

Page 1

8240 Risskov | Denmark |
A Hampshire Road | Westlake Village | CA 91361 USA |
VoiceCraft
HUMAN VOICE MODELING CARD
Rev 1.1
TC Electronic A/S | Sindalsvej 34 | DK-
TC Electronic Inc. | 742-
E-Mail: www.service@tcelectronic.com | Web: www.tc-helicon.com
Installation Procedures
Phone: +45 8742 7000 | Fax: +45 8742 7010
Phone: (805) 373 1828 | Fax: (805) 379 2648
Page 2

Page 3

CAUTION
These servicing instructions are for use by qualified service personnel
only. To reduce the risk of electric shock do not perform any servicing
other than that contained in the operating manuals unless you are
qualified to do so.
Important Please Read
This upgrade procedure overwrites all presets that were in the unit prior
to upgrading. Users who want to keep presets written prior to the
upgrade must backup presets using the procedure in the VoicePrism
manual. These backed up presets may be uploaded to the unit with the
VoiceCraft card following installation of hardware and software.
The VoiceCraft upgrade card has both hardware and software
components. Software may be installed by either of two methods, by
MIDI or by replacing a ROM chip on the VoicePrism.
Option 1:
Upgrade Procedure Using ROM Replacement To
Update Software
Requires proper PLCC IC puller tool and #2 Philips screw driver
1. Unplug the power cable from the VoicePrism.
2. Remove the top cover of the VoicePrism by removing 7 screws.
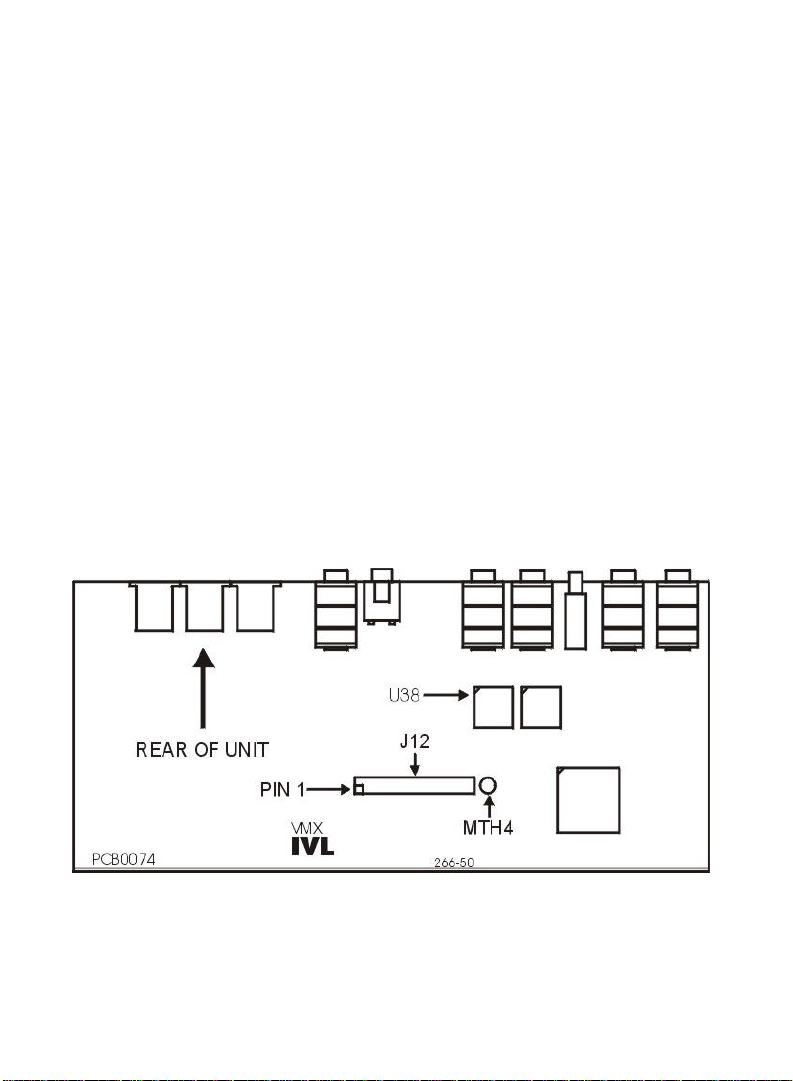
3. Using an IC puller, remove the ROM from location U38 on the main
board of the VoicePrism, as indicated in Figure 1.
4. Before pressing into the socket, place the supplied ROM in the
socket ensuring that:
• The beveled corner of the ROM is oriented correctly with the
beveled corner on the socket.
• The ROM is laying flat with all pins correctly lined up in the
socket.
Page 4
5. Now press the ROM into the socket.
6. Remove the back plate on the VoicePrism reserved for the
VoicePrismPlus expansion card by removing 4 screws.
7. Press the plastic standoff into the hole labeled MTH4 on the main
circuit board in the VoicePrism.
8. The red stripe on the ribbon cable connected to the VoiceCraft card
indicates pin 1. Align the connector on the ribbon cable with J12
header on the VoicePrism main board making sure that pin 1 on the
cable is oriented correctly with pin 1 of J12.
9. CAREFULLY press the ribbon cable connector onto J12.
10. Position the VoiceCraft card so that the standoff is aligned with the
corresponding hole on the VoiceCraft Card.
11. Press the VoiceCraft card down so that the standoff presses into the
card.
12. Attach the plate of the VoiceCraft card to the back panel of the
VoicePrism using 4 screws removed earlier.
13. Put the top cover back on to the VoicePrism using 7 screws removed
earlier.
Figure 1 - VoicePrism Main Board
Page 5

Option 2:
Upgrade Procedure Using MIDI to Update
Software
Requires #2 Philips screw driver
1. Unplug the power cable from the VoicePrism.
2. Remove the top of the VoicePrism by removing 7 screws.
3. Remove the back plate on the VoicePrism reserved for the
VoicePrismPlus expansion card by removing 4 screws.
4. Press the plastic standoff into the hole labeled MTH4 on the
main circuit board in the VoicePrism, as indicated in Figure 1.
5. The red stripe on the ribbon cable connected to the VoiceCraft
card indicates pin1. Align the connector on the ribbon cable with
J12 header making sure that pin 1 on the cable is oriented
correctly with pin 1 of J12.
6. CAREFULLY press the ribbon cable connector onto J12.
7. Position the VoiceCraft card so that the standoff is aligned with
the corresponding hole on the VoiceCraft Card.
8. Press the VoiceCraft card down so that the standoff presses into
the card.
9. Attach the plate of the VoiceCraft card to the back panel of the
VoicePrism using 4 screws removed earlier.
10. Put the top cover back on to the VoicePrism using 7 screws
removed earlier.
11. Plug the power cable into the VoicePrism and power up the unit.
12. Make note of the current version number (press the Utility
button and tab to the Version page).
13. Tab to the Upgrade page, one page to the right of Version.
14. Enter the upgrade code ‘H’, ‘V’, ‘K’.
15. Press soft knob 1 and select ‘EXECUTE’ from the popup menu.
16. A message box titled “ARE YOU SURE” will be displayed. If you
want to proceed select ‘YES’ and press soft knob 1.
Page 6

Note: proceeding with the upgrade will not only remove the
software but also clear all user presets and preference
settings.
17. Another message box titled “PROCEED WITH UPGRAGE” will
be displayed. If you are certain you want to proceed select ‘OK’.
Selecting ‘CANCEL’ will stop the upgrade process.
18. If you decided to continue, your VoicePrism should be displaying
a message saying “YOU MAY START UPLOAD…” (see Figure
2).
Figure 2 - Upload Screen
19. Using a software application capable of sending MIDI such as
MIDI-OX or CakeWalk Pro load the “ClearFlash.syx” file.
20. Transmit the file and wait for at least 10 seconds. It takes a few
seconds to erase the flash.
21. Load “VP+xxx.syx” where xxx represents the current version
number. If you are using MIDI-OX make sure that there is a 60
ms delay after each F7 (one of the options in the Sysex,
Configure dialog box in MIDI-OX, see Figure 3 for an example).
This might not be absolutely necessary, depending on the type
of MIDI device you are using.
Page 7

Figure 3 - Sample MIDI-OX Sysex Configuration
22. Transmit the file.
23. When the file has been sent, your VoicePrism should reset
automatically.
24. Confirm that the new software has been loaded by checking the
version number again.
Page 8

Troubleshooting
If there was a power failure, transmission error, or any other reason the
upgrade did not complete properly, turn the VoicePrism off and on. If the
old software is still present, you should see the main screen as usual.
Simply start the upgrade process from the beginning. If the unit powers
on and nothing happens, start the upgrade procedure by resending the
“ClearFlash.syx” file (step 19) and continue with the upgrade procedure
from there.
BIST (Built In Self Test)
1. On the VoiceCraft card, connect a cable from the S/PDIF input to the
S/PDIF output and from the AES/EBU input to the AES/EBU output.
2. Press the Power switch to turn on the VoicePrism.
3. Press and hold the Left Arrow, Preview and Store buttons within 3
seconds of power up until the LCD Display appears filled. Note:
VoicePrism will not enter BIST mode if there are cables attached to
any of the MIDI jacks on the back panel.
4. Confirm LCD moves through the following stages:
• Filled
• Full screen grid
• Grid on right half of screen
• Grid on left half of screen
• Full screen grid
• Automatic BIST status
Note: If the patterns do not appear in the order indicated, or if the
grid is incomplete, the unit fails the BIST. The above criteria
are only confirmed visually. No other indication is given.
5. Confirm the Automatic BIST status screen reads “PASS” beside the
following headings: FPGA, Address Bus, Flash, Audio ROM, Bit Bus,
RAM, EEPROM, 2181 DSP, EXP DSP, EXP RAM, EXP FLASH, VC
AUDIO.
6. The LCD indication should read “VISUAL CHECK”. If any of the
headings do not appear this also indicates a failure.
Page 9

7. Push the Left Arrow.
8. Confirm that the LCD now displays the Manual BIST status screen.
9. Confirm the 7 Segment Display reads “188”.
10. Confirm the MIDI and Lock indicators below the display and the input
dB scale LED’s are lit.
11. Push the Right Arrow button.
12. Confirm the 7 Segment Display, input dB scale and the MIDI and
Lock indicators below the display turn off.
13. Rotate Soft Knob #1 clockwise.
14. Confirm the corresponding value on the LCD Display increases.
15. Rotate Soft Knob #1 counter clockwise.
16. Confirm the corresponding value on the LCD Display decreases.
17. Push Soft Knob #1 until it clicks.
18. Confirm ‘OK’ appears on the corresponding line on the LCD Display.
19. Repeat steps 12 through 17 for Soft Knob #1, #2 and #3.
20. Rotate the Data Wheel clockwise.
21. Confirm the corresponding value on the LCD increases.
22. Rotate the Data Wheel counter clockwise.
23. Confirm the corresponding value on the LCD decreases.
24. Rotate the Data Wheel counter clockwise until the 7 Segment
Display shows “1”.
25. Rotate the Lead knob fully clockwise.
26. Verify that the value displayed beside Lead on the LCD is 127.
27. Rotate the Lead fully counter clockwise.
28. Verify that the value displayed beside Lead on the LCD is 0.
29. Repeat steps 23 through 27 for the Harmony and Effects knobs.
30. Confirm all labeled black buttons are lit.
31. Press each button once to turn off its LED.
32. Press the Power switch to turn off the unit and exit BIST mode.
(Note: Input and Headphone Level are analog, and therefore not
tested in the BIST.)
Page 10

Notes
Page 11

Page 12

February/02 Prod. No. 607013011
 Loading...