

Page 1
TALKBOX SYNTH
Studio-Quality Stompbox for Guitar Talkbox Eects
and Vocal Tone Polishing
User Manual
Page 2
2 TALKBOX SYNTH User Manual
9. Do not defeat the safety purpose of the polarized
20. Please keep the environmental aspects of battery
or statement contained herein. Technical speci cations,
Important Safety
Instructions
Terminals marked with this symbol carry
electrical current of su cient magnitude
to constitute risk of electric shock.
Use only high-quality professional speaker cables with
¼" TS or twist-locking plugs pre-installed. Allother
installation or modi cation should be performed only
by quali edpersonnel.
This symbol, wherever it appears,
alertsyou to the presence of uninsulated
dangerous voltage inside the
enclosure-voltage that may be su cient to constitute a
risk ofshock.
This symbol, wherever it appears,
alertsyou to important operating and
maintenance instructions in the
accompanying literature. Please read the manual.
Caution
To reduce the risk of electric shock, donot
remove the top cover (or the rear section).
No user serviceable parts inside. Refer servicing to
quali ed personnel.
Caution
To reduce the risk of re or electric shock,
do not expose this appliance to rain and
moisture. The apparatus shall not be exposed to dripping
or splashing liquids and no objects lled with liquids,
suchas vases, shall be placed on the apparatus.
Caution
These service instructions are for use
by quali ed service personnel only.
Toreduce the risk of electric shock do not perform any
servicing other than that contained in the operation
instructions. Repairs have to be performed by quali ed
servicepersonnel.
1. Read these instructions.
2. Keep these instructions.
3. Heed all warnings.
4. Follow all instructions.
5. Do not use this apparatus near water.
6. Clean only with dry cloth.
7. Do not block any ventilation openings. Install in
accordance with the manufacturer’s instructions.
8. Do not install near any heat sources such as
radiators, heat registers, stoves, or other apparatus
(including ampli ers) that produce heat.
or grounding-type plug. A polarized plug has two blades
with one wider than the other. A grounding-type plug
has two blades and a third grounding prong. The wide
blade or the third prong are provided for your safety. Ifthe
provided plug does not t into your outlet, consult an
electrician for replacement of the obsolete outlet.
10. Protect the power cord from being walked on or
pinched particularly at plugs, convenience receptacles,
and the point where they exit from the apparatus.
11. Use only attachments/accessories speci ed by
themanufacturer.
12. Use only with the
cart, stand, tripod, bracket,
or table speci ed by the
manufacturer, orsold with
the apparatus. When a cart
is used, use caution when
moving the cart/apparatus
combination to avoid
injury from tip-over.
13. Unplug this apparatus during lightning storms or
when unused for long periods of time.
14. Refer all servicing to quali ed service personnel.
Servicing is required when the apparatus has been
damaged in any way, such as power supply cord or plug
is damaged, liquid has been spilled or objects have fallen
into the apparatus, the apparatus has been exposed
to rain or moisture, does not operate normally, or has
beendropped.
15. The apparatus shall be connected to a MAINS socket
outlet with a protective earthing connection.
16. Where the MAINS plug or an appliance coupler is
used as the disconnect device, the disconnect device shall
remain readily operable.
17. Correct disposal of this
product: This symbol indicates that
this product must not be disposed
of with household waste,
according to the WEEE Direc tive
(2012/19/EU) and your national
law. This product should be taken
to a collection center licensed for the recycling of waste
electrical and electronic equipment (EEE). The
mishandling of this type of waste could have a possible
negative impact on the environment and human health
due to potentially hazardous substances that are generally
associated with EEE. At the same time, your cooperation
in the correct disposal of this product will contribute to
the e cient use of natural resources. For more
information about where you can take your waste
equipment for recycling, please contact your local city
o ce, or your household waste collection service.
18. Do not install in a con ned space, such as a book
case or similar unit.
19. Do not place naked ame sources, such as lighted
candles, on the apparatus.
disposal in mind. Batteries must be disposed-of at a
battery collection point.
21. Use this apparatus in tropical and/or
moderate climates.
LEGAL DISCLAIMER
MUSIC Group accepts no liability for any loss which
may be su ered by any person who relies either
wholly or in part upon any description, photograph,
appearances and other information are subject to
change without notice. All trademarks are the property
of their respective owners. MIDAS, KLARK TEKNIK,
LAB GRUPPEN, LAKE, TANNOY, TURBOSOUND,
TC ELECTRONIC, TC HELICON, BEHRINGER, BUGERA
and DDA are trademarks or registered trademarks
of MUSIC Group IP Ltd. © MUSIC Group IP Ltd.
2017 All rights reserved.
LIMITED WARRANTY
For the applicable warranty terms and conditions
and additional information regarding MUSIC Group’s
Limited Warranty, please see complete details online at
music-group.com/warranty.
Page 3
3 TALKBOX SYNTH User Manual
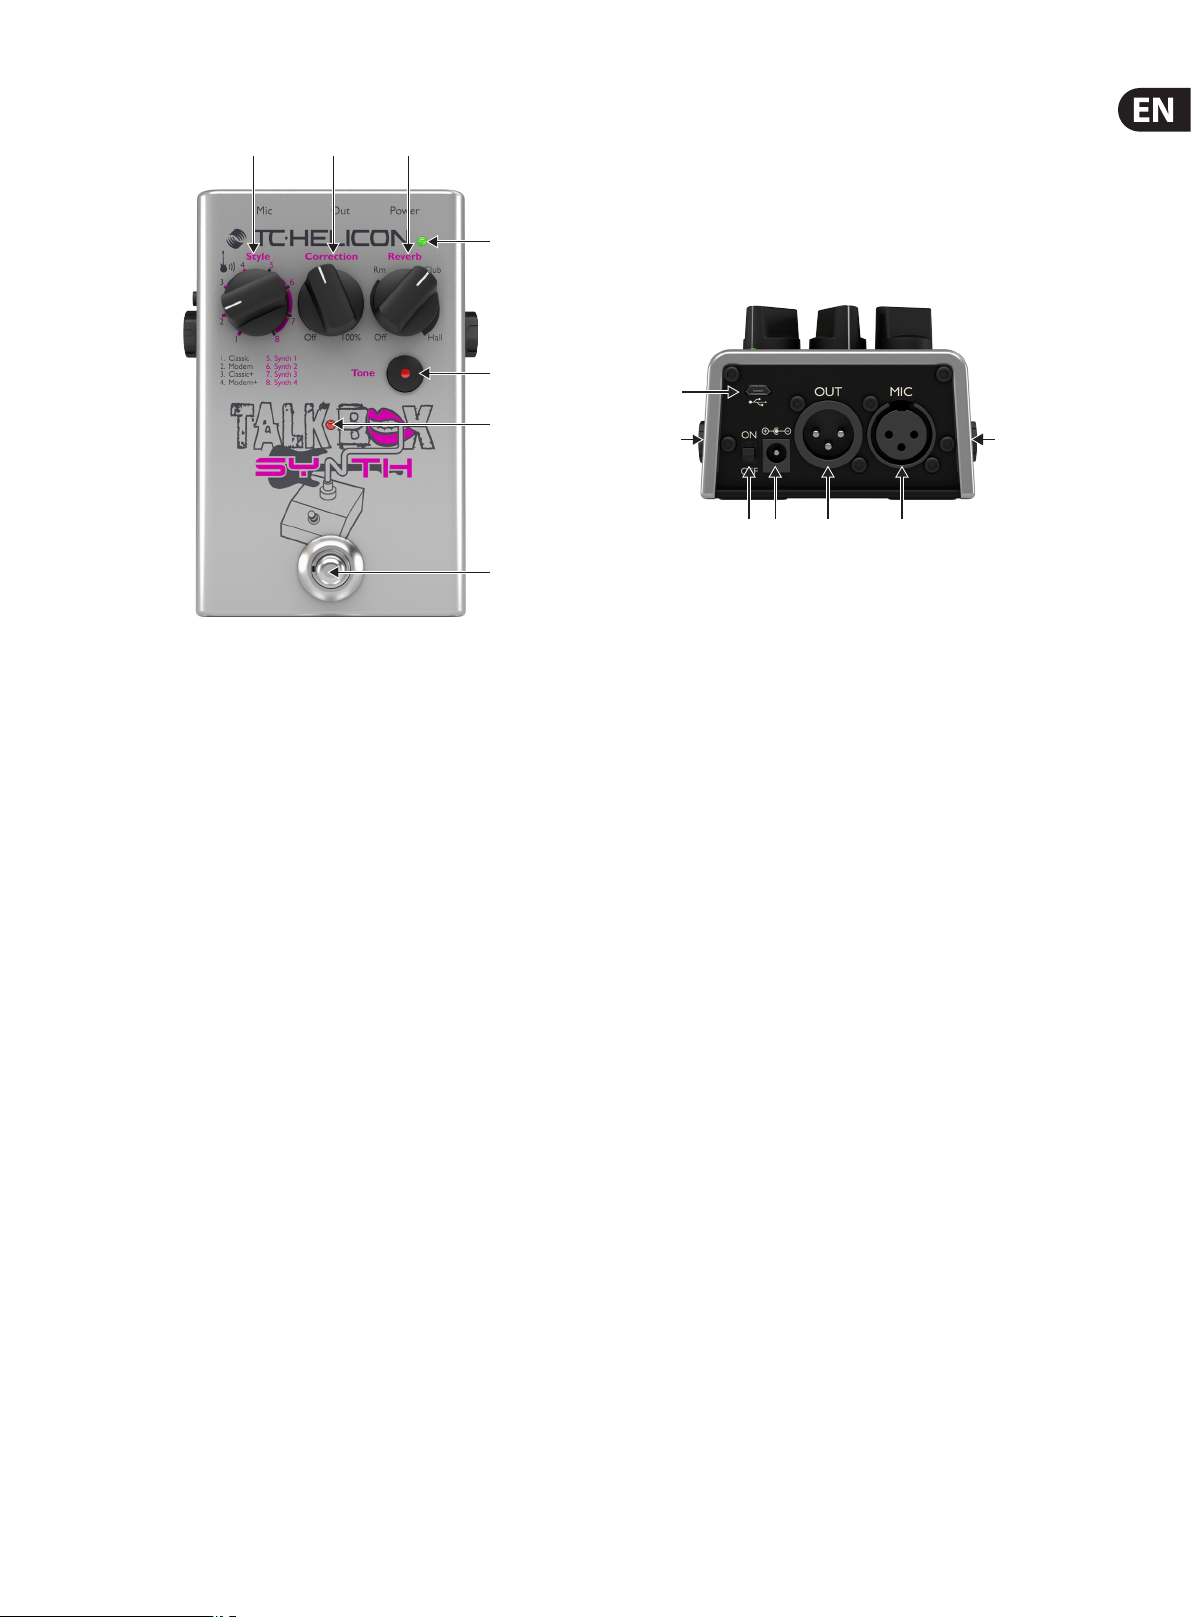
1. Controls
(1) (2) (3)
(4)
(5)
(6)
(7)
(1) STYLE knob selects from the range of Talkbox and Synth sounds.
See Chapter 2: Using the Style Knob for details.
(2) CORRECTION knob adjusts the amount of pitch correction. With the knob
at the center 12:00 position, the eect will provide subtle pitch support
without noticeable or unnatural artifacts. Turn the knob all the way up for
a more aggressive eect, or fully counterclockwise to turn the eect o.
Correction is inactive while Talkbox or Synth eects are engaged.
(3) REVERB knob selects the type and amount of reverb eec t on your voice.
The 3 types of reverb appear in order from the smallest space (Room) to the
largest (Hall). Adjusting the knob within your preferred reverb
space determines how pronounced the eect will be.
Turning the knob fully counterclockwise turns the reverb o.
Reverb is active regardless of the on/o status of the Talkbox Synth eect.
(4) BATTERY LED indicates the battery level, with green showing full life,
yellow being partial life, and red to alert that the batteries
should be changed.
(8)
(13)
(14)
(9) (10) (11) (12)
(6) ON/OFF LED lights when the eect is engaged.
(7) FOOTSWITCH bypasses the Talkbox or Synth eect,
but does not aect the reverb or Tone status.
(8) USB input accepts a micro USB cable for connec tion to a computer. Use the
VoiceSupport application to install rmware updates, and for other features
depending on your product.
Download VoiceSupport from www.tc-helicon.com/products/voicesupport/
(9) ON/OFF switch powers the pedal on and o. To prevent audible thumps,
ensure PA level is down before powering o unit.
(10) POWER input accepts a 9V power cable (not included).
(11) OUT jack accepts a balanced XLR cable for connection to a
mixer or active speaker at approximately mic output level.
(12) MIC input jack accepts a balanced XLR cable to connect your microphone.
(13) GUITAR IN jack accepts a ¼" TS cable to connect your guitar.
(5) TONE button engages a preset combination of adaptive EQ, compression,
de-essing, and noise gate. “Normal” and “Less Bright” settings can be
toggled by holding the Tone button and pressing the footswitch.
(14) GUITAR THRU jack sends your guitar signal out via ¼" TS cable.
Page 4

4 TALKBOX SYNTH User Manual
2. Operation
Connection
Power cable
Micro USB cable
MP-75 microphone
Mixing board
Page 5

5 TALKBOX SYNTH User Manual
• Connect a microphone to the MIC jack
• Connect the OUT jack to a mixer, interface or active speaker
• Connect a guitar to the Guitar Input jack on the right side of the pedal
• Connect the left Guitar Output jack to an amplier or mixing console
Optional:
• Connect a micro USB cable to a computer
• Connect power cable
Using the Pedal
Vocalize into the mic while playing guitar to hear the eect. Don’t worry about
singing in tune; the pitch of the eect comes from your guitar.
Over-enunciate your vowels to get more interesting and expressive eec ts.
You can play guitar chords with Styles 1-4 but only monophonically (one note at
a time) using Styles 5-8. A light picking touch helps with tracking.
Classic, Modern and all Synth st yles mute the guitar output to INST THRU. The
guitar is unmuted only on the Classic+ and Modern+ styles.
Using the Style Knob
Turn the knob to select which eect you want. There are two sets of styles:
Talkbox (1-4) and Synth (5-8). See the table below for descriptions.
1. Classic – This most closely imitates the sound of a saturated (distorted) horn
driver piping your guitar sound into your mouth.
2. Modern – This style is clean and clear to mimic a vocoder eect.
3. Classic + – This produces the same sound as Classic but unmutes the dry
guitar sound from the Guitar output for a duo eect.
Momentary Mode
The standard func tion of the footswitch is a latching style, meaning that each
press of the footswitch turns the eect on and o. Alternatively, the pedal can
operate in momentary mode, meaning that the eect is only active while the
footswitch is held down. As soon as you release the footswitch,
the eect is bypassed.
To switch the unit to momentary mode, hold the Tone button down while
powering the unit on. Repeat the process to return to latching mode.
Changing the Batteries
Talkbox Synth can operate on 4 AA batteries. Remove the single screw on the
bottom of the pedal to open the battery door. Make sure to observe correct
polarity when inserting the batteries.
Auto Gain
Talkbox Synth will automatically adjust the gain set ting for your microphone,
eliminating the need for manual adjustments and ensuring that a good signal is
passed to the mixer without any unwanted distortion.
24 V Phantom Power
Phantom power is always active on the Talkbox Synth. This will power
condenser microphones, but will not aect dynamic mics either.
Mic Control
Mic Control allows you to control the eect's on/o status via an
MP-75 microphone. Press and hold the footswitch while powering up the unit
to toggle Mic Control.
Note that when using a condenser microphone, Mic Control should be disabled to
prevent unwanted on/o switching.
4. Modern+ – This produces the same sound as Modern but also unmutes the
guitar sound.
5. Synth 1 – Two synthesizer voices triggered by your guitar are slightly
detuned for a chorused mono synth sound.
6. Synth 2 – A single fat, square wave synth voice produces a rich sound almost
like a totally saturated distorted guitar tone.
7. Synth 3 – A pair of detuned, octave down synth voices make a bassy,
chorused eect.
8. Synth 4 – A unison voice with a fth above make a classic synthy sound.
Adjusting Style levels
You are able to raise or lower individual style levels to suit dierent guitars and
sound requirements. Load the style you want to adjust then hold the Tone button
while turning the Correction knob. The middle detent on the Correction knob
represents the factory level adjustment; to the left (counterclockwise) is quieter
and to the right (clockwise) is louder. Releasing the Tone button stores your new
level until the next time you require a change.
After setting, re-adjust the Correction knob to where you want it when singing
without the Talkbox or Synth eects.
Guitar Connection Tip:
Guitar – Placing Talkbox Synth as the rst device in your pedal chain will give it
the cleanest signal with which to drive the synth sounds. If you prefer to have
other pedals before, optimum synth tracking is derived when their eects are o.
Page 6

6 TALKBOX SYNTH User Manual
3. Specications
Input
Mic Input Impedance: Balanced: 2.68 kOhm
Mic Input Level @ 0 dBFS: -42 dBu to +1 dBu
EIN @ Max Mic Gain Rg = 150 Ohm: -126 dBu
Mic input SNR: >104 dB
Guitar Input impedance: 1 MOhm
Guitar Input Level @ 0 dBFS: -7 dBU to 17 dBu
Guitar Input SNR: >115 dB
Output
Output Impedance, Bal./Unbal.: 200/100 Ohm
Output Full Scale: +1 dBu
Dynamic Range: >104 dB, 20 Hz to 20 kHz
Frequency Response: +0/-0.3 dB, 20 Hz to 20 kHz
Power
Power Supply (Optional): 9 V / 670 mA
Power Consumption: 6 W
Requirements
Operating Temperature: 32° F to 122° F (0° C to 50° C)
Storage Temperature: -22° F to 167° F (-30° C to 70° C)
Humidity Max.: 90% non-condensing
Size & Weight
Dimensions: 5.4" x 3.5" x 2.3" (140 x 90 x 60 mm)
Weight: 0.92 lb. (420 g)
Warranty
For the applicable warranty terms and conditions and additional information
regarding MUSIC Group’s Limited Warranty, please see complete details
online at music-group.com/warranty.
Due to continuous development, these specications are subject to change
without notice
Page 7

7 TALKBOX SYNTH User Manual
Page 8

 Loading...