

Page 1
These icons alert you to a possible risk of personal injury.
Look for this icon to find information about how to avoid damaging the
equipment while doing a procedure.
Look f
MILKSHAKE AND SOFT-SERVE MACHINES
SS 3
Model C602
Taylor Company milkshake and soft
3
Taylor Company
Milkshake and Soft-serve Machine
Daily maintenance tasks
SS 3 D1 Opening
procedures
SS 3 D2 Closing procedures
Weekly maintenance tasks
SS 3 W1 Clean and sanitize
syrup lines with
duckbill valves
SS 3 W2 Clean hot sundae
topping water baths
SS 3 W3 Clean and sanitize
hot sundae topping
pumps
Bi-weekly maintenance tasks
SS 3 B1 14 day brush
cleaning
Monthly maintenance tasks
SS 3 M1 Calibrate hopper
temperatures
SS 3 M2 Calibrate draw
temperatures
SS 3 M3 Calibrate hot
sundae topping
temperatures and
volumes
Quarterly maintenance tasks
SS 3 Q1 Replace soft-serve
mix scraper blades
SS 3 Q2 Clean non-
aluminum air filter
SS 3 Q3 Replace machine
components
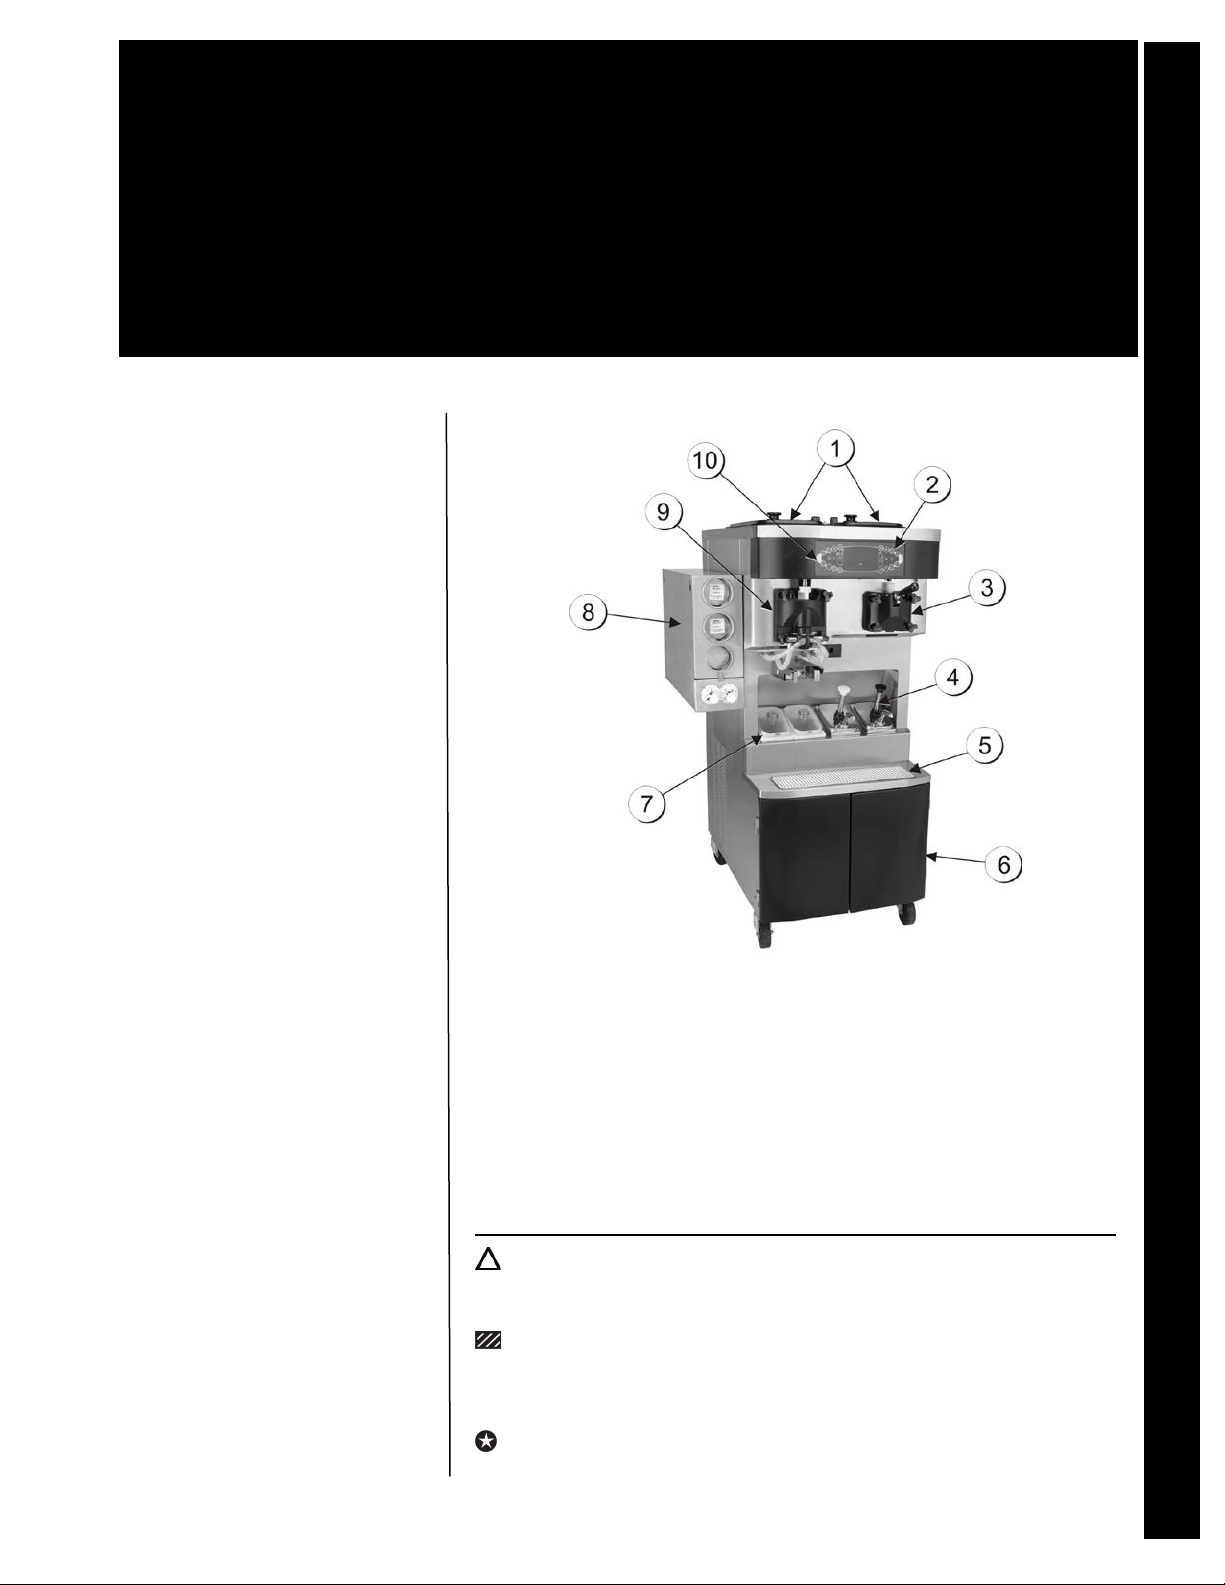
Model C602
1. Hopper Covers 6. Cabinet Doors
2. Keypad-S
3. Soft Serve Door Assembly 8. Cup & Cone Dispenser
4. Topping Pump 9. Shake Door Assembly
5. Drip Tray/Splash Shield 10. Keypad-Shake
oft Serve 7. Cold Topping Containers
-serve machine model C602 SS
Semi-annual maintenance tasks
SS 3 S1 Replace milkshake
mix scraper blades
Annual maintenance tasks
SS 3 A1 Replace syrup
pump tubes
SS 3 A2 Replace non-
aluminum air filter
Hazards
Equipment alerts
Tips
or this icon to find helpful tips about how to do a procedure.
©McDonald’s Corporation · Planned Maintenance Manual · Revised January, 2021
Page 2
Opening Procedures Daily SS 3 D1
Taylor Company milkshake and soft
Daily
Why
Prepare Milkshake/Soft-Serve machine for serving
Time required
5 minutes to prepare
30 minutes to complete
Time of day
When store opens in the morning
24-hour restaurants: during low-volume periods
Hazard icons
Brushes
Bucket with Kay 5
Kay 5
Taylor Seal
Taylor Lube HP
Clean Sanitized
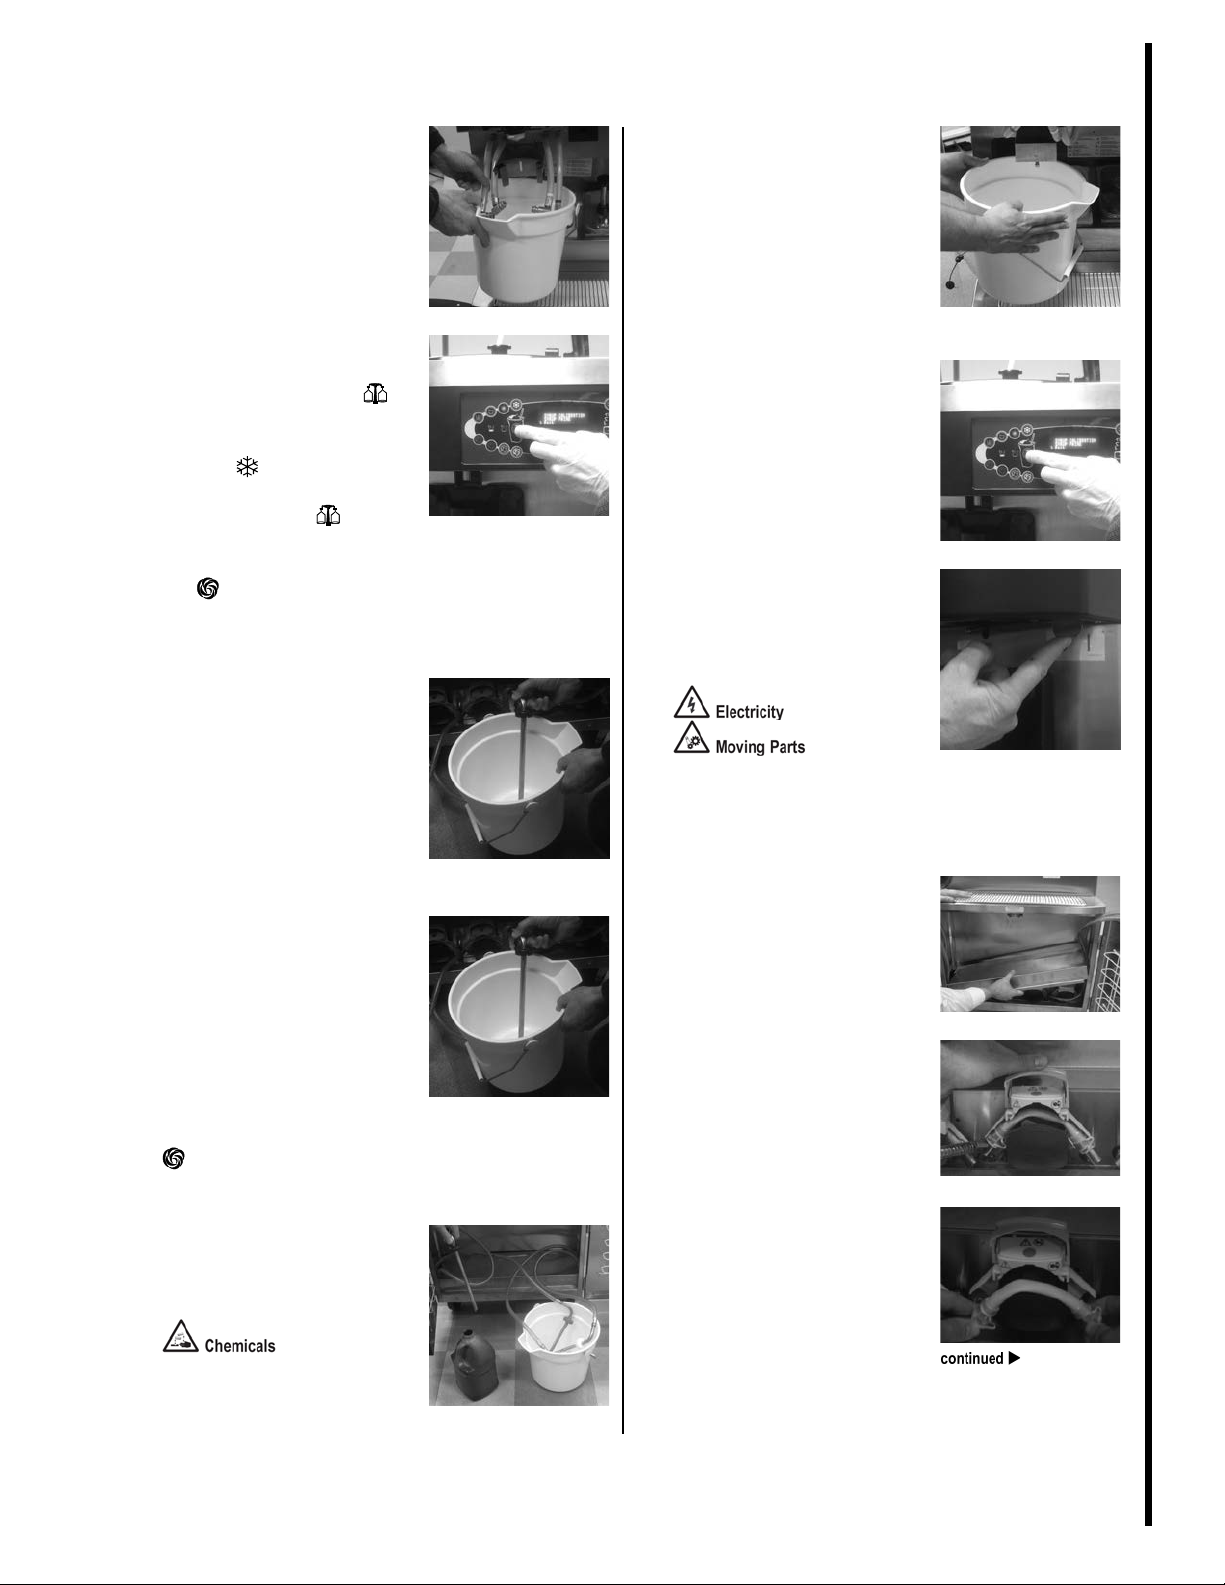
1
Fill heated topping wells with
2
Place topping heaters in ON
W2 & W3.)
3
Fill topping containers.
4
Sanitize topping ladles.
5
Fill cup dispensers, cup lid
holder and cone dispenser.
product after the heat treatment cycle is completed
Tools and supplies
-serve machine model C602
Sanitizing Solution
Sanitizing
Solution
Install /
Removal Tool
Towels
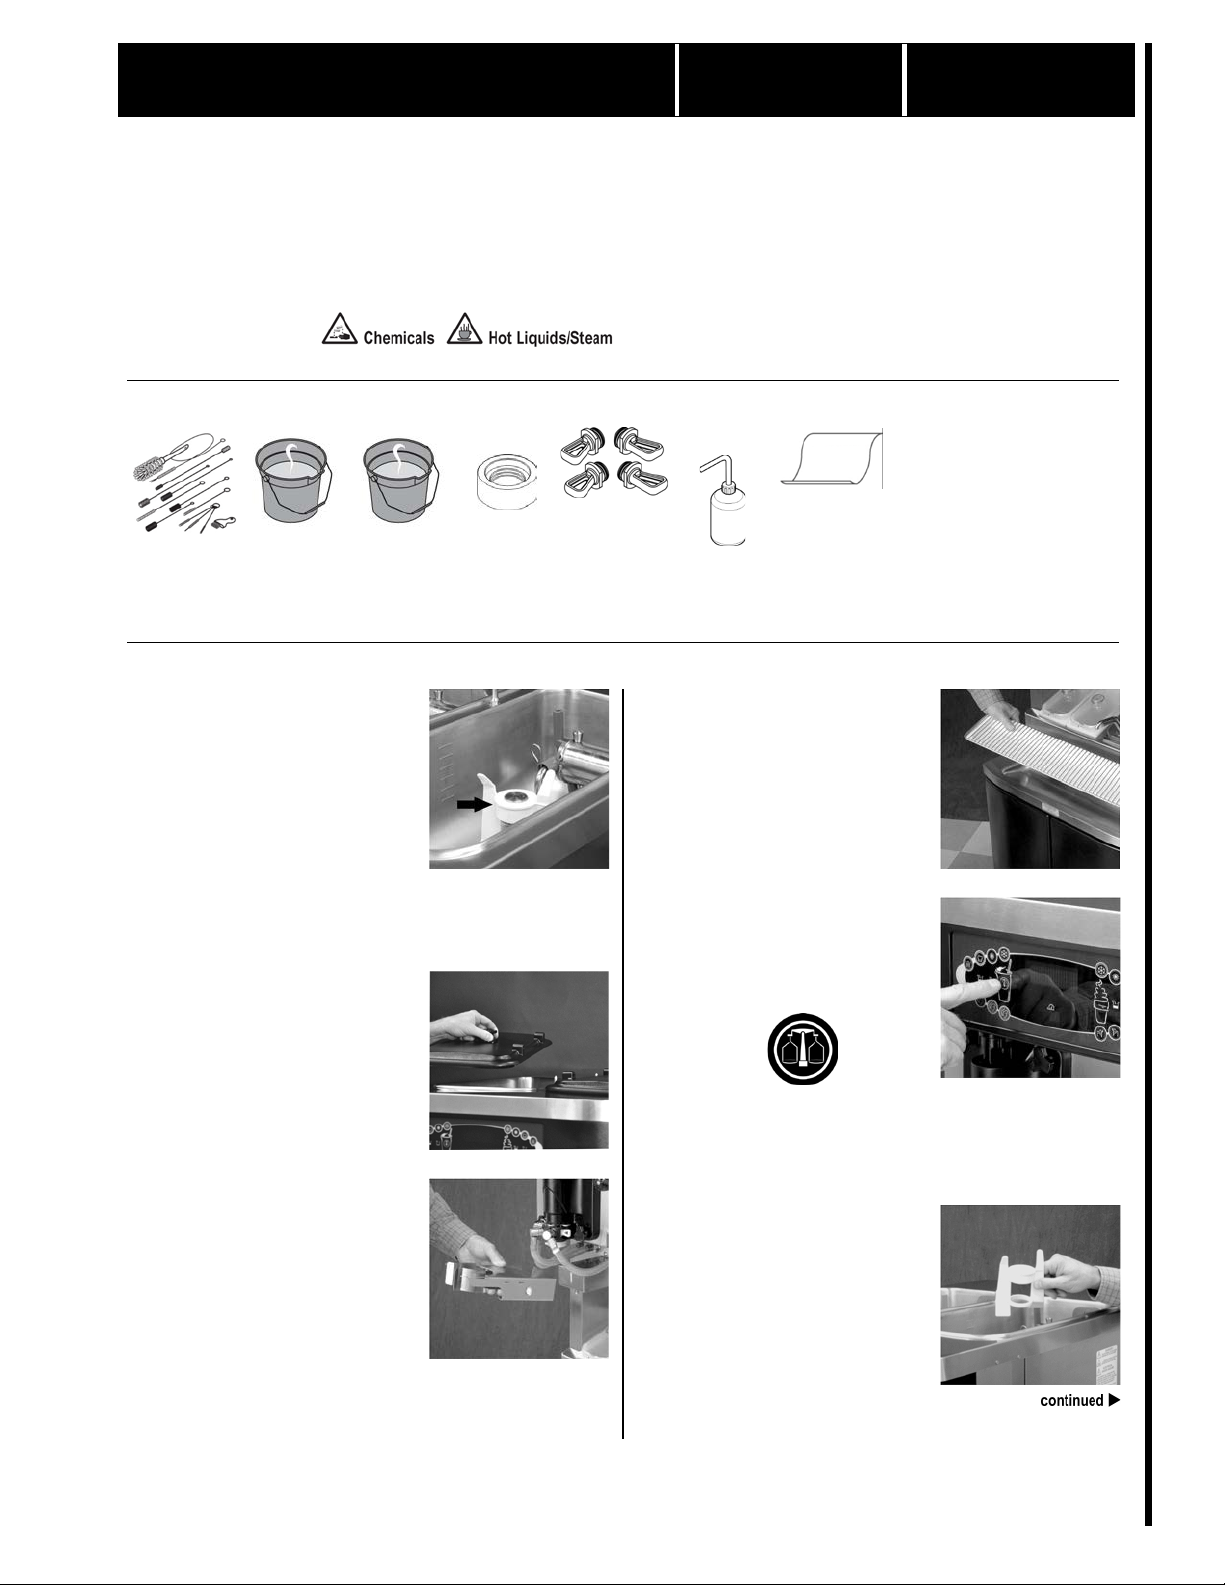
Procedure – Set Up
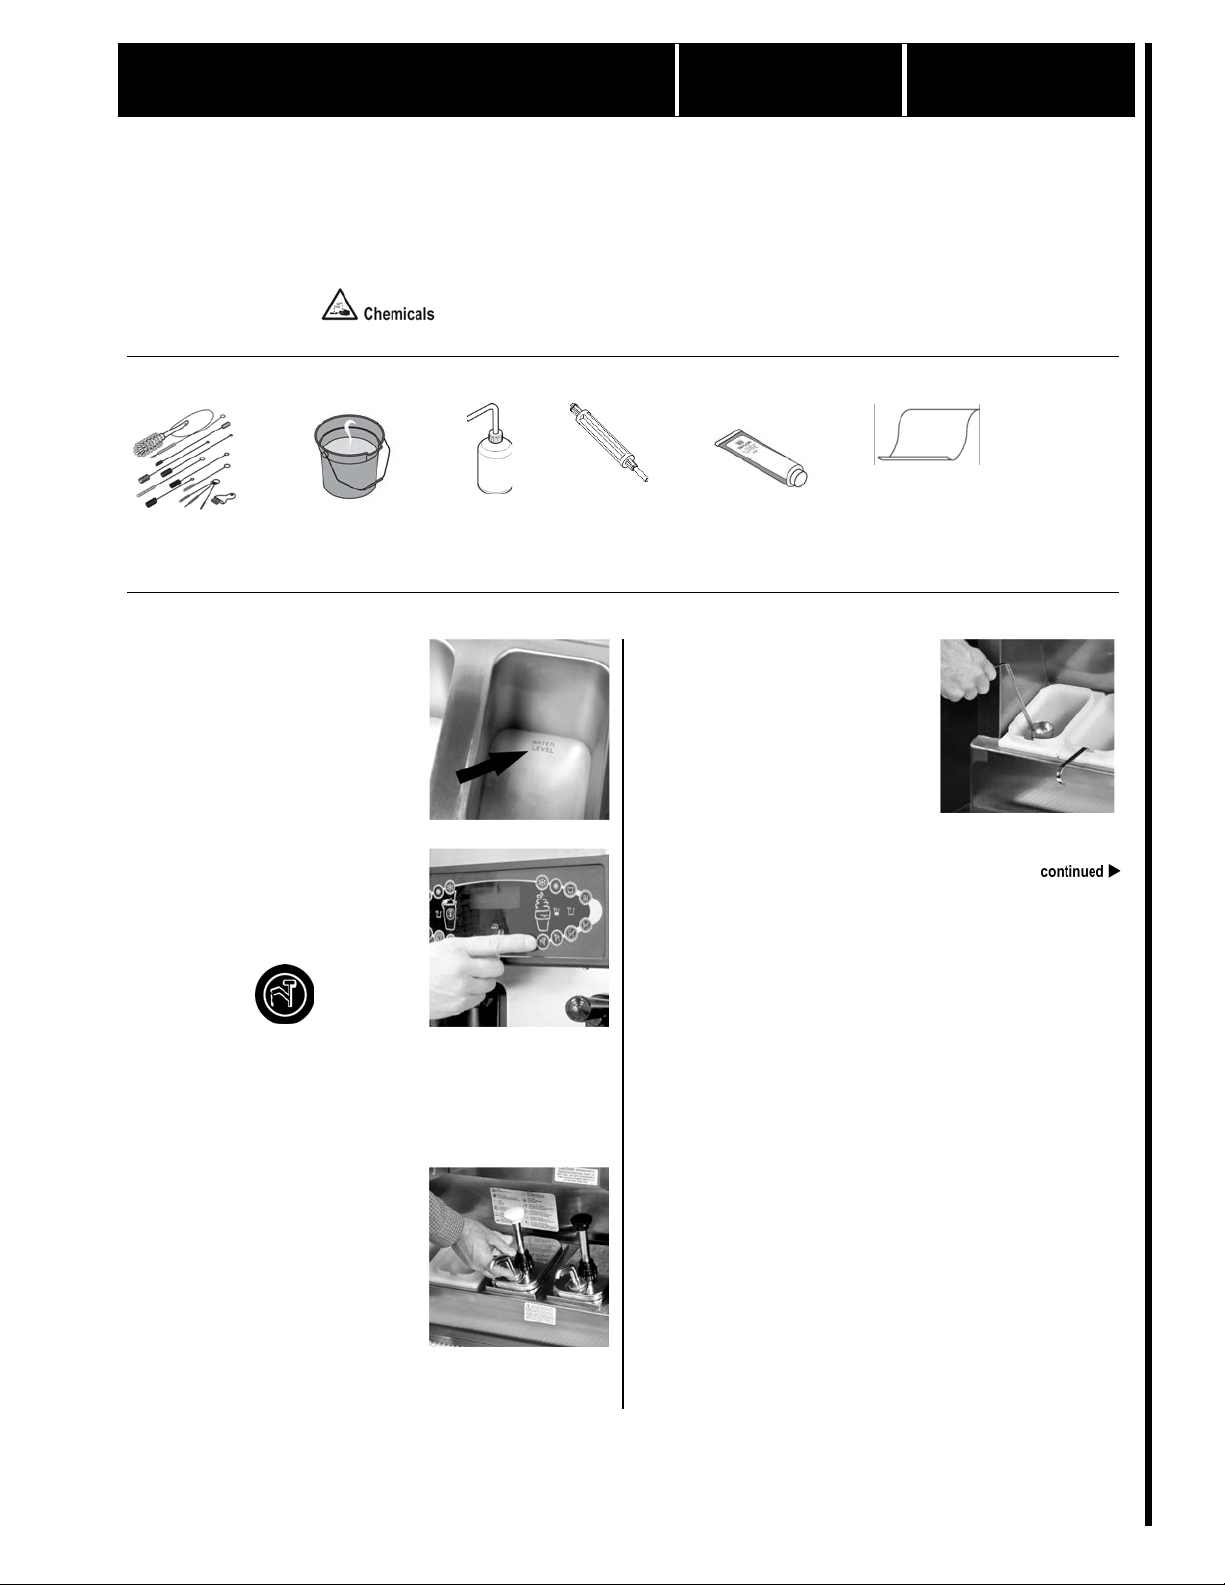
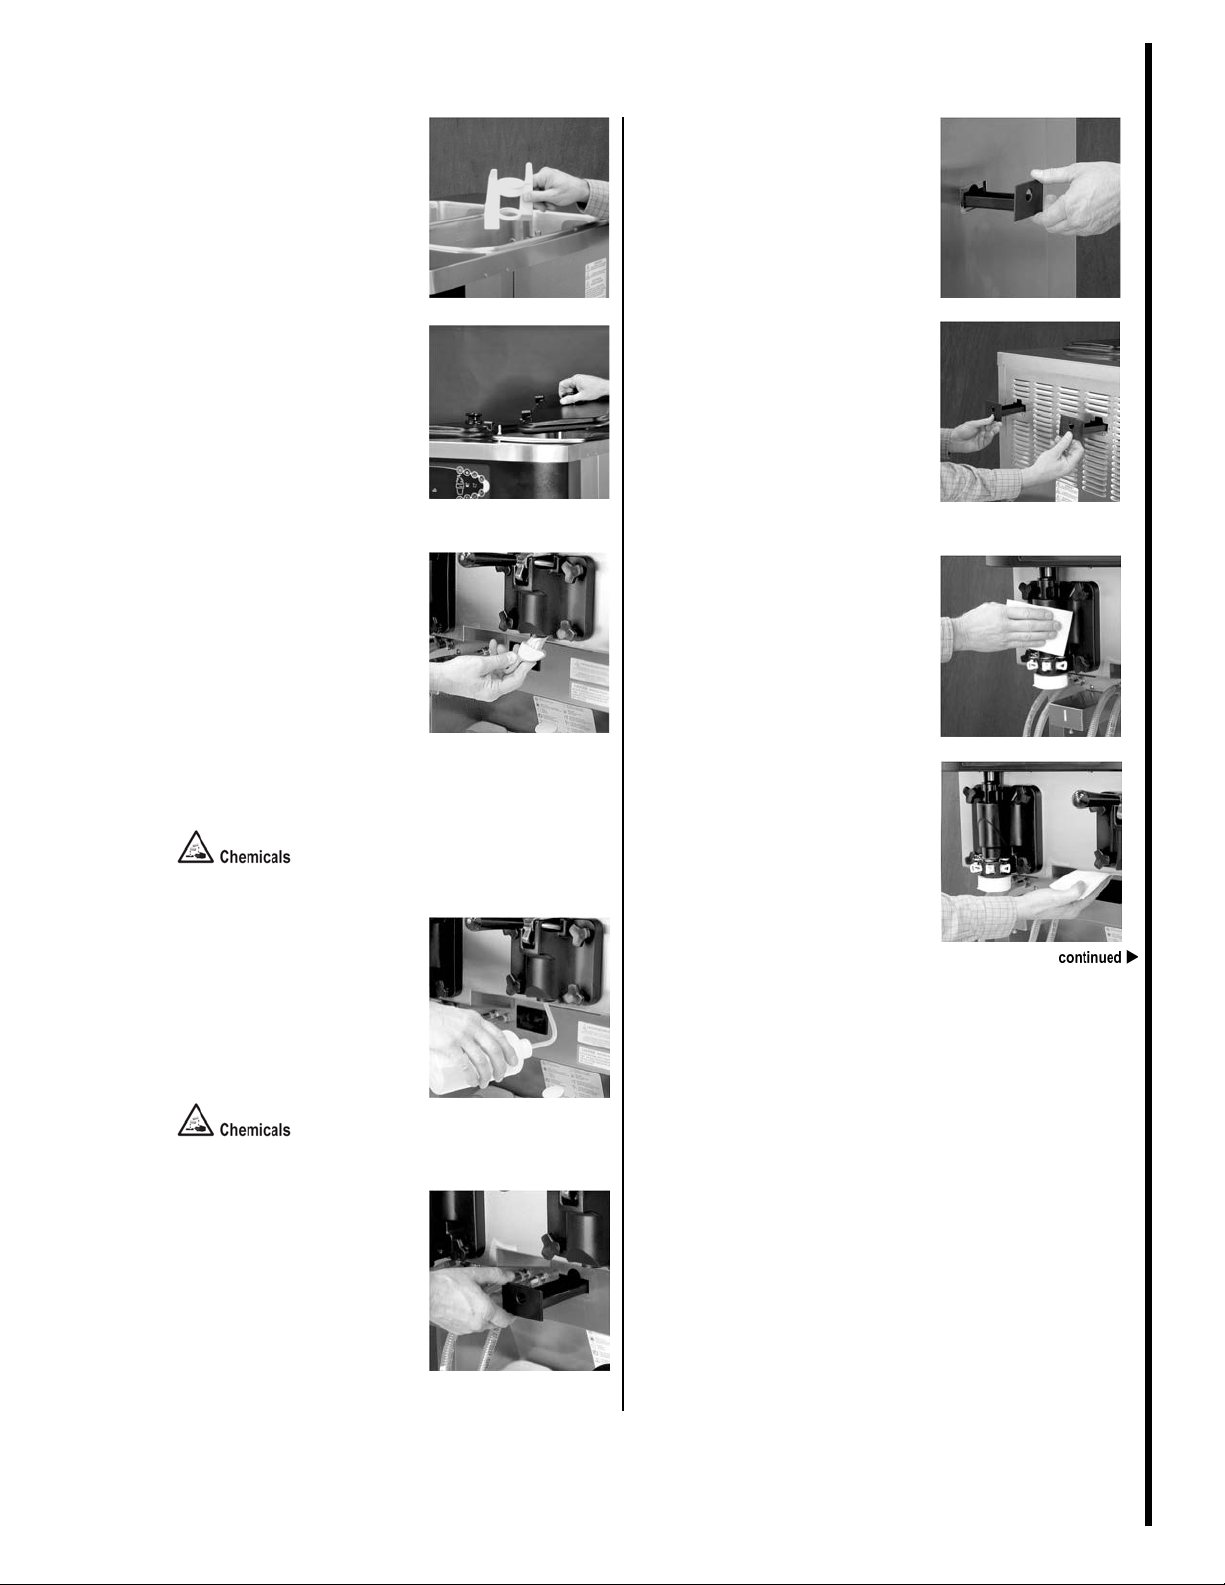
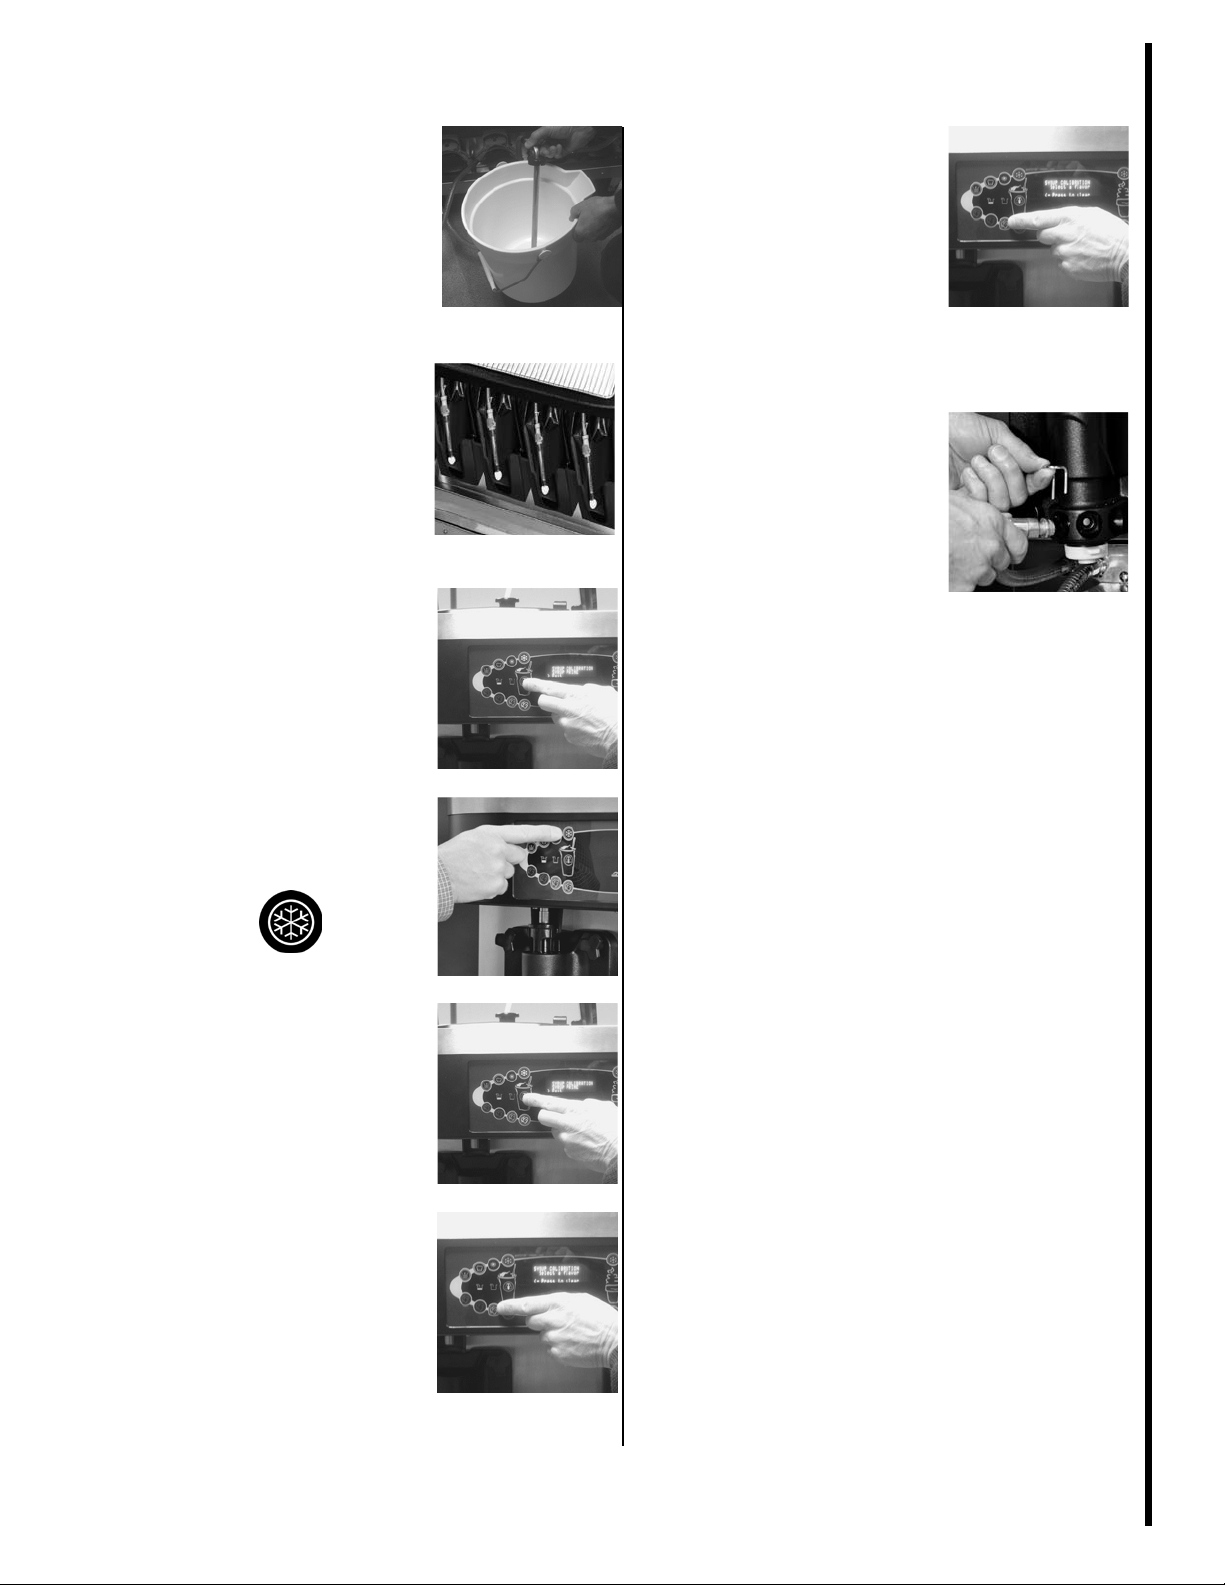
clean water.
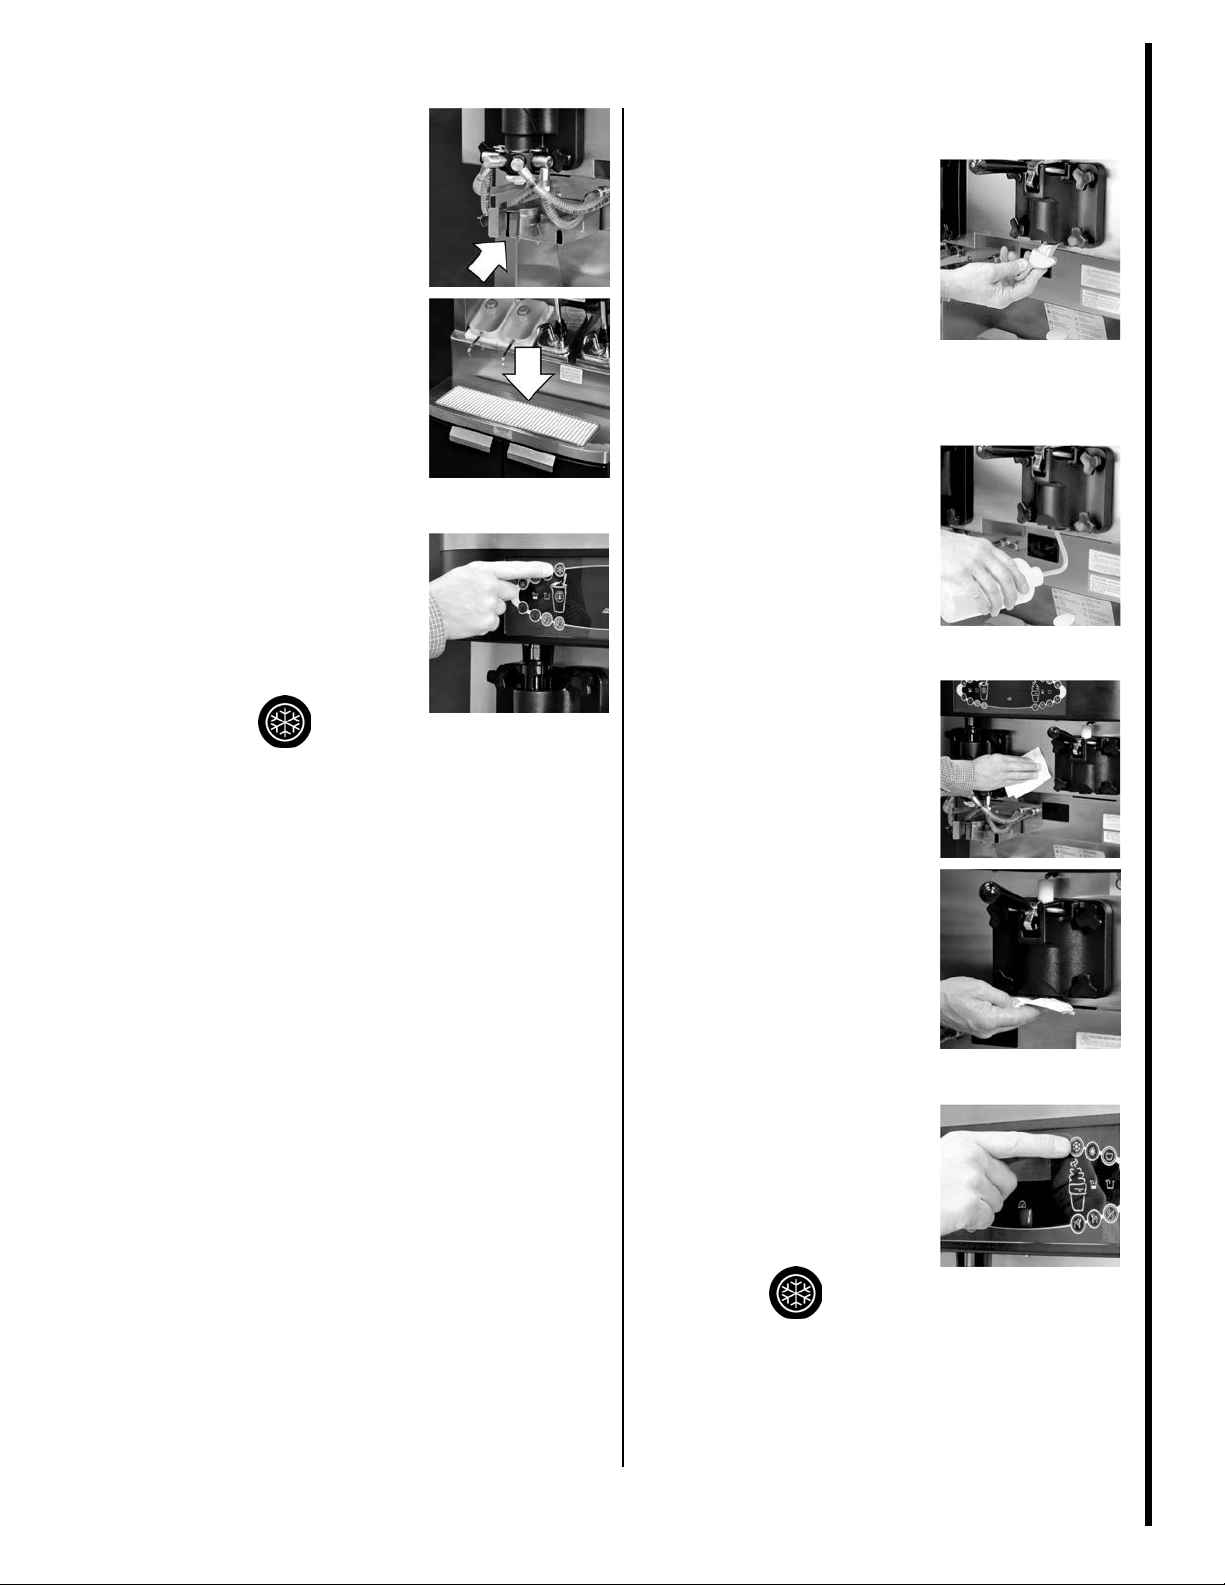
Remove the topping
containers. Fill the heated
Sanitize the topping ladles
and place them in the cold
topping containers.
wells with clean water, up to
the fill line located on the
bottom of the well.
position.
Place the topping heaters in
the ON position by touching
the topping heater symbols.
Note: Clean and sanitize
topping containers, topping
pumps, and heated wells
weekly. (See PM cards SS01
Fill the topping containers.
Place the caramel and fudge
topping containers in the
heated wells and the
remaining two containers in
the unheated wells. Cover the
containers.
SS 3 D1
©McDonald’s Corporation · Planned Maintenance Manual · Revised January, 2021 Page 1 of 4
Page 3
Opening Procedures (continued)
Taylor Company milkshake and soft
Daily
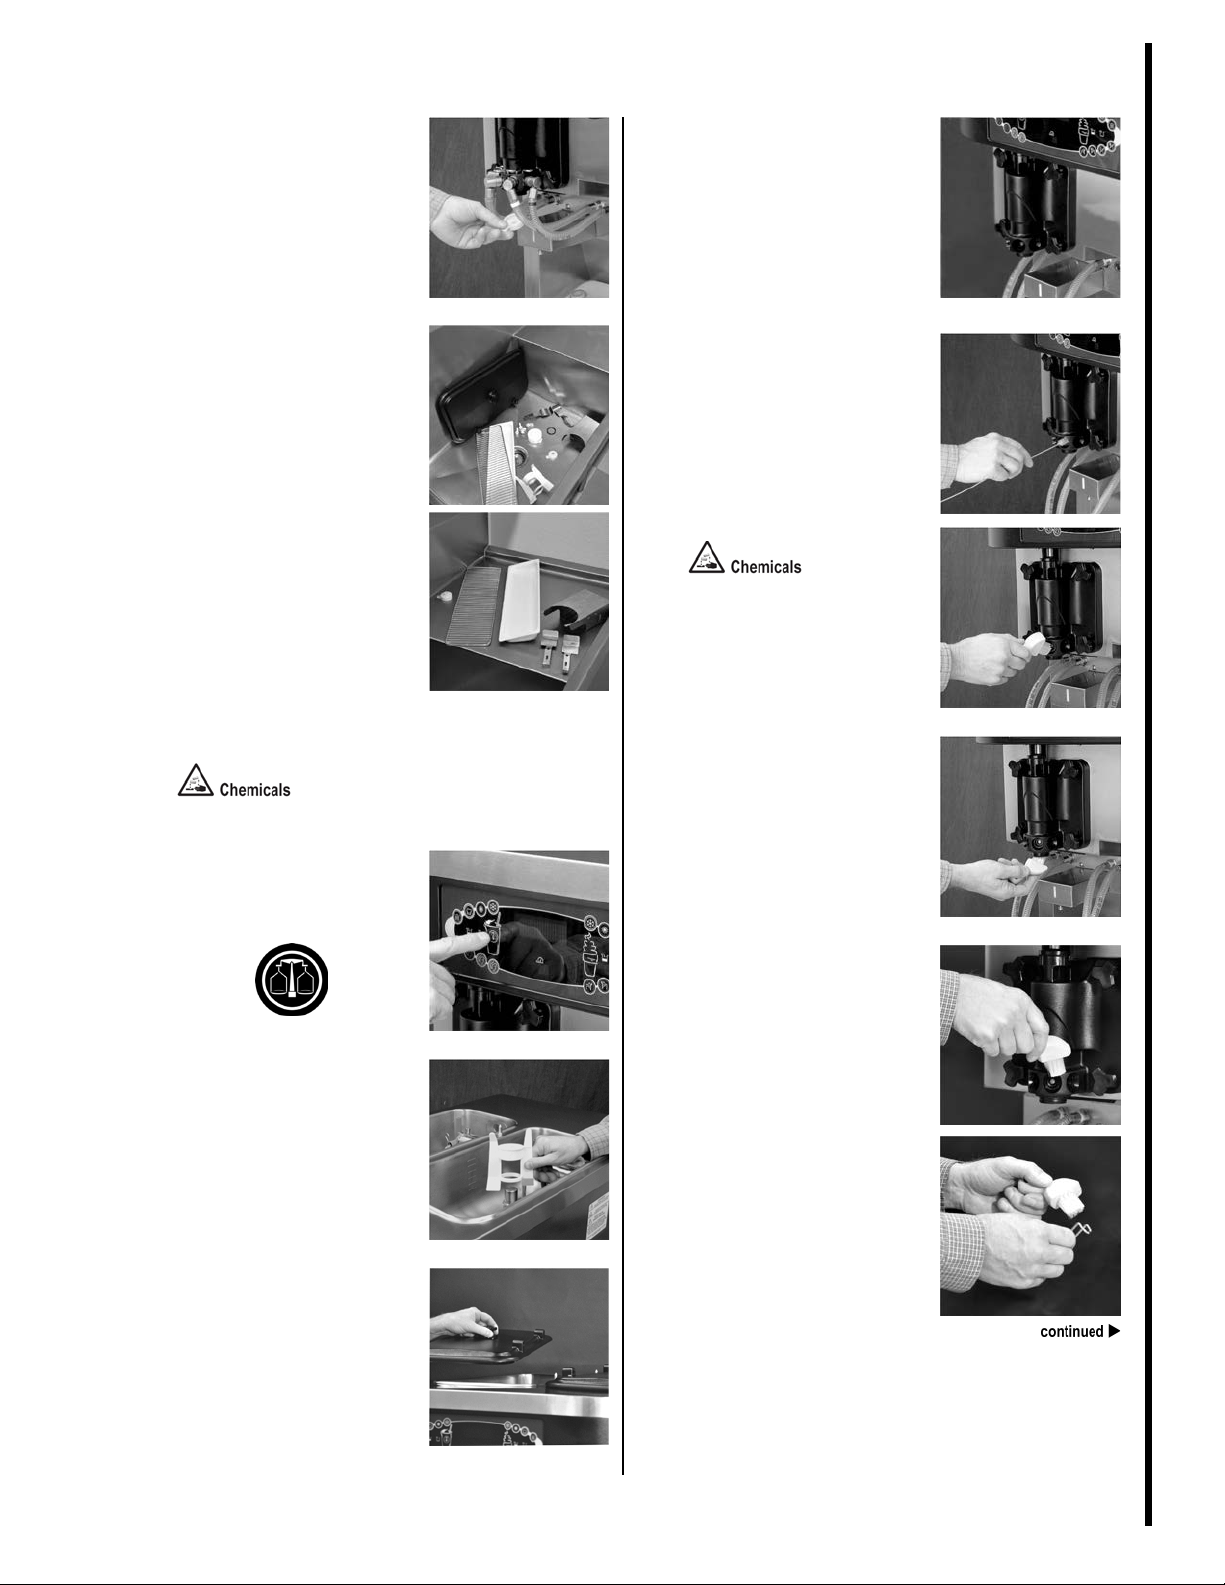
1
Remove syrup valve retainers
2
Remove draw valve cap.
3
Sanitize parts.
4
Sanitize door spout, driven
5
Sanitize syrup port holes.
6
Flush syrup port holes with
7
Flush door spout with
8
Install syrup valve retainers
9
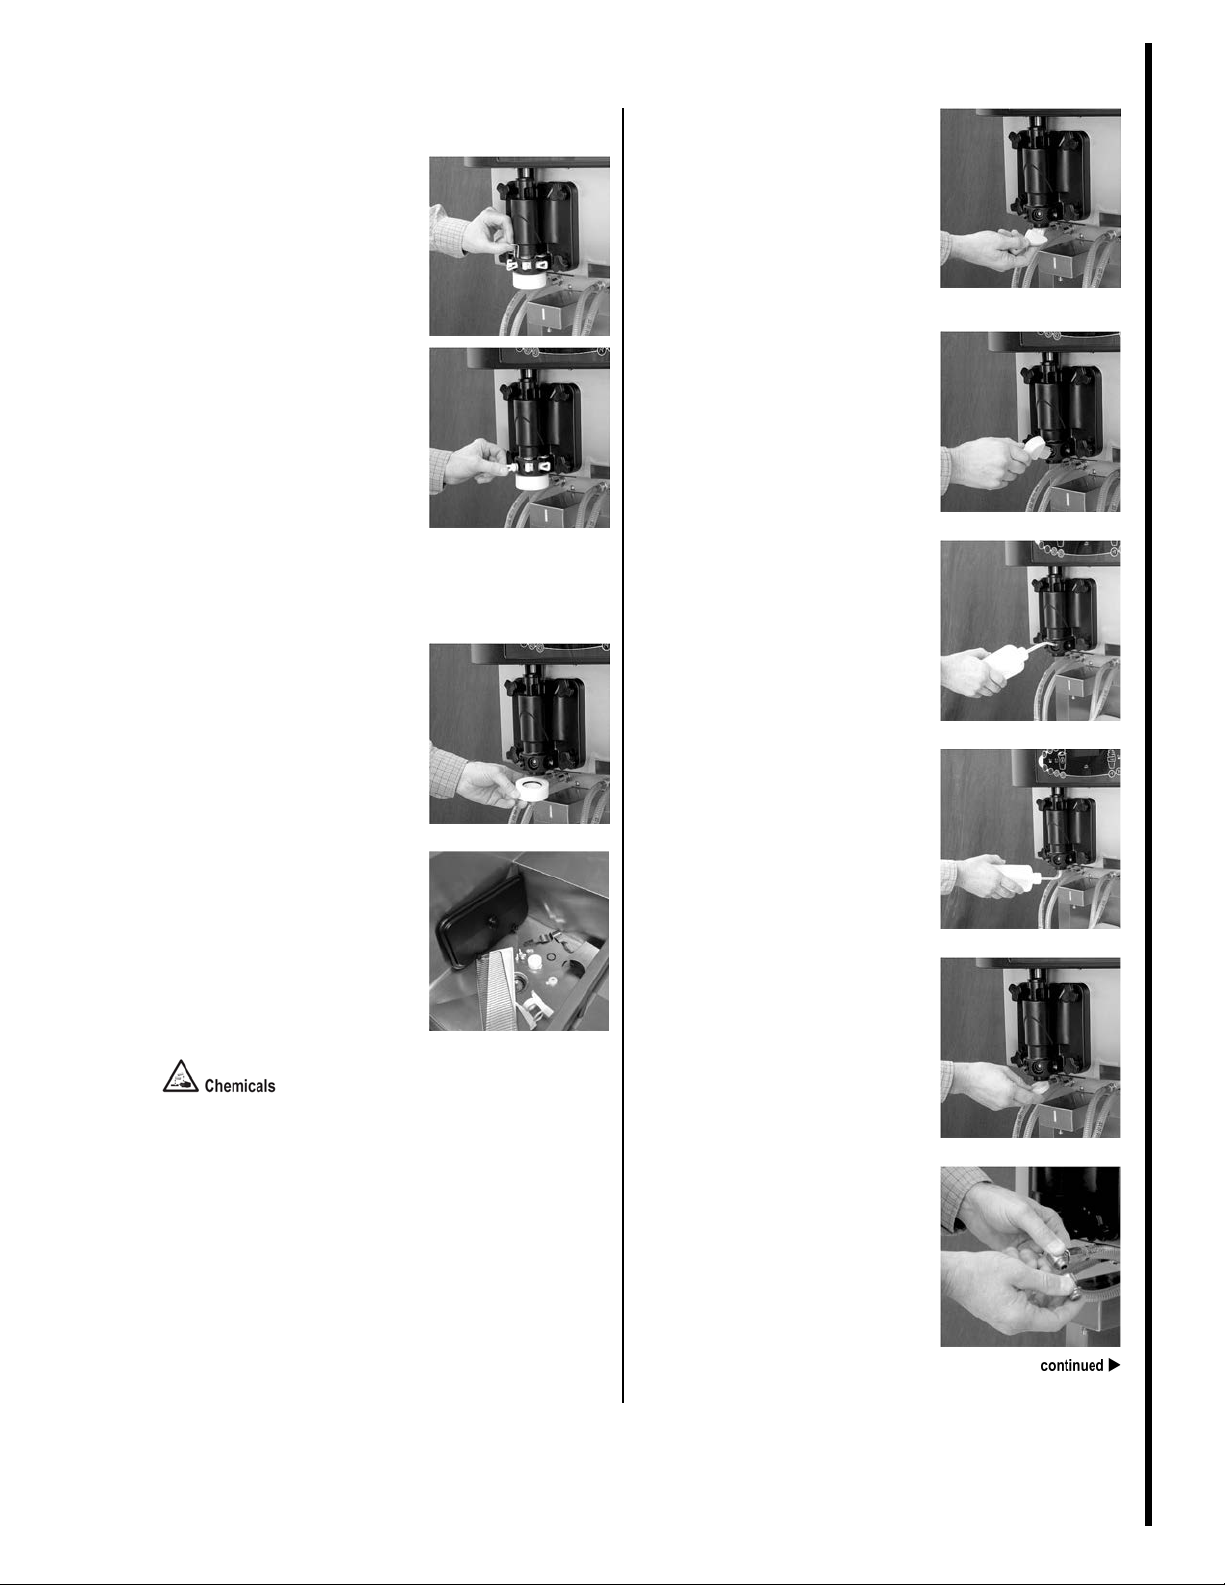
Remove syrup nose fittings.
Procedure – Shake Side
and syrup hole plugs.
Remove the syrup valve
retainers and the syrup hole
plugs.
Remove the o-rings from the
syrup hole plugs.
Remove the draw valve cap
and remove the o-ring.
spinner, spinner blade, and
syrup line fittings.
Brush clean each item for a
total of 60 seconds,
repeatedly dipping the brush
in sanitizing solution.
Place a pail below the door
spout.
Brush each syrup port hole 10
to 15 times. Dip the brush in
sanitizing solution before
brushing ea ch port.
sanitizing solution.
Insert tube end of squeeze
bottle into each syrup port
and squeeze the bottle firmly.
Flush each port for 10
seconds.
-serve machine model C602
Prepare a small amount of
KAY-5 Sanitizer solution.
Sanitize the o-rings, restrictor
cap, syrup hole plugs, syrup
valve retainers, draw valve
cap, shake cup holder, front
drip tray, and splash shield in
this solution.
Sa
nitizer Solution
sanitizing solution.
Flush the bottom of the door
spout door with sanitizing
solution.
and restrictor cap on door
spout.
Remove the syrup nose fitting
from each syrup line by
turning the syrup nose fitting
counter-clockwise.
SS 3 D1
©McDonald’s Corporation · Planned Maintenance Manual · Revised January, 2021 Page 2 of 4
Page 4
Opening Procedures (continued)
Taylor Company milkshake and soft
Daily
10
Remove duckbill valve.
11
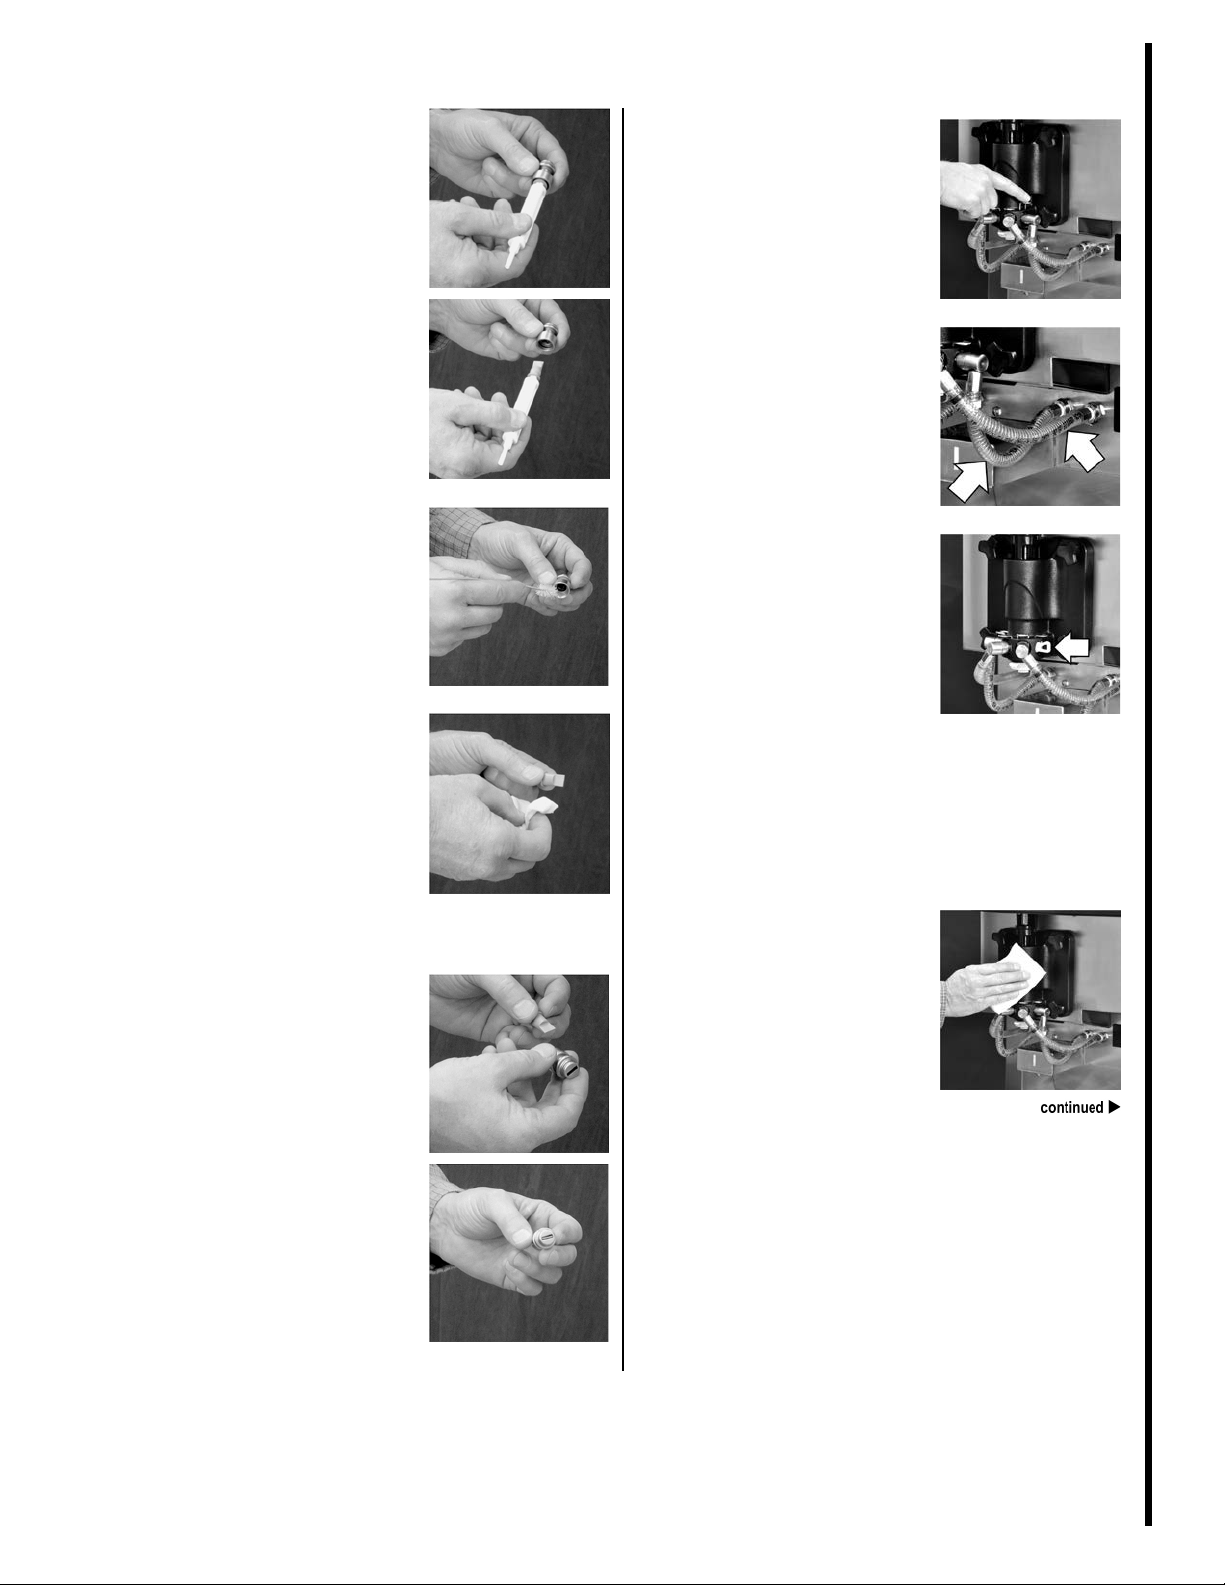
Clean syrup nose fitting.
12
Sanitize syrup nose fittings
fittings and duckbill valve.
13
Install duckbill valve into syrup
14
Install syrup valves.
15
Check syrup lines for air
16
Install syrup plugs for unused
(See PM card SS01 W1)
17
Wipe exterior of machine.
Remove the d uc kb ill val ve
and the o-ring from each
syrup nose fitting, by using
the seal removal tool.
Using a brush and the
sanitizing solution, brush
clean the inside of each syrup
nose fitting until there is no
remaining syrup or mix inside
the fitting.
and duckbill valve.
Using a clean, sanitized
towel, gently wipe a ny syrup
and mix fro m ea ch duckbil l
valve.
Use a milkshake cup filled
with sanitizing solution to
thoroughly rinse the nos e
Raise the syrup valve retainer
and install the syrup valve.
Push the reta iner down to
hold the valve in place.
Repeat for each syrup valve.
pockets in the line.
If air pockets are present,
prime the syrup lines. (See
Operator Manual for priming
syrup lines.)
syrup lines.
Install a syr up hole plug into
the syrup port in the door
whenever a syrup line is not
in use. (Example: When the
optional flavor shake is not
being served.)
Do not install an empty syrup
line into the syrup port of an
unused syrup line.
Note: The syrup system
must be flushed and
sanitized weekly.
-serve machine model C602
nose fitting and install syrup
nose fitting onto syrup line
fitting.
Install the duckbill valve into
the syrup nose fitting with the
flat end aligned with the open
slot in the fitting.
Install the syrup nose fitting
onto the syrup line fitting.
Tighten by hand (cloc kwise)
until snug.
Install and lubricate the o-ring
on the syrup nose fittin g.
Using a clean, sanitized
towel, wipe down the freezer
door, front panel, and other
areas that have a build up of
moistur e or food substance.
SS 3 D1
©McDonald’s Corporation · Planned Maintenance Manual · Revised January, 2021 Page 3 of 4
Page 5
Opening Procedures (continued)
Taylor Company milkshake and soft
Daily
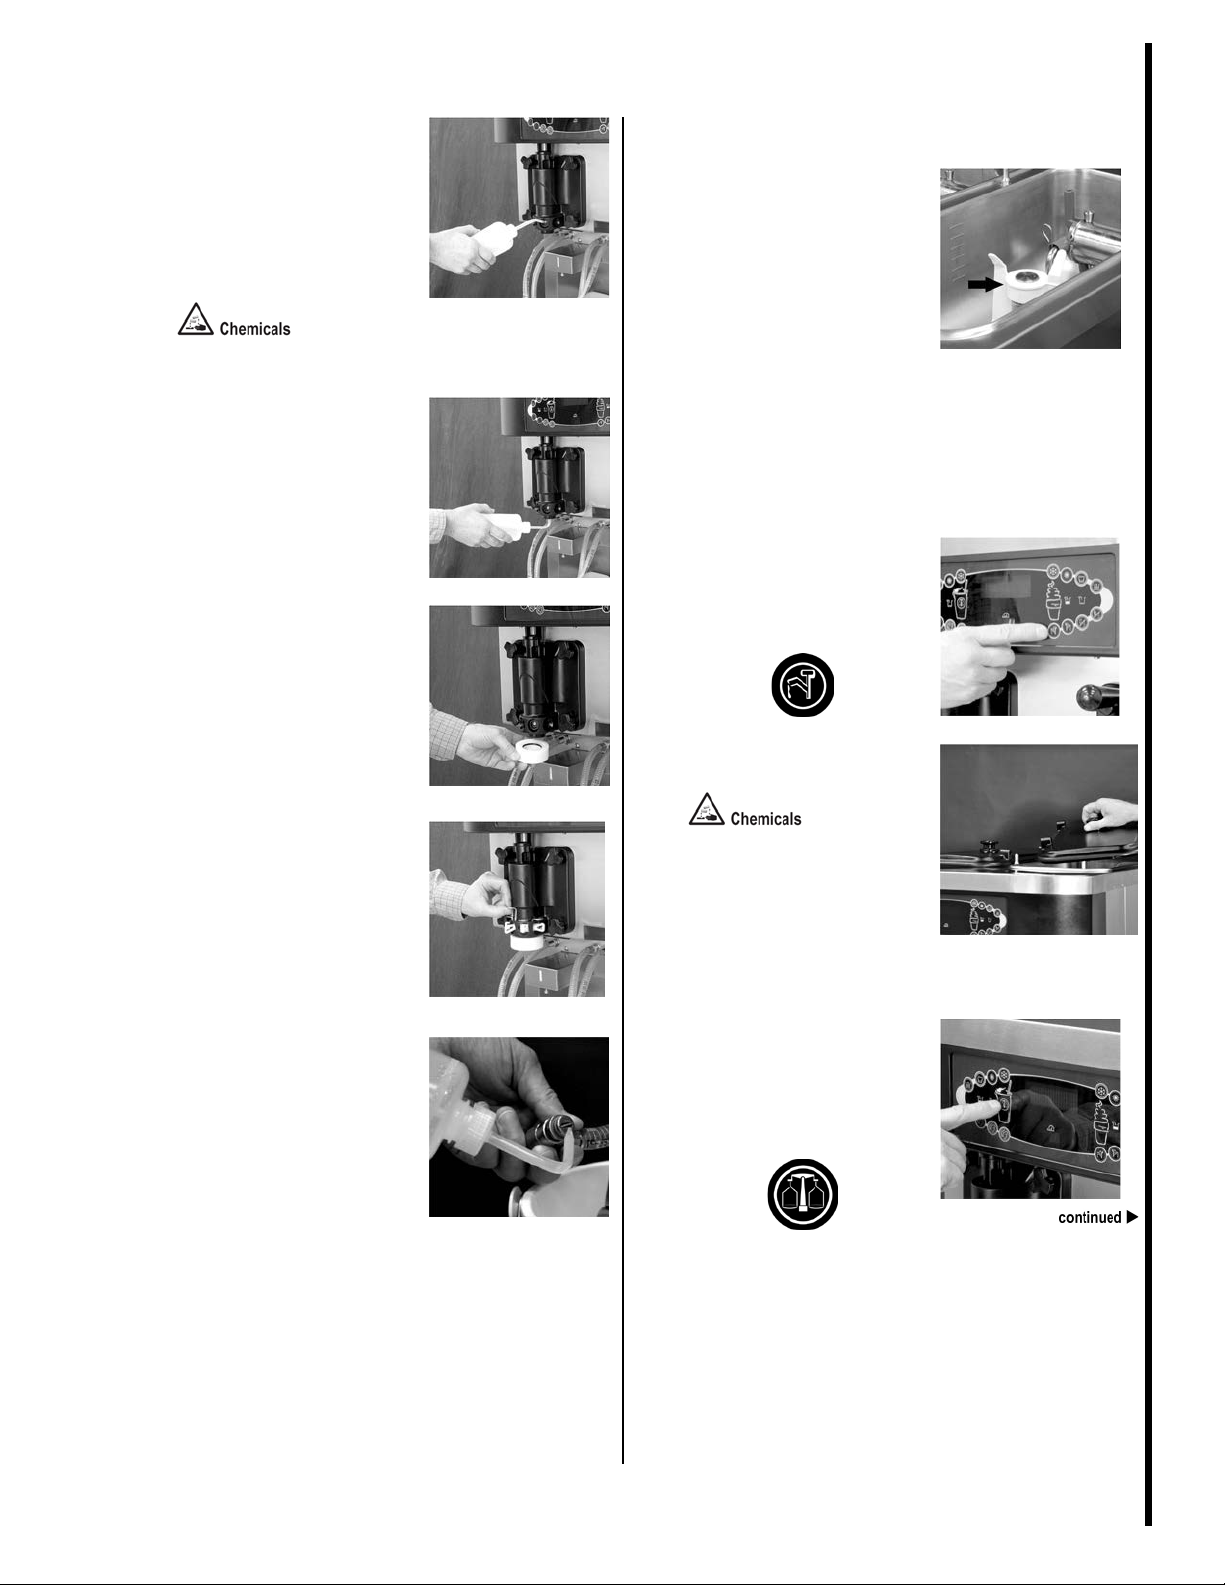
18
Install shake cup holder, front
19
Select the AUTO symbol.
product.
1
Sanitize door spout and
2
Flush door spout and bottom
3
Wipe exterior of machine.
4
Select the AUTO symbol.
product.
drip tray and splash shield.
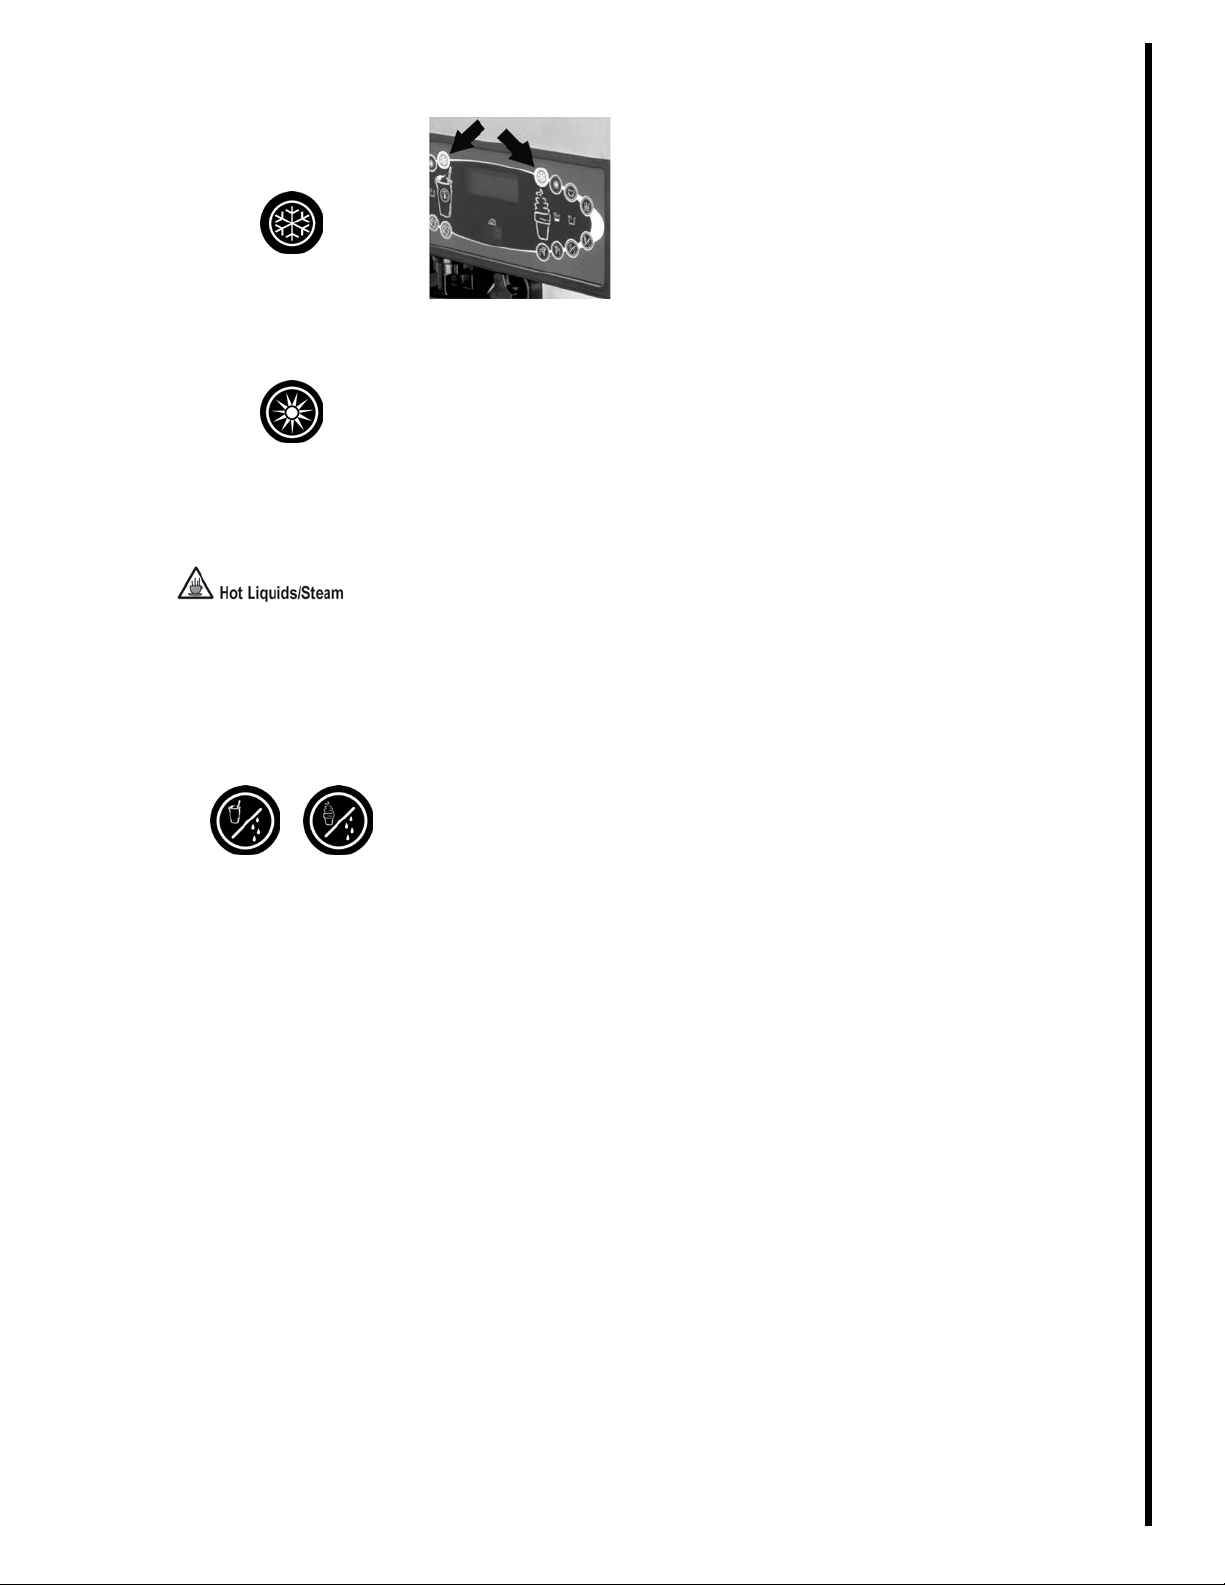
When ready to resume normal
operation, touch the AUTO
symbol. The frozen product
should be ready to serve in
approximately 10 minutes.
Procedure – Soft Serve Side
bottom of draw valve.
With a pail placed beneat h the
soft serve door, dip the door
spout brus h in sanitizing
solution. Brush cle an the door
spout and bottom of the draw
valve. Repeatedly dip the
brush in sani tizing solution
and brush clean each item for
60 seconds.
of draw valve with sanitizing
solution.
Use the squeeze bottle filled
with sanitizing solution to
flush the door spout and
bottom of the draw valve.
-serve machine model C602
Note: This step should be
performed approximately
15 minutes prior to serving
Using a clean, sanitized
towel, wipe down the freezer
door, front panel, and other
areas that have a build up of
moistur e or food substance.
When ready to resume normal
operation, touch the AUTO
symbol. The frozen product
should be ready to serve in
approximately 10 minutes.
Note: This step should be
performed approximately
15 minutes prior to serving
©McDonald’s Corporation · Planned Maintenance Manual · Revised January, 2021 Page 4 of 4
SS 3 D1
Page 6
Closing Procedures Daily SS 3 D2
Taylor Company milkshake and soft
Daily
Why
Prepare Milkshake/Soft-Serve machine for the heat treatment cycle
Time required
30 minutes
Time of day
At closing
24-hour restaurants: one hour before heat treatment cycle
Hazard icons
Brushes
SolidSense All
Kay 5 Sanitizing
Valve Cap
Syrup Hole Plugs
Kay 5 Sanitizing
Clean Sanitized
1
Fill mix hopper.
must not be on.
2
Remove hopper cover.
3
Remove milkshake cup
4
Remove drip tray and splash
5
Remove agitator paddle.
performing the next steps.
With sanitized hands,
begins
Tools and supplies
-serve machine model C602
Purpose Super
Concentrate (APSC)
Solution
Procedure – Shake Side
Fill the hopper with fresh
mix, up to the l ine on the
agitator paddle. Do not fill
above the agitator paddle.
Important: The level of
mix in the hopper must be
at the line on the agitator
paddle. The mix low light
Solution
Solution
Towels
shield.
Select the calibrate symbol
to momentarily stop the
agitator paddle from
turning.
holder.
Important: Make sure
your hands are clean and
sanitized before
remove the agitator paddle
from the hopper.
SS 3 D2
©McDonald’s Corporation · Planned Maintenance Manual · Revised January, 2021 Page 1 of 5
Page 7
Closing Procedures (continued)
Taylor Company milkshake and soft
Daily
6
Remove restrictor cap.
7
Clean and sanitize parts.
APSC & Sanitizer solution
8
Install agitator paddle.
Using sanitized hands,
9
Install hopper cover.
10
Remove syrup lines.
11
Clean syrup port holes.
12
Clean door spout, bottom of
13
Clean syrup valve retainers
Remove the restrictor cap
from the door spout.
At the sink, brush clean and
sanitize:
Agitator paddle
Hopper cover
Milkshake cup holder
Milkshake restrictor cap
Drip tra y
Splash shield
Syrup hole plugs
Spout cap
Spout cap o-ring
Place the restrictor cap,
splash shield, drip tray, and
milkshake cup holder on a
clean, dry surface to air dry
overnight or until the heat
treatment cycle is complete.
Select the calibrate symbol
to momentarily stop the
agitator drive motor.
Raise the retaining pins and
remove the syrup valves.
Place a bucket beneath the
door. Brush clean each
syrup port hole 10 to 15
times. Dip t he brush in
cleaning solution before
brushing ea ch port.
Brush each item for a total
of 60 seconds.
A
PSC solution
driven spinner, spinner blade
and syrup line fittings.
Brush clean each item for a
total of 60 seconds,
repeatedly dipping the brush
in cleaning solution.
-serve machine model C602
reinstall the agitator paddle
on the drive post in the
hopper.
and holes.
With sanitized hands,
remove the syrup valve
retainers. Dip the brush in
cleaning solution and brush
clean the retainers and the
retainer holes. Reinstall the
syrup valve retainers.
SS 3 D2
©McDonald’s Corporation · Planned Maintenance Manual · Revised January, 2021 Page 2 of 5
Page 8
Closing Procedures (continued)
Taylor Company milkshake and soft
Daily
14
Flush syrup port holes with
APSC solution
15
Flush door spout with
16
Fill valve cap with sanitizing
17
Install syrup hole plugs.
18
Sanitize syrup nose fittings.
1
Fill mix hopper.
Important: The level of
2
Place topping heaters in OFF
3
Remove, clean, and sanitize
4
Remove, clean, sanitize, and
performing the next steps.
sanitizing solution.
Insert the tube end of the
squeeze bottle filled with
sanitizing solution into each
syrup port. Squeeze the
bottle firmly. Flush ea ch
port for 10 seconds.
Procedure – Soft Serve Side
Fill the hopp er with fresh
mix, up to the line on the
agitator paddle. Do not fill
the mix hopper above the
agitator paddle.
sanitizing solution.
Flush the bottom of the door
spout door with sanitizing
solution.
solution and install.
Fill the insulated valve cap
with sanitizing solution and
install the cap onto the
milkshake door spout.
Raise the retainer pins.
Install a syr up hole plug
into each syrup port. Lower
the retainer pins to secure
the syrup hole plugs.
mix in the hopper must be
at the line on the agitator
paddle. The mix low light
must not be on.
position.
Turn the topping heaters
OFF by selecting the
topping heater symbols.
hopper cover.
A
PSC & Sanitizer solution
-serve machine model C602
Hold the squeeze bottle over
a bucket. Squeeze the bottle
and thoroughly rinse the slot
of each syrup nose fitting.
Wipe the outside of the
syrup nose f ittings with a
clean, sanitized towel.
te: The syrup system
No
must be flushed and
sanitized weekly.
(See PM card SS01 W1.)
reinstall agitator paddle.
Select the calibrate symbol
to momentarily stop the
agitator paddle from
turning.
Important: Make sure
your hands are clean and
sanitized before
SS 3 D2
©McDonald’s Corporation · Planned Maintenance Manual · Revised January, 2021 Page 3 of 5
Page 9
Closing Procedures (continued)
Taylor Company milkshake and soft
Daily
Remove the agitator paddle
5
Install hopper cover.
6
Clean door spout and bottom
APSC solution
7
Flush door spout with
Sanitizer solution
8
Remove, clean and reinstall
Note: Mix in the dri p pans
9
Wipe exterior of machine.
from the hopper and ta ke it
to the sink. Brush clea n,
sanitize, and reinstall the
agitator paddle.
of draw valve.
Place a bucket beneath the
soft-serve door. Dip the
door spout brush into
cleaning solution and brush
clean the door spout and
bottom of the draw valve.
Repeatedly dip the brus h in
cleaning solution and brush
clean each item for 60
seconds.
indicates there is a leak that
needs to be corrected before
damage occurs inside the
machine.
Examples:
If mix is in the front or side
drip pans, inspect/replace
the beater drive shaft seals.
If mix is in the rear drip
pan, inspect/replace the
pump drive shaft seals.
-serve machine model C602
Use a clean, sanitized towel
to wipe down the freezer
doors, front panels, and any
other areas that have a
build-up of either moisture
or food substance.
sanitizing solution.
Use the squeeze bottle filled
with sanitizing solution to
rinse the bottom of the door
spout. Rinse the spout wi th
sanitizing solution for 10
seconds.
drip pans.
Remove the drip pans and
take them to the sink. Br ush
clean, sanitize, and reinstall
the drip pans.
SS 3 D2
©McDonald’s Corporation · Planned Maintenance Manual · Revised January, 2021 Page 4 of 5
Page 10
Closing Procedures (continued)
Taylor Company milkshake and soft
Daily
10 Make sure unit is in AUTO.
Note: The machine must be
in AUTO (or STANDBY) to
start the heat treatment
cycle at the programmed
time.
DO NOT attempt to draw
product or disassemble the
machine during the HEAT
cycle. The product is hot and
under extreme pressure.
hen the heat cycle is
W
complete, the control panel
will change to the
STANDBY mode. The
STANDBY symbols will be
illuminated.
-serve machine model C602
SS 3 D2
©McDonald’s Corporation · Planned Maintenance Manual · Revised January, 2021 Page 5 of 5
Page 11

Clean and sanitize syrup lines with duckbill
valves
Weekly SS 3 W1
Taylor Company milkshake and soft
Weekly
W1
Why
To break the bacteria cycle
Time required
5 minutes to prepare
20 minutes to complete
Time of day
At close
For 24-hour restaura nts: during breakfast menu
Hazard icons
Brushes
Bucket, SolidSense
Bucket, clean and
Bucket, soiled towels
Bucket, plastic
Cold-drink cup
Kay-5 Sanitizing
Plastic wrap
Taylor Lube HT
Kay-5 Sanitizing
solution
1
Disconnect the QD fitting
4
Re-connect the QD
5
Clean inside of cabinet.
Tools and supplies
-serve machine model C602
Procedure
Disconnect the QD fitting
on the syrup bag.
Remove the syrup bags wit h
the line attached from the
cabinet.
Wipe the outside of the feed
tubes or the hose connector
fittings with a clean,
sanitizer-soaked towel.
Sanitizer solution
2
Place the syrup bag on a level
surface. Remove the syrup
bag line from the syrup bag.
All Purpose Super
Concentrate (APSC)
sanitizer-soaked
towels
Fitting/Hose from the syrup
bag
Place the syrup feed hose in a
bucket of APSC solution.
AP
SC Solution
Wipe down the inside of the
syrup cabinet with a clean,
sanitizer-soaked towel. Spray
resistant areas with additional
sanitizer solution.
solution
3
Cover the syrup inlet port
with plastic wrap.
SS 3
©McDonald’s Corporation · Planned Maintenance Manual · Revised January, 2021 Page 1 of 4
Page 12
Clean and sanitize syrup lines with duckbill valves (continued)
Taylor Company milkshake and soft
Weekly
W1
6
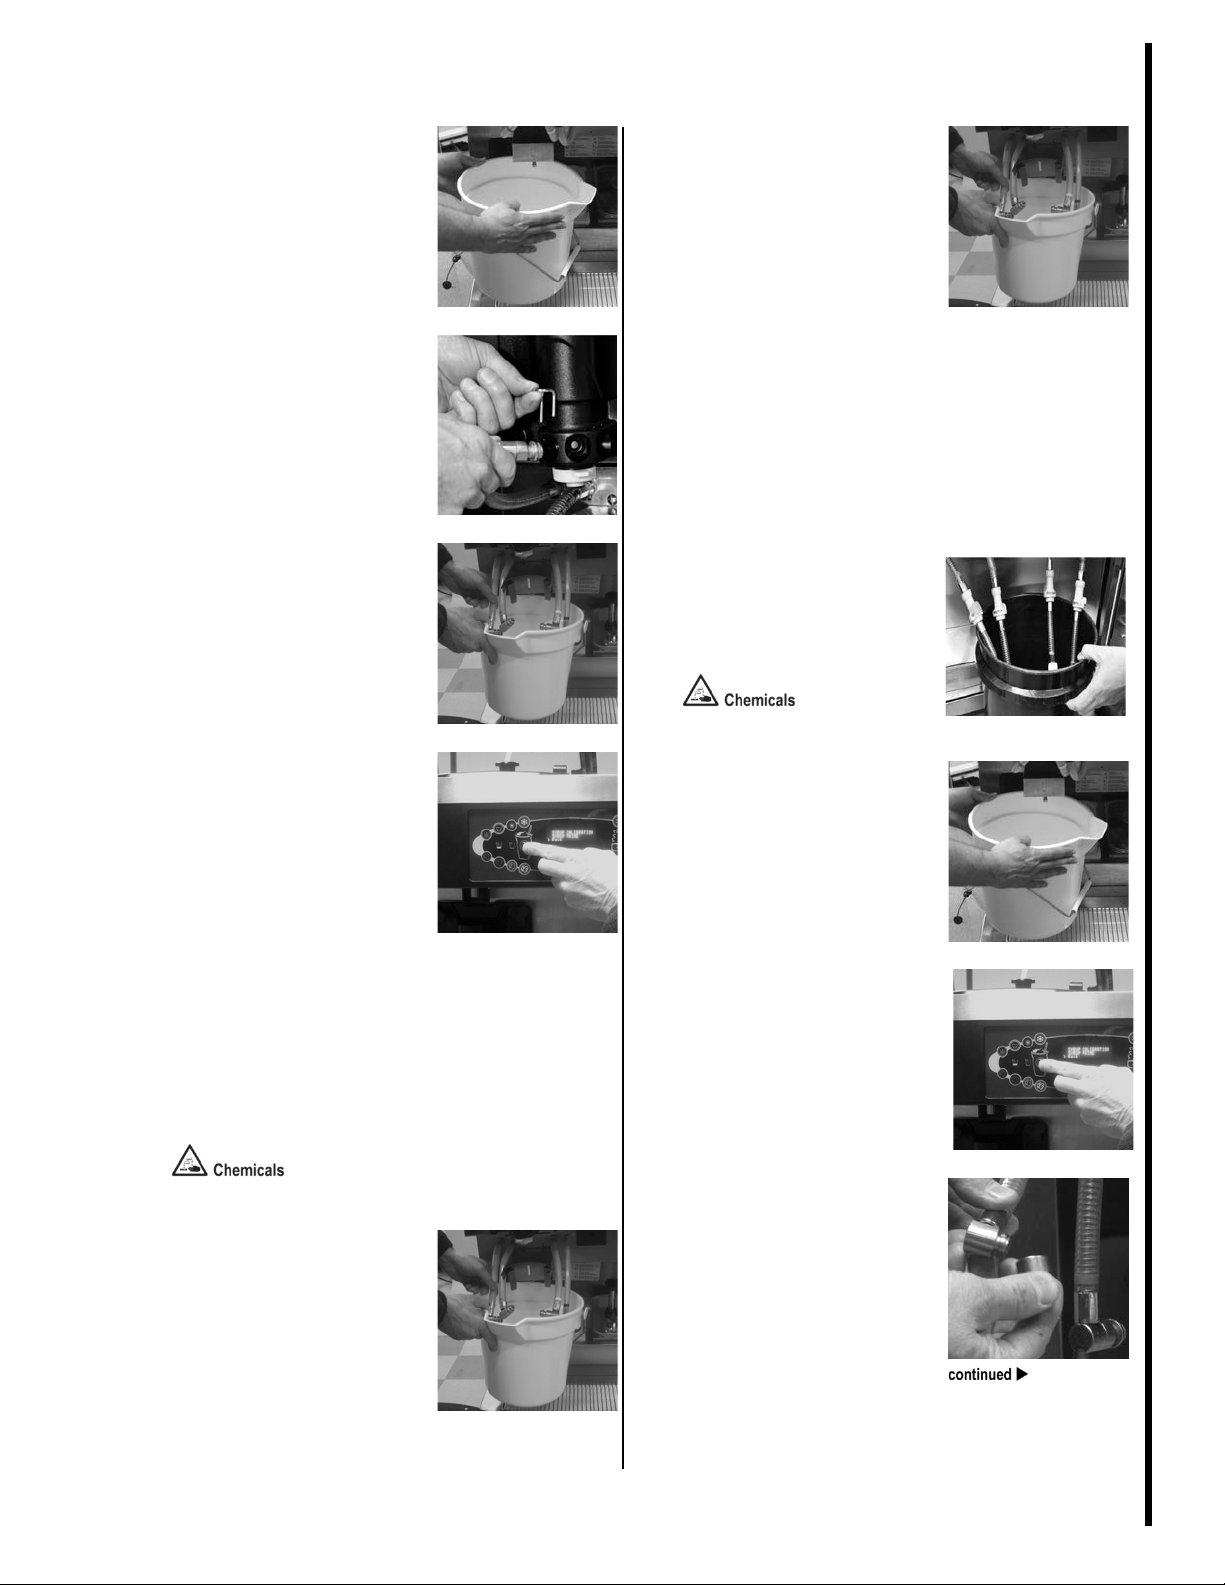
Place empty bucket under
7
Remove syrup line from
8
Place syrup line and valve in
9
Start flow of APSC solution.
APSC solution
10
Flush syrup line with APSC
is completely flushed.
11
Pump all liquid from syrup
line.
12
Rinse with clean, hot water
hot water.
13
Place feed tubes in sanitizer
Sanitizer solution
14
Place empty bucket under
15
Flush syrup line with sanitizer
16
Remove nose fitting.
milkshake draw valve.
Place a clean plastic bucket
under the milkshake draw
valve.
milkshake freezer door.
Disconnect the corresponding
syrup line from the milkshake
freezer door by raising the
syrup valve retainer. Pull the
valve straight out.
bucket.
Hang the syrup line and valve
in the empty bucket.
line.
Remove the syrup feed tube
from the bucket of APSC
solution and continue to run
the pump until APSC solution
no longer ru ns from the s yrup
line.
Touch the Flavor Select key
to stop the flow of APSC
solution thr ough the syrup
-serve machine model C602
Repeat steps 7-10 with clean,
solution.
Place the syrup bag connect
fittings into a bucket of
sanitizer solution.
Press the Calibration key on
the control panel to display
the menu options.
ouch the Auto ke y to move
T
the arrow to “Syrup Prime.”
T
ouch the Calibration key
again to disp lay the syrup
prime screen.
ress the Flavor Select key
P
for the correct flavor, to start
the flow of APSC through the
line.
solution.
Allow the APSC solution to
continue to flow into the
empty bucket until all the
syrup is flushed from the line.
When the liq uid from the
syrup line runs clear, the line
milkshake draw valve.
Place a clean plastic bucket
under the milkshake draw
valve.
solution.
Repeat steps 7 through 9
using sanitizer solution.
Unscrew the nose fitting from
the syrup valve in the b ucket
by turning the cap counterclockwise.
SS 3
©McDonald’s Corporation · Planned Maintenance Manual · Revised January, 2021 Page 2 of 4
Page 13
Clean and sanitize syrup lines with duckbill valves (continued)
Taylor Company milkshake and soft
Weekly
W1
17
Remove valve and o-ring.
18
Clean nose and elbow fitting.
19
Clean duckbill valves.
20
Sanitize syrup valve fittings.
Sanitizer solution
21
Insert duckbill valve.
22
Connect nose fitting.
23
Install and lubricate o-ring.
24
Reassemble remaining valves.
25
Place clean bucket under
Remove the duckbill valve
and o-ring from each syrup
nose fitting, by using the seal
removal tool.
Install the duckbill valve into
one of the no se fittings with
the flat end a ligned wit h the
open slot in the nose fitting.
Do not lubricate the duckbill
valve.
-serve machine model C602
Use the white end of the
double-ended brush to scrub
the inside of the syrup nose
fitting and the elbow fitting.
Remove any residual
particles.
Screw the nose fitting o nto
one of the s yrup valve elbows
by turning it clockwise.
Tighten it by hand until snug.
Use a clean, sanitizer-soaked
towel to wipe any syrup from
the duckbill valves.
Fill a cup with sanitizer
solution. S ubmerge the syrup
valve fittings in the sanitizer
solution in the cup. Rotate the
cup gently so the fittings are
washed thoroughly. Allo w to
soak for at least one minute.
Push one of the o-rings onto
the nose fitting and lubricate
it with Taylor Lube HP.
Repeat steps 20 through 22 to
reassemble the remaining
syrup valve s .
milkshake draw valve.
Place a clean plastic bucket
under the milkshake draw
valve. Position the sanitized
valves so t hey are hanging
over the bucket.
SS 3
©McDonald’s Corporation · Planned Maintenance Manual · Revised January, 2021 Page 3 of 4
Page 14
Clean and sanitize syrup lines with duckbill valves (continued)
Taylor Company milkshake and soft
Weekly
W1
26
Drain syrup feed tubes.
27
Replace syrup feed tubes and
28
Display syrup menu options.
29
Touch AUTO key.
30
Touch calibration key.
31
Start syrup flow.
32
Stop flow of syrup.
33
Repeat steps 27-31 for each
flavor.
34
Reconnect syrup valves.
Remove the syrup feed tubes
from the bucket of sanitizer
solution and allow them to
drain back i nto the bucket.
syrup bags.
For syrup bag systems, attach
the bag connector fittings to
the proper syrup flavors.
Return the syrup bags to the
cabinet.
Press the Calibration key on
the control panel to display
the syrup menu options.
Press the Flavor Select key to
stop the flow of syrup.
Connect the syrup valves to
the freezer door. Secure by
lowering the retainers.
-serve machine model C602
Touch the Auto ke y to move
the arrow to “Syrup Prime.”
Touch the Calibration key to
display the syrup prime
screen.
Press the Flavor Select key to
start the flow of syrup
through the l ine.
Allow the syrup to flow until
all sanitizer solution and air is
flushed from the line.
SS 3
©McDonald’s Corporation · Planned Maintenance Manual · Revised January, 2021 Page 4 of 4
Page 15

Clean hot sundae topping water bat hs Weekly SS 3 W2
Taylor Company
Weekly
2
Why
To maintain food quality
Time required
5 minutes to prepare
10 minutes to complete
Time of day
At close and after topping pumps and
containers have been removed
For 24-hour restaura nts: during breakfast menu and
after topping pumps and containers have been removed
Hazard icons
Brushes
Bucket, Sol-
Concentrate (APSC)
Bucket, tap water
Bucket, clean and
Bucket, soiled towels
Pan, prep, 1/3 size,
Paper towels
Screwdriver, flat
1
Turn off water bath heaters.
2
Remove pumps and containers
baths may be extremely hot.
3
Position prep pan under water
water bath drain tubes.
4
Drain water bath.
completely into the prep pan.
milkshake and soft-serve machine model C602
Tools and supplies
idSense™ All
Purpose Super
Procedure
Using the control panel on the
front of the machine, t urn off
both the left and right water
bath heaters.
and allow water bath to cool.
Remove both hot topping
pumps and containers. Allow
the water in the water baths to
cool for 10 minutes.
solution
sanitized towels
6 inches deep
bath drain tubes.
Place the 6 inch deep, 1/3 size
prep pan under the machine
just to the right of the center
front. The pan should b e positioned directly under the
Using a flat screwdriver,
loosen the drain screw in the
bottom of one of the baths by
turning the s crew counterclockwise. Do not remove the
screw.
Metal surfaces and water
Allow the water to drain
SS 3 W
©McDonald’s Corporation · Planned Maintenance Manual · Revised January, 2021 Page 1 of 2
Page 16

Clean hot sundae topping water baths (continued)
Taylor Company
Weekly
2
so the water can still drain.
5
Discard water in pan.
extremel y hot.
6
Position prep pan under
7
Tighten drain screw.
8
Clean water bath.
APSC & Sanitizer solution
9
Drain water bath.
10
Rinse water bath.
11
Drain water bath.
12
Dry interior of water bath.
13
Refill water bath.
14
Clean second water bath.
If the drain is plugged,
remove the drain screw
completely by turning it
counterclockwise. Clear the
drain using the double-ended
brush. Replace the screw
loosely, turning it clockwise,
Make sure the water has
drained completely out of the
bath and into the pan. Carefully slide the pan out from
under the machine and d iscard the water.
Water baths may be
machine.
Return the prep pan to the
same position under the water
bath drain tubes.
Repeat steps 4 through 7 to
drain and discard the APSC
solution. Remember to tighten
the drain screw before beginning the next st ep.
milkshake and soft-serve machine model C602
Using a clean, sanitized towel
and clean tap water, thoroughly rinse the interior of
the water bath.
Repeat steps 4 through 7 to
drain and discard the rinse
water. Remember to tighten
the drain screw before beginning the next step.
Use a dry paper towel to dry
the inside of the water bath
and remove any remaining
sanitizer residue.
Turn the dr ain screw clo ckwise to tighten it.
Fill the water bath with APSC
solution. U s ing a clean, sanitized towel, thoroughly wash
the inside of the water bath.
Fill the water bath with clean
tap water, up to the fill lines
marked on the sides of the
bath.
Repeat steps 3 through 13 for
the second water bath.
SS 3 W
©McDonald’s Corporation · Planned Maintenance Manual · Revised January, 2021 Page 2 of 2
Page 17

Clean and sanitize hot sundae topping pumps Weekly SS 3 W3
Taylor Company
Weekly
W3
Why
To break the bacteria cycle
Time required
5 minutes to prepare
30 minutes to complete
Time of day
During 14 day brush cleaning
During 14 day brush cleaning
Hazard icons
Brushes
Spatula, rubber
Taylor Lube HT
Kay-5®
SolidSense™ All
1
Remove topping pump and
The pumps may be hot.
2
Discard topping.
before starting this procedure.
3
Rinse container and pump.
spout.
4
Remove plunger assembly.
5
Remove plunger knob.
hand.
milkshake and soft-serve machine model C602
Tools and supplies
Procedure
container.
Lift the topping pump and
container from the water bath.
D
o not remove the pump by
pulling on t he spout.
Use a rubber spatula to remove and di scard the topping
from the container.
To minimize waste, run the
topping as low as possible
Sanitizer/Cleaner
Purpose Super
Concentrate (APSC
)
Transfer the pump and container to the threecompartment sink. Rinse the
container with hot water.
Spray the pump with hot water to remove any remaining
topping. Place the lower end
of the pump in a container of
water and p ush down on the
pump lever several times until
only water flows from the
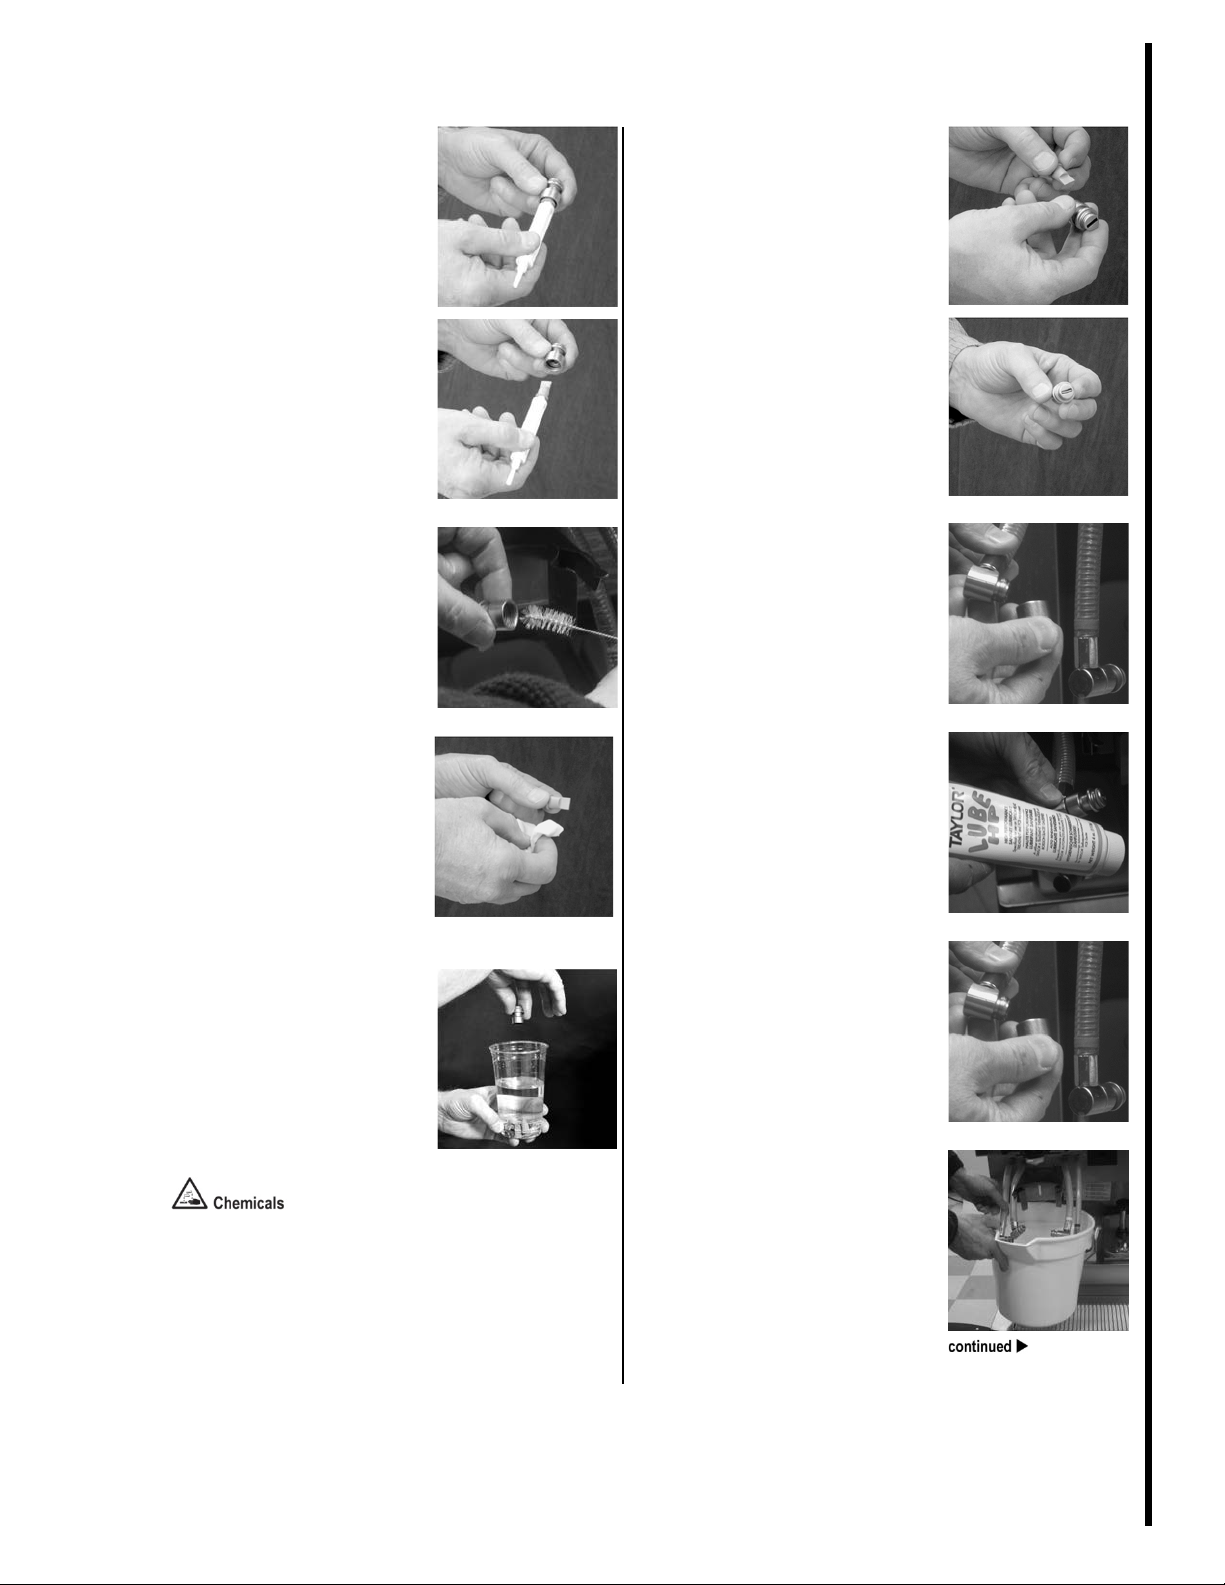
Turn the plu nger nut count erclockwise to remove the
plunger assembly from the
pump body.
To remove the knob, compress the spring toward the
knob, using the washer . Compress it enough to grab onto
the plunger with your hand
for suppo rt. Begin removing
the knob with your other
©McDonald’s Corporation · Planned Maintenance Manual · Revised January, 2021 Page 1 of 5
SS 3
Page 18

Clean and sanitize hot sundae topping pumps (continued)
Taylor Company
Weekly
W3
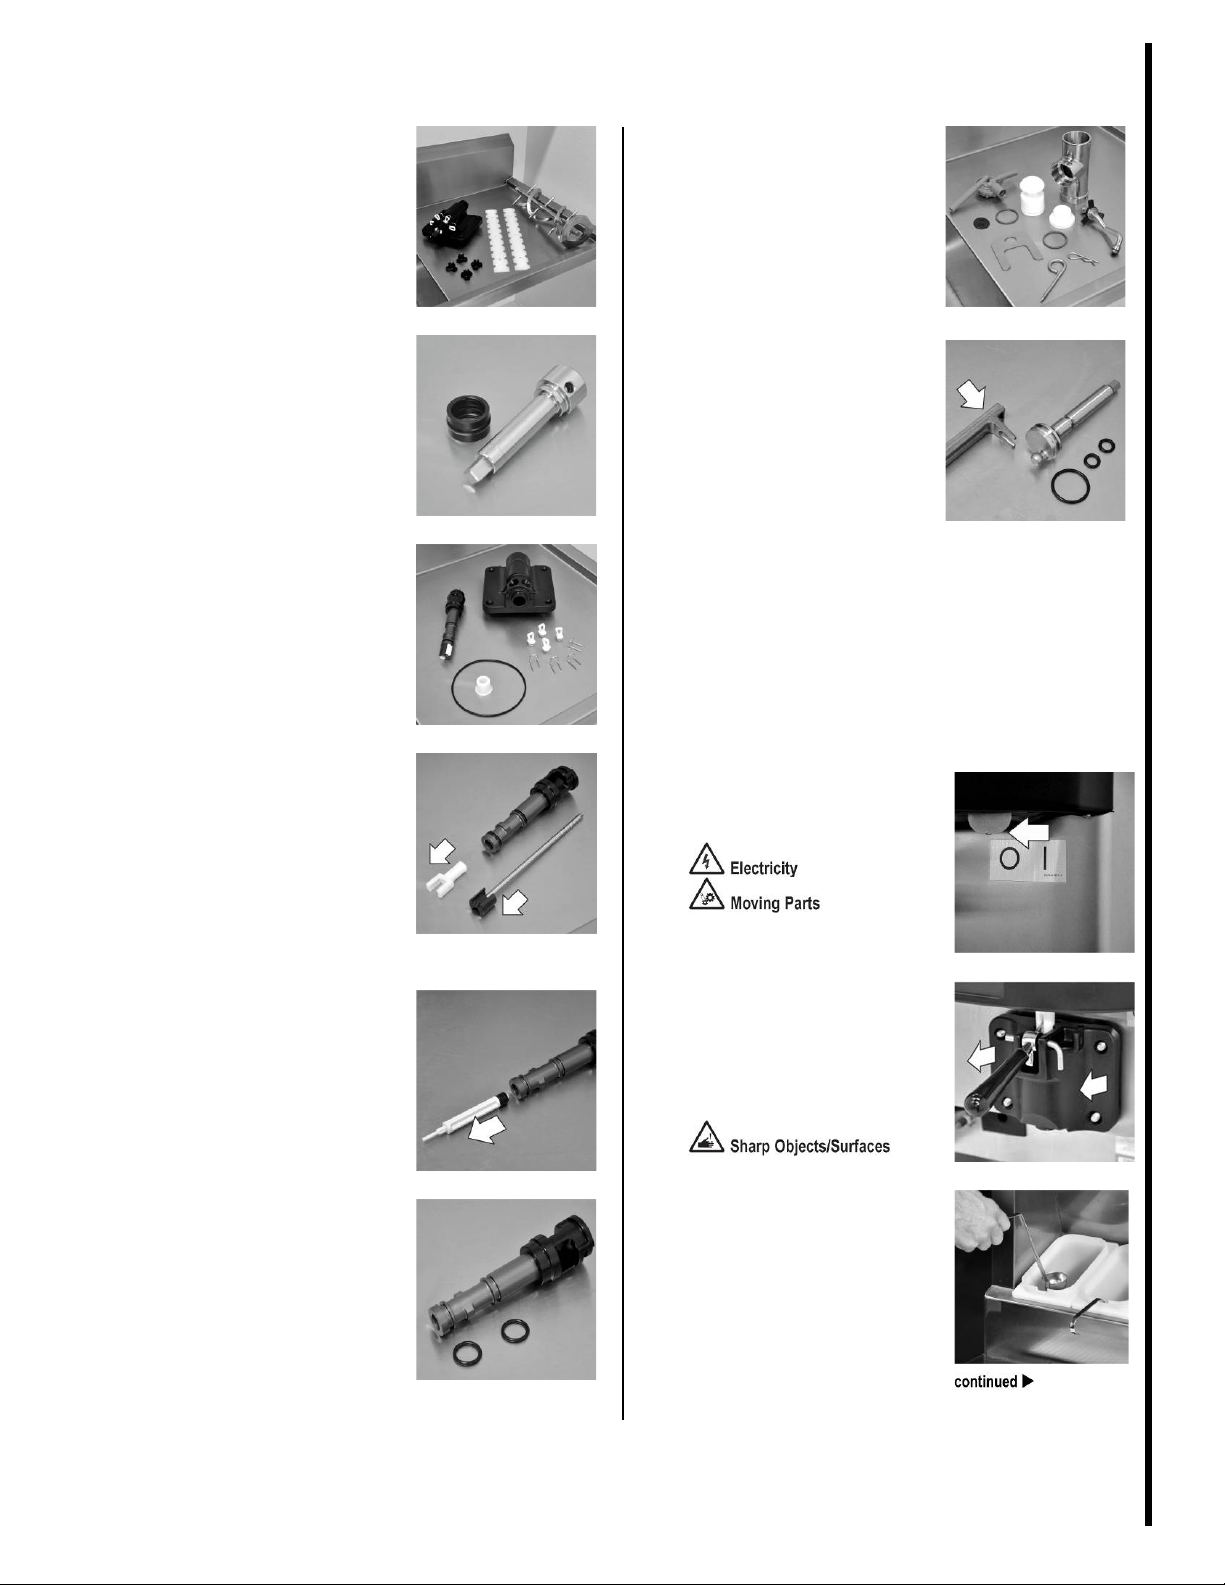
6
Remove plunger nut.
7
Remove plunger tube and
8
Remove spring and washer.
9
Remove seal assembly.
10
Remove o-ring from seal.
11
Remove spout lock nut from
12
Remove lid.
13
Remove plunger cylinder from
14
Remove spout from valve
15
Remove o-rings from valve
16
Wash all pump parts.
APSC Solution
17
Clean spout.
Remove the plunger nut from
the plunger tube.
Lift the lid off the spout and
plunger c ylinder.
milkshake and soft-serve machine model C602
insert.
Remove the plunger tube and
insert from the plunger assembly.
valve body.
Turn cylinde r counterclockwise to remove.
body.
Remove the s pring and wa sher from the plunger assembly.
Turn spout counter-clockwise
to remove.
Slide the seal assembly off
the bottom of the plunger.
lid.
Loosen the spout lock nut by
turning it counterclockwise.
Remove it from the spout and
lid.
body and spout.
Remove the 15/16 inch o-ring
from the val ve body and remove the 1 inch o-ring from
the spout.
Wash all pump parts in the
three-compartment sink using
APSC solution and the
supplied b rushes.
Insert the bristle end of the
spout brus h into the tip of the
spout. Move the brush back
and forth quickly. Pus h the
brush all the way through the
spout and pull it out the opposite end.
SS 3
©McDonald’s Corporation · Planned Maintenance Manual · Revised January, 2021 Page 2 of 5
Page 19

Clean and sanitize hot sundae topping pumps (continued)
Taylor Company
Weekly
W3
18
Clean top side of inlet valve on
19
Clean top side of outlet valve.
20
Clean passageway between
the valve bo dy.
21
Rinse and sanitize pump parts.
Sanitizer solution
22
Insert seal assembly o-ring.
23
Lubricate seal assembly
24
Install seal assembly.
25
Install washer and spring.
26
Install plunger insert into
27
Install plunger nut.
28
Insert plunger with spring into
tube.
valve body.
Retrieve the valve body. Use
the bristle e nd of the brush to
scrub the top side of the inlet
valve. Be sure to scrub around
the steel ball.
Use the bristle end of the
brush to scrub the top side of
the outlet valve. Be sure to
scrub around the steel ball.
o-ring.
Lubricate the seal assembly
o-ring, using Taylor Lube.
milkshake and soft-serve machine model C602
Install the seal assembly onto
the end of the plunger that is
opposite the stem end.
valves.
Insert the non-bristle end of
the brush into the top side of
the inlet valve. Thread it
through the passageway between the valves. Pull it out
through the top side of the
outlet valve until the bristles
are in the pass ageway.
Move the brush back and
forth quickly to scrub the passageway. Pull the brush out of
Slide the washer and spr ing
onto the ste m end of the
plunger.
plunger tube.
Locate the beveled edge of
the plunger insert. Thi s end
will also have the smaller
hole. Insert this end into the
open end of the plunger tube.
Rinse and sanitize all clean
pump parts in the threecompartment sink.
ather all pump parts for
G
re-assembly.
Insert the o-ring in the seal.
Slide the plunger nut onto the
plunger tube.
plunger tube.
Insert the plunger wit h t he
spring into t he larger end of
the plunger tube assembly.
Push on the end of the plunger, compressing the spring,
until the thr eaded end of the
stem proj ects through the
opposite end of the plunger
©McDonald’s Corporation · Planned Maintenance Manual · Revised January, 2021 Page 3 of 5
SS 3
Page 20

Clean and sanitize hot sundae topping pumps (continued)
Taylor Company
Weekly
W3
29
Install knob.
turning it clockwise.
30
Install spout o-ring.
31
Lubricate spout o-ring.
32
Install valve body o-ring.
33
Lubricate valve body o-ring.
34
Connect spout and valve body.
valve bod y.
35
Connect plunger cylinder and
grooves on the valve bo dy.
36
Slide lid onto pump assembly.
37
Secure lid to pump assembly.
Place the knob with the knob
o-ring onto the threaded en
o
f the plunger. Push the
plunger tube down toward the
seal assembly, squeezing th
pring as far as it will go.
s
Tighten the knob secure ly by
Position the spout o-ring in
the groove s on the spout.
d
e
Lubricate the o-ring, using
Taylor Lube.
Position the valve body o-ring
in the grooves on the top side
of the inlet valve.
Insert the spout into the
smaller opening in the valve
body by aligning the flats on
the spout wi th the locki ng
grooves on the valve bo dy.
milkshake and soft-serve machine model C602
Push the spout down until it is
seated in the valve body
opening. Turn the spout
clockwise to fully engage it in
the lockin g grooves on t he
valve body.
Insert the c ylinder into the
larger opening in the valve
body by tilting the cylinder
away from the spout. Slide
the widest section of the cylinder flange under the center
locking groove on the valve
body.
Align the tabs on the cylinder
with the locking groove s on
the valve bo dy. Turn the cylinder clockwise until the tabs
fully engage in the locking
Lubricate 15/16 inch o-ring,
using Taylor Lube.
Insert the spout through the
smaller hole in the lid. Slide
the lid down until the top of
the plunger cylinder is aligned
with the larger hole.
Slide the spout lock nut over
the spout and onto lid. Tighten it securely by turning it
clockwise.
SS 3
©McDonald’s Corporation · Planned Maintenance Manual · Revised January, 2021 Page 4 of 5
Page 21

Clean and sanitize hot sundae topping pumps (continued)
Taylor Company
Weekly
W3
38
Lubricate plunger assembly.
39
Install plunger assembly.
40
Tighten plunger nut.
Lubricate bottom of the
plunger assembly, using
Taylor Lube.
milkshake and soft-serve machine model C602
Slide the plunger assembly
through the cylinder opening
in the lid and into the pump
body.
Securely tighten the p lunger
nut on to the li d by turning it
clockwise.
SS 3
©McDonald’s Corporation · Planned Maintenance Manual · Revised January, 2021 Page 5 of 5
Page 22

14 Day Brush Cleaning Every 14 Days SS 3 B1
Taylor Company milkshake and soft
Every 14 Days
B1
Why
Required Cleaning and Lubrication of Machine
Time required
5 minutes to prepare
4 hours to co mplete
Time of day
At close
For 24-hour restaura nts: during low-volume periods
Hazard icons
Procedure
1
Turn topping heaters off.
serve side.
2
Cancel AUTO mode.
3
Remove shake cup holder
4
Remove hopper cover.
SolidSense All Purpose
Kay-5 Sanitizing Solution
Pail, clean and sanitized
Taylor milkshake
Taylor soft-serve
Simplified Pump
Tool – Pump Drive Shaft
Taylor High Performance
O-Ring Removal Tool
Syrup Hole Plugs
Brushes
Tool – Seal Install &
Tools and supplies
-serve machine model C602
Super Concentrate
(APSC)
Lubricant
towels
side Parts Tray
side Parts Tray
Parts Trays
Remove
Cancel automatic operation
Draining Product From the
Freezing Cylinder
by touching the AUTO
symbol
.
Note: As parts are removed,
place them on a roll-a-cart for
transport to the sink.
(shake side only).
Place the topping heater
switches in the OFF position
by touching the heater
symbols
C
lean and sanitize the topping
.
pumps using MRC card
SS1W3.
Note: The steps to drain product
from the freezing cylinder are the
same for both sides. Therefore,
perform all draining steps for the
shake side and then duplicate
the applicable steps for the soft
SS 3
©McDonald’s Corporation · Planned Maintenance Manual · Revised January, 2021 Page 1 of 7
Page 23

14 Day Brush Cleaning (continued)
Taylor Company milkshake and soft
Every 14 Days
B1
5
Remove the agitator.
6
Press WASH and PUMP
Shake Side: Touch any flavor
7
When the flow of product
WASH operation is cancelled.
8
Discard the product/mix.
9
Remove hopper parts.
10
Remove syrup lines and install
Insert the syrup hole plugs in
SS01W1 instructions.
11
Take cart of parts to the sink.
12
Drain the soft-serve side.
the soft serve side.
Rinsing
1
Rinse mix hopper.
syrup plugs (shake side only).
Remove the syrup lines from
the freezer door by raising the
syrup valve retainers and
pulling the valves stra ight out
of the door.
symbols and drain product.
With a pail beneath the door
spout, touch the WASH and
PUMP symbols
open the draw valve.
Drain the product from t he
freezing c ylinder and the mix
hopper.
selection symbol to open the
draw valve.
and
the syrup ports.
Lower the retainer pins to
secure the hole plugs in the
door.
Note: The syrup system
must be flushed and
sanitized weekly per MRC
Repeat the draining steps for
Note: Perform all rinsing steps for
the shake side and then
duplicate the applicable steps for
the soft serve side.
-serve machine model C602
stops, touc h the WASH and
PUMP symbols
The shake dr aw valve will
automatically close when the
Remove the locking clip , mix
feed tube, pump clip and the
assembled air/mix pump.
.
Pour two gallons (7.6 liters)
of cool, clean water into the
mix hopper. With the white
hopper brush, scrub the
hopper, mi x l evel sensing
probes, and the outside of the
agitator drive shaft ho using.
SS 3
©McDonald’s Corporation · Planned Maintenance Manual · Revised January, 2021 Page 2 of 7
Page 24

14 Day Brush Cleaning (continued)
Taylor Company milkshake and soft
Every 14 Days
B1
Using the double ended
2
Activate WASH mode.
3
Drain water and cancel WASH.
discharged is clear.
4
Rinse the soft serve side.
soft serve side of the freezer.
Cleaning, Rinsing and
1
Prepare and pour cleaning
APSC Solution
2
Brush clean mix hopper.
3
Activate WASH mode.
brush, clean the mix inl et
hole.
Sanitizing
Do not clean t he mix inlet
hole while the machine is in
the WASH mode.
With a mix pail beneath the
door spout, touch the W ASH
symbol
.
Open the draw valve and
drain the rinse water. Close
the draw valve and touc h the
WASH symbol,
cancelling the wash mode.
Repeat the rinsing procedure
until the wa t er being
Note: Perform all cleaning,
rinsing, and sanitizing steps for
the shake side and then
duplicate the applicable steps for
the soft serve side.
solution into hopper.
Draw 2 gallons (7.6 liters) of
Solid Sense All Purpose
Super Concentrate (AP SC )
(HCS) cleaning solution from
the sink proportioner.
Pour the cleaning soluti on
into the hopper and allow it to
flow into the freezing
cylinder.
Using the white hopper brush,
clean the mi x hopper, mix
level sensi ng probes and the
outside of the agitator drive
shaft housin g.
-serve machine model C602
Repeat the rinse steps for the
Using the double ended
brush, clean the mix inl et
hole.
Do not brush c lean the mi x
inlet hole while the machine
is in the WASH mode.
Touch the WASH symbol .
This will cause the cleaning
solution to come in contact
with all areas of the freezing
cylinder. Allow the solution
to agitate for 5 minutes.
SS 3
©McDonald’s Corporation · Planned Maintenance Manual · Revised January, 2021 Page 3 of 7
Page 25

14 Day Brush Cleaning (continued)
Taylor Company milkshake and soft
Every 14 Days
B1
4
Draw off cleaning solution.
Shake Side: Touch any flavor
5
Close draw valve and cancel
WASH operation is cancelled.
6
Rinse mix hopper.
mix hopper. Repeat steps 2-5.
7
Prepare sanitizing solution and
Sanitizer Solution
8
Clean, rinse, and sanitize
soft serve side.
Disassembly - Shake Side
1
Turn power switch off.
2
Remove syrup plugs.
3
Remove restrictor cap.
4
Detach spinner blade.
5
Remove freezer door.
Place an empty pail beneath
the door spout and draw off
the solution.
selection symbol to open the
draw valve.
WASH mode.
Once the cleaning solution
stops flowing from the door
spout, close the draw valve
and touch the WASH
symbol
wash mode.
, cancelling the
Note: As parts are removed,
place them on a roll-a-cart for
transport to the sink.
Be sure the power switch is
in the OFF position.
-serve machine model C602
Remove the hole plugs from
the syrup ports.
The shake dr aw valve will
automatically close when the
Pour two gallons (7.6 liters)
of cool, clean water into the
pour into hopper.
Prepare 2.5 gallons (9.5 liters)
of Kay-5 Sanitizing solution.
Use one packet in 2.5 gallons
(9.5 liters) of water (100
PPM). Pour solution into
hopper and repeat steps 3 – 5.
soft serve side.
Repeat the cleaning, rinsing,
and sanitizing steps for the
Remove the restrictor cap
from the bottom of the door
spout.
Detach the spinner blade from
the bottom of the door spout
by lifting up the locking
collar (1) on the spinner
coupling and pulling down
the blade (2).
Remove the handscre ws,
freezer door, beater assembly,
drive shaft, drive shaft seal,
and scraper blades from the
freezing cylinder.
©McDonald’s Corporation · Planned Maintenance Manual · Revised January, 2021 Page 4 of 7
SS 3
Page 26
14 Day Brush Cleaning (continued)
Taylor Company milkshake and soft
Every 14 Days
B1
6
Take cart of parts to the sink.
7
Remove drive shaft seal.
8
Disassemble freezer door.
9
Remove spinner and seal.
Remove the s pinner shaft
10
Remove draw valve o-rings.
11
Disassemble pump cylinder.
all o-rings.
12
Remove pump drive shaft.
Disassembly - Soft Serve Side
1
Turn power switch off.
2
Remove freezer door.
3
Remove drip tray, splash
From the shake pump
cylinder, remove the retaining
pin, mix inlet adaptor, valve
cap, pump gasket, and the
piston.
Remove the check valve and
Remove the drive shaft seal
from the dr i ve shaft.
Remove the freezer door oring, front bearing, retainer
pins, and the draw valve
spinner assembly.
Remove the driven spinner
from the dr aw valve by
grasping the draw valve and
pulling the driven spinner out.
Using the pump drive shaft
removal tool, remove the
pump drive shaft from the
drive hub in t he rear wall of
the mix hopper.
Remove the o-rings.
Note: As parts are removed,
place them on a roll-a-cart for
transport to the sink.
Be sure the power switch is in
the OFF position.
-serve machine model C602
seal, using the seal install/
removal tool.
Remove the two o-rings from
the draw valve.
Remove the handscre ws,
freezer door, beater assembly,
scraper blades, and drive shaft
with drive shaft seal from the
freezing cylinder.
shield and topping ladles.
Remove the front drip tray
and splash shield. Remove the
ladles from the two cold
topping containers.
©McDonald’s Corporation · Planned Maintenance Manual · Revised January, 2021 Page 5 of 7
SS 3
Page 27

14 Day Brush Cleaning (continued)
Taylor Company milkshake and soft
Every 14 Days
B1
4
Remove drip pans.
5
Take cart of parts to the sink.
6
Remove drive shaft seal.
7
Disassemble pump.
tube.
8
Disassemble freezer door.
removeable piece.
9
Remove pump drive shaft.
Brush Cleaning
the following ste ps.
1
Prepare cleaning solution and
Remove the long dr ip pan
from the front panel, the two
short drip pans from the rear
panel, and the two notched
drip pans from the left and
right side panels.
Remove the drive shaft seal
from the drive shaft .
Using the pump drive shaft
removal tool, remove the
pump drive shaft from the
drive hub in t he rear wall of
the mix hopper .
Remove the o-rings.
Perform all brush cleaning steps
for the shake side and place
them in the parts tray. Then
duplicate the applicable steps for
the soft serve side.
U
se parts trays to avoid
interchanging shake and soft
serve parts.
IMPORTANT: Make sure
your hands are clean and
sanitized before performing
-serve machine model C602
From the soft serve pump
cylinder, remove the retaining
pin, mix inlet adaptor, valve
cap, pump gasket, and the
piston. Re move the o-rings
and check ring from the feed
Remove the freezer door
gasket, front bearing, pivot
pin, draw handle, and draw
valve. Remove the draw valve
o-rings.
DO NOT attempt to remove
the star design from the
door. The star design is part
of the door and is NOT a
brush clean parts in the sink.
From sink proportioner draw
cleaning solution into the
sink.
horoughly brush clean all
T
disassembled parts and parts
trays in the cl eaning so l ution,
making sure all lubricant and
mix film is removed. Be sure
to brush all surfaces.
PSC Solution
A
Brush clean syrup line fittings
2
(shake side only).
Brush clea n t he syrup line
fittings using MRC car d
SS1D1.
SS 3
©McDonald’s Corporation · Planned Maintenance Manual · Revised January, 2021 Page 6 of 7
Page 28

14 Day Brush Cleaning (continued)
Taylor Company milkshake and soft
Every 14 Days
B1
3
Rinse parts.
4
Clean drive hub opening.
5
Clean rear shell bearing.
6
Soak parts in sanitizing
Sanitizer solution
7
Place parts in parts trays.
8
Brush clean soft serve side.
9
Wipe down freezer.
10
Perform equipment set-up
Equipment Manual.
Rinse all parts with clean,
warm water, one tray at a
time, includ ing the tray.
Using the bl ack brush a nd a
small amount of cleaning
solution, clean the drive hub
openings in the rear wall of
the mix hopper .
Repeat brush cleaning and
sanitizing steps for the soft
serve side of the freezer.
-serve machine model C602
Using the bl ack brush a nd a
small amount of cleaning
solution, clean the rear shell
bearing at the back of the
freezing cylinder.
Wipe all exterior surfaces of
the freezer with a clean,
sanitized towel.
solution.
Prepare a sink with sanitizing
solution. Soak the parts and
trays for a minimum o f 1
minute.
Using clean and sanitized
hands, place disassembled
parts in clean and sanitized
parts trays until the equipment
is set up.
procedures.
Perform the equipment set-up
procedures outlined in the
SS 3
©McDonald’s Corporation · Planned Maintenance Manual · Revised January, 2021 Page 7 of 7
Page 29
Calibrate hopper temperatur es Monthly SS 3 M1
Taylor Company milkshake and soft
Monthly
M1
Why
To meet food safety standards and to maintain product quality
Time required
5 minutes to prepare
5 minutes to complete
recalibrated the machine
Time of day
At open
For 24-hour restaura nts: during breakfast menu
Hazard icons
Pyrometer with sanitized
needle probe
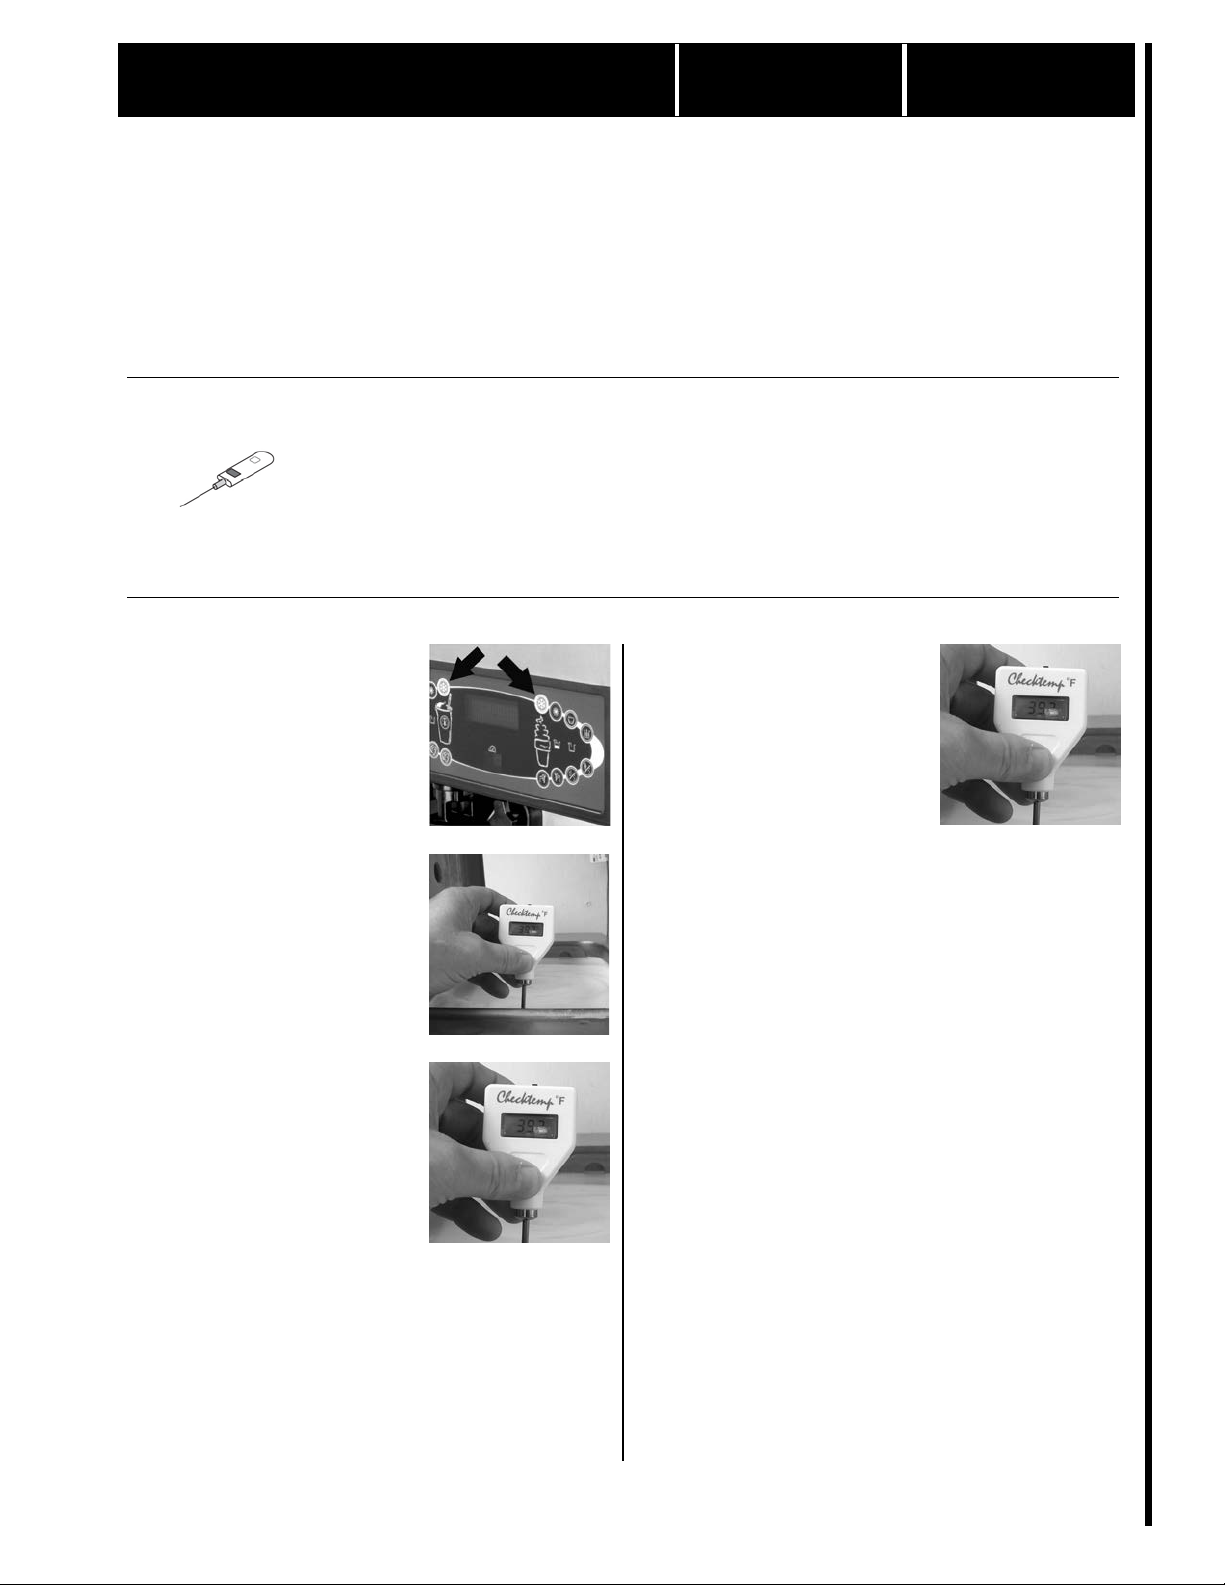
1
Turn machine to Auto or
2
Place needle probe in mix.
3
Read temperature.
the hopper cover.
4
Read temperature of mix in
the hopper cover.
30 minutes to complete if a service technician has
Tools and supplies
-serve machine model C602
Procedure
Standby.
Set both sides of the machine
to the Auto or Standby mode.
Open the hopper cover until it
is fully upright. Place the sanitized probe of a calibrated
pyrometer i nto the mix.
Allow the temperature to stabilize for 10 seconds. Read
the temperature on the pyrometer.
he temperature of the mix
T
should be between 34° and
38°F (1° and 3°C). If the temperature reading is not
between these temperatures,
contact your factoryauthorized service center.
other hopper.
Open the other hopper cover
and repeat the temperature
check.
he temperature of the mix
T
should be between 34° and
38°F (1° and 3°C). If the temperature reading is not
between these temperatures,
contact your factoryauthorized service center.
Remove the probe and close
SS 3
Remove the probe and close
©McDonald’s Corporation · Planned Maintenance Manual · Revised January, 2021 Page 1 of 1
Page 30
Calibrate draw temperatures Monthly SS 3 M2
Taylor Company
Monthly
M2
Why
To maintain product quality
Time required
5 minutes to prepare
5 minutes to complete
ibrated the machine
Time of day
At open
For 24-hour restaura nts: during breakfast menu
Hazard icons
Pyrometer with sanitized
Cold drink cup, child
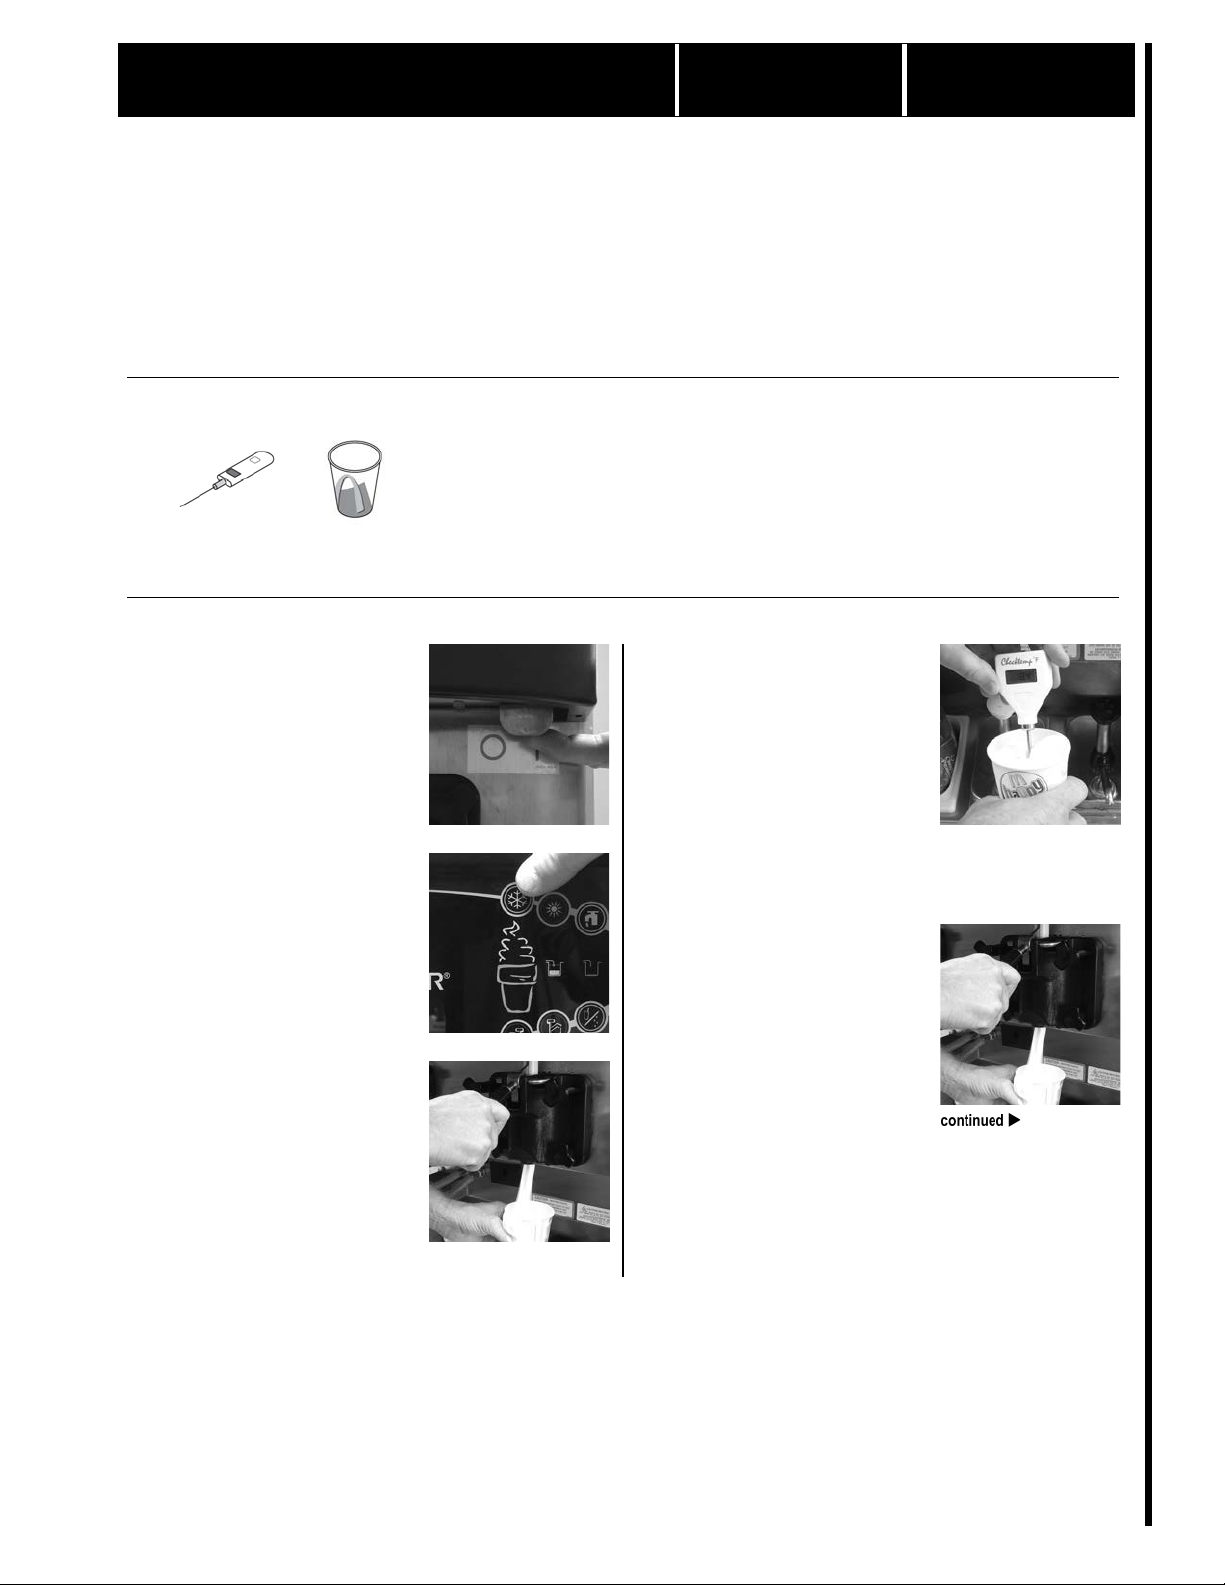
1
Turn main power switch on.
2
Select auto function on soft-
3
Draw small portion of soft
handle all the way back.
4
Pre-cool needle probe.
5
Draw second sample of soft
30 minutes to complete if a service technician has recal-
milkshake and soft-serve machine model C602
Tools and supplies
needle probe
Procedure
serve side of machine.
serve.
Place a child-size cold-drink
cup under t he dispensing nozzle and pull t he draw handle
forward. Draw a small portion
of soft serve, and push the
size
Place the sanitized probe of a
calibrated pyrometer into the
soft serve to pre-cool it.
Leave the pyrometer in the
soft serve until you are ready
to read the temperature in the
next step.
serve.
Using a fresh child-size colddrink cup, d raw another small
sample of soft serve.
SS 3
©McDonald’s Corporation · Planned Maintenance Manual · Revised January, 2021 Page 1 of 2
Page 31

Calibrate draw temperatures (continued)
Taylor Company
Monthly
M2
6
Read temperature of soft
7
Read temperature of
serve.
Place the needle probe into
the soft serve. Allow the pyrometer to stabilize for 10
seconds, and read the temperature on the pyrometer.
The temperature should be
between 16° and 18°F (-9°
and -8°C). If the te mperature
reading is not between these
temperatures, contact your
factory-authorized service
center.
milkshake and soft-serve machine model C602
Lea
ve the pyrometer in the
soft serve until you are ready
to read the temperature in the
next step.
milkshake.
Using a fresh child-size colddrink cup, d raw a small sample of milkshake.
e proper draw temperature
Th
for Triple Thick Milks hakes
is between 22° and 24°F (-5°
and -4°C). If the temperature
reading is not between these
temperatures, contact your
factory-authorized service
center.
The proper draw temperature
for milkshakes is between 24°
and 26°F (-4° and -3°C). If
the temperature reading is not
between these temperatures,
contact your factoryauthorized service center.
SS 3
©McDonald’s Corporation · Planned Maintenance Manual · Revised January, 2021 Page 2 of 2
Page 32

Calibrate hot sundae topping temperatures
and volumes
Monthly SS 3 M3
Taylor Company
Monthly
M3
Why
To meet food quality standards and to meet Gold Standard quality descriptions
Time required
5 minutes to prepare
5 minutes to complete
30 minutes to recalibrate temperatures
Time of day
At open
For 24-hour restaura nts: during breakfast menu
Hazard icons
Bucket, clean and
Bucket, soiled towels
Calibration cup
Pyrometer with sanitized
Screwdriver, flat
Sundae cup
1
Dispense hot topping.
2
Read temperature of topping.
steps 3-8.
CAUTION! Steps 3-8 mu s t
3
Remove right panel.
4
Read water bath temperature.
may be extre mel y ho t.
milkshake and soft-serve machine model C602
Tools and supplies
sanitized towels
Procedure
Hold an empty sundae cup
under a hot topping pump
spout. Push the pump lever
down one full stroke.
Place the sanitized probe of a
calibrated pyrometer into the
topping and wait 20 seconds
for the temperature to stabilize.
The temperature should be
between 115° and 125°F (46°
and 52°C).
Remove the probe and clean
it thoroughly with a clean,
sanitized towel.
S
anitizer solution
f the temperature falls within
I
the proper range, go to step 9.
If a temperature adjustment is
needed, contact an authorized
service technician to perform
needle probe
be performed by an authorized service technician.
Temperature controls for the
water baths are located behind
the topping pumps. To access
the controls, remove the right
panel. Use a flat screwdriver
to remove the screws from the
panel. Set the panel and
screws aside.
If the topping temperature is
not within range, check the
water bath temperature.
Remove the topping pump.
Insert the probe into the water
in the water bath and wait 20
seconds for the temperature to
stabilize.
The temperature should be
between 135° and 145°F (57°
and 63°C).
SS 3
©McDonald’s Corporation · Planned Maintenance Manual · Revised January, 2021 Page 1 of 2
Metal surfaces and water bath
Page 33

Calibrate hot sundae topping t em peratures and volumes (continued)
Taylor Company
Monthly
M3
Remove the probe and wipe it
5
Adjust water bath temperature.
and 63°C).
6
Read temperature of topping.
7
Calibrate other hot topping
8
Replace right panel.
9
Dispense hot topping into
run down the s ides of the cup.
10
Read volume of hot topping.
sink.
11
Calibrate other hot topping
thoroughl y with a clean, sanitized towel.
M
etal surfaces and water bath
may be extre mel y ho t.
There is one temperature adjustment screw for each water
bath. Use a flat screwdriver to
turn the correct screw.
f the water bath temperature
I
is below 135°F (57°C), turn
the screw clockwise.
I
f the water bath temperature
is above 145°F (63°C), turn
the screw counterclockwise.
Turn the adjustment screw in
small increments.
ait 10 minutes for the water
W
bath temperature to stabilize.
Repeat steps 4 and 5 until the
water bath temperature is
between 135° and 145°F (57°
When all hot topping temperatures have been calibrated,
reinstall the right panel. Hold
the panel in position, and use
the screwdriver to replace the
screws.
calibration cup.
Do not begin this step until
the topping temperature is
between 115° and 125°F (46°
and 52°C) or the dispensed
amounts will not be correct.
Hold the small chamber of a
calibration cup under a pump
spout. Push the pump lever
down one full stroke. Dispense the topping directly
onto the bottom of the cup.
Do not allow the topping to
Read the topping level in the
calibration cup. The amount
of dispensed topping should
be 1 fluid ounce (30 ml).
f the dispensed amount i s not
I
1 fluid ounce (30 ml), contact
an authorized service technician.
milkshake and soft-serve machine model C602
Replace the topping pump.
Wait 60 minutes for the topping temperature to stabilize.
epeat steps 1 and 2 to read
R
the topping temperature.
temperatures.
Repeat steps 1 through 6 for
each hot topping pump.
Wash and rinse the calibration
cup at the three-compartment-
volumes.
Repeat steps 9 and 10 for
each hot topping pump.
SS 3
©McDonald’s Corporation · Planned Maintenance Manual · Revised January, 2021 Page 2 of 2
Page 34

Replace soft-serve scraper blades Quarterly SS 3 Q1
Ta
Quarterly
Q1
Why
To scrape frozen mix off the cold freezing cylinder wall.
Time required
0 minutes to prepare
2 minutes to complete
Time of day
At 14 Day Brush Cleaning
Hazard icons
1
Machine must be off.
2
Inspect scraper blade.
Scraper blades are sharp.
3
Install rear scraper blade.
5
Install front scraper blade and
6
Slide beater assembly into
Procedure
IMPORTANT: The scraper blade replacement procedures must be performed during the 14 Day Brush Cleaning. Perform the 14 Day Brush
Cleaning per the Operations Manual to properly drain, disassemble, clean, rinse, assemble, sanitize, and prime the machine.
ylor Company soft serve machine model C602
Make sure the power switch
is in the off position.
Make sure scraper blade is
straight and blade opening is
clean. If bent or chipped,
replace with new blade. Brush
clean blade to remove dried
mix.
Scraper blades are sharp.
Place the rear scraper blade
over the rea r holding pi n on
the beater assembly.
Insert beater half way.
4
Insert beater half way into the
freezing cylinder to support
the rear of the beater.
beater shoes.
Place the front scraper blade
over the front holding pin.
Install beater shoes on beater.
freezing cylinder.
Slide the beater assembly into
the freezing cylinder to secure
the scraper blade on the beater.
S
craper blades are sharp.
S
craper blades are sharp.
Rock the beater.
7
ock the beater assembly
R
back and for th slightly to
make sure it is properly seated on the drive shaft. The
assembly should not stick out
beyond the front of the fr eezing cylinder.
SS 3
©McDonald’s Corporation · Planned Maintenance Manual · Revised January, 2021 Page 1 of 1
Page 35

Clean non-aluminum air filter Quarterly SS 3 Q2
Taylor Company milkshake and soft
Quarterly
Q2
Why
To prevent dust and dirt build-up on the main condenser
Time required
5 minutes to prepare
30 minutes to complete
Time of day
During 14 day brush cleaning.
For 24-hour restaura nts: Durin g 14 day brush cleaning.
Hazard icons
Bucket, clean and
Bucket, soiled towels
Brush, pot, nylon
SolidSense™ All
Concentrate (APSC)
1
Turn off and unplug machine.
turned off and unplugged.
2
Remove air filter.
3
Wash filter.
4
Rinse filter.
of normal air flow.
5
Shake filter.
6
Dry filter.
Tools and supplies
-serve machine model C602
sanitized towels
Procedure
Move the power switch to the
off position. Unplug the machine.
Do not begin c leaning the air
filter until the machine is
Remove the filter and take it
to sink.
Purpose Super
solution
Rinse the filter with hot water
from the hot water hose.
Flush the wat er through the
filter in the opposite direction
While holding the filter over
the sink, shake it to remove as
much water as possible.
Wash the filter thoroughly in
APSC solutio n.
AP
SC solution
Using a clean, sanitized towel, wipe any remaining
moisture from the filter.
S
anitizer solution
©McDonald’s Corporation · Planned Maintenance Manual · Revised January, 2021 Page 1 of 2
SS 3
Page 36

Clean non-aluminum air filter (continued)
Taylor Company milkshake and soft
Quarterly
Q2
7
Replace filter.
Install the new filter. Push
firmly until the filter is seated.
-serve machine model C602
SS 3
©McDonald’s Corporation · Planned Maintenance Manual · Revised January, 2021 Page 2 of 2
Page 37

Replace machine components Quarterly SS 3 Q3
Taylor Company milkshake and soft
Quarterly
Q3
Why
To meet food safety and food quality standards and to ensure proper machine operation
Time required
5 minutes to prepare
30 minutes to complete
Time of day
During 14 day brush cleaning
For 24-hour restaura nts: During 14 day brush cleaning
Hazard icons
Taylor Tune-up Kit,
milkshake side parts
Taylor Tune-up Kit,
soft
1
Set up parts tray for milkshake
2
Replace milkshake side parts.
Discard the old parts.
3
Replace soft-serve side parts.
Tools and supplies
-serve machine model C602
-serve side parts
Procedure
side.
Place the new pa rts in the
proper location on the parts
tray.
Using the tools included with
the kit, replace the old
machine components with the
new parts.
Refer to the instructions provided with the tune-up ki t for
your equipment.
Repeat steps 1 through 2 for
the soft-serve side.
SS 3
©McDonald’s Corporation · Planned Maintenance Manual · Revised January, 2021 Page 1 of 1
Page 38

Replace milkshake mix scraper blades Semi-annually SS 3 S1
Taylor Company milkshake and soft
Semi
S1
Why
To prevent frozen milkshake mix from freezing on the cylinder wall
Time required
5 minutes to prepare
5 minutes to complete
Time of day
During low-volume periods
For 24-hour restaura nts: during low-volume periods
Hazard icons
1
Drain milkshake mix from
2
Turn off and unplug machine.
unplugged.
3
Remove freezing cylinder
door. Set aside.
4
Remove beater assembly.
Scraper blades are sharp.
5
Remove scraper blades.
Scraper blades are sharp.
6
Install new scraper blades.
Always replace both blades.
7
Slide beater assembly into
8
Replace freezing cylinder door.
Procedure
hopper and freezing cylinder.
Move the power switch to the
off position. Unplug the
machine.
Do not begin replacing the
scraper blades until the machine is tur ned off and
door.
Remove the handscre ws fr o m
the freezing cylinder door and
set aside.
Remove the freezing cyl inder
Carefully remove the scraper
blades by lifting the blades
off the holding pins.
Place each scraper blade over
the holding pins on the beater
assembly.
S
craper blades are sharp.
freezing cylinder.
Slide the beater assembly into
the freezing cylinder. Rock it
back and forth sl ightly to
make sure it is properly seated. The assembly should not
stick out beyond the fro nt of
the freezing cylinder.
-serve machine model C602
Grasp the front of the beater
assembly and carefully pull it
all the way out of the machine. Support both the front
and back of the assembly as
you remove it.
S
craper blades are sharp.
Using the stud nuts, replace
the freezing cylinder door.
I
nstall the handscrews.
©McDonald’s Corporation · Planned Maintenance Manual · Revised January, 2021 Page 1 of 1
-annually SS 3
Page 39

Taylor Co
Annually
A1
Why
To break the bacteria cycle and to ensure proper flow of syrup to the draw valve
Time required
5 minutes to prepare
20 minutes to complete
Time of day
At open
For 24-hour restaura nts: during breakfast menu
Hazard icons
Bucket, SolidSense™ All
Bucket, KAY-5®
Bucket, plastic
Bucket, clean and
Bucket, soiled towels
Plastic wrap
Pump tube
Taylor Lube HP
1
Remove syrup feed tube and
Sanitizing Solution
2
Cover jug with plastic wrap.
3
Place syrup feed tube in
4
Place empty bucket under
5
Remove syrup line from
Replace syrup pump tubes Annually SS 3 A1
mpany milkshake and soft-serve machine model C602
Tools and supplies
Purpose Super
Concentrate (APSC)
Sanitizing Solution
Procedure
syrup jug.
Open the cabinet door. Remove the syrup feed tube
from a syrup jug. Wipe the
outside of the feed tube with a
clean, sanitized towel.
Remove the syrup jugs from
the cabinet.
sanitized towels
SolidSense APSC solution.
Place the syrup feed tube in a
bucket of APSC solution.
AP
SC Solution
milkshake draw valve.
Place a clean plastic bucket
under the milkshake draw
valve.
©McDonald’s Corporation · Planned Maintenance Manual · Revised January, 2021 Page 1 of 4
milkshake freezer door.
Disconnect the corresponding
syrup line from the milkshake
freezer door by raising the
syrup valve retainer. Pull the
valve straight out.
SS 3
Page 40
Replace syrup pump tubes (continued)
Taylor Company milkshake and soft
A
A1
6
Place syrup line and valve in
7
Start flow of SolidSense APSC
APSC throu gh the line.
8
Flush syrup line with
pletely flushed.
9
Pump all liquid from syrup
through the syrup line.
10
Place feed tube in KAY-5
11
Place empty bucket under
12
Flush syrup line with KAY-5
13
Turn off and unplug machine.
unplugged.
14
Remove pump cover tray.
15
Open pump.
exposed.
16
Remove the pump tube.
bucket.
Hang the syrup line and valve
into the empty bucket.
solution though syrup line.
Press the calibration key
on the control panel to display
the menu op t ions. Touch the
auto key
row to “syrup prime.” Touch
the calibration key
to display the syrup p rime
screen. Press the flavor select
key
flavor to start the flow of
SolidSense APSC.
Allow the APSC solution to
continue to flow into the empty bucket until all the syrup is
flushed from the line. When
the liquid from the syrup line
runs clear, the line is com-
to move the ar-
again
for the corresponding
milkshake draw valve.
Place a clean plastic bucket
under the milkshake draw
valve.
Sanitizing solution.
Repeat steps 8 through 10
using the sanitizing solution.
Move the power switch to the
off position. Unplug the machine.
Do not begin working with
the syrup pump until the machine is tur ned off and
-serve machine model C602
line.
Remove the syrup feed tube
from the bucket of APSC
solution and continue to run
the pump until APSC solution
no longer ru ns from the s yrup
line.
T
ouch the flavo r select key
to stop the flow of APSC
Sanitizing solution.
Place the syrup feed tube in a
bucket of sanitizing solution.
San
itizing Solution
Remove the pump cover tray
in the cabinet by lifting it up
and out. Set it aside.
Open the pump for the corresponding line by pushing up
on the hinged cover. The
pump tube assembly is now
nnually
Using both hands, grasp the
pump tube assembly on both
ends and pull it up and out of
the pump body.
SS 3
©McDonald’s Corporation · Planned Maintenance Manual · Revised January, 2021 Page 2 of 4
Page 41

Replace syrup pump tubes (continued)
Taylor Company milkshake and soft
A
A1
17
Remove clips.
18
Remove fittings.
19
Lubricate o-rings.
20
Insert fittings into new pump
firmly into place.
21
Attach clips to collars.
22
Position the pump rollers.
23
Push the pump tube assembly
24
Close pump.
cover.
25
Flush remaining syrup lines
26
Replace the pump cover tray.
27
Replace the syrup jugs and
28
Plug in machine and turn on.
29
Prime each syrup line.
Remove the two clips attached to the pump tube
collars.
Remove the two fittings that
connect the feed tube and
syrup line to the pump tube.
Locate the o-rings on the
fittings. Lubricate each o-ring
with Taylor Lube HP.
tube.
Insert the fittings on the feed
tube and syr up line into a new
pump tube by pushing them
Push down on the hinged
cover to close the pump body.
To avoid damage to the pump
tube, make sure it is seated
properly in the pump body
before closing the hinged
and replace remaining pump
tubes.
Repeat steps 1 through 25 for
each remaining syrup flavor.
Replace the pump cover tray
by sliding the tray in ove r the
pumps.
-serve machine model C602
Attach one clip to each collar
on the new pump tube.
Using both hands, rotate the
pump rollers so they are in the
10 o’clock and 2 o’clock
positions.
into the pump body.
Make sure the syrup line i s
pushed through the rear of the
cabinet.
syrup feed tubes.
Remove the plastic wrap from
each syrup jug. Return the
syrup jugs to the cabinet.
Match the feed tubes to the
correct jug and place the feed
tubes into the jug.
Plug in the machine and turn
the power switch to the on
position.
nnually
SS 3
©McDonald’s Corporation · Planned Maintenance Manual · Revised January, 2021 Page 3 of 4
Page 42

Replace syrup pump tubes (continued)
Taylor Company milkshake and soft
A
A1
30
Calibrate syrup system.
Calibrate the syrup system,
checking eve ry flavor.
-serve machine model C602
nnually
SS 3
©McDonald’s Corporation · Planned Maintenance Manual · Revised January, 2021 Page 4 of 4
Page 43

Replace non-aluminum air filter Annually SS 3 A2
Taylor Company milkshake and soft
Annually
A2
Why
To maintain proper operation of the main condenser
Time required
5 minutes to prepare
10 minutes to complete
Time of day
During low-volume periods
For 24-hour restaura nts: during low-volume periods
Hazard icons
Screwdriver, flat
1
Turn off and unplug machine.
turned off and unplugged.
2
Remove air filter.
3
Insert new filter.
Tools and supplies
-serve machine model C602
Procedure
Move the power switch to the
off position. Unplug the machine.
Do not begin c leaning the air
filter until the machine is
Remove the filter.
Install the new filter. Push
firmly until the filter is seated.
SS 3
©McDonald’s Corporation · Planned Maintenance Manual · Revised January, 2021 Page 1 of 1
 Loading...