

Page 1

TANDBERG
What’s in this Guide?
Introduction
Connecting EX90
Using EX90
The Settings
Web interface
EX90
User Guide
D 14724.02 TANDBERG EX90 User Guide (TC3.1) June 2010
1
Page 2

Thank you for choosing
What’s in this Guide?
Introduction
Connecting EX90
Using EX90
The Settings
Web interface
TANDBERG!
Your TANDBERG EX90
has been designed to
give you many years of
safe, reliable operation.
Our main objective
with this User Guide is
to address your goals
and needs. Please let
us know how well we
succeeded!
The web interface of
the EX90 is treated
in detail in the
Administrator Guide,
which is available for
download separately.
May we recommend
that you visit the
TANDBERG web site
regularly for updated
versions of this
Administrator Guide.
The guide can be
found on http://www.
tandberg.com/docs.
Introduction ....................................................................... 3
Intellectual Property Rights .........................................................................4
Trademark ................................................................................................................... 4
Disclaimer ...................................................................................................................4
Copyright Notice .................................................................................................. 4
Safety Instructions ..............................................................................................5
Water and Moisture ............................................................................................5
Cleaning ....................................................................................................................... 5
Ventilation ................................................................................................................... 5
Lightning ...................................................................................................................... 5
Dust ..................................................................................................................................5
Vibration ....................................................................................................................... 5
Power Connection and Hazardous Voltage ................................. 5
Servicing ......................................................................................................................5
Accessories ..............................................................................................................6
Communication Lines ......................................................................................6
Environmental Issues ........................................................................................ 6
Digital User Guides ............................................................................................6
European Environmental Directives.....................................................6
Waste Handling ..................................................................................................... 6
Information for Recyclers .............................................................................. 6
Connecting the EX90 ....................................................... 8
Rear sockets access ......................................................................................... 9
The EX90 parts ..................................................................................................... 9
Connecting ...............................................................................................................9
Connecting for use as PC screen ........................................................ 9
Connecting a PC to the unit .....................................................................10
Use as PC screen ............................................................................................. 10
Setting the screen resolution ................................................................. 10
Using an external monitor to show presentations ................10
Using the EX90 ............................................................... 11
Camera adjustments .....................................................................................12
Use as document camera ......................................................................... 12
inTouch controller—initial view .............................................................13
Initial settings—before you begin ......................................................14
Calling someone by dialing......................................................................15
Calling someone using Recent calls ................................................16
Calling someone using My contacts................................................ 17
Calling someone using the Phone book ......................................18
Search the Phone book, then call .......................................................19
Phone book matters .......................................................................................20
Adding someone to My contacts from call lists
or the Phone book ....................................................................................20
Entering a new contact manually ..................................................20
Editing in My contacts .............................................................................20
Calling more than one ................................................................................... 21
Call transfer ............................................................................................................22
Sharing presentations ..................................................................................22
Receiving calls .....................................................................................................23
Do not disturb .......................................................................................................23
Far end camera control ................................................................................23
Receiving another call while already in a call ...........................23
The settings—using inTouch ......................................... 24
Setting the TANDBERG EX90 in standby ....................................25
Shutting down the TANDBERG EX90..............................................25
Reverting to factory default settings ................................................25
Changing background image on inTouch ...................................25
Entering the Settings menus ..................................................................26
Call settings ........................................................................................................... 27
Date, time & location .......................................................................................28
Ringtone & sound settings ........................................................................29
Display settings ..................................................................................................30
Camera control & settings.........................................................................31
IP settings ................................................................................................................ 32
H.323 settings ......................................................................................................33
SIP settings ............................................................................................................34
System information .........................................................................................35
Call status ................................................................................................................36
The web interface ........................................................... 37
Entering the web interface ........................................................................38
Upgrade software .............................................................................................39
Advanced configuration ..............................................................................39
Upgrade software .............................................................................................39
Call .................................................................................................................................39
XML files ....................................................................................................................39
Log files ......................................................................................................................39
D 14724.02 TANDBERG EX90 User Guide (TC3.1) June 2010
2
Page 3

CHAPTER 1
What’s in this Guide?
Introduction
Connecting EX90
Using EX90
The Settings
Web interface
INTRODUCTION
D 14724.02 TANDBERG EX90 User Guide (TC3.1) June 2010
3
Page 4

Intellectual Property Rights
What’s in this Guide?
Introduction
Connecting EX90
Using EX90
The Settings
Web interface
This User Guide and the Products to which it pertains contain information that is
proprietary to TANDBERG and its licensors.
Information regarding the Products is found in the Administrator guide for this product,
which is available for download separately. Further information can be found in the
Administrator Guide for this product.
This User Guide may be reproduced in its entirety, including all copyright and
intellectual property notices, in limited quantities in connection with the use of the
Products. Except for the limited exception set forth in the previous sentence, no part
of this User Guide may be reproduced, stored in a retrieval system, or transmitted, in
any form, or by any means, electronically, mechanically, by photocopying, or otherwise,
without the prior written permission of TANDBERG Requests for such permission
should be addressed to tandberg@tandberg.com.
Trademark
Trademarks used in this document are the property of their respective holders.
COPYRIGHT © 2010, TANDBERG All rights reserved.
TANDBERG
Philip Pedersens vei 20
1366 Lysaker, Norway
Tel: +47 67 125 125 Fax: +47 67 125 234
E-mail: tandberg@tandberg.com
Copyright Notice
The product covered by this User Guide is protected under copyright, patent, and
other intellectual property rights of various jurisdictions. This product is Copyright ©
2010, TANDBERG All rights reserved. This product includes copyrighted software
licensed from others.
A document describing the copyright notices and the terms and conditions of use can
be found at: http://www.tandberg.com/docs.
IMPORTANT: USE OF THIS PRODUCT IS SUBJECT IN ALL CASES TO THE
COPYRIGHT RIGHTS AND THE TERMS AND CONDITIONS OF USE REFERRED TO
ABOVE. USE OF THIS PRODUCT CONSTITUTES AGREEMENT TO SUCH TERMS
AND CONDITIONS.
This unit makes use of photos provided by Fotolia. These photos are copyright ©
Fotolia. The following photographers have contributed:
Anette Linnea Rasmussen
Alex Bramwell
Stephen Coburn
Eric Gevaert
Stephen Coburn
Stocksnapper
Yurok Aleksandrovich
ordus
Sven Taubert
Bas Meelker
Paylessimages
Vilnis
Disclaimer
The specifications for the Products and the information in this document are subject to
change at any time, without notice, by TANDBERG .
Every effort has been made to supply complete and accurate information in this User
Guide, however, TANDBERG assumes no responsibility or liability for any errors or
inaccuracies that may appear in this document.
D 14724.02 TANDBERG EX90 User Guide (TC3.1) June 2010
4
Page 5

Safety Instructions
What’s in this Guide?
Introduction
Connecting EX90
Using EX90
The Settings
Web interface
For your protection please read these safety instructions completely before
you connect the equipment to the power source. Carefully observe all warnings,
precautions and instructions both on the apparatus and in these operating
instructions. Keep this manual for future reference.
Water and Moisture
Do not operate the apparatus under or near water—for example near a bathtub,
kitchen sink, or laundry tub, in a wet basement, near a swimming pool or in other areas
with high humidity.
Never install jacks for communication cables in wet locations unless the jack is
specifically designed for wet locations.
Do not touch the product with wet hands.
Cleaning
Unplug the apparatus from communication lines, line power-outlet or any power
source before cleaning or polishing. Do not use liquid cleaners or aerosol cleaners.
Use a lint-free cloth lightly moistened with water for cleaning the exterior of the
apparatus.
Ventilation
Do not block any of the ventilation openings of the apparatus. Never cover the slots
and openings with a cloth or other material. Never install the apparatus near heat
sources such as radiators, heat registers, stoves, or other apparatus (including
amplifiers) that produce heat.
Do not place the product in direct sunlight or close to a surface directly heated by the sun.
Lightning
Never use this apparatus, or connect/disconnect communication cables or power
cables during lightning storms.
Dust
Do not operate the apparatus in areas with high concentration of dust.
Vibration
Do not operate the apparatus in areas with vibration or place it on an unstable surface.
Power Connection and Hazardous Voltage
• The product may have hazardous voltage inside.
• Never attempt to open this product, or any peripherals connected to the product,
where this action requires a tool.
• This product should always be powered from an earthed power outlet.
• Never connect attached power supply cord to other products.
• In case any parts of the product has visual damage never attempt to connect main
power, or any other power source, before consulting service personnel
• The plug connecting the power cord to the product/power supply serves as the
main disconnect device for this equipment. The power cord must always be easily
accessible.
• Route the power cord so as to avoid it being walked on or pinched by items
placed upon or against it. Pay particular attention to the plugs, receptacles and the
point where the cord exits from the apparatus.
• Do not tug the power cord.
• If the provided plug does not fit into your outlet, consult an electrician.
• Never install cables, or any peripherals, without first unplugging the device from its
power source.
Servicing
Do not attempt to service the apparatus yourself as opening or removing covers may
expose you to dangerous voltages or other hazards, and will void the warranty. Refer
all servicing to qualified service personnel.
Unplug the apparatus from its power source and refer servicing to qualified personnel
under the following conditions:
• If the power cord or plug is damaged or frayed.
• If liquid has been spilled into the apparatus.
• If objects have fallen into the apparatus.
• If the apparatus has been exposed to rain or moisture
• If the apparatus has been subjected to excessive shock by being dropped.
• If the cabinet has been damaged.
• If the apparatus seems to be overheated.
• If the apparatus emits smoke or abnormal odor.
• If the apparatus fails to operate in accordance with the operating instructions.
D 14724.02 TANDBERG EX90 User Guide (TC3.1) June 2010
5
Page 6

Accessories
What’s in this Guide?
Introduction
Connecting EX90
Using EX90
The Settings
Web interface
Use only accessories specified by the manufacturer, or sold with the apparatus.
Communication Lines
Do not use communication equipment to report a gas leak in the vicinity of the leak.
Environmental Issues
Thank you for buying a product which contributes to a reduction in pollution, and
thereby helps save the environment. Our products reduce the need for travel and
transport and thereby reduce pollution.
Our products have either none or few consumable parts (chemicals, toner, gas, paper).
TANDBERG Environmental Policy Environmental stewardship is important to our
culture. As a global company with strong corporate values, TANDBERG is committed
to following international environmental legislation and designing technologies that
help companies, individuals and communities creatively address environmental
challenges.
Our environmental objectives are to:
• Develop products that reduce energy consumption, CO
congestion.
emissions, and traffic
2
• Provide products and services that improve quality of life for our customers.
• Produce products that can be recycled or disposed of safely at the end of product
life.
• Comply with all relevant environmental legislation.
Digital User Guides
TANDBERG is pleased to announce that we have replaced the printed versions of
our video systems user guides with digital versions available on the TANDBERG/
TANDBERG web site: http://www.tandberg.com/docs. The environmental benefits of
this are significant. The user guides can still be printed locally, whenever needed.
European Environmental Directives
As a manufacturer of electrical and electronic equipment TANDBERG is responsible
for compliance with the requirements in the European Directives 2002/96/EC
(WEEE—Waste Electrical and Electronic Equipment) and 2002/95/EC (RoHS).
The primary aim of the WEEE Directive and RoHS Directive is to reduce the impact of
disposal of electrical and electronic equipment at end-of-life. The WEEE Directive aims
to reduce the amount of waste electrical and electronic equipment sent for disposal to
landfill or incineration by requiring producers to arrange for collection and recycling.
The RoHS Directive bans the use of certain heavy metals and brominated flame
retardants to reduce the environmental impact of WEEE which is in landfill or
incinerated. TANDBERG has implemented necessary process changes to comply
with the European WEEE Directive (2002/96/EC) and the European RoHS Directive
(2002/95/EC).
Waste Handling
In order to avoid the dissemination of hazardous substances in our environment and to
diminish the pressure on natural resources, we encourage you to use the appropriate
recycling systems in your area. Those systems will reuse or recycle most of the
materials of your end of life equipment in a sound way.
TANDBERG/TANDBERG video products products put on the market after August
2005 are marked with a crossed-out wheelie bin symbol that invites you to use
those take-back systems.
Please contact your local supplier, the regional waste administration or visit our
web page http://www.tandberg.com/recycling if you need more information on the
collection and recycling system in your area.
Information for Recyclers
As part of compliance with the European WEEE Directive, TANDBERG provides
recycling information on request for all types of new equipment put on the market in
Europe after 13 August 2005.
Please contact TANDBERG/TANDBERG and provide the following details for the
product for which you would like to receive recycling information:
• Model number of TANDBERG product
• Your company’s name
• Contact name
• Address
• Telephone number
• E-mail
D 14724.02 TANDBERG EX90 User Guide (TC3.1) June 2010
6
Page 7
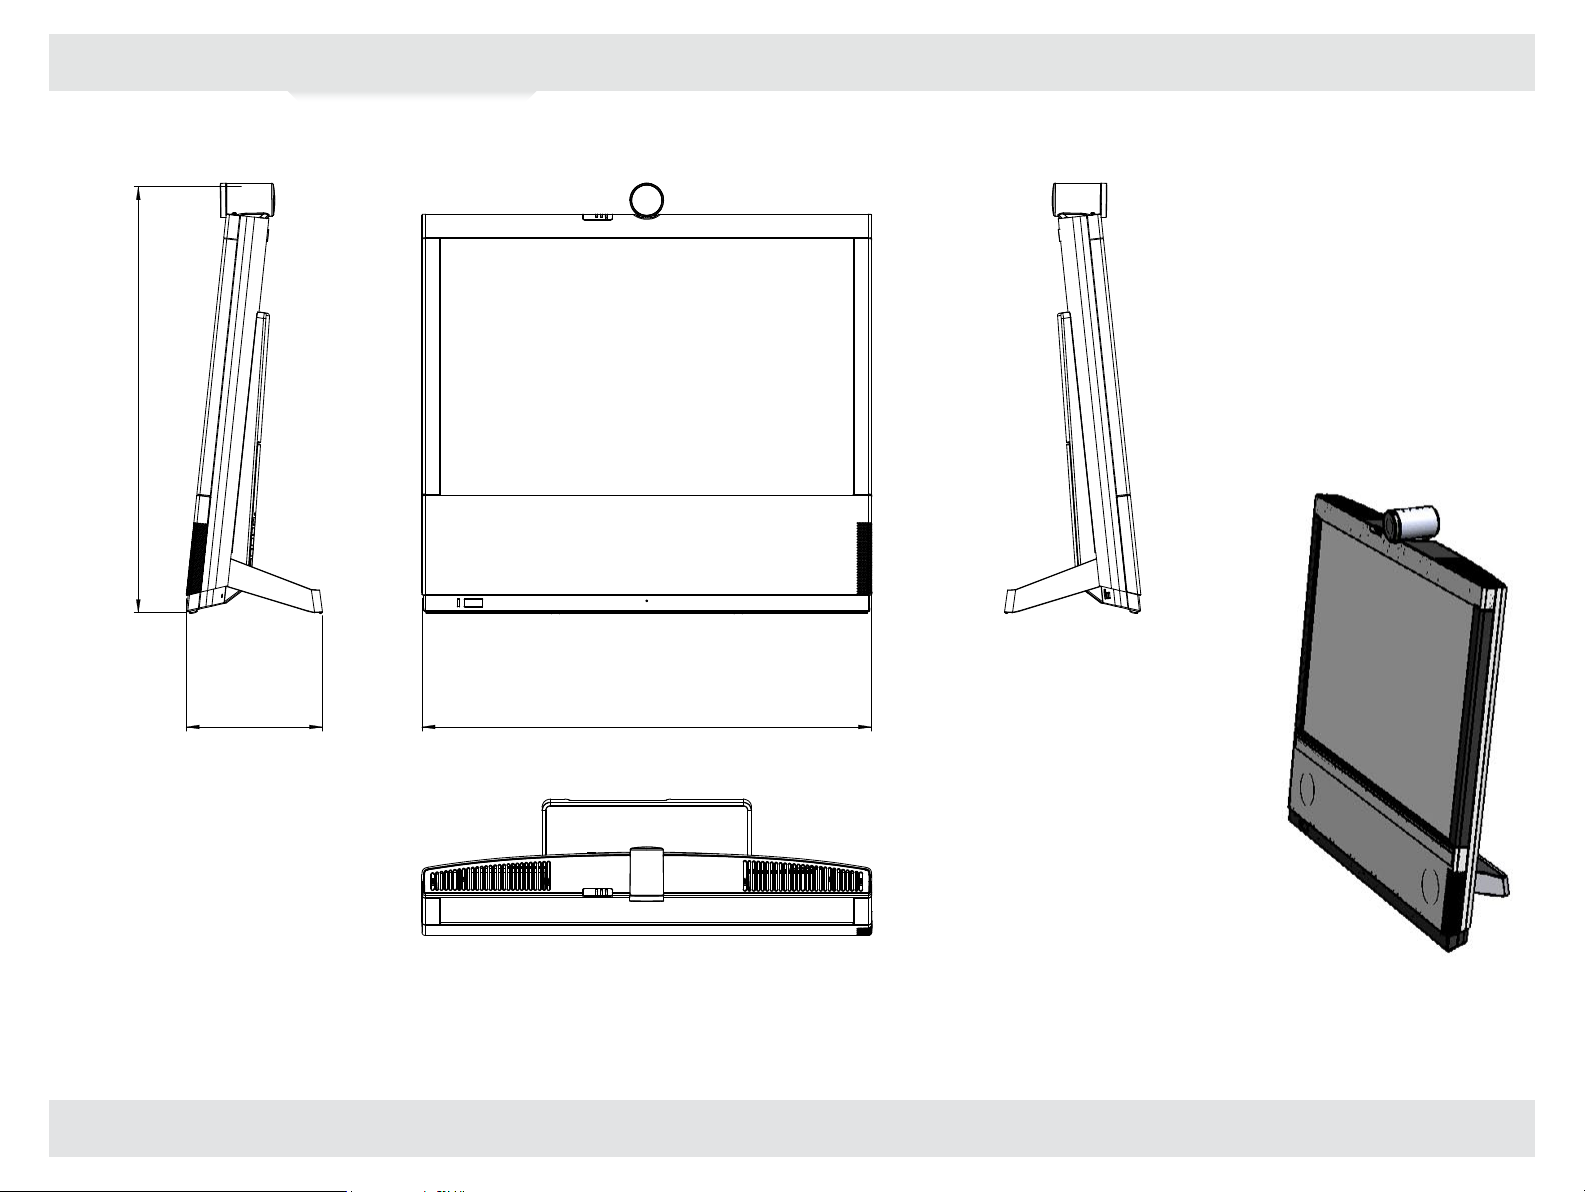
537mm
What’s in this Guide?
Introduction
Connecting EX90
Using EX90
The Settings
Web interface
172mm
D 14724.02 TANDBERG EX90 User Guide (TC3.1) June 2010
567mm
7
Page 8
CHAPTER 2
What’s in this Guide?
Introduction
Connecting EX90
Using EX90
The Settings
Web interface
CONNECTING THE EX90
D 14724.02 TANDBERG EX90 User Guide (TC3.1) June 2010
8
Page 9
Connecting the TANDBERG EX90
What’s in this Guide?
Introduction
Connecting EX90
Using EX90
The Settings
Web interface
Connect the cables as shown. Sockets are located behind the rear cover. If you have
one LAN connection only—and need that for your PC—the TANDBERG EX90 has a
built in Gigabit ethernet switch that enables you to connect your PC to the TANDBERG
EX90 to access the LAN through the TANDBERG EX90.
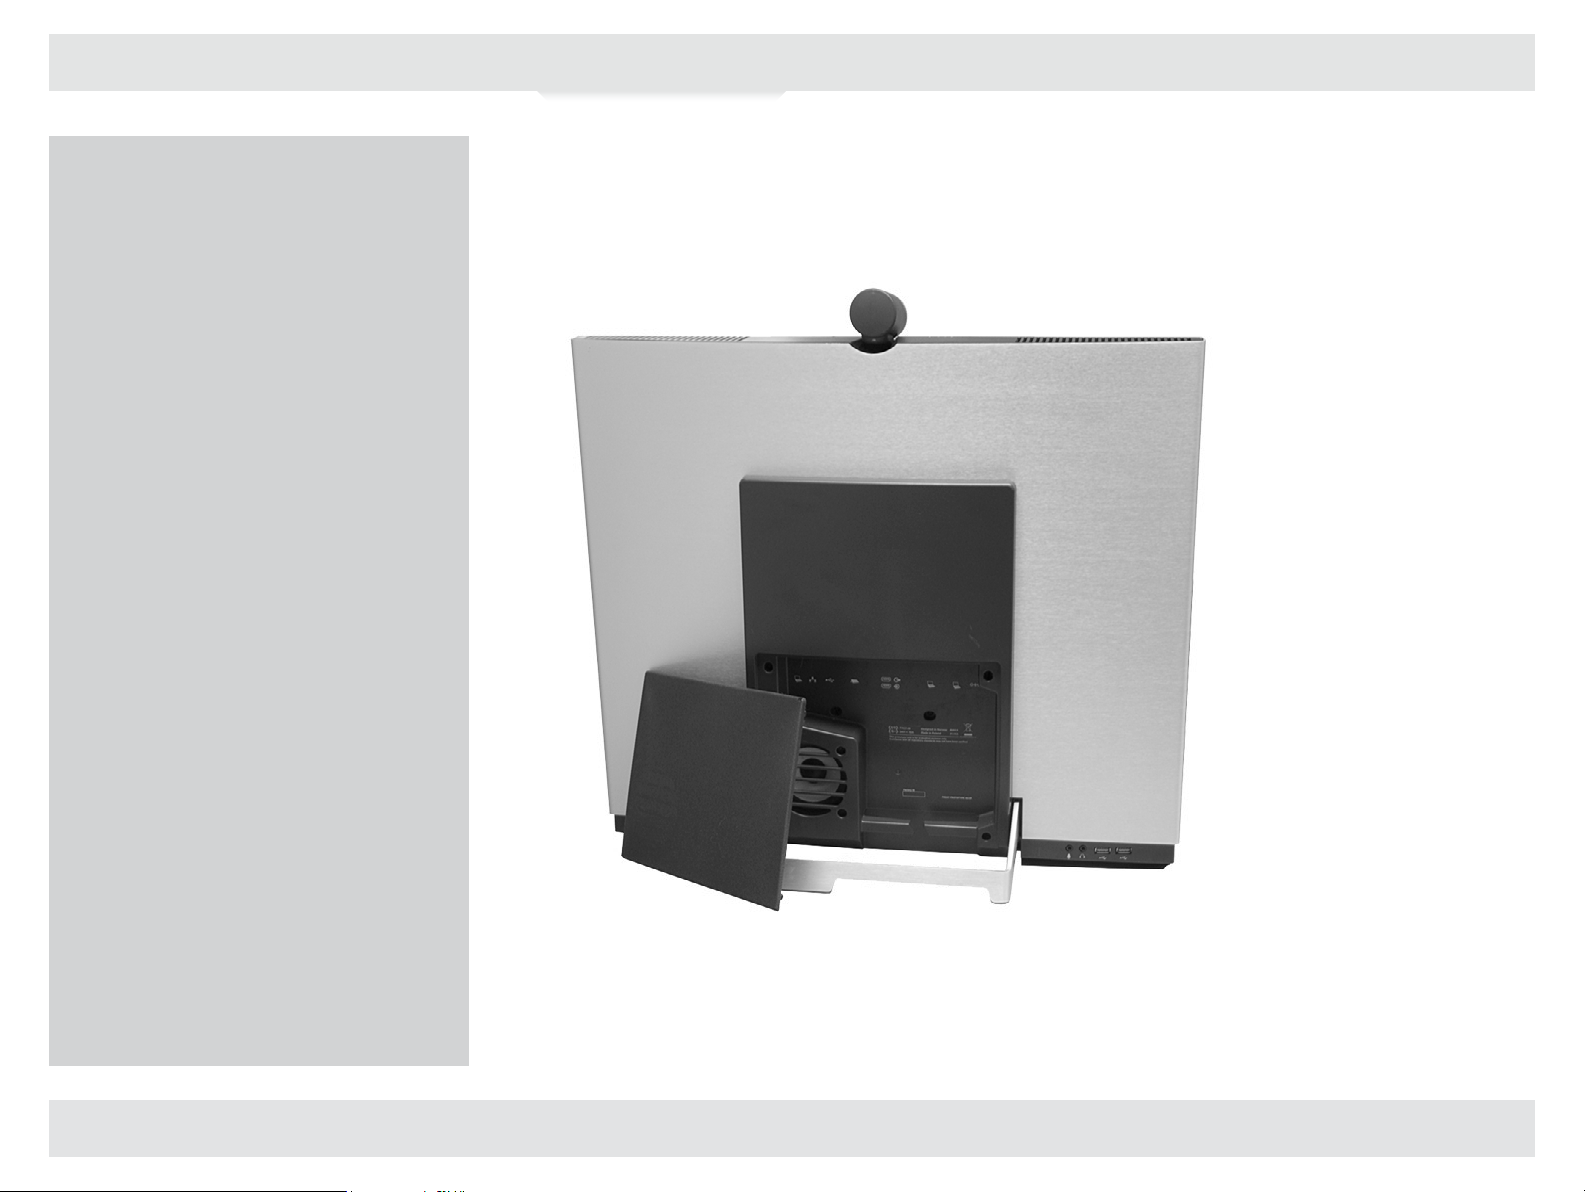
Rear sockets access
Remove cover to get access to
the connector sockets.
The cover is vented in the lower
left corner (external view) due to
the rear mounted loudspeaker.
When mounting the cover
back on, make sure the vents
are where the speaker is (as
shown).
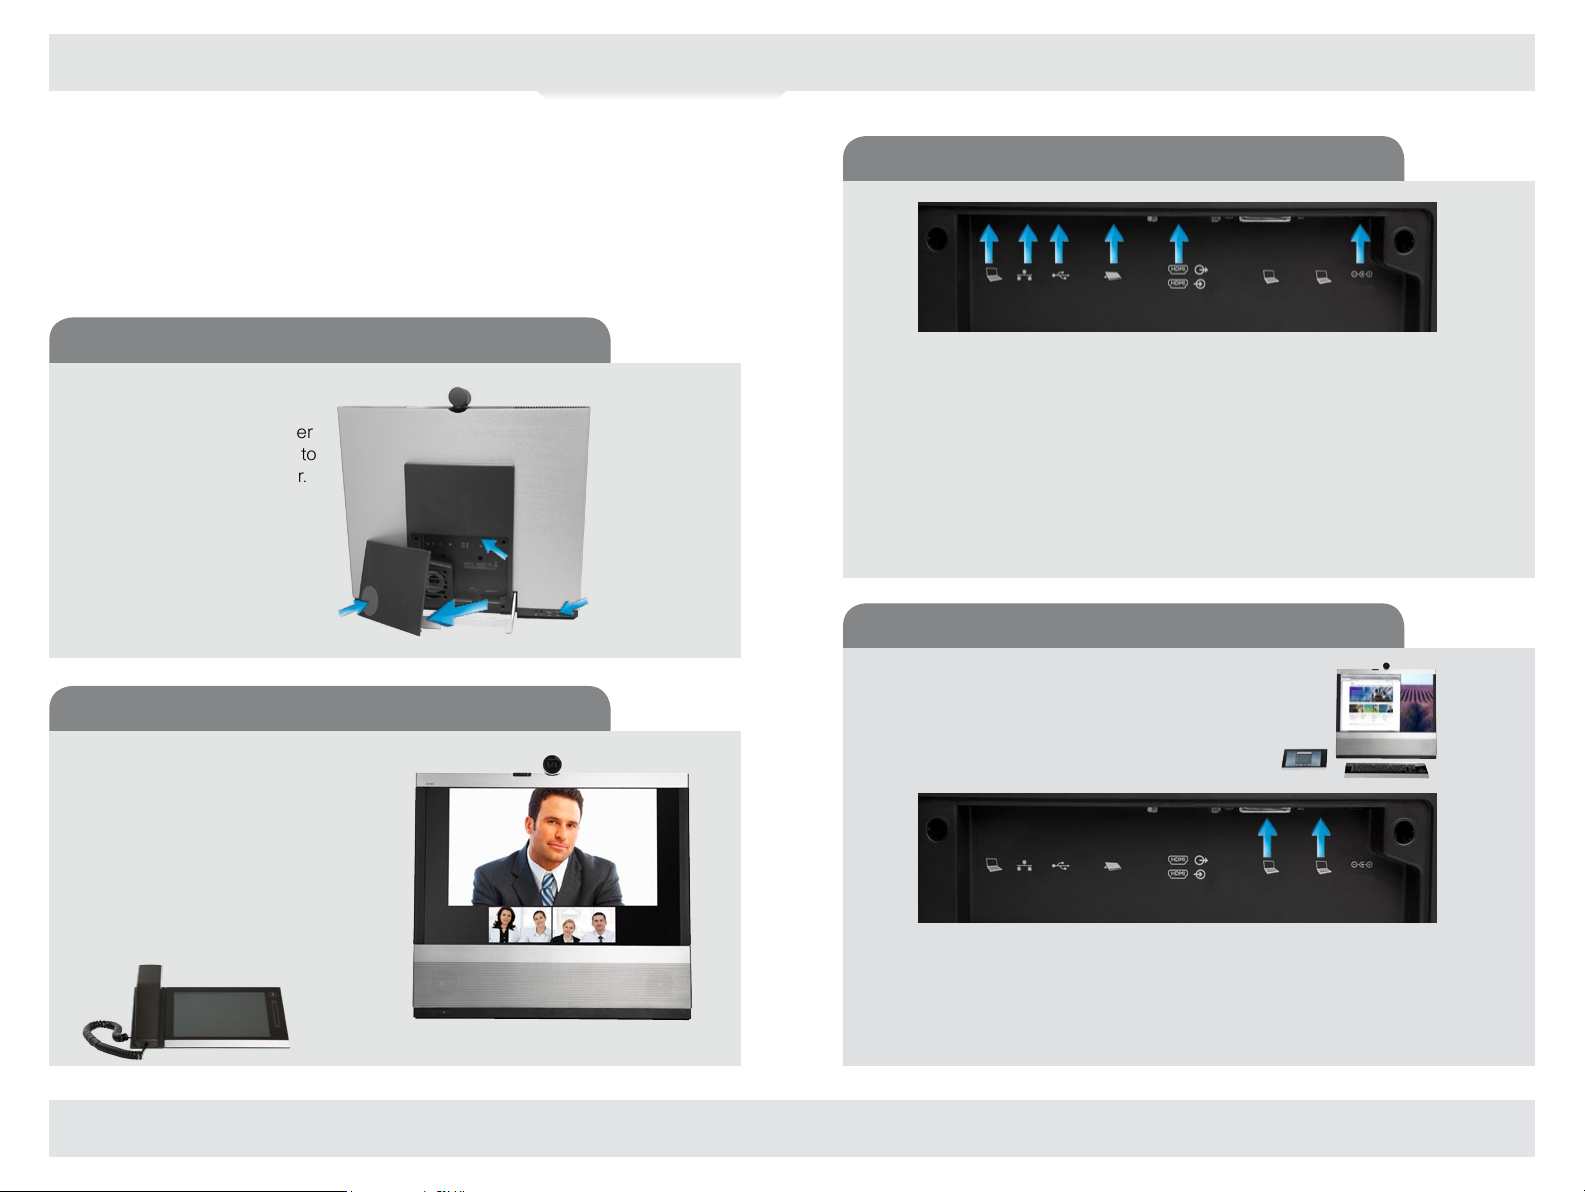
The EX90 parts
Camera with built-in privacy shutter.
Cover vents
Pull out
Sockets
Connect
headphones
and external
microphone here.
Connecting
Connect your PC here if you need to share a single LAN connection with the EX90.
Connect your TANDBERG EX90 to the LAN.
USB socket (for future use).
Connect the inTouch controller.
HDMI In (inner socket) and HDMI Out* (outer socket).
Connect power here.
* HDMI out is used when connecting an extra monitor (typically for presentations)—see the next
page for more.
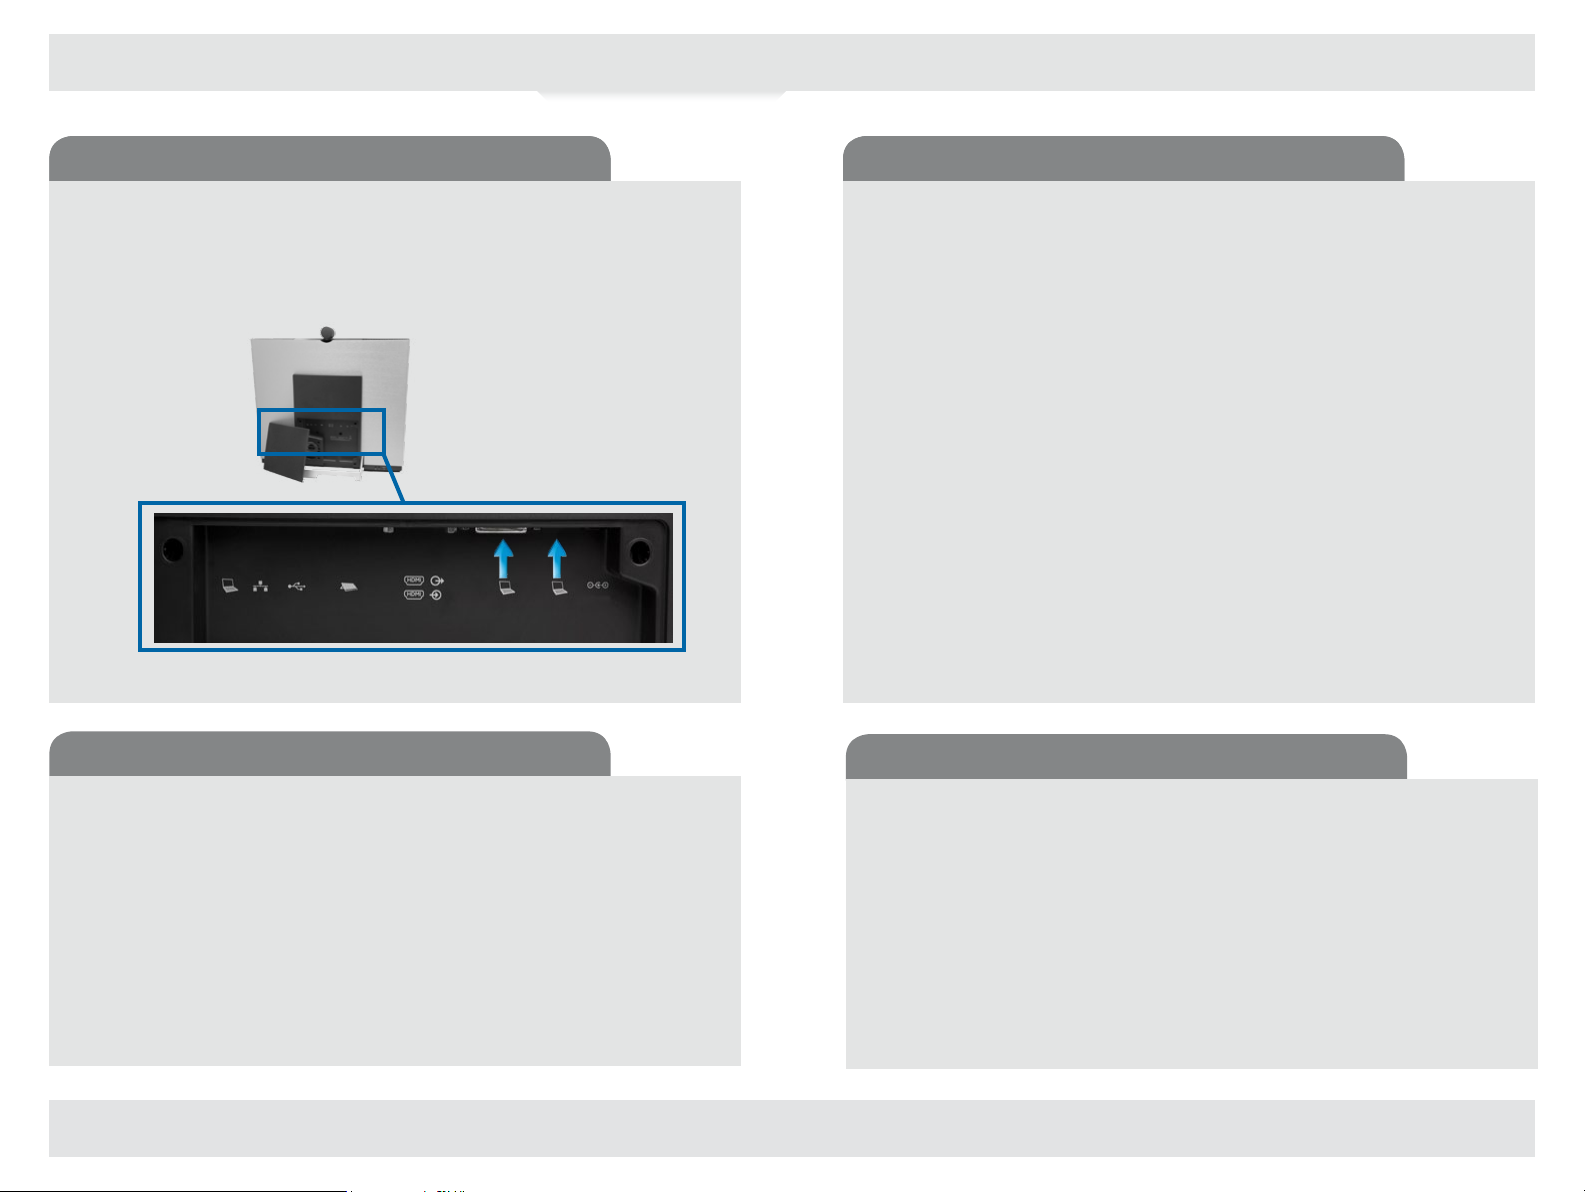
Connecting for use as PC screen
Your TANDBERG EX90 has an HD
display, which also may serve as your PC
screen.
Connect your PC to the sockets on the
rear panel as shown below.
The inTouch controller
D 14724.02 TANDBERG EX90 User Guide (TC3.1) June 2010
Connect your PC video to and PC audio to
A resolution of 1920 × 1200 is recommended. For a list of other
screen resolutions supported, see “Setting the screen resolution”
on page 10.
9
Page 10
Calling another (optional feature) Calling another (optional feature)
What’s in this Guide?
Introduction
Connecting EX90
Using EX90
The Settings
Web interface
Connecting a PC to the unit Setting the screen resolution
Your TANDBERG EX90 has an HD display, which also may serve as your PC
screen. Connect your PC to the sockets on the rear panel as shown below. For
optimal PC image quality, digital output (DVI) from the PC is recommended. If both
DVI and HDMI are connected, a Source button appears in the setup menu on the
inTouch to let you select which source to use as PC screen.
Connect your PC video to and PC audio to
Use as PC screen
A resolution of 1920 × 1200 is recommended. However, other resolutions may also
be used as shown in the below tables.
Digital input via DVI
1920 × 1200 (recommended)
1920 × 1080
1776 × 1000 (not full screen)
1680 × 1050
1600 × 1200 (not full screen)
1440 × 9 00
1400 × 1050 (not full screen)
1280 × 1024 (not full screen)
1280 × 960 (not full screen)
1280 × 80 0
1280 × 768 (not full screen)
1280 × 720 (not full screen)
1152 × 648 (not full screen)
1024 × 768 (not full screen)
960 × 600 (not full screen)
800 × 600 (not full screen)
Analog input via DVI
1920 × 1200 (recommended)
1680 × 1050
1600 × 1200 (not full screen)
1440 × 9 00
1280 × 1024 (not full screen)
1024 × 768 (not full screen)
800 × 600 (not full screen)
Screen resolution must be set via the web interface, using the Video Output
HDMI [1] Resolution setting. For details on this, see the TANDBERG EX90
Administrator Guide, which is available separately for download.
Using an external monitor to show presentations
Your TANDBERG EX90 has an HD display, which also may serve as your PC
screen. Connect your PC to the sockets on the rear panel as shown above.
Your TANDBERG EX90 will serve as your PC screen outside calls. In a call tap
View desktop to see the desktop.
Your desktop is not exposed to the other side.
D 14724.02 TANDBERG EX90 User Guide (TC3.1) June 2010
You may connect an external monitor to your TANDBERG EX90 to have it work with
two monitors at the same time. The second monitor can be configured to show
presentations instead of having everything on a single screen.
To enable the use of a second monitor the system must be configured for it. This is
done via the web interface using the Video DefaultPresentationSource setting.
Doing so is described in the TANDBERG EX90 Administrator Guide which is
available separately for download .
10
Page 11
CHAPTER 3
What’s in this Guide?
Introduction
Connecting EX90
Using EX90
The Settings
Web interface
USING THE EX90
D 14724.02 TANDBERG EX90 User Guide (TC3.1) June 2010
11
Page 12
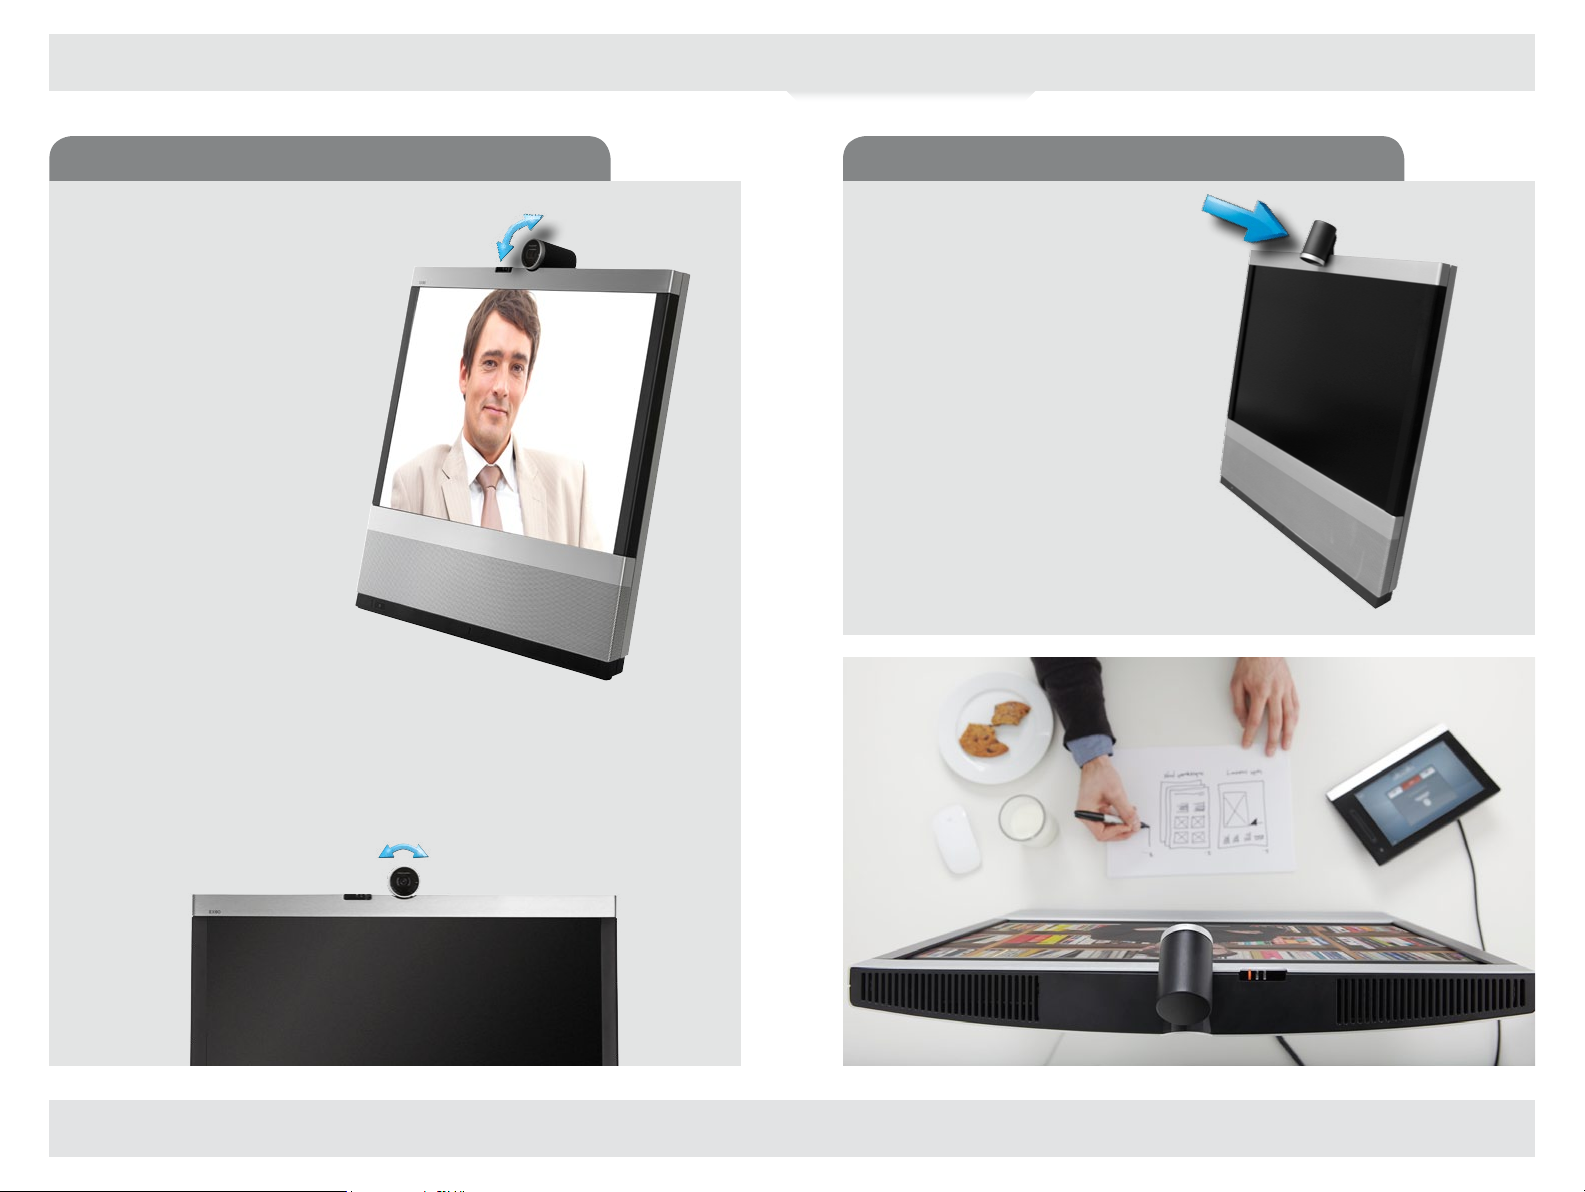
Camera adjustments Use as document camera
What’s in this Guide?
Introduction
Connecting EX90
Using EX90
The Settings
Web interface
Tilt the camera as shown to use
it as a document camera. Image
is automatically turned upside
down, so that both parties will
The camera can be
tilted mechanically in
vertical direction.
see the document correctly.
Turn the circumference
to activate the privacy
shutter.
D 14724.02 TANDBERG EX90 User Guide (TC3.1) June 2010
12
Page 13

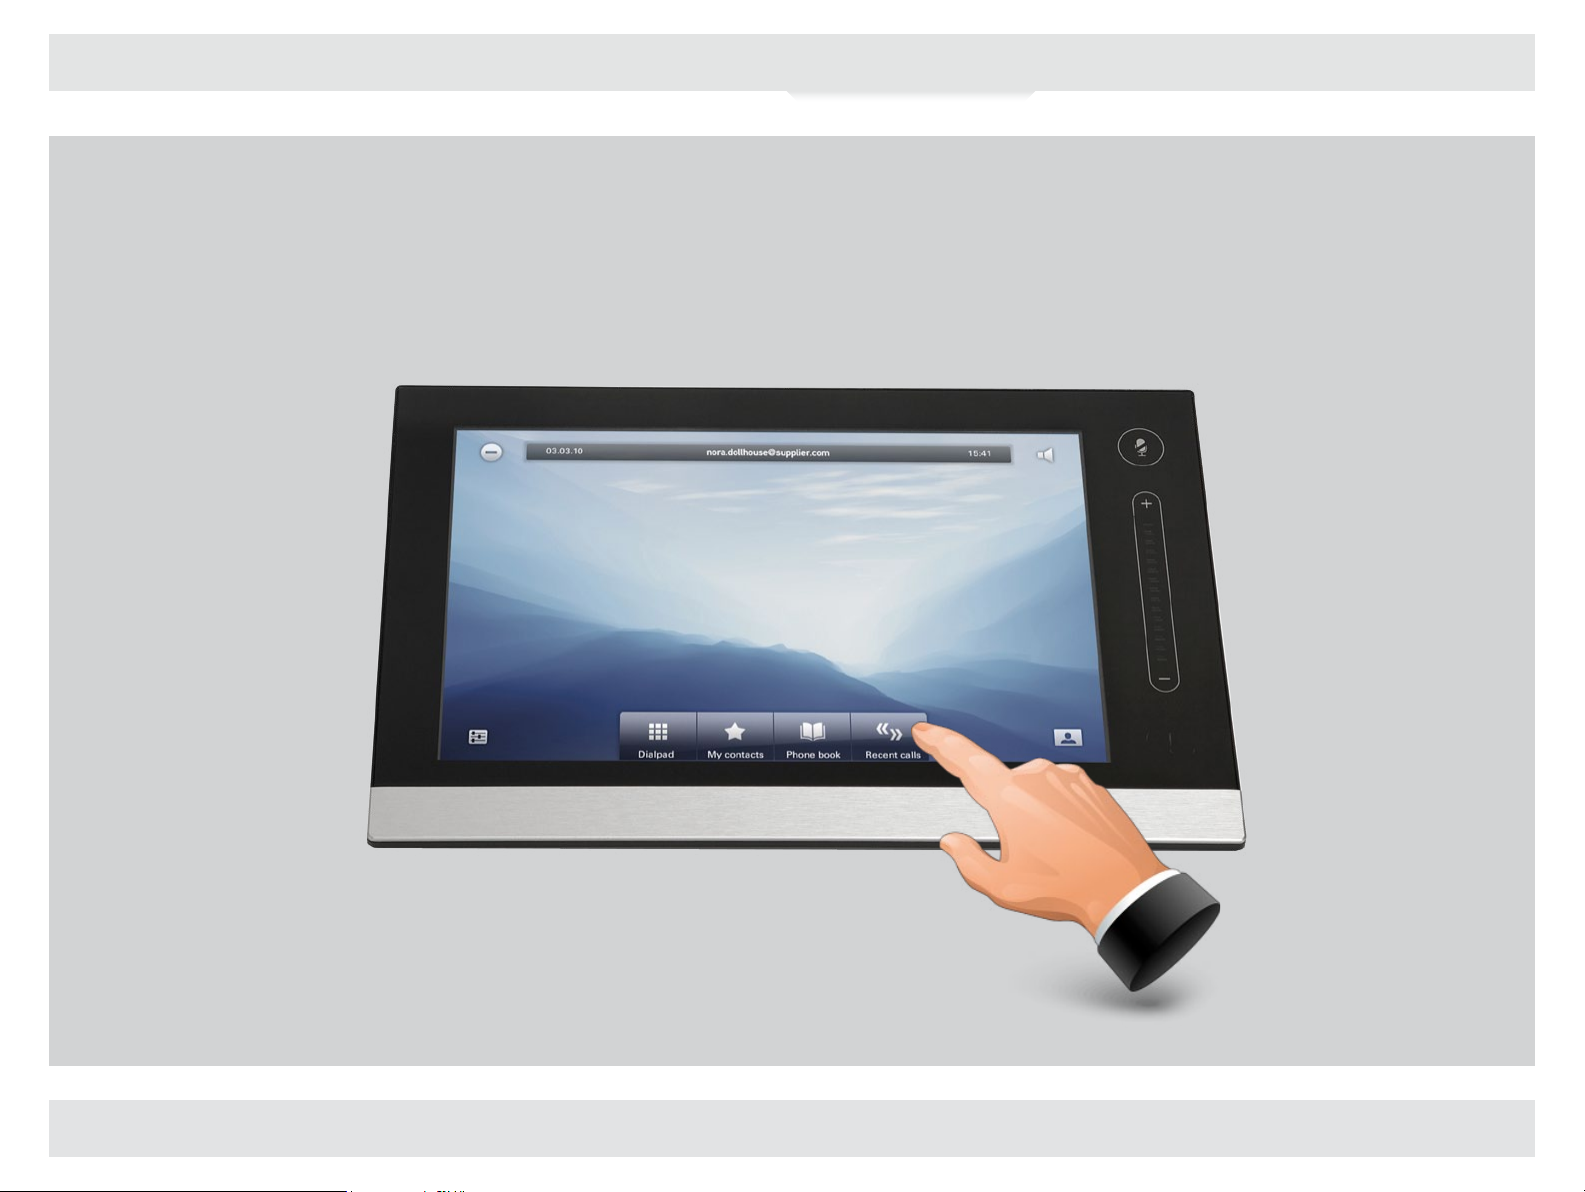
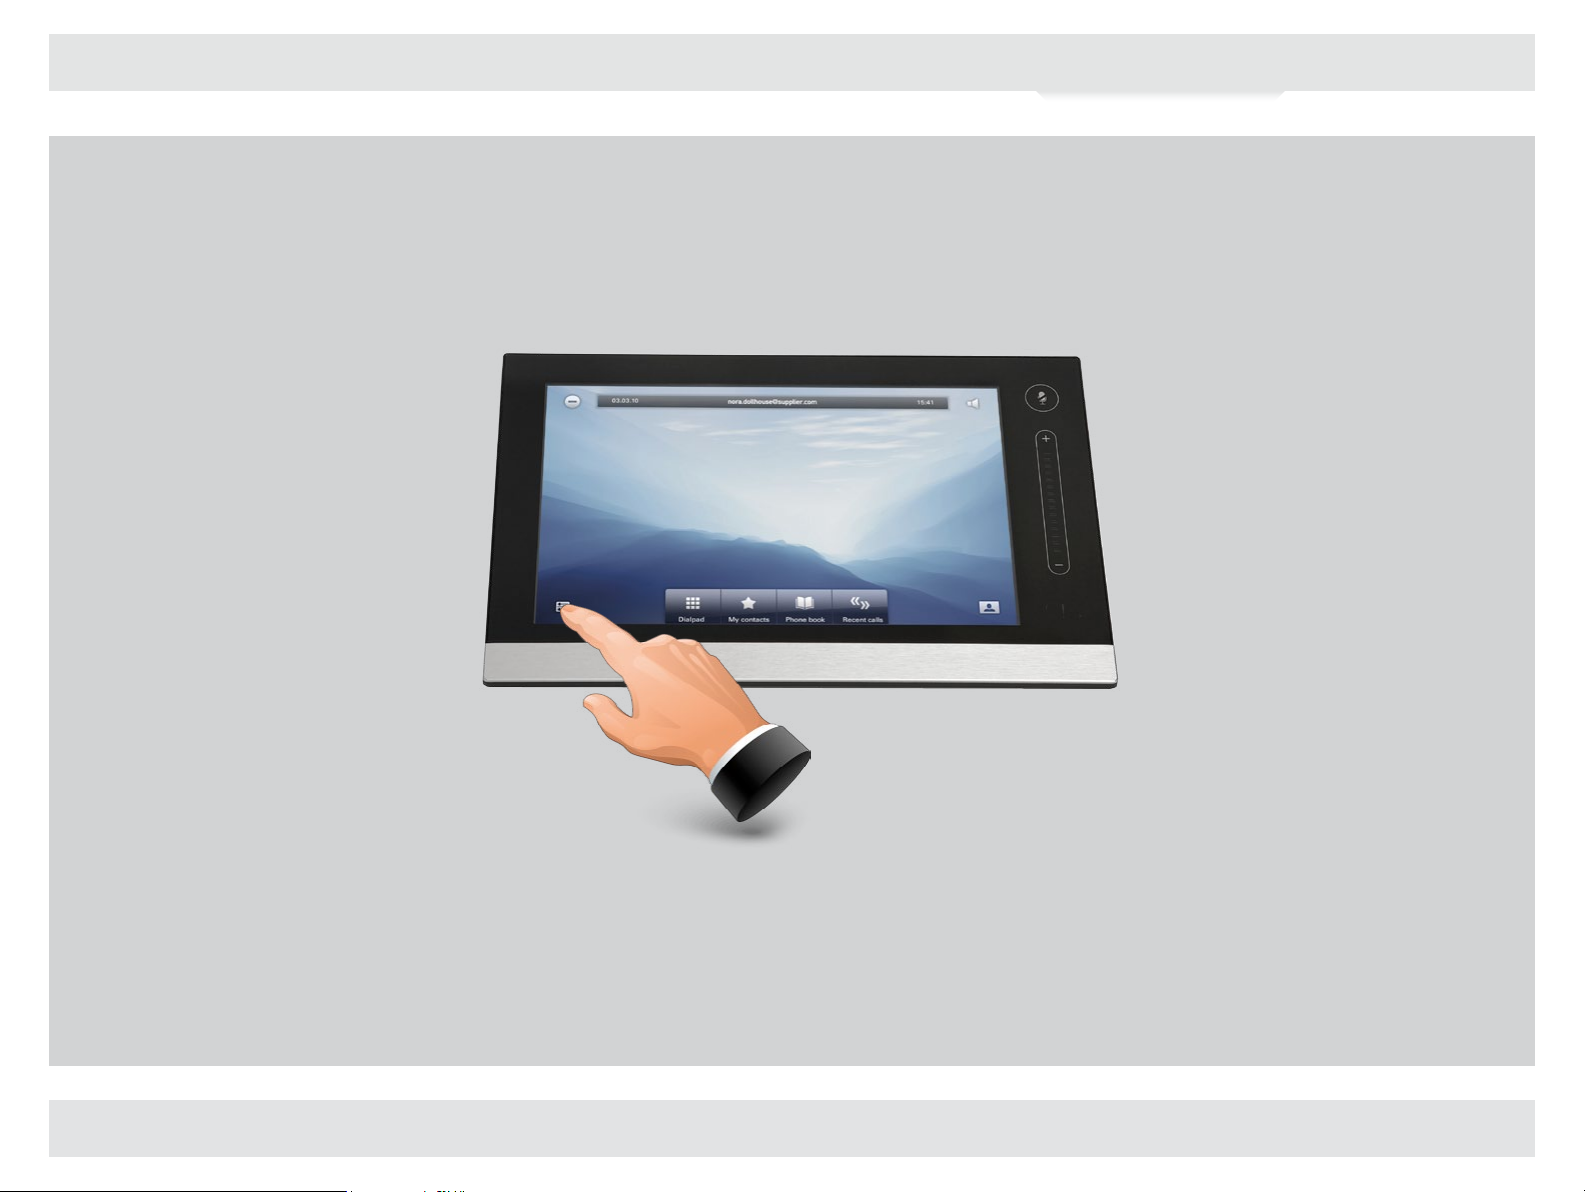
inTouch controller—initial view
What’s in this Guide?
Introduction
Connecting EX90
Using EX90
The Settings
Web interface
Select between
handset, headset
and speaker
Information bar
Do not
disturb
System setup
Numeric keypad
or alphanumeric
keyboard
Your personal
phone book,
generated and
maintained by
you
Corporate
phone book
List of recent
calls, placed,
received and
missed
Microphone mute
(on/off)
Volume
Any messages while you
were away?
Selfview (what others
see from your video
system—the outgoing
video)
Tap the touch
pad to wake up the
system, if needed.
D 14724.02 TANDBERG EX90 User Guide (TC3.1) June 2010
13
Page 14

Initial settings—before you begin
What’s in this Guide?
Introduction
Connecting EX90
Using EX90
The Settings
Web interface
Tap Selfview to see
what others will see
of you.
Tap Camera.
Tilt the camera
to obtain the best view.
The best view wil be the view that positions
your face as high up on the screen as possible
without cutting off the top of your head.
Use + and – to adjust the zoom.
If you need to adjust zoom,
tap Setup.
Collapse menu
after use.
D 14724.02 TANDBERG EX90 User Guide (TC3.1) June 2010
14
Page 15

Calling someone by dialing
What’s in this Guide?
Introduction
Connecting EX90
Using EX90
The Settings
Web interface
alice.wonderland@company.com
Tap Dial pad. Use the numeric keypad for
numbers, or use the keyboard
mode.
Tap the green Call button to place the call. Terminate the call by tapping the
red Terminate call.
Tap abc to change to
keyboard and 123 to
change back.
If you need to key in digits
or special characters, press and hold the key until
the character appears.
D 14724.02 TANDBERG EX90 User Guide (TC3.1) June 2010
15
Page 16
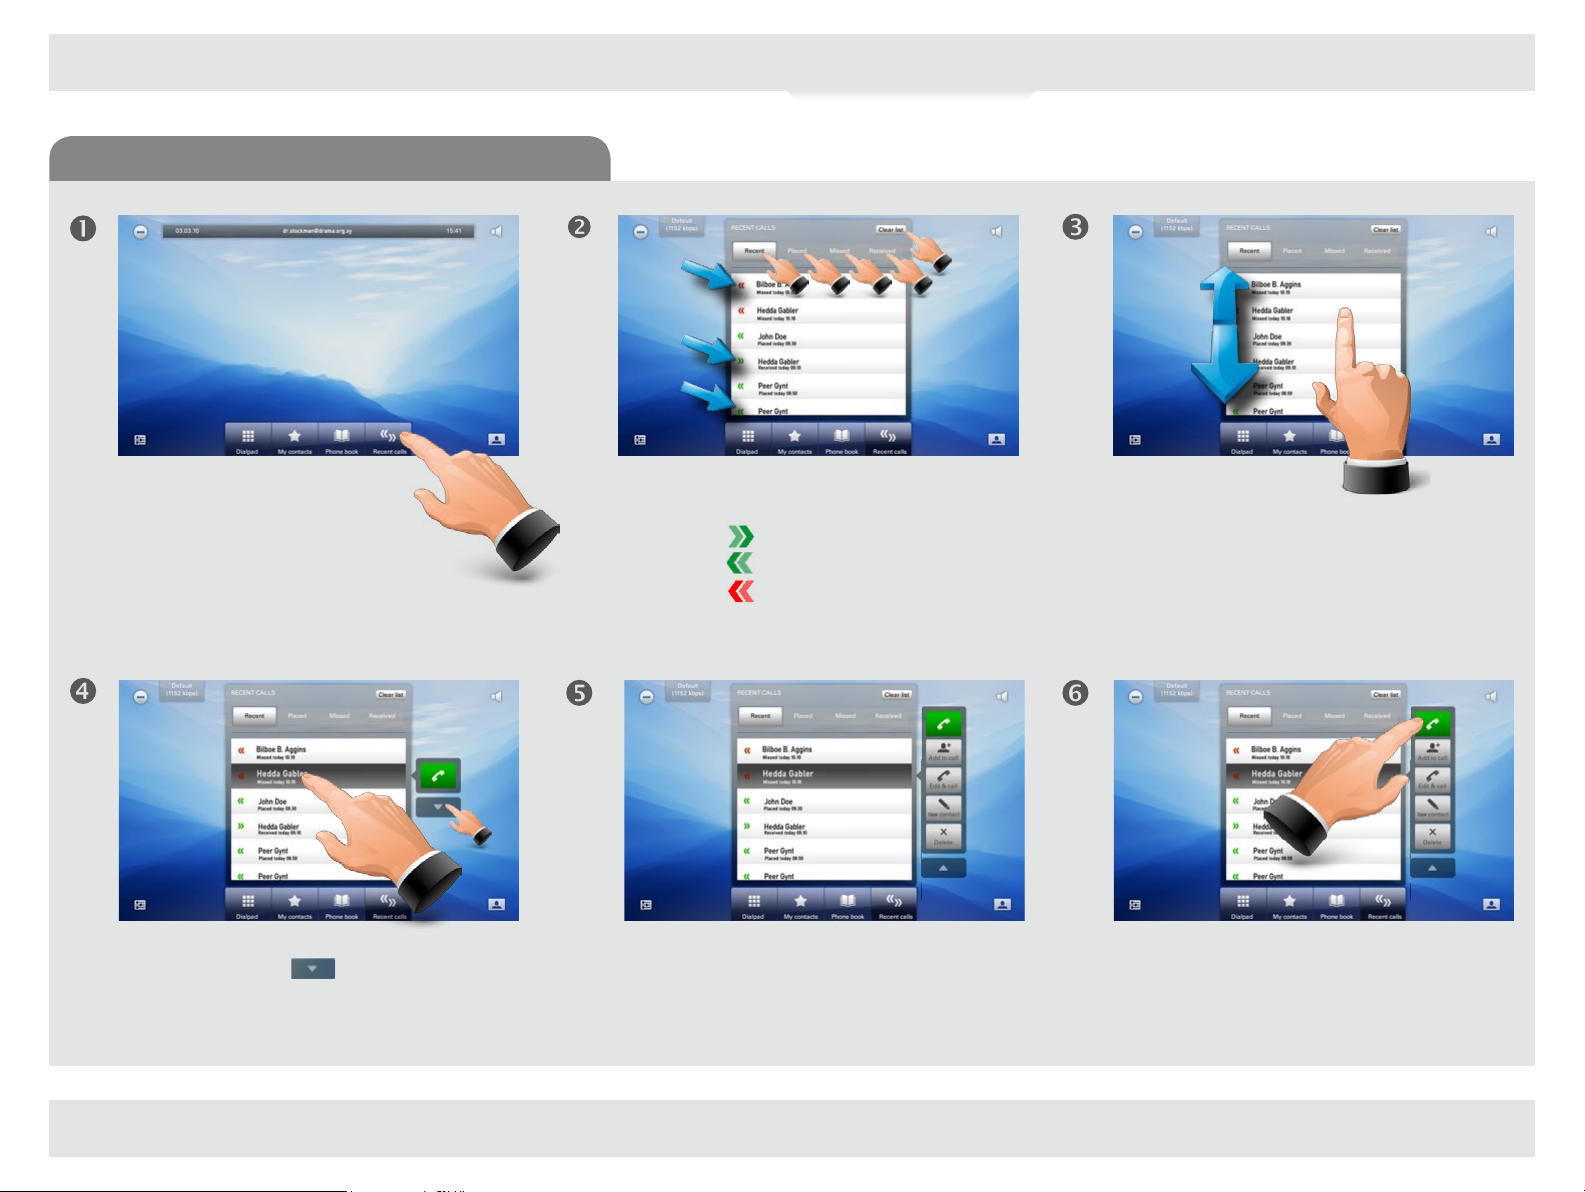
Calling someone using Recent calls
What’s in this Guide?
Introduction
Connecting EX90
Using EX90
The Settings
Web interface
Tap Recent calls to display the list
of recent calls.
Tap the entry to be called. This will cause the Call
button to appear. Tap to display the context
sensitive options list, if needed.
Recent calls is a list of placed, missed and received calls
since the last time you cleared the list.
Calls placed
Calls received
Calls missed
You may now either call the entry; add the entry to call
more than one; edit the entry before calling; add the
entry to My contacts or simply remove the entry. Or you
may do nothing—just tap Recent calls again to hide the
entire Recent calls list.
Scroll by dragging up
or down anywhere in
these lists.
Place the call.
Terminate the call as described in “Calling
someone by dialing” on page 15.
D 14724.02 TANDBERG EX90 User Guide (TC3.1) June 2010
16
Page 17
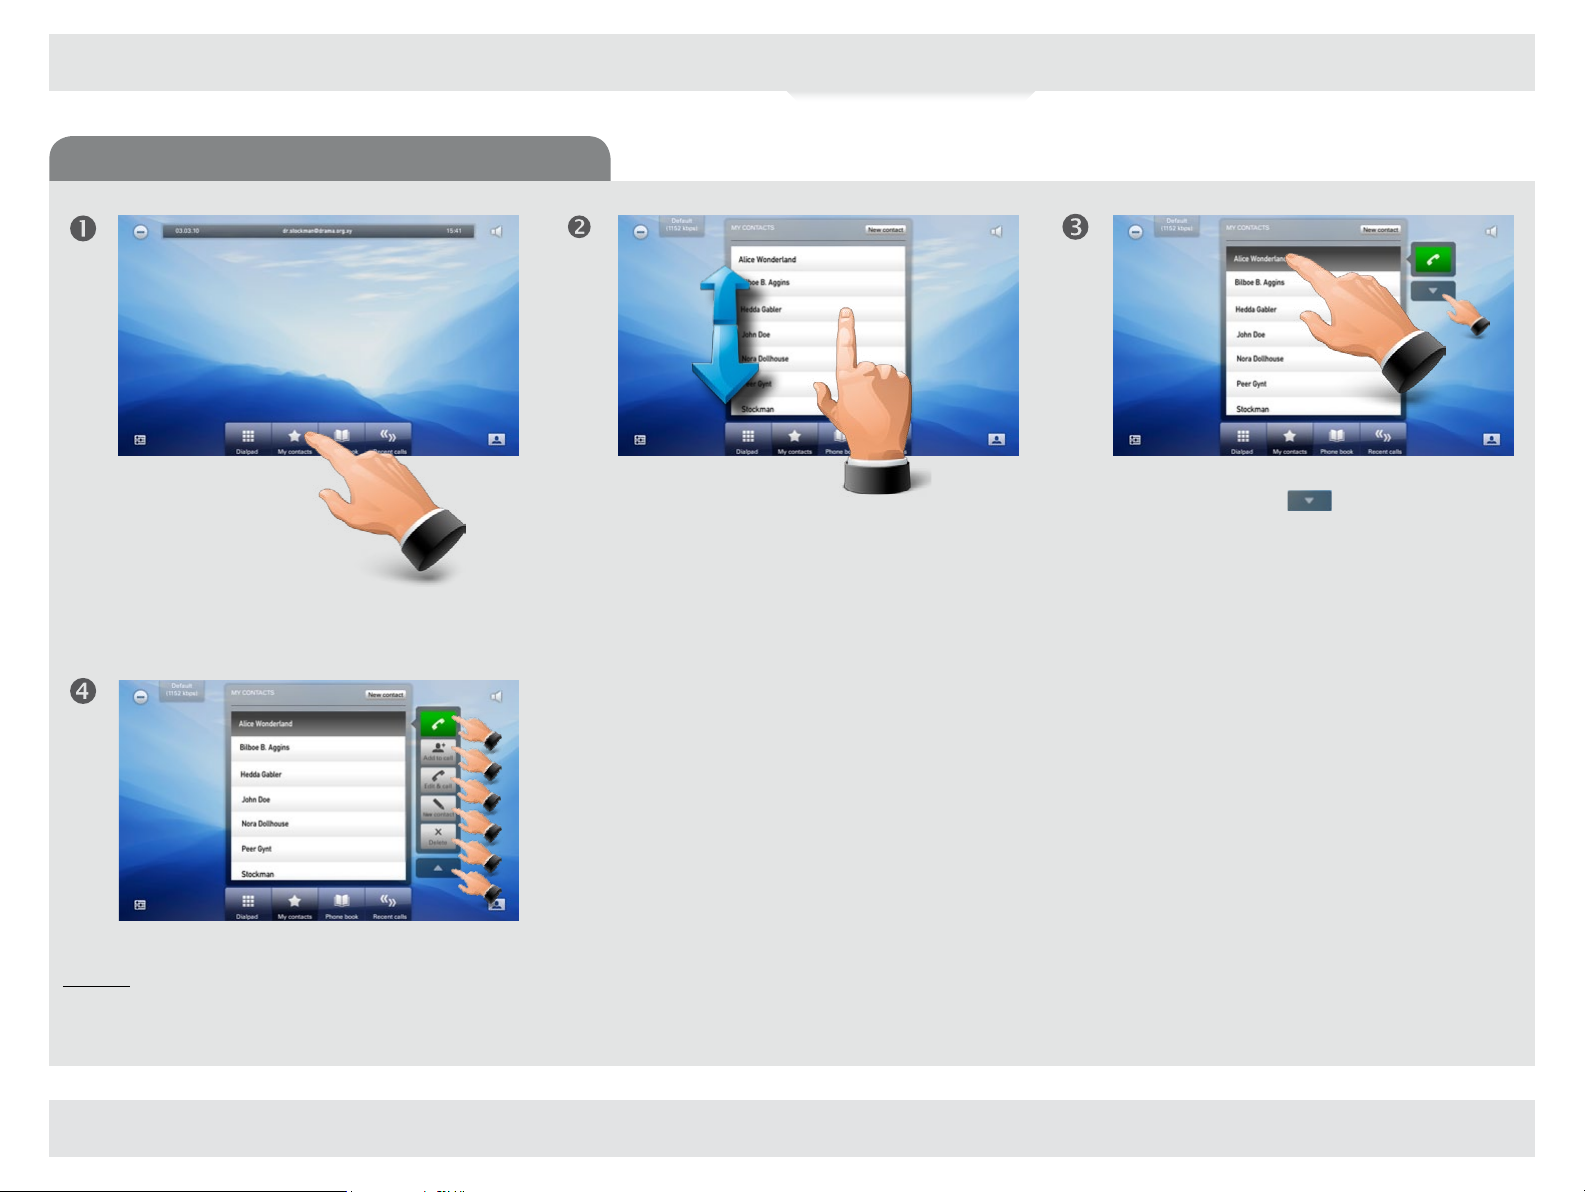
Calling someone using My contacts
What’s in this Guide?
Introduction
Connecting EX90
Using EX90
The Settings
Web interface
Tap My contacts to
display your personal
phone book.
Call the entry now.
Add to call1.
Edit before calling.
Edit the entry itself.
Remove the entry.
Contract list.
1)
Systems with the optional Add to call let you specify
which two to call before you call them. When both have been
added to the call list, they can be called in one go.
Scroll by dragging up
or down anywhere in
the list.
Tap the entry to be called. This will cause the Call
button to appear. Tap to display the context
sensitive options list, if needed.
D 14724.02 TANDBERG EX90 User Guide (TC3.1) June 2010
17
Page 18

Calling someone using the Phone book
What’s in this Guide?
Introduction
Connecting EX90
Using EX90
The Settings
Web interface
Tap Phone book to
display the corporate
phone book.
Tap Call to place the call.
Phone books may have subfolders.
Tap a subfolder to display its contents.
You may expand the list to get
the same options as on the
previous pages.
Scroll by dragging up or
down anywhere in these
lists.
Tap the entry you want to
call.
D 14724.02 TANDBERG EX90 User Guide (TC3.1) June 2010
18
Page 19

Search the Phone book, then call
What’s in this Guide?
Introduction
Connecting EX90
Using EX90
The Settings
Web interface
Tap Phone book to
display the corporate
phone book.
Tap Call to place the call.
Tap in the search field to start searching for an
entry.
The keyboard will now appear.
You may expand the list to get
the same options as outlined
on the previous pages.
Start keying in the entry. Matches will
appear as you write.
D 14724.02 TANDBERG EX90 User Guide (TC3.1) June 2010
19
Page 20

Phone book matters
What’s in this Guide?
Introduction
Connecting EX90
Using EX90
The Settings
Web interface
The contents of the phone book cannot be altered
by the user. However, any entries in the phone
book may be copied to My contacts and altered
there, if needed.
In addition the “number” of any call received or
dialed (including entries in the list of recent calls)
can be entered into My contacts.
Entering a new contact manually
Once within My contacts, tap New contact to produce the New contact dialog. Fill in as required and tap Save
contact to exit dialog, putting changes into effect.
Editing in My contactsAdding someone to My contacts from call lists or the Phone book
There is a multitude of ways to enter someone into
My contacts. You may add entries from the Phone
book; entries from the Recent calls list, as well as the
“number” of anyone you call or receive calls from.
To add someone, expand the call menu as shown and
tap New contact. This will produce the Edit contact
dialog box. Edit if required and tap Save to add the new
contact to the My contacts list.
D 14724.02 TANDBERG EX90 User Guide (TC3.1) June 2010
To edit, including delete, any of the entries
in My contacts, tap My contacts and tap
the entry to be edited or deleted.
Expand the menu, if required.
Tap Edit to produce the Edit dialog box
and Delete to delete the entry. You will be
alerted to confirm.
20
Page 21

Calling another (optional feature)Calling more than one (I)
What’s in this Guide?
Introduction
Connecting EX90
Using EX90
The Settings
Web interface
You can be in a call with two
others simultaneously, or one at
a time. This is an optional feature
that may, or may not, be present
in your system.
Place the call.
(Optional feature)
You may want to
(but do not have to) put
the current
call on hold first.
Tap Add to call another.
You will now have both parties shown side-by-side
on your main screen.
You will now see the list of recent calls. Tap an entry
here, or tap My contacts or Phone book and do
your selection there.
Alternatively, you may tap the Dial pad and use that
to place the call as shown in “Calling someone by
dialing” on page 15.
To terminate one of the two calls, tap the
participant to be disconnected. This will produce
a small menu, with which you may terminate that
part of the call. To terminate both calls, tap the red
Terminate call directly.
D 14724.02 TANDBERG EX90 User Guide (TC3.1) June 2010
21
Page 22
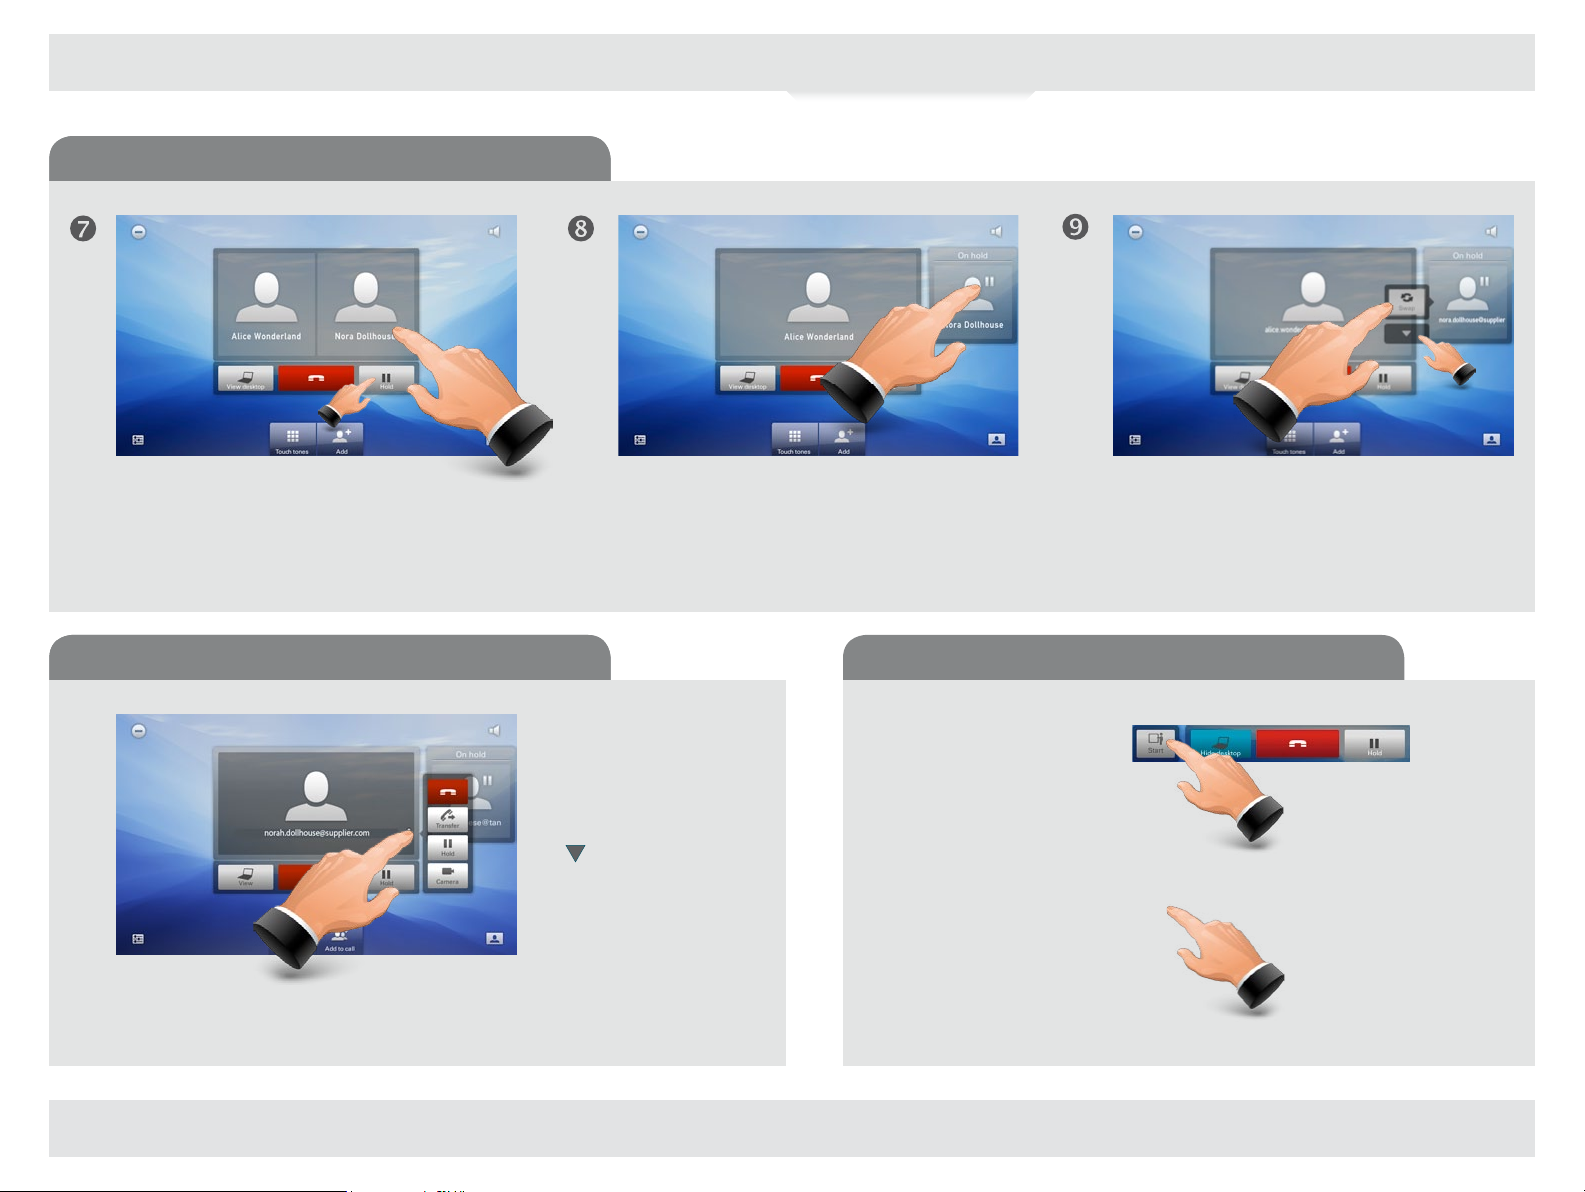
Calling more than one (II)
What’s in this Guide?
Introduction
Connecting EX90
Using EX90
The Settings
Web interface
To put one of the participants on hold, tap that participant.
A menu will appear next to that person allowing you to put
him or her on hold. To put both on hold, tap Hold (next to
the red Terminate call button), as outlined.
(Optional feature)
Tap on the participant on hold to display options.
Tap Swap to swap the two participants (switch
between the two). If you expand the list you will be
able to also choose between joining the two (bring
the one on hold back in) or disconnecting the one
on hold.
Call transfer Sharing presentations
With one on hold,
tap the one in call to
display the menu.
The menu will allow
you to transfer this
call to someone else.
A indicates that
you should use the
Dialpad, the Phone
book, or the Recent
calls list to locate
whom to transfer the
call to.
(Optional feature)
In a call, you may share
your PC screen with the
other side. Tap View
desktop (as above) and
then tap Start to activate.
To deactivate, tap Stop.
For other aspects of this
feature, including how to
use the EX90 as your PC
screen—see the section
“Use as PC screen” on
page 10
D 14724.02 TANDBERG EX90 User Guide (TC3.1) June 2010
22
Page 23

Calling another (optional feature) Calling another (optional feature)Receiving calls Receiving another call while already in a call
What’s in this Guide?
Introduction
Connecting EX90
Using EX90
The Settings
Web interface
If you already are in a call and someone
else calls you will get the following
options:
• Accept the incoming call and join it
• Accept the incoming call and put the
• Accept the incoming call and
• Reject the incoming call and continue
Tap Accept to accept the
incoming call or Reject to
reject it.
(Optional feature)
with the current call.
current call on hold.
disconnect the current call.
with the current call.
Do not disturb
The Do not disturb feature can be activated to
disable the incoming call alert signal. You may still
receive and place calls. Tap to activate—the icon will
then turn red and white. Tap again to deactivate.
D 14724.02 TANDBERG EX90 User Guide (TC3.1) June 2010
Far end camera control
If the other end point permits it, you may even
control that camera. This is known as Far end
camera control. Tap Camera.
23
Pan and zoom the far end camera as needed. If
the other camera cannot be controlled, nothing
happens. Press Exit when finished.
Page 24
The TANDBERG EX90 can be c onfigured via the inTouch controller or
What’s in this Guide?
Introduction
Connecting EX90
Using EX90
The Settings
Web interface
via its web interface. For full access to all configurable parameters
the web interface must be used—the inTouch controller provides
CHAPTER 4
THE SETTINGS—USING INTOUCH
access to a limited set of parameters only.
D 14724.02 TANDBERG EX90 User Guide (TC3.1) June 2010
24
Page 25
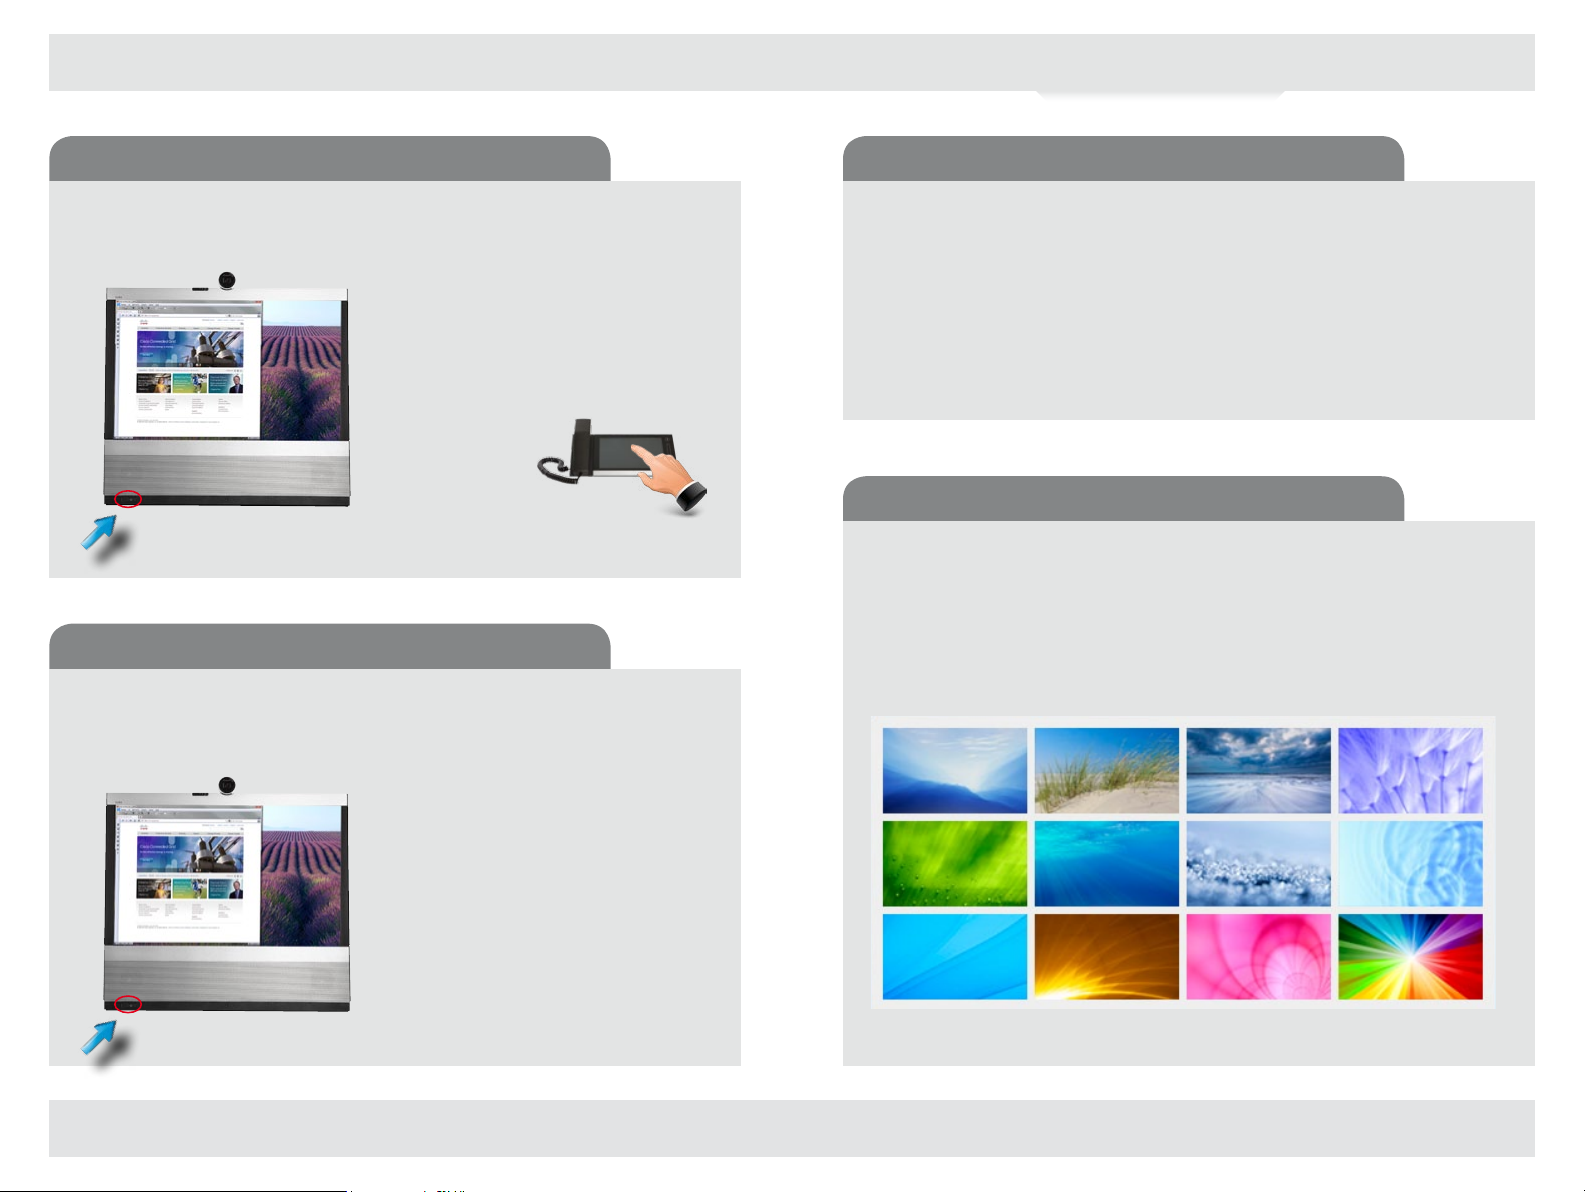
Setting the TANDBERG EX90 in standby
What’s in this Guide?
Introduction
Connecting EX90
Using EX90
The Settings
Web interface
Reverting to factory default settings
Outside a call, you may have the unit enter standby mode by touching the Power
button on the main unit (the screen). The Standby dialog is displayed and the unit
enters standby immediately. This does not work when you are in a call.
Tap the touch
pad to wake up the
system from standby.
Shutting down the TANDBERG EX90
Outside a call, press the Power button until the Shutdown progress bar is filled
completely.
Release the button and the unit will go in shutdown in just a few seconds.
To revert to the factory default settings, do as follows:
1. Disconnect the power cord.
2. Reconnect the power cord—a green light will illuminate shortly after.
3. Press the Power button as soon as the green light appears. Keep it depressed
for 15 seconds or so, until the green light starts flashing.
4. Release the button and press twice within 2 seconds. All settings will now revert
to factory default settings.
Changing background image on inTouch
The background image on the inTouch controller can be changed.
Do as follows:
1. Draw a circle with your finger anywhere on the screen where there are no icons.
2. The below image will then appear on the inTouch screen. Tap one of the small
images to use it as background image.
D 14724.02 TANDBERG EX90 User Guide (TC3.1) June 2010
To start the system again,
press the Power button
until the LED illuminates
(green light).
25
Page 26

Entering the Settings menus
What’s in this Guide?
Introduction
Connecting EX90
Using EX90
The Settings
Web interface
Tap Setup.
Select the tab required by tapping on it.
Tap a field to enter
the corresponding
settings.
Tap Settings
to gain access to the Settings.
If both DVI and HDMI are connected to
external sources, a Source button will appear
in addition, letting you select which source to
display.
D 14724.02 TANDBERG EX90 User Guide (TC3.1) June 2010
26
Page 27
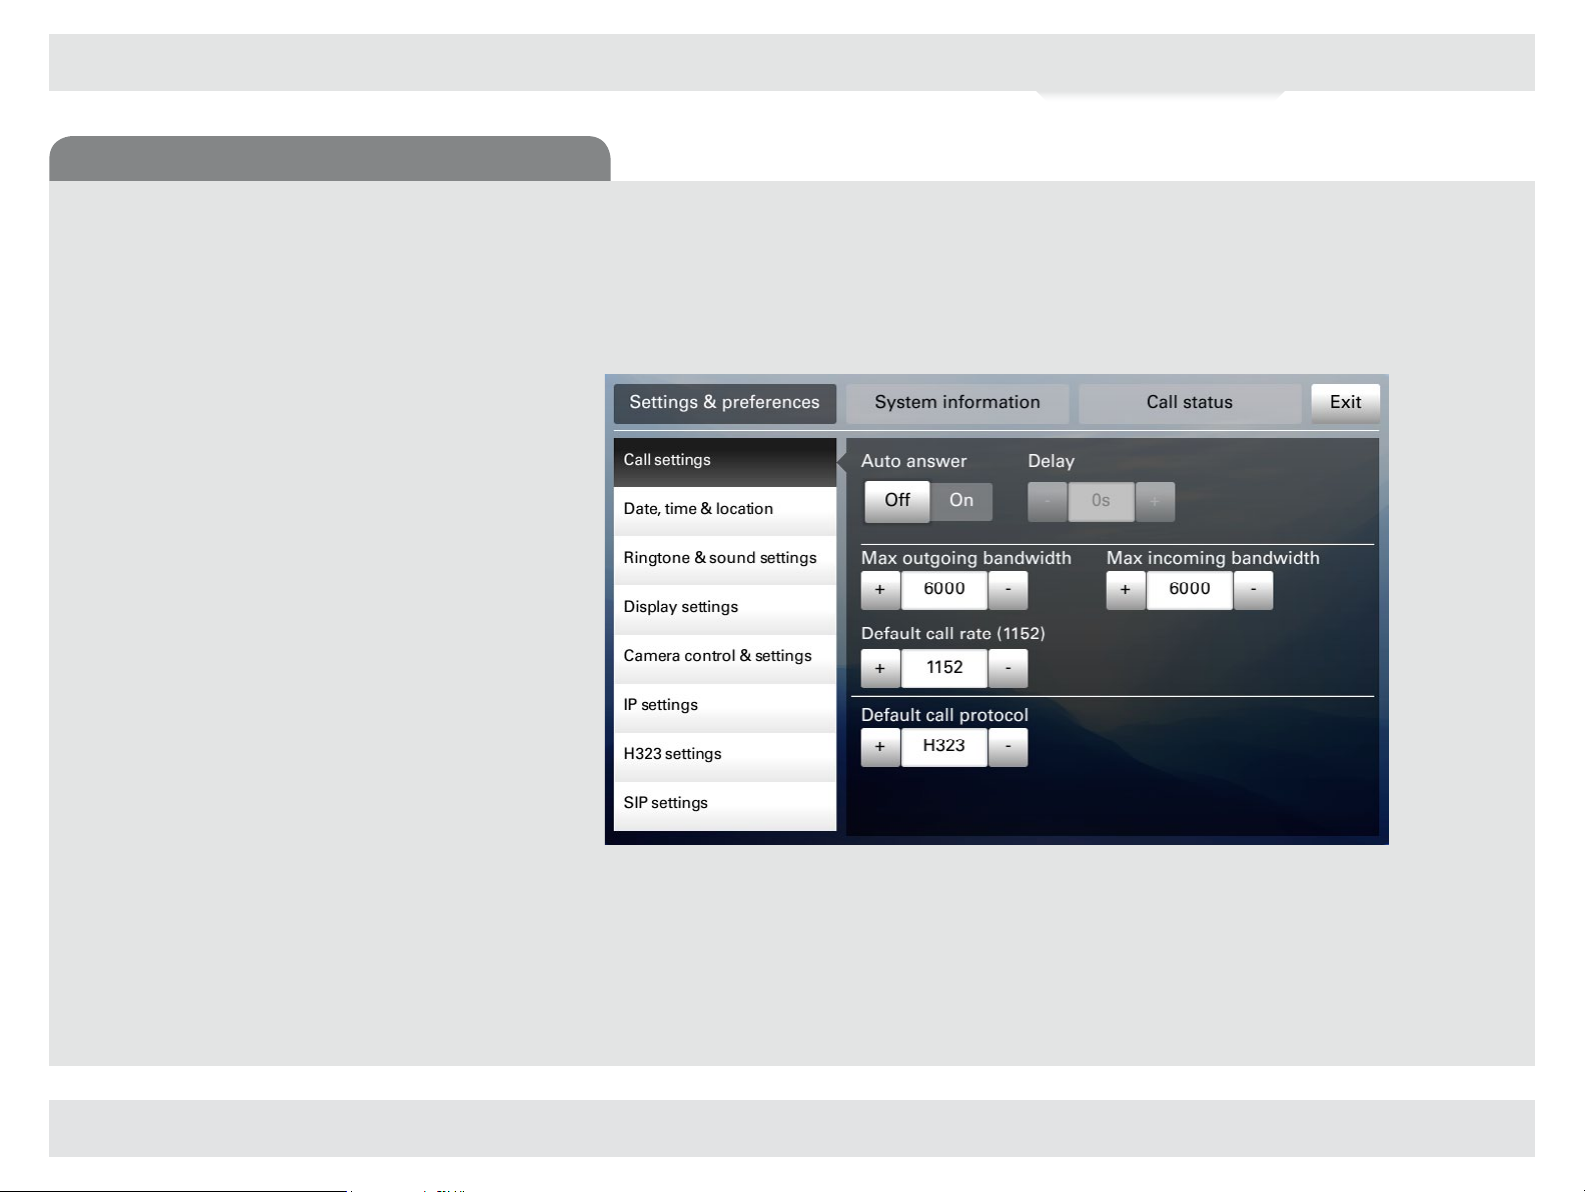
Call settings
What’s in this Guide?
Introduction
Connecting EX90
Using EX90
The Settings
Web interface
The Call settings let you define whether your EX90
shall respond automatically to incoming calls or not.
If you set it to Auto answer On, you may specify a
delay from the moment an incoming call appears
until the unit responds. The delay can be set to 0–50
seconds in one-second steps.
You may also specify:
• Maximum outgoing and incoming bandwidth.
The two may have different settings.
• A preferred default call rate different from the
one the unit comes with, if needed.
• The default call protocol, choose between SIP
and H.323.
Bandwidth and call rates can be set to 128, 384, 512,
768, 1152, 1920, 2560, 3072, 4000 or 6000 kbps.
D 14724.02 TANDBERG EX90 User Guide (TC3.1) June 2010
27
Page 28

Date, time & location
What’s in this Guide?
Introduction
Connecting EX90
Using EX90
The Settings
Web interface
The Date, time & location settings let you specify:
• 24h or 12h time format.
• Your preferred date format.
• Your preferred time zone.
• Whether date and time shall be set automatically or
manually.
D 14724.02 TANDBERG EX90 User Guide (TC3.1) June 2010
28
Page 29

Ringtone & sound settings
What’s in this Guide?
Introduction
Connecting EX90
Using EX90
The Settings
Web interface
The Ringtone & sound settings let you specify:
• Audible tones when tapping keys on or off.
• The ringtone volume.
• The type of ringtone. Tap a ringtone to hear what it
sounds like.
D 14724.02 TANDBERG EX90 User Guide (TC3.1) June 2010
29
Page 30

Display settings
What’s in this Guide?
Introduction
Connecting EX90
Using EX90
The Settings
Web interface
The Display settings let you adjust:
• Preferred brightness by moving the Brightness slider.
• The color balance. There are four preset color settings
(Cold, Neutral, Warm and your own (Custom)) available.
When you select Custom, you may use the Red, Green
and Blue sliders to specify your own setting.
• The DVI mode can be set to automatically detect the type
of video signal received, or forced to analog or digital. The
DVI mode is used when the unit is connected to a PC to
serve as a PC monitor.
D 14724.02 TANDBERG EX90 User Guide (TC3.1) June 2010
30
Page 31

Camera control & settings
What’s in this Guide?
Introduction
Connecting EX90
Using EX90
The Settings
Web interface
The Camera control & settings let you specify:
• The Whitebalance setting.
• The Exposure setting.
• Whether Backlight compensation shall be activated or
not. Backlight compensation is used to avoid that you
appear darker than needed whenever there is much light
behind you.
D 14724.02 TANDBERG EX90 User Guide (TC3.1) June 2010
31
Page 32

IP settings
What’s in this Guide?
Introduction
Connecting EX90
Using EX90
The Settings
Web interface
The IP settings let you specify:
• The use of DHCP or Static IP addresses. If you decide
to use Static, make sure you tap Save before leaving the
menu.
D 14724.02 TANDBERG EX90 User Guide (TC3.1) June 2010
32
Page 33

H.323 settings
What’s in this Guide?
Introduction
Connecting EX90
Using EX90
The Settings
Web interface
The H.323 settings let you specify:
• An H.323 alias.
• Your H.323 id.
• Gatekeeper discovery (Manual or Automatic).
• The Gatekeeper address must be specified by you if
discovery has been set to manual.
• Authentication mode On or Off. If set to On, the EX90 will
send Login name and password to the Gatekeeper for
authentication.
In addition there are:
• Two fields to enter Login name and password. The
alphanumeric keyboard will appear whenever needed.
Be sure to:
• Tap Save to put changes into effect.
nora.dollhouse@supplier.com
D 14724.02 TANDBERG EX90 User Guide (TC3.1) June 2010
33
Page 34

SIP settings
What’s in this Guide?
Introduction
Connecting EX90
Using EX90
The Settings
Web interface
The SIP settings let you specify:
• Your URI.
• The Default transport layer, this can be set to TCP, UDP,
TLS or Auto.
• The proxy type can be set to Standard, Alcatel, Avaya,
TANDBERG, Microsoft, Nortel, Experimental, Siemens.
The experimental setting is for testing purposes.
• Outbound is not used in this version.
• Proxy discovery can automatic or manual. In the case of
manual the proxy address must be specified by you.
• Login name and password is required by the VCS.
Be sure to:
• Tap Save to put settings into effect.
nora.dollhouse@supplier.com
D 14724.02 TANDBERG EX90 User Guide (TC3.1) June 2010
34
Page 35

System information
What’s in this Guide?
Introduction
Connecting EX90
Using EX90
The Settings
Web interface
The System information provides all the system information
at a glance.
Scroll down to also see status on video inputs (DVI and HDMI).
D 14724.02 TANDBERG EX90 User Guide (TC3.1) June 2010
35
Page 36

Call status
What’s in this Guide?
Introduction
Connecting EX90
Using EX90
The Settings
Web interface
The Call status provides all the call status information at a
glance.
D 14724.02 TANDBERG EX90 User Guide (TC3.1) June 2010
36
Page 37
CHAPTER 5
What’s in this Guide?
Introduction
Connecting EX90
Using EX90
The Settings
Web interface
THE WEB INTERFACE
D 14724.02 TANDBERG EX90 User Guide (TC3.1) June 2010
37
Page 38

Entering the web interface
What’s in this Guide?
Introduction
Connecting EX90
Using EX90
The Settings
Web interface
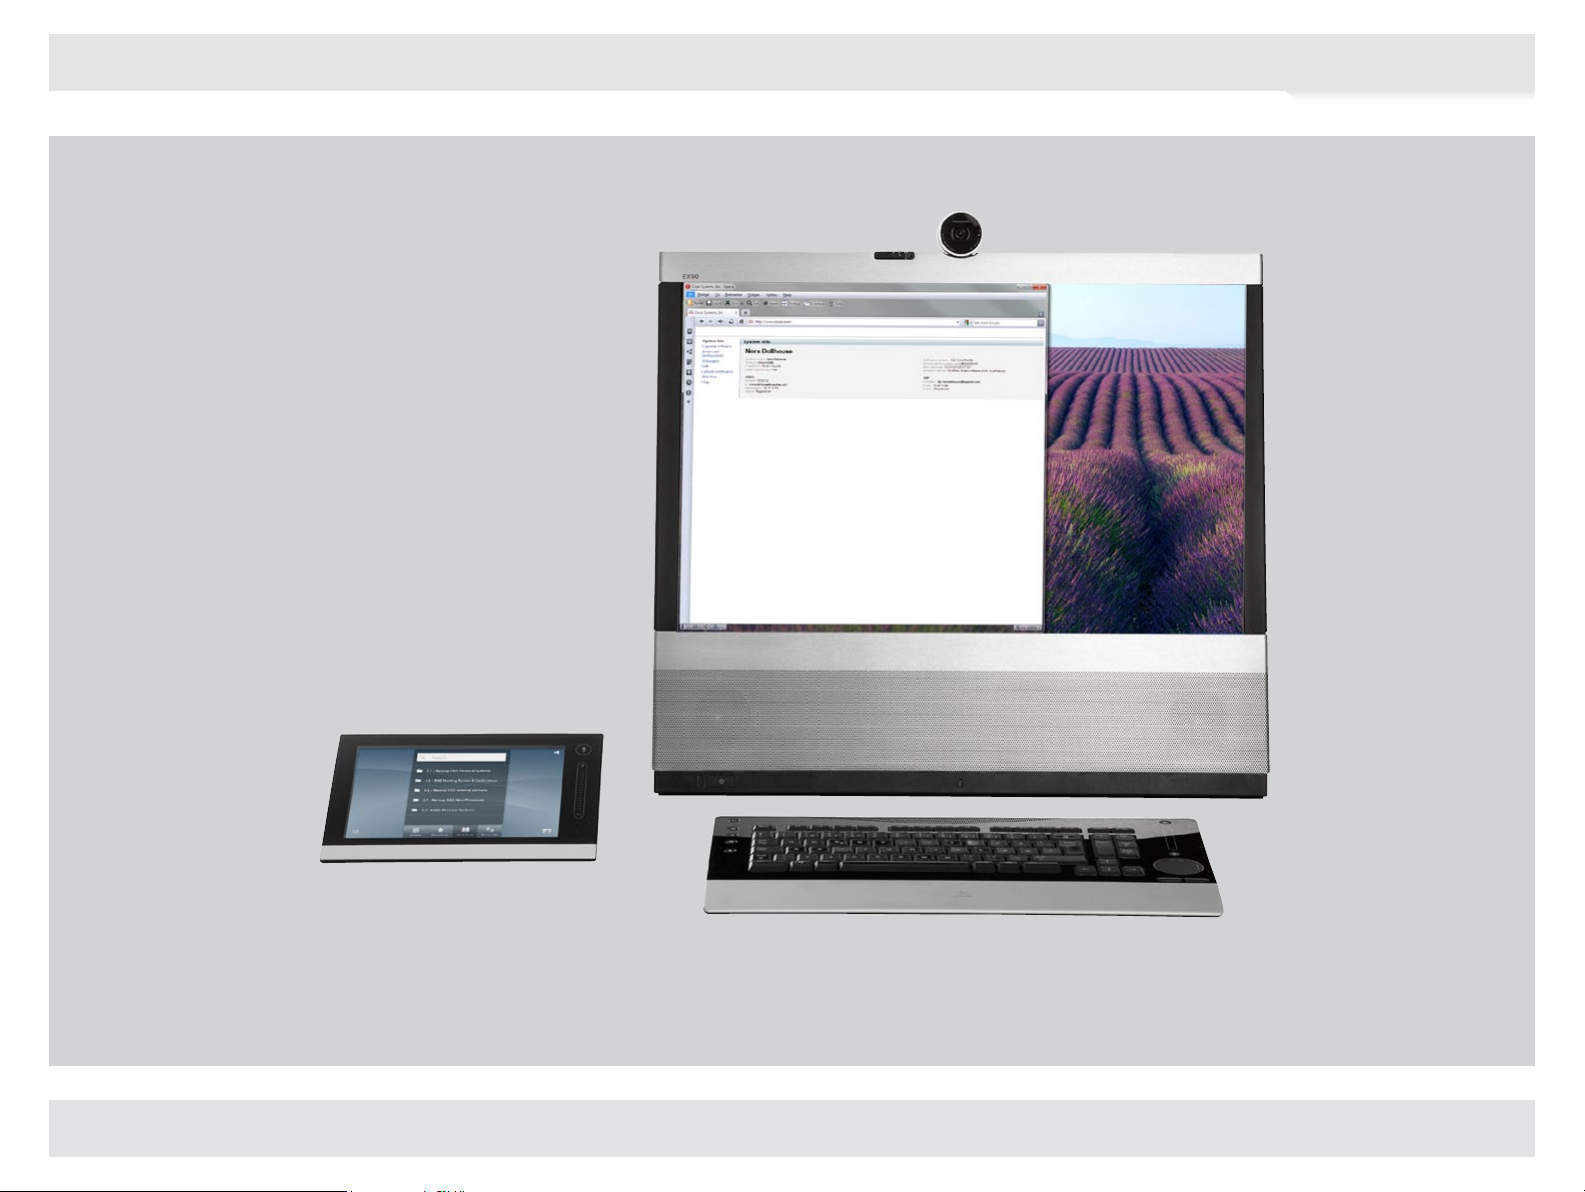
Key in the IP address of your TANDBERG EX90 in your browser to access its web interface.
System information page is accessed here. This is the
“Home page” of your video system.
The advanced configuration is accessed from here.
Software upgrades of the system are done from here.
Calls can be made from this interface as well.
The settings of the video system are stored as XML.
Click here to view the XML files.
D 14724.02 TANDBERG EX90 User Guide (TC3.1) June 2010
Wallpaper for the system’s main screen (not the inTouch) is
uploaded from here.
Certificates are uploaded from here.
Log files are available from here.
38
Page 39
Upgrade software Call
What’s in this Guide?
Introduction
Connecting EX90
Using EX90
The Settings
Web interface
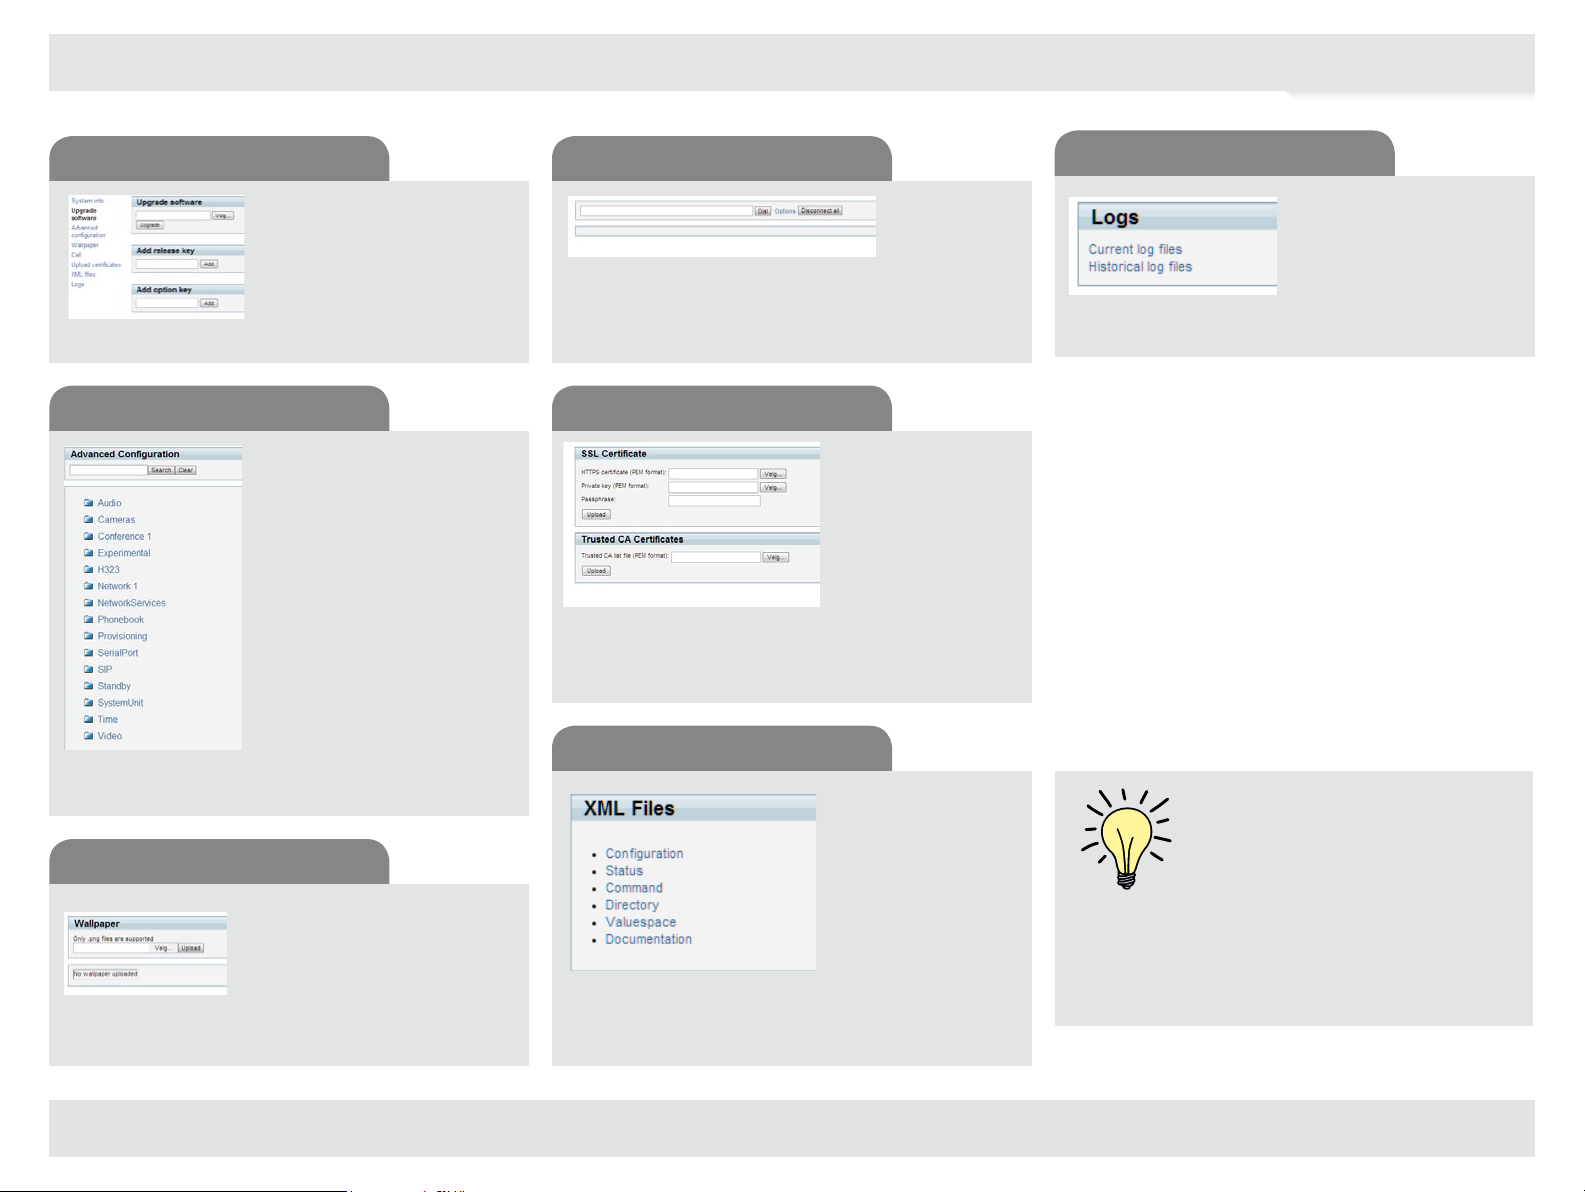
Log files
When upgrading your
software you will need
a release key and an
option key. Contact
your local TANDBERG
representative for details
on software upgrades.
Advanced configuration
The Advanced configuration
settings gives you a multitude
of ways to set up and finetune your TANDBERG EX90.
Log files may be requested
by the Support Dept. when
support is needed.
You may also call someone from the web interface.
Upload certificates
Upload SSL and Trusted CA certificates to the system.
XML files
Upgrade software
You may upload a
wallpaper to your
system’s main screen.
Browse for an image
with this dialog. Note
that only png files are
supported.
D 14724.02 TANDBERG EX90 User Guide (TC3.1) June 2010
39
The settings of
the video system
are stored as XML.
View the different
types of XML files
from here.
A detailed explanation of all aspects
of the web interface is given in the
TANDBERG EX90 Administrator
guide, which is available for download
separately.
< End of document>
 Loading...