

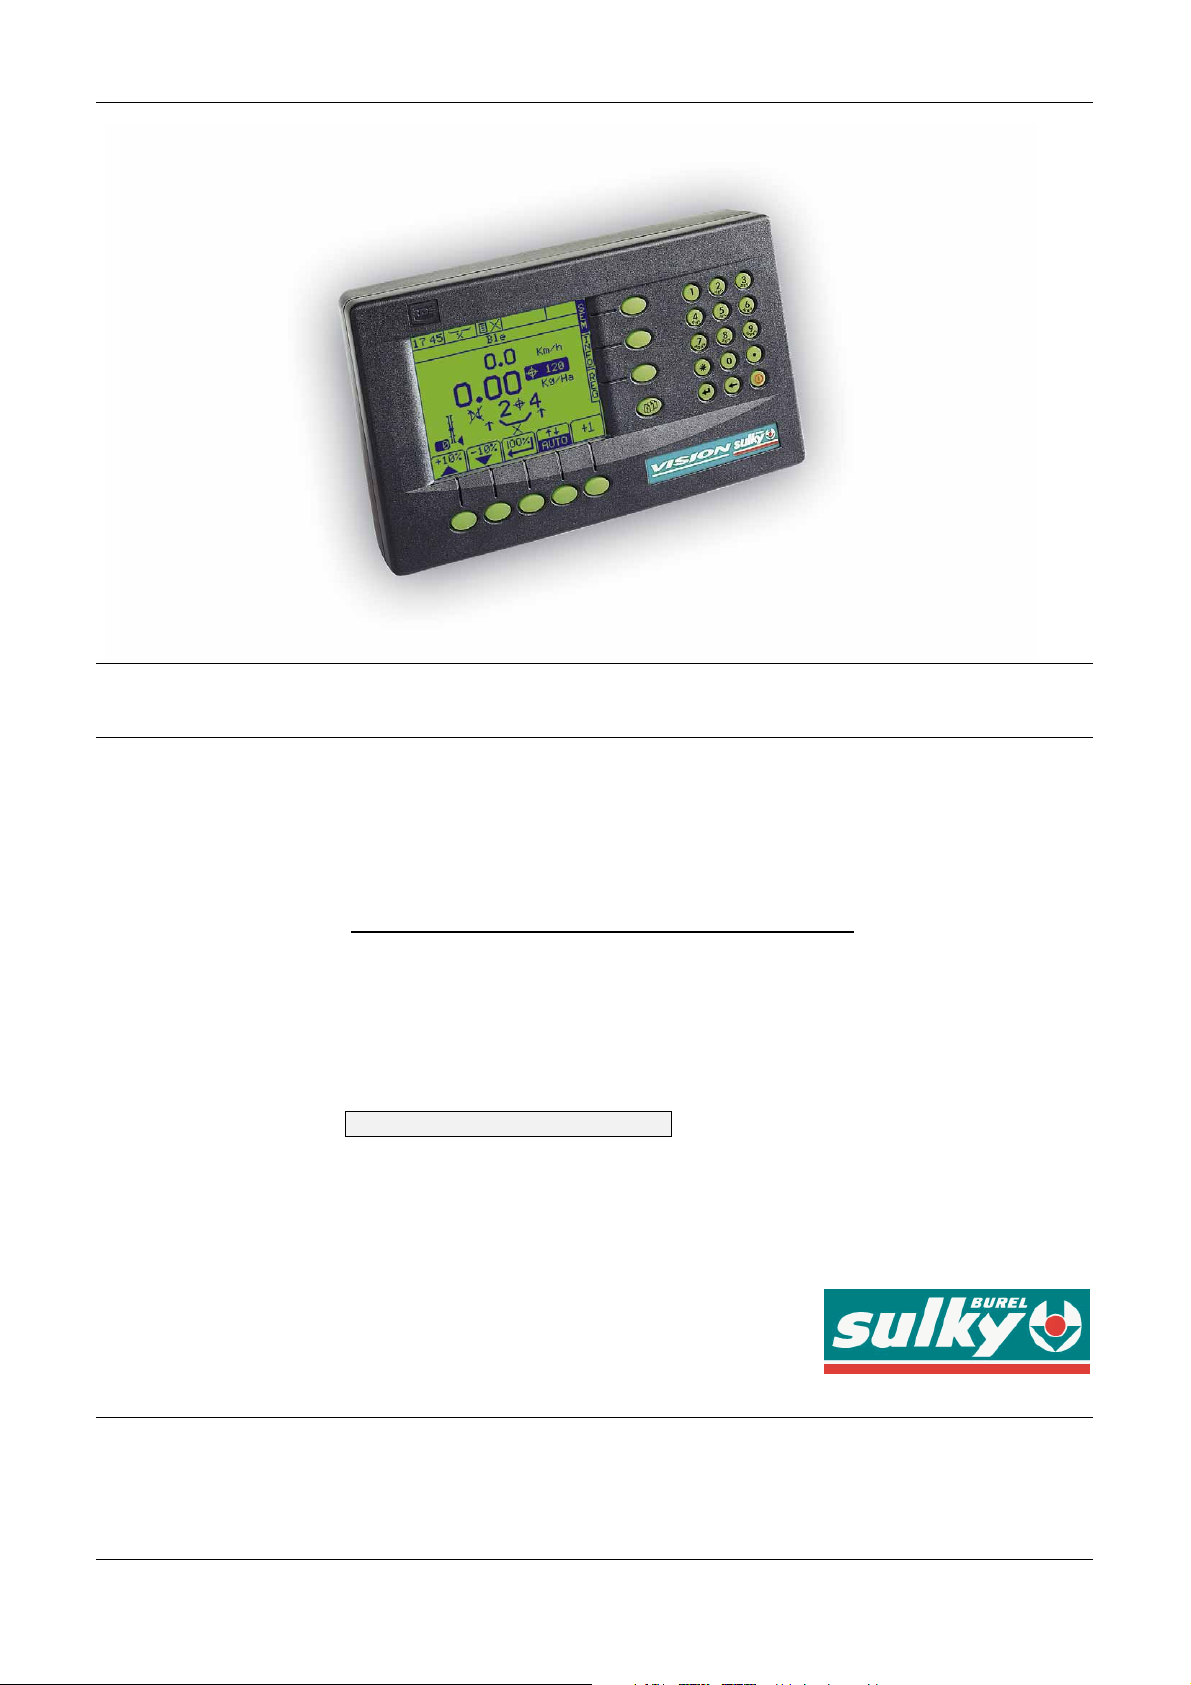
VISION SPB
Utilisateur - User - Benutzer
Sulky Burel
BP 92111 - rue Fabien Burel
35221 Châteaubourg Cedex- FRANCE
Tél: 02.99.00.84.84 - Fax: 02.99.62.39.38
Site Internet : www.sulky-burel.com
e-mail : info@sulky-burel.com
A LIRE ATTENTIVEMENT AVANT D’UTILISER LE BOITIER
PLEASE READ CAREFULLY BEFORE USING THE CONTROL BOX
VOR GEBRAUCH DES ELEKTRONIKGERÄTS SORGFÄLTIG LESEN
Réf: 400 226 - F-GB-D/SEM/C-01
• Respecter les instructions de cette notice.
• Respecter les instructions du manuel d’utilisation Semoir correspondant.
• Ne jamais quitter le poste de conduite lorsque le tracteur est en marche.
• Réaliser les réglages du Semoir tracteur à l’arrêt.
• Assurez-vous qu’il n’y ait personne autour de la machine avant d’effectuer l’étalonnage du VISION.
• Ces symboles sont utilisés dans cette notice chaque fois que des recommandations concernent votre sécurité, celle
d’autrui ou le bon fonctionnement de la machine.
• Transmettez impérativement ces recommandations à tout utilisateur de la machine.
Risque d’accident Risque d’endommager
la machine
Faciliter le travail
F
GB
D
Consignes de sécurité
Safety instructions
Sicherheitsvorschriften
• These symbols are used in these instructions every time recommendations are provided concerning your safety, the
safety of others or the correct operation of the machine.
• These recommendations must be given to all users of the machine.
Risk of accident Risk of damage
to the machine
Operating tip
• Diese Symbole werden in dieser Anleitung jedes Mal dann benutzt, wenn Empfehlungen für Ihre und anderer Personen
Sicherheit oder den einwandfreien Betrieb der Maschine gegeben werden.
• Es ist unerlässlich, diese Empfehlungen an alle Benutzer der Maschine weiterzugeben.
Unfallgefahr Gefahr, die Maschine
zu beschädigen
Arbeitserleichterung
2
• Follow the instructions contained in this manual.
• Follow the Seed drill User Manual recommendations.
• Never leave the driver’s position whilst the tractor is running.
• Carry out Seeddrill adjustments with the tractor stopped.
• Make sure no one is near the machine before calibrating the VISION unit.
•Die Anweisungen dieser Anleitung einhalten.
•Die Anweisungen des Benutzerhandbuchs des entsprechenden Drillmaschine einhalten.
• Den Führerstand niemals bei laufendem Schleppermotor verlassen.
•Einstellungen des Drillmashine bei ausgestelltem Schlepper vornehmen.
• Darauf achten, dass sich beim Kalibrieren des VISION niemand im Maschinenbereich aufhält.

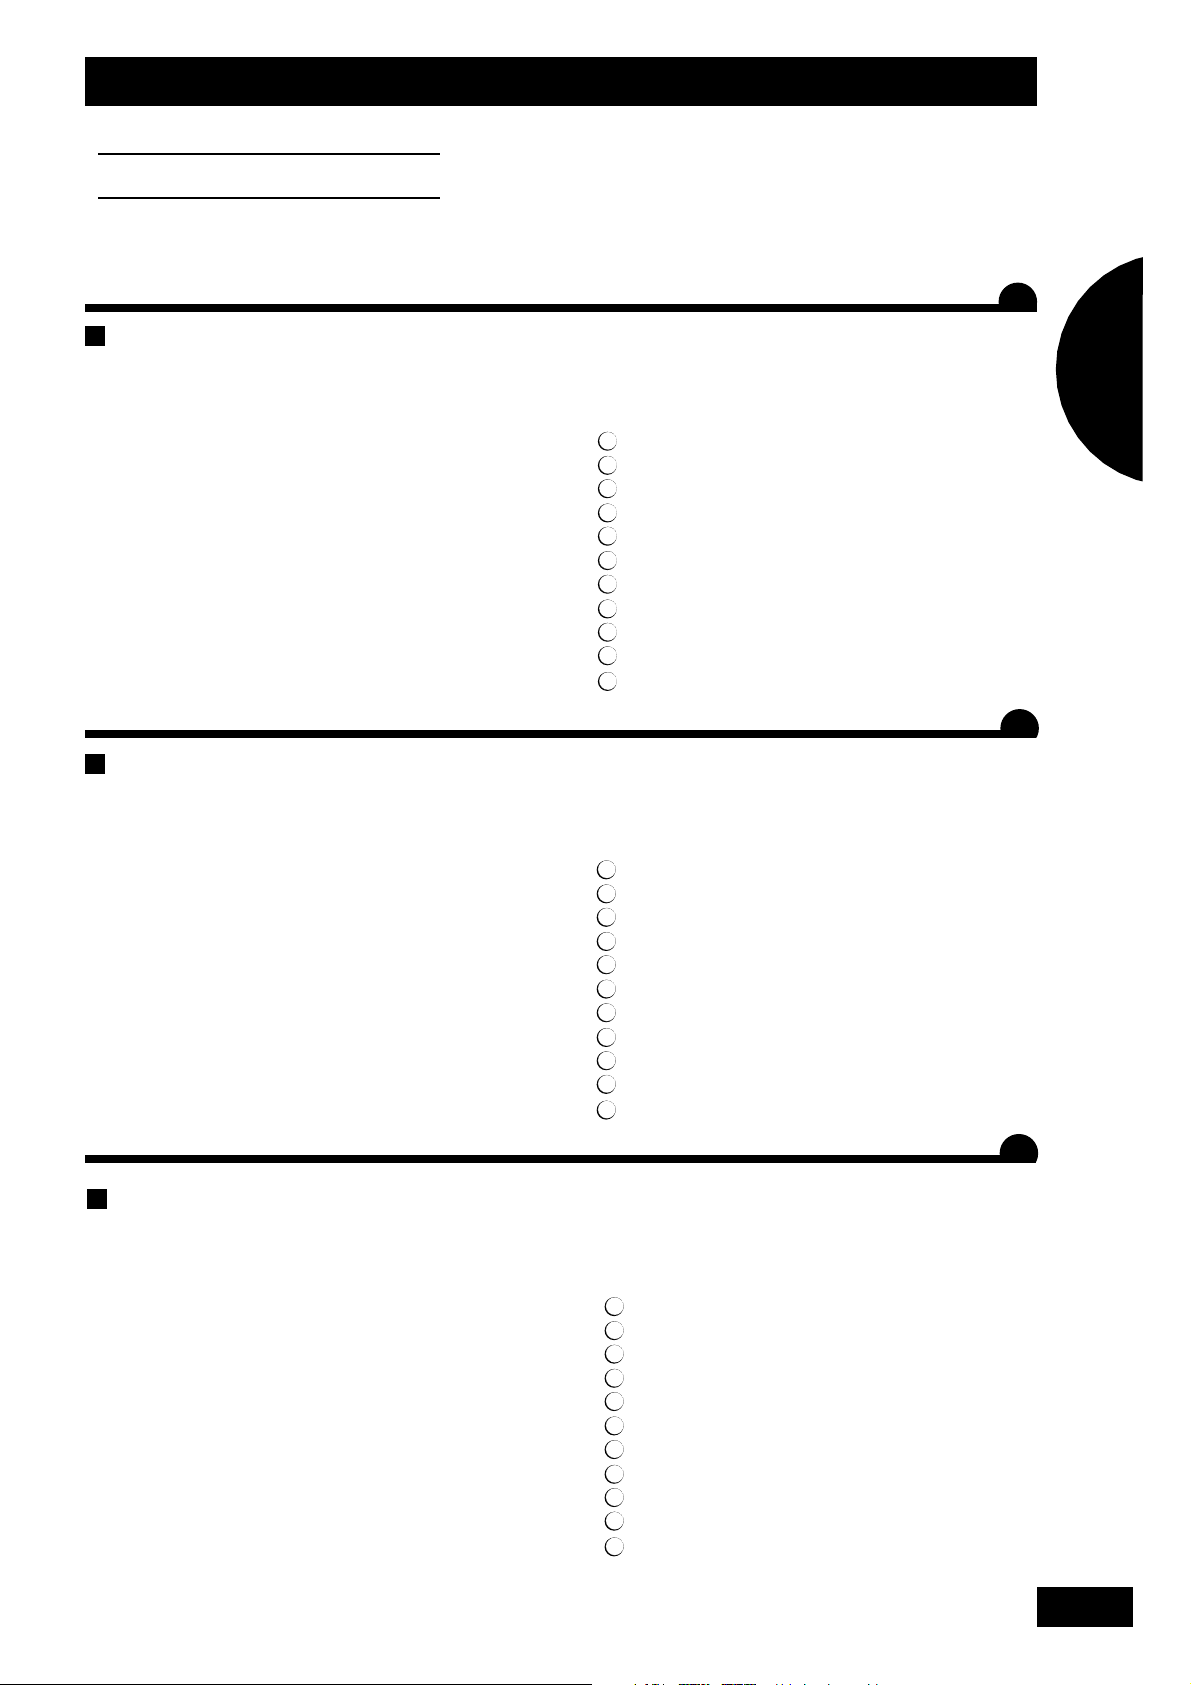
Pages
PRESENTATION
SOMMAIRE
Français
6-7
8-9
10-11
12-17
• A Présentation du système Vision SPB
• B Connexion au tracteur
• C Boîtier de commande Vision
• D Présentation des fonctions
Pages PROGRAMMATION
18-23
24-27
28-31
32-33
34-35
36-37
• A Calibrage
• B Choix de la semence
• C Réglage du débit
• D Jalonnage
• E Modulation
• F Fonctions complémentaires
Pages
38-39
40-41
42-43
• Français
• Anglais
• Allemand
Lire attentivement la notice avant l’utilisation. Comprendre son
boîtier électronique c’est mieux l’utiliser. En français suivre le symbole.
F
Pages INFORMATIONS
44-45
46-47
48-49
50-51
52-54
• A Enregistrement des données
• B Modulation automatique
• C Diagnostique/Paramètrage
• D Maintenance
• E Pannes/Remèdes
MISE EN ROUTE RAPIDE
1
2
3
4
3

CONTENTS
Read the operator's manual carefully before use. Understanding your electronic unit
will help you make better use of it. English instructions: follow this
symbol.
GB
English
Pages
PRESENTATION
6-7
8-9
10-11
12-17
Pages PROGRAMMING
18-23
24-27
28-31
32-33
34-35
36-37
Pages
38-39
40-41
42-43
• French
• English
• German
Pages INFORMATIONS
44-45
46-47
48-49
50-51
52-54
QUICK POWER UP
4
• A Presentation of the VISION SPB system
• B Tractor interface connections
• D VISION control unit
• E Functions
• A Calibration
• B Choosing the seed
• C Output adjustment
• D
Marking out
• E Modulation
• F Additional functions
• A Saving data
• B Automatic modulation
• C Diagnosis/Configuration
• D Maintenance
• E Faults/Solutions

• A Kalibrierung
• B Saatart wählen
• C Streumengeneinstellung
• D Fahrgassenmarkierung
• E Dosierungsänderung
• F Zusatzfunktionen
• A Beschreibung des Vision SPB Systems
• B Schlepperanschluss
• D Bordcomputer VISION
• E Funktionsbeschreibungen
5
VERZEICHNIS
Deutsch
Anleitung vor Benutzung sorgfältig durchlesen. Das Elektronikgerät richtig zu
verstehen, heißt, es besser (aus)nutzen zu können. Die deutsche Fassung ist
mit gekennzeichnet.
D
Seite
BESCHREIBUNG
6-7
8-9
10-11
12-17
Seite
PROGRAMMIERUNG
18-23
24-27
28-31
32-33
34-35
36-37
Seite
38-39
40-41
42-43
• Französisch
• Englisch
• Deutsch
Seite
INFORMATIONEN
44-45
46-47
48-49
50-51
52-54
SCHNELLE INBETRIEBNAHME
1
2
3
4
5
• A Speichern der Daten
• B Automatische Modulation/Veränderung
• C Diagnose/
Parametrierung
• D Wartung
• E Störungen/ Störungsbeseitigung
Présentation
Presentation
Beschreibung
A
7
6
9
10
3
8
2
5
4
1
11
6
1
2
3
4
5
6
7
8
9
10
11
Présentation
Presentation
Beschreibung
1
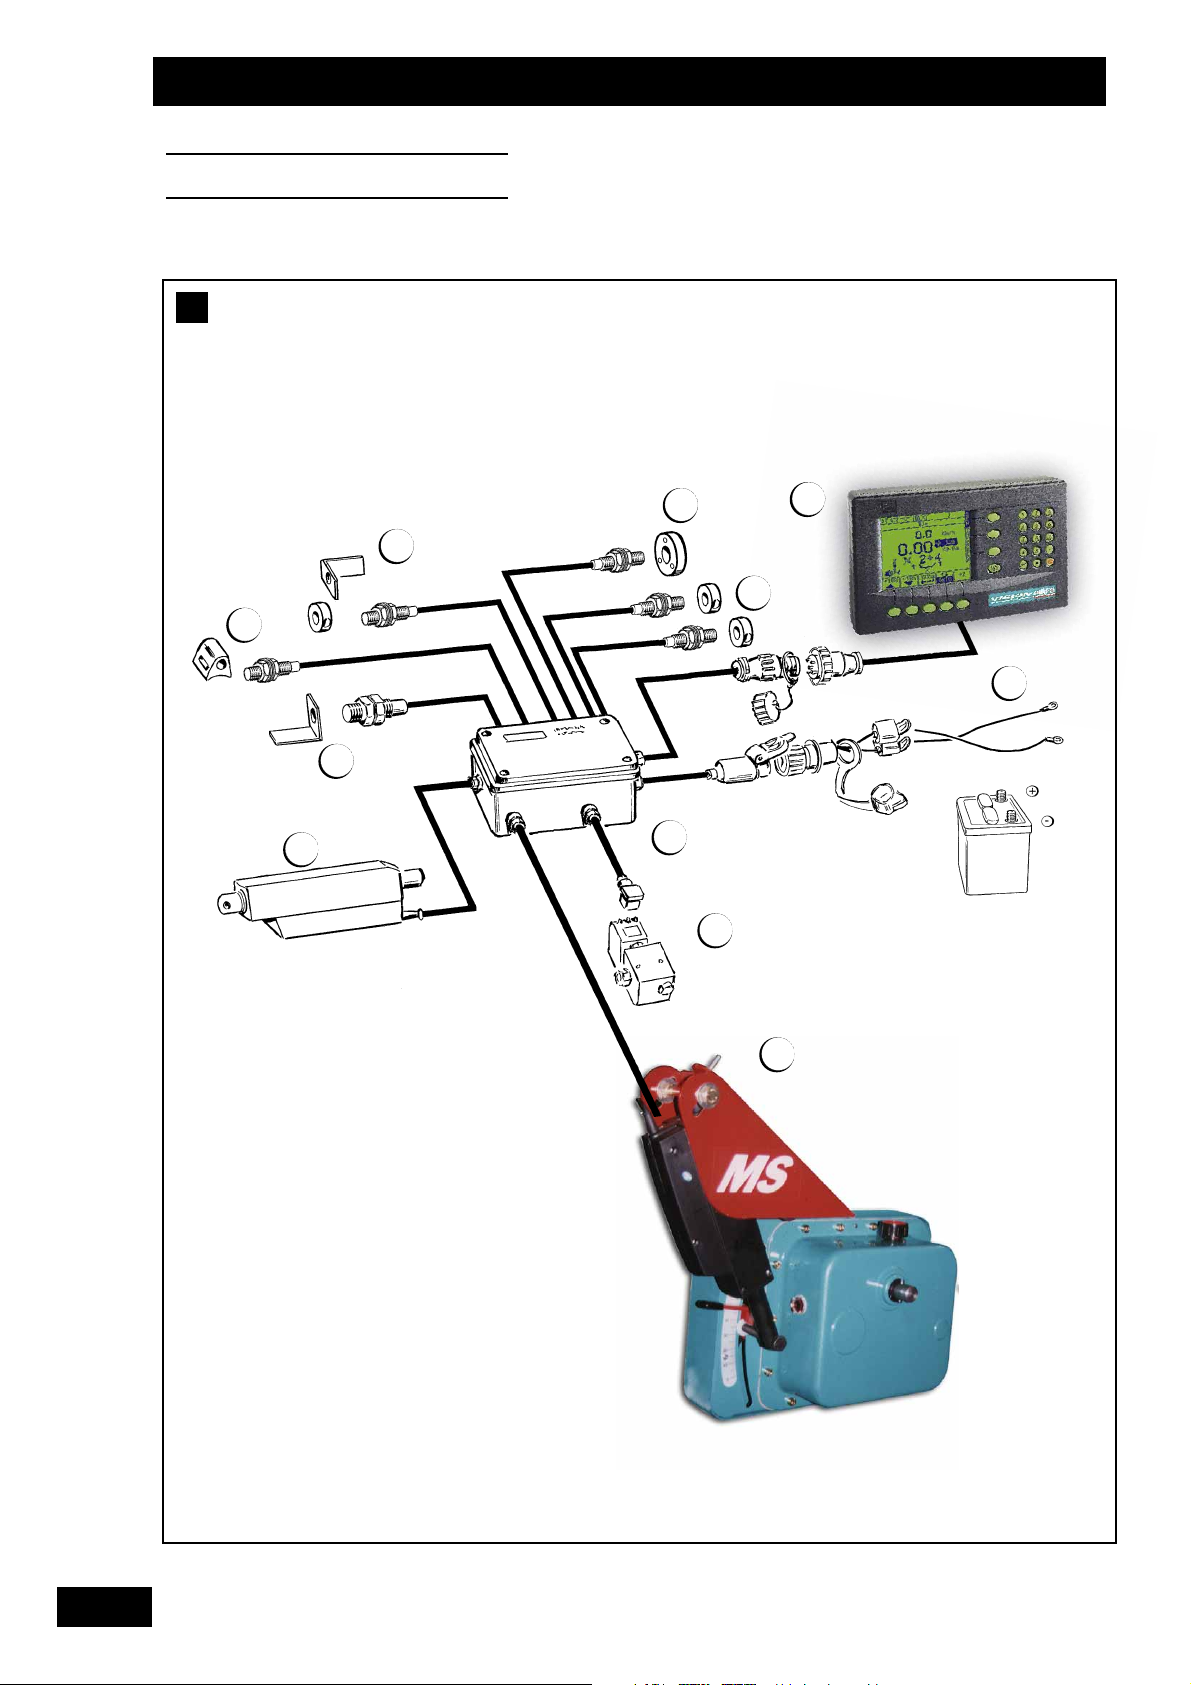
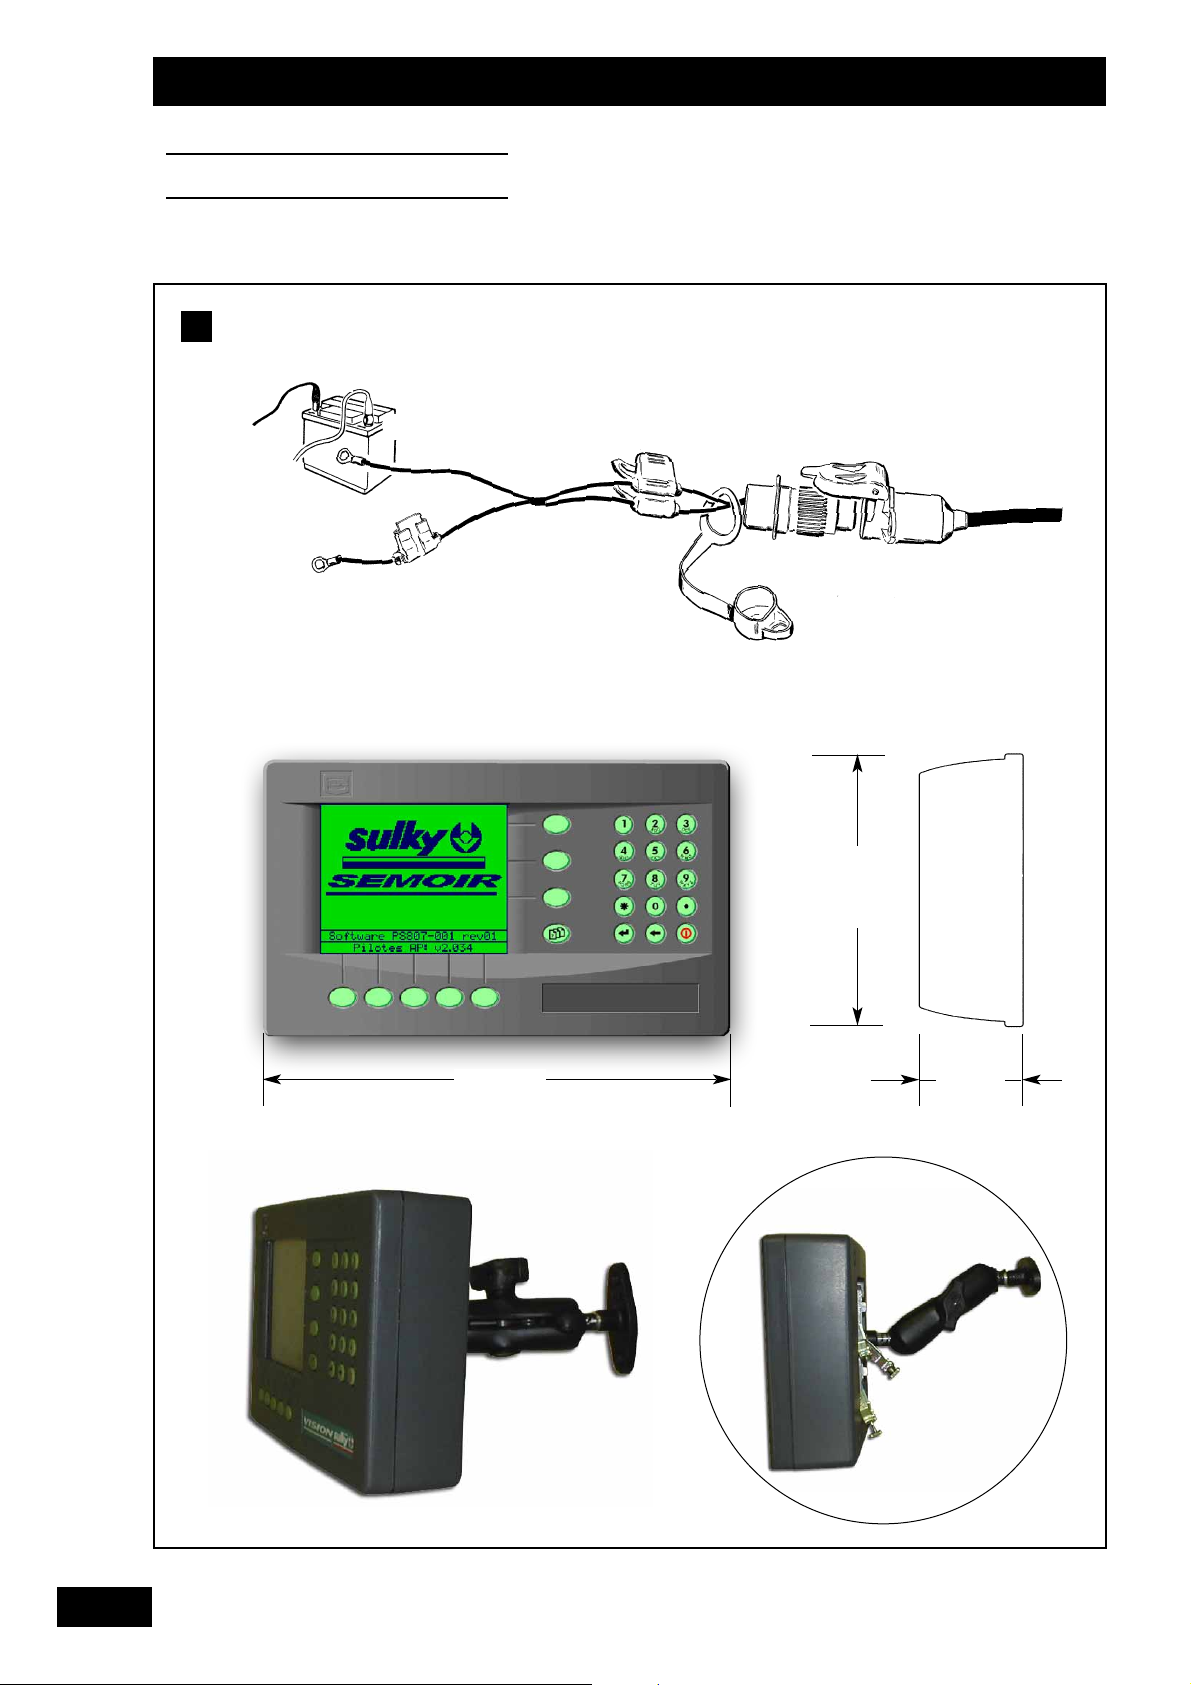
Présentation du système VISION SPB
a)
Introduction
• Le boîtier VISION est un instrument de réglage et de
contrôle.
•Les informations de poids et de surface données par le
VISION, ne peuvent pas être utilisées pour des
transactions commerciales.
b) Présentation
Boîtier VISION
Faisceau d’alimentation avec fusible 5 A (en option)
Boîte de connexion sur semoir
Capteur turbine.
Capteur de jalonnage
Capteur de vitesse / Surface
Capteur de l’arbre de distribution
Electrovanne jalonnage de prélevée
Capteur de fin de trémie
Jalonnage de post levée
Modulation de débit
GB
F
A
D
A
A
7
1
2
3
4
5
6
7
8
9
10
11
1
2
3
4
5
6
7
8
9
10
11
Presentation of the VISION SPB system
a) Introduction
• The VISION unit is used for performing adjustments and
checks.
•Weight and surface area information provided by the
VISION unit may not be used for business purposes.
b) Presentation
VISION unit
Power bundle with 5 amp fuse (optional)
Seed-drill connector unit
Turbine sensor
Marking sensor
Speed/area sensor
Metering device shaft sensor
Pre-emergence marking solenoid valve
Hopper-end sensor
Jalonnage de post levée
Application rate adjustment
Beschreibung des Systems VISION SPB
a)
Einführung
• Das VISION-Gerät ist ein Steuer- und Kontrollinstrument.
• Die von VISIONangegebenen Daten zu Gewicht und Fläche
dürfen nicht zu Geschäftszwecken verwendet werden.
b) Beschreibung
VISION-Gerät
Versorgungskabel mit 5 A-Sicherung (Sonderausrüstung)
Anschlussgerät an Drillmaschine
Turbinensensor
Markierungssensor
Sensor Geschwindigkeit/ Fläche
Sensor Verteilerwelle
Elektroventil für Vorauflaufmarkierung
Sensor Trichterfüllstand
Nachauflaufmarkierung
Aussaatmengenänderung
Présentation
Presentation
Beschreibung
B
237 mm
75 mm
142 mm
1
+
1
-
8

B
Présentation
Presentation
Beschreibung
Connexion au tracteur
• Il est impératif de brancher l’alimentation électrique
du boîtier directement à la batterie 12 volts du tracteur.
•Lorsque la prise est branchée, le boîtier peut être allumé.
•Le boîtier VISION possède un accumulateur permettant
de garder en mémoire les données programmées.
•Le boîtier VISION doit être est protégé par des fusibles 5 A
sur son alimentation.
•Le boîtier doit être monté de manière à ce qu’il soit
bien visible par le conducteur.
R
EMARQUE:
Si votre tracteur est pré-équipé avec une prise électrique
identique (cobo), vérifier que le fusible est bien de 5A.
GB
F
D
B
B
9
Tractor interface connections
• The unit power supply must be connected directly to the
12-volt battery of the tractor.
• Once the plug has been connected, the unit can be turned
on.
•The VISION unit features a buffer battery which enables it
to keep programmed data and settings in memory.
•The VISION unit is protected by 5-Amp fuses.
•The unit must be sited so as to be clearly visible to the
driver.
N
OTE
If your tractor has been pre-fitted with an identical socket
(cobo), make sure that it includes a 5-Amp fuse.
Schlepperanschluss
• Es ist notwendig, die Stromversorgung des Bordcomputers
direkt an die 12V-Batterie des Schleppers anzuschließen.
• Sobald der Stecker angeschlossen ist, kann der Bord-
computer angeschaltet werden.
•Der Bordcomputer VISION verfügt über einen
Akkumulator, der die programmierten Daten speichert.
• Die Stromversorgung des VISION-Elektronikgerät durch 5
A-Sicherungen schützen.
• Der Computer muss so installiert sein, dass er gut vom
Fahrer gesehen und abgelesen werden kann.
A
N
MERKUNG
:
Wenn Ihr Schlepper bereits mit dem gleichen Stecker (cobo)
ausgestattet ist, prüfen, dass dieser auch durch eine 5 A
Sicherung geschützt ist.
10
Présentation
Presentation
Beschreibung
C
3
8 9 10
2
1
4
5
6
7

10
7
8
9
1
2
3
4
5
6
10
7
8
9
1
2
3
4
5
6
10
7
8
9
1
2
3
4
5
6
11
GB
F
D
Présentation
Presentation
Beschreibung
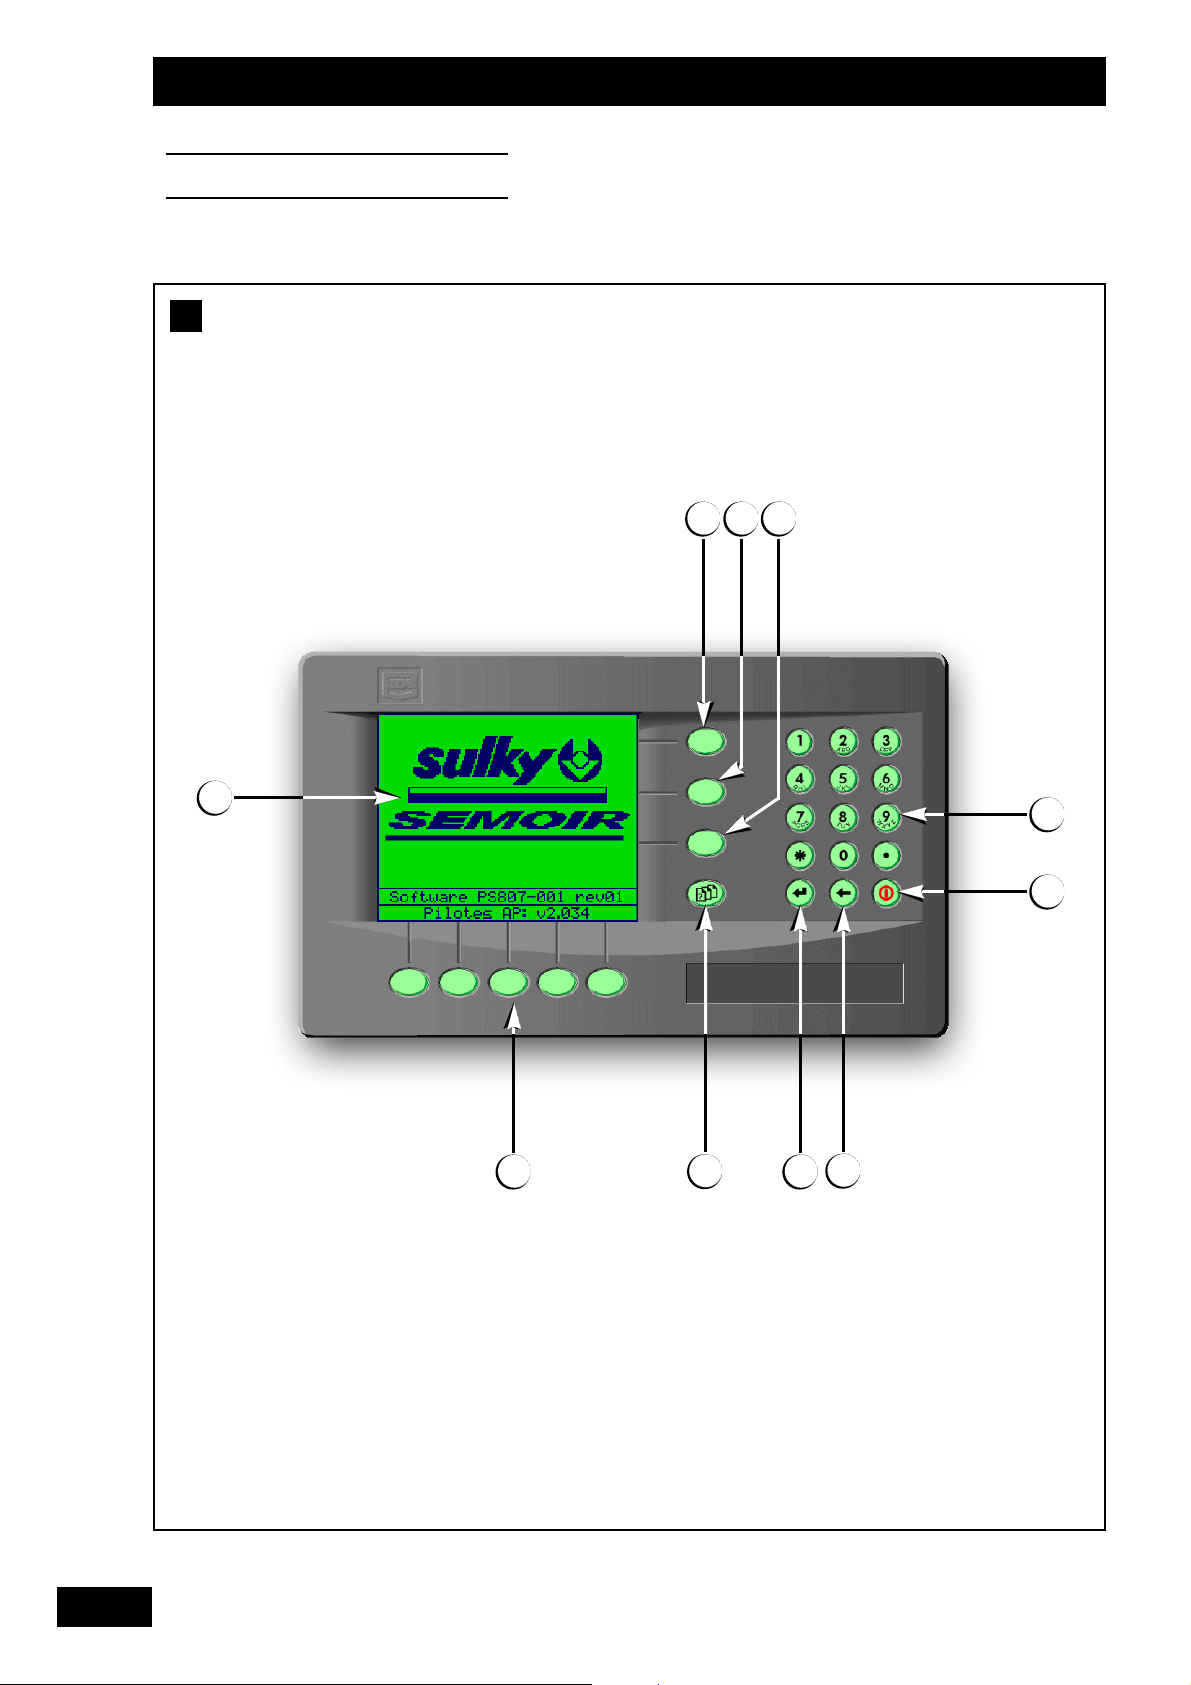
Boîtier de commande VISION
Mise sous tension
Pavé numérique et alphabétique
Ecran multifonction
Touches des fonctions
Touche menu paramétrage usine
et diagnostique revendeur
Touche de “confirmation” ou “entrée” d’un paramétrage
Touche “retour”
Touche “menu semis” : utilisée en cours de semis
Touche “menu information” : utilisée en consultation
Touche “menu réglage” : utilisée pour l’étalonnage
• Le boîtier fonctionne sous la forme d’un menu défilant.
• Prendre le temps de lire les informations.
C
VISION control unit
Power up
Alpha-numeric pad
Multifunction screen
Function keys
Factory settings and diagnostic key
Settings confirmation or ENTER key
C
Bordcomputer VISION
Unterspannungsetzen
Zahlentastenfeld
Multifunktioneller Bildschirm
Funktionstasten
Taste des Menüs Werksparametrierung und Diagnose des
Verkäufers
„Bestätigungs“-Taste oder „Eingabe“ einer Parametrierung
C
„Zurück“-Taste
Taste „Menü Ausbringung“: wird bei der Ausbringungsarbeit verwendet
Taste „Informations-Menü“: wird bei Anfragen benutzt
Taste „Menü Einstellung“: wird zum Eichen verwendet
• Das Gerät funktioniert mit ablaufenden Menüs.
• Nehmen Sie sich die Zeit, die angezeigten Informationen zu lesen.
“Backspace” key
“Drilling menu” key: use during drilling
“Info menu ” key: used for diagnosis or monitoring
“Settings menu” key: use for calibration
• The unit operates according to a scroll-down menu.
• Take time to read all the data and info.
Présentation
Presentation
Beschreibung
D
a)
10
14
13
9
87
6
5
11
12
10
4
3
2
1
12
Funktionsbeschreibungen
a) Menü Ausbringung
• Das Menü Ausbringung wird während der Arbeit verwendet.
Sie verfügen über die wesentlichsten Informationen zur Kontrolle.
Uhrzeit
Fahrgeschwindigkeit. Diese kann geringfügig von der des
Geschwindigkeitsmessers des Schleppers abweichen.
Streumengendosierung.
Positionsindikator des elektrischen Auslösers des MS
Modulationstaste + 10%
6
7
8
9
10
11
12
13
14
3
2
1
4
5
6
7
8
9
10
11
12
13
14
3
2
1
4
5
6
7
8
9
10
11
12
13
14
3
2
1
4
5
GB
F
D
Présentation
Presentation
Beschreibung
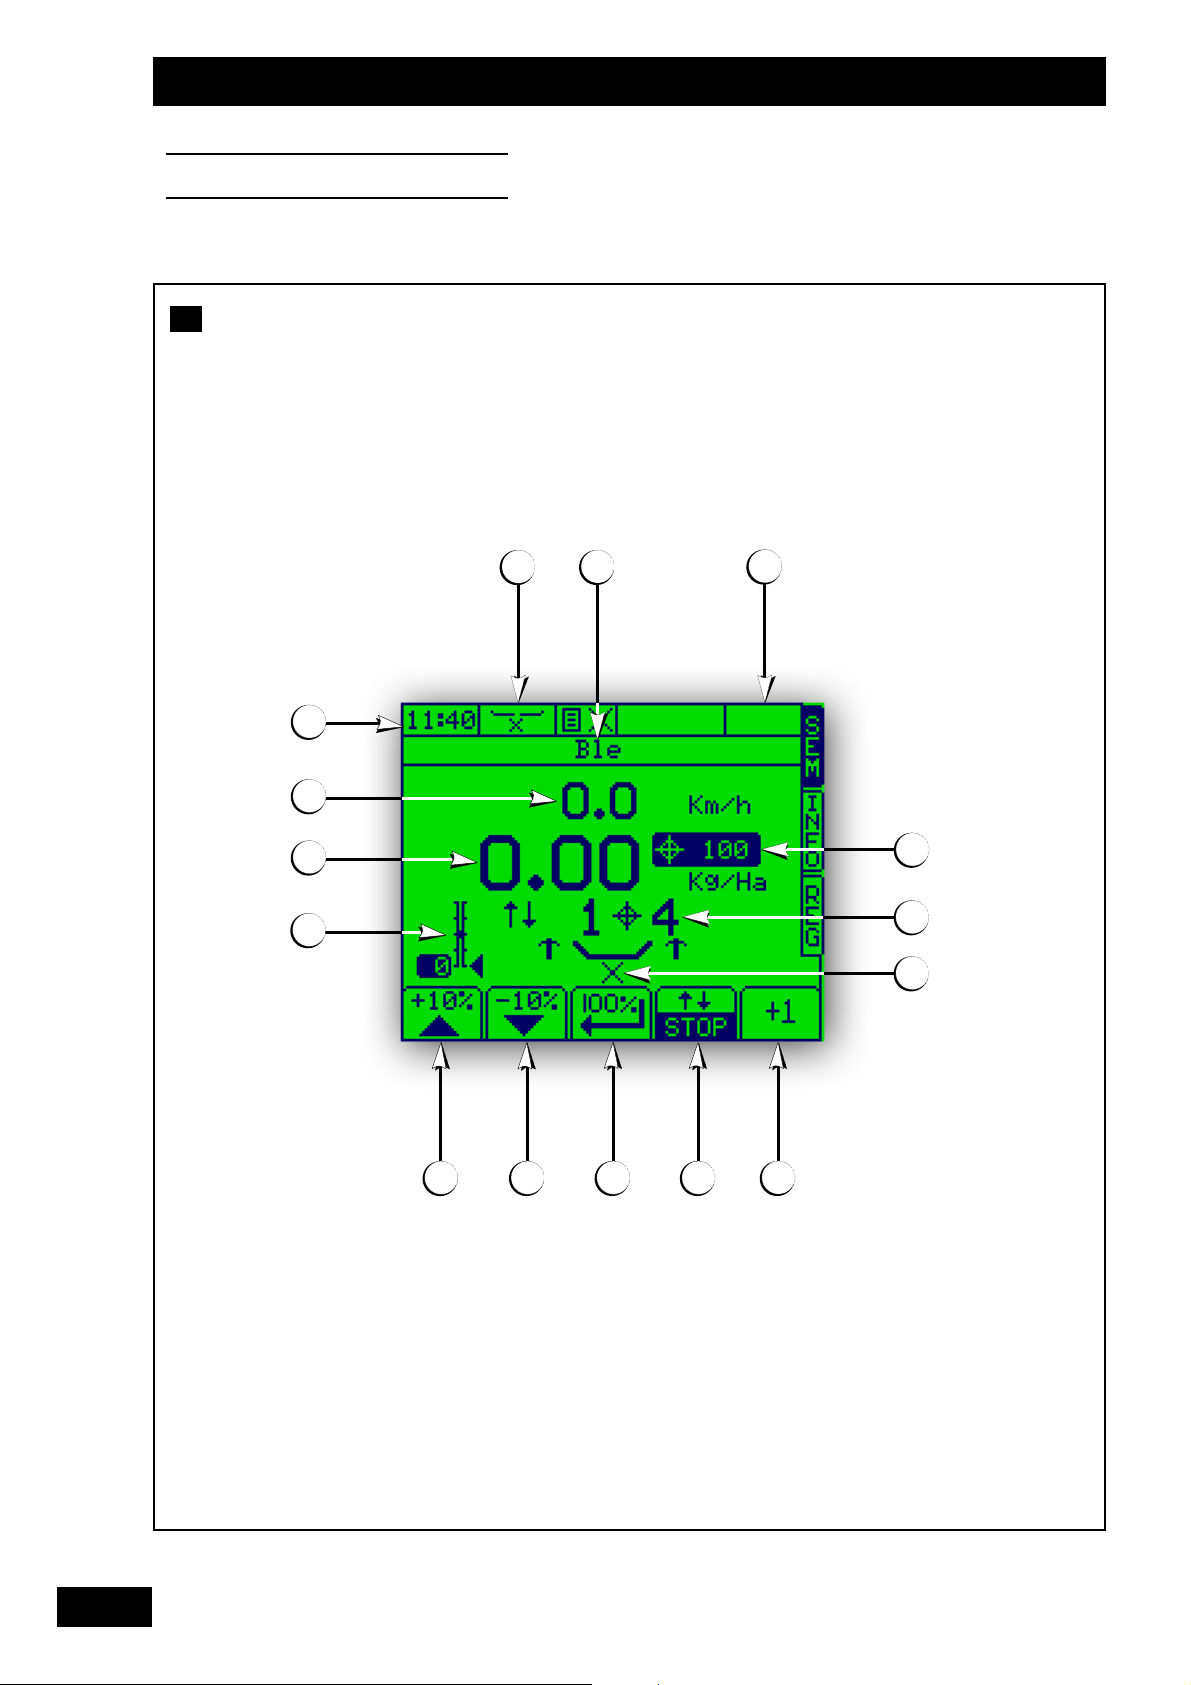
Présentation des fonctions`
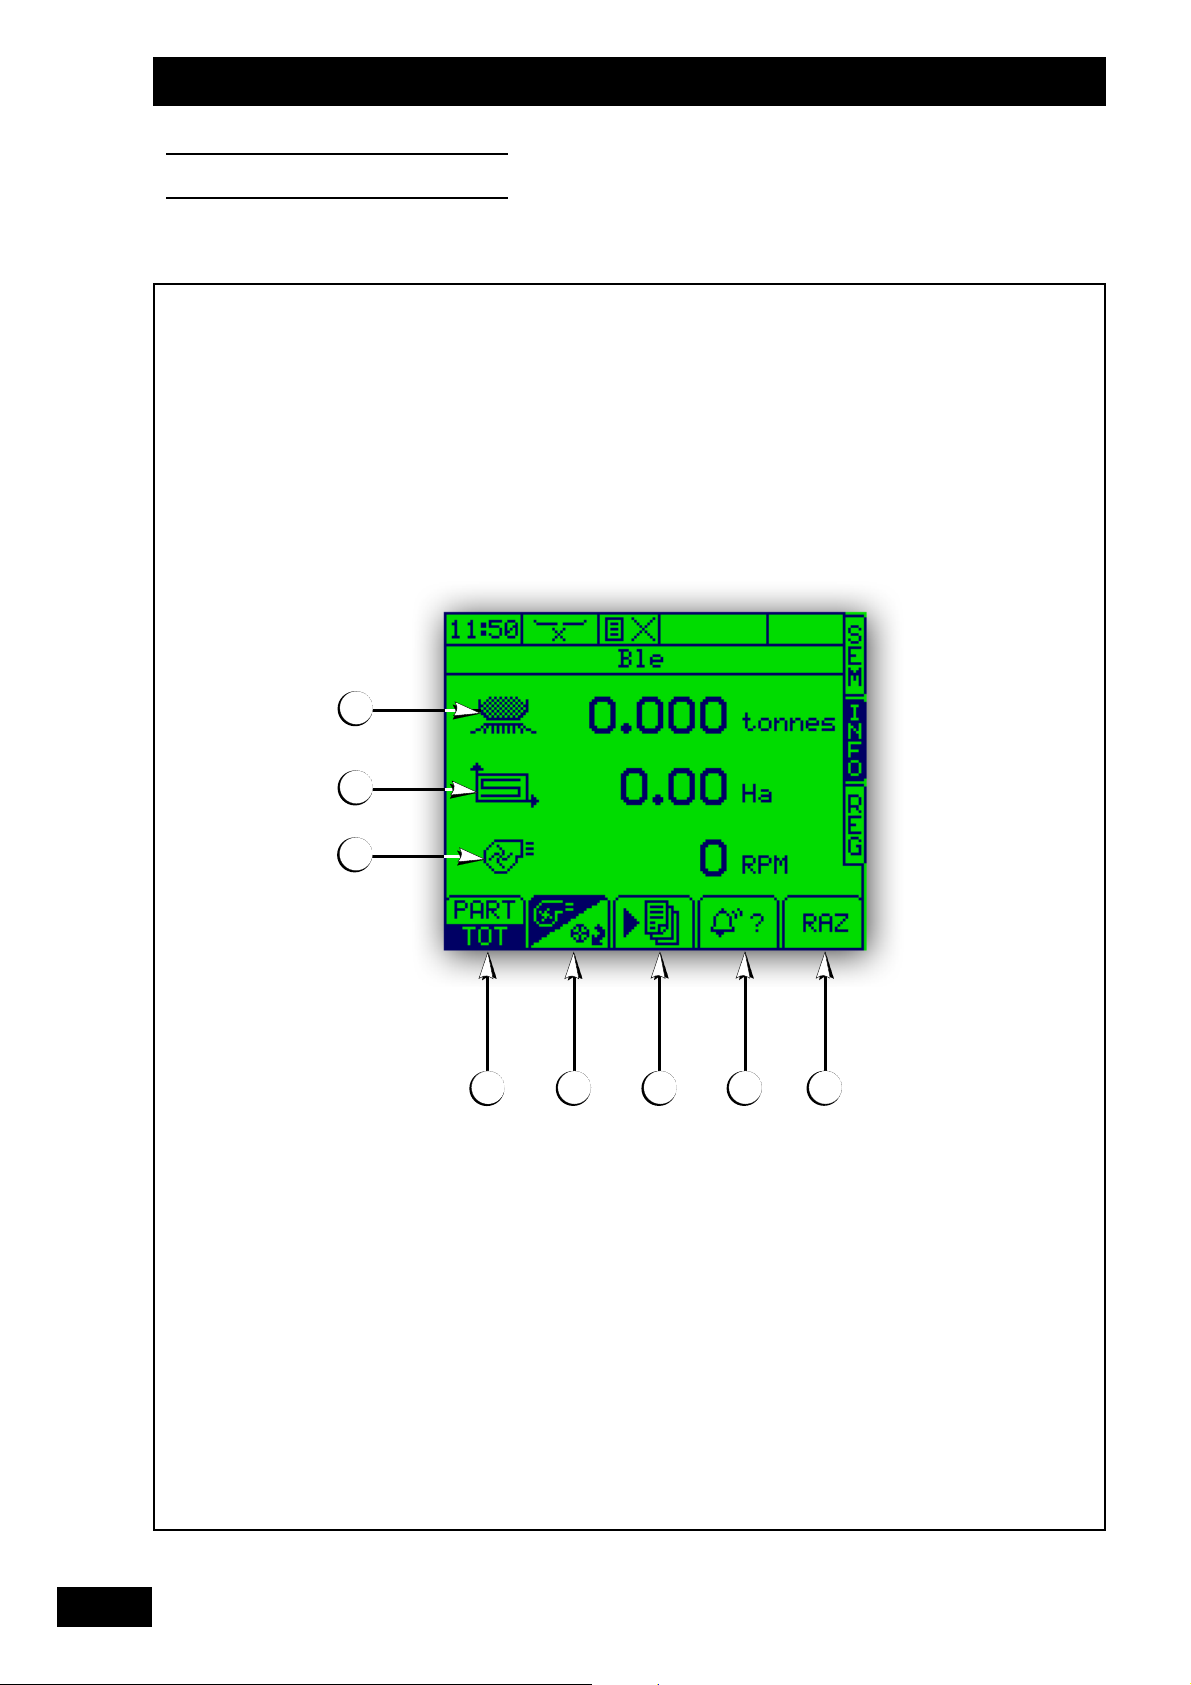
a) Menu semis
• Le menu semis est utilisé en cours de travail.
Vous disposez des principales informations de contrôle.
Heure
Vitesse d’avancement. Elle peut être légèrement
différente du compteur tracteur.
Dose de semis.
Indicateur de positionnement du vérin électrique du MS.
Touche modulation + 10%
Touche modulation - 10%
Retour à la dose hectare de référence après une modulation.
Arrêt du comtage jalonnage.
Avance manuel du jalonnage.
Indicateur de fonctionnement de la distribution.
Indication passage du jalonnage.
Dose hectare programmée en Kg/ha ou gr/m
2
Alarme
Semence sélectionnée.
D
D
D
13
Functions`
a) Drilling menu
• Use the drilling menu while the work is being performed.
It gives you the main controlling data:
Time
Working speed. It may be slightly different from that on
the tractor speedometer.
Seed load.
MS actuator position reading.
+10% modulation key
-10% modulation key
Restoration of the reference dose/hectare following
modulation.
Stop marking count.
Advance the marking manually.
Metering-system operating indicator.
Marking pass reading.
The per-hectare rate is programmed in Kg/ha or gr/m2.
Alarm
Seed selected.
Modulationstaste - 10%
Zurück zur Referenzstreumenge/ha nach einer Modulation.
Stop Fahrgassenzählung.
Manuelles Vorstellen der Fahrgassenmarkierung.
Betriebsanzeiger Saatgutverteilung.
Anzeige Fahrgassenmarkierung.
Programmierte Hektardosierung in kg/ha bzw. g/m2.
Alarm
Gewählte Saatart.
Présentation
Presentation
Beschreibung
b)
8
76
5
4
3
2
1
14
b) Informations-Menü
• Das Angabenmenü wird zum Abfragen der Aussaatleistung
verwendet.
Gesäte Tonnenzahl. (Theoretisch)
Gesäte Hektarfläche. (Reell)
Turbinenumdrehungszahl oder Verteilerrotation.
Wahltaste für Teilangaben zur Parzelle bzw.
Gesamtangaben für die gesamte Aussaatmenge.
Wahl Turbine bzw. Verteiler
Wahltaste: Datenspeicherung oder DGPS-Modus.
Informationstaste: aktivierte Alarmfunktionen.
Taste zur Nullstellung von Hektar- und Mengenzähler.
5
6
3
2
1
4
8
7
5
6
3
2
1
4
5
6
3
2
1
4
GB
F
D
Présentation
Presentation
Beschreibung
b) Menu informations
• Le menu information est utilisé en consultation pour
connaître les performances du chantier de semis.
Nombre de tonnes semées. (Théorique)
Surface en hectare semée. (Réelle)
Régime de la turbine ou rotation de la distribution.
Touche de sélection en information partielle
pour la parcelle ou totale pour le chantier de semis.
15
8
7
b) Info menu
• Consult the information menu to enquire about drilling
performance.
Number of tonnes sown. (theoretical)
Surface area covered in hectares. (effective)
Turbine speed or metering system rpm.
Partial (plot) or full (site) drilling information select key.
Sélection turbine ou distribution.
Touche de sélection de la fonction enregistrement
des données et mode DGPS.
Touche d’information des alarmes actives.
Touche de remise à zéro des compteurs hectare et tonnage.
7
8
Turbine or metering system select key.
Selection key for data saving or GPS functions.
Active alarm info key.
Area and tonnage counter reset key.
16
Présentation
Presentation
Beschreibung
c)
65432
1
c) Menü Einstellung
• Das Einstellmenü dient zur Inbetriebnahme der VISION-
Drillmaschine. Entweder zur Speicherung endgültiger Daten
oder zur Speicherung der laufenden Aussaatdaten.
Daten zur Einstellung des Bordcomputers:
1- Einstellung der Uhrzeit
2- Einstellung der Bildschirmhelligkeit
3- Einstellung der Maßeinheiten
4- Einstellung der Zunge
5- Hilfe
Kalibriertaste für die Fahrgeschwindigkeit
3
4
6
5
1
2
3
4
6
5
1
2
3
4
6
5
1
2
17
GB
F
D
Présentation
Presentation
Beschreibung
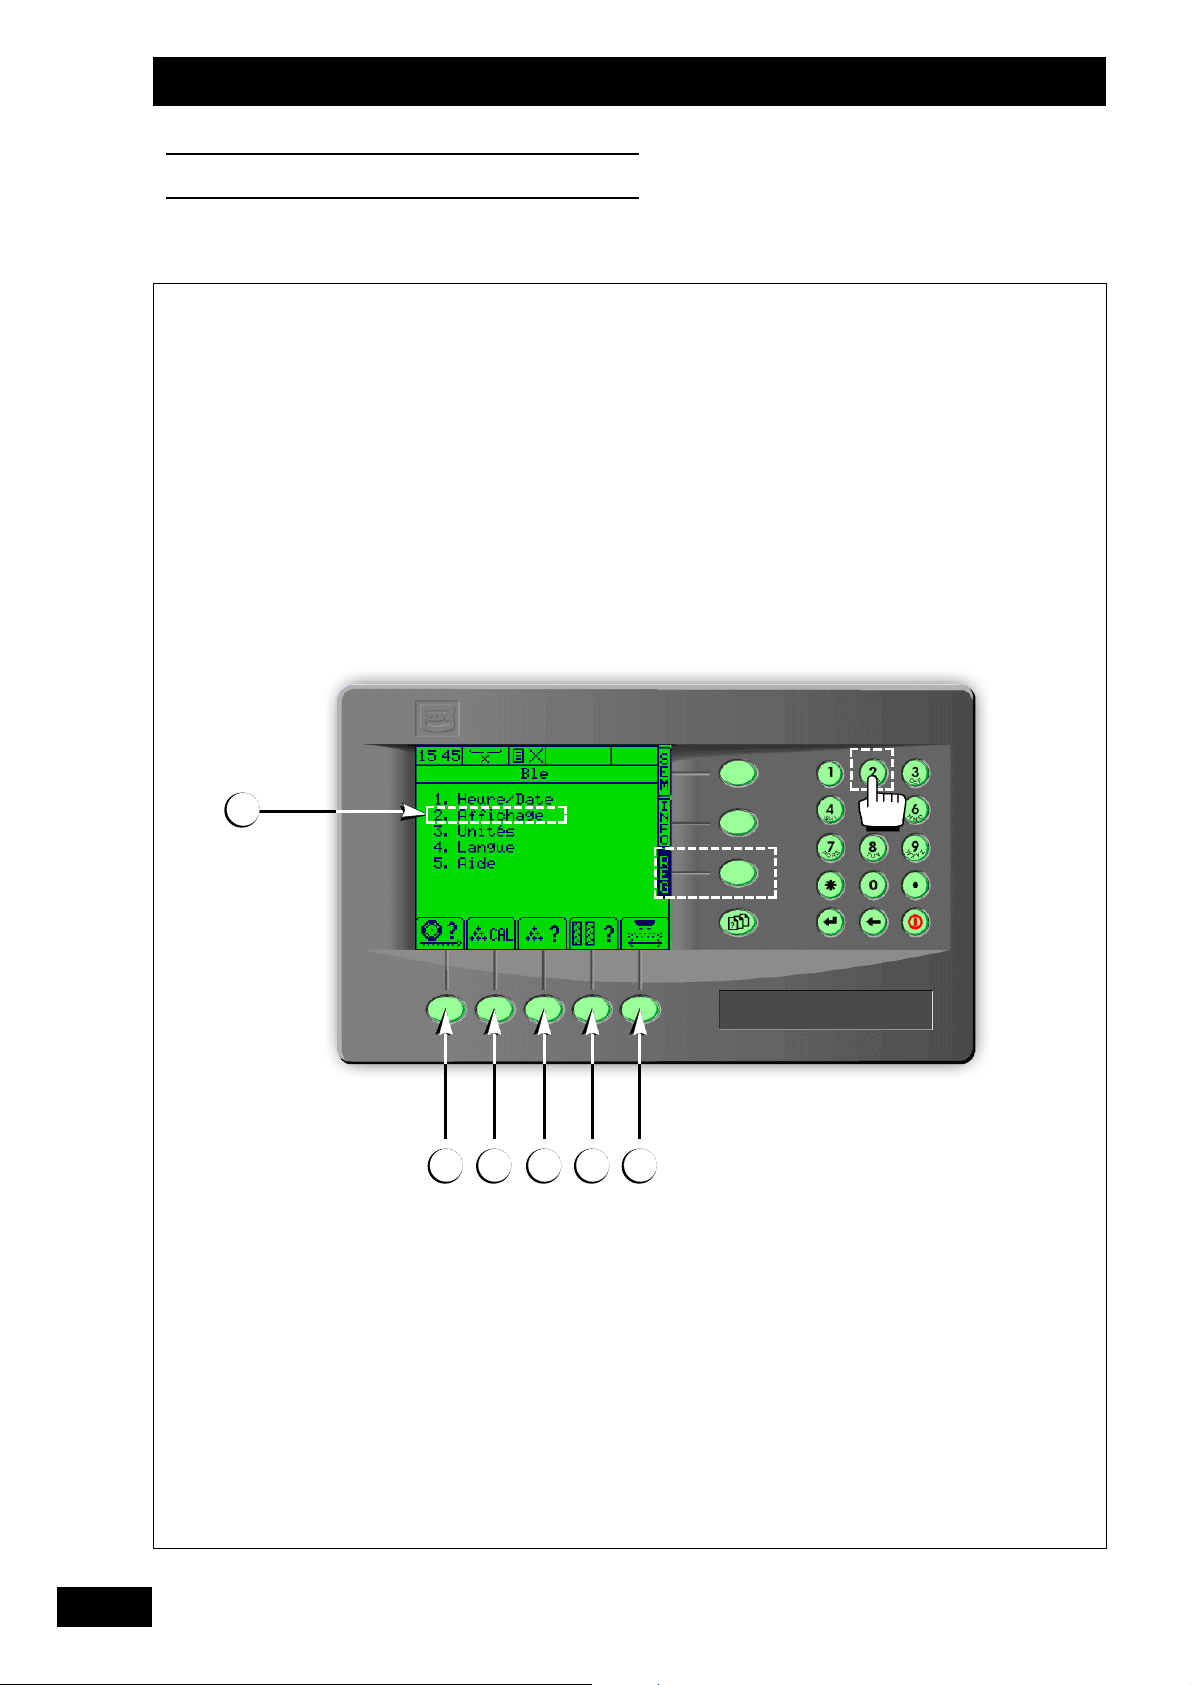
c) Menu réglage
• Le menu réglage est utilisé à la mise en route du Semoir
VISION. Soit pour l’enregistrement des données définitives,
soit pour l’enregistrement des données propres au chantier
de semis.
Données réglage du boîtier
1- Réglage de l’heure.
2- Réglage de la luminosité de l’écran.
3- Réglage des unités de mesure.
4- Réglage de la langue.
5- Aide
Touche de calibrage de la vitesse d’avancement.
Durchführungstaste Abdrehprobe.
Saatart-Wahltaste mit 8 Speicherplätzen, Eingabe des „TFaktors“ für jede Saatart.
Einstelltaste Fahrgassenmarkierung.
Wahltaste für die Arbeitsbreite zur Berechnung aller
Informationen des Bordcomputers.
Calibration test start key.
Seed memory select key (8 memory slots), and seedspecific "variable T" log.
Marking adjustment key.
Working width selection key for computation of all unit
data.
c) Settings menu
• Use the settings menu when starting up the VISION seed drill,
either to record final data or to record data for the particular
drilling site.
Unit settings:
1- Time settings
2- Screen brightness settings
3- Measurement units settings
4- Language settings
5- Help
Drive rate calibration keys
Touche de réalisation de l’essai de débit.
Touche de sélection de la semence mise en mémoire
(8 niveaux), et inscription du “Facteur T” propre
à chaque semence.
Touche réglage jalonnage.
Touche de sélection de la largeur de travail
pour le calcul de toutes les informations du boîtier.
 Loading...