


 Loading...
System 6
Dual Trigger Rotary Handpiece
ref 6205
Instructions For Use
2008/01 |
6205-001-700 Rev-A |
www.stryker.com |

2008/01 |
6205-001-700 Rev-A |
Important Information
The words WARNING, CAUTION and NOTE have special meaning and should be reviewed.
WARNING: Disregarding WARNING information may compromise the safety of the
patient and/or health care staff and may result in injury.
CAUTION: |
Disregarding CAUTION information |
|
may compromise product reliability |
|
and may result in damage. |
NOTE: |
NOTE information supplements and/ |
|
or clarifies procedural information. |
|
A triangle with an exclamation point |
|
alerts the health care professional to |
|
read and understand the accom- |
|
panying instructions, especially the |
|
operating, maintenance, and safety |
|
information. |
Intended Use
The Stryker System 6 Battery Powered Heavy Duty Dual Trigger Rotary Handpiece, when used with a variety of attachments, is intended for surgical procedures involving drilling, reaming, driving wire or pins, cutting bone and hard tissue.
Accessory Information*
WARNING: Use only Stryker-approved components and accessories, unless otherwise specified. Other accessories may result in increased electromagnetic emissions or decreased electromagnetic immunity of the system. DO NOT modify any component or accessory. Failure to comply may result in patient and/or health care staff injury.
DESCRIPTION |
REF |
Small Battery Pack................................................... |
6212 |
Large Battery Pack................................................... |
6215 |
Aseptic Battery Kit..................................................... |
6126 |
Small Aseptic Battery Kit........................................... |
6127 |
*See the System 6 Rotary Handpiece Attachments booklet for a complete list of attachments. Contact your Stryker sales representative for a complete list of additional accessories.
www.stryker.com

6205-001-700 Rev-A |
2008/01 |
|
|
User/Patient Safety*
 WARNINGS:
•Only trained and experienced health care professionals should use this equipment. Before using any system component or any component compatible with this system, read and understand the instructions. Pay special attention to WARNING information. Become familiar with the system components prior to use. Failure to comply may result in patient and/or health care staff injury.
•Upon initial receipt and before each use, operate the equipment and inspect each component for damage. DO NOT use any component if damage is apparent. Failure to comply may result in patient and/or health care staff injury.
•Perform recommended periodic maintenance as indicated in the instructions for use. Only trained and experienced health care professionals should maintain this equipment.
•Clean and sterilize handpieces, attachments and batteries before first and every use.
•DO NOT use this equipment in the presence of a mixture consisting of flammable anesthetic and air or with oxygen or nitrous oxide.
•Take special precautions regarding electromagnetic compatibility (EMC) when using medical electri-
cal equipment like the handpiece. Install and place the handpiece into service according to the EMC information in this manual. Portable and mobile RF communications equipment can affect the function of the handpiece.
•ALWAYS place the handpiece in the safe mode while the handpiece is idle, before installing or removing any accessory, or when passing the handpiece to another person. Failure to comply may result in patient and/or health care staff injury.
•A wobbling attachment may cause bone or tissue damage or inaccurate wiring or pin placement. If wobbling occurs, see Troubleshooting Guide. Failure to comply may result in patient injury.
•DO NOT apply excessive pressure, such as bending or prying, with a cutting accessory to prevent fracturing the accessory. Applying excessive pressure, especially during high operating speeds, may cause the cutting accessory to bend significantly and result in tissue damage, loss of tactile control and the ejection of cutting accessory pieces at a high velocity. Failure to comply may result in patient and/or health care staff injury.
•DO NOT reuse single use cutting accessories. Failure to comply may result in patient and/or health care staff injury.
*If you need more information, contact your Stryker sales representative or call Stryker customer service at 1-800-253-3210. Outside the US, contact your nearest Stryker subsidiary.
www.stryker.com |
|

2008/01 |
6205-001-700 Rev-A |
Features
•Battery Latch - To release the battery pack from the handpiece, depress the battery latch.
•Battery Pack - Rechargeable battery pack provides power to the handpiece.
•Reverse Trigger - To cause counterclockwise rotation and vary speed, press this pressure-sensitive trigger.
•Forward Trigger - To cause clockwise rotation and vary speed, press this pressure-sensitive trigger.
•F/R/Safe Control - Based on its position, allows the handpiece to operate in forward, reverse, or oscillate mode; safe mode prevents the operation of the handpiece.
•Actuating Collar - To release the attachment, slide the actuating collar.
•Shifter Knob - To select the handpiece mode of REAM [slow] or DRILL [fast], rotate the knob to the appropriate position, as required.
•Accessory Interface - Connector provides power and communication for future accessories.
|
|
Shifter Knob |
F/R/Safe Control |
|
|
Accessory Interface |
|
Actuating Collar |
|
|
|
|
|
Reverse Trigger |
Battery Latch |
|
|
|
|
Forward Trigger |
|
|
Battery Pack |
Symbol Definitions |
|
|
FORWARD - Fully depress the |
REVERSE - Press trigger to |
REAM - For slow |
F/R/Safe control to lock the |
operate in the counterclock- |
speed, rotate the |
reverse trigger. The forward trigger |
wise direction. |
shifter knob to REAM. |
is functional. |
|
|
SAFETY - Center the F/R/Safe |
OSCILLATE - Press both |
DRILL - For fast |
control to lock both triggers. |
triggers to operate the hand- |
speed, rotate the |
|
piece in the oscillate mode. |
shifter knob to DRILL. |
FORWARD/REVERSE - Fully |
FORWARD - Press trigger |
|
extend the F/R/Safe control to |
to operate in the clockwise |
|
unlock both triggers. Both triggers |
direction. |
|
are functional. |
|
|
|
|
www.stryker.com |
6205-001-700 Rev-A |
2008/01 |
|
|
Instructions
To Install Attachment
WARNING: To prevent inadvertent running of the handpiece, ALWAYS place the F/R/Safe control in the safe position before installing or removing any attachment.
NOTE: Several attachments are available and each has a specialized accessory retainer.
1.Slide the F/R/Safe control to the safe position.
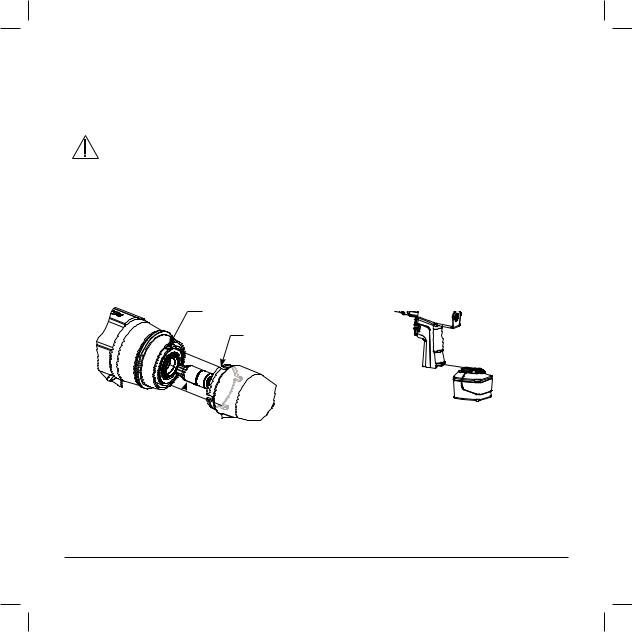
2.To install an attachment, align the driveshaft of the attachment with the handpiece spindle. If the attachment has notches, also align the notches with the tabs in the sleeve of the handpiece (see figure 1).
Tabs
Notches
(not always present)
To Install Battery Pack
NOTES:
•This handpiece is designed to accept a Stryker Large or Small Battery Pack only (REF 6215 or REF 6212). These battery packs can be charged in the Stryker System 6 Battery Charger REF 6110-120 configured with the appropriate battery charger modules.
•See the instructions supplied with the battery charger and/or battery pack for charging details and specifications.
1.Slide a fully charged battery pack firmly into the handpiece until the battery latch snaps, indicating the battery pack is secure (see figure 2).
Driveshaft 
Figure 1 To Install Attachment
. Once properly aligned, insert the attachment into the handpiece until the attachment “snaps” into place.
. Tug the attachment to ensure it is secure.
5.Install the desired cutting accessory. See the System 6 Rotary Handpiece Attachments booklet.
Figure 2 To Install Battery Pack
2.Test the operation of the handpiece by sliding the F/R/Safe control to FORWARD (F) or FORWARD/REVERSE (F/R) and squeezing the trigger.
. Slide the F/R/Safe control to the safe position until you are ready to use the handpiece.
www.stryker.com
Loading...