


® JetStar® JetStar® JetStar
JetStar®
POPCORN CART
MODEL
JPC-4/6
Installation and
Operation
Instructions
2M-Z7691 Rev. D 12/16/05
JPC-4/6
etStar
1
IMPORTANT
Before assembling your new equipment, read and understand all the instructions & labels associated with the unit prior to putting it together.
All shipping containers should be checked for freight damage both visible and concealed. This unit has been carefully packaged to insure delivery of your unit in perfect condition. If equipment is received in damaged condition, either apparent or concealed, a claim must be made with the delivering carrier.
Concealed damage or loss - if damage or loss is not apparent until after equipment is unpacked, a request for inspection of concealed damage must be made with carrier within 15 days. Be certain to retain all contents plus external and internal packaging materials for inspection. The carrier will make an inspection and will supply necessary claim forms.
ASSEMBLY INSTRUCTIONS FOR JETSTAR POPPER CART
Jetstar 6oz. Gussett
Secure Gussetts with screws removed from the bottom
of the popper
Gussett
6 oz. Popper
Door Side Up
Screws
IL1074
1.6 oz. Popper Installation (4 oz go to step 2)
When using the Cart with a Jetstar 6 oz Popper, attach the popper to the body wrap prior to assembling the cart.
•Remove the (8) screws from the bottom of the popper, located next to each foot.
Body Wrap
IL1078
•Position the body wrap so the top faces the bottom of the popper, as shown.
•Locate the (4) 6 oz Gussetts as shown, and secure them in place with the previously removed screws from the bottom of the popper.
2

2.Bottom Shelf & Leg Post
When using the Cart with a Jetstar 4 oz. Popper, assemble the cart prior to attaching the popper.
•Begin by positioning the Bottom Shelf to the Body Wrap as shown.
•Slide the Leg Posts into position on the left side.
•Line up the holes in the Leg Post with the holes on the Bottom Shelf and Body Wrap.
•Secure with one 1/4-20 bolt, washer, and nut per leg.
•Install the Black Plastic Leg Plugs into position as shown.
Bottom Shelf
Body Wrap
Leg Plugs
Leg Posts
IL1071
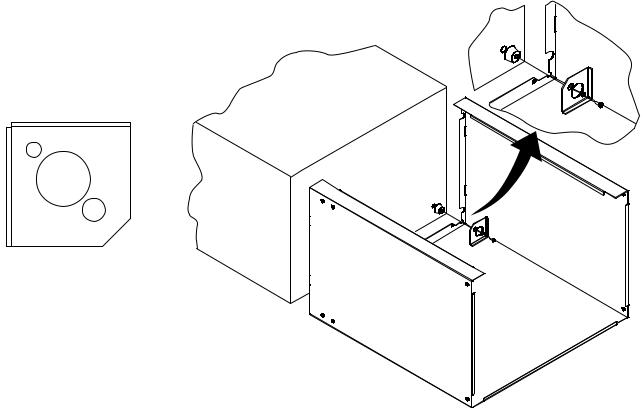
3.Handle & Handle Support
•Attach one Handle Support (a) with the open end facing in the up position and secure it with:
TWO 1/4-20 bolts and washers.
•Place the Handle and remaining Handle Support (b) in position and secure with:
ONE 1/4-20 bolt and washer in the lower of the two holes.
Do not install the second 1/4-20 bolt or washer on the top side at this time.
4.Wheel Post
•Slide the Wheel Posts into position as shown.
•Line up the holes in the Leg Post with the holes on the Bottom Shelf and Body Wrap.
•Attach to the Body Wrap & Bottom Shelf with one 1/4-20 bolt, washer, and nut per post.
 Handle Support (b)
Handle
Handle Support (a) |
IL1061 |
Bottom Shelf
Wheel Posts
IL1060
3
 Loading...