

Sony STR-DN1080 Help Guide

MULTI CHANNEL AV RECEIVER STR-DN1080
Introduction
Main features of the AV receiver [1]
Parts and Controls
Receiver
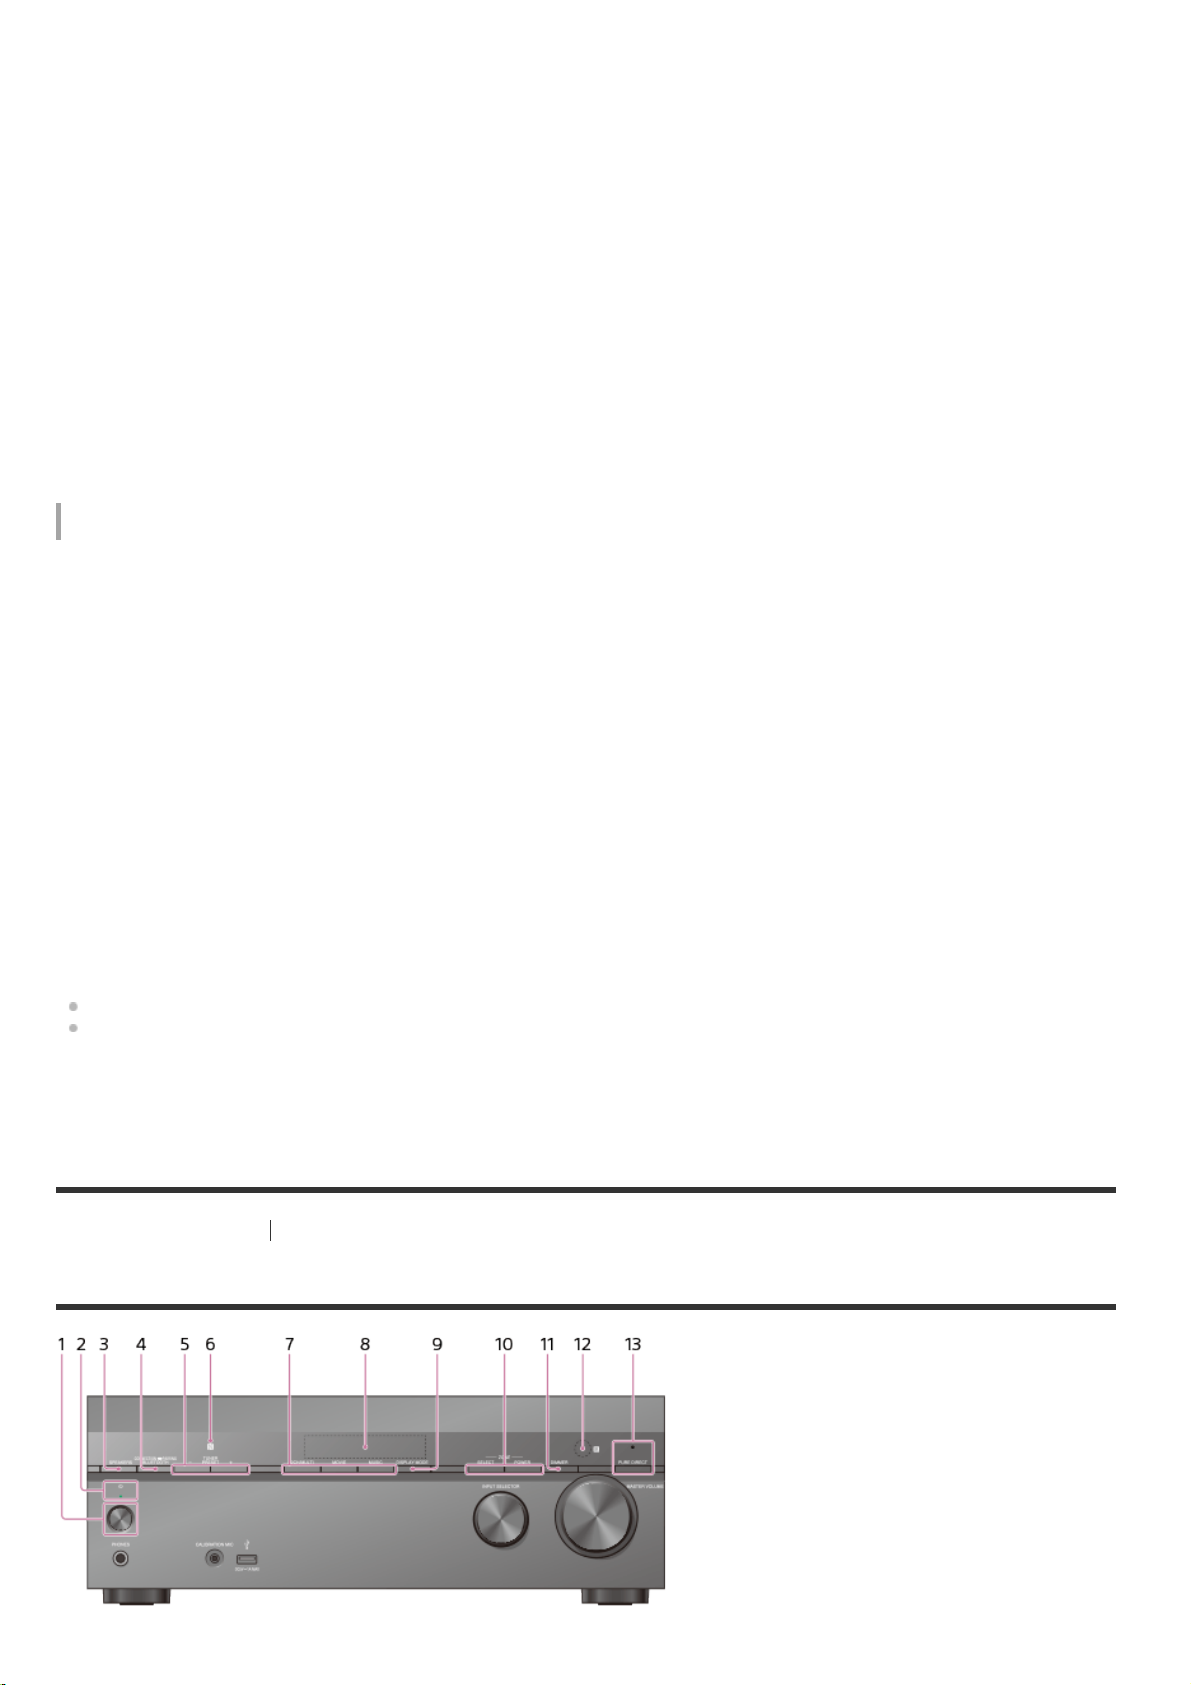
Front panel (upper section) [2]
Front panel (lower section) [3]
Power indicator [4]
Indicators on the display panel [5]
Rear panel [6]
Remote control
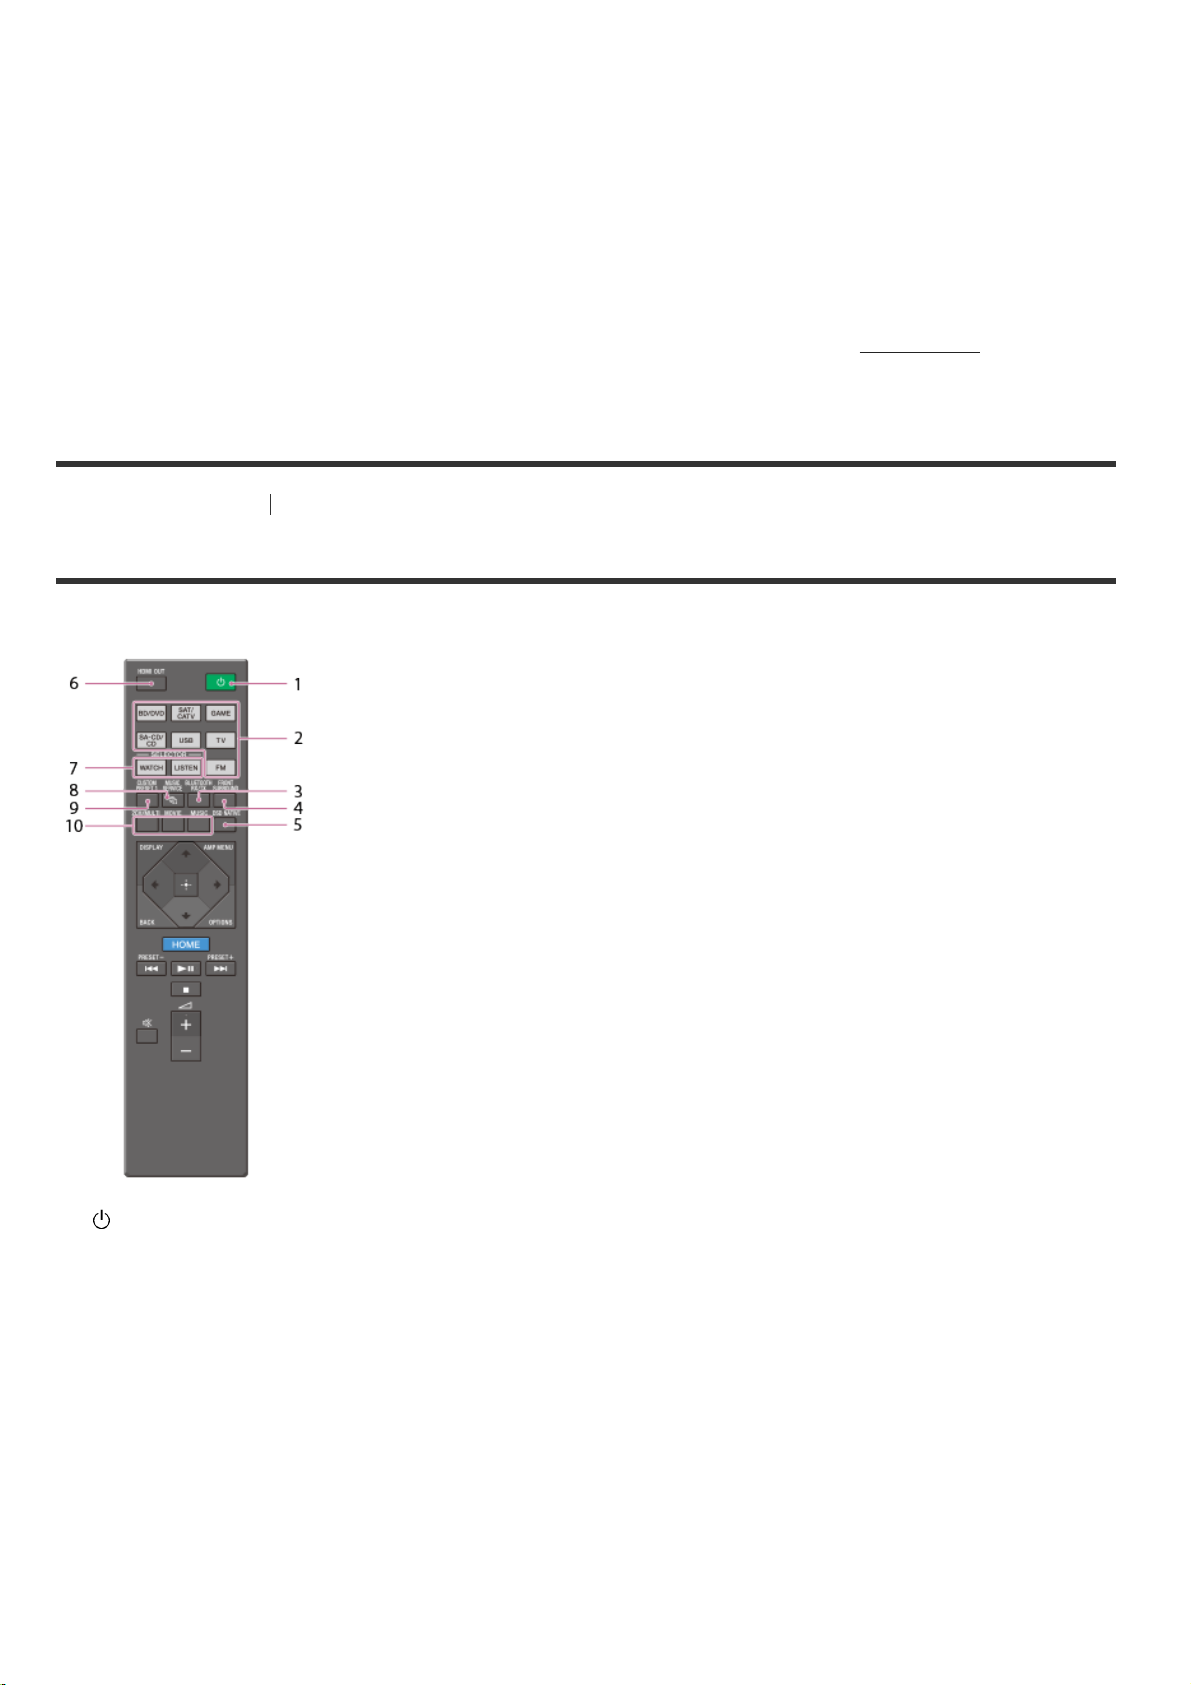
Remote control (upper section) [7]
Remote control (lower section) [8]
Preparation
1. Installing speakers
Names and functions of speakers [9]
Installing 5.1-channel speaker system [10]
Installing 7.1-channel speaker system using surround back speakers [11]
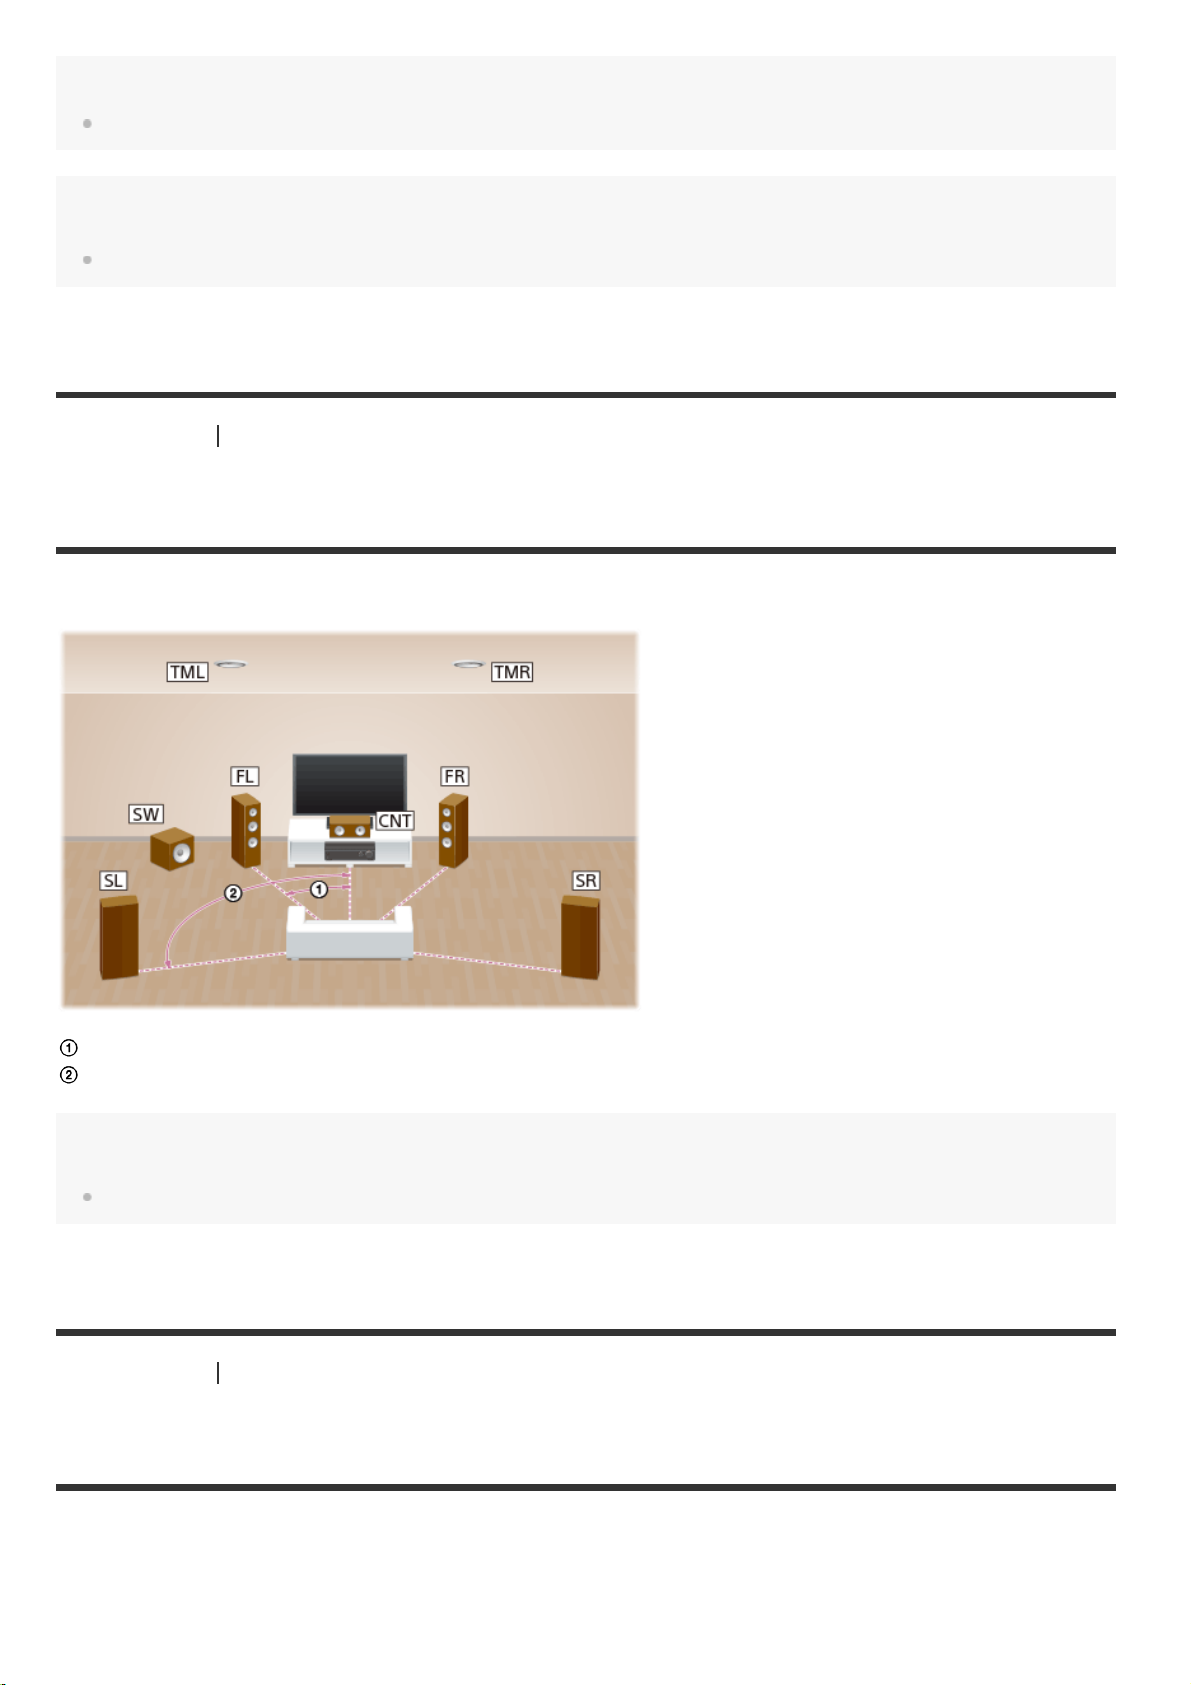
Installing 5.1.2-channel speaker system using top middle speakers [12]
Installing 5.1.2-channel speaker system using front Dolby Atmos enabled speakers [13]
Installing 5.1-channel speaker system with Zone 2 connection [14]
Installing 5.1-channel speaker system with bi-amplifier connection [15]
Installing 5.1-channel speaker system with front B speaker connection [16]
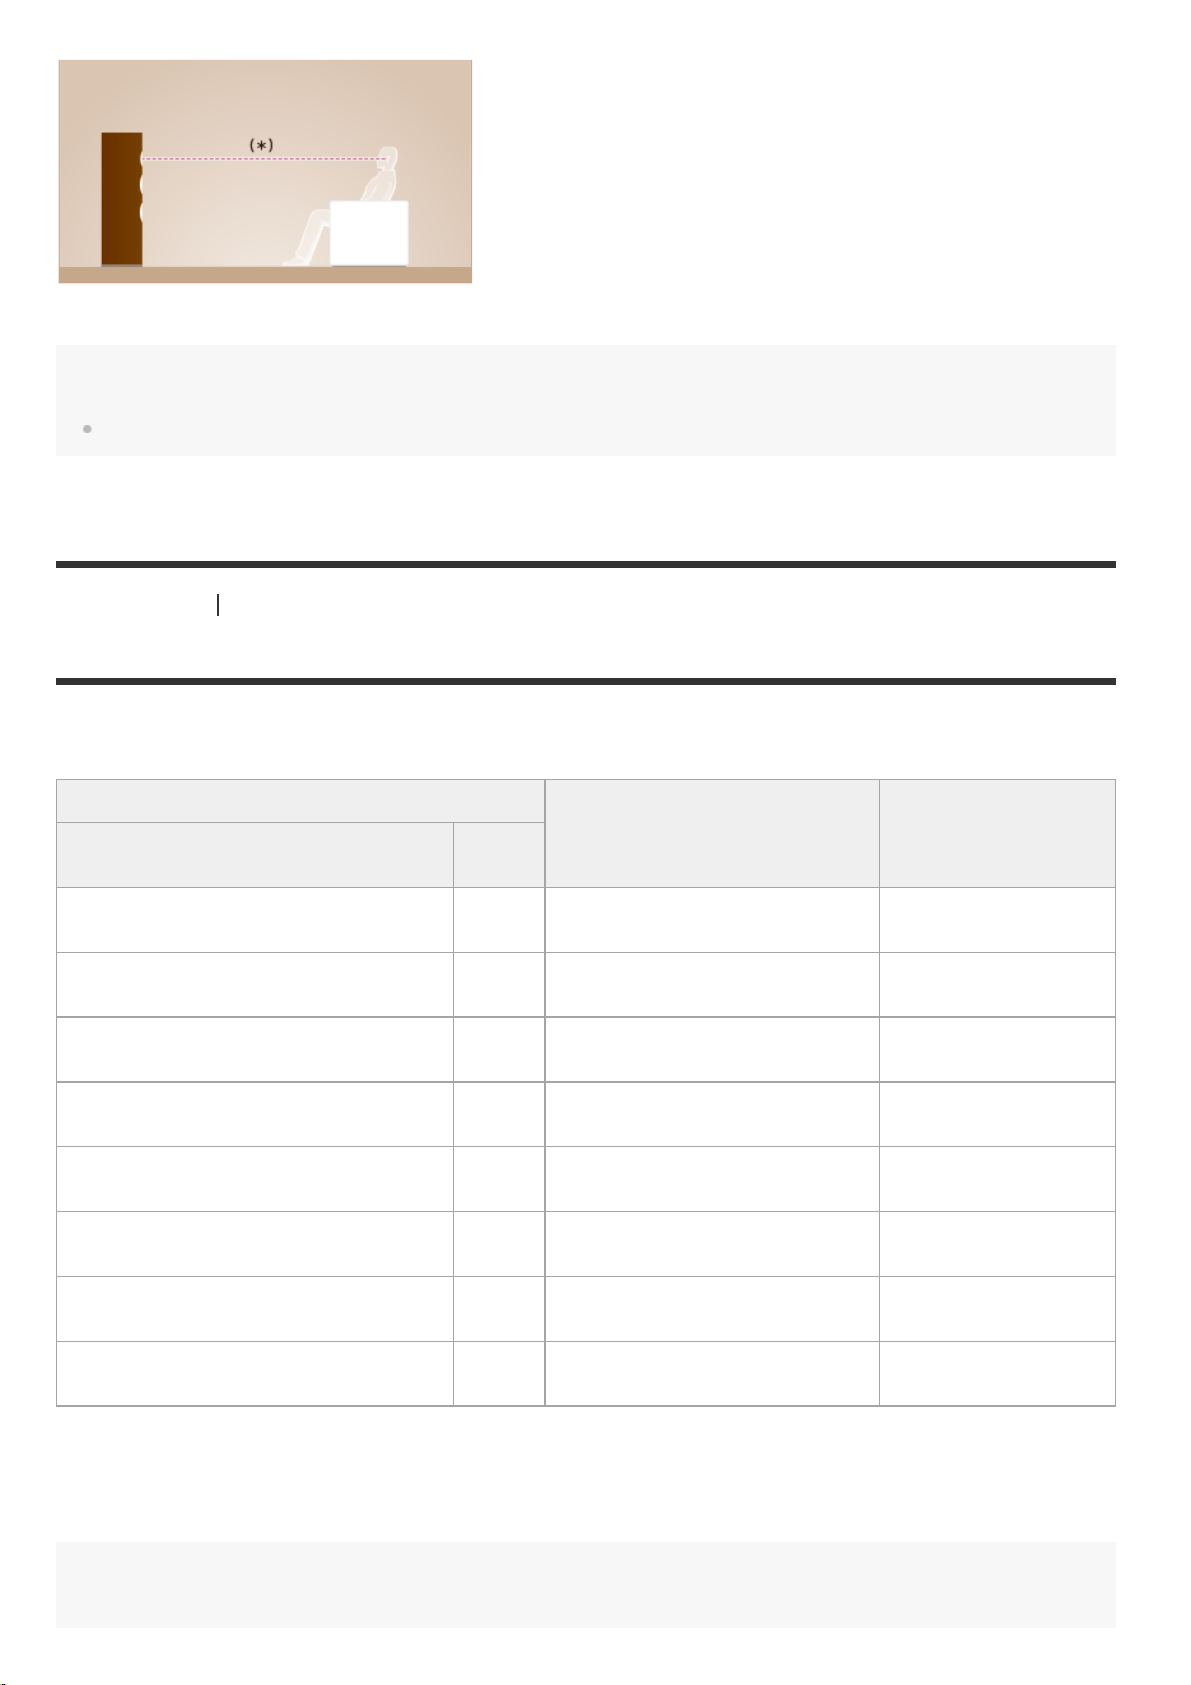
Installing 2.1-channel speaker system to enjoy the Front Surround mode [17]
Speaker configuration and speaker pattern settings [18]

2. Connecting speakers
Connecting 5.1-channel speaker system [19]
Connecting 7.1-channel speaker system using surround back speakers [20]
Connecting 5.1.2-channel speaker system using top middle speakers [21]
Connecting 5.1.2-channel speaker system using front Dolby Atmos enabled speakers [22]
Connecting 5.1-channel speaker system with Zone 2 connection [23]
Connecting 5.1-channel speaker system with bi-amplifier connection [24]
Connecting 5.1-channel speaker system with front B speaker connection [25]
Connecting 2.1-channel speaker system to enjoy the Front Surround mode [26]
3. Connecting a TV
Connecting a TV [27]
Connecting a 4K TV [28]
About input/output of video signals [29]
Notes on connecting cables [30]
About HDMI connections [31]
4. Connecting audio-visual devices and the antennas (aerials)
Connecting devices with HDMI jacks [32]
Connecting devices with jacks other than HDMI jacks [33]
About input/output of video signals [34]
Connecting a USB device [35]
Connecting the antenna (aerial) [36]
Connecting another amplifier in Zone 2 [37]
Connecting another amplifier or TV in the HDMI zone [38]
Digital audio formats supported by the receiver [39]
Notes on connecting cables [40]
About HDMI connections [41]
5. Connecting to the network
Connecting the receiver to the network using a LAN cable (for wired LAN connections only) [42]
Connecting the receiver to the network using the wireless LAN antenna (for wireless LAN connections only) [43]
6. Turning on the receiver/preparing the remote control

Inserting batteries into the remote control [44]
Turning on the receiver [45]
7. Setting up the receiver using Easy Setup
Setting up the receiver using Easy Setup [46]
Performing Auto Calibration
1. About Auto Calibration [47]
2. Before you perform Auto Calibration [48]
3. Connecting the calibration microphone [49]
4. Selecting the front speakers [50]
5. Performing Auto Calibration [51]
6. Checking Auto Calibration results [52]
Enjoying Video and Sound
Playing AV devices
Enjoying video and sound [53]
Using the menu on the TV screen [54]
Enjoying video/sound from the connected device [55]
Enjoying sound of a TV compatible with the Audio Return Channel (ARC) function [56]
Watching HDCP 2.2 copyright-protected content [57]
Playing content from an iPhone/iPad/iPod
Enjoying audio content from iTunes or an iPhone/iPad/iPod via the network (AirPlay) [58]
Enjoying audio content using the BLUETOOTH function (Pairing operation) [59]
Compatible iPhone/iPad/iPod models [60]
Playing content from a USB device
Enjoying music stored on a USB device [61]
USB specifications and compatible USB devices [62]
Notes on USB devices [63]

Listening to the radio
Listening to FM radio [64]
Presetting FM radio stations (Preset Memory) [65]
Naming preset stations (Preset Name Input) [66]
Tuning to a station directly (Direct Tuning) [67]
Receiving RDS broadcasts (for European and Asia-Pacific models only) [68]
Enjoying content stored on a server on the home network (DLNA) [69]
Enjoying internet music services
Enjoying music services offered on the Internet [70]
Using Chromecast built-in™ to enjoy audio content from a smartphone or tablet device [71]
Using Spotify Connect to enjoy music [72]
Enjoying audio content stored on a BLUETOOTH device with a one-touch connection (NFC)
[73]
Enjoying sound effects
Selecting a sound field (Sound Field) [74]
Selectable sound fields and their effects [75]
Relations between sound fields and speaker outputs [76]
Resetting sound fields to the default settings [77]
Adjusting the equalizer (Equalizer) [78]
Enjoying clear and dynamic sound at a low volume (Sound Optimizer) [79]
Enjoying more natural sound with speakers installed in the ceiling (In-Ceiling Speaker Mode) [80]
Enjoying high-fidelity sound (Pure Direct) [81]
Using the DTS:X Dialog Control function [82]
Using Network Features
What you can do with network features [83]
Setting up a wired LAN connection (for wired LAN connections only)

Connecting the receiver to the network using a LAN cable (for wired LAN connections only) [84]
Setting up a wired LAN connection [85]
Setting up a wireless LAN connection (for wireless LAN connections only)
Connecting the receiver to the network using the wireless LAN antenna (for wireless LAN connections only) [86]
Setting up a wireless LAN connection [87]
Enjoying content stored on a server on the home network (DLNA)
Enjoying content stored on a server on the home network (DLNA) [88]
Deleting a server from the server list [89]
Setting whether to control this receiver from a controller device on the home network (Home Network Access
Control) [90]
About DLNA [91]
Enjoying audio content from iTunes or an iPhone/iPad/iPod via the network (AirPlay)
Compatible iPhone/iPad/iPod models [92]
Enjoying audio content from iTunes or an iPhone/iPad/iPod via the network (AirPlay) [93]
Enjoying internet music services
Enjoying music services offered on the Internet [94]
Using SongPal to control the receiver from a smartphone or tablet device
Controlling the receiver using a smartphone or tablet device (SongPal) [95]
Listening to the same music on multiple devices/Listening to different music in a different location (SongPal Link)
[96]
Listening to music by connecting the SongPal Link-compatible device
Listening to the same music in different rooms (Wireless Multi-Room) [97]

Using Video & TV SideView to control the receiver from a smartphone or tablet device
Registering Video & TV SideView device to the receiver [98]
Checking the registered Video & TV SideView device (Registered Remote Devices) [99]
Deleting Video & TV SideView device from device list [100]
Using Chromecast built-in™ to enjoy audio content from a smartphone or tablet device
[101]
Using Spotify Connect to enjoy music [102]
Setting whether to control this receiver from a device on the home network
Setting whether to control this receiver from a controller device on the home network (Home Network Access
Control) [103]
Enabling automatic access from a newly detected controller device (Auto Home Network Access Permission) [104]
Deleting devices from the device list in Home Network Access Control [105]
Using BLUETOOTH Features
What you can do with BLUETOOTH features [106]
Enjoying audio content stored on a BLUETOOTH device
Enjoying audio content stored on a BLUETOOTH device with a one-touch connection (NFC) [107]
Enjoying audio content using the BLUETOOTH function (Pairing operation) [108]
Controlling a BLUETOOTH device using the remote control [109]
Compatible BLUETOOTH version and profiles [110]
Listening with BLUETOOTH receiver (headphones/speakers)
Listening with BLUETOOTH headphones/speakers (Pairing operation) [111]
Compatible BLUETOOTH version and profiles [112]
Using SongPal to control the receiver from a smartphone or tablet device
Controlling the receiver using a smartphone or tablet device (SongPal) [113]
Listening to the same music on multiple devices/Listening to different music in a different location (SongPal Link)

[114]
Using the Multi-Zone Features
Overview of multi-zone features
What you can do with multi-zone features [115]
Available inputs for each zone [116]
Enjoying sound from speakers located in another room (Zone 2)
Connecting 5.1-channel speaker system with Zone 2 connection [117]
Setting the priority on the surround back speakers or Zone 2 speakers (SURROUND BACK/ZONE2 Priority) (for
USA and Canadian models only) [118]
Configuring speakers installed in Zone 2 (for European and Asia-Pacific models only) [119]
Enjoying sound in Zone 2 [120]
Enjoying sound in two rooms using another amplifier
Connecting another amplifier in Zone 2 [121]
Setting the volume control for Zone 2 (Zone2 Line Out) [122]
Enjoying sound using another amplifier in Zone 2 [123]
Enjoying video and sound in another room using a TV or another receiver
Connecting another amplifier or TV in the HDMI zone [124]
Selecting the method to use the HDMI OUT B jack (HDMI Out B Mode) [125]
Setting the priority for the main zone (Priority) [126]
Enjoying video and sound in another location by connecting another amplifier or TV using HDMI connections
(HDMI zone) [127]
Using Other Features
Interlocking with BRAVIA TV and other devices (“BRAVIA” Sync)
What is “BRAVIA” Sync? [128]
Preparing to use “BRAVIA” Sync function [129]

Turning off the receiver and connected devices simultaneously with the TV (System Power Off function) (Standby
Linked to TV) [130]
Enjoying TV sound from the speakers connected to the receiver (System Audio Control function) [131]
Enjoying an input source from a connected device immediately (One-Touch Play function) [132]
Selecting the optimum picture quality and sound field automatically (Scene Select function) [133]
About Home Theatre Control function [134]
Operating the receiver menu using the TV remote control (Remote Easy Control function) [135]
Echo Canceling function [136]
About Language Follow function [137]
Enjoying video and sound with your desired way of use
Switching the TVs that output the HDMI video signals [138]
Switching between digital and analog audio (Input Mode) [139]
Using other audio input jacks (Input Assign) [140]
Saving and recalling various settings for the receiver (Custom Preset)
About Custom Preset [141]
Saving the settings to a preset [142]
Recalling the preset settings [143]
Items for which you can save settings and the default values for each item [144]
Using the sleep timer (Sleep) [145]
Saving power during standby mode [146]
Viewing information on the display panel [147]
Adjusting Settings
Easy Setup
Setting up the receiver using Easy Setup [148]
Performing Auto Calibration
1. About Auto Calibration [149]

2. Before you perform Auto Calibration [150]
3. Connecting the calibration microphone [151]
4. Selecting the front speakers [152]
5. Performing Auto Calibration [153]
6. Checking Auto Calibration results [154]
Speaker Settings
Calibrating the phase characteristics of the speakers (A.P.M. (Automatic Phase Matching)) [155]
Selecting the Auto Calibration type (Calibration Type) [156]
Outputting a test tone from each speaker (Test Tone) [157]
Adjusting the speaker level (Level) [158]
Adjusting the equalizer (Equalizer) [159]
Adjusting the speaker distance (Distance) [160]
Adjusting the speaker size (Size) [161]
Setting the crossover frequency of the speakers (Crossover Frequency) [162]
Assigning the surround back speaker terminals (Surround Back Speaker Assign) [163]
Selecting the speaker pattern (Speaker Pattern) [164]
Checking the speaker position and the corresponding speaker terminals (Speaker Connection Guide) [165]
Setting the priority on the surround back speakers or Zone 2 speakers (SURROUND BACK/ZONE2 Priority) (for
USA and Canadian models only) [166]
Lifting up the sound of the center speaker (Center Speaker Lift Up) [167]
Setting the correct angles of the surround speakers (Surround Speaker Position) [168]
Calibrating speaker positioning (Speaker Relocation/Phantom Surround Back) [169]
Setting the height from the floor to the ceiling (Ceiling Height) [170]
Selecting the unit of measurement (Distance Unit) [171]
Audio Settings
Playing audio signals with high-quality sound (Digital Legato Linear (D.L.L.)) [172]
Enjoying clear and dynamic sound at a low volume (Sound Optimizer) [173]
Selecting a sound field (Sound Field) [174]
Enjoying more natural sound with speakers installed in the ceiling (In-Ceiling Speaker Mode) [175]
Enabling the direct playback of DSD signals (DSD Native) [176]
Enjoying high-fidelity sound (Pure Direct) [177]
Setting the low-pass filter for the subwoofer output (Subwoofer Low Pass Filter) [178]
Synchronizing audio with video output (A/V Sync) [179]
Selecting the language of digital broadcasts (Dual Mono) [180]
Compressing the dynamic range (Dynamic Range Compressor) [181]
Switching the mode of the DTS decoder (Neural:X) [182]
HDMI Settings

Upscaling video signals to 4K (HDMI In 4K Scaling) [183]
Controlling HDMI devices (Control for HDMI) [184]
Turning off the receiver and connected devices simultaneously with the TV (System Power Off function) (Standby
Linked to TV) [185]
Enjoying content of a connected device without turning on the receiver (Standby Through) [186]
Setting the HDMI audio signal output of connected devices (Audio Out) [187]
Setting the level of the subwoofer (Subwoofer Level) [188]
Selecting the method to use the HDMI OUT B jack (HDMI Out B Mode) [189]
Setting the priority for the main zone (Priority) [190]
Setting HDMI signal formats (HDMI Signal Format) [191]
Setting the color space conversion for the video signal from HDMI jacks (YCbCr/RGB (HDMI)) [192]
Input Settings
Changing the assignment and display for the input jacks [193]
Changing the name for each input (Name) [194]
Network Settings
Setting up a wired LAN connection [195]
Setting up a wireless LAN connection [196]
Checking the network connection status (Network Connection Status) [197]
Checking whether the network connection has been made properly (Network Connection Diagnostics) [198]
Displaying the connected home network server (Connection Server Settings) [199]
Enabling automatic access from a newly detected controller device (Auto Home Network Access Permission) [200]
Setting whether to control this receiver from a controller device on the home network (Home Network Access
Control) [201]
Checking the registered Video & TV SideView device (Registered Remote Devices) [202]
Reducing the startup time (Network Standby) (for USA, Canadian and Asia-Pacific models only) [203]
Enabling the network function even when this receiver is in standby mode (Remote Start) (for USA, Canadian and
Asia-Pacific models only) [204]
Turning on the control mode for maintenance (External Control) [205]
Bluetooth Settings
Selecting the BLUETOOTH mode (Bluetooth Mode) [206]
Checking the BLUETOOTH device list (Device List) [207]
Setting the BLUETOOTH Standby mode (Bluetooth Standby) [208]
Setting BLUETOOTH audio codecs (Bluetooth Codec - AAC/Bluetooth Codec - LDAC) [209]
Setting the BLUETOOTH sound quality (Wireless Playback Quality) [210]

Zone Settings
The receiver is turned off automatically. [231]
Setting whether or not to display [Zone Controls] on the home menu (Zone Controls) [211]
Setting the volume control for Zone 2 (Zone2 Line Out) [212]
System Settings
Selecting the language (Language) (for USA, Canadian, European and Australian models only) [213]
Tuning on/off the display for the volume level or sound field (Auto Display) [214]
Setting standby mode (Auto Standby) [215]
Switching the brightness of the display panel (Dimmer) [216]
Using the sleep timer (Sleep) [217]
Receiving information on newer software (Software Update Notification) [218]
Deleting personal data (Initialize Personal Information) [219]
Assigning a name to the receiver (Device Name) [220]
Checking the software version and MAC address of the receiver (System Information) [221]
Checking software license information (Software License Information) [222]
Updating the software automatically (Auto Update Settings) [223]
Updating the software (Software Update) [224]
Using the menu on the display panel
Operating the receiver with the menu on the display panel [225]
Viewing information on the display panel [226]
Reverting to the factory default settings [227]
Troubleshooting
Error messages
PROTECTOR [228]
[Overload occurred.] appears on the TV screen. [229]
List of messages after Auto Calibration measurements [230]
General

Cannot find an available input when connecting several digital devices. [232]
The RDS information that you want does not appear (for European and Asia-Pacific models only). [263]
The receiver does not turn on even when the TV is turned on. [233]
The receiver turns off when the TV is turned off. [234]
The receiver does not turn off even when the TV is turned off. [235]
Image
No image appears on the TV screen. [236]
No 3D content appears on the TV screen. [237]
No 4K content appears on the TV screen. [238]
No image is output from the TV screen when the receiver is in standby mode. [239]
The home menu does not appear on the TV screen. [240]
HDR (High Dynamic Range) images cannot be displayed in HDR mode. [241]
Display does not appear on the display panel. [242]
Image does not appear on the TV screen when the receiver is not turned on. [243]
When the language for the on-screen display of the TV is changed, the on-screen display language of the receiver
is changed simultaneously. [244]
Sound
No sound or only a very low level of sound is heard, no matter which device is selected. [245]
There is severe humming or noise. [246]
No sound or only a very low level of sound is heard from specific speakers. [247]
There is no sound from a specific device. [248]
The left and right sound is unbalanced or reversed. [249]
Dolby Digital or DTS multi-channel sound is not reproduced. [250]
The surround effect cannot be obtained. [251]
A test tone is not output from the speakers. [252]
A test tone is output from a different speaker than the speaker displayed on the TV screen. [253]
No sound is output from the TV when the receiver is in standby mode. [254]
No TV sound is output from the receiver. [255]
Image and sound are not output from the TV when the receiver is not turned on. [256]
The sound is output from both the receiver and the TV. [257]
The sound lags behind the picture. [258]
Tuner
The FM reception is poor. [259]
The FM stereo reception is poor. [260]
You cannot tune to radio stations. [261]
RDS does not work (for European and Asia-Pacific models only). [262]

USB devices
Are you using a compatible USB device? [264]
When the music on the USB device is played back, there is noise, skipping, or distorted sound. [265]
A USB device is not recognized. [266]
Playback does not start. [267]
A USB device cannot be connected to the USB port. [268]
Erroneous display. [269]
An audio file cannot be played. [270]
Network connection
Cannot connect to the network using WPS via a wireless LAN connection. [271]
Cannot connect to the network. [272]
Cannot control the receiver using a SongPal device. [273]
Cannot control the receiver using a Video & TV SideView device. [274]
Cannot select the [Network Settings] menu. [275]
Home network
Cannot connect to the network. [276]
A server does not appear in the server list. (A message that indicates that the receiver cannot find the server
appears on the TV screen.) [277]
Cannot access to the server, etc., connected to the router via a wireless LAN connection. [278]
Playback does not start, or the player does not automatically proceed to the next track or file. [279]
The sound skips during playback. [280]
[No playable file in this category.] appears. [281]
Cannot play copyrighted files. [282]
Cannot select a previously selected track. [283]
Controller devices or applications on the home network cannot connect to the receiver. [284]
The receiver cannot be turned on by devices on a network. [285]
AirPlay
The receiver cannot be found from an iPhone/iPad/iPod or iTunes. [286]
The sound skips. [287]
The receiver cannot be operated. [288]

Music services
Cannot connect the receiver to a service. [289]
The sound skips. [290]
BLUETOOTH device
Pairing cannot be done. [291]
Cannot make a BLUETOOTH connection. [292]
The sound skips or fluctuates, or the connection is lost. [293]
The sound of your BLUETOOTH device cannot be heard on the receiver. [294]
Severe humming or noise. [295]
Cannot control the receiver using a SongPal device. [296]
“BRAVIA” Sync (Control for HDMI)
The Control for HDMI function does not work properly. [297]
TV sound cannot be heard from the speakers connected to the receiver. [298]
Remote control
The remote control does not function. [299]
If the problem is not solved
Reverting to the factory default settings [300]
Resetting sound fields to the default settings [301]
Customer support websites [302]
Other Information
Trademarks [303]
[1] Introduction
Main features of the AV receiver

Compatible with a variety of connections and high- quality audio/video formats
Compatible with wired/wireless network, BLUETOOTH®, and USB connections
Connect a Walkman, iPod/iPhone (AirPlay), computer, NAS or USB device to the receiver to play content on
those devices or transmit music to BLUETOOTH headphones/speakers.
Music services such as Spotify and Chromecast built-in are supported.
Compatible with the latest object-based audio formats
Dolby Atmos and DTS:X are supported.
Compatible with high-definition playback of High-Resolution Audio
During network audio playback or content playback on a USB device, the receiver supports High-Resolution
Audio content at up to 5.6 MHz in the DSD format and at up to 192 kHz/24 bits in the WAV, FLAC, and AIFF
formats.
Native playback of DSD files is also supported.
Compatible with high-definition 4K video formats (*)
The receiver supports 4K HDR and HDCP 2.2, letting you enjoy high-definition video images.
*
You need to change the setting of [HDMI Signal Format] depending on the input video signal.
Functions for an optimum surround environment
Calibrating your viewing and listening environment to bring it closer to an ideal surround
space using Auto Calibration (D.C.A.C. EX (*))
D.C.A.C. EX measures and calibrates the distance, angle, level, and frequency characteristics of the speakers
using the supplied stereo calibration microphone.
The sound is then remapped to an ideal position by simulating ideal speaker positions and angles (Speaker
Relocation).
*
Digital Cinema Auto Calibration EX
Calibration functions for sound fields corresponding to various speaker installation
conditions
Phantom Surround Back: Allows you to enjoy a surround-sound effect acoustically equivalent to that of a 7-
channel speaker system, using only a 5-channel speaker system, and when using a 5.1.2-channel speaker
system, it allows you to enjoy a surround-sound effect acoustically equivalent to that of a 7.1.2-channel speaker
system.
Front Surround: Allows you to enjoy virtual surround-sound with only two front speakers.
In-Ceiling Speaker Mode : Reproduces more natural sound by lowering the position of audio output from
speakers installed in the ceiling.
Center Speaker Lift Up : Reproduces natural sound that feels more authentic by lifting the sound from the
center speaker up to the height of the screen.
Audio technologies for high -definition music playback
Sound fields selectable by preference
You can select from a variety of sound fields according to speaker connections or input sources (2ch Stereo, Direct,
A.F.D. (Auto Format Decoding), etc.).
Upscaling of existing sound sources into higher resolutions with the same quantity of
information as High-Resolution Audio using DSEE HX (*)
The receiver restores signals from compressed sound sources to the region originally included in High-Resolution
Audio content by up-sampling the sampling frequency and expanding the bit depth to the equivalent of a maximum
of 192 kHz/24 bits, letting you enjoy CDs and lossy compressed sound sources such as MP3 files in expressive
sound quality closer to the original.
*
Digital Sound Enhancement Engine HX
High-definition BLUETOOTH music playback (LDAC)
LDAC allows approximately three times more data to be transmitted than with the previous BLUETOOTH A2DP-SBC
(328 kbps, 44.1 kHz). The receiver supports wireless playback (transmission/reception) of high-quality sound when
speakers, headphones, a Walkman, or a smartphone that supports LDAC are connected to the receiver via a
BLUETOOTH connection.
Reproduction of authentic impact and realistic sense of immersion in movies (Sound
Optimizer)
Sound Optimizer calibrates disparities in acoustic frequency characteristics caused by the difference in volume levels
between movie production and playback, and reproduces the impact and immersive surround effect that the movie’s
sound engineers intended even when the movie is played back at low volume levels in a home.
Other useful functions
Compatible with “SongPal” and “SongPal Link”
SongPal is a dedicated app for operating SongPal-compatible audio devices manufactured by Sony from a
smartphone or tablet device.
It lets you operate the receiver from the smartphone or tablet device and use the SongPal Link function such as the
Wireless Multi-Room function, etc.
Equipped with an HDMI jack compatible with the Audio Return Channel (ARC) function
TV sound can be output from the receiver using only one HDMI cable.
Supports bi-amping of front speakers
You can enhance the sound quality of the front speakers by connecting different amplifiers to the tweeter and
woofer using a bi-amplifier connection.
Support for music and video playback in different rooms
The Wireless Multi-Room function (*) lets you listen to the same music in different rooms.
The multi-zone features let you output audio and video signals to another room.
*
You can enjoy the sound of the device that is connected to the receiver. The sound is delayed behind the picture.
[2] Parts and Controls
Receiver
Front panel (upper section)
10
11
12
13
(power)
1.
Power indicator
2.
SPEAKERS
3.
CONNECTION PAIRING BLUETOOTH
4.
Operates the BLUETOOTH function.
TUNER PRESET +/–
5.
Select preset FM stations or channels.
NFC sensor
6.
2CH/MULTI, MOVIE (*), MUSIC (*)
7.
Display panel
8.
DISPLAY MODE
9.
Switches information on the display panel.
ZONE SELECT , ZONE POWER
DIMMER
.
Adjusts the brightness of the display panel.
.
Remote control sensor
Receives signals from remote control.
.
PURE DIRECT
The indicator above the button lights up when the Pure Direct function is activated.
.
*
The sound fields for movies and music may not work depending on the input or speaker pattern you have selected or with certain audio
formats.
[3] Parts and Controls Receiver
Front panel (lower section)
PHONES jack
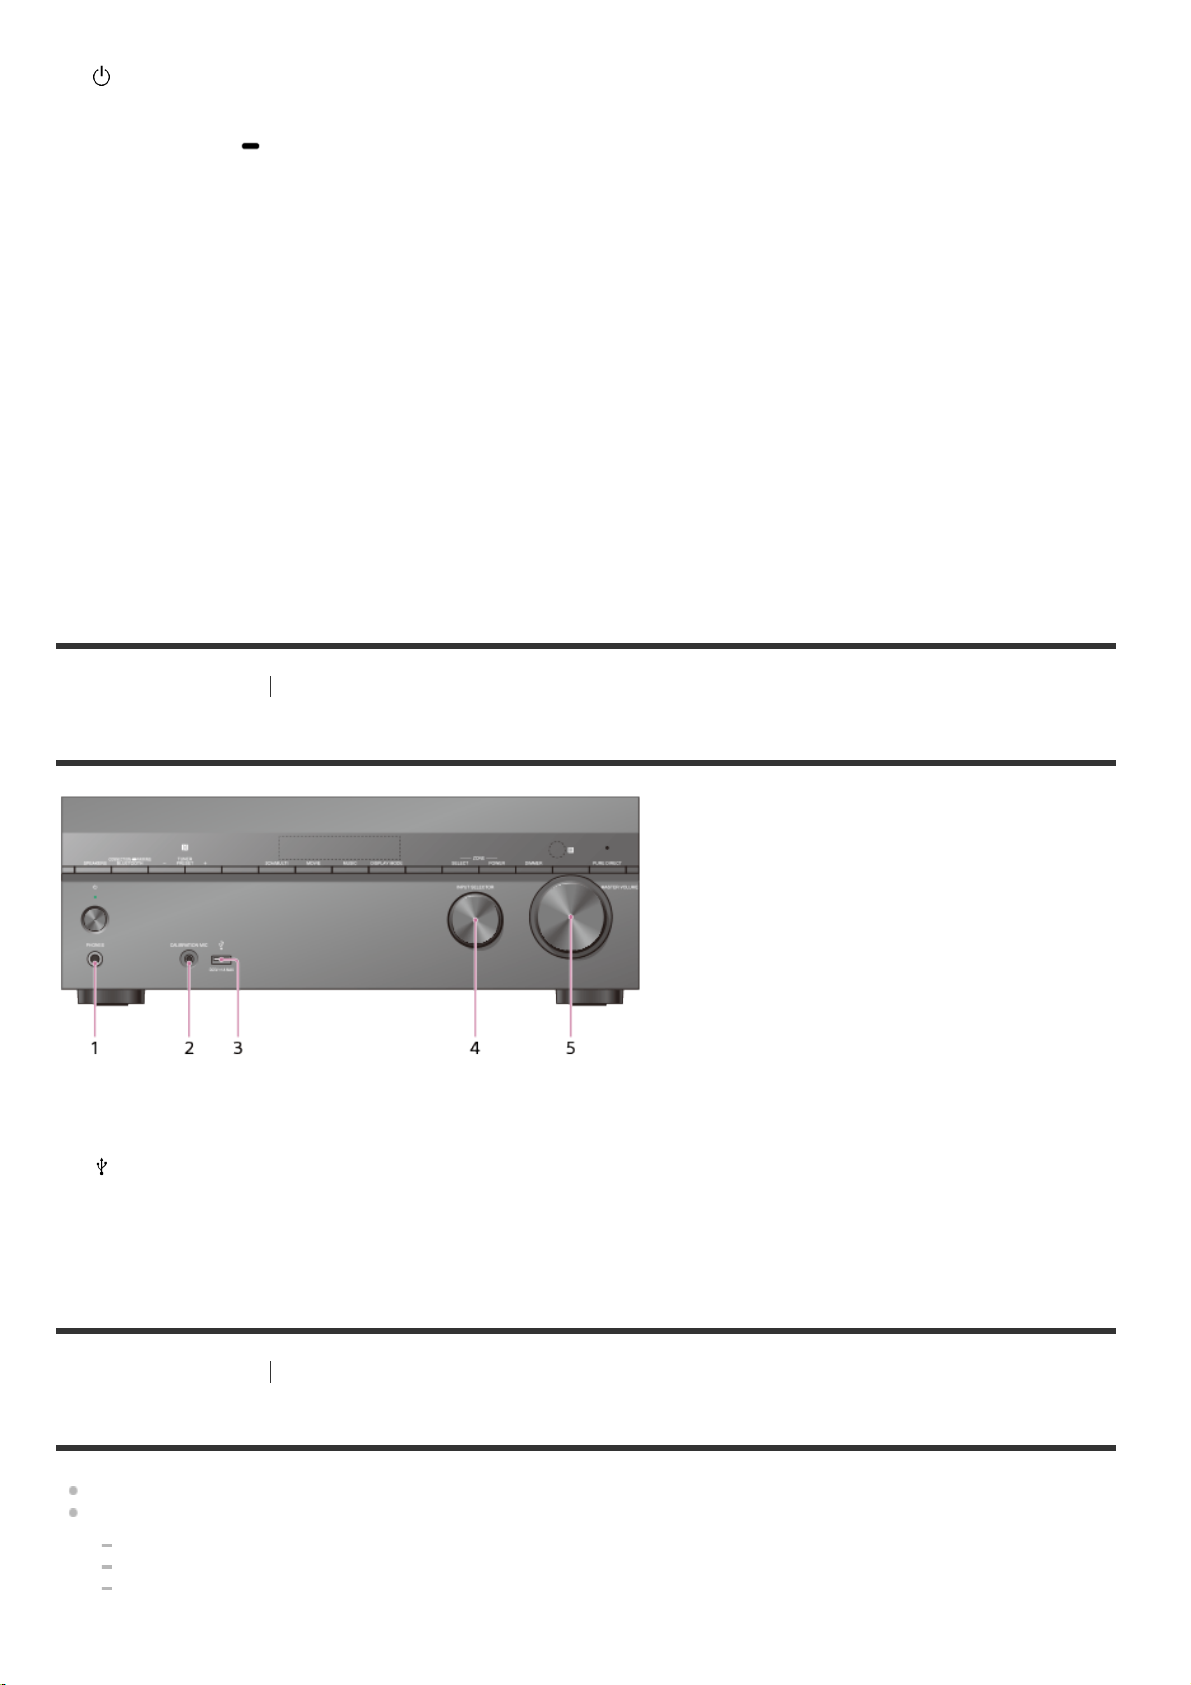
1.
Connect headphones here.
CALIBRATION MIC jack
2.
(USB) port
3.
INPUT SELECTOR
4.
MASTER VOLUME
5.
[4] Parts and Controls Receiver
Power indicator
Green: The receiver is turned on.
Amber: The receiver is in standby mode, and you have set one of the following:
[Control for HDMI], [Bluetooth Standby] (*1), [Network Standby] (*2) or [Remote Start] (*2) is set to [On].
[Standby Through] is set to [On] or [Auto].
[Zone2 Power] or [HDMI Zone Power] is set to [On].
The indicator turns off when the receiver is in standby mode, and the following settings are set to [Off]:
10
11
12
13
14
15
16
17
18
*1
*2
[Control for HDMI]
[Standby Through]
[Bluetooth Standby] (*1)
[Network Standby] (*2)
[Remote Start] (*2)
[Zone2 Power] and [HDMI Zone Power]
When [Bluetooth Standby] is activated, the indicator lights up in amber only if a device has been paired with the receiver. If no devices
are paired with the receiver, the indicator turns off (for European model only).
For USA, Canadian and Asia-Pacific models only.
[5] Parts and Controls
Receiver
Indicators on the display panel
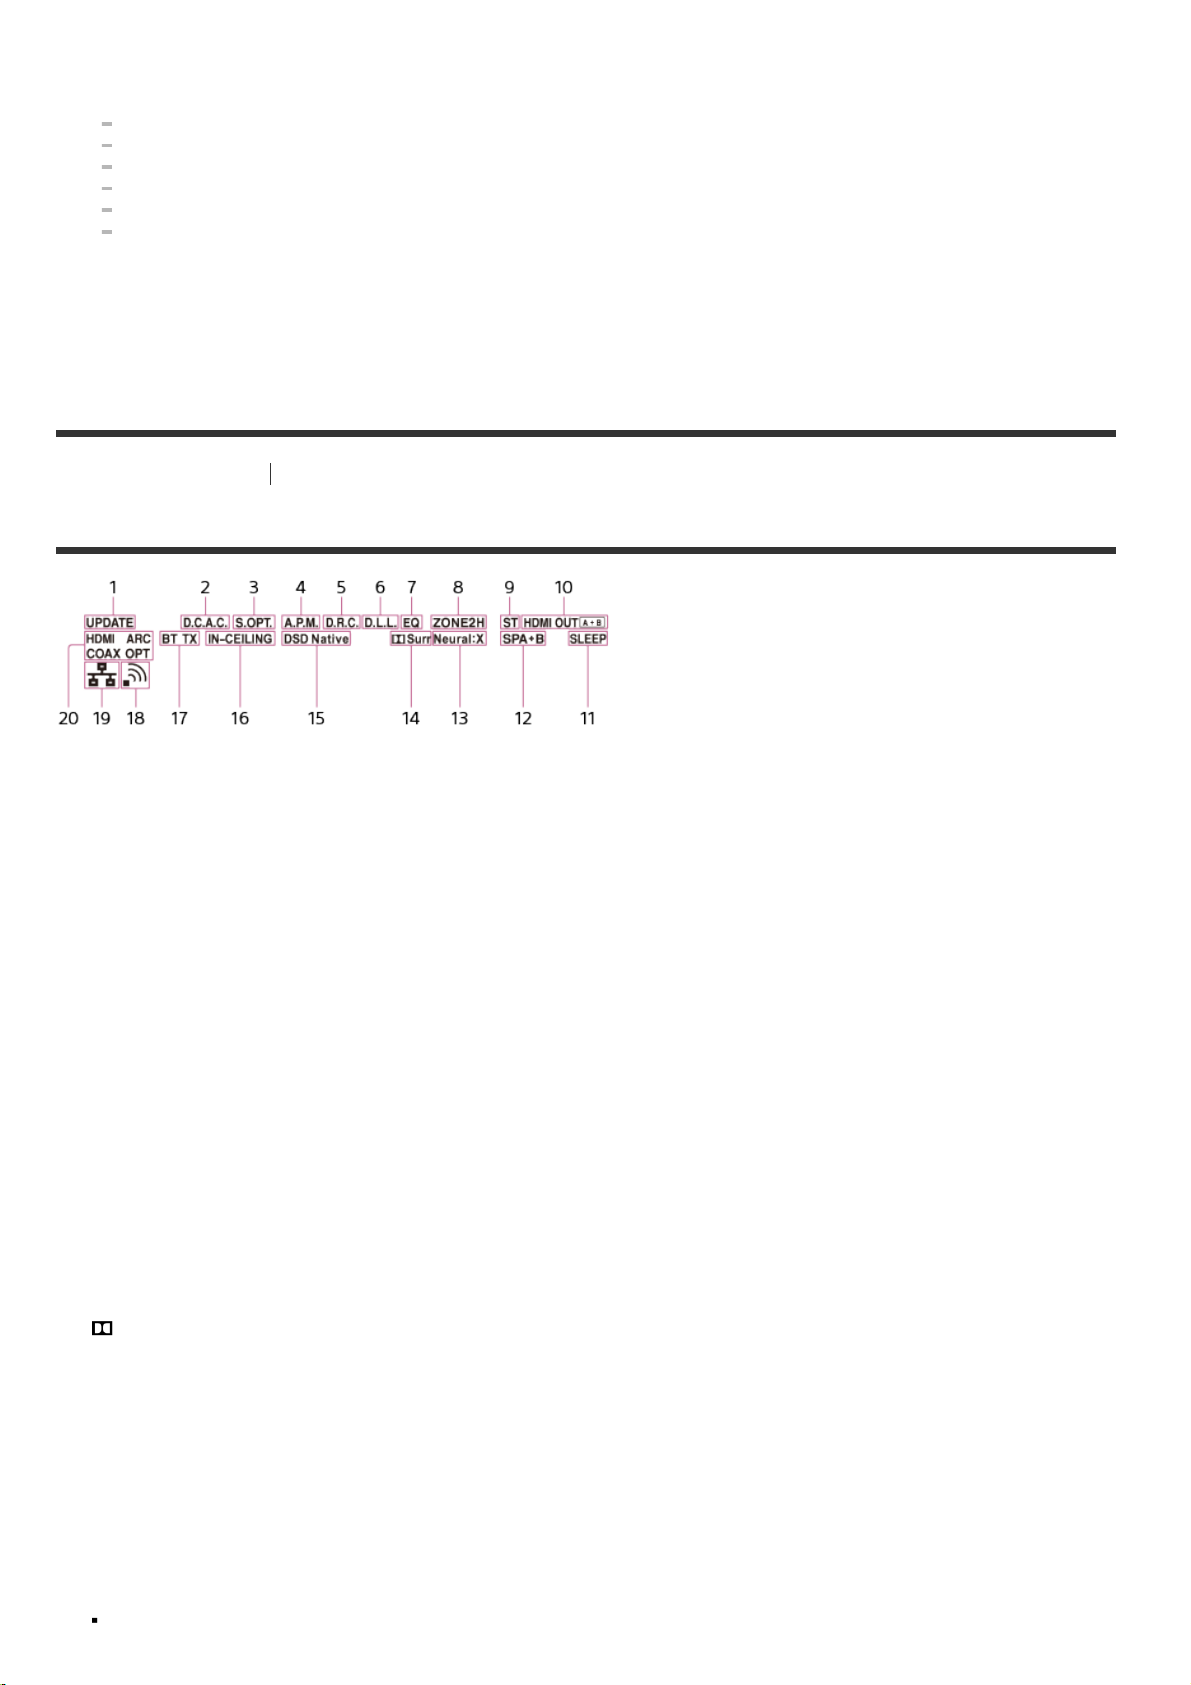
UPDATE
1.
Lights up when new software is available.
D.C.A.C.
2.
Lights up when the measurement results of the Auto Calibration (D.C.A.C. EX) function are applied.
S.OPT
3.
Lights up when the Sound Optimizer function is activated.
A.P.M.
4.
Lights up when the A.P.M. (Automatic Phase Matching) function is activated. You can only set the A.P.M.
function in the D.C.A.C. (Digital Cinema Auto Calibration) function.
D.R.C.
5.
Lights up when dynamic range compression is activated.
D.L.L.
6.
Lights up when the D.L.L. (Digital Legato Linear) function is activated.
EQ
7.
Lights up when the equalizer is activated.
ZONE2, ZONE H
8.
[ZONE2] lights up when the power for Zone 2 is on. [ZONE H] lights up when the power for HDMI zone is on.
ST
9.
Lights up when the receiver tunes to a FM stereo broadcast.
HDMI OUT A + B
Indicates the HDMI OUT jacks that currently output the audio/video signals.
.
SLEEP
Lights up when the sleep timer is activated.
.
Speaker system indicator
Neural:X
.
Lights up when DTS Neural:X processing is activated.
.
Surr
Lights up when Dolby Surround processing is activated.
.
DSD Native
Lights up when DSD native playback is performed.
.
IN-CEILING
Lights up when the In-Ceiling Speaker Mode is activated.
.
BLUETOOTH indicator
[BT] lights up when a BLUETOOTH device is connected. Flashes while connecting. [BT TX] lights up when
.
[Bluetooth Mode] is set to [Transmitter].
Wireless LAN signal strength indicator
Lights up to show the strength of the wireless LAN signal. If the network settings for the receiver have not been
.
configured, this indicator flashes for 30 minutes after you turn on the receiver.
No signal
Weak
Moderate
19
20
Strong
Wired LAN indicator
Lights up when the receiver is connected to a network using a wired LAN connection.
.
Input indicator
Lights up to indicate the current input.
.
HDMI
Digital signals are input through the selected HDMI IN jack.
ARC
TV input is selected and Audio Return Channel (ARC) signals are detected.
COAX
Digital signals are input through the COAXIAL jack.
OPT
Digital signals are input through the OPTICAL jack.
[6] Parts and Controls Receiver
Rear panel
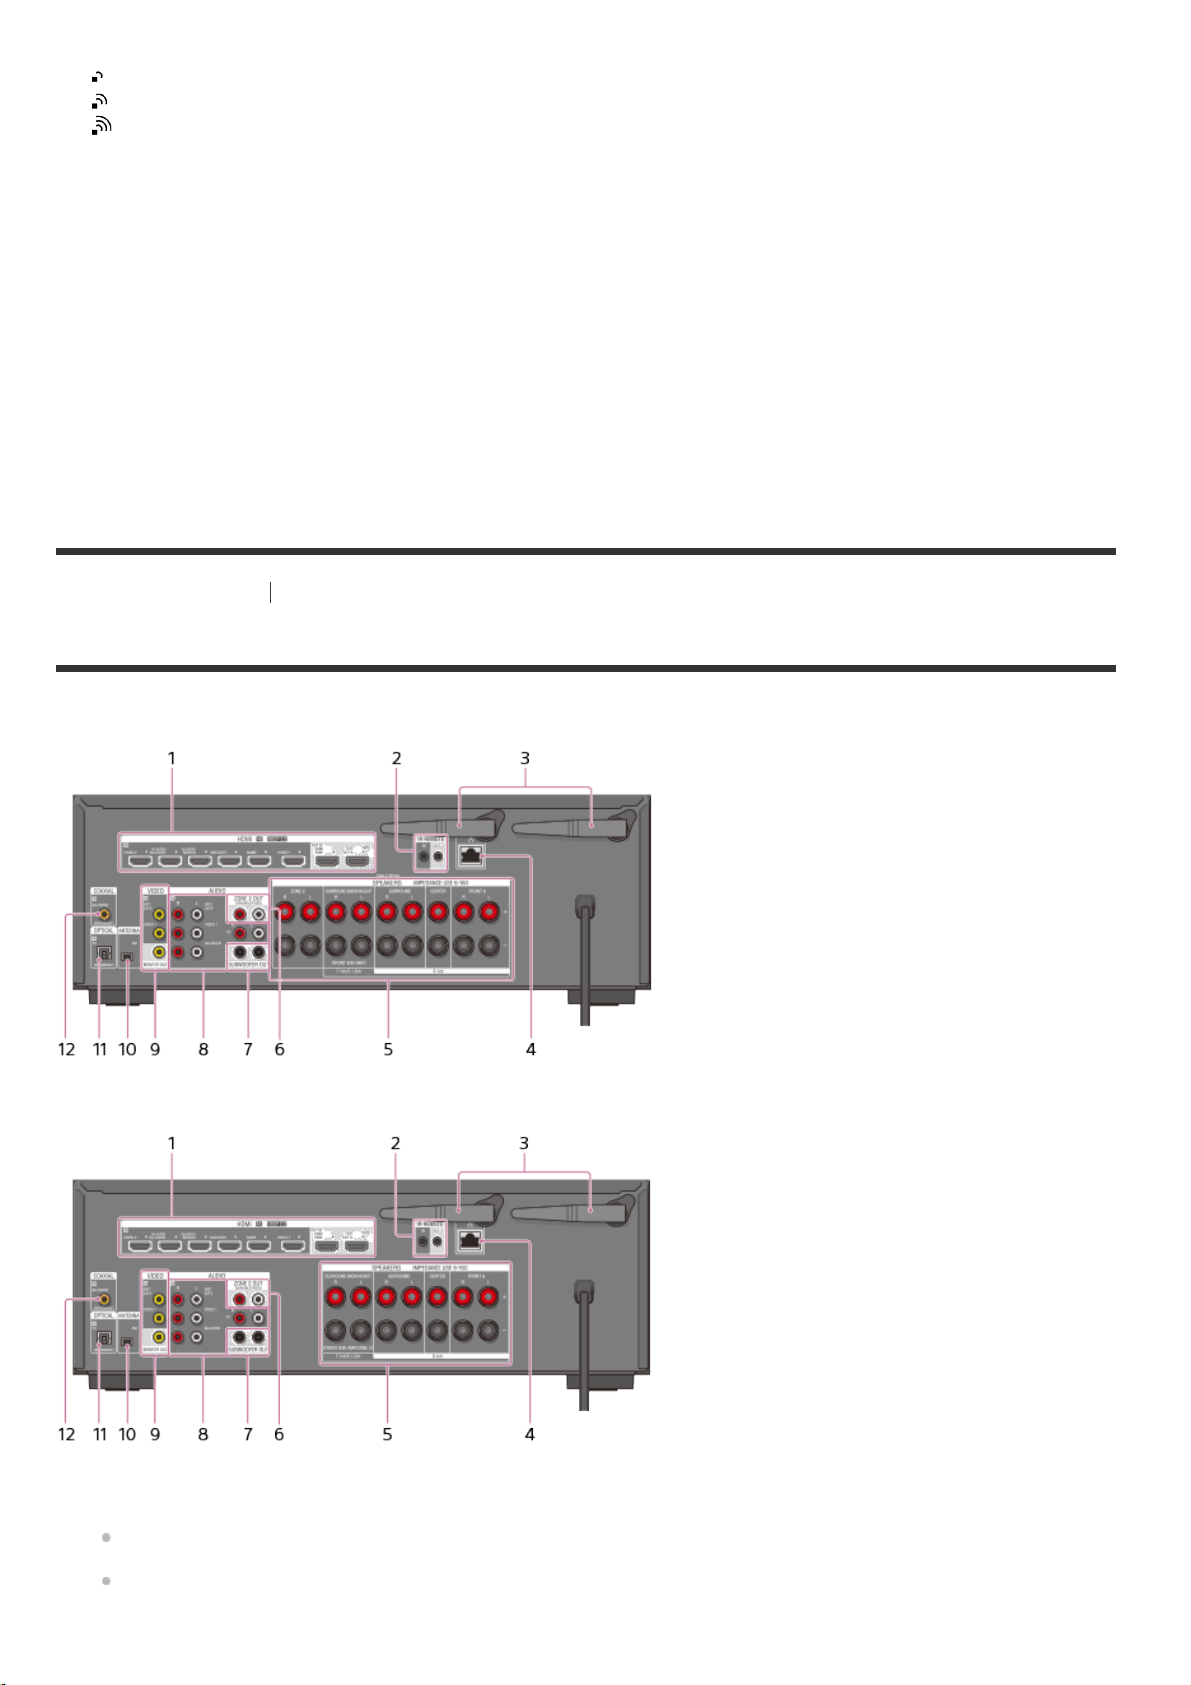
USA and Canadian models
Other models
HDMI IN/OUT jacks (*1)(*2)
1.
IR REMOTE IN/OUT jacks
2.
You can control the receiver from a distance by connecting an IR repeater (not supplied) to the IR REMOTE
IN jack.
You can start or stop playback of devices such as a CD player connected to the receiver by connecting an IR
Blaster (not supplied) to the IR REMOTE OUT jack.
Wireless LAN antenna
10
11
12
3.
LAN port
4.
SPEAKERS terminals
5.
ZONE 2 OUT jacks
6.
SUBWOOFER OUT jacks
7.
AUDIO IN jacks
8.
VIDEO IN/MONITOR OUT jacks (*2)
9.
FM ANTENNA terminal
OPTICAL IN jacks
.
COAXIAL IN jack
.
.
*1
All of the HDMI IN/OUT jacks on the receiver support HDCP 2.2. HDCP 2.2 is newly enhanced copyright protection technology that is used
to protect content such as 4K movies.
*2
Connect a TV to the corresponding output jacks to watch video input from these jacks. For details, see “Connecting a TV.”
[7] Parts and Controls Remote control
Remote control (upper section)
Use the supplied remote control to operate this receiver.
(power)
1.
Turns the receiver on or sets it to the standby mode.
Input buttons
2.
Select the input channel connected to the device you want to use.
When you press any of the input buttons, the receiver turns on.
BLUETOOTH RX/TX
3.
Switches [Bluetooth Mode] to [Receiver] or [Transmitter].
In [Receiver] mode, the receiver receives and outputs audio from the player.
In [Transmitter] mode, the receiver sends audio to BLUETOOTH headphones/speakers.
FRONT SURROUND
4.
Activates the Front Surround mode and lets you enjoy virtual surround effects using only the two front speakers.
DSD NATIVE
5.
Activates the DSD Native function.
You can turn on or off this function only when playback on the source device is stopped.
HDMI OUT
6.
Switches the output for two TVs connected to the HDMI OUT A (TV) and HDMI OUT B/HDMI ZONE jacks. When
[HDMI Out B Mode] is set to [Main] in the [HDMI Settings] menu, output is toggled between [HDMI A], [HDMI
B], [HDMI A+B] and [HDMI OFF] each time the button is pressed. When [HDMI Out B Mode] is set to [Zone],
output is toggled between [HDMI A] and [HDMI OFF] each time the button is pressed.
WATCH, LISTEN
Selects [Watch] or [Listen] on the home menu directly. When pressing these buttons on the Watch or Listen
7.
10
MUSIC SERVICE
8.
screen, you can move the focus to select the desired input.
If you have been playing the music on the receiver using Spotify Connect (*1)(*2), you can resume Spotify
playback by pressing MUSIC SERVICE.
CUSTOM PRESET 1
9.
Saves and recalls various settings for the receiver. Press to select the custom preset setting(s). Press and hold to
save the current settings to a preset.
2CH/MULTI, MOVIE (*3), MUSIC (*3)
Select a sound field.
.
*1
Available services may vary depending on your location.
*2
Spotify playback using the receiver is limited to Spotify Premium accountholders.
*3
The sound fields for movies and music may not work depending on the input or speaker pattern you have selected or with certain audio
formats.
Note
The above explanations are intended to serve as examples.
Depending on the model of your connected device, some functions explained in this section may not work with the supplied
remote control.
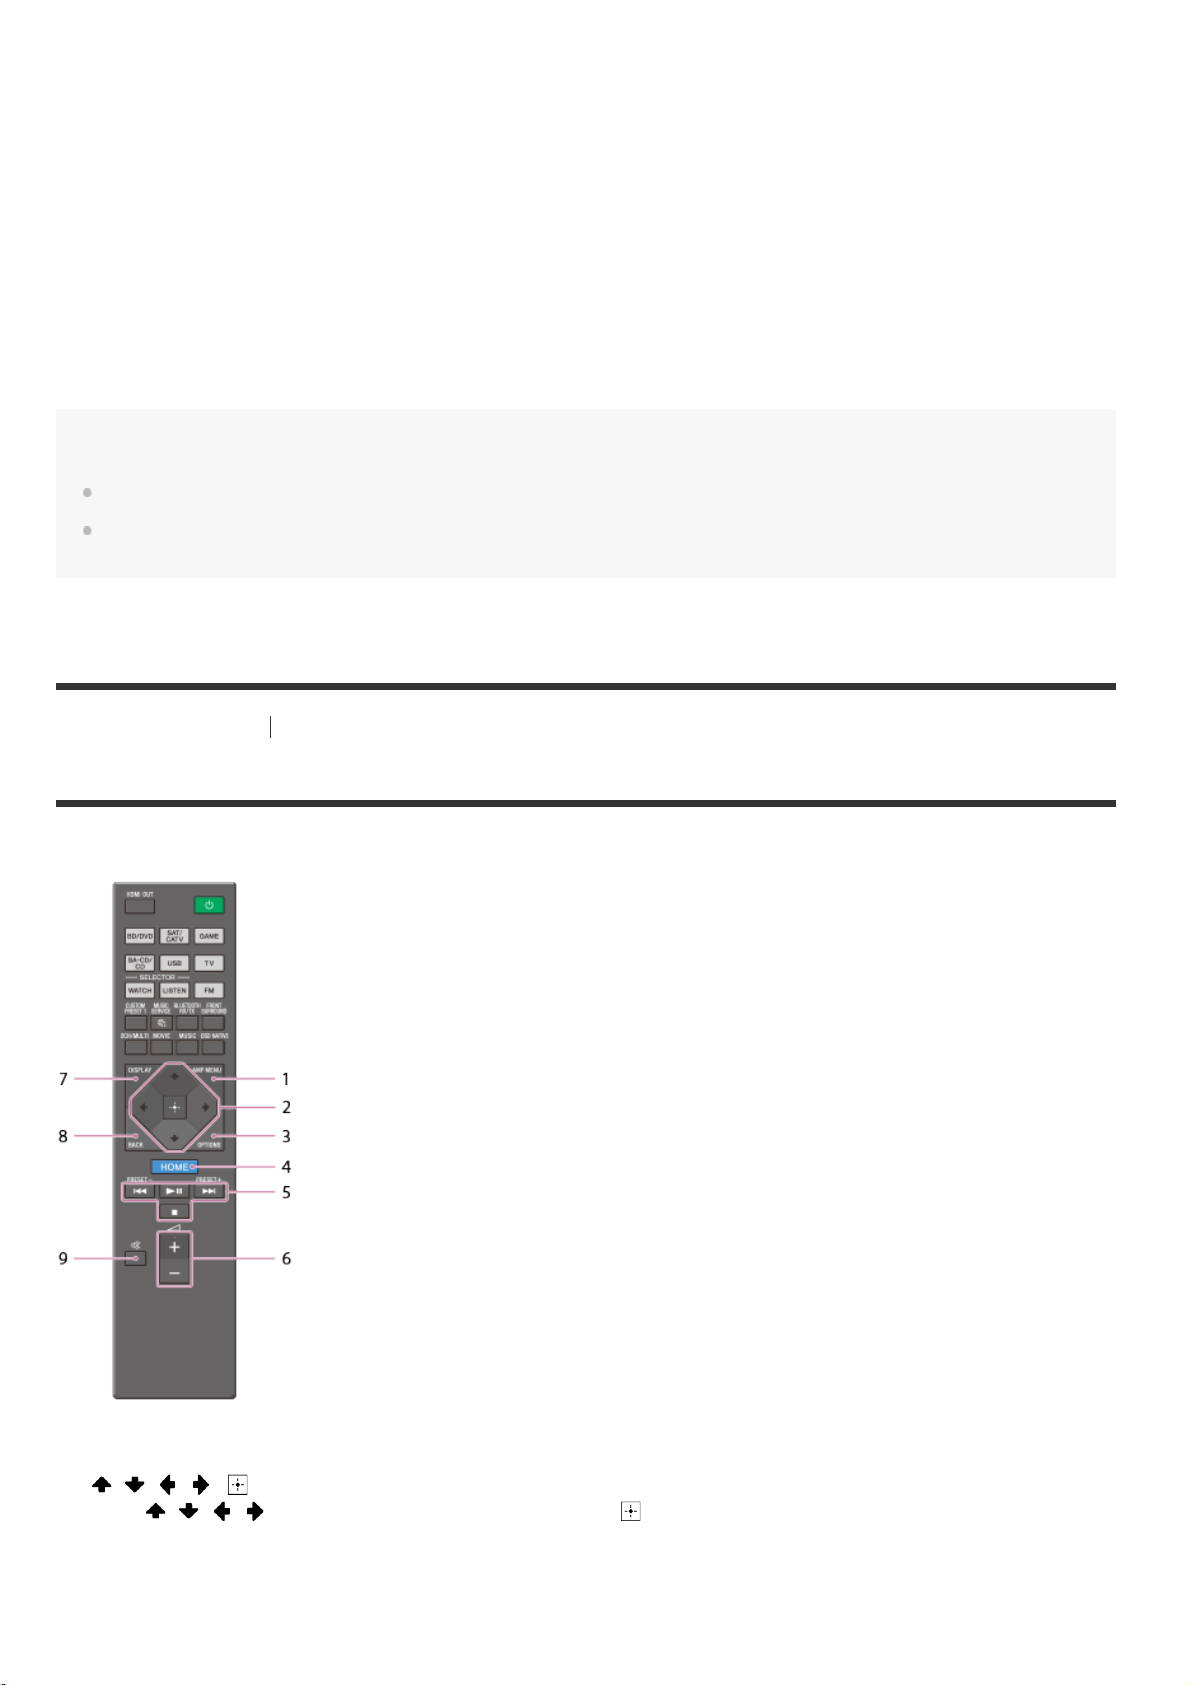
[8] Parts and Controls Remote control
Remote control (lower section)
Use the supplied remote control to operate this receiver.
AMP MENU
1.
Displays the menu on the display panel to operate the receiver.
/ / / ,
2.
Press / / / to select the menu items. Then press to enter the selection.
OPTIONS
3.
Display the options menus.
HOME
4.
Displays the home menu on the TV screen.
/ , (*),
5.
6.
7.
8.
9.
*
Skip, play, pause, stop operation.
PRESET+/–
Select preset stations or channels. Press and hold to scan stations automatically.
+(*)/–
Adjust the volume level of all speakers at the same time.
DISPLAY
Press to view information on the TV screen.
BACK
Returns to the previous menu or exits a menu or on-screen guide that is displayed on the TV screen.
Turns off the sound temporarily. Press the button again to restore the sound.
The and + buttons have tactile dots. Use the tactile dots as a reference when operating the receiver.
Note
The above explanations are intended to serve as examples.
Depending on the model of your connected device, some functions explained in this section may not work with the supplied
remote control.
[9] Preparation 1. Installing speakers
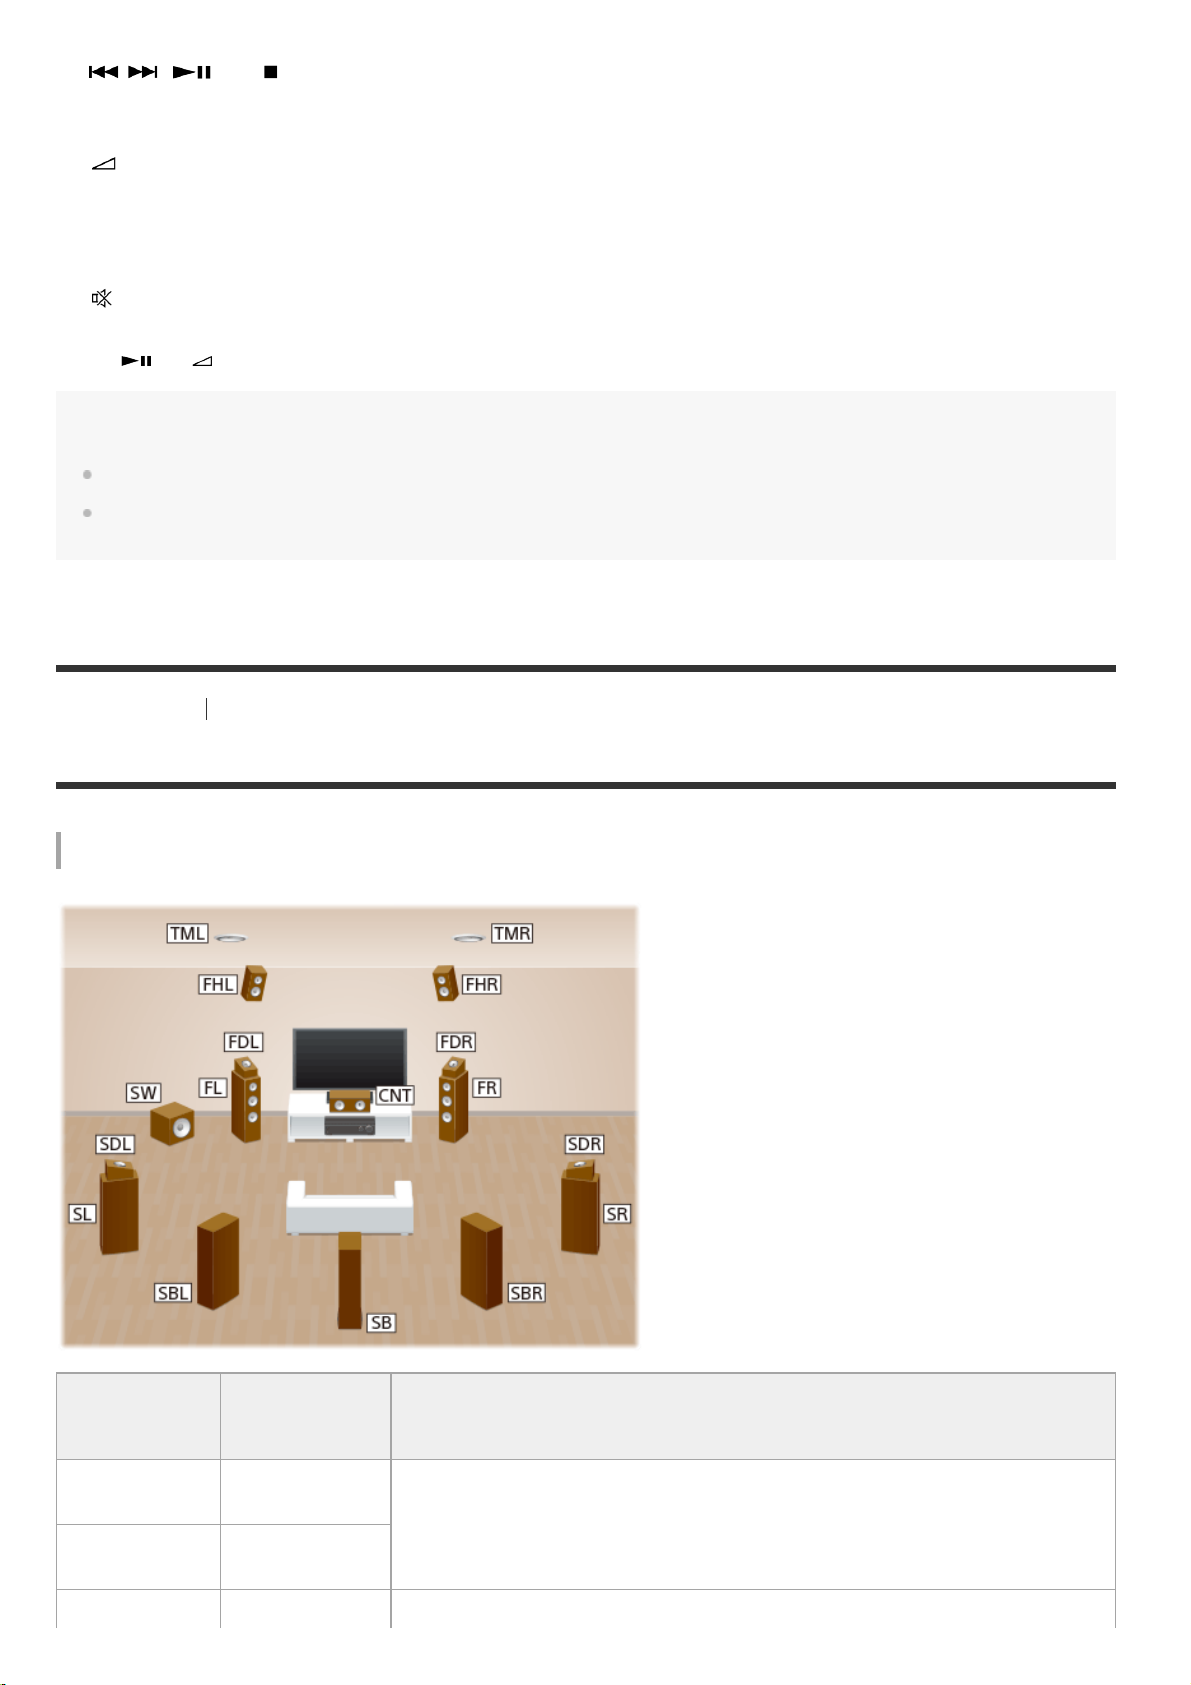
Names and functions of speakers
Speaker installation example
Abbreviations
used in
illustrations
FL
FR
CNT Center speaker Produces vocal sounds from center channel.
Speaker name Functions
Front left
speaker
Produces sounds from front left/right channels.
Front right
speaker

SL
SR
Surround left
speaker
Produces sounds from surround left/right channels.
Surround right
speaker
SBL
SBR
SB
SW Subwoofer
FHL
FHR
TML
TMR
FDL
FDR
Surround back
left speaker
Surround back
right speaker
Surround back
speaker
Front high left
speaker
Front high right
speaker
Top middle left
speaker
Top middle right
speaker
Front Dolby
Atmos enabled
left speaker Produces sounds from the top middle left/right channel and reflects these
Front Dolby
Atmos enabled
right speaker
Produces sounds from surround back left/right channels.
Produces sounds from surround back channel.
Produces LFE (low frequency effect) channel sounds and reinforces bass
parts of other channels.
Produces vertical sound effects from front high left/right channels.
Produces sounds from top middle left/right channel.
sounds off the ceiling. Enables playing back sounds of Dolby Atmos 3D
movies without the need to install ceiling speakers.
Surround Dolby
SDL
SDR
Z2L
Z2R
[10] Preparation 1. Installing speakers
Atmos enabled
left speaker Produces sounds from the top middle left/right channel and reflects these
sounds off the ceiling. Enables playing back sounds of Dolby Atmos 3D
Surround Dolby
Atmos enabled
right speaker
Zone 2 left
speaker
Zone 2 right
speaker
movies without the need to install ceiling speakers.
Outputs sounds to another location (“Zone 2”). For details on Zone 2, see
“
Installing 5.1-channel speaker system with Zone 2 connection.”
Installing 5.1 -channel speaker system
To fully enjoy theater-like multi-channel surround sound, you need five speakers (two front speakers, a center
speaker, and two surround speakers) and a subwoofer.
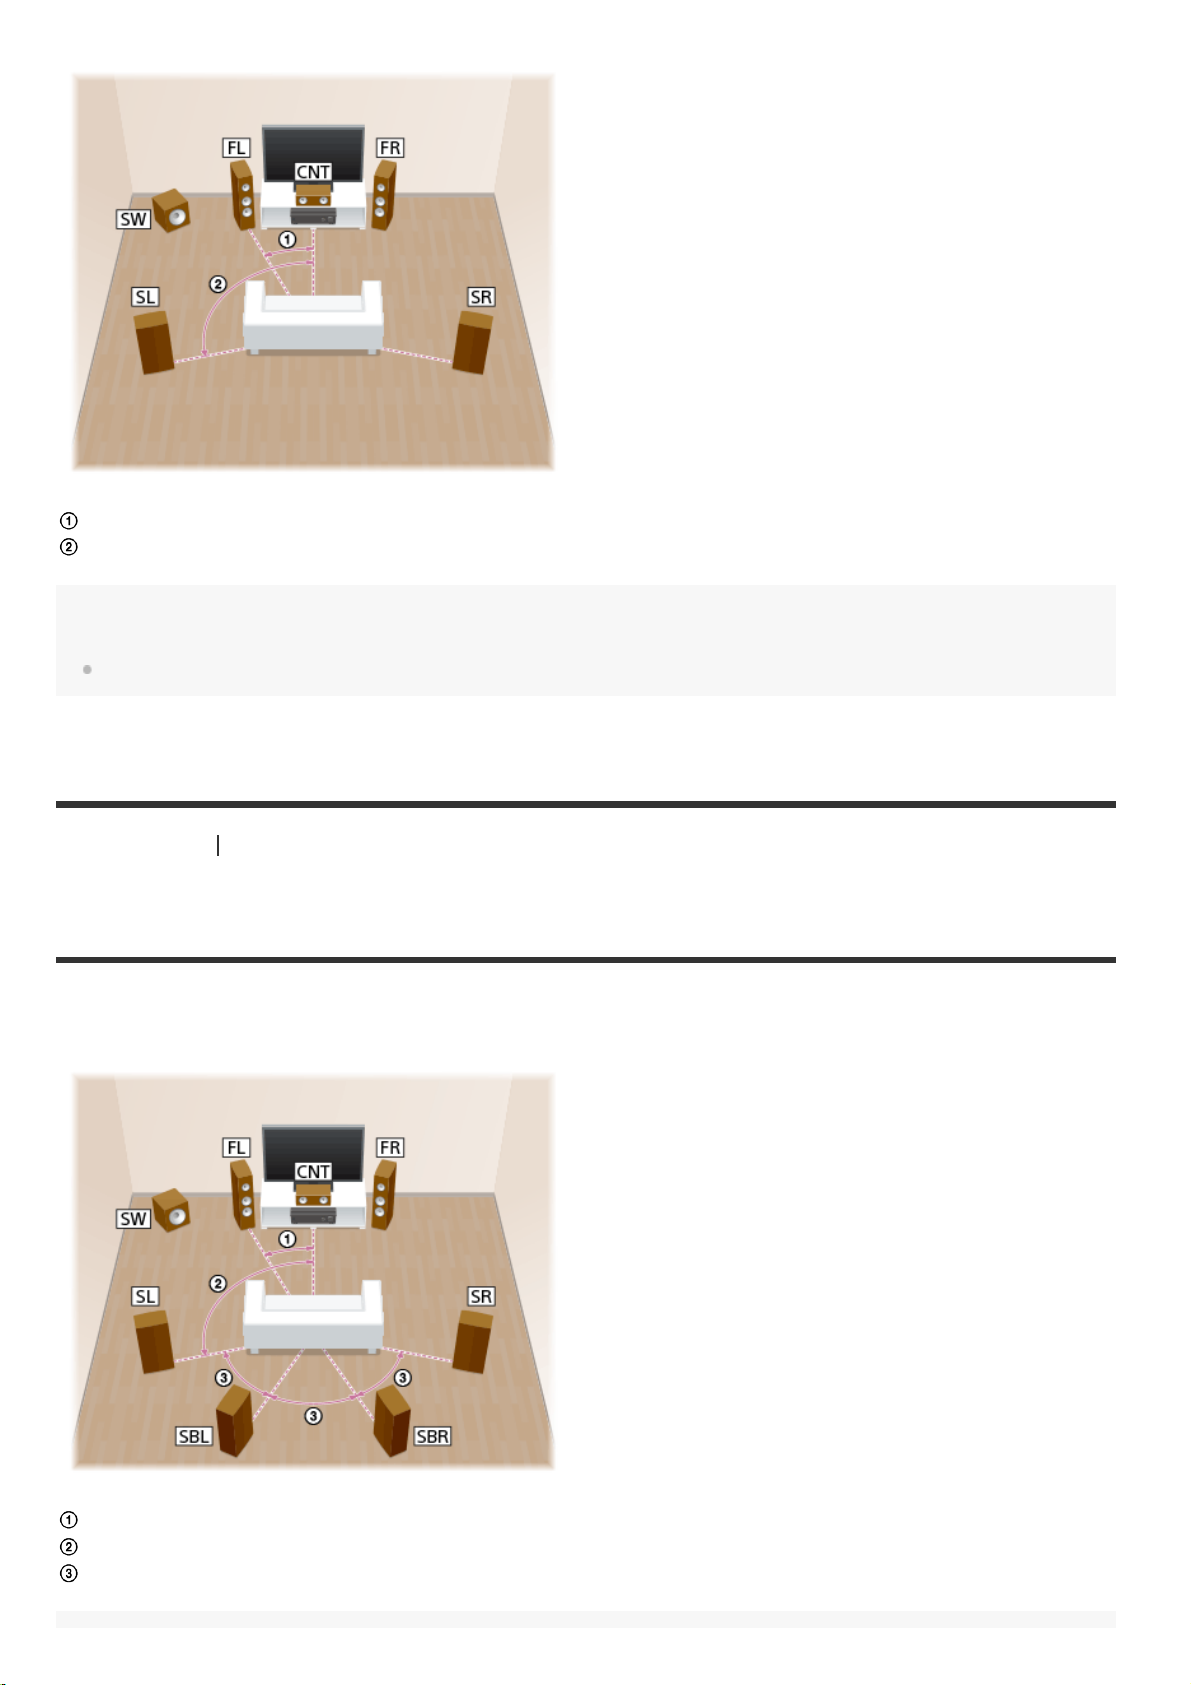
30°
100° - 120°
Hint
As the subwoofer does not emit highly directional signals, you can place it wherever you want.
[11] Preparation 1. Installing speakers
Installing 7.1 -channel speaker system using surround back
speakers
You can enjoy high-fidelity reproduction of recorded sound from DVD or Blu-ray Disc software in 6.1-channel or 7.1channel format.
30°
100° - 120°
Same angle
Note
When you use a 6.1-channel connection, place a surround back speaker directly behind the listening position.
Hint
As the subwoofer does not emit highly directional signals, you can place it wherever you want.
[12] Preparation 1. Installing speakers
Installing 5.1.2- channel speaker system using top middle
speakers
You can enjoy vertical sound effects by connecting additional two top middle speakers.
30°
100° - 120°
Hint
As the subwoofer does not emit highly directional signals, you can place it wherever you want.
[13] Preparation 1. Installing speakers
Installing 5.1.2- channel speaker system using front Dolby
Atmos enabled speakers
You can enjoy vertical sound effects by connecting additional two front Dolby Atmos enabled speakers.
30°
100° - 120°
Hint
As the subwoofer does not emit highly directional signals, you can place it wherever you want.
[14] Preparation 1. Installing speakers
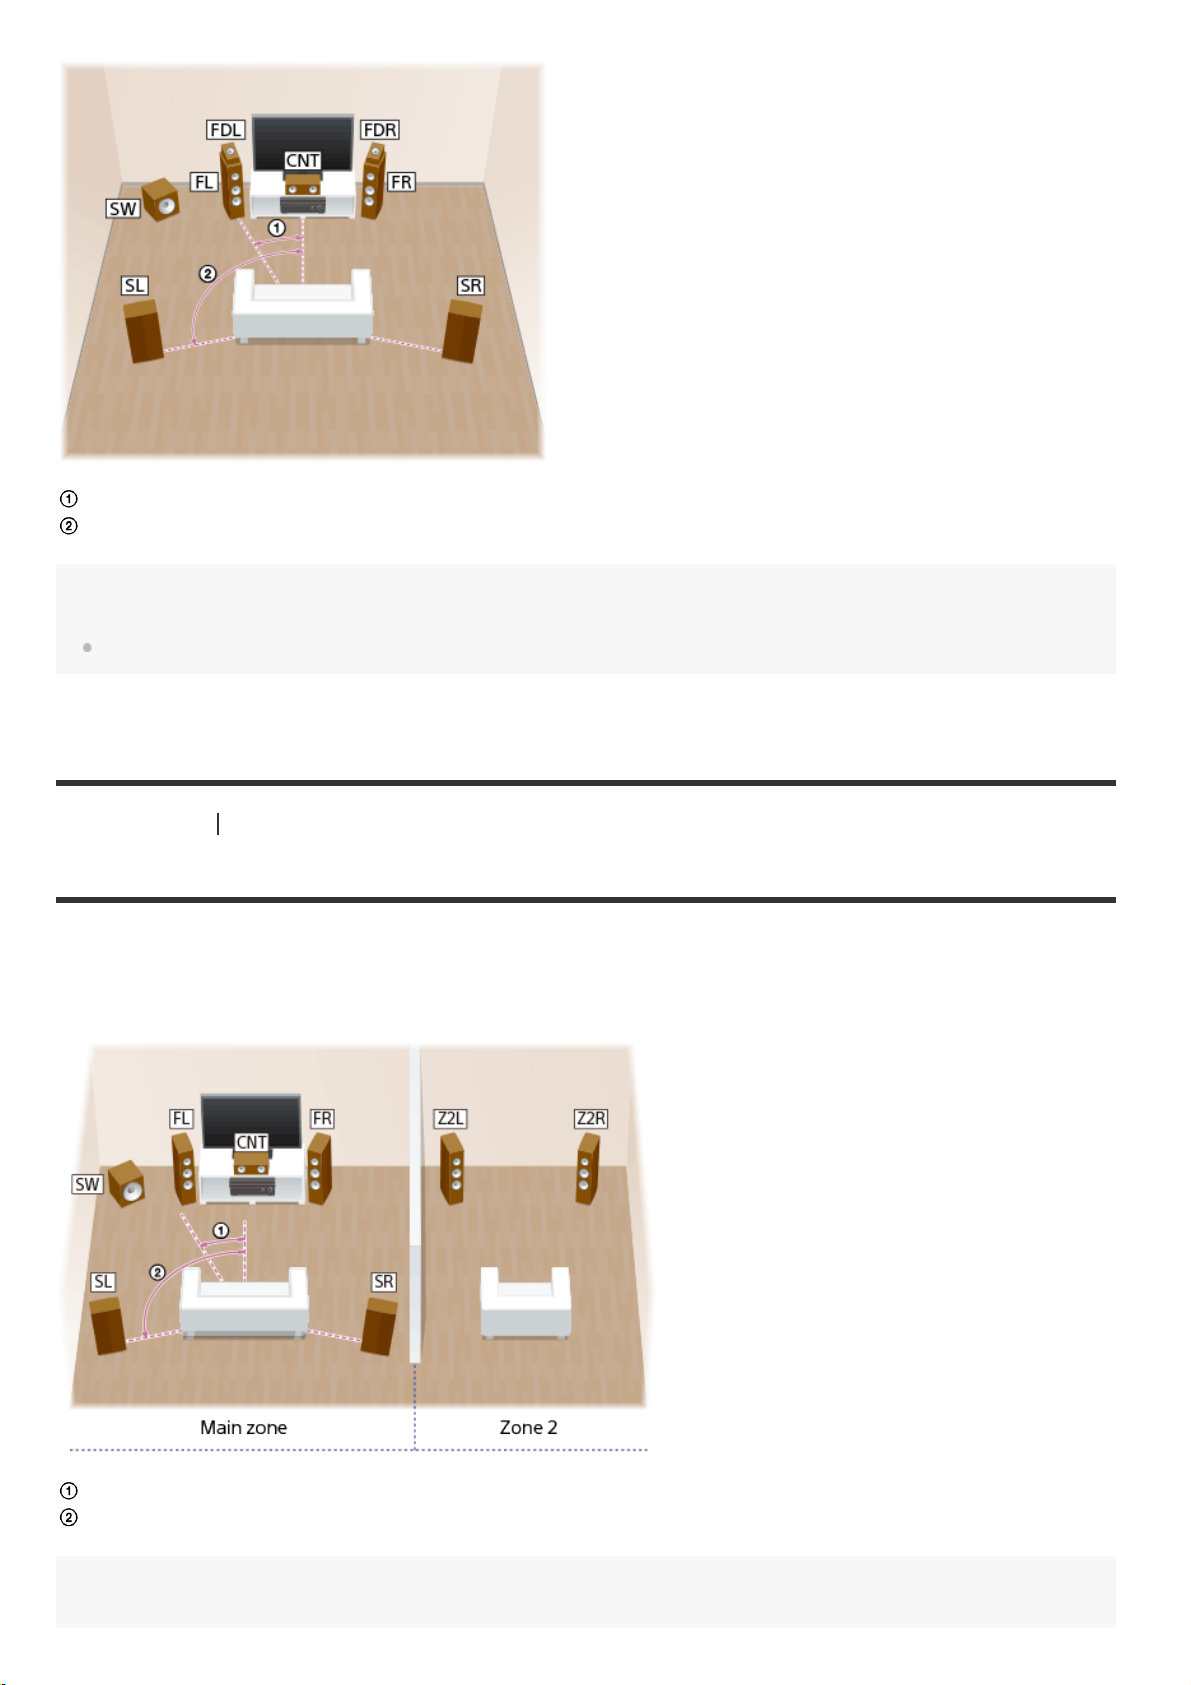
Installing 5.1 -channel speaker system with Zone 2 connection
To fully enjoy theater-like multi-channel surround sound, you need five speakers (two front speakers, a center
speaker, and two surround speakers) and a subwoofer. You can also enjoy the audio in another location (“Zone 2”)
by connecting additional Zone 2 speakers. For example, it is possible to listen to music received from music services
in Zone 2 while enjoying a DVD in the main zone.
30°
100-120°
Hint
As the subwoofer does not emit highly directional signals, you can place it wherever you want.
[15] Preparation 1. Installing speakers
Installing 5.1 -channel speaker system with bi-amplifier
connection
You can enhance the sound quality of the front speakers by separately connecting the built-in amplifiers to tweeters
and woofers in a bi-amplifier configuration.
30°
100° - 120°
Hint
As the subwoofer does not emit highly directional signals, you can place it wherever you want.
[16] Preparation 1. Installing speakers
Installing 5.1 -channel speaker system with front B speaker
connection
If you have an additional front speaker system, connect it to SPEAKERS SURROUND BACK/HEIGHT terminals.
You can output sound from either front A speakers or front B speakers, or both front A speakers and front B
speakers.
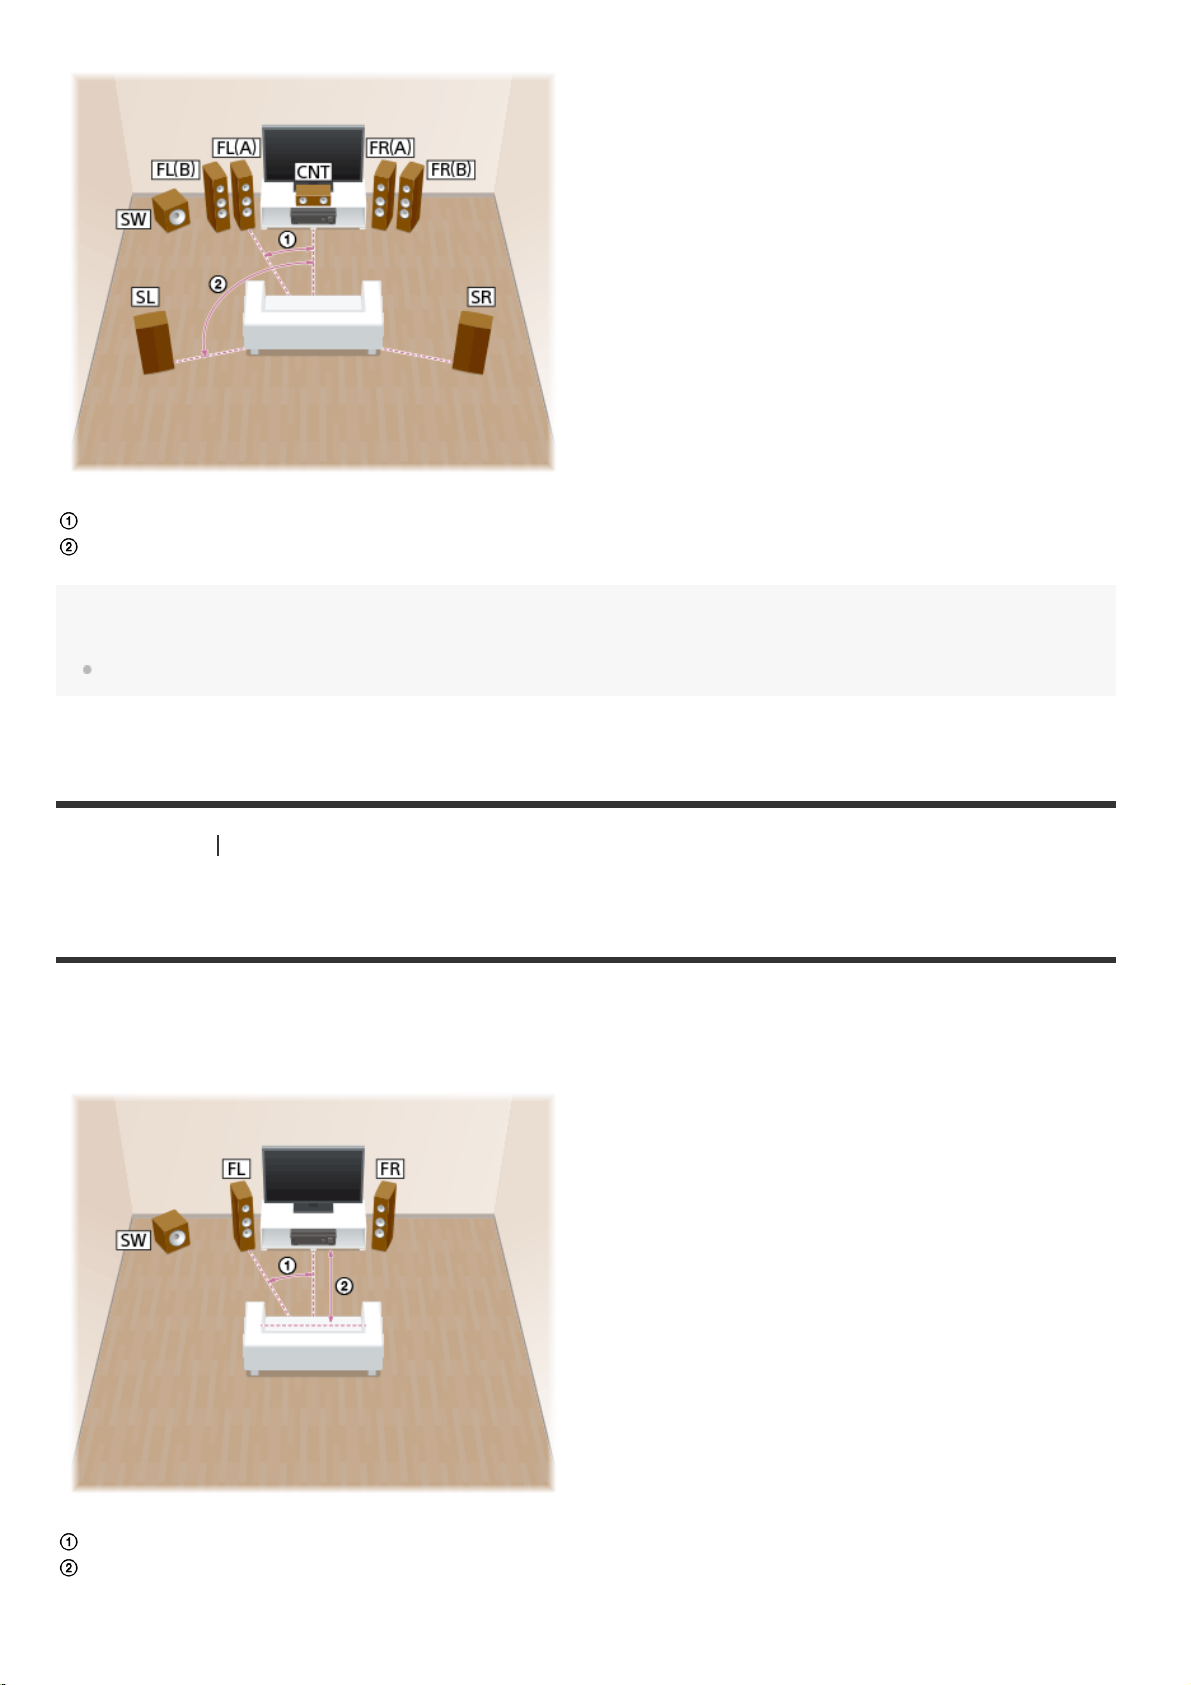
30°
100° - 120°
Hint
As the subwoofer does not emit highly directional signals, you can place it wherever you want.
[17] Preparation 1. Installing speakers
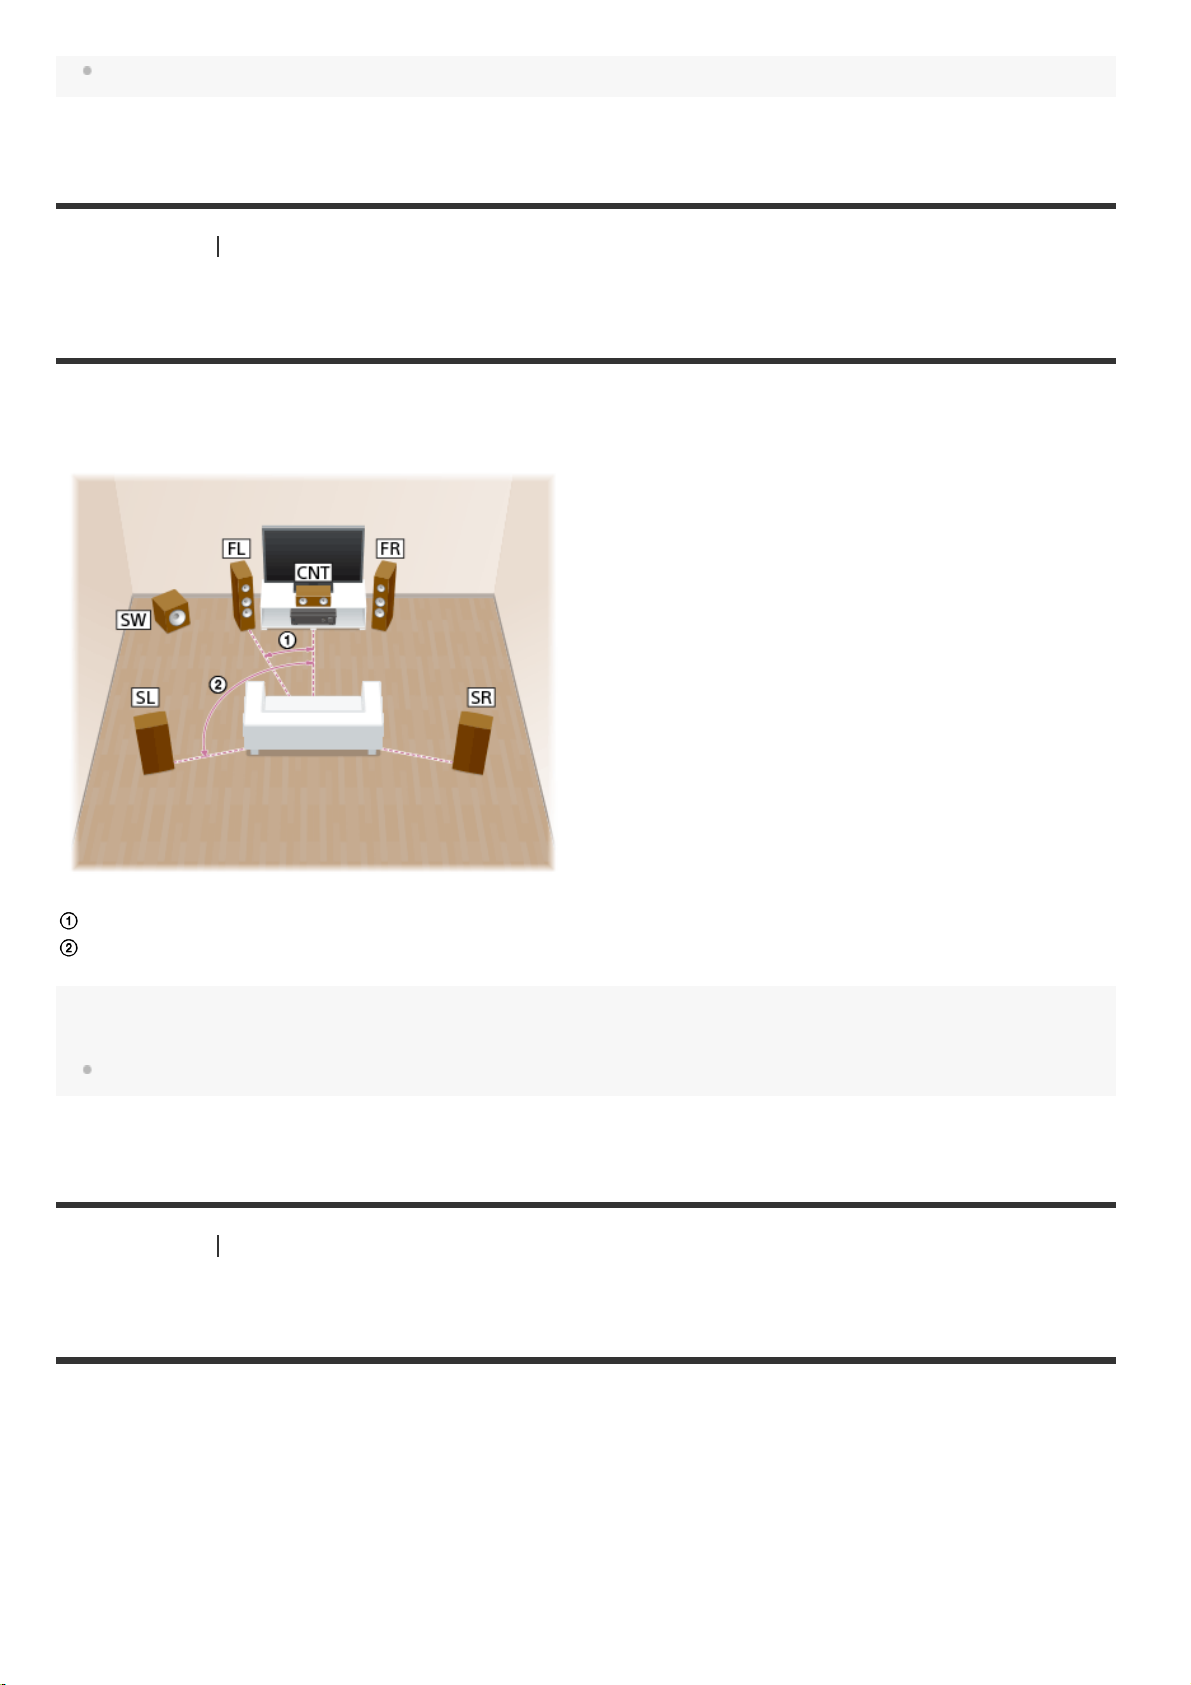
Installing 2.1 -channel speaker system to enjoy the Front
Surround mode
If you select [Front Surround] for the sound field setting, you can enjoy virtual surround effects using only two front
speakers.
Place speakers as shown below to enjoy Front Surround mode.
30°
1.5 m - 3 m
*
Set the height of a tweeter of the front speaker at the same height as your ears.
Hint
As the subwoofer does not emit highly directional signals, you can place it wherever you want.
[18] Preparation 1. Installing speakers
Speaker configuration and speaker pattern settings
Select the speaker pattern according to the speaker configuration which you are using. The table below shows
examples of speaker configurations and speaker pattern settings.
Speaker configuration in each zone
Main zone
Zone
2
[Surround Back Speaker
Assign] (*1)
[Speaker Pattern]
setting
5.1-channel
7.1-channel using surround back
speakers
5.1.2-channel using top middle speakers
5.1.2-channel using Dolby Atmos
enabled speakers
5.1-channel with Zone 2 connection
5.1-channel with bi-amplifier connection
5.1-channel with front B speaker
connection
2.1-channel (for enjoying Front
Surround)
*1
You can only set [Surround Back Speaker Assign] if the speaker pattern is set to a setting that does not have surround back and
height/overhead speakers.
*2
For USA and Canadian models only
*3
For other models only
Not
used
Not
used
Not
used
Not
used
2channel
Not
used
Not
used
Not
used
- [5.1]
- [7.1]
- [5.1.2 (TM)]
- [5.1.2 (FD)]
[Off] (*2)/[Zone2] (*3) [5.1]
[BI-AMP] [5.1]
[Front B] [5.1]
- [2.1]
Hint
The receiver allows you to enjoy a surround- sound effect acoustically equivalent to that of up to a 7.1.2-channel speaker
system when you select [Type A] or [Type B] for [SpeakerRelocation/PhantomSurroundBack] in the [Speaker Settings]
menu. When setting [SpeakerRelocation/PhantomSurroundBack], perform Auto Calibration beforehand.
[19] Preparation 2. Connecting speakers
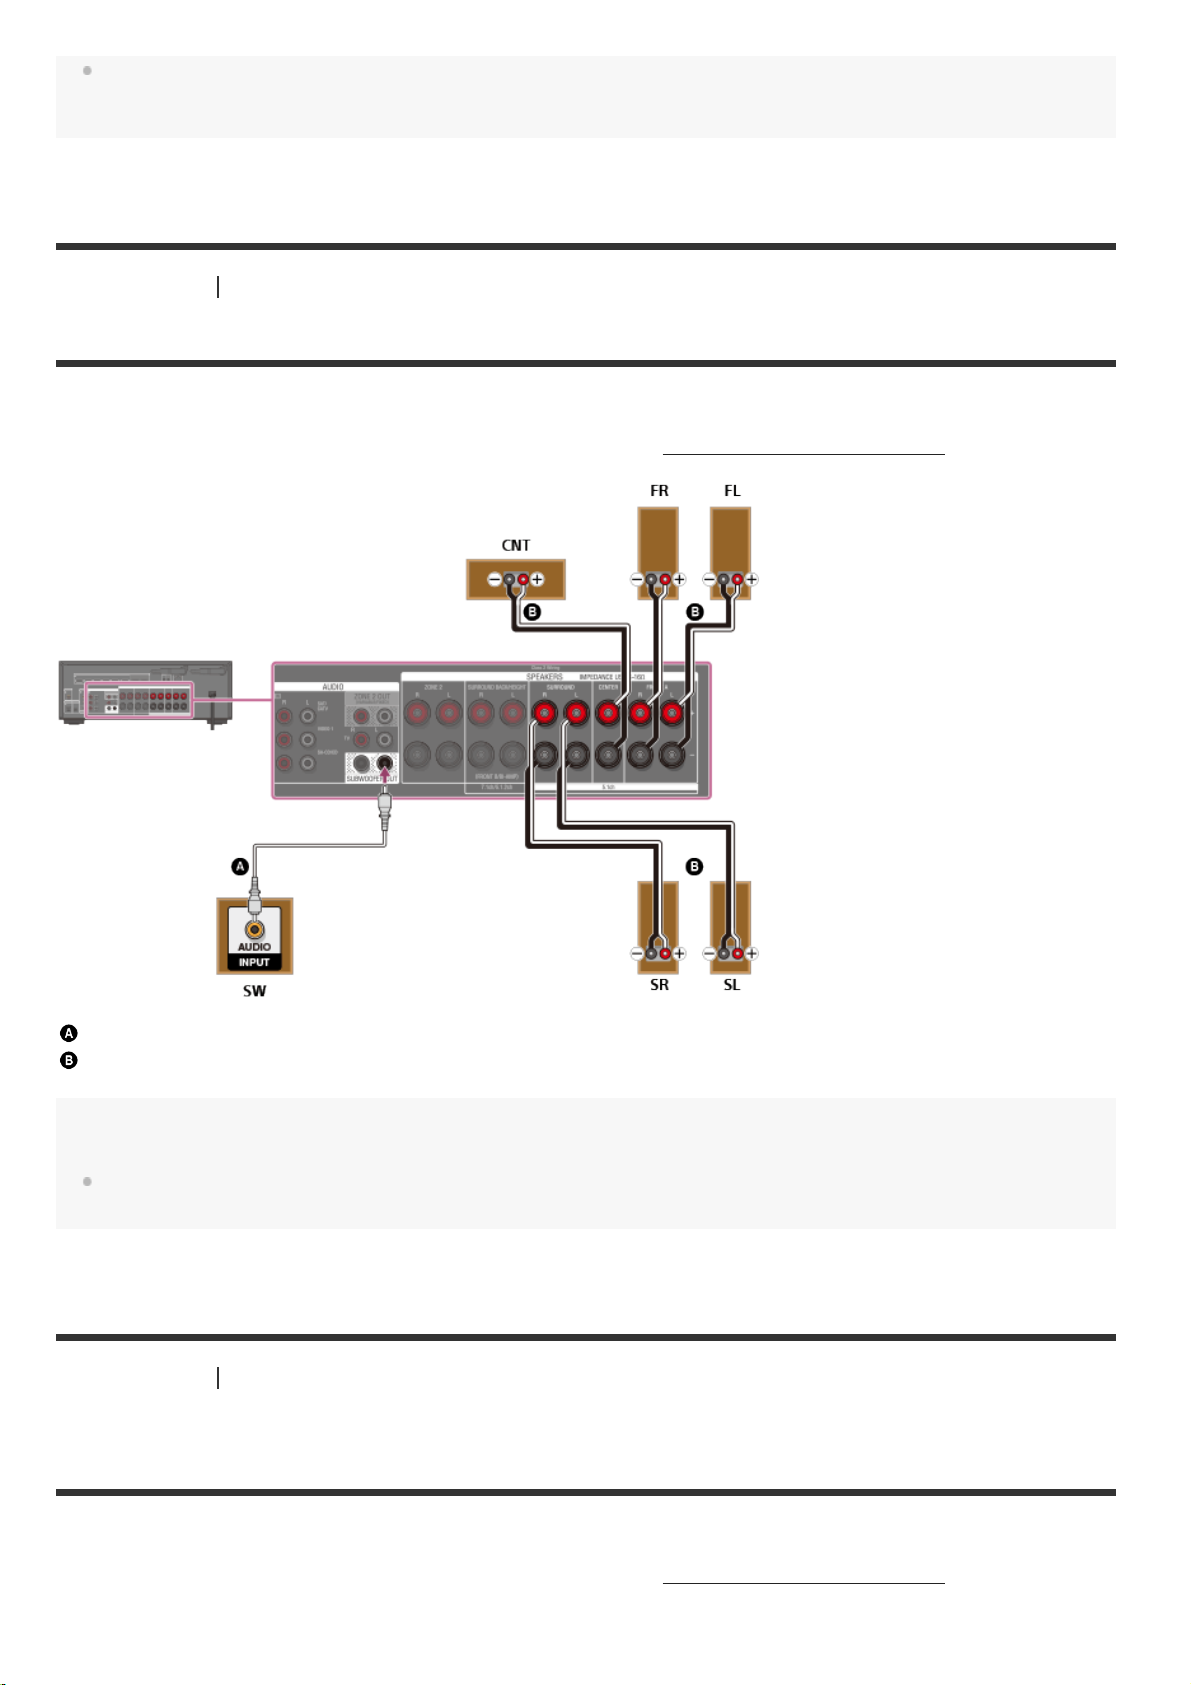
Connecting 5.1 -channel speaker system
Connect each speaker as illustrated below.
Before connecting cables, be sure to disconnect the AC power cord (mains lead).
For details on how to connect speaker cables to the receiver, see “
How to connect speaker cables.”
Monaural audio cable (not supplied)
Speaker cable (not supplied)
Note
After you have installed and connected your speakers, be sure to select the speaker pattern you want using [Speaker
Pattern] in the [Speaker Settings] menu.
[20] Preparation 2. Connecting speakers
Connecting 7.1 -channel speaker system using surround back
speakers
Connect each speaker as illustrated below.
Before connecting cables, be sure to disconnect the AC power cord (mains lead).
For details on how to connect speaker cables to the receiver, see “
How to connect speaker cables.”
 Loading...