


 Loading...
Digital Video Camera Recorder
Operating Guide
DCR-HC36E/HC44E/HC46E/ HC94E/HC96E
2-659-814-11(1)
Getting Started |
8 |
Recording/ |
24 |
Playback |
|
Using the Menu |
40 |
Dubbing/Editing |
67 |
Using a Computer |
82 |
Troubleshooting |
95 |
Additional Information |
118 |
© 2006 Sony Corporation

Read this first
Before operating the unit, please read this manual thoroughly, and retain it for future reference.
WARNING
To reduce fire or shock hazard, do not expose the unit to rain or moisture.
CAUTION
Replace the battery with the specified type only. Otherwise, fire or injury may result.
FOR CUSTOMERS IN THE
UNITED KINGDOM
NOTICE ON THE SUPPLIED AC ADAPTOR
A moulded plug complying with BS1363 is fitted to this equipment for your safety and convenience.
Should the fuse in the plug supplied need to be replaced, a fuse of the same rating as the supplied one and approved by ASTA or BSI to BS 1362, (i.e., marked with  or
or  mark) must be used.
If the plug supplied with this equipment has a detachable fuse cover, be sure to attach the fuse cover after you change the fuse. Never use the plug without the fuse cover. If you should lose the fuse cover, please contact your nearest Sony service station.
FOR CUSTOMERS IN EUROPE
ATTENTION
The electromagnetic fields at the specific frequencies may influence the picture and sound of this camcorder.
This product has been tested and found compliant with the limits set out in the EMC Directive for
using connection cables shorter than 3 meters (9.8 feet).
Notice
If static electricity or electromagnetism causes data transfer to discontinue midway (fail), restart the application or disconnect and connect the communication cable (USB, etc.) again.
Disposal of Old Electrical & Electronic Equipment (Applicable in the European Union and other European countries with separate collection systems)
This symbol on the product or on its packaging indicates that this product shall not be treated as household waste. Instead it shall be handed over to the applicable collection point for the recycling of electrical and electronic equipment. By ensuring this product is disposed of correctly, you will help prevent potential negative consequences for the environment and human health, which could otherwise be caused by inappropriate waste handling of this product. The recycling of materials will help to conserve natural resources. For more detailed information about recycling of this product, please contact your local Civic Office, your household waste disposal service or the shop where you purchased the product. Applicable Accessory: Remote Commander
Notes on use
Your camcorder is supplied with two kinds of operation guides.
–“Operating Guide” (This manual)
–“First Step Guide” for connecting the camcorder to a computer and using the supplied software (stored on the supplied CD-ROM)
2

Types of cassette you can use in your camcorder
You can use mini DV cassettes marked with 

 . Mini DV cassettes with Cassette Memory are incompatible (p. 118).
Types of “Memory Stick” you can use in your camcorder
There are two sizes of “Memory Stick.” You can use “Memory Stick Duo” marked with 


 or
or


 (p. 119).
“Memory Stick Duo”
(This size can be used with your camcorder.)
Using the camcorder
•Do not hold the camcorder by the following parts.
Viewfinder |
Battery pack |
“Memory Stick”
(You cannot use it in your camcorder.)
•You cannot use any type of memory card except “Memory Stick Duo.”
•“Memory Stick PRO” and “Memory Stick PRO Duo” can be used only with “Memory Stick PRO” compatible equipment.
When using a “Memory Stick Duo” with “Memory Stick” compatible equipment
Be sure to insert the “Memory Stick Duo” into the Memory Stick Duo Adaptor.
Memory Stick Duo Adaptor
LCD panel |
Shoe cover |
|
(DCR-HC94E/HC96E) |
•The camcorder is not dustproof, dripproof or waterproof.
See “Maintenance and precautions” (p. 124).
•Before connecting your camcorder to another device with a USB or i.LINK cable, be sure to insert the connector plug the correct way, and not forcibly to avoid damaging the terminal, or cause a malfunction of your camcorder.
•For DCR-HC44E/HC46E/HC94E/ HC96E:
Disconnect the AC Adaptor from the Handycam Station holding both the Handycam Station and the DC plug.
•For DCR-HC44E/HC46E/HC94E/ HC96E:
Be sure to slide the POWER switch to OFF (CHG) when you insert the camcorder into the Handycam Station or remove the camcorder from it.
Continued , 3

Read this first (Continued)
About menu items, LCD panel, viewfinder, and lens
•A menu item that is grayed out is not available under the current recording or playback conditions.
•The LCD screen and the viewfinder are manufactured using extremely highprecision technology, so over 99.99% of the pixels are operational for effective use. However, there may be some tiny black points and/or bright points (white, red, blue, or green in color) that appear constantly on the LCD screen and the viewfinder. These points are normal results of the manufacturing process and do not affect the recording in any way.
Black point
White, red, blue or green point
•Exposing the LCD screen, the viewfinder, or the lens to direct sunlight for long periods of time may cause malfunctions.
•Do not aim at the sun. Doing so might cause your camcorder to malfunction. Take pictures of the sun only in low light conditions, such as at dusk.
On recording
•Before starting to record, test the recording function to make sure the picture and sound are recorded without any problems.
•Compensation for the contents of recordings cannot be provided, even if recording or playback is not possible due
to a malfunction of the camcorder, storage media, etc.
•TV color systems differ depending on the countries/regions. To view your recordings on a TV, you need a PAL system-based TV.
•Television programs, films, video tapes, and other materials may be copyrighted. Unauthorized recording of such materials may be contrary to the copyright laws.
About this manual
•The images of the LCD screen and the viewfinder used in this manual for illustration purposes are captured using a digital still camera, and therefore may appear different.
•The on-screen displays in each local language are used for illustrating the operating procedures. Change the screen language before using your camcorder if necessary (p. 65).
•The illustrations used on this manual are based on the model DCR-HC96E. The model name is indicated on the bottom of your camcorder.
•Design and specifications of recording media and accessories are subject to change without notice.
About the Carl Zeiss lens
•Your camcorder is equipped with a Carl Zeiss lens, which was developed jointly by Carl Zeiss, in Germany, and Sony Corporation, and produces superior images. It adopts the MTF measurement system for video cameras and offers a quality typical of a Carl Zeiss lens. MTF= Modulation Transfer Function. The number value indicates the amount of light from a subject coming into the lens.
•For DCR-HC94E/HC96E:
The lens for your camcorder is T -coated to suppress unwanted reflections and faithfully reproduce colors.
4

Table of Contents |
|
Read this first ........................................................................................... |
2 |
Getting Started |
|
Step 1: Checking supplied items .............................................................. |
8 |
Step 2: Charging the battery pack ............................................................ |
9 |
Step 3: Turning the power on and holding your camcorder firmly .......... |
14 |
Step 4: Adjusting the LCD panel and viewfinder .................................... |
16 |
Step 5: Using the touch panel ................................................................ |
17 |
Changing the language setting .................................................................... |
17 |
Checking the screen indicators (Display guide) .......................................... |
17 |
Step 6: Setting the date and time ........................................................... |
19 |
Step 7: Inserting a tape or a “Memory Stick Duo” .................................. |
20 |
Step 8: Selecting the aspect ratio (16:9 or 4:3) of the recording picture |
|
(DCR-HC44E/HC46E/HC94E/HC96E) ......................................... |
22 |
Recording/Playback |
|
Easy Recording/Playback (Easy Handycam) ......................................... |
24 |
Recording ............................................................................................... |
26 |
Playback ................................................................................................. |
27 |
Functions used for recording/playback, etc. ........................................... |
28 |
Recording
To use zoom
To use the flash (DCR-HC94E/HC96E)
To record in dark places (NightShot plus) (DCR-HC36E/HC44E/HC46E) To record in dark places (NightShot) (DCR-HC94E/HC96E)
To adjust the exposure for backlit subjects (BACK LIGHT) To adjust the focus for an off center subject (SPOT FOCUS)
To fix the exposure for the selected subject (Flexible spot meter) To record in mirror mode
To use a tripod
To use a Shoulder belt
Playback
To play back the images in sequence (SLIDE SHOW) To use PB zoom
Recording/playback
To check the remaining battery (Battery Info)
To turn off the operation confirmation beep (BEEP) To use special effects
To initialize the settings (RESET) Other part names and functions
Continued , 5

Indicators displayed during recording/playback ..................................... |
32 |
Searching for the starting point .............................................................. |
35 |
Searching for the last scene of the most recent recording |
|
(END SEARCH) .................................................................................. |
35 |
Searching manually (EDIT SEARCH) ........................................................... |
35 |
Reviewing the most recently recorded scenes (Rec review) ....................... |
35 |
Remote Commander .............................................................................. |
36 |
Searching quickly for a desired scene (Zero set memory) .......................... |
36 |
Searching for a scene by date of recording (Date search) .......................... |
37 |
Playing the picture on a TV .................................................................... |
38 |
Using the Menu |
|
Using the menu items ........................................................... |
40 |
Menu items ............................................................................................ |
42 |
CAMERA SET menu ........................................................................ |
45 |
Settings to adjust your camcorder to the recording conditions (EXPOSURE/ |
|
WHITE BAL./STEADYSHOT, etc.) |
|
MEMORY SET menu ...................................................................... |
51 |
Settings for the “Memory Stick Duo” (BURST/QUALITY/IMAGE SIZE/ |
|
ALL ERASE/NEW FOLDER, etc.) |
|
PICT.APPLI. menu ......................................................................... |
55 |
Special effects on pictures or additional functions on recording/playback |
|
(SLIDE SHOW/PICT. EFFECT/FRAME REC, etc.) |
|
EDIT/PLAY menu ........................................................................... |
60 |
Settings for editing or playing back in various modes (VAR.SPD PB/ |
|
END SEARCH, etc.) |
|
STANDARD SET menu .................................................................. |
61 |
Settings while recording on a tape or other basic settings (REC MODE/ |
|
MULTI-SOUND/LCD/VF SET/DISP OUTPUT, etc.) |
|
TIME/LANGU. menu ....................................................................... |
65 |
(CLOCK SET/WORLD TIME/LANGUAGE) |
|
Customizing Personal Menu .................................................................. |
65 |
Dubbing/Editing |
|
Dubbing to VCR/DVD device, etc. ......................................................... |
67 |
Recording pictures from a TV or VCR/DVD device, etc. |
|
(DCR-HC36E/HC46E/HC96E) ..................................................... |
70 |
Dubbing pictures from a tape to a “Memory Stick Duo” ......................... |
73 |
Dubbing sound to a recorded tape ......................................................... |
74 |
Deleting recorded pictures from the “Memory Stick Duo” ...................... |
76 |
Marking images on the “Memory Stick Duo” with specific information |
|
(Print mark/Image protection) ....................................................... |
77 |
6

Printing recorded images (PictBridge compliant printer) ........................ |
78 |
Jacks to connect external devices .......................................................... |
80 |
Using a Computer |
|
Before referring to the “First Step Guide” on your computer .................. |
82 |
Installing the software and “First Step Guide” on a computer ................ |
85 |
Viewing “First Step Guide” ..................................................................... |
89 |
Creating a DVD (Direct Access to “Click to DVD”) ................................. |
90 |
Connecting an analog VCR to the computer via your camcorder |
|
(Signal convert function) (DCR-HC96E) ....................................... |
93 |
Troubleshooting |
|
Troubleshooting ...................................................................................... |
95 |
Warning indicators and messages ....................................................... |
113 |
Additional Information |
|
Using your camcorder abroad .............................................................. |
118 |
Usable cassette tapes .......................................................................... |
118 |
About the “Memory Stick” ..................................................................... |
119 |
About the “InfoLITHIUM” battery pack .................................................. |
121 |
About i.LINK ......................................................................................... |
123 |
Maintenance and precautions .............................................................. |
124 |
Specifications ....................................................................................... |
127 |
Index ..................................................................................................... |
133 |
7

Getting Started
Step 1: Checking supplied items
Make sure that you have following items supplied with your camcorder.
The number in the parentheses indicates the number of that item supplied.
•The cassette tape and “Memory Stick Duo” are not supplied. See page 3, 118, 119, for compatible cassettes and “Memory Stick Duo” for your camcorder.
AC Adaptor (1) (p. 9)
Mains lead (1) (p. 9)
Handycam Station (1) (DCR-HC44E/HC46E/HC94E/HC96E) (p. 9)
Wireless Remote Commander (1) (p. 36)
A button-type lithium battery is already installed.
A/V connecting cable (1) (p. 38, 70, 93)
USB cable (1) (p. 78, 82)
Lens cap (1) (DCR-HC36E/HC44E/HC46E) (p. 14, 24, 26)
•To attach the lens cap
Attach the lens cap to the metal fittings of the Grip belt, as illustrated below, using the strap.
Rechargeable battery pack (1) (p. 9, 121)
NP-FP30 (DCR-HC36E)
NP-FP50 (DCR-HC44E/HC46E/HC94E/HC96E)
CD-ROM “Picture Package Ver.1.5.1” (1) (p. 82)
21-pin adaptor (1) (DCR-HC44E/HC46E/HC94E/HC96E) (p. 39)
For the models with the 
 mark printed on their bottom surfaces only.
Operating Guide (This manual) (1)
8

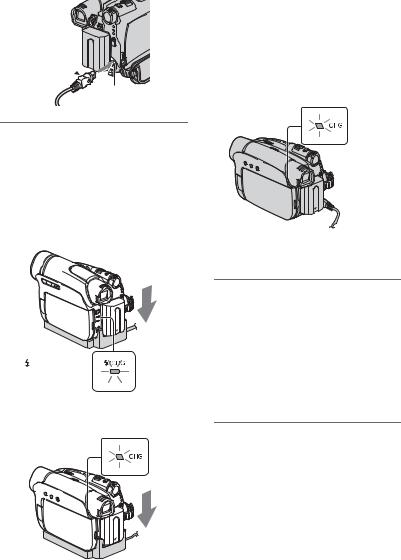
Step 2: Charging the battery pack
You can charge the “InfoLITHIUM” battery pack (P series) (p. 121) after attaching it to your camcorder.
For DCR-HC44E/HC46E/HC94E/HC96E:
POWER switch


 DC IN jack
Handycam DC plug
Station
To the wall socket
AC Adaptor
Mains lead
1 Align the terminals of the battery pack and your camcorder (1), then attach the battery pack and click it into place (2).
2 

1
2 Slide the POWER switch in the direction of the arrow to OFF (CHG) (The default setting).
Started Getting
For DCR-HC36E:
POWER switch
DC IN jack 
 DC plug
To the wall socket
AC Adaptor
Mains lead
3 Connect the AC Adaptor to the DC IN jack on the Handycam Station for the DCR-HC44E/ HC46E/HC94E/HC96E or on your camcorder for the DCR-HC36E.
For DCR-HC44E/HC46E/HC94E/
HC96E:
DC IN jack
With the v mark facing up
Continued , 9
Step2: Charging the battery pack (Continued)
For DCR-HC36E:
With the v mark 
 facing to the LCD screen


DC IN jack
4 For DCR-HC44E/HC46E/HC94E/ HC96E:
Connect the mains lead to the AC Adaptor and the wall socket. Insert the camcorder into the Handycam Station securely, all the way to the bottom.
DCR-HC94E/HC96E:
The CHG (charge) lamp lights up and charging starts.
•When inserting the camcorder into the Handycam Station, close the DC IN jack cover.
For DCR-HC36E:
Connect the mains lead to the AC Adaptor and the wall socket.
CHG (charge) lamp
The CHG (charge) lamp lights up and charging starts.
5 The CHG (charge) lamp turns off when the battery is fully charged. Disconnect the AC Adaptor from the DC IN jack.
|
For DCR-HC44E/HC46E/HC94E/ |
/CHG |
HC96E: |
(charge) lamp |
Disconnect the AC Adaptor from the |
|
DC IN jack holding both the Handycam |
DCR-HC44E/HC46E: |
Station and the DC plug. |
|
CHG (charge) lamp
For DCR-HC44E/HC46E/HC94E/HC96E: To charge the battery pack using only the AC Adaptor
Turn off the power, then connect the AC Adaptor to the DC IN jack on your camcorder.
• You can operate your camcorder connected to a power source such as a wall socket as shown in the illustration. The battery pack will not lose its charge in this case.
10
POWER switch
With the v mark 


 facing to the LCD


screen
DC IN jack
DC plug
To the wall socket
AC Adaptor
Mains lead
For DCR-HC44E/HC46E/HC94E/HC96E: To remove your camcorder from the Handycam Station
Turn off the power, then remove the camcorder from the Handycam Station holding both your camcorder and the Handycam Station.
For DCR-HC36E:
To use an outside power source
You can operate your camcorder using the power from the wall socket by making the same connections as you do when charging the battery pack. The battery pack will not lose its charge in this case.
To remove the battery pack
1Slide the POWER switch to OFF (CHG). Hold down the V BATT (battery) release lever with one hand.
2Remove the battery in the direction of the arrow with the other hand.
POWER switch |
|
|
1 |
Getting |
|
Started |
||
2 |
||
|
||
V BATT (battery) |
|
|
release lever |
|
When storing the battery pack
Fully discharge the battery before storing it for an extended period (p. 122).
Charging time
Approximate time (min.) required when you fully charge a fully discharged battery pack.
Battery pack |
Charging time |
NP-FP30*1 |
115 |
NP-FP50*2 |
125 |
NP-FP70 |
155 |
|
|
NP-FP71 |
170 |
|
|
NP-FP90 |
220 |
|
|
*1 supplied with DCR-HC36E
*2 supplied with DCR-HC44E/HC46E/HC94E/ HC96E
Recording time
Approximate time (min.) available when you use a fully charged battery pack.
Continued , 11
Step2: Charging the battery pack (Continued)
DCR-HC36E
|
Continuous |
Typical |
Battery pack |
recording |
recording |
|
time |
time* |
NP-FP30 (supplied) |
85 |
40 |
|
105 |
50 |
|
|
|
NP-FP50 |
120 |
60 |
|
150 |
75 |
|
|
|
NP-FP70 |
255 |
125 |
|
310 |
155 |
|
|
|
NP-FP71 |
300 |
150 |
|
370 |
185 |
|
|
|
NP-FP90 |
455 |
225 |
|
550 |
275 |
|
|
|
•All times measured under the following conditions:
Top: Recording with LCD screen.
Bottom: Recording with viewfinder while the LCD panel closed.
*Typical recording time shows the time when you repeat recording start/stop, turning the power on/off and zooming.
DCR-HC44E/HC46E
|
Continuous |
Typical |
Battery pack |
recording |
recording |
|
time |
time* |
NP-FP50 (supplied) |
100 |
55 |
|
115 |
65 |
|
115 |
65 |
|
|
|
NP-FP70 |
215 |
120 |
|
240 |
130 |
|
240 |
130 |
|
|
|
NP-FP71 |
255 |
140 |
|
290 |
160 |
|
290 |
160 |
|
|
|
NP-FP90 |
385 |
210 |
|
435 |
240 |
|
435 |
240 |
|
|
|
•All times measured under the following conditions:
Top: Recording with LCD screen.
Middle: When the LCD backlight turns off. Bottom: Recording with viewfinder while the LCD panel closed.
*Typical recording time shows the time when you repeat recording start/stop, turning the power on/off and zooming.
DCR-HC94E/HC96E
Battery pack |
Continuous |
Typical |
recording |
recording |
|
|
time |
time* |
NP-FP50 (supplied) |
80 |
45 |
|
90 |
50 |
|
95 |
50 |
|
|
|
NP-FP70 |
175 |
95 |
|
190 |
105 |
|
200 |
110 |
|
|
|
NP-FP71 |
205 |
110 |
|
230 |
125 |
|
235 |
130 |
|
|
|
NP-FP90 |
310 |
170 |
|
345 |
190 |
|
355 |
195 |
|
|
|
•All times measured under the following conditions:
Top: Recording with LCD screen.
Middle: When the LCD backlight turns off. Bottom: Recording with viewfinder while the LCD panel closed.
*Typical recording time shows the time when you repeat recording start/stop, turning the power on/off and zooming.
Playing time
Approximate time (min.) available when you use a fully charged battery pack.
DCR-HC36E
Battery pack |
LCD panel |
LCD panel |
|
opened |
closed |
||
|
|||
NP-FP30 (supplied) |
90 |
110 |
|
|
|
|
|
NP-FP50 |
125 |
160 |
|
|
|
|
|
NP-FP70 |
265 |
330 |
|
|
|
|
|
NP-FP71 |
315 |
395 |
|
|
|
|
|
NP-FP90 |
475 |
580 |
|
|
|
|
12

DCR-HC44E/HC46E
Battery pack |
LCD panel |
LCD panel |
|
opened* |
closed |
||
|
|||
NP-FP50 (supplied) |
120 |
150 |
|
|
|
|
|
NP-FP70 |
255 |
310 |
|
|
|
|
|
NP-FP71 |
300 |
370 |
|
|
|
|
|
NP-FP90 |
455 |
550 |
|
|
|
||
* When the LCD backlight turns on. |
|
||
DCR-HC94E/HC96E |
|
|
|
|
|
|
|
Battery pack |
LCD panel |
LCD panel |
|
opened* |
closed |
||
|
|||
NP-FP50 (supplied) |
115 |
140 |
|
|
|
|
|
NP-FP70 |
240 |
295 |
|
|
|
|
|
NP-FP71 |
290 |
350 |
|
|
|
|
|
NP-FP90 |
435 |
525 |
|
|
|
|
|
* When the LCD backlight turns on.
On the battery pack
•Before changing the battery pack, slide the POWER switch to OFF (CHG).
•The CHG (charge) lamp flashes during charging, or the Battery Info (p. 31) will not be correctly displayed under the following conditions.
–The battery pack is not attached correctly.
–The battery pack is damaged.
–The battery pack is worn-out (For Battery Info only).
•The power will not be supplied from the battery as long as the AC Adaptor is connected to the DC IN jack of your camcorder or the Handycam Station supplied with the DCR-HC44E/HC46E/ HC94E/HC96E, even when the mains lead is disconnected from the wall socket.
On the charging/recording/playback time
•Times measured with the camcorder at 25°C (77°F). (10 - 30 °C (50 - 86°F) is recommended.)
•The recording and playback time will be shorter when you use your camcorder in low temperatures.
•The recording and playback time will be shorter depending on the conditions under which you use your camcorder.
On the AC Adaptor
•Use the nearby wall socket when using the AC Adaptor. Disconnect the AC Adaptor from the wall socket immediately if any malfunction occurs while using your camcorder.
•Do not use the AC Adaptor placed in a narrow space, such as between a wall and furniture.
•Do not short-circuit the DC plug of the AC Adaptor or battery terminal with any metallic objects. This may cause a malfunction.
PRECAUTION
•Even if your camcorder is turned off, AC power (mains) is still supplied to it while connected to the wall socket via the AC Adaptor.
Started Getting
13

Step 3: Turning the power on and holding your camcorder firmly
To record or play back, slide the POWER switch repeatedly to turn on the respective lamp.
When using it for the first time, the [CLOCK SET] screen appears (p. 19).
POWER switch
1 Slide the POWER switch repeatedly in the direction of the arrow to turn on the respective lamp.
For DCR-HC36E/HC44E/HC46E: Remove the lens cap by pressing both knobs on the sides of the cap.
Lamps that light up CAMERA-TAPE: To record on a tape.
CAMERA-MEMORY: To record on a “Memory Stick Duo.”
PLAY/EDIT: To play or edit pictures.
•After you have set the date and time ([CLOCK SET], p. 19), the next time you turn on the power of your camcorder, the current date and time will be displayed on the LCD screen for a few seconds.
2 Hold the camcorder correctly.
3 Ensure a good grip, then fasten the Grip belt.
For DCR-HC94E/HC96E:
The lens cover opens automatically when the POWER switch is set to CAMERA-TAPE or CAMERAMEMORY.
If the POWER  switch is set to OFF
(CHG), slide it while pressing the green button.
4
1

 2
2
3
14

To turn off the power
Slide the POWER switch to OFF (CHG).
For DCR-HC36E/HC44E/HC46E: Attach the lens cap after turning off the power.
•At the time of purchase, the power will be set to turn off automatically if you leave your camcorder without any operation attempted for approximately 5 minutes, to save battery power ([A.SHUT OFF], p. 64).
•If warning messages appear on the screen, follow the instructions (p. 114).
Started Getting
15
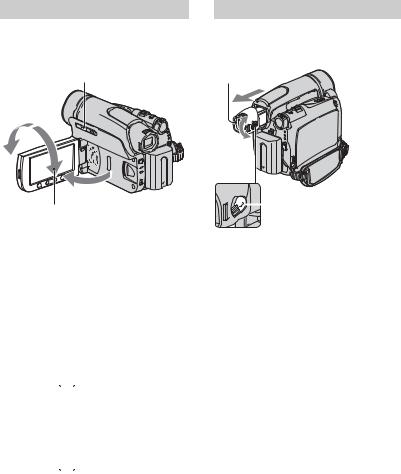
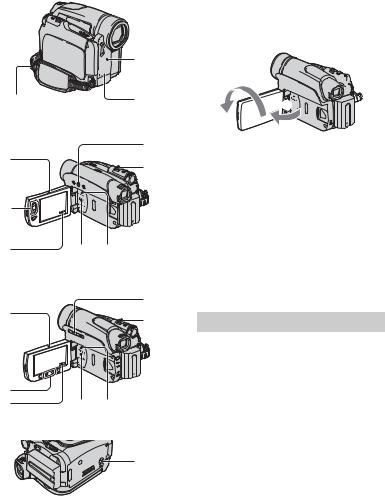
Step 4: Adjusting the LCD panel and viewfinder
The LCD panel
Open the LCD panel 90 degrees to the camcorder (1), then rotate it to the best angle to record or play (2).
DISP/BATT INFO
180 degrees (max.)
2
1
90 degrees to
90 degrees the camcorder (max.)
•Do not press the buttons on the LCD frame accidentally when you open or adjust the LCD panel.
•If you rotate the LCD panel 180 degrees to the lens side, you can close the LCD panel with the LCD screen facing out. This is convenient during playback operations.
The viewfinder
You can view pictures using the viewfinder to avoid wearing down the battery, or when the picture seen on the LCD screen is poor.
Viewfinder

 Viewfinder lens adjustment lever
Move it until the picture is clear.
•You can adjust the brightness of the viewfinder backlight by selecting [LCD/VF SET] - [VF B.LIGHT] (p. 62).
•You can adjust the [FADER] and the [EXPOSURE] setting using the viewfinder (p. 56).
For DCR-HC44E/HC46E/HC94E/HC96E: To turn off the LCD backlight to make the battery last longer
Press and hold DISP/BATT INFO for a few seconds until
 appears.
This setting is practical when you use your camcorder in bright conditions or where you want to save battery power. The recorded picture will not be affected by the setting. To turn on the LCD backlight, press and hold DISP/BATT INFO for a few seconds until
 disappears.
•See [LCD/VF SET] - [LCD BRIGHT] (p. 62) to adjust the brightness of the LCD screen.
16

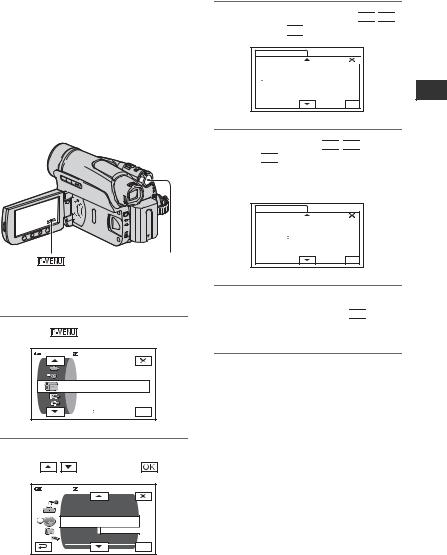
Step 5: Using the touch panel
You can play back recorded pictures
(p. 27), or change the settings (p. 40) using the touch panel.
Place your hand on the rear side of the LCD panel to support it. Then, touch the buttons displayed on the screen.
DISP/BATT INFO
DCR-HC36E/
HC44E/HC46E
DCR-HC94E/
HC96E
Touch the button on the LCD screen.
•Perform the same actions as explained above when you press the buttons on the LCD frame.
•Be careful not to press buttons on the LCD frame accidentally while using the touch panel.
•If the buttons on the touch panel do not work correctly, adjust the LCD screen (CALIBRATION) (p. 125).
•Dots in lines may appear on the LCD screen, but this is not a malfunction. These dots are not recorded.
To hide the screen indicators
Press DISP/BATT INFO to toggle the screen indicators (such as time code) on or off.
Changing the language setting
You can change the on-screen displays to show messages in a specified language. Select the screen language in [LANGUAGE] on the  (TIME/ LANGU.) menu (p. 40, 65).
Checking the screen indicators (Display guide)
You can easily check the meaning of each indicator (p. 34) that appears on the LCD screen.
1 Touch |
|
. |
|
|
|
60min |
– : – – : – – |
||
|
|
MENU |
DISP |
|
|
|
GUIDE |
||
|
|
|
||
1/3 |
TELE |
EXPO- |
||
MACRO |
SURE |
|||
|
|
|||
|
|
SPOT |
FADER |
|
|
|
FOCUS |
||
|
|
|
||
Touch [MENU] during Easy Handycam operation (p. 24).
2 Touch [DISP GUIDE].
Select area for guide .
D I S P G U I D E |
|
END |
The indicators vary depending on the settings.
Started Getting
Continued , 17

Step 5: Using the touch panel (Continued)
3 Touch the area including the indicator that you want to check.
DISP GUIDE |
|
|
END |
|
FOCUS: |
1/2 |
MANUAL |
PROGRAM AE: |
|
|
SPOTLIGHT |
|
STEADYSHOT: |
|
OFF |
The meanings of the indicators in the area are listed on the screen. If you cannot find the indicator you want to check, touch  /
/ to toggle.
When you touch 

 , the screen returns to the area selecting display.
To finish the operation
Touch [END].
18
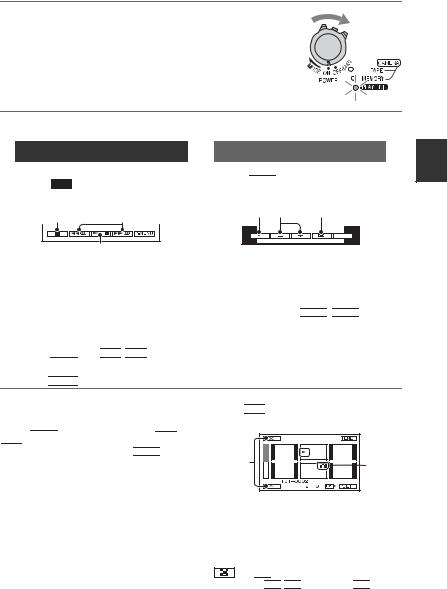
Step 6: Setting the date and time
Set the date and time when using this camcorder for the first time. If you do not set the date and time, the [CLOCK SET] screen appears every time you turn on your camcorder or change the POWER switch position.
•If you do not use your camcorder for about 3 months, the built-in rechargeable battery gets discharged and the date and time settings may be cleared from the memory. In that case, charge the rechargeable battery and then set the date and time again (p. 126).
POWER switch
Skip to step 4 when you set the clock for the first time.
1 Touch |
t [MENU]. |
60min |
– : –– : –– |
|
CAMERA SET |
|
PROGRAM AE |
|
SPOT METER |
|
EXPOSURE |
|
OK |
2 Select  (TIME/LANGU.) menu
with |
/ |
, then touch |
. |
||
|
60min |
|
|
– : –– : –– |
|
|
|
DISP OUTPUT |
|
|
|
|
|
MENU ROTATE |
|
|
|
|
|
A.SHUT OFF |
|
|
|
|
|
CLOCK SET |
|
|
|
|
|
WORLD |
––:––:–– |
|
|
|
|
|
|
|
|
|
|
LANGUAGE |
OK |
|
|
|
|
PROGRAM AE |
|
||
3 Select [CLOCK SET] with 

 /
/

 , then touch

 .
.
CLOCK SET |
|
|
|
– : –– : –– |
|||
|
DATE |
|
|
|
|
|
|
|
1M 1D |
0: 00 |
|||||
|
2006 |
Y |
|||||
OK
4 Set [Y] (year) with 

 /
/

 , then touch

 .
.
You can set any year up to the year 2079.
CLOCK SET |
|
|
|
– : –– : –– |
||
|
|
|
|
|
|
|
DATE |
|
|
|
|
|
|
2006Y |
|
1 |
M 1D |
0: 00 |
||
OK
5 Set [M] (month), [D] (day), hour and minute, then touch 

 .
.
The clock starts.
•The date and time are not displayed while recording, but they are automatically recorded on the tape, and can be displayed during playback (see page 63 for [DATA CODE] (During Easy Handycam operation, you can set only [DATE/TIME])).
Started Getting
19

Step 7: Inserting a tape or a “Memory Stick Duo”
Cassette tape
You can use mini DV 

 cassettes only (p. 118).
•The recordable time varies depending on [ REC MODE] (p. 61).
1 Slide and hold the  OPEN/ EJECT lever in the direction of the arrow and open the lid.
 OPEN/EJECT lever
Lid
The cassette compartment automatically comes out and opens up.
2 Insert a cassette with its window facing outwards, then press
 .
.
Push the center of the back of the cassette lightly.
Window
Cassette compartment
The cassette compartment automatically slides back in.
•Do not force the cassette compartment closed by pressing the portion marked {DO NOT PUSH} while it is sliding in. It may cause a malfunction.
3 Close the lid.
To eject the cassette
Open the lid following the same procedure as described in Step 1 and remove the cassette.
•For DCR-HC44E/HC46E/HC94E/HC96E: Do not insert/eject the cassette while your camcorder is on the Handycam Station. This may cause a malfunction.
20
“Memory Stick Duo”
You can use only a “Memory Stick Duo” marked with 


 or
or


 (p. 119).
•The number and time of recordable pictures varies depending on the image quality or the image size. For details, see page 52.
1 Open the LCD panel.
2 Insert the “Memory Stick Duo” into the “Memory Stick Duo” slot in the right direction until it clicks.
DCR-HC94E/HC96E:
Access lamp
With the v mark facing to the LCD screen
DCR-HC36E/HC44E/HC46E:
Access lamp
With the v mark facing to the LCD screen
•If you force the “Memory Stick Duo” into the slot in the wrong direction, the “Memory Stick Duo,” the “Memory Stick Duo” slot, or image data may be damaged.
To eject a “Memory Stick Duo”
Lightly push in once and slide out the “Memory Stick Duo” alongside the camcorder body.
•Do not remove the “Memory Stick Duo” forcibly with the fingers as it may be damaged.
•When the access lamp is lit or flashing, your camcorder is reading/writing data. Do not shake or knock your camcorder, turn the power off, eject the “Memory Stick Duo,” or remove the battery pack. Otherwise, image data may be damaged.
•When inserting or ejecting the “Memory Stick Duo,” be careful that the “Memory Stick Duo” does not pop out and drop.
Started Getting
21
Step 8: Selecting the aspect ratio (16:9 or 4:3) of the recording picture (DCR-HC44E/HC46E/ HC94E/HC96E)
By recording in the 16:9 (wide) mode, you can enjoy wide-angle, high-quality pictures.
•If you intend to view pictures on a wide TV, recording in the 16:9 (wide) mode is recommended.
•When viewing pictures recorded in 16:9 aspect ratio with [TV TYPE] set to [4:3], pictures may appear rough depending on the subject (p. 39).
WIDE SELECT button POWER switch
Selecting the aspect ratio for recording movies on a tape 
Be sure to set the POWER switch to CAMERA-TAPE.
Press WIDE SELECT repeatedly to select the desired screen aspect ratio.
16:9* |
|
4:3* |
|
|
|
*When viewing on the LCD screen. It may be different in the viewfinder.
•Differences in the angle of view between 4:3 and 16:9 vary depending on the zoom position.
•If you play back a picture on TV, set [TV TYPE] for playback in the aspect ratio of the TV (p. 39).
Recording a moving picture or still image on the “Memory Stick Duo” 
1Set the POWER switch to CAMERAMEMORY.
The aspect ratio of the picture switches to 4:3.
2Press WIDE SELECT to select the desired screen aspect ratio.
•If you record movies (MPEG MOVIE EX) in the 16:9 (wide) mode, black bands appear at the top and bottom of the picture when they are played back.
•For the number of recordable pictures, see page 52.
•For DCR-HC44E/HC46E:
Still images will be fixed to image size [0.7M]
( |
) in the 16:9 (wide) mode. In the 4:3 |
|
mode, you can select up to [1.0M] ( |
). |
|
•For DCR-HC94E/HC96E:
Still images will be fixed to image size [2.3M]
( |
) in the 16:9 (wide) mode. In the 4:3 |
|
mode, you can select up to [3.0M] ( |
). |
|
22

Started Getting
23

Recording/Playback
Easy Recording/Playback (Easy Handycam)
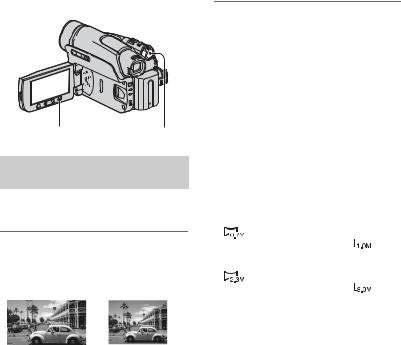
With this Easy Handycam operation, most of the camera settings are automatically optimally adjusted, which frees you from detailed adjustments. The screen font size increases for easy viewing.
A

 DCR-HC36E/ DCR-HC36E/HC44E/HC46E: HC44E/HC46E
Remove the lens cap (p. 14).
DCR-HC94E/
 HC96E
HC96E
DCR-HC36E:
B 


 D
D


 F
F

C
E
If the POWER switch is set to OFF (CHG), slide it while pressing the green button.
Movies 
1 Slide the POWER switch E to turn on the CAMERA-TAPE lamp.
2 Press EASY A.
 appears on the screen B.
3 Press REC START/STOP F (or
C) to start recording.*1
 60min EASY REC
MENU
The indicator changes [STBY] to [REC].
To stop recording, press F again.
Still images (4:3) 
1 Slide the POWER 
 switch E to turn on


 the CAMERA-MEMORY
lamp.
2 Press EASY A.
 appears on the screen B.
3 Press PHOTO D to record.*2
 60min EASY
  3.0M30
MENU
Flashing t Lit
Press and hold lightly Press fully to record. to adjust the focus.
When 


 disappears, the image has been recorded.
*1 Movies are recorded in SP (Standard Play) mode on a cassette.
*2 Still images are recorded in [FINE] quality on a “Memory Stick Duo.”
24

Playing back movies/still images
Slide the POWER switch E to turn on the PLAY/EDIT lamp. Touch the buttons on the screen B as follows.
Movies
Touch  , then touch
  to start playback.
AC
B |
A Stop
B Play/Pause toggles C Rewind/Fast forward
Still images
Touch 


 t
t 

 /
/


 to select a picture.
|
A B |
|
|
|
C |
|||
|
|
|
|
|||||
|
|
|
|
|
|
|
|
|
|
|
|
|
|
|
|
|
|
|
|
|
|
|
MENU |
|
|
|
|
|
|
|
|
|
|
|
|
A Tape playback
B Previous/Next
C Delete (p. 76)
x To cancel Easy Handycam operation
Press EASY A again.  disappears from the screen.
x Adjustable menu settings during Easy Handycam operation
Touch [MENU] to display adjustable menu settings. See page 41 for details on settings.
•Almost all the settings return to the default setting automatically (p. 42).
• is not displayed during Easy Handycam operation.
•Cancel Easy Handycam operation if you want to add any effects or settings to the images. Almost all the settings are returned to the previous status.
x Unavailable buttons during Easy Handycam
During Easy Handycam operation, the following buttons are unavailable, since the items are set automatically. [Invalid during Easy Handycam operation.] may appear if operations not available during Easy Handycam are attempted.
•BACK LIGHT button (p. 29)
•PHOTO button (in the CAMERA-TAPE mode) (p. 26)
•REC START/STOP button (in the CAMERA-MEMORY mode) (p. 26).
•For DCR-HC44E/HC46E/HC94E/HC96E:
Pressing and holding DISP/BATT INFO button (p. 16)
•For DCR-HC44E/HC46E/HC94E/HC96E:
WIDE SELECT button (in the CAMERA-MEMORY mode) (p. 22)
Recording/Playback
25

Recording
Lens cap (DCR-HC36E/HC44E/HC46E)
Remove the lens cap by pressing both knobs on the sides of the cap.
Lens cover (DCR-HC94E/HC96E)
Opens in accordance with the setting of the POWER switch.
DCR-HC36E:
REC START/STOP B 

PHOTO
POWER switch |

 REC START/STOP A
1 Slide the POWER switch in the direction of the arrow repeatedly to turn on the respective lamp to select a recording medium.
To record on a tape, light up the CAMERA-TAPE lamp.
To record on a “Memory Stick Duo,” light up the CAMERA-MEMORY lamp.
If the POWER  switch is set to OFF
(CHG), slide it while pressing the green button.
2 Start recording.
Movies |
|
Still images |
Press REC START/STOP A (or
B).
60min |
REC |
|
60min |
A
The indicator (A) changes [STBY] (tape only) to [REC].
Press and hold PHOTO lightly to adjust the focus (A), then press it fully (B).
3.0M |
Flashing t Lit
•The sound of a movie (MPEG MOVIE EX) recorded on a “Memory Stick Duo” will be monaural.
A shutter sound is heard. When 


 disappears, the image has been recorded.
To stop movie recording
Press REC START/STOP again.
•While recording movies on a tape, or while in standby mode, you can record a still image on a “Memory Stick Duo” by pressing PHOTO fully. Still images will be fixed to image size [0.2M] in 16:9 screen (DCR-HC44E/HC46E/HC94E/ HC96E), or [VGA (0.3M)] in 4:3 screen.
To check the latest recording on a “Memory Stick Duo”
Touch 

 . To delete the picture, touch
  t [YES].
26
Playback
1 Slide the POWER switch in the direction of the arrow repeatedly to turn on the PLAY/EDIT lamp.
2 Start playing back.
Movies
On a Tape:
Touch , then touch
 to start playback.
AC
B |
A Stop
BPlay/Pause toggles as you touch it
•Playback automatically stops if pause is engaged for more than 3 minutes.
C Rewind/Fast forward
On a “Memory Stick Duo”: Touch  t
t 

 /
/

 to select a picture with
  , then touch


 .
.
Still images
Touch 


 .
.
The most recently recorded image is displayed.
A B C
P-MENU |
A Tape playback
B Previous/Next
C Index screen display
•When a “Memory Stick Duo” is inserted, touch  to display


 .
. 


 is not displayed when an inserted “Memory Stick Duo” contains no image data.
To adjust the volume
Touch 


 t [VOLUME], then

 /
/  to adjust the volume.
•If you cannot find [VOLUME] in 


 , touch [MENU] (p. 40).
To search for a scene during playback
Touch and hold  /
/ during playback (Picture Search), or
  /
/
while fast forwarding or rewinding the tape (Skip Scan).
•You can play back in various modes ([ VAR. SPD PB], p. 60).
To display pictures on a “Memory Stick Duo” on the Index screen
Touch 

 . Touch one of the pictures to back to the single display mode.
|
B |
A |
C |
|
A Previous/Next 6 pictures
BThe picture displayed before switching to the index screen.
C Movie icon
To view pictures in other folders, touch


 t [PB FOLDER], select a

 /
/

 , then touch


Recording/Playback
27

Functions used for recording/playback, etc.
2 |
|
|
1 |
For DCR-HC36E: |
|
6 |
3 |
5 |
|
4
For DCR-HC44E/HC46E:
6 3
3
5
4
Recording
To use zoom ..................... |
2 5 |
Move the power zoom lever 2 slightly for a slower zoom. Move it further for a faster zoom.
Wider range of view: (Wide angle)
Close view: (Telephoto)
•You cannot change the zoom speed with the zoom buttons 5 on the LCD frame.
•The minimum possible distance between camcorder and subject while maintaining sharp focus is about 1 cm (about 13/32 in.) for wide angle and about 80 cm (about 2 5/8 feet) for telephoto.
•You can set [DIGITAL ZOOM] (p. 50) if you want to zoom to a level greater than the following:
–20 × (DCR-HC36E)
–12 × (DCR-HC44E/HC46E)
–10 × (DCR-HC94E/HC96E)
•Be sure to keep your finger on the power zoom lever. If you move your finger off the power zoom lever, the operation sound of the power zoom lever may also be recorded.
For DCR-HC94E/HC96E:
6 |
7 |
5 |
8 |
|
4 |
||
|
To use the flash (DCR-HC94E/HC96E)
.......................................... 7
Press  (flash) repeatedly to select an appropriate setting.
No indication (Auto flash):
Automatically flashes when there is insufficient ambient light.
r
 (Forced flash): Always uses the flash regardless of the surrounding brightness. r
(No flash): Records without flash.
28

•The recommended distance to the subject when using the built-in flash is 0.3 to 2.5 m (1 to 8 feet).
•Remove any dust from the surface of the flash lamp before using it. Flash effect may be impaired if heat discoloration or dust obscures the lamp.
•The flash charge lamp flickers when charging the flash, and remains lit when the battery charge is complete (In the CAMERA-TAPE mode, it takes a while to fully charge the flash lamp).
•If you use the flash in bright places such as when shooting a backlit subject, the flash may not be effective.
•Attaching a conversion lens (optional) may create a shadow.
•You can change the brightness of the flash by setting [FLASH LEVEL], or you can prevent the redeye by setting [REDEYE REDUC], in [FLASH SET] (p. 48).
To record in dark places (NightShot plus) (DCR-HC36E/HC44E/HC46E)
......................................... 3
Set the NIGHTSHOT PLUS switch 3 to ON. ( and [“NIGHTSHOT PLUS”] appear.)
•To record an image brighter, use Super NightShot plus function (p. 48).
To record an image more faithful to the original colors, use Color Slow Shutter function (p. 49).
•The NightShot plus and Super NightShot plus
function use infrared light. Therefore, do not cover the infrared port 1 with your fingers or other objects. Remove the conversion lens (optional) if it is attached.
•Adjust the focus manually ([FOCUS], p. 47) when it is hard to focus automatically.
•Do not use these functions in bright places. This may cause a malfunction.
To record in dark places (NightShot) |
|
(DCR-HC94E/HC96E) ................ |
8 |
Set the NIGHTSHOT switch 8 to ON. ( and [“NIGHTSHOT”] appear.)
•To record an image brighter, use Super NightShot function (p. 49).
To record an image brighter in color in dim light, use Color Slow Shutter function (p. 49).
•The NightShot and Super NightShot function
use infrared light. Therefore, do not cover the infrared port 1 with your fingers or other objects. Remove the conversion lens (optional) if it is attached.
•Adjust the focus manually ([FOCUS], p. 47) when it is hard to focus automatically.
•Do not use these functions in bright places. This may cause a malfunction.
To adjust the exposure for backlit |
|
subjects (BACK LIGHT).............. |
6 |
To adjust the exposure for backlit subjects, press BACK LIGHT 6 to display .. To cancel the back light function, press BACK LIGHT again.
To adjust the focus for an off center |
|
subject (SPOT FOCUS) .............. |
4 |
See [SPOT FOCUS] on page 47. |
|
To fix the exposure for the selected |
|
subject (Flexible spot meter) ...... |
4 |
See [SPOT METER] on page 45. |
|
Continued ,
Recording/Playback
29
Functions used for recording/playback, etc. (Continued)
9


 q;
q;
qs |
qa |
For DCR-HC36E:
qd
qh
2
5 |
4 |
qg qf |
To record in mirror mode ........... |
qh |
Open the LCD panel qh 90 degrees to the camcorder (1), then rotate it 180 degrees to the lens side (2).
2 


 1
1


•A mirror-image of the subject appears on the LCD screen, but the picture will be normal when recorded.
To use a tripod ....................... |
qj |
Attach the tripod (optional: the length of the screw must be less than 5.5 mm (7/32 in.)) to the tripod receptacle qj using a tripod screw.
For DCR-HC44E/HC46E/HC94E/HC96E:
qd
qh
2
5
4qg qf
qj
To use a Shoulder belt .............. |
qs |
Attach the Shoulder belt (optional) to its designated hook qs.
Playback |
|
To play back the images in sequence |
|
(SLIDE SHOW)........................ |
4 |
See [SLIDE SHOW] on page 56. |
|
To use PB zoom ................. |
2 5 |
You can magnify pictures from about 1.1 to 5 times the original size.
Magnification can be adjusted with the power zoom lever 2 or the zoom buttons 5 on the LCD frame.
1Play back the picture you want to magnify.
2 Magnify the picture with T (Telephoto).
3Touch the screen at the point you want to display in the center of the displayed frame.
4Adjust the magnification with W (Wide angle)/T (Telephoto).
30
Loading...