

Page 1
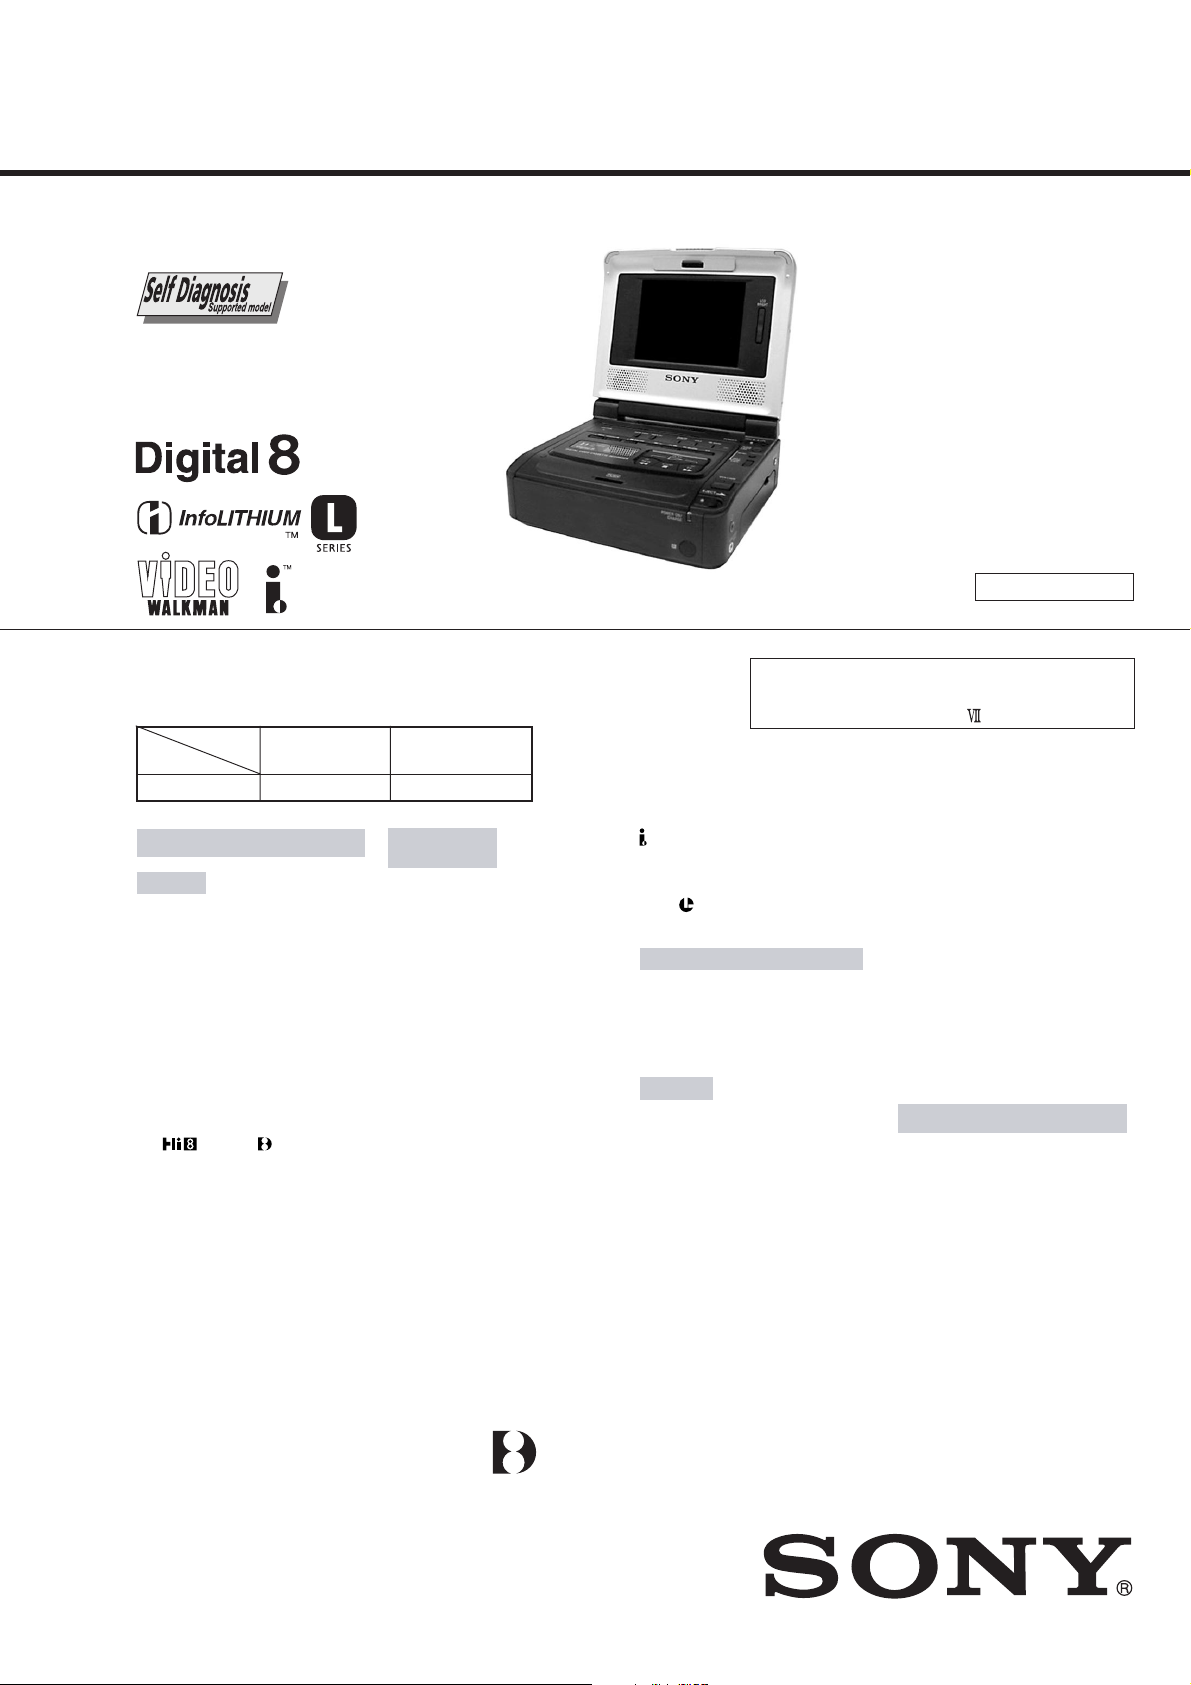
GV-D200/D200E/D800/D800E
SERVICE MANUAL
Ver 1.0 2000. 09
Photo : GV-D800E
NTSC MODEL : GV-D200/D800
PAL MODEL : GV-D200E/D800E
Function difference table
Model
Function
LCD
GV-D200/200E
—
VCR
System
Video recording system
2 rotary heads
Helical scanning system
Audio recording system
Rotary heads, PCM system
Quantization: 12 bits (Fs 32 kHz,
stereo 1, stereo 2), 16 bits (Fs 48 kHz,
stereo)
Video signal
GV-D200/D800:
NTSC color, EIA standards
GV-D200E/D800E:
PAL colour, CCIR standards
Recommended cassette
Hi8
Recording/playback time
(GV-D200/D800: using
120 min. Hi8 video cassette)
(GV-D200E/D800E: using
90 min. Hi8 (PAL) video cassette)
SP mode: 1 hour
LP mode: 1 hour and 30 minutes
Fastforward/rewind time
(GV-D200/D800: using
120 min. Hi8 video cassette)
(GV-D200E/D800E: using
90 min. Hi8 (PAL) video cassette)
Approx. 5 minutes and 15 seconds
/Digital8 video cassette
GV-D800/D800E
4.0 inches
SPECIFICATIONS
Input/output
connectors
S video input
4-pin mini DIN
Luminance signal: 1 Vp-p, 75 ohms,
unbalanced
GV-D200/D800:
Chrominance signal: 0.286 Vp-p
GV-D200E/D800E:
Chrominance signal: 0.3 Vp-p,
75 ohms, unbalanced
S video output
4-pin mini DIN
Luminance signal: 1 Vp-p, 75 ohms,
unbalanced
GV-D200/D800:
Chrominance signal: 0.286 Vp-p
GV-D200E/D800E:
Chrominance signal: 0.3 Vp-p,
75 ohms, unbalanced
Audio/Video input
AV MINIJACK
Video: 1 Vp-p, 75 ohms, unbalanced,
sync negative
Audio: 327 mV, input impedance
more than 47 kiloohms
Video output
Phono jack, 1 Vp-p, 75 ohms,
unbalanced, sync negative
Audio output
Phono jacks (2) 327 mV, output
impedance less than 1 kiloohm
RFU DC OUT
Special minijack DC 5 V
DV input/output
4-pin connector
Headphone jack
Stereo minijack (ø 3.5 mm)
LANC
Stereo mini-minijack (ø 2.5 mm)
LCD screen (GV-D800/D800E)
Picture
4.0 type
80.6 × 60.5 mm (3 1/4 × 2 1/2 in.)
Total dot number
123,200 (560 × 220)
General
Power requirements
7.2 V (battery pack)
8.4 V (AC power adaptor)
Average power consumption
(when using the battery pack)
GV-D800/D800E only
During playback using LCD
4.9 W
During playing back when you close
the LCD panel
3.0 W
Operating temperature
0 °C to 40 °C (32 °F to 104 °F)
Storage temperature
–20 °C to +60 °C (–4 °F to +140 °F)
jack
US Model
Canadian Model
GV-D200/D800
AEP Model
UK Model
E Model
GV-D200E/D800E
B MECHANISM
For MECHANISM ADJUSTMENT, refer to
the “8mm Video MECHANICAL
ADJUSTMENT MANUAL
Dimensions (Approx.)
GV-D200/D200E:
148 × 50 × 135 mm
(5 7/8 × 2 × 5 3/8 in.)
GV-D800/D800E:
148 × 65 × 135 mm
(5 7/8 × 2 5/8 × 5 3/8 in.) (w/h/d)
Mass (approx.)
GV-D200/D200E:
660 g (1 lb 7 oz)
GV-D800/D800E:
930 g (2 lb)
excluding the battery pack and
cassette
Supplied accessories
See page 2.
AC power adaptor
Power requirements
100 - 240 V AC, 50/60 Hz
Power consumption
23 W
Output voltage
DC OUT: 8.4 V, 1.5 A in the
operating mode
Operating temperature
0 °C to 40 °C (32 °F to 104 °F)
Storage temperature
–20 °C to +60 °C (–4 °F to +140 °F)
” (9-973-801-11).
— Continued on next page —
DIGITAL VIDEO CASSETTE RECORDER
Page 2
Dimensions (approx.)
125 × 39 × 62 mm
(5 × 1 9/16 × 2 1/2 in.) (w/h/d)
excluding projecting parts
Mass (approx.)
280 g (9.8 oz) excluding power cord
Cord length (approx.)
Power cord: 2 m (6.6 feet)
Connecting cord: 1.6 m (5.2 feet)
Design and specifications are subject
to change without notice.
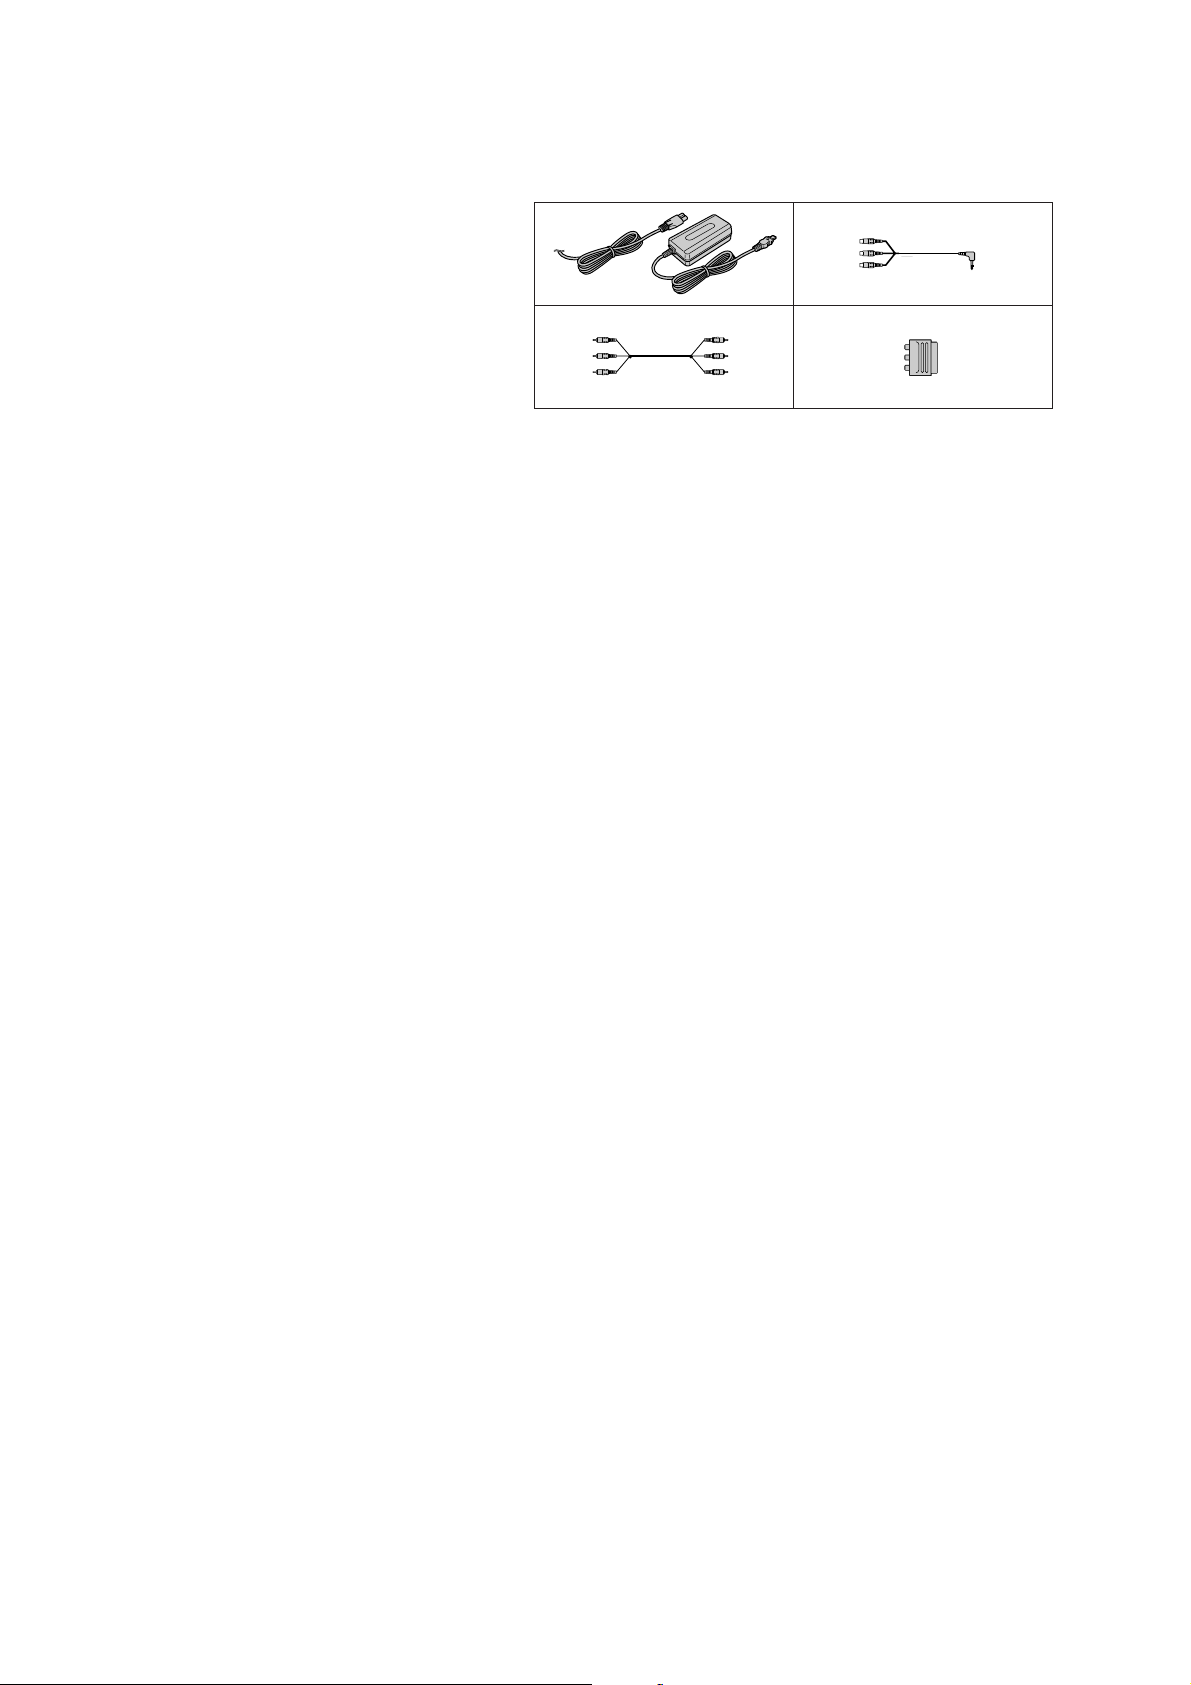
• SUPPLIED ACCESSORIES
Make sure that the following accessories are supplied with your VCR.
21
43
SAFETY-RELATED COMPONENT WARNING!!
COMPONENTS IDENTIFIED BY MARK 0 OR DOTTED LINE WITH
MARK 0 ON THE SCHEMATIC DIAGRAMS AND IN THE PARTS
LIST ARE CRITICAL TO SAFE OPERATION. REPLACE THESE
COMPONENTS WITH SONY PARTS WHOSE PART NUMBERS
APPEAR AS SHOWN IN THIS MANUAL OR IN SUPPLEMENTS
PUBLISHED BY SONY.
1 AC-L10A/L10B/L10C AC power adaptor (1),
Mains lead (1)
23A/V converting cable (1)
ATTENTION AU COMPOSANT AYANT RAPPORT
LES COMPOSANTS IDENTIFÉS P AR UNE MARQUE 0 SUR LES
DIAGRAMMES SCHÉMA TIQUES ET LA LISTE DES PIÈCES SONT
CRITIQUES POUR LA SÉCURITÉ DE FONCTIONNEMENT. NE
REMPLACER CES COMPOSANTS QUE PAR DES PIÈSES SONY
DONT LES NUMÉROS SONT DONNÉS DANS CE MANUEL OU
DANS LES SUPPÉMENTS PUBLIÉS PAR SONY.
À LA SÉCURITÉ!
A/V connecting cable (1)
4 21-pin adaptor (1)
GV-D200E/D800E only
SAFETY CHECK-OUT
After correcting the original service problem, perform the following
safety checks before releasing the set to the customer.
1. Check the area of your repair for unsoldered or poorly-soldered
connections. Check the entire board surface for solder splashes
and bridges.
2. Check the interboard wiring to ensure that no wires are
"pinched" or contact high-wattage resistors.
3. Look for unauthorized replacement parts, particularly
transistors, that were installed during a previous repair . Point
them out to the customer and recommend their replacement.
4. Look for parts which, through functioning, show obvious signs
of deterioration. Point them out to the customer and
recommend their replacement.
5. Check the B+ voltage to see it is at the values specified.
6. Flexible Circuit Board Repairing
• Keep the temperature of the soldering iron around 270˚C
during repairing.
• Do not touch the soldering iron on the same conductor of the
circuit board (within 3 times).
• Be careful not to apply force on the conductor when soldering
or unsoldering.
— 2 —
Page 3

TABLE OF CONTENTS
SERVICE NOTE
1. POWER SUPPLY DURING REPAIRS ····························· 6
2. TO TAKE OUT A CASSETTE WHEN NOT EJECT
(FORCE EJECT) (1) ·························································· 6
3. TO TAKE OUT A CASSETTE WHEN NOT EJECT
(FORCE EJECT) (2)
(TO TAKE OUT A CASSETTE WITHOUT
HURTING THE TAPE) ······················································ 7
SELF-DIAGNOSIS FUNCTION
1. SELF-DIAGNOSIS FUNCTION······································· 8
2. SELF-DIAGNOSIS DISPLAY ·········································· 8
3. SERVICE MODE DISPLAY ············································· 8
3-1. Display Method ·································································· 8
3-2. Switching of Backup No. ··················································· 8
3-3. End of Display····································································8
4. SELF-DIAGNOSIS CODE TABLE ···································9
2-4. PD-130, LS-56 BOARDS (D800, D800E MODEL) ······2-4
2-5. LCD WINDOW CABINET ASSEMBLY (SP-901, 902)
(D800, D800E MODEL) ·················································2-5
2-6. BATTERY PANEL ASSEMBLY, BATTERY TERMINAL
BOARD, DC-IN CONNECTOR·····································2-6
2-7. VC-250, FU-145 BOARDS·············································2-6
2-8.
CONTROL SWITCH BLOCK (FK-78), LOADING LID ··
2-9. MECHANISM DECK, MAIN FRAME ASSEMBLY ···2-7
2-10. CABINET (R) BLOCK ASSEMBLY, JACK FRAME
(IO-68, IR-38 BOARDS) ················································2-8
2-11. EX-36 BOARD, FP-570 FLEXIBLE BOARD···············2-9
2-12. UPPER CABINET ASSEMBLY,
LCD BLOCK ASSEMBLY (D800, D800E MODEL)····2-9
2-13. HINGE UNIT, FP-569 FLEXIBLE BOARD
(D800, D800E MODEL) ···············································2-10
2-14. CIRCUIT BOARDS LOCATION ·································2-12
2-15. FLEXIBLE BOARDS LOCATION ······························2-13
2-7
1. GENERAL
Getting started
Using this manual ··································································1-1
Checking supplied accessories ··············································1-1
Step 1 Preparing the power supply ········································1-1
Connecting to the mains ····················································· 1-1
Using with a battery pack (not supplied) ···························· 1-2
Step 2 Inserting a cassette····················································· 1-2
Basic operations
Playing back a tape ······························································· 1-3
Viewing the recording on TV ················································1-4
Recording from the other VCR or TV ···································1-5
Advanced operations
Enlarging playback images – PB ZOOM ······························1-6
Watching a tape with special effects – Picture effect·············1-7
Watching a tape with special performances – Digital effect··1-7
Quickly locating a scene – Zero set memory·························1-8
Searching with recording date – Date search ························1-8
Searching for a photo – Photo search/Photo scan··················1-9
Displaying recording data and screen indicators
– Data code function ······························································1-9
Superimposing a title ···························································1-10
Making your own titles ························································1-10
Editing
Dubbing a tape ·····································································1-11
Dubbing only desired scenes – Digital program editing ·····1-12
Using with an analogue video unit and a personal computer
– Signal convert function·····················································1-15
Inserting a scene from the other (playback) VCR
– Insert Editing ····································································1-15
Customizing your VCR
Changing the menu settings·················································1-16
Resetting the date and time··················································1-17
Additional information
Digital8
About i.LINK·······································································1-19
Troubleshooting ···································································1-19
Self-diagnosis display ··························································1-20
Warning indicators and messages ········································1-20
Using your VCR abroad ······················································ 1-21
Maintenance information and precautions···························1-21
Quick reference
Identifying the parts and controls ········································ 1-22
system, recording, and playback·······················1-18
2. DISASSEMBLY
2-1. CASSETTE LID ASSEMBLY ········································2-2
2-2. BOTTOM CABINET ASSEMBLY, FP-571 FLEXIBLE
BOARD (LITHIUM BATTERY) ····································2-2
2-3.
LCD CABINET ASSEMBLY (D800, D800E MODEL)··
2-3
3. BLOCK DIAGRAMS
3-1. OVERALL BLOCK DIAGRAM (1/4) ···························3-1
3-2. OVERALL BLOCK DIAGRAM (2/4) ···························3-3
3-3. OVERALL BLOCK DIAGRAM (3/4) ···························3-5
3-4. OVERALL BLOCK DIAGRAM (4/4) ···························3-7
3-5. POWER BLOCK DIAGRAM (1/2)································3-9
3-6. POWER BLOCK DIAGRAM (2/2)······························3-11
4. PRINTED WIRING BOARDS AND
SCHEMATIC DIAGRAMS
4-1. FRAME SCHEMATIC DIAGRAM (1/2)·······················4-1
FRAME SCHEMATIC DIAGRAM (2/2)·······················4-3
4-2. PRINTED WIRING BOARDS AND
SCHEMATIC DIAGRAMS ············································4-5
• VC-250 (REC/PB AMP, DAC, DV INTERFACE,
AD CONVERTER, Y/C PROCESSOR, LINE A/D,
LINE I/O, IR, AUDIO I/O, DRUM/CAPSTAN
MOTOR DRIVE, MECHA CONTROL, HI CONTROL,
DC/DC CONVERTER, CONNECTION)
PRINTED WIRING BOARD ·························4-7
• VC-250 (REC/PB AMP)(1/16)
SCHEMATIC DIAGRAM····························4-11
• VC-250 (PB AMP, DAC)(2/16)
SCHEMATIC DIAGRAM····························4-13
• VC-250 (DV INTERFACE)(3/16)
SCHEMATIC DIAGRAM····························4-15
• VC-250 (DV INTERFACE)(4/16)
SCHEMATIC DIAGRAM····························4-17
• VC-250 (AD CONVERTER)(5/16)
SCHEMATIC DIAGRAM····························4-19
• VC-250 (Y/C PROCESSOR)(6/16)
SCHEMATIC DIAGRAM····························4-21
• VC-250 (LINE A/D)(7/16)
SCHEMATIC DIAGRAM····························4-23
• VC-250 (LINE IN/OUT)(8/16)
SCHEMATIC DIAGRAM····························4-25
• VC-250 (IR)(9/16)
SCHEMATIC DIAGRAM····························4-27
• VC-250 (MECHANISM CONTROL)(10/16)
SCHEMATIC DIAGRAM····························4-29
• VC-250 (AUDIO I/O)(11/16)
SCHEMATIC DIAGRAM····························4-31
• VC-250 (DRUM/CAPSTAN MOTOR DRIVE)(12/16)
SCHEMATIC DIAGRAM····························4-33
• VC-250 (MECHA CONTROL)(13/16)
SCHEMATIC DIAGRAM····························4-35
• VC-250 (HI CONTROL)(14/16)
SCHEMATIC DIAGRAM····························4-37
— 3 —
Page 4

• VC-250 (DC/DC CONVERTER)(15/16)
SCHEMATIC DIAGRAM····························4-39
• VC-250 (CONNECTION)(16/16)
SCHEMATIC DIAGRAM····························4-41
• FP-575 (LANC), IO-68 (AV IN/OUT)
PRINTED WIRING BOARDS ·····················4-43
• IO-68 (AV IN/OUT)
SCHEMATIC DIAGRAM····························4-45
• FU-145 (DC/DC CONVERTER)
PRINTED WIRING BOARD ·······················4-47
• FU-145 (DC/DC CONVERTER)
SCHEMATIC DIAGRAM····························4-49
• PD-130 (LCD DRIVER, BACK-LIGHT)
PRINTED WIRING BOARD ·······················4-51
• LS-56 (LCD SWITCH)
PRINTED WIRING BOARD ·······················4-54
• PD-130 (LCD DRIVER, BACK-LIGHT)(1/2)
SCHEMATIC DIAGRAM····························4-55
• PD-130 (BACK-LIGHT)(2/2)
SCHEMATIC DIAGRAM····························4-57
• IR-38 (IR TRANSMITTER),
CONTROL SWITCH BLOCK (FK-78)
PRINTED WIRING BOARDS ·····················4-59
• CONTROL SWITCH BLOCK (FK-78)
SCHEMATIC DIAGRAM····························4-61
• EX-36 (MULTI CONNECTOR)
PRINTED WIRING BOARD ·······················4-63
• EX-36 (MULTI CONNECTOR)
SCHEMATIC DIAGRAM····························4-65
• FP-571 (BATTERY), FP-249 (S/T REEL)
PRINTED WIRING BOARDS ·····················4-67
4-3. WAVEFORMS ······························································4-68
4-4. MOUNTED PARTS LOCATION ·································4-70
5. ADJUSTMENTS
1. Before starting adjustment···············································5-1
1-1. Adjusting items when replacing main parts and boards.·5-2
5-1. ADJUSTMENT PREPARATIONS·································5-3
1-1. PREPARATIONS BEFORE ADJUSTMENT·················5-3
1-1-1.List of Service Tools ························································5-3
5-2. MECHANISM SECTION ADJUSTMENT····················5-4
2-1. Hi8/STANDARD8 MODE··············································5-4
2-1-1.OPERA TING WITHOUT CASSETTE ··························5-4
2-1-2.TAPE PATH ADJUSTMENT··········································5-4
1. Preparations for Adjustment············································ 5-4
2-2. DIGITAL8 MODE ··························································5-5
2-2-1.HOW TO ENTER RECORD MODE WITHOUT
CASSETTE ····································································· 5-5
2-2-2.HOW TO ENTER PLAYBACK MODE WITHOUT
CASSETTE ····································································· 5-5
2-2-3.OVERALL TAPE PATH CHECK ···································5-5
1. Recording of the tape path check signal·························· 5-5
2. Tape path check ······························································· 5-5
5-3. ELECTRICAL ADJUSTMENT······································5-6
3-1. PREPARATIONS BEFORE ADJUSTMENTS ·············· 5-6
3-1-1.Equipment to Required····················································5-6
3-1-2.Precautions on Adjusting·················································5-7
3-1-3.Adjusting Connectors ······················································5-7
3-1-4.Connecting the Equipment ·············································· 5-8
3-1-5.Alignment Tape ·······························································5-9
3-1-6.Input/output Level and Impedance ································5-10
3-2. INITIALIZATION OF C, D, E, F, 7, 8 PAGE DATA ···5-11
3-2-1.INITIALIZATION OF C, D, 8 PAGE DATA ················5-11
1. Initializing the C, D, 8 Page Data··································5-11
2. Modification of C, D, 8 Page Data ································5-11
3. C Page Table ··································································5-11
4. D Page Table··································································5-12
5. 8 Page Table···································································5-13
3-2-2.INITIALIZATION OF E, F, 7 PAGE DATA ·················5-14
1. Initializing the E, F, 7 Page Data ···································5-14
2. Modification of E, F, 7 Page Data ·································5-14
3. F Page Table ··································································5-14
4. E Page Table ··································································5-15
5. 7 Page Table···································································5-16
3-3. SYSTEM CONTROL SYSTEM ADJUSTMENT········5-17
1. Serial No. Input ·····························································5-17
1-1. Company ID Input·························································5-17
1-2. Serial No. Input ·····························································5-17
2. Battery End Adjustment ················································5-19
3-4. SERVO AND RF SYSTEM ADJUSTMENT ···············5-20
1. REEL FG Adjustment (VC-250 Board) ························5-20
2. PLL fo & LPF fo Pre-Adjustment (VC-250 Board)······5-20
3. Switching Position Adjustment (VC-250 Board)··········5-21
4. AGC Center Level and APC & AEQ Adjustment ·········5-21
4-1. Preparations before adjustments····································5-21
4-2. AGC Center Level Adjustment (VC-250 Board) ··········5-21
4-3. APC & AEQ Adjustment (VC-250 Board) ···················5-22
4-4. Processing after Completing Adjustments ···················· 5-22
5. PLL fo & LPF fo Final Adjustment (VC-250 Board) ···5-23
6. Hi8/Standard8 Switching Position Adjustment
(VC-250 Board)·····························································5-23
7. CAP FG Offset Adjustment (VC-250 board) ················5-24
3-5. VIDEO SYSTEM ADJUSTMENTS·····························5-25
1.
27MHz Origin Oscillation Adjustment (VC-250 board) ··
2. Chroma BPF fo Adjustment (VC-250 Board)···············5-25
3. S VIDEO OUT Y Level Adjustment (VC-250 Board) ··5-26
4. S VIDEO OUT Chroma Level Adjustment
(VC-250 Board)·····························································5-26
5.
VIDEO OUT Y, Chroma Level Check (VC-250 Board) ··
Hi8/Standard8 Y/C Output Level Setting (VC-250 Board)·
6.
7.
Hi8/standard 8mm AFC fo Adjustment (VC-250 board) ··
3-6. IR TRANSMITTER ADJUSTMENTS·························5-29
1.
IR Video Carrier Frequency Adjustment (VC-250 board)··
2. IR Video Deviation Adjustment (VC-250 board) ··········5-29
3. IR Audio Deviation Adjustment (VC-250 board) ·········5-30
3-7. AUDIO SYSTEM ADJUSTMENTS ····························5-31
1.
Hi8/Standard8 AFM BPF fo Adjustment (VC-250 board)··
2. Hi8/Standard8 AFM 1.5 MHz Deviation Adjustment
(VC-250 board) ·····························································5-32
3. Hi8/Standard8 AFM 1.7 MHz Deviation Adjustment
(VC-250 board) ·····························································5-32
4. Digital8 Playback Level Check ·····································5-32
5. Overall Level Characteristics Check ·····························5-32
6. Overall Distortion Check···············································5-32
7. Overall Noise Level Check············································5-33
8. Overall Separation Check·············································· 5-33
3-8. LCD SYSTEM ADJUSTMENT (GV-D800/D800E) ···5-34
1. LCD Initial Data Input (1)·············································5-34
2. LCD Initial Data Input (2)·············································5-35
3. VCO Adjustment (PD-130 board)·································5-35
4. RGB AMP Adjustment (PD-130 board)························5-36
5. Contrast Adjustment (PD-130 board)····························5-36
6. COM AMP Adjustment (PD-130 board)·······················5-37
7. V-COM Adjustment (PD-130 board) ····························5-37
8. White Balance Adjustment (PD-130 board)··················5-38
5-4. SERVICE MODE··························································5-39
4-1. ADJUSTMENT REMOTE COMMANDER ················5-39
1. Using the Adjustment Remote Commander··················5-39
2. Precautions Upon Using the Adjustment Remote
Commander ··································································· 5-39
4-2. DATA PROCESS···························································5-40
4-3. SERVICE MODE··························································5-41
1. Setting the Test Mode ····················································5-41
2. Emergence Memory Address ········································5-41
5-25
5-27
5-27
5-28
5-29
5-31
— 4 —
Page 5

2-1. C Page Emergence Memory Address ····························5-41
2-2. F Page Emergence Memory Address ····························5-42
2-3. EMG Code (Emergency Code) ·····································5-42
2-4. MSW Code ····································································5-43
3. Bit V alue Discrimination ···············································5-44
4. Switch check (1) ····························································5-44
5. Switch check (2) ····························································5-44
6. Switch check (3) ····························································5-44
7. Switch check (4) ····························································5-45
8. Record of Use check······················································5-45
9. Record of Self-diagnosis check ·····································5-46
6. REPAIR PARTS LIST
6-1. EXPLODED VIEWS ······················································6-1
6-1-1.OVERALL SECTION-1 ················································· 6-1
6-1-2.OVERALL SECTION-2 ················································· 6-2
6-1-3.LCD SECTION (D800/D800E MODEL) ·······················6-3
6-1-4.MECHANISM SECTION···············································6-4
6-1-5.CASSETTE COMPARTMENT ASSEMBLY ················6-5
6-1-6.LS CHASSIS ASSEMBLY ·············································6-6
6-1-7.MECHANISM CHASSIS ASSEMBLY ························· 6-7
6-2. ELECTRICAL PARTS LIST ··········································6-8
— 5 —
Page 6

SERVICE NOTE
1. POWER SUPPLY DURING REPAIRS
In this unit, about 10 seconds after power is supplied (8.4V) to the battery terminal using the service power code (J-6082-223-A), the power
is shut off so that the unit cannot operate.
These following two methods are available to prevent this. Take note of which to use during repairs.
Method 1:
Connect the adjustment remote commander RM-95 (J-6082-053-B) to the LANC jack, and set the HOLD switch to the “ADJ” side.
Method 2:
Use the DC IN terminal. (Use the AC power adaptor. (AC-L10, AC-VQ800 etc.))
2. TO TAKE OUT A CASSETTE WHEN NOT EJECT (FORCE EJECT) (1)
1 Remove the power supply (Battery or AC power adaptor).
2 Push the EJECT switch and open the cassette lid.
3 Refer to 2-2. to remove the cabinet (lid) assembly.
4 Refer to 2-2. to remove the cabinet (bottom) assembly.
5 Add 5V from the regulated power supply between Pin 5, 6 of CN4401 (ULD5V +) and Pin 7, 8 of CN4401 (ULD5V –), and unload
the cassette.
VC-250 board
CN4401
8
ULD
5V
1
Regulated
power supply (+5V)
— 6 —
Page 7
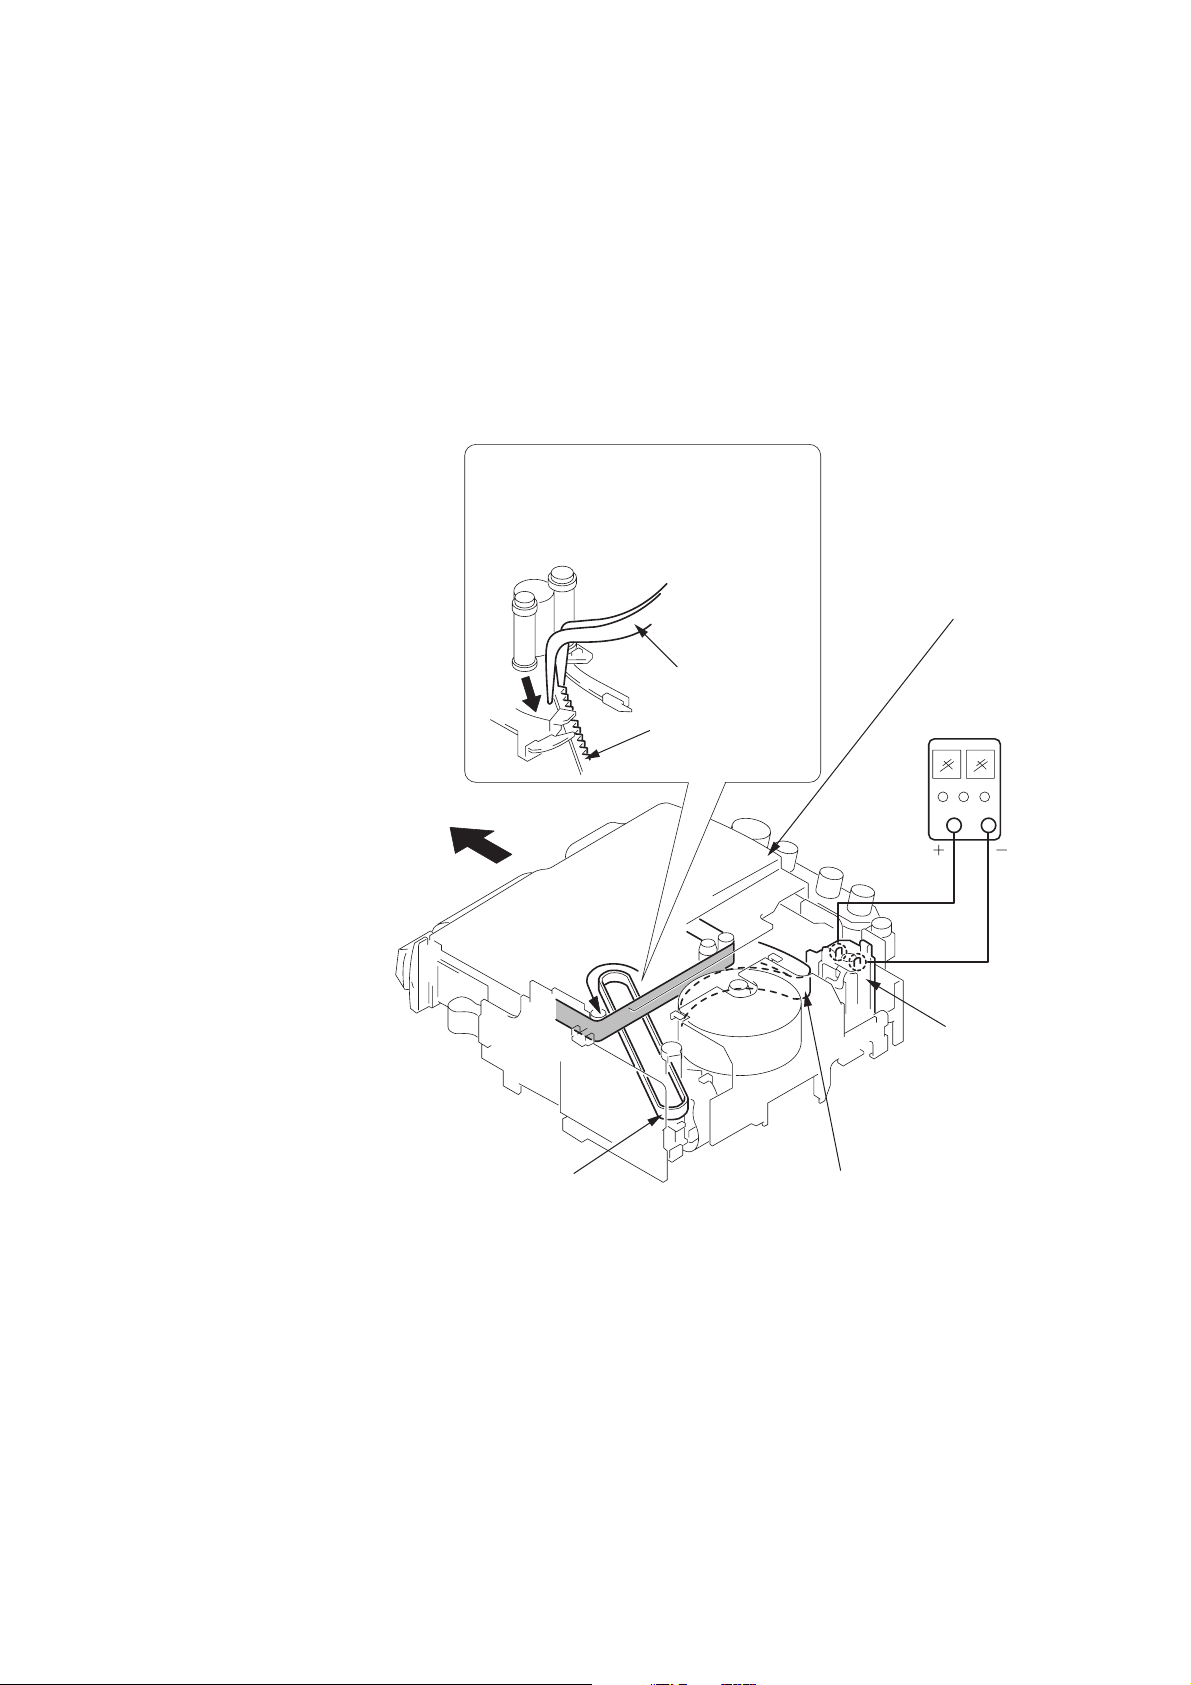
3. TO TAKE OUT A CASSETTE WHEN NOT EJECT (FORCE EJECT) (2)
(TO TAKE OUT A CASSETTE WITHOUT HURTING THE TAPE)
1 Disconnect the power supply (Battery or AC adaptor)
2 Refer to 2-2. to remove the cabinet (lid) assembly.
3 Refer to 2-2. to remove the cabinet (bottom) assembly.
4 Refer to 2-1. to remove the Cassette (lid) assembly.
5 Refer to 2-6 to 2-8. to remove the LCD block (GV-D800/D800E only) and the cabinet (upper) assembly.
6 Remove the FU-145 board.
7 Refer to 2-9. to remove the lid frame assembly.
8 Add +5V from the regulated power supply and unload with a pressing the cassette lid.
9
Pull the timing belt in the direction of
A
arrow
the cassette lid (take care not to damage)
to adjust the bending of a tape.
with a pincette while pressing
Press the cassette lid not to rise
the cassette compartment
0
Let go your hold the cassette
lid and rise the cassette
compartment to take out a cassette.
Timing belt
Pincette
Timing belt
Regulated
power supply
(+5V)
Loading motor
Adjust the bending of a tape
— 7 —
Page 8
SELF-DIAGNOSIS FUNCTION
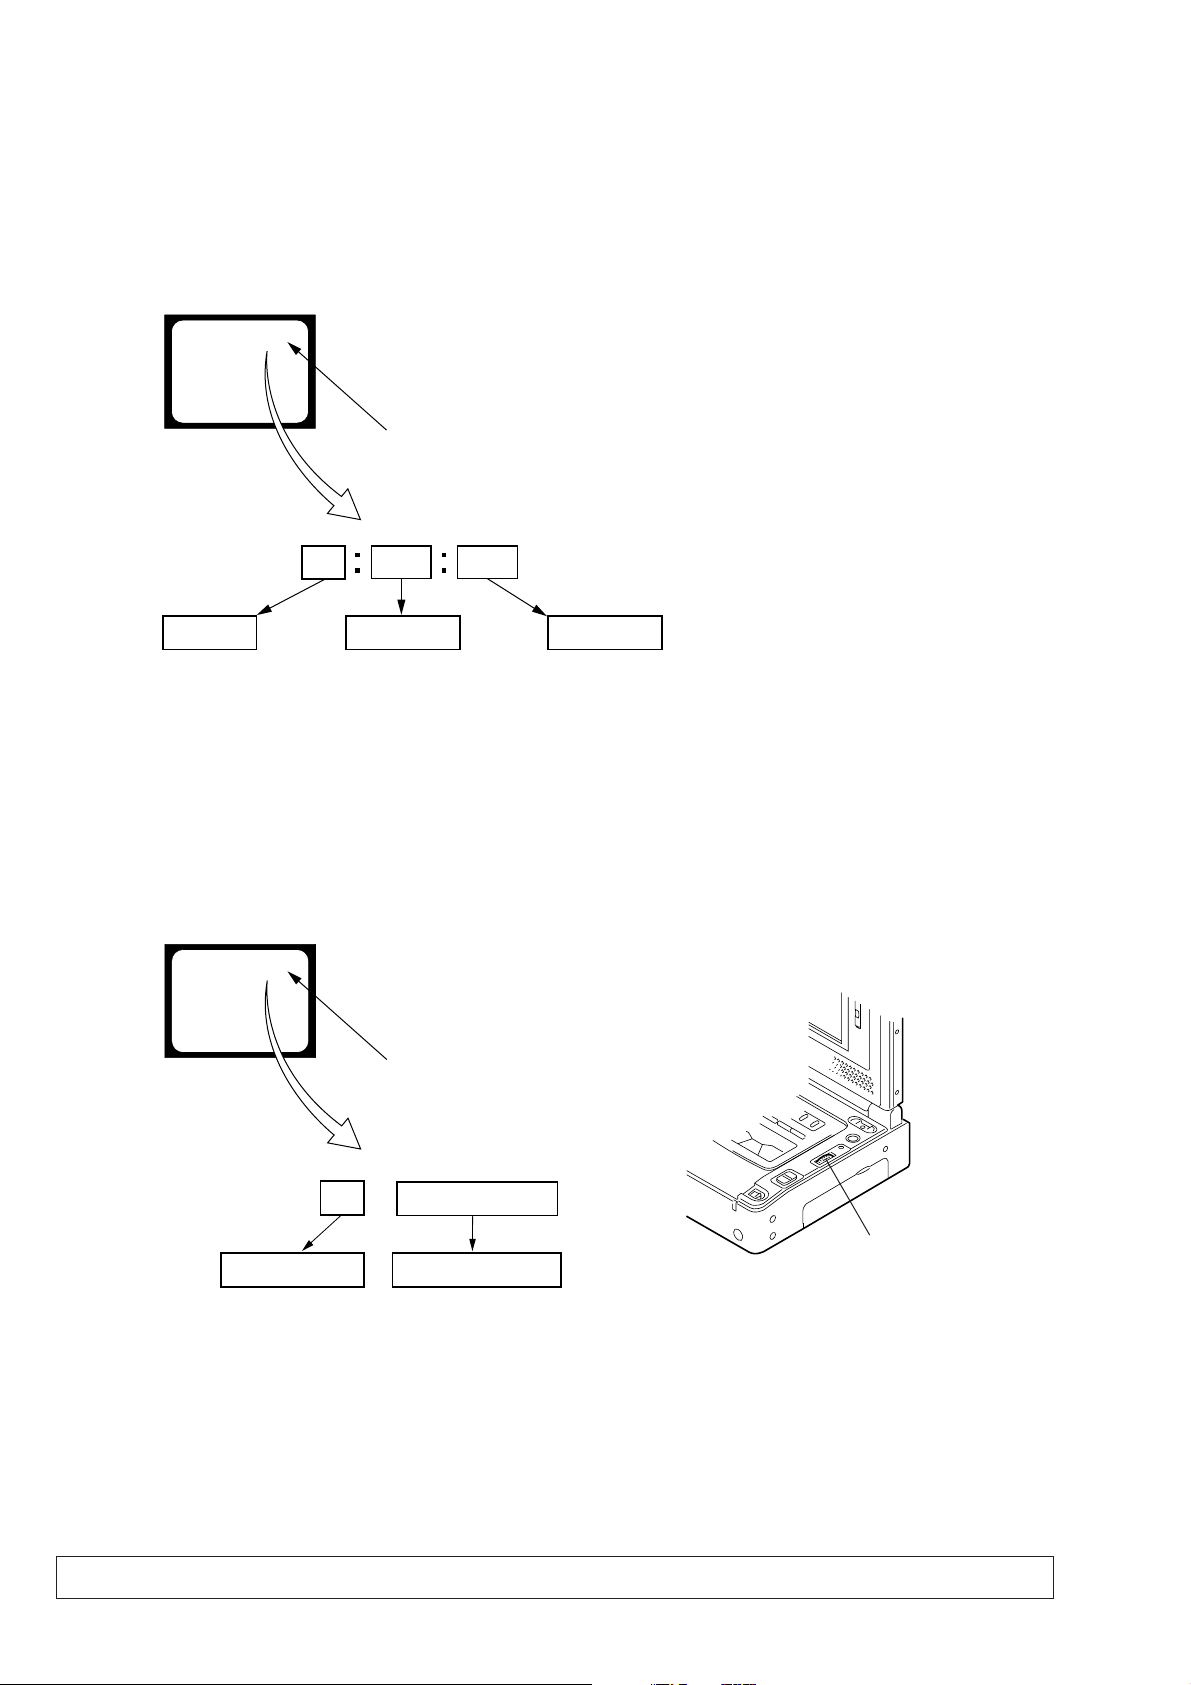
1. SELF-DIAGNOSIS FUNCTION
When problems occur while the unit is operating, the self-diagnosis
function starts working, and displays on the LCD screen or monitor
TV (Note) what to do. This function consists of two display; selfdiagnosis display and service mode display.
Details of the self-diagnosis functions are provided in the Instruction
manual.
LCD screen or monitor TV
C : 3 1 : 1 1
Repaired by:
C : Corrected by customer
H : Corrected by dealer
E : Corrected by service
engineer
Blinks at 3.2Hz
3 1C
Block
Indicates the appropriate
step to be taken.
E.g.
31 ....Reload the tape.
32 ....Turn o n power again.
1 1
2. SELF-DIAGNOSIS DISPLAY
When problems occur while the unit is operating, the counter of the
viewfinder shows a 4-digit display consisting of an alphabet and
numbers, which blinks at 3.2 Hz. This 5-character display indicates
the “repaired by:”, “block” in which the problem occurred, and
“detailed code” of the problem.
Note: Set the DISPLAY in the menu system to V-OUT/LCD only for the
model with LCD screen, and press the DISPLAY button.
Detailed Code
Refer to page 9.
Self-diagnosis Code Table.
3. SER VICE MODE DISPLAY
The service mode display shows up to six self-diagnosis codes shown in the past.
3-1. Display Method
While pressing the “STOP” key , set the PO WER switch from OFF to ON, and continue pressing the “STOP” ke y for 10 seconds continuously .
The service mode will be displayed, and the counter will show the backup No. and the 5-character self-diagnosis codes.
LCD screen or monitor TV
[3] C : 3 1 : 1 1
Lights up
[3]
Backup No.
Order of previous errors
3-2. Switching of Backup No.
By rotating the control dial, past self-diagnosis codes will be shown in order. The backup No. in the [] indicates the order in which the
problem occurred. (If the number of problems which occurred is less than 6, only the number of problems which occurred will be shown.)
[1] : Occurred first time [4] : Occurred fourth time
[2] : Occurred second time [5] : Occurred fifth time
[3] : Occurred third time [6] : Occurred the last time
C : 3 1 : 1 1
Control dial
self-diagnosis codes
3-3. End of Display
Turning OFF the power supply will end the service mode display.
Note: The “self-diagnosis displa y” data will be backed up by the coin-type lithium battery of FP-571 flexible board. When this coin-type lithium ba ttery
is removed, the “self-diagnosis display” data will be lost by initialization.
— 8 —
Page 9

4. SELF-DIAGNOSIS CODE TABLE
Self-diagnosis Code
Function
Repaired by:
C
C
C
C
C
C
C
C
C
C
C
C
C
C
C
C
C
C
C
C
C
C
C
Block
04
21
22
31
31
31
31
31
31
31
31
31
31
31
31
32
32
32
32
32
32
32
32
Detailed
Code
00
00
00
10
11
20
21
22
23
24
30
40
42
10
11
20
21
22
23
24
30
40
42
Symptom/State
Non-standard battery is used.
Condensation.
Video head is dirty.
LOAD direction. Loading does not
complete within specified time
UNLOAD direction. Loading does not
complete within specified time
T reel side tape slacking when unloading
Winding S reel fault when counting the
rest of tape.
T reel fault.
S reel fault.
T reel fault.
FG fault when starting capstan.
FG fault when starting drum.
FG fault during normal drum operations.
LOAD direction loading motor time-
out.
UNLOAD direction loading motor
time-out.
T reel side tape slacking when
unloading.
Winding S reel fault when counting the
rest of tape.
T reel fault.
S reel fault.
T reel fault.
FG fault when starting capstan.
FG fault when starting drum
FG fault during normal drum
operations
Correction
Use the info LITHIUM battery.
Remove the cassette, and insert it again after one hour.
Clean with the optional cleaning cassette.
Load the tape again, and perform operations from the beginning.
Load the tape again, and perform operations from the beginning.
.
Load the tape again, and perform operations from the beginning.
Load the tape again, and perform operations from the beginning.
Load the tape again, and perform operations from the beginning.
Load the tape again, and perform operations from the beginning.
Load the tape again, and perform operations from the beginning.
Load the tape again, and perform operations from the beginning.
Load the tape again, and perform operations from the beginning.
Load the tape again, and perform operations from the beginning.
Remove the battery or power cable, connect, and perform
operations from the beginning.
Remove the battery or power cable, connect, and perform
operations from the beginning.
Remove the battery or power cable, connect, and perform
operations from the beginning.
Remove the battery or power cable, connect, and perform
operations from the beginning.
Remove the battery or power cable, connect, and perform
operations from the beginning.
Remove the battery or power cable, connect, and perform
operations from the beginning.
Remove the battery or power cable, connect, and perform
operations from the beginning.
Remove the battery or power cable, connect, and perform
operations from the beginning.
Remove the battery or power cable, connect, and perform
operations from the beginning.
Remove the battery or power cable, connect, and perform
operations from the beginning.
— 9 —
Page 10
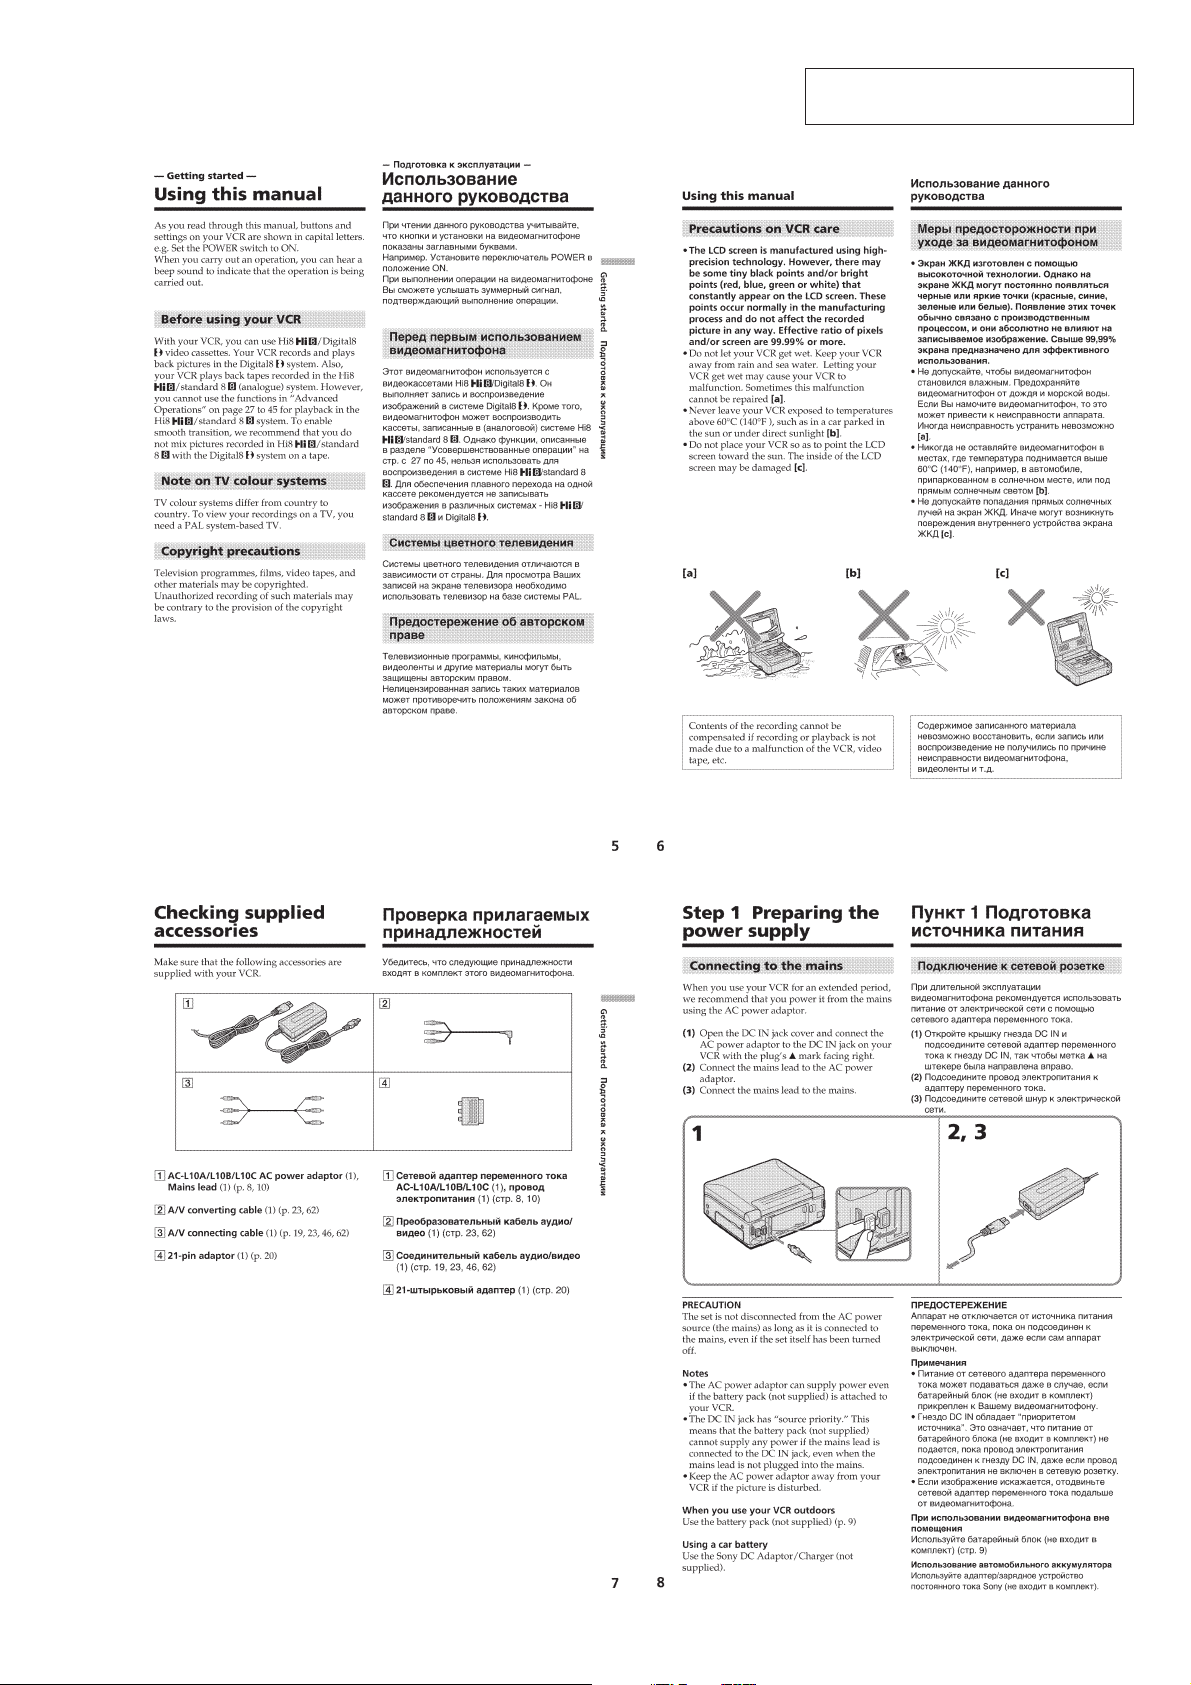
SECTION 1
GENERAL
GV-D200/D200E/D800/D800E
This section is extracted from instruction
manual. (GV-D800E model)
1-1
Page 11

1-2
Page 12

1-3
Page 13
1-4
Page 14
1-5
Page 15
1-6
Page 16

1-7
Page 17

1-8
Page 18
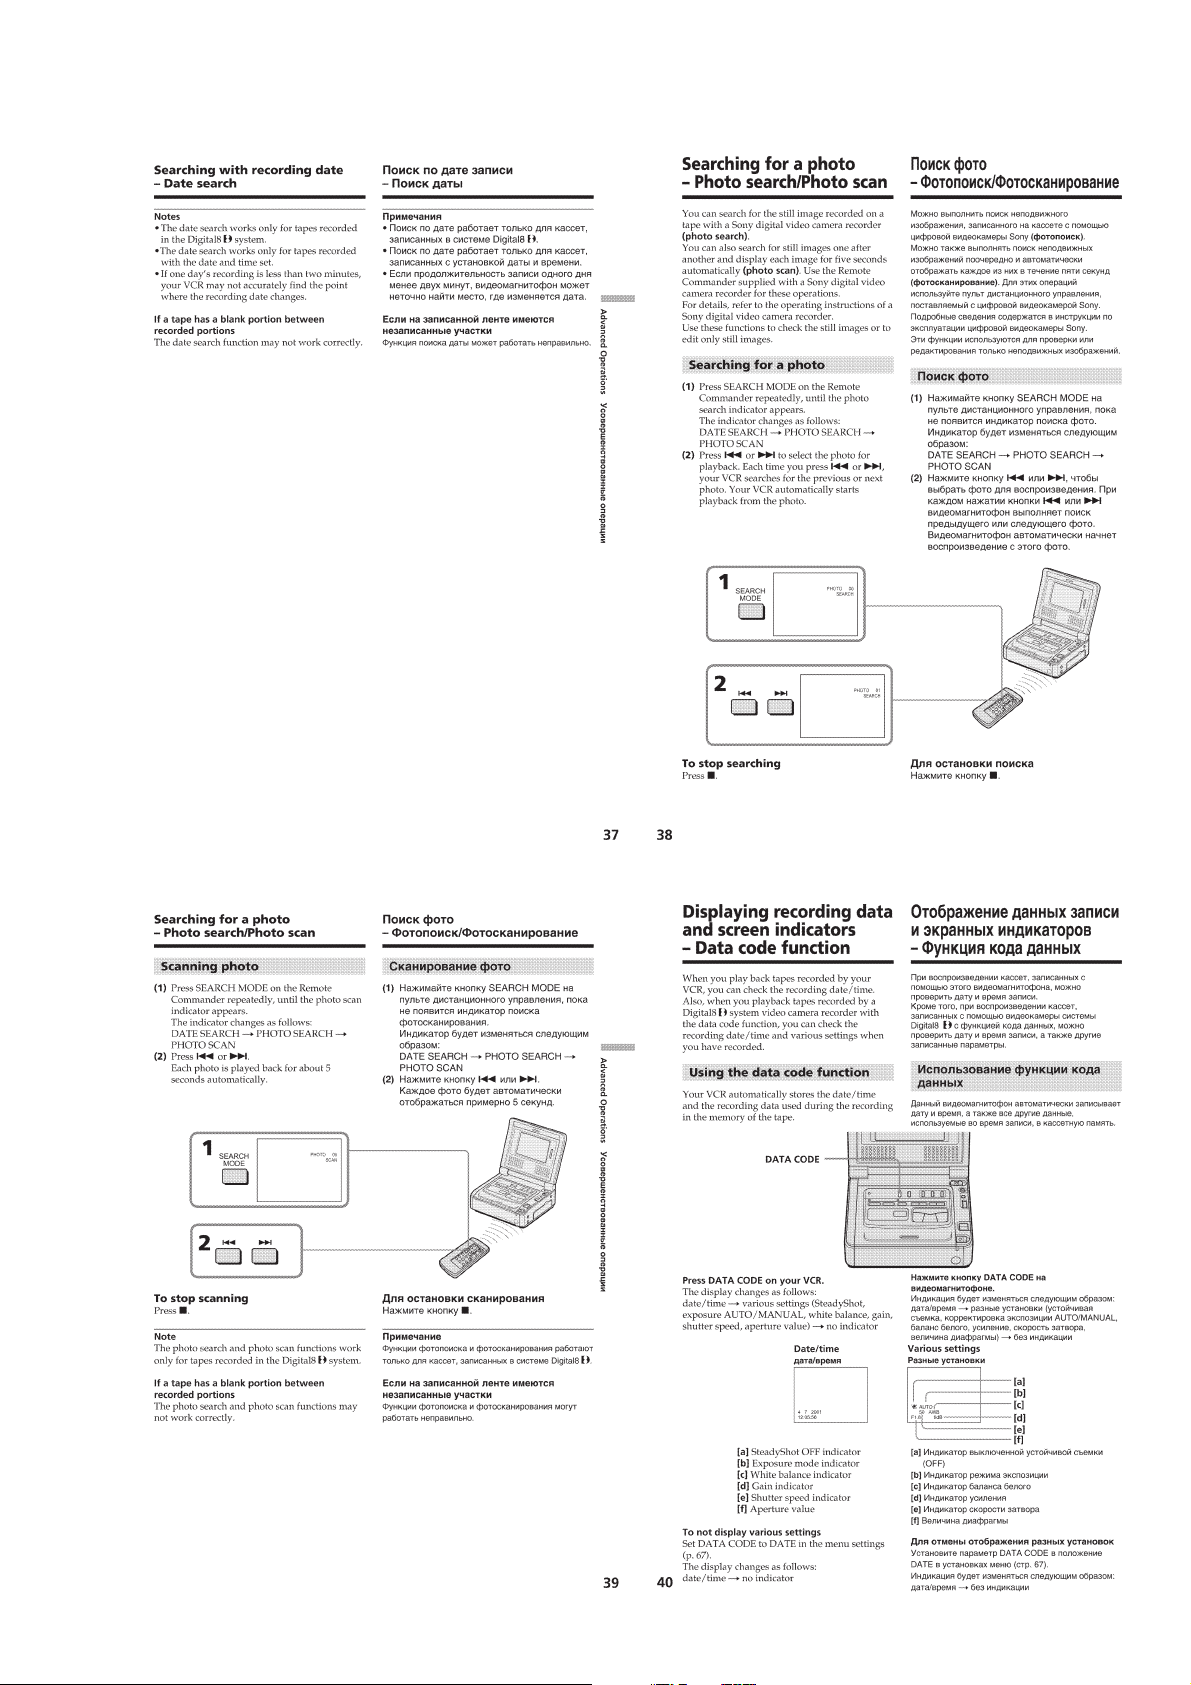
1-9
Page 19

1-10
Page 20

1-11
Page 21

1-12
Page 22
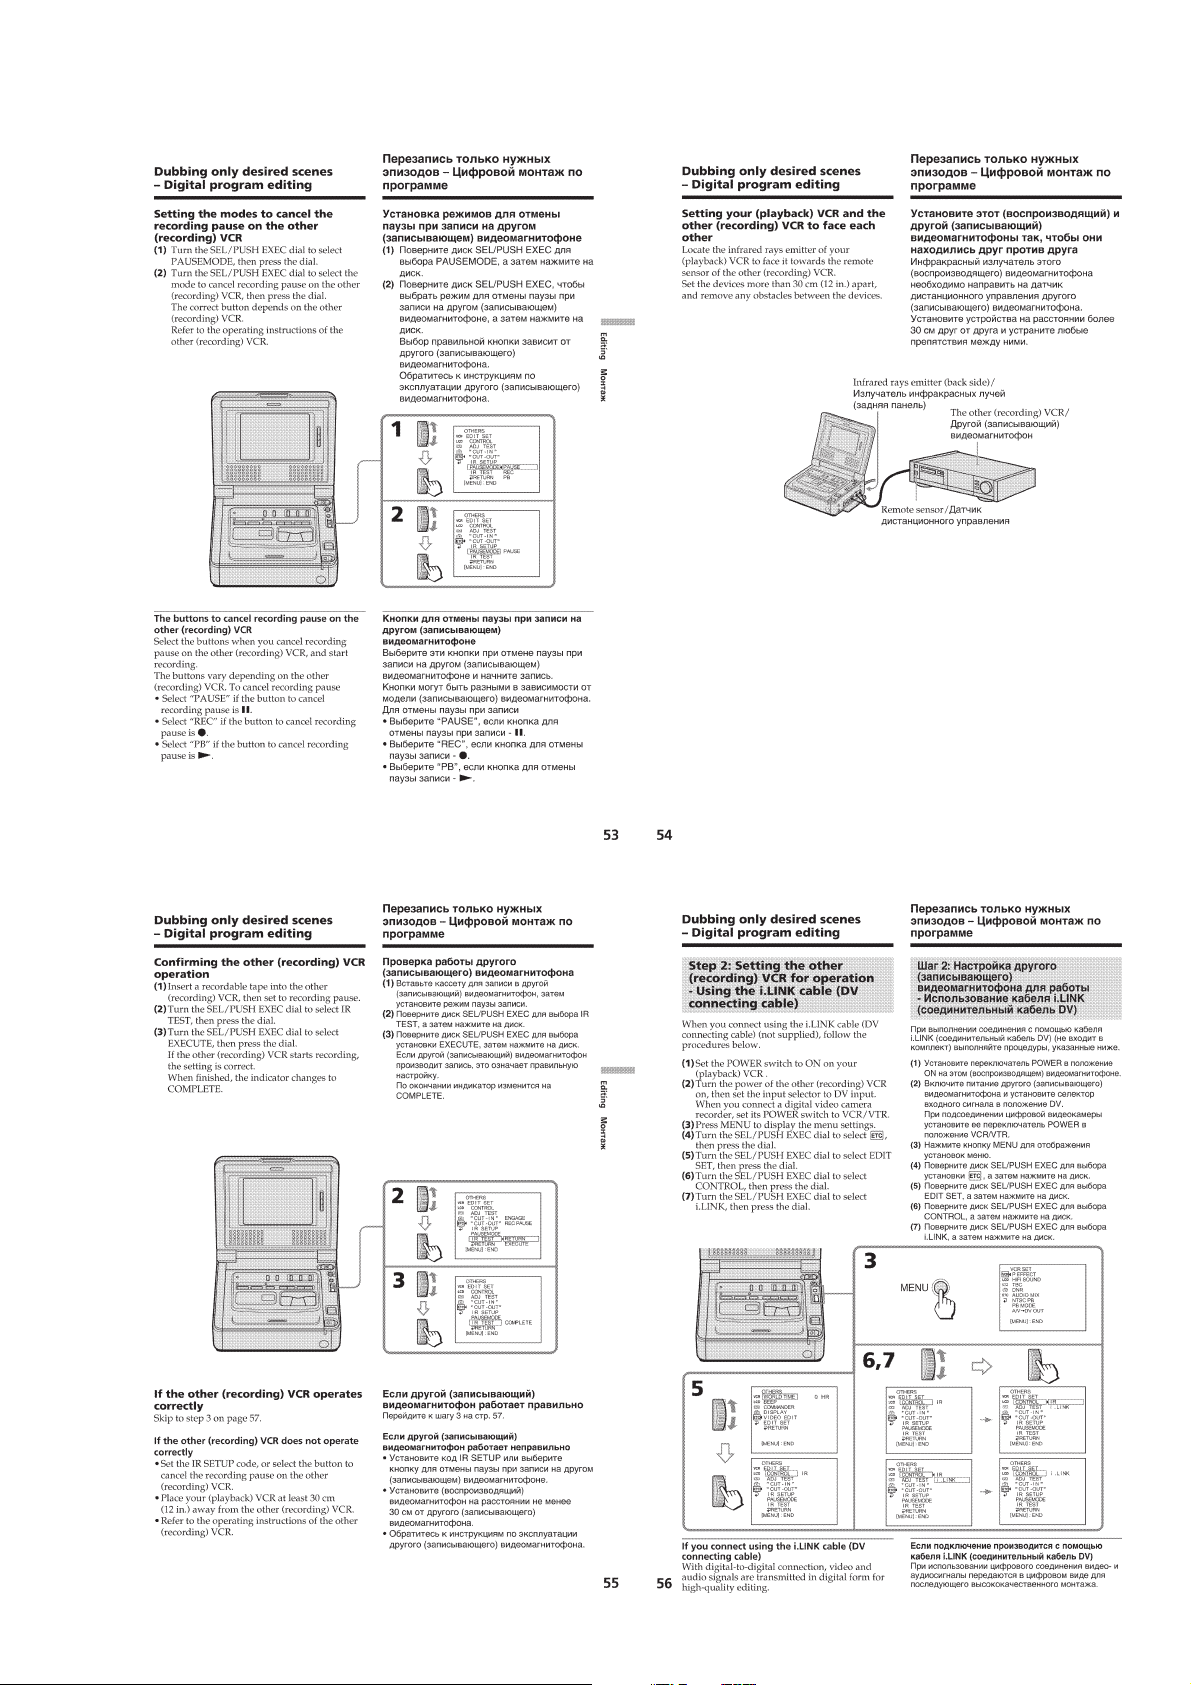
1-13
Page 23

1-14
Page 24

1-15
Page 25

1-16
Page 26

1-17
Page 27

1-18
Page 28
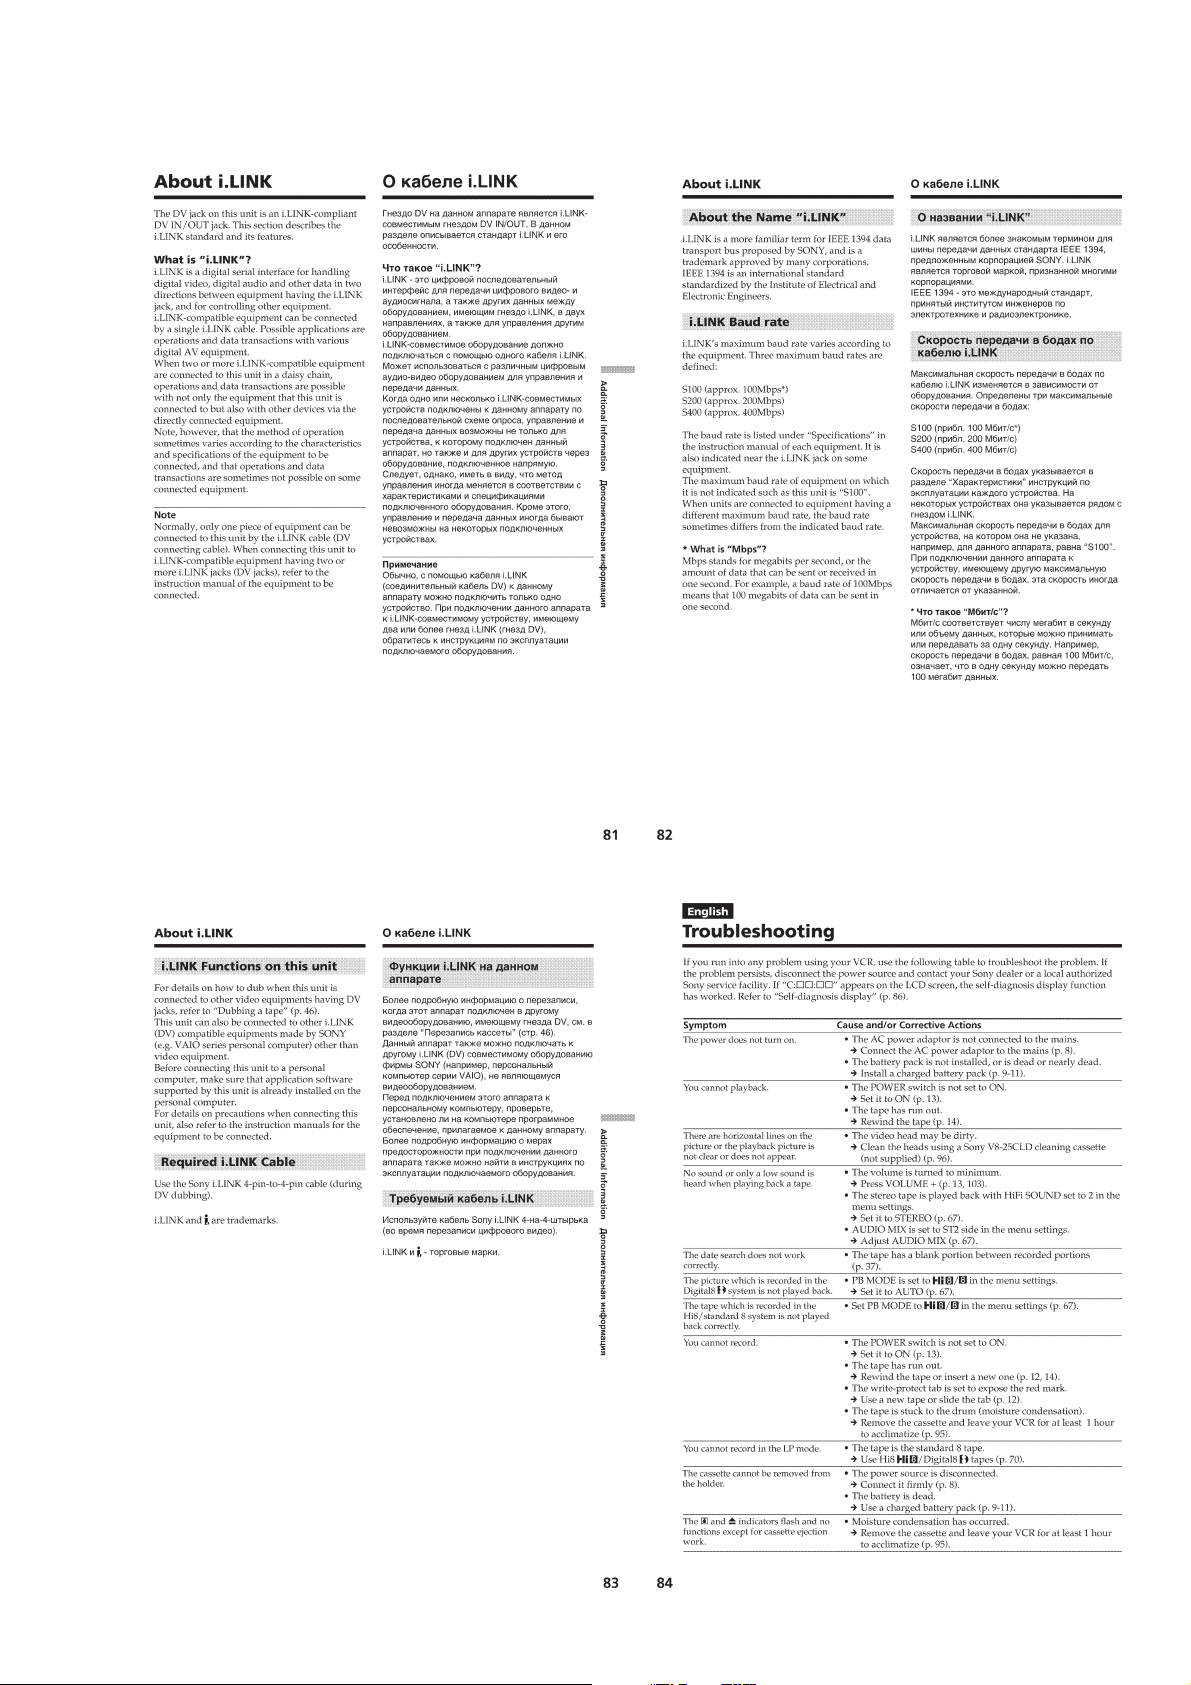
1-19
Page 29
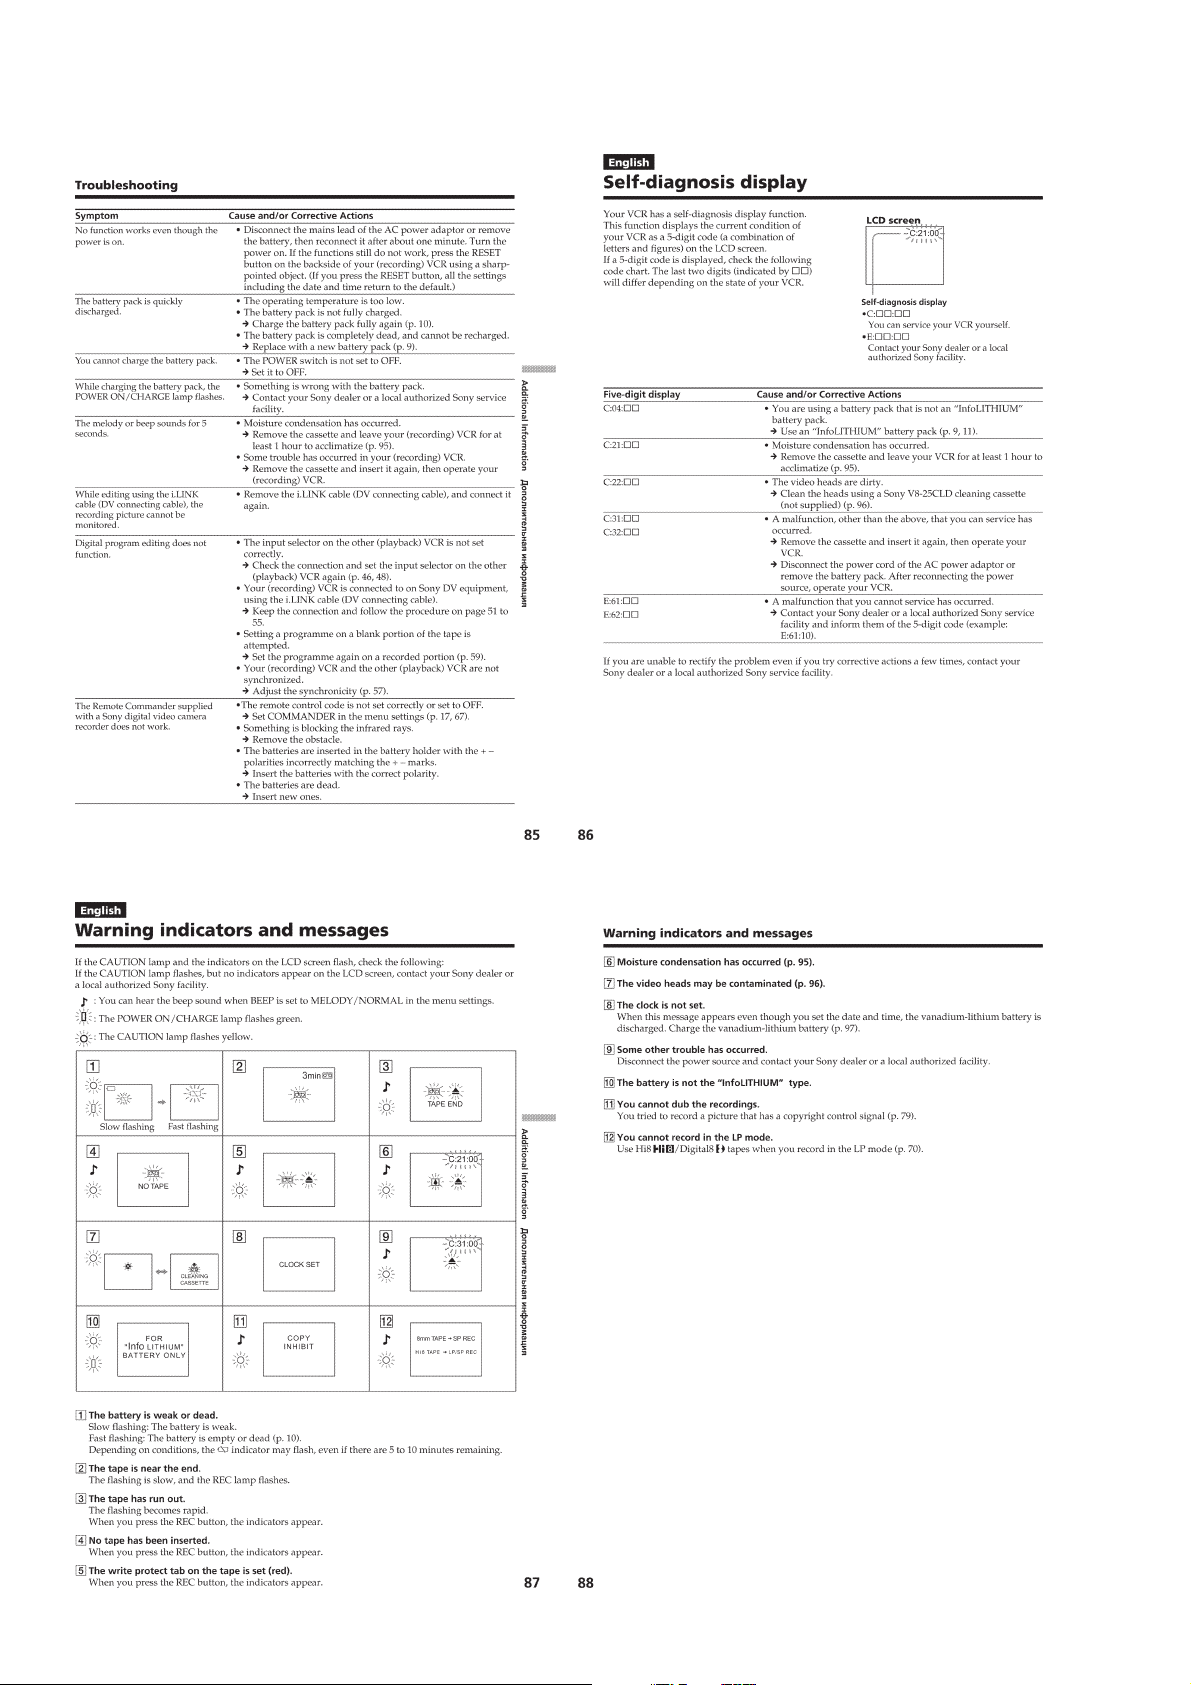
1-20
Page 30
1-21
Page 31
1-22
Page 32
1-23E
Page 33
SECTION 2
DISASSEMBLY
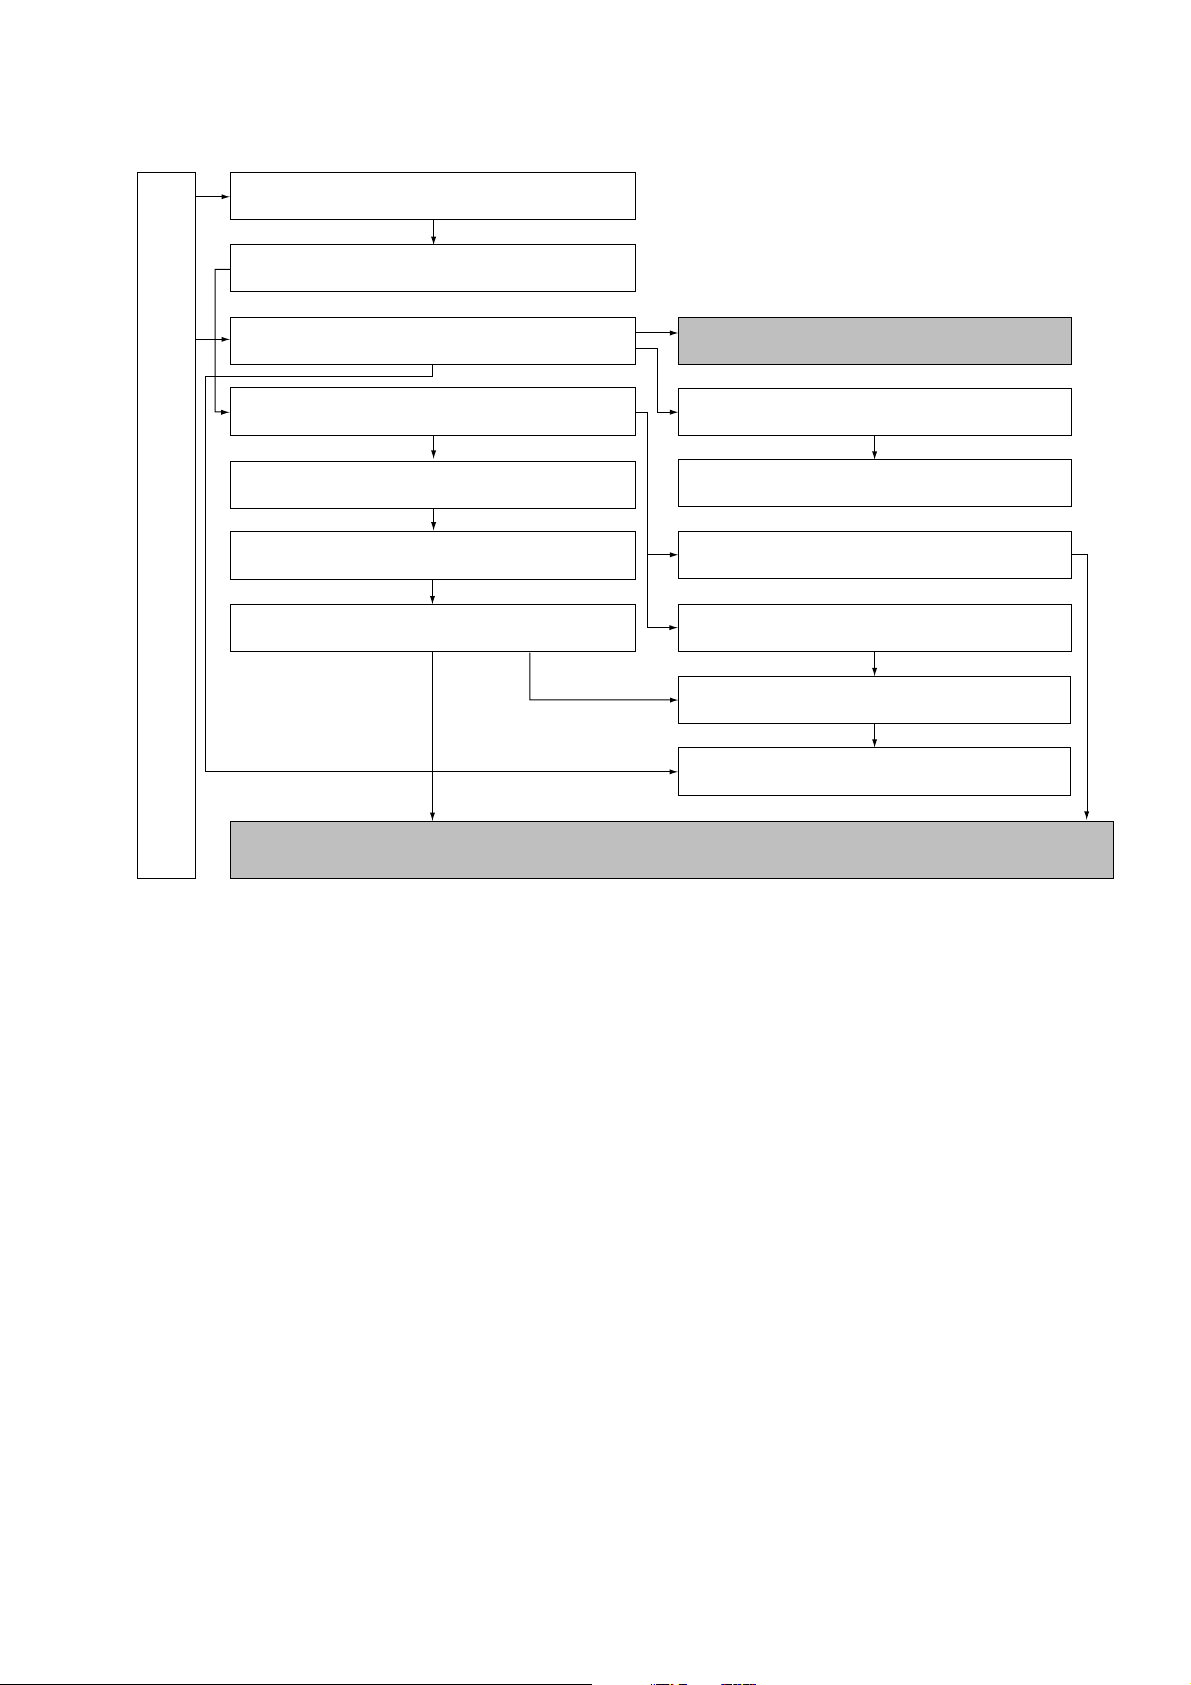
The following flow chart shows the disassembly procedure.
2-1. Cassette Lid assembly
2-2. Bottom cabinet assembly, FP-571 flexible board
(Lithium battery)
GV-D200/D200E/D800/D800E
2-3. LCD cabinet assembly (D800, D800E model)
2-6. Battery panel assembly, Battery terminal board,
DC-IN connector
2-7. VC-250, FU-145 boards
2-9. Mechanism deck, Main frame assembly
2-10. Cabinet (R) block assembly, Jack frame
(IO-68, IR-38 boards)
GV-D200/D200E/D800/D800E
[CONNECTION DIAGRAM FOR SERVICE POSITION (Mainly for voltage measurement and check)]
(VC-250, FU-145, IO-68 boards, Mechanism deck)
PD-130 board service position
(D800, D800E model)
2-4. PD-130, LS-56 boards (D800, D800E model)
2-5. LCD window cabinet assembly (SP-901,902)
(D800, D800E model)
2-8. Control switch block (FK-78), Loading lid
2-11. EX-36 board, FP-570 flexible board
2-12. Upper cabinet assembly,
LCD block assembly (D800, D800E model)
2-13. Hinge unit , FP-569 flexible board
(D800, D800E model)
2-1
Page 34
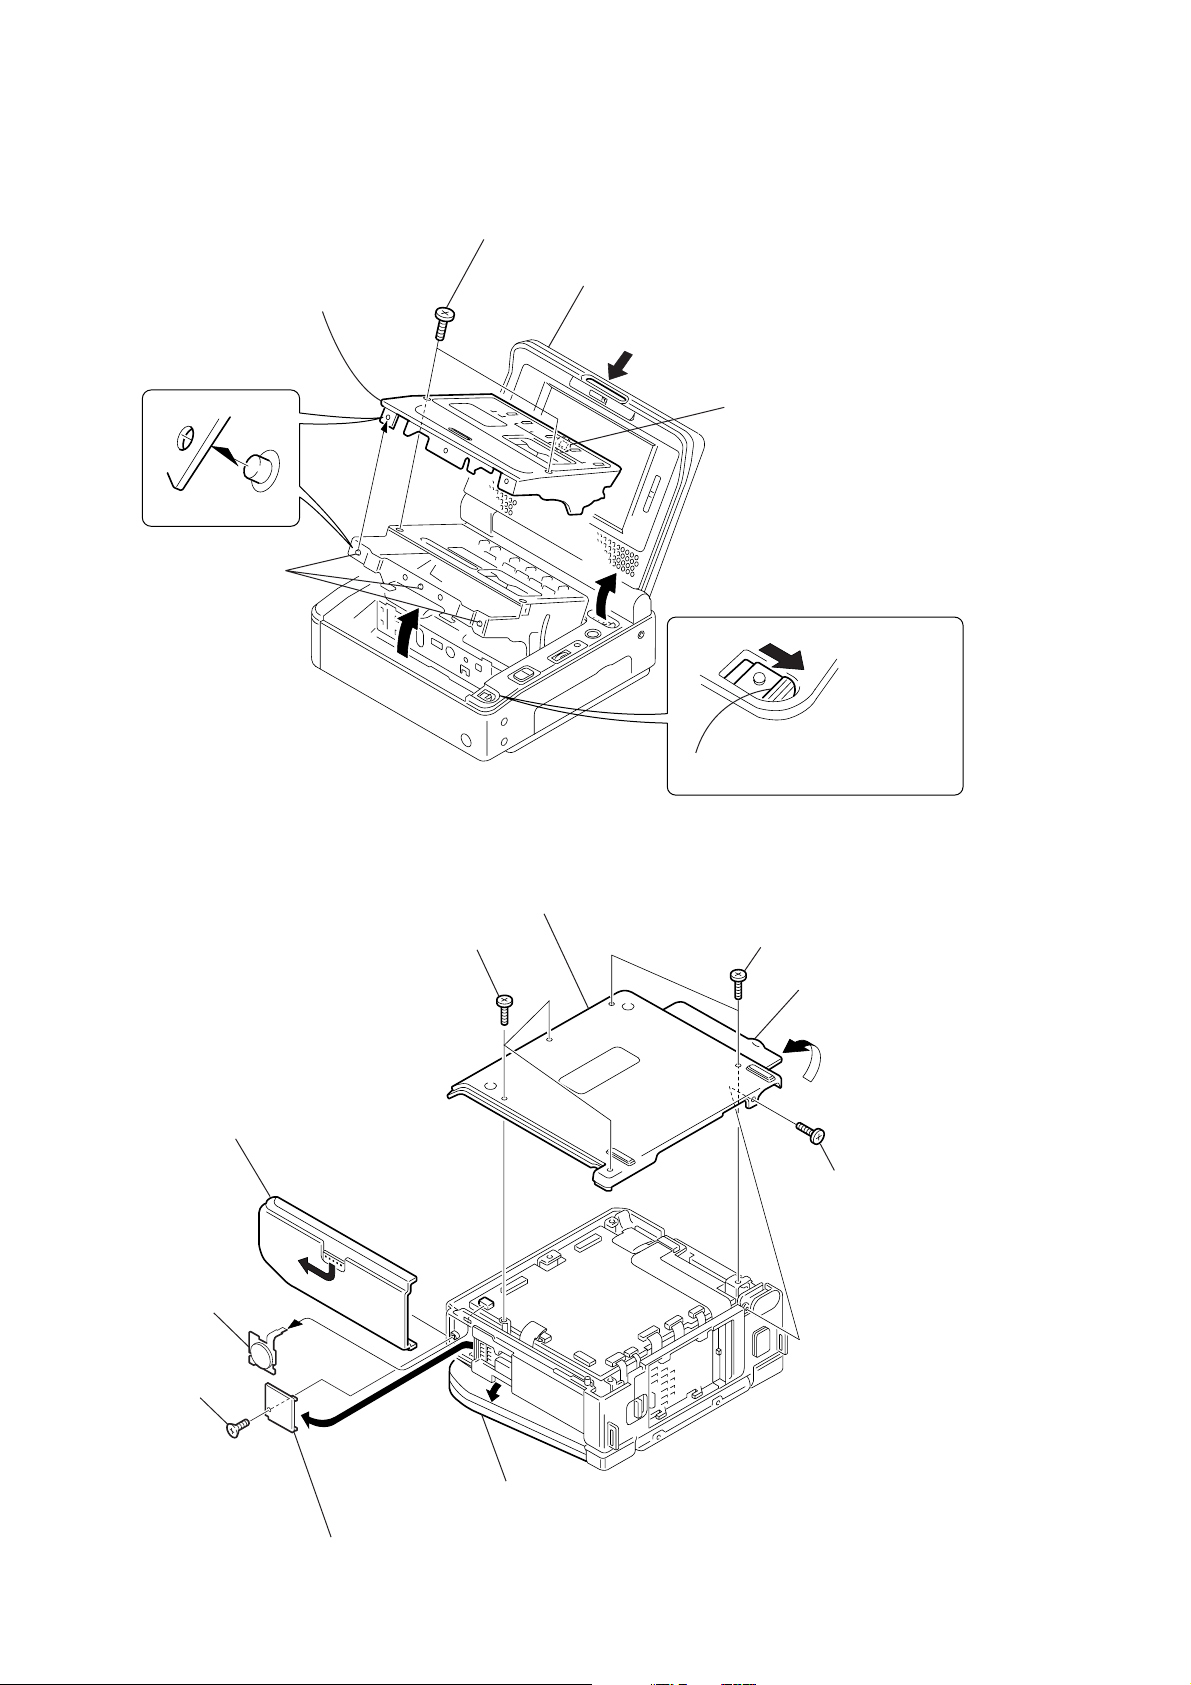
NOTE: F ollo w the disassembly procedure in the numerical order given.
2-1. CASSETTE LID ASSEMBLY
2
Two screws (M2 × 4),
lock ace, p2
1
Open the LCD panel in the
direction of the arrow A.
(GV-D800/D800E model)
A
4
Three dowels
6
Cassette lid
assembly
Push
5
Claw
Press the cassette EJECT knob to
3
open the cassette compartment.
2-2. BOTTOM CABINET ASSEMBLY, FP-571 FLEXIBLE BOARD (LITHIUM BATTERY)
7
Bottom cabinet assembly
3
2
Press the release button to remove
the cabinet lid assembly in the
direction of the arrow
A
0
FP-571 flexible board
(4P)
Three screws (M2 × 4),
lock ace, p2
A
.
Board
VC-250
4
Two screws (M2 × 4),
lock ace, p2
6
Open the jack lid assembly
in the direction of the arrow
B
5
Screw (M2 × 4),
lock ace, p2
B
.
8
T apping screw
×
(+k 2
5)
C
9
Remove the lithium lid in the
direction of the arrow
1
Open the LCD panel little.
(GV-D800/D800E model)
C
.
2-2
Page 35
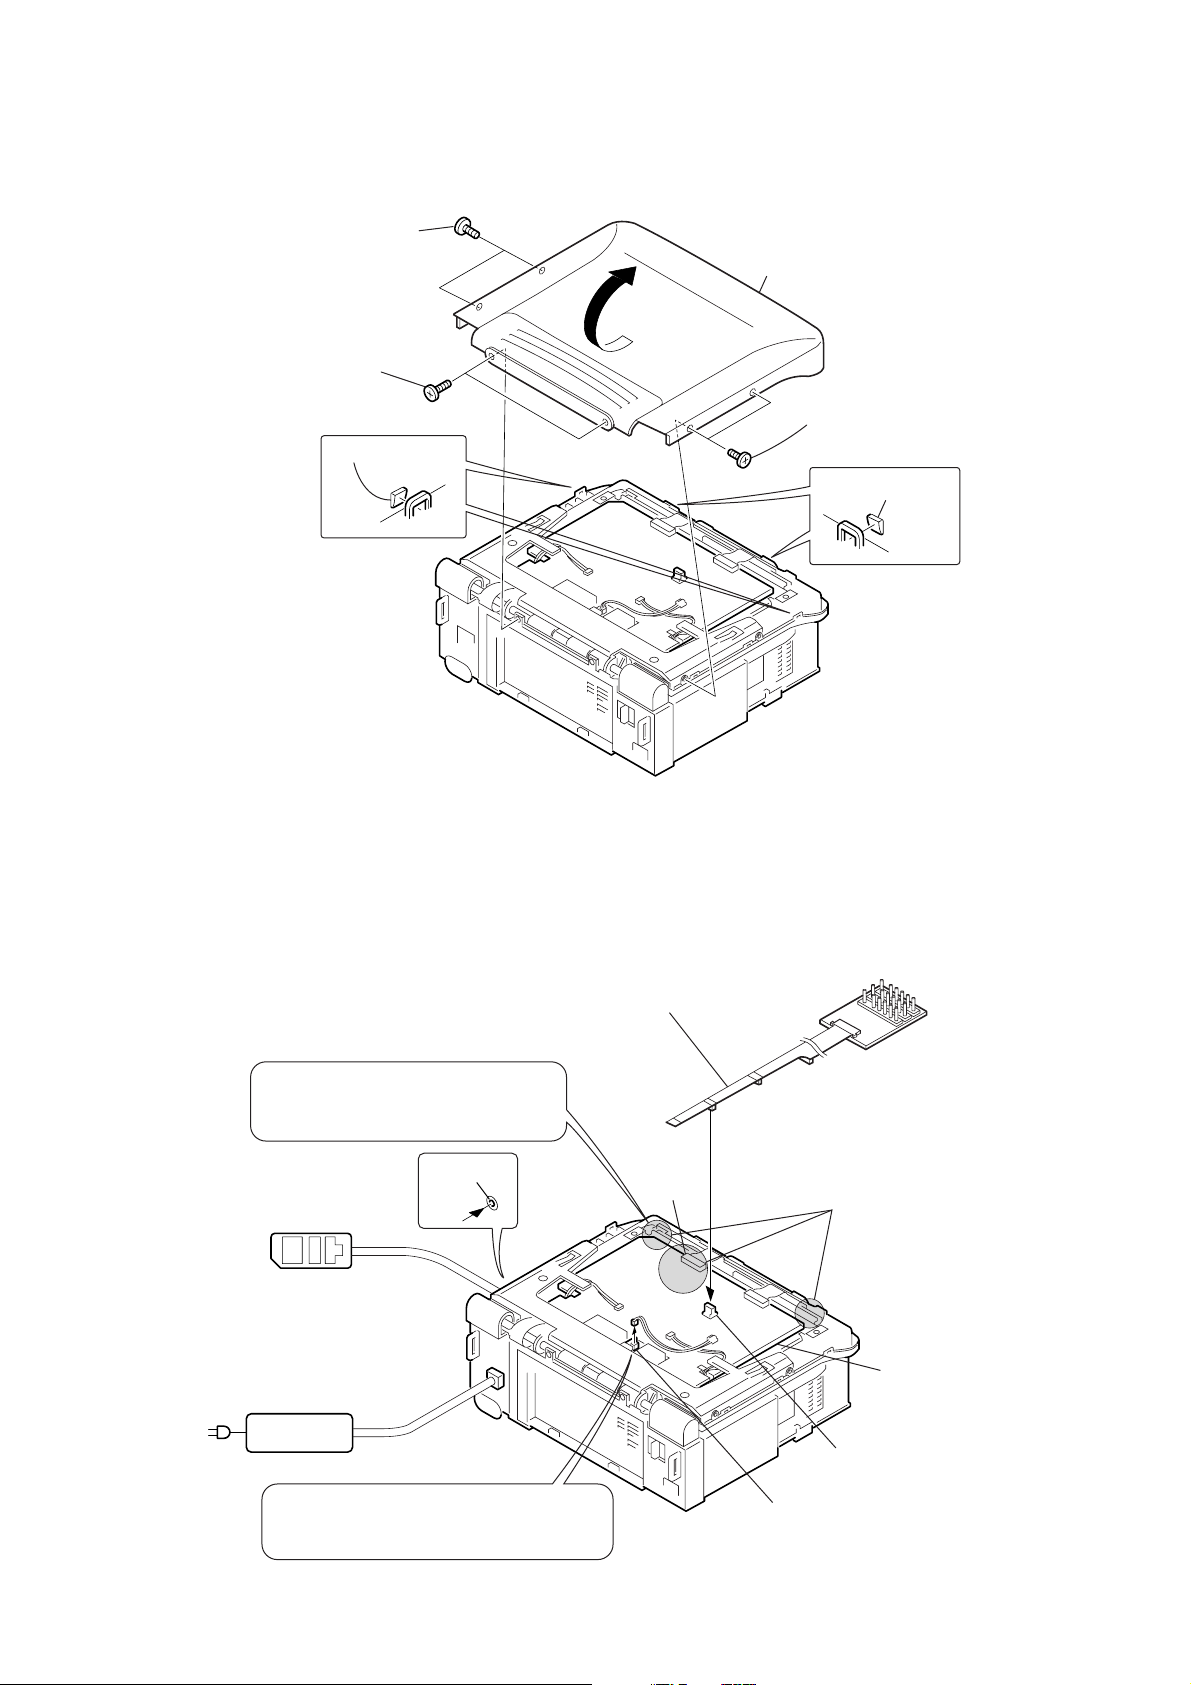
2-3. LCD CABINET ASSEMBLY (D800, D800E MODEL)
2
Two screws (M2 × 4),
lock ace, p2
3
Two screws (M2 × 3),
lock ace, p2
4
Two
claws
6
Remove the LCD cabinet assembly
in the direction of the arrow.
1
Two screws (M2 × 4),
lock ace, p2
5
Two
claws
[PD-130 BOARD SERVICE POSITION]
(D800, D800E MODEL)
Touching here is safe when the machine
is normal. However touching here can be
dangerous if defective parts exist.
LANC
jack
Adjustment remote
commander (RM-95)
AC IN
AC POWER
ADAPTOR
Multi-CPC jig
(J-6082-311-A)
CN5607
PD-130
Board
Caution
High voltage
1
2
9
10
PD-130 board
CN5502
When the hinge unit is closed to be laid down,
remove CN01 (2P) on the LS-56 board.
If not, the main power cannot be turned on.
LS-56 board
CN01 (2P)
2-3
Page 36
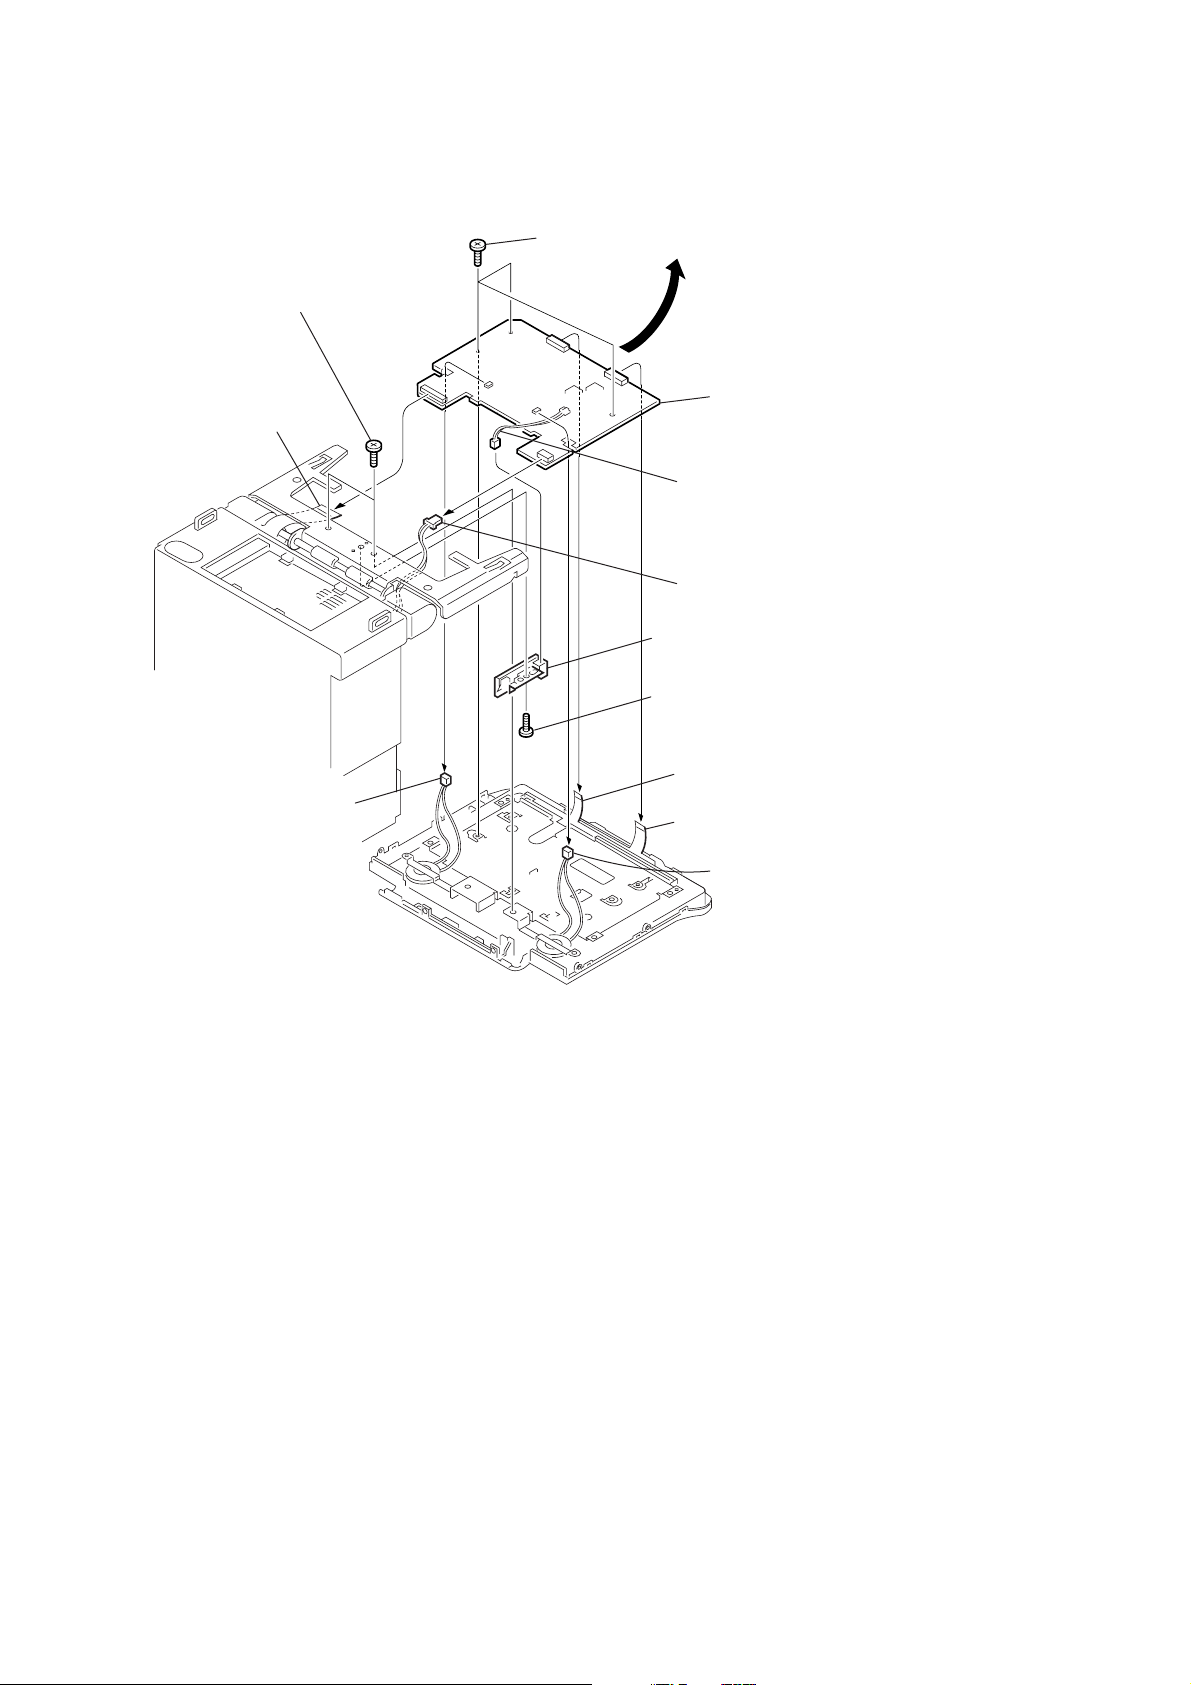
2-4. PD-130, LS-56 BOARDS (D800, D800E MODEL)
9
Three screws (M2 × 3),
lock ace, p2
6
Two tapping screws
(B2
×
5)
PD-130
Board
7
FP-569 flexible
board (26, 32P)
0
Remove the PD-130 board
in the direction of the arrow.
3
Harness (PL-53) (2P)
8
Harness (EP-51) (2P)
qs
LS-56 board, LS bracket
qa
Screw (M2 × 3),
lock ace, p2
1
SP902 (2P)
4
ND901 (10P)
5
LCD901 (24P)
2
SP901 (2P)
2-4
Page 37
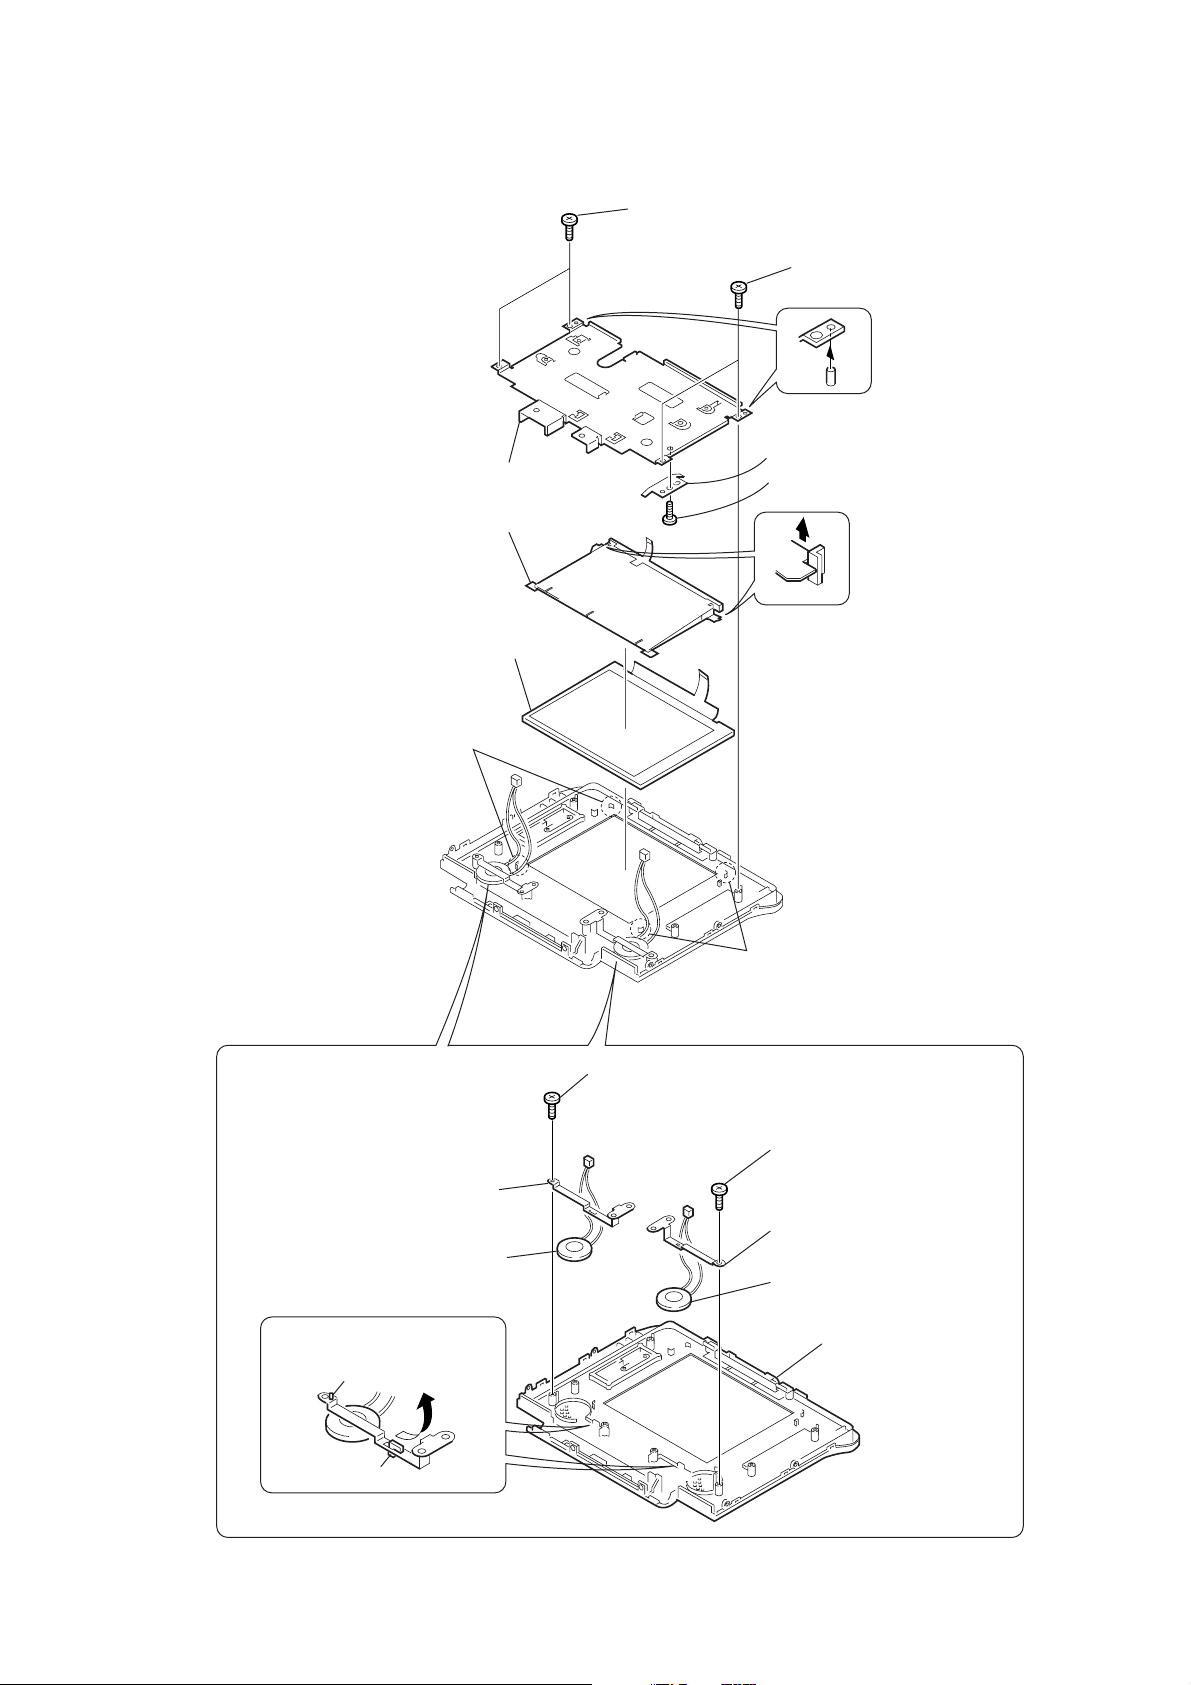
2-5. LCD WINDOW CABINET ASSEMBLY (SP-901, 902)(D800, D800E MODEL)
1
Two tapping screws
×
5)
2
Two tapping screws
(B2 × 5)
5
LCD ground plate
4
Screw (M2 × 3),
lock ace, p2
3
PD frame
6
LCD901
9
ND901
(B2
7
3
SP ground plate
4
Two claws
SP902
8
Two claws
REMOVING THE LCD WINDOW
CABINET ASSEMBLY (SP901, 902)
1
Tapping screw
×
(B2
5)
5
Tapping screw
×
(B2
6
5)
SP ground plate
7
SP901
2
Remove the SP ground plate
in the direction of the arrow.
Dowel
Claw
2-5
8
LCD window cabinet
assembly
Page 38
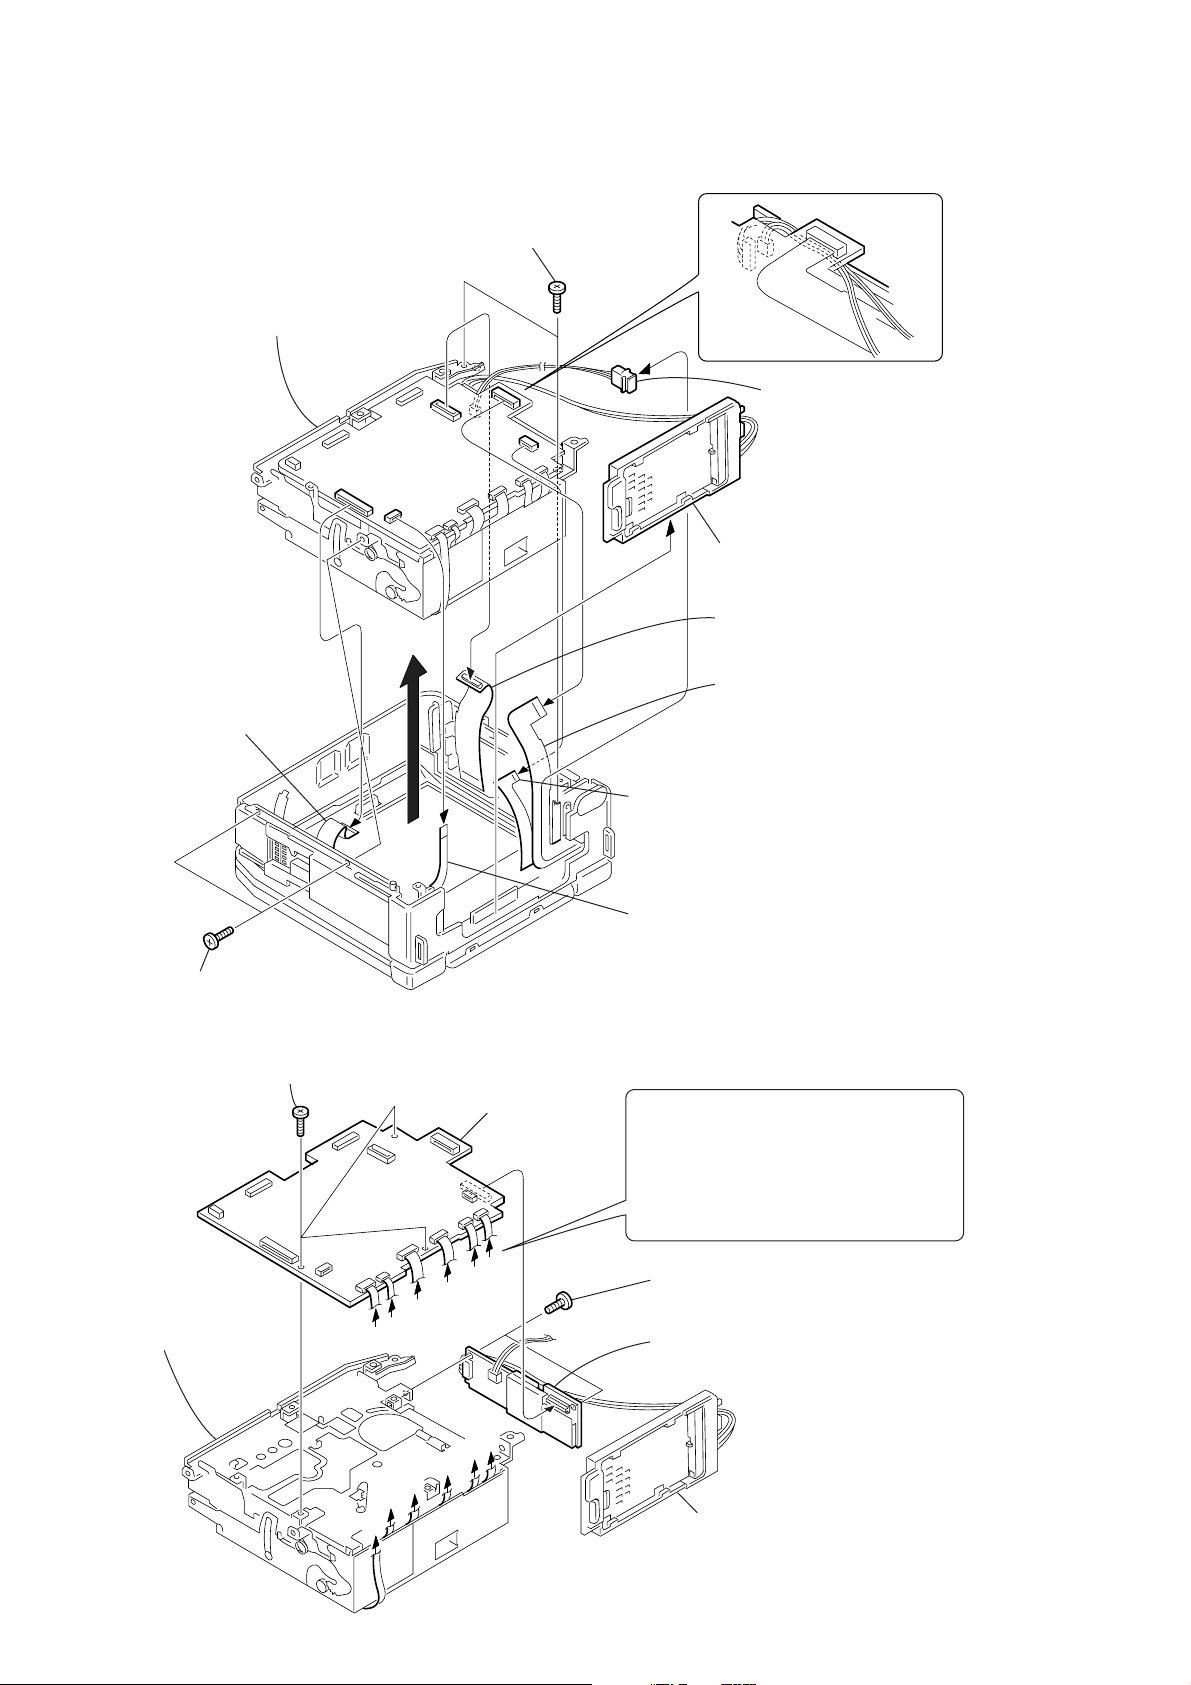
2-6. BATTERY PANEL ASSEMBLY, BATTERY TERMINAL BOARD, DC-IN CONNECTOR
7
Two tapping screws
×
5)
9
DC-IN connector (3P),
DC jack assembly
6
Battery panel assembly,
Battery terminal board
5
FP-247 flexible board
(50P)
3
FP-569 flexible board
(26, 32P)
0
Mechanism section
1
FP-570 flexible board
(40P)
(B2
Board
VC-250
8
Two screws (M2 × 4),
lock ace, p2
2-7. VC-250, FU-145 BOARDS
3
Three screws (M2 × 3),
lock ace, p2
VC-250
5
Mechanism deck
A
B
B
oard
C
D
E
4
VC-250 board
F
4
FP-572 flexible board
(6, 10P)
2
FP-602 flexible board
(5P)
A
Control switch block (FK-78) (10P)
B
Flexible board
(from loading motor, mode switch) (8P)
C
Flexible board (from video head) (16P)
D
Flexible board (from drum motor) (10P)
E
Flexible board (from capstan motor) (12P)
F
Flexible board (from S reel/T reel) (15P)
1
Two screws (M2 × 3),
lock ace, p2
2
FU-145 board
A
B
C
D
E
F
Battery panel assembly,
Battery terminal board
2-6
Page 39
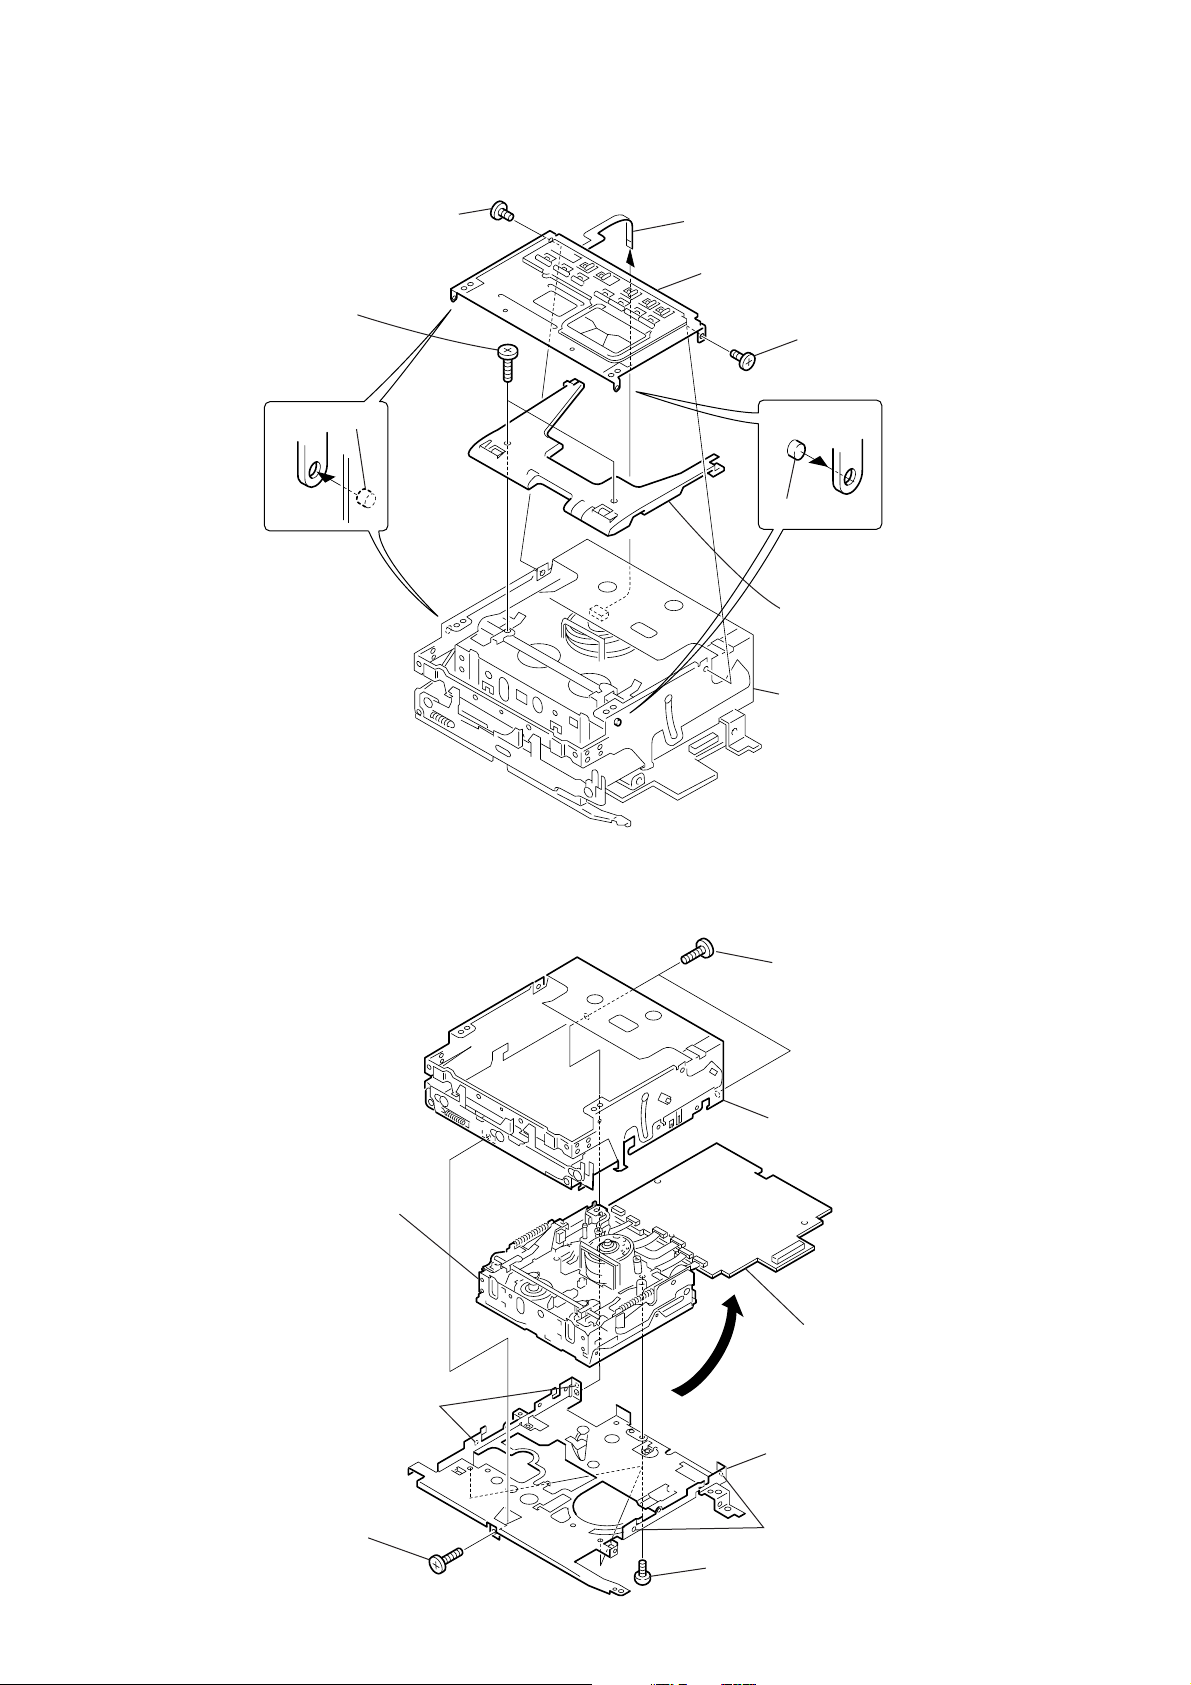
2-8. CONTROL SWITCH BLOCK (FK-78), LOADING LID
2
Screw (M1.4 × 1.6)
7
Two screws (M2 × 4),
lock ace, p2
4
Dowel
1
Remove the control switch block
(FK-78) (10P) in the direction of the arrow.
6
Control switch block
(FK-78) (10P)
3
Screw (M1.4 × 1.6)
5
Dowel
8
Loading lid
9
Mechanism deck
2-9. MECHANISM DECK, MAIN FRAME ASSEMBLY
9
Mechanism deck
3
Two dowels
Board
VC-250
1
Two screws (M2 × 3),
lock ace, p2
5
Lid frame assembly
6
Open the VC-250 board in the
direction of the arrow .
8
Main frame assembly
2
Screw (M2 × 3),
lock ace, p2
2-7
4
Two dowels
7
Three screws (M2 × 3),
lock ace, p2
Page 40
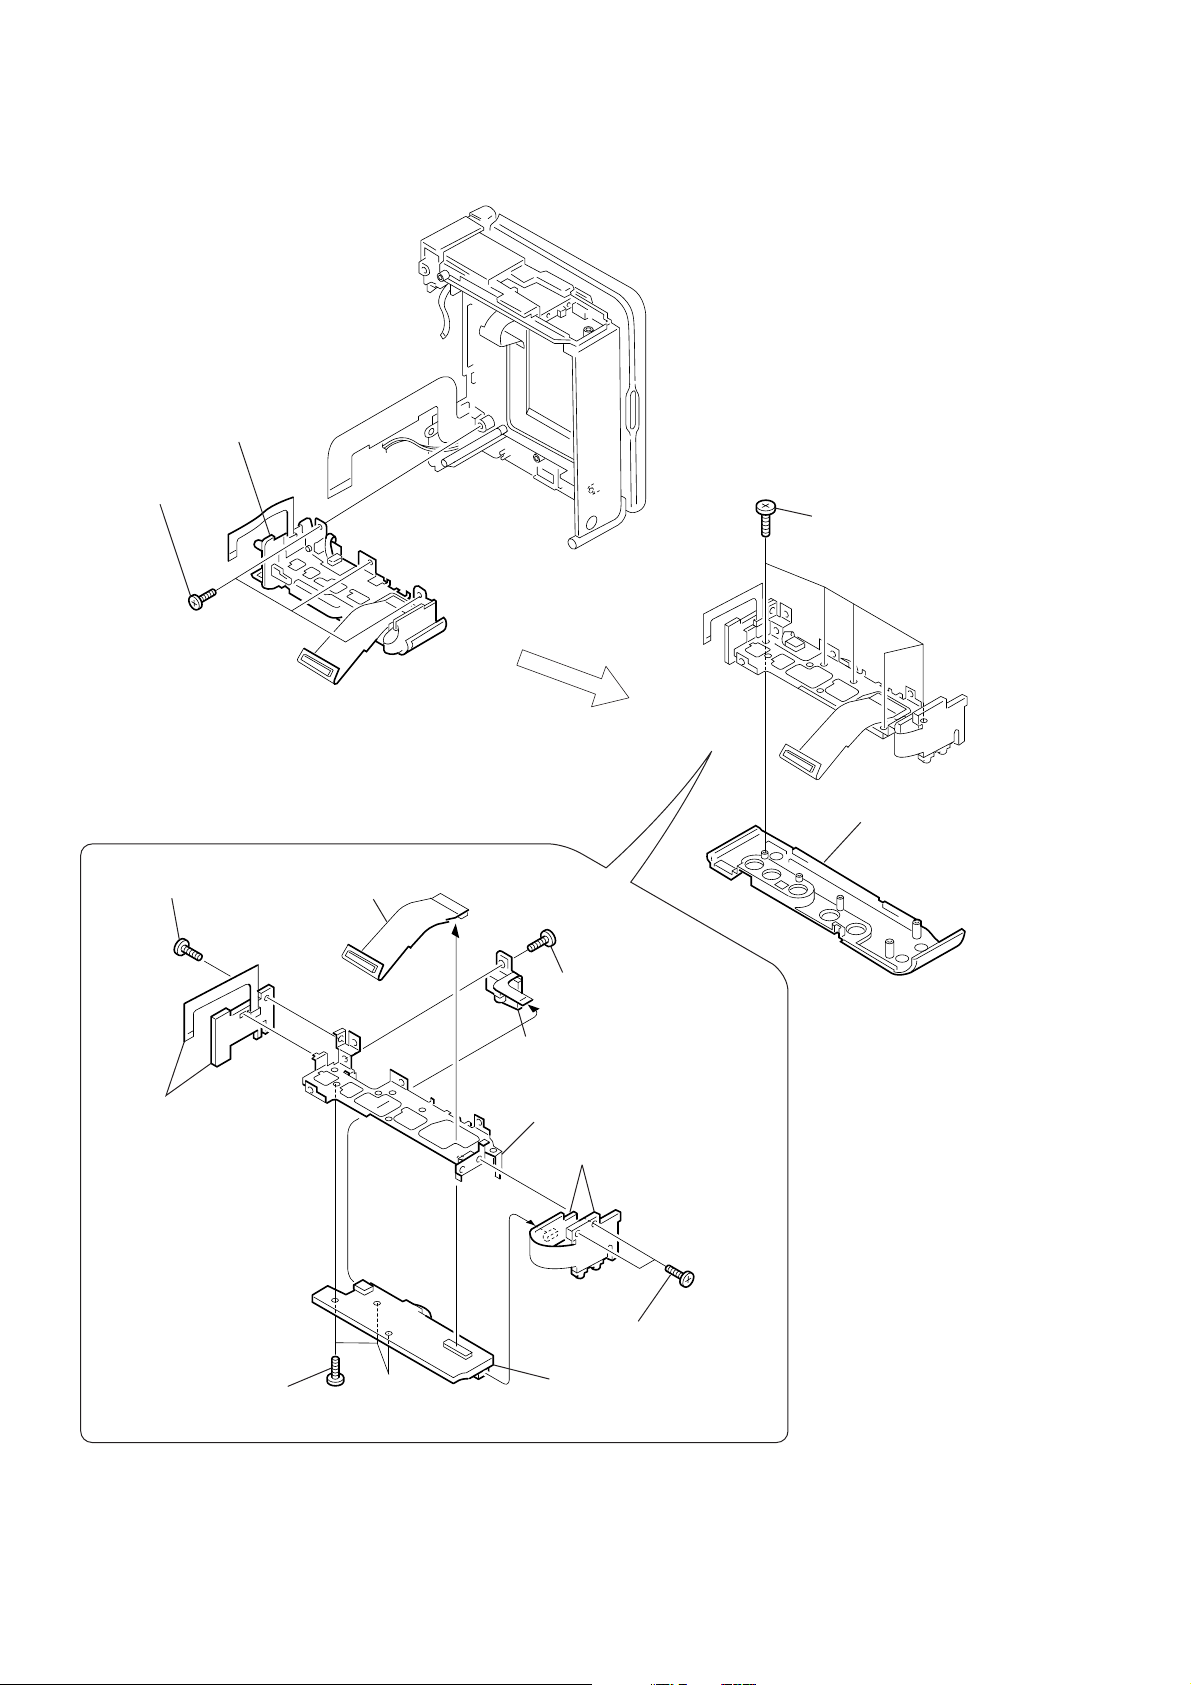
2-10.CABINET (R) BLOCK ASSEMBLY, JACK FRAME (IO-68, IR-38 BOARDS)
2
Cabinet (R)
block assembly
1
Three tapping
screws (B2
×
5)
3
Five tapping screws (B2 × 6)
REMOVING THE JACK FRAME
8
Screw (M2 × 3),
lock ace, p2
9
IR-38 board,
FP-572 flexible board
(6, 10P)
6
Three screws
(M2 × 4), lock ace, p2
5
board (50P)
IR-38
FP-247 flexible
IO-68
Board
3
Screw (M2 × 3),
lock ace, p2
4
FP-575 flexible board (6P)
0
Jack frame
2
FP-246 flexible
board (16P)
FP-246
1
Two screws (M2 × 3),
lock ace, p2
7
IO-68 board
4
Cabinet (R)
2-8
Page 41
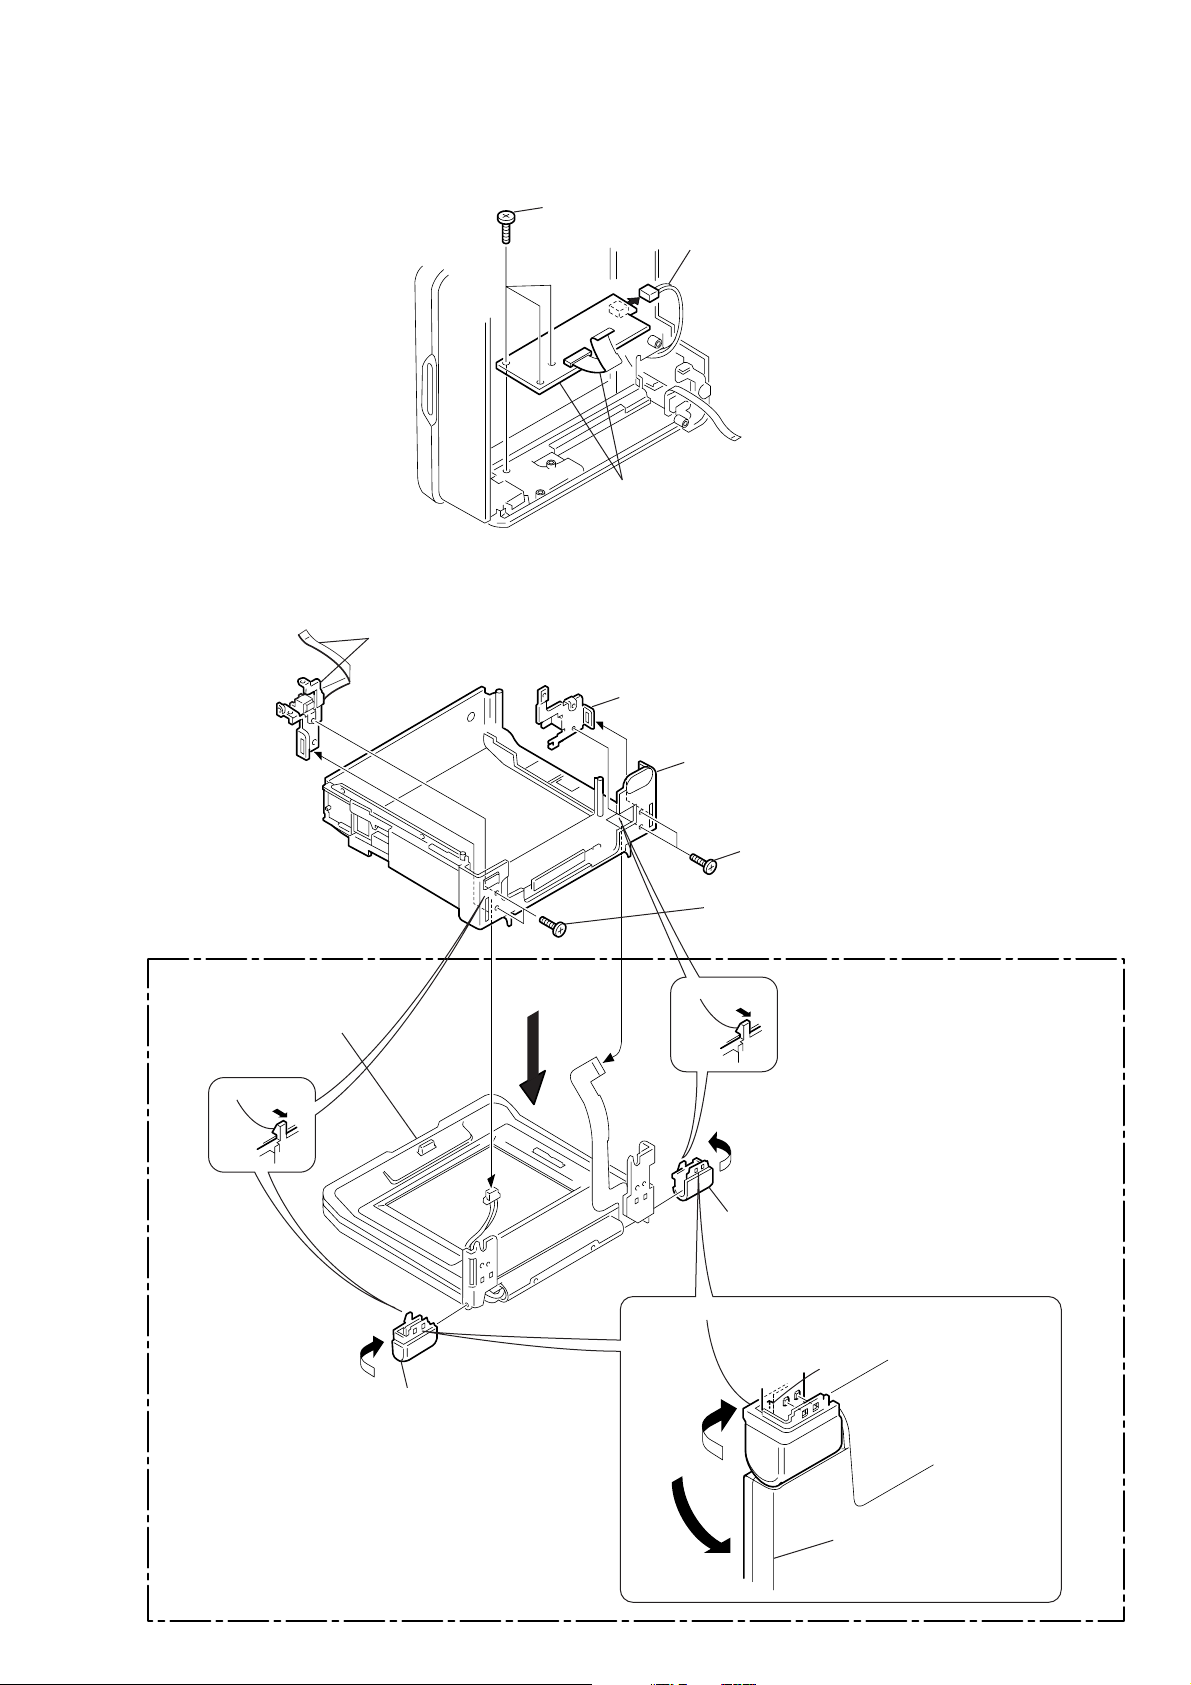
2-11.EX-36 BOARD, FP-570 FLEXIBLE BOARD
)
1
Three tapping screws (B2 × 5)
EX-36 board
3
EX-36 board,
FP-570 flexible board (40P)
2-12.UPPER CABINET ASSEMBLY,
LCD BLOCK ASSEMBLY (D800, D800E MODEL)
2
FP-602 flexible board (5P),
Strap sheet metal (L)
4
Strap sheet metal (R)
2
Harness (EP-51) (2P
(GV-D800/D800E model)
8
Remove the LCD block
assembly in the direction
of the arrow
6
A
Claw
5
Upper cabinet assembly
3
Two screws (M2 × 4),
lock ace, p2
1
Two screws (M2 × 4),
lock ace, p2
7
A
.
C
qa
Shaft cover (L)
Claw
D
qs
Shaft cover (R)
0
Remove the shaft cover (R), shaft cover
(L) in the direction of the arrow
Claw
CD
.
2-9
B
9
Open the LCD block
assembly in the direction
of the arrow
B
.
Page 42
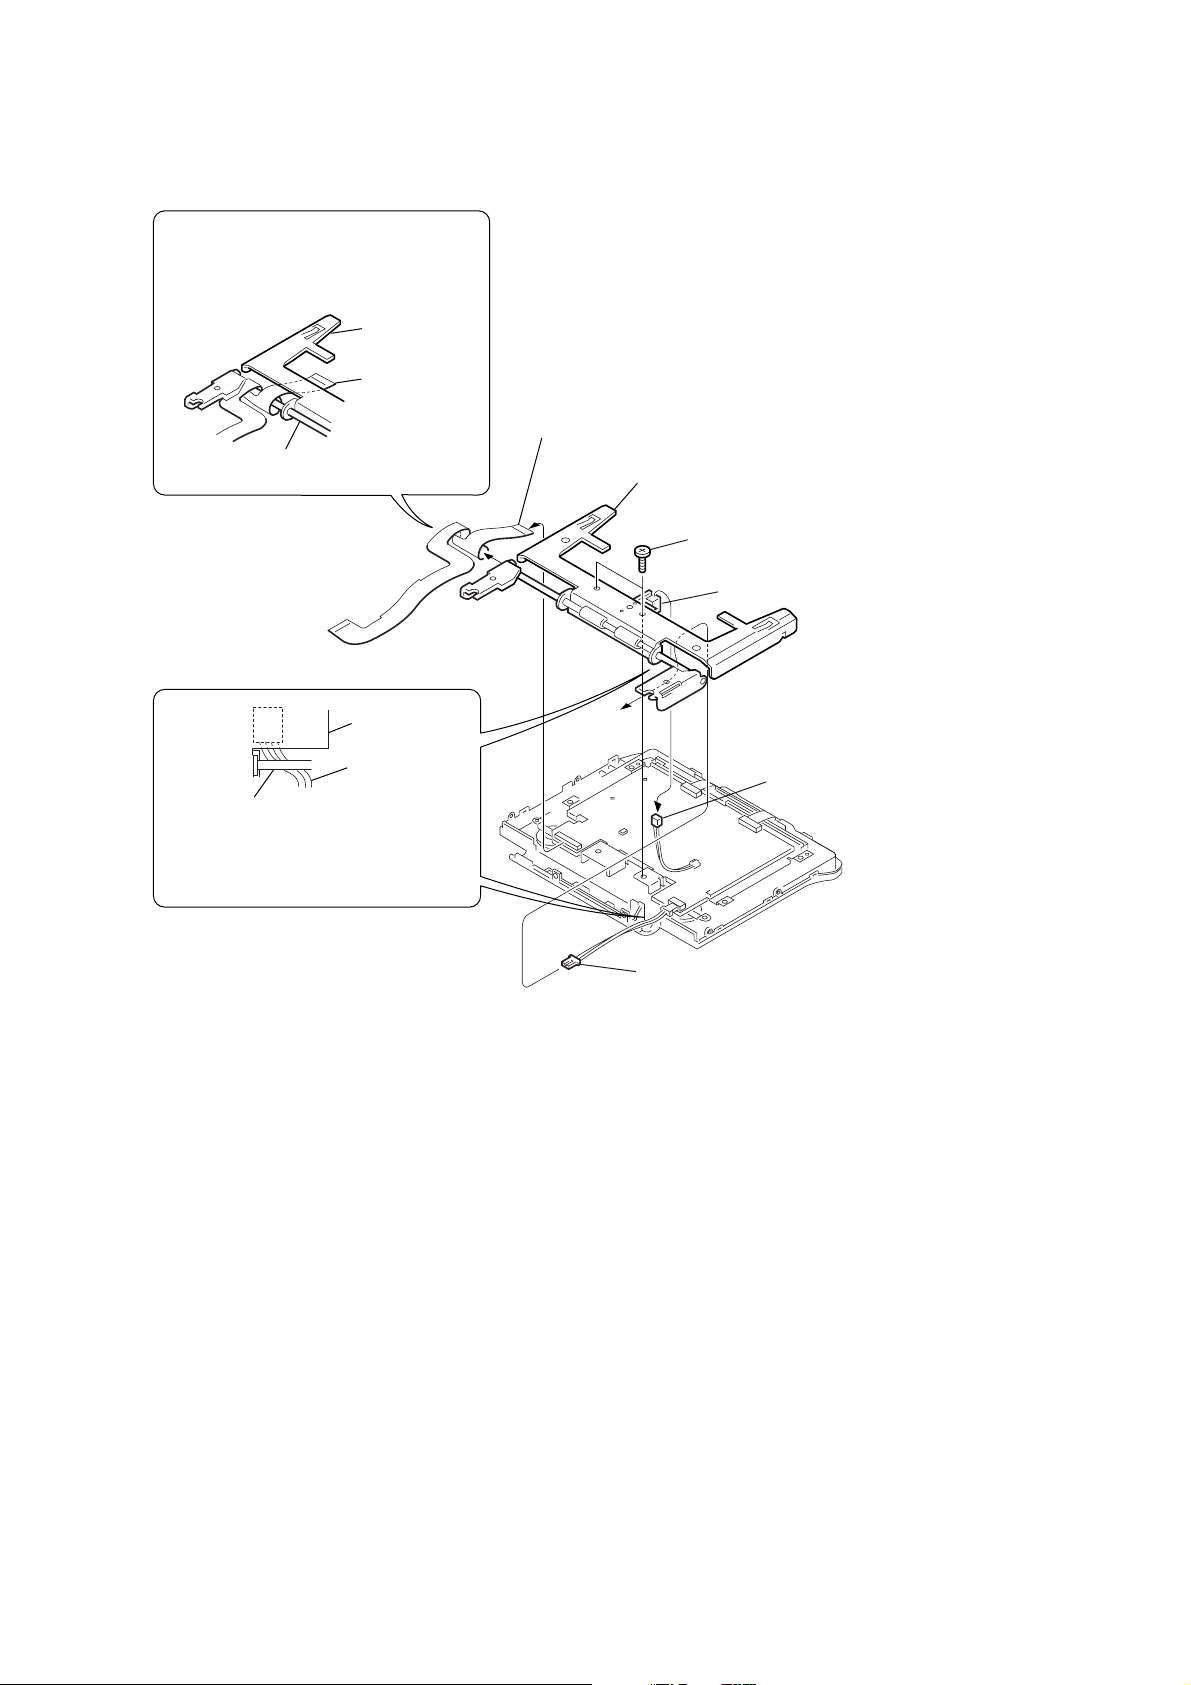
2-13.HINGE UNIT, FP-569 FLEXIBLE BOARD (D800, D800E MODEL)
When attaching the hinge unit, wrap the
FP-569 flexible board hinge shaft as shown
while taking care so that the flexible board
must not be caught or pinched.
Hinge unit
FP-569 flexible
board (26, 32P)
3
FP-569 flexible
Hinge shaft
Hinge unit
board (26, 32P)
4
Hinge unit
1
Two tapping screws
×
(B2
5)
LS-56 board
Harness
(EP-51) (2P)
Hinge shaft
When attaching the hinge unit, route the
harness through the notch as shown while
taking care so that the harness must not
be caught or pinched.
2
PD-130
Board
Harness (EP-51) (2P)
Harness (PL-53) (2P)
2-10
Page 43
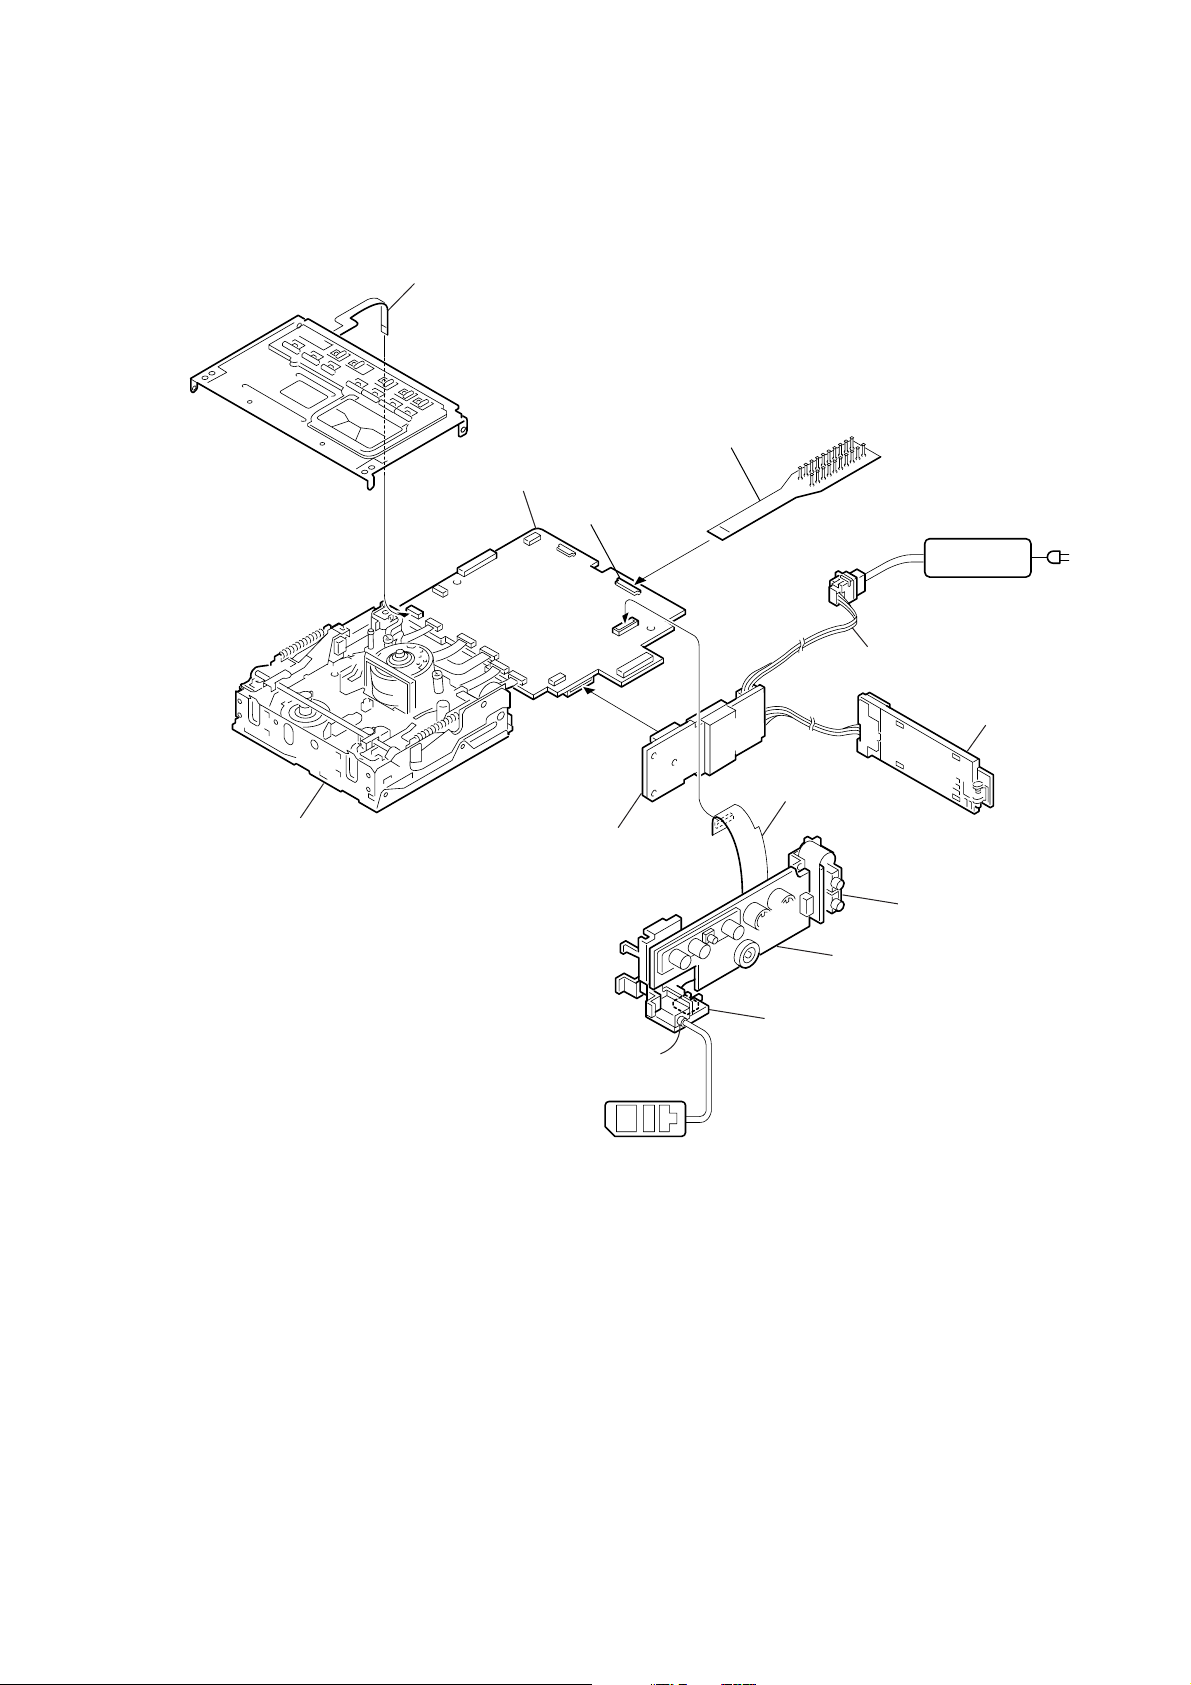
[CONNECTION DIAGRAM FOR SERVICE POSITION (Mainly for voltage measurement and check)]
(VC-250, FU-145, IO-68 BOARDS, MECHANISM DECK)
Control switch block
(FK-78) (10P)
CPC-13 jig
(J-6082-443-A)
VC-250 board
CN933
AC POWER
Mechanism deck
VC-250
Board
20
FU-145 board
ADAPTOR
1
DC-IN connector (3P),
DC jack assembly
Battery panel assembly,
Battery terminal board
FU-145
Board
FP-247 flexible
board (50P)
AC IN
LANC
jack
Adjustment remote
commander (RM-95)
IO-68
Board
FP-575 flexible
board (6P)
IO-68 board
FP-246 flexible
board (16P)
2-11
Page 44
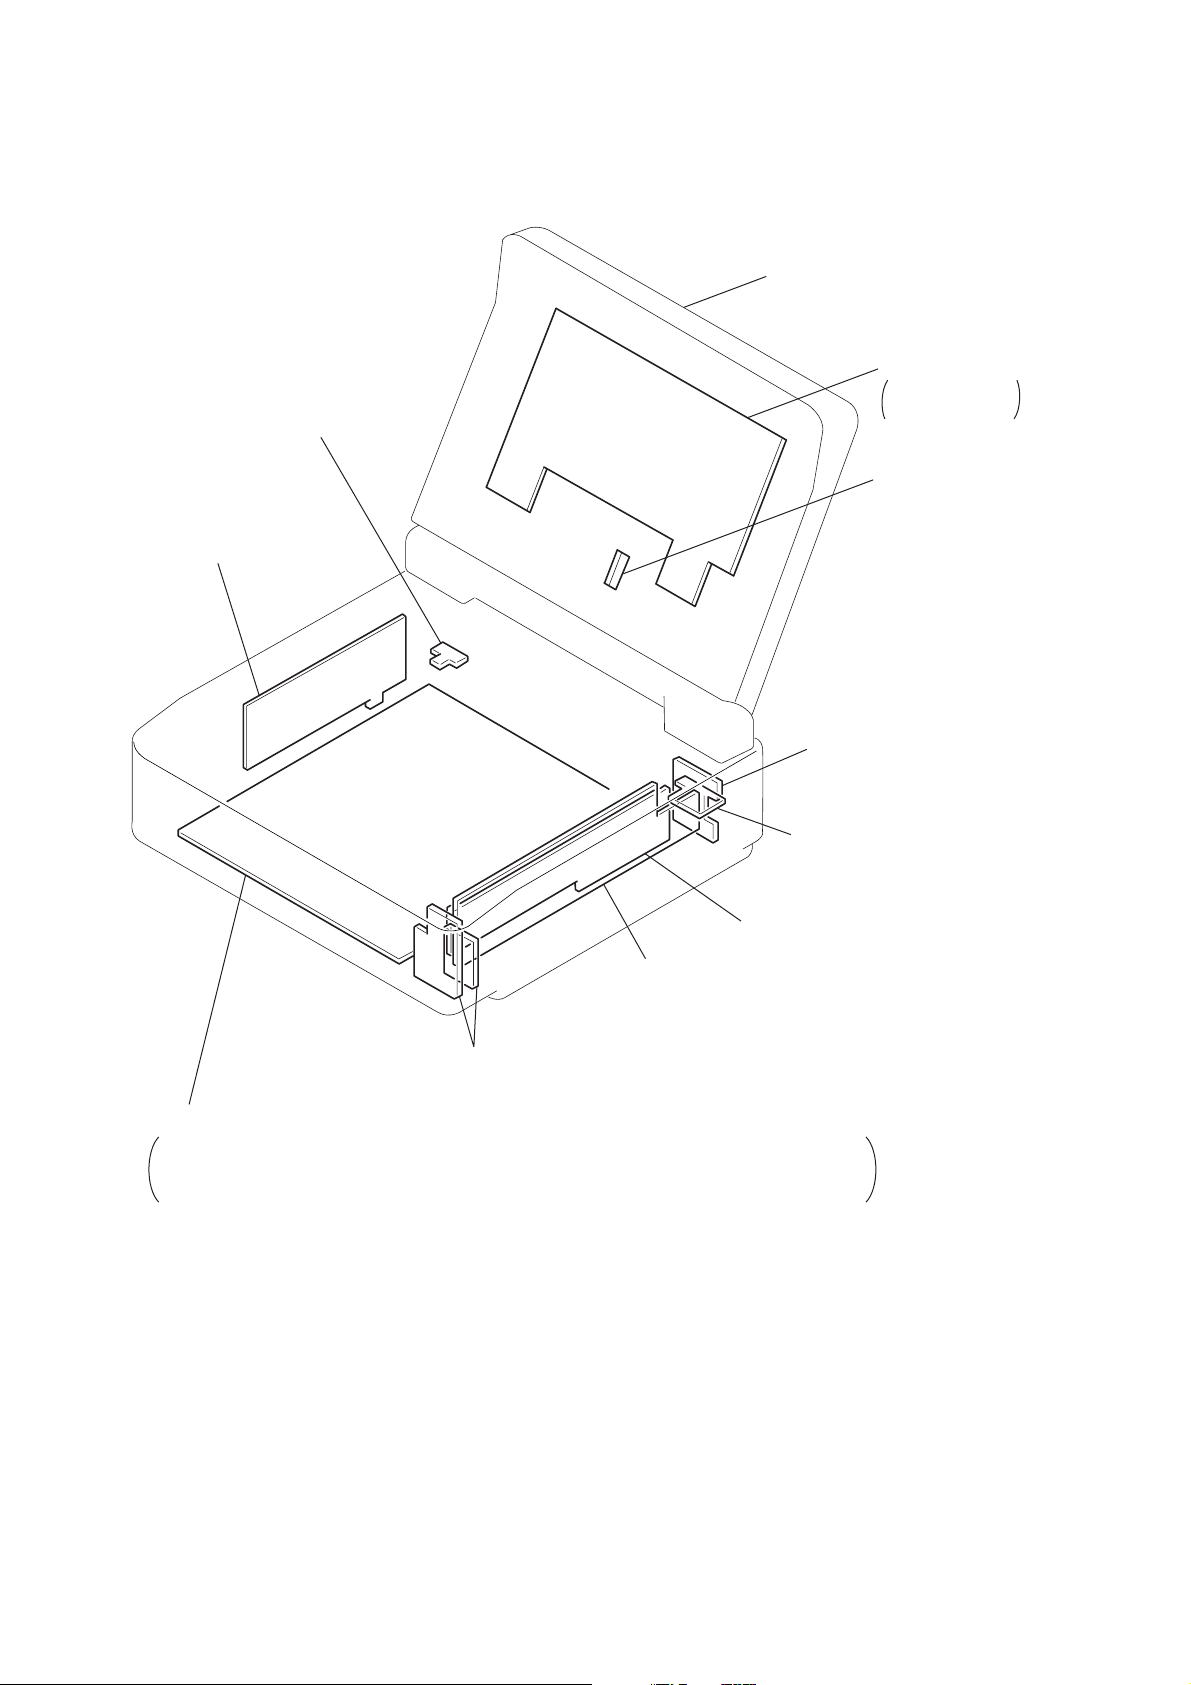
)
2-14.CIRCUIT BOARDS LOCATION
FP-602
(DV IN/OUT)
EX-36
(MULTI CONNECTOR)
LCD DISPLAY
MODULE
(D800/D800E ONLY)
PD-130
LCD DRIVER,
BACK LIGHT
LS-56
(LCD SWITCH
IR-38
(IR TRANSMITTER)
FP-575
(LANC)
FU-145
(DC/DC CONVERTER)
IO-68
(AV IN/OUT)
FP-246
(REMOTE COMMANDER RECEIVER)
VC-250
REC/PB AMP, DAC, DV INTERFACE, AD CONVERTER, Y/C PROCESSOR,
LINE A/D, LINE IN/OUT, IR, AUDIO IN/OUT, DRUM/CAPSTAN MOTOR DRIVE,
MECHA CONTROL, HI CONTROL, DC/DC CONVERTER
2-12
Page 45
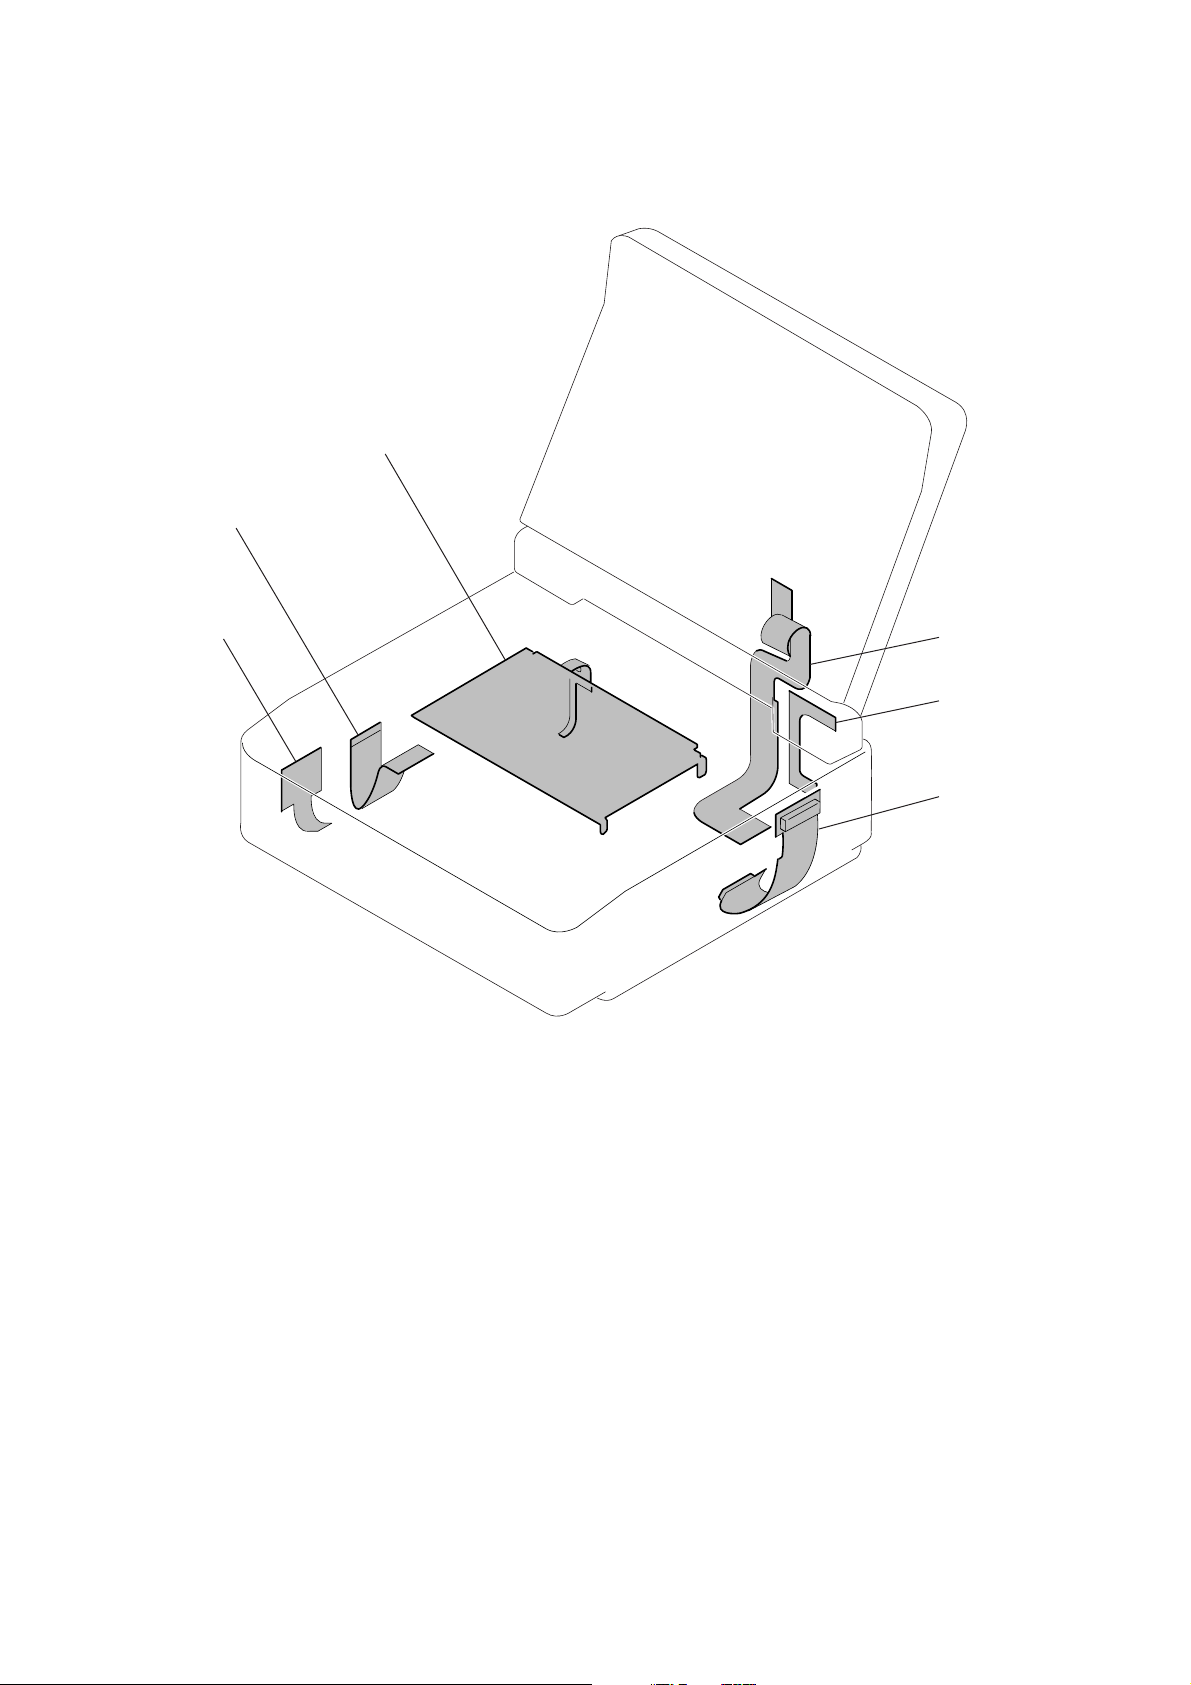
9
2
7
2-15.FLEXIBLE BOARDS LOCATION
The flexible boards contained in the mechanism deck are not shown.
CONTROL SWITCH BLOCK
(FK-78)
FP-570
FP-571
FP-56
FP-57
FP-24
2-13E
Page 46
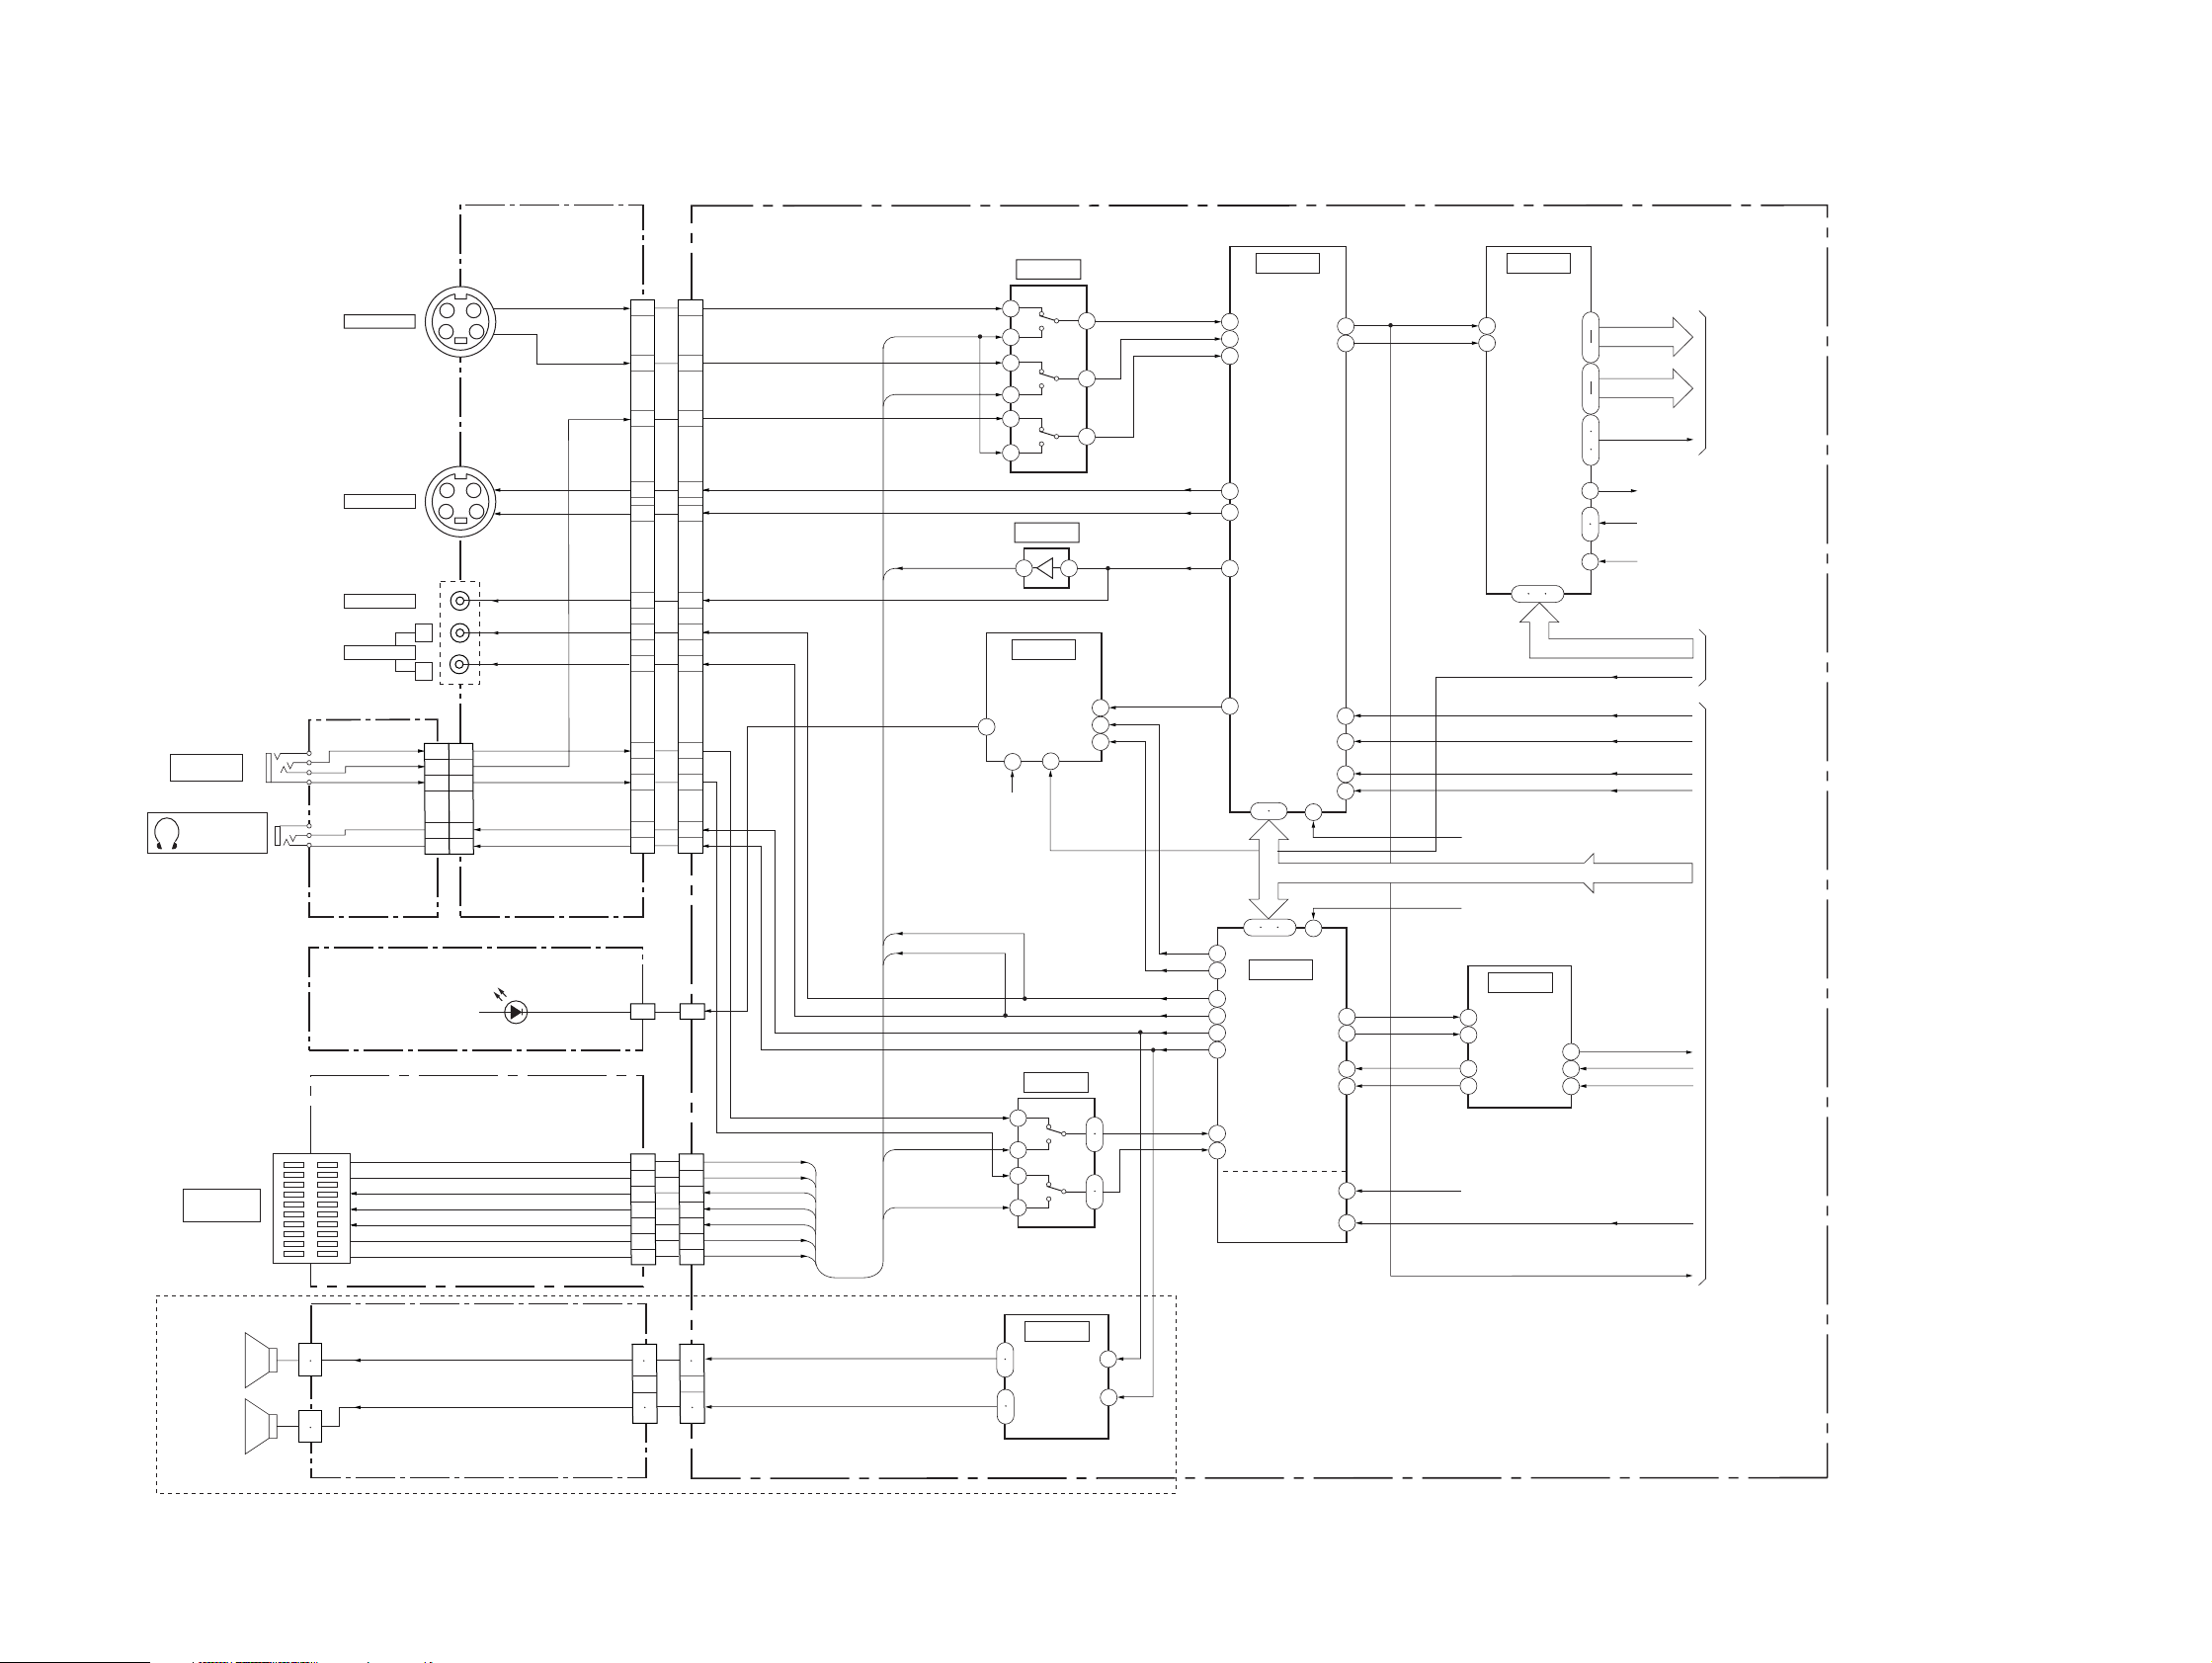
SECTION 3
BLOCK DIAGRAMS
GV-D200/D200E/D800/D800E
3-1. OVERALL BLOCK DIAGRAM (1/4)
(SEE PAGE 4-45)
IO-68 BOARD VC-250 BOARD(1/4)
(1/2)
13
1
2
5
7
CN104
L
V
R
HP L
HP R
Y
C
Y
C
V
L
R
J001
AUDIO/VIDEO
IN
J002
(HEADPHONES)
J101
S VIDEO IN
J103
S VIDEO OUT
VIDEO OUT
AUDIO OUT
J102
CN001
L
R
1
2
13
5
7
FP-246(1/2)
(FLEXIBLE)
(SEE PAGE 4-45)
IR-38 BOARD
(SEE PAGE 4-27)
D362,363
(SUPER LASER LINK)
EX-36 BOARD(1/2)
(SEE PAGE 4-63)
3
1
2
1
2
CN5505
20
1
15
14
6
5
PD-130 BOARD(1/3)
(SEE PAGE 4-55)
(GV-D800/D800E)
SPEAKER(L)
SPEAKER(R)
16
CN204
MULTI
CONNECTOR
SP901
SP902
( ) : Page No. shown in ( ) indicates the page to refer on the schematic diagram.
(4-25)
IC3702
CN924
29
31
35
19
17
15
11
9
37
39
43
41
43
CN922
EX Y/V IN
EX C IN
EX VIDEO OUT
EX AUDIO L OUT
EX AUDIO R OUT
22
IR FSC
(IC3301)
11
14
16
1
8
9
IC3703
1
(4-27)
IC3901
IR
TRANSMITTER
18
7
(4-31)
3
5
3
6
(4-25)
41
46
48
Y
C
V
Y
C
V
IR V
IR L
IR R
IR L
IR R
L
R
HP L
HP R
CN103
30
32
36
20
18
16
12
10
38
40
44
42
CN361
IC5703
CN203
CN5503CN5506
1
2
19
13
17
15
6
4
EX Y/V IN
2
EX C IN
19
EX VIDEO OUT
13
EX AUDIO L OUT
17
EX AUDIO R OUT
15
EX AUDIO L IN
6
EX AUDIO R IN
4
CN931
EX AUDIO L IN
EX AUDIO R IN
4
8
11
IC5704
25
26
1
2
SP L+,L-
SP R+,R-
CN923
2
1
26
25
13
16
7
4
SPEAKER
AMP
(4-31)
2
3
9
10
11
9
L
R
L
R
(4-26)
IC3701
(TAKO)
LINE IN
LINE OUT
39
AGC
48
ACC
42
18
14
22
24
910
20 21 22
55
56
IC5701
AUDIO
57
58
52
54
64
3
I/O
8mm
PB AUDIO
PROCESS
Y
36
C
34
46
7
44
5
11
23
4
5
7
8
14
26
L
R
L
R
(4-31)
(4-23)
IC3603
(ALIGN)
A/D
CONVERTER
2
6
66 64 63
XCS TAKO (IC4501)
XCS AU (IC4501)
(4-32)
IC5702
AUDIO
A/D CONV.
3
D/A CONV.
2
15
16
AFM FSC (IC2201)
59
Y0-Y7
52
49
C0-C7
42
38
HD,VD,DE
37
36
34
AFCK
68
SPCK
31
(IC1505)
XCS ALIGN
65
(IC4803)
HI SO,HI SI,XHI SCK
SIRCS PWM
CAIN Y
CAIN C
KINUTA Y
KINUTA C
VSP SO,VSP SI,XVSP,SCK
DATA TO SFD
8
DATA FROM SFD
9
12
SFD BCK
PB RF
TO
OVERALL
BLOCK(2/4)
(SEE PAGE 3-3)
TO
OVERALL
BLOCK(4/4)
(SEE PAGE 3-8)
TO
OVERALL
BLOCK(2/4)
(SEE PAGE 3-3)
Y
3-1 3-2
Page 47
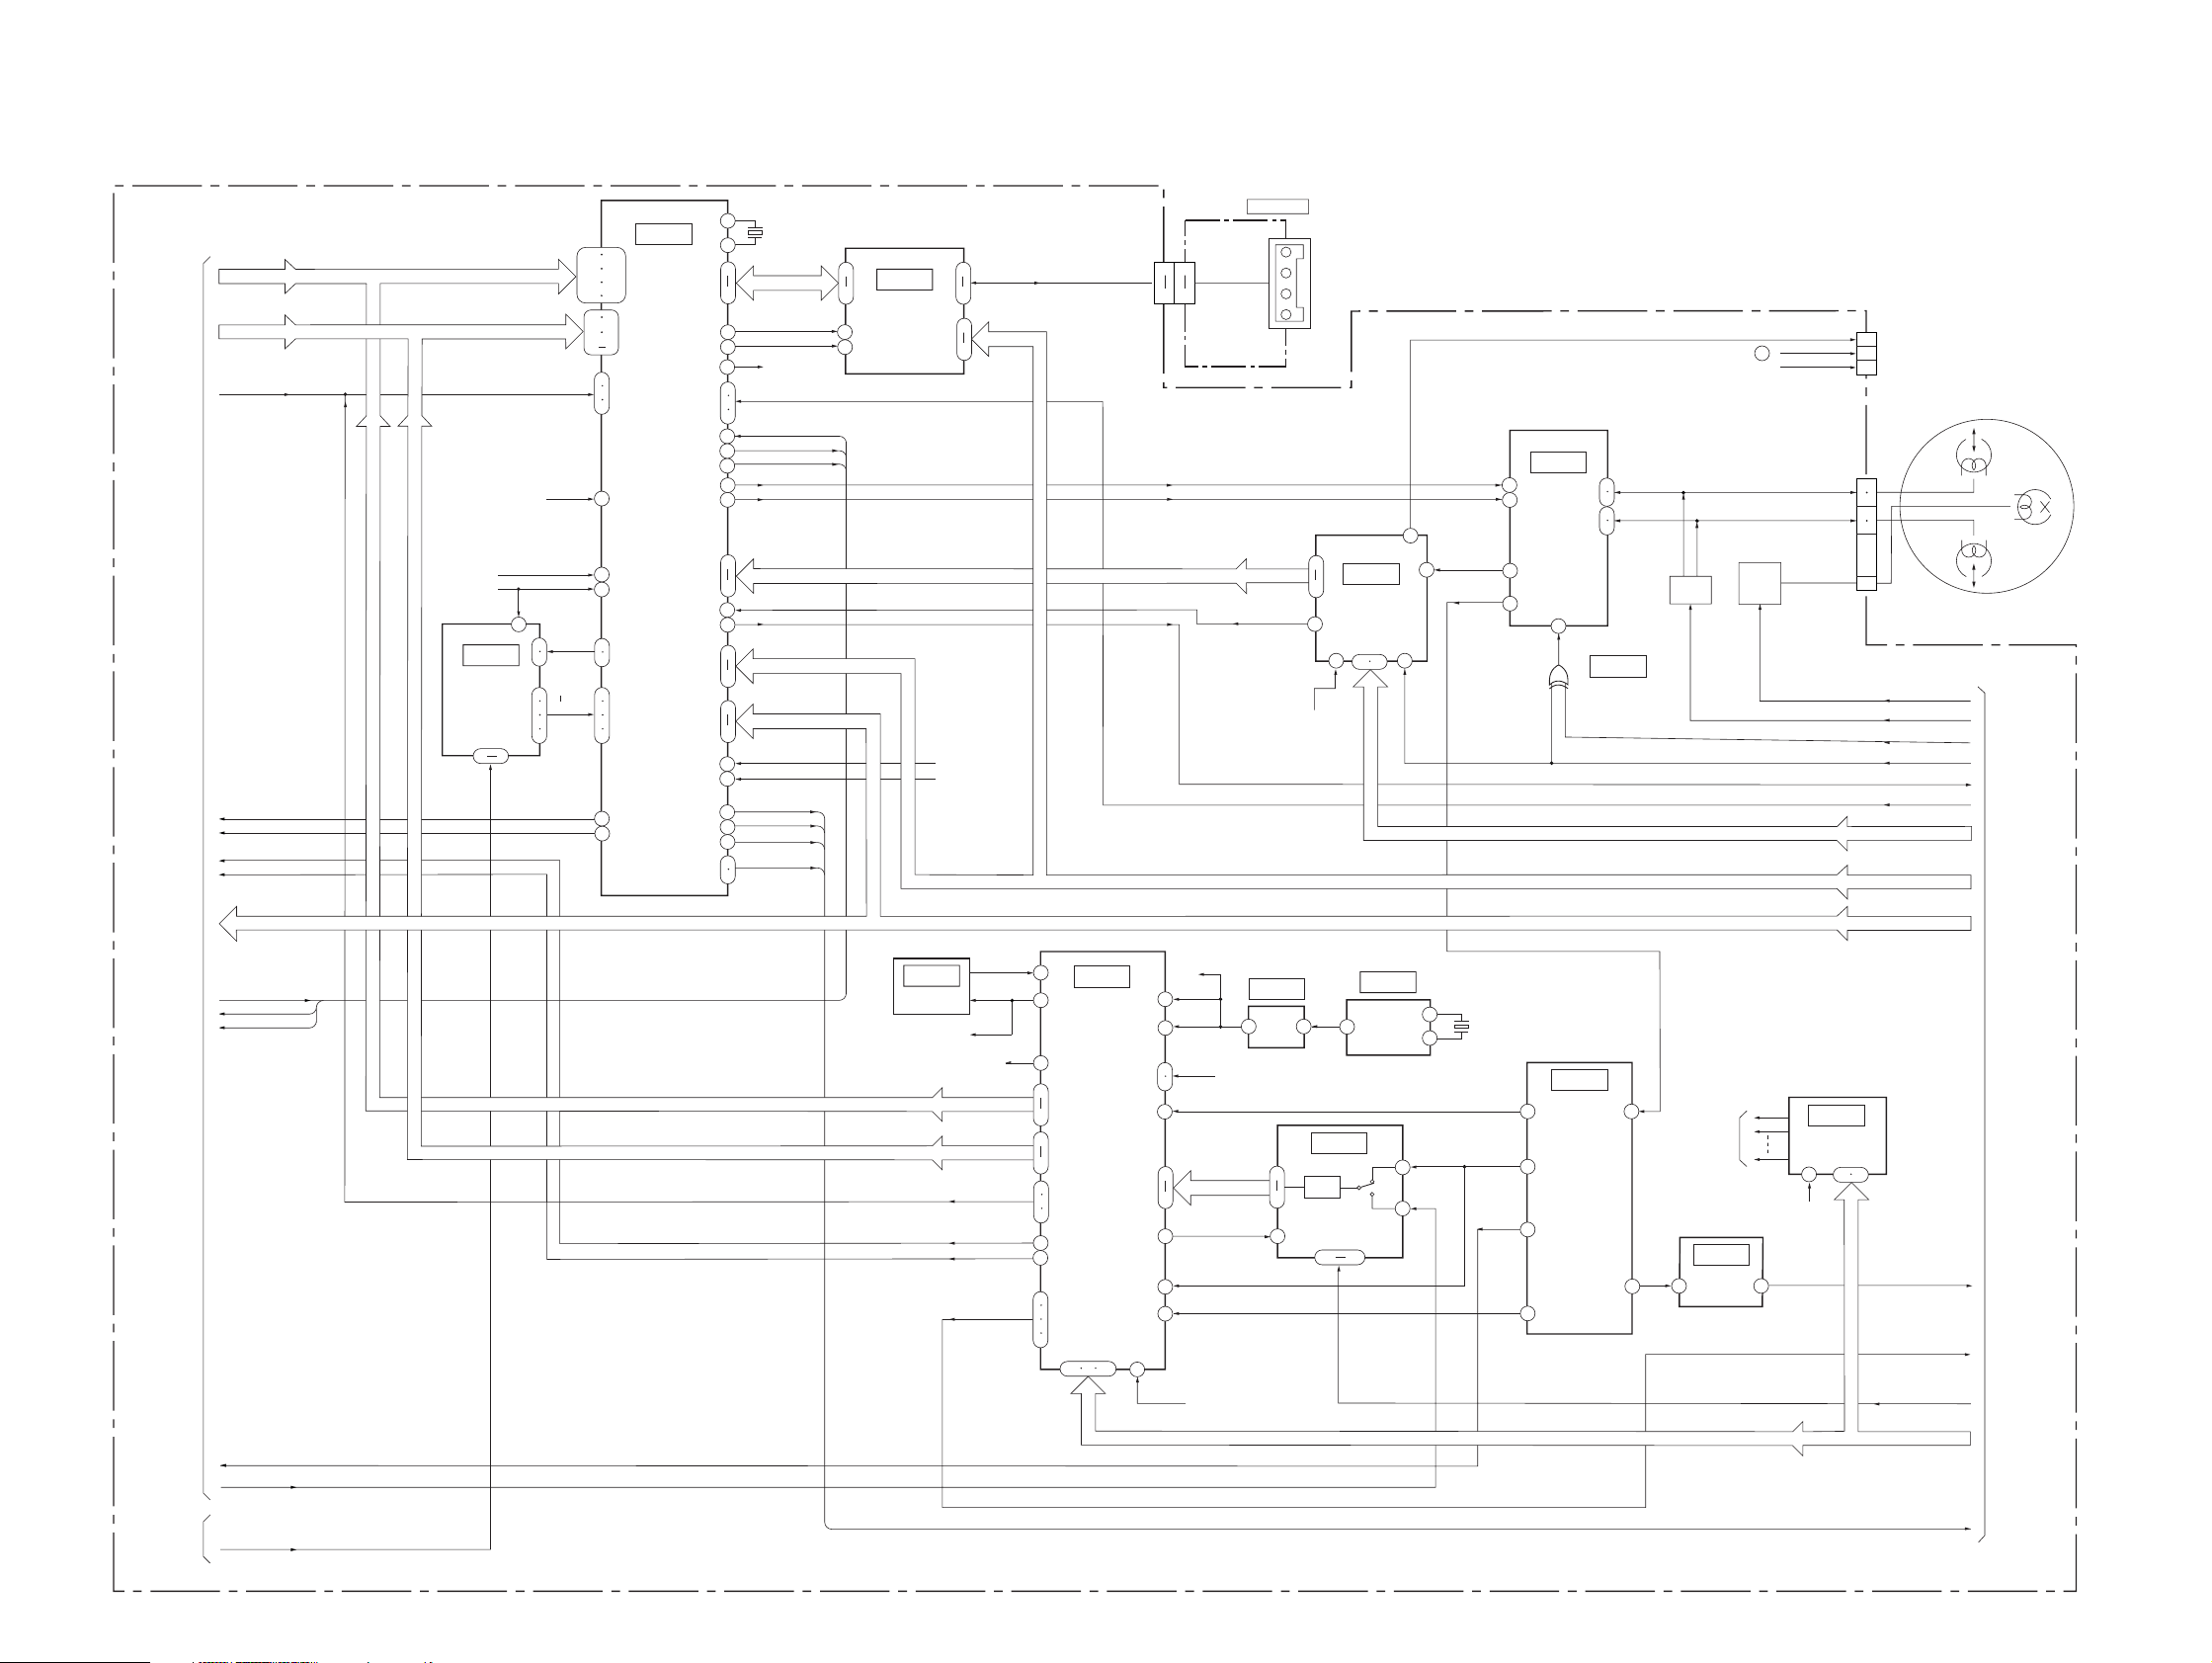
GV-D200/D200E/D800/D800E
3-2. OVERALL BLOCK DIAGRAM (2/4)
VC-250 BOARD(2/4)
TO
OVERALL
BLOCK(1/4)
(SEE PAGE
3-2)
Y0-Y7
C0-C7
HD, VD, OE
CAIN Y
CAIN C
KINUTA Y
KINUTA C
Y0-Y7
C0-C7
HD,VD,OE
AFCK (IC2603)
SPCK (IC1505)
IC3302
CHARACTER
GENERATOR
(4-15)
13
XCS OSD
OSD SO
XOSD SCK
IR FCS
( ) : Page No. shown in ( ) indicates the page to refer on the schematic diagram.
(4-15)
IC3301
199 201
203 205
207 211
213 215
13
57
916
8
HD
VD
20
19
COL0
18
COL3
17
16
14
(CAIN)
DV SIGNAL
PROCESS
17
21
23
182
196
48
184
183
195
194
191
190
55
59
138
X3301
24.576MHz
139
142
L BUS
145
TRCK
51
LCK
141
VREF
151
152
PRRV,TRRV,TRRT
153
156
DATA TO SFD
133
DATA FROM SFD
132
127
99
97
83
88
81
79
170
179
159
161
163
162
75
73
71
105
106
SFD BCK
6 6
MC BUS
VSP SO, SI, SCK
PANEL G
PANEL R
PANEL B
PANEL HD,VD
45
42
47
79
(4-17)
IC3303
(LIP)
DV INTERFACE
TPA+,-
6
TPB+,-
9
29
MC BUS
37
XCS SFD (IC4501)
XCS VFD (IC4501)
CN929
REC CK
REC DT
AD DT
6
PB CK
ATF ERR
CN1104
2
4
5
1
FP-602
(FLEXIBLE)
(SEE PAGE 4-17)
CN1105
DV IN/OUT
AD DT
PB CK
15
20
13
XCS TRF
(IC4501)
(4-11)
IC3101
(TRF)
EQ
A/D CONV.
PLL
25 31
22 24
RF MON
16
CN933(1/2)
PB RF (IC3202 )
AFC FO (IC2201)
14
(4-12)
IC3103
40
42
27
29
(TRW)
REC/PB
AMP
35
4
12
6
7
2
1
Q3107
Q3109,3110
Q3112-3115
IC3102
(4-11)
ODD
EVEN 12
Q3104,3108
Q3111,3116
FLYING
FILTER
SW
ERASE
OSC
REC CK
REC DT
34
PB Y OUT
42
DV PB RF
CN3101
FOR
5
ADJUSTMENTS
2
10
9
13
16
ERRV,TRRV,TRRT
DRP SO,XDRP SCK
(SEE PAGE 4-11)
XFE ON
DRUM 8PB
VC RF SWP
DV RF SWP
ATF ERR
MC BUS
DRUM
ODD
EVEN
FLYING
ERASE
TO
OVERALL
BLOCK(4/4)
(SEE PAGE 3-8)
16
DATA TO SFD
DATA FROM SFD
SFD BCK
PB RF
Y
XCS OSD
OSD SO
XOSD SCK
(4-21)
OSCI
IC2202
VCO (KINUTA)
AFC FO
AFM FSC
Y0-Y7
C0-C3
HD,VD,OE
Y
C
MECHA HD
MECHA VD
MECHA FLD
TBC VD
AMPO
67
53
79
139
122
112
199
146
144
142
4
213
93
94
89
168
(4-21)
IC2201
HI8/STD8
PB Y/C
PROCESS
9695 97
VSP SO,VSP SI,XVSP SCKVSP SO,VSP SI,XVSP SCK
9
7
DV PB RF
(4-13)
IC3201
HI8/STD8
PB RF
AMP
TO
OVERALL
BLOCK(3/4)
(4-13)
18
ADJUSTMENT
VOLTAGE
(4-13)
IC2291
3
DA STB
(IC4902)
D/A CONV.
(EVR)
12
(SEE PAGE
3-5)
IC3202
RF ENV
DET
3
5
4
RF ENV DET
MECHA HD
MECHA VD
MECHA FLD
TBC VD
XCS CH
CH SO
XCH SCK
VC SO,VC SI,XVC SCK
PANEL R
PANEL G
PANEL B
PANEL HD,VD
4
IC1502
A/D
REC
(4-19)
46 48
(4-19)
IC1504
27MHz
PB
XTAL
OSC
X1501
27MHz
4
2
PB C RF
36
34
PB RF
DOP
11
14
SPCK
SPCK
81
VCK
198
101
100
RF AGC OUT
51
196
187
AD CK
185
PB C RF
49
77
98
XCS KINUTA(IC4902)
(4-19)
IC1505
5 1
CK CONT 1,2(IC4902)
AD1-AD10
1/2
2
11
16
3-3 3-4
Page 48
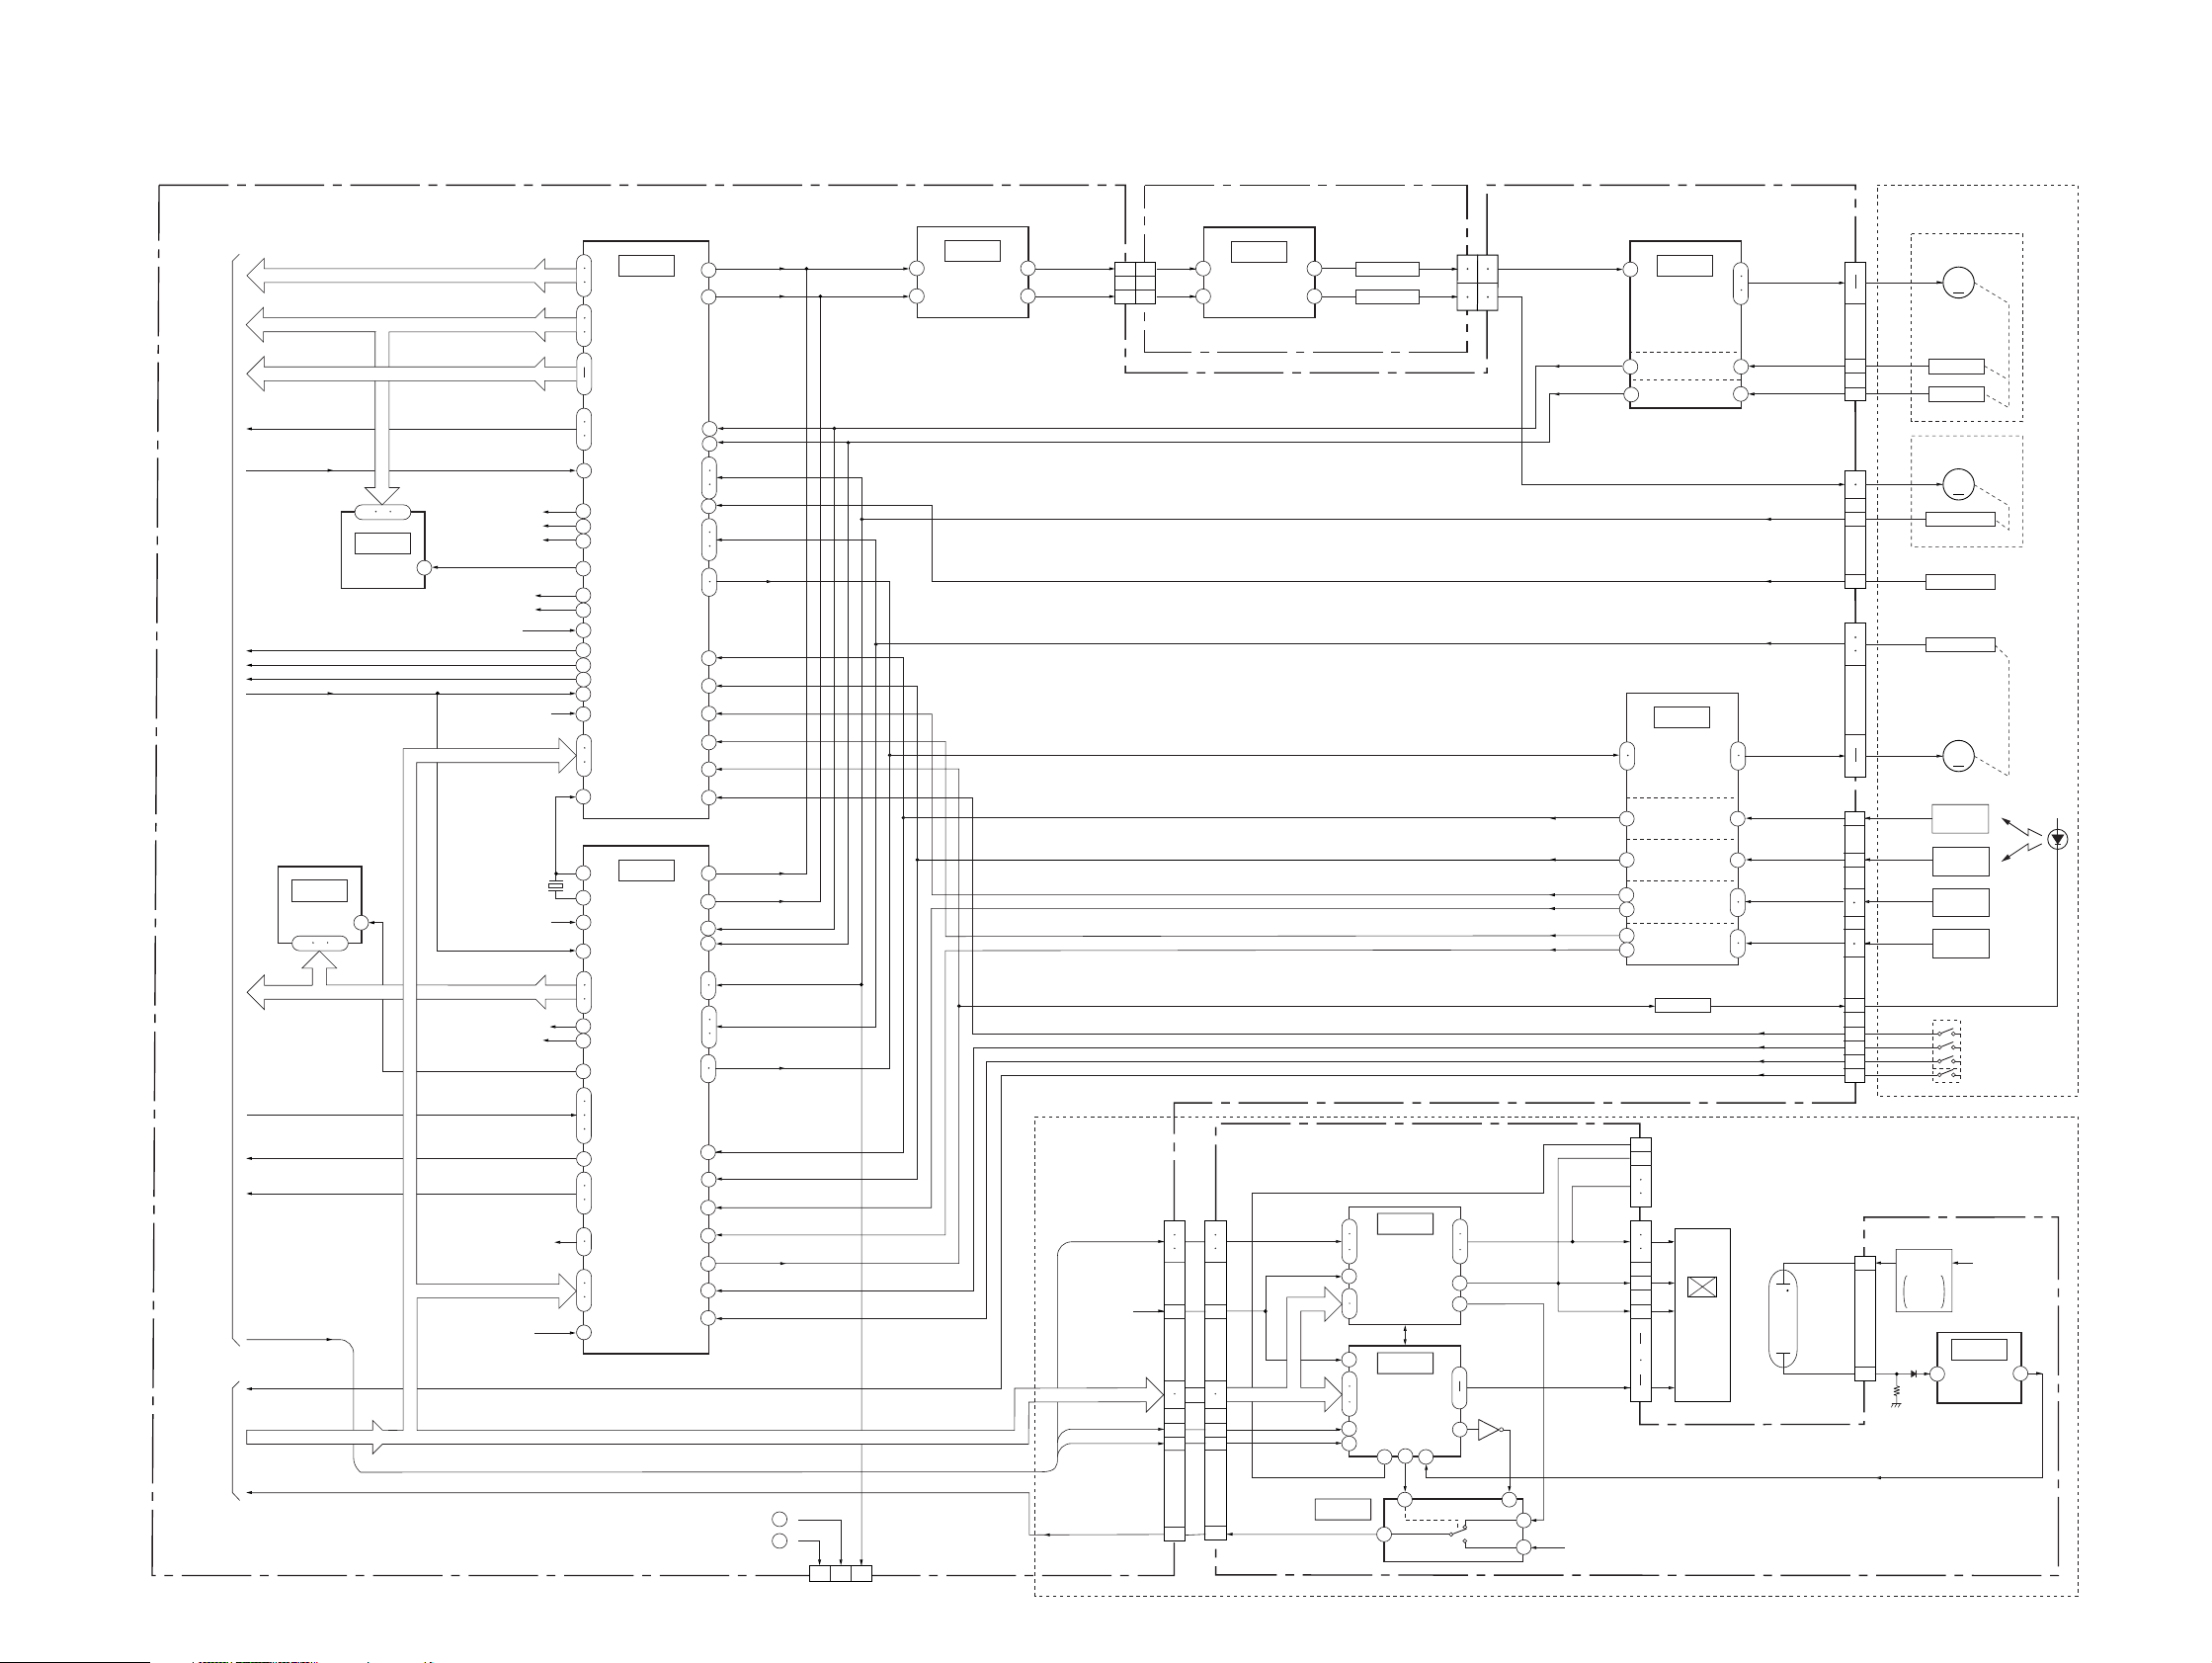
GV-D200/D200E/D800/D800E
3-3. OVERALL BLOCK DIAGRAM (3/4)
VC-250 BOARD(3/4)
DRP SO,DRP SI,XDRP SCK
VSP SO,VSP SI,XVSP SCK
MC BUS
FRRV,TRRT,TRRV
ATF ERR
XCS VFD (IC3301)
XCS SFD (IC3301)
XCS TAKO (IC3701)
XCS EEP
1
XCS AU (IC5701)
XCS TRF (IC3101)
VREF (IC3301)
XCS MECHA (IC4803)
HI SO,HI SI,XHI SCX
LINE OUT V (IC3301)
XCS KINUTA (IC2201)
DA STRB (IC2291)
CK CONT 1,2 (IC2201)
HI SO,HI SI,XHI SCX
XCS VC (IC4803)
X4901
20MHz
XCS EEPROM
16
TO
OVERALL
BLOCK(2/4)
(SEE PAGE
3-4)
TO
OVERALL
BLOCK(4/4)
(SEE PAGE
3-8)
32 4
IC4502
EEPROM
(4-36)
DV RF SWP
XFE ON
DRUM 8 PB
RF ENV DET
(4-29)
IC4901
EEPROM
1
32 4
VC SO,VC SI,XVC SCX VC SO,VC SI,XVC SCX
MECHA FLD
MECHA HD
MECHA VD
TBC VD
VC RF SWP
XCS CH,CH SO,XCH SCK
PANEL R
PANEL G
PANEL B
PANEL HD,VD
XCC DOWN
HI SO,HI SI,XHI SCK
BL CONT
( ) : Page No. shown in ( ) indicates the page to refer on the schematic diagram.
(4-35)
78
IC4501
79
80
DIGITAL8
MECHA
74
CONTROL
SIGNAL
75
PROCESS
76
CONTROL
26
38
106
107
108
95
17
28
18
88
21
23
112
62
59
111
99
72
81
82
83
1
DRUM PWM DRUM PWM
68
CAP PWM
69
DRUM FG
116
DRUM PG
117
115
CAP FG
110
109
DEW DET
96
39
MODE SW A-C
40
41
LOAD
UNLOAD
49
50
TAPE END
54
TAPE TOP
53
T REEL FG
114
S REEL FG
113
TAPE LED ON
55
REC PROOF
44
CAP PWM
(4-33)
IC4401
28
25
(3/3)
LPF
DRUM ERROR
29
CAP ERROR
27
(4-29)
2
IC4902
HI8/STD8
1
MECHA
CONTROL
114
39
78
79
80
19
21
27
111
112
113
118
47
83
82
81
104
110
74
75
76
78
DRUM PWM
69
CAP PWM
68
DRUM FG
116
DRUM PG
117
CAP FG
115
109
35
MODE SW A-C
36
37
LOAD
UNLOAD
32
33
TAPE END
42
TAPE TOP
41
T REEL AFG
96
S REEL AFG
95
TAPE LED ON
31
ME SW
38
HI8 MP SW
40
DV RF SWP (IC4501 )
VC RF SWP (IC4902 )
62
47
8 13 15
CN933(2/2)
FOR ADJUSTMENTS
PANEL R
PANEL G
PANEL B
XCS LCD
(IC4803)
HI SO,XHI SCK
PANEL HD
PANEL VD
BL CONT
FU-145 BOARD(1/2)
IC1301
15
9109
10
11
CN1301CN921
PD-130 BOARD(2/3)
5
22
6
21
7
20
14
13
13
14
15
12
10
17
11
16
23
4
CN923
CN5503
PWM
DRIVE
(4-49)
HD OUT
(1/2)
(4-57)
58
64
IC5601
48
47
46
41
40
39
44
46
45
42
1
48
Q1306
SWITCHING
SWITCHING
Q1305
GENERATOR
CN1301
RGB
20
22
24
27
35
10
24
IC5501
DRIVE
(4-55)
IC5502
TIMING
(4-55)
8
2 5
5 2
1
3
4
1
2
9
CN921
3
4
1
2
VR,VG,VB
COM
DA
Q5601
DRUM YS
DRUM FG
DRUM PG
LOAD
UNLOAD
TAPE END
TAPE TOP
T REEL FG
T REEL AFG
S REEL FG
S REEL AFG
TAPE LED ON
HD OUT
PANEL COM
VR,VG,VB
VCOM
VGLAC
CN5501
7
6
PANEL 2.8V
3-5 3-6
(4-33)
IC4401
6
(1/3)
DRUM
MOTOR
DRIVE
FG AMP
16
PG AMP
22
(4-33)
IC4401
LED DRIVE
8
4
CN5502
FOR
5
ADJUSTMENTS
3
1
19
20
21
11
4
5
10
12
18
(2/3)
LOADING
MOTOR
DRIVE
TAPE END
DETECT
TAPE TOP
DETECT
T REEL
FG AMP
S REEL
FG AMP
Q4401
LCD
UNIT
55
56
47 46
44
41
39
33
34
61
59
57
17
20
53
51
45
38
39
36
35
MODE SW A-C
LM(+),LM(-)
TAPE END(C)
TAPE TOP(C)
T REEL(+),(-)
S REEL(+),(-)
REC PROOF
HI8 MP SW
XCC DOWN
ND901
BACKLIGHT
CN4402
U, V, W
CN4403
CAP VS
CAP FG
DEW DET
CN4401
ME SW
CN4404
BL HIGH
BL LOW
CN5604
B710-MECHA DECK
(SEE PAGE 4-56)
M901
10
5
3
1
8
7
1
12
2
3
4
5
8
8
2
12
11
5
4
14
7
6
3
15
10
DRUM MOTOR
DRUM FG
DRUM PG
CAPSTAN MOTOR
CAPSTAN FG
DEW SENSOR
MODE SWITCH
LOADING MOTOR
Q002
TAPE END
Q001
TAPE TOP
S001
S002
T5601
Q5602
INVERTER
BACK
LIGHT
DRIVE
M
M902
M
S901
M903
M
SENSOR
SENSOR
T REEL
SENSOR
S REEL
SENSOR
IC5602
CURRENT
3
3
BL DET
REC PROOF
ME/MP
HI8 MP
CC DOWN
BL REG
(4-57)
DET
D001
TAPE
H001
H002
(GV-D800/D800E)
4
LED
Page 49
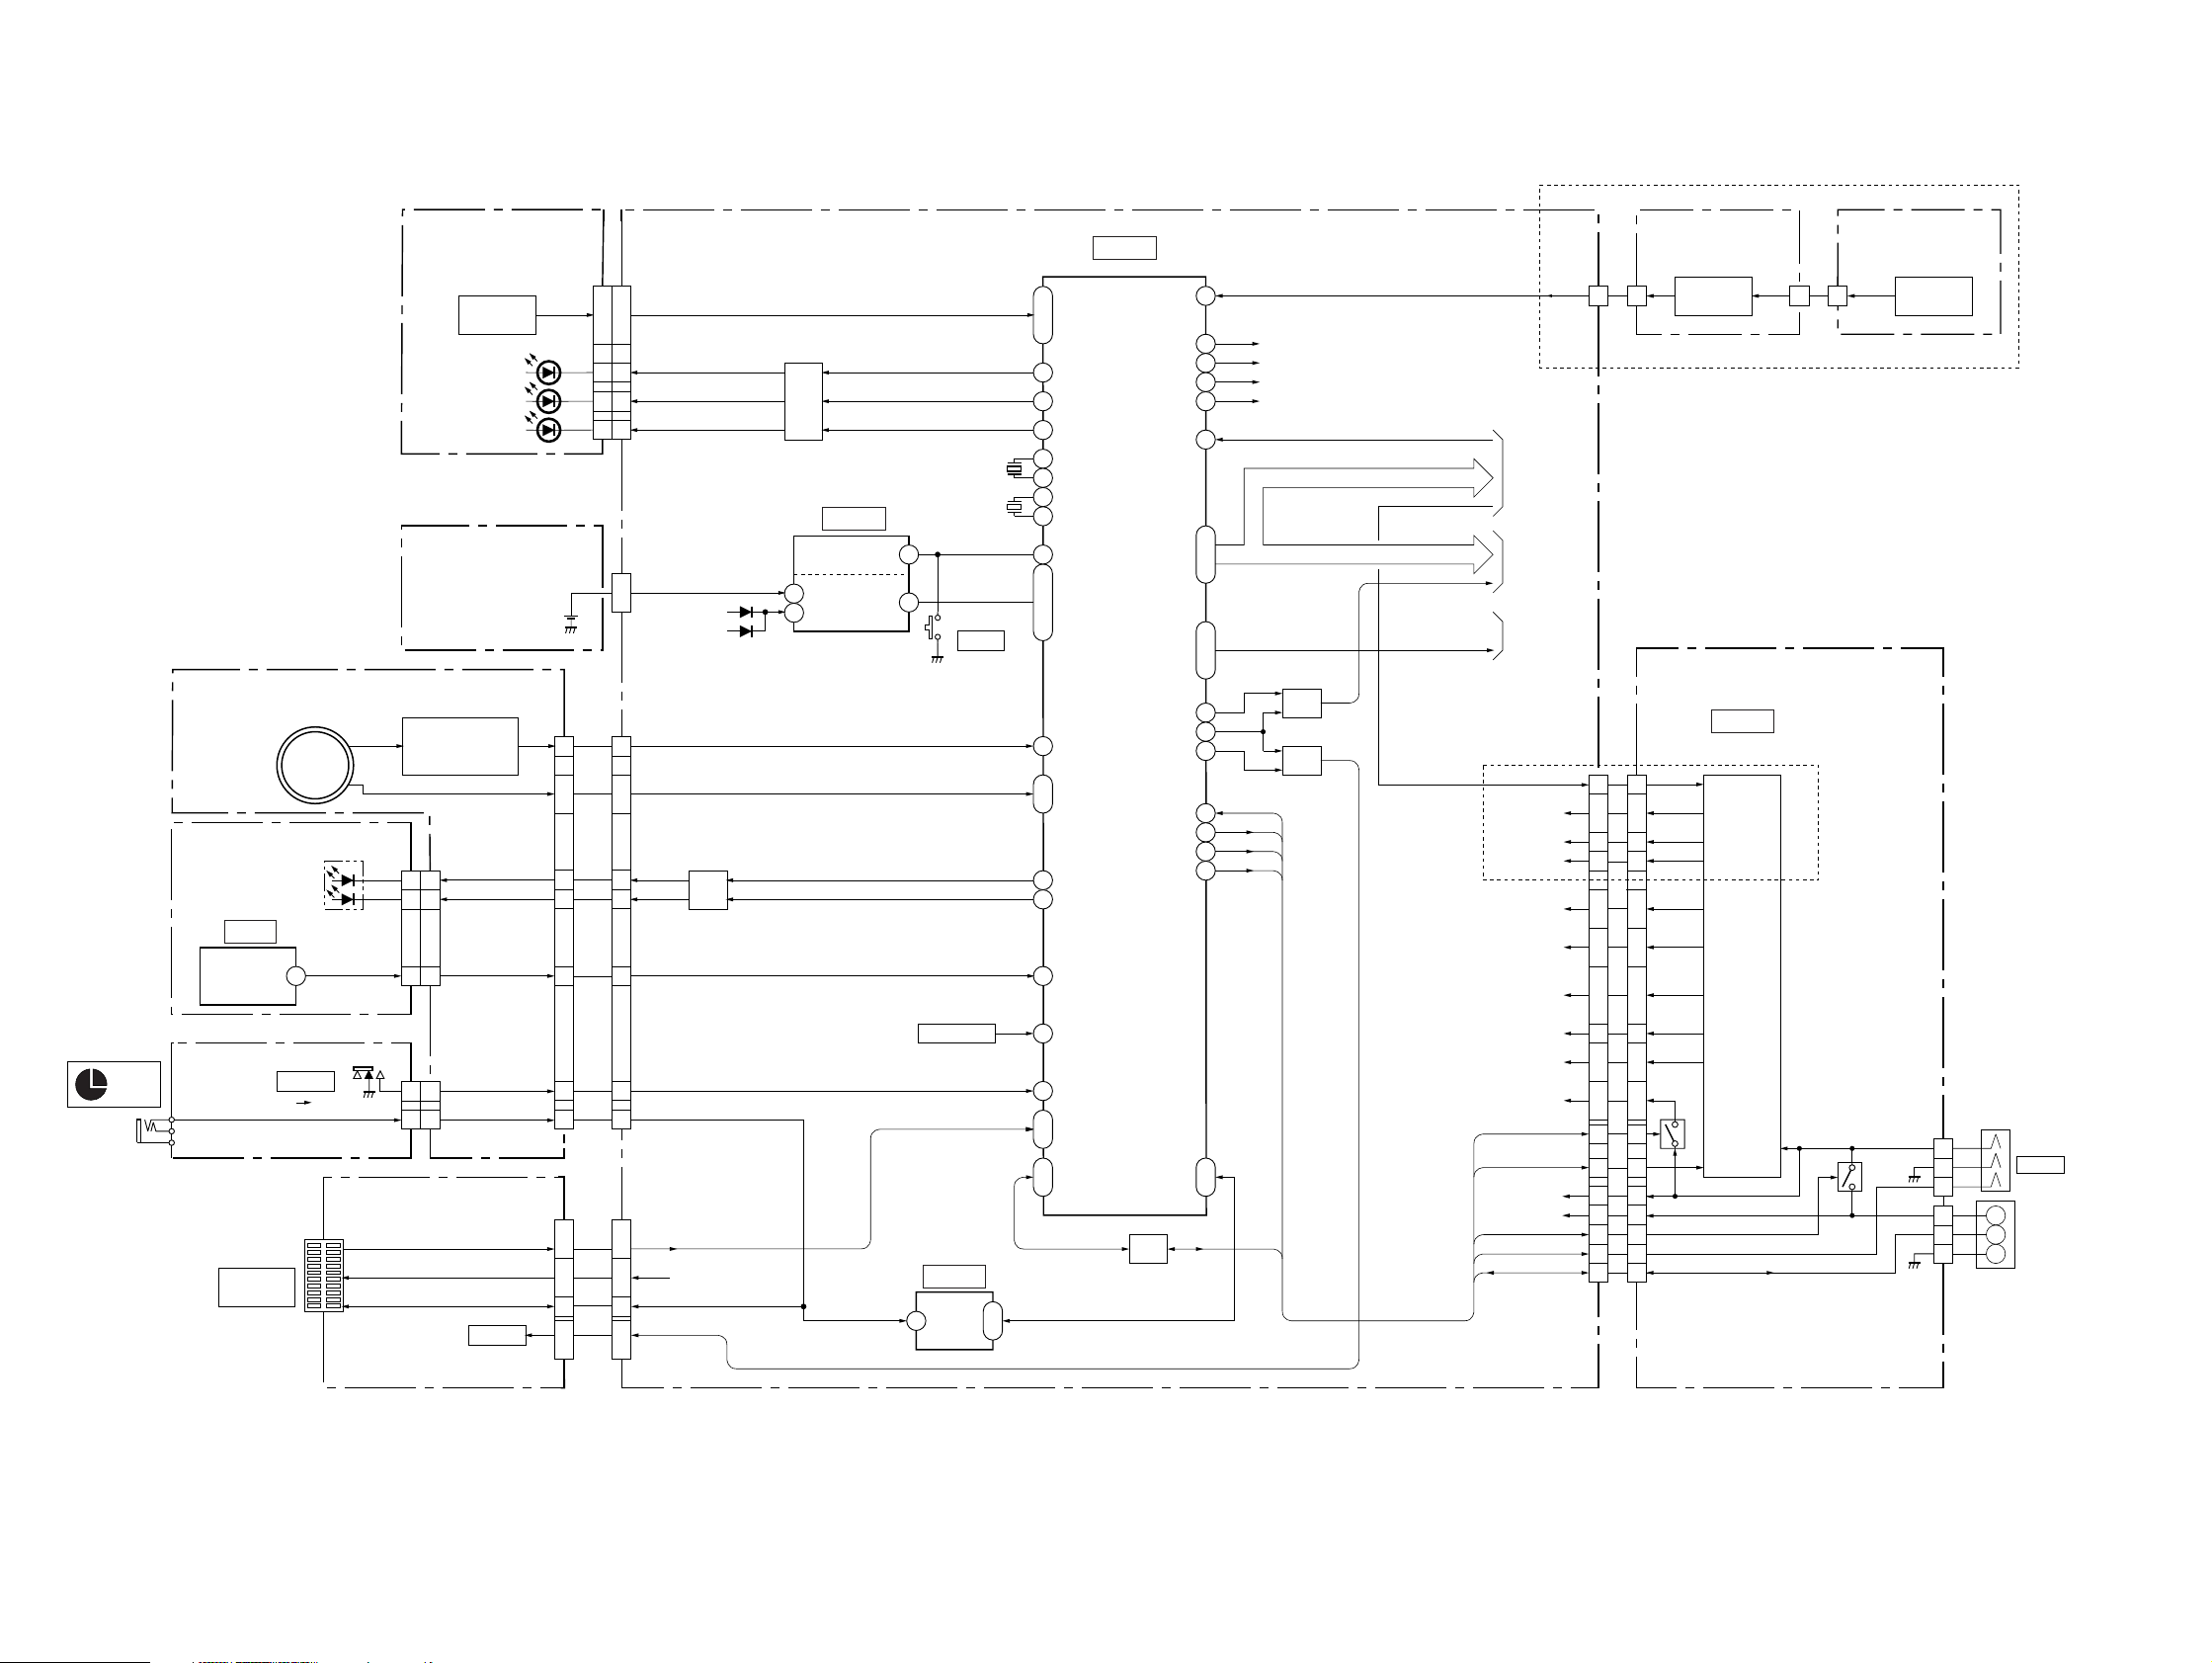
GV-D200/D200E/D800/D800E
3-4. OVERALL BLOCK DIAGRAM (4/4)
FK-78 BOARD VC-250 BOARD (4/4)
(SEE PAGE 4-61)
S001–016
FUNCTION
SWITCH
D001 (REC)
D002 (PAUSE)
D003 (CAUTION)
(SEE PAGE 4-37)
FP-571
(FLEXIBLE)
VANADIUM
LITHIUM
BATTERY
IO-68 BOARD (2/2)
S101, 102, 104, 105
EXEC
S. LASER LINK SW
CN001
8
10
14
121
VOLUME SW
MENU SW
CN104
X POWER LED
8
X CHARGE LED
10
SIRCS SIG
14
LANC SIG
2
CN105
J001
(LANC)
(SEE PAGE 4-45)
S103
FP-246 (2/2)
(FLEXIBLE)
COMMANDER
(SEE PAGE 4-45)
(POWER)
(CHARGE)
IC001
REMOTE
RECEIVER
FP-575
(FLEXIBLE)
OFF ON
(SEE PAGE 4-45)
SEL/PUSH
EXEC
DIAL
1
S001
POWER
D001
EX-36 BOARD(2/2)
CN204
MULTI
CONNECTOR
11, 17
18, 19
8
(SEE PAGE 4-65)
16
BZ201
BUZZER
( ) : Page No. shown in ( ) indicates the page to refer on the schematic diagram.
CN001
6
BT001 1
CN103 CN922
23
26
•
25
46
43
45
2
1
10
•
11
23
|
CN203
26
8
39
•
40
LANC SIG
6
•
•
5
5
•
•
7
7
2
2
4
4
3
3
CN926
•
2
24
25
•
26
45
44
46
1
2
10
•
11
23
|
26
8
39
•
40
X REC LED
X PAUSE LED
X CAUTION LED
BATT LI 3V
VTR UNREG
BATT UNREG
Q4808–4810
DRIVE
EX UNREG
BEEP
CN931
LED
Q906–908
LED
DRIVE
3
7
(4-37)
IC4801
RESET
VDD SWITCH
LANC SIG
5
6
IC4802
X4801
20MHz
X4802
32.768kHz
S4801
RESET
S4802
EJECT SW
(4-37)
LANC I/O11
93
•
94
•
95
6
8
55
40
41
52
53
38
42
•
51
•
77
•
87
98
67
•
68
5
57
4
17
14
72
•
73
48
•
49
10
•
12
(4-37)
IC4803
HI CONTROL
KEY AD0
KEY AD1
KEY AD2
X REC LED
X PAUSE LED
X CAUTION LED
20MHz OUT
20MHz IN
32kHz IN
32kHz OUT
XRESET
VDD
KEY AD5
DIAL A
DIAL B
X POWER LED
X CHARGE LED
SIRCS SIG
X EJECT SW
X VTR MODE SW
ID1
ID2
IB SI
IB SO
XCS MECHA
XCS ALIGN
XOSD SCK
SIRCS ENV
MELODY ENV
BATT/EXT SW
FAST CHARGE
VTR DO ON
LANC OUT
Q4804
XCS VC
XCS LCD
HI SO
HI SI
HI SCK
XCS OSD
OSD SO
MELODY
SHOE ON
LANC IN
IF
99KEY AD6
80
3
58
27
18XCC DOWN
33
•
34
•
35
44
•
45
•
46
59
36
56
66
50
29
81
1
•
2
BATT SIG
XCS MECHA (IC4501)
XCS VC (IC4902)
XCS ALIGN (IC3603)
XCS LCD (IC5501, 5502)
HI SO, HI SI, XHI SCK
HI SO, HI SI, XHI SCK
Q4802, 4805
MOD
Q4803
MOD
XCC DOWN
BL CONT
SIRCS, PWM
XCS OSD
OSD SO
XOSD SCK
(GV-D800/D800E)
CN923
TO
OVERALL
BLOCK(3/4)
(SEE PAGE
3-5)
TO
OVERALL
BLOCK(1/4)
(SEE PAGE
3-2)
TO
OVERALL
BLOCK(2/4)
(SEE PAGE
3-3)
(GV-D800/D800E)
BL CONT
BL REG
PANEL –15V
PANEL 13V
1.5V
2.8V
4.75V
RP UNREG
MT 5V
EX UNREG
SHOE ON
VTR DO ON
VTR UNREG
BATT UNREG
PD-130
LS-56 BOARD
BOARD (3/3)
S5601, 5602
23 4 11
LCD BRIGHT
CN5503
(SEE PAGE 4-57)
AD6
SW
CN001CN5608
(SEE PAGE 4-56)
FU-145 BOARD (2/2)
(4-49)
IC1301
DC-DC CONVERTER
(2/2)
42
42
46
46
•
•
45
45
44
44
43
43
26
26
•
•
25
25
22
22
|
|
19
19
16
16
•
•
15
15
•
•
14
14
13
13
8
8
•
•
7
7
32
•
31
30
29
35
36
39
38
37
Q507
VTR UNREG
BATT UNREG
FAST CHARGE
BATT/EXT SW
BATT SIG
CN1301CN921
32
•
31
30
29
35
36
39
38
37
Q502
S001
LCD ON/OFF
SW
CN502
CN501
+
S
–
J902
DC IN
J901
BATTERY
TERMINAL
1
2
3
1
5
4
3-7 3-8
Page 50
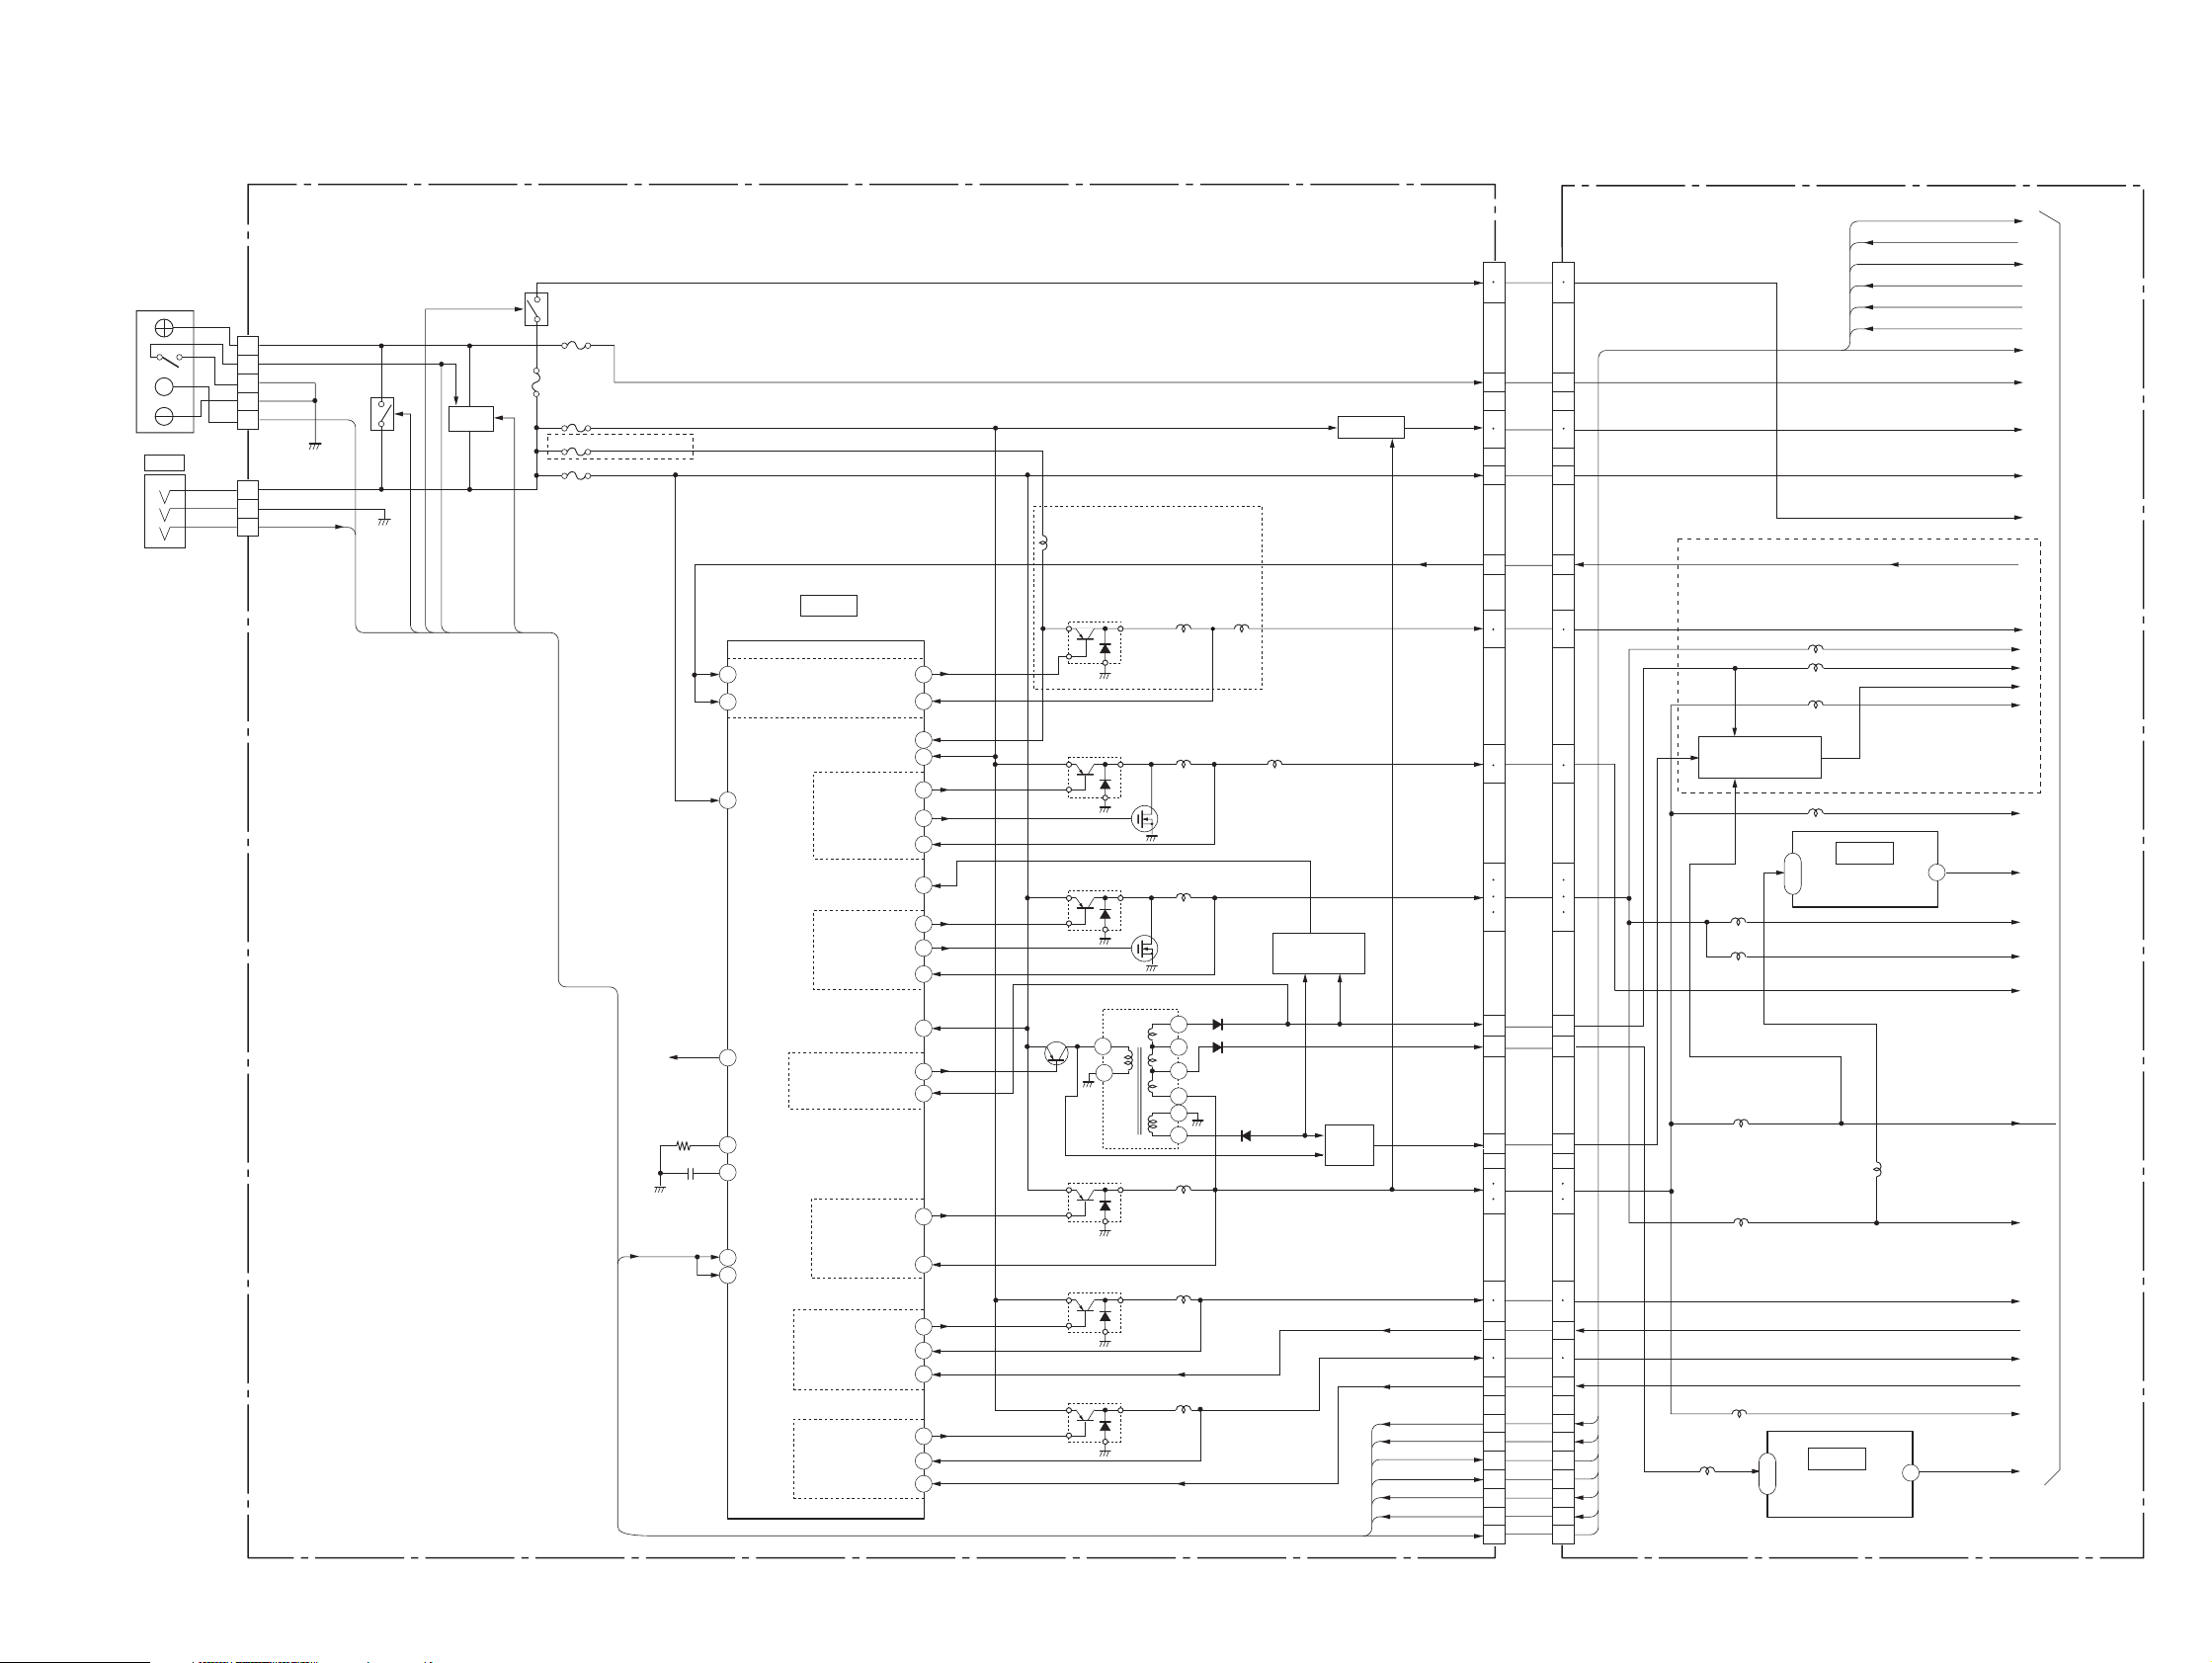
GV-D200/D200E/D800/D800E
S
7
31
28
2
6
5
1
57
54
18
41
45
42
40
49
50
34
27
6
7
2
3
46
37
21
22
29
30
64
10
11
58
14
15
1
4
5
8
4
3
1
2
3
4
5
1
2
3
1
5
IC1301
IC1303
IC1302
J901
BATTERY
TERMINAL
J902
DC IN
CN501
BATT (+)
BATT SW(+)
BATT SW(–)
BATT(–)
BATT SIG
Q501,
502
Q506,
507
ACV UNREG
BATT/XEXT SW
CN502
FAST CHARGE
SHOE ON
DC PACK SW
F501
F502
F504
F505
F503
Q503–505
CHARGE
SWITCH
INIT CHARGE ON
(GV–D800/D800E)
C/D VS D1.5V
BL UNREG
VTR UNREG
BL CONT
VC–250 BOARD(1/2)FU–145 BOARD
DC/DC CONVERTER
(4–39)
(4–39)
(4–49)
NONINV
INPUT–7
STANDBY–7
OUTPUT–7
MONITOR-7
OUTPUT
OUTPUT VCC–7
OUTPUT VCC–4,5,6
OUTPUT–4
MOS GATE–4
OUTPUT
MONITOR–4
OUTPUT–1
MOS GATE–1
OUTPUT
MONITOR–1
VCC
COMP
VREF
VTR DD ON
16
VREF
OUTPUT VCC–1,2,3
OUTPUT–3
OUTPUT MONITOR–3
RT
CT
OUTPUT–2
OUTPUT
MONITOR–2
OUTPUT–6
OUTPUT MONITOR–6
NONINV INPUT–6
OUTPUT–5
OUTPUT MONITOR–5
NONINV INPUT–5
STANDBY–3
STANDBY
VTR DD ON
SHOE ON
BATT SIG
BATT/XEXT SW
FAST CHARGE
INIT CHARGE ON
DC PACK SW
29
30
37
38
39
40
41
29
30
37
38
39
40
41
1
2
10
3
4
9
1
2
10
3
4
9
44 44
14
15
16
43
13
43
13
19
20
21
22
19
20
21
22
2.8V
PANEL 13V
RP UNREG
25
26
25
26
1.5V
BL CONT
BL REG
BATT UNREG
MT 5V
VTR UNREG
42
45
46
42
45
46
31
32
36
7
8
35
31
32
36
7
8
35
CAP VS
CAP ERROR
DRUM VS
DRUM ERROR
PANEL –15V
4.75V
5.9V
REG
2
5
BL REG
PANEL 2.8V
PANEL 13.3V
PANEL –15.3V
PANEL 4.75V
A 4.75V
A 2.8V
AU 2.8V
D 1.5V
D 1.9V
1.9V REG
TO
POWER
BLOCK(2/2)
L1313
AV 4.75V
(GV–D800/D800E)
–15.3V
REG
L1309
L1320
L1315
Q1322,1324,1326
L1311
L1316
CAP VS
CAP ERROR
DRUM VS
DRUM ERROR
RP 4.75V
RP 6.0V
L1314
L1306
L1321
D 2.8V
L1307
L1308
Q1303
SWITCHING
Q1308
SWITCHING
Q1307
SWITCHING
Q1304
SWITCHING
Q1301
SWITCHING
Q1302
SWITCHING
Q1305
SWITCHING
Q1306
SWITCHING
L1305 L1310
L302
T1301
Q1314
D1302 (1/2)
RECT
D1306
RECT
D1302
RECT
EMERGENCY
DETECT
RECT
D1301,305
L1301
L1303
L1304
CAP VS
CAP ERROR
DRUM VS
DRUM ERROR
BATT UNREG
(GV–D800/D800E)
L501
L1317
L1318
Q1309
SWITCHING
EX UNREG
DC PACK SW
SHOE ON
BATT SIG
INIT CHARGE ON
VTR DD ON
FAST CHARGE
BATT/XEXT SW
BATT UNREG
MT 5V
VTR UNREG
EX UNREG
BL CONT
CN921
CN1301
5V REG
Q1310–1313
EX UNREG
14
15
16
(SEE PAGE
3-11)
3-5. POWER BLOCK DIAGRAM (1/2)
( ) : Page No. shown in ( ) indicates the page to refer on the schematic diagram.
3-9 3-10
Page 51
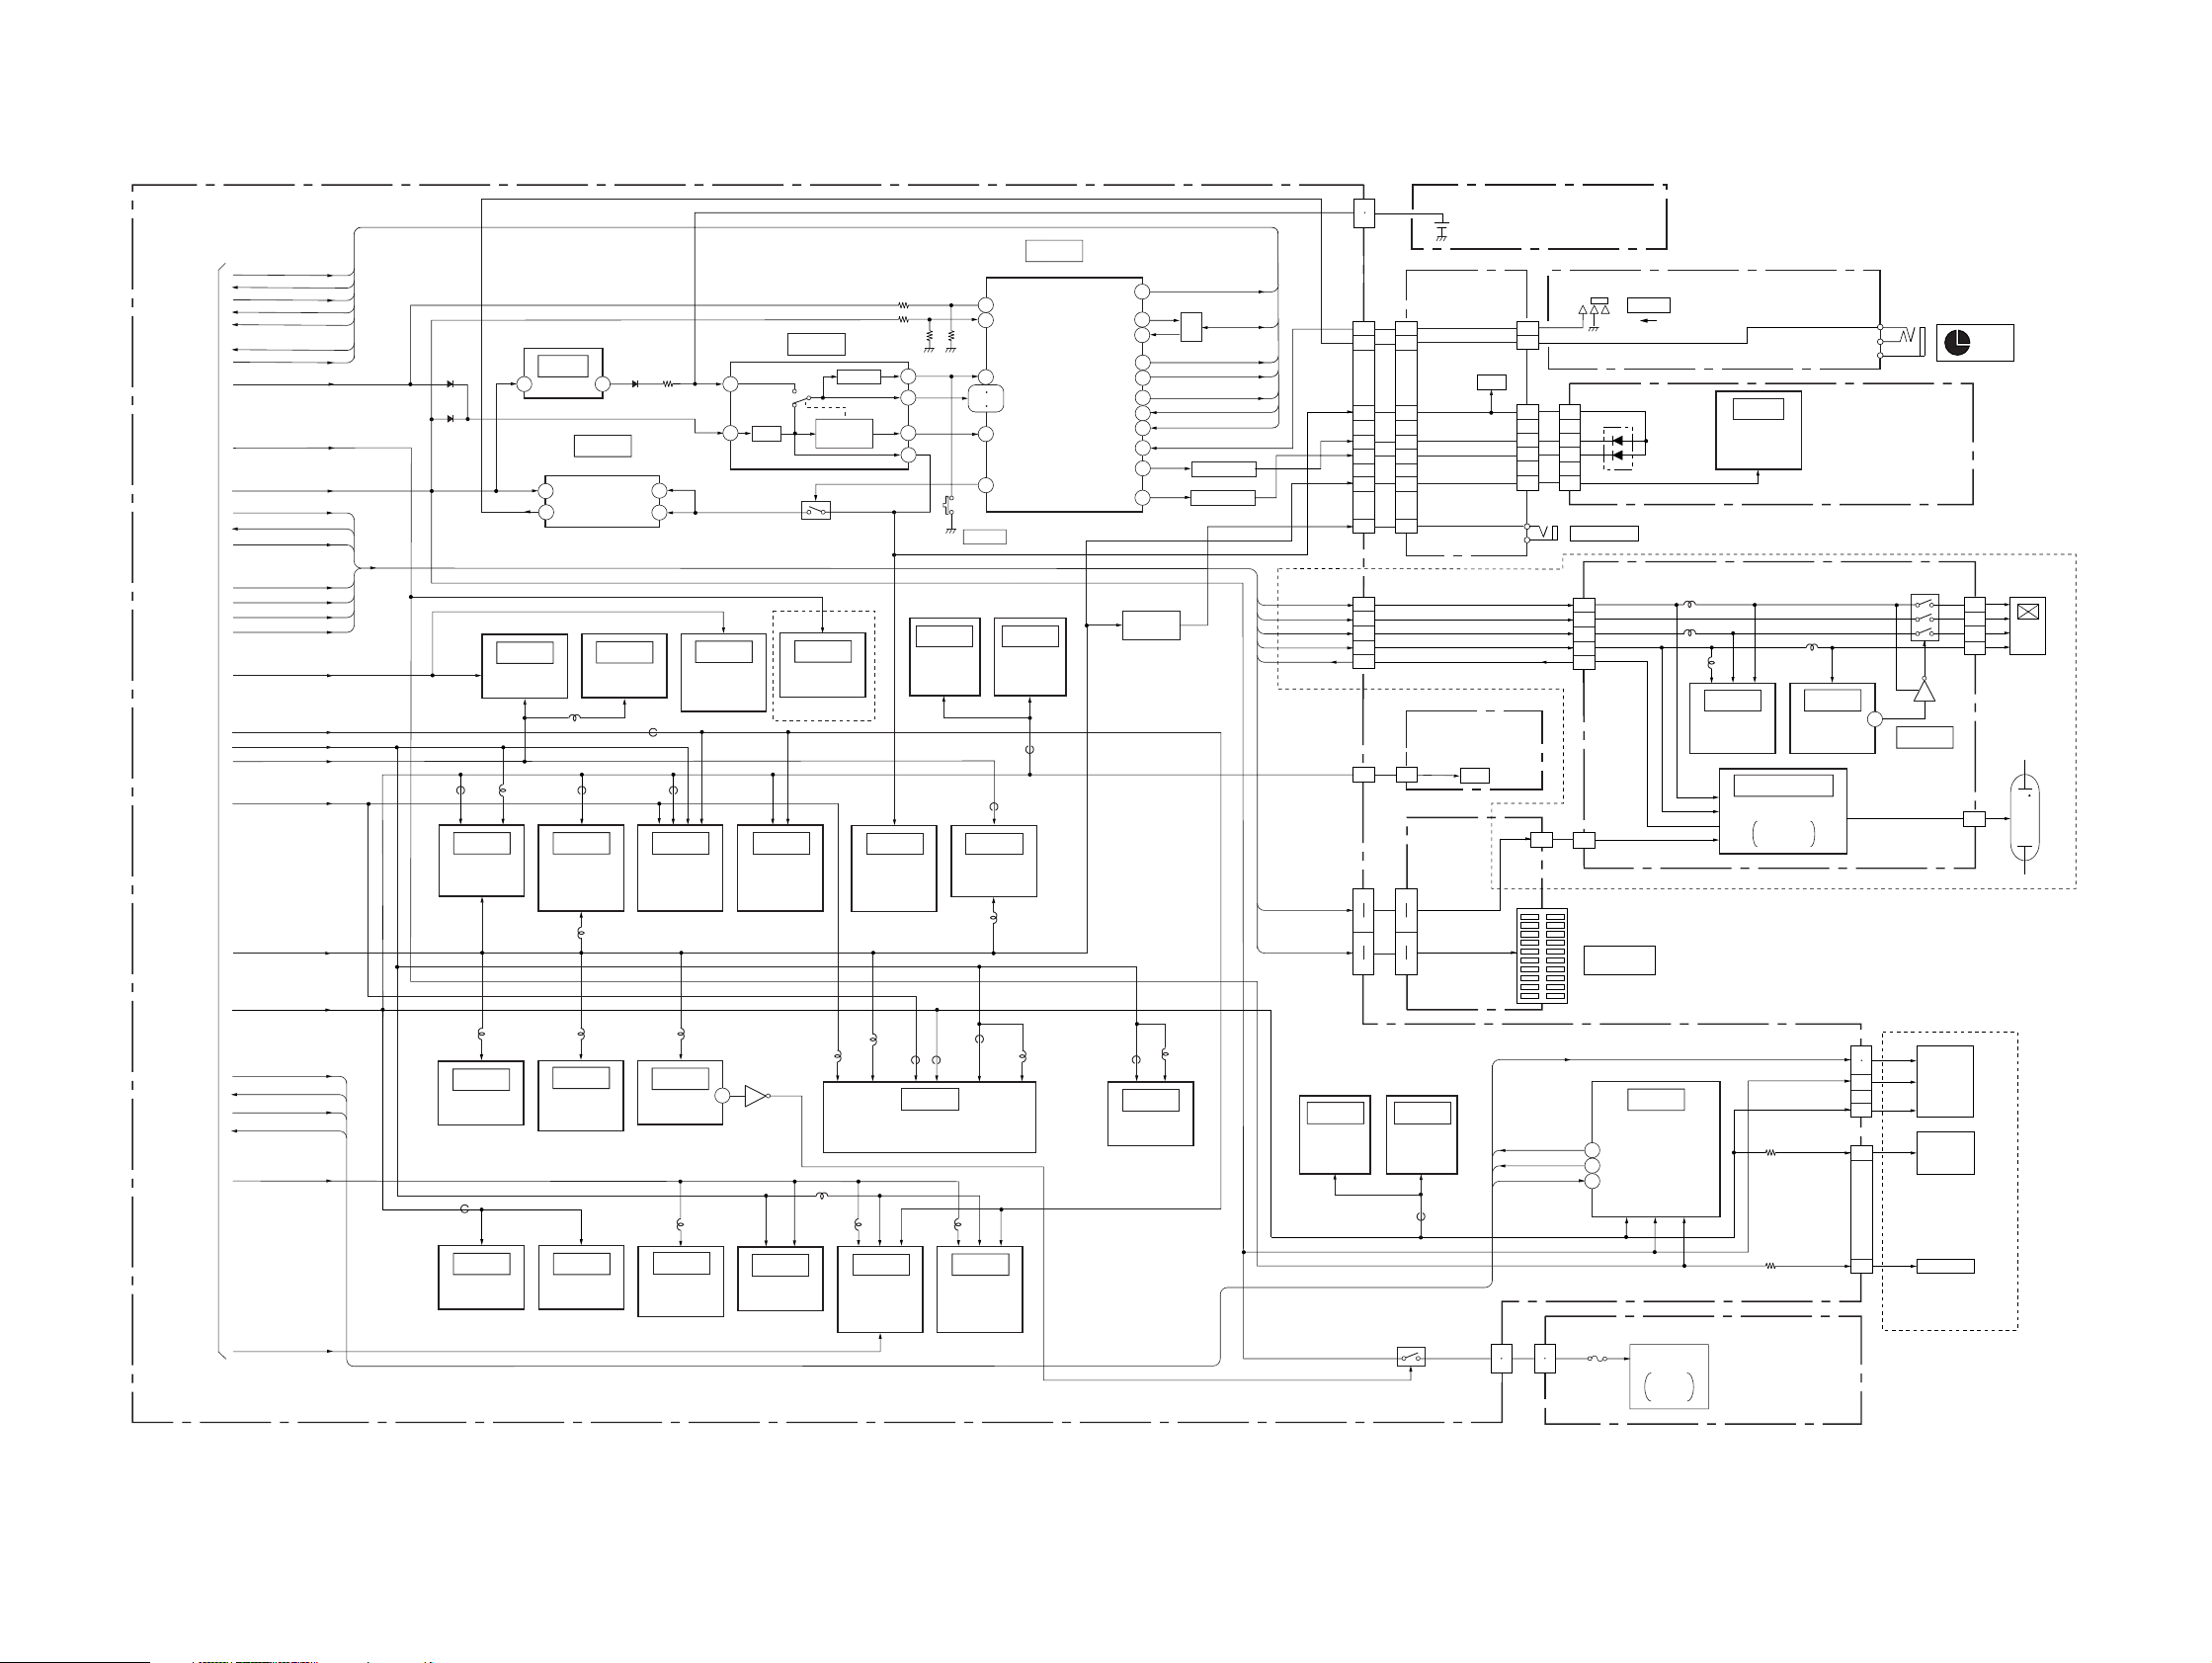
GV-D200/D200E/D800/D800E
3-6. POWER BLOCK DIAGRAM (2/2)
VC-250 BOARD(2/2)
DC PACK SW
SHOE ON
BATT SIG
INIT CHARGE ON
VTR DD ON
FAST CHARGE
16
TO
POWER BLOCK
(1/2)
(SEE PAGE
3-10)
BATT XEXT SW
BATT UNREG
MT 5V
VTR UNREG
EX UNREG
BL CONT
BL REG
PANEL 2.8V
PANEL 13.3V
PANEL -15.3V
PANEL 4.75V
AU 4.75V
D 1.9V
A 2.8V A 2.8V
AU 2.8V
D 1.5V
A 4.75V A 4.75V
D 2.8V D 2.8V
CAP VS
CAP ERROR
DRUM VS
DRUM ERROR
RP 4.75V
RP 6.0V
D4802
D4801
VTR UNREG
MT 5V
AU 4.75V
AU 2.8V
D 2.8V
FB3601
L3602
IC3603
(ALIGN)
A/D CONV.
A 2.8V
MT 5V
D 1.5V
L3707
IC3703
VIDEO OUT
AMP
RP 4.75V
A 2.8V
D 2.8V
FB1501
IC1504
XTAL
OSC
(4-19) (4-19)
LANC DC
IC5701
AUDIO I/O
(4-23)
(4-25)
( ) : Page No. shown in ( ) indicates the page to refer on the schematic diagram.
(4-37)
IC4803
HI CONTROL
INIT CHARGE ON
XVTR MODE SE
XCHARGE LED
FB4501
L2201-2203,
L2208
SHOE ON
IB SO
IB SI
VTR DD ON
FAST CHARGE
CHARGE INH
BATT/XEXT
XPOWER LED
FB1504
(4-37)
IC901
REG
1
14
(4-31)
FB3701
L3701,
3705
L3706
IC4802
LANC I/O
UNREG
LANC DC
L5701
IC3701
(TAXO)
VIDEO
LINE IN/OUT
AMP
(4-26)
IC3702
VIDEO
INPUT
SELECT
(4-25)
IC1505
FREQUENCY
DIVIDER
IC4801
D901
3 32
Q4806
IC5704
SPEAKER
(GV-D800/D800E)
REG 1.5V
(LIP)
DV
(4-17)
IR DRV
RF ENV
DET
(4-14)
AMP
L2209
L3102
BATTER IN
DETECT
(4-31)
L2204
REG
DV
7
(4-31)
IC5703
AUDIO
INPUT
SELECT
IC3303
INTERFACE
POWER
VCC
IC5702
AUDIO
ADC&DAC
(4-37)
(4-31)
FB3303
FB3370
4
8
IC3301
(CAIN)
SIGNAL
PROCESS
(4-15)
L3901
(4-27)
IC3901
TRANSMITTER
L3201 L3104 L3103
IC3201
IR
HI8/STD8
PB RF
AMP
24
Q3903
IC3202
(4-13)
(4-37)
RESET
CHARACTER
IC3103
(TRW)
REC/PB
5
6
4
8
EVER 3.0V
IC3302
GENERATER
(4-15)
FB2202
IC2201
RF 1.9V
AMP
42 51
86 87
S4801
RESET
(4-36) (4-35)
IC4502
EEPROM
IC2291
D/A CONV.
L2291
FB2204
HI8/STD8
PB Y/C
PROCESS
IC3101
(TRF)
EQ.
A/D CONV.
PLL
90
91
38
61
12
(EVR)
FB2203,
FB2205
(4-11)(4-12)
BATT SENS
ACV SENS
XRESET
VDD
BATT IN
XLANC ON
IC4501
DIGITAL8
MECHA
CONTROL
FB2291
(4-13)
(4-21)
81
49
48
25
29
50
47
66
14
5
57
Q904,905
CURRENT
LIMITER
IC1502
AGC,
A/D CONV.
(4-19)
Q4804
I/F
DC PACK SW
Q4809,4810
LED DRIVE
Q4808
LED DRIVE
L1501
BATT LI3V
BATT SIG
CN926
PANEL 4.75V
PANEL -15.3V
PANEL 13.3V
PANEL 2.8V
BL CONT
D 2.8V
CN927
BL REG
EX UNREG
CN931
(4-29) (4-29)
IC4901
EEPROM
D 2.8V
VTR UNREG
MT 5V
IR DRV
1
2
1
5
22
45
44
47
12
9
5
6
10
4
CN923
1 1
34
36
23
26
FB4901
2
6
21
46
43
48
11
34
36
23
26
IC4902
HI8/STD8
CONTROL
Q901-903
BT001
VANADIUM
LITHIUM
BATTERY
(SEE PAGE 4-45)
IO-68
BOARD
XVTR MODE SW
LANC SW
CN105
LED
EVER 3.0V
XPOWER LED
XCHARGE LED
A 4.75V
CN104
RFU DC OUT
CN103
(SEE PAGE 4-61)
FK-78 BOARD
CN001
LED
EX-36
BOARD
18
19
CN203
MECHA
1
IR 5V
2
FP-571
(SEE PAGE 4-37)
1
6
6
8
10
12
1
CN205
CAP VS
DRUM ERROR
CAP ERROR
DRUM VS
1
2
CN361CN924
(FLEXIBLE)
S001
POWER
CN001
6
8
10
12
RFU DC OUT
J102
(CHARGE)
PD-130 BOARD
PANEL 4.75V
18
PANEL -15.3V
22
PANEL 13.3V
6
PANEL 2.8V
17
BL CONT
23
CN5503
BL REG
2
CN5607
CN204
MULTI
CONNECTOR
(SEE PAGE 4-65)
(4-33)
IC4401
(RABI)
DRUM
MOTOR DRIVE
29
DRUM FG,PG AMP
27
LOADING
MOTOR DRIVE
6
REEL FG AMP
TAPE TOP,END DET
DRUM,CAP ERROR AMP
D362,363
F361
OFFON
D001
(POWER)
L5501
IR LED
SUPER
LASER
LINK
FP-575
IC001
REMOTE
COMMANDER
RECEIVER
L5504
L5503
IC5501
RGB DRIVE
(4-55)
IC5601,5602
INVERTER
BACKLIGHT
R4407
R4411
IR-38 BOARD
(SEE PAGE 4-27)
(FLEXIBLE)
(SEE PAGE 4-45)
(4-45)
FP-246
(SEE PAGE 4-45)
L5502
(4-55)
IC5502
TIMING
GENERATOR
DRIVE
CN4403
SENSOR VCC
TAPE LED(A)
CN4404
(FLEXIBLE)
Q5502-5506
28
IC5503
(4-57)
7
8
9
10
13
9
B710 MECHA
DECK
(SEE PAGE 4-33)
5
(4-56)
BL HIGH
CAPSTAN
TAPE LED
CN5501
4
2
CN5604
MOTOR
T REEL,
S REEL
SENSOR
J001
24
3
18
23
10
(LANC)
(GV-D800/D800E)
LCD
UNIT
ND901
BACKLIGHT
3-11 3-12E
Page 52
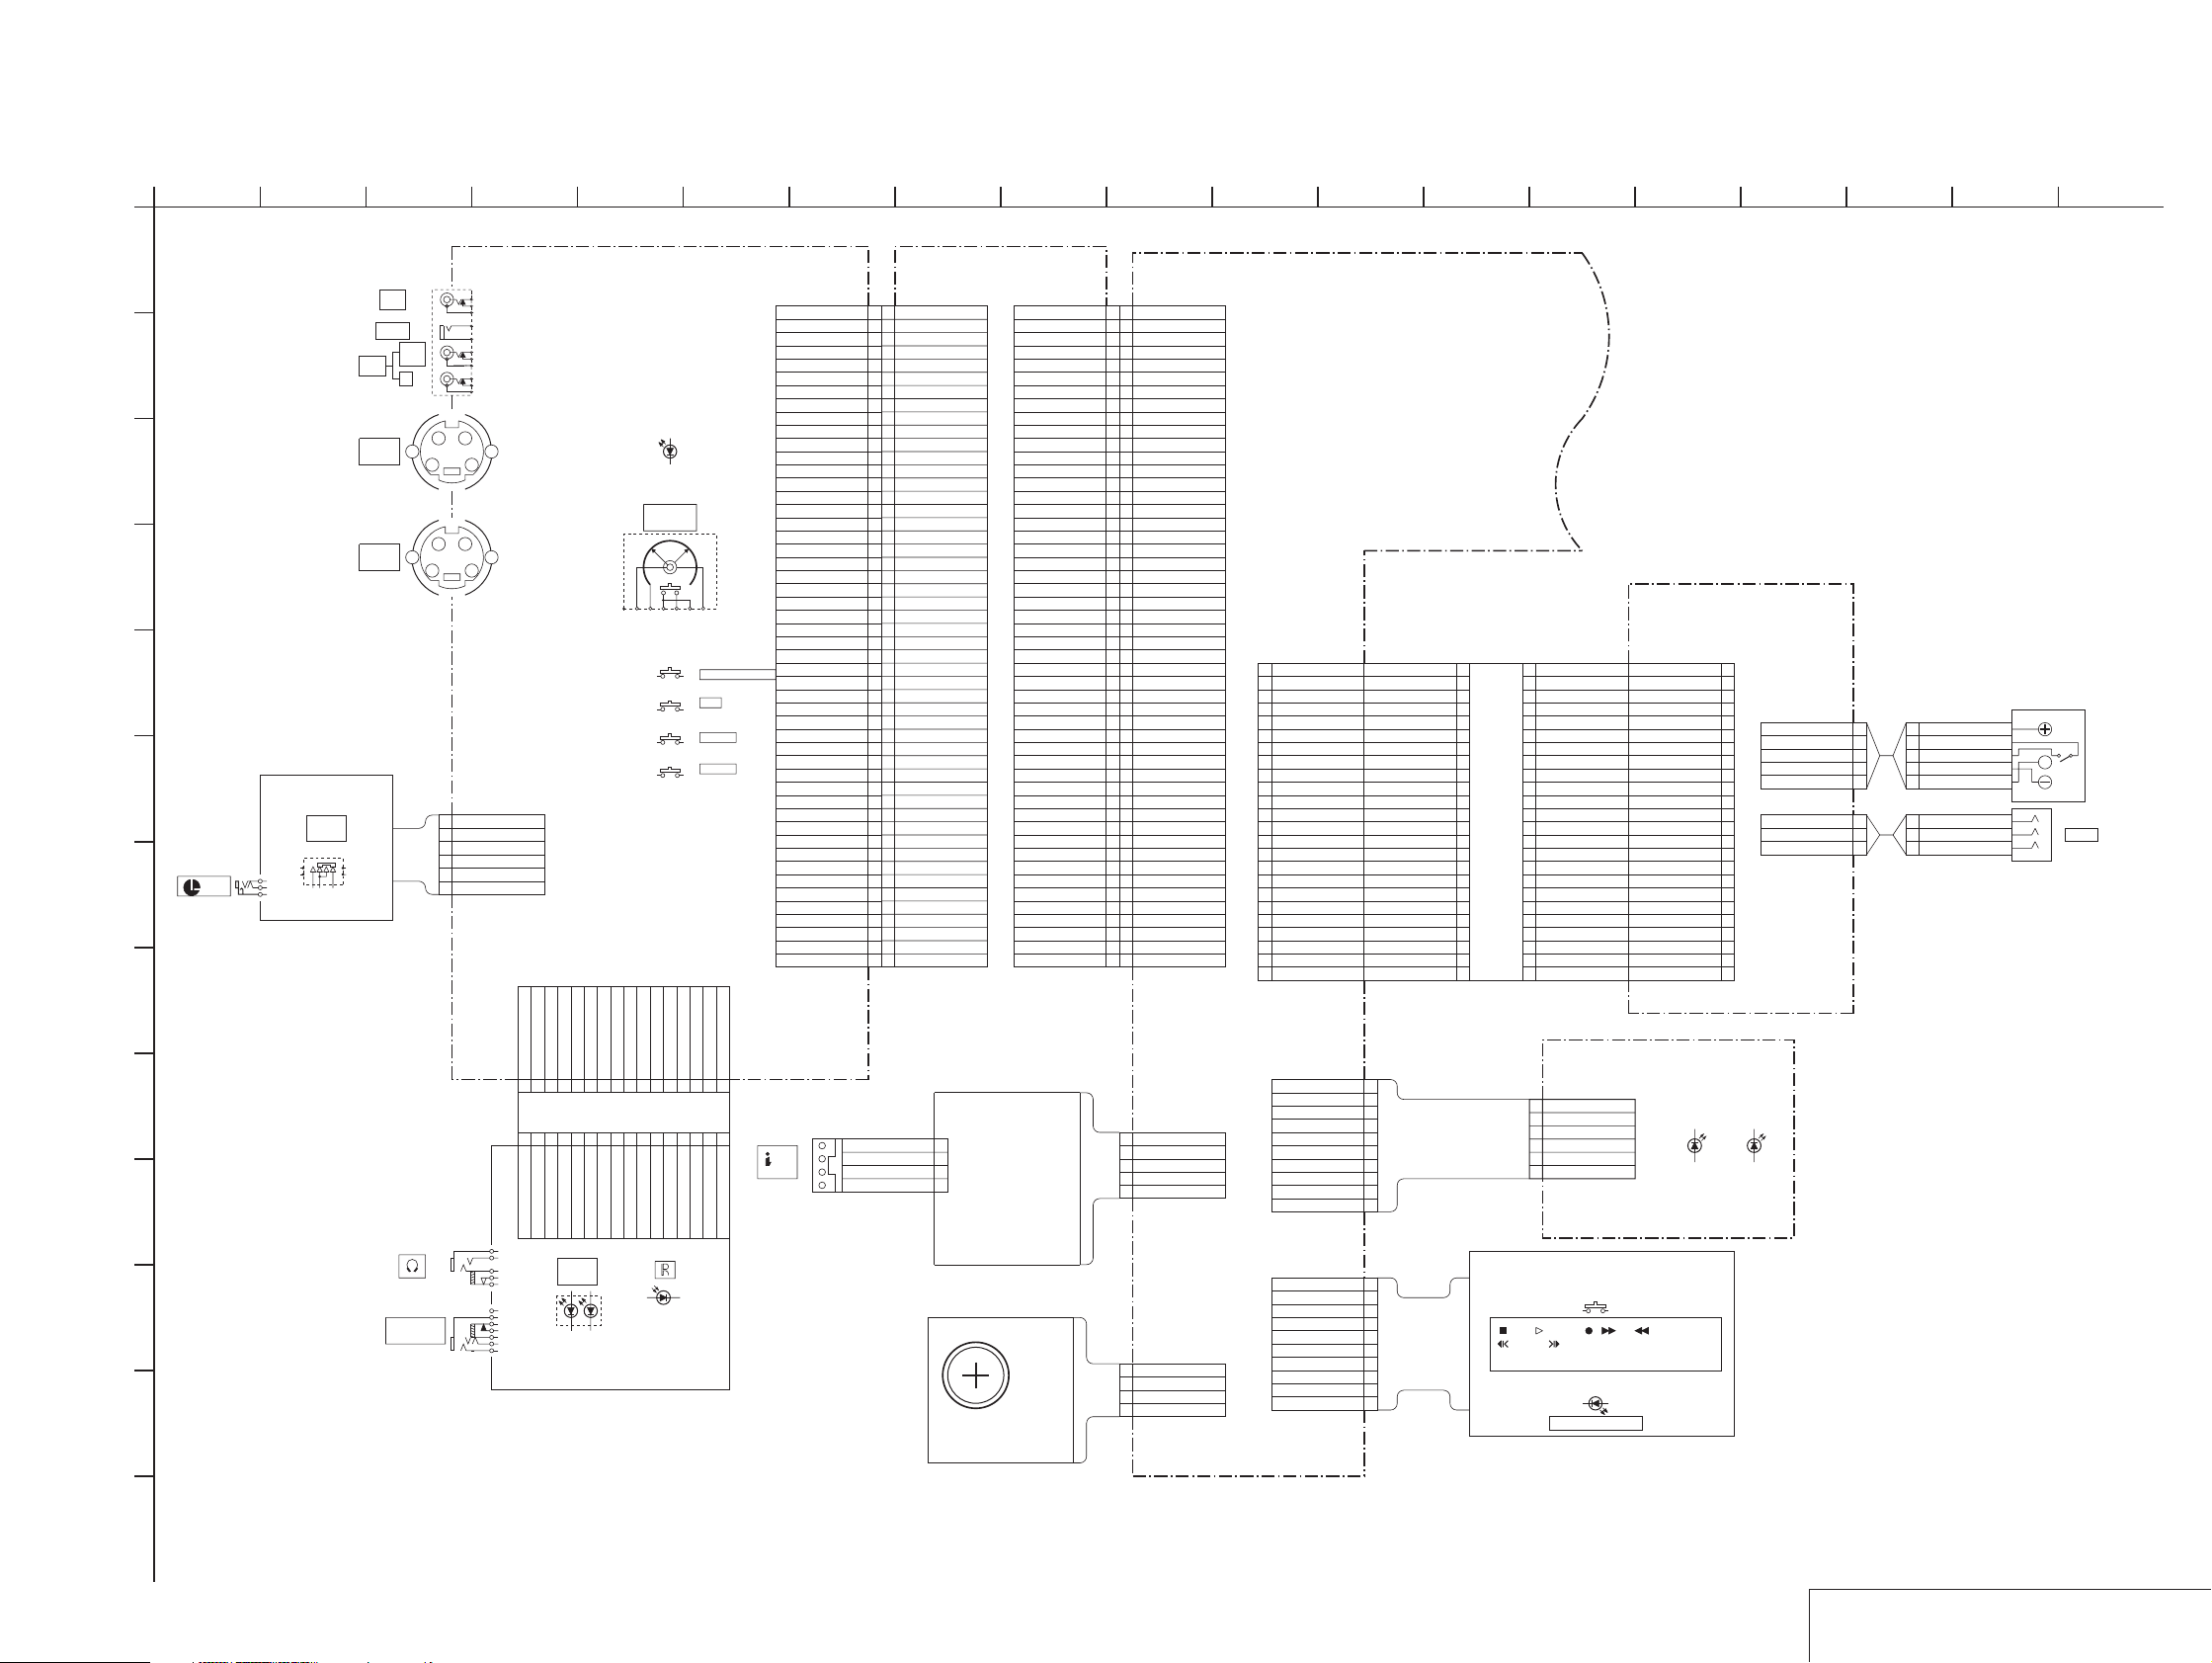
SECTION 4
PRINTED WIRING BOARDS AND SCHEMATIC DIAGRAMS
4-1. FRAME SCHEMATIC DIAGRAM (1/2)
GV-D200/D200E/D800/D800E
10
CN922
1 XVTR_MODE_SW
1XVTR_MODE_SW
2 LANC_SIG
2LANC_SIG
3 XLANC_JACK_IN
3XLANC_JACK_IN
4 REG_GND
4REG_GND
5 LANC_DC
5LANC_DC
6 REG_GND
6REG_GND
7RCH_DET
7 RCH_OUT_DET
8LCH_DET
8 LCH_OUT_DET
9AUDIO_R_OUT
9 AUDIO_R_OUT
10AUDIO_GND
10 REG_GND
11AUDIO_L_OUT
11 AUDIO_L_OUT
12RF_DC_OUT
12 RF_DC_OUT
13 V_JACK_OUT_DET
13V_JACK_DET
14 VIDEO_OUT_GND
14VIDEO_OUT_GND
15 VIDEO_OUT
15VIDEO_OUT
16 S_C_GND
16S_C_GND
17 S_C_OUT
17S_C_OUT
18 S_Y_GND
18S_Y_GND
19 S_Y_OUT
19S_Y_OUT
20 REG_GND
20REG_GND
21 XS_JACK_OUT_DET
21XS_JACK_OUT_DET
22 EVER_3.0V
22EVER_3.0V
23 XIR_LED_ON
23XIR_LED_ON
24 KEY_AD5
24KEY_AD5
25 DIAL_A
25DIAL_A
26 DIAL_B
26DIAL_B
27 XS_JACK_IN_DET
27XS_JACK_IN
28 S_Y_GND
28S_Y_GND
29 S_Y_IN
29S_Y_IN
30 S_C_GND
30S_C_GND
31 S_C_IN
31S_C_IN
32 REG_GND
32REG_GND
33 AV_JACK_IN_DET
33AV_JACK_IN
34 VIDEO_GND
34VIDEO_GND
35 VIDEO_IN
35VIDEO_IN
36 REG_GND
36REG_GND
37 AUDIO_L_IN
37AUDIO_L_IN
38 AUDIO_GND
38AUDIO_GND
39 AUDIO_R_IN
39AUDIO_R_IN
40 XHP_SENS
40XHP_SENS
41 HP_R
41HP_R
42 HP_GND
42HP_GND
43 HP_L
43HP_L
44 XCHARGE_LED
44XCHARGE_LED
45 XPOWER_LED
45XPOWER_LED
46 XSIRCS_SIG
46XSIRCS_SIG
47 A_4.75V
47A_4.75V
48 REG_GND
48REG_GND
49 REG_GND
49REG_GND
50 REG_GND
50REG_GND
50P
CN001
924 7
50P
1
38
5 13
A
J102
VIDEO
OUT
RFU
DC OUT
L
(MONO)
AUDIO
B
C
D
0UT
J103
S VIDEO
J101
S VIDEO
R
C
Y
S
OUT
G
S
IN
G
S
G
C
Y
S
G
IO-68 BOARD
D109
(SUPER LASER LINK)
S103
SEL/PUSH
EXEC
S101
E
S102
S104
S105
F
J001
G
LANC
H
FP-575
FLEXIBLE
POWER
OFF-ON
S001
1 XVTR_MODE_SW
2 LANC_SIG
3 REG_GND
4 REG_GND
5 REG_GND
6 LANC_DC
6PCN105
16PCN104
6
SUPER LASER LINK
MENU
VOLUME+
VOLUME-
50PCN5713
AV_JACK_IN_DET
FP-247
FLEXIBLE
1LANC_SIG
1 LANC_SIG
2XVTR_MODE_SW
2 XVTR_MODE_SW
3REG_GND
3 REG_GND
4XLANC_JACK_IN
4 XLANC_JACK_IN
5REG_GND
5 REG_GND
6LANC_DC
6 LANC_DC
7LCH_OUT_DET
7 LCH_DET
8RCH_OUT_DET
8 RCH_DET
9REG_GND
9 AUDIO_GND
10AUDIO_R_OUT
10 AUDIO_R_OUT
11RF_DC_OUT
11 RF_DC_OUT
12AUDIO_L_OUT
12 AUDIO_L_OUT
13VIDEO_OUT_GND
13 VIDEO_OUT_GND
14V_JACK_OUT_DET
14 V_JACK_OUT_DET
15S_C_GND
15 S_C_GND
16VIDEO_OUT
16 VIDEO_OUT
17S_Y_GND
17 S_Y_GND
18 S_C_OUT
18S_C_OUT
19 REG_GND
19REG_GND
20 S_Y_OUT
20S_Y_OUT
21 EVER_3.0V
21EVER_3.0V
22 XS_JACK_OUT
22XS_JACK_OUT_DET
23 KEY_AD5
23KEY_AD5
24 XIR_LED_ON
24XIR_LED_ON
25 DIAL_B
25DIAL_B
26 DIAL_A
26DIAL_A
27 S_Y_GND
27S_Y_GND
28 XS_JACK_IN
28XS_JACK_IN_DET
29 S_C_GND
29S_C_GND
30 S_Y_IN
30S_Y_IN
31 REG_GND
31REG_GND
32 S_C_IN
32S_C_IN
33 VIDEO_GND
33VIDEO_GND
AV_JACK_IN
34
34
35 REG_GND
35REG_GND
36 VIDEO_IN
36VIDEO_IN
37 AUDIO_GND
37AUDIO_GND
38 AUDIO_L_IN
38AUDIO_L_IN
39 XHP_SENS
39XHP_SENS
40 AUDIO_R_IN
40AUDIO_R_IN
41 HP_GND
41HP_GND
42 HP_R
42HP_R
43 XCHRGE_LED
43XCHRGE_LED
44 HP_L
44HP_L
45 XSIRCS_LED
45XSIRCS_LED
46 XPOWER_LED
46XPOWER_LED
47 REG_GND
47REG_GND
48 A_4.75V
48A_4.75V
49 REG_GND
49REG_GND
50 REG_GND
50REG_GND
CN002
50P
11 1514
12
VC-250 BOARD(1/2)
REC/PB ANP
1/16
2/16
PB AMP,DAC
DV INTERACE
3/16
DV INTERACE
4/16
5/16
AD CONVERTER
Y/C PROCESSOR
6/16
LINE A/D
7/16
LINE IN/OUT
8/16
IR
9/16
MECHANISM CONTROL
10/16
AUDIO I/O
11/16
DRUM/CAPSTAN MOTOR DRIVE
12/16
MECHA CONTROL
13/16
HI CONTROL
14/16
DC/DC CONVERTER
15/16
CONNECTION
16/16
CN921
48P
1 CAP_VS
3 DRUM_VS
5 MT_GND
7 MT_5V
9 DRUM_ERROR
11 REG_GND
13 RP_UNREG
15 4.75V
17 REG_GND
19 2.8V
21 2.8V
23 REG_GND
25 1.5V
27 REG_GND
29 VTR_DD_ON
31 SHOE_UNREG
33 REG_GND
35 VTR_UNREG
37 BATT_SIG
39 FAST_CHARGE
41 DC_PACK_SW
43 PANEL_13V
45 BL_REG
47 REG_GND
2CAP_VS
4DRUM_VS
6MT_GND
8MT_5V
10CAP_ERROR
12REG_GND
144.75V
164.75V
18REG_GND
202.8V
222.8V
24REG_GND
261.5V
28REG_GND
30SHOE_ON
32SHOE_UNREG
34REG_GND
36BATT_UNREG
38BATT/XEXT_SW
40INIT_CHARGE
42BL_CONT
44PANEL_-15V
46BL_REG
48REG_GND
B TO B
1 CAP_VS
3 DRUM_VS
5 MT_GND
7 MT_5V
9 DRUM_ERROR
11 REG_GND
13 RP_UNREG
15 4.75V
17 REG_GND
19 2.8V
21 2.8V
23 REG_GND
25 1.5V
27 REG_GND
29 VTR_DD_ON
31 SHOE_UNREG
33 REG_GND
35 VTR_UNREG
37 BATT_SIG
39 FAST_CHARGE
41 DC_PACK_SW
43 PANEL_13V
45 BL_REG
47 REG_GND
TO(2/2)
FU-145 BOARD
CN1301
1716 18 19
48P
2CAP_VS
4DRUM_VS
6MT_GND
8MT_5V
10CAP_ERROR
12REG_GND
144.75V
164.75V
18REG_GND
202.8V
222.8V
24REG_GND
261.5V
28REG_GND
30SHOE_ON
32SHOE_UNREG
34REG_GND
36BATT_UNREG
38BATT/XEXT_SW
40INIT_CHARGE
42BL_CONT
44PANEL_-15V
46BL_REG
48REG_GND
CN501
CN502
5P
3P
1 BATT(+)
1BATT(+)
2 BATT_SW(+)
2BATT_SW(+)
3 BATT_SW(-)
3BATT_SW(-)
4 BATT(-)
4BATT(-)
5BATT_SIG
5 BATT_SIG
1ACV_UNREG
1 ACV_UNREG
2ACV_GND
2 ACV_GND
3BATT/XEXT
3 BATT/XEXT
5PCN901
BATTERY
TERMINAL
S
3PCN902
DC IN
IR-38 BOARD
6PCN361
(SUPER LASER LINK)
S001~S016
FLAME+/SLOW/DATE CODE/DISPLAY/
D001~D003
D362,363
(SUPER LASER LINK)
CN927
10PCN924
1IR_5V
2IR_5V
3IR_CL_OUT
4IR_EM_OUT
FP-572
5IR_GND
6IR_GND
7IR_GND
8KEY_AD3
9REG_GND
10REG_GND
10P
1D_2.8V
2XREC_LED
3XCAUTION_LED
4XPAUSE_LED
5KEY_AD1
6KEY_AD0
7KEY_AD2
8REG_GND
9REG_GND
10REG_GND
FLEXIBLE
1 IR_5V
2 IR_CL_OUT
3 IR_ME_OUT
4 IR_GND
5 KEY_AD3
6 REG_GND
CONTROL SWITCH BLOCK
(FK-78)
STOP/
PLAY/REC / FF/ REW/PAUSE/X2/
FRAME-/
DIGITAL EFFECT/TITLE/PB ZOOM
REC/CAUTION/PAUSE
1 AUDIO_L_IN
2 VIDEO_IN
3 AV_GND
4 AV_JACK_IN_DET
5 HP_L
6 EVER_3.0V
7 HP_R
8 XPOWEER_LED
9 XHP_SENS
10 XCHARGE_LED
11 HP_GND
12 A_4.75V
13 AUDIO_R_IN
14 XSIRCS_SIG
15 AV_GND
16 GND
I
VIDEO_IN 2
AUDIO_L_IN 1
16P
J
J002
(HEADPHONES)
K
J001
AUDIO/VIDEO
IN
CN001
FP-246
L
M
16
B to B
4PCN1105
1NTPB
DV
HP_L 5
HP_R 7
AV_GND 3
EVER_3.0V 6
AV_JACK_IN_DET 4
D001
POWER/
CHARGE
HP_GND 11
XHP_SENS 9
XPOWER_LED 8
XCHARGE_LED 10
GND 16
A_4.75V 12
XSIRCS_SIG 14
AUDIO_R_IN 13
IC001
IN/OUT
AV_GND 15
FLEXIBLE
2TPB
3NTPA
4TPA
FP-571
FLEXIBLE
FP-602
FLEXIBLE
BT001
LITHIUM
BATTERY
1 GND
2 NTPA
3TPA
4 TPB
5 NTPB
1 LI_3V
2 LI_3V
3 GND
4 GND
CN926
5PCN929
4P
FRAME SCHEMATIC DIAGRAM (1/2)
4-1 4-2
Page 53
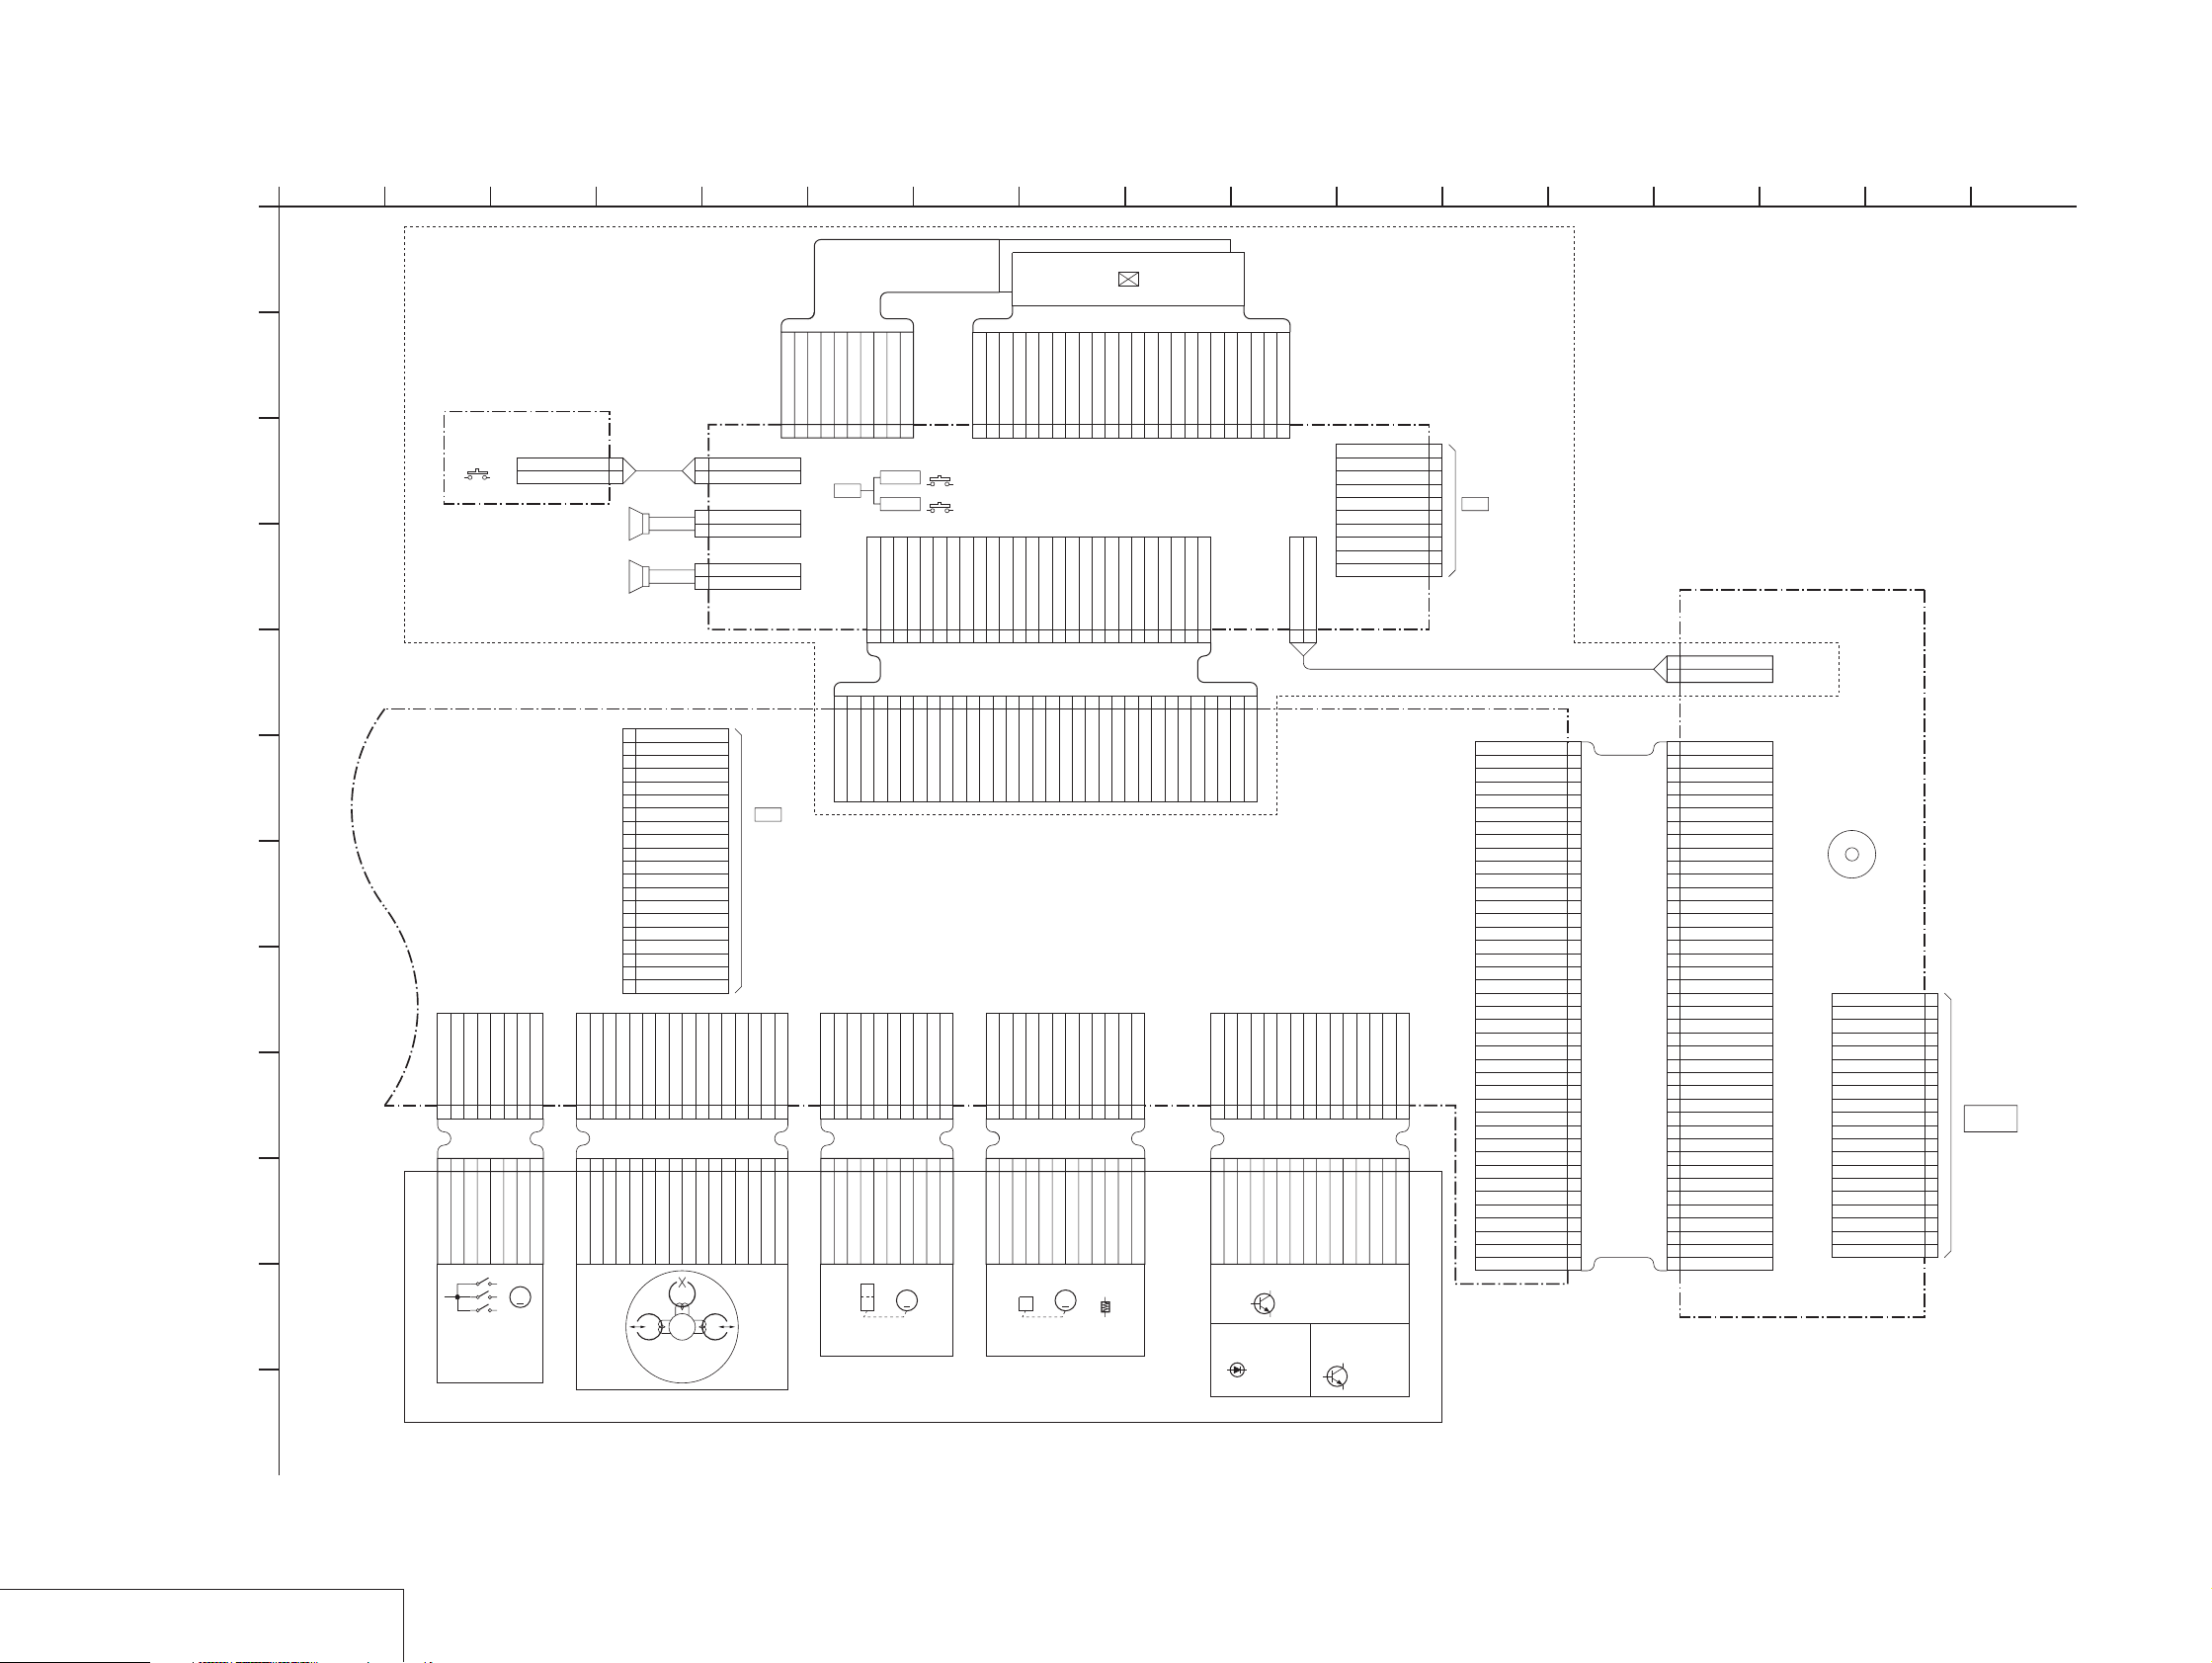
GV-D200/D200E/D800/D800E
FRAME SCHEMATIC DIAGRAM (2/2)
VCOM
VCOM
8 REG_GND
22PANEL_R
VCC_1
10
3
VCC_1
VBC
CLS
7 PANEL_B
23AD_6
REG_GND
11
264
REG_GND
STBYB
RES
6 PANEL_G
DEW
12
1
DEW
SRT
PSS1
5 PANEL_R
24REG_GND
25SP_L_+
924 7
OE
CLR
MCLK
HCNT
SPD
PSS2
CLD
CTR
1 SP_L_-
2 SP_L_+
3 REG_GND
4 AD_6
26SP_L_-
27NC
28NC
29NC
15P
CN4404
1
GV-D800/D800E MODEL
38
5 13
A
10P
B
LS-56 BOARD
2P
CN01
C
S001
(LCD ON/OFF)
D
SPEAKER L
SPEAKER R
SP901
SP902
1AD_6
2GND
PL-53
HARNESS
1 AD_6
2 GND
1 SP_L_+
2 SP_L_-
1 SP_R_+
2 SP_R_-
CN5604
1 LED_GND
2PCN5608
2PCN5506
2PCN5505
E
1
2
3
4
F
G
TO(1/2)
H
I
J
8P
CN4401
M-SW(C)
M-SW(B)
M-SW(A)
COM_GND
1234567
FP-220
FLEXIBLE
5
6
8
7
M-SW(A)
M-SW(C)
M-SW(B)
COM_GND
LM(+)
LM(+)
LM(-)
LM(-)
8
2
4
3
1
LM(-)
LM(-)
LM(+)
LM(+)
5
6
7
8
9
10
11
12
13
14
15
16
17
18
19
20
16P
CN3101
LP2Y2LP2X3GND4LP1X5LP1Y6GND7GND8GND9XODD10YODD11GND12XEVEN13YEVEN14GND15FEY16FEX
1
3
2
4
1
GND
LP1X
LP2X
LP2Y
M
K
S901
MODE
SWITCH
M903
LOADING
MOTOR
20PCN933
SWP
AFC_FO
BPF_MONI
F0_ADJ_RF_IN
PB_RF
REG_GND
RF_AGC_OUT
VC_RF_SWP
NC(EVF_BL)
NC(EVF_BL_4.6V)
NC(VCO)
NC(EVF_VG)
DV_RF_SWP
RF_IN
CAP_FG
RF_MON
TMS
TCK
TDO
TDI
8
6
9
7
5
GND
GND
GND
LP1Y
SP1Y
ODD EVEN
CPC
(FOR CHECK)
10
11
14
12
16
15
13
FEX
FEY
GND
GND
SP1X
SP2X
SP2Y
FE
VIDEO
HEAD
6
2 LED
3 BL_LOW
4 N.C
5 N.C
6 N.C
LCD
26P
CN5503
1SP_R_+
2SP_R_-
32P
CN923
CN4402 10P
PG
FG-PG_COM
FG
123456789
8
9
10
FG
PG
FG-PG_COM
FG
PG
DRUM MOTOR
7 N.C
8 N.C
9 N.C
10 BL_HIGH
S5601
BLIGHT+
S5602
BLIGHT-
22 PANEL_-15.3V
23 BL_CONT
24 REG_GND
25 SP_R_-
26 SP_R_+
3REG_GND
4BL_CONT
5PANEL_-15.3V
6PANEL_13.3V
7REG_GND
8REG_GND
COMWWVVUU
6
5
4
2
3
7
V
V
U
W
W
COM
M
M901
24P
CN5501
VSS
VGL
VDD
N.C.
VGH
VGH
123456789
GRES
GND
VDD3V
SPS
VGL
EX1
PD-130 BOARD
13 VC_SO
14 XCS_LCD_DA
15 XVC_SCK
16 REG_GND
17 PANEL_2.8V
18 PANEL_4.75V
19 REG_GND
20 REG_GND
21 PANEL_13.3V
FP-569
9PANEL_4.75V
10PANEL_2.8V
11REG_GND
12XVC_SCK
13XCS_LCD_DA
14VC_SO
15REG_GND
16PANEL_XVD
VC-250 BOARD(2/2)
12P
CN4403
FRC
STAND_BYVSMT_GND
FG_OUT
OFFSET_ADJ
123456789
10
FP-433
FLEXIBLE
12
FG_OUT
11
OFFSET_ADJ
8
9
10
FRC
MT_GND
STAND_BY
FG
M902
CAPSTAN MOTOR
1
U
ND901 BACK LIGHT
LCD 901
4 INCH COLOR LCD UNIT
STBYB
RESET
GPCK
GSRT
MO1
EX2
MO2
MO3
101112131415161718192021222324
LCD DRIVER(1/2)
BACK LIGHT(2/2)
9 PANEL_HOLD
10 C-SYNC/XHD
11 PANEL_XVD
12 REG_GND
FLEXIBLE
17
18PANEL_-HOLD
19REG_GND
20PANEL_B
21PANEL_G
C-SYNC/XHD
MT_GND
VCC_2
VS
5
7
VS
VS
VCC_2
MT_GND
M
DEW
SENSOR
10
VSS
VDD
VG
VG
30NC
TAPE_TOP(C)
14
TAPE_TOP(C)
VSH
VB
VSH3V
VB
GND
VSH5V
2P
CN5607
1 BL_LOW
31NC
32NC
HI8_MP
S_REEL(+)
ME/MP
REC_PROOF
S_REEL(-)
FP-221
FLEXIBLE
9
13
12
10
ME/MP
HI8_MP
S_REEL(-)
S_REEL(+)
REC_PROOF
VR
VR
REG_GND
123456789
15
REG_GND
FP-249
Q002
TAPE END
FP-355
FLEXIBLE
D001
TAPE LED
2 BL_HIGH
TAPE_END(C)
8
TAPE_END(C)
11 1514
10P
CN5502
C_LOCK_SW
TAPE_LED(K)
SENSOR_VCC
T_REEL(+)
T_REEL(-)
HALL_COM
TAPE_LED(A)
1011121314
6115
7
HALL_COM
TAPE_LED(A)
4
T_REEL(-)
3
T_REEL(+)
2
TAPE_LED(K)
SENSOR_VCC
15
1
C_LOCK_SW
1VB
2XVD_OUT
3VG
4PANEL_COM
5VR
6SHARP/XCASIO
7C-SYNC/XHD
8XHD_OUT
9GND
10GND
CPC
(FOR CHECK)
EP-51
CN931
12
HARNESS
40P
1VIDEO_GND
2V/Y_IN
3V/Y_IN_GND
4AUDIO_R_IN
5AUDIO_R_IN_GND
6AUDIO_L_IN
7AUDIO_L_IN_GND
8LANC_SIG
9LANC_GND
10ID1
11ID2
12VIDEO_GND
13VIDEO_OUT
14VIDEO_OUT_GND
15AUDIO_R_OUT
16AUDIO_R_OUT_GND
17AUDIO_L_OUT
18AUDIO_L_OUT_GND
19C_IN
20VIDEO_GND
21IO_GND
22IO_GND
23EX_UNREG
24EX_UNREG
25EX_UNREG
26EX_UNREG
27REG_GND
28REG_GND
29REG_GND
30REG_GND
31BL_GND
32BL_GND
33BL_GND
34BL_REG
35BL_REG
36BL_REG
37REG_GND
38REG_GND
39BEEP
40BEEP
FP-570
FLEXIBLE
H001,002
S/T REEL
SENSOR
FP-356
FLEXIBLE
Q001
TAPE TOP
FLEXIBLE
1
BL_HIGT
2
BL_LOW
1 VIDEO_GND
2 V/Y_IN
3 V/Y_IN_GND
4 AUDIO_R_IN
5 AUDIO_R_IN_GND
6 AUDIO_L_IN
7 AUDIO_L_IN_GND
8 LANC_SIG
9 LANC_GND
10 ID1
11 ID2
12 VIDEO_GND
13 VIDEO_OUT
14 VIDEO_OUT_GND
15 AUDIO_R_OUT
16 AUDIO_R_OUT_GND
17 AUDIO_L_OUT
18 AUDIO_L_OUT_GND
19 C_IN
20 VIDEO_GND
21 IO_GND
22 IO_GND
23 EX_UNREG
24 EX_UNREG
25 EX_UNREG
26 EX_UNREG
27 REG_GND
28 REG_GND
29 REG_GND
30 REG_GND
31 BL_GND
32 BL_GND
33 BL_GND
34 BL_REG
35 BL_REG
36 BL_REG
37 REG_GND
38 REG_GND
39 BEEP
40 BEEP
CN205
CN203
2P
40P
EX-36 BOARD
BZ201
BUZZER
CN204
20P
1VIDEO_OUT
2VIDEO_OUT_GND
3V/Y_IN
4VIDEO_IN_GND
5AUDIO_R_IN
6AUDIO_L_IN
7AUDIO_IN_GND
8LANC_SIG
9IO_GND
10LANC_GND
11ID1
12EX_GND
13EX_GND
14AUDIO_R_OUT
15AUDIO_L_OUT
16AUDIO_OUT_GND
17ID2
18EX_UNREG
19EX_UNREG
20C_IN
MULTI
CONNECTOR
1716
MECHANISM DECK(B710 MECHA)
L
16
FRAME SCHEMATIC DIAGRAM (2/2)
4-3 4-4
Page 54
GV-D200/D200E/D800/D800E
4-2. PRINTED WIRING BOARDS AND SCHEMATIC DIAGRAMS
THIS NOTE IS COMMON FOR WIRING BOARDS AND SCHEMATIC DIAGRAMS
(In addition to this, the necessary note is printed in each block)
GV-D200/D200E/D800/D800E
(For printed wiring boards)
• b: Pattern from the side which enables seeing.
(The other layers' patterns are not indicated.)
• Through hole is omitted.
• Circled numbers refer to waveforms.
• There are few cases that the part printed on diagram
isn’t mounted in this model.
• Chip parts.
C
BE
5
64
2
13
Transistor
5
46
2
31
45
2
31
12
4
53
Diode
3
21321321
(For schematic diagrams)
• All capacitors are in µF unless otherwise noted. pF : µ
µF. 50V or less are not indicated except f or electrolytics
and tantalums.
• Chip resistors are 1/10W unless otherwise noted.
kΩ=1000Ω, MΩ=1000kΩ.
• Caution when replacing chip parts.
New parts must be attached after removal of chip.
Be careful not to heat the minus side of tantalum
capacitor, Because it is damaged by the heat.
• Some chip part will be indicated as follows.
Example C541 L452
22U 10UH
TA A 2520
(Measuring conditions voltage and waveform)
• Voltages and waveforms are measured between the
measurement points and ground when composite video
signal is REC or PB. They are reference values and
reference waveforms. *
(VOM of DC 10 MΩ input impedance is used.).
• V oltage v alues change depending upon input impedance
of VOM used.)
When indicating parts by reference number, pleas include
the board name.
Kinds of capacitor
Temperature characteristics
External dimensions (mm)
• Constants of resistors, capacitors, ICs and etc with XX
indicate that they are not used.
In such cases, the unused circuits may be indicated.
• Parts with ★ differ according to the model/destination.
Refer to the mount table for each function.
• All variable and adjustable resistors have characteristic
curve B, unless otherwise noted.
• Signal name
XEDIT→ EDIT PB/XREC → PB/REC
• 2: non flammable resistor
• 1: fusible resistor
• C : panel designation
• A : B+ Line *
• B : B– Line *
• J : IN/OUT direction of (+,–) B LINE. *
• C : adjustment for repair. *
• Circled numbers refer to waveforms. *
* Indicated by the color red.
Note :
The components identified by
mark 0 or dotted line with mark
0 are critical for safety.
Replace only with part number
specified.
Note :
Les composants identifiés par
une marque 0 sont critiques
pour la sécurité.
Ne les remplacer que par une
pièce portant le numéro spécifié.
4-5
Page 55
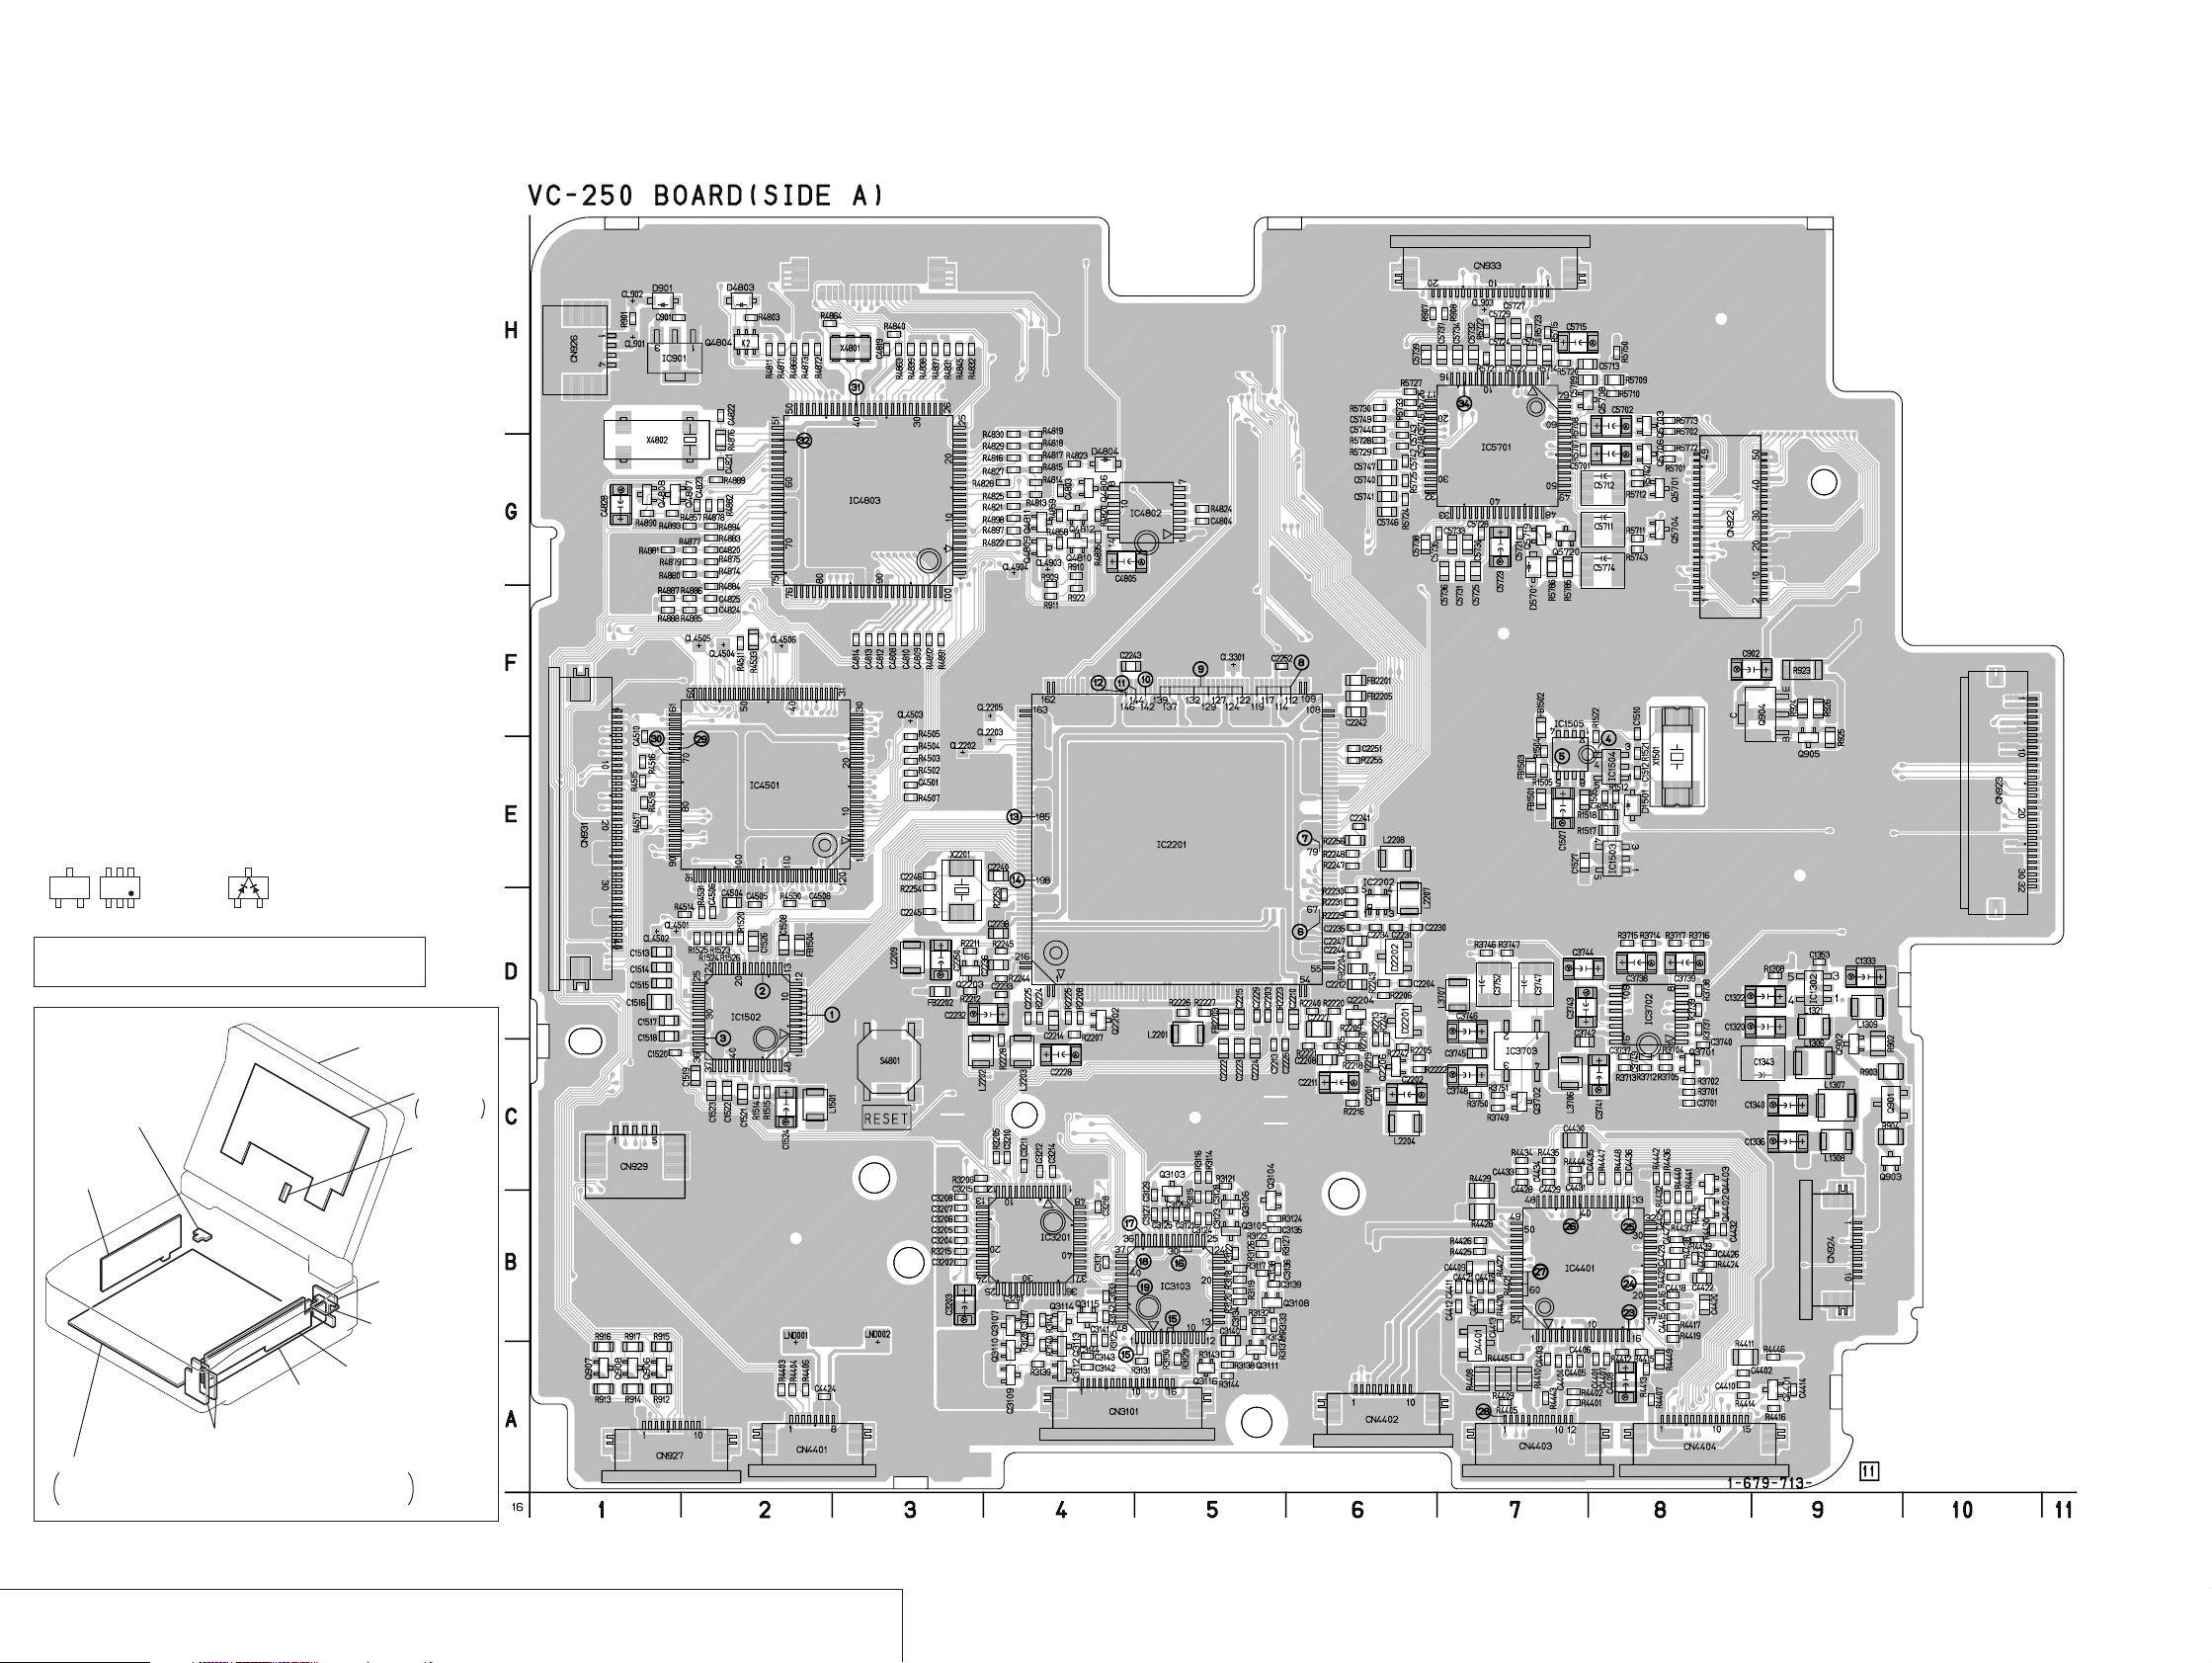
GV-D200/D200E/D800/D800E
)
VC-250 (REC/PB AMP, DAC, DV INTERFACE, AD CONVERTER, Y/C PROCESSOR, LINE A/D, LINE I/O, IR, AUDIO I/O, DRUM/CAPSTAN MOTOR DRIVE, MECHA CONTROL,
HI CONTROL, DC/DC CONVERTER, CONNECTION) PRINTED WIRING BOARD
— Ref. No. VC-250 Board; 30,000 Series —
For printed wiring board
• Refer to pages 4-70, 71 for parts location.
• VC-250 board consists of multiple layers. Howe ver , only
the sides (layers) A and B are shown.
• Chip parts
Transistor Diode
C
BE
5
46
2
31
3
21
There are few cases that the part printed on this
diagram isn’t mounted in this model.
LCD DISPLAY
MODULE
(D800/D800E ONLY)
FP-602
(DV IN/OUT)
EX-36
(MULTI CONNECTOR)
IR-38
(IR TRANSMITTER)
PD-130
LCD DRIVER,
BACK LIGHT
LS-56
(LCD SWITCH
FP-575
(LANC)
FU-145
IO-68
(AV IN/OUT)
FP-246
VC-250
REC/PB AMP, DAC, DV INTERFACE, AD CONVERTER, Y/C PROCESSOR,
LINE A/D, LINE IN/OUT, IR, AUDIO IN/OUT, DRUM/CAPSTAN MOTOR DRIVE,
MECHA CONTROL, HI CONTROL, DC/DC CONVERTER
(REMOTE COMMANDER RECEIVER)
(DC/DC CONVERTER)
REC/PB AMP, DAC, DV I/F, Y/C PROCESSOR, LINE, SERVO, MECHA/HI CONT, D-D CONV.
VC-250
4-8
Page 56
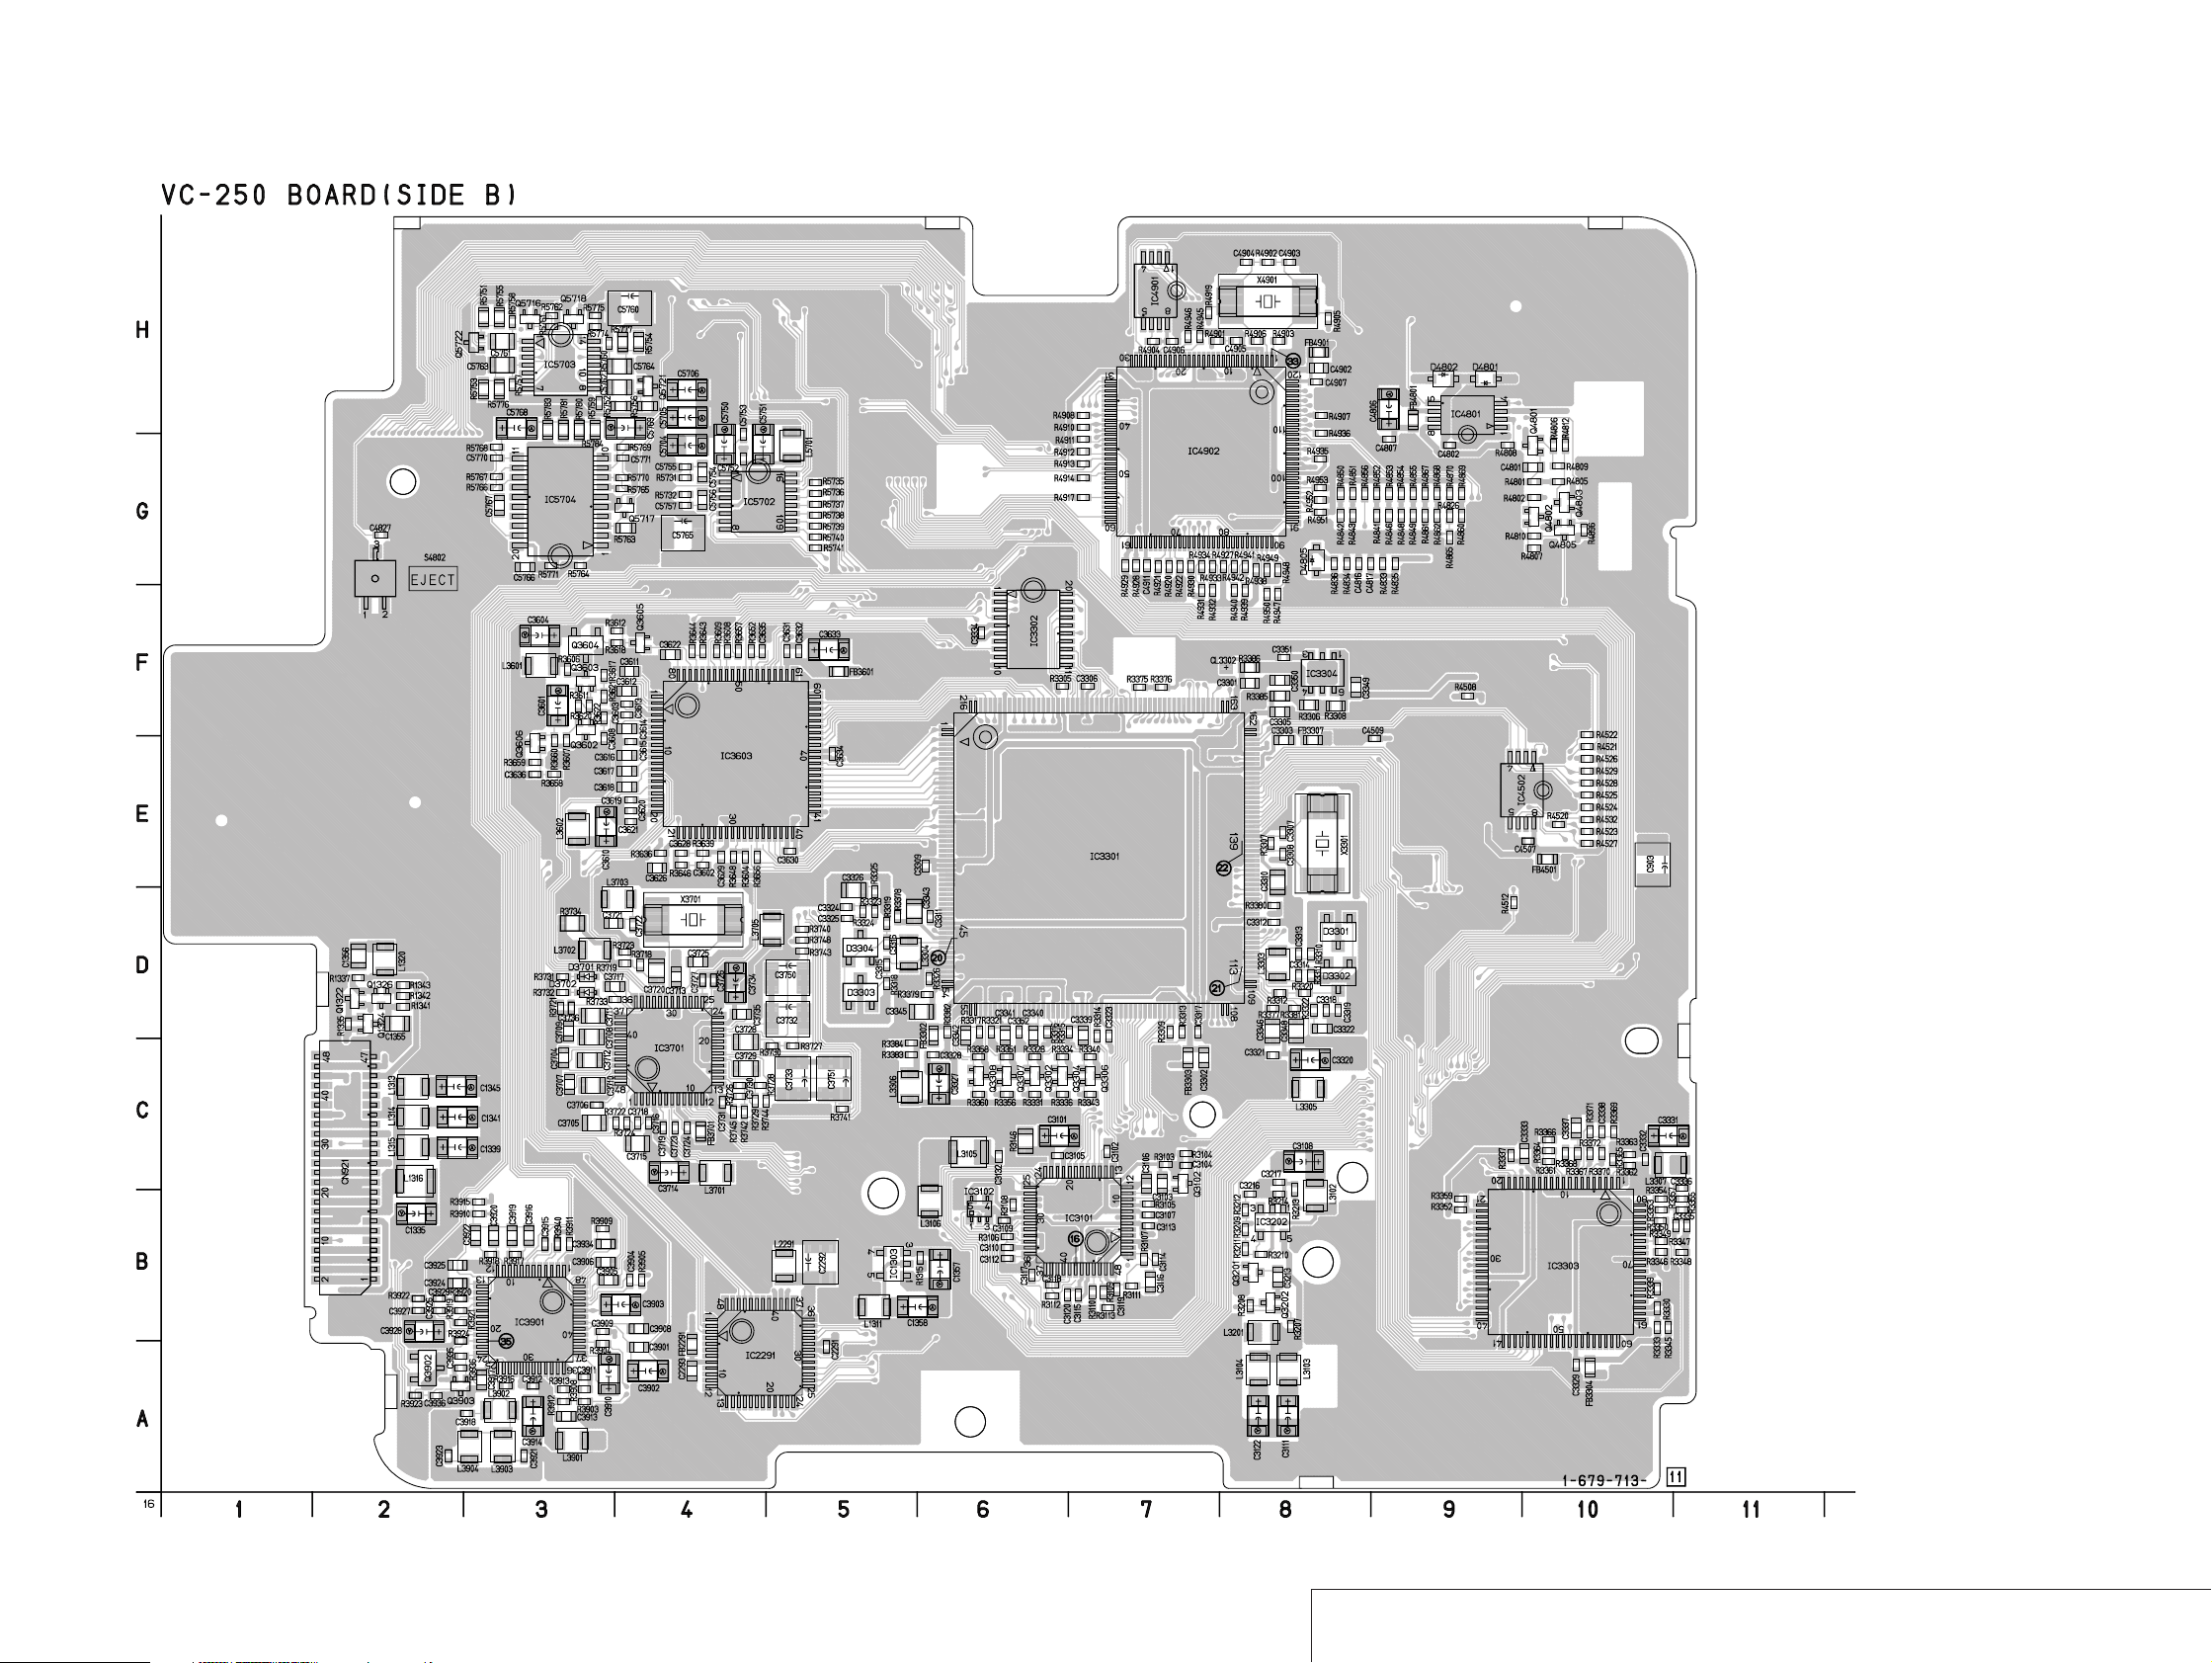
GV-D200/D200E/D800/D800E
4-9
REC/PB AMP, DAC, DV I/F, Y/C PROCESSOR, LINE, SERVO, MECHA/HI CONT, D-D CONV.
VC-250
Page 57
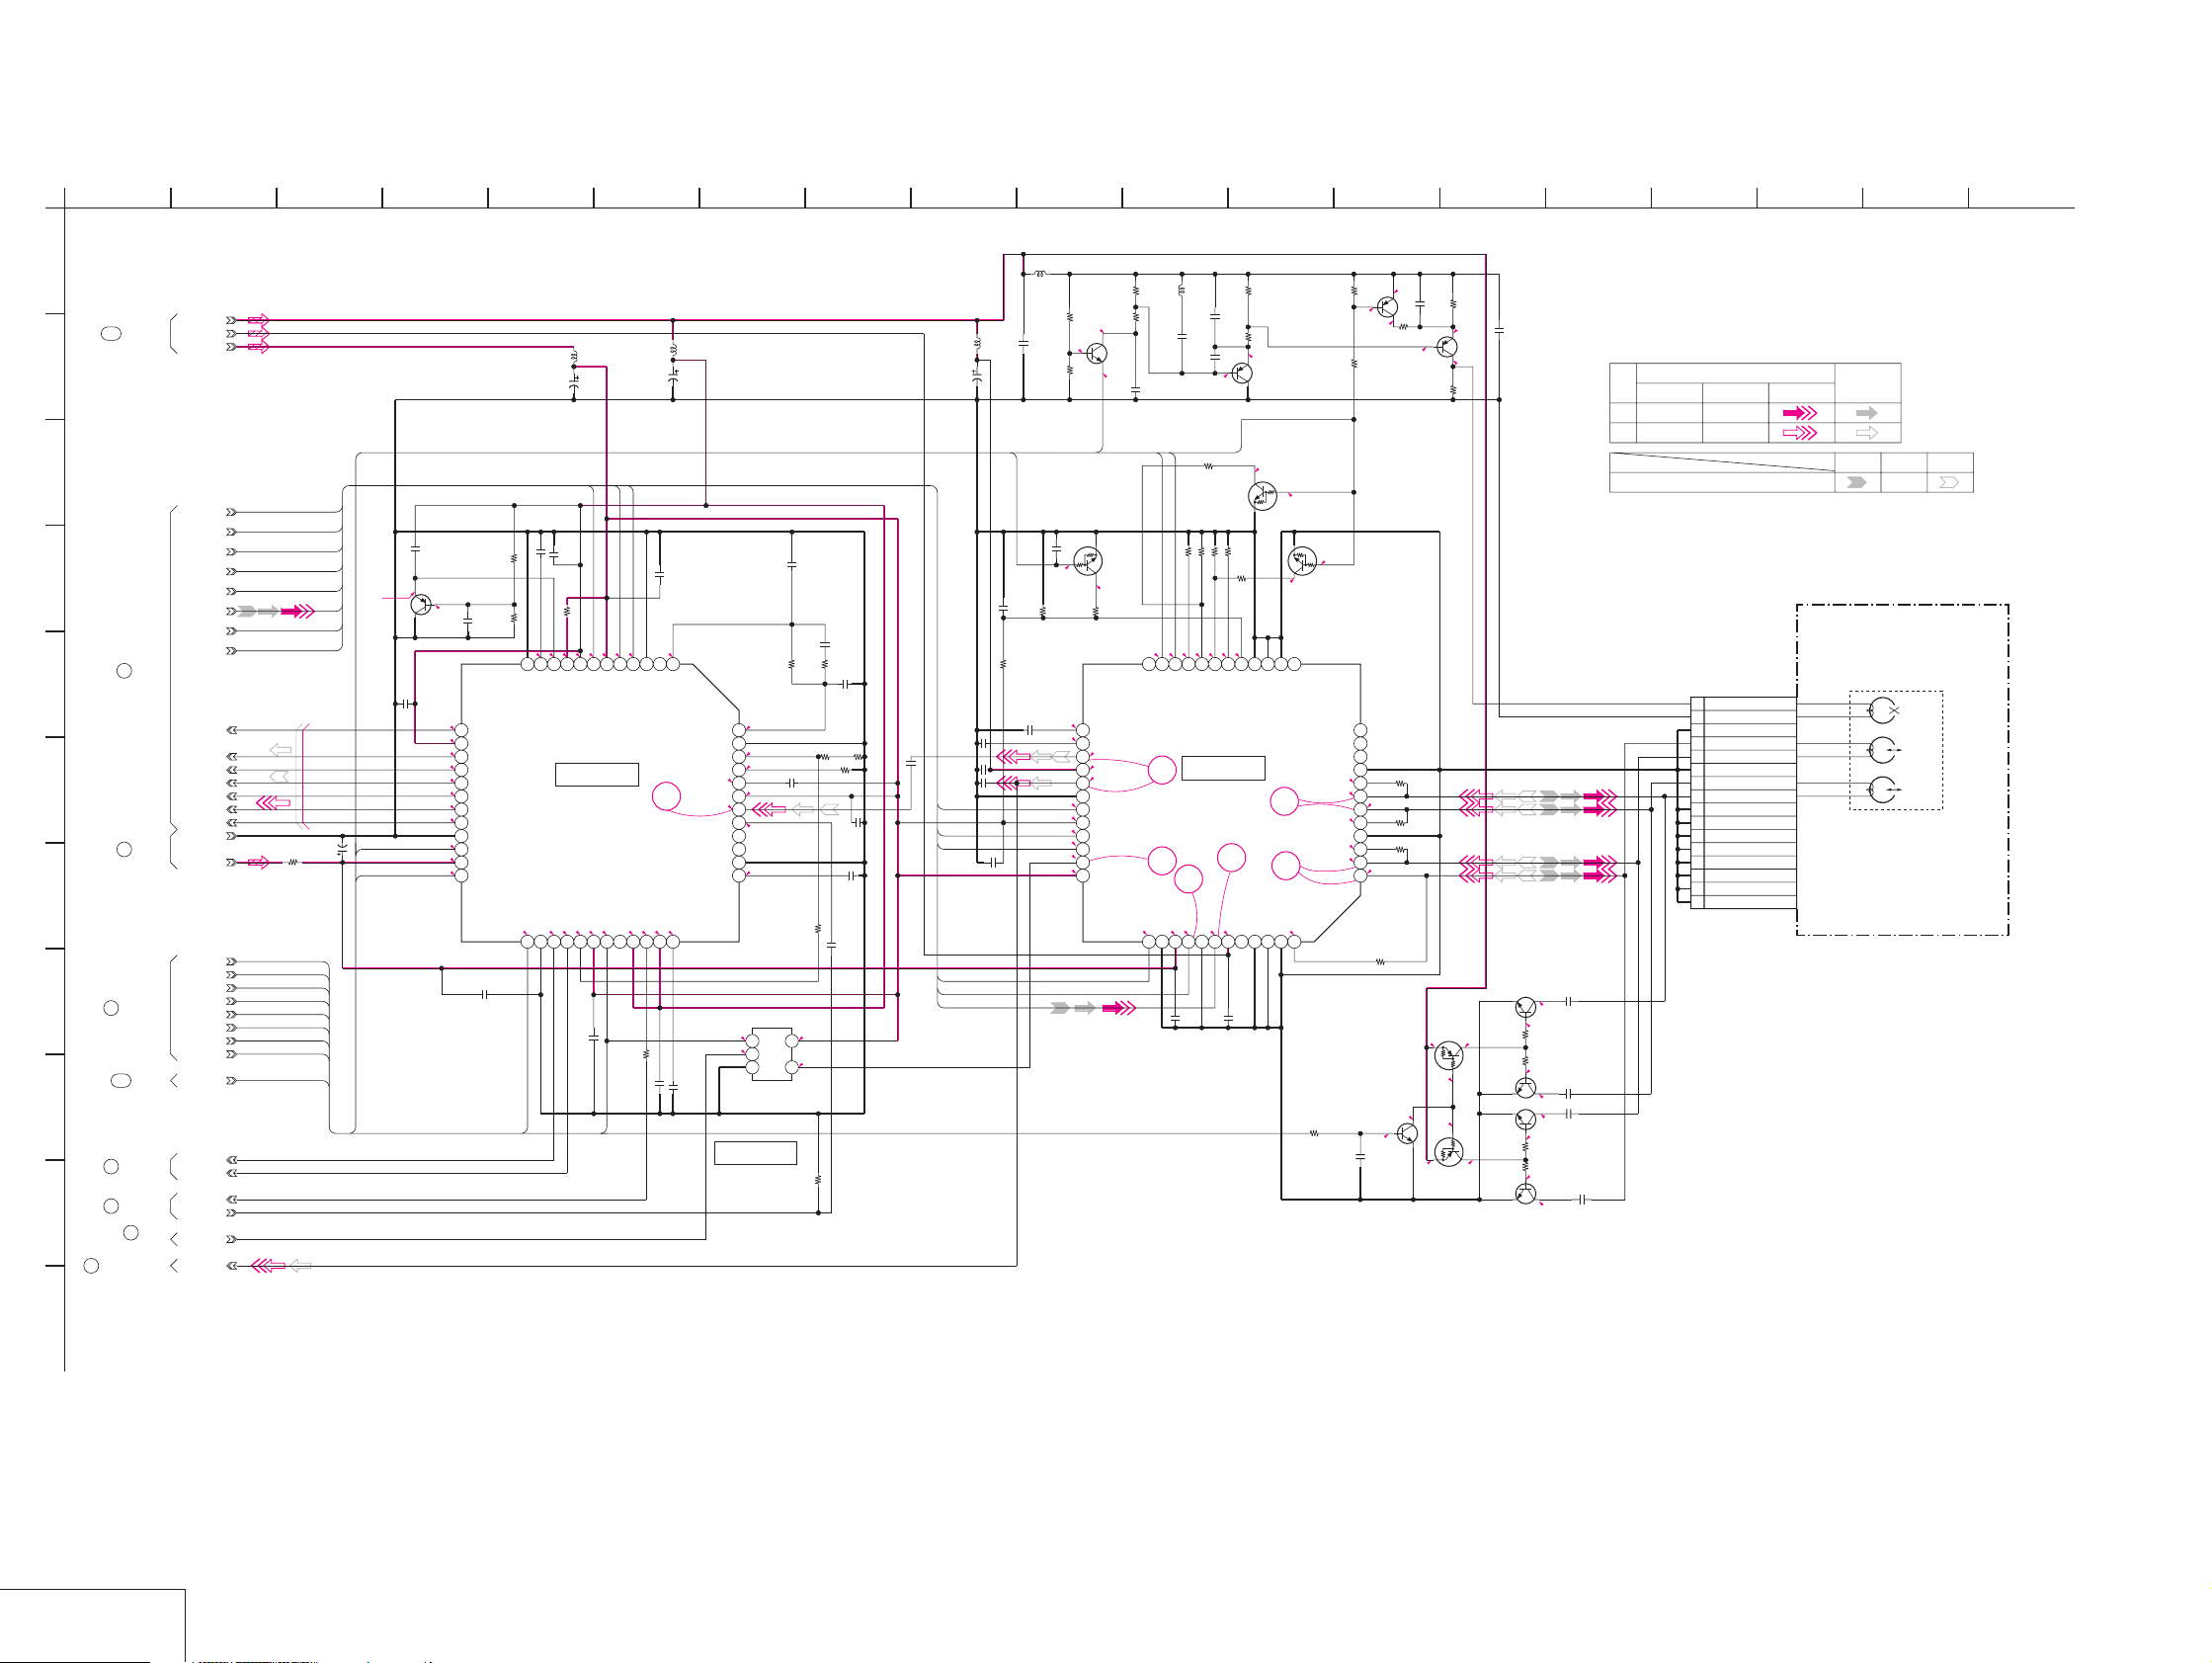
GV-D200/D200E/D800/D800E
For Schematic Diagram
• Refer to page 4-7 for printed wiring board.
• Refer to page 4-68 for waveforms.
1
38
5 136
924 7
10
11 1514
12
1716 18 19
VC-250 BOARD(1/16)
REC/PB AMP(RF BLOCK)
A
-REF.NO.:30000 SERIESXX MARK:NO MOUNT
101
TO(15/16)
B
C
D
E
1
F
2
G
H
3
TO(13/16)
118
I
4
TO(12/16)
5
TO
(2/16,11/16,16/16)
6
TO(2/16,16/16)
TO(16/16)
68
J
TO(3/16)
TO(3/16)
TO(2/16)
RP_4.75V
RP_6.0V
SW_PS
ALL_PS
PLLMSK
REG_GND
RF_1.9V
DRP_SO
XDRP_SCK
XCS_TRF
REC_CRRT0
REC_CRRT1
DV_RF_SWP
DRUM_8PB
XFE_ON
XMP/ME
T_REEL_EVR
S_REEL_EVR
RF_MON
VC_RF_SWP
DV_PB_RF
A_2.8V
RECA1
RECA2
RECCK
RECDT
PLLSW
ADDT0
ADDT1
ADDT2
ADDT3
ADDT4
ADDT5
RF_IN
NO MARK:REC/PB MODE
R :REC MODE
P :PB MODE
C3121
0.01u
L3104
10uH
C3122
10u
10V
A
TA
C3124
6800p
B
B
C3126
0.01u
B
C3125
XX
F
RECA2
RECA1
SW_PS
C3127
0.01u
B
ALL_PS
RECCK
RECDT
L3103
PLLSW
7
2.8
6
REC XP
1.4
DV_RF_SWP
RECDT
PLL VCC
0.8
5
R3106
0.01u
REC DATA
C3110
PLLMSK
0
4
4.7
0
B
PD HOLD
R0.1/P0.5
10uH
C3111
10u
10V
TA
3
PLL GND
DRUM_8PB
A
C3113
0.01u
2
FAST ACCESS
16
4.7
B
2.3
1
CP TC2
R3.4/P2.2
C3112
C3114
47p
CH
C3116
0.033u
B
R3111
R3107
470
150k
C3119
47p
R3109
0.1u
B
R3108
1M
2.8
1.4
45
R3112
68
R3110
CH
12k
12k
10k
R3113
C3120
0.01u
B
C3117
470p
B
C3118
0.01u
B
R2.3/P2.1
CP TC1
48
F GND
47
R0.1/P1.2
R REF2
46
R0/P0.6
R REF3
45
DECUP
IN
TESTIN
F VCC
44
2.8
43
42
41
2.8
40
39
38
R3.4/P2.3
37
TC7S86FU(TE85R)
1.4
123
2.7
IC1302
AMP
C3115
IC3102
R2.2/P1.9
R0.1/P2.7
DC_TC2
DC_TC1
AGC GND
AGCTC2
470p
B
L3102
10uH
C3108
10u
6.3V
A
TA
SW_PS
ALL_PS
RECA1
RECA2
RECCK
RECDT
PLLSW
PLLMSK
PBCK
C3101
XX
6.3V
R3146
0
DRP_SO
XDRP_SCK
XCS_TRF
REC_CRRT0
REC_CRRT1
DV_RF_SWP
DRUM_8PB
XFE_ON
XMP/ME
R0.5/
P2.6
C3102
0.01u
B
XDRP_SCK
DRP_SO
C3103
XX
B
Q3102
2SA1832F-Y/GR(TPL3)
V,REF
1.9
C3104
0.01u
B
R0/P1.1
4.7
R0/P1.1
R0/P1.1
R0/P1.1
R0/P1.1
R0/P1.1
R0/P1.1
2.7
1.9
0
13
14
15
16
17
18
19
20
21
22
23
24
CLK
AD D VCC
DATA0
DATA1
DATA2
DATA3
DATA4
DATA5
AD D GND
XSCK
VDD
SI
C3106
XX
F
C3107
0.01u
B
R3105
0
R0.5/P3.1
R0.5/P2.6
2.8
9
10
11
12
VRT
VRB
AD A GND
IC3101
EQ,PLL,A/D CONVERTER
XCS26S IO GND27ATF328ATF229ATF130I/O VCC31JSWP32ATF OUT33BUF VCC34BUF OUT35AGC VCC36AGCTC1
2.7
1.4
1.4
25
XCS_TRF
C3105
0.01u
R3103
10k
R3104
6800
B
4.702.8
8
AD A VCC
LOCK MON
IC3101
CXA2071R-T4
R2.6/P1.3
B
0.01u
C3109
C3132
XX
B
DRUM_8PB
C3128
0.01u
R3114
4700
L3105
220uH
R3123
22k
R3124
22k
Q3104
2SC4738F-Y/GR(TPL3)
FE SWITCH
C3129
XX
F
0
R3115
10k
B
C3123
6800p
B
R0/P2.1
R0/P2.2
R1.8/P0
2.8
R1.8/P0
R1.9/P0
1.4
2.8
R2.1/
P4.6
R1.4/
P2.3
XFE_ON
Q3103
RN1104F(TPL3)
SWITCH
CO
25
CE
26
R4.2/P2.4
PBYOUT
27
4.7
VCC2
28
PB X OUT
29
GND
30
RECA2
31
VCC3
32
RECA1
33
PBSW_PS
34
CONT0
35
CONT1
36
R3126
L3106
22k
12uH
C3135
C3138
C3136
82p
CH
C3139
100p
CH
REC_CRRT0
REC_CRRT1
22kR3117
2.7
2.7
R2.2/P1.3
21
22
23
24
CL
RECCONT_E
RECCONT_O
16
1.9
R3116
R4.2/P2.4
R3127
R1.2/
P2.8
33k
0
17
18
0
1.9
R0.6/P0
ALL_PS38TEST39VDD40CLK41GND42DATA43VCC144NC45GND46GND47GND48D1E
37
C3131
0.01u
B
100p
CH
150p
CH
R3.7/P4.6
R3122
68k
±
0.5%
R3119
27k
±
0.5%
±0.5%
13kR3118
R2.8/P2.6
2.7
19
20
PB_IR
RECI_IR
IC3103
REC/PB AMP
IC3103
CXA2072R-T4
R0.8/P0
R3132
270
R3133
220
1.3
18
PEAKI_IR
19
5.9
C3133
0.01u
B
XMP/ME
R3120
R3121
1.9
17
PEAKT_IR
22k
12k
FBDP_R
R3.4/P4.6
Q3108
2SA1832F-Y/GR(TPL3)
ERASE OSC
0
RN1104F(TPL3)
TAPE SELECT
±0.5%
0
±0.5%
14
GND15GND16GND
15
15
Q3105
4.6
13
D2L
R4.7/P1.7
RN1104F(TPL3)
TAPE SELECT
R4.7/P1.7
R4.4/P1.7
R4.7/P1.7
R4.7/P1.7
R4.4/P1.7
R3128
10k
2SA1832F-Y/GR(TPL3)
R3136
2200
R3137
4700
4.6
Q3106
YL
12
XL
11
D1L
10
9
GND
8
D2O
7
YO
6
XO
5
DIO
4
GND
3
D2E
2
YE
1
XE
Q3107
2SC4738F-Y/GR(TPL3)
C3137
0.01u
B
Q3111
4.6
R4.2/P4.6
R4.0/P4.6
Q3104,3108,
Q3111,3116
FLYING ERASE
OSD
R4.4/P1.7
R4.4/P1.7
R3125
220
±0.5%
Q3109
RN2102F(TPL3)
0
4.6
R3138
100
Q3116
2SA1965-S-TL
R3129
±0.5%
R3130
±0.5%
R3131
±0.5%
4.7
C3140
XX
220
220
220
4.7
4.7
4.7
4.7
Q3110
RN2102F(TPL3)
R3144
560
R-0.6/
P-0.4
R-0.6/
R4.2/
P4.6
0
R3143
P-0.4
56
C3134
0.1u
B
Q3111,3116
FE OSC AMP
2SC4738F-Y/GR(TPL3)
R3139
R-0.6/P-0.4
3900
R3140
3900
R-0.6/P-0.4
R-0.6/P-0.4
R3141
3900
R3142
3900
R-0.6/P-0.4
Q3115
2SC4738F-Y/GR(TPL3)
Q3112
0
C3142
220p
CH
Q3113
2SC4738F-Y/GR(TPL3)
C3143
220p
CH
0
0
C3144
220p
CH
Q3114
2SC4738F-Y/GR(TPL3)
C3141
220p CH
0
SIGNAL PATH
VIDEO SIGNAL
REC
PB
Ref.signal
16
15
14
13
12
11
10
9
8
7
6
5
4
3
2
1
Q3107,3109
3110,
Q3112-3115
Hi8/Std8
PB ON SW
FEX
FEY
GND
YEVEN
XEVEN
GND
YODD
XODD
GND
GND
GND
LP1Y
LP1X
GND
LP2X
LP2Y
Y/CHROMA
AUDIO
SIGNAL
PBREC/PBREC
MECHA DECK(1/2)
(B710 MECHANISM)
VIDEO HEAD
FLYING
ERASE
EVEN
CH
ODD
CH
16PCN3101
K
16
REC/PB AMP
VC-250 (1/16)
4-11 4-12
Page 58
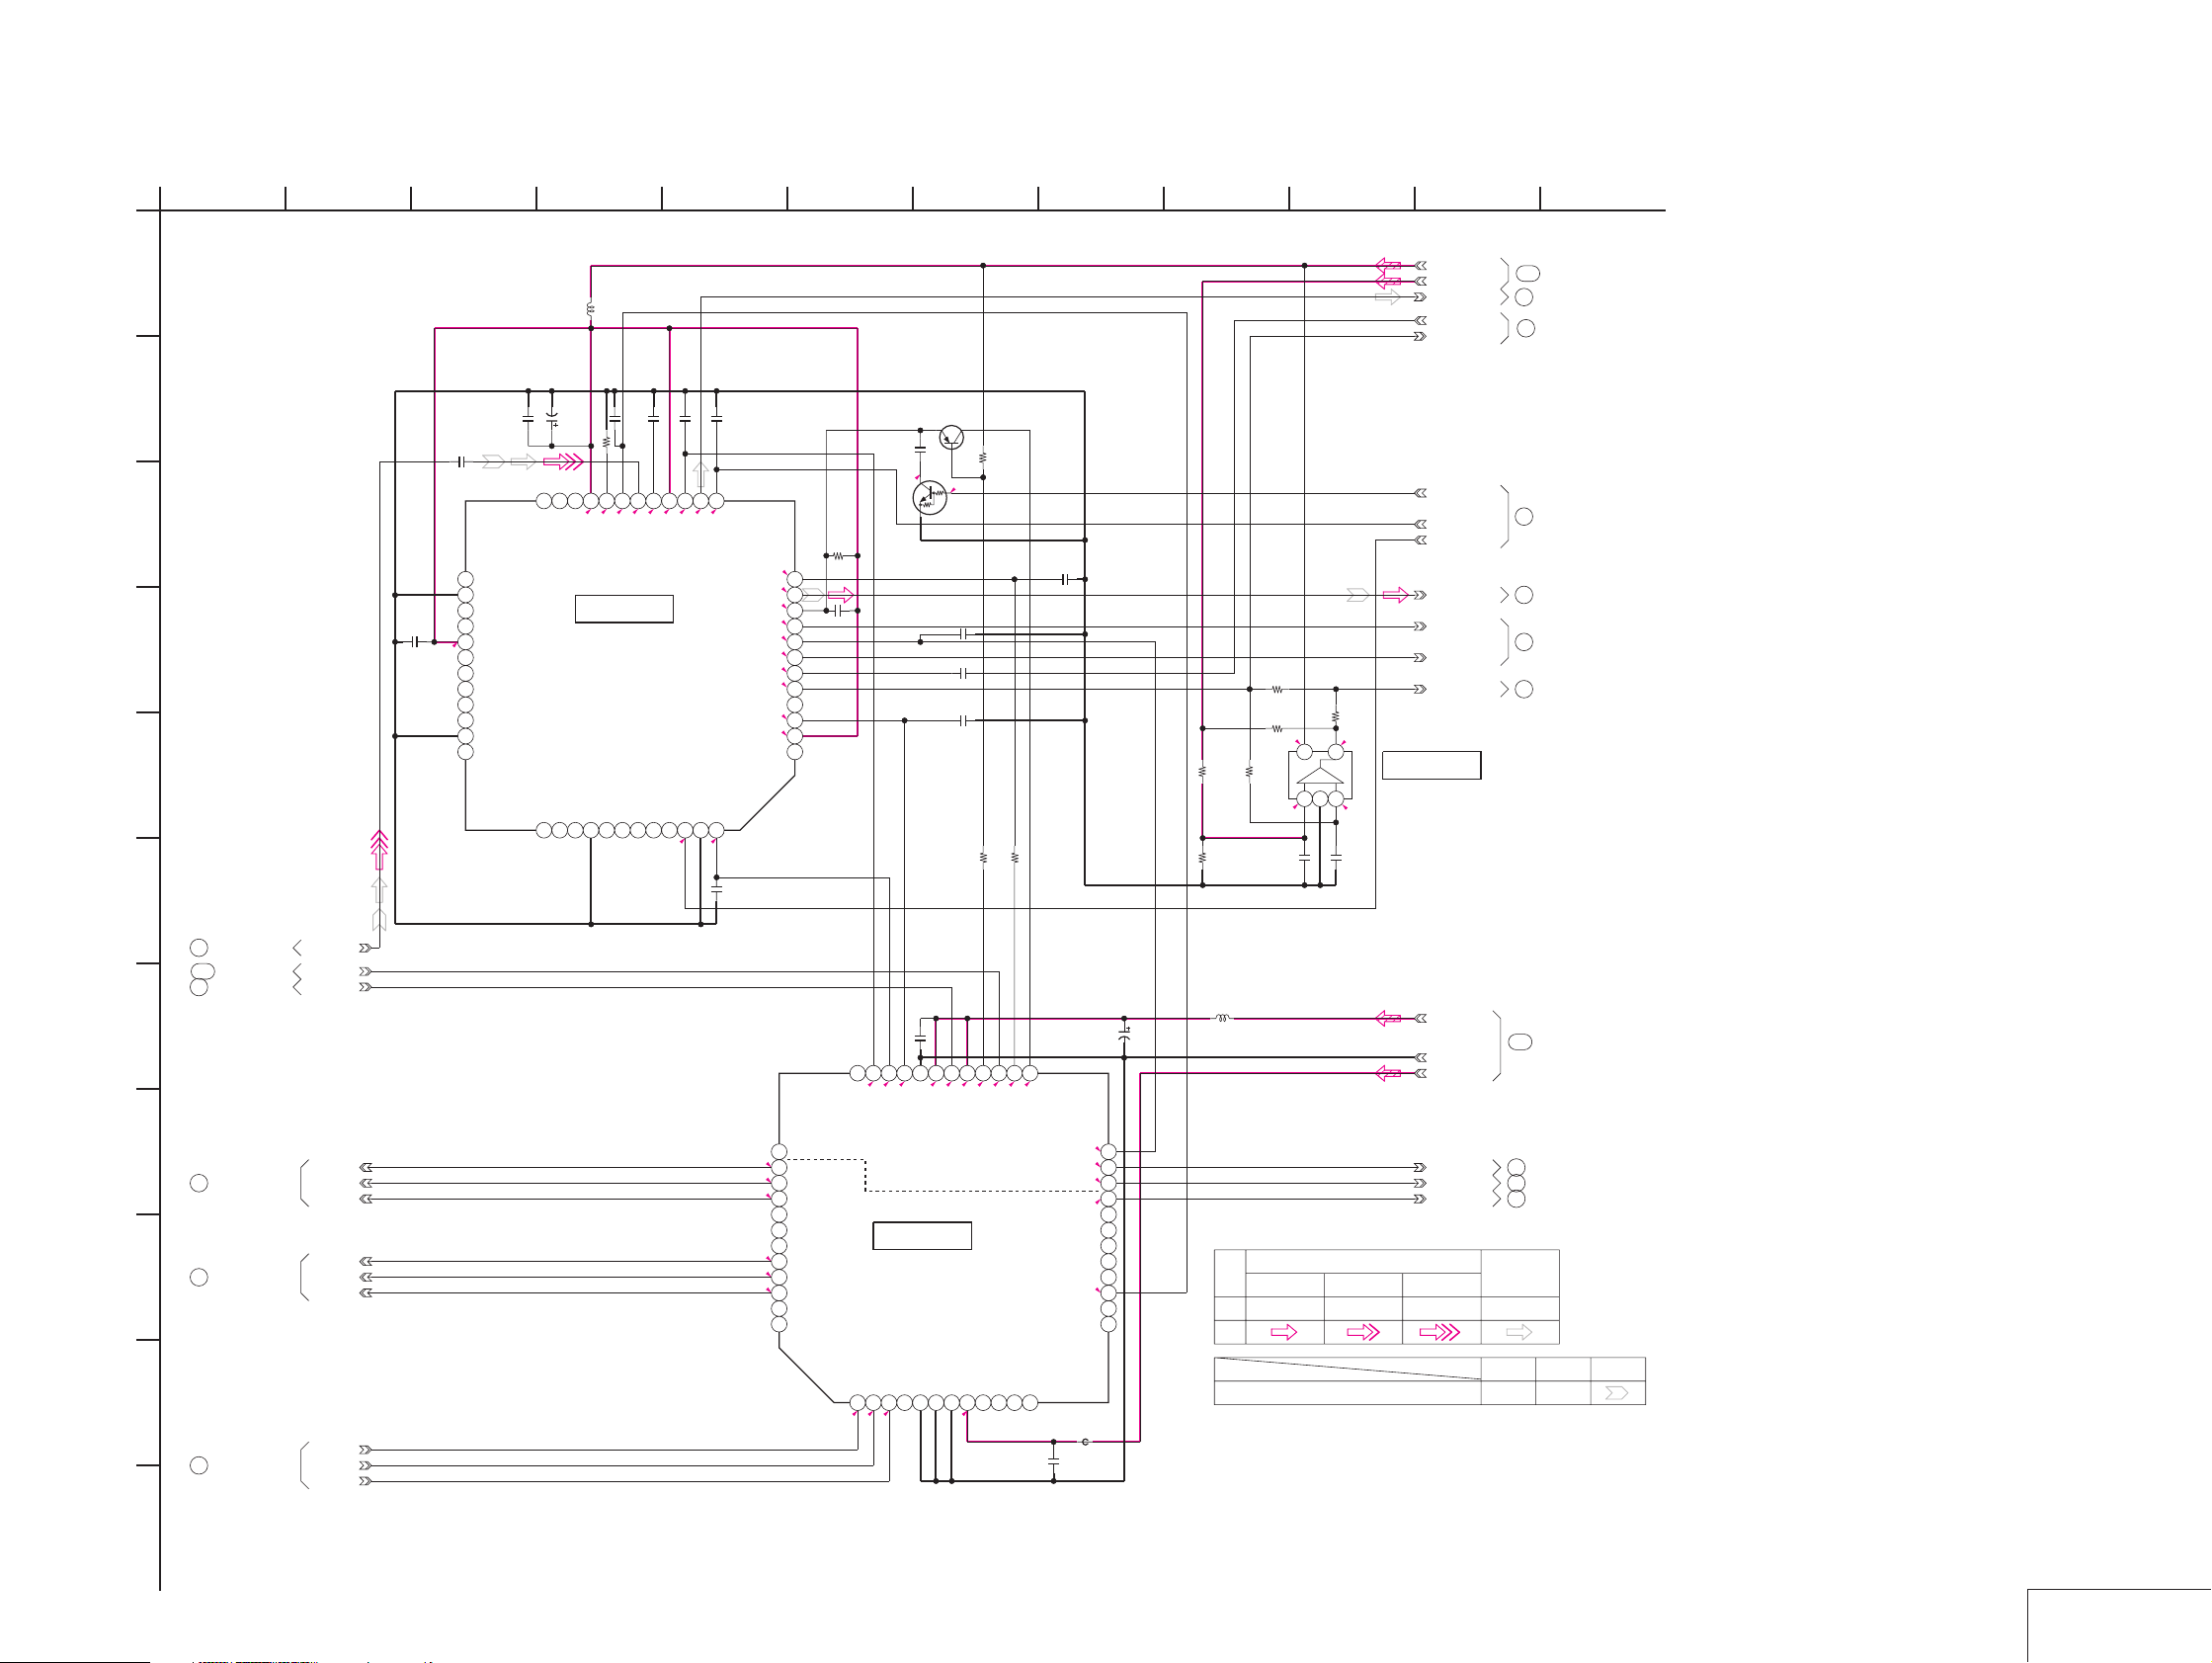
For Schematic Diagram
• Refer to page 4-7 for printed wiring board.
1
38
56
924 7
10
11
GV-D200/D200E/D800/D800E
12
VC-250 BOARD(2/16)
PB AMP,DAC(RF,ER BLOCK)
A
-REF.NO.:30000 SERIESXX MARK:NO MOUNT
NO MARK:REC/PB MODE
R :REC MODE
P :PB MODE
B
C
D
E
F
C3201
0.01u
RP_4.75V
A_2.8V
L3201
22uH
C3206
C3204
0.01u
B
C3203
C3202
0.01u
B
C3205
0.01u
B
REC DUMP1
25
GND
26
REC1 OUT
27
PB1 IN
28
B
VCC AMP
29
4.6
PB DUMP1
30
PB DUMP2
31
BIASADJ
32
PB2 IN
33
REC2 OUT
34
GND
35
REC DUMP2
36
10u
150k
10V
±0.5%
TA
R3215
20
21
22
23
24
4.600.5
VCC
REC1 IN
VPSW1 OUT
RAMP IR
RAMP V1
IC3201
Hi8/Std8
PB AMP
IC3201
CXA3265R-T4
RAMP V238REC2 IN39VSSW2 OUT40GND41PCM IN42RAMP CONT43RAMP44PCM REC45AFREC46BOTH_REC/DV PBPS
37
19
MT_Q
0.01u
18
MTIN
R0.9/P0.7
B
17
CARDET
R1.8/P2.7
C3207
0.01u
B
14
15
16
4.6
2.1
MT_F0
R0.1/P0
PCMOUT/MTSW
YLPFOUT/CARDETOUT
47
0
C3208
0.01u
B
13
2.7
RP_PB
PBRFOUT
DOC_DET
CLPFOUT
RF AGCOUT
Y/C/ATF IN
REC_Y/MT_CONT
SWP48REC_L_CONT
2.9
C3218
0.01u
B
AGC TC
RP_IR
R0/P2.6
Y MIX
AFM IN
VCC3
Q3202
XX
C3213
0.047u
B
0
R3205
470k
2.4
12
0
11
4.4
10
0
9
0
8
0
7
DOP
0
6
5
4
0.8
3
4.6
2
1
C3210
4700p
B
Q3201
RN1104F(TPL3)
SWITCH
C3211
0.01u
C3212
0.01u
C3214
0.01u
R3208
R3207
XX
0
C3215
0.01u
B
B
R3209
XX
R3213
470k
R3214
220k
R3212
R3210
560k
10k
C3217
0.01u
4.7
0.9
B
B
R3206
470k
XX
R3211
0
R0/
P2.8
4
5
+-
123
R0/
P2.5
C3216
B
0.1u
B
PB_RF
F0_ADJ_RF_IN
RF_ENV
AGC_SLOW
RP_PB_MODE
RP_POWER_SAVE
PB_C_RF
RF_AGC_OUT
DOP
RF_ENV_DET
IC3202
RF ENV DET
IC3202
TA75S393F-TE85R
102
97
TO(11/16,16/16)
13
14
TO(10/16)
15
TO(5/16,6/16)
16
TO(6/16)
17
TO(10/16,13/16)
TO(15/16)
TO(16/16)
6
TO(1/16,16/16)
118
TO(1/16)
TO(1/16,11/16,
68
16/16)
G
H
7
TO(9/16)
8
I
TO(11/16)
J
9
TO(10/16)
DV_PB_RF
XMP_ME
VC_RF_SWP
IR_A_DEV
IR_CARR
IR_V_DEV
1.5M_DEV
AU_BPF
1.7M_DEV
VC_SO
XVC_SCK
DA_STB
C2291
0.01u
B
252627282930313233343536
2.1
2.9
0.8
4.6
2.7
4.6
4.6
4.6
0.9
4.6V(VCC)
XRF_AGC_OFF
5V
3V
2.8V(VDD1)
HALL_OFFSET
XMP/ME
DOC_DET
HALL_GAIN
HALL_REF
3.8
(BW_CONTRAST)
RF_AGC_CONT
PRINT_HEAD_DDCONT
REC_BIASSI
37
ACC/RF_CONT
0.6
38
AUDIO_DEV
1.7
39
VIDEO_CAR
0.9
40
VIDEO_DEV
41
ND_CONT
42
LCD_BL_CONT
43
V_ON
0.7
44
1.5M_DEV
2.1
45
AU_BPF
1.0
46
1.7M_DEV
47
A_FADE
48
ZM_MIC_CONT
MB88344BPFV-G-BND-ER
XSCK
123456789101112
0.1
2.5
RF_ENV_DET_LEVEL
IC2291
D/A CONVERTER
(EVR)
N.C.
GND
STB
0
4.6V(VDD2)
IC2291
C0
VSS1 SWP(C1)
2.8
VSS2
MT_F0
MT_CONT
RP_IR
AFC_F0_ADJ
FRQ_TUNE
CFG_DUTY
(BW_BRIGHT)
N.C.
(BW_VCO)
(BW_BL)
R5.1/P0.5
MT_Q
AGC_CONT2
AGC_CONT1
C2293
1u
B
1608
FB2291
0uH
C2292
22u
10V
TA
0
24
2.9
23
2.9
22
21
1.1
20
19
18
17
16
15
14
13
L2291
10uH
SIGNAL PATH
CHROMA Y
REC
PB
Ref.signal
VIDEO SIGNAL
A_4.75V
REG_GND
AU_2.8V
AFC_FO_ADJ
FRQ_TUNE
CFG_DUTY
Y/CHROMA
103
11
12
10
AUDIO
SIGNAL
TO(15/16)
TO(6/16)
TO(5/16)
TO(12/16)
PBREC REC/PB
K
16
PB AMP, DAC
4-13 4-14
VC-250 (2/16)
Page 59
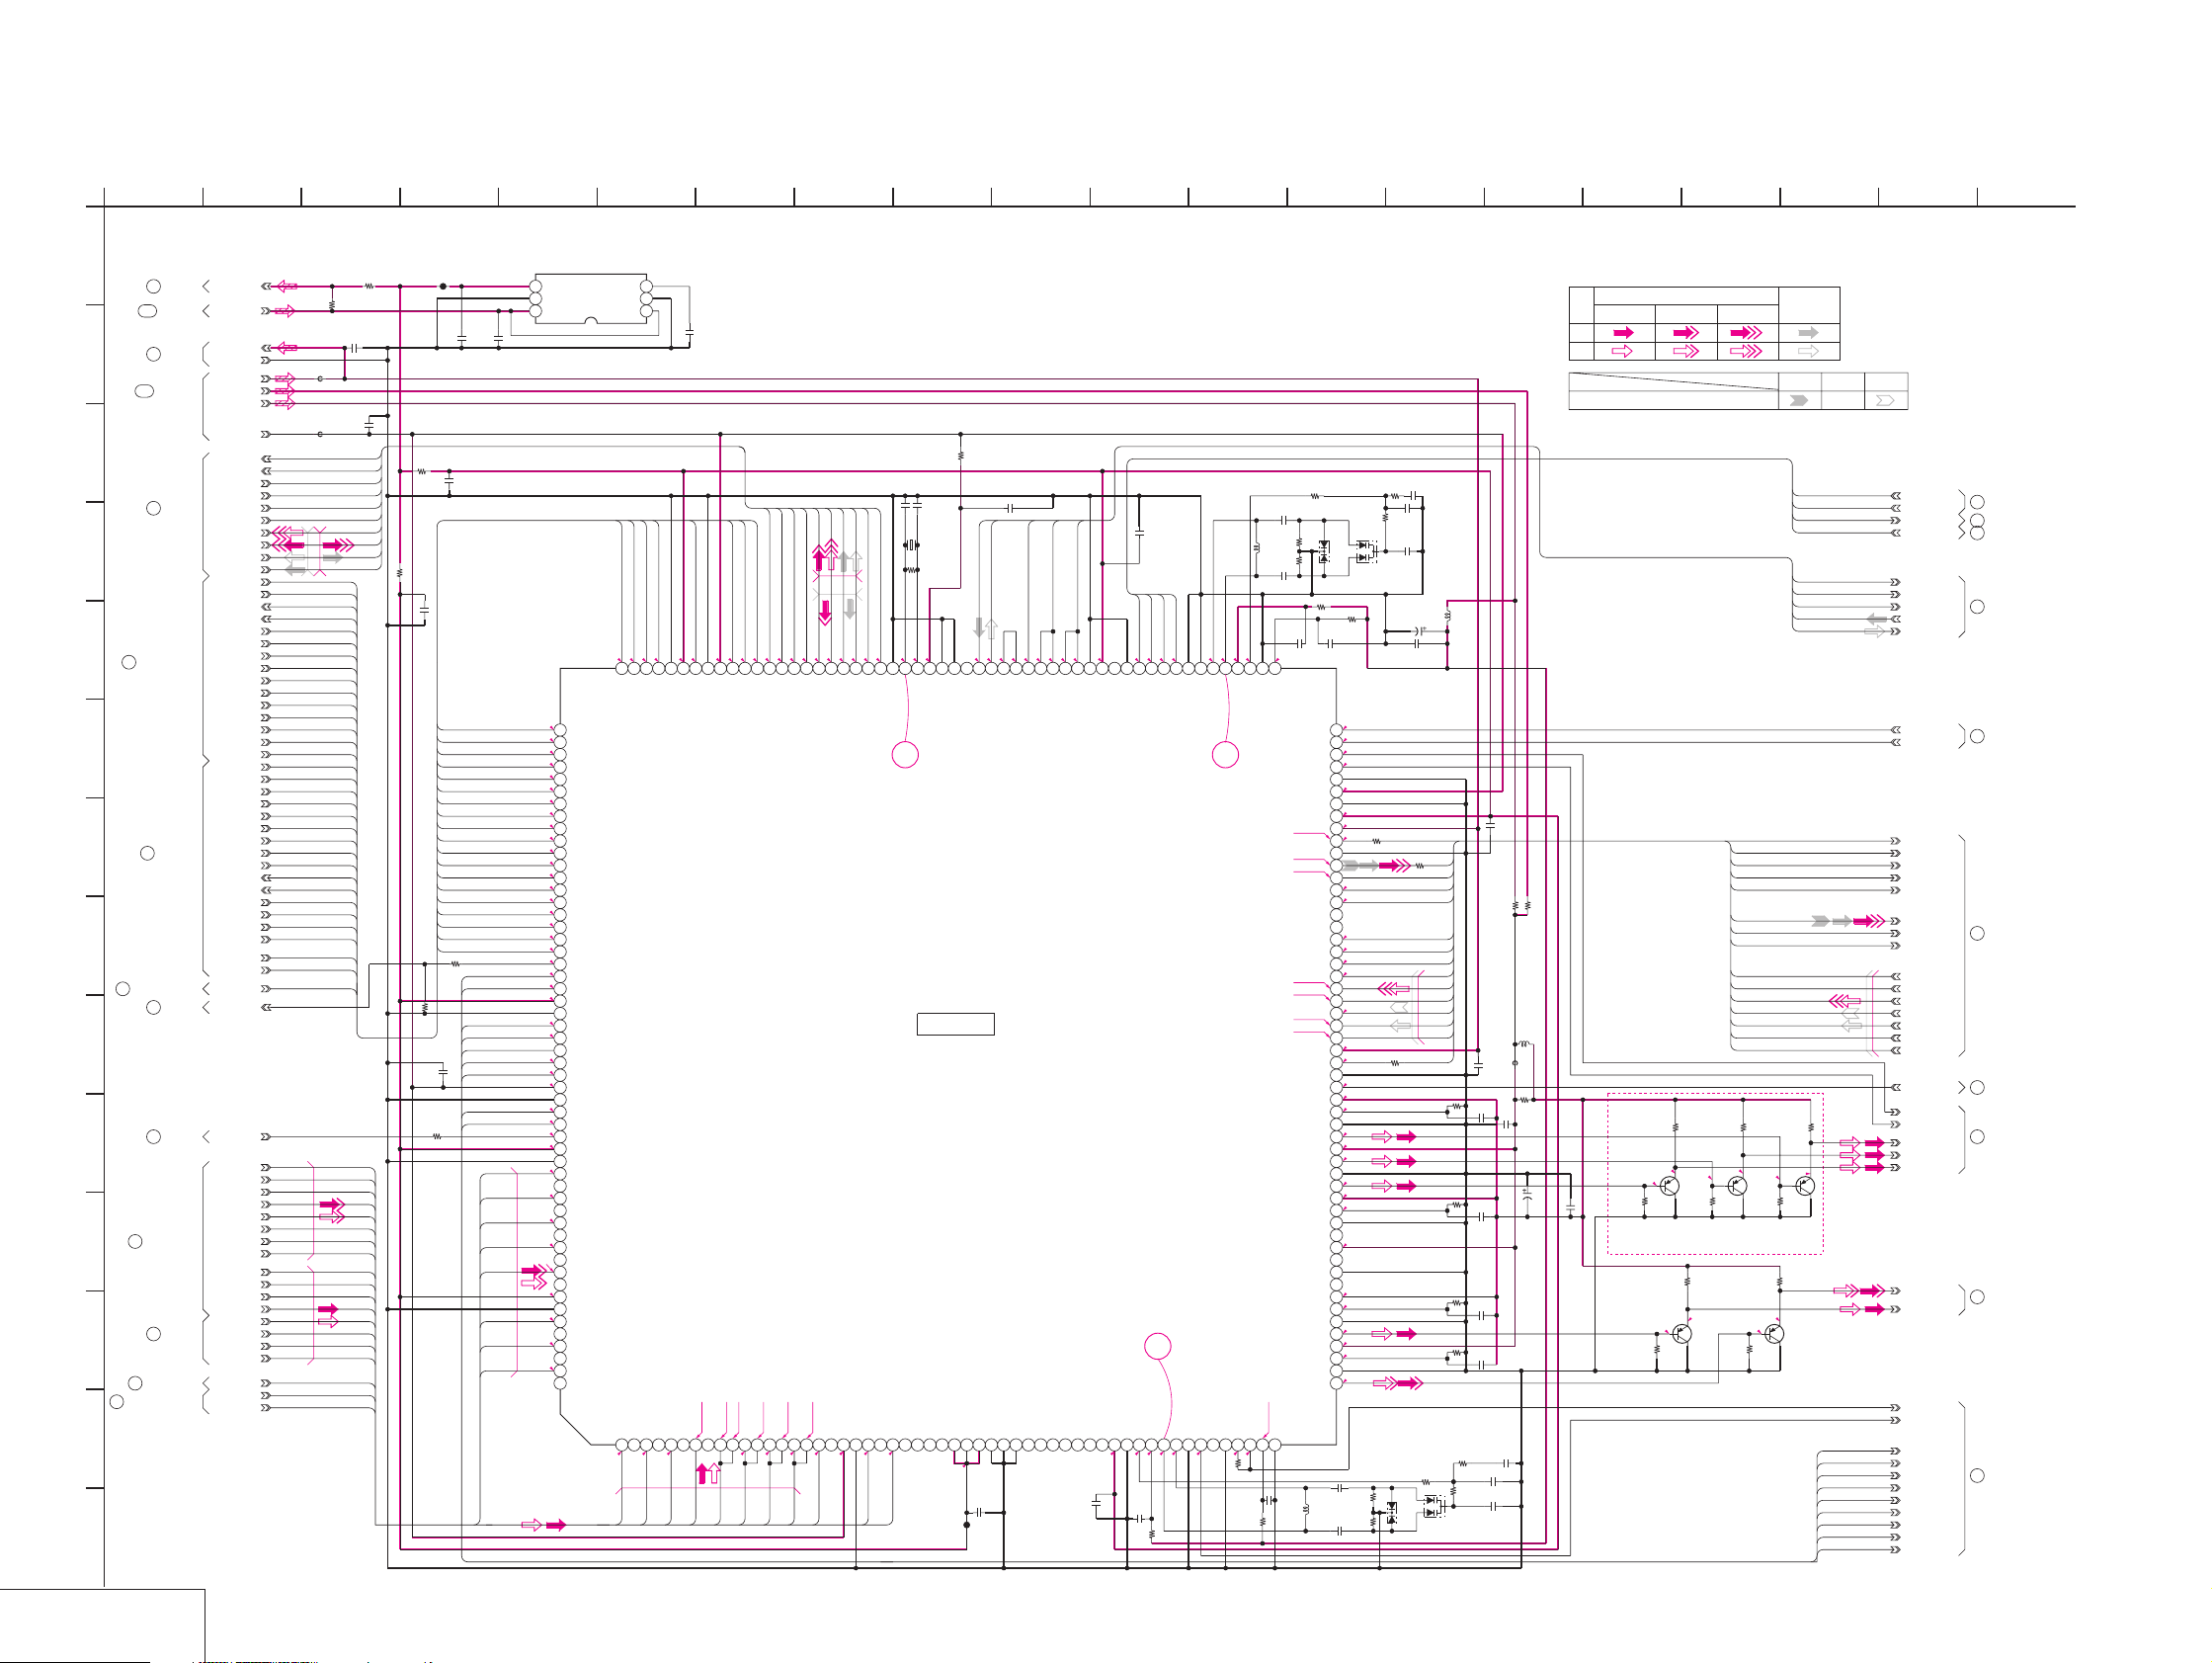
GV-D200/D200E/D800/D800E
For Schematic Diagram
• Refer to page 4-7 for printed wiring board.
• Refer to page 4-68 for waveforms.
1
VC-250 BOARD(3/16)
DV INTERFACE
-REF.NO.:30000 SERIES-
A
XX MARK:NO MOUNT
23
104
B
2
105
TO(15/16)
C
18
D
E
22
TO(4/16,13/16)
F
G
19
TO(13/16)
H
96
TO(13/16,16/16)
24
I
20
25
26
TO(6/16,7/16)
27
95
TO(6/16,7/16)
TO
(6/16,7/16,13/16)
J
K
L
M
N
16
DV INTERFACE
VC-250 (3/16)
TO(6/16)
TO(15/16)
TO(1/16)
TO(4/16)
TO(9/16)
TO(7/16)
TO(7/16)
REG_1.5V
RF_1.9V
REG_GND
AU_2.8V
LIP_SLEEP
XRST_LINK
XRST_PHY
VSP_SO
XVSP_SCK
XRST_VSP
SCOD_WINDOW
XCS_SFD
XCS_VFD
2
(JC-1 BLOCK)
D_1.5V
D_1.9V
A_2.8V
D_2.8V
LCKO
XACC
XENA
DIR
FCLR
FRL
LBUS3
LBUS2
LBUS1
LBUS0
WRX
RDX
FRRV
TRRT
DRP
ALE
MCCE
MCDA0
MCDA1
MCDA2
MCDA3
MCDA4
MCDA5
MCDA6
MCDA7
MCHA0
MCHA1
XDVCN
LPS
OFR
VREF
TRRV
VSP_SI
SWP
IR_FSC
AFCK
IFI_Y0
IFI_Y1
IFI_Y2
IFI_Y3
IFI_Y4
IFI_Y5
IFI_Y6
IFI_Y7
IFI_C0
IFI_C1
IFI_C2
IFI_C3
IFI_C4
IFI_C5
IFI_C6
IFI_C7
IFI_HD
IFI_VD
IFI_OE
3 12 167 1915
R3308
0
C3302
0.1u
B
FB3303
0uH
C3303
FB3307
0.1u
0uH
B
LBUS3
LBUS2
LBUS1
LBUS0
WRX
RDX
FRRV
TRRT
DRP
ALE
MCCE
MCDA0
MCDA1
MCDA2
MCDA3
MCDA4
MCDA5
MCDA6
MCDA7
MCHA0
MCHA1
XDVCN
LIP_SLEEP
LPS
OFR
XRST_LINK
XRST_PHY
VREF
TRRV
VSP_SI
VSP_SO
XVSP_SCK
XRST_VSP
SCOD_WINDOW
XCS_SFD
XCS_VFD
SWP
IFI_Y0
IFI_Y1
IFI_Y2
IFI_Y3
IFI_Y4
IFI_Y5
IFI_Y6
IFI_Y7
IFI_C0
IFI_C1
IFI_C2
IFI_C3
IFI_C4
IFI_C5
IFI_C6
IFI_C7
IFI_HD
IFI_VD
IFI_OE
NO MARK:REC/PB MODE
R :REC MODE
P :PB MODE
R3306
0
LCKO
R3385
XACC
XENA
DIR
FCLR
FRL
0
R3386
C3301
0.1u
R3376
1k
DIR
FRL
FCLR
2.702.702.7
DIR
FRL
FCLR
XENA
R1.0/P0
R1.7/P0
CO6
CO7
CI7
R1.7/P0
R2.5/P0
IFI_HD
IFI_C7
LBUS3
145146147148149150151152153154155156157158159160161162
HI
8
LBUS2
LBUS3
HO
2.7
LBUS2
2.7
LBUS1
2.7
LBUS1
HVDD1
LBUS0
2.7
LBUS0
HVSS1
R2.6/P0
IFI_VD
C3307
LCK0
R1.0/P0.8
VI
4 11
XX
R2.4/P1.5
R2.1/P1.5
R1.7/P1.0
R1.3/P0.8
R1.1/P1.5
R1.2/P1.7
R1.8/P1.2
R0.3/P0.1
R1.3/P2.8
R1.3/P0
R1.2/P0
R1.0/P0
R0.3/P0
R1.4/P0
R1.0/P0
R0.7/P0
R0.8/P0
IC3304
NOISE_BY_PASS
4
Vout
5
GND
6
Vin
2.6
MSCSS
163164165166167168169170171172173174175176177178179180181182183184185186187188189190191192193194195196197198199200201202203204205206207208209210211212213214215216
2.7
WRX
2.7
RDX
1.4
DRP
1.4
SWP
0
ALE
2.3
MCCE
2.2
MCHA0
2.1
MCHA1
MCDA0
MCDA1
MCDA2
MCDA3
MCDA4
MCDA5
MCDA6
MCDA7
0
SCWIN
2.7
XRST
0
F358
2.7
OSDVD
2.5
OSDHD
1.4
RVDD4
RVSS4
0
OSDR
0
OSDL
OSDP
0
COL3
0
COL2
2.7
HVDD4
HVSS4
0
COL1
0
COL0
AFCKI
1.4
RVDD5
RVSS5
YI0
YO0
YI1
YO1
YI2
YO2
YI3
YO3
YI4
YO4
1.4
RVDD6
RVSS6
YI5
YO5
YI6
YO6
YI7
YO7
3
GND
2
Cont
1
C3351
XX
B
XENA
XACC
VREF
FRRV
TRRT
LVSS4
R1.0/P0
TRRV
1.4
1.4
2.7
1.4
0.502.7
VREF
FRRV
TRRT
LVDD4
HVSS3
R1.0/P0
CI3
CO2
CI2
IFI_C3
CO3
IFI_C4
HVDD3
R1.0/P0
CI4
TRRV
CO4
XACC
R1.0/P0
R1.0/P0
CO5
CI5
CI6
R1.0/P0
R1.0/P0
IFI_C5
IFI_C6
VSP_SI
VSP_SO
XCS_VFD
XVSP_SCK
2.6
2.6
0.4
2.5
MSI
MSO
MSCSV
MSSCK
CO1
CO0
CI1
CI0
123456789101112131415161718192021222324252627282930313233343536 5354
R1.1/P0
R1.1/P0
IFI_C2
IFI_C0
IFI_C1
0
B
R3305
CL3302
C3306
0.01u
0
C3350
1u
B
C3305
0.1u
B
XCS_SFD
WRX
RDX
DRP
SWP
ALE
MCCE
MCHA0
MCHA1
MCDA0
MCDA1
MCDA2
MCDA3
MCDA4
MCDA5
MCDA6
MCDA7
SCOD_WINDOW
XRST_VSP
R3375
B
OSDVD
OSDHD
OSDR
OSDL
OSDP
COL3
COL2
COL1
COL0
C3349
1u
B
10k
IFI_Y0
IFI_Y1
IFI_Y2
IFI_Y3
IFI_Y4
IFI_Y5
IFI_Y6
IFI_Y7
9 18
R3380
100
10p
CH
C3308
10p
CH
X3301
24.576MHz
R3307
DATA_TO_SFD
XX
1.3
2.7
1.1
XOI
XOO
OVSS3
OVDD3
ECKI
ADAI2
ADAO2
LCKO
0.7
ADAI1
C3310
4.7u
DATA_FROM_SFD
0.7
1.1
OCKI
ADAO1
B
1.1
OCKO
SFD_FCK
0.9
FCKO
10 136
SFD_BCK
SFD_LRCK
1.4
1.4
1.4
1.4
BCKI
BCKO
LRCKI
LRCKO
22 21
IC3301
VIDEO DSP
D/A CONVERTER
IC3301
CAIN
1.4
RVDD2
C3309
0.01u
B
RVDD3
RVSS1
RVSS2
RVSS3
TESTD6
TESTD5
TESTD3
TESTD4
C3311
0.01u
TESTD2
B
OEI
OEO
VO
TESTD9
TESTD7
TESTD8
RVDD1
R1.3/P0
IFI_OE
CL3301
4-15 4-16
LVSS3
TESTD1
1.4
LVDD3
SCAN
LVDD1
TESTD0
1.4
TEST
TD_3-4
LVSS1
C3343
4.7u
B
0.5
TDO
PCO
R2.7/P1.6
R3378
TDO
100
C3312
0.01u
2.7
20
44 5243 5142 5041 4940 4839 4738 4637 45
2.7
B
TMS
TDI
OVDD1
14 20
175
SIGNAL PATH
VIDEO SIGNAL
Y/CHROMAYCHROMA SIGNAL
REC
PB
Ref.signal
R3322
D3301
RB705D-T146
KV1470TL1-3
100R3381
B
2.7
0
2.7
2.5
2.7
1.4
1.9
0.6
R1.8/P0
R1.9/P0
0
0
0
R0/P1.2
R0.1/P1.2
1.9
R0.1/P1.0
1.4
2.8
1.6
0.1
2.8
0.1
0.1
2.8
0
2.8
2.8
1.6
0.4
2.8
1.5
0.3
55 56 57 58 59 60 61 62 63 64 65 66 67 68 69 70 71 72 73 74 75 76 77 78 79 80 81 82 83 84 85 86 87 88 89 90 91 92 93 94 95 96 97 98 99 100101 102 103104 105 106107 108
R3318
10k
R3319
10k
B
D3302
R3320
2200
R3313
R3314
D3303
RB705D-T146
100
C3322
0.47u
B
C3318
0.01u
B
C3319
0.001u
B
L3305
10uH
C3320
10u
6.3V
A
TA
C3321
0.01u
B
R3325
47
R3324
B
0.01u
C3317
R3383
0
R3384
XX
L3306
10uH
B
XX
C3323
0.01u
FB3302
C3339
R3382
XX
B
0
C3352
XX
B
R3316
3300
C3327
C3340
XX
B
R3321
3300
C3341
1u
B
R3317
4700
1u
C3326
2.2u
C3324
4700
0.047u
B
C3325
0.001u
B
C3328
0.01u
22u
B
6.3V
ATA
C3342
B
B
R3331
4700
0.7
0.1 0.1
0.1
R3328
910
±0.5%
2SA1832F-Y/GR(TPL3)
2SA1832F-Y/GR(TPL3)
C BUFFER
R3334
910
±0.5%
Q3302
B BUFFER G BUFFER
Q3307
R3351
270
R3356
2200
Q3304
2SA1832F-Y/GR(TPL3)
R BUFFER
1.0
R3336
4700
0.7
GV-D800/D800E MODEL ONLY
R3358
220
RECCK
0
RECDT
RECA2
0R3309
RECA1
SW_PS
ALL_PS
PLLMSK
PLLSW
ADDT5
ADDT4
ADDT3
ADDT2
ADDT1
ADDT0
PBCK
0
R3315
3300
R3323
330
D3304
KV1470TL1-3
R3312
270
C3313
0.001u
B
R3310
1.5
PCOR
R0.1/P1.2
R0.1/P1.2
1.2
R0.1/P1.1
R0.1/P1.1
TRCKI
0
0.001u
109110111112113114115116117118119120121122123124125126127128129130131132133134135136137138139140141142143144
PVSS2
R0.6/P0
R0.8/P0
R1.8/P0
PVDD1
R3311
10k
C3314
PVDD2
2.7
PVSS1
B
C3346
4.7u
2.7
HVSS2
HVDD2
LVDD2
MVDD2
RECCK
MVSS2
RECDT
RECA2
PLLMSK
PLLSW
ADDT5
ADDT4
ADDT3
ADDT2
ADDT1
ADDT0
MVDD1
MVSS1
AVDD3
PYOUT
DVDD3
PCROUT
DVSS3
PCBOUT
AVDD2
EYOUT
DVDD2
ECROUT
DVSS2
ECBOUT
AVDD1
DVDD1
DVSS1
L3304
1.8uH
B
XSWE
DPVD
DPHD
LVSS2
RECA1
SWPS
CTRL0
CTRL1
ALLPS
PBCK
IREFP
AVSS3
IREFE
AVSS2
IREFC
AVSS1
COUT
IREFY
YOUT
10k
SSS
ATF
0.001u B
0.001u
100R3377
C3348
4.7u
C3315
C3316
L3303
0.56uH
TCK
2.7
0
TMS
POO
1.1
1.2
2.7
1.1
1.3
TCK
OSCIN
OVSS2
OVDD2
PLLTES
OSCOUT
SPCKI
TSCKO
POI
OVSS1
HVSS5
TRCKO
1.4
1.2
R3326
C3345
4.7u
B
R3379
100
SW_PS
ALL_PS
RECA2
RECA1
RECCK
RECDT
PLLSW
PLLMSK
ADDT5
ADDT4
ADDT3
ADDT2
ADDT1
ADDT0
PBCK
R3340
910
±0.5%
2SA1832F-Y/GR(TPL3)
R3360
2200
0.9
0.30.4
AUDIO
REC REC/PB
R3343
4700
Q3306
2SA1832F-Y/GR(TPL3)
TCK
TMS
TDO
TD_3-4
SFD_FCK
SFD_LRCK
SFD_BCK
DATA_TO_SFD
DATA_FROM_SFD
0.7
Q3308
Y BUFFER
OSDL
OSDR
COL3
OSDP
COL2
COL1
COL0
OSDVD
OSDHD
PB
TCK
TMS
TDO
TD_3-4
SFD_FCK
SFD_LRCK
SFD_BCK
DATA_TO_SFD
DATA_FROM_SFD
XWEN
SSS
SW_PS
ALL_PS
RECA2
RECA1
RECCK
RECDT
PLLSW
PLLMSK
ADDT5
ADDT4
ADDT3
ADDT2
ADDT1
ADDT0
PBCK
ATF_ERR
PANEL_VD
PANEL_HD
PANEL_G
PANEL_R
PANEL_B
CAIN_Y_OUT
CAIN_C_OUT
18M
SPCK
OSDL
OSDR
COL3
OSDP
COL2
COL1
COL0
LINE_OUT_V
OSDHD
28
98
29
31
87
1
99
32
33
34
TO(7/16,16/16)
TO(16/16)
TO(7/16)
TO(11/16)
TO(10/16)
TO(1/16)
TO(13/16)
TO(16/16)
TO(8/16)
TO(4/16)
Page 60
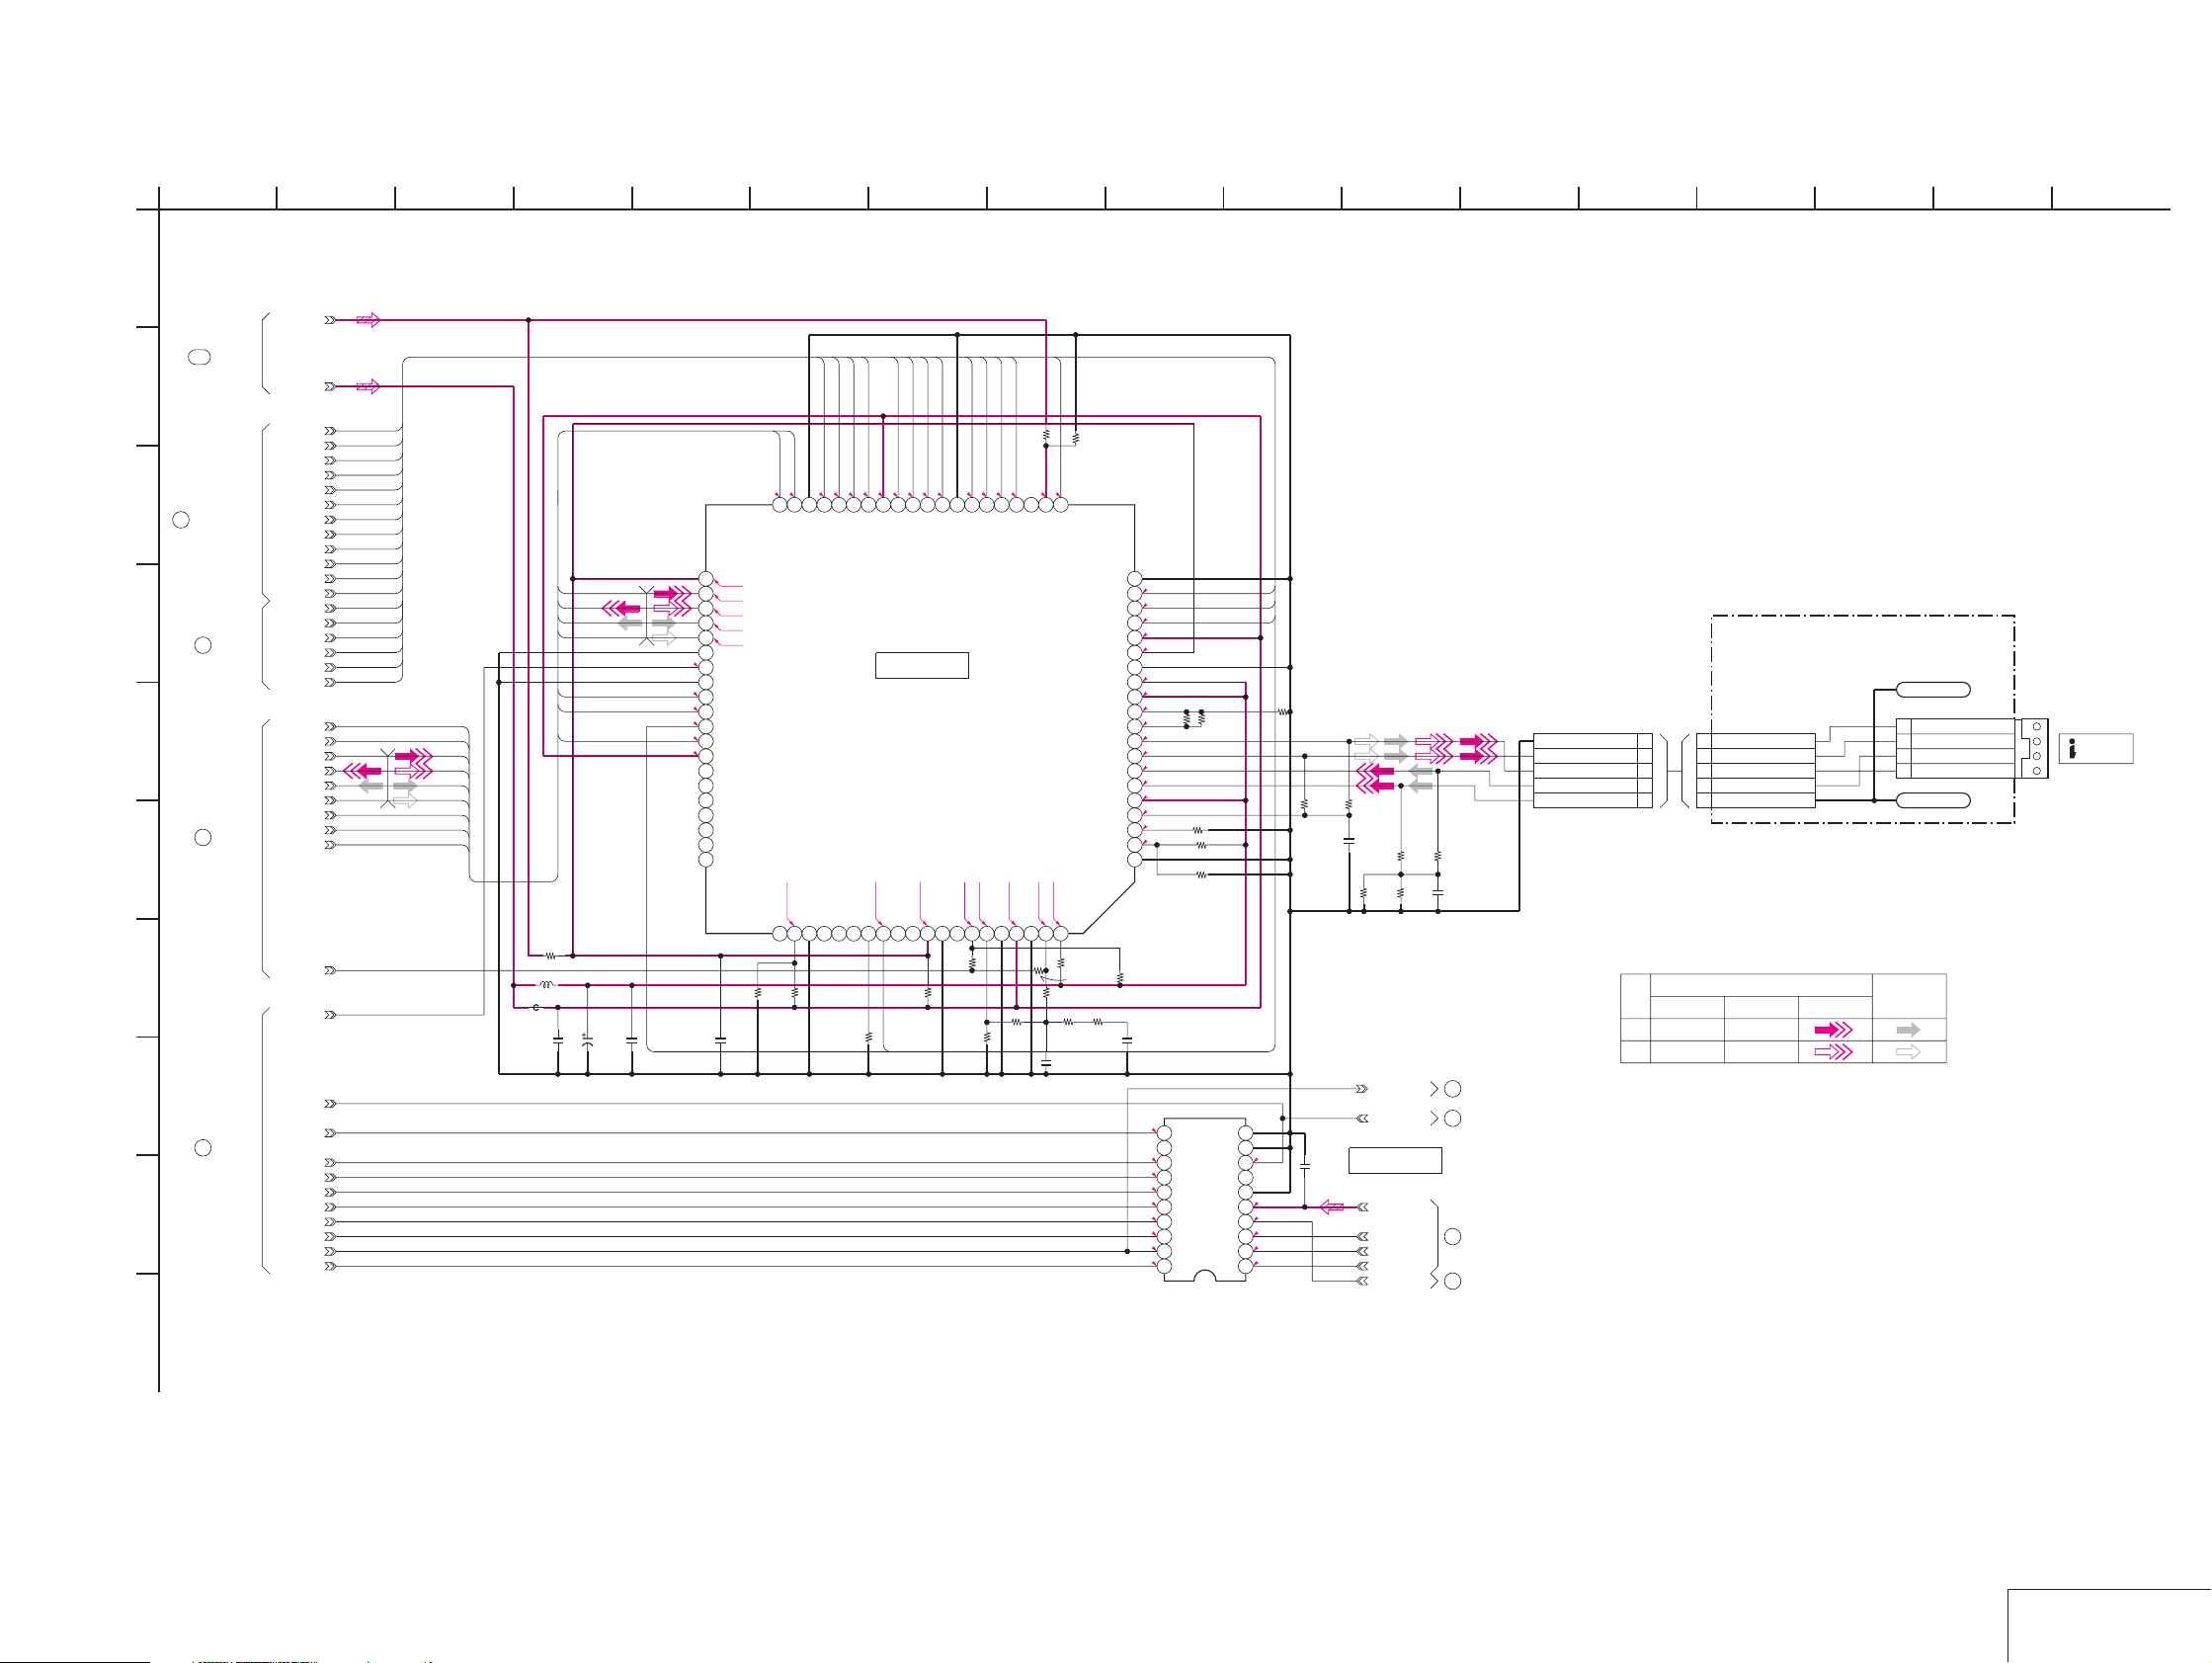
For Schematic Diagram
• Refer to page 4-7 for printed wiring board.
1
38
5 136
924 7
10
11 1514
12
GV-D200/D200E/D800/D800E
1716
VC-250 BOARD(4/16)
DV INTERFACE(JC-2 BLOCK)
A
-REF.NO.:30000 SERIESXX MARK:NO MOUNT
107
TO(15/16)
B
C
22
TO(3/16,13/16)
D
21
TO(3/16)
E
18
TO(3/16)
F
G
H
34
TO(3/16)
I
D_1.9V
D_2.8V
MCDA7
MCDA6
MCDA5
MCDA4
MCDA3
MCDA2
MCDA1
MCDA0
XDVCN
LIP_SLEEP
XRST_LINK
XRST_PHY
LBUS3
LBUS2
LBUS1
LBUS0
LINE_OUT_V
OSDHD
MCCE
XACC
XENA
FCLR
LCK0
SPCK
OSDL
OSDR
COL3
OSDP
COL2
COL1
COL0
NO MARK:REC/PB MODE
R :REC MODE
P :PB MODE
ALE
RDX
WRX
MCCE
MCDA1
MCDA7
MCDA6
MCDA5
MCDA4
MCDA7
MCDA6
MCDA5
MCDA4
MCDA3
MCDA2
MCDA1
MCDA0
MCCE
XDVCN
LIP_SLEEP
XRST_LINK
XRST_PHY
RDX
WRX
ALE
LPS
OFR
XACC
DIR
LBUS3
LBUS2
LBUS1
LBUS0
XENA
FRL
FCLR
L3307
FB3304
C3329
0.01u
LBUS3
LBUS2
LBUS1
LBUS0
XENA
FRL
FCLR
R3337
0
10uH
C3331
C3332
10u
4V
TA
B
A
0.01u
OFR
B
VDD
41
ID3
42
ID2
43
ID1
44
ID0
45
46
VSS
1.2
47
ICLK
48
VSS
2.7
49
XIEN
0
50
FR
0
51
OFR
2.7
52
IFCLEAR
2.7
53
VDD
54
TEST0
55
TEST1
56
TEST2
57
TEST3
58
TEST4
59
TEST5
60
TEST6
R3330
RDX
WRX
ALE
LPS
OFR
DIR
FRL
18M
DIR
XACC
C3333
0.01u
2.700.2
40
1.9
2.7
2.7
2.7
2.7
61
R3333
XX
B
R1.8/P1.2
R1.2/P1.7
R1.0/P1.4
38
39
XDIR
XIACC
2.7
TEST762BC163VSS64TENA165TDO66TDI67TCK68LPS69XSLOW70TESTM071TESTM172VSS73XO74XI75ENEC76VSS77VDD78AVS079PLL180AVD0
0
34
R3339
DA435DA536DA637DA7
XX
VSS
MCDA3
MCDA2
2.7
R1.4/P0.8
R1.7/P0.9
33
VDD
IC3303
DV INTERFACE(LIP)
IC3303
SN104266PN-TEB
0
R3345
XX
LPS
MCDA0
R2.2/P1.5
1.9
R2.4/P1.5
29
DA030DA131DA232DA3
R3347
XX
R3348
XRST_LINK
R3352
2.3
2.7
2.7
001.9
27
24
25
26
ALE
XCS28VSS
RDX
XRW
2.7
R1.1/P0
2.7
R3349
0
XX
R3359
22
XINTT
R1.1/P0.9
21
VST
R3355
R1.2/P0
R3353
XX
XX
C3335
22P
CH
XRESETL
R3354
XX
R3350
0
XX
XRESETP
TPBIAS
R3357
XX
AVD1
AVD1
AVS1
AVS1
TPA+
TPA-
TPB+
TPB-
VREF
VSS
CNA
PWD
VDD
VDD
VSS
AVD
R1
AVS
20
2.7
19
R2.7/P0
18
R0/P2.8
17
2.7
16
1.9
15
14
2.7
13
2.7
12
R3361
1.2
11
0
10
R1.8/P0
9
R1.8/P0
8
0
7
0
6
2.7
5
R1.8/P0
4
R3365
0
3
2.7
2
1
R3346
0
C3336
XX
0
BLKC
11
NC
12
0
BLKB
13
0
VC3
14
0
VBLA
15
0
VC2
16
0
VC1
17
0
VC0
18
2.7
XVSYNC
19
2.5
XHSYNC
20
MB90099PFV-G-104-BND-ER
R3362
R3363
12k
XX
IC3302
0
±0.5%
±0.5%
TEST
CMDCT
XPCL
DATA
XCLK
XDVCN
XRST_PHY
LIP_SLEEP
R3364
12k
0
GND
OSC
OSC
VDD
XCS
FP-602 BOARD
R3366
DV IN/OUT
XX
R3367
56
R3368
56
±0.5%
±0.5%
C3337
1u
B
R3370
1608
R3369
10k
±0.5%
56
±0.5%
R3371
10k
±0.5%
R3372
±0.5%
C3338
220p
56
CH
CN929
5P
GND
1
2NTPA
3TPA
4TPB
5NTPB
NTPB
1
2 TPB
3TPA
4 NTPA
5 GND
CN1104
5P
LND1
GND
1 NTPB
2 TPB
3 NTPA
4 TPA
LND2
GND
CN1105
4P
DV IN/OUT
SIGNAL PATH
VIDEO SIGNAL
Y/CHROMA
REC
PB
LINE_OUT_V
10
9
1.4
8
7
6
5
4
3
2
1
C3334
0.01u
3.0
2.6
0.1
2.7
2.8
SPCK
IC3302
B
EVER_3.0V
OSD_SO
XCS_OSD
XOSD_SCK
XSYS_RST
35
TO(10/16)
36
TO(5/16,6/16,7/16)
OSD
38
TO(14/16)
TO(7/16,10/16,
76
13/16,14/16)
AUDIO
SIGNAL
0
23
J
16
DV INTERFACE
4-17 4-18
VC-250 (4/16)
Page 61
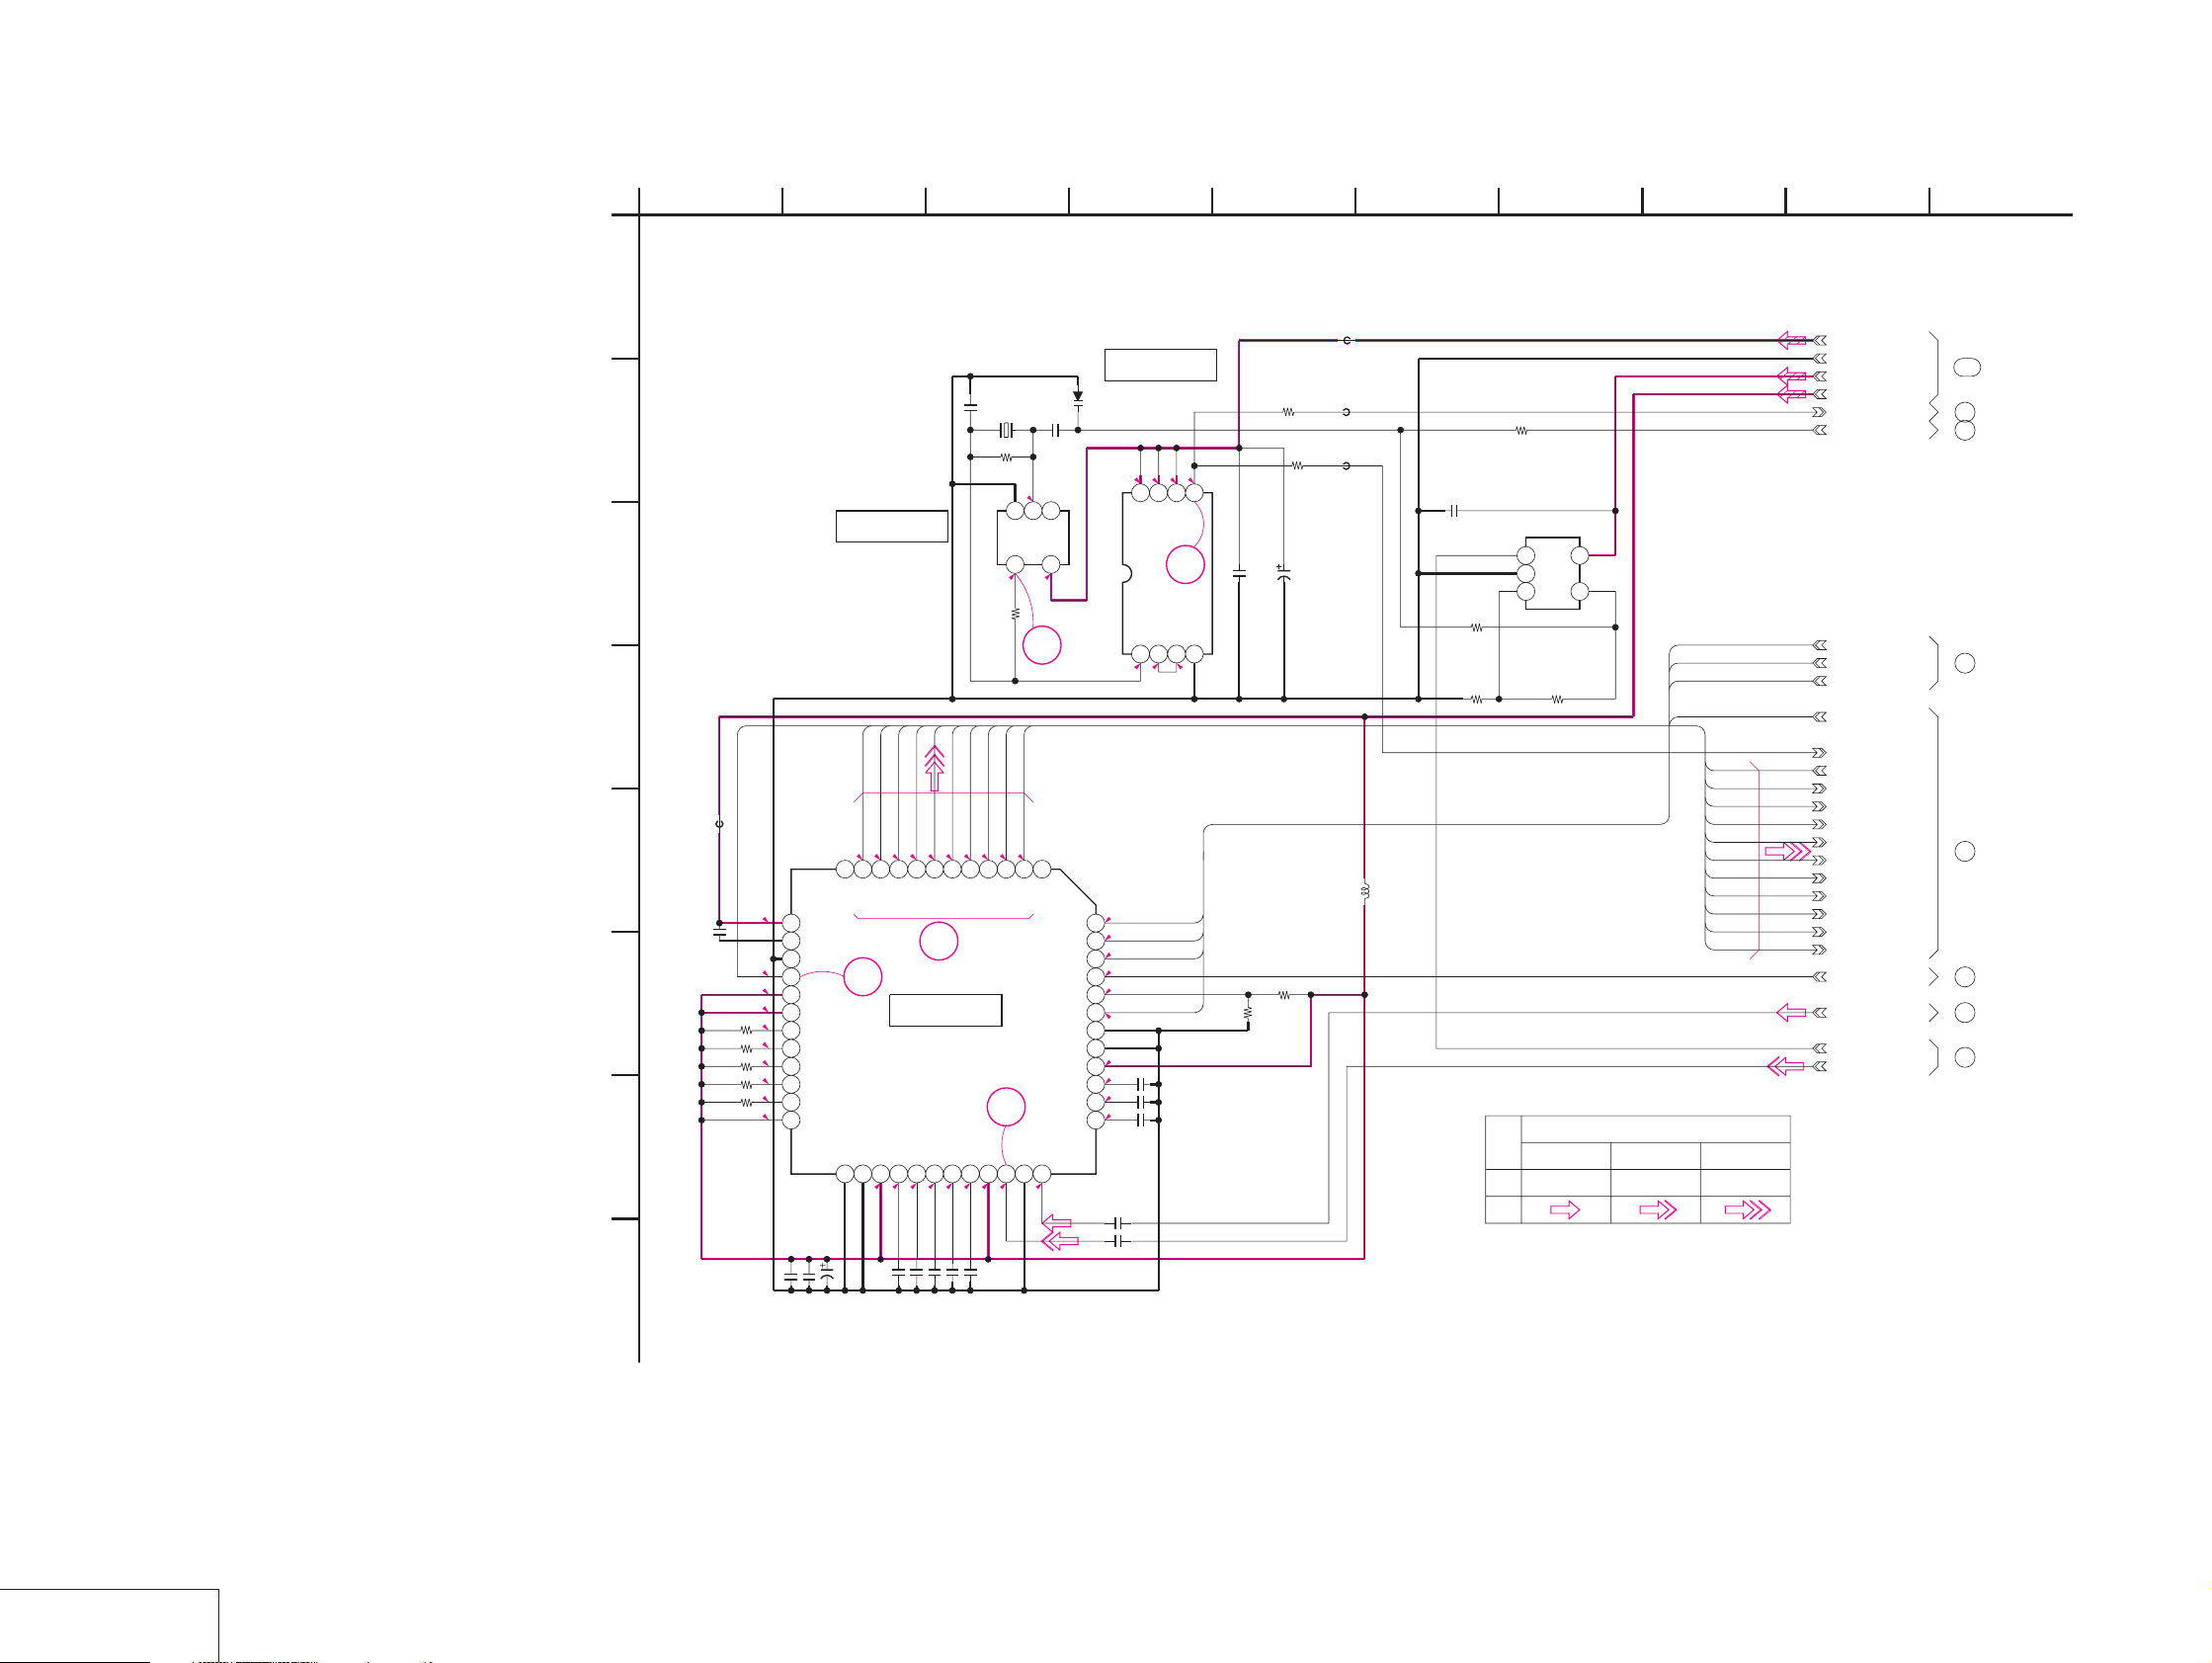
GV-D200/D200E/D800/D800E
For Schematic Diagram
• Refer to page 4-7 for printed wiring board.
• Refer to page 4-68 for waveforms.
1
VC-250 BOARD(5/16)
AD CONVERTER(CH BLOCK)
A
-REF.NO.:30000 SERIESXX MARK:NO MOUNT
NO MARK:REC/PB MODE
R :REC MODE
P :PB MODE
B
IC1504
CLOCK OSC
C
D
AD8
A
C1524
6.3V
AD9
AD10
R2.3/P0
R1.7/P0
R1.6/P0
12
DVDD
2
AVSS
AVSS
AVDD
25
26
27
0
2.8
C1513
C1514
0.47u
68P
CH
B
22u
TA
ADCK
FB1504
0uH
E
C1508
F
R1520
0
R1526
0
R1523
0
R1524
0
R1525
0
2.8
13
1u
B
1.3
2.8
2.8
2.8
2.8
R0.2/P0.5
R0.2/P0.5
R0.2/P0.5
2.8
14
15
16
17
18
19
20
21
22
23
24
DRVDD
DRVSS
DVSS
ADCLK
DVDD
DVDD
PBLK
CLPOB
XSHP
XSHD
CLPDM
AVDD
G
C1518
1u
B
H
16
C1526
1u
B
C1510
6p
CH
AD5
AD6
AD7
R2.3/P2.8
R2.1/P0
R1.9/P0
1
CCD2000
IC1502
S/H,AGC A/D
CONVERTER
IC1502
VSP2200Y-1/2K
CCD IN
L1+28L2+
29
30L31L-32
0
0.9
0.6
C1515
0.22u
B
38
IC1505
SI
XCE
TIMING GENERATOR
D1501
1T379-01-T8A
TC7WH74FU(TE12R)
IC1505
1.5
2.7
48
0
47
2.7
46
2.4
45
0
44
XRST_KINUTA
43
2.7
42
41
2.8
40
1.2
39
1.7
38
1.5
37
C1523
0.1u
C1520
0.001u
B
C1519
0.22u
B
2.8
2.8
2.8
7
8
XPR
VCC
1CK2D3XQ4
1.4
XCH_SCK
CH_SO
XCS_CH
C1521
1u
C1522
B
XCLR
5
B
1u
B
1.4
5Q6
GND
1.4
R1514
AD4
R2.0/P2.5
0.5
C1516
1u
B
X1501
27MHz
R1521
1M
IC1504
TC7SU04F(TE85R)
R1522
0
AD2
AD3
R1.9/P0.6
R1.9/P1.1
3
AVDD
33
34
2.8
R1.3/P0.7
C1517
120p
CH
1.5
3
GND
OUT Y
4
1.5
AD1
R1.9/P1.4
LatchSelect
LINE
AVSS
35
C1512
0.001u
B
1NC2
IN A
VCC
5
2.8
4
1D02D13D24D35D46D57D68D79D810D911
TEST
XSCK
SYSV
HDRST
AVSS
AVSS
AVDD
REFN
REFP
CMLEVEL
CHROMA
36
1.5
56
FB1501
0uH
R1505
FB1503
100
C1505
1u
F
R1515
0
0uH
R1504
FB1502
0uH
100
C1507
10u
6.3V
TA
L1501
10uH
XX
R1512
C1527
XX
F
R1516
XX
R1517
XX
SIGNAL PATH
REC
PB
470k
123
IC1503
XX
R1518
XX
45
VIDEO SIGNAL
CH_SO
XCH_SCK
XCS_CH
XRST_KINUTA
ADCK
AD10
AD9
AD8
AD7
AD6
AD5
AD4
AD3
AD2
AD1
Y/CHROMACHROMA Y
924 7
D_2.8V
REG_GND
A_4.75V
A_2.8V
SPCK
FRQ_TUNE
CH_SO
XCH_SCK
XCS_CH
XRST_KINUTA
VCK
ADCK
AD10
AD9
AD8
AD7
AD6
AD5
AD4
AD3
AD2
AD1
SYS_V
PB_C_RF
ALIGN_APC_ERROR
TAKO_Y_OUT
10
108
TO(15/16)
36
TO(4/16,6/16,7/16)
12
TO(2/16)
43
TO(10/16)
40
TO(6/16)
94
TO(6/16,10/16,14/16)
15
TO(2/16,6/16)
41
TO(7/16,8/16)
AD CONVERTER
VC-250 (5/16)
4-19 4-20
Page 62
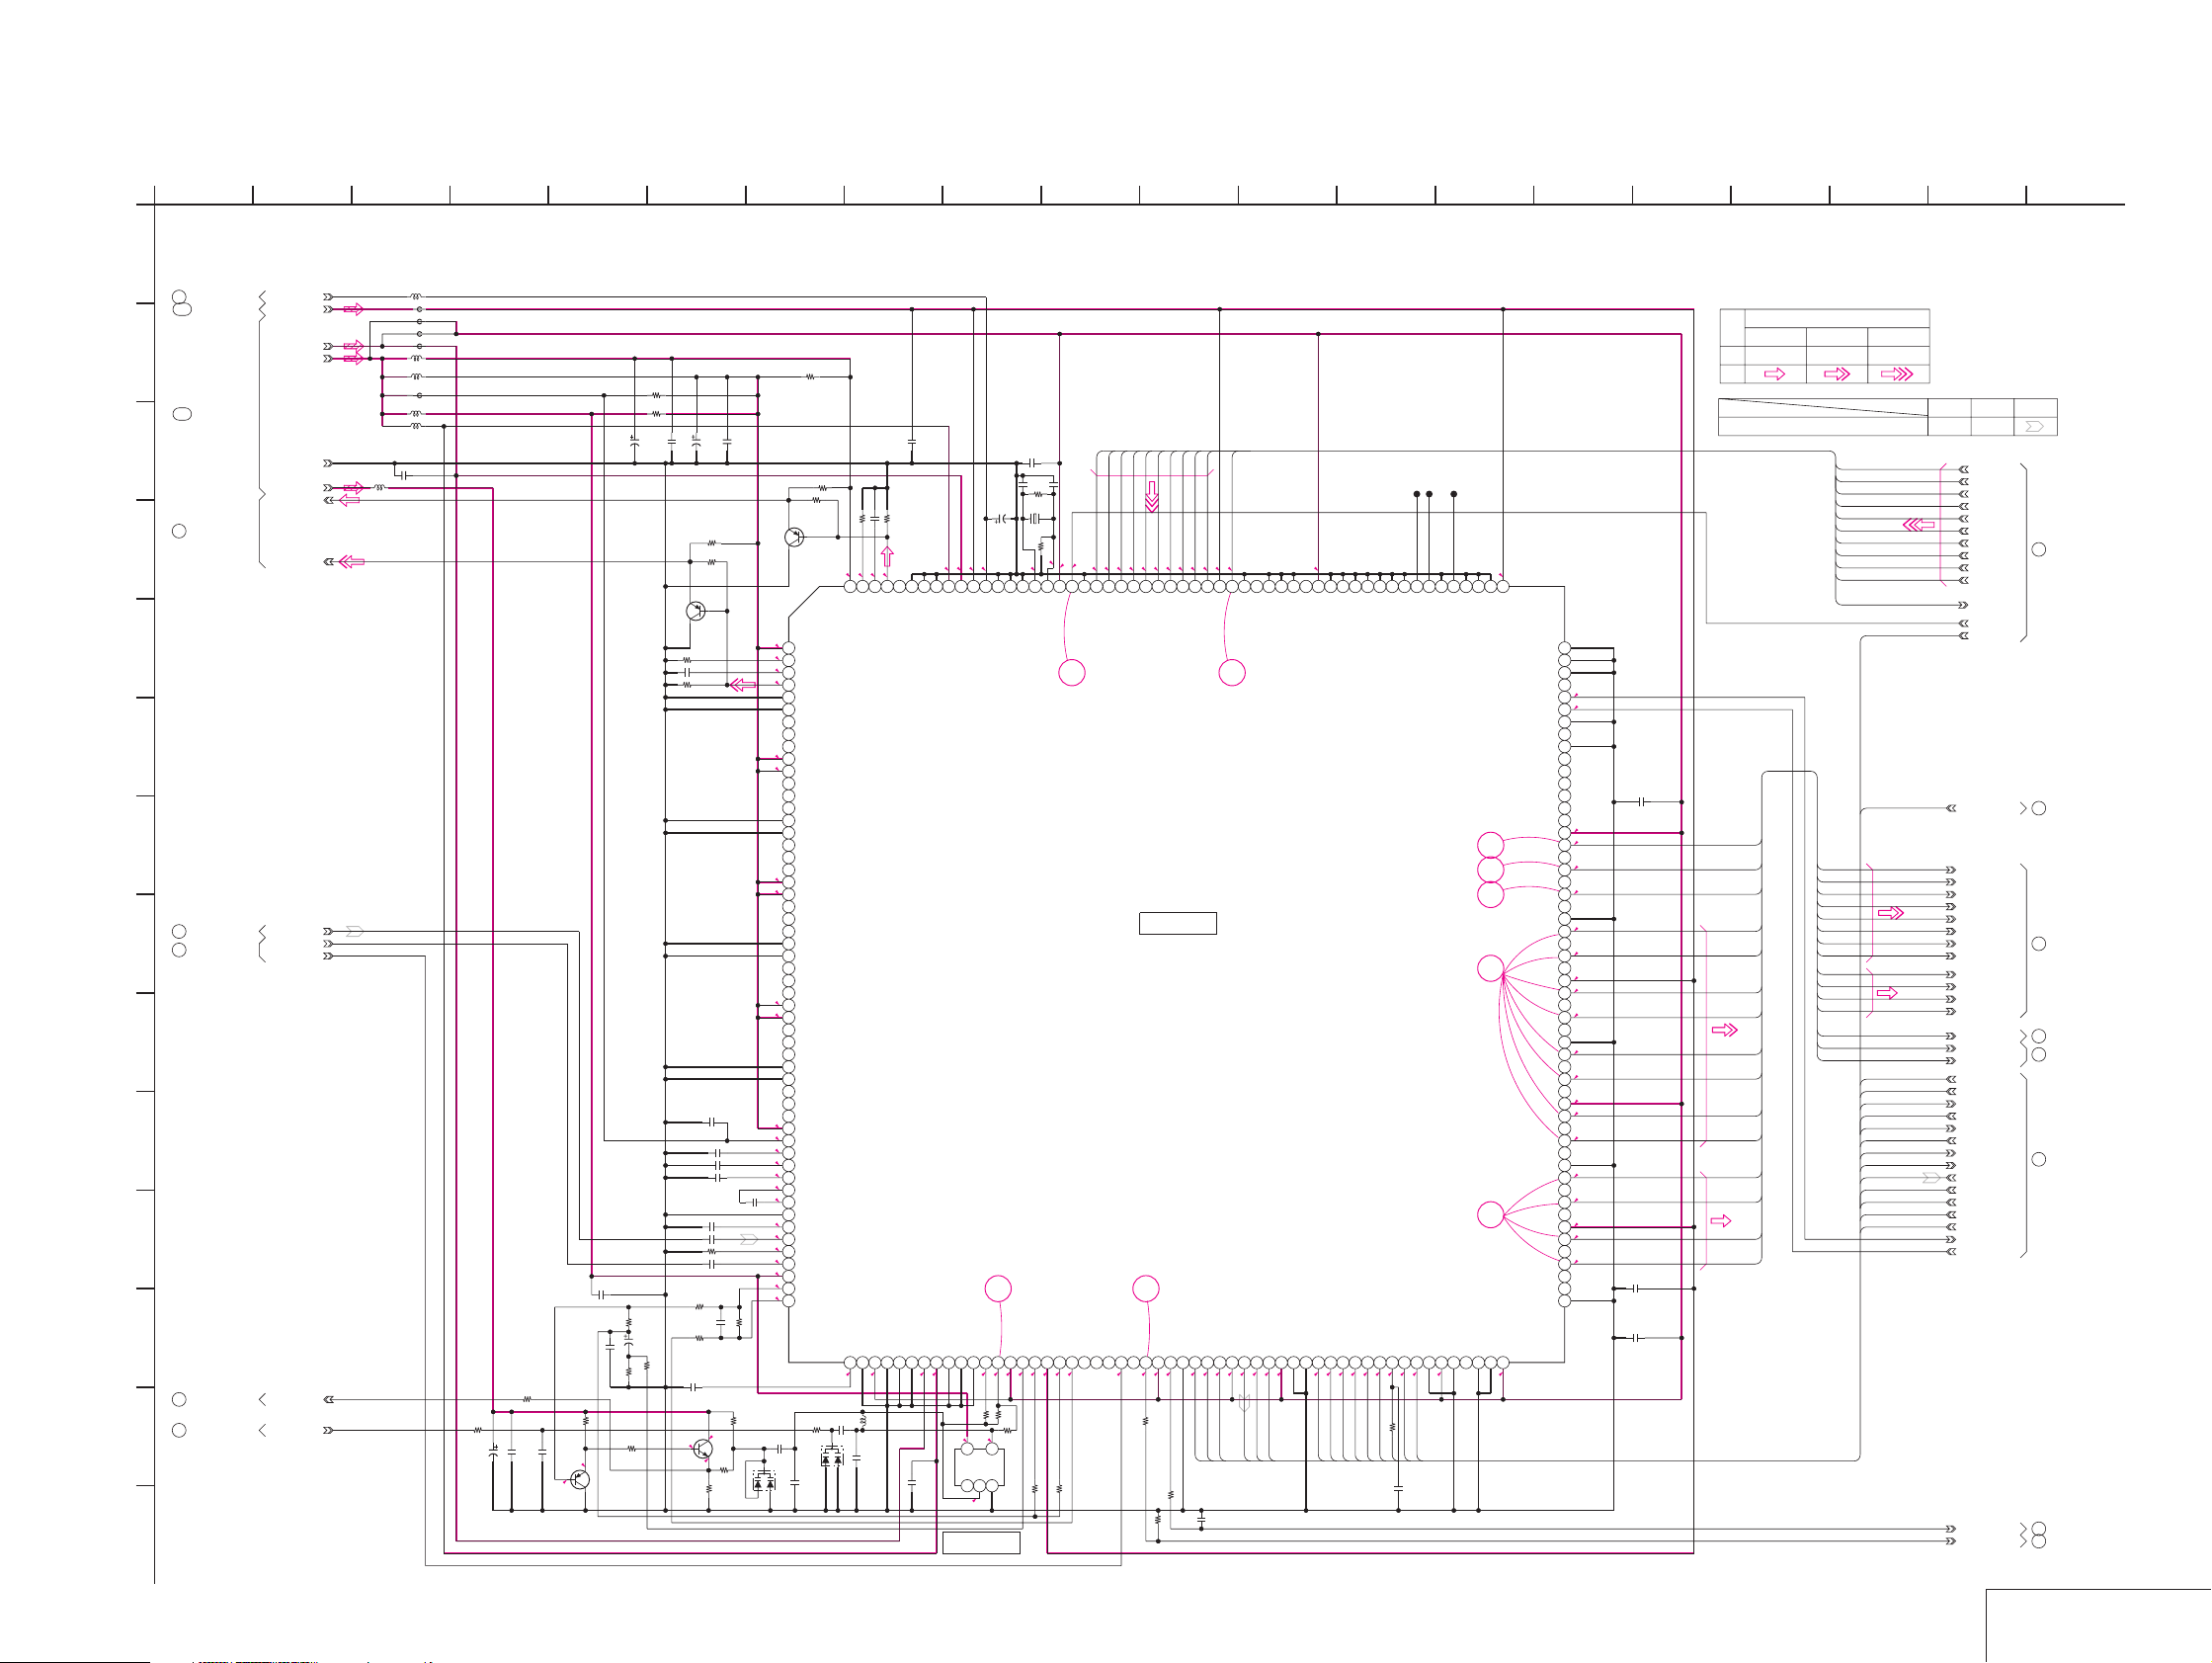
For Schematic Diagram
• Refer to page 4-7 for printed wiring board.
• Refer to page 4-68 for waveforms.
1
38
5 13
6
924 7
10
11 1514
12
GV-D200/D200E/D800/D800E
17 2016 18 19
VC-250 BOARD(6/16)
Y/C PROCESSOR(CL BLOCK)
A
-REF.NO.:30000 SERIESXX MARK:NO MOUNT
23
TO(3/16)
104
TO(15/16)
B
106
TO(15/16)
C
44
TO(8/16)
D
E
F
G
15
TO(2/16,5/16)
H
16
TO(2/16)
I
J
K
L
93
TO(10/16,16/16)
11
TO(2/16)
M
N
16
REG_1.5V
REG_GND
A_4.75V
KINUTA_C_OUT
KINUTA_Y_OUT
PB_C_RF
RF_AGC_OUT
AFC_F0_ADJ
D_1.5V
D_2.8V
A_2.8V
AFC_F0
NO MARK:REC/PB MODE
R :REC MODE
P :PB MODE
10uH
L2209
FB2202
0uH
0uH
FB2205
FB2201
XX
0uH
FB2204
10uH
L2202
10uH
L2203
FB2203
0uH
L2201
10uH
L2208
10uH
L2204
C2244
10uH
0.01u B
DOP
C2210
1u
B
1608
R2205
10k
R2206
100k
C2202
10u
10V
TA
C2201
0.01u
B
C2204
0.1u
B
R2213
5600
3.5
2.9
Q2204
2SA1832F-Y/GR(TPL3)
R2227
XX
R2226
XX
C2232
10u
C2233
6.3V
0.01u
TA
A
C2214
0.1u
R2225
470
C2208
390p
R2215
1k
CH
C2211
4.7u
6.3V
6800
R2218
R2216
R2219
100
C2228
C2225
10u
0.01u
6.3V
B
TA
A
R2207
XX
R2208
0
Q2202
XX
R2224
12k
B
C2215
1u
B
1608
C2222
0.1u
0.1u
C2224
0.1u B
C2229
0.01u
B
C2203
0.01u B
0.01u
C2213
B
R2223
8200
0.01u
C2226
R2221
820
C2227
0.47u
B
2012
R2220
R2240
39k
1M
C2212
1u
470
B
1608
Q2206
2SC4738F-Y/GR(TPL3)
R2241
4.7
3.5
2.9
R2242
15k
R2222
D2201
3300
KV1470TL1-3
R2228
XX
1.4
206
PDVDCC
IN_VSS1
PDVSSA
65
1.32.8
123
INVERTER
C2240
1u
B
1608
R2253
C2245
XX
C2250
10u
4V
TA
A
1.4
203
204
205
PAVSCC
PAVDCC
PDVSCC
C2246
XX
X2201
XX
R2254
0
0
2.8
198
199
200
201
202
IN_VSS3
IN_VDD3
XTALIN
XTALOUT
AD4
AD3
AD2
AD1
XX
1.4
2.8
R1.9/P0.6
R1.9/P1.2
R1.9/P1.3
193
194
195
196
197
ADIN2
ADIN1
ADIN0
PLLENB
CCDCKL
14 13
DOP
PANELSYNC
PANELVD
PDET3
PANELHD
73
74
75
76
77
0
2.7
R2248
10k
R2247
R2229
AFCC
OSCI
OSCO
66
67
2.8
1.3
XX
R2230
45
IN_VDD1
68
69
2.802.9
XX
R2231
0
IC2202
TC7SU04FU(TE85R)
PDET2
PDET1
DVDD1
70
71
72
1.4
2.9
10k
R2210 1200
R2209
AD5
R2.0/P2.5
ADIN3
TRAPCONT
78
1k
AD6
R2.1/P0
R1.9/P0
191
192
ADIN4
IC2201
Y/C PROCESSOR
HGH5C012SFL
76
OFSC
79
80
1.3
2.8
R2256
68
AD7
R2.4/P2.8
190
ADIN5
Hi8/Std8
IC2201
OUT_VDD1
81
1.4
AD9
AD8
AD10
ADCK
CLP1
SYSV
181
182
OSD_L_ON
MECHAFLD
89
2.8
MECHA_FLD
OSD_R_ON
IN_VDD2
90
2.8
180
91
179
OSD_P_ON
BCK
92
178
CGCK
IN_VSS2
2.8
177
IO_VDD5
CSYNC
93
94
0
0
MECHA_HD
MECHA_VD
COLOR4
MECHAVD
176
95
2.5
XVC_SCK
175
COLOR3
XSCK
96SO97SI98
COLOR2
2.5
VC_SI
1.3
1.4
R2.3/P0
R1.7/P0
R1.6/P0
183
184
185
186
187
188
189
DVSS11
ADCK
DVDD5
ADIN9
ADIN8
ADIN7
ADIN6
JVDI
MCK
SWP
HSWP
DVSS2
XSGRST
83
0
JOG_VD
C2241
XX
CH
84
0
X1/2_SWP
85
2.7
SWP_DIR
86
2.802.3
ATSMPL
87
88
ATF_SAMPLE
SYS_V
82
CL2202
CL2203
CL2205
1.4
163
164
165
166
167
168
169
170
171ID172
173
174
DVDD4
VCK
DVSS9
XSG1
VGAT
XV1
AHD
AVD
PBLK
DVSS10
COLOR1
SENS1
162
SENS0
161
TEST
160
IRIS
159
2.8
TBCVD
158
0
XTECVRST
157
TESTBS
156
VCKO
155
DVSS8
154
EN1
153
DIR1B
152
DIR1A
151
DIR0A
150
DIR0B
0.2
VC_SO
149
EN0
148
IO_VDD4
147
VIHDO
12
11
10
9
8
XCS
XRST
FECKIN
XFEON
ADCKCONT
MCKCONT
99
100
101
102
103
104
0
0
2.1
2.7
2.8
R2255
0
XCS_KINUTA
CK_CONT2
CK_CONT1
XRST_KINUTA
C2251
XX
B
RAMTEST
105
FECKOUT
106
DVSS3
IO_VDD2
DVSS4
107
108
2.8
MEMHDI
MEMVDI
VIFLDO
MEMFLDI
IO_VDD3
EOR_OUT
TESTKP
VIVDO
DVSS7
DVDD3
DVSS6
DVSS5
DVDD2
146
145
144
143
142
141
140
YMO0
139
YMI0
138
YMO1
137
YMI1
136
135
YMO2
134
YMI2
133
YMO3
132
YMI3
131
130
YMO4
129
YMI4
128
YMO5
127
YMI5
126
125
YMO6
124
YMI6
123
YMO7
122
YMI7
121
120
CMO3
119
CMI3
118
CMO2
117
CMI2
116
115
CMO1
114
CMI1
113
CMO0
112
CMI0
111
110
109
2.8
R2.5/P0
R2.6/P0
R1.3/P0
R1.3/P0
R1.2/P0
1.4
R1.0/P0
R0.3/P0
R1.4/P0
R1.0/P0
2.8
R0.7/P0
R0.8/P0
R1.0/P0
R1.0/P0
1.4
R1.2/P0
R1.0/P0
C2243
1u
B
1608
C2252
XX
C2242
1u
C2238
REXT9
AVSS
1u
B
B
0.1u
R2245
470
C2236
2.8
DAO9
WRHLD
212
59
TESTDAC
MUTE
2.8
207
208
209
210
211
PDVDDB
PAVDDB
PAVSSB
PDVSSB
VSSA9
PAVSSA
PAVDDA
DVSS1
PDVDDA
60
61
62
63
64
2.8
2.8
C2247
1u
B
1.3
000
213
214
CBU9
SCAN_PATH
57
58
2.8
C2235
XX
CH
B
XXR2212
12k
R2211
0
R2244
Q2203
XX
2.80
215
216
VDDAA9
2.8
1
VDDAA8
0
2
REXT8
0
3
CBU8
0
4
DAO8
5
VSSAA8
6
VSSAA7
7
DAO7
8
CBU7
9
REXT7
2.8
10
VDDAA7
2.8
11
VDDAA6
12
REXT6
13
CBU6
14
DAO6
15
VSSAA6
16
VSSAA5
17
DAO5
18
CBU5
19
REXT5
2.8
20
VDDAA5
2.8
21
VDDAA4
22
REXT4
23
CBU4
24
DAO4
25
VSSAA4
26
VSSAA3
27
DAO3
28
CBU3
29
REXT3
2.8
30
VDDAA3
2.8
31
VDDAA2
32
REXT2
33
CBU2
34
DAO2
35
VSSAA2
36
VSSAA1
37
DAO1
38
CBU1
39
REXT1
2.8
40
VDDAA1
2.8
41
VDDAA0
0
B
42
VRBAD
1.2
BC2223
43
VRTAD
0
44
VINNAD
0.6
45
AD_IN
1.4
46
OP_OUT
47
VSSAA0
1.4
48
C_IN
1.4
49
ATF_IN
0
50
VREFOP
B
1.4
51
Y_RF_IN
2.8
52
AVDD
2.9
53
AMPO
2.7
54
INN
INP
56
55
L2207
3.3uH
C2234
XX
0.01u B
C2230
1500p
R2243
B
15k
C2231
XX
CH
D2202
KV1470TL1-3
IC2202
SIGNAL PATH
VIDEO SIGNAL
REC
PB
Ref.signal
IFI_HD
IFI_VD
IFI_OE
IFI_Y0
IFI_Y1
IFI_Y2
IFI_Y3
IFI_Y4
IFI_Y5
IFI_Y6
IFI_Y7
IFI_C3
IFI_C2
IFI_C1
IFI_C0
IFI_Y0
IFI_Y1
IFI_Y2
IFI_Y3
IFI_Y4
IFI_Y5
IFI_Y6
IFI_Y7
IFI_C0
IFI_C1
IFI_C2
IFI_C3
IFI_HD
IFI_VD
IFI_OE
Y/CHROMA
YCHROMA
PBREC REC/PB
AD1
AD2
AD3
AD4
AD5
AD6
AD7
AD8
AD9
AD10
ADCK
XRST_KINUTA
SYS_V
XVC_SCK
VC_SO
VC_SI
XCS_KINUTA
MECHA_HD
JOG_VD
MECHA_VD
MECHA_FLD
ATF_SAMPLE
X1/2_SWP
SWP_DIR
CK_CONT2
CK_CONT1
AD1
AD2
AD3
AD4
AD5
AD6
AD7
AD8
AD9
AD10
ADCK
VCK
XRST_KINUTA
SYS_V
IFI_Y0
IFI_Y1
IFI_Y2
IFI_Y3
IFI_Y4
IFI_Y5
IFI_Y6
IFI_Y7
IFI_C0
IFI_C1
IFI_C2
IFI_C3
IFI_HD
IFI_VD
IFI_OE
XVC_SCK
VC_SO
VC_SI
XCS_KINUTA
MECHA_HD
JOG_VD
MECHA_VD
MECHA_FLD
ATF_SAMPLE
X1/2_SWP
SWP_DIR
CK_CONT2
CK_CONT1
TBC_VD
XTBC_V_RST
SPCK
AFM_FSC
40
94
26
95
20
45
36
37
TO(5/16)
TO(5/16,10/16
14/16)
TO(3/16,7/16)
TO(3/16,7/16)
TO(3/16,7/16,
13/16)
TO(10/16)
TO(4/16,5/16,
7/16)
TO(11/16)
4-21 4-22
Y/C PROCESSOR
VC-250 (6/16)
Page 63
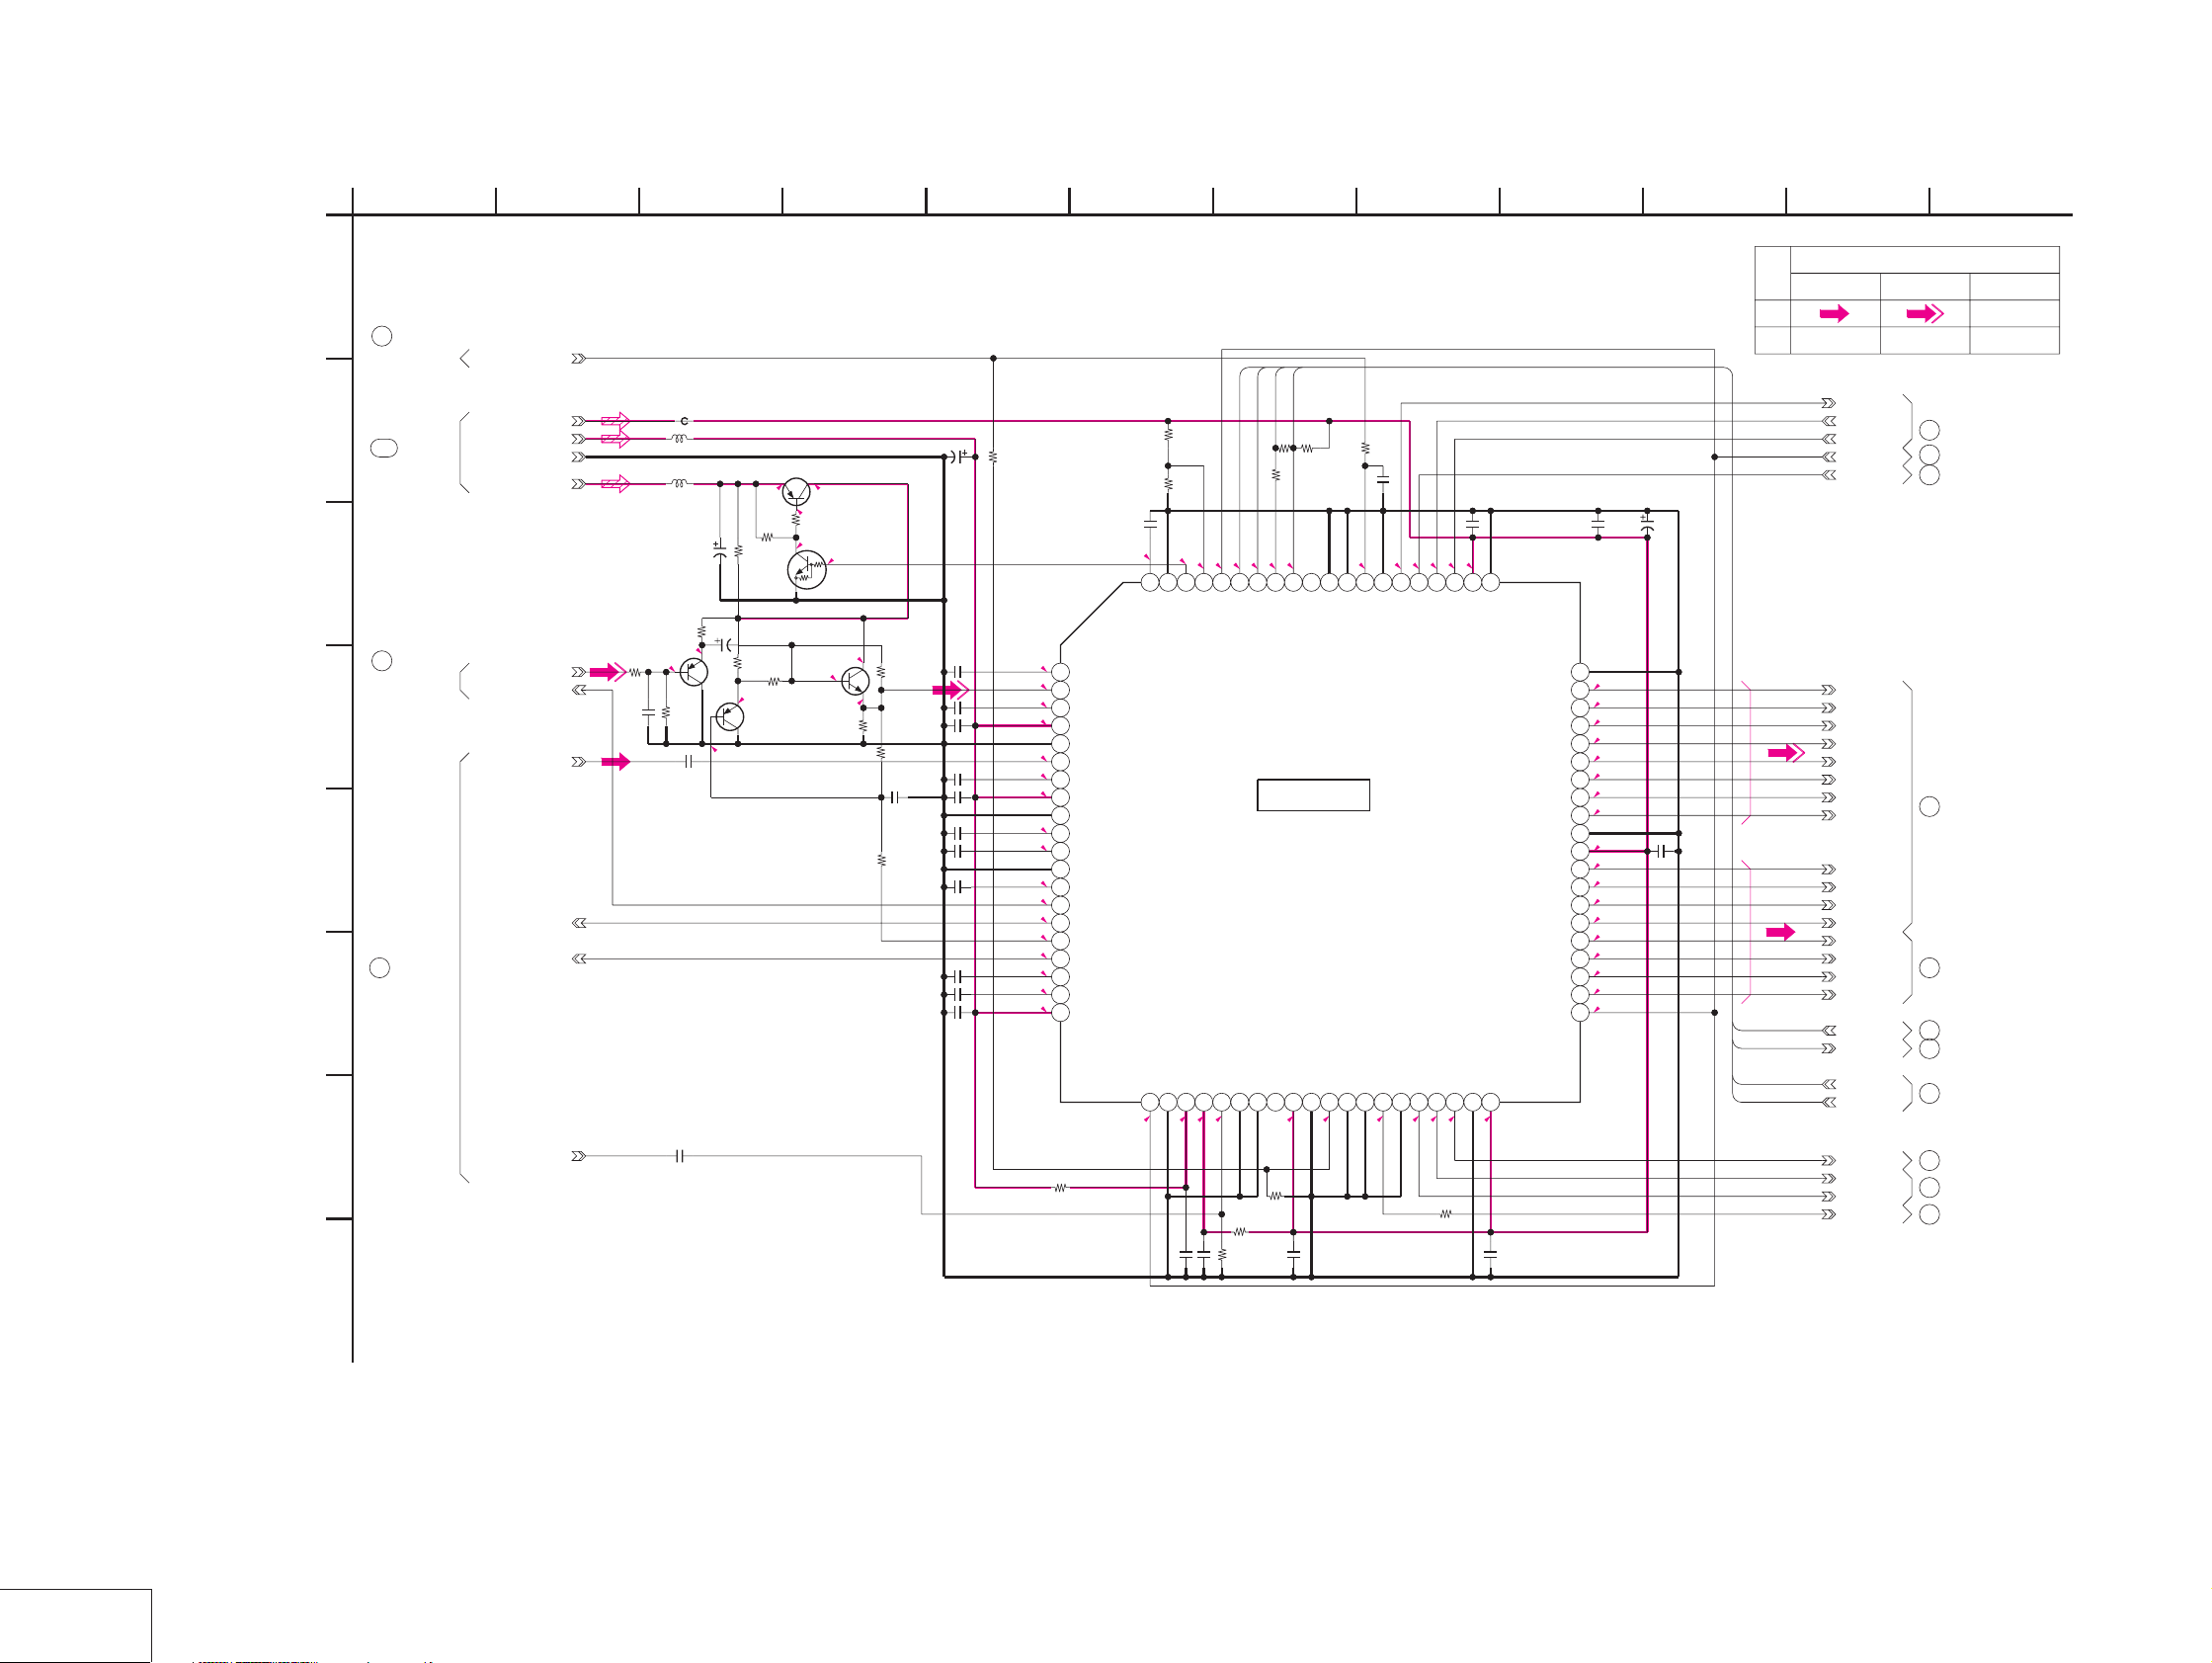
GV-D200/D200E/D800/D800E
For Schematic Diagram
• Refer to page 4-7 for printed wiring board.
A
B
C
D
E
F
G
H
1
VC-250 BOARD(7/16)
LINE A/D(IN BLOCK)
-REF.NO.:30000 SERIESXX MARK:NO MOUNT
36
TO(4/16,5/16,
6/16)
D_2.8V
109
TO(15/16)
41
TO(5/16,8/16)
46
TO(8/16)
ALIGN_APC_ERROR
A_2.8V
REG_GND
A_4.75V
TAKO_Y_OUT
TAKO_C_OUT
AGC_CONT
ACC_CONT
TAKO_CK
SPCK
2SA1832F-Y/GR(TPL3)
Q3606
NO MARK:REC/PB MODE
R :REC MODE
P :PB MODE
FB3601
0uH
L3602
L3601
10uH
C3604
Q3604,Q3605
SWITCH
R3660
2200
R2.5/P-0.5
R1.9/P0
R3658
1k
R3659
3900
C3636
22p
CH
C3603
0.01u
B
C3602
XX
B
38
56
924 7
10
11
SIGNAL PATH
CHROMA
REC
PB
TCK
10uH
TMS
TD_3-4
TD_2-3
R3643
R1.4/P0
C3622
0
R3644
XX
1u
B
R2.7/P0
0
2.6
2.7
75
76
77
78
79
80
DVSS4
PLLVSS
23
B
PSCNTO
PLLVDD
2.8
24
2.7
C3628
0.01u
RCKSEL
OSVDD
25
2.4
B
TRST
BCKI
R3646
26
R3639
XX
21
2.6
ADATB
XPLRST
22
C3626
0.1u
R3604
Q3604
2SB1295-UL5/6-TB
4.7
R3612
10u
4V
TA
R1.5/P0
Q3603,Q3606
AMP
47k
R3606
XX
R3607
10k
R2.0/P-0.5
R3611
10k
Q3602
2SA1832F-Y/GR(TPL3)
10u
10V
TA
C3601
SWITCHING
R4.7/P0
R4.0/P4.6
10k
R3618
R0.4/P0
R2.7/P0
Q3605
RN1104F(TPL3)
SWITCH
Q3603
2SC4738F-Y/GR(TPL3)
R4.7/P-0.5
R1.9/
P-0.5
R1.3/P0
R3617
680
R3622
470
R3620
R3621
C3608
0.1u
XX
XX
C3616
C3619
0.01u
C3620
0.01u
C3621
0.01u
C3612
C3613
0.01u
C3615
0.01u
1u
C3617
1u
C3618
1u
B
B
B
C3610
10u
6.3V
C3611
1u
B
B
C3614
B
B
B
B
TA
1u
B
1u
B
0
R0.7/P0
R1.3/P0
R2.1/P0
R0/P0.5
R1.4/P0
ADABOT
1
ADAIN
2
ADATOP
3
2.8
ADAVDD
4
ADAVSS
5
AD8IN
6
0
AD8BOT
7
2.8
AD8VDD
8
AD8VSS
9
0
AD8TOP
10
0
AD8TB
11
DAVSS
12
DAREF
13
1.4
APCVO
14
1.7
AGCVO
15
1.5
CLPVO
16
0
ACCVO
17
1.6
DATOP
18
1.2
DABOT
19
2.8
DAVDD
20
R3636
0
R3657
100k
R3608
0
XX
R3609
2.7
0.7
2.7
71
72
74
TDI73TDO
TCK
TMS
VERIFY
IC3603
A/D CONVERTER(BBI)
AFC,AGC
IC3603
MB87L1241PFV-G-BND-ER
VCXOI
R3648
C3629
0.1u
DVSS0
DVDD0
VCXOO
28
29
30
2.7
XX
B
OSVSS
27
0
70
31
1.4
R3652
TS2
EXCKI
69
32
0
DVSS3
MCSEL
1.4
68
33
C3635
XX
CH
ZCKI
OSCSEL
34
R1.3/P28
MZSEL
ACLKO
2.3
66SO67
35
2.9
XACLKE
36
R1.3/P0
XCS
AOE
2.5
64SI65
37
R2.6/P0
R3656
AVD
0
C3631
2.5
63
XSCK
AHD
38
R2.5/P0
0.1u
2.7
62
39
61
DVDD3
DVSS1
40
2.7
B
TS1
DVDD1
C3630
0.1u
C3632
0.01u
B
TS0
60
DYOUT0
DYOUT1
DYOUT2
DYOUT3
DYOUT4
DYOUT5
DYOUT6
DYOUT7
DVSS2
DVDD2
DCOUT0
DCOUT1
DCOUT2
DCOUT3
DCOUT4
DCOUT5
DCOUT6
DCOUT7
XRST
B
R1.3/P0
59
R1.2/P0
58
R1.0/P0
57
R0.3/P0
56
R1.4/P0
55
R1.0/P0
54
R0.7/P0
53
R0.8/P0
52
51
2.7
50
R1.1/P0
49
R1.2/P0
48
R1.0/P0
47
R1.0/P0
46
R1.0/P0
45
R1.0/P0
44
R1.0/P0
43
R1.7/P0
42
2.6
41
C3633
10u
6.3V
TA
C3634
0.1u
B
TD_2-3
TD_3-4
TCK
TMS
HI_SI
HI_SO
XHI_SCK
XSYS_RST
XCS_ALIGN
IFI_Y0
IFI_Y1
IFI_Y2
IFI_Y3
IFI_Y4
IFI_Y5
IFI_Y6
IFI_Y7
IFI_C0
IFI_C1
IFI_C2
IFI_C3
IFI_C4
IFI_C5
IFI_C6
IFI_C7
TD_2-3
TCK
TMS
IFI_HD
IFI_VD
IFI_OE
AFCK
VIDEO SIGNAL
TD_3-4
Y
80
TO(10/16,13/16,14/16)
TO(4/16,10/16,
76
13/16,14/16)
47
TO(14/16)
26
TO(3/16,6/16)
27
TO(3/17)
30
TO(16/16)
29
TO(3/16)
28
TO(3/16,16/16)
95
TO(3/16,6/16)
TO(3/17,6/17,
20
13/17)
25
TO(3/16)
12
Y/CHROMA
LINE A/D
VC-250 (7/16)
16
4-23 4-24
Page 64
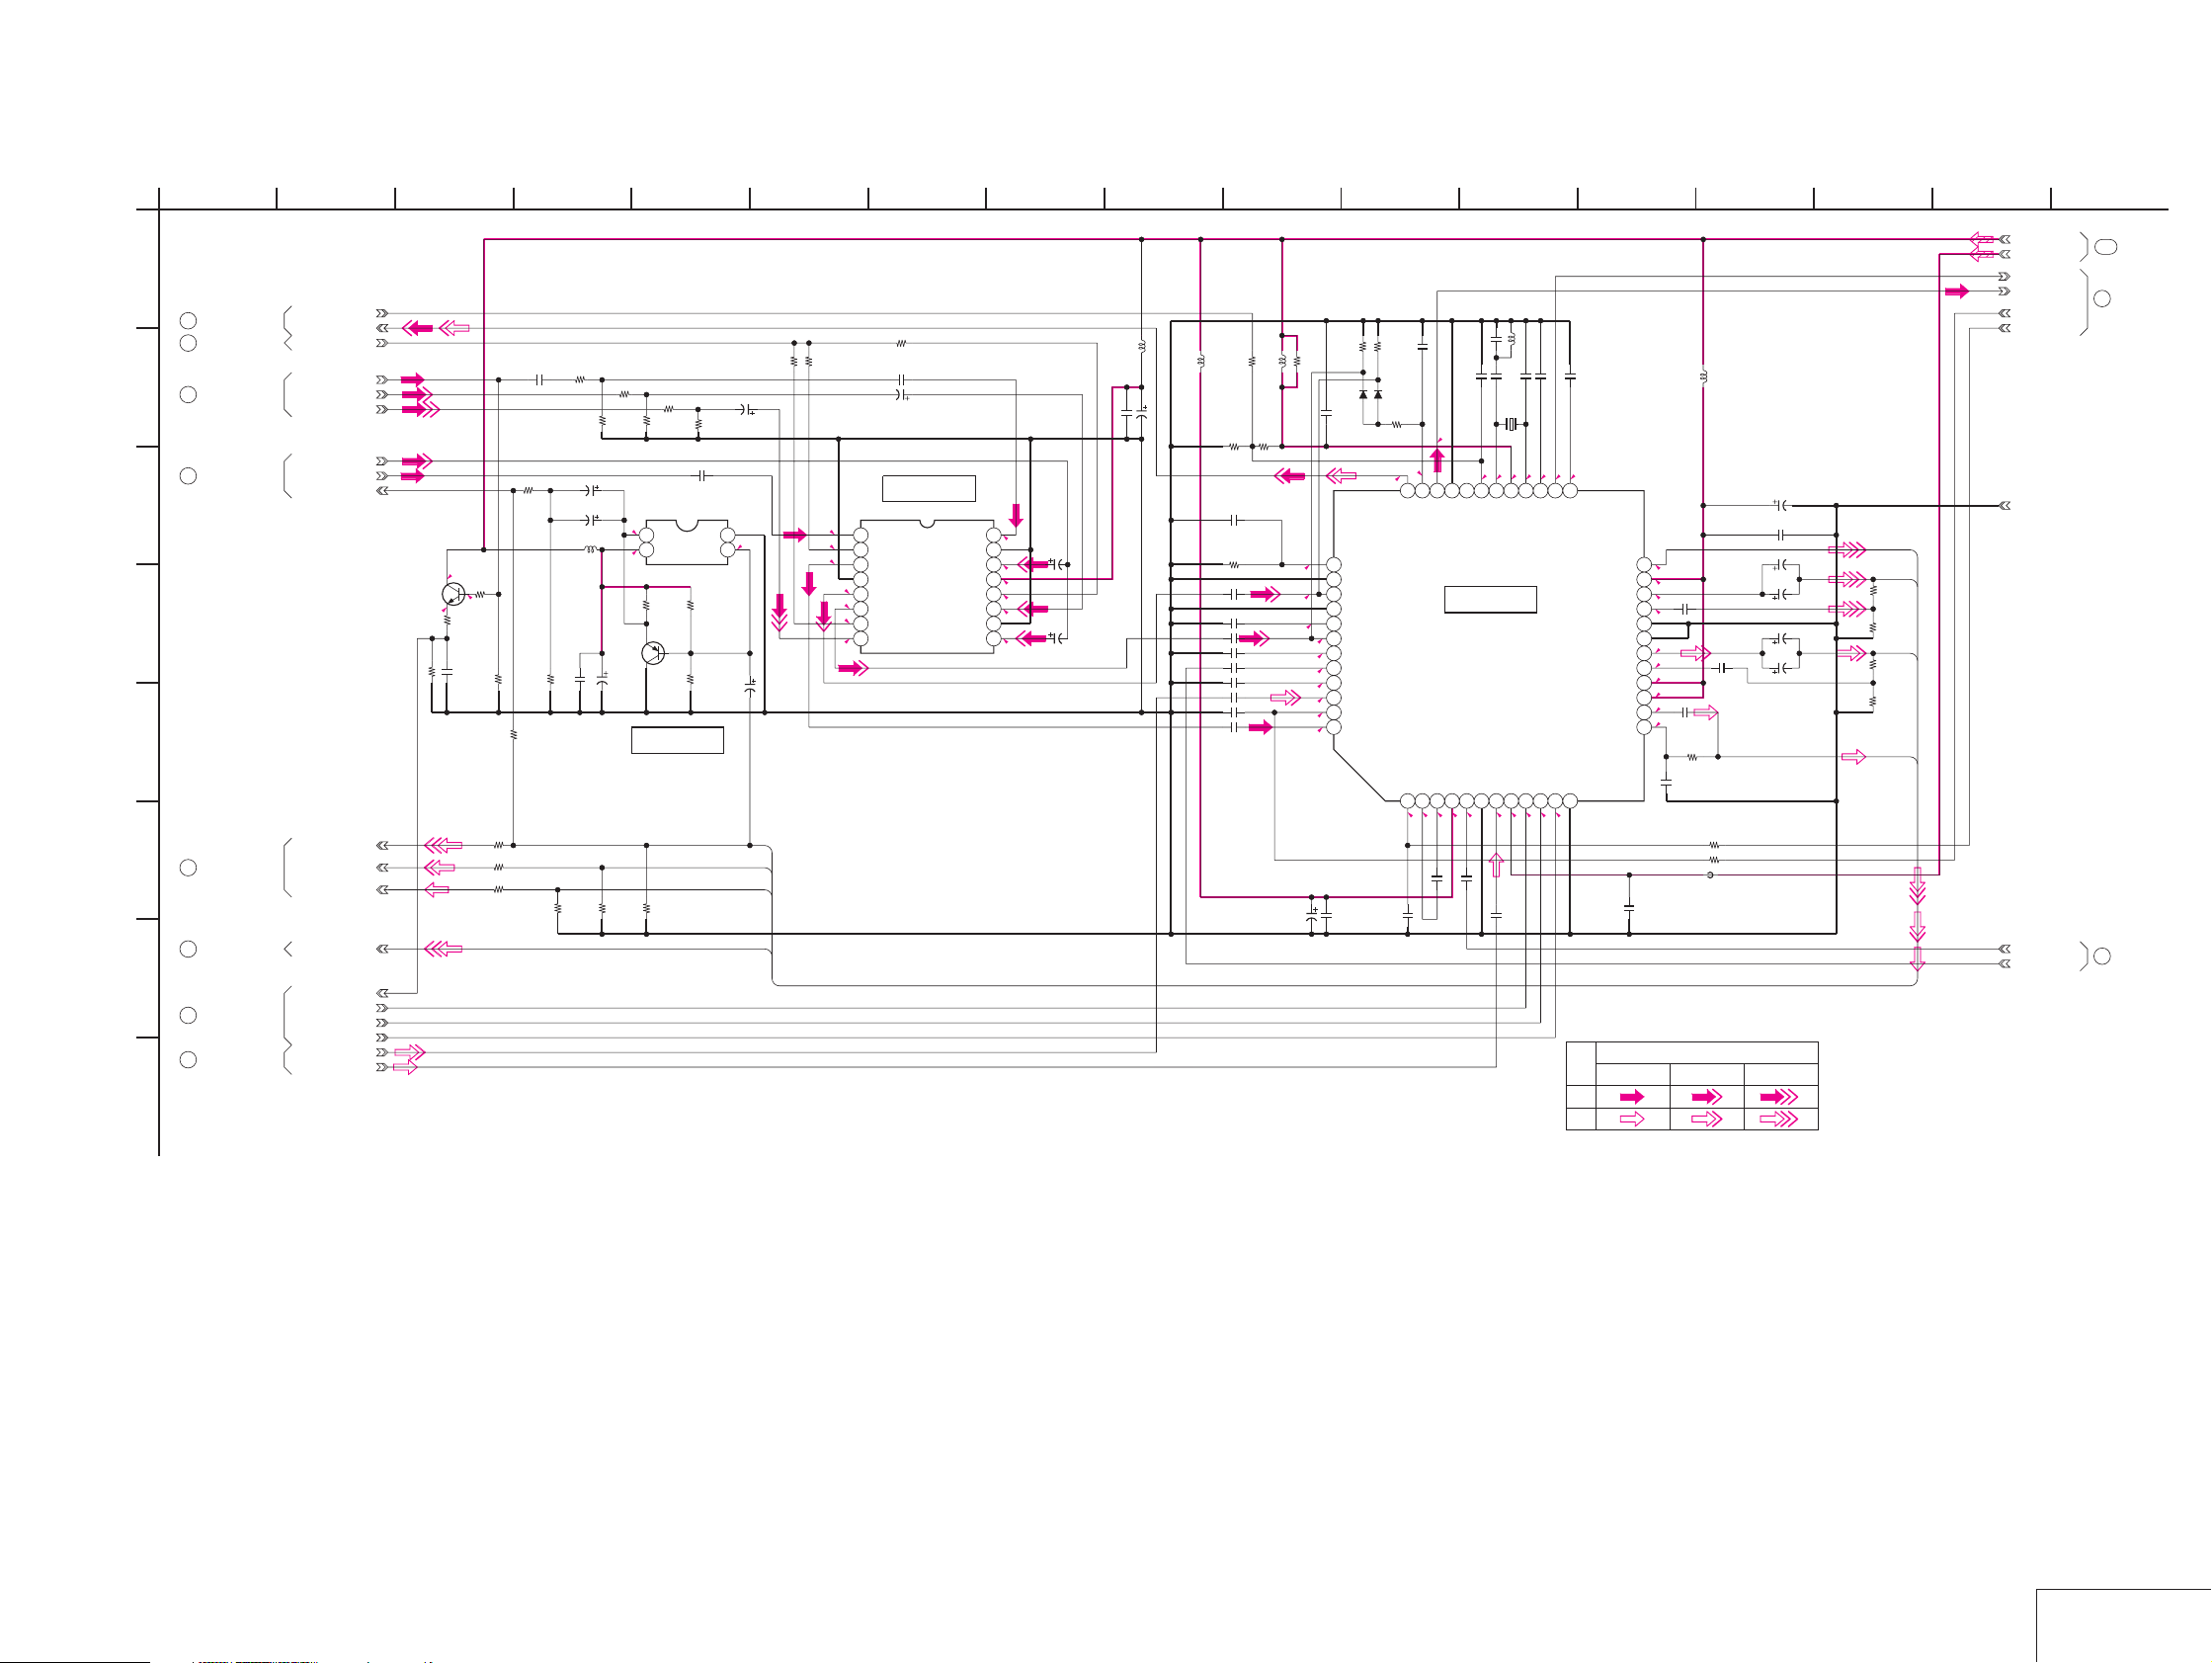
For Schematic Diagram
• Refer to page 4-7 for printed wiring board.
1
38
5 136
924 7 1716
10
11 1514
GV-D200/D200E/D800/D800E
12
VC-250 BOARD(8/16)
LINE IN/OUT(IO BLOCK)
A
-REF.NO.:30000 SERIESXX MARK:NO MOUNT
41
TO(5/16,7/16)
48
TO(11/16,14/16)
B
86
TO(14/16)
49
TO(16/16)
C
NO MARK:REC/PB MODE
R :REC MODE
P :PB MODE
D
E
F
85
TO(14/16)
51
TO(9/16)
G
50
TO(13/16)
33
TO(3/16)
H
16
ALIGN_APC_ERROR
TAKO_Y_OUT
INPUT_SEL
VIDEO_IN
EX_V/Y_IN
EX_C_IN
EX_VIDEO_OUT
VIDEO_OUT
S_Y_OUT
S_C_OUT
IR_VIDEO
VSP_SO
XVSP_SCK
XCS_TAKO
CAIN_Y_OUT
CAIN_C_OUT
S_C_IN
S_Y_IN
2SC4738F-Y/GR(TPL3)
SDC_IN
Q3701
BUFFER
4700
R3701
A_4.75V
D_2.8V
TAKO_CK
L3703
C3721
XX
XX
R3731
R2.5/P0
R3.1/P2.3
C3714
TA
1.6
2.2
R1.6/P0
10u
10V
R3732
XX
XX
R3734
0
D3702
C3713
2.1
2.2
2.6
2.2
0
A
XX
1u
B
IR
373839404142434445464748
MAIN_GND1
Y_IN1
MAIN_GND2
SYNC_SEP_TC
Y_IN2
CLAMP_TC1
Y_IN3
CLAMP_TC2
Y_IN4
Y_GCA_CONT
C_IN1
C3716
0.01u
B
C3717
1u
C3720
B
VREF
INPUT_Y_OUT
XX
R1.8/P0.7
PLL_GND
INPUT_C_OUT
APC_FIL
BGT_OUT
R2.4/P0
D3701
XX
R3733
XX
2.4
IC3701
VIDEO IN/OUT
IC3701
AN2225FHQ-EB
AN2225
C_GCA_CONT
AGC_VOUT
C_IN2
MAIN_VCC
C_IN3
123456789101112
0
C3715
0.33u
B
D_GND
0
P0
2.2
4.6
R2.1/
B
0.01u
C3718
0.01u
B
C3719
XX
C3722
1.6
X3701
EXTAL
C_IN4
C3723
0.01u
XX
C3725
XX
4.7
0.6
XTAL
PLL_VCC
D_VCCSIXSCK
0
2.8
B
XX
C3726
R0.8/P3.9
MM_TC3
0.3
4FSC_OUT
XCS
2.6
252627282930313233343536
2.7
C3727
1.601.7
MM_TC2
DRV_V_OUT
DRV_Y_OUT
DRV_C_OUT
C_GND
XX
IR_V_OUT
V_VCC
V_INV
V_GND
Y_GND
Y_INV
Y_VCC
C_VCC
L3705
10uH
C3734
10u
10V
TA A
C3735
0.01u
C3750
C3728
0
4.6
1.9
1.6
1.9
1.6
4.6
4.6
2.2
0
C3730
SDC
13 14 15 16 17 18 19 20 21 22 23 24
0.01u
C3731
0.01u
C3724
0.1u
B
2.2u
B
B
B
R3726
10k
R3722
R3724
FB3701
C3729
1k
100u
6.3V
TA B
C3751
100u
6.3V
TA B
2.2u
B
1k
C3732
100u
6.3V
TA
C3733
100u
TA
6.3V
IR_VIDEO
DRV_V_O
R3727
DRV_Y_O
DRV_C_O
R3730
R3728
R3729
1k
1k
1k
1k
B
B
L3706
10uH
A
C3744
10u
6.3V
A
C3742
0.01u
L3701
C3741
0.22u
10uH
10u
10V
TA
A
2.2u
B
B
C3711
C3709
C3708
C3704
C3712
C3707
C3710
C3705
L3702
R3723
XX
XX
R3719
XX
R3718
XX
C3736
XX
R3721
22k
0.5%
2.2u
B
0.033u
B
2.2u
B
1u
B
2.2u
B
0.33u
B
C3706
0.01u
B
IC3702
1
2
3
4
5
6
7
8
IN1B
CTL1
OUT1
GND2
OUT2
OUT3
CTL3
IN3A
C3737
0.01u
R3738
4700
B
C3738
10u
6.3V
A
IC3702
VIDEO SW
NJM2285V-TE2
IN1A
GND1
IN2B
V+
CTL2
IN2A
GND3
IN3B
C3743
16
10u
2.3
6.3V
15
14
1.5
13
4.7
12
0
11
1.4
10
9
1.5
C3749
0.01u
R3712
B
39
R3713
C3747
R3746
100u
6.3V
39
B
TA
C3752
100u
6.3V
B
TA
L3707
4.7
R3704
100
0
0
R3702
4700
C3701
0.01u
B
R3705
220k
R3740
68
R3741
R3742
10uH
R3747
33
C3745
R3748
0.01u
XX
68
68
R3745
R3744
XX
XX
39
R3714
R3716
R3715
33
33
C3746
10u
10V
TA
A
39
C3740
0.01u
B
GND
SIN
R3751
XX
C3748
C3739
10u
A
6.3V
4
2.6
3
10u
6.3V
A
R3717
33
MM1031XML
IC3703
2.84.7
1
SOUT
2
VCC
R3749
XX
Q3702
XX
R3750
XX
IC3703
DRV_V_O
DRV_Y_O
R3743
XX
DRV_C_O
IR_VIDEO
R3739
4700
R3737
4700
2.3
1.6
0
0.7
0.8
0
1.5
TAKO_C_OUT
AGC_CONT
ACC_CONT
REG_GND
KINUTA_Y_OUT
KINUTA_C_OUT
110
TO(15/16)
46
TO(7/16)
44
TO(6/16)
SIGNAL PATH
VIDEO SIGNAL
CHROMA Y/CHROMA
REC
PB
Y
4-25 4-26
LINE IN/OUT
VC-250 (8/16)
Page 65
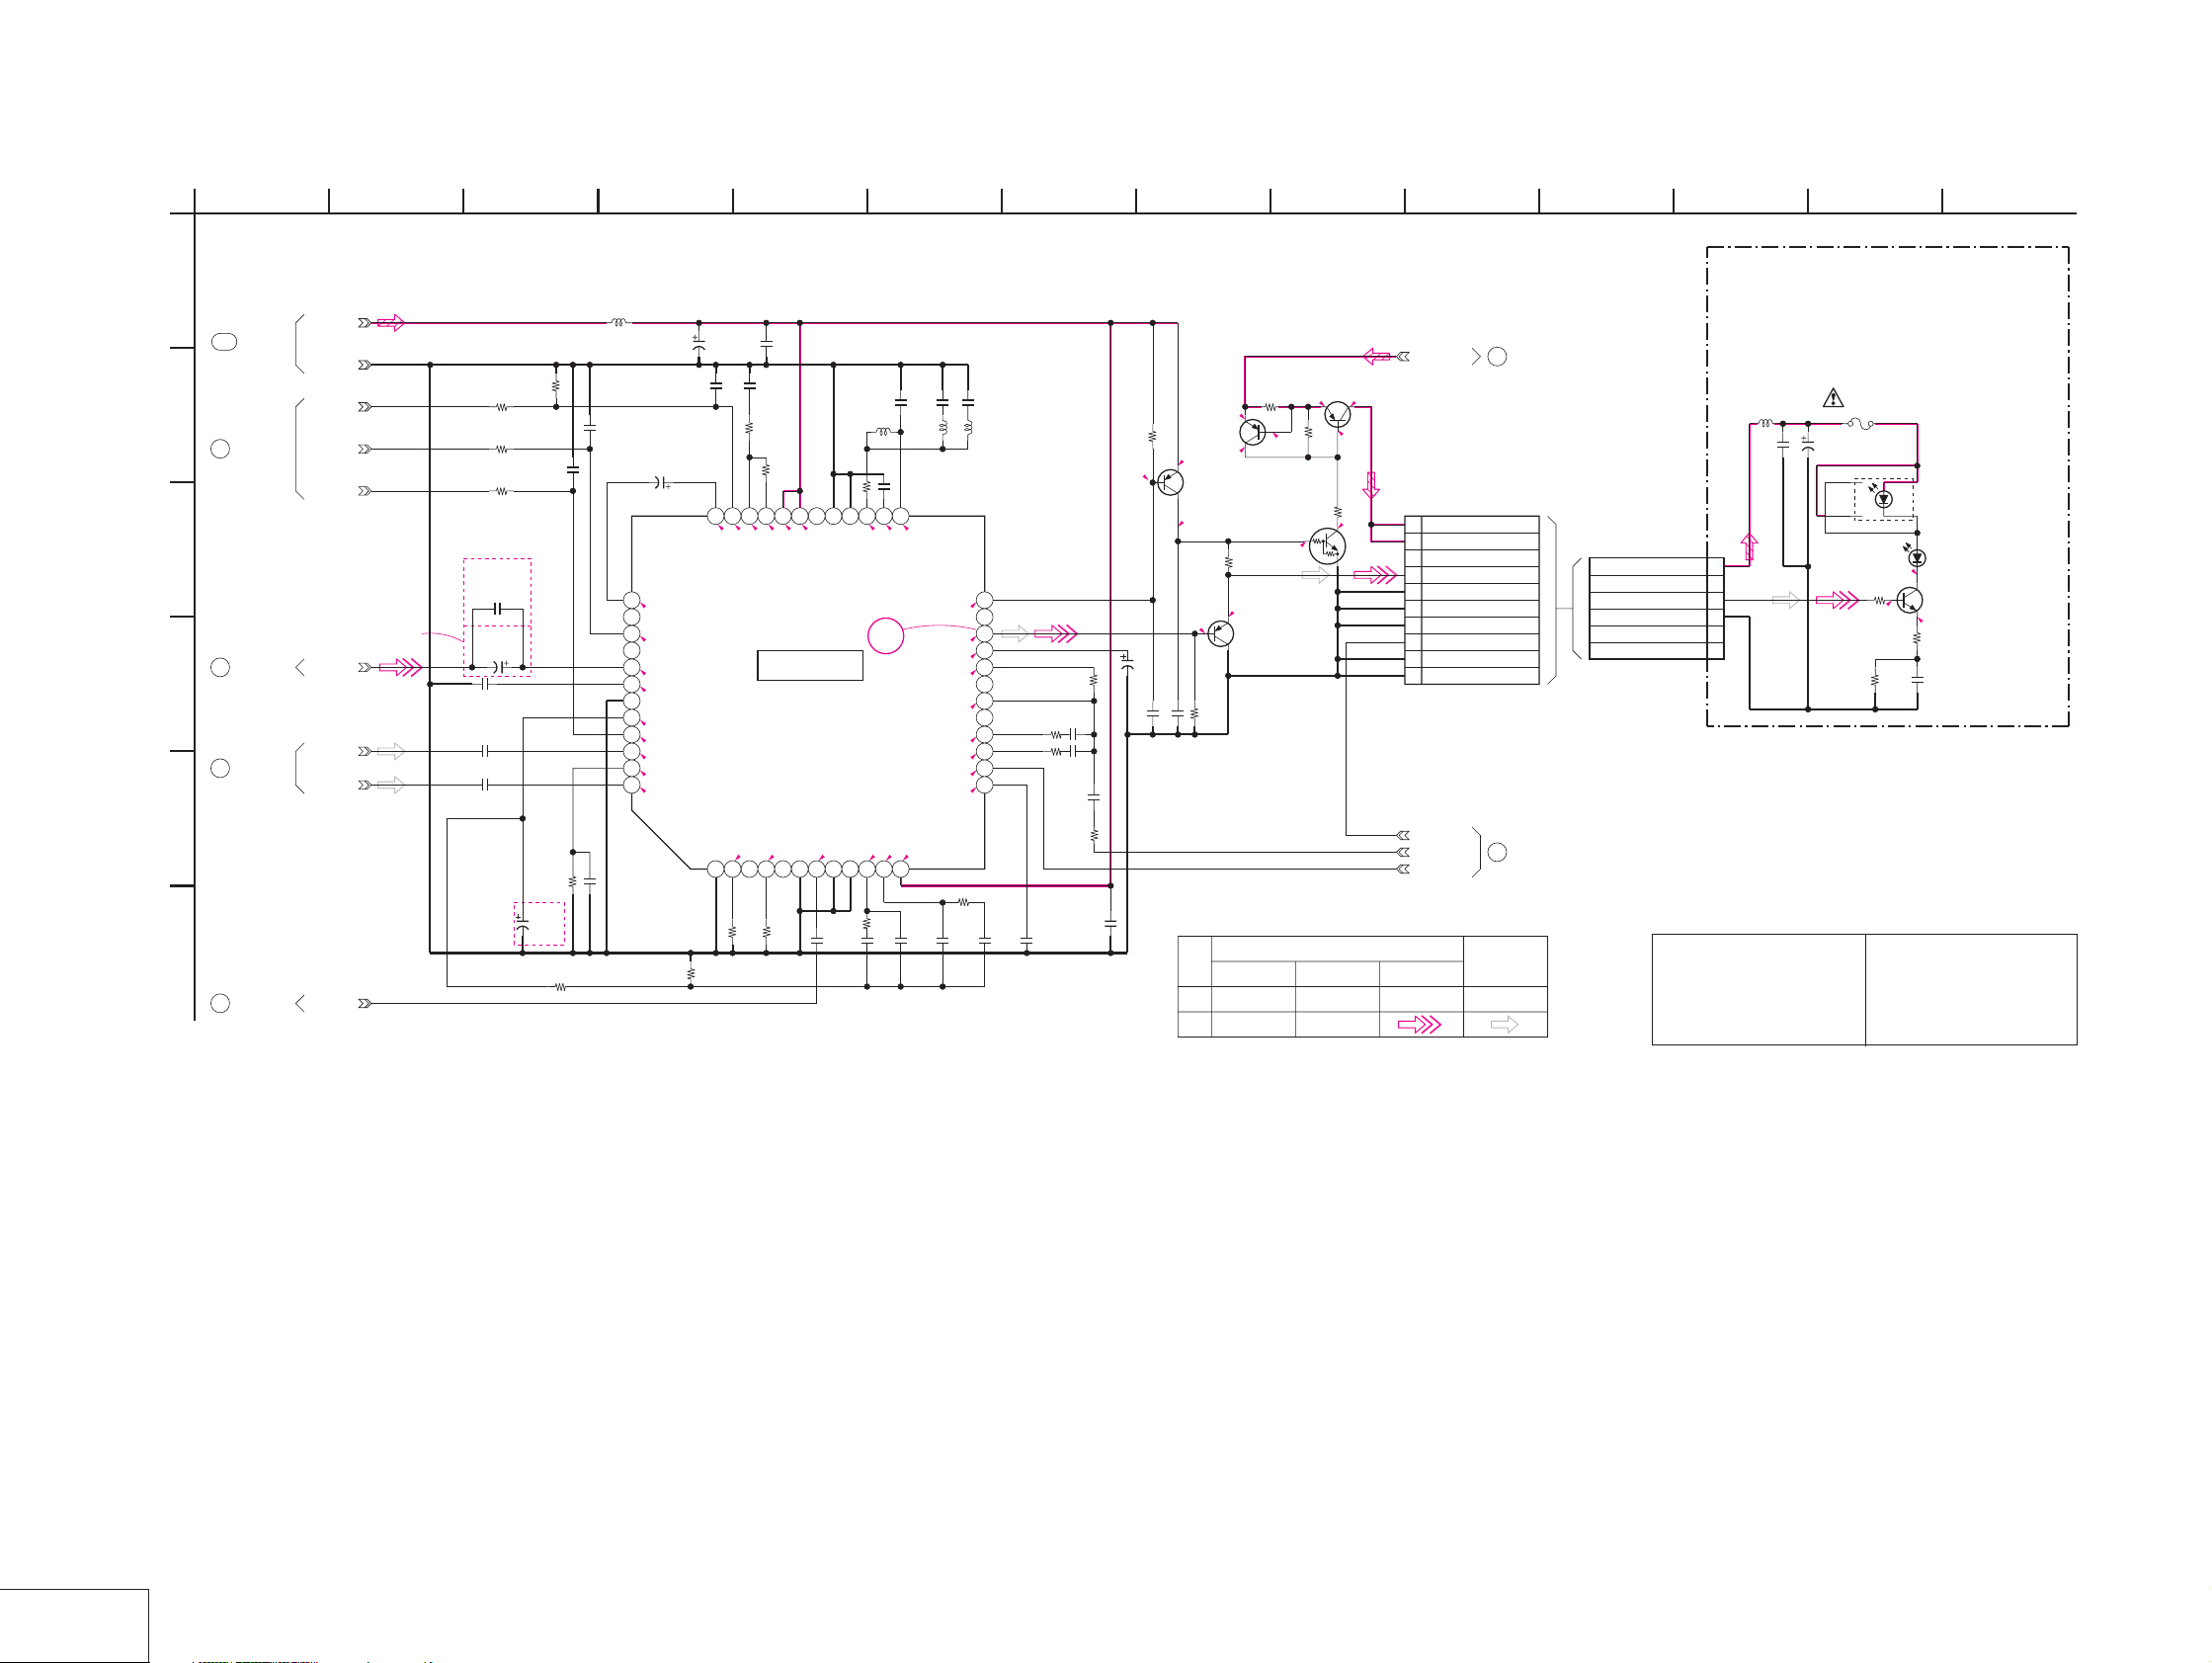
GV-D200/D200E/D800/D800E
For Schematic Diagram
• Refer to page 4-7 for VC-250 printed wiring board.
• Refer to page 4-59 for IR-38 printed wiring board.
• Refer to page 4-69 for waveform.
1
38
924 7
105 136
11 14
12
VC-250 BOARD(9/16)
IR(IR-BLOCK)
-REF.NO.:30000 SERIES-
A
XX MARK:NO MOUNT
111
TO(15/16)
B
7
TO(2/16)
C
51
TO(8/16)
D
55
TO(11/16)
E
F
24
TO(3/16)
16
A_4.75V
REG_GND
IR_CARR
IR_V_DEV
IR_A_DEV
IR_VIDEO
IR_FSC
GV-D200/D800
MODEL
IR_L
IR_R
NO MARK:ON/OFF MODE
( ):IR ON MODE
[ ]:IR OFF MODE
R3908
R3903
15k
18k
R3904
4700
C3904
R3905
0.01u
4700
B
GV-D200E/D800E
MODEL
C3901
1u
6.3V
B
C3902
10u
4V
C3908
1u
B
C3905
0.47u
B
C3906
0.47u
B
R3909
1M
C3903
10u
6.3V
GV-D200E/D800E
MODEL
R3910
IR-38 BOARD
IR TRANSMITTER
L3901
10uH
C3914
10u
10V
C3909
0.01u
B
C3910
4.7u
6.3V
TA
37
CLAMP C1
(2.2)[0.2]
38
NC
39
V DEV ADJ
1.0
40
NC
41
V IN
(2.3)[2.7]
42
REG
(1.3)[0]
43
NC
44
REF
(2.3)[3.6]
45
A DEV ADJ
0.6
46
Lch IN
(2.3)[3.6]
47
ALC C
(0.9)[0]
48
Rch IN
(2.3)[3.2]
C3934
1u
B
0
R3915
XX
C3912
0.01u
TA
C3911
0.01u
B
C3913
36
CLAMP C2
35
CAR ADJ
(2.4)[0.2]
34
0.8
PRE EM IN
510p
CH
R3912
330
R3913
33
(2.3)[2.1]
PRE EM OUT
1k
(2.3)[2.1]
30NC31
4.6
4.6
VCC32VCC
B
IC3901
IR TRANSMITTER
IC3901
R3940
XX
(1.2)[0]
C3915
0.01u
B
(GV-D200/D800)
(GV-D200E/D800E)
LA9511WL-TBM
AN2920FHQ-EB
BAND SEL2REF R3[ALC OUT Lch]4X‘tal SEL5[ALC OUT Rch]6[OSC OUT]7X’tal IN8A GND9A GND10LPF L11LPF R12OSC VCC
(1.3)[0]
1
R3911
22k
±0.5%
28
(2.3)[4.6]
C3916
1u
B
C3918
C3921
4p
33p
CH
CH
L3902
5.6uH
L3903
33uH
R3916
470
C3917
0.1u
B
25
26
27
V REF
V GND29V GND
VRF IN
HPF OUT
(2.3)[2.8]
(2.3)[2.8]
(2.3)[2.8]
DRV CL OUT
DRV EM OUT
35
2.1
2.1
4.6
R3917
150k
C3920
0.47u
B
C3919
0.47u
B
(3.9)[4.6]
(0.6)[0]
DRV SW
(2.0)[0.5]
MIX OUT
(1.3)[0]
MIX IN
(1.3)[0]
VRF OUT
(2.3)[2.6]
ARF OUT
(2.4)[2.8]
STBY
(3.0)[0]
CHUP C
(2.9)[0]
R3918
150k
C3923
39p
CH
L3904
33uH
24
23
NC
22
21
20
19
NC
18
17
16
15
14
13
C3922
R3919
560
R3920
6800
C3927
0.01u
R3922
C3924
1u
1u
B
B
NC
R3921
C3926
0.01u
C3929
0.01u
39k
R3936
1500
C3928
470
B
B
B
C3925
0.1u
B
4.6
(3.9)
[4.6]
Q3903
SWITCH
(4.6)[0]
22u
4V
TA
C3936
C3935
0.01u
0.01u
B
B
SIGNAL PATH
2SA1832F-Y/GR(TPL3)
R3923
470
(0.6)
[0]
R3924
470
IR B+ SWITCH
8.2
8.2
UN9211J-(K8).SO
(1.3)[0]
2SA1226-T1E4
IR DRIVER
CHROMA
Q901,902
Q902
2SB1462J-QR(K8).SO
R902
6.8
8.2
8.2
Q903
SWITCH
0
Q3902
VIDEO SIGNAL
VTR_UNREG
(0.5)[0.8]
Q901
R904
8.2
8.2
1k
2SB624-T1BV4
1 IR_5V
2 IR_5V
3 IR_CL_OUT
4 IR_EM_OUT
5 IR_GND
6 IR_GND
7 IR_GND
8 KEY_AD3
9 REG_GND
10 REG_GND
KEY_AD3
SIRCS_PWM
IR_ON
Y/CHROMA
R903
47k
Y SIGNAL
57
CN924
56
AUDIO
TO(12/16)
10P
6PCN361
TO(14/16)
REC
PB
-REF.NO:10000 SERIES-
NO MARK:ON/OFF MODE
( ):IR ON MODE
[ ]:IR OFF MODE
L363
10uH
C393
1u
1IR_5V
2IR_CL_OUT
3IR_EM_OUT
4IR_GND
5KEY_AD3
6REG_GND
C382
4.7u
B
10V
TA
NC2
NC1
R388
1/10W
Note :
The components identified by
mark 0 or dotted line with mark
0 are critical for safety.
Replace only with part number
specified.
F361
0.2A
24V
A
4
3
(4.3)[0]
R392
22
2
(1.2)[0]
2.7
1
DCR2815
(SUPER LASER LINK)
2
K
D362
DAC3825
(SUPER LASER LINK)
1
Q365
2SD999-T1-CLCK
LED DRIVER
3
(0.5)[0]
R389
6.8
1/10W
C932
0.1u
B
D363
Note :
Les composants identifiés par
une marque 0 sont critiques
pour la sécurité.
Ne les remplacer que par une
pièce portant le numéro spécifié.
IR
VC-250 (9/16)
4-27 4-28
Page 66
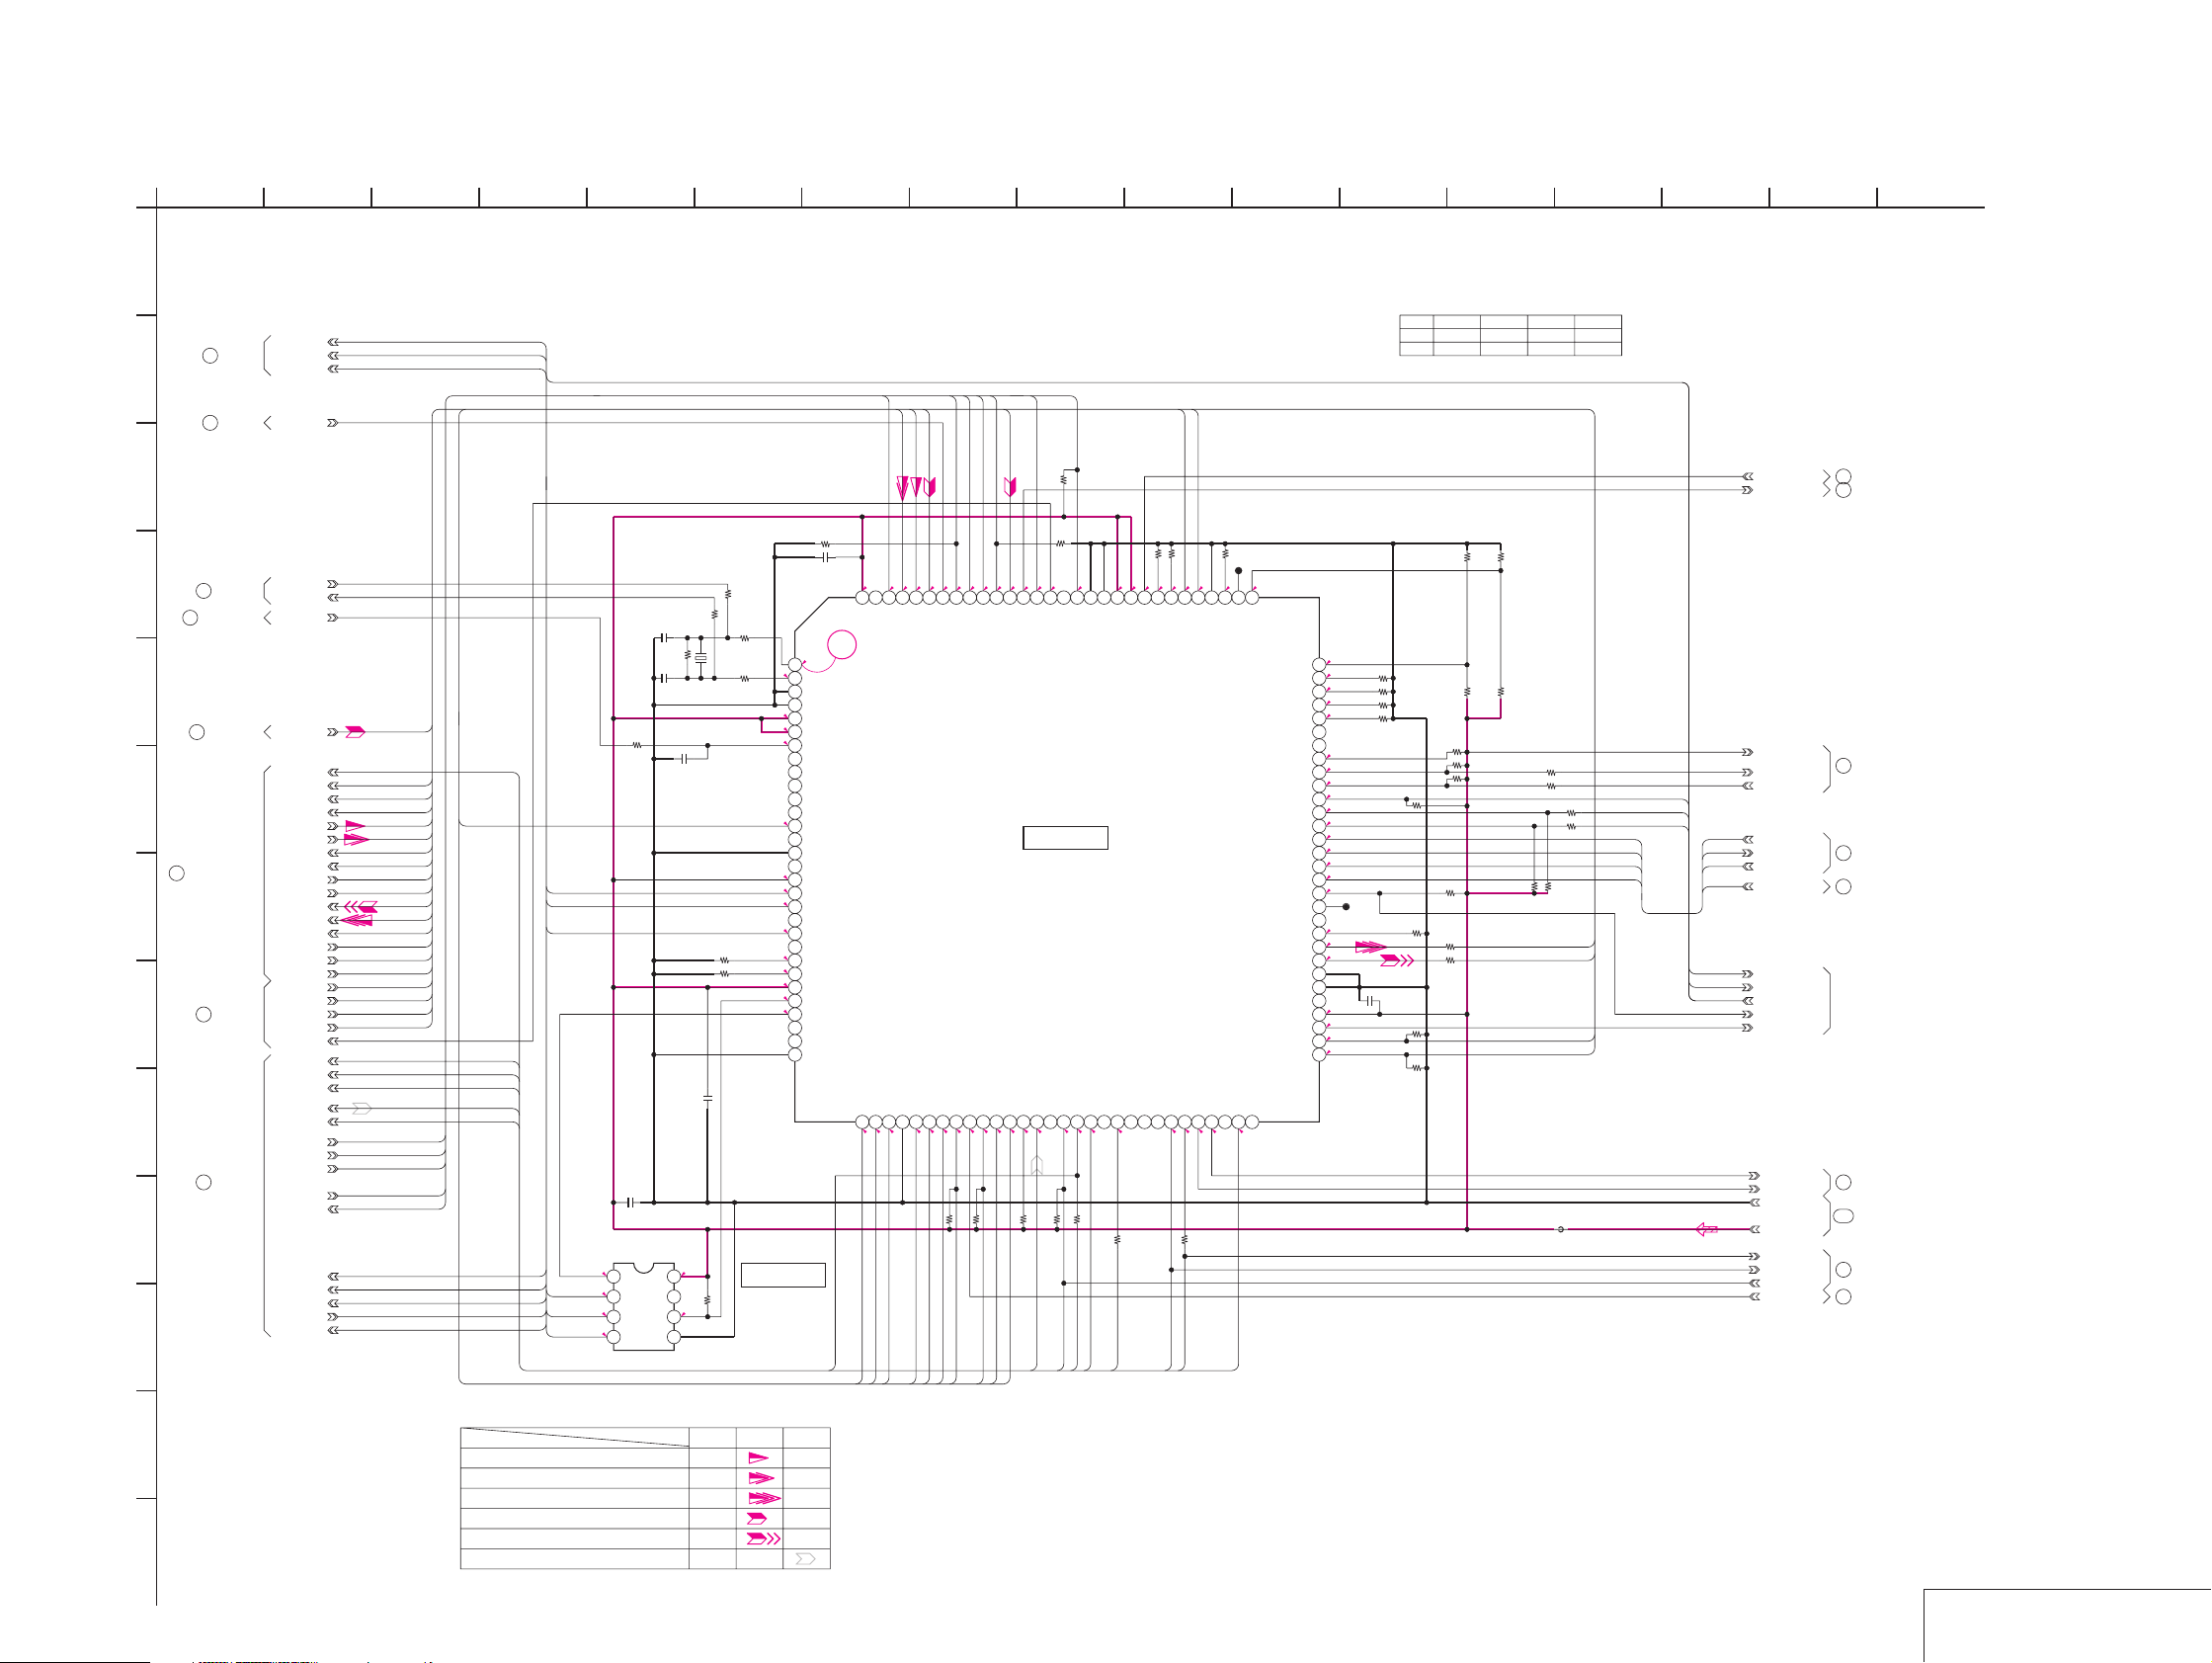
For Schematic Diagram
• Refer to page 4-7 for printed wiring board.
• Refer to page 4-69 for waveform.
1
38
5 13
6
924 7
10
11 1514
12
GV-D200/D200E/D800/D800E
1716
VC-250 BOARD(10/16)
MECHANISM CONTROL(VC BLOCK)
A
-REF.NO.:30000 SERIESXX MARK:NO MOUNT
9
TO(2/16)
B
35
TO(4/16)
C
D
76
58
TO(13/16)
TO(4/16,7/16,
13/16,14/16)
E
TO(12/16,
84
13/16,16/16)
F
61
TO(12/16,13/16)
G
60
H
TO(13/16)
I
45
TO(6/16)
J
K
XVC_SCK
DA_STB
LINE_OUT_V
XTAL20M
XSYS_RST
CAP_FG
DRUM_START
CAP_ON
CAP_FWD
DRUM_ON
DRUM_FG
DRUM_PG
UNLOAD
TAPE_END
TAPE_TOP
CAP_PWM
DRUM_PWM
TAPE_LED_ON
MODE_SW_A
MODE_SW_B
MODE_SW_C
ME_SW
HI8_MP_SW
SREEL_AFG
TREEL_AFG
XDRUM_BRAKE
JOG_VD
VC_RF_SWP
X1/2_SWP
ATF_SAMPLE
SWP_DIR
TBC_VD
MECHA_HD
MECHA_FLD
MECHA_VD
CK_CONT1
XRST_KINUTA
XVC_SCK
XCS_KINUTA
VC_SO
VC_SO
LOAD
VC_SI
NO MARK:REC/PB MODE
R :REC MODE
P :PB MODE
* :Cannot measure
XVC_SCK
VC_SO
DA_STB
X0
CAP_FG
DRUM_START
CAP_ON
CAP_FWD
DRUM_ON
DRUM_FG
DRUM_PG
UNLOAD
TAPE_END
TAPE_TOP
CAP_PWM
DRUM_PWM
TAPE_LED_ON
MODE_SW_A
MODE_SW_B
MODE_SW_C
ME_SW
HI8_MP_SW
SREEL_AFG
TREEL_AFG
MECHA_HD
MECHA_FLD
MECHA_VD
CK_CONT1
LOAD
TBC_VD
DRUM_ON
VC_RF_SWP
X1/2_SWP
ATF_SAMPLE
SWP_DIR
XRST_KINUTA
XVC_SCK
XCS_KINUTA
JOG_VD
VC_SO
VC_SI
XRST_KINUTA
XCS_KINUTA
DA_STB
XVC_SCK
VC_SO
VC_SI
2.7
2.5
0.1
2.5
Note:Capacitor is mounted to the location
where R4919 is printed.
R4919
0.01u
B
C4903
(Note)
10p
CH
R4902
560k
C4904
10p
CH
X4901
20MHz
R4901
1k
C4905
0.01u
B
R4945
R4946
C4906
0.1u
B
C4902
B
1u
IC4901
AK6480AM-E2
1
XCS
2
XSCK
3
OI
4
OO
xBUSY
2.7
Vcc
8
7
2.7
6
RST
R4904
100k
5
GND
10k
10k
R4905
R4903
R4906
XX
0
0
IC4901
*
2.7
2.7
2.6
2.7
2.7
2.7
2.1
0
0
0
2.7
2.7
2.7
EEPROM
R4907
XX
C4907
0.1u
B
33
*
1
X0
2
X1
3
VSS
4
MD2
5
MD1
6
MD0
7
XRST_VC
8
Not Used/FE_10MHz
9
Not Used
Not Used
10
Not Used
11
Not Used
12
DRUM_ON
13
Not Used/XCS_HONEY
14
Not Used/DOP
15
Not Used/XCS_IO
16
G8/GX GX=H
1718
XRST_KINUTA
XCS_KINUTA
19
Not Used/XCS_AU
20
DA_STRB
21
ZM_RST_LED
22
ZM_RST_SENS
23
FC_RST_SENS
24
VDD
25
XWE_EEPROM
26
XCS_EEPROM
27
Not Used/XREEL_HALL_ON
28
Not Used/LM_LIM_CONT
29
Not Used/XLM_LIM_ON
30
SWP_DIR
2.700.1
119NC120
VDD
TAPE_LED_ON
LOAD
32
31
0.1
TAPE_LED_ON
LOAD
118
33
CAP_FG
DRUM_FG
DRUM_PG
MECHA_VD
1.4
1.4
114
115
116
117
CAP_FG
DRUM_FG
DRUM_PG
MECHA_VD
VSS
UNLOAD
MSW_A36MSW_B
34
35
37
00000
UNLOAD
MODE_SW_A
MODE_SW_B
MODE_SW_C
TBC_VD
LINE_OUT_V
2.7
113
TBC_VD
LINE_OUT_V
ME_SW
MSW_C
38
100k
R4908
ME_SW
MECHA_HD
2.8
111
112
MECHA_HD
RF_ENV_DET
39
R2.7/P0
2.8
40
R0/P2.8
100k
R4910
HI8_MP_SW
CAP_FG
CK_CONT2
MECHA_FLD
R2.8/P001.4
109
110
CFG_HMS
CK_CONT2
MECHA_FLD
MB91192PFF-G-117-BND-ER
HI8_MP_SW41TAPE_TOP42TAPE_END
R0/P2.8
R2.8/P0
TAPE_TOP
TAPE_END
R4935
XTBC_V_RST
100k
R4936
100k
2.402.7
106
107
108
SYS_V
TBC_V_RST
XDRUM_BRAKE/Not Used
IC4902
Hi8/Std8
MECHANISM CONTROL
IC4902
ATF_SAMPLE45Not Used/XSG_V_RST
XNS_ON_SW
43
44
0
2.7
R0/P2.8
100k
R4911
ATF_SAMPLE
CK_CONT1
104
105
INT_VD
RP_PB_MODE
46
47
2.7
2200
4700
R4913
R4912
VC_RF_SWP
RP_PB_MODE
0
102
103
VSS
CK_CONT1
SWP
X1/2_SWP(HSWP)
48
49
2.7
X1/2_SWP
100
101
AVRH
AVSS
Not Used/XFE_ON
D_START
50
51
0
R4914
DRUM_START
2.7
2.7
99
AVDD
AUDIO_OUT
52
0
0
R4953
3.300
98
AFC_F0_IN
MF_LED
53
0
0
R4952
97
YAW_AD
PITCH_AD
FC_RST_LED
AGC_SLOW
54
AGC_SLOW
TREEL_AFG
SREEL_AFG
R4951
1.1
1.1
94
95
96
93
LENS_DETE
S_REEL_FG_AD
T_REEL_FG_AD
(V_LIGHT_PWM)YAW_PWM
RP_PS
XWEN/Not Used
SSS/Not Used
55
56
57
58
000
R4917
1k
SSS
XWEN
RP_POWER_SAVE
0
CL4904
0
91
92
HALL_AD
SYSTEM_AD
Not Used/DRUM_TEMP_AD
ZOOM_SW_AD
LENS_TEMP_AD
CS_CH/GCAM_PB
CH_SI/CAM/XLINE
SCK_CH/AGC_DIRECT
(TANUKI→VC) VC_SI
(VC→TANUKI) VC_SO
(HI→VC) HI_SO
(VC→HI) HI_SI
XCS_VC_STAR
VST_C_CHARGE
JOG_VD
LCD_HOLD
59
60
0
2.7
JOG_VD
2.5
GENERAL_AD
YRF_OFF
ATF_OFF
SCK_VC
XCS_VC
HI_SCK
PITCH_PWM
IRIS_PWM
DRUM_PWM
CAP_PWM
(OSCI) GND
(OSCO) NC
VC_F_BUSY
CAP_ON
CAP_FWD
*MARKED:MOUNT TABLE
GV-D800
R911
2.5
90
0
MF_A
89
0
MF_B
88
0
87
0
86
85
84
2.7
83
0
82
2.7
81
2.5
80
0.1
79
2.5
78
2.8
77
2.4
76
2.3
75
2.5
74
2.7
73
72
71
0
70
1.2
69
0.4
68
VSS
67
66
65
2.7
VDD
64
0
63
2.7
62
2.7
61
CL4903
R4928
R4927
R4950
R4947
R4948
R4949
0
47k
R4922
47k
C4911
0.1u
B
100k
R4929
100k
GV-D800E
10K
47K
100K
100K
R922
R910
*
100k
0
R909
R911
0
*
10k
0
R4938
100k
100kR4939
100kR4940
R4930
100k
R4920
10k
R4921
10k
R4931
R4942
GV-D200
100K
47k
0R4941
0
R4933
R4934
R4932
47k
DRUM_PWM
CAP_PWM
CAP_ON
CAP_FWD
FB4901
0uH
GV-D200E
100K
10K47KR922
0
0
XCS_VC
XHI_SCK
HI_SO
AFC_F0
SYS_V
XCS_CH
CH_SO
HI_SO
HI_SI
XHI_SCK
XCS_VC
XCH_SCK
HI_SO
HI_SI
XHI_SCK
XCS_VC
XVC_SCK
VC_SO
VC_SI
XCS_VC_STAR
VC_F_BUSY
XWEN
SSS
REG_GND
D_2.8V
RP_POWER_SAVE
AGC_SLOW
RP_PB_MODE
RF_ENV_DET
VC_SI
VC_SO
XVC_SCK
HI_SI
XVC_SCK
VC_SO
VC_SI
93
TO(6/16,16/16)
94
TO(5/16,6/16,14/16)
43
TO(5/16)
80
TO(7/16,13/16,14/16)
77
TO(14/16)
(NOT USE)
87
TO(3/16)
112
TO(15/16)
14
TO(2/16)
17
TO(2/16,13/16)
SIGNAL PATH
L
Drum speed servo
REC/PBREC
Drum phase servo
Drum servo (speed and phase)
Capstan speed servo
Capstan servo (speed and phase)
M
Ref.signal
16
PB
MECHANISM CONTROL
4-29 4-30
VC-250 (10/16)
Page 67
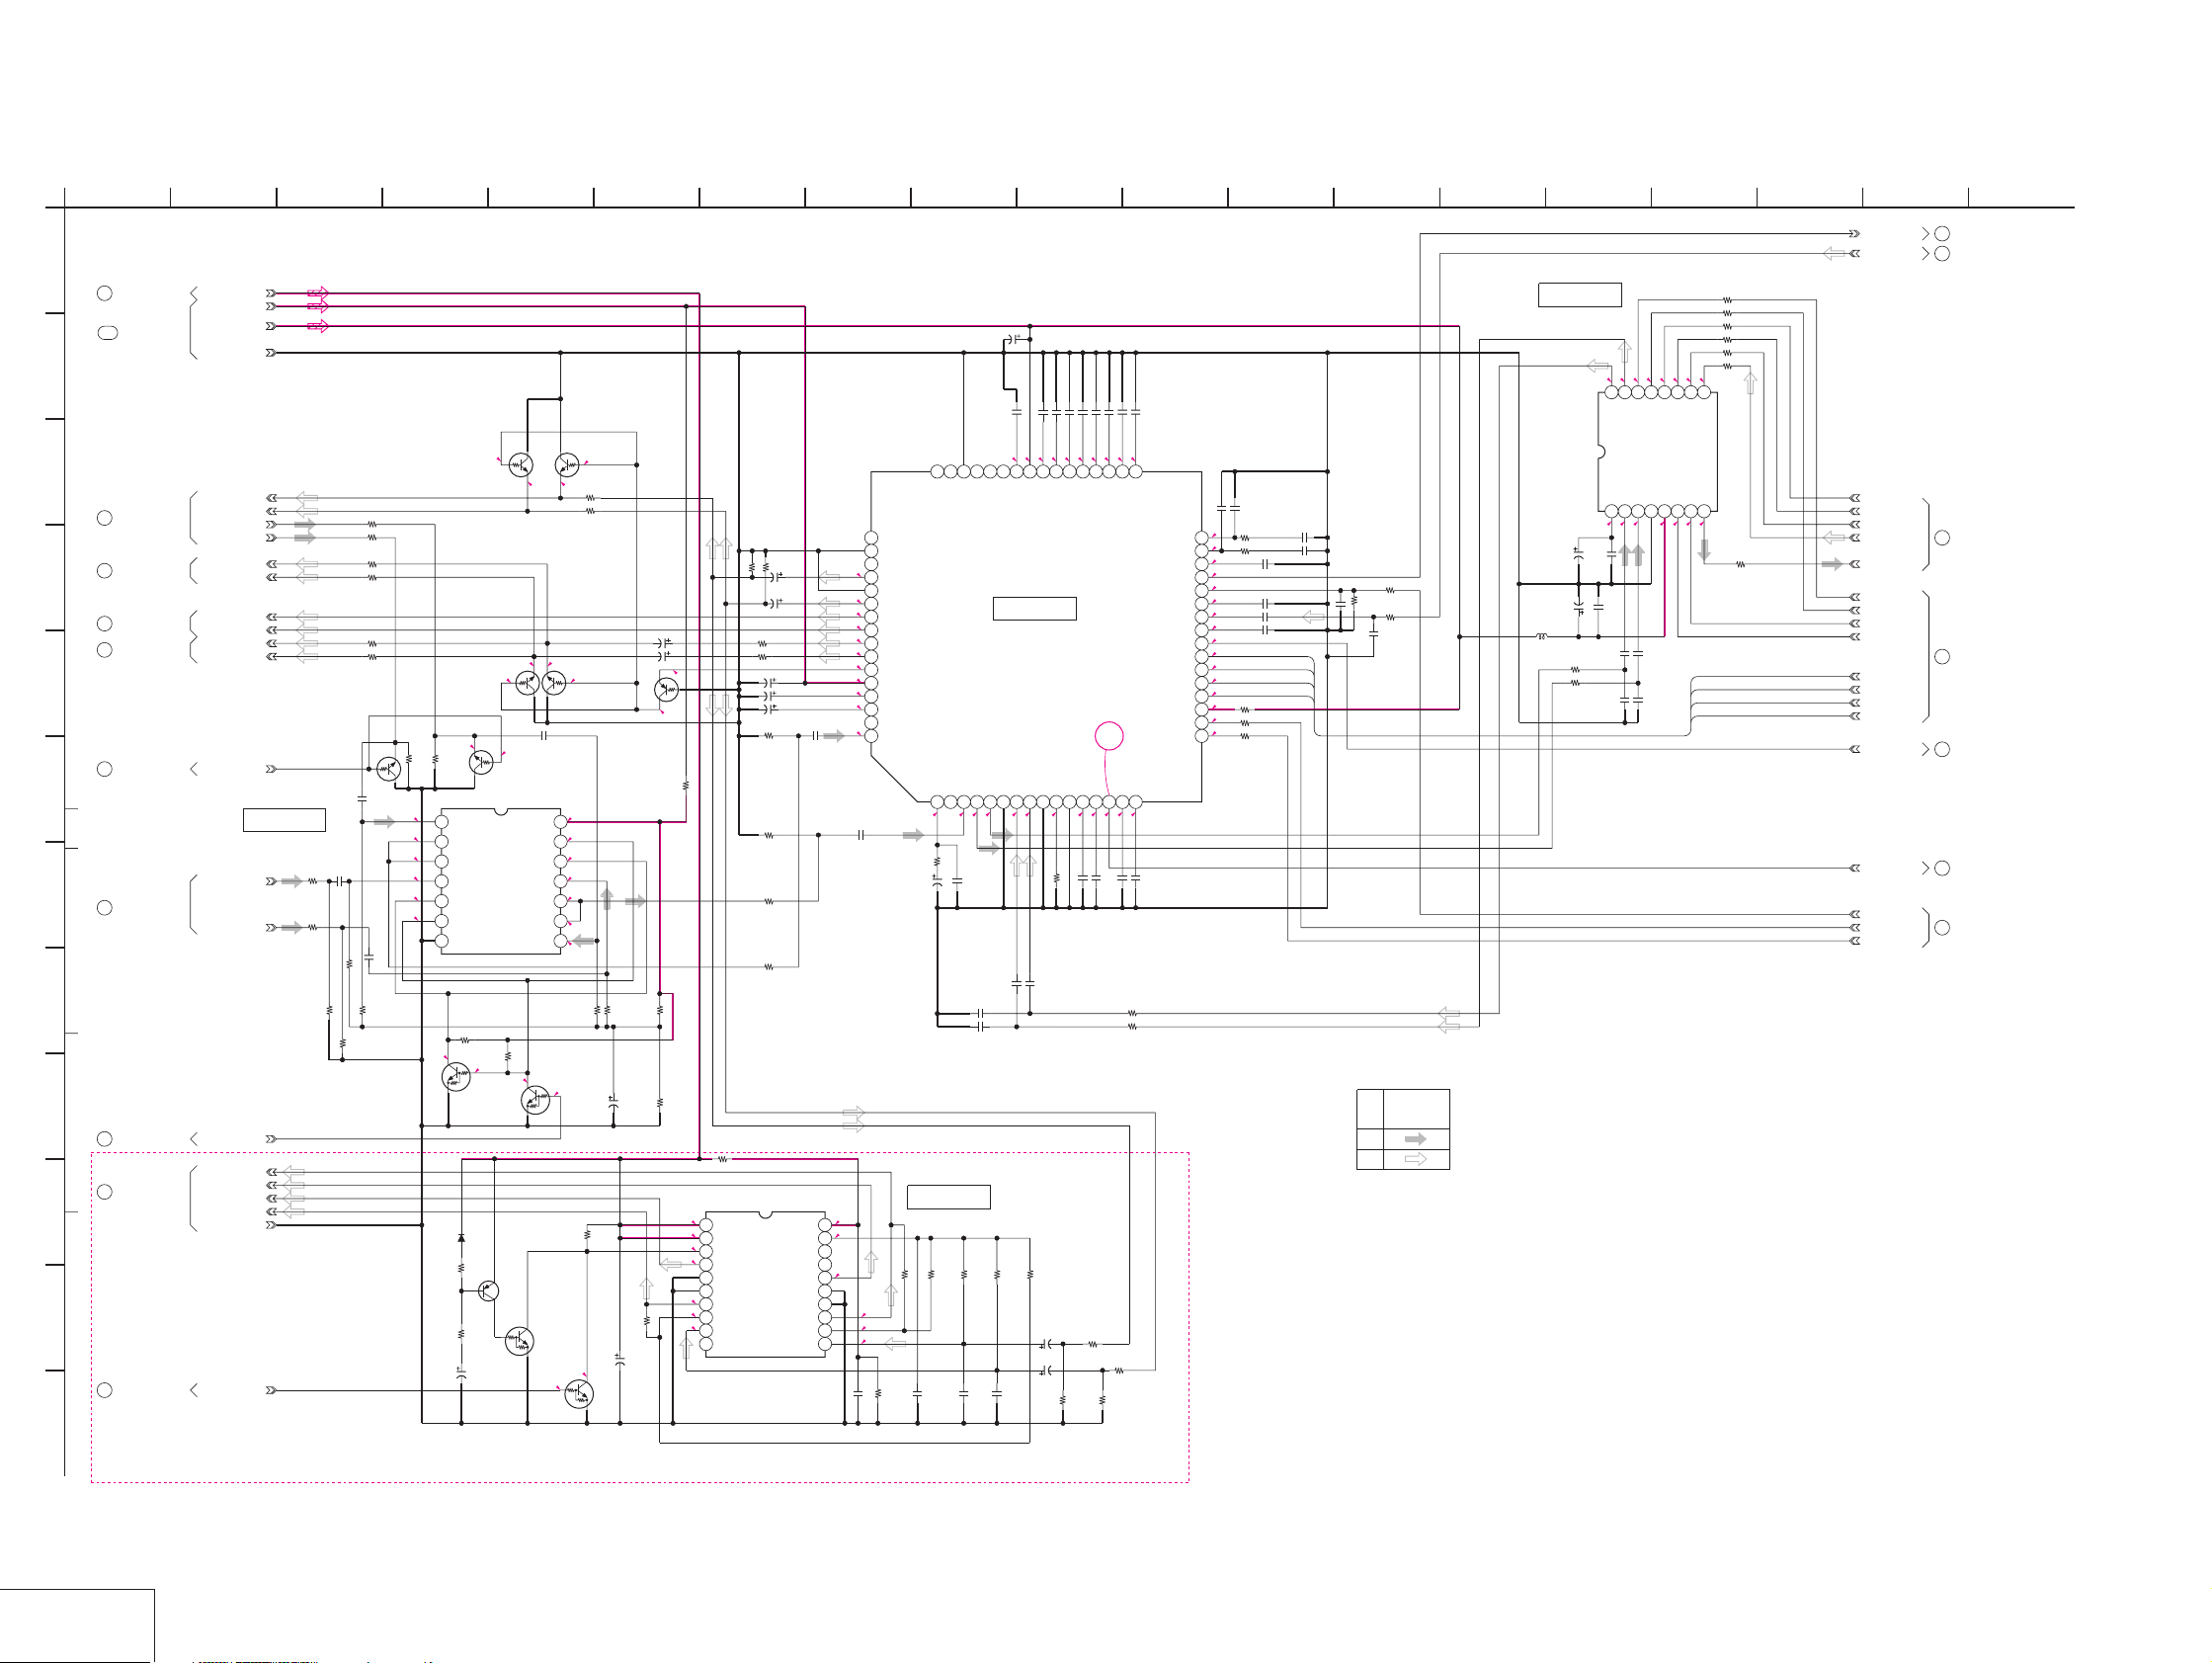
GV-D200/D200E/D800/D800E
For Schematic Diagram
• Refer to page 4-7 for printed wiring board.
• Refer to page 4-69 for waveform.
1
VC-250 BOARD(11/16)
AUDIO I/O(AU BLOCK)
-REF.NO.:30000 SERIES-
A
XX MARK:NO MOUNT
70
TO(12/16,15/16)
113
TO(15/16)
B
C
64
TO(14/16)
53
D
TO(16/16)
55
TO(9/16)
63
TO(14/16)
E
65
TO(14/16)
F
G
54
TO(10/16)
H
I
48
TO(8/16,14/16)
66
TO(16/16)
J
K
81
TO(14/16)
L
16
AU_4.75V
REG_GND
HP_L_OUT
HP_R_OUT
AUDIO_R_IN
AUDIO_L_IN
EX_AUDIO_L_OUT
EX_AUDIO_R_OUT
AUDIO_L_OUT
AUDIO_R_OUT
AV_JACK_MUTE
EX_AUDIO_L_IN
EX_AUDIO_R_IN
INPUT_SEL
REG_GND
SP_MUTE
MT_5V
AU_2.8V
SP_L_+
SP_L_-
SP_R_-
SP_R_+
IR_R
IR_L
IC5703
38
NO MARK:REC/PB MODE
R :REC MODE
P :PB MODE
R5751
R5701
C5761
2.2u
B
AUDIO SW
C5763
R5753
2.2u
68k
B
R5754
68k
R5757
100k
R5776
22k
R5777
22k
R5772
R5773
470
C5764
B
2200p
C5721
2.8
0.2
41
42
VCC
CTLPF
SP_OUT
IC5701
AUDIO IN/OUT
IC5701
CXA3284R-T6
1.4
1.4
1608
B
1u
C5725
0.8
40
C5724
0.22u
R5721
10
1608
1608
1608
B
B
B
B
B
0.1u
0.22u
0.1u
1u
1u
C5730
C5731
C5733
C5735
C5728
0.800
0.2
35
36
37
38
39
TC_L
TC_R
TCH_R
NRDC_R
WEIGHT_R
34
0
0
0.1
1.2
C5734
1u
C5732
47k
1u
B
B
11 1514
1608
1608
B
B
0.22u
1u
C5736
C5738
000.2
34
33
TCH_L
NRDC_L
WEIGHT_L
32
PLL_LOOP_L
31
PLL_LOOP_R
30
MUTE_TC
BPF_ADJ
PB_RF_IN
RF_AGC_TC
RF_SWP
MIC_MONO
1u
B
0
0R5723
CS_IN
CK_IN
DEV_L
DEV_R
29
28
27
26
25
24
23
22
21
SI_IN
20
19
18
17
RECFM_OUT/BPF_MONI
ST/MONO_TC
MONO_OUT(SO)
0
0
C5739
B
C5737
1u
B
R5722
B
0.22u
C5740
0
R5725
0
R0/
P0.1
R0.1/P0.3
2.1
0
0.1
1.5
2.7
2.7
2.6
0.3
2.4
1.7
0.7
1.0
R5727
C5743
C5744
C5745
C5741
0
R5724
12
R5735
IC5702
A/D,D/A
CONVERTER
0.9
1.4
2.7
2.7
1.2
1.2
16
AOUTR
AK4550VT-E2IC5702
0.22u
B
C5746
0.47u
B
470k
C5747
R5733
C5742
470k
R5726
470k
B
0.47u
C5748
0.001u
B
0.01u
B
0.001u
B
0.01u
B
B
0.01u
XCS_AU
XVSP_SCK
VSP_SO
VSP_SI
0
C5749
R5729
R5728
0
XX
±5%
R5730
820
68p
CH
L5701
10uH
C5751
C5750
1
1.2
C5753
10u
0.01u
4V
B
TA
C5752
10u
6.3V
0.01u
TA
B
A
C5754
0.22u
R5731
B
470
1608
R5732
470
C5755
6800p
B
11
12
13
15
SCLK
AOUTL
XPWAD14XPWDA
ADC&DAC
AK4550
VCOM2AINR3AINL4VSS5VDD6DEM07DEM18SDTO
1.2
1.2
2.8
2.700.7
C5756
0.22u
B
C5757
6800p
B
0
R5736
0
R5737
0
R5738
0
R5739
0
R5740
0
0.7
1.4
9
10
SDTI
LRCK
MCLK
R5741
1716 18 19
BPF_MONI
PB_RF
SFD_BCK
SFD_FCK
SFD_LRCK
0
VSP_SI
VSP_SO
XVSP_SCK
XCS_AU
DATA_FROM_SFD
DATA_TO_SFD
XPWDA
XPWAD
DEM1
DEM0
VSP_SI
VSP_SO
XVSP_SCK
XCS_AU
VC_RF_SWP
AFM_FSC
AU_BPF
1.5M_DEV
1.7M_DEV
67
97
31
69
68
37
8
TO(16/16)
TO(2/16,16/16)
TO(3/16)
TO(13/16)
TO(1/16,2/16,
16/16)
TO(6/16)
TO(2/16)
SIGNAL PATH
AUDIO
SIGNAL
5 13
0.2
0
C5762
2.2u
B
V +
R_IN
R_IN
Q5718
UN9211J-(K8).SO
MUTE
R5711
R5712
0.2
14
13
12
11
10
9
8
0
RN1110F(TPL3)
0
-0.4
Q5706
RN1110F(TPL3)
MUTEMUTE
4.7
3.9
0
2.3
2.3
2.3
2.3
R5759
100k
-0.4
Q5701
RN1110F(TPL3)
MUTE
68kR5752
68k
470
0
0R5702
R5755
22k
Q5722
XX
2.3
2.3
2.3
2.3
0
3.9
2.2u
B
R5758
100k
RN1110F(TPL3)
R5756
22k
1
LINE_L_IN
2
L_IN
3
L_IN
4
EX_AUD_L_IN
5
LINE/EX_AUD
6
LINE/EX_AUD
7
Vss(GND)
R5761
0
Q5716
Q5703
0
R5762
10k
10k
3.9
UN9213J-(K8).SO
MUTE
-0.4
R0/
P2.5
Q5721
RN1110F(TPL3)
NJU4066BV(TE2)IC5703
LINE/EX_AUD
LINE/EX_AUD
EX_AUD_R_IN
MUTE
LINE_R_IN
3.9
C5760
Q5704
MUTE
47u
6.3V
6
-0.4
100
100
R5743
R5742
10k
10k
C5711
47u
6.3V
B
TA
C5712
R5707
R5708
R5710
R5715
R5714
R5709
1608
47u
6.3V
TA
B
1k
1k
C5704
22u
C5705
TA
C5706
10u
C5709
XX
0.22u
B
1608
XX
0
1608
0
C5701
10u
4V
TA A
C5702
10u
0
4V
TA
A
-0.4
Q5708
RN2111F(TPL3)
POWER MUTE
R5750
0
R5760
100k
R5774
10k
R5775
10k
TA
B
49
SP+
50
SP_GND
51
SP-
2.3
52
HP_L
53
HP_GND
2.3
54
HP_R
2.3
55
IR_OUT_L
2.3
56
IR_OUT_R
2.3
57
LINE_OUT_L
2.3
58
LINE_OUT_R
0
59
MUTE_OUT
4.7
60
10VTA10u
A
A
6.3V
VCCH
2.3
61
VREFH
4V
1.1
62
VREF
TA
63
MIC_IN_L
1.4
64
LINE_IN_L
C5719
0.22u
924 7
C5723
22u
6.3V
TA
A
43
44
45
46
47
48
SP_IN
SP_SIG
SP_VCC
BEEP_IN
SP_VREF
AGCTC2MIC_IN_R3LINE_IN_R4REC_OUT_L5REC_OUT_R6AU_GND7PB_IN_L8PB_IN_R9FADER10IREF11RF_GND12IFDC_L13IFDC_R14FSC15RFDC_L16RFDC_R
1
1.4
1.4
1.4
0.1
R5720
150k
C5715
C5713
3.3u
0.47u
4V
TA
B
A
C5722
0.22u
C5729
B
XX
B
C5727
XX
B
REC
PB
D5701
C5774
R5785
R5786
XX
10V
R5764
47k
IC5704
NJW1105VF1(TE2)
1
V+
2
V+
3
MUTE
4
OUT1
5
GND
6
GND
7
OUT2
8
VIN1(-)
9
VIN1(+)
10
NC
VBOUT
VIN2(-)
VIN2(+)
2.4
VBIN
20
2.4
19
NC
18
NC
17
2.4
OUT4
16
GND
15
GND
14
OUT3
13
12
11
C5766
1u
B
R5765
4.9
4.9
4.2
2.4
2.4
2.4
2.4
100k
R5763
XX
XX
XX
B
Q5720
Q5719
XX
10k
XX
C5765
33u
10V
TA
4.2
0
Q5717
UN9214J-(K8).SO
MUTE SW
IC5704
SPEAKER AMP
R5766
100k
R5767
47k
2.4
2.4
2.4
C5767
1u
B
R5771
47k
R5768
C5770
0.001u
R5769
R5770
47k
47k
B
C5771
0.001u
47k
C5768
10u
R5781
6.3V
4700
TA
1608
C5769
10u
6.3V
TA
B
R5780
4700
1608
R5783
2200
R5784
1608
2200
1608
GV-D800/D800E MODEL ONLY
AUDIO I/O
VC-250 (11/16)
4-31 4-32
Page 68
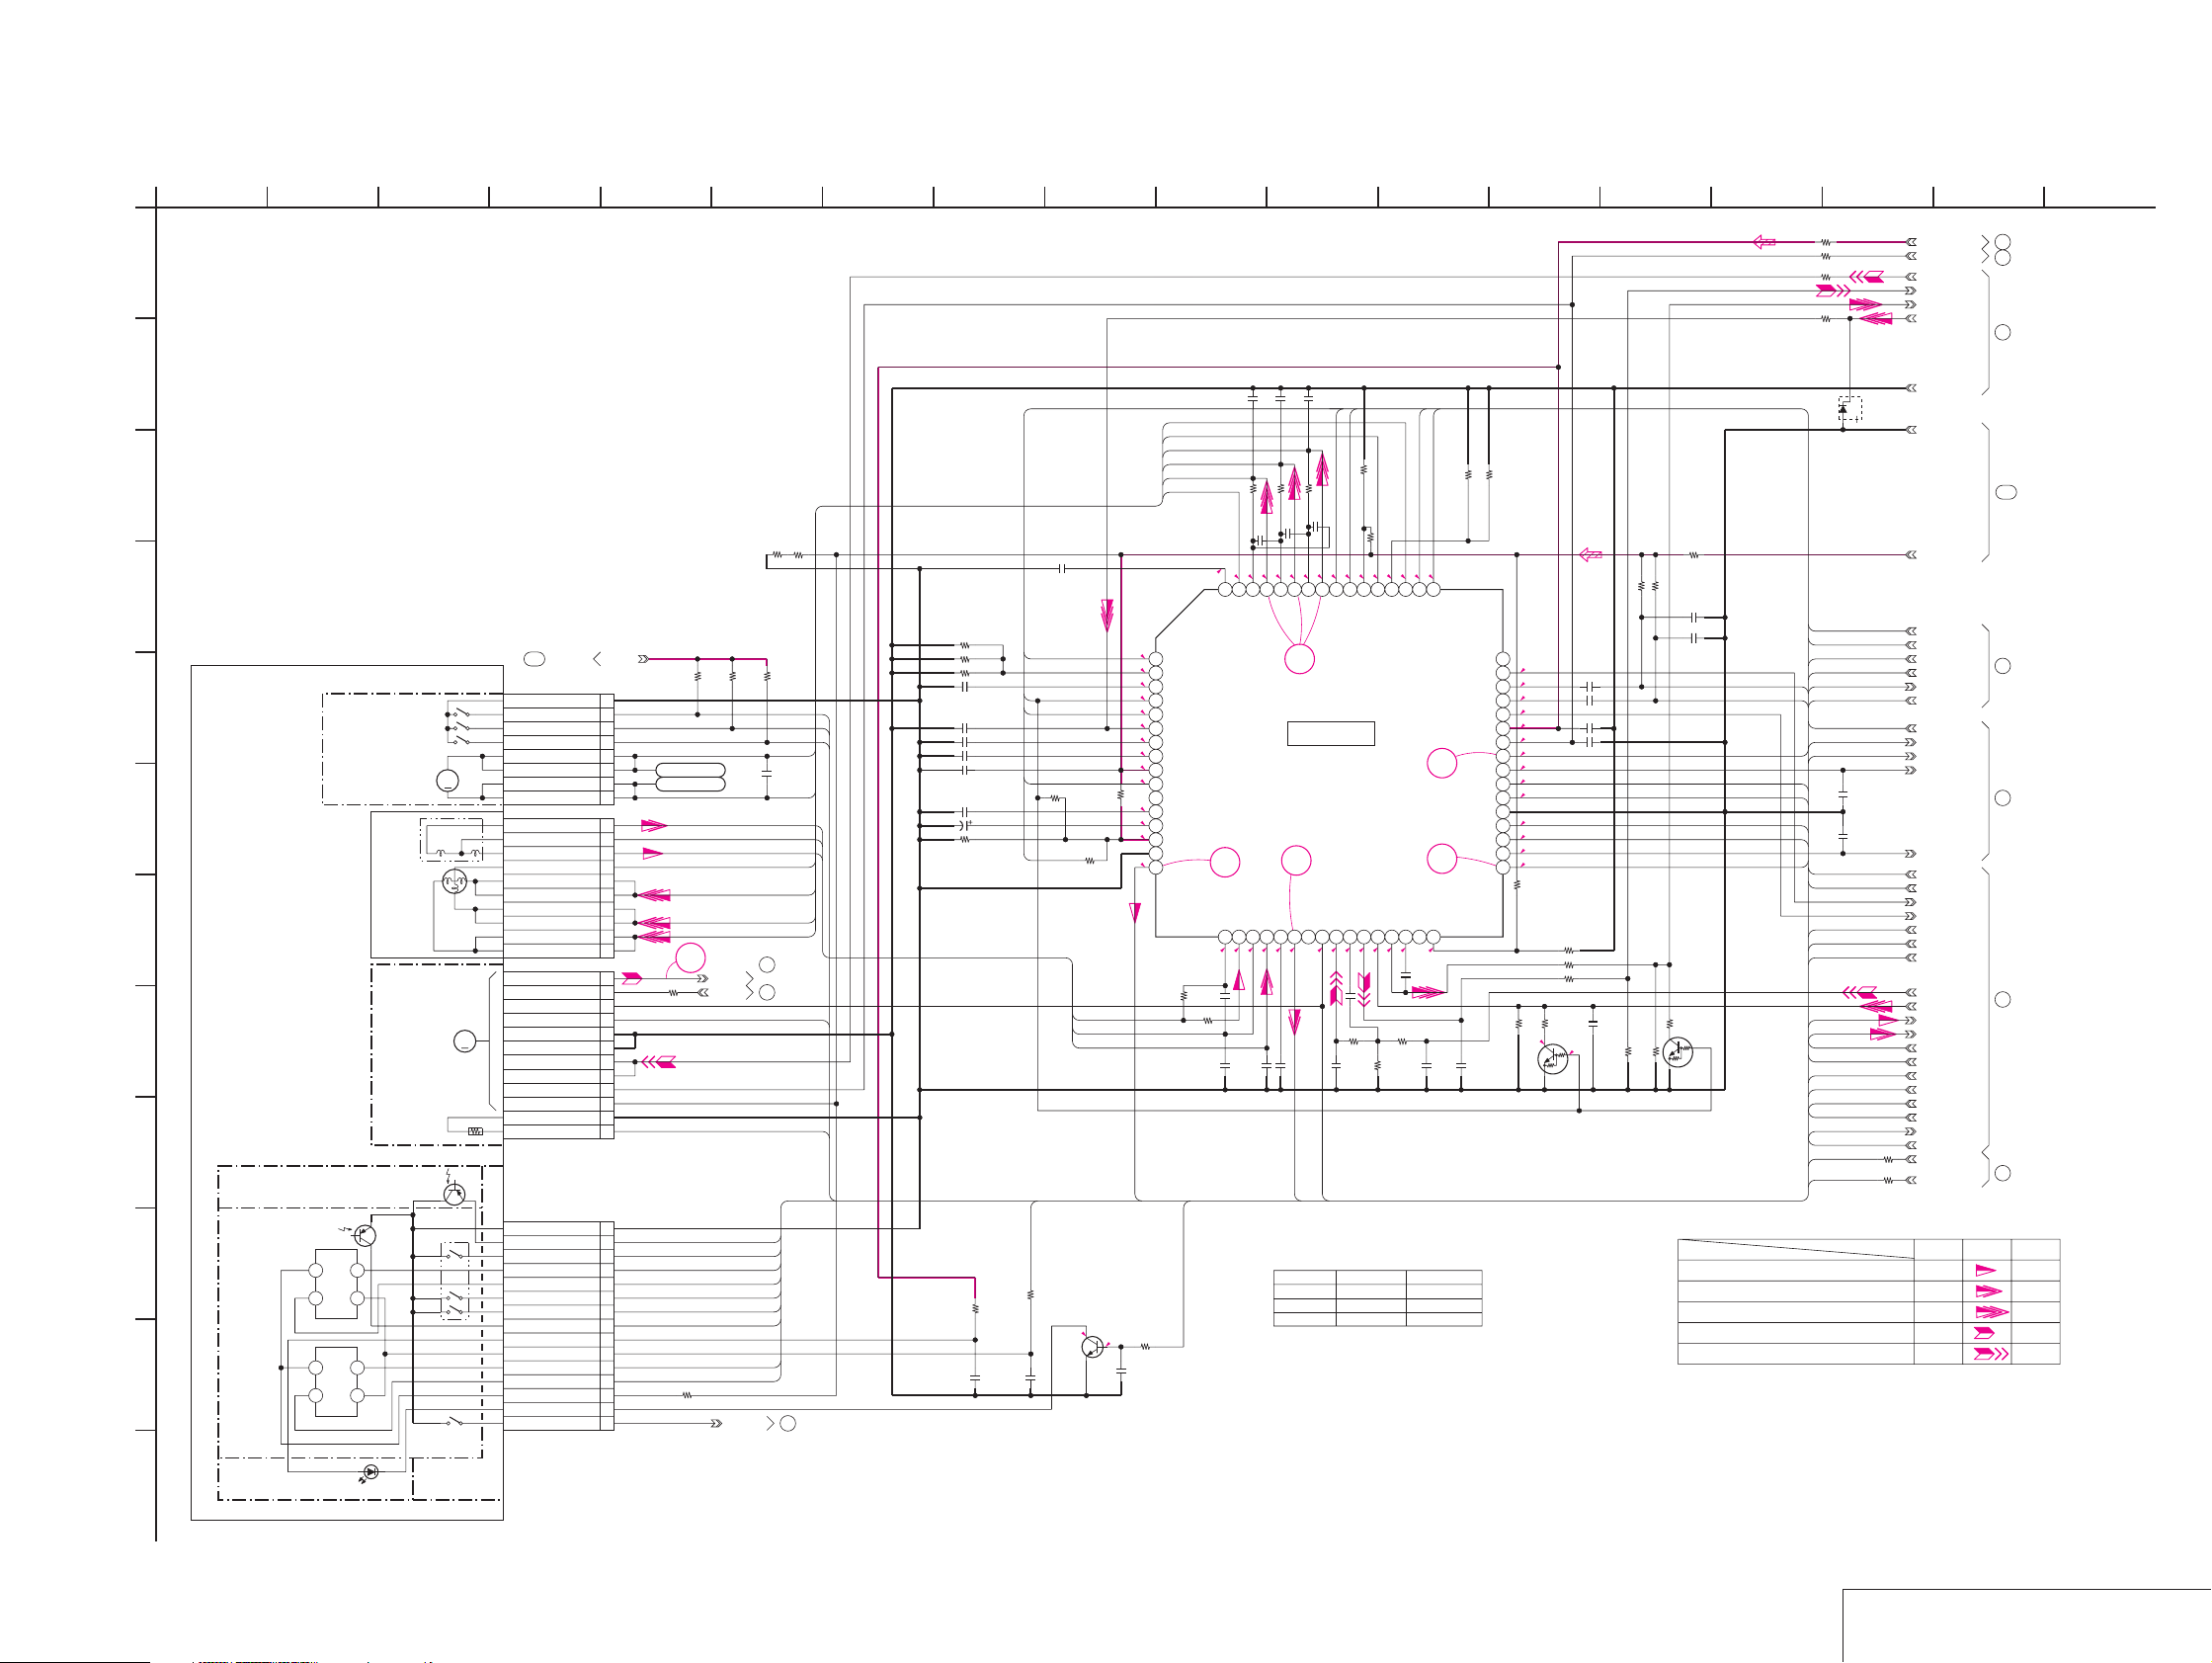
For Schematic Diagram
• Refer to page 4-7 for VC-250 printed wiring board.
• Refer to page 4-67 for FP-249, FP-355, FP-356 printed wiring boards.
• Refer to page 4-68,69 for waveforms.
1
38
VC-250 BOARD(12/16)
DRUM/CAPSTAN MOTOR DRIVE(MD BLOCK)
A
-REF.NO.:30000 SERIESXX MARK:NO MOUNT
NO MARK:REC/PB MODE
R :REC MODE
P :PB MODE
B
C
D
114
TO(15/16
D_2.8V
MECHA DECK(2/2)
E
(B710 MECHANISM)
F
FP-220
FLEXIBLE
S901
MODE SWITCH
M903
LOADING
MOTOR
M901
DRUM MOTOR
M
PG
G
FP-433
FLEXIBLE
H
DEW SENSOR
M902
CAPSTAN MOTOR
CN4401
8P
10P
CN4402
FG
12P
CN4403
M
COM_GND
M-SW(A)
M-SW(B)
M-SW(C)
FG_OUT
OFFSET_ADJ
STAND_BY
MT_GND
MT_GND
REG_GND
LM(-)
LM(-)
LM(+)
LM(+)
VCC_2
VCC_1
1
2
3
4
5
6
7
8
1PG
2FG-PG_COM
3FG
4COM
5W
6W
7V
8V
9U
10U
1
2
3
4
FRC
5
6
7
VS
8
VS
9
10
11
12
DEW
I
Q002
TAPE TOP
15PCN4404
S001
HI8
MP
43
ME/MP
REC
PROOF
43
S002 C LOCK
REG_GND
TAPE_TOP(C)
HI8_MP
S_REEL(-)
S_REEL(+)
ME/MP
REC_PROOF
TEPE_END(C)
TAPE_LED(A)
HALL_COM
T_REEL(-)
T_REEL(+)
SENSOR_VCC
TAPE_LED(K)
C_LOCK_SW
1
2
3
4
5
6
7
8
9
10
11
12
13
14
15
H001
S REEL
SENSOR
H002
T REEL
SENSOR
FLEXIBLE
Q001
TAPE END
IN
OUT
OUT
21
IN
IN
OUT
OUT
21
IN
FP-356
FP-249
FLEXIBLE
J
K
11 1514
C4411
0.1u
B
C4409
0.1u
B
R4421
U IN
R4422
XX
1.7
1.7
V IN
U OUT
LOAD
C4419
1.7
B
0.001u
1.700
W IN
C4421
W OUT
UNLOAD
B
0.001u
DEC2
3300
R4425
0.1
DEC1
XX
1.7
V OUT
27
IC4401
LOADING/DRUM MOTOR DRIVE,
SENSOR AMP
IC4401
24
VREF
PG IN
PG OUT1
PGC
PG OUT2
CBEN
CBIN
CBOUT
1.3
1.0
0.1
2.7
0.4
0.4
0.5
C4423
XX
B
R4423
C4422
XX
C4420
B
1u
R4424
B
*
DRUM_PG
CAP_ON
*MARKED:MOUNT TABLE
R4424
R4427
R4431
GV-D200/D800
15k
0
15k 47k
LM_-
LM_+
100k
R4426
0.100.102.8
RS
RFL
OUT1
CBLOUT
DBIN
DBOUT
1.1
1.100.3
R4427
0
*
C4426
0.01u
B
12
LM_LIM_ON
LM_LIM_DET
R4428
4950515253545556575859606162
OUT2
LIMEN
LIM OUT
26
25
ISNFNCRSB
C4425
0.022u
B
GV-D200E/D800E
47k
10k
R4429
1
END OUT
END IN
TOP IN
TOP OUT
RLDO2
RLM2
RLM1
RLDO1
VCC2
RLO2
RLP2
RLP1
RLO1
C4427
1
NC
VM
41 42 43 44 45 46 47 48
GND
33 34 35 36 37 38 39 40
R4430
470k
0.01u
B
RN1104F(TPL3)
±0.5%
12345678
910111213141516
R4417
10k
LM_LM_+
DRUM_W
DRUM_V
DRUM_U
DRUM_COM
STBY D
RF
OSC
SELSLP1
SELSLP2
VS
CSLP1
CSLP2
VCC1
XBRAKE
FRC
FILTER
FC
RSAT
GND
FGOUT
R4419
TAPE_LED_ON
C4415
10
C4412
0.1u
B
XXR4420
B
C4417
0.001u
1.7
1.7
1.3
6364
AGC
COM
23
FG IN2
FG IN
19 20 21 22 23 24 25 26 27 28 29 30 31 32
17 18
1.3
1.3
1.3
470p
B
XX
C4416
C4418
0.1u
470p
B
B
5 13
R4403
100k
LND001
ULD_+
ULD_-
LND002
28
R4405 100k
R4407
470
R4404
100k
CAP_FG
CEG_DUTY
REC_PROOF_SW
XCC_DOWN
R4406
100k
C4424
0.1u
B
TAPE_TOP_C
HI8_MP_SW
S_REEL_-
S_REEL_+
ME_SW
TAPE_END_C
T_REEL_-
T_REEL_+
6
R4401
47k
MODE_SW_A
MODE_SW_B
MODE_SW_C
DRUM_PG_SENS
FG_PG_COM
DRUM_FG_SENS
DRUM_COM
DRUM_W
DRUM_V
DRUM_U
84
TO(10/16,13/16,
16/16)
10
TO(2/16)
73
R4402
330k
LM_-
LM_+
CAP_FWD
DEW_AD
TO(14/16)
C4407
C4408
R4408
R4409
R4410
C4404
C4405
C4406
C4403
3.3u
C4402
0.1u
0.047u
R4412
B
924 7
C4413
0.1u
B
1
2012
1
2012
0.022u
0.1u
DRUM_ON
2012
B
DRUM_8PB
0.1u
6.3V
TA
R4411
2012
DRUM_START
B
B
B
BC4401
XDRUM_BRAKE
B
DRUM_CONT
XREEL_HALL_ON
R4414
270
R4415
4.0
B
82
C4410
0.1u
1
0.1u
0.022u
XX
R4413
0
XX
R4449
XX
DRUM_FG_SENS
FG_PG_COM
DRUM_PG_SENS
Q4401
2SC4738F-Y/GR(TPL3)
LED DRIVE
0
2.7
0
0.5
0
0
3.3
0.3
0.3
2.8
2.7
3.2
2.1
2.8
1.4
DRUM_FG
R4416
4700
C4414
220p
B
2.8
1.3
1.3
R0/
P2.8
4.9
8.2
1.4
1.5
1.2
1.2
1.2
1.2
1.4
1.4
R4432
1.1
C4431
47k
R4437
R4438
Q4402
C4428
0.047u
C4429 0.047u
0.1u
R4436
4700
0
0
R4431
*
0
GV-D200/D200E/D800/D800E
1716 18
R4446
0
R4444
0
R4443
0
R4445
0
R4442
R4434
B
C4430
2.2u
B
C4432
0.01u
B
R4440
R4439
XX
0
10k
R4435
10k
C4433
0.001u
B
C4434
0.001u
B
TAPE_END_C
B
F
R4441
XX
Q4403
TAPE_TOP_C
TREEL_FG
T_REEL_-
T_REEL_+
S_REEL_+
S_REEL_-
SREEL_FG
XX
XX
LM_LIM_ON
LM_LIM_DET
SREEL_FG
TREEL_FG
REC_PROOF_SW
XREEL_HALL_ON
XDRUM_BRAKE
ME_SW
HI8_MP_SW
C4435
470p
C4436
470p
UNLOAD
LOAD
TAPE_LED_ON
CAP_ON
CAP_FWD
DRUM_FG
DRUM_PG
DRUM_ON
DRUM_START
MODE_SW_A
MODE_SW_B
MODE_SW_C
DRUM_CONT
DEW_AD
DRUM_8PB
T_REEL_-
S_REEL_-
R4447
R4448
MA3XD21001S0
D4401
33k
33k
MT_5V
VTR_UNREG
CAP_VS
CAP_ERROR
DRUM_ERROR
DRUM_VS
MT_GND
REG_GND
D_2.8V
LM_LIM_ON
LM_LIM_DET
SREEL_FG
TREEL_FG
REC_PROOF_SW
XREEL_HALL_ON
XDRUM_BRAKE
ME_SW
HI8_MP_SW
TREEL_AFG
SREEL_AFG
UNLOAD
LOAD
TAPE_END
TAPE_TOP
TAPE_LED_ON
CAP_ON
CAP_FWD
CAP_PWM
DRUM_PWM
DRUM_FG
DRUM_PG
DRUM_ON
DRUM_START
MODE_SW_A
MODE_SW_B
MODE_SW_C
DRUM_CONT
DEW_AD
DRUM_8PB
T_REEL_EVR
S_REEL_EVR
SIGNAL PATH
REC
Drum speed servo
Drum phase servo
Drum servo (speed and phase)
Capstan speed servo
Capstan servo (speed and phase)
REC/PB
70
57
62
114
59
60
61
4
TO(11/16,15/16)
TO(9/16)
TO(15/16)
TO(15/16)
TO(13/16)
TO(10/16)
TO(10/16,13/16)
TO(1/16)
PB
L
FP-355
FLEXIBLE
TAPE LED
D001
FLEXIBLE
FP-221
16
DRUM/CAPSTAN MOTOR DRIVE
4-33 4-34
VC-250 (12/16)
Page 69
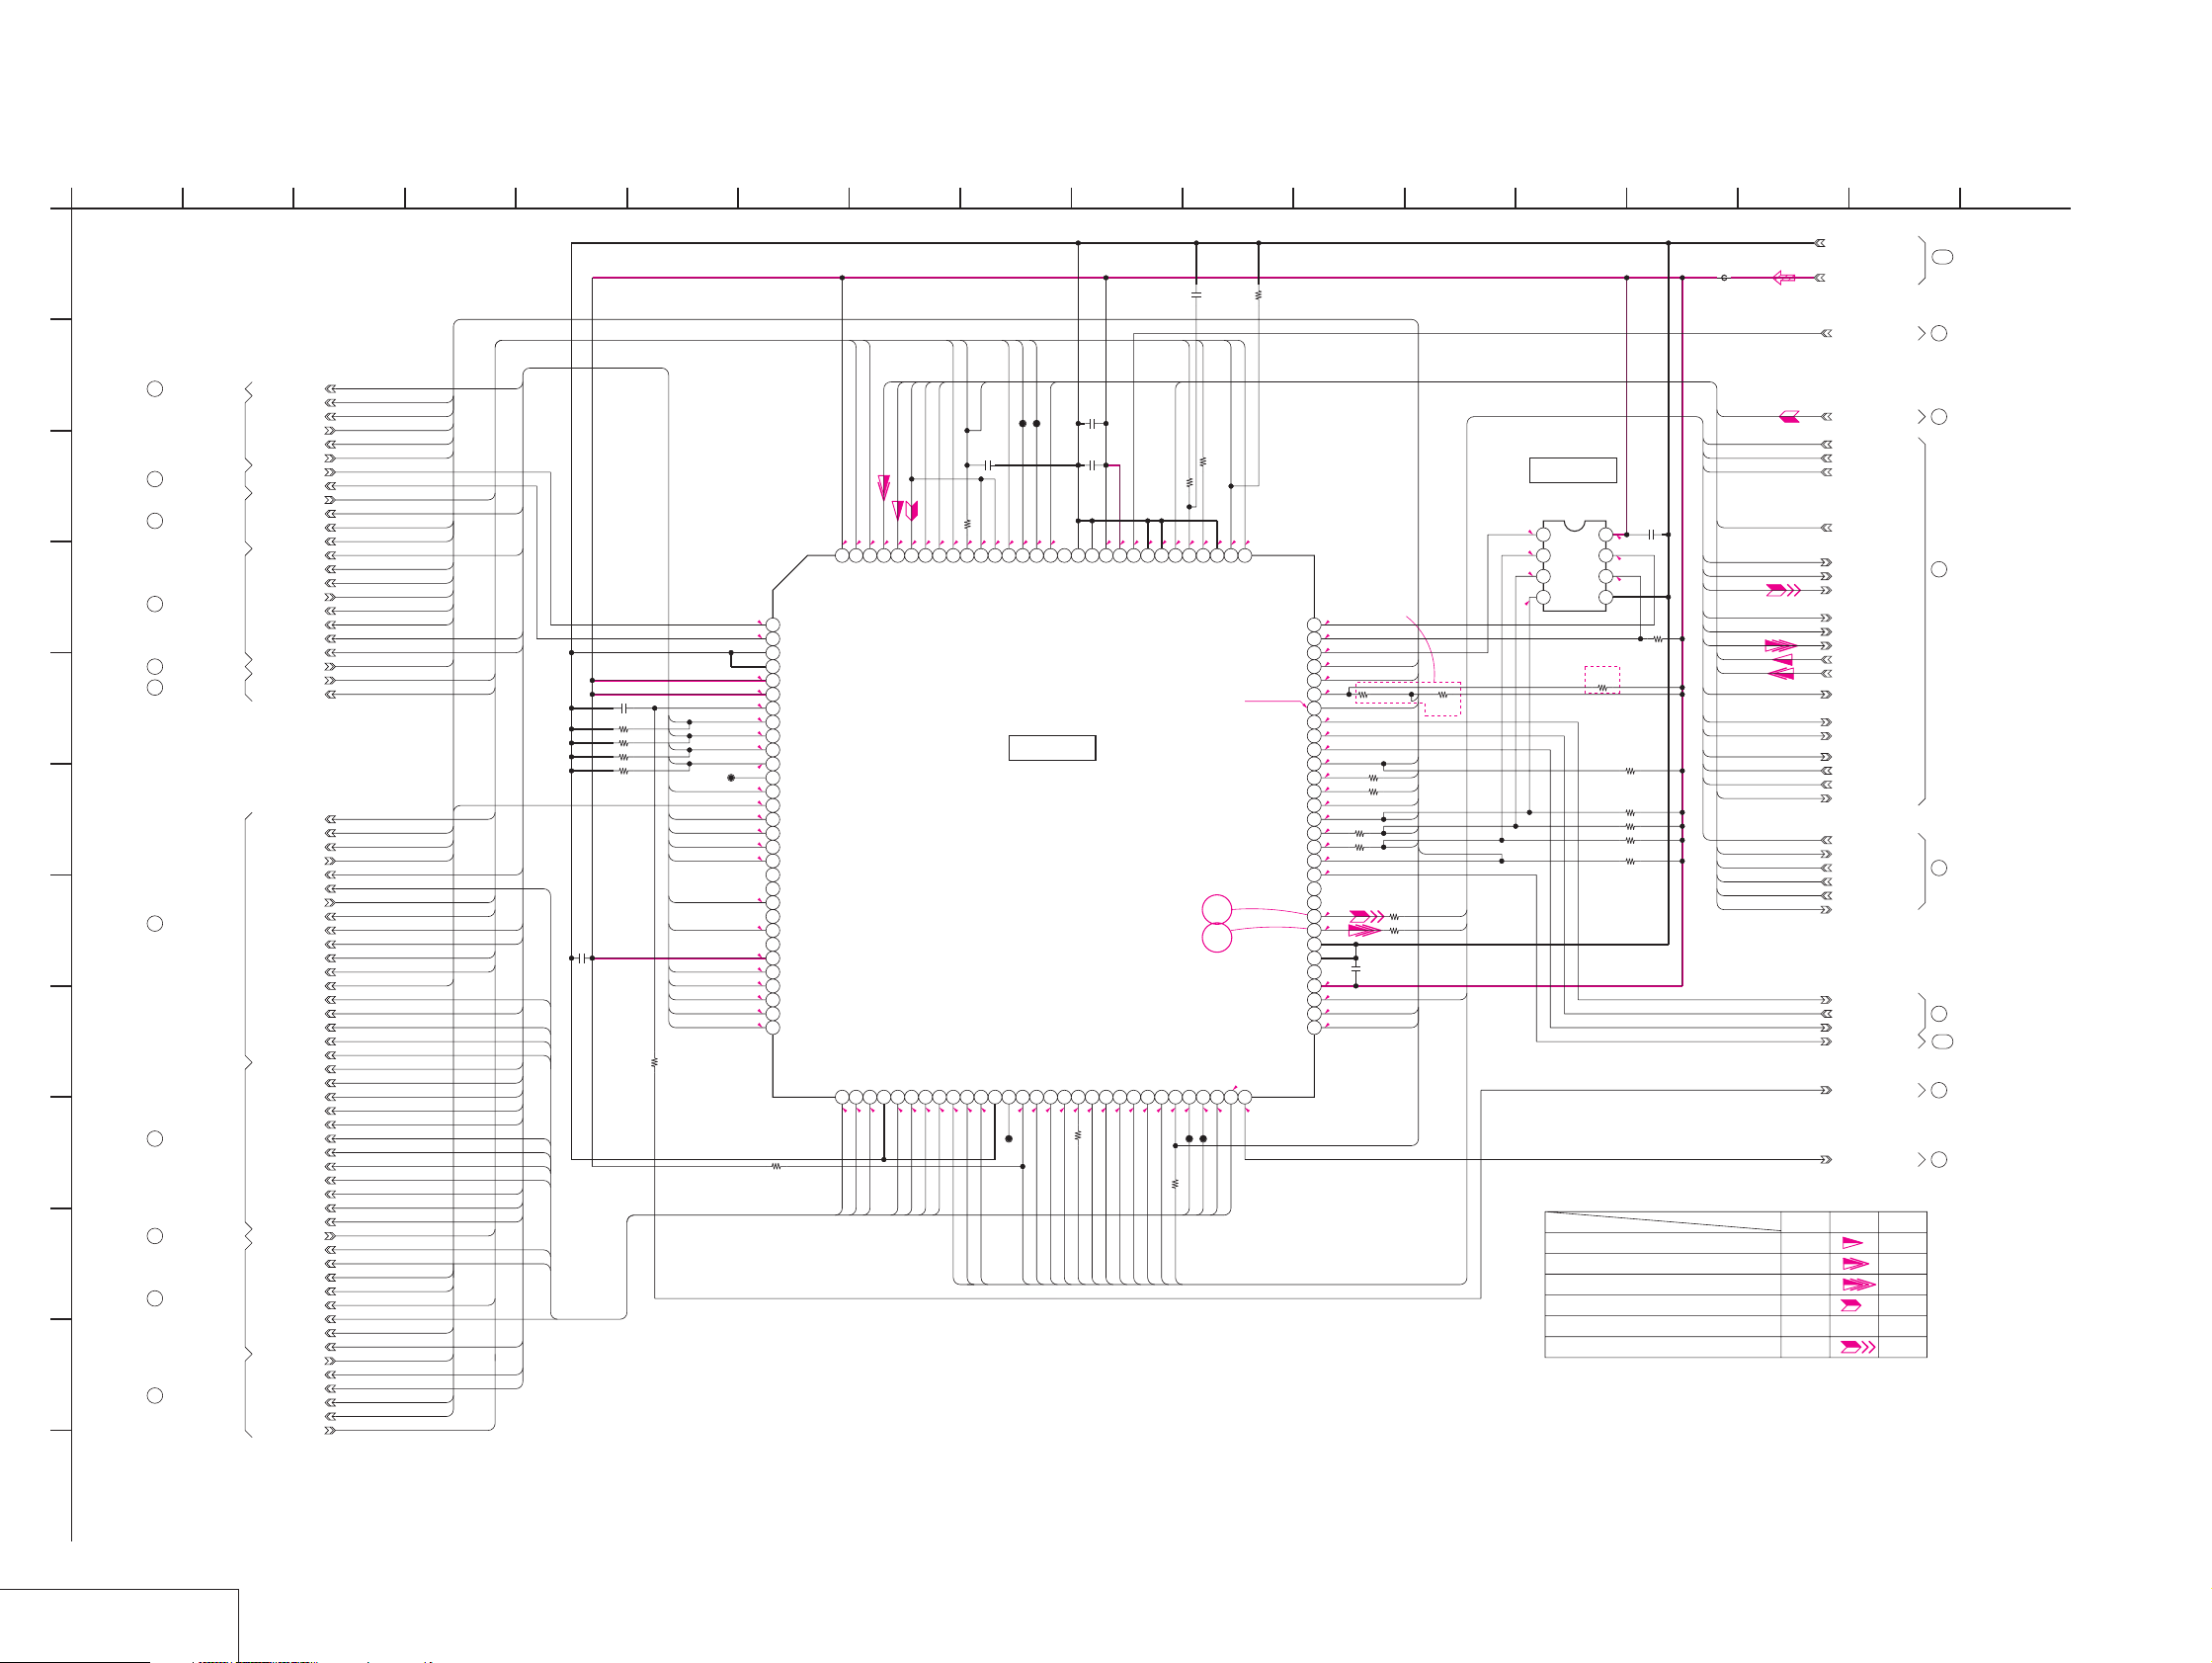
GV-D200/D200E/D800/D800E
For Schematic Diagram
• Refer to page 4-7 for printed wiring board.
• Refer to page 4-69 for waveforms.
1
38
5 13
6
924 7
10
11 1514
12
1716 18
VC-250 BOARD(13/16)
MECHA CONTROL(MC BLOCK)
A
-REF.NO.:30000 SERIESXX MARK:NO MOUNT
NO MARK:REC/PB MODE
R :REC MODE
P :PB MODE
* :Cannot measure
B
C
42
58
50
D
69
72
20
E
F
G
19
H
22
I
99
J
3
K
21
TO(1/16,16/16)
(NOT USE)
TO(10/16)
TO(8/16)
TO(11/16)
TO(14/16)
TO(3/16,6/16,
7/16)
TO(3/16)
TO(3/16,4/16)
TO(3/16)
TO(1/16)
TO(4/16)
XCS_TRF
XDRP_SCK
DRP_SO
DRP_SI
MC_F_BUSY
XCS_MC_FLASH
XTAL20M
SDC_IN
XCS_TAKO
XVSP_SCK
VSP_SO
XCS_AU
XVSP_SO
VSP_SO
VSP_SI
XPWAD
XPWDA
HP_SENS
XRST_VSP
XVSP_SCK
VSP_SO
VSP_SI
XCS_VFD
XCS_SFD
MCHA0
MCHA1
SCOD_WINDOW
MCDA0
MCDA1
MCDA2
MCDA3
MCDA4
MCDA5
MCDA6
MCDA7
ATF_ERR
REC_CRRT0
REC_CRRT1
DV_RF_SWP
XDRP_SCK
DRUM_8PB
XFE_ON
DRP_SO
XCS_TRF
XDVCN
XRST_LINK
XRST_PHY
LIP_SLEEP
IFI_VD
IFI_OE
DEM0
DEM1
TRRV
MCCE
VREF
FRRV
TRRT
REG_GND
FB4501
IFI_OE
SDC_IN
XRST_VSP
0
R4531
2.700
91
92
93
OOE
XRST_VTR
XCASETTE_IN
/ATF_DEBUG_IN
SDC_IN
DEM1
R0/P2.8
HI_SO(HI→MC)
HI_SI(MC
XCS_HONEY
30
29
DRUM_START
/DRUM_MASTER_CLOCK
/DEBUG_OUT2
R1.2/P2.8
XFE_ON/REEL_FWD
SCOD_WINDOW
SWP
58
59
60
0
2.7
SCOD_WINDOW
XFE_ON
R4514
100k
R1.3/P0
EEP_RDY/BSY
EEP_RST
XCS_EEP
/XCS_DSP
(HP_JACK_IN)
LIP_SLEEP
XHI_SCK
DRP_SI
DRP_SO
XDRP_SCK
VSP_SI
VSP_SO
XVSP_SCK
/CAP_HICUE
XHI_CS_MC
/ATF_DEBUG
REEL_PWM
CAP_PWM
DRUM_PWM
GND(EXTAL)
N.C.(XTAL)
SWP_75Hz
/REEL_ON
1.4
DEM0
→HI)
CAP_FG
MODE_SW_A
MODE_SW_B
IC4502
EEP ROM
IC4502
AK6417AM-E2
2.7
1
XCS
2.6
XBUSY
2
XSCK
0.3
3
DI
GND
4
GV-D200/D200E
MODEL ONLY
2.7
90
2.7
89
2.7
88
0
87
2.7
86
2.6
85
84
2.4
83
2.3
82
2.5
81
2.7
80
0
79
2.7
78
0
LPS
77
2.4
76
0.3
75
2.6
74
0
73
2.7
72
71
70
0.6
69
1.1
68
VSS
67
66
65
2.7
VDD
64
0
63
1.4
62
1.4
DRP
61
R4516
LIP_SLEEP
0R4517
R4518
R4515
0
0
R4521
C4510
0.01u
DRUM_START
DV_RF_SWP
MC_F_BUSY
HP_SENS
XDRP_SCK
0
R4522
DRP_SI
DRP_SO
DEM1
DEM0
1kR4520
R4532
470k
LPS
VSP_SI
VSP_SO
XVSP_SCK
XCS_MC_FLASH
XCS_MECHA
10k
CAP_PWM
DRUM_PWM
10k
DRP
DO
2.5
GV-D800/D800E
MODEL ONLY
C4507
0.01u
R4523
B
8
2.7
7
2.7
6
2.7
5
R4527
100k
470k
100k
R4524
R4525
100k
100k
R4528
R4529
100k
R4526
470k
Vcc
RST
MODE_SW_C
DEW_AD
CAP_ON
CAP_FWD
CAP_PWM
DRUM_ON
DRUM_START
DRUM_PWM
DRUM_FG
DRUM_PG
DRUM_CONT
LOAD
UNLOAD
TAPE_LED_ON
TAPE_TOP
TAPE_END
DRUM_8PB
REC_PROOF_SW
LM_LIM_ON
LM_LIM_DET
SREEL_FG
TREEL_FG
XREEL_HALL_ON
SIGNAL PATH
Drum speed servo
Drum phase servo
Drum servo (speed and phase)
Capstan speed servo
Capstan phase servo
Capstan servo (speed and phase)
C4506
0.01u
B
OFR
VDD
/PLUG_CONT/DEBUG_OUT0
/XCC_DOWN
MCDA532MCDA6
31
MCDA6
MCDA5
2.7
119FP120
/REELM_FG
R1.2/P1.8
IFI_VD
0
118
33
R1.8/P1.3
MCDA7
DRUM_PG
R2.6/P0
117
EXVSYNC
MCDA7
34
R0.3/P0.1
DRUM_PG
VSS
XCS_TRF
XDRP_SCK
DRP_SO
DRP_SI
MC_F_BUSY
XCS_MC_FLASH
X0
WRX
RDX
DRP
SWP
ALE
WRX
RDX
ALE
LPS
OFR
SDC_IN
XCS_TAKO
XVSP_SCK
VSP_SO
XCS_AU
XVSP_SO
VSP_SO
XPWAD
XPWDA
HP_SENS
XRST_VSP
XVSP_SCK
VSP_SO
XCS_VFD
XCS_SFD
SCOD_WINDOW
ATF_ERR
REC_CRRT0
REC_CRRT1
DV_RF_SWP
XDRP_SCK
DRUM_8PB
XFE_ON
DRP_SO
XCS_TRF
XRST_LINK
XRST_PHY
LIP_SLEEP
VSP_SI
DEM0
DEM1
IFI_VD
IFI_OE
VSP_SI
MCHA0
MCHA1
MCDA0
MCDA1
MCDA2
MCDA3
MCDA4
MCDA5
MCDA6
MCDA7
MCCE
XDVCN
TRRV
FRRV
TRRT
*
1
X0
*
2
X1
3
VSS
4
R2.7/P0
MD2
2.7
5
MD1
2.7
6
MD0
2.6
7
XSYS_RST
2.7
8
XPWAD
2.7
9
XPWDA
0
XRST_LINK
10
XRST_PHY
11
ANALOG_MUTE
12
0
ALE
13
2.7
XDVCN
14
2.7
WR01
15
2.7
RDX
16
2.6
XCS_VFD
17
2.7
XCS_TAKO
18
XCS_DAC
19
AUDIO_IN
20
2.7
XCS_XYZ1
21
XHP_ON
22
2.7
XCS_TRF
23
XCS_XYZ2
24
2.7
VDD
25
MCDA0
26
MCDA1
27
MCDA2
28
MCDA3
29
MCDA4
30
R4508
470k
MD1
MD0
C4501
0.001u
B
100k
R4502
R4503
100k
R4504
100k
100k
XDVCN
VREF
WRX
RDX
DRP
SWP
ALE
WRX
RDX
ALE
LPS
OFR
R4505
C4509
0.01u
R4507
1k
ALE
WRX
RDX
XCS_VFD
XCS_TAKO
XCS_AU
XCS_TRF
MCDA0
MCDA1
MCDA2
MCDA3
MCDA4
XPWAD
XPWDA
XRST_LINK
XRST_PHY
CL4503
R2.3/P1.5
R2.1/P1.9
R1.7/P1.0
RR1.3/P0.8
RR1.1/P1.4
DRUM_FG
0.1
116
35
MCHA0
CAP_FG
1.4
115
CAP_FG
DRUM_FG
MCHA036MCHA1
2.1
MCHA1
TREEL_FG
1.4
114
TREEL_FG
MCCE
37
2.1
MCCE
113
XCS_SFD
VREF
DRUM_8PB
SREEL_FG
470
R4530
1.4
1.4
111
112
/FP
VREF
SREEL_FG
XCS_SFD
MODE_SW_A40MODE_SW_B41MODE_SW_C
38
39
2.6
2.3
MODE_SW_A
MODE_SW_B
TRRT
TRRV
DRUM_8PB
CL4501
C4508
0.01u
B
1.4
1.4
1.400
106
107
108
109
110
TRRT
TRRV
/FP_SEL
CFG_COUNT
CFG_COUNT
DRUM_8PB/PLUG_DC_SW
IC4501
MECHANISM CONTROL
MB91192PFF-G-116-BND-ER
/PB_XREC
VIDEO_IN
REC_PROOF
MODE_SW_D
42
43
44
0
000
CL4506
MODE_SW_C
REC_PROOF_SW
FRRV
CL4502
XREEL_HALL_ON
0.5
1.4
105
FRRV
DIGITAL8
IC4501
CAP_ON
45
46
2.7
2.7
CAP_FWD
CAP_ON
C4504
1u
B
1608
C4505
0.01u
B
0.2
102
103
104
VSS
/CM-
/CM+
BBI_LINE_X8
XREEL_HALL_ON
DORUM_FWD(DRUM_CONT)
CAP_FWD
DRUM_ON
47
48
49
2.7
2.7
XX
1608
R4533
DRUM_ON
LOAD
DRUM_CONT
AVSS
LM+
101
50
UNLOAD
2.7
100
AVDD
AVRH
/CM_LIM_ON
LM_LIM_ON
LM-
51
000
LM_LIM_ON
2.7
98NC99
/T_ENLTN_ERR
RF_ENV_DET
/CM_LIM_DET
LM_LIM_DET
52
53
0
2.8
TAPE_TOP
LM_LIM_DET
DEW_AD
97
/L_CASETTE
/S_ELTN_ERR
PLUG_DC_LEVEL
TAPE_TOP
TAPE_END
54
55
0
0.1
1k
R4511
TAPE_END
TAPE_LED_ON
ATF_ERR
4700R4512
1.4000R0/P2.8
94
95
ATF_ERR96DEW_DET
XCS_MC_FLASH
/ME_F_BUSY
/DEBUG_OUT1
TAPE_LED_ON
REC_CRRT057REC_CRRT1
56
2.7
CL4504
REC_CRRT0
CL4505
REC_CRRT1
D_2.8V
RF_ENV_DET
CAP_FG
MODE_SW_A
MODE_SW_B
MODE_SW_C
DEW_AD
CAP_ON
CAP_FWD
CAP_PWM
DRUM_ON
DRUM_START
DRUM_PWM
DRUM_FG
DRUM_PG
DRUM_CONT
LOAD
UNLOAD
TAPE_LED_ON
TAPE_TOP
TAPE_END
DRUM_8PB
REC_PROOF_SW
LM_LIM_ON
LM_LIM_DET
SREEL_FG
TREEL_FG
XREEL_HALL_ON
HI_SO
HI_SI
XHI_SCK
XCS_MECHA
XSYS_RST
SWP
REC/PB
115
TO(15/16)
17
TO(2/16,10/16)
TO(10/16,12/16,
84
16/16)
61
TO(10/16,12/16)
59
TO(12/16)
TO(7/,10/16,
80
14/16)
100
TO(14/16)
TO(4/16,7/16,
76
10/16,14/16)
96
TO(3/16,16/16)
PBREC
L
16
MECHA CONTROL
VC-250 (13/16)
4-35 4-36
Page 70
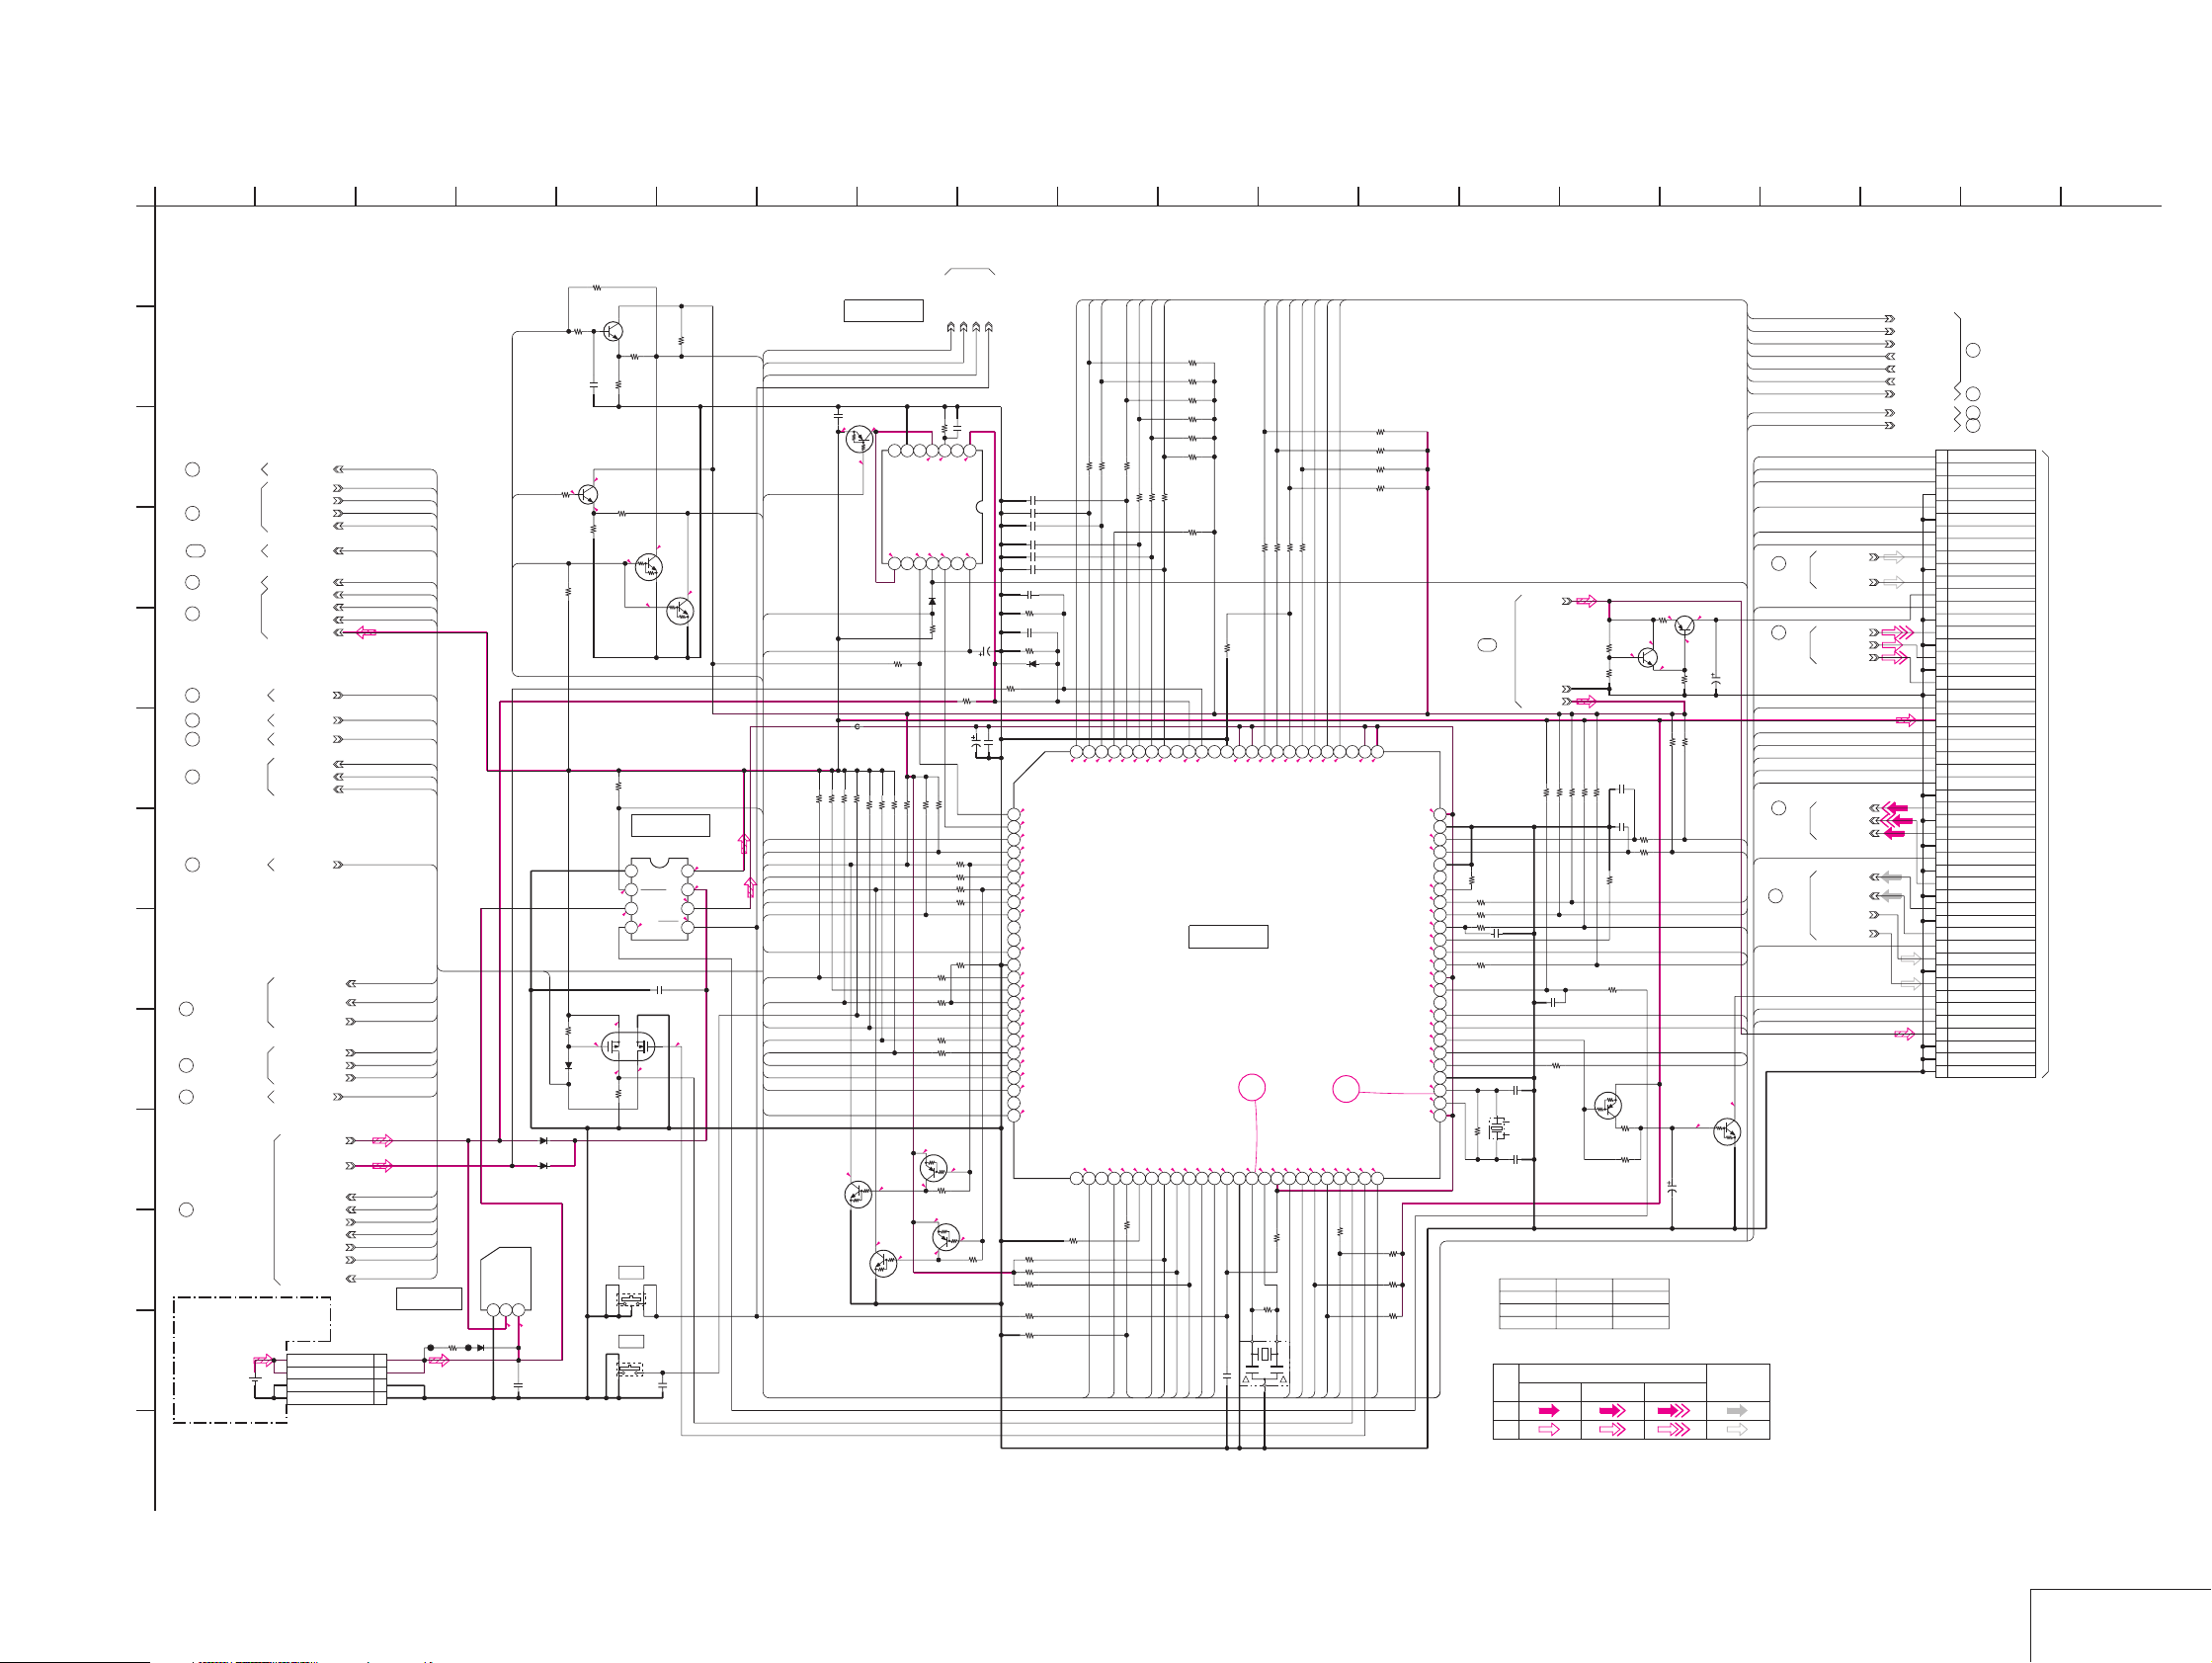
For Schematic Diagram
• Refer to page 4-7 for VC-250 printed wiring board.
• Refer to page 4-67 for FP-571 printed wiring board.
• Refer to page 4-69 for waveforms.
1
38
5 13
6
924 7
10
11 1514
12
GV-D200/D200E/D800/D800E
1716 18 19
20
VC-250 BOARD(14/16)
HI CONTROL(HI BLOCK)
A
-REF.NO.:30000 SERIESXX MARK:NO MOUNT
NO MARK:REC/PB MODE
R :REC MODE
P :PB MODE
B
C
77
TO(10/16)
74
TO(16/16)
100
76
38
TO(13/16)
TO(4/16,7/16
10/16,13/16)
TO(4/16)
D
E
73
TO(12/16)
72
TO(13/16)
47
TO(7/16)
F
G
80
94
TO(7/16,10/16
13/16)
TO(5/16,6/16
10/16)
H
59
TO(9/16)
I
83
TO(16/16)
65
TO(11/16)
J
90
TO(16/16)
K
FP-571 BOARD
-REF.NO.:20000 SERIES-
L
BT001
LITHIUM
BATTERY
XCS_VC
KEY_AD6
XCS_LCD
HI_SCK
HI_SO
XCS_MECHA
XSYS_RST
OSD_SO
XCS_OSD
XOSD_SCK
EVER_3.0V
XCC_DOWN
HP_SENS
XCS_ALIGN
XHI_SCK
HI_SO
SYS_V
SIRCS_PWM
HOTSHOE_ID1
HOTSHOE_ID2
AV_JACK_MUTE
VTR_UNREG
BATT_UNREG
VTR_DD_ON
INIT_CHARGE_ON
DC_PACK_SW
FAST_CHARGE
BATT/XEXT_SW
CN926
HI_SI
IR_ON
KEY_AD3
LANNC_SIG
BATT_SIG
SHOE_ON
4P
LI_3V
LI_3V
XHI_SCK
HI_SI
INIT_CHARGE_ON
GND
GND
XCS_LCD
HI_SO
XCS_MECHA
XSYS_RST
OSD_SO
XCS_OSD
XOSD_SCK
XCC_DOWN
HP_SENS
XCS_ALIGN
SIRCS_PWM
KEY_AD3
LANNC_SIG
HOTSHOE_ID1
HOTSHOE_ID2
AV_JACK_MUTE
VTR_DD_ON
DC_PACK_SW
FAST_CHARGE
BATT/XEXT_SW
BATT_SIG
SHOE_ON
1
2
3
4
XCS_VC
KEY_AD6
HI_SCK
HI_SO
SYS_V
IR_ON
IC901
CL901
3.6V
REG
R901
27
D901
MA728-(K8).SO
S-81236SGUP-DQ7-T1
CL902
GND2IN3OUT
1
SIRCS_ENV
MELODY
IC901
8.2
MELODY_ENV
D4801
MA111-(K8).S0
D4802
MA111-(K8).S0
3.7
C901
0.01u
B
R4801
XX
C4801
XX
Q4802
2SC4738F-Y/GR(TPL3)
BUFFER
0
R4802
4700
R4807
2200
R4896
XX
R4803
BATT_SIG
100k
D4803
R4805
3300
Q4801
XX
R4809
XX
R4806
XX
2.7
R4810
1k
0
Q4803
RN1104F(TPL3)
SWITCH
0.1
0.1
Q4805
RN1104F(TPL3)
SWITCH
R4808
470k
IC4801
1
VSS
2
PREEND
2.8
3
VBAT
3.5
3.0
4
CS
S-8423YFS-T2
Q4804
HN1L02FU(TE85R)
BATTERY CHARGE DETECTOR
4
3.0
5
2.8
36
2.6
0.3
R4811
MA111-(K8).S0
100k
S4801
RESET
S4802
EJECT
0
BACK UP VDD,
INITIAL RESET
VRO
VIN
VOUT
RESET
IC4801
C4802
1
2
C4827
0.01u
B
(NOT USE)
HI_XRESET
HI_TEST_A
HI_TXD
2700
0.1
3.0
POWER
LANC_SIG
3.0
0.3
DATA
11
12
47k
470k
R4822
R4821
R4897
R4891
R4898
R4892
R4828
1k
*
R4829
R4830
Q4809
2.7
Q4811
RN2107F(TPL3)
2.7
0
DATA
R4858
R4859
C4806
1k
1k
HI_RXD
C4804
0.1u
B
1
2NC3C4
8.2
UNREG
C4808
C4809
C4810
C4812
TL1596CPWR IC4802
LANC_DC
5.5
C4813
13NC14
C4814
0.1u
C4817
470k
R4833
C4805
C4816
0.1u
10u
10V
470k
TA
R4834
±0.5%
D4805
R4836
1M
R4835
C4807
0.1u
B
R4837
XX
R4839
R4840
R4832
±0.5%
0.3
1
LANC_IN
0.3
2
LANC_OUT
2.8
XCS_VC
3
3.3
XSIRCS_IN
4
0
XPOWER_LED(SW_LED_ON)
5
R1.6/P0
XREC_LED(XF_TALLY_LED)
6
2.7
XIR_LED_ON
7
0
XPAUSE_LED(XDS_WAKE_UP)
8
2.6
XSYS_RST
9
NC(EVF_DD_ON)
10
NC(XDS_FLASH_RST)
11
0
XLANC_ON
12
GND
13
0
XVTR_MODE_SW
14
2.8
NC(LCH_DET(XCAM_MODE_SW))
15
0
HP_SENS(XS/S_SW)
16
0
XEJECT_SW
17
0
XCC_DOWN
18
0.1
V_JACK_OUT_DET(XPHOTO_FREEZE)
19
2.8
XS_JACK_OUT_DET(XPHOTO_STBY_SW)
20
2.7
XLANC_POWER_ON
21
0
TXD
22
0.5
RXD
23
NC(LCD_COM/XDATA)
24
0
INIT_CHARGE_ON
25
±0.5%
33u
4V
TA
XX
0
XX
0
*
0
XX
2.7
0.01u
0.01u
0.01u
0.01u
0.01u
0.01u
±0.5%
XX
1k
1M
KEY_AD5
KEY_AD3
KEY_AD2
KEY_AD1
1k
R4841
96
97
2.7
2.7
(KEY_AD4)
XLANC_JACK_IN
NC(CAM_DD_ON)
VTR_DD_ON
2.900
29
30
VTR_DD_ON
XLANC_JACK_IN
KEY_AD0
1k
1k
1k
R4846
R4848
R4849
2.7
2.7
2.7
KEY_AD093KEY_AD194KEY_AD295KEY_AD3
(LID_OPEN(PRINTING))
XLI_PRE_END32HI_SI
2.8
2.3
31
33
XLI_PRE_END
HI_SI
R4850
R4851
R4852
R4853
R4854
R4855
R4856
92
2.5
NC(232C_ON)
HI_SO
2.4
2.5
34
HI_SO
10k
91
ACV_SENSE
35
XHI_SCK
10k
10k
10k
XX
XX
XX
88
89
90
2.6
N.C
GND
BATT_SENSE
IC4803
HI CONTROL
IC4803
S579640PZ-TEB
MELODY/SIRCS_CARRIER
XHI_SCK
TEST_PORT
XRESET
0.103.001.5
36
37
38
HI_TEST_A
MELODY
R4865
87
3.0
39
B
0.022u
C4819
XX
86
3.0
VDD
31
GND
40
RCH_OUT_DET
AV_JACK_MUTE
XS_JACK_IN_DET
AV_JACK_IN_DET
1kR4862
1k
1k
1k
R4861
R4860
R4826
8283
84
85
2.6
0.202.7
R2.6/P0
R0/P2.9
VDD(PWE)
AV_JACK_MUTE
XS_JACK_IN_DET
AV_JACK_IN_DET
RCH_OUT_DET((EXT_MIC_DET)XJACK_MONO)
20MHZ_IN
IR_ON
20MHZ_OUT
XCS_OSD
3.0
2.7
1.5
VDD
42
43
44
41
47k
R4863
R4864
560k
X4801
20MHz
IR_ON
XCS_OSD
SHOE_ON
81
SHOE_ON
0.1
45
OSD_SO
XCS_MECHA
80
2.8
OSD_SO
46
XOSD_SCK
SP_MUTE
79
0
XCS_MECHA
32
XOSD_SCK
2.7
47
1k
R4866
DC_PACK_SW
470kR4867
470kR4868
470kR4869
470kR4870
76
77
78
3.0
3.0
AVDD
AVREF_1
(LCD_LED_ON)NC
SP_MUTE(XCS_DS)
HOTSHOE_ID2
HOTSHOE_ID1
232C_SENCE
BATT/XEXT
(DS_BUSY)
LCH_OUT_DET
TEST_PORT
(XCS_LCD_DRIVER)NC
SIRCS_ENV
XCS_ALIGN
(MS_LED)XCHARGE_LED
MELODY_ENV
(TALLY_LED)XCAUTION_LED
32KHZ_OUT
32KHZ_IN
IB_SI
FAST_CHARGE
IB_SO
CHARGE_INH
0.3
0.3
3.0
48
49
50
R4871
1M
R4872
100k
R4873
100k
FAST_CHARGE
AVREF_0
(MS_IN)
DIAL_B
DIAL_A
SYS_V
BATT_IN
Q904,905
RF-DC SWITCH
Q904
Q4807
R4893
2SB798-T1-DLDK
4.7
R923
3.3
R925
1/8W
4.7
820
4.4
R926
18k
C4824
0.1u
B
470k
C4825
0.1u
B
R4883
0
R4882
470
XX
R4890
XX
R4857
0
XX
XX
0
R4886
R4885
R4887
4.0
4.0
C902
R924
10u
5600
10V
R4888
100k
1k
HOTSHOE_ID2
HOTSHOE_ID1
1k
BATT/XEXT_SW
LCH_OUT_DET
MELODY_ENV
XCAUTION_LED
Q4808
RN1107F(TPL3)
LED DRIVE
C4828
XX
A_7.45V
116
TO(15/16)
3.0
75
GND
74
2.7
73
2.7
72
71
NC
R4884
0
0
69 70
2.6
68
0
67
2.8
66
0
65
2.4
64
0.2
63
3.0
62
3.0
61
60
0
59
2.9
58
0
57
0
56
0
55
GND
54
1.5
53
1.2
52
3.0
VDD
51
R4874
R4875
R4877
R4894
R4876
10M
1608
*MARKED:MOUNT TABLE
1k
1k
1k
6800pC4820
B
1k
C4821
22p
CH
C4822
18p
CH
R4815
R4827
R4828
2SC4738F-Y/GR(TPL3)
REG_GND
D_2.8V
470k
470k
100k
R4879
R4880
R4878
C4823
0.1u
B
R4889
0
X4802
32.768kHz
GV-D800/800E GV-D200/200E
470k
1k
XX
Q905
470kR4881
SIGNAL PATH
VIDEO SIGNAL
CHROMA
Y/CHROMA
Y
KEY_AD6
INPUT_SEL
1k
1k
R4842
R4843
B
B
B
B
B
B
B
B
1M
99
100
0
2.7
2.7
KEY_AD598KEY_AD6
INPUT_SEL
NC(XCS_EVF)
XCS_LCD_TG
3.0
28
26
27
R4845
100k
R4831
0
100k
100kR4838
100k
XCS_LCD
4.7
TA
100k
SIRCS_ENV
XCS_ALIGN
0
LANC_SIG
DIAL_B
DIAL_A
SYS_V
1.6
AUDIO
SIGNAL
XPAUSE_LED
XREC_LED
XCAUTION_LED
KEY_AD0
KEY_AD1
KEY_AD2
INPUT_SEL
XIR_LED_ON
BEEP
XVTR_MODE_SW
LANC_SIG
XLANC_JACK_IN
LANC_DC
RCH_OUT_DET
LCH_OUT_DET
63
TO(11/16)
V_JACK_OUT_DET
85
TO(8/16)
XS_JACK_OUT_DET
XIR_LED_ON
KEY_AD5
DIAL_A
DIAL_B
XS_JACK_IN_DET
86
TO(8/16)
AV_JACK_IN_DET
64
TO(11/16)
HP_SENS
XPOWER_LED
SIRCS_SIG
AUDIO_R_OUT
AUDIO_L_OUT
VIDEO_OUT
S_C_OUT
S_Y_OUT
VIDEO_IN
AUDIO_L_IN
AUDIO_R_IN
HP_R_OUT
HP_L_OUT
S_Y_IN
S_C_IN
XPAUSE_LED
XREC_LED
XCAUTION_LED
KEY_AD0
KEY_AD1
KEY_AD2
INPUT_SEL
SP_MUTE
BEEP
79
48
81
82
CN922
50P
1 XVTR_MODE_SW
2 LANC_SIG
3 XLANC_JACK_IN
4 REG_GND
5 LANC_DC
6 REG_GND
7 RCH_OUT_DET
8 LCH_OUT_DET
9 AUDIO_R_OUT
10 REG_GND
11 AUDIO_L_OUT
12 RF_DC_OUT
13 V_JACK_OUT_DET
14 VIDEO_OUT_GND
15 VIDEO_OUT
16 S_C_GND
17 S_C_OUT
18 S_Y_GND
19 S_Y_OUT
20 REG_GND
21 XS_JACK_OUT_DET
22 EVER_3.0V
23 XIR_LED_ON
24 KEY_AD5
25 DIAL_A
26 DIAL_B
27 XS_JACK_IN_DET
28 S_Y_GND
29 S_Y_IN
30 S_C_GND
31 S_C_IN
32 REG_GND
33 AV_JACK_IN_DET
34 VIDEO_GND
35 VIDEO_IN
36 REG_GND
37 AUDIO_L_IN
38 AUDIO_GND
39 AUDIO_R_IN
40 HP_SENS
41 HP_R
42 HP_GND
43 HP_L
44 XCHARGE_LED
45 XPOWER_LED
46 SIRCS_SIG
47 A_4.75V
48 REG_GND
49 REG_GND
50 REG_GND
TO(16/16)
TO(8/16,11/16)
TO(11/16)
TO(16/16)
TO
FP-247
FLEXIBLE
CN001
(SEE PAGE
4-46)
IC4802
C4803
0.1u
470k
R4813
LANC I/O
MA111-(K8).S0
R4820
470k
470k
R4817
3.0
7
NC
3.0
8
D4804
470k
470k
R4819
R4818
2.7
1.7
Q4812
RN1107F(TPL3)
VCC
R4823
100k
GND
WAKE
9
10k
XX
R4895
0
R4824
5NC6
0.3
10
R4825
R4827
RN2107F(TPL3)
2.7
3.0
B
0
FB4801
0uH
*
470k
R4814
R4815
R4816
0.2
R4812
XX
0
XLI_PRE_END
3.0
8
7.3
7
3.0
6
3.0
5
0.1u
B
0.3
SIRCS_PWM
BEEP
HI_TEST_A
HI_TXD
HI_RXD
Q4806
RN2102F(TPL3)
LANC ON SW
XLANC_ON
XLANC_PWR_ON
LANC_DC
XCS_VC
SIRCS_SIG
XPOWER_LED
XREC_LED
XIR_LED_ON
XPAUSE_LED
XSYS_RST
XLANC_ON
XVTR_MODE_SW
HP_SENS
XCC_DOWN
V_JACK_OUT_DET
XS_JACK_OUT_DET
XLANC_PWR_ON
HI_TXD
HI_RXD
INIT_CHARGE_ON
Q4810
RN1107F(TPL3)
Q4809-4812
LED DRIVE
REC
PB
M
16
HI CONTROL
4-37 4-38
VC-250 (14/16)
Page 71
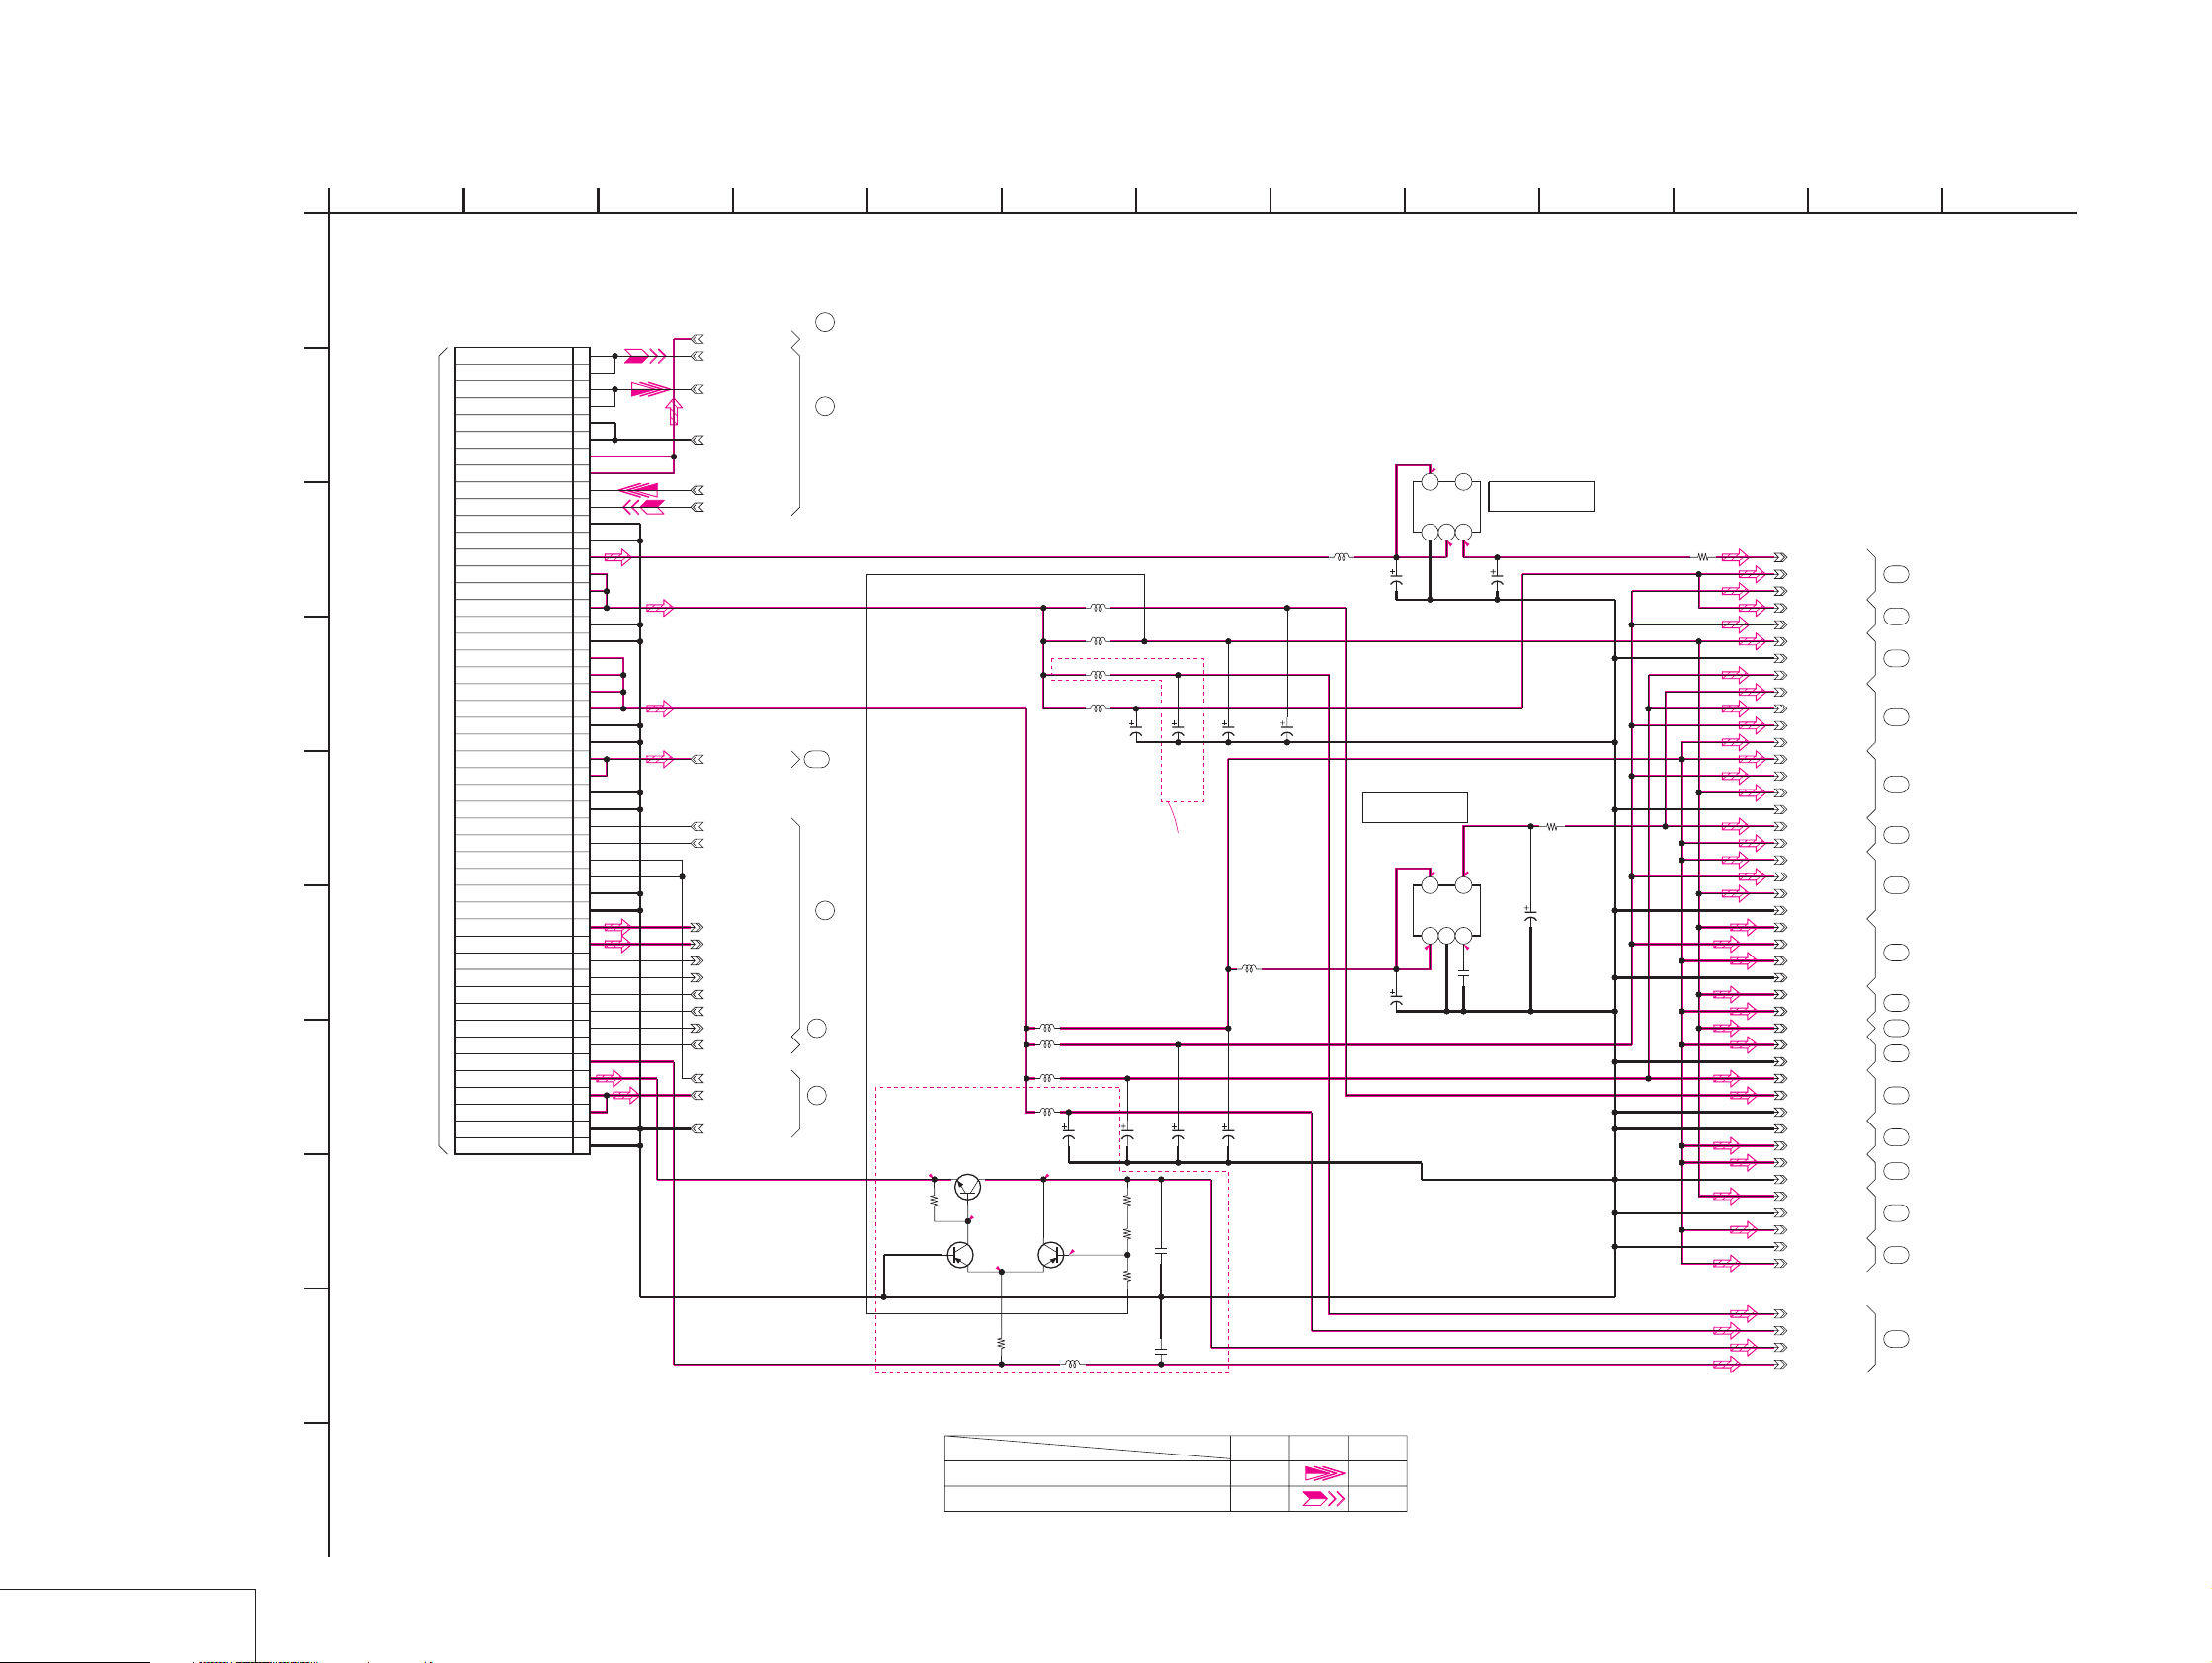
GV-D200/D200E/D800/D800E
For Schematic Diagram
• Refer to page 4-7 for printed wiring board.
1
38
5 136
924 7
10
11
12
A
B
C
D
E
F
G
H
I
VC-250 BOARD(15/16)
DC/DC CONVERTER(DD BLOCK)
-REF.NO.:30000 SERIESXX MARK:NO MOUNT
CN921
48P
TO FU-145
BOARD
CN301
(SEE PAGE
4-50)
NO MARK:REC/PB MODE
R :REC MODE
P :PB MODE
MT_5V
1CAP_VS
2CAP_VS
3DRUM_VS
4DRUM_VS
5MT_GND
6MT_GND
7MT_5V
8MT_5V
9DRUM_ERROR
10CAP_ERROR
11REG_GND
12REG_GND
13RP_UNREG
144.75V
154.75V
164.75V
17REG_GND
18REG_GND
192.8V
202.8V
212.8V
222.8V
23REG_GND
24REG_GND
251.5V
261.5V
27REG_GND
28REG_GND
29VTR_DD_ON
30SHOE_ON
31EX_UNREG
32EX_UNREG
33REG_GND
34REG_GND
35VTR_UNREG
36BATT_UNREG
37BATT_SIG
38BATT/XEXT_SW
39FAST_CHARGE
40INIT_CHARGE_ON
41DC_PACK_SW
42BL_CONT
43PANEL_13V
44PANEL_-15V
45BL_REG
46BL_REG
47REG_GND
48REG_GND
CAP_VS
DRUM_VS
MT_GND
DRUM_ERROR
CAP_ERROR
D_1.5V
VTR_DD_ON
SHOE_ON
VTR_UNREG
BATT_UNREG
BATT_SIG
BATT/XEXT_SW
FAST_CHARGE
INIT_CHARGE_ON
DC_PACK_SW
BL_CONT
EX_UNREG
BL_REG
REG_GND
TO(11/16,12/16)
TO(12/16)
104
TO(3/16,6/16)
TO(14/16)
91
TO(16/16)
92
TO(16/16)
70
62
R6.6/P7.0
45
IC1303
123
C1357
A
R6.6/P7.0
4.7uHL1313
4.7uHL1314
4.7uHL1315
L1316 22uH
C1335
10u
L1311
4.7uH
C1358
XX
16V
C1345
C1341
C1339
10u
10V
10V
A
A
10V
10u
10u
A
10V A
IC1302
C1320
6.3V
10u
A
1.9V REG
IC1302
TK11119SCL
2.8 1.9
123
2.8 1.2
45
GV-D800/800E
MODEL ONLY
90
L1321
4.7uH
L1306
4.7uH
L1307
4.7uH
L1308
4.7uH
R-20.2/
P-19.2
0.5
L1309
4.7uH
C1333
-15.7
0.1
Q1326
2SA1832F-Y/GR(TPL3)
-15.3V REG
L1320
22uH
6.3V
10u
A
±0.5%
R1341
4700
±5%
R1342
220k
C1356
2.2u
C1336
F
22u
6.3V
R1343
C1340
C1343
10u
10u
6.3V
A
C1355
2.2u
68k
±0.5%
6.3V
A
B
F
GV-D800/800E
MODEL ONLY
2SC4738F-Y/GR(TPL3)
R-20.8/
P-19.8
R1335
100k
2SA1832F-Y/GR(TPL3)
-15.3V REG
Q1322
Q1324
-15.3V REG
R1337
100k
6V REG
IC1303
RN5RZ59BA-TL
5.9
10u
10V
A
R1308
0
C1322
10u
4V
A
C1353
1005
0.1u
B
R1315
0
RP_6.0V
RP_4.75V
A_2.8V
RP_4.75V
A_2.8V
A_4.75V
REG_GND
AU_2.8V
D_1.9V
AU_2.8V
A_2.8V
D_2.8V
D_2.8V
A_2.8V
A_4.75V
REG_GND
D_1.9V
D_2.8V
D_2.8V
A_2.8V
A_4.75V
REG_GND
A_4.75V
A_2.8V
D_2.8V
REG_GND
A_4.75V
D_2.8V
A_4.75V
D_2.8V
REG_GND
AU_2.8V
AU_4.75V
REG_GND
REG_GND
D_2.8V
D_2.8V
REG_GND
A_4.75V
REG_GND
D_2.8V
REG_GND
D_2.8V
PANEL_4.75V
PANEL_2.8V
PANEL_-15.3V
PANEL_13.3V
101
TO(1/16)
102
TO(2/16)
103
TO(2/16)
105
TO(3/16)
106
TO(6/16)
107
TO(4/16)
108
TO(5/16)
109
TO(7/16)
110
TO(8/16)
111
TO(9/16)
112
TO(10/16)
113
TO(11/16)
114
TO(12/16)
115
TO(13/16)
116
TO(14/16)
117
TO(16/16)
118
TO(16/16)
DC/DC CONVERTER
VC-250 (15/16)
SIGNAL PATH
REC/PB
REC
PB
Drum servo (speed and phase)
J
Capstan servo (speed and phase)
16
4-39 4-40
Page 72
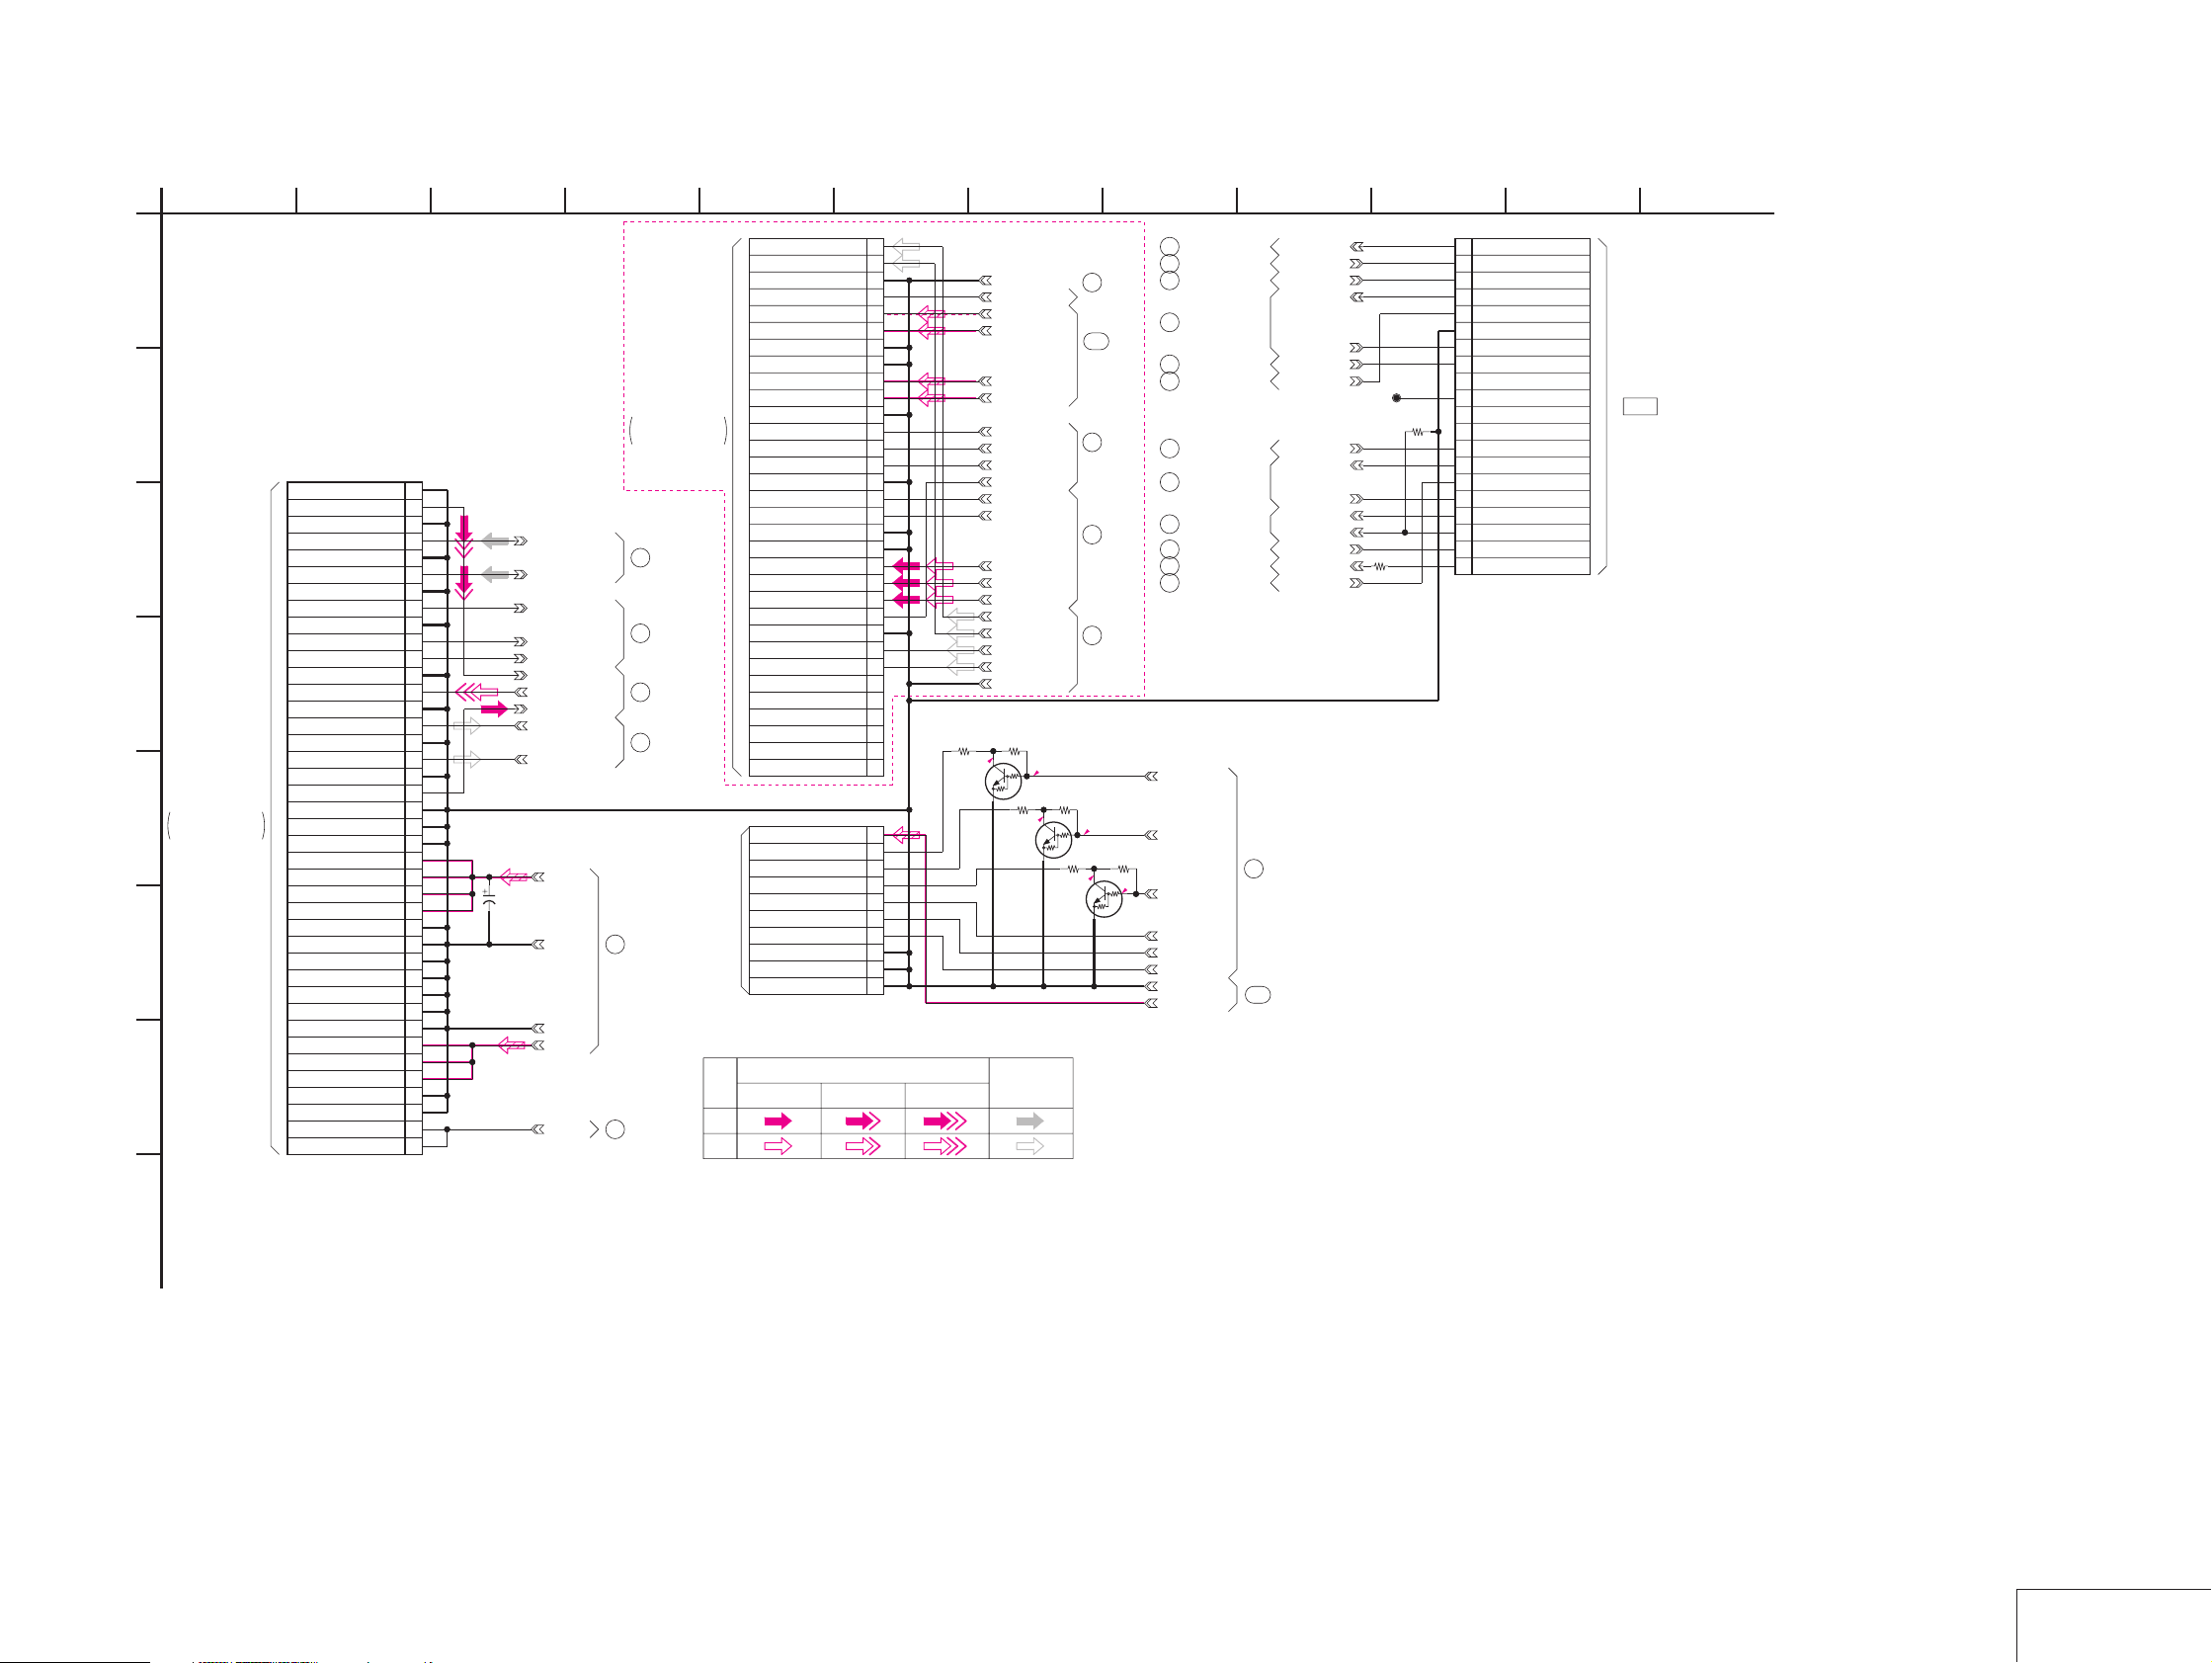
For Schematic Diagram
• Refer to page 4-7 for printed wiring board.
1
VC-250 BOARD(16/16)
CONNECTION(CN BLOCK)
-REF.NO.:30000 SERIES-
A
XX MARK:NO MOUNT
NO MARK:REC/PB MODE
R :REC MODE
P :PB MODE
B
CN931
40P
ZIF
1VIDEO_GND
2V/Y_IN
3V/Y_IN_GND
C
D
E
F
G
TO
EX-36
BOARD
CN203
THROUGH THE
FP-570 FLEXIBLE
BOARD
(SEE PAGE
4-65)
4AUDIO_R_IN
5AUDIO_R_IN_GND
6AUDIO_L_IN
7AUDIO_L_IN_GND
8LANC_SIG
9LANC_GND
10ID1
11ID2
12VIDEO_GND
13VIDEO_OUT
14VIDEO_OUT_GND
15AUDIO_R_OUT
16AUDIO_R_OUT_GND
17AUDIO_L_OUT
18AUDIO_L_OUT_GND
19C_IN
20VIDEO_GND
21IO_GND
22IO_GND
23EX_UNREG
24EX_UNREG
25EX_UNREG
26EX_UNREG
27REG_GND
28REG_GND
29REG_GND
30REG_GND
31BL_GND
32BL_GND
33BL_GND
34BL_REG
35BL_REG
36BL_REG
37REG_GND
38REG_GND
39BEEP
40BEEP
CL903
10
1 SWP
2 AFC_F0
3 BPF_MONI
4 F0_ADJ_RF_IN
5 PB_RF
6 REG_GND
7 RF_AGC_OUT
8 VC_RF_SWP
9 NC(EVF_BL)
10 NC(EVF_BL_4.75V)
R908
11 NC(VCO)
4700
12 NC(EVF_VG)
13 DV_RF_SWP
14 RF_IN
15 CAP_FG
16 RF_MON
17 TMS
18 TCK
0
19 TDO
20 TDI
11
20PCN933
38
GV-D800/800E
MODEL ONLY
TO
PD-130
BOARD(1/2)
CN5503
THROUGH THE
FP-569 FLEXIBLE
BOARD
(SEE PAGE
4-55)
C903
XX
16V
TA
B
EX_AUDIO_R_IN
EX_AUDIO_L_IN
LANC_SIG
HOTSHOE_ID1
HOTSHOE_ID2
EX_V/Y_IN
EX_VIDEO_OUT
EX_C_IN
EX_AUDIO_R_OUT
EX_AUDIO_L_OUT
EX_UNREG
REG_GND
(BL_GND)
REG_GND
BL_REG
BEEP
92
TO(15/16)
82
54
83
49
53
(SEE PAGE
4-61)
TO(14/16)
TO(11/16)
TO(14/16)
TO(8/16)
TO(11/16)
TO
CONTROL SWITCH
BLOCK
(FK-78)
CN001
56
32PCN923
10PCN927
SIGNAL PATH
VIDEO SIGNAL
YCHROMA
REC
1SP_R_+
2SP_R_-
3REG_GND
4BL_CONT
5PANEL_-15.3V
6PANEL-13.3V
7REG_GND
8REG_GND
9PANEL_4.75V
10PANEL_2.8V
11REG_GND
12XVC_SCK
13XCS_LCD_DA
14VC_SO
15REG_GND
16PANEL_XVD
17C-SYNC/XHD
18PANEL_HOLD
19REG_GND
20PANEL_B
21PANEL_G
22PANEL_R
23AD_6
24REG_GND
25SP_L_+
26SP_L_-
27NC
28NC
29NC
30NC
31NC
32NC
1D_2.8V
2XREC_LED
3XCAUTION_LED
4XPAUSE_LED
5KEY_AD1
6KEY_AD0
7KEY_AD2
8REG_GND
9REG_GND
10REG_GND
Y/CHROMA
1608
R912
220
R0.1/
924 7
96
TO(3/16,13/16)
93
TO(6/16,10/16)
67
R917
XX
0
Q908
RN1107F(TPL3)
LED DRIVE
TO(14/16)
13
TO(2/16)
TO(1/16,2/16
68
11/16)
97
TO(2/16,11/16)
6
TO(1/16,2/16)
5
TO(1/16)
28
TO(3/16)
98
TO(3/16)
30
TO(7/16)
TO(10/16,12/16,
84
13/16)
XREC_LED
XCAUTION_LED
XPAUSE_LED
KEY_AD1
KEY_AD0
KEY_AD2
REG_GND
D_2.8V
79
117
REG_GND
BL_CONT
PANEL_-15.3V
PANEL_13.3V
PANEL_4.75V
PANEL_2.8V
XHI_SCK
XCS_LCD
HI_SO
KEY_AD6
PANEL_VD
PANEL_HD
PANEL_B
PANEL_G
PANEL_R
SP_R_+
SP_R_-
SP_L_+
SP_L_-
REG_GND
R915
XX
1608
P1.7
1608
1.4
AUDIO
SIGNAL
RN1107F(TPL3)
LED DRIVE
R1.7/P0
R913
220
Q906
R916
XX
1608
TO(15/16)
TO(15/16)
TO(14/16)
TO(3/16)
TO(11/16)
R914
220
1608
1.5
91
118
74
32
66
Q907
RN1107F(TPL3)
LED DRIVE
0
1608
F0_ADJ_RF_IN
TO(14/16)
TO(15/16)
AFC_F0
BPF_MONI
RF_ENV
VC_RF_SWP
PB_RF
DV_RF_SWP
RF_IN
RF_MON
TD_2-3
CAP_FG
SWP
TMS
TCK
TDO
R907
PB
GV-D200/D200E/D800/D800E
12
CPC
(FOR CHECK)
H
16
CONNECTION
4-41 4-42
VC-250 (16/16)
Page 73
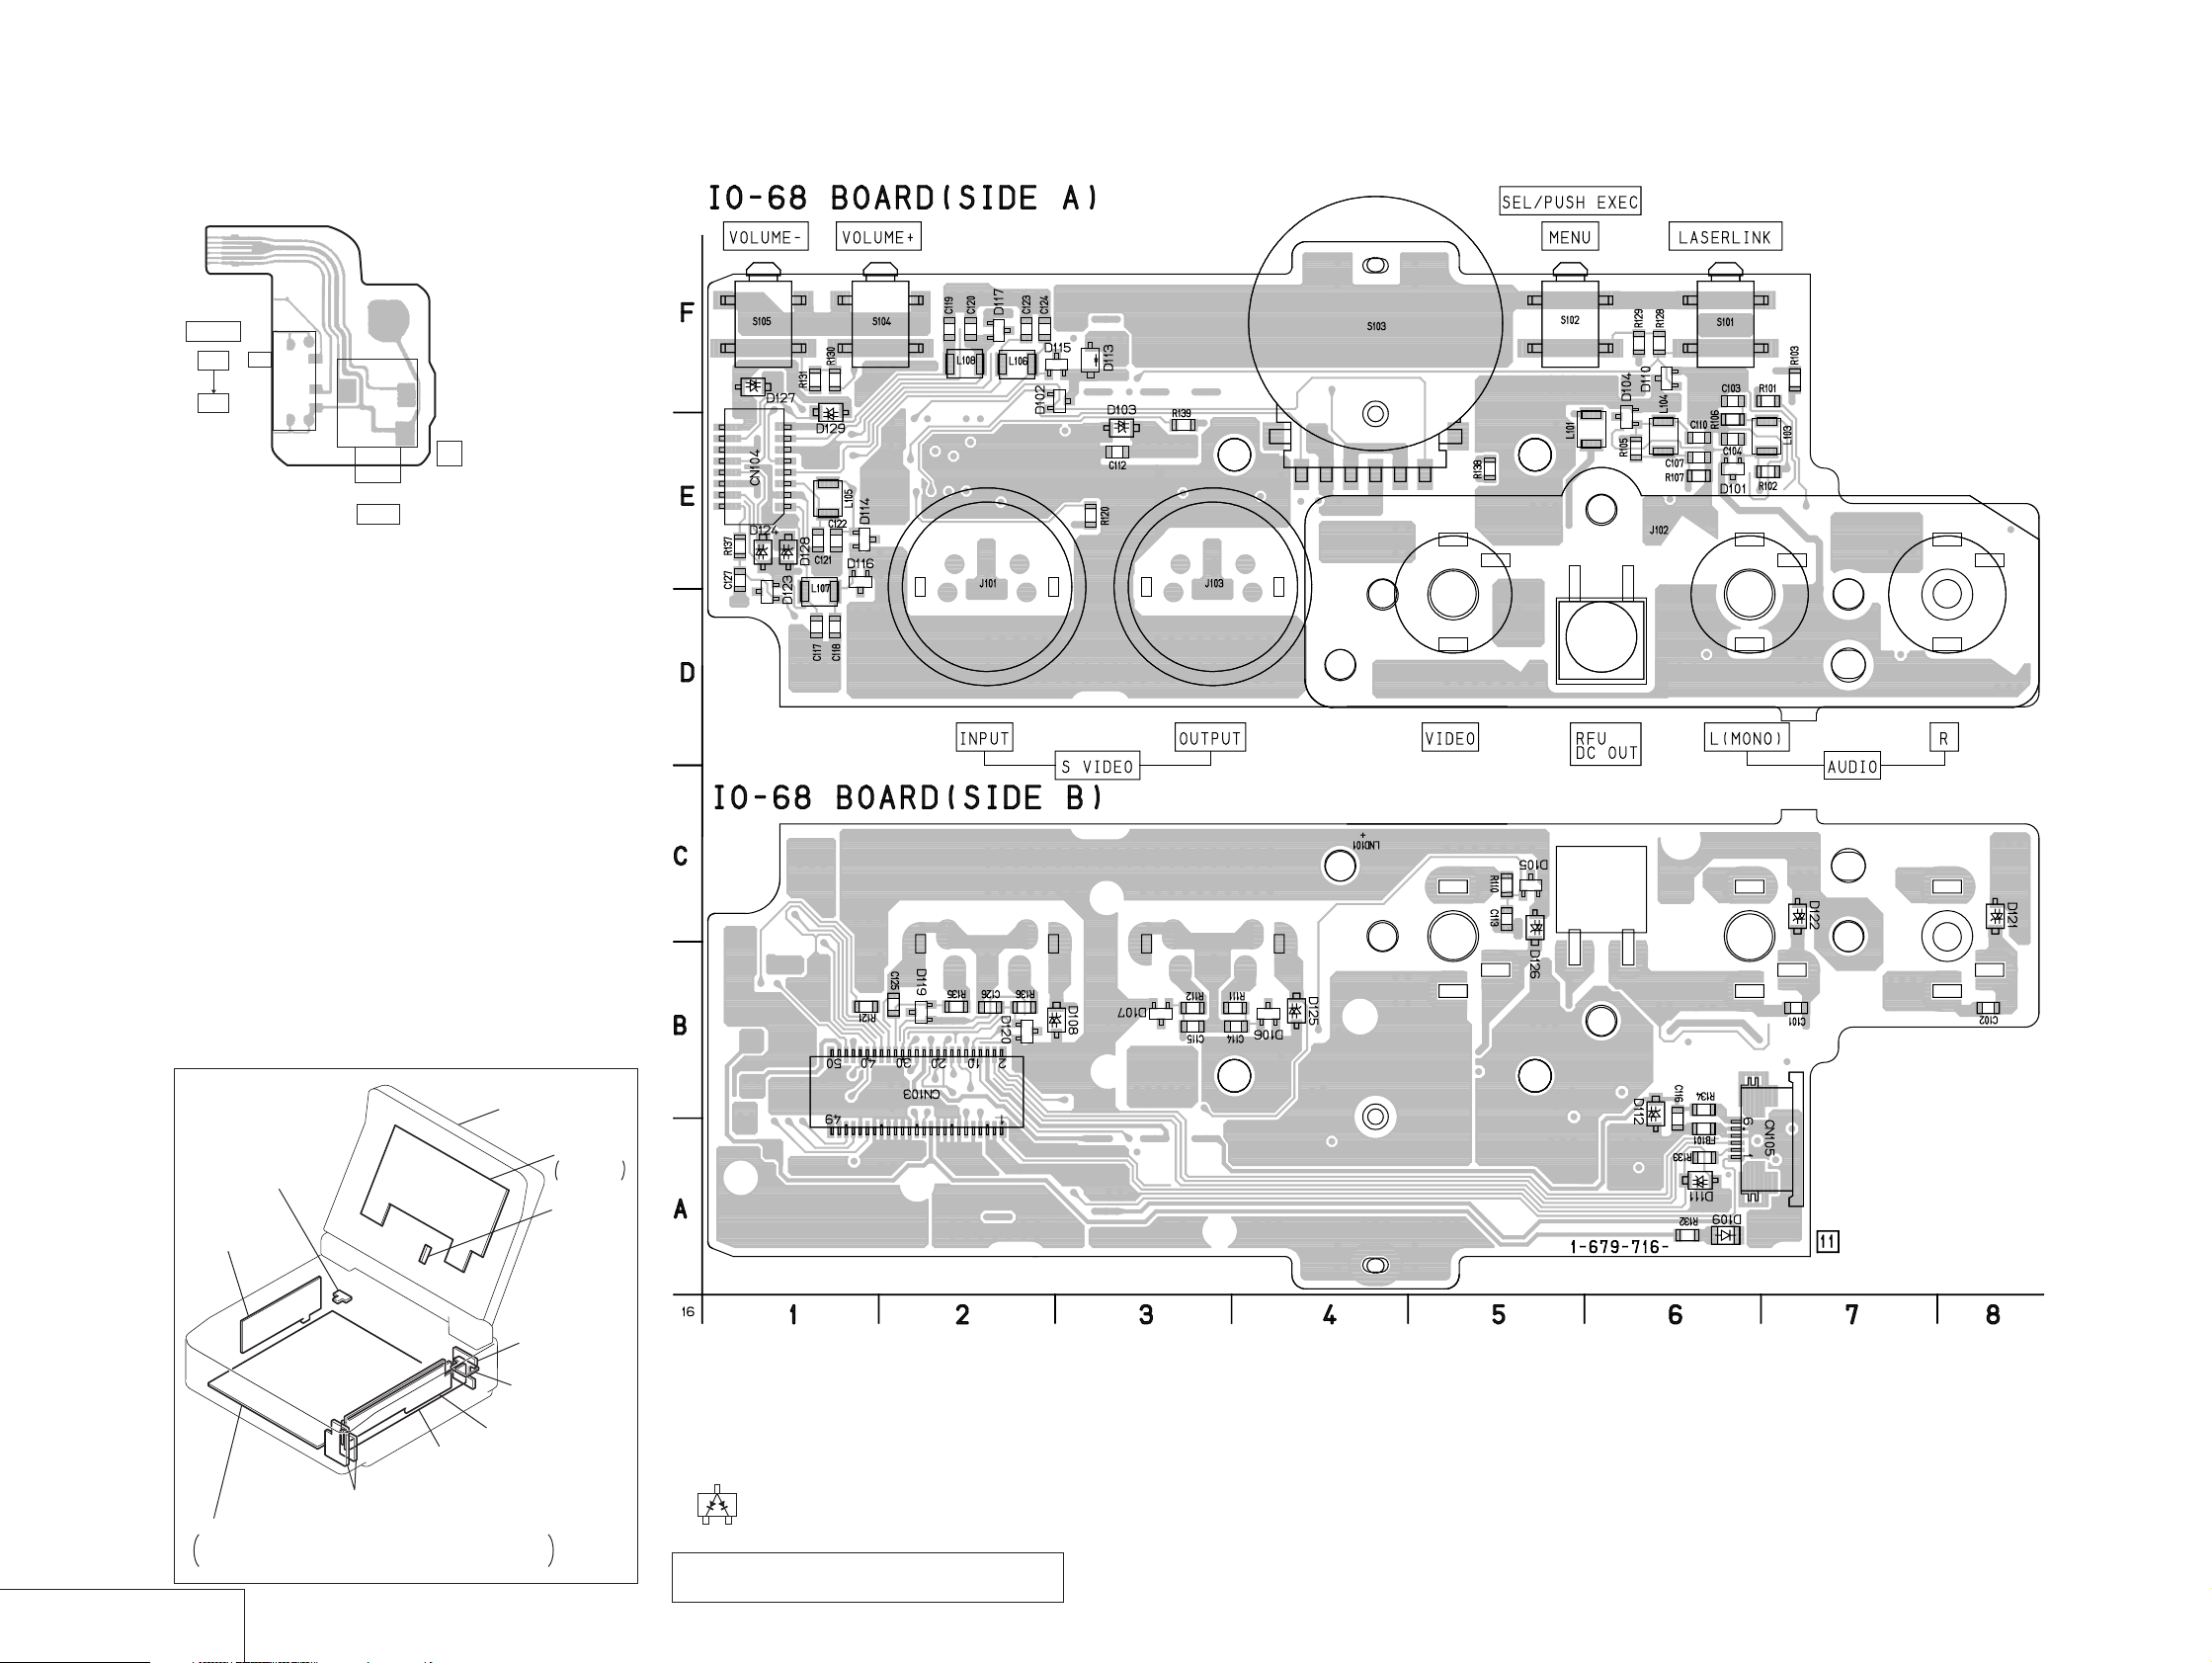
GV-D200/D200E/D800/D800E
)
FP-575 (LANC), IO-68 (AV IN/OUT) PRINTED WIRING BOARDS
— Ref. No. IO-68 Board; 10,000 Series —
FP-575 FLEXIBLE BOARD
6
1
S001
POWER
ON
OFF
1-667-404-
11
J001
LANC
LANC
FP-575
AV IN/OUT
/
IO-68
LCD DISPLAY
MODULE
(D800/D800E ONLY)
FP-602
(DV IN/OUT)
EX-36
(MULTI CONNECTOR)
IO-68
(AV IN/OUT)
FP-246
VC-250
REC/PB AMP, DAC, DV INTERFACE, AD CONVERTER, Y/C PROCESSOR,
LINE A/D, LINE IN/OUT, IR, AUDIO IN/OUT, DRUM/CAPSTAN MOTOR DRIVE,
MECHA CONTROL, HI CONTROL, DC/DC CONVERTER
(REMOTE COMMANDER RECEIVER)
IR-38
(IR TRANSMITTER)
FU-145
(DC/DC CONVERTER)
PD-130
LCD DRIVER,
BACK LIGHT
LS-56
(LCD SWITCH
For printed wiring board
• Refer to page 4-72 for parts location.
FP-575
(LANC)
• IO-68 board consists of multiple layers. Howev er , only
the sides (layers) A and B are shown.
• Chip parts
Diode
3
21
There are few cases that the part printed on this
diagram isn’t mounted in this model.
4-43 4-44
Page 74
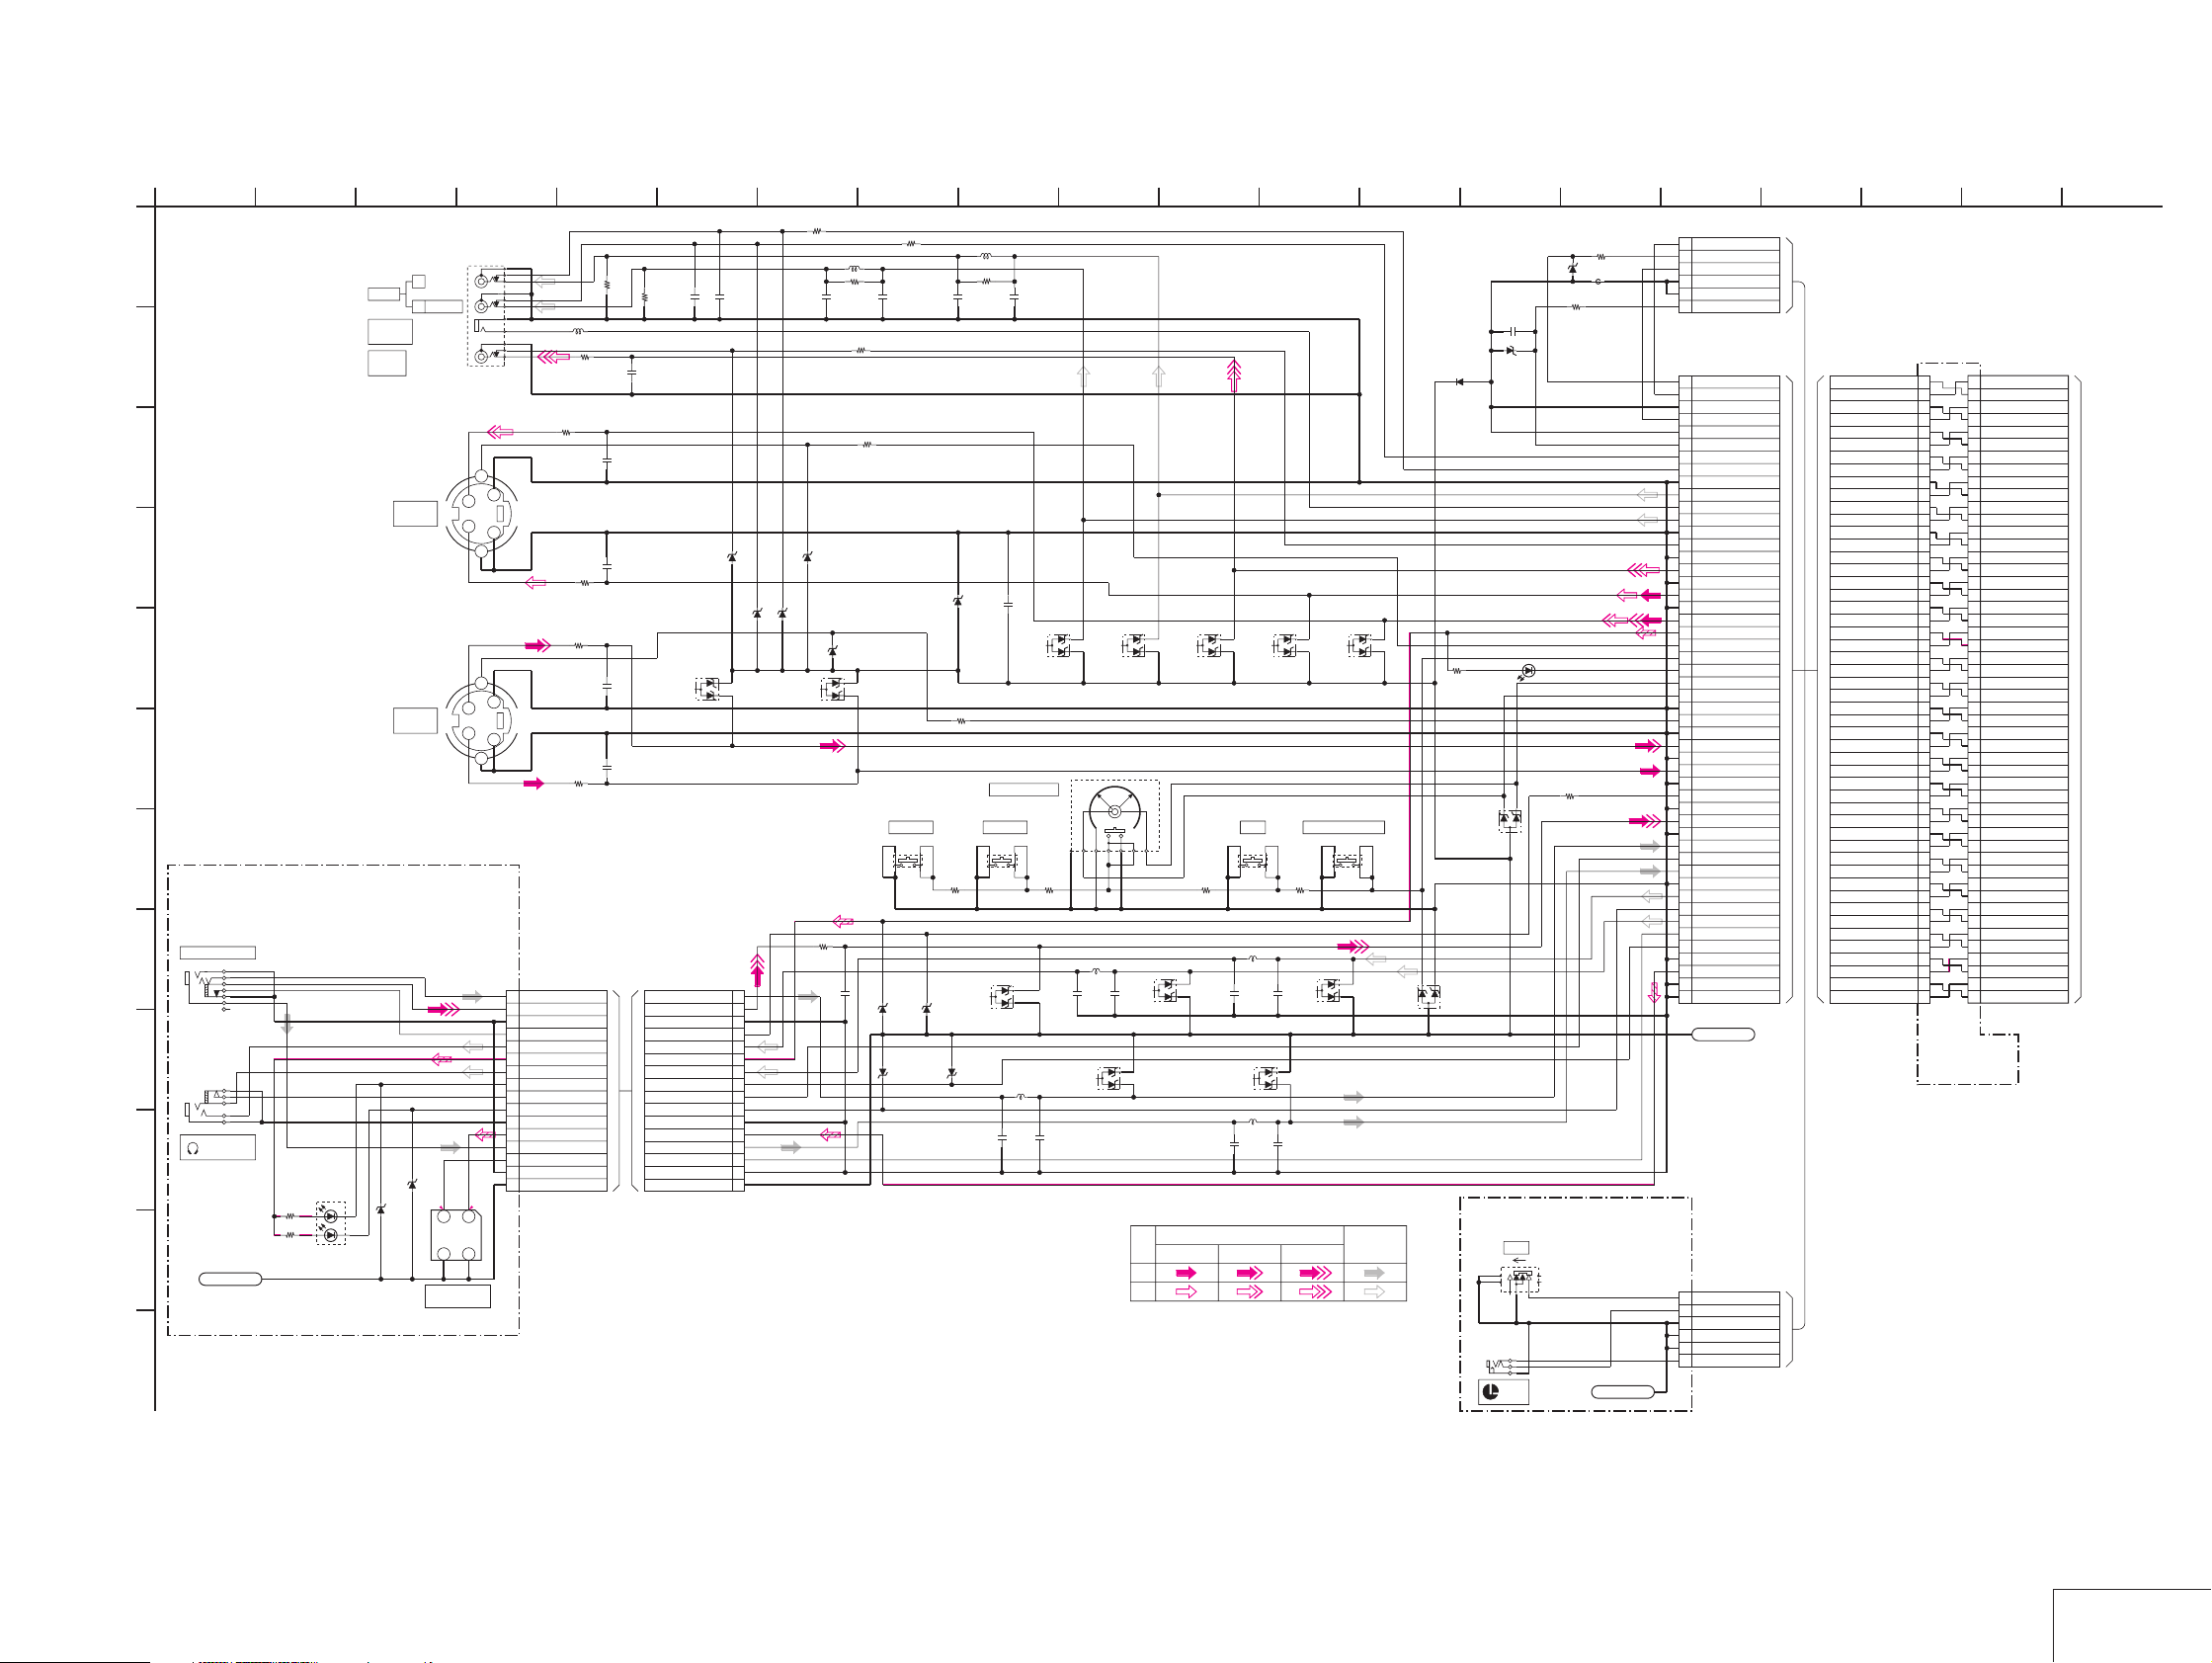
GV-D200/D200E/D800/D800E
1
IO-68 BOARD
A
AV IN/OUT
-REF.NO.:10000 SERIES-
XX MARK:NO MOUNT
B
C
D
E
F
G
FP-246 BOARD
REMOTE COMMANDER RECEIVER
-REF.NO.:20000 SERIES-
NO MARK:REC/PB MODE
J001
AVDIO/VIDEO IN
H
I
J002
(HEADPHONES)
J
K
16
L
CH GND
LND001
R001
33
R002
47
(POWER)
PG
Y
(CHARGE)
D001
CL-165Y/PG-D-T
R130
2200
C121
0.001u
01ZA8.2(TPL3)
C118
0.001u
10
D101
01ZA8.2(TPL3)
L105
100uH
C122
D114
0.001u
01ZA8.2(TPL3)
D116
SIGNAL PATH
CHROMA
REC
PB
38
J102
R
AUDIO
L
(MOMO)
RFU
DC OUT
VIDEO
OUT
XX
12
IC001
RS-70-TU
34
Y
C
Y
C
4.73.0
S
G
G
S
S
G
G
S
CN001
1 AUDIO_L_IN
2 VIDEO_IN
3 AV_GND
4 AV_JACK_DET
5 HP_L
6 EVER_3.0V
7 HP_R
8 XPOWER_LED
9 XHP_SENS
10 XCHARGE_LED
11 HP_GND
12 A_4.75V
13 AUDIO_R_IN
14 XSIRCS_SIG
15 AV_GND
16 GND
J103
S VIDEO
OUT
J101
S VIDEO
IN
D003
D002
XX
5 13
R106
47k
L101
2520
1uH
R110
R111
0
R112
R136
0
R135
0
16P
Service of the FP-246 flexible board is based on the replacement
of the entire board except J001,J002.
So that this PRINTED WIRING BOARD is omitted.
C113
0
XX
C114
XX
CH
C115
XX
CH
0
C126
XX
CH
C125
XX
CH
R107
47k
CH
C101
0.001u
B
MA8082-(K8).S0
MA8082-(K8).S0
CN104
6
1k
R103
C102
0.001u
B
D126
D122
D120
01ZA8.2(TPL3)
16P
1AUDIO_L_IN
2VIDEO_IN
3AV_GND
4AV_JACK_IN_DET
5HP_L
6EVER_3.0V
7HP_R
8XPOWER_LED
9XHP_SENS
10XCHARGE_LED
11HP_GND
12A_4.75V
13AUDIO_R_IN
14XSIRCS_SIG
15AV_GND
16GND
0.001u
C107
B
D125
D121
MA8082-(K8).S0
R137
0
C127
R105
R138
R139
MA8082-(K8).S0
D108
XX
CH
XX
MA8082-(K8).S0
1k
R101
100uHL104
2520
C110
C103
0.001u
0.001u
B
B
1k
1k
D103
MA8082-(K8).S0
D119
01ZA8.2(TPL3)
S105
VOLUME- VOLUME+
D127
D124
XX
D129
XX
R120 1k
R131
3900
MA8082-(K8).S0
L103
D123
01ZA8.2(TPL3)
D128
XX
0.001u
R102
XX
C117
100uH
C112
XX
B
SEL/PUSH EXEC
S104
924 7
2520
C104
0.001u
B
D104
01ZA8.2(TPL3)
S103
L107
100uH
IC001
REMOTE COMMANDER
RECEIVER
11 1514
D105
01ZA8.2(TPL3)
R129
1500
L106
C123
0.001u
D117
01ZA8.2(TPL3)
L108
C119
0.001u
VIDEO SIGNAL
D107
S102
MENU
0.001u
Y
01ZA8.2(TPL3)
100uH
C124
100uH
12
SUPER LASER LINK
R128
1200
D115
01ZA8.2(TPL3)
C120
0.001u
Y/CHROMA
D106
01ZA8.2(TPL3)
S101
01ZA8.2(TPL3)
AUDIO
SIGNAL
D112
MA8082-(K8).S0
D113
MA111-TX
R132
470
01ZA8.2(TPL3)
D110
MA8082-(K8).S0
C116
0.01u
B
D109
D102
FP-575 BOARD
LANC JACK
S001
POWER
OFF ON
J001
LANC
D111
R134
R121
1k
R133
0
FB101
0uH
0
TLSU1002(TPX1,SONY)
LND001
CH GND
1
XVTR_MODE_SW
LANC_SIG
2
XLANC_JACK_IN
3
REG_GND
4
REG_GND
5
LANC_DC
6
CN103
1 LANC_SIG
2 XVTR_MODE_SW
3 REG_GND
4 XLANC_JACK_IN
5 REG_GND
6 LANC_DC
7 LCH_OUT_DET
8 RCH_OUT_DET
9 REG_GND
10 AUDIO_R_OUT
11 RF_DC_OUT
12 AUDIO_L_OUT
13 VIDEO_OUT_GND
14 V_JACK_OUT_DET
15 S_C_GND
16 VIDEO_OUT
17 S_Y_GND
18 S_C_OUT
19 REG_GND
20 S_Y_OUT
21 EVER_3.0V
22 XS_JACK_OUT_DET
23 KEY_AD5
24 XIR_LED_ON
25 DIAL_B
26 DIAL_A
27 S_Y_GND
28 XS_JACK_IN_DET
29 S_C_GND
30 S_Y_IN
31 REG_GND
32 S_C_IN
33 VIDEO_GND
34 AV_JACK_IN_DET
35 REG_GND
36 VIDEO_IN
37 AUDIO_GND
38 AUDIO_L_IN
39 XHP_SENS
40 AUDIO_R_IN
41 HP_GND
42 HP_R
43 XCHARGE_LED
44 HP_L
45 XSIRCS_LED
46 XPOWRER_LED
47 REG_GND
48 A_4.75V
49 REG_GND
50 REG_GND
LND101
A
1 XVTR_MODE_SW
2
LANC_SIG
REG_GND
3
REG_GND
4
REG_GND
5
LANC_DC
6
CN105
17 2016 18 19
6P
50P
6P
50P
CN002
1LANC_SIG
2XVTR_MODE_SW
3REG_GND
4XLANC_JACK_IN
5REG_GND
6LANC_DC
7LCH_DET
8RCH_DET
9AUDIO_GND
10AUDIO_R_OUT
11RF_DC_OUT
12AUDIO_L_OUT
13VIDEO_OUT_GND
14V_JACK_DET
15S_C_GND
16VIDEO_OUT
17S_Y_GND
18S_C_OUT
19REG_GND
20S_Y_OUT
21EVER_3.0V
22XS_JACK_OUT
23KEY_AD5
24XIR_LED_ON
25DIAL_B
26DIAL_A
27S_Y_GND
28XS_JACK_IN
29S_C_GND
30S_Y_IN
31REG_GND
32S_C_IN
33VIDEO_GND
34AV_JACK_IN
35REG_GND
36VIDEO_IN
37AUDIO_GND
38AUDIO_L_IN
39XHP_SENS
40AUDIO_R_IN
41HP_GND
42HP_R
43XCHARGE_LED
44HP_L
45XSIRCS_LED
46XPOWER_LED
47REG_GND
48A_4.75V
49REG_GND
50REG_GND
FP-247 flexible board is ablock.
So that this PRINTED WIRING BOARD is omitted.
FP-247
FLEXIBLE
50P CN001
1 XVTR_MODE_SW
2 LANC_SIG
3 XLANC_JACK_IN
4 REG_GND
5 LANC_DC
6 REG_GND
7 RCH_DET
8 LCH_DET
9 AUDIO_R_OUT
10 AUDIO_GND
11 AUDIO_L_OUT
12 RF_DC_OUT
13 V_JACK_DET
14 VIDEO_OUT_GND
15 VIDEO_OUT
16 S_C_GND
17 S_C_OUT
18 S_Y_GND
19 S_Y_OUT
20 REG_GND
21 XS_JACK_OUT
22 EVER_3.0V
23 XIR_LED_ON
24 KEY_AD5
25 DIAL_A
26 DIAL_B
27 XS_JACK_IN
28 S_Y_GND
29 S_Y_IN
30 S_C_GND
31 S_C_IN
32 REG_GND
33 AV_JACK_IN
34 VIDEO_GND
35 VIDEO_IN
36 REG_GND
37 AUDIO_L_IN
38 AUDIO_GND
39 AUDIO_R_IN
40 XHP_SENS
41 HP_R
42 HP_GND
43 HP_L
44 XCHARGE_LED
45 XPOWER_LED
46 XSIRCS_LED
47 A_4.75V
48 REG_GND
49 REG_GND
50 REG_GND
TO
VC-250(14/16)
CN922
(SEE PAGE
4-38)
4-45 4-46
AV IN/OUT
IO-68
Page 75
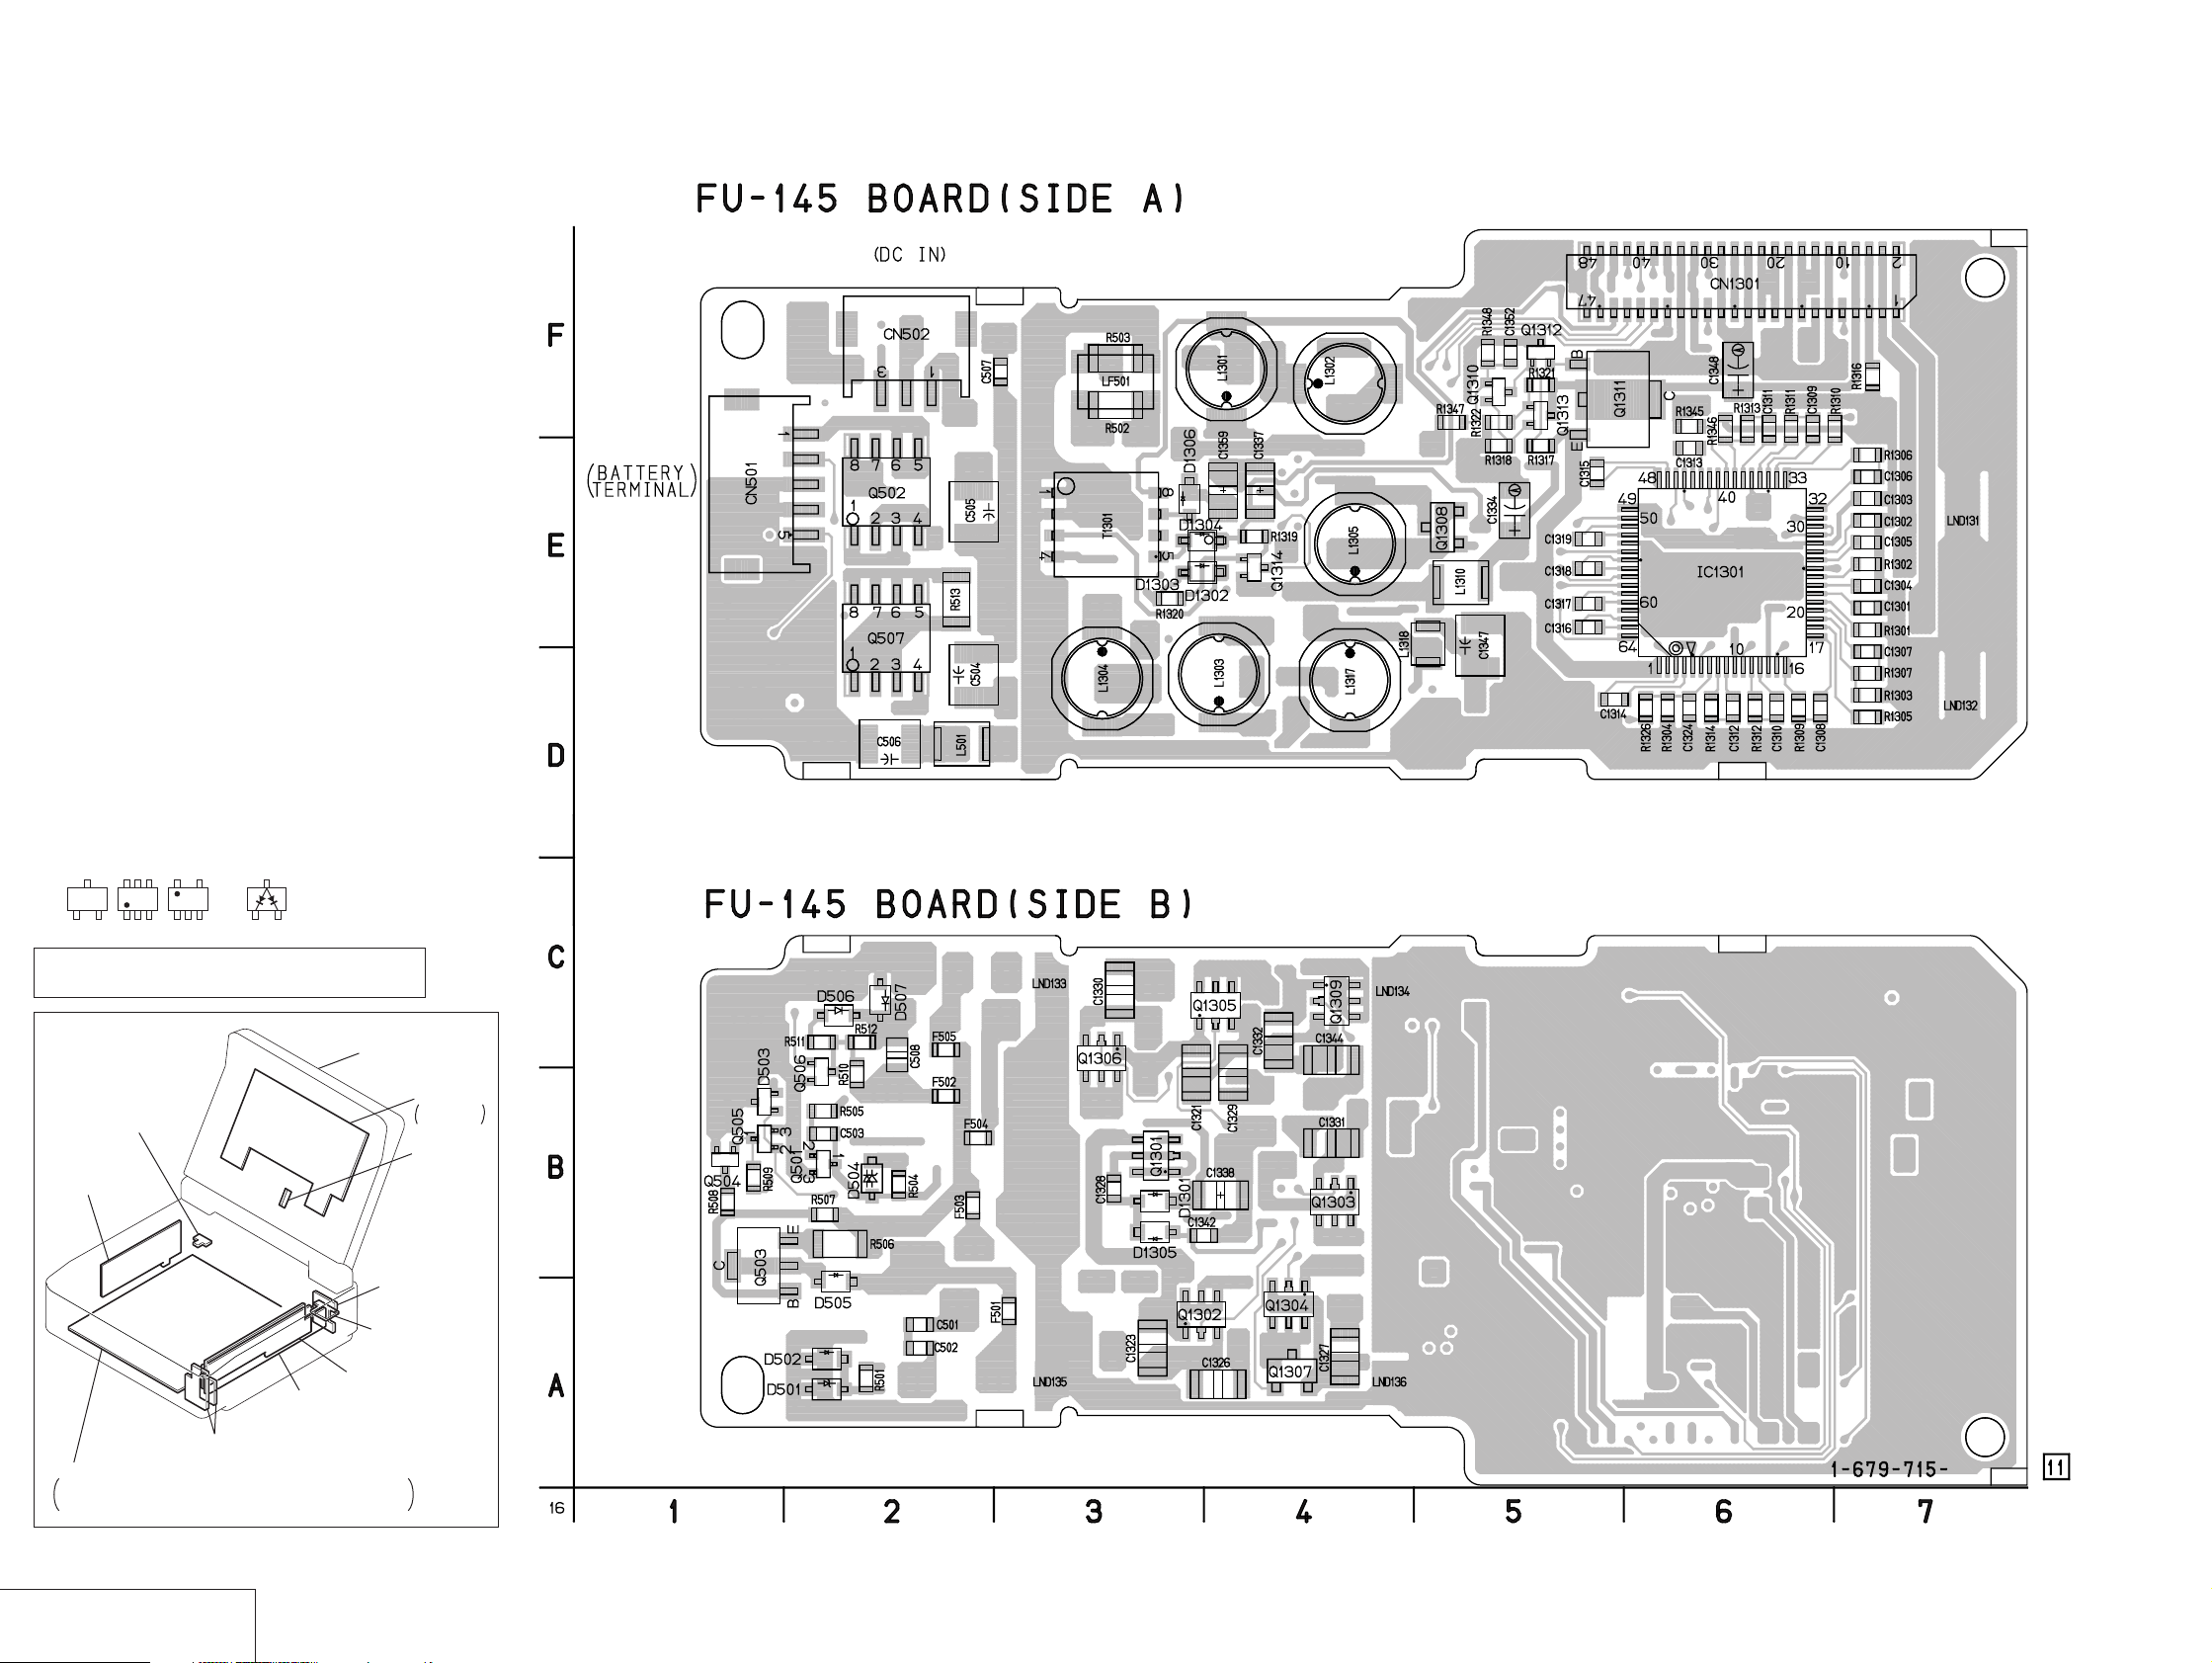
GV-D200/D200E/D800/D800E
)
FU-145 (DC/DC CONVERTER) PRINTED WIRING BOARD
— Ref. No. FU-145 Board; 10,000 Series —
For printed wiring board
• Refer to page 4-72 for parts location.
• FU-145 board consists of multiple layers. Howe ver , only
the sides (layers) A and B are shown.
• Chip parts
Transistor Diode
C
BE
5
64
2
13
12
4
53
3
21
There are few cases that the part printed on this
diagram isn’t mounted in this model.
LCD DISPLAY
MODULE
(D800/D800E ONLY)
FP-602
(DV IN/OUT)
EX-36
(MULTI CONNECTOR)
IR-38
(IR TRANSMITTER)
PD-130
LCD DRIVER,
BACK LIGHT
LS-56
(LCD SWITCH
IO-68
(AV IN/OUT)
FP-246
VC-250
REC/PB AMP, DAC, DV INTERFACE, AD CONVERTER, Y/C PROCESSOR,
LINE A/D, LINE IN/OUT, IR, AUDIO IN/OUT, DRUM/CAPSTAN MOTOR DRIVE,
MECHA CONTROL, HI CONTROL, DC/DC CONVERTER
(REMOTE COMMANDER RECEIVER)
DC/DC CONVERTER
FU-145
FP-575
(LANC)
FU-145
(DC/DC CONVERTER)
4-47 4-48
Page 76
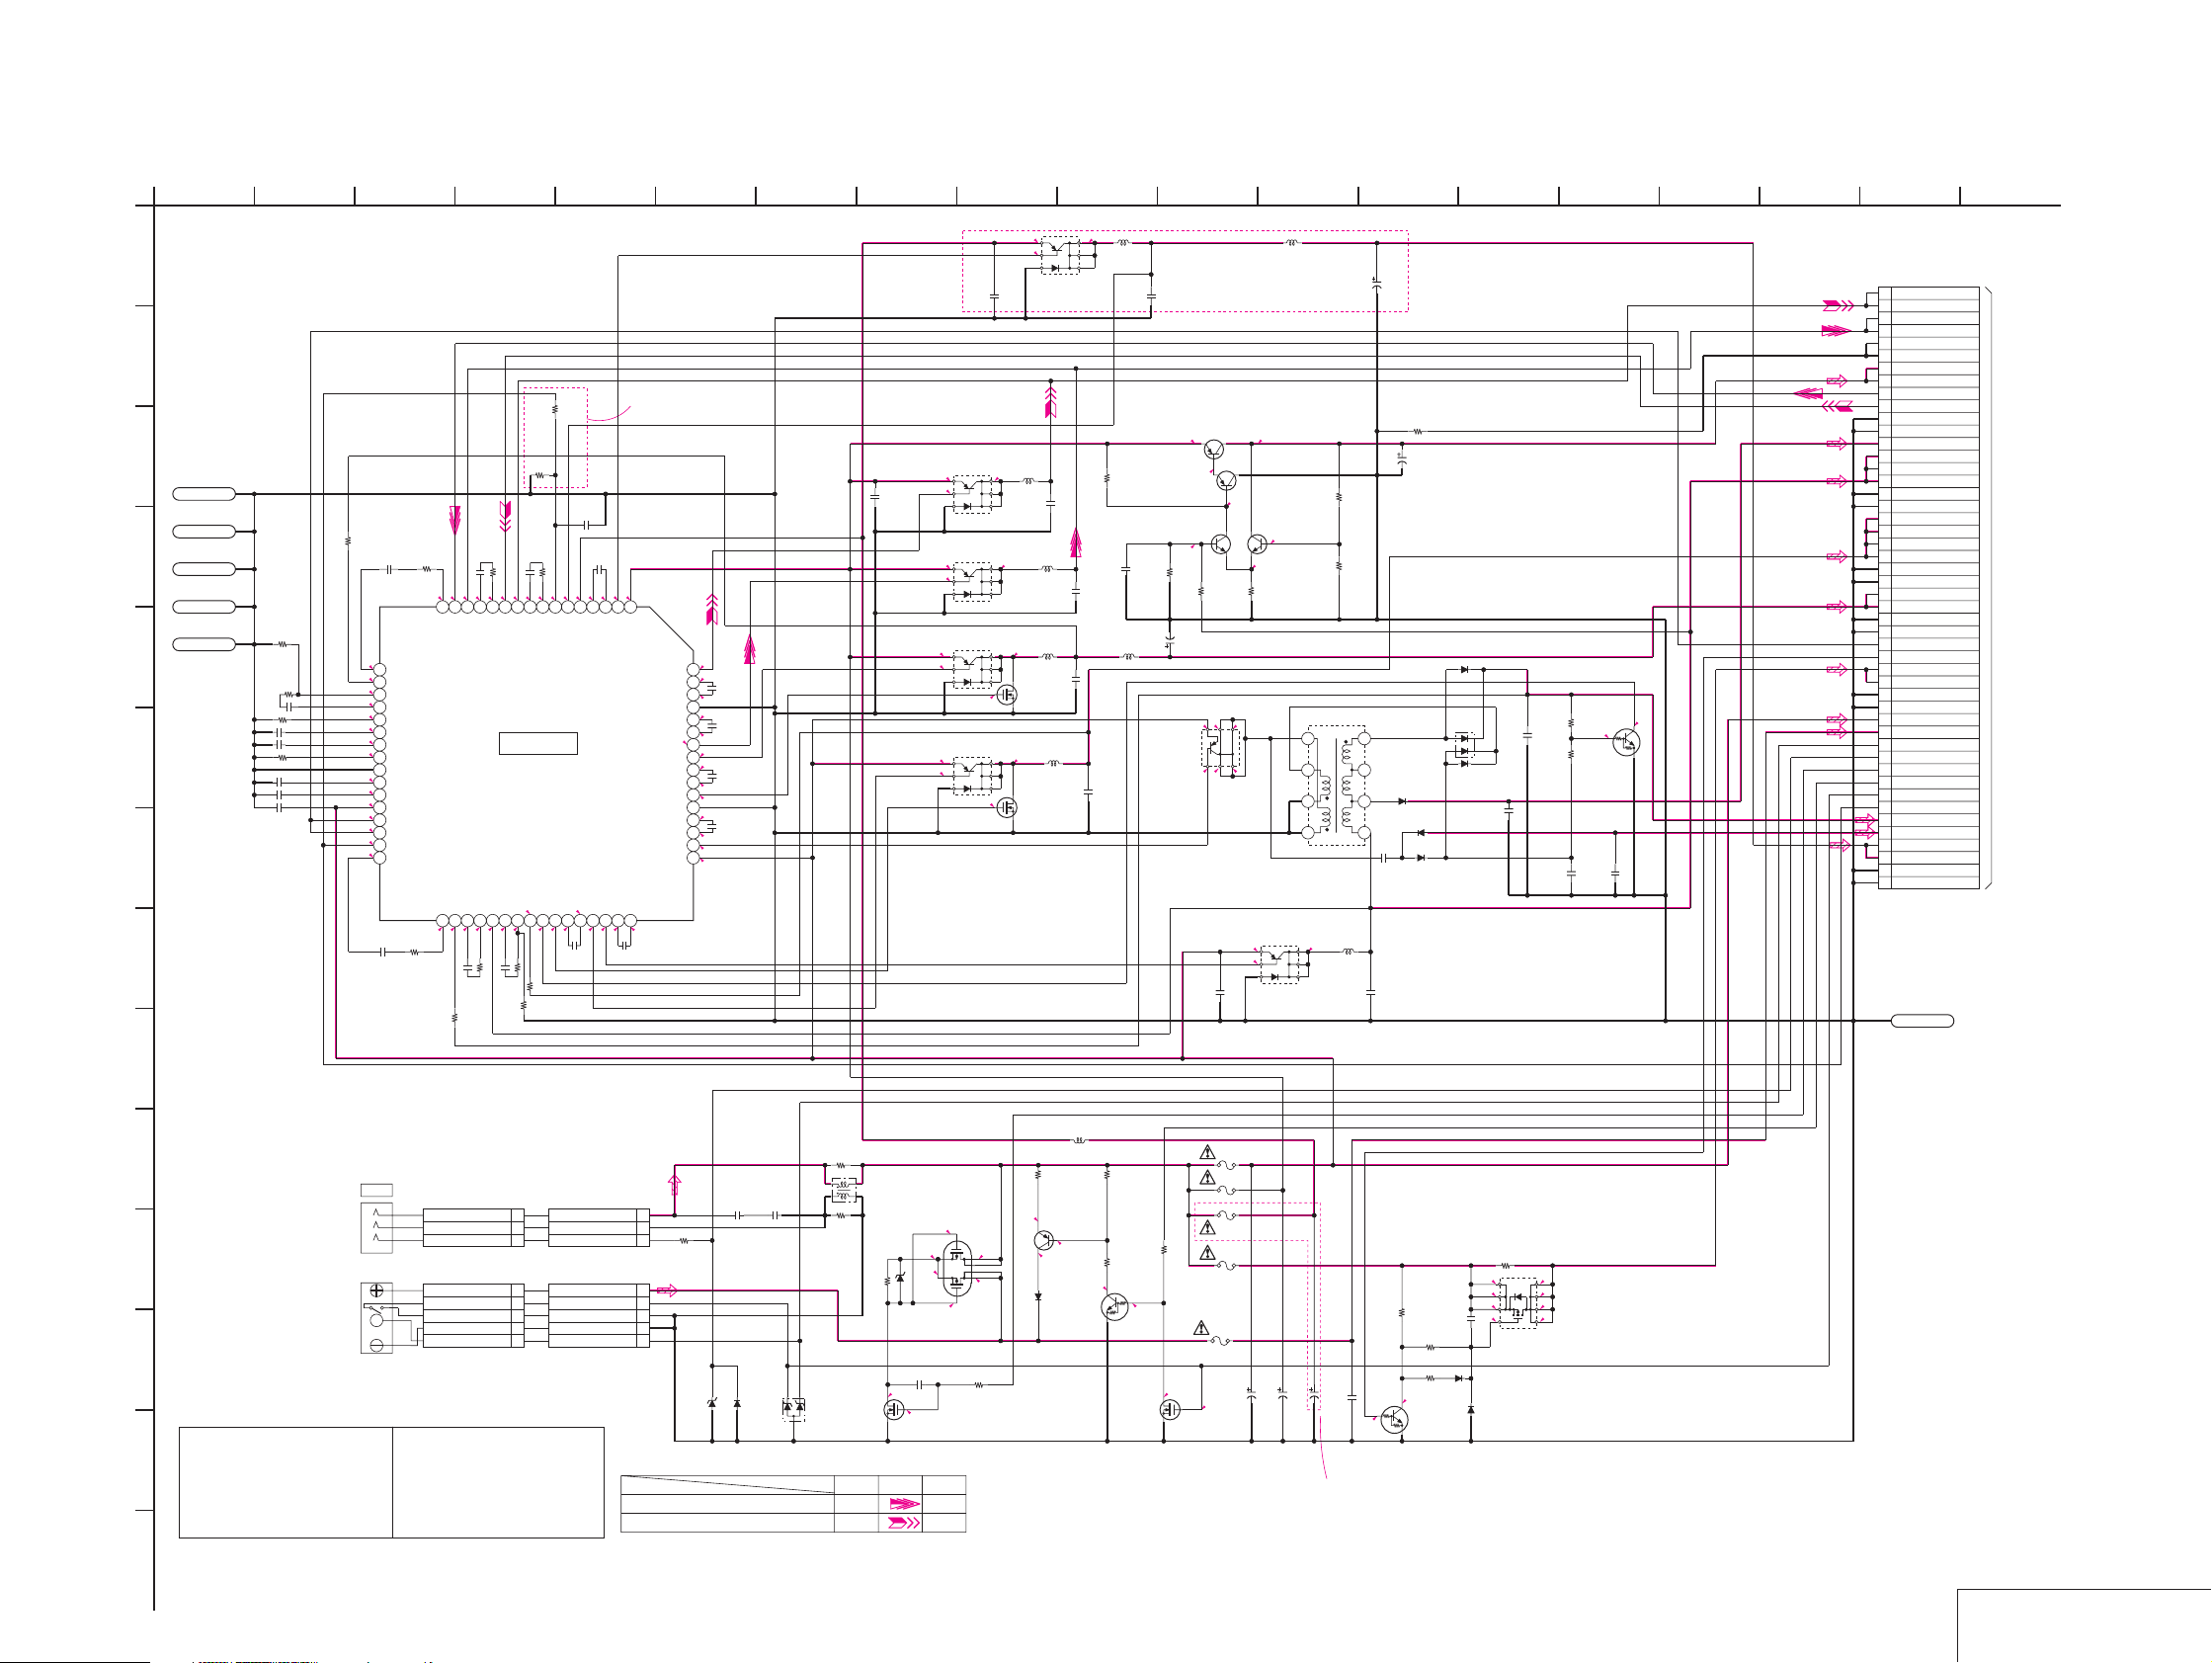
For Schematic Diagram
• Refer to page 4-7 for printed wiring board.
1
2
3 12 167 1915
4 11
8
9 18
10 136
GV-D200/D200E/D800/D800E
14
175
FU-145 BOARD
DC/DC CONVERTER
A
-REF.NO.:10000 SERIESXX MARK:NO MOUNT
NO MARK:REC/PB MODE
B
C
LND131
LND132
LND133
D
LND135
LND136
E
F
G
H
C1305
C1302
C1303
C1301
R1301
R1302
0.047u
4.38.2
R1317
L1317
22uH
C1344
4.7u
10V
B
Q1310-1313
5V REG
Q1311
2SB1581-T1
47k
C1352
0.047u
B
L1310
4.7uH
C1327
4.7u
10V
B
Q1312
2SA1832F-Y/GR(TPL3)
Q1310
2SC4738F-Y/GR(TPL3)
1.5
R1348
10k
± 0.5%
6.3V
10u
TA
A
8.2
C1323
7.7
R1347
22k
± 0.5%
008.0
CPH6102-TL
SWITCHING
4.7u
10V
B
GV-D800/D800E MODEL ONLY
4.98.3
7.1
2SC4738F-Y/GR(TPL3)
1.0
R1318
4700
00
Q1301
Q1302
CPH6702-TL
SWITCHING
7.7
L1318
4.7uH
Q1313
1.5
DC-DC CONVERTER
45
3
2
1
4.78.2
C1347
10u
16V
B
TA
R1316
0
C1348
10u
10V
TA
A
R1321
22k
± 0.5%
R1322
10k
± 0.5%
XXD1304
T1301
D1302
MA796-TX
6
D1306
1SS357-TPH3
7
D1305
1SS357-TPH3
8
C1328
1SS357-TPH3
0.01u
F
L1301
33uH
C1326
4.7u
10V
B
D1301
D1303
XX
C1337
C1359
R1319
47k
4.7u
F
R1320
22k
RN1104F(TPL3)
C1338
EMERGENCY
C1342
4.7u
F
4.7u
F
-0.8
DETECT
0.1u
1.4
Q1314
F
CN1301
1 CAP_VS
2 CAP_VS
3 DRUM_VS
4 DRUM_VS
5 MT_GND
6 MT_GND
7 MT_5V
8 MT_5V
9 DRUM_ERROR
10 CAP_ERROR
11 REG_GND
12 REG_GND
13 RP_UNREG
14 4.75V
15 4.75V
16 4.75V
17 REG_GND
18 REG_GND
19 2.8V
20 2.8V
21 2.8V
22 2.8V
23 REG_GND
24 REG_GND
25 1.5V
26 1.5V
27 REG_GND
28 REG_GND
29 VTR_DD_ON
30 SHOE_ON
31 EX_UNREG
32 EX_UNREG
33 REG_GND
34 REG_GND
35 VTR_UNREG
36 BATT_UNREG
37 BATT_SIG
38 BATT/XEXT_SW
39 FAST_CHARGE
40 INIT_CHARGE
41 DC_PACK_SW
42 BL_CONT
43 PANEL_13V
44 PANEL_-15V
45 BL_REG
46 BL_REG
47 REG_GND
48 REG_GND
A_BISU_ANA
48P
TO
VC-250 BOARD(15/16)
CN921
(SEE PAGE 4-39)
LND134
7.8
C1332
4.7u
10V
B
GV-D800,GV-D800E
10k
C1324
XX
B
C1314
470p
B
8.2
8.2
6.6
BOOT_CAP_H-7
OUTPUT_VCC-7
OUTPUT_MONITOR-7
6.8
OUTPUT-1
BOOT_CAP_L-1
BOOT_CAP_H-1
7.9
7.7
B
MODEL ONLY
7.8
8.2
12345678
-4,5,6
OUTPUT-7
OUTPUT_VCC
BOOT_CAP_L-7
BOOT_CAP_L-6
BOOT_CAP_H-6
OUTPUT_GND-4,5,6,7
BOOT_CAP_H-5
BOOT_CAP_L-5
BOOT_CAP_L-4GND
BOOT_CAP_H-4SOFT_START
MOS_GATE-4VREF
OUTPUT_GND-1,2,3
BOOT_CAP_H-3
BOOT_CAP_L-3
BOOT_CAP_H-2
BOOT_CAP_L-2
OUTPUT-2
8.1
C1315
6.5
0.001u
OUTPUT-6
OUTPUT-5
OUTPUT-4MOS_DUTY
OUTPUT-3
OUTPUT_
VCC-1,2,3
B
Q1305
CPH6702-TL
SWITCHING
8.1
C1321
4.7u
10V
B
Q1306
CPH6702-TL
SWITCHING
8.2
8.0
Q1303
CPH6702-TL
8.1
C1316
7.1
0.001u
63 64
B
8.6
8.5
C1317
0.001u
B
6.9
8.0
8.1
7.1
C1318
0.001u
B
8.6
2.9
8.5
C1319
0.001u
B
7.0
8.0
49 50 51 52 53 54 55 56 57 58 59 60 61 62
8.2
SWITCHING
8.1
2.9
Q1304
CPH6702-TL
SWITCHING
7.9
2.2
Q1307
SI2304DS-T1
R1326
R1304
33k
B
R1305
0
C1308
2200p
R1309
B
10k
R1303
XX
± 0.5%
0.9
FEED_BACK-5
1718
R1307
0
C1307
3300p
B
22k
220p
B
0.1uBC1304
33k
B
0.1u
B
0.1u
B
1.5
1.5
0.8
0.8
1.2
1.5
2.0
1.5
8.2
2.9
2.9
1.4
0.8
0
C1306
0.01u
OUTPUT_MONITOR-4
INV_INPUT-4
1920212223242526272829303132
FEED_BACK-4
RT
CT
SCP
VCC
STANDBY-3
STANDBY
STANDBY-7
FEED_BACK-3
R1306
22k
B
B
C1310
R1312
4700p
1.1
3.4
0.8
1.1
R1310
0.5
INV_INPUT-5
FEED_BACK-6
NONINV_INPUT-5
OUTPUT_MONITOR-5
OUTPUT_MONITOR-3
FEED_BACK-2
INV_INPUT-2
INV_INPUT-3
33 34 35 36 37 38 39 40
1.5
1.1
1.5
4.7
13.4
B
33k
R1311
C1309
470p
0
C1312
4700
2200p
0.5
1.5
1.0
910111213141516
INV_INPUT-6
FEED_BACK-7
NONINV_INPUT-6
OUTPUT_MONITOR-6
IC1301
DC/DC CONVERTER
IC1301
CXA3057R-T6
2.8
OUTPUT_MONITOR-1
OUTPUT_MONITOR-2
INV_INPUT-1
FEED_BACK-1
0.9
1.5
B
22k
R1313
C1311
1500p
R1346
XX
22k
R1314
1.1
1.1
4.3
INV_INPUT-7
NONINV_INPUT-7
COMP
MOS_GATE-1
41 42 43 44 45 46 47 48
1.4
2.2
8.3
C1313
0.001u
0R1345
Q1309
CPH6702-TL
SWITCHING
L1303
22uH
1.48.2
C1329
4.7u
10V
B
L1304
22uH
3.3
C1330
4.7u
10V
B
L1305
22uH
1.58.2
C1331
4.7u
10V
B
Q1308
SI2304DS-T1
L1302
22uH
2.98.2
I
J
K
L
Note :
The components identified by
M
mark 0 or dotted line with mark
0 are critical for safety.
Replace only with part number
specified.
N
16
J902
DC IN
BATTERY TERMINAL
CN902
J901
CN901
S
Note :
Les composants identifiés par
une marque 0 sont critiques
pour la sécurité.
Ne les remplacer que par une
pièce portant le numéro spécifié.
2
Q505
SSM3K03FE(TPL3)
CHARGE SW
F503
1.4A
32V
F504
1.4A
32V
F505
1.4A
32V
F502
1.4A
32V
R510
C507
XX
F
1608
GV-D800/D800E
MODEL ONLY
2
0
10k
1
3
Q506
RN1104F(TPL3)
SWITCH
R512
1M
R511
1k
8.2
F501
1.4A
32V
C506
C504
C505
22u
16V
2.7
TA B
22u
22u
16V
16V
B
TA
TA B
R513
XX
1/8W
MMSF5P02HDR2
SWITCHING
D506
D507
0
0
0
0
Q507
8.3
8.3
8.3
C508
8.0
1u
B
1
2
1SS352-TPH3
2
1SS352-TPH3
1
8.3
R506
10
1/8W
2SB1122-ST-TD
3
CHARGE SW
1
-0.5
1
1SS357-TPH3
2
RN1104F(TPL3)
CHARGE SW
L501
4.7uH
R507
1k
Q503
2
8.3
D505
Q504
R509
R508
6800
47k
8.2
1
2
0
3
1
3
R502
0
LF501
3
1
D503
01ZA8.2(TPL3)
XX
Q502
SI4963DY-T1
R503
0
R504
470k
1
3
SWITCH
7.8
2
8.0
2
8.0
1
D504
MA8120-TX
C503
0.022u
7.8 0
2
0
1
3
7.8
B
Q501
SSM3K03FE(TPL3)
SWITCH
8.3
8
7
5
6
0
4
R505
1M
C502
C501
0.1u
R501
1k
2
D501
1
UDZS-TE17-8.2B
0.1u
B
B
2
2
D502
1
MA728-(K8).S0
1ACV_UNREG
2ACV_GND
3BATT/XEXT
CN501
1BATT(+)
2BATT_SW(+)
3BATT_SW(-)
4BATT(-)
5BATT_SIG
5P
1ACV_UNREG
2ACV_GND
3BATT/XEXT
1BATT(+)
2BATT_SW(+)
3BATT_SW(-)
4BATT(-)
5BATT_SIG
3P
CN502
SIGNAL PATH
REC/PB PB
REC
Drum servo (speed and phase)
Capstan servo (speed and phase)
DC/DC CONVERTER
4-49 4-50
FU-145
Page 77
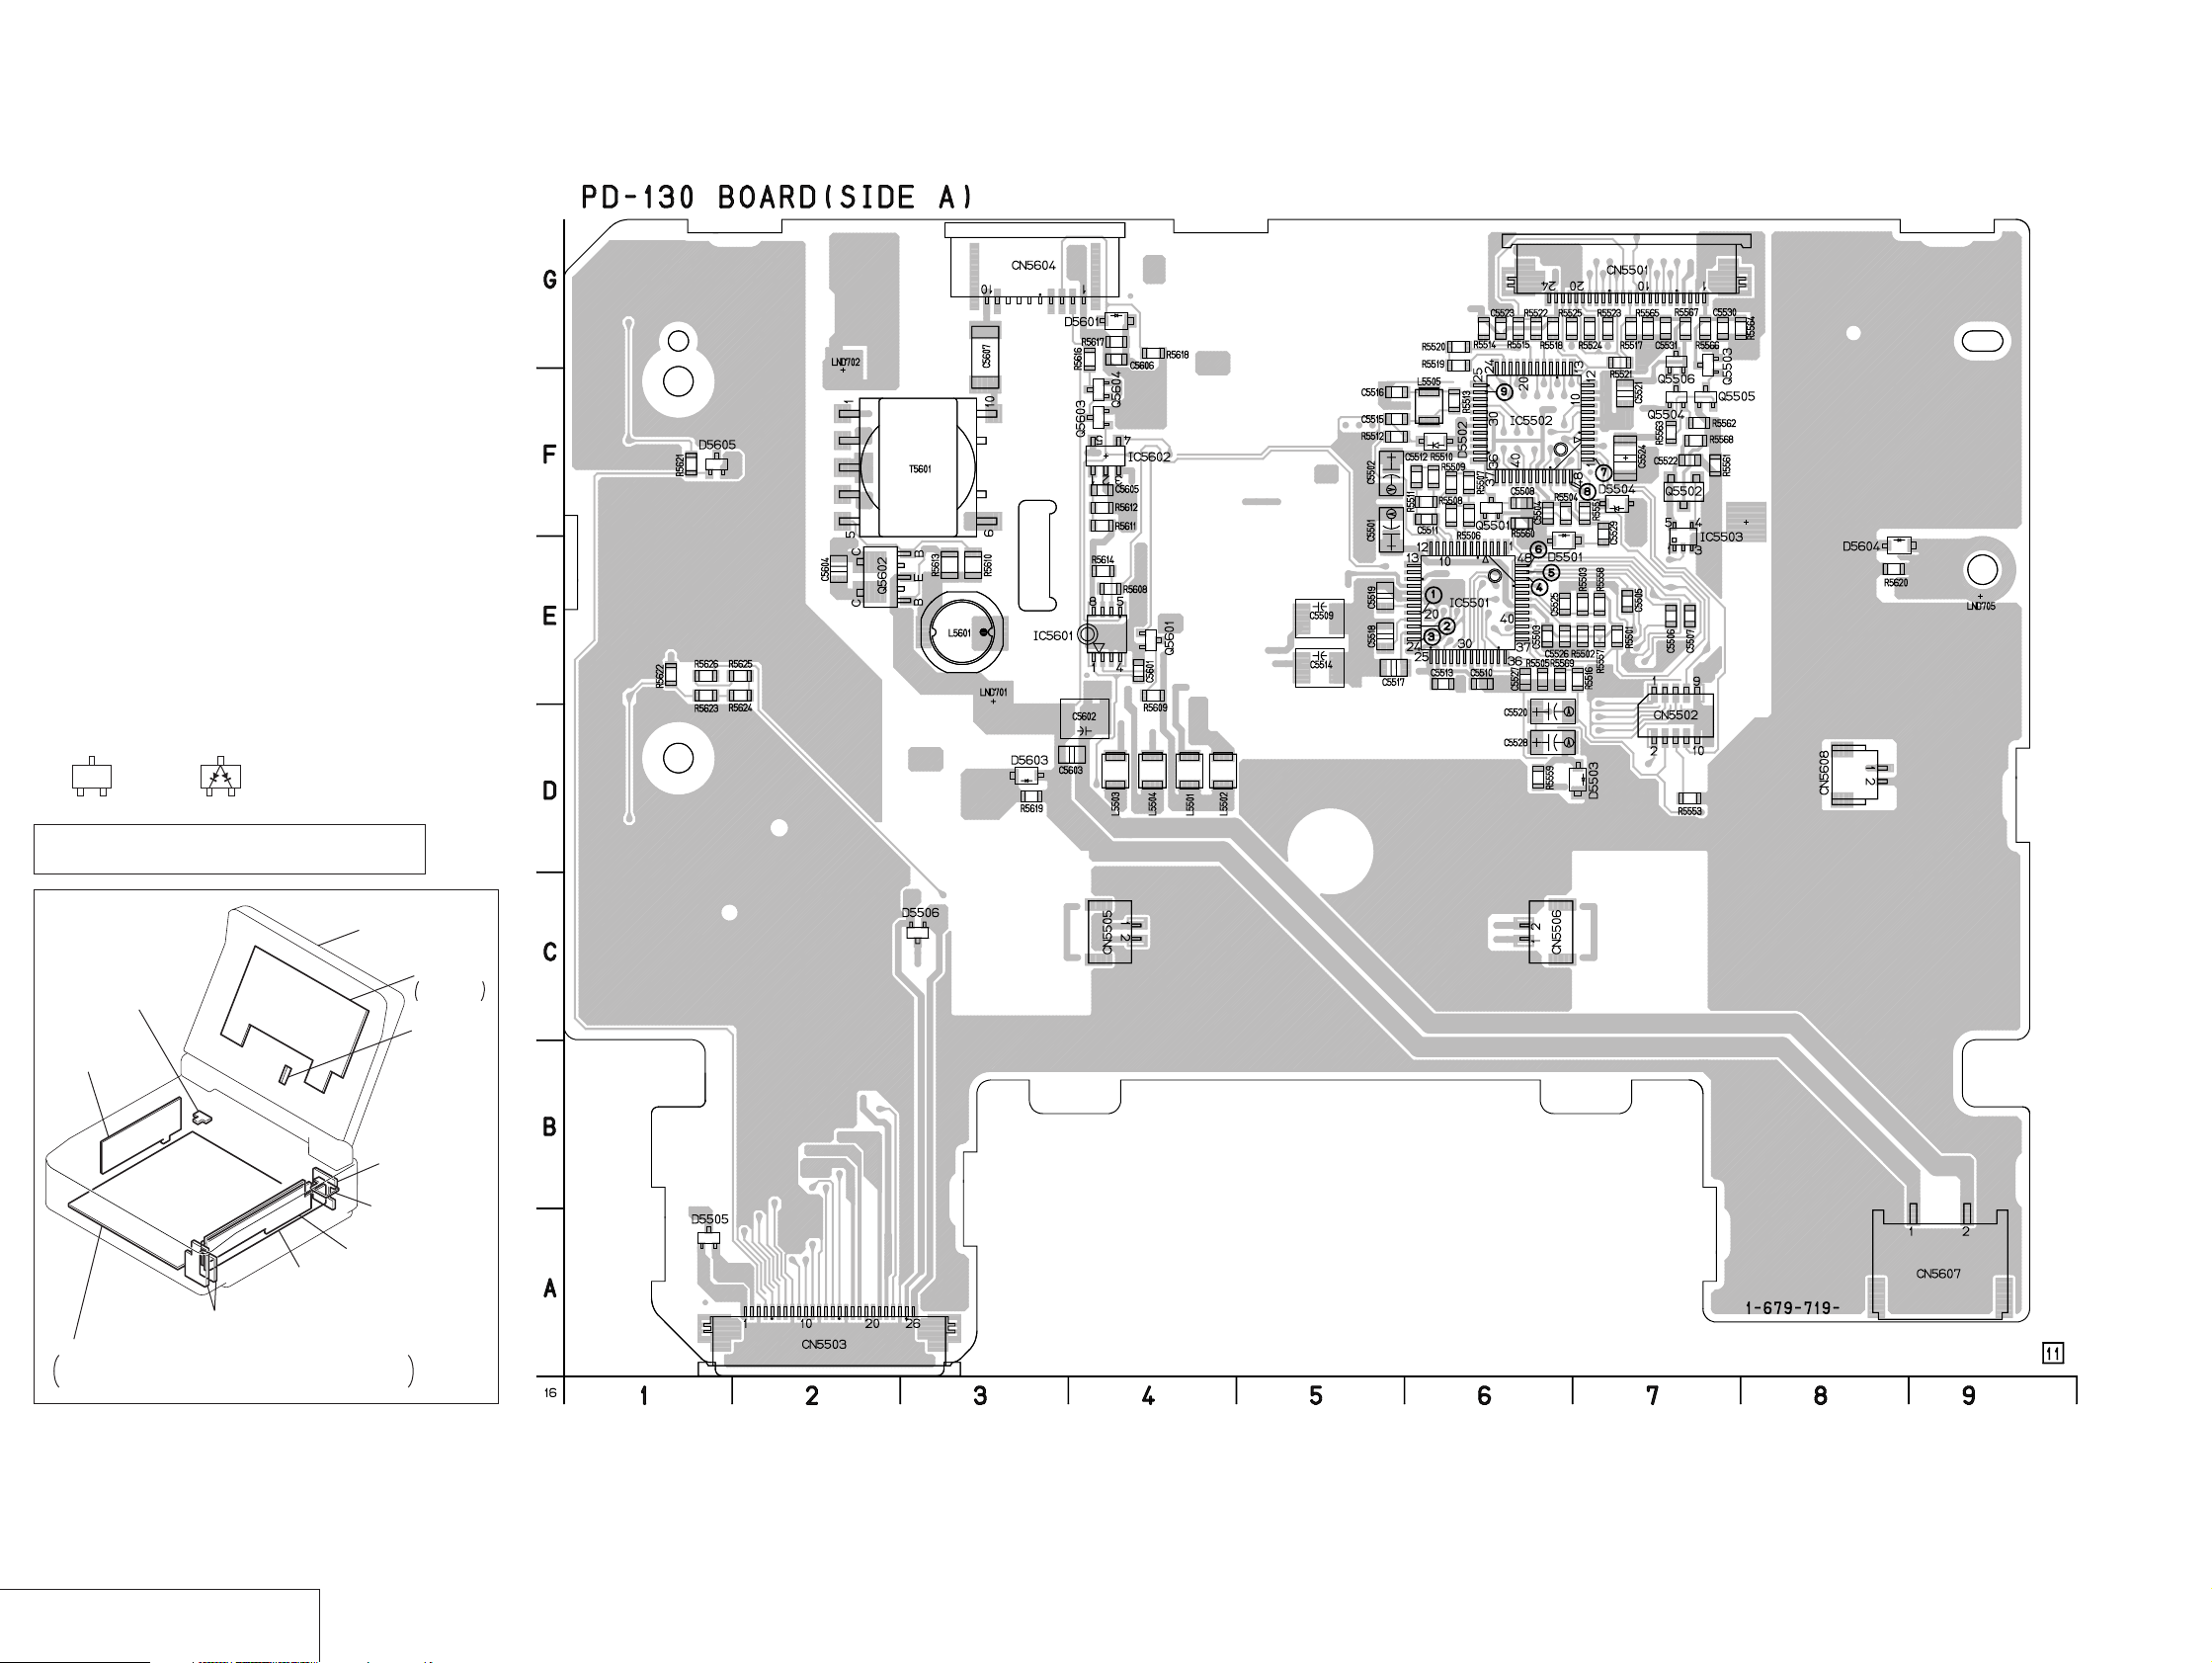
GV-D200/D200E/D800/D800E
)
For printed wiring board
• Refer to page 4-73 for parts location.
• PD-130 board consists of multiple layers. Howe ver , only
the sides (layers) A and B are shown.
• Chip parts
PD-130 (LCD DRIVER, BACK-LIGHT) PRINTED WIRING BOARD
— Ref. No. PD-130 Board; 10,000 Series —
Transistor Diode
C
BE
3
21
There are few cases that the part printed on this
diagram isn’t mounted in this model.
LCD DISPLAY
MODULE
(D800/D800E ONLY)
FP-602
(DV IN/OUT)
EX-36
(MULTI CONNECTOR)
IR-38
(IR TRANSMITTER)
FP-575
(LANC)
FU-145
IO-68
(AV IN/OUT)
FP-246
VC-250
REC/PB AMP, DAC, DV INTERFACE, AD CONVERTER, Y/C PROCESSOR,
LINE A/D, LINE IN/OUT, IR, AUDIO IN/OUT, DRUM/CAPSTAN MOTOR DRIVE,
MECHA CONTROL, HI CONTROL, DC/DC CONVERTER
(REMOTE COMMANDER RECEIVER)
(DC/DC CONVERTER)
PD-130
LCD DRIVER,
BACK LIGHT
LS-56
(LCD SWITCH
LCD DRIVER, BACK-LIGHT
PD-130
4-51 4-52
Page 78
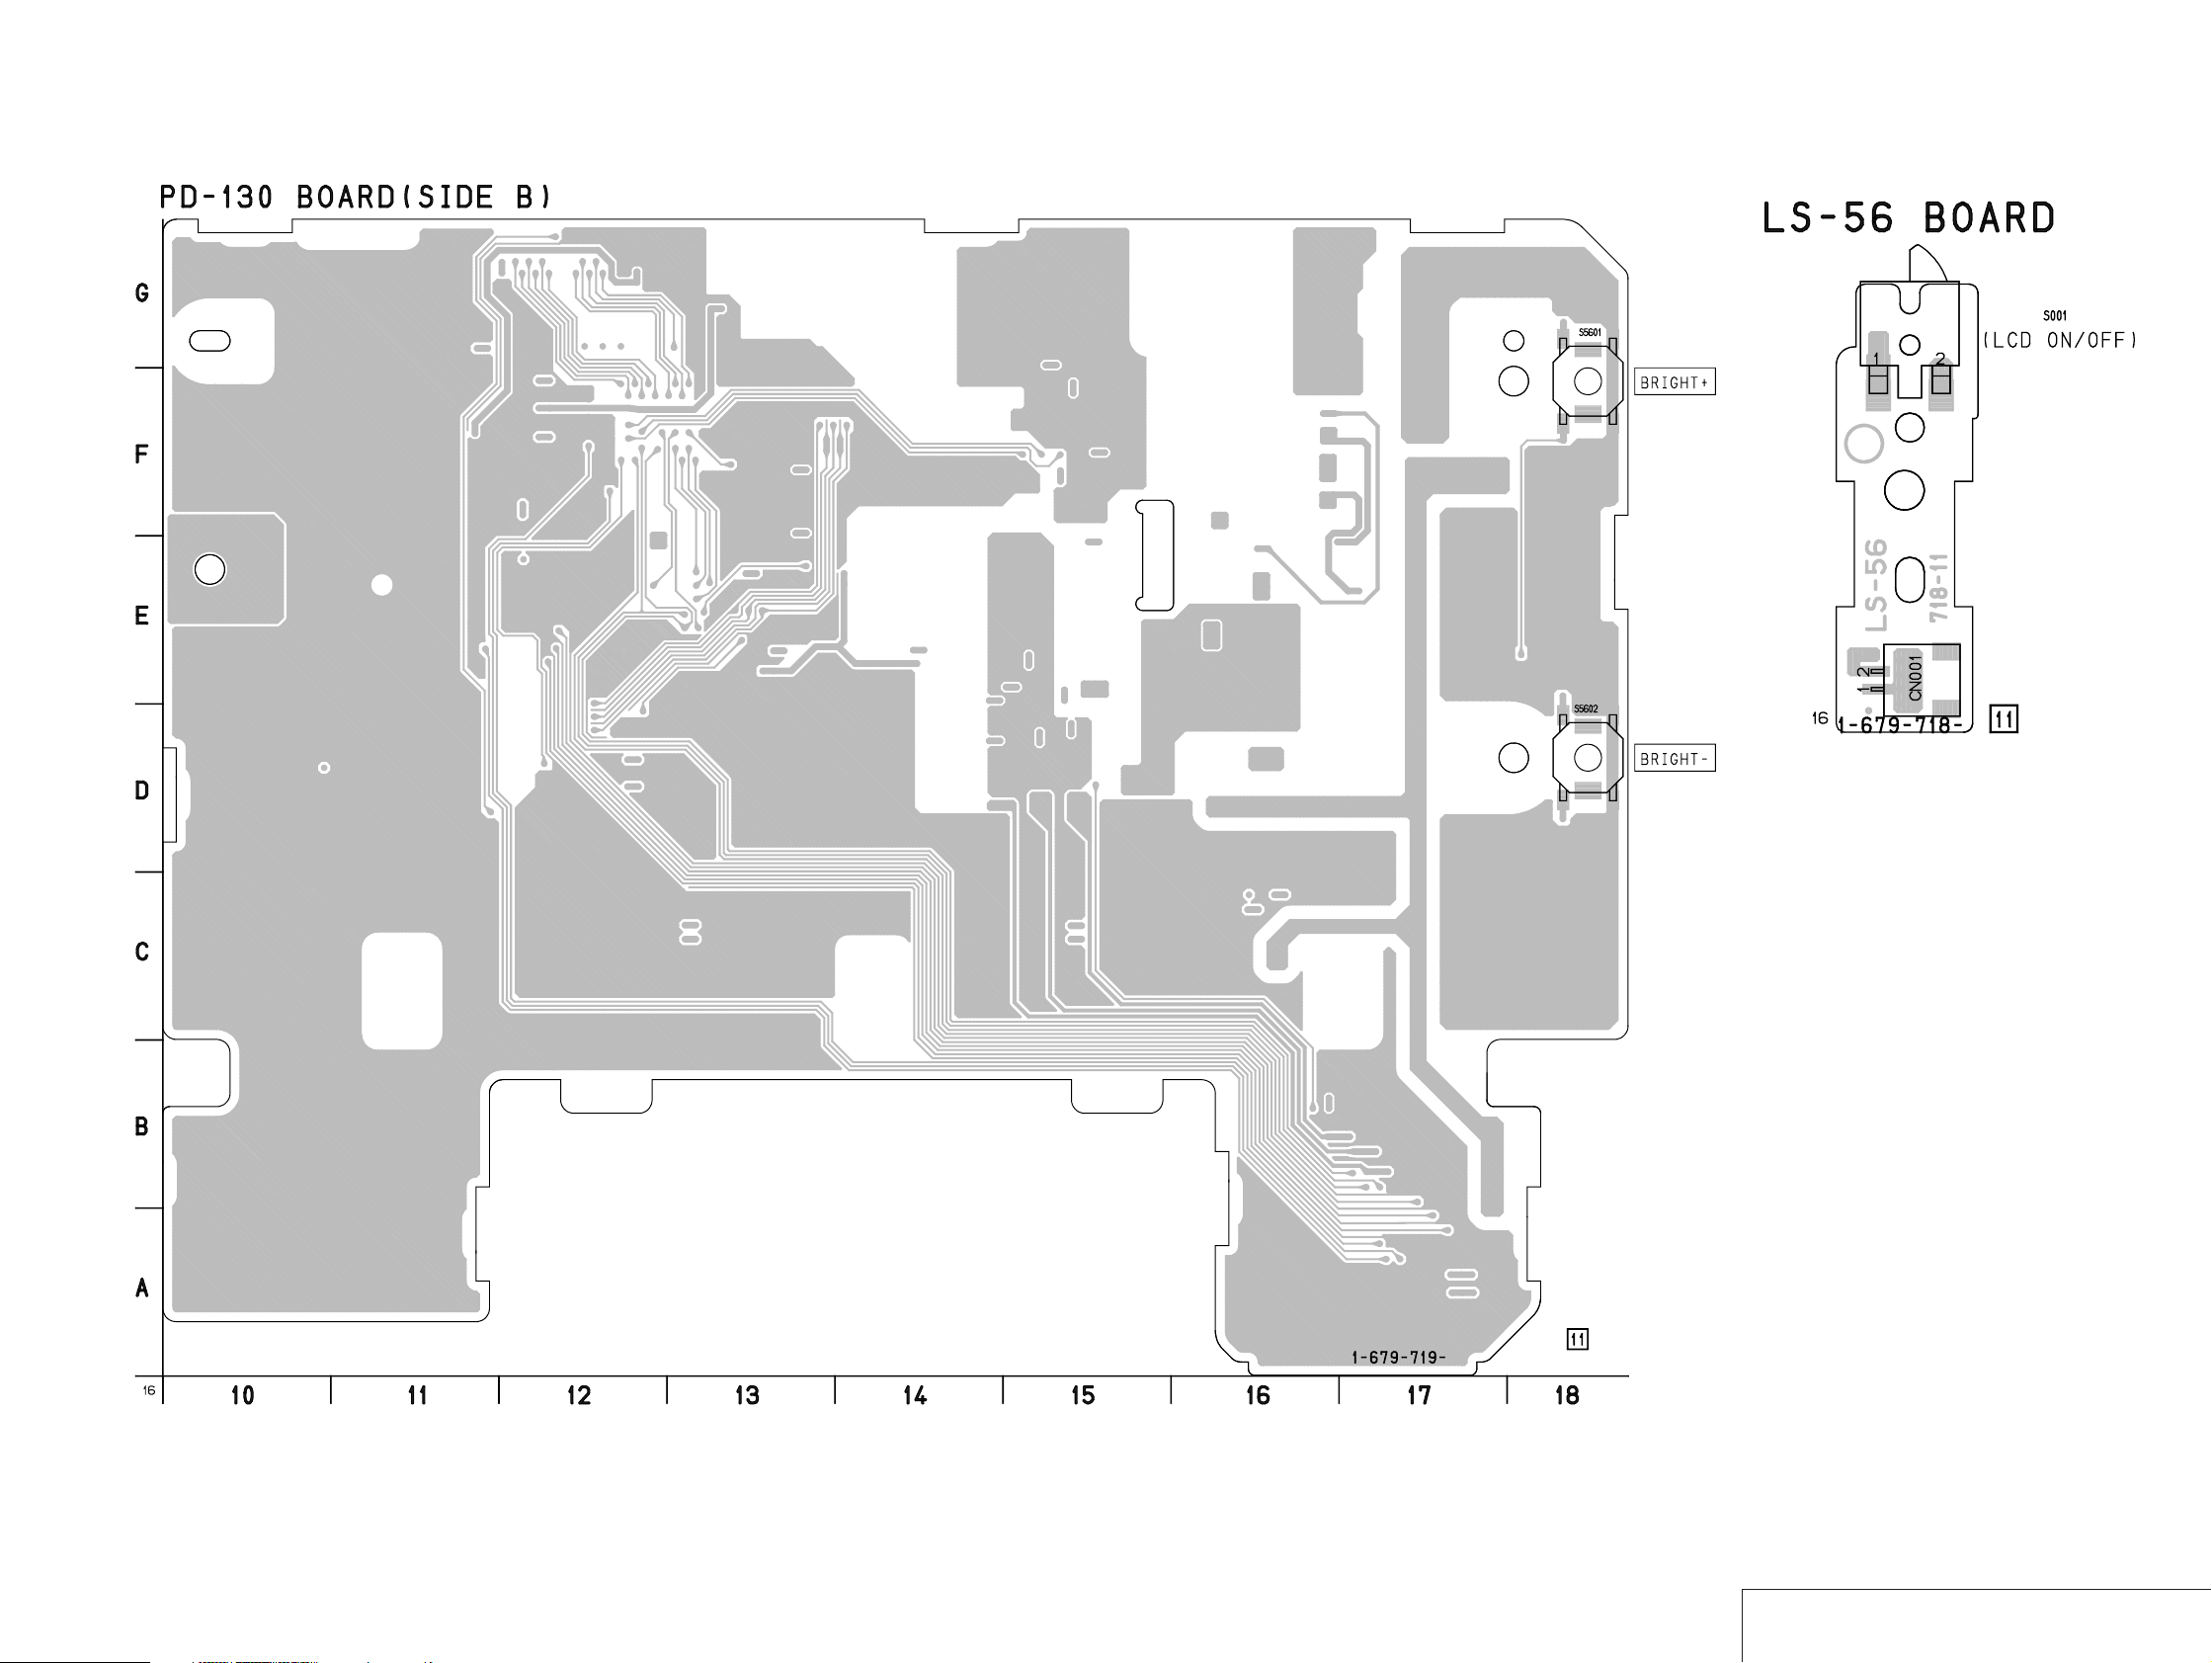
GV-D200/D200E/D800/D800E
LS-56 (LCD SWITCH) PRINTED WIRING BOARD
— Ref. No. LS-56 Board; 20,000 Series —
4-53 4-54
LCD DRIVER, BACK-LIGHT
PD-130
LCD SWITCH
/
LS-56
Page 79
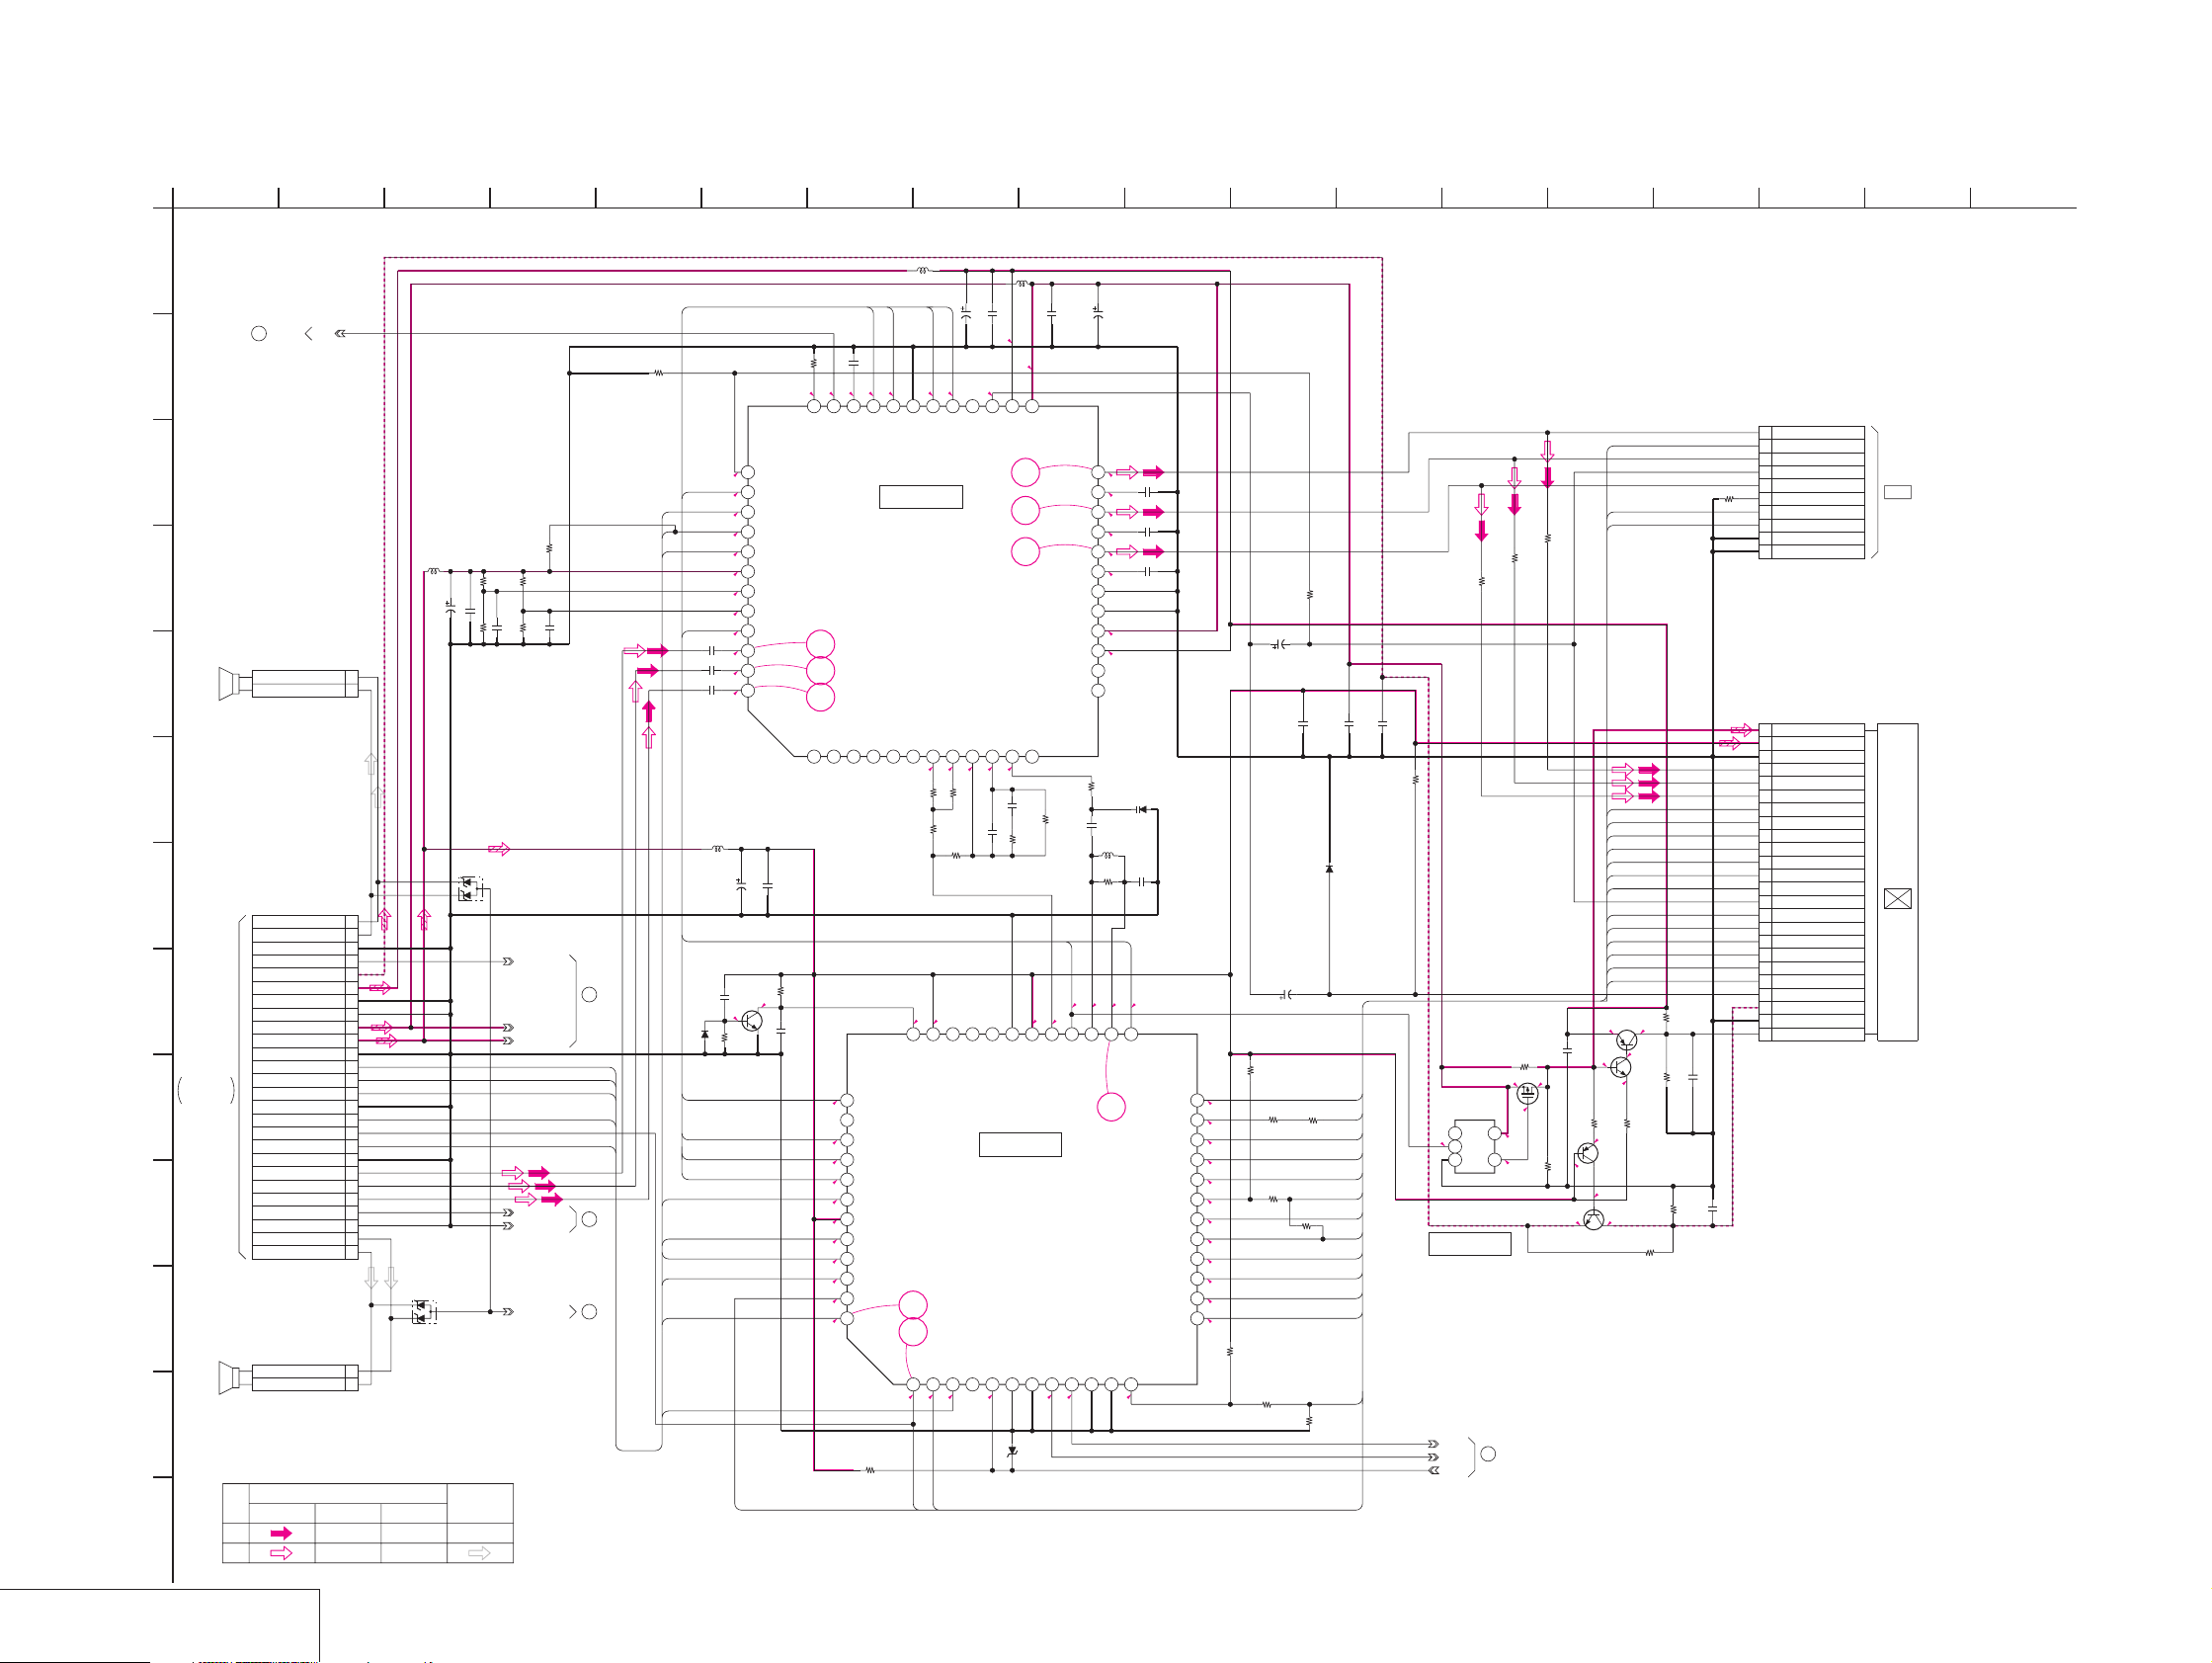
GV-D200/D200E/D800/D800E
For Schematic Diagram
• Refer to page 4-51 for printed wiring board.
• Refer to page 4-69 for waveforms.
1
PD-130 BOARD(1/2)
LCD DRIVER
A
-REF.NO.:10,000 SERIES
XX MARK:NO MOUNT
NO MARK:REC/PB MODE
DAC
1
TO(2/2)
B
C
D
2P
E
F
G
H
I
J
K
L
M
SP902
SPEAKER
TO
VC-250 BOARD
(16/16)
CN923
THROGH THE
FP-569
FLEXIBLE
BOARD
(SEE PAGE
4-41)
SP901
SPEAKER
16
CN5505
26P
CN5503
PANEL_-15.3V
PANEL_13.3V
PANEL_4.75V
2PCN5506
SIGNAL PATH
CHROMA Y/CHROMA
REC
PB
SP_R_+
SP_R_REG_GND
BL_CONT
REG_GND
REG_GND
PANEL_2.8V
REG_GND
XVC_SCK
XCS_LCD_DA
REG_GND
PANEL_XVD
C-SYNC/XHD
PANEL_HOLD
REG_GND
PANEL_B
PANEL_G
PANEL_R
AD_6
REG_GND
SP_L_+
SP_L_-
VIDEO SIGNAL
1SP_R(+)
2SP_R(-)
26
25
24
23
22
21
20
19
18
17
16
15
14
13VC_SO
12
11
10
9
8
7
6
5
4
3
2
1
1SP_L(+)
2SP_L(-)
Y
38
5 13
6
924 7
10
(GV-D800/800E MODEL ONLY)
L5504
13.4
C5510
4.7
0.1u
B
6.7
25
27
Vcc226Vcc3
COM_OUT
3
2
1
1.1
2.7
C5512
0.1u
B
1608
R5510
68k
1608
31
32
GND
-IN/TESTO
IC5502
TIMING GENERATOR
IC5502
LZ9FF444
2.8
D5504
XX
PS/VDD
10uH
2.8
B_DC_DET
G_DC_DET
R_DC_DET
R5511
1M
1608
29PD30
0
C5513
1.4
C5514
0.1u
22u
B
10V
TA
B
24
VB
2.3
23
1.6
22
VG
2.3
21
1.7
20
VR
2.3
19
1.6
18
GND2
17
GND1
16
VSH
4.7
15
Vcc4
13.4
14
N.C
13
N.C
R5512
100k
1608
C5515
1000p
SL
L5505
6.8uH
R5513
1M
1608
2.8
1.4
1.4
XC.SAVE
26
27
28
OSCI
OSCO
XC.SAVE
9
2.8
D5502
1T369-01-T8A
C5516
68p
2.8
XP.SAVE
25
DR.P.SAVE
GSRT/MODE2
GPCK/MODE1
2.4
HCNT/SPD
MCLK/CLD
CLR/CTR
OE/PSS2
SRT/PSS1
VDD/RES
RESET/EX2
STBYB/PSG
GRES/EX1
CP/SPS
C5517
C5519
0.1u
2012
C5518
0.1u
2012
2012
B
B
0.1u
B
24
0.1
23
1.2
22
1.4
21
2.8
20
2.3
19
1.4
18
0
17
2.8
16
2.8
15
2.8
14
2.8
13
2.8
D5505
10uH
L5503
FRP
BLK
BGP
C5527
R5505
15k
C5529
0.1u
B
1608
R5560
470k
1608
Q5501
DC LEVEL
XVD_OUT
37
38
39
40
41
42
43
44
45
46
47
48
EXT_DA2
XC.SAVE
XSCK
SI
XCS
Vcc1
TRAP_ADJ
LPF_ADJ
XP.SAVE
B_IN
G_IN
R_IN
2.8
C5504
1608
1608
0.1u
B
R5504
100k
1608
C5508
0.1u
B
1608
R5569
180k
1608
1.5
XC.SAVE
2.8
XVC_SCK
2.5
L5501
R5501
R5557
470k
R5558
XX
0
C5525
XX
C5526
XX
R5502
R5503
XX
100k
±0.5%
BL_CONT
10uH
2520
C5501
22u
6.3V
TA
C5503
A
0.1u
B
D5506
XX
XTG_SO
XCS_PANEL
XP.SAVE
0.01u
C5505
0.01u
C5506
0.01u
C5507
L5502
C5502
2.7
3.0
2.8
2.8
1.1
2.8
B
1.8
B
1.8
B
1.8
10uH
2520
XX
3
PANEL_4.75V
PANEL_2.8V
KEY_AD6
REG_GND
XX
AUDIO
SIGNAL
CH_GND
TO(2/2)
XVC_SCK
XCS_PANEL
XVC_SO
PANEL_HOLD
4
TO(2/2)
5
TO(2/2)
XVD
BGP
BLK
FRP
COM_FRP
XVC_SCK
XCS_PANEL
XTG_SO
XVC_SO
XVD
PANEL_HOLD
0
D5501
XX
2SD2216J-QR(K8).SO
B0.01u
0.7
1.4
1.1
2.7
0.2
32
33
34
35
36
N.C
BGP
EXT_DA1
R_INJECT
RGB LCD DRIVER
4
5
6
N.C2N.C3N.C4N.C5N.C6N.C7BIAS8OP_IN+9OP_IN-10OP_OUT11VCO12N.C
1
BGP
37
2.7
SWCOM
38
SW
39
0.2
FRP
40
1.4
COM_FRP
41
1.4
XSCK
42
2.5
VDD/TESTI
43
2.8
XCS
44
3.0
SO
45
2.7
SI
46
2.4
VSYB
47
2.8
XVD
48
2.8
R5551
47k
COM_FRP
C5509
3.3u
25V
TA
B
1.4
1.4
28
29
30
31
N.C
FRP
GND3
BLACK_IN
COM_FRP
IC5501
IC5501
RB5P003AM1
1.4
1.4
R5506
1608
2700
R5507
1608
47k
36
1.4
R5508
68k
1608
R5509
C5511
22k
560p
1608
CH
1608
2.8
2.8
33
34
35
SYF
POCB
OUT/TESTO
+IN/TESTO
8
7
HDI2HDB3W/H4BL-ON5BL-DET6GND/TESTI7TESTI/GND8LED9PWM10TESTI11TESTI12CPMODE/CLS
1
0
2.6
2.7
XHD_OUT
SYNC
11 1514
R5516
10k
1608
C5520
6.8u
16V
TA
A
C5523
C5522
0.1u
0.1u
B
1608
D5503
MA111-(K8).S0
C5528
1u
25V
TA
A
R5514
XX
R5519
R5520
0
0
R5515
0
R5522
XX
R5518
XX
R5521
0
1608
R5517
12
R5525
100
R5524
100
R5523
100
C5521
1u
B
B
1608
R5559
XX
Q5503
2SB1462J-QR(K8).SO
R5568
XX
Q5502
4.7
TG24
TG23
TG22
TG21
TG20
TG19
TG18
TG17
TG16
TG15
TG14
TG13
TG12
XX
MGSF1PO2LT1
IC5503
TC7SET04FU(TE85R)
123
2.8
IC5503
AMP
PWM
LED
DETIN
45
2
TO(2/2)
0
4.7
0
R5561
C5524
XX
1u
B
3216
4.7
-15.7
13.4
4.7
R5562
10K
1608
3.4
2.8
-15.1
Q5506
2SD2216J-QR(K8).SO
XVD_OUT
SYNC
XHD_OUT
TG24
TG23
TG22
TG21
TG20
TG19
TG12
TG18
TG17
TG16
TG15
TG14
TG13
12.9
4.1
R5563
47K
1608
Q5504
2SB1462J-QR(K8).SO
-15.7
R5567
13.4
Q5505
2SD2216J-QR(K8).SO
R5564
1M
R5565
1M
1608
xx
R5566
1716 18
10P
CN5502
1VB
2 XVD_OUT
3VG
4 PANEL_COM
5VR
8200R5553
6 SHARP/CASIO
7 C-SYNC/XHD
8 XHD_OUT
9 GND
10 GND
CN5501
24
VSH
23
VDD
22
VSS
21
VB
20
VG
19
VR
18
HCNT
17
MCLK
16
CLR
15
OE
14
SRT
13
STBYB
12
VBC
11
VCOM
10
RESET
9
STBYB
8
GSRT
7
GPCK
6
GRES
5
N.C.
4
VDD
3
VGL
2
Q5502-5506
SWITCH
VSS
1
VGH
XX
C5530
0.01u
25V
B
C5531
0.01u
25V
B
CPU
(FOR CHECK)
24P
LCD 901
4 inch
COLOR
LCD
UNIT
LCD DRIVER, BACK-LIGHT
PD-130 (1/2)
4-55 4-56
Page 80
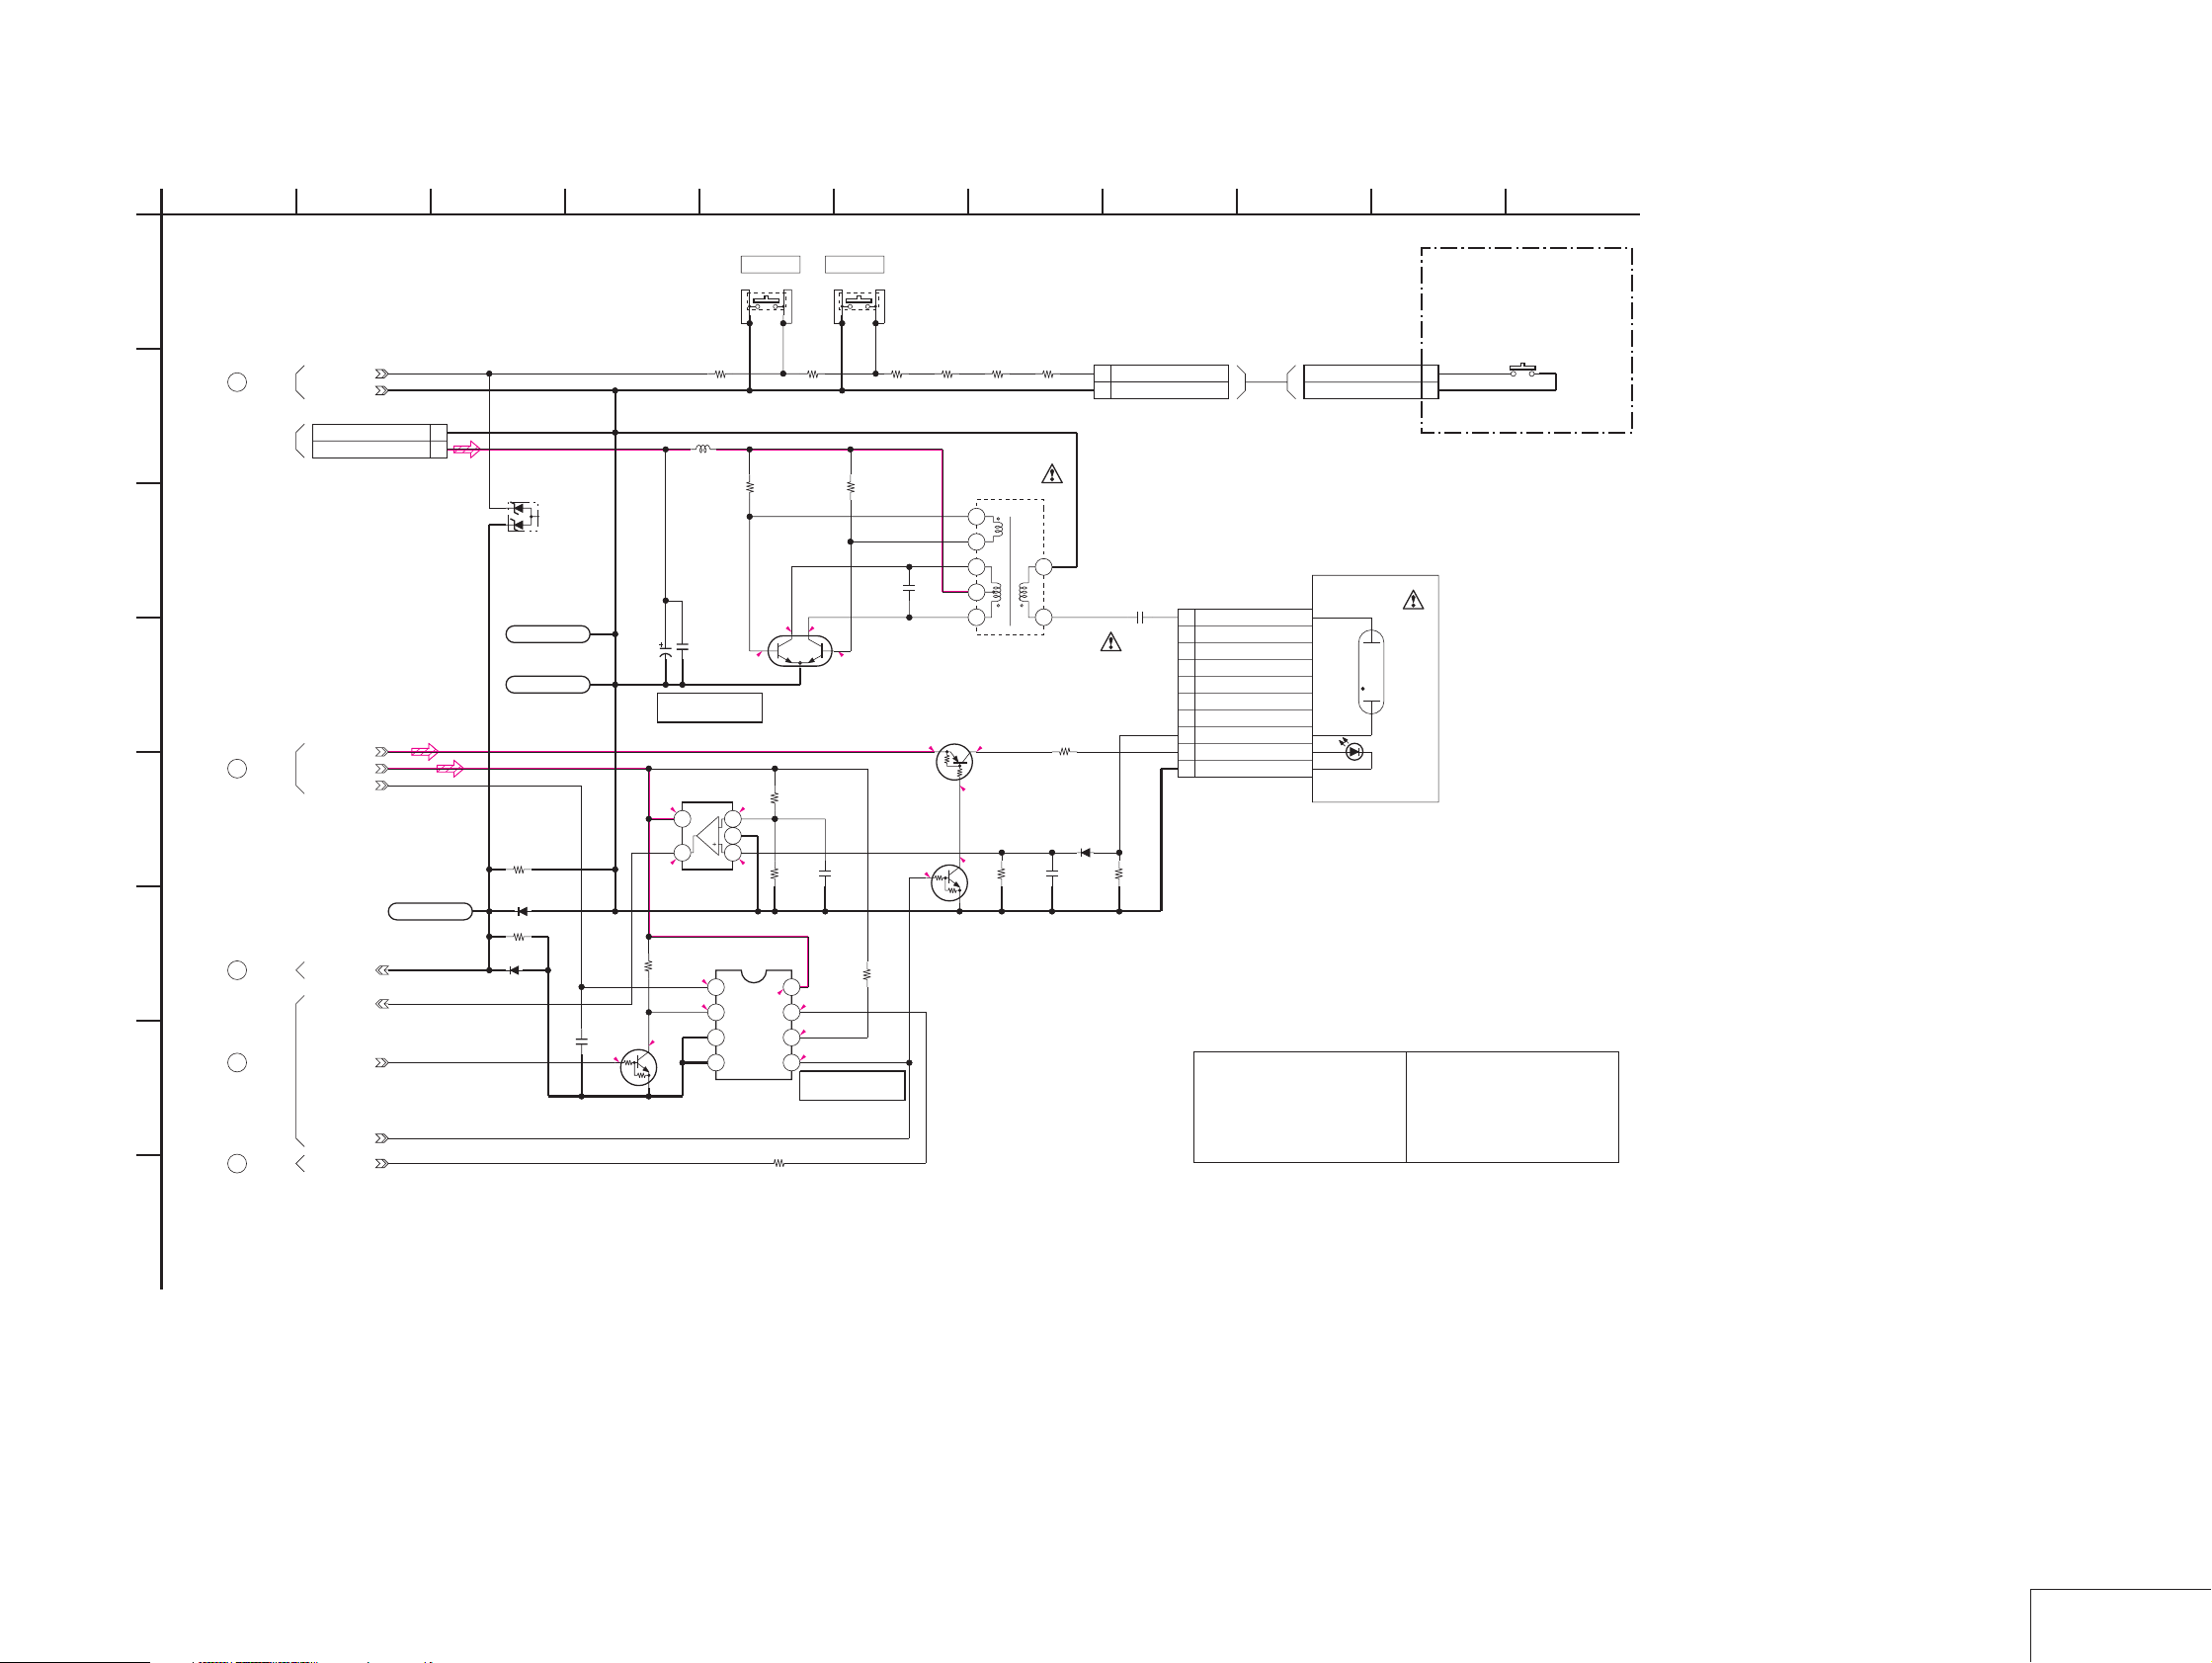
For Schematic Diagram
• Refer to page 4-51 for PD-130 printed wiring board.
• Refer to page 4-54 for LS-56 printed wiring board.
1
38
56
924 7
10
11
GV-D200/D200E/D800/D800E
PD-130 BOARD(2/2)
BACK LIGHT
-REF.NO.:10000 SERIES-
A
XX MARK:NO MOUNT
NO MARK:REC/PB MODE
4
TO(1/2)
B
TO
EX-36 BOARD
CN205
(SEE PAGE
4-65)
C
D
3
TO(1/2)
E
F
5
TO(1/2)
2
TO(1/2)
G
1
TO(1/2)
KEY_AD6
REG_GND
CN5607
PANEL_4.75V
PANEL_2.8V
BL_CONT
CH_GND
DETIN
PWM
(GV-D800/800E MODEL ONLY)
BRIGHT+ BRIGHT-
S5601
S5602
LS-56 BOARD
LCD SWITCH
-REF.NO.:10000 SERIES-
S001
R5623
R5624
R5625
R5621
1200
2P
BL_LOW
1
BL_HIGH
2
D5605
01ZA8.2(TPL3)
LND701
SHIELD_CASE
LND702
SHIELD_CASE
C5602
L5601
100uH
C5603
33u
10V
TA
1u
B
B
-0.2 -0.2
IC5602
CURRENT
DETECT
VCC
LND705
CH_GND
R5620
D5604
R5619
XX
D5603
XX
2.8
2.8
XX
XX
C5601
XX
2.8
TA75S393F-TE85R
R5609
10k
0
45
IC5602
TC7W53FU(TE12R)
1.4
1
0
2
3
4
123
1.2
IC5601
COM
INH
VEE
GND
R5622
1500
R5610
1800
1/10W
2012
3.83.8
Q5602
FP216-TL
OSC
R5611
100k
0.3
R5612
12k
VCC
8
2.8
1.4
CH0
7
2.8
CH1
6
0
A
5
C5605
0.1u
2200
3900
R5613
1800
1/10W
2012
C5604
0.015u
B
Q5604
UN9111J-(K8).SO
B+ SWITCH
4.7
4.7
R5614
18k
0
UN9213J-(K8).SO
LED DRIVE
Q5603
B
IC5601
Q5601
UN9213J-(K8).SO
LED
DAC
SWITCH
R5608
BACK LIGHT
BRIGHT SWITCH
0
8200
T5601
INVERTER
TRANSFORMER
5
1
2
3
4
1.14.7
R5617
22k
R5626
27k
6
10
R5616
120
MA111-(K8).S0
D5601
C5606
0.1u
2P
CN5604
CN001
ND901
BACK LIGHT
(STARTER)
10P
1AD_6
2GND
Note :
Les composants identifiés par
une marque 0 sont critiques
pour la sécurité.
Ne les remplacer que par une
pièce portant le numéro spécifié.
CN5608
1 AD_6
2 GND
C5607
12p
3kV
SL
4520
R5618
470
B
2P
10 BL_HIGH
9N.C
8N.C
7N.C
6N.C
5N.C
4N.C
3 BL_LOW
2 LED
1 LED_GND
Note :
The components identified by
mark 0 or dotted line with mark
0 are critical for safety.
Replace only with part number
specified.
(LCD ON/OFF)
H
16
BACK-LIGHT
4-57 4-58
PD-130 (2/2)
Page 81
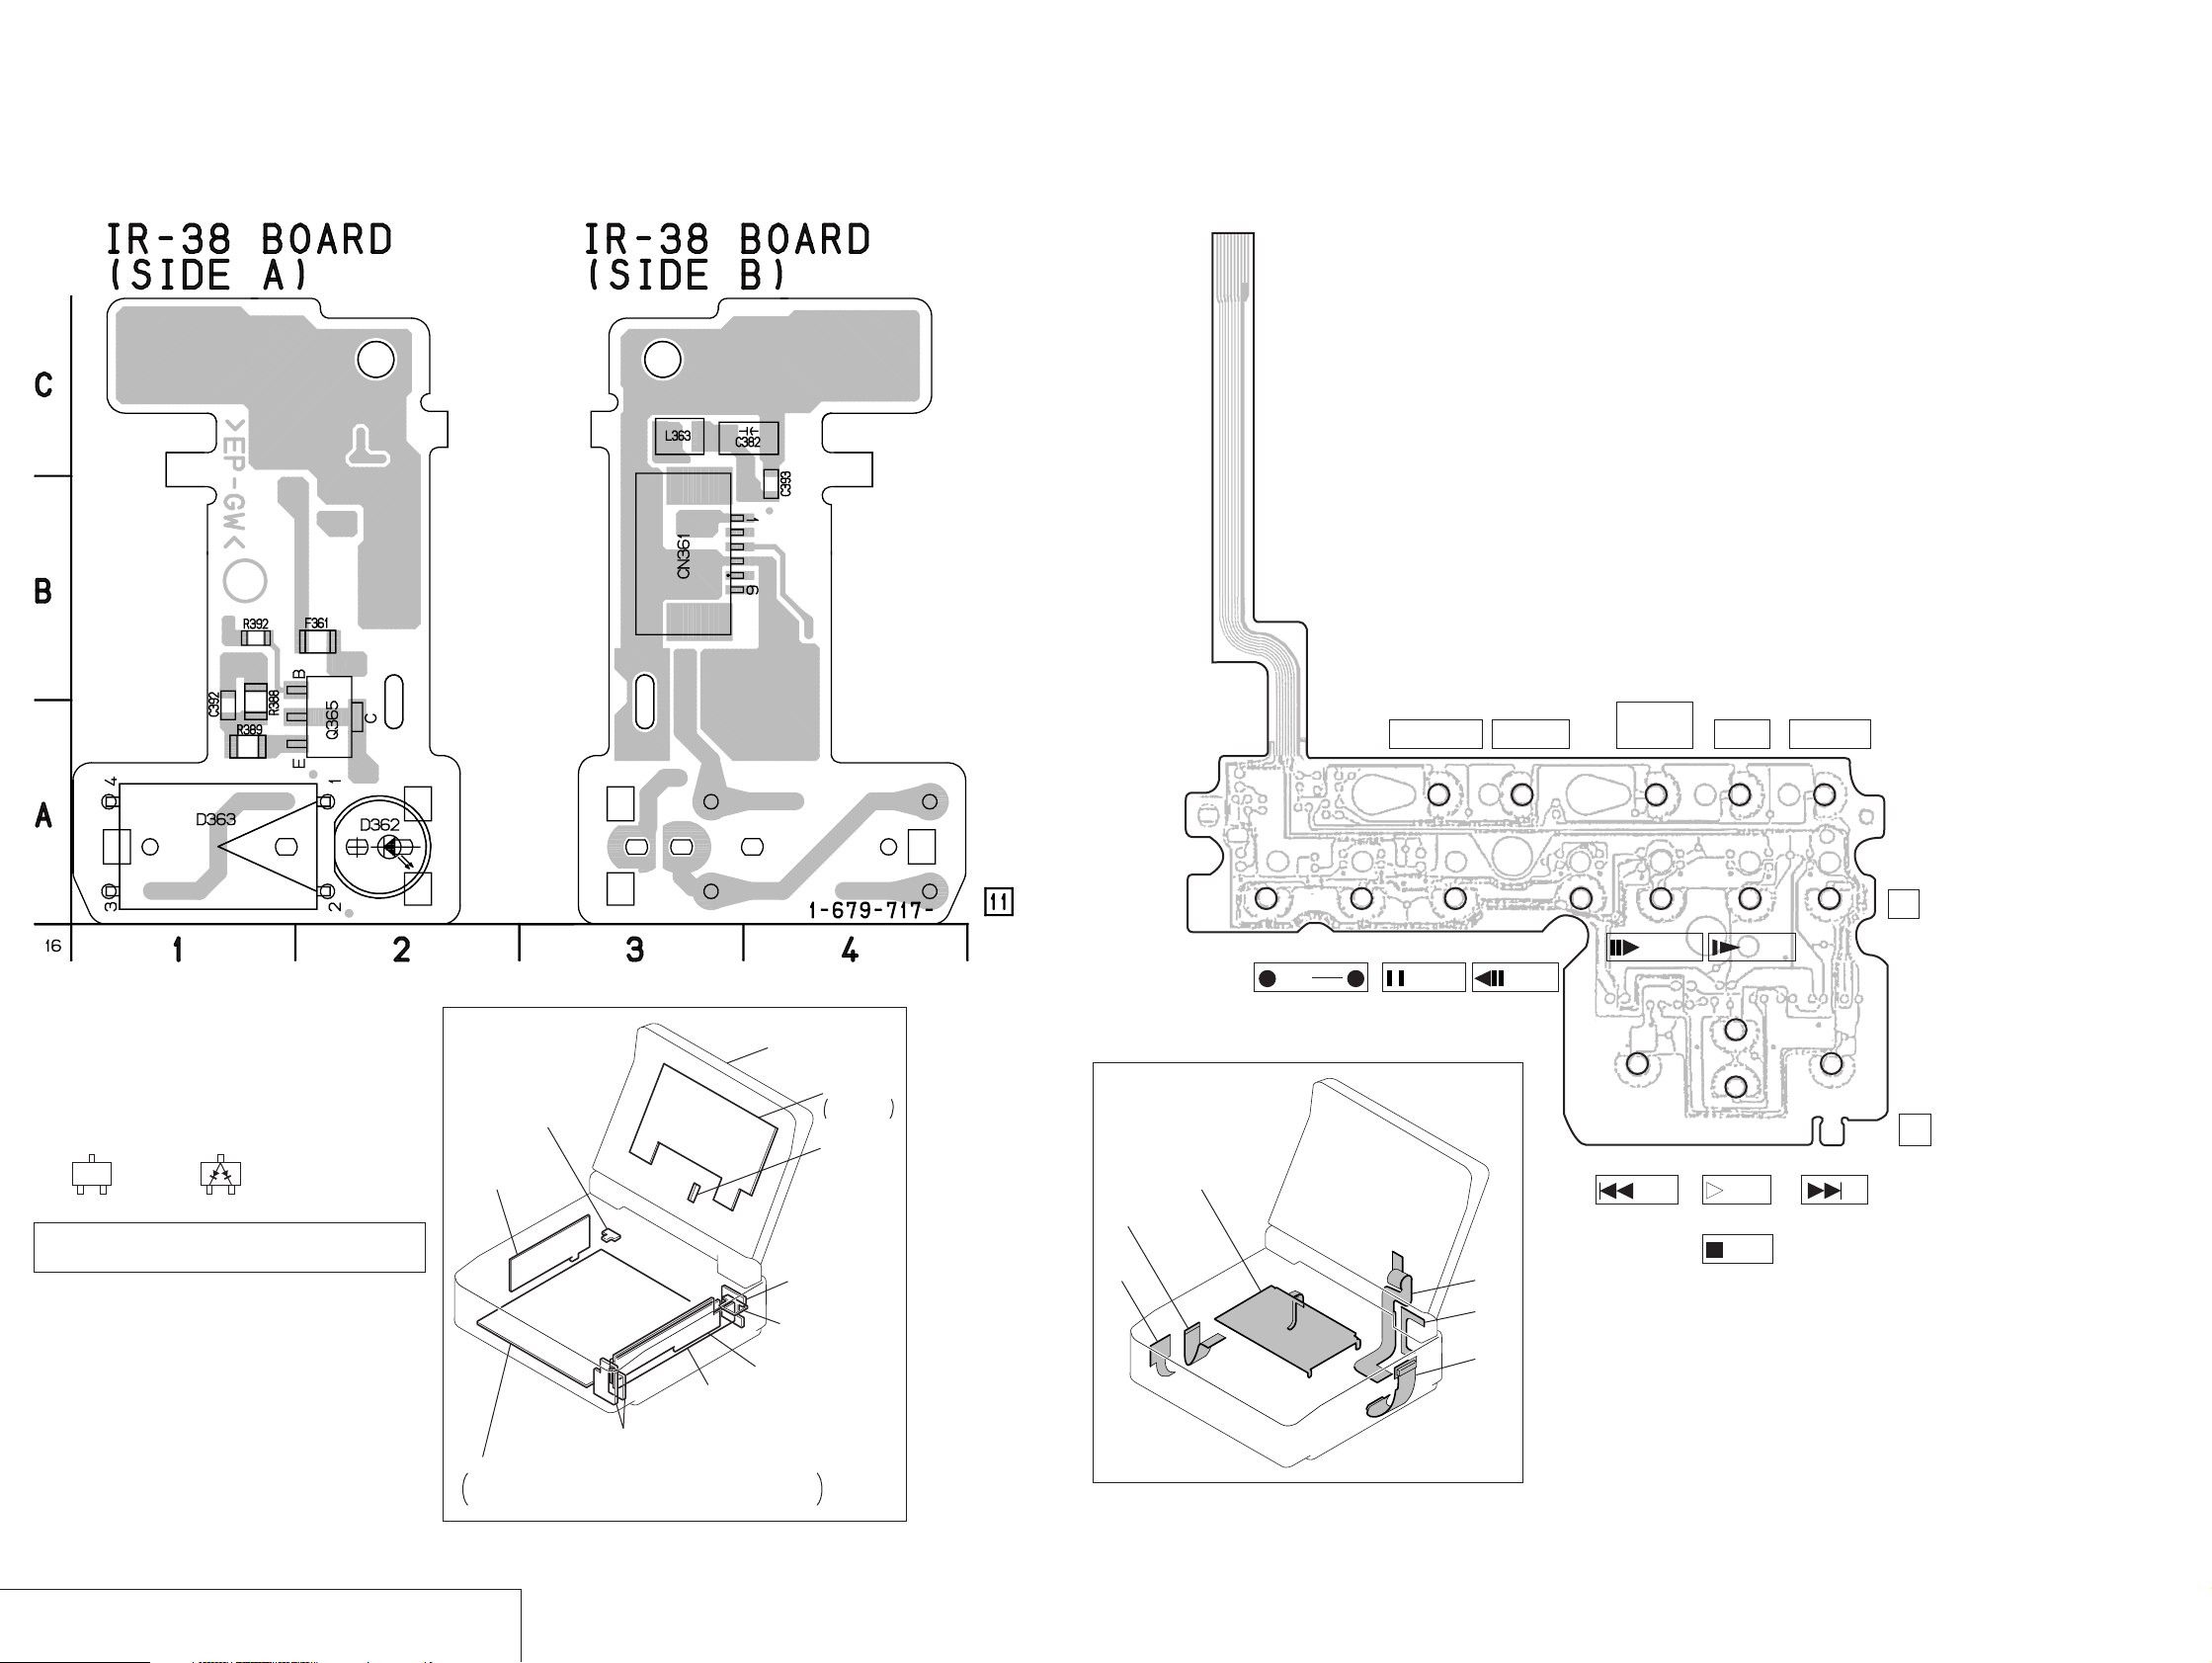
GV-D200/D200E/D800/D800E
9
2
7
)
IR-38 (IR TRANSMITTER), CONTROL SWITCH BLOCK (FK-78) PRINTED WIRING BOARDS
— Ref. No. IR-38 Board; 10,000 Series, Control switch block (FK-78) Board; 40,000 Series —
• Refer to page 4-28 for IR-38 schematic diagram.
CONTROL SWITCH BLOCK (FK-78)
110
For printed wiring board
• Refer to page 4-73 for parts location.
• IR-38 board consists of multiple layers. However, only
the sides (layers) A and B are shown.
• Chip parts
Transistor Diode
C
BE
3
21
There are few cases that the part printed on this
diagram isn’t mounted in this model.
LCD DISPLAY
MODULE
(D800/D800E ONLY)
FP-602
(DV IN/OUT)
EX-36
(MULTI CONNECTOR)
IR-38
(IR TRANSMITTER)
FU-145
IO-68
(AV IN/OUT)
FP-246
VC-250
REC/PB AMP, DAC, DV INTERFACE, AD CONVERTER, Y/C PROCESSOR,
LINE A/D, LINE IN/OUT, IR, AUDIO IN/OUT, DRUM/CAPSTAN MOTOR DRIVE,
MECHA CONTROL, HI CONTROL, DC/DC CONVERTER
(REMOTE COMMANDER RECEIVER)
(DC/DC CONVERTER)
FP-575
(LANC)
PD-130
LCD DRIVER,
BACK LIGHT
LS-56
(LCD SWITCH
CONTROL SWITCH BLOCK
(FK-78)
FP-570
FP-571
S003 S004
S012 S013
DATA CODE DISPLAY
S007
PAUSE
S009
FRAM-REC
FP-56
FP-57
FP-24
S014
DIGITAL
EFFECT
S010
S015 S016
TITLE PB ZOOM
S011
SLOWFRAM+
S006 S005S002
PLAY
S001
STOP
S008
X2
1-476-355-
21
FFREW
CONTROL SWITCH BLOCK
FK-78
IR TRANSMITTER
/
IR-38
4-60
Page 82
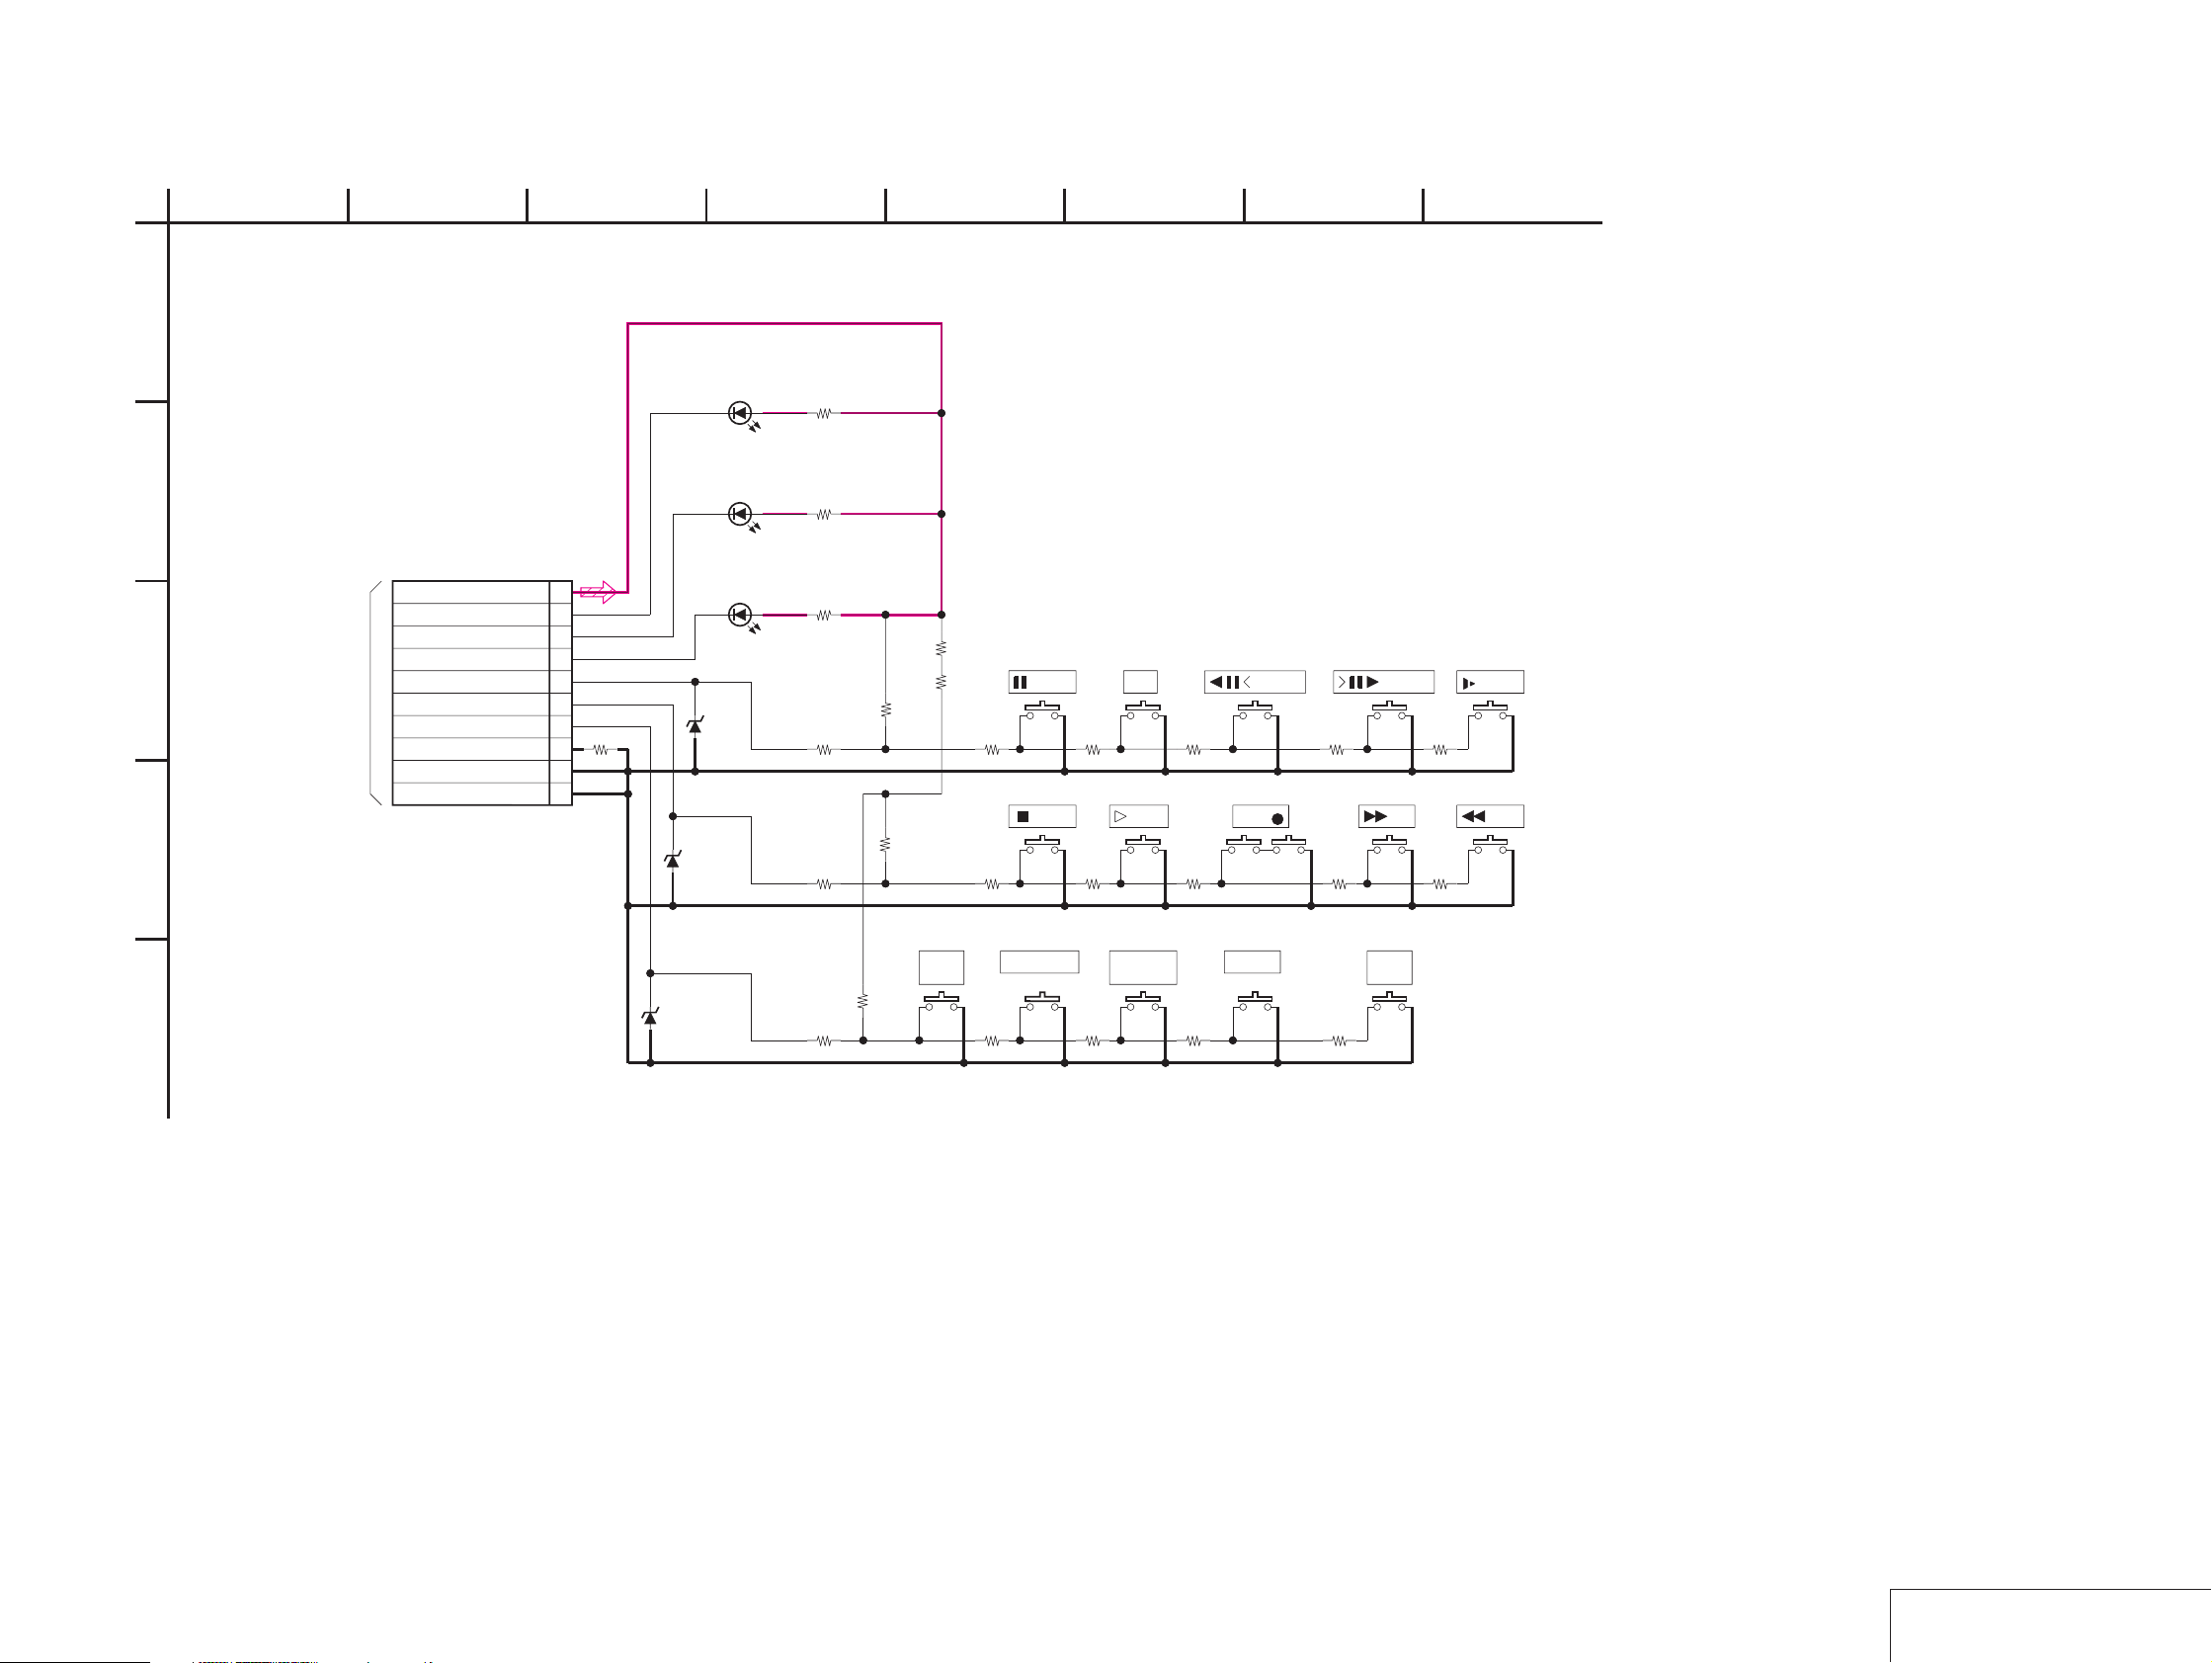
GV-D200/D200E/D800/D800E
A
B
C
D
1
24 7
CONTROL SWITCH BLOCK
(FK-78)
-REF.NO.:40000 SERIES-
XX MARK:NO MOUNT
XCAUTION_LED
TO
VC250 BOARD(16/16)
CN927
(SEE PAGE 4-41)
10P
D_2.8V
XREC_LED
XPAUSE_LED
KEY_AD1
KEY_AD0
KEY_AD2
REG_GND
REG_GND
REG_GND
38
D001
SML-211UT-T86
(REC)
D003
SML-211YT-T86
(CAUTION)
D002
SML-211DT-T86
D005
XX
(PAUSE)
D006
XX
1
2
3
4
5
6
7
R103
0
8
9
10
R022
1608
R024
1608
R023
1608
R008
1608
R001
1608
180
0
120
R009
10k
1k
1k
1608
R002
10k
1608
56
R101
R102
0
0
S007
PAUSE
R010
1200
1608
S001
STOP PLAY REC
R003
1200
1608
S008
R011
1500
1608
S002 S005 S006
R004
1500
1608
X2
R012
2200
1608
R005
2200
1608
S003
S009
FRAME-
S004
R013
3900
1608
R006
3900
1608
S010 S011
FRAME+
FF
R014
8200
1608
R007
8200
1608
SLOW
REW
R018
1500
1608
S014
DIGITALDATA
R019
2200
1608
S015
TITLEDISPLAY
R020
3900
1608
S016
ZOONEFFECT
PB
S012
CODE
D007
E
XX
R015
1608
R016
1k
10k
1608
R017
1200
1608
S013
16
4-61 4-62
CONTROL SWITCH BLOCK
FK-78
Page 83
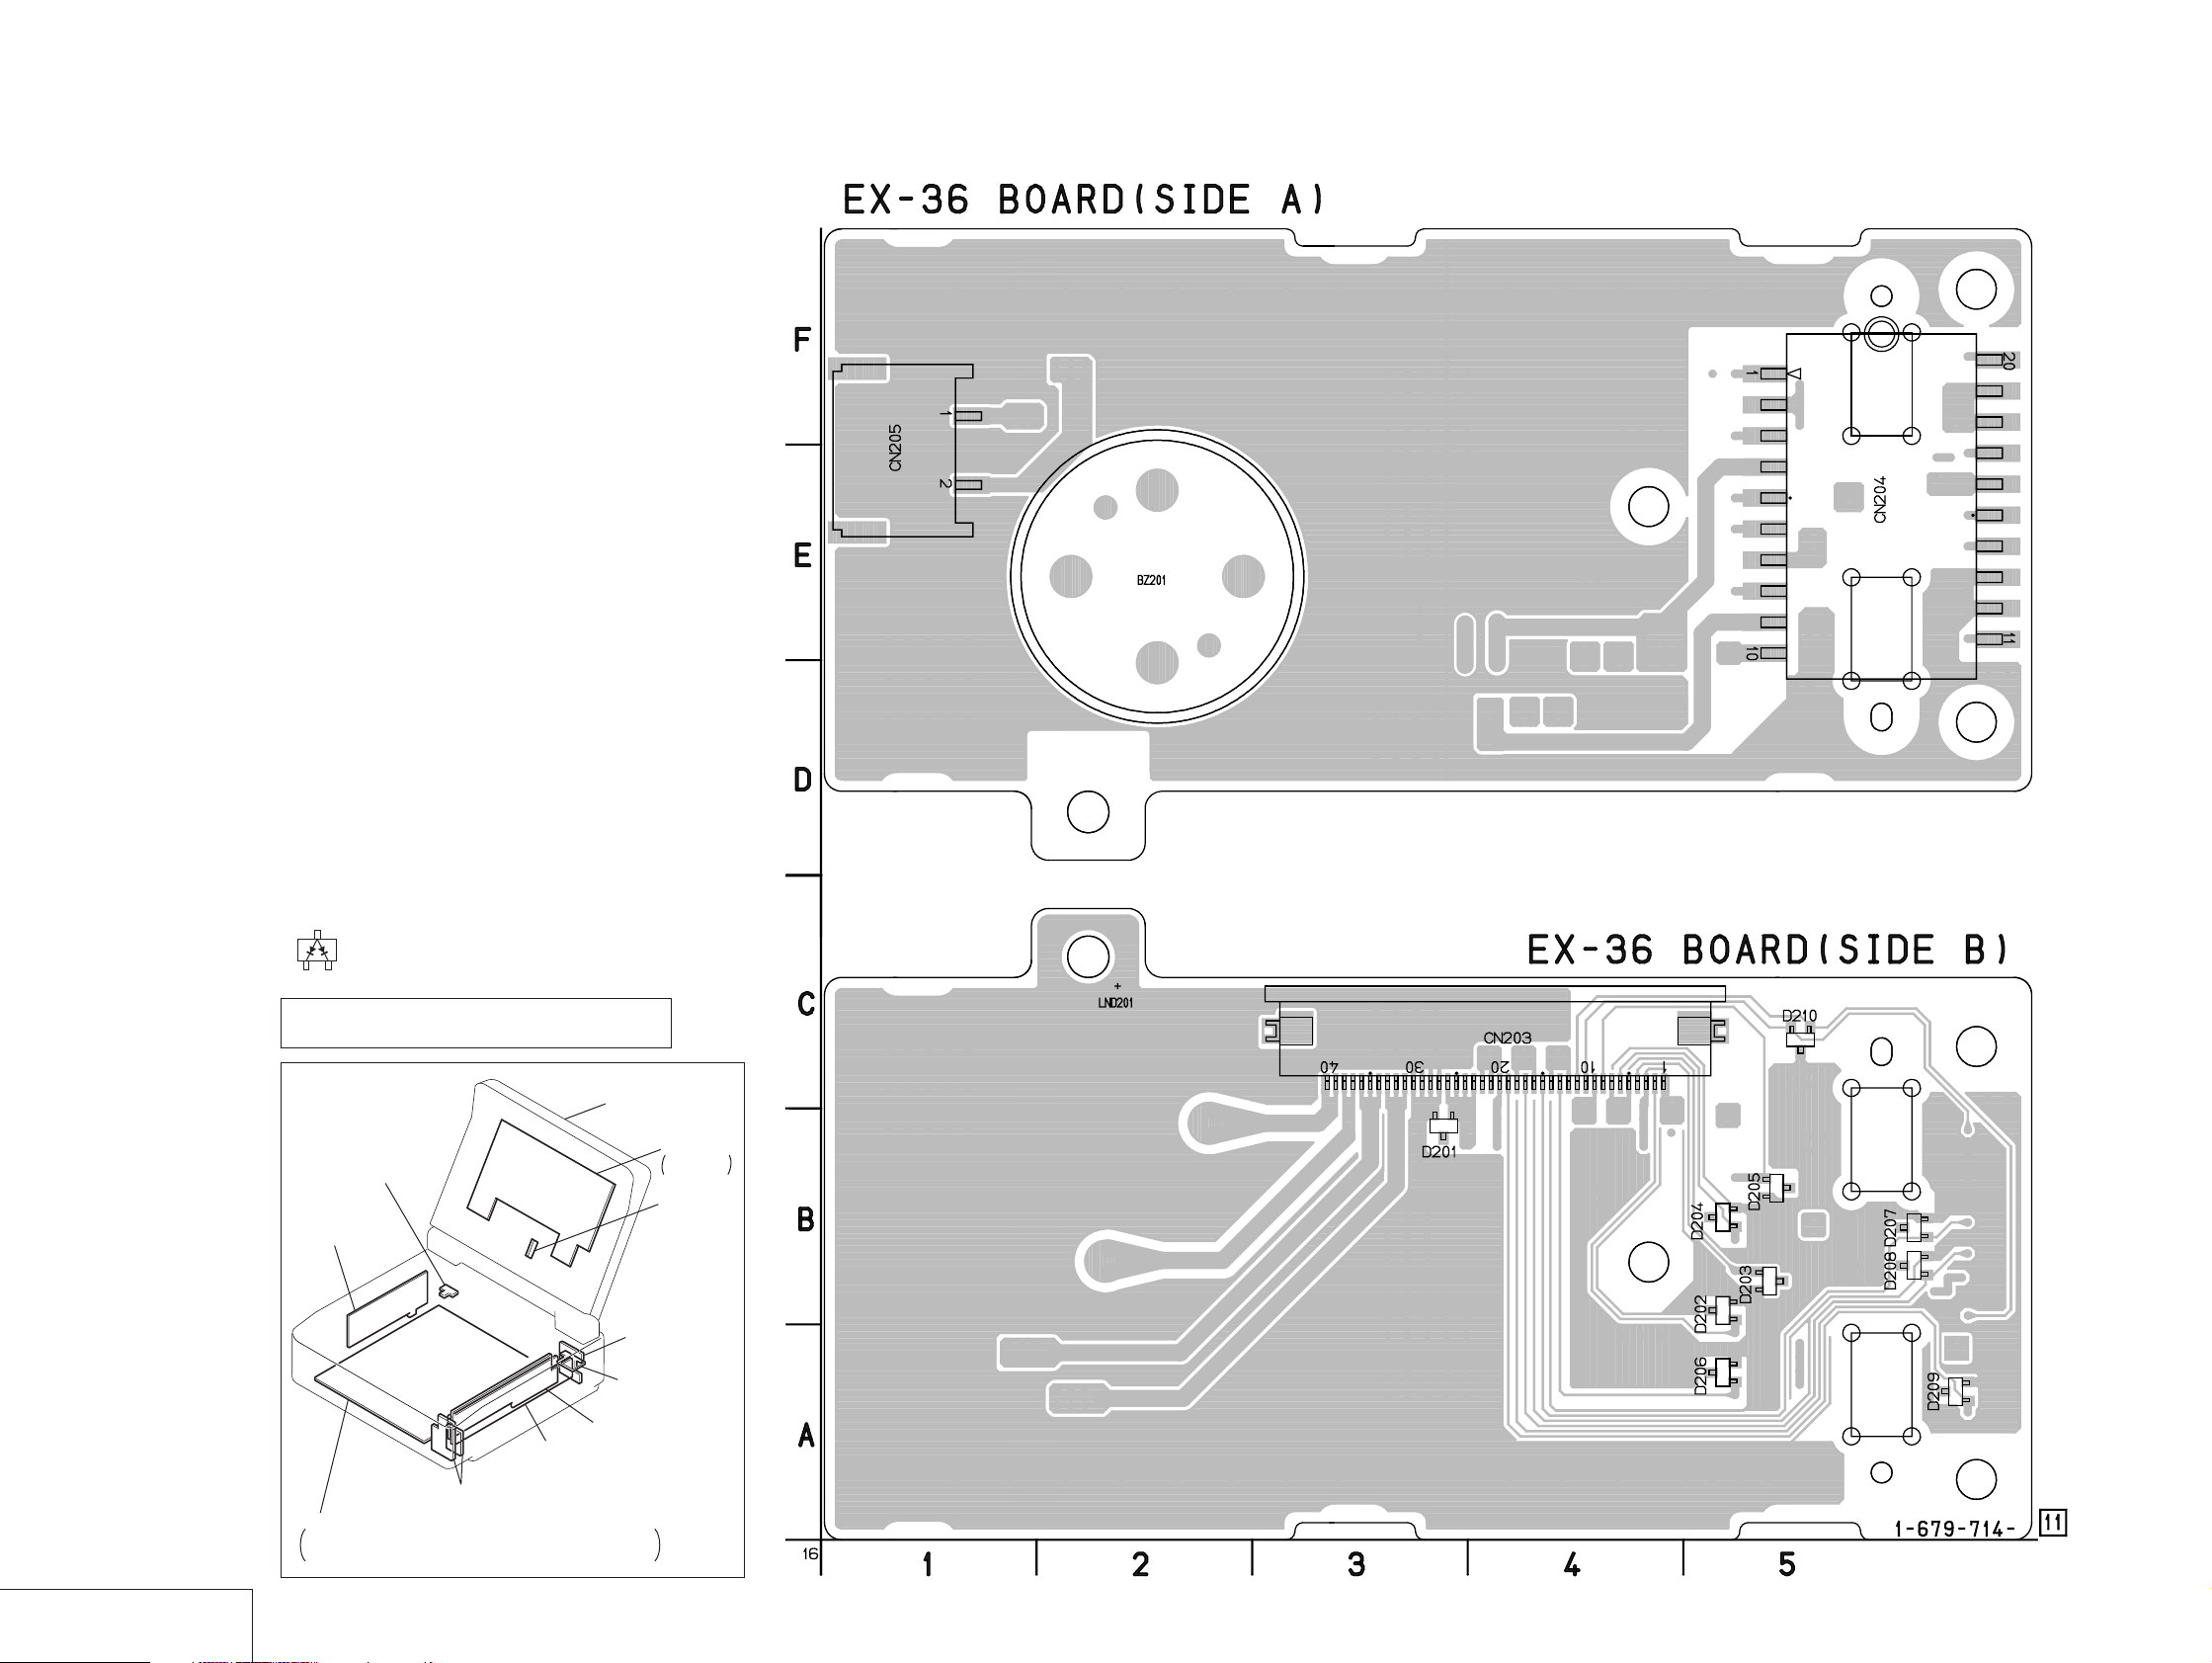
GV-D200/D200E/D800/D800E
)
EX-36 (MULTI CONNECTOR) PRINTED WIRING BOARD
— Ref. No. EX-36 Board; 10,000 Series —
For printed wiring board
• Refer to page 4-73 for parts location.
• EX-36 board consists of multiple layers . Ho wev er, only
the sides (layers) A and B are shown.
• Chip parts
Diode
3
21
There are few cases that the part printed on this
diagram isn’t mounted in this model.
LCD DISPLAY
MODULE
(D800/D800E ONLY)
FP-602
(DV IN/OUT)
EX-36
(MULTI CONNECTOR)
IR-38
(IR TRANSMITTER)
PD-130
LCD DRIVER,
BACK LIGHT
LS-56
(LCD SWITCH
MULTI CONNECTOR
EX-36
FP-575
(LANC)
FU-145
IO-68
(AV IN/OUT)
FP-246
VC-250
REC/PB AMP, DAC, DV INTERFACE, AD CONVERTER, Y/C PROCESSOR,
LINE A/D, LINE IN/OUT, IR, AUDIO IN/OUT, DRUM/CAPSTAN MOTOR DRIVE,
MECHA CONTROL, HI CONTROL, DC/DC CONVERTER
(REMOTE COMMANDER RECEIVER)
(DC/DC CONVERTER)
4-63 4-64
Page 84
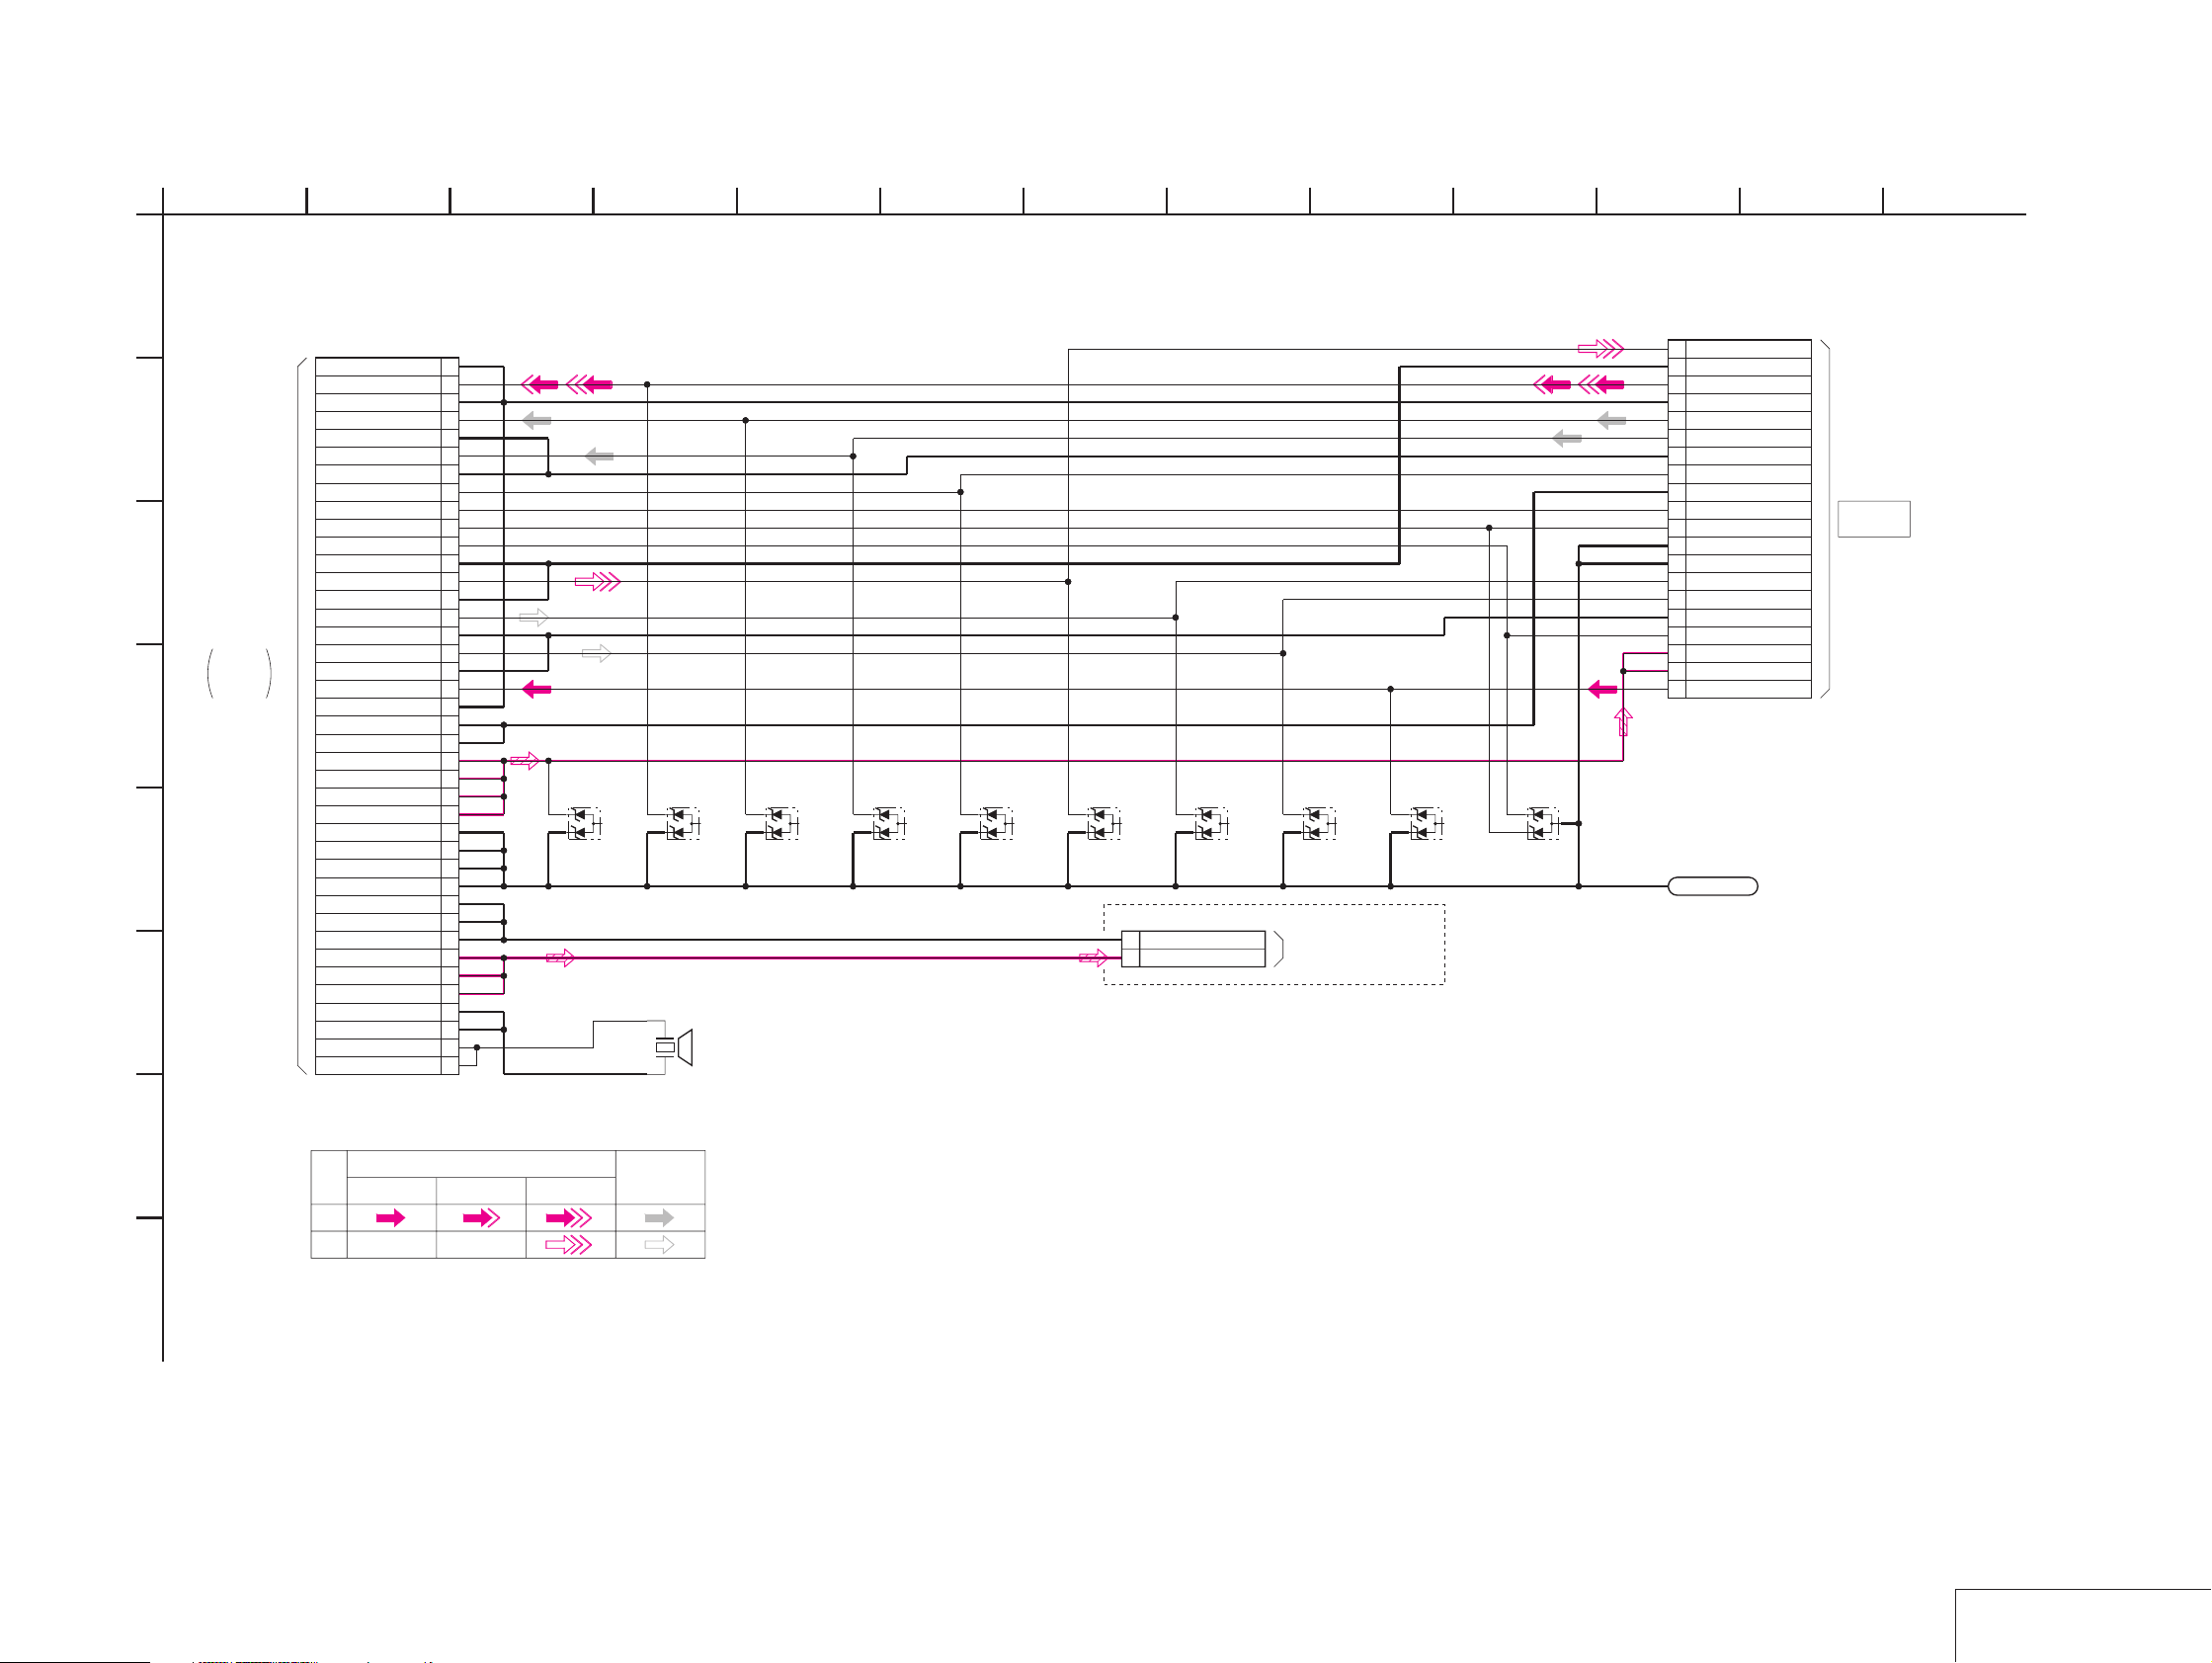
GV-D200/D200E/D800/D800E
EX-36 BOARD
MULTI CONNECTOR
A
-REF.NO.:10000 SERIES-
B
C
BOARD(16/16)
D
(SEE PAGE
4-41)
E
F
1
TO
VC-250
CN931
THROUGH
THE
FP-570
FLEXIBLE
BOARD
CN203
38
40P
1VIDEO_GND
2V/Y_IN
3V/Y_IN_GND
4AUDIO_R_IN
5AUDIO_R_IN_GND
6AUDIO_L_IN
7AUDIO_L_IN_GND
8LANC_SIG
9LANC_GND
10ID1
11ID2
12VIDEO_GND
13VIDEO_OUT
14VIDEO_OUT_GND
15AUDIO_R_OUT
16AUDIO_R_OUT_GND
17AUDIO_L_OUT
18AUDIO_L_OUT_GND
19C_IN
20VIDEO_GND
21IO_GND
22IO_GND
23EX_UNREG
24EX_UNREG
25EX_UNREG
26EX_UNREG
27REG_GND
28REG_GND
29REG_GND
30REG_GND
31BL_GND
32BL_GND
33BL_GND
34BL_REG
35BL_REG
36BL_REG
37REG_GND
38REG_GND
39BEEP
40BEEP
D201
01ZA8.2(TPL3)
D202
01ZA8.2(TPL3)
BZ201
(BUZZER)
5 136
D203
01ZA8.2(TPL3)
D204
01ZA8.2(TPL3)
D205
01ZA8.2(TPL3)
D206
01ZA8.2(TPL3)
2 BL_LOW
1
BL_HIGH
GV-D800/D800E MODEL ONLY
D207
01ZA8.2(TPL3)
CN205
2P
924 7
D208
01ZA8.2(TPL3)
TO
PD-130 BOARD(2/2)
CN5607
(SEE PAGE 4-57)
D209
01ZA8.2(TPL3)
10
D210
01ZA8.2(TPL3)
11
LND201
VIDEO_OUT1
VIDEO_OUT_GND2
V/Y_IN3
VIDEO_IN_GND4
AUDIO_R_IN5
AUDIO_L_IN6
AUDIO_IN_GND7
LANC_SIG8
IO_GND9
LANC_GND10
ID111
EX_GND12
EX_GND13
AUDIO_R_OUT14
AUDIO_L_OUT15
AUDIO_OUT_GND16
ID217
EX_UNREG18
EX_UNREG19
C_IN20
CHASSIS_GND
CN204 20P
12
MULTI
CONNECTOR
G
SIGNAL PATH
VIDEO SIGNAL
CHROMA
Y
Y/CHROMA
AUDIO
SIGNAL
REC
PB
H
16
MULTI CONNECTOR
4-65 4-66
EX-36
Page 85
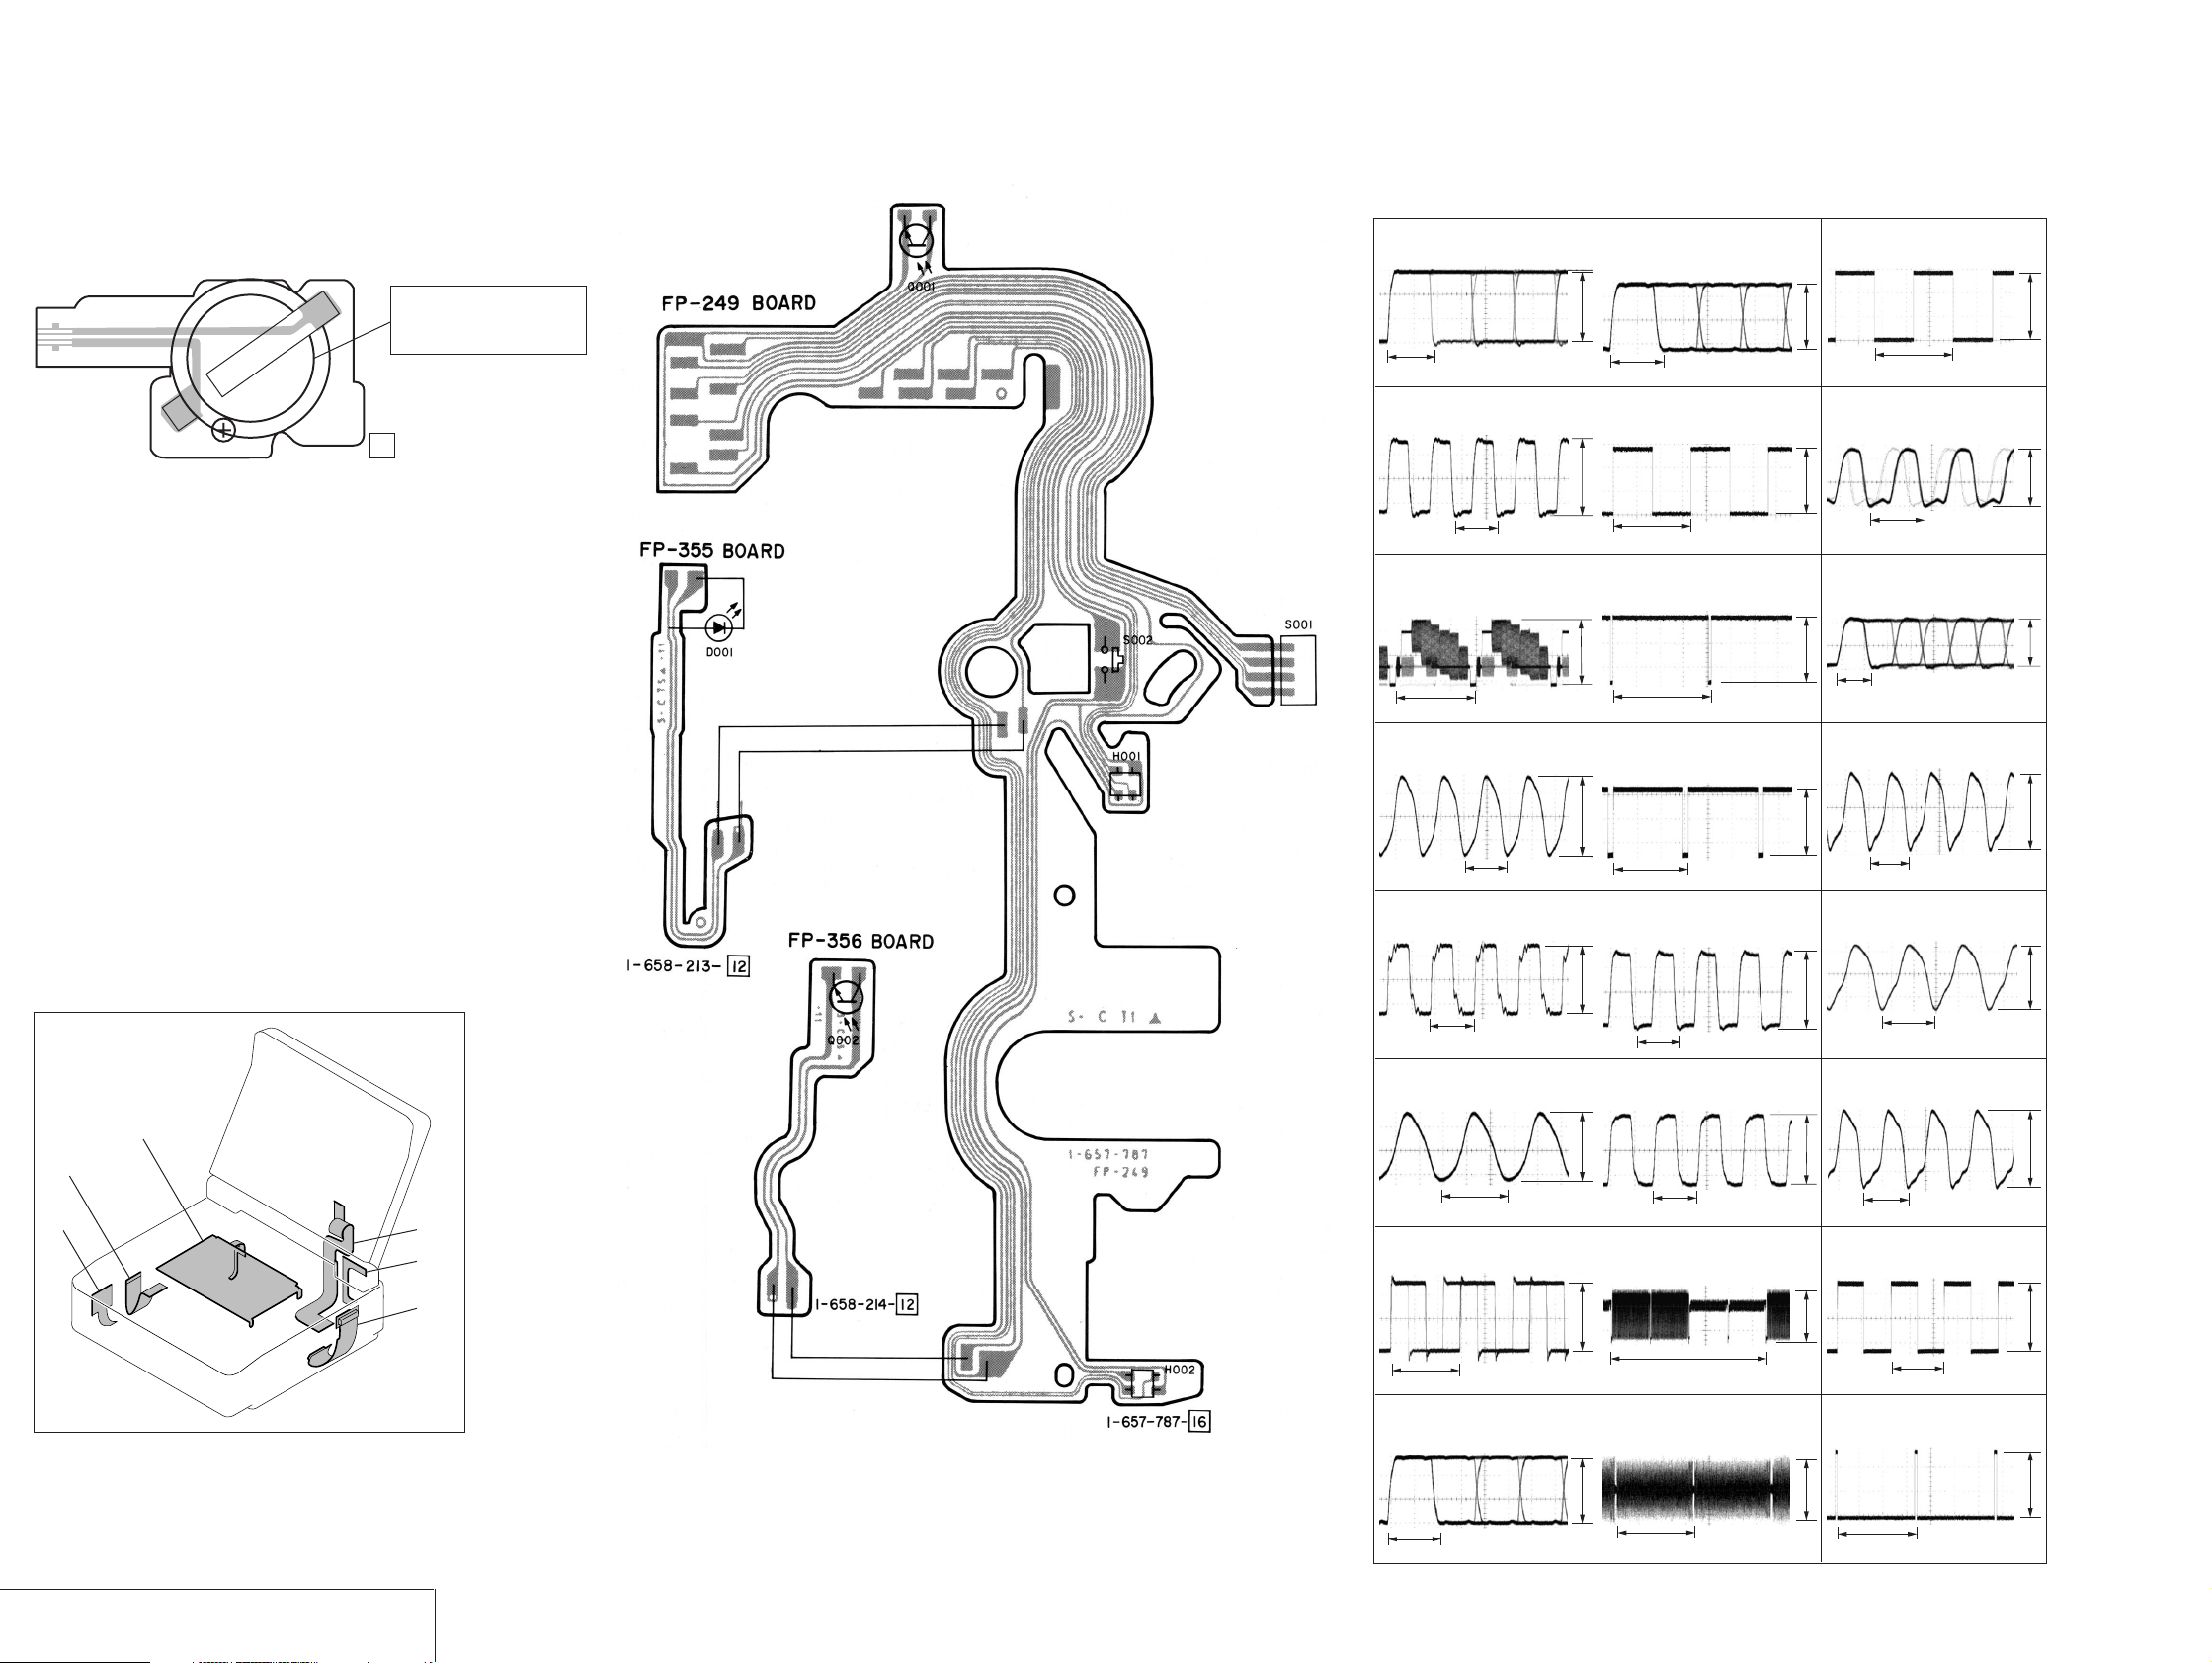
GV-D200/D200E/D800/D800E
9
2
7
FP-571 (BATTERY), FP-249 (S/T REEL) PRINTED WIRING BOARDS
— Ref. No. FP-571, FP-249 Boards; 20,000 Series —
• Refer to page 4-37 for FP-571 schematic diagram.
• Refer to page 4-33 for FP-249, FP-355, FP-356 schematic diagrams.
FP-571 FLEXIBLE BOARD
4
1
1-667-400-
11
BT001
LITHIUM BATTERY
4-3. WA VEFORMS
VC-250 BOARD
1 IC1502 2 – qa
80 nsec
3.2Vp-p
2 IC1502 qh
70 nsec
3.2Vp-p
3 IC1502 ef
REC
H
1.3Vp-p
9 IC2201 <zxx ,<zxv ,<zxm ,<zx. ,<zcx ,
<zcv ,<zcm ,<zc. REC
80 nsec
2.8Vp-p
0 IC2201 <zvx
REC
33.3 msec
3.2Vp-p
qa IC2201 <zvv
REC
V
2.8Vp-p
qj IC3103 eg
13.3msec
qk IC3103 r;
REC
24 nsec
ql IC3103 rs
REC
30 nsec
2.8Vp-p
2.4Vp-p
2.0Vp-p
CONTROL SWITCH BLOCK
(FK-78)
FP-570
FP-571
FP-56
FP-57
FP-24
4 IC1504 4
37 nsec
5 IC1505 5
74 nsec
6 IC2201 yj
56 nsec
7 IC2201 ul
qs IC2201 <zvn
REC
3.4Vp-p
H
qd IC2201 <z,b
REC
2.8Vp-p
qf IC2201 <z.,
2.8Vp-p
qg IC3103 1,2,6,7
REC
74 nsec
70 nsec
2.8Vp-p
2.8Vp-p
2.8Vp-p
w; IC3301 rg
34 nsec
wa IC3301 <zzc
23.8 msec
ws IC3301 <zc.
40.6 nsec
wd IC4401 qh
3.4Vp-p
2.8Vp-p
3.6Vp-p
BATTERY
FP-571
S/T REEL
/
FP-249
WAVEFORMS
/
VC-250
300 nsec
5.7Vp-p
8 IC2201 <zzx ,<zzv ,<zzm ,<zz.
REC
80 nsec
2.8Vp-p
13.3 msec
qh IC3101 rs, IC3103 wj,wl
PB
3.3 msec
4.5Vp-p
400mVp-p
2.2 msec
wf IC4401 ws
13.3 msec
2.8Vp-p
2.8Vp-p
4-684-67
Page 86
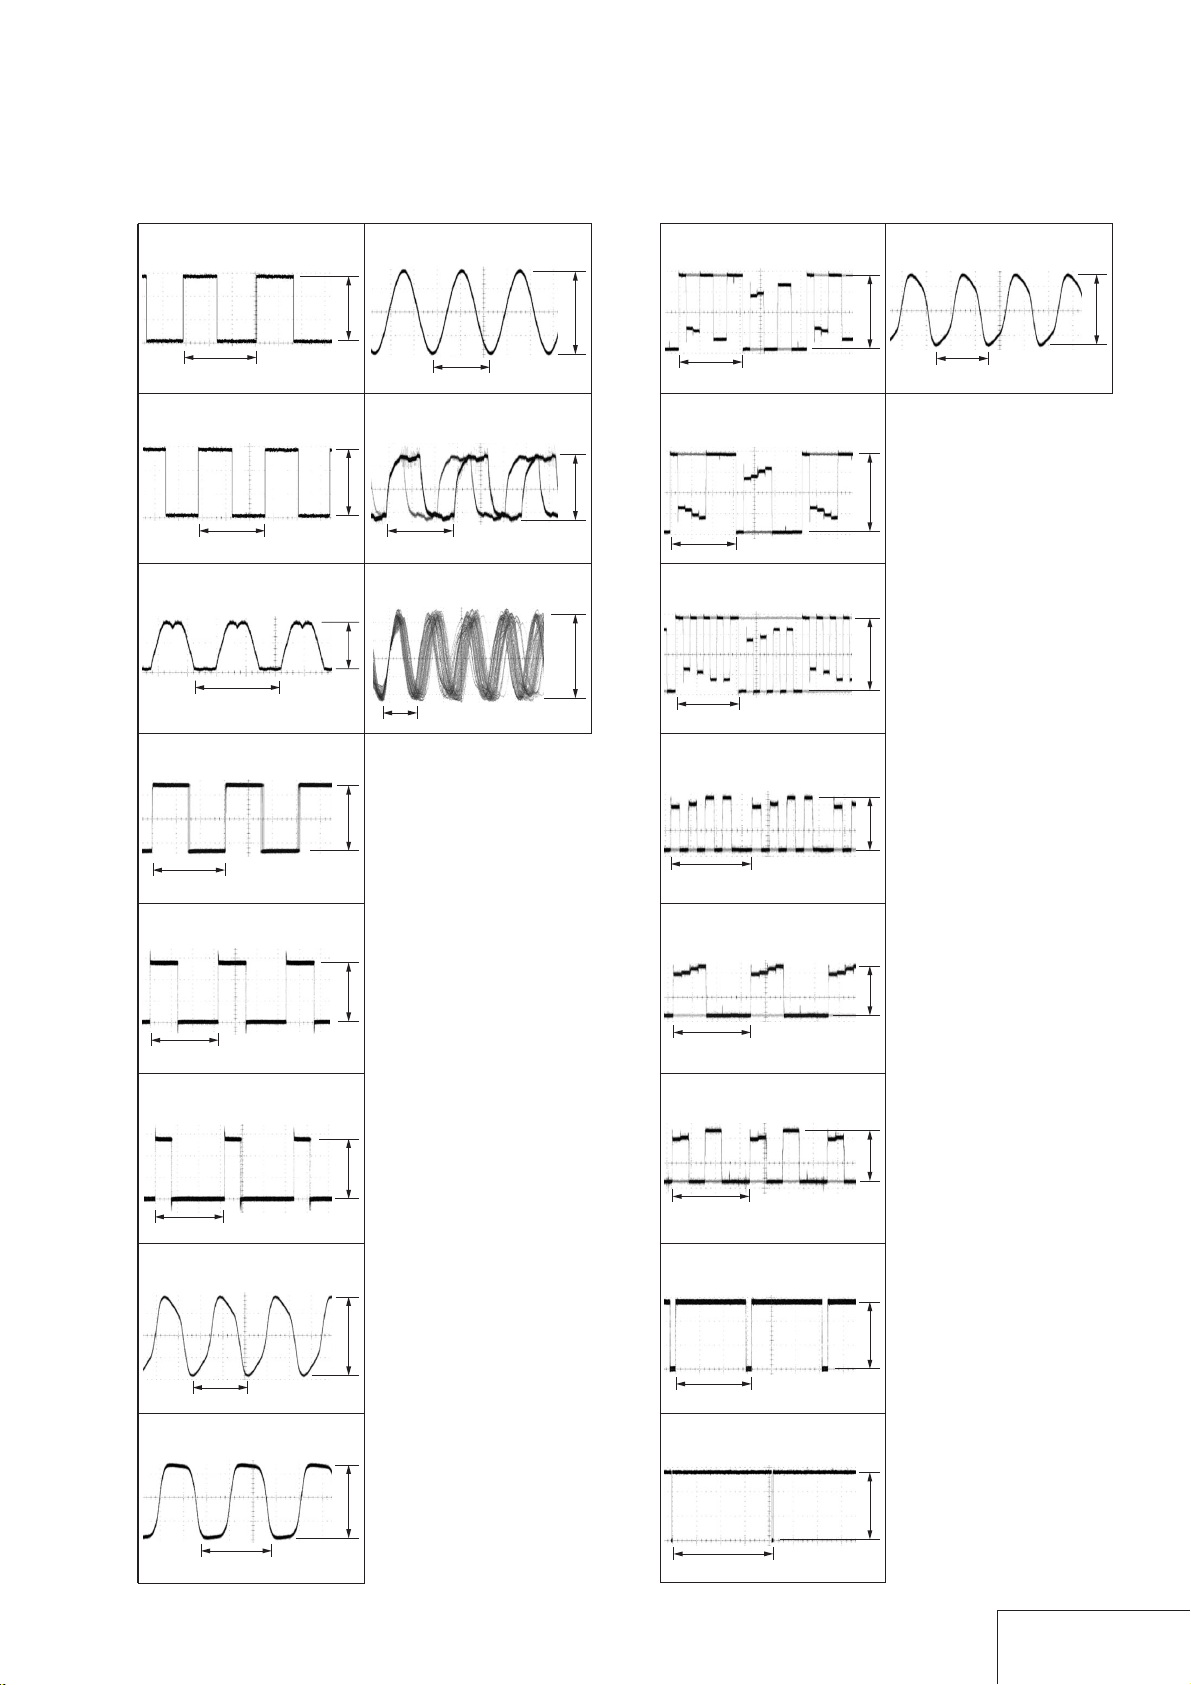
GV-D200/D200E/D800/D800E
PD-130
BOARD
2
IC5501 ws
3
IC5501 wf
1
IC5501 w;
3.6Vp-p
H
9
IC5502 wh
2.8Vp-p
85 nsec
3.7Vp-p
3.6Vp-p
H
H
4
IC5501 rh
400mVp-p
H
5
IC5501 rj
400mVp-p
H
6
IC5501 rk
400mVp-p
H
7
IC5502 1
2.8Vp-p
H
8
IC5502 rk
2.8Vp-p
V
VC-250
wg
wh
wj
wk
BOARD
IC4401 ed
0.6 sec
IC4401 ra
IC4401 tj,tl,ya
CN4403 1
1.1 sec
2.2 msec
2.8Vp-p
2.8Vp-p
3.4Vp-p
ed
IC4902 1
50 nsec
ef
IC5701 qf
300 nsec
eg
IC3901 ws IR ON
70 nsec
3.6Vp-p
250mVp-p
1.0Vp-p
610 µsec
wl
IC4501 yk
12.5 µsec
e;
IC4501 yl
12.5 µsec
ea
IC4803 r;
50 nsec
2.8Vp-p
2.8Vp-p
2.8Vp-p
3.6Vp-p
es
IC4803 td
30.5 µsec
3.0Vp-p
WAVEFORMS
4-69
VC-250, PD-130
Page 87

GV-D200/D200E/D800/D800E
4-4. MOUNTED PARTS LOCATION
VC-250 BOARD (SIDE A)
C901 H-1
C902 F-9
C1320 D-9
C1322 D-9
C1333 D-9
C1336 C-9
C1340 C-9
C1343 C-9
C1353 D-9
C1505 E-7
C1507 E-7
C1508 D-2
C1510 F-8
C1512 E-8
C1513 D-1
C1514 D-1
C1515 D-1
C1516 D-1
C1517 D-1
C1518 D-1
C1519 C-2
C1520 C-1
C1521 C-2
C1522 C-2
C1523 C-2
C1524 C-2
C1526 D-2
C1527 E-7
C2201 C-6
C2202 C-6
C2203 D-5
C2204 D-6
C2208 C-6
C2210 D-6
C2211 C-6
C2212 D-6
C2213 C-5
C2214 D-4
C2215 D-5
C2222 C-5
C2223 C-5
C2224 C-5
C2225 D-4
C2226 C-5
C2227 D-6
C2228 C-4
C2229 D-5
C2230 D-6
C2231 D-6
C2232 D-3
C2233 D-4
C2234 D-6
C2235 D-6
C2236 D-4
C2238 D-4
C2240 E-4
C2241 E-6
C2242 F-6
C2243 F-4
C2244 D-6
C2245 D-3
C2246 E-3
C2250 D-3
C2251 E-6
C2252 F-5
C3121 B-5
C3123 B-5
C3124 B-5
C3125 B-5
C3126 B-5
C3127 B-5
C3128 B-5
C3129 B-5
C3131 B-4
C3133 B-4
C3134 B-5
C3136 B-5
C3137 B-4
C3138 B-5
C3139 B-5
C3140 B-5
C3142 A-4
C3143 A-4
C3144 A-4
C3201 B-4
C3202 B-3
C3203 B-3
C3204 B-3
C3205 B-3
C3206 B-3
C3207 B-3
C3208 B-3
C3210 C-4
C3211 C-4
C3212 C-4
C3214 C-4
C3215 C-4
C3218 B-4
C3347 D-6
C3701 C-8
C3737 C-8
C3738 D-8
C3739 D-8
C3740 D-8
C3741 C-8
C3742 D-7
C3743 D-7
C3744 D-7
C3745 C-7
C3746 D-7
C3747 D-7
C3748 C-7
C3749 C-8
C3752 D-7
C4401 A-8
C4402 A-9
C4403 A-7
C4404 A-7
C4405 A-7
C4406 A-7
C4407 A-8
C4409 B-7
C4410 A-9
C4411 B-7
C4412 B-7
C4413 B-7
C4414 A-9
C4415 B-8
C4416 B-8
C4417 B-7
C4418 B-8
C4419 B-7
C4420 B-8
C4421 B-7
C4423 B-8
C4424 A-2
C4425 B-8
C4427 B-8
C4428 C-7
C4429 C-7
C4430 C-7
C4436 C-8
C4501 E-3
C4504 D-2
C4505 D-2
C4506 D-2
C4508 D-2
C4510 F-1
C4803 G-4
C4804 G-5
C4805 G-4
C4808 F-3
C4809 F-3
C4810 F-3
C4812 F-3
C4813 F-3
C4814 F-3
C4819 H-3
C4820 G-2
C4821 G-2
C4822 H-2
C4823 G-2
C4828 G-1
C5701 G-7
C5702 H-8
C5709 H-7
C5711 G-8
C5712 G-8
C5713 H-7
C5715 H-7
C5719 H-7
C5721 G-7
C5722 H-7
C5723 G-7
C5724 H-7
C5725 G-7
C5727 H-7
C5728 G-7
C5729 H-7
C5730 G-7
C5731 G-7
C5732 H-7
C5733 G-6
C5734 H-7
C5735 G-6
C5736 G-7
C5737 H-6
C5738 G-6
C5739 H-6
C5740 G-6
C5741 G-6
C5742 G-6
C5743 H-6
C5744 H-6
C5745 H-6
C5746 G-6
C5747 G-6
C5748 H-6
C5749 H-6
C5774 G-8
CN922 G-8
CN923 E-10
CN924 B-9
CN926 H-1
CN927 A-1
CN929 C-1
CN931 E-1
CN933 H-7
CN3101 A-4
CN4401 A-2
CN4402 A-6
CN4403 A-7
CN4404 A-8
D901 H-1
D1501 E-8
D2201 D-6
D2202 D-6
D4401 A-7
D4803 H-2
D4804 G-4
D5701 G-7
FB1501 E-7
FB1502 F-7
FB1503 E-7
FB1504 D-2
FB2201 F-6
FB2202 D-3
FB2203 D-5
FB2204 D-6
FB2205 F-6
IC901 H-1
IC1302 D-9
IC1502 D-2
IC1503 E-8
IC1504 E-8
IC1505 E-7
IC2201 E-5
IC2202 D-6
IC3103 B-5
IC3201 B-4
IC3702 D-8
IC3703 C-7
IC4401 B-7
IC4501 E-2
IC4802 G-5
IC4803 G-3
IC5701 G-7
L1306 C-9
L1307 C-9
L1308 C-9
L1309 D-9
L1321 D-9
L1501 C-2
L2201 D-5
L2202 C-4
L2203 C-4
L2204 C-6
L2207 D-6
L2208 E-6
L2209 D-3
L3706 C-7
L3707 D-7
Q901 C-9
Q902 C-9
Q903 C-9
Q904 F-9
Q905 F-9
Q906 A-1
Q907 A-1
Q908 A-1
Q2202 D-4
Q2203 D-3
Q2204 D-6
Q2206 C-6
Q3103 B-5
Q3104 B-5
Q3105 B-5
Q3106 B-5
Q3107 B-4
Q3108 B-5
Q3109 A-4
Q3110 A-4
Q3111 A-5
Q3112 A-4
Q3113 A-4
Q3114 B-4
Q3115 B-4
Q3116 A-5
Q3701 C-8
Q3702 C-7
Q4401 A-9
Q4403 C-8
Q4804 H-2
Q4806 G-4
Q4807 G-1
Q4808 G-1
Q4809 G-4
Q4810 G-4
Q4811 G-4
Q4812 G-4
Q5701 G-8
Q5703 H-8
Q5704 G-8
Q5706 G-8
Q5708 H-7
Q5719 G-7
Q5720 G-7
R901 H-1
R902 C-9
R903 C-9
R904 C-9
R907 H-6
R908 H-7
R909 G-4
R910 G-4
R911 F-4
R912 A-1
R913 A-1
R914 A-1
R915 A-1
R916 A-1
R917 A-1
R922 F-4
R923 F-9
R924 F-9
R925 F-9
R926 F-9
R1308 D-9
R1504 E-7
R1505 E-7
R1512 E-8
R1514 C-2
R1515 C-2
R1516 E-8
R1517 E-8
R1518 E-7
R1520 D-2
R1521 E-8
R1522 F-8
R1523 D-2
R1524 D-2
R1525 D-2
R1526 D-2
R2205 C-6
R2206 D-6
R2207 D-4
R2208 D-4
R2209 D-6
R2210 C-6
R2211 D-3
R2212 D-3
R2213 D-6
R2215 C-6
R2216 C-6
R2218 C-6
R2219 C-6
R2220 D-6
R2221 C-6
R2222 C-6
R2223 D-5
R2224 D-4
R2225 D-4
R2226 D-5
R2227 D-5
R2228 C-4
R2229 D-6
R2230 D-6
R2231 D-6
R2240 D-6
R2241 D-6
R2242 C-6
R2243 D-6
R2244 D-4
R2245 D-4
R2247 E-6
R2248 E-6
R2253 D-4
R2254 E-3
R2255 E-6
R2256 E-6
R3114 C-5
R3115 B-5
R3116 C-5
R3117 B-5
R3118 B-5
R3119 B-5
R3120 B-5
R3122 B-5
R3123 B-5
R3124 B-5
R3125 A-4
R3126 B-5
R3127 B-5
R3128 A-4
R3129 A-5
R3130 A-5
R3131 A-5
R3132 B-5
R3133 B-5
R3135 B-5
R3136 B-5
R3137 A-5
R3138 A-5
R3139 A-4
R3140 A-4
R3141 B-4
R3142 B-4
R3143 A-5
R3144 A-5
R3205 C-4
R3206 C-4
R3215 B-3
R3701 C-8
R3702 C-8
R3704 C-8
R3705 C-8
R3712 C-8
R3713 C-8
R3714 D-8
R3715 C-7
R3715 D-8
R3716 D-8
R3717 D-8
R3737 D-8
R3738 D-8
R3739 D-8
R3746 D-7
R3747 D-7
R3749 C-7
R3750 C-7
R4401 A-7
R4402 A-7
R4403 A-2
R4404 A-2
R4405 A-7
R4406 A-2
R4407 A-8
R4408 A-7
R4409 A-7
R4410 A-7
R4411 A-9
R4412 A-8
R4413 A-8
R4414 A-9
R4415 A-8
R4416 A-9
R4417 B-8
R4419 B-8
R4420 B-7
R4421 B-7
R4422 B-7
R4423 B-8
R4425 B-7
R4426 B-7
R4428 B-7
R4429 B-7
R4431 C-7
R4432 B-8
R4433 C-7
R4434 C-7
R4435 C-7
R4436 C-8
R4438 B-8
R4440 C-8
R4441 C-8
R4442 C-8
R4443 A-7
R4444 C-7
R4445 A-7
R4446 A-9
R4447 C-8
R4448 C-8
R4449 A-8
R4502 E-3
R4503 E-3
R4504 E-3
R4505 F-3
R4507 E-3
R4511 F-2
R4515 E-1
R4516 E-1
R4517 E-1
R4518 E-1
R4530 D-2
R4531 D-2
R4533 F-2
R4803 H-2
R4811 H-2
R4813 G-4
R4814 G-4
R4815 G-4
R4816 G-4
R4817 G-4
R4818 G-4
R4819 G-4
R4820 G-4
R4821 G-4
R4822 G-4
R4823 G-4
R4824 G-5
R4825 G-4
R4827 G-4
R4828 G-4
R4829 G-4
R4830 G-4
R4831 H-3
R4832 H-3
R4837 H-3
R4838 H-3
R4839 H-3
R4840 H-3
R4845 H-3
R4857 G-1
R4858 G-4
R4859 G-4
R4863 H-3
R4864 H-2
R4866 H-2
R4871 H-2
R4872 H-2
R4873 H-2
R4874 G-2
R4875 G-2
R4876 G-2
R4877 G-2
R4878 G-2
R4879 G-1
R4880 G-1
R4881 G-1
R4882 G-2
R4883 G-2
R4884 F-2
R4885 F-2
R4886 F-2
R4887 F-1
R4888 F-1
R4889 G-2
R4890 G-1
R4891 F-3
R4892 F-3
R4893 G-1
R4894 G-2
R4895 G-4
R4897 G-4
R4898 G-4
R5701 G-8
R5702 H-8
R5707 G-7
R5708 H-7
R5709 H-8
R5710 H-8
R5711 G-8
R5712 G-8
R5714 H-7
R5715 H-7
R5720 H-7
R5721 H-7
R5723 H-7
R5724 G-6
R5725 G-6
R5726 H-6
R5727 H-6
R5728 G-6
R5729 G-6
R5730 H-6
R5733 H-6
R5742 G-8
R5743 G-8
R5750 H-8
R5772 G-8
R5773 H-8
R5785 G-7
R5786 G-7
S4801 C-3
X1501 E-8
X2201 D-3
X4801 H-3
X4802 G-1
PARTS LOCATION
VC-250
4-70
Page 88

VC-250 BOARD (SIDE B)
C903 E-20
C1335 B-12
C1339 C-12
C1341 C-12
C1345 C-12
C1355 D-12
C1356 D-12
C1357 B-16
C1358 B-16
C2291 A-15
C2292 B-15
C2293 A-14
C3101 C-16
C3102 C-17
C3103 B-17
C3104 C-17
C3105 C-16
C3106 C-17
C3107 B-17
C3108 C-18
C3109 B-16
C3110 B-16
C3111 A-18
C3112 B-16
C3113 B-17
C3114 B-17
C3115 B-17
C3116 B-17
C3117 B-16
C3118 B-16
C3119 B-17
C3120 B-17
C3122 A-18
C3132 C-16
C3213 B-18
C3216 B-18
C3217 C-18
C3302 C-17
C3303 E-18
C3305 F-18
C3306 F-17
C3307 E-18
C3308 E-18
C3309 E-16
C3310 E-18
C3311 D-16
C3312 D-18
C3313 D-18
C3314 D-18
C3315 D-15
C3316 D-15
C3317 D-17
C3318 D-18
C3319 D-18
C3320 C-18
C3321 C-18
C3322 D-18
C3323 D-17
C3324 D-15
C3325 D-15
C3326 D-15
C3327 C-16
C3328 C-16
C3329 A-20
C3331 C-20
C3332 C-20
C3333 C-20
C3334 F-16
C3335 B-20
C3336 B-20
C3337 C-20
C3338 C-20
C3339 D-17
C3340 D-16
C3341 D-16
C3342 D-16
C3343 D-16
C3345 D-15
C3346 D-18
C3348 D-18
C3349 F-18
C3350 F-18
C3351 F-18
C3352 D-16
C3601 F-13
C3602 E-14
C3603 F-14
C3604 F-13
C3608 E-13
C3610 E-13
C3611 F-14
C3612 F-14
C3613 F-14
C3614 F-14
C3615 E-14
C3616 E-14
C3617 E-14
C3618 E-14
C3619 E-14
C3620 E-14
C3621 E-14
C3622 F-14
C3626 E-14
C3628 E-14
C3629 E-14
C3630 E-15
C3631 F-15
C3632 F-15
C3633 F-15
C3634 E-15
C3635 F-14
C3636 E-13
C3704 C-13
C3705 C-13
C3706 C-13
C3707 C-13
C3708 D-13
C3709 D-13
C3710 C-13
C3711 D-13
C3712 C-13
C3713 D-14
C3714 C-14
C3715 C-14
C3716 C-14
C3717 D-14
C3718 C-14
C3719 C-14
C3720 D-14
C3721 D-14
C3722 D-14
C3723 C-14
C3724 C-14
C3725 D-14
C3726 D-14
C3727 D-14
C3728 C-14
C3729 C-14
C3730 C-14
C3731 C-14
C3732 D-15
C3733 C-15
C3734 D-14
C3735 D-14
C3736 D-13
C3750 D-15
C3751 C-15
C3901 A-14
C3902 A-14
C3903 B-14
C3904 B-14
C3905 B-13
C3906 B-13
C3908 B-14
C3909 B-13
C3910 A-13
C3911 A-13
C3913 A-13
C3914 A-13
C3915 B-13
C3916 B-13
C3917 A-13
C3918 A-13
C3919 B-13
C3920 B-13
C3921 A-13
C3922 B-13
C3923 A-12
C3924 B-12
C3925 B-12
C3926 B-12
C3927 B-12
C3928 B-12
C3929 B-12
C3934 B-13
C3935 A-12
C3936 A-12
C4507 E-20
C4509 E-19
C4801 G-20
C4802 G-19
C4806 H-19
C4807 G-19
C4816 G-18
C4817 G-18
C4827 G-12
C4902 H-18
C4903 H-18
C4904 H-18
C4905 H-18
C4906 H-17
C4907 H-18
C4911 G-17
C5704 G-14
C5705 H-14
C5706 H-14
C5750 G-14
C5751 G-14
C5752 G-14
C5753 G-14
C5754 G-14
C5755 G-14
C5756 G-14
C5757 G-14
C5760 H-14
C5761 H-13
C5762 H-14
C5763 H-13
C5764 H-14
C5765 G-14
C5766 G-13
C5767 G-13
C5768 H-13
C5769 H-14
C5770 G-13
C5771 G-14
CN921 C-12
D3301 D-18
D3302 D-18
D3303 D-15
D3304 D-15
D3701 D-13
D3702 D-13
D4801 H-19
D4802 H-19
D4805 G-18
FB2291 A-14
FB3302 D-16
FB3303 C-17
FB3304 A-20
FB3307 E-18
FB3601 F-15
FB3701 C-14
FB4501 E-20
FB4801 H-19
FB4901 H-18
IC1303 B-15
IC2291 A-14
IC3101 B-17
IC3102 B-16
IC3202 B-18
IC3301 E-17
IC3302 F-16
IC3303 B-20
IC3304 F-18
IC3603 E-14
IC3701 C-14
IC3901 B-13
IC4502 E-20
IC4801 H-19
IC4901 H-17
IC4902 G-17
IC5702 G-14
IC5704 G-13
L1311 B-15
L1313 C-12
L1314 C-12
L1315 C-12
L1316 C-12
L1320 D-12
L2291 B-15
L3102 B-18
L3103 A-18
L3104 A-18
L3105 C-16
L3106 B-16
L3201 B-18
L3303 D-18
L3304 D-16
L3305 C-18
L3306 C-15
L3307 C-20
L3601 F-13
L3602 E-13
L3701 C-14
L3702 D-13
L3703 D-14
L3705 D-15
L3901 A-13
L3902 A-13
L3903 A-13
L3904 A-13
L5701 G-15
Q1322 D-12
Q1324 D-12
Q1326 D-12
Q3102 C-17
Q3201 B-18
Q3202 B-18
Q3302 C-16
Q3304 C-16
Q3306 C-17
Q3307 C-16
Q3308 C-16
Q3602 F-13
Q3603 F-13
Q3604 F-13
Q3605 F-14
Q3606 E-13
Q3902 A-12
Q3903 A-12
Q4801 G-20
Q4802 G-20
Q4803 G-20
Q4805 G-20
Q5716 H-13
Q5717 G-14
Q5718 H-13
Q5721 H-14
Q5722 H-13
R1315 B-16
R1335 D-12
R1337 D-12
R1341 D-12
R1342 D-12
R1343 D-12
R3103 C-17
R3104 C-17
R3105 B-17
R3106 B-16
R3107 B-17
R3108 B-16
R3109 B-17
R3110 B-17
R3111 B-17
R3112 B-16
R3113 B-17
R3146 C-16
R3207 B-18
R3208 B-18
R3209 B-18
R3210 B-18
R3211 B-18
R3212 B-18
R3213 B-18
R3214 B-18
R3305 F-16
R3306 F-18
R3307 E-18
R3308 F-18
R3309 D-17
R3310 D-18
R3311 D-18
R3312 D-18
R3313 D-17
R3314 D-17
R3315 D-16
R3316 D-16
R3317 D-16
R3318 D-15
R3319 D-15
R3320 D-18
R3321 D-16
R3322 D-18
R3323 D-15
R3324 D-15
R3325 D-15
R3326 D-16
R3328 C-16
R3330 B-20
R3331 C-16
R3333 B-20
R3334 C-16
R3336 C-16
R3337 C-19
R3339 B-20
R3340 C-17
R3343 C-17
R3345 B-20
R3346 B-20
R3347 B-20
R3348 B-20
R3349 B-20
R3350 B-20
R3351 C-16
R3352 B-19
R3353 B-20
R3354 B-20
R3355 B-20
R3356 C-16
R3357 B-20
R3358 C-16
R3359 B-19
R3360 C-16
R3361 C-20
R3362 C-20
R3363 C-20
R3364 C-20
R3365 C-20
R3366 C-20
R3367 C-20
R3368 C-20
R3369 C-20
R3370 C-20
R3371 C-20
R3372 C-20
R3375 F-17
R3376 F-17
R3377 D-18
R3378 D-15
R3379 D-16
R3380 D-18
R3381 D-18
R3382 D-16
R3383 C-15
R3384 C-15
R3385 F-18
R3386 F-18
R3604 E-14
R3606 F-13
R3607 E-13
R3608 F-14
R3609 F-14
R3611 F-13
R3612 F-14
R3617 F-13
R3618 F-14
R3620 F-13
R3621 F-13
R3622 F-13
R3636 E-14
R3639 E-14
R3643 F-14
R3644 F-14
R3646 E-14
R3648 E-14
R3652 F-14
R3656 E-14
R3657 F-14
R3658 E-13
R3659 E-13
R3660 E-13
R3718 D-14
R3719 D-14
R3721 D-13
R3722 C-14
R3723 D-14
R3724 C-14
R3726 C-14
R3727 C-15
R3728 C-14
R3729 C-14
R3730 C-15
R3731 D-13
R3732 D-13
R3733 D-14
R3734 D-13
R3740 D-15
R3741 C-15
R3742 C-14
R3743 D-15
R3744 C-14
R3745 C-14
R3748 D-15
R3903 A-13
R3904 A-13
R3905 B-14
R3908 A-13
R3909 B-13
R3910 B-13
R3911 B-13
R3912 A-13
R3913 A-13
R3915 B-13
R3916 A-13
R3917 B-13
R3918 B-13
R3919 B-12
R3920 B-12
R3922 B-12
R3923 A-12
R3924 B-12
R3936 A-13
R3940 B-13
R4508 F-19
R4512 D-19
R4520 E-20
R4521 E-20
R4522 E-20
R4523 E-20
R4524 E-20
R4525 E-20
R4526 E-20
R4527 E-20
R4528 E-20
R4529 E-20
R4532 E-20
R4801 G-20
R4802 G-20
R4805 G-20
R4806 G-20
R4807 G-20
R4808 G-19
R4809 G-20
R4810 G-20
R4812 G-20
R4826 G-19
R4833 G-19
R4834 G-18
R4835 G-19
R4836 G-18
R4841 G-19
R4842 G-18
R4843 G-18
R4846 G-19
R4848 G-19
R4849 G-19
R4850 G-18
R4851 G-18
R4852 G-19
GV-D200/D200E/D800/D800E
R4853 G-19
R4854 G-19
R4855 G-19
R4856 G-18
R4860 G-19
R4861 G-19
R4862 G-19
R4865 G-19
R4867 G-19
R4868 G-19
R4869 G-19
R4870 G-19
R4896 G-20
R4901 H-17
R4902 H-18
R4903 H-18
R4904 H-17
R4905 H-18
R4906 H-18
R4907 H-18
R4908 H-17
R4910 H-17
R4911 G-17
R4912 G-17
R4913 G-17
R4914 G-17
R4917 G-17
R4919 H-17
R4920 G-17
R4921 G-17
R4927 G-18
R4928 G-17
R4929 G-17
R4930 G-17
R4931 F-17
R4932 F-17
R4933 G-17
R4934 G-17
R4935 G-18
R4936 H-18
R4938 G-18
R4939 F-18
R4940 F-18
R4941 G-18
R4942 G-18
R4945 H-17
R4946 H-17
R4947 F-18
R4948 G-18
R4949 G-18
R4950 F-18
R4951 G-18
R4952 G-18
R4953 G-18
R5731 G-14
R5732 G-14
R5735 G-15
R5736 G-15
R5737 G-15
R5738 G-15
R5739 G-15
R5740 G-15
R5741 G-15
R5751 H-13
R5752 H-13
R5753 H-13
R5754 H-14
R5755 H-13
R5756 H-14
R5757 H-13
R5758 H-13
R5759 H-13
R5760 H-13
R5761 H-13
R5762 H-13
R5763 G-14
R5764 G-13
R5765 G-14
R5766 G-13
R5767 G-13
R5768 G-13
R5769 G-14
R5770 G-14
R5771 G-13
R5774 H-13
R5775 H-13
R5776 H-13
R5777 H-14
R5780 H-13
R5781 H-13
R5783 H-13
R5784 H-13
S4802 G-12
X3301 E-18
X3701 D-14
X4901 H-18
4-71
PARTS LOCATION
VC-250
Page 89

GV-D200/D200E/D800/D800E
IO-68 BOARD (SIDE A)
C103 F-6
C104 E-6
C107 E-6
C110 E-6
C112 E-3
C117 D-1
C118 D-1
C119 F-2
C120 F-2
C121 E-1
C122 E-1
C123 F-2
C124 F-2
C127 E-1
CN104 E-1
D101 E-6
D102 F-3
D103 E-3
D104 E-6
D110 F-6
D113 F-3
D114 E-1
D115 F-3
D116 E-1
D117 F-2
D123 E-1
D124 E-1
D127 F-1
D128 E-1
D129 E-1
J101 E-2
J102 E-6
J103 E-3
L101 E-6
L103 E-7
L104 E-6
L105 E-1
L106 F-2
L107 E-1
L108 F-2
R101 F-7
R102 E-7
R103 F-7
R105 E-6
R106 E-6
R107 E-6
R120 E-3
R128 F-6
R129 F-6
R130 F-1
R131 F-1
R137 E-1
R138 E-5
R139 E-3
S101 F-6
S102 F-5
S103 F-4
S104 F-2
S105 F-1
IO-68 BOARD (SIDE B)
C101 B-7
C102 B-8
C113 C-5
C114 B-4
C115 B-3
C116 A-6
C125 B-2
C126 B-2
CN103 B-2
CN105 A-7
D105 C-5
D106 B-4
D107 B-3
D108 B-3
D109 A-6
D111 A-6
D112 A-6
D119 B-2
D120 B-2
D121 C-8
D122 C-7
D125 B-4
D126 C-5
FB101 A-6
R110 C-5
R111 B-4
R112 B-3
R121 B-1
R132 A-6
R133 A-6
R134 B-6
R135 B-2
R136 B-2
FU-145 BOARD (SIDE A)
C504 D-2
C505 E-2
C506 D-2
C507 F-3
C1301 E-7
C1302 E-7
C1303 E-7
C1304 E-7
C1305 E-7
C1306 E-7
C1307 E-7
C1308 D-6
C1309 F-6
C1310 D-6
C1311 F-6
C1312 D-6
C1313 E-6
C1314 D-6
C1315 E-5
C1316 E-5
C1317 E-5
C1318 E-5
C1319 E-5
C1324 D-6
C1334 E-5
C1337 E-4
C1347 E-5
C1348 F-6
C1352 F-5
C1359 E-4
CN501 E-1
CN502 F-2
CN1301 F-6
D1302 E-4
D1303 E-3
D1304 E-4
D1306 E-3
IC1301 E-6
L501 D-2
L1301 F-4
L1302 F-4
L1303 D-4
L1304 D-3
L1305 E-4
L1310 E-5
L1317 D-4
L1318 E-5
LF501 F-3
Q502 E-2
Q507 E-2
Q1308 E-5
Q1310 F-5
Q1311 F-6
Q1312 F-5
Q1313 F-5
Q1314 E-4
R502 F-3
R503 F-3
R513 E-2
R1301 E-7
R1302 E-7
R1303 D-7
R1304 D-6
R1305 D-7
R1306 E-7
R1307 D-7
R1309 D-6
R1310 F-6
R1311 F-6
R1312 D-6
R1313 F-6
R1314 D-6
R1316 F-7
R1317 E-5
R1318 E-5
R1319 E-4
R1320 E-3
R1321 F-5
R1322 F-5
R1326 D-6
R1345 F-6
R1346 F-6
R1347 F-5
R1348 F-5
T1301 E-3
FU-145 BOARD (SIDE B)
C501 A-2
C502 A-2
C503 B-2
C508 C-2
C1321 B-3
C1323 A-3
C1326 A-4
C1327 A-4
C1328 B-3
C1329 B-4
C1330 C-3
C1331 B-4
C1332 C-4
C1338 B-4
C1342 B-4
C1344 C-4
D501 A-2
D502 A-2
D503 B-1
D504 B-2
D505 A-2
D506 C-2
D507 C-2
D1301 B-3
D1305 B-3
F501 A-3
F502 B-2
F503 B-2
F504 B-2
F505 C-2
Q501 B-2
Q503 B-1
Q504 B-1
Q505 B-1
Q506 B-2
Q1301 B-3
Q1302 A-3
Q1303 B-4
Q1304 A-4
Q1305 C-4
Q1306 C-3
Q1307 A-4
Q1309 C-4
R501 A-2
R504 B-2
R505 B-2
R506 B-2
R507 B-2
R508 B-1
R509 B-1
R510 B-2
R511 C-2
R512 C-2
PARTS LOCATION
IO-68, FU-145
4-72
Page 90

GV-D200/D200E/D800/D800E
PD-130 BOARD (SIDE A)
C5501 F-5
C5502 F-5
C5503 E-6
C5504 F-6
C5505 E-7
C5506 E-7
C5507 E-7
C5508 F-6
C5509 E-5
C5510 E-6
C5511 F-6
C5512 F-6
C5513 E-6
C5514 E-5
C5515 F-5
C5516 F-5
C5517 E-5
C5518 E-5
C5519 E-5
C5520 D-6
C5521 F-7
C5522 F-7
C5523 G-6
C5524 F-7
C5525 E-6
C5526 E-6
C5527 E-6
C5528 D-6
C5529 F-7
C5530 G-7
C5531 G-7
C5601 E-4
C5602 D-4
C5603 D-4
C5604 E-2
C5605 F-4
C5606 G-4
C5607 G-3
CN5501 G-7
CN5502 D-7
CN5503 A-2
CN5505 C-4
CN5506 C-6
CN5604 G-3
CN5607 A-9
CN5608 D-8
D5501 E-6
D5502 F-6
D5503 D-7
D5504 F-7
D5505 A-1
D5506 C-3
D5601 G-4
D5603 D-3
D5604 E-8
D5605 F-1
IC5501 E-6
IC5502 F-6
IC5503 F-7
IC5601 E-4
IC5602 F-4
L5501 D-4
L5502 D-4
L5503 D-4
L5504 D-4
L5505 F-6
L5601 E-3
Q5501 F-6
Q5502 F-7
Q5503 G-7
Q5504 F-7
Q5505 F-7
Q5506 G-7
Q5601 E-4
Q5602 E-2
Q5603 F-4
Q5604 F-4
R5501 E-7
R5502 E-7
R5503 E-7
R5504 F-6
R5505 E-6
R5506 F-6
R5507 F-6
R5508 F-6
R5509 F-6
R5510 F-6
R5511 F-6
R5512 F-5
R5513 F-6
R5514 G-6
R5515 G-6
R5516 E-7
R5517 G-7
R5518 G-6
R5519 G-6
R5520 G-6
R5521 G-7
R5522 G-6
R5523 G-7
R5524 G-7
R5525 G-6
R5551 F-7
R5553 D-7
R5557 E-7
R5558 E-7
R5559 D-6
R5560 F-6
R5561 F-7
R5562 F-7
R5563 F-7
R5564 G-7
R5565 G-7
R5566 G-7
R5567 G-7
R5568 F-7
R5569 E-6
R5608 E-4
R5609 E-4
R5610 E-3
R5611 F-4
R5612 F-4
R5613 E-3
R5614 E-4
R5616 G-4
R5617 G-4
R5618 G-4
R5619 D-3
R5620 E-8
R5621 F-1
R5622 E-1
R5623 E-1
R5624 E-2
R5625 E-2
R5626 E-1
T5601 F-3
IR-38 BOARD (SIDE A)
C392 A-1
D362 A-2
D363 A-1
F361 B-2
Q365 A-2
R388 A-1
R389 A-1
R392 B-1
IR-38 BOARD (SIDE B)
C382 C-3
C393 B-4
CN361 B-3
L363 C-3
EX-36 BOARD (SIDE A)
BZ201 E-2
CN204 E-5
CN205 E-1
EX-36 BOARD (SIDE B)
CN203 C-4
D201 B-3
D202 B-5
D203 B-5
D204 B-5
D205 B-5
D206 A-5
D207 B-5
D208 B-5
D209 A-5
D210 C-5
PD-130 BOARD (SIDE B)
S5601 G-18
S5602 D-18
4-73E
PARTS LOCATION
PD-130, IR-38, EX-36
Page 91
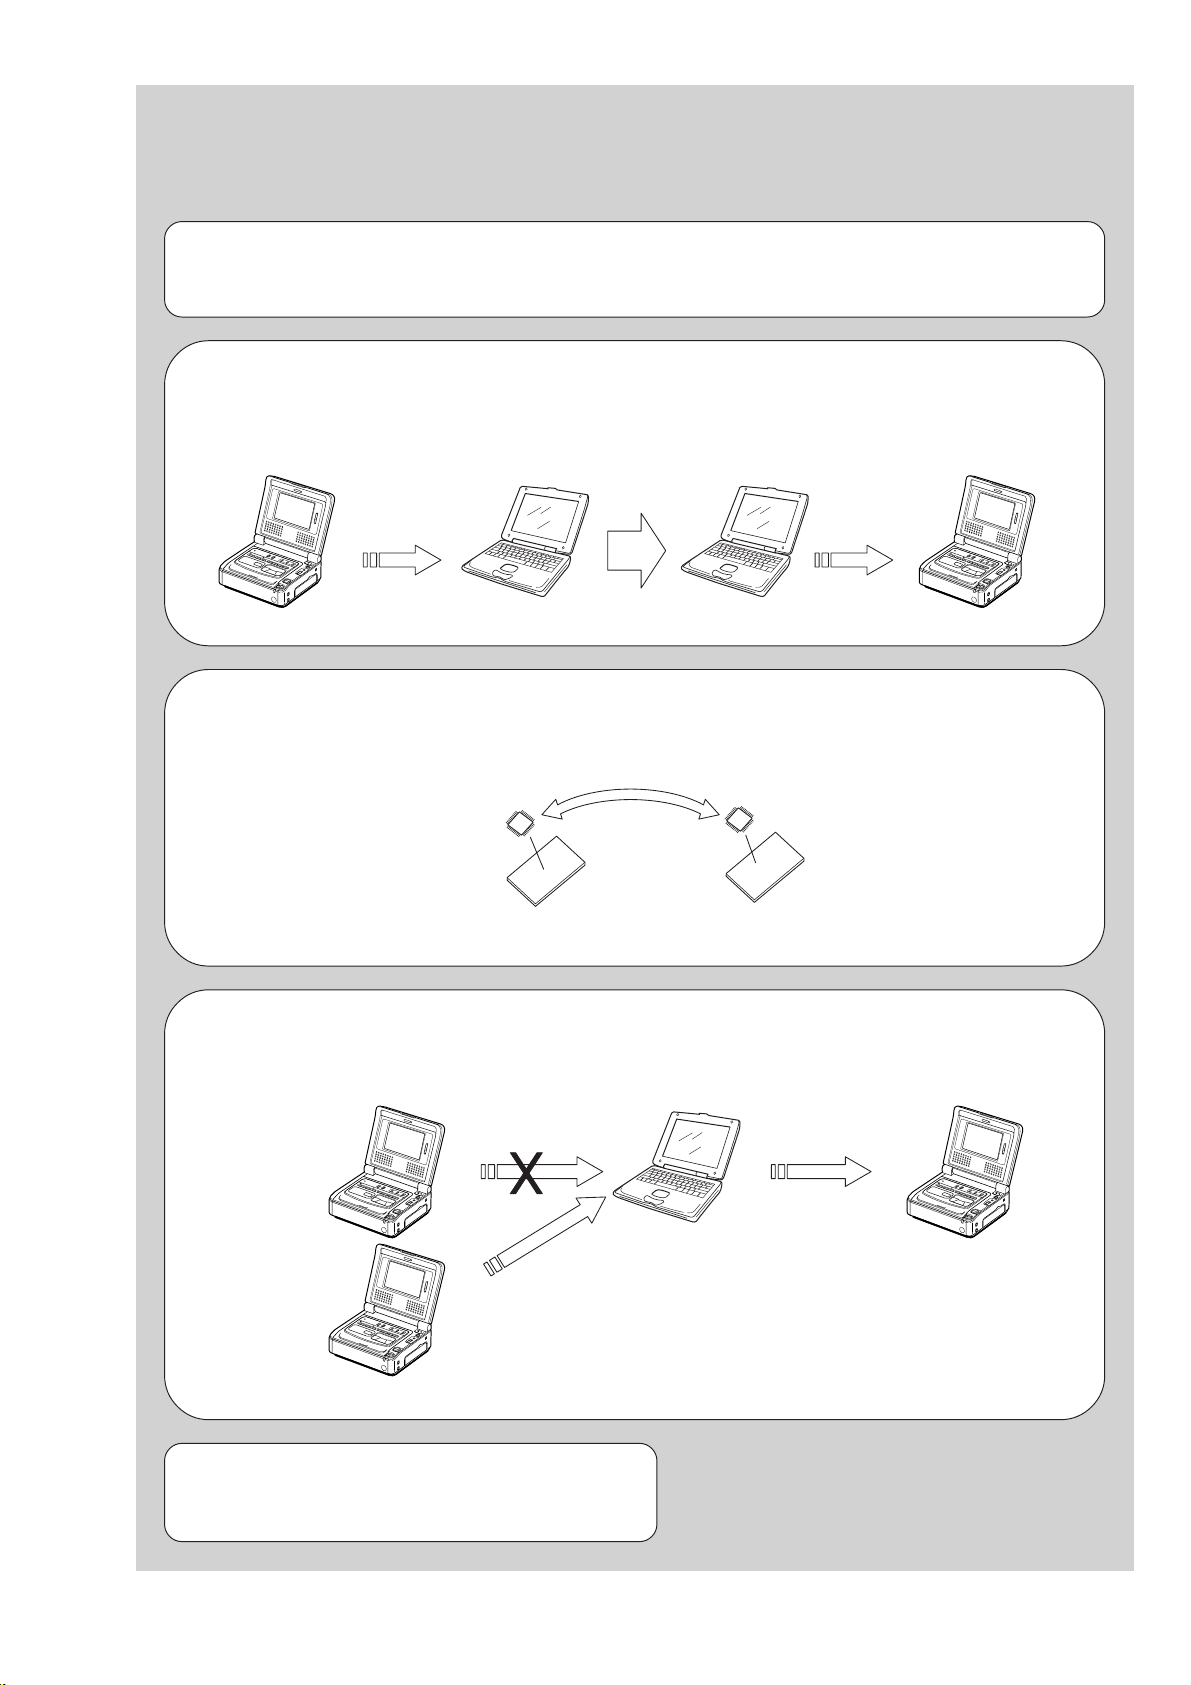
1. Before starting adjustment
EVR Data Re-writing Procedure When Replacing Board
The data that is stored in the repair board, is not necessarily correct.
Perform either procedure 1 or procedure 2 or procedure 3 when replacing board.
Procedure 1
Save the EVR data of the machine in which a board is going to be replaced. Download the sa ved data after a board
is replaced.
(Machine before starting repair)
SECTION 5
ADJUSTMENTS
PC PC
GV-D200/D200E/D800/D800E
(Machine after a board is replaced)
Save the EVR data
to a personal computer.
Download the saved
data to a machine.
Procedure 2
Remove the EEPR OM from the board of the machine that is going to be repaired. Install the removed EEPR OM
to the replaced board.
Remove the EEPROM and install it.
(Former board)
(New board)
Procedure 3
When the data cannot be saved due to defective EEPROM, or when the EEPROM cannot be removed or
installed, save the data from the same model of the same destination, and download it.
(Machine to be repaired) (Machine to be repaired)
PC
Save the data.
(The same model of the same destination)
After the EVR data is saved and downloaded, check the
respective items of the EVR data.
(Refer to page 5-3 for the items to be checked.)
Download the data.
5-1
Page 92
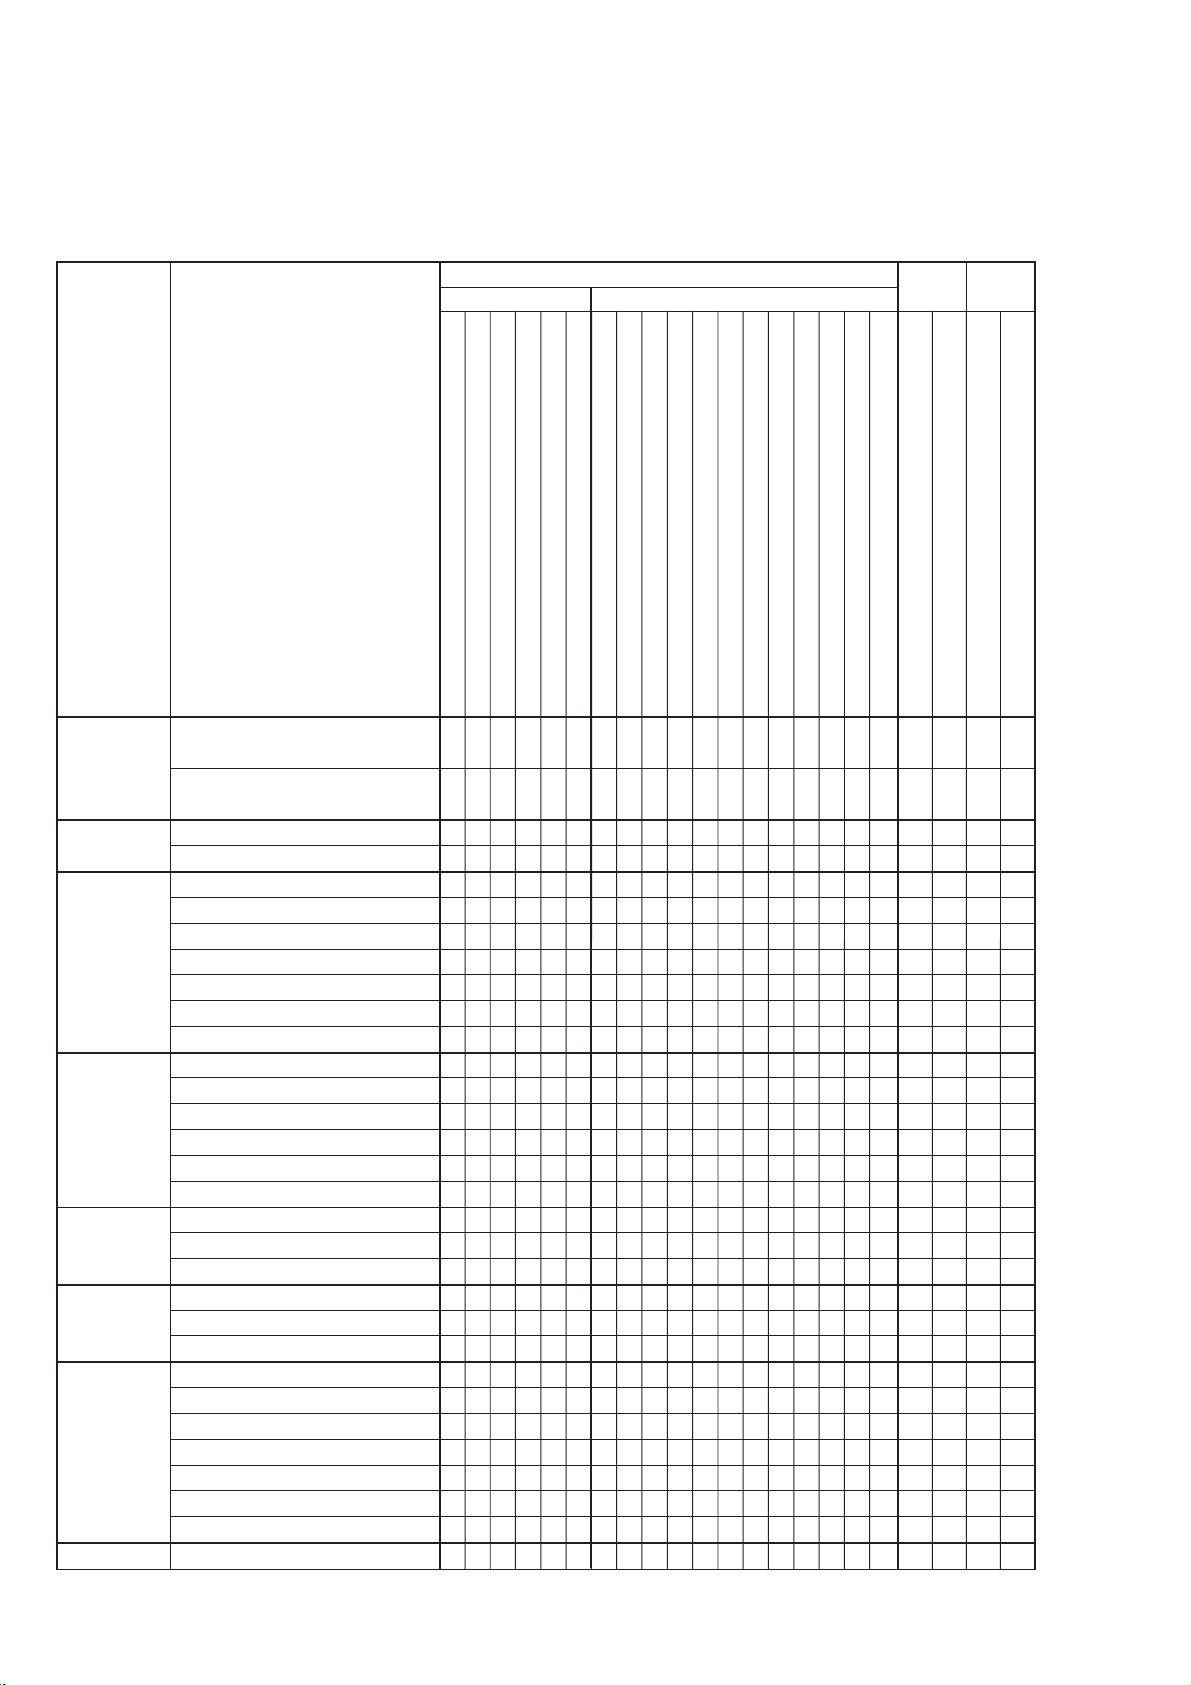
1-1. Adjusting items when replacing main parts and boards.
When replacing main parts, adjust the items indicated by z in the following table.
*1: When replacing the drum assy . or mechanism deck, reset the data of page: 2, ad dress: A2 to A4 to “00”. (Refer to “Record of Use check”
of “5-4. SERVICE MODE”)
*2: GV-D800/D800E only
Replaced parts Board EEPROM
Block replacement Parts replacement
replacement
replacement
Adjustment
Section
Initialization of
C,D,E,F,7,8
page data
System control
Servo & RF
Video
IR
Audio
LCD *2
Mechanism
Adjustment
Initialization of C, D, 8 page data
Initialization of E, F, 7 page data
Serial No. input
Battery end adj.
REEL FG adj.
Switching position adj.
AGC center level adj.
APC & AEQ adj.
PLL fo & LPF fo adj.
Hi8/Std8 switching position adj.
CAP FG duty adj.
27MHz origin oscillation adj.
Chroma BPF fo adj.
S VIDEO OUT Y level adj.
S VIDEO OUT chroma level adj.
Hi8/Std8 Y/C output level setting
Hi8/Std8 AFC fo adj.
IR video carrier frequency adj.
IR video deviation adj.
IR audio deviation adj.
Hi8/Std8 AFM BPF fo adj.
Hi8/Std8 AFM 1.5MHz deviation adj.
Hi8/Std8 AFM 1.7MHz deviation adj.
LCD initial data input
VCO adj.
RGB AMP adj.
Contrast adj.
COM-AMP adj.
V-COM adj.
White balance adj.
Tape path adj.
Mechanism deck *1
Mechanism deck M901 (Drum assy) *1
Mechanism deck M902 (Capstan motor)
Mechanism deck LS chassis assy
LCD block ND901 (Fluorescent tube) *2
LCD block LCD901 (LCD panel) *2
PD-130 board IC5501 (RGB driver (LCD)) *2
PD-130 board IC5502 (Timing generator (LCD)) *2
PD-130 board Q5602, T5601 (Inverter) *2
VC-250 board IC3103 (REC/PB AMP)
VC-250 board IC3101 (EQ, A/D conv. PLL)
VC-250 board IC3701 (LINE IN/OUT)
VC-250 board IC3301 (DV signal process)
VC-250 board IC1504, X1501 (X’tal OSC)
VC-250 board IC2291 (EVR)
VC-250 board IC2201 (Hi8/Std8 Y/C process)
VC-250 board IC3901 (IR transmitter)
VC-250 board IC5701 (AUDIO IN/OUT)
PD-130 board (COMPLETE) *2
VC-250 board (COMPLETE)
VC-250 board IC4502 (EEPROM)
VC-250 board IC4901 (EEPROM)
zz
zz
zz
zz
zz zz
zz z z
zz z z
zz z z
zz z z
zz z z
zz z z
zz z z
zzz
zz z z
zz z z
zzz
zz z z
zz z z
zzz zz
zzz z z
zzzz
zzzz
zzzz
zz
zzzz
zzzz
zz zzz
zzzz
zz z z z
zz z z z z z
zzzz
Table. 5-1-1
5-2
Page 93
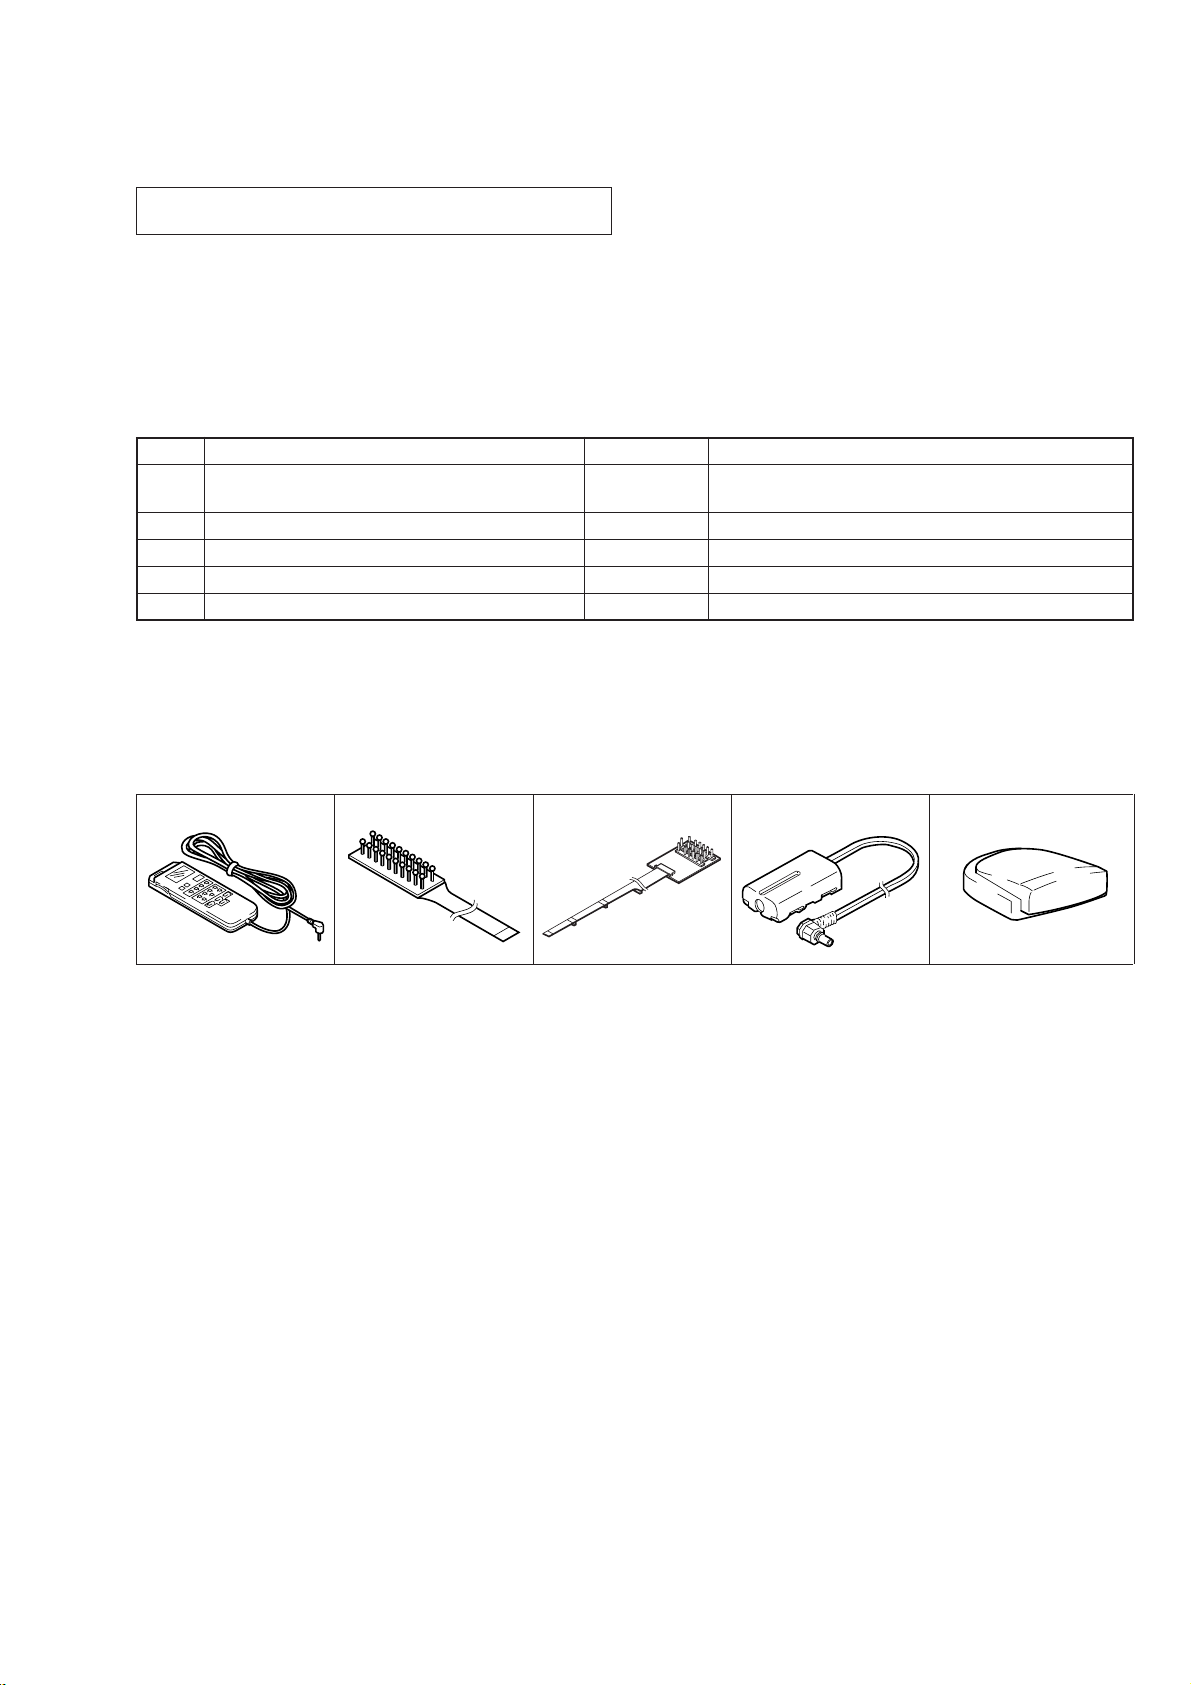
5-1. ADJUSTMENT PREPARATIONS
For details of the adjustment remote commander, refer to “5-4.
SERVICE MODE”.
With 4-inch LCD panel: GV-D800/D800E
Without 4-inch LCD panel: GV-D200/D200E
1-1. PREPARATIONS BEFORE ADJUSTMENT
1-1-1. List of Service Tools
• Oscilloscope • Regulated power supply • Frequency counter • Monitor TV
• Digital voltmeter • Pattern generator
Ref. No.
Adjustment remote commander (RM-95 upgraded).
J-1
(Note 1)
J-2
CPC-13 jig
J-3
Multi CPC jig
J-4
Power cord (Note 2)
J-5
IR receiver jig
Note 1: If the micro processor IC in the adjustment remote commander is
not the new micro processor (UPD7503G-C56-12), the pages
cannot be switched. In this case, replace with the new micro
processor (8-759-148-35).
Name
Parts Code
Usage
J-6082-053-B
J-6082-443-A
J-6082-311-A
J-6082-223-A
J-6082-383-A
For adjusting the video section
For adjusting the LCD block
For connecting the battery terminal and DC power supply
For adjusting the IR transmitter
Note 2: Connect the adjustment remote commander to the LANC jack,
and set to HOLD switch to the “ADJ” side.
J-1 J-2 J-3 J-4 J-5
Fig. 5-1-1.
5-3
Page 94
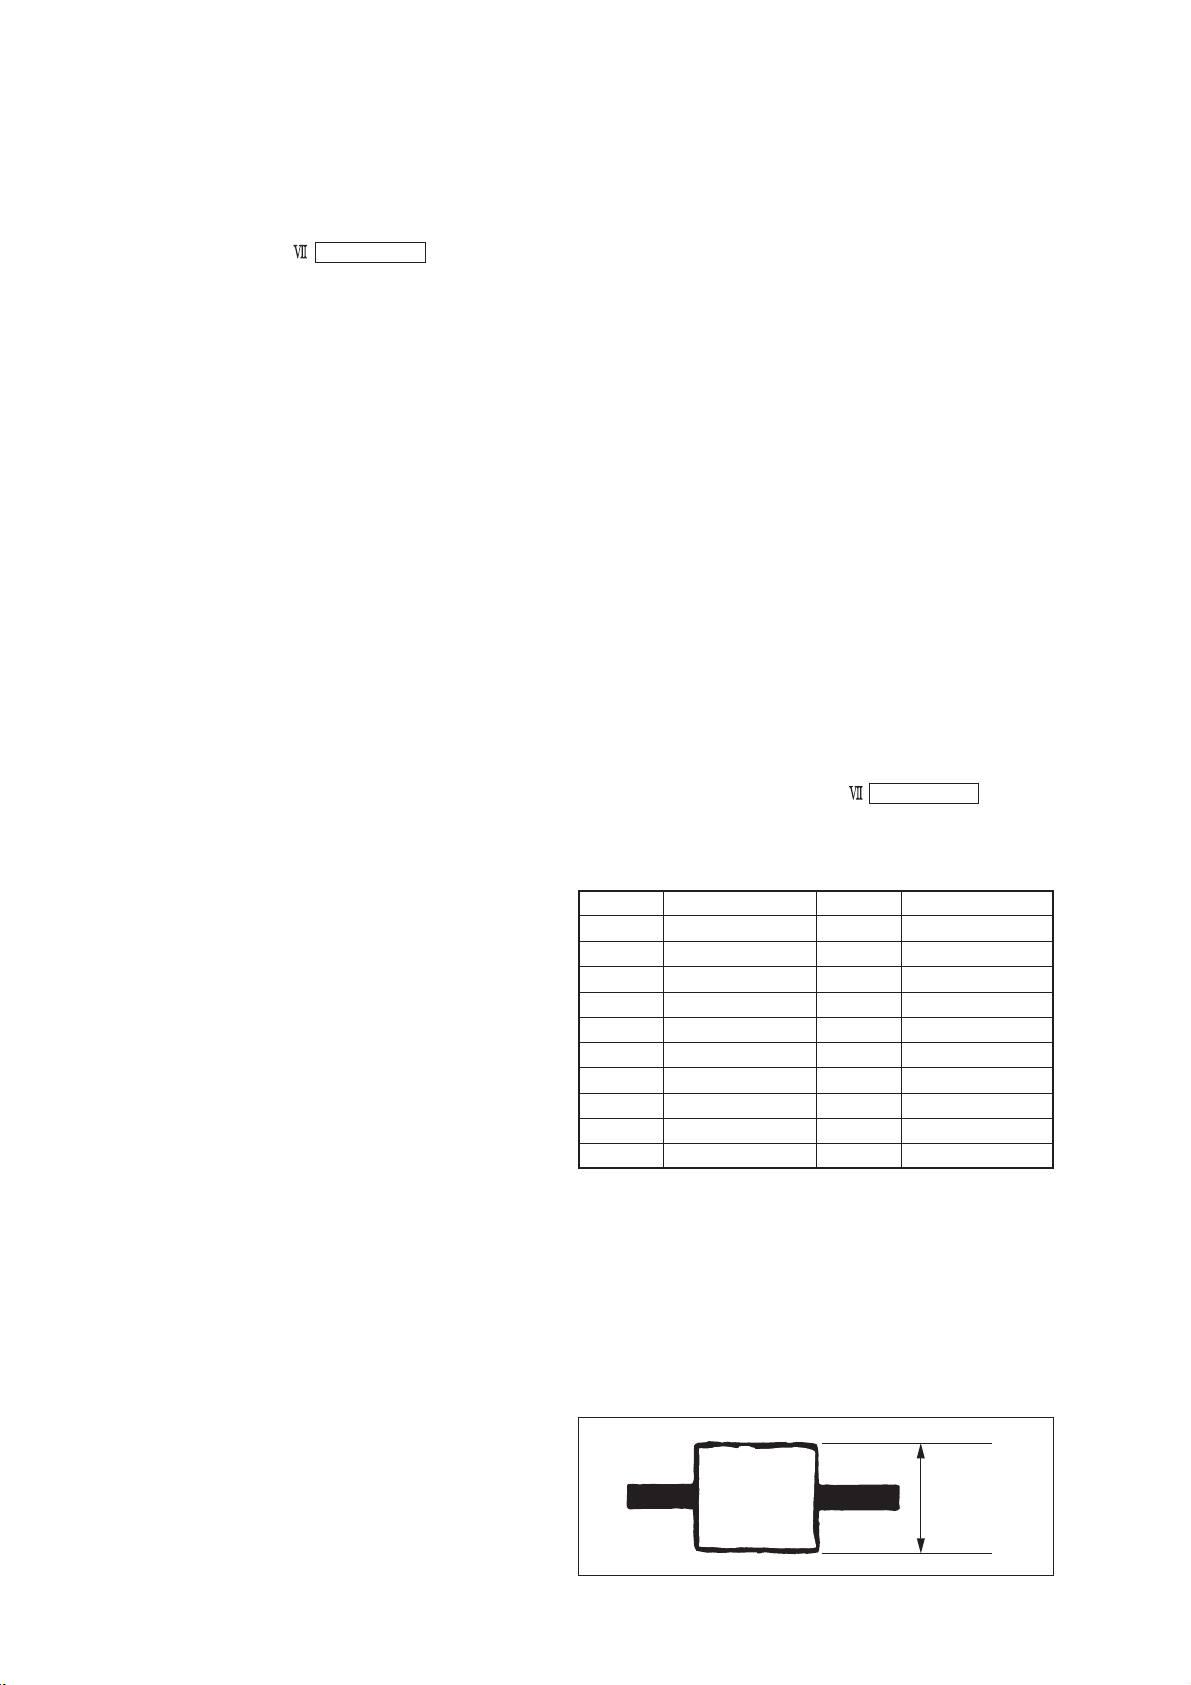
5-2. MECHANISM SECTION
ADJUSTMENT
Mechanism Section adjustments, checks, and replacement of
mechanism parts, refer to the separate volume “8mm Video
Mechanism Adjustment Manual
B Mechanism ”.
Note 1: NTSC model: GV-D200/D800
PAL model: GV-D200E/D800E
2-1. Hi8/STANDARD8 MODE
2-1-1. OPERATING WITHOUT CASSETTE
1) Refer to “Section 2. DISASSEMBLY” and supply the power
with the cabinet assembly removed. (So that the mechanical
deck can be operated.)
2) Connect the adjustment remote commander to the LANC jack.
3) Turn on the HOLD switch of the adjustment remote
commander.
4) Close the cassette compartment without loading a cassette and
complete loading.
5) Select page: 0, address: 01, and set data: 01.
6) Select page: F, address: 22, set data: 81, and press the PAUSE
button of the adjustment remote commander.
7) Select page: D, address: 10, set data: 10, and press the P AUSE
button of the adjustment remote commander.
8) Disconnect the power supply of the unit.
By carrying out the above procedure, the unit can be operated
without loading a cassette. (Note2)
Be sure to carry out “Processing after Operations” after
checking the operations.
Set the data of page: D, address: 10 to “12”, if the sensor
ineffective mode, forced VTR power supply ON mode is to be
used together.
Note 2: Except for the recording mode.
[Procedure after checking operations]
1) Select page: 0, address: 01, and set data: 01.
2) Select page: F, address: 22, set data: 80, and press the PAUSE
button of the adjustment remote commander.
3) Select page: D, address: 10, set data: 00, and press the P AUSE
button of the adjustment remote commander.
4) Select page: 0, address: 01, and set data: 00.
5) Disconnect the power supply of the unit.
2-1-2. TAPE PATH ADJUSTMENT
1. Preparations for Adjustment
1) Clean the tape path face (tape guide, capstan shaft, pinch roller).
2) Connect the adjustment remote commander to the LANC jack.
3) Turn on the HOLD switch of the adjustment remote
commander.
4) Select page: 0, address: 01, and set data: 01.
5) Select page: 2, address: 2E, and set data: 02.
6) Select page: F, addr ess: 22, set data: 88, and press the PAUSE
button of the adjustment remote commander.
(Be sure to perform “Processing after operation” after
completing adjustments.)
7) Connect the oscilloscope to VC-250 board CN933 via CPC-13
jig (J-6082-443-A).
Channel 1: VC-250 board, CN933 Pin 5
External trigger: VC-250 board, CN933 Pin 8
8) Playback Hi8/standard8 alignment tape for tracking.
(WR5-1NP(NTSC))
(WR5-1CP(PAL))
9) Check that the oscilloscope RF waveform is flat at the entrance
and exit.
If not flat, adjust according to the separate volume “8mm Video
Mechanical Adjustment Manual
10) Perform “Processing after operations”, after completing
adjustment.
CN933 of VC-250board
Pin No.
1
2
3
4
5
6
7
8
9
10
Signal Name
SWP
AFC F0
BPF MONI
F0 ADJ RF IN
PB RF
REG GND
RF AGC OUT
VC RF SWP
NC
NC
B Mechanism ”.
Pin No.
11
12
13
14
15
16
17
18
19
20
Signal Name
NC
NC
DV RF SWP
RF IN
CAP FG
RF MON
TMS
TCK
TDO
TDI
Table 5-2-1.
[Procedure after operations]
1) Connect the adjustment remote commander, and turn on the
HOLD switch.
2) Select page: 0, address: 01, and set data: 01.
3) Select page: 2, address: 2E, and set data: 00.
4) Select page: F, addr ess: 22, set data: 80, and press the PAUSE
button of the adjustment remote commander.
5) Select page: 0, address: 01, and set data: 00.
6) Remove the power supply from the unit.
Must be flat
Fig. 5-2-1.
5-4
Page 95
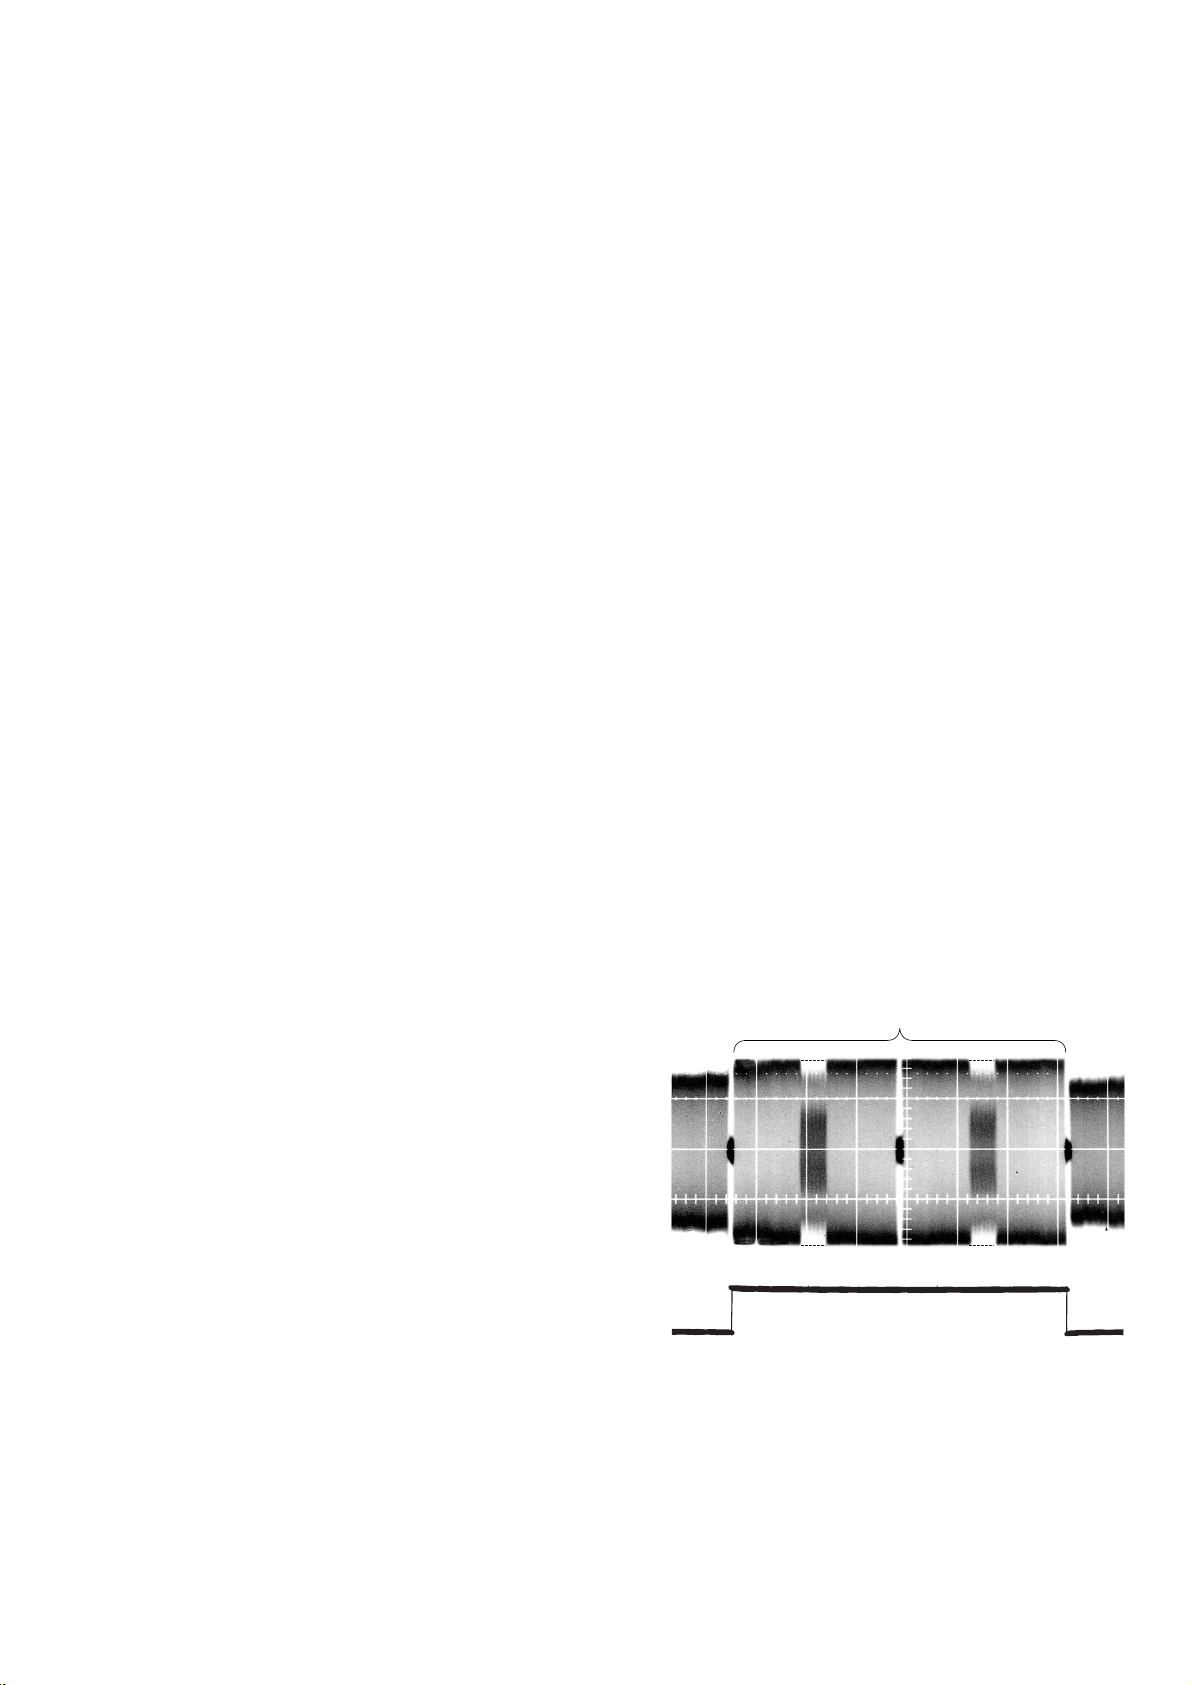
2-2. DIGITAL8 MODE
2-2-1. HOW TO ENTER RECORD MODE WITHOUT
CASSETTE
1) Connect the adjustment remote commander to the LANC jack.
2) Turn the HOLD switch of the adjustment remote commander
to the ON position.
3) Close the cassette compartment without the cassette.
4) Select page: 3, address: 01, and set data: 0C, and press the
PAUSE button of the adjustment remote commander.
(The mechanism enters the record mode automatically.)
Note: The function buttons becomes inoperable.
5) To quit the record mode, select page: 3, address: 01, set data:
00, and press the PAUSE button of the adjustment remote
commander. (Whenever you want to quit the record mode, be
sure to quit following this procedure.)
2-2-3. OVERALL TAPE PATH CHECK
1. Recording of the tape path check signal
1) Clean the tape running side (tape guide, capstan shaft, pinch
roller).
2) Input a color bar signal to the AUDIO/VIDEO INPUT jack.
3) Connect the adjustment remote commander to the LANC jack.
4) Turn the HOLD switch of the adjustment remote commander
to the ON position.
5) Set to the recording mode.
6) Select page: 3, address: 1C, set data: 5D, and press the P A USE
button of the adjustment remote commander.
7) Record for several minutes.
8) Release the recording mode.
9) Select page: 3, address: 1C, set data: 00, and press the P AUSE
button.
2-2-2. HOW TO ENTER PLAYBACK MODE WITHOUT
CASSETTE
1) Connect the adjustment remote commander to the LANC jack.
2) Turn the HOLD switch of the adjustment remote commander
to the ON position.
3) Close the cassette compartment without the cassette.
4) Select page: 3, address: 01, and set data: 0B, and press the
PAUSE button of the adjustment remote commander.
(The mechanism enters the playback mode automatically.)
Note: The function buttons becomes inoperable.
5) To quit the playback mode, select page: 3, address: 01, set data:
00, and press the PAUSE button of the adjustment remote
commander. (Whenever you want to quit the playback mode,
be sure to quit following this procedure.)
2. Tape path check
1) Clean the tape running side (tape guide, capstan shaft, pinch
roller).
2) Connect the adjustment remote commander to the LANC jack.
3) Turn the HOLD switch of the adjustment remote commander
to the ON position.
4) Connect an oscilloscope to VC-250 board CN933 via the CPC13 jig (J-6082-443-A).
Channel 1: VC-250 board, CN933 Pin qh (Note)
External trigger: VC-250 board, CN933 Pin qd
Note: Connect a 75Ω resistor between Pins qh of CN910 and 6
(GND).
5) Select page: 2, address: 2E, and set data: 01.
6) Playback the tape path check signal.
7) Select page: 3, address: 33, and set data: 08.
8) Select page: 3, address: 26, and set data: 31.
9) Check that the oscilloscope RF waveform is flat at the entrance
and exit.
If not flat, perform “2-1-2. TAPE PATH ADJUSTMENT “ of
“2-1. Hi8/STANDARD 8mm MODE”.
10) Select page: 3, address: 26, and set data: 00.
11) Select page: 3, address: 33, and set data: 00.
12) Select page: 2, address: 2E, and set data: 00.
Must be flat
Pin
Pin
5-5
qh
qd
Fig. 5-2-2.
Page 96

5-3. ELECTRICAL ADJUSTMENT
For details of the adjustment remote commander, refer to “5-4.
SERVICE MODE”.
3-1. PREPARATIONS BEFORE ADJUSTMENTS
Use the following measuring instruments for video section
adjustments.
Note: NTSC model:GV-D200/D800
PAL model: GV-D200E/D800E
3-1-1. Equipment to Required
1) TV monitor
2) Oscilloscope (dual-phenomenon, band width above 30 MHz
with delay mode) (Unless specified otherwise, use a 10 : 1
probe.)
3) Frequency counter
4) Pattern generator with video output terminal
5) Digital voltmeter
6) Audio generator
7) Audio level meter
8) Audio distortion meter
9) Audio attenuator
10) Regulated power supply
11) Digital8 alignment tapes
• SW/OL standard (WR5-2D)
Parts code: 8-967-993-22
• Audio operation check for NTSC (WR5-3ND)
Parts code: 8-967-993-32
• System operation check for NTSC (WR5-5ND)
Parts code: 8-967-993-42
• Audio operation check for PAL (WR5-3CD)
Parts code: 8-967-993-37
• System operation check for PAL (WR5-5CD)
Parts code: 8-967-993-47
12) NTSC Hi8/standard8 alignment tapes (For NTSC model)
• For tracking adjustment (WR5-1NP)
Parts code : 8-967-995-02
• For video frequency characteristics adjustment (WR5-7NE)
Parts code : 8-967-995-13
• For checking Standard 8 mode operations
For LP (WR5-4NL)
Parts code : 8-967-995-51
For SP (WR5-5NSP)
Parts code : 8-967-995-42
Note : The following alignment tapes can also be used.
WR5-4NSP (8-967-995-41)
• For checking Hi8 mode operations
For LP (WR5-8NLE)
Parts code : 8-967-995-52
For SP (WR5-8NSE)
Parts code : 8-967-995-43
• For Checking AFM stereo operations (WR5-9NS)
Parts code : 8-967-995-23
• For BPF adjustment (WR5-11NS)
Parts code : 8-967-995-71
13) PAL Hi8/standard8 alignment tapes (For PAL model)
• For tracking adjustment (WR5-1CP)
Parts code : 8-967-995-07
• For video frequency characteristics adjustment (WR5-7CE)
Parts code : 8-967-995-18
• For checking Standard 8 mode operations
For LP (WR5-4CL)
Parts code : 8-967-995-56
For SP (WR5-5CSP)
Parts code : 8-967-995-47
Note : The following alignment tapes can also be used.
1) WR5-3CL (8-967-995-36)
2) WR5-4CSP (8-967-995-46)
• For checking Hi8 mode operations
For LP (WR5-8CLE)
Parts code : 8-967-995-57
For SP (WR5-8CSE)
Parts code : 8-967-995-48
• For Checking AFM stereo operations (WR5-9CS)
Parts code : 8-967-995-28
• For BPF adjustment (WR5-11CS)
Parts code : 8-967-995-76
14) Adjustment remote commander (J-6082-053-B)
15) CPC-13 jig (J-6082-443-A)
16) Power code (J-6082-223-A)
Note : Connect the adjustment remote commander to the LANC jack,
and set the HOLD switch to the “ADJ” side.
17) IR receiver jig (J-6082-383-A)
18) Multi CPC jig (J-6082-311-A)
5-6
Page 97
3-1-2. Precautions on Adjusting
VC-250 board
CN933
20 1
1) Disconnecting the VC-250 board CN926 (4P, 0.8mm) means
disconnecting the lithium 3V power supply (FP-571 board
BT001), data such as date, time, user-set menus will be lost.
After completing adjustments, reset these data. If the CN926
has been disconnected, the self-diagnosis data, data on history
of use (total drum rotation time etc.) will be lost. Before
disconnecting, note down the self-diagnosis data (data of page:
2, address: B0 to C6) and data on history use (data of page: 2,
address: A2 to AA). (Refer to “5-4. SER VICE MODE” for the
self-diagnosis data and the data on the history use.)
2) To remove the cabinet (upper) and LCD block (GV-D800/
D800E only), disconnect the following connectors.
VC-250 board CN926 (4P 0.8mm)
(Lithium battery)
VC-250 board CN931 (40P 0.5mm)
(EX-36 board (Multi connector))
VC-250 board CN929 (5P 0.8mm)
(DV jack)
VC-250 board CN923 (32P 0.5mm) (GV-D800/D800E
only)
(PD-130 board (LCD panel)
VC-250 board CN924 (10P 0.5mm)
(IR-38 board (IR transmitter))
VC-250 board CN922 (50P 0.5mm)
(
IO-68 board, FP-575 flexibles, FP-246 flexible
As the video and audio jacks and LANC jack are provided on
the IO-68 board and the power switch is provided on the FP575 flexible board, these boards must be connected to the VC250 board. So remove the cabinet (R) assembly (IO-68 board
and FP-575 flexible and FP-246 flexible) from the cabinet
(upper) assembly and connect it to the following connector.
VC-250 board CN922 (50P 0.5mm)
3) By setting the “Forced VTR Power ON mode”, the video section
can be operate even if the FP-575 flexible board (po wer switch)
has been removed.
3-1-3. Adjusting Connectors
Some of the adjusting points of the video section are concentrated
at VC-250 board CN933. Connect the measuring instruments via
the CPC-13 jig (J-6082-443-A). The following table lists the pin
numbers and signal names of CN933.
Pin No.
1
2
3
4
5
6
7
8
9
10
Signal Name
SWP
AFC F0
BPF MONI
FO ADJ RF IN
PB RF
REG GND
RF AGC OUT
VC RF SWP
NC
NC
Pin No.
11
12
13
14
15
16
17
18
19
20
Signal Name
NC
NC
DV RF SWP
RF IN
CAP FG
RF MON
TMS
TCK
TDO
TDI
Table. 5-3-1.
)
Note 1: Setting the “Forced VTR Power ON” mode (VTR mode)
1) Select page: 0, address: 01, and set data: 01.
2) Select page: D, address: 10, set data: 02, and press the PAUSE
button of the adjustment remote commander.
The above procedure will enable the VTR power to be turned
on with the FP-575 flexible board removed.
After completing adjustments, be sure to exit the “Forced VTR
Power ON mode”.
Note 2: Exiting the “Forced Power ON” mode
1) Select page: 0, address: 01, and set data: 01.
2) Select page: D, address: 10, set data: 00, and press the PAUSE
button of the adjustment remote commander.
3) Select page: 0, address: 01, and set data: 00.
Fig. 5-3-1.
5-7
Page 98
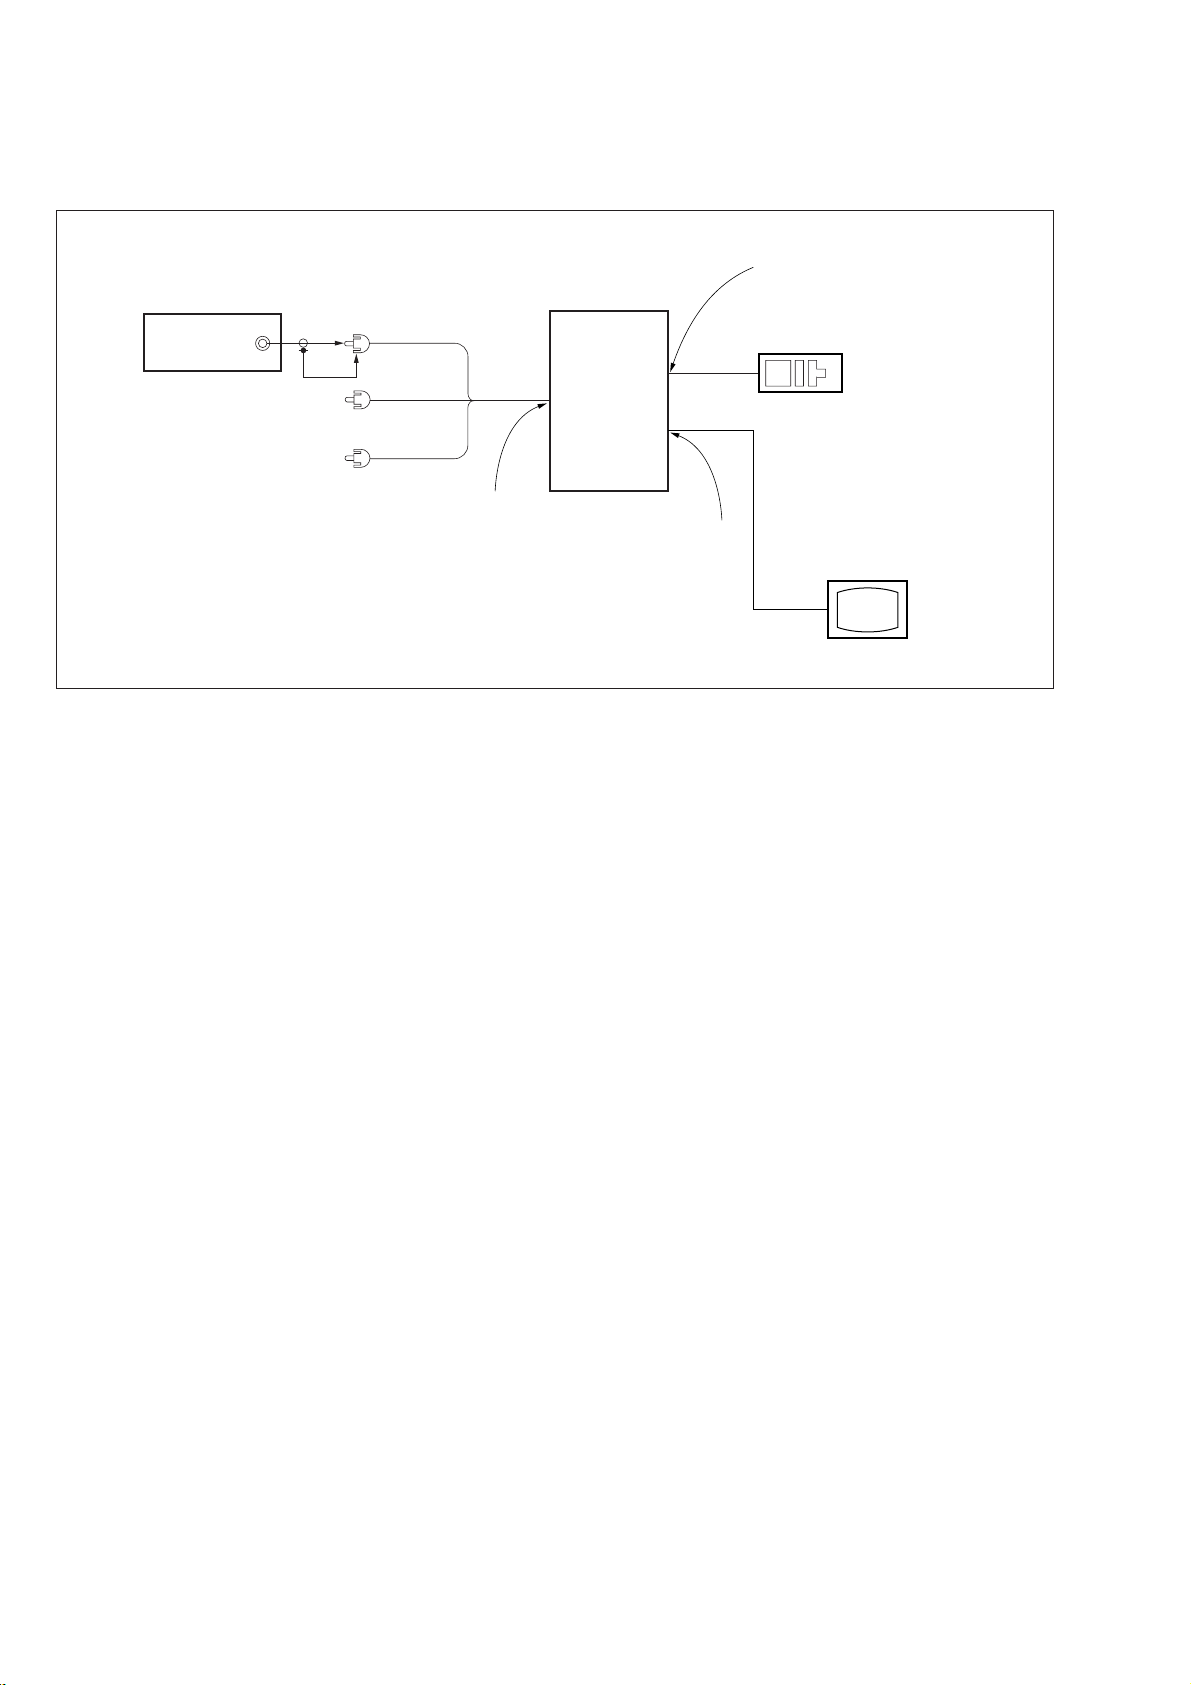
3-1-4. Connecting the Equipment
Connect the measuring instruments as shown in Fig. 5-3-2, and
perform the adjustments.
LANC jack
Pattern generator
Video output
(75
Ω
)
VIDEO
(Yellow)
AUDIO L
(White)
AUDIO R
(Red)
AUDIO/VIDEO INPUT jack
Adjustment
remote
commander
Main unit
VIDEO OUTPUT
jack
TV monitor
Fig. 5-3-2
5-8
Page 99
3-1-5. Alignment Tape
The following table lists alignment tapes which are available.
Use the tape specified in the signal column for each adjustment. If
the type of tape to be used for checking operations is not specified,
use whichever type.
Digital8 alignment tape
Name Usage
SW/OL standard
Audio operation check Audio system adjustment
(WR5-3ND (NTSC),
WR5-3CD (PAL))
System operation check Operation check
(WR5-5ND (NTSC),
WR5-5CD (PAL))
Hi8/standard8 alignment tape
Tracking
(WR5-1NP(NTSC), WR5-1CP(P AL))
Video frequency characteristics
(WR5-7NE(NTSC), WR5-7CE(P AL))
Operation check
(WR5-5NSP(NTSC), WR5-5CSP(P AL))
Operation check
(WR5-8NSE(NTSC), WR5-8CSE(P AL))
Operation check
(WR5-4NL(NTSC), WR5-4CL(P AL))
Operation check
(WR5-8NLE(NTSC), WR5-8CLE(PAL)
AFM stereo operation check
WR5-9NS(NTSC), WR5-9CS(P AL)
BPF adjustment
WR5-11NS(NTSC), WR5-11CS(PAL)
(WR5-2D)
Name
Switching position adjustment
Recording
mode
Standard8
Hi8
Standard8
Hi8
Standard8
Hi8
Standard8
Standard8
Tape type
MP
ME
MP
ME
MP
ME
MP
MP
Tape
speed
SP
SP(NTSC)
LP(PAL)
SP
SP
LP
LP
SP
SP
Usage
Tape path adjustment, Switching position
adjustment
Frequency characteristics adjustment
Operation check
AFM stereo Operation check
BPF adjustment
Tape type
ME ......... Particle type metal tape
MP.......... Evaporated type metal tape
Table. 5-3-2.
5-9
Page 100
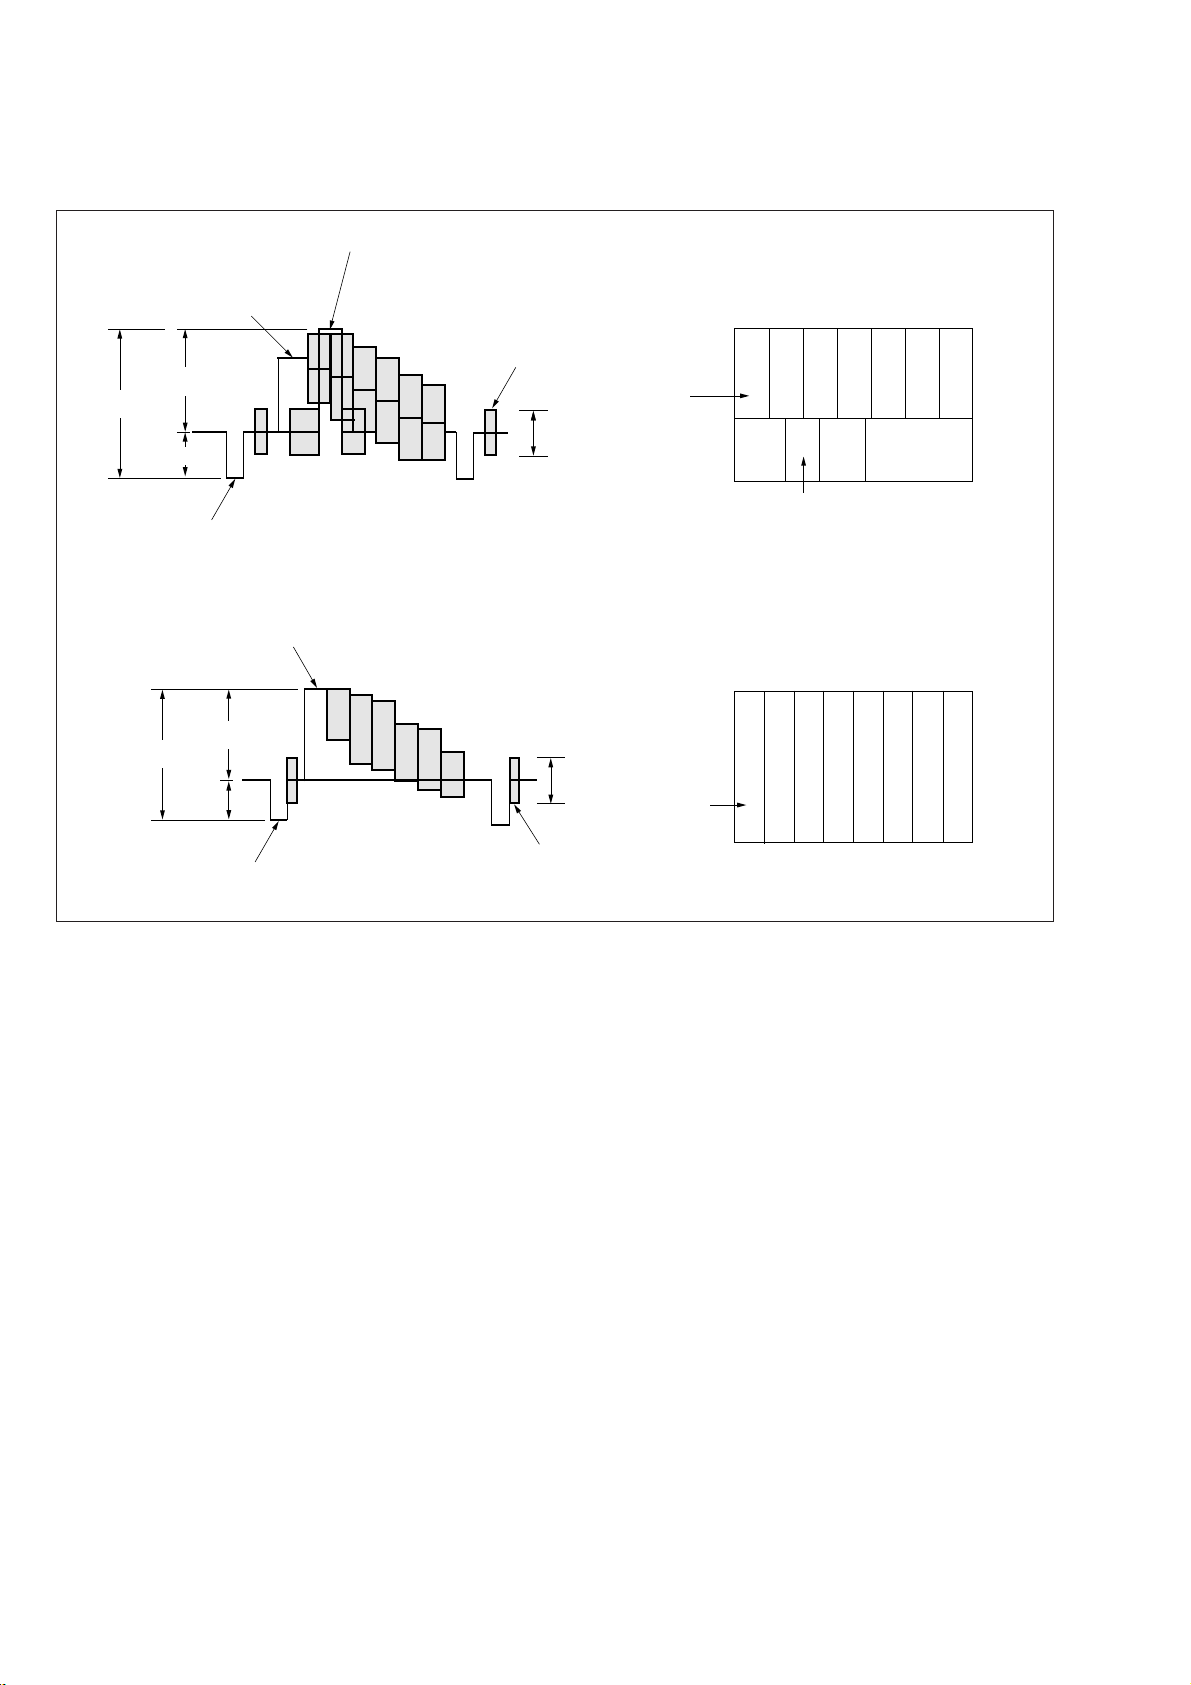
Fig. 5-3-3. Shows the color bar signals recorded on the alignment
tape.
Note : Measure using the VIDEO terminal (Terminated at 75 Ω).
For NTSC model
White (75%)
0.714V
1V
0.286V
Horizontal sync signal
For PAL model
White (100%)
0.7V
1V
0.3V
White (100%)
Yellow
Cyan
Green
Magenta
Red
Q
I
Color bar signal waveform Color bar pattern
Yellow
Cyan
Green
Magenta
Blue
Red
Blue
Burst signal
0.286V
0.3V
(75%)
(100%)
White
Q
White
Yellow
White
(100%)
Cyan
Yellow
Cyan
Green
I
Green
Magenta
Black
Red
Magenta
Red
Blue
Blue
Black
Horizontal sync signal
Color bar signal waveform Color bar pattern
Burst signal
Fig. 5-3-3. Color Bar Signal of the Alignment Tape
3-1-6. Input/output Level and Impedance
Video input/output
Phono jack, 1Vp-p, 75Ω, unbalanced, sync negative
S video input/output
4-pin mini DIN
Luminance signal:
1Vp-p, 75Ω, unbalanced, sync negative
Chrominance signal:
0.286Vp-p, 75Ω, unbalanced (NTSC)
0.300Vp-p, 75Ω, unbalanced (P AL)
Audio input/output
Phono jack:
Input: -7.5dBs, input impedance more than 47kΩ
Output: -7.5dBs, (at load impedance 47kΩ), output impedance less than 2.2kΩ
5-10
 Loading...