


PDXF30RD1
Smeg PDXF30RD1, PDXF30PNL, PDXS30P, PDXF30B, PDXK30C User Manual
...
37
Contents
INSTRUCTIONS FOR THE USER: these contain user advice, description
of the commands and the correct procedures for cleaning and maintenance
of the appliance
INSTRUCTIONS FOR THE INSTALLER: these instructions are intended
for the qualified technician who must perform the installation, put it into
operation and test the appliance
1. INSTRUCTIONS FOR USE ........................................................38
2. INSTRUCTIONS FOR DISPOSAL – OUR CONCERN FOR THE
ENVIRONMENT..........................................................................39
3. SAFETY INSTRUCTIONS ..........................................................40
4. GET TO KNOW YOUR APPLIANCE ..........................................42
5. BEFORE INSTALLATION...........................................................43
6. USING THE HOB........................................................................44
7. CLEANING AND MAINTENANCE ..............................................57
8. INSTALLING THE APPLIANCE..................................................60
9. GAS CONNECTION ...................................................................64
10. ADAPTATION TO DIFFERENT TYPES OF GAS.......................66
11. FINAL OPERATIONS FOR GAS APPLIANCES.........................68
38
Precautions for use
1. INSTRUCTIONS FOR USE
THIS MANUAL IS AN INTEGRAL PART OF THE APPLIANCE. IT MUST BE KEPT
IN ITS ENTIRETY AND IN AN ACCESSIBLE PLACE FOR THE WHOLE
WORKING LIFE OF THE HOB.
WE URGE YOU TO READ THIS MANUAL AND ALL THE INFORMATION IT
CONTAINS CAREFULLY BEFORE USING THE APPLIANCE.
INSTALLATION MUST BE CARRIED OUT BY QUALIFIED PERSONNEL IN
ACCORDANCE WITH THE REGULATIONS IN FORCE. THIS APPLIANCE IS
INTENDED FOR DOMESTIC USE AND CONFORMS TO THE EEC DIRECTIVES
CURRENTLY IN FORCE. THE APPLIANCE HAS BEEN BUILT TO CARRY OUT
THE FOLLOWING FUNCTIONS: COOKING AND HEATING OF FOOD; ALL
OTHER USES ARE CONSIDERED UNSUITABLE.
THE MANUFACTURER DECLINES ALL RESPONSIBILITY FOR IMPROPER
USE.
DO NOT USE THIS APPLIANCE FOR HEATING ROOMS.
DO NOT DISCARD PACKAGING IN THE HOME ENVIRONMENT. SEPARATE
THE VARIOUS WASTE MATERIALS AND TAKE THEM TO THE NEAREST
DIFFERENTIATED WASTE COLLECTION CENTRE.
THIS APPLIANCE IS MARKED ACCORDING TO THE EUROPEAN DIRECTIVE
2002/96/EC ON WASTE ELECTRICAL AND ELECTRONIC EQUIPMENT (WEEE).
THIS DIRECTIVE DETERMINES THE STANDARDS FOR THE COLLECTION
AND RECYCLING OF WASTE ELECTRICAL AND ELECTRONIC EQUIPMENT
APPLICABLE THROUGHOUT THE EUROPEAN UNION.
DO NOT OBSTRUCT VENTILATION OPENINGS AND HEAT DISPERSAL SLITS.
THE IDENTIFICATION PLATE WITH THE TECHNICAL DATA, SERIAL NUMBER
AND BRAND NAME IS IN A VISIBLE POSITION UNDER THE CASING.
THE PLATE MUST NOT BE REMOVED.
(ONLY FOR GLASS CERAMIC MODELS).
TAKE CARE NOT TO SPILL SUGAR OR SWEET MIXTURES ON THE
HOB WHILE COOKING OR TO PLACE MATERIALS OR SUBSTANCES
WHICH COULD MELT ON IT (PLASTIC OR TINFOIL). IF THIS
HAPPENS, TO AVOID DAMAGE TO THE SURFACE, TURN OFF THE
HEAT IMMEDIATELY AND CLEAN THE SURFACE WITH THE
SCRAPER PROVIDED WHILE THE PLATE IS STILL WARM. IF THE
GLASS CERAMIC HOB IS NOT CLEANED IMMEDIATELY, THERE IS
A RISK THAT INCRUSTATIONS WILL BE LEFT THAT ARE
IMPOSSIBLE TO REMOVE ONCE THE HOB HAS COOLED.

39
Instructions for disposal
2. INSTRUCTIONS FOR DISPOSAL – OUR
CONCERN FOR THE ENVIRONMENT
Our product's packing is made of non-polluting materials, therefore
compatible with the environment and recyclable. Please help by disposing
of the packaging correctly. You can obtain the addresses of collection,
recycling and disposal centres from your retailer or from the competent
local organisations.
Do not throw the packing or any part of it away. It can constitute a
suffocation hazard for children, especially the plastic bags.
Your old appliance also needs to be disposed of correctly.
Important: hand over your appliance to the local agency authorised for
the collection of electrical appliances no longer in use. Correct disposal
enables intelligent recovery of valuable materials.
It is also necessary to cut the connecting cable to the power supply
network, removing it along with the plug.
40
Safety instructions
3. SAFETY INSTRUCTIONS
CONSULT THE INSTALLATION INSTRUCTIONS FOR SAFETY STANDARDS ON
ELECTRICAL OR GAS APPLIANCES AND FOR VENTILATION FUNCTIONS. IN
YOUR INTERESTS AND FOR YOUR SAFETY THE LAW REQUIRES THAT THE
INSTALLATION AND SERVICING OF ALL ELECTRICAL APPLIANCES IS
CARRIED OUT BY QUALIFIED PERSONNEL IN ACCORDANCE WITH THE
REGULATIONS IN FORCE.
OUR APPROVED INSTALLERS GUARANTEE A SATISFACTORY JOB. GAS OR
ELECTRICAL APPLIANCES MUST ALWAYS BE DISCONNECTED BY
QUALIFIED PEOPLE.
THE PLUG TO BE CONNECTED TO THE POWER SUPPLY CABLE AND ITS
SOCKET MUST BE OF THE SAME TYPE AND CONFORM TO THE
REGULATIONS IN FORCE.
THE SOCKET MUST BE ACCESSIBLE AFTER THE APPLIANCE IS INSTALLED.
NEVER UNPLUG BY PULLING ON THE CABLE.
IT IS OBLIGATORY FOR ALL ELECTRICAL EQUIPMENT TO BE EARTHED
ACCORDING TO THE METHODS LAID DOWN BY SAFETY REGULATIONS.
IMMEDIATELY AFTER INSTALLATION CARRY OUT A BRIEF INSPECTION TEST,
FOLLOWING THE INSTRUCTIONS BELOW. SHOULD THE APPLIANCE NOT
FUNCTION, DISCONNECT IT FROM THE ELECTRICITY SUPPLY AND CALL
THE NEAREST TECHNICAL ASSISTANCE CENTRE.
NEVER ATTEMPT TO REPAIR THE APPLIANCE.
THE APPLIANCE BECOMES VERY HOT DURING USE. SUITABLE HEAT-PROOF
GLOVES SHOULD BE WORN FOR ALL OPERATIONS.
THE APPLIANCE IS INTENDED FOR USE BY ADULTS. KEEP CHILDREN AT A
SAFE DISTANCE AND NEVER ALLOW THEM TO PLAY WITH IT.
ALWAYS CHECK THAT THE CONTROL KNOBS ARE IN THE 0 (OFF) POSITION
WHEN YOU FINISH USING THE APPLIANCE.
AS SOON AS YOU NOTICE A FRACTURE OR A CRACK ON THE SURFACE OF
THE GLASS CERAMIC HOB, SWITCH THE APPLIANCE OFF AND CONTACT AN
AUTHORISED TECHNICAL ASSISTANCE CENTRE.
USERS OF PACEMAKERS OR SIMILAR DEVICES MUST ENSURE THAT THE
OPERATION OF THEIR DEVICES WILL NOT BE AFFECTED BY THE
INDUCTION FIELD, WHICH HAS A FREQUENCY RANGE OF 20-50 KHZ.
41
Safety instructions
IN CONFORMITY WITH THE PROVISIONS REGARDING ELECTROMAGNETIC
COMPATIBILITY, THE ELECTROMAGNETIC INDUCTION COOKING HOB
COMES UNDER GROUP 2 AND CLASS B (EN 55011).
The manufacturer cannot be held liable for damage to persons or things
caused by failure to observe the above instructions, by interference with
any part of the appliance or by the use of non-original spare parts.
42
Instructions for the user
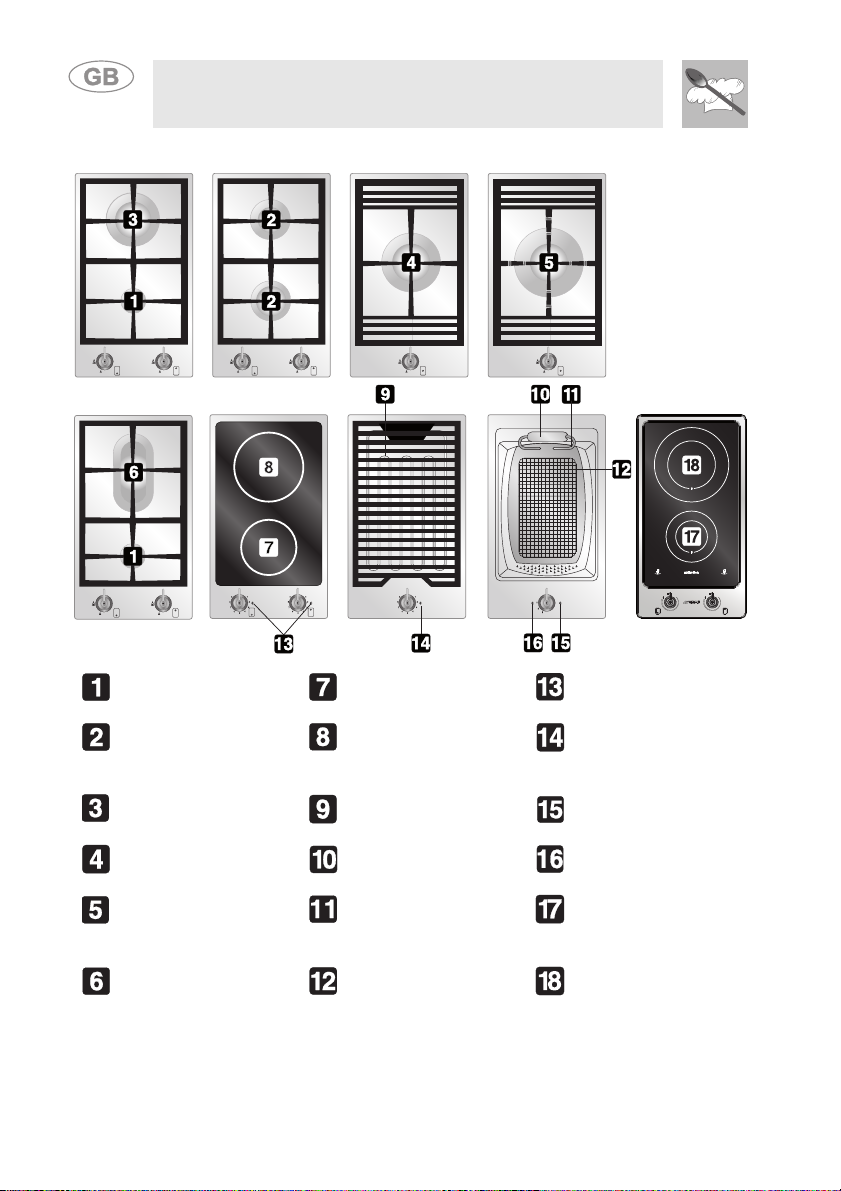
4. GET TO KNOW YOUR APPLIANCE
Auxiliary Burner
(AUX)
Small glass ceramic
hot plate
Residual heat
indicator lights
Semi-rapid Burner
(SR)
Large glass ceramic
hot plate
Barbeque
resistance
thermostat light
Rapid Burner (R) Barbeque
resistance
Green voltage light
Ultra-rapid burner
(UR3)
Resistance safety Deep fat fryer
thermostat red light
Ultra-rapid
burner (UR3)
Raised rack spokes
Resistance Small
induction
hot plate
Fish burner Pull-out basket Large
induction
hot plate
43
Instructions for the user
5. BEFORE INSTALLATION
Do not discard packing in the home environment. Separate the various
waste materials and take them to the nearest special garbage collection
centre.
In order to remove all manufacturing residues, we recommend you to
clean the appliance. For further information on cleaning see point "7.
CLEANING AND MAINTENANCE".
Before using the electric plates or the barbecue (if included) for the first
time, pre-heat them to the maximum temperature long enough to burn off
any manufacturing oily residues which could give the food a bad smell.
44
Instructions for the user
6. USING THE HOB
6.1 Gas hob
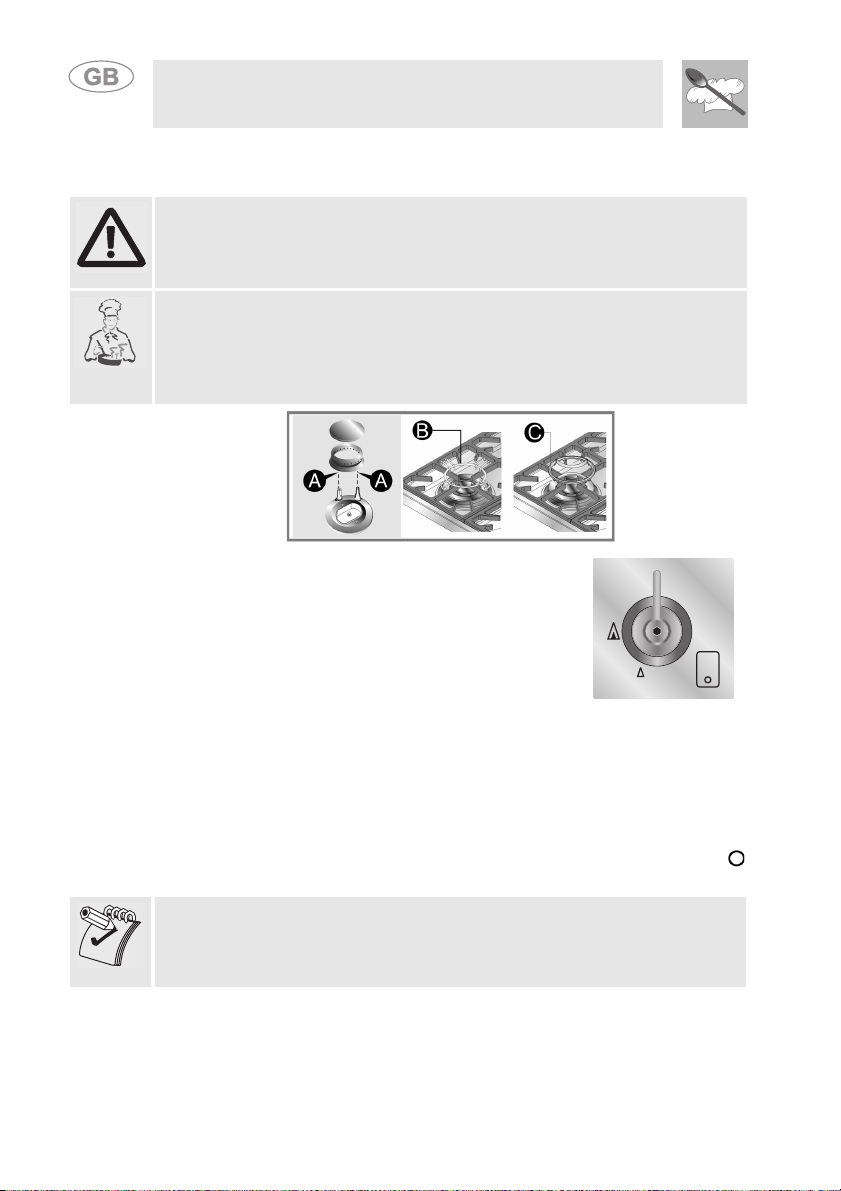
Before lighting the hob burners, check that the flame-spreader crowns are
correctly in place with their respective burner caps, making sure that the
holes A in the flame-spreaders are aligned with the plugs and
thermocouples.
The rack B is for use with woks. To prevent damage to the cooker hob, it
comes complete with a raised pan stand C. This must be placed under
pans with a diameter bigger than those indicated in the table in point "6.3
Pan diameters". In any case, the pan stand C should not be used on UR-3
burners and the fish burner.
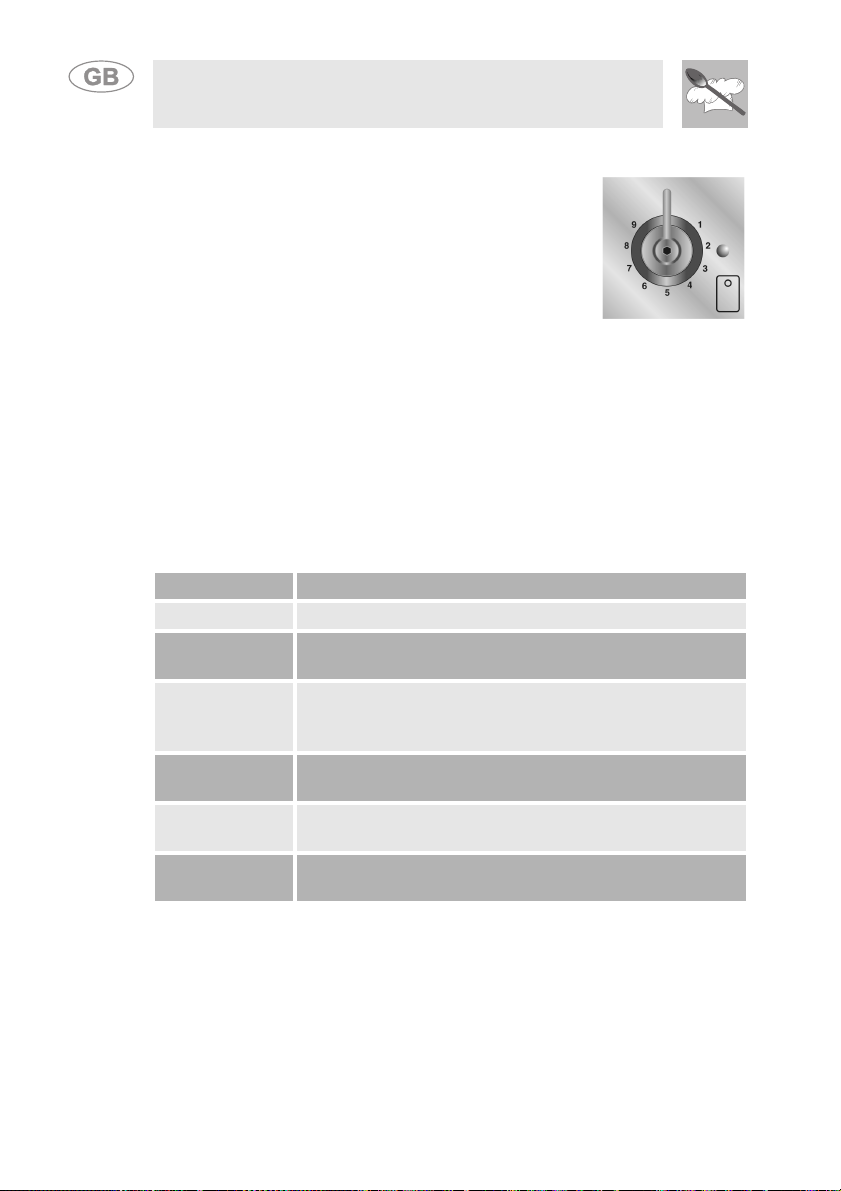
The burner controlled by each knob is shown next to
the knob. The appliance is equipped with an
electrical ignition device. Simply press the knob and
turn it counterclockwise to the maximum flame
symbol, until the burner lights. If it does not light in
the first 15 seconds, position the knob on 0 and wait
at least 60 seconds before trying to light it again.
On valved models, once the burner is lit, keep the knob pressed for a few
seconds to give the thermocouple time to heat up. The burner may go out
when the knob is released: in this case, the thermocouple has not heated
up sufficiently. Wait a few moments and repeat the operation keeping the
knob pressed for longer. This is not necessary on burners that are not
equipped with a thermocouple. Once the burner is lit, the flame can be
adjusted as required. Always check that the control knobs are in the
(off) position when you finish using the hob.
If the burners should go out accidentally, after about 20 seconds a safety
device will be tripped, cutting off the gas supply, even if the gas tap is
open. In this case, turn the knob to the OFF position and wait at least 60
seconds before trying to light the burner again.
45
Instructions for the user
6.2 Practical tips for using the burners
For better burner efficiency and to minimise gas consumption, use pans
with a flat, smooth base and a lid that have a suitable size for the burner,
thus preventing the flames reaching the sides of the pan (see point "6.3
Pan diameters"). Once the contents come to the boil, turn down the flame
far enough to prevent the liquid from boiling over.
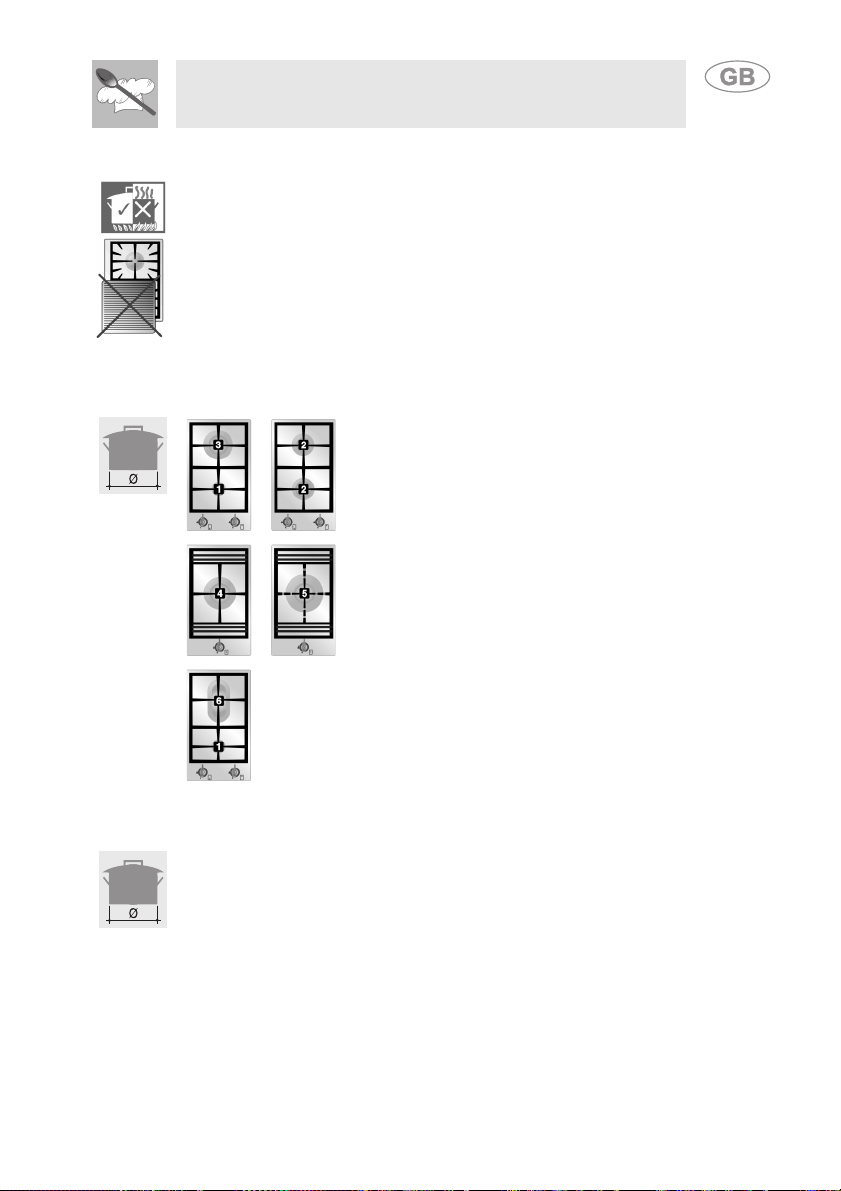
To prevent burns or damage to the hob during cooking, all pans or griddle
plates must be placed inside the perimeter of the hob.
Take the greatest care when using fats or oils since they may catch fire if
overheated.
6.3 Pan diameters
BURNERS
1 Auxiliary
2 Semi-rapid
3 Rapid
4 Ultra-rapid
5 Ultra-rapid
rack with
raised
spokes
6Fish burner
MIN. AND MAX. Ø (IN CM)
12 - 16
16 - 24
18 - 26
20 - 26
20 - 30
SPECIFIC OVAL
CONTAINERS
The pot diameters that can be used will be indicated below
with raised rack:
BURNERS
7 Auxiliary
8 Semi-rapid
9 Rapid
MIN. AND MAX. Ø (IN CM)
16 - 24
24 - 28
26 - 28
46
Instructions for the user
6.4 Glass ceramic hob
The appliance has two cooking zones of various
power levels and diameters.
The positions are clearly indicated by circles and the
heat is concentrated within the diameters traced on
the hob. The radiating zones come on after a few
seconds and their heat level can be adjusted by
rotating the knob to the required position between 1
and 9.
The adjustment is gradual so all the intermediate zones can be used. The
lights to the side of the knobs indicate the residual heat: they come on
when the electric hot plates exceed 50°C and go off when the temperature
falls below this level. For cleaning, see paragraph "7.3 Cleaning the glass
ceramic hob".
6.4.1 Cooking guidelines
The table below shows the power values which can be set, with the
relative type of food alongside. Settings may vary depending on the
amount of food and personal taste.
Knob Position
Suitable kind of cooking
1
To melt butter, chocolate or similar products.
2 - 3
To heat food, keep small amounts of water on the boil,
and whip up sauces with egg yolk or butter.
4 - 5
To heat solid or liquid food, keep water on the boil, thaw
deep-frozen food, cook omelettes of 2 or 3 eggs, fruit
and vegetables, various cooking processes.
6
To stew meat, fish and vegetables, simmer food, make
jams, etc.
7 - 8
To roast meat, fish, steaks and liver; to sauté meat, fish,
eggs, etc.
9
To deep-fry potatoes, etc., or bring water to the boil
rapidly.
 Loading...