

Page 1

MUKOMNN
uflp
mäìë
=pЙелзкл
kÉï=~ë=çÑW==
bеЦдблЬ
lйЙк~нбеЦ=fелнкмЕнбзел
Cover page
Page 2

61 97 102 D3495
2 D3495.201.03.07.02 08.2011
Sirona Dental Systems GmbH
Operating Instructions XIOS
Plus
Sensors
Table of contents
1
Dear Customer, ........................................................................................................ 4
1.1 Contents of this document ............................................................................ 4
1.2 General conventions ..................................................................................... 4
1.3 Structure of the document ............................................................................. 4
1.3.1 Identification of danger levels............................................................. 4
1.3.2 Formats and symbols used................................................................ 5
1.4 Other valid documents .................................................................................. 5
2
Warning and safety information................................................................................ 6
2.1 ESD protective measures ............................................................................. 9
2.2 About the physics of electrostatic charges.................................................... 10
3
Technical description................................................................................................ 12
3.1 General data ................................................................................................. 12
3.2 Sensors ......................................................................................................... 12
3.3 Ambient conditions........................................................................................ 12
3.4 Requirements for intraoral X-ray tube assemblies ........................................ 13
4
Accessories and spare parts .................................................................................... 14
4.1 Accessories................................................................................................... 14
5
Use of the X-ray Sensor ........................................................................................... 17
5.1 Preparation.................................................................................................... 17
5.2 Hygienic protection........................................................................................ 18
5.2.1 General information............................................................................ 18
5.2.2 Sliding the hygienic protective sleeve over the sensor ...................... 19
5.2.3 Removing the hygienic protective sleeve from the sensor................. 19
5.3 Parallel technique with radiation limiter!........................................................ 21
5.3.1 Anterior tooth exposure ...................................................................... 21
5.3.2 Posterior tooth exposures .................................................................. 22
5.3.3 Bite wing exposures ........................................................................... 23
5.3.4 Endodontics ....................................................................................... 24
5.4 Half-angle technique without radiation limiter ............................................... 25
5.4.1 Endodontic Exposures ....................................................................... 25
Page 3

61 97 102 D3495
D3495.201.03.07.02 08.2011
3
Sirona Dental Systems GmbH
Operating Instructions XIOS
Plus
Sensors
bеЦдблЬ
6
Exposure times........................................................................................................ 27
6.1 HELIODENT DS........................................................................................... 28
6.1.1 HELIODENT DS Serial Nos. 15864 and higher (wall model) and
4416 and higher (ceiling model)
28
6.1.2 HELIODENT DS up to Serial No. 15863 (wall model) and 4415
(ceiling model)
30
7
Care of outer surface............................................................................................... 32
7.1 Care and cleaning agents ............................................................................ 32
7.2 Disinfecting................................................................................................... 32
7.3 Sterilizing ...................................................................................................... 33
8
Configuration ........................................................................................................... 36
Page 4

61 97 102 D3495
4 D3495.201.03.07.02 08.2011
1 Dear Customer, Sirona Dental Systems GmbH
1.1 Contents of this document Operating Instructions XIOS
Plus
Sensors
1
Dear Customer,
Dear Customer,
XIOS Plus Sensors
Thank you for purchasing the XIOS
Plus
X-ray sensor.
In combination with a XIOS
Plus
wall module or a XIOS
Plus
USB module,
the XIOS
Plus
X-ray sensor facilitates the digital acquisition of intraoral X-
ray images.
General
Your XIOS Team
1.1
Contents of this document
Contents of this document
Table of contents This operator manual describes the handling of the sensor.
1.2
General conventions
General conventions
General conventions You should familiarize yourself with the unit by reading through the
operating instructions before taking patient exposures. Please always
observe the valid radiation protection directives and the safety
information in these instructions.
These operating instructions are based on the assumption that you are
familiar with the SIDEXIS XG software.
In case you get stuck despite having thoroughly studied the operating
instructions, please contact your dental depot.
To prevent any personal injury or material damage, pay special attention
to any notes printed in bold type or highlighted with signal words such as
NOTICE, CAUTION or WARNING:
1.3
Structure of the document
Structure of the document
1.3.1 Identification of danger levels
Identification of danger level s
To prevent personal injury and material damage, please observe the
warning and safety information provided in this document. Such
information is highlighted as follows:
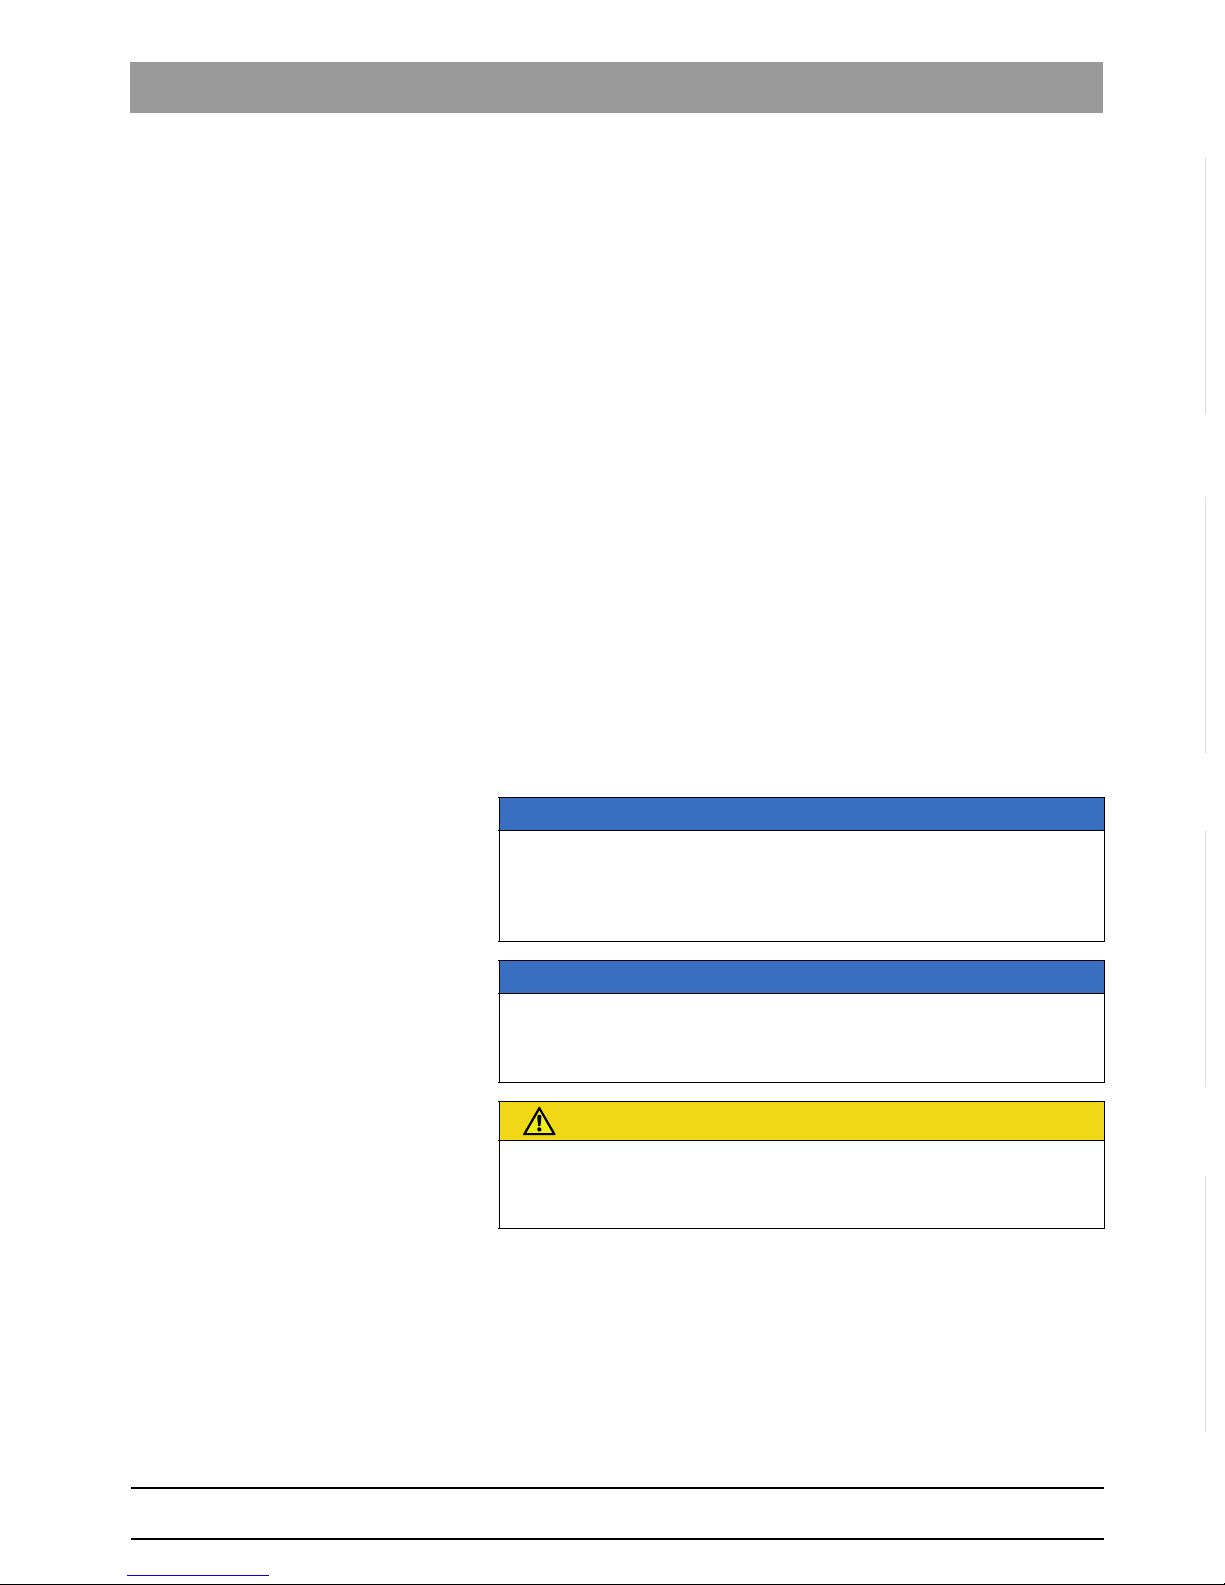
DANGER
An imminent danger that could result in serious bodily injury or death.
WARNING
A possibly dangerous situation that could result in serious bodily injury
or death.
CAUTION
A possibly dangerous situation that could result in slight bodily injury.
NOTICE
A possibly harmful situation which could lead to damage of the product
or an object in its environment.
Page 5

61 97 102 D3495
D3495.201.03.07.02 08.2011
5
Sirona Dental Systems GmbH 1 Dear Customer,
Operating Instructions XIOS
Plus
Sensors 1.4 Other valid documents
bеЦдблЬ
Tip: Information on making work easier.
1.3.2 Formats and symbols used
Formats a nd sy mbol s used
The symbols and character formats used in this manual have the
following meaning:
1.4
Other valid documents
Other valid documents
Documents for XIOS Plus Sensors
For the operation of XIOS
Plus
sensors the following documents are
required:
● Operating instructions:
XIOS
Plus
wall module
or
XIOS
Plus
USB module
● SIDEXIS XG Installation Instructions (included in delivery SIDEXIS
XG)
● SIDEXIS XG Operator's Manual (for working with SIDEXIS XG
software, included in delivery SIDEXIS XG).
X-ray system book
Keep these documents handy at all times (file them in the X-ray System
Logbook in Germany).
The system integrator must complete the enclosed declaration of
conformity.
To safeguard your warranty claims, please complete the attached
"Installation Report / Warranty Passport" together with the service
engineer immediately after the installation of your unit.
IMPORTANT
Application instructions and other important information.
✔ Prerequisite
1. First action step
2. Second action step
or
➢ Alternative action
ª Result
Requests you to do something.
See "Formats and symbols
used [ → 5]“
Identifies a reference to another
text passage and specifies its page
number.
●List Identifies a list item.
"Command/menu item" Identifies commands, menu items
or quotations.
Page 6

61 97 102 D3495
6 D3495.201.03.07.02 08.2011
2 Warning and safety information Sirona Dental Systems GmbH
Operating Instructions XIOS
Plus
Sensors
2
Warning and safety information
Warning and safety information
Symbols used Symbols used
Observe accompanying documents (on rating plate)
Intended use Intraoral
Intended use This product has been designed for the digital acquisition of intraoral X-
ray images.
This product must not be used in areas subject to explosion hazards.
Indications in the areas:
Intraoral indication
● Conservative dentistry
● Caries diagnosis, especially of proximal lesions
● Endodontics
● Periodontology
● Prosthodontics
● Functional diagnosis and therapy of craniomandibular dysfunctions
● Surgical dentistry
● Implantology
● Oral and maxillofacial surgery
● Orthodontics
Contraindications:
Intraoral contraindication
● Display of cartilage structures
● Display of soft tissue
Restriction of customers (USA)
USA only: Caution! According to US Federal Law, this product may be sold only to or by
instruction of physicians, dentists, or licensed professionals.
Maintenance and service recommendations
Maintenance and service
recommendations
Inspection and maintenance must be performed at scheduled intervals to
ensure the operational and functional reliability of your product and to
protect the safety and health of patients, users and other persons. In
accordance with IEC 60601-1.
The system owner must ensure that all inspections and maintenance
events take place.
If the system owner fails to fulfill the obligation to have inspections and
maintenance work performed or ignores error messages, Sirona Dental
Systems GmbH and its authorized dealers cannot assume any liability for
resulting damage.
As manufacturers of medical electrical equipment, we can assume
responsibility for the safety properties of the system only if maintenance
and repair work on the system is performed by ourselves or by agencies
expressly authorized by us, and if components affecting safe operation of
the system are replaced by original spare parts in case of failure.
Page 7

61 97 102 D3495
D3495.201.03.07.02 08.2011
7
Sirona Dental Systems GmbH 2 Warning and safety information
Operating Instructions XIOS
Plus
Sensors
bеЦдблЬ
We suggest that you request a certificate showing the nature and extent
of the work performed from those who carry out such work; it must contain
any changes in rated parameters or working ranges (if applicable), as well
as the date, the name of the company and a signature.
Modifications to the unit
Modifications to the unit For reasons of product safety, this product may be operated only with
original Sirona accessories or third-party accessories expressly approved
by Sirona. The user assumes the risk of using non-approved accessories.
CAUTION! PC extensions can lead to impairment of the system's
functional reliability (e.g. patient safety and electromagnetic
compatibility). The guarantee of the system's functional reliability will
automatically be transferred to anyone who implements a system
extension which has not been expressly approved by Sirona.
Changes to unit / X-raying of patients - XIOS Plus Sens or Operating Instructions
Use the XIOS
Plus
sensor only as described in these Operating
Instructions.
Combination with other equipment
Combination with other equipment Permissible combinations are specified in the Declaration of Conformity
by the system integrator.
Page 8

61 97 102 D3495
8 D3495.201.03.07.02 08.2011
2 Warning and safety information Sirona Dental Systems GmbH
Operating Instructions XIOS
Plus
Sensors
Patient environment
Patient environment
Within the patient environment (A), direct contact is only permissible with
devices or system parts that are approved for use in the patient
environment (A).
This applies to all possible patient positions (B) during the examination or
treatment.
X-raying of patients
X-raying of patients X-rays of patients must be taken only when the system works without
errors.
The system may only be operated by skilled or properly trained
personnel.
Do not leave the patient at the unit unattended.
Changes to unit / X-raying of patients - XIOS Plus Sensor Operating Instructions
Use the XIOS
Plus
sensor only as described in these Operating
Instructions.
1500mm
59”
1500mm
59”
1500mm
59”
1500mm
59”
1500mm
59”
1500mm
59”
1500mm
59”
1500mm
59”
1500mm
59”
1500mm
59”
1500mm
59”
Page 9

61 97 102 D3495
D3495.201.03.07.02 08.2011
9
Sirona Dental Systems GmbH 2 Warning and safety information
Operating Instructions XIOS
Plus
Sensors 2.1 ESD protective measures
bеЦдблЬ
Electromagnetic compatibility (EMC) of the XIOS Plus Sensor
Electromagnetic compatibility (EMC)
The XIOS
Plus
sensor complies with the requirements of IEC 60601-1-2.
Medical electrical devices are subject to special precautionary measures
regarding EMC. It must be installed and operated as specified in the
document “Installation Requirements”.
Portable and mobile RF communications equipment may interfere with
medical electrical equipment. Therefore, the use of mobile wireless
phones in medical office or hospital environments must be prohibited.
Allocation of acquisition system to patient
Allocation of acquisition system to
patient
Within the scope of practice operations, unambiguous allocation of the
acquisition system to the examinee must be ensured to guarantee
reliable allocation of X-ray exposures to the patient data saved by
SIDEXIS!
XIOS Plus hygiene inf ormation
Hygiene information
The XIOS
Plus
protective sleeves and the XIOS
Plus
sensor holder tabs are
single use devices and must be renewed for each patient. The sterilizable
exposure accessories should be resterilized for each new patient to
prevent any possible transmission of infective agents which might under
certain circumstances cause serious illnesses.
Suitable hygienic measures must be taken to prevent cross
contamination between patients, users and other persons.
The sensors and the cable must be wiped disinfected before each patient!
Disturbance of electronic devices worn on th e patient's body
Disturbance of electronic devices worn
on the patient's body
To prevent the malfunctioning of electronic devices and data memories,
e.g. radio-controlled watches, telephone cards etc., these objects must
be removed prior to the X-ray exposure.
Environmentally sound disposal
Your product is marked with the adjacent symbol. Within the European
Economic Area, this product is subject to Directive 2002/96/EC as well as
the corresponding national laws. This directive requires environmentally
sound recycling/disposal of the product. The product must not be
disposed of as domestic refuse!
Please observe the disposal regulations applicable in your country.
2.1
ESD protective measures
ESD protective measures
ESD ESD stands for ElectroStatic Discharge.
ESD protective measures ESD protective measures include:
● Procedures for preventing electrostatic charge build-up (e.g. air
conditioning, air moistening, conductive floor coverings and nonsynthetic clothing)
● Discharging the electrostatic charges of your own body on the frame
of the UNIT, the protective ground wire or large metallic objects
● Connecting yourself to ground using a wrist band.
Training We therefore recommend that all persons working with this system be
instructed on the significance of this warning label. Furthermore, they also
should receive training in the physics of electrostatic discharges which
can occur in the practice and the destruction of electronic components
which may result if such components are touched by electrostatically
charged USERS.
Page 10

61 97 102 D3495
10 D3495.201.03.07.02 08.2011
2 Warning and safety information Sirona Dental Systems GmbH
2.2 About the physics of electrostatic charges Operating Instructions XIOS
Plus
Sensors
The content of this training is explained in the Chapter "About the physics
of electrostatic charges" [ → 10].
2.2
About the physics of electrostatic charges
About the physics of electrostatic charges
What is an electrostatic charge? An electrostatic charge is a voltage field on and in an object (e.g. a human
body) which is protected against conductance to ground potential by a
nonconductive layer (e.g. a shoe sole).
Formation of an electrostatic charge
Electrostatic charges generally build up whenever two bodies are rubbed
against each other, e.g. when walking (shoe soles against the floor) or
driving a vehicle (tires against the street pavement).
Amount of charge The amount of charge depends on several factors:
Thus the charge is higher in an environment with low air humidity than in
one with high air humidity; it is also higher with synthetic materials than
with natural materials (clothing, floor coverings).
The following rule of thumb can be applied to assess the transient
voltages resulting from an electrostatic discharge.
An electrostatic discharge is:
● perceptible at 3,000 V or higher
● audible at 5,000 V or higher (cracking, crackling)
● visible at 10,000 V or higher (arc-over)
The transient currents resulting from these discharges have a magnitude
of 10 amperes. They are not hazardous for humans because they last for
only several nanoseconds.
Background Integrated circuits (logical circuits and microprocessors) are used to
implement a wide variety of functions in dental/X-ray/CAD/CAM systems.
The circuits must be miniaturized to a very high degree in order to include
as many functions as possible on these chips. This leads to structure
thicknesses as low as a few ten thousandths of a millimeter.
It is obvious that integrated circuits which are connected to plugs leading
outside of the unit via cables are sensitive to electrostatic discharge.
Even voltages which are imperceptible to the user can cause breakdown
of the structures, thus leading to a discharge current which melts the chip
in the affected areas. Damage to individual integrated circuits may cause
malfunction or failure of the system.
NOTICE
Electrostatic discharge must be preceded by electrostatic charging.
Page 11

61 97 102 D3495
D3495.201.03.07.02 08.2011
11
Sirona Dental Systems GmbH 2 Warning and safety information
Operating Instructions XIOS
Plus
Sensors 2.2 About the physics of electrostatic charges
bеЦдблЬ
To prevent this from happening, the ESD warning label next to the plug
warns of this hazard. ESD stands for ElectroStatic Discharge.
Page 12

61 97 102 D3495
12 D3495.201.03.07.02 08.2011
3 Technical description Sirona Dental Systems GmbH
3.1 General data Operating Instructions XIOS
Plus
Sensors
3
Technical description
Technical descript ion
3.1
General data
General data
XIOS Plus sensors
The XIOS
Plus
sensors, type D3495, were tested in combination with the
XIOS
Plus
wall module or the XIOS
Plus
USB module in accordance with
IEC 60 601–1.
They comply with the requirements of these regulations.
3.2
Sensors
Sensors
NEW
3.3
Ambient conditions
Ambient conditions
Original language of the
present document:
German
Patents US 5,912,942
US 5,434,418
US 6,811,312
US 6,069,935
US 6,134,298
US 5,841,126;
US 6,549,235;
US 6,570,617
US 5,513,252
Additional patents pending.
Technology: CMOS-APS (Active Pixel Sensor)
Physical pixel size: 15 µm
Active surface: Size 1 - sensor = 20 x 30 mm
Size 2 - sensor = 25.6 x 36 mm
The active surface of the sensor is identified
by dots and labeling.
External dimensions: Size 1 - sensor = 24,8 x 38,5 x 6.7 mm
Size 2 - sensor = 31.3 x 44.5 x 6.7 mm
Cable length: 2,85 m
Degree of protection
against electrical shock:
Type BF
Ambient temperature: 10° (50°F) – 40°C (104°F)
Storage temperature: -40°C (-40°F) – 70°C (158°F)
Relative humidity
(storage and transport)
10% – 95%
Page 13

61 97 102 D3495
D3495.201.03.07.02 08.2011
13
Sirona Dental Systems GmbH 3 Technical description
Operating Instructions XIOS
Plus
Sensors 3.4 Requirements for intraoral X-ray tube assemblies
bеЦдблЬ
3.4
Requirements for intraoral X-ray tube assemblies
Requirements for intraoral X- ray tube assemblies
Relative humidity in
operation
10% – 75%
Air pressure (storage
and transport)
500 – 1060 hPa
Air pressure (operation) 700 – 1060 hPa
Operating altitude: ≤ 3000 m
Multipulse units (DC),
mAs product:
0.14 – 1.4 mAs, at 60 – 70 kV and 8" cone
This information must be modified
accordingly for single-pulse units or other
cone lengths.
NOTICE
The intraoral X-ray tube assembly must be installed in accordance with
the manufacturer's instructions and requirements. Please refer to the
manuals supplied with your intraoral X-ray unit for more information.
NOTICE
For optimal image quality we recommend using a multipulse unit as well
as a 12" cone.
Page 14

61 97 102 D3495
14 D3495.201.03.07.02 08.2011
4 Accessories and spare parts Sirona Dental Systems GmbH
4.1 Accessories Operating Instructions XIOS
Plus
Sensors
4
Accessories and spare parts
Accessories and spare par ts
General
Sensors
Identification of single use devices
Single use devices are identified with the symbol shown at left.
4.1
Accessories
Accessories
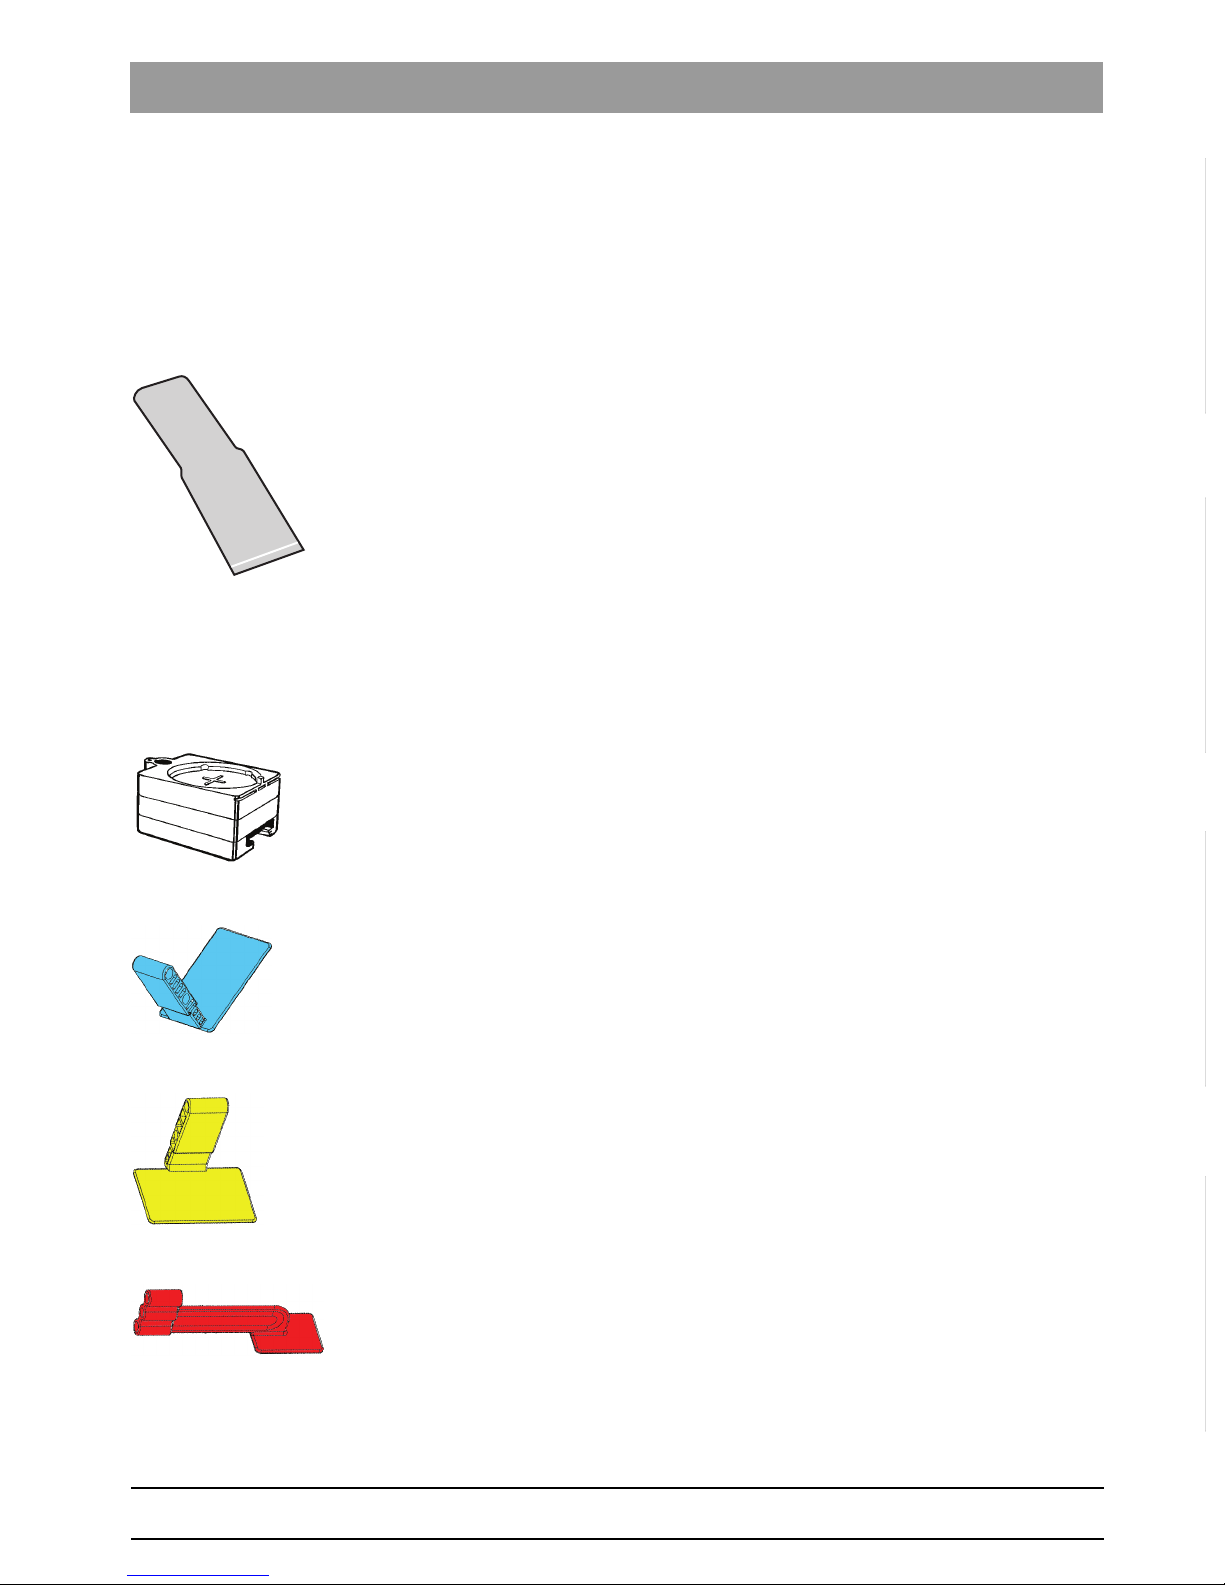
XIOS
Plus
sensor holder starter kit, size 2
Order No.: 61 73 624
Contents:
● 15x sensor holder tab, anterior (blue), including localizer ring and
guide rod
● 15x sensor holder tab, posterior (yellow), including localizer ring and
guide rod
● 15x sensor holder tab, bite wing (red), including localizer ring and
guide rod
● 15x sensor holder tab, endo (gray), including localizer ring and guide
rod
● 15x sensor holder tab, universal (green)
● 50x hygienic protective sleeves, size 2
XIOS
Plus
sensor holder starter kit, size 1
Order No.: 61 73 632
Contents:
● 15x sensor holder tab, anterior (blue), including localizer ring and
guide rod
● 15x sensor holder tab, posterior (yellow), including localizer ring and
guide rod
● 15x sensor holder tab, bite wing (red), including localizer ring and
guide rod
NOTICE
Not all of the accessories listed here are included in the scope of supply.
NOTICE
Sensor holder tabs and hygienic protective sleeves are single use
devices!
They can, however, be used repeatedly on the same patient. The
adhesive on the sensor holder tabs is suitable for gluing and detaching
them from the protective sleeve repeatedly.
Page 15
61 97 102 D3495
D3495.201.03.07.02 08.2011
15
Sirona Dental Systems GmbH 4 Accessories and spare parts
Operating Instructions XIOS
Plus
Sensors 4.1 Accessories
bеЦдблЬ
● 15x sensor holder tab, endo (gray), including localizer ring and guide
rod
● 15x sensor holder tab, universal (green)
● 50x hygienic protective sleeves, size 1
XIOS
Plus
Hygienic protective sleeves, size 1 (single use device, 300
pcs)
● Size 1: Order No.: 61 48 998
● Size 2: Order No.: 61 49 004
Wall holder for XIOS X-ray sensors
Order No.: 61 74 879
Phantom XIOS
Plus
sensor sizes 1 and 2 for constancy test (only for
Germany)
Order No.: 62 09 634
XIOS sensor holder tab, anterior, blue (single use device, 100 pcs)
Order No.: 61 76 510
XIOS sensor holder tab, posterior, yellow (single use device, 100 pcs)
Order No.: 61 76 528
XIOS sensor holder tab, bite wing, red (single use device, 100 pcs)
Order No.: 61 76 536
Page 16

61 97 102 D3495
16 D3495.201.03.07.02 08.2011
4 Accessories and spare parts Sirona Dental Systems GmbH
4.1 Accessories Operating Instructions XIOS
Plus
Sensors
XIOS sensor holder tab, endo, gray (single use device, 50 pcs)
Order No.: 61 76 551
XIOS sensor holder tab, universal, green (single use device, 100 pcs)
Order No.: 61 76 544
Radiation field limiter 3x4 for HELIODENT DS, replacement
Order No.: 46 81 974
Radiation field limiter 2x3 for HELIODENT DS, replacement
Order No.: 60 00 579
Page 17

61 97 102 D3495
D3495.201.03.07.02 08.2011
17
Sirona Dental Systems GmbH 5 Use of the X-ray Sensor
Operating Instructions XIOS
Plus
Sensors General information
bеЦдблЬ
5
Use of the X-ray Sensor
Use of the X-ray Sensor
General information
General information
Placement
The X-ray sensor should be placed according to the well-known parallel
or half-angle technique.
Risk of damage to sensor
XIOS Plus sensor ope rational reliability
5.1
Preparation
Preparation
Checklist
CAUTION
Illustrations without hygienic sleeves
For the sake of clarity, no hygienic sleeves are shown in some of the
illustrations. However, a hygienic sleeve always must be slipped over
the sensor before using it on a patient.
NOTICE
Risk of damage
- Handle the sensor carefully.
- Do not drop the sensor!
- Do not swirl the sensor about by its cable.
- Do not bend the sensor cables or run over them (e.g. with a chair)!
- Avoid laying sensor cables on the floor if possible.
- Make sure that the patient does not bite on the sensor or the sensor
cable.
NOTICE
Operational reliability
- The sensor must be checked to ensure that it is plugged in correctly
before releasing an exposure!
- The user must check exposure readiness prior to radiation release.
See Operating Instructions for the XIOS
Plus
wall module or the XIOS
Plus
USB module.
- Never place two sensors in the beam path at the same time!
NOTICE
Check the sensor cable and sensor for damage, e.g. cracks or splinters,
prior to each exposure. In case of visible damage to the sensor, please
contact your dealer.
Page 18

61 97 102 D3495
18 D3495.201.03.07.02 08.2011
5 Use of the X-ray Sensor Sirona Dental Systems GmbH
5.2 Hygienic protection Operating Instructions XIOS
Plus
Sensors
● No other programs should be running on the PC during an exposure.
5.2
Hygienic protection
Hygienic protection
5.2.1 General information
General information
Hygienic protection
Please use Sirona hygienic protective sleeves for hygienic protection.
● Prior to each application on a new patient, the sensor must be
covered with a new hygienic protective sleeve.
● Do not bend the sensor cable when slipping the hygienic protective
sleeve over it!
● Please use the hygienic protective sleeve which correctly matches
the sensor.
Hygienic protective sleeves
●XIOS
Plus
hygienic protective sleeve for sensor size 1
300 pcs, Order-No: 62 01 839
●XIOS
Plus
hygienic protective sleeve for sensor size 2
300 pcs, Order-No: 62 01 847
Sensor
NOTICE
Check all adhesive labels at regular intervals, and at least once a month,
to make sure that they are intact, legible and properly affixed.
Also check the acquisition unit (i.e. XIOS
Plus
USB module or XIOS
Plus
wall module) and the cables connected to it for damage.
In case of visible damage to the acquisition unit, cables or adhesive
labels, please contact your dealer.
CAUTION
Use only the XIOS
Plus
hygienic protective sleeves offered by Sirona,
especially in connection with the XIOS
Plus
sensor holders.
CAUTION
Hygienic protective sleeves and sensor holder tabs are single use
devices. Do not use hygienic protective sleeves more than once!
NOTICE
Make sure that the cable connecting the sensor is run out of the patient's
mouth in such a way that the patient cannot bite it.
Page 19

61 97 102 D3495
D3495.201.03.07.02 08.2011
19
Sirona Dental Systems GmbH 5 Use of the X-ray Sensor
Operating Instructions XIOS
Plus
Sensors 5.2 Hygienic protection
bеЦдблЬ
5.2.2 Sliding the hygienic protective sleeve over the sensor
Sliding the hygienic protective sleeve over the sensor
Handling
1. Please select a hygienic protective sleeve with a size that matches
the sensor.
2. Slide the sensor into the hygienic protective sleeve.
3. Position the sensor holder tab on the hygienic protective sleeve.
Handling information for the parallel technique
If the supplied XIOS sensor holder tab set is used, the hygienic protection
sleeve must be placed between the sensor and the holder. The sensor
holder tab must not be glued onto the unprotected sensor.
5.2.3 Removing the hygienic protective sleeve from the sensor
Removing the hygienic protect ive sleeve from the senso r
NOTICE
Size of the hygienic protective sleeve
The hygienic protective sleeve is slightly undersized, so that it surrounds
the sensor tightly and prevents the sensor from slipping out of place.
NOTICE
The exact position depends on the sensor holder tab used and the X-ray
exposure area. The following sections contain specific information on
how to position different sensor holder tabs.
NOTICE
Never slide the hygienic protective sleeve over the sensor with glued on
sensor holder!
NOTICE
Leave the sensor holder tab attached to the sensor and slide the sensor
out of the hygienic protective sleeve using your thumb.
NOTICE
Please do not pull on the sensor cable while pushing the sensor out of
the hygienic protective sleeve!
NOTICE
Always handle the cable with care when removing the hygienic
protective sleeve.
Page 20

61 97 102 D3495
20 D3495.201.03.07.02 08.2011
5 Use of the X-ray Sensor Sirona Dental Systems GmbH
5.2 Hygienic protection Operating Instructions XIOS
Plus
Sensors
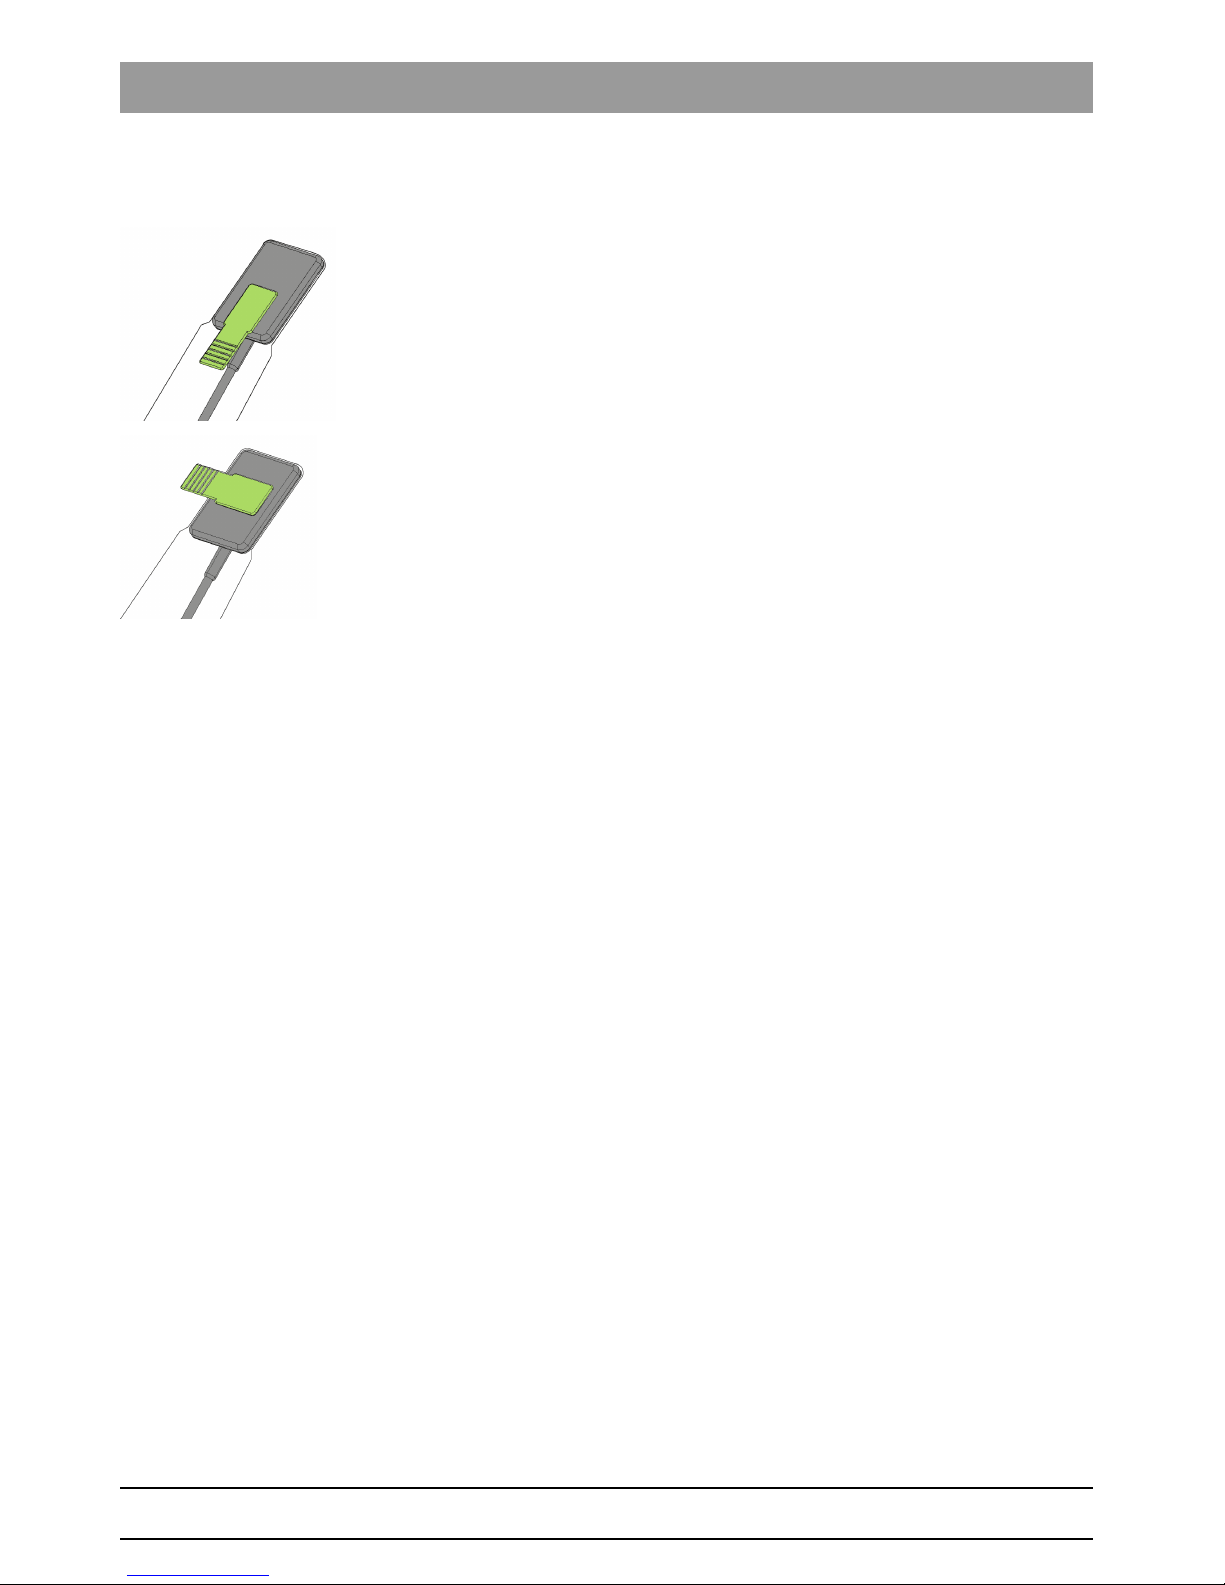
1. Grasp the guide rod in one hand so that you can touch the side of the
sensor facing away from the sensor cable with your thumb.
2. Carefully push the sensor out of the part of the hygienic protective
sleeve that is glued to the sensor holder tab with your thumb.
3. Slide the sensor further out of the hygienic protective sleeve with your
thumb.
Page 21

61 97 102 D3495
D3495.201.03.07.02 08.2011
21
Sirona Dental Systems GmbH 5 Use of the X-ray Sensor
Operating Instructions XIOS
Plus
Sensors 5.3 Parallel technique with radiation limiter!
bеЦдблЬ
4. Hold the sensor cable firmly to prevent the sensor from falling out of
the hygienic protective sleeve.
5.3
Parallel technique with radiation limiter!
Parallel technique with radiation limiter!
For enhanced dose reduction, we recommend using the radiation limiter
and the XIOS holder system for the parallel technique.
5.3.1 Anterior tooth exposure
Anterior tooth exposure
Explanation A special "anterior" sensor holder tab is available for anterior tooth
exposures.
● This sensor holder tab and the matching localizer ring are colorcoded blue.
● The (triple-offset) guide rod and the blue localizer ring for anterior
tooth exposures must be used.
● The following illustrations show how to attach the sensor holder tab
to the hygienic protective sleeve with sensor.
Preparation
1. Plug together the triple-offset guide rod (C) and the blue localizer ring
(B) of the XIOS holder system for anterior tooth exposures.
2. Select the blue sensor holder tab for periapical exposures (A) and
plug it onto the guide rod (C).
3. Slide the sensor into the hygienic protective sleeve, When doing so,
follow the instructions for sensors. [ → 19]
Page 22

61 97 102 D3495
22 D3495.201.03.07.02 08.2011
5 Use of the X-ray Sensor Sirona Dental Systems GmbH
5.3 Parallel technique with radiation limiter! Operating Instructions XIOS
Plus
Sensors
4. Adhere the sensor holder tab in the middle of the active area of the
sensor to the hygienic protective sleeve as shown in the illustration.
The active area of the sensor is identified by dots on the sensor.
X-ray image
1. Position the sensor in the patient's mouth.
2. Place the X-ray tube assembly in the correct position. Change the
position of the sensor holder if necessary.
3. Release an X-ray exposure.
4. Discard the sensor holder tab and the hygienic protective sleeve
following the patient examination.
5. The guide rod and localizer ring must be cleaned and sterilized.
5.3.2 Posterior tooth exposures
Posterior tooth exposures
Explanation The "posterior" type sensor holder tab is available for periapical posterior
tooth exposures.
● This sensor holder tab and the matching localizer ring are colorcoded yellow.
● The (double-offset) guide rod and the yellow localizer ring for
posterior tooth exposures must be used.
● The following illustrations show how to attach the sensor holder tab
to the hygienic protective sleeve with sensor.
Preparation
1. Plug together the double-offset guide rod (C) and the yellow localizer
ring (B) of the XIOS holder system for posterior tooth exposures.
2. Select the yellow sensor holder tab for periapical posterior tooth
exposures (A) and plug it onto the guide rod (C).
3. Slide the sensor into the hygienic protective sleeve, When doing so,
follow the instructions for sensors. [ → 19]
Page 23

61 97 102 D3495
D3495.201.03.07.02 08.2011
23
Sirona Dental Systems GmbH 5 Use of the X-ray Sensor
Operating Instructions XIOS
Plus
Sensors 5.3 Parallel technique with radiation limiter!
bеЦдблЬ
4. For the left upper jaw and right lower jaw: Position the sensor holder
tab in the middle of the active area of the sensor as shown in the
illustration. The active area of the sensor is identified by dots on the
sensor. The edge of the sensor holder tab must be flush with the edge
of the sensor.
5. For the right upper jaw and left lower jaw: Position the sensor holder
tab in the middle of the active area of the sensor as shown in the
illustration. The active area of the sensor is identified by dots on the
sensor. The edge of the sensor holder tab must be flush with the edge
of the sensor.
X-ray image
1. Position the sensor in the patient's mouth.
2. Place the X-ray tube assembly in the correct position. Change the
position of the sensor holder if necessary.
3. Release an X-ray exposure.
4. Discard the sensor holder tab and the hygienic protective sleeve
following the patient examination.
5. The guide rod and localizer ring must be sterilized.
5.3.3 Bite wing exposures
Bite wing exposures
Explanation The "bite tab" type sensor holder tab is available for bite wing exposures.
● This sensor holder tab and the matching localizer ring are colorcoded red.
● The straight guide rod and red localizer ring for bite wing exposures
must be used.
● The following illustrations show how to attach the sensor holder tab
to the hygienic protective sleeve with sensor.
Page 24

61 97 102 D3495
24 D3495.201.03.07.02 08.2011
5 Use of the X-ray Sensor Sirona Dental Systems GmbH
5.3 Parallel technique with radiation limiter! Operating Instructions XIOS
Plus
Sensors
Preparation
1. Plug together the straight guide rod (C) and the red localizer ring (B)
of the XIOS holder system for bite wing exposures.
2. Select the (bite tab type) red sensor holder tab (A) for bite wing
exposures and plug it onto the guide rod (C).
3. Slide the sensor into the hygienic protective sleeve, When doing so,
follow the instructions for sensors. [ → 19]
4. For vertical bite wing exposures: Position the sensor holder tab
vertically on the hygienic protective sleeve in the middle of the active
area of the sensor as shown in the illustration. The active area of the
sensor is identified by dots on the sensor.
5. For horizontal bite wing exposures: Position the sensor holder tab
horizontally on the hygienic protective sleeve in the middle of the
active area of the sensor as shown in the illustration. The active area
of the sensor is identified by dots on the sensor.
X-ray image
1. Position the sensor in the patient's mouth.
2. Place the X-ray tube assembly in the correct position. Change the
position of the sensor holder if necessary.
3. Release an X-ray exposure.
4. Discard the sensor holder tab and the hygienic protective sleeve
following the patient examination.
5. The guide rod and localizer ring must be sterilized.
5.3.4 Endodontics
Endodontics
Explanation The "endo" type sensor holder tab is available for endodontics.
● This sensor holder tab, the matching guide rod and the matching
localizer ring are color-coded gray.
Page 25

61 97 102 D3495
D3495.201.03.07.02 08.2011
25
Sirona Dental Systems GmbH 5 Use of the X-ray Sensor
Operating Instructions XIOS
Plus
Sensors 5.4 Half-angle technique without radiation limiter
bеЦдблЬ
Preparation
1. Plug together the gray guide rod made of plastic (C) and the gray
localizer ring (B) of the XIOS holder system for endodontic
exposures.
2. Select the gray sensor holder tab (A) for endodontic exposures and
plug it onto the guide rod (C).
3. Slide the sensor into the hygienic protective sleeve, When doing so,
follow the instructions for sensors. [ → 19]
4. Adhere the sensor holder tab in the middle of the active area of the
sensor to the hygienic protective sleeve as shown in the illustration.
The active area of the sensor is identified by dots on the sensor.
X-ray image
1. Position the sensor in the patient's mouth.
2. Place the X-ray tube assembly in the correct position. Change the
position of the sensor holder if necessary.
3. Release an X-ray exposure.
4. Discard the sensor holder tab and the hygienic protective sleeve after
completing the root treatment.
5. The guide rod and localizer ring must be disinfected.
5.4
Half-angle technique without radiation limiter
Half-angle technique without radiation limiter
Depending on the size of the tooth or position of the area to be exposed,
place the X-ray sensor in the patient’s mouth vertically or horizontally.
The patient may be asked to immobilize the sensor by holding it himself.
5.4.1 Endodontic Exposures
Endodontic Exposures
Explanation A special universal sensor holder tab is available for exposures with the
half-angle technique.
● This universal sensor holder tab is color-coded green.
● The following illustrations show how to attach the sensor holder tab
to the hygienic protective sleeve with sensor.
Preparation 1. Slide the sensor into the hygienic protective sleeve, following the
instructions for sensors. [ → 19]
C
B
A
NOTICE
The endodontic needles and files can remain in the root canal for the
measurement exposure.
Page 26
61 97 102 D3495
26 D3495.201.03.07.02 08.2011
5 Use of the X-ray Sensor Sirona Dental Systems GmbH
5.4 Half-angle technique without radiation limiter Operating Instructions XIOS
Plus
Sensors
2. Select the green universal sensor holder tab and remove the
protective foil from the adhesive surface.
3. Anterior tooth exposures: To take anterior tooth exposures, position
the sensor holder tab on the edge of the sensor near the cable.
4. Posterior tooth exposures: To take posterior tooth exposures,
position the sensor holder tab in the middle of the active area of the
sensor. The active area of the sensor is identified by dots on the
sensor.
X-ray image 1. Position the sensor in the patient's mouth.
2. Place the X-ray tube assembly in the correct position. Change the
position of the sensor holder if necessary.
3. Release an X-ray exposure.
4. Discard the universal sensor holder tab and the hygienic protective
sleeve following the patient examination.
Page 27
61 97 102 D3495
D3495.201.03.07.02 08.2011
27
Sirona Dental Systems GmbH 6 Exposure times
Operating Instructions XIOS
Plus
Sensors
bеЦдблЬ
6
Exposure times
Exposure times
Explanation The dose to be set for X-ray exposure depends primarily on the following:
● Type of X-ray tube assembly (manufacturer, AC/DC, etc.),
● Distance between beam focus and sensor,
● Morphology of patient,
● Object (i.e. tooth), which is to be X-rayed.
The dose is adjusted through tube voltage and tube current (specified by
kV/mA) as well as exposure time.
The X-ray dose influences the image quality that can be achieved by an
X-ray system. Based on fundamental laws of physics, with digital X-ray
sensors - as with film - an insufficient dose generally means higher image
noise, which usually leads to poorer detail discrimination.
On the other hand, a too-high dose can cause the sensor to be
overexposed. This is noticeable by a decreasing detail discrimination,
specifically in darker areas.
Brightness and contrast can always be optimally adjusted through the
XIOS
Plus
image preprocessing function, independent of dose.
XIOS
Plus
sensors have a very wide effective dose area, so that,
depending on the object and diagnostic question at hand, the selection of
an optimal parameter adjustment is always possible.
Exposure times for size 1 and size 2
XIOS
Plus
X-ray sensors
Short exposure times are adequate for the highly sensitive size 1 and
size 2 XIOS
Plus
X-ray sensors.
The exposure parameters specified for X-ray sensors in the
documentation for the various Sirona intraoral X-ray systems therefore do
not apply to size 1 and size 2 XIOS
Plus
X-ray sensors.
Recommended exposure times for Sirona devices are described below.
Exposure times of 0.06 - 0.12 s correspond to dose values between
approx. 300 and 600 µGy at the sensor when measured without an object
NOTICE
Since the exposure time depends on the diagnostic problem as well as
the respective clinical situation, the selection of an optimal adjustment is
the responsibility of the treating physician.
NOTICE
Image degradations resulting from an insufficient dose
Image degradations resulting from an insufficient dose can be partially
compensated through image postprocessing.
CAUTION
Image degradations caused by overexposure of the sensor cannot be
compensated!
Page 28

61 97 102 D3495
28 D3495.201.03.07.02 08.2011
6 Exposure times Sirona Dental Systems GmbH
6.1 HELIODENT DS Operating Instructions XIOS
Plus
Sensors
and with a focus-sensor-distance of 23 cm. Corresponding values apply
to devices from other manufacturers and to AC tube units. However, for
optimal image quality DC tube units should be used.
6.1
HELIODENT DS
HELIODENT DS
General HELIODENT DS has its own exposure times for operation with digital X-
ray sensors.
The preset exposure times are not valid for XIOS
Plus
sensors.
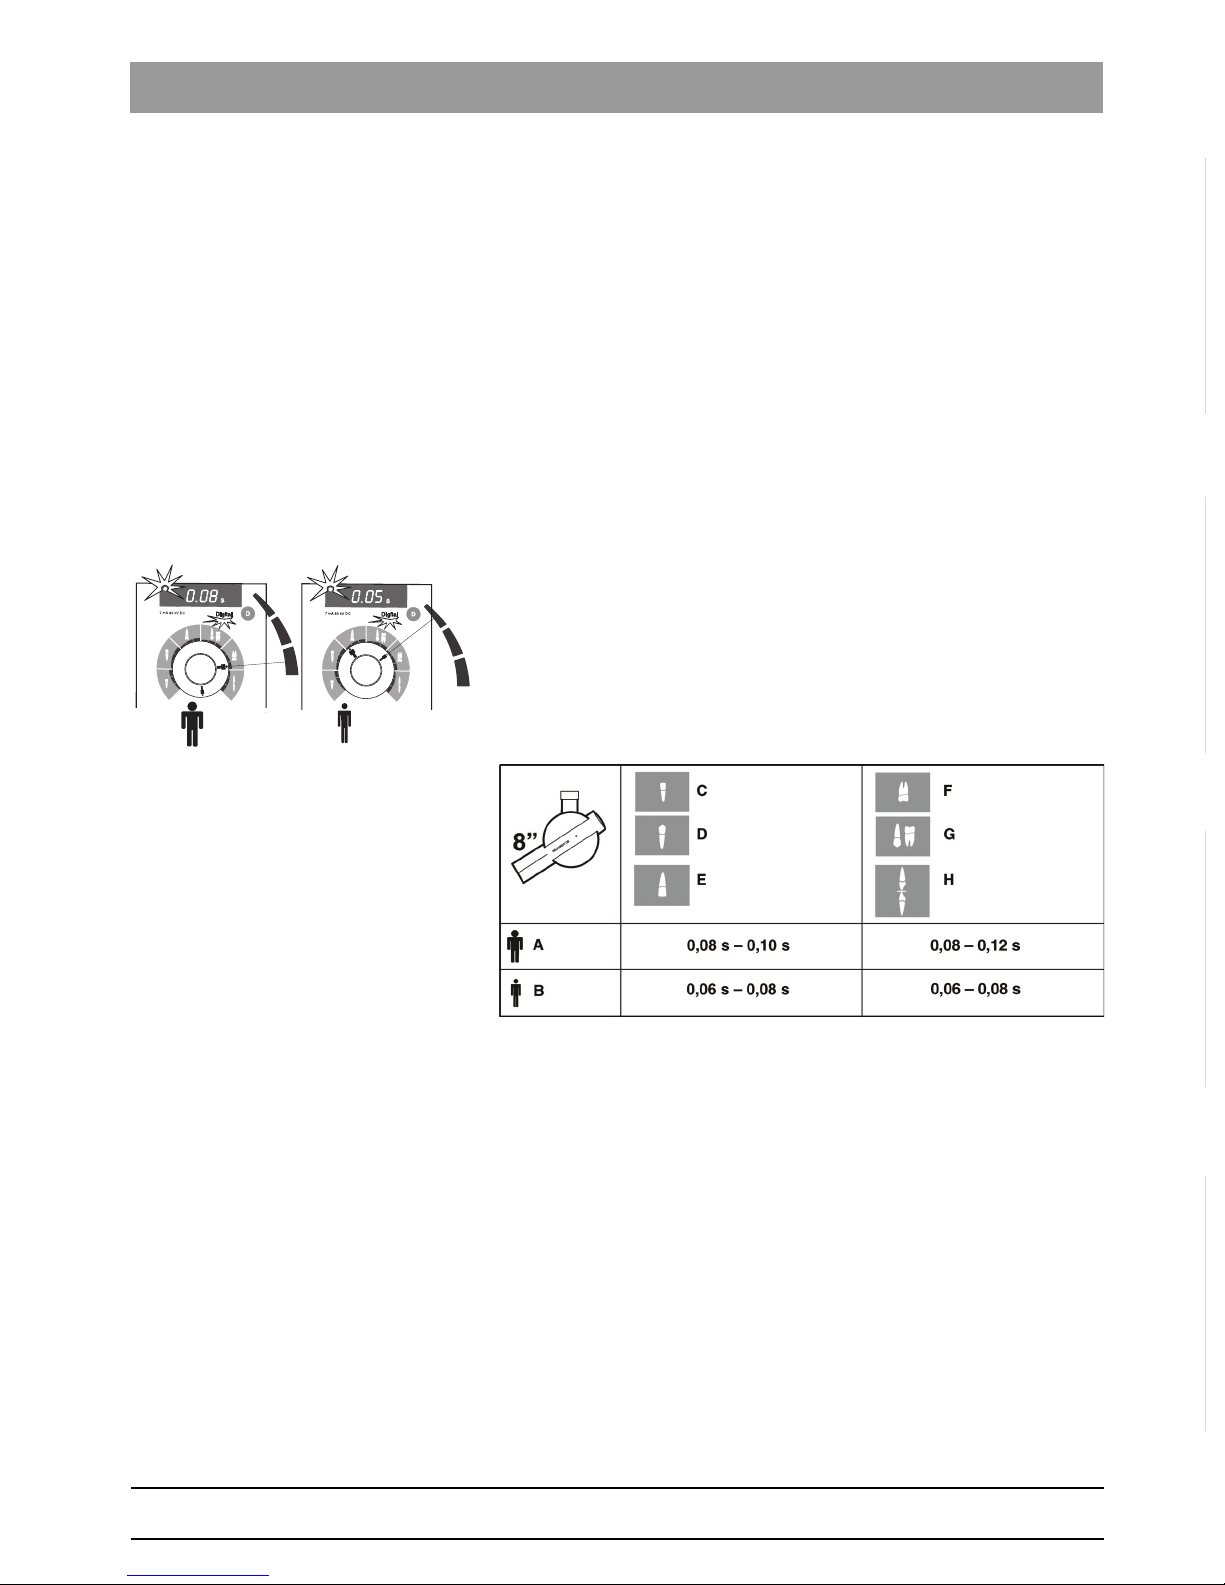
To switch from conventional to digital acquisition, briefly press the D
button.
● The word "DIGITAL" lights up on the membrane keyboard to indicate
the switch-over.
● The reduced exposure time is indicated.
➢ In this case please use the radiation limiter for digital acquisition.
For a detailed description please refer to the Operating Instructions of the
HELIODENT DS.
6.1.1 HELIODENT DS Serial Nos. 15864 and higher (wall
model) and 4416 and higher (ceiling model)
HELIODENT DS Serial No s. 15864 and higher (wall model) and 4416 and higher (ceiling model)
Possible exposure times
Recommended exposure times – with 8"
SSD cone and XIOS size 1 / size 2 X-ray
sensors
An excellent image quality is achieved with XIOS sensors when using a
radiation time of 0.08 to 0.10 s (at 60 kV, 7 mA).
NOTICE
Please observe the corresponding specifications of the X-ray device
manufacturer.
NOTICE
Better image quality
Since the positioning of the sensors in the beam path of the cone
strongly influences the image quality, using the parallel technique (with
XIOS sensor holders) is recommended for optimal positioning of the
sensors.
NOTICE
Prior to an exposure, check the following:
- Is digital exposure selected (illuminated display "DIGITAL")?
- Is the correct exposure time for the exposure region displayed?
Page 29
61 97 102 D3495
D3495.201.03.07.02 08.2011
29
Sirona Dental Systems GmbH 6 Exposure times
Operating Instructions XIOS
Plus
Sensors 6.1 HELIODENT DS
bеЦдблЬ
● The positioning of the sensors using the parallel technique (with XIOS
sensor holders) ensures an optimal positioning of the sensors in the
beam path of the cone.
● It is the responsibility of each individual dentist to determine the
required dose for each patient in order to achieve image quality
suitable to make a diagnosis. Sirona can only make
recommendations.
When the desired patient symbol is set to the tooth symbol, the
recommended exposure times are assigned automatically.
Each tooth symbol is subdivided into three different exposure times.
For digital X-ray exposures, make sure to set the longest exposure time
setting within a tooth symbol for X-rays of adults, and the shortest
exposure time setting for X-rays of children.
Only then does the corresponding value appear on the digital display.
Adjacent example: Maxillary molar
Valid for software version 17 and higher (number appears briefly after the
unit is switched on).
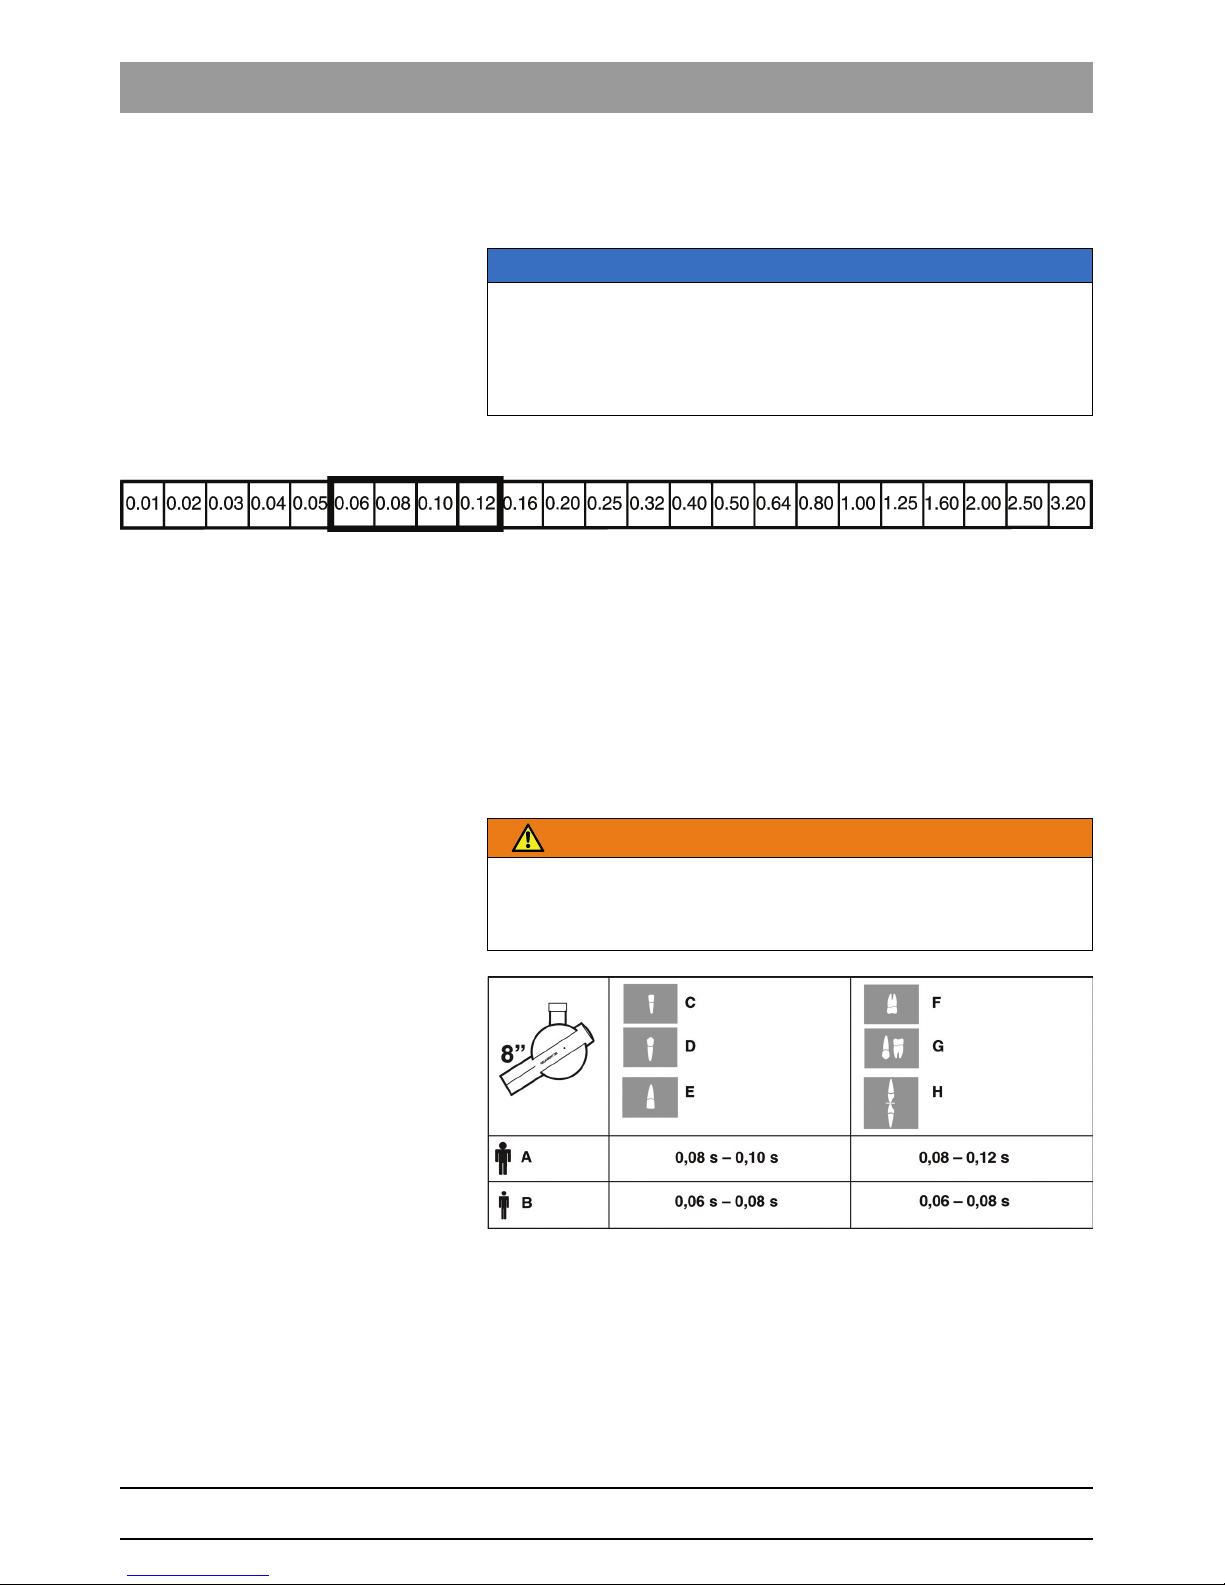
Classification of recommended exposure
times by tooth region:
● A = adults
● B = children
● C = Mandibular anterior tooth
● D = Mandibular canine tooth
● E = Maxillary anterior tooth
● F = Maxillary molars
● G = Maxillary canine tooth / Mandibular molars
● H = occlusal exposure
If a 12" SSD cone is used together with a size 1 / size 2 XIOS X-ray
sensor, the above exposure times are doubled!
Page 30
61 97 102 D3495
30 D3495.201.03.07.02 08.2011
6 Exposure times Sirona Dental Systems GmbH
6.1 HELIODENT DS Operating Instructions XIOS
Plus
Sensors
6.1.2 HELIODENT DS up to Serial No. 15863 (wall model) and
4415 (ceiling model)
HELIODENT DS up to S erial No. 15863 (wall mo del) and 4415 (ceiling mo del)
Note prior to exposure
Possible exposure times
Possible exposure times
Recommended XIOSPlus exp osure time
Recommended exposure times – with 8"
SSD cone and XIOS
Plus
size 1 / size 2 X-
ray sensors
An excellent image quality is achieved with XIOS
Plus
sensors when using
a radiation time of 0.08 to 0.10 s (at 60 kV, 7 mA).
● The positioning of the sensors using the parallel technique (with
XIOS
Plus
sensor holders) ensures an optimal positioning of the
sensors in the beam path of the cone.
● It is the responsibility of each individual dentist to determine the
required dose for each patient in order to achieve image quality
suitable to make a diagnosis. Sirona can only make
recommendations.
Classification of exposure times
Classification of recommended exposure
times by tooth region:
● A = adults
● B = children
● C = Mandibular anterior tooth
● D = Mandibular canine tooth
● E = Maxillary anterior tooth
● F = Maxillary molars
NOTICE
Prior to an exposure, check the following:
- Is digital exposure selected (illuminated display "DIGITAL")?
- Is the correct exposure time for the exposure region displayed?
WARNING
The preset exposure times on the Heldiodent DS do not apply to
XIOS
Plus
sensors.
Page 31

61 97 102 D3495
D3495.201.03.07.02 08.2011
31
Sirona Dental Systems GmbH 6 Exposure times
Operating Instructions XIOS
Plus
Sensors 6.1 HELIODENT DS
bеЦдблЬ
● G = Maxillary canine tooth / Mandibular molars
● H = occlusal exposure
If a 12" SSD cone is used together with a size 1 / size 2 XIOS X-ray
sensor, the above exposure times are doubled!
Page 32

61 97 102 D3495
32 D3495.201.03.07.02 08.2011
7 Care of outer surface Sirona Dental Systems GmbH
7.1 Care and cleaning agents Operating Instructions XIOS
Plus
Sensors
7
Care of outer surface
Care of outer surface
7.1
Care and cleaning agents
Care and cleaning agents
CAUTION: Approved care and clea ning agents
Care and cleaning a gents, with R EF number
A continuously updated list of approved agents can be downloaded from
the Internet at the address
"www.sirona.com"
. In the navigation bar, go to
the menu items
"SERVICE"
/
"Care and cleaning"
and then open the
document
"Care and cleaning agents"
.
If you do not have any access to the Internet, please contact your dental
depot to order the list.
REF 59 70 905
Care and cleaning agents, supplement for USA
Care and cleaning agents, supplement for USA
The outside areas may be disinfected with a suitable chemical
disinfectant. Only use disinfectants that meet the requirements of the
national authorities and have been tested and certified for the necessary
bactericidal, fungicidal and virucidal properties.
Examples of approved disinfectants are:
● MinutenSpray classic, by ALPRO®
● MinutenWipes, by ALPRO®
In the USA and Canada:
● CaviCide® or
● CaviWipes ™ .
7.2
Disinfecting
Disinfecting
Overview The following components can only be disinfected by wiping them off:
● Size 1 and size 2 XIOS
Plus
X-ray sensors
NOTICE
Approved care and cleaning agents
Use only care and cleaning agents which have been approved by
Sirona!
NOTICE
Risk of sensor destruction
The sensor plug contains sensitive electronics.
No fluids may penetrate the sensor plug during preliminary cleaning and
wipe disinfection!
Page 33

61 97 102 D3495
D3495.201.03.07.02 08.2011
33
Sirona Dental Systems GmbH 7 Care of outer surface
Operating Instructions XIOS
Plus
Sensors 7.3 Sterilizing
bеЦдблЬ
The following should be observed regarding XIOS sensors and their
connecting leads:
● Sensors must not be thermally disinfected!
● Sensors must not be immersed in disinfectant solutions!
● The sensors must not be disinfected or sterilized with radiation!
Preliminary Cleaning
Visible contamination
✔ Sensor or cable visibly contaminated (e.g. with blood or saliva).
1. Clean the sensor and cable with a cloth or a paper towel moistened
in soapsuds.
2. Then dry the sensor and cable with a fiber-free cloth or paper towel.
Disinfection 1. Wipe the sensor and cable completely and thoroughly at least twice
with one of the disinfectants recommended in the section "Care and
cleaning agents.
2. Remove any chemical residues by wiping off the sensor with a moist
cloth or gauze.
3. Dry the sensor and the cable with a fiber-free cloth if necessary.
4. Store the sensor for the next treatment in a clean place.
7.3
Sterilizing
Sterilizing
General
NOTICE
Never spray with disinfectants or cleaning agents!
NOTICE
Prior to wipe disinfection or preliminary cleansing, pull the XIOS
Plus
sensor out of the USB module.
NOTICE
Do not let the cable connector of the sensor get wet!
NOTICE
Risk of destruction of the XIOS
Plus
sensors
The XIOS
Plus
sensors are not sterilizable!
Page 34

61 97 102 D3495
34 D3495.201.03.07.02 08.2011
7 Care of outer surface Sirona Dental Systems GmbH
7.3 Sterilizing Operating Instructions XIOS
Plus
Sensors
The following components can be sterilized:
● Rods and rings of the XIOS
Plus
holder system
The manufacturer's instructions have to be observed for other systems.
Interval Used rods and rings must be cleaned and sterilized after every patient
treatment.
Preparation 1. Separate the rods and rings.
2. Remove any residues with hot soapy water or mild dishwashing
liquid.
3. Put the components, metal parts separated from plastic parts, into
individual sterilization pouches.
4. Put the sterilization pouches into the middle tray of the autoclave,
ensuring sufficient distance to the walls of the autoclave and the
heating element.
Sterilization
➢ Operate the autoclave according to the manufacturer's instructions.
(the conditions for sterilization are specified below).
NOTICE
Risk of damage
Please follow the instructions given below carefully. Otherwise, your
components, the autoclaves or any other objects you have placed in the
autoclaves may be damaged.
NOTICE
Durability of plastic parts
Plastic parts have a limited durability and therefore should be replaced
regularly. The durability of plastic parts is shortened by every sterilizing
procedure.
NOTICE
Risk of melting and distortion of plastic parts
- During sterilization plastic parts must be in a sterilization pouch which
is separate from metal parts!
- During sterilization the temperature in the autoclave must not exceed
132°C (270°F)!
NOTICE
- Do not use glutaraldehyde with a phenol base!
- Do not use cleaners specialized for specific applications or ultrasonic
cleaners!
- Do not use chemical sterilizers or hot air sterilizers!
- Do not perform cold sterilization!
Page 35

61 97 102 D3495
D3495.201.03.07.02 08.2011
35
Sirona Dental Systems GmbH 7 Care of outer surface
Operating Instructions XIOS
Plus
Sensors 7.3 Sterilizing
bеЦдблЬ
Conditions for sterilization
Sterilized contents packed loosely
Sterilizer temperature/pressure, length of cycle:
● Steam sterilizer 121°C/103.4 kPa (250°F/15 psi) 20 minutes.
or
● Steam sterilizer 132 ℃ /206.8 kPa (270°F/30 psi) 8 minutes.
Sterilized contents packed tightly
Sterilizer temperature/pressure, length of cycle:
● Steam sterilizer 121°C/103.4 kPa (250°F/15 psi) 20 minutes.
or
● Steam sterilizer 132°C/206.8 kPa (270°F/30 psi) 10 minutes.
Page 36

61 97 102 D3495
36 D3495.201.03.07.02 08.2011
8 Configuration Sirona Dental Systems GmbH
Operating Instructions XIOS
Plus
Sensors
8
Configuration
Configuration
Explanation
It is possible to automatically optimize the image quality of an X-ray image
after capture with the XIOS
Plus
sensor using a configuration dialog.
XIOS Plus image optimizatio n
Call
➢ Follow the path
"start"/"programs"/"SIDEXIS"/"SIDEXIS Manager"
and start the application
"XIOS Configuration"
.
ª The application
"XIOS Configuration"
opens.
Configuration
●
"Automatic Image Optimization"
check box
The
"Automatic Image Optimization"
check box activates the
"Contrast"
area.
●
"Contrast"
area
The modifications made in this area will be executed for each X-ray
image when the
"Automatic Image Optimization"
check box is
activated.
Selection fields
"Filter 1", "Filter 2", "Filter 3"
: Filter operations can be
selected here, which will be processed in the following order:
"Filter
1"
, then
"Filter 2"
, then
"Filter 3"
.
Selection field
"Brightness"
: The brightness can be corrected here.
Selection field
"Contrast"
: The contrast can be corrected here.
●
"Binning"
area
The modifications made in this area will be processed for each X-ray
exposure.
Binning is the technique of combining neighboring pixels to one single
pixel.
The more pixels that are combined, the lower the image noise. In
contrast, the resolution of the system decreases.
In the case of Software Binning the binning is done with the image
processing software.
In the case of Hardware Binning the binning is done directly on the
sensor.
In the latter case the image transfer time and the amount of saved
data is less.
The binning factor specifies how many pixels are combined into one
pixel:
(
"1x1"
) means that binning is not activated.
(
"2x2"
) means that the pixels from two neighboring rows and columns
are combined into one pixel.
(
"3x3"
) means that the pixels from three neighboring rows and
columns are combined into one pixel.
●
"16 bit"
check box
When the
"16 bit"
check box is activated, the standard gray scale
IMPORTANT
"Software"
binning is only possible if
"Hardware"
binning is not activated
(
"Hardware"
binning =
"1x1"
).
Page 37

61 97 102 D3495
D3495.201.03.07.02 08.2011
37
Sirona Dental Systems GmbH 8 Configuration
Operating Instructions XIOS
Plus
Sensors
bеЦдблЬ
reduction is deactivated (8 bit gray levels).
The
"16 bit"
setting prevents a loss of information caused by a
reduction of the gray levels. In this case, the amount of data doubles.
●
"Orientation marker"
check box
Activation of the
"Orientation marker"
check box causes the position
of the XIOS
Plus
sensor to be retained during the exposure; this is
achieved with the displayed sensor size.
Marking of sensor sizes: 1 = sensor size 1, 2 = sensor size 2
The sensor size is displayed on the XIOS
Plus
sensor, on which the
name SIRONA is located.
For example, a mirror-inverted 1 or 2 shows that the image was
mirror-inverted.
Example screen
IMPORTANT
The compression of X-ray images with a value range of more than 8 b i ts
is not currently supported.
Page 38

tЙ=кЙлЙкоЙ=нЬЙ=кбЦЬн=нз=г~вЙ=~еу=~днЙк~нбзел=пЬбЕЬ=г~у=ДЙ=кЙимбкЙЗ=ЗмЙ=нз=нЙЕЬебЕ~д=бгйкзоЙгЙенлK
«=pбкзе~=aЙен~д=pулнЙгл=dгДe=OMNN pйк~ЕЬЙW ЙеЦдблЕЬ mкбенЙЗ=бе=dЙкг~еу
aPQVRKOMNKMPKMTKMO MUKOMNN ûKJkêKW= NNQ=RVS
pбкзе~=aЙен~д=pулнЙгл=dгДe
áå=íÜÉ=rp^W
c~Дкбвлнк~≈Й=PN
SQSOR=_ЙелЬЙбг
dЙкг~еу
пппKлбкзе~KЕзг
pбкзе~=aЙен~д=pулнЙгл=ii`
QUPR=pбкзе~=aкбоЙI=pмбнЙ=NMM
`Ь~кдзннЙI=k`=OUOTP
rp^
lêÇÉê=kç
SN=VT=NMO=aPQVR
 Loading...