


IAN 270236
TV SIMULATOR STS 12 B2
TV SIMULATOR
Operating instructions
JELENLÉT SZIMULÁTOR
Használati utasítás
SIMULÁTOR TELEVIZE
Návod k obsluze
TV SIMULÁTOR
Návod na obsluhu
TV-SIMULATOR
Bedienungsanleitung
GB Operating instructions Page 1
HU Használati utasítás Oldal 17
CZ Návod k obsluze Strana 33
SK Návod na obsluhu Strana 49
DE / AT / CH Bedienungsanleitung Seite 65
Before reading, unfold the page containing the illustrations and
familiarise yourself with all functions of the device.
Olvasás előtt kattintson az ábrát tartalmazó oldalra és végezetül
ismerje meg a készülék mindegyik funkcióját.
Před čtením si otevřete stranu s obrázky a potom se seznamte se
všemi funkcemi přístroje.
Pred čítaním si odklopte stranu s obrázkami a potom sa oboznámte
so všetkými funkciami prístroja.
Klappen Sie vor dem Lesen die Seite mit den Abbildungen aus und
machen Sie sich anschließend mit allen Funktionen des Gerätes
vertraut.

1
STS 12 B2
GB
Index
Introduction ...............................2
Copyright .................................2
Intended use ..............................2
Scope of delivery and transport inspection .....3
Unpacking ...................................... 4
Disposal of the packaging ......................... 4
Operating elements ........................4
Technical data .............................5
Safety instructions .........................6
Functions .................................8
Setup ....................................9
Wall mounting. . . . . . . . . . . . . . . . . . . . . . . . . . . .10
Operation ...............................12
Cleaning. . . . . . . . . . . . . . . . . . . . . . . . . . . . . . . . .14
Storage .................................14
Disposal of the appliance ...................14
Appendix ................................15
Warranty ......................................15
Service .......................................16
Importer ......................................16
GB
2
STS 12 B2
Introduction
Congratulations on the purchase of your new appliance.
You have clearly decided in favour of a high-quality product.
These operating instructions are a part of this product. They
contain important information in regard to safety, use and
disposal. Before using the product, familiarise yourself with
all operating and safety instructions. Use this appliance only
as described and only for the specified areas of application.
In addition, pass these operating instructions on to whoever
might acquire the appliance at a future date.
Copyright
This documentation is copyright protected.
Any copying or reproduction of it, including as extracts,
as well as the reproduction of images, also in an altered
state, is only permitted with the written authorisation of the
manufacturer.
Intended use
This appliance is used to simulate light proportions similar
to those created by a TV set. This appliance is intended
exclusively for indoor use in private households. Do not use
it for commercial applications!
WARNING
Risks from unintended use!
Risks can be engendered if the appliance is used for
unintended purposes and/or other types of use.
► Use the appliance exclusively for its intended
purposes.
► Observe the procedures described in these operating
instructions.

3
STS 12 B2
GB
Claims of any kind for damage resulting from unintended
use, incompetent repairs, unauthorised modification or the
use of unauthorised spare parts will not be accepted. The
user alone bears the risk.
Scope of delivery and
transport inspection
WARNING
► Packaging materials should not be used as a play-
thing. There is a risk of suffocation.
This appliance is supplied with the following components as
standard:
▯ TV Simulator
▯ Power adapter
▯ Assembly material (2 screws, 2 plugs, adhesive strips)
▯ Operating instructions
NOTE
► Check the contents to ensure that everything is avail-
able and for signs of visible damage.
► If the contents are not complete, or are damaged
due to defective packaging or through transportation, contact the Service Hotline (see chapter
Service).
GB
4
STS 12 B2
Unpacking
♦ Remove all appliance parts and these operating instruc-
tions from the carton.
♦ Remove all packaging materials from the appliance.
Disposal of the packaging
The packaging protects the appliance against transport
damage. The packaging materials are selected from the
point of view of their environmental friendliness and disposal
technology and are therefore recyclable.
The recirculation of packaging into the material
circuit saves on raw material and reduces the
amount of waste generated. Dispose of
packaging material that is no longer needed as
per the regionally established regulations.
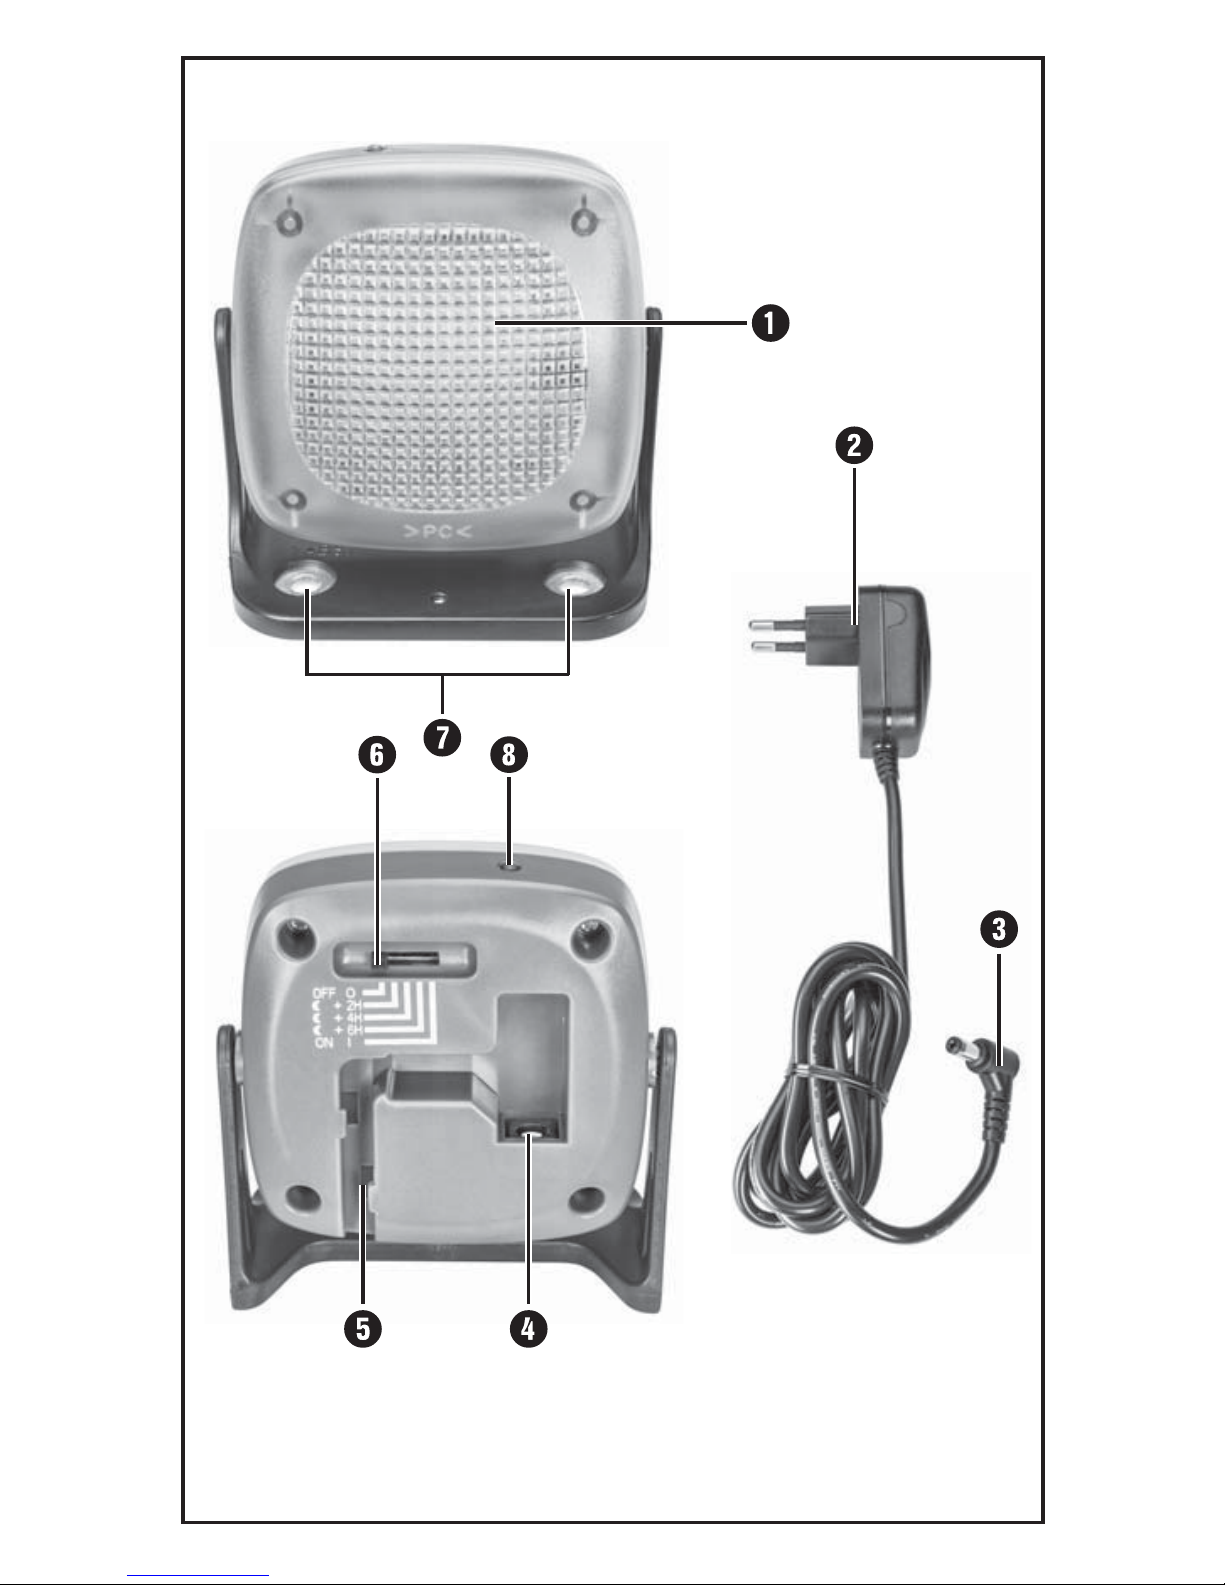
Operating elements
Light surface
Power adapter
Barrel connector
Plug socket
Cable conduit
Switch
Holes for wall mounting
Twilight sensor

5
STS 12 B2
GB
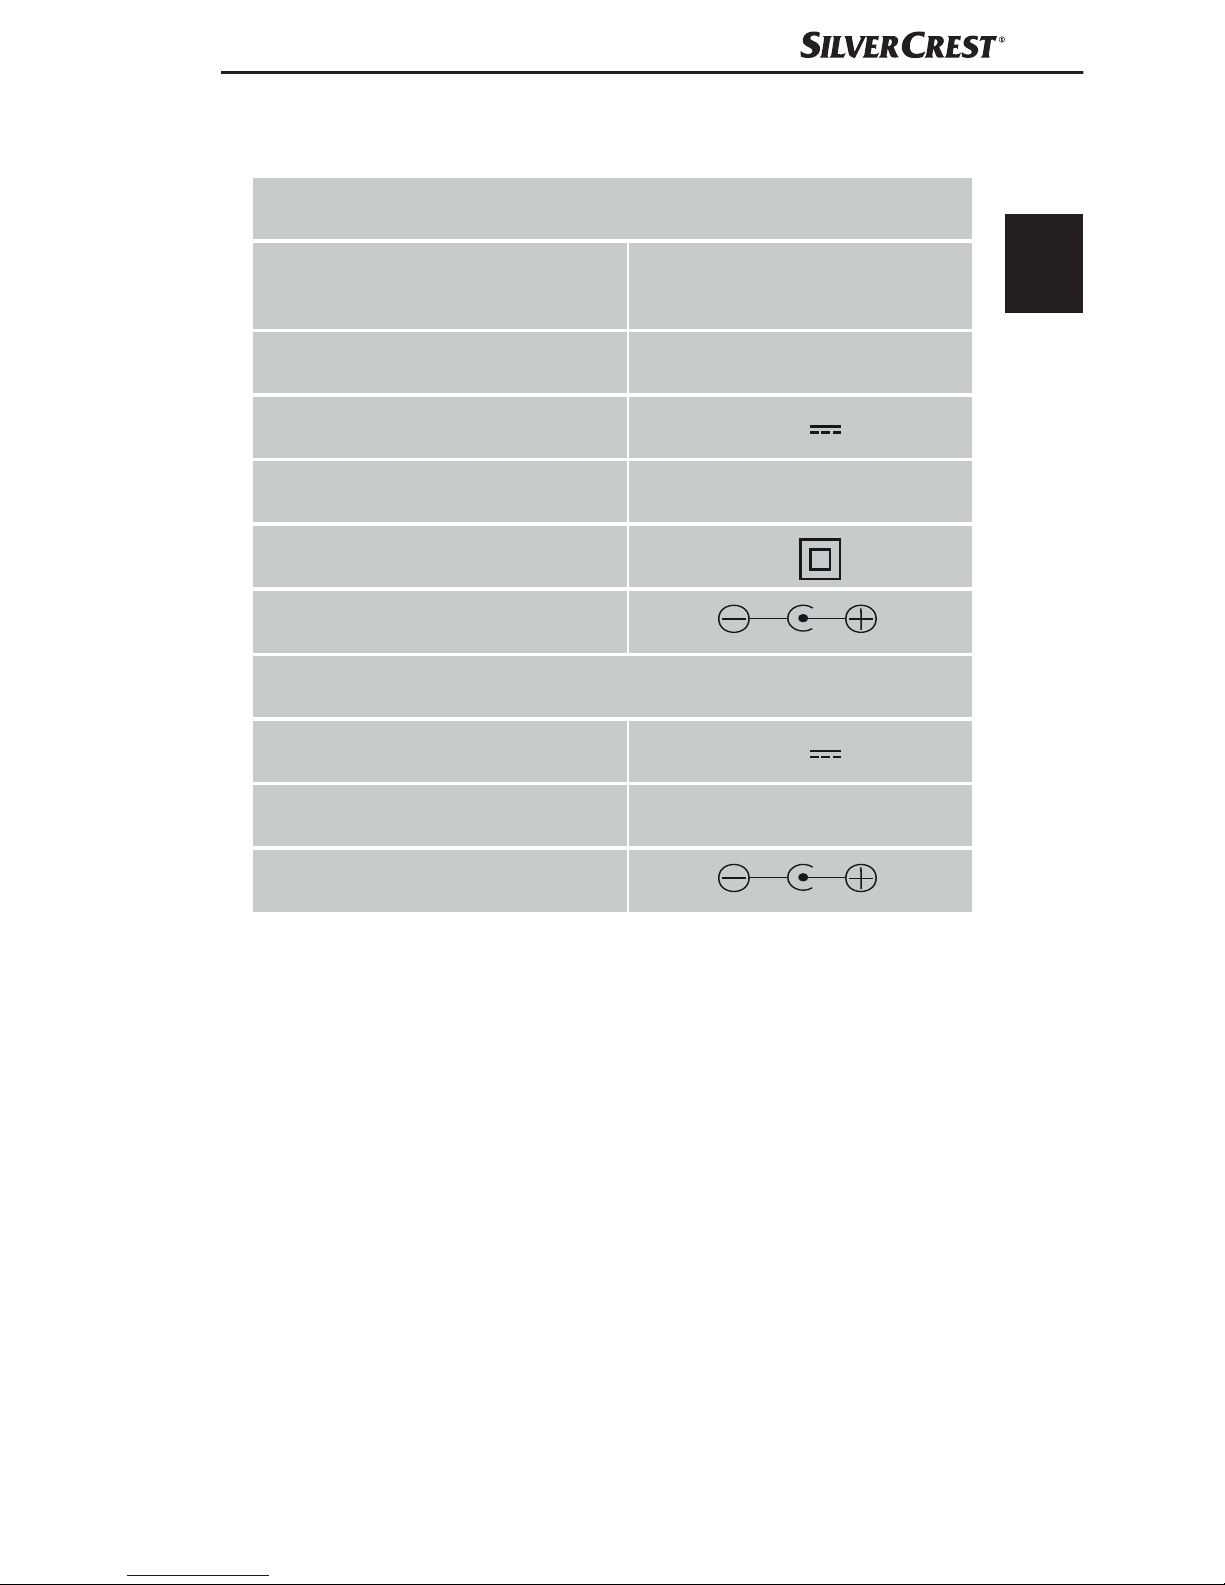
Technical data
Power adapter Type HX06D-0900200-AG
Input voltage
100 - 240 V ~,
50 - 60 Hz
Current consumption 0,3 A max
Output voltage 9 V
Output current 200 mA
Protection class
II /
Polarity
Appliance
Input voltage 9 V
Current consumption 200 mA
Polarity
GB
6
STS 12 B2
Safety instructions
RISK OF ELECTRIC SHOCK!
► Ensure that water or moisture cannot
penetrate the appliance.
► Do not use the appliance if the power
adapter or the power cable are damaged.
Use the appliance/the mains adapter
indoors only! Do not use the appliance/the mains adapter outdoors!
WARNING - RISK OF INJURY!
► This appliance may be used by children
aged 8 years and above and by persons
with limited physical, sensory or mental
capabilities or lack of experience and
knowledge, provided that they are under
supervision or have been told how to use
the appliance safely and are aware of
the potential risks. Children must not use
the appliance as a plaything. Cleaning
and user maintenance tasks may not be
carried out by children unless they are
supervised.

7
STS 12 B2
GB
WARNING - RISK OF INJURY!
► Do not use the appliance if people
suffering from epilepsy are in the room.
The changes in light levels can cause
epileptic seizures in people susceptible
to them.
► Before use, check the appliance for
visible external damage. Do not operate
a damaged appliance or one that has
been dropped. There is also a risk of
personal injury!
► Never look directly into the LEDs! They
are very bright and can caause injury
to the eyes!
► Repairs must only be carried out by au-
thorised specialist companies or by the
Customer Service. Incompetent repairs
may result in risks for the user. In addition, warranty claims become void.
► Place the power cable such that no
one can stumble over it.

GB
8
STS 12 B2
CAUTION - PROPERTY DAMAGE
► Do not operate the appliance close to
open flames (e.g. candles). The appliance could be irreparably damaged!
► Avoid direct sunlight. The appliance
could be irreparably damaged!
► This appliance must not be exposed
to rain. Protect the appliance against
moisture and the penetration of liquids
and objects into the housing. Never
submerge the appliance in water and
do not place objects filled with liquids
(such as vases) on the appliance. The
appliance could be irreparably damaged!
► Operate the appliance only with the
supplied power adapter (type HX06D0900200-AG).
Functions
With this TV simulator you can simulate the flicker patterns
of a switched-on television and so feign your presence to
potential burglars.
For this purpose 5 different settings are available:
OFF 0: the appliance is switched off.

9
STS 12 B2
GB
+2H: the LEDs switch on automatically at dusk and
then light up for 2 hours.
+4H: the LEDs switch on automatically at dusk and
then light up for 4 hours.
+6H: the LEDs switch on automatically at dusk and
then light up for 6 hours.
ON I: the LEDs light up in different colours and combina-
tions.
Setup
Select a suitable location for setting up the appliance. This
location must fulfil the following criteria:
― The TV Simulator may not be directly visible from
outdoors.
― The flickering generated by the TV simulator must be
visible on the walls and/or ceiling from outdoors.
― A power socket must be easily accessible.
― The TV Simulator must be installed such that it can
be influenced by the twilight. This means that it must
be able to detect light from outside!
― The TV Simulator may not be located near a window
which could be well lit from outdoors, such as on a
busy street or next to street lights.
― There should be no additional time-controlled light
source in the room, e.g. a night light.
♦ Place the appliance on a firm and flat surface so that
it is stable and secure. To help prevent it from tipping
over, you can secure the stand with the adhesive strips.
CAUTION - PROPERTY DAMAGE
► Do not use the adhesive strips to hang the appliance
on a wall! The appliance may fall down and be
irreparably damaged!

GB
10
STS 12 B2
♦ Align the light surface so that the flicker is visible on
the walls and/or ceiling.
♦ Connect the power adapter with the appliance by
inserting the barrel connector into the plug socket
at the rear side of the appliance. If required, route
the power cable through the cable conduit on the
appliance.
♦ Connect the power adapter into a power socket.
NOTE
► It is best to check the location and alignment of the
appliance in the dark from outdoors and through the
window. Only in this way can you assess whether the
appliance is aligned so that it appears as if someone
is watching television inside.
If necessary, realign the appliance.
Wall mounting
RISK OF ELECTRIC SHOCK!
Ensure that there are no power cables or other
conduits or pipes in the wall at the location where
you intend to bore the holes for the wall holder. It
would be a potentially fatal risk to bore into a current
carrying electric cable!
Select a suitable mounting location for the appliance:
― The TV Simulator may not be directly visible from
outdoors.
― The flickering generated by the TV simulator must be
visible on the walls and/or ceiling from outdoors.
― A power socket must be easily accessible.
― The TV Simulator must be installed such that it can
be influenced by the twilight. This means that it must
be able to detect light from outside!

11
STS 12 B2
GB
― The TV Simulator may not be located near a window
which could be well lit from outdoors, such as on a
busy street or next to street lights.
― There should be no additional time-controlled light
source in the room, e.g. a night light.
♦ Remove the stand by bending it slightly apart and then
pull the restraints out of the mountings.
♦ Drill two holes with a spacing of about 52 mm. Use
the stand to mark the holes: the spacing will thus be
measured correctly. The boreholes must be suitable for
8 mm wall plugs.
♦ Insert the supplied plugs into the holes and screw the
stand firmly down through the holes for wall mounting
using the supplied screws.
♦ Push the TV Simulator back onto the stand. Ensure that
the two cross-shaped restraints engage correctly with
the mountings.
CAUTION - PROPERTY DAMAGE
► Before you connect the appliance to the power sup-
ply, check to ensure that the required input voltage
as given on the type plate tallies with that for the
intended power source.
► Check to ensure that the cable for the power adapt-
er is not damaged and that it does not lead over
hot surfaces and/or sharp edges, otherwise it could
be damaged.
► Ensure that the cable for the power adapter is not
over-taut or kinked.
♦ Connect the power adapter with the appliance by
inserting the barrel connector into the plug socket
at the rear side of the appliance.
♦ Align the light surface so that the flicker is visible on
the walls and/or ceiling.
GB
12
STS 12 B2
♦ Connect the power adapter into a power socket.
NOTE
► It is best to check the location and alignment of the
appliance in the dark from outdoors and through the
window. Only in this way can you assess whether
the appliance is aligned so that it appears as if
someone is watching television inside.
If necessary, realign the appliance.
Operation
♦ When it gets dark early, for example, in the winter
months, set switch to „
+6H“. 3 green LEDs light
up immediately. The appliance becomes active at dusk
and, for 6 hours, simulates the flickering of a television.
After 6 hours the appliance switches itself off, except
for the 3 green LEDs.
As soon as it is dusk again, the appliance switches
back on for 6 hours.
To switch your appliance off again, you need to slide
switch to the position “OFF“.
NOTE
► In the case of exposure to light (> ca. 30 lux) the TV
Simulator also switches off before the 6 hours have
lapsed.
♦ Set the switch to „
+4H“, for example, during
autumn and spring. 2 blue LEDs light up immediately.
The appliance becomes active at dusk and, for 4 hours,
simulates the flickering of a television. After 4 hours the
appliance switches itself off, except for the 2 blue LEDs.
As soon as it is dusk again, the appliance switches
back on for 4 hours.
13
STS 12 B2
GB
♦ To switch your appliance off again, you need to slide
switch to the position “OFF“.
NOTE
►
In the case of exposure to light (> ca. 30 lux) the TV
Simulator also switches off before the 4 hours have
lapsed.
♦ When it gets dark late, for example, in the summer
months, set switch to „
+2H“. A red LED
lights up immediately. The appliance becomes active
at dusk and, for 2 hours, simulates the flickering of a
television. After 2 hours the appliance switches itself
off, except for the red LED.
As soon as it is dusk again, the appliance switches
back on for 2 hours.
To switch your appliance off again, you need to slide
switch to the position “OFF“.
NOTE
► In the case of exposure to light (> ca. 30 lux) the TV
Simulator also switches off before the 2 hours have
lapsed.
♦ Place switch at “ON” to have the appliance perma-
nently switched on. To switch your appliance off , you
need to slide switch to the position “OFF”.
NOTE
► Neither this TV Simulator, nor any other simulation
systems, can guarantee that you will not be burgled.
However, the TV Simulator conveys to potential
burglars that someone is at home and watching TV.
► In every case, we recommend good door locks and
anti-burglar aids, such as security doors and windows, as well as an alarm system, to deter burglars
from breaking into your home.

GB
14
STS 12 B2
Cleaning
CAUTION - PROPERTY DAMAGE
► Ensure that, when cleaning it, no moisture can pen-
etrate into the appliance, so as to avoid irreparable
damage to it.
► Ensure that you remove the power adapter from
the power socket before cleaning the appliance.
♦ Clean the surfaces of the appliance and the power
adapter with a soft, dry cloth.
♦ For stubborn soiling, use a damp cloth and possibly
add a mild detergent to it.
♦ Ensure that the appliance and the power adapter
are completely dry before using them again.
Storage
Should you decide not use the appliance for an extended
period, disconnect it from the power supply and store it in a
clean and dry location away from direct sunlight. If the appliance is mounted to the wall, disconnect it from the power
socket.
Disposal of the appliance
Do not dispose of the appliance in your
normal domestic waste. This product is
subject to the provisions of European
Directive 2012/19/EU-WEEE (Waste
Electrical and Electronic Equipment).
Dispose of the appliance through an approved disposal
centre or at your community waste facility. Please observe
the currently applicable regulations. In case of doubt, please
contact your waste disposal centre.

15
STS 12 B2
GB
Appendix
Warranty
The warranty for this appliance is for 3 years from the date
of purchase. This appliance has been manufactured with
care and meticulously examined before delivery.
Please retain your receipt as proof of purchase. In the event
of a warranty claim, please contact our Customer Service
department by telephone. Only in this way can a post-free
despatch for your goods be assured.
NOTE
► The warranty applies to material or manufacturing
faults only, not for transport damage, parts subject
to wear and tear or for damage to fragile parts.
This appliance is intended solely for private domestic use,
not for commercial applications. If this product has been
subjected to improper or inappropriate handling, abuse,
or modifications not carried out by one of our authorised
service centres, the warranty will be considered void.
Your statutory rights are not restricted in any way by this
warranty. The warranty period is not extended by repairs
made under the warranty. This applies also to replaced and
repaired parts.
Damages and defects extant at the time of purchase must
be reported immediately after unpacking, resp. no later than
two days after the date of purchase.
Repairs made after the lapse of the warranty period are
subject to charge.
GB
16
STS 12 B2
Service
Service Great Britain
Tel.: 0871 5000 720 (£ 0.10/Min.)
E-Mail: kompernass@lidl.co.uk
IAN 270236
Hotline availability:
Monday to Friday 08:00 - 20:00 (CET)
Importer
KOMPERNASS HANDELS GMBH
BURGSTRASSE 21
44867 BOCHUM
GERMANY
www.kompernass.com

17
STS 12 B2
HU
Tartalomjegyzék
Bevezető ................................18
Szerzői jogvédelem .......................18
Rendeltetésszerű használat .................18
A csomag tartalmának és
hiánytalanságának ellenőrzése .............19
Kicsomagolás ..................................20
A csomagolás ártalmatlanítása. . . . . . . . . . . . . . . . . . . . . 20
Kezelőelemek ............................20
Műszaki adatok ..........................21
Biztonsági tudnivalók .....................22
Funkciók ................................24
A készülék elhelyezése ....................25
Falra szerelés ............................26
Kezelés .................................28
Tisztítás .................................30
Tárolás ..................................30
A készülék ártalmatlanítása ................30
Függelék ................................31
Garancia ......................................31
Szerviz .......................................32
Gyártja .......................................32
HU
18
STS 12 B2
Bevezető
Gratulálunk új készüléke megvásárlásához!
Vásárlásával kiváló minőségű termék mellett döntött. A hasz-
nálati utasítás a termék része. Fontos tudnivalókat tartalmaz a
biztonságra, használatra és ártalmatlanításra vonatkozóan.
A termék használata előtt ismerkedjen meg valamennyi
kezelési l és biztonsági tudnivalóval. Csak a leírtak szerint és
a megadott célokra használja a készüléket.
A készülék harmadik személynek történő továbbadása esetén adja át a készülékhez tartozó valamennyi leírást is.
Szerzői jogvédelem
Ez a dokumentáció szerzői jogvédelem alatt áll.
Bármilyen sokszorosítás, ill. utánnyomás még kivonatos formában is, valamint az ábrák megjelentetése, még módosított
formában is, csak a gyártó írásos engedélyével lehetséges.
Rendeltetésszerű használat
A készülék olyan fényviszonyok utánzására szolgál, amelyek egy TV-készülék fényeihez hasonlítanak. A készülék kizárólag magánháztartásokban, belső helyiségekben történő
használatra alkalmas. Ne használja kereskedelmi célokra.
FIGYELMEZTETÉS
Nem a rendeltetésnek megfelelő használatból eredő veszély!
A készülék nem rendeltetésnek megfelelő használatából és/vagy másfajta használatából veszélyek
adódhatnak.
► A készüléket csak rendeltetésének megfelelően
szabad használni.
► Be kell tartani a jelen használati útmutatóban leírt
kezelési módot.
19
STS 12 B2
HU
A nem rendeltetésszerű használatból, szakszerűtlen javítási
munkából, jogosulatlanul végzett módosításból vagy nem
engedélyezett alkatrész használatából eredő károk esetén
semmilyen igény nem érvényesíthető. A kockázatot egyedül
a felhasználó viseli.
A csomag tartalmának és
hiánytalanságának ellenőrzése
FIGYELMEZTETÉS
► A csomagolóanyag nem játékszer. Fulladásveszély áll fenn.
A készüléket alapvetően az alábbi elemekkel szállítjuk:
▯ Jelenlét szimulátor
▯ hálózati adapter
▯ szerelési anyag (2 csavar, 2 tipli, ragasztószalag)
▯ használati útmutató
TUDNIVALÓ
► Ellenőrizze a csomag tartalmát, hogy hiánytalan-e
és nincs-e rajta látható sérülés.
► Hiányos szállítás vagy a nem megfelelő csomagolás-
ból eredő, illetve a szállítás során keletkezett károk
esetén forduljon az ügyfélszolgálathoz (lásd a
Szerviz fejezetet).
HU
20
STS 12 B2
Kicsomagolás
♦ Vegye ki a készülék valamennyi részét és ezt a leírást a
kartondobozból.
♦ Távolítson el minden csomagolóanyagot a készülékről.
A csomagolás ártalmatlanítása
A csomagolás védi a készüléket a sérülésektől a szállítás
során.
A csomagolóanyagokat környezetbarát és hulladék
ártalmatlanítási szempontok szerint választottuk ki és ezért
újrahasznosíthatók.
Nyersanyagot takarít meg és csökkenti a
hulladékmennyiséget, ha a csomagolást
visszajuttatja az anyagkörforgásba.
A feleslegessé vált csomagolóanyagokat a
hatályos helyi előírásoknak megfelelően
helyezze el a hulladékban.
Kezelőelemek
világító felület
hálózati adapter
üreges dugasz
dugaszaljzat
Kábelcsatorna
kapcsoló
lyukak a falra szereléshez
fényérzékelő
21
STS 12 B2
HU
Műszaki adatok
Hálózati adapter HX06D-0900200-AG
Bemeneti feszültség
100 - 240 V ~,
50 - 60 Hz
Áramfelvétel 0,3 A max
Kimeneti feszültség 9 V
Kimeneti áram 200 mA
Védelmi osztály
II /
Polaritás
Készülék
Bemeneti feszültség 9 V
Áramfelvétel 200 mA
Polaritás
HU
22
STS 12 B2
Biztonsági tudnivalók
ÁRAMÜTÉS VESZÉLYE!
► Ne használja a készüléket, ha a hálóza-
ti adapter vagy a csatlakozókábel sérült.
► Ügyeljen arra, hogy ne kerüljön víz
vagy nedvesség a készülék belsejébe!
A készüléket/hálózati adaptert ki-
zárólag beltérben használja! A készüléket/hálózati adaptert ne használja a
szabadban!
FIGYELMEZTETÉS -
SÉRÜLÉSVESZÉLY!
► A készüléket 8 éves kor feletti gyerme-
kek és csökkent fizikai, érzékszervi vagy
mentális képességű vagy tapasztalattal,
illetve tudással nem rendelkező személyek csak felügyelet mellett használhatják, vagy ha felvilágosították őket a
készülék biztonságos használatáról és
megértették az ebből eredő veszélyeket.
Gyermekek nem játszhatnak a készülékkel. Tisztítást és a felhasználó által
végzendő karbantartást felügyelet nélküli
gyermekek nem végezhetnek.

23
STS 12 B2
HU
FIGYELMEZTETÉS -
SÉRÜLÉSVESZÉLY!
► Ne használja a készüléket, ha epilepszi-
ában szenvedő személyek tartózkodnak
a helyiségben. A fényváltás arra hajlamos embereknél epilepsziás rohamot
válthat ki.
► Használat előtt ellenőrizze a készüléket,
hogy nincs-e rajta látható sérülés. Ne
működtessen hibás vagy leesett készüléket. Balesetveszély!
► Soha ne nézzen közvetlenül a LED-ekbe!
Ezek nagyon világosak, és a szem sérüléséhez vezethetnek!
► Csak megfelelő jogosultsággal rendelke-
ző szakemberrel vagy az ügyfélszolgálattal javíttassa a készüléket.
A szakszerűtlen javítás veszélyt jelenthet
a használó számára. Ezenkívül a garancia is érvényét veszti.
► Úgy fektesse le a hálózati vezetéket,
hogy senki sem botolhasson meg benne.
 Loading...