

Page 1
TABLETOP GRILL STGG 1800 A1
TABLETOP GRILL
Operating instructions
ASZTALI GRILL
Használati utasítás
STOLOVÝ GRIL
Návod na obsluhu
IAN 103845
GRILL STOŁOWY
Instrukcja obsługi
STOLNÍ GRIL
Návod k obsluze
TISCHGRILL
Bedienungsanleitung
Page 2
Before reading, unfold the page containing the illustrations and familiarise yourself with all functions of
the device.
Przed przeczytaniem proszę rozłożyć stronę z ilustracjami, a następnie proszę zapoznać się z wszystkimi
funkcjami urządzenia.
Olvasás előtt kattintson az ábrát tartalmazó oldalra és végezetül ismerje meg a készülék mindegyik
funkcióját.
Před čtením si otevřete stranu s obrázky a potom se seznamte se všemi funkcemi přístroje.
Pred čítaním si odklopte stranu s obrázkami a potom sa oboznámte so všetkými funkciami prístroja.
Klappen Sie vor dem Lesen die Seite mit den Abbildungen aus und machen Sie sich anschließend mit allen
Funktionen des Gerätes vertraut.
GB Operating instructions Page 1
PL Instrukcja obsługi Strona 17
HU Használati utasítás Oldal 33
CZ Návod k obsluze Strana 49
SK Návod na obsluhu Strana 65
DE / AT / CH Bedienungsanleitung Seite 81
Page 3
A
BAB
Page 4

Contents
Introduction . . . . . . . . . . . . . . . . . . . . . . . . . . . . . . . . . . . . . . . . . . . . . . . . . . . . . . . . . . . .2
Proper use . . . . . . . . . . . . . . . . . . . . . . . . . . . . . . . . . . . . . . . . . . . . . . . . . . . . . . . . . . . . .2
Package contents . . . . . . . . . . . . . . . . . . . . . . . . . . . . . . . . . . . . . . . . . . . . . . . . . . . . . . .2
Appliance description . . . . . . . . . . . . . . . . . . . . . . . . . . . . . . . . . . . . . . . . . . . . . . . . . . . .2
Technical details . . . . . . . . . . . . . . . . . . . . . . . . . . . . . . . . . . . . . . . . . . . . . . . . . . . . . . . .2
Safety instructions . . . . . . . . . . . . . . . . . . . . . . . . . . . . . . . . . . . . . . . . . . . . . . . . . . . . . .3
Assembly and setting up . . . . . . . . . . . . . . . . . . . . . . . . . . . . . . . . . . . . . . . . . . . . . . . . .6
Before fi rst use . . . . . . . . . . . . . . . . . . . . . . . . . . . . . . . . . . . . . . . . . . . . . . . . . . . . . . . . .6
Thermostat settings . . . . . . . . . . . . . . . . . . . . . . . . . . . . . . . . . . . . . . . . . . . . . . . . . . . . .7
Using the lid . . . . . . . . . . . . . . . . . . . . . . . . . . . . . . . . . . . . . . . . . . . . . . . . . . . . . . . . . . .7
Operation . . . . . . . . . . . . . . . . . . . . . . . . . . . . . . . . . . . . . . . . . . . . . . . . . . . . . . . . . . . . .7
Cleaning and care . . . . . . . . . . . . . . . . . . . . . . . . . . . . . . . . . . . . . . . . . . . . . . . . . . . . . . .8
Storage . . . . . . . . . . . . . . . . . . . . . . . . . . . . . . . . . . . . . . . . . . . . . . . . . . . . . . . . . . . . . . .8
Troubleshooting . . . . . . . . . . . . . . . . . . . . . . . . . . . . . . . . . . . . . . . . . . . . . . . . . . . . . . . .9
GB
Warranty and service . . . . . . . . . . . . . . . . . . . . . . . . . . . . . . . . . . . . . . . . . . . . . . . . . .10
Disposal . . . . . . . . . . . . . . . . . . . . . . . . . . . . . . . . . . . . . . . . . . . . . . . . . . . . . . . . . . . . . .10
Importer . . . . . . . . . . . . . . . . . . . . . . . . . . . . . . . . . . . . . . . . . . . . . . . . . . . . . . . . . . . . .10
Recipes . . . . . . . . . . . . . . . . . . . . . . . . . . . . . . . . . . . . . . . . . . . . . . . . . . . . . . . . . . . . . . .11
Marinated pork fi llets . . . . . . . . . . . . . . . . . . . . . . . . . . . . . . . . . . . . . . . . . . . . . . . . . . . . . . . . . . . . . . 11
Grilled pineapple . . . . . . . . . . . . . . . . . . . . . . . . . . . . . . . . . . . . . . . . . . . . . . . . . . . . . . . . . . . . . . . . . 11
Grilled vegetables . . . . . . . . . . . . . . . . . . . . . . . . . . . . . . . . . . . . . . . . . . . . . . . . . . . . . . . . . . . . . . . . . 12
Tofu with mushrooms . . . . . . . . . . . . . . . . . . . . . . . . . . . . . . . . . . . . . . . . . . . . . . . . . . . . . . . . . . . . . . . 12
Coconut curry prawns . . . . . . . . . . . . . . . . . . . . . . . . . . . . . . . . . . . . . . . . . . . . . . . . . . . . . . . . . . . . . . 13
Baked toast . . . . . . . . . . . . . . . . . . . . . . . . . . . . . . . . . . . . . . . . . . . . . . . . . . . . . . . . . . . . . . . . . . . . . . 14
Grilled asparagus . . . . . . . . . . . . . . . . . . . . . . . . . . . . . . . . . . . . . . . . . . . . . . . . . . . . . . . . . . . . . . . . . 14
Turkey breast fi llet . . . . . . . . . . . . . . . . . . . . . . . . . . . . . . . . . . . . . . . . . . . . . . . . . . . . . . . . . . . . . . . . . 15
Grilled corn on the cob . . . . . . . . . . . . . . . . . . . . . . . . . . . . . . . . . . . . . . . . . . . . . . . . . . . . . . . . . . . . . 16
Bruschetta . . . . . . . . . . . . . . . . . . . . . . . . . . . . . . . . . . . . . . . . . . . . . . . . . . . . . . . . . . . . . . . . . . . . . . . 16
STGG 1800 A1
1
Page 5

TABLETOP GRILL
GB
STGG 1800 A1
Introduction
Congratulations on the purchase of your new
appliance.
You have selected a high-quality product.
The operating instructions are a constituent of this
product. They contain important information about
safety, use and disposal. Before using the product,
familiarise yourself with all operating and safety
instructions. Use this product only as described and
only for the specifi ed areas of application. Please
also pass these operating instructions on to any
future owner(s).
Proper use
This appliance is intended exclusively for grilling
food indoors. This appliance is intended exclusively
for use in domestic households. Not to be used for
commercial purposes.
Package contents
Tabletop Grill
(griddle, frame, drip tray, thermostat)
Operating instructions
Appliance description
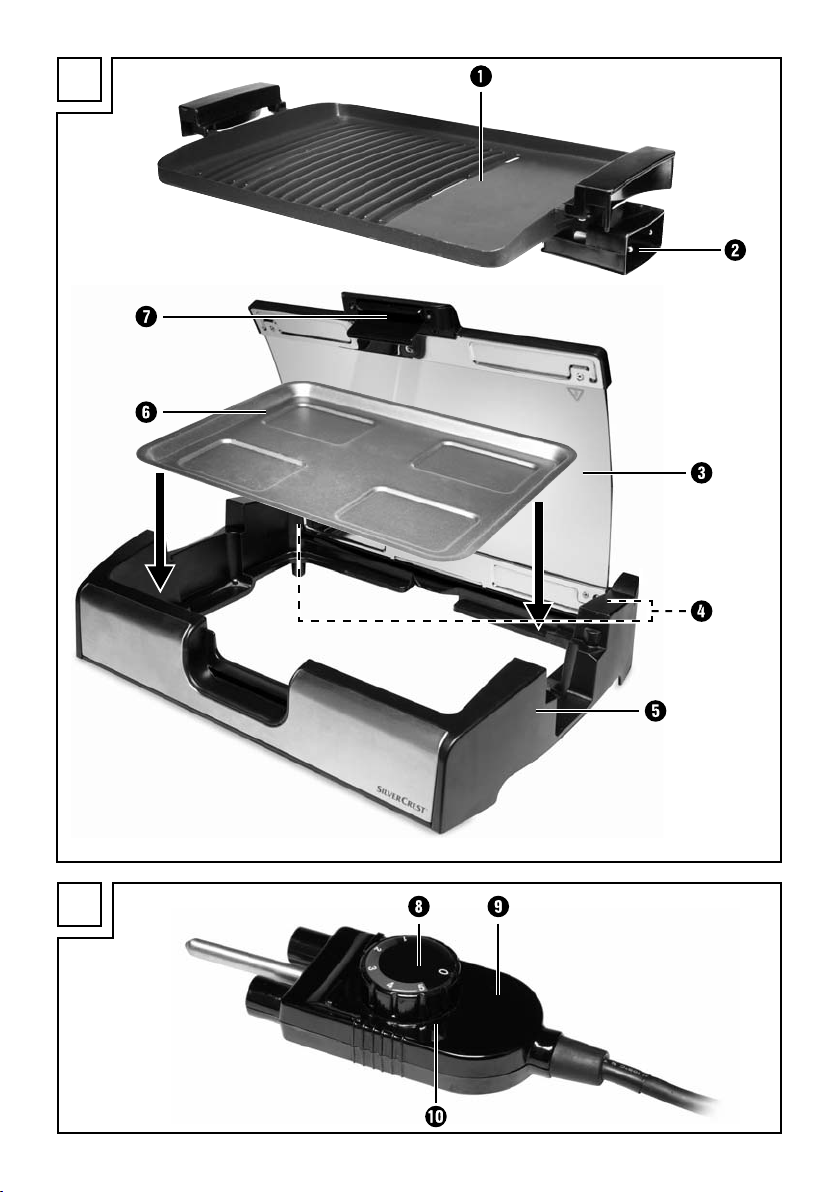
1 Griddle
2 Socket
3 Lid
4 Hinge guide
5 Frame
6 Drip tray
7 Handle with catch
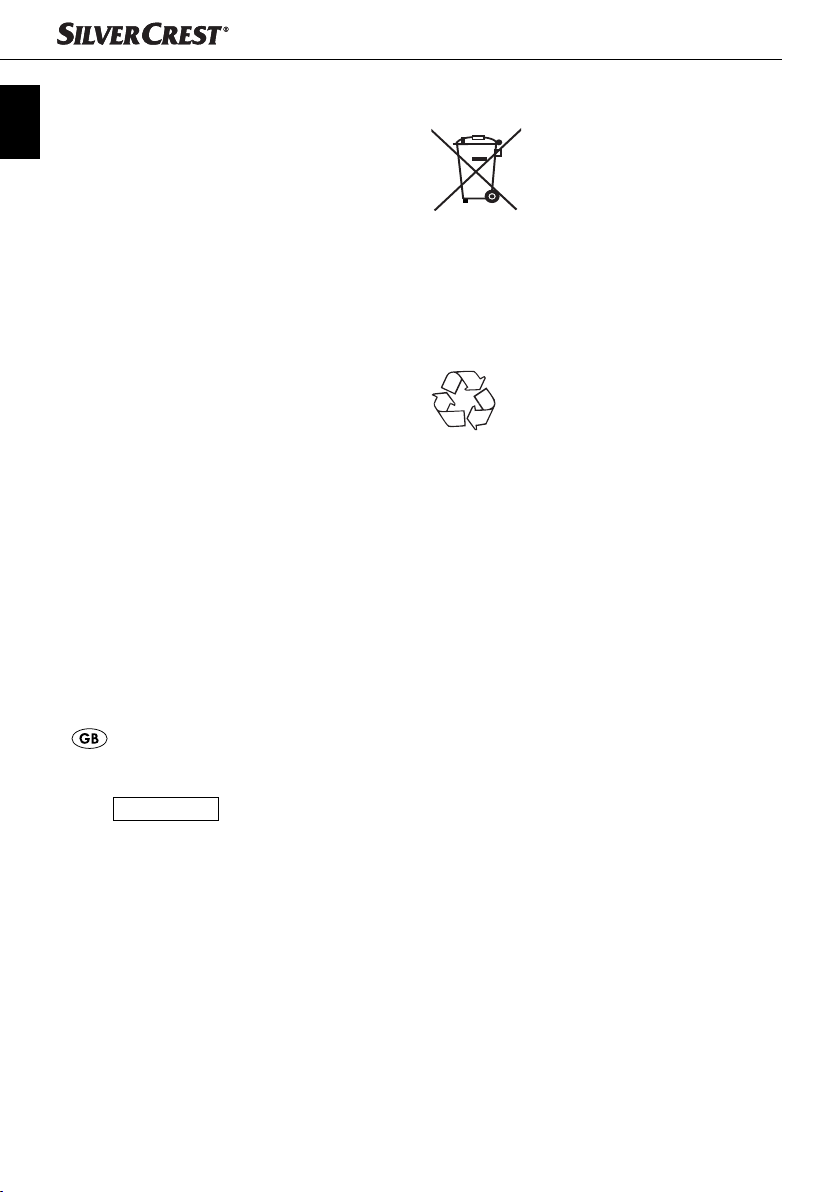
8 Temperature control
9 Thermostat
0 Indicator lamp
Technical details
Rated voltage: 220 - 240 V ~,
50/60 Hz
Max. power
consumption: 1500 - 1800 W
NOTE
Check the contents for completeness and damage
directly after unpacking. Contact Customer
Services if necessary.
2
STGG 1800 A1
Page 6

Safety instructions
DANGER – RISK OF ELECTRICAL SHOCK!
► To avoid risks, have defective plugs and/or power cables replaced
immediately by qualifi ed technicians or our Customer Service
Department.
► Protect the power cable from contact with hot appliance parts.
NEVER use the appliance near naked fl ames, a hotplate or a
heated oven.
► Do not expose the appliance to rain, and never use it in a humid
or wet environment. Ensure that the power cable never becomes
wet or moist during operation.
► Before use, check the appliance for externally visible damage.
Do not use an appliance that has been damaged or dropped.
► The power cable must be checked for signs of damage at regular
intervals. If the power cable is damaged, the appliance may no
longer be used.
► The appliance must be connected to a mains socket with a pro-
tective earth.
GB
► The appliance must not come into contact with moisture such as
rain or water.
NEVER immerse the appliance in water or other liquids!
You could receive a fatal electric shock if residual liquids
come into contact with live components during operation.
STGG 1800 A1
3
Page 7

GB
WARNING – RISK OF INJURY!
► This appliance may be used by children of the age of 8 years or
more and by persons with reduced physical, sensory or mental
capabilities or lack of experience and/or knowledge if they are
being supervised or have been instructed with regard to the safe
use of the appliance and have understood the potential risks.
► Children must not play with the appliance.
► Cleaning and user maintenance should not be performed by chil-
dren, unless they are older than 8 years of age and are supervised.
► Children younger than 8 years of age must be kept away from
the appliance and the power cable.
► After use, allow the appliance to cool down completely before
cleaning it. Risk of burns!
► Set up the appliance as close as possible to the electrical power
socket. Ensure that the power plug is quickly reachable in case of
danger, and also that there is no danger of tripping over the cable.
► Provide a stable location for the appliance.
Caution! Hot surface!
► Do not touch anything other than the handle on the lid while
the appliance is in use. The surfaces of the appliance become
extremely hot during use.
► Never leave the appliance unattended while it is being used.
► Discontinue use of the appliance if it is damaged!
► Discontinue use of the appliance if there are any visible cracks
or other damage on the lid.
4
STGG 1800 A1
Page 8

CAUTION – PROPERTY DAMAGE!
► Do not use an external timing switch or a separate remote
control system to operate the appliance.
► Never leave the appliance unattended during operation.
► Ensure that the appliance, the power cable and the plug do not
come into contact with heat sources such as hotplates or naked
fl ames.
► Do not use charcoal or similar fuels to operate the appliance!
► To protect the non-stick coating, do not use metallic tools such as
knives, forks, etc. Should the non-stick coating become damaged,
discontinue use of the appliance.
► Operate the appliance only with the original accessories supplied.
► Never operate the appliance without the drip tray. Otherwise
fat and other hot liquids will drip down from the appliance.
► Use the appliance only with the supplied thermostat.
GB
STGG 1800 A1
5
Page 9

Assembly and setting up
GB
WARNING! RISK OF FIRE!
► Never place the appliance underneath wall
cupboards or next to curtains, cupboard
walls or other fl ammable objects.
► Set up the appliance at least 70 cm from any
fl ammable materials (e.g. curtains).
► Always place the appliance on a heat-resistant
surface.
► Set up the appliance with its rear side directly
against the wall. When doing so, ensure that
the wall is made of heat-resistant material
and that the lid 3 can open fully.
1) Remove all of the parts from the box and
remove the packaging material and any
protective fi lm.
2) Clean all components as described in Chapter
“Cleaning and care”. Ensure that all parts are
completely dry.
3) Place the appliance on a heat-resistant, clean
and level surface.
4) Place the drip tray 6 in the frame 5 so that
it sits in the recess to the left of the centre.
ATTENTION! DAMAGE TO PROPERTY!
Never use the appliance without the drip
►
tray 6! Otherwise hot fat and other hot
liquids will drip down from the appliance
onto the surface below.
5) Place the griddle 1 onto the frame 5.
Ensure that the socket 2 is on the right side.
The griddle 1 must sit correctly in the frame
otherwise the thermostat 9 cannot be connected to the socket 2.
6) Push the hinges of the lid 3 into the recess on
the frame 5 and close the lid 3.
7) Connect the thermostat 9 with the socket 2
on the appliance. Ensure that the thermostat
9 is pushed up to the stop in the socket 2.
Otherwise the appliance cannot heat up!
Before fi rst use
1) Open the lid 3 by pushing up the catch on
the handle 7 and, at the same time, pulling
the lid 3 upwards.
Open the lid 3 until the hinges slide down
into the hinge guides 4 and the lid 3 is fi rmly
in place.
2) Wipe the griddle 1 with a moist cloth.
3) Lightly grease the griddle 1 with fat or oil that
is suitable for baking/grilling. This allows any
cooking residues on the griddle 1 to be more
easily removed.
4) Close the lid 3 by lifting it lightly into the
hinge guide 4 so that it can be folded shut.
5) Insert the plug in a mains power socket and
set the temperature control 8 to level 5. The
appliance will heat up.
6) Wait for 10 minutes.
7) Then disconnect the plug and allow the appliance to cool down.
NOTE
The fi rst time the appliance heats up, a small
►
amount of smoke and smell may be generated
due to production-related residues. This is
completely normal and is not dangerous.
Provide suffi cient ventilation by opening a
window, for example.
8) Wipe the griddle 1 with a damp cloth after
cooling.
9) Clean the drip tray 6 as described in Chapter
“Cleaning and care”.
10) Ensure that all parts are completely dry before
operating the appliance.
The appliance is now ready for use.
6
STGG 1800 A1
Page 10

Thermostat settings
The temperature control 8 on the thermostat 9
can be used to set the temperature level.
Level 0 Grill switched off
Level > 0 - 1 Grill switched on;
low temperature
Level 1 - 3 Grill switched on;
medium temperature
Level 3 - 5 Grill switched on;
high temperature
As soon as you set a temperature level, the indicator
lamp 0 lights up. When the set temperature has
been reached, the indicator lamp 0 goes out.
However, this may come on and go off again at any
time. This means that the appliance is maintaining
the temperature and has heated up again a little.
NOTE
Select the correct temperature level by trial
►
and error. The lower and medium temperature
levels are better suited for vegetables, fruits
and delicate foods. The higher temperature
levels are better for meat.
Using the lid
The lid 3 can either be closed or left open during
the preparation of foods:
■ When open, the lid 3 serves as a splash
protector.
■ If you close the lid 3 while grilling you will
achieve higher temperatures and the food will
be cooked from all sides.
■ To open the lid 3, push up the catch on the
handle 7 and, at the same time, pull the lid 3
upwards. Open it until the hinges slip down into
the hinge guides 4. The lid 3 now sits fi rmly.
■ To reclose the lid 3 lift it up so that the hinges
slide up into the hinge guides 4. Now you can
reclose the lid 3. Ensure that the catch on the
handle 7 also engages.
Operation
WARNING! RISK OF INJURY!
► The appliance is extremely hot during use!
For this reason, do not touch anything but
the handle 7 on the lid 3 during use! Use
oven gloves if you need to take hold of the
appliance.
1) Close the lid 3.
2) Insert the plug into a mains power socket. The
indicator lamp 0 lights up and the appliance
heats up.
3) As soon as the indicator lamp 0 goes off ,
the appliance has heated up.
Open the lid 3 using the handle 7 and place
the food onto the griddle 1.
4) If required, close the lid 3. Fat and liquids
will run into the drip tray during use 6.
5) Check the grilling progress regularly and turn
the food being grilled. Once you are satisfi ed,
open the lid 3 using the handle 7 and remove
the food from the griddle 1.
ATTENTION! DAMAGE TO PROPERTY!
Do not use metal implements such as knives,
►
forks, etc. Should the non-stick coating become
damaged, discontinue use of the appliance.
6) If you do not want to grill any more food, turn
the temperature control 8 to “0” and remove
the plug from the mains socket. This is the only
way to switch the appliance off .
GB
STGG 1800 A1
7
Page 11

Cleaning and care
GB
DANGER – ELECTRIC SHOCK!
Before cleaning the appliance, disconnect
►
the plug from the mains power socket!
Risk of electric shock!
Never submerge the griddle 1 or the
thermostat 9 in water or other liquids!
WARNING! RISK OF INJURY!
► Always allow the appliance to cool down
before cleaning it. Otherwise there is a risk
of burns!
ATTENTION! DAMAGE TO PROPERTY!
Do not use abrasive or aggressive cleaning
►
materials. These could damage the surface
of the appliance!
► Do not use metal implements such as knives,
forks, etc. Should the non-stick coating become
damaged, discontinue use of the appliance.
■ It is best to clean the appliance as soon as it has
cooled down. This makes food residues easier
to remove.
■ Dismantle the appliance for cleaning:
– Pull the thermostat 9 from the socket 2.
– Pull the lid 3 out of the hinge guides 4.
– Lift the griddle 1 out of the frame 5.
– Carefully remove the drip tray 6 from the
frame 5.
■ Empty the drip tray 6. Then rinse it in warm
water containing a mild detergent. Then rinse
the drip tray 6 with clean water and dry it off .
■ Clean the lid 3 in warm water containing a
mild detergent. Then rinse the lid 3 with clean
water and dry it off .
■ After it has cooled down, wipe the griddle 1
with a damp cloth. The griddle 1 must be
completely dry before it is used again.
NOTE
If there is any stubborn residue on the griddle 1,
►
you can soak the griddle 1 in warm water
with a little detergent. Afterwards, rinse the
griddle 1 with clean water. Ensure that no
detergent residues remain on the griddle 1.
► The griddle 1 must be completely dry before
it is used again. Take particular care to
ensure that no moisture remains in the socket
2.
► If you have used detergent to clean the grid-
dle 1 make sure that you grease it lightly
with a little oil again afterwards, otherwise
the non-stick coating will not function optimally.
■ Wipe the frame 5 and the thermostat 9 with a
moist cloth. If necessary, put a little mild detergent
on the cloth and wipe this off afterwards with
clear water. Dry everything properly.
■ Then reassemble the appliance.
Storage
■ Store the cleaned appliance in a clean, dust-free
and dry location.
■ When the appliance has been reassembled and
the catch on the lid 3 has clicked back into
place, you can store the appliance upright to
save space.
8
STGG 1800 A1
Page 12

Troubleshooting
Defect Cause Solution
GB
The mains plug is not connected to the
mains power.
The appliance is not
working.
The indicator
lamp 0
illuminates
and goes off again
repeatedly.
The indicator
lamp 0 does not
illuminate.
If the malfunction cannot be corrected with the above suggestions, or if you have found some other
kind of malfunction, please contact our Customer Service.
The mains power socket is defective.
The appliance is defective. Contact Customer Services.
The appliance is maintaining the temperature.
To do this, it has to heat up briefl y every
so often. When this occurs, the indicator
lamp 0 comes on.
The appliance is defective. Contact Customer Services.
The appliance has heated up. This is not a defect.
Insert the plug into a mains
power socket.
Use a diff erent mains power
socket.
This is not a defect.
STGG 1800 A1
9
Page 13
Warranty and service
GB
The warranty provided for this appliance is
3 years from the date of purchase. This appliance has been manufactured with care and
inspected meticulously prior to delivery. Please
retain your receipt as proof of purchase. In the
event of a warranty claim, please contact your
Customer Service by telephone. This is the only
way to guarantee free return of your goods.
The warranty only covers claims for material and
manufacturing defects, not for transport damage,
wearing parts or for damage to fragile components
such as switches or batteries. This appliance is intended solely for private use and not for commercial
purposes.
The warranty is deemed void if this product has been
subjected to improper or inappropriate handling,
abuse or modifi cations which were not carried out
by one of our authorised service centres. Your
statutory rights are not restricted in any way by this
warranty.
The warranty period is not prolonged by repairs
made under the warranty. This also applies to
replaced and repaired parts. Damage and defects
present at the time of purchase must be reported
immediately after unpacking, or no later than two
days after the date of purchase. Repairs made
after expiry of the warranty period are chargeable.
Disposal
Under no circumstance, should
you dispose of the appliance
in the normal domestic waste.
This product is subject to the
provisions of European
Directive 2012/19/EU.
Dispose of the appliance via an approved disposal
company or your municipal waste facility. Please
observe the currently applicable regulations.
Please contact your waste disposal centre if you
are in any doubt.
The packaging is made from environ-
mentally friendly material and can be
disposed of at your local recycling plant.
Importer
KOMPERNASS HANDELS GMBH
BURGSTRASSE 21
44867 BOCHUM
GERMANY
www.kompernass.com
Service Great Britain
Tel.: 0871 5000 720 (£ 0.10/Min.)
E-Mail: kompernass@lidl.co.uk
IAN 103845
Hotline availability:
Monday to Friday 08:00 - 20:00 (CET)
10
STGG 1800 A1
Page 14

Recipes
NOTE
The information regarding grill times and temperature levels in the recipes are guide values and can
►
vary greatly depending on the nature of the foodstuff s. Always take account of your own experience
when preparing meals.
Marinated pork fi llets
Ingredients:
♦ 500 g pork fi llet
♦ 2 tbsp. balsamic vinegar
♦ 2 tsp. basil (seasoning)
♦ 1 orange
♦ Salt
♦ Pepper
1) Remove the fat and skin from the pork fi llet.
2) Cut the fi llet into medallions around 2 - 3 cm thick and lay these in a dish.
3) Add the juice of the orange, the balsamic vinegar, 1 tsp. basil seasoning, a dash of salt and a little
pepper and marinate the meat for around one hour.
4) Lay the medallions on the griddle 1 and grill them for around 5 - 7 minutes on each side at temperature level 4.
GB
Grilled pineapple
Ingredients:
♦ 1 pineapple
♦ 1 - 2 tbsp. sugar
♦ 1 tsp. cinnamon
1) Stand the pineapple upright and peel it with a sharp knife from top to bottom until the pineapple is
completely peeled.
2) Cut the pineapple into quarters and cut out the core.
3) Cut the pineapple into strips of about 2 cm thickness.
4) Grill the strips on each side for around 5 - 7 minutes at temperature level 3.
5) Sprinkle the pineapple with cinnamon and sugar to taste.
STGG 1800 A1
11
Page 15

Grilled vegetables
Ingredients:
GB
♦ 2 peppers
♦ 1 courgette
♦ 1 aubergine
♦ Olive oil
♦ Salt
♦ Pepper
♦ Herbs de Provence (seasoning mix)
1) Wash the vegetables thoroughly. Cut the peppers in half, remove the seeds and cut them into strips.
Cut the aubergine and courgette in half along their length and then into around 0.5 cm pieces.
2) Brush the vegetables with a little olive oil.
3) Lay the vegetables on the griddle 1 (preheated to temperature level 3) and grill them on both sides
for around 8 - 10 minutes each until they have reached a light brown colour.
4) Season the vegetables with salt, pepper and herbs de Provence according to taste.
Tofu with mushrooms
Ingredients:
♦ 4 tofu slices a 50 g
♦ 1 - 2 tbsp. soya sauce
♦ Sesame oil
♦ Olive oil
♦ 200 g mushrooms
♦ 1 onion
♦ Salt
♦ Pepper
1) Marinate the tofu slices in 2 tbsp. soya sauce and a few drops of sesame oil, salt and pepper for
30 minutes in a dish.
2) Grill the tofu on both sides at temperature level 4 for around 5 minutes.
3) Clean the mushrooms and cut these – as well as the onion – into slices.
4) Add the slices, 1 tbsp. of olive oil and 2 tbsp. soya sauce into a bowl and mix them together.
5) Fry the mushrooms and onions for a short while on the griddle 1 at temperature level 4 and serve
them with the tofu.
12
STGG 1800 A1
Page 16

Coconut curry prawns
Ingredients:
♦ 100 g red curry paste
♦ 50 ml coconut milk
♦ 400 g prawns (alternatively shrimps)
♦ 200 g sugar snaps
♦ 2 peppers
♦ 2 onions
♦ 2 garlic cloves
♦ Salt and pepper
♦ Kitchen foil
1) Mix the curry paste and the coconut milk.
2) Wash the prawns, the sugar snaps and the peppers.
3) Peel the onions and garlic cloves.
4) Chop the onions, the garlic cloves and peppers into small pieces.
5) Spread the prawns and the vegetables evenly over four pieces of aluminium foil. The aluminium foil
must be big enough so that it is possible to wrap up the ingredients in little packages. Drip the coconut
curry sauce over the food and season everything with salt and pepper.
6) Close up the packages well so that no liquids can escape.
7) Place the fi lled packages on the griddle 1 (preheated to temperature level 4) and cook them from
both sides for around 15 minutes each side.
GB
NOTE
Depending on the size of the packages, it is possible that only 2 - 3 of the packages will fi t onto the
►
griddle 1 at once. Grill the remaining packages after the fi rst ones are cooked.
STGG 1800 A1
13
Page 17

Baked toast
Ingredients:
GB
♦ 8 slices of toasting bread
♦ 2 eggs
♦ 100 ml cream
♦ 100 g grated Parmesan
♦ 1 tbsp. vegetable oil
♦ 20 g chopped parsley
♦ 20 g chopped chives
♦ Salt
♦ Pepper
1) Mix the cream with the eggs, the grated cheese and the herbs in a bowl. Add salt and pepper.
2) Grease the griddle 1 lightly with a little vegetable oil.
3) Dip the slices of bread into the mixture and grill them for about 5 minutes on each side at temperature
level 3.
Grilled asparagus
Ingredients:
♦ 10 asparagus spears (diameter of around 1.5 cm)
♦ 50 g butter
♦ 1 bunch of parsley
♦ Salt
♦ Pepper
1) Wash and peel the asparagus.
2) Wash and chop the parsley.
3) Lay out some aluminium foil and cover it with a layer of parsley and butter fl akes. Lay half of the
asparagus on top. Add another layer of parsley and butter fl akes on top. Now lay the remaining
asparagus on the top and season with salt and pepper.
4) Close the package and lay it on the griddle 1 at a temperature level of 4 - 5. Close the lid 3 to
cook the food.
5) After 20 minutes, carefully turn the package over. After another 20 minutes, the asparagus is cooked.
NOTE
Depending on the thickness of the food being grilled, it is possible that the lid 3 can rest on the
►
food during grilling.
14
STGG 1800 A1
Page 18

Turkey breast fi llet
Ingredients:
♦ 2 fi llets of turkey breast, (each approx. 150 g)
♦ 1 clove of garlic
♦ 1 tbsp. honey
♦ 1 tsp. mustard (grainy)
♦ 1 tbsp. vegetable oil
♦ Salt
♦ Coloured pepper
1) Peel the garlic cloves and crush them.
2) Mix the garlic, the honey, the mustard and the oil and season the marinade with salt and pepper.
3) Wash and dry the turkey breasts. Add the fi llets to the marinade in a covered bowl and chill them
for around one hour.
4) Lay the fi llets on the griddle 1 at temperature level 4 and close the lid 3.
– Thin fi llets: Turn the fi llets after around 5 minutes and grill the other side of the fi llet for another
5 minutes at temperature level 4 with the lid 3 closed.
– Thick fi llets: Turn the fi llets after around 10 minutes and grill the other side of the fi llet for another
10 minutes at temperature level 4 with the lid 3 closed.
NOTE
Depending on the thickness of the food being grilled, it is possible that the lid 3 can rest on the
►
food during grilling.
GB
STGG 1800 A1
15
Page 19

Grilled corn on the cob
Ingredients:
GB
♦ 2 sweet corn cobs
♦ 100 g herb butter
♦ Garlic salt
♦ Salt
♦ Pepper
1) Brush a piece of aluminium foil with the herb butter.
2) Salt the corn cobs and wrap them in the aluminium foil.
3) Lay the package on the griddle 1 with the lid 3 closed at temperature level 4.
4) Turn the package after 15 minutes and cook the cobs for another 15 minutes.
5) Season the corn cobs with garlic salt and pepper.
NOTE
Depending on the thickness of the food being grilled, it is possible that the lid 3 can rest on the
►
food during grilling.
Bruschetta
Ingredients:
♦ 2 ciabatta loaves
♦ 2 tomatoes
♦ 4 tbsp. tomato ketchup
♦ 2 garlic cloves
♦ 2 tbsp. olive oil
♦ 1 tbsp. basil, fi nely chopped
1) Cut the ciabatta loaves in half and lay them on the griddle 1 at temperature level 3 - 4 for around
2 minutes so that the ciabatta halves are lightly browned.
2) Wash and dice the tomatoes. Crush the garlic.
3) Mix the tomato pieces, the ketchup, the garlic, the olive oil and the chopped basil.
4) Spread this paste over the toasted ciabatta pieces and lay these onto the griddle 1 for about
5 minutes at temperature level 3.
16
STGG 1800 A1
Page 20

Spis treści
Wstęp. . . . . . . . . . . . . . . . . . . . . . . . . . . . . . . . . . . . . . . . . . . . . . . . . . . . . . . . . . . . . . . .18
Zastosowanie zgodne z przeznaczeniem . . . . . . . . . . . . . . . . . . . . . . . . . . . . . . . . . .18
Zakres dostawy . . . . . . . . . . . . . . . . . . . . . . . . . . . . . . . . . . . . . . . . . . . . . . . . . . . . . . .18
Opis urządzania . . . . . . . . . . . . . . . . . . . . . . . . . . . . . . . . . . . . . . . . . . . . . . . . . . . . . . .18
Dane techniczne . . . . . . . . . . . . . . . . . . . . . . . . . . . . . . . . . . . . . . . . . . . . . . . . . . . . . . .18
Wskazówki bezpieczeństwa . . . . . . . . . . . . . . . . . . . . . . . . . . . . . . . . . . . . . . . . . . . . .19
Montaż i ustawienie . . . . . . . . . . . . . . . . . . . . . . . . . . . . . . . . . . . . . . . . . . . . . . . . . . . .22
Przed pierwszym użyciem . . . . . . . . . . . . . . . . . . . . . . . . . . . . . . . . . . . . . . . . . . . . . . .22
Ustawienia termostatu . . . . . . . . . . . . . . . . . . . . . . . . . . . . . . . . . . . . . . . . . . . . . . . . .23
Korzystanie z pokrywy . . . . . . . . . . . . . . . . . . . . . . . . . . . . . . . . . . . . . . . . . . . . . . . . .23
Obsługa . . . . . . . . . . . . . . . . . . . . . . . . . . . . . . . . . . . . . . . . . . . . . . . . . . . . . . . . . . . . . .23
Czyszczenie i pielęgnacja. . . . . . . . . . . . . . . . . . . . . . . . . . . . . . . . . . . . . . . . . . . . . . . .24
Przechowywanie . . . . . . . . . . . . . . . . . . . . . . . . . . . . . . . . . . . . . . . . . . . . . . . . . . . . . .24
Usuwanie usterek . . . . . . . . . . . . . . . . . . . . . . . . . . . . . . . . . . . . . . . . . . . . . . . . . . . . . .25
Gwarancja i serwis . . . . . . . . . . . . . . . . . . . . . . . . . . . . . . . . . . . . . . . . . . . . . . . . . . . .26
Utylizacja . . . . . . . . . . . . . . . . . . . . . . . . . . . . . . . . . . . . . . . . . . . . . . . . . . . . . . . . . . . .26
Importer . . . . . . . . . . . . . . . . . . . . . . . . . . . . . . . . . . . . . . . . . . . . . . . . . . . . . . . . . . . . .26
PL
Przepisy . . . . . . . . . . . . . . . . . . . . . . . . . . . . . . . . . . . . . . . . . . . . . . . . . . . . . . . . . . . . . .27
Marynowane polędwiczki wieprzowe . . . . . . . . . . . . . . . . . . . . . . . . . . . . . . . . . . . . . . . . . . . . . . . . . 27
Grillowany ananas . . . . . . . . . . . . . . . . . . . . . . . . . . . . . . . . . . . . . . . . . . . . . . . . . . . . . . . . . . . . . . . . 27
Grillowane warzywa . . . . . . . . . . . . . . . . . . . . . . . . . . . . . . . . . . . . . . . . . . . . . . . . . . . . . . . . . . . . . . . 28
Tofu z pieczarkami. . . . . . . . . . . . . . . . . . . . . . . . . . . . . . . . . . . . . . . . . . . . . . . . . . . . . . . . . . . . . . . . . 28
Kokosowe curry z krewetkami . . . . . . . . . . . . . . . . . . . . . . . . . . . . . . . . . . . . . . . . . . . . . . . . . . . . . . . . 29
Pieczone tosty . . . . . . . . . . . . . . . . . . . . . . . . . . . . . . . . . . . . . . . . . . . . . . . . . . . . . . . . . . . . . . . . . . . . 30
Szparagi z grilla . . . . . . . . . . . . . . . . . . . . . . . . . . . . . . . . . . . . . . . . . . . . . . . . . . . . . . . . . . . . . . . . . . 30
Filet z piersi indyka . . . . . . . . . . . . . . . . . . . . . . . . . . . . . . . . . . . . . . . . . . . . . . . . . . . . . . . . . . . . . . . . 31
Grillowane kolby kukurydzy . . . . . . . . . . . . . . . . . . . . . . . . . . . . . . . . . . . . . . . . . . . . . . . . . . . . . . . . . 32
Bruschetta . . . . . . . . . . . . . . . . . . . . . . . . . . . . . . . . . . . . . . . . . . . . . . . . . . . . . . . . . . . . . . . . . . . . . . . 32
STGG 1800 A1
17
Page 21

GRILL STOŁOWY
STGG 1800 A1
Wstęp
Serdecznie gratulujemy zakupu nowego urządzenia.
PL
Wybrany produkt charakteryzuje się wysoką jakością. Instrukcja obsługi stanowi element składowy
produktu. Zawiera ona ważne wskazówki na temat
bezpieczeństwa, użytkowania i utylizacji. Przed
przystąpieniem do eksploatacji produktu należy
zapoznać się ze wszystkimi wskazówkami dotyczącymi obsługi i bezpieczeństwa. Produkt należy
użytkować wyłącznie zgodnie z zamieszczonym
tu opisem oraz w podanym zakresie zastosowań.
W przypadku przekazania urządzenia następnej
osobie, nie zapomnij dołączyć również instrukcji
obsługi.
Zastosowanie zgodne
z przeznaczeniem
Niniejsze urządzenie przeznaczone jest wyłącznie
do grillowania produktów spożywczych wewnątrz
pomieszczeń. Urządzenie to przeznaczone jest
wyłącznie do zastosowania w gospodarstwach
domowych. Nie należy go używać do celów
komercyjnych.
Opis urządzania
1 Płyta grillowa
2 Gniazdo
3 Pokrywa
4 Prowadnica zawiasu
5 Ramka
6 Tacka na tłuszcz
7 Uchwyt z blokadą
8 Regulator temperatury
9 Termostat
0 Lampka kontrolna
Dane techniczne
Napięcie znamionowe: 220 - 240 V ~,
50/60 Hz
Maks. pobór mocy: 1500 - 1800 W
Zakres dostawy
Grill stołowy
(płyta grillowa, ramka, tacka na tłuszcz, termostat)
Instrukcja obsługi
WSKAZÓWKA
Bezpośrednio po rozpakowaniu sprawdź, czy
dostarczony produkt jest kompletny oraz czy
nie ma żadnych uszkodzeń. Jeśli zaistnieje taka
potrzeba, zwróć się do serwisu.
18
STGG 1800 A1
Page 22

Wskazówki bezpieczeństwa
NIEBEZPIECZEŃSTWO PORAŻENIA
PRĄDEM ELEKTRYCZNYM!
► Naprawę uszkodzonego wtyku lub kabla sieciowego zleć nie-
zwłocznie wykwalifi kowanemu specjaliście lub serwisowi, aby
uniknąć wszelkich zagrożeń.
► Chroń kabel sieciowy przed zetknięciem z gorącymi elementami
urządzenia. Nigdy nie używaj urządzenia w pobliżu otwartych
płomieni, płyty grzewczej lub piekarnika.
► Urządzenia nie wolno wystawiać na działanie deszczu ani
używać go w wilgotnym, ani też mokrym środowisku. Dopilnuj,
aby kabel sieciowy w trakcie użytkowania urządzenia nie był
mokry ani wilgotny.
► Przed przystąpieniem do użytkowania sprawdź, czy urządzenie
nie ma widocznych uszkodzeń. Nie uruchamiaj uszkodzonego
ani upuszczonego urządzenia.
► Kabel sieciowy należy regularnie sprawdzać pod kątem uszko-
dzeń. Jeśli dojdzie do uszkodzenia kabla, zabrania się dalszego
korzystania z urządzenia.
PL
► Urządzenie musi zostać podłączone do gniazda z przewodem
ochronnym.
► Urządzenie nie może być narażone na działanie wilgoci związa-
nej na przykład z opadami deszczu.
W żadnym przypadku nie zanurzaj urządzenia w wodzie ani
w innej cieczy! Przedostanie się cieczy na części przewodzące
prąd podczas pracy urządzenia powoduje powstanie zagrożenia dla życia na skutek porażenia prądem elektrycznym.
STGG 1800 A1
19
Page 23

OSTRZEŻENIE –
NIEBEZPIECZEŃSTWO ODNIESIENIA OBRAŻEŃ!
► To urządzenie może być używane przez dzieci od 8 roku życia
PL
oraz przez osoby o zmniejszonych zdolnościach fi zycznych,
sensorycznych lub umysłowych lub też osoby nieposiadające
odpowiedniego doświadczenia i/lub wiedzy, wyłącznie pod
nadzorem lub po przeszkoleniu w zakresie bezpiecznego używania urządzenia oraz wynikających z niego zagrożeń.
► Dzieci nie mogą bawić się urządzeniem.
► Czyszczenia ani konserwacji przez użytkownika nie mogą wy-
konywać dzieci, chyba że ukończyły 8 lat i są pod nadzorem.
► Dzieci w wieku poniżej 8 lat należy trzymać z dala od urzą-
dzenia i kabla zasilającego.
► Przed przystąpieniem do czyszczenia po korzystaniu z urzą-
dzenia odczekaj do jego całkowitego ostygnięcia!
Niebezpieczeństwo poparzenia!
► Postaw urządzenie jak najbliżej gniazda sieciowego. Pamiętaj,
by wtyk był łatwo dostępny w celu wyjęcia go z gniazda w przypadku zagrożenia, a także by kabel sieciowy nie był przyczyną
potknięcia.
► Należy zadbać o stabilne ustawienie urządzenia na powierzchni.
Ostrożnie! Gorąca powierzchnia!
► Podczas pracy urządzenia dotykać tylko uchwytu na pokrywie.
Powierzchnia urządzenia w czasie pracy nagrzewa się do wysokiej temperatury.
► W trakcie używania nigdy nie zostawiać urządzenia bez nadzoru.
► Nigdy nie używać urządzenia, gdy zostało ono uszkodzone.
► Nie korzystać dalej z urządzenia, gdy widoczne są pęknięcia
lub inne uszkodzenia na pokrywie.
20
STGG 1800 A1
Page 24

UWAGA – SZKODY MATERIALNE!
► Do sterowania pracą urządzenia nie używaj żadnych zewnętrznych
zegarów sterujących ani innego systemu zdalnego sterowania.
► W trakcie używania nigdy nie pozostawiaj urządzenia bez
nadzoru.
► Upewnij się, że urządzenie, kabel sieciowy lub wtyk sieciowy nie
stykają się z gorącymi źródłami, takimi jak gorące płyty grzejne
lub nieosłonięty płomień.
► Do grilla nie można wrzucać węgla ani żadnych innych, podob-
nych materiałów palnych!
► Chroń powłokę przeciwdziałającą przywieraniu, unikając stoso-
wania metalowych przedmiotów, np. noży, widelców itp.
W przypadku uszkodzenia powłoki przeciwdziałającej przywieraniu, urządzenie nie powinno być już używane.
► Urządzenie należy używać tylko z dostarczonym oryginalnym
osprzętem.
► Nigdy nie korzystaj z urządzenia bez zamontowanej tacki na
tłuszcz. W przeciwnym razie tłuszcz i gorąca ciecz będzie kapać
na podstawę urządzenia!
PL
► Używaj urządzenia tylko z dołączonym termostatem.
STGG 1800 A1
21
Page 25

Montaż i ustawienie
OSTRZEŻENIE!
NIEBEZPIECZEŃSTWO POŻARU!
PL
► Nigdy nie ustawiaj urządzenia pod wiszą-
cymi szafkami, ani obok fi ran, meblościanek
oraz innych łatwopalnych przedmiotów.
► Ustawiaj urządzenie zachowując odległość
co najmniej 70 cm od palnych materiałów
(np. zasłonek).
► Urządzenie można ustawiać wyłącznie na
podłożu odpornym na wysoką temperaturę.
► Stawiaj urządzenie bezpośrednio tylną stroną
do ściany. Uważaj przy tym na to, aby ściana
była wykonana z materiału odpornego na
działanie wysokich temperatur oraz by można
było jeszcze otworzyć pokrywę 3.
1) Wyjmij wszystkie elementy z kartonu i usuń
opakowania oraz ewentualnie folie ochronne.
2) Wyczyść urządzenie zgodnie z opisem w rozdziale „Czyszczenie i pielęgnacja”. Upewnij
się, że wszystkie części są całkowicie suche.
3) Ustaw urządzenie na odpornym na działanie wysokiej temperatury, czystym i równym
podłożu.
4) Włóż tackę na tłuszcz 6 w ramkę 5, aby
znajdowała się ona w szczelinie, po lewej
stronie od środka.
UWAGA! SZKODY MATERIALNE!
Nigdy nie korzystaj z urządzenia bez zamon-
►
towanej tacki na tłuszcz 6! W przeciwnym
razie gorący tłuszcz i gorące ciecze będą
kapały na podstawę!
5) Załóż płytę grillową 1 na ramkę 5.
Uważaj przy tym, aby gniazdo 2 znajdowało
się po prawej stronie. Płyta grillowa 1 musi
prawidłowo leżeć w ramce, ponieważ w przeciwnym razie nie będzie można połączyć
termostatu 9 z gniazdem 2.
6) Wsuń zawiasy pokrywy 3 w szczeliny w
ramce 5 i zamknij pokrywę 3.
7) Połącz termostat 9 z gniazdem 2 urządzenia.
Należy uważać na to, aby termostat 9 został
wsunięty aż do oporu w gniazdo 2.
W przeciwnym razie urządzenie nie będzie się
nagrzewało!
Przed pierwszym użyciem
1) Otwórz pokrywę 3, wciskając do góry blokadę
na uchwycie 7 i jednocześnie pociągając
pokrywę 3 do góry.
Otwórz pokrywę 3 tak daleko, aby zawiasy
wsunęły się do dołu w prowadnicę zawiasu 4,
a pokrywa 3 będzie w ustalonym położeniu.
2) Płytę do grillowania 1 wycieraj zawsze
wilgotną szmatką.
3) Nasmaruj lekko płytę do grillowania 1 tłusz-
czem lub olejem odpowiednim do pieczenia/grillowania.. W ten sposób lepiej usunięte zostaną
ewentualne pozostałości poprodukcyjne znajdujące się jeszcze na płycie do grillowania 1.
4) Zamknij pokrywę 3, podnosząc ją lekko
w prowadnicach zawiasów 4, aż będzie
można ją ponownie zamknąć.
5) Włóż wtyk sieciowy do gniazda sieciowego i
ustaw regulator temperatury 8 na stopień 5.
Urządzenie rozgrzewa się.
6) Odczekaj 10 minut.
7) Następnie wyciągnij wtyk z gniazda i pozostaw
urządzenia do ostygnięcia.
WSKAZÓWKA
Pierwszemu nagrzewaniu urządzenia może
►
towarzyszyć zapach spalenizny i dym wywołany wypalaniem się pozostałości środków
zastosowanych podczas produkcji. Jest to
zjawisko całkowicie normalne i nie stanowi
jakiegokolwiek zagrożenia. Pamiętaj o
zapewnieniu odpowiedniej wentylacji w
pomieszczeniu, np. poprzez otwarcie okna.
8) Po ostygnięciu wytrzyj płytę grillową 1 zwil-
żoną szmatką.
9) Wyczyść tackę na tłuszcz 6 zgodnie z opisem
w rozdziale „Czyszczenie i pielęgnacja".
10) Przed ponownym użyciem urządzenia upewnij
się, że wszystkie części są całkowicie suche.
Teraz urządzenie jest gotowe do pracy.
22
STGG 1800 A1
Page 26

Ustawienia termostatu
Za pomocą regulatora temperatury 8 na termostacie 9 można ustawiać stopnie temperatury.
Stopień 0 Grill wyłączony
Stopień > 0 - 1 Grill włączony;
niska temperatura
Stopień 1 - 3 Grill włączony;
średnia temperatura
Stopień 3 - 5 Grill włączony;
wysoka temperatura
Gdy tylko ustawisz dany stopień temperatury, zapali
się lampka kontrolna 0. Lampka kontrolna 0
wyłączy się gdy zostanie osiągnięta ustawiona
temperatura.
Może ona jednak cały czas ponownie zapalać się
i gasnąć. Oznacza to, że urządzenie utrzymuje
temperaturę przez okresowe podgrzewanie.
WSKAZÓWKA
Wybierz odpowiedni stopień ustawienia tempe-
►
ratury przez przeprowadzenie odpowiednich
prób. Niskie i średnie stopnie ustawienia temperatury są przeznaczone raczej dla warzyw,
owoców oraz wrażliwych produktów spożywczych, natomiast wysokie stopnie ustawienia
temperatury są przeznaczone dla mięsa.
Korzystanie z pokrywy
W trakcie przygotowywania potraw pokrywę 3
można zamknąć lub pozostawić otwartą:
■ W stanie otwartym pokrywa 3 służy jako
osłona antybryzgowa.
■ Po zamknięciu pokrywy 3 w czasie grillowania
uzyskuje się wyższą temperaturę, a potrawy są
opiekane ze wszystkich stron.
■ Aby otworzyć pokrywę 3, wciśnij do góry blo-
kadę na uchwycie 7 i jednocześnie pociągnij
pokrywę 3 do góry. Otwórz ją na tyle, aby
zawiasy zsunęły się w prowadnicach zawiasów
4 do dołu. Pokrywa 3 jest teraz w ustalonym
położeniu.
■ Aby ponownie zamknąć pokrywę 3, unieś ją
na tyle, aby zawiasy w prowadnicach zawiasów 4 przesunęły się do góry. Wtedy można
ponownie zamknąć pokrywę 3. Zwróć przy
tym uwagę na to, czy blokada w uchwycie 7
się zatrzasnęła.
Obsługa
OSTRZEŻENIE! ZAGROŻENIE
ODNIESIENIEM OBRAŻEŃ!
► Podczas pracy urządzenie jest bardzo
gorące! Podczas korzystania z urządzenia
dotykaj tylko uchwytu 7 na pokrywie 3!
Gdy musisz chwycić urządzenie, użyj rękawic kuchennych.
1) Zamknąć pokrywę 3.
2) Włóż wtyk sieciowy do gniazda sieciowego.
Kontrolka 0 świeci się i urządzenie nagrzewa się.
3) Gdy kontrolka 0 zgaśnie, urządzenie jest
nagrzane.
Otwórz pokrywę 3 za uchwyt 7 i ułóż według
swojego uznania produkty spożywcze na
płycie grillowej 1.
4) Jeśli będzie to potrzebne, zamknij pokrywę 3.
Tłuszcz i płyny spływają podczas grillowania
na tackę na tłuszcz 6.
5) Regularnie sprawdzaj wynik grillowania oraz
obracaj grillowane produkty. Gdy uznasz go
za zadowalający, otwórz w razie potrzeby pokrywę 3, chwytając za uchwyt 7, i zdejmij
produkt z płyty grillowej 1.
UWAGA! SZKODY MATERIALNE!
Nie używaj żadnych metalowych narzędzi,
►
takich jak noże, widelce itp. W przypadku
uszkodzenia powłoki przeciwdziałającej
przywieraniu, urządzenie nie powinno być
już używane.
6) Gdy nie będziesz chciał już grillować żadnych
produktów spożywczych, ustaw regulator temperatury 8 na „0“ i wyciągnij wtyk sieciowy
z gniazda sieciowego. Tylko w ten sposób
można całkowicie wyłączyć urządzenie.
PL
STGG 1800 A1
23
Page 27

Czyszczenie i pielęgnacja
NIEBEZPIECZEŃSTWO PORAŻENIA
PRĄDEM ELEKTRYCZNYM!
Przed każdym czyszczeniem należy wycią-
PL
►
gnąć wtyk z gniazda sieciowego! Istnieje
zagrożenie porażenia prądem elektrycznym!
Nigdy nie zanurzaj płyty grillowej 1
ani termostatu 9 w wodzie ani w innych
cieczach!
OSTRZEŻENIE! ZAGROŻENIE
ODNIESIENIEM OBRAŻEŃ!
► Przed przystąpieniem do czyszczenia urzą-
dzenia zawsze odczekaj, aż ostygnie.
W przeciwnym razie istnieje niebezpieczeństwo poparzenia!
UWAGA! SZKODY MATERIALNE!
Nie używaj żrących ani szorujących środków
►
czyszczących. Mogą one uszkodzić powierzchnię urządzenia!
► Nie używaj żadnych metalowych narzędzi,
takich jak noże, widelce itp. W przypadku
uszkodzenia powłoki przeciwdziałającej
przywieraniu, urządzenie nie powinno być
już używane.
■ Urządzenie czyść najlepiej natychmiast po osty-
gnięciu. Wtedy łatwiej jest usuwać pozostałości
produktów spożywczych.
■ W celu wyczyszczenia należy urządzenie
rozłożyć na części.
– Wyjmij termostat 9 z gniazda 2.
– Wyjmij pokrywę 3 z prowadnic
zawiasów 4.
– Podnieś płytę grillową 1 z ramki 5.
– Wyjmij tackę na tłuszcz 6 z ramki 5.
■ Opróżnij tackę na tłuszcz 6. Umyj ją w ciepłej
wodzie z dodatkiem łagodnego płynu do mycia
naczyń. Następnie wypłucz tackę na tłuszcz 6
dużą ilością czystej wody i dobrze ją wysusz.
■ Umyj pokrywę 3 w ciepłej wodzie z dodatkiem
łagodnego płynu do mycia naczyń. Następnie
wypłucz pokrywę 3 dużą ilością czystej wody
i dobrze ją wysusz.
■ Po ostygnięciu wytrzyj płytę grillową 1 wilgotną
szmatką. Przed ponownym użyciem płyta grillowa 1 musi być całkowicie sucha.
WSKAZÓWKA
Gdy do płyty grillowej 1 będą przylegały
►
trudne do usunięcia zanieczyszczenia, płytę
grillową 1 można namoczyć w ciepłej wodzie
z dodatkiem płynu do mycia naczyń. Następnie spłucz płytę grillową 1 czystą wodą.
Pamiętaj o tym, by na płycie do grillowania 1
nie pozostały żadne resztki płynu do mycia
naczyń.
► Przed użyciem płyta grillowa 1 musi być
całkowicie sucha. W szczególności należy
zwrócić uwagę na to, aby w gnieździe 2
nie było żadnej wilgoci.
► Po zakończeniu czyszczenia płynem do
mycia naczyń płyta grillowa 1 musi zostać
nasmarowana lekko olejem, w przeciwnym
razie będzie to miało negatywny wpływ na
powłokę zapobiegającą przyleganiu.
■ Ramkę 5 oraz termostat 9 wycieraj wilgotną
szmatką. W razie potrzeby nałóż na szmatkę
nieco płynu do mycia naczyń, następnie przetrzyj szmatką zwilżoną w czystej wodzie. Osusz
dokładnie wszystkie części.
■ Zmontuj ponownie całe urządzenie.
Przechowywanie
■ Wyczyszczone urządzenie należy przechowywać
w czystym, wolnym od pyłów i suchym miejscu.
■ Gdy urządzenie zostanie zmontowane, a bloka-
da pokrywy 3 się zablokuje, można urządzenie
również przechowywać na stojąco, aby nie
zajmowało wiele miejsca.
24
STGG 1800 A1
Page 28

Usuwanie usterek
Usterka Przyczyna Rozwiązanie
Urządzenie
nie działa.
Wtyk nie jest podłączony do sieci
elektrycznej.
Gniazdo zasilania jest uszkodzone.
Urządzenie jest uszkodzone. Skontaktuj się z serwisem.
Włóż wtyk sieciowy do gniazda
sieciowego.
Spróbuj skorzystać z innego
gniazda.
PL
Kontrolka 0
cały czas zapala
się i gaśnie.
Kontrolka 0
nie świeci się.
Jeżeli za pomocą powyższych wskazówek nie można usunąć usterki lub gdy występują inne rodzaje
usterek, proszę zwrócić się do naszego serwisu.
Urządzenie podtrzymuje ustawiony stopień
temperatury. Wymaga to włączania się
urządzenia co pewien czas. Świeci się
przy tym kontrolka 0.
Urządzenie jest uszkodzone. Skontaktuj się z serwisem.
Urządzenie nagrzało się. Nie jest to usterką.
Nie jest to usterką.
STGG 1800 A1
25
Page 29
Gwarancja i serwis
Urządzenie objęte jest trzyletnią gwarancją,
licząc od daty zakupu. Urządzenie zostało
przed dostarczeniem starannie wyprodukowane
i poddane skrupulatnej kontroli. Paragon należy
PL
zachować jako dowód zakupu. W przypadku
napraw gwarancyjnych należy się skontaktować
telefonicznie z najbliższym punktem serwisowym. Tylko w ten sposób można zagwarantować bezpłatną wysyłkę zakupionego produktu.
Gwarancja obejmuje wyłącznie wady materiałowe
i fabryczne, natomiast nie obejmuje szkód transportowych, części ulegających zużyciu ani uszkodzeń
części łatwo łamliwych, np. wyłącznika lub akumulatorów. Produkt przeznaczony jest wyłącznie do
użytku domowego, a nie do zastosowań przemysłowych i profesjonalnych.
Gwarancja traci ważność w przypadku niewłaściwego używania urządzenia, używania niezgodnego z przeznaczeniem, użycia siły lub ingerencji w
urządzenie dokonywanej poza naszymi autoryzowanymi punktami serwisowymi. Niniejsza gwarancja nie ogranicza ustawowych praw nabywcy
urządzenia.
Wykonanie usługi gwarancyjnej nie przedłuża
czasu gwarancji. Dotyczy to również części
wymienionych i naprawionych. Wszelkie szkody
i wady wykryte podczas zakupu należy zgłosić
bezpośrednio po rozpakowaniu urządzenia, nie
później niż po upływie dwóch dni od daty zakupu.
Po upływie czasu gwarancji wszelkie naprawy
będą wykonywane odpłatnie.
Utylizacja
W żadnym przypadku nie
należy wyrzucać urządzenia
wraz z normalnymi odpadami
domowymi. Ten produkt podlega dyrektywie europejskiej
2012/19/EU.
Urządzenie należy zutylizować za pośrednictwem
dopuszczonego zakładu oczyszczania i przetwarzania odpadów miejskich lub komunalnego
zakładu oczyszczania i przetwarzania odpadów.
Przestrzegać aktualnie obowiązujących przepisów.
W razie pytań i wątpliwości dotyczących zasad
utylizacji skontaktuj się z najbliższym zakładem
utylizacji.
Opakowanie urządzenia jest wykonane
z materiałów przyjaznych dla środowiska
naturalnego, które można zutylizować
w lokalnych punktach recyklingu.
Importer
KOMPERNASS HANDELS GMBH
BURGSTRASSE 21
44867 BOCHUM
GERMANY
www.kompernass.com
Serwis Polska
Tel.: 22 397 4996
E-Mail: kompernass@lidl.pl
IAN 103845
Czas pracy infolinii: od poniedziałku do piątku,
w godzinach 08:00 - 20:00 czasu środkowoeuropejskiego
26
STGG 1800 A1
Page 30

Przepisy
WSKAZÓWKA
Informacje dotyczące czasów grillowania oraz stopni ustawień temperatury w recepturach są warto-
►
ściami orientacyjnymi i mogą się znacznie różnić w zależności od danych produktów spożywczych.
W czasie przygotowania potraw uwzględniaj zawsze swoje własne doświadczenia.
Marynowane polędwiczki wieprzowe
Składniki:
♦ 500 g polędwicy wieprzowej
♦ 2 łyżki stołowe octu balsamicznego
♦ 1 łyżeczka bazylii (przyprawa)
♦ 1 pomarańcza
♦ Sól
♦ Pieprz
1) Usuń z polędwicy tłuszcz i błony.
2) Potnij polędwicę na medaliony o grubości ok. 2 - 3 cm i ułóż je w misce.
3) Dodaj sok z pomarańczy, ocet balsamiczny, 1 łyżeczkę bazylii, szczyptę soli i nieco pieprzu, a
następnie marynuj mięso przez ok. jedną godzinę.
4) Ułóż medaliony na płycie grillowej 1 i grilluj je przez ok. 5 - 7 minut z każdej strony przy ustawieniu
temperatury na stopniu 4.
PL
Grillowany ananas
Składniki:
♦ 1 ananas
♦ 1 - 2 łyżki stołowe cukru
♦ 1 łyżeczka cynamonu
1) Połóż ananasa pionowo i obierz go ostrym nożem od góry do dołu, dopóki nie zostanie obrany
w całości.
2) Podziel ananasa na cztery części i wytnij głąb.
3) Potnij ananasa na paski o grubości ok. 2 cm.
4) Grilluj paski z każdej strony przez ok. 5 - 7 minut przy temperaturze ustawionej na stopniu 3.
5) Wedle uznania posyp ananasa cynamonem i cukrem.
STGG 1800 A1
27
Page 31

Grillowane warzywa
Składniki:
♦ 2 papryki
♦ 1 cukinia
PL
♦ 1 bakłażan
♦ Oliwa
♦ Sól
♦ Pieprz
♦ Zioła prowansalskie (mieszanka ziół)
1) Umyj warzywa dokładnie. Pokrój paprykę, usuń pestki i potnij ją na paski. Przekrój bakłażana
i cukinię wzdłuż na dwie połowy i następnie na kawałki po ok. 0,5 cm.
2) Posmaruj warzywa olejem z oliwek.
3) Ułóż warzywa na rozgrzanej przy ustawieniu stopnia temperatury 3 płycie grillowej 1 i grilluj
warzywa z obu stron przez ok. 8 - 10 minut, aż uzyskają jasnobrązowy kolor.
4) Posyp warzywa solą, pieprzem i według uznania ziołami prowansalskimi.
Tofu z pieczarkami
Składniki:
♦ 4 plastry tofu po 50 g
♦ 1 - 2 łyżki stołowe sosu sojowego
♦ Olej sezamowy
♦ Oliwa
♦ 200 g pieczarek
♦ 1 cebula
♦ Sól
♦ Pieprz
1) Dodając 2 łyżki stołowe sosu sojowego oraz kilka kropli oleju sezamowego, sól i pieprz marynuj
plastry tofu przez 30 minut w misce.
2) Grilluj tofu z obu stron przy temperaturze ustawionej w pozycji 4 przez ok. 5 minut.
3) Oczyść pieczarki i pokrój je wraz z cebulą na plastry.
4) Dodaj plastry, 1 łyżkę stołową oliwy, 2 łyżki stołowe sosu sojowego do miski i wymieszaj wszystko.
5) Piecz pieczarki i cebulę kilka chwil na płycie grillowej 1 przy ustawieniu temperatury na stopniu 4 i
podaj je razem z tofu.
28
STGG 1800 A1
Page 32

Kokosowe curry z krewetkami
Składniki:
♦ 100 g czerwonej pasty curry
♦ 50 ml mleczka kokosowego
♦ 400 g krewetek (alternatywnie kraby)
♦ 200 g groszku cukrowego
♦ 2 papryki
♦ 2 cebule
♦ 2 ząbki czosnku
♦ Sól i pieprz
♦ Folia aluminiowa
1) Wymieszaj pastę curry i mleczko kokosowe.
2) Umyj krewetki, groszek cukrowy i paprykę.
3) Obierz cebulę i ząbki czosnku.
4) Pokrój cebulę, czosnek i paprykę na małe kawałki.
5) Rozłóż krewetki i warzywa równomiernie na 4 kawałkach folii aluminiowej. Folia powinna być tak
duża, aby można było w niej zawinąć składniki, jak w paczkę. Polać je sosem curry z kokosem oraz
doprawić solą i pieprzem.
6) Zawiń paczuszki dobrze, aby nie mogła się z nich wydostać ciecz.
7) Ułóż wypełnione paczuszki na rozgrzanej do stopnia ustawienia temperatury 4 płycie grillowej 1 i
opiekaj wszystko z obu stron po ok. 15 minut.
PL
WSKAZÓWKA
W zależności od wielkości paczuszek, może okazać się, że tylko 2-3 paczuszki zmieszczą się na
►
raz na płycie grillowej 1. Pozostałe paczuszki grilluj po upieczeniu poprzednich.
STGG 1800 A1
29
Page 33

Pieczone tosty
Składniki:
♦ 8 kromek chleba tostowego
♦ 2 jaja
PL
♦ 100 ml śmietany
♦ 100 g parmezanu, startego
♦ 1 łyżka stołowa oleju roślinnego
♦ 20 g natki pietruszki, posiekanej
♦ 20 g szczypiorku, posiekanego
♦ Sól
♦ Pieprz
1) Śmietanę wymieszaj w misce z jajkami, startym serem i ziołami. Dodaj sól i pieprz.
2) Posmaruj lekko płytę grillową 1 niewielką ilością oleju roślinnego.
3) Zanurz tosty w masie i grilluj je z obu stron przez około 5 minut na stopniu ustawienia temperatury 3.
Szparagi z grilla
Składniki:
♦ 10 szparagów (średnica około 1,5 cm)
♦ 50 g masła
♦ 1 pęczek natki pietruszki
♦ Sól
♦ Pieprz
1) Umyj i obierz szparagi.
2) Umyj i posiekaj natkę pietruszki.
3) Rozłóż folię aluminiową i połóż na niej najpierw warstwę z natki pietruszki i masła. Ułóż na tym
połowę szparagów. Teraz ułóż warstwę pietruszki i masła na szparagach. Przypraw szparagi solą
i pieprzem.
4) Zamknij paczuszkę i połóż ją na płycie grillowej 1 przy ustawieniu stopnia temperatury 4 - 5.
Do pieczenia zamknij pokrywę 3.
5) Po 20 minutach obróć ostrożnie paczuszkę. Po upływie kolejnych 20 minut, szparagi są upieczone.
WSKAZÓWKA
Zależnie od grubości grillowanych produktów pokrywa 3 może w czasie grillowania dotykać
►
grillowanych produktów.
30
STGG 1800 A1
Page 34

Filet z piersi indyka
Składniki:
♦ 2 fi lety z piersi indyka, (ok. 150 g każdy)
♦ 1 ząbek czosnku
♦ 1 łyżka stołowa miodu
♦ 1 łyżeczka musztardy, ziarnistej
♦ 1 łyżka stołowa oleju roślinnego
♦ Sól
♦ Kolorowy pieprz
1) Obierz czosnek i rozgnieć go.
2) Zmieszaj czosnek z miodem, musztardą i olejem oraz dopraw marynatę solą i pieprzem.
3) Umyj i osusz fi lety z piersi indyka. Włóż fi lety pokryte marynatą do miski i odstaw je na godzinę.
4) Ułóż fi lety na rozgrzanej do stopnia ustawienia temperatury 4 płycie grillowej 1 i zamknij pokrywę 3.
– Cienkie fi lety: Po około 5 minutach obróć je i grilluj drugą stronę fi leta przy temperaturze ustawionej
na stopniu 4 przez kolejne 5 minut z zamkniętą pokrywą 3.
– Grube fi lety: Po około 10 minutach obróć je i grilluj drugą stronę fi leta przy temperaturze ustawionej
na stopniu 4 przez kolejne 10 minut z zamkniętą pokrywą 3.
WSKAZÓWKA
Zależnie od grubości grillowanych produktów pokrywa 3 może w czasie grillowania dotykać
►
grillowanych produktów.
PL
STGG 1800 A1
31
Page 35

Grillowane kolby kukurydzy
Składniki:
♦ 2 kolby kukurydzy cukrowej
♦ 100 g masła ziołowego
PL
♦ Sól czosnkowa
♦ Sól
♦ Pieprz
1) Posmaruj kawałek folii aluminiowej masłem ziołowym.
2) Posól kolby kukurydzy i zawiń je w folię aluminiową.
3) Połóż paczuszkę przy ustawieniu temperatury na stopniu 4 i zamkniętej pokrywie 3 na płycie
grillowej 1.
4) Obróć paczuszkę po 15 minutach i grilluj kukurydzę przez kolejne 15 minut.
5) Przypraw kolby kukurydzy solą czosnkową i pieprzem.
WSKAZÓWKA
Zależnie od grubości grillowanych produktów pokrywa 3 może w czasie grillowania dotykać
►
grillowanych produktów.
Bruschetta
Składniki:
♦ 2 ciabatty
♦ 2 pomidory
♦ 4 łyżki stołowe keczupu pomidorowego
♦ 2 ząbki czosnku
♦ 2 łyżka stołowa oliwy
♦ 1 łyżka stołowa bazylii, drobno posiekanej
1) Pokrój ciabattę i umieść ją przy poziomie ustawienia temperatury 3-4 na około 2 minuty na płycie
grillowej 1 tak, aby połówki ciabatty się zarumieniły.
2) Umyj i pokrój w kostkę pomidory. Rozgnieć czosnek.
3) Wymieszaj pomidory pokrojone w kostkę, ketchup, czosnek, oliwę z oliwek i posiekaną bazylię.
4) Rozłóż masę na zarumienionych plastrach ciabatty na ok. 5 minut przy stopniu ustawienia temperatury 3 na płycie grillowej 1.
32
STGG 1800 A1
Page 36

Tartalomjegyzék
Bevezető . . . . . . . . . . . . . . . . . . . . . . . . . . . . . . . . . . . . . . . . . . . . . . . . . . . . . . . . . . . . .34
Rendeltetésszerű használat . . . . . . . . . . . . . . . . . . . . . . . . . . . . . . . . . . . . . . . . . . . . . .34
A csomag tartalma . . . . . . . . . . . . . . . . . . . . . . . . . . . . . . . . . . . . . . . . . . . . . . . . . . . . .34
A készülék leírása . . . . . . . . . . . . . . . . . . . . . . . . . . . . . . . . . . . . . . . . . . . . . . . . . . . . .34
Műszaki adatok . . . . . . . . . . . . . . . . . . . . . . . . . . . . . . . . . . . . . . . . . . . . . . . . . . . . . . .34
Biztonsági utasítások . . . . . . . . . . . . . . . . . . . . . . . . . . . . . . . . . . . . . . . . . . . . . . . . . . .35
Összeszerelés és felállítás . . . . . . . . . . . . . . . . . . . . . . . . . . . . . . . . . . . . . . . . . . . . . . .38
Az első használat előtt . . . . . . . . . . . . . . . . . . . . . . . . . . . . . . . . . . . . . . . . . . . . . . . . . .38
Termosztát beállítások . . . . . . . . . . . . . . . . . . . . . . . . . . . . . . . . . . . . . . . . . . . . . . . . . .39
A fedél használata . . . . . . . . . . . . . . . . . . . . . . . . . . . . . . . . . . . . . . . . . . . . . . . . . . . . .39
Kezelés . . . . . . . . . . . . . . . . . . . . . . . . . . . . . . . . . . . . . . . . . . . . . . . . . . . . . . . . . . . . . .39
Tisztítás és ápolás . . . . . . . . . . . . . . . . . . . . . . . . . . . . . . . . . . . . . . . . . . . . . . . . . . . . . .40
Tárolás . . . . . . . . . . . . . . . . . . . . . . . . . . . . . . . . . . . . . . . . . . . . . . . . . . . . . . . . . . . . . . .40
Hibaelhárítás . . . . . . . . . . . . . . . . . . . . . . . . . . . . . . . . . . . . . . . . . . . . . . . . . . . . . . . . .41
Garancia és szerviz . . . . . . . . . . . . . . . . . . . . . . . . . . . . . . . . . . . . . . . . . . . . . . . . . . . .42
Ártalmatlanítás . . . . . . . . . . . . . . . . . . . . . . . . . . . . . . . . . . . . . . . . . . . . . . . . . . . . . . . .42
Gyártja . . . . . . . . . . . . . . . . . . . . . . . . . . . . . . . . . . . . . . . . . . . . . . . . . . . . . . . . . . . . . .42
Receptek . . . . . . . . . . . . . . . . . . . . . . . . . . . . . . . . . . . . . . . . . . . . . . . . . . . . . . . . . . . . .43
Pácolt sertésfi lé . . . . . . . . . . . . . . . . . . . . . . . . . . . . . . . . . . . . . . . . . . . . . . . . . . . . . . . . . . . . . . . . . . . 43
Grillezett ananász . . . . . . . . . . . . . . . . . . . . . . . . . . . . . . . . . . . . . . . . . . . . . . . . . . . . . . . . . . . . . . . . . 43
Grillezett zöldség . . . . . . . . . . . . . . . . . . . . . . . . . . . . . . . . . . . . . . . . . . . . . . . . . . . . . . . . . . . . . . . . . 44
Tofu csiperkegombával . . . . . . . . . . . . . . . . . . . . . . . . . . . . . . . . . . . . . . . . . . . . . . . . . . . . . . . . . . . . . 44
Kókuszos currys garnéla . . . . . . . . . . . . . . . . . . . . . . . . . . . . . . . . . . . . . . . . . . . . . . . . . . . . . . . . . . . . 45
Sütött pirítós kenyér . . . . . . . . . . . . . . . . . . . . . . . . . . . . . . . . . . . . . . . . . . . . . . . . . . . . . . . . . . . . . . . . 46
Grillezett spárga . . . . . . . . . . . . . . . . . . . . . . . . . . . . . . . . . . . . . . . . . . . . . . . . . . . . . . . . . . . . . . . . . . 46
Pulykamellfi lé . . . . . . . . . . . . . . . . . . . . . . . . . . . . . . . . . . . . . . . . . . . . . . . . . . . . . . . . . . . . . . . . . . . . . 47
Grillezett kukoricacső . . . . . . . . . . . . . . . . . . . . . . . . . . . . . . . . . . . . . . . . . . . . . . . . . . . . . . . . . . . . . . 48
Bruschetta . . . . . . . . . . . . . . . . . . . . . . . . . . . . . . . . . . . . . . . . . . . . . . . . . . . . . . . . . . . . . . . . . . . . . . . 48
HU
STGG 1800 A1
33
Page 37

ASZTALI GRILL STGG 1800 A1
Bevezető
Gratulálunk új készüléke megvásárlásához!
Vásárlásával kiváló minőségű termék mellett döntött.
A használati utasítás a termék része. Fontos tudnivalókat tartalmaz a biztonságra, használatra és
ártalmatlanításra vonatkozóan. A termék haszná-
HU
lata előtt ismerkedjen meg valamennyi használati
útmutatóval és biztonsági fi gyelmeztetéssel. Csak
a leírtak szerint és a megadott célokra használja
a készüléket. A készülék harmadik személynek
történő továbbadása esetén adja át a készülékhez
tartozó valamennyi leírást is.
Rendeltetésszerű használat
Ez a készülék kizárólag élelmiszerek grillezésére
szolgál belső térben. A készülék kizárólag magánháztartásokban használható. Ne használja kereskedelmi célra.
A csomag tartalma
asztali grill
(grill-lap, keret, folyadékfelfogó tálca, termosztát)
használati útmutató
A készülék leírása
1 grill-lap
2 aljzat
3 fedél
4 csuklópánt-vezető
5 keret
6 folyadékfelfogó tálca
7 fogantyú retesszel
8 hőmérséklet-szabályozó
9 termosztát
0 ellenőrző lámpa
Műszaki adatok
Névleges feszültség: 220 - 240 V ~,
50/60 Hz
Maximális
teljesítményfelvétel: 1500 - 1800 W
TUDNIVALÓ
Közvetlenül kicsomagolás után ellenőrizze, hogy
a csomag hiánytalan és ép-e. Szükség esetén
forduljon a szervizhez.
34
STGG 1800 A1
Page 38

Biztonsági utasítások
VESZÉLY - ELEKTROMOS ÁRAMÜTÉS!
► A veszélyek elkerülése érdekében a sérült hálózati csatlakozót
vagy vezetéket azonnal cseréltesse ki engedélyezett szakemberrel
vagy az ügyfélszolgálattal.
► Vigyázzon, hogy a hálózati vezeték ne érjen hozzá a készülék
forró részeihez. Soha ne használja a készüléket nyílt láng, fűtőlap
vagy forró tűzhely közelében.
► Soha ne tegye ki a készüléket esőnek és ne használja nedves
vagy vizes környezetben. Ügyeljen arra, hogy a hálózati vezeték
működés közben soha ne legyen vizes vagy nedves.
► Használat előtt ellenőrizze a készüléket, hogy nincs-e rajta látható
sérülés. Ne működtessen hibás vagy leesett készüléket.
► A hálózati kábelt esetleges sérülések szempontjából rendszeresen
ellenőrizni kell. Amennyiben a hálózati kábel megsérült, a készüléket nem szabad tovább használni.
► A készüléket földelt hálózati aljzatra kell csatlakoztatni.
HU
► A készülék nem érintkezhet nedvességgel, például esővel vagy
nyirkos felülettel.
Soha ne merítse a készüléket vízabe vagy más folyadékba!
Ilyen esetben áramütés miatt életveszély alakul ki, ha működés
közben folyadék kerül a feszültség alatt álló részekre.
STGG 1800 A1
35
Page 39

HU
FIGYELMEZTETÉS - SÉRÜLÉSVESZÉLY!
► A készüléket 8 éves kor feletti gyermekek és csökkent fi zikai,
érzékszervi vagy mentális képességű vagy tapasztalattal és/
vagy tudással nem rendelkező személyek csak felügyelet mellett
használhatják, vagy ha felvilágosították őket a készülék biztonságos használatáról és megértették az ebből eredő veszélyeket.
► Gyermekek nem játszhatnak a készülékkel.
► Tisztítást és a felhasználói karbantartást 8 évesnél fi atalabb vagy
felügyelet nélküli gyermekek nem végezhetnek.
► Ne engedjen 8 évesnél fi atalabb gyerekeket a készülék és a
csatlakozó vezeték közelébe.
► Használat után hagyja lehűlni a készüléket, mielőtt megtisztítaná!
Égési sérülés veszélye!
► A készüléket lehetőleg egy hálózati aljzat közelében állítsa fel.
Gondoskodjon arról, hogy a hálózati csatlakozó vészhelyzetben
gyorsan elérhető legyen és hogy a vezetékben le lehessen megbotlani.
► Gondoskodjon arról, hogy a készülék stabilan álljon.
Vigyázat! Forró felület!
► Használat közben csak a fedélen lévő fogantyúhoz érjen hozzá.
A készülék felülete használat közben nagyon felforrósodhat.
► Üzemeltetés közben soha se hagyja a készüléket felügyelet
nélkül.
► Ne használja tovább a készüléket, ha az megsérült.
► Ne használja tovább a készüléket, ha a fedélen repedés vagy
egyéb sérülés látható.
36
STGG 1800 A1
Page 40

FIGYELEM - ANYAGI KÁR!
► A készülék üzemeltetéséhez ne használjon külső időkapcsolót
vagy külön távműködtető rendszert.
► Üzemeltetés közben soha se hagyja a készüléket felügyelet
nélkül.
► Győződjön meg arról, hogy a készülék, a hálózati kábel és a
csatlakozó nem ér forró felülethez, pl. főzőlaphoz vagy nyílt
lánghoz.
► Ne használjon szenet vagy hasonló tüzelőanyagot a készülék
üzemeltetésére!
► A tapadásmentes bevonat védelme érdekében ne használjon fém
eszközöket, pl. kést, villát stb. Ne használja tovább a készüléket,
ha megsérül a tapadásmentes bevonat.
► Csak a mellékelt eredeti tartozékkal üzemeltesse a készüléket.
► Folyadékfelfogó tálca nélkül soha ne működtesse a készüléket.
Ellenkező esetben zsír és forró folyadék csöpög a készülék alsó
részére!
► Csak a mellékelt termosztáttal használja a készüléket.
HU
STGG 1800 A1
37
Page 41

Összeszerelés és felállítás
FIGYELMEZTETÉS! TŰZVESZÉLY!
► Soha ne állítsa a készüléket fali szekrény
alá vagy függöny, szekrénysor, illetve más
gyúlékony tárgyak mellé.
► A készüléket éghető anyagoktól (pl. függönytől)
HU
legalább 70 cm távolságban állítsa fel.
► A készüléket csak hőálló felületre helyezze!
► Állítsa a készüléket hátlapjával közvetlenül
a falhoz. Ügyeljen arra, hogy a fal hőálló
anyagból legyen és a fedelet 3 még fel
lehessen nyitni.
1) Vegye ki az összes részt a dobozból, majd távolítsa el a csomagolóanyagot és az esetleges
védőfóliákat.
2) Tisztítson meg minden alkatrészt a „Tisztítás és
ápolás“ részben leírtak alapján. Ügyeljen arra,
hogy valamennyi rész teljesen megszáradjon.
3) Helyezze a készüléket hőálló, tiszta és sík
felületre.
4) Helyezze bele a folyadékfelfogó tálcát 6 a
keretbe 5 úgy, hogy az a középtől kissé balra
található mélyedésben feküdjön.
FIGYELEM! ANYAGI KÁR VESZÉLYE!
Folyadékfelfogó tálca 6 nélkül soha ne
►
működtesse a készüléket! Ellenkező esetben
zsír és forró folyadék csöpög a készülék alsó
részére!
5) Helyezze rá a grill-lapot 1 a keretre 5.
Ügyeljen arra, hogy az aljzat 2 a jobb oldalon
legyen. A grill-lapnak 1 megfelelően kell feküd-
nie a keretben, különben a termosztát 9 nem
csatlakoztatható az aljzathoz 2.
6) Csúsztassa a fedél 3 csuklópántjait a kereten 5
lévő mélyedésekbe és csukja le a fedelet 3.
7) Csatlakoztassa a termosztátot 9 az aljzathoz 2
a készüléken. Ügyeljen arra, hogy a termosztátot 9 ütközésig betolja az aljzatba 2. Máskülönben a készülék nem tud felmelegedni!
Az első használat előtt
1) Nyissa ki a fedelet 3 oly módon, hogy a
fogantyún 7 található reteszt felfelé nyomja
és a fedelet 3 egyidejűleg felfelé húzza.
Nyissa ki a fedelet 3 annyira, hogy a csuk-
lópántok a csuklópánt-vezetőben 4 lefelé
csússzanak és a fedél 3 rögzítve legyen.
2) Nedves kendővel törölje le a grill-lapot 1.
3) Kenje be vékonyan a grill-lapot 1 sütésre/
grillezésre alkalmas zsírral vagy olajjal. Így
jobban leoldódnak a gyártásból esetlegesen
visszamaradt anyagok a grill-lapról 1.
4) Csukja be a fedelet 3 úgy, hogy kissé megemeli
a csuklópánt-vezetőben 4, amíg az vissza
nem hajtható.
5) Csatlakoztassa a hálózati csatlakozót egy aljzatba és állítsa a hőmérséklet-szabályozót 8
az 5 fokozatra. A készülék melegedni kezd.
6) Várjon 10 percet.
7) Ezután húzza ki a hálózati csatlakozót és
hagyja a készüléket lehűlni.
TUDNIVALÓ
A készülék első felmelegedése során a gyár-
►
tásból visszamaradt anyagok miatt enyhe
füstöt és szagot érezhet. Ez teljesen normális
és veszélytelen. Gondoskodjon elegendő
szellőzésről, nyisson ki például egy ablakot.
8) A lehűlés után nedves kendővel törölje le a
grill-lapot 1.
9) A folyadékfelfogó tálcát 6 a „Tisztítás és ápolás” fejezetben leírtak szerint tisztítsa meg.
10) Győződjön meg arról, hogy a készülék minden
része teljesen száraz, mielőtt a készüléket
üzembe helyezi.
A készülék ezzel üzemkész.
38
STGG 1800 A1
Page 42

Termosztát beállítások
A termosztáton 9 lévő hőmérséklet-szabályozóval 8 állíthatja be a hőmérséklet-fokozatokat.
0. fokozat A grill ki van kapcsolva
> 0 - 1. fokozat A grill be van kapcsolva;
alacsony hőmérséklet
1 - 3. fokozat A grill be van kapcsolva;
közepes hőmérséklet
3 - 5. fokozat A grill be van kapcsolva;
magas hőmérséklet
Amint beállít egy hőmérséklet-fokozatot, kigyullad
az ellenőrző lámpa 0. Amint a készülék elérte a
beállított hőfokot, kialszik az ellenőrző lámpa 0.
A lámpa azonban újra kigyulladhat és kialudhat. Ez
azt jelenti, hogy a készülék tartja a hőmérsékletet
és ismételten fűtött egy kicsit.
TUDNIVALÓ
A megfelelő hőmérséklet-fokozatot kipróbálás-
►
sal válassza ki. Az alacsonyabb és a közepes
hőmérséklet-fokozatok inkább zöldséghez,
gyümölcshöz és kényes élelmiszerhez, a magas hőmérséklet-fokozatok pedig a húshoz
alkalmasak.
A fedél használata
A fedelet 3 az ételek készítése közben becsukhatja
vagy nyitva hagyhatja:
■ Nyitott állapotban a fedél 3 a kifröccsenés
ellen véd.
■ Ha a fedelet 3 grillezés közben becsukja,
magasabb hőmérséklet érhető el, és az ételek
ugyanakkor minden oldalról párolódnak.
■ A fedél 3 kinyitásához nyomja felfelé a reteszt a
fogantyún 7 és egyidejűleg húzza a fedelet 3
felfelé. Annyira nyissa ki, hogy a csuklópántok
a csuklópánt-vezetőben 4 lecsússzanak.
A fedél 3 ezáltal stabilan áll.
■ Ha a fedelet 3 le akarja csukni, emelje meg,
hogy a csuklópántok a csuklópánt-vezetőben 4
felfelé csússzanak. Ezután ismét lecsukhatja a
fedelet 3. Ügyeljen arra, hogy a fogantyún 7
lévő retesz is bepattanjon.
Kezelés
FIGYELMEZTETÉS! SÉRÜLÉSVESZÉLY!
► Használat közben a készülék nagyon forró!
Ezért használat közben csak a fedél 3
fogantyújánál 7 fogja meg! Használjon
edényfogót, amikor megfogja a készüléket.
1) Csukja le a fedelet 3.
2) Csatlakoztassa a hálózati csatlakozót egy
aljzatba. Az ellenőrző lámpa 0 világít és
a készülék melegszik.
3) Amint az ellenőrző lámpa 0 kialszik, a ké-
szülék felmelegedett.
Nyissa fel a fedelet 3 a fogantyúnál 7 fogva
és tegyen tetszés szerinti élelmiszert a grilllapra 1.
4) Igény szerint, csukja le a fedelet 3.
Grillezés közben a zsír és a folyadékok a
folyadékfelfogó tálcába 6 folynak.
5) Ellenőrizze rendszeresen a grillezés eredményét
és fordítsa meg a grillezett élelmiszert. Amennyiben elégedett az eredménnyel, ha szükséges,
nyissa ki a fedelet 3 a fogantyúnál 7 fogva, és
vegye le a grillezett élelmiszert a grill-lapról 1.
FIGYELEM! ANYAGI KÁR VESZÉLYE!
Ne használjon fémes eszközöket, mint pl. kést,
►
villát stb. Ne használja tovább a készüléket,
ha megsérül a tapadásmentes bevonat.
6) Ha nem kíván további élelmiszert grillezni, állítsa a hőmérséklet-szabályozót 8 „0“ állásba
és húzza ki a hálózati csatlakozót az aljzatból.
Csak így kapcsolható ki teljesen a készülék.
HU
STGG 1800 A1
39
Page 43

Tisztítás és ápolás
VESZÉLY - ELEKTROMOS ÁRAMÜTÉS!
Tisztítás előtt mindig húzza ki az aljzatból a
►
hálózati csatlakozót. Elektromos áramütés
veszélye áll fenn!
Soha ne merítse a grill-lapot 1 vagy a
HU
termosztátot 9 vízbe vagy egyéb folyadékba!
FIGYELMEZTETÉS! SÉRÜLÉSVESZÉLY!
► Mindig hagyja lehűlni a készüléket, mielőtt
megtisztítaná. Egyéb esetben balesetveszély
áll fenn!
FIGYELEM! ANYAGI KÁR VESZÉLYE!
Ne használjon súroló vagy erős hatású tisztí-
►
tószert! Ezek kárt tehetnek a felületben.
► Ne használjon fémes eszközöket, mint pl. kést,
villát stb. Ne használja tovább a készüléket,
ha megsérül a tapadásmentes bevonat.
■ A legjobb, ha a készüléket rögtön a lehűlés után
megtisztítja. Ebben az esetben az élelmiszer-maradékok könnyebben eltávolíthatók.
■ A tisztításhoz szedje szét a készüléket:
– Húzza ki a termosztátot 9 az aljzatból 2.
– Húzza ki a fedelet 3 a csuklópánt-vezetők-
ből 4.
– Emelje ki a grill-lapot 1 a keretből 5.
– Vegye ki óvatosan a folyadékfelfogó tálcát 6
a keretből 5.
■ Ürítse ki a folyadékfelfogó tálcát 6. A tálcát
meleg, enyhén mosogatószeres vízben mosogassa el. A folyadékfelfogó tálcát 6 ezután
öblítse le tiszta vízzel és szárítsa meg.
■ A fedelet 3 meleg, enyhén mosogatószeres víz-
ben mosogassa el. Ezután a fedelet 3 öblítse le
tiszta vízzel és szárítsa meg.
■ A lehűlés után nedves törlőruhával törölje le a
grill-lapot 1. Az újabb használat előtt a grilllapnak 1 teljesen száraznak kell lennie.
TUDNIVALÓ
A grill-lapra 1 tapadt makacs szennyeződés
►
esetén, áztassa a grill-lapot 1 meleg, enyhén
mosogatószeres vízben. Ezután öblítse le a
grill-lapot 1 tiszta vízzel. Ügyeljen arra, hogy
ne maradjon mosogatószer a grill-lapon 1.
► Az újabb használat előtt a grill-lapnak 1
teljesen száraznak kell lennie. Fokozottan
ügyeljen arra, hogy ne maradjon nedvesség
az aljzatban 2.
► Mosogatószeres tisztítás után a grill-lapot 1
azonban ismét be kell kenni olajjal, különben
a tapadásmentes bevonat károsodik.
■ A keretet 5 és a termosztátot 9 nedves
törlőruhával törölje le. Szükség esetén tegyen
mosogatószert a törlőkendőre, majd tiszta vízzel
öblítse le. Töröljön mindent teljesen szárazra.
■ Szerelje ismét össze a készüléket.
Tárolás
■ A megtisztított készüléket tiszta, pormentes és
száraz helyen tárolja.
■ Ha a készülék össze van szerelve és a fedél 3
retesze be van pattintva, a készülék helytakarékos módon függőlegesen is tárolható.
40
STGG 1800 A1
Page 44

Hibaelhárítás
Hiba Oka Megoldás
A hálózati csatlakozó nincs az elektromos
hálózatra csatlakoztatva.
A készülék nem
működik.
Az ellenőrző
lámpa 0 újra
és újra kigyullad,
majd elalszik.
Az ellenőrző
lámpa 0 nem
világít.
Ha a hibát nem lehet elhárítani a fenti hibaelhárító tippekkel, vagy ha ezektől eltérő zavarokat észlel,
akkor forduljon szervizünkhöz.
A hálózati csatlakozó aljzat hibás.
A készülék elromlott. Forduljon a szervizhez.
A készülék tartja a hőmérsékletet. Ehhez
szükséges, hogy a készülék újra és újra
rövid ideig fűtsön. Eközben világít az ellenőrző lámpa 0.
A készülék elromlott. Forduljon a szervizhez.
A készülék felmelegedett. Nem áll fenn zavar.
Csatlakoztassa a hálózati
csatlakozót egy aljzatba.
Használjon másik csatlakozó
aljzatot!
Nem áll fenn zavar.
HU
STGG 1800 A1
41
Page 45

Garancia és szerviz
A készülékre a vásárlás napjától számított 3 év
garanciát vállalunk. A készüléket gondosan
gyártottuk, és szállítás előtt lelkiismeretesen
ellenőriztük. Kérjük, hogy a vásárlás igazolására őrizze meg a pénztári blokkot. Kérjük, hogy
garanciaigény esetén telefonon keresse fel ügyfélszolgálatát. Csak ebben az esetben garantál-
HU
hatjuk, hogy ingyen tudja beküldeni az árut.
A garancia csak anyag- és gyártási hibára vonatkozik, nem pedig szállítási kárra, kopásra vagy
törékeny részek (pl. kapcsoló vagy elem) sérülésére. A termék kizárólag magánhasználatra, nem
ipari felhasználásra készült.
A garancia érvényét veszti visszaélésszerű vagy
szakszerűtlen kezelés, erőszak alkalmazása vagy
olyan beavatkozások esetén, amelyeket általunk
nem engedélyezett szervizben végeztek el. Az
Ön törvényben előírt jogait ez a garancia nem
korlátozza.
A garancia ideje nem hosszabbodik meg a
jótállással. Ez a cserélt és javított alkatrészekre is
vonatkozik. Az esetlegesen már vételkor meglévő
károkat és hiányokat a kicsomagolás után azonnal,
de legkésőbb 2 nappal a vásárlás napja után
jelezni kell. A garanciaidő lejárta után esedékes
javítások díjkötelesek.
Ártalmatlanítás
Semmi esetre se dobja a
készüléket a háztartási
hulladékba. A termékre a
2012/19/EU uniós irányelv
vonatkozik.
A készüléket engedélyeztetett hulladékgyűjtő
helyen vagy a helyi hulladékeltávolító üzemnél
tudja leadni. Vegye fi gyelembe az érvényben lévő
előírásokat. Ha bizonytalan, vegye fel a kapcsolatot a hulladékkezelővel.
A csomagolás környezetbarát anyagok-
ból van, melyeket a helyi hulladékhasznosítónál adhat le.
Gyártja
KOMPERNASS HANDELS GMBH
BURGSTRASSE 21
44867 BOCHUM
GERMANY
www.kompernass.com
Szerviz Magyarország
Tel.: 0640 102785
E-Mail: kompernass@lidl.hu
IAN 103845
Az ügyfélszolgálati forródrót elérhetősége:
hétfőtől péntekig 8.00 és 20.00 óra között (középeurópai idő szerint)
42
STGG 1800 A1
Page 46

Receptek
TUDNIVALÓ
A receptekben a grillezési időkre és a hőmérséklet-fokozatokra vonatkozó értékek tájékoztató jelle-
►
gűek és az élelmiszer fajtájától függően jelentősen eltérhetnek. Az ételkészítés során mindig vegye
fi gyelembe saját tapasztalatait is.
Pácolt sertésfi lé
Hozzávalók:
♦ 50 dkg sertésfi lé
♦ 2 evőkanál balzsamecet
♦ 1 teáskanál bazsalikom (fűszer)
♦ 1 narancs
♦ só
♦ bors
1) Távolítsa el a zsírt és a bőrt a sertésfi léről.
2) Vágja a fi lét kb. 2 - 3 cm vastag érmékbe és tegye bele őket egy tálba.
3) Adja hozzá a narancs levét, a balzsamecetet, egy evőkanál bazsalikomfűszert, egy csipet sót és
kevés borsot, majd pácolja a húst kb. egy óráig.
4) Helyezze az érméket a grill-lapra 1 és grillezze őket kb. 5 - 7 percig minden oldalról a 4 hőmérséklet-
fokozaton.
HU
Grillezett ananász
Hozzávalók:
♦ 1 ananász
♦ 1 - 2 evőkanál cukor
♦ 1 teáskanál fahéj
1) Állítsa függőleges helyzetbe az ananászt és hámozza meg éles késsel, felülről lefelé, amíg az teljesen
meg nincs hámozva.
2) Vágja négy részre az ananászt és vágja ki a torzsát.
3) Szeletelje fel az ananászt kb. 2 cm vastag csíkokra.
4) Grillezze a csíkokat minden oldalról kb. 5 - 7 percig a 3 hőmérséklet-fokozaton.
5) Tetszés szerint szórjon rá fahéjat és cukrot.
STGG 1800 A1
43
Page 47

Grillezett zöldség
Hozzávalók:
♦ 2 paprika
♦ 1 cukkini
♦ 1 padlizsán
♦ olívaolaj
HU
♦ só
♦ bors
♦ Provence-i fűszerkeverék
1) Mossa meg alaposan a zöldséget. Vágja ketté és magozza ki a paprikákat, majd vágja őket csíkokra.
Vágja ketté hosszában a padlizsánt és a cukkinit, majd aprítsa fel kb. 0,5 cm-es darabokra.
2) Kenje be a zöldségeket olívaolajjal.
3) Helyezze a zöldségeket a 3 fokozaton előmelegített grill-lapra 1 és grillezze oldalanként kb.
8 - 10 percig, amíg világosbarna színük nem lesz.
4) Szórjon a zöldségekre sót, borsot és ízlés szerint Provence-i fűszerkeveréket.
Tofu csiperkegombával
Hozzávalók:
♦ 4 tofuszelet, egyenként 50 g
♦ 1 - 2 evőkanál szójaszósz
♦ szezámolaj
♦ olívaolaj
♦ 20 dkg fehér csiperkegomba
♦ 1 fej hagyma
♦ só
♦ bors
1) Pácolja a tofuszeleteket 2 evőkanál szójaszósszal és néhány csepp szezámolajjal, sóval és borssal
30 percig egy tálban.
2) Grillezze a tofu mindkét oldalát a 4 hőmérséklet-fokozaton kb. 5 percig.
3) Tisztítsa meg a csiperkegombát és – akárcsak a hagymát – vágja szeletekre.
4) Tegye a szeleteket, egy evőkanál olívaolajat, 2 evőkanál szójaszószt egy tálba, majd keverje össze.
5) Pirítsa a csiperkegombát és a hagymát kis ideig a grill-lapon 1 a 4 hőmérséklet-fokozaton, majd
tálalja a tofuhoz.
44
STGG 1800 A1
Page 48

Kókuszos currys garnéla
Hozzávalók:
♦ 10 dkg vörös curry paszta
♦ 0,5 dl kókusztej
♦ 40 dkg garnélarák (vagy rövid farkú rák vagy apró rák)
♦ 20 dkg cukorborsó
♦ 2 paprika
♦ 2 hagyma
♦ 2 gerezd fokhagyma
♦ só és bors
♦ alufólia
1) Keverje össze a curry pasztát és a kókusztejet.
2) Mossa meg a garnélát, a cukorborsót és a paprikát.
3) Hámozza meg a hagymát és a fokhagymagerezdeket.
4) Vágja apróra a hagymát, a fokhagymagerezdeket és a paprikát.
5) Ossza el egyenlően a garnélát és a zöldséget négy alufóliára. Az alufólia legyen akkora, hogy a
hozzávalókat kis csomagként bele lehessen csomagolni. Csepegtesse rá a curry-kókusz szószt és
fűszerezze az egészet sóval és borssal.
6) Zárja le jól a csomagokat, hogy ne folyjon ki belőle folyadék.
7) Helyezze a megtöltött csomagokat a 4 hőmérséklet-fokozaton előmelegített grill-lapra 1 és párolja
az összeset mindkét oldalról kb. 15-15 percig.
HU
TUDNIVALÓ
A csomagok méretétől függően előfordulhat, hogy csak 2 - 3 csomag fér egyszerre a grill-lapra 1.
►
A megmaradt csomagokat azután grillezze, miután az elsők elkészültek.
STGG 1800 A1
45
Page 49

Sütött pirítós kenyér
Hozzávalók:
♦ 8 szelet pirítós kenyér
♦ 2 tojás
♦ 1 dl tejszín
♦ 10 dkg parmezán, reszelve
HU
♦ 1 evőkanál növényi olaj
♦ 2 dkg petrezselyem, aprítva
♦ 2 dkg metélőhagyma, aprítva
♦ só
♦ bors
1) Keverje össze a tejszínt a tojásokkal, a reszelt sajttal és a fűszernövényekkel egy tálban.
Adjon hozzá sót és borsot.
2) Zsírozza be a grill-lapot 1 egy kevés növényi olajjal.
3) Merítse bele a kenyérszeleteket a masszába és grillezze őket mindkét oldalon, kb. 5-5 percig a
3 hőmérséklet-fokozaton.
Grillezett spárga
Hozzávalók:
♦ 10 szál spárga (átmérő kb. 1,5 cm)
♦ 5 dkg vaj
♦ 1 csomó petrezselyem
♦ só
♦ bors
1) Mossa meg és hámozza meg a spárgát.
2) Mossa meg és aprítsa fel a petrezselymet.
3) Terítsen ki alufóliát és tegyen rá először egy réteg petrezselymet és vajdarabokat. Helyezze rá a
spárga felét. Ezután tegyen ismét egy réteg petrezselymet és vajdarabokat a spárgára. Fűszerezze
a spárgát sóval és borssal.
4) Zárja le a csomagot és tegye a grill-lapra 1 4 - 5 hőmérséklet-fokozaton. Pároláshoz csukja le a
fedelet 3.
5) 20 perc múlva óvatosan fordítsa meg a csomagot. További 20 perc múlva a spárga kész.
TUDNIVALÓ
A grillezendő élelmiszer vastagságától függően előfordulhat, hogy a fedél 3 párolás közben
►
hozzáér az ételhez.
46
STGG 1800 A1
Page 50

Pulykamellfi lé
Hozzávalók:
♦ 2 pulykamellfi lé (szeletenként kb. 15 dkg)
♦ 1 gerezd fokhagyma
♦ 1 evőkanál méz
♦ 1 teáskanál mustár, szemcsés
♦ 1 evőkanál növényi olaj
♦ só
♦ tarka bors
1) Hámozza meg a fokhagymagerezdet és törje össze.
2) Keverje össze a fokhagymát, a mézet, a mustárt és az olajat, majd fűszerezze a páclét sóval és
borssal.
3) Mossa és szárítsa meg a pulykamellfi lét. Tegye a fi lét a páclével fedve egy tálba, majd helyezze
egy órára hideg helyre.
4) A fi lét 4 hőmérséklet-fokozaton helyezze a grill-lapra 1 és csukja le a fedelet 3.
– Vékony szeletek: Kb. 5 perc múlva fordítsa meg és grillezze a másik oldalt 4 hőmérséklet-fokozaton
további 5 percig csukott fedél 3 mellett.
– Vastag szeletek: Kb. 10 perc múlva fordítsa meg és grillezze a másik oldalt 4 hőmérséklet-fokozaton
további 10 percig csukott fedél 3 mellett.
TUDNIVALÓ
A grillezendő élelmiszer vastagságától függően előfordulhat, hogy a fedél 3 párolás közben
►
hozzáér az ételhez.
HU
STGG 1800 A1
47
Page 51

Grillezett kukoricacső
Hozzávalók:
♦ 2 cső csemegekukorica
♦ 10 dkg fűszeres vaj
♦ fokhagymasó
♦ só
HU
♦ bors
1) Kenjen be egy darab alufóliát fűszeres vajjal.
2) Sózza meg a kukoricacsöveket, majd csavarja őket az alufóliába.
3) A csomagot 4 hőmérséklet-fokozaton, csukott fedél 3 mellett helyezze a grill-lapra 1.
4) 15 perc elteltével fordítsa meg, és párolja a kukoricacsöveket további 15 percig.
5) Fűszerezze a kukoricacsöveket fokhagymasóval és borssal.
TUDNIVALÓ
A grillezendő élelmiszer vastagságától függően előfordulhat, hogy a fedél 3 párolás közben
►
hozzáér az ételhez.
Bruschetta
Hozzávalók:
♦ 2 ciabatta
♦ 2 paradicsom
♦ 4 evőkanál paradicsom-ketchup
♦ 2 gerezd fokhagyma
♦ 2 evőkanál olívaolaj
♦ 1 evőkanál bazsalikom apróra vágva
1) Felezze meg a ciabattákat és tegye őket 3-4 hőmérséklet-fokozaton 2-2 percre a grill-lapra 1, úgy
hogy a ciabatta-felek megpiruljanak.
2) Mossa meg és vágja négy részre a paradicsomokat. Passzírozza ki a fokhagymát.
3) Keverje össze a negyed paradicsomokat, a ketchupot, a fokhagymát, az olívaolajat és az aprított
bazsalikomot.
4) Ossza el a masszát a megpirított ciabatta-szeletekre és tegye azokat kb. 5 percre 3 hőmérsékletfokozaton a grill-lapra 1.
48
STGG 1800 A1
Page 52

Obsah
Úvod . . . . . . . . . . . . . . . . . . . . . . . . . . . . . . . . . . . . . . . . . . . . . . . . . . . . . . . . . . . . . . . .50
Použití vsouladu surčením . . . . . . . . . . . . . . . . . . . . . . . . . . . . . . . . . . . . . . . . . . . . . .50
Rozsah dodávky . . . . . . . . . . . . . . . . . . . . . . . . . . . . . . . . . . . . . . . . . . . . . . . . . . . . . . .50
Popis přístroje . . . . . . . . . . . . . . . . . . . . . . . . . . . . . . . . . . . . . . . . . . . . . . . . . . . . . . . . .50
Technické údaje . . . . . . . . . . . . . . . . . . . . . . . . . . . . . . . . . . . . . . . . . . . . . . . . . . . . . . .50
Bezpečnostní pokyny . . . . . . . . . . . . . . . . . . . . . . . . . . . . . . . . . . . . . . . . . . . . . . . . . . .51
Smontování a ustavení. . . . . . . . . . . . . . . . . . . . . . . . . . . . . . . . . . . . . . . . . . . . . . . . . .54
Před prvním použitím . . . . . . . . . . . . . . . . . . . . . . . . . . . . . . . . . . . . . . . . . . . . . . . . . . .54
Nastavení termostatu . . . . . . . . . . . . . . . . . . . . . . . . . . . . . . . . . . . . . . . . . . . . . . . . . .55
Použití víka . . . . . . . . . . . . . . . . . . . . . . . . . . . . . . . . . . . . . . . . . . . . . . . . . . . . . . . . . . .55
Obsluha . . . . . . . . . . . . . . . . . . . . . . . . . . . . . . . . . . . . . . . . . . . . . . . . . . . . . . . . . . . . . .55
Čištění a údržba . . . . . . . . . . . . . . . . . . . . . . . . . . . . . . . . . . . . . . . . . . . . . . . . . . . . . . .56
Uložení . . . . . . . . . . . . . . . . . . . . . . . . . . . . . . . . . . . . . . . . . . . . . . . . . . . . . . . . . . . . . . .56
Odstranění závad . . . . . . . . . . . . . . . . . . . . . . . . . . . . . . . . . . . . . . . . . . . . . . . . . . . . . .57
CZ
Záruka a servis . . . . . . . . . . . . . . . . . . . . . . . . . . . . . . . . . . . . . . . . . . . . . . . . . . . . . . . .58
Likvidace . . . . . . . . . . . . . . . . . . . . . . . . . . . . . . . . . . . . . . . . . . . . . . . . . . . . . . . . . . . . .58
Dovozce . . . . . . . . . . . . . . . . . . . . . . . . . . . . . . . . . . . . . . . . . . . . . . . . . . . . . . . . . . . . . .58
Recepty . . . . . . . . . . . . . . . . . . . . . . . . . . . . . . . . . . . . . . . . . . . . . . . . . . . . . . . . . . . . . .59
Marinované vepřové maso . . . . . . . . . . . . . . . . . . . . . . . . . . . . . . . . . . . . . . . . . . . . . . . . . . . . . . . . . . 59
Grilovaný ananas . . . . . . . . . . . . . . . . . . . . . . . . . . . . . . . . . . . . . . . . . . . . . . . . . . . . . . . . . . . . . . . . . 59
Grilovaná zelenina . . . . . . . . . . . . . . . . . . . . . . . . . . . . . . . . . . . . . . . . . . . . . . . . . . . . . . . . . . . . . . . . 60
Tofu se žampiony . . . . . . . . . . . . . . . . . . . . . . . . . . . . . . . . . . . . . . . . . . . . . . . . . . . . . . . . . . . . . . . . . . 60
Kari garnáty s kokosovým mlékem. . . . . . . . . . . . . . . . . . . . . . . . . . . . . . . . . . . . . . . . . . . . . . . . . . . . . 61
Pečený toast . . . . . . . . . . . . . . . . . . . . . . . . . . . . . . . . . . . . . . . . . . . . . . . . . . . . . . . . . . . . . . . . . . . . . . 62
Grilovaný chřest . . . . . . . . . . . . . . . . . . . . . . . . . . . . . . . . . . . . . . . . . . . . . . . . . . . . . . . . . . . . . . . . . . . 62
Krůtí prsíčka . . . . . . . . . . . . . . . . . . . . . . . . . . . . . . . . . . . . . . . . . . . . . . . . . . . . . . . . . . . . . . . . . . . . . . 63
Grilovaná kukuřice . . . . . . . . . . . . . . . . . . . . . . . . . . . . . . . . . . . . . . . . . . . . . . . . . . . . . . . . . . . . . . . . . 64
Bruschetta . . . . . . . . . . . . . . . . . . . . . . . . . . . . . . . . . . . . . . . . . . . . . . . . . . . . . . . . . . . . . . . . . . . . . . . 64
STGG 1800 A1
49
Page 53

STOLNÍ GRIL STGG 1800 A1
Úvod
Gratulujeme vám kzakoupení nového přístroje.
Rozhodli jste se pro vysoce kvalitní výrobek.
Návod kobsluze je součástí tohoto výrobku.
Obsahuje důležité informace obezpečnosti, použití
a likvidaci. Před použitím výrobku se prosím dobře
seznamte se všemi provozními a bezpečnostními
pokyny. Výrobek používejte pouze předepsaným
způsobem a prouvedené oblasti použití. Při předá-
CZ
vání výrobku třetím osobám předejte spolu sním i
tyto podklady.
Popis přístroje
1 grilovací deska
2 zdířka
3 víko
4 vedení závěsu
5 rám
6 záchytná miska na šťávu
7 rukojeť s uzávěrem
8 regulátor teploty
9 termostat
0 kontrolní světlo
Použití vsouladu surčením
Tento přístroj je určen výhradně pro grilování potravin ve vnitřních prostorách. Tento přístroj je určen
výhradně kpoužití vdomácnostech pro soukromé
účely. Není určen ke komerčnímu použití.
Rozsah dodávky
Stolní gril
(grilovací deska, rám, záchytná miska na šťávu,
termostat)
Návod kobsluze
UPOZORNĚNÍ
Po vybalení ihned zkontrolujte rozsah dodávky,
zda je úplná a není poškozená. Vpřípadě potřeby
se obraťte na servis.
Technické údaje
Jmenovité napětí: 220 - 240 V ~,
50/60 Hz
Max. příkon: 1500 - 1800 W
50
STGG 1800 A1
Page 54

Bezpečnostní pokyny
NEBEZPEČÍ ÚRAZU ELEKTRICKÝM PROUDEM!
► Poškozené zástrčky nebo poškozený síťový kabel nechte ihned
vyměnit autorizovaným odborným personálem nebo zákaznickým
servisem – vyhnete se tím nebezpečí.
► Chraňte síťový kabel před kontaktem shorkými díly přístroje.
Nikdy přístroj nepoužívejte vblízkosti otevřeného plamene, topné
desky nebo horkých kamen.
► Nevystavujte zařízení působení deště a rovněž jej nikdy nepouží-
vejte ve vlhkém nebo mokrém prostředí. Dbejte na to, aby nebyl
síťový kabel během provozu nikdy vlhký nebo mokrý.
► Zkontrolujte před použitím přístroj, zda na něm nejsou vnější
viditelná poškození. Poškozený nebo na zem spadlý přístroj
neuvádějte do provozu.
► Síťový kabel se musí pravidelně kontrolovat zhlediska poškození.
Je-li síťový kabel poškozen, nesmí se přístroj dále používat.
► Přístroj se musí zastrčit do zásuvky sochranným vodičem.
CZ
► Do přístroje se nesmí dostat vlhkost, jako je déšť nebo voda.
Přístroj nikdy neponořujte do vody či jiných tekutin! Pokud se
během provozu dostanou zbytky tekutiny do kontaktu sdíly
pod napětím, může dojít kohrožení života vdůsledku zásahu
elektrickým proudem.
STGG 1800 A1
51
Page 55

CZ
VÝSTRAHA – NEBEZPEČÍ ZRANĚNÍ!
► Děti od 8let a osoby somezenými fyzickými, smyslovými nebo
mentálními schopnostmi či nedostatkem zkušeností a/nebo znalostí
mohou používat tento přístroj pouze tehdy, pokud jsou pod dohledem nebo pokud byly poučeny obezpečném používání přístroje a
pokud porozuměly nebezpečí, které vyplývá z jeho použití.
► Děti si nesmí hrát spřístrojem.
► Čištění a uživatelskou údržbu nesmí provádět děti, ledaže jsou
starší 8let a jsou pod dohledem.
► Děti mladší 8let nesmí mít přístup kpřístroji a přívodnímu kabelu.
► Než se pustíte do čištění, nechte přístroj po použití dostatečně
vychladnout! Nebezpečí popálení!
► Přístroj umístěte pokud možno v blízkosti zásuvky. Zajistěte, aby
síťová zástrčka byla vpřípadě nebezpečí rychle dosažitelná a
aby nebylo možné zakopnout osíťový kabel.
► Zajistěte, aby byl přístroj postaven stabilně.
Pozor! Horký povrch!
► Během provozu se dotýkejte pouze rukojeti na víku.
Povrchy přístroje se během provozu silně zahřívají.
► Nenechávejte přístroj během provozu nikdy bez dozoru.
► Je-li přístroj poškozen, nepoužívejte jej dál.
► Pokud je na víku viditelná prasklina nebo jiné poškození, nepouží-
vejte přístroj dál.
52
STGG 1800 A1
Page 56

POZOR – VĚCNÉ ŠKODY!
► Kprovozu přístroje nepoužívejte externí spínací hodiny ani samo-
statné dálkové ovládání.
► Přístroj během provozu nikdy nenechávejte bez dozoru.
► Zajistěte, aby se přístroj, síťový kabel nebo síťová zástrčka nedo-
staly do styku shorkými zdroji, jakými jsou například topná
plotýnka nebo otevřený oheň.
► Pro provoz přístroje nepoužívejte uhlí nebo podobná paliva!
► Chraňte antiadhezivní vrstvu tak, že nebudete používat kovové
nástroje, jako jsou nůž, vidlička apod. Je-li antiadhezivní vrstva
poškozená, přístroj dále nepoužívejte.
► Přístroj provozujte výhradně spolu s dodaným originálním příslu-
šenstvím.
► Přístroj nikdy neprovozujte bez záchytné misky na šťávu.
Jinak odkapávají tuk a horké kapaliny na spodek přístroje!
► Přístroj používejte pouze spolu s dodaným termostatem.
CZ
STGG 1800 A1
53
Page 57

Smontování a ustavení
VÝSTRAHA! NEBEZPEČÍ POŽÁRU!
► Přístroj nikdy nestavte pod závěsné skříňky
nebo vedle záclon, pod skříňkové stěny nebo
jiné zápalné předměty.
► Postavte přístroj s odstupem minimálně 70 cm
od hořlavých materiálů (např. záclony).
► Přístroj postavte pouze na tepelně odolný
podklad.
CZ
► Postavte přístroj zadní stranou přímo ke zdi.
Dbejte při tom na to, aby stěna byla ze žáruvzdorného materiálu a abyste mohli ještě
otevřít víko 3.
1) Vyjměte zkartonu všechny části a odstraňte
obalový materiál a případně ochrannou fólii.
2) Všechny části přístroje vyčistěte tak, jak je
popsáno vkapitole „Čištění a údržba“.
Ujistěte se, že jsou všechny díly úplně suché.
3) Přístroj postavte na tepelně odolnou, čistou a
rovnou plochu.
4) Vložte záchytnou misku na šťávu 6 do rámu 5
tak, aby byla tato ve vyhloubenině, která se
nachází kousek vlevo od středu.
POZOR! VĚCNÉ ŠKODY!
Přístroj nikdy neprovozujte bez záchytné misky
►
na šťávu 6! Jinak odkapávají horký tuk a
horké kapaliny na spodek přístroje!
5) Nasaďte grilovací desku 1 na rám 5.
Dbejte při tom na to, aby se zdířka 2 nacházela na pravé straně. Grilovací deska 1 musí
správně doléhat na rám, protože jinak nelze
zapojit termostat 9 do zdířky 2.
6) Zasuňte závěsy víka 3 do vyhloubenin v rámu 5
a zavřete víko 3.
7) Zastrčte termostat 9 do zdířky 2 na přístroji.
Dbejte na to, aby byl termostat 9 zasunut na
doraz do zdířky 2. V opačném případě se
přístroj nemůže zahřát!
Před prvním použitím
1) Otevřete víko 3 vytlačením uzávěru na rukojeti 7
a současným tažením víka 3 směrem nahoru.
Otevřete víko 3 tak daleko, dokud závěsy
nezaskočí do vedení závěsu 4 směrem dolů
a víko 3 nestojí napevno.
2) Otřete grilovací desku 1 vlhkým hadříkem.
3) Grilovací desku 1 lehce namažte tukem nebo
olejem vhodným na pečení/grilování. Tak se lépe
uvolní případné zbytky na grilovací desce 1,
které vznikly při výrobě.
4) Zavřete víko 3 lehkým nadzvednutím ve vedení
závěsu 4, dokud jej nelze opět zaklapnout.
5) Zastrčte síťovou zástrčku do zásuvky a nastavte regulátor teploty 8 na stupeň 5. Přístroj se
zahřívá.
6) Vyčkejte 10 minut.
7) Poté vytáhněte zástrčku ze zásuvky a nechte
přístroj vychladnout.
UPOZORNĚNÍ
Při prvním zahřátí přístroje může kvůli zbytkům
►
vzniklým při výrobě dojít kvýskytu lehkého
kouře nebo zápachu. To je zcela normální
a není to nebezpečné. Zajistěte dostatečné
větrání – otevřete například okno.
8) Po ochlazení otřete grilovací desku 1 vlhkým
hadříkem.
9) Záchytnou misku na šťávu 6 vyčistěte tak, jak
je popsáno v kapitole „Čištění a péče“.
10) Před uvedením přístroje do provozu je nutné
se ujistit, zda jsou všechny díly úplně suché.
Nyní je přístroj připravený kprovozu.
54
STGG 1800 A1
Page 58

Nastavení termostatu
Regulátorem teploty 8 na termostatu 9 můžete
nastavit teplotní stupně.
Stupeň0 Gril vypnutý
Stupeň > 0 - 1 Gril zapnutý; nízká teplota
Stupeň 1-3 Gril zapnutý; střední teplota
Stupeň 3-5 Gril zapnutý; vysoká teplota
Jakmile nastavíte teplotní stupeň, rozsvítí se kontrolní
světlo 0. Jakmile se dosáhne nastavená teplota,
kontrolní světlo 0 zhasne.
Světlo se však může kdykoli znovu rozsvítit a opět
kdykoli zhasnout. To znamená, že přístroj udržuje
teplotu a potom se opět mírně zahřívá.
UPOZORNĚNÍ
Správný teplotní stupeň zvolte na základě
►
vyzkoušení. Nízké a střední teplotní stupně
jsou vhodné pro zeleninu, ovoce a delikátní
jídla a vysoké teplotní stupně pro maso.
Použití víka
Víko 3 můžete po dobu přípravy jídel zavřít nebo
nechat otevřené:
■ V otevřeném stavu slouží víko 3 jako ochrana
proti stříkání.
■ Pokud víko 3 zavřete během grilování, můžete
dosáhnout vyšší teploty a jídlo se také griluje ze
všech stran.
■ K otevření víka 3 vytlačte uzávěr na rukojeti 7
a současně tahejte víko 3 směrem nahoru.
Otevřete jej tak daleko, dokud závěsy v závěsném
vedení 4 nesklouznou směrem dolů. Víko 3 je
nyní pevně usazeno.
■ K opětovnému zavření víka 3 jej nadzvedněte
tak, aby závěsy v závěsném vedení 4 vyklouzly
směrem nahoru. Potom můžete víko 3 opět
zavřít. Dbejte přitom na to, aby také zapadl
uzávěr na rukojeti 7.
Obsluha
VÝSTRAHA! NEBEZPEČÍ ZRANĚNÍ!
► Během používání je přístroj velmi horký! Proto
se během provozu dotýkejte pouze rukojeti 7
na víku 3! Při uchopení přístroje používejte
chňapku.
1) Zavřete víko 3.
2) Zasuňte zástrčku do síťové zásuvky. Kontrolní
světlo 0 svítí a přístroj se zahřívá.
3) Jakmile kontrolní světlo 0 zhasne, je přístroj
zahřátý.
Otevřete víko 3 uchycením za rukojeť 7 a
podle libosti položte potraviny na grilovací
desku 1.
4) Podle potřeby zavřete víko 3.
Během grilování odkapávají tuk a šťávy do
záchytné misky na šťávu 6.
5) Pravidelně kontrolujte výsledek grilování a
obracejte grilované potraviny. Pokud jste
spokojeni, otevřete podle potřeby víko 3
uchopením za rukojeť 7 a odeberte
ogrilované potraviny z grilovací desky 1.
POZOR! VĚCNÉ ŠKODY!
Nepoužívejte kovové náčiní, jako je nůž,
►
vidlička atd. Je-li antiadhezivní vrstva
poškozená, přístroj dále nepoužívejte.
6) Pokud nechcete dál grilovat další potraviny,
nastavte regulátor teploty 8 na „0“ a vytáhněte zástrčku ze zásuvky. Pouze tak je přístroj
vypnutý.
CZ
STGG 1800 A1
55
Page 59

Čištění a údržba
NEBEZPEČÍ ÚRAZU ELEKTRICKÝM
PROUDEM!
Před každým čištěním vytáhněte zástrčku ze
►
zásuvky! Hrozí nebezpečí úrazu elektrickým
proudem!
Grilovací desku 1 ani termostat 9 nikdy
neponořujte do vody nebo jiných tekutin!
CZ
VÝSTRAHA! NEBEZPEČÍ ZRANĚNÍ!
► Před čištěním nechte přístroj vždy nejprve
vychladnout. Jinak hrozí nebezpečí popálení!
POZOR! VĚCNÉ ŠKODY!
Nepoužívejte abrazivní nebo agresivní čisticí
►
prostředky. Mohou poškodit povrch přístroje!
► Nepoužívejte kovové náčiní, jako je nůž,
vidlička atd. Je-li antiadhezivní vrstva poškozená, přístroj dále nepoužívejte.
■ Vyčistěte přístroj nejlépe hned po ochlazení.
Poté lze zbytky potravin lépe odstranit.
■ Před čištěním přístroj rozeberte:
– Vytáhněte termostat 9 ze zdířky 2.
– Vytáhněte víko 3 z vedení závěsu 4.
– Sejměte grilovací desku 1 z rámu 5.
– Sejměte opatrně záchytnou misku na šťávu 6
z rámu 5.
■ Vyprázdněte záchytnou misku na šťávu 6.
Následně misku umyjte v teplé vodě s jemným
mycím prostředkem. Záchytnou misku na šťávu 6
opláchněte poté pod tekoucí vodou a dobře ji
vytřete do sucha.
■ Víko 3 umyjte v teplé vodě a přidejte jemný
mycí prostředek. Víko 3 opláchněte poté pod
tekoucí vodou a dobře jej vytřete do sucha.
■ Po ochlazení otřete grilovací desku 1 vlhkým
hadříkem. Před opětovným použitím musí být
grilovací deska 1 zcela suchá.
UPOZORNĚNÍ
V případě přilepení tvrdších nečistot na grilo-
►
vací desce 1 můžete grilovací desku 1
namočit do teplé vody s trochou mycího prostředku. Poté opláchněte grilovací desku 1
čistou vodou. Dbejte na to, aby na grilovací
desce 1 nezůstaly zbytky mycího prostředku.
► Před opětovným použitím musí být grilovací
deska 1 zcela suchá. Dbejte obzvláště na
to, aby nezůstala žádná vlhkost ve zdířce 2.
► Po čištění mycím prostředkem je třeba grilovací
desku 1 znovu natřít lehce olejem, protože
jinak může být omezená funkce antiadhezivní
vrstvy.
■ Rám 5 a termostat 9 otřete vlhkým hadříkem.
Podle potřeby dejte na hadřík jemný mycí
prostředek a opláchněte čistou vodou. Dobře
vše osušte.
■ Poté přístroj opět složte dohromady.
Uložení
■ Vyčištěný přístroj uložte na čistém a bezprašném
suchém místě.
■ Je-li přístroj složen a uzávěr víka 3 zaskočen,
můžete uložit přístroj také svisle za účelem
úspory místa.
56
STGG 1800 A1
Page 60

Odstranění závad
Závada Příčina Řešení
Zástrčka není zapojená do zásuvky.
Přístroj nefunguje.
Kontrolní světlo 0
vždy rozsvítí a poté
opět zhasne.
Kontrolní světlo 0
nesvítí.
Pokud nemůžete odstranit poruchy výše popsaným způsobem nebo pokud zjistíte jakoukoli jinou
závadu, obraťte se na náš servis.
Zásuvka je vadná. Použijte jinou síťovou zásuvku.
Přístroj je vadný. Obraťte se na servis.
Přístroj udržuje teplotu. Ktomu je nutné,
se
aby se přístroj vždy znovu krátce zahřál.
Přitom svítí kontrolní světlo 0.
Přístroj je vadný. Obraťte se na servis.
Přístroj je zahřátý. Nejedná se oporuchu.
Zasuňte zástrčku do síťové
zásuvky.
Nejedná se oporuchu.
CZ
STGG 1800 A1
57
Page 61

Záruka a servis
Na tento přístroj získáváte záruku vtrvání 3let
od data zakoupení. Přístroj byl vyroben pečlivě
a před dodáním byl svědomitě odzkoušen.
Uschovejte si prosím pokladní lístek jako doklad
onákupu. Vpřípadě uplatňování záruky se spojte
telefonicky se servisní provozovnou. Pouze tak
lze zajistit bezplatné zaslání vašeho zboží.
Záruční plnění se vztahuje pouze na vady materiálu
nebo výrobní vady, nikoliv však na škody způsobené
při dopravě, na opotřebované díly nebo poškození
CZ
rozbitných součástí, např. spínačů nebo akumulátorů. Výrobek je určen jen pro soukromé účely a ne
pro komerční použití.
Při nesprávném a neodborném používání, při
použití násilí a při zásazích, které nebyly provedeny našimi autorizovanými servisními provozovnami,
záruční nároky zanikají. Vaše práva vyplývající ze
zákona nejsou touto zárukou omezena.
Záručním plněním se záruční doba neprodlužuje.
To platí i pro vyměněné a opravené součásti.
Poškození nebo vady vyskytující se již při nákupu
výrobku je nutno oznámit ihned po vybalení,
avšak nejpozději do dvou dnů od data nákupu.
Po uplynutí záruční doby podléhají veškeré opravy
poplatkům.
Likvidace
Přístroj vžádném případě
nevhazujte do běžného
domovního odpadu. Tento
výrobek podléhá evropské
směrnici č. 2012/19/EU.
Přístroj předejte klikvidaci odborné fi rmě oprávněné
knakládání sodpady nebo využijte možnost likvidace zajišťovanou obcí. Dodržujte aktuálně platné
předpisy. Vpřípadě pochybností se informujte ve
sběrném dvoře.
Obal se skládá zekologických materi-
álů, které lze vkomunálních sběrných
dvorech odevzdat krecyklaci.
Dovozce
KOMPERNASS HANDELS GMBH
BURGSTRASSE 21
44867 BOCHUM
GERMANY
www.kompernass.com
Servis Česko
Tel.: 800143873
E-Mail: kompernass@lidl.cz
IAN 103845
Dostupnost horké linky:
pondělí až pátek 8:00 hod. – 20:00 hod. (SEČ)
58
STGG 1800 A1
Page 62

Recepty
UPOZORNĚNÍ
Údaje týkající se grilovací doby a teplotního stupně, uvedené v receptech, jsou orientační hodnoty
►
a mohou se silně lišit podle vlastností potravin. Při přípravě jídel se vždy řiďte podle svých vlastních
zkušeností.
Marinované vepřové maso
Suroviny:
♦ 500 g vepřového masa (panenka)
♦ 2 PL balzamikového octa
♦ 1 ČL bazalky (koření)
♦ 1 pomeranč
♦ sůl
♦ pepř
1) Z vepřové panenky odstraňte tuk a kůži.
2) Nakrájejte z panenky cca 2-3 cm tlusté medailonky a položte je do misky.
3) Přidejte pomeranč, balzamikový olej, 1 ČL bazalkového koření, špetku soli a trochu pepře a nechte
maso marinovat cca jednu hodinu.
4) Položte medailonky na grilovací desku 1 a grilujte je cca 5 - 7 minut z každé strany na teplotním
stupni 4.
CZ
Grilovaný ananas
Suroviny:
♦ 1 ananas
♦ 1 - 2 PL cukru
♦ 1ČL skořice
1) Postavte ananas kolmo a loupejte jej ostrým nožem shora dolů, dokud není ananas kompletně oloupaný.
2) Ananas nakrájejte na čtvrtky a vyřežte z něj jádro.
3) Nakrájejte ananas na proužky, tenké cca 2 cm.
4) Grilujte tyto proužky z každé strany cca 5-7 minut na teplotním stupni 3.
5) Podle chuti posypte ananas skořicí a cukrem.
STGG 1800 A1
59
Page 63

Grilovaná zelenina
Suroviny:
♦ 2 papriky
♦ 1 cuketa
♦ 1 lilek
♦ olivový olej
♦ sůl
♦ pepř
CZ
♦ provensálské koření (směs koření)
1) Zeleninu důkladně omyjte. Papriku nakrájejte na půlky, odstraňte zrníčka a nakrájejte ji na proužky.
Lilek a cuketu rozkrojte podélně na dvě půlky a potom je nakrájejte vždy na cca 0,5 cm velké kusy.
2) Potřete zeleninu olivovým olejem.
3) Položte zeleninu na grilovací desku 1 předehřátou na teplotní stupeň 3 a grilujte ji z obou stran
vždy cca 8 - 10 minut, dokud neobdrží světle hnědou barvu.
4) Posypte zeleninu solí, pepřem a podle chuti provensálským kořením.
Tofu se žampiony
Suroviny:
♦ 4 plátky tofu á 50 g
♦ 1 - 2 PL sójové omáčky
♦ sezamový olej
♦ olivový olej
♦ 200 g žampiónů
♦ 1 cibule
♦ sůl
♦ pepř
1) Marinujte plátky tofu s 2 PL sójové omáčky a několika kapkami sezamového oleje, solí a pepřem
30 minut v misce.
2) Grilujte tofu po obou stranách na teplotním stupni 4 po dobu cca 5 minut.
3) Očistěte žampiony, nakrájejte na plátky a přidejte cibuli nakrájenou také na plátky.
4) Dejte do misky plátky, 1 PL olivového oleje, 2 PL sójové omáčky a vše promíchejte.
5) Žampiony a cibuli krátce osmažte na grilovací desce 1 na teplotním stupni 4 a podávejte k tofu.
60
STGG 1800 A1
Page 64

Kari garnáty s kokosovým mlékem
Suroviny:
♦ 100 g červené kari pasty
♦ 50 ml kokosového mléka
♦ 400 g garnátů (alternativně krabů nebo krevet)
♦ 200 g cukrových lusků
♦ 2 papriky
♦ 2 cibule
♦ 2 stroužky česneku
♦ sůl a pepř
♦ alobal
1) Smíchejte kari pastu a kokosové mléko.
2) Omyjte garnáty, cukrové lusky a papriku.
3) Oloupejte cibuli a stroužky česneku.
4) Nakrájejte cibuli, stroužky česneku a papriku na malé kousky.
5) Garnáty a zeleninu rozdělte stejnoměrně do 4 alobalových balení. Alobal musí být tak velký, aby
se suroviny mohly do něj zabalit jako do balíčku. Nakapejte na vše omáčku z curry a kokosu a vše
okořeňte solí a pepřem.
6) Balíček dobře uzavřete, aby nemohla vytéct žádná tekutina.
7) Takto naplněné balíčky položte na grilovací desku 1, předehřátou na teplotním stupni 4 a nechte
vše dusit a grilovat po obou stranách vždy cca 15 minut.
CZ
UPOZORNĚNÍ
Podle velikosti balíčku se mohou umístit 2 - 3 balíčky najednou na grilovací desku 1.
►
Zbývající balíčky grilujte, až budou hotové ty první.
STGG 1800 A1
61
Page 65

Pečený toast
Suroviny:
♦ 8 krajíců- toastového chleba
♦ 2vejce
♦ 100 ml smetany
♦ 100 g strouhaného parmezánu
♦ 1 PL rostlinného oleje
♦ 20 g pokrájené petrželky
CZ
♦ 20 g pokrájené pažitky
♦ sůl
♦ pepř
1) V misce smíchejte smetanu s vejci, nastrouhaným sýrem a bylinkami. Přidejte sůl a pepř.
2) Grilovací desku 1 lehce potřete trochou rostlinného oleje.
3) Ponořte krajíce toustového chleba do této směsi a grilujte je po obou stranách cca. 5 minut na
teplotním stupni 3.
Grilovaný chřest
Suroviny:
♦ 10 ks chřestu (průměr cca 1,5 cm)
♦ 50 g másla
♦ 1 svazek petrželky
♦ sůl
♦ pepř
1) Omyjte a oloupejte chřest.
2) Omyjte a nakrájejte petrželku.
3) Na vyložený alobal položte nejdříve vrstvu petrželky a kousky másla. Na to položte půlky chřestu.
Potom opět položte vrstvu petrželky a kousky másla na chřest. Okořeňte chřest solí a pepřem.
4) Balíček uzavřete a položte jej na grilovací desku 1 při nastavení vyhřívacího stupně 4 - 5.
K vaření zavřete víko 3.
5) Po 20 minutách balíček opatrně obraťte. Po dalších 20 minutách je chřest hotový.
UPOZORNĚNÍ
Může se stát, že podle tloušťky grilovaných potravin víko 3 během přípravy doléhá na grilované
►
potraviny.
62
STGG 1800 A1
Page 66

Krůtí prsíčka
Suroviny:
♦ 2 plátky krůtích prsíček (à cca 150 g)
♦ 1 stroužek česneku
♦ 1 PL medu
♦ 1 ČL hořčice, zrnité
♦ 1 PL rostlinného oleje
♦ sůl
♦ pepř, barevný
1) Oloupejte stroužek česneku a rozmačkejte jej.
2) Smíchejte česnek, med, hořčici olej a okořeňte marinádu solí a pepřem.
3) Omyjte a osušte krůtí prsíčka. Dejte maso do misky, zalijte marinádou a nechte uležet v chladu cca
jednu hodinu.
4) Položte maso na grilovací desku 1 při teplotním stupni 4 a zavřete víko 3.
– Tenké plátky masa: Po cca 5 minutách obraťte plátky a grilujte z druhé strany na teplotním stupni 4
po dobu dalších 5 minut při zavřeném víku 3.
– Silné plátky masa: Po cca 10 minutách obraťte plátky a grilujte z druhé strany na teplotním stupni 4
po dobu dalších 10 minut při zavřeném víku 3.
UPOZORNĚNÍ
Může se stát, že podle tloušťky grilovaných potravin víko 3 během přípravy doléhá na grilované
►
potraviny.
CZ
STGG 1800 A1
63
Page 67

Grilovaná kukuřice
Suroviny:
♦ 2 cukrové kukuřice
♦ 100 g bylinkového másla
♦ česneková sůl
♦ sůl
♦ pepř
1) Kousek alobalu natřete bylinkovým máslem.
CZ
2) Osolte kukuřici a zabalte ji do alobalu.
3) Při teplotním stupni 4 a zavřeném víku 3 položte balíček na grilovací desku 1.
4) Obraťte po 15 minutách a grilujte kukuřici dalších 15 minut.
5) Okořeňte kukuřici česnekovou solí a pepřem.
UPOZORNĚNÍ
Může se stát, že podle tloušťky grilovaných potravin víko 3 během přípravy doléhá na grilované
►
potraviny.
Bruschetta
Suroviny:
♦ 2 ciabatty
♦ 2 rajčata
♦ 4 PL rajčatového kečupu
♦ 2 stroužky česneku
♦ 2 lžíce olivového oleje
♦ 1 PL jemně nasekané bazalky
1) Rozkrojte ciabattu na dvě půlky a položte tyto na cca 2 minuty na grilovací desku 1 při teplotním
stupni 3 - 4, aby se půlky ciabatty lehce opekly.
2) Omyjte a nakrájejte rajčata na kostičky. Česnek prolisujte.
3) Smíchejte rajčata, nakrájená na kostičky, kečup, česnek, olivový olej a nasekanou bazalku.
4) Rozdělte tuto hmotu na opečené plátky ciabatty a položte tyto na cca 5 minut na grilovací desku 1
při teplotním stupni 3.
64
STGG 1800 A1
Page 68

Obsah
Úvod . . . . . . . . . . . . . . . . . . . . . . . . . . . . . . . . . . . . . . . . . . . . . . . . . . . . . . . . . . . . . . . .66
Používanie vsúlade surčením . . . . . . . . . . . . . . . . . . . . . . . . . . . . . . . . . . . . . . . . . . .66
Rozsah dodávky . . . . . . . . . . . . . . . . . . . . . . . . . . . . . . . . . . . . . . . . . . . . . . . . . . . . . . .66
Popis prístroja . . . . . . . . . . . . . . . . . . . . . . . . . . . . . . . . . . . . . . . . . . . . . . . . . . . . . . . . .66
Technické údaje . . . . . . . . . . . . . . . . . . . . . . . . . . . . . . . . . . . . . . . . . . . . . . . . . . . . . . .66
Bezpečnostné upozornenia . . . . . . . . . . . . . . . . . . . . . . . . . . . . . . . . . . . . . . . . . . . . . .67
Zloženie a umiestnenie . . . . . . . . . . . . . . . . . . . . . . . . . . . . . . . . . . . . . . . . . . . . . . . . .70
Pred prvým použitím . . . . . . . . . . . . . . . . . . . . . . . . . . . . . . . . . . . . . . . . . . . . . . . . . . .70
Nastavenie termostatu . . . . . . . . . . . . . . . . . . . . . . . . . . . . . . . . . . . . . . . . . . . . . . . . .71
Používanie veka . . . . . . . . . . . . . . . . . . . . . . . . . . . . . . . . . . . . . . . . . . . . . . . . . . . . . . .71
Obsluha . . . . . . . . . . . . . . . . . . . . . . . . . . . . . . . . . . . . . . . . . . . . . . . . . . . . . . . . . . . . . .71
Čistenie a ošetrovanie . . . . . . . . . . . . . . . . . . . . . . . . . . . . . . . . . . . . . . . . . . . . . . . . . .72
Skladovanie . . . . . . . . . . . . . . . . . . . . . . . . . . . . . . . . . . . . . . . . . . . . . . . . . . . . . . . . . .72
Odstraňovanie porúch . . . . . . . . . . . . . . . . . . . . . . . . . . . . . . . . . . . . . . . . . . . . . . . . . .73
Zárukaaservis . . . . . . . . . . . . . . . . . . . . . . . . . . . . . . . . . . . . . . . . . . . . . . . . . . . . . . . .74
Likvidovanie . . . . . . . . . . . . . . . . . . . . . . . . . . . . . . . . . . . . . . . . . . . . . . . . . . . . . . . . . .74
Dovozca . . . . . . . . . . . . . . . . . . . . . . . . . . . . . . . . . . . . . . . . . . . . . . . . . . . . . . . . . . . . . .74
Recepty . . . . . . . . . . . . . . . . . . . . . . . . . . . . . . . . . . . . . . . . . . . . . . . . . . . . . . . . . . . . . .75
Marinovaná bravčová sviečkovica . . . . . . . . . . . . . . . . . . . . . . . . . . . . . . . . . . . . . . . . . . . . . . . . . . . . 75
Grilovaný ananás . . . . . . . . . . . . . . . . . . . . . . . . . . . . . . . . . . . . . . . . . . . . . . . . . . . . . . . . . . . . . . . . . 75
Grilovaná zelenina . . . . . . . . . . . . . . . . . . . . . . . . . . . . . . . . . . . . . . . . . . . . . . . . . . . . . . . . . . . . . . . . 76
Tofu so šampiňónmi . . . . . . . . . . . . . . . . . . . . . . . . . . . . . . . . . . . . . . . . . . . . . . . . . . . . . . . . . . . . . . . . 76
Krevety s kokosom a karí korením . . . . . . . . . . . . . . . . . . . . . . . . . . . . . . . . . . . . . . . . . . . . . . . . . . . . . 77
Zapekané toasty . . . . . . . . . . . . . . . . . . . . . . . . . . . . . . . . . . . . . . . . . . . . . . . . . . . . . . . . . . . . . . . . . . 78
Grilovaná špargľa . . . . . . . . . . . . . . . . . . . . . . . . . . . . . . . . . . . . . . . . . . . . . . . . . . . . . . . . . . . . . . . . . 78
Rezne z morčacích pŕs . . . . . . . . . . . . . . . . . . . . . . . . . . . . . . . . . . . . . . . . . . . . . . . . . . . . . . . . . . . . . . 79
Grilovaná kukurica . . . . . . . . . . . . . . . . . . . . . . . . . . . . . . . . . . . . . . . . . . . . . . . . . . . . . . . . . . . . . . . . 80
Bruschetta . . . . . . . . . . . . . . . . . . . . . . . . . . . . . . . . . . . . . . . . . . . . . . . . . . . . . . . . . . . . . . . . . . . . . . . 80
SK
STGG 1800 A1
65
Page 69

STOLNÝ GRIL STGG 1800 A1
Úvod
Srdečne vám gratulujeme ku kúpe tohto nového
prístroja.
Touto kúpou ste sa rozhodli pre vysokokvalitný výrobok. Návod na obsluhu je súčasťou tohto výrobku.
Obsahuje dôležité upozornenia týkajúce sa bezpečnosti, používania alikvidovania. Pred používaním výrobku sa oboznámte so všetkými pokynmi
na obsluhu abezpečnostnými upozorneniami. Výrobok používajte iba tak, ako je to popísané aiba
vtých oblastiach použitia, ktoré sú tu uvedené. Pri
postúpení výrobku tretej osobe odovzdajte sním
aj všetky podklady.
SK
Používanie vsúlade surčením
Tento elektrický spotrebič slúži výlučne na grilovanie
potravín v interiéri. Tento elektrický spotrebič je
určený výlučne na používanie vdomácnosti.
Nepoužívajte ho komerčne.
Rozsah dodávky
Stolný gril
(grilovacia platňa, rám, miska na zachytávanie
výpeku, termostat)
Návod na obsluhu
Popis prístroja
1 Grilovacia platňa
2 Zásuvka
3 Veko
4 Vedenia pántov
5 Rám
6 Miska na zachytávanie výpeku
7 Rukoväť s poistkou
8 Regulátor teploty
9 Termostat
0 Kontrolka
Technické údaje
Menovité napätie: 220 - 240 V ~,
50/60 Hz
Max. príkon: 1500 - 1800 W
UPOZORNENIE
Ihneď po vybalení prekontrolujte úplnosť a nepoškodenosť rozsahu dodávky . V prípade potreby
sa obráťte na servis.
66
STGG 1800 A1
Page 70

Bezpečnostné upozornenia
NEBEZPEČENSTVO ÚRAZU ELEKTRICKÝM PRÚDOM!
► Poškodenú elektrickú zástrčku alebo pripojovací kábel nechajte
ihneď vymeniť kvalifi kovaným aautorizovaným personálom alebo
vzákazníckom servise, aby ste zabránili ohrozeniu zdravia.
► Chráňte sieťové vedenie pred kontaktom s horúcimi časťami spot-
rebiča. Spotrebič nikdy nepoužívajte v blízkosti otvoreného ohňa,
výhrevnej platne alebo rozpálenej rúry.
► Elektrický spotrebič nevystavujte dažďu a nikdy ho nepoužívajte
vo vlhkom alebo mokrom prostredí. Dbajte na to, aby sieťové
vedenie počas prevádzky nikdy nebolo mokré ani vlhké.
► Pred použitím spotrebič skontrolujte na viditeľné vonkajšie poško-
denia. Neuvádzajte do prevádzky poškodený spotrebič, alebo
spotrebič, ktorý spadol na zem.
► Prípojný kábel sa musí pravidelne kontrolovať, či nejaví známky
poškodenia. Ak je prípojný kábel poškodený, spotrebič sa nesmie
používať.
► Elektrický spotrebič sa smie zapojiť len do elektrickej zásuvky
s ochranným vodičom.
SK
► Elektrický spotrebič sa nesmie sa dostať do kontaktu s vlhkosťou,
ako napríklad dažďom alebo mokrom.
Nikdy neponárajte elektrický spotrebič do vody ani do iných
kvapalín! Môže dôjsť kohrozeniu života vdôsledku zásahu
elektrickým prúdom, ak sa pri prevádzke dostanú zvyšky
kvapaliny na časti, ktoré sú pod napätím.
STGG 1800 A1
67
Page 71

SK
VAROVANIE - NEBEZPEČENSTVO PORANENIA!
► Tento elektrický spotrebič môžu používať deti od 8 rokov, ako aj
osoby so zníženými fyzickými, senzorickými alebo mentálnymi
schopnosťami, prípadne snedostatočnými skúsenosťami alebo
znalosťami, ak sú pod dohľadom, alebo boli dostatočne poučené
obezpečnom používaní elektrického spotrebiča apochopili
ztoho vyplývajúce riziká.
► Deti sa nesmú hrať s elektrickým spotrebičom.
► Čistenie aužívateľskú údržbu nesmú vykonávať deti, okrem prípa-
dov, ak sú staršie ako 8 rokov asú pod dostatočným dozorom.
► Deti mladšie ako 8 rokov nesmú mať prístup k elektrickému spot-
rebiču, ani k prípojnému káblu.
► Skôr, než začnete elektrický spotrebič čistiť, nechajte ho vždy
najskôr vychladnúť. Nebezpečenstvo popálenia!
► Nepoužívajte spotrebič vblízkosti horúcich povrchov. Zabezpečte,
aby sieťová zástrčka bola v prípade nebezpečenstva ľahko
a rýchlo dostupná a aby prípojný kábel nepredstavoval riziko
potknutia.
► Pre elektrický spotrebič zaistite bezpečné miesto.
Pozor! Horúci povrch!
► Počas prevádzky sa dotýkajte len rukoväte na veku. Povrch
elektrického spotrebiča je počas prevádzky veľmi horúci.
► Počas činnosti nikdy nenechávajte elektrický spotrebič bez dozoru.
► Elektrický spotrebič ďalej nepoužívajte, ak je poškodený.
► Elektrický spotrebič ďalej nepoužívajte, ak je na veku viditeľná
prasklina alebo iné poškodenie.
68
STGG 1800 A1
Page 72

POZOR - VECNÉ ŠKODY!
► Na zapínanie avypínanie elektrického spotrebiča nepoužívajte
externý časový spínač, ani separátny systém diaľkového ovládania.
► Počas prevádzky nenechávajte elektrický spotrebič nikdy bez
dozoru.
► Zabezpečte, aby sa elektrický spotrebič, prípojný kábel a elektrická
zástrčka nemohli dostať do kontaktu s tepelnými zdrojmi, ako
sú napr. varné platne alebo otvorený oheň.
► Na prevádzku elektrického spotrebiča nepoužívajte žiadne uhlie
ani iné podobné horľaviny!
► Chráňte antiadhéznu vrstvu a preto nepoužívajte kovové pomôcky,
napr. nože, vidličky atď. Ak sa antiadhézna vrstva poškodí, elektrický spotrebič ďalej nepoužívajte.
► Spotrebič používajte výhradne len s originálnym príslušenstvom,
ktoré je súčasťou dodávky.
► Nikdy nepoužívajte prístroj bez misky na zachytávanie výpeku.
Bez tejto misky bude tuk a horúca šťava kvapkať na podložku
prístroja!
SK
► Elektrický spotrebič používajte len s termostatom, ktorý je súčasťou
dodávky.
STGG 1800 A1
69
Page 73

Zloženie a umiestnenie
VAROVANIE!
NEBEZPEČENSTVO POŽIARU!
► Nikdy neumiestňujte spotrebič pod závesné
skrine alebo vedľa záclon, nábytkových stien,
prípadne iných horľavých predmetov.
► Elektrický spotrebič umiestňujte do vzdialenosti
minimálne 70 cm od horľavých materiálov
(napr. záclon).
► Spotrebič postavte vždy na tepelne odolnú
podložku.
► Spotrebič postavte tak, aby jeho zadná strana
bola bezprostredne pri stene. Dbajte pritom
SK
na to, aby táto stena bola tepelne odolná
a aby ste mohli veko 3 ešte otvoriť.
1) Vyberte všetky diely zkartónového obalu, odstráňte obalový materiál aprípadné ochranné
fólie.
2) Vyčistite všetky diely elektrického spotrebiča
podľa popisu vkapitole „Čistenie aúdržba“.
Uistite sa, či sú všetky diely úplne suché.
3) Spotrebič postavte na tepelne odolnú, čistú
arovnú plochu.
4) Misku na zachytávanie výpeku 6 vložte do
rámu 5 tak, aby ležala vo výreze, ktorý sa
nachádza trochu naľavo od stredu.
POZOR! VECNÉ ŠKODY!
Spotrebič nikdy nepoužívajte bez misky
►
na zachytávanie výpeku 6! Horúci tuk a
horúce šťavy by bez tejto misky kvapkali na
podložku!
5) Grilovaciu platňu 1 nasaďte na rám 5.
Dbajte pritom na to, aby sa zásuvka 2 nachádzala na pravej strane. Grilovacia platňa 1
musí byť správne vložená do rámu, pretože inak
sa termostat 9 nedá zapojiť do zásuvky 2.
6) Zasuňte pánty veka 3 do výrezov v ráme 5
a veko 3 zatvorte.
7) Zapojte termostat 9 do zásuvky 2 na
spotrebiči. Dbajte na to, aby bol termostat 9
zasunutý do zásuvky 2 na doraz. Inak sa
nemôže prístroj zahriať!
Pred prvým použitím
1) Otvorte veko 3 vytlačením poistky na rukoväti 7
a súčasným ťahaním veka 3 smerom hore.
Veko 3 otvorte natoľko, aby sa pánty vo
vedeniach 4 posunuli smerom dole a veko 3
pevne stálo.
2) Grilovaciu platňu 1 utrite vlhkou utierkou.
3) Grilovaciu platňu 1 zľahka potrite tukom
alebo olejom vhodným na pečenie/grilovanie.
Takto sa z grilovacej platne 1 ľahšie uvoľnia
prípadné zvyšky, ktoré vznikajú pri príprave
jedla.
4) Veko 3 zatvorte miernym nadvihnutím vedení
pántov 4 tak, aby sa veko znovu dalo zaklapnúť.
5) Zasuňte zástrčku do elektrickej zásuvky a regulátor teploty 8 nastavte na stupeň 5. Prístroj sa
zohrieva.
6) Vyčkajte 10minút.
7) Potom vytiahnite sieťovú zástrčku anechajte
prístroj vychladnúť.
UPOZORNENIE
Pri prvom zohrievaní prístroja môže dôjsť
►
kvzniku mierneho zápachu adymu, čo
je spôsobené zvyškami, podmienenými
výrobou. Je to úplne normálne anie je to nebezpečné. Zabezpečte dostatočné vetranie,
napr. otvorte okno.
8) Grilovaciu platňu 1 utrite po vychladnutí
vlhkou utierkou.
9) Misku na zachytávanie výpeku 6 zbavte
nečistôt podľa popisu v kapitole „Čistenie
aúdržba“.
10) Skôr, než prístroj uvediete do prevádzky, uistite
sa, či sú všetky diely dokonale suché.
Elektrický spotrebič je teraz pripravený na prevádzku.
70
STGG 1800 A1
Page 74

Nastavenie termostatu
Pomocou regulátora teploty 8 na termostate 9
môžete nastavovať teplotné stupne.
Stupeň 0 Gril vypnutý
Stupeň > 0 - 1 Gril zapnutý; nízka teplota
Stupeň 1 - 3 Gril zapnutý; stredná teplota
Stupeň 3 - 5 Gril zapnutý; vysoká teplota
Akonáhle nastavíte teplotný stupeň, rozsvieti sa kontrolka 0. Po dosiahnutí nastavenej teploty kontrolka 0
zhasne.
Môže sa však vždy znova rozsvecovať a zhasínať.
To znamená, že prístroj udržiava teplotu a opäť
sa musí trochu zohriať.
UPOZORNENIE
Správny teplotný stupeň zvoľte skúšaním.
►
Nízke a stredné teplotné stupne sú pritom
vhodné skôr na zeleninu, ovocie a chúlostivé
potraviny a vysoké teplotné stupne na mäso.
Používanie veka
Veko 3 môžete počas prípravy jedál zatvoriť,
alebo ho môžete nechať otvorené:
■ Keď je veko 3 otvorené, slúži ako ochrana
proti vystrekovaniu.
■ Ak veko 3 počas grilovania zatvoríte, dosiah-
nete vyššiu teplotu a potraviny budú zo všetkých
strán zároveň aj dusené.
■ Otvorte veko 3 vytlačením poistky na rukoväti 7
a súčasne veko 3 ťahajte smerom hore. Veko
otvorte natoľko, aby sa pánty vo vedeniach 4
posunuli smerom dole. Veko 3 teraz stojí pevne.
■ Ak chcete veko 3 znovu zatvoriť, nadvihnite
ho do takej polohy, aby sa pánty vo vedení 4
posunuli smerom hore. Potom môžete veko 3
znovu zatvoriť. Dbajte pritom na to, aby poistka
na rukoväti 7 zaklapla.
Obsluha
VAROVANIE!
NEBEZPEČENSTVO PORANENIA!
► Počas používania je prístroj veľmi horúci! Preto
sa počas grilovania dotýkajte len rukoväte 7
na veku 3! Ak sa dotýkate priamo grilu,
použite chňapku.
1) Zatvorte veko 3.
2) Zasuňte zástrčku do elektrickej zásuvky.
Kontrolka 0 sa rozsvieti a prístroj sa začne
zohrievať.
3) Keď kontrolka 0 zhasne, je spotrebič zohriaty.
Otvorte veko 3 pomocou rukoväte 7 a potraviny podľa chuti položte na grilovaciu platňu 1.
4) Ak to považujete za potrebné, veko 3 zatvorte.
Tuk a šťava vytekajú počas grilovania do misky
na zachytávanie výpeku 6.
5) Výsledok grilovania pravidelne kontrolujte a
grilované jedlo obracajte. Ak ste s výsledkom
grilovania spokojní, otvorte, ak je to potrebné,
veko 3 uchopením za rukoväť 7 a grilované
jedlo zoberte z grilovacej platne 1.
POZOR! VECNÉ ŠKODY!
Nepoužívajte kovové pomôcky, ako napr. nôž,
►
vidličku a pod. Ak sa antiadhézna vrstva poškodí, elektrický spotrebič ďalej nepoužívajte.
6) Ak nechcete grilovať ďalšie potraviny, regulátor
teploty 8 nastavte do polohy „0“ azástrčku
vytiahnite z elektrickej zásuvky. Len po vytiahnutí zástrčky zo zásuvky je prístroj vypnutý.
SK
STGG 1800 A1
71
Page 75

Čistenie a ošetrovanie
NEBEZPEČENSTVO ÚRAZU
ELEKTRICKÝM PRÚDOM!
Pred každým čistením vytiahnite zástrčku
►
zelektrickej zásuvky! Hrozí nebezpečenstvo
úrazu elektrickým prúdom!
Grilovaciu platňu 1 ani termostat 9 nikdy
neponárajte do vody alebo inej kvapaliny!
VAROVANIE!
NEBEZPEČENSTVO PORANENIA!
► Pred čistením prístroja ho nechajte vždy najskôr
SK
vychladnúť. V opačnom prípade hrozí nebezpečenstvo popálenia!
POZOR! VECNÉ ŠKODY!
Nepoužívajte žiadne abrazívne alebo agre-
►
sívne čistiace prostriedky. Mohli by poškodiť
povrch prístroja!
► Nepoužívajte kovové pomôcky, ako napr. nôž,
vidličku a pod. Ak sa antiadhézna vrstva poškodí, elektrický spotrebič ďalej nepoužívajte.
■ Spotrebič vyčistíte najlepšie ihneď po vychlad-
nutí. Vtedy sa dajú zvyšky potravín ľahšie
odstrániť.
■ Kvôli vyčisteniu musíte elektrický spotrebič
rozobrať:
– Termostat 9 odpojte od zásuvky 2.
– Veko 3 vytiahnite z vedení pántov 4.
– Grilovaciu platňu 1 vyberte z rámu 5.
– Misku na zachytávanie výpeku 6 opatrne
vyberte z rámu 5.
■ Misku na zachytávanie výpeku 6 vyprázdnite.
Umyte ju teplou vodou s pridaním jemného prostriedku na umývanie riadu. Misku na zachytávanie výpeku 6 potom opláchnite čistou vodou a
utrite ju do sucha.
■ Veko 3 umyte vteplej vode, do ktorej ste pridali
trocha jemného prostriedku na umývanie riadu.
Veko 3 potom opláchnite čistou vodou a utrite
ho do sucha.
■ Po vychladnutí utrite grilovaciu platňu 1 vlhkou
utierkou. Pred opakovaným použitím musí byť
grilovacia platňa 1 celkom suchá.
UPOZORNENIE
Ak sa na grilovacej platni 1 nachádzajú
►
odolnejšie nečistoty, môžete grilovaciu platňu 1 odmočiť v teplej vode s pridaním
malého množstva prostriedku na umývanie
riadu. Potom grilovaciu platňu 1 opláchnite
v čistej vode. Dbajte na to, aby na grilovacej
platni 1 nezostali žiadne zvyšky čistiaceho
prostriedku.
► Pred opakovaným použitím musí byť grilova-
cia platňa 1 celkom suchá. Dbajte najmä na
to, aby sa v zásuvke 2 neudržiavala vlhkosť.
► Po vyčistení prostriedkom na umývanie riadu
musíte grilovaciu platňu 1 znovu zľahka
natrieť olejom, aby sa neznížila funkčnosť
antiadhéznej vrstvy.
■ Rám 5 a termostat 9 utrite vlhkou utierkou.
V prípade potreby pridajte na utierku trocha
jemného prostriedku na umývanie riadu a potom
spotrebič pretrite utierkou namočenou v čistej
vode. Všetko poriadne vytrite do sucha.
■ Elektrický spotrebič znovu zložte.
Skladovanie
■ Elektrický spotrebič skladujte na čistom, bezpraš-
nom asuchom mieste.
■ Keď ste spotrebič znovu zložili a poistka veka 3
zaklapla, môžete ho uskladniť priestorovo
úsporne aj v kolmej polohe.
72
STGG 1800 A1
Page 76

Odstraňovanie porúch
Chyba Príčina Riešenie
Sieťová zástrčka nie je zapojená do
elektrickej siete.
Prístroj nefunguje.
Kontrolka 0
znovu rozsvieti a
potom opäť zhasne.
Kontrolka 0 nesvieti.
Ak sa poruchy nedajú odstrániť spôsobom uvedeným vovyššie uvedenej tabuľke, alebo ak zistíte iné
druhy porúch, obráťte sa, prosím, na náš servis.
sa vždy
Elektrická zásuvka je pokazená. Použite inú elektrickú zásuvku.
Elektrický spotrebič je pokazený. Obráťte sa na servis.
Elektrický spotrebič udržiava nastavený
stupeň teploty. Preto je potrebné, aby
sa vždy opäť krátky čas zohrieval.
Pri zohrievaní svieti kontrolka 0.
Elektrický spotrebič je pokazený. Obráťte sa na servis.
Elektrický spotrebič sa rozohrial. Nejde o žiadnu poruchu.
Zasuňte zástrčku do elektrickej
zásuvky.
Nejde o žiadnu poruchu.
SK
STGG 1800 A1
73
Page 77

Zárukaaservis
Natento elektrický spotrebič máte záruku 3roky
od dátumu zakúpenia. Elektrický spotrebič bol
starostlivo vyrobený apred expedíciou dôkladne
preskúšaný. Pokladničný blok si uschovajte ako
dôkaz ozakúpení. Vprípade uplatneniazáruky
telefonicky kontaktujte servis. Len tak sadá
zabezpečiť bezplatné zaslanie vášho tovaru.
Zárukaplatí len nachyby materiálu avýroby, nie
naškody, spôsobené prepravou, opotrebením, ani
napoškodeniakrehkých častí, ako sú spínače alebo
akumulátory. Výrobok je určený len nasúkromné
použitie anie nakomerčné použitie.
Zárukastrácaplatnosť pri nesprávnom zaobchádzaní apri neodbornom zaobchádzaní, pri použití
SK
násiliaapri zásahoch, ktoré neboli vykonané naším
autorizovaným servisom. Vaše práva, vyplývajúce
zo zákona, nie sú touto zárukou obmedzené.
Záručná dobasanepredlžuje záručnou opravou. To
platí tiež pre náhradné aopravené diely. Prípadné
chyby anedostatky, zistené už pri zakúpení, musíte
nahlásiť ihneď po vybalení, najneskoršie však do
dvoch dní od dátumu zakúpenia. Opravy, vykonané
po uplynutí záručnej doby, samusiazaplatiť.
Servis Slovensko
Tel. 0850 232001
E-Mail: kompernass@lidl.sk
IAN 103845
Likvidovanie
Elektrický spotrebič vžiadnom
prípade nevyhadzujte do bežného komunálneho odpadu.
Na tento výrobok sa vzťahuje
európska smernica
č. 2012/19/EU.
Elektrický spotrebič likvidujte odovzdaním vautorizovanej prevádzke na likvidovanie odpadov alebo
vkomunálnej zberni zabezpečujúcej likvidáciu.
Dodržiavajte pritom aktuálne platné predpisy.
V prípade pochybností kontaktujte vašu zberňu na
likvidovanie odpadov.
Obal pozostáva z ekologických materiá-
lov, môžete ho likvidovať odovzdaním
v miestnom recyklačnom stredisku.
Dovozca
KOMPERNASS HANDELS GMBH
BURGSTRASSE 21
44867 BOCHUM
GERMANY
www.kompernass.com
Dostupnosť hotline:
pondelok až piatok od 8:00 hod. – 20:00 hod.
(SEČ)
74
STGG 1800 A1
Page 78

Recepty
UPOZORNENIE
Údaje v receptoch, týkajúce sa doby grilovania a teplotných stupňov, sú orientačné a môžu sa
►
výrazne líšiť v závislosti od vlastností potravín. Vždy vychádzajte aj z vlastných skúseností, ktoré
máte s prípravou jednotlivých jedál.
Marinovaná bravčová sviečkovica
Prísady:
♦ 500 g bravčová sviečkovica
♦ 2 PL balzamikového octu
♦ 1 ČL bazalky (korenina)
♦ 1 pomaranč
♦ soľ
♦ čierne korenie
1) Z bravčovej sviečkovice odstránime tuk a blany.
2) Sviečkovicu nakrájame na cca 2 - 3 cm hrubé medailónky a vložíme ich do misky.
3) Pridáme šťavu z pomaranča, balzamikový ocot, 1 ČL bazalkového korenia, štipku soli a trochu
čierneho korenia a mäso marinujeme asi hodinu.
4) Medailónky uložíme na grilovaciu platňu 1 a z každej strany ich grilujeme cca 5 - 7 minút na
teplotnom stupni 4.
SK
Grilovaný ananás
Prísady:
♦ 1 ananás
♦ 1 - 2 PL cukru
♦ 1 ČL škorice
1) Ananás postavíme kolmo a ostrým nožom ho postupne zhora nadol olúpeme.
2) Rozštvrtíme ho a vyrežeme stonku.
3) Ananás rozrežeme na plátky hrubé cca 2 cm.
4) Plátky grilujeme z každej strany cca 5 - 7 minút na teplotnom stupni 3.
5) Ananás podľa chuti posypeme mletou škoricou a pocukrujeme.
STGG 1800 A1
75
Page 79

Grilovaná zelenina
Prísady:
♦ 2 papriky
♦ 1 cuketa
♦ 1 baklažán
♦ olivový olej
♦ soľ
♦ čierne korenie
♦ provensálske bylinky (zmes korenín)
1) Zeleninu dôkladne umyjeme. Papriky rozpolíme, vykrojíme jadrovníky a nakrájame na prúžky.
SK
Baklažán a cuketu rozrežeme pozdĺžne na dve polovice a potom nakrájame na cca 0,5 cm kúsky.
2) Potrieme olivovým olejom.
3) Kúsky zeleniny poukladáme na grilovaciu platňu 1 predhriatu na teplotný stupeň 3 a grilujeme
z oboch strán cca 8 - 10 minút, pokým nezíska svetlohnedú farbu.
4) Posypeme soľou, čiernym korením a podľa chuti provensálskymi bylinkami.
Tofu so šampiňónmi
Prísady:
♦ 4 plátky tofu po 50 g
♦ 1 - 2 PL sójovej omáčky
♦ sezamový olej
♦ olivový olej
♦ 200 g šampiňónov
♦ 1 cibuľa
♦ soľ
♦ čierne korenie
1) Plátky tofu marinujeme v miske s 2 PL sójovej omáčky a niekoľkými kvapkami sezamového oleja, soli
a čierneho korenia 30 minút.
2) Tieto plátky potom grilujeme z oboch strán na teplotnom stupni 4 cca 5 minút.
3) Očistíme šampiňóny a nakrájame ich - takisto ako cibuľu - na plátky.
4) Dáme ich do misky, pridáme 1 PL olivového oleja, 2 PL sójovej omáčky a premiešame.
5) Šampiňóny a cibuľu krátko opečieme na grilovacej platni 1 pri teplotnom stupni 4 a servírujeme
s tofu.
76
STGG 1800 A1
Page 80

Krevety s kokosom a karí korením
Prísady:
♦ 100 g červenej karí pasty
♦ 50 ml kokosového mlieka
♦ 400 g kreviet (môžu byť aj kraby alebo morské raky)
♦ 200 g cukrového hrášku
♦ 2 papriky
♦ 2 cibule
♦ 2 strúčiky cesnaku
♦ soľ ačierne korenie
♦ alobal
1) Zmiešame karí pastu a kokosové mlieko.
2) Umyjeme krevety, cukrový hrášok a papriky.
3) Olúpeme cibuľu astrúčiky cesnaku.
4) Cibuľu, cesnak a papriku nakrájame na malé kúsky.
5) Krevety a zeleninu rozložíme rovnomerne na 4 kusy alobalu. Kusy alobalu musia byť také veľké,
aby sa do nich prísady dali zavinúť, ako do balíčkov. Pokvapkáme šťavou z karí pasty a kokosu,
posypeme soľou a okoreníme čiernym korením.
6) Balíčky dobre uzatvoríme, aby šťava nemohla vytekať.
7) Naplnené balíčky poukladáme na grilovaciu platňu 1 predhriatu na teplotnom stupni 4 a dusíme
z oboch strán, z každej strany cca 15 minút.
SK
UPOZORNENIE
Podľa veľkosti balíčkov sa zmestia len 2 - 3 kusy naraz na grilovaciu platňu 1. Zostávajúce balíčky
►
budeme grilovať, keď budú prvé balíčky hotové.
STGG 1800 A1
77
Page 81

Zapekané toasty
Prísady:
♦ 8 plátov toastového chleba
♦ 2 vajcia
♦ 100 ml smotany
♦ 100 g strúhaného parmezánu
♦ 1 PL rastlinného oleja
♦ 20 g nasekanej petržlenovej vňate
♦ 20 g nasekanej pažítky
♦ soľ
♦ čierne korenie
SK
1) V miske zmiešame smotanu s vajíčkami, strúhaným syrom a bylinkami. Pridáme soľ a čierne korenie.
2) Grilovaciu platňu 1 potrieme trochou rastlinného oleja.
3) Toasty namáčame do masy a grilujeme z každej strany cca 5 minút na teplotnom stupni 3.
Grilovaná špargľa
Prísady:
♦ 10 stoniek špargle (priemer cca 1,5 cm)
♦ 50 g masla
♦ 1 zväzok petržlenovej vňate
♦ soľ
♦ čierne korenie
1) Špargľu umyjeme a ošúpeme
2) Petržlenovú vňať umyjeme a nasekáme nadrobno.
3) Rozostrieme alobal a uložíme naň najprv vrstvu petržlenu a kúsky masla. Na to naukladáme polovicu
špargle. Na špargľu dáme opäť vrstvu petržlenu a kúsky masla. Špargľu osolíme a okoreníme čiernym
korením.
4) Balíček uzavrieme a položíme na grilovaciu platňu 1 nastavenú na vyhrievací stupeň 4 - 5.
Veko 3 zatvoríme, aby sa jedlo dusilo.
5) Po 20 minútach balíček opatrne obrátime. Po ďalších 20 minútach je špargľa hotová.
UPOZORNENIE
V závislosti od hrúbky grilovanej potraviny je možné, že veko 3 bude počas dusenia priliehať na
►
grilovanom jedle.
78
STGG 1800 A1
Page 82

Rezne z morčacích pŕs
Prísady:
♦ 2 rezne z morčacích pŕs (à cca 150 g)
♦ 1 strúčik cesnaku
♦ 1 PL medu
♦ 1 ČL horčice, zrnitej
♦ 1 PL rastlinného oleja
♦ soľ
♦ rôznofarebné korenie
1) Olúpeme cibuľu apokrájame ju na kocky.
2) Zmiešame cesnak, med, horčicu a olej a marinádu osolíme a okoreníme.
3) Rezne z morčacích pŕs umyjeme a osušíme. Vložíme ich do misky s marinádou, misku zakryjeme
a dáme na hodinu do chladničky.
4) Rezne položíme na grilovaciu platňu 1 (teplotný stupeň 4) a zatvoríme veko 3.
– Tenké rezne: Po cca 5 minútach rezne otočíme a grilujeme z druhej strany na teplotnom stupni 4
ďalších 5 minút pri zatvorenom veku 3.
– Hrubé rezne: Po cca 10 minútach rezne otočíme a grilujeme z druhej strany na teplotnom stupni 4
ďalších 10 minút pri zatvorenom veku 3.
UPOZORNENIE
V závislosti od hrúbky grilovanej potraviny je možné, že veko 3 bude počas dusenia priliehať na
►
grilovanom jedle.
SK
STGG 1800 A1
79
Page 83

Grilovaná kukurica
Prísady:
♦ 2 kusy cukrovej kukurice
♦ 100 g bylinkového masla
♦ cesnaková soľ
♦ soľ
♦ čierne korenie
1) Kus alobalu natrieme bylinkovým maslom.
2) Kukuričné klasy posolíme a zabalíme do alobalu.
3) Alobalový balíček položíme na grilovaciu platňu 1 (teplotný stupeň 4) a zatvoríme veko 3.
4) Po 15 minútach alobalový balíček otočíme a kukuričné klasy dusíme ďalších 15 minút.
SK
5) Kukuričné klásy osolíme cesnakovou soľou a okoreníme čiernym korením.
UPOZORNENIE
V závislosti od hrúbky grilovanej potraviny je možné, že veko 3 bude počas dusenia priliehať na
►
grilovanom jedle.
Bruschetta
Prísady:
♦ 2 Ciabatta (taliansky chlieb)
♦ 2 rajčiny
♦ 4 PL rajčinového kečupu
♦ 2 strúčiky cesnaku
♦ 2 PL olivového oleja
♦ 1 PL bazalky, jemne nasekanej
1) Ciabattu prekrojíme na dve polovice a každú z nich položíme na cca 2 minúty (teplotný stupeň 3 - 4)
na grilovaciu platňu 1, aby sa opražila.
2) Rajčiny umyjeme a nakrájame na kocky. Roztlačíme cesnak.
3) Zmiešame na kocky nakrájané rajčiny, kečup, cesnak, olivový olej a nasekanú bazalku.
4) Masu natrieme na opražené polovice ciabatty a položíme ich na cca 5 minút na grilovaciu platňu 1
(teplotný stupeň 3).
80
STGG 1800 A1
Page 84

Inhaltsverzeichnis
Einleitung . . . . . . . . . . . . . . . . . . . . . . . . . . . . . . . . . . . . . . . . . . . . . . . . . . . . . . . . . . . . .82
Bestimmungsgemäßer Gebrauch . . . . . . . . . . . . . . . . . . . . . . . . . . . . . . . . . . . . . . . . .82
Lieferumfang . . . . . . . . . . . . . . . . . . . . . . . . . . . . . . . . . . . . . . . . . . . . . . . . . . . . . . . . . .82
Gerätebeschreibung. . . . . . . . . . . . . . . . . . . . . . . . . . . . . . . . . . . . . . . . . . . . . . . . . . . .82
Technische Daten . . . . . . . . . . . . . . . . . . . . . . . . . . . . . . . . . . . . . . . . . . . . . . . . . . . . . .82
Sicherheitshinweise . . . . . . . . . . . . . . . . . . . . . . . . . . . . . . . . . . . . . . . . . . . . . . . . . . . .83
Zusammenbauen und Aufstellen . . . . . . . . . . . . . . . . . . . . . . . . . . . . . . . . . . . . . . . . .86
Vor dem ersten Gebrauch . . . . . . . . . . . . . . . . . . . . . . . . . . . . . . . . . . . . . . . . . . . . . . .86
Thermostat-Einstellungen . . . . . . . . . . . . . . . . . . . . . . . . . . . . . . . . . . . . . . . . . . . . . . . .87
Benutzung des Deckels . . . . . . . . . . . . . . . . . . . . . . . . . . . . . . . . . . . . . . . . . . . . . . . . .87
Bedienen . . . . . . . . . . . . . . . . . . . . . . . . . . . . . . . . . . . . . . . . . . . . . . . . . . . . . . . . . . . . .87
Reinigung und Pfl ege . . . . . . . . . . . . . . . . . . . . . . . . . . . . . . . . . . . . . . . . . . . . . . . . . . .88
Aufbewahrung . . . . . . . . . . . . . . . . . . . . . . . . . . . . . . . . . . . . . . . . . . . . . . . . . . . . . . . .88
Fehlerbehebung . . . . . . . . . . . . . . . . . . . . . . . . . . . . . . . . . . . . . . . . . . . . . . . . . . . . . . .89
Garantie und Service . . . . . . . . . . . . . . . . . . . . . . . . . . . . . . . . . . . . . . . . . . . . . . . . . . .90
Entsorgung . . . . . . . . . . . . . . . . . . . . . . . . . . . . . . . . . . . . . . . . . . . . . . . . . . . . . . . . . . .90
Importeur . . . . . . . . . . . . . . . . . . . . . . . . . . . . . . . . . . . . . . . . . . . . . . . . . . . . . . . . . . . .90
Rezepte . . . . . . . . . . . . . . . . . . . . . . . . . . . . . . . . . . . . . . . . . . . . . . . . . . . . . . . . . . . . . .91
Marinierte Schweinefi lets. . . . . . . . . . . . . . . . . . . . . . . . . . . . . . . . . . . . . . . . . . . . . . . . . . . . . . . . . . . . 91
Gegrillte Ananas . . . . . . . . . . . . . . . . . . . . . . . . . . . . . . . . . . . . . . . . . . . . . . . . . . . . . . . . . . . . . . . . . . 91
Gegrilltes Gemüse . . . . . . . . . . . . . . . . . . . . . . . . . . . . . . . . . . . . . . . . . . . . . . . . . . . . . . . . . . . . . . . . . 92
Tofu mit Champignons . . . . . . . . . . . . . . . . . . . . . . . . . . . . . . . . . . . . . . . . . . . . . . . . . . . . . . . . . . . . . . 92
Kokos-Curry-Garnelen . . . . . . . . . . . . . . . . . . . . . . . . . . . . . . . . . . . . . . . . . . . . . . . . . . . . . . . . . . . . . . 93
Gebackenes Toast . . . . . . . . . . . . . . . . . . . . . . . . . . . . . . . . . . . . . . . . . . . . . . . . . . . . . . . . . . . . . . . . . 94
Spargel vom Grill. . . . . . . . . . . . . . . . . . . . . . . . . . . . . . . . . . . . . . . . . . . . . . . . . . . . . . . . . . . . . . . . . . 94
Putenbrustfi let . . . . . . . . . . . . . . . . . . . . . . . . . . . . . . . . . . . . . . . . . . . . . . . . . . . . . . . . . . . . . . . . . . . . . 95
Gegrillte Maiskolben . . . . . . . . . . . . . . . . . . . . . . . . . . . . . . . . . . . . . . . . . . . . . . . . . . . . . . . . . . . . . . . 96
Bruschetta . . . . . . . . . . . . . . . . . . . . . . . . . . . . . . . . . . . . . . . . . . . . . . . . . . . . . . . . . . . . . . . . . . . . . . . 96
DE
AT
CH
STGG 1800 A1
81
Page 85

TISCHGRILL STGG 1800 A1
Einleitung
Herzlichen Glückwunsch zum Kauf Ihres neuen
Gerätes.
Sie haben sich damit für ein hochwertiges Produkt
entschieden. Die Bedienungsanleitung ist Bestandteil dieses Produkts. Sie enthält wichtige Hinweise
für Sicherheit, Gebrauch und Entsorgung. Machen
Sie sich vor der Benutzung des Produkts mit allen
Bedien- und Sicherheitshinweisen vertraut. Benutzen Sie das Produkt nur wie beschrieben und für
die angegebenen Einsatzbereiche. Händigen Sie
alle Unterlagen bei Weitergabe des Produkts an
Dritte mit aus.
Bestimmungsgemäßer
DE
Gebrauch
AT
CH
Dieses Gerät dient ausschließlich dem Grillen von
Lebensmitteln im Innenbereich. Dieses Gerät ist ausschließlich für die Benutzung in privaten Haushalten
bestimmt. Benutzen Sie es nicht gewerblich.
Lieferumfang
Tischgrill
(Grillplatte, Rahmen, Sudauff angschale, Thermostat)
Bedienungsanleitung
Gerätebeschreibung
1 Grillplatte
2 Buchse
3 Deckel
4 Scharnierführung
5 Rahmen
6 Sudauff angschale
7 Griff mit Verriegelung
8 Temperaturregler
9 Thermostat
0 Kontrollleuchte
Technische Daten
Nennspannung: 220 - 240 V ~,
50/60 Hz
max. Leistungsaufnahme: 1500 - 1800 W
HINWEIS
Kontrollieren Sie den Lieferumfang direkt nach
dem Auspacken auf Vollständigkeit und Beschädigungen. Wenden Sie sich, wenn nötig, an den
Service.
82
STGG 1800 A1
Page 86

Sicherheitshinweise
GEFAHR - ELEKTRISCHER SCHLAG!
► Lassen Sie beschädigte Netzstecker oder Netzkabel sofort von
autorisiertem Fachpersonal oder dem Kundenservice austauschen, um Gefährdungen zu vermeiden.
► Schützen Sie die Netzleitung vor Berührungen mit heißen Geräte-
teilen. Benutzen Sie das Gerät niemals in der Nähe einer off enen
Flamme, einer Heizplatte oder eines beheizten Ofens.
► Setzen Sie das Gerät nicht dem Regen aus und benutzen Sie
es auch niemals in feuchter oder nasser Umgebung. Achten Sie
darauf, dass die Netzleitung während des Betriebs niemals nass
oder feucht wird.
► Kontrollieren Sie das Gerät vor der Verwendung auf äußere
sichtbare Schäden. Nehmen Sie ein beschädigtes oder heruntergefallenes Gerät nicht in Betrieb.
► Das Netzkabel muss regelmäßig auf Zeichen von Beschädigun-
gen untersucht werden. Falls das Netzkabel beschädigt ist, darf
das Gerät nicht mehr benutzt werden.
DE
AT
CH
► Das Gerät muss an eine Steckdose mit Schutzleiter angeschlossen
werden.
► Das Gerät darf nicht mit Feuchtigkeit, wie Regen oder Nässe, in
Berührung kommen.
Tauchen Sie das Gerät niemals in Wasser oder andere Flüssigkeiten! Hier kann Lebensgefahr durch elektrischen Schlag
entstehen, wenn im Betrieb Flüssigkeitsreste auf spannungsführende Teile gelangen.
STGG 1800 A1
83
Page 87

WARNUNG - VERLETZUNGSGEFAHR!
► Dieses Gerät kann von Kindern ab 8 Jahren sowie von Personen mit
reduzierten physischen, sensorischen oder mentalen Fähigkeiten oder
Mangel an Erfahrung und/oder Wissen benutzt werden, wenn sie
beaufsichtigt oder bezüglich des sicheren Gebrauchs des Gerätes
unterwiesen wurden und die daraus resultierenden Gefahren verstanden haben.
► Kinder dürfen nicht mit dem Gerät spielen.
► Reinigung und Benutzer-Wartung dürfen nicht durch Kinder
durchgeführt werden, es sei denn, sie sind älter als 8 Jahre und
beaufsichtigt.
DE
AT
CH
► Kinder jünger als 8 Jahre sind vom Gerät und der Anschlusslei-
tung fernzuhalten.
► Lassen Sie das Gerät nach dem Gebrauch abkühlen, bevor Sie es
reinigen! Verbrennungsgefahr!
► Stellen Sie das Gerät möglichst in der Nähe einer Steckdose auf.
Sorgen Sie dafür, dass der Netzstecker bei Gefahr schnell erreichbar ist und die Netzleitung nicht zur Stolperfalle werden kann.
► Sorgen Sie für einen sicheren Stand des Gerätes.
Vorsicht! Heiße Oberfl äche!
► Berühren Sie nur den Griff am Deckel während des Betriebs. Die
Oberfl ächen des Gerätes werden während des Betriebs sehr heiß.
► Lassen Sie das Gerät während des Betriebs niemals unbeaufsichtigt.
► Benutzen Sie das Gerät nicht weiter, wenn es beschädigt ist.
► Benutzen Sie das Gerät nicht weiter, wenn ein Riss oder eine
andere Beschädigung am Deckel zu erkennen ist.
84
STGG 1800 A1
Page 88

ACHTUNG - SACHSCHADEN!
► Benutzen Sie keine externe Zeitschaltuhr oder ein separates Fern-
wirksystem, um das Gerät zu betreiben.
► Lassen Sie das Gerät während des Betriebes niemals unbeauf-
sichtigt.
► Stellen Sie sicher, dass das Gerät, das Netzkabel oder der Netz-
stecker nicht mit heißen Quellen, wie Kochplatten oder off enen
Flammen, in Berührung kommen.
► Benutzen Sie keine Kohle oder ähnliche Brennstoff e, um das
Gerät zu betreiben!
► Schützen Sie die Antihaftbeschichtung, indem Sie keine metallischen
Werkzeuge wie Messer, Gabel usw. benutzen. Wenn die Antihaftbeschichtung beschädigt ist, benutzen Sie das Gerät nicht weiter.
► Betreiben Sie das Gerät ausschließlich mit dem mitgelieferten
Originalzubehör.
► Betreiben Sie das Gerät niemals ohne Sudauff angschale. Fett und
heiße Flüssigkeit tropft ansonsten auf die Unterlage des Gerätes!
► Benutzen Sie das Gerät nur mit dem mitgelieferten Thermostat.
DE
AT
CH
STGG 1800 A1
85
Page 89

Zusammenbauen und
Aufstellen
WARNUNG! BRANDGEFAHR!
► Stellen Sie das Gerät niemals unter Hänge-
schränke oder neben Gardinen, Schrankwänden
oder anderen entzündlichen Gegenständen.
► Stellen Sie das Gerät mit einem Abstand von
mindestens 70 cm zu brennbaren Materialien
(z.B. Gardinen) auf.
► Stellen Sie das Gerät nur auf eine hitzebestän-
dige Unterlage.
► Stellen Sie das Gerät unmittelbar mit der Rück-
seite an die Wand. Achten Sie dabei darauf,
dass die Wand aus hitzeunempfi ndlichem
Material besteht und dass Sie den Deckel 3
DE
AT
CH
noch öff nen können.
1) Entnehmen Sie alle Teile aus dem Karton und
entfernen Sie das Verpackungsmaterial und
eventuelle Schutzfolien.
2) Reinigen Sie alle Teile, wie im Kapitel „Reinigung und Pfl ege“ beschrieben. Stellen Sie
sicher, dass alle Teile vollständig getrocknet sind.
3) Stellen Sie das Gerät auf eine hitzebeständige,
saubere und ebene Fläche.
4) Legen Sie die Sudauff angschale 6 in den
Rahmen 5, so dass diese in der Aussparung,
die sich etwas links der Mitte befi ndet, liegt.
ACHTUNG! SACHSCHADEN!
Benutzen Sie das Gerät niemals ohne
►
Sudauff angschale 6! Heißes Fett und heiße
Flüssigkeiten tropfen ansonsten auf die
Unterlage!
5) Setzen Sie die Grillplatte 1 auf den Rahmen 5.
Achten Sie dabei darauf, dass die Buchse 2
dabei auf der rechten Seite liegt. Die Grillplatte 1 muss korrekt im Rahmen liegen, ansonsten
kann der Thermostat 9 nicht mit der Buchse 2
verbunden werden.
6) Schieben Sie die Scharniere des Deckels 3 in
die Aussparungen am Rahmen 5 und schließen Sie den Deckel 3.
7) Verbinden Sie den Thermostat 9 mit der
Buchse 2 am Gerät. Achten Sie darauf, der
Thermostat 9 bis zum Anschlag in die Buchse
2 eingeschoben wird. Ansonsten kann das
Gerät nicht aufheizen!
Vor dem ersten Gebrauch
1) Öff nen Sie den Deckel 3, indem Sie die
Verriegelung am Griff 7 hochdrücken und den
Deckel 3 gleichzeitig nach oben ziehen.
Öff nen Sie den Deckel 3 soweit, dass die
Scharniere in der Scharnierführung 4 nach
unten rutschen und der Deckel 3 fest steht.
2) Wischen Sie die Grillplatte 1 mit einem
feuchten Tuch ab.
3) Fetten Sie die Grillplatte 1 leicht mit zum Backen/
Grillen geeignetem Fett oder Öl ein. So lösen
sich eventuelle fertigungsbedingte Rückstände
an der Grillplatte 1 besser.
4) Schließen Sie den Deckel 3, indem Sie ihn in
der Scharnierführung 4 leicht anheben, bis er
sich wieder zuklappen lässt.
5) Stecken Sie den Netzstecker in eine Netzsteckdose und stellen Sie den Temperaturregler 8
auf Stufe 5. Das Gerät heizt auf.
6) Warten Sie 10 Minuten ab.
7) Ziehen Sie dann den Netzstecker und lassen
Sie das Gerät abkühlen.
HINWEIS
Beim erstmaligen Aufheizen des Gerätes
►
kann es durch fertigungsbedingte Rückstände
zu leichter Rauch- und Geruchsentwicklung
kommen. Das ist normal und völlig ungefährlich. Sorgen Sie für ausreichende Belüftung,
öff nen Sie zum Beispiel ein Fenster.
8) Wischen Sie die Grillplatte 1 nach dem
Abkühlen mit einem feuchten Tuch ab.
9) Reinigen Sie die Sudauff angschale 6 wie im
Kapitel „Reinigung und Pfl ege“ beschrieben.
10) Stellen Sie sicher, dass alle Teile vollständig
getrocknet sind, bevor Sie das Gerät in Betrieb
nehmen.
Das Gerät ist nun betriebsbereit.
86
STGG 1800 A1
Page 90

Thermostat-Einstellungen
Mit dem Temperaturregler 8 am Thermostat 9
können Sie die Temperaturstufen einstellen.
Stufe 0 Grill ausgeschaltet
Stufe > 0 - 1 Grill eingeschaltet;
niedrige Temperatur
Stufe 1 - 3 Grill eingeschaltet;
mittlere Temperatur
Stufe 3 - 5 Grill eingeschaltet;
hohe Temperatur
Sobald Sie eine Temperaturstufe einstellen, leuchtet
die Kontrollleuchte 0 auf. Wenn die eingestellte
Temperatur erreicht ist, erlischt die Kontrollleuchte 0.
Jedoch kann diese immer wieder aufl euchten und
erlöschen. Das bedeutet, dass das Gerät die Temperatur hält und wieder etwas aufgeheizt hat.
HINWEIS
Wählen Sie die korrekte Temperaturstufe
►
durch Ausprobieren aus. Die niedrigeren und
mittleren Temperaturstufen sind dabei eher für
Gemüse, Früchte und empfi ndliche Lebensmittel und die hohen Temperaturstufen für Fleisch
geeignet.
Benutzung des Deckels
Den Deckel 3 können Sie während des Zuberei-
tens der Speisen schließen oder geöff net stehen
lassen:
■ Im geöff neten Zustand dient der Deckel 3 als
Spritzschutz.
■ Wenn Sie den Deckel 3 während des Grillens
schließen, erreichen Sie eine höhere Temperatur und die Speisen werden von allen Seiten
zusätzlich gegart.
■ Um den Deckel 3 zu öff nen, drücken Sie die
Verriegelung am Griff 7 hoch und ziehen
gleichzeitig den Deckel 3 nach oben. Öff nen
Sie ihn soweit, dass die Scharniere in den
Scharnierführungen 4 nach unten rutschen.
Der Deckel 3 steht nun fest.
■ Um den Deckel 3 wieder zu schließen, heben
Sie ihn an, so dass die Scharniere in der Scharnierführung 4 nach oben rutschen. Dann können Sie den Deckel 3 wieder schließen. Achten
Sie dabei darauf, dass auch die Verriegelung
am Griff 7 einrastet.
Bedienen
WARNUNG! VERLETZUNGSGEFAHR!
► Während der Benutzung ist das Gerät
sehr heiß! Fassen Sie daher während der
Benutzung nur den Griff 7 am Deckel 3
an! Benutzen Sie Topfl appen, wenn Sie das
Gerät anfassen.
1) Schließen Sie den Deckel 3.
2) Stecken Sie den Netzstecker in eine Netzsteckdose. Die Kontrollleuchte 0 leuchtet und das
Gerät heizt auf.
3) Sobald die Kontrollleuchte 0 erlischt, ist das
Gerät aufgeheizt.
Öff nen Sie den Deckel 3 am Griff 7 und
legen Sie die Lebensmittel nach Belieben auf
die Grillplatte 1.
4) Falls gewünscht, schließen Sie den Deckel 3.
Fett und Flüssigkeiten laufen während des
Grillens in die Sudauff angschale 6.
5) Kontrollieren Sie das Grillergebnis regelmäßig
und wenden Sie das Grillgut. Wenn Sie zufrieden sind, öff nen Sie, falls nötig, den Deckel 3
am Griff 7 und nehmen Sie das Grillgut von
der Grillplatte 1.
ACHTUNG! SACHSCHADEN!
Benutzen Sie keine metallischen Werkzeuge
►
wie Messer, Gabel usw.. Wenn die Antihaftbeschichtung beschädigt ist, benutzen Sie
das Gerät nicht weiter.
6) Wenn Sie keine weiteren Lebensmittel grillen
wollen, stellen Sie den Temperaturregler 8 auf
„0“ und ziehen Sie den Netzstecker aus der
Netzsteckdose. Nur so ist das Gerät ausgeschaltet.
DE
AT
CH
STGG 1800 A1
87
Page 91

Reinigung und Pfl ege
GEFAHR - ELEKTRISCHER SCHLAG!
Ziehen Sie vor jeder Reinigung den Netzste-
►
cker aus der Netzsteckdose! Es besteht die
Gefahr eines elektrischen Schlages!
Tauchen Sie die Grillplatte 1 oder das
Thermostat 9 niemals in Wasser oder
andere Flüssigkeiten!
WARNUNG! VERLETZUNGSGEFAHR!
► Lassen Sie das Gerät immer erst abkühlen,
bevor Sie es reinigen. Es besteht sonst Verbrennungsgefahr!
ACHTUNG! SACHSCHADEN!
DE
AT
CH
Verwenden Sie keine scheuernden oder
►
aggressiven Reinigungsmittel. Diese können
die Oberfl äche beschädigen!
► Benutzen Sie keine metallischen Werkzeuge
wie Messer, Gabel usw.. Wenn die Antihaftbeschichtung beschädigt ist, benutzen Sie
das Gerät nicht weiter.
■ Reinigen Sie das Gerät am besten sofort nach
dem Abkühlen. Dann lassen sich Lebensmittelreste leichter entfernen.
■ Nehmen Sie das Gerät zum Reinigen ausein-
ander:
– Ziehen Sie das Thermostat 9 aus der
Buchse 2.
– Ziehen Sie den Deckel 3 aus den Schar-
nierführungen 4.
– Heben Sie die Grillplatte 1 aus dem
Rahmen 5.
– Nehmen Sie vorsichtig die Sudauff angscha-
le 6 aus dem Rahmen 5.
■ Leeren Sie die Sudauff angschale 6 aus. Spülen
Sie diese dann in warmem Wasser und geben
Sie ein mildes Spülmittel hinzu. Spülen Sie die
Sudauff angschale 6 danach mit klarem Wasser aus und trocknen Sie diese ab.
■ Spülen Sie den Deckel 3 in warmem Wasser
und geben Sie ein mildes Spülmittel hinzu. Spülen Sie die Deckel 3 danach mit klarem Wasser
ab und trocknen Sie diesen ab.
■ Wischen Sie, nach dem Erkalten, die Grillplatte 1
mit einem feuchten Tuch ab. Vor der erneuten
Benutzung muss die Grillplatte 1 vollständig
trocken sein.
HINWEIS
Wenn hartnäckigere Verschmutzungen auf
►
der Grillplatte 1 haften, können Sie die
Grillplatte 1 in warmem Wasser mit etwas
Spülmittel einweichen. Spülen Sie danach die
Grillplatte 1 mit klarem Wasser ab. Achten
Sie darauf, dass keine Spülmittelreste auf der
Grillplatte 1 verbleiben.
► Vor der erneuten Benutzung muss die Grill-
platte 1 vollständig trocken sein. Achten Sie
insbesondere darauf, dass keine Feuchtigkeit
in der Buchse 2 zurück bleibt.
► Nach der Reinigung mit Spülmittel muss die
Grillplatte 1 jedoch wieder leicht mit Öl eingerieben werden, ansonsten ist die Funktion
der Antihaftbeschichtung beeinträchtigt.
■ Wischen Sie den Rahmen 5 und das Thermo-
stat 9 mit einem feuchten Tuch ab. Bei Bedarf
geben Sie ein mildes Spülmittel auf das Tuch
und wischen Sie mit klarem Wasser nach. Trocknen Sie alles gut ab.
■ Bauen Sie das Gerät wieder zusammen.
Aufbewahrung
■ Bewahren Sie das gereinigte Gerät an einem
sauberen, staubfreien und trockenen Ort auf.
■ Wenn das Gerät zusammengebaut ist und die
Verriegelung des Deckels 3 eingerastet ist, kön-
nen Sie das Gerät auch platzsparend senkrecht
aufbewahren.
88
STGG 1800 A1
Page 92

Fehlerbehebung
Fehler Ursache Lösung
Der Netzstecker ist nicht mit dem Stromnetz
verbunden.
Das Gerät funktio-
niert nicht.
Die Kontrollleuchte 0
leuchtet immer wieder auf und erlischt
dann wieder.
Die Kontrollleuchte 0
leuchtet nicht.
Sollten sich die Störungen nicht mit oben stehenden Fehlerbehebungen beheben lassen, oder wenn
Sie andere Arten von Störungen feststellen, wenden Sie sich bitte an unseren Service.
Die Netzsteckdose ist defekt.
Das Gerät ist defekt. Wenden Sie sich an den Service.
Das Gerät hält die Temperatur. Dafür ist es
nötig, dass das Gerät immer wieder kurz aufheizt. Dabei leuchtet die Kontrollleuchte 0.
Das Gerät ist defekt. Wenden Sie sich an den Service.
Das Gerät hat aufgeheizt. Es liegt kein Fehler vor.
Stecken Sie den Netzstecker in
eine Netzsteckdose.
Benutzen Sie eine andere Netzsteckdose.
Es liegt kein Fehler vor.
DE
AT
CH
STGG 1800 A1
89
Page 93

Garantie und Service
Sie erhalten auf dieses Gerät 3 Jahre Garantie
ab Kaufdatum. Das Gerät wurde sorgfältig
produziert und vor Anlieferung gewissenhaft
geprüft. Bitte bewahren Sie den Kassenbon als
Nachweis für den Kauf auf. Bitte setzen Sie sich
im Garantiefall mit Ihrer Servicestelle telefonisch
in Verbindung. Nur so kann eine kostenlose
Einsendung Ihrer Ware gewährleistet werden.
Die Garantieleistung gilt nur für Material- oder
Fabrikationsfehler, nicht aber für Transportschäden,
Verschleißteile oder für Beschädigungen an zerbrechlichen Teilen, z. B. Schalter oder Akkus. Das Produkt
ist lediglich für den privaten und nicht für den
gewerblichen Gebrauch bestimmt.
Bei missbräuchlicher und unsachgemäßer Behandlung, Gewaltanwendung und bei Eingriff en, die
DE
nicht von unserer autorisierten Service-Niederlas-
AT
sung vorgenommen wurden, erlischt die Garantie.
CH
Ihre gesetzlichen Rechte werden durch diese Garantie nicht eingeschränkt.
Die Garantiezeit wird durch die Gewährleistung
nicht verlängert. Dies gilt auch für ersetzte und reparierte Teile. Eventuell schon beim Kauf vorhandene
Schäden und Mängel müssen sofort nach dem
Auspacken gemeldet werden, spätestens aber zwei
Tage nach Kaufdatum. Nach Ablauf der Garantiezeit anfallende Reparaturen sind kostenpfl ichtig.
Erreichbarkeit Hotline: Montag bis Freitag von
8:00 Uhr – 20:00 Uhr (MEZ)
Entsorgung
Werfen Sie das Gerät kei-
nesfalls in den normalen
Hausmüll. Dieses Produkt
unterliegt der europäischen
Richtlinie 2012/19/EU.
Entsorgen Sie das Gerät über einen zugelassenen
Entsorgungsbetrieb oder über Ihre kommunale
Entsorgungseinrichtung. Beachten Sie die aktuell
geltenden Vorschriften. Setzen Sie sich im Zweifelsfall mit Ihrer Entsorgungseinrichtung in Verbindung.
Die Verpackung besteht aus umwelt-
freundlichen Materialien, die Sie über
die örtlichen Recyclingstellen entsorgen
können.
Importeur
KOMPERNASS HANDELS GMBH
BURGSTRASSE 21
44867 BOCHUM
GERMANY
www.kompernass.com
Service Deutschland
Tel.: 0800 5435 111 (Kostenfrei aus dem
dt. Festnetz/Mobilfunknetz)
E-Mail: kompernass@lidl.de
IAN 103845
Service Österreich
Tel.: 0820 201 222 (0,15 EUR/Min.)
E-Mail: kompernass@lidl.at
IAN 103845
Service Schweiz
Tel.: 0842 665566 (0,08 CHF/Min.,
Mobilfunk max. 0,40 CHF/Min.)
E-Mail: kompernass@lidl.ch
IAN 103845
90
STGG 1800 A1
Page 94

Rezepte
HINWEIS
Die Angaben der Grillzeiten und der Temperaturstufen in den Rezepten sind Anhaltswerte und
►
können je nach Beschaff enheit der Lebensmittel stark variieren. Lassen Sie immer Ihre eigenen Erfahrungswerte bei der Zubereitung mit einfl ießen.
Marinierte Schweinefi lets
Zutaten:
♦ 500 g Schweinefi let
♦ 2 EL Balsamicoessig
♦ 1 TL Basilikum (Gewürz)
♦ 1 Orange
♦ Salz
♦ Pfeff er
1) Entfernen Sie das Fett und die Haut von dem Schweinefi let.
2) Schneiden Sie das Filet in ca. 2 - 3 cm dicke Medaillons und legen Sie diese in eine Schüssel.
3) Fügen Sie den Saft der Orange, den Balsamicoessig, 1 TL Basilikumgewürz, eine Prise Salz und etwas
Pfeff er hinzu und marinieren Sie das Fleisch für ca. eine Stunde.
4) Legen Sie die Medaillons auf die Grillplatte 1 und grillen diese für ca. 5 - 7 Minuten von jeder Seite
bei der Temperaturstufe 4.
DE
AT
CH
Gegrillte Ananas
Zutaten:
♦ 1 Ananas
♦ 1 - 2 EL Zucker
♦ 1 TL Zimt
1) Stellen Sie die Ananas senkrecht auf und schälen Sie diese mit einem scharfen Messer von oben nach
unten, bis die Ananas komplett geschält ist.
2) Vierteln Sie die Ananas und schneiden Sie den Strunk heraus.
3) Schneiden Sie die Ananas in Streifen mit einer Dicke von ca. 2 cm.
4) Grillen Sie die Streifen von jeder Seite für ca. 5 - 7 Minuten bei der Temperaturstufe 3.
5) Bestreuen Sie die Ananas nach Belieben mit Zimt und Zucker.
STGG 1800 A1
91
Page 95

Gegrilltes Gemüse
Zutaten:
♦ 2 Paprika
♦ 1 Zucchini
♦ 1 Aubergine
♦ Olivenöl
♦ Salz
♦ Pfeff er
♦ Kräuter der Provence (Gewürzmischung)
1) Waschen Sie das Gemüse gründlich. Halbieren Sie die Paprika, entkernen Sie diese und schneiden
Sie diese in Streifen. Schneiden Sie die Aubergine und die Zucchini längs in zwei Hälften und dann
jeweils in ca. 0,5 cm große Stücke.
2) Bestreichen Sie das Gemüse mit Olivenöl.
DE
3) Legen Sie das Gemüse auf die auf Temperaturstufe 3 vorgeheizte Grillplatte 1 und grillen Sie das
AT
CH
Gemüse von beiden Seiten jeweils ca. 8 - 10 Minuten bis es eine hellbraune Farbe erreicht hat.
4) Bestreuen Sie das Gemüse mit Salz, Pfeff er und je nach Geschmack mit Kräutern der Provence.
Tofu mit Champignons
Zutaten:
♦ 4 Tofuscheiben à 50 g
♦ 1 - 2 EL Sojasauce
♦ Sesamöl
♦ Olivenöl
♦ 200 g Champignons
♦ 1 Zwiebel
♦ Salz
♦ Pfeff er
1) Marinieren Sie die Tofuscheiben mit 2 EL Sojasauce und einigen Tropfen Sesamöl, Salz und Pfeff er für
30 Minuten in einer Schüssel.
2) Grillen Sie den Tofu von beiden Seiten mit der Temperaturstufe 4 von beiden Seiten für ca. 5 Minuten.
3) Putzen Sie die Champignons und schneiden Sie diese – ebenso wie die Zwiebel – in Scheiben.
4) Geben Sie die Scheiben, 1 EL Olivenöl, 2 EL Sojasauce in eine Schüssel und vermischen Sie diese.
5) Braten Sie die Champignons und Zwiebeln kurz auf der Grillplatte 1 mit der Temperaturstufe 4 an
und servieren Sie diese zu dem Tofu.
92
STGG 1800 A1
Page 96

Kokos-Curry-Garnelen
Zutaten:
♦ 100 g rote Curry-Paste
♦ 50 ml Kokosmilch
♦ 400 g Garnelen (alternativ Krabben oder Shrimps)
♦ 200 g Zuckerschoten
♦ 2 Paprika
♦ 2 Zwiebeln
♦ 2 Knoblauchzehen
♦ Salz und Pfeff er
♦ Alufolie
1) Mischen Sie die Curry-Paste und die Kokosmilch.
2) Waschen Sie die Garnelen, die Zuckerschoten und die Paprika.
3) Schälen Sie die Zwiebeln und die Knoblauchzehen.
4) Schneiden Sie die Zwiebeln, die Knoblauchzehen und die Paprika in kleine Stücke.
5) Verteilen Sie die Garnelen und das Gemüse gleichmäßig auf 4 Stücke Alufolie. Die Alufolie muss so
groß sein, dass man die Zutaten darin einwickeln kann, wie ein Päckchen. Träufeln Sie die CurryKokos-Sauce darüber und würzen Sie alles mit Salz und Pfeff er.
6) Verschließen Sie die Päckchen gut, so dass keine Flüssigkeit austreten kann.
7) Legen Sie die gefüllten Päckchen auf die auf Temperaturstufe 4 vorgeheizte Grillplatte 1 und garen
Sie alles von beiden Seiten jeweils ca. 15 Minuten.
DE
AT
CH
HINWEIS
Je nach Größe der Päckchen, kann es sein, dass nur 2 - 3 der Päckchen auf einmal auf die Grillplatte 1
►
passen. Grillen Sie dann die verbliebenen Päckchen nachdem die ersten gar sind.
STGG 1800 A1
93
Page 97

Gebackenes Toast
Zutaten:
♦ 8 Scheiben Toast
♦ 2 Eier
♦ 100 ml Sahne
♦ 100 g Parmesan, gerieben
♦ 1 EL Pfl anzenöl
♦ 20 g Petersilie, gehackt
♦ 20 g Schnittlauch, gehackt
♦ Salz
♦ Pfeff er
1) Vermengen Sie die Sahne mit den Eiern, dem geriebenen Käse und den Kräutern in einer Schüssel.
DE
AT
CH
Fügen Sie Salz und Pfeff er hinzu.
2) Fetten Sie die Grillplatte 1 leicht mit etwas Pfl anzenöl ein.
3) Tauchen Sie die Toastscheiben in die Masse und grillen diese von beiden Seiten je ca. 5 Minuten bei
der Temperaturstufe 3.
Spargel vom Grill
Zutaten:
♦ 10 Spargelstangen (Durchmesser ca 1,5 cm)
♦ 50 g Butter
♦ 1 Bund Petersilie
♦ Salz
♦ Pfeff er
1) Waschen und schälen Sie den Spargel.
2) Waschen und hacken Sie die Petersilie.
3) Legen Sie Alufolie aus und belegen Sie diese zuerst mit einer Lage Petersilie und Butterfl öckchen. Legen Sie
darauf die Hälfte des Spargels. Darauf legen Sie eine Lage Petersilie und Butterfl öckchen. Legen Sie nun den
restlichen Spargel darauf und würzen Sie diesen mit Salz und Pfeff er.
4) Verschließen Sie das Päckchen und legen Sie es auf die Grillplatte 1 bei der Heizstufeneinstellung
4 - 5. Schließen Sie zum Garen den Deckel 3.
5) Nach 20 Minuten wenden Sie das Päckchen vorsichtig. Nach weiteren 20 Minuten ist der Spargel gar.
HINWEIS
Es kann sein, je nach Dicke des Grillgutes, dass der Deckel 3 während des Garen auf dem Grillgut
►
aufl iegt.
94
STGG 1800 A1
Page 98

Putenbrustfi let
Zutaten:
♦ 2 Putenbrustfi let, (à ca. 150 g)
♦ 1 Knoblauchzehe
♦ 1 EL Honig
♦ 1 TL Senf, körniger
♦ 1 EL Pfl anzenöl
♦ Salz
♦ bunter Pfeff er
1) Schälen Sie die Knoblauchzehe und zerdrücken Sie diese.
2) Vermengen Sie den Knoblauch, den Honig, den Senf und das Öl und würzen die Marinade mit Salz
und Pfeff er.
3) Waschen und trocknen Sie die Putenbrustfi lets. Geben Sie die Filets mit der Marinade bedeckt in eine
Schüssel und stellen Sie diese für eine Stunde kalt.
4) Legen Sie die Filets bei der Temperaturstufe 4 auf die Grillplatte 1 und schließen Sie den Deckel 3.
– Dünne Filets: Nach ca. 5 Minuten wenden Sie diese und grillen die andere Seite der Filets bei der
Temperaturstufe 4 für weitere 5 Minuten bei geschlossenem Deckel 3.
– Dicke Filets: Nach ca. 10 Minuten wenden Sie diese und grillen die andere Seite der Filets bei der
Temperaturstufe 4 für weitere 10 Minuten bei geschlossenem Deckel 3.
HINWEIS
Es kann sein, je nach Dicke des Grillgutes, dass der Deckel 3 während des Garen auf dem Grillgut
►
aufl iegt.
DE
AT
CH
STGG 1800 A1
95
Page 99

Gegrillte Maiskolben
Zutaten:
♦ 2 Zucker-Maiskolben
♦ 100 g Kräuterbutter
♦ Knoblauchsalz
♦ Salz
♦ Pfeff er
1) Bestreichen Sie ein Stück Alufolie mit der Kräuterbutter.
2) Salzen Sie den Maiskolben und wickeln diesen in die Alufolie.
3) Legen Sie das Päckchen bei der Temperaturstufe 4 bei geschlossenem Deckel 3 auf die Grillplatte 1.
4) Wenden Sie es nach 15 Minuten und garen Sie die Maiskolben weitere 15 Minuten.
5) Würzen Sie den Maiskolben mit Knoblauchsalz und Pfeff er.
HINWEIS
DE
AT
CH
Es kann sein, je nach Dicke des Grillgutes, dass der Deckel 3 während des Garen auf dem Grillgut
►
aufl iegt.
Bruschetta
Zutaten:
♦ 2 Ciabatta
♦ 2 Tomate(n)
♦ 4 EL Tomatenketchup
♦ 2 Zehen Knoblauch
♦ 2 EL Olivenöl
♦ 1 EL Basilikum, fein gehackt
1) Halbieren Sie die Ciabatta und legen Sie diese bei der Temperaturstufe 3-4 für jeweils ca. 2 Minuten
auf die Grillplatte 1, so dass die Ciabattahälften angeröstet sind.
2) Waschen und würfeln Sie die Tomaten. Pressen Sie den Knoblauch.
3) Vermengen Sie die Tomatenwürfel, den Ketchup, den Knoblauch, das Olivenöl und das gehackte
Basilikum.
4) Verteilen Sie die Masse auf den angerösteten Ciabattascheiben und legen Sie diese für ca. 5 Minuten
bei der Temperaturstufe 3 auf die Grillplatte 1.
96
STGG 1800 A1
Page 100

KOMPERNASS HANDELS GMBH
BURGSTRASSE 21
44867 BOCHUM
DEUTSCHLAND / GERMANY
www.kompernass.com
Last Information Update · Stan informacji · Információk állása
Stav informací · Stav informácií · Stand der Informationen:
10 / 2014 · Ident.-No.: STGG1800A1-092014-1
IAN 103845
4
 Loading...