

Page 1
KITCHEN TOOLS
6
Tabletop Freezer STG 85 A1
Tabletop Freezer
Operating instructions
CY
KOMPERNASS GMBH
BURGSTRASSE 21 · D-44867 BOCHUM
www.kompernass.com
ID-Nr.: STG 85 A1-01/10-V8
Page 2
STG 85 A1
123 4 5
8
7
6
Page 3

CONTENT PAGE
Intended Use 2
Safety instructions 2
Technical data 3
Items supplied 4
Description of the appliance 4
Setting the appliance up 4
Ventilation ...........................................................................................................................................................4
Laying and connecting the power cable.........................................................................................................4
Protect against moisture and heat ...................................................................................................................4
Installation of the appliance..............................................................................................................................4
Start-up 5
Switching on .......................................................................................................................................................5
Control lamps .....................................................................................................................................................5
Storage times......................................................................................................................................................6
Freezing fresh foods...........................................................................................................................................6
Frozen Foods......................................................................................................................................................6
Making ice cubes...............................................................................................................................................7
Operating noises 7
Saving energy 7
Power failure 7
Defrosting 8
Cleaning and Care 8
Cleaning the interior ..........................................................................................................................................9
Cleaning the outside of the appliance.............................................................................................................9
Prolonged non-usage.........................................................................................................................................9
Changing the door hinging 9
Troubleshooting 10
Information about the refrigerant 11
Disposal 12
Warranty and Service 12
Importer 13
Read the operating instructions carefully before using the appliance for the first time and preserve this
booklet for later reference. Pass the manual on to whomsoever might acquire the appliance at a later date.
- 1 -
Page 4
Tabletop Freezer
Intended Use
This appliance is intended solely for the freezing of
fresh foods and the storage of frozen foods. This
appliance is not intended for industrial, commercial
or laboratory use, only for employment in domestic
households.
rriisskk ttoo lliiffee aanndd lliimmbb
In addition, the warranty will become void.
Safety instructions
• NEVER open the housing of your freezer. There
are no user-serviceable elements inside. Arrange
for repairs to be carried out by qualified specialist
workshops that are approved and authorised by
us.
• Never allow children to play with the appliance
or insert anything into any of the openings. There
will be a risk of a potentially fatal electric shock.
• Never touch the power cable with moist or wet
hands! Never use a damaged power cable!
This brings also the
• Arrange for defective power plugs and/or cables
to be replaced at once by qualified technicians
or our Customer Service Department.
IInn ccaasseess ooff iimmpprrooppeerr uussee tthheerree wwiillll bbee
due to electric shock or fire.
Attention! Risk of electric shock!
rriisskk ooff aann eelleeccttrriicc sshhoocckk..
• The electrical safety regulations require that this
equipment may
eeaarrtthheedd
for injury to life or limb of persons resp. animals
or property damage arising from any breach
of these regulations.
• Before you connect the appliance, you must check
to ensure that the power cable has withstood the
transportion and is undamaged.
eelleeccttrriiccaall ssaaffeettyy
• The
be assured when it is operating on
ccoonnnneecctteedd aanndd eeaarrtthheedd hho
ssoocckkeett
.
• When setting the appliance up, ensure that the
appliance cannot damage the power cable.
• Before cleaning the appliance, disconnect it
from the mains power supply or switch off the
corresponding circuit breaker.
oonnllyy bbee ooppeerraatteedd wwhheenn iitt iiss
. The manufacturer accepts no liability
of this appliance can only
aa pprrooppeerrllyy
ouusseehhoolldd mmaaiinnss ppoowweerr
Risk of personal injury!
• This appliance is not intended for use by individuals
(including children) with restricted physical, physiological or intellectual abilities or deficiences in
experience and/or knowledge unless they are
supervised by a person responsible for their
safety or receive from this person instruction in
how the appliance is to be used.
• Children should be supervised to ensure that
they do not play with the appliance.
• Use the appliance only for storing frozen foods
or for freezing fresh food. Do not place glass
containers containing liquids in the appliance,
they may burst.
• Never take anything out of the freezer if you have
wet/damp hands. You could get stuck to the
frozen item.
• Do not eat ice lollipops immediately after removal
from the freezer, otherwise they could cause
frostbite or numbness.
- 2 -
Page 5

DDAANNGGEERR!!
•
freezer or to hide in it! They could become trapped
in the device and suffocate!
NEVER allow children to play in a
Risk of fire!
• Should the power cable be too short to reach
an existing mains power socket, arrange for a
qualified electrician to install a new one. Do
not use extension cables or multi-plug sockets.
• Do not store or use petrol, gas or flammable liquids
in the vicinity of the appliance or other electrical
equipments. The vapours could cause a fire or
an explosion.
• Never damage the pipes of the coolant circulation
system.
Warning in regard to property
damage!
• The appliance may only be operated in indoor
spaces.
• This appliance is designed for operation with an
alternating current power supply of 230V /50Hz.
NEVER attempt to operate the appliance with a
different power source rating.
• Wait at least 4 hours for the first start-up, so that
the coolant has re-amassed.
IIff yyoouu hhaavvee ddiissccoonnnneecctteedd tthhee aapppplliiaannccee ffrroomm tthhee
•
mmaaiinnss ppoowweerr ssuuppppllyy,, yyoouu mmuusstt wwaaiitt aatt lleeaasstt 55
nnuutteess bbeeffoorree yyoouu rreeccoonnnneecctt tthhee aapppplliiaannccee.. IIff yyoouu
ddoo nnoott,, tthhee ccoommpprreessssoorr ccoouulldd bbee ddaammaaggeedd..
the event of a power failure, you should immediately unplug the appliance from the mains power
socket. After 5 minutes you can re-connect it, regardless of whether the power supply is working
again or not.
• Before plugging in, ensure that the voltage of
your domestic power supply is the same as that
indicated on the appliance typeplate.
mmii--
In
• Do not locate the appliance near a source of
heat (e.g. oven, electric heater).
• To ensure adequate ventilation, there must be
sufficient clearance behind the appliance. In this
regard, comply with the information provided
for setting up the appliance.
• Ensure that the ventilation openings on the appliance are always clear.
• Take care to locate the appliance only on a
surface that can also carry the weight of it.
• Move the appliance gently over the floor, so
that you do not cause damage it (e.g., parquet
floors).
• Do not use any mechanical, electrical or chemical
method for defrosting, briefly any methodother
than those recommended by the manufacturer.
• Do not use or place any electrical devices in the
interior of the freezer, unless they are expressly
authorised by the manufacturer.
We exclude all liability for damages if one or more
of the above safety instructions or general recommendations has not been complied with.
Technical data
Voltage : 230 V ~/ 50 Hz
Power consumption : 110 W
Rated current: 0,8 A
Volume: 85l (Total content, when
all drawers (freezer
compartments/storage
compartments) are re-
moved)
Freezing capacity: 10.5 kg in 24 hours
Storage time on defect: 14 hours
- 3 -
Page 6

Items supplied
Tabletop Freezer
Ice cube mould
Operating instructions
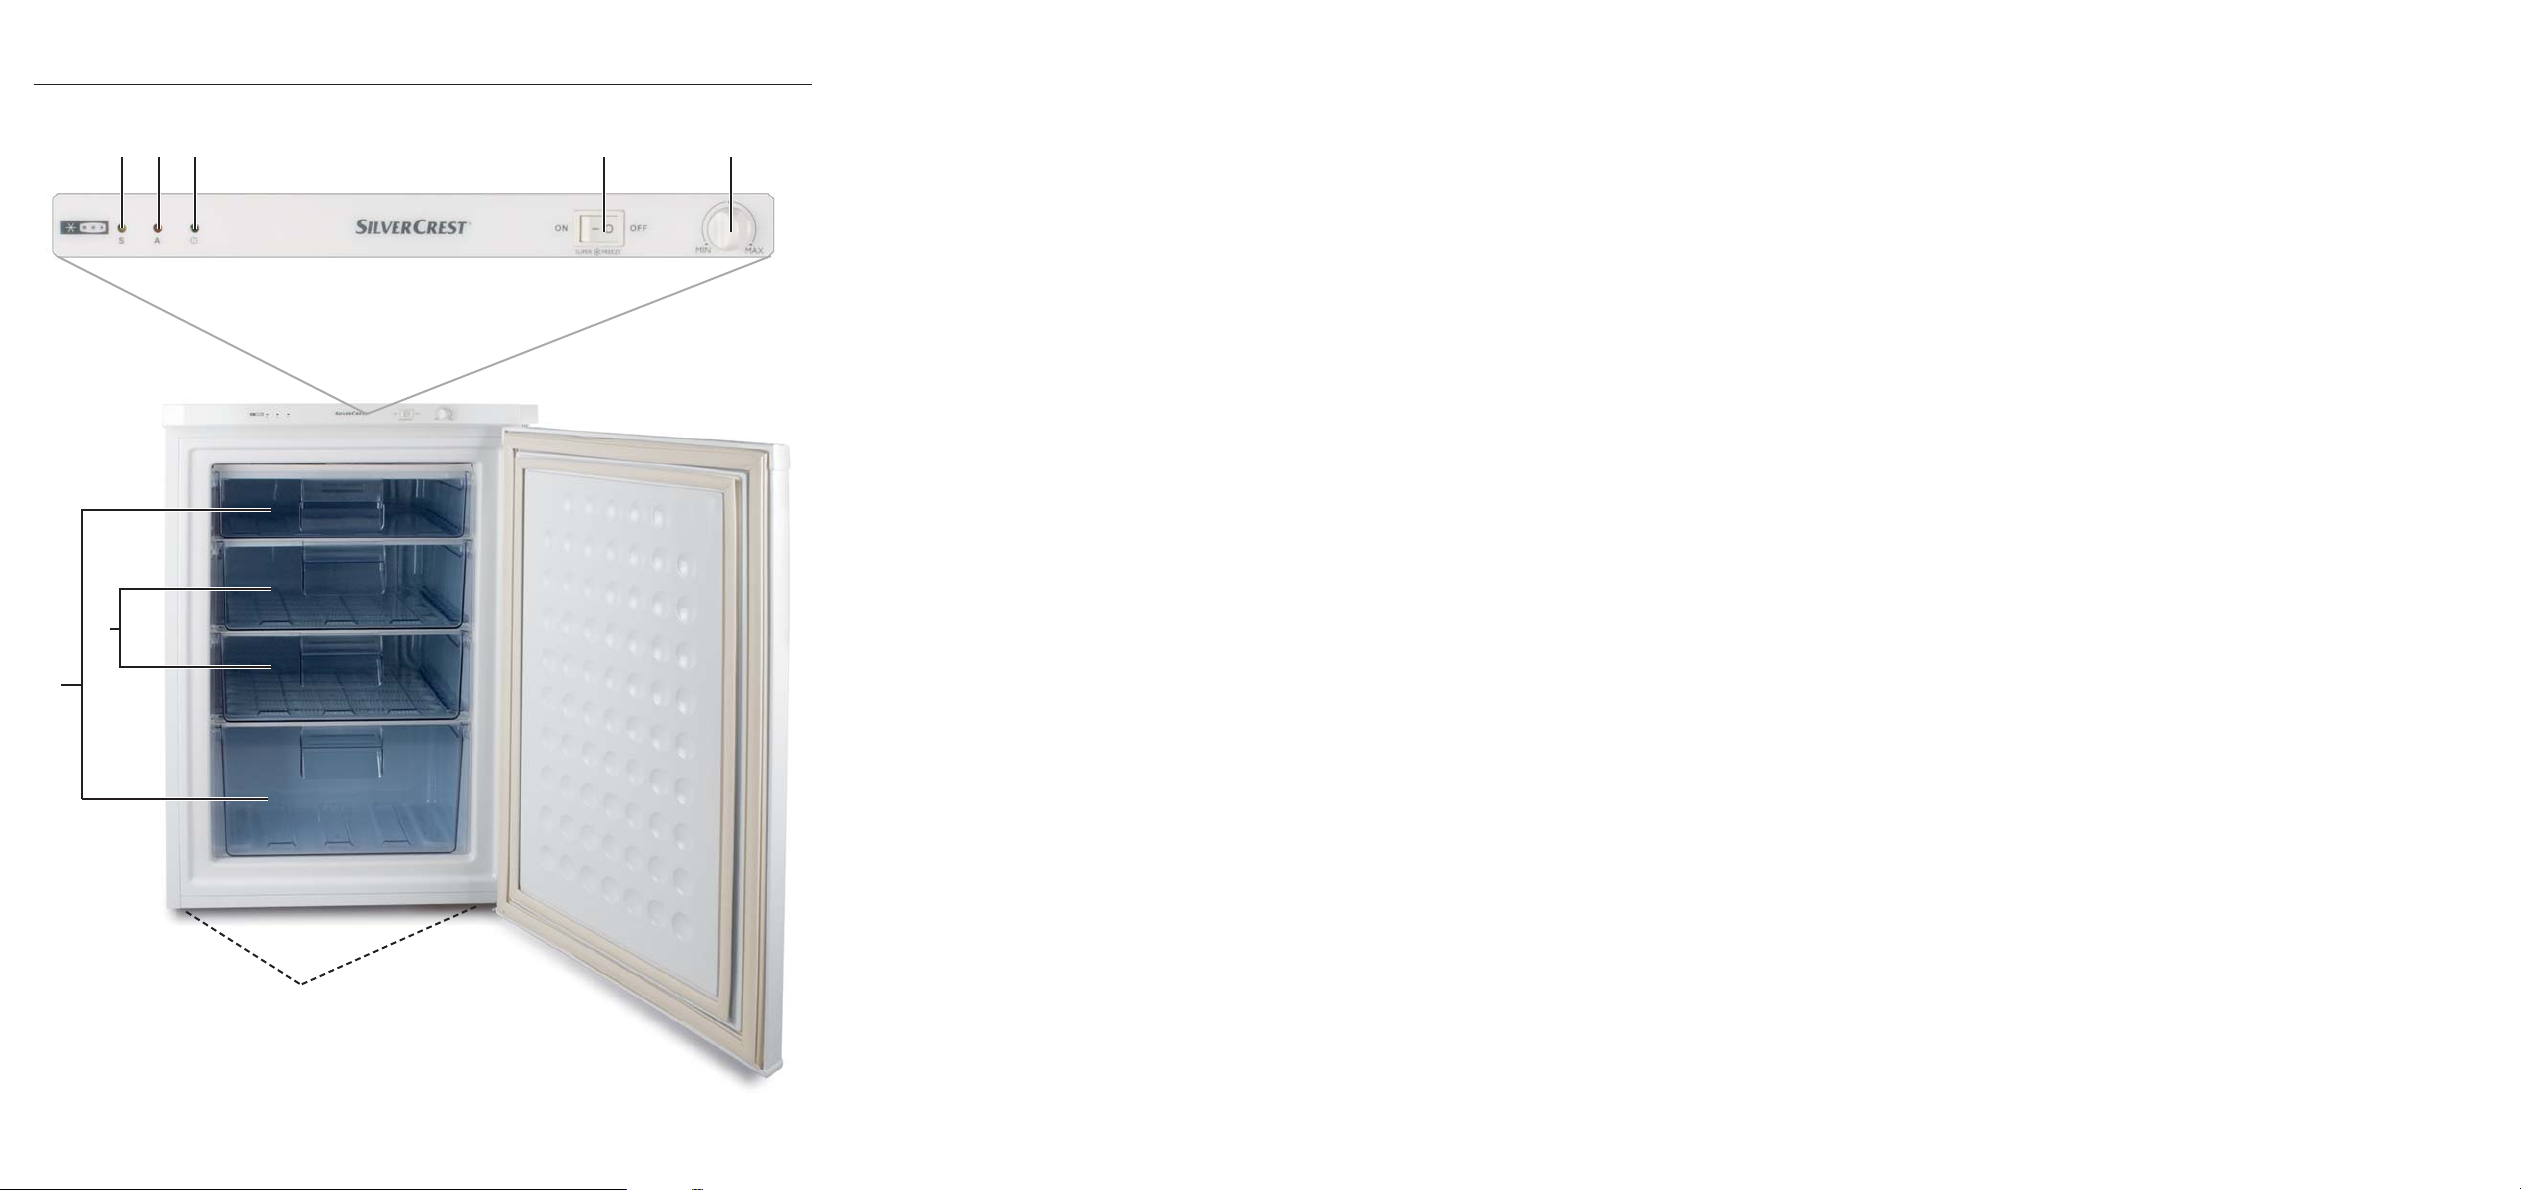
Description of the appliance
1 "Super Freeze" control lamp (yellow)
2 Temperature control lamp (red)
3 Operational control lamp (green)
4 "Super Freeze" switch
5 Temperature regulator
6 Adjustable feet
7 Storage compartments
8 Freezer compartments
Setting the appliance up
Laying and connecting the power cable
Connect the appliance via the power cable with
a properly connected and earthed 230 V mains
power socket. Do not use extension cables or multiplug sockets. It must at all times be possible to disconnect the appliance from the mains power supply
by simply removing the plug from the mains power
socket. Route the power cable so that it does not
make contact with the compressor of the appliance.
This becomes hot during operation and could damage the insulation of the cable. Also ensure that
the cable does not come under the adjustable feet 6
or is in any way clamped and, because of this, could
be damaged.
Protect against moisture and heat
Place the appliance in a dry and well ventilated
room. The appliance is not suitable for operation
outdoors. Protect the appliance from direct sunlight
and do not place it near sources of heat such as
stoves or radiators, etc.
Note
While setting the appliance up, and also later should
you want to relocate it, do not slope it by more than
45 °.
Ventilation
In order not to impede the heat exchange, and to
ensure high cooling efficiency with low power consumption, a free space of 50 mm should remain
above the appliance. Should this not be possible,
then at least a space of 25 mm on each side of the
appliance.
Installation of the appliance
Ensure that the freezer is positioned horizontally on
a stable surface. It works properly only in this position.
Check that it is horizontal with a spirit level. To make
any corrections, you can screw the the adjustable
feet 6 in or out. All adjustable feet 6 must have solid
contact to the undersurface so that the appliance
stands firmly.
Attention!
To avoid the risk of fire, do not place electrical heaters
on the freezer. Also, do not place kettles or water
boilers on it, as overflowing boiling liquids could
damage the electrical insulation of the appliance.
- 4 -
Page 7

Start-up
Before commissioning, remove all paper and plastic
packaging from the appliance. Check to ensure that
the appliance is not damaged and the door closes
properly. Clean the inside of the appliance (see
chapter "Cleaning and Care").
Switching on
Attention!
Wait at least 4 hours for the first start-up, so that the
coolant has re-amassed. If you do not, it would lead
to irreparable damage to the appliance!
Note
With the "super freeze function" you can in a short
time set the maximum cooling performance. In this
case it does not matter at what level the temperature
regulator 5 is set.
Place the switch “Super Freeze” 4 at the ON position if you want to cool the appliance down before
freezing fresh foods (see chapter "Freezing fresh
foods").
Always distribute the food to be frozen evenly in the
freezer compartments 8.
Later, do not forget to place the switch 4 back into
the OFF position.
1. Connect the appliance via the power cable with
a properly connected and earthed 230 V mains
power socket.
2. Bring the temperature controller 5 into the desired position. The further you turn the regulator
clockwise, the lower the temperature will be inside the appliance.
• MIN = relatively low cooling
• = normal setting
• MAX = lowest temperature, maximum cooling
• The appliance will take about four hours to reach the desired interior temperature. Please wait
this long until you start to fill the appliance with
frozen foods.
Note
The cooling temperature is influenced by, ...
• ... how high the ambient room temperature is,
• ... how much food is stored in the appliance,
• ... how you have set the appliance up.
Please take note of all of these factors when setting
the cooling temperature. Do not be afraid to experiment a little to find out which cooling temperature best
suits your needs.
Control lamps
• The operating control lamp (green) 3 glows
constantly when the appliance is connected to
the mains power supply. When you disconnect
the appliance from the power mains or there is a
power failure, then the lamp extinguishes.
• The temperature control lamp (red) 2 indicates
a temperature in the freezer compartment that is
too high. These may be the reasons for it:
- the appliance was just connected to the mains
power supply,
- a larger quantity of food is being stored in the
appliance than is admissible as given on the
typeplate,
- the appliance door has been left open for too
long,
- the temperature controller has just been turned
clockwise and the appliance has not yet
reached the desired temperature.
• The "Super Freeze" control lamp (yellow) 1 glows
when the "Super Freeze" switch is brought into
the ON position - the compressor then operates
continuously.
- 5 -
Page 8

Storage times
This freezer is suitable for the long-term storage of
frozen foods. You can also freeze fresh foods in it and
then store them there. The following list is intended as
general information about how long you can store
frozen foods in the appliance. In every case you
should however pay heed to the storage instructions
printed on the packaging of already frozen foods.
• Meat and poultry - up to 12 months
• Prepared Meats - up to 2 months
• Fresh fish - up to 6 months
• Fruits and vegetables - up to 12 months
• Bread and Cake - up to 6 months
Note
Write down the date of freezing on the package
when you freeze fresh food yourself.
Attention!
Under no circumstances should you store liquids in
bottles or cans in the appliance, because, when it
freezes its volume also increases, which would lead
to the bursting of the container! Risk of Injury!
Freezing fresh foods
1. If you want to freeze fresh food yourself, activate
the "Super Freeze" feature around 24 hours beforehand, by moving the switch "Super Freeze" 4
into the ON position. The setting of the temperature controller 5 is for the moment unimportant,
as the "Super Freeze" function, regardless of the
setting of the temperature controller 5, always
provides the maximum cooling performance.
2. Firmly pack the fresh foods into aluminum foil,
plastic wrap or airtight and watertight plastic
bags. You can also use plastic containers with
lids or freezer boxes which are suitable for the
freezing of fresh foods.
Note
Pack the foods in the smallest possible portions.
Thus, the food freezes faster.
You can freeze a maximum of 10.5 kg at one time.
3. Distribute the food to be frozen evenly in the
freezer compartments 8.
Note
Ensure that the food being frozen does not come
into contact with the already frozen foods.
Otherwise they could defrost.
4. Deactivate the "Super Freeze" function after you
have put the food in the appliance: Place the
switch "Super Freeze" 4 at the OFF position
and turn the temperature controller to a central
position between "•" and "• MAX".
Note
Never freeze more than 10.5 kg at one time.
The foods will be completely frozen in 24 hours.
Frozen Foods
Please take note of the following when you buy
already frozen products:
• Ensure that the packaging is not damaged.
Damaged packaging may have a negative impact
on the quality of frozen food. If the packaging
shows signs of swelling or moist spots, the foods
could have been frozen under adverse conditions
and/or is already thawed.
• When shopping, select your frozen foods as the
very last and transport them only in isolated cool
bags.
• Place your frozen foods into the appliance immediately after you arrive home.
• Should the foods already be thawed, do not
freeze them again, instead, consume them within
24 hours.
- 6 -
Page 9

• Always comply with the information given on
the packaging about storage.
Making ice cubes
Fill the ice cube mould to two thirds with water.
Place the ice cube mould level on the bottom of one
of the freezer compartments 8.
Operating noises
You may possibly hear a faint gurgle when the appliance pumps the coolant in the cooling system
through the coils and pipes on the back of the appliance.
When the compressor is working, you can hear a
slight rustling or pulsation.
The temperature controller controls the compressor
and you may hear a slight click when it is switched
on or off. All of this is completely normal and does
not indicate a malfunction of the appliance!
Saving energy
• The cooler the ambient air, the less energy the
appliance has to consume to deliver the desired
cooling capacity. Accordingly, never locate the
unit next to sources of heat such as radiators,
stoves or dishwashers. Provide for sufficient ventilation.
• Do not leave the door open for longer than necessary. If you do, warm air will flow into the interior, which will lead to increased ice formation
and cause an increase in energy consumption.
• Take care to ensure that no objects, or incompletely closed drawers, in the freezer compartments 8 or the storage compartments 7 impede the proper closing of the door.
Power failure
• If the power supply should suddenly fail, immediately disconnect the power cable from the mains
power socket. After 5 minutes you can re-connect
it, regardless of whether the power supply is
working again or not.
• Should a power cut be planned, and therefore
have a lead time, we recommend turning the
temperature regulator 5 to the position "max"
2 - 3 hours beforehand and to switch the "SuperFreeze" function on.
• During the power cut avoid any unnecessary
opening of the appliance door and place no
foods in for storage.
• If the power cut lasts for a long time, when the
power is switched back on check to see if melt
water has collected on the bottoms of the freezer
compartments 8 or on the bottoms of the storage
compartments 7. In this case, you must wipe the
water up with a soft, dry cloth so that the foods
do not freeze to these surfaces.
• Check the condition of the foods. Should they
be slighly or even fully thawed, they should be
removed from the appliance and consumed
promptly.
- 7 -
Page 10

Defrosting
Ice forms on the inside surfaces of the appliance
through normal use. This is normal. How much ice
is formed, and how quickly, is dependent on the
ambient temperature, the humidity level and the frequency of door opening. If this ice is too thick, the
cooling capacity and efficiency of the appliance
will deteriorate.
If the ice layer is thicker than 3 - 5 mm you need to
defrost the appliance. If possible, defrost the appliance when it is almost empty.
Note
Check the food to be refrozen to see if any of it has
started to thaw. Do not refreeze food that has started
to thaw, instead, consume it.
6. Place the food back into the freezer and close
the door.
7. Connect the appliance once again to the mains
power supply. Keep in mind that it will take some
time until it reaches the desired cooling temperature.
1. Disconnect the appliance from the power supply
by removing the plug from the mains power socket.
2. Take the food out of the appliance, wrap it in
newspaper and put it all together in a cool place
or in a portable cooler box.
3. Leave the appliance with the door open until the
ice has melted.
Appliance damage!
• Never use sharp-edged tools to separate the ice
from the housing.
• Do not use hot water or a hairdryer to accelerate
the melting rate. This could damage the material
of the interior walls.
4. Mop up the meltwater with a soft, dry cloth.
Clean the inside surfaces with a sponge and
some warm water and/or a neutral detergent.
Appliance damage!
Never use aggressive, chemical or abrasive cleansers!
These could damage the surfaces.
5. Thoroughly dry the interior.
Cleaning and Care
Danger of electrical shock
Before cleaning, ALWAYS remove the plug from the
mains power socket. If you do not, there is the great
risk of you receiving an electric shock!
Risk of Injury!
There may be some sharp edges below the appliance,
please exercise care when cleaning it.
Appliance damage!
Never use aggressive, chemical or abrasive cleansers!
These could damage the surfaces.
Note
After cleaning, always check the food to be refrozen
to see if any of it has started to thaw. Do not refreeze
food that has started to thaw. There is a risk that
bacteria can form in it.
- 8 -
Page 11
Cleaning the interior
• Allow the appliance to defrost as previously described.
• Clean the appliance with a soft cloth, warm
water or a little neutral detergent.
• Dry the appliance thoroughly with a dry cloth.
We recommend a cleaning every month.
Cleaning the outside of the appliance
• Wipe the housing down with warm soapy water.
• Dry the housing thoroughly with a dry cloth.
• Once or twice a year use a brush or a vacuum
cleaner to remove dust from the back of the unit
and the compressor. This increases the performance and energy efficiency of the appliance.
Prolonged non-usage
• Take all foodstuffs out of the appliance.
• Unplug the appliance from the mains power
supply.
• Defrost the appliance and clean the inside.
• Leave the door open during long periods of nonusage, so that mould, mildew, foul odours or
oxidation cannot form.
• Regularly clean the appliance inside and out
even when it is not in use.
Danger of electrical shock
Before changing the hinge, unplug the appliance
from the mains power socket. Otherwise, there is
the great risk of receiving an electric shock!
Note
Changing the door hinge is easier to carry out when
there is assistance from a second person.
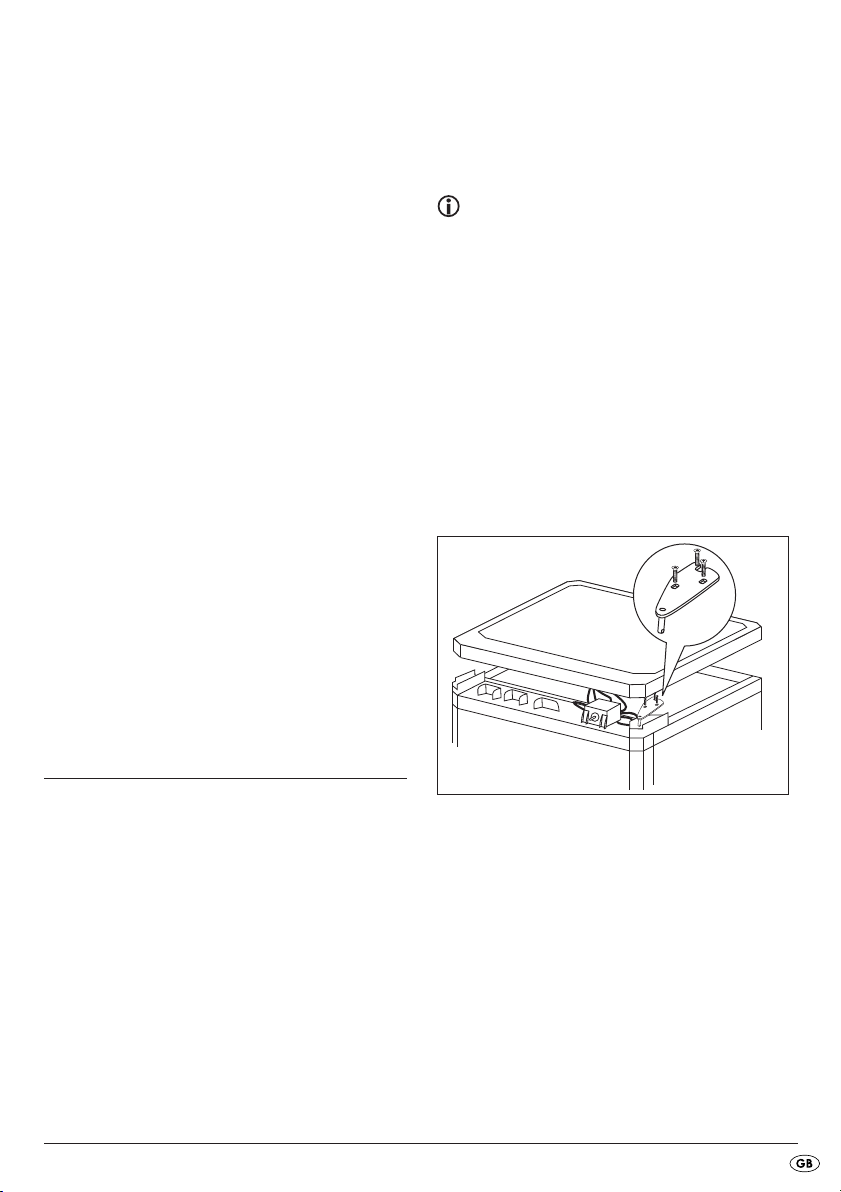
1. Unscrew the two screws at the rear that secure
the upper appliance cover. Pull the temperature
control from the axle to the front by using pliers.
Pull the upper appliance unit cover upwards and
then press it forward. Turn it a little so that you
have access to the screws on the top hinge. Then
loosen the screws securing the top hinge and remove it (Fig. 1). Replace the screws back into the
holes on the freezer.
Changing the door hinging
Subject to preference, the door of the freezer can
open to either the right or the left. Decisive for this
is the position of the door hinge. On delivery, the
door hinge is fitted on the right.
Fig. 1
- 9 -
Page 12

2. Lean the appliance back a little and secure it so
that it is safe. Completely unscrew and remove
the front adjustable feet. Before you commence
the next step, make preparations to prevent the
appliance door from falling down. Remove the
screws holding the lower door hinge and take
the hinge off (Fig. 2). Replace the screws back
into the holes on the freezer.
Fig. 2
3. Now lay the door to the side.
4. Unscrew the nut of the lower door hinge off and
remove the axle. Fit the axle on the other side.
Now rescrew the nut tightly firmly back on the
axle (Fig. 3).
Fig. 4
7. Remove the white cap on the door bottom that
covers the hole for the axis of the hinge. Replace
the white cap in the now no longer needed hole.
8. Now position the door on the axis of the lower
hinge. Remove the screws for the top hinge from
the holes on the opposite side of the freezer and
screw the top hinge back on with the help of these
bbuutt nnoott yyeett ffiirrmmllyy..
screws,
9. Now check the horizontal and vertical alignment
of the door. Ensure that the sealing of the door
sits firmly against its counterpart on the housing.
First then do you secure all screws hand tight.
10.Now replace the upper appliance cover and
screw it down tightly using the corresponding
screws. Refit the temperature controller on the
axle so that it is firmly seated.
Fig. 3
5. You now have to reassemble the components on
the opposite side. For this, unscrew the screws from
the pre-drilled holes and screw the door hinge
back on. Replace the adjustable feet. The adjustable foot with the long screwed thread must be
located on the side where the door hinges are
fixed. Bring the appliance back into the horizontal.
6. Unscrew the axle of the upper door hinge. Turn the
hinge around through 180 ° on its longitudinal
axis and rescrew the axle back in (Fig. 4).
Troubleshooting
Should the problems or malfunctions described in the
following occur in the operation of your appliance,
please first try to resolve the problem by means of
this checklist. If this does not help, please contact
our Service Hotline.
- 10 -
Page 13

TThhee aapppplliiaannccee ddooeessnn''tt wwoorrkk
• Is there possibly a power failure?
• Is the plug sitting firmly in the mains power socket?
• Is the circuit-breaker turned on in the residence?
• Is the power cable damaged?
this only after you have removed the plug!
• Is the appliance possibly standing in direct sunlight
or close to a source of heat?
TThhee iinnssiiddee tteemmppeerraattuurree ddooeess nnoott ssiinnkk ddeeeepp eennoouugghh
• Is the door is properly closed?
• Is the appliance possibly standing in direct sun-
light or close to a source of heat?
• Is the temperature regulator 5 correctly set?
• Did you leave enough space around the appliance
when setting it up ?
TT
hhee iinnssiiddee tteemmppeerraattuurree iiss ttoooo llooww
• Is the temperature regulator 5 correctly set?
• Is the "Super Freeze" function activated?
TThhee aapppplliiaannccee ggeenneerraatteess ccoonnssiiddeerraabbllee nnooiissee
• Have you set the appliance up correctly according
to these instructions?
• Does the appliance vibrate or does it hit on the
back somewhere?
• The sounds described in the chapter "Operating
noises" are harmless.
SSttrroonngg iiccee ffoorrmma
• Is the door is properly closed?
• Check that the door seal is clean.
• Is possibly some stored food preventing the
correct closing of the door?
• Is the door being opened too often?
attiioonn oonn tthhee iinnssiiddee
CCAAUUTTIIOONN!!
Check
• Is the door being opened too often?
• Is the "Super Freeze" function activated?
CCoonnddeennssaattiioonn ffoorrmmss oonn tthhee ffrreeeezzeerr iinntteer
• Is the weather particularly hot or humid? This can
cause increased condensation.
• Has the door been left open?
• Was the door opened very often or allowed to
stand open for an extended period?
CCoonnddeennssaattiioonn ffoorrmmss oonn tthhee ffrreeeezzeerr eexxtteerriioorr ssuurrffaacceess
• Is there especially high humidity at present? This
can cause increased condensation on the exterior
surfaces. As soon as the humidity decreases, the
condensation will disappear.
IItt ssmmeellllss uunnpplleeaassaanntt iinn tthhee f
• Does the interior need to be cleaned?
• Are perhaps packaging materials causing the
smell?
frreeeezzeerr iinntteerriioorr
riioorr ssuurrffaacceess
Information about the refrigerant
This appliance contains the refrigerant Isobutane
(R600a). Isobutane is a naturally occurring, lowpolluting gas. Nevertheless, caution is advised, because Isobutane is a flammable gas. Therefore, you
must make sure that the pipes of the cooling circuit
cannot be damaged. Should it ever happen, you
must avoid sparks and open flames. Do not smoke!
Carefully ventilate the room!
Please contact the Service Hotline in conjunction
with this.
TThhee ccoommpprreessssoorr rruunnss ccoonnttiinnuuoouussllyy
• Is the door is properly closed?
• Have you just frozen large quantities of food?
If yes, please allow the appliance a few hours
to regain the desired cooling temperature.
- 11 -
Page 14

Disposal
Warranty and Service
Do not dispose of the appliance in your
normal domestic waste. This product is
subject to the provisions of European
Directive 2002/96/EC.
Dispose of the appliance through an approved disposal centre or at your community waste facility.
Observe the currently applicable regulations.
In case of doubt, please contact your waste disposal
centre.
Dispose of all packaging materials in an
environmentally friendly manner.
You receive a 3-year warranty for this device as of
the purchase date. The appliance has been manufactured with care and meticulously examined before
delivery.
During the warranty period our warranty covers, at
our option, either the repair or the replacement of
the appliance against an equivalent appliance. The
wages, material costs and transport costs of the
appliance incurred by us will be assumed by us.
Please retain your receipt as proof of purchase.
Without a receipt, we cannot provide free warranty
services. In the case of a warranty claim, please make
contact by telephone with our Service Department.
The warranty covers only claims for material and
manufacturing defects, but not for transport damage,
improper set-up, wearing parts or for damage to
fragile components, e.g. buttons or batteries. This product is for private use only and is not intended for
commercial use.
The warranty is void in the case of abusive and improper handling, use of force and internal tampering
not carried out by our authorized service branch.
Your statutory rights are not restricted in any way
by this warranty.
The warranty period is not extended by a repair made
under warranty. This also applies to replaced and
repaired parts. Damages and defects extant on purchase must be reported immediately after unpacking,
at the latest by two days after the date of purchase.
Repairs made after expiry of the warranty period
will be subject to charge.
- 12 -
Page 15

The warranty becomes void if the appliance has been
opened, and/or modifications have been made to
it, by you or by a third party not authorized by us.
The warranty does not cover any further liability on
our part, in particular no liability for damages that
are not from the appliance itself or caused by the
failure of the appliance until it is repaired (e.g. transport costs, handling costs, etc.).Hereby, our statutory
liabilities, in particular under product liability laws,
are in no way limited or excluded.
Limitation of the warranty in regard to noise development: Noises generated by cooling and freezing
equipments do not result in any warranty claims. This
includes all of the sounds that may occur in normal
operation.
Contact your Service Department in a case of malfunction. There, the next steps can be discussed.
DES UK LTD
Tel.: 0871 5000 700
e-mail: support.uk@kompernass.com
(£ 0.10 / minute)
Importer
KOMPERNASS GMBH
BURGSTRASSE 21
44867 BOCHUM, GERMANY
www.kompernass.com
Kompernass Service Ireland
Tel: 1850 930 412 (0,082 EUR/Min.)
Standard call rates apply. Mobile operators may vary.
e-mail: support.ie@kompernass.com
- 13 -
Page 16

- 14 -
 Loading...