

Page 1
SANDWICHMAKER SSWM 750 B2
SANDWICHMAKER
Bedienungsanleitung
TOSTIERA
Istruzioni per l'uso
IAN 103935
APPAREIL À CROQUE-MONSIEUR
Mode d'emploi
SANDWICH TOASTER
Operating instructions
Page 2

Klappen Sie vor dem Lesen die Seite mit den Abbildungen aus und machen Sie sich anschließend mit allen
Funktionen des Gerätes vertraut.
Avant de lire le mode d'emploi, ouvrez la page contenant les illustrations et familiarisez-vous ensuite avec
toutes les fonctions de l'appareil.
Prima di leggere aprire la pagina con le immagini e prendere confi denza con le diverse funzioni
dell'apparecchio.
Before reading, unfold the page containing the illustrations and familiarise yourself with all functions of
the device.
DE / AT / CH Bedienungsanleitung Seite 1
FR / CH Mode d'emploi Page 15
IT / CH Istruzioni per l'uso Pagina 29
GB Operating instructions Page 43
Page 3
A
B
Page 4

Inhaltsverzeichnis
Einführung . . . . . . . . . . . . . . . . . . . . . . . . . . . . . . . . . . . . . . . . . . . . . . . . . . . . 2
Urheberrecht . . . . . . . . . . . . . . . . . . . . . . . . . . . . . . . . . . . . . . . . . . . . . . . . . . . . . . . . . . . . 2
Haftungsbeschränkung . . . . . . . . . . . . . . . . . . . . . . . . . . . . . . . . . . . . . . . . . . . . . . . . . . . . 2
Bestimmungsgemäße Verwendung . . . . . . . . . . . . . . . . . . . . . . . . . . . . . . . . . . . . . . . . . . . 2
Lieferumfang . . . . . . . . . . . . . . . . . . . . . . . . . . . . . . . . . . . . . . . . . . . . . . . . . . 3
Entsorgung der Verpackung . . . . . . . . . . . . . . . . . . . . . . . . . . . . . . . . . . . . . . . . . . . . . . . . 3
Gerätebeschreibung . . . . . . . . . . . . . . . . . . . . . . . . . . . . . . . . . . . . . . . . . . . . 4
Technische Daten . . . . . . . . . . . . . . . . . . . . . . . . . . . . . . . . . . . . . . . . . . . . . . . 4
Sicherheitshinweise . . . . . . . . . . . . . . . . . . . . . . . . . . . . . . . . . . . . . . . . . . . . 5
Erste Inbetriebnahme . . . . . . . . . . . . . . . . . . . . . . . . . . . . . . . . . . . . . . . . . . . 7
Bedienen . . . . . . . . . . . . . . . . . . . . . . . . . . . . . . . . . . . . . . . . . . . . . . . . . . . . . 7
Sandwiches rösten . . . . . . . . . . . . . . . . . . . . . . . . . . . . . . . . . . . . . . . . . . . . . . . . . . . . . . . . 7
Reinigen . . . . . . . . . . . . . . . . . . . . . . . . . . . . . . . . . . . . . . . . . . . . . . . . . . . . . . 8
Aufbewahren . . . . . . . . . . . . . . . . . . . . . . . . . . . . . . . . . . . . . . . . . . . . . . . . . 9
Fehlerbehebung . . . . . . . . . . . . . . . . . . . . . . . . . . . . . . . . . . . . . . . . . . . . . . . 9
Rezepte . . . . . . . . . . . . . . . . . . . . . . . . . . . . . . . . . . . . . . . . . . . . . . . . . . . . . 10
Holländischer Tomatentoast . . . . . . . . . . . . . . . . . . . . . . . . . . . . . . . . . . . . . . . . . . . . . . . . 10
Italienischer Toast . . . . . . . . . . . . . . . . . . . . . . . . . . . . . . . . . . . . . . . . . . . . . . . . . . . . . . . . 11
Toast Hawaii . . . . . . . . . . . . . . . . . . . . . . . . . . . . . . . . . . . . . . . . . . . . . . . . . . . . . . . . . . . 11
Toast Scandia . . . . . . . . . . . . . . . . . . . . . . . . . . . . . . . . . . . . . . . . . . . . . . . . . . . . . . . . . . 12
Curry-Putenbrust-Toast . . . . . . . . . . . . . . . . . . . . . . . . . . . . . . . . . . . . . . . . . . . . . . . . . . . . 13
DE
AT
CH
Entsorgung. . . . . . . . . . . . . . . . . . . . . . . . . . . . . . . . . . . . . . . . . . . . . . . . . . . 13
Garantie und Service . . . . . . . . . . . . . . . . . . . . . . . . . . . . . . . . . . . . . . . . . . 14
Importeur . . . . . . . . . . . . . . . . . . . . . . . . . . . . . . . . . . . . . . . . . . . . . . . . . . . 14
SSWM 750 B2
1
Page 5

DE
AT
CH
Einführung
Herzlichen Glückwunsch zum Kauf Ihres neuen Gerätes!
Sie haben sich damit für ein modernes und hochwertiges Produkt entschieden.
Die Bedienungsanleitung ist Bestandteil dieses Produktes. Sie enthält wichtige
Hinweise für Sicherheit, Gebrauch und Entsorgung. Machen Sie sich vor der
Benutzung des Produkts mit allen Bedien- und Sicherheitshinweisen vertraut.
Benutzen Sie dieses Produkt nur wie beschrieben und für die angegebenen
Einsatzbereiche. Händigen Sie alle Unterlagen bei Weitergabe des Produkts an
Dritte mit aus.
Urheberrecht
Diese Dokumentation ist urheberrechtlich geschützt.
Jede Vervielfältigung, bzw. jeder Nachdruck, auch auszugsweise sowie die
Wiedergabe der Abbildungen, auch im veränderten Zustand, ist nur mit
schriftlicher Zustimmung des Herstellers gestattet.
Haftungsbeschränkung
Alle in dieser Bedienungsanleitung enthaltenen technischen Informationen, Daten
und Hinweise für den Anschluss und die Bedienung entsprechen dem letzten
Stand bei Drucklegung und erfolgen unter Berücksichtigung unserer bisherigen
Erfahrungen und Erkenntnisse nach bestem Wissen.
Aus den Angaben, Abbildungen und Beschreibungen in dieser Anleitung können
keine Ansprüche hergeleitet werden.
Der Hersteller übernimmt keine Haftung für Schäden aufgrund von Nichtbeachtung der Anleitung, nicht bestimmungsgemäßer Verwendung, unsachgemäßen
Reparaturen, unerlaubt vorgenommenen Veränderungen oder Verwendung nicht
zugelassener Ersatzteile.
Bestimmungsgemäße Verwendung
Dieses Gerät ist ausschließlich vorgesehen für das Rösten von gefüllten Sandwiches.
Dieses Gerät ist ausschließlich für die Benutzung in privaten Haushalten be-
stimmt. Benutzen Sie das Gerät nicht gewerblich!
2
SSWM 750 B2
Page 6

Lieferumfang
Das Gerät wird standardmäßig mit folgenden Komponenten geliefert:
▯ Sandwichmaker
▯ Bedienungsanleitung
1) Entnehmen Sie das Gerät und die Bedienungsanleitung aus dem Karton.
2) Entfernen Sie sämtliches Verpackungsmaterial.
HINWEIS
Prüfen Sie die Lieferung auf Vollständigkeit und auf sichtbare Schäden.
►
► Bei einer unvollständigen Lieferung oder Schäden infolge mangelhafter
Verpackung oder durch Transport wenden Sie sich an die Service-Hotline
(siehe Kapitel Garantie und Service).
Entsorgung der Verpackung
Die Verpackung schützt das Gerät vor Transportschäden. Die Verpackungsmaterialien sind nach umweltverträglichen und entsorgungstechnischen Gesichtspunkten ausgewählt und deshalb recyclebar.
Die Rückführung der Verpackung in den Materialkreislauf spart Rohstoff e und
verringert das Abfallaufkommen. Entsorgen Sie nicht mehr benötigte Verpackungsmaterialien gemäß den örtlich geltenden Vorschriften.
HINWEIS
Heben Sie wenn möglich die Originalverpackung während der Garan-
►
tiezeit des Gerätes auf, um das Gerät im Garantiefall ordnungsgemäß
verpacken zu können.
DE
AT
CH
SSWM 750 B2
3
Page 7

DE
AT
CH
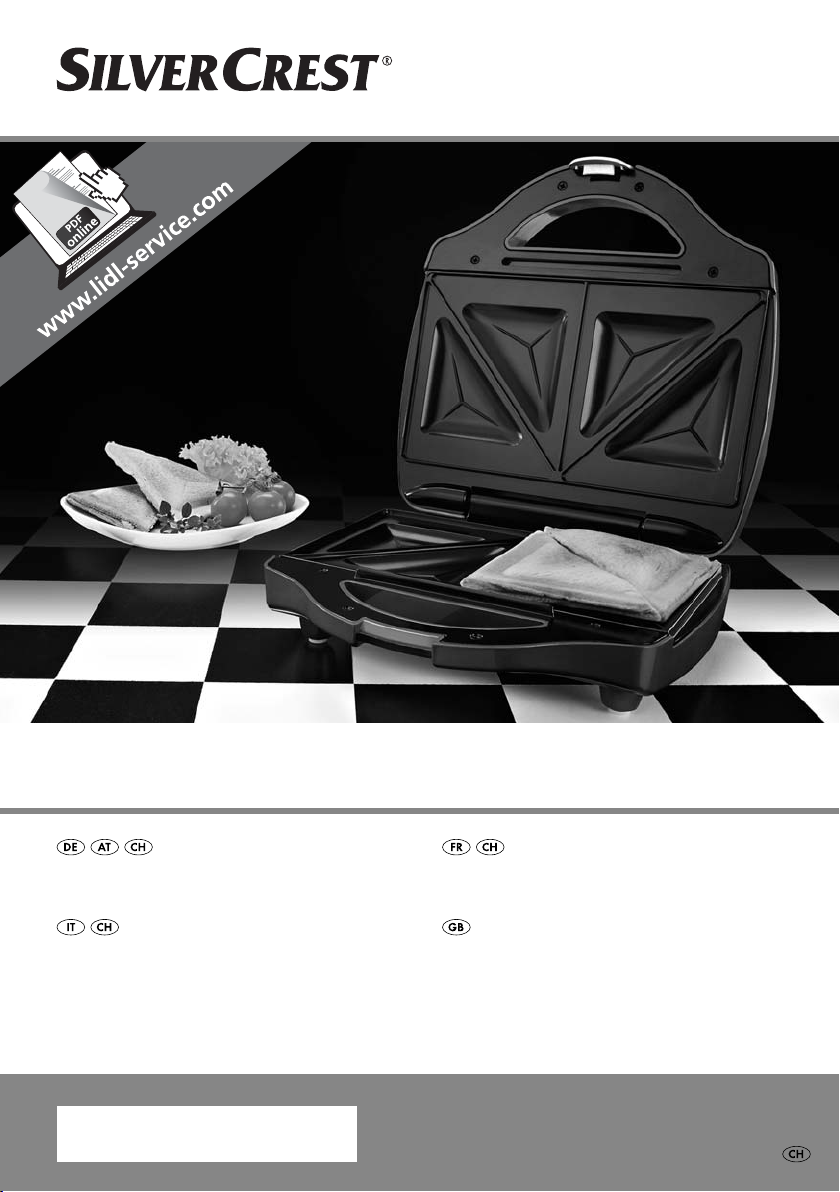
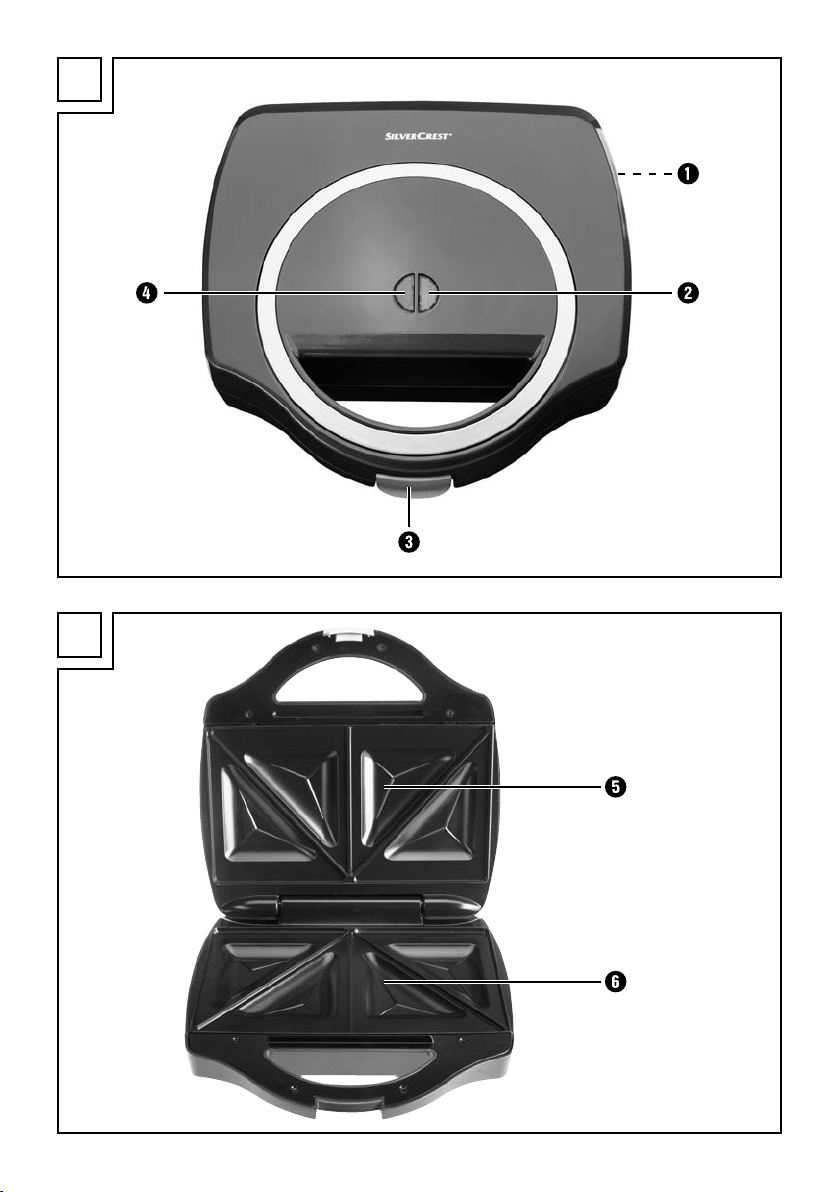
Gerätebeschreibung
Abbildung A:
1 Kabelaufwicklung
2 Kontrollleuchte „Betriebsbereit“
3 Deckelverriegelung
4 Kontrollleuchte „Power“
Abbildung B:
5 obere Toastfl ächen
6 untere Toastfl ächen
Technische Daten
Spannung 220 - 240 V ∼, 50 Hz
Leistungsaufnahme 750 W
4
SSWM 750 B2
Page 8

Sicherheitshinweise
WARNUNG! STROMSCHLAGGEFAHR!
► Lassen Sie beschädigte Netzkabel oder Netzstecker sofort von
autorisiertem Fachpersonal ersetzen, um Gefährdungen zu vermeiden.
► Verwenden Sie das Gerät nur in trockenen Räumen, nicht im
Freien.
Tauchen Sie das Gerät niemals in Wasser oder andere
Flüssigkeiten! Andernfalls besteht Lebensgefahr durch
elektrischen Schlag.
► Achten Sie beim Reinigen darauf, dass kein Wasser in das Innere
des Gerätes gelangt. Reinigen Sie das Gerät nie unter fl ießendem
Wasser.
► Stellen Sie sicher, dass das Gerät niemals mit Wasser in Berüh-
rung kommen kann. Betreiben Sie das Gerät niemals in der Nähe
von Wasser oder neben Gefäßen, die Flüssigkeit enthalten.
► Achten Sie darauf, dass im Betrieb das Netzkabel niemals nass
oder feucht wird. Führen Sie es so, dass es nicht eingeklemmt
oder anderweitig beschädigt werden kann.
DE
AT
CH
► Ziehen Sie nach jedem Gebrauch den Netzstecker aus der Netz-
steckdose, um das Gerät auszuschalten.
► Öff nen Sie nie das Gehäuse des Gerätes.
SSWM 750 B2
5
Page 9

DE
AT
CH
WARNUNG! VERLETZUNGSGEFAHR!
► Dieses Gerät kann von Kindern ab 8 Jahren sowie von Personen
mit reduzierten physischen, sensorischen oder mentalen Fähigkeiten
oder Mangel an Erfahrung und/oder Wissen benutzt werden,
wenn sie beaufsichtigt oder bezüglich des sicheren Gebrauchs
des Gerätes unterwiesen wurden und die daraus resultierenden
Gefahren verstanden haben.
► Kinder dürfen nicht mit dem Gerät spielen.
► Reinigung und Benutzer-Wartung dürfen nicht durch Kinder
durchgeführt werden, es sei denn, sie sind älter als 8 Jahre und
beaufsichtigt. Kinder jünger als 8 Jahre sind vom Gerät und der
Anschlussleitung fernzuhalten.
► Die Geräteteile können im Betrieb heiß werden. Fassen Sie daher
nur die Griff e an.
► Lassen Sie das Gerät erst vollständig abkühlen, bevor Sie es reinigen
oder es verstauen.
► Seien Sie vorsichtig beim Herausnehmen der fertigen Sandwiches.
Das Gerät, sowie die Sandwiches sind sehr heiß.
► Betreiben Sie das Gerät nur auf einer stabilen, rutschfesten und
ebenen Stellfl äche.
► Benutzen Sie keine externe Zeitschaltuhr oder ein separates Fern-
wirksystem, um das Gerät zu betreiben.
Achtung! Heiße Oberfl äche!
ACHTUNG - BRANDGEFAHR!
► Das Gerät darf nicht in der Nähe von brennbaren Materialien
verwendet werden.
► Decken Sie das Gerät nicht ab, solange es in Betrieb ist.
► Betreiben Sie das Gerät nur auf einer hitzebeständigen Unterlage.
► Betreiben Sie das Gerät niemals unbeaufsichtigt.
6
SSWM 750 B2
Page 10

ACHTUNG - SACHSCHADEN!
► Entnehmen Sie die Speisen nur mit einem Kunststoff - oder Holzspatel
oder einem anderen geeigneten, nichtmetallischen Gegenstand,
um die Antihaftbeschichtung des Sandwichmakers nicht zu zerstören.
► Benutzen Sie zur Reinigung keine scharfen Putzmittel und spitze
Gegenstände.
Erste Inbetriebnahme
■ Reiben Sie einmalig die Antihaftbeschichtung der Toastfl ächen 5/6 mit
zum Kochen geeignetem Öl ein.
■ Stecken Sie den Netzstecker in eine Netzsteckdose.
■ Schließen Sie das Gerät und verriegeln Sie es mit der Deckelverriegelung 3.
Diese muss spürbar am unteren Griff einrasten.
■ Lassen Sie das Gerät ca. 10 Minuten aufheizen.
HINWEIS
Beim ersten Gebrauch kann ein leichter Geruch entstehen (auch geringe
►
Rauchentwicklung möglich). Dieser ist normal und verliert sich nach kurzer
Zeit. Sorgen Sie bitte für ausreichende Entlüftung. Öff nen Sie zum Beispiel
ein Fenster.
■ Ziehen Sie den Netzstecker und lassen Sie das Gerät abkühlen.
■ Reinigen Sie das Gerät wie im Kapitel „Reinigen“ beschrieben.
Das Gerät ist nun betriebsbereit.
DE
AT
CH
Bedienen
Sandwiches rösten
1) Schließen Sie den Deckel und verriegeln Sie ihn mit der Deckelverriegelung 3.
Diese muss spürbar am unteren Griff einrasten.
2) Stecken Sie den Netzstecker in eine Netzsteckdose. Die rote Kontrollleuchte
„Power“ 4 leuchtet.
3) Sobald das Gerät aufgeheizt ist, leuchtet die grüne Kontrollleuchte „Betriebsbereit“ 2.
4) Öff nen Sie den Deckel und legen Sie zwei vorbereitete Sandwiches auf die
unteren Toastfl ächen 6.
SSWM 750 B2
7
Page 11
DE
AT
CH
5) Schließen Sie den Deckel und verriegeln Sie ihn mit der Deckelverriegelung 3.
ACHTUNG - SACHSCHADEN!
6) Nach ca. 3 - 5 Minuten sind die Sandwiches fertig. Diese Zeitangabe kann,
7) Wenn Sie keine weiteren Sandwiches mehr zubereiten wollen, ziehen Sie
Reinigen
Diese muss spürbar am unteren Griff einrasten. Sollte das Sandwich zu dick
sein, so dass sich die Deckelverriegelung 3 nicht schließen lässt, entfernen
Sie etwas Belag von den Sandwiches.
Entnehmen Sie die Sandwiches nur mit einem Kunststoff - oder Holzspatel
►
oder einem anderen geeigneten, nichtmetallischen Gegenstand, um die
Antihaftbeschichtung des Sandwichmakers nicht zu zerstören.
je nach verwendetem Belag und persönlichem Geschmack, variieren. Öff nen
Sie den Deckel und entnehmen Sie die Sandwiches.
den Netzstecker aus der Netzsteckdose.
WARNUNG! STROMSCHLAGGEFAHR
Ziehen Sie erst den Netzstecker aus der Steckdose, bevor Sie das Gerät
►
reinigen.
Tauchen Sie das Gerät niemals in Wasser oder andere Flüssigkeiten!
Andernfalls besteht Lebensgefahr durch elektrischen Schlag.
WARNUNG! VERLETZUNGSGEFAHR!
► Lassen Sie das Gerät vor der Reinigung abkühlen. Verbrennungsgefahr!
ACHTUNG - SACHSCHADEN!
Keine scharfen oder scheuernden Reinigungsmittel verwenden. Das greift
►
die Oberfl äche des Gerätes an.
HINWEIS
Warten Sie mit der Reinigung nicht zu lange. Warten Sie, bis sich das Ge-
►
rät soweit abgekühlt hat, dass Sie es ohne Verbrennungsgefahr anfassen
können. Dann lassen sich die Lebensmittelreste besser entfernen.
■ Das Gehäuse reinigen Sie mit einem trockenen Tuch oder einem leicht ange-
feuchteten Lappen.
■ Wischen Sie die Toastfl ächen 5/6 mit einem mit warmen Wasser befeuch-
teten Lappen ab, so dass alle Lebensmittelreste entfernt sind.
Bei festgebackenen Rückständen können Sie den feuchten Lappen auf diese
Stellen legen, so dass die Rückstände eingeweicht werden. Nach einiger Zeit
lassen sich die Rückstände dann entfernen.
8
SSWM 750 B2
Page 12

HINWEIS
Bei hartnäckigen Verschmutzungen geben Sie ein mildes Spülmittel auf
►
den feuchten Lappen. Wischen Sie nach der Reinigung mit Spülmittel die
Toastfl ächen 5/6 noch einmal mit einem mit klarem Wasser befeuchteten Tuch ab, so dass alle Spülmittelreste entfernt werden. Nach der
Reinigung mit Spülmittel empfehlen wir die Toastfl ächen 5/6 wieder mit
zum Kochen geeignetem Öl einzureiben.
■ Trocknen Sie alle Teile vor dem erneuten Gebrauch gut ab.
HINWEIS
Sollten Fett oder Lebensmittel in Spalten oder Ecken hereingelaufen sein,
wo Sie diese nicht mit einem feuchten Tuch entfernen können, gehen Sie
folgendermaßen vor:
– Tupfen Sie Fett oder andere Flüssigkeiten mit einem Stück Küchen-
papier ab.
– Entfernen Sie Rückstände mit einem Holzspatel oder einem kleinen
Holzspieß.
– Wischen Sie dann alles noch einmal wie bereits beschrieben ab.
Aufbewahren
■ Reinigen Sie das Gerät wie im Kapitel „Reinigen“ beschrieben.
■ Wickeln Sie das Kabel um die Kabelaufwicklung 1 an der Unterseite des
Gerätes und fi xieren Sie den Netzstecker an der kleinen Aussparung an der
Kabelaufwicklung 1.
■ Bewahren Sie den Sandwichmaker an einem trockenen Ort auf.
DE
AT
CH
Fehlerbehebung
Störung Ursache Abhilfe
Das Gerät funktioniert nicht.
Die Sandwiches
werden zu dunkel.
SSWM 750 B2
Der Netzstecker steckt nicht
in der Netzsteckdose.
Das Gerät ist defekt.
Die Sandwiches waren zu
lange im Sandwichmaker.
Verbinden Sie den Netzstecker mit dem Stromnetz.
Wenden Sie sich an den
Kundendienst.
Nehmen Sie die Sandwiches eher heraus.
9
Page 13

DE
AT
CH
Rezepte
Holländischer Tomatentoast
Zutaten:
♦ 4 Scheiben Toastbrot
♦ Wasser
♦ Frühlingszwiebeln
♦ 1 mittelgroße Tomate
♦ Kräuterbutter
♦ 2 Scheiben gekochter Schinken
♦ Salz
♦ frisch gemahlener Pfeff er
♦ 2 Scheiben junger Gouda-Käse
1) Waschen Sie die Frühlingszwiebeln und lassen diese anschließend abtropfen.
Halbieren Sie die Frühlingszwiebeln längs und schneiden Sie diese in große
Stücke. Bringen Sie das Wasser mit Salz in einem Topf zum Kochen. Geben
Sie die Frühlingszwiebeln hinzu und blanchieren Sie sie etwa 1 Minute.
Anschließend geben Sie die Frühlingszwiebeln in ein Sieb, übergießen Sie
sie mit kaltem Wasser und lassen Sie sie abtropfen.
2) Waschen Sie die Tomaten und tupfen Sie sie trocken. Halbieren Sie sie und
entfernen Sie die Stängelansätze. Schneiden Sie die Tomaten in Scheiben.
3) Bestreichen Sie eine Toastscheibe mit Kräuterbutter und legen Sie eine
zusammengeklappte Scheibe Schinken auf die bestrichene Toastscheibe.
Verteilen Sie die Frühlingszwiebelstücke und Tomatenscheiben darauf. Mit
Salz und Pfeff er würzen.
4) Legen Sie die Käsescheiben auf die Toastscheibe.
5) Bestreichen Sie eine weitere Toastscheibe mit etwas Kräuterbutter und decken Sie Ihr Sandwich mit der bestrichenen Seite nach unten damit zu.
10
SSWM 750 B2
Page 14

Italienischer Toast
Zutaten:
♦ 4 Scheiben Toastbrot
♦ 4 EL Tomatenmark
♦ 2 EL Mayonnaise
♦ Salz
♦ Kräuter der Provence
♦ frisch gemahlener Pfeff er
♦ 1 mittelgroße Tomate
♦ 1 Pck. Mozzarella-Käse
♦ frisch gemahlener bunter Pfeff er
1) Verrühren Sie das Tomatenmark, die Mayonnaise, das Salz, die Kräuter der
Provence und den Pfeff er miteinander. Bestreichen Sie die Toastscheiben
damit.
2) Waschen Sie die Tomaten und tupfen Sie sie trocken. Halbieren Sie sie und
entfernen Sie die Stängelansätze. Schneiden Sie die Tomaten in Scheiben.
3) Lassen Sie den Mozzarella-Käse in einem Sieb abtropfen und schneiden Sie
ihn in Scheiben. Diese nochmals halbieren.
4) Die bereits bestrichene Toastscheibe wird nun mit Tomaten- und Mozzarellascheiben belegt und mit Pfeff er bestreut.
5) Decken Sie Ihr Sandwich mit der anderen Toastscheibe zu.
DE
AT
CH
Toast Hawaii
Zutaten:
1) Lassen Sie die Ananas in einem Sieb abtropfen.
2) Bestreichen Sie nun die Toastscheibe mit Butter.
3) Belegen Sie die Toastscheibe mit dem Schinken und der Ananas.
4) Der Käse wird als letztes über die Ananas gelegt.
5) Decken Sie Ihr Sandwich mit einer Toastscheibe zu.
SSWM 750 B2
♦ 4 Scheiben Toastbrot
♦ 2 Scheiben Ananas (aus der Dose)
♦ Butter
♦ 2 Scheiben gekochter Schinken
♦ 2 Käsescheibletten
11
Page 15

DE
AT
CH
Toast Scandia
Zutaten:
♦ 4 Scheiben Toastbrot
♦ Dill
♦ 125 g Joghurt-Salat-Creme
♦ 1 TL Dijon-Senf
♦ 1 TL fl üssiger Honig
♦ 20 g Echtlachscreme (Tube aus dem Kühlregal)
♦ 1 Salatgurke
♦ 1 Pck. Mozzarella-Käse
♦ 100 g Räucherlachs, in Scheiben
♦ frisch gemahlener Pfeff er
1) Spülen Sie den Dill ab und tupfen Sie ihn trocken. Zupfen Sie die Spitzen
von den Stängeln des Dills und hacken Sie die Spitzen.
2) Verrühren Sie die Joghurt-Salat-Creme mit dem Senf, dem Honig, der Lachscreme und dem Dill.
3) Schälen Sie die Gurke und schneiden die Enden ab. Halbieren Sie die Gurke der Länge nach und schaben Sie die Kerne mit einem Teelöff el heraus.
Schneiden Sie die Gurkenhälfte in Stücke.
4) Lassen Sie den Mozzarella in einem Sieb abtropfen und schneiden Sie ihn in
Scheiben.
5) Bestreichen Sie eine Toastscheibe mit Joghurt-Salat-Creme.
6) Legen Sie ein Gurken-Stück auf die bestrichene Toastscheibe, verteilen Sie
die Lachsscheiben gleichmäßig darauf und belegen Sie die Toastscheibe mit
den Käsescheiben. Schmecken Sie mit Pfeff er ab.
7) Decken Sie Ihr Sandwich mit einer Toastscheibe zu.
12
SSWM 750 B2
Page 16

Curry-Putenbrust-Toast
Zutaten:
♦ 4 Scheiben Toastbrot
♦ 25 g Butter
♦ Putenbrustaufschnitt
♦ Pfl aumen
♦ Cocktail-Currysauce
♦ Currypulver
1) Verrühren Sie die Butter mit der Currysauce und dem Currypulver.
2) Waschen Sie die Pfl aumen, trocknen und entkernen Sie sie. Halbieren Sie
die Pfl aumen und schneiden Sie die Hälften in dünne Scheiben.
3) Bestreichen Sie eine Toastscheibe mit der Curry-Butter.
4) Belegen Sie nun die bestrichene Toastscheibe mit dem Putenbrustaufschnitt
und den Pfl aumenscheiben.
5) Decken Sie Ihr Sandwich mit einer weiteren Toastscheibe zu.
Entsorgung
Werfen Sie das Gerät keinesfalls in den normalen Hausmüll.
Dieses Produkt unterliegt der europäischen Richtlinie 2012/19/EU.
(Waste Electrical and Electronic Equipment).
Entsorgen Sie das Gerät über einen zugelassenen Entsorgungsbetrieb oder über
Ihre kommunale Entsorgungseinrichtung. Beachten Sie die aktuell geltenden
Vorschriften. Setzen Sie sich im Zweifelsfall mit Ihrer Entsorgungseinrichtung in
Verbindung.
DE
AT
CH
SSWM 750 B2
13
Page 17

DE
AT
CH
Garantie und Service
Sie erhalten auf dieses Gerät 3 Jahre Garantie ab Kaufdatum. Das Gerät wurde
sorgfältig produziert und vor Anlieferung gewissenhaft geprüft.
Bitte bewahren Sie den Kassenbon als Nachweis für den Kauf auf. Bitte setzen
Sie sich im Garantiefall mit Ihrer Servicestelle telefonisch in Verbindung. Nur so
kann eine kostenlose Einsendung Ihrer Ware gewährleistet werden.
HINWEIS
Die Garantieleistung gilt nur für Material- oder Fabrikationsfehler, nicht
►
aber für Transportschäden, Verschleißteile oder für Beschädigungen an
zerbrechlichen Teilen, z. B. Schalter oder Akkus.
Das Produkt ist lediglich für den privaten und nicht für den gewerblichen
Gebrauch bestimmt. Bei missbräuchlicher und unsachgemäßer Behandlung,
Gewaltanwendung und bei Eingriff en, die nicht von unserer autorisierten ServiceNiederlassung vorgenommen wurden, erlischt die Garantie.
Ihre gesetzlichen Rechte werden durch diese Garantie nicht eingeschränkt. Die
Garantiezeit wird durch die Gewährleistung nicht verlängert. Dies gilt auch für
ersetzte und reparierte Teile.
Eventuell schon beim Kauf vorhandene Schäden und Mängel müssen sofort nach
dem Auspacken gemeldet werden, spätestens aber zwei Tage nach Kaufdatum.
Nach Ablauf der Garantiezeit anfallende Reparaturen sind kostenpfl ichtig.
Die Garantiezeit wird durch die Gewährleistung nicht verlängert. Dies gilt auch
für ersetzte und reparierte Teile.
Service Deutschland
Tel.: 0800 5435 111 (Kostenfrei aus dem dt. Festnetz/Mobilfunknetz)
E-Mail: kompernass@lidl.de
IAN 103935
Importeur
14
Service Österreich
Tel.: 0820 201 222 (0,15 EUR/Min.)
E-Mail: kompernass@lidl.at
IAN 103935
Service Schweiz
Tel.: 0842 665566 (0,08 CHF/Min., Mobilfunk max. 0,40 CHF/Min.)
E-Mail: kompernass@lidl.ch
IAN 103935
Erreichbarkeit Hotline: Montag bis Freitag von 8:00 Uhr – 20:00 Uhr (MEZ)
KOMPERNASS HANDELS GMBH
BURGSTRASSE 21
44867 BOCHUM
GERMANY
www.kompernass.com
SSWM 750 B2
Page 18

Table des matières
Introduction . . . . . . . . . . . . . . . . . . . . . . . . . . . . . . . . . . . . . . . . . . . . . . . . . . 16
Droits d’auteur . . . . . . . . . . . . . . . . . . . . . . . . . . . . . . . . . . . . . . . . . . . . . . . . . . . . . . . . . . 16
Limitation de responsabilité . . . . . . . . . . . . . . . . . . . . . . . . . . . . . . . . . . . . . . . . . . . . . . . . 16
Utilisation conforme . . . . . . . . . . . . . . . . . . . . . . . . . . . . . . . . . . . . . . . . . . . . . . . . . . . . . . 16
Matériel livré . . . . . . . . . . . . . . . . . . . . . . . . . . . . . . . . . . . . . . . . . . . . . . . . . 17
Élimination de l’emballage . . . . . . . . . . . . . . . . . . . . . . . . . . . . . . . . . . . . . . . . . . . . . . . . 17
Description de l’appareil . . . . . . . . . . . . . . . . . . . . . . . . . . . . . . . . . . . . . . . 18
Caractéristiques techniques . . . . . . . . . . . . . . . . . . . . . . . . . . . . . . . . . . . . . 18
Consignes de sécurité . . . . . . . . . . . . . . . . . . . . . . . . . . . . . . . . . . . . . . . . . . 19
Première mise en service . . . . . . . . . . . . . . . . . . . . . . . . . . . . . . . . . . . . . . . 21
Utilisation . . . . . . . . . . . . . . . . . . . . . . . . . . . . . . . . . . . . . . . . . . . . . . . . . . . . 21
Dorer des sandwichs . . . . . . . . . . . . . . . . . . . . . . . . . . . . . . . . . . . . . . . . . . . . . . . . . . . . . 21
Nettoyage . . . . . . . . . . . . . . . . . . . . . . . . . . . . . . . . . . . . . . . . . . . . . . . . . . . 22
Rangement . . . . . . . . . . . . . . . . . . . . . . . . . . . . . . . . . . . . . . . . . . . . . . . . . . 23
Dépannage . . . . . . . . . . . . . . . . . . . . . . . . . . . . . . . . . . . . . . . . . . . . . . . . . . 23
Recettes . . . . . . . . . . . . . . . . . . . . . . . . . . . . . . . . . . . . . . . . . . . . . . . . . . . . . 24
Toast hollandais aux tomates . . . . . . . . . . . . . . . . . . . . . . . . . . . . . . . . . . . . . . . . . . . . . . . 24
Toast à l’italienne . . . . . . . . . . . . . . . . . . . . . . . . . . . . . . . . . . . . . . . . . . . . . . . . . . . . . . . . 25
Toast Hawaï . . . . . . . . . . . . . . . . . . . . . . . . . . . . . . . . . . . . . . . . . . . . . . . . . . . . . . . . . . . . 25
Toast Scandia . . . . . . . . . . . . . . . . . . . . . . . . . . . . . . . . . . . . . . . . . . . . . . . . . . . . . . . . . . 26
Toast au curry et à la dinde . . . . . . . . . . . . . . . . . . . . . . . . . . . . . . . . . . . . . . . . . . . . . . . . 27
FR
CH
Mise au rebut . . . . . . . . . . . . . . . . . . . . . . . . . . . . . . . . . . . . . . . . . . . . . . . . 27
Garantie et service . . . . . . . . . . . . . . . . . . . . . . . . . . . . . . . . . . . . . . . . . . . . 28
Importateur . . . . . . . . . . . . . . . . . . . . . . . . . . . . . . . . . . . . . . . . . . . . . . . . . . 28
SSWM 750 B2
15
Page 19

FR
CH
Introduction
Félicitations pour l’achat de votre nouvel appareil!
Vous avez opté pour un produit moderne, de grande qualité. Le présent mode
d’emploi fait partie intégrante de ce produit. Il contient des remarques importantes
concernant la sécurité, l’usage et la mise au rebut. Avant d’utiliser le produit,
veuillez vous familiariser avec toutes les consignes d’utilisation et de sécurité.
N’utilisez l’appareil que comme indiqué et pour les domaines d’application
spécifi és. Si vous cédez le produit à un tiers, remettez-lui également tous les
documents.
Droits d’auteur
Cette documentation est protégée par des droits d’auteur.
Toute reproduction ou réimpression même partielle ainsi que la reproduction des
illustrations même après modifi cation sont interdites sans l’autorisation écrite du
fabricant.
Limitation de responsabilité
L’ensemble des informations, données et remarques techniques contenues dans
ce mode d’emploi sont conformes au dernier état lors du passage en presse et
correspondent à nos expériences et connaissances acquises jusqu’à présent.
Les indications, photos et descriptions contenues dans le présent mode d’emploi
ne peuvent donner lieu à aucune réclamation.
Le fabricant n’assume aucune responsabilité pour les dommages résultant d’un
non-respect du mode d’emploi, d’un usage non conforme, de réparations non
conformes, de modifi cations eff ectuées sans autorisation ou de l’usage de pièces
de rechange non agréées.
Utilisation conforme
Cet appareil est exclusivement prévu pour dorer des sandwichs garnis.
Cet appareil est exclusivement réservé à un usage domestique. N’utilisez pas
l’appareil pour des applications commerciales !
16
SSWM 750 B2
Page 20

Matériel livré
L’appareil est équipé de série des composants suivants:
▯ Appareil à croque-monsieur
▯ Mode d’emploi
1) Retirez l’appareil et le mode d’emploi du carton.
2) Retirez tous les matériaux d’emballage.
REMARQUE
Vérifi ez si la livraison est au complet et ne présente aucun dégât apparent.
►
► En cas de livraison incomplète ou de dommages résultant d'un emballage
défectueux ou du transport, veuillez vous adresser à la ligne téléphonique
du service après-vente (voir le chapitre Garantie et service).
Élimination de l’emballage
L’emballage protège l’appareil de tous dommages éventuels au cours du transport.
Les matériaux d’emballage ont été sélectionnés selon des critères de respect de
l’environnement et de recyclage permettant une élimination écologique de ceux-ci.
Le recyclage de l’emballage en fi lière de revalorisation permet d’économiser des
matières premières et de réduire le volume de déchets. Veuillez éliminer les matériaux d’emballage qui ne servent plus en respectant la réglementation locale.
REMARQUE
Si possible, conservez l'emballage d'origine pendant la période de garantie
►
de l'appareil afi n de pouvoir emballer ce dernier en bonne et due forme en
cas de recours en garantie.
FR
CH
SSWM 750 B2
17
Page 21

FR
CH
Description de l’appareil
Figure A:
1 Enroulement du câble
2 Voyant de contrôle «Opérationnel»
3 Verrouillage du couvercle
4 Voyant de contrôle «Power»
Figure B:
5 Surfaces supérieures de cuisson
6 Surfaces inférieures de cuisson
Caractéristiques techniques
Tension 220 - 240 V ∼, 50 Hz
Puissance absorbée 750 W
18
SSWM 750 B2
Page 22

Consignes de sécurité
AVERTISSEMENT ! RISQUE D'ÉLECTROCUTION!
► Faites remplacer aussitôt un cordon d'alimentation ou une fi che
secteur endommagée par des techniciens spécialisés agréés, afi n
d'éviter tout danger.
► Utilisez l'appareil exclusivement dans des locaux secs, surtout pas
en extérieur.
N'immergez jamais l'appareil dans de l'eau ou dans d'autres
liquides ! Présence dans le cas contraire d'un danger de
mort par électrocution.
► Lors du nettoyage, veillez à ce qu'il n'y ait pas d'eau qui pénètre
à l'intérieur de l'appareil. Ne nettoyez pas l'appareil sous l'eau
courante.
► Assurez-vous que l'appareil ne puisse jamais entrer en contact
avec de l'eau. N'opérez jamais l'appareil à proximité d'eau ou
à côté de récipients qui contiennent des liquides.
► Veillez à ce que le cordon d'alimentation ne soit jamais mouillé
ou humide durant le fonctionnement. Disposez le cordon de
manière à éviter qu'il ne soit endommagé ou coincé.
FR
CH
► Après chaque utilisation, veuillez retirer la fi che secteur de la
prise secteur, pour éteindre l'appareil.
► N'ouvrez jamais le boîtier de l'appareil.
SSWM 750 B2
19
Page 23

FR
CH
AVERTISSEMENT ! RISQUE DE BLESSURES!
► Cet appareil peut être utilisé par des enfants à partir de 8 ans
et plus et par des personnes ayant des capacités physiques,
sensorielles ou mentales réduites ou un manque d'expérience et
de connaissances à condition qu'elles aient reçu une supervision
ou des instructions concernant I’utilisation de I'appareil en toute
sécurité et qu'elles comprennent les dangers encourus.
► Ne pas laisser les enfants jouer avec l'appareil.
► Le nettoyage et la maintenance utilisateur ne doivent pas être
eff ectués par des enfants à moins qu'ils aient plus de 8 ans et sont
surveillés. Maintenir l'appareil et son cordon hors de portée des
enfants de moins de 8 ans.
► Les pièces de l'appareil peuvent devenir très chaudes en service.
Pour cette raison, ne saisissez que les poignées.
► Laissez l’appareil intégralement refroidir avant de le nettoyer ou
de le ranger.
► Soyez prudents au moment de retirer les sandwichs fi nis de cuire.
En eff et, l'appareil et les sandwichs sont très chauds.
► Opérez l'appareil uniquement sur une surface de dépôt stable,
antidérapante et plane.
► N'utilisez pas de minuterie externe ni de dispositif de commande
à distance séparé pour utiliser l'appareil.
Attention ! Surface brûlante!
ATTENTION - RISQUE D'INCENDIE !
► Il est absolument interdit d'utiliser l'appareil à proximité de maté-
riaux infl ammables.
► Ne recouvrez pas l'appareil aussi longtemps qu'il est en opération.
► Toujours opérer l'appareil sur un support résistant à la chaleur.
► N'utilisez jamais l'appareil sans surveillance.
20
SSWM 750 B2
Page 24

ATTENTION - RISQUE DE DOMMAGES MATÉRIELS!
► Retirez tous les aliments à l'aide d'une spatule en plastique ou
en bois ou d'un autre objet adapté, non métallique, pour ne pas
endommager le revêtement anti-adhésif du sandwichmaker.
► N'utilisez ni produits nettoyants agressifs ni objets pointus pour le
nettoyage.
Première mise en service
■ Commencez par étaler de l’huile adaptée à la cuisson sur le revêtement
anti-adhésif des surfaces de cuisson 5/6.
■ Branchez la fi che secteur dans une prise secteur.
■ Fermez l’appareil et verrouillez-le avec le verrouillage du couvercle 3.
Ce verrouillage doit s’enclencher perceptiblement au niveau de la poignée
inférieure.
■ Faites chauff er l’appareil pendant env. 10 minutes.
REMARQUE
Lors de la première utilisation, une légère odeur peut se dégager (voire
►
même un peu de fumée). Ce phénomène est normal et s'estompe rapidement. Veuillez assurer une aération suffi sante. Ouvrez par exemple une
fenêtre.
■ Retirez la fi che secteur et laissez refroidir l’appareil.
■ Nettoyer l’appareil comme indiqué au chapitre «Nettoyage».
L’appareil est maintenant prêt à l’emploi.
FR
CH
Utilisation
Dorer des sandwichs
1) Fermez le couvercle et verrouillez-le avec le verrouillage du couvercle 3.
Ce verrouillage doit s’enclencher perceptiblement au niveau de la poignée
inférieure.
2) Branchez la fi che secteur dans une prise secteur. Le voyant de contrôle
rouge «Power» 4 s’allume.
3) Dès que l’appareil est chaud, le voyant de contrôle vert «Opérationnel» 2
s’allume.
4) Ouvrez le couvercle, posez deux sandwichs à cuire sur les surfaces de
cuisson inférieures 6.
SSWM 750 B2
21
Page 25

FR
CH
5) Fermez le couvercle et verrouillez-le avec le verrouillage du couvercle 3.
Ce verrouillage doit s’enclencher perceptiblement au niveau de la poignée
inférieure. Si le sandwich était trop épais et que le verrouillage du couvercle 3
ne peut pas être fermé, retirez un peu de garniture des sandwichs.
ATTENTION - RISQUE DE DOMMAGES MATÉRIELS!
Retirez tous les sandwichs à l'aide d'une spatule en plastique ou en bois
►
ou d'un autre objet adapté, non métallique, pour ne pas endommager le
revêtement anti-adhésif du sandwichmaker.
6) Après env. 3 - 5 minutes, les sandwichs sont prêts. Selon la garniture et les
préférences personnelles, cette indication temporelle peut varier. Ouvrez le
couvercle et retirez les sandwichs.
7) Si vous ne souhaitez pas préparer d’autres sandwichs, retirez la fi che secteur
de la prise secteur.
Nettoyage
AVERTISSEMENT! RISQUE D'ÉLECTROCUTION
Débranchez tout d'abord la fi che de la prise secteur avant de nettoyer
►
l'appareil.
AVERTISSEMENT! RISQUE DE BLESSURES!
► Laissez refroidir l'appareil avant de le nettoyer. Risque de brûlure!
N'immergez jamais l'appareil dans de l'eau ou dans d'autres liquides !
Présence dans le cas contraire d'un danger de mort par électrocution.
22
ATTENTION - RISQUE DE DOMMAGES MATÉRIELS!
N'utilisez pas de produit de nettoyage abrasif ou agressif. Il risque d'attaquer
►
la surface de l'appareil.
REMARQUE
N'attendez pas trop longtemps avant de procéder au nettoyage. Attendez
►
que l'appareil soit suffi samment refroidi pour pouvoir le saisir sans risque
de brûlure. Il est ainsi plus facile de retirer les restes d'aliments.
■ Nettoyez le corps de l’appareil avec un chiff on sec ou un torchon légère-
ment humidifi é.
■ Pour retirer tous les résidus de cuisson, frottez les surfaces de cuisson 5/6
avec un torchon légèrement humidifi é pour retirer tous les résidus d’aliments.
Si des résidus ont cuit sur les surfaces, vous pouvez poser le torchon humide
dessus afi n de les ramollir. Au bout d’un certain temps, les résidus se laissent
détacher.
SSWM 750 B2
Page 26

REMARQUE
En présence de taches tenaces, appliquez un peu de produit vaisselle
►
doux sur le torchon humide. Après le nettoyage avec du produit vaisselle,
essuyez les surfaces de cuisson 5/6 encore une fois avec un chiff on
humidifi é d'eau propre afi n de retirer toutes les traces de produit vaisselle.
Après le nettoyage avec du produit vaisselle, nous recommandons d'enduire
à nouveau, en frottant, de l'huile adaptée à la cuisson sur les surfaces de
cuisson 5/6.
■ Séchez soigneusement toutes les pièces avant de les utiliser à nouveau.
REMARQUE
Si de la graisse ou des produits alimentaires devaient avoir coulé dans
des fentes ou des coins les rendant impossible à nettoyer avec un chiff on
humide, procédez comme suit :
– Retirez la graisse ou d'autres liquides avec du papier essuie-tout.
– Retirez les résidus avec une spatule en bois ou une petite brochette
– Ensuite, essuyez à nouveau toute la surface comme décrit plus haut.
Rangement
■ Nettoyez l’appareil comme indiqué au chapitre «Nettoyage».
■ Enroulez le cordon autour de l’enroulement du câble 1 prévu à cet eff et
situé contre la face inférieure de l’appareil puis immobilisez la fi che secteur
contre le petit évidement situé au niveau de l’enroulement du câble 1.
■ Conservez le sandwichmaker dans un endroit sec.
FR
CH
en bois.
Dépannage
SSWM 750 B2
Panne Cause Remède
L'appareil ne
fonctionne pas.
Les sandwichs
brunissent trop.
La fi che secteur n'a pas
été insérée dans la prise
secteur.
L'appareil est défectueux.
Les sandwichs sont restés
trop longtemps dans le
sandwichmaker.
Raccordez la fi che secteur
au réseau électrique.
Adressez-vous au service
clientèle.
Retirez les sandwichs
plus tôt.
23
Page 27

FR
CH
Recettes
Toast hollandais aux tomates
Ingrédients :
♦ 4 tranches de toast
♦ Eau
♦ Oignons verts
♦ 1 tomate de taille moyenne
♦ Beurre aux herbes
♦ 2 tranches de jambon blanc
♦ Sel
♦ Poivre frais moulu
♦ 2 tranches de jeune gouda
1) Lavez les oignons et laissez-les ensuite s’égoutter. Coupez en deux les
oignons verts dans le sens de la longueur et puis hachez-les grossièrement.
Portez de l’eau salée à ébullition dans une casserole. Rajoutez les oignons
verts et blanchissez-les environ 1 minute.
Mettez ensuite les oignons verts dans un tamis, recouvrez-les d’eau froide
et laissez-les s’égoutter.
2) Lavez les tomates et tamponnez-les pour les sécher. Coupez-les en deux et
retirez les tiges. Coupez les tomates en tranches.
3) Tartinez le beurre aux herbes sur le toast et posez une tranche repliée de
jambon sur le toast beurré. Répartissez dessus les petits morceaux d’oignons
vert et les tranches de tomate. Assaisonnez de sel et de poivre.
4) Posez les tranches de fromage sur la tranche de toast.
5) Tartinez un peu de beurre aux herbes sur un autre toast et recouvrez votre
sandwich avec le côté tartiné du toast tourné vers le bas.
24
SSWM 750 B2
Page 28

Toast à l’italienne
Ingrédients :
♦ 4 tranches de toast
♦ 4 cs de concentré de tomate
♦ 2 cs de mayonnaise
♦ Sel
♦ Herbes de Provence
♦ Poivre frais moulu
♦ 1 tomate de taille moyenne
♦ 1 paquet de mozzarella
♦ Poivre de couleur frais moulu
1) Mélangez le concentré de tomates, la mayonnaise, le sel, les herbes de
Provence et le poivre. Tartinez-en les tranches de toast.
2) Lavez les tomates et tapotez-les pour les sécher. Coupez-les en deux et
retirez les tiges. Coupez les tomates en tranches.
3) Laissez goutter la mozzarella dans une passoire et découpez-la en tranches.
Coupez cette dernière encore une fois en deux.
4) Après avoir tartiné le toast, garnissez-le maintenant de tranches de tomate
et de mozzarella puis saupoudrez de poivre.
5) Recouvrez votre sandwich avec l’autre tranche de toast.
FR
CH
Toast Hawaï
Ingrédients :
1) Laissez l’ananas s’égoutter dans une passoire.
2) Tartinez la tranche de toast avec du beurre.
3) Posez du jambon et de l’ananas sur la tranche de toast.
4) Le fromage est posé en dernier sur l’ananas.
5) Refermez le sandwich avec une autre tranche de toast.
SSWM 750 B2
♦ 4 tranches de toast
♦ 2 tranches d’ananas (en conserve)
♦ Beurre
♦ 2 tranches de jambon blanc
♦ 2 fi nes tranches de fromage
25
Page 29

FR
CH
Toast Scandia
Ingrédients :
♦ 4 tranches de toast
♦ Aneth
♦ 125 g de crème au yaourt pour assaisonner la salade
♦ 1 cc de moutarde de Dijon
♦ 1 cc de miel liquide
♦ 20 g de crème de saumon (en tube, en linéaires réfrigérés)
♦ 1 concombre
♦ 1 paquet de mozzarella
♦ 100 g de saumon fumé en tranches
♦ Poivre frais moulu
1) Rincez l’aneth et tapotez-le pour le sécher. Cueillez les pointes des petites
tiges d’aneth et hachez ces pointes.
2) Mélangez la crème salade au yaourt avec la moutarde, le miel, la crème
au saumon et l’aneth.
3) Épluchez le concombre, coupez et retirez les extrémités. Coupez le concombre
en deux dans le sens de la longueur et raclez les pépins avec une cuillère à
café. Découpez ensuite chaque moitié de concombre en morceaux.
4) Laissez la mozzarella s’égoutter dans une passoire puis découpez-la en
tranches.
5) Tartinez une tranche de toast avec la crème salade au yaourt.
6) Posez un morceau de concombre sur la tranche de toast tartinée, répartissez
uniformément les tranches de saumon et fi nissez de garnir le toast avec les
tranches de fromage. Assaisonnez selon vos préférences avec du poivre.
7) Refermez le sandwich avec une autre tranche de toast.
26
SSWM 750 B2
Page 30

Toast au curry et à la dinde
Ingrédients :
♦ 4 tranches de toast
♦ 25 g de beurre
♦ Blanc de dinde en tranches
♦ Prunes
♦ Sauce cocktail au curry
♦ Poudre de curry
1) Mélangez le beurre, la sauce au curry et la poudre de curry.
2) Lavez les prunes, séchez et dénoyautez-les. Coupez les prunes en deux et
coupez les moitiés en fi nes tranches.
3) Tartinez le beurre au curry sur une tranche de toast.
4) Puis disposez sur la tranche de toast beurrée une fi ne tranche de dinde et
des tranches de prune.
5) Refermez le sandwich avec une autre tranche de toast.
Mise au rebut
Ne jamais jeter l’appareil avec les ordures ménagères.
Ce produit est assujetti à la directive européenne 2012/19/EUDEEE (déchets d’équipements électriques et électroniques).
Éliminez l’appareil par l’intermédiaire d’une entreprise de traitement des déchets
autorisée ou via le service de recyclage de votre commune. Respectez la
réglementation en vigueur. En cas de doute, veuillez contacter votre centre de
recyclage.
FR
CH
SSWM 750 B2
27
Page 31

FR
CH
Garantie et service
Cet appareil est garanti 3 ans à partir de la date d’achat. L’appareil a été fabriqué
avec soin et contrôlé consciencieusement avant sa livraison.
Veuillez conserver le ticket de caisse en guise de preuve d’achat. En cas de
garantie, veuillez contacter le service après-vente compétent. Cette condition
doit être respectée pour assurer l’expédition gratuite de votre marchandise.
REMARQUE
► La prestation sous garantie s'applique uniquement aux vices de matière ou
de fabrication, non aux dégâts sur
d'usure ou aux dégâts subis par des pièces fragiles comme par ex. les
commutateurs ou les accumulateurs.
Le produit est destiné uniquement à un usage privé et ne répond pas à un usage
professionnel. La garantie est annulée en cas de manipulation incorrecte et
inappropriée, d’usage de la force et en cas d’intervention non réalisée par notre
centre de service après-vente agréé.
Vos droits légaux ne sont pas restreints par la présente garantie. L’exercice de
la garantie ne prolonge pas la période de garantie. Cette disposition s’applique
également aux pièces remplacées ou réparées.
Signalez sans attendre toute anomalie éventuelle sur le matériel au moment du
déballage au plus tard deux jours après la date d’achat.
Toute réparation fera l’objet d’une facturation après expiration de la période de
garantie.
L’exercice de la garantie ne prolonge pas la période de garantie. Cette disposition
s’applique également aux pièces remplacées ou réparées.
Service France
Tel.: 0800 919270
E-Mail: kompernass@lidl.fr
IAN 103935
venus pendant le transport, aux pièces
Service Suisse
Tel.: 0842 665566 (0,08 CHF/Min., mobile max. 0,40 CHF/Min.)
E-Mail: kompernass@lidl.ch
Heures de service de notre hotline : du lundi au vendredi de 8 h à 20 h (HEC)
Importateur
KOMPERNASS HANDELS GMBH
BURGSTRASSE 21
44867 BOCHUM
GERMANY
www.kompernass.com
28
IAN 103935
SSWM 750 B2
Page 32

Indice
Introduzione . . . . . . . . . . . . . . . . . . . . . . . . . . . . . . . . . . . . . . . . . . . . . . . . . 30
Diritto d'autore . . . . . . . . . . . . . . . . . . . . . . . . . . . . . . . . . . . . . . . . . . . . . . . . . . . . . . . . . . 30
Limitazione di responsabilità . . . . . . . . . . . . . . . . . . . . . . . . . . . . . . . . . . . . . . . . . . . . . . . 30
Uso conforme . . . . . . . . . . . . . . . . . . . . . . . . . . . . . . . . . . . . . . . . . . . . . . . . . . . . . . . . . . 30
Volume della fornitura . . . . . . . . . . . . . . . . . . . . . . . . . . . . . . . . . . . . . . . . . 31
Smaltimento della confezione . . . . . . . . . . . . . . . . . . . . . . . . . . . . . . . . . . . . . . . . . . . . . . 31
Descrizione dell'apparecchio . . . . . . . . . . . . . . . . . . . . . . . . . . . . . . . . . . . .32
Dati tecnici . . . . . . . . . . . . . . . . . . . . . . . . . . . . . . . . . . . . . . . . . . . . . . . . . . . 32
Indicazioni relative alla sicurezza . . . . . . . . . . . . . . . . . . . . . . . . . . . . . . . . 33
Prima messa in funzione . . . . . . . . . . . . . . . . . . . . . . . . . . . . . . . . . . . . . . . 35
Uso . . . . . . . . . . . . . . . . . . . . . . . . . . . . . . . . . . . . . . . . . . . . . . . . . . . . . . . . .35
Tostatura di sandwich . . . . . . . . . . . . . . . . . . . . . . . . . . . . . . . . . . . . . . . . . . . . . . . . . . . . 35
Pulizia . . . . . . . . . . . . . . . . . . . . . . . . . . . . . . . . . . . . . . . . . . . . . . . . . . . . . . 36
Conservazione . . . . . . . . . . . . . . . . . . . . . . . . . . . . . . . . . . . . . . . . . . . . . . . 37
Eliminazione dei guasti . . . . . . . . . . . . . . . . . . . . . . . . . . . . . . . . . . . . . . . . . 37
Ricette . . . . . . . . . . . . . . . . . . . . . . . . . . . . . . . . . . . . . . . . . . . . . . . . . . . . . . 38
Toast con pomodori all'olandese . . . . . . . . . . . . . . . . . . . . . . . . . . . . . . . . . . . . . . . . . . . . 38
Toast all'italiana . . . . . . . . . . . . . . . . . . . . . . . . . . . . . . . . . . . . . . . . . . . . . . . . . . . . . . . . . 39
Toast Hawaii . . . . . . . . . . . . . . . . . . . . . . . . . . . . . . . . . . . . . . . . . . . . . . . . . . . . . . . . . . . 39
Toast Scandia . . . . . . . . . . . . . . . . . . . . . . . . . . . . . . . . . . . . . . . . . . . . . . . . . . . . . . . . . . 40
Toast con petto di tacchino e curry . . . . . . . . . . . . . . . . . . . . . . . . . . . . . . . . . . . . . . . . . . 41
IT
CH
Smaltimento . . . . . . . . . . . . . . . . . . . . . . . . . . . . . . . . . . . . . . . . . . . . . . . . . 41
Garanzia e assistenza . . . . . . . . . . . . . . . . . . . . . . . . . . . . . . . . . . . . . . . . . 42
Importatore . . . . . . . . . . . . . . . . . . . . . . . . . . . . . . . . . . . . . . . . . . . . . . . . . . 42
SSWM 750 B2
29
Page 33

IT
CH
Introduzione
Congratulazioni per l'acquisto del Suo nuovo apparecchio!
È stato scelto un prodotto moderno e di alta qualità. Il manuale di istruzioni è
parte integrante del presente prodotto. Esso contiene importanti indicazioni per
la sicurezza, l'uso e lo smaltimento. Prima di utilizzare il prodotto, familiarizzare
con tutte le indicazioni relative ai comandi e alla sicurezza. Usare il prodotto
solo come descritto e per i campi di impiego indicati. In caso di cessione del
prodotto a terze persone, consegnare anche tutta la relativa documentazione.
Diritto d'autore
La presente documentazione è tutelata dal diritto d'autore.
La diff usione o ristampa di qualsiasi genere, anche se parziale, nonché la
riproduzione delle illustrazioni, anche se modifi cate, è consentita solo previa
autorizzazione scritta del produttore.
Limitazione di responsabilità
Tutte le informazioni tecniche contenute nel presente manuale di istruzioni, così
come tutti i dati e le indicazioni relativi al collegamento e all'uso, corrispondono
alle ultime informazioni disponibili al momento dell'invio in stampa, fornite in
buona fede tenendo conto delle nostre attuali esperienze e conoscenze.
I dati, le illustrazioni e le descrizioni contenute nel presente manuale di istruzioni
non costituiscono una base valida per alcun tipo di rivendicazione.
Il produttore non si assume alcuna responsabilità per eventuali danni derivanti
da mancata osservanza del manuale di istruzioni, uso non conforme, riparazioni
non professionali, modifi che non consentite o uso di parti di ricambio non
omologate.
Uso conforme
30
Questo apparecchio è destinato esclusivamente al alla tostatura di sandwich
farciti.
Questo apparecchio è destinato esclusivamente all'uso in ambienti domestici.
Non utilizzare l'apparecchio a fi ni commerciali!
SSWM 750 B2
Page 34

Volume della fornitura
La fornitura standard dell'apparecchio comprende i seguenti componenti:
▯ Tostiera
▯ Istruzioni per l'uso
1) Rimuovere l'apparecchio e il manuale di istruzioni dal cartone.
2) Rimuovere completamente il materiale di imballaggio.
AVVISO
Controllare se la fornitura è integra e se presenta danni visibili.
►
► In caso di fornitura incompleta o in presenza di danni derivanti da
imballaggio insuffi ciente o causati dal trasporto, rivolgersi alla Hotline
di assistenza (v. capitolo Garanzia e assistenza ).
Smaltimento della confezione
L'imballaggio protegge l'apparecchio dai danni da trasporto. I materiali di
imballaggio sono stati selezionati in relazione alla loro ecocompatibilità e
alle caratteristiche di smaltimento e pertanto sono riciclabili.
Il riciclo dell'imballaggio consente di risparmiare materie prime e riduce la generazione di rifi uti. Smaltire il materiale di imballaggio inutilizzato in conformità
alle norme vigenti locali.
AVVISO
Durante il periodo di validità della garanzia, se possibile, conservare
►
l'imballaggio originale per poter imballare adeguatamente l'apparecchio
in caso di intervento in garanzia.
IT
CH
SSWM 750 B2
31
Page 35

IT
CH
Descrizione dell'apparecchio
Figura A:
1 Avvolgicavo
2 Spia di controllo "Pronto per l'uso"
3 Blocco del coperchio
4 Spia di controllo "Power"
Figura B:
5 Superfi ci di cottura superiori
6 Superfi ci di cottura inferiori
Dati tecnici
Tensione 220 - 240 V ∼, 50 Hz
Assorbimento di potenza 750 W
32
SSWM 750 B2
Page 36

Indicazioni relative alla sicurezza
ATTENZIONE! PERICOLO DI FOLGORAZIONE!
► Fare sostituire immediatamente da personale specializzato
autorizzato il cavo (o la spina) di rete danneggiato, per evitare
pericoli.
► Utilizzare l'apparecchio solo in ambienti asciutti, non all'aperto.
Non immergere mai l'apparecchio in acqua o altri liquidi!
Sussiste altrimenti pericolo di morte per folgorazione.
► Durante la pulizia, impedire la penetrazione di acqua all'interno
dell'apparecchio. Non pulire mai l'apparecchio sotto l'acqua
corrente.
► Impedire che l'apparecchio venga a contatto con l'acqua.
Non azionare mai l'apparecchio nelle vicinanze di acqua o di
contenitori pieni d'acqua.
► Impedire che il cavo di rete si bagni o si inumidisca durante l'uso
dell'apparecchio. Disporlo in modo tale che non venga schiacciato
o possa venire danneggiato in altro modo.
► Dopo l'uso estrarre la spina di rete dalla presa per spegnere
l'apparecchio.
IT
CH
► Non aprire mai l'alloggiamento dell'apparecchio.
SSWM 750 B2
33
Page 37

IT
CH
ATTENZIONE! PERICOLO DI LESIONI!
► Questo apparecchio può essere utilizzato dai bambini di almeno
8anni di età e da persone con capacità fi siche, sensoriali o mentali
ridotte o insuffi ciente esperienza o conoscenza, solo se sorvegliati
o istruiti sull'uso sicuro dell'apparecchio e qualora ne abbiano
compreso i pericoli associati.
► I bambini non devono giocare con l'apparecchio.
► La pulizia e la manutenzione a cura dell'utente non devono essere
eseguite da bambini, a meno che non abbiano almeno 8anni di
età e siano sorvegliati. Tenere l'apparecchio e il cavo di collegamento fuori dalla portata dei bambini di età inferiore agli 8anni.
► Durante il funzionamento i componenti dell'apparecchio possono
diventare molto caldi. Toccare quindi solo le maniglie.
► Prima di pulire o ritirare l'apparecchio, lasciarlo completamente
raff reddare.
► Prestare attenzione quando si estraggono i sandwich pronti.
L'apparecchio e i sandwich sono bollenti.
► Azionare l'apparecchio solo su una superfi cie stabile, antisdruc-
ciolevole e piana.
► Non utilizzare timer esterni o un sistema di telecomando separato
per azionare l'apparecchio.
Attenzione! Superfi cie rovente!
ATTENZIONE - PERICOLO DI INCENDIO!
► L'apparecchio non deve essere utilizzato nelle immediate vicinanze
di materiali infi ammabili.
► Non coprire l'apparecchio mentre è in funzione.
► Azionare l'apparecchio solo su un supporto resistente al calore.
► Non azionare mai l'apparecchio incustodito.
34
SSWM 750 B2
Page 38

ATTENZIONE - DANNI MATERIALI!
► Prelevare le vivande solo con una spatola di plastica o legno o un
altro oggetto idoneo non metallico, per non rovinare il rivestimento
antiaderente dell'apparecchio.
► Per la pulizia non utilizzare detergenti aggressivi e oggetti acuminati.
Prima messa in funzione
■ Applicare frizionando sul rivestimento antiaderente delle superfi ci di cottura 5/
6 uno strato di olio da cucina.
■ Inserire la spina in una presa di corrente.
■ Chiudere l'apparecchio e bloccarlo con i blocchi del coperchio 3.
Esso deve innestarsi udibilmente in posizione sull'impugnatura inferiore.
■ Fare riscaldare l'apparecchio per ca. 10 minuti.
AVVISO
Durante il primo impiego può svilupparsi un leggero odore (e anche una
►
leggera formazione di fumo). Si tratta di un evento normale che cessa
dopo poco tempo. Provvedere a una suffi ciente aerazione. Aprire ad
esempio una fi nestra.
■ Staccare la spina di rete e fare raff reddare l'apparecchio.
■ Pulire l'apparecchio come descritto al capitolo “Pulizia”.
L'apparecchio è pronto per l'uso.
IT
CH
Uso
Tostatura di sandwich
1) Chiudere il coperchio e bloccarlo con i blocchi del coperchio 3. Esso deve
innestarsi udibilmente in posizione sull'impugnatura inferiore.
2) Inserire la spina in una presa di corrente. La spia di controllo "Power" 4
è accesa.
3) Non appena l'apparecchio si è riscaldato, si accende la spia di controllo
verde "Pronto per l'uso" 2.
4) Aprire il coperchio e collocare due sandwich precedentemente preparati
sulle superfi ci di cottura inferiori 6.
SSWM 750 B2
35
Page 39

IT
CH
Pulizia
5) Chiudere il coperchio e bloccarlo con i blocchi del coperchio 3. Esso deve
innestarsi udibilmente in posizione sull'impugnatura inferiore. Se il sandwich
fosse troppo spesso e impedisse la chiusura dei blocchi del coperchio 3,
rimuovere un po' di facitura dal sandwich.
ATTENZIONE - DANNI MATERIALI!
Prelevare i sandwich solo con una spatola di plastica o legno o un altro
►
oggetto idoneo non metallico, per non distruggere il rivestimento antiaderente dell'apparecchio.
6) I sandwich sono pronti dopo ca. 3 - 5 minuti. Queste indicazioni temporali
possono variare a seconda della farcitura utilizzata e dei gusti personali.
Aprire il coperchio e prelevare i sandwich
7) Se non si desidera preparare altri sandwich, staccare la spina di rete dalla
presa di corrente.
ATTENZIONE! PERICOLO DI FOLGORAZIONE
Prima di pulire l'apparecchio, disinserire la spina dalla presa.
►
Non immergere mai l'apparecchio in acqua o altri liquidi! Sussiste
altrimenti pericolo di morte per folgorazione.
AVVERTENZA! PERICOLO DI LESIONI!
► Fare raff reddare l'apparecchio prima della pulizia. Pericolo di ustioni!
36
ATTENZIONE - DANNI MATERIALI!
Non utilizzare detergenti abrasivi o corrosivi. Essi attaccano la superfi cie
►
dell'apparecchio.
AVVISO
Non attendere troppo per eseguire la pulizia. Attendere fi no al raff redda-
►
mento dell'apparecchio per poterlo toccare senza rischio di ustioni. In tal
modo è possibile rimuovere meglio i resti di alimenti.
■ Pulire l'alloggiamento con un canovaccio asciutto o leggermente inumidito.
■ Passare le superfi ci di cottura 5/6 con un panno inumidito di acqua calda
in modo tale da rimuovere tutti i resti di cibo.
In caso incrostazioni ostinate, si può appoggiare il panno umido sul punto
interessato in modo da ammorbidirle. Dopo qualche tempo è poi possibile
rimuovere anche questi resti.
SSWM 750 B2
Page 40

AVVISO
In caso di sporco ostinato, versare qualche goccia di detersivo per i piatti
►
delicato sul panno morbido. Dopo la pulizia passare nuovamente le superfi ci
di cottura 5/6 con un canovaccio inumidito di acqua pulita in modo
tale da rimuovere tutti i resti di detersivo. Dopo la pulizia con detersivo si
consiglia di frizionare nuovamente le superfi ci 5/6 con olio da cucina.
■ Fare asciugare bene tutte le parti dell'apparecchio prima di riutilizzarlo.
AVVISO
Qualora grasso o cibi giungessero in fessure o angoli e non è possibile
rimuoverli con un panno umido, procedere come segue:
– asciugare il grasso o altri liquidi con un pezzo di carta assorbente.
– Rimuovere i resti con una spatola di legno o un piccolo spiedo di
legno.
– Poi passare tutto nuovamente con un panno come già descritto.
Conservazione
■ Pulire l'apparecchio come descritto al capitolo “Pulizia”.
■ Avvolgere il cavo attorno all'avvolgicavo 1 sul lato inferiore dell'apparecchio
e fi ssare la spina sulla piccola cavità che si trova sull'avvolgicavo 1.
■ Conservare il sandwichmaker in un luogo asciutto.
Eliminazione dei guasti
IT
CH
SSWM 750 B2
Guasto Causa Soluzione
L'apparecchio non
funziona.
I sandwich diventano troppo scuri.
La spina di rete non
è inserita nella presa.
L'apparecchio è guasto.
I sandwich sono rimasti
troppo a lungo nel
sandwichmaker.
Collegare la spina di rete
alla rete elettrica.
Rivolgersi al servizio
clienti.
Prelevare prima i
sandwich.
37
Page 41

IT
CH
Ricette
Toast con pomodori all'olandese
Ingredienti:
♦ 4 fette di pane per toast
♦ acqua
♦ Cipolle primavera
♦ 1 pomodoro di media grandezza
♦ Burro alle erbe
♦ 2 fette di prosciutto cotto
♦ Sale
♦ Pepe macinato di fresco
♦ 2 fette di formaggio Gouda non stagionato
1) Lavare le cipolle e farle sgocciolare. Dividere le cipolle in lunghezza e tagliarle
a pezzi grossi. Portare l'acqua a ebollizione con il sale in un tegame.
Aggiungere le cipolle e scottarle per ca. 1 minuto.
Infi ne travasarle in un colapasta, versarvi sopra dell'acqua fredda e farle
sgocciolare.
2) Lavare i pomodori e asciugarli. Dividerli a metà e rimuovere la parte verde
del picciolo. Tagliare i pomodori a fette.
3) Spalmare su una fetta di toast del burro alle erbe e appoggiarvi sopra una
fetta di prosciutto piegata. Distribuirvi sopra i pezzi di cipolle e le fette di
pomodoro. Insaporire con sale e pepe.
4) Collocare le fette di formaggio sulla fetta di toast.
5) Spalmare su un'altra fetta di toast un po' di burro alle erbe e coprire con
essa il sandwich con la parte imburrata rivolta verso il basso.
38
SSWM 750 B2
Page 42

Toast all'italiana
Ingredienti:
♦ 4 fette di pane per toast
♦ 4 cucchiai di concentrato di pomodoro
♦ 2 cucchiai di maionese
♦ Sale
♦ Erbe di Provenza
♦ Pepe macinato di fresco
♦ 1 pomodoro di media grandezza
♦ 1 confezione di mozzarella
♦ Pepe multicolore macinato di fresco
1) Mescolare il concentrato di pomodoro, la maionese, il sale, le erbe di
Provenza e il pepe. Cospargerne le fette di toast.
2) Lavare i pomodori e asciugarli. Dividerli a metà e rimuovere la parte verde
del picciolo. Tagliare i pomodori a fette.
3) Fare sgocciolare la mozzarella in un colapasta e tagliarla a fette. Dividere
ancora una volta le fette.
4) La fetta di toast già imburrata viene ora farcita di fette di pomodoro e
mozzarella e insaporita con pepe.
5) Coprire il sandwich con l'altra fetta di toast.
IT
CH
Toast Hawaii
Ingredienti:
1) Fare sgocciolare l'ananas in un colapasta.
2) Spalmare il burro sulla fetta di pane.
3) Coprire la fetta di toast con il prosciutto e l'ananas.
4) Il formaggio viene messo per ultimo sull'ananas.
5) Coprire il sandwich con un'altra fetta di pane.
SSWM 750 B2
♦ 4 fette di pane per toast
♦ 2 fette di ananas (in scatola)
♦ Burro
♦ 2 fette di prosciutto cotto
♦ 2 sottilette di formaggio
39
Page 43

IT
CH
Toast Scandia
Ingredienti:
♦ 4 fette di pane per toast
♦ Aneto
♦ 125 g di crema allo yogurt per insalata
♦ 1 cucchiaino di senape di Digione
♦ 1 cucchiaino di miele fl uido
♦ 20 g paté di vero salmone (tubetti reperibili negli scaff ali frigoriferi al super-
mercato)
♦ 1 cetriolo da insalata
♦ 1 confezione di mozzarella
♦ 100 g di salmone aff umicato, in fette
♦ Pepe macinato di fresco
1) Sciacquare l'aneto e asciugarlo battendolo con un panno. Staccare le punte
dagli steli dell'aneto e tritare le punte.
2) Mescolare la salsa allo yogurt con la senape, il miele, la crema di salmone
e l'aneto.
3) Pelare il cetriolo e tagliare le estremità. Dividere il cetriolo in lunghezza ed
estrarne il centro con un cucchiaino. Tagliare a pezzi la metà di cetriolo.
4) Far scolare la mozzarella in un colapasta e tagliarla a fette.
5) Spalmare su una fetta di toast un po' di crema allo yogurt per insalata.
6) Mettere un pezzo di cetriolo sulla festa di toast cosparsa di crema, distribuirvi
sopra uniformemente le fette di salmone e farcire la fetta di toast con le fette
di formaggio. Insaporire con pepe.
7) Coprire il sandwich con un'altra fetta di pane.
40
SSWM 750 B2
Page 44

Toast con petto di tacchino e curry
Ingredienti:
♦ 4 fette di pane per toast
♦ 25 g di burro
♦ Petto di tacchino aff ettato
♦ Prugne
♦ Salsa al curry per cocktail
♦ Curry in polvere
1) Mescolare il burro con la salsa al curry e il curry in polvere.
2) Lavare le prugne, asciugarle e snocciolarle. Dividere a metà le prugne e
tagliarle a fette sottili.
3) Spalmare su una fetta di toast del burro al curry.
4) Coprire la fetta di pane imburrata con il tacchino e le fette di prugne.
5) Coprire il sandwich con un'altra fetta di pane.
Smaltimento
Non smaltire per alcun motivo l'apparecchio assieme ai normali
rifi uti domestici. Questo prodotto è soggetto alla Direttiva Europea
2012/19/EU. (Waste Electrical and Electronic Equipment).
Far smaltire l'apparecchio da un'azienda di smaltimento autorizzata o dall'ente
di smaltimento comunale. Rispettare le norme attualmente in vigore. In caso di
dubbi mettersi in contatto con l'ente di smaltimento competente.
IT
CH
SSWM 750 B2
41
Page 45

IT
CH
Garanzia e assistenza
Questo apparecchio è garantito per tre anni a partire dalla data di acquisto.
L'apparecchio è stato prodotto con cura e debitamente collaudato prima della
consegna.
Conservare lo scontrino come prova di acquisto. Nei casi contemplati dalla
garanzia, mettersi in comunicazione telefonicamente con il centro di assistenza
più vicino. Solo in tal modo è possibile garantire una spedizione gratuita della
merce.
AVVISO
La garanzia copre solo i difetti del materiale o di fabbricazione, non vale
►
invece per danni dovuti al trasporto, pezzi soggetti a usura o danni a parti
fragili, come ad es. interruttori o batterie.
Il prodotto è destinato esclusivamente all'uso domestico e non a quello commerciale. La garanzia decade in caso di impiego improprio o manomissione, uso
della forza e interventi non eseguiti dalla nostra fi liale di assistenza autorizzata.
Questa garanzia non costituisce alcun limite ai diritti legali del consumatore.
Il periodo di garanzia non viene prolungato da interventi in garanzia. Ciò vale
anche per le parti sostituite e riparate.
I danni e difetti eventualmente presenti già all'atto dell'acquisto devono venire
comunicati immediatamente dopo il disimballo, e comunque entro e non oltre
due giorni dalla data di acquisto.
Le riparazioni eseguite dopo la scadenza del periodo di garanzia sono a
pagamento.
Il periodo di garanzia non viene prolungato da interventi in garanzia. Ciò vale
anche per le parti sostituite e riparate.
Assistenza Italia
Tel.: 02 36003201
E-Mail: kompernass@lidl.it
IAN 103935
Assistenza Svizzera
Tel.: 0842 665566 (0,08 CHF/Min., telefonia mobile max. 0,40 CHF/Min.)
E-Mail: kompernass@lidl.ch
Raggiungibilità della hotline: dal lunedì al venerdì, dalle 8.00 alle 20.00 (CET)
Importatore
KOMPERNASS HANDELS GMBH
BURGSTRASSE 21
44867 BOCHUM
GERMANIA
www.kompernass.com
42
IAN 103935
SSWM 750 B2
Page 46

Contents
Introduction . . . . . . . . . . . . . . . . . . . . . . . . . . . . . . . . . . . . . . . . . . . . . . . . . . 44
Copyright . . . . . . . . . . . . . . . . . . . . . . . . . . . . . . . . . . . . . . . . . . . . . . . . . . . . . . . . . . . . . . 44
Limitation of liability . . . . . . . . . . . . . . . . . . . . . . . . . . . . . . . . . . . . . . . . . . . . . . . . . . . . . . 44
Intended use . . . . . . . . . . . . . . . . . . . . . . . . . . . . . . . . . . . . . . . . . . . . . . . . . . . . . . . . . . . 44
Package contents . . . . . . . . . . . . . . . . . . . . . . . . . . . . . . . . . . . . . . . . . . . . . 45
Disposal of packaging materials . . . . . . . . . . . . . . . . . . . . . . . . . . . . . . . . . . . . . . . . . . . . 45
Description of the appliance . . . . . . . . . . . . . . . . . . . . . . . . . . . . . . . . . . . . 46
Technical data . . . . . . . . . . . . . . . . . . . . . . . . . . . . . . . . . . . . . . . . . . . . . . . . 46
Safety guidelines . . . . . . . . . . . . . . . . . . . . . . . . . . . . . . . . . . . . . . . . . . . . . 47
First use . . . . . . . . . . . . . . . . . . . . . . . . . . . . . . . . . . . . . . . . . . . . . . . . . . . . . 49
Operation . . . . . . . . . . . . . . . . . . . . . . . . . . . . . . . . . . . . . . . . . . . . . . . . . . . 49
Toasting sandwiches . . . . . . . . . . . . . . . . . . . . . . . . . . . . . . . . . . . . . . . . . . . . . . . . . . . . . 49
Cleaning . . . . . . . . . . . . . . . . . . . . . . . . . . . . . . . . . . . . . . . . . . . . . . . . . . . . . 50
Storage . . . . . . . . . . . . . . . . . . . . . . . . . . . . . . . . . . . . . . . . . . . . . . . . . . . . . 51
Troubleshooting . . . . . . . . . . . . . . . . . . . . . . . . . . . . . . . . . . . . . . . . . . . . . .51
Recipes . . . . . . . . . . . . . . . . . . . . . . . . . . . . . . . . . . . . . . . . . . . . . . . . . . . . . . 52
Dutch tomato toast . . . . . . . . . . . . . . . . . . . . . . . . . . . . . . . . . . . . . . . . . . . . . . . . . . . . . . . 52
Italian toast . . . . . . . . . . . . . . . . . . . . . . . . . . . . . . . . . . . . . . . . . . . . . . . . . . . . . . . . . . . . 53
Hawaiian toast . . . . . . . . . . . . . . . . . . . . . . . . . . . . . . . . . . . . . . . . . . . . . . . . . . . . . . . . . 53
Scandia toast . . . . . . . . . . . . . . . . . . . . . . . . . . . . . . . . . . . . . . . . . . . . . . . . . . . . . . . . . . . 54
Curried turkey breast toast . . . . . . . . . . . . . . . . . . . . . . . . . . . . . . . . . . . . . . . . . . . . . . . . . 55
Disposal . . . . . . . . . . . . . . . . . . . . . . . . . . . . . . . . . . . . . . . . . . . . . . . . . . . . . 55
Warranty and service . . . . . . . . . . . . . . . . . . . . . . . . . . . . . . . . . . . . . . . . . . 56
Importer . . . . . . . . . . . . . . . . . . . . . . . . . . . . . . . . . . . . . . . . . . . . . . . . . . . . . 56
GB
SSWM 750 B2
43
Page 47

GB
Introduction
Congratulations on the purchase of your new appliance!
You have selected a modern, high-quality product. These operating instructions
are part of this product. They contain important information on safety, usage and
disposal. Before using the product, familiarise yourself with all handling and safety
guidelines. This appliance may only be used as described and for the purposes
indicated. Please also pass these operating instructions on to any future owner(s).
Copyright
This documentation is protected by copyright.
Any copying or reproduction, including in the form of extracts, or any reproduction
of images (even in a modifi ed state), is permitted only with the written authorisation of the manufacturer.
Limitation of liability
All the technical information, data and instructions regarding installation, connection and operation contained in these operating instructions corresponds to the
latest information available to us at the time of printing and takes our previous
experience and know-how into account.
No claims can be derived from the details, illustrations and descriptions in these
instructions.
The manufacturer assumes no responsibility for damage caused by failure to
observe these instructions, improper use, incompetent repairs, unauthorised
modifi cations or for the use of non-approved replacement parts.
Intended use
44
This appliance is only intended for the toasting of fi lled sandwiches.
This appliance is intended solely for use in private households. Not for commer-
cial use!
SSWM 750 B2
Page 48

Package contents
The appliance is supplied with the following components as standard:
▯ Sandwich Toaster
▯ Operating instructions
1) Remove the appliance and the operating instructions from the carton.
2) Remove all packaging material.
NOTE
Check the package for completeness and for signs of visible damage.
►
► If the delivery is not complete or has been damaged due to defective
packaging or transportation, contact the Service Hotline (see section
Warranty and Service).
Disposal of packaging materials
The packaging protects the appliance from damage during carriage.
The packaging materials have been selected for their environmental friendliness
and ease of disposal, and are therefore recyclable.
Returning the packaging to the materials cycle conserves raw materials and
reduces the amount of waste that is generated. Dispose of packaging materials
that are no longer needed in accordance with applicable local regulations.
NOTE
If possible, keep the original packaging of the appliance during the warranty
►
period so that the appliance can be packed properly for returning in the
event of a warranty claim.
GB
SSWM 750 B2
45
Page 49

GB
Description of the appliance
Figure A:
1 Cable retainer
2 “Ready” control lamp
3 Lid catch
4 “Power” control lamp
Figure B:
5 Upper toasting surface
6 Lower toasting surface
Technical data
Voltage 220 - 240V ~, 50Hz
Power consumption 750 W
46
SSWM 750 B2
Page 50

Safety guidelines
WARNING! RISK OF ELECTRIC SHOCK!
► Arrange for damaged power cables and/or plugs to be replaced
as soon as possible by a qualifi ed specialist or by Customer
Services.
► Use the appliance only in dry indoor areas, not outdoors.
NEVER immerse the appliance in water or other liquids!
Otherwise there is a risk of an electric shock.
► When cleaning, ensure that water cannot permeate into the
appliance. NEVER clean the appliance under running water.
► Ensure that the appliance can never come into contact with water.
NEVER use the appliance adjacent to water or close to vessels
containing liquids.
► Ensure that the power cable never becomes wet or damp when
the appliance is in use. Route the cable so that it cannot be
trapped or damaged in any way.
► After use, disconnect the power cable from the mains power
socket to turn off the unit.
GB
► NEVER open the housing of the appliance.
SSWM 750 B2
47
Page 51

WARNING! RISK OF INJURY!
► This appliance may be used by children of the age of 8 years or
more and by persons with reduced physical, sensory or mental
capabilities or lack of experience and/or knowledge if they are
being supervised or have been instructed with regard to the safe
use of the appliance and have understood the potential risks.
► Children must not use the appliance as a plaything.
GB
► Cleaning and user maintenance must not be performed by children
unless they are older than 8 years of age and are supervised.
Children younger than eight years of age must be kept away from
the appliance and the power cable.
► The appliance components can get hot during operation.
Therefore, only touch the handles.
► Allow the appliance to cool down completely before cleaning
or storing it.
► Take care when removing the fi nished sandwiches! The appliance
as well as the sandwiches are very hot.
► Use the appliance only on a stable, non-slippery and level surface.
► Do not use an external timer switch or a separate remote control
system to operate the appliance.
Caution! Hot surface!
CAUTION – RISK OF FIRE!
► This appliance may not be used in close vicinity to fl ammable
material.
► Do not leave the appliance unattended at any time when it is in
use.
► Operate the appliance only on heat resistant surface.
► The appliance must always be supervised during use.
48
SSWM 750 B2
Page 52

CAUTION – PROPERTY DAMAGE!
► To avoid damaging the non-stick coating of the sandwich toaster,
remove your cooked foods only with a plastic or wooden spatula
or some other suitable, non-metallic implement.
► Do not use abrasive cleansers or sharp objects for cleaning.
First use
■ Oil the non-stick coating of the toasting surfaces 5/6 with a suitable
cooking oil.
■ Insert the plug into a mains power socket.
■ Close the appliance and lock it with the lid catch 3. This must click audibly
into the lower handle.
■ Let the appliance heat up for about 10 minutes.
NOTE
During fi rst usage, a slight smell can arise (minimal smoke development is
►
also possible). This is normal and dissipates after a short time. Ensure
suffi cient ventilation. For example, by opening a window.
■ Disconnect the plug and allow the appliance to cool down.
■ Clean the appliance as described in the chapter “Cleaning”.
The appliance is now ready for use.
GB
Operation
Toasting sandwiches
1) Close the lid and lock it with the lid catch 3. This must click audibly into the
lower handle.
2) Insert the plug into a mains power socket. The red “Power” control lamp 4
lights up.
3) As soon as the appliance has heated up, the green “Ready” control lamp 2
lights up.
4) Open the lid and place two prepared sandwiches on the lower toasting
surface 6.
SSWM 750 B2
49
Page 53

GB
5) Close the lid and lock it with the lid catch 3. This must click audibly into
CAUTION – PROPERTY DAMAGE!
6) The sandwiches are ready after about 3–5 minutes. Toasting times can vary
7) When you no longer wish to prepare any more sandwiches, disconnect the
Cleaning
the lower handle. If the sandwich is so thick that the lid catch 3 cannot be
closed, remove some fi lling from the sandwiches.
To avoid damaging the non-stick coating of the sandwich toaster, remove
►
your cooked foods only with a plastic or wooden spatula or some other
suitable, non-metallic implement.
depending on the type of fi lling and personal tastes. Open the lid and take
the sandwiches out.
plug from the mains power socket.
WARNING! RISK OF ELECTRIC SHOCK
Disconnect the plug from the mains power socket before cleaning the
►
appliance.
NEVER immerse the appliance in water or other liquids! Otherwise
there is a risk of an electric shock.
WARNING! RISK OF INJURY!
► Allow the appliance to cool suffi ciently before cleaning it. Risk of burns!
50
CAUTION – PROPERTY DAMAGE!
Do not use aggressive or abrasive cleaning agents. These can damage the
►
surfaces of the appliance.
NOTE
Do not wait too long to start with the cleaning. Wait until the appliance
►
has cooled down suffi ciently that you can touch it without the risk of being
burnt. Then the food particles can be removed more easily.
■ Clean the appliance housing using only a dry or a lightly moistened cloth.
■ Wipe the toasting surfaces 5/6 with a warm, damp cloth so that all food
residues are removed.
For cooked-on residues, lay a damp cloth on the aff ected area for a while to
soften the residues. After a short time, you can then remove the residues.
SSWM 750 B2
Page 54

NOTE
For stubborn residues, use a mild detergent on a damp cloth. After cleaning
►
with detergent, wipe the toasting surfaces 5/6 again with a cloth dampened with fresh water to remove any detergent residues. After cleaning with
detergent, we recommend re-greasing the toasting surfaces 5/6 with a
suitable cooking oil.
■ Dry all parts well before re-use.
NOTE
If fat or food runs into the grooves or corners where you cannot remove
them with a damp cloth, proceed as follows:
– Dab the fats or other liquids with a piece of kitchen paper.
– Remove the residues with a wooden spatula or a small wooden
skewer.
– Afterwards, wipe off everything as described above.
Storage
■ Clean the appliance as described in the chapter “Cleaning”.
■ Wind the cable around the cable retainer 1 on the underside of the appliance
and fasten the mains plug into the small recess on the cable retainer 1.
■ Store the sandwich toaster in a dry location.
Troubleshooting
GB
SSWM 750 B2
Malfunction Cause Solution
The appliance is
not working.
The sandwiches
are too dark.
The plug is not inserted into
a mains power socket.
The appliance is defective.
The sandwiches were in the
sandwich toaster for too
long.
Connect the plug to the
power supply.
Contact the Customer
Service department.
Take out the sandwiches
earlier.
51
Page 55

GB
Recipes
Dutch tomato toast
Ingredients:
♦ 4 slices of toasting bread
♦ Water
♦ Spring onions
♦ 1 medium tomato
♦ Herb butter
♦ 2 slices of cooked ham
♦ Salt
♦ Freshly ground pepper
♦ 2 slices of young Gouda cheese
1) Wash the spring onions and let them drip dry. Halve the onions lengthwise
and then cut them into large pieces. Bring the water with salt to the boil in
a pot. Add the spring onions and blanch them for about 1 minute.
Then place the spring onions in a sieve, douse them with cold water and let
them drip dry.
2) Wash the tomatoes and dab them dry. Halve them and remove the stalks.
Cut the tomatoes into slices.
3) Spread the herb butter on the bread and place a folded slice of ham on the
buttered bread. Chop the spring onions and spread them and the tomato
pieces on the bread. Season with salt and pepper.
4) Lay the cheese slices on the slice of toast bread.
5) Spread a little herb butter on another slice of bread and use it to top your
sandwich (buttered side downwards).
52
SSWM 750 B2
Page 56

Italian toast
Ingredients:
♦ 4 slices of toasting bread
♦ 4 tbsp. tomato purée
♦ 2 tbsp mayonnaise
♦ Salt
♦ Herbs de Provence
♦ Freshly ground pepper
♦ 1 medium tomato
♦ 1 pack of Mozzarella cheese
♦ Freshly ground coloured pepper
1) Stir the tomato paste, mayonnaise, salt, herbs de Provence and pepper
together. Spread the slices of toast bread with it.
2) Wash the tomatoes and dab them dry. Halve them and remove the stalks.
Cut the tomatoes into slices.
3) Drain the Mozzarella cheese in a sieve and then cut it into slices. Cut these
in half.
4) Now add the tomato and Mozzarella slices to the already spread bread.
5) Top your sandwich with the other piece of bread.
GB
Hawaiian toast
Ingredients:
1) Drain the pineapples in a sieve.
2) Now coat the toast slice with butter.
3) Garnish the toast bread with ham and pineapple.
4) Lay the cheese on the pineapple as the last ingredient.
5) Top your sandwich with a slice of bread.
SSWM 750 B2
♦ 4 slices of toasting bread
♦ 2 slices of pineapple (tinned)
♦ Butter
♦ 2 slices of cooked ham
♦ 2 cheese slices
53
Page 57

GB
Scandia toast
Ingredients:
♦ 4 slices of toasting bread
♦ Dill
♦ 125 g yoghurt salad cream
♦ 1 tsp. Dijon mustard
♦ 1 tsp. liquid honey
♦ 20 g salmon pâté (tube from chiller cabinet)
♦ 1 cucumber
♦ 1 pack of Mozzarella cheese
♦ Smoked salmon
♦ Freshly ground pepper
1) Rinse the dill and blot it dry. Pluck the tips of the dill stems and chop the tips.
2) Mix the yoghurt salad cream with the mustard, honey, salmon cream and dill.
3) Peel the cucumber and chop it into small pieces. Slice the cucumber in half
lengthwise and scoop out the seeds with a teaspoon. Chop the halved
cucumber into small pieces.
4) Drain the Mozzarella in a sieve and cut it into slices.
5) Spread yoghurt salad cream onto a slice of bread.
6) Lay cucumber pieces onto the already spread bread, spread salmon slices
evenly on it and top with the cheese slices. Add pepper to taste.
7) Top your sandwich with a slice of bread.
54
SSWM 750 B2
Page 58

Curried turkey breast toast
Ingredients:
♦ 4 slices of toasting bread
♦ 25 g butter
♦ Sliced turkey breast
♦ Plums
♦ Cocktail curry sauce
♦ Curry powder
1) Mix until the butter with the curry sauce and curry powder.
2) Wash and dry the plums and remove the stones. Cut the plums in half and
slice the halves into thin slices.
3) Spread the curry butter onto a slice of bread.
4) Now spread the sliced turkey breast and plum slices onto the buttered
bread.
5) Top your sandwich with another toast slice.
Disposal
Under no circumstances should you dispose of the appliance
with the normal household waste. This product is subject to the
provisions of European Directive 2012/19/EU. (Waste Electrical
and Electronic Equipment).
Dispose of the appliance via an approved waste disposal company or your
municipal waste disposal facility. Please observe applicable regulations.
Please contact your waste disposal facility if you are in any doubt.
GB
SSWM 750 B2
55
Page 59

GB
Warranty and service
You are provided a 3-year warranty on this appliance, valid from the date
of purchase. This appliance has been manufactured with care and inspected
meticulously prior to delivery.
Please retain your receipt as proof of purchase. In the event of a warranty claim,
please contact your Customer Service unit by telephone. This is the only way to
guarantee free return of your goods.
NOTE
The warranty only covers claims for material and manufacturing defects,
►
not for transport damage, worn parts or damage to fragile components
such as buttons or batteries.
This appliance is intended solely for private use and not for commercial purposes.
The warranty shall be deemed void in cases of misuse or improper handling,
use of force and interventions which have not been carried out by one of our
authorised Service centres.
Your statutory rights are not restricted by this warranty. The warranty period
is not prolonged by repairs eff ected under the warranty. This also applies to
replaced and repaired components.
Any damage and defects present at the time of purchase must be reported immediately after unpacking, but no later than two days after the date of purchase.
Repairs carried out after expiry of the warranty period shall be subject to charge.
The warranty period is not prolonged by repairs eff ected under the warranty.
This also applies to replaced and repaired components.
Service Great Britain
Tel.: 0871 5000 720 (£ 0.10/Min.)
E-Mail: kompernass@lidl.co.uk
IAN 103935
Importer
56
Hotline availability: Monday to Friday 08:00 - 20:00 (CET)
KOMPERNASS HANDELS GMBH
BURGSTRASSE 21
44867 BOCHUM
GERMANY
www.kompernass.com
SSWM 750 B2
Page 60

KOMPERNASS HANDELS GMBH
BURGSTRASSE 21
44867 BOCHUM
DEUTSCHLAND / GERMANY
www.kompernass.com
Stand der Informationen · Version des informations
Versione delle informazioni · Last Information Update:
12 / 2014 · Ident.-No.: SSWM750B2-112014-2
IAN 103935
 Loading...