

SANDWICHMAKER
SANDWICH TOASTER
APPAREIL À CROQUE-MONSIEUR S
SWM 1400 B2
SANDWICHMAKER
Bedienungsanleitung
APPAREIL À CROQUE-MONSIEUR
Mode d’emploi
SENDVIČOVAČ
Návod k obsluze
TOSTADEIRA
Manual de instruções
IAN 297765
SANDWICH TOASTER
Operating instructions
SANDWICHMAKER
Gebruiksaanwijzing
SANDWICHERA
Instrucciones de uso
Klappen Sie vor dem Lesen die Seite mit den Abbildungen aus und machen Sie sich anschließend mit allen
Funktionen des Gerätes vertraut.
Before reading, unfold the page containing the illustrations and familiarise yourself with all functions of
the device.
Avant de lire le mode d‘emploi, ouvrez la page contenant les illustrations et familiarisez-vous ensuite avec
toutes les fonctions de l‘appareil.
Vouw vóór het lezen de pagina met de afbeeldingen open en maak u vertrouwd met alle functies van het
apparaat.
Před čtením si otevřete stranu s obrázky a potom se seznamte se všemi funkcemi přístroje.
Antes de empezar a leer abra la página que contiene las imágenes y, en seguida, familiarícese con todas
las funciones del dispositivo.
Antes de começar a ler abra na página com as imagens e, de seguida, familiarize-se com todas as
funções do aparelho.
DE / AT / CH Bedienungsanleitung Seite 1
GB/IE Operating instructions Page 17
FR / BE Mode d’emploi Page 33
NL / BE Gebruiksaanwijzing Pagina 49
CZ Návod k obsluze Strana 65
ES Instrucciones de uso Página 81
PT Manual de instruções Página 97
A
B

Inhaltsverzeichnis
Einführung ....................................................2
Urheberrecht ............................................................ 2
Haftungsbeschränkung .................................................... 2
Bestimmungsgemäße Verwendung ........................................... 2
Lieferumfang ..................................................3
Entsorgung der Verpackung ................................................ 3
Gerätebeschreibung ............................................4
Technische Daten ...............................................4
Sicherheitshinweise ............................................5
Erste Inbetriebnahme ...........................................7
Bedienen .....................................................8
Sandwiches rösten ........................................................ 8
Reinigen ......................................................8
Aufbewahren .................................................9
Fehlerbehebung ..............................................10
Rezepte .....................................................10
Holländischer Tomatentoast ................................................ 10
Italienischer Toast ........................................................11
Toast Hawaii ........................................................... 11
Toast Scandia ..........................................................12
Curry-Putenbrust-Toast .................................................... 13
Entsorgung. . . . . . . . . . . . . . . . . . . . . . . . . . . . . . . . . . . . . . . . . . . . . . . . . . . 13
Garantie der Kompernaß Handels GmbH .........................14
Service ................................................................ 15
Importeur .............................................................. 15
SSWM 1400 B2
DE│AT│CH
│
1 ■

Einführung
Herzlichen Glückwunsch zum Kauf Ihres neuen Gerätes!
Sie haben sich damit für ein modernes und hochwertiges Produkt entschieden.
Die Bedienungsanleitung ist Bestandteil dieses Produktes. Sie enthält wichtige
Hinweise für Sicherheit, Gebrauch und Entsorgung. Machen Sie sich vor der
Benutzung des Produkts mit allen Bedien- und Sicherheitshinweisen vertraut.
Benutzen Sie dieses Produkt nur wie beschrieben und für die angegebenen
Einsatzbereiche. Händigen Sie alle Unterlagen bei Weitergabe des Produkts an
Dritte mit aus.
Urheberrecht
Diese Dokumentation ist urheberrechtlich geschützt.
Jede Vervielfältigung, bzw. jeder Nachdruck, auch auszugsweise sowie die
Wiedergabe der Abbildungen, auch im veränderten Zustand, ist nur mit
schriftlicher Zustimmung des Herstellers gestattet.
Haftungsbeschränkung
Alle in dieser Bedienungsanleitung enthaltenen technischen Informationen, Daten
und Hinweise für den Anschluss und die Bedienung entsprechen dem letzten
Stand bei Drucklegung und erfolgen unter Berücksichtigung unserer bisherigen
Erfahrungen und Erkenntnisse nach bestem Wissen.
Aus den Angaben, Abbildungen und Beschreibungen in dieser Anleitung können
keine Ansprüche hergeleitet werden.
Der Hersteller übernimmt keine Haftung für Schäden aufgrund von Nichtbeachtung der Anleitung, nicht bestimmungsgemäßer Verwendung, unsachgemäßen
Reparaturen, unerlaubt vorgenommenen Veränderungen oder Verwendung nicht
zugelassener Ersatzteile.
Bestimmungsgemäße Verwendung
Dieses Gerät ist ausschließlich vorgesehen für das Rösten von gefüllten Sandwiches.
Dieses Gerät ist ausschließlich für die Benutzung in privaten Haushalten be-
stimmt. Benutzen Sie das Gerät nicht gewerblich!
■ 2│DE
│AT│
CH
SSWM 1400 B2

Lieferumfang
Das Gerät wird standardmäßig mit folgenden Komponenten geliefert:
Sandwichmaker
Bedienungsanleitung
1) Entnehmen Sie das Gerät und die Bedienungsanleitung aus dem Karton.
2) Entfernen Sie sämtliches Verpackungsmaterial.
HINWEIS
► Prüfen Sie die Lieferung auf Vollständigkeit und auf sichtbare Schäden.
► Bei einer unvollständigen Lieferung oder Schäden infolge mangelhafter
Verpackung oder durch Transport wenden Sie sich an die Service-Hotline
(siehe Kapitel Service).
Entsorgung der Verpackung
Die Verpackung schützt das Gerät vor Transportschäden. Die Verpackungsmaterialien sind nach umweltverträglichen und entsorgungstechnischen Gesichtspunkten ausgewählt und deshalb recyclebar.
Die Rückführung der Verpackung in den Materialkreislauf spart Rohstoffe und
verringert das Abfallaufkommen. Entsorgen Sie nicht mehr benötigte Verpackungsmaterialien gemäß den örtlich geltenden Vorschriften.
HINWEIS
► Heben Sie wenn möglich die Originalverpackung während der Garan-
tiezeit des Gerätes auf, um das Gerät im Garantiefall ordnungsgemäß
verpacken zu können.
Beachten Sie die Kennzeichnung auf den verschiedenen Verpackungsmaterialien
und trennen Sie diese gegebenenfalls gesondert. Die Verpackungsmaterialien sind
gekennzeichnet mit Abkürzungen (b) und Ziffern (a) mit folgender Bedeutung:
1–7: Kunststoffe
20–22: Papier und Pappe
80–98: Verbundstoffe
SSWM 1400 B2
DE│AT│CH
│
3 ■
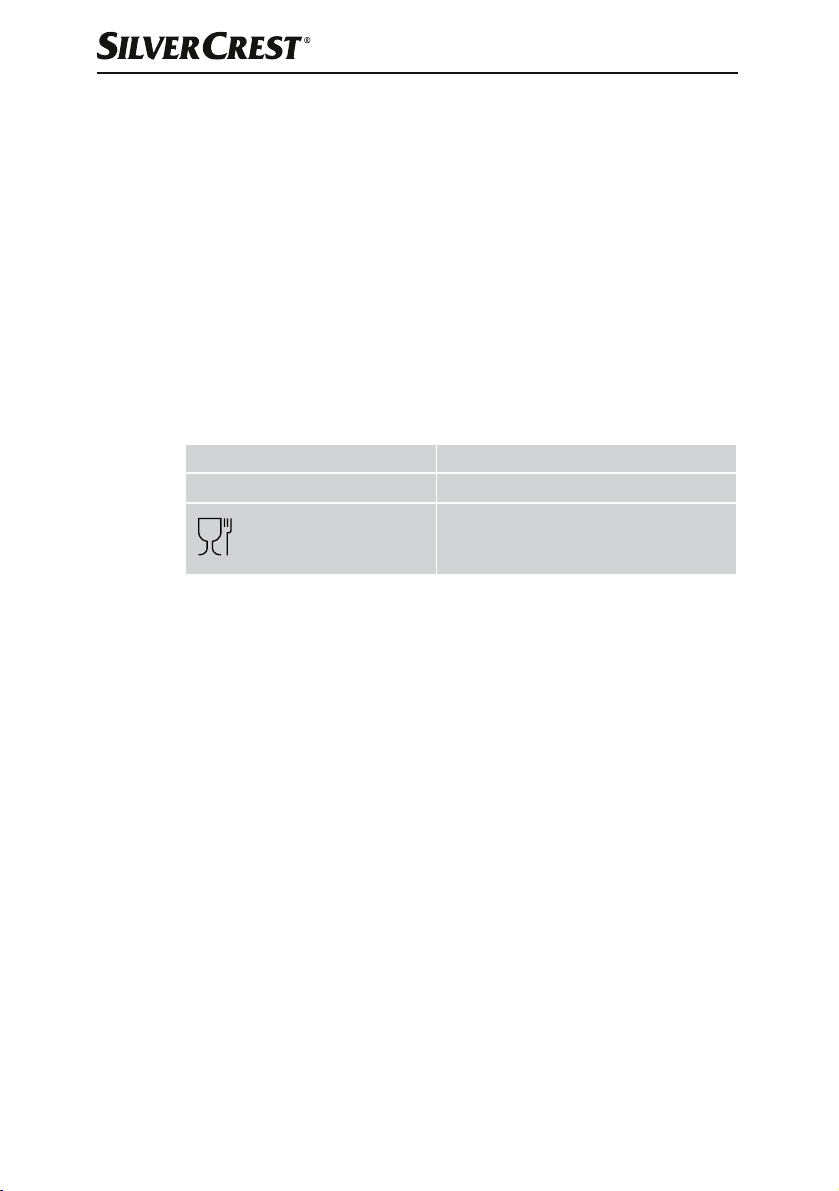
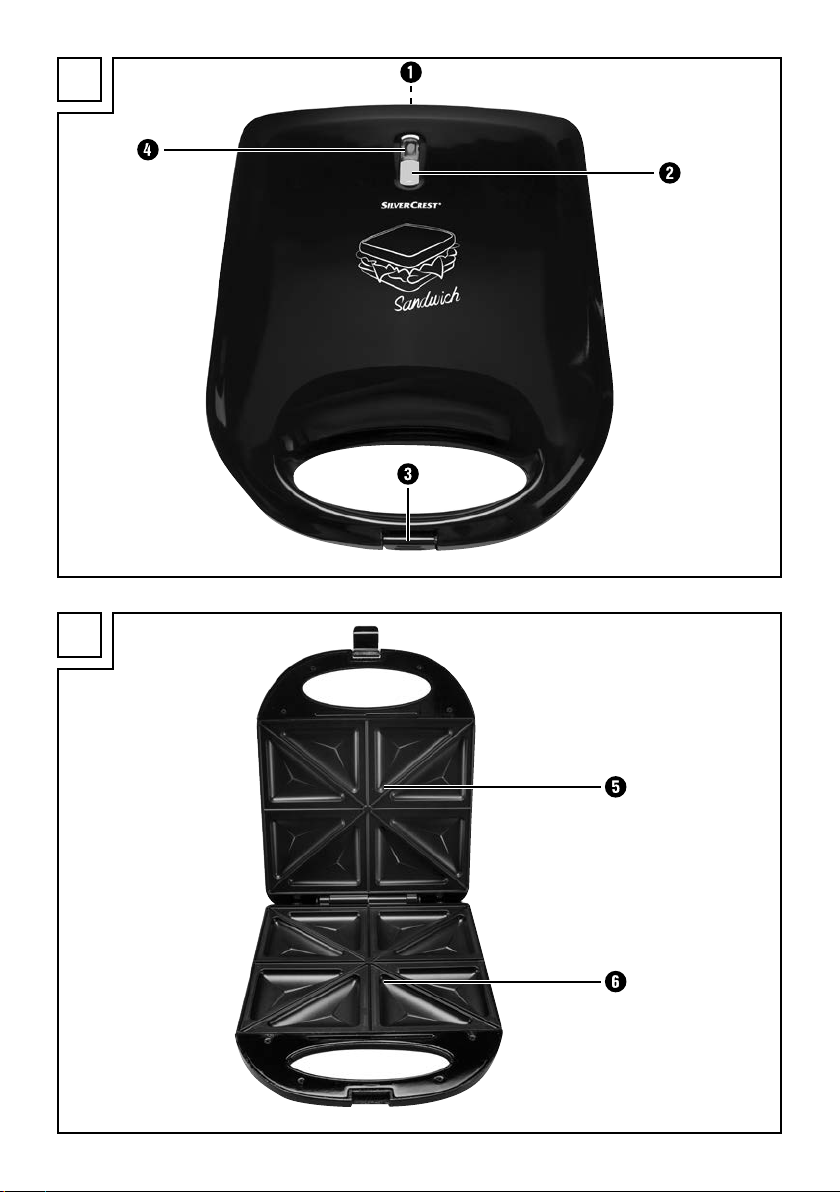
Gerätebeschreibung
Abbildung A:
1 Kabelaufwicklung
2 Kontrollleuchte „Betriebsbereit“
3 Deckelverriegelung
4 Kontrollleuchte „Power“
Abbildung B:
5 obere Toastflächen
6 untere Toastflächen
Technische Daten
Spannung 220 - 240 V ∼, 50 Hz
Leistungsaufnahme 1400 W
Alle Teile dieses Gerätes, welche mit
Lebensmitteln in Berührung kommen, sind
lebensmittelecht.
■ 4│DE
│AT│
CH
SSWM 1400 B2

Sicherheitshinweise
WARNUNG! STROMSCHLAGGEFAHR!
► Lassen Sie beschädigte Netzkabel oder Netzstecker sofort
von autorisiertem Fachpersonal ersetzen, um Gefährdungen
zu vermeiden.
► Verwenden Sie das Gerät nur in trockenen Räumen, nicht im
Freien.
Tauchen Sie das Gerät niemals in Wasser oder andere Flüssigkeiten! Andernfalls besteht Lebensgefahr
durch elektrischen Schlag.
► Achten Sie beim Reinigen darauf, dass kein Wasser in das
Innere des Gerätes gelangt. Reinigen Sie das Gerät nie
unter fließendem Wasser.
► Stellen Sie sicher, dass das Gerät niemals mit Wasser in
Berührung kommen kann. Betreiben Sie das Gerät niemals in
der Nähe von Wasser oder neben Gefäßen, die Flüssigkeit
enthalten.
► Achten Sie darauf, dass im Betrieb das Netzkabel niemals
nass oder feucht wird. Führen Sie es so, dass es nicht eingeklemmt oder anderweitig beschädigt werden kann.
► Ziehen Sie nach jedem Gebrauch den Netzstecker aus der
Netzsteckdose, um das Gerät auszuschalten.
► Öffnen Sie nie das Gehäuse des Gerätes.
SSWM 1400 B2
DE│AT│CH
│
5 ■

WARNUNG! VERLETZUNGSGEFAHR!
► Dieses Gerät kann von Kindern ab 8 Jahren sowie von Per-
sonen mit reduzierten physischen, sensorischen oder mentalen Fähigkeiten oder Mangel an Erfahrung und/oder Wissen benutzt werden, wenn sie beaufsichtigt oder bezüglich
des sicheren Gebrauchs des Gerätes unterwiesen wurden
und die daraus resultierenden Gefahren verstanden haben.
► Kinder dürfen nicht mit dem Gerät spielen.
► Reinigung und Benutzer-Wartung dürfen nicht durch Kinder
durchgeführt werden, es sei denn, sie sind älter als 8 Jahre
und beaufsichtigt. Kinder jünger als 8 Jahre sind vom Gerät
und der Anschlussleitung fernzuhalten.
► Die Geräteteile können im Betrieb heiß werden. Fassen Sie
daher nur die Griffe an.
► Lassen Sie das Gerät erst vollständig abkühlen, bevor Sie es
reinigen oder es verstauen.
► Seien Sie vorsichtig beim Herausnehmen der fertigen Sand-
wiches. Das Gerät, sowie die Sandwiches sind sehr heiß.
► Betreiben Sie das Gerät nur auf einer stabilen, rutschfesten
und ebenen Stellfläche.
► Benutzen Sie keine externe Zeitschaltuhr oder ein separates
Fernwirksystem, um das Gerät zu betreiben.
► Achtung! Heiße Oberfläche!
■ 6│DE
│AT│
CH
SSWM 1400 B2

ACHTUNG - BRANDGEFAHR!
► Das Gerät darf nicht in der Nähe von brennbaren Materiali-
en verwendet werden.
► Decken Sie das Gerät nicht ab, solange es in Betrieb ist.
► Betreiben Sie das Gerät nur auf einer hitzebeständigen
Unterlage.
► Betreiben Sie das Gerät niemals unbeaufsichtigt.
ACHTUNG - SACHSCHADEN!
► Entnehmen Sie die Speisen nur mit einem Kunststoff- oder
Holzspatel oder einem anderen geeigneten, nichtmetallischen Gegenstand, um die Antihaftbeschichtung des Sandwichmakers nicht zu zerstören.
► Benutzen Sie zur Reinigung keine scharfen Putzmittel und
spitze Gegenstände.
Erste Inbetriebnahme
■ Reiben Sie einmalig die Antihaftbeschichtung der Toastflächen 5/6 mit
zum Kochen geeignetem Öl ein.
■ Stecken Sie den Netzstecker in eine Netzsteckdose.
■ Schließen Sie das Gerät und verriegeln Sie es mit der Deckelverriegelung 3.
Diese muss spürbar am unteren Griff einrasten.
■ Lassen Sie das Gerät ca. 10 - 15 Minuten aufheizen.
HINWEIS
Das Gerät ist nun betriebsbereit.
SSWM 1400 B2
► Beim ersten Gebrauch kann ein leichter Geruch entstehen (auch geringe
Rauchentwicklung möglich). Dieser ist normal und verliert sich nach kurzer
Zeit. Sorgen Sie bitte für eine ausreichende Entlüftung. Öffnen Sie zum
Beispiel ein Fenster.
■ Ziehen Sie den Netzstecker und lassen Sie das Gerät abkühlen.
■ Reinigen Sie das Gerät wie im Kapitel „Reinigen“ beschrieben.
DE│AT│CH
│
7 ■
Bedienen
Sandwiches rösten
1) Schließen Sie den Deckel und verriegeln Sie ihn mit der Deckelverriegelung 3.
Diese muss spürbar am unteren Griff einrasten.
2) Stecken Sie den Netzstecker in eine Netzsteckdose. Die rote Kontrollleuchte
„Power“ 4 leuchtet.
3) Sobald das Gerät aufgeheizt ist, leuchtet die grüne Kontrollleuchte „Betriebsbereit“ 2.
4) Öffnen Sie den Deckel und legen Sie die vorbereiteten Sandwiches auf die
unteren Toastflächen 6.
5) Schließen Sie den Deckel und verriegeln Sie ihn mit der Deckelverriegelung 3.
Diese muss spürbar am unteren Griff einrasten. Sollte das Sandwich zu dick
sein, so dass sich die Deckelverriegelung 3 nicht schließen lässt, entfernen
Sie etwas Belag von den Sandwiches.
ACHTUNG - SACHSCHADEN!
► Entnehmen Sie die Sandwiches nur mit einem Kunststoff- oder Holzspatel
oder einem anderen geeigneten, nichtmetallischen Gegenstand, um die
Antihaftbeschichtung des Sandwichmakers nicht zu zerstören.
6) Nach ca. 4 - 8 Minuten sind die Sandwiches fertig. Diese Zeitangabe kann,
je nach verwendetem Belag und persönlichem Geschmack, variieren. Öffnen
Sie den Deckel und entnehmen Sie die Sandwiches.
7) Wenn Sie keine weiteren Sandwiches mehr zubereiten wollen, ziehen Sie
den Netzstecker aus der Netzsteckdose.
Reinigen
ACHTUNG - SACHSCHADEN!
■ 8│DE
│AT│
WARNUNG! STROMSCHLAGGEFAHR
► Ziehen Sie erst den Netzstecker aus der Steckdose, bevor Sie das Gerät
reinigen.
Tauchen Sie das Gerät niemals in Wasser oder andere Flüssigkeiten!
Andernfalls besteht Lebensgefahr durch elektrischen Schlag.
WARNUNG! VERLETZUNGSGEFAHR!
► Lassen Sie das Gerät vor der Reinigung abkühlen. Verbrennungsgefahr!
► Keine scharfen oder scheuernden Reinigungsmittel verwenden. Das greift
die Oberfläche des Gerätes an.
CH
SSWM 1400 B2

HINWEIS
► Warten Sie mit der Reinigung nicht zu lange. Warten Sie, bis sich das Ge-
rät soweit abgekühlt hat, dass Sie es ohne Verbrennungsgefahr anfassen
können. Dann lassen sich die Lebensmittelreste besser entfernen.
■ Das Gehäuse reinigen Sie mit einem trockenen Tuch oder einem leicht ange-
feuchteten Lappen. Bei Bedarf geben Sie etwas Spülmittel auf den Lappen.
Wischen Sie mit einem nur mit klarem Wasser befeuchteteten Tuch nach, um
eventuelle Spülmittelreste zu beseitigen.
■ Wischen Sie die Toastflächen 5/6 mit einem mit warmen Wasser befeuch-
teten Lappen ab, so dass alle Lebensmittelreste entfernt sind.
Bei festgebackenen Rückständen können Sie den feuchten Lappen auf diese
Stellen legen, so dass die Rückstände eingeweicht werden. Nach einiger Zeit
lassen sich die Rückstände dann entfernen.
HINWEIS
► Bei hartnäckigen Verschmutzungen geben Sie ein mildes Spülmittel auf
den feuchten Lappen. Wischen Sie nach der Reinigung mit Spülmittel die
Toastflächen 5/6 noch einmal mit einem mit klarem Wasser befeuchteten Tuch ab, so dass alle Spülmittelreste entfernt werden. Nach der
Reinigung mit Spülmittel empfehlen wir die Toastflächen 5/6 wieder mit
zum Kochen geeignetem Öl einzureiben.
■ Trocknen Sie alle Teile vor dem erneuten Gebrauch gut ab.
HINWEIS
Sollten Fett oder Lebensmittel in Spalten oder Ecken hereingelaufen sein,
wo Sie diese nicht mit einem feuchten Tuch entfernen können, gehen Sie
folgendermaßen vor:
– Tupfen Sie Fett oder andere Flüssigkeiten mit einem Stück Küchen-
papier ab.
– Entfernen Sie Rückstände mit einem Holzspatel oder einem kleinen
Holzspieß.
– Wischen Sie dann alles noch einmal wie bereits beschrieben ab.
Aufbewahren
■ Reinigen Sie das Gerät wie im Kapitel „Reinigen“ beschrieben.
■ Wickeln Sie das Netzkabel um die Kabelaufwicklung 1 an der Unterseite
■ Bewahren Sie den Sandwichmaker an einem trockenen Ort auf.
SSWM 1400 B2
des Gerätes. Fixieren Sie das Netzkabel mit dem Kabelclip. Fixieren Sie
den Netzstecker, indem Sie diesen in die Aussparungen an der Platte der
Kabelaufwicklung 1 stecken.
DE│AT│CH
│
9 ■

Fehlerbehebung
Störung Ursache Abhilfe
Der Netzstecker steckt nicht
Das Gerät funktioniert nicht.
Die Sandwiches
werden zu dunkel.
in der Netzsteckdose.
Das Gerät ist defekt.
Die Sandwiches waren zu
lange im Sandwichmaker.
Rezepte
Holländischer Tomatentoast
Zutaten:
♦ 8 Scheiben Toastbrot
♦ Wasser
♦ Frühlingszwiebeln
♦ 2 mittelgroße Tomate
♦ Kräuterbutter
♦ 4 Scheiben gekochter Schinken
♦ Salz
♦ frisch gemahlener Pfeffer
♦ 4 Scheiben junger Gouda-Käse
1) Waschen Sie die Frühlingszwiebeln und lassen diese anschließend abtropfen.
Halbieren Sie die Frühlingszwiebeln längs und schneiden Sie diese in große
Stücke. Bringen Sie das Wasser mit Salz in einem Topf zum Kochen. Geben
Sie die Frühlingszwiebeln hinzu und blanchieren Sie sie etwa 1 Minute.
Anschließend geben Sie die Frühlingszwiebeln in ein Sieb, übergießen Sie
sie mit kaltem Wasser und lassen Sie sie abtropfen.
2) Waschen Sie die Tomaten und tupfen Sie sie trocken. Halbieren Sie sie und
entfernen Sie die Stängelansätze. Schneiden Sie die Tomaten in Scheiben.
3) Bestreichen Sie eine Toastscheibe mit Kräuterbutter und legen Sie eine
zusammengeklappte Scheibe Schinken auf die bestrichene Toastscheibe.
Verteilen Sie die Frühlingszwiebelstücke und Tomatenscheiben darauf. Mit
Salz und Pfeffer würzen.
4) Legen Sie die Käsescheiben auf die Toastscheibe.
5) Bestreichen Sie eine weitere Toastscheibe mit etwas Kräuterbutter und decken Sie Ihr Sandwich mit der bestrichenen Seite nach unten damit zu.
Verbinden Sie den Netzstecker mit dem Stromnetz.
Wenden Sie sich an den
Kundendienst.
Nehmen Sie die Sandwiches eher heraus.
■ 10│DE
│AT│
CH
SSWM 1400 B2

Italienischer Toast
Zutaten:
♦ 8 Scheiben Toastbrot
♦ 8 EL Tomatenmark
♦ 4 EL Mayonnaise
♦ Salz
♦ Kräuter der Provence
♦ frisch gemahlener Pfeffer
♦ 2 mittelgroße Tomate
♦ 2 Pck. Mozzarella-Käse
♦ frisch gemahlener bunter Pfeffer
1) Verrühren Sie das Tomatenmark, die Mayonnaise, das Salz, die Kräuter der
Provence und den Pfeffer miteinander. Bestreichen Sie die Toastscheiben
damit.
2) Waschen Sie die Tomaten und tupfen Sie sie trocken. Halbieren Sie sie und
entfernen Sie die Stängelansätze. Schneiden Sie die Tomaten in Scheiben.
3) Lassen Sie den Mozzarella-Käse in einem Sieb abtropfen und schneiden Sie
ihn in Scheiben. Diese nochmals halbieren.
4) Die bereits bestrichene Toastscheibe wird nun mit Tomaten- und Mozzarellascheiben belegt und mit Pfeffer bestreut.
5) Decken Sie Ihr Sandwich mit der anderen Toastscheibe zu.
Toast Hawaii
Zutaten:
1) Lassen Sie die Ananas in einem Sieb abtropfen.
2) Bestreichen Sie nun die Toastscheibe mit Butter.
3) Belegen Sie die Toastscheibe mit dem Schinken und der Ananas.
4) Der Käse wird als letztes über die Ananas gelegt.
5) Decken Sie Ihr Sandwich mit einer Toastscheibe zu.
SSWM 1400 B2
♦ 8 Scheiben Toastbrot
♦ 4 Scheiben Ananas (aus der Dose)
♦ Butter
♦ 4 Scheiben gekochter Schinken
♦ 4 Käsescheibletten
DE│AT│CH
│
11 ■

Toast Scandia
Zutaten:
♦ 8 Scheiben Toastbrot
♦ Dill
♦ 250 g Joghurt-Salat-Creme
♦ 2 TL Dijon-Senf
♦ 2 TL flüssiger Honig
♦ 40 g Echtlachscreme (Tube aus dem Kühlregal)
♦ 1 Salatgurke
♦ 2 Pck. Mozzarella-Käse
♦ 200 g Räucherlachs, in Scheiben
♦ frisch gemahlener Pfeffer
1) Spülen Sie den Dill ab und tupfen Sie ihn trocken. Zupfen Sie die Spitzen
von den Stängeln des Dills und hacken Sie die Spitzen.
2) Verrühren Sie die Joghurt-Salat-Creme mit dem Senf, dem Honig, der Lachscreme und dem Dill.
3) Schälen Sie die Gurke und schneiden die Enden ab. Halbieren Sie die Gurke der Länge nach und schaben Sie die Kerne mit einem Teelöffel heraus.
Schneiden Sie die Gurkenhälfte in Stücke.
4) Lassen Sie den Mozzarella in einem Sieb abtropfen und schneiden Sie ihn in
Scheiben.
5) Bestreichen Sie eine Toastscheibe mit Joghurt-Salat-Creme.
6) Legen Sie ein Gurken-Stück auf die bestrichene Toastscheibe, verteilen Sie
die Lachsscheiben gleichmäßig darauf und belegen Sie die Toastscheibe mit
den Käsescheiben. Schmecken Sie mit Pfeffer ab.
7) Decken Sie Ihr Sandwich mit einer Toastscheibe zu.
■ 12│DE
│AT│
CH
SSWM 1400 B2

Curry-Putenbrust-Toast
Zutaten:
♦ 8 Scheiben Toastbrot
♦ 50 g Butter
♦ Putenbrustaufschnitt
♦ Pflaumen
♦ Cocktail-Currysauce
♦ Currypulver
1) Verrühren Sie die Butter mit der Currysauce und dem Currypulver.
2) Waschen Sie die Pflaumen, trocknen und entkernen Sie sie. Halbieren Sie
die Pflaumen und schneiden Sie die Hälften in dünne Scheiben.
3) Bestreichen Sie eine Toastscheibe mit der Curry-Butter.
4) Belegen Sie nun die bestrichene Toastscheibe mit dem Putenbrustaufschnitt
und den Pflaumenscheiben.
5) Decken Sie Ihr Sandwich mit einer weiteren Toastscheibe zu.
Entsorgung
Werfen Sie das Gerät keinesfalls in den normalen Hausmüll.
Dieses Produkt unterliegt der europäischen Richtlinie 2012/19/EU.
(Waste Electrical and Electronic Equipment).
Entsorgen Sie das Gerät über einen zugelassenen Entsorgungsbetrieb oder über
Ihre kommunale Entsorgungseinrichtung. Beachten Sie die aktuell geltenden
Vorschriften. Setzen Sie sich im Zweifelsfall mit Ihrer Entsorgungseinrichtung in
Verbindung.
SSWM 1400 B2
DE│AT│CH
│
13 ■

Garantie der Kompernaß Handels GmbH
Sehr geehrte Kundin, sehr geehrter Kunde,
Sie erhalten auf dieses Gerät 3 Jahre Garantie ab Kaufdatum. Im Falle von
Mängeln dieses Produkts stehen Ihnen gegen den Verkäufer des Produkts gesetzliche Rechte zu. Diese gesetzlichen Rechte werden durch unsere im Folgenden
dargestellte Garantie nicht eingeschränkt.
Garantiebedingungen
Die Garantiefrist beginnt mit dem Kaufdatum. Bitte bewahren Sie den OriginalKassenbon gut auf. Diese Unterlage wird als Nachweis für den Kauf benötigt.
Tritt innerhalb von drei Jahren ab dem Kaufdatum dieses Produkts ein Materialoder Fabrikationsfehler auf, wird das Produkt von uns – nach unserer Wahl – für
Sie kostenlos repariert oder ersetzt. Diese Garantieleistung setzt voraus, dass
innerhalb der Drei-Jahres-Frist das defekte Gerät und der Kaufbeleg (Kassenbon)
vorgelegt und schriftlich kurz beschrieben wird, worin der Mangel besteht und
wann er aufgetreten ist.
Wenn der Defekt von unserer Garantie gedeckt ist, erhalten Sie das reparierte
oder ein neues Produkt zurück. Mit Reparatur oder Austausch des Produkts
beginnt kein neuer Garantiezeitraum.
Garantiezeit und gesetzliche Mängelansprüche
Die Garantiezeit wird durch die Gewährleistung nicht verlängert. Dies gilt auch
für ersetzte und reparierte Teile. Eventuell schon beim Kauf vorhandene Schäden
und Mängel müssen sofort nach dem Auspacken gemeldet werden. Nach Ablauf
der Garantiezeit anfallende Reparaturen sind kostenpflichtig.
Garantieumfang
Das Gerät wurde nach strengen Qualitätsrichtlinien sorgfältig produziert und vor
Auslieferung gewissenhaft geprüft.
Die Garantieleistung gilt für Material- oder Fabrikationsfehler. Diese Garantie
erstreckt sich nicht auf Produktteile, die normaler Abnutzung ausgesetzt sind und
daher als Verschleißteile angesehen werden können oder für Beschädigungen
an zerbrechlichen Teilen, z. B. Schalter, Akkus, Backformen oder Teile die aus
Glas gefertigt sind.
Diese Garantie verfällt, wenn das Produkt beschädigt, nicht sachgemäß benutzt
oder gewartet wurde. Für eine sachgemäße Benutzung des Produkts sind alle
in der Bedienungsanleitung aufgeführten Anweisungen genau einzuhalten.
Verwendungszwecke und Handlungen, von denen in der Bedienungsanleitung
abgeraten oder vor denen gewarnt wird, sind unbedingt zu vermeiden.
Das Produkt ist nur für den privaten und nicht für den gewerblichen Gebrauch
bestimmt. Bei missbräuchlicher und unsachgemäßer Behandlung, Gewaltanwendung und bei Eingriffen, die nicht von unserer autorisierten Service-Niederlassung
vorgenommen wurden, erlischt die Garantie.
■ 14│DE
│AT│
CH
SSWM 1400 B2
Abwicklung im Garantiefall
Um eine schnelle Bearbeitung ihres Anliegens zu gewährleisten, folgen Sie bitte
den folgenden Hinweisen:
■ Bitte halten Sie für alle Anfragen den Kassenbon und die Artikelnummer (z. B.
IAN 12345) als Nachweis für den Kauf bereit.
■ Die Artikelnummer entnehmen Sie bitte dem Typenschild, einer Gravur, auf
dem Titelblatt ihrer Anleitung (unten links) oder als Aufkleber auf der Rückoder Unterseite.
■ Sollten Funktionsfehler oder sonstige Mängel auftreten kontaktieren Sie zunächst
die nachfolgend benannte Serviceabteilung telefonisch oder per E-Mail.
■ Ein als defekt erfasstes Produkt können Sie dann unter Beifügung des Kauf-
belegs (Kassenbon) und der Angabe, worin der Mangel besteht und wann
er aufgetreten ist, für Sie portofrei an die Ihnen mitgeteilte Service-Anschrift
übersenden.
Auf www.lidl-service.com können Sie diese und viele weitere H Produktvideos und Software herunterladen.
Service
Service Deutschland
Tel.: 0800 5435 111 (Kostenfrei aus dem dt. Festnetz/Mobilfunknetz)
E-Mail: kompernass@lidl.de
Service Österreich
Tel.: 0820 201 222 (0,15 EUR/Min.)
E-Mail: kompernass@lidl.at
Service Schweiz
Tel.: 0842 665566 (0,08 CHF/Min., Mobilfunk max. 0,40 CHF/Min.)
E-Mail: kompernass@lidl.ch
IAN 297765
Importeur
Bitte beachten Sie, dass die folgende Anschrift keine Serviceanschrift ist.
Kontaktieren Sie zunächst die benannte Servicestelle.
KOMPERNASS HANDELS GMBH
BURGSTRASSE 21
DE - 44867 BOCHUM
DEUTSCHLAND
www.kompernass.com
SSWM 1400 B2
DE│AT│CH
│
15 ■

■ 16│DE
│AT│
CH
SSWM 1400 B2

Contents
Introduction ..................................................18
Copyright .............................................................. 18
Limitation of liability ...................................................... 18
Intended use ........................................................... 18
Package contents .............................................19
Disposal of packaging materials ............................................19
Description of the appliance ....................................20
Technical data ................................................20
Safety guidelines .............................................21
First use .....................................................23
Operation ...................................................24
Toasting sandwiches ..................................................... 24
Cleaning .....................................................24
Storage .....................................................25
Troubleshooting ..............................................26
Recipes ......................................................26
Dutch tomato toast ....................................................... 26
Italian toast ............................................................ 27
Hawaiian toast .........................................................27
Scandia toast ........................................................... 28
Curried turkey breast toast ................................................. 29
Disposal .....................................................29
Kompernass Handels GmbH warranty ............................30
Service ................................................................ 31
Importer ............................................................... 31
SSWM 1400 B2
GB│IE
│
17 ■

Introduction
Congratulations on the purchase of your new appliance!
You have selected a modern, high-quality product. These operating instructions
are part of this product. They contain important information on safety, usage and
disposal. Before using the product, familiarise yourself with all handling and safety
guidelines. This appliance may only be used as described and for the purposes
indicated. Please also pass these operating instructions on to any future owner(s).
Copyright
This documentation is protected by copyright.
Any copying or reproduction, including in the form of extracts, or any reproduction
of images (even in a modified state), is permitted only with the written authorisation
of the manufacturer.
Limitation of liability
All the technical information, data and instructions regarding installation, connection
and operation contained in these operating instructions corresponds to the latest
information available to us at the time of printing and takes our previous experience
and know-how into account.
No claims can be derived from the details, illustrations and descriptions in these
instructions.
The manufacturer assumes no responsibility for damage caused by failure to
observe these instructions, improper use, incompetent repairs, unauthorised
modifications or for the use of non-approved replacement parts.
Intended use
This appliance is only intended for the toasting of filled sandwiches.
This appliance is intended solely for use in private households. Not for commercial use!
■ 18│GB
│
IE
SSWM 1400 B2
Package contents
The appliance is supplied with the following components as standard:
Sandwich Toaster
Operating instructions
1) Remove the appliance and the operating instructions from the carton.
2) Remove all packaging material.
NOTE
► Check the package for completeness and for signs of visible damage.
► If the delivery is not complete or has been damaged due to defective
packaging or transportation, contact the Service Hotline (see section
Service).
Disposal of packaging materials
The packaging protects the appliance from damage during carriage.
The packaging materials have been selected for their environmental friendliness
and ease of disposal, and are therefore recyclable.
Returning the packaging to the materials cycle conserves raw materials and
reduces the amount of waste that is generated. Dispose of packaging materials
that are no longer needed in accordance with applicable local regulations.
NOTE
► If possible, keep the original packaging of the appliance during the warranty
period so that the appliance can be packed properly for returning in the
event of a warranty claim.
Note the labelling on the packaging and separate the packaging material
components for disposal if necessary. The packaging material is labelled with
abbreviations (b) and numbers (a) with the following meanings:
1–7: Plastics
20–22: Paper and cardboard
80–98: Composites
SSWM 1400 B2
GB│IE
│
19 ■

Description of the appliance
Figure A:
1 Cable retainer
2 “Ready” control lamp
3 Lid catch
4 “Power” control lamp
Figure B:
5 Upper toasting surface
6 Lower toasting surface
Technical data
Voltage 220 - 240V ~, 50Hz
Power consumption 1400 W
All of the parts of this appliance that come
into contact with food are food-safe.
■ 20│GB
│
IE
SSWM 1400 B2
Safety guidelines
WARNING! RISK OF ELECTRIC SHOCK!
► Arrange for damaged power cables and/or plugs to be
replaced as soon as possible by a qualified specialist or by
Customer Services.
► Use the appliance only in dry indoor areas, not outdoors.
NEVER immerse the appliance in water or other liquids!
Otherwise there is a risk of an electric shock.
► When cleaning, ensure that water cannot permeate into the
appliance. NEVER clean the appliance under running water.
► Ensure that the appliance can never come into contact with
water. NEVER use the appliance adjacent to water or close
to vessels containing liquids.
► Ensure that the power cable never becomes wet or damp
when the appliance is in use. Route the cable so that it cannot be trapped or damaged in any way.
► After use, disconnect the power cable from the mains power
socket to turn off the unit.
► NEVER open the housing of the appliance.
SSWM 1400 B2
GB│IE
│
21 ■

WARNING! RISK OF INJURY!
► This appliance may be used by children of the age of 8
years or more and by persons with reduced physical,
sensory or mental capabilities or lack of experience and/
or knowledge if they are being supervised or have been
instructed with regard to the safe use of the appliance and
have understood the potential risks.
► Children must not use the appliance as a plaything.
► Cleaning and user maintenance must not be performed by
children unless they are older than 8 years of age and are
supervised. Children younger than eight years of age must
be kept away from the appliance and the power cable.
► The appliance components can get hot during operation.
Therefore, only touch the handles.
► Allow the appliance to cool down completely before cleaning
or storing it.
► Take care when removing the finished sandwiches!
The appliance as well as the sandwiches are very hot.
► Use the appliance only on a stable, non-slippery and level
surface.
► Do not use an external timer switch or a separate remote
control system to operate the appliance.
Caution! Hot surface!
■ 22│GB
│
IE
SSWM 1400 B2

CAUTION – RISK OF FIRE!
► This appliance may not be used in close vicinity to flammable
material.
► Do not leave the appliance unattended at any time when it
is in use.
► Operate the appliance only on heat resistant surface.
► The appliance must always be supervised during use.
CAUTION – PROPERTY DAMAGE!
► To avoid damaging the non-stick coating of the sandwich
toaster, remove your cooked foods only with a plastic or wooden
spatula or some other suitable, non-metallic implement.
► Do not use abrasive cleansers or sharp objects for cleaning.
First use
■ Oil the non-stick coating of the toasting surfaces 5/6 with a suitable
cooking oil.
■ Insert the plug into a mains power socket.
■ Close the appliance and lock it with the lid catch 3. This must click audibly
into the lower handle.
■ Let the appliance heat up for about 10 - 15 minutes.
NOTE
The appliance is now ready for use.
SSWM 1400 B2
► During first usage, a slight smell can arise (minimal smoke development is
also possible). This is normal and dissipates after a short time. Ensure
sufficient ventilation. For example, by opening a window.
■ Disconnect the plug and allow the appliance to cool down.
■ Clean the appliance as described in the chapter “Cleaning”.
GB│IE
│
23 ■
Operation
Toasting sandwiches
1) Close the lid and lock it with the lid catch 3. This must click audibly into the
lower handle.
2) Insert the plug into a mains power socket. The red “Power” control lamp 4
lights up.
3) As soon as the appliance has heated up, the green “Ready” control lamp 2
lights up.
4) Open the lid and place prepared sandwiches on the lower toasting surfaces 6.
5) Close the lid and lock it with the lid catch 3. This must click audibly into
the lower handle. If the sandwich is so thick that the lid catch 3 cannot be
closed, remove some filling from the sandwiches.
CAUTION – PROPERTY DAMAGE!
► To avoid damaging the non-stick coating of the sandwich toaster, remove
your cooked foods only with a plastic or wooden spatula or some other
suitable, non-metallic implement.
6) The sandwiches are ready after about 4–8 minutes. Toasting times can vary
depending on the type of filling and personal tastes. Open the lid and take
the sandwiches out.
7) When you no longer wish to prepare any more sandwiches, disconnect the
plug from the mains power socket.
Cleaning
CAUTION – PROPERTY DAMAGE!
■ 24│GB
WARNING! RISK OF ELECTRIC SHOCK
► Disconnect the plug from the mains power socket before cleaning the
appliance.
NEVER immerse the appliance in water or other liquids! Otherwise
there is a risk of an electric shock.
WARNING! RISK OF INJURY!
► Allow the appliance to cool sufficiently before cleaning it. Risk of burns!
► Do not use aggressive or abrasive cleaning agents. These can damage the
surfaces of the appliance.
│
IE
SSWM 1400 B2

NOTE
► Do not wait too long to start with the cleaning. Wait until the appliance
has cooled down sufficiently that you can touch it without the risk of being
burnt. Then the food particles can be removed more easily.
■ Clean the appliance housing using only a dry or a lightly moistened cloth.
If necessary, use a little washing-up liquid on the cloth. Afterwards, wipe with
a cloth moistened only with fresh water to ensure that no detergent remains
on the appliance.
■ Wipe the toasting surfaces 5/6 with a warm, damp cloth so that all food
residues are removed.
For cooked-on residues, lay a damp cloth on the affected area for a while to
soften the residues. After a short time, you can then remove the residues.
NOTE
► For stubborn residues, use a mild detergent on a damp cloth. After cleaning with
detergent, wipe the toasting surfaces 5/6 again with a cloth dampened
with fresh water to remove any detergent residues. After cleaning with
detergent, we recommend re-greasing the toasting surfaces 5/6 with a
suitable cooking oil.
■ Dry all parts well before re-use.
NOTE
If fat or food runs into the grooves or corners where you cannot remove them
with a damp cloth, proceed as follows:
– Dab the fats or other liquids with a piece of kitchen paper.
– Remove the residues with a wooden spatula or a small wooden skewer.
– Afterwards, wipe off everything as described above.
Storage
SSWM 1400 B2
■ Clean the appliance as described in the chapter “Cleaning”.
■ Wind the power cable around the cable retainer 1 on the underside of the
appliance. Fix the power cable in place with the cable clip. Fix the power
plug in place, by pushing it into the recesses in the cable retainer 1 plate.
■ Store the sandwich toaster in a dry location.
GB│IE
│
25 ■

Troubleshooting
Malfunction Cause Solution
The appliance is
not working.
The sandwiches
are too dark.
Recipes
Dutch tomato toast
Ingredients:
♦ Slices of toasting bread
♦ Water
♦ Spring onions
♦ 2 medium tomato
♦ Herb butter
♦ 4 slices of cooked ham
♦ Salt
♦ Freshly ground pepper
♦ 4 slices of young Gouda cheese
1) Wash the spring onions and let them drip dry. Halve the onions lengthwise
and then cut them into large pieces. Bring the water with salt to the boil in
a pot. Add the spring onions and blanch them for about 1 minute.
Then place the spring onions in a sieve, douse them with cold water and let
them drip dry.
2) Wash the tomatoes and dab them dry. Halve them and remove the stalks.
Cut the tomatoes into slices.
3) Spread the herb butter on the bread and place a folded slice of ham on the
buttered bread. Chop the spring onions and spread them and the tomato
pieces on the bread. Season with salt and pepper.
4) Lay the cheese slices on the slice of toast bread.
5) Spread a little herb butter on another slice of bread and use it to top your
sandwich (buttered side downwards).
The plug is not inserted into
a mains power socket.
The appliance is defective.
The sandwiches were in
the sandwich toaster for
too long.
Connect the plug to the
power supply.
Contact the Customer
Service department.
Take out the sandwiches
earlier.
■ 26│GB
│
IE
SSWM 1400 B2

Italian toast
Ingredients:
♦ 8 slices of toasting bread
♦ 8 tbsp. tomato purée
♦ 4 tbsp mayonnaise
♦ Salt
♦ Herbs de Provence
♦ Freshly ground pepper
♦ 2 medium tomato
♦ 2 pack of Mozzarella cheese
♦ Freshly ground coloured pepper
1) Stir the tomato paste, mayonnaise, salt, herbs de Provence and pepper
together. Spread the slices of toast bread with it.
2) Wash the tomatoes and dab them dry. Halve them and remove the stalks.
Cut the tomatoes into slices.
3) Drain the Mozzarella cheese in a sieve and then cut it into slices. Cut these
in half.
4) Now add the tomato and Mozzarella slices to the already spread bread.
5) Top your sandwich with the other piece of bread.
Hawaiian toast
Ingredients:
1) Drain the pineapples in a sieve.
2) Now coat the toast slice with butter.
3) Garnish the toast bread with ham and pineapple.
4) Lay the cheese on the pineapple as the last ingredient.
5) Top your sandwich with a slice of bread.
SSWM 1400 B2
♦ 8 slices of toasting bread
♦ 4 slices of pineapple (tinned)
♦ Butter
♦ 4 slices of cooked ham
♦ 4 cheese slices
GB│IE
│
27 ■

Scandia toast
Ingredients:
♦ 8 slices of toasting bread
♦ Dill
♦ 250 g yoghurt salad cream
♦ 2 tsp. Dijon mustard
♦ 2 tsp. liquid honey
♦ 40 g salmon pâté (tube from chiller cabinet)
♦ 1 cucumber
♦ 2 pack of Mozzarella cheese
♦ 200 g Smoked salmon
♦ Freshly ground pepper
1) Rinse the dill and blot it dry. Pluck the tips of the dill stems and chop the tips.
2) Mix the yoghurt salad cream with the mustard, honey, salmon cream and dill.
3) Peel the cucumber and chop it into small pieces. Slice the cucumber in half
lengthwise and scoop out the seeds with a teaspoon. Chop the halved
cucumber into small pieces.
4) Drain the Mozzarella in a sieve and cut it into slices.
5) Spread yoghurt salad cream onto a slice of bread.
6) Lay cucumber pieces onto the already spread bread, spread salmon slices
evenly on it and top with the cheese slices. Add pepper to taste.
7) Top your sandwich with a slice of bread.
■ 28│GB
│
IE
SSWM 1400 B2

Curried turkey breast toast
Ingredients:
♦ 8 slices of toasting bread
♦ 50 g butter
♦ Sliced turkey breast
♦ Plums
♦ Cocktail curry sauce
♦ Curry powder
1) Mix until the butter with the curry sauce and curry powder.
2) Wash and dry the plums and remove the stones. Cut the plums in half and
slice the halves into thin slices.
3) Spread the curry butter onto a slice of bread.
4) Now spread the sliced turkey breast and plum slices onto the buttered
bread.
5) Top your sandwich with another toast slice.
Disposal
Under no circumstances should you dispose of the appliance
with the normal household waste. This product is subject to the
provisions of European Directive 2012/19/EU. (Waste Electrical
and Electronic Equipment).
Dispose of the appliance via an approved waste disposal company or your
municipal waste disposal facility. Please observe applicable regulations.
Please contact your waste disposal facility if you are in any doubt.
SSWM 1400 B2
GB│IE
│
29 ■

Kompernass Handels GmbH warranty
Dear Customer,
This appliance has a 3-year warranty valid from the date of purchase. If this product
has any faults, you, the buyer, have certain statutory rights. Your statutory rights
are not restricted in any way by the warranty described below.
Warranty conditions
The validity period of the warranty starts from the date of purchase. Please keep
your original receipt in a safe place. This document will be required as proof of
purchase.
If any material or production fault occurs within three years of the date of purchase
of the product, we will either repair or replace the product for you at our discretion.
This warranty service is dependent on you presenting the defective appliance
and the proof of purchase (receipt) and a short written description of the fault
and its time of occurrence.
If the defect is covered by the warranty, your product will either be repaired or
replaced by us. The repair or replacement of a product does not signify the beginning of a new warranty period.
Warranty period and statutory claims for defects
The warranty period is not prolonged by repairs effected under the warranty.
This also applies to replaced and repaired components. Any damage and defects
present at the time of purchase must be reported immediately after unpacking.
Repairs carried out after expiry of the warranty period shall be subject to a fee.
Scope of the warranty
This appliance has been manufactured in accordance with strict quality guidelines
and inspected meticulously prior to delivery.
The warranty covers material faults or production faults. The warranty does not
extend to product parts subject to normal wear and tear or fragile parts such as
switches, batteries, baking moulds or parts made of glass.
The warranty does not apply if the product has been damaged, improperly used
or improperly maintained. The directions in the operating instructions for the product
regarding proper use of the product are to be strictly followed. Uses and actions
that are discouraged in the operating instructions or which are warned against
must be avoided.
This product is intended solely for private use and not for commercial purposes.
The warranty shall be deemed void in cases of misuse or improper handling, use
of force and modifications / repairs which have not been carried out by one of
our authorised Service centres.
■ 30│GB
│
IE
SSWM 1400 B2

Warranty claim procedure
To ensure quick processing of your case, please observe the following instructions:
■ Please have the till receipt and the item number (e.g. IAN 12345) available
as proof of purchase.
■ You will find the item number on the type plate, an engraving on the front
page of the instructions (bottom left), or as a sticker on the rear or bottom of
the appliance.
■ If functional or other defects occur, please contact the service department
listed either by telephone or by e-mail.
■ You can return a defective product to us free of charge to the service address
that will be provided to you. Ensure that you enclose the proof of purchase
(till receipt) and information about what the defect is and when it occurred.
You can download these instructions along with many other manuals,
product videos and software on www.lidl-service.com.
Service
Service Great Britain
Tel.: 0871 5000 720 (£ 0.10/Min.)
E-Mail: kompernass@lidl.co.uk
Service Ireland
Tel.: 1890 930 034
(0,08 EUR/Min., (peak))
(0,06 EUR/Min., (off peak))
E-Mail: kompernass@lidl.ie
IAN 297765
Importer
Please note that the following address is not the service address. Please use the
service address provided in the operating instructions.
KOMPERNASS HANDELS GMBH
BURGSTRASSE 21
DE - 44867 BOCHUM
GERMANY
www.kompernass.com
SSWM 1400 B2
GB│IE
│
31 ■

■ 32│GB
│
IE
SSWM 1400 B2

Table des matières
Introduction ..................................................34
Droits d'auteur ..........................................................34
Limitation de responsabilité ................................................34
Utilisation conforme ...................................................... 34
Matériel livré .................................................35
Élimination de l'emballage .................................................35
Description de l'appareil .......................................36
Caractéristiques techniques .....................................36
Consignes de sécurité ..........................................37
Première mise en service .......................................39
Utilisation ....................................................40
Dorer des sandwichs .....................................................40
Nettoyage ...................................................40
Rangement ..................................................41
Dépannage ..................................................42
Recettes .....................................................42
Toast hollandais aux tomates ...............................................42
Toast à l'italienne ........................................................43
Toast Hawaï ............................................................43
Toast Scandia ..........................................................44
Toast au curry et à la dinde ................................................ 45
Mise au rebut ................................................45
Garantie de Kompernass Handels GmbH. . . . . . . . . . . . . . . . . . . . . . . . . . 46
Service après-vente ...................................................... 47
Importateur ............................................................ 47
SSWM 1400 B2
FR│BE
│
33 ■

Introduction
Félicitations pour l'achat de votre nouvel appareil!
Vous avez opté pour un produit moderne, de grande qualité. Le présent mode
d'emploi fait partie intégrante de ce produit. Il contient des remarques importantes
concernant la sécurité, l'usage et la mise au rebut. Avant d'utiliser le produit,
veuillez vous familiariser avec toutes les consignes d'utilisation et de sécurité.
N'utilisez l'appareil que comme indiqué et pour les domaines d'application
spécifiés. Si vous cédez le produit à un tiers, remettez-lui également tous les
documents.
Droits d'auteur
Cette documentation est protégée par des droits d'auteur.
Toute reproduction ou réimpression même partielle ainsi que la reproduction des
illustrations même après modification sont interdites sans l'autorisation écrite du
fabricant.
Limitation de responsabilité
L'ensemble des informations, données et remarques techniques contenues dans
ce mode d'emploi sont conformes au dernier état lors du passage en presse et
correspondent à nos expériences et connaissances acquises jusqu'à présent.
Les indications, photos et descriptions contenues dans le présent mode d'emploi
ne peuvent donner lieu à aucune réclamation.
Le fabricant n'assume aucune responsabilité pour les dommages résultant d'un
non-respect du mode d'emploi, d'un usage non conforme, de réparations non
conformes, de modifications effectuées sans autorisation ou de l'usage de pièces
de rechange non agréées.
Utilisation conforme
Cet appareil est exclusivement prévu pour dorer des sandwichs garnis.
Cet appareil est exclusivement réservé à un usage domestique. N'utilisez pas
l'appareil pour des applications commerciales !
■ 34│FR
│
BE
SSWM 1400 B2

Matériel livré
L'appareil est équipé de série des composants suivants:
Appareil à croque-monsieur
Mode d'emploi
1) Retirez l'appareil et le mode d'emploi du carton.
2) Retirez tous les matériaux d'emballage.
REMARQUE
► Vérifiez si la livraison est au complet et ne présente aucun dégât apparent.
► En cas de livraison incomplète ou de dommages résultant d'un emballage
défectueux ou du transport, veuillez vous adresser à la ligne téléphonique
du service après-vente (voir le chapitre Service après-vente).
Élimination de l'emballage
L'emballage protège l'appareil de tous dommages éventuels au cours du transport.
Les matériaux d'emballage ont été sélectionnés selon des critères de respect de
l'environnement et de recyclage permettant une élimination écologique de ceux-ci.
Le recyclage de l'emballage en filière de revalorisation permet d'économiser des
matières premières et de réduire le volume de déchets. Veuillez éliminer les matériaux d'emballage qui ne servent plus en respectant la réglementation locale.
REMARQUE
► Si possible, conservez l'emballage d'origine pendant la période de garantie
de l'appareil afin de pouvoir emballer ce dernier en bonne et due forme en
cas de recours en garantie.
Observez le marquage sur les différents matériaux d‘emballage et triez-les séparément si nécessaire. Les matériaux d‘emballage sont repérés par des abréviations
(b) et des numéros (a) qui ont la signification suivante :
1–7 : Plastiques
20–22 : Papier et carton
80–98 : Matériaux composites
SSWM 1400 B2
FR│BE
│
35 ■

Description de l'appareil
Figure A:
1 Enroulement du câble
2 Voyant de contrôle «Opérationnel»
3 Verrouillage du couvercle
4 Voyant de contrôle «Power»
Figure B:
5 Surfaces supérieures de cuisson
6 Surfaces inférieures de cuisson
Caractéristiques techniques
Tension 220 - 240 V ∼, 50 Hz
Puissance absorbée 1400 W
Tous les éléments de cet appareil, entrant
en contact avec les aliments sont approuvés
pour le contact alimentaire.
■ 36│FR
│
BE
SSWM 1400 B2

Consignes de sécurité
AVERTISSEMENT ! RISQUE D'ÉLECTROCUTION!
► Faites remplacer aussitôt un cordon d'alimentation ou une
fiche secteur endommagée par des techniciens spécialisés
agréés, afin d'éviter tout danger.
► Utilisez l'appareil exclusivement dans des locaux secs, sur-
tout pas en extérieur.
N'immergez jamais l'appareil dans de l'eau ou dans
d'autres liquides ! Présence dans le cas contraire d'un
danger de mort par électrocution.
► Lors du nettoyage, veillez à ce qu'il n'y ait pas d'eau qui
pénètre à l'intérieur de l'appareil. Ne nettoyez pas l'appareil
sous l'eau courante.
► Assurez-vous que l'appareil ne puisse jamais entrer en
contact avec de l'eau. N'opérez jamais l'appareil à proximité
d'eau ou à côté de récipients qui contiennent des liquides.
► Veillez à ce que le cordon d'alimentation ne soit jamais mouillé
ou humide durant le fonctionnement. Disposez le cordon de
manière à éviter qu'il ne soit endommagé ou coincé.
► Après chaque utilisation, veuillez retirer la fiche secteur de la
prise secteur, pour éteindre l'appareil.
► N'ouvrez jamais le boîtier de l'appareil.
SSWM 1400 B2
FR│BE
│
37 ■

AVERTISSEMENT ! RISQUE DE BLESSURES!
► Cet appareil peut être utilisé par des enfants à partir de
8 ans et plus et par des personnes ayant des capacités
physiques, sensorielles ou mentales réduites ou un manque
d'expérience et de connaissances à condition qu'elles aient
reçu une supervision ou des instructions concernant I’utilisation
de I'appareil en toute sécurité et qu'elles comprennent les
dangers encourus.
► Ne pas laisser les enfants jouer avec l'appareil.
► Le nettoyage et la maintenance utilisateur ne doivent pas
être effectués par des enfants à moins qu'ils aient plus de 8
ans et sont surveillés. Maintenir l'appareil et son cordon hors
de portée des enfants de moins de 8 ans.
► Les pièces de l'appareil peuvent devenir très chaudes en
service. Pour cette raison, ne saisissez que les poignées.
► Laissez l’appareil intégralement refroidir avant de le nettoyer
ou de le ranger.
► Soyez prudents au moment de retirer les sandwichs finis de
cuire. En effet, l'appareil et les sandwichs sont très chauds.
► Opérez l'appareil uniquement sur une surface de dépôt
stable, antidérapante et plane.
► N'utilisez pas de minuterie externe ni de dispositif de com-
mande à distance séparé pour utiliser l'appareil.
Attention ! Surface brûlante!
■ 38│FR
│
BE
SSWM 1400 B2

ATTENTION - RISQUE D'INCENDIE !
► Il est absolument interdit d'utiliser l'appareil à proximité de
matériaux inflammables.
► Ne recouvrez pas l'appareil aussi longtemps qu'il est en
opération.
► Toujours opérer l'appareil sur un support résistant à la chaleur.
► N'utilisez jamais l'appareil sans surveillance.
ATTENTION - RISQUE DE DOMMAGES MATÉRIELS!
► Retirez tous les aliments à l'aide d'une spatule en plastique ou
en bois ou d'un autre objet adapté, non métallique, pour ne pas
endommager le revêtement anti-adhésif du sandwichmaker.
► N'utilisez ni produits nettoyants agressifs ni objets pointus
pour le nettoyage.
Première mise en service
■ Commencez par étaler de l'huile adaptée à la cuisson sur le revêtement
anti-adhésif des surfaces de cuisson 5/6.
■ Branchez la fiche secteur dans une prise secteur.
■ Fermez l'appareil et verrouillez-le avec le verrouillage du couvercle 3.
Ce verrouillage doit s'enclencher perceptiblement au niveau de la poignée
inférieure.
■ Faites chauffer l'appareil pendant env. 10 - 15 minutes.
REMARQUE
L'appareil est maintenant prêt à l'emploi.
SSWM 1400 B2
► Lors de la première utilisation, une légère odeur peut se dégager (voire
même un peu de fumée). Ce phénomène est normal et s'estompe rapidement. Veuillez assurer une aération suffisante. Ouvrez par exemple une
fenêtre.
■ Retirez la fiche secteur et laissez refroidir l'appareil.
■ Nettoyer l'appareil comme indiqué au chapitre «Nettoyage».
FR│BE
│
39 ■

Utilisation
Dorer des sandwichs
1) Fermez le couvercle et verrouillez-le avec le verrouillage du couvercle 3.
Ce verrouillage doit s'enclencher perceptiblement au niveau de la poignée
inférieure.
2) Branchez la fiche secteur dans une prise secteur. Le voyant de contrôle
rouge «Power» 4 s'allume.
3) Dès que l'appareil est chaud, le voyant de contrôle vert «Opérationnel» 2
s'allume.
4) Ouvrez le couvercle, posez les sandwichs préparés sur les surfaces inférieures
de cuisson 6.
5) Fermez le couvercle et verrouillez-le avec le verrouillage du couvercle 3.
Ce verrouillage doit s'enclencher perceptiblement au niveau de la poignée
inférieure. Si le sandwich était trop épais et que le verrouillage du couvercle 3
ne peut pas être fermé, retirez un peu de garniture des sandwichs.
ATTENTION - RISQUE DE DOMMAGES MATÉRIELS!
► Retirez tous les sandwichs à l'aide d'une spatule en plastique ou en bois
ou d'un autre objet adapté, non métallique, pour ne pas endommager le
revêtement anti-adhésif du sandwichmaker.
6) Après env. 4 - 8 minutes, les sandwichs sont prêts. Selon la garniture et les
préférences personnelles, cette indication temporelle peut varier. Ouvrez le
couvercle et retirez les sandwichs.
7) Si vous ne souhaitez pas préparer d'autres sandwichs, retirez la fiche secteur
de la prise secteur.
Nettoyage
AVERTISSEMENT! RISQUE D'ÉLECTROCUTION
► Débranchez tout d'abord la fiche de la prise secteur avant de nettoyer
l'appareil.
AVERTISSEMENT! RISQUE DE BLESSURES!
► Laissez refroidir l'appareil avant de le nettoyer. Risque de brûlure!
ATTENTION - RISQUE DE DOMMAGES MATÉRIELS!
► N'utilisez pas de produit de nettoyage abrasif ou agressif. Il risque d'attaquer
la surface de l'appareil.
■ 40│FR
│
BE
N'immergez jamais l'appareil dans de l'eau ou dans d'autres liquides !
Présence dans le cas contraire d'un danger de mort par électrocution.
SSWM 1400 B2

REMARQUE
► N'attendez pas trop longtemps avant de procéder au nettoyage. Attendez
que l'appareil soit suffisamment refroidi pour pouvoir le saisir sans risque
de brûlure. Il est ainsi plus facile de retirer les restes d'aliments.
■ Nettoyez le corps de l'appareil avec un chiffon sec ou un torchon légè-
rement humidifié. Si nécessaire, versez un peu de liquide vaisselle sur la
lavette. Essuyez ensuite avec un chiffon uniquement humidifié d‘eau claire
pour éliminer d‘éventuels restes de liquide vaisselle.
■ Pour retirer tous les résidus de cuisson, frottez les surfaces de cuisson 5/6
avec un torchon légèrement humidifié pour retirer tous les résidus d'aliments.
Si des résidus ont cuit sur les surfaces, vous pouvez poser le torchon humide
dessus afin de les ramollir. Au bout d'un certain temps, les résidus se laissent
détacher.
REMARQUE
► En présence de taches tenaces, appliquez un peu de produit vaisselle
doux sur le torchon humide. Après le nettoyage avec du produit vaisselle,
essuyez les surfaces de cuisson 5/6 encore une fois avec un chiffon
humidifié d'eau propre afin de retirer toutes les traces de produit vaisselle.
Après le nettoyage avec du produit vaisselle, nous recommandons d'enduire
à nouveau, en frottant, de l'huile adaptée à la cuisson sur les surfaces de
cuisson 5/6.
■ Séchez soigneusement toutes les pièces avant de les utiliser à nouveau.
REMARQUE
Si de la graisse ou des produits alimentaires devaient avoir coulé dans
des fentes ou des coins les rendant impossible à nettoyer avec un chiffon
humide, procédez comme suit :
– Retirez la graisse ou d'autres liquides avec du papier essuie-tout.
– Retirez les résidus avec une spatule en bois ou une petite brochette
en bois.
– Ensuite, essuyez à nouveau toute la surface comme décrit plus haut.
Rangement
SSWM 1400 B2
■ Nettoyez l'appareil comme indiqué au chapitre «Nettoyage».
■ Enroulez le cordon d‘alimentation autour de l‘enroulement du câble 1
prévu à cet effet, situé contre la face inférieure de l‘appareil. Fixez le cordon
d‘alimentation à l‘aide du clip de câble. Fixez la fiche secteur en l‘introduisant
dans les évidements situés sur la plaque de l‘enroulement du câble 1.
■ Conservez le sandwichmaker dans un endroit sec.
FR│BE
│
41 ■

Dépannage
Panne Cause Remède
La fiche secteur n'a pas
L'appareil ne
fonctionne pas.
Les sandwichs
brunissent trop.
été insérée dans la prise
secteur.
L'appareil est défectueux.
Les sandwichs sont restés
trop longtemps dans le
sandwichmaker.
Recettes
Toast hollandais aux tomates
Ingrédients :
♦ 8 tranches de toast
♦ Eau
♦ Oignons verts
♦ 2 tomate de taille moyenne
♦ Beurre aux herbes
♦ 4 tranches de jambon blanc
♦ Sel
♦ Poivre frais moulu
♦ 4 tranches de jeune gouda
Raccordez la fiche secteur
au réseau électrique.
Adressez-vous au service
clientèle.
Retirez les sandwichs
plus tôt.
■ 42│FR
1) Lavez les oignons et laissez-les ensuite s'égoutter. Coupez en deux les
oignons verts dans le sens de la longueur et puis hachez-les grossièrement.
Portez de l'eau salée à ébullition dans une casserole. Rajoutez les oignons
verts et blanchissez-les environ 1 minute.
Mettez ensuite les oignons verts dans un tamis, recouvrez-les d'eau froide
et laissez-les s'égoutter.
2) Lavez les tomates et tamponnez-les pour les sécher. Coupez-les en deux et
retirez les tiges. Coupez les tomates en tranches.
3) Tartinez le beurre aux herbes sur le toast et posez une tranche repliée de
jambon sur le toast beurré. Répartissez dessus les petits morceaux d'oignons
vert et les tranches de tomate. Assaisonnez de sel et de poivre.
4) Posez les tranches de fromage sur la tranche de toast.
5) Tartinez un peu de beurre aux herbes sur un autre toast et recouvrez votre
sandwich avec le côté tartiné du toast tourné vers le bas.
│
BE
SSWM 1400 B2

Toast à l'italienne
Ingrédients :
♦ 8 tranches de toast
♦ 8 cs de concentré de tomate
♦ 4 cs de mayonnaise
♦ Sel
♦ Herbes de Provence
♦ Poivre frais moulu
♦ 2 tomate de taille moyenne
♦ 2 paquet de mozzarella
♦ Poivre de couleur frais moulu
1) Mélangez le concentré de tomates, la mayonnaise, le sel, les herbes de
Provence et le poivre. Tartinez-en les tranches de toast.
2) Lavez les tomates et tapotez-les pour les sécher. Coupez-les en deux et
retirez les tiges. Coupez les tomates en tranches.
3) Laissez goutter la mozzarella dans une passoire et découpez-la en tranches.
Coupez cette dernière encore une fois en deux.
4) Après avoir tartiné le toast, garnissez-le maintenant de tranches de tomate
et de mozzarella puis saupoudrez de poivre.
5) Recouvrez votre sandwich avec l'autre tranche de toast.
Toast Hawaï
Ingrédients :
1) Laissez l'ananas s'égoutter dans une passoire.
2) Tartinez la tranche de toast avec du beurre.
3) Posez du jambon et de l'ananas sur la tranche de toast.
4) Le fromage est posé en dernier sur l'ananas.
5) Refermez le sandwich avec une autre tranche de toast.
SSWM 1400 B2
♦ 8 tranches de toast
♦ 4 tranches d'ananas (en conserve)
♦ Beurre
♦ 4 tranches de jambon blanc
♦ 4 fines tranches de fromage
FR│BE
│
43 ■

Toast Scandia
Ingrédients :
♦ 8 tranches de toast
♦ Aneth
♦ 250 g de crème au yaourt pour assaisonner la salade
♦ 2 cc de moutarde de Dijon
♦ 2 cc de miel liquide
♦ 40 g de crème de saumon (en tube, en linéaires réfrigérés)
♦ 1 concombre
♦ 2 paquet de mozzarella
♦ 200 g de saumon fumé en tranches
♦ Poivre frais moulu
1) Rincez l'aneth et tapotez-le pour le sécher. Cueillez les pointes des petites
tiges d'aneth et hachez ces pointes.
2) Mélangez la crème salade au yaourt avec la moutarde, le miel, la crème
au saumon et l'aneth.
3) Épluchez le concombre, coupez et retirez les extrémités. Coupez le concombre
en deux dans le sens de la longueur et raclez les pépins avec une cuillère à
café. Découpez ensuite chaque moitié de concombre en morceaux.
4) Laissez la mozzarella s'égoutter dans une passoire puis découpez-la en
tranches.
5) Tartinez une tranche de toast avec la crème salade au yaourt.
6) Posez un morceau de concombre sur la tranche de toast tartinée, répartissez
uniformément les tranches de saumon et finissez de garnir le toast avec les
tranches de fromage. Assaisonnez selon vos préférences avec du poivre.
7) Refermez le sandwich avec une autre tranche de toast.
■ 44│FR
│
BE
SSWM 1400 B2

Toast au curry et à la dinde
Ingrédients :
♦ 8 tranches de toast
♦ 50 g de beurre
♦ Blanc de dinde en tranches
♦ Prunes
♦ Sauce cocktail au curry
♦ Poudre de curry
1) Mélangez le beurre, la sauce au curry et la poudre de curry.
2) Lavez les prunes, séchez et dénoyautez-les. Coupez les prunes en deux et
coupez les moitiés en fines tranches.
3) Tartinez le beurre au curry sur une tranche de toast.
4) Puis disposez sur la tranche de toast beurrée une fine tranche de dinde et
des tranches de prune.
5) Refermez le sandwich avec une autre tranche de toast.
Mise au rebut
Ne jamais jeter l'appareil avec les ordures ménagères.
Ce produit est assujetti à la directive européenne 2012/19/EUDEEE (déchets d'équipements électriques et électroniques).
Éliminez l'appareil par l'intermédiaire d'une entreprise de traitement des déchets
autorisée ou via le service de recyclage de votre commune. Respectez la
réglementation en vigueur. En cas de doute, veuillez contacter votre centre de
recyclage.
SSWM 1400 B2
FR│BE
│
45 ■

Garantie de Kompernass Handels GmbH
Chère cliente, cher client,
Cet appareil est garanti 3 ans à partir de la date d’achat. Si ce produit venait à
présenter des vices, vous disposez de droits légaux face au vendeur de ce produit.
Vos droits légaux ne sont pas restreints par notre garantie présentée ci-dessous.
Conditions de garantie
La période de garantie débute à la date de l’achat. Veuillez bien conserver le
ticket de caisse d’origine. Ce document servira de preuve d’achat.
Si dans un délai de trois ans suivant la date d’achat de ce produit, un vice de
matériel ou de fabrication venait à apparaître, le produit sera réparé ou remplacé
gratuitement par nos soins, selon notre choix. Cette prestation de garantie nécessite dans un délai de trois ans la présentation de l’appareil défectueux et du
justificatif d’achat (ticket de caisse) ainsi que la description brève du vice et du
moment de son apparition.
Si le vice est couvert par notre garantie, vous recevrez le produit réparé ou un
nouveau produit en retour. Aucune nouvelle période de garantie ne débute avec
la réparation ou l’échange du produit.
Période de garantie et réclamation légale pour vices cachés
L’exercice de la garantie ne prolonge pas la période de garantie. Cette disposition
s’applique également aux pièces remplacées ou réparées. Les dommages et
vices éventuellement déjà présents à l’achat doivent être signalés immédiatement
après le déballage. Toute réparation survenant après la période sous garantie
fera l’objet d’une facturation.
Étendue de la garantie
L’appareil a été fabriqué avec soin conformément à des directives de qualité
strictes et consciencieusement contrôlé avant sa livraison.
La prestation de garantie est valable pour des vices de matériel et de fabrication.
Cette garantie ne s’étend pas aux pièces du produit qui sont exposées à une usure
normale et peuvent de ce fait être considérées comme pièces d’usure, ni aux détériorations de pièces fragiles, par ex. connecteur, accu, moules ou pièces en verre.
Cette garantie devient caduque si le produit est détérioré, utilisé ou entretenu de
manière non conforme. Toutes les instructions listées dans le manuel d’utilisation
doivent être exactement respectées pour une utilisation conforme du produit. Des
buts d’utilisation et actions qui sont déconseillés dans le manuel d’utilisation, ou
dont vous êtes avertis doivent également être évités.
Le produit est uniquement destiné à un usage privé et ne convient pas à un usage
professionnel. La garantie est annulée en cas d’entretien incorrect et inapproprié,
d’usage de la force et en cas d’intervention non réalisée par notre centre de
service après-vente agréé.
■ 46│FR
│
BE
SSWM 1400 B2

Procédure en cas de garantie
Afin de garantir un traitement rapide de votre demande, veuillez suivre les indications suivantes :
■ Veuillez avoir à portée de main pour toutes questions le ticket de caisse et la
référence article (par ex. IAN 12345) en tant que justificatif de votre achat.
■ Vous trouverez la référence sur la plaque signalétique, une gravure, sur la
page de garde de votre manuel d’utilisation (en bas à gauche) ou sous
forme d’autocollant au dos ou sur le dessous.
■ Si des erreurs de fonctionnement ou d’autres vices venaient à apparaître,
veuillez d’abord contacter le département service clientèle cité ci-dessous
par téléphone ou par e-mail.
■ Vous pouvez ensuite retourner un produit enregistré comme étant défectueux
en joignant le ticket de caisse et en indiquant en quoi consiste le vice et
quand il est survenu, sans devoir l’affranchir à l’adresse de service aprèsvente communiquée.
Sur www.lidl-service.com, vous pouvez télécharger ce manuel ainsi que
beaucoup d’autres, des vidéos produit et logiciels.
Service après-vente
Service France
Tel.: 0800 919270
E-Mail: kompernass@lidl.fr
Service Belgique
Tel.: 070 270 171 (0,15 EUR/Min.)
E-Mail: kompernass@lidl.be
IAN 297765
Importateur
Veuillez tenir compte du fait que l’adresse suivante n’est pas une adresse de
service après-vente. Veuillez d’abord contacter le service mentionné.
KOMPERNASS HANDELS GMBH
BURGSTRASSE 21
DE - 44867 BOCHUM
ALLEMAGNE
www.kompernass.com
SSWM 1400 B2
FR│BE
│
47 ■

■ 48│FR
│
BE
SSWM 1400 B2

Inhoud
Inleiding .....................................................50
Auteursrecht ............................................................ 50
Beperking van aansprakelijkheid ............................................ 50
Gebruik in overeenstemming met bestemming ................................. 50
Inhoud van het pakket .........................................51
De verpakking afvoeren. . . . . . . . . . . . . . . . . . . . . . . . . . . . . . . . . . . . . . . . . . . . . . . . . . . 51
Productbeschrijving ...........................................52
Technische gegevens ..........................................52
Veiligheidsvoorschriften ........................................53
Ingebruikname ...............................................55
Bedienen ....................................................56
Sandwiches roosteren ....................................................56
Reinigen .....................................................56
Opbergen ...................................................57
Problemen oplossen ...........................................58
Recepten ....................................................58
Hollandse tomatentosti ................................................... 58
Italiaanse tosti ..........................................................59
Tosti Hawaii ............................................................59
Scandinavische tosti ......................................................60
Kerrie-kalkoen-tosti ....................................................... 61
Afvoeren ....................................................61
Garantie van Kompernaß Handels GmbH .........................62
Service ................................................................ 63
Importeur .............................................................. 63
SSWM 1400 B2
NL│BE
│
49 ■

Inleiding
Gefeliciteerd met de aankoop van uw nieuwe apparaat!
U hebt hiermee gekozen voor een hoogwaardig product. De gebruiksaanwijzing
maakt deel uit van dit product. Deze bevat belangrijke aanwijzingen voor veiligheid, gebruik en afvoer. Lees alle bedienings- en veiligheidsaanwijzingen voordat
u het product in gebruik neemt. Gebruik het product uitsluitend op de voorgeschreven wijze en voor de aangegeven doeleinden. Geef alle documenten mee
als u het product doorgeeft aan een derde.
Auteursrecht
Deze documentatie is auteursrechtelijk beschermd.
Elke vermenigvuldiging resp. elke reproductie, ook die van delen van het docu-
ment, alsmede de weergave van de afbeeldingen, ook in gewijzigde toestand,
is uitsluitend toegestaan met schriftelijke toestemming van de fabrikant.
Beperking van aansprakelijkheid
Alle technische informatie, gegevens en aanwijzingen voor de aansluiting en de
bediening in deze gebruiksaanwijzing voldoen aan de laatste stand bij het ter
perse gaan en worden naar ons beste weten verstrekt, met inachtneming van
onze bestaande ervaringen en inzichten.
Er kunnen geen aanspraken worden gedaan op basis van de gegevens, afbeeldingen en beschrijvingen in deze gebruiksaanwijzing.
De fabrikant aanvaardt geen aansprakelijkheid voor schade voortvloeiend uit
het niet in acht nemen van de handleiding, gebruik in strijd met de bestemming,
ondeskundig uitgevoerde reparaties, zonder toestemming uitgevoerde veranderingen of gebruik van niet toegestane vervangingsonderdelen.
Gebruik in overeenstemming met bestemming
Dit apparaat is uitsluitend bestemd voor het roosteren van gevulde sandwiches.
Dit apparaat is uitsluitend bestemd voor gebruik in privéhuishoudens.
Gebruik het apparaat niet bedrijfsmatig!
■ 50│NL
│
BE
SSWM 1400 B2

Inhoud van het pakket
Het apparaat wordt standaard met de volgende componenten geleverd:
Sandwichmaker
Gebruiksaanwijzing
1) Haal het apparaat en de gebruiksaanwijzing uit de doos.
2) Verwijder al het verpakkingsmateriaal.
OPMERKING
► Controleer of het pakket compleet is en of er sprake is van zichtbare
schade.
► Neem contact op met de Service-Hotline (zie het hoofdstuk Service) als
het pakket niet compleet is, of indien er sprake is van schade door gebrekkige verpakking of transport.
De verpakking afvoeren
De verpakking beschermt het apparaat tegen transportschade. De verpakkingsmaterialen zijn niet schadelijk voor het milieu. Ze zijn gekozen op grond van
milieuvriendelijkheid en daarom recyclebaar.
Het terugvoeren van de verpakking in de materiaalkringloop betekent een besparing op grondstoffen en zorgt voor minder afval. Voer niet meer benodigde
verpakkingsmaterialen af conform de plaatselijk geldende voorschriften.
OPMERKING
► Bewaar, indien mogelijk, de originele verpakking gedurende de garantie-
periode van het apparaat, om het apparaat bij een garantiekwestie volgens
de voorschriften te kunnen verpakken.
Let op de aanduiding op de verschillende verpakkingsmaterialen en voer ze zo
nodig gescheiden af. De verpakkingsmaterialen zijn voorzien van afkortingen (b) en
cijfers (a) met de volgende betekenis:
1–7: kunststoffen
20–22: papier en karton
80–98: composietmaterialen
SSWM 1400 B2
NL│BE
│
51 ■

Productbeschrijving
Afbeelding A:
1 Kabelspoel
2 Indicatielampje “Gebruiksklaar”
3 Dekselvergrendeling
4 Indicatielampje “Power”
Afbeelding B:
5 Bovenste toastvlakken
6 Onderste toastvlakken
Technische gegevens
Spanning 220 - 240 V ∼, 50 Hz
Vermogen 1400 W
Alle delen van het apparaat die in
aanraking komen met levensmiddelen,
zijn levensmiddelveilig.
■ 52│NL
│
BE
SSWM 1400 B2

Veiligheidsvoorschriften
WAARSCHUWING!
GEVAAR VOOR EEN ELEKTRISCHE SCHOK!
► Laat beschadigde snoeren of stekkers onmiddellijk door
geautoriseerd en vakkundig personeel vervangen, om
gevaarlijke situaties te voorkomen.
► Gebruik het apparaat alleen in droge ruimtes, niet in de
openlucht.
Dompel het apparaat nooit onder in water of in
andere vloeistoffen! Er bestaat levensgevaar door een
elektrische schok.
► Let er bij het reinigen op dat er geen water het apparaat
binnendringt. Maak het apparaat nooit schoon onder
stromend water.
► Zorg ervoor dat het apparaat nooit met water in aanraking
kan komen. Gebruik het apparaat nooit in de buurt van
water of naast voorwerpen die vloeistof bevatten.
► Let erop dat het snoer nooit nat of vochtig wordt wanneer
het apparaat in bedrijf is. Leg het snoer zo neer dat het niet
beklemd raakt of anderszins beschadigd kan raken.
► Haal na elk gebruik de stekker uit het stopcontact om het
apparaat uit te schakelen.
► Open nooit de behuizing van het apparaat.
SSWM 1400 B2
NL│BE
│
53 ■

WAARSCHUWING! LETSELGEVAAR!
► Dit apparaat mag worden gebruikt door kinderen vanaf 8
jaar en door personen met beperkte fysieke, zintuiglijke of
geestelijke vermogens of gebrek aan ervaring en/of kennis,
mits ze onder toezicht staan of over het veilige gebruik van
het apparaat zijn geïnstrueerd en de daaruit resulterende
gevaren hebben begrepen.
► Kinderen mogen niet met het apparaat spelen.
► Reiniging en onderhoud door de gebruiker mogen niet door
kinderen worden uitgevoerd, tenzij ze ouder dan 8 jaar zijn
en onder toezicht staan. Houd het apparaat en het snoer
buiten bereik van kinderen jonger dan 8 jaar.
► De onderdelen van het apparaat kunnen tijdens gebruik
heet worden. Raak daarom alleen de handgrepen aan.
► Laat het apparaat eerst volledig afkoelen voordat u het
reinigt of opbergt.
► Wees voorzichtig bij het uitnemen van de bereide sandwiches
uit het apparaat. Het apparaat en de sandwiches zijn zeer
heet.
► Plaats het apparaat voor gebruik alleen op een stabiele,
antislip-ondergrond die waterpas is.
► Gebruik geen externe timer of een aparte afstandsbediening
om het apparaat te bedienen.
Let op! Heet oppervlak!
■ 54│NL
│
BE
SSWM 1400 B2

LET OP - BRANDGEVAAR!
► Het apparaat mag niet worden gebruikt in de buurt van
brandbare materialen.
► Dek het apparaat niet af zolang het in bedrijf is.
► Gebruik het apparaat uitsluitend op een hittebestendige
ondergrond.
► Gebruik het apparaat nooit zonder toezicht.
LET OP - MATERIËLE SCHADE!
► Verwijder de etenswaren alleen met een spatel van kunststof
of hout of met een ander geschikt, niet-metalen voorwerp,
om de antiaanbaklaag van de sandwichmaker niet te beschadigen.
► Gebruik voor het reinigen geen agressieve schoonmaakmid-
delen en spitse voorwerpen.
Ingebruikname
■ Wrijf één keer de antiaanbaklaag van de toastvlakken 5/6 in met voor
koken geschikte olie.
■ Steek de stekker in een stopcontact.
■ Sluit het apparaat en vergrendel het met de dekselvergrendeling 3.
Deze moet merkbaar in de onderste handgreep vastklikken.
■ Laat het apparaat ca. 10 - 15 minuten heet worden.
OPMERKING
Nu is het apparaat gereed voor gebruik.
SSWM 1400 B2
► Bij het eerste gebruik kan er sprake zijn van een lichte geur (mogelijk ook
van lichte rookontwikkeling). Dit is normaal en gaat na korte tijd over.
Zorg voor voldoende ventilatie. Open bijvoorbeeld een raam.
■ Trek de stekker uit het stopcontact en laat het apparaat afkoelen.
■ Reinig het apparaat zoals beschreven in het hoofdstuk “Reinigen”.
NL│BE
│
55 ■

Bedienen
Sandwiches roosteren
1) Sluit het deksel en vergrendel het met de dekselvergrendeling 3.
Deze moet merkbaar in de onderste handgreep vastklikken.
2) Steek de stekker in een stopcontact. Het rode indicatielampje “Power” 4
brandt.
3) Zodra het apparaat heet genoeg is, brandt het groene indicatielampje
“Gebruiksklaar” 2.
4) Open het deksel en leg de voorbereide sandwiches op de onderste toastvlakken 6.
5) Sluit het deksel en vergrendel het met de dekselvergrendeling 3. Deze moet
merkbaar in de onderste handgreep vastklikken. Als de sandwich te dik is,
waardoor de dekselvergrendeling 3 niet meer kan worden gesloten, haalt
u een beetje beleg van de sandwiches.
LET OP - MATERIËLE SCHADE!
► Verwijder de sandwiches alleen met een spatel van kunststof of hout of met
een ander geschikt, niet-metalen voorwerp, om de antiaanbaklaag van de
sandwichmaker niet te beschadigen.
6) Na ca. 4 - 8 minuten zijn de sandwiches klaar. Deze tijd kan variëren al naar
gelang het gebruikte beleg en uw persoonlijke smaak. Open het deksel en
haal de sandwiches uit het apparaat.
7) Wanneer u geen andere sandwiches meer wilt bereiden, haalt u de stekker
uit het stopcontact.
Reinigen
LET OP - MATERIËLE SCHADE!
■ 56│NL
WAARSCHUWING!
GEVAAR VOOR EEN ELEKTRISCHE SCHOK
► Haal de stekker uit het stopcontact voordat u het apparaat schoonmaakt.
Dompel het apparaat nooit onder in water of in andere vloeistoffen!
Er bestaat levensgevaar door een elektrische schok.
WAARSCHUWING! LETSELGEVAAR!
► Laat het apparaat afkoelen voordat u het schoonmaakt. Verbrandingsgevaar!
► Gebruik geen agressieve of schurende schoonmaakmiddelen. Deze tasten
het oppervlak van het apparaat aan.
│
BE
SSWM 1400 B2

OPMERKING
► Wacht niet te lang met reinigen. Wacht tot het apparaat zover is afgekoeld
dat u het zonder verbrandingsgevaar kunt vastpakken. Dan laten resten
van levensmiddelen zich beter verwijderen.
■ Reinig de behuizing met een droge of licht bevochtigde doek. Doe zo nodig
wat afwasmiddel op de doek. Veeg vervolgens na met een doek die alleen
met schoon water is bevochtigd, om eventuele resten van afwasmiddel te
verwijderen.
■ Veeg de toastvlakken 5/6 af met een doek die is bevochtigd met warm
water, tot alle levensmiddelresten zijn verwijderd.
Bij vastgekoekte resten kunt u de vochtige doek op deze plaatsen leggen
om de resten los te weken. Na enige tijd kunnen de resten dan worden
verwijderd.
OPMERKING
► Bij hardnekkige verontreinigingen doet u wat mild afwasmiddel op de
vochtige doek. Veeg na het reinigen met afwasmiddel de toastvlakken 5/6
nog één keer af met een met schoon water bevochtigde doek, zodat alle
afwasmiddelresten worden verwijderd. Na reiniging met afwasmiddel
verdient het aanbeveling om de toastvlakken 5/6 weer met voor koken
geschikte olie in te wrijven.
■ Droog alle delen goed af alvorens ze opnieuw te gebruiken.
OPMERKING
Als er vet of levensmiddel terecht is gekomen in spleten of hoeken waar u dit
niet meer met een vochtige doek kunt verwijderen, gaat u als volgt te werk:
– Dep vet of andere vloeistoffen op met een stuk keukenpapier.
– Verwijder resten met een houten spatel of een kleine houten spies.
– Veeg dan alles nog een keer af zoals hiervoor beschreven.
Opbergen
SSWM 1400 B2
■ Reinig het apparaat zoals beschreven in het hoofdstuk “Reinigen”.
■ Wikkel het netsnoer om de kabelspoel 1 aan de onderkant van het appa-
raat. Zet het snoer vast met behulp van de kabelklem. Zet de netstekker vast
door hem in de gaten van de plaat van de kabelspoel 1 te steken.
■ Berg de sandwichmaker op een droge plaats op.
NL│BE
│
57 ■

Problemen oplossen
Storing Oorzaak Oplossing
Het apparaat
werkt niet.
De sandwiches
worden te donker.
Recepten
Hollandse tomatentosti
Ingrediënten:
♦ 8 plakjes witbrood
♦ Water
♦ Lente-uitjes
♦ 2 middelgrote tomaat
♦ Kruidenboter
♦ 4 plakken gekookte ham
♦ Zout
♦ Versgemalen peper
♦ 4 plakken jonge Goudse kaas
1) Was de lente-uitjes en laat ze uitlekken. Halveer de lente-uitjes in de lengte
en snij ze in grote stukken. Breng het water met het zout in een pan aan de
kook. Voeg de lente-uitjes toe en blancheer ze ongeveer 1 minuut.
Doe daarna de lente-uitjes in een vergiet, giet er koud water over en laat ze
uitlekken.
2) Was de tomaten en dep ze droog. Halveer ze en verwijder de aanzetten
van de steeltjes. Snijd de tomaten in plakjes.
3) Bestrijk een boterham met kruidenboter en leg een dichtgeklapte plak ham
op de bestreken boterham. Verdeel de stukjes lente-ui en de plakjes tomaat
erover. Breng op smaak met zout en peper.
4) Leg de plakjes kaas op de boterham.
5) Besmeer nog een boterham met kruidenboter en leg deze op de sandwich
met de besmeerde kant omlaag.
De stekker zit niet in het
stopcontact.
Het apparaat is defect.
De sandwiches hebben te
lang in de sandwichmaker
gezeten.
Steek de stekker in het
stopcontact.
Neem contact op met de
klantenservice.
Haal de sandwiches er
eerder uit.
■ 58│NL
│
BE
SSWM 1400 B2

Italiaanse tosti
Ingrediënten:
♦ 8 plakjes witbrood
♦ 8 el tomatenpuree
♦ 4 EL mayonaise
♦ Zout
♦ Provençaalse kruiden
♦ Versgemalen peper
♦ 2 middelgrote tomaat
♦ 2 pakje mozzarella
♦ Versgemalen gemengde peper
1) Roer de tomatenpuree, de mayonaise, het zout, de Provençaalse kruiden en
de peper door elkaar. Bestrijk de boterhammen hiermee.
2) Was de tomaten en dep ze droog. Halveer ze en verwijder de aanzetten
van de steeltjes. Snijd de tomaten in plakjes.
3) Laat de mozzarella uitlekken in een vergiet en snijd de kaas in plakjes.
Halveer de plakjes.
4) Leg plakjes tomaat en mozzarella op de besmeerde boterham en bestrooi
deze met peper.
5) Leg de andere boterham op de sandwich.
Tosti Hawaii
Ingrediënten:
1) Laat de ananas uitlekken in een vergiet.
2) Besmeer de boterham met boter.
3) Beleg de boterham met de ham en de ananas.
4) De kaas wordt als laatste op de ananas gelegd.
5) Leg nog een boterham op de sandwich.
SSWM 1400 B2
♦ 8 plakjes witbrood
♦ 4 schijven ananas (uit blik)
♦ Boter
♦ 4 plakken gekookte ham
♦ 4 plakjes kaas
NL│BE
│
59 ■

Scandinavische tosti
Ingrediënten:
♦ 8 plakjes witbrood
♦ Dille
♦ 250 g yoghurt-saladedressing
♦ 2 TL Dijon-mosterd
♦ 2 TL vloeibare honing
♦ 40 g zalmcrème (tube uit koelvak)
♦ 1 komkommer
♦ 2 pakje mozzarella
♦ 200 g gerookte zalm, in plakjes
♦ Versgemalen peper
1) Spoel de dille af en dep deze droog. Pluk de topjes van de stengels van de
dille af en hak de topjes fijn.
2) Meng de yoghurt-saladedressing met de mosterd, de honing, de zalmpasta
en de dille.
3) Schil de komkommer en snijd de uiteinden af. Halveer de komkommer in
de lengte en schep het vruchtvlees er met een theelepel uit. Snijd de komkommerhelften in stukken.
4) Laat de mozzarella uitlekken in een vergiet en snijd hem in plakjes.
5) Besmeer een boterham met yoghurt-saladedressing.
6) Leg een stuk komkommer op de besmeerde boterham, verdeel de plakken
zalm er gelijkmatig over en beleg de boterham met de plakjes mozzarella.
Voeg peper naar smaak toe.
7) Leg nog een boterham op de sandwich.
■ 60│NL
│
BE
SSWM 1400 B2

Kerrie-kalkoen-tosti
Ingrediënten:
♦ 8 plakjes witbrood
♦ 50 g boter
♦ Kalkoenborstfilet
♦ Pruimen
♦ Cocktail-currysaus
♦ Kerriepoeder
1) Roer de boter met de currysaus en het kerriepoeder door elkaar.
2) Was de pruimen, droog ze af en verwijder de pitten. Halveer de pruimen
en snijd de helften in dunne plakjes.
3) Besmeer een boterham met de curryboter.
4) Beleg de besmeerde boterham met de plakjes kalkoen en de stukjes pruim.
5) Leg nog een boterham op de sandwich.
Afvoeren
Gooi het apparaat in geen geval weg bij het gewone huisvuil.
Dit product voldoet aan de Europese richtlijn 2012/19/EU.
(Afgedankte elektrische en elektronische apparatuur).
Voer het apparaat af via een erkend afvalverwerkingsbedrijf of via uw gemeentereiniging. Neem de momenteel geldende voorschriften in acht. Neem bij twijfel
contact op met de verantwoordelijke instantie.
SSWM 1400 B2
NL│BE
│
61 ■

Garantie van Kompernaß Handels GmbH
Geachte klant,
U hebt op dit apparaat 3 jaar garantie vanaf de aankoopdatum. In geval van
ge breken in dit product hebt u wettelijke rechten tegenover de verkoper van het
product. Deze wettelijke rechten worden door onze hierna beschreven garantie
niet beperkt.
Garantievoorwaarden
De garantieperiode geldt vanaf de datum van aankoop. Bewaar de originele
kassabon. U hebt de bon nodig als bewijs van aankoop.
Als er binnen drie jaar vanaf de aankoopdatum van dit product een materiaal- of
fabricagefout optreedt, wordt het product door ons – naar onze keuze – voor u
kosteloos gerepareerd of vervangen. Voorwaarde voor deze garantie is dat binnen de termijn van drie jaar het defecte apparaat en het aankoopbewijs (kassabon) worden overlegd en dat kort wordt omschreven waaruit het gebrek bestaat
en wanneer het is opgetreden.
Wanneer het defect door onze garantie wordt gedekt, krijgt u het gerepareerde
product of een nieuw product retour. Met de reparatie of vervanging van het
product begint er geen nieuwe garantieperiode.
Garantieperiode en wettelijke aanspraken bij gebreken
De garantieperiode wordt door deze waarborg niet verlengd. Dat geldt ook voor
vervangen en gerepareerde onderdelen. Eventueel al bij aankoop aanwezige
schade en gebreken moeten meteen na het uitpakken worden gemeld. Voor reparaties na afloop van de garantieperiode worden kosten in rekening gebracht.
Garantieomvang
Het apparaat is op basis van strenge kwaliteitsnormen met de grootst mogelijke
zorg vervaardigd en voorafgaand aan de levering nauwkeurig gecontroleerd.
De garantie geldt voor materiaal- of fabricagefouten. Deze garantie geldt niet voor
productonderdelen die blootstaan aan normale slijtage en derhalve als aan
slijtage onderhevige onderdelen kunnen worden aangemerkt, of voor beschadigingen aan breekbare onderdelen, bijv. schakelaars, accu’s, bakvormen of
onderdelen die van glas zijn gemaakt.
Deze garantie vervalt wanneer het product is beschadigd, ondeskundig is gebruikt of is gerepareerd. Voor deskundig gebruik van het product moeten alle
in de gebruiksaanwijzing beschreven aanwijzingen precies worden opgevolgd.
Gebruiksdoeleinden en handelingen die in de gebruiksaanwijzing worden afgeraden of waarvoor wordt gewaarschuwd, moeten beslist worden vermeden.
Het product is uitsluitend bestemd voor privégebruik en niet voor bedrijfsmatige
doeleinden. Bij verkeerd gebruik en ondeskundige behandeling, bij gebruik van
geweld en bij reparaties die niet door ons erkend servicefiliaal zijn uitgevoerd,
vervalt de garantie.
■ 62│NL
│
BE
SSWM 1400 B2

Afhandeling bij een garantiekwestie
Voor een snelle afhandeling van uw aanvraag neemt u de volgende aanwijzingen
in acht:
■ Houd voor alle aanvragen de kassabon en het artikelnummer (bijv. IAN
12345) als aankoopbewijs bij de hand.
■ Het artikelnummer vindt u op het typeplaatje, in het product gegraveerd, op
de titelpagina van de gebruiksaanwijzing (linksonder) of als sticker op de
achter- of onderkant van het product.
■ Als er fouten in de werking of andere gebreken optreden, neemt u eerst
contract op met de hierna genoemde serviceafdeling, telefonisch of via
e-mail.
■ Een als defect geregistreerd product kunt u dan zonder portokosten naar het
aan u doorgegeven serviceadres sturen. Voeg het aankoopbewijs (kassabon)
bij en vermeld waaruit het gebrek bestaat en wanneer het is opgetreden.
Op www.lidl-service.com kunt u deze en vele andere handboeken,
productvideo’s en software downloaden.
Service
Service Nederland
Tel.: 0900 0400223 (0,10 EUR/Min.)
E-Mail: kompernass@lidl.nl
Service België
Tel.: 070 270 171 (0,15 EUR/Min.)
E-Mail: kompernass@lidl.be
IAN 297765
Importeur
Let op: het volgende adres is geen serviceadres. Neem eerst contact op met het
opgegeven serviceadres.
KOMPERNASS HANDELS GMBH
BURGSTRASSE 21
DE - 44867 BOCHUM
DUITSLAND
www.kompernass.com
SSWM 1400 B2
NL│BE
│
63 ■

■ 64│NL
│
BE
SSWM 1400 B2

Obsah
Úvod ........................................................66
Autorské právo ..........................................................66
Omezení odpovědnosti ...................................................66
Použití vsouladu surčením ................................................ 66
Rozsah dodávky ..............................................67
Likvidace obalu ......................................................... 67
Popis přístroje ................................................68
Technické údaje ...............................................68
Bezpečnostní pokyny ..........................................69
První uvedení do provozu ......................................71
Obsluha .....................................................72
Opékání sendvičů ....................................................... 72
Čištění .......................................................72
Uložení ......................................................73
Odstranění poruch ............................................74
Recepty .....................................................74
Holandský toast s rajčaty .................................................74
Italský toast ............................................................75
Toast Hawaii ........................................................... 75
Toast Scandia ..........................................................76
Toast s krůtími prsíčky na kari ...............................................77
Likvidace ....................................................77
Záruka společnosti Kompernass Handels GmbH. . . . . . . . . . . . . . . . . . . . 78
Servis ................................................................. 79
Dovozce ...............................................................79
SSWM 1400 B2
CZ
│
65 ■

Úvod
Gratulujeme vám kzakoupení nového přístroje!
Svým nákupem jste si vybrali moderní a kvalitní výrobek. Návod kobsluze je
součástí tohoto výrobku. Obsahuje důležité informace obezpečnosti, použití
a likvidaci. Před použitím výrobku se prosím dobře seznamte se všemi provozními
a bezpečnostními pokyny. Tento výrobek používejte pouze předepsaným způsobem
a pro uvedené oblasti použití. Při předávání výrobku třetím osobám předejte
spolu sním i tyto podklady.
Autorské právo
Tato dokumentace je chráněná autorským právem.
Jakékoliv rozmnožování resp. přetisk, byť i jen částečně, stejně jako reprodukce
obrázků, a to i v upravené podobě, je povoleno pouze s písemným souhlasem
výrobce.
Omezení odpovědnosti
Všechny technické informace obsažené vtomto návodu kobsluze, jakož i údaje
a pokyny pro připojení a obsluhu, odpovídají poslednímu stavu techniky vdobě
tisku a byly sestaveny spřihlédnutím knašim dosavadním zkušenostem a poznatkům a podle našeho nejlepšího vědomí.
Zúdajů, obrázků a popisů vtomto návodu nelze vyvozovat žádné nároky.
Výrobce nepřebírá ručení za škody vzniklé na základě nedodržení návodu, na
základě používání vrozporu surčením, neodborných oprav, nedovoleně provedených změn nebo na základě použití nedovolených náhradních dílů.
Použití vsouladu surčením
Tento přístroj je určen pro opékání plněných sendvičů.
Tento přístroj je určen výhradně kpoužití vdomácnostech pro soukromé účely.
Nepoužívejte přístroj pro komerční účely!
■ 66│CZ
SSWM 1400 B2

Rozsah dodávky
Přístroj se standardně dodává snásledujícími komponentami:
Sendvicovac
Návod kobsluze
1) Vyjměte přístroj a návod kobsluze zkrabice.
2) Odstraňte veškerý obalový materiál.
UPOZORNĚNÍ
► Zkontrolujte dodávku, zda je kompletní a zda není viditelně poškozená.
► V případě neúplné dodávky nebo poškození v důsledku vadného balení
nebo dopravou, se obraťte na servisní linku (viz kapitola Servis).
Likvidace obalu
Obal chrání přístroj před poškozením při přepravě. Zvolený obalový materiál
odpovídá hlediskům ochrany přírody a likvidace a je tudíž recyklovatelný.
Navrácení obalu do oběhu zpracování materiálu šetří suroviny a snižuje produkci
odpadů. Již nepotřebný obalový materiál zlikvidujte podle místně platných
předpisů.
UPOZORNĚNÍ
► Uschovejte pokud možno originální obal během záruční doby přístroje,
aby bylo možné vpřípadě uplatnění záruky přístroj řádně zabalit.
Dbejte na označení na různých obalových materiálech a v případě potřeby je
roztřiďte odděleně. Obalové materiály jsou označeny zkratkami (b) a číslicemi
(a) s následujícím významem:
1–7: Plasty
20–22: Papír a lepenka
80–98: Kompozitní materiály
SSWM 1400 B2
CZ
│
67 ■

Popis přístroje
ObrázekA:
1 navíjení kabelu
2 kontrolka „Připraveno k provozu“
3 zablokování víka
4 kontrolka „Power“
ObrázekB:
5 horní toastovací plocha
6 spodní toastovací plocha
Technické údaje
Napětí 220 - 240 V ∼, 50 Hz
Příkon 1400 W
Všechny části tohoto přístroje, přicházející
do styku s potravinami, jsou bezpečné
pro potraviny.
■ 68│CZ
SSWM 1400 B2

Bezpečnostní pokyny
VÝSTRAHA!
NEBEZPEČÍ ÚRAZU ELEKTRICKÝM PROUDEM!
► Nechte poškozený síťový kabel nebo síťovou zástrčku oka-
mžitě vyměnit autorizovaným odborným personálem, abyste
zabránili ohrožení.
► Přístroj používejte jen v suchých prostorách, ne venku.
Přístroj nikdy neponořujte do vody či jiných tekutin!
V opačném případě hrozí ohrožení života v důsledku úderu
elektrickým proudem.
► Při čištění dbejte na to, aby se do vnitřní části přístroje nedo-
stala voda. Přístroj nikdy nečistěte pod tekoucí vodou.
► Ujistěte se, zda přístroj nemůže nikdy přijít do styku s vodou.
Nepoužívejte přístroj nikdy v blízkosti vody nebo nádob,
které obsahují kapaliny.
► Dbejte na to, aby síťový kabel během provozu nikdy nebyl
mokrý ani vlhký. Veďte jej tak, aby nemohlo dojít kjeho
sevření nebo jinému poškození.
► K vypnutí přístroje vytáhněte po každém použití zástrčku ze
zásuvky.
► Kryt přístroje nikdy neotevírejte.
SSWM 1400 B2
CZ
│
69 ■

VÝSTRAHA!NEBEZPEČÍ ZRANĚNÍ!
► Děti od 8let a osoby somezenými fyzickými, smyslovými
nebo mentálními schopnostmi či nedostatkem zkušeností a/
nebo znalostí mohou používat tento přístroj pouze tehdy,
pokud jsou pod dohledem nebo pokud byly poučeny obezpečném používání přístroje a pokud porozuměly nebezpečí,
které vyplývá z jeho použití.
► Děti si nesmí spřístrojem hrát.
► Čištění a uživatelskou údržbu nesmí provádět děti, ledaže
jsou starší 8let a jsou pod dohledem. Děti mladší 8let nesmí
mít přístup kpřístroji a přívodnímu kabelu.
► Části přístroje mohou být během provozu horké. Proto
přístroj uchopte pouze za rukojeti.
► Před čištěním nebo uložením nechte přístroj úplně vychladnout.
► Buďte opatrní při vyjímání hotových sendvičů. Přístroj i sendvič
jsou velmi horké.
► Přístroj provozujte pouze na stabilní a rovné ploše, která není
kluzká.
► Kprovozu přístroje nepoužívejte externí spínací hodiny, ani
samostatné dálkové ovládání.
Pozor! Horký povrch!
■ 70│CZ
SSWM 1400 B2

POZOR - NEBEZPEČÍ POŽÁRU!
► Přístroj nesmí být nikdy použit v blízkosti hořlavých materiálů.
► Během provozu přístroj nikdy nezakrývejte.
► Provozujte přístroj pouze na tepelně odolném podkladu.
► Přístroj nikdy neuvádějte do provozu bez dozoru.
POZOR – VĚCNÉ ŠKODY!
► Hotové pokrmy vyjímejte pouze špachtlí z umělé hmoty nebo
ze dřeva nebo jiným vhodným nekovovým předmětem, aby
jste nezničili nepřilnavý povrch Vašeho sendvičovače.
► K čištění nepoužívejte žádné agresivní čistící prostředky a
ostré předměty.
První uvedení do provozu
■ Namažte jednorázově nepřilnavou vrstvu toastovacích ploch 5/6 olejem
vhodným na vaření.
■ Zastrčte zástrčku do síťové zásuvky.
■ Přístroj zavřete a zablokujte zablokování víka 3. Toto musí citelně zaskočit
do spodní rukojeti.
■ Přístroj nechte 10 - 15 minut rozehřát.
UPOZORNĚNÍ
Nyní je přístroj připravený kprovozu.
SSWM 1400 B2
► Při prvním použití může dojít ke vzniku lehkého zápachu (možný nepatrný
únik kouře). Toto je normální a po určité době to zmizí. Postarejte se o
dostatečné větrání. Otevřete například okno.
■ Vytáhněte zástrčku ze zásuvky a nechte přístroj ochladnout.
■ Přístroj vyčistěte, jak je uvedeno v kapitole “Čištění“.
│
CZ
71 ■

Obsluha
Opékání sendvičů
1) Zavřete víko a zablokujte jej zablokováním víka 3. Toto musí citelně zaskočit
do spodní rukojeti.
2) Zastrčte zástrčku do síťové zásuvky. Svítí červená kontrolka „Power“ 4.
3) Jakmile je přístroj rozehřán, svítí zelená kontrolka „Připraveno k provozu“ 2.
4) Otevřete víko a položte připravené sendviče na spodní toastovací plochy 6.
5) Zavřete víko a zablokujte jej zablokováním víka 3. Toto musí citelně zaskočit
do spodní rukojeti. Pokud je sendvič příliš silný a zablokování víka 3 se nedá
zavřít, odeberte některé přísady z náplně sendviče.
POZOR – VĚCNÉ ŠKODY!
► Sendviče vyjímejte pouze špachtlí z umělé hmoty nebo ze dřeva nebo
jiným vhodným nekovovým předmětem, aby jste nezničili nepřilnavý povrch
Vašeho sendvičovače.
6) Po cca 4 - 8 minutách jsou sendviče hotové. Tento časový údaj se může lišit
od použité oblohy a osobní chuti. Otevřete víko a odeberte sendviče.
7) Pokud nechcete připravovat další sendviče, vytáhněte zástrčku ze zásuvky.
Čištění
VÝSTRAHA! NEBEZPEČÍ ÚRAZU ELEKTRICKÝM PROUDEM
► Nejprve vytáhněte zástrčku ze zásuvky, než se pustíte do čištění přístroje.
Přístroj nikdy neponořujte do vody či jiných tekutin! V opačném případě
hrozí ohrožení života v důsledku úderu elektrickým proudem.
■ 72│CZ
VÝSTRAHA! NEBEZPEČÍ ZRANĚNÍ!
► Před čištěním nechte přístroj vychladnout. Nebezpečí popálení!
POZOR – VĚCNÉ ŠKODY!
► Nepoužívejte agresivní nebo abrazivní čisticí prostředky. Jimi se povrch
přístroje poškodí.
SSWM 1400 B2

UPOZORNĚNÍ
► S čištěním nečekejte příliš dlouho. Počkejte, až přístroj vychladne natolik,
že se jej můžete dotknout i bez nebezpečí popálení. Poté se dají zbytky
potravin lépe odstranit.
■ Kryt vyčistěte suchým hadříkem nebo mírně navlhčeným hadrem. V případě
potřeby dejte na hadřík trochu mycího prostředku. Otřete je hadrem, namočeným
pouze čistou vodou, abyste odstranili případné zbytky mycího prostředku.
■ Toastovací plochy 5/6 otřete hadrem, namočeným v teplé vodě tak, aby
se odstranily veškeré zbytky potravin.
V případě silně připečených zbytků můžete položit vlhký hadr na tato místa,
aby se zbytky odmočily. Po nějaké době lze zbytky odstranit.
UPOZORNĚNÍ
► V případě úporných nečistot dejte na vlhký hadřík jemný čisticí prostředek.
Po omytí mycím prostředkem otřete toastovací plochy 5/6 ještě jednou
hadrem namočeným v čisté vodě, aby se odstranily veškeré zbytky mycího
prostředku. Po omytí mycím prostředkem doporučujeme namazat opět
toastovací plochy 5/6 olejem, vhodným na vaření.
■ Před opětovným použitím všechny díly dobře vytřete do sucha.
UPOZORNĚNÍ
Pokud do štěrbin nebo do rohů pronikne tuk nebo potraviny, kde je nemůžete
odstranit vlhkým hadříkem, postupujte následovně:
– Tuk nebo jiné kapaliny vytřete kusem kuchyňské papírové utěrky.
– Odstraňte zbytky dřevěnou špachtlí nebo malou dřevěnou špejlí.
– Potom vše ještě jednou otřete tak, jak již bylo popsáno.
Uložení
SSWM 1400 B2
■ Přístroj vyčistěte, jak je uvedeno v kapitole “Čištění “.
■ Oviňte síťový kabel kolem navíjení kabelu 1 ve spodní části přístroje. Síťový
kabel upevněte kabelovou sponou. Síťovou zástrčku upevněte jejím zastrčením
do vyhloubenin na desce navíjení kabelu 1.
■ Uchovávejte sendvičovač na suchém místě.
│
CZ
73 ■

Odstranění poruch
Porucha Příčina
Zástrčka není zastrčená do
Přístroj nefunguje.
Sendviče jsou
příliš tmavé.
zásuvky.
Přístroj je vadný.
Sendviče byly příliš dlouho
v sendvičovači.
Recepty
Holandský toast s rajčaty
Suroviny:
♦ 8 krajíce toastovacího chleba
♦ voda
♦ jarní cibulky
♦ 2 středně velké rajče
♦ bylinkové máslo
♦ 4 plátky vařené šunky
♦ sůl
♦ čerstvě mletý pepř
♦ 4 plátky čerstvého sýru Gouda
Odstranění
problému
Zapojte zástrčku do sítě.
Obraťte se na zákaznický
servis.
Vyjměte sendviče dřív ze
sendvičovače.
■ 74│CZ
1) Umyjte jarní cibulku a nechte ji odkapat. Nakrájejte jarní cibulku podélně na
velké kusy. Vodu se solí nechte svařit v hrnci. Přidejte jarní cibulku a osmažte
ji cca 1 minutu.
Vzápětí odeberte jarní cibulky sítkem, přelijte je studenou vodou a nechte
odkapat.
2) Omyjte rajčata a osušte. Nakrájejte je na půlky a odstraňte stopky.
Nakrájejte rajčata na plátky.
3) Potřete krajíc toastovacího chleba bylinkovým máslem a položte složený
plátek šunky na potřený toastovací chléb. Poté na krajíc rozdělte kousky
jarní cibulky a plátky rajčat. Posypte solí a pepřem.
4) Nakonec na toastovací krajíc položte plátek sýra.
5) Potřete další krajíc toastovacího chleba bylinkovým máslem a zakryjte Váš
sendvič potřenou stranou směrem dolů.
SSWM 1400 B2

Italský toast
Suroviny:
♦ 8 krajíce toastovacího chleba
♦ 8 PL rajčatového protlaku
♦ 4 PL majonézy
♦ sůl
♦ provensálské koření
♦ čerstvě mletý pepř
♦ 2 středně velké rajče
♦ 2 balíček sýra mozzarella
♦ čerstvě mletý barevný pepř
1) Smíchejte dohromady rajský protlak, majonézu, sůl, provensálské koření
a pepř. Touto směsí potřete plátky toastu.
2) Omyjte rajčata a osušte. Nakrájejte je na půlky a odstraňte stopky.
Nakrájejte rajčata na plátky.
3) Dále nechte mozzarellu odkapat v sítku a poté ji nakrájejte na plátky.
Rozkrojte je ještě jednou napůl.
4) Na již natřený krajíc toastovacího chleba nyní položte plátky rajčat
a mozzarelly a posypejte je paprikou.
5) Váš sendvič překryjte dalším plátkem toastovacího chleba.
Toast Hawaii
Suroviny:
1) Nechte ananas odkapat v sítku.
2) Nyní plátek toastovacího chleba natřete máslem.
3) Na plátky toastovacího chleba položte šunku a ananas.
4) Sýr se položí na ananas jako poslední.
5) Sendvič překryjte plátkem toastovacího chleba.
SSWM 1400 B2
♦ 8 krajíce toastovacího chleba
♦ 4 plátky ananasu (z plechovky)
♦ máslo
♦ 4 plátky vařené šunky
♦ 4 plátky sýra
CZ
│
75 ■

Toast Scandia
Suroviny:
♦ 8 krajíce toastovacího chleba
♦ kopr
♦ 250 g jogurtové smetany do salátu
♦ 2 ČL dijonské hořčice
♦ 2 ČL tekutého medu
♦ 40 g krému z pravého lososa (tuba z chladicí vitríny)
♦ 1 salátová okurka
♦ 2 balíček sýra mozzarella
♦ 200 g uzeného lososa, plátky
♦ čerstvě mletý pepř
1) Opláchněte kopr a otřete jej do sucha. Odtrhněte špičky ze stonků kopru
a špičky nasekejte je na jemno.
2) Jogurtovou smetanu do salátů smíchejte s hořčicí, medem, pastou z pravého
lososa a koprem.
3) Oloupejte okurku a odřízněte konce. Rozkrojte okurku podélně a čajovou
lžičkou vyndejte jádra. Nakrájejte půlku okurky na kousky.
4) Nechte mozzarellu v cedníku okapat a nakrájejte ji pak na plátky.
5) Krajíc toastovacího chleba potřete jogurtovou smetanou do salátů.
6) Položte kousek okurky na potřený krajíc toastovaného chleba, rozložte
na něj rovnoměrně plátky lososa a obložte krajíc toastovacího chleba
plátkem sýra. Vše ochuťte pepřem.
7) Sendvič překryjte plátkem toastovacího chleba.
■ 76│CZ
SSWM 1400 B2

Toast s krůtími prsíčky na kari
Suroviny:
♦ 8 krajíce toastovacího chleba
♦ 50 g másla
♦ nářez z krůtích prsíček
♦ švestky
♦ koktejlová kari omáčka
♦ mleté kari
1) Smíchejte máslo s kari omáčkou a mletým kari.
2) Omyjte švestky, vytřete je do sucha a odpeckujte je. Rozkrojte švestky
a poté je nakrájejte na tenké plátky.
3) Krajíc toastovacího chleba potřete kari máslem.
4) Nyní obložte namazaný plátek toastovacího chleba nářezem z krůtích
prsou a řezy ze švestek.
5) Sendvič překryjte dalším plátkem toastovacího chleba.
Likvidace
Vžádném případě nevyhazujte přístroj do normálního domovního
odpadu. Tento výrobek podléhá evropské směrnici č. 2012/19/EU.
(Waste Electrical and Electronic Equipment).
Přístroj předejte klikvidaci odborné firmě oprávněné knakládání sodpady nebo
využijte možnost likvidace zajišťovanou obcí. Dodržujte aktuálně platné předpisy.
Vpřípadě pochybností se informujte ve sběrném dvoře.
SSWM 1400 B2
CZ
│
77 ■

Záruka společnosti Kompernass Handels GmbH
Vážená zákaznice, vážený zákazníku,
na tento přístroj získáváte záruku v trvání 3let od data zakoupení. V případě
závad tohoto výrobku máte zákonná práva vůči prodejci výrobku. Tato zákonná
práva nejsou omezena naší níže uvedenou zárukou.
Záruční podmínky
Záruční doba začíná plynout dnem nákupu. Dobře uschovejte originál pokladního lístku. Tento doklad je potřebný jako důkaz o koupi.
Pokud do tří let od data zakoupení tohoto výrobku dojde k vadě materiálu nebo
vý robní závadě, pak Vám podle našeho uvážení výrobek zdarma opravíme nebo
vyměníme. Předpokladem této záruky je, že bude během tříleté lhůty předložen
vadný přístroj a doklad o koupi (pokladní lístek) a stručně se popíše v čem závada
spočívá a kdy se vyskytla.
Vztahuje-li se na závadu naše záruka, obdržíte zpět buď opravený nebo nový
produkt. Opravou nebo výměnou výrobku nezačne plynout nová záruční doba.
Záruční doba a zákonné nároky vyplývající ze závad
Záručním plněním se záruční doba neprodlužuje. To platí ipro vyměněné a
opravené součásti. Poškození nebo vady vyskytující se případně již při nákupu
se musí oznámit ihned po vybalení. Po uplynutí záruční doby podléhají veškeré
opravy zpoplatnění.
Rozsah záruky
Přístroj byl vyroben pečlivě podle přísných směrnic kvality a před expedicí byl
svědomitě vyzkoušen.
Záruka se vztahuje na materiálové nebo výrobní vady. Tato záruka se nevztahuje
na součásti produktu, které jsou vystaveny normálnímu opotřebení, a proto je lze
považovat za opotřebovatelné díly nebo za poškození křehkých součástí jako jsou
např. spínače, akumulátory, formy na pečení nebo části, které jsou vyrobeny ze skla.
Tato záruka zaniká, pokud je výrobek poškozen, nebyl řádně používán nebo
udržován. Pro zajištění správného používání výrobku se musí přesně dodržovat
všechny pokyny uvedené v návodu kobsluze. Účelům použití a úkonům, které se
v návodu kobsluze nedoporučují nebo se před nimi varuje, je třeba se bezpodmínečně vyhnout.
Výrobek je určen pouze pro soukromé účely a ne pro komerční použití. Při nesprávném
a neodborném používání, při použití násilí a při zásazích, které nebyly provedeny
našimi autorizovanými servisními provozovnami, záruční nároky zanikají.
■ 78│CZ
SSWM 1400 B2

Vyřízení v případě záruky
Pro zajištění rychlého Vaší žádosti postupujte podle následujících pokynů:
■ Pro všechny dotazy mějte připraven pokladní lístek a číslo výrobku (např.
IAN 12345) jako doklad o koupi.
■ Číslo výrobku naleznete na typovém štítku, rytině, na titulní straně svého
návodu (vlevo dole) nebo jako nálepku na zadní nebo spodní straně.
■ Pokud by se měly vyskytovat funkční vady nebo jiné závady, kontaktujte
nejprve níže uvedené servisní oddělení telefonicky nebo e-mailem.
■ Výrobek, zaevidovaný jako vadný výrobek pak můžete při přiložení dokladu
o nákupu (pokladní lístek) a při uvedení, v čem spočívá vada a kdy k ní došlo,
poslat výrobek pro Vás bez poštovného na adresu, kterou Vám oznámí servis.
Na webových stránkách www.lidl-service.com si můžete stáhnout tyto a
mnoho dalších příruček, videí o výrobku a software.
Servis
Servis Česko
Tel.: 800143873
E-Mail: kompernass@lidl.cz
IAN 297765
Dovozce
Dbejte prosím na to, že následující adresa není adresou servisu. Kontaktujte
nejprve uvedený servis.
KOMPERNASS HANDELS GMBH
BURGSTRASSE 21
DE - 44867 BOCHUM
NĚMECKO
www.kompernass.com
SSWM 1400 B2
CZ
│
79 ■

■ 80│CZ
SSWM 1400 B2

Índice
Introducción ..................................................82
Derechos de propiedad industrial ...........................................82
Limitación de la responsabilidad ............................................ 82
Uso previsto ............................................................ 82
Volumen de suministro .........................................83
Desecho del embalaje .................................................... 83
Descripción del aparato ........................................84
Características técnicas .........................................84
Indicaciones de seguridad ......................................85
Primera puesta en funcionamiento ...............................87
Manejo ......................................................88
Tueste de sándwiches ....................................................88
Limpieza ....................................................88
Almacenaje ..................................................89
Eliminación de fallos ...........................................90
Recetas ......................................................90
Sándwich de tomate holandés ............................................. 90
Sándwich italiano ....................................................... 91
Sándwich hawaiano ..................................................... 91
Sándwich escandinavo ................................................... 92
Sándwich de pechuga de pavo al curry ...................................... 93
Desecho .....................................................93
Garantía de Kompernass Handels GmbH .........................94
Asistencia técnica ....................................................... 95
Importador ............................................................. 95
SSWM 1400 B2
ES
│
81 ■

Introducción
¡Felicidades por la compra de su aparato nuevo!
Ha optado por adquirir un producto moderno y de alta calidad. Las instrucciones
de uso forman parte del producto y contienen indicaciones importantes acerca
de la seguridad, el uso y el desecho de este aparato. Antes de usar el producto,
familiarícese con todas las indicaciones de manejo y de seguridad. Utilice el
producto como se describe y para los ámbitos de aplicación indicados.
Entregue todos los documentos cuando transfiera el producto a terceros.
Derechos de propiedad industrial
Esta documentación está protegida por derechos de propiedad industrial.
Solo se permite su reproducción o reimpresión, total o parcial, así como la re-
producción de imágenes, incluso modificadas, con la autorización por escrito
del fabricante.
Limitación de la responsabilidad
Toda la información técnica, los datos y las indicaciones de estas instrucciones de
uso para la conexión y el manejo del aparato reflejan la situación más avanzada
en el momento de la impresión y se proporcionan teniendo en cuenta nuestras
experiencias y conocimientos hasta ese momento.
Los datos, ilustraciones y descripciones de estas instrucciones no pueden servir
como base para posibles reclamaciones.
El fabricante no asume responsabilidad alguna por los daños derivados del
incumplimiento de las instrucciones, del uso contrario a lo previsto, de las reparaciones inadecuadas, de las modificaciones realizadas sin autorización o del
empleo de recambios no homologados.
Uso previsto
Este aparato está diseñado exclusivamente para el tueste de sándwiches rellenos.
Este aparato está previsto exclusivamente para su uso doméstico privado.
¡No lo utilice para fines comerciales!
■ 82│ES
SSWM 1400 B2

Volumen de suministro
El aparato se suministra de serie con los siguientes componentes:
Sandwichera
Instrucciones de uso
1) Extraiga el aparato y las instrucciones de uso de la caja.
2) Retire todo el material de embalaje.
INDICACIÓN
► Compruebe la integridad del suministro y si hay daños visibles.
► Si el suministro está incompleto o presenta daños debido a un embalaje
deficiente o al transporte, póngase en contacto con la línea directa de
asistencia técnica (consulte el capítulo Asistencia técnica).
Desecho del embalaje
El embalaje protege el aparato durante el transporte. El material de embalaje
se ha seleccionado teniendo en cuenta criterios ecológicos y de desecho, por
lo que es reciclable.
El reciclaje del embalaje permite ahorrar en materias primas y reduce el volumen
de residuos. Deseche el material de embalaje innecesario de la forma dispuesta
por las normativas locales aplicables.
INDICACIÓN
► Si es posible, conserve el embalaje original durante el periodo de garantía
del aparato para poder empaquetarlo correctamente en caso de una
reclamación conforme a la garantía.
Observe las indicaciones de los distintos materiales de embalaje y, si procede,
recíclelos de la manera correspondiente. Los materiales de embalaje cuentan
con abreviaciones (b) y cifras (a) que significan lo siguiente:
1-7: plásticos
20-22: papel y cartón
80-98: materiales compuestos
SSWM 1400 B2
ES
│
83 ■

Descripción del aparato
Figura A:
1 Enrollacables
2 Piloto de control "listo para el funcionamiento"
3 Bloqueo de la tapa
4 Piloto de control "encendido"
Figura B:
5 Superficie superior de tueste
6 Superficie inferior de tueste
Características técnicas
Tensión 220 - 240 V ∼, 50 Hz
Consumo de potencia 1400 W
Todas las piezas de este aparato que
entran en contacto con alimentos son
aptas para su uso con alimentos.
■ 84│ES
SSWM 1400 B2

Indicaciones de seguridad
¡ADVERTENCIA! ¡PELIGRO DE DESCARGA ELÉCTRICA!
► Para evitar riesgos, encomiende a un especialista la
sustitución inmediata del cable de red o de la clavija de
red si están dañados.
► Utilice el aparato únicamente en espacios secos, no al aire
libre.
¡No sumerja nunca el aparato en agua ni en otros
líquidos! De lo contrario, existe peligro de muerte por
descarga eléctrica.
► Procure que no penetre agua en el interior del aparato al
limpiarlo. Nunca limpie el aparato bajo el agua corriente.
► Asegúrese de que el aparato no pueda entrar nunca en
contacto con el agua. No utilice el aparato cerca de agua ni
de recipientes que contengan líquidos.
► Procure que el cable de red no se moje ni se humedezca
durante el funcionamiento. Tienda el cable de modo que no
pueda aplastarse ni dañarse.
► Para apagar el aparato, extraiga después de cada uso la
clavija de red de la base de enchufe.
► Nunca abra la carcasa del aparato.
SSWM 1400 B2
ES
│
85 ■

¡ADVERTENCIA! ¡PELIGRO DE LESIONES!
► Este aparato puede ser utilizado por niños a partir de 8
años y por personas cuyas facultades físicas, sensoriales o
mentales sean reducidas o carezcan de los conocimientos
y de la experiencia necesaria siempre que sean vigilados o
hayan sido instruidos correctamente sobre el uso seguro del
aparato y hayan comprendido los peligros que entraña.
► Los niños no deben jugar con el aparato.
► Los niños no deben realizar las tareas de limpieza y mante-
nimiento del aparato a no ser que sean mayores de 8 años
y estén bajo supervisión. El aparato y el cable de conexión
deben mantenerse fuera del alcance de los niños menores
de 8 años.
► Las piezas del aparato pueden calentarse mucho durante el
funcionamiento. Por lo tanto, toque el aparato solo por las
asas.
► Deje que el aparato se enfríe totalmente antes de limpiarlo
o almacenarlo.
► Proceda con cautela al retirar los sándwiches ya hechos.
Tanto el aparato como los sándwiches están muy calientes.
► Utilice el aparato solamente sobre una superficie estable,
antideslizante y plana.
► No utilice ningún tipo de reloj programador externo ni sistema
de control remoto para accionar el aparato.
¡Atención! ¡Superficie caliente!
■ 86│ES
SSWM 1400 B2

ATENCIÓN: ¡RIESGO DE INCENDIO!
► No debe utilizarse el aparato cerca de materiales inflamables.
► No destape el aparato mientras esté en funcionamiento.
► Utilice el aparato exclusivamente sobre una base termorre-
sistente.
► No deje nunca el aparato en funcionamiento sin vigilancia.
¡ATENCIÓN: DAÑOS MATERIALES!
► Retire los alimentos exclusivamente con una espátula de plásti-
co o de madera u otro objeto adecuado no metálico para no
dañar el revestimiento antiadherente de la sandwichera.
► No utilice productos de limpieza agresivos ni objetos puntia-
gudos para la limpieza.
Primera puesta en funcionamiento
■ Unte una vez el revestimiento antiadherente de las superficies de tueste 5/6
con aceite de cocina.
■ Inserte la clavija de red en una base de enchufe.
■ Cierre el aparato y cierre el bloqueo de la tapa 3. El bloqueo debe hacer
un clic al quedar encastrado en el mango inferior.
■ Deje que el aparato se caliente durante aprox. 10 - 15 minutos.
INDICACIÓN
El aparato estará ahora listo para funcionar.
SSWM 1400 B2
► Durante la primera utilización, es posible que se produzca un ligero olor
(también puede generarse un poco de humo). Esto es normal y cesa al
poco tiempo. Procure que haya suficiente ventilación. Por ejemplo, abra
una ventana.
■ Extraiga la clavija de red y deje que se enfríe el aparato.
■ Limpie el aparato tal y como se describe en el capítulo "Limpieza".
│
ES
87 ■

Manejo
Tueste de sándwiches
1) Cierre la tapa y bloquéela con el bloqueo de la tapa 3. El bloqueo debe
hacer un clic al quedar encastrado en el mango inferior.
2) Inserte la clavija de red en una base de enchufe. Tras esto, se iluminará el
piloto de control rojo "encendido" 4.
3) En cuanto el aparato se caliente, se ilumina el piloto de control verde "listo
para el funcionamiento" 2.
4) Abra la tapa y coloque los sándwiches ya preparados en la superficie
inferior de tueste 6.
5) Cierre la tapa y bloquéela con el bloqueo de la tapa 3. El bloqueo debe
hacer un clic al quedar encastrado en el mango inferior. Si el sándwich es
demasiado grueso y no puede cerrarse el bloqueo de la tapa 3, retire algo
del relleno.
¡ATENCIÓN: DAÑOS MATERIALES!
► Extraiga los sándwiches exclusivamente con una espátula de plástico o de
madera u otro objeto adecuado no metálico para no dañar el revestimiento
antiadherente de la sandwichera.
6) Los sándwiches están listos tras aprox. 4 - 8 minutos. Esta indicación es
meramente orientativa y puede variar según el relleno y el gusto personal.
Abra la tapa y retire los sándwiches.
7) Si no desea preparar más sándwiches, extraiga la clavija de red de la base
de enchufe.
Limpieza
¡ATENCIÓN: DAÑOS MATERIALES!
■ 88│ES
¡ADVERTENCIA! PELIGRO DE DESCARGA ELÉCTRICA
► Desenchufe primero la clavija de la base de enchufe antes de limpiar el
aparato.
¡No sumerja nunca el aparato en agua ni en otros líquidos!
De lo contrario, existe peligro de muerte por descarga eléctrica.
¡ADVERTENCIA! ¡PELIGRO DE LESIONES!
► Deje que el aparato se enfríe antes de limpiarlo. ¡Peligro de quemaduras!
► No utilice productos de limpieza agresivos ni abrasivos. Dichas sustancias
corroen la superficie del aparato.
SSWM 1400 B2

INDICACIÓN
► No espere demasiado tiempo para realizar la limpieza. Espere hasta que
se enfríe suficientemente el aparato y pueda tocarlo sin riesgo de sufrir
quemaduras. Así, podrá eliminar mejor los restos de alimentos.
■ Limpie la carcasa con un paño seco o con una bayeta ligeramente húmeda.
En caso necesario, añada al paño un poco de jabón lavavajillas. A continuación,
vuelva a frotar con un paño humedecido exclusivamente con agua limpia
para eliminar cualquier resto de jabón lavavajillas.
■ Limpie las superficies de tueste 5/6 con una bayeta humedecida con
agua caliente para retirar todos los restos de alimentos.
Si los restos están incrustados, deje la bayeta húmeda sobre la superficie
para ablandarlos. Tras unos minutos, podrán eliminarse los restos.
INDICACIÓN
► Si los restos están incrustados, añada un producto de limpieza suave a la
bayeta húmeda. Tras la limpieza con producto de limpieza, frote una vez
más las superficies de tueste 5/6 con un paño humedecido con agua
limpia para eliminar los restos del producto de limpieza. Tras la limpieza
con producto de limpieza, recomendamos volver a untar las superficies de
tueste 5/6 con aceite de cocina.
■ Seque todas las piezas antes de volver a utilizarlas.
INDICACIÓN
Si se acumulan restos de grasa o de alimentos en los huecos o las esquinas que
no puedan limpiarse con un paño húmedo, proceda de la siguiente manera:
– Quite la grasa u otros líquidos con un trozo de papel de cocina.
– Retire los restos con una espátula de madera o un palillo.
– Tras esto, vuelva a limpiar el aparato de la manera descrita.
Almacenaje
SSWM 1400 B2
■ Limpie el aparato tal y como se describe en el capítulo "Limpieza".
■ Enrolle el cable de red en el enrollacables 1 de la parte inferior del
aparato. Fije el cable de red con el clip de sujeción. Para fijar el enchufe,
colóquelo en el alojamiento de la placa del enrollacables 1.
■ Guarde la sandwichera en un lugar seco.
│
ES
89 ■

Eliminación de fallos
Anomalía Causa Solución
La clavija de red no está
El aparato no
funciona.
Los sándwiches se
tuestan demasiado.
conectada a una base de
enchufe.
El aparato está defectuoso.
Los sándwiches se han
dejado demasiado tiempo
en la sandwichera.
Recetas
Sándwich de tomate holandés
Ingredientes:
♦ 8 rebanadas de pan de molde
♦ Agua
♦ Cebolletas
♦ 2 tomate mediano
♦ Mantequilla de hierbas
♦ 4 lonchas de jamón cocido
♦ Sal
♦ Pimienta recién molida
♦ 4 lonchas de queso Gouda joven
Conecte la clavija de red
a la red eléctrica.
Póngase en contacto con
el servicio posventa.
Retire antes los sándwiches.
■ 90│ES
1) Lave las cebolletas y escúrralas. Corte las cebolletas longitudinalmente por
la mitad y, después, en trozos grandes. Ponga el agua a hervir con sal en
una cacerola. Añada las cebolletas y cuézalas durante 1 minuto.
A continuación, escurra las cebolletas en un escurridor, vierta agua fría por
encima y deje que se escurran.
2) Lave los tomates y séquelos. Córtelos por la mitad y retire la parte verde.
Corte los tomates en rodajas.
3) Unte una de las rebanadas con la mantequilla de hierbas y coloque una
loncha de jamón doblada por la mitad sobre la rebanada untada. Coloque
encima los trozos de cebolleta y las rodajas de tomate. Condimente con sal
y pimienta.
4) Coloque las lonchas de queso sobre la rebanada.
5) Unte la otra rebanada con un poco de mantequilla de hierbas y cubra el
sándwich con la parte untada hacia abajo.
SSWM 1400 B2

Sándwich italiano
Ingredientes:
♦ 8 rebanadas de pan de molde
♦ 8 cucharadas de concentrado de tomate
♦ 4 cucharadas de mayonesa
♦ Sal
♦ Hierbas de Provenza
♦ Pimienta recién molida
♦ 2 tomate mediano
♦ 2 envase de queso mozzarella
♦ Pimienta de colores recién molida
1) Mezcle el concentrado de tomate, la mayonesa, la sal, las hierbas de
Provenza y la pimienta. Unte las rebanadas con la mezcla.
2) Lave los tomates y séquelos. Córtelos por la mitad y retire la parte verde.
Corte los tomates en rodajas.
3) Deje escurrir el queso mozzarella en un colador y córtelo en rodajas.
Vuelva a cortar las rodajas por la mitad.
4) Cubra la rebanada ya untada con las rodajas de tomate y mozzarella y
condimente con la pimienta.
5) Cubra el sándwich con la otra rebanada.
Sándwich hawaiano
Ingredientes:
♦ 8 rebanadas de pan de molde
♦ 4 rodajas de piña (de lata)
♦ Mantequilla
♦ 4 lonchas de jamón cocido
♦ 4 lonchas de queso
1) Deje escurrir la piña en un colador.
2) Unte una de las rebanadas con mantequilla.
3) Añada el jamón cocido y la piña a la rebanada.
4) Por último, coloque el queso sobre la piña.
5) Cubra su sándwich con la otra rebanada.
SSWM 1400 B2
ES
│
91 ■

Sándwich escandinavo
Ingredientes:
♦ 8 rebanadas de pan de molde
♦ Eneldo
♦ 250 g de aliño de yogur para ensaladas
♦ 2 cucharadita de mostaza de Dijon
♦ 2 cucharadita de miel líquida
♦ 40 g de crema de salmón (en tubo)
♦ 1 pepino
♦ 2 envase de queso mozzarella
♦ 200 g de salmón ahumado en lonchas
♦ Pimienta recién molida
1) Lave el eneldo y séquelo. Tire de las ramas para soltar las hojas y córtelas.
2) Mezcle el aliño de yogur para ensaladas con la mostaza, la miel, la crema
de salmón y el eneldo.
3) Pele el pepino y corte los extremos. Corte el pepino longitudinalmente por
la mitad y quite las semillas con una cucharilla. Corte las dos mitades del
pepino en trozos.
4) Deje escurrir el queso mozzarella en un colador y córtelo en rodajas.
5) Unte una rebanada con el aliño de yogur para ensaladas.
6) Coloque un trozo de pepino sobre la rebanada untada, añada las lonchas
de salmón de forma uniforme y cúbralas con las rodajas de queso.
Condimente con pimienta al gusto.
7) Cubra su sándwich con la otra rebanada.
■ 92│ES
SSWM 1400 B2

Sándwich de pechuga de pavo al curry
Ingredientes:
♦ 8 rebanadas de pan de molde
♦ 50 g de mantequilla
♦ Loncha de pechuga de pavo cocida
♦ Ciruelas
♦ Salsa cóctel de curry
♦ Curry en polvo
1) Mezcle la mantequilla con la salsa de curry y el curry en polvo.
2) Lave las ciruelas, séquelas y retire los huesos. Corte las ciruelas por la mitad
y, después, vuelva a cortarlas en rodajas finas.
3) Unte una rebanada con la mantequilla de curry.
4) Coloque la loncha de pavo y las rodajas de ciruela en la rebanada untada.
5) Cubra su sándwich con la otra rebanada.
Desecho
No deseche nunca el aparato con la basura doméstica.
Este aparato está sujeto a la Directiva europea 2012/19/EU
sobre residuos de aparatos eléctricos y electrónicos (RAEE).
Deseche el aparato en un centro de residuos autorizado o a través de las instalaciones de desecho de residuos comunitarias. Observe las normas vigentes.
En caso de duda, póngase en contacto con las instalaciones municipales de
desecho de residuos.
SSWM 1400 B2
ES
│
93 ■

Garantía de Kompernass Handels GmbH
Estimado cliente:
Este aparato cuenta con una garantía de 3 años a partir de la fecha de compra.
Si se detectan defectos en el producto, puede ejercer sus derechos legales frente
al vendedor. Estos derechos legales no se ven limitados por la garantía descrita
a continuación.
Condiciones de la garantía
El plazo de la garantía comienza con la fecha de compra. Guarde bien el comprobante de caja original, ya que lo necesitará como justificante de compra.
Si dentro de un periodo de tres años a partir de la fecha de compra de este producto se detecta un defecto en su material o un error de fabricación, asumiremos
la reparación o sustitución gratuita del producto a nuestra elección. La prestación
de la garantía requiere la presentación del aparato defectuoso y del comprobante
de caja, así como una breve descripción por escrito del defecto detectado y de
las circunstancias en las que se haya producido dicho defecto, dentro del plazo
de tres años.
Si el defecto está cubierto por nuestra garantía, le devolveremos el producto reparado o le suministraremos uno nuevo. La reparación o sustitución del producto no
supone el inicio de un nuevo periodo de garantía.
Duración de la garantía y reclamaciones legales por vicios
La duración de la garantía no se prolonga por hacer uso de ella. Este principio
también se aplica a las piezas sustituidas y reparadas. Si después de la compra
del aparato, se detecta la existencia de daños o de defectos al desembalarlo,
deben notificarse de inmediato. Cualquier reparación que se realice una vez
finalizado el plazo de garantía estará sujeta a costes.
Alcance de la garantía
El aparato se ha fabricado cuidadosamente según estándares elevados de
calidad y se ha examinado en profundidad antes de su entrega.
La prestación de la garantía solo rige para defectos en los materiales o errores
de fabricación. Esta garantía no cubre las piezas del producto normalmente
sometidas al desgaste y que, en consecuencia, puedan considerarse piezas de
desgaste ni los daños producidos en los componentes frágiles, p. ej., interruptores,
baterías, moldes de horno o piezas de vidrio.
Se anulará la garantía si el producto se daña o no se utiliza o mantiene correctamente.
Para utilizar correctamente el producto, deben observarse todas las indicaciones
especificadas en las instrucciones de uso. Debe evitarse cualquier uso y manejo que
esté desaconsejado o frente al que se advierta en las instrucciones de uso.
El producto está previsto exclusivamente para su uso privado y no para su uso
comercial. En caso de manipulación indebida e incorrecta, uso de la fuerza
y apertura del aparato por personas ajenas a nuestros centros de asistencia
técnica autorizados, la garantía perderá su validez.
■ 94│ES
SSWM 1400 B2

Proceso de reclamación conforme a la garantía
Para garantizar una tramitación rápida de su reclamación, le rogamos que observe
las siguientes indicaciones:
■ Mantenga siempre a mano el comprobante de caja y el número de artículo
(p. ej., IAN 12345) como justificante de compra.
■ Podrá ver el número de artículo en la placa de características, grabado en
el aparato, en la portada de las instrucciones (parte inferior izquierda) o en
un adhesivo en la parte trasera o inferior del aparato.
■ Si se producen errores de funcionamiento u otros defectos, póngase primero
en contacto con el departamento de asistencia técnica especificado a continuación por teléfono o por correo electrónico.
■ Podrá enviar el producto calificado como defectuoso junto con el justificante
de compra (comprobante de caja) y la descripción del defecto y de las
circunstancias en las que se haya producido de forma gratuita a la dirección
de correo proporcionada.
En www.lidl-service.com, podrá descargar este manual de usuario y muchos
otros más, así como vídeos sobre los productos y software.
Asistencia técnica
Servicio España
Tel.: 902 59 99 22
(0,08 EUR/Min. + 0,11 EUR/llamada (tarifa normal))
(0,05 EUR/Min. + 0,11 EUR/llamada (tarifa reducida))
E-Mail: kompernass@lidl.es
IAN 297765
Importador
Tenga en cuenta que la dirección siguiente no es una dirección de asistencia técnica.
Póngase primero en contacto con el centro de asistencia técnica especificado.
KOMPERNASS HANDELS GMBH
BURGSTRASSE 21
DE - 44867 BOCHUM
ALEMANIA
www.kompernass.com
SSWM 1400 B2
ES
│
95 ■

■ 96│ES
SSWM 1400 B2

Índice
Introdução ...................................................98
Direitos de autor ........................................................ 98
Limitação da responsabilidade .............................................98
Utilização correta .......................................................98
Conteúdo da embalagem .......................................99
Eliminação da embalagem ................................................ 99
Descrição do aparelho ........................................100
Dados técnicos ...............................................100
Instruções de segurança .......................................101
Primeira colocação em funcionamento ...........................103
Utilização ...................................................104
Torrar sanduíches .......................................................104
Limpeza ....................................................104
Guardar ....................................................105
Eliminação de erros ..........................................106
Receitas ....................................................106
Tosta de tomate à holandesa .............................................106
Tosta à italiana ........................................................107
Tosta Havai ...........................................................107
Tosta escandinava ......................................................108
Tosta de peito de peru e caril .............................................109
Eliminação ..................................................109
Garantia da Kompernass Handels GmbH ........................110
Assistência Técnica .....................................................111
Importador ............................................................ 111
SSWM 1400 B2
PT
│
97 ■
 Loading...