

Page 1
Page 2
Page 3

Italiano ................................................................... 2
Português .............................................................. 30
English ................................................................... 59
Deutsch ................................................................. 87
V 1.2
Page 4

Radiosveglia SRW 250 A2
Indice
Introduzione ....................................................................... 3
Utilizzo previsto .................................................................. 4
Contenuto della confezione ................................................. 5
Specifiche tecniche............................................................... 6
Istruzioni di sicurezza .......................................................... 7
Ambiente operativo ..................................................................................... 7
Nota relativa al distaccamento dall’alimentazione di rete ...................... 8
Cavo d’alimentazione ................................................................................. 9
Batterie ......................................................................................................... 9
Bambini ....................................................................................................... 10
Copyright.................................................................................................... 10
Dispositivo e spiegazione dei pulsanti ............................... 11
Display ........................................................................................................ 13
Prima di iniziare… ............................................................. 13
Cenni preliminari ............................................................... 14
Spegnere/accendere il dispositivo .......................................................... 14
Visualizzazione su 12/24 ore ................................................................. 14
Impostazione dell’ora ................................................................................ 14
Sintonizzare una stazione ......................................................................... 16
Ricerca automatica delle stazioni ............................................................. 16
Selezione di una stazione salvata ............................................................ 17
Impostazione della sveglia ....................................................................... 17
Attivazione della sveglia ........................................................................... 19
Spegnere la sveglia ................................................................................... 19
Timer di spegnimento ................................................................................ 20
2 - Italiano
Page 5

Radiosveglia SRW 250 A2
Timer di pausa breve ................................................................................. 21
Collegare una periferica audio ................................................................ 22
Luminosità del display ............................................................................... 23
Luce notturna .............................................................................................. 23
Inserimento delle batterie di riserva ......................................................... 24
Risoluzione dei problemi ................................................... 25
Manutenzione/Pulizia ....................................................... 26
Considerazioni ambientali e riciclaggio ............................. 26
Dichiarazione di conformità .............................................. 27
Informazioni sull'assistenza e garanzia ............................. 28
Introduzione
Grazie per aver acquistato un prodotto SilverCrest. La radiosveglia
SilverCrest SRW 250 A2 è dotata di un orologio digitale con la funzione
di sveglia. Inoltre, consente di ascoltare i programmi radio.
Leggere attentamente le pagine seguenti per le istruzioni d’uso del
prodotto.
Questo simbolo indica istruzioni importanti per operare in
sicurezza con il prodotto e per la sicurezza dell’utente.
Questo simbolo indica ulteriori informazioni
sull’argomento.
Italiano - 3
Page 6

Radiosveglia SRW 250 A2
Utilizzo previsto
Questo è un dispositivo elettronico di largo consumo, progettato per
ricevere e riprodurre le stazioni radio. Inoltre, il dispositivo può essere
impiegato come sveglia. Deve essere utilizzato unicamente a scopo
privato e non industriale o commerciale. Il dispositivo non può essere fatto
funzionare all’esterno o in climi tropicali. Il produttore non può essere
ritenuto responsabile per eventuali danni o problemi causati da modifiche
non autorizzate.
Rispettare le leggi e la normativa in materia vigenti nel paese di utilizzo.
Attenzione – potrebbero esistere norme specifiche per singolo paese
riguardo alle bande di frequenza che possono essere ricevute. Qualsiasi
informazione ottenuta su bande di frequenza diverse da quelle
esplicitamente destinate all’utilizzo pubblico non può essere utilizzata, né i
suoi contenuti divulgati a terzi.
4 - Italiano
Page 7
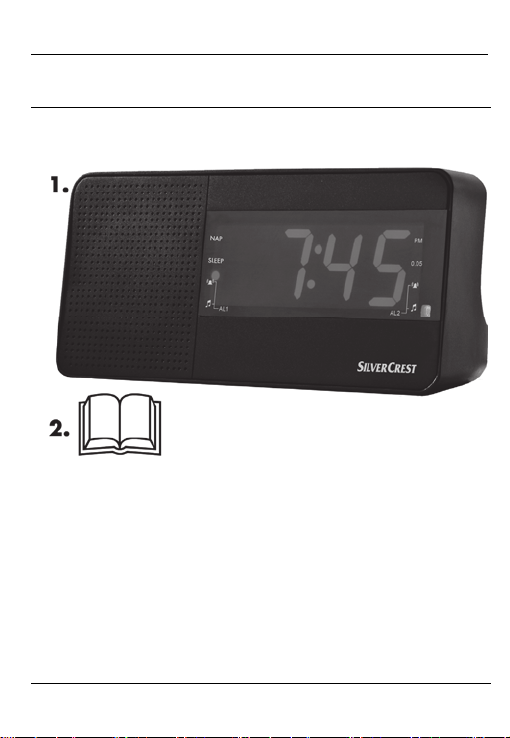
Contenuto della confezione
1. Radiosveglia SilverCrest SRW 250 A2
2. Questo manuale dell’utente (illustrazione)
Radiosveglia SRW 250 A2
Italiano - 5
Page 8
Radiosveglia SRW 250 A2
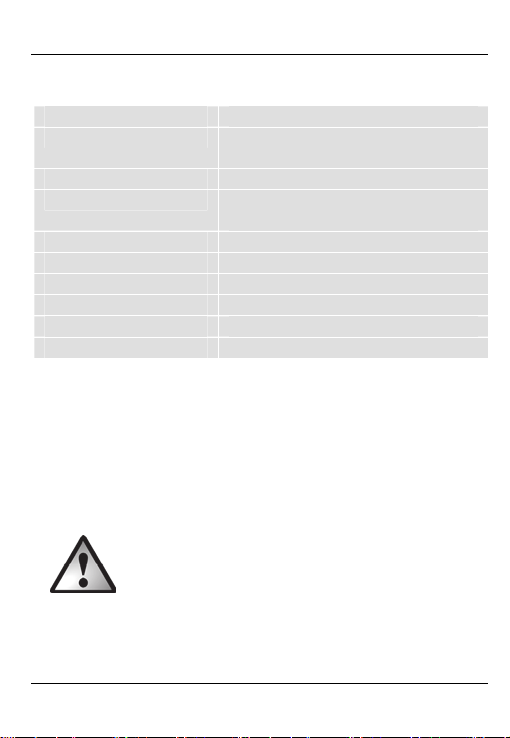
Specifiche tecniche
Tensione di ingresso
Consumo elettrico
Corrente in uscita 250 mW
Batterie di riserva
Frequenza FM 87,5 - 108 MHz
Stazioni preimpostate
Dimensioni
Peso
Temperatura operativa
Umidità operativa Max. 85 % umidità relativa
*Il consumo elettrico in standby dipende dall’impostazione della
luminosità del display.
Soggetto a variazioni relative alle specifiche tecniche o al design
senza preavviso.
Queste informazioni descrivono le caratteristiche
tecniche del dispositivo. La normativa in materia di
bande di frequenza destinate al pubblico utilizzo può
differire da nazione a nazione. Attenzione! Ricevere
informazioni da bande di frequenza diverse da quelle
esplicitamente destinate all’utilizzo pubblico è illegale e
potrà essere perseguito a termini di legge.
230 V~ / 50 Hz
Standby: max. 1 W *
Funzionamento: max. 3 W
2 Batterie AAA (Micro/R03/LR03) da
1.5 V (non accluse alla confezione).
20 FM
189 x 92 x 85 mm (L x H x P)
circa 435 g (senza batterie)
Da 5 °C a 35 °C
6 - Italiano
Page 9

Radiosveglia SRW 250 A2
Istruzioni di sicurezza
Quando si utilizza questo dispositivo per la prima volta, leggere le
seguenti note contenute in questo manuale e rispettare tutti gli
avvertimenti, anche se si ha dimestichezza con i dispositivi elettronici.
Conservare queste istruzioni per successive consultazioni. In caso di
vendita o cessione del dispositivo, è importante che questo manuale vi sia
allegato.
Ambiente operativo
Non utilizzare il dispositivo in ambienti con alte temperature o forti tassi di
umidità (es. stanze da bagno) o in ambienti estremamente polverosi.
Temperatura e umidità operative: da 5 °C a 35 °C, max. 85 % di umidità
relativa.
Accertarsi sempre che:
l’aria possa circolare liberamente intorno al dispositivo (non
posizionarlo su librerie, tappeti, letti o in altri posti in cui i fori di
ventilazione risultino ostruiti e lasciare almeno 10 cm di spazio da
ogni lato);
il dispositivo non venga esposto a fonti di calore diretto (es.
termosifoni);
il dispositivo non venga esposto a luce solare o artificiale diretta;
Italiano - 7
Page 10

Radiosveglia SRW 250 A2
il dispositivo non entri in contatto con spruzzi o gocce d’acqua o
liquidi aggressivi e non venga messo in funzione vicino all’acqua.
Soprattutto, il dispositivo non deve mai essere immerso in liquidi (non
posizionare oggetti contenenti liquidi, come vasi o bicchieri, sopra o
vicino al dispositivo);
il dispositivo non venga mai posizionato in prossimità di campi
magnetici (es. altoparlanti);
non vengano posizionate fiamme libere (come candele accese) sopra
o in prossimità del dispositivo;
nel dispositivo non penetrino corpi estranei;
il dispositivo non venga esposto a brusche variazioni di temperatura,
in quanto ciò potrebbe provocare la formazione di condensa e
conseguenti cortocircuiti. Se il dispositivo è stato esposto a brusche
variazioni di temperatura, attendere che giunga a temperatura
ambiente (circa 2 ore) prima di accenderlo.
il dispositivo non venga esposto a forti vibrazioni o urti.
Nota relativa al distaccamento
dall’alimentazione di rete
L’interruttore ON/OFF-FM/AUX (2) posto sulla parte superiore del
dispositivo non scollega completamente l’apparecchio dall’alimentazione
di rete. In modalità standby il dispositivo consuma elettricità. Per
scollegare totalmente il dispositivo, staccare la spina dalla presa di
alimentazione di rete. A tal fine il dispositivo deve essere posizionato in
modo tale che l’accesso alla presa sia libero da impedimenti, affinché sia
possibile staccare facilmente la spina d’alimentazione in situazioni
8 - Italiano
Page 11
Radiosveglia SRW 250 A2
d’emergenza. Per evitare il rischio d’incendi, nel caso in cui il dispositivo
non venga utilizzato per lunghi periodi di tempo (es. durante le vacanze),
scollegarlo sempre dalla presa d’alimentazione. In presenza di temporali
scollegare il dispositivo dall’alimentazione di rete.
Non aprire la cassa del dispositivo. L’apertura potrebbe provocare scosse
elettriche mortali.
Cavo d’alimentazione
Impugnare sempre il cavo dalla spina. Non staccare mai la spina dalla
presa tirando il cavo e impugnarlo mai con le mani bagnate, in quanto ciò
può provocare cortocircuiti o scosse elettriche. Non posizionare il
dispositivo, mobili o altre apparecchiature sul cavo di alimentazione e
accertarsi che esso non venga schiacciato. Non annodare mai il cavo, né
legarlo insieme ad altri cavi. Posizionare il cavo d’alimentazione in
maniera tale da non inciamparci o che esso non costituisca un ostacolo.
Un cavo di alimentazione danneggiato può causare un incendio o uno
shock elettrico. Ispezionare periodicamente il cavo. In caso di
danneggiamento, per la sostituzione contattare il centro assistenza più
vicino o il rivenditore.
Batterie
Inserire le batterie prestando attenzione alla polarità. Fare riferimento
all’illustrazione nel vano batterie. Non tentare di ricaricare le batterie e
non gettarle nel fuoco. Non mescolare batterie (nuove e vecchie,
Italiano - 9
Page 12
Radiosveglia SRW 250 A2
carbonio e alcaline, ecc.) Quando il dispositivo rimane inutilizzato per
lunghi periodi di tempo, rimuovere le batterie. Un utilizzo improprio può
causare esplosioni o fuoriuscite di liquido.
Bambini
I dispositivi elettrici non devono essere lasciati alla portata dei bambini.
Non consentire ai bambini di utilizzare le apparecchiature elettriche senza
supervisione. I bambini potrebbero non comprendere gli eventuali rischi.
Le componenti più piccole possono venire ingerite. In caso di ingestione
accidentale, consultare immediatamente un medico. Tenere il materiale
d’imballaggio fuori dalla portata dei bambini. Rischio di soffocamento!
Copyright
Rischio di soffocamento!
Tutti i contenuti del presente Manuale per l’utente sono coperti da
copyright e vengono forniti all’utente unicamente a scopo informativo. È
rigorosamente vietato copiare qualsiasi dato o informazione senza
precedente autorizzazione scritta ed esplicita dell’autore. Questo si
applica anche a un qualsiasi uso commerciale dei contenuti e delle
informazioni. Tutti i testi e le illustrazioni sono aggiornati alla data di
pubblicazione.
10 - Italiano
Page 13
Radiosveglia SRW 250 A2
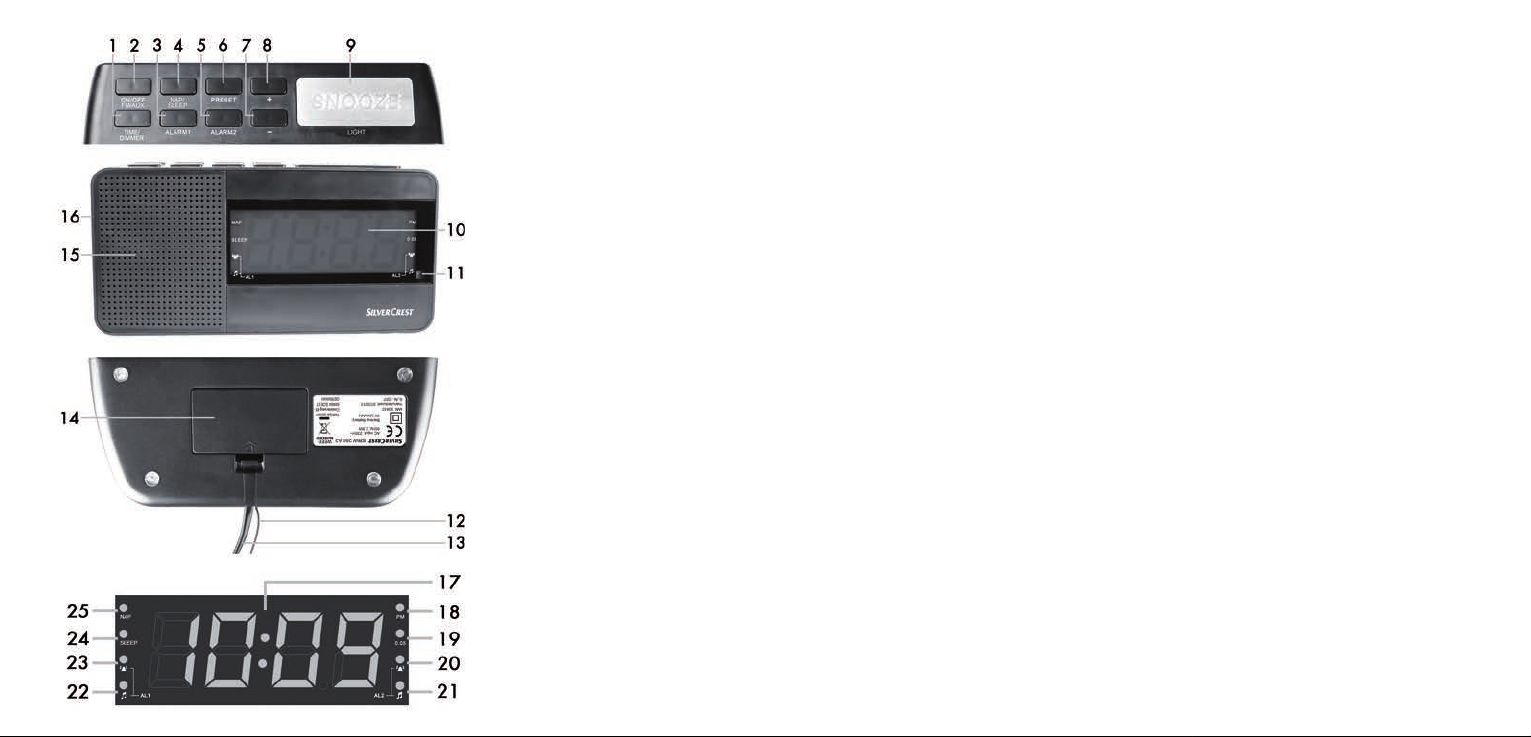
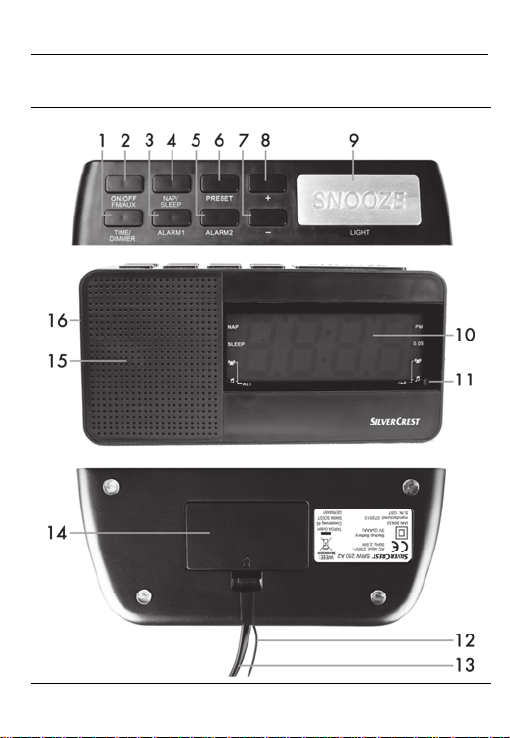
Dispositivo e spiegazione dei pulsanti
Italiano - 11
Page 14

Radiosveglia SRW 250 A2
1
TIME/DIMMER (ora/luminosità del display)
2
ON/OFF (accensione/spegnimento); FM/AUX (selezione)
3
ALARM1 (per impostare o attivare/disattivare la sveglia
ALARM1)
4
NAP/SLEEP (imposta il timer di pausa breve o quello di
autospegnimento)
5
ALARM2 (per impostare o attivare/disattivare la sveglia
ALARM2)
6
PRESET (salva/sintonizza la stazione preimpostata, ricerca le
stazioni)
7
- (abbassa il volume o seleziona un’opzione)
8
+ (alza il volume o seleziona un’opzione)
9
SNOOZE/LIGHT (ritarda la sveglia di circa 6 min,
attiva/disattiva la luce notturna)
10
Display
11
Sensore della luce
12
Antenna a filo
13
Cavo d’alimentazione
14
Vano per le batterie
15
Altoparlante
16
Entrata AUX (pannello posteriore)
12 - Italiano
Page 15
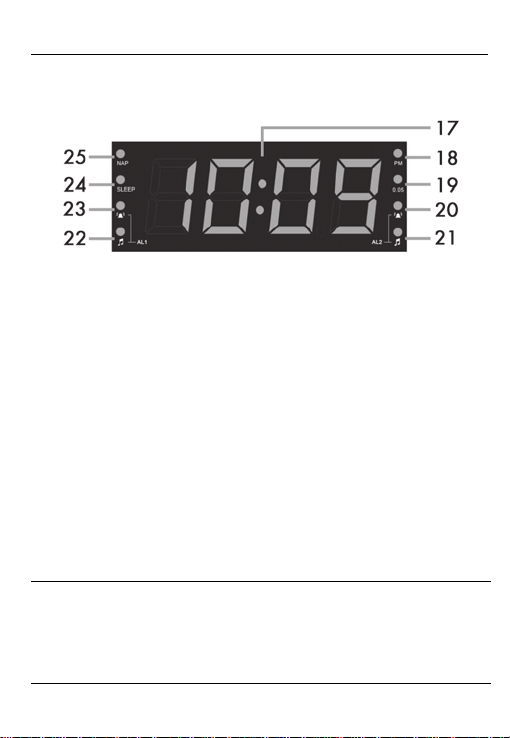
Display
17
Orologio/frequenza/indicazione del volume
PM (solo per la modalità su 12 ore)
18
0.05 MHz per la sintonizzazione FM
19
AL2 – orario di sveglia attivato con il suono di sveglia
20
AL2 – orario di sveglia attivato con la radio
21
AL1 – orario di sveglia attivato con la radio
22
23
AL1 – orario di sveglia attivato con il suono di sveglia
SLEEP LED (LED del timer di autospegnimento)
24
NAP LED (LED del timer di pausa breve)
25
Radiosveglia SRW 250 A2
Prima di iniziare…
Posizionare l’apparecchiatura su una superficie piana e stabile e non
collocare oggetti pesanti sopra di essa. Collegare la spina del cavo
d’alimentazione (13) a una presa facilmente accessibile.
Italiano - 13
Page 16

Radiosveglia SRW 250 A2
È possibile utilizzare le batterie di riserva per non dover
riprogrammare le impostazioni personalizzate in caso di
mancanza di corrente. Per maggiori informazioni,
consultare il capitolo “Inserimento delle batterie di riserva”
a pag. 24.
Cenni preliminari
Spegnere/accendere il dispositivo
Per accendere il dispositivo premere ON/OFF-FM/AUX [2]. Quando si
accende il prodotto, sul display [10] appaiono brevemente la frequenza
impostata e poi l’ora.
Per spegnere il dispositivo tenere premuto ON/OFF-FM/AUX [2] per
almeno 1 sec. Quando si spegne il dispositivo, sul display [10] appare
l’ora.
Visualizzazione su 12/24 ore
La radiosveglia può visualizzare l’orario nel formato su 12 o 24 ore. Le
modalità d’impostazione del formato sono descritte nel capitolo
successivo, “Impostare l’ora”.
Impostazione dell’ora
L’ora può essere impostata solo a dispositivo spento. Nel caso in cui
l’apparecchio fosse acceso, spegnerlo premendo il pulsante ON/OFFFM/AUX (2).
14 - Italiano
Page 17

Radiosveglia SRW 250 A2
A
Premere TIME/DIMMER (1) fino a quando le cifre dell’ora non
iniziano a lampeggiare (10).
Quando viene acceso per la prima volta, il dispositivo
entra automaticamente in modalità Impostazione
orologio e l’ora sul display lampeggia (10). In base alle
impostazioni predefinite di fabbrica, il dispositivo è
impostato su “24 ore”.
Premere - (7) o + (8) per impostare l’ora. È possibile anche tenere
premuti i pulsanti – (7) o + (8).
Premere quindi TIME/DIMMER (1) brevemente per impostare i
minuti. I minuti lampeggeranno sul display (10).
Premere - (7) o + (8) per impostare i minuti. È possibile anche tenere
premuto - (7) o + (8) per impostare i minuti procedendo di 10 min
alla volta.
Premere TIME/DIMMER (1) per spostarsi fra le modalità 12 e 24
ore. Sul display (10) apparirà “12” o “24”.
È possibile anche utilizzare i pulsanti – (7) o + (8) per spostarsi fra
queste due modalità. Nella modalità 12 ore, per distinguere fra
mattino e pomeriggio sul display apparirà PM (18).
Attendere fino a quando sul display (10) non appare l’ora impostata
o premere brevemente TIME/DIMMER (1).
ttenzione! L’ora può essere impostata solo mentre il
display lampeggia. In assenza di comandi per qualche
secondo, le cifre sul display (10) smetteranno di
lampeggiare e sarà necessario ripetere la procedura.
Italiano - 15
Page 18

Radiosveglia SRW 250 A2
Sintonizzare una stazione
Accendere il dispositivo premendo ON/OFF-FM/AUX [2].
Sul display (10) apparirà brevemente la frequenza in uso. Quando
appare l’ora, premere – [7] o + [8] per regolare il volume.
Premere brevemente ON/OFF-FM/AUX [2] . Quando appare la
frequenza in uso, premere – [7] o + [8] per impostare manualmente
la frequenza desiderata.
Per la ricerca automatica di una stazione, tenere premuti i pulsanti –
[7] o + [8]. La frequenza in uso è indicata in MHz. Tutte le frequenze
con 0.05 MHz appaiono per mezzo del LED 0.05 [19]. Se
necessario, per migliorare la ricezione spostare l’antenna in una
posizione diversa o cambiare posto al dispositivo.
È possibile salvare una stazione tenendo premuto il pulsante PRESET
[6] per circa 1-2 sec.
Sul display [10] lampeggerà “P” seguito da un numero fra 01 e 20.
Premere – [7] o + [8] per selezionare la stazione preimpostata
desiderata.
Premere nuovamente PRESET [6] per salvare la stazione in uso sulla
preimpostazione di memoria selezionata.
Ricerca automatica delle stazioni
Se non si desidera impostare manualmente le stazioni, è possibile
eseguire la ricerca automatica. Procedere nel seguente modo:
16 - Italiano
Page 19

Radiosveglia SRW 250 A2
Accendere il dispositivo tramite l’interruttore ON/OFF-FM/AUX (2).
Tenere premuto il pulsante PRESET (6) per circa 4 secondi. La ricerca
partirà e tutte le stazioni rilevate verranno salvate automaticamente.
Una volta individuata una stazione, la preimpostazione di memoria
assegnata lampeggerà brevemente sul display [10].
Premere nuovamente PRESET (6) per annullare la ricerca.
Attenzione: è possibile salvare al massimo 20 stazioni.
Nel caso in cui venisse rilevato un numero superiore di
stazioni, verranno salvate solo le prime 20.
Selezione di una stazione salvata
Per selezionare una stazione da quelle memorizzate è necessario
accendere il dispositivo. Nel caso in cui l’apparecchio fosse spento,
accenderlo premendo il pulsante ON/OFF-FM/AUX (2).
Premere brevemente il pulsante PRESET (6). Verrà mostrata la
stazione memorizzata selezionata (da P01 a P20).
Premere – (7) o + (8) per selezionare una stazione preimpostata
diversa.
Impostazione della sveglia
Accertarsi che l’impostazione dell’orologio sia corretta (vedere pag. 14 –
Impostazione dell’ora). È possibile impostare due diversi orari di sveglia
(ALARM1 e ALARM2). La sveglia può essere impostata solo a dispositivo
spento. Nel caso in cui l’apparecchio fosse acceso, spegnerlo premendo il
pulsante ON/OFF-FM/AUX (2).
Italiano - 17
Page 20

Radiosveglia SRW 250 A2
Tenere premuto ALARM1 (3) o ALARM2 (5) fino a quando l’ora sul
display non lampeggia.
Premere - (7) o + (8) per impostare l’ora. È possibile anche tenere
premuti i pulsanti – (7) o + (8).
Premere ancora e brevemente ALARM1 (3) o ALARM2 (5) per
impostare i minuti. I minuti lampeggeranno sul display (10).
Premere - (7) o + (8) per impostare i minuti. È possibile anche tenere
premuto - (7) o + (8) per impostare i minuti procedendo di 10 min
alla volta.
Premere di nuovo ALARM1 [3] o ALARM2 [5] rapidamente per
impostare il volume della sveglia sul livello desiderato da 00 a 16. Il
livello di volume in uso lampeggerà sul display [10].
Premere – [7] o + [8] per impostare il volume della sveglia. È
possibile anche tenere premuti i pulsanti – [7] o + [8]. È possibile
impostare diversi livelli di volume per i due orari di sveglia (ALARM1
e ALARM2).
Attendere fino a quando il display (10) non smette di lampeggiare o
premere brevemente ALARM1 (3) o ALARM2 (5).
Attenzione! L’ora e il volume della sveglia possono
essere impostati solo mentre le cifre sul display [10]
lampeggiano. In assenza di comandi per qualche
secondo, le cifre sul display [10] smetteranno di
lampeggiare e sarà necessario ripetere la procedura.
18 - Italiano
Page 21

Radiosveglia SRW 250 A2
Attivazione della sveglia
Una volta impostata la sveglia desiderata, è possibile attivarla nei
seguenti modi:
Premere brevemente ALARM1 (3) o ALARM2 (5). Sul display
comparirà il LED di AL1 suono (23) o AL2 suono (20). A questo
punto è attivata la sveglia con il suono di sveglia.
Premere di nuovo brevemente ALARM1 (3) o ALARM2 (5). Sul
display comparirà il LED di AL1 radio (22) o AL2 radio (21). A
questo punto è attivata la sveglia con la radio.
Per disattivare la sveglia, premere nuovamente ALARM1 (3) o
ALARM2 (5). Quando la sveglia è disattivata, i LED di AL1 suono
(23), AL1 radio (22), AL2 suono (20) e AL2 radio (21) risultano
spenti.
In modalità radiosveglia, il dispositivo si accende all’ora
impostata sintonizzandosi sull’ultima frequenza e all’ultimo
volume impostati. In modalità allarme acustico, la sveglia
suonerà al volume assegnato alla funzione
corrispondente.
Spegnere la sveglia
Quando si attiva la sveglia, è possibile disattivarla nel seguente modo:
Premere ON/OFF-FM/AUX (2) per interrompere la sveglia. La
sveglia viene spenta fino al giorno successivo.
o
Italiano - 19
Page 22

Radiosveglia SRW 250 A2
Premere SNOOZE/LIGHT (9) per posticipare la sveglia di circa 6
min. Trascorso questo periodo di tempo, la sveglia ricomincerà a
suonare.
Quando è attiva la funzione SNOOZE, il LED di sveglia
relativo (20, 21, 22 o 23) lampeggia.
Timer di spegnimento
Il timer di autospegnimento spegne automaticamente il dispositivo dopo
un certo periodo di tempo.
A dispositivo acceso, premere NAP/SLEEP [4]. Sul display [10]
apparirà il numero “60” a indicare che il dispositivo si spegnerà
automaticamente dopo 60 minuti.
Premere il pulsante NAP/SLEEP [4] più volte per diminuire questo
valore. Il ritardo nello spegnimento diminuirà di 10 minuti a ogni
pressione del pulsante.
Quando sul display [10] apparirà “OFF”, il timer di spegnimento
verrà disabilitato e il dispositivo rimarrà acceso. Premere nuovamente
NAP/SLEEP [4] per ricominciare l’operazione.
Quando è attivo il timer di spegnimento, sul display [10] rimarrà
acceso lo SLEEP LED [24].
20 - Italiano
Page 23
Radiosveglia SRW 250 A2
Mentre è attivo il conto alla rovescia per lo spegnimento,
in qualsiasi momento è possibile spegnere il dispositivo
premendo il pulsante ON/OFF-FM/AUX [2].
Mentre è attivo il timer di spegnimento, premere
NAP/SLEEP [4] per visualizzare il tempo rimanente
prima dello spegnimento.
Timer di pausa breve
Per un singolo evento è possibile impostare il timer di pausa breve (solo
con allarme acustico). Si può impostare un valore da 1 a 60 minuti.
A dispositivo spento, premere NAP/SLEEP [4]. Sul display [10]
apparirà “n30” a indicare che il dispositivo si accenderà
automaticamente dopo 30 minuti.
Premere – [7] o + [8] per impostare un ritardo nell’accensione fra 1 e
60 min. È possibile anche tenere premuti i pulsanti – [7] o + [8].
Quando è attivo il timer di pausa breve, sul display [10] rimarrà
acceso il NAP LED [25].
Per disabilitare l’allarme acustico di questa funzione premere un
qualsiasi pulsante.
Mentre è attivo il conto alla rovescia per il timer di pausa
breve, in qualsiasi momento è possibile disabilitare questa
funzione premendo il pulsante ON/OFF-FM/AUX [2].
Italiano - 21
Page 24
Radiosveglia SRW 250 A2
Mentre è attivo il timer di pausa breve, premere
NAP/SLEEP [4] per visualizzare il tempo rimanente prima
dell’accensione.
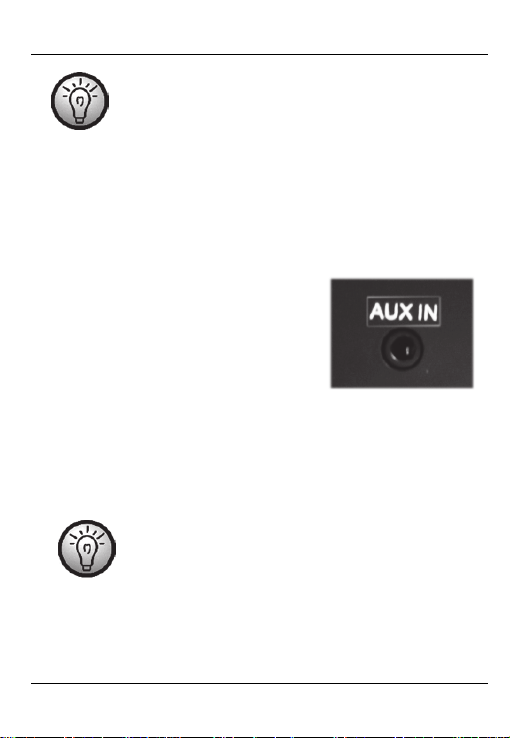
Collegare una periferica audio
Per collegare la radiosveglia a una periferica audio è necessario un
cavo audio con uno spinotto di tipo jack da 3.5 mm. Questo cavo è
opzionale e, di conseguenza, non è incluso nella confezione.
Inserire un’estremità del cavo audio
nell’uscita per le cuffie della periferica e
l’altra estremità nell’entrata AUX IN
[16] sul pannello posteriore della
radiosveglia.
Accendere il dispositivo e premere ON/OFF-FM/AUX [2] più volte
per selezionare “AUH” come fonte audio. La scritta sul display
“AUH” significa “AUSILIARIA”.
Avviare la riproduzione sulla periferica audio.
Premere – [7] o + [8] per impostare il volume desiderato.
Il volume della riproduzione può essere regolato anche
dalla periferica.
22 - Italiano
Page 25

Radiosveglia SRW 250 A2
Luminosità del display
Al momento della consegna il display è impostato sulla luminosità
massima. Per regolarla, procedere come segue:
Premere TIME/DIMMER (1) brevemente per oscurare il display. Sul
display (10) apparirà brevemente “L” (Basso).
Premere nuovamente TIME/DIMMER (1) per regolare la luminosità
del display automaticamente in base all’illuminazione dell’ambiente.
Le condizioni di luce vengono misurate dal sensore relativo. Sul
display (10) apparirà brevemente “A” (Automatico).
Premere ancora una volta TIME/DIMMER (1) per riportare al
massimo la luminosità. Sul display (10) apparirà brevemente “H”
(Alto).
Premendo ancora una volta TIME/DIMMER (1) sarà possibile
ricominciare l’operazione.
Luce notturna
La radiosveglia è dotata di una luce che aiuta a orientarsi nel buio. Inoltre,
consente di utilizzare la radiosveglia al buio più facilmente. A dispositivo
spento, per accendere la luce notturna premere SNOOZE/LIGHT [9].
Premerlo nuovamente per spegnere la luce notturna.
La luce notturna inserita nella radiosveglia non è
utilizzabile per illuminare la stanza.
Italiano - 23
Page 26
Radiosveglia SRW 250 A2
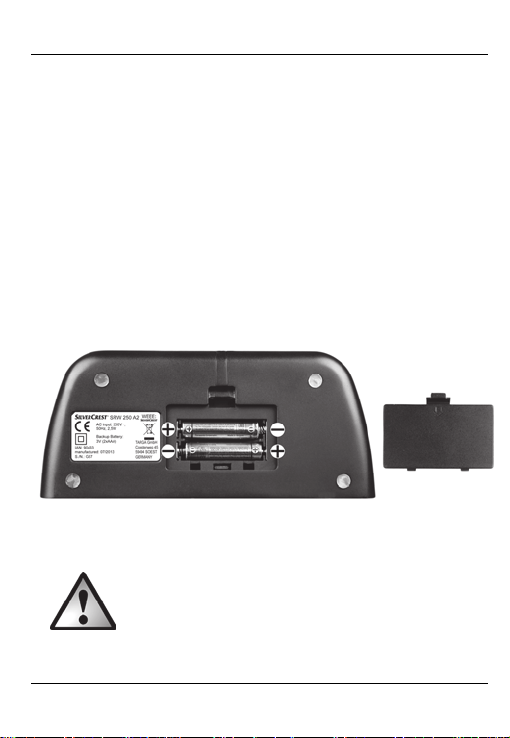
Inserimento delle batterie di riserva
Per evitare di dover reimpostare tutti i valori del dispositivo in caso di
mancanza di corrente o di disconnessione dall'alimentazione di rete, è
possibile utilizzare le batterie di riserva (non in dotazione). Procedere nel
seguente modo:
Scollegare il dispositivo dall’alimentazione di rete.
Aprire l’alloggiamento delle batterie (14) sul fondo del dispositivo.
Inserire due batterie AAA (Micro/R03/LR03) da 1.5 V
scompartimento, assicurandosi che la polarità sia corretta. Fare
attenzione ai simboli + e – situati sulle batterie e nel relativo
alloggiamento (vedere illustrazione).
Chiudere il coperchio.
Ricollegare il dispositivo all’alimentazione di rete.
Quando il dispositivo rimane inutilizzato per lunghi
periodi di tempo, rimuovere le batterie.
nello
24 - Italiano
Page 27

Radiosveglia SRW 250 A2
Risoluzione dei problemi
Il dispositivo non si accende.
Presa difettosa o fusibile saltato: controllare la presa collegandola a
un altro dispositivo.
Non vengono emessi suoni.
Nel caso in cui il sonoro risultasse molto basso o assente, controllare
le impostazioni audio (il dispositivo deve essere acceso) e, se
necessario, aumentare il volume con il pulsante + (8).
Ricezione radio debole
Srotolare completamente l’antenna a filo (12) e, se necessario,
cambiare posizione.
Nessuna riproduzione delle periferiche audio
Accertarsi che il cavo audio sia collegato correttamente all’entrata
AUX IN [16] della radiosveglia e alla presa per le cuffie della
periferica audio.
Accertarsi di selezionare la periferica audio controllando che sul
display appaia "AUH". La scritta sul display “AUH” significa
“AUSILIARIA”.
Accertarsi di aver avviato la riproduzione sulla periferica audio e che
il volume sia sufficientemente alto. Leggere anche le istruzioni
operative della periferica.
Italiano - 25
Page 28

Radiosveglia SRW 250 A2
Manutenzione/Pulizia
È necessario rivolgersi all’assistenza nel caso in cui il dispositivo abbia
subito dei danni, come, per esempio, quando la spina, il cavo
d’alimentazione o il case siano danneggiati, quando liquidi od oggetti
siano penetrati nel dispositivo, quando il prodotto sia stato esposto a
pioggia o umidità, quando l’apparecchio non funzioni correttamente o sia
caduto. In presenza di fumo, rumori od odori insoliti, spegnere
immediatamente il dispositivo e scollegarlo dall’alimentazione di rete. In
questo caso, non utilizzare ulteriormente l’apparecchio e farlo controllare
da personale autorizzato. Tutte le operazioni di assistenza devono essere
eseguite da personale specializzato. Non aprire la cassa del dispositivo.
L’apertura potrebbe provocare scosse elettriche mortali. Per la pulizia,
utilizzare solo un panno pulito e asciutto. Non impiegare mai liquidi
aggressivi. Non tentare di smontare il dispositivo, l’apertura della sua
cassa annullerà la garanzia.
Considerazioni ambientali e riciclaggio
I dispositivi contrassegnati da questo simbolo sono soggetti
alla Direttiva europea 2002/96/EC. Tutti i dispositivi
elettrici ed elettronici devono essere smaltiti separatamente
dai rifiuti domestici presso gli enti prestabiliti. Uno
smaltimento adeguato dei dispositivi usati evita danni
26 - Italiano
Page 29

Radiosveglia SRW 250 A2
all’ambiente e alla salute. Per ulteriori informazioni su uno smaltimento
appropriato, contattare i locali enti di smaltimento, le autorità competenti
o il negozio dove è stato acquistato l’apparecchio.
Rispettare l’ambiente. Non smaltire le batterie usate fra i rifiuti domestici.
Portarle in un apposito punto di raccolta. Attenzione! Le batterie devono
essere smaltite, totalmente scariche, negli appositi punti di raccolta
differenziata. Nel caso in cui si gettino batterie non completamente
scariche, prendere le necessarie precauzioni per prevenire cortocircuiti.
Smaltire i materiali d’imballaggio in maniera eco-compatibile. Le scatole
possono essere riciclate negli appositi cassonetti per la carta o portate nei
centri di raccolta pubblici. Le pellicole e i materiali plastici della
confezione originale possono essere smaltiti in maniera eco-compatibile
con l’aiuto dell’ente di raccolta rifiuti.
Dichiarazione di conformità
Questo dispositivo è conforme ai requisiti di base e ad altri
relativi della direttiva CEM 2004/108/EC, della direttiva
sulla bassa tensione 2006/95/EC, della direttiva RoHS II
2011/65/EU e della direttiva ErP 2009/125/EC. La
dichiarazione di conformità si trova alla fine di questo
manuale.
Italiano - 27
Page 30

Radiosveglia SRW 250 A2
Informazioni sull'assistenza e garanzia
Garanzia di TARGA GmbH
con questo apparecchio riceve 3 anni di garanzia a partire dalla data di
acquisto. Si prega di conservare lo scontrino fiscale originale come prova
d'acquisto. Prima della messa in funzione del prodotto, leggere la
documentazione allegata o la guida in linea. Se dovesse presentarsi un
problema che non si riesce a risolvere con i mezzi indicati, contattare la
nostra assistenza clienti. Per ogni richiesta si prega di avere a disposizione
il codice articolo o il numero di serie, se esistente. Nel caso in cui non sia
possibile trovare una soluzione per via telefonica, tramite la nostra
assistenza clienti viene contattata una seconda assistenza, in base alla
causa del difetto. Grazie alla garanzia, se dovessero essere riscontrati
difetti di materiale o di fabbricazione, il prodotto sarà, a nostra
discrezione, riparato o sostituito gratuitamente. La riparazione o
sostituzione del prodotto non comporta l’inizio di un nuovo periodo di
garanzia. Materiali soggetti a usura come batterie, accumulatori ed
elementi illuminanti sono esclusi dalla garanzia.
La garanzia legale nei confronti del venditore sussiste oltre alla presente
garanzia e non viene in alcun modo limitata da quest'ultima.
28 - Italiano
Page 31

Radiosveglia SRW 250 A2
Assistenza
E-Mail: service.IT@targa-online.com
E-Mail: service.CH@targa-online.com
E-Mail: service.MT@targa-online.com
TARGA GmbH
IAN: 90433
Produttore
Coesterweg 45
59494 SOEST
GERMANY
Telefono: 02 – 69 68 28 59
Telefono: 044 – 511 82 91
Telefono: 800 – 62 175
Italiano - 29
Page 32

Rádio Despertador SRW 250 A2
Índice
Introdução ......................................................................... 31
Fim a que se destina .......................................................... 32
Conteúdo da embalagem .................................................. 33
Especificações técnicas ....................................................... 34
Instruções de segurança .................................................... 35
Condições de funcionamento ................................................................... 35
Nota sobre desligamento da rede elétrica ............................................. 36
Cabo de alimentação ............................................................................... 37
Pilhas ........................................................................................................... 38
Crianças ..................................................................................................... 38
Copyright
Vista geral do dispositivo e explicação dos botões............ 40
Ecrã ............................................................................................................. 42
Antes de Dar os Primeiros Passos ...................................... 42
Os Primeiros Passos .......................................................... 43
Ligar e desligar o dispositivo .................................................................... 43
Ver as horas em formato 12/24 .............................................................. 43
Acertar as horas......................................................................................... 43
Sintonizar uma estação ............................................................................. 45
Procurar automaticamente uma estação ................................................. 46
Selecionar uma estação guardada .......................................................... 46
Definir o despertador ................................................................................ 47
Ativar o despertador ................................................................................. 48
Desligar o despertador ............................................................................. 49
Temporizador para dormir ....................................................................... 49
Temporizador para sesta .......................................................................... 50
30 - Português
.................................................................................................... 39
Page 33

Rádio Despertador SRW 250 A2
Ligar uma fonte externa de áudio ............................................................ 51
Luminosidade do ecrã ............................................................................... 52
Luz de presença para uso na escuridão ................................................. 52
Inserir as pilhas de reserva ....................................................................... 53
Resolução de problemas ................................................... 54
Manutenção / Limpeza ..................................................... 55
Considerações Ambientais e Reciclagem ........................... 55
Notas relativas à conformidade ........................................ 56
Informação relativa à garantia e assistência ..................... 57
Introdução
Obrigado por ter escolhido um produto SilverCrest. O rádio despertador
SilverCrest SRW 250 A2 possui um relógio digital com função de
despertador. Também lhe permite ouvir programas de rádio.
Leia as páginas que se seguem com as instruções sobre como utilizar este
produto.
Este símbolo identifica informação importante para
utilizar o dispositivo com segurança e para a
segurança do utilizador.
Este símbolo identifica informação adicional sobre o
tópico em questão.
Português - 31
Page 34

Rádio Despertador SRW 250 A2
Fim a que se destina
Este é um dispositivo de eletrónica de consumo. Foi concebido para
receber e reproduzir estações de rádio. O dispositivo também pode ser
utilizado como despertador. É apropriado apenas para utilização pessoal
e não para fins industriais ou comerciais. O dispositivo não pode ser
utilizado em exteriores ou em climas tropicais. O fabricante não é
responsável por quaisquer danos ou problemas causados por
modificações não autorizadas.
Respeite os regulamentos e leis do país onde utilizar o rádio despertador
SilverCrest.
Note que podem existir regulamentos específicos para um certo país no
que diz respeito às bandas de frequência que podem ser recebidas.
Qualquer informação recebida de bandas de frequência fora das que
são explicitamente de utilização pública livre não pode ser utilizada, nem
os seus conteúdos divulgados a terceiros.
32 - Português
Page 35

Rádio Despertador SRW 250 A2
Conteúdo da embalagem
1. Rádio Despertador SilverCrest SRW 250 A2
2. Este Manual de Utilizador (ilustração a preto e branco)
Português - 33
Page 36

Rádio Despertador SRW 250 A2
Especificações técnicas
Tensão de entrada 230 V AC / 50 Hz
Consumo de energia Em espera: máx. 1 W *
Em funcionamento: máx. 3 W
Potência de saída 250 mW
Pilhas de reserva 2x AAA 1,5 V (Micro/R03/LR03)
(não incluídas na embalagem)
Frequência FM 87,5 – 108 MHz
Predefinição de estações 20 FM
Dimensões 189 x 92 x 85 mm (L x A x P)
Peso Aprox. 435 g (sem pilhas)
Temperatura de funcionamento 5 °C a 35 °C
Humidade de funcionamento Máx. 85% de humidade relativa
* O consumo de energia em espera depende da definição da
luminosidade do ecrã.
As especificações técnicas e
prévio.
Esta informação descreve as características técnicas do
seu dispositivo. Podem aplicar-se, em diferentes países,
diferentes regulamentos no que respeita às bandas de
frequência de utilização pública livre. Note que receber
qualquer informação de bandas fora destes intervalos
de frequência poderá ser ilegal e estar sujeito a ação
punitiva.
design
podem ser alterados sem aviso
34 - Português
Page 37

Rádio Despertador SRW 250 A2
Instruções de segurança
Antes de utilizar este dispositivo pela primeira vez, leia as notas que se
seguem, neste manual, e preste atenção a todos os avisos, mesmo se
estiver habituado a lidar com dispositivos eletrónicos. Guarde este manual
num local seguro, para futura referência. Se vender ou oferecer o
dispositivo a alguém, é imperativo que o faça acompanhar também deste
manual.
Condições de funcionamento
O dispositivo não foi concebido para ser utilizado em ambientes com
temperatura ou humidade elevadas (por exemplo, casas de banho), ou
com níveis de pó acima da média. Temperatura e humidade de
funcionamento: de 5 °C a 35 °C; máximo de 85% de HR.
Certifique-se que:
o ar circula livremente (não coloque o dispositivo em prateleiras,
numa carpete, numa cama, ou em qualquer lugar onde as ranhuras
de ventilação fiquem obstruídas, e deixe uma margem de pelo menos
10 cm em todas as direções);
fontes de calor indiretas (por exemplo, aquecedores) podem afetar o
dispositivo;
o dispositivo não é exposto a luz solar direta ou luz artificial
brilhante;
Português - 35
Page 38

Rádio Despertador SRW 250 A2
evita o contacto com salpicos e pingos de água e líquidos abrasivos,
e que nunca utiliza o dispositivo perto de água. Nunca, sob
quaisquer circunstâncias, mergulhe o dispositivo em líquidos (não
coloque em cima ou perto do dispositivo qualquer recipiente com
líquidos como bebidas ou jarras);
o dispositivo nunca é colocado perto de campos magnéticos (ex.:
colunas);
não são colocadas fontes de chama (por exemplo, velas acesas) em
cima ou perto do dispositivo;
não são introduzidos corpos estranhos no dispositivo;
o dispositivo não é sujeito a grandes mudanças de temperatura, pois
tal pode causar condensação e curto-circuitos. Se o dispositivo foi
exposto, duma forma ou doutra, a grandes mudanças de
temperatura, espere (aprox. 2 horas) antes de o voltar a ligar, de
modo a que atinja a temperatura ambiente;
o dispositivo não é sujeito a excessivas pancadas ou vibrações.
Nota sobre desligamento da rede
elétrica
O botão ON/OFF-FM/AUX [ligar/desligar-FM/aux] [2] localizado na
parte superior do dispositivo não o desliga por completo da rede elétrica.
O dispositivo ainda consome eletricidade quando no modo em espera.
Desligar completamente o dispositivo implica remover a ficha de
alimentação da tomada de parede. Por isso, o dispositivo deve estar
36 - Português
Page 39

Rádio Despertador SRW 250 A2
posicionado de forma a ser fácil o acesso à tomada de parede, para, em
caso de emergência, ser possível remover a ficha de alimentação. Para
evitar o risco de incêndio, se tencionar não utilizar o dispositivo durante
um longo período de tempo (por exemplo, quando for de férias), este
deve ser sempre desligado da tomada de parede. Desligue sempre o
dispositivo da fonte de energia na presença de trovoadas ou
tempestades.
Nunca abra a caixa do dispositivo! Abrir a caixa do dispositivo pode
expô-lo a choques elétricos letais.
Cabo de alimentação
Pegue sempre no cabo de alimentação pela ficha. Nunca puxe pelo cabo
em si e nunca pegue no cabo de alimentação com as mãos molhadas
pois tal pode causar um curto-circuito ou um choque elétrico. Não
coloque a unidade ou qualquer mobiliário ou outros dispositivos em cima
do cabo de alimentação e certifique-se que o cabo não fica preso. Nunca
dê nós no cabo e não o ate a outros cabos. O cabo de alimentação deve
ser disposto de modo a que ninguém possa tropeçar nele ou fique
obstruído por ele. Um cabo de alimentação danificado pode provocar um
incêndio ou um choque elétrico. Inspecione o cabo de alimentação de
tempos a tempos. Se estiver danificado, substitua-o contactando o centro
de assistência autorizado mais próximo ou o local onde adquiriu o
equipamento.
Português - 37
Page 40

Rádio Despertador SRW 250 A2
Pilhas
Insira as pilhas respeitando a polaridade. Observe o diagrama dentro do
compartimento das pilhas. Não tente recarregar as pilhas e não as deite
ao fogo. Não misture pilhas de tipos diferentes (usadas e novas, ou de
carbono e alcalinas, etc.). Remova as pilhas se antecipar que o
dispositivo não vai ser utilizado durante um longo período de tempo. A
utilização inapropriada das pilhas pode causar explosões ou fugas.
Crianças
Os aparelhos elétricos não devem ser manuseados por crianças! Nunca
permita que crianças utilizem dispositivos elétricos se não se encontrarem
sob supervisão. As crianças podem não compreender que eles podem ser
perigosos. Os componentes mais pequenos podem constituir risco de
asfixia. Se uma pilha for engolida, procure imediatamente ajuda médica.
Mantenha os materiais de embalamento fora do alcance de crianças.
Perigo de asfixia!
38 - Português
Page 41

Rádio Despertador SRW 250 A2
Copyright
O conteúdo deste manual de utilizador está protegido, na sua totalidade,
por
copyright
expressamente proibido copiar dados e informação sem prévio
consentimento escrito e explícito por parte do autor. Tal também se aplica
a qualquer utilização comercial do seu conteúdo e informação. Todos os
textos e diagramas estão atualizados à data de impressão.
e é fornecido ao leitor apenas para título informativo. É
Português - 39
Page 42

Rádio Despertador SRW 250 A2
Vista geral do dispositivo e explicação dos
botões
40 - Português
Page 43

Rádio Despertador SRW 250 A2
1
TIME/DIMMER (horas/luminosidade do ecrã)
2
ON/OFF (ligar/desligar); FM/AUX (selecionar)
3
ALARM1 (para definir ou ativar/desativar o ALARM1)
4
NAP/SLEEP [sesta/dormir] (definir o temporizador para
NAP [sesta] ou o temporizador para SLEEP [dormir])
5
ALARM2 (para definir ou ativar/desativar o ALARM2)
6
PRESET [predefinição] (guardar/carregar uma estação
predefinida, procurar estações)
7
- (Reduzir o volume ou selecionar uma opção)
8
+ (Aumentar o volume ou selecionar uma opção)
9
SNOOZE/LIGHT [soneca/luz] (atrasar o despertador
durante aprox. 6 minutos, ativar/desativar a luz de presença
para uso na escuridão)
10
Ecrã
11
Sensor de luz
12
Antena de fio
13
Cabo de alimentação
14
Compartimento das pilhas
15
Coluna de som
16
Entrada AUX (painel traseiro)
Português - 41
Page 44

Rádio Despertador SRW 250 A2
Ecrã
17 Relógio/frequência/indicação de volume
18 PM (apenas em modo 12 horas)
19 0,05 MHz para sintonização FM
20 AL2 – Hora de despertador ativada com som de despertador
21 AL2 – Hora de despertador ativada com rádio
22 AL1 – Hora de despertador ativada com rádio
23 AL1 – Hora de despertador ativada com som de despertador
24 LED SLEEP [dormir] (temporizador para dormir)
25 LED NAP [sesta] (temporizador para sesta)
Antes de Dar os Primeiros Passos
Posicione o dispositivo numa superfície estável e plana, e não coloque
quaisquer objetos pesados em cima dele. Ligue a ficha do cabo de
alimentação [13] a uma tomada de parede de fácil acesso.
42 - Português
Page 45

Rádio Despertador SRW 250 A2
Pode utilizar pilhas de reserva de modo a não ter de
reprogramar todas as suas definições personalizadas se
houver uma falha de energia. Para mais informação leia o
capítulo “Inserir as pilhas de reserva” na página 53.
Os Primeiros Passos
Ligar e desligar o dispositivo
Para ligar o dispositivo, prima o botão ON/OFF-FM/AUX [ligar/desligarFM/aux] [2]. Quando ligado, primeiro aparece brevemente no ecrã [10]
a frequência definida atualmente, e depois as horas.
Para desligar o dispositivo, mantenha premido o botão ON/OFFFM/AUX [ligar/desligar-FM/aux] [2] durante pelo menos um segundo.
Quando desligado, as horas atuais são mostradas no ecrã [10].
Ver as horas em formato 12/24
O rádio despertador pode mostrar as horas em formato de 12 ou 24
horas. A definição do formato está descrita na secção seguinte “Acertar
as horas”.
Acertar as horas
Apenas pode acertar as horas quando o dispositivo estiver desligado. Se
estiver ligado, prima o botão ON/OFF-FM/AUX [ligar/desligar-FM/aux]
[2] para o desligar.
Prima o botão TIME/DIMMER [horas/luminosidade do ecrã] [1] até
que as horas comecem a piscar [10].
Português - 43
Page 46

Rádio Despertador SRW 250 A2
Ao ligar o dispositivo pela primeira vez, ele fica
automaticamente no modo de acertar as horas, e as
horas piscam no ecrã [10]. Mediante a entrega de
fábrica o formato das horas está definido para 24 horas.
Prima o botão – [7] ou + [8] para acertar as horas. Pode também
manter premido o botão – [7] ou + [8].
Depois prima rapidamente o botão TIME/DIMMER
[horas/luminosidade do ecrã] [1] para definir os minutos. Os minutos
piscam no ecrã [10].
Prima o botão – [7] ou + [8] para definir os minutos. Pode também
manter premido o botão – [7] ou + [8] para definir os minutos em
passos de 10 minutos.
Prima o botão TIME/DIMMER [horas/luminosidade do ecrã] [1]
para alternar entre o modo 12 e 24 horas. “24” ou “12” é mostrado
no ecrã [10].
Pode então premir o botão – [7] ou + [8] para mudar entre os
modos 12 e 24 horas. Para distinguir entre a hora de manhã e de
tarde no modo 12 horas, existe um LED PM [18] no ecrã.
Espere até que o ecrã [10] mostre a hora definida ou prima
brevemente o botão TIME/DIMMER [horas/luminosidade do ecrã]
[1].
44 - Português
Page 47

Rádio Despertador SRW 250 A2
Note que apenas pode acertar as horas enquanto o
ecrã [10] estiver a piscar. Se passarem mais do que
alguns segundos sem ser feita qualquer introdução, os
números no ecrã [10] param de piscar e terá de repetir
o procedimento.
Sintonizar uma estação
Ligue o dispositivo, premindo o botão ON/OFF-FM/AUX
[ligar/desligar-FM/aux] [2].
A frequência atual aparece brevemente no ecrã [10]. Assim que a
hora atual aparecer, pode premir os botões – [7] ou + [8] para
ajustar o volume.
Prima brevemente o botão ON/OFF-FM/AUX [ligar/desligar-
FM/aux] [2]. Assim que a frequência atual aparecer, pode premir os
botões – [7] ou + [8] para definir manualmente a frequência
desejada.
Para procurar automaticamente uma estação, mantenha premido o
botão – [7] ou + [8]. A frequência atualmente sintonizada é
indicada em MHz. Quaisquer frequências com 0,05 MHz são
mostradas com o LED 0,05 [19]. Para melhorar a receção, se
necessário, mova a antena de fio para uma posição diferente ou
mude o dispositivo de local.
Pode guardar uma estação mantendo premido o botão PRESET
[predefinição] [6] durante aprox. 1-2 segundos.
Um “P” pisca no ecrã [10], seguido por um número entre 01 e 20.
Português - 45
Page 48

Rádio Despertador SRW 250 A2
Prima o botão – [7] ou + [8] para selecionar a estação predefinida
que pretende.
Prima novamente o botão PRESET [predefinição] [6] para guardar a
estação atual na predefinição selecionada.
Procurar automaticamente uma estação
Se não deseja definir manualmente as estações, pode colocar o
dispositivo a procurá-las automaticamente. Proceda da seguinte forma:
Ligue o dispositivo, premindo o botão ON/OFF-FM/AUX
[ligar/desligar-FM/aux] [2].
Mantenha premido o botão PRESET [predefinição] [6] durante aprox.
4 segundos. A pesquisa começa e quaisquer estações encontradas
são automaticamente guardadas.
Uma vez encontrada uma estação, a estação predefinida atribuída
pisca brevemente no ecrã [10].
Prima novamente o botão PRESET [predefinição] [6] para cancelar a
pesquisa.
Note que podem ser guardadas um máximo de 20
estações. Se forem encontradas mais de 20 estações,
apenas as primeiras 20 são guardadas.
Selecionar uma estação guardada
Para selecionar uma estação predefinida, o dispositivo tem de estar
ligado. Se estiver desligado, prima o botão ON/OFF-FM/AUX
[ligar/desligar-FM/aux] [2] para o ligar.
46 - Português
Page 49

Rádio Despertador SRW 250 A2
Prima brevemente o botão PRESET [predefinição] [6]. A estação
predefinida de momento selecionada (P01 a P20) aparece.
Prima o botão – [7] ou + [8] para selecionar uma estação
predefinida diferente.
Definir o despertador
Certifique-se que o relógio está certo (consulte a página 43 – Acertar as
horas). Pode definir duas horas de despertador diferentes (ALARM1 e
ALARM2). A hora de despertador apenas pode ser definida com o
dispositivo desligado. Se estiver ligado, prima o botão ON/OFF-FM/AUX
[ligar/desligar-FM/aux] [2] para o desligar.
Mantenha premido o botão ALARM1 [3] ou ALARM2 [5] até que as
horas comecem a piscar [10].
Prima o botão – [7] ou + [8] para definir as horas. Pode também
manter premido o botão – [7] ou + [8].
Prima de novo, rapidamente, o botão ALARM1 [3] ou ALARM2 [5]
para definir os minutos. Os minutos piscam no ecrã [10].
Prima o botão – [7] ou + [8] para definir os minutos. Pode também
manter premido o botão – [7] ou + [8] para definir os minutos em
incrementos de 10 minutos.
Prima de novo, rapidamente, o botão ALARM1 [3] ou ALARM2 [5]
para definir o volume do despertador para o nível desejado de 00 a
16. O atual nível de volume pisca no ecrã [10].
Prima o botão – [7] ou + [8] para definir o volume do despertador.
Pode também manter premido o botão – [7] ou + [8]. Pode definir
Português - 47
Page 50

Rádio Despertador SRW 250 A2
volumes de despertador diferentes para as duas horas de
despertador (ALARM1 e ALARM2).
Espere até que o ecrã [10] pare de piscar ou prima rapidamente o
botão ALARM1 [3] ou ALARM2 [5].
Note que apenas pode definir as horas e o volume do
despertador enquanto os números estiverem a piscar no
ecrã [10]. Se passarem mais do que alguns segundos
sem ser feita qualquer introdução, os números no ecrã
[10] param de piscar e terá de repetir o procedimento.
Ativar o despertador
Depois de ter definido as horas de despertador que deseja, pode ativar o
despertador da seguinte forma:
Prima rapidamente o botão ALARM1 [3] ou ALARM2 [5]. Os LEDs
de som de despertador AL1 [23] ou AL2 [20] acendem no ecrã [10].
O despertador está agora ativado para a hora definida e com o som
de despertador.
Prima de novo, rapidamente, o botão ALARM1 [3] ou ALARM2 [5].
Os LEDs de rádio despertador AL1 [22] ou AL2 [21] acendem no
ecrã [10]. O despertador está agora ativado para a hora definida e
com o rádio.
Para desativar o despertador, prima de novo o botão ALARM1 [3]
ou ALARM2 [5]. Enquanto o despertador estiver desativado, os LEDs
de som de despertador AL1 [23] e AL2 [20] e os de rádio
despertador AL1 [22] e AL2 [21] estão apagados.
48 - Português
Page 51

Rádio Despertador SRW 250 A2
No modo de despertador de rádio, o dispositivo liga-se
na hora de despertador definida e recebe a última
frequência e volume definidos. No modo de despertador
sonoro, o despertador também soará com o volume
atribuído à respetiva função de despertador.
Desligar o despertador
Quando o despertador começa, pode desativá-lo da seguinte forma:
Prima o botão ON/OFF-FM/AUX [ligar/desligar-FM/aux] [2] para
parar o despertador. O despertador está desligado até ao dia
seguinte.
ou
Prima o botão SNOOZE/LIGHT [soneca/luz] [9] para atrasar o
despertador aprox. 6 minutos. Após este período, o despertador
recomeça.
Enquanto SNOOZE [soneca] estiver ativado, o respetivo
LED de despertador [20, 21, 22 ou 23] pisca.
Temporizador para dormir
O temporizador para dormir desliga automaticamente o dispositivo
depois dum tempo definido.
Com o dispositivo ligado, prima o botão NAP/SLEEP [sesta/dormir]
[4]. O número “60” aparece no ecrã [10], indicando que o
dispositivo se desligará automaticamente passados 60 minutos.
Português - 49
Page 52

Rádio Despertador SRW 250 A2
Prima o botão NAP/SLEEP [sesta/dormir] [4] múltiplas vezes para
diminuir a contagem de tempo mostrada. Cada vez que prime o
botão, o tempo para desligar diminui 10 minutos.
Se a palavra “OFF” aparecer no ecrã [10], o temporizador para
dormir é desativado e o dispositivo permanecerá ligado. Pode premir
de novo o botão NAP/SLEEP [sesta/dormir] [4] para selecionar o
atraso para desligar a partir do início.
Quando o temporizador para dormir está ativado, o LED SLEEP
[dormir] [24] acende-se no ecrã [10].
Enquanto a contagem do temporizador para dormir
estiver a decorrer, pode, a qualquer momento, desligar
o dispositivo premindo o botão ON/OFF-FM/AUX
[ligar/desligar-FM/aux] [2].
Prima o botão NAP/SLEEP [sesta/dormir] [4] enquanto
o temporizador para dormir estiver ativado para mostrar
o tempo que resta até o dispositivo se desligar.
Temporizador para sesta
Pode definir um temporizador para sesta (com despertador sonoro
apenas) de utilização única, para ligar o dispositivo. Pode definir um
valor entre 1 e 60 minutos.
Com o dispositivo desligado, prima o botão NAP/SLEEP
[sesta/dormir] [4]. No ecrã [10] aparece “n30“ indicando que o
dispositivo se ligará automaticamente passados 30 minutos.
Prima o botão – [7] ou + [8] para definir o atraso de ligar o
dispositivo entre 1 e 60 minutos. Pode também manter premido o
botão – [7] ou + [8].
50 - Português
Page 53

Rádio Despertador SRW 250 A2
Quando o temporizador para sesta está ativado, o LED NAP [sesta]
[25] acende-se no ecrã [10].
Prima qualquer botão para desativar o despertador sonoro do
temporizador para sesta.
Enquanto a contagem do temporizador para sesta
estiver a decorrer, pode, a qualquer momento, desativála premindo o botão ON/OFF-FM/AUX [ligar/desligarFM/aux] [2].
Prima o botão NAP/SLEEP [sesta/dormir] [4] enquanto
o temporizador para sesta estiver ativado para mostrar
o tempo que resta até o dispositivo se ligar.
Ligar uma fonte externa de áudio
Para ligar o rádio despertador a uma fonte externa de áudio,
necessita de um cabo de áudio com uma ficha
cabo é opcional e não está incluído no rádio despertador.
Ligue uma das extremidades do cabo
de áudio à saída de auscultadores do
dispositivo externo e a outra
extremidade à entrada AUX [16] no
painel traseiro do rádio despertador.
Ligue o dispositivo e prima múltiplas vezes o botão ON/OFF-
FM/AUX [ligar/desligar-FM/aux] [2] para selecionar a fonte áudio
“AUH”. A indicação “AUH” mostrada significa “AUXILIAR”
Inicie a reprodução na fonte externa de áudio.
Prima o botão – [7] ou + [8] para definir o volume desejado.
jack
de 3,5 mm. Este
Português - 51
Page 54

Rádio Despertador SRW 250 A2
Também pode ajustar o volume de reprodução no
dispositivo externo.
Luminosidade do ecrã
Na entrega, a luminosidade do ecrã está definida para o máximo. Para
ajustar a luminosidade do ecrã, proceda da seguinte forma:
Prima rapidamente o botão TIME/DIMMER [horas/luminosidade do
ecrã] [1] para diminuir a luminosidade do ecrã. A letra “L“ (LOW)
[BAIXA] aparece brevemente no ecrã [10].
Prima de novo, rapidamente, o botão TIME/DIMMER
[horas/luminosidade do ecrã] [1] para diminuir automaticamente a
luminosidade do ecrã em função da iluminação ambiente. As
condições de iluminação são medidas pelo sensor de luz [11]. A
letra “A“ (AUTOMATIC) [automática] aparece brevemente no ecrã
[10].
Prima uma vez mais, brevemente, o botão TIME/DIMMER
[horas/luminosidade do ecrã] [1] para definir a luminosidade do
ecrã de novo para o máximo. A letra “H“ (HIGH) [ALTA] aparece
brevemente no ecrã [10].
Premir de novo o botão TIME/DIMMER [horas/luminosidade do
ecrã] [1] permite-lhe repetir as definições de luminosidade na
sequência apresentada em cima.
Luz de presença para uso na escuridão
O radio despertador tem uma luz de presença que o ajuda a ver na
escuridão. Ela também permite utilizar mais facilmente o rádio
despertador quando está escuro. Com o dispositivo desligado, prima o
botão SNOOZE/LIGHT [soneca/luz] [9] para ligar a luz de presença
52 - Português
Page 55

Rádio Despertador SRW 250 A2
para uso na escuridão. Prima novamente o botão SNOOZE/LIGHT
[soneca/luz] [9] para desligar a luz de presença para uso na escuridão.
A luz de presença integrada no rádio despertador não
é apropriada para iluminar o quarto.
Inserir as pilhas de reserva
Para não ter de ajustar de novo as definições do dispositivo após uma
falha de energia, ou se ele for desligado da rede elétrica, pode utilizar
pilhas de reserva (não fornecidas). Proceda da seguinte forma:
Desligue o dispositivo da rede elétrica.
Abra o compartimento das pilhas [14] na parte inferior do
dispositivo.
Insira duas pilhas AAA 1,5 V (Micro/R03/LR03) no compartimento
das pilhas, assegurando-se que a polaridade está certa. Repare nos
ícones + e – nas pilhas e no compartimento das pilhas e faça-os
coincidir (ver diagrama).
Feche o compartimento das pilhas.
Volte a ligar o dispositivo à rede elétrica.
Remova as pilhas se antecipar que o dispositivo não vai
ser utilizado durante um longo período de tempo.
Português - 53
Page 56

Rádio Despertador SRW 250 A2
Resolução de problemas
O dispositivo não se liga
A tomada de parede está com defeito ou um fusível fundiu: verifique
a tomada de parede ligando um dispositivo diferente.
Não há som
Se o som estiver com o volume muito baixo ou se não se ouvir som
algum, verifique a definição do volume (o dispositivo necessita de
estar ligado) e, se necessário, aumente o volume premindo diversas
vezes o botão + [8].
Má receção de rádio
Estenda completamente a antena de fio [12] e, se necessário, mude
a sua posição.
Não se houvem fontes externas de áudio
Certifique-se que o cabo de áudio está firmemente ligado à entrada
AUX [6] do rádio despertador e à saída de auscultadores do
dispositivo externo.
Certifique-se que selecionou a fonte externa de áudio verificando a
indicação “AUH” no ecrã. A indicação “AUH” mostrada significa
“AUXILIAR”
Certifique-se que a reprodução começou na fonte externa de áudio e
que o seu volume está suficientemente alto. Leia também as
instruções de funcionamento do dispositivo externo.
54 - Português
Page 57

Rádio Despertador SRW 250 A2
Manutenção / Limpeza
O dispositivo deve ser reparado quando estiver danificado, seja de que
forma for, por exemplo, quando a ficha de alimentação, o cabo de
alimentação, ou a caixa estiverem danificados, quando líquidos ou
objetos entraram no dispositivo, ou o dispositivo esteve exposto a chuva
ou humidade, quando o dispositivo não funcionar devidamente, ou se
deixou cair o dispositivo. Se observar fumo, ruído incomum, ou odores
estranhos, desligue imediatamente o dispositivo e remova a ficha da
tomada de parede. Se tal acontecer, o dispositivo não deve ser utilizado
mais e deve ser inspecionado por um perito. Todas as reparações devem
ser efetuadas por pessoal especialista qualificado. Nunca abra a caixa
do dispositivo. Abrir a caixa do dispositivo pode expô-lo a choques
elétricos letais. Para limpar o dispositivo, utilize apenas um pano seco e
limpo. Nunca utilize líquidos abrasivos. Não tente abrir a caixa do
dispositivo; se o fizer, a garantia caduca.
Considerações Ambientais e Reciclagem
Os dispositivos marcados com este símbolo estão sujeitos à
Diretiva Europeia 2002/96/EC. O descarte de todos os
dispositivos elétricos e eletrónicos deve ser efetuado
separadamente do lixo doméstico, em centros de descarte
oficiais. O devido descarte de dispositivos antigos evita
danos ao ambiente e à sua saúde. Para mais informação
Português - 55
Page 58

Rádio Despertador SRW 250 A2
sobre como se descartar devidamente do dispositivo, contacte as
agências governamentais locais, centros de reciclagem, ou a loja onde
adquiriu o dispositivo.
Respeite o ambiente. Não deve descartar-se de pilhas gastas juntamente
com lixo doméstico. Elas devem ser entregues num ponto de recolha
criado para este efeito. Note que as pilhas devem estar completamente
descarregadas quando se descartar delas em pontos de recolha
apropriados. Se se descartar de pilhas que não estejam completamente
descarregadas, tome as precauções necessárias para evitar que ocorram
curto-circuitos.
Descarte-se de todo o material de embalamento duma forma que respeite
o ambiente. O cartão da embalagem pode ser depositado em caixas de
reciclagem de papel ou depositado em pontos de recolha públicos para
reciclagem. Quaisquer películas ou plásticos contidos na embalagem
devem ser depositados num ponto de recolha público para descarte.
Notas relativas à conformidade
Este dispositivo está em conformidade com os requisitos
básicos e outros requisitos relevantes da Diretiva de
Compatibilidade Eletromagnética 2004/108/EC, da
Diretiva de Baixa Voltagem 2006/95/EC, da Diretiva
RoHS II 2011/65/EU e da Diretiva ErP 2009/125/EC. A
respetiva Declaração de Conformidade encontra-se no fim
deste Manual do Utilizador.
56 - Português
Page 59

Rádio Despertador SRW 250 A2
Informação relativa à garantia e assistência
Garantia da TARGA GmbH
Com este aparelho, usufrui de 3 anos de garantia a partir da data de
compra. Guarde o recibo original como comprovativo de compra. Antes
de utilizar o produto, leia a documentação fornecida ou a ajuda online.
Caso ocorra algum problema que não possa ser resolvido com estas
informações, contacte a nossa linha de apoio ao cliente. Para qualquer
pedido, tenha a postos o número de referência ou, se disponível, o
número de série. Caso não seja possível conseguir uma solução por via
telefónica, a nossa linha de apoio ao cliente fará o encaminhamento para
um serviço de assistência técnica complementar, consoante a causa do
erro. Dentro do prazo da garantia, tratando-se de falhas de material ou
de fabrico, o produto será reparado ou substituído à nossa discrição, sem
custos para o comprador. Os consumíveis, como pilhas, baterias e
lâmpadas, estão excluídos da garantia.
Esta garantia não limita nem exclui os direitos legais do consumidor.
Português - 57
Page 60

Rádio Despertador SRW 250 A2
Serviço de assistência técnica
E-Mail: service.PT@targa-online.com
IAN: 90433
Fabricante
TARGA GmbH
Coesterweg 45
59494 SOEST
GERMANY
Telefone: 21 – 415 90 76
58 - Português
Page 61

SRW 250 A2 Alarm Clock Radio
Contents
Introduction....................................................................... 60
Intended use ..................................................................... 61
Package contents .............................................................. 62
Technical specifications ...................................................... 63
Safety Instructions ............................................................. 64
Operating Environment ............................................................................. 64
Note on mains disconnection ................................................................... 65
Power cable ............................................................................................... 66
Batteries ...................................................................................................... 66
Children ...................................................................................................... 67
Copyright.................................................................................................... 67
Device view and buttons explanation ............................... 68
Display ........................................................................................................ 70
Before Getting Started ...................................................... 70
Getting started .................................................................. 71
Switching the device on/off ...................................................................... 71
12/24-hours display ................................................................................. 71
Setting the Time .......................................................................................... 71
Tuning to a Station ..................................................................................... 73
Automatic Station Search .......................................................................... 73
Selecting a Saved Station ......................................................................... 74
Setting the Alarm ....................................................................................... 75
Enabling the Alarm .................................................................................... 76
Switching the alarm off .............................................................................. 77
SLEEP Timer ................................................................................................ 77
English - 59
Page 62

SRW 250 A2 Alarm Clock Radio
NAP Timer .................................................................................................. 78
Connecting an external audio source ...................................................... 79
Display Brightness ...................................................................................... 80
Light for orientation at night ...................................................................... 80
Inserting the Backup Batteries ................................................................... 81
Troubleshooting ................................................................ 82
Maintenance/Cleaning ...................................................... 83
Environmental Considerations and Recycling ..................... 83
Declaration of conformity .................................................. 84
Warranty and service information ..................................... 85
Introduction
Thank you for choosing a SilverCrest product. The SilverCrest SRW 250
A2 Alarm Clock Radio features a digital clock with an alarm clock
function. It also allows you to listen to radio programmes.
Please read the following pages for instructions on how to use your
product.
This symbol indicates important instructions for the safe
operation of the device and the protection of the user.
60 - English
This symbol denotes further information on the topic.
Page 63

SRW 250 A2 Alarm Clock Radio
Intended use
This device is a consumer electronics device. It has been designed to
receive and play back radio stations. The device can also be used as an
alarm clock. It is suitable only for private use, not for industrial or
commercial purposes. The device may not be used outdoors or in tropical
climates. The manufacturer is not liable for any damage or problems
caused by unauthorised modifications.
Please observe the regulations and laws in the country of use.
Please note that country-specific regulations may exist with respect to the
frequency bands that can be received. Any information received from
frequency bands outside those that are explicitly free for public use may
not be used, nor may its contents be forwarded to any third parties.
English - 61
Page 64

SRW 250 A2 Alarm Clock Radio
Package contents
1. SilverCrest SRW 250 A2 Alarm Clock Radio
2. This User Manual (Lineart illustration)
62 - English
Page 65

SRW 250 A2 Alarm Clock Radio
Technical specifications
Input voltage 230V~ / 50 Hz
Power consumption Standby: max. 1 W *
Operation: max. 3 W
Output power 250 mW
Backup batteries 2x AAA (Micro/R03/LR03) 1.5V
batteries (not included)
FM frequency 87.5 - 108 MHz
Station presets 20 FM
Dimensions 189 x 92 x 85 mm (W x H x D)
Weight approx. 435 g (without batteries)
Operating temperature 5 °C to 35 °C
Operating humidity max. 85 % rel. humidity
* The standby power consumption depends on the display brightness
set.
The technical data and design may be changed without notification.
This information describes the technical characteristics of
your device. Different national regulations may apply in
different countries with respect to the frequency bands
that are free for public use. Please note that receiving
any information from bands outside these frequency
bands will be illegal and may be punishable by law.
English - 63
Page 66

SRW 250 A2 Alarm Clock Radio
Safety Instructions
Before you use this device for the first time, please read the following notes
in this manual and heed all warnings, even if you are familiar with
handling electronic devices. Keep this manual safe for future reference. If
you sell the device or pass it on, it is essential that you also hand over this
manual.
Operating Environment
The device is not designed for use in environments with high temperatures
or humidity (e.g. bathrooms) or those with above-average levels of dust.
Operating temperature and operating humidity: 5 °C to 35 °C,
max. 85 % RH.
Always make sure that:
there is free circulation of air (do not place the device on shelves, on
a carpet, on a bed, or anywhere that obstructs the ventilation slots
and leave at least 10 cm clearance on all sides);
no direct heat sources (e.g. radiators) can affect the device;
the device is not exposed to direct sunlight or bright artificial light;
contact with sprayed and dripping water and aggressive fluids must
be avoided and the device should never be operated near water.
Never under any circumstances immerse the device in liquid
64 - English
Page 67

SRW 250 A2 Alarm Clock Radio
(do not place any items containing liquids such as drinks, vases, etc.
on or near the device);
the device is never placed near magnetic fields (e.g. speakers);
no fire hazards (e.g. burning candles) are placed on or near the
device;
no foreign bodies enter the device;
the device is not subject to major great temperature fluctuations as this
can cause condensation and short-circuits; if the device has been
exposed to strong temperature variations anyway, wait (approx. 2
hours) before turning it on, so it has reached the ambient temperature.
the device is not subjected to excessive shocks or vibrations.
Note on mains disconnection
The ON/OFF-FM/AUX button [2] located on the top of the device does
not fully disconnect the device from the mains. The device still consumes
electricity in standby mode. Disconnecting the device completely involves
removing the power plug from the wall outlet. For this reason, the device
should be positioned such as to enable unobstructed access to the wall
outlet so that the power plug can be pulled out immediately in an
emergency. To avoid the risk of fire, if the device is not going to be used
for an extended period (e.g. during holidays), it should always be
disconnected from the power socket. Always disconnect the device from
the power supply in stormy conditions.
English - 65
Page 68

SRW 250 A2 Alarm Clock Radio
Never open the housing of the device! Opening the housing could expose
you a fatal electric shock.
Power cable
Always hold the power cord by the plug. Never pull on the cable itself
and never hold the power cord with wet hands as this may cause a short
circuit or electric shock. Do not place the unit itself or any furniture or other
devices on the power cord and make sure that the cable does not get
trapped. Never tie knots in the cable and do not tie it to other cables. The
power cord should be positioned so that nobody can trip over it or be
obstructed by it. A damaged power cord can cause a fire or electric
shock. Check the power cord from time to time. If it is damaged, contact
the nearest authorised service centre or your dealer for a replacement.
Batteries
Insert the batteries with the correct polarity. Refer to the diagram inside the
battery compartment. Do not attempt to recharge the batteries and do not
throw batteries into a fire. Do not mix battery types (old and new or
carbon and alkaline, etc.). Remove the batteries if the device will not be in
use for an extended period. Improper use could cause explosions or
leaks.
66 - English
Page 69

SRW 250 A2 Alarm Clock Radio
Children
Electrical appliances do not belong in the hands of children! Never allow
children use electrical devices unsupervised. Children may not understand
that they can be dangerous. Small parts can represent choking hazards. If
a battery is swallowed, seek medical help immediately. Keep the
packaging materials out of the reach of children. There is a risk of
suffocation!
Risk of suffocation!
Copyright
All the contents of this user manual are protected by copyright and
provided to the reader for information only. Copying data and information
without the prior explicit written consent of the author is strictly forbidden.
This also applies to any commercial use of the contents and information.
All texts and diagrams are up to date as of the date of printing.
English - 67
Page 70

SRW 250 A2 Alarm Clock Radio
Device view and buttons explanation
68 - English
Page 71

SRW 250 A2 Alarm Clock Radio
1
TIME/DIMMER (time/display brightness)
2
ON/OFF (switch on/off); FM/AUX (select)
3
ALARM1 (to set or enable/disable ALARM1)
4
NAP/SLEEP (set the NAP timer or the SLEEP timer)
5
ALARM2 (to set or enable/disable ALARM2)
6
PRESET (save/load preset station, scan for stations)
7
- (Reduce volume or select an option)
8
+ (Increase audio volume or select an option)
9
SNOOZE/LIGHT (delay the alarm for approx. 6 minutes,
enable/disable the light for orientation at night)
10
Display
11
Light sensor
12
Wire antenna
13
Power cable
14
Battery compartment
15
Speaker
16
AUX input (back panel)
English - 69
Page 72

SRW 250 A2 Alarm Clock Radio
Display
17 Clock/frequency/volume indication
18 PM (for 12 hour mode only)
19 0.05 MHz for FM tuning
20 AL2 – Alarm time enabled with alarm sound
21 AL2 – Alarm time enabled with radio
22 AL1 – Alarm time enabled with radio
23 AL1 – Alarm time enabled with alarm sound
24 SLEEP LED (sleep timer)
25 NAP LED (NAP timer)
Before Getting Started
Position the device on a stable, flat surface and do not place any heavy
objects on the device. Next, connect the power plug of the power cord
[13] to an easily accessible wall outlet.
70 - English
Page 73

SRW 250 A2 Alarm Clock Radio
You can use backup batteries so you do not have to reprogram all your custom settings if there is a power cut.
For more information, please read the “Inserting the
Backup Batteries” chapter on page 81.
Getting started
Switching the device on/off
To power the device on, press the ON/OFF-FM/AUX button [2]. When
powered on, first the currently set frequency is shown briefly on the display
[10] and then the time.
To power the device off, hold the ON/OFF-FM/AUX button [2] for at
least one second. When powered off, the current time is shown on the
display [10].
12/24-hours display
The alarm clock radio can show the time in 12- or 24-hours format.
Settings the format is described in the following section “Setting the Time”.
Setting the Time
The time can only be set while the device is powered off. If it is still
powered on, press the ON/OFF-FM/AUX button [2] to power the device
off.
Press the TIME/DIMMER button [1] until the hour display flashes
[10].
English - 71
Page 74

SRW 250 A2 Alarm Clock Radio
When powering the device on for the first time, the
device goes into clock setting mode automatically and
the hour display flashes[10]. Upon factory delivery the
time format is set to 24-hours.
Press the – [7] or + [8] button to set the hour. You can also press and
hold the – [7] or + [8] button.
Then press the TIME/DIMMER button [1] quickly to set the minutes.
The minutes counter flashes on the display [10].
Press the – [7] or + [8] button to set the minutes. You can also press
and hold the – [7] or + [8] button to set the minutes in 10-minute
steps.
Press the TIME/DIMMER button [1] to toggle between 12 and 24
hour mode. “24” or “12” is shown on the display [10].
You can then the – [7] or + [8] button to change between 12 and
24-hour time mode. To distinguish between morning and afternoon
time in 12-hour mode, there is a PM LED [18] on the display.
Wait until the display [10] shows the set time or press the
TIME/DIMMER button [1] briefly.
Please note that you can only set the time while the
display is flashing [10]. If no input is made for a few
seconds, the display [10] stops flashing and the
procedure needs to be repeated.
72 - English
Page 75

SRW 250 A2 Alarm Clock Radio
Tuning to a Station
Power the device on by pressing the ON/OFF-FM/AUX button [2].
The current frequency is shown briefly on the display [10]. As soon as
the current time is shown, you can press the – [7] or + [8] buttons to
adjust the volume.
Press the ON/OFF-FM/AUX button [2] briefly. As soon as the current
frequency is shown, you can press the – [7] or + [8] buttons to set the
desired frequency manually.
To search for a station automatically, press and hold the – [7] or +
[8] button. The currently-tuned frequency is indicated in MHz. Any
frequencies with 0.05 MHz are shown by means of the 0.05 LED
[19]. If required, move the wire antenna into a different position or
move the device to improve reception.
You can save a station by pressing and holding the PRESET button [6]
for approx. 1-2 seconds.
“P” flashes on the display [10], followed by a number between 01
and 20.
Press – [7] or + [8] to select the station preset you want.
Press the PRESET button [6] again to save the current station to the
selected preset.
Automatic Station Search
If you do not want to set the stations manually, you can have the device
search for them automatically. Proceed as follows:
English - 73
Page 76

SRW 250 A2 Alarm Clock Radio
Power the device on by pressing the ON/OFF-FM/AUX button [2].
Press and hold the PRESET button [6] for approx. 4 seconds. The
search is started and any stations found are saved automatically.
Once a station has been found, the assigned station preset will flash
briefly on the display [10].
Press the PRESET button [6] again to cancel the search.
Please note that a maximum of 20 stations can be saved.
If more than 20 stations are found, only the first 20 are
saved.
Selecting a Saved Station
To select a station from a preset, the device has to be powered on. If
it is powered off, press the ON/OFF-FM/AUX button [2] to power
the device on.
Press the PRESET button [6] briefly. The current station preset (P01 to
P20) selected is shown.
Press the – [7] or + [8] button to select a different station (preset).
74 - English
Page 77

SRW 250 A2 Alarm Clock Radio
Setting the Alarm
Make sure that the clock has been set correctly (see the page 71 – Setting
the Time). You can set two different alarm times (ALARM1 and ALARM2).
The alarm time can only be set while the device is powered off. If it is
powered on, press the ON/OFF-FM/AUX button [2] to power the device
off.
Press and hold the ALARM1 [3] or ALARM2 [5] button until the hour
display flashes [10].
Press the – [7] or + [8] button to set the hour. You can also press and
hold the – [7] or + [8] button.
Press the ALARM1 [3] or the ALARM2 [5] button quickly again to set
the minutes. The minutes flash on the display [10].
Press the – [7] or + [8] button to set the minutes. You can also press
and hold the – [7] or + [8] button to set the minutes in 10-minute
steps.
Press the ALARM1 [3] or the ALARM2 [5] button quickly again to set
the alarm volume to the desired level from 00 to 16. The current
volume level flashes on the display [10].
Press the – [7] or + [8] button to set the alarm volume. You can also
press and hold the – [7] or + [8] button. You can set different alarm
volumes for the two alarm times (ALARM1 and ALARM2).
Wait until the display [10] stops flashing or quickly press the
ALARM1 [3] or the ALARM2 [5] button.
English - 75
Page 78

SRW 250 A2 Alarm Clock Radio
Please note that you can only set the alarm time and
alarm volume while the numbers are flashing on the
display [10]. If no input is made for a few seconds, the
numbers on the display [10] stop flashing and you will
have to repeat the procedure.
Enabling the Alarm
After the you have set the alarm time you want, you can enable the alarm
as follows:
Press the ALARM1 [3] or the ALARM2 [5] button quickly. The AL1
alarm sound LED [23] or the AL2 alarm sound LED [20] lights up on
the display [10]. The alarm is now enabled for the set time and with
the alarm sound.
Press the ALARM1 [3] or the ALARM2 [5] button again quickly. The
AL1 alarm radio LED [22] or the AL2 radio [21] lights up on the
display [10]. The alarm is now enabled for the set time and with the
radio.
To disable the alarm, press the ALARM1 [3] or the ALARM2 [5]
button again. While the alarm is disabled, the AL1 alarm sound LED
[23], the AL1 radio LED [22], the AL2 alarm sound LED [20] and the
AL2 radio LED [21] are off.
In radio alarm mode, the device powers on at the alarm time
set and receives the last frequency and the last volume set. In
buzzer alarm mode the alarm will sound with the volume
assigned to the corresponding alarm function too.
76 - English
Page 79

SRW 250 A2 Alarm Clock Radio
W
Switching the alarm off
When the alarm starts, you can disable it as follows.
Press the ON/OFF-FM/AUX button [2] to stop the alarm. The alarm is
switched off until the next day.
or
Press the SNOOZE/LIGHT button [9] to delay the alarm for approx.
6 minutes. After this period, the alarm starts again.
hile SNOOZE is enabled, the corresponding alarm
LED [20, 21, 22 or 23] will flash.
SLEEP Timer
The sleep timer powers the device off automatically after a set time.
While the device is powered on, press the NAP/SLEEP button [4]. The
number “60” appears on the display [10] to indicate that the device
will power off automatically after 60 minutes.
Press the NAP/SLEEP button [4] multiple times to decrease the
countdown time shown. Each press of the button reduces the poweroff time by 10 minutes.
If “OFF” is shown on the display [10], the sleep timer is disabled and
the device will stay on. You can press the NAP/SLEEP button [4]
again to select the power-off delay from the beginning.
English - 77
Page 80

SRW 250 A2 Alarm Clock Radio
When the sleep timer is enabled, the SLEEP LED [24] will light on the
display [10].
While the sleep timer countdown is running, you can
power the device off at any time by pressing the
ON/OFF-FM/AUX button [2].
Press the NAP/SLEEP button [4] while the sleep timer is
enabled to display the remaining time until the unit
powers off.
NAP Timer
You can set a nap timer (with alarm buzzer only) for a one-time power on
event. You can set a value between 1 and 60 minutes.
While the device is powered off, press the NAP/SLEEP button [4].
“n30” appears on the display [10] to indicate that the device will
power on automatically after 30 minutes.
Press the – [7] or + [8] button to set power-on delay between 1 and
60 minutes. You can also press and hold the – [7] or + [8] button.
When the nap timer is enabled, the NAP LED [25] will light on the
display [10].
Press any button to disable the nap timer alarm buzzer.
78 - English
Page 81

SRW 250 A2 Alarm Clock Radio
W
hile the nap timer countdown is running, you can
disable it at any time by pressing the ON/OFF-FM/AUX
button [2].
Press the NAP/SLEEP button [4] while the nap timer is
enabled to display the remaining time until the unit
powers on.
Connecting an external audio source
To connect the alarm clock radio to an external audio source you
need an audio cable with 3.5 mm jack-type plug. This is optional and
not included with the alarm clock radio.
Plug one end of the audio cable into the
headphones output of the external
device and the other end into the AUX
input [16] on the alarm clock radio
back panel.
Power the device on and press the ON/OFF-FM/AUX button [2]
multiple times to select the “AUH” audio source. The display
indication “AUH” means “AUXILIARY”.
Start playback on the external audio source.
Press the – [7] or + [8] button to set the desired volume.
You can also adjust the playback volume on the
external device.
English - 79
Page 82

SRW 250 A2 Alarm Clock Radio
Display Brightness
The display is set to maximum brightness on delivery. To adjust the display
brightness, proceed as follows:
Press the TIME/DIMMER button [1] quickly to dim the display. “L”
(LOW) is shown briefly on the display [10].
Quickly press the TIME/DIMMER button [1] again to dim the display
brightness automatically as a function of the ambient lighting. The
lightning conditions are measured by the light sensor [11]. “A”
(AUTOMATIC) is briefly shown on the display [10].
Briefly press the TIME/DIMMER button [1] once again to set the
display brightness back to maximum. “H” (HIGH) is briefly shown on
the display [10].
Pressing the TIME/DIMMER [1] button again allows you to repeat the
display brightness setting in the above sequence.
Light for orientation at night
The alarm clock radio has a light for orientation at night that helps you to
orientate in darkness. It also allows operating the alarm clock radio more
easily when it is dark. While the device is powered off, press the
SNOOZE/LIGHT button [9] to switch the light for orientation at night on.
Press the SNOOZE/LIGHT button [9] again to switch the light for
orientation at night back off.
80 - English
The light for orientation at night built into the alarm clock
radio is not suitable for room lightning.
Page 83

SRW 250 A2 Alarm Clock Radio
Inserting the Backup Batteries
To avoid having to adjust the device settings again after a power failure or
the device being disconnecting from the mains, you can use backup
batteries (not supplied). Proceed as follows:
Disconnect the device from the mains.
Open the battery compartment [14] on the bottom of the device.
Insert two AAA batteries 1,5 V (Micro/ R03/LR03) into the battery
compartment, making sure the polarity is correct. Note the + and –
icons on the batteries and inside the battery compartment (see
diagram).
Close the battery compartment.
Reconnect the device to the mains.
Remove the batteries when the device is not to be used
for an extended period.
English - 81
Page 84

SRW 250 A2 Alarm Clock Radio
Troubleshooting
Device will not switch on.
Power socket defective or fuse blown: check the power socket by
connecting a different device.
No sound
If the sound is very low or there is no sound at all, double-check the
volume setting (the device needs to be powered on) and, if
necessary, increase the volume by pressing the + button [8] several
times.
Poor radio reception
Extend the wire aerial [12] fully and change its position if necessary.
No playback of external audio sources
Make sure that the audio cable is firmly connected to the alarm clock
radio AUX input [16] and to the external device headphones jack.
Make sure to select the external audio source by checking the “AUH”
indication on the display. The display indication “AUH” means
“AUXILIARY”.
Make sure that playback is started on the external audio source and
that its volume is sufficiently high. Please also read the operating
instructions of the external device.
82 - English
Page 85

SRW 250 A2 Alarm Clock Radio
Maintenance/Cleaning
The device must be serviced if it has been damaged in any way, for
example, if the power plug, power cord or housing is damaged, if liquid
or objects have penetrated the device, if the product has been exposed to
rain or moisture, if the product does not work normally or if the product
has been dropped. If you notice any smoke, unusual noise or strange
smells, switch off the device immediately and pull the plug from the wall
outlet. If this occurs, the device should no longer be used and should be
inspected by an expert. All servicing work must be carried out by qualified
specialist personnel. Never open the housing of the device. Opening the
housing can exposes you to a lethal electric shock. Only use a clean, dry
cloth for cleaning. Never use any aggressive liquids. Do not attempt to
open the housing of the device, this could void your warranty.
Environmental Considerations and Recycling
Devices marked with this symbol are subject to European
Directive 2002/96/EC. All electric and electronic devices
must be disposed of separately from household waste at
official disposal centres. Proper disposal of old devices
prevents damage to the environment or your health.
For further information about proper disposal, contact your local council,
recycling centre or the shop where you bought the device.
English - 83
Page 86

SRW 250 A2 Alarm Clock Radio
Respect the environment. Old batteries do not belong in with household
waste. They must be handed in to a collection point for waste batteries.
Please note that batteries must be disposed of fully discharged at
appropriate collection points for old batteries. If disposing of batteries
which are not fully discharged, take precautions to prevent short circuits.
Dispose of all packaging in an environmentally-friendly manner. Boxes can
be recycled with waste paper collections or handed in to public collection
points. Films and plastics included in the original packaging can be
disposed of via your local waste disposal company in an environmentallyfriendly way.
Declaration of conformity
This device complies with the basic and other relevant
requirements of the EMC Directive 2004/108/EC, the Lowvoltage Directive 2006/95/EC, the RoHS II Directive
2011/65/EU and the ErP Directive 2009/125/EC. The
corresponding Declaration of Conformity can be found at
the end of this User Manual.
84 - English
Page 87

SRW 250 A2 Alarm Clock Radio
Warranty and service information
Warranty of TARGA GmbH
This device is sold with three years warranty from the date of purchase.
Please keep the original receipt in a safe place as proof of purchase.
Before using your product for the first time, please read the enclosed
documentation or online help. Should any problems arise which cannot be
solved in this way, please call our hotline. Please have the article number
and, if available, the serial number to hand for all enquiries. If it is not
possible to solve the problem on the phone, our hotline support staff will
initiate further servicing procedures depending on the fault. Within the
warranty period the product will be repaired or replaced free of charge as
we deem appropriate. No new warranty period commences if the product
is repaired or replaced. Consumables such as batteries, rechargeable
batteries and lamps are not covered by the warranty.
Your statutory rights towards the seller are not affected or restricted by this
warranty.
English - 85
Page 88

SRW 250 A2 Alarm Clock Radio
Service
Phone: 0207 – 36 50 744
E-Mail: service.GB@targa-online.com
Phone: 01 – 242 15 83
E-Mail: service.IE@targa-online.com
Phone: 800 – 62 175
E-Mail: service.MT@targa-online.com
Phone: 800 – 92 496
E-Mail: service.CY@targa-online.com
IAN: 90433
Manufacturer
TARGA GmbH
Coesterweg 45
59494 SOEST
GERMANY
86 - English
Page 89

Radiowecker SRW 250 A2
Inhalt
Einleitung .......................................................................... 88
Bestimmungsgemäße Verwendung ................................... 89
Lieferumfang ..................................................................... 90
Technische Daten ............................................................... 91
Sicherheitshinweise ........................................................... 92
Betriebsumgebung ..................................................................................... 92
Hinweis zur Netztrennung ........................................................................ 93
Netzkabel ................................................................................................... 94
Batterien ..................................................................................................... 94
Kinder ......................................................................................................... 95
Urheberrecht .............................................................................................. 95
Geräteansicht und Tastenerklärung .................................. 96
Display ........................................................................................................ 98
Vor der Inbetriebnahme .................................................... 98
Inbetriebnahme ................................................................ 99
Das Gerät ein- und ausschalten ................................................................ 99
12- / 24-Stunden Anzeige ........................................................................ 99
Die Uhrzeit einstellen ................................................................................. 99
Einen Sender einstellen .......................................................................... 101
Automatischer Sendersuchlauf .............................................................. 102
Einen gespeicherten Sender auswählen ............................................... 102
Eine Weckzeit einstellen ......................................................................... 103
Die Weckfunktion aktivieren .................................................................. 104
Weckruf abschalten................................................................................ 105
Die Einschlaffunktion (SLEEP Timer) ....................................................... 105
Kurzzeittimer (NAP Timer) ..................................................................... 106
Deutsch - 87
Page 90

Radiowecker SRW 250 A2
Externe Audioquelle anschließen .......................................................... 107
Displaybeleuchtung ................................................................................ 108
Nachtorientierungslicht ........................................................................... 108
Stützbatterien einlegen ........................................................................... 109
Fehlerbehebung .............................................................. 110
Wartung / Reinigung ....................................................... 111
Umwelthinweise und Entsorgungsangaben ..................... 111
Konformitätsvermerke .................................................... 112
Hinweise zu Garantie und Serviceabwicklung ................. 113
Einleitung
Vielen Dank, dass Sie sich für ein Produkt von SilverCrest entschieden
haben. Der SilverCrest SRW 250 A2 Radiowecker ist mit einer digitalen
Uhr ausgerüstet, die Sie als Wecker programmieren können. Weiterhin
können Sie mit dem Gerät Radioprogramme hören.
Lesen Sie auf den folgenden Seiten, wie Sie das Gerät einsetzen können.
Dieses Symbol kennzeichnet wichtige Hinweise für den
sicheren Betrieb des Gerätes und zum Schutz des
Anwenders.
Dieses Symbol kennzeichnet weitere informative Hinweise
zum Thema.
88 - Deutsch
Page 91

Radiowecker SRW 250 A2
Bestimmungsgemäße Verwendung
Dieses Gerät ist ein Gerät der Unterhaltungselektronik und dient zum
Empfang und zur Wiedergabe von Radiosendern. Das Gerät kann
außerdem als Wecker eingesetzt werden. Es darf nur zu privaten, und
nicht zu industriellen und kommerziellen Zwecken verwendet werden.
Außerdem darf das Gerät nicht außerhalb von geschlossenen Räumen
und in tropischen Klimaregionen genutzt werden. Bei eigenmächtigen
Umbauten des Gerätes und hieraus resultierenden Schäden oder
Störungen ist jegliche Haftung seitens des Herstellers ausgeschlossen.
Bitte beachten Sie die Landesvorschriften bzw. Gesetze des Einsatzlandes.
Beachten Sie, dass in verschiedenen Ländern abweichende nationale
Regelungen bestehen können, welche Frequenzbereiche frei empfangen
werden dürfen. Außerhalb der zugestandenen Frequenzbereiche
empfangene Informationen dürfen weder verwertet, noch deren Inhalt
oder die Tatsache des Empfangs an Dritte weitergegeben werden.
Deutsch - 89
Page 92

Radiowecker SRW 250 A2
Lieferumfang
1. SilverCrest SRW 250 A2 Radiowecker
2. Dieses Benutzerhandbuch (Symbolbild)
90 - Deutsch
Page 93

Radiowecker SRW 250 A2
Technische Daten
Eingangsspannung 230 V~ / 50 Hz
Leistungsaufnahme Standby: max. 1 W *
Betrieb: max. 3 W
Audioausgangsleistung 250 mW
Stützbatterien 2x AAA 1,5 V (Micro/ R03/LR03)
(nicht im Lieferumfang)
FM-Frequenz 87,5 - 108 MHz
Senderspeicherplätze 20 FM
Abmessungen 189 x 92 x 85 mm (B x H x T)
Gewicht ca. 435 g (ohne Batterien)
Betriebstemperatur 5 °C bis 35 °C
Betriebsluftfeuchtigkeit max. 85 % rel. Feuchte
* Die Leistungsaufnahme im Standby Betrieb ist abhängig von der
eingestellten Displayhelligkeit.
Änderungen der technischen Daten sowie des Designs können ohne
Ankündigung erfolgen.
Diese Angaben beschreiben nur die technischen
Möglichkeiten des Gerätes. Die verschiedenen Länder
können davon abweichende gesetzliche Regelungen
über den frei empfangbaren Frequenzbereich treffen.
Beachten Sie, dass der Empfang außerhalb dieser
Regelungen dann illegal und mit Strafe bedroht sein
kann.
Deutsch - 91
Page 94

Radiowecker SRW 250 A2
Sicherheitshinweise
Vor der ersten Verwendung des Gerätes lesen Sie bitte die folgenden
Anweisungen genau durch und beachten Sie alle Warnhinweise, selbst
wenn Ihnen der Umgang mit elektronischen Geräten vertraut ist. Bewahren
Sie dieses Handbuch sorgfältig als zukünftige Referenz auf. Wenn Sie das
Gerät verkaufen oder weitergeben, händigen Sie unbedingt auch diese
Anleitung aus.
Betriebsumgebung
Das Gerät ist nicht für den Betrieb in Räumen mit hoher Temperatur oder
Luftfeuchtigkeit (z.B. Badezimmer) oder übermäßigem Staubaufkommen
ausgelegt. Betriebstemperatur und Betriebsluftfeuchtigkeit: 5 °C bis
35 °C, max. 85 % rel. Feuchte.
Achten Sie darauf, dass:
immer eine ausreichende Belüftung gewährleistet ist (stellen Sie das
Gerät nicht in Regale, auf einen Teppich, auf ein Bett oder dorthin,
wo Belüftungsschlitze verdeckt werden, und lassen Sie mindestens 10
cm Abstand zu allen Seiten);
keine direkten Wärmequellen (z.B. Heizungen) auf das Gerät wirken;
kein direktes Sonnenlicht oder starkes Kunstlicht auf das Gerät trifft;
der Kontakt mit Spritz- und Tropfwasser und aggressiven Flüssigkeiten
vermieden wird und das Gerät nicht in der Nähe von Wasser
betrieben wird. Insbesondere darf das Gerät niemals untergetaucht
92 - Deutsch
Page 95

Radiowecker SRW 250 A2
werden (stellen Sie keine mit Flüssigkeiten gefüllten Gegenstände, z.B.
Vasen oder Getränke auf oder neben das Gerät);
das Gerät nicht in unmittelbarer Nähe von Magnetfeldern (z.B.
Lautsprechern) steht;
keine offenen Brandquellen (z.B. brennende Kerzen) auf oder neben
dem Gerät stehen;
keine Fremdkörper eindringen;
das Gerät keinen übermäßigen Temperaturschwankungen ausgesetzt
wird, da sonst Luftfeuchtigkeit kondensieren und zu elektrischen
Kurzschlüssen führen kann; wurde das Gerät jedoch starken
Temperaturschwankungen ausgesetzt, warten Sie (ca. 2 Stunden) mit
der Inbetriebnahme, bis das Gerät die Umgebungstemperatur
angenommen hat.
das Gerät keinen übermäßigen Erschütterungen und Vibrationen
ausgesetzt wird;
Hinweis zur Netztrennung
Die Taste ON/OFF-FM/AUX [2] auf der Oberseite des Gerätes trennt das
Gerät nicht vollständig vom Stromnetz. Außerdem nimmt das Gerät im
Standby-Betrieb Strom auf. Um das Gerät vollständig vom Netz zu
trennen, muss der Netzstecker aus der Netzsteckdose gezogen werden.
Daher sollte das Gerät so aufgestellt werden, dass stets ein unbehinderter
Zugang zur Netzsteckdose gewährleistet ist, damit der Netzstecker in
einer Notsituation sofort abgezogen werden kann. Um Brandgefahr
auszuschließen, sollte der Netzstecker vor einem längeren Nichtgebrauch
des Gerätes, beispielsweise während des Urlaubs, grundsätzlich von der
Deutsch - 93
Page 96

Radiowecker SRW 250 A2
Netzsteckdose getrennt werden. Vor einem Sturm und/oder Gewitter
trennen Sie das Gerät bitte vom Stromnetz.
Öffnen Sie niemals das Gehäuse des Gerätes! Bei geöffnetem Gehäuse
besteht Lebensgefahr durch elektrischen Schlag.
Netzkabel
Fassen Sie das Netzkabel immer am Stecker an. Ziehen Sie nicht am
Kabel selbst, und fassen Sie das Netzkabel niemals mit nassen Händen
an, da dies einen Kurzschluss oder elektrischen Schlag verursachen kann.
Stellen Sie weder das Gerät, Möbelstücke o.ä. auf das Netzkabel und
achten Sie darauf, dass es nicht eingeklemmt wird. Machen Sie niemals
einen Knoten in das Netzkabel, und binden Sie es nicht mit anderen
Kabeln zusammen. Das Netzkabel sollte so gelegt werden, dass niemand
darauf tritt. Ein beschädigtes Netzkabel kann einen Brand oder
elektrischen Schlag verursachen. Prüfen Sie das Netzkabel von Zeit zu
Zeit. Sollte es beschädigt sein, wenden Sie sich an Ihre nächste autorisierte
Kundendienststelle oder Ihren Händler, um es zu ersetzen.
Batterien
Legen Sie die Batterien stets polrichtig ein. Beachten Sie dazu die
Kennzeichnung im Batteriefach. Versuchen Sie nicht, Batterien wieder
aufzuladen und werfen Sie diese unter keinen Umständen ins Feuer.
Verwenden Sie keine unterschiedlichen Batterien (alte und neue, Alkali
94 - Deutsch
Page 97

Radiowecker SRW 250 A2
und Kohle, usw.) gleichzeitig. Entnehmen Sie die Batterien, wenn Sie das
Gerät über einen längeren Zeitraum nicht verwenden. Bei
unsachgemäßem Gebrauch besteht Explosions- und Auslaufgefahr.
Kinder
Elektrische Geräte gehören nicht in Kinderhände! Lassen Sie Kinder
niemals unbeaufsichtigt elektrische Geräte benutzen. Kinder können
mögliche Gefahren nicht immer richtig erkennen. Kleinteile können bei
Verschlucken lebensgefährlich sein. Wurde eine Batterie verschluckt, muss
sofort medizinische Hilfe in Anspruch genommen werden. Halten Sie auch
die Verpackungsfolien von Kindern fern.
Es besteht Erstickungsgefahr!
Urheberrecht
Alle Inhalte dieser Bedienungsanleitung unterliegen dem Urheberrecht und
werden dem Leser ausschließlich als Informationsquelle bereitgestellt.
Jegliches Kopieren oder Vervielfältigen von Daten und Informationen ist
ohne ausdrückliche und schriftliche Genehmigung durch den Autor
verboten. Dies betrifft auch die gewerbliche Nutzung der Inhalte und
Daten. Text und Abbildungen entsprechen dem technischen Stand bei
Drucklegung.
Deutsch - 95
Page 98

Radiowecker SRW 250 A2
Geräteansicht und Tastenerklärung
96 - Deutsch
Page 99

Radiowecker SRW 250 A2
1
TIME/DIMMER (Uhrzeit/Displayhelligkeit einstellen)
2
ON/OFF (Ein-/Ausschalten) ; FM/AUX (Auswahl)
3
ALARM1 (ALARM1 einstellen bzw. aktivieren/deaktivieren)
4
NAP/SLEEP (Kurzzeit-Timer, bzw. SLEEP-Timer einstellen)
5
ALARM2 (ALARM2 einstellen bzw. aktivieren/deaktivieren)
6
PRESET (Sender abspeichern/aufrufen, Sendersuchlauf
durchführen)
7
- (Lautstärke verringern bzw. Auswahl vornehmen)
8
+ (Lautstärke erhöhen bzw. Auswahl vornehmen)
9
SNOOZE/LIGHT (Weckruf für ungefähr 6 Minuten aussetzen/
Nachtorientierungslicht ein-, ausschalten)
10
Display
11
Lichtsensor
12
Wurfantenne
13
Netzkabel
14
Batteriefach
15
Lautsprecher
16
AUX-Eingang (Rückseite)
Deutsch - 97
Page 100

Radiowecker SRW 250 A2
Display
17 Zeit-/Frequenz-/Lautstärkeanzeige
18 Nachmittagsstunden (nur bei 12-Stunden-Anzeige)
19 0.05 MHz bei FM-Empfang
20 AL2 – Weckzeit mit Alarmton aktiviert
21 AL2 – Weckzeit mit Radio aktiviert
22 AL1 – Weckzeit mit Radio aktiviert
23 AL1 – Weckzeit mit Alarmton aktiviert
24 SLEEP-LED (Einschlaffunktion)
25 NAP-LED (Kurzzeittimer)
Vor der Inbetriebnahme
Stellen Sie das Gerät auf eine feste, ebene Oberfläche und stellen Sie
keine schweren Gegenstände auf das Gerät. Stecken Sie nun den
Netzstecker des Netzkabels [13] in eine leicht erreichbare Netzsteckdose.
98 - Deutsch
 Loading...