

Page 1

STAINLESS STEEL MICROWAVE SMW 900 EDS B3
STAINLESS STEEL MICROWAVE
Operating instructions
MAGNETRON
Gebruiksaanwijzing
IAN 107212
FOUR À MICRO-ONDES
EN ACIER INOX
Mode d'emploi
EDELSTAHL-MIKROWELLE
Bedienungsanleitung
Page 2

Before reading, unfold the page containing the illustrations and familiarise yourself with all functions of
the device.
Avant de lire le mode d'emploi, ouvrez la page contenant les illustrations et familiarisez-vous ensuite avec
toutes les fonctions de l'appareil.
Vouw vóór het lezen de pagina met de afbeeldingen open en maak u vertrouwd met alle functies van het
apparaat.
Klappen Sie vor dem Lesen die Seite mit den Abbildungen aus und machen Sie sich anschließend mit allen
Funktionen des Gerätes vertraut.
GB / IE Operating instructions Page 1
FR / BE Mode d'emploi Page 29
NL / BE Gebruiksaanwijzing Pagina 57
DE / AT / CH Bedienungsanleitung Seite 85
Page 3
A
B C
Page 4

INDEX PAGE
Introduction 3
Intended Usage 3
Scope of delivery 3
Appliance description 3
Technical details 3
Important safety instructions 4
Before you begin 10
Basic principles of microwave cookery . . . . . . . . . . . . . . . . . . . . . . . . . . . . . . . . . . . . . . . . .10
Use suitable cookware . . . . . . . . . . . . . . . . . . . . . . . . . . . . . . . . . . . . . . . . . . . . . . . . . . . . . .10
Commissioning 11
Installation of the appliance . . . . . . . . . . . . . . . . . . . . . . . . . . . . . . . . . . . . . . . . . . . . . . . . . .11
Preparing the appliance . . . . . . . . . . . . . . . . . . . . . . . . . . . . . . . . . . . . . . . . . . . . . . . . . . . . .11
Place the turntable inside . . . . . . . . . . . . . . . . . . . . . . . . . . . . . . . . . . . . . . . . . . . . . . . . . . . .12
Operation 12
Setting the Clock . . . . . . . . . . . . . . . . . . . . . . . . . . . . . . . . . . . . . . . . . . . . . . . . . . . . . . . . . . .12
Standby mode . . . . . . . . . . . . . . . . . . . . . . . . . . . . . . . . . . . . . . . . . . . . . . . . . . . . . . . . . . . .13
Setting the kitchen timer . . . . . . . . . . . . . . . . . . . . . . . . . . . . . . . . . . . . . . . . . . . . . . . . . . . . .13
Child lock . . . . . . . . . . . . . . . . . . . . . . . . . . . . . . . . . . . . . . . . . . . . . . . . . . . . . . . . . . . . . . . .13
Query functions . . . . . . . . . . . . . . . . . . . . . . . . . . . . . . . . . . . . . . . . . . . . . . . . . . . . . . . . . . . .13
Interrupt/cancel cooking or defrosting processes . . . . . . . . . . . . . . . . . . . . . . . . . . . . . . . . .14
Heating and cooking 14
Microwave operation . . . . . . . . . . . . . . . . . . . . . . . . . . . . . . . . . . . . . . . . . . . . . . . . . . . . . . .14
Grill function . . . . . . . . . . . . . . . . . . . . . . . . . . . . . . . . . . . . . . . . . . . . . . . . . . . . . . . . . . . . . .15
Combination cooking process "Grill" . . . . . . . . . . . . . . . . . . . . . . . . . . . . . . . . . . . . . . . . . . .16
Convection operation . . . . . . . . . . . . . . . . . . . . . . . . . . . . . . . . . . . . . . . . . . . . . . . . . . . . . . .17
Convection operation with preheating . . . . . . . . . . . . . . . . . . . . . . . . . . . . . . . . . . . . . . . . . .17
Combination cooking process "Convection" . . . . . . . . . . . . . . . . . . . . . . . . . . . . . . . . . . . . .18
Auto menu 18
Starting the Auto menu . . . . . . . . . . . . . . . . . . . . . . . . . . . . . . . . . . . . . . . . . . . . . . . . . . . . . .18
Baking pizza . . . . . . . . . . . . . . . . . . . . . . . . . . . . . . . . . . . . . . . . . . . . . . . . . . . . . . . . . . . . . .21
Defrosting 22
Defrosting by weight . . . . . . . . . . . . . . . . . . . . . . . . . . . . . . . . . . . . . . . . . . . . . . . . . . . . . . . .22
Defrosting by time . . . . . . . . . . . . . . . . . . . . . . . . . . . . . . . . . . . . . . . . . . . . . . . . . . . . . . . . . .23
- 1 -
Page 5

Recipes 23
Meat patty . . . . . . . . . . . . . . . . . . . . . . . . . . . . . . . . . . . . . . . . . . . . . . . . . . . . . . . . . . . . . . . .23
Baking frozen ready-made bread rolls . . . . . . . . . . . . . . . . . . . . . . . . . . . . . . . . . . . . . . . . .23
Potato gratin . . . . . . . . . . . . . . . . . . . . . . . . . . . . . . . . . . . . . . . . . . . . . . . . . . . . . . . . . . . . . .24
Muffins . . . . . . . . . . . . . . . . . . . . . . . . . . . . . . . . . . . . . . . . . . . . . . . . . . . . . . . . . . . . . . . . . . .24
Courgette soup . . . . . . . . . . . . . . . . . . . . . . . . . . . . . . . . . . . . . . . . . . . . . . . . . . . . . . . . . . . .25
Choco-apple cake . . . . . . . . . . . . . . . . . . . . . . . . . . . . . . . . . . . . . . . . . . . . . . . . . . . . . . . . . .25
Meat loaf . . . . . . . . . . . . . . . . . . . . . . . . . . . . . . . . . . . . . . . . . . . . . . . . . . . . . . . . . . . . . . . . .26
Cleaning and Care 26
Troubleshooting 27
Disposal 28
Warranty and Service 28
Importer 28
- 2 -
Page 6
Stainless Steel
Microwave
Introduction
Congratulations on the purchase of your new appliance.
You have decided to purchase a high-quality product. The operating instructions are a constituent
of this product. They contain important information
regarding safety, use and disposal. Before using the
product, familiarise yourself with all operating and
safety instructions. Use this appliance only as described
and only for the specified areas of application.
Please also pass these operating instructions on to
any future owner(s).
Intended Usage
Appliance description
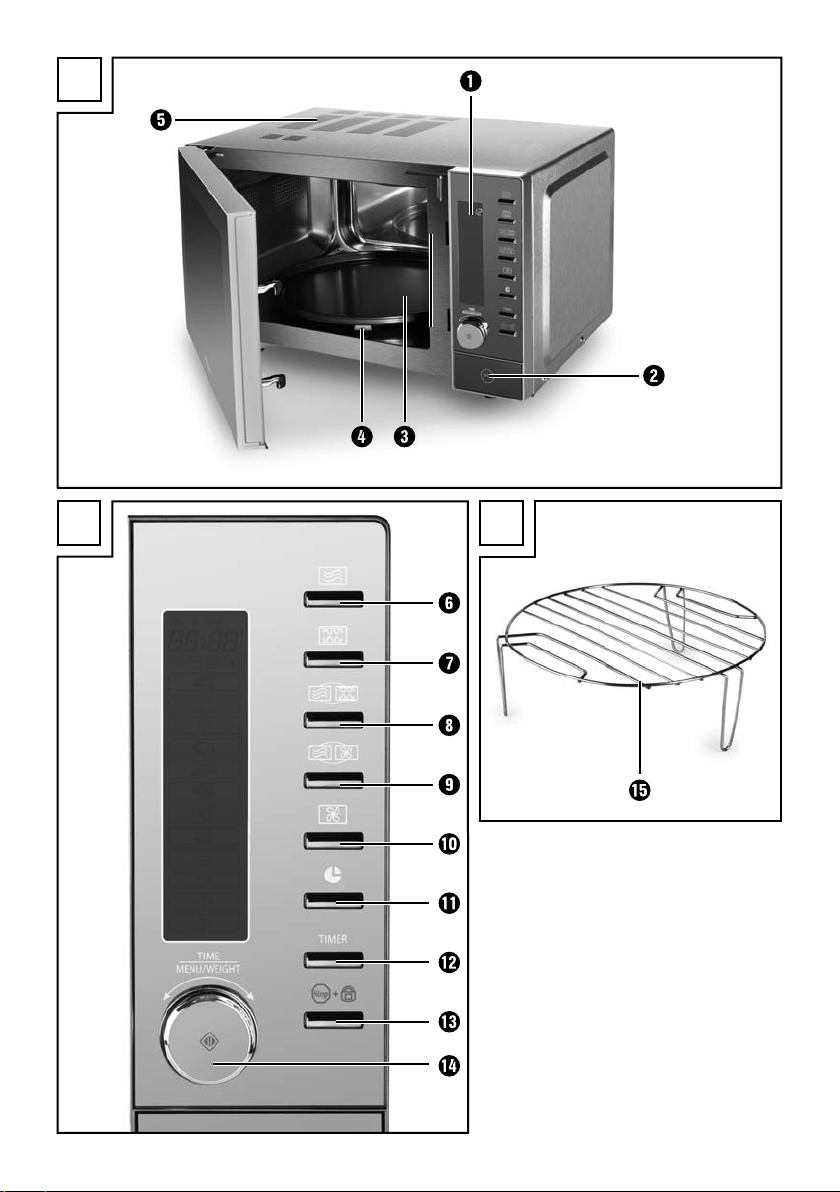
Figure A:
1 Display
2 Door opener button
3 Turntable
4 Rollers
5 Ventilation slot
Figure B:
6 Microwave button
7 Grill button
8 Combination microwave - grill button
9 Combination microwave -
convection button
0 Convection button
q Clock button
w TIMER button (kitchen timer)
e Stop/child lock button
r Rotary knob / Start/quick start button
This appliance is intended for the heating up and
preparation of foods in accordance with the described
procedures.
Any modification to the appliance shall be deemed
to be improper use and entails considerable accident
hazards. The manufacturer accepts no responsibility
for damages arising from usage contrary to the instructions specified below.
This appliance is intended exclusively for use in
domestic households!
Do not use it in/for commercial, industrial or laboratory
areas/applications!
Scope of delivery
Stainless Steel Microwave
Turntable
Grill stand
Operating instructions
Concise information (2 no.)
Figure C:
t Grill stands
Technical details
Nominal voltage: 230 - 240 V ~,
50 Hz
Maximum power consumption
Microwave: 1400 W
Grill: 1500 W
Convection: 1950 W
Maximum power delivery
Microwave: 900 W +/- 10%
Microwave frequency: 2450 MHz
- 3 -
Page 7
Important safety instructions
Carefully read these safety and operating instructions before the first use and preserve them for future
reference.
Danger! / Risk of injury!
Warning about physical injuries and electric shock!
Risk of fire!
Warning about risks of fire.
Important!
Warnings regarding damage to the appliance.
Notice!
Note – Hints and tips for using the microwave.
Safety precautions for the avoidance of excessive contact with microwave
energy
• Do not try to operate the appliance while the door is open, as this can lead to
you coming into contact with a potentially harmful dose of microwave radiation. It is also important not to break open or manipulate the safety locks .
• Do not jam anything between the front of the appliance and the door, and
make sure that there is no residual food or cleaning agent on the seals.
Danger!
• Never submerse the appliance, the power cable or the plug in water or other
fluids.
• Keep the power cable away from hot surfaces. Do not lead it in front of the
appliance door. The heat could damage the cable.
• Never pour fluids into the ventilation openings or the safety locks. Should fluids
ever enter them, immediately switch the appliance off and remove the plug
from the mains power socket. Arrange for the appliance to be checked by
qualified specialists.
- 4 -
Page 8

Risk of injury!
• If the door or the door seal is damaged, under no circumstances may you continue to use the appliance. Arrange for it to be repaired as soon as possible
by qualified specialists.
• Never attempt to repair the appliance yourself. Removal of the appliance housing could cause the release of microwave energy. Arrange for the repair to
be carried out only by qualified specialists.
• This appliance may be used by children of the age of 8 years or more and by
persons with reduced physical, sensory or mental capabilities or lack of experience and/or knowledge if they are supervised or have been instructed how
to use the appliance safely and have understood the potential risks.
• Children must not play with the appliance.
• Cleaning and user maintenance tasks should not be carried out by children,
unless they are at least 8 years old or more and are constantly supervised.
• Children younger than 8 years of age are to be kept away from the appliance
and the power cable.
• Only use this appliance for its intended purpose as described in this manual.
Do not use any caustic chemicals or vapours in this appliance. This micro-wave
oven is especially designed for heating, cooking, grilling, or drying foodstuffs.
It is not intended for use in industrial applications or laboratories.
• Do not operate the microwave oven if the power cable or plug are damaged.
To avoid injury, arrange for damaged power cables or plugs to be exchanged
by qualified specialists before re-using the appliance.
• Keep children well away from the microwave oven when it is in use.
Risk of Burns!
• Under no circumstances should you remove the microwave oven housing.
• Should the lamp in the interior of the microwave oven need replacing, arrange
for this to be done by a qualified specialist.
• Never touch the microwave oven door, housing, ventilation openings, accessories or the dinnerware directly after the grill, combi or automatic menu process.
The parts will be very hot. Allow them to cool down before cleaning them.
- 5 -
Page 9

• Ensure that the plug is at all times easily accessible, so that it can be quickly removed in the event of an emergency.
• People fitted with a heart pacemaker should consult their doctor about the
possible risks of using a microwave oven before taking one into use.
• Do not allow the power cable to hang from a table or work surface. Children
could pull on it.
• After they have been warmed up, always open containers, popcorn-bags etc.
with the opening pointing away from your body. Escaping steam could lead to
scalds.
• Never stand directly against the microwave oven when opening the door.
Escaping steam could lead to scalds.
• Do not fry in the microwave. Hot oil can damage parts of the appliance and
utensils and even cause skin burns.
• Always shake-up or stir warmed up baby glasses or bottles! The contents could
have heated up unevenly and the baby could be burned/scalded by them.
At all events, check their temperature before feeding them to the baby!
• Do not modify the microwave oven.
• Microwave radiation is dangerous! Maintenance and repairs requiring the removal of access covers, which are intended for protection against contact with
microwave radiation, are to be carried out by trained specialists only.
• Before consumption, check the temperature, so as to avoid a potentially lifethreatening scalding for babies.
Cooking utensils may become hot from the heat emitted by the food, so that
you may require oven gloves to touch them. In this case, a check should also
be made to ensure that the cooking utensils are suitable for use with the microwave oven.
Attention! Hot surfaces!
Risk of fire!
• Never leave the microwave oven unattended if you are heating foodstuffs
packed in plastics or paper.
• Never place flammable materials close to the microwave oven or the ventilation
openings.
- 6 -
Page 10

• Remove ALL metallic closures from the packaging of the foodstuff that you intend to warm up. Risk of fire!
• When making popcorn, use only popcorn-bags suitable for microwave ovens.
• Do not use the microwave oven to warm up cushions filled with kernels, cherry
stones or gels. Risk of fire!
• Do not use the microwave oven for storing foodstuffs or other objects.
• Do not exceed the cooking times detailed by the manufacturer.
• Do not place any objects on the microwave oven when it is in use. The ventilation openings would be blocked!
• Do not place the microwave oven adjacent to other appliances discharging
heat, for example, an oven.
• Clean the microwave oven thoroughly after warming up greasy foods, especially if they were not covered. Allow the appliance to cool down completely before cleaning it. Residues such as fat or grease cannot be allowed to collect on
the heating elements of the grill. They could possibly ignite.
• Do not thaw frozen fat or oil in the microwave oven. The fat or oil could ignite.
• Do not use an external timing switch or a separate remote control system to
operate the appliance.
• This microwave is designed to be used for heating foods and drinks.
Drying foods or clothing or the warming of heating pads, slippers, sponges,
damp cloths or similar can lead to injuries, ignition of the material or fires.
• This cooking appliance should be cleaned regularly and all food residues
should be removed.
Important! Appliance Damage!
• Never operate the microwave when it is empty.
Never operate the microwave when it is empty. The only exception to this is the
first use (see section "First use") during which the microwave is operated empty
for a brief period in the operating mode "Grill".
- 7 -
Page 11

• Never insert foreign objects into the ventilation openings or the door safety locks.
• Do not use metallic utensils which reflect microwaves and lead to sparking.
Do not place tins in the microwave oven.
• Do not place plastic containers in the microwave oven immediately after a
grill, combi or automatic menu process. The plastic could melt.
• This microwave oven may not be located in areas with high humidity or where
moisture could collect.
• Liquids and other foods must not be heated in airtight containers, as these may
explode and damage the appliance.
• Do not lean on the microwave oven door.
• Insufficient cleanliness of the appliance could lead to the destruction of the upper surfaces, which themselves influence its useful lifespan and could possibly
also lead to dangerous situations.
• Use only microwave-suitable cookware.
Safety tips
• To minimize the risk of fire in the appliance: When heating food in plastic or
paper containers, always keep an eye on the appliance when it is in operation,
as these materials can catch fire.
• When heating drinks in the appliance, bubbling may be delayed when the
drink boils. Therefore, be careful when handling the container.
To avoid sudden simmering:
– If possible, place a glass rod in the fluid for as long as it is being heated.
– To avoid an unexpected reboiling, leave the fluid to stand in the appliance
oven for ca. 20 seconds after being warmed up.
• Puncture the skins of potatoes, sausages or similar. Otherwise, they could explode.
• Proceed with caution when warming up fluids. Use only open containers, so
that any air bubbles produced can escape.
• If the appliance starts to give off smoke it should be switched off immediately
or the plug removed from the mains and the door should be kept closed to
smother any flames that might otherwise escape.
- 8 -
Page 12

• Eggs in their shells and hard-boiled eggs should not be heated in the appliance
as they could explode, even on completion of the heating process. Food with
thick skins, such as potatoes, whole pumpkins, apples and chestnuts must be
pricked before cooking.
• Do not transport the appliance when it is in use.
Earthing information/correct installation
This appliance must be earthed. This appliance is to be connected only to a
correctly earthed power socket. An individual circuit, solely for the connection of the
appliance, is recommended.
Danger: Improper use of the earthing connector could increase the risk of an
electric shock.
Notice: Should you have any questions about earthing or about the instructions
on the use of this electrical appliance given here, please consult an electrician or a maintenance technician.
Neither the manufacturer nor the dealer can accept liability for damage to the
appliance or injury to persons resulting from failure to comply with the
instructions for electrical connection.
Interference with other appliances
The operation of the appliance may cause interference on your radio, television
or similar appliances.
If such interference should occur, they may be reduced or corrected by the following remedial measures:
• Clean the door and the seal of the appliance.
• Re-align the receiver antenna of your radio or television.
• Position the appliance in a different place to the receiver.
• Move the appliance away from the receiver.
• Plug the appliance into another wall socket. The appliance and the receiver
should be connected to different circuits.
- 9 -
Page 13
Before you begin
Basic principles of microwave cookery
• Arrange the food with consideration.
• The thickest parts near the edges.
• Pay attention to the cooking time. Select the
shortest possible stated cooking time and increase as required. Food that is cooked too
long can begin to smoke or catch fire.
• Cover the food during cooking with a lid suitable
for microwave cookery. The lid prevents splashing
and helps in the even cooking of the food.
• While cooking, turn the food in the microwave
once so that items such as chicken or hamburgers
are cooked more quickly.
• Large pieces of food, such as joints of meat,
must be turned at least once.
• Completely re-arrange foods such as meatballs
after half the cooking time. Turn them and
move the meatballs from the middle of the
cookware to the edge.
Use suitable cookware
• The ideal material for a microwave oven is
microwave-permeable, allowing the energy
to penetrate the container to heat the food.
Microwaves cannot permeate metal. For this
reason metal containers and cookware may
not be used.
• When using the microwave for heating do not
use products made of recycled paper. These
can contain minute fragments of metal, which
can generate sparks and/or fires.
• We recommend the use of round/oval cookware instead of square or oblong containers,
as food in corner areas tends to overcook.
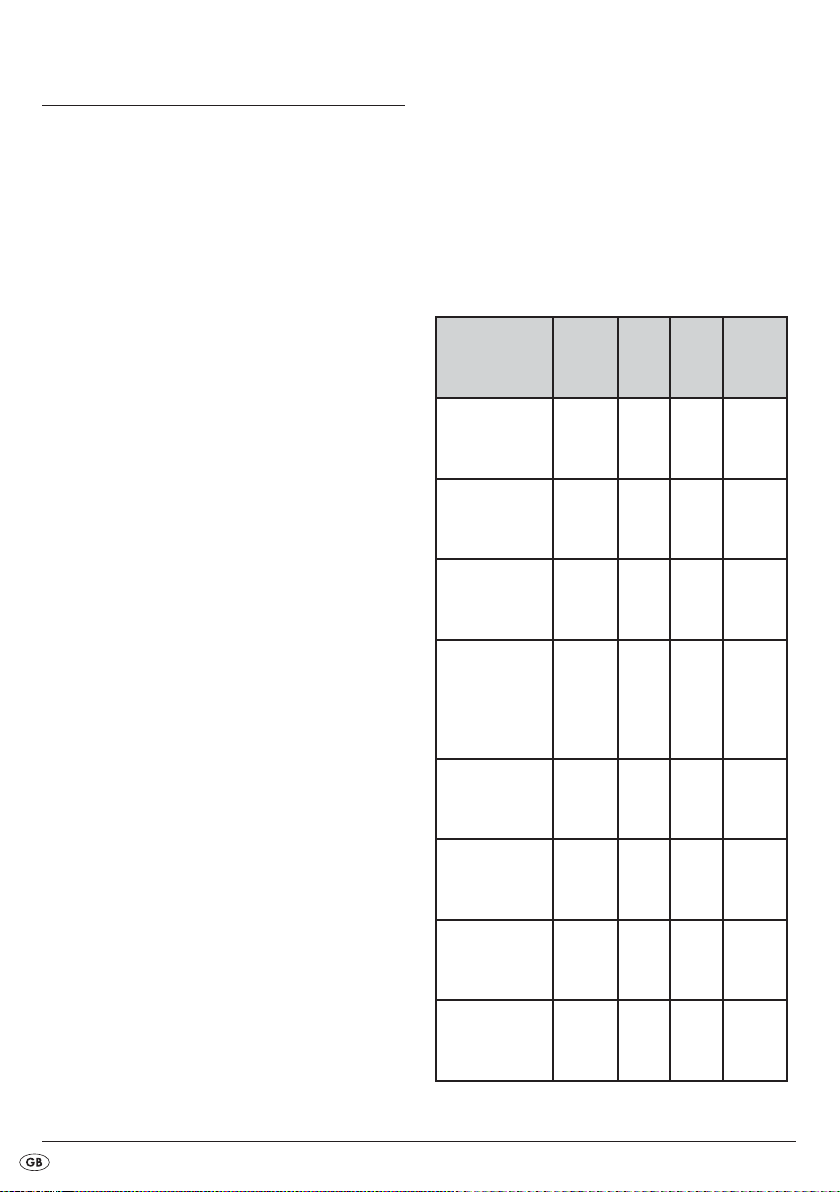
The following list provides general hints to
assist you in selecting the correct cookware.
Micro-
Cookware
Heat-resistant
glass
Non-heatresistant glass
Heat-resistant
ceramics
Plastic crockery
suitable for
microwave
Kitchen roll Yes No No No
wave
oven
Yes Yes Yes Yes
No No No No
Yes Yes Yes Yes
Yes No No No
Grill
Con-
vection
Combination
Metal
tray/plate
Grill stand No Yes Yes No
Alufoil & Foil
containers
- 10 -
No Yes Yes No
No Yes Yes No
Page 14
Risk of fire!
NEVER use the grill stand or other metallic objects
when you are using the appliance in the microwave mode or in the combination cooking process.
Metals reflect the microwave radiation and it leads
to the generation of sparks. This could cause a fire
and irreparably damage the appliance!
Commissioning
Note on heating up for
the first time
Never operate the microwave in
"Microwave" mode when it is
empty!
When heating up for the first time,
operate the microwave without
food or accessories and select
operating mode "Grill" (Gr 3)!
ee section "Preparing the appliance")
Installation of the appliance
Risk of fire!
This microwave oven is not suitable for installation
in a kitchen cabinet. In closed cabinets sufficient
ventilation for the appliance cannot be assured.
The appliance could be damaged and there
would be the additional risk of a fire!
Warning:
Do not install the microwave above a cooker or
any other appliance generating heat. Installation
at such a location could cause damage to the appliance and thereby a subsequent lapse of the
warranty provisions.
• Select an even surface offering sufficient space
for the adequate ventilation of the appliance:
Ensure that you maintain a minimum distance
of 10 cm from neighbouring walls/surfaces.
Make sure that the door of the microwave
oven can be opened easily.
Maintain a gap of at least 20 cm above the
microwave oven.
• Ensure that the electrical plug is accessible
without problem, so that in case of danger it
can be easily reached and removed.
• Do not remove the pads underneath the microwave oven.
• Do not block the ventilation openings 5. If you
do, it could cause damage to the appliance.
• Install the appliance as far away as possible
from radios and televisions. The operation of
the microwave oven can cause malfunctions
of radio and televsision reception.
Preparing the appliance
• Remove the packaging material and the protective film applied to the panel and the door
opener button 2.
Do not remove the light grey flimmer cover plate, which is mounted
in the cooking compartment to
protect the magnetron.
- 11 -
Page 15
• Insert the plug into a mains power socket. Use a
230 - 240 V ~, 50 Hz, mains power socket
with a 16 A fuse. We recommend that the
microwave is powered by its own mains circuit.
If you are unsure about how to connect the microwave oven, consult a specialist.
Before the first regular usage of the microwave oven
the appliance must be heated up to remove any remaining production residues.
Once you have plugged the plug into the socket,
open the microwave door once by pressing the
Door opener button 2.
Switch the appliance on in grill operating mode
without foods and without accessories (turntable 3
and grill stands t):
Note on heating up for
the first time
• Press the Start/quick start button r to
start the grill process.
Note:
Light smoke generation and a slight smell can
occur on first usage, this is due to production
residues. These are not harmful. Provide sufficient
ventilation. For example, open a window.
• After 5 minutes the appliance will switch itself
off automatically. Wait until it has cooled down
completely.
• Remove the plug from the mains power socket
then, after cleaning the appliance with a moist
cloth, dry it carefully.
Place the turntable inside
• Place the turntable 3 centrally over the axle in
the cooking compartment. Ensure that it slides
completely onto the axle and is firmly seated.
When heating up for the first
time, operate the microwave
without food or accessories.
Operate the microwave for a maximum of 5 minutes when empty!
• Press the Grill button 7 . "Gr 1" will
appear in the display 1.
• Turn the rotary knob r , as far as "Gr 3"
and the and symbols appear in the
display 1, then confirm the selection by pressing the Start/quick start button r .
• Use the rotary knob r to set a cooking
time of 5 minutes.
Operation
Setting the Clock
After inserting the mains plug into the socket, open
the microwave door once. The display 1 shows
"1:00". Re-close the door.
1. Press the Clock button q . "Hr 12" appears
in the display 1.
2. Select the required mode (Hr 24 or Hr 12) by
turning the rotary knob r and then confirm
your selection by pressing the Start/quick start
button r .
- 12 -
Page 16

Note:
The time display will only appear once you turn
the rotary knob r again, which enables you
to set the hour.
3. Select the required hour by turning the rotary
knob r and confirm your selection by
pressing the Start/quick start button r .
4. Select the required minutes by turning the rotary
knob r and confirm your selection by
pressing the Start/quick start button r .
The time display is now programmed.
To read the current time while the microwave is in
operation, press the Clock button q ; the time
is then shown in the display 1 for a few seconds.
Standby mode
The microwave automatically switches over to standby mode, and the time is displayed, if no button is
pressed for a longer period. The display illumination also dims a few seconds after switching over
to standby mode.
Setting the kitchen timer
The microwave oven is provided with a kitchen timer
which you can use independently of the microwave
operation.
1. Press the TIMER button w while the appliance
is in standby mode. "0:00" is shown in the
display 1 along with symbol .
2. Now set the required time using the rotary knob
r . You can select any time range from
10 seconds to 95 minutes.
3. Press the Start/quick start button r .
The appliance emits an acoustic signal. The
countdown begins. After approx. 3 seconds
the current time is shown once again. The
kitchen timer will continue to run in the background. If you want to check the kitchen timer
inbetween times, press the TIMER button w.
The kitchen timer appears for a moment.
As soon as the set time period has expired, signal
tones sound.
Child lock
Engage this setting to prevent accidental activation
by children and other persons not familiar with the
operation of the appliance.
The symbol for the child lock appears in the
display 1 , which means that the appliance cannot
be operated as long as this function is activated.
• Press the Stop/child lock button e and
hold it down until a signal tone is sounded and
the symbol for the child lock appears in
the display 1. The buttons and the control dial
now no longer have a function.
• To deactivate the child lock, press the Stop/child
lock button e and hold it down until
a signal tone is sounded and the symbol for the
child lock goes out.
Query functions
Query the time during operation
During the cooking process, press the Clock
button q . The time will appear for a few
seconds in the display 1.
Query the power level operation
During the cooking process, press the Microwave
button 6 . The activated power level will
appear for a few seconds in the display 1.
- 13 -
Page 17

Interrupt/cancel cooking or defrosting
processes
• Press the Stop button e , once in order
to interrupt a cooking or defrosting process. The
appliance interrupts the process and stops countdown of the remaining time. Press the Start/quick
start button r to continue the process.
• Press the Stop button e twice to cancel
a cooking process. The appliance reverts to
standby mode.
Heating and cooking
Note:
This microwave is equipped with a cooling function. This means that the machine fan continues
running for about 3 minutes after a cooking or
grill process which takes at least two minutes. This
is not a malfunction of the appliance! The rapid
cooling helps to prolong the life of the appliance.
Microwave operation
Selecting the operation level
1. Press the Microwave button 6 . "900"
(900 W power) appears in the display 1.
2. Now set the required power level using the
rotary knob r .
3. Press the Start/quick start button r
to confirm the power level you have set.
Programming the cooking time
After you have selected the power level, programme in
the desired cooking time:
• Turn the rotary knob r until the required
cooking time has been set.
The stages for the rotary knob r setting
times are as follows:
• from 0 sec to 5 min: in 10 second increments
• from 5 to 10 min: in 30 second increments
• from 10 to 30 min: in 1 minute increments
• from 30 to 95 min: in 5 minute increments
Aborting/stopping an input process
Press the Stop button e once to cancel
and exit an input process. The appliance reverts to
standby mode.
Note:
During the cooking process, drops of water can
form on the oven door or on the housing. This is
normal and is not an indication of a malfunction.
When the appliance has cooled down, wipe the
moisture off with a dry cloth.
Fire hazard!
NEVER use the grill stand t or other metallic
objects when you are using the appliance in the
microwave mode. Metals reflect the microwave
radiation and it leads to the generation of sparks.
This could cause a fire and irreparably damage
the appliance!
Starting the cooking process
When you have set the power and cooking time,
you can start the cooking process:
Press the Start/quick start button r to start
the cooking process. The symbol for microwave
operation appears in the display 1. The set
time will now count down backwards. Once the
set time has expired, "End" and "Hot" are shown
alternating in the display 1. A signal tone is heard
repeatedly.
- 14 -
Page 18

Quick start 1
When in standby mode, turn the rotary knob r
to the right and set the required cooking period.
Start the cooking process with 900 W power by
pressing the Start/quick start button r .
Quick start 2
You can use this function to start cooking immediately
for 30 seconds (or longer, up to 95 min) at 900 W
power.
• Press the Start/quick start button r once.
The symbol for microwave operation
appears in the display 1 in addition to "00:30".
The microwave starts the cooking process for
30 seconds. The countdown begins.
If you want to cook for longer than 30 seconds, press
the Start/quick start button r several times until
the required time has been set.
The time levels are apportioned as follows:
• from 30 sec to 5 min: in 30 second increments
• from 5 min to 95 min: in 1 minute increments
Grill function
Fire hazard!
When using the grill functions, under no circumstances should you use any form of covering or
cookware that is not heat-resistant, as these could
melt or ignite themselves!
Note:
Always use the grill stands t when grilling.
This achieves an optimal grilling result. Always
placed the grill stands t on the turntable 3.
3 grill functions are available:
• "Top heat" grill function (Gr 1):
With this function, the heat only comes from
above. Only the top grill is activated. This grill
function is therefore suitable for grilled sandwiches and gratins.
• "Bottom heat" grill function (Gr 2):
With this function, the heat only comes from below. Only the bottom grill is activated. This grill
function is therefore suitable for meals or foods
which need to be cooked or grilled from below.
• "Top and bottom heat" grill function (Gr 3):
With this function, the heat comes from above
and below. The top and the bottom grills are
activated. This grill function is therefore suitable
for thin slices of meat, steaks, hamburgers,
sausages or chicken pieces.
1. Press the Grill button 7 once to activate
the grill function.
The symbol for the "Top heat" grill function
appears in the display 1 along with
"Gr 1".
2. Now set the required grill function using the
rotary knob r :
"Gr 1" for top heat,
"Gr 2" for bottom heat,
"Gr 3" for top and bottom heat.
Confirm your selection by pressing the
Start/quick start button r .
3. Now set the required cooking time using the
rotary knob r . The maximum possible
cooking time setting is 95 minutes.
4. To start grill function, press the Start/quick
start button r .
The symbol for the selected grill function / /
appears in the display 1. The set time will
now count down backwards. Once the set time has
expired, "End" and "Hot" are shown alternating in
the display 1. A signal tone is heard repeatedly.
- 15 -
Page 19
Combination cooking process "Grill"
This function combines the grill function and the
normal microwave operation. During the combination
mode, a certain amount of time for cooking and the
remaining time for grilling is carried out automatically
and in one process. You may notice a quiet clicking
noise when the oven is switching between modes.
Fire hazard!
Never use the grill stand t or other metallic objects
when you are using the microwave for combined
cooking processes. Metals reflect the microwave
radiation and it leads to the generation of sparks.
This could cause a fire and irreparably
damage the appliance!
When using the "Grill" combined cooking functions, under no circumstances should you use any
form of covering or cookware that is not heatresistant, as these could melt or ignite themselves!
4 combinations are available:
• Combination 1 (C 1):
For Combination 1, the microwave power is
30% and the grill power is 70% of the cooking
time. This is suitable for fish or gratins, for example.
The microwave function and the grill function
"top heat" are used.
• Combination 2 (C 2):
For Combination 2, the microwave power is
55% and the grill power is 45% of the cooking
time. This is suitable for puddings, omelets or
lasagne, for example. The microwave function
and the "top heat" grill function are used.
• Combination 3 (C 3):
For Combination 3, the microwave power is
30% and the grill power is 70% of the cooking
time. This is suitable for potatoes, for example.
The microwave function and the grill functions
"top and bottom heat" are used.
• Combination 4 (C 4):
For Combination 4, the microwave power is
55% and the grill power is 45% of the cooking
time. This is suitable for poultry dishes, for example.
The microwave function and the grill functions
"top and bottom heat" are used.
1. Press the Combination microwave-grill button
8 once to activate Combination 1
(C 1). , , and "C 1" are shown in the
display 1.
2. Now set the required combination using the
rotary knob r :
"C 1" for combination 1,
"C 2" for combination 2,
"C 3" for combination 3,
"C 4" for combination 4.
Confirm your selection by pressing the
Start/quick start button r .
3. Now set the required cooking time using the
rotary knob r . The maximum possible
cooking time setting is 95 minutes.
4. Press the Start/quick start button r to
start the process.
The symbols of the cooking process being used
, , appear on the screen 1. The programmed time counts backwards. Once the set time
has expired, "End" and "Hot" are shown alternating
in the display 1. A signal tone is heard repeatedly.
- 16 -
Page 20
Convection operation
When cooking with convection, hot air circulates in
the cooking compartment. Convection is especially
recommended for cooking souffles or crunchy foods.
You can set a temperature of between 110°C and
200°C and a duration of max. 95 min.
1. Press the Convection button 0 . "200C"
(= 200°C) appears in the display 1 along
with the symbol for convection operation .
2. Use the rotary knob r to set the required
temperature and confirm your selection by
pressing the Start/quick start button r .
3. Now set the required cooking time using the
rotary knob r .
4. Press the Start/quick start button r to
start the cooking process.
The symbol for convection operation appears
in the display 1. The programmed time counts backwards. Once the set time has expired, "End" and
"Hot" are shown alternating in the display 1.
A signal tone is heard repeatedly.
Convection operation with preheating
You can also preheat your microwave before you
start a cooking process:
1. Select the required temperature by pressing the
Convection button 0 and use the rotary
knob r to set the temperature. You do
NOT need to confirm this setting by pressing
the Start/quick start button r .
2. To start preheating, press the Convection button 0 . "30:00" appears in the display 1
and the symbol for convection operation
flashes. The countdown begins. Assumes the
set temperature is reached, signal tones will
sound and the time will stop.
3. Open the door and place the foods to be
cooked inside.
4. Turn the rotary knob r to set the temperature and confirm the temperature by pressing
the Start/quick start button r .
5. Now set the required cooking time using the
rotary knob r . The maximum possible
cooking time setting is 95 minutes.
6. Press the Start/quick start button r to
start the process.
The symbol for convection operation appears
in the display 1 permanently. The programmed time
counts backwards. Once the set time has expired,
"End" and "Hot" are shown alternating in the display 1. A signal tone is heard repeatedly.
- 17 -
Page 21
Combination cooking process
"Convection"
This function combines the convection function
with the normal microwave operation. With this,
for example, meat is juicy and tender but still crisp.
Fire hazard!
Never use the grill stand t or other metallic objects
when you are using the microwave for combined
cooking processes. Metals reflect the microwave
radiation and it leads to the generation of sparks.
This could cause a fire and irreparably damage
the appliance!
Auto menu
For foods to be prepared in automatic menu mode,
it is not necessary to enter the cooking time or power
setting. It is quite sufficient to enter which type of
food is to be cooked/boiled, and its weight.
Fire hazard!
Under NO circumstances may you use covers or
non-heat-resistant dishes for programmes with
enabled Grill function (A-01, A-02, A-03, A-04,
A-05), as they can melt or catch fire!
1. Press the Combination microwave-convection
button 9 . The preset temperature
"200C" and the symbols and appear
in the display 1.
2. Now set the required temperature using the
rotary knob r : 110°C, 140°C, 170°C
or 200°C. Confirm your selection by pressing
the Start/quick start button r .
3. Now set the required cooking time using the
rotary knob r . The maximum cooking
time is 95 minutes. Press the Start/quick start
button r to confirm the set cooking time.
The combination process starts. The symbols for the
combination cooking process "Convection" ,
appear on the screen 1. The programmed time
counts backwards. Once the set time has expired,
"End" and "Hot" are shown alternating in the display 1. A signal tone is heard repeatedly.
Note:
The microwave will calculate the time/power level
for fresh foods. Deep-frozen foods will not be
cooked properly using the times specified by
the microwave (with the exception of the "Pizza"
automatic programme).
If needs be, defrost frozen foods with the defrost
programme beforehand (see section "Defrosting").
Starting the Auto menu
1. Turn the rotary knob r (in standby
mode) slowly to the left to call up the automatic menu mode. A number (e.g. "A - 02" for
automatic programme 2 (pork)) and the "Pork"
symbol appear in the display 1. Turn the
rotary knob r to select the appropriate
automatic menu for your food.
Note:
If you have entered automatic menu mode by
turning the rotary knob r to the left, you
can turn the rotary knob to the right afterwards
to select the automatic menus in the sequence of
A01, A02, A03... .
- 18 -
Page 22
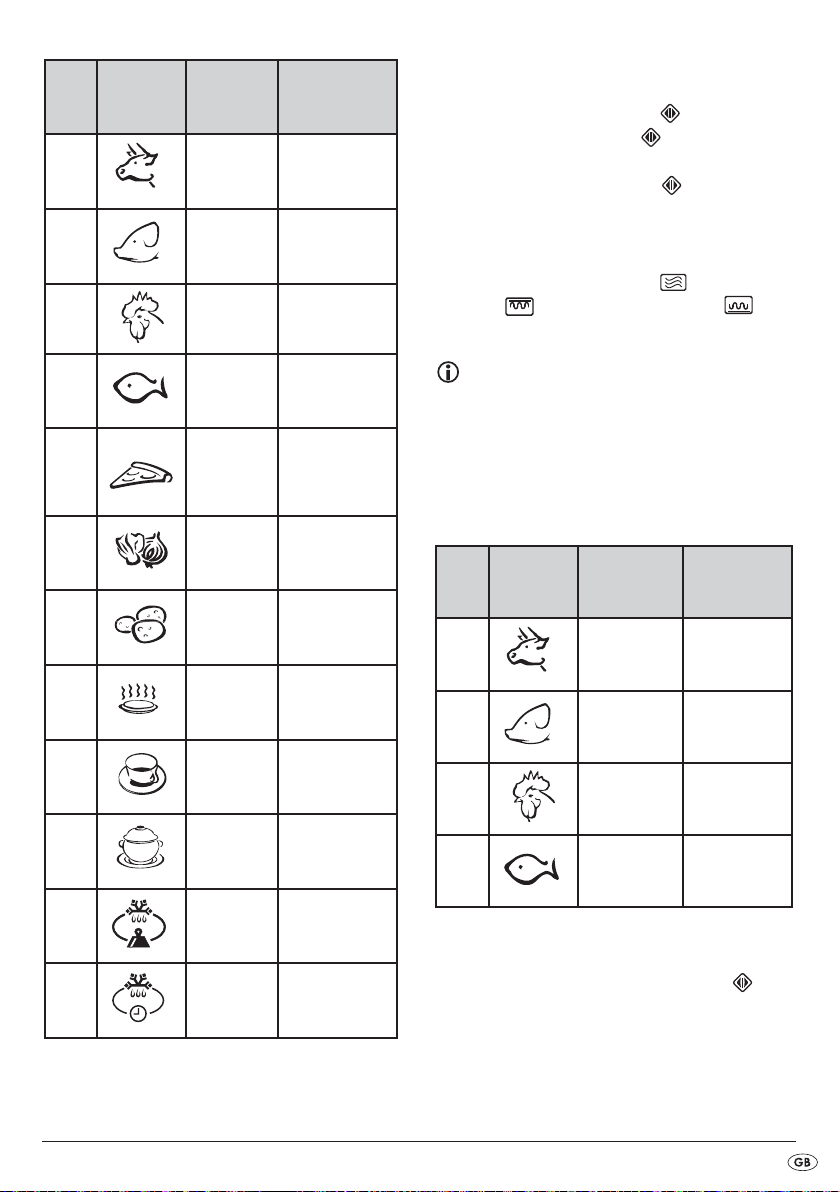
Dis-
Symbol Food Weight
play
A-01 Beef 200 - 1400 g
A-02 Pork 200 - 1400 g
A-03 Poultry 400 - 1400 g
2. Confirm your selection by pressing the
Start/quick start button r .
3. Turn the rotary knob r to set the weight,
and then confirm this by pressing the
Start/quick start button r .
The cooking process starts. The symbols for the
cooking and grill functions that are being used for
the selected automatic programme appear on the
display 1. Microwave function , grill function
Top heat , grill function Bottom heat .
The calculated time starts running down.
A-04 Fish 200 - 1200 g
*P1 150-450 g
A-05 Pizza
A-06
A-07 Potatoes 100 - 800 g
A-08 Warming 300 - 700 g
A-09 Beverages 200 - 500 ml
A-10 Entrees 300 / 500 g
A-11
A-12
Fruit/
vegetables
Defrosting
by weight
Defrosting
by time
P2 150-450 g
P3 150-450 g
100 - 1000 g
-
-
Note:
To obtain uniform warming or cooking, some
foods should be turned after 2/3 of the cooking
process duration. The microwave automatically
stops after this time, 4 signal tones sound and
"Turn" appears in the display 1.
Dis-
Symbol Food
play
A-01 Beef
A-02 Pork
A-03 Poultry
A-04 Fish
• Turn the food over. Proceed cautiously with
food which may already be hot.
• Press the Start/quick start button r to
continue the cooking process.
Turn over
after...
2/3 of the
time
2/3 of the
time
2/3 of the
time
2/3 of the
time
*Please refer to the chapter entitled "Baking pizzas"
for more information on the pizza programme.
- 19 -
Page 23

Note:
If you do not want to turn the food, just wait for
the signal tones to stop. The appliance will automatically continue the cooking process. We recommend that you do turn the food. This will ensure
even cooking.
Note:
If the meal is not completely cooked after the
automatic menu has finished, proceed as follows:
• Use the cooking process stated in the table
for re-cooking. Start this process for a few minutes, and check the cooking result.
• When re-cooking a pizza using automatic
menu "P2", interrupt the cooking process by
pressing the Stop/child lock button as
soon as the pizza has been cooked enough.
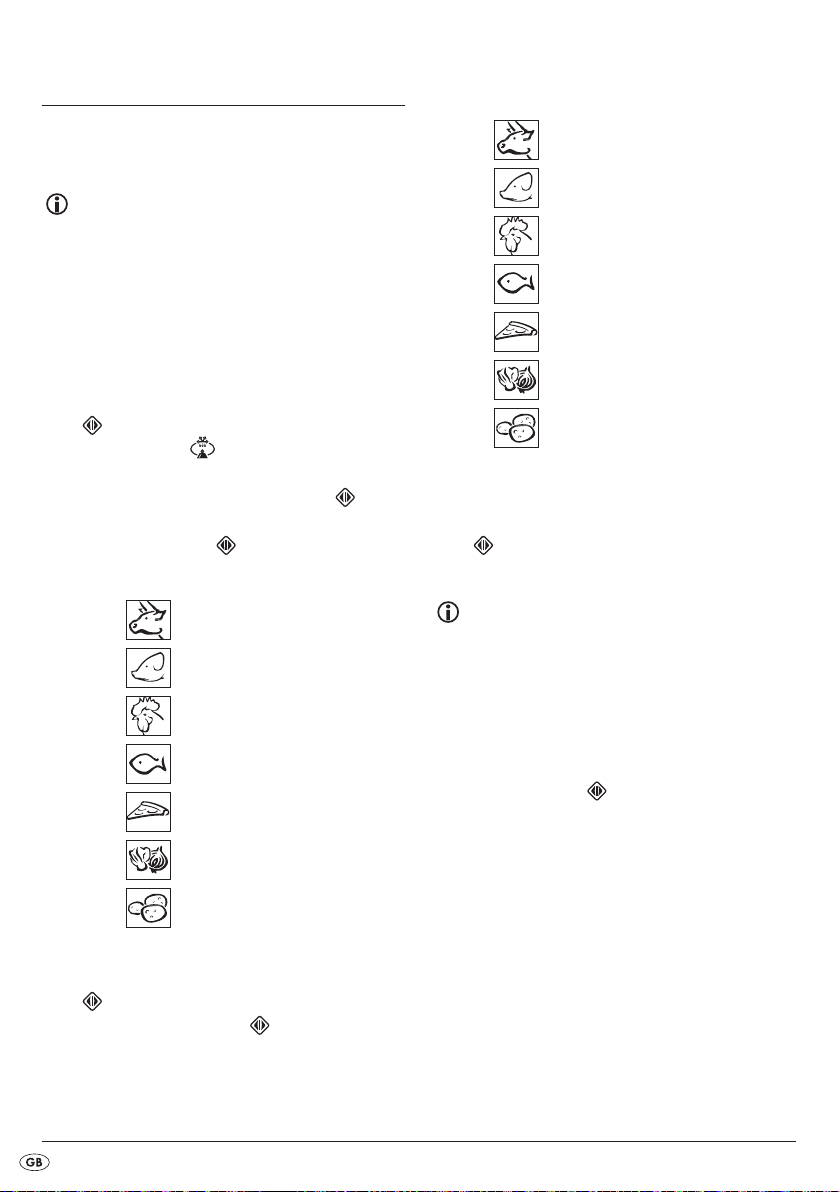
Dis-
Symbol Food
play
A-01 Beef
A-02 Pork
A-03 Poultry
A-04 Fish
A-05 Pizza
A-06
Fruit/
vegetables
Re-cook
with ...
"Grill" combina-
tion cooking
process - C 3
"Grill" combina-
tion cooking
process - C 3
"Grill" combina-
tion cooking
process - C 3
"Grill" combina-
tion cooking
process - C 3
"Pizza" auto-
matic menu - P2
Microwave
operation with
900 W power
Microwave
A-07
A-08
A-09 Beverages
A-10 Entrees
A-11
A-12
Potatoes
Warming
Defrosting
by weight
Defrosting
by time
operation with
900 W power
Microwave
operation with
900 W power
Microwave
operation with
900 W power
Microwave
operation with
900 W power
Microwave
operation with
100 W power
Microwave
operation with
100 W power
Risk of injury!
The turntable 3 is always very hot after a cooking process using the grill! You should therefore
always use an oven cloth or heat-resistant oven
gloves when removing it from the cooking compartment.
Note:
Please note that the size, shape and the type of
foodstuff determines the result of the cooking
process.
Example 1:
Proceed as follows to cook 400 g vegetables or fruit:
1. Turn the rotary knob r to the left (when
in standby mode) until "A-06" appears in the
display 1 and then confirm your selection by
pressing the Start/quick start button r .
2. Now set a weight of "400" using the rotary
knob r .
- 20 -
Page 24
3. Press the Start/quick start button r to
start the cooking process.
Example 2:
To heat 300 ml water, proceed as follows:
1. Turn the rotary knob r to the left (when
in standby mode) until "A-09" appears in the
display 1 and then confirm your selection by
pressing the Start/quick start button r .
2. Now set a weight of "300" using the rotary
knob r .
3. Press the Start/quick start button r to
start the cooking process.
Example 3:
To heat 300 g of appetizers, proceed as follows:
1. Turn the rotary knob r to the left (when
in standby mode) until "A-10" appears in the
display 1 and then confirm your selection by
pressing the Start/quick start button r .
2. Since "300" is always the first selection in the
display 1, press the Start/quick start button
r to start the cooking process.
Baking pizza
With the automatic programme "Pizza" you can
prepare delicious pizzas in the microwave. In this
case you can select between pizza programmes "P-01"
(deep-frozen pizza), "P-02" (refrigerated pizza) and
"P-03" (fresh pizza).
1. Turn the rotary knob r slowly to the left
(when in standby mode) until "A-05" appears
in the display 1.
2. Press the Start/quick start button r .
3. Now set the required pizza programme using
the rotary knob r :
• "P-01" for deep-frozen pizza, temperature
approx. -18°, weight 150g–450g ("P-01"
appears in the display 1).
• "P-02" for refrigerated pizza, temperature
approx. 5°, weight 150g–450g ("P-02"
appears in the display 1).
• "P-03" for fresh pizza, temperature approx.
20°, weight 150g–450g ("P-03" appears
in the display 1).
4. Confirm your selection by pressing the
Start/quick start button r .
5. Turn the rotary knob r to set the required
weight, and then confirm this by pressing the
Start/quick start button r .
The cooking process starts.
Note:
If you are cooking pizza, you can place this directly
on the turntable 3. It will be very crispy. Ensure
that the edge of the pizza does not extend up to the
walls of the cooking compartment during cooking.
Example:
Proceed as follows to cook a deep-frozen pizza
weighing 450 g:
1. Turn the rotary knob r slowly to the left
(when in standby mode) until "A-05" appears
in the display 1.
2. Press the Start/quick start button r .
3. Now set the programme "P-01" using the
rotary knob r :
4. Press the Start/quick start button r .
5. Now set a weight of "450" using the rotary
knob r .
6. Press the Start/quick start button r to
start the cooking process. The appliance
calculates the time required automatically.
- 21 -
Page 25
Defrosting
Defrosting by weight
Note:
Always place the food to be defrosted on dishes
suitable for use in a microwave oven. Never place
it directly on the turntable 3!
The following weights can be set:
"d-01"/ / "beef" 100 - 1800g
"d-02"/ / "pork" 100 - 1800g
"d-03"/ / "poultry" 100 - 1800g
"d-04"/ / "fish" 100 - 1800g
You can use this function to defrost. The defrosting
time and the power level are calculated and set
automatically once you have entered the weight.
1. When in standby mode, turn the rotary knob r
anticlockwise until "A-11" appears in the
display 1 and flashes (see chapter
"Automatic menu").
2. Press the Start/quick start button r .
3. Now select the food to be defrosted by turning
the rotary knob r .
The following appears in the display 1 :
"d-01" and for "beef"
"d-02" and for "pork"
"d-03" and for "poultry"
"d-04" and for "fish"
"d-05" and for "pizza"
"d-06" and for "fruit/vegetables"
"d-07" and for "potatoes"
4. When the required food appears in the dis-
play 1, press the Start/quick start button r
.
5. Turn the rotary knob r to set the weight.
"d-05"/ / "pizza" 100 - 900g
"d-06"/ /"fruit/vegetables " 100 - 900g
"d-07"/ / "potatoes" 100 - 900g
5. When the required weight appears in the display 1, press the Start/quick start button r
. The appliance will then automatically
calculate the required defrosting time.
Note:
To ensure optimum defrosting, it is necessary to
turn the food during the defrosting process. The
appliance will remind you to turn the food over
by sounding a signal tone and showing "turn" in
the display 1. Open the appliance door, turn the
food and then reclose the door. Press the Start/
quick start button r to continue the defrosting
process.
If you do not want to turn the food, just wait for
the signal tones to stop. The appliance will automatically continue the defrosting process. We recommend that you do turn the food. This will ensure
even defrosting.
- 22 -
Page 26
Defrosting by time
Note:
Always place the food to be defrosted on dishes
suitable for use in a microwave oven. Never place
it directly on the turntable 3!
1. When in standby mode, turn the rotary knob r
anticlockwise until 1 "A-12" and
appear in the display.
2. Press the Start/quick start button r .
3. Now set the required time using the rotary
knob r.
4. Press the Start/quick start button r to
start the defrosting process. The countdown
begins.
Note:
To ensure optimum defrosting, it is necessary to
turn the food during the defrosting process. The appliance will remind you to turn the food over by
sounding a signal tone and showing "turn" in the
display 1. Open the appliance door, turn the
food and then reclose the door. Press the Start/
quick start button r to continue the defrosting process.
If you do not want to turn the food, just wait for
the signal tones to stop. The appliance will automatically continue the defrosting process. We recommend that you do turn the food. This will ensure
an even defrosting.
Recipes
Meat patty
• Use around 125 g of minced beef to form
each patty (diameter approx. 75 mm, height
approx. 35mm).
• Distribute the patties evenly around the
turntable 3.
Preparation
You will achieve the best results if you alternate
between the convection and microwave functions.
Always wait until the set cooking process has completed before setting the next process.
1. Convection 200°C, 4:00 min.
2. Microwave 900 W power, 5:30 min.
3. Convection 200°C, 2:00 min.
(depending on personal taste, a time of up to
4:00 min can also be used).
Baking frozen ready-made bread rolls
• Select the convection function to bake bread
rolls.
• Place 3-4 bread rolls on the turntable 3.
Pre-heating of the microwave is not required.
Select the following settings for the baking process:
• Convection 170°C, duration: 12 minutes
If you wish to bake additional rolls directly afterwards, shorten the baking time for these by about
1-2 minutes, as the appliance is now already preheated.
- 23 -
Page 27

Potato gratin
Ingredients
• 750 g waxy potatoes, peeled
• 300 g cream
• 100 g grated cheese with a fat content of 25%
to 30 % fat in dry matter.
• Spices to taste (e.g., salt/pepper)
Use a microwave-proof, round dish with a lid, height
5-6 cm and a diameter of about 22 cm.
Preparation
• Cut the potatoes into slices around 3 - 4 mm
thick.
• Place around half of the potato slices in the
baking dish in "roofing tile" formation.
• Sprinkle the potatoes with around half of the
cheese.
• Add half of the spices in addition to approx.
150 g of cream.
• Now place the rest of the potato slices in
"roofing tile" formation over the first layer.
• Sprinkle the rest of the cheese over the potatoes
and pour the rest of the cream over this.
• Sprinkle the remaining spices over the gratin.
• Cover the dish with the cover and place it in
the centre of the turntable 3.
Preparation
You will achieve the best results if you alternate
between the convection and microwave functions.
Always wait until the set cooking process has completed before setting the next process.
1. Microwave 900 W power, 10:00 min.
2. Convection 200°C, 13:00 min.
3. Microwave 900 W power, 10:00 min.
Muffins
Ingredients
This recipe yields 10 to 20 muffins.
• Baking margarine (80% fat content) or salted
butter
• 170 g granulated sugar (up to 0.3 mm grain
size)
• 3 eggs (55-60 g with shell/Size M)
• 225 g wheat flour
• 7 g baking powder
• 0,25 g salt
Preparation
• Mix all ingredients well.
• Fill the muffin pastry into commercial paper baking
cases (diameter 45 mm, height 28 mm)
• Preheat the oven with the convection function to
170°C.
Note
:
Should, due to the number of muffins,
multiple baking operations be necessary,
preheating is required only once.
• Distribute the muffins evenly on the turntable 3.
• Select the following settings for the baking
process:
Convection 170°C, Duration: 12 Minutes
Pre-heating is not required.
- 24 -
Page 28

Courgette soup
Ingredients
• 1 courgette (approx. 250 g)
• 80 ml water
• 2 teaspoons of powdered vegetable stock
• Approx. 150 g processed cheese (with herbs)
• 100 ml cream
Preparation
• Finely dice the courgette.
• Place the diced courgette, water and the powdered vegetable stock into a suitable microwaveable
container.
• Start microwave cooking at 700 watts for about
6 minutes.
• Add the processed cheese and cream.
• Start microwaving again for 10 minutes at 600
watts.
Note
:
You could blend the soup with a hand blender
before serving to get a creamy consistence.
Choco-apple cake
Ingredients
• 125 g butter
• 125 g sugar
• 1 packet of vanilla sugar
• 2 eggs
• 125 g flour
• 2 tbsp. cocoa powder
• 1/2 packet of baking powder
• 1 apple
• a little icing sugar
Preparation
• Mix the sugar, softened butter, vanilla sugar,
eggs, flour, baking powder and cocoa powder
to make a dough.
• Peel and core the apple. Chop the apple into
small pieces.
• Fold the apple pieces into the dough.
• Put the dough into a microwaveable dish.
• Cook the cake at 900 watt for approx. 9 minutes in the microwave.
• Allow the cake to cool a bit after cooking before
knocking out of the form.
• Sprinkle a little icing sugar over the cake.
- 25 -
Note
:
The cooking time can vary depending on the
shape.
Page 29
Meat loaf
Ingredients
• 500 g minced meat (half and half)
• 1/2 onion
• 1 egg
• 1/2 bread roll
• Salt, pepper, paprika powder
For the sauce:
• 75 ml water
• 1 tablespoon of mustard
• 2 tablespoons of tomato ketchup
• 2 tablespoons of gravy
• Nutmeg, parsley, paprika powder
• Add a little sauce thickener
Preparation
• Soften the bread in a little water.
• Finely dice the onion.
• Mix the mince, onion, eggs, softened bread to
make a meat loaf dough and season with salt
and pepper.
• Form a meat loaf and place it in a microwaveable dish, sprinkle the meatloaf with paprika powder and cover the dish.
• Cook the meat loaf for about 18–22 minutes at
700 watts.
• After cooking, remove 2 tbsp. of stock and mix it
with the water, tomato ketchup and mustard to
make a gravy.
• Pour the gravy over the meat loaf and cook without a lid using the grill combination 1 (C 1) for
about 10 minutes.
• If necessary, add a little sauce thickener to the
gravy.
Note:
The cooking time can vary depending on the
shape of the meat loaf.
Cleaning and Care
Risk of injury!
Before cleaning, switch the microwave oven off
and remove the plug from the mains power socket. Otherwise, there is the great risk of receiving
an electric shock!
UNDER NO CIRCUMSTANCES should you
immerse the appliance in water or other liquids.
This could result in you receiving a fatal electric
shock and the appliance could be damaged.
• Always keep the interior of the microwave
oven clean.
• If splashes of food or spilt liquids stick to the
walls of the microwave, wipe them off with a
damp cloth.
• Use a mild detergent if the microwave is more
heavily soiled.
• Avoid using cleaning sprays and other aggressive cleaning agents, as they can cause stains,
stripes or a blurring of the door surface. Clean
the external walls with a damp cloth.
• To avoid damage to the functional components
in the interior of the microwave, do not let liquids
to seep in through the ventilation slits 5.
• Regularly remove splashes or contaminants. Clean the door, both sides of the viewing window,
door seals and adjacent components with a
damp cloth. Do not use abrasive cleaning
agents.
• Should steam collect on or around the outside
of the appliance door, wipe it off with a soft
towel. This can happen if the microwave is
operated in extremely humid conditions.
- 26 -
Page 30

• Clean the turntable 3 regularly. Clean the
plate in warm soapy water.
• Clean the grill stand t in warm dishwater and
dry it well.
• Regularly eliminate odours. Place a deep microwave bowl with a cup of water and the juice
and peel of a lemon into the microwave oven.
Heat it up for 5 minutes. Wipe off thoroughly
and rub dry with a cloth.
• Should replacement of the bulb in the microwave be necessary, arrange for it to be exchanged by a dealer or consult our Service
Department.
Troubleshooting
The turntable 3 generates loud noise when
revolving.
• The turntable 3 is not correctly positioned on
the axle. Insert the turntable 3 correctly into
the cooking area.
• The small rollers 4 and/or the floor of the
cooking area are unclean. Clean the rollers 4
and the floor of the cooking area.
The display 1 indicates "E01" and signal tones
sound.
• The microwave is overheated. Terminate the
current programme immediately. Remove the
plug from the mains power socket, open the
microwave door and allow the appliance to
cool down.
The display 1 indicates nothing.
• The plug is not inserted into a power socket.
Check the plug.
• The mains power socket is defective.
Try another mains power socket.
• The display 1 is defective. Contact our
Customer Services Department.
The appliance does not respond to pressing
the buttons.
• The Child safety facility is activated. Deactivate
the Child safety facility (see chapter "Operation“).
The appliance does not start the cooking/
warming process.
• The door is not properly closed. Close the
door correctly.
The display 1 indicates "E02" and signal tones
sound.
• There is an error on the sensor. Interrupt the
programme and let the appliance cool down.
Then restart the microwave. If the error occurs
again, contact Customer Support.
• There is an error during the heating up of the
appliance. Interrupt the programme and let the
appliance cool down. Then restart the microwave. If the error occurs again, contact Customer
Support.
The display 1 indicates "E03" and signal tones
sound.
• Due to a short circuit or open circuit voltage,
the microwave has switched into fault protection. Stop the programme and remove the
power plug. If possible, eliminate the problem,
e.g. metals in the cooking area, which can
lead to the above problem when using the
microwave function. Otherwise, please contact
our Customer Support.
- 27 -
Page 31

The light in the interior of the microwave is not
working.
• The light bulb is possibly defective. Contact the
Customer Service department.
There is a risk of injury!
• Never try to replace the light bulb yourself.
Opening the appliance housing could cause
the release of microwave energy.
Disposal
Do not dispose of this appliance in your
normal domestic waste. This product is
subject to the provisions of European
Directive 2012/19/EU.
Dispose of the appliance through an approved disposal centre or at your community waste facility.
Observe the currently applicable regulations.
In case of doubt, please
contact your waste disposal centre.
The warranty covers only claims for material and
manufacturing defects, not for transport damages,
worn parts or for damage to fragile components,
e.g. buttons or batteries. This product is for private
use only and is not intended for commercial applications.
In the event of misuse and improper handling, use
of force and interference not carried out by our
authorized service branch, the warranty will become void. Your statutory rights are not restricted
in any way by this warranty.
The warranty period is not extended by repairs effected under warranty. This applies also to replaced
and repaired parts. Damages or defects discovered
after purchase are to be reported directly after unpacking, at the latest two days after the purchase
date. Repairs carried out after lapse of the warranty
period are subject to charge.
Service Great Britain
Tel.: 0871 5000 720 (£ 0.10/Min.)
E-Mail: kompernass@lidl.co.uk
IAN 107212
Dispose of all packaging materials in an environmentally friendly manner.
Warranty and Service
You receive a 3-year warranty for this appliance
as of the purchase date. This appliance has been
manufactured with care and meticulously examined
before delivery.
Please retain your receipt as proof of purchase. In
the case of a warranty claim, please make contact
by telephone with our service department. Only in
this way can a post-free despatch for your goods
be assured.
Service Ireland
Tel.: 1890 930 034
(0,08 EUR/Min., (peak))
(0,06 EUR/Min., (off peak))
E-Mail: kompernass@lidl.ie
IAN 107212
Hotline availability:
Monday to Friday 08:00 - 20:00 (CET)
Importer
KOMPERNASS HANDELS GMBH
BURGSTRASSE 21
44867 BOCHUM
GERMANY
www.kompernass.com
- 28 -
Page 32

SOMMAIRE PAGE
Introduction 31
Usage conforme 31
Etendue de la livraison 31
Description de l'appareil 31
Caractéristiques techniques 31
Consignes de sécurité importantes 32
Avant de commencer 38
Principes fondamentaux lors de la cuisson au micro-ondes . . . . . . . . . . . . . . . . . . . . . . . . .38
Utiliser de la vaisselle de cuisson appropriée . . . . . . . . . . . . . . . . . . . . . . . . . . . . . . . . . . . .38
Première mise en service 39
Installer l'appareil . . . . . . . . . . . . . . . . . . . . . . . . . . . . . . . . . . . . . . . . . . . . . . . . . . . . . . . . . .39
Préparez l'appareil . . . . . . . . . . . . . . . . . . . . . . . . . . . . . . . . . . . . . . . . . . . . . . . . . . . . . . . . .39
Mettre en place le plateau rotatif . . . . . . . . . . . . . . . . . . . . . . . . . . . . . . . . . . . . . . . . . . . . .40
Opération 40
Réglage de l'heure . . . . . . . . . . . . . . . . . . . . . . . . . . . . . . . . . . . . . . . . . . . . . . . . . . . . . . . . .40
Mode veille . . . . . . . . . . . . . . . . . . . . . . . . . . . . . . . . . . . . . . . . . . . . . . . . . . . . . . . . . . . . . . .41
Régler la minuterie . . . . . . . . . . . . . . . . . . . . . . . . . . . . . . . . . . . . . . . . . . . . . . . . . . . . . . . . .41
Sécurité enfant . . . . . . . . . . . . . . . . . . . . . . . . . . . . . . . . . . . . . . . . . . . . . . . . . . . . . . . . . . . .41
Fonctions d'affichage . . . . . . . . . . . . . . . . . . . . . . . . . . . . . . . . . . . . . . . . . . . . . . . . . . . . . . .41
Interrompre/annuler des procédures de décongélation ou de cuisson . . . . . . . . . . . . . . . .42
Cuisson 42
Mode micro-ondes . . . . . . . . . . . . . . . . . . . . . . . . . . . . . . . . . . . . . . . . . . . . . . . . . . . . . . . . .42
Fonction grill . . . . . . . . . . . . . . . . . . . . . . . . . . . . . . . . . . . . . . . . . . . . . . . . . . . . . . . . . . . . . .43
Mode de cuisson combinée "grill" . . . . . . . . . . . . . . . . . . . . . . . . . . . . . . . . . . . . . . . . . . . . .44
Mode air chaud . . . . . . . . . . . . . . . . . . . . . . . . . . . . . . . . . . . . . . . . . . . . . . . . . . . . . . . . . . .45
Mode air chaud avec préchauffage . . . . . . . . . . . . . . . . . . . . . . . . . . . . . . . . . . . . . . . . . . .45
Mode de cuisson "air chaud" combiné . . . . . . . . . . . . . . . . . . . . . . . . . . . . . . . . . . . . . . . . .46
Menu automatique 46
Démarrer le menu automatique . . . . . . . . . . . . . . . . . . . . . . . . . . . . . . . . . . . . . . . . . . . . . . .46
Cuisson de pizza . . . . . . . . . . . . . . . . . . . . . . . . . . . . . . . . . . . . . . . . . . . . . . . . . . . . . . . . . .49
Décongeler 50
Décongélation selon le poids . . . . . . . . . . . . . . . . . . . . . . . . . . . . . . . . . . . . . . . . . . . . . . . . .50
Décongélation selon la durée . . . . . . . . . . . . . . . . . . . . . . . . . . . . . . . . . . . . . . . . . . . . . . . .51
- 29 -
Page 33

Recettes 51
Boulettes de viande . . . . . . . . . . . . . . . . . . . . . . . . . . . . . . . . . . . . . . . . . . . . . . . . . . . . . . . . .51
Décongélation de petits pains congelés . . . . . . . . . . . . . . . . . . . . . . . . . . . . . . . . . . . . . . . .51
Gratin de pommes de terre . . . . . . . . . . . . . . . . . . . . . . . . . . . . . . . . . . . . . . . . . . . . . . . . . .52
Muffins . . . . . . . . . . . . . . . . . . . . . . . . . . . . . . . . . . . . . . . . . . . . . . . . . . . . . . . . . . . . . . . . . . .52
Soupe aux courgettes . . . . . . . . . . . . . . . . . . . . . . . . . . . . . . . . . . . . . . . . . . . . . . . . . . . . . . .53
Gâteau au chocolat et aux pommes . . . . . . . . . . . . . . . . . . . . . . . . . . . . . . . . . . . . . . . . . . .53
Rôti de viande hachée . . . . . . . . . . . . . . . . . . . . . . . . . . . . . . . . . . . . . . . . . . . . . . . . . . . . . .54
Nettoyage et entretien 54
Dépannage 55
Mise au rebut 56
Garantie et service après-vente 56
Importateur 56
- 30 -
Page 34

Four à micro-ondes
en acier inox
Introduction
Toutes nos félicitations pour l'achat de votre nouvel
appareil.
Ainsi, vous venez d'opter pour un produit de grande
qualité. Le mode d'emploi fait partie de ce produit.
Il contient des remarques importantes concernant la
sécurité, l'usage et la mise au rebut. Avant d'utiliser
le produit, veuillez vous familiariser avec toutes les
consignes d'utilisation et de sécurité. N'utilisez le
produit que conformément aux consignes et pour
les domaines d'utilisation prévus. Si vous cédez le
produit à un tiers, remettez-lui également tous les
documents.
Usage conforme
Description de l'appareil
Figure A :
1 Ecran
2 Touche ouverture de porte
3 Plateau rotatif
4 Roulettes
5 Sorties d'air
Figure B :
6 Touche micro-ondes
7 Touche grill
8 Touche combinée micro-ondes - grill
9 Touche combinée micro-ondes - air chaud
0 Touche air chaud
q Touche horloge
w Touche TIMER (minuterie)
e Touche arrêt/sécurité enfant
r Sélecteur rotatif/ Touche Start/Démarrage
immédiat
Cet appareil est prévu pour le réchauffement et la
préparation de denrées alimentaires selon les procédures décrites.
Chaque modification réalisée sur l'appareil est
considérée comme non conforme et présente des
risques d'accident. Le fabricant décline toute responsabilité pour des dommages résultant d'une
utilisation non conforme.
Cet appareil est exclusivement réservé à une utilisation dans un cadre domestique.
Ne pas l'utiliser dans un cadre professionnel, pour des
opérations de caractère industriel ou en laboratoire !
Etendue de la livraison
Four à micro-ondes en acier inox
Plateau rotatif
Grille
Mode d'emploi
Brève information (2 pièces)
Figure C :
t Grille
Caractéristiques techniques
Tension nominale : 230 - 240 V
50 Hz
Puissance absorbée maximum
Micro-ondes : 1400 W
Grill : 1500 W
Air chaud : 1950 W
Puissance maximale délivrée
Micro-ondes : 900 W +/- 10%
Fréquence du micro-ondes : 2450 MHz
- 31 -
~
Page 35

Consignes de sécurité importantes
Lire attentivement le mode d'emploi avant la première utilisation et le conserver pour une utilisation ultérieure.
Danger ! / Risque de blessures !
Avertissement à l'encontre de blessures et d'un choc électrique !
Risque d'incendie !
Avertissement face au risque d'incendie.
Attention !
Avertissements pour la prévention d'endommagements sur l'appareil.
Remarque !
Remarques et conseils pour la manipulation du micro-ondes.
Mesures de précaution pour éviter un contact éventuellement trop important
avec l'énergie du micro-ondes
• N'essayez pas de faire fonctionner l'appareil avec la porte ouverte, étant
donné que le fonctionnement avec la porte ouverte peut conduire au contact
avec une dose nocive de rayons micro-ondes. A cet égard, il est également
important de ne pas forcer les verrouillages de sécurité ou de les manipuler.
• Ne mettez rien entre l'avant de l'appareil et la porte et assurez-vous qu'aucune
salissure ou résidu de détergent ne s'accumule sur les joints.
Danger !
• Ne plongez jamais le cordon d'alimentation ou la fiche secteur dans de
l'eau ou d'autres liquides.
• Tenez le cordon d'alimentation à l'écart de sources de chaleur. Ne le faites
pas passer devant la porte du micro-ondes. La chaleur risque d'endommager
le cordon.
• Ne versez jamais de liquides dans les ouvertures d'aération ou les fermetures de
sécurité. Si toutefois, un liquide devait quand même y pénétrer, éteignez aussitôt le micro-ondes et retirez la fiche secteur de la prise secteur. Faites contrôler
le micro-ondes par des techniciens qualifiés.
- 32 -
Page 36

Risque d'accident !
• Si la porte ou les joints de portes sont endommagés, arrêtez aussitôt d'opérer le
micro-ondes. Faites-le immédiatement réparer par du personnel qualifié.
• N'essayez jamais de réparer l'appareil par vos propres soins. En retirant le
boîtier, vous pouvez libérer de l'énergie micro-ondes. Confiez les réparations
exclusivement à des spécialistes qualifiés.
• Les enfants à partir de l'âge de 8 ans ou les personnes souffrant d'un handicap
physique ou psychomoteur ou encore les personnes souffrant de déficiences
mentales ou d'un manque de connaissances et d'expérience, doivent toujours
rester sous la surveillance d'un adulte s'ils utilisent cet appareil, même si
l'usage de l'appareil leur a été expliqué et si elles sont conscientes des dangers résultants.
• Ne pas laisser les enfants jouer avec l'appareil.
• Ne pas laisser un enfant nettoyer cet appareil, même au dessus de l'âge de 8
ans et même sous la surveillance d'un adulte.
• Les enfants âgés de moins de 8 ans doivent être tenus hors de portée de
l'appareil et de son cordon d'alimentation.
• Utilisez cet appareil uniquement dans le cadre de la finalité prévue selon la des-
cription mentionnée dans ce manuel. N'utilisez pas de vapeurs ou des produits
chimiques corrosifs dans cet appareil. Ce micro-ondes est spécialement prévu
pour réchauffer, cuire et faire griller, ou pour sécher des denrées alimentaires.
Il n'est pas conçu pour une utilisation dans le milieu laboratoire ou industriel.
• N'opérez pas le micro-ondes lorsque le cordon d'alimentation/la fiche secteur
sont endommagés. Faites remplacer le cordon d'alimentation/la fiche secteur
par des techniciens spécialisés qualifiés, afin d'éviter tout danger.
• MISE EN GARDE: Si l'appareil fonctionne en mode combiné, il est recommandé
que les enfants n'utilisent le four que sous la surveillance d'adultes en raison
des températures générées.
• Ne retirez jamais le boîtier du micro-ondes.
• Faites remplacer la lampe à l'intérieur du micro-ondes par des techniciens
qualifiés uniquement.
• Ne touchez jamais la porte du micro-ondes, le boîtier, les ouvertures
d'aération, les accessoires ou les couverts juste après le fonctionnement du mode
grill, de la cuisson combinée ou du menu automatique. Ces pièces deviennent
brûlantes. Laissez ces pièces refroidir avant de les nettoyer.
- 33 -
Page 37

• Veillez à ce que la fiche secteur soit toujours facilement accessible, afin que vous
puissiez aisément le débrancher de l'alimentation électrique en cas d'urgence.
• Il est recommandé aux porteurs de stimulateurs cardiaques de s'informer auprès
de leur médecin sur les risques éventuels avant d'utiliser le micro-ondes.
• Ne laissez jamais traîner le cordon d'alimentation sur la table ou le plan de
travail. Les enfants pourraient le tirer.
• Ouvrez toujours les boîtes, les sachets de pop-corn, etc. après la cuisson en orientant
l'ouverture loin de votre corps. La vapeur qui s'échappe peut causer des brûlures.
• Ne vous placez jamais directement devant le micro-ondes lorsque vous ouvrez
la porte. La vapeur qui s'échappe peut causer des brûlures.
• Ne réalisez pas de fritures dans le micro-ondes. De l'huile très chaude peut
endommager les pièces de l'appareil et les ustensiles, voire même causer des
brûlures cutanées.
• Agitez et remuez systématiquement les biberons en verre ou plastique réchauffés !
Le contenu peut avoir été réchauffé de manière irrégulière et le bébé peut se
brûler avec le contenu. Contrôlez en tous cas la température avant de nourrir
votre enfant !
• Ne modifiez pas la construction du micro-ondes.
• Les rayons micro-ondes sont dangereux ! Les travaux de maintenance ou de ré-
paration nécessitant la dépose des capots destinés à protéger du contact avec
les rayons micro-ondes doivent être exécutés uniquement par des techniciens
spécialisés compétents.
• Avant toute consommation, contrôlez la température pour éviter toutes brûlures
qui pourraient s'avérer mortelles pour les bébés. Les ustensiles de cuisson
peuvent devenir très chauds en raison de la chaleur transmise par les denrées
alimentaires réchauffées, ce qui empêche de les saisir à mains nues. Utilisez
impérativement une manique. Assurez-vous que les ustensiles de cuisson sont
bien adaptés au micro-ondes.
Attention, surface chaude !
Risque d'incendie !
• Ne laissez pas le micro-ondes sans surveillance lorsque vous chauffez des
aliments dans des emballages en plastique ou en papier.
• Ne placez pas de matériaux inflammables à proximité du micro-ondes ou des
ouvertures d'aération.
- 34 -
Page 38

• Enlevez toutes les fermetures métalliques présentes sur l'emballage des
aliments à chauffer. Risque d'incendie !
• Pour la préparation du popcorn, utilisez uniquement des sachets de popcorn
allant au micro-ondes.
• N'utilisez pas le micro-ondes pour réchauffer des coussins remplis de graines,
de noyaux de cerise ou de gel. Risque d'incendie !
• N'utilisez pas le micro-ondes pour stocker des aliments ou d'autres choses.
• Ne dépassez jamais les temps de cuisson pré-conisés par le fabricant.
• Ne posez pas d'objets sur le micro-ondes, lorsque celui-ci est en opération.
Les ouvertures d'aération seraient recouvertes !
• Ne placez pas le micro-ondes à proximité d'autres appareils diffusant de la
chaleur tel qu'un four.
• Nettoyez soigneusement le micro-ondes après avoir chauffé des plats conte-
nant des matières grasses, en particulier s'ils n'étaient pas recouverts. Laissez
l'appareil refroidir complètement avant de le nettoyer. Il ne doit
rester aucun résidu, de graisse notamment, sur les éléments chauffants du grill.
Celui-ci pourrait surchauffer et s'enflammer.
• Ne décongelez pas de la graisse ou de l'huile congelée dans le micro-ondes.
La graisse ou l'huile risque de s'enflammer.
• N'utilisez pas de minuterie externe ou système de commande à distance sépa-
ré pour opérer l'appareil.
• Le four à micro-ondes est prévu pour chauffer des denrées alimentaires et
des boissons. Le séchage de denrées alimentaires ou de linge et le chauffage
de coussins chauffants, pantoufles, éponges, linge humide et autres articles
similaires peuvent entraîner des risques de blessures, d'inflammation ou de feu.
• Il faudrait régulièrement nettoyer l'appareil de cuisson et supprimer les restes
d'aliments.
Attention ! Risque d'endommager l'appareil !
• Ne faites jamais fonctionner le micro-ondes lorsqu'il est vide.
L'exception est constituée par la première mise en service (voir le chapitre
«Première mise service»), au cours de laquelle le micro-ondes peut être
brièvement opéré vide en mode d'opération «Grill».
- 35 -
Page 39

• N'insérez pas d'objets dans les ouvertures d'aération ou les verrouillages de
sécurité de la porte.
• N'utilisez pas d'ustensiles métalliques : ceux-ci réfléchissent les micro-ondes et
créent des étincelles. Ne placez pas de boîte en tôle dans le micro-ondes.
• Ne placez pas de récipient en plastique dans le micro-ondes immédiatement
après avoir utilisé le mode grill, cuisson combinée ou le menu automatique.
Le plastique risque de fondre.
• Le micro-ondes ne doit pas être utilisé dans des locaux très humides ou dans
lesquels l'humidité se concentre.
• Des liquides et autres denrées alimentaires ne doivent pas être réchauffés dans
des récipients hermétiquement fermés étant donné que ces derniers peuvent
exploser et endommager l'appareil.
• Ne vous appuyez pas sur la porte du micro-ondes.
• Une mauvaise hygiène de l'appareil de cuisson peut entraîner la destruction
de la surface, ce qui influe d'une part sur la durée d'usage de l'appareil en
aboutissant éventuellement sur des situations dangereuses.
• Utilisez uniquement de la vaisselle adaptée à l'utilisation en micro-ondes.
Conseils de sécurité
• Afin de réduire le risque d'incendie dans le micro-ondes : conservez toujours le
micro-ondes à portée de vue lorsque vous réchauffez des denrées alimentaires
emballées dans des récipients en plastique ou en papier étant donné que les
matériaux peuvent éventuellement s'enflammer.
• Lors du réchauffement de boissons dans le micro-ondes, un bouillonnement retar-
dé peut se produire lorsque la boisson est portée à ébullition. Soyez donc très
prudent lorsque vous manipulez le récipient. Pour éviter toute ébullition soudaine :
– Placez si possible une baguette de verre dans le liquide pendant qu'il est
mis à chauffer.
– Laissez reposer le liquide pendant 20 secondes dans le micro-ondes après
l'avoir chauffé afin d'éviter la projection inattendue de gouttes de liquide.
• Piquez la peau des pommes de terre, des saucisses ou autres aliments afin
d'éviter qu'elles n'éclat.
• Soyez très prudent lorsque vous chauffez des liquides. N'utilisez que des réci-
pients ouverts afin de permettre aux bulles d'air qui se forment de s'échapper.
• Si l'appareil émet de la fumée, éteindre l'appareil ou le débrancher et garder
la porte fermée pour étouffer les flammes éventuelles.
- 36 -
Page 40

• Les œufs à la coque et les œufs durs ne doivent pas être chauffés au micro-ondes
car ils risquent d'exploser même après réchauffement au micro-ondes. Des
denrées alimentaires avec une peau dure, comme des pommes de terre, des
citrouilles entières, des pommes ou des châtaignes doivent être piquées avant
d'être réchauffées.
• Ne déplacez pas le micro-ondes pendant qu'il fonctionne.
Indications relatives à la mise à la terre/installation conforme
Le présent appareil doit être mis à la terre. Cet appareil doit être raccordé à une
prise mise à la terre. Il est conseillé d'utiliser un circuit électrique propre qui est
uniquement destiné à alimenter le micro-ondes.
Danger : une manipulation non appropriée avec un connecteur de mise à la
terre peut entraîner un risque d'électrocution.
Remarque : si vous avez encore des questions concernant la mise à la terre
ou les instructions en matière de système électrique, demandez conseil à votre
spécialiste de maintenance ou à votre électricien.
Le fabricant et le distributeur n'endossent aucune responsabilité pour un endommagement du micro-ondes ou pour des atteintes à des personnes qui seraient à porter
au compte d'un non-respect des procédures pour le raccordement électrique.
Interférences chez d'autres appareils
La mise en service du micro-ondes peut causer des pannes sur votre radio, votre
téléviseur ou des appa-reils similaires.
Si de telles interférences devaient se produire, elles peuvent être diminuées ou
éliminées à l'aide des mesures suivantes :
• Nettoyage de la porte et des joints du micro-ondes.
• Nouvelle orientation de l'antenne de réception de la radio ou du téléviseur.
• Positionnement du micro-ondes à un autre endroit que celui où le récepteur
est placé.
• Eloignement du micro-ondes du récepteur.
• Branchement du micro-ondes dans une autre prise. Le micro-ondes et le récepteur devraient avoir recours à une section différente du circuit électrique.
- 37 -
Page 41

Avant de commencer
Principes fondamentaux lors de la
cuisson au micro-ondes
• Ordonnez les denrées alimentaires de manière
correcte.
• en plaçant notamment les portions les plus
épaisses aux bords.
• Veillez au temps de cuisson. Sélectionnez
le temps de cuisson le plus court indiqué et
prolongez ce dernier en cas de besoin.
Des denrées alimentaires cuites pendant trop
longtemps peuvent commencer à fumer ou à
s'enflammer.
• En cours de cuisson, recouvrez les plats avec
un couvercle spécialement adapté pour le
micro-ondes. Le couvercle empêche les éclaboussures et contribue également à la cuisson
uniforme des denrées.
• Pendant la préparation au micro-ondes, tournez
les denrées alimentaires une fois afin que les
plats comme le poulet ou les hamburgers soient
plus rapidement cuits dans leur intégralité.
• De gros morceaux comme un rôti doivent être
tournés au moins une fois.
• Après la moitié du temps de cuisson, il est recommandé de déplacer entièrement les denrées alimentaires comme des boulettes de viande par exemple. Tournez-les et déplacez les
boulettes du milieu de l'assiette vers le bord.
Utiliser de la vaisselle de cuisson
appropriée
• Le matériau idéal pour un four à micro-ondes
laisse passer les micro-ondes, laisse donc passer l'énergie à travers le récipient afin de réchauffer les denrées alimentaires.
Les micro-ondes ne sont pas en mesure de passer
à travers le métal. C'est la raison pour laquelle
aucun récipient et aucune vaisselle métallique
ne doivent être utilisés.
• N'utilisez pas de produits en papier recyclé pour
le réchauffement au micro-ondes. Ces derniers
peuvent contenir de minuscules fragments
métalliques pouvant générer des étincelles
et/ou des incendies.
• Il est plutôt recommandé d'utiliser de la vaisselle
ronde/ovale au lieu de la vaisselle rectangulaire/
longue étant donné que les denrées alimentaires
dans les coins peuvent facilement cuire trop.
La liste ci-après s'entend comme une assistance
globale pour le choix de la vaisselle correcte.
Vaisselle de
cuisson
Verre résistant à la
chaleur
Verre non
résistant à la
chaleur
Céramique
thermorésistante
Vaisselle en
plastique
adaptée au
micro-ondes
Essuie-tout Oui Non Non Non
Tablette/plaque métallique
Support gril Non Oui Oui Non
Film alu & récipient de
film
Microondes
Gril
Oui Oui Oui Oui
Non Non Non Non
Oui Oui Oui Oui
Oui Non Non Non
Non Oui Oui Non
Non Oui Oui Non
Air
chaud
Combinaison
- 38 -
Page 42

Risque d'incendie !
N'utilisez jamais le support gril ou d'autres objets
métalliques lorsque vous utilisez le micro-ondes en
mode micro-ondes ou en procédure de cuisson
combinée. Le métal reflète le rayonnement des microondes et entraîne ainsi la formation d'étincelles. Il
en peut en résulter un incendie et l'appareil peut
être endommagé de manière irréparable !
Première mise en service
Remarque concernant le
premier échauffement
N'opérez jamais le micro-ondes
vide en mode «Micro-ondes» !
Utilisez le micro-ondes exclusivement sans accessoires et aliments
lorsque vous le faites chauffer
pour la première fois dans le
mode d'opération «Grill» (Gr 3) !
(voir le chapitre Préparer l'appareil")
Installer l'appareil
Risque d'incendie !
Ce micro-ondes n'est pas adapté au montage
dans un placard de cuisine. En effet, dans les
armoires fermées, l'aération n'est pas suffisante.
L'appareil peut être endommagé et il y a un risque
d'incendie !
Attention :
Ne positionnez pas le micro-ondes au-dessus
d'une cuisinière ou d'un appareil générant de la
chaleur. Une installation à un tel endroit pourrait
provoquer des dégâts sur l'appareil et vous risquez
ainsi de perdre le bénéfice de la garantie.
• Choisissez une surface plane, qui laisse suffisamment d'espace pour assurer l'aération et
la ventilation de l'appareil :
Maintenez impérativement un écart minimum
de 10 cm entre l'appareil et les murs avoisinants. Assurez-vous que la porte du micro-ondes peut être ouverte sans problèmes.
Maintenez un écart d'au moins 20 cm audessus du micro-ondes.
• Assurez-vous que la fiche secteur soit toujours
aisément accessible afin de pouvoir y accéder
et la débrancher sans peine en cas de danger.
• Ne retirez pas les pieds sous l'appareil à micro-ondes.
• Ne bloquez pas les fentes d'aération 5. Autrement l'appareil risque d'être endommagé.
• Positionnez l'appareil le plus loin possible des
appareils radio et de télévision. Le fonctionnement du micro-ondes peut causer des interférences au niveau de la radio et du téléviseur.
Préparez l'appareil
• Eliminez le matériel d'emballage ainsi que le
film protecteur sur le panneau et la touche
d'ouverture de porte 2.
Ne retirez pas la plaque de recouvrement en mica, car elle sert de
protection aux tubes de champs
magnétiques dans l'espace de
cuisson.
- 39 -
Page 43

• Branchez la fiche secteur dans une prise secteur.
Utilisez une prise de courant de 230 - 240 V~,
50 Hz, avec un fusible 16 A. Il est recommandé
qu'un circuit électrique propre alimente le microondes. Si vous n'êtes pas sûr de la manière dont
vous souhaitez brancher le micro-ondes, faites
appel à un expert.
Avant de pouvoir l'utiliser, vous devez tout d'abord
réchauffer l'appareil à vide, afin de faire évaporer
tous les résidus liés à la fabrication.
Une fois que vous avez inséré la fiche dans la prise
de courant, ouvrez une fois la porte du micro-ondes
en appuyant sur la touche d'ouverture de porte 2.
Allumez l'appareil sans aliments et sans accessoires
(plateau rotatif 3 et grille t) en mode de service
grill :
Remarque concernant
le premier échauffement
• Appuyez sur la touche Start/démarrage immédiat r , pour démarrer le grill.
Remarque
En raison de résidus liés à la fabrication, la première mise en service peut entraîner la formation de légères odeurs et de fumée. Ceci est absolument inoffensif. Veillez à une aération suffisante. Ouvrez
par exemple une fenêtre.
• L'appareil s'arrête automatiquement au bout
de 5 minutes. Attendez que l'appareil se soit
entièrement éteint.
• Débranchez la fiche secteur de la prise de
courant et nettoyez ensuite l'intérieur de l'appareil avec un chiffon humide et essuyez-le avec
soin.
Mettre en place le plateau rotatif
• Placez le plateau rotatif 3 au centre de l'axe
dans l'espace de cuisson. Veillez à ce qu'il glisse
sur l'axe dans son intégralité et qu'il soit bien
en place.
Utilisez le micro-ondes exclusivement sans accessoires et aliments
lorsque vous le faites chauffer
pour la première fois !
Ne faites pas fonctionner le microondes plus de 5 minutes lorsqu'il
est vide !
• Appuyez sur la touche grill 7 . "Gr 1"
apparaît à l'écran 1.
• Tournez le sélecteur rotatif r , jusqu'à ce
que "Gr 3" et les symboles et apparaissent à l'écran 1 et confirmez la sélection
en appuyant sur la touche Start/démarrage immédiat r .
• Réglez une durée de cuisson de 5 minutes
avec le sélecteur rotatif r .
Opération
Réglage de l'heure
Une fois que vous avez inséré la fiche dans la prise
de courant, ouvrez la porte du micro-ondes.
L'écran 1 affiche "1:00". Refermez à nouveau la
porte.
1. Appuyez sur la touche horloge q . "Hr 12"
apparaît à l'écran 1.
2. Sélectionnez le mode souhaité (Hr 24 ou Hr 12)
en tournant le sélecteur rotatif r et confirmez
votre sélection en appuyant sur la touche Start/
démarrage immédiat r .
- 40 -
Page 44

Remarque
Ce n'est qu'en tournant ensuite le sélecteur rotatif
r, que l'affichage de l'heure apparaît et
que les heures peuvent être réglées.
3. Réglez l'heure souhaitée en tournant le sélecteur
rotatif r et confirmez votre sélection en
appuyant sur la touche Start/démarrage immédiat r .
4. Réglez les minutes souhaitées en tournant le
sélecteur rotatif r et confirmez votre sélection en appuyant sur la touche Start/démarrage
immédiat r .
L'heure est maintenant réglée.
Pour lire l'heure actuelle pendant le fonctionnement
du micro-ondes, appuyez sur la touche horloge q
; l'heure s'affiche alors durant quelques secon-
des à l'écran 1.
Mode veille
Le micro-ondes passe automatiquement en mode
veille et l'horloge s'affiche, lorsqu'aucune touche
n'est actionnée durant un certain temps. Quelques
secondes après le passage en mode veille, l'éclairage
de l'écran s'assombrit.
Régler la minuterie
Le micro-ondes dispose d'une minuterie de cuisine
que vous pouvez utiliser indépendamment du fonctionnement du micro-ondes.
1. Appuyez sur la touche TIMER w, lorsque
l'appareil est en mode veille. "0:00" apparaît
à l'écran 1 ainsi que le symbole .
2. Réglez maintenant le temps souhaité à l'aide du
sélecteur rotatif r .
Vous pouvez choisir une valeur entre 10 secondes et 95 minutes.
3. Appuyez sur la touche Start/démarrage immédiat r . Un signal sonore retentit.
L'heure fait l'objet d'un compte à rebours.
Au bout d'env. 3 secondes, l'heure normale
s'affiche à nouveau. La minuterie tourne en
arrière-plan. Si vous souhaitez contrôler le
temps de la minuterie entre deux, appuyez sur
la touche TIMER w. La minuterie de cuisine
s'affiche brièvement.
Des signaux sonores retentissent une fois le temps
réglé écoulé.
Sécurité enfant
Activez ce réglage pour empêcher une mise en
service accidentelle du micro-ondes par de jeunes
enfants et d'autres personnes non familiarisées avec
la commande.
L'icône de sécurité enfant apparaît à l'écran 1,
et l'appareil ne peut être mis en service tant que
cette fonction est activée.
• Appuyez sur la touche Stop/sécurité enfant e
et maintenez-la appuyée jusqu'à ce
qu'un signal sonore retentisse et que l'icône de
sécurité enfant apparaisse à l'écran 1. Les
touches et le bouton de réglage du micro-ondes
ne sont maintenant plus fonctionnels.
• Pour désactiver la securité enfant, appuyez sur
la touche Stop/ sécurité enfant e et
maintenez-la appuyée jusqu'à ce qu'un signal
sonore retentisse et que l'icône de sécurité enfant disparaisse.
Fonctions d'affichage
Afficher l'heure pendant le fonctionnement.
Appuyez sur la touche horloge q durant la
cuisson. L'heure apparait alors pendant quelques
secondes à l'écran 1.
Afficher le niveau de puissance pendant le
fonctionnement
Appuyez sur la touche micro-ondes 6
durant la cuisson. Le niveau de puissance apparait
alors pendant quelques secondes à l'écran 1.
- 41 -
Page 45

Interrompre/annuler des procédures
de décongélation ou de cuisson
• Appuyez une fois sur la touche Stop e ,
pour interrompre une procédure de décongélation
ou de cuisson. L'appareil interrompt la procédure
et arrête le temps qui reste encore. Appuyez sur
la touche Start/démarrage immédiat r ,
pour poursuivre à nouveau la procédure.
• Appuyez deux fois sur la touche Stop e ,
pour interrompre une procédure de cuisson. L'appareil passe de nouveau en mode veille.
Cuisson
Sélectionner la puissance
1. Appuyez sur la touche micro-ondes 6 .
"900" (puissance de 900 W) apparaît à
l'écran 1.
2. Réglez la puissance souhaitée à l'aide du
sélecteur rotatif r .
3. Appuyez sur la touche Start/démarrage immédiat r pour confirmer la puissance
réglée.
Définir le temps de cuisson
Après avoir sélectionné la puissance, définissez
le temps de cuisson souhaité :
• Tournez le sélecteur rotatif r , jusqu'à ce
que le temps de cuisson souhaité soit réglé.
Remarque
Ce micro-ondes est équipé d'une fonction de refroidissement. Autrement dit, après un processus de
cuisson ou de grill qui dure au moins 2 minutes, le
ventilateur de l'appareil continue encore de tourner pendant 3 minutes environ. Ce n'est pas un
dysfonctionnement de l'appareil ! Un refroidissement plus rapide contribue à accroître la longévité
de l'appareil.
Mode micro-ondes
Remarque
Des gouttes d'eau peuvent se former sur la porte
du micro-ondes ou sur le boîtier durant une procédure de cuisson. C'est un phénomène normal qui
n'indique aucun dysfonctionnement du micro-ondes.
Essuyez l'humidité à l'aide d'un chiffon sec, une
fois que l'appareil s'est refroidi.
Risque d'incendie !
N'utilisez jamais la grille t ou d'autres objets
métalliques, lorsque vous utilisez le micro-ondes en
mode micro-ondes. Le métal reflète le rayonnement
des micro-ondes et entraîne ainsi la formation d'étincelles. Il en peut en résulter un incendie et l'appareil
peut être endommagé de manière irréparable !
Les niveaux de temps de réglage du sélecteur
rotatif r sont les suivants :
• de 0 sec. à 5 min : par pas de 10 sec.
• de 5 à 10 min : par pas de 30 sec.
• de 10 à 30 min : par pas de 1 min
• de 30 à 95 min : par pas de 5 min.
Interrompre/terminer la procédure de saisie
Appuyez une fois sur la touche Stop e ,
pour interrompre et annuler une procédure de saisie.
L'appareil passe de nouveau en mode veille.
Démarrer la procédure de cuisson
Une fois que vous avez réglé la puissance et la durée
de cuisson, vous pouvez démarrer la cuisson:
Appuyez sur la touche Start/démarrage immédiat
r pour démarrer la cuisson.
À l'écran 1 apparait l'icône de fonctionnement
du micro-ondes . Le temps réglé est décompté
à rebours. Une fois le temps réglé écoulé, "End"
et "Hot" apparaissent à tour de rôle à l'écran 1.
Un signal sonore retentit plusieurs fois de suite.
- 42 -
Page 46

Démarrage immédiat 1
En mode veille, tournez le sélecteur rotatif r
vers la droite et réglez le temps de cuisson souhaité.
Démarrez la cuisson avec une puissance de 900 W
en appuyant sur la touche Start/démarrage immédiat r .
Démarrage immédiat 2
Cette fonction vous permet de commencer immédiatement la cuisson à une puissance de 900 W durant
30 secondes (ou plus longtemps, jusqu'à 95 minutes).
• Appuyez sur la touche Start/démarrage immédiat r . L'écran 1 affiche l'icône du
fonctionnement du micro-ondes , ainsi que
"00:30". Le micro-ondes démarre la cuisson
pendant 30 secondes. Le temps est décompté
à rebours.
Si vous souhaitez cuire plus longtemps que 30 secondes, appuyez sur la touche Start/démarrage
immédiat r , jusqu'à atteindre la durée souhaitée.
Les niveaux de temps se répartissent comme suit :
• de 30 sec. à 5 min : par pas de 30 sec.
• de 5 à 95 min : par pas de 1 min
Fonction grill
Risque d'incendie !
Lors de l'utilisation des fonctions grill, n'utilisez en
aucun cas des recouvrements ou une vaisselle
non thermorésistante, car ces derniers fondent ou
risquent de s'enflammer !
Remarque
Utiliser toujours la grille pour le grill t. Vous ob-
tiendrez ainsi un résultat optimal. Placez toujours
la grille t sur le plateau rotatif 3.
3 fonctions grill sont disponibles :
• Fonction de grill "chaleur de voûte" (Gr 1) :
Pour cette fonction, la chaleur vient uniquement
du haut. Seul le grill supérieur est activé. Cette
fonction de grill est de ce fait déale pour les
sandwiches gratinés et les gratins.
• Fonction de grill "chaleur de sole" (Gr 2) :
Pour cette fonction, la chaleur vient uniquement
du bas. Seul le grill inférieur est activé. C'est
pourquoi cette fonction de grill est idéale pour
les plats ou les aliments qui doivent être cuits/
grillés à partir du bas.
• Fonction de grill "convection naturelle" (Gr 3) :
Pour cette fonction, la chaleur vient du haut et
du bas. Les grills inférieur et supérieur sont activés.
C'est pourquoi cette fonction grill est idéale pour
de fines tranches de viandes, des steaks, des
boulettes de viandes, de petites saucisses ou
des morceaux de poulet.
1. Appuyez une fois sur la touche grill 7.
pour activer la fonction grill.
L'écran 1 affiche l'icône de la fonction grill
"chaleur de voûte" et "Gr 1".
2. Réglez la fonction de grill souhaitée à l'aide
du sélecteur rotatif r :
"Gr 1" pour la chaleur de voûte,
"Gr 2" pour la chaleur de sole,
"Gr 3" pour la convection naturelle.
Confirmez votre sélection en appuyant sur la
touche Start/démarrage immédiat r .
3. Réglez le temps de cuisson souhaité avec le
sélecteur rotatif r . Le temps de cuisson
maximum réglable est de 95 minutes.
4. Appuyez sur la touche Start/démarrage immé-
diat r pour démarrer la fonction grill.
L'écran 1 affiche l'icône de la fonction de grill
sélectionnée / / . Le temps réglé est
décompté à rebours. Une fois le temps réglé écoulé,
"End" et "Hot" apparaissent à tour de rôle à l'écran 1.
Un signal sonore retentit plusieurs fois de suite.
- 43 -
Page 47

Mode de cuisson combinée "grill"
Cette fonction associe la fonction d'un grill au fonctionnement normal du micro-ondes. Pendant la procédure combinée, une durée de cuisson définie et la
durée restante pour la fonction de grill est appliquée
automatiquement et dans une même procédure. Le
moment de commutation de l'appareil se caractérise
par un léger clic audible.
Risque d'incendie !
N'utilisez jamais la grille t ou d'autres objets métalliques, lorsque vous utilisez le micro-ondes en
mode de cuisson combiné. Le métal reflète le rayonnement des micro-ondes et entraîne ainsi la formation d'étincelles. Un incendie peut en résulter et
l'appareil risque d'être endommagé de manière
irréparable !
Lors de l'utilisation des modes de cuisson combinés
"grill", n'utilisez en aucun cas des recouvrements ou
une vaisselle non thermorésistante, car ces derniers
fondent ou risquent de s'enflammer !
4 combinaisons sont disponibles :
• Combinaison 1 (C 1) :
Pour la combinaison 1 la puissance du microondes s'élève à 30 % et la puissance du grill à
70 % du temps de cuisson. Ceci convient par
ex. à du poisson ou des gratins. La fonction micro-ondes et la fonction grill "chaleur de voûte"
• Combinaison 2 (C 2) :
Pour la combinaison 2 la puissance du microondes s'élève à 55 % et la puissance du grill à
45 % du temps de cuisson. Ceci convient par ex.
à des omelettes, puddings ou lasagnes. La fonction micro-ondes et la fonction grill "Chaleur de
voûte" est utilisée.
• Combinaison 3 (C 3) :
Pour la combinaison 3 la puissance du microondes s'élève à 30 % et la puissance du grill à
70 % du temps de cuisson. Ceci convient par
exemple aux pommes de terre. La fonction micro-ondes et la fonction grill "Convection naturelle" sont utilisées.
• Combinaison 4 (C 4) :
Pour la combinaison 4 la puissance du microondes s'élève à 55 % et la puissance du grill à
45 % du temps de cuisson. Ceci convient par ex.
à la volaille. La fonction micro-ondes et la fonction grill "Convection naturelle" sont utilisées.
1. Appuyez une fois sur la touche combinée
micro-ondes - grill 8 1 1pour activer
la fonction combinaison 1 (C1). L'écran 1
affiche , , ainsi que "C 1".
2. Réglez la combinaison souhaitée avec le sélec-
teur rotatif r .
• "C 1" pour la combinaison 1
• "C 2" pour la combinaison 2
• "C 3" pour la combinaison 3
• "C 4" pour la combinaison 4
Confirmez votre sélection en appuyant sur la
touche Start/démarrage immédiat r .
3. Réglez le temps de cuisson souhaité avec le
sélecteur rotatif r . Le temps de cuisson
maximum réglable est de 95 minutes.
4. Pour démarrer, appuyez sur la touche
Start/démarrage immédiat r .
Les symboles des modes de cuisson respectivement
utilisés , , apparaissent à l'écran 1.
L'heure réglée fait l'objet d'un compte à rebours.
Une fois le temps réglé écoulé, "End" et "Hot" apparaissent à tour de rôle à l'écran 1. Un signal sonore
retentit plusieurs fois de suite.
- 44 -
Page 48

Mode air chaud
Pendant la cuisson, de l'air chaud circule dans l'espace
de cuisson. Cet air chaud est particulièrement recommandé pour préparer des soufflés ou des plats
croustillants. Vous pouvez régler une température
de 110°C - 200°C et une durée maximale de
95 minutes.
1. Appuyez sur la touche air chaud 0 .
"200C" (= 200°C) et l'icône du mode air
chaud apparaissent à l'écran 1.
2 Réglez la température souhaitée avec le sélec-
teur rotatif r et confirmez la sélection en
appuyant sur la touche Start/démarrage immédiat r .
3. Réglez le temps de cuisson souhaité avec le
sélecteur rotatif r .
4. Appuyez sur la touche Start/démarrage immédiat r pour démarrer la cuisson.
L'écran 1 affiche l'icône du mode air chaud .
L'heure réglée fait l'objet d'un compte à rebours.
Une fois le temps réglé écoulé, "End" et "Hot"
apparaissent à tour de rôle à l'écran 1. Un signal
sonore retentit plusieurs fois de suite.
Mode air chaud avec préchauffage
Vous pouvez également préchauffer votre microondes avant de lancer une procédure de cuisson:
1. Sélectionnez la température souhaitée en
appuyant une fois sur la touche air chaud 0
et en réglant la température avec le sélecteur rotatif r . Ne confirmez PAS cette
sélection en appuyant sur la touche Start/
démarrage immédiat r .
2. Pour démarrer le préchauffage, appuyez sur la
touche air chaud 0 . "30:00" apparait à
l'écran 1 et l'icône de mode air chaud
clignote. Le temps est décompté à rebours.
Une fois la température réglée, des signaux
sonores retentissent et le temps s'arrête.
3. Ouvrez la porte et placez les aliments à cuire
à l'intérieur.
4. Réglez la température en tournant le sélecteur
rotatif r et confirmez la température en
appuyant sur la touche Start/démarrage immédiat r .
5. Réglez le temps de cuisson souhaité avec le
sélecteur rotatif r . Le temps de cuisson
maximum réglable est de 95 minutes.
6. Pour démarrer, appuyez sur la touche
Start/démarrage immédiat r .
L'écran 1 affiche durablement l'icône du mode air
chaud . L'heure réglée fait l'objet d'un compte
à rebours. Une fois le temps réglé écoulé, "End" et
"Hot" apparaissent à tour de rôle à l'écran 1.
Un signal sonore retentit plusieurs fois de suite.
- 45 -
Page 49

Mode de cuisson "air chaud" combiné
Cette fonction combine la fonction air chaud avec
le fonctionnement normal du micro-ondes. Elle permet
par exemple de rendre la viande plus juteuse, tendre
et malgré tout croustillante.
Risque d'incendie !
N'utilisez jamais la grille t ou d'autres objets
métalliques, lorsque vous utilisez le micro-ondes
en mode de cuisson combiné. Le métal reflète le
rayonnement des micro-ondes et entraîne ainsi la
formation d'étincelles. Il en peut en résulter un
incendie et l'appareil peut être endommagé de
manière irréparable !
Menu automatique
Pour les denrées alimentaires qui doivent être préparées en mode de menu automatique, il n'est pas
nécessaire de saisir la durée de la procédure de
cuisson et le niveau de puissance. Il suffit largement
d'entrer le type de denrée alimentaire qui doit être
cuit, ainsi que le poids de cette denrée.
Risque d'incendie !
Pour les programmes avec fonction de grill activée (A-01, A-02, A-03, A-04, A-05), n'utilisez en aucun cas des couvercles ou de la vaisselle non résistante à la chaleur, car ces derniers risquent de
fondre ou de prendre feu !
1. Appuyez sur la touche de combinaison microondes - air chaud 9 . L'écran 1 affiche
la température préréglée "200°C" et les icônes et .
2. Sélectionnez la température souhaitée à l'aide
du sélecteur rotatif r : 110°C, 140°C,
170°C ou 200°C. Confirmez votre sélection
en appuyant sur la touche Start/démarrage
rapide r .
3. Réglez le temps de cuisson souhaité avec le
sélecteur rotatif r . Le temps de cuisson
maximum est de 95 minutes. Confirmez le
temps de cuisson réglé en appuyant sur la
touche Start/démarrage immédiat r .
Le mode de cuisson combinée démarre. Les symboles du mode de cuisson combinée "Air chaud"
, apparaissent à l'écran 1. L'heure réglée
fait l'objet d'un compte à rebours. Une fois le temps
réglé écoulé, "End" et "Hot" apparaissent à tour de
rôle à l'écran 1. Un signal sonore retentit plusieurs
fois de suite.
Remarque
Le micro-ondes calcule le temps/le niveau de puissance pour les denrées alimentaires fraîches. Les
aliments surgelés ne seront pas cuits avec les
temps indiqués par le micro-ondes (à l'exception
du programme automatique "pizza"). Le cas échéant, décongelez au préalable les aliments surgelés
à l'aide du programme de décongelation (voir le
chapitre "Décongeler").
Démarrer le menu automatique
1. Tournez le sélecteur rotatif r (en mode
veille) lentement vers la gauche pour afficher
le mode menu automatique. L'écran 1 affiche
un numéro (par ex. "A-02" pour le programme
automatique 2 (porc) et l'icône "Porc". En tournant le sélecteur rotatif r , sélectionnez le
menu automatique correspondant à vos denrées
alimentaires.
Remarque
Si vous avez accédé au mode menu automatique
en tournant le sélecteur rotatif r vers la
gauche, vous pouvez sélectionner les menus automatiques dans l'ordre A01, A02, A03... en tournant ensuite vers la droite.
- 46 -
Page 50

Ecran Icône Aliment Poids
A-01 Bœuf 200 - 1400 g
A-02 Porc 200 - 1400 g
A-03 Volaille 400 - 1400 g
A-04 Poisson 200 - 1200 g
2 Confirmez votre sélection en appuyant sur la
touche Start/démarrage immédiat r .
3. Réglez le poids à l'aide du sélecteur rotatif r
et confirmez-le en appuyant sur la touche
Start/démarrage immédiat r .
Le mode de cuisson démarre. Les symboles des
fonctions de cuisson et de grill utilisés pour le programme automatique choisi s'affichent à l'écran 1.
Fonction micro-ondes , fonction de grill chaleur
de voûte , fonction de grill chaleur de sole .
Le temps calculé est décompté à rebours.
*P1 150-450 g
A-05 Pizza
A-06
A-07
A-08 Réchauffer 300 - 700 g
A-09 Boissons 200 - 500 ml
A-10
A-11
A-12
Fruits/
légumes
Pommes
de terre
Hors-
d'œuvre
Décongéla-
tion en fonc-
tion du poids
Décongéla-
tion en fonc-
tion de la
durée
P2 150-450 g
P3 150-450 g
100 - 1000 g
100 - 800 g
300 / 500 g
-
-
Remarque
Pour obtenir une cuisson uniforme, il faudra retourner certains aliments des 2/3 du temps de cuisson. Le micro-ondes s'arrête automatiquement
au bout de ce temps, 4 signaux sonores retentissent et "Turn" apparait à l'écran 1.
Ecran Icône Aliment
A-01 Bœuf 2/3 du temps
A-02 Porc 2/3 du temps
A-03 Volaille 2/3 du temps
A-04 Poisson 2/3 du temps
• Retournez les aliments. Manipulez les aliments
éventuellement déjà chauds avec précaution.
Appuyez sur la touche Start/démarrage immédiat
r , pour poursuivre la cuisson.
Tourner au
bout de . . .
*Pour de plus amples informations sur les programmes
pizza, veuillez lire le chapitre "cuire une pizza".
- 47 -
Page 51

Remarque
Si vous ne voulez pas retourner les aliments, attendez simplement les signaux sonores. L'appareil
poursuit automatiquement la cuisson. Nous recommandons cependant de retourner les denrées.
Vous obtenez ainsi une cuisson uniforme.
Remarque
Si le plat n'est pas correctement cuit une fois le menu
automatique terminé, poursuivez la cuisson comme
suit :
• Utilisez la procédure de cuisson indiquée dans
le tableau pour la poursuite de la cuisson.
Démarrez-la pendant quelques minutes et
contrôlez le résultat de cuisson.
• Lors de la poursuite de la cuisson d'une pizza à
l'aide du menu automatique "P2", interrompez
la cuisson en appuyant sur la touche Stop/
sécurité enfant , dès que la pizza est
suffisamment cuite.
Ecran Icône Aliment
A-01 Bœuf
A-02 Porc
A-03 Volaille
A-04 Poisson
A-05 Pizza
A-06
Fruits/
légumes
Poursuivre la
cuisson avec...
Cuisson combinée "Grill" - C3
Cuisson combinée "Grill" - C3
Cuisson combinée "Grill" - C3
Cuisson combinée "Grill" - C3
Menu automati-
que "Pizza" - P2
Fonctionnement
du micro-ondes
avec une
puissance de
900 W
Fonctionnement
A-07
A-08 Réchauffer
A-09 Boissons
A-10
A-11
A-12
Pommes
de terre
Hors-
d'œuvre
Décongéla-
tion en
fonction du
poids
Décongéla-
tion en fonc-
tion de la
durée
du micro-ondes
avec une
puissance de
900 W
Fonctionnement
du micro-ondes
avec une
puissance de
900 W
Fonctionnement
du micro-ondes
avec une
puissance de
900 W
Fonctionnement
du micro-ondes
avec une
puissance de
900 W
Fonctionnement
du micro-ondes
avec une
puissance de
100 W
Fonctionnement
du micro-ondes
avec une
puissance de
100 W
Risque de blessure !
Le plateau rotatif 3 est brûlant suite à une cuisson avec grill !Utilisez donc obligatoirement des maniques ou des gants résistants à la chaleur pour le
sortir du compartiment de cuisson.
Remarque
Veuillez tenir compte du fait que la taille, la forme et
les sortes d'aliments influencent le résultat de cuisson.
- 48 -
Page 52

Exemple d'application 1 :
Procédez comme suit si vous souhaitez faire cuire
400 g de légumes ou de fruits :
1. Tournez le sélecteur rotatif r (en mode
veille) lentement vers la gauche, jusqu'à ce que
"A-06" apparaisse à l'écran 1 et confirmez
la sélection en appuyant sur la touche Start/
démarrage immédiat r .
2. Réglez le poids "400" à l'aide du sélecteur
rotatif r .
3. Appuyez sur la touche Start/démarrage im-
médiat r , pour démarrer la cuisson.
Exemple d'application 2 :
Procédez comme suit lorsque vous souhaitez chauffer
300 ml d'eau :
1. Tournez le sélecteur rotatif r (en mode
veille) lentement vers la gauche, jusqu'à ce que
"A-09" apparaisse à l'écran 1 et confirmez
la sélection en appuyant sur la touche Start/
démarrage immédiat r .
2. Réglez "300" à l'aide du sélecteur rotatif r .
3. Appuyez sur la touche Start/démarrage im-
médiat r , pour démarrer la cuisson.
Exemple d'application 3 :
Procédez comme suit lorsque vous voulez chauffer
300 g de hors-d'oeuvre:
1. Tournez le sélecteur rotatif r (en mode
veille) lentement vers la gauche, jusqu'à ce que
"A-10" apparaisse à l'écran 1 et confirmez
la sélection en appuyant sur la touche Start/
démarrage immédiat r .
2. Comme "300" apparait comme première
sélection à l'écran 1, appuyez sur la touche
Start/démarrage immédiat r pour
démarrer la cuisson.
Cuisson de pizza
Avec le programme automatique "Pizza", vous pouvez préparer une pizza croustillante dans le microondes. Vous avez ici le choix entre les programmes
de pizza "P-01" (pizza surgelée), "P-02" (pizza
réfrigérée) et "P-03" (pizza fraîche).
1. Tournez le sélecteur rotatif r (en mode
veille) lentement vers la gauche jusqu'à ce que
"A-05" apparaisse à l'écran 1.
2. Appuyez sur la touche Start/démarrage immédiat r .
3. À l'aide du sélecteur rotatif r , sélection-
nez le programme de pizza adapté :
• "P-01" pour une pizza surgelée, température
environ -18 degrés poids 150 g–450 g
("P-01" apparaît à l'écran 1).
• "P-02" pour une pizza réfrigérée, température
env. 5 degrés, poids 150 g–450 g
("P-02" apparaît à l'écran 1).
• "P-03" pour une pizza fraîche, température
env. 20 degrés, poids 150 g–450 g
("P-03" apparaît à l'écran 1).
4 Confirmez votre sélection en appuyant sur la
touche Start/démarrage immédiat r .
5. Sélectionnez maintenant le poids souhaité
avec le sélecteur rotatif r et confirmez-le
en appuyant sur la touche Start/démarrage
immédiat r . La cuisson démarre.
Remarque :
Lorsque vous préparez une pizza, vous pouvez la
déposer directement sur le plateau rotatif 3. Elle
devient ainsi particulièrement croustillante. Faites
attention que le bord de la pizza ne touche pas les
parois de l'espace de cuisson pendant la cuisson.
Exemple d'application :
Procédez comme suit lorsque vous voulez cuire une
pizza surgelée qui pèse 450 g :
1. Tournez le sélecteur rotatif r (en mode
veille) lentement vers la gauche jusqu'à ce que
"A-05" apparaisse à l'écran 1.
2. Appuyez sur la touche Start/démarrage immédiat r .
3. À l'aide du sélecteur rotatif r , sélection-
nez le programme "P-01".
4. Appuyez sur la touche Start/démarrage immédiat r .
5. Sélectionnez le poids "450" à l'aide du sélecteur rotatif r .
6. Appuyez sur la touche Start/démarrage immédiat r , pour démarrer la cuisson. L'appareil
calcule automatiquement le temps requis.
- 49 -
Page 53

Décongeler
Vous pouvez régler les poids suivants :
Décongélation selon le poids
Remarque
Posez toujours les denrées alimentaires à décongeler sur une vaisselle adaptée au micro-ondes.
Jamais directement sur le plateau rotatif 3 !
Cette fonction vous permet de décongeler facilement
viande, volaille, poisson, fruits/légumes et pizza. Le
temps de décongélation et le niveau de puissance
sont automatiquement calculés et réglés après la
saisie du poids.
1. En mode veille, tournez le sélecteur rotatif r
dans le sens inverse des aiguilles d'une
montre jusqu'à ce que "A-11" apparaisse à
l'écran 1 et que clignote (voir le chapitre
"Menu automatique")
2. Appuyez sur la touche Start/démarrage im-
médiat r .
3. Sélectionnez maintenant l'aliment à déconge-
ler en tournant le sélecteur rotatif r .
L'écran 1 indique :
"d-01" et pour "boeuf"
"d-02" et pour "porc"
"d-03" et pour "volaille"
"d-04" et pour "poisson"
"d-05" et pour "pizza"
"d-06" et pour "fruits/légumes"
"d-07" et pour "pommes de terre"
4. Lorsque l'aliment souhaité s'affiche à l'écran 1,
appuyez sur la touche Start/démarrage immédiat r .
5. Réglez le poids à l'aide du sélecteur
rotatif r .
"d-01"/ / "boeuf" 100 - 1800 g
"d-02"/ / "porc" 100 - 1800 g
"d-03"/ / "volaille" 100 - 1800 g
"d-04"/ / "poisson" 100 - 1800 g
"d-05"/ / "pizza" 100 - 900 g
"d-06"/ /"fruits/légumes" 100 - 900 g
"d-07"/ /"pommes de
terre" 100 - 900 g
5. Lorsque le poids souhaité s'affiche à l'écran 1,
appuyez sur la touche Start/démarrage immédiat r . L'appareil calcule automatiquement le temps de décongélation.
Remarque
Pour garantir une décongélation optimale, il est
nécessaire de retourner les aliments pendant le
processus de décongélation. L'appareil vous rappelle que les aliments doivent être retournés à
l'aide de signaux sonores et en affichant "turn" à
l'écran 1. Ouvrez la porte de l'appareil, retournez
l'aliment, puis refermez la porte de l'appareil.
Appuyez sur la touche Start/ démarrage immédiat
r, pour démarrer le processus de décongéla-
tion.
Si vous ne voulez pas retourner les aliments, attendez simplement que les signaux sonores soient
terminés. L'appareil poursuit automatiquement le
processus de décongélation. Nous recommandons
cependant de retourner les denrées. Vous atteignez ainsi une décongélation uniforme.
- 50 -
Page 54

Décongélation selon la durée
Remarque
Posez toujours sur des articles de vaisselle appropriés pour le micro-ondes les produits alimentaires
à décongeler. Jamais directement sur le plateau
rotatif 3 !
1. Tournez en mode veille le sélecteur rotatif r
dans le sens contraire aux aiguilles d'une
montre jusqu'à ce que "A-12" apparaisse à
l'écran 1 ainsi que .
2. Appuyez sur la touche Start/démarrage im-
médiat r .
3 Réglez le temps souhaité à l'aide du sélecteur
rotatif r .
4. Appuyez sur la touche Start/démarrage im-
médiat r , pour démarrer la cuisson.
L'heure fait l'objet d'un compte à rebours.
Remarque
Pour garantir une décongélation optimale, il est
nécessaire de retourner les aliments pendant le
processus de décongélation. L'appareil vous rappelle que les aliments doivent être retournés à
l'aide de signaux sonores et en affichant "turn" à
l'écran 1. Ouvrez la porte de l'appareil, retournez
l'aliment, puis refermez la porte de l'appareil.
Appuyez sur la touche Start/démarrage immédiat
r, pour démarrer le processus de décongé-
lation.
Si vous ne voulez pas retourner les aliments, attendez simplement que les signaux sonores soient terminés. L'appareil poursuit automatiquement le
processus de décongélation. Nous recommandons
cependant de retourner les denrées. Vous atteignez
ainsi une décongélation uniforme.
Recettes
Boulettes de viande
• Formez une boulette de viande avec env.
125 g de viande hachée (diamètre env. 75 mm,
hauteur env. 35 mm).
• Répartissez les boulettes de viande de manière
homogène sur le plateau rotatif 3.
Préparation
Vous obtiendrez un résultat idéal en utilisant l'air
chaud et la fonction micro-ondes à tour de rôle.
Attendez que la procédure de cuisson réglée soit
terminée et réglez la procédure suivante.
1. Air chaud 200°C, 4:00 min.
2. Micro-ondes puissance de 900 W, 5:30 min.
3. Air chaud 200°C, 2:00 min (selon le goût
personnel, une durée pouvant atteindre 4h00
est également possible).
Décongélation de petits pains congelés
• Pour cuire des petits pains, sélectionnez la fonc-
tion air chaud.
• PLacez 3-4 petits pains sur le plateau rotatif 3.
Aucun préchauffage du micro-ondes n'est nécessaire.
Sélectionnez maintenant le réglage suivant pour le
processus de cuisson :
• Air chaud 170°C, durée : 12 minutes
Lorsque vous voulez immédiatement décongeler
d'autres petits pains, vous raccourcissez la durée
d'env. 1 à 2 minutes, car l'appareil est maintenant
déjà préchauffé.
- 51 -
Page 55

Gratin de pommes de terre
Ingrédients
• 750 g de pommes de terre fermes épluchées
• 300 g de crème
• 100 g de fromage râpé avec une teneur en
matières grasses de 25% à 30 % sur extrait sec.
• Epices selon votre goût (par ex. sel/poivre)
Utilisez un article de vaisselle rond et résistant aux
micro-ondes, avec couvercle, d'une hauteur de 5
à 6 cm et d'un diamètre d'env. 22 cm.
Préparation
• Coupez les pommes de terre en rondelles de
3 à 4 mm d'épaisseur.
• Placez environ la moitié des pommes de terre en
écailles de poisson dans le moule à manqué.
• Saupoudrez les pommes de terre avec la moitié
du fromage.
• Ajoutez la moitié des épices ainsi que 150g de
crème.
• Recouvrez avec le reste des pommes de terre
coupées, également en écailles de poisson.
• Répartissez le reste de fromage sur les pommes
de terre et versez le reste de crème par dessus.
• Saupoudrez le reste des épices sur le gratin.
• Placez le couvercle sur le plat et mettez-le au
milieu du plat rotatif 3.
Préparation
Vous obtiendrez un résultat idéal en utilisant l'air
chaud et la fonction micro-ondes à tour de rôle.
Attendez que la procédure de cuisson réglée soit
terminée et réglez la procédure suivante.
1. Micro-ondes puissance de 900 W, 10:00 min.
2. Air chaud 200°C, 13:00 min.
3. Micro-ondes puissance de 900 W, 10:00 min.
Muffins
Ingrédients
La recette permet d'obtenir env. 10 à 20 muffins.
• Margarine de cuisson (80 % de matières
grasses) ou beurre salé
• 170 g de sucre cristallisé (grosseur maxi
0,3 mm)
• 3 œufs(55 à 60 g avec coquille/taille M)
• 225 g de farine de froment
• 7 g de levure chimique
• 0,25 g de sel
Préparation
• Mélangez bien ensemble tous les ingrédients.
• Versez la pâte à muffin dans des petits moules
à papier du comemrce (diamètre env. 45 mm,
hauteur env. 28 mm)
• Préchauffez le micro-ondes avec la fonction d'air
chaud à 170 °C.
Remarque :
Si vous avez besoin de plusieurs opérations
de cuisson compte tenu du nombre de muffins, un seul préchauffage est nécessaire.
• Répartissez maintenant les muffins uniformé-
ment sur le plateau tournant 3.
• Sélectionnez maintenant le réglage suivant
pour le processus de cuisson:
Air chaud 170°C, durée : 12 minutes
Aucun préchauffage n'est nécessaire.
- 52 -
Page 56

Soupe aux courgettes
Ingrédients
• 1 courgette (env. 250 g)
• 80 ml d'eau
• 2 cc de bouillon de légumes en poudre
• env. 150 g de de fromage à pâte fondue
(aux herbes)
• 100 de crème fraîche
Préparation
• Coupez les courgettes en petits dés.
• Mettez la courgette, l'eau et le bouillon de
légumes en poudre dans un récipient allant
au micro-ondes.
• Démarrez une opération de cuisson au microondes pendant env. 6 minutes à 700 watts.
• Ajoutez alors le fromage à pâte fondue et la
crème.
• Démarrez ensuite une autre opération de cuisson
au micro-ondes pendant 10 minutes à 600 watts.
Remarque :
Vous pouvez avant de servir la soupe la
réduire en purée avec un mixeur plongeant.
C’est ainsi que la soupe reçoit une constance
crémeuse.
Gâteau au chocolat et aux pommes
Ingrédients
• 125 g de beurre
• 125 g de sucre
• 1 sachet de sucre vanillé
• 2 œufs
• 125 g de farine
• 2 cuillères à soupe de cacao en poudre
• 1/2 paquet de levure chimique
• 1 pomme
• un peu de sucre glace
Préparation
• Mélangez le sucre, le beurre ramolli, le sucre
vanillé, les œufs, la farine, la levure chimique et
le cacao en poudre pour obtenir une pâte.
• Pelez et épépinez la pomme. Coupez la pomme
en petits dés.
• Incorporez les morceaux de pomme à la pâte.
• Placez la pâte dans un plat allant au micro-ondes.
• Faites cuire le gâteau à 900 watts pendant 9
minutes environ au micro-ondes.
• Laissez le gâteau refroidir un peu après la cuisson
avant de le démouler.
• Saupoudrez un peu de sucre glace sur le gâteau.
Remarque :
En fonction de la forme du gâteau, le temps
de cuisson peut varier.
- 53 -
Page 57

Rôti de viande hachée
Ingrédients
• 500 g de viande hachée (moitié/moitié)
• 1/2 oignon
• 1 œuf
• 1/2 pain
• Sel, poivre, paprika en poudre
pour la sauce :
• 75 ml d'eau
• 1 cuillère à soupe de moutarde
• 2 cuillères à soupe de ketchup
• 2 cuillères à soupe de jus de viande
• Muscade, persil, paprika en poudre
• évtl. un peu de liant pour sauce
Préparation
• Faites ramollir le petit pain dans un peu d'eau.
• Coupez les oignons en petits dés.
• Mélangez la viande hachée, les dés d'oignons,
les œufs, le petit pain ramolli pour former une
boule de viande hachée, salez et poivrez.
• Formez un rôti de viande hachée et mettez-le
dans un plat allant au micro-ondes, saupoudrez
le rôti de paprika en poudre et couvrez-le.
• Faites cuire le rôti de viande haché pendant env.
18 – 22 minutes à 700 watts.
• Une fois la cuisson terminée, prélevez 2 cuillères
à soupe de jus de cuisson et mélangez-les à
l'eau, au ketchup et à la moutarde pour obtenir
une sauce de cuisson.
• Versez la sauce sur le rôti de viande hachée et
faites cuire à couvercle ouvert en combinaison
grill 1 (C 1) pendant 10 minutes environ.
• Si nécessaire, liez la sauce du rôti avec un peu
de liant pour sauce.
Nettoyage et entretien
Risque d'accident !
Eteignez le micro-ondes avant de nettoyer le micro-ondes et retirez la fiche secteur de la prise
secteur. Sinon, il y a un risque de choc électrique !
L'appareil ne doit sous aucun prétexte être
plongé dans l'eau ou d'autres liquides. Il peut
en résulter un danger de mort par choc électrique et l'appareil peut être endommagé.
• Maintenez l'intérieur du micro-ondes toujours
à l'état propre.
• Si des éclaboussures de denrées alimentaires
ou des liquides renversés devaient coller aux
parois du micro-ondes, essuyez ces derniers
avec un chiffon humide.
• Utilisez un produit vaisselle doux s'il devait
s'avérer nécessaire de nettoyer le micro-ondes
d'encrassements plus importants.
• Evitez l'utilisation de sprays de nettoyage et
autres produits détergents puissants étant donné
que ces derniers peuvent créer des taches, des
marques ou une opacité de la porte.
• Nettoyez les parois extérieures avec un chiffon
humide.
• Pour éviter d'endommager les pièces fonctionnelles à l'intérieur du micro-ondes, ne laissez
pas pénétrer d'eau dans la fente d'aération 5.
• Retirez régulièrement les éclaboussures ou les
encrassements. Nettoyez la porte et les fenêtres
des deux côtés, les joints de la porte et les
pièces adjacentes avec un chiffon humide.
N'utilisez pas de produits récurants.
Remarque :
En fonction de la forme du rôti de viande
hachée, le temps de cuisson peut varier.
- 54 -
Page 58

• Si des émanations se déposent dans ou autour
du côté extérieur de la porte, essuyez-les
avec un chiffon doux. Un tel phénomène se
produit lorsque le micro-ondes est utilisé dans
des conditions d'humidité extrême.
• Nettoyez également régulièrement le plateau
tournant 3. Lavez-le dans une eau savonneuse chaude.
• Nettoyez le support de gril t dans de l'eau
chaude et séchez-le bien.
• Evacuez régulièrement les odeurs. Posez une
cuvette à micro-ondes profonde avec une tasse
d'eau, de jus et la peau d'un citron dans le microondes. Réchauffez-les pendant 5 minutes.
Essuyez-le bien et séchez-le avec un chiffon
doux.
• S'il s'avère nécessaire de remplacer l'ampoule
installée dans le micro-ondes, demandez alors
à un revendeur de procéder à ce remplacement ou contactez notre service après-vente.
Dépannage
L'écran 1 n'indique rien.
• La fiche secteur n'a pas été insérée dans la
prise secteur. Contrôlez la fiche secteur.
• La prise secteur est défectueuse. Essayez de
brancher l'appareil sur une autre prise.
• L'écran 1 est défectueux. Contactez le service
après-vente.
L'appareil ne réagit pas lorsque l'on appuie sur
les touches.
• La sécurité enfant est activée. Désactiver la
sécurité enfant (voir le chapitre "Opération").
L'appareil ne démarre pas la procédure de
cuisson.
• La porte n'est pas correctement fermée. Fermez
correctement la porte.
Le plateau tournant 3 fait des bruits audibles
lorsqu'il tourne.
• Le plateau tournant 3 ne repose pas correctement sur son axe. Posez le plateau tournant 3
correctement dans le compartiment de cuisson.
• Les petits rouleaux 4 et/ou le fond du compartiment de cuisson sont encrassés. Nettoyez
les rouleaux 4 et le fond.
L'écran 1 affiche „E01“ et des signaux
sonores retentissent.
• Le micro-ondes a surchauffé. Interrompez immédiatement le programme en cours. Sortez
la fiche de la prise de courant, ouvrez la porte
du micro-ondes et laissez refroidir l'appareil.
L'écran 1 affiche „E02“ et des signaux
sonores retentissent.
• Une défaillance se manifeste lors du chauffage
de l'appareil. Interrompez le programme et
laissez refroidir l'appareil. Remettez ensuite le
micro-ondes en marche. Si le défaut se reproduit, veuillez vous adresser au service clients.
• Une défaillance se manifeste lors du chauffage
de l'appareil. Interrompez le programme et
laissez refroidir l'appareil. Remettez ensuite le
micro-ondes en marche. Si le défaut se reproduit, veuillez vous adresser au service clients.
L'écran 1 affiche „E03“ et des signaux
sonores retentissent.
• En raison d'un court-circuit ou d'une tension de
marche à vide, le micro-ondes est passé sur le
mode de protection contre les défauts. Interrompez le programme et sortez la fiche de la prise
de courant. Réglez le problème si possible, par
exemple s'il y a du métal dans le compartiment
de cuisson qui peut provoquer les problèmes
susmentionnés lorsque la fonction micro-ondes
est utilisée. Autrement, veuillez vous adresser
au service clients.
- 55 -
Page 59

L'éclairage à l'intérieur du micro-ondes ne fonctionne pas.
• La lampe est vraisemblablement défectueuse.
Adressez-vous au service clientèle.
Risque de blessure !
• N'essayez jamais de remplacer la lampe
vous-même. En ouvrant le boîtier, vous pouvez
libérer de l'énergie du micro-ondes.
Mise au rebut
L'appareil ne doit jamais être jeté
dans la poubelle domestique normale.
Ce produit est assujetti à la directive
européenne 2012/19/EU.
Remettez l'appareil destiné au recyclage à une
entreprise spécialisée ou au centre de recyclage de
votre commune.
Respectez la réglementation en vigueur.
En cas de doutes, contactez votre organisme de
recyclage.
La prestation de garantie s'applique uniquement pour
les erreurs de matériaux et de fabrication, pas pour les
dommages de transport, les pièces d'usure ou les dommages subis par les pièces fragiles, comme par ex. les
interrupteurs ou les batteries. Le produit est exclusivement destiné à un usage privé et non commercial.
La garantie est annulée en cas de manipulation incorrecte et inappropriée, d'utilisation brutale et en cas
d'intervention qui n'aurait pas été réalisée par notre
centre de service après-vente agréé. Cette garantie ne
constitue pas une restriction de vos droits légaux.
La durée de la garantie n'est pas prolongée par la
garantie du fabricant. Ceci vaut également pour les
pièces remplacées et réparées. Tous dommages et
défauts présents dès l'achat doivent être notifiés dès
que le produit est déballé, et au plus tard deux
jours après la date d'achat. Toutes réparations survenant après la période sous garantie ne seront pas
prises en charge.
Service France
Tel.: 0800 919270
E-Mail: kompernass@lidl.fr
IAN 107212
Eliminez l'ensemble des matériaux
d'emballage d'une manière respectueuse
de l'environnement.
Garantie et service après-vente
Cet appareil bénéficie de 3 ans de garantie à
compter de la date d'achat. L'appareil a été
fabriqué avec soin et consciencieusement contrôlé
avant sa distribution.
Veuillez conserver le ticket de caisse en guise de
preuve d'achat. Si la garantie devait s'appliquer,
contactez par téléphone votre interlocuteur du service
après-vente. Cette condition doit être respectée pour
assurer l'expédition gratuite de votre marchandise.
Service Belgique
Tel.: 070 270 171 (0,15 EUR/Min.)
E-Mail: kompernass@lidl.be
IAN 107212
Heures de service de notre hotline :
du lundi au vendredi de 8 h à 20 h (HEC)
Importateur
KOMPERNASS HANDELS GMBH
BURGSTRASSE 21
44867 BOCHUM
GERMANY
www.kompernass.com
- 56 -
Page 60

INHOUDSOPGAVE PAGINA
Inleiding 59
Gebruik in overeenstemming met bestemming 59
Inhoud van het pakket 59
Apparaatbeschrijving 59
Technische gegevens 59
Belangrijke veiligheidsvoorschriften 60
Voordat u begint 66
Basisprincipes voor het koken in de magnetron . . . . . . . . . . . . . . . . . . . . . . . . . . . . . . . . . . .66
Maak gebruik van geschikt kookgerei . . . . . . . . . . . . . . . . . . . . . . . . . . . . . . . . . . . . . . . . . .66
Voor het eerst in gebruik nemen 67
Apparaat plaatsen . . . . . . . . . . . . . . . . . . . . . . . . . . . . . . . . . . . . . . . . . . . . . . . . . . . . . . . . .67
Apparaat voorbereiden . . . . . . . . . . . . . . . . . . . . . . . . . . . . . . . . . . . . . . . . . . . . . . . . . . . . .67
Draaiplateau plaatsen . . . . . . . . . . . . . . . . . . . . . . . . . . . . . . . . . . . . . . . . . . . . . . . . . . . . . .68
Bedienen 68
Tijd instellen . . . . . . . . . . . . . . . . . . . . . . . . . . . . . . . . . . . . . . . . . . . . . . . . . . . . . . . . . . . . . . .68
Stand-bymodus . . . . . . . . . . . . . . . . . . . . . . . . . . . . . . . . . . . . . . . . . . . . . . . . . . . . . . . . . . . .69
Kooktimer instellen . . . . . . . . . . . . . . . . . . . . . . . . . . . . . . . . . . . . . . . . . . . . . . . . . . . . . . . . .69
Kinderbeveiliging . . . . . . . . . . . . . . . . . . . . . . . . . . . . . . . . . . . . . . . . . . . . . . . . . . . . . . . . . .69
Controlefuncties . . . . . . . . . . . . . . . . . . . . . . . . . . . . . . . . . . . . . . . . . . . . . . . . . . . . . . . . . . . .69
Garings- of ontdooiproces onderbreken/afbreken . . . . . . . . . . . . . . . . . . . . . . . . . . . . . . . .70
Koken en gaar laten worden 70
Magnetronmodus . . . . . . . . . . . . . . . . . . . . . . . . . . . . . . . . . . . . . . . . . . . . . . . . . . . . . . . . . .70
Grillfunctie . . . . . . . . . . . . . . . . . . . . . . . . . . . . . . . . . . . . . . . . . . . . . . . . . . . . . . . . . . . . . . . .71
Combinatie-garingsproces “Grill” . . . . . . . . . . . . . . . . . . . . . . . . . . . . . . . . . . . . . . . . . . . . .72
Heteluchtmodus . . . . . . . . . . . . . . . . . . . . . . . . . . . . . . . . . . . . . . . . . . . . . . . . . . . . . . . . . . . .73
Heteluchtmodus met voorverwarmen . . . . . . . . . . . . . . . . . . . . . . . . . . . . . . . . . . . . . . . . . . .73
Combinatie-garingsproces “Hetelucht” . . . . . . . . . . . . . . . . . . . . . . . . . . . . . . . . . . . . . . . . .74
Automatische programma's 74
Menu Automatische programma's starten . . . . . . . . . . . . . . . . . . . . . . . . . . . . . . . . . . . . . . .74
Pizza bakken . . . . . . . . . . . . . . . . . . . . . . . . . . . . . . . . . . . . . . . . . . . . . . . . . . . . . . . . . . . . . .77
Ontdooien 78
Ontdooien op gewicht . . . . . . . . . . . . . . . . . . . . . . . . . . . . . . . . . . . . . . . . . . . . . . . . . . . . . .78
Ontdooien op tijd . . . . . . . . . . . . . . . . . . . . . . . . . . . . . . . . . . . . . . . . . . . . . . . . . . . . . . . . . .79
- 57 -
Page 61

Recepten 79
Gehaktballen . . . . . . . . . . . . . . . . . . . . . . . . . . . . . . . . . . . . . . . . . . . . . . . . . . . . . . . . . . . . . .79
Afbakken van kant-en-klare diepvriesbroodjes . . . . . . . . . . . . . . . . . . . . . . . . . . . . . . . . . . .79
Aardappelgratin . . . . . . . . . . . . . . . . . . . . . . . . . . . . . . . . . . . . . . . . . . . . . . . . . . . . . . . . . . .80
Muffins . . . . . . . . . . . . . . . . . . . . . . . . . . . . . . . . . . . . . . . . . . . . . . . . . . . . . . . . . . . . . . . . . . .80
Courgettesoep . . . . . . . . . . . . . . . . . . . . . . . . . . . . . . . . . . . . . . . . . . . . . . . . . . . . . . . . . . . . .81
Choco-appeltaart . . . . . . . . . . . . . . . . . . . . . . . . . . . . . . . . . . . . . . . . . . . . . . . . . . . . . . . . . .81
Gehaktbrood (meatloaf) . . . . . . . . . . . . . . . . . . . . . . . . . . . . . . . . . . . . . . . . . . . . . . . . . . . . .82
Reiniging en onderhoud 82
Problemen oplossen 83
Milieurichtlijnen 84
Garantie en service 84
Importeur 84
- 58 -
Page 62

Magnetron
Inleiding
Hartelijk gefeliciteerd met de aankoop van uw
nieuwe apparaat.
U hebt hiermee gekozen voor een hoogwaardig
product. De gebruiksaanwijzing maakt deel uit van
dit product. Deze bevat belangrijke aanwijzingen
voor veiligheid, gebruik en afvoeren. Maak u vertrouwd met alle bedienings- en veiligheidsaanwijzingen voordat u het product in gebruik neemt.
Gebruik het product uitsluitend op de voorgeschreven
wijze en voor de aangegeven doeleinden. Geef
alle documenten mee als u het product doorgeeft
aan een derde.
Gebruik in overeenstemming
met bestemming
Dit apparaat is bestemd om levensmiddelen op te
warmen en te bereiden volgens de beschreven
procedures.
Elke verandering van het apparaat wordt beschouwd
als niet correct en draagt aanzienlijke risico's voor
ongevallen in zich. De fabrikant aanvaardt geen
enkele aansprakelijkheid voor schade die voortvloeit
uit gebruik in strijd met de bestemming.
Dit apparaat is uitsluitend bestemd voor gebruik in
privéhuishoudens.
Gebruik het niet bedrijfsmatig, op industrieel gebied
of in laboratoria!
Inhoud van het pakket
Apparaatbeschrijving
Afbeelding A:
1 Display
2 Deuropenertoets
3 Draaiplateau
4 Rollen
5 Ventilatiesleuf
Afbeelding B:
6 Toets Magnetron
7 Toets Grill
8 Toets Combinatie magnetron - grill
9 Toets Combinatie magnetron - hetelucht
0 Toets Hetelucht
q Toets Klok
w Toets TIMER (kookwekker)
e Toets Stop/kinderbeveiliging
r Draaiknop/toets Start/snelstart
Afbeelding C:
t Grillstandaard
Technische gegevens
Nominale spanning: 230 - 240 V ~,
50 Hz
Maximaal opgenomen vermogen
Magnetron: 1400 W
Grill: 1500 W
Hetelucht: 1950 W
Maximaal afgegeven vermogen
Magnetron: 900 W +/- 10%
Frequentie magnetron: 2450 MHz
Magnetron
Draaiplateau
Grillstandaard
Gebruiksaanwijzing
Beknopte informatie (2 stuks)
- 59 -
Page 63

Belangrijke veiligheidsvoorschriften
Lees de veiligheidsvoorschriften voordat u het apparaat voor het eerst gebruikt aandachtig door en berg
deze op voor toekomstig gebruik.
Gevaar! / Letselgevaar!
Waarschuwing voor letsel en stroomschokken!
Brandgevaar!
Waarschuwing voor brandgevaar.
Let op!
Waarschuwingen voor beschadigingen aan het apparaat.
Opmerking!
Aanwijzingen en tips voor het gebruik van de magnetron.
Voorzorgsmaatregelen om een eventueel overmatig contact met microgolfenergie te voorkomen.
• Probeert u het apparaat niet met geopende deur te gebruiken, omdat het
gebruik bij geopende deur kan leiden tot contact met een schadelijke dosis
microgolfstraling. In dit kader is het ook belangrijk om de veiligheidsvergrendelingen niet open te breken of te manipuleren.
• Klem niets tussen de voorzijde van het apparaat en de deur en zorg ervoor
dat zich geen kleine verontreinigingen of restanten van schoonmaakmiddelen
op de sluitvlakken kunnen ophopen.
Gevaar!
• Dompel het netsnoer of de netstekker nooit onder in water of andere vloeistoffen.
• Houd het netsnoer uit de buurt van warmtebronnen. Leid het snoer niet voor de
deur van de magnetron langs. Door de hitte kan het snoer beschadigd raken.
• Giet nooit vloeistof in de ventilatieopeningen of de veiligheid-deurvergrendelingen. Mocht er toch vloeistof binnenkomen, schakel de magnetron dan meteen
uit en haal de stekker uit het stopcontact. Laat de magnetron nakijken door gekwalificeerd en deskundig personeel.
- 60 -
Page 64

Letselgevaar!
• Als de deur beschadigd is of de dichtingen van de deur beschadigd zijn, mag
u de magnetron in geen geval nog verder gebruiken. Laat deze onmiddellijk
door gekwalificeerd personeel repareren.
• Probeer nooit het apparaat zelf te repareren. Door het afnemen van de behuizing
kan de microgolfenergie vrijkomen. Laat reparaties alleen door gekwalificeerd en
vakkundig personeel uitvoeren.
• Dit apparaat mag worden gebruikt door kinderen vanaf 8 jaar en door personen met beperkte fysieke, zintuiglijke of geestelijke vermogens of gebrek aan
ervaring en/of kennis, mits ze onder toezicht staan of over het veilige gebruik
van het apparaat zijn geïnstrueerd en de daaruit resulterende gevaren hebben
begrepen.
• Kinderen mogen niet met het apparaat spelen.
• Reiniging en onderhoud door de gebruiker mogen niet worden uitgevoerd
door kinderen, tenzij ze 8 jaar of ouder zijn en onder toezicht staan.
• Houd het apparaat en het snoer buiten het bereik van kinderen jonger dan 8
jaar.
• Gebruik dit apparaat uitsluitend in overeenstemming met het gebruiksdoel
conform de beschrijving in deze handleiding. Gebruik in dit apparaat geen
bijtende chemicaliën of dampen. Deze magnetron is speciaal voor het verwarmen, koken, grillen of drogen van voedingsmiddelen gebouwd.
Hij is niet ontworpen voor gebruik in de industrie of in een laboratorium.
• Gebruik de magnetron niet als netsnoer/netstekker beschadigd zijn. Laat
netsnoer/ netstekker vervangen door gekwalificeerd en deskundig personeel
om risico's te vermijden.
• Houd kinderen uit de buurt van de deur van de magnetron terwijl deze in
werking is. Verbrandingsgevaar!
• Verwijder onder geen beding de behuizing van de magnetron.
• Laat de lamp in de magnetron uitsluitend vervangen door gekwalificeerd en
deskundig personeel.
• Raak nooit de deur of behuizing van de magnetron, de ventilatieopeningen,
accessoire-onderdelen of het eetgerei aan direct na de grill-, combi- of
automaatmenu-procedure. De onderdelen worden zeer heet. Laat de onderdelen afkoelen voordat u ze schoonmaakt.
- 61 -
Page 65

• Let erop, dat de netstekker altijd goed te bereiken is, zodat u deze in geval
van nood snel van het stroomnet kunt scheiden.
• Personen die een pacemaker dragen, dienen voor ingebruikname van de
magnetron bij hun huisarts te informeren naar mogelijke risico's.
• Laat het netsnoer nooit over de tafel of het werkblad hangen. Kinderen zouden
eraan kunnen trekken.
• Open verpakkingen, popcornzakjes enz. na het verwarmen altijd met de opening
van uw lichaam af. Ontsnappende stoom kan verbrandingen veroorzaken.
• Ga niet direct voor de magnetron staan wanneer u de deur opent. Ontsnappende stoom kan verbrandingen veroorzaken.
• Frituur niet in de magnetron. Hete olie kan onderdelen van het apparaat en
hulpstukken beschadigen en zelfs brandwonden veroorzaken.
• Opgewarmde glazen potjes met babyvoeding of zuigflessen in ieder geval
schudden of omroeren! De inhoud kan niet gelijkmatig verhit zijn en de baby
zou zich aan de inhoud kunnen verbranden. Controleer altijd de temperatuur
voordat u uw baby voedt!
• Verander de magnetron niet.
• Microgolfstralen zijn gevaarlijk! Laat onderhouds- of reparatiewerkzaamheden waarbij afdekkingen moeten worden verwijderd die bescherming bieden
tegen contact met microgolfstraling uitsluitend uitvoeren door geschoold en
deskundig personeel.
• Controleer de temperatuur vóór de consumptie, om verbrandingen te voorkomen
die voor baby’s eventueel levensgevaarlijk kunnen zijn. Kookbenodigdheden kunnen door de hitte die wordt afgegeven door de verwarmde gerechten heet
worden zodat u ze mogelijk alleen met pannenlappen aan kunt pakken. Kookgerei moet worden gecontroleerd op geschiktheid voor de magnetron.
Let op! Heet oppervlak!
Brandgevaar!
• Laat de magnetron nooit zonder toezicht wanneer u levensmiddelen in plastic- of
papierverpakkingen verwarmt.
• Plaats geen brandbare materialen in de buurt van de magnetron of de ventilatieopeningen.
- 62 -
Page 66

• Verwijder alle metalen sluitingen van de verpakking van de levensmiddelen
die u wilt verwarmen. Brandgevaar!
• Gebruik voor het maken van popcorn uitsluitend popcornzakjes die geschikt
zijn voor de magnetron.
• Gebruik de magnetron niet om korrels, kersenpitten of met gel gevulde kussens
te verwarmen. Brandgevaar!
• Gebruik de magnetron niet voor het opbergen van levensmiddelen of andere
zaken.
• Overschrijd nooit de door de fabrikant aangegeven garingstijden.
• Zet geen voorwerpen op de magnetron, terwijl deze in werking is.
De ventilatieopeningen worden afgedekt!
• Plaats de magnetron niet in de buurt van andere apparaten die warmte afgeven,
zoals bijv. een oven.
• Reinig de magnetron na gebruik grondig na het verhitten van vethoudende
gerechten, vooral als die niet waren afgedekt. Laat het apparaat volledig
afkoelen voordat u het schoonmaakt. Op de verwarmingselementen van de
grill mogen zich geen resten, bijvoorbeeld vet, bevinden. Deze kunnen oververhit raken en in brand vliegen.
• Ontdooi geen bevroren vet of olie in de magnetron. Het vet of de olie kan in
brand vliegen.
• Gebruik geen externe tijdschakelklok of een separaat systeem voor afstandbediening om het apparaat aan te sturen.
• Deze magnetron is bestemd voor het verwarmen van spijzen en dranken.
Het drogen van spijzen of kleding en het verwarmen van warmtekussens,
pantoffels, sponzen, vochtige poetslappen en dergelijke kan letsel, ontbranding of brand tot gevolg hebben.
• De magnetron moet regelmatig worden gereinigd en resten van levensmiddelen
moeten worden verwijderd.
Let op! Schade aan het apparaat!
• Gebruik de magnetron nooit in lege toestand.
Een uitzondering hierop vormt de eerste ingebruikname (zie hoofdstuk
“Eerste ingebruikname”), waarin de magnetron kortstondig in lege toestand
in de modus Grillen mag worden gebruikt.
- 63 -
Page 67

• Steek geen voorwerpen in de ventilatieopeningen of de veiligheid-deurvergrendelingen.
• Gebruik geen metalen voorwerpen die microgolven reflecteren en vonken kunnen veroorzaken. Plaats geen blikjes in de magnetron.
• Plaats geen plasticvoorwerpen direct na een grill-, combi- of automaatmenuprocedure in de magnetron. Het plastic kan smelten.
• De magnetron mag niet worden geplaatst op plekken met een hoge luchtvochtigheid, of op plaatsen waar zich vocht verzamelt.
• Vloeistoffen en andere levensmiddelen mogen niet in luchtdicht afgesloten reservoirs worden verhit, aangezien deze exploderen en het apparaat kunnen
beschadigen.
• Leun niet op de deur van de magnetron.
• Niet afdoende schoonmaken van het kooktoestel kan leiden tot beschadiging
van het oppervlak, hetgeen wederom van invloed is op de levensduur en mogelijk resulteert in gevaarlijke situaties.
• Er mag alleen servies worden gebruikt dat geschikt is voor gebruik in magnetrons.
Tips voor veilig gebruik
• Om het brandrisico in de magnetron tot een minimum te beperken: houd
wanneer u spijzen in kunststof- of papieren schalen verwarmt ten alle tijde de
magnetronoven in het oog, want deze materialen zouden vlam kunnen vatten.
• Bij het verhitten van dranken in de magnetron, kan er sprake zijn van een tijdelijk vertraagd borrelen als het drankje kookt. Wees derhalve voorzichtig bij het
hanteren van de beker. Om een plotseling koken te vermijden:
- Plaats zo mogelijk een glasstaafje in de vloeistof, zolang die wordt verwarmd.
- Laat de vloeistof na het verwarmen 20 seconden in de magnetron staan, om
onverwacht opborrelen te voorkomen.
• Prik op een paar plaatsen in de schil van aardappelen, worstjes, of dergelijke.
Ze kunnen anders exploderen.
• Wees voorzichtig bij het verwarmen van vloeistoffen. Gebruik alleen open
vloeistofhouders, zodat luchtbelletjes die zich vormen, kunnen ontsnappen.
• Als het apparaat rook afgeeft, moet het apparaat afgeschakeld worden of de
stekker worden uitgetrokken en de deur gesloten, om eventuele vlammen te
doven.
- 64 -
Page 68

• Eieren in de schaal en hardgekookte eieren mogen niet in de magnetron worden
verwarmd, aangezien ze zelfs na het verwarmen in de magnetron kunnen exploderen.Voedingsmiddelen met een dikke schil, zoals aardappelen, hele pompoenen, appels en kastanjes voor het koken inprikken.
• Beweeg de magnetron niet terwijl deze in werking is.
Aanwijzingen over aarding/installatie volgens de voorschriften
Dit apparaat moet geaard zijn. Dit apparaat mag alleen worden aangesloten
op een volgens de voorschriften geaard stopcontact. Het verdient de voorkeur
om een eigen stroomkring te gebruiken waarmee alleen de magnetron wordt verzorgd.
Gevaar: ondeskundige omgang met de aardstekker kan het risico van een
elektrische schok tot gevolg hebben.
Opmerking: voor vragen over het aarden of voor instructies over de elektrische installatie, wendt u zich tot een elektro- of onderhoudsvakman.
Zowel de fabrikant, als de dealer wijzen de aansprakelijkheid van de hand voor
een beschadiging van de magnetron of voor persoonlijke schade die terug te voeren is op de niet-naleving van de aanwijzingen voor de elektrische installatie.
Interferentiestoringen bij andere apparatuur
Het gebruik van de magnetron kan storingen bij uw radio, TV-toestel of vergelijkbare apparatuur veroorzaken.
Indien dergelijke interferenties zouden optreden, kunt u deze met behulp van de
volgende maatregelen verminderen of wegnemen:
• Reinig deur- en afdichtvlakken van de magnetron.
• Richt de ontvangstantenne van de radio of het TV-toestel opnieuw.
• Zet de magnetron op een andere plek dan de ontvanger.
• Haal de magnetron weg bij de ontvanger.
• Sluit de magnetron op een ander stopcontact aan. De magnetron en de ont-
vanger moeten van een verschillende tak van de stroomkring hun energie
betrekken.
- 65 -
Page 69

Voordat u begint
Basisprincipes voor het koken in de
magnetron
• Rangschik de spijzen op weloverwogen wijze.
• De dikste plekken komen zo dicht mogelijk bij
de rand.
• Let op de garingstijd. Kies de kortst aangegeven
garingstijd en verleng deze zo nodig. Veel te
lang gekookte gerechten kunnen beginnen te
roken of kunnen vlam vatten.
• Bedek de gerechten tijdens het garen met een
voor de magnetron geschikt deksel. Het deksel
verhindert het spatten en draag er voorts toe
bij dat de gerechten gelijkmatig gaar worden.
• Draai de gerechten tijdens de bereiding in de
magnetron één keer om, zodat gerechten zoals
kip of hamburgers sneller van binnen gaar zijn.
• Levensmiddelen in grote stukken, zoals bijv.
gebraad moeten ten minste eenmaal worden
omgedraaid.
• Rangschik delen van levensmiddelen, zoals
bijv. gehaktballen na de helft van de gaartijd
helemaal anders. Keer ze om, en plaats de
gehaktballen van het midden van het bord
naar de rand.
Maak gebruik van geschikt kookgerei
• Het ideale materiaal voor een magnetronoven
laat microgolven door en laat dus de energie
door het reservoir heendringen om het gerecht
te verwarmen.
Microgolven kunnen niet door metaal dringen.
Derhalve mag u geen metalen pannen of
schalen en metalen keukengerei gebruiken.
• Gebruik bij het verwarmen in de magnetron
geen producten van kringlooppapier. Deze
kunnen minuscule metaalfragmenten bevatten
die vonken en/of branden kunnen veroorzaken.
• Ronde of ovalen schalen genieten de voorkeur
boven hoekige/langwerpige schalen, omdat
gerechten in de hoeken snel te lang koken.
De onderstaande lijst is bedoeld als algemeen
hulpmiddel voor de keuze van het juiste servies.
Potten en
pannen
Hittebestendig
glas
Niet hittebestendig glas
Hittebestendig
keramiek
Kunststofservies geschikt voor de
magnetron
Keukenrol Ja Nee Nee Nee
Metalen
plateau/plaat
Magnetron
Ja Ja Ja Ja
Nee Nee Nee Nee
Ja Ja Ja Ja
Ja Nee Nee Nee
Nee Ja Ja Nee
Grill
Hete
lucht
Combinatie
Grillstandaard Nee Ja Ja Nee
Alumiumfolie
& reservoirs
van folie
- 66 -
Nee Ja Ja Nee
Page 70

Brandgevaar!
Gebruik nooit de grillstandaard of andere metaalhoudende voorwerpen als u de magnetron
gebruikt in de magnetron-modus of in het gecombineerde garingsproces. Metaal reflecteert de
microgolfstraling en laat zodoende vonken ontstaan. Dat kan brand veroorzaken en het apparaat
onherstelbaar beschadigen!
Voor het eerst in gebruik nemen
Opmerking over de eerste
keer opwarmen
Gebruik de magnetron nooit
in lege toestand in de modus
Magnetron!
Laat de magnetron bij de eerste
keer opwarmen uitsluitend werken
zonder accessoires en levensmiddelen in de modus Grillen (Gr 3)!
(zie hoofdstuk “Apparaat voorbereiden”)
Let op:
zet de magnetronoven niet boven een fornuis of
enig ander apparaat dat hitte produceert. Een
installatie op zo'n plek kan tot beschadiging van
het apparaat en dientengevolge ook tot het vervallen van de garantie leiden.
• Kies een egaal vlak dat genoeg afstand biedt
voor de be- en ontluchting van het apparaat:
Houd tussen apparaat en aangrenzende wanden in iedere geval een minimale afstand aan
van 10 cm. Let er hierbij op dat de deur van
de magnetron zonder problemen geopend kan
worden.
Houd boven de magnetron een afstand aan
van ten minste 20 cm.
• Zorg dat de netstekker altijd toegankelijk is,
zodat u deze in geval van gevaar probleemloos
kunt bereiken en uit het stopcontact kunt halen.
• Verwijder de voetjes onder de magnetronoven
niet.
• Blokkeer de ventilatieopening 5 niet. Dit zou
namelijk beschadigingen aan het apparaat
kunnen veroorzaken.
• Zet het apparaat zo mogelijk ver van radioen televisietoestellen vandaan. Het gebruik
van de magnetron kan storingen van radio- of
tv-ontvangst tot gevolg hebben.
Apparaat plaatsen
Brandgevaar!
Deze magnetron is ongeschikt voor de inbouw in
een keukenkast. In gesloten kasten is de ventilatie
van het apparaat onvoldoende gegarandeerd.
Het apparaat kan beschadigd raken en er bestaat brandgevaar!
Apparaat voorbereiden
• Verwijder het verpakkingsmateriaal en de op
het paneel en de deuropenertoets 2 aangebrachte beschermfolie.
Verwijder niet de lichtgrijze mica
afdekplaat die ter bescherming
van de magneetveldbuizen in de
garingsruimte is aangebracht.
- 67 -
Page 71

• Steek de stekker in een stopcontact. Gebruik
een 230 - 240 V~, 50 Hz stopcontact met een
16 A zekering. Het verdient aanbeveling voor
de magnetron een aparte stroomgroep te
gebruiken. Als u niet zeker weet hoe u de magnetron moet aansluiten, raadpleegt u een vakman.
Voordat de magnetron in gebruik wordt genomen,
moet het apparaat eerst leeg worden opgewarmd,
zodat restanten die inherent zijn aan het productieproces kunnen verdampen.
Nadat u de stekker in het stopcontact hebt gestoken,
opent u de deur van de magnetron door op de
deuropenertoets 2 te drukken.
• Druk op de toets Start/snelstart r om
het grillen te starten.
Opmerking
Bij de eerste ingebruikname kan er door restanten
die inherent zijn aan het productieproces, een
lichte rook- en geurontwikkeling ontstaan. Dit is
onschadelijk. Zorg voor voldoende ventilatie.
Open bijv. een raam.
• Na 5 minuten gaat het apparaat automatisch
uit. Wacht totdat het volledig is afgekoeld.
• Haal de stekker uit het stopcontact, reinig het
apparaat daarna van binnen met een vochtige
doek en maak het daarna zorgvuldig droog.
Schakel het apparaat in zonder levensmiddelen en
zonder accessoires (draaiplateau 3 en grillstandaard t) in de bedrijfsmodus Grillen:
Opmerking over de eerste
keer opwarmen
Laat de magnetron bij de eerste
keer opwarmen uitsluitend werken zonder accessoires en levensmiddelen!
Laat de magnetron in lege toestand
maximaal 5 minuten werken!
• Druk op de toets Grill 7 . Op het display
1 verschijnt “Gr 1”.
• Draai de draaiknop r , tot “Gr 3” en de
symbolen en op het display 1 ver-
schijnen, en bevestig uw keuze door een druk
op de toets Start/snelstart r .
• Stel met de draaiknop r een gaartijd
van 5 minuten in.
Draaiplateau plaatsen
• Plaats het draaiplateau 3 midden op de as in
de garingsruimte. Let erop dat het helemaal op
de as glijdt en vastzit.
Bedienen
Tijd instellen
Nadat u de stekker in het stopcontact hebt gestoken,
opent u de deur van de magnetron één keer. Het
display 1 geeft "1:00" aan. Sluit de deur weer.
1. Druk op de toets Klok q . Op het display 1
verschijnt “Hr 12”.
2. Kies door de draaiknop r te draaien de
gewenste modus (Hr 24 of Hr 12) en bevestig
uw keuze door een druk op de toets Start/
snelstart r .
- 68 -
Page 72

Opmerking
Pas als u daarna de draaiknop r draait,
verschijnt de tijdindicatie en kunt u het uur instellen.
3. Stel door de draaiknop r te draaien het
gewenste uur in en bevestig uw keuze door
een druk op de toets Start/snelstart r .
4. Stel door de draaiknop r te draaien de
gewenste minuut in en bevestig uw keuze door
een druk op de toets Start/snelstart r .
Nu is de tijd ingesteld.
Om de actuele tijd van de dag af te lezen terwijl
de magnetron in bedrijf is, drukt u op de toets
Klok q ; de tijd wordt dan enkele seconden
lang op het display 1 weergegeven.
Stand-bymodus
Wanneer langere tijd niet op een toets wordt gedrukt, schakelt de magnetron automatisch over op
de stand-bymodus en wordt de tijd weergegeven.
Enkele seconden na de omschakeling op de standbymodus wordt de displayverlichting gedimd.
Kooktimer instellen
De magnetron beschikt over een kooktimer die u
onafhankelijk van de magnetronmodus kunt
gebruiken.
1. Druk op de toets TIMER w wanneer het
apparaat in de stand-bystand staat. Op het
display 1 verschijnt “0:00” en het
symbool .
2. Stel nu met de draaiknop r de gewenste
tijd in.
U kunt de tijd instellen van 10 seconden tot
95 minuten.
3. Druk op de toets Start/snelstart r . Er
klinkt een geluidssignaal. De tijd telt terug naar
0. Na ca. 3 seconden wordt de normale tijd
opnieuw weergegeven. De kooktimer loopt op
de achtergrond verder. Wanneer u tussendoor
de tijd van de kooktimer
wilt controleren, drukt u op de toets TIMER w.
De kookwekker verschijnt even.
Zodra de ingestelde tijd is afgelopen, klinken er
geluidssignalen.
Kinderbeveiliging
Activeer deze instelling om onbedoeld gebruik van
de magnetron door kleine kinderen of door andere
personen die niet bekend zijn met het gebruik van
de magnetron te voorkomen.
Het symbool voor de kinderbeveiliging verschijnt
op het display 1. Het apparaat kan niet worden
gebruikt zolang deze functie is geactiveerd.
• Druk op de toets Stop/kinderbeveiliging e
en houd deze zolang ingedrukt tot er
een geluidssignaal klinkt en het symbool voor de
kinderbeveiliging op het display 1 verschijnt.
De toetsen en de draaiknop van de magnetron
werken nu niet meer.
• Om de kinderbeveiliging te deactiveren, drukt u
op de toets Stop/kinderbeveiliging e
en houdt u deze zolang ingedrukt tot er een
geluidssignaal klinkt en het symbool voor de
kinderbeveiliging verdwijnt.
Controlefuncties
Tijd tijdens bedrijf opvragen
Druk tijdens het garingsproces op de toets
Klok q .
Op het display 1 verschijnt enkele seconden de
tijd.
Vermogensniveau tijdens bedrijf opvragen
Druk tijdens het garingsproces op de toets Magnetron 6 . Op het display 1 verschijnt enkele
seconden het geactiveerde vermogen.
- 69 -
Page 73

Garings- of ontdooiproces
onderbreken/afbreken
• Druk één keer op de toets Stop e
om een garings- of ontdooiproces te onderbreken. Het apparaat onderbreekt het proces en
stopt de nog resterende tijd. Druk op de toets
Start/snelstart r om het proces voort te
zetten.
• Druk twee keer op de toets Stop e ,
om een garingsproces af te breken. Het apparaat keert dan weer terug naar stand-by.
Koken en gaar laten worden
Opmerking
Deze magnetron heeft een afkoelfunctie: Dat wil
zeggen: na een garings- of grillproces dat minstens 2 minuten duurt, loopt de ventilator van het
apparaat nog ca. 3 minuten na. Dit is geen storing
van het apparaat! Het snellere afkoelen draagt bij
aan een langere levensduur van het apparaat.
Magnetronmodus
Vermogen kiezen
2 Druk op de toets Magnetron 6 .
Op het display 1 verschijnt “900” (900 Watt
vermogen).
2 Stel met de draaiknop r het gewenste
vermogen in.
3. Druk op de toets Start/snelstart r om
het ingestelde vermogen te bevestigen.
Gaartijd instellen
Nadat het vermogen is gekozen, stelt u de gewenste
gaartijd in:
• Draai de draaiknop r tot de gewenste
gaartijd is ingesteld.
De standen voor de tijdsinstelling van de
draaiknop r zijn als volgt:
• van 0 sec. tot 5 min: in stappen van 10 sec.
• van 5 tot 10 min: in stappen van 30 sec.
• van 10 tot 30 min: in stappen van 1 min.
• van 30 tot 95 min: in stappen van 5 min.
Invoerproces afbreken/beëindigen
Druk één keer op de toets Stop e om een
invoerproces af te breken en te beëindigen. Het
apparaat keert dan weer terug naar stand-by.
Opmerking
Op de deur of de behuizing van de magnetron
kunnen zich tijdens een garingsproces waterdruppels vormen. Dit is normaal en duidt niet op een
storing van de magnetron. Nadat de magnetron
is afgekoeld veegt u het vocht met een droge
doek af.
Brandgevaar!
Gebruik nooit de grillstandaard t of andere me-
talen voorwerpen wanneer u de magnetronfunctie
van de magnetron gebruikt. Metaal reflecteert de
microgolfstraling en laat zodoende vonken ontstaan. Dat kan brand veroorzaken en het apparaat
onherstelbaar beschadigen!
Garingsproces starten
Wanneer u het vermogen en de gaartijd hebt
ingesteld, kunt u het garingsproces starten:
Druk voor het starten van het garingsproces op de
toets Start/snelstart r . Op het display 1 ver-
schijnt het symbool voor magnetronmodus . De
ingestelde tijd loopt terug. Wanneer de ingestelde
tijd is verstreken, verschijnt afwisselend “End” en
“Hot” op het display 1. Er klinkt een aantal keren
achtereen een geluidssignaal.
- 70 -
Page 74

Snelstart 1
Draai in de stand-bymodus de draaiknop r
naar rechts en stel de gewenste gaartijd in. Start
het garingsproces met 900 W vermogen door een
druk op de toets Start/snelstart r .
Snelstart 2
Met deze functie kunt u onmiddellijk 30 seconden
lang (of langer, tot maximaal 95 minuten) bij een
vermogen van 900 W met de garing beginnen.
• Druk één keer op de toets Start/snelstart r
. Op het display 1 verschijnt het symbool
voor magnetronmodus , en “00:30”. De
magnetron start het garingsproces gedurende
30 seconden. De tijd telt terug naar 0.
Wanneer u langer dan 30 seconden wilt garen,
drukt u zo vaak op de toets Start/snelstart r ,
tot de gewenste tijd is bereikt.
De tijdniveaus zijn als volgt ingedeeld:
• van 30 sec. tot 5 min: in stappen van 30 sec.
• van 5 min. tot 95 min: in stappen van 1 min.
Grillfunctie
Brandgevaar!
Gebruik bij de grillfuncties in geen geval afdekkingen of niet-hittebestendig servies, omdat deze
kunnen smelten of in brand kunnen raken!
Opmerking
Gebruik voor het grillen altijd de grillstandaard t.
Zo krijgt u een optimaal grillresultaat. Plaats de
grillstandaard t altijd op het draaiplateau 3.
Er zijn 3 grillfuncties:
• Grillfunctie “Bovenhitte” (Gr 1):
De hitte komt bij deze functie alleen van boven.
Alleen de bovenste grill is geactiveerd. Daardoor
is deze grillfunctie geschikt voor het bakken van
broodjes en voor gratins.
• Grillfunctie “Onderhitte” (Gr 2):
De hitte komt bij deze functie alleen van onderen.
Alleen de onderste grill is geactiveerd. Daardoor
is deze grillfunctie geschikt voor gerechten of
levensmiddelen die van onderaf moeten worden
gegaard/gegrilld.
• Grillfunctie “Boven- en onderhitte” (Gr 3):
De hitte komt bij deze functie van boven en van
onderen. De bovenste en de onderste grill zijn
geactiveerd. Daardoor is deze grillfunctie
geschikt voor dunne plakken vlees, steaks,
hamburgers, worstjes of stukken kip.
1. Druk één keer op de toets Grill 7 om
de grillfunctie te activeren.
Op het display 1 verschijnt het symbool voor
de grillfunctie “Bovenhitte” en
“Gr 1”.
2. Stel met de draaiknop r de gewenste
grillfunctie in:
“Gr 1” voor bovenhitte,
“Gr 2” voor onderhitte,
“Gr 3” voor boven- en onderhitte.
Bevestig uw keuze door een druk op de toets
Start/snelstart r .
3. Stel met de draaiknop r de gewenste
gaartijd in. De maximaal instelbare gaartijd is
95 minuten.
4. Druk voor het starten van de grillfunctie op de
toets Start/snelstart r .
Op het display 1 verschijnt het symbool voor de
gekozen grillfunctie / / . De ingestelde
tijd loopt terug. Wanneer de ingestelde tijd is verstreken, verschijnt afwisselend “End” en “Hot” op
het display 1. Er klinkt een aantal keren achtereen
een geluids-signaal.
- 71 -
Page 75

Combinatie-garingsproces “Grill”
Deze functie combineert de grillfunctie met de
normale magnetronwerking. Gedurende dit gecombineerde proces wordt een bepaalde tijd voor
het gaar laten worden en een resterende tijd voor
het grillen automatisch en in een doorgaand proces
uitgevoerd. Het omschakelmoment van het apparaat kunt u dankzij een zachte klik waarnemen.
Brandgevaar!
Gebruik nooit de grillstandaard t of andere meta-
len voorwerpen wanneer u de magnetron in het
combinatie-garingsproces gebruikt. Metaal reflecteert de microgolfstraling en laat zodoende vonken ontstaan. Dat kan brand veroorzaken en het
apparaat onherstelbaar beschadigen!
Gebruik bij de combinatie-garingsprocessen
“Grill” in geen geval afdekkingen of niet-hittebestendig servies, omdat deze kunnen smelten of in
brand kunnen raken!
Er zijn 4 combinaties beschikbaar:
• Combinatie 1 (C 1):
Bij combinatie 1 is het magnetronaandeel 30 %
en het grillaandeel 70 % van de gaartijd. Dit is
bijv. geschikt voor vis of gratins. De magnetronfunctie en de grillfunctie “Bovenhitte” worden
gebruikt.
• Combinatie 2 (C 2):
Bij combinatie 2 is het magnetronaandeel 55 %
en het grillaandeel 45 % van de gaartijd.
Dit is bijv. geschikt voor omeletten, pudding of
lasagne. De magnetronfunctie en de grillfunctie
“Bovenhitte” worden gebruikt.
• Combinatie 3 (C 3):
Bij combinatie 3 is het magnetronaandeel 30 %
en het grillaandeel 70 % van de gaartijd.
Dit is bijvoorbeeld geschikt voor aardappels.
De magnetronfunctie en de grillfunctie “Bovenen onderhitte” worden gebruikt.
• Combinatie 4 (C 4):
Bij combinatie 4 is het magnetronaandeel 55 %
en het grillaandeel 45 % van de gaartijd.
Dit is bijvoorbeeld geschikt voor gevogelte.
De magnetronfunctie en de grillfunctie “Bovenen onderhitte” worden gebruikt.
1. Druk één keer op de toets Combinatie magne-
tron-grill 8 om combinatie 1 (C 1) te
activeren. Op het display 1 verschijnen ,
en “C 1”.
2. Stel met de draaiknop r de gewenste
combinatie in:
“C 1” voor combinatie 1,
“C 2” voor combinatie 2,
“C 3” voor combinatie 3,
“C 4” voor combinatie 4.
Bevestig uw keuze door een druk op de toets
Start/snelstart r .
3. Stel met de draaiknop r de gewenste
gaartijd in. De maximaal instelbare gaartijd is
95 minuten.
4. Druk voor het starten op de toets Start/
snelstart r .
Op het display 1 verschijnen de symbolen van de
gebruikte garingsprocessen , , . De ingestelde tijd loopt terug. Wanneer de ingestelde tijd
is verstreken, verschijnt afwisselend “End” en “Hot”
op het display 1. Er klinkt een aantal keren achtereen een geluidssignaal.
- 72 -
Page 76

Heteluchtmodus
Bij het gaar laten worden met hete lucht circuleert
er hete lucht in de garingsruimte. Hete lucht is bij
uitstek geschikt voor het bereiden van soufflés of
knapperige levensmiddelen. U kunt een temperatuur
van 110°C - 200°C en een duur van max.
95 minuten instellen.
1. Druk op de toets Hetelucht 0 . Op het
display 1 verschijnt “200C” (= 200°C) en
het symbool voor de heteluchtfunctie .
2. Stel met de draaiknop r de gewenste
temperatuur in en bevestig uw keuze door een
druk op de toets Start/snelstart r .
3. Stel met de draaiknop r de gewenste
gaartijd in.
4. Druk voor het starten van het garingsproces
op de toets Start/snelstart r .
Op het display 1 verschijnt het symbool voor de
heteluchtfunctie . De ingestelde tijd loopt terug.
Wanneer de ingestelde tijd is verstreken, verschijnt
afwisselend “End” en “Hot” op het display 1.
Er klinkt een aantal keren achtereen een geluidssignaal.
Heteluchtmodus met voorverwarmen
U kunt de magnetron ook voorverwarmen voordat
u een garingsproces start:
1. Kies de gewenste temperatuur door één keer
op de toets Hetelucht 0 te drukken en
met de draaiknop r de temperatuur in
te stellen. Bevestig deze instelling NIET door
een druk op de toets Start/snelstart r .
2. Druk om het voorverwarmen te starten op de
toets Hetelucht 0 . Op het display 1
verschijnt “30:00” en het symbool voor heteluchtmodus knippert. De tijd loopt terug.
Zodra de ingestelde temperatuur is bereikt,
klinken er geluidssignalen en stopt de tijd.
3. Open de deur en plaats het te garen levensmiddel in de garingsruimte.
4. Stel de temperatuur in door de draaiknop r
te draaien en bevestig de temperatuur door
een druk op de toets Start/snelstart r .
5. Stel met de draaiknop r de gewenste
gaartijd in. De maximaal instelbare gaartijd
is 95 minuten.
6. Druk voor het starten op de toets Start/snelstart r .
Op het display 1 wordt het symbool voor de
heteluchtfunctie permanent weergegeven. De
ingestelde tijd loopt terug. Wanneer de ingestelde
tijd is verstreken, verschijnt afwisselend “End” en
“Hot” op het display 1. Er klinkt een aantal keren
achtereen een geluids-signaal.
- 73 -
Page 77

Combinatie-garingsproces “Hetelucht”
Deze functie combineert de heteluchtfunctie met
de normale magnetronwerking. Daardoor wordt bijvoorbeeld vlees sappig, mals en toch krokant.
Brandgevaar!
Gebruik nooit de grillstandaard t of andere meta-
len voorwerpen wanneer u de magnetron in het
combinatie-garingsproces gebruikt. Metaal reflecteert de microgolfstraling en laat zodoende vonken ontstaan. Dat kan brand veroorzaken en het
apparaat onherstelbaar beschadigen!
1. Druk op de toets Combinatie magnetronhetelucht 9 . Op het display 1
verschijnen de vooringestelde temperatuur
“200C” en de symbolen en .
2. Kies de gewenste temperatuur met behulp van
de draaiknop r : 110°C, 140°C,
170°C of 200°C. Bevestig uw keuze door
een druk op de toets Start/snelstart r .
3. Stel met de draaiknop r de gewenste
gaartijd in. De maximale gaartijd
bedraagt 95 minuten. Bevestig de ingestelde
gaartijd door een druk op de toets Start/snelstart r .
Het combinatieproces start. Op het display 1 ver-
schijnen de symbolen voor het combinatie-garingsproces “Hetelucht” , . De ingestelde tijd
loopt terug. Wanneer de ingestelde tijd is verstreken, verschijnt afwisselend “End” en “Hot” op het
display 1. Er klinkt een aantal keren achtereen een
geluidssignaal.
Automatische programma's
Voor levensmiddelen die moeten worden bereid
met automatische programma's, is het niet nodig de
duur van het garingsproces en de vermogensstand
in te voeren. Het is belangrijker dat u invoert welke
soort levensmiddelen gegaard of gekookt moet worden, alsook het gewicht van deze levensmiddelen.
Brandgevaar!
Gebruik bij programma's met ingeschakelde grillfunctie (A-01, A-02, A-03, A-04, A-05) in geen geval
afdekkingen of niet hittebestendig servies, omdat
deze kunnen smelten of in brand kunnen raken!
Opmerking
De magnetron berekent de tijd/vermogensstand
voor verse levensmiddelen. Diepgevroren levensmiddelen worden met de door de magnetron berekende tijden niet gaar (uitgezonderd bij het
automatische programma “Pizza”).
In het voorkomende geval ontdooit u de levensmiddelen eerst met het ontdooi-programma (zie
het hoofdstuk “Ontdooien”).
Menu Automatische programma's
starten
1. Draai de draaiknop r (in de stand-bystand) langzaam naar links om het menu met
automatische programma's op te roepen. Op het
display 1 verschijnt een nummer (bijv. “A - 02”
voor automatisch programma 2 (varkensvlees)
en het symbool “Varken”. Kies door de draaiknop r te draaien het passende automatische programma voor het levensmiddel.
Opmerking
Wanneer u door de draaiknop naar links te draaien
r in het menu met automatische programma's
bent gekomen, kunt u vervolgens door naar
rechts te draaien de automatische programma's in
de volgorde A01, A02, A03... selecteren.
- 74 -
Page 78

Dis-
Symbool
play
A-01 Rundvlees 200 - 1400 g
A-02
A-03 Gevogelte 400 - 1400 g
Levens-
middel
Varkens-
vlees
Gewicht
200 - 1400 g
2. Bevestig uw keuze door een druk op de toets
Start/snelstart r .
3. Stel met de draaiknop r het gewicht
in en bevestig dit door een druk op de draaiknop/de toets Start/snelstart r .
Het garingsproces start. Op het display 1 verschij-
nen de symbolen van de garings- en grillfuncties die
kunnen worden gebruikt voor het automatische
programma: magnetronfunctie , grillfunctie
bovenhitte , grillfunctie onderhitte .
De berekende tijd loopt terug.
A-04 Vis 200 - 1200 g
*P1 150-450 g
A-05 Pizza
A-06
A-07 Aardappels 100 - 800 g
A-08 Opwarmen 300 - 700 g
A-09 Dranken 200 - 500 ml
A-10 Voorgerecht 300 / 500 g
A-11
A-12
Fruit/
groente
Ontdooien
op gewicht
Ontdooien
op tijd
P2 150-450 g
P3 150-450 g
100 - 1000 g
-
-
Opmerking
Om tot een gelijkmatig kook- of garingsresultaat
te komen, moeten de gerechten na 2/3 van de
gaartijd worden omgedraaid. De magnetron
stopt na deze tijd automatisch, er klinken 4 geluidssignalen en op het display 1 verschijnt “Turn”.
Dis-
Symbool
play
A-01 Rundvlees
A-02 Varkensvlees
A-03 Gevogelte
A-04 Vis
• Draai de gerechten om. Ga voorzichtig te werk
met de mogelijk al hete gerechten.
• Druk op de toets Start/snelstart r om het
garingsproces voort te zetten.
Levens-
middel
Omdraaien
na...
2/3 van
de tijd
2/3 van
de tijd
2/3 van
de tijd
2/3 van
de tijd
*Verdere informatie over de pizza-programma's
vindt u in het hoofdstuk “Pizza bakken”.
- 75 -
Page 79

Opmerking
Wanneer u de etenswaren niet wilt omdraaien,
wacht u na de geluidssignalen gewoon af. Het apparaat vervolgt het garingsproces automatisch. Wij
bevelen het omkeren van de etenswaren wel aan.
Hierdoor wordt de etenswaren gelijkmatiger gaar.
A-06
A-07 Aardappels
Fruit/
groente
Magnetronmo-
dus met 900 W
vermogen
Magnetron
modus met
900 W
vermogen
Opmerking
Wanneer het gerecht na afsluiting van het automatische programma niet goed is doorgegaard,
gaart u het als volgt na:
• Gebruik voor het nagaren het in de tabel aangegeven garingsproces. Start dit proces, laat
het enkele minuten werken en controleer het
garingsresultaat.
• Bij het nagaren van een pizza met behulp van
het automatische programma “P2” onderbreekt u het garingsproces door te drukken
op de knop Stop/kinderbeveiliging ,
zodra de pizza voldoende is nagegaard.
Dis-
Symbool
play
A-01 Rundvlees
A-02
A-03 Gevogelte
A-04 Vis
A-05 Pizza
Levens-
middel
Varkens-
vlees
Nagaren
met...
Combinatie-
garingsproces
“Grill” - C3
Combinatie-
garingsproces
“Grill” - C3
Combinatie-
garingsproces
“Grill” - C3
Combinatie-
garingsproces
“Grill” - C3
automatische
programma
“Pizza” - P2
Magnetronmo-
A-08 Opwarmen
A-09 Dranken
A-10 Voorgerecht
A-11
A-12
Ontdooien
op gewicht
Ontdooien
op tijd
dus met 900 W
vermogen
Magnetron
modus met 900
W vermogen
Magnetron
modus met 900
W vermogen
Magnetron-
modus met 100
W vermogen
Magnetron-
modus met 100
W vermogen
Letselgevaar!
Het draaiplateau 3 is na een garingsproces met
grill zeer heet! Gebruik daarom beslist ovenwanten of hittebestendige handschoenen als u het
draaiplateau uit de kookruimte haalt.
Tip:
Let op: de grootte, vorm en soort van de levensmiddelen zijn medebepalend voor het kookresultaat.
Toepassingsvoorbeeld 1:
Ga als volgt te werk wanneer u 400 g groente of
fruit wilt garen:
1. Draai de draaiknop r (in de stand-bystand) langzaam naar links, tot “A-06” op het
display 1 verschijnt en bevestig uw keuze door
een druk op de knop Start/snelstart r .
2. Stel met de draaiknop r het gewicht
“400” in.
- 76 -
Page 80

3. Druk op de toets Start/snelstart r om
het garingsproces te starten.
Toepassingsvoorbeeld 2:
Ga als volgt te werk wanneer u 300 ml water wilt
verhitten:
1. Draai de draaiknop r (in de stand-bystand) langzaam naar links, tot “A-09” op het
display 1 verschijnt en bevestig uw keuze
door een druk op de knop Start/snelstart r
.
2. Stel met de draaiknop r “300” in.
3. Druk op de toets Start/snelstart r om
het garingsproces te starten.
Toepassingsvoorbeeld 3:
Ga als volgt te werk als u 300 ml voorgerecht wilt
verwarmen:
1. Draai de draaiknop r (in de stand-bystand) langzaam naar links, tot “A-10” op het
display 1 verschijnt en bevestig uw keuze door
een druk op de knop Start/snelstart r .
2. Omdat “300” als eerste optie op het display 1
verschijnt, drukt u op de toets Start/snelstart r
om het garingsproces te starten.
• “P-01” voor diepgevroren pizza,
temperatuur ca. -18 graden,
gewicht 150 g–450 g
(“P-01” verschijnt op het display 1).
• “P-02” voor gekoelde pizza,
temperatuur ca. 5 graden,
gewicht 150 g–450 g
(“P-02” verschijnt op het display 1).
• “P-03” voor verse pizza,
temperatuur ca. 20 graden,
gewicht 150 g–450 g
(“P-03” verschijnt op het display 1).
4. Bevestig uw keuze door een druk op de toets
Start/snelstart r .
5. Kies nu het gewenste gewicht met de draaiknop r en bevestig uw keuze door een
druk op de toets Start/snelstart r .
Het garingsproces start.
Opmerking
Wanneer u pizza bereidt, kunt u deze direct op
het draaiplateau 3 leggen. Zo wordt de pizza
extra krokant. Let erop dat de rand van de pizza
tijdens het garingsproces niet tegen de wanden
van de garingsruimte aankomt.
Pizza bakken
Met het automatische programma “Pizza” kunt u
krokante pizza in de magnetron bereiden. Hierbij
hebt u de keus tussen de pizza-programma's
“P-01” (diepgevroren pizza), “P-02” (gekoelde
pizza) en “P-03” (verse pizza).
1. Draai de draaiknop r (in de stand-bystand) langzaam naar links, tot “A-05” op het
display 1 verschijnt.
2. Druk op de toets Start/snelstart r .
3. Kies met behulp van de draaiknop r
het gewenste pizza-programma:
Toepassingsvoorbeeld:
Ga als volgt te werk wanneer u een diepvriespizza
van 450 g gaar wilt laten worden:
1. Draai de draaiknop r (in de stand-bystand) langzaam naar links, tot “A-05” op het
display 1 verschijnt.
2. Druk op de toets Start/snelstart r .
3. Kies met behulp van de draaiknop r
het programma “P-01”.
4. Druk op de toets Start/snelstart r .
5. Kies met de draaiknop r het gewicht
“450”.
6. Druk op de toets Start/snelstart r om
het garingsproces te starten. Het apparaat
berekent automatisch de benodigd tijd.
- 77 -
Page 81

Ontdooien
De volgende gewichten kunnen worden ingesteld:
Ontdooien op gewicht
Opmerking
Leg de te ontdooien levensmiddelen altijd op servies dat geschikt is voor magnetrons. Nooit direct
op het draaiplateau 3!
Met deze functie kunt u probleemloos vlees,
gevogelte, vis, fruit/groente en pizza ontdooien. De
ontdooitijd en het vermogensniveau worden na de
invoer van het gewicht automatisch berekend en
ingesteld.
1. Draai in de stand-bystand de draaiknop r
tegen de wijzers van de klok in, tot op het
display 1 “A-11” verschijnt en knippert
(zie het hoofdstuk “Automatische programma's”).
2. Druk op de toets Start/snelstart r .
3. Kies nu door de draaiknop r te draaien
het te ontdooien levensmiddel.
Op het display 1 verschijnt:
“d-01” en voor “rundvlees”
“d-02” en voor “varkensvlees”
“d-03” en voor “gevogelte”
“d-04” en voor “vis”
“d-05” en voor “pizza”
“d-06” en voor “fruit/groente”
“d-07” en voor “aardappels”
4. Wanneer het gewenste levensmiddel op het
display 1 verschijnt, drukt u op de toets
Start/snelstart r .
5. Stel door de draaiknop r te draaien
het gewicht in.
“d-01”/ / “rundvlees” 100 - 1800g
“d-02”/ / “varkensvlees” 100 - 1800g
“d-03”/ / “gevogelte” 100 - 1800g
“d-04”/ / “vis” 100 - 1800g
“d-05”/ / “pizza” 100 - 900g
“d-06”/ /“fruit/groente” 100 - 900g
“d-07”/ / “aardappels” 100 - 900g
5. Wanneer het gewenste gewicht op het display 1 verschijnt, drukt u op de toets Start/
snelstart r . Het apparaat berekent de
benodigde ontdooitijd automatisch.
Opmerking
Voor een optimaal ontdooiresultaat moeten de
etenswaren tijdens het ontdooien worden gekeerd. Het apparaat herinnert u aan het keren
doordat er geluidssigalen klinken en op het display 1 “turn” verschijnt. Open de magnetrondeur, draai de etenswaren om en sluit de deur
weer. Druk op de toets Start/snelstart r om
het ontdooien te vervolgen.
Wanneer u de etenswaren niet wilt omdraaien,
wacht u na de geluidssignalen gewoon af. Het
apparaat vervolgt het ontdooien automatisch. Wij
bevelen het omkeren van de etenswaren wel aan.
Hierdoor wordt de etenswaren gelijkmatiger ontdooid.
- 78 -
Page 82

Ontdooien op tijd
Opmerking
Leg de te ontdooien levensmiddelen altijd op servies dat geschikt is voor magnetrons. Nooit direct
op het draaiplateau 3!
1. Draai in de stand-bystand de draaiknop r
tegen de wijzers van de klok in, tot op
het display 1 “A-12” en verschijnt.
2. Druk op de toets Start/snelstart r .
3. Stel met de draaiknop r de gewenste
tijd in.
4. Druk op de toets Start/snelstart r om
het ontdooien te starten. De tijd telt terug naar 0.
Recepten
Gehaktballen
• Vorm steeds van ca. 125g rundergehakt
een gehaktbal (diameter ca. 75mm, hoogte
ca. 35mm).
• Verdeel de gehaktballen gelijkmatig over het
draaiplateau 3.
Bereiding
Het beste resultaat bereikt u wanneer u afwisselend
de hetelucht- en de magnetronfunctie gebruikt.
Wacht steeds tot het ingestelde garingsproces is
afgelopen en stel dan het volgende proces in.
Opmerking
Voor een optimaal ontdooiresultaat moeten de
etenswaren tijdens het ontdooien worden gekeerd. Het apparaat herinnert u aan het keren
doordat er geluidssigalen klinken en op het display 1 “turn” verschijnt. Open de magnetrondeur, draai de etenswaren om en sluit de deur
weer. Druk op de toets Start/snelstart r
om het ontdooien te vervolgen.
Wanneer u de etenswaren niet wilt omdraaien,
wacht u na de geluidssignalen gewoon af. Het
apparaat vervolgt het ontdooien automatisch. Wij
bevelen het omkeren van de etenswaren wel aan.
Hierdoor wordt de etenswaren gelijkmatiger ontdooid.
1. Hetelucht 200°C, 4:00 min.
2. Magnetron 900 W vermogen, 5:30 min.
3. Hetelucht 200°C, 2:00 min
(al naar gelang de persoonlijke smaak kan
ook een tijd van maximaal 4:00 min. worden
ingesteld).
Afbakken van kant-en-klare
diepvriesbroodjes
• Voor het afbakken van broodjes kiest u de
heteluchtfunctie.
• Leg 3-4 broodjes op het draaiplateau 3.
De magnetron hoeft niet te worden voorverwarmd.
Kies de volgende instelling voor het afbakproces:
• Hetelucht 170°C, duur: 12 minuten
Wanneer u meteen hierna nog meer broodjes wilt
afbakken, stelt u een ca. 1-2 minuten kortere tijd in,
omdat het apparaat al is voorverwarmd.
- 79 -
Page 83

Aardappelgratin
Ingrediënten
• 750 g vastkokende geschilde aardappelen
• 300 g room
• 100 g geraspte kaas met een vetgehalte van
25% tot 30%.
• Kruiden naar smaak (bijv. zout/peper)
Gebruik een voor de magnetron geschikte ronde
schaal met deksel, met een hoogte van 5 tot 6 cm
en een diameter van ca. 22 cm.
Bereiding
• Snijd de aardappels in ca. 3 – 4 mm dikke
schijfjes.
• Leg ongeveer de helft van de aardappels
dakpansgewijs in de ovenschaal
• Bestrooi de aardappels met ca. de helft van de
kaas.
• Voeg de helft van de kruiden toe, en ca. 150 g
room.
• Leg de rest van de aardappelschijfjes eveneens
dakpansgewijs eroverheen.
• Verdeel de rest van de kaas over de aardappels
en giet de rest van de room eroverheen.
• Strooi de rest van de kruiden over de gratin.
• Dek de ovenschaal af met de deksel en plaats
hem midden op het draaiplateau 3.
Bereiding
Het beste resultaat bereikt u wanneer u afwisselend
de hetelucht- en de magnetronfunctie gebruikt.
Wacht steeds tot het ingestelde garingsproces is
afgelopen en stel dan het volgende proces in.
1. Magnetron 900 W vermogen, 10:00 min.
2. Hetelucht 200 °C, 13:00 min.
3. Magnetron 900 W vermogen, 10:00 min.
Muffins
Ingrediënten
Dit recept is goed voor ca. 10 tot 20 muffins.
• Bakmargarine (vetgehalte 80%) of gezouten
roomboter
• 170 g kristalsuiker (max. korrelgrootte 0,3 mm)
• 3 eieren (55 - 60 g, grootte M)
• 225 g tarwemeel
• 7 g bakpoeder
• 0,25 g zout
Bereiding
• Meng alle ingrediënten goed door elkaar.
• Doe het muffindeeg in papieren bakvormpjes
die in de winkel te koop zijn (diameter ca.
45 mm, hoogte ca. 28 mm)
• Verwarm de magnetron met de heteluchtfunctie
voor op 170°C.
Opmerking:
Als er meerder bakbeurten nodig zijn (dit hangt
af van het aantal muffins), is voorverwarmen
maar één keer nodig.
• Verdeel muffins gelijkmatig over het draaipla-
teau 3.
• Kies de volgende instelling voor het bakproces:
Hete lucht 170°C, duur: 12 minuten
Voorverwarmen is niet nodig.
- 80 -
Page 84

Courgettesoep
Ingrediënten
• 1 courgette (ca. 250 g)
• 80 ml water
• 2 theelepels groentebouillonpoeder
• ca. 150 g roomkaas (met kruiden)
• 100 ml room
Bereiding
• Snijd de courgette in kleine blokjes.
• Doe de courgette, het water en het groentebouillonpoeder in een voor de magnetron geschikte
kom of schaal.
• Start een magnetron-garingsproces met 700
watt vermogen gedurende ca. 6 minuten.
• Voeg daarna de roomkaas en de room toe.
• Start vervolgens een tweede magnetron-garingsproces gedurende 10 minuten bij 600 watt.
Opmerking:
U kunt de soep voor het opdienen met een
staafmixer pureren. Zo krijgt de soep een
romige consistentie.
Choco-appeltaart
Ingrediënten
• 125 g boter
• 125 g suiker
• 1 pakje vanillesuiker
• 2 eieren
• 125 g bloem
• 2 el cacaopoeder
• 1/2 pakje bakpoeder
• 1 appel
• Poedersuiker
Bereiding
• Meng de suiker, de zachte boter, de vanillesuiker,
de eieren, de bloem, het bakpoeder en het cacaopoeder tot een deeg.
• Schil de appel en verwijder het klokhuis. Snijd
de appel in kleine stukjes.
• Leg de stukjes appel onder het deeg.
• Doe het deeg in een voor de magnetron geschikte vorm.
• Laat de taart bij 900 watt ca. 9 minuten in de
magnetron garen.
• Laat de taart na het garen iets afkoelen, voordat
u deze uit de vorm stort.
• Strooi poedersuiker over de taart.
- 81 -
Opmerking:
Afhankelijk van de vorm van de taart kan de
gaartijd iets variëren.
Page 85

Gehaktbrood (meatloaf)
Ingrediënten
• 500 g gehakt (half-om-half)
• 1/2 ui
• 1 ei
• 1/2 boterham
• Zout, peper, paprikapoeder
Reiniging en onderhoud
Letselgevaar!
Schakel de magnetron vóór het schoonmaken uit
en haal de stekker uit het stopcontact. Anders
bestaat het gevaar voor een elektrische schok!
Voor de saus:
• 75 ml water
• 1 ui
• 2 eieren
• 1 boterham
• Zout, peper, paprikapoeder
• Eventueel een beetje sausbindmiddel
Bereiding
• Week de boterham in een beetje water.
• Snipper de ui.
• Meng het gehakt, de gesnipperde ui, de eieren
en de geweekte boterham tot een gehaktbrooddeeg en kruid het met zout en peper.
• Maak een gehaktbrood, doe het in een voor de
magnetron geschikte vorm, bestrooi het met paprikapoeder en dek het af.
• Laat het gehaktbrood ca. 18 – 22 minuten bij
700 watt garen.
• Schep na het garen 2 el vleesjus uit de vorm en
meng dat met het water, de tomatenketchup en
de mosterd tot een saus.
• Giet de saus over het gehaktbrood en gaar dit
met open deksel met de grill-combinatie 1 (C 1)
gedurende ca. 10 minuten.
• Zo nodig bindt u de saus met wat sausbindmiddel.
Het apparaat mag in geen geval worden
ondergedompeld in water of andere vloeistoffen. Hierdoor kan levensgevaar ontstaan
door een elektrische schok en het apparaat
kan beschadigd raken.
• Houd de magnetron van binnen altijd schoon.
• Neem als voedselspatten of gemorste vloeistoffen aan de binnenwanden van de magnetron zitten, deze met een vochtige doek af.
• Gebruik een mild afwasmiddel als de magnetron vuiler blijkt te zijn.
• Gebruik geen schoonmaaksprays en andere
scherpe schoonmaakmiddelen, want deze
kunnen vlekken, strepen of een vertroebeling
van het deuroppervlak veroorzaken.
• Maak de buitenwanden met een vochtige
doek schoon.
• Om een beschadiging van de componenten
binnenin de magnetron te voorkomen, laat u
geen water in de ventilatiesleuven 5 sijpelen.
• Verwijder regelmatig spatten of andere verontreinigingen. Maak de deur, het kijkglas aan
weerszijden, de deurafdichtingen en de aangrenzende delen met een vochtige doek
schoon. Gebruik geen schuurmiddelen.
Opmerking:
Afhankelijk van de vorm van het gehaktbrood kan de gaartijd iets variëren.
- 82 -
Page 86

• Als op of rond de buitenkant van de deur
wasem neerslaat, veeg dit dan met een zachte
doek af. Dit kan gebeuren als de magnetron
onder zeer vochtige omstandigheden gebruikt
wordt.
• Reinig ook het draaiplateau 3 regelmatig.
Was deze af in warm zeepsop.
• Reinig de grillstandaard t in warm afwaswater
en droog hem goed af.
• Verhelp regelmatig geurtjes. Plaats een diepe
magnetronschaal met een kopje gevuld met
water en sap en schil van een citroen in de
magnetron. Verwarm deze 5 minuten. Grondig
schoonvegen en met een zachte doek droog
wrijven.
• Mocht het nodig zijn om de lamp in de magnetron te vervangen, laat u dit dan door een
dealer doen of vraag het aan onze service.
Problemen oplossen
Het display 1 geeft niets aan.
• De stekker steekt niet in het stopcontact.
Controleer de stekker.
• Het stopcontact is defect. Probeer een ander
stopcontact.
• Het display 1 is defect. Neem contact op met
het servicecentrum.
Het draaiplateau 3 maakt harde geluiden
tijdens het draaien.
• Het draaiplateau 3 ligt niet correct op de as.
Leg het draaiplateau 3 correct in de kookruimte.
• De kleine rollen 4 en/of de bodem van de
kookruimte zijn vuil. Reinig de rollen 4 en
de bodem.
Het display 1 geeft “E01” aan en er klinken
geluidssignalen.
• De magnetron is oververhit. Breek meteen het
lopende programma af. Haal de netstekker
uit het stopcontact, open de magnetrondeur
en laat het apparaat afkoelen.
Het display 1 geeft “E02” aan en er klinken
geluidssignalen.
• Er is een sensorfout. Onderbreek het programma
en laat het apparaat afkoelen. Start de magnetron daarna opnieuw. Mocht de fout zich opnieuw voordoen, neem dan contact op met
de klantendienst.
• Er doet zich een fout voor bij het verwarmen
van het apparaat. Onderbreek het programma
en laat het apparaat afkoelen. Start de magnetron daarna opnieuw. Mocht de fout zich opnieuw voordoen, neem dan contact op met de
klantendienst.
Het apparaat reageert niet op het indrukken
van de toetsen.
• Het kinderslot is geactiveerd. Schakel het
kinderslot uit ( zie hoofdstuk “Bediening”).
Het apparaat start niet met de procedure voor
garing/koken.
• De deur zit niet goed dicht. Doe de deur goed
dicht.
Het display 1 geeft “E03” aan en er klinken
geluidssignalen.
• De storingsbeveiliging van de magnetron is
geactiveerd door een kortsluiting of een
nullastspanning. Onderbreek het programma
en haal de netstekker uit het stopcontact. Verhelp indien mogelijk het probleem, bijv. metaal
in de kookruimte, dat bij gebruik van de magnetronfunctie in het voornoemde probleem kan
resulteren. Neem anders contact op met de
klantendienst.
- 83 -
Page 87

De verlichting in de magnetron werkt niet.
• De lamp is mogelijk defect. Neem contact op
met de klantenservice.
Letselgevaar!
• Probeer nooit zelf de lamp te vervangen.
Bij het openen van de behuizing kan energie
in de vorm van microgolven vrijkomen.
Milieurichtlijnen
Deponeer het apparaat in geen geval
bij het normale huisvuil. Dit product is
onderworpen aan de Europese richtlijn
2012/19/EU.
Voer het apparaat af via een erkend afvalverwerkingsbedrijf of via uw gemeentereiniging.
Neem de momenteel geldende voorschriften in
acht.
Neem in geval van twijfel contact op met uw
gemeentereinigingsdienst.
Voer alle verpakkingsmaterialen op een
milieuvriendelijke manier af.
Garantie en service
U heeft op dit apparaat 3 jaar garantie vanaf de
aankoopdatum. Het apparaat is met de grootst mogelijke zorg vervaardigd en voorafgaand aan de
levering nauwkeurig gecontroleerd. Bewaar a.u.b.
de kassabon als aankoopbewijs. Als u aanspraak
wilt maken op garantie, neem dan a.u.b. telefonisch
contact op met uw servicefiliaal. Alleen op die manier is een kostenloze verzending van uw product
gegarandeerd.
De garantie geldt alleen voor materiaal- of fabricagefouten, echter niet voor transportschade, of voor onderdelen die aan slijtage onderhevig zijn, of voor beschadigingen aan breekbare delen, bijv. schakelaars
of accu's. Het product is uitsluitend bestemd voor privé-gebruik en niet voor bedrijfsmatige doeleinden.
Bij verkeerd gebruik en ondeskundige behandeling,
bij gebruik van geweld en bij reparaties die niet
door ons geautoriseerd servicefiliaal zijn uitgevoerd, vervalt de garantie.
Uw wettelijke rechten worden door deze garantie
niet beperkt.
De garantieperiode wordt niet verlengd door de
aansprakelijkheid. Dit geldt eveneens voor vervangen en gerepareerde onderdelen. Schade en gebreken die mogelijk reeds bij de aankoop aanwezig zijn, moeten direct na het uitpakken worden
gemeld, uiterlijk echter twee dagen na de dag van
aankoop. Na verstrijken van de garantieperiode
moeten alle voorkomende reparaties vergoed worden.
Service Nederland
Tel.: 0900 0400223 (0,10 EUR/Min.)
E-Mail: kompernass@lidl.nl
IAN107212
Service België
Tel.: 070 270 171 (0,15 EUR/Min.)
E-Mail: kompernass@lidl.be
IAN107212
Bereikbaarheid hotline:
Maandag t/m vrijdag van 8:00 tot 20:00 uur (CET)
Importeur
KOMPERNASS HANDELS GMBH
BURGSTRASSE 21
44867 BOCHUM
GERMANY
www.kompernass.com
- 84 -
Page 88

INHALTSVERZEICHNIS SEITE
Einleitung 87
Bestimmungsgemäßer Gebrauch 87
Lieferumfang 87
Gerätebeschreibung 87
Technische Daten 87
Wichtige Sicherheitshinweise 88
Bevor Sie beginnen 94
Grundprinzipien beim Kochen in der Mikrowelle . . . . . . . . . . . . . . . . . . . . . . . . . . . . . . . . .94
Geeignetes Kochgeschirr verwenden . . . . . . . . . . . . . . . . . . . . . . . . . . . . . . . . . . . . . . . . . . .94
Erste Inbetriebnahme 95
Gerät aufstellen . . . . . . . . . . . . . . . . . . . . . . . . . . . . . . . . . . . . . . . . . . . . . . . . . . . . . . . . . . . .95
Gerät vorbereiten . . . . . . . . . . . . . . . . . . . . . . . . . . . . . . . . . . . . . . . . . . . . . . . . . . . . . . . . . .95
Drehteller einsetzen . . . . . . . . . . . . . . . . . . . . . . . . . . . . . . . . . . . . . . . . . . . . . . . . . . . . . . . . .96
Bedienen 96
Uhr einstellen . . . . . . . . . . . . . . . . . . . . . . . . . . . . . . . . . . . . . . . . . . . . . . . . . . . . . . . . . . . . . .96
Standby-Modus . . . . . . . . . . . . . . . . . . . . . . . . . . . . . . . . . . . . . . . . . . . . . . . . . . . . . . . . . . . .97
Küchentimer einstellen . . . . . . . . . . . . . . . . . . . . . . . . . . . . . . . . . . . . . . . . . . . . . . . . . . . . . . .97
Kindersicherung . . . . . . . . . . . . . . . . . . . . . . . . . . . . . . . . . . . . . . . . . . . . . . . . . . . . . . . . . . .97
Abfragefunktionen . . . . . . . . . . . . . . . . . . . . . . . . . . . . . . . . . . . . . . . . . . . . . . . . . . . . . . . . . .97
Gar- oder Auftauvorgänge unterbrechen/abbrechen . . . . . . . . . . . . . . . . . . . . . . . . . . . . . .98
Kochen und Garen 98
Mikrowellenbetrieb . . . . . . . . . . . . . . . . . . . . . . . . . . . . . . . . . . . . . . . . . . . . . . . . . . . . . . . . .98
Grill-Funktion . . . . . . . . . . . . . . . . . . . . . . . . . . . . . . . . . . . . . . . . . . . . . . . . . . . . . . . . . . . . . .99
Kombinations-Garvorgang „Grill“ . . . . . . . . . . . . . . . . . . . . . . . . . . . . . . . . . . . . . . . . . . . .100
Heißluftbetrieb . . . . . . . . . . . . . . . . . . . . . . . . . . . . . . . . . . . . . . . . . . . . . . . . . . . . . . . . . . .101
Heißluftbetrieb mit Vorheizen . . . . . . . . . . . . . . . . . . . . . . . . . . . . . . . . . . . . . . . . . . . . . . . .101
Kombinations-Garvorgang „Heißluft“ . . . . . . . . . . . . . . . . . . . . . . . . . . . . . . . . . . . . . . . . .102
Automatik-Menü 102
Automatik-Menü starten . . . . . . . . . . . . . . . . . . . . . . . . . . . . . . . . . . . . . . . . . . . . . . . . . . . .102
Pizza backen . . . . . . . . . . . . . . . . . . . . . . . . . . . . . . . . . . . . . . . . . . . . . . . . . . . . . . . . . . . .105
Auftauen 106
Auftauen nach Gewicht . . . . . . . . . . . . . . . . . . . . . . . . . . . . . . . . . . . . . . . . . . . . . . . . . . . .106
Auftauen nach Zeit . . . . . . . . . . . . . . . . . . . . . . . . . . . . . . . . . . . . . . . . . . . . . . . . . . . . . . . .107
- 85 -
Page 89

Rezepte 107
Frikadellen . . . . . . . . . . . . . . . . . . . . . . . . . . . . . . . . . . . . . . . . . . . . . . . . . . . . . . . . . . . . . . .107
Aufbacken von Tiefkühlfertigbrötchen . . . . . . . . . . . . . . . . . . . . . . . . . . . . . . . . . . . . . . . . .107
Kartoffelgratin . . . . . . . . . . . . . . . . . . . . . . . . . . . . . . . . . . . . . . . . . . . . . . . . . . . . . . . . . . . .108
Muffins . . . . . . . . . . . . . . . . . . . . . . . . . . . . . . . . . . . . . . . . . . . . . . . . . . . . . . . . . . . . . . . . .108
Zucchinisuppe . . . . . . . . . . . . . . . . . . . . . . . . . . . . . . . . . . . . . . . . . . . . . . . . . . . . . . . . . . . .109
Schoko-Apfel-Kuchen . . . . . . . . . . . . . . . . . . . . . . . . . . . . . . . . . . . . . . . . . . . . . . . . . . . . . .109
Hackbraten . . . . . . . . . . . . . . . . . . . . . . . . . . . . . . . . . . . . . . . . . . . . . . . . . . . . . . . . . . . . . .110
Reinigung und Pflege 110
Fehlerbehebung 111
Entsorgen 112
Garantie und Service 112
Importeur 112
- 86 -
Page 90

Edelstahl-Mikrowelle
Einleitung
Herzlichen Glückwunsch zum Kauf Ihres neuen
Gerätes.
Sie haben sich damit für ein hochwertiges Produkt
entschieden. Die Bedienungsanleitung ist Bestandteil dieses Produkts. Sie enthält wichtige Hinweise
für Sicherheit, Gebrauch und Entsorgung. Machen
Sie sich vor der Benutzung des Produkts mit allen
Bedien- und Sicherheitshinweisen vertraut. Benutzen
Sie das Produkt nur wie beschrieben und für die angegebenen Einsatzbereiche. Händigen Sie alle
Unterlagen bei Weitergabe des Produkts an Dritte
mit aus.
Bestimmungsgemäßer
Gebrauch
Dieses Gerät ist zum Erhitzen und Zubereiten von
Lebensmitteln gemäß den beschriebenen Vorgehensweisen vorgesehen.
Jede Veränderung des Gerätes gilt als nicht bestimmungsgemäß und birgt erhebliche Unfallgefahren.
Für aus bestimmungswidriger Verwendung entstandene Schäden übernimmt der Hersteller keine
Haftung.
Dieses Gerät ist ausschließlich für die Benutzung in
privaten Haushalten bestimmt!
Benutzen Sie es nicht gewerblich, in Industrie- oder
Laborbereichen!
Lieferumfang
Edelstahl-Mikrowelle
Drehteller
Grillständer
Bedienungsanleitung
Kurzinformation (2 Stück)
Gerätebeschreibung
Abbildung A:
1 Display
2 Taste Türöffner
3 Drehteller
4 Rollen
5 Lüftungsschlitze
Abbildung B:
6 Taste Mikrowelle
7 Taste Grill
8 Taste Kombination Mikrowelle - Grill
9 Taste Kombination Mikrowelle - Heißluft
0 Taste Heißluft
q Taste Uhr
w Taste TIMER (Küchentimer)
e Taste Stop/Kindersicherung
r Drehregler / Taste Start/Schnellstart
Abbildung C:
t Grillständer
Technische Daten
Nennspannung: 230 - 240 V ~,
50 Hz
Maximale
Leistungsaufnahme
Mikrowelle: 1400 W
Grill: 1500 W
Heißluft: 1950 W
Maximale Leistungsabgabe
Mikrowelle: 900 W +/- 10%
Mikrowellen-Frequenz: 2450 MHz
- 87 -
Page 91

Wichtige Sicherheitshinweise
Lesen Sie die Sicherheitshinweise und die Bedienungsanleitung vor der ersten Verwendung aufmerksam
durch und heben Sie diese für den späteren Gebrauch auf.
Gefahr! / Verletzungsgefahr!
Warnung vor Verletzungen und elektrischem Schlag!
Brandgefahr!
Warnung vor Brandgefahr.
Achtung!
Warnungen vor Beschädigungen am Gerät.
Hinweis
Hinweise und Tipps zur Handhabung der Mikrowelle.
Vorsichtsmaßnahmen zur Vermeidung eines möglichen übermäßigen
Kontaktes mit Mikrowellenenergie
• Versuchen Sie nicht, das Gerät bei geöffneter Tür zu betreiben, da der Betrieb
bei geöffneter Tür zum Kontakt mit einer schädlichen Dosis Mikrowellenstrahlung führen kann. Wichtig ist hierbei auch, nicht die Sicherheitsverriegelungen
aufzubrechen oder zu manipulieren.
• Klemmen Sie nichts zwischen Gerätefront und Tür und sorgen Sie dafür, dass
sich keine Verschmutzungen oder Reinigungsmittelrückstände auf den
Dichtflächen ansammeln.
Gefahr!
• Tauchen Sie nie das Netzkabel oder den Netzstecker in Wasser oder andere
Flüssigkeiten.
• Halten Sie das Netzkabel von Hitzequellen fern. Führen Sie es nicht vor der
Mikrowellentür her. Die Hitze kann das Kabel beschädigen.
• Schütten Sie niemals Flüssigkeiten in die Lüftungsöffnungen oder die Sicherheits-Türverriegelungen. Sollte doch Flüssigkeit hineingelangen, stellen Sie die
Mikrowelle sofort aus und ziehen Sie den Netzstecker aus der Netzsteckdose.
Lassen Sie die Mikrowelle von qualifiziertem Fachpersonal überprüfen.
- 88 -
Page 92

Verletzungsgefahr!
• Wenn die Tür oder die Türdichtungen beschädigt sind, betreiben Sie die
Mikrowelle auf keinen Fall weiter. Lassen Sie sie sofort von qualifiziertem Fachpersonal reparieren.
• Versuchen Sie nie das Gerät selber zu reparieren. Durch das Abnehmen
des Gehäuses kann Mikrowellenenergie freigesetzt werden. Lassen Sie
Reparaturen nur von qualifiziertem Fachpersonal durchführen.
• Dieses Gerät kann von Kindern ab 8 Jahren und darüber und von Personen
mit reduzierten physischen, sensorischen oder mentalen Fähigkeiten oder Mangel an Erfahrung und/oder Wissen benutzt werden, wenn sie beaufsichtigt
oder bezüglich des sicheren Gebrauchs des Gerätes unterwiesen wurden und
die daraus resultierenden Gefahren verstanden haben.
• Kinder dürfen nicht mit dem Gerät spielen.
• Reinigung und Benutzer-Wartung dürfen nicht durch Kinder durchgeführt werden, es sei denn, sie sind 8 Jahre und älter und werden beaufsichtigt.
• Kinder jünger als 8 Jahre sind vom Gerät und der Anschlussleitung fernzuhalten.
• Verwenden Sie dieses Gerät nur zum bestimmungsgemäßen Gebrauch gemäß
Beschreibung in diesem Handbuch. Verwenden Sie in diesem Gerät keine ätzenden Chemikalien oder Dämpfe. Diese Mikrowelle ist speziell für Erhitzen,
Kochen, Grillen oder Trocknen von Nahrungsmitteln konstruiert.
Sie ist nicht für eine Nutzung im Industrie- oder Laborbereich konzipiert.
• Betreiben Sie die Mikrowelle nicht, wenn Netzkabel/Netzstecker beschädigt
sind. Lassen Sie Netzkabel/Netzstecker von qualifiziertem Fachpersonal austauschen, um Gefährdungen zu vermeiden.
• Halten Sie Kinder von der Mikrowellentür fern, während diese in Betrieb ist.
Verbrennungsgefahr!
• Entfernen Sie unter keinen Umständen das Mikrowellengehäuse.
• Lassen Sie die Lampe im Inneren der Mikrowelle nur von qualifiziertem Fachpersonal austauschen.
• Berühren Sie nie die Mikrowellentür, das Mikrowellengehäuse, die Lüftungsöffnungen, Zubehörteile oder das Essgeschirr direkt nach dem Grill-, Kombi- oder
Automatikmenü-Vorgang. Die Teile werden sehr heiß. Lassen Sie vor dem Reinigen die Teile abkühlen.
- 89 -
Page 93

• Achten Sie darauf, dass der Netzstecker immer gut zu erreichen ist, damit Sie
diesen im Notfall schnell vom Stromnetz trennen können.
• Personen, die einen Herzschrittmacher tragen, sollten sich vor Inbetriebnahme
der Mikrowelle bei ihrem Hausarzt über mögliche Risiken informieren.
• Lassen Sie das Netzkabel nie über den Tisch oder die Arbeitsplatte hängen.
Kinder könnten daran ziehen.
• Öffnen Sie Dosen, Popcorntüten etc. nach dem Erhitzen immer so, dass die
Öffnung von Ihrem Körper weg zeigt. Austretender Dampf kann zu Verbrühungen führen.
• Stellen Sie sich nie direkt vor die Mikrowelle, wenn Sie die Tür öffnen. Austretender Dampf kann zu Verbrühungen führen.
• Frittieren Sie nicht in der Mikrowelle. Heißes Öl kann Geräteteile und Utensilien beschädigen und sogar Hautverbrennungen hervorrufen.
• Schütteln oder rühren Sie aufgewärmte Babygläschen oder Babyfläschchen
auf jeden Fall um! Der Inhalt kann sich ungleichmäßig erhitzt haben und das
Baby kann sich am Inhalt verbrennen. Kontrollieren Sie auf jeden Fall die Temperatur, bevor Sie Ihr Baby füttern!
• Bauen Sie die Mikrowelle nicht um.
• Mikrowellenstrahlen sind gefährlich! Lassen Sie Wartungs- oder Reparaturarbeiten, bei denen Abdeckungen zu entfernen sind, die vor einem Kontakt mit
Mikrowellenstrahlen schützen, nur von geschultem Fachpersonal durchführen.
• Überprüfen Sie vor dem Verzehr die Temperatur, um für Babys u. U.
lebensgefährliche Verbrennungen zu vermeiden. Kochutensilien können durch
die von den erhitzten Speisen abgegebene Hitze heiß werden, so dass sie sich
eventuell nur mit Topflappen anfassen lassen. Die Kochutensilien müssen daraufhin geprüft werden, ob sie mikrowellengeeignet sind.
Achtung! Heiße Oberfläche!
Brandgefahr!
• Lassen Sie die Mikrowelle nie unbeaufsichtigt, wenn Sie Lebensmittel in Plastikoder Papierverpackungen erhitzen.
• Stellen Sie keine brennbaren Materialien in der Nähe der Mikrowelle oder
der Lüftungsöffnungen auf.
- 90 -
Page 94

• Entfernen Sie alle metallischen Verschlüsse der Verpackungen der Lebensmittel,
die Sie erhitzen wollen. Brandgefahr!
• Benutzen Sie zur Herstellung von Popcorn nur mikrowellengeeignete PopcornTüten.
• Benutzen Sie die Mikrowelle nicht, um mit Körnern, Kirschkernen oder Gel
gefüllte Kissen zu erhitzen. Brandgefahr!
• Benutzen Sie die Mikrowelle nicht zur Lagerung von Lebensmitteln oder
anderen Dingen.
• Überschreiten Sie nie die vom Hersteller angegebenen Garzeiten.
• Stellen Sie keine Gegenstände auf die Mikrowelle, während diese in Betrieb
ist. Die Lüftungsöffnungen werden verdeckt!
• Stellen Sie die Mikrowelle nicht in der Nähe von anderen Hitze absondernden
Geräten, wie zum Beispiel einem Backofen, auf.
• Reinigen Sie die Mikrowelle nach dem Erhitzen von fetthaltigen Speisen, insbesondere wenn diese nicht abgedeckt waren, gründlich. Lassen Sie das Gerät
vollständig abkühlen, bevor Sie es reinigen. Auf den Heizelementen des Grills
dürfen sich keine Rückstände, wie zum Beispiel Fett befinden. Dieses könnte
überhitzen und sich entzünden.
• Tauen Sie kein gefrorenes Fett oder Öl in der Mikrowelle auf. Das Fett oder Öl
kann sich entzünden.
• Benutzen Sie keine externe Zeitschaltuhr oder ein separates Fernwirksystem,
um das Gerät zu betreiben.
• Diese Mikrowelle ist für die Erwärmung von Speisen und Getränken bestimmt.
Trocknen von Speisen oder Kleidung und Erwärmung von Heizkissen, Hausschuhen, Schwämmen, feuchten Putzlappen und Ähnlichem kann zu Verletzungen, Entzündungen oder Feuer führen.
• Das Kochgerät sollte regelmäßig gereinigt und Nahrungsmittelreste entfernt
werden.
Achtung! Geräteschäden!
• Betreiben Sie die Mikrowelle niemals im Leerzustand.
Ausgenommen ist die erste Inbetriebnahme (siehe Kapitel „Erste Inbetriebnahme“),
in der die Mikrowelle kurzzeitig in der Betriebsart „Grill” im Leerzustand betrieben werden darf.
- 91 -
Page 95

• Stecken Sie keine Gegenstände in die Lüftungsöffnungen oder die SicherheitsTürverriegelungen.
• Benutzen Sie keine metallischen Utensilien, die Mikrowellen reflektieren und zu
Funkenbildung führen. Stellen Sie keine Blechdosen in die Mikrowelle.
• Stellen Sie keine Plastikbehälter sofort nach einem Grill-, Kombi- oder Automatikmenü-Vorgang in die Mikrowelle. Das Plastik kann schmelzen.
• Die Mikrowelle darf nicht an Orten mit hoher Luftfeuchtigkeit, oder wo sich
Feuchtigkeit sammelt, aufgestellt werden.
• Flüssigkeiten und sonstige Nahrungsmittel dürfen nicht in luftdicht verschlossenen
Behältern erhitzt werden, da diese explodieren und das Gerät beschädigen
können.
• Lehnen Sie sich nicht auf die Mikrowellentür.
• Mangelhafte Sauberkeit des Kochgerätes kann zu einer Zerstörung der Oberfläche führen, die ihrerseits die Gebrauchsdauer beeinflusst und möglicherweise
zu gefährlichen Situationen führt.
• Es darf nur Geschirr benutzt werden, das für den Gebrauch in Mikrowellenkochgeräten geeignet ist.
Sicherheitstipps
• Um das Brandrisiko in der Mikrowelle zu minimieren: Behalten Sie, wenn Sie
Speisen in Kunststoff- oder Papierbehältern erhitzen, die Mikrowelle immer im
Auge, da sich die Materialien eventuell entzünden können.
• Beim Erhitzen von Getränken in der Mikrowelle kann es zu einem zeitlich
verzögerten Sprudeln kommen, wenn das Getränk kocht. Seien Sie deshalb
vorsichtig beim Hantieren mit dem Gefäß. Um plötzliches Sieden zu vermeiden:
– Stellen Sie, wenn möglich, einen Glasstab in die Flüssigkeit, solange es er-
hitzt wird.
– Lassen Sie die Flüssigkeit nach dem Erhitzen 20 Sekunden in der Mikrowelle
stehen, um unerwartetes Aufbrodeln zu vermeiden.
• Durchstechen Sie die Haut von Kartoffeln, Würstchen oder ähnlichem. Sie können sonst explodieren.
• Seien Sie vorsichtig beim Erhitzen von Flüssigkeiten. Benutzen Sie nur offene
Gefäße, damit entstehende Luftblasen entweichen können.
• Wenn das Gerät Rauch abgibt, ist das Gerät abzuschalten oder der Stecker
zu ziehen und die Tür geschlossen zu halten, um eventuell auftretende Flammen zu ersticken.
- 92 -
Page 96

• Eier in der Schale und hart gekochte Eier dürfen nicht in der Mikrowelle erhitzt
werden, da sie selbst noch nach der Beendigung des Erhitzens in der Mikrowelle explodieren können.
Nahrungsmittel mit dicker Schale, wie etwa Kartoffeln, ganze Kürbisse, Äpfel
und Kastanien vor dem Kochen einstechen.
• Bewegen Sie die Mikrowelle nicht, während sie in Betrieb ist.
Erdungshinweise/ordnungsgemäße Installation
Das vorliegende Gerät muss geerdet sein. Dieses Gerät ist nur an eine
vorschriftsmäßig geerdete Steckdose anzuschließen. Es wird empfohlen, einen
eigenen Stromkreis zu verwenden, der nur die Mikrowelle versorgt.
Gefahr: Unsachgemäßer Umgang mit dem Erdungsstecker kann das Risiko
eines elektrischen Schlages nach sich ziehen.
Hinweis: Sollten Sie Fragen zum Erden oder den Anweisungen in Sachen
Elektrik haben, fragen Sie eine Elektro- oder Wartungsfachkraft.
Weder der Hersteller noch der Händler können die Haftung für eine Beschädigung der Mikrowelle oder für Personenschäden übernehmen, die auf eine Nichtbeachtung der Verfahrenshinweise für den Elektroanschluss zurückgehen.
Funkstörungen bei anderen Geräten
Der Betrieb der Mikrowelle kann Störungen bei Ihrem Radio, Fernseher oder
ähnlichen Geräten hervorrufen.
Falls solche Interferenzen auftreten sollten, lassen sie sich mit Hilfe der folgenden
Maßnahmen vermindern oder ausschalten:
• Tür und Dichtfläche der Mikrowelle säubern.
• Empfangsantenne des Radios oder Fernsehers neu ausrichten.
• Mikrowelle an einen anderen Ort stellen als den, an dem der Empfänger steht.
• Entfernen Sie die Mikrowelle vom Empfänger.
• Stecken Sie die Mikrowelle in eine andere Steckdose ein. Mikrowelle und
Empfänger sollten einen unterschiedlichen Zweig des Stromkreises in
Anspruch nehmen.
- 93 -
Page 97

Bevor Sie beginnen
Grundprinzipien beim Kochen in der
Mikrowelle
• Ordnen Sie die Speisen wohlbedacht an.
• Die dicksten Stellen kommen in Randnähe.
• Achten Sie auf die Garzeit. Wählen Sie die
kürzeste angegebene Garzeit und verlängern
Sie diese bei Bedarf. Massiv zu lange gekochte Speisen können zu rauchen beginnen oder
sich entzünden.
• Versehen Sie die Speisen während des Garens
mit einem für die Mikrowelle geeigneten Deckel.
Der Deckel verhindert ein Spritzen und trägt
außerdem dazu bei, dass Speisen gleichmäßig
gar werden.
• Wenden Sie die Speisen während der Zuberei-
tung in der Mikrowelle einmal, damit Gerichte
wie Hähnchen oder Hamburger schneller
„durch“ sind.
• Große Lebensmittelstücke wie etwa Braten
müssen mindestens einmal gewendet werden.
• Sortieren Sie Lebensmittelteile wie etwa Hack-
bällchen nach der halben Garzeit komplett um.
Wenden Sie sie und platzieren Sie die Bällchen von der Mitte des Geschirrs an den Rand.
Geeignetes Kochgeschirr verwenden
• Das ideale Material für einen Mikrowellenherd
ist mikrowellendurchlässig, lässt also die Energie durch den Behälter hindurch, um die
Speise zu erwärmen.
Mikrowellen sind nicht in der Lage, Metall zu
durchdringen. Aus diesem Grund dürfen keine
Metallgefäße und kein Metallgeschirr verwendet werden.
• Verwenden Sie beim Erhitzen in der Mikrowelle keine Erzeugnisse aus Recyclingpapier.
Diese können winzige Metallfragmente enthalten, die Funken und/oder Brände erzeugen
können.
• Es empfiehlt sich eher rundes/ovales Geschirr
statt eckiges/längliches, da Speisen im Eckbereich leicht verkochen.
Die nachstehende Liste versteht sich als allgemeine Hilfe für die Wahl des korrekten Geschirrs.
Kochgeschirr
Hitzebeständiges Glas
Nicht hitzebeständiges Glas
Hitzebeständige Keramik
Mikrowellengeeignetes
Plastikgeschirr
Küchenpapier Ja Nein Nein Nein
Metalltablett/
-platte
Grillständer Nein Ja Ja Nein
Mikrowelle
Ja Ja Ja Ja
Nein Nein Nein Nein
Ja Ja Ja Ja
Ja Nein Nein Nein
Nein Ja Ja Nein
Grill
Heiß-
luft
Kombination
Alufolie &
Folienbehälter
- 94 -
Nein Ja Ja Nein
Page 98

Brandgefahr!
ersten
Benutzen Sie niemals den Grillständer oder andere metallische Gegenstände, wenn Sie die Mikrowelle im Mikrowellenbetrieb oder im Kombinations-Garvorgang verwenden. Metall reflektiert
die Mikrowellenstrahlung und führt so zu Funkenbildung. Das kann zu einem Brand führen und das
Gerät irreparabel beschädigen!
Erste Inbetriebnahme
Hinweis zum ersten
Aufheizen
Betreiben Sie die Mikrowelle
niemals in der Betriebsart
„Mikrowelle“ im Leerzustand!
Betreiben Sie die Mikrowelle ausschließlich beim
ohne Zubehör und Lebensmittel in
der Betriebsart „Grill“ (Gr 3)!
(siehe Kapitel „Gerät vorbereiten”)
Gerät aufstellen
Aufheizen
Achtung:
Stellen Sie die Mikrowelle nicht über einem Küchenherd oder einem sonstigen Hitze erzeugenden Gerät auf. Eine Aufstellung an einem solchen
Ort könnte zur Beschädigung des Gerätes und
damit auch zum Erlöschen der Garantie führen.
• Wählen Sie eine ebene Fläche, die genug
Abstand für die Be- und Entlüftung des Gerätes
lässt:
Halten Sie zwischen Gerät und den angrenzenden Wänden einen Mindestabstand von
10 cm unbedingt ein. Stellen Sie sicher,
dass sich die Tür der Mikrowelle einwandfrei
öffnen lässt.
Halten Sie über der Mikrowelle einen Abstand
von mindestens 20 cm.
• Sorgen Sie dafür, dass der Netzstecker
problemlos zugänglich ist, damit er im Fall von
Gefahren mühelos erreicht und gezogen
werden kann.
• Entfernen Sie nicht die Füße unter dem Mikrowellengerät.
• Blockieren Sie nicht die Lüftungsschlitze 5. An-
dernfalls kann es zu Beschädigungen des Geräts kommen.
• Stellen Sie das Gerät möglichst weit entfernt
von Radio- und Fernsehgeräten auf. Der
Betrieb der Mikrowelle kann Störungen des
Radio- oder Fernsehempfangs hervorrufen.
Brandgefahr!
Diese Mikrowelle ist nicht für den Einbau in einen
Küchenschrank geeignet. In geschlossenen
Schränken ist die Belüftung des Gerätes nicht ausreichend gewährleistet. Das Gerät kann beschädigt
werden und es besteht die Gefahr eines Brandes!
Gerät vorbereiten
• Entfernen Sie das Verpackungsmaterial und
die auf dem Panel und der Taste Türöffner 2
angebrachte Schutzfolie.
Entfernen Sie nicht die hellgraue
Glimmer-Abdeckplatte, die zum
Schutz der Magnetfeldröhre im
Garraum angebracht ist.
- 95 -
Page 99

• Stecken Sie den Netzstecker in eine Netz-
ersten
steckdose. Benutzen Sie eine 230 - 240 V ~,
50 Hz, Netzsteckdose mit einer 16 A Sicherung. Es wird empfohlen, dass ein eigener
Stromkreis die Mikrowelle versorgt. Wenn Sie
sich nicht sicher sind, wie Sie die Mikrowelle
anschließen sollen, ziehen Sie einen Fachmann
zu Rate.
Vor dem Verwenden der Mikrowelle muss das Gerät zunächst leer aufgeheizt werden, damit fertigungsbedingte Rückstände verdampfen können.
Nachdem Sie den Stecker in die Steckdose gesteckt
haben, öffnen Sie einmal die Tür der Mikrowelle
durch Drücken der Taste Türöffner 2.
Schalten Sie das Gerät ohne Lebensmittel und ohne
Zubehör (Drehteller 3 und Grillständer t) in der
Betriebsart Grillen ein:
Hinweis zum ersten
Aufheizen
• Drücken Sie die Taste Start/Schnellstart r
, um den Grillvorgang zu starten.
Hinweis
Bei der ersten Inbetriebnahme kann es durch fertigungsbedingte Rückstände zu leichter Rauch- und
Geruchsentwicklung kommen. Dieses ist unschädlich. Sorgen Sie für eine ausreichende Belüftung.
Öffnen Sie zum Beispiel ein Fenster.
• Nach 5 Minuten schaltet sich das Gerät auto-
matisch aus. Warten Sie, bis es vollständig abgekühlt ist.
• Ziehen Sie den Netzstecker aus der Steckdose
und reinigen Sie das Gerät anschließend innen
mit einem feuchten Tuch und trocknen Sie es
sorgfältig ab.
Drehteller einsetzen
• Setzen Sie den Drehteller 3 mittig auf die Ach-
se im Garraum. Achten Sie darauf, dass er
komplett auf die Achse rutscht und fest sitzt.
Betreiben Sie die Mikrowelle ausschließlich beim
Aufheizen
ohne Zubehör und Lebensmittel!
Betreiben Sie die Mikrowelle maximal 5 Minuten im Leerzustand!
• Drücken Sie die Taste Grill 7 . Im Display
1 erscheint “Gr 1”.
• Drehen Sie den Drehregler r , bis
“Gr 3” und die Symbole und im
Display 1 erscheinen und bestätigen Sie die
Auswahl durch Drücken auf die Taste
Start/Schnellstart r .
• Stellen Sie mit dem Drehregler r eine
Garzeit von 5 Minuten ein.
Bedienen
Uhr einstellen
Nachdem Sie den Stecker in die Steckdose gesteckt
haben, öffnen Sie die Tür der Mikrowelle einmal.
Das Display 1 zeigt "1:00" an. Schließen Sie die
Tür wieder.
1. Drücken Sie die Taste Uhr q . Im
Display 1 erscheint „Hr 12“.
2. Wählen Sie durch Drehen am Drehregler r
den gewünschten Modus (Hr 24 oder Hr
12) und bestätigen Sie Ihre Auswahl durch
Drücken auf die Taste Start/Schnellstart r .
- 96 -
Page 100

Hinweis
Erst beim anschließenden Drehen des Drehreglers
r, erscheint die Anzeige der Uhrzeit und
man kann die Stunde einstellen.
3. Stellen Sie durch Drehen am Drehregler r
die gewünschte Stunde ein und bestätigen Sie
Ihre Auswahl durch Drücken auf die Taste
Start/Schnellstart r .
4. Stellen Sie durch Drehen am Drehregler r
die gewünschten Minuten ein und bestätigen Sie
Ihre Auswahl durch Drücken auf die Taste
Start/Schnellstart r .
Die Uhrzeit ist nun eingestellt.
Um die aktuelle Tageszeit abzulesen, während die
Mikrowelle in Betrieb ist, drücken Sie die Taste Uhr
q ; die Uhrzeit wird dann einige Sekunden im
Display 1 angezeigt.
Standby-Modus
Die Mikrowelle schaltet automatisch in den Standby-Modus und die Uhrzeit wird angezeigt, wenn für
längere Zeit keine Taste gedrückt wird. Wenige Sekunden nach der Umstellung in den Standby-Modus
wird auch die Displaybeleuchtung gedimmt.
Küchentimer einstellen
Die Mikrowelle verfügt über einen Küchentimer, den
Sie unabhängig vom Mikrowellenbetrieb einsetzen
können.
1. Drücken Sie die Taste TIMER w, wenn das
Gerät im Standby-Betrieb ist. Im Display 1 er-
scheint „0:00“ und das Symbol .
2. Stellen Sie nun mit dem Drehregler r die
gewünschte Zeit ein.
Sie können Zeiteinstellungen von 10 Sekunden
bis 95 Minuten vornehmen.
3. Drücken Sie die Taste Start/Schnellstart r .
Ein Signalton ertönt. Die Zeit zählt rückwärts
herunter. Nach ca. 3 Sekunden wird die normale Uhrzeit wieder angezeigt. Der Küchentimer
läuft im Hintergrund weiter.
Wenn Sie zwischendurch die Zeit des Küchentimers kontrollieren wollen, drücken Sie die
Taste TIMER w. Es erscheint für kurze Zeit der
Küchentimer.
Sobald die eingestellte Zeit abgelaufen ist, ertönen
Signaltöne.
Kindersicherung
Aktivieren Sie diese Einstellung, um eine unbeaufsichtigte Inbetriebnahme der Mikrowelle durch
Kleinkinder und andere nicht mit der Bedienung
vertraute Personen zu verhindern.
Das Symbol für die Kindersicherung erscheint
im Display 1 , und das Gerät kann solange, wie
diese Funktion aktiviert ist, nicht in Betrieb genommen werden.
• Drücken Sie die Taste Stop/Kindersicherung e
und halten Sie sie solange gedrückt, bis
ein Signalton ertönt und das Symbol für die Kindersicherung im Display 1 erscheint. Die
Tasten und der Regler der Mikrowelle haben nun
keine Funktion mehr.
• Um die Kindersicherung zu deaktivieren,
drücken Sie die Taste Stop/Kindersicherung e
und halten Sie sie solange gedrückt bis
ein Signalton ertönt und das Symbol für die Kindersicherung erlischt.
Abfragefunktionen
Uhrzeit während des Betriebs abfragen
Drücken Sie während des Garvorgangs die Taste
Uhr q . Im Display 1 erscheint für einige
Sekunden die Uhrzeit.
Leistungsstufe während des Betriebs abfragen
Drücken Sie während des Garvorgangs die Taste
Mikrowelle 6 . Im Display 1 erscheint für
einige Sekunden die aktivierte Leistungsstufe.
- 97 -
 Loading...