


MIKROWELLENHALTERUNG / MICROWAVE BRACKET /
SUPPORT DE MICRO-ONDES SMH 30 A1
MIKROWELLENHALTERUNG
Montageanleitung
SUPPORT DE MICRO-ONDES
Instructions de montage
DRŽÁK NA MIKROVLNNOU TROUBU
Montážní návod
SUPORTE PARA MICRO-ONDAS
Instruções de montagem
IAN 277031
MICROWAVE BRACKET
Assembly instructions
MAGNETRONHOUDER
Montage-instructies
SOPORTE PARA MICROONDAS
Instrucciones de montaje

DE / AT / CH Montageanleitung Seite 1
GB/IE Assembly instructions Page 11
FR / BE Instructions de montage Page 21
NL / BE Montage-instructies Pagina 31
CZ Montážní návod Strana 41
ES Instrucciones de montaje Página 51
PT Instruções de montagem Página 61

Inhaltsverzeichnis
Einführung ....................................................2
Informationen zu dieser Montageanleitung ..................................... 2
Bestimmungsgemäße Verwendung ........................................... 2
Sicherheit .....................................................2
Lieferumfang ..................................................3
Montagematerial ..............................................3
Montage .....................................................4
Montage vorbereiten ...................................................... 4
Benötigtes Werkzeug ...................................................... 4
Montageschritte .......................................................... 5
Wartung ......................................................7
Reinigung .....................................................7
Entsorgung. . . . . . . . . . . . . . . . . . . . . . . . . . . . . . . . . . . . . . . . . . . . . . . . . . . . 7
Anhang ......................................................7
Technische Daten ......................................................... 7
Garantie der Kompernaß Handels GmbH ..................................... 8
Service ................................................................. 9
Importeur ............................................................... 9
SMH 30 A1
DE│AT│CH
│
1 ■

Einführung
Informationen zu dieser Montageanleitung
Herzlichen Glückwunsch!
Mit Ihrem Kauf haben Sie sich für ein hochwertiges Produkt entschieden. Machen
Sie sich vor der Montage und der ersten Inbetriebnahme mit dem Produkt vertraut.
Lesen Sie hierzu aufmerksam die nachfolgende Montageanleitung und die
Sicherheitshinweise. Benutzen Sie das Produkt nur wie beschrieben und für die
angegebenen Einsatzbereiche. Bewahren Sie diese Montageanleitung gut auf.
Händigen Sie alle Unterlagen bei Weitergabe des Produkts an Dritte ebenfalls
mit aus.
Bestimmungsgemäße Verwendung
Die Mikrowellenhalterung dient ausschließlich der Wandbefestigung von Mikrowellen und bauähnlichen Kleinelektrogeräten für den privaten, nichtgewerblichen
Hausgebrauch. Die Mikrowellenhalterung ist nur für den Gebrauch innerhalb
von Gebäuden vorgesehen.
Für Schäden, die von missbräuchlicher oder unsachgemäßer Behandlung, von
Gewaltanwendung oder unautorisierter Modifikation herrühren, wird keine
Haftung übernommen. Das Risiko trägt allein der Benutzer.
Sicherheit
GEFAHR! ELEKTRISCHER SCHLAG!
► Vergewissern Sie sich, dass sich an der Montagestelle in der Wand keine
elektrischen Leitungen, Wasser-, Gas-, oder sonstige Rohrleitungen befinden.
■ 2 │ DE
WARNUNG! VERLETZUNGSGEFAHR!
► Montieren Sie das Produkt nicht an Orten, unter denen sich Personen
aufhalten könnten.
ACHTUNG - SACHSCHÄDEN!
► Beachten Sie, dass die mitgelieferten Dübel nur für Beton- und Vollziegel-
wände zugelassen sind. Besorgen Sie sich geeignetes Montagematerial
im Fachhandel bei anderen Material- und Konstruktionsarten der für die
Installation vorgesehenen Wand.
► Das im Lieferumfang enthaltene Montagematerial muss vollständig verwen-
det werden.
► Wenden Sie bei der Montage niemals Gewalt oder hohe Kräfte an. Dies
kann das Produkt beschädigen.
│AT│
CH
SMH 30 A1

ACHTUNG - SACHSCHÄDEN!
► Achten Sie darauf, dass die maximal zulässige Tragfähigkeit des Produkts
von 30kg nicht überschritten wird.
► Überprüfen Sie nach der Montage des Produkts und der daran befestigten
Last, diese auf ausreichende Festigkeit und Betriebssicherheit. Diese Prüfung
ist in regelmäßigen Abständen zu wiederholen (mindestens vierteljährlich).
► Halten Sie einen ausreichenden Sicherheitsabstand um die angebrachte
Last ein, um ausreichende Be- und Entlüftung zu gewährleisten.
► Entfernen Sie bei Beschädigungen des Produkts sofort die angebrachte Last
und benutzen Sie das Produkt nicht weiter.
► Im Zweifel wenden Sie sich für die Montage dieses Produkts an dazu
ausgebildete Fachkräfte und versuchen Sie es nicht selbst!
Lieferumfang
▯ 1 x Wandhalterung
▯ 2 x Profilschiene
▯ 2 x Verlängerungsschiene
▯ 2 x Feststellschraube der Verlängerungsschiene
▯ 1 x Innensechskantschlüssel
▯ 6 x Dübel
▯ 6 x Befestigungsschraube der Wandhalterung
▯ 2 x Sicherungsschraube der Wandhalterung
▯ 2 x Schraubenabdeckung
▯ Diese Montageanleitung
HINWEIS
► Prüfen Sie die Lieferung auf Vollständigkeit und auf sichtbare Schäden.
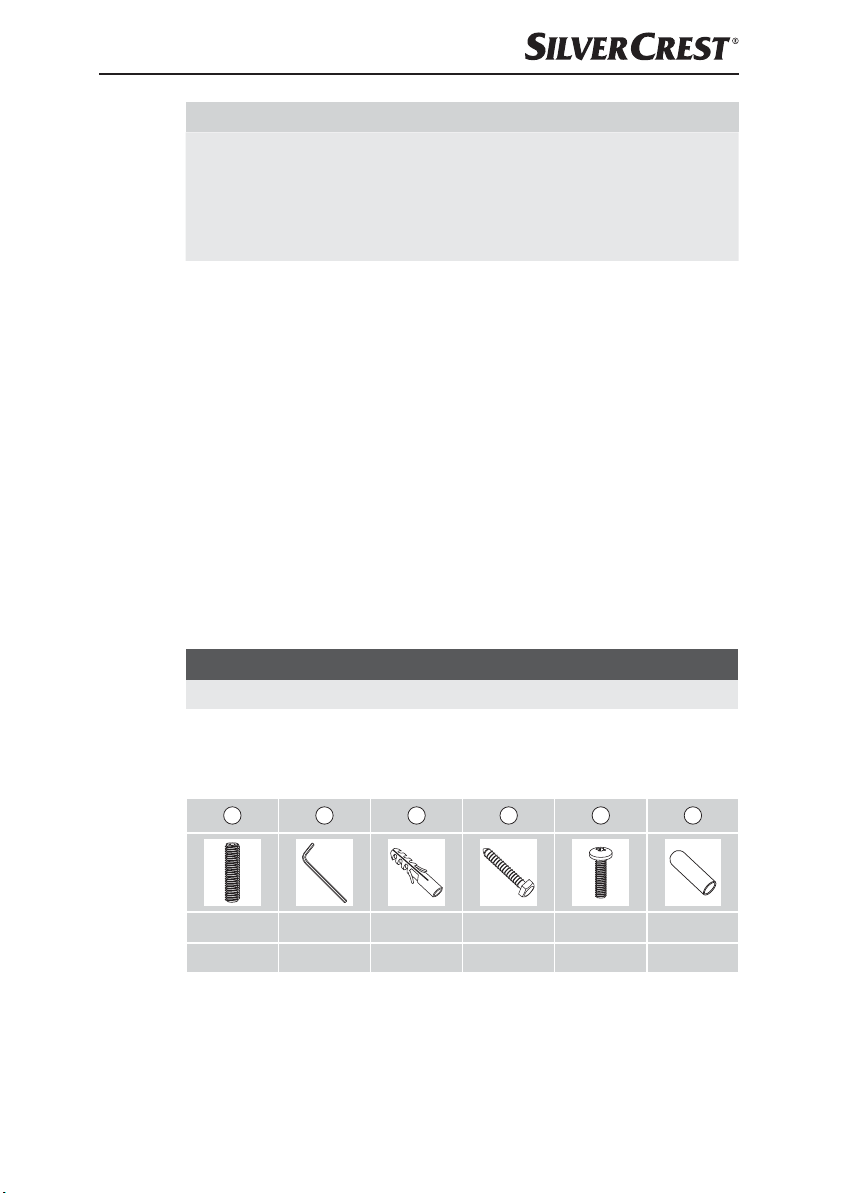
Montagematerial
A B C D E
Ø 6 x 20 mm 3 x 3 mm S10 x 50 mm Ø 8 x 50 mm Ø 4 x15 mm —
2 x1 x6 x6 x2 x2 x
SMH 30 A1
DE│AT│CH
F
│
3 ■

Montage
Montage vorbereiten
GEFAHR! ELEKTRISCHER SCHLAG!
► Vergewissern Sie sich, dass sich an der Montagestelle in der Wand keine
elektrischen Leitungen, Wasser-, Gas-, oder sonstige Rohrleitungen befinden.
ACHTUNG - SACHSCHÄDEN!
► Prüfen Sie unbedingt vor der Installation die Eignung der vorgesehenen
Wand für das anzubringende Gewicht.
► Beachten Sie, dass die mitgelieferten Dübel nur für Beton- und Vollziegel-
wände zugelassen sind. Wenn Sie sich über die Beschaffenheit Ihrer Wand
nicht sicher sind, ziehen Sie bitte einen Fachmann zu Rate.
HINWEIS
► Nehmen Sie sich ausreichend Zeit für die Montage des Produkts.
► Entnehmen Sie alle Einzelteile der Verpackung und legen Sie die Teile in
Griffnähe bereit.
Benötigtes Werkzeug
Bleistift
■ 4 │ DE
│AT│
Wasserwaage
Bohrmaschine
Bohrer Ø 10 mm
Kreuzschlitzschraubendreher
Maulschlüssel SW 13 mm
Innensechskantschlüssel 3 x 3 mm (im Lieferumfang enthalten)
CH
SMH 30 A1

Montageschritte
Schritt 1: Wandhalterung an der Wand befestigen
♦ Wählen Sie zuerst eine geeignete Montagehöhe aus. Beachten Sie hierbei
auch die Maße des Geräts, dass auf dem Produkt stehen soll. Lesen Sie
die Bedienungsanleitung des Geräts, um die erforderlichen Abstände zu
Wänden oder Schränken einzuhalten.
♦ Halten Sie die Wandhalterung als Schablone an die gewünschte Stelle der
Wand und richten Sie sie mit Hilfe einer Wasserwaage gerade aus.
♦ Markieren Sie die sechs Bohrlöcher mit einem Bleistift.
♦ Bohren Sie an den markierten Stellen Löcher mit einem Durchmesser von
10 mm und einer Tiefe von mindestens 50 mm.
C
♦ Setzen Sie die mitgelieferten Dübel S10 x 50 mm
♦ Schrauben Sie die Wandhalterung mit Hilfe der beiliegenden Schrauben
D
Ø 8 x 50 mm
an die Wand.
HINWEIS
► Beginnen Sie mit den innenliegenden Bohrlöchern, da Sie Platz für die
Schraubbewegung des Maulschlüssels benötigen.
in die Löcher ein.
SMH 30 A1
C
D
50 mm
DE│AT│CH
│
10 mm
5 ■

Schritt 2: Profilschienen in die Wandhalterung schieben
♦ Schieben Sie die Profilschienen in die Wandhalterung (1.).
E
♦ Schrauben Sie die zwei Sicherungsschrauben Ø 4 x15 mm
die Wandhalterung, damit die Profilschienen nicht aus der Wandhalterung
fallen können (2.).
♦ Stülpen Sie die zwei Schraubenabdeckungen F über die Sicherungs-
schrauben Ø 4 x15 mm
E
(3.).
HINWEIS
► Wenn Sie die gesamte Breite der Wandhalterung nutzen möchten, können
Sie auf die Sicherungsschrauben Ø 4 x15 mm E verzichten. Berücksichtigen Sie, dass die Profilschienen dadurch nicht gesichert sind.
F
E
von unten in
Schritt 3: Verlängerungsschienen befestigen
HINWEIS
Die Vertiefungen der Profil- und Verlängerungsschienen sind für das Aufsetzen
Ihres Geräts vorgesehen. Richten Sie Ihr Gerät möglichst Richtung Wand aus.
Dadurch erhält ihr Gerät einen guten Halt.
► Messen Sie die Abstände zwischen den Füßen Ihres Geräts.
► Richten Sie die Profil- und Verlängerungsschienen danach aus.
♦ Schieben Sie die Verlängerungsschienen in die Profilschienen, unter Berück-
sichtigung des zuvor gemessenen Abstands (1.).
♦ Achten Sie darauf, dass Sie die zwei Feststellschrauben Ø 6 x 20 mm
hinter der Sicherung befestigen. Dadurch sind die Verlängerungsschienen
gegen Herausfallen gesichert (2.).
■ 6 │ DE
│AT│
CH
A
SMH 30 A1

♦ Schrauben Sie die zwei Feststellschrauben Ø 6 x 20 mm A, mit dem
Wartung
♦ Überprüfen Sie in regelmäßigen Abständen (mindestens vierteljährlich)
♦ Ziehen Sie ggf. alle Schraubverbindungen des Produkts nach.
Reinigung
WARNUNG
► Verwenden Sie keine aggressiven oder scheuernden Reinigungsmittel,
♦ Reinigen Sie das Produkt mit einem leicht angefeuchteten Tuch und einem
B
beiliegenden Innensechskantschlüssel 3 x 3 mm
ziehen die Feststellschrauben Ø 6 x 20 mm
A
die Festigkeit und Betriebssicherheit der Wandhalterung und der daran
befestigten Last.
da diese die Oberfläche des Produkts angreifen können.
handelsüblichen Haushaltsreiniger.
, in die Profilschienen und
A
handfest an (3.).
B
Entsorgung
Entsorgen Sie das Produkt über einen zugelassenen Entsorgungsbetrieb oder über
Ihre kommunale Entsorgungseinrichtung. Beachten Sie die geltenden Vorschriften.
Setzen Sie sich im Zweifelsfall mit Ihrer Entsorgungseinrichtung in Verbindung.
Führen Sie alle Verpackungsmaterialien einer umweltgerechten Entsorgung zu.
Anhang
Technische Daten
Maximale Tragkraft 30 kg (66 lbs)
Maximale Gesamtausmaße
Gewicht ca. 2,4 kg
SMH 30 A1
ca. 43 x 23,4 x 54 cm
DE│AT│CH
│
7 ■

Garantie der Kompernaß Handels GmbH
Sehr geehrte Kundin, sehr geehrter Kunde,
Sie erhalten auf dieses Gerät 3 Jahre Garantie ab Kaufdatum. Im Falle von Mängeln
dieses Produkts stehen Ihnen gegen den Verkäufer des Produkts gesetzliche Rechte zu.
Diese gesetzlichen Rechte werden durch unsere im Folgenden dargestellte Garantie
nicht eingeschränkt.
Garantiebedingungen
Die Garantiefrist beginnt mit dem Kaufdatum. Bitte bewahren Sie den Original Kassenbon gut auf. Diese Unterlage wird als Nachweis für den Kauf benötigt.
Tritt innerhalb von drei Jahren ab dem Kaufdatum dieses Produkts ein Material- oder
Fabrikationsfehler auf, wird das Produkt von uns – nach unserer Wahl – für Sie
kostenlos repariert oder ersetzt. Diese Garantieleistung setzt voraus, dass innerhalb
der Drei-Jahres-Frist das defekte Gerät und der Kaufbeleg (Kassenbon) vorgelegt und
schriftlich kurz beschrieben wird, worin der Mangel besteht und wann er aufgetreten ist.
Wenn der Defekt von unserer Garantie gedeckt ist, erhalten Sie das reparierte oder
ein neues Produkt zurück. Mit Reparatur oder Austausch des Produkts beginnt kein
neuer Garantiezeitraum.
Garantiezeit und gesetzliche Mängelansprüche
Die Garantiezeit wird durch die Gewährleistung nicht verlängert. Dies gilt auch für
ersetzte und reparierte Teile. Eventuell schon beim Kauf vorhandene Schäden und
Mängel müssen sofort nach dem Auspacken gemeldet werden. Nach Ablauf der
Garantiezeit anfallende Reparaturen sind kostenpflichtig.
Garantieumfang
Das Gerät wurde nach strengen Qualitätsrichtlinien sorgfältig produziert und vor Auslieferung gewissenhaft geprüft.
Die Garantieleistung gilt für Material- oder Fabrikationsfehler. Diese Garantie erstreckt
sich nicht auf Produktteile, die normaler Abnutzung ausgesetzt sind und daher als
Verschleißteile angesehen werden können oder für Beschädigungen an zerbrechlichen
Teilen, z. B. Schalter, Akkus, Backformen oder Teile die aus Glas gefertigt sind.
Diese Garantie verfällt, wenn das Produkt beschädigt, nicht sachgemäß benutzt oder
gewartet wurde. Für eine sachgemäße Benutzung des Produkts sind alle in der Bedienungsanleitung aufgeführten Anweisungen genau einzuhalten. Verwendungszwecke
und Handlungen, von denen in der Bedienungsanleitung abgeraten oder vor denen
gewarnt wird, sind unbedingt zu vermeiden.
Das Produkt ist nur für den privaten und nicht für den gewerblichen Gebrauch bestimmt.
Bei missbräuchlicher und unsachgemäßer Behandlung, Gewaltanwendung und bei
Eingriffen, die nicht von unserer autorisierten Service-Niederlassung vorgenommen
wurden, erlischt die Garantie.
■ 8 │ DE
│AT│
CH
SMH 30 A1

Abwicklung im Garantiefall
Um eine schnelle Bearbeitung ihres Anliegens zu gewährleisten, folgen Sie bitte den
folgenden Hinweisen:
▯ Bitte halten Sie für alle Anfragen den Kassenbon und die Artikelnummer
(z. B. IAN 12345) als Nachweis für den Kauf bereit.
▯ Die Artikelnummer entnehmen Sie bitte dem Typenschild, einer Gravur, auf dem
Titelblatt ihrer Anleitung (unten links) oder als Aufkleber auf der Rück- oder
Unterseite.
▯ Sollten Funktionsfehler oder sonstige Mängel auftreten kontaktieren Sie zunächst
die nachfolgend benannte Serviceabteilung telefonisch oder per E-Mail.
▯ Ein als defekt erfasstes Produkt können Sie dann unter Beifügung des Kaufbelegs
(Kassenbon) und der Angabe, worin der Mangel besteht und wann er aufgetreten ist, für Sie portofrei an die Ihnen mitgeteilte Service Anschrift übersenden.
Auf www.lidl-service.com können Sie diese und viele weitere Handbücher,
Produktvideos und Software herunterladen.
Service
Service Deutschland
Tel.: 0800 5435 111 (Kostenfrei aus dem dt. Festnetz/Mobilfunknetz)
E-Mail: kompernass@lidl.de
Service Österreich
Tel.: 0820 201 222 (0,15 EUR/Min.)
E-Mail: kompernass@lidl.at
Service Schweiz
Tel.: 0842 665566 (0,08 CHF/Min., Mobilfunk max. 0,40 CHF/Min.)
E-Mail: kompernass@lidl.ch
IAN 277031
Importeur
Bitte beachten Sie, dass die folgende Anschrift keine Serviceanschrift ist.
Kontaktieren Sie zunächst die benannte Servicestelle.
KOMPERNASS HANDELS GMBH
BURGSTRASSE 21
44867 BOCHUM
GERMANY
www.kompernass.com
SMH 30 A1
DE│AT│CH
│
9 ■

■ 10
SMH 30 A1

Contents
Introduction ..................................................12
Information about these assembly instructions .................................. 12
Intended use ........................................................... 12
Safety. . . . . . . . . . . . . . . . . . . . . . . . . . . . . . . . . . . . . . . . . . . . . . . . . . . . . . . 12
Package contents .............................................13
Assembly material ............................................13
Assembly ....................................................14
Preparing for assembly ................................................... 14
Required tools .......................................................... 14
Assembly steps .........................................................15
Maintenance .................................................17
Cleaning .....................................................17
Disposal .....................................................17
Appendix ....................................................17
Technical details. . . . . . . . . . . . . . . . . . . . . . . . . . . . . . . . . . . . . . . . . . . . . . . . . . . . . . . . . 17
Kompernass Handels GmbH warranty .......................................18
Service ................................................................19
Importer ............................................................... 19
SMH 30 A1
GB│IE
│
11 ■
Introduction
Information about these assembly instructions
Congratulations! You have purchased a high-quality product. Familiarise yourself
with the product before assembly and first use. Please read the following assembly
instructions and safety notes carefully. Use the product only as described and for
the range of applications specified. Retain these instructions for future reference.
Please also pass all associated documents on to any future owner(s).
Intended use
This microwave wall bracket is intended exclusively for mounting microwaves
and electrical appliances with a similar constructions on walls in private, noncommercial households. The microwave wall bracket is only intended for use
inside buildings.
No liability will be assumed for damage caused by misuse or improper handling,
the use of force or unauthorised modification. The risk shall be borne solely by
the user.
Safety
DANGER! ELECTRIC SHOCK!
► Ensure that there are no electrical cables, water or gas pipes or other lines
in the wall at the mounting location.
■ 12 │ GB
WARNING! RISK OF INJURY!
► Do not install the product in places under which people might stand.
CAUTION – PROPERTY DAMAGE
► Note that the supplied wall plugs are only suitable for concrete and brick
walls. If your wall is made of different types of materials or constructed
differently from what is recommended for the installation, purchase suitable
materials from a specialist shop.
► All of the assembly material supplied must be used.
► Never use violence or excessive force for assembly. This could damage the
product.
► Ensure that you do not exceed the maximum permissible load capacity of
the product of 30 kg.
► After mounting the product, check its stability and operational reliability as
well as that of the mounted load. This check should be repeated at regular
intervals (at least quarterly).
│
IE
SMH 30 A1
CAUTION – PROPERTY DAMAGE
► Maintain a sufficient safety distance around the mounted load to ensure
sufficient ventilation.
► In the case of damage, remove the mounted load and stop using the product.
► If in doubt, contact a suitable specialist for information on mounting this
product and do not try to mount the product yourself.
Package contents
▯ 1 x wall bracket
▯ 2 x profile rails
▯ 2 x extension rails
▯ 2 x locking screws for the extension rails
▯ 1 x allen key
▯ 6 x wall plugs
▯ 6 x fixing screws for the wall bracket
▯ 2 x locking screws for the wall bracket
▯ 2 x screw covers
▯ These assembly instructions
NOTE
► Check the package for completeness and signs of visible damage.
Assembly material
A B C D E
Ø 6 x 20 mm 3 x 3 mm S10 x 50 mm Ø 8 x 50 mm Ø 4 x15 mm —
2 x1 x6 x6 x2 x2 x
SMH 30 A1
GB│IE
F
│
13 ■

Assembly
Preparing for assembly
DANGER! ELECTRIC SHOCK!
► Ensure that there are no electrical cables, water or gas pipes or other lines
in the wall at the mounting location.
CAUTION – PROPERTY DAMAGE
► Before installation, check the suitability of the intended wall for supporting
the weight to be mounted.
► Note that the supplied wall plugs are only suitable for concrete and brick
walls. If you are unsure about the suitability of your wall, please consult an
expert.
NOTE
► Allow plenty of time for the assembly of the product.
► Remove the individual parts from the packaging and place them within
easy reach.
Required tools
Pencil
■ 14 │ GB
│
Spirit level
Drill
Drill bit Ø 10 mm
Phillips screwdriver
Open-ended spanner SW 13 mm
Allen key 3 x 3 mm (supplied)
IE
SMH 30 A1

Assembly steps
Step 1: Attaching the wall bracket to the wall
♦ Start by selecting a suitable mounting height. Take into account the dimen-
sions of the appliance that you want to mount on the product. Read the
operating instructions for the appliance to ensure the required distances to
walls or cupboards.
♦ Hold the wall bracket up to the to the desired position on the wall to use it
as a template and align it with the help of a spirit level.
♦ Mark the location of the six drill holes with a pencil.
♦ Drill holes with a diameter of 10 mm and a depth of at least 50 mm at the
marked positions.
C
♦ Insert the supplied wall plugs S10 x 50 mm
♦ Screw the wall bracket to the wall using the supplied screws Ø 8 x 50 mm
NOTE
► Start with the inner holes as you will need to leave room for the screwing
motion of the open-ended spanner.
into the holes.
D
.
SMH 30 A1
C
D
50 mm
GB│IE
│
15 ■
10 mm

Step 2: Push the profile rails into the wall bracket
♦ Push the profile rails into the wall bracket (1.).
E
♦ Screw the two locking screws Ø 4 x15 mm
below to stop the profile rails from falling out of the wall bracket (2.).
♦ Push the two screw covers F over the locking screws Ø 4 x15 mm E (3.).
NOTE
► If you want to use the entire width of the wall bracket, you can leave out
the locking screws Ø 4 x15 mm E. Bear in mind that the profile rails will no
longer be secured.
F
E
into the wall bracket from
Step 3: Fitting the extension rails
■ 16 │ GB
NOTE
The grooves in the profile and extension rails are intended for the placement
of your appliance. Align your appliance as far as possible towards the wall.
This will provide the best hold.
► Measure the distance between the feet of your appliance.
► Align the profile and extension rails according to this.
♦ Push the extension rails into the profile rails, taking into account the distance
you just measured (1.).
A
♦ Ensure that you attach the two locking screws Ø 6 x 20 mm
locking mechanism. This will prevent the extension rails from falling out (2.).
│
IE
behind the
SMH 30 A1

♦ Screw the two locking screws Ø 6 x 20 mm
Allen key 3 x 3 mm
tight (3.).
Maintenance
♦ Check the stability and operational reliability of the wall bracket and the
attached load at regular intervals (at least quarterly).
♦ If necessary, tighten all of the product's screw connections.
Cleaning
WARNING
► Do not use aggressive or abrasive cleaning agents, as these can damage
the product's outer surfaces.
♦ Clean the product using a moistened cloth and a standard commercial
household detergent.
A
into the profile rails using the
B
, and tighten the locking screws Ø 6 x 20 mm A hand
B
A
Disposal
Dispose of the product via an approved waste disposal company or your municipal
waste disposal facility. Observe the currently applicable regulations.
Please contact your waste disposal facility if you are in any doubt.
Dispose of all packaging materials in an environmentally friendly manner.
Appendix
Technical details
Maximal load capacity 30 kg (66 lbs)
Maximum total dimensions
Weight approx. 2.4 kg
SMH 30 A1
approx. 43 x 23.4 x 54 cm
GB│IE
│
17 ■

Kompernass Handels GmbH warranty
Dear Customer,
This appliance has a 3-year warranty valid from the date of purchase. If this product
has any faults, you, the buyer, have certain statutory rights. Your statutory rights are
not restricted in any way by the warranty described below.
Warranty conditions
The validity period of the warranty starts from the date of purchase. Please keep your
original receipt in a safe place. This document will be required as proof of purchase.
If any material or production fault occurs within three years of the date of purchase
of the product, we will either repair or replace the product for you at our discretion.
This warranty service is dependent on you presenting the defective appliance and
the proof of purchase (receipt) and a short written description of the fault and its time
of occurrence.
If the defect is covered by the warranty, your product will either be repaired or replaced
by us. The repair or replacement of a product does not signify the beginning of a
new warranty period.
Warranty period and statutory claims for defects
The warranty period is not prolonged by repairs effected under the warranty. This also
applies to replaced and repaired components. Any damage and defects present at
the time of purchase must be reported immediately after unpacking. Repairs carried out
after expiry of the warranty period shall be subject to a fee.
Scope of the warranty
This appliance has been manufactured in accordance with strict quality guidelines
and inspected meticulously prior to delivery.
The warranty covers material faults or production faults. The warranty does not extend
to product parts subject to normal wear and tear or fragile parts such as switches,
batteries, baking moulds or parts made of glass.
The warranty does not apply if the product has been damaged, improperly used or
improperly maintained. The directions in the operating instructions for the product
regarding proper use of the product are to be strictly followed. Uses and actions that
are discouraged in the operating instructions or which are warned against must be
avoided.
This product is intended solely for private use and not for commercial purposes. The
warranty shall be deemed void in cases of misuse or improper handling, use of force
and modifications/repairs which have not been carried out by one of our authorised
Service centres.
■ 18 │ GB
│
IE
SMH 30 A1

Warranty claim procedure
To ensure quick processing of your case, please observe the following instructions:
▯ Please have the till receipt and the item number (e.g. IAN 12345) available as
proof of purchase.
▯ You will find the item number on the type plate, an engraving on the front page of
the instructions (bottom left), or as a sticker on the rear or bottom of the appliance.
▯ If functional or other defects occur, please contact the service department listed
either by telephone or by e-mail.
▯ You can return a defective product to us free of charge to the service address
that will be provided to you. Ensure that you enclose the proof of purchase (till
receipt) and information about what the defect is and when it occurred.
You can download these instructions along with many other manuals, product
videos and software on www.lidl-service.com.
Service
Service Great Britain
Tel.: 0871 5000 720 (£ 0.10/Min.)
E-Mail: kompernass@lidl.co.uk
Service Ireland
Tel.: 1890 930 034
(0,08 EUR/Min., (peak))
(0,06 EUR/Min., (off peak))
E-Mail: kompernass@lidl.ie
IAN 277031
Importer
Please note that the following address is not the service address. Please use the
service address provided in the operating instructions.
KOMPERNASS HANDELS GMBH
BURGSTRASSE 21
44867 BOCHUM
GERMANY
www.kompernass.com
SMH 30 A1
GB│IE
│
19 ■

■ 20
SMH 30 A1
 Loading...