

3-IN-1 FLOOR CLEANER / 3-IN-1-BODENREINIGER
NETTOYEUR DE SOL 3 EN 1 SHBR 560 B1
3-IN-1 FLOOR CLEANER
Operating instructions
NETTOYEUR DE SOL 3 EN 1
Mode d’emploi
PODLAHOVÁ MYČKA, 3 V 1
Návod k obsluze
PODLAHOVÝ ČISTIČ 3 V 1
Návod na obsluhu
3I1 GULVRENSER
Betjeningsvejledning
IAN 368340_2101
3-IN-1-BODENREINIGER
Bedienungsanleitung
3-IN-1 BODEMREINIGER
Gebruiksaanwijzing
MYJKA DO PODŁOGI 3 W 1
Instrukcja obsługi
ASPIRADOR FREGASUELOS 3 EN 1
Instrucciones de uso

Before reading, unfold the page containing the illustrations and familiarise yourself with all functions of the
device.
Klappen Sie vor dem Lesen die Seite mit den Abbildungen aus und machen Sie sich anschließend mit
allen Funktionen des Gerätes vertraut.
Avant de lire le mode d‘emploi, ouvrez la page contenant les illustrations et familiarisez-vous ensuite avec
toutes les fonctions de l‘appareil.
Vouw vóór het lezen de pagina met de afbeeldingen open en maak u vertrouwd met alle functies van het
apparaat.
Před čtením si otevřete stranu s obrázky a potom se seznamte se všemi funkcemi přístroje.
Przed przeczytaniem proszę rozłożyć stronę z ilustracjami, a następnie proszę zapoznać się z wszystkimi
funkcjami urządzenia.
Pred čítaním si odklopte stranu s obrázkami a potom sa oboznámte so všetkými funkciami prístroja.
Antes de empezar a leer abra la página que contiene las imágenes y, en seguida, familiarícese con todas
las funciones del dispositivo.
Før du læser, vend siden med billeder frem og bliv bekendt med alle apparatets funktioner.
GB /IE Operating instructions Page 1
DE / AT / CH Bedienungsanleitung Seite 29
FR / BE Mode d’emploi Page 57
NL / BE Gebruiksaanwijzing Pagina 89
CZ Návod k obsluze Strana 117
PL Instrukcja obsługi Strona 145
SK Návod na obsluhu Strana 173
ES Instrucciones de uso Página 201
DK Betjeningsvejledning Side 229

A
B

Contents
Introduction ...................................................2
Information about these operating instructions .................................. 2
Copyright ............................................................... 2
Proper use .............................................................. 2
Safety information .............................................3
Description of the appliance .....................................6
Package contents and transport inspection .........................7
Use ..........................................................7
Assembling the appliance .................................................. 7
Filling the fresh water tank .................................................. 9
Handling and operation ........................................11
Continuous spray function .................................................11
Cleaning hard floors ..................................................... 11
Cleaning carpets ........................................................13
Cleaning and maintenance .....................................14
Cleaning the waste water tank .............................................15
Self-cleaning function ..................................................... 18
Manual cleaning ........................................................18
Replacing the dirt filter .................................................... 21
Ordering replacement parts ....................................21
Storage .....................................................21
Troubleshooting ..............................................23
Disposal .....................................................25
Disposal of the appliance .................................................25
Disposal of the packaging ................................................. 25
Attachment ..................................................25
Technical data ..........................................................25
Kompernass Handels GmbH warranty ....................................... 26
Service ................................................................ 27
Importer ...............................................................27
SHBR 560 B1
GB│IE
│
1 ■

Introduction
Information about these operating instructions
Congratulations on the purchase of your new appliance.
You have selected a high-quality product.
The operating instructions are part of this product. They contain impor-
tant information about safety, usage and disposal.
Before using the product, please familiarise yourself with all operating and safety
instructions. Use the product only as described and for the range of applications
specified. Please also pass these operating instructions on to any future owner.
Copyright
This documentation is protected by copyright.
Any copying or reproduction, including in the form of extracts, or any reproduc-
tion of images (even in a modified state), is permitted only with the written
authorisation of the manufacturer.
Proper use
This appliance is designed exclusively for cleaning indoor floors and carpets.
It is not intended for any other purpose nor for use beyond the scope described.
The appliance is not intended for use in commercial or industrial environments.
The manufacturer accepts no responsibility for damage caused by failure to
observe these instructions, improper use or repairs, unauthorised modifications
or the use of unapproved replacement parts. The operator bears sole liability.
■ 2 │ GB
│
IE
SHBR 560 B1
Safety information
RISK OF ELECTRICAL SHOCK!
► Connect the appliance only to a properly installed mains
power socket supplying a mains power voltage of 220–
240 V ∼, 50–60 Hz.
► Always pull on the plug to disconnect the appliance from
the mains. Do not pull on the cable itself.
► Do not kink or crush the power cable, and route the cable
so that it cannot be stepped on or tripped over.
► To avoid risks, arrange for defective plugs and/or power
cables to be replaced at once by qualified technicians or
our Customer Service Department.
► Ensure that the power cable does not become wet or damp
during use. Route the cable in such a way that it cannot be
crushed or damaged.
► Do not drive the appliance over the power cable.
► In case of a malfunction, remove the plug from the socket.
► Remove the mains plug from the mains socket before filling
the appliance with water, changing accessories or cleaning it.
► To prevent risks, stop using the appliance immediately if it
is damaged.
► Operate the appliance only with dry hands and never with-
out shoes (i.e. not barefoot). This will help reduce the effect
of an electric shock in the event of a malfunction.
Use the appliance only in indoor areas, not outdoors.
SHBR 560 B1
GB│IE
│
3 ■

RISK OF ELECTRICAL SHOCK!
► Never immerse the appliance in water or other liquids.
► Never aim the appliance at moisture-sensitive objects, floors
or surfaces.
► This appliance may be used by children aged 8 years and
above and by persons with limited physical, sensory or mental
capabilities or lack of experience and knowledge, provided
that they are under supervision or have been told how to use
the appliance safely and are aware of the potential risks.
Do not allow children to use the appliance as a toy.
► Cleaning and user maintenance tasks may not be carried out
by children unless they are supervised.
WARNING! RISK OF INJURY!
► Use only the original accessory parts recommended by the
manufacturer for this appliance.
► Only use the appliance when it is properly and completely
assembled.
► The appliance may not be used if it has been dropped, if
there are any obvious signs of physical damage or if it is
leaking.
► Always pull the plug out of the power socket during each
break in use, as well as after use and before any cleaning.
► Be particularly careful while using the appliance on steps or
stairs.
► Do not use the appliance to vacuum up chemicals, poisonous
materials or inflammable liquids.
■ 4 │ GB
│
IE
SHBR 560 B1

ATTENTION! PROPERTY DAMAGE!
► Always comply with the cleaning instructions of the carpet
manufacturer. Before cleaning, check also whether the
carpet is suitable for cleaning with the appliance.
► Do not leave the appliance standing on wooden floors for
any length of time when it is switched on. The wood could
swell.
► Do not operate the appliance with an empty water tank.
Otherwise, the pump could run empty and overheat.
► Do not insert any objects into the openings of the appliance.
► Do not use the appliance if the openings are blocked. Keep
the openings free of dirt, fluff, hairs or anything that could
impede the air circulation.
► Make sure that you do not vacuum up hard, pointed or
sharp objects (e.g. glass, nails, screws, coins, etc.) with the
appliance.
► Ensure that the appliance, the power cable and the plug do
not come into contact with heat sources such as hotplates or
naked flames.
► Use only the type and quantity of liquids listed in these
operating instructions when operating the appliance.
► Never leave the appliance unattended during operation.
SHBR 560 B1
GB│IE
│
5 ■

Description of the appliance
(See fold-out page for illustrations)
Figure A:
1 Hand element with handle
2 Waste water tank
3 Foot section with brush chamber
4 Storage tray
5 Rotary brush holder
6 Rotary brush
7 Splash guard
8 Float
9 Lid of the waste water tank
0 Dirt filter
q Fresh water tank
w Cleaning solution display
e Carpet switch (with LED)
r Hard floor switch (with LED)
Figure B:
t Cleaning solution switch
z Upper cable retainer
u Power cable with mains plug
i Carrying handle
o Self-cleaning switch
p Lower cable retainer
■ 6 │ GB
│
IE
SHBR 560 B1
Package contents and transport inspection
Ƈ Remove all parts of the appliance and the operating instructions from the
carton.
Ƈ Remove all packaging materials and any films and labels.
Check the contents of the package. The package contents include the following
components (see fold-out page for illustrations):
Floor cleaner
Hand element
Storage tray
Rotary brush holder
Operating instructions
NOTE
► Check the package for completeness and signs of visible damage.
► If the delivery is incomplete or damage has occurred as a result of defec-
tive packaging or during transport, contact the Service hotline (see section
Service).
Use
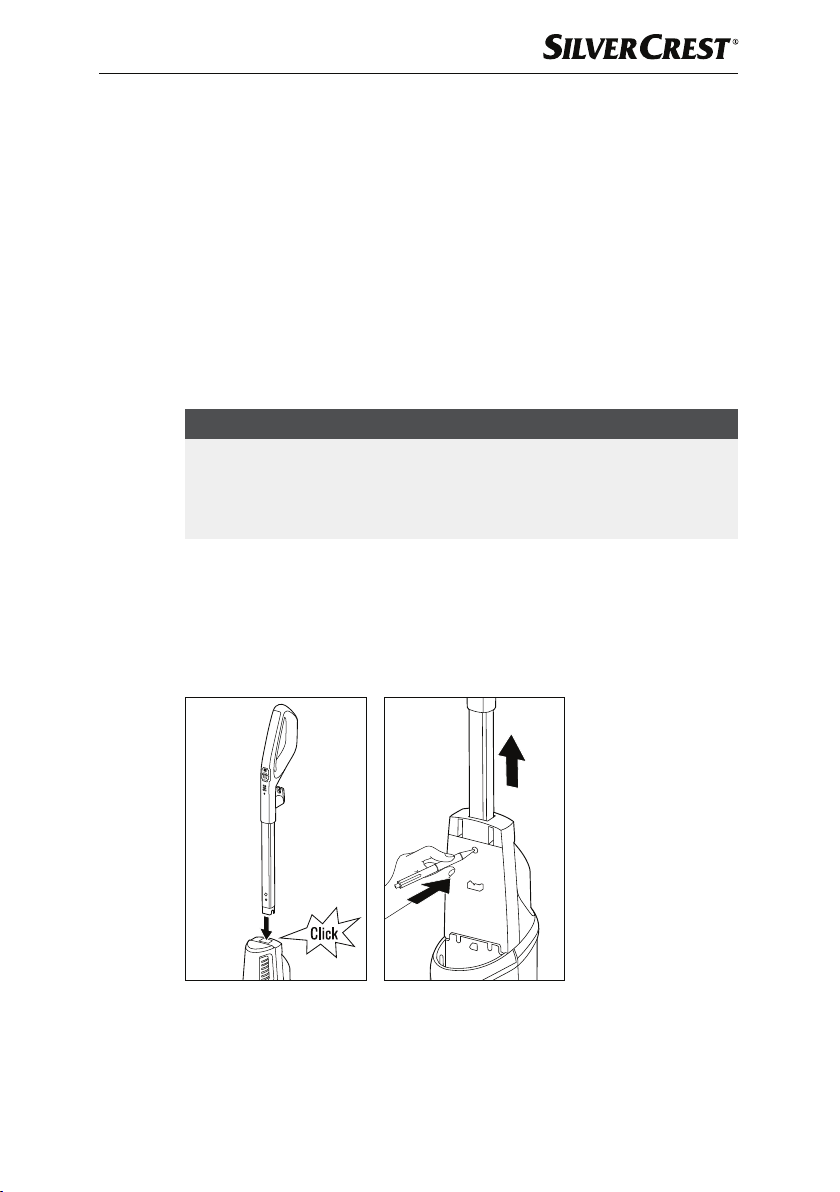
Assembling the appliance
Ƈ Slide the hand element 1 into the opening on the top of the appliance until the
hand element 1 clicks into the opening (see fig. 1).
Fig. 1 Fig. 2
SHBR 560 B1
GB│IE
│
7 ■
NOTE
► If you want to remove the hand element
first remove the fresh water tank q from the appliance to reach the catch
of the hand element 1 (see section Filling the fresh water tank). Once
you have removed the fresh water tank
element 1 out of the catch opening with a pointed object. You can then
pull the hand element 1 back out of the appliance (see fig. 2).
1 from the appliance, you must
q, press the catch on the hand
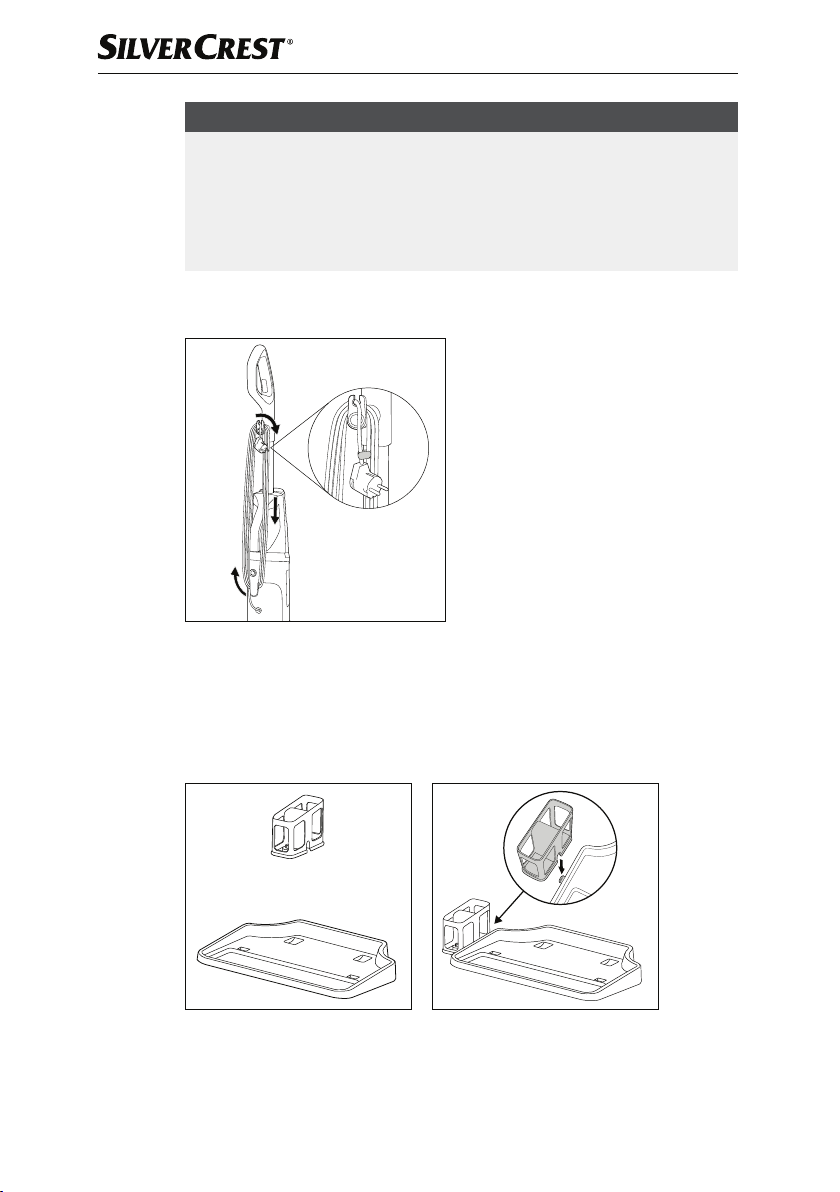
Ƈ Wind the power cable
retainers z/p (see fig. 3).
Fig. 3
Ƈ The parking and cleaning station consists of a storage tray
brush holder 5 (see fig. 4). To assemble the parking and cleaning station, slide
the rotary brush holder 5 sideways into the opening on the storage tray 4.
Slide the rotary brush holder 5 downwards into the opening until it sits firmly in
place on the side of the storage tray 4 (see fig. 5).
u completely around the upper and lower cable
4 and a rotary
■ 8 │ GB
+
Fig. 4 Fig. 5
│
IE
SHBR 560 B1

Filling the fresh water tank
ATTENTION! PROPERTY DAMAGE!
►
► Never operate the appliance without water in the fresh water tank
► Use only standard commercial, non-foaming floor cleaners as cleaning
agents.
Ƈ Grasp the fresh water tank
upwards out of the appliance (see fig. 6).
Ƈ Flip the fresh water tank
Fig. 6 Fig. 7
Ƈ For small areas
or distilled water up to the first fill level marking (see fig. 8).
Ƈ For small areas
solution up to the second fill level marking (see fig. 8).
Ƈ For large areas
or distilled water up to the third fill level marking (see fig. 9).
Ƈ For large areas
solution up to the fourth fill level marking (see fig. 9).
Fill the fresh water tank q only with cold to warm tap water
(up to max. 60°C) or distilled water.
Do not use boiling water.
q by the gripping grooves on the side and pull it
q over and unscrew the lid. (see fig. 7).
(up to 25 m), fill the fresh water tank q with tap water
(up to 25 m), fill the fresh water tank q with cleaning
(up to 55 m), fill the fresh water tank q with tap water
(up to 55 m), fill the fresh water tank q with cleaning
q.
SHBR 560 B1
GB│IE
│
9 ■
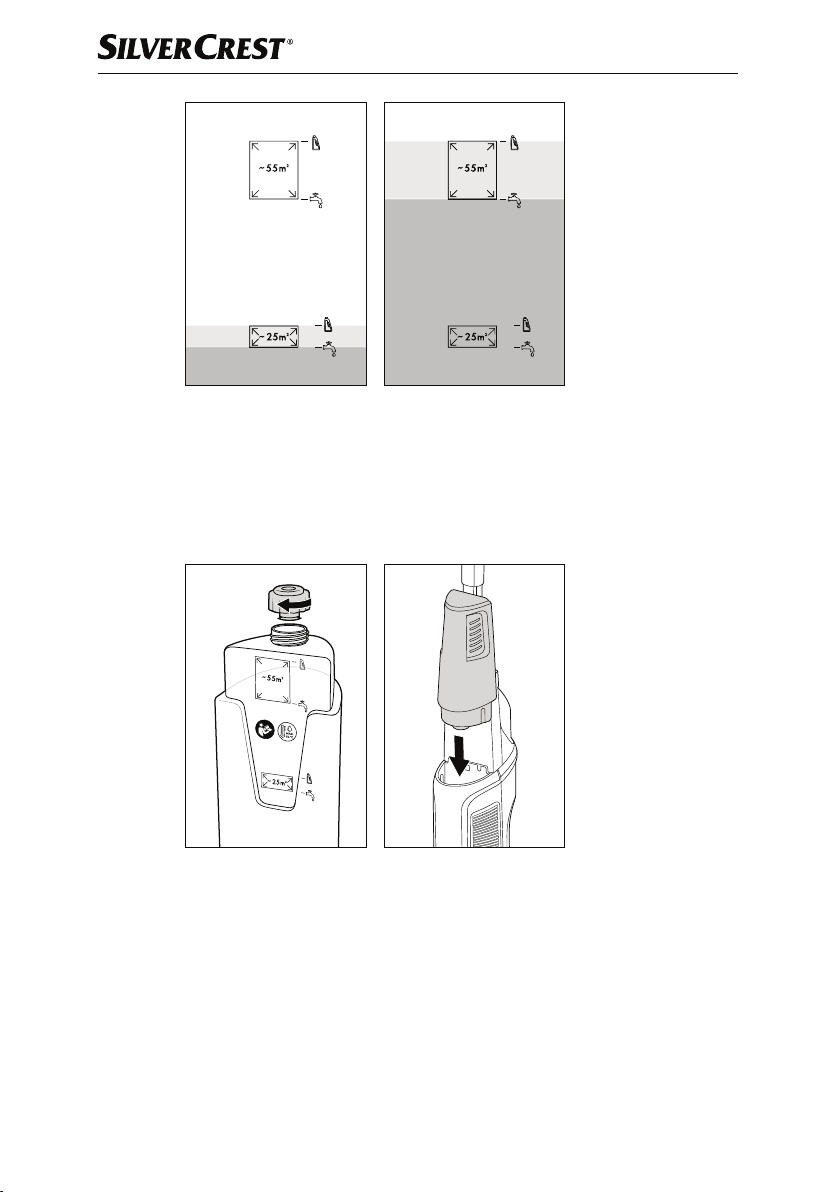
Fig. 8 Fig. 9
Ƈ Close the lid of the fresh water tank
Ƈ Flip the fresh water tank
the front of the appliance (see fig. 11).
Ƈ Push the fresh water tank
fresh water tank q audibly snaps into place and sits firmly in the appliance.
Fig. 10 Fig. 11
q over and slide it back into the opening at the top on
q down along the grooves in the opening until the
q (see fig. 10).
■ 10 │ GB
│
IE
SHBR 560 B1

Handling and operation
ATTENTION! PROPERTY DAMAGE!
► While working with the appliance, make sure that the rotary brush
not get blocked by loose objects lying around on the floor or by carpet
edges. These can damage the rotary brush
properly.
NOTE
► Before finishing the cleaning process, use the appliance approx. 15
seconds without adding cleaning solution. This prevents larger amounts of
water residue being left behind and gives you a better cleaning result.
► A small amount of water may remain on the floor after cleaning for func-
tional reasons. In this case, remove the remaining water from the floor with
a cloth.
Continuous spray function
The appliance has a continuous spray function that allows you to continuously
apply cleaning solution to the rotary brush 6 without having to hold down the
cleaning solution switch t:
Ƈ Press the cleaning solution switch
spray function.
Ƈ Press the cleaning solution switch
continuous spray function.
6 does
6 and stop it from working
t twice briefly to activate the continuous
t twice briefly again to deactivate the
Cleaning hard floors
Once the appliance is assembled and the fresh water tank q is filled with water
and cleaning solution:
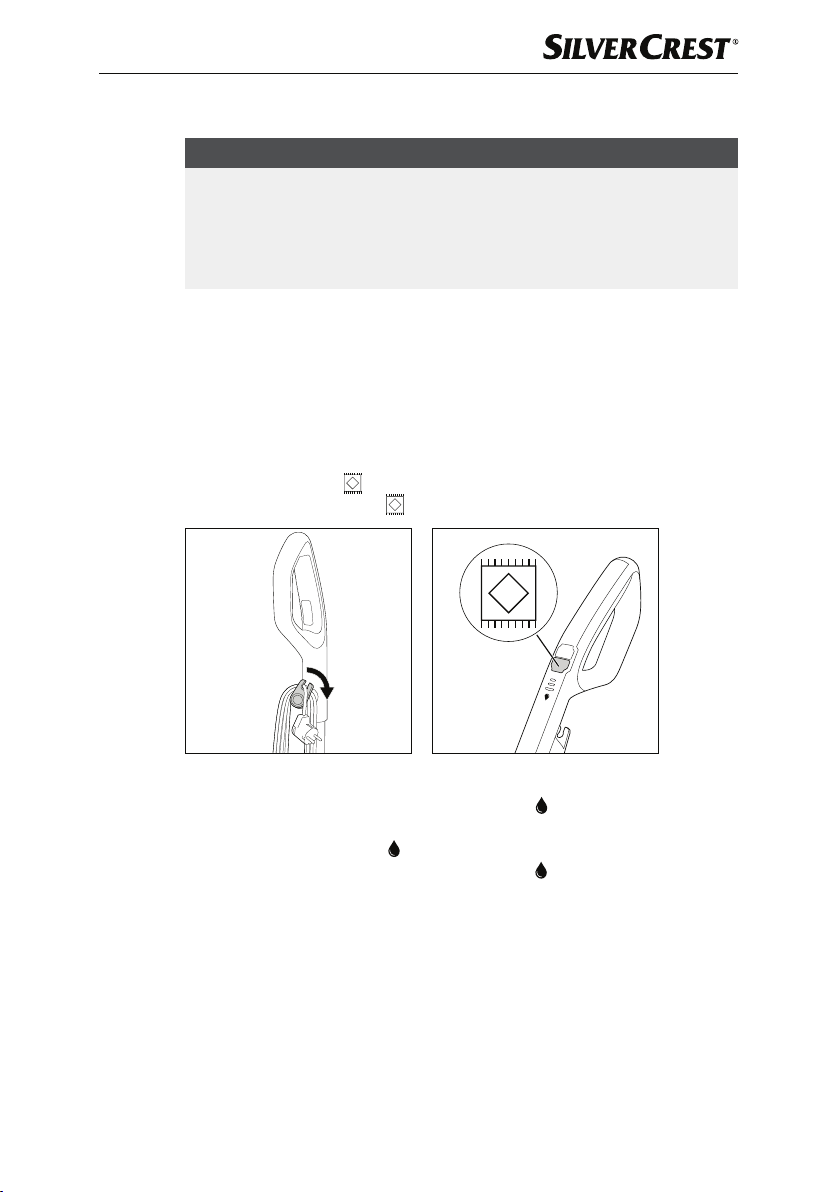
Ƈ Unwind the power cable
z/p. To unwind the power cable u quickly from the cable retainers z/p,
pull the upper cable retainer z out a little way and turn it downwards (see
fig. 12).
Ƈ Insert the plug into the mains power socket.
SHBR 560 B1
u completely from the upper and lower cable retainers
GB│IE
│
11 ■

Ƈ Press the hard floor switch r to switch the appliance on (see fig. 13).
The LED on the hard floor switch r lights up blue.
Fig. 12 Fig. 13
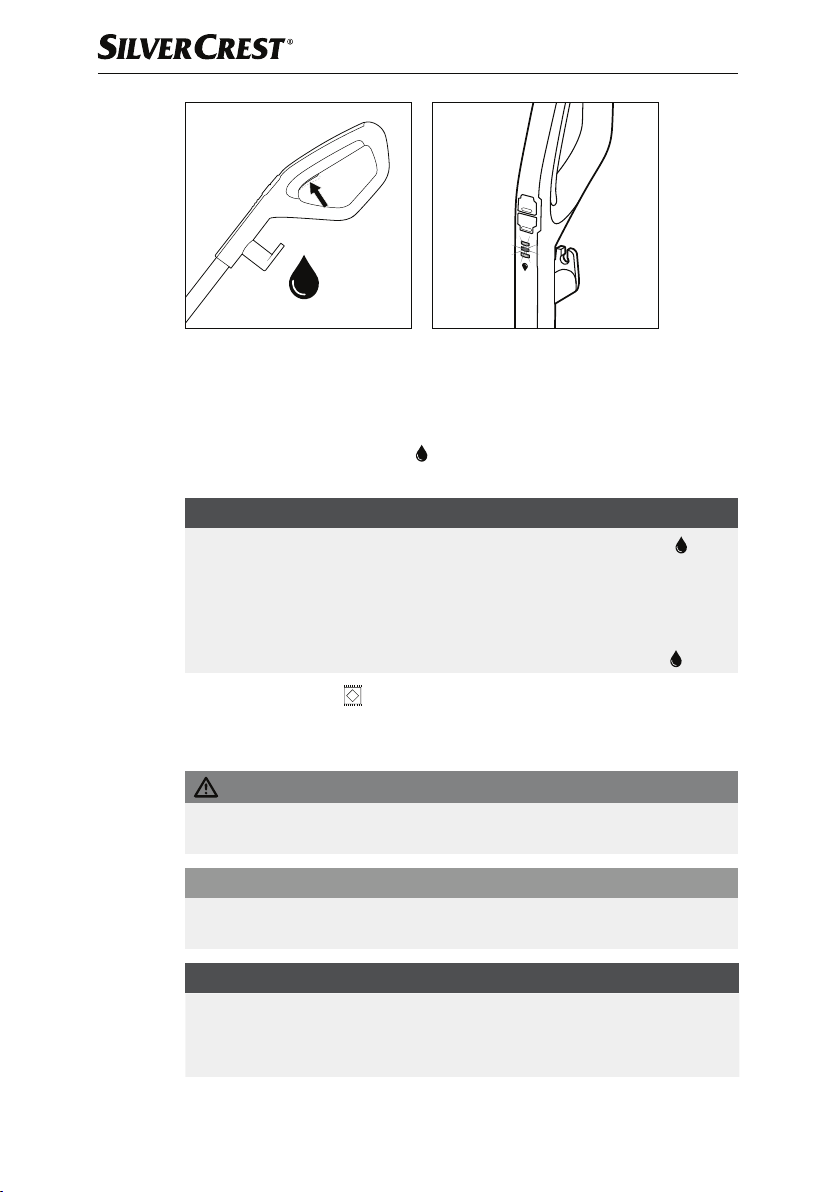
Ƈ Before each use, press the cleaning solution switch
continuous spray function and add cleaning solution to the rotary brush 6 so that
it is ready for operation (see fig. 14). The cleaning solution display w flashes
alternately blue when the continuous spray function is activated or the cleaning
solution switch t is being held down (see fig. 15).
t twice briefly to activate the
2 x
Fig. 14 Fig. 15
Ƈ Activate the continuous spray function
backward movements with the appliance. This way, the cleaning solution is
evenly applied to the hard floor via the rotary brush 6.
Ƈ Press the cleaning solution switch
continuous spray function.
NOTE
For stubborn soiling, move the appliance over the soiled areas several times
►
and activate the continuous spray function.
Ƈ Press the hard floor switch
during cleaning with both forward and
t twice briefly again to deactivate the
r again to switch the appliance off (see fig. 13).
■ 12 │ GB
│
IE
SHBR 560 B1
Cleaning carpets
NOTE
► Before using the appliance to clean a carpet, test the appliance on an
inconspicuous area of the carpet.
► Before cleaning, check the carpet manufacturer's label for special care
instructions. The appliance is not suitable for sensitive carpets (e.g. silk,
leather, flokati etc.).
Once the appliance is assembled and the fresh water tank
and cleaning solution:
Ƈ Unwind the power cable
z/p. To unwind the power cable u quickly from the cable retainers z/p,
pull the upper cable retainer z out a little way and turn it downwards (see
fig. 16).
Ƈ Insert the plug into the mains power socket.
Ƈ Press the carpet switch
The LED on the carpet switch e lights up blue.
q is filled with water
u completely from the upper and lower cable retainers
e to switch the appliance on (see fig. 17).
Fig. 16 Fig. 17
Ƈ Before each use, press the cleaning solution switch
cleaning solution to the rotary brush 6 so that it is ready for use (see fig. 18).
The cleaning solution display w flashes alternately blue when continuous spray
function is activated or the cleaning solution switch t is being held down
(see fig. 19).
SHBR 560 B1
t twice briefly to add
GB│IE
│
13 ■
2 x
Fig. 18 Fig. 19
Ƈ Activate the continuous spray function
backward movements with the appliance. This way, the cleaning solution is
evenly applied to the hard floor via the rotary brush
Ƈ Press the cleaning solution switch
continuous spray function.
NOTE
► When cleaning carpets, if you activate the cleaning solution switch
twice as much cleaning solution is applied to the rotary brush 6 as during
hard floor cleaning.
► To allow carpets to dry more quickly after cleaning, move the appliance
several times over the carpet. Do not activate the continuous spray function
while doing so and do not hold down the cleaning solution switch t.
Ƈ Press the carpet switch
e again to switch the appliance off (see fig. 17).
t twice briefly again to deactivate the
Cleaning and maintenance
RISK OF ELECTRICAL SHOCK!
► Switch the appliance off and pull out the mains plug before cleaning the
appliance!
ATTENTION! PROPERTY DAMAGE
►
Do not use caustic, abrasive or solvent-based cleaning materials. These can
damage the surfaces of the appliance.
during cleaning with both forward and
6.
t,
■ 14 │ GB
NOTE
► Empty the waste water tank
► Clean the dirt filter
putting it back into the waste water tank 2.
│
IE
0 after each use and let it dry completely before
2 after every use.
SHBR 560 B1
NOTE
► After every use, carry out a self-cleaning of the appliance (see section
Self-cleaning function).
Ƈ Clean the appliance with a moist cloth or rag. For stubborn soiling use a mild
detergent on the cloth.
Cleaning the waste water tank
NOTE
► Empty the waste water tank
water has reached the MAX marking.
► When emptying the waste water tank 2 make sure that the drain (e.g. the
wash basin) is not blocked by hair or coarse dirt.
► Once the waste water tank
to switch off automatically.
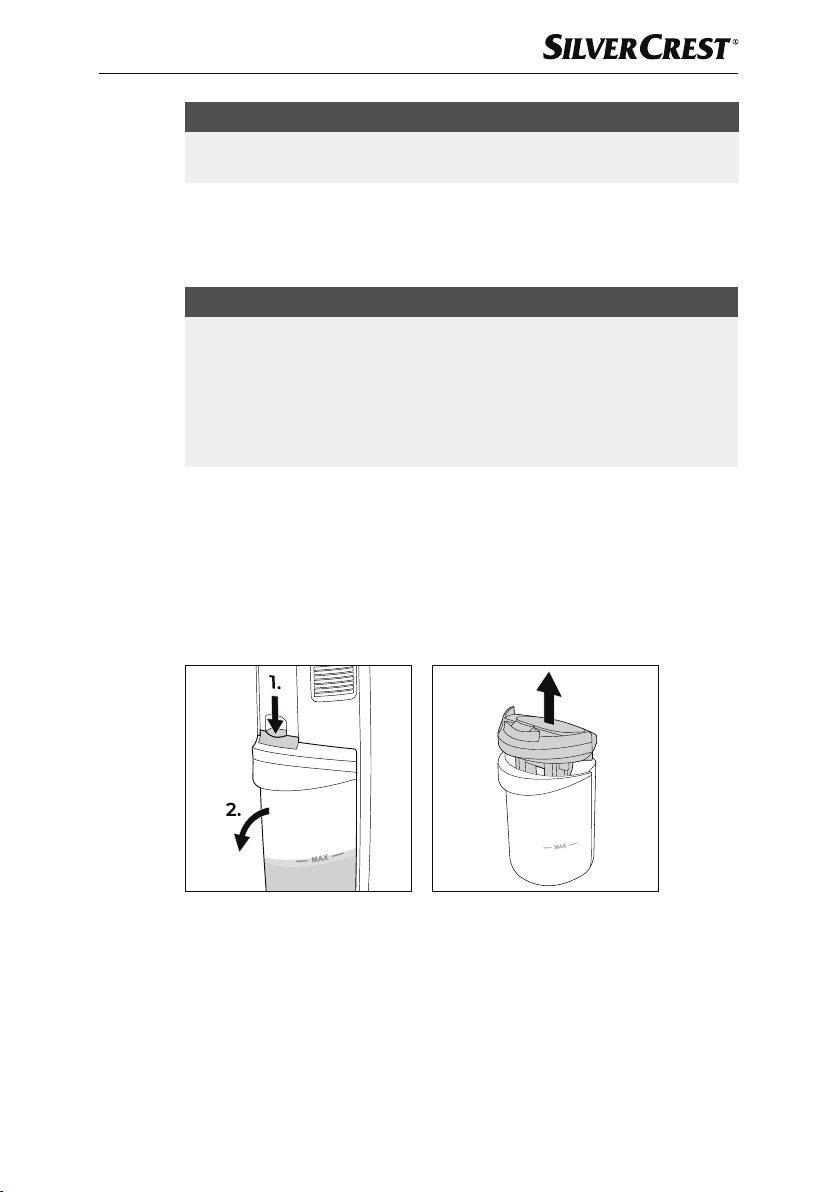
Ƈ Proceed as follows to empty the waste water tank 2:
1. Press the knob at the top of the waste water tank
Hold the handle of the waste water tank 2 while pressing the knob downwards.
2. Pull the waste water tank
Ƈ Pull the lid of the waste water tank
(see fig. 21).
2 after every use and as soon as the dirty
2 is full, the float 8 causes the suction motor
2 forwards out of the appliance (see fig. 20).
9 upwards out of the waste water tank 2
2 downwards (see fig. 20).
Fig. 20 Fig. 21
Ƈ Tip out the dirty water and dirt (see fig. 22).
Ƈ Rinse the waste water tank
SHBR 560 B1
2 in hot running water (see fig. 23).
GB│IE
│
15 ■

Fig. 22 Fig. 23
Ƈ Remove the dirt filter
of the seal on the dirt filter
of the lid of the waste water tank 9 (see Fig. 24).
Ƈ Clean the dirt filter
running water (see fig. 25). If necessary, use a mild detergent.
Fig. 24 Fig. 25
0 from the waste water tank 2 by pulling on the side
0 with your fingers. Pull the dirt filter 0 upwards out
0, the float 8 and the lid of the waste water tank 9 in hot
Ƈ If necessary, clean the opening in which the waste water tank
■ 16 │ GB
the appliance with a damp cloth or rag (see fig. 26).
Fig. 26
│
IE
2 is located on
SHBR 560 B1

Ƈ Allow the dirt filter 0, the waste water tank 2 and the lid of the waste water
tank 9 to dry completely (see fig. 27).
Ƈ Once the parts are fully dry, replace the dirt filter
water tank 9 (see fig. 28).
Fig. 27 Fig. 28
0 back in the lid of the waste
Ƈ Place the lid of the waste water tank
(see fig. 29).
Ƈ Fit the waste water tank
of the waste water tank 2 first. Then push the waste water tank 2 into the
appliance until the waste water tank 2 audibly clicks into place (see fig. 30).
Fig. 29 Fig. 30
2 back onto the appliance by inserting the bottom
9 back onto the waste water tank 2
SHBR 560 B1
GB│IE
│
17 ■

Self-cleaning function
The appliance has a self-cleaning function that allows you to automatically clean
the rotary brush 6, the brush chamber in the foot section 3 and the suction
channel after use.
Ƈ Place the switched-off appliance on the storage tray 4 of the parking and
cleaning station (see fig. 31).
Ƈ Press the self-cleaning switch
Fig. 31 Fig. 32
Ƈ The following cleaning programme is started:
1. The rotary brush
applied to the rotary brush 6.
2. The rotary brush
30 seconds while cleaning solution is applied to the rotary brush 6.
3. The appliance will switch off automatically when the cleaning programme
completes.
o (see fig. 32).
6 is started for approx. 20 seconds and cleaning solution is
6 turns and the vacuum function remains active for approx.
Manual cleaning
For heavier soiling, it is necessary to manually clean the rotary brush 6, the
splash guard 7 and the brush chamber in the foot section 3 of the appliance.
If this occurs, do the following:
Ƈ Make sure that the appliance is not plugged in.
Ƈ Take hold of the top of the splash guard
and pull it forward to remove it from the foot section 3 (see fig. 33).
■ 18 │ GB
│
IE
7 by the edge of the handle (PULL)
SHBR 560 B1

Ƈ Take hold of the bracket on the left side of the rotary brush 6 and pull it
upwards to remove the rotary brush from the foot section 3 (see fig. 34).
Fig. 33 Fig. 34
Ƈ Clean the splash guard
fig. 35).
Ƈ If the brush chamber is dirty, wipe it out with a damp cloth or rag (see fig. 36).
Fig. 35 Fig. 36
Ƈ Allow the rotary brush
fitting them back onto the appliance (see fig. 37).
Ƈ You can also place the rotary brush
the parking and cleaning station for drying (see Figure 38).
7 and the rotary brush 6 in hot running water (see
6 and the splash guard 7 to dry completely before
6 upright in the rotary brush holder 5 on
SHBR 560 B1
GB│IE
│
19 ■

Fig. 37 Fig. 38
Ƈ Fit the rotary brush
first pushing the rotary brush 6 onto the fitting on the right side of the foot
section 3 (see fig. 39).
Ƈ Then push the bracket on the left end of the rotary brush
the left side of the foot section 3 until the rotary brush 6 audibly clicks into
place (see fig. 40).
Fig. 39 Fig. 40
Ƈ Replace the splash guard
section 3 (see fig. 41).
Ƈ Then push the splash guard
the foot section 3 (see fig. 42).
6 and the splash guard 7 back onto the appliance by
6 into the opening on
7 by first aligning it with the bracket on the foot
7 into position until it audibly clicks into place on
■ 20 │ GB
Fig. 41 Fig. 42
│
IE
SHBR 560 B1
Replacing the dirt filter
After 12–18 months, or approximately 100 cleaning cycles (one cycle corresponds to one water tank filling), you will need to change the dirt filter 0.
Information on ordering replacement dirt filters can be found in the following
section: Ordering replacement parts.
RISK OF ELECTRICAL SHOCK!
► Before changing the dirt filter
mains power socket!
Ƈ To change the dirt filter
waste water tank.
0, proceed as described in the section Cleaning the
0, disconnect the power plug from the
Ordering replacement parts
You can order replacement parts for this product on the Internet at
www.kompernass.com.
Scan the QR code with your smartphone/tablet.
You can use this QR code to go directly to our website to view
and order the available spare parts.
NOTE
► If you have problems with your online order, you can contact our service
centre by phone or e-mail.
► Please always quote the article number (e.g. 123456_7890) when order-
ing. You can find it on the title page of these operating instructions.
► Please note that online ordering of replacement parts is not possible for all
countries.
Storage
NOTE
Ƈ Move the hand element
audibly into place. This parking position prevents the appliance from tipping over.
SHBR 560 B1
► For storage, place the appliance on the storage tray
purpose. This must not be placed on absorbent or swelling surfaces such as
carpets or parquet flooring.
► Empty the fresh water tank q if you are not going to use the appliance for
a long period.
► Always clean the appliance before storage. Observe the instructions in the
section Cleaning and maintenance.
4 provided for this
1 of the appliance into an upright position until it clicks
GB│IE
│
21 ■

NOTE
► To release the appliance from the parking position, hold the foot section
of the appliance in place with one foot and then move the hand unit 1
backwards.
Ƈ Pull the upper cable retainer
Ƈ Wind the power cable
tainers z/p (see fig. 44).
Fig. 43 Fig. 44
z out a little and turn it back upwards (see fig. 43).
u completely around both the upper and lower cable re-
3
Ƈ Carry the appliance by the carrying handle
Ƈ For storage, place the appliance on the storage tray
Ƈ Store the appliance in a dry and dust-free location out of direct sunlight.
■ 22 │ GB
cleaning station (see fig. 45).
Fig. 45
│
IE
i only.
4 of the parking and
SHBR 560 B1

Troubleshooting
The following table will help you to identify and rectify minor malfunctions. If the
solutions presented below do not resolve the problem, please contact Customer
Service (see section Service).
Fault Cause Remedy
Make sure that the appliance is properly
The appliance
will not switch
on.
The suction
power is too
weak.
The appliance is not
switched on.
The plug is not
plugged in.
The mains socket is
not supplying any
power.
The waste water
tank
2 is full.
The appliance is
defective.
The fresh and waste
water tanks
are not properly fitted.
The waste water tank
q/2
2 is full.
The splash guard
is not fitted properly.
The suction channel is
blocked.
The dirt filter
blocked.
0 is
connected to the power supply.
Press the hard floor switch
switch
Insert the plug into the mains power socket.
Check the house mains fuse.
Empty the waste water tank
Cleaning the waste water tank).
Switch the appliance off and pull out the mains
plug.
Contact Customer Service (see section Service).
Attach the fresh and waste water tanks
properly to the appliance (see sections
Filling the fresh water tank and Cleaning the
waste water tank).
Empty the waste water tank
Cleaning the waste water tank).
7
Fit the splash guard 7 properly onto the foot
section 3 (see section Manual cleaning).
Clean the suction channel and remove the
blockage (see sections Self-cleaning function
and Manual cleaning).
Remove the dirt filter 0 and clean it (see sec-
tion Cleaning the waste water tank).
r or the carpet
e to switch the appliance on.
2 (see section
q/2
2 (see section
SHBR 560 B1
GB│IE
│
23 ■

Fault Cause Remedy
The appliance
does not
dispensing
enough cleaning solution.
The rotary
brush
6 is not
turning.
Water is leaking from the
appliance.
The fresh water
q is empty.
tank
The fresh water
tank
q is not closed
properly.
The appliance is not
completely ready for
use.
The continuous spray
function is not activated.
The splash guard
is not fitted properly.
The rotary brush
not fitted properly.
The rotary brush
blocked.
The fresh water
tank
q is not closed
properly.
Fill up the fresh water tank
Filling the fresh water tank).
Take the fresh water tank
appliance and tighten the lid (see section
Filling the fresh water tank).
Before each use, press and hold the cleaning
solution switch
add cleaning solution to the rotary brush 6
so that it is ready for use.
Press the cleaning solution switch
briefly to activate the continuous spray function
and continuously apply cleaning solution to the
brush roll 6.
7
Fit the splash guard 7 properly (see section
Manual cleaning).
Switch the appliance off and pull out the mains
plug.
6 is
Fit the rotary brush
section 3 (see section Manual cleaning).
Remove the plug from the mains power socket.
Remove the splash guard
brush 6 to clear the blockage.
Fit the rotary brush 6 and the splash guard 7
6 is
back onto the appliance (see section Manual
cleaning).
Insert the plug into a mains power socket and
switch on the appliance.
Take the fresh water tank
appliance and tighten the lid (see section
Filling the fresh water tank).
q (see section
q out of the
t for about 10 seconds to
t twice
6 properly onto the foot
7 and the rotary
q out of the
■ 24 │ GB
│
IE
SHBR 560 B1

Disposal
Disposal of the appliance
The adjacent symbol of a crossed-out wheelie bin means that this product is subject
to Directive 2012/19/EU. This directive states that the product may not be
disposed of in normal household waste at the end of its useful life, but must be
taken to a specially set-up collection point, recycling depot or disposal company.
This disposal is free of charge for the user. Protect the environment and dispose of this appliance properly.
Your local community or municipal authorities can provide information on how
to dispose of the product.
The product is recyclable, subject to extended producer responsibility and is
collected separately.
Disposal of the packaging
The packaging materials have been selected for their environmental friendliness
and ease of disposal and are therefore recyclable.
Dispose of packaging materials that are no longer needed in accordance with
applicable local regulations.
Dispose of the packaging in an environmentally friendly manner.
Note the labelling on the packaging and separate the packaging material
components for disposal if necessary. The packaging material is labelled with
abbreviations (a) and numbers (b) with the following meanings:
1–7: plastics,
20–22: paper and cardboard,
80–98: composites.
Attachment
Technical data
Power supply 220–240 V ∼ (AC), 50–60 Hz
Power consumption 480–560 W
SHBR 560 B1
GB│IE
│
25 ■

Kompernass Handels GmbH warranty
Dear Customer,
This appliance has a 3-year warranty valid from the date of purchase. If this product
has any faults, you, the buyer, have certain statutory rights. Your statutory rights
are not restricted in any way by the warranty described below.
Warranty conditions
The warranty period starts on the date of purchase. Please keep your receipt in a
safe place. This will be required as proof of purchase.
If any material or manufacturing fault occurs within three years of the date of purchase of the product, we will either repair or replace the product for you or refund the purchase price (at our discretion). This warranty service requires that
you present the defective appliance and the proof of purchase (receipt) within
the three-year warranty period, along with a brief written description of the fault
and of when it occurred.
If the defect is covered by the warranty, your product will either be repaired or
replaced by us. The repair or replacement of a product does not signify the beginning of a new warranty period.
Warranty period and statutory claims for defects
The warranty period is not prolonged by repairs effected under the warranty.
This also applies to replaced and repaired components. Any damage and defects present at the time of purchase must be reported immediately after unpacking. Repairs carried out after expiry of the warranty period shall be subject to a
fee.
Scope of the warranty
This appliance has been manufactured in accordance with strict quality guidelines and inspected meticulously prior to delivery.
The warranty covers material faults or production faults. The warranty does not
extend to product parts subject to normal wear and tear or to fragile parts which
could be considered as consumable parts such as switches, batteries or parts
made of glass.
The warranty does not apply if the product has been damaged, improperly used
or improperly maintained. The directions in the operating instructions for the
product regarding proper use of the product are to be strictly followed. Uses and
actions that are discouraged in the operating instructions or which are warned
against must be avoided.
This product is intended solely for private use and not for commercial purposes.
The warranty shall be deemed void in cases of misuse or improper handling, use
of force and modifications / repairs which have not been carried out by one of
our authorised Service centres.
■ 26 │ GB
│
IE
SHBR 560 B1

Warranty claim procedure
To ensure quick processing of your case, please observe the following instructions:
■ Please have the till receipt and the item number (IAN) 368340_2101
available as proof of purchase.
■ You will find the item number on the type plate on the product, an engraving
on the product, on the front page of the operating instructions (below left) or
on the sticker on the rear or bottom of the product.
■ If functional or other defects occur, please contact the service department list-
ed either by telephone or by e-mail.
■ You can return a defective product to us free of charge to the service address
that will be provided to you. Ensure that you enclose the proof of purchase
(till receipt) and information about what the defect is and when it occurred.
You can download these instructions along with many other manuals, product
videos and installation software at www.lidl-service.com.
This QR code will take you directly to the Lidl service page
(www.lidl-service.com) where you can open your operating instructions
by entering the item number (IAN) 368340_2101.
Service
Service Great Britain
Tel.: 0800 404 7657
E-Mail: kompernass@lidl.co.uk
Service Ireland
Tel.: 1890 930 034
(0,08EUR /Min.,(peak))
(0,06EUR /Min.,(off peak))
E-Mail: kompernass@lidl.ie
IAN 368340_2101
Importer
Please note that the following address is not the service address. Please use the
service address provided in the operating instructions.
KOMPERNASS HANDELS GMBH
BURGSTRASSE 21
44867 BOCHUM
GERMANY
www.kompernass.com
SHBR 560 B1
GB│IE
│
27 ■

■ 28 │ GB
│
IE
SHBR 560 B1

Inhaltsverzeichnis
Einführung ...................................................30
Informationen zu dieser Bedienungsanleitung .................................. 30
Urheberrecht ........................................................... 30
Bestimmungsgemäße Verwendung ..........................................30
Sicherheitshinweise ...........................................31
Gerätebeschreibung ...........................................34
Lieferumfang und Transportinspektion ...........................35
Inbetriebnahme ..............................................35
Gerät montieren ......................................................... 35
Frischwasserbehälter auffüllen .............................................. 37
Bedienung und Betrieb .........................................39
Dauersprühfunktion ...................................................... 39
Reinigung von Hartfußböden ............................................... 39
Reinigung von Teppichböden ..............................................41
Reinigung und Pflege ..........................................42
Schmutzwasserbehälter säubern ............................................43
Selbstreinigungsfunktion ..................................................46
Manuelle Reinigung ...................................................... 46
Schmutzfilter wechseln ....................................................49
Ersatzteile bestellen ...........................................49
Aufbewahrung ...............................................49
Fehlerbehebung ..............................................51
Entsorgung. . . . . . . . . . . . . . . . . . . . . . . . . . . . . . . . . . . . . . . . . . . . . . . . . . . 53
Entsorgung des Gerätes. . . . . . . . . . . . . . . . . . . . . . . . . . . . . . . . . . . . . . . . . . . . . . . . . . . 53
Entsorgung der Verpackung ............................................... 53
Anhang .....................................................53
Technische Daten ........................................................ 53
Garantie der Kompernaß Handels GmbH ....................................54
Service ................................................................ 55
Importeur ..............................................................55
SHBR 560 B1
DE│AT│CH
│
29 ■

Einführung
Informationen zu dieser Bedienungsanleitung
Herzlichen Glückwunsch zum Kauf Ihres neuen Gerätes.
Sie haben sich damit für ein hochwertiges Produkt entschieden.
Die Bedienungs anleitung ist Bestandteil dieses Produkts. Sie enthält
wichtige Hinweise für Sicherheit, Gebrauch und Entsorgung.
Machen Sie sich vor der Benutzung des Produkts mit allen Bedien- und Sicherheitshinweisen vertraut. Benutzen Sie das Produkt nur wie beschrieben und für
die angegebenen Einsatzbereiche. Händigen Sie alle Unterlagen bei Weitergabe des Produkts an Dritte mit aus.
Urheberrecht
Diese Dokumentation ist urheberrechtlich geschützt.
Jede Vervielfältigung, bzw. jeder Nachdruck, auch auszugsweise sowie die
Wiedergabe der Abbildungen, auch im veränderten Zustand ist nur mit schriftlicher Zustimmung des Herstellers gestattet.
Bestimmungsgemäße Verwendung
Dieses Gerät dient ausschließlich zur Reinigung von Hartfußböden und Teppichböden im Innenbereich. Eine andere oder darüber hinausgehende Benutzung gilt
als nicht bestimmungsgemäß. Das Gerät ist nicht zur Verwendung in gewerblichen oder industriellen Bereichen vorgesehen.
Ansprüche jeglicher Art wegen Schäden aus nicht bestimmungsgemäßer Verwendung, unsachgemäßen Reparaturen, unerlaubt vorgenommener Veränderungen
oder Verwendung nicht zugelassener Ersatzteile sind ausgeschlossen. Das Risiko
trägt allein der Betreiber.
■ 30 │ DE
│AT│
CH
SHBR 560 B1

Sicherheitshinweise
GEFAHR DURCH ELEKTRISCHEN SCHLAG!
► Schließen Sie das Gerät nur an eine vorschriftsmäßig
installierte Netzsteckdose mit einer Netzspannung von
220 – 240V ∼, 50–60 Hz an.
► Ziehen Sie das Netzkabel stets am Netzstecker aus der
Netzsteckdose. Ziehen Sie nicht am Netzkabel selbst.
► Knicken oder quetschen Sie das Netzkabel nicht und ver-
legen Sie das Netzkabel so, dass niemand darauf treten
oder darüber stolpern kann.
► Lassen Sie beschädigte Netzstecker oder Netzkabel sofort
von autorisiertem Fachpersonal oder dem Kundenservice
austauschen, um Gefährdungen zu vermeiden.
► Achten Sie darauf, dass im Betrieb das Netzkabel nicht
nass oder feucht wird. Führen Sie es so, dass es nicht eingeklemmt oder beschädigt werden kann.
► Fahren Sie mit dem Gerät nicht über das Netzkabel.
► Ziehen Sie bei Betriebsstörungen den Netzstecker aus der
Netzsteckdose.
► Ziehen Sie erst den Netzstecker aus der Netzsteckdose, be-
vor Sie das Gerät mit Wasser befüllen, reinigen oder Zubehörteile wechseln.
► Sollte das Gerät beschädigt sein, benutzen Sie dieses nicht
weiter, um Gefährdungen zu vermeiden.
► Verwenden Sie das Gerät nur mit trockenen Händen und
nicht ohne Schuhe (nicht barfuß). Damit verringern Sie im
Fehlerfall gefährliche Körperströme.
Verwenden Sie das Gerät nur in Innenräumen, nicht
im Freien.
SHBR 560 B1
DE│AT│CH
│
31 ■

GEFAHR DURCH ELEKTRISCHEN SCHLAG!
► Tauchen Sie das Gerät nicht in Wasser oder Flüssigkeiten
ein.
► Richten Sie das Gerät nie auf wasserempfindliche Gegen-
stände, Böden oder Flächen.
► Dieses Gerät kann von Kindern ab 8 Jahren und darüber so-
wie von Personen mit verringerten physischen, sensorischen
oder mentalen Fähigkeiten oder Mangel an Erfahrung und
Wissen benutzt werden, wenn sie beaufsichtigt oder bezüglich des sicheren Gebrauchs des Gerätes unterwiesen wur-
den und die daraus resultierenden Gefahren verstehen. Kinder dürfen nicht mit dem Gerät spielen.
► Reinigung und Benutzerwartung dürfen nicht von Kindern
ohne Beaufsichtigung durchgeführt werden.
WARNUNG! VERLETZUNGSGEFAHR!
► Verwenden Sie nur die vom Hersteller empfohlenen Original-
Zubehörteile für dieses Gerät.
► Verwenden Sie das Gerät nur, wenn es ordnungsgemäß
und vollständig montiert ist.
► Das Gerät darf nicht verwendet werden, wenn es herunter-
gefallen ist, wenn offensichtliche Beschädigungen sichtbar
sind oder wenn es undicht ist.
► Ziehen Sie bei jeder Unterbrechung sowie nach Beenden
des Gebrauchs und vor jeder Reinigung den Netzstecker
aus der Netzsteckdose.
► Seien Sie besondere vorsichtig, wenn Sie das Gerät auf
Treppen oder Stufen benutzen.
► Verwenden Sie das Gerät nicht zum Aufsaugen von chemi-
schen oder giftigen Materialien oder von entflammbaren/
brennbaren Flüssigkeiten.
■ 32 │ DE
│AT│
CH
SHBR 560 B1

ACHTUNG! SACHSCHADEN!
► Beachten Sie stets die Reinigungshinweise des Teppich-
herstellers. Prüfen Sie vor Beginn der Reinigung zusätzlich,
ob der Teppich für die Reinigung mit dem Gerät geeignet ist.
► Lassen Sie das Gerät nicht längere Zeit eingeschaltet auf
Holzfußböden stehen. Das Holz könnte quellen.
► Betreiben Sie das Gerät nicht mit leerem Wassertank.
Ansonsten kann die Pumpe leerlaufen und überhitzen.
► Stecken Sie keine Objekte in die Öffnungen des Gerätes.
► Benutzen Sie das Gerät nicht mit blockierten Öffnungen.
Halten Sie die Öffnungen frei von Schmutz, Fusseln, Haaren
und allem, was die Luftzirkulation behindern kann.
► Achten Sie darauf, dass Sie keine harten, spitzen oder
scharfen Objekte (z. B. Glas, Nägel, Schrauben, Münzen
etc.) mit dem Gerät aufgesaugen.
► Stellen Sie sicher, dass das Gerät, das Netzkabel oder der
Netzstecker nicht mit heißen Quellen, wie Kochplatten oder
offenen Flammen, in Berührung kommen.
► Verwenden Sie für den Betrieb des Gerätes nur die in dieser
Bedienungsanleitung nach Art und Menge aufgeführten
Flüssigkeiten.
► Lassen Sie das Gerät während des Betriebes niemals un-
beaufsichtigt.
SHBR 560 B1
DE│AT│CH
│
33 ■

Gerätebeschreibung
(Abbildungen siehe Ausklappseite)
Abbildung A:
1 Handteil mit Griff
2 Schmutzwasserbehälter
3 Fußteil mit Bürstenkammer
4 Abstellschale
5 Bürstenrollenhalter
6 Bürstenrolle
7 Spritzschutz
8 Schwimmer
9 Deckel Schmutzwasserbehälter
0 Schmutzfilter
q Frischwasserbehälter
w Anzeige Reinigungslösung
e Schalter Teppichboden (mit LED)
r Schalter Hartfußboden (mit LED)
Abbildung B:
t Schalter Reinigungslösung
z Kabelhalter oben
u Netzkabel mit Netzstecker
i Tragegriff
o Schalter Selbstreinigung
p Kabelhalter unten
■ 34 │ DE
│AT│
CH
SHBR 560 B1

Lieferumfang und Transportinspektion
Ƈ Entnehmen Sie alle Teile des Gerätes und die Bedienungsanleitung aus der
Verpackung.
Ƈ Entfernen Sie sämtliches Verpackungsmaterial und eventuelle Folien und Auf-
kleber.
Bitte prüfen Sie den Lieferumfang. Der Lieferumfang besteht aus folgenden
Komponenten (Abbildungen siehe Ausklappseite):
Bodenreiniger
Handteil
Abstellschale
Bürstenrollenhalter
Bedienungsanleitung
HINWEIS
► Prüfen Sie die Lieferung auf Vollständigkeit und auf sichtbare Schäden.
► Bei einer unvollständigen Lieferung oder Schäden infolge mangelhafter
Verpackung oder durch Transport wenden Sie sich an die Service-Hotline
(siehe Kapitel Service).
Inbetriebnahme
Gerät montieren
Ƈ Schieben Sie das Handteil 1 in die Öffnung an der Oberseite des Gerätes, bis
das Handteil 1 hörbar in der Öffnung einrastet (siehe Abb. 1).
Abb. 1 Abb. 2
SHBR 560 B1
DE│AT│CH
│
35 ■

HINWEIS
► Wenn Sie das Handteil
zuerst den Frischwasserbehälter q entfernen (siehe Kapitel Frischwasser-
behälter auffüllen). Wenn Sie den Frischwasserbehälter q entfernt haben,
drücken Sie die Einrastung des Handteils
aus der Einrastöffnung. Anschließend können Sie das Handteil 1 wieder
aus dem Gerät ziehen (siehe Abb. 2).
1 vom Gerät abmontieren möchten, müssen Sie
1 mit einem spitzen Gegenstand
Ƈ Wickeln Sie das Netzkabel
u vollständig um die Kabelhalter oben und unten
z/p (siehe Abb. 3).
Abb. 3
Ƈ Die Park- und Reinigungsstation besteht aus einer Abstellschale
Bürstenrollenhalter 5 (siehe Abb. 4). Um die Park- und Reinigungsstation zu
montieren, schieben Sie den Bürstenrollenhalter 5 seitlich in die Öffnung an der
Abstellschale 4. Schieben Sie den Bürstenrollenhalter 5 nach unten in die Öffnung, bis dieser fest and der Abstellschale 4 sitzt (siehe Abb. 5).
4 und einem
■ 36 │ DE
+
Abb. 4 Abb. 5
│AT│
CH
SHBR 560 B1

Frischwasserbehälter auffüllen
ACHTUNG! SACHSCHADEN!
►
► Betreiben Sie das Gerät niemals ohne Wasser im Frischwasserbehälter
► Verwenden Sie nur handelsübliche, nicht schäumende Bodenreiniger als
Reinigungsmittel.
Ƈ Fassen Sie den Frischwasserbehälter
Sie diesen nach oben aus dem Gerät (siehe Abb. 6).
Ƈ Drehen Sie den Frischwasserbehälter
(siehe Abb. 7).
Abb. 6 Abb. 7
Füllen Sie nur kaltes bis warmes Leitungswasser (bis max. 60 °C)
oder destilliertes Wasser in den Frischwasserbehälter q.
Verwenden Sie kein kochendes Wasser.
q an den seitlichen Greifrillen und ziehen
q um und schrauben Sie den Deckel ab
q.
Ƈ Füllen Sie für kleine Flächen
Wasser bis zur ersten Füllstand-Markierung in den Frischwasserbehälter q
(siehe Abb. 8).
Ƈ Füllen Sie für kleine Flächen
Füllstand-Markierung in den Frischwasserbehälter q (siehe Abb. 8).
Ƈ Füllen Sie für große Flächen
Wasser bis zur dritten Füllstand-Markierung in den Frischwasserbehälter q
(siehe Abb. 9).
Ƈ Füllen Sie für große Flächen
Füllstand-Markierung in den Frischwasserbehälter q (siehe Abb. 9).
SHBR 560 B1
(bis zu 25 m) Leitungswasser oder destilliertes
(bis zu 25 m) Reinigungsmittel bis zur zweiten
(bis zu 55 m) Leitungswasser oder destilliertes
(bis zu 55 m) Reinigungsmittel bis zur vierten
DE│AT│CH
│
37 ■

Abb. 8 Abb. 9
Ƈ Schrauben Sie den Deckel des Frischwasserbehälters
Ƈ Drehen Sie den Frischwasserbehälter
den Einsatz oben an der Vorderseite des Gerätes (siehe Abb. 11).
Ƈ Schieben Sie den Frischwasserbehälter
ten, bis der Frischwasserbehälter q hörbar einrastet und fest am Gerät sitzt.
Abb. 10 Abb. 11
q um und schieben Sie diesen wieder in
q entlang der Rillen im Einsatz nach un-
q wieder zu (siehe Abb. 10).
■ 38 │ DE
│AT│
CH
SHBR 560 B1

Bedienung und Betrieb
ACHTUNG! SACHSCHADEN!
► Achten Sie darauf, dass beim Betrieb des Gerätes die Bürstenrolle
nicht durch herumliegende, lose Gegenstände oder durch Teppichkanten
blockiert wird. Dies kann dazu führen, dass die Bürstenrolle
wird und nicht mehr ordnungsgemäß funktioniert.
HINWEIS
► Verwenden Sie das Gerät ca. 15 Sekunden vor dem Beenden des
Reinigungsvorgangs ohne Zugabe von Reinigungslösung. So vermeiden
Sie, dass größere Mengen an Wasserrückständen zurückbleiben und Sie
erhalten ein besseres Reinigungsergebnis.
► Funktionsbedingt kann nach der Reinigung eine geringe Menge Wasser
auf dem Boden verbleiben. Entfernen Sie in diesem Fall das verbliebene
Wasser mit einem Tuch vom Boden.
Dauersprühfunktion
Das Gerät verfügt über eine Dauersprühfunktion, mit der Sie kontinuierlich Reinigungslösung auf die Bürstenrolle 6 geben können ohne den Schalter Reinigungslösung t gedrückt zu halten:
Ƈ Zweimal kurz den Schalter Reinigungslösung
funktion zu aktiveren.
Ƈ Erneut zweimal kurz den Schalter Reinigungslösung
sprühfunktion wieder zu deaktivieren.
6
6 beschädigt
t drücken, um die Dauersprüh-
t drücken, um die Dauer-
Reinigung von Hartfußböden
Wenn das Gerät fertig montiert und der Frischwasserbehälter q mit Wasser und
Reinigungslösung befüllt ist:
Ƈ Wickeln Sie das Netzkabel
z/p ab. Um das Netzkabel u schnell von den Kabelhaltern z/p abzuwi-
ckeln, ziehen Sie den oberen Kabelhalter
sen nach unten (siehe Abb. 12).
Ƈ Stecken Sie den Netzstecker in die Netzsteckdose.
SHBR 560 B1
u vollständig von den Kabelhaltern oben und unten
z etwas heraus und drehen Sie die-
DE│AT│CH
│
39 ■

Ƈ Um das Gerät einzuschalten, drücken Sie den Schalter Hartfußboden r
(siehe Abb. 13). Die LED des Schalters Hartfußboden r leuchtet blau.
Abb. 12 Abb. 13
Ƈ Drücken Sie vor jedem Gebrauch zweimal kurz den Schalter Reinigungslösung
um die Dauersprühfunktion zu aktivieren und die Bürstenrolle 6 mit Reinigungslösung betriebsbereit zu machen (siehe Abb. 14). Die Anzeige Reinigungslösung w
blinkt abwechselnd blau auf, wenn die Dauersprühfunktion aktiviert ist oder der
Schalter Reinigungslösung t gedrückt gehalten wird (s. Abb. 15).
2 x
Abb. 14 Abb. 15
Ƈ Aktivieren Sie die Dauersprühfunktion
wärts- als auch bei Rückwärtsbewegungen mit dem Gerät. So wird die Reinigungslösung gleichmäßig über die Bürstenrolle 6 auf dem Hartfußboden aufgetragen.
Ƈ Drücken Sie erneut zweimal kurz den Schalter Reinigungslösung
Dauersprühfunktion wieder zu deaktivieren.
HINWEIS
Fahren Sie bei hartnäckigen Verschmutzungen mit dem Gerät mehrmals
►
über die verschmutzten Stellen und aktivieren Sie dabei die Dauersprühfunktion.
Ƈ Drücken Sie zum Ausschalten des Gerätes erneut den Schalter Hartfußboden
(siehe Abb. 13).
während der Reinigung sowohl bei Vor-
t, um die
t,
r
■ 40 │ DE
│AT│
CH
SHBR 560 B1

Reinigung von Teppichböden
HINWEIS
► Testen Sie das Gerät vor der Reinigung von Teppichböden zuerst an einer
unauffälligen Stelle des Teppichs.
► Überprüfen Sie vor der Reinigung das Herstelleretikett des Teppichs auf
besondere Pflegeanweisungen. Das Gerät ist nicht geeignet für empfindliche Teppiche (z. B. Seide, Leder, Flokati etc.).
Wenn das Gerät fertig montiert und der Frischwasserbehälter
Reinigungslösung befüllt ist:
Ƈ Wickeln Sie das Netzkabel
z/p ab. Um das Netzkabel u schnell von den Kabelhaltern z/p abzuwi-
ckeln, ziehen Sie den oberen Kabelhalter z etwas heraus und drehen Sie diesen
nach unten (siehe Abb. 16).
Ƈ Stecken Sie den Netzstecker in die Netzsteckdose.
Ƈ Um das Gerät einzuschalten, drücken Sie den Schalter Teppichboden
(siehe Abb. 17). Die LED des Schalters Teppichboden e leuchtet blau.
u vollständig von den Kabelhaltern oben und unten
q mit Wasser und
e
Abb. 16 Abb. 17
Ƈ Drücken Sie vor jedem Gebrauch zweimal kurz den Schalter Reinigungslösung
um die Dauersprühfunktion zu aktivieren und die Bürstenrolle 6 mit Reinigungslösung betriebsbereit zu machen (siehe Abb. 18). Die Anzeige Reinigungslösung w
blinkt abwechselnd blau auf, wenn die Dauersprühfunktion aktiviert ist oder der
Schalter Reinigungslösung t gedrückt gehalten wird (s. Abb. 19).
SHBR 560 B1
t,
DE│AT│CH
│
41 ■

2 x
Abb. 18 Abb. 19
Ƈ Aktivieren Sie die Dauersprühfunktion
wärts- als auch bei Rückwärtsbewegungen mit dem Gerät. So wird die Reinigungslösung gleichmäßig über die Bürstenrolle 6 auf dem Hartfußboden aufgetragen.
Ƈ Drücken Sie erneut zweimal kurz den Schalter Reinigungslösung
Dauersprühfunktion wieder zu deaktivieren.
HINWEIS
►
Wenn Sie beim Reinigen von Teppichböden den Schalter Reinigungslösung
doppelt soviel Reinigungslösung auf die Bürstenrolle
► Um Teppichböden nach der Reinigung schneller trocknen zu lassen, fahren
Sie mit dem Gerät mehrmals über den Teppich. Aktivieren Sie dabei nicht
die Dauersprühfunktion und halten Sie den Schalter Reinigungslösung
nicht gedrückt.
Ƈ Drücken Sie zum Ausschalten des Gerätes erneut den Schalter Teppichboden
(s. Abb. 17).
t betätigen, wird im Vergleich zur Hartfußbodenreinigung
Reinigung und Pflege
GEFAHR DURCH ELEKTRISCHEN SCHLAG!
► Schalten Sie vor jeder Reinigung das Gerät aus und ziehen Sie den Netz-
stecker aus der Netzsteckdose!
während der Reinigung sowohl bei Vor-
t, um die
6 gegeben.
t
e
■ 42 │ DE
ACHTUNG! SACHSCHADEN
►
Verwenden Sie keine ätzenden, scheuernden oder lösungsmittelhaltigen
Reinigungsmittel. Diese können die Oberflächen des Gerätes angreifen.
HINWEIS
► Entleeren Sie nach jedem Gebrauch den Schmutzwasserbehälter
► Reinigen Sie den Schmutzfilter 0 nach jedem Gebrauch und lassen Sie ihn
vollständig trocknen, bevor Sie ihn wieder in den Schmutzwasserbehälter2
einsetzen.
│AT│
CH
2.
SHBR 560 B1

HINWEIS
► Führen Sie nach jedem Gebrauch eine Selbstreinigung des Gerätes durch
(siehe Kapitel Selbstreinigungsfunktion).
Ƈ Reinigen Sie das Gerät mit einem feuchten Lappen oder Tuch. Bei hart näckigeren
Verschmutzungen geben Sie ein mildes Spülmittel auf das Tuch.
Schmutzwasserbehälter säubern
HINWEIS
► Entleeren Sie den Schmutzwasserbehälter
die MAX-Markierung erreicht hat.
► Achten Sie beim Entleeren des Schmutzwasserbehälters 2 darauf, dass
der Abfluss (z. B. bei Waschbecken) nicht durch Haare oder groben
Schmutz verstopft wird.
► Wenn der Schmutzwasserbehälter
der Absaugmotor automatisch abgeschaltet.
Ƈ Um den Schmutzwasserhehälter 2 zu leeren, gehen Sie folgendermaßen vor:
1. Drücken Sie den Knopf über dem Schmutzbehälter
Abb. 20). Halten Sie den Griff des Schmutzwasserbehälters 2, während Sie
den Knopf hinunter drücken.
2. Ziehen Sie den Schmutzwasserbehälter
(siehe Abb. 20).
Ƈ Ziehen Sie den Deckel des Schmutzwasserbehälters
Schmutzwasserbehälter 2 (siehe Abb. 21).
2 voll ist, wird mithilfe des Schwimmers 8
2, wenn das Schmutzwasser
2 nach unten (siehe
2 nach vorne aus dem Gerät
9 nach oben aus dem
Abb. 20 Abb. 21
Ƈ Schütten Sie das Schmutzwasser und den Schmutz aus (siehe Abb. 22).
Ƈ Spülen Sie den Schmutzwasserbehälter 2 unter fließendem, warmen Wasser
aus (siehe Abb. 23).
SHBR 560 B1
DE│AT│CH
│
43 ■

Abb. 22 Abb. 23
Ƈ Entfernen Sie den Schmutzfilter 0 aus dem Schmutzwasserbehälter 2, indem
Sie mit den Fingern seitlich unter die Dichtung des Schmutzfilters
Ziehen Sie dann den Schmutzfilter
wasserbehälters
Ƈ Reinigen Sie den Schmutzfilter 0, den Schwimmer 8 und den Deckel des
Schmutzwasserbehälters
Verwenden Sie bei Bedarf ein mildes Reinigungsmittel.
Abb. 24 Abb. 25
9 (siehe Abb. 24).
9 unter fließendem, warmen Wasser (siehe Abb. 25).
0 nach oben aus dem Deckel des Schmutz-
0 fassen.
Ƈ Reinigen Sie bei Bedarf den Einsatz, in dem sich der Schmutzwasserbehälter
■ 44 │ DE
am Gerät befindet, mit einem feuchten Lappen oder Tuch (siehe Abb. 26).
Abb. 26
│AT│
CH
SHBR 560 B1
2

Ƈ Lassen Sie den Schmutzfilter 0, den Schmutzwasserbehälter 2 und den Deckel
des Schmutzwasserbehälters 9 vollständig trocknen (siehe Abb. 27).
Ƈ Wenn die Teile getrocknet sind, setzen Sie den Schmutzfilter
Deckel des Schmutzwasserbehälters 9 (siehe Abb. 28).
Abb. 27 Abb. 28
0 wieder in den
Ƈ Setzen Sie den Deckel des Schmutzwasserbehälters
wasserbehälter 2 (siehe Abb. 29).
Ƈ Befestigen Sie den Schmutzwasserbehälter
erst den Boden des Schmutzwasserbehälters 2 einsetzen. Schieben Sie dann
den Schmutzwasserbehälter 2 in Richtung des Gerätes, bis der Schmutzwasserbehälter 2 hörbar am Gerät einrastet (siehe Abb. 30).
Abb. 29 Abb. 30
2 wieder am Gerät, indem Sie zu-
9 wieder auf den Schmutz-
SHBR 560 B1
DE│AT│CH
│
45 ■

Selbstreinigungsfunktion
Das Gerät verfügt über eine Selbstreinigungsfunktion. Mit dieser Funktion können
Sie die Bürstenrolle 6, die Bürstenkammer im Fußteil 3 des Gerätes und den
Saugkanal nach dem Gebrauch automatisch reinigen.
Ƈ Stellen Sie das ausgeschaltete Gerät auf die Abstellschale 4 der Park- und Rei-
nigungsstation (siehe. Abb. 31).
Ƈ Drücken Sie den Schalter Selbstreinigung
Abb. 31 Abb. 32
Ƈ Folgendes Reinigungsprogramm wird gestartet:
1. Für ca. 20 Sekunden wird die Bürstenrolle
auf die Bürstenrolle 6 gegeben.
2. Für ca. 30 Sekunden dreht sich die Bürstenrolle
während weiterhin Reinigungslösung auf die Bürstenrolle 6 gegeben wird.
3. Nach Beendigung des Reinigungsprogramms schaltet sich das Gerät automa-
tisch wieder aus.
o (siehe Abb. 32).
6 gestartet und Reinigungslösung
6 und die Saugfunktion ist aktiv,
Manuelle Reinigung
Bei stärkeren Verschmutzungen ist es nötig, die Bürstenrolle 6, den Spritzschutz 7
und die Bürstenkammer im Fußteil 3 des Gerätes manuell zu reinigen. Gehen
Sie in diesem Fall folgendermaßen vor:
Ƈ Stellen Sie sicher, dass der Netzstecker des Gerätes aus der Netzsteckdose ge-
zogen ist.
Ƈ Fassen Sie den Spritzschutz
diesen nach vorne, um ihn vom Fußteil 3 zu entfernen (siehe Abb. 33).
■ 46 │ DE
│AT│
CH
7 oben an der Griffkante (PULL) und ziehen Sie
SHBR 560 B1

Ƈ Fassen Sie die Halterung links an der Bürstenrolle 6 und ziehen Sie diese nach
oben, um die Bürstenrolle vom Fußteil 3 zu entfernen (siehe Abb. 34).
Abb. 33 Abb. 34
Ƈ Reinigen Sie den Spritzschutz
warmen Wasser (siehe Abb. 35).
Ƈ Sollte die Bürstenkammer verschmutzt sein, säubern Sie diese mit einem feuchten
Lappen oder Tuch (siehe Abb. 36).
Abb. 35 Abb. 36
Ƈ Lassen Sie die Bürstenrolle
vor Sie diese wieder am Gerät anbringen (siehe Abb. 37).
Ƈ Sie können die Bürstenrolle
an der Park- und Reinigungsstation stellen (siehe Abb. 38).
7 und die Bürstenrolle 6 unter fließendem,
6 und den Spritzschutz 7 vollständig trocknen, be-
6 zum Trocknen auch aufrecht in den Bürstenhalter 5
SHBR 560 B1
DE│AT│CH
│
47 ■

Abb. 37 Abb. 38
Ƈ Montieren Sie die Bürstenrolle
Setzen Sie dafür die Bürstenrolle
des Fußteils 3 (siehe Abb. 39).
Ƈ Drücken Sie dann die Halterung links an der Bürstenrolle
linken Seite des Fußteils
Abb. 39 Abb. 40
Ƈ Setzen Sie den Spritzschutz
Halterungen am Fußteil 3 ausrichten (siehe Abb. 41).
Ƈ Drücken Sie dann den Spritzschutz
Fußteil 3 einrastet (siehe Abb. 42).
6 und den Spritzschutz 7 wieder am Gerät.
6 zuerst in die Halterung an der rechten Seite
3, bis die Bürstenrolle 6 hörbar einrastet (siehe Abb. 40).
7 wieder ein, indem Sie diesen zunächst an den
7 wieder in Position, bis dieser hörbar am
6 in die Öffnung an der
■ 48 │ DE
Abb. 41 Abb. 42
│AT│
CH
SHBR 560 B1

Schmutzfilter wechseln
Nach 12 – 18 Monaten oder ca. 100 Reinigungszyklen (ein Zyklus entspricht einer Frischwasserbehälterbefüllung), sollten Sie den Schmutzfilter 0 wechseln.
Informationen zur Bestellung von Ersatz-Schmutzfltern finden Sie im folgenden
Kapitel Ersatzteile bestellen.
GEFAHR DURCH ELEKTRISCHEN SCHLAG!
► Ziehen Sie vor dem Wechsel des Schmutzfilters
der Netzsteckdose!
Ƈ Zum Wechseln des Schmutzfilters
behälter säubern beschrieben vor.
Ersatzteile bestellen
Sie können Ersatzteile für dieses Produkt bequem im Internet unter
www.kompernass.com dauerhaft nachbestellen.
Scannen Sie diesen QR-Code mit Ihrem Smartphone oder Tablet.
Mit dem QR-Code gelangen Sie direkt auf unsere Webseite
(www.kompernass.com) und können die für dieses Gerät
verfügbaren Ersatzteile einsehen und bestellen.
HINWEIS
► Sollten Sie Probleme mit der Online-Bestellung haben, können Sie sich telefo-
nisch oder per E-Mail an unser Servicecenter wenden (siehe Kapitel Service).
► Bitte geben Sie immer die Artikelnummer (z. B. 123456_7890), die Sie
dem Titelblatt dieser Bedienungsanleitung entnehmen können, bei Ihrer
Bestellung mit an.
► Bitte beachten Sie, dass nicht für alle Lieferländer eine Online-Bestellung
von Ersatzteilen möglich ist.
0 den Netzstecker aus
0 gehen Sie wie im Kapitel Schmutzwasser-
Aufbewahrung
HINWEIS
► Stellen Sie das Gerät zur Aufbewahrung in die dafür vorgesehene Abstell-
4. Diese darf nicht auf saugenden bzw. aufquellenden Untergrün-
schale
den, wie z. B. Teppichböden oder Parkett platziert werden.
► Leeren Sie den Frischwasserbehälter q aus, wenn Sie das Gerät eine
längere Zeit nicht benutzen.
► Bewahren Sie das Gerät nur im gereinigten Zustand auf. Beachten Sie
hierzu die Anweisungen im Kapitel Reinigung und Pflege.
Ƈ Bringen Sie das Handteil
einrastet. In dieser Parkposition wird ein Umkippen des Gerätes verhindert.
SHBR 560 B1
1 des Gerätes in eine aufrechte Position, bis es hörbar
DE│AT│CH
│
49 ■

HINWEIS
► Um das Gerät aus der Parkposition zu lösen, fixieren Sie mit einem Fuß
das Fußteil
hinten.
Ƈ Ziehen Sie den oberen Kabelhalter
wieder nach oben (siehe Abb. 43).
Ƈ Wickeln Sie das Netzkabel
unten z/p (siehe Abb. 44).
Abb. 43 Abb. 44
3 des Gerätes und bewegen Sie dann das Handteil 1 nach
z ein wenig heraus und drehen Sie diesen
u vollständig um die beiden Kabelhalter oben und
Ƈ Tragen Sie das Gerät nur am Tragegriff
Ƈ Stellen Sie das Gerät zur Aufbewahrung auf die Abstellschale
Ƈ Bewahren Sie das Gerät an einem trockenen und staubfreien Ort ohne direkte
■ 50 │ DE
Reinigungsstation (s. Abb. 45).
Abb. 45
Sonneneinstrahlung auf.
│AT│
CH
i.
4 der Park- und
SHBR 560 B1

Fehlerbehebung
Die nachfolgende Tabelle hilft bei der Lokalisierung und Behebung kleinerer
Störungen. Wenn Sie mit den nachfolgend genannten Schritten das Problem nicht
lösen können, wenden Sie sich bitte an den Kundendienst (siehe Kapitel Service).
Fehler Ursache Behebung
Vergewissern Sie sich, dass das Gerät ordnungsgemäß an die Stromversorgung angeschlossen ist.
Drücken Sie den Schalter Hartfußboden
oder den Schalter Teppichboden e, um das
Gerät einzuschalten.
Stecken Sie den Netzstecker in die Netzsteckdose.
Überprüfen Sie die Haussicherungen.
Entleeren Sie den Schmutzwasserbehälter
(siehe Kapitel Schmutzwasserbehälter säubern).
Schalten Sie das Gerät aus und ziehen Sie den
Netzstecker aus der Netzsteck dose.
Wenden Sie sich an den Kundenservice
(siehe Kapitel Service).
Bringen Sie die Behälter für Frisch- und Schmutzwasser
q /2 ordnungsgemäß am Gerät an
(siehe Kapitel Frischwasserbehälter auffüllen
und Schmutzwasserbehälter säubern).
Entleeren Sie den Schmutzwasserbehälter
(siehe Kapitel Schmutzwasserbehälter säubern).
7 ist
Befestigen Sie den Spritzschutz 7 ordnungsgemäß am Fußteil 3 (siehe Kapitel Manuelle Rei-
nigung).
Reinigen Sie den Saugkanal und entfernen Sie
die Verstopfung (siehe Kapitel Selbstreinigung
und Manuelle Reinigung).
Entfernen Sie den Schmutzfilter 0 und reinigen
0 ist
Sie diesen (siehe Kapitel Schmutzwasserbehälter
säubern).
Das Gerät lässt
sich nicht einschalten.
Die Saugleistung ist zu
schwach.
Das Gerät ist nicht
eingeschaltet.
Der Netzstecker ist
nicht eingesteckt.
Die Netzsteckdose liefert keine Spannung.
Der Schmutzwasserbe-
2 ist voll.
hälter
Das Gerät ist defekt.
Die Behälter für Frischund Schmutzwasser
q /2 sind nicht ord-
nungsgemäß am Gerät angebracht.
Der Schmutzwasserbe-
2 ist voll.
hälter
Der Spritzschutz
nicht ordnungsgemäß
befestigt.
Der Saugkanal ist verstopft.
Der Schmutzfilter
verstopft.
r
2
2
SHBR 560 B1
DE│AT│CH
│
51 ■

Fehler Ursache Behebung
Das Gerät gibt
zu wenig Reinigungslösung
ab.
Die Bürstenrolle
6 dreht sich
nicht.
Aus dem Gerät
tritt Wasser aus.
Der Frischwasserbehäl-
q ist leer.
ter
Der Frischwasserbehäl-
q ist nicht richtig
ter
verschlossen.
Das Gerät ist noch
nicht vollständig betriebsbereit.
Die Dauersprühfunktion
ist nicht aktiviert.
Der Spritzschutz
nicht ordnungsgemäß
befestigt.
Die Bürstenrolle
nicht richtig montiert.
Die Bürstenrolle
blockiert.
Der Frischwasserbehäl-
q ist nicht richtig
ters
verschlossen.
Füllen Sie den Frischwasserbehälter
(siehe Kapitel Frischwasserbehälter auffüllen).
Nehmen Sie den Frischwasserbehälter
dem Gerät und schrauben Sie den Deckel fest zu
(siehe Kapitel Frischwasserbehälter auffüllen).
Halten Sie vor dem Gebrauch den Schalter Reinigungslösung
um die Bürstenrolle 6 mit Reinigungslösung betriebsbereit zu machen.
Drücken Sie zweimal kurz den Schalter Reinigungslösung
zu aktivieren und kontinuierlich Reinigungslösung
auf die Bürstenrolle 6 zu geben.
7 ist
Befestigen Sie den Spritzschutz 7 ordnungsgemäß (siehe Kapitel Manuelle Reinigung).
Schalten Sie das Gerät aus und ziehen Sie den
Netzstecker aus der Netzsteckdose.
6 ist
Montieren Sie die Bürstenrolle
mäß am Fußteil 3 (siehe Kapitel Manuelle Rei-
nigung).
Ziehen Sie den Netzstecker aus der Netzsteckdose. Entfernen Sie den Spritzschutz
Bürstenrolle 6, um die Blockade zu entfernen.
Montieren Sie die Bürstenrolle 6 und den
6 ist
Spritzschutz 7 wieder am Gerät (siehe Kapitel
Manuelle Reinigung).
Stecken Sie den Netzstecker in die Netzsteckdose
und schalten Sie das Gerät ein.
Nehmen Sie den Frischwasserbehälter
dem Gerät und schrauben Sie den Deckel fest zu
(siehe Kapitel Frischwasserbehälter auffüllen).
q auf
q aus
t für 10 Sekunden gedrückt,
t, um die Dauersprühfunktion
6 ordnungsge-
7 und die
q aus
■ 52 │ DE
│AT│
CH
SHBR 560 B1

Entsorgung
Entsorgung des Gerätes
Das nebenstehende Symbol einer durchgestrichenen Mülltonne auf Rädern zeigt
an, dass dieses Produkt der Richtlinie 2012/19/EU unterliegt. Diese Richtlinie
besagt, dass Sie dieses Produkt am Ende seiner Nutzungszeit nicht mit dem
normalen Hausmüll entsorgen dürfen, sondern in speziell eingerichteten Sammelstellen, Wertstoffhöfen oder Entsorgungsbetrieben abgeben müssen.
Diese Entsorgung ist für Sie kostenfrei. Schonen Sie die Umwelt
und entsorgen Sie fachgerecht.
Möglichkeiten zur Entsorgung des ausgedienten Produkts erfahren Sie bei Ihrer
Gemeinde- oder Stadtverwaltung.
Das Produkt ist recycelbar, unterliegt einer erweiterten Herstellerverantwortung
und wird getrennt gesammelt.
Entsorgung der Verpackung
Die Verpackungs materialien sind nach umweltverträglichen und entsorgungstechnischen Gesichtspunkten ausgewählt und deshalb recyclebar.
Entsorgen Sie nicht mehr benötigte Verpackungsmaterialien gemäß den örtlich
geltenden Vorschriften.
Entsorgen Sie die Verpackung umweltgerecht.
Beachten Sie die Kennzeichnung auf den verschiedenen Verpackungsmaterialien
und trennen Sie diese gegebenenfalls gesondert. Die Verpackungsmaterialien sind
gekennzeichnet mit Abkürzungen (a) und Ziffern (b) mit folgender Bedeutung:
1–7: Kunststoffe,
20–22: Papier und Pappe,
80–98: Verbundstoffe.
Anhang
Technische Daten
Spannungsversorgung 220 – 240 V ∼ (Wechselstrom), 50-60 Hz
Leistungsaufnahme 480 – 560 W
SHBR 560 B1
DE│AT│CH
│
53 ■

Garantie der Kompernaß Handels GmbH
Sehr geehrte Kundin, sehr geehrter Kunde,
Sie erhalten auf dieses Gerät 3 Jahre Garantie ab Kaufdatum. Im Falle von Män-
geln dieses Produkts stehen Ihnen gegen den Verkäufer des Produkts gesetzliche
Rechte zu. Diese gesetzlichen Rechte werden durch unsere im Folgenden dargestellte Garantie nicht eingeschränkt.
Garantiebedingungen
Die Garantiefrist beginnt mit dem Kaufdatum. Bitte bewahren Sie den Kassenbon
gut auf. Dieser wird als Nachweis für den Kauf benötigt.
Tritt innerhalb von drei Jahren ab dem Kaufdatum dieses Produkts ein Materialoder Fabrikationsfehler auf, wird das Produkt von uns – nach unserer Wahl – für
Sie kostenlos repariert, ersetzt oder der Kaufpreis erstattet. Diese Garantieleistung setzt voraus, dass innerhalb der Dreijahresfrist das defekte Gerät und der
Kaufbeleg (Kassenbon) vorgelegt und schriftlich kurz beschrieben wird, worin
der Mangel besteht und wann er aufgetreten ist.
Wenn der Defekt von unserer Garantie gedeckt ist, erhalten Sie das reparierte
oder ein neues Produkt zurück. Mit Reparatur oder Austausch des Produkts beginnt kein neuer Garantiezeitraum.
Garantiezeit und gesetzliche Mängelansprüche
Die Garantiezeit wird durch die Gewährleistung nicht verlängert. Dies gilt auch
für ersetzte und reparierte Teile. Eventuell schon beim Kauf vorhandene Schäden
und Mängel müssen sofort nach dem Auspacken gemeldet werden. Nach Ablauf
der Garantiezeit anfallende Reparaturen sind kostenpflichtig.
Garantieumfang
Das Gerät wurde nach strengen Qualitätsrichtlinien sorgfältig produziert und vor
Auslieferung gewissenhaft geprüft.
Die Garantieleistung gilt für Material- oder Fabrikationsfehler. Diese Garantie erstreckt sich nicht auf Produktteile, die normaler Abnutzung ausgesetzt sind und daher als Verschleißteile angesehen werden können oder für Beschädigungen an
zerbrechlichen Teilen, z. B. Schalter, Akkus oder Teile, die aus Glas gefertigt sind.
Diese Garantie verfällt, wenn das Produkt beschädigt, nicht sachgemäß benutzt
oder gewartet wurde. Für eine sachgemäße Benutzung des Produkts sind alle in
der Bedienungsanleitung aufgeführten Anweisungen genau einzuhalten. Verwendungszwecke und Handlungen, von denen in der Bedienungsanleitung abgeraten oder vor denen gewarnt wird, sind unbedingt zu vermeiden.
Das Produkt ist nur für den privaten und nicht für den gewerblichen Gebrauch
bestimmt. Bei missbräuchlicher und unsachgemäßer Behandlung, Gewaltanwendung und bei Eingriffen, die nicht von unserer autorisierten Serviceniederlassung
vorgenommen wurden, erlischt die Garantie.
■ 54 │ DE
│AT│
CH
SHBR 560 B1

Abwicklung im Garantiefall
Um eine schnelle Bearbeitung Ihres Anliegens zu gewährleisten, folgen Sie bitte
den folgenden Hinweisen:
■ Bitte halten Sie für alle Anfragen den Kassenbon und die Artikelnummer
(IAN) 368340_2101 als Nachweis für den Kauf bereit.
■ Die Artikelnummer entnehmen Sie bitte dem Typenschild am Produkt, einer
Gravur am Produkt, dem Titelblatt der Bedienungsanleitung (unten links) oder
dem Aufkleber auf der Rück- oder Unterseite des Produktes.
■ Sollten Funktionsfehler oder sonstige Mängel auftreten, kontaktieren Sie
zunächst die nachfolgend benannte Serviceabteilung telefonisch oder
perE-Mail.
■ Ein als defekt erfasstes Produkt können Sie dann unter Beifügung des Kaufbelegs
(Kassenbon) und der Angabe, worin der Mangel besteht und wann er aufgetreten ist, für Sie portofrei an die Ihnen mitgeteilte Serviceanschrift übersenden.
Auf www.lidl-service.com können Sie diese und viele weitere Handbücher,
Produktvideos und Installationssoftware herunterladen.
Mit diesem QR-Code gelangen Sie direkt auf die Lidl-Service-Seite
(www.lidl-service.com) und können mittels der Eingabe der Artikelnummer
(IAN) 368340_2101 Ihre Bedienungsanleitung öffnen.
Service
Service Deutschland
Tel.: 0800 5435 111 (kostenfreiausdemdt.Festnetz /Mobilfunknetz)
E-Mail: kompernass@lidl.de
Service Österreich
Tel.: 0820 201 222 (0,15 EUR /Min.)
E-Mail: kompernass@lidl.at
Service Schweiz
Tel.: 0842 665566 (0,08CHF /Min.,Mobilfunkmax.0,40CHF /Min.)
E-Mail: kompernass@lidl.ch
IAN 368340_2101
Importeur
Bitte beachten Sie, dass die folgende Anschrift keine Serviceanschrift ist.
Kontaktieren Sie zunächst die benannte Servicestelle.
KOMPERNASS HANDELS GMBH
BURGSTRASSE 21
44867 BOCHUM
DEUTSCHLAND
www.kompernass.com
SHBR 560 B1
DE│AT│CH
│
55 ■

■ 56 │ DE
│AT│
CH
SHBR 560 B1

Table des matières
Introduction ..................................................58
Informations relatives à ce mode d'emploi .................................... 58
Droits d'auteur ..........................................................58
Utilisation conforme ......................................................58
Avertissements de sécurité ......................................59
Description de l’appareil .......................................62
Matériel livré et inspection après le transport ......................63
Mise en service ...............................................63
Assemblage de l'appareil .................................................63
Remplir le réservoir d'eau fraîche. . . . . . . . . . . . . . . . . . . . . . . . . . . . . . . . . . . . . . . . . . . . 65
Utilisation et fonctionnement ....................................67
Fonction spray continu .................................................... 67
Nettoyage de sols durs ...................................................67
Nettoyage de moquettes .................................................. 69
Nettoyage et entretien .........................................70
Nettoyer le réservoir d'eau sale ............................................. 71
Fonction d'autonettoyage ................................................. 74
Nettoyage manuel .......................................................74
Remplacer le filtre à impuretés .............................................. 77
Commander des pièces de rechange .............................77
Rangement ..................................................77
Dépannage ..................................................79
Recyclage ....................................................81
Recyclage de l'appareil ................................................... 81
Recyclage de l'emballage .................................................81
Annexe ......................................................81
Caractéristiques techniques ................................................81
Garantie pour Kompernass Handels GmbH pour la Belgique ..................... 82
Garantie pour Kompernass Handels GmbH pour la France .......................84
Service après-vente ...................................................... 87
Importateur ............................................................ 87
SHBR 560 B1
FR│BE
│
57 ■

Introduction
Informations relatives à ce mode d’emploi
Toutes nos félicitations pour l’achat de votre nouvel appareil.
Vous venez ainsi d’opter pour un produit de grande qualité.
Le mode d’emploi fait partie intégrante de ce produit. Il contient des
remarques importantes concernant la sécurité, l’utilisation et le recyclage.
Avant d’utiliser le produit, veuillez vous familiariser avec toutes les consignes
d’utilisation et avertissements de sécurité. N’utilisez le
produit que conformément aux descriptions et pour les domaines
d’utilisation indiqués. Si vous cédez le produit à un tiers, remettez-lui également
tous les documents.
Droits d’auteur
Cette documentation est protégée par des droits d’auteur.
Toute reproduction ou réimpression, même partielle, y compris la reproduction des
illustrations, même modifiées, n’est autorisée qu’avec l’accord écrit du fabricant.
Utilisation conforme
Cet appareil sert exclusivement au nettoyage de sols durs et de sols en moquette
en intérieur. Tout usage autre ou dépassant ce cadre est réputé non conforme.
Cet appareil n’est pas conçu pour être utilisé dans des secteurs commerciaux
ou industriels.
Les prétentions de toute nature pour dommages résultant d’un usage non
conforme, de réparations inappropriées, de modifications réalisées sans autorisation ou
du recours à des pièces de rechange non autorisées sont exclues. L’utilisateur
répond lui seul des risques encourus.
■ 58 │ FR
│
BE
SHBR 560 B1

Avertissements de sécurité
RISQUE D'ÉLECTROCUTION!
► L'appareil ne doit être branché que dans une prise régle-
mentairement installée et alimentée par une tension secteur
de 220 – 240V ∼, 50–60 Hz.
► Pour débrancher l'appareil, retirez uniquement la fiche sec-
teur de la prise secteur. Ne tirez pas sur le cordon d'alimentation proprement dit.
► Évitez de plier ou de coincer le cordon d'alimentation et
posez-le de telle manière que personne ne puisse marcher
ou trébucher dessus.
► Faites immédiatement remplacer les fiches secteur ou les
cordons d'alimentation endommagés par du personnel
agréé ou par le service clientèle, pour éviter tout risque.
► Veillez à ce que le cordon d'alimentation ne soit pas mouillé
ou humide pendant le fonctionnement. Acheminez-le afin
qu'il ne soit ni coincé ni endommagé.
► Ne faites pas passer l'appareil sur le cordon d'alimentation.
► En cas de problèmes d'utilisation, débrancher la fiche sec-
teur de la prise secteur.
► Débranchez préalablement la fiche secteur de la prise sec-
teur avant de verser de l'eau dans l'appareil, de le nettoyer
ou de remplacer des accessoires.
► Si l'appareil venait à être endommagé, arrêtez aussitôt de
vous en servir pour éviter tous dangers.
► Utilisez l'appareil seulement si vous avez les mains sèches
et conservez vos chaussures (n'utilisez pas l'appareil si vous
êtes pieds nus). Vous réduisez ainsi des courants dangereux
pouvant traverser le corps en cas de panne.
Utilisez l'appareil exclusivement dans des locaux
intérieurs, pas en extérieur.
SHBR 560 B1
FR│BE
│
59 ■

RISQUE D'ÉLECTROCUTION!
► N'immergez jamais l'appareil dans de l'eau ou dans des
liquides.
► Ne dirigez jamais l'appareil vers des objets, sols ou surfaces
sensibles à l'eau.
► Cet appareil peut être utilisé par des enfants à partir de
8 ans et par des personnes ayant des capacités physiques,
sensorielles ou mentales réduites ou disposant de peu d'expérience et/ou de connaissances, à condition qu'ils soient
surveillés ou qu'ils aient été initiés à l'utilisation sécurisée de
l'appareil et qu'ils aient compris les dangers en résultant.
Les enfants ne doivent pas jouer avec l'appareil.
► Ne pas laisser un enfant effectuer un nettoyage ou une
opération d'entretien sans surveillance.
AVERTISSEMENT! RISQUE DE BLESSURES!
► Utilisez uniquement les accessoires d'origine recommandés
par le fabricant pour cet appareil.
► N'utilisez l'appareil que s'il est monté correctement et
entière ment.
► L'appareil ne doit pas être utilisé s'il est tombé, si des dété-
riorations évidentes sont visibles ou s'il n'est pas étanche.
► Après chaque interruption, en fin d'utilisation ou avant chaque
nettoyage, retirez la fiche secteur de la prise secteur.
► Soyez particulièrement prudent en utilisant l'appareil dans
les escaliers ou sur des marches.
► N'utilisez pas l'appareil pour aspirerdes matériaux
chimiques ou toxiques ou des liquides inflammables/combustibles.
■ 60 │ FR
│
BE
SHBR 560 B1

ATTENTION! RISQUE DE DÉGÂTS MATÉRIELS!
► Tenez toujours compte des indications de nettoyage don-
nées par le fabricant de moquette/tapis. Avant de débuter
le nettoyage, vérifiez si le tapis est adapté à un nettoyage
avec l'appareil.
► Ne laissez pas l'appareil allumé sur des sols en bois pen-
dant une longue période. Le bois risquerait de gonfler.
► N'utilisez pas l'appareil avec un réservoir d'eau vide.
Sinon la pompe peut tourner à vide et surchauffer.
► N'introduisez aucun objet dans les orifices de l'appareil.
► N'utilisez pas l'appareil avec les orifices bloqués. Tenez les
orifices libres de toute saleté, des peluches, cheveux et tout
ce qui est susceptible d'entraver la circulation de l'air.
► Veillez à n'aspirer aucun objet dur, pointu ou à arêtes vives
(par ex, verre, clous, vis, pièces etc.) avec l'appareil.
► Assurez-vous que l'appareil, le cordon d'alimentation ou la
fiche secteur n'entre pas en contact avec des sources de
chaleur telles que des plaques de cuisson ou des flammes
nues.
► N'utilisez que les types et quantités de liquides listés dans
ce mode d'emploi.
► Ne laissez jamais l'appareil sans surveillance pendant son
fonctionnement.
SHBR 560 B1
FR│BE
│
61 ■

Description de l’appareil
(Figures: voir le volet dépliant)
Figure A:
1 Partie portable avec poignée
2 Réservoir d’eau sale
3 Tête de nettoyage avec compartiment à brosse
4 Socle
5 Support pour rouleau brosse
6 Rouleau brosse
7 Protection antiprojections
8 Flotteur
9 Couvercle du réservoir d’eau sale
0 Filtre à impuretés
q Réservoir d’eau fraîche
w Voyant de solution de nettoyage
e Interrupteur moquette (avec LED)
r Interrupteur sol dur (avec LED)
Figure B:
t Interrupteur solution de nettoyage
z Support de cordon supérieur
u Cordon d’alimentation avec fiche secteur
i Poignée de transport
o Interrupteur d’auto-nettoyage
p Support de cordon inférieur
■ 62 │ FR
│
BE
SHBR 560 B1

Matériel livré et inspection après le transport
Ƈ Sortez de l’emballage toutes les pièces de l’appareil et le mode d’emploi.
Ƈ Enlevez tout le matériel d’emballage, les éventuels films et les autocollants.
Veuillez vérifier le matériel livré. Le matériel livré comprend les éléments
suivants(voir figures sur le volet dépliant):
Nettoyeur de sol
Partie portable
Socle
Support pour rouleau brosse
Mode d’emploi
REMARQUE
► Vérifiez si la livraison est complète et ne présente aucun dégât apparent.
► En cas de livraison incomplète ou de dommages résultant d'un emballage
défectueux ou liés au transport, veuillez-vous adresser à la hotline du
service après-vente (voir le chapitre Service après-vente).
Mise en service
Assemblage de l’appareil
Ƈ Insérez la partie portable 1 dans l’ouverture située sur le dessus de l’appareil,
jusqu’à ce que la partie portable 1 s’enclenche audiblement dans l’ouverture
(voir fig. 1).
Fig. 1 Fig. 2
SHBR 560 B1
FR│BE
│
63 ■

REMARQUE
► Lorsque vous souhaitez retirer à nouveau la partie portable
reil, vous devez commencer par sortir le réservoir d'eau fraîche q de
l'appareil, pour accéder à l'encliquetage de la partie portable 1 (voir le
chapitre Remplir le réservoir d’eau fraîche). Une fois le réservoir d'eau
fraîche
q retiré, appuyez sur l'encliquetage de la partie portable 1 à l'aide
d'un objet pointu pour l'éloigner de l'orifice d'encliquetage. Vous pouvez
ensuite retirer à nouveau la partie portable 1 de l'appareil (voir fig. 2).
1 de l'appa-
Ƈ Enroulez le cordon d’alimentation
supérieur et inférieur z/p (voir fig. 3).
Fig. 3
Ƈ La station d’accueil et de nettoyage est composée d’un socle
pour rouleau brosse 5 (voir fig. 4). Pour monter la station d’accueil et de nettoyage, glissez le support pour rouleau brosse 5 latéralement dans l’ouverture
sur le socle 4. Glissez le support pour rouleau brosse 5 vers le bas dans l’ouverture jusqu’à ce qu’il soit bien fixé sur le socle 4 (voir fig. 5).
u entièrement autour du support de cordon
4 et d’un support
■ 64 │ FR
+
Fig. 4 Fig. 5
│
BE
SHBR 560 B1

Remplir le réservoir d’eau fraîche
ATTENTION! RISQUE DE DÉGÂTS MATÉRIELS!
►
► N'utilisez jamais l'appareil sans eau dans le réservoir d'eau fraîche
► Utilisez uniquement des produits de lavage pour sol non moussants comme
produit de nettoyage.
Ƈ Saisissez le réservoir d’eau fraîche
sortez-le par le haut de l’appareil (voir fig. 6).
Ƈ Retournez le réservoir d’eau fraîche
Fig. 6 Fig. 7
Ƈ Pour de petites surfaces
de l’eau distillée jusqu’au premier repère de niveau de remplissage dans le
réservoir d’eau fraîche q (voir fig. 8).
Ƈ Pour de petites surfaces
jusqu’au second repère de niveau de remplissage dans le réservoir d’eau
fraîche q (voir fig. 8).
Ƈ Pour de grandes surfaces
de l’eau distillée jusqu’au troisième repère de niveau de remplissage dans
le réservoir d’eau fraîche q (voir fig. 9).
Ƈ Pour de grandes surfaces
toyage jusqu’au quatrième repère de niveau de remplissage dans le réservoir
d’eau fraîche q (voir fig. 9).
Remplissez uniquement de l'eau du robinet froide à chaude
(jusqu'à max. 60 °C) ou de l'eau distillée dans le réservoir
d'eau fraîche q. N'utilisez pas d'eau bouillante.
q.
q au niveau des poignées latérales et
q et dévissez le couvercle (voir fig. 7).
(jusqu’à 25 m), remplissez de l’eau du robinet ou
(jusqu’à 25 m), remplissez du produit de nettoyage
(jusqu’à 55 m), remplissez de l’eau du robinet ou
(jusqu’à 55 m) remplissez du produit de net-
SHBR 560 B1
FR│BE
│
65 ■

Fig. 8 Fig. 9
Ƈ Revissez à nouveau le couvercle du réservoir d’eau fraîche
Ƈ Retournez le réservoir d’eau fraîche
située en haut sur le devant de l’appareil (voir fig. 11).
Ƈ Glissez le réservoir d’eau fraîche
le bas, jusqu’à ce que le réservoir d’eau fraîche q s’encliquète de manière audible et soit bien fixé sur l’appareil.
Fig. 10 Fig. 11
q et glissez-le à nouveau dans l’insertion
q le long des rainures dans l’insertion vers
q (voir fig. 10).
■ 66 │ FR
│
BE
SHBR 560 B1

Utilisation et fonctionnement
ATTENTION! RISQUE DE DÉGÂTS MATÉRIELS!
► Veillez à ce que le rouleau brosse
traînant à terre ou par les bords de tapis lors du fonctionnement de l'appareil. Cela peut causer l'endommagement du rouleau brosse
fonctionne alors plus correctement.
REMARQUE
► Utilisez l’appareil pendant env. 15 secondes sans solution de nettoyage
avant de finir le nettoyage. Vous évitez ainsi que des quantités importantes
d’eau résiduelle ne subsistent et vous obtenez un
meilleur résultat de nettoyage.
► Du fait du fonctionnement, il est possible qu’une petite quantité d’eau
demeure au sol après le nettoyage. Éliminez dans ce cas l’eau résiduelle
au sol à l’aide d’un chiffon.
Fonction spray continu
L’appareil dispose d’une fonction spray continu avec laquelle vous pouvez alimenter continuellement le rouleau brosse 6 en solution de nettoyage sans avoir
à maintenir enfoncé l’interrupteur solution de nettoyage t:
Ƈ Appuyer deux fois brièvement sur l’interrupteur solution de nettoyage
activer la fonction spray continu.
Ƈ Appuyer à nouveau deux fois brièvement sur l’interrupteur solution de nettoyage t
pour désactiver la fonction spray continu.
6 ne soit pas bloqué par des objets
6 qui ne
t pour
Nettoyage de sols durs
Une fois l’appareil assemblé et le réservoir d’eau fraîche q rempli d’eau et de
solution de nettoyage:
Ƈ Déroulez le cordon d’alimentation
rieur et inférieur z/p. Pour dérouler rapidement le cordon d’alimentation u
des supports de cordon z/p, sortez légèrement le support de cordon
supérieur z et tournez-le vers le bas (voir fig. 12).
Ƈ Branchez la fiche secteur dans la prise secteur.
SHBR 560 B1
u entièrement du support de cordon supé-
FR│BE
│
67 ■

Ƈ Appuyez sur l’interrupteur sol dur r pour allumer l’appareil (voir fig. 13).
La LED de l’interrupteur sol dur r s’allume en bleu.
Fig. 12 Fig. 13
Ƈ Avant chaque utilisation, appuyez deux fois brièvement sur l’interrupteur solution
de nettoyage
brosse 6 soit opérationnel avec la solution de nettoyage (voir fig. 14). Le voyant
de solution de nettoyage w clignote en alternance en bleu lorsque la fonction spray continu est activée ou que l’interrupteur solution de nettoyage t est
maintenu appuyé (voir fig. 15).
t pour activer la fonction spray continu et pour que le rouleau
Ƈ Activez la fonction spray continu
Ƈ Appuyez à nouveau deux fois brièvement sur l’interrupteur solution de nettoyage
Ƈ Appuyez à nouveau sur l’interrupteur sol dur r pour éteindre l’appareil
■ 68 │ FR
2 x
Fig. 14 Fig. 15
pendant le nettoyage, lors des mouvements aussi
bien en avant qu’en arrière effectués avec l’appareil. La solution de nettoyage est
ainsi appliquée uniformément sur le sol dur par le rouleau brosse 6.
pour désactiver la fonction spray continu.
REMARQUE
►
En cas de salissures tenaces, passez plusieurs fois l’appareil sur les endroits
sales et activez en même temps la fonction spray continu.
(voirfig. 13).
│
BE
SHBR 560 B1
t

Nettoyage de moquettes
REMARQUE
► Avant le nettoyage, commencez par tester l'appareil sur un endroit discret
de la moquette.
► Vérifiez avant le nettoyage les éventuelles instructions d'entretien données
sur l'étiquette du fabricant de la moquette. L'appareil ne convient pas aux
tapis/moquettes sensibles (par ex. soie, cuir, flokati etc.).
Une fois l’appareil assemblé et le réservoir d’eau fraîche
solution de nettoyage:
Ƈ Enroulez le cordon d’alimentation
supérieur et inférieur z/p. Pour dérouler rapidement le cordon d’alimentation u
des supports de cordon z/p, sortez légèrement le support de cordon
supérieur z et tournez-le vers le bas (voir fig. 16).
Ƈ Branchez la fiche secteur dans la prise secteur.
Ƈ Appuyez sur l’interrupteur moquette
La LED de l’interrupteur moquette e s’allume en bleu.
q rempli d’eau et de
u entièrement autour du support de cordon
e pour allumer l’appareil (voir fig. 17).
Fig. 16 Fig. 17
Ƈ Avant chaque utilisation, appuyez deux fois brièvement sur l’interrupteur solution
de nettoyage
brosse 6 soit opérationnel avec la solution de nettoyage (voir fig. 18). Le voyant
de solution de nettoyage w clignote en alternance en bleu lorsque la fonction spray continu est activée ou que l’interrupteur solution de nettoyage t est
maintenu appuyé (voir fig. 19).
SHBR 560 B1
t pour activer la fonction spray continu et pour que le rouleau
FR│BE
│
69 ■

2 x
Fig. 18 Fig. 19
Ƈ Activez la fonction spray continu
bien en avant qu’en arrière effectués avec l’appareil. La solution de nettoyage
est ainsi appliquée uniformément sur le sol dur par le rouleau brosse
Ƈ Appuyez à nouveau deux fois brièvement sur l’interrupteur solution de nettoyage
pour désactiver la fonction spray continu.
REMARQUE
►
Lorsque pour nettoyer des moquettes vous appuyez sur l'interrupteur
solution de nettoyage
distribué sur le rouleau brosse
► Pour faire sécher plus vite les moquettes après le nettoyage, passez
plusieurs fois l’appareil sur la moquette. Pour cela, n’activez pas la fonction
spray continu et ne maintenez pas l’interrupteur solution de nettoyage
enfoncé.
Ƈ Appuyez à nouveau sur l’interrupteur moquette
(voir fig. 17).
t, deux fois autant de solution de nettoyage est
Nettoyage et entretien
RISQUE D'ÉLECTROCUTION!
► Éteignez l'appareil avant chaque nettoyage et débranchez la fiche secteur
de la prise secteur !
ATTENTION! RISQUE DE DÉGÂTS MATÉRIELS
► N'utilisez pas de produits nettoyants décapants, abrasifs ou contenant des
solvants. Ils peuvent en effet endommager les surfaces de l'appareil.
pendant le nettoyage, lors des mouvements aussi
6.
t
6 par rapport au nettoyage de sols durs.
t
e pour éteindre l’appareil
■ 70 │ FR
REMARQUE
► Après chaque utilisation, videz le réservoir d'eau sale
► Nettoyez le filtre à impuretés 0 après chaque utilisation et laissez-le entière-
ment sécher avant de le remettre dans le réservoir d‘eau sale 2.
│
BE
2.
SHBR 560 B1

REMARQUE
► Effectuez un autonettoyage de l'appareil après chaque utilisation (voir
chapitre Fonction d'autonettoyage).
Ƈ Nettoyez l’appareil à l’aide d’une lavette ou d’un chiffon humide. En présence
de taches tenaces, appliquez un peu de liquide vaisselle doux sur le chiffon.
Nettoyer le réservoir d’eau sale
REMARQUE
Videz le réservoir d’eau sale
►
sale a atteint le repère MAX.
► En vidant le réservoir d’eau sale
d’un lavabo) ne soit pas obstrué par des poils ou de grosses impuretés.
► Une fois le réservoir d'eau sale 2 plein, le moteur d'aspiration est automa-
tiquement éteint à l'aide du flotteur 8.
Ƈ Pour vider le réservoir d’eau sale
1. Poussez le bouton situé au-dessus du réservoir d’eau sale
(voir fig. 20). Tenez la poignée du réservoir d’eau sale 2 pendant que vous
appuyez sur le bouton.
2. Sortez le réservoir d’eau sale
Ƈ Sortez le couvercle du réservoir d’eau sale
sale 2 (voir fig. 21).
2 après chaque utilisation et dès que l’eau
2, veillez à ce que l’écoulement (par ex.
2, procédez comme suit:
2 par l’avant de l’appareil (voir fig. 20).
2 vers le bas
9 par le haut du réservoir d’eau
Fig. 20 Fig. 21
Ƈ Videz l’eau sale et la saleté (voir fig. 22).
Ƈ Rincez le réservoir d’eau sale
SHBR 560 B1
2 à l’eau courante chaude (voir fig. 23).
FR│BE
│
71 ■

Fig. 22 Fig. 23
Ƈ Retirez le filtre à impuretés
latéralement sous le joint du filtre à impuretés
Sortez ensuite le filtre à impuretés
sale 9 (voir fig. 24).
Ƈ Nettoyez le filtre à impuretés
sale 9 à l’eau courante chaude (voir fig. 25). Utilisez un produit de nettoyage
doux si nécessaire.
Fig. 24 Fig. 25
0 du réservoir d’eau sale 2 en plaçant les doigts
0.
0 par le haut du couvercle du réservoir d’eau
0, le flotteur 8 et le couvercle du réservoir d’eau
Ƈ Nettoyez si nécessaire l’insertion dans laquelle se trouve le réservoir d’eau sale
■ 72 │ FR
sur l’appareil, à l’aide d’une lavette ou d’un chiffon humide (voir fig. 26).
Fig. 26
│
BE
SHBR 560 B1
2

Ƈ Laissez entièrement sécher le filtre à impuretés 0, le réservoir d’eau sale 2
et le couvercle du réservoir d’eau sale 9 (voir fig. 27).
Ƈ Une fois les pièces séchées, replacez le filtre à impuretés
du réservoir d’eau sale 9 (voir fig. 28).
Fig. 27 Fig. 28
0 dans le couvercle
Ƈ Repositionnez le couvercle du réservoir d’eau sale
sale 2 (voir fig. 29).
Ƈ Fixez à nouveau le réservoir d’eau sale
fond du réservoir d’eau sale 2. Glissez ensuite le réservoir d’eau sale 2 en
direction de l’appareil, jusqu’à ce que le réservoir d’eau sale 2 s’enclenche
audiblement dans l’appareil (voir fig. 30).
Fig. 29 Fig. 30
2 sur l’appareil en insérant d’abord le
9 sur le réservoir d’eau
SHBR 560 B1
FR│BE
│
73 ■

Fonction d’autonettoyage
L’appareil possède une fonction d’autonettoyage, qui vous permet de nettoyer
automatiquement le rouleau brosse 6, le compartiment à brosse dans la tête
de nettoyage
Ƈ Posez l’appareil éteint sur le socle
(voir fig. 31).
Ƈ Appuyez sur l’interrupteur autonettoyage o (voir fig. 32).
Fig. 31 Fig. 32
Ƈ Le programme de nettoyage suivant démarre :
1. Le rouleau brosse
de nettoyage est délivrée sur le rouleau brosse 6.
2. Le rouleau brosse
d’aspiration est active, pendant que la solution de nettoyage est délivrée
sur le rouleau brosse 6.
3. Une fois le programme de nettoyage terminé, l’appareil s’éteint à nouveau
automatiquement.
3 de l’appareil et le canal d’aspiration après l’utilisation.
6 démarre pendant 20 secondes environ et la solution
6 tourne pendant 30 secondes environ et la fonction
4 de la station d’accueil et de nettoyage
Nettoyage manuel
En présence de salissures plus coriaces, il est nécessaire de nettoyer manuellement
le rouleau brosse 6, la protection antiprojections 7 et le compartiment à brosse
dans la tête de nettoyage 3 de l’appareil. Dans ce cas, procédez comme suit:
Ƈ Assurez-vous que la fiche secteur de l’appareil est débranchée de la prise secteur.
Ƈ Saisissez la protection antiprojections 7 par le haut au niveau de la poignée (PULL)
et tirez-la en avant pour la détacher de la tête de nettoyage 3 (voir fig. 33).
■ 74 │ FR
│
BE
SHBR 560 B1

Ƈ Saisissez le support à gauche du rouleau brosse 6 et tirez-le vers le haut pour
détacher le rouleau brosse de la tête de nettoyage 3 (voir fig. 34).
Fig. 33 Fig. 34
Ƈ Nettoyez la protection antiprojections
chaude (voir fig. 35).
Ƈ Si le compartiment à brosse est sale, nettoyez-le avec une lavette ou un chiffon
humide (voir fig. 36).
Fig. 35 Fig. 36
Ƈ Laissez le rouleau brosse
avant de les placer dans l’appareil (voir fig. 37).
Ƈ Vous pouvez également placer le rouleau brosse
pour rouleau brosse 5 de la station d’accueil et de nettoyage pour qu’il sèche
(voir fig. 38).
6 et la protection antiprojections 7 sécher entièrement
7 et le rouleau brosse 6 à l’eau courante
6 verticalement dans le support
SHBR 560 B1
FR│BE
│
75 ■

Fig. 37 Fig. 38
Ƈ Remontez le rouleau brosse
en commençant par positionner le rouleau brosse 6 dans le support à droite de
la tête de nettoyage 3 (voir fig. 39).
Ƈ Poussez ensuite le support à gauche sur le rouleau brosse 6 dans l’ouverture sur
le côté gauche de la tête de nettoyage 3, jusqu’à ce que le rouleau brosse 6
s’enclenche audiblement (voir fig. 40).
Fig. 39 Fig. 40
Ƈ Remettez la protection antiprojections
avec les supports de la tête de nettoyage 3 (voir fig. 41).
Ƈ Poussez ensuite sur la protection antiprojections 7 pour qu’elle reprenne sa position,
jusqu’à ce qu’elle s’enclenche audiblement sur la tête de nettoyage 3 (voir fig. 42).
6 et la protection antiprojections 7 sur l’appareil
7 en place en commençant par l’aligner
■ 76 │ FR
Fig. 41 Fig. 42
│
BE
SHBR 560 B1

Remplacer le filtre à impuretés
Le filtre à impuretés 0 doit être remplacé au bout de 12 – 18 mois ou de 100
cycles de nettoyage environ (un cycle correspond à un réservoir à eau fraîche).
Vous trouverez des informations pour la commande de filtre à impuretés de
remplacement dans le chapitre suivant Commander des pièces de rechange.
RISQUE D'ÉLECTROCUTION!
► Avant de remplacer le filtre à impuretés
prise secteur!
Ƈ Pour remplacer le filtre à impuretés
chapitre Nettoyer le réservoir d’eau sale.
0, procédez de la manière décrite au
0, retirez la fiche secteur de la
Commander des pièces de rechange
Vous pouvez commander des pièces détachées pour ce produit de manière pratique sur Internet sur www.kompernass.com.
Scannez le code QR avec votre smartphone/tablette.
Ce code QR vous donne un accès direct à notre site web sur
lequel vous pouvez visualiser et commander les pièces de rechange disponibles.
REMARQUE
► Si vous rencontrez des problèmes avec la commande en ligne, vous pou-
vez vous adresser par téléphone ou par e-mail à notre Centre de service
après-vente (voir chapitre
► Veuillez toujours indiquer à la commande la référence article (par ex.
123456_7890), que vous trouverez sur la couverture de ce mode d’emploi.
► Veuillez noter qu’une commande en ligne de pièces de rechange n’est pas
possible pour tous les pays de livraison.
Service après-vente
).
Rangement
REMARQUE
► Placez l’appareil pour le rangement sur le socle
dernier ne doit pas être placé sur des sols absorbants ou gonflants, par ex.
des tapis ou du parquet.
► Videz le réservoir d'eau fraîche q si vous n'utilisez pas l'appareil pendant
une période prolongée.
► Rangez uniquement l'appareil lorsqu'il est propre. Suivez pour cela les
consignes du chapitre Nettoyage et entretien.
Ƈ Placez la partie portable avec poignée
jusqu’à ce qu’il s’enclenche de manière audible. Cette position de stationnement
empêche un basculement de l’appareil.
SHBR 560 B1
4 prévu à cet effet. Ce
1 de l’appareil en position verticale
FR│BE
│
77 ■

REMARQUE
► Pour détacher l'appareil de la position de stationnement, bloquez avec un
pied la tête de nettoyage avec compartiment à brosse
déplacez ensuite la partie portable avec poignée 1 vers l'arrière.
Ƈ Sortez légèrement le support de cordon supérieur
vers le haut (voir fig. 43).
Ƈ Enroulez le cordon d’alimentation
cordon supérieur et inférieur z/p (voir fig. 44).
Fig. 43 Fig. 44
u entièrement autour des deux supports de
z et tournez-le à nouveau
3 de l'appareil et
Ƈ Transportez l’appareil uniquement par sa poignée
Ƈ Posez l’appareil pour le rangement sur le socle
Ƈ Entreposez l’appareil à un endroit sec et exempt de poussières, sans exposition
■ 78 │ FR
de nettoyage (voir fig. 45).
Fig. 45
directe au soleil.
│
BE
i.
4 de la station d’accueil et
SHBR 560 B1

Dépannage
Le tableau ci-dessous vous aidera à localiser les petits dysfonctionnements et à y
remédier. Si vous ne réussissez pas à résoudre le problème à l’aide des mesures
citées ci-dessous, veuillez vous adresser au service après-vente (voir le chapitre
Service après-vente).
Erreur Cause Dépannage
Assurez-vous que l'appareil est correctement
branché à l'alimentation électrique.
Appuyez sur l'interrupteur sol dur r ou
sur l'interrupteur moquette
l'appareil.
Branchez la fiche secteur dans la prise secteur.
Vérifiez les fusibles domestiques.
Impossible de
mettre l'appareil en marche.
L'appareil n'est pas
allumé.
La fiche secteur n'est
pas insérée.
La prise secteur n'est
pas sous tension.
e pour allumer
La puissance
d'aspiration est
trop faible.
Le réservoir d’eau
2 est plein.
sale
L'appareil est
défectueux.
Les réservoirs d'eau
fraîche et d'eau
sale
q/2 ne sont
pas correctement en
place sur l'appareil.
Le réservoir d'eau sale
2 est plein.
La protection antiprojections
7 n'est pas
correctement fixée.
Le canal d'aspiration
est colmaté.
Le filtre à impuretés
0 est colmaté.
Videz le réservoir d’eau sale 2 (voir chapitre
Nettoyer le réservoir d’eau sale).
Éteignez l'appareil et débranchez la fiche
secteur de la prise secteur.
Adressez-vous au service après-vente
(voir chapitre Service après-vente).
Placez correctement les réservoirs d'eau fraîche
et d'eau sale q/2 dans l'appareil (voir
chapitre Remplir le réservoir d'eau fraîche et
Nettoyer le réservoir d'eau sale).
Videz le réservoir d'eau sale
Nettoyer le réservoir d'eau sale).
Fixez la protection antiprojections
ment sur la tête de nettoyage 3 (voir chapitre
Nettoyage manuel).
Nettoyez le canal d'aspiration et éliminez le
colmatage (voir chapitre Fonction d’autonet-
toyage et Nettoyage manuel).
Videz le filtre à impuretés
le chapitre Nettoyer le réservoir d'eau sale).
2 (voir chapitre
7 correcte-
0 et nettoyez-le (voir
SHBR 560 B1
FR│BE
│
79 ■

Erreur Cause Dépannage
L'appareil délivre trop peu
de solution de
nettoyage.
Le rouleau
6 ne
brosse
tourne pas.
De l'eau
s'écoule de
l'appareil.
Le réservoir d'eau
fraîche
q est vide.
Le réservoir d'eau
fraîche
q n'est pas
correctement fermé.
L'appareil n'est pas
encore entièrement
opérationnel.
La fonction spray continu n'est pas activée.
La protection antiprojections
7 n'est pas
correctement fixée.
Le rouleau brosse
n'est pas monté correctement.
Le rouleau brosse
est bloqué.
Le réservoir d'eau
fraîche
q n'est pas
correctement fermé.
6
6
Remplir le réservoir d'eau fraîche
chapitre Remplir le réservoir d'eau fraîche).
Sortez le réservoir d'eau fraîche
reil et vissez bien le couvercle (voir chapitre
Remplir le réservoir d'eau fraîche).
Avant chaque utilisation, maintenez l'interrupteur
solution de nettoyage
env. 10 secondes, pour que le rouleau
brosse6 soit opérationnel avec la solution de
nettoyage.
Appuyez deux fois brièvement sur l'interrupteur
solution de nettoyage
tion spray continu et délivrer en continu de la
solution de nettoyage au rouleau brosse 6.
Fixez la projection antiprojections
ment (voir chapitre Nettoyage manuel).
Éteignez l'appareil et débranchez la fiche
secteur de la prise secteur.
Montez le rouleau brosse
la tête de nettoyage
Nettoyage manuel).
Débranchez la fiche secteur de la prise secteur.
Retirez la protection antiprojections
rouleau brosse 6 pour éliminer le blocage.
Remontez le rouleau brosse 6 et la protection
antiprojections 7 sur l'appareil (voir chapitre
Nettoyage manuel).
Branchez la fiche secteur dans la prise secteur
et allumez l'appareil.
Sortez le réservoir d'eau fraîche
reil et vissez bien le couvercle (voir chapitre
Remplir le réservoir d'eau fraîche).
t appuyé pendant
t pour activer la fonc-
3 (voir chapitre
q (voir
q de l'appa-
7 correcte-
6 correctement sur
7 et le
q de l'appa-
■ 80 │ FR
│
BE
SHBR 560 B1

Recyclage
Recyclage de l’appareil
Le symbole ci-contre, d’une poubelle barrée sur roues, indique que le produit
est assujetti à la directive 2012/19/EU. Cette directive stipule que vous ne
devez pas éliminer ce produit en fin de vie avec les ordures ménagères, mais le
rapporter à des points de collecte désignés, des centres de recyclage ou des
entreprises de gestion des déchets.
Ce recyclage est gratuit. Respectez l’environnement et recyclez
en bonne et due forme.
Renseignez-vous auprès de votre commune ou des services administratifs de
votre ville pour connaître les possibilités de recyclage du produit usagé.
Le produit récyclable doit être trié ou rapporté dans un point de collecte pour
être recycle.
Recyclage de l’emballage
Les matériaux d’emballage ont été sélectionnés selon des critères de respect de
l’environnement, de technique d’élimination et sont de ce fait recyclables.
Veuillez recycler les matériaux d’emballage qui ne servent plus en respectant
la réglementation locale.
Recyclez l’emballage d’une manière respectueuse de l’environnement.
Observez le marquage sur les différents matériaux d’emballage et triez-les
séparément si nécessaire. Les matériaux d’emballage sont repérés par des
abréviations (a) et des numéros (b) qui ont la signification suivante:
1–7 : Plastiques,
20–22: Papier et carton,
80–98: Matériaux composites.
Annexe
Caractéristiques techniques
Alimentation électrique 220 – 240V ∼ (courant alternatif), 50–60Hz
Puissance absorbée 480 – 560 W
SHBR 560 B1
FR│BE
│
81 ■

Garantie pour Kompernass Handels GmbH pour la
Belgique
Chère cliente, cher client,
Cet appareil est garanti 3 ans à partir de la date d’achat. Si ce produit venait à
présenter des vices, vous disposez de droits légaux face au vendeur de ce produit. Vos droits légaux ne sont pas restreints par notre garantie présentée ci-dessous.
Conditions de garantie
La période de garantie débute à la date d’achat. Veuillez bien conserver le ticket
de caisse. Celui-ci servira de preuve d’achat.
Si dans un délai de trois ans suivant la date d’achat de ce produit, un vice de
matériel ou de fabrication venait à apparaître, le produit sera réparé, remplacé
gratuitement par nos soins ou le prix d’achat remboursé, selon notre choix. Cette
prestation sous garantie nécessite, dans le délai de trois ans, la présentation de
l’appareil défectueux et du justificatif d’achat (ticket de caisse) ainsi que la description brève du vice et du moment de son apparition.
Si le vice est couvert par notre garantie, vous recevrez le produit réparé ou un
nouveau produit en retour. Aucune nouvelle période de garantie ne débute avec
la réparation ou l’échange du produit.
Période de garantie et réclamation légale pour vices cachés
L’exercice de la garantie ne prolonge pas la période de garantie. Cette disposition s’applique également aux pièces remplacées ou réparées. Les dommages et
vices éventuellement déjà présents à l’achat doivent être signalés immédiatement
après le déballage. Toute réparation survenant après la période sous garantie
fera l’objet d’une facturation.
Étendue de la garantie
L’appareil a été fabriqué avec soin conformément à des directives de qualité
strictes et consciencieusement contrôlé avant sa livraison.
La prestation de la garantie s’applique aux vices de matériel et de fabrication.
Cette garantie ne s’étend pas aux pièces du produit qui sont exposées à une usure
normale et peuvent de ce fait être considérées comme pièces d’usure, ni aux détériorations de pièces fragiles, par ex. interrupteurs, batteries ou pièces en verre.
Cette garantie devient caduque si le produit est détérioré, utilisé ou entretenu de
manière non conforme. Toutes les instructions listées dans le manuel d’utilisation
doivent être exactement respectées pour une utilisation conforme du produit. Des
buts d’utilisation et actions qui sont déconseillés dans le manuel d’utilisation, ou
dont vous êtes avertis doivent également être évités.
■ 82 │ FR
│
BE
SHBR 560 B1

Le produit est uniquement destiné à un usage privé et ne convient pas à un
usage professionnel. La garantie est annulée en cas d’entretien incorrect et inapproprié, d’usage de la force et en cas d’intervention non réalisée par notre
centre de service après-vente agréé.
Procédure en cas de garantie
Afin de garantir un traitement rapide de votre demande, veuillez suivre les indications suivantes :
■ Veuillez avoir à portée de main pour toutes questions le ticket de caisse et la
référence article (IAN) 368340_2101 en tant que justificatif de votre achat.
■ Vous trouverez la référence sur la plaque signalétique sur le produit, une
gravure sur le produit, sur la page de garde du mode d’emploi (en bas à
gauche) ou sur l’autocollant au dos ou sur le dessous du produit.
■ Si des erreurs de fonctionnement ou d’autres vices venaient à apparaître,
veuillez d’abord contacter le département service clientèle cité ci-dessous
par téléphone ou par e-mail.
■ Vous pouvez ensuite retourner un produit enregistré comme étant défec-
tueux en joignant le ticket de caisse et en indiquant en quoi consiste le vice
et quand il est survenu, sans devoir l’affranchir à l’adresse de service aprèsvente communiquée.
Sur www.lidl-service.com, vous pourrez télécharger ce mode d’emploi et de
nombreux autres manuels, vidéos produit et logiciels d’installation.
Grâce à ce code QR, vous arriverez directement sur le site Lidl service aprèsvente (www.lidl-service.com) et vous pourrez ouvrir votre mode d’emploi en
saisissant votre référence (IAN) 368340_2101.
SHBR 560 B1
FR│BE
│
83 ■

Garantie pour Kompernass Handels GmbH pour la
France
Chère cliente, cher client,
Cet appareil est garanti 3 ans à partir de la date d’achat. Si ce produit venait à
présenter des vices, vous disposez de droits légaux face au vendeur de ce produit. Vos droits légaux ne sont pas restreints par notre garantie présentée ci-dessous.
Conditions de garantie
La période de garantie débute à la date d’achat. Veuillez bien conserver le ticket
de caisse. Celui-ci servira de preuve d’achat.
Si dans un délai de trois ans suivant la date d’achat de ce produit, un vice de
matériel ou de fabrication venait à apparaître, le produit sera réparé, remplacé
gratuitement par nos soins ou le prix d’achat remboursé, selon notre choix. Cette
prestation sous garantie nécessite, dans le délai de trois ans, la présentation de
l’appareil défectueux et du justificatif d’achat (ticket de caisse) ainsi que la description brève du vice et du moment de son apparition.
Si le vice est couvert par notre garantie, vous recevrez le produit réparé ou un
nouveau produit en retour. Aucune nouvelle période de garantie ne débute avec
la réparation ou l’échange du produit.
Période de garantie et réclamation légale pour vices cachés
L’exercice de la garantie ne prolonge pas la période de garantie. Cette disposition s’applique également aux pièces remplacées ou réparées. Les dommages et
vices éventuellement déjà présents à l’achat doivent être signalés immédiatement
après le déballage. Toute réparation survenant après la période sous garantie
fera l’objet d’une facturation.
Étendue de la garantie
L’appareil a été fabriqué avec soin conformément à des directives de qualité
strictes et consciencieusement contrôlé avant sa livraison.
La prestation de la garantie s’applique aux vices de matériel et de fabrication.
Cette garantie ne s’étend pas aux pièces du produit qui sont exposées à une usure
normale et peuvent de ce fait être considérées comme pièces d’usure, ni aux détériorations de pièces fragiles, par ex. interrupteurs, batteries ou pièces en verre.
Cette garantie devient caduque si le produit est détérioré, utilisé ou entretenu de
manière non conforme. Toutes les instructions listées dans le manuel d’utilisation
doivent être exactement respectées pour une utilisation conforme du produit. Des
buts d’utilisation et actions qui sont déconseillés dans le manuel d’utilisation, ou
dont vous êtes avertis doivent également être évités.
■ 84 │ FR
│
BE
SHBR 560 B1

Le produit est uniquement destiné à un usage privé et ne convient pas à un
usage professionnel. La garantie est annulée en cas d’entretien incorrect et inapproprié, d’usage de la force et en cas d’intervention non réalisée par notre
centre de service après-vente agréé.
Article L217-16 du Code de la consommation
Lorsque l‘acheteur demande au vendeur, pendant le cours de la garantie commerciale qui lui a été consentie lors de l‘acquisition ou de la réparation d‘un bien
meuble, une remise en état couverte par la garantie, toute période d‘immobilisation d‘au moins sept jours vient s‘ajouter à la durée de la garantie qui restait
à courir. Cette période court à compter de la demande d‘intervention de l‘acheteur ou de la mise à disposition pour réparation du bien en cause, si cette mise à
disposition est postérieure à la demande d‘intervention.
Indépendamment de la garantie commerciale souscrite, le vendeur reste tenu des
défauts de conformité du bien et des vices rédhibitoires dans les conditions prévues aux articles L217-4 à L217-13 du Code de la consommation et aux articles
1641 à 1648 et 2232 du Code Civil.
Article L217-4 du Code de la consommation
Le vendeur livre un bien conforme au contrat et répond des défauts de
conformité existant lors de la délivrance. Il répond également des défauts de
conformité résultant de l‘emballage, des instructions de montage ou de l‘installation lorsque celle-ci a été mise à sa charge par le contrat ou a été réalisée sous
sa responsabilité.
Article L217-5 du Code de la consommation
Le bien est conforme au contrat :
1° S´il est propre à l‘usage habituellement attendu d‘un bien semblable et, le
cas échéant :
– s‘il correspond à la description donnée par le vendeur et posséder les
qualités que celui-ci a présentées à l‘acheteur sous forme d‘échantillon
ou de modèle ;
– s‘il présente les qualités qu‘un acheteur peut légitimement attendre eu
égard aux déclarations publiques faites par le vendeur, par le producteur ou par son représentant, notamment dans la publicité ou l‘étiquetage ;
2° Ou s‘il présente les caractéristiques définies d‘un commun accord par les par-
ties ou être propre à tout usage spécial recherché par l‘acheteur, porté à la
connaissance du vendeur et que ce dernier a accepté.
Article L217-12 du Code de la consommation
L‘action résultant du défaut de conformité se prescrit par deux ans à compter de
la délivrance du bien.
SHBR 560 B1
FR│BE
│
85 ■

Article 1641 du Code civil
Le vendeur est tenu de la garantie à raison des défauts cachés de la chose vendue qui la rendent impropre à l‘usage auquel on la destine, ou qui diminuent tellement cet usage que l‘acheteur ne l‘aurait pas acquise, ou n‘en aurait donné
qu‘un moindre prix, s‘il les avait connus.
Article 1648 1er alinéa du Code civil
L‘action résultant des vices rédhibitoires doit être intentée par l‘acquéreur dans
un délai de deux ans à compter de la découverte du vice.
Les pièces détachées indispensables à l’utilisation du produit sont disponibles
pendant la durée de la garantie du produit.
Procédure en cas de garantie
Afin de garantir un traitement rapide de votre demande, veuillez suivre les indications suivantes :
■ Veuillez avoir à portée de main pour toutes questions le ticket de caisse et la
référence article (IAN) 368340_2101 en tant que justificatif de votre achat.
■ Vous trouverez la référence sur la plaque signalétique sur le produit, une
gravure sur le produit, sur la page de garde du mode d’emploi (en bas à
gauche) ou sur l’autocollant au dos ou sur le dessous du produit.
■ Si des erreurs de fonctionnement ou d’autres vices venaient à apparaître,
veuillez d’abord contacter le département service clientèle cité ci-dessous
par téléphone ou par e-mail.
■ Vous pouvez ensuite retourner un produit enregistré comme étant défec-
tueux en joignant le ticket de caisse et en indiquant en quoi consiste le vice
et quand il est survenu, sans devoir l’affranchir à l’adresse de service aprèsvente communiquée.
Sur www.lidl-service.com, vous pourrez télécharger ce mode d’emploi et de
nombreux autres manuels, vidéos produit et logiciels d’installation.
Grâce à ce code QR, vous arriverez directement sur le site Lidl service aprèsvente (www.lidl-service.com) et vous pourrez ouvrir votre mode d’emploi en
saisissant votre référence (IAN) 368340_2101.
■ 86 │ FR
│
BE
SHBR 560 B1

Service après-vente
Service France
Tel.: 0800 919270
E-Mail: kompernass@lidl.fr
Service Belgique
Tel.: 070 270 171 (0,15 EUR/Min.)
E-Mail: kompernass@lidl.be
IAN 368340_2101
Importateur
Veuillez tenir compte du fait que l’adresse suivante n’est pas une adresse de service après-vente. Veuillez d’abord contacter le service mentionné.
KOMPERNASS HANDELS GMBH
BURGSTRASSE 21
44867 BOCHUM
ALLEMAGNE
www.kompernass.com
SHBR 560 B1
FR│BE
│
87 ■

■ 88 │ FR
│
BE
SHBR 560 B1

Inhoud
Inleiding .....................................................90
Informatie bij deze gebruiksaanwijzing .......................................90
Auteursrecht ............................................................ 90
Gebruik in overeenstemming met de bestemming ...............................90
Veiligheidsvoorschriften ........................................91
Beschrijving apparaat .........................................94
Inhoud van het pakket en inspectie na transport ...................95
Ingebruikname ...............................................95
Apparaat monteren ......................................................95
Schoonwaterreservoir vullen ...............................................97
Bediening en gebruik ..........................................99
Continusprayfunctie ......................................................99
Reiniging van harde vloeren ............................................... 99
Reiniging van tapijtvloeren ................................................101
Reiniging en onderhoud .......................................102
Vuilwaterreservoir reinigen ...............................................103
Zelfreinigingsfunctie .....................................................106
Met de hand reinigen ...................................................107
Vuilfilter vervangen .....................................................109
Vervangingsonderdelen bestellen ..............................109
Opbergen ..................................................109
Problemen oplossen ..........................................111
Afvoeren ...................................................113
Het apparaat afvoeren ..................................................113
De verpakking afvoeren. . . . . . . . . . . . . . . . . . . . . . . . . . . . . . . . . . . . . . . . . . . . . . . . . . 113
Bijlage .....................................................113
Technische gegevens ....................................................113
Garantie van Kompernaß Handels GmbH ...................................114
Service ...............................................................115
Importeur .............................................................115
SHBR 560 A1
NL│BE
│
89 ■

Inleiding
Informatie bij deze gebruiksaanwijzing
Hartelijk gefeliciteerd met de aankoop van uw nieuwe apparaat.
U hebt hiermee gekozen voor een hoogwaardig product.
De gebruiksaanwijzing maakt deel uit van dit product. Hij bevat
belangrijke aanwijzingen voor de veiligheid, het gebruik en het
afvoeren van dit product.
dat u het product in gebruik neemt. Gebruik het product uitsluitend op de voorgeschreven wijze en voor de aangegeven doeleinden. Geef alle documenten mee
als u het product overdraagt aan een derde.
Auteursrecht
Deze documentatie is auteursrechtelijk beschermd.
Elke vermenigvuldiging resp. elke reproductie, ook die van delen van het docu-
ment, alsmede de weergave van de afbeeldingen, ook in gewijzigde toestand,
is uitsluitend toegestaan met schriftelijke toestemming van de fabrikant.
Gebruik in overeenstemming met de bestemming
Dit apparaat is uitsluitend bestemd voor het reinigen van vloeren en vloerbedekking
binnenshuis. Elk ander of verdergaand gebruik geldt als niet in overeenstemming
met de bestemming. Het apparaat is niet bedoeld voor gebruik in commerciële
of industriële omgevingen.
De fabrikant aanvaardt geen aansprakelijkheid voor schade als gevolg van gebruik
dat niet in overeenstemming met de bestemming is, onvakkundige reparaties,
veranderingen die ongeoorloofd zijn uitgevoerd of gebruik van vervangingsonderdelen die niet zijn toegestaan. Het risico ligt uitsluitend bij de gebruiker.
Lees alle bedienings- en veiligheidsvoorschriften voor-
■ 90 │ NL
│
BE
SHBR 560 A1

Veiligheidsvoorschriften
GEVAAR VOOR EEN ELEKTRISCHE SCHOK!
► Sluit het apparaat uitsluitend aan op een volgens de voor-
schriften geïnstalleerd stopcontact met een netspanning van
220–240V ∼, 50–60 Hz.
► Trek het snoer altijd aan de stekker uit het stopcontact.
Trek niet aan het snoer zelf.
► Knik of plet het snoer niet en leg het snoer zodanig dat
niemand erop kan gaan staan of erover kan struikelen.
► Laat beschadigde stekkers en snoeren onmiddellijk door
geautoriseerd en vakkundig personeel of door de klantenservice vervangen, om risico's te vermijden.
► Let erop dat het snoer niet nat of vochtig wordt tijdens het
gebruik van het apparaat. Leg het snoer zodanig, dat het
niet bekneld of beschadigd kan raken.
► Ga niet met het apparaat over het snoer.
► Haal bij storing van het apparaat de stekker uit het stopcon-
tact.
► Haal eerst de stekker uit het stopcontact, voordat u het
apparaat met water vult, accessoires verwisselt of het apparaat schoonmaakt.
► Als het apparaat beschadigd is, gebruik het dan niet meer,
om risico's te voorkomen.
► Gebruik het apparaat uitsluitend met droge handen en niet
zonder schoenen (niet met blote voeten). Op die manier
vermindert u bij storingen het gevaar voor elektrische
schokken.
Gebruik het apparaat alleen binnenshuis, niet in de
openlucht.
SHBR 560 A1
NL│BE
│
91 ■

GEVAAR VOOR EEN ELEKTRISCHE SCHOK!
► Dompel het apparaat niet onder in water of andere vloei-
stoffen.
► Gebruik het apparaat nooit op vochtgevoelige voorwerpen,
vloeren of oppervlakken.
► Dit apparaat mag worden gebruikt door kinderen vanaf
8jaar en door personen met beperkte fysieke, zintuiglijke of
geestelijke vermogens of gebrek aan ervaring of kennis, mits
ze onder toezicht staan of over het veilige gebruik van het
apparaat zijn geïnstrueerd en de daaruit voortkomende ge-
varen hebben begrepen.Kinderen mogen niet met het apparaat spelen.
► Kinderen mogen geen reiniging en gebruikersonderhoud
zonder toezicht uitvoeren.
WAARSCHUWING! LETSELGEVAAR!
► Gebruik uitsluitend de door de fabrikant aanbevolen origi-
nele accessoires voor dit apparaat.
► Gebruik het apparaat uitsluitend als het correct en volledig
in elkaar is gezet.
► Het apparaat mag niet worden gebruikt wanneer het is
gevallen, wanneer er duidelijk zichtbare beschadigingen
zijn en wanneer het lekt.
► Haal bij elke onderbreking van het gebruik, na gebruik en
bij reiniging altijd de stekker uit het stopcontact.
► Wees zeer voorzichtig wanneer u het apparaat op trappen
of traptreden gebruikt.
► Gebruik het apparaat niet voor het opzuigen van chemische
of giftige materialen, of van ontvlambare of brandbare
vloeistoffen.
■ 92 │ NL
│
BE
SHBR 560 A1

LET OP! MATERIËLE SCHADE!
► Neem altijd de reinigingsvoorschriften van de tapijtfabrikant
in acht. Controleer voorafgaand aan de reiniging ook of het
tapijt geschikt is voor reiniging met het apparaat.
► Laat het apparaat niet langere tijd ingeschakeld op een
houten vloer staan. Het hout kan uitzetten.
► Gebruik het apparaat niet als het waterreservoir leeg is.
Anders kan de pomp zonder water draaien en oververhit
raken.
► Steek geen voorwerpen in de openingen van het apparaat.
► Gebruik het apparaat niet als openingen geblokkeerd zijn.
Houd de openingen vrij van vuil, pluizen, haar en alles wat
de luchtcirculatie kan belemmeren.
► Let erop dat u geen harde, puntige of scherpe voorwerpen
(bijv. glas, spijkers, schroeven, munten, enz.) opzuigt met het
apparaat.
► Let erop dat het apparaat, het snoer en de stekker nooit in
aanraking komen met warmtebronnen zoals kookplaten of
open vuur.
► Gebruik bij het apparaat alleen de in deze gebruiksaanwij-
zing qua soort en hoeveelheid gespecificeerde vloeistoffen.
► Laat het apparaat nooit onbeheerd achter terwijl het in
werking is.
SHBR 560 A1
NL│BE
│
93 ■

Beschrijving apparaat
(afbeeldingen: zie uitvouwpagina)
Afbeelding A:
1 Handgedeelte met handgreep
2 Vuilwaterreservoir
3 Voetgedeelte met borstelkamer
4 Neerzetplateau
5 Borstelrolhouder
6 Borstelrol
7 Sproeikap
8 Vlotter
9 Deksel vuilwaterreservoir
0 Vuilfilter
q Schoonwaterreservoir
w Indicatie schoonmaakmiddel
e Schakelaar tapijtvloer (met LED)
r Schakelaar harde vloer (met LED)
Afbeelding B:
t Schakelaar schoonmaakmiddel
z Bovenste kabelhouder
u Snoer met stekker
i Draaghandgreep
o Schakelaar zelfreiniging
p Onderste kabelhouder
■ 94 │ NL
│
BE
SHBR 560 A1

Inhoud van het pakket en inspectie na transport
Ƈ Haal alle onderdelen van het apparaat en de gebruiksaanwijzing uit de
verpakking.
Ƈ Verwijder alle verpakkingsmaterialen en eventuele folie en stickers van het
apparaat.
Controleer de inhoud van het geleverde pakket. Het pakket bestaat uit de volgende onderdelen (afbeeldingen: zie uitvouwpagina):
Vloerreiniger
Handgedeelte
Neerzetplateau
Borstelrolhouder
Gebruiksaanwijzing
OPMERKING
► Controleer of het pakket compleet is en of er geen zichtbare schade is.
► Neem contact op met de service-hotline (zie het hoofdstuk Service) als het
pakket niet compleet is, of indien er sprake is van schade door gebrekkige
verpakking of transport.
Ingebruikname
Apparaat monteren
Ƈ Schuif het handgedeelte 1 in de opening aan de bovenzijde van het apparaat
tot het handgedeelte 1 hoorbaar in de opening vastklikt (zie afb. 1).
Afb. 1 Afb. 2
SHBR 560 A1
NL│BE
│
95 ■

OPMERKING
► Als u het handgedeelte
u eerst het schoonwaterreservoir q uit het apparaat te nemen, zodat u
bij de plek kunt waar het handgedeelte 1 is vastgeklikt (zie het hoofdstuk
Schoonwaterreservoir vullen). Als u het schoonwaterreservoir
verwijderd, duwt u met een puntig voorwerp op de nok van het handgedeelte 1 om die uit de uitsparing te drukken. Daarna kunt u het handgedeelte 1 weer uit het apparaat trekken (zie afb. 2).
1 weer van het apparaat wilt verwijderen, dient
q hebt
Ƈ Wikkel het snoer
(zie afb. 3).
Afb. 3
Ƈ Het neerzet- en reinigingsstation bestaat uit een neerzetplateau
stelrolhouder 5 (zie afb. 4). Monteer het neerzet- en reinigingsstation door de
borstelrolhouder 5 van opzij in de opening van het neerzetplateau 4 te schuiven.
Schuif de borstelrolhouder 5 omlaag in de opening, tot hij stevig op het neerzetplateau 4 vastzit (zie afb. 5).
u helemaal om de bovenste en onderste kabelhouder z/p
4 en een bor-
■ 96 │ NL
+
Afb. 4 Afb. 5
│
BE
SHBR 560 A1

Schoonwaterreservoir vullen
LET OP! MATERIËLE SCHADE!
►
► Gebruik het apparaat nooit zonder water in het schoonwaterreservoir
► Gebruik uitsluitend in de handel verkrijgbare, niet schuimende vloerreini-
gers als schoonmaakmiddel.
Ƈ Pak het schoonwaterreservoir
trek het omhoog uit het apparaat (zie afb. 6).
Ƈ Draai het schoonwaterreservoir
Afb. 6 Afb. 7
Ƈ Vul het schoonwaterreservoir
de eerste peilstreep met leidingwater of gedestilleerd water (zie afb. 8).
Ƈ Voeg aan het water in het schoonwaterreservoir
(tot 25 m) tot de tweede peilstreep schoonmaakmiddel toe (zie afb. 8).
Ƈ Vul het schoonwaterreservoir
derde peilstreep met leidingwater of gedestilleerd water (zie afb. 9).
Ƈ Voeg aan het water in het schoonwaterreservoir
(tot 55 m) tot de vierde peilstreep schoonmaakmiddel toe (zie afb. 9).
Vul het schoonwaterreservoir q uitsluitend met koud of warm
leidingwater (tot 60 °C) of gedestilleerd water. Gebruik geen
kokend water.
q vast bij de greepvlakken op de zijkanten en
q om en schroef het deksel eraf (zie afb. 7).
q voor kleine oppervlakken (tot 25 m) tot
q voor kleine oppervlakken
q voor grote oppervlakken (tot 55 m) tot de
q voor grote oppervlakken
q.
SHBR 560 A1
NL│BE
│
97 ■
 Loading...