


MINI ASPIRAPOLVERE-LIQUIDI RICARICABILE SAS 7.4 LI B2
MINI ASPIRAPOLVERE-LIQUIDI
RICARICABILE
Istruzioni per l‘uso
ASPIRADOR DE MÃO COM BATERIA
RECARREGÁVEL DE IÕES DE LÍTIO
Manual de instruções
LI-ION RECHARGEABLE
HANDHELD VACUUM CLEANER
Operating instructions
IAN 275064
LI-IONEN-AKKU-HANDSTAUBSAUGER
Bedienungsanleitung

Prima di leggere aprire la pagina con le immagini e prendere confidenza con le diverse funzioni
dell’apparecchio.
Antes de começar a ler abra na página com as imagens e, de seguida, familiarize-se com todas as
funções do aparelho.
Before reading, unfold the page containing the illustrations and familiarise yourself with all functions of
the device.
Klappen Sie vor dem Lesen die Seite mit den Abbildungen aus und machen Sie sich anschließend mit allen
Funktionen des Gerätes vertraut.
IT / MT Istruzioni per l‘uso Pagina 1
PT Manual de instruções Página 13
GB / MT Operating instructions Page 25
DE / AT / CH Bedienungsanleitung Seite 37

-

Indice
Introduzione . . . . . . . . . . . . . . . . . . . . . . . . . . . . . . . . . . . . . . . . . . . . . . . . . . 2
Uso conforme . . . . . . . . . . . . . . . . . . . . . . . . . . . . . . . . . . . . . . . . . . . . . . . . . 2
Volume della fornitura . . . . . . . . . . . . . . . . . . . . . . . . . . . . . . . . . . . . . . . . . . 2
Descrizione dell’apparecchio . . . . . . . . . . . . . . . . . . . . . . . . . . . . . . . . . . . . . 3
Dati tecnici . . . . . . . . . . . . . . . . . . . . . . . . . . . . . . . . . . . . . . . . . . . . . . . . . . . . 3
Importanti indicazioni di sicurezza . . . . . . . . . . . . . . . . . . . . . . . . . . . . . . . . 4
Prima di utilizzare l’apparecchio per la prima volta . . . . . . . . . . . . . . . . . . 6
Informazioni relative alle batterie . . . . . . . . . . . . . . . . . . . . . . . . . . . . . . . . 6
Montaggio del supporto a parete . . . . . . . . . . . . . . . . . . . . . . . . . . . . . . . . . 7
Ricarica . . . . . . . . . . . . . . . . . . . . . . . . . . . . . . . . . . . . . . . . . . . . . . . . . . . . . . 8
Uso . . . . . . . . . . . . . . . . . . . . . . . . . . . . . . . . . . . . . . . . . . . . . . . . . . . . . . . . . . 8
Pulizia . . . . . . . . . . . . . . . . . . . . . . . . . . . . . . . . . . . . . . . . . . . . . . . . . . . . . . . 9
Smaltimento . . . . . . . . . . . . . . . . . . . . . . . . . . . . . . . . . . . . . . . . . . . . . . . . . 10
Garanzia e assistenza . . . . . . . . . . . . . . . . . . . . . . . . . . . . . . . . . . . . . . . . . 11
Importatore . . . . . . . . . . . . . . . . . . . . . . . . . . . . . . . . . . . . . . . . . . . . . . . . . . 11
SAS 7.4 LI B2
IT│MT
│
1 ■

Introduzione
Congratulazioni per l’acquisto del Suo nuovo apparecchio.
È stato scelto un prodotto di alta qualità. Il manuale di istruzioni è parte integrante
del presente prodotto. Esso contiene importanti indicazioni per la sicurezza, l’uso
e lo smaltimento. Prima di utilizzare il prodotto, familiarizzare con tutte le indicazioni relative ai comandi e alla sicurezza. Utilizzare il prodotto solo come descritto e
per i campi d’impiego indicati. In caso di cessione del prodotto a terze persone,
consegnare anche tutta la relativa documentazione.
Uso conforme
L’aspirapolvere portatile dev’essere impiegato esclusivamente per la pulizia di
superfi ci asciutte o bagnate o per aspirare materiali asciutti o bagnati ovvero
liquidi. Non utilizzare l’apparecchio su animali o persone. Qualunque altro impiego e qualunque modifi ca dell’apparecchio è da considerarsi non conforme
alla destinazione e comporta il rischio di infortuni. La casa produttrice non è
responsabile per i danni causati da un impiego non conforme alle regole o da
un uso non corretto. L’apparecchio non è destinato all’uso commerciale.
Volume della fornitura
▯ Mini aspirapolvere-liquidi ricaricabile
▯ Bocchetta per giunti
▯ Bocchetta per l’aspirazione dei liquidi
▯ Supporto a parete
▯ Materiale di montaggio
▯ Alimentatore
▯ Manuale di istruzioni
■ 2 │ IT
Subito dopo il disimballaggio, controllare l’integrità della fornitura.
│
MT
SAS 7.4 LI B2

Descrizione dell’apparecchio
1 Bocchetta di aspirazione materiali bagnati
2 Bocchetta per giunti
3 Supporto a parete
4 Alimentatore
5 Spinotto cavo
6 Interruttore ON/OFF
7 Spia di controllo della carica (rossa/verde)
8 Tasto di sbloccaggio
9 Sacchetto-fi ltro della polvere
0 Filtro della polvere
q Contenitore dello sporco
AVVERTENZA
L'apparecchio è stato fornito con batterie scariche. Prima di usare l'appa-
►
recchio per la prima volta, mettere le batterie sotto carica per 24 ore.
Dati tecnici
Alimentatore di rete 4
Tensione/corrente d'ingresso
Tensione/corrente di uscita: 9,6 V
Classe di protezione
Nome del modello SAS 7.4 LI B2-1
Apparecchio
Tensione di ingresso 9,6 V
Batterie
Capacità 1300 mAh
Batteria 7,4 V (2 x batteria agli ioni di litio 3,7 V)
100 - 240 V ~, 50/60 Hz
max 300 mA
II /
/ 300 mA
SAS 7.4 LI B2
IT│MT
│
3 ■

Importanti indicazioni di sicurezza
PERICOLO DI FOLGORAZIONE!
► Non caricare e non usare l'apparecchio all'aperto.
► Non utilizzare mai l'apparecchio in presenza di danni al
cavo, alla spina o all'alloggiamento.
► Fare sostituire immediatamente il cavo o la spina danneggia-
ti da personale specializzato autorizzato, per evitare rischi.
► Fare eseguire questi lavori unicamente da un'offi cina specia-
lizzata. Non aprire mai l'apparecchio di propria iniziativa.
Gli interventi non eseguiti da centri specializzati potrebbero
dare luogo a lesioni.
► Prima di accendere l'apparecchio controllare che la tensione
riportata nei dati tecnici corrisponda alla tensione di rete
esistente.
► Non toccare mai l'alimentatore o l'apparecchio con mani
bagnate o umide.
► Non usare cavi di prolunga, bensì inserire l'alimentatore
direttamente nella spina.
AVVERTENZA! PERICOLO DI LESIONI
► Non cambiare gli accessori con l'apparecchio acceso.
► Non usare l'aspirapolvere portatile per aspirare oggetti a
punta
o pezzi di vetro.
► Non aspirare mai fi ammiferi accesi, cenere ancora ardente
o mozziconi di sigarette.
► Non usare l'aspirapolvere per aspirare prodotti chimici, pol-
vere di pietra, gesso, cemento o sostanze analoghe.
► L'apparecchio non è indicato per materiali infi ammabili ed
esplosivi o liquidi chimici e aggressivi.
■ 4 │ IT
│
MT
SAS 7.4 LI B2

AVVERTENZA! PERICOLO DI LESIONI
► Riporre l’apparecchio sempre in luoghi chiusi. Per evitare infor-
tuni, dopo l’uso riporre l’apparecchio in un luogo asciutto.
► In condizioni estreme possono verifi carsi delle perdite dagli
elementi delle batterie. In caso di contatto del liquido con la
cute o con gli occhi, lavare e risciacquare immediatamente
con acqua pulita. Contattare un medico.
► Questo apparecchio può essere utilizzato dai bambini di
almeno 8anni di età e da persone con capacità fi siche,
sensoriali o mentali ridotte o insuffi ciente esperienza o conoscenza, solo se sorvegliati o istruiti sull'uso sicuro dell'apparecchio e qualora ne abbiano compreso i pericoli associati.
► I bambini non devono giocare con l'apparecchio.
► La pulizia e la manutenzione a cura dell'utente non devono
essere eseguite da bambini, a meno che non siano sorvegliati.
► Adottare la massima cautela utilizzando l'aspirapolvere per
le scale.
ATTENZIONE! PERICOLO DI DANNI MATERIALI!
► Usare solo accessori consigliati dalla casa produttrice.
► Il cavo di rete non dev'essere utilizzato per altri scopi. Non
trasportare mai il supporto a parete o l'alimentatore tenendolo dal cavo. Non spostare mai l'apparecchio maneggiandolo dal cavo.
► Aff errare sempre la spina per disconnettere l'apparecchio
dalla presa di corrente.
► Non collocare mai l'aspirapolvere vicino a corpi riscaldanti,
forni o altri apparecchi o superfi ci riscaldate.
SAS 7.4 LI B2
IT│MT
│
5 ■

ATTENZIONE! PERICOLO DI DANNI MATERIALI!
► Verifi care sempre che le aperture di ventilazione non siano
ostruite. L'ostruzione alla circolazione dell'aria può dare luogo
al surriscaldamento dell'apparecchio e provocare dei danni.
► Questo prodotto contiene batterie ricaricabili. Non gettare
mai le batterie nel fuoco e non esporle a temperature elevate. Sussiste il pericolo di esplosione!
► Non usare l'aspirapolvere senza aver prima inserito il fi ltro
della polvere.
► Non usare l'alimentatore per altri prodotti e non cercare di
ricaricare l'apparecchio con un'altra stazione di carica. Usare
esclusivamente l'alimentatore incluso nella fornitura dell'apparecchio.
► Non tentare mai di ricaricare pile non ricaricabili.
► Le batterie presenti in questo apparecchio non possono
venire sostituite.
Prima di utilizzare l’apparecchio
per la prima volta
■ Rimuovere tutti i materiali di imballaggio dall’apparecchio.
■ Mettere il contenitore di raccolta dello sporco q sul blocco motore:
– Infi lare il nasello di plastica che si trova sul lato inferiore dell’aspirapolvere
portatile nell’apposito intaglio del contenitore di raccolta dello sporco q.
– Premere il tasto di sbloccaggio 8 e infi lare contemporaneamente il
contenitore di raccolta dello sporco q sul blocco motores.
– Rilasciare il tasto di sbloccaggio 8 in modo che il blocco entri nell’in-
taglio. Il contenitore di raccolta dello sporco q è ora fi ssato sul blocco
motore.
Informazioni relative alle batterie
1) L’aspirapolvere portatile è azionato da batterie agli ioni di litio ricaricabili.
Prima del primo impiego, caricare le batterie almeno per 24 ore.
■ 6 │ IT
│
MT
SAS 7.4 LI B2

2) Le batterie raggiungono la piena capacità dopo un periodo di ricarica di 24
ore. Per la manutenzione delle batterie consigliamo quanto segue: dopo che
le batterie sono state caricate, staccare l’alimentatore 4 dalla presa. Collegare nuovamente l’alimentatore 4 alla presa di rete solo quando si nota che il
potenza di aspirazione dell’aspiratore portatile si è sensibilmente indebolita.
Montaggio del supporto a parete
PERICOLO DI SCOSSA ELETTRICA!
Assicurarsi che nella parete non si trovino linee di corrente o di altro tipo,
►
ovvero tubi, prima di eseguire i fori per il supporto a parete 3. Sussiste il
pericolo di morte se si fora una linea di corrente!
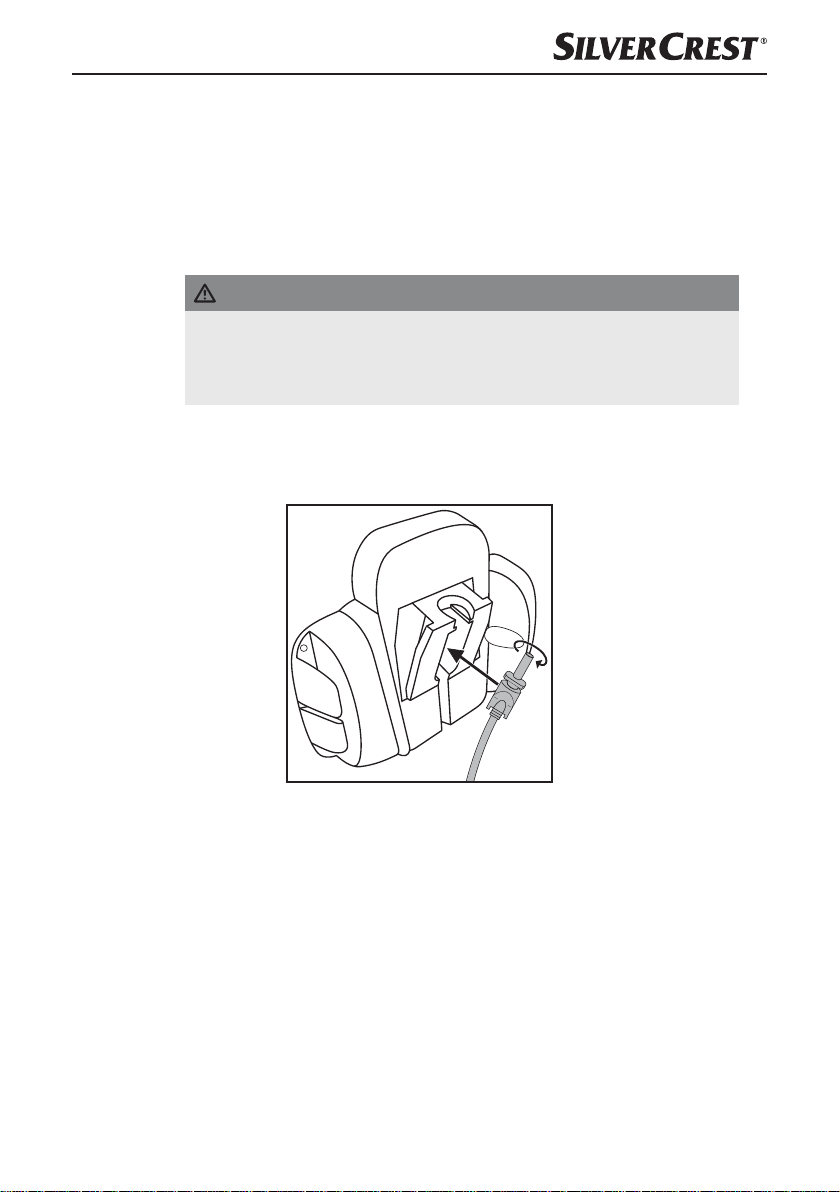
1) Inserire lo spinotto cavo 5 dell’alimentatore 4 nel supporto a parete 3 come
descritto nella seguente illustrazione. Fissare lo spinotto cavo 5 ruotandolo.
SAS 7.4 LI B2
1) Cercare una posizione di montaggio idonea per il supporto a parete 3:
l’aspirapolvere portatile deve poter essere estratto dal supporto a parete
senza problemi e l’alimentatore 4 deve trovarsi nelle vicinanze della presa
di rete.
2) Eff ettuare due fori a una distanza di ca. 61 mm l’uno dall’altro. Utilizzare il
supporto a parete 3 per segnare i punti in cui eff ettuare i fori: in tal modo la
distanza viene misurata correttamente. I fori devono essere eseguiti in modo
da essere adatti per tasselli da 5 mm.
3) Inserire i tasselli nei fori e avvitare saldamente il supporto a parete 3 con
l’ausilio delle viti.
4) I tasselli si possono inserire sui supporti laterali per gli accessori.
5) Inserire l’alimentatore 4 in una presa di rete.
IT│MT
│
7 ■

Ricarica
AVVERTENZA
Verifi care che l'interruttore ON/OFF 6 sia stato spostato all'indietro
►
(in posizione "0”) prima di avviare il procedimento di carica.
■ Inserire l’aspirapolvere portatile dall’alto nel supporto a parete 3, in modo
che lo spinotto cavo 5 scivoli nella presa dell’aspirapolvere portatile. La
spia di controllo della carica 7 lampeggia di colore rosso e il procedimento
di carica comincia.
■ Importante: quando l’aspirapolvere portatile ha di nuovo suffi ciente ener-
gia per aspirare, la spia di controllo della carica 7 si accende di colore
verde. Ciò non signifi ca che le batterie sono completamente cariche. Quando la spia di controllo della carica 7 si accende di colore verde, le batterie
sono cariche ca. all’80%.
■ Una volta concluso il processo di carica, il quale può durare circa 5 ore, in
caso di batterie completamente scariche, l’apparecchio passa automaticamente alla modalità di mantenimento della carica (funzione di mantenimento).
Non lasciare tuttavia l’apparecchio permanentemente connesso all’alimentatore 4, per evitare eventuali danni alle batterie.
■ Ricaricare le batterie solo quando la potenza di aspirazione dell’aspirapol-
vere portatile si riduce sensibilmente e la spia di controllo della carica 7
lampeggia di colore verde.
AVVERTENZA
L'aspirapolvere portatile può essere caricato direttamente anche tramite
►
l'alimentatore 4. Rimuovere a tale scopo lo spinotto cavo 5 tramite una
leggera rotazione dal supporto a parete 3 e inserirlo nella presa dell'aspirapolvere portatile.
Uso
■ 8 │ IT
ATTENZIONE!
L'apertura di aspirazione deve essere sempre libera e non intasata.
►
Gli intasamenti provocano surriscaldamento e danni al motore.
AVVERTENZE
Verifi care che il fi ltro della polvere 0 sia sempre inserito prima di usare
►
l'apparecchio.
► Aspirare liquidi al massimo fi no a quando il contenitore di raccolta dello
sporco q si riempie alla tacca MAX.
│
MT
SAS 7.4 LI B2

Pulizia
1) Rimuovere l’aspirapolvere portatile dal supporto a parete 3 o se non si
utilizza il supporto a parete 3, estrarre lo spinotto cavo 5 dalla presa.
2) Se lo si desidera, inserire la bocchetta adatta nell’apertura di aspirazione:
– la bocchetta per giunti 2 per pulire punti stretti e diffi cili da raggiungere.
– la bocchetta di aspirazione materiali bagnati 1 per l’aspirazione di liquidi.
AVVERTENZA
Dopo aver aspirato i liquidi, pulire immediatamente il contenitore di raccolta
►
dello sporco q. Altrimenti si formano batteri e germi. Verifi care che il
sacchetto-fi ltro della polvere 9 sia sempre completamente asciutto prima
di riutilizzare l'apparecchio.
3) Per accendere l’apparecchio spingere l’interruttore ON/OFF 6 in avanti.
La spia di controllo della carica 7 si accende di colore verde.
4) Dopo l’uso, spingere indietro ‘interruttore ON/OFF 6.
AVVERTENZA
Inserire l'aspirapolvere portatile nel supporto a parete 3 e iniziare il
►
processo di ricarica quando la potenza di aspirazione si indebolisce
sensibilmente e la spia di controllo della carica 7 lampeggia di verde.
Per ottenere i migliori risultati, svuotare il contenitore di raccolta dello sporco q
e pulire il fi ltro della polvere 0 dopo ogni uso.
SAS 7.4 LI B2
ATTENZIONE! PERICOLO DI DANNI MATERIALI!
Non utilizzare detergenti chimici, abrasivi o aggressivi. Essi attaccano la
►
superfi cie dell'apparecchio.
1) Per aprire il contenitore di raccolta dello sporco q, premere il tasto di sbloccaggio 8 e rimuovere il contenitore di raccolta dello sporco q.
2) Rimuovere il fi ltro della polvere 0 dal contenitore di raccolta dello sporco q.
3) Svuotare il contenitore di raccolta dello sporco q.
4) Sfi lare il sacchetto-fi ltro della polvere 9 con il suo supporto dal fi ltro della
polvere 0.
5) Sciacquare il sacchetto-fi ltro della polvere 9 con acqua fredda e attendere
fi no alla completa asciugatura, prima di reinserirlo nel fi ltro della polvere 0.
Non asciugarlo con aria calda.
6) Reinserire il fi ltro della polvere 0 nel contenitore di raccolta dello sporco q.
Assicurarsi che il fi ltro della polvere 0 sia inserito correttamente e che il
bordo di gomma del contenitore di raccolta dello sporco q sia a tenuta.
IT│MT
│
9 ■

7) Reinserire il fi ltro della polvere q sul blocco motore.
– Infi lare il nasello di plastica che si trova sul lato inferiore dell’aspirapolvere
portatile nell’apposito intaglio del contenitore di raccolta dello sporco q.
– Premere il tasto di sbloccaggio 8 e infi lare contemporaneamente il
contenitore di raccolta dello sporco q sul blocco motore.
– Rilasciare il tasto di sbloccaggio 8 in modo che il blocco entri nell’intaglio.
Il contenitore di raccolta dello sporco q è ora fi ssato sul blocco motore.
8) Pulire l’alloggiamento e le due bocchette con un panno leggermente inumidito. In caso di sporco resistente, versare un po’ di detergente delicato sul
panno.
9) Asciugare accuratamente tutte le parti prima di riutilizzare o conservare
l’apparecchio.
Smaltimento
Non gettare per alcun motivo l‘apparecchio insieme ai normali
rifi uti domestici.
Questo prodotto è soggetto alla Direttiva Europea 2012/19/EU.
Far smaltire l‘apparecchio da un‘azienda di smaltimento autorizzata o dall‘ente
di smaltimento comunale. Rispettare le norme attualmente in vigore. In caso di
dubbi mettersi in contatto con l‘ente di smaltimento competente.
AVVERTENZA
Non è possibile rimuovere la batteria dall‘apparecchio per gettarla via.
►
L’imballaggio è costituito da materiali ecocompatibili che possono venire smaltiti
tramite gli appositi centri di raccolta e riciclaggio.
■ 10 │ IT
│
MT
SAS 7.4 LI B2

Garanzia e assistenza
Questo apparecchio ha una garanzia di 3 anni dalla data di acquisto. L’apparecchio è stato prodotto con cura e debitamente collaudato prima della consegna.
Conservare lo scontrino come prova di acquisto. Nei casi contemplati dalla garanzia, mettersi in contatto telefonicamente con il centro di assistenza più vicino.
Solo in tal modo è possibile garantire una spedizione gratuita della merce.
AVVERTENZA
La garanzia copre solo i difetti del materiale o di fabbricazione, non vale
►
invece per danni dovuti al trasporto, pezzi soggetti a usura o danni a parti
fragili, come ad es. interruttori o batterie.
Il prodotto è destinato esclusivamente all’uso domestico e non a quello commerciale. La garanzia decade in caso di impiego improprio o manomissione, uso
della forza e interventi non eseguiti dalla nostra fi liale di assistenza autorizzata.
Questa garanzia non costituisce alcun limite ai diritti legali del consumatore.
Il periodo di garanzia non viene prolungato da interventi in garanzia. Ciò vale
anche per le parti sostituite e riparate.
I danni e difetti eventualmente presenti già all’atto dell’acquisto devono venire
comunicati immediatamente dopo il disimballo, e comunque entro e non oltre
due giorni dalla data di acquisto.
Le riparazioni eseguite dopo la scadenza del periodo di garanzia sono a pagamento.
Assistenza Italia
Tel.: 02 36003201
E-Mail: kompernass@lidl.it
IAN 275064
Assistenza Malta
Tel.: 80062230
E-Mail: kompernass@lidl.com.mt
Importatore
KOMPERNASS HANDELS GMBH
BURGSTRASSE 21
44867 BOCHUM
GERMANY
www.kompernass.com
SAS 7.4 LI B2
IAN 275064
IT│MT
│
11 ■

■ 12 │ IT
│
MT
SAS 7.4 LI B2

Índice
Introdução . . . . . . . . . . . . . . . . . . . . . . . . . . . . . . . . . . . . . . . . . . . . . . . . . . . 14
Utilização correta . . . . . . . . . . . . . . . . . . . . . . . . . . . . . . . . . . . . . . . . . . . . . 14
Conteúdo da embalagem . . . . . . . . . . . . . . . . . . . . . . . . . . . . . . . . . . . . . . . 14
Descrição do aparelho . . . . . . . . . . . . . . . . . . . . . . . . . . . . . . . . . . . . . . . . . 15
Dados técnicos . . . . . . . . . . . . . . . . . . . . . . . . . . . . . . . . . . . . . . . . . . . . . . . . 15
Indicações de segurança importantes . . . . . . . . . . . . . . . . . . . . . . . . . . . . 16
Antes da primeira colocação em funcionamento . . . . . . . . . . . . . . . . . . . . 18
Informações sobre os acumuladores . . . . . . . . . . . . . . . . . . . . . . . . . . . . .18
Montagem do suporte de parede . . . . . . . . . . . . . . . . . . . . . . . . . . . . . . . . 19
Carregamento . . . . . . . . . . . . . . . . . . . . . . . . . . . . . . . . . . . . . . . . . . . . . . . . 20
Utilização . . . . . . . . . . . . . . . . . . . . . . . . . . . . . . . . . . . . . . . . . . . . . . . . . . . . 20
Limpeza . . . . . . . . . . . . . . . . . . . . . . . . . . . . . . . . . . . . . . . . . . . . . . . . . . . . . 21
Eliminação . . . . . . . . . . . . . . . . . . . . . . . . . . . . . . . . . . . . . . . . . . . . . . . . . . . 22
Garantia e assistência técnica . . . . . . . . . . . . . . . . . . . . . . . . . . . . . . . . . . . 23
Importador . . . . . . . . . . . . . . . . . . . . . . . . . . . . . . . . . . . . . . . . . . . . . . . . . . 23
SAS 7.4 LI B2
PT
│
13 ■

Introdução
Parabéns pela compra do seu novo aparelho.
Optou por um produto de elevada qualidade. O manual de instruções é parte
integrante deste produto. Este contém instruções importantes para a segurança,
utilização e eliminação. Antes de utilizar o produto, familiarize-se com todas as
instruções de operação e segurança. Utilize o produto apenas como descrito e
nas áreas de aplicação indicadas. Ao transferir o produto para terceiros, entregue todos os respetivos documentos.
Utilização correta
O aspirador manual só pode ser utilizado para aspirar superfícies ou materiais
secos ou molhados, ou líquidos. Nem pessoas nem animais podem ser aspirados com este aparelho. Qualquer outra utilização ou alteração do aparelho é
considerada incorreta e acarreta perigo de acidentes graves. O fabricante não
assume qualquer responsabilidade por danos resultantes da utilização incorreta
ou operação indevida. O aparelho não é indicado para a utilização comercial.
Conteúdo da embalagem
▯ Aspirador de mão com bateria recarregável de iões de lítio
▯ Bocal para frestas
▯ Bocal para líquidos
▯ Suporte de parede
▯ Material de montagem
▯ Fonte de alimentação
▯ Manual de instruções
■ 14 │ PT
Ao retirar o material da embalagem, verifi que se foram fornecidas todas as peças.
SAS 7.4 LI B2
Descrição do aparelho
1 Bocal para líquidos
2 Bocal para frestas
3 Suporte de parede
4 Fonte de alimentação
5 Ficha fêmea
6 Interruptor Ligar/Desligar
7 Luz de controlo de carregamento (vermelha/verde)
8 Botão de desbloqueio
9 Saco do fi ltro de pó
0 Filtro de pó
q Depósito de resíduos
NOTA
O aparelho é fornecido com acumuladores descarregados. Antes da
►
primeira utilização do aparelho, os acumuladores têm de ser carregados
durante 24 horas.
Dados técnicos
Fonte de alimentação 4
Tensão/corrente de entrada
Tensão/corrente de saída 9,6 V
Classe de proteção
Designação do modelo SAS 7.4 LI B2-1
Aparelho
Tensão de entrada 9,6 V
Acumuladores
Capacidade 1.300 mAh
Acumulador
100 - 240 V ~, 50/60 Hz
máx. 300 mA
/ 300 mA
II /
7,4 V
(2 acumuladores de iões de lítio de 3,7 V)
SAS 7.4 LI B2
PT
│
15 ■

Indicações de segurança importantes
PERIGO - CHOQUE ELÉTRICO!
► Não carregue ou utilize este aparelho ao ar livre.
► Nunca utilize o aspirador manual se o cabo, a fi cha ou a
caixa estiver danifi cado(a).
► Cabos ou fi chas de alimentação elétrica danifi cados devem
ser imediatamente substituídos por técnicos devidamente
autorizados, de modo a evitar situações de perigo.
► As reparações devem ser efetuadas apenas por uma ofi cina
qualifi cada. Nunca abra o aparelho. As intervenções que
não tiverem sido realizadas por uma empresa especializada
podem levar à ocorrência de ferimentos.
► Antes de ligar o aparelho, certifi que-se de que a tensão
mencionada nos dados técnicos do aparelho corresponde à
tensão de alimentação.
► Não toque na fonte de alimentação ou no aparelho com as
mãos molhadas ou húmidas.
► Não utilize a fonte de alimentação com uma extensão,
ligue-a diretamente à tomada.
AVISO! PERIGO DE FERIMENTOS!
► Não mude de acessórios com o aparelho em funcionamento.
► Não utilize o aspirador manual para aspirar objetos pontia-
gudos ou vidros.
► Nunca aspire fósforos acesos, cinzas em brasa ou pontas
de cigarro acesas.
► Não utilize o aspirador manual para aspirar produtos
químicos, pó de pedra, gesso, cimento ou outras partículas
similares.
■ 16 │ PT
SAS 7.4 LI B2
AVISO! PERIGO DE FERIMENTOS!
► O aparelho não é adequado para substâncias infl amáveis
e explosivas ou para líquidos químicos e agressivos.
► Guarde sempre o aparelho em espaços fechados. Para
evitar acidentes, guarde o aparelho num local seco após a
utilização.
► Em condições extremas pode ocorrer um derrame de ácido
do acumulador. Em caso de contacto do ácido com a pele
ou os olhos, lave imediatamente a zona em questão com
água limpa. Procure um médico.
► Este aparelho pode ser utilizado por crianças com idades
superiores a 8 anos, bem como por pessoas com capacidades físicas, sensoriais ou mentais reduzidas, ou com falta
de experiência e/ou conhecimento, caso sejam vigiadas ou
instruídas sobre a utilização segura do aparelho e compreendam os perigos daí resultantes.
► As crianças não podem brincar com o aparelho.
► A limpeza e a manutenção pelo utilizador não podem ser
realizadas por crianças não vigiadas.
► Tenha especial cuidado ao utilizar o aspirador em escadas.
ATENÇÃO! DANOS MATERIAIS!
► Utilize apenas acessórios recomendados pelo fabricante.
► A fonte de alimentação não pode ser utilizada para outros
fi ns. Nunca transporte o suporte de parede ou a fonte de
alimentação pelo cabo. Não puxe pelo cabo para deslocar
o aparelho.
► Agarre sempre na fi cha para desligar o aparelho da alimen-
tação elétrica.
SAS 7.4 LI B2
PT
│
17 ■

ATENÇÃO! DANOS MATERIAIS!
► Certifi que-se de que o aspirador manual não é colocado
perto de aquecedores, fornos ou outros aparelhos ou superfícies aquecidos.
► Certifi que-se sempre de que as ranhuras de ventilação não
fi cam cobertas. Um circuito de ar bloqueado pode resultar
no sobreaquecimento e na danifi cação do aparelho.
► Este produto contém acumuladores recarregáveis. Não
deite os acumuladores para o lume e não os exponha a
temperaturas elevadas. Perigo de explosão!
► Não utilize o aspirador manual sem o fi ltro de pó montado.
► Não utilize a fonte de alimentação noutro produto e não
tente carregar este aparelho com outra base de carregamento.
Utilize apenas a fonte de alimentação fornecida com este
aparelho.
► Nunca tente carregar baterias não recarregáveis.
► Os acumuladores neste aparelho não podem ser substituídos.
Antes da primeira colocação em funcionamento
■ Remova todos os materiais da embalagem do aparelho.
■ Coloque o depósito de resíduos q sobre o bloco do motor:
– Desloque a patilha de plástico, na parte inferior do aspirador manual,
para dentro do entalhe do depósito de resíduos q.
– Prima o botão de desbloqueio 8 e desloque simultaneamente o depósito
de resíduos q para cima do bloco do motor.
– Solte o botão de desbloqueio 8, para que o bloqueio encaixe no entalhe.
O depósito de resíduos q está agora fi xo no bloco do motor.
Informações sobre os acumuladores
1) O aspirador manual é operado com acumuladores de iões de lítio recarregáveis. Antes de colocar o aspirador manual pela primeira vez em funcionamento, os acumuladores têm de ser carregados, no mínimo, durante 24 horas.
■ 18 │ PT
SAS 7.4 LI B2
2) Os acumuladores atingem a sua capacidade total após um período de carregamento de 24 horas. Para a conservação dos acumuladores, recomendamos o seguinte: após o carregamento dos acumuladores, remova a fonte
de alimentação 4 da tomada. Ligue novamente a fonte de alimentação 4
à tomada apenas quando a potência de aspiração do aspirador manual
diminuir signifi cativamente.
Montagem do suporte de parede
PERIGO - CHOQUE ELÉTRICO!
Certifi que-se de que não existe um condutor de corrente, ou outros con-
►
dutoresou tubos, na parede onde deseja efetuar os furos para o suporte
de parede 3. Existe perigo de morte caso perfure um cabo condutor de
corrente!
1) Coloque a fi cha fêmea 5 da fonte de alimentação 4 no suporte de parede 3, conforme ilustrado na fi gura abaixo. Fixe a fi cha fêmea 5, rodando-a.
SAS 7.4 LI B2
2) Procure um local de montagem adequado para o suporte de parede 3:
o aspirador manual deve poder ser facilmente retirado e deve estar acessível
uma tomada para a fonte de alimentação 4.
3) Fure dois orifícios numa distância de aprox. 61 mm. Utilize o suporte de
parede 3 para marcar os furos. Deste modo, a distância será medida corretamente. Os furos devem ser adequados a buchas de 5 mm.
4) Coloque as buchas nos furos e aparafuse o suporte de parede 3 com a
ajuda dos parafusos.
5) Pode colocar os bocais no suporte de acessórios lateral.
6) Insira a fonte de alimentação 4 numa tomada.
│
PT
19 ■

Carregamento
NOTA
Certifi que-se de que o interruptor Ligar/Desligar 6 está deslocado para
►
trás (posição "0"), antes de iniciar o carregamento.
■ Insira o aspirador manual no suporte de parede 3, por cima, de modo
que a fi cha fêmea 5 deslize para a entrada no aspirador manual. A luz
de controlo de carregamento 7 pisca na cor vermelha e o carregamento
é iniciado.
■ Importante: quando o aspirador manual tiver novamente energia sufi ciente
para aspirar, a luz de controlo de carregamento 7 acende na cor verde.
Isto não signifi ca que os acumuladores estão completamente carregados.
Se a luz de controlo de carregamento 7 apresentar a luz verde, signifi ca
que os acumuladores têm uma carga de 80%.
■ Quando o carregamento terminar, o que pode demorar aprox. 5 horas no
caso de acumuladores completamente descarregados, o aparelho liga automaticamente para o carregamento de compensação (função de conservação).
Não deixe o aparelho permanentemente ligado à fonte de alimentação 4,
a fi m de evitar eventuais danos nos acumuladores.
■ Volte a carregar os acumuladores apenas quando a potência de aspiração
do aspirador manual diminuir signifi cativamente e a luz de controlo de carregamento 7 piscar na cor verde.
NOTA
O aspirador manual também pode ser carregado diretamente através
►
da fonte de alimentação 4. Para tal, retire a fi cha fêmea 5, rodando-a
ligeiramente para fora do suporte de parede 3, e coloque-a na entrada
do aspirador manual.
Utilização
■ 20 │ PT
ATENÇÃO!
A abertura de aspiração deve estar sempre livre e não pode estar obstruída.
►
Obstruções levam ao sobreaquecimento e à danifi cação do motor.
INDICAÇÕES
Certifi que-se de que o fi ltro de pó 0 está sempre colocado antes de
►
utilizar o aparelho.
► Aspire líquido, no máximo até que o conteúdo do depósito de residuos q
atinja a marcação MAX.
SAS 7.4 LI B2

1) Retire o aspirador manual do suporte de parede 3 ou, caso não utilize o
2) Coloque, se desejar, o bocal adequado na abertura de aspiração:
NOTA
3) Para ligar o aparelho, desloque o interruptor Ligar/Desligar 6 para a frente.
4) Após a utilização, desloque o interruptor Ligar/Desligar 6 para trás.
NOTA
Limpeza
Para obter os melhores resultados, esvazie o depósito de resíduos q e limpe o
fi ltro de pó 0 após cada utilização.
suporte de parede 3, retire a fi cha fêmea 5 da entrada.
– O bocal para frestas 2 para limpar locais estreitos e pouco acessíveis.
– O bocal para líquidos 1 para aspirar líquidos.
Limpe o depósito de resíduos q mediatamente após ter aspirado líquidos.
►
Caso contrário, formar-se-ão bactérias e germes! Verifi que se o saco
do fi ltro de pó 9 está completamente seco antes de voltar a utilizar o
aparelho.
A luz de controlo de carregamento 7 acende na cor verde.
Insira o aspirador manual no suporte de parede 3 e inicie o processo de
►
carregamento quando a potência de aspiração diminuir signifi cativamente
e a luz de controlo de carregamento 7 piscar na cor verde.
SAS 7.4 LI B2
ATENÇÃO! DANOS MATERIAIS!
Não utilize produtos de limpeza agressivos, químicos ou abrasivos.
►
Estes danifi cam a superfície do aparelho.
1) Para abrir o depósito de resíduos q, prima o botão de desbloqueio 8 e
retire o depósito de resíduos q.
2) Retire o fi ltro de pó 0 do depósito de resíduos q.
3) Esvazie o depósito de resíduos q.
4) Puxe o saco do fi ltro de pó 9, com o respetivo suporte, para fora do fi ltro
de pó 0.
5) Lave o saco do fi ltro de pó 9 com água fria e aguarde até que este esteja
totalmente seco, antes de o voltar a colocar no fi ltro de pó 0. Não o seque
com ar quente.
6) Insira novamente o fi ltro de pó 0 no depósito de resíduos q. Certifi que-se
de que o fi ltro de pó 0 está colocado corretamente e que o rebordo de
borracha veda o depósito de resíduos q.
│
PT
21 ■

7) Volte a colocar o depósito de resíduos q sobre o bloco do motor:
8) Limpe o corpo e os dois bocais com um pano ligeiramente humedecido.
Em caso de sujidade resistente, aplique um detergente suave no pano.
9) Seque bem todas as peças antes de utilizar novamente ou armazenar o
aparelho.
Eliminação
Nunca deposite o aparelho no lixo doméstico comum.
Este produto está sujeito ao disposto na Diretiva Europeia
2012/19/EU.
Elimine o aparelho apenas através de uma empresa de eliminação de resíduos
autorizada ou através da entidade de eliminação de resíduos do seu município.
Respeite os regulamentos atualmente em vigor. Em caso de dúvida, entre em
contacto com a sua empresa de eliminação de resíduos.
NOTA
O acumulador integrado deste aparelho não pode ser retirado para a
►
eliminação.
– Desloque a patilha de plástico, na parte inferior do aspirador manual,
para dentro do entalhe do depósito de resíduos q.
– Prima o botão de desbloqueio 8 e desloque simultaneamente o depósito
de resíduos q para cima do bloco do motor.
– Solte o botão de desbloqueio 8, para que o bloqueio encaixe no entalhe.
O depósito de resíduos q está agora fi xo no bloco do motor.
A embalagem é composta por materiais recicláveis que pode depositar nos
ecopontos locais.
■ 22 │ PT
SAS 7.4 LI B2

Garantia e assistência técnica
Este aparelho tem uma garantia de 3 anos a contar da data de compra. Este
aparelho foi fabricado com o maior cuidado e testado escrupulosamente antes
da sua distribuição.
Guarde o talão de compra como comprovativo da compra. Caso deseje acionar
a garantia, telefone para o seu serviço de Assistência Técnica. Apenas deste
modo pode ser garantido um envio gratuito do seu produto.
NOTA
A garantia abrange apenas defeitos de material ou de fabrico e não
►
inclui danos durante o transporte, peças de desgaste ou danos em peças
frágeis, p. ex. interruptores ou acumuladores.
O produto foi concebido apenas para uso privado e não para uso comercial.
A garantia extingue-se em caso de utilização incorreta, uso de força e intervenções que não tenham sido efetuadas pela nossa Filial de Assistência Técnica
autorizada.
Os seus direitos legais não são limitados por esta garantia.
O período de garantia não é prolongado pelo acionamento da mesma. Isto
também se aplica a peças substituídas e reparadas.
Danos e defeitos que possam eventualmente existir no momento da compra
devem ser imediatamente comunicados, após retirar o aparelho da embalagem,
o mais tardar dois dias após a data de compra.
Expirado o período da garantia, quaisquer reparações necessárias estão sujeitas a pagamento.
Assistência Portugal
Tel.: 70778 0005 (0,12 EUR/Min.)
E-Mail: kompernass@lidl.pt
IAN 275064
Importador
SAS 7.4 LI B2
KOMPERNASS HANDELS GMBH
BURGSTRASSE 21
44867 BOCHUM
GERMANY
www.kompernass.com
PT
│
23 ■

■ 24 │ PT
SAS 7.4 LI B2

Contents
Introduction . . . . . . . . . . . . . . . . . . . . . . . . . . . . . . . . . . . . . . . . . . . . . . . . . . 26
Intended use . . . . . . . . . . . . . . . . . . . . . . . . . . . . . . . . . . . . . . . . . . . . . . . . . 26
Package contents . . . . . . . . . . . . . . . . . . . . . . . . . . . . . . . . . . . . . . . . . . . . . 26
Description of the appliance . . . . . . . . . . . . . . . . . . . . . . . . . . . . . . . . . . . . 27
Technical data . . . . . . . . . . . . . . . . . . . . . . . . . . . . . . . . . . . . . . . . . . . . . . . . 27
Important safety instructions . . . . . . . . . . . . . . . . . . . . . . . . . . . . . . . . . . . . 28
Prior to fi rst use . . . . . . . . . . . . . . . . . . . . . . . . . . . . . . . . . . . . . . . . . . . . . . . 30
Information about the batteries . . . . . . . . . . . . . . . . . . . . . . . . . . . . . . . . . 30
Installation of the wall bracket . . . . . . . . . . . . . . . . . . . . . . . . . . . . . . . . . . 31
Charging . . . . . . . . . . . . . . . . . . . . . . . . . . . . . . . . . . . . . . . . . . . . . . . . . . . .32
Operation . . . . . . . . . . . . . . . . . . . . . . . . . . . . . . . . . . . . . . . . . . . . . . . . . . . 32
Cleaning . . . . . . . . . . . . . . . . . . . . . . . . . . . . . . . . . . . . . . . . . . . . . . . . . . . . . 33
Disposal . . . . . . . . . . . . . . . . . . . . . . . . . . . . . . . . . . . . . . . . . . . . . . . . . . . . .34
Warranty and service . . . . . . . . . . . . . . . . . . . . . . . . . . . . . . . . . . . . . . . . . . 35
Importer . . . . . . . . . . . . . . . . . . . . . . . . . . . . . . . . . . . . . . . . . . . . . . . . . . . . . 35
SAS 7.4 LI B2
GB│MT
│
25 ■

Introduction
Congratulations on the purchase of your new appliance.
You have selected a high-quality product. The operating instructions are part of this
product. They contain important information on safety, usage and disposal. Before
using the product, familiarise yourself with all operating and safety instructions. Use
the product only as described and for the specifi ed areas of application. Please also
pass on these operating instructions to any future owner.
Intended use
This handheld vacuum cleaner may only be used to vacuum dry or wet surfaces,
or dry or wet materials and liquids. Do not vacuum people or animals with this
appliance. Any other usage of or modifi cation to the appliance is deemed to be
improper and carries a signifi cant risk of accidents. The manufacturer accepts no
liability for damages that result from improper use of the appliance or are caused
by the incorrect operation of it. The appliance is not intended for commercial use.
Package contents
▯ Li-Ion Rechargeable Handheld Vacuum Cleaner
▯ Crevice tool
▯ Wet suction nozzle
▯ Wall bracket
▯ Mounting kit
▯ Mains adapter
▯ Operating instructions
■ 26 │ GB
Check the package contents for completeness directly after unpacking.
│
MT
SAS 7.4 LI B2

Description of the appliance
1 Wet suction nozzle
2 Crevice nozzle
3 Wall bracket
4 Mains adapter
5 Barrel plug
6 On/off switch
7 Charge indicator lamp (red/green)
8 Release button
9 Dust fi lter bag
0 Dust fi lter
q Dirt container
NOTE
This appliance is supplied with non-charged batteries. The batteries must be
►
charged for 24 hours before the fi rst use.
Technical data
Mains adapter 4
Input voltage/current
Output voltage/current: 9.6 V
Protection class
Type designation SAS 7.4 LI B2-1
Appliance
Input voltage 9.6 V
Rechargeable batteries
Capacity 1300 mAh
Rechargeable battery
100 - 240 V ~, 50/60 Hz
max. 300 mA
II /
7.4 V (2 x 3.7 V Lithium-ion
rechargeable batteries)
/ 300 mA
SAS 7.4 LI B2
GB│MT
│
27 ■

Important safety instructions
DANGER – ELECTRIC SHOCK!
► Do not charge or use the appliance outdoors.
► Never use the handheld vacuum cleaner if the cable, plug
or casing are damaged.
► To avoid risks, arrange to have damaged power cables
and/or plugs replaced as soon as possible by a qualifi ed
specialist.
► Have all repairs carried out by a specialist workshop. Under
no circumstances should you open the appliance yourself.
Repairs that are not carried out by a specialist workshop
could lead to physical injuries.
► Before switching on the appliance, make sure that the mains
voltage corresponds to the voltage indicated in the technical
data for the appliance.
► Never touch the mains adapter or the appliance with wet or
damp hands.
► Do not use the mains adapter with an extension cable; con-
nect the mains adapter directly to a power socket.
WARNING! RISK OF INJURY!
► Do not change any accessories while the appliance is
switched on.
► Do not use the handheld vacuum cleaner for vacuuming up
sharp objects or glass shards.
► Never vacuum up burning matches, glowing ashes or ciga-
rette butts.
► Do not use the handheld vacuum cleaner for vacuuming up
chemical products, stone dust, gypsum, cement or similar
particles.
■ 28 │ GB
│
MT
SAS 7.4 LI B2

WARNING! RISK OF INJURY!
► This appliance is not suitable for use with infl ammable and
explosive substances or chemical and aggressive liquids.
► Always store the appliance indoors. To prevent accidents,
keep the appliance in a dry location when not in use.
► Under extreme conditions, leaks in the battery cells may oc-
cur. In the event that battery fl uid comes into contact with skin
or eyes, the aff ected area must be rinsed off with water immediately. Contact a physician.
► This appliance may be used by children aged 8 years and
above and by persons with limited physical, sensory or mental
capabilities or lack of experience and knowledge, provided
that they are under supervision or have been told how to use
the appliance safely and are aware of the potential risks.
► Children must not use the appliance as a plaything.
► Cleaning and user maintenance tasks may not be carried
out by children unless they are supervised.
► Take special care when using the handheld vacuum cleaner
on stairs.
CAUTION! PROPERTY DAMAGE!
► Use only accessories recommended by the manufacturer.
► The mains adapter may not be used for other purposes.
Never carry the wall bracket or the mains adapter by the
cable. Do not pull on the cable when you want to move the
appliance.
► Always grip the power plug to disconnect the appliance
from the power supply.
SAS 7.4 LI B2
GB│MT
│
29 ■

CAUTION! PROPERTY DAMAGE!
► Always be sure to keep the handheld vacuum cleaner away
from heating elements, ovens or other heated appliances
and surfaces.
► Make sure that the ventilation slits are never obstructed.
A blocked ventilation circuit can result in overheating and
damage to the appliance.
► This product contains rechargeable batteries. Do not throw
the batteries into a fi re and do not subject them to high temperatures. There is a risk of explosion!
► Do not use the handheld vacuum cleaner without the dust
fi lter inserted.
► Do not use the mains adapter for a diff erent product and do
not attempt to charge this appliance with a diff erent mains
adapter. Use only the mains adapter supplied with this appliance.
► Never attempt to recharge non-rechargeable batteries.
► The batteries in this appliance cannot be replaced.
Prior to fi rst use
■ Remove all packaging materials from the appliance.
■ Place the dirt container q on the motor unit:
– Push the plastic tab on the underside of the handheld vacuum cleaner
into the recess on the dirt container q.
– Press the release button 8 and push the dirt container q onto the motor
unit at the same time.
– Let go of the release button 8 so that the restraint engages in the recess.
The dirt container q is now fi rmly seated on the motor unit.
Information about the batteries
1) This handheld vacuum cleaner is powered by rechargeable lithium-ion batteries.
Before using the handheld vacuum cleaner for the fi rst time, the batteries must
be charged for at least 24 hours.
■ 30 │ GB
│
MT
SAS 7.4 LI B2
2) The batteries reach their full capacity after a charging time of 24 hours. For
care of the batteries, we recommend the following: Once the batteries have
been charged, disconnect the mains adapter 4 from the mains socket. Do
not reconnect the mains adapter 4 with the mains socket until the handheld
vacuum cleaner’s suction power has noticeably decreased.
Installation of the wall bracket
DANGER – ELECTRIC SHOCK!
Ensure that there are no power cables or other conduits or pipes in the wall
►
at the location where you intend to bore the holes for the wall bracket 3.
Drilling into a current-carrying electric cable can be potentially fatal!
1) Place the barrel plug 5 of the mains adapter 4 into the wall bracket 3 as
shown in the diagram. Secure the barrel plug 5 by turning it.
SAS 7.4 LI B2
2) Select a suitable installation location for the wall bracket 3:
It must be possible to remove the handheld vacuum cleaner easily and there
must be an accessible mains power socket for the mains adapter 4.
3) Drill two holes about 61 mm apart. Use the wall bracket 3 to mark the holes,
to ensure the correct spacing. The drill holes must be suitable for 5 mm wall
plugs.
4) Push the wall plugs into the holes and then screw the wall bracket 3 fi rmly
into place using the screws.
5) You can place the nozzles on the accessories holder on the side.
6) Connect the mains adapter 4 to a mains power socket.
GB│MT
│
31 ■

Charging
NOTE
■ Place the handheld vacuum cleaner from above into the wall bracket 3 so
■ Important: The charge indicator lamp 7 lights up green once the handheld
■ When charging is complete, which can take around 5 hours with fully dis-
■ Do not recharge the batteries again until the handheld vacuum cleaner’s
NOTE
Check to ensure that the on/off switch 6 has been pushed back (to the
►
position "0 ) before starting the charging process.
that the barrel plug 5 slips into the socket on the handheld vacuum cleaner.
The charge indicator lamp 7 lights up red and the charging process begins.
vacuum cleaner is charged enough to vacuum again. This does not mean that
all the batteries are completely charged. When the charge indicator lamp 7
lights up green, the batteries are charged to around 80%.
charged batteries, the appliance automatically switches to a trickle charge
(maintenance function). Nevertheless, in order to avoid possible damage
to the batteries, do not leave the appliance permanently connected to the
mains adapter 4.
suction power becomes appreciably weaker and the charge indicator lamp 7
fl ashes green.
The handheld vacuum cleaner can also be charged directly via the mains
►
adapter 4. To do this, remove the barrel plug 5 with a slight twist from the
wall bracket 3 and insert it into the socket on the handheld vacuum cleaner.
Operation
■ 32 │ GB
CAUTION!
The suction opening must always be open and may not be blocked. Block-
►
ages lead to overheating and damage to the motor.
NOTICES
Make certain that the dust fi lter 0 is always inserted before using the
►
appliance.
► When vacuuming liquid, do not exceed the MAX marking in dirt container q.
│
MT
SAS 7.4 LI B2

1) Remove the handheld vacuum cleaner from the wall bracket 3 or, if you are
2) If required, place the appropriate nozzle in the suction opening:
NOTE
3) To switch the appliance on, slide the on/off switch 6 forwards. The charge
4) When you have fi nished using the appliance, slide the on/off switch 6 to
NOTE
Cleaning
To achieve the best results, empty the dirt container q and clean the dust fi lter 0
after every use.
not using the wall bracket 3 remove the barrel plug 5 from the socket.
– the crevice nozzle 2, to clean narrow and diffi cult to reach locations.
– the wet suction nozzle 1 to vacuum up liquids.
After you have vacuumed up liquids, immediately clean the dirt container q.
►
Otherwise, bacteria or mould will build up inside! Ensure that the dust fi lter
bag 9 is completely dry before using the appliance again.
indicator lamp 7 lights up green.
the rear.
Place the handheld vacuum cleaner in the wall bracket 3 and start the
►
charging process once the vacuum power has become noticeably weaker
and the charge indicator lamp 7 fl ashes green.
SAS 7.4 LI B2
CAUTION! MATERIAL DAMAGE!
Do not use aggressive, chemical or abrasive cleaning agents. These could
►
damage the outer surfaces of the appliance.
1) To open the dirt container q, press the release button 8 and remove the
dirt container q.
2) Remove the dust fi lter 0 from the dirt container q.
3) Empty the dirt container q.
4) Pull the dust fi lter bag 9 with its holder out of the dust fi lter 0.
5) Rinse the dust fi lter bag 9 out in cold water and wait until it is completely
dry before reinserting it into the dust fi lter 0. Do not dry it with hot air.
6) Reinsert the dust fi lter 0 into the dirt container q. When doing so, ensure
that the dust fi lter 0 is seated squarely and that the rubber lip seals the dirt
container q.
GB│MT
│
33 ■

7) Replace the dirt container q on the motor unit again:
– Push the plastic tab on the underside of the handheld vacuum cleaner
into the recess on the dirt container q.
– Press the release button 8 and push the dirt container q onto the motor
unit at the same time.
– Let go of the release button 8 so that the restraint engages in the recess.
The dirt container q is now fi rmly seated on the motor unit.
8) Clean the housing and both nozzles with a lightly moistened cloth. For stubborn
soiling use a mild detergent on the cloth.
9) Dry all parts thoroughly before using the appliance again or storing it.
Disposal
Do not dispose of the appliance in your normal domestic waste.
This product is subject to the provisions of European Directive
2012/19/EU.
Dispose of the appliance via an approved waste disposal company or your
municipal waste disposal facility. Please comply with all applicable regulations.
Please contact your waste disposal facility if you are in any doubt.
NOTE
The integrated rechargeable battery in this appliance cannot be removed
►
for disposal.
The packaging is made from environmentally friendly material and can be
disposed of at your local recycling plant.
■ 34 │ GB
│
MT
SAS 7.4 LI B2

Warranty and service
This appliance is provided with a 3-year warranty valid from the date of purchase.
This appliance has been manufactured with care and inspected meticulously prior
to delivery.
Please retain your receipt as proof of purchase. In the event of a warranty claim,
please contact your Customer Service unit by telephone. This is the only way to
guarantee free return of your goods.
NOTE
The warranty only covers claims for material and manufacturing defects, not
►
for transport damage, worn parts or damage to fragile components such as
buttons or rechargeable batteries.
This product is intended solely for private use and not for commercial purposes.
The warranty shall be deemed void in cases of misuse or improper handling, use
of force and modifi cations/repairs which have not been carried out by one of
our authorised Service centres.
Your statutory rights are not restricted by this warranty.
The warranty period is not prolonged by repairs eff ected under the warranty.
This also applies to replaced and repaired components.
Any damage and defects present at the time of purchase must be reported immediately after unpacking, but no later than two days after the date of purchase.
Repairs carried out after expiry of the warranty period shall be subject to charge.
Service Great Britain
Tel.: 0871 5000 720 (£ 0.10/Min.)
E-Mail: kompernass@lidl.co.uk
IAN 275064
Importer
SAS 7.4 LI B2
Service Malta
Tel.: 80062230
E-Mail: kompernass@lidl.com.mt
IAN 275064
KOMPERNASS HANDELS GMBH
BURGSTRASSE 21
44867 BOCHUM
GERMANY
www.kompernass.com
GB│MT
│
35 ■

■ 36 │ GB
│
MT
SAS 7.4 LI B2

Inhaltsverzeichnis
Einleitung . . . . . . . . . . . . . . . . . . . . . . . . . . . . . . . . . . . . . . . . . . . . . . . . . . . . 38
Bestimmungsgemäßer Gebrauch . . . . . . . . . . . . . . . . . . . . . . . . . . . . . . . .38
Lieferumfang . . . . . . . . . . . . . . . . . . . . . . . . . . . . . . . . . . . . . . . . . . . . . . . . . 38
Gerätebeschreibung . . . . . . . . . . . . . . . . . . . . . . . . . . . . . . . . . . . . . . . . . . . 39
Technische Daten . . . . . . . . . . . . . . . . . . . . . . . . . . . . . . . . . . . . . . . . . . . . . . 39
Wichtige Sicherheitshinweise . . . . . . . . . . . . . . . . . . . . . . . . . . . . . . . . . . . 40
Vor der ersten Inbetriebnahme . . . . . . . . . . . . . . . . . . . . . . . . . . . . . . . . . . 42
Informationen zu den Akkus . . . . . . . . . . . . . . . . . . . . . . . . . . . . . . . . . . . . 42
Montage des Wandhalters . . . . . . . . . . . . . . . . . . . . . . . . . . . . . . . . . . . . . . 43
Aufl aden . . . . . . . . . . . . . . . . . . . . . . . . . . . . . . . . . . . . . . . . . . . . . . . . . . . . 44
Bedienen . . . . . . . . . . . . . . . . . . . . . . . . . . . . . . . . . . . . . . . . . . . . . . . . . . . . 44
Reinigen . . . . . . . . . . . . . . . . . . . . . . . . . . . . . . . . . . . . . . . . . . . . . . . . . . . . . 45
Entsorgen . . . . . . . . . . . . . . . . . . . . . . . . . . . . . . . . . . . . . . . . . . . . . . . . . . . . 46
Garantie und Service . . . . . . . . . . . . . . . . . . . . . . . . . . . . . . . . . . . . . . . . . . 47
Importeur . . . . . . . . . . . . . . . . . . . . . . . . . . . . . . . . . . . . . . . . . . . . . . . . . . . 47
SAS 7.4 LI B2
DE│AT│CH
│
37 ■

Einleitung
Herzlichen Glückwunsch zum Kauf Ihres neuen Gerätes.
Sie haben sich damit für ein hochwertiges Produkt entschieden. Die Bedienungsan-
leitung ist Bestandteil dieses Produkts. Sie enthält wichtige Hinweise für Sicherheit,
Gebrauch und Entsorgung. Machen Sie sich vor der Benutzung des Produkts mit
allen Bedien- und Sicherheitshinweisen vertraut. Benutzen Sie das Produkt nur
wie beschrieben und für die angegebenen Einsatzbereiche. Händigen Sie alle
Unterlagen bei Weitergabe des Produkts an Dritte mit aus.
Bestimmungsgemäßer Gebrauch
Der Handstaubsauger darf nur zum Saugen von trockenen oder nassen Oberfl ächen bzw. trockenem oder nassem Sauggut oder Flüssigkeiten eingesetzt
werden. Menschen oder Tiere dürfen mit diesem Gerät nicht abgesaugt werden.
Jede andere Verwendung oder Veränderung des Gerätes gilt als nicht bestimmungsgemäß und birgt erhebliche Unfallgefahren. Der Hersteller haftet nicht für
Schäden, die durch nicht bestimmungsgemäßen Gebrauch oder falsche Bedienung
verursacht werden. Das Gerät ist nicht für den gewerblichen Gebrauch bestimmt.
Lieferumfang
▯ Li-Ionen-Akku-Handstaubsauger
▯ Fugendüse
▯ Nasssaugdüse
▯ Wandhalter
▯ Montagematerial
▯ Netzteil
▯ Bedienungsanleitung
■ 38 │ DE
Kontrollieren Sie direkt nach dem Auspacken den Lieferumfang auf Vollständigkeit.
│AT│
CH
SAS 7.4 LI B2

Gerätebeschreibung
1 Nasssaugdüse
2 Fugendüse
3 Wandhalter
4 Netzteil
5 Hohlstecker
6 Ein-/Ausschalter
7 Ladekontrollleuchte (rot/grün)
8 Entriegelungstaste
9 Staubfi lter-Beutel
0 Staubfi lter
q Schmutzbehälter
HINWEIS
Das Gerät wird mit nicht geladenen Akkus geliefert. Vor dem ersten Ge-
►
brauch des Gerätes sind die Akkus zunächst für 24 Stunden zu laden.
Technische Daten
Netzteil 4
Eingangsspannung/- strom
Ausgangsspannung/- strom: 9,6 V
Schutzklasse
Typenbezeichnung SAS 7.4 LI B2-1
Gerät
Eingangsspannung 9,6 V
Akkus
Kapazität 1300 mAh
Akku 7,4 V (2 x 3,7 V Lithium-Ionen-Akku)
100 - 240 V ~, 50/60 Hz
max. 300 mA
/ 300 mA
II /
SAS 7.4 LI B2
DE│AT│CH
│
39 ■

Wichtige Sicherheitshinweise
GEFAHR - ELEKTRISCHER SCHLAG!
► Laden bzw. verwenden Sie dieses Gerät nicht im Freien.
► Den Handstaubsauger niemals gebrauchen, wenn Kabel,
Stecker oder Gehäuse beschädigt sind.
► Lassen Sie beschädigte Netzstecker oder Netzkabel sofort
von autorisiertem Fachpersonal austauschen, um Gefährdungen zu vermeiden.
► Lassen Sie Reparaturen nur von einer Fachwerkstatt durch-
führen. Öff nen Sie unter keinen Umständen selbst das Gerät.
Eingriff e, die nicht durch einen Fachbetrieb vorgenommen
wurden, können zu Verletzungen führen.
► Überzeugen Sie sich vor dem Einschalten des Gerätes, dass
die in den technischen Daten des Gerätes verzeichnete
Spannung der Netzspannung entspricht.
► Fassen Sie das Netzteil oder das Gerät nicht mit nassen
oder feuchten Händen an.
► Verwenden Sie das Netzteil nicht mit einem Verlängerungs-
kabel, sondern verbinden Sie das Netzteil direkt mit einer
Steckdose.
WARNUNG! VERLETZUNGSGEFAHR!
► Wechseln Sie keine Zubehörteile aus, wenn das Gerät in Be-
trieb ist.
► Benutzen Sie den Handstaubsauger nicht zum Aufsaugen
von spitzen Gegenständen oder Glasscherben.
► Niemals brennende Streichhölzer, glimmende Asche oder
Zigarettenstummel aufsaugen.
► Gebrauchen Sie den Handstaubsauger nicht zum Aufsaugen
von chemischen Produkten, Steinstaub, Gips, Zement, oder
anderen ähnlichen Partikeln.
■ 40 │ DE
│AT│
CH
SAS 7.4 LI B2

WARNUNG! VERLETZUNGSGEFAHR!
► Das Gerät ist nicht für entfl ammbare und explosive Stoff e
oder chemische und aggressive Flüssigkeiten geeignet.
► Lagern Sie das Gerät immer in geschlossenen Räumen. Um
Unfälle zu verhindern, bewahren Sie das Gerät nach Gebrauch
an einem trockenen Ort auf.
► Unter extremen Bedingungen können Leckagen an den Akku-
zellen auftreten. Bei Kontakt der Flüssigkeit mit Haut oder
Augen ist die betreff ende Stelle sofort mit sauberem Wasser
aus- bzw. abzuspülen. Suchen Sie einen Arzt auf.
► Dieses Gerät kann von Kindern ab 8 Jahren und darüber
sowie von Personen mit verringerten physischen, sensorischen oder mentalen Fähigkeiten oder Mangel an Erfahrung
und Wissen benutzt werden, wenn sie beaufsichtigt oder
bezüglich des sicheren Gebrauchs des Gerätes unterwiesen
wurden und die daraus resultierenden Gefahren verstehen.
► Kinder dürfen nicht mit dem Gerät spielen.
► Reinigung und Benutzer-Wartung dürfen nicht von Kindern
ohne Beaufsichtigung durchgeführt werden.
► Üben Sie besondere Sorgfalt aus, wenn Sie den Handstaub-
sauger auf Treppen benutzen.
ACHTUNG! SACHSCHADEN!
► Verwenden Sie nur Zubehörteile, die vom Hersteller empfoh-
len werden.
► Das Netzteil darf nicht für andere Zwecke benutzt werden.
Tragen Sie den Wandhalter oder das Netzteil niemals am Kabel.
Ziehen Sie nicht am Kabel, wenn Sie das Gerät verstellen wollen.
► Fassen Sie immer den Netzstecker an, um das Gerät von der
Stromversorgung zu trennen.
► Achten Sie unbedingt darauf, dass Sie den Handstaub-
sauger nicht neben Heizkörpern, Backöfen oder anderen
erhitzten Geräten oder Flächen abstellen.
SAS 7.4 LI B2
DE│AT│CH
│
41 ■

ACHTUNG! SACHSCHADEN!
► Achten Sie immer darauf, dass die Lüftungsschlitze frei sind.
Ein blockierter Luftkreislauf kann zur Überhitzung und Beschädigung des Gerätes führen.
► Dieses Produkt enthält wiederaufl adbare Akkus. Werfen
Sie die Akkus nicht ins Feuer und setzen Sie sie nicht hohen
Temperaturen aus. Es besteht Explosionsgefahr!
► Benutzen Sie den Handstaubsauger nicht ohne eingesetzten
Staubfi lter.
► Benutzen Sie das Netzteil nicht für ein anderes Produkt und
versuchen Sie nicht, dieses Gerät mittels einer anderen Ladestation aufzuladen. Verwenden Sie nur das mit diesem Gerät
gelieferte Netzteil.
► Versuchen Sie niemals, nicht wiederaufl adbare Batterien
aufzuladen.
► Die Akkus in diesem Gerät können nicht ersetzt werden.
Vor der ersten Inbetriebnahme
■ Entfernen Sie alle Verpackungsmaterialien vom Gerät.
■ Setzen Sie den Schmutzbehälter q auf den Motorblock:
– Schieben Sie die Plastik-Nase an der Unterseite des Handstaubsaugers
in die Aussparung am Schmutzbehälter q.
– Drücken Sie die Entriegelungstaste 8 und schieben Sie gleichzeitig den
Schmutzbehälter q auf den Motorblock.
– Lassen Sie die Entriegelungstaste 8 los, so dass die Verriegelung in
die Aussparung greift. Der Schmutzbehälter q sitzt nun fest auf dem
Motorblock.
Informationen zu den Akkus
1) Der Handstaubsauger wird mit wiederaufl adbaren Lithium-Ionen-Akkus
betrieben. Bevor Sie den Handstaubsauger zum ersten Mal verwenden,
müssen die Akkus für mindestens 24 Stunden geladen werden.
■ 42 │ DE
│AT│
CH
SAS 7.4 LI B2
2) Die Akkus erreichen ihre volle Kapazität nach einer Aufl adezeit von 24 Stunden. Zur Pfl ege der Akkus empfehlen wir folgendes: Ziehen Sie, nachdem
die Akkus geladen sind, das Netzteil 4 aus der Netzsteckdose. Verbinden
Sie das Netzteil 4 erst wieder mit der Netzsteckdose, wenn die Saugleistung
des Handstaubsaugers spürbar schwächer wird.
Montage des Wandhalters
GEFAHR - ELEKTRISCHER SCHLAG!
Stellen Sie sicher, dass sich keine Stromleitungen oder andere Leitungen oder
►
Rohre in der Wand befi nden, in der Sie die Löcher für den Wandhalter 3
bohren wollen. Es besteht Lebensgefahr, wenn Sie eine stromführende
Leitung anbohren!
1) Setzen Sie den Hohlstecker 5 des Netzteils 4 wie auf der nachfolgenden
Abbildung gezeigt in den Wandhalter 3 ein. Fixieren Sie den Hohlstecker 5,
indem Sie ihn drehen.
SAS 7.4 LI B2
1) Suchen Sie einen geeigneten Montageplatz für den Wandhalter 3:
Der Handstaubsauger muss problemlos aus ihm herausgezogen werden
können und eine Netzsteckdose muss für das Netzteil 4 erreichbar sein.
2) Bohren Sie zwei Löcher im Abstand von ca. 61 mm. Benutzen Sie den
Wandhalter 3 zum Anzeichnen der Löcher: so ist der Abstand korrekt abgemessen. Die Bohrlöcher müssen passend für 5 mm-Dübel gebohrt werden.
3) Stecken Sie die Dübel in die Löcher und schrauben Sie den Wandhalter 3
mit Hilfe der Schrauben fest.
4) Sie können die Düsen auf die seitlichen Zubehörhalter aufstecken.
5) Stecken Sie das Netzteil 4 in eine Netzsteckdose ein.
DE│AT│CH
│
43 ■

Aufl aden
HINWEIS
■ Setzen Sie den Handstaubsauger von oben in den Wandhalter 3, so dass
■ Wichtig: Wenn der Handstaubsauger wieder genug Energie hat, um zu
■ Ist der Ladevorgang abgeschlossen, welcher bei komplett entladenen Akkus
■ Laden Sie die Akkus erst wieder auf, wenn die Saugleistung des Handstaub-
HINWEIS
Vergewissern Sie sich, dass der Ein-/Ausschalter 6 nach hinten geschoben
►
ist (Position „0”), bevor Sie mit dem Laden beginnen.
der Hohlstecker 5 in die Buchse am Handstaubsauger rutscht. Die Ladekontrollleuchte 7 blinkt rot auf und der Ladevorgang beginnt.
saugen, leuchtet die Ladekontrollleuchte 7 grün. Dies bedeutet nicht, dass
die Akkus voll geladen sind. Wenn die Ladekontrollleuchte 7 grün aufl euchtet, sind die Akkus zu ca. 80% geladen.
ca. 5 Stunden dauern kann, schaltet das Gerät automatisch in die Erhaltungsladung (Pfl egefunktion). Lassen Sie dennoch das Gerät nicht permanent
am Netzteil 4 angeschlossen, um eventuelle Beschädigungen der Akkus zu
vermeiden.
saugers spürbar schwächer wird und die Ladekontrollleuchte 7 grün blinkt.
Der Handstaubsauger kann auch direkt über das Netzteil 4 geladen wer-
►
den. Entnehmen Sie dafür den Hohlstecker 5 durch eine leichte Drehung
aus dem Wandhalter 3 und stecken Sie ihn in die Buchse am Handstaubsauger.
Bedienen
■ 44 │ DE
ACHTUNG!
Die Saugöff nung muss jederzeit frei und darf nicht verstopft sein. Verstopfungen
►
führen zu Überhitzung und Beschädigung des Motors.
HINWEISE
Achten Sie darauf, dass der Staubfi lter 0 immer eingesetzt ist, bevor Sie
►
das Gerät verwenden.
► Saugen Sie maximal nur so viel Flüssigkeit auf, bis der Schmutzbehälter q
bis zur MAX-Markierung gefüllt ist.
│AT│
CH
SAS 7.4 LI B2

1) Nehmen Sie den Handstaubsauger von dem Wandhalter 3 herunter, oder,
2) Setzen Sie, wenn gewünscht, die passende Düse in die Saugöff nung:
HINWEIS
3) Um das Gerät einzuschalten, schieben Sie den Ein-/Ausschalter 6 nach
4) Nach Gebrauch schieben Sie den Ein-/Ausschalter 6 nach hinten.
HINWEIS
Reinigen
Um beste Ergebnisse zu erzielen, leeren Sie den Schmutzbehälter q und reinigen Sie den Staubfi lter 0 nach jedem Gebrauch.
wenn Sie den Wandhalter 3 nicht benutzen, ziehen Sie den Hohlstecker 5
aus der Buchse.
– die Fugendüse 2, um enge, schwer zu erreichende Stellen zu reinigen.
– die Nasssaugdüse 1, um Flüssigkeiten aufzusaugen.
Reinigen Sie, nachdem Sie Flüssigkeiten aufgesaugt haben, sofort den
►
Schmutzbehälter q. Ansonsten bilden sich Bakterien und Keime! Achten
Sie darauf, dass der Staubfi lter-Beutel 9 vollständig getrocknet ist, bevor
Sie das Gerät wieder benutzen.
vorne. Die Ladekontrollleuchte 7 leuchtet grün auf.
Setzen Sie den Handstaubsauger in den Wandhalter 3 und beginnen Sie
►
mit dem Ladevorgang, wenn die Saugleistung spürbar schwächer wird und
die Ladekontrollleuchte 7 grün blinkt.
SAS 7.4 LI B2
ACHTUNG! SACHSCHADEN!
Benutzen Sie keine aggressiven, chemischen oder scheuernde Reinigungs-
►
mittel. Diese greifen die Oberfl äche des Gerätes an.
1) Um den Schmutzbehälter q zu öff nen, drücken Sie die Entriegelungstaste 8
und nehmen Sie den Schmutzbehälter q ab.
2) Entnehmen Sie den Staubfi lter 0 aus dem Schmutzbehälter q.
3) Entleeren Sie den Schmutzbehälter q.
4) Ziehen Sie den Staubfi lter-Beutel 9 mit seiner Halterung aus dem Staubfi lter 0.
5) Spülen Sie den Staubfi lter-Beutel 9 in kaltem Wasser aus und warten Sie,
bis dieser wieder vollständig trocken ist, bevor Sie ihn wieder in den Staubfi lter 0 einsetzen. Trocknen Sie ihn nicht mit heißer Luft.
6) Setzen Sie den Staubfi lter 0 wieder in den Schmutzbehälter q ein. Achten
Sie darauf, dass der Staubfi lter 0 gerade sitzt und die Gummilippe den
Schmutzbehälter q verschließt.
DE│AT│CH
│
45 ■

7) Setzen Sie den Schmutzbehälter q wieder auf den Motorblock:
8) Reinigen Sie das Gehäuse und die beiden Düsen mit einem leicht angefeuchteten Tuch. Bei hartnäckigen Verschmutzungen geben Sie ein mildes
Reinigungsmittel auf das Tuch.
9) Trocknen Sie alle Teile gut ab, bevor Sie das Gerät wieder verwenden oder
verstauen.
Entsorgen
Werfen Sie das Gerät keinesfalls in den normalen Hausmüll.
Dieses Produkt unterliegt der europäischen Richtlinie
2012/19/EU.
Entsorgen Sie das Gerät über einen zugelassenen Entsorgungsbetrieb oder über
Ihre kommunale Entsorgungseinrichtung. Beachten Sie die aktuell geltenden
Vorschriften. Setzen Sie sich im Zweifelsfall mit Ihrer Entsorgungseinrichtung in
Verbindung.
HINWEIS
►
– Schieben Sie die Plastik-Nase an der Unterseite des Handstaubsaugers
in die Aussparung am Schmutzbehälter q.
– Drücken Sie die Entriegelungstaste 8 und schieben Sie gleichzeitig den
Schmutzbehälter q auf den Motorblock.
– Lassen Sie die Entriegelungstaste 8 los, so dass die Verriegelung in
die Aussparung greift. Der Schmutzbehälter q sitzt nun fest auf dem
Motorblock.
Der integrierte Akku dieses Gerätes kann zur Entsorgung nicht entnommen
werden.
Die Verpackung besteht aus umweltfreundlichen Materialien, die Sie über die
örtlichen Recyclingstellen entsorgen können.
■ 46 │ DE
│AT│
CH
SAS 7.4 LI B2

Garantie und Service
Sie erhalten auf dieses Gerät 3 Jahre Garantie ab Kaufdatum. Das Gerät wurde
sorgfältig produziert und vor Auslieferung gewissenhaft geprüft.
Bitte bewahren Sie den Kassenbon als Nachweis für den Kauf auf. Bitte setzen
Sie sich im Garantiefall mit Ihrer Servicestelle telefonisch in Verbindung. Nur so
kann eine kostenlose Einsendung Ihrer Ware gewährleistet werden.
HINWEIS
Die Garantieleistung gilt nur für Material- oder Fabrikationsfehler, nicht
►
aber für Transportschäden, Verschleißteile oder für Beschädigungen an
zerbrechlichen Teilen, z. B. Schalter oder Akkus.
Das Produkt ist nur für den privaten und nicht für den gewerblichen Gebrauch
bestimmt. Bei missbräuchlicher und unsachgemäßer Behandlung, Gewaltanwendung und bei Eingriff en, die nicht von unserer autorisierten Service-Niederlassung
vorgenommen wurden, erlischt die Garantie.
Ihre gesetzlichen Rechte werden durch diese Garantie nicht eingeschränkt.
Die Garantiezeit wird durch die Gewährleistung nicht verlängert. Dies gilt auch
für ersetzte und reparierte Teile.
Eventuell schon beim Kauf vorhandene Schäden und Mängel müssen sofort nach
dem Auspacken gemeldet werden, spätestens aber zwei Tage nach Kaufdatum.
Nach Ablauf der Garantiezeit anfallende Reparaturen sind kostenpfl ichtig.
Service Deutschland
Tel.: 0800 5435 111 (Kostenfrei aus dem dt. Festnetz/Mobilfunknetz)
E-Mail: kompernass@lidl.de
IAN 275064
Importeur
SAS 7.4 LI B2
Service Österreich
Tel.: 0820 201 222 (0,15 EUR/Min.)
E-Mail: kompernass@lidl.at
IAN 275064
Service Schweiz
Tel.: 0842 665566 (0,08 CHF/Min., Mobilfunk max. 0,40 CHF/Min.)
E-Mail: kompernass@lidl.ch
IAN 275064
KOMPERNASS HANDELS GMBH
BURGSTRASSE 21
44867 BOCHUM
GERMANY
www.kompernass.com
DE│AT│CH
│
47 ■

■ 48 │ DE
│AT│
CH
SAS 7.4 LI B2

KOMPERNASS HANDELS GMBH
BURGSTRASSE 21
44867 BOCHUM
DEUTSCHLAND / GERMANY
www.kompernass.com
Versione delle informazioni · Estado das informações
Last Information Update · Stand der Informationen:
03 / 2016 · Ident.-No.: SAS7.4LIB2-022016-1
IAN 275064
5
 Loading...