


LI-ION RECHARGEABLE HANDHELD
VACUUM CLEANER SAS 7.4 LI B1
LI-ION RECHARGEABLE HANDHELD
VACUUM CLEANER
Operating instructions
LI-IONEN-AKKU-HANDSTAUBSAUGER
Bedienungsanleitung
IAN 106317
ΕΠΑΝΑΦΟΡΤΙΖΟΜΕΝΟ ΣΚΟΥΠΑΚΙ
ΧΕΙΡΟΣ ΜΠΑΤΑΡΙΑΣ ΛΙΘΙΟΥ
Οδηүίες χρήσης

Before reading, unfold the page containing the illustrations and familiarise yourself with all functions of
the device.
Πριν ξεκινήσετε την ανάγνωση, ανοίξτε τις δυο σελίδες με τις εικόνες και εξοικειωθείτε με όλες τις
λειτουργίες της συσκευής.
Klappen Sie vor dem Lesen die Seite mit den Abbildungen aus und machen Sie sich anschließend mit allen
Funktionen des Gerätes vertraut.
GB / IE / CY Operating instructions Page 1
GR / CY Οδηүίες χρήσης Σελίδα 9
DE / AT / CH Bedienungsanleitung Seite 17

q
0
9
8
7
6
1
2
3

Content Page
Intended Usage 2
Items supplied 2
Appliance description 2
Technical data 2
Important safety instructions 3
Before taking into use 5
Information about the batteries 5
Installation of the wall holder 5
Charging 6
Operation 6
Cleaning 7
Disposal 7
Warranty and Service 8
Importer 8
- 1 -

Li-Ion Rechargeable
Appliance
Batteries
Handheld Vacuum
Cleaner
Congratulations on the purchase of your new
appliance.
You have clearly decided in favour of a quality product. These operating instructions are a part of this
product. They contain important information in regard
to safety, use and disposal. Before using the product,
familiarise yourself with all of these operating and
safety instructions. Use the product only as described
and only for the specified areas of application. In addition, pass these documents on, together with the
product, to any future owner.
Intended Usage
This cordless hand-held vacuum cleaner may only
be used to vacuum dry or wet surfaces resp. dry or
wet materials and fluids. People or animals may not
be vacuumed with this appliance. Any other usage
of, or modification to, the appliance is deemed to be
improper usage and carries the risk of serious personal injury. The manufacturer accepts no liability
for damages that result from improper use of the appliance or are caused by the incorrect operation of
it. The appliance is not intended for commercial use.
Items supplied
Li-Ion Rechargeable Handheld Vacuum Cleaner
Crevice nozzle
Wet suction nozzle
Wall holder
Assembly material
Power transformer
Operating instructions
Appliance description
1 Wet suction nozzle
2 Crevice nozzle
3 Wall holder
4 Power adapter
5 Barrel plug
6 On/Off switch
7 Charge indicator lamp (red/green)
8 Unlocking button
9 Dust filter bag
0 Dust filter
q Dirt container
Note:
This appliance is supplied with non-charged batteries.
The batteries must be charged for 24 hours before
the first use.
Technical data
Power adapter 4
Input voltage /
- current: 100 - 240 V ~, 50/60 Hz
max. 300 mA
Output voltage/
- current: 9,6 V / 300 mA
Protection class: II /
Type designation: SAS 7.4 LI B1-2
Input voltage 9,6 V
Capacity: 1300 mAh
Batteries: 7,4 V
(2 x 3.7 V Lithium-Ion
Batteries)
Check the items supplied directly after unpacking
for completeness.
- 2 -

Important safety instructions
To avoid potentially fatal electric shocks:
• Do not charge or use the appliance outdoors.
• Never use the hand vacuum cleaner if the cable, plug or casing are damaged.
• To avoid risks, arrange for damaged power cables and/or plugs to be replaced
as soon as possible by a qualified specialist or by our Customer Services.
• Arrange for repairs to be carried out only by specialist workshops. Under no
circumstances should you open the appliance yourself. Interferences that are
not carried out by a specialist workshop could lead to physical injuries.
• Before switching the hand vacuum cleaner on, ensure that the mains voltage
corresponds to the voltage indicated in the technical data for the appliance.
• Never touch the power supply or the appliance with wet or damp hands.
• Do not use the power adapter with an extension cable; connect the power
adapter directly to a power socket.
To avoid the risk of injury:
• Do not change any accessories while the appliance is switched on.
• Do not use the hand vacuum for vacuuming up sharp objects or glass shards.
• Never vacuum up burning matches, glowing ashes or cigarette butts.
• Do not use the hand vacuum for vacuuming up chemical products, stone dust,
gypsum, cement or similar particles.
• This appliance is not suitable for use with inflammable and explosive substances or chemical and aggressive liquids.
• Always store the appliance indoors. To prevent accidents, keep the appliance
in a dry location when not in use.
• Under extreme conditions, leaks in the battery cells may occur. In the event that
battery fluid comes into contact with skin or eyes, the affected area must be
rinsed off with water immediately. Contact a physician.
- 3 -

Tips for safety:
• This appliance may be used by children aged 8 over and by persons with
reduced physical, sensory or mental capabilities or lack of experience and
knowledge, provided that they are under supervision or have been told how
to use the appliance safely and are aware of the potential risks.
• Children must not play with the appliance.
• Cleaning and user maintenance tasks must not be carried out by children
unless they are supervised.
• Use only accessory parts recommended by the manufacturer.
• The power adapter may not be used for other purposes. Never carry the wall
holder or the power adapter by the cable. Do not pull on the cable when you
want to move the appliance.
• Always grip the power plug to disconnect the appliance from the power supply.
• Always be sure to keep the hand vacuum away from heating elements, ovens
or other heated appliances and surfaces.
• Always make certain that the ventilation slits are open. A blocked ventilation
circuit can result in overheating and damage to the appliance.
• This product contains rechargeable batteries. Do not thow the batteries into a
fire and do not subject them to high temperatures.
There is the risk of an explosion!
• Take special care when using the hand vacuum on stairs.
• Do not use the hand vacuum without the dust filter inserted.
• Do not use the power adapter for a different product and do not attempt to
charge this appliance with a different charging station. Use only the charging
station supplied with this appliance.
• Never try to recharge non-rechargeable batteries.
• The batteries in this appliance cannot be replaced.
- 4 -
Before taking into use
Installation of the wall holder
• Remove all packaging materials from the
appliance.
• Place the dirt container q onto the motor block:
• Slide the plastic tab on the underside of the
handheld vacuum cleaner into the recess in the
dirt container q.
• Press the unlocking button 8 and slide the dirt
container q onto the motor block at the same
time.
• Let go of the unlocking button 8 so that the lok-
king mechanism engages in the recess.
The dirt container q is now sitting securely on
the motor block.
Information about the batteries
1. This hand-held vacuum cleaner is powered by
rechargeable lithium-ion batteries.
Before using the cableless hand vacuum cleaner
for the first time, the batteries must be charged
for at least 24 hours.
2. The batteries reach their full capacity after a
charging period of 24 hours. For care of the batteries we recommend the following: after the batteries are charged, remove the power adapter 4
from the mains power socket. Reconnect the
power adapter 4 again with the mains power
socket when the suction power of the appliance
is noticeably weaker.
Mortal danger!
Ensure that there are no power cables or other conduits or pipes in the wall at the location where you
intend to bore the holes for the wall holder 3.
It would be a potentially fatal risk to bore into a
current carrying electric cable!
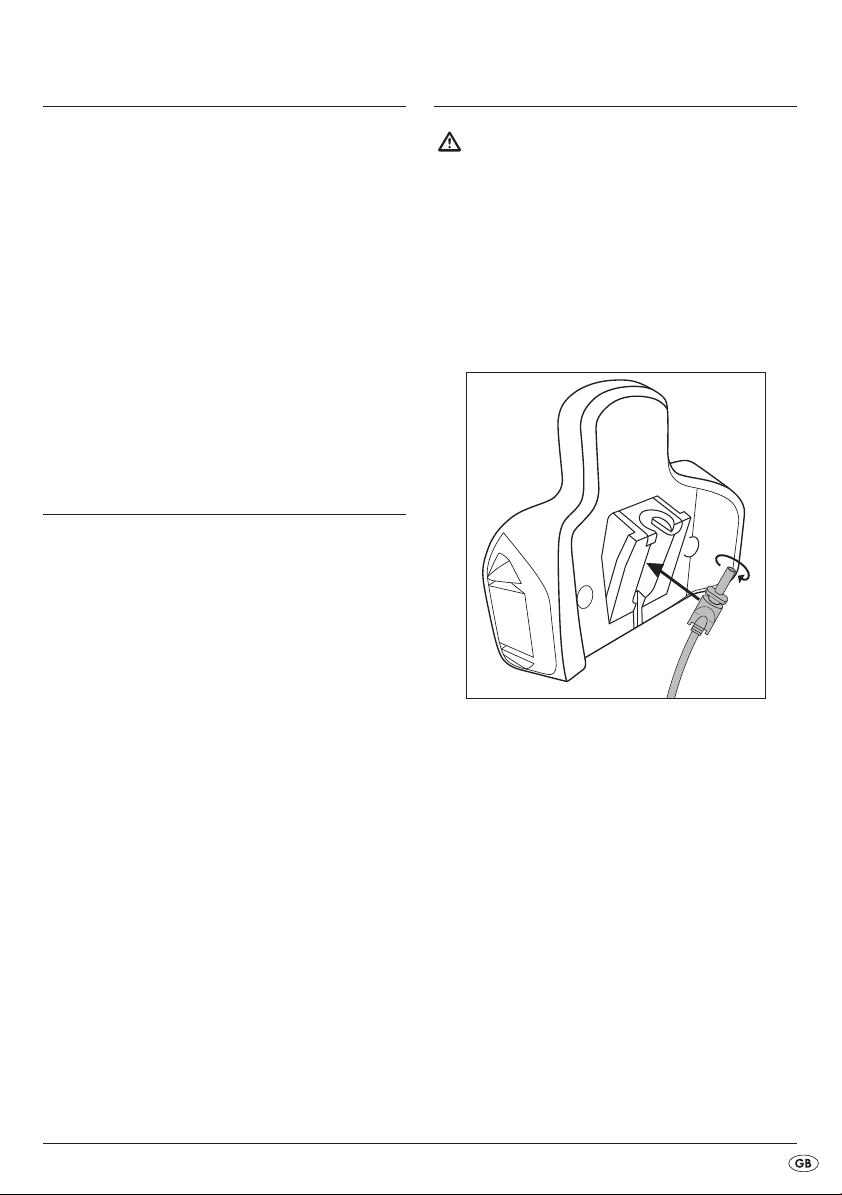
1. Place the barrel plug 5 of the power adapter 4
into the wall holder 3 as shown in the diagramme.
Secure the barrel plug 5 by turning it.
2. Select a suitable installation location for the wall
holder 3: It should present no problem with
taking the hand vacuum cleaner out of it and a
mains power socket for the power adapter 4
must be accessible.
3. Bore two holes with a spacing of approx. 62 mm.
Use the wall holder 3 to mark the boreholes:
this will ensure the spacing is correct. The boreholes must be suitable for 5 mm wallplugs.
4. Insert the wallplugs into the boreholes and, using the
screws, firmly screw the wall holder 3 to the wall.
5. You can place the nozzles on the lateral accessories holder.
6. Connect the power adapter 4 to a mains power
socket.
- 5 -

Charging
Operation
Note:
Check to ensure that the on/off switch 6 has been
slid back (to the position "0") before starting the
charging process.
• Place the hand vacuum cleaner from above into
the wall holder 3, so that the barrel plug 5
slips into the socket on the hand vacuum cleaner.
The charge indicator lamp 7 glows red and the
charging process begins.
Important:
• When the hand vacuum again has enough energy to vacuum, the charge indicator lamp 7
glows green. This does not mean that the batteries are fully charged. When the charge indicator lamp 7 glows green, it means the batteries
are charged to about 80%.
• When charging is complete, which with fully
discharged batteries can take approx. 5 hours,
the appliance automatically switches to a trickle
charge (maintenance function). Nevertheless, in
order to avoid possible damage to the batteries,
do not leave the appliance permanently connected to the power adapter 4.
• First recharge the batteries when the suction
power of the hand vacuum cleaner is noticeably
weaker and the charge indicator lamp 7 green
is blinking.
Note:
The hand vacuum cleaner can also be charged
directly via the power adapter 4. For this, remove
the barrel plug 5 with a slight twist from the wall
holder 3 and insert it into the socket on the hand
vacuum cleaner.
Warning!
The suction opening must always be open and
unblocked. Blockages lead to overheating and damage to the motor.
Tips:
• Make certain that the dust filter 0 is always
inserted before using the appliance.
• As the maximum, suck up only as much liquid as
will fill the dirt container q to the MAX mark.
1. Take the hand vacuum cleaner from the wall holder 3 or, if you do not use the wall holder 3,
remove the barrel plug 5 from the socket.
2. If required, place the appropriate nozzle into the
suction opening:
• the crevice nozzle 2, to clean narrow and
difficult to reach locations.
• the wet suction nozzle 1 to vacuum liquids up.
Note:
After you have vacuumed up liquids, immediately
clean the dirt container q. Otherwise bacteria and
microbes could form in it! Ensure that the dust filter
bag 9 is completely dry before using the appliance
again.
3. To switch the appliance on, slide the on/off
switch 6 forwards. The charge indicator lamp 7
lights up green.
4. When you have finished using it, slide the on/
off switch 6 to the rear.
Note:
Place the hand vaccum cleaner into the wall
holder 3 and start the charging process when
the suction power is noticeably weaker and the
charge indicator lamps 7 green is blinking.
- 6 -
Cleaning
Disposal
To achieve the best results, empty the dirt container q
and clean the dust filter 0 after every use.
Important:
Do not use aggressive, chemical or abrasive cleaning
agents. These could damage the surfaces of the appliance.
1. To open the dirt container q, press the unlocking
button 8 and remove the dirt container q.
2. Remove the dust filter 0 from the dirt container q.
3. Empty the dirt container q.
4. Pull the dust filter bag 9 with its mounting out of
the dust filter 0.
5. Rinse the dust filter bag 9 in cold water and
then wait until it is completely dry again before
you place it back into the dust filter 0. Do not
dry it with hot air.
6. Place the dust filter 0 back into the dirt container q. Ensure that the dust filter 0 is seated
squarely and that the rubber lip seals the dirt
container q.
7. Replace the dirt container q back onto the
motor block:
• Push the plastic nose on the underside of the
hand vacuum cleaner into the recess on the
dirt container q.
• Press the unlocking button 8 and, at the same
time, slide the dirt container q onto the motor
block.
• Release the unlocking button 8 so that the
restraint grips into the recess. The dirt container q now sits firmly on the motor block.
8. Clean the housing and both nozzles with a lightly
moistened cloth. For stubborn soiling use a mild
detergent on the cloth.
9. Dry all parts thoroughly before reusing the appliance or putting it into storage.
Do not dispose of this appliance in your
normal domestic waste. This product is
subject to the provisions of European
Directive 2012/19/EU.
The appliance and the batteries must be disposed
of separately.
1. Unscrew all the cross-head screws on the motor
block and take it apart.
2. Cut the connection cable from the battery and
remove the battery from the appliance.
Dispose of the appliance through an approved disposal centre or at your community waste facility.
Observe the currently applicable regulations.
In a case of doubt, please contact your waste disposal centre.
Disposal of batteries/cells
Used batteries/cells may not be disposed
of in house-hold waste. Every consumer is
statutorily obliged to dispose of batteries
at a collection site of his community/city
district or at a retail store.
The purpose of this obligation is to ensure that batteries
are disposed of in a non-polluting manner. Only dispose of batteries/cells when they are fully discharged.
Dispose of all packaging materials in an
environmentally friendly manner.
- 7 -
Warranty and Service
The warranty for this appliance is for 3 years from
the date of purchase. The appliance has been manufactured with care and meticulously examined before delivery.
Please retain your receipt as proof of purchase. In
the event of a warranty claim, please make contact
by telephone with our Service Department. Only in
this way can a post-free despatch for your goods be
assured.
The warranty covers only claims for material and maufacturing defects, but not for transport damage, for
wearing parts or for damage to fragile components,
e.g. buttons or batteries. This product is for private
use only and is not intended for commercial use.
The warranty is void in the case of abusive and improper handling, use of force and internal tampering not
carried out by our authorized service branch. Your
statutory rights are not restricted in any way by this
warranty.
The warranty period will not be extended by repairs
made under warranty. This applies also to replaced
and repaired parts. Any damage and defects extant
on purchase must be reported immediately after unpacking the appliance, at the latest, two days after
the purchase date. Repairs made after the expiration of the warranty period are subject to payment.
Service Great Britain
Tel.: 0871 5000 720 (£ 0.10/Min.)
E-Mail: kompernass@lidl.co.uk
IAN 106317
Service Ireland
Tel.: 1890 930 034
(0,08 EUR/Min., (peak))
(0,06 EUR/Min., (off peak))
E-Mail: kompernass@lidl.ie
IAN 106317
CY
Service Cyprus
Tel.: 8009 4409
E-Mail: kompernass@lidl.com.cy
IAN 106317
Hotline availability:
Monday to Friday 08:00 - 20:00 (CET)
Importer
KOMPERNASS HANDELS GMBH
BURGSTRASSE 21
44867 BOCHUM
GERMANY
www.kompernass.com
- 8 -

Περιεχόμενα Σελίδα
Χρήση σύμφωνη με τους κανονισμούς 10
Σύνολο αποστολής 10
Περιγραφή συσκευής 10
Τεχνικές πληροφορίες 10
Σημαντικές υποδείξεις ασφαλείας 11
Πριν από την πρώτη θέση σε λειτουργία 13
Πληροφορίες για τους συσσωρευτές 13
Συναρμολόγηση της συγκράτησης τοίχου 13
Φόρτιση 14
Χειρισμός 14
Καθαρισμός 15
Απομάκρυνση 15
Εγγύηση και σέρβις 16
Εισαγωγέας 16
- 9 -

Ε
Επαναφορτιζόμενο σκουπάκι
χειρός μπαταρίας λιθίου
Τροφοδοτικό
Συσκευή
Συσσωρευτές
Συγχαρητήρια για την αγορά της νέας σας
συσκευής.
Αποφασίσατε έτσι την απόκτηση ενός προϊόντος
υψηλής ποιότητας. Οι οδηγίες χειρισμού είναι τμήμα
αυτού του προϊόντος. Περιέχουν σημαντικές
υποδείξεις για την ασφάλεια, τη χρήση και την
απόρριψη.Πριν από τη χρήση του προϊόντος εξοικειωθείτε με όλες τις υποδείξεις χειρισμού και
ασφάλειας. Χρησιμοποιείτε το προϊόν μόνο όπως
περιγράφεται και για τα αναφερόμενα πεδία χρήσης.
Σε περίπτωση παράδοσης του προϊόντος σε
τρίτους, παραδίδετε και όλα τα έγγραφα.
Χρήση σύμφωνη με τους
κανονισμούς
Το σκουπάκι χειρός επιτρέπεται να χρησιμοποιείται
μόνο για απορρόφηση στεγνών ή βρεγμένων
επιφανειών ή στεγνών ή βρεγμένων ειδών ή υγρών. Δεν
επιτρέπεται η απορρόφηση σε άτομα ή ζώα με αυτή τη
συσκευή. Κάθε άλλη χρήση ή μετατροπή της συσκευής
δεν ισχύει ως σύμφωνη με τους κανονισμούς και κρύβει
σημαντικούς κινδύνους ατυχημάτων.
Ο κατασκευαστής δεν φέρει ευθύνη για βλάβες που
προκαλούνται από χρήση μη σύμφωνη με τους
κανονισμούς ή από λάθος χειρισμό.
Η συσκευή δεν προορίζεται για την επαγγελματική
χρήση.
Σύνολο αποστολής
Περιγραφή συσκευής
1 Ακροφύσιο υγρής απορρόφησης
2 Ακροφύσιο αρμών
3 Συγκράτηση τοίχου
4 Τροφοδοτικό
5 Κύλινδρος συνδετήρα
6 Διακόπτης on/off
7 Λυχνία ελέγχου φόρτισης (κόκκινο/πράσινο)
8 Πλήκτρο απασφάλισης
9 Σακούλα φίλτρου σκόνης
0 Φίλτρο σκόνης
q Δοχείο ακαθαρσιών
Υπόδειξη
Η συσκευή αποστέλλεται με αφόρτιστους συσσωρευτές.
Πριν από την πρώτη χρήση της συσκευής πρέπει οι
συσσωρευτές να φορτίζονται πρώτα για 24 ώρες.
:
Τεχνικές πληροφορίες
Τάση / Ρεύμα
εισόδου: 100 - 240 V ~,
Τάση / Ρεύμα
εξόδου: 9,6 V / 300 mA
Κατηγορία προστασίας: II /
Περιγραφή τύπου: SAS 7.4 LI B1-2
4
50/60 Hz
μέγ. 300 mA
Επαναφορτιζόμενο σκουπάκι χειρός μπαταρίας λιθίου
Ακροφύσιο αρμών
Ακροφύσιο υγρής απορρόφησης
Συγκράτηση τοίχου
Υλικό τοποθέτησης
Τροφοδοτικό
Οδηγία χρήσης
Αμέσως μετά την αποσυσκευασία του συνόλου
αποστολής ελέγχετε το σύνολο αποστολής για την
πληρότητα του.
Τάση εισόδου: 9,6 V
Απόδοση: 1300 mAh
Συσσωρευτής: 7,4 V
(2 συσσωρευτές λιθίου ιόντων 3,7 V)
- 10 -

Σημαντικές υποδείξεις ασφαλείας
Προς αποφυγή κινδύνου ζωής από ηλεκτροπληξία:
• Μην φορτίζετε ή χρησιμοποιείτε αυτή τη συσκευή σε εξωτερικό χώρο.
• Μην χρησιμοποιείτε το σκουπάκι χειρός όταν το καλώδιο, το βύσμα ή η
επικάλυψη έχουν βλάβη.
• Επιτρέπετε την αντικατάσταση του φθαρμένου βύσματος ή καλωδίου άμεσα από
εξουσιοδοτημένο ειδικό προσωπικό, ώστε να αποφεύγονται κίνδυνοι.
• Επιτρέπετε οι επισκευές να γίνονται μόνο από ένα ειδικό συνεργείο. Σε καμία
περίπτωση μην ανοίγετε οι ίδιοι τη συσκευή. Παρεμβάσεις οι οποίες δεν έχουν
διεξαχθεί μέσω μιας ειδικής επιχείρησης, μπορούν να οδηγήσουν σε
τραυματισμούς.
• Βεβαιώνεστε πριν από την ενεργοποίηση της συσκευής ότι η αναφερόμενη τάση
στα τεχνικά δεδομένα της συσκευής, αντιστοιχεί στην τάση δικτύου.
• Μην πιάνετε το τροφοδοτικό ή τη συσκευή με βρεγμένα ή υγρά χέρια.
• Μην χρησιμοποιείτε το τροφοδοτικό με ένα καλώδιο επέκτασης, αλλά συνδέστε
το τροφοδοτικό απευθείας με μια υποδοχή.
Για την αποφυγή κινδύνου τραυματισμού:
• Μην αλλάζετε εξαρτήματα όταν η συσκευή λειτουργεί.
• Μην χρησιμοποιείτε το σκουπάκι χειρός για απορρόφηση μυτερών αντικειμένων
ή γυάλινων θραυσμάτων.
• Ποτέ μην απορροφάτε φλεγόμενα σπίρτα, στάχτες που καίνε ή αποτσίγαρα.
• Μην χρησιμοποιείτε το σκουπάκι χειρός για την απορρόφηση χημικών
προϊόντων, υπολείμματα πέτρας, γύψο, τσιμέντο ή άλλα παρόμοια σωματίδια.
• Η συσκευή δεν ενδείκνυται για εύφλεκτα ή εκρηκτικά υλικά ή για χημικά και
επιθετικά υγρά.
• Αποθηκεύετε πάντα τη συσκευή σε κλειστούς χώρους. Για την αποφυγή
ατυχημάτων φυλάτε τη συσκευή μετά τη χρήση σε ένα στεγνό σημείο.
• Σε ακραίες συνθήκες μπορεί να εμφανιστούν διαρροές στις κυψέλες του
συσσωρευτή. Σε επαφή του υγρού με το δέρμα ή τα μάτια πρέπει το σχετικό σημείο
να καθαριστεί αμέσως με καθαρό νερό. Αναζητήστε έναν γιατρό.
- 11 -

Έτσι θα συμπεριφέρεστε με ασφάλεια:
• Αυτή η συσκευή επιτρέπεται να χρησιμοποιείται από παιδιά άνω των 8 ετών,
καθώς και από άτομα με περιορισμένες φυσικές, αισθητηριακές ή νοητικές
ικανότητες ή ελλείψεις από άποψη εμπειρίας και γνώσεων, εφόσον επιτηρούνται
ή έχουν ενημερωθεί αναφορικά με την ασφαλή χρήση της συσκευής και
κατανοούν τους προκύπτοντες κινδύνους.
• Τα παιδιά δεν επιτρέπεται να παίζουν με τη συσκευή.
• Ο καθαρισμός και η συντήρηση χρήστη δεν επιτρέπεται να διεξάγονται από
παιδιά, χωρίς επιτήρηση.
• Χρησιμοποιείτε μόνο εξαρτήματα τα οποία προτείνονται από τον κατασκευαστή.
• Το τροφοδοτικό δεν επιτρέπεται να χρησιμοποιείται για άλλους σκοπούς. Ποτέ
μην τραβάτε τη συγκράτηση τοίχου ή το τροφοδοτικό από το καλώδιο. Μην
τραβάτε από το καλώδιο όταν θέλετε να μετατοπίσετε τη συσκευή.
• Πιάνετε πάντα το βύσμα δικτύου όταν θέλετε να αποσυνδέσετε τη συσκευή από
την παροχή ρεύματος.
• Προσέξτε απαραιτήτως ώστε να μην τοποθετείτε το σκουπάκι χειρός δίπλα σε
θερμαντικά σώματα, φούρνους ή άλλες θερμαντικές συσκευές ή επιφάνειες.
• Προσέχετε πάντα ώστε οι εγκοπές αερισμού να είναι ελεύθερες. Ένα κύκλωμα
αέρα με εμπλοκή μπορεί να οδηγήσει σε υπερθέρμανση και βλάβη της
συσκευής.
• Αυτό το προϊόν περιλαμβάνει επαναφορτιζόμε-νους συσσωρευτές. Μην πετάτε
τους συσσωρευτές στη φωτιά και μην τους εκθέτετε σε υψηλές θερμοκρασίες.
Υπάρχει κίνδυνος έκρηξης!
• Δίδετε ιδιαίτερη προσοχή όταν χρησιμοποιείτε το σκουπάκι χειρός σε σκάλες.
• Μην χρησιμοποιείτε το σκουπάκι χειρός χωρίς το τοποθετημένο φίλτρο σκόνης.
• Μην χρησιμοποιείτε το τροφοδοτικό για ένα άλλο προϊόν και μην προσπαθείτε
να φορτίζετε αυτή τη συσκευή μέσω ενός άλλου σταθμού φόρτισης.
Χρησιμοποιείτε μόνο το απεσταλμένο με αυτή τη συσκευή τροφοδοτικό.
• Ποτέ μην προσπαθείτε να φορτίζετε μη επαναφορτιζόμενες μπαταρίες.
• Οι συσσωρευτές σε αυτή τη συσκευή δεν αντικαθίστανται.
- 12 -

Πριν από την πρώτη
θέση σε λειτουργία
Συναρμολόγηση της
συγκράτησης τοίχου
• Απομακρύνετε όλα τα υλικά συσκευασίας από τη
συσκευή.
• Τοποθετήστε το δοχείο ακαθαρσιών q επάνω στο
μπλοκ μοτέρ.
• Ωθήστε την πλαστική προεξοχή στην κάτω
πλευρά της σκούπας χειρός στην εσοχή του
δοχείου ακαθαρσιών q.
• Πιέστε το πλήκτρο απασφάλισης 8 και ωθήστε
ταυτόχρονα το δοχείο ακαθαρσιών q στο
μπλοκ μοτέρ.
• Αφήστε το πλήκτρο απασφάλισης 8, ώστε η
ασφάλιση να πιάσει στην εσοχή.
• Το δοχείο ακαθαρσιών q εδράζεται τώρα
σταθερά επάνω στο μπλοκ μοτέρ.
Πληροφορίες για τους
συσσωρευτές
1. Το σκουπάκι χειρός λειτουργεί με επαναφορτιζόμενους συσσωρευτές λιθίου - ιόντων.
Πριν χρησιμοποιήσετε το σκουπάκι χειρός για
πρώτη φορά, πρέπει οι συσσωρευτές να φορτιστούν
το λιγότερο για 24 ώρες.
2. Οι συσσωρευτές επιτυγχάνουν την πλήρη τους
απόδοση μετά από ένα χρόνο φόρτισης 24
ωρών. Για τη φροντίδα του συσσωρευτή
προτείνουμε τα ακόλουθα: Αφού έχουν φορτιστεί
οι συσσωρευτές, αποσυνδέετε το τροφοδοτικό 4
από την πρίζα δικτύου. Συνδέετε το τροφοδοτικό
4 πάλι με την πρίζα δικτύου, μόνο όταν η
απόδοση απορρόφησης της συσκευής έχει γίνει
εμφανώς πιο αδύναμη.
Κίνδυνος ζωής!
Εξασφαλίστε ότι δεν υπάρχουν γραμμές ρεύματος
ή άλλες γραμμές ή σωλήνες στον τοίχο, στον οποίο
θέλετε να κάνετε διάτρηση οπών για τις συγκρατήσεις
τοίχου 3. Υπάρχει κίνδυνος ζωής όταν κάνετε
διάτρηση σε μια γραμμή που φέρει ρεύμα!
1. Τοποθετήστε τον κύλινδρο συνδετήρα 5 του
τροφοδοτικού 4 όπως φαίνεται στην ακόλουθη
απεικόνιση, στη συγκράτηση τοίχου 3.
Σταθεροποιήστε τον κύλινδρο συνδετήρα 5,
περιστρέφοντάς τον.
2. Αναζητήστε μια κατάλληλη θέση μονταρίσματος
για τη συγκράτηση τοίχου 3: Το σκουπάκι χειρός
πρέπει να μπορεί να απομακρύνεται εύκολα και
πρέπει να υπάρχει μια προσβάσιμη πρίζα δικτύου
για το τροφοδοτικό 4.
3. Κάντε δύο οπές σε απόσταση περ. 62 χιλ.
Χρησιμοποιήστε τη συγκράτηση τοίχου 3 για να
σημαδέψετε τις οπές:έτσι μετρίέται η απόσταση
σωστά. Οι οπές διάτρησης πρέπει να διατρηθούν
έτσι ώστε να ταιριάζουν σε πείρους 5 χιλ.
4. Εισάγετε τους πείρους στις οπές και βιδώστε καλά
τη συγκράτηση τοίχου 3 με τη βοήθεια των βιδών.
5. Μπορείτε να εισάγετε τα ακροφύσια στην
πλευρική συγκράτηση αξεσουάρ.
6. Εισάγετε το τροφοδοτικό 4 σε μια πρίζα δικτύου.
- 13 -

Φόρτιση
Χειρισμός
Υπόδειξη
Εξασφαλίστε ότι ο διακόπτης on/off 6 έχει ωθηθεί
προς τα πίσω (θέση “0”) πριν ξεκινήσετε με τη φόρτιση.
• Τοποθετήστε το σκουπάκι χειρός από επάνω στη
συγκράτηση τοίχου 3, έτσι ώστε ο κύλινδρος
συνδετήρα 5 να γλιστράει στην υποδοχή στο
σκουπάκι χειρός. Η λυχνία ελέγχου φόρτισης 7
αναβοσβήνει κόκκινη και ξεκινά η διαδικασία
φόρτισης.
:
Σημαντικό:
• Όταν το σκουπάκι χειρός έχει πάλι επαρκή
ενέργεια για να απορροφήσει, ανάβει η λυχνία
ελέγχου φόρτισης 7 πράσινη. Αυτό δε σημαίνει
ότι οι συσσωρευτές έχουν φορτίσει πλήρως. Εάν
η λυχνία ελέγχου φόρτισης 7 ανάβει πράσινη,
οι συσσωρευτές έχουν φορτιστεί περ. στο 80%.
• Μόλις λήξει η διαδικασία φόρτισης, η οποία σε
πλήρως αποφορτισμένους συσσωρευτές μπορεί
να διαρκεί περ. 5 ώρες, η συσκευή γυρίζει
αυτόματα στη φόρτιση διατήρησης (λειτουργία
προστασίας). Ωστόσο μην αφήνετε τη συσκευή
μόνιμα συνδεδεμένη στο τροφοδοτικό 4, ώστε
να αποφεύγετε ενδεχόμενες φθορές των
συσσωρευτών.
• Φορτίζετε πάλι τους συσσωρευτές, όταν η
απόδοση απορρόφησης στο σκουπάκι χειρός
γίνεται αισθητά πιο αδύναμη και η λυχνία
ελέγχου φόρτισης 7 αναβοσβήνει πράσινη.
Υπόδειξη:
Το σκουπάκι χειρός μπορεί επίσης να φορτιστεί και
μέσω του τροφοδοτικού 4. Απομακρύνετε για αυτό
τον κύλινδρο συνδετήρα 5 μέσω μιας ελαφριάς
περιστροφής στη συγκράτηση τοίχου 3 και εισάγετέ
τον στην υποδοχή στο σκουπάκι χειρός.
Προσοχή!
Το άνοιγμα απορρόφησης πρέπει να είναι πάντα
ελεύθερο και χωρίς εμφράξεις. Οι εμφράξεις οδηγούν
σε υπερθέρμανση και σε βλάβες στο μοτέρ.
Υποδείξεις:
• Προσέχετε ώστε το φίλτρο σκόνης 0 να είναι πάντα
τοποθετημένο προτού χρησιμοποιήσετε τη συσκευή.
• Απορροφάτε το ανώτερο μόνο τόσα υγρά έως
ότου το δοχείο ακαθαρσιών q έχει γεμίσει έως
το σύμβολο του μέγιστου ΜΑΧ.
1. Κατεβάζετε το σκουπάκι χειρός από τη συγκράτηση
τοίχου 3, ή όταν δεν χρησιμοποιείτε τη συγκράτηση
τοίχου 3, τραβάτε τον κύλινδρο συνδετήρα 5
από την υποδοχή.
2. Τοποθετήστε εάν επιθυμείται, το αντίστοιχο
ακροφύσιο στο άνοιγμα απορρόφησης:
• το ακροφύσιο αρμών 2, ώστε να καθαρίσετε
στενές, δύσκολα προσβάσιμες θέσεις.
• το ακροφύσιο υγρής απορρόφησης 1, ώστε
να απορροφάτε υγρά.
Υπόδειξη
Αφού απορροφήσετε υγρά, καθαρίζετε αμέσως το
δοχείο ακαθαρσιών q. Αλλιώς δημιουργούνται
βακτήρια και μικρόβια! Προσέχετε ώστε η σακούλα
φίλτρου σκόνης 9 να έχει στεγνώσει πλήρως,
προτού χρησιμοποιήσετε πάλι τη συσκευή.
3. Για να ενεργοποιήσετε τη συσκευή, ωθήστε το
διακόπτη on/off 6 προς τα εμπρός. Η λυχνία
ελέγχου φόρτισης 7 ανάβει πράσινη.
4. Μετά τη χρήση ωθήστε το διακόπτη on/off 6
προς τα πίσω.
:
Υπόδειξη:
Τοποθετείτε το σκουπάκι χειρός στη συγκράτηση
τοίχου 3 και ξεκινάτε με τη διαδικασία φόρτισης,
όταν η απόδοση απορρόφησης γίνεται αιαθητά
πιο αδύναμη και η λυχνία ελέγχου φόρτισης 7
αναβοσβήνει πράσινη.
- 14 -

Καθαρισμός
Απομάκρυνση
Για την επίτευξη καλύτερων αποτελεσμάτων, αδειάξετε
το δοχείο ακαθαρσιών q και καθαρίζετε το φίλτρο
σκόνης 0 μετά από κάθε χρήση.
Σημαντικό:
Μη χρησιμοποιείτε μέσα καθαρισμού τα οποία είναι
επιθετικά, χημικά ή τριβικά.Αυτά προσβάλουν την
επιφάνεια της συσκευής.
1. Για να ανοίξετε το δοχείο ακαθαρσιών q, πιέστε
το πλήκτρο απασφάλισης 8 και απομακρύνετε
το δοχείο ακαθαρσιών q.
2. Απομακρύνετε το φίλτρο σκόνης 0 από το
δοχείο ακαθαρσιών q.
3. Αδειάστε το δοχείο ακαθαρσιών q.
4. Τραβήξτε τη σακούλα φίλτρου σκόνης 9 με τη
συγκράτηση από το φίλτρο σκόνης 0.
5. Ξεπλένετε τη σακούλα φίλτρου σκόνης 9 σε κρύο
νερό και περιμένετε έως ότου αυτή στεγνώσει
πλήρως προτού την τοποθετήσετε πάλι στο φίλτρο
σκόνης 0. Μην τη στεγνώνετε με καυτό αέρα.
6. Τοποθετήστε το φίλτρο σκόνης 0 πάλι στο δοχείο
ακαθαρσιών q. Προσέχετε ώστε το φίλτρο σκόνης
0 να εδράζεται ίσιο και το ελαστικό χείλος να
ασφαλίζει στο δοχείο ακαθαρσιών q.
7. Τοποθετήστε το δοχείο ακαθαρσιών q πάλι
επάνω στο μπλοκ κινητήρα:
• Ωθήστε την πλαστική προεξοχή στην κάτω
πλευρά της σκούπας χειρός στην εσοχή στο
δοχείο ακαθαρσιών q.
• Πιέστε το πλήκτρο απασφάλισης 8 και ωθήστε
ταυτόχρονα το δοχείο ακαθαρσιών q επάνω
στο μπλόκ κινητήρα.
• Αφήστε το πλήκτρο απασφάλισης 8, ώστε
η ασφάλιση να πιάνει στην εσοχή. Το δοχείο
ακαθαρσιών q εδράζεται τώρα σταθερά
επάνω στον κινητήρα μοτέρ.
8. Καθαρίστε το περίβλημα και τα δύο ακροφύσια με
ένα ελαφρά νωπό πανί. Σε σκληρές ακαθαρσίες
βάζετε ένα ήπιο καθαριστικό μέσο επάνω στο πανί.
9 Στεγνώνετε όλα τα εξαρτήματα καλά, πριν από τη
νέα χρήση της συσκευής ή πριν την αποθήκευση.
Σε καμία περίπτωση μην πετάξετε τη
συσκευή στα οικιακά απορρίμματα.
Αυτό το προϊόν υπόκειται στην Ευρωπαϊκή
Οδηγία 2012/19/EU.
Η συσκευή και ο συσσωρευτής πρέπει να απορρίπτονται ξεχωριστά.
1. Για αυτό λασκάρετε όλες τις βίδες Φίλιπς στο
μπλοκ μοτέρ και αποσυναρμολογήστε το.
2. Κόψτε το καλώδιο σύνδεσης του συσσωρευτή
και αφαιρέστε το συσσωρευτή από τη συσκευή.
Απομακρύνετε τη συσκευή μέσω μιας εγκεκριμένης
επιχείρησης απομάκρυνσης ή μέσω της κοινοτικής
επιχείρησης απομάκρυνσης.
Να τηρείτε τους ισχύοντες κανονισμούς.
Επικοινωνήστε σε περίπτωση αμφιβολιών με την
επιχείρηση απομάκρυνσης.
Απόρριψη μπαταριών/ συσσωρευτών
Οι μπαταρίες / συσσωρευτές δεν επιτρέπεται
να απορρίπτονται μέσω των οικιακών
απορριμμάτων. Κάθε χρήστης είναι νομικά
υποχρεωμένος να παραδίδει τις μπαταρίες /
τους συσσωρευτές σε ένα σημείο
συγκέντρωσης της κοινότητας / της πόλης
του ή στο εμπόριο.
Αυτή η υποχρέωση εξυπηρετεί στο να απομακρύνονται
οι μπαταρίες / συσσωρευτές με έναν φιλικό προς το
περιβάλλον τρόπο. Επιστρέφετε τις μπαταρίες / τους
συσσωρευτές μόνο σε αποφορτισμένη κατάσταση.
Απορρίπτετε όλα τα υλικά συσκευασιών
φιλικά προς το περιβάλλον.
- 15 -

Εγγύηση και σέρβις
Έχετε για αυτή τη συσκευή 3 χρόνια εγγύηση από
την ημερομηνία αγοράς. Η συσκευή κατασκευάστηκε
και ελέγχθηκε προσεκτικά πριν από την αποστολή.
Παρακαλούμε φυλάξτε την απόδειξη ταμείου ως
απόδειξη για την αγορά. Παρακαλούμε
επικοινωνήστε τηλεφωνικά με την υπηρεσία σέρβις σε
περίπτωση εγγύησης. Μόνο έτσι μπορεί να
εξασφαλιστεί μια δωρεάν αποστολή του
εμπορεύματός σας.
Η απόδοση εγγύησης ισχύει μόνο για σφάλματα
υλικού ή κατασκευής, όχι όμως για ζημιές από τη
μεταφορά, για εξαρτήματα φθοράς ή για βλάβες σε
εύθραυστα εξαρτήματα, π.χ. διακόπτες ή
συσσωρευτές. Το προϊόν προορίζεται μόνο για την
ιδιωτική και όχι για την επαγγελματική χρήση.
Σε περίπτωση κακής μεταχείρισης και ακατάλληλης
χρήσης, σε χρήση βίας και σε παρεμβάσεις οι
οποίες δεν διεξήχθησαν από το εξουσιοδοτημένο
μας τμήμα σέρβις, η εγγύηση παύει να ισχύει. Τα νομικά σας δικαιώματα δεν περιορίζονται μέσω αυτής
της εγγύησης.
Ο χρόνος εγγύησης δεν επεκτείνεται μέσω της
απόδοσης εγγύησης. Αυτό ισχύει και για
εξαρτήματα τα οποία έχουν αντικατασταθεί ή
επισκευαστεί. Ενδεχόμενες ήδη υπάρχουσες κατά
την αγορά, ζημιές και ελλείψεις πρέπει να
αναφέρονται αμέσως μετά την αποσυσκευασία, το
αργότερο όμως δύο ημέρες μετά την ημερομηνία
αγοράς. Επισκευές που εμφανίζονται μετά τη λήξη
του χρόνου εγγύησης χρεώνονται.
Σέρβις Ελλάδα
Tel.: 801 5000 019 (0,03 EUR/Min.)
E-Mail: kompernass@lidl.gr
IAN 106317
CY
Σέρβις Κύπρος
Tel.: 8009 4409
E-Mail: kompernass@lidl.com.cy
IAN 106317
Τηλεφωνικό κέντρο (Hotline):
Δευτέρα έως Παρασκευή, 8:00 – 20:00 (CET)
Εισαγωγέας
KOMPERNASS HANDELS GMBH
BURGSTRASSE 21
44867 BOCHUM
GERMANY
www.kompernass.com
- 16 -

Inhaltsverzeichnis Seite
Bestimmungsgemäßer Gebrauch 18
Lieferumfang 18
Gerätebeschreibung 18
Technische Daten 18
Wichtige Sicherheitshinweise 19
Vor der ersten Inbetriebnahme 21
Informationen zu den Akkus 21
Montage des Wandhalters 21
Aufladen 22
Bedienen 22
Reinigen 23
Entsorgen 23
Garantie und Service 24
Importeur 24
- 17 -

Li-Ionen-Akku-
Netzteil
Gerät
Akkus
Handstaubsauger
Herzlichen Glückwunsch zum Kauf Ihres neuen
Gerätes.
Sie haben sich damit für ein hochwertiges Produkt
entschieden. Die Bedienungsanleitung ist Bestandteil dieses Produkts. Sie enthält wichtige Hinweise
für Sicherheit, Gebrauch und Entsorgung. Machen
Sie sich vor der Benutzung des Produkts mit allen
Bedien- und Sicherheitshinweisen vertraut. Benutzen
Sie das Produkt nur wie beschrieben und für die angegebenen Einsatzbereiche. Händigen Sie alle
Unterlagen bei Weitergabe des Produkts an Dritte
mit aus.
Bestimmungsgemäßer
Gebrauch
Der Handstaubsauger darf nur zum Saugen von trokkenen oder nassen Oberflächen bzw. trockenem
oder nassem Sauggut oder Flüssigkeiten eingesetzt
werden. Menschen oder Tiere dürfen mit diesem Gerät nicht abgesaugt werden. Jede andere Verwendung oder Veränderung des Gerätes gilt als nicht bestimmungsgemäß und birgt erhebliche
Unfallgefahren. Der Hersteller haftet nicht für Schäden, die durch nicht bestimmungsgemäßen Gebrauch oder falsche Bedienung verursacht werden.
Das Gerät ist nicht für den gewerblichen Gebrauch
bestimmt.
Gerätebeschreibung
1 Nasssaugdüse
2 Fugendüse
3 Wandhalter
4 Netzteil
5 Hohlstecker
6 Ein-/Ausschalter
7 Ladekontrollleuchte (rot/grün)
8 Entriegelungstaste
9 Staubfilter-Beutel
0 Staubfilter
q Schmutzbehälter
Hinweis:
Das Gerät wird mit nicht geladenen Akkus geliefert.
Vor dem ersten Gebrauch des Gerätes sind die
Akkus zunächst für 24 Stunden zu laden.
Technische Daten
4
Eingangsspannung/
- strom: 100 - 240 V ~, 50/60 Hz
max. 300 mA
Ausgangsspannung/
- strom: 9,6 V / 300 mA
Schutzklasse: II /
Typenbezeichnung: SAS 7.4 LI B1-2
Lieferumfang
Li-Ionen-Akku-Handstaubsauger
Fugendüse
Nasssaugdüse
Wandhalter
Montagematerial
Netzteil
Bedienungsanleitung
Kontrollieren Sie direkt nach dem Auspacken den
Lieferumfang auf Vollständigkeit.
Eingangsspannung: 9,6 V
Kapazität: 1300 mAh
Akku: 7,4 V
(2 x 3,7 V LithiumIonen-Akku)
- 18 -

Wichtige Sicherheitshinweise
Um Lebensgefahr durch elektrischen Schlag zu vermeiden:
• Laden bzw. verwenden Sie dieses Gerät nicht im Freien.
• Den Handstaubsauger niemals gebrauchen, wenn Kabel, Stecker oder Gehäuse
beschädigt sind.
• Lassen Sie beschädigte Netzstecker oder Netzkabel sofort von autorisiertem
Fachpersonal austauschen, um Gefährdungen zu vermeiden.
• Lassen Sie Reparaturen nur von einer Fachwerkstatt durchführen. Öffnen Sie
unter keinen Umständen selbst das Gerät. Eingriffe, die nicht durch einen Fachbetrieb vorgenommen wurden, können zu Verletzungen führen.
• Überzeugen Sie sich vor dem Einschalten des Gerätes, dass die in den technischen Daten des Gerätes verzeichnete Spannung der Netzspannung entspricht.
• Fassen Sie das Netzteil oder das Gerät nicht mit nassen oder feuchten Händen an.
• Verwenden Sie das Netzteil nicht mit einem Verlängerungskabel, sondern verbinden Sie das Netzteil direkt mit einer Steckdose.
Um Verletzungsgefahr zu vermeiden:
• Wechseln Sie keine Zubehörteile aus, wenn das Gerät in Betrieb ist.
• Benutzen Sie den Handstaubsauger nicht zum Aufsaugen von spitzen Gegenständen oder Glasscherben.
• Niemals brennende Streichhölzer, glimmende Asche oder Zigarettenstummel
aufsaugen.
• Gebrauchen Sie den Handstaubsauger nicht zum Aufsaugen von chemischen
Produkten, Steinstaub, Gips, Zement, oder anderen ähnlichen Partikeln.
• Das Gerät ist nicht für entflammbare und explosive Stoffe oder chemische und
aggressive Flüssigkeiten geeignet.
• Lagern Sie das Gerät immer in geschlossenen Räumen. Um Unfälle zu verhindern,
bewahren Sie das Gerät nach Gebrauch an einem trockenen Ort auf.
• Unter extremen Bedingungen können Leckagen an den Akkuzellen auftreten.
Bei Kontakt der Flüssigkeit mit Haut oder Augen ist die betreffende Stelle sofort mit
sauberem Wasser aus- bzw. abzuspülen. Suchen Sie einen Arzt auf.
- 19 -

So verhalten Sie sich sicher:
• Dieses Gerät kann von Kindern ab 8 Jahren und darüber sowie von Personen
mit verringerten physischen, sensorischen oder mentalen Fähigkeiten oder
Mangel an Erfahrung und Wissen benutzt werden, wenn sie beaufsichtigt oder
bezüglich des sicheren Gebrauchs des Gerätes unterwiesen wurden und die
daraus resultierenden Gefahren verstehen.
• Kinder dürfen nicht mit dem Gerät spielen.
• Reinigung und Benutzer-Wartung dürfen nicht von Kindern ohne Beaufsichtigung durchgeführt werden.
• Verwenden Sie nur Zubehörteile, die vom Hersteller empfohlen werden.
• Das Netzteil darf nicht für andere Zwecke benutzt werden. Tragen Sie den
Wandhalter oder das Netzteil niemals am Kabel. Ziehen Sie nicht am Kabel,
wenn Sie das Gerät verstellen wollen.
• Fassen Sie immer den Netzstecker an, um das Gerät von der Stromversorgung
zu trennen.
• Achten Sie unbedingt darauf, dass Sie den Handstaubsauger nicht neben
Heizkörpern, Backöfen oder anderen erhitzten Geräten oder Flächen abstellen.
• Achten Sie immer darauf, dass die Lüftungsschlitze frei sind. Ein blockierter Luftkreislauf kann zur Überhitzung und Beschädigung des Gerätes führen.
• Dieses Produkt enthält wiederaufladbare Akkus. Werfen Sie die Akkus nicht ins
Feuer und setzen Sie sie nicht hohen Temperaturen aus.
Es besteht Explosionsgefahr!
• Üben Sie besondere Sorgfalt aus, wenn Sie den Handstaubsauger auf Treppen benutzen.
• Benutzen Sie den Handstaubsauger nicht ohne eingesetzten Staubfilter.
• Benutzen Sie das Netzteil nicht für ein anderes Produkt und versuchen Sie
nicht, dieses Gerät mittels einer anderen Ladestation aufzuladen. Verwenden
Sie nur das mit diesem Gerät gelieferte Netzteil.
• Versuchen Sie niemals, nicht wiederaufladbare Batterien aufzuladen.
• Die Akkus in diesem Gerät können nicht ersetzt werden.
- 20 -

Vor der ersten Inbetriebnahme
Montage des Wandhalters
• Entfernen Sie alle Verpackungsmaterialien vom
Gerät.
• Setzen Sie den Schmutzbehälter q auf den Mo-
torblock:
• Schieben Sie die Plastik-Nase an der Untersei-
te des Handstaubsaugers in die Aussparung
am Schmutzbehälter q.
• Drücken Sie die Entriegelungstaste 8 und schie-
ben Sie gleichzeitig den Schmutzbehälter q
auf den Motorblock.
• Lassen Sie die Entriegelungstaste 8 los, so
dass die Verriegelung in die Aussparung
greift. Der Schmutzbehälter q sitzt nun fest
auf dem Motorblock.
Informationen zu den Akkus
1. Der Handstaubsauger wird mit wiederaufladbaren Lithium-Ionen-Akkus betrieben.
Bevor Sie den Handstaubsauger zum ersten
Mal verwenden, müssen die Akkus für mindestens 24 Stunden geladen werden.
2. Die Akkus erreichen ihre volle Kapazität nach
einer Aufladezeit von 24 Stunden. Zur Pflege
der Akkus empfehlen wir folgendes: Ziehen Sie,
nachdem die Akkus geladen sind, das Netzteil 4
aus der Netzsteckdose. Verbinden Sie das Netzteil 4 erst wieder mit der Netzsteckdose, wenn
die Saugleistung des Handstaubsaugers spürbar
schwächer wird.
Lebensgefahr!
Stellen Sie sicher, dass sich keine Stromleitungen
oder andere Leitungen oder Rohre in der Wand befinden, in der Sie die Löcher für den Wandhalter 3
bohren wollen. Es besteht Lebensgefahr, wenn Sie
eine stromführende Leitung anbohren!
1. Setzen Sie den Hohlstecker 5 des Netzteils 4
wie auf der nachfolgenden Abbildung gezeigt in
den Wandhalter 3 ein. Fixieren Sie den Hohlstecker 5, indem Sie ihn drehen.
2. Suchen Sie einen geeigneten Montageplatz für
den Wandhalter 3: Der Handstaubsauger muss
problemlos aus ihm herausgezogen werden können und eine Netzsteckdose muss für das Netzteil 4 erreichbar sein.
3. Bohren Sie zwei Löcher im Abstand von
ca. 62 mm. Benutzen Sie den Wandhalter 3
zum Anzeichnen der Löcher: so ist der Abstand
korrekt abgemessen. Die Bohrlöcher müssen passend für 5 mm-Dübel gebohrt werden.
4. Stecken Sie die Dübel in die Löcher und schrauben Sie den Wandhalter 3 mit Hilfe der Schrauben fest.
5. Sie können die Düsen auf die seitlichen Zubehörhalter aufstecken.
6. Stecken Sie das Netzteil 4 in eine Netzsteckdose ein.
- 21 -
Aufladen
Bedienen
Hinweis:
Vergewissern Sie sich, dass der Ein-/Ausschalter 6
nach hinten geschoben ist (Position „0”), bevor Sie
mit dem Laden beginnen.
• Setzen Sie den Handstaubsauger von oben in
den Wandhalter 3, so dass der Hohlstecker 5
in die Buchse am Handstaubsauger rutscht. Die
Ladekontrollleuchte 7 blinkt rot auf und der
Ladevorgang beginnt.
Wichtig:
• Wenn der Handstaubsauger wieder genug Energie hat, um zu saugen, leuchtet die Ladekontrollleuchte 7 grün. Dies bedeutet nicht, dass die
Akkus voll geladen sind. Wenn die Ladekontrollleuchte 7 grün aufleuchtet, sind die Akkus zu
ca. 80% geladen.
• Ist der Ladevorgang abgeschlossen, welcher bei
komplett entladenen Akkus ca. 5 Stunden dauern kann, schaltet das Gerät automatisch in die
Erhaltungsladung (Pflegefunktion). Lassen Sie
dennoch das Gerät nicht permanent am Netzteil
4 angeschlossen, um eventuelle Beschädigungen der Akkus zu vermeiden.
• Laden Sie die Akkus erst wieder auf, wenn die
Saugleistung des Handstaubsaugers spürbar
schwächer wird und die Ladekontrollleuchte 7
grün blinkt.
Achtung!
Die Saugöffnung muss jederzeit frei und darf nicht
verstopft sein. Verstopfungen führen zu Überhitzung
und Beschädigung des Motors.
Hinweise:
• Achten Sie darauf, dass der Staubfilter 0 immer
eingesetzt ist, bevor Sie das Gerät verwenden.
• Saugen Sie maximal nur so viel Flüssigkeit auf,
bis der Schmutzbehälter q bis zur MAX-Markie-
rung gefüllt ist.
1. Nehmen Sie den Handstaubsauger von dem
Wandhalter 3 herunter, oder, wenn Sie den
Wandhalter 3 nicht benutzen, ziehen Sie den
Hohlstecker 5 aus der Buchse.
2. Setzen Sie, wenn gewünscht, die passende Düse
in die Saugöffnung:
• die Fugendüse 2, um enge, schwer zu errei-
chende Stellen zu reinigen.
• die Nasssaugdüse 1, um Flüssigkeiten aufzu-
saugen.
Hinweis:
Reinigen Sie, nachdem Sie Flüssigkeiten aufgesaugt
haben, sofort den Schmutzbehälter q. Ansonsten
bilden sich Bakterien und Keime! Achten Sie darauf,
dass der Staubfilter-Beutel 9 vollständig getrocknet
ist, bevor Sie das Gerät wieder benutzen.
Hinweis:
Der Handstaubsauger kann auch direkt über das
Netzteil 4 geladen werden. Entnehmen Sie dafür
den Hohlstecker 5 durch eine leichte Drehung aus
dem Wandhalter 3 und stecken Sie ihn in die
Buchse am Handstaubsauger.
3. Um das Gerät einzuschalten, schieben Sie den
Ein-/Ausschalter 6 nach vorne. Die Ladekontrollleuchte 7 leuchtet grün auf.
4. Nach Gebrauch schieben Sie den Ein-/Ausschalter 6 nach hinten.
Hinweis:
Setzen Sie den Handstaubsauger in den Wandhalter 3 und beginnen Sie mit dem Ladevorgang,
wenn die Saugleistung spürbar schwächer wird und
die Ladekontrollleuchte 7 grün blinkt.
- 22 -
Reinigen
Entsorgen
Um beste Ergebnisse zu erzielen, leeren Sie den
Schmutzbehälter q und reinigen Sie den Staubfilter 0 nach jedem Gebrauch.
Wichtig:
Benutzen Sie keine aggressiven, chemischen oder
scheuernde Reinigungsmittel. Diese greifen die
Oberfläche des Gerätes an.
1. Um den Schmutzbehälter q zu öffnen, drücken
Sie die Entriegelungstaste 8 und nehmen Sie
den Schmutzbehälter q ab.
2. Entnehmen Sie den Staubfilter 0 aus dem
Schmutzbehälter q.
3. Entleeren Sie den Schmutzbehälter q.
4. Ziehen Sie den Staubfilter-Beutel 9 mit seiner
Halterung aus dem Staubfilter 0.
5. Spülen Sie den Staubfilter-Beutel 9 in kaltem
Wasser aus und warten Sie, bis dieser wieder
vollständig trocken ist, bevor Sie ihn wieder in
den Staubfilter 0 einsetzen. Trocknen Sie ihn
nicht mit heißer Luft.
6. Setzen Sie den Staubfilter 0 wieder in den
Schmutzbehälter q ein. Achten Sie darauf, dass
der Staubfilter 0 gerade sitzt und die Gummilip-
pe den Schmutzbehälter q verschließt.
7. Setzen Sie den Schmutzbehälter q wieder auf
den Motorblock:
• Schieben Sie die Plastik-Nase an der Untersei-
te des Handstaubsaugers in die Aussparung
am Schmutzbehälter q.
• Drücken Sie die Entriegelungstaste 8 und schie-
ben Sie gleichzeitig den Schmutzbehälter q
auf den Motorblock.
• Lassen Sie die Entriegelungstaste 8 los, so
dass die Verriegelung in die Aussparung
greift. Der Schmutzbehälter q sitzt nun fest
auf dem Motorblock.
8. Reinigen Sie das Gehäuse und die beiden Düsen mit einem leicht angefeuchteten Tuch. Bei
hartnäckigen Verschmutzungen geben Sie ein
mildes Reinigungsmittel auf das Tuch.
9. Trocknen Sie alle Teile gut ab, bevor Sie das Gerät wieder verwenden oder verstauen.
Werfen Sie das Gerät keinesfalls in den
normalen Hausmüll. Dieses Produkt
unterliegt der europäischen Richtlinie
2012/19/EU.
Das Gerät und der Akku müssen getrennt
voneinander entsorgt werden.
1. Lösen Sie hierzu alle Kreuzschrauben am Motorblock und nehmen Sie ihn auseinander.
2. Schneiden Sie das Anschlusskabel des Akkus ab
und nehmen Sie den Akku aus dem Gerät.
Entsorgen Sie das Gerät über einen zugelassenen
Entsorgungsbetrieb oder über Ihre kommunale
Entsorgungseinrichtung.
Beachten Sie die aktuell geltenden Vorschriften.
Setzen Sie sich im Zweifelsfall mit Ihrer Entsorgungseinrichtung in Verbindung.
Batterien/Akkus entsorgen
Batterien/Akkus dürfen nicht im Hausmüll
entsorgt werden. Jeder Verbraucher ist
gesetzlich verpflichtet, Batterien/Akkus bei
einer Sammelstelle seiner Gemeinde/sei-
nes Stadtteils oder im Handel abzugeben.
Diese Verpflichtung dient dazu, dass Batterien/
Akkus einer umweltschonenden Entsorgung zugeführt werden können. Geben Sie Batterien/Akkus
nur im entladenen Zustand zurück.
Führen Sie alle Verpackungsmaterialien
einer umweltgerechten Entsorgung zu.
- 23 -

Garantie und Service
Sie erhalten auf dieses Gerät 3 Jahre Garantie ab
Kaufdatum. Das Gerät wurde sorgfältig produziert
und vor Anlieferung gewissenhaft geprüft.
Bitte bewahren Sie den Kassenbon als Nachweis
für den Kauf auf. Bitte setzen Sie sich im Garantiefall mit Ihrer Servicestelle telefonisch in Verbindung.
Nur so kann eine kostenlose Einsendung Ihrer Ware
gewährleistet werden.
Die Garantieleistung gilt nur für Material- oder
Fabrikationsfehler, nicht aber für Transportschäden,
Verschleißteile oder für Beschädigungen an zerbrechlichen Teilen, z. B. Schalter oder Akkus. Das
Produkt ist lediglich für den privaten und nicht für
den gewerblichen Gebrauch bestimmt.
Bei missbräuchlicher und unsachgemäßer Behandlung, Gewaltanwendung und bei Eingriffen, die
nicht von unserer autorisierten Service-Niederlassung vorgenommen wurden, erlischt die Garantie.
Ihre gesetzlichen Rechte werden durch diese
Garantie nicht eingeschränkt.
Die Garantiezeit wird durch die Gewährleistung
nicht verlängert. Dies gilt auch für ersetzte und reparierte Teile. Eventuell schon beim Kauf vorhandene
Schäden und Mängel müssen sofort nach dem
Auspacken gemeldet werden, spätestens aber zwei
Tage nach Kaufdatum. Nach Ablauf der Garantiezeit anfallende Reparaturen sind kostenpflichtig.
Service Deutschland
Tel.: 0800 5435 111
(Kostenfrei aus dem dt. Festnetz/Mobilfunknetz)
E-Mail: kompernass@lidl.de
IAN 106317
Service Österreich
Tel.: 0820 201 222 (0,15 EUR/Min.)
E-Mail: kompernass@lidl.at
IAN 106317
Service Schweiz
Tel.: 0842 665566 (0,08 CHF/Min.,
Mobilfunk max. 0,40 CHF/Min.)
E-Mail: kompernass@lidl.ch
IAN 106317
Erreichbarkeit Hotline:
Montag bis Freitag von 8:00 Uhr - 20:00 Uhr (MEZ)
Importeur
KOMPERNASS HANDELS GMBH
BURGSTRASSE 21
44867 BOCHUM
GERMANY
www.kompernass.com
- 24 -

KOMPERNASS HANDELS GMBH
BURGSTRASSE 21
44867 BOCHUM
DEUTSCHLAND / GERMANY
www.kompernass.com
Last Information Update · Έκδοση των πληροφοριών
Stand der Informationen:
09 / 2014 · Ident.-No.: SAS7.4LIB1-082014-1
IAN 106317
 Loading...