

Page 1
Page 2
Page 3
3
Introduction
ENGLISH
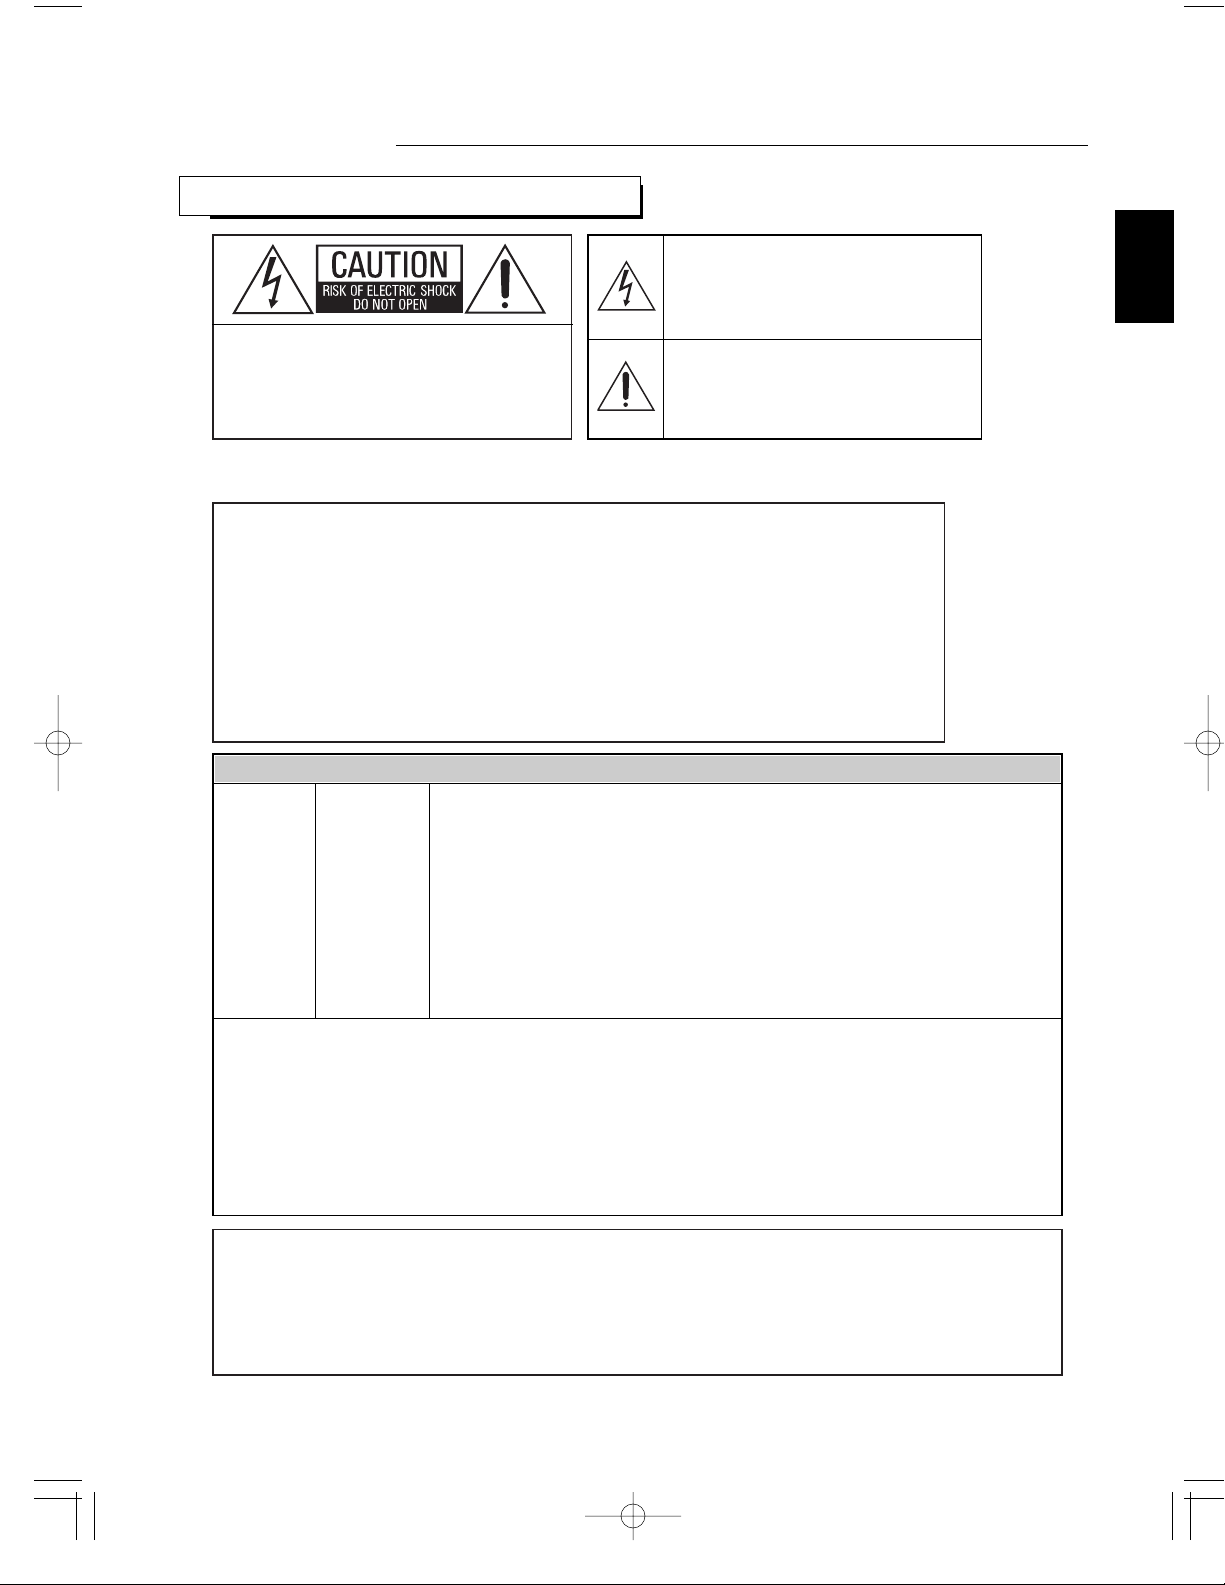
READ THIS BEFORE OPERA TING YOUR UNIT
This symbol is intended to alert the user to the
presence of uninsulated "dangerous voltage"
within the product's enclosure that may be of
sufficient magnitude to constitute a risk of
electric shock to persons.
This symbol is intended to alert the user to the
presence of important operating and
maintenance (servicing) instructions in the
literature accompanying the appliance.
Units shipped to Australia are designed for operation on 240 V AC only.
To ensure safe operation, the three-pin plug supplied must be inserted only into a
standard three-pin power point which is effectively earthed through the normal
household wiring. Extension cords used with the equipment must be three-core and
be correctly wired to provide connection to earth.
Improper extension cords are a major cause of fatalities. The fact that the
equipment operates satisfactorily does not imply that the power point is earthed
and that the installation is completely safe. For your safety, if in any doubt about the
effective earthing of the power point, consult a qualified electrician.
PAN-EUROPEAN UNIFIED VOLTAGE
All units are suitable for use on supplies 220-240 V AC.
FOR YOUR SAFETY
EUROPE
AUSTRALIA
220 V
-
240 V
Caution regarding placement
To maintain proper ventilation, be sure to leave a space around the unit (from
the largest outer dimensions including projections)
equal to, or greater than, shown below.
Left and right panels: 5 cm
Rear panel: 10 cm
Top panel: 20 cm
Do not block ventilation openings or stack other equipment on the top.
•
Avoid high temperatures. Allow for sufficient heat dispersion when installed on a rack.
•
Keep the set free from moisture, water, and dust.
•
Do not let foreign objects in the set.
•
Handle the power cord carefully. Hold the plug when unplugging the cord.
•
Unplug the power cord when not using the set for long periods of time.
•
Do not obstruct the ventilation holes.
•
Do not let insecticides, benzene, and thinner come in contact wth the set.
•
Never disassemble or modify the set in any way.
: TO REDUCE THE RISK OF
ELECTRIC SHOCK, DO NOT
REMOVE COVER (OR BACK). NO
USER-SERVICEABLE PARTS
INSIDE. REFER SERVICING TO
QUALIFIED SERVICE PERSONNEL.
CAUTION
CAUTION
•
The ventilation should not be impeded by covering the ventilation openings with items, such
as newspapers, table-cloths, curtains, etc.
•
No naked flame sources, such as lighted candles, should be placed on the apparatus.
•
Please be care the environmental aspects of battery disposal.
•
The apparatus shall not be exposed to dripping or splashing for use.
•
No objects filled with liquids, such as vases, shall be placed on the apparatus.
: TO REDUCE THE RISK OF FIRE OR ELECTRIC SHOCK,
DO NOT EXPOSE THIS APPLIANCE TO RAIN OR MOISTURE.
WARNING
Page 4

4
CONTENTS
Introduction
READ THIS BEFORE OPERATING YOUR UNIT | 3
System Connections | 5
Front Panel Controls | 9
Universal Remote Controls | 10
OPERATING COMPONENTS WITH REMOTE CONTROL | 12
REMOTE CONTROL OPERATION RANGE | 12
LOADING BATTERIES | 12
USING FUNCTIONS OF REMOTE CONTROL | 13
Before Operation
SURROUND SOUND | 16
Operations
TURNING THE POWER ON/OFF | 21
LISTENING TO A PROGRAM SOURCE | 22
ENJOYING SURROUND SOUND | 24
LISTENING TO RADIO BROADCASTS | 31
LISTENING TO RDS BROADCASTS (FM ONLY) | 33
ANALOG AUDIO/VIDEO RECORDING | 35
DIGITAL AUDIO RECORDING WITH MD RECORDER | 36
OTHER FUNCTIONS | 37
Using the OSD
CURRENT STATUS DISPLAY | 38
MENU SCREEN | 38
Troubleshooting Guide | 41
Specifications | 42
Appendix
INITIALIZING THE SYSTEM | 43
SETTING UP THE SYSTEM ON FRONT PANEL | 43
SETUP CODE TABLE | 45
ENGLISH
Page 5
5
System Connections
• Do not plug the AC input cord into the wall AC outlet until all connections are completed.
• Be sure to observe the color coding when connecting audio and video cords.
• Make connections firmly and correctly. If not, it can cause loss of sound, noise or damage to the receiver.
ENGLISH
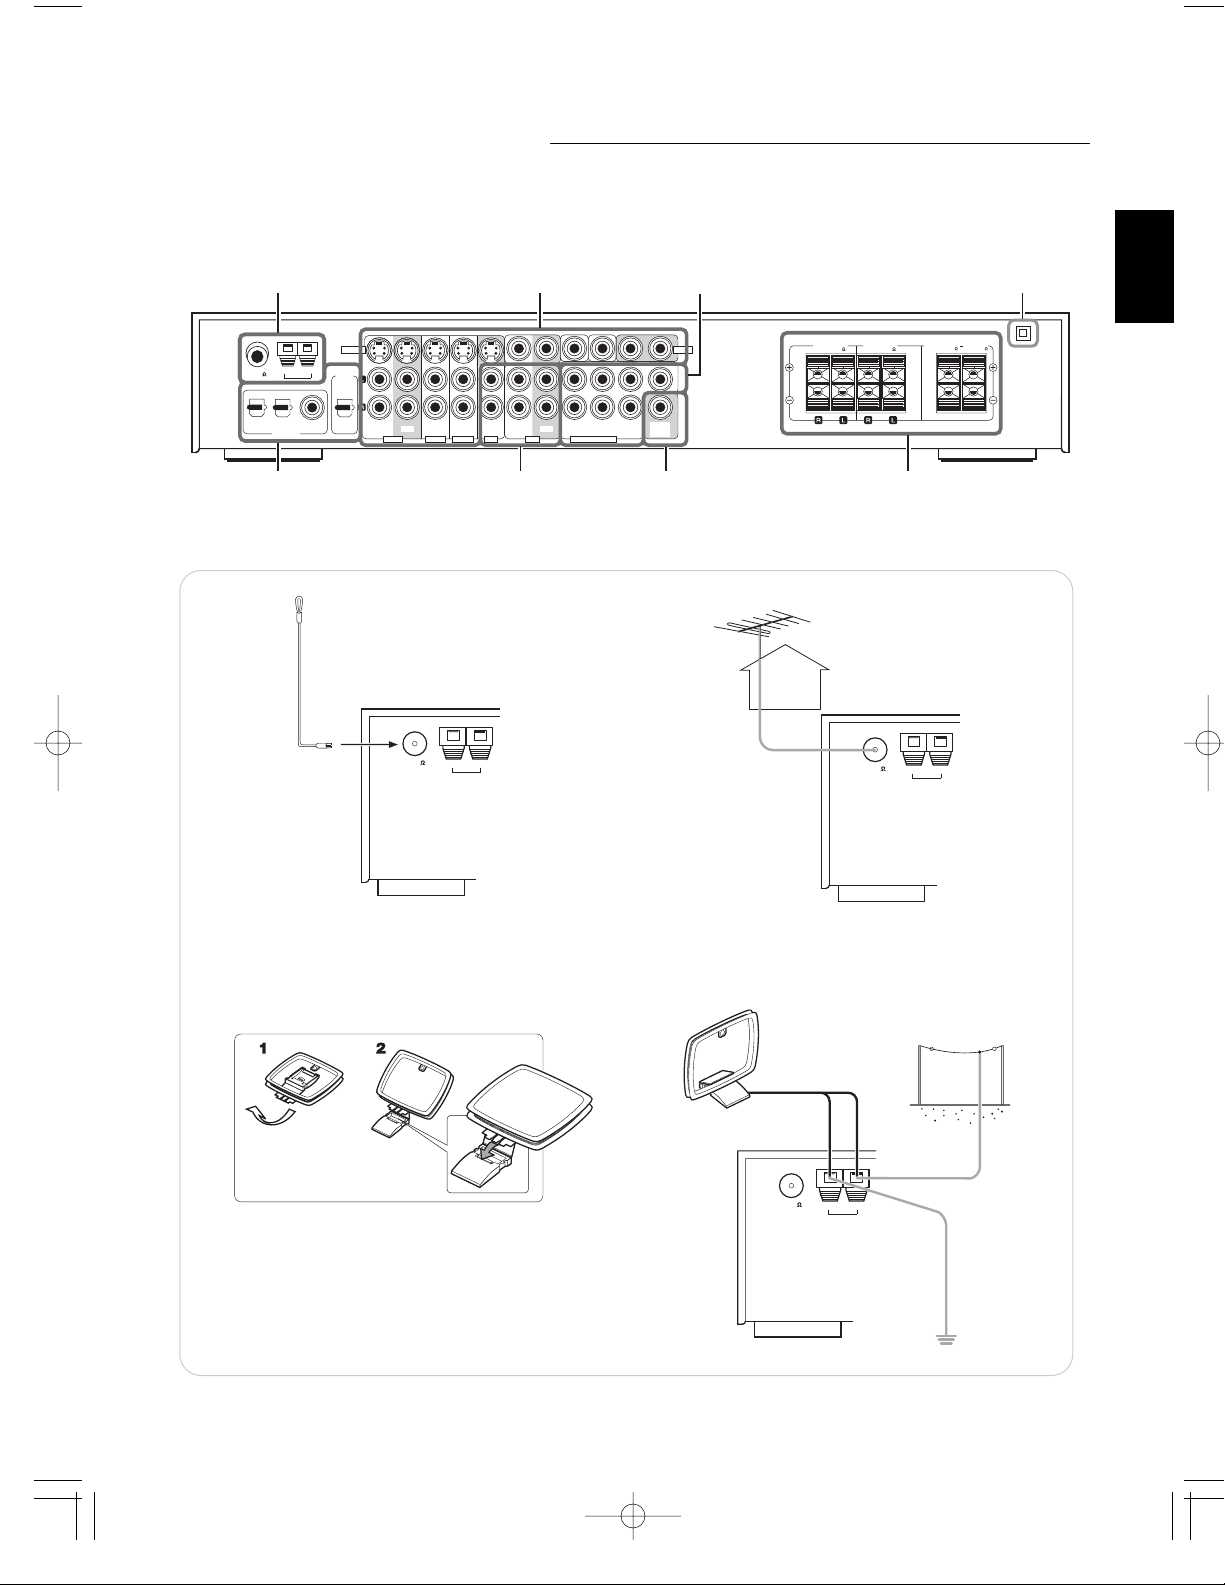
1.
CONNECTING ANTENNAs
FM 75
ANTENNA
GND AM
doo
a
• Change the position of the FM indoor antenna until you
get the best reception of your favorite FM stations.
FM 75
ANTENNA
GND AM
A
a
AM O
a
• Place the AM loop antenna as far as possible from the
receiver, TV set, speaker cords and the AC input cord
and set it to a direction for the best reception.
• If the reception is poor with the AM loop antenna, an AM
outdoor antenna can be used in place of the AM loop
antenna.
FM 75
ANTENNA
GND AM
a
• A 75Ω outdoor FM antenna may be used to further
improve the reception. Disconnect the indoor
antenna before replacing it with the outdoor one.
1 58
4
ANTENNA
FRONT
VIDEOS-VIDEO
GND AM
FM 75
OPT 1
DIGITAL IN
DIGITAL
OUT
OPT 2
OPT
COAX
IN OUT
IN IN IN
IN OUT
FRONT SURROUND SURR.BACK
7CH DIRECT INPUTTAPEVIDEO 1 VIDEO 2 VIDEO 3 AUX
SUB WOOFERCENTER
WOOFER
SUB OUT
SPEAKERS(6 )
326
FM Outdoor Antenn
FM In
r Antenn
SURROUND
SPEAKERS(6 )
7
SURR. BACK /
SUB WOOFER(6 )
CENTER
SPEAKER(6 )
M Loop Antenn
utdoor Antenn
Page 6
6
ENGLISH
FRONT
SURROUND
SURR.BACK
SUB WOOFER
IN OUT
OUT
IN IN IN
7CH DIRECT INPUT
TAPEVIDEO 1 VIDEO 2 VIDEO 3 AUX
.
.
A
O
O
L
R
AUDIO
OUT
A
O
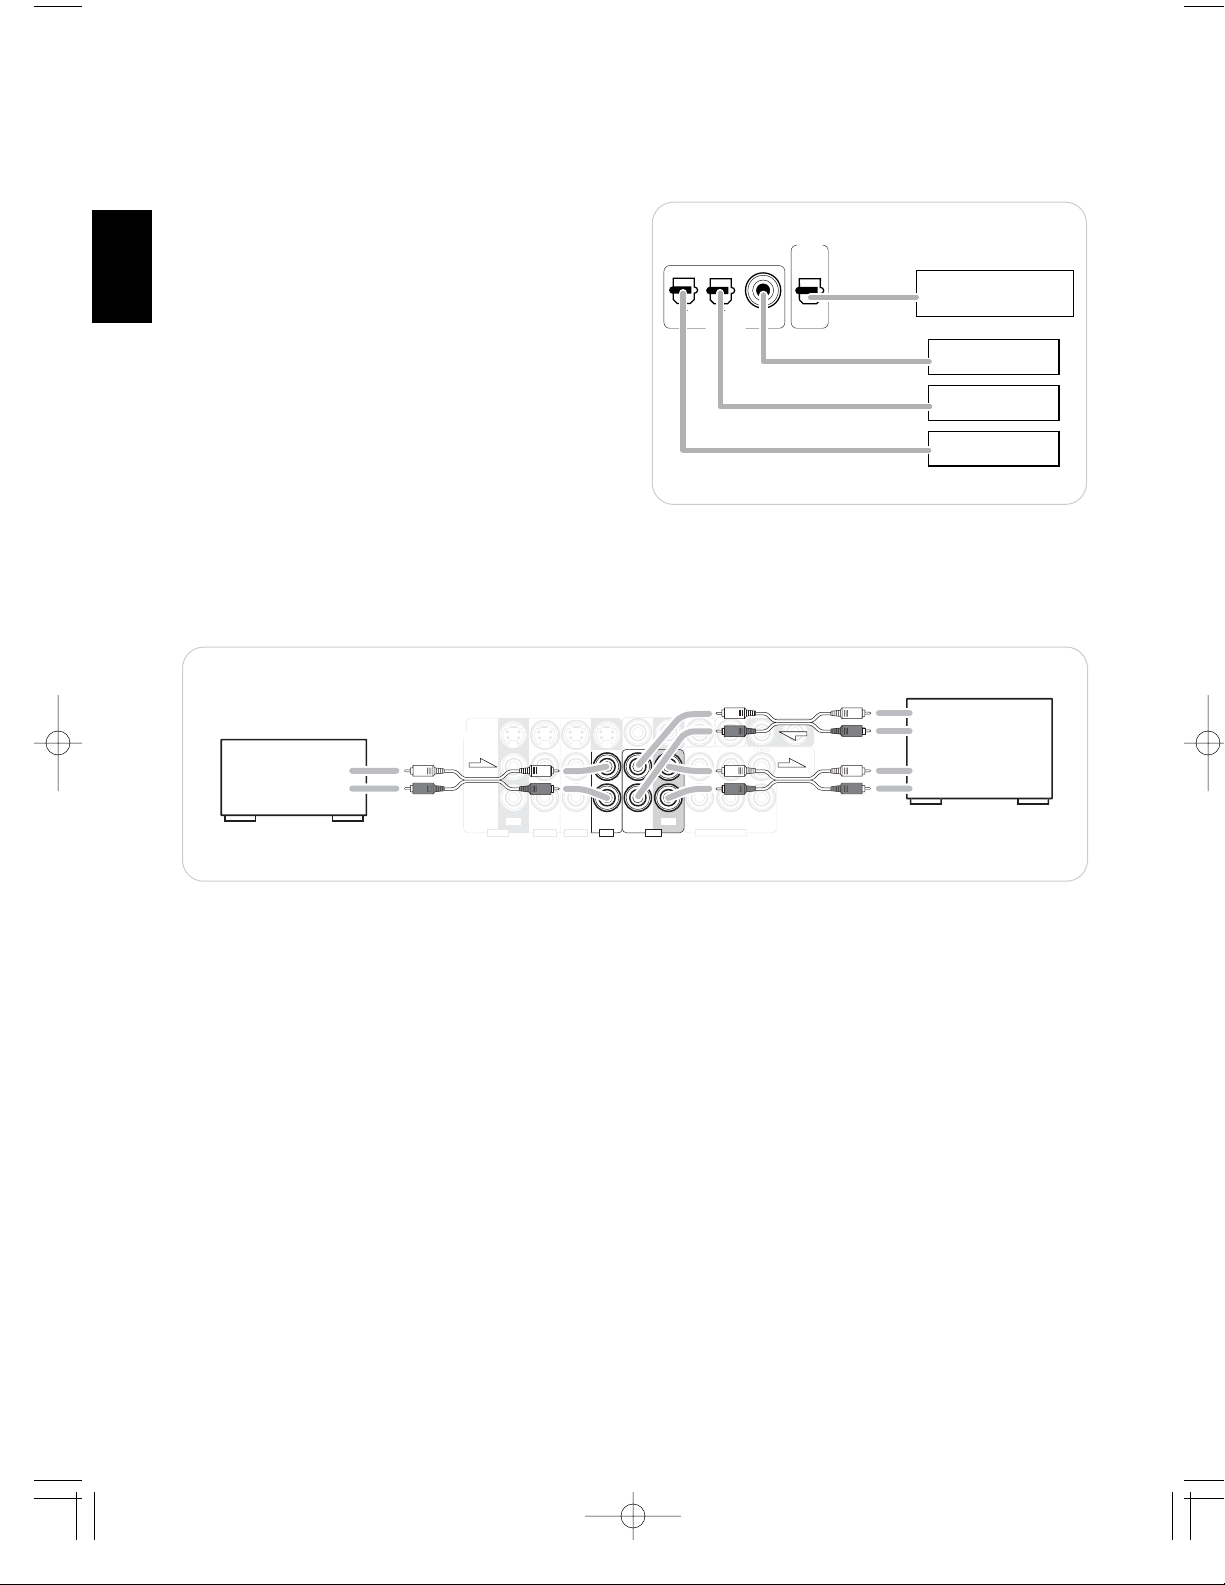
3. CONNECTING AUDIO COMPONENTS
• The AUX jacks may be connected to an additional audio component such as a CD player, a tape deck, etc.
• The TAPE IN/OUT jacks can be connected to PLAY(OUT) / REC(IN) jacks of MD recorder.
2. CONNECTING DIGITAL INs and OUT
• The COAXIAL or the OPTICAL DIGITAL OUTs of the components that are connected to AUX and VIDEO 1~3 of this unit can
be connected to these DIGITAL INs.
Component with
COAXIAL DIGITAL OUT
Component with
OPTICAL DIGITAL OUT
Component with
OPTICAL DIGITAL OUT
Component such as
an MD recorder, CD recorder
with OPTICAL DIGITAL IN
OPT 1 OPT 2
COAX
OPT
DIGITAL
OUT
DIGITAL IN
• If a digital recorder or other component with OPTICAL DIGITAL IN/OUT jacks is connected to the corresponding jacks of
this unit, you can playback and/or record the high quality
sound of CD’s, etc. without analog conversion or degradation.
• A digital input should be connected to the components such
as a CD player, LD player, DVD player, etc. capable ofoutputting DTS Digital Surround, Dolby Digital or PCM format
digital signals, etc.
• For details, refer to the operating instructions of the component connected.
• When making the COAXIAL DIGITAL connection, be sure to
use a 75Ω COAXIAL cord, not a conventional AUDIO cord.
• All of the commercially available optical fiber cords cannot be
used for the equipment. If there is an optical fiber cord which
cannot be connected to your equipment, consult your dealer
or nearest service organization.
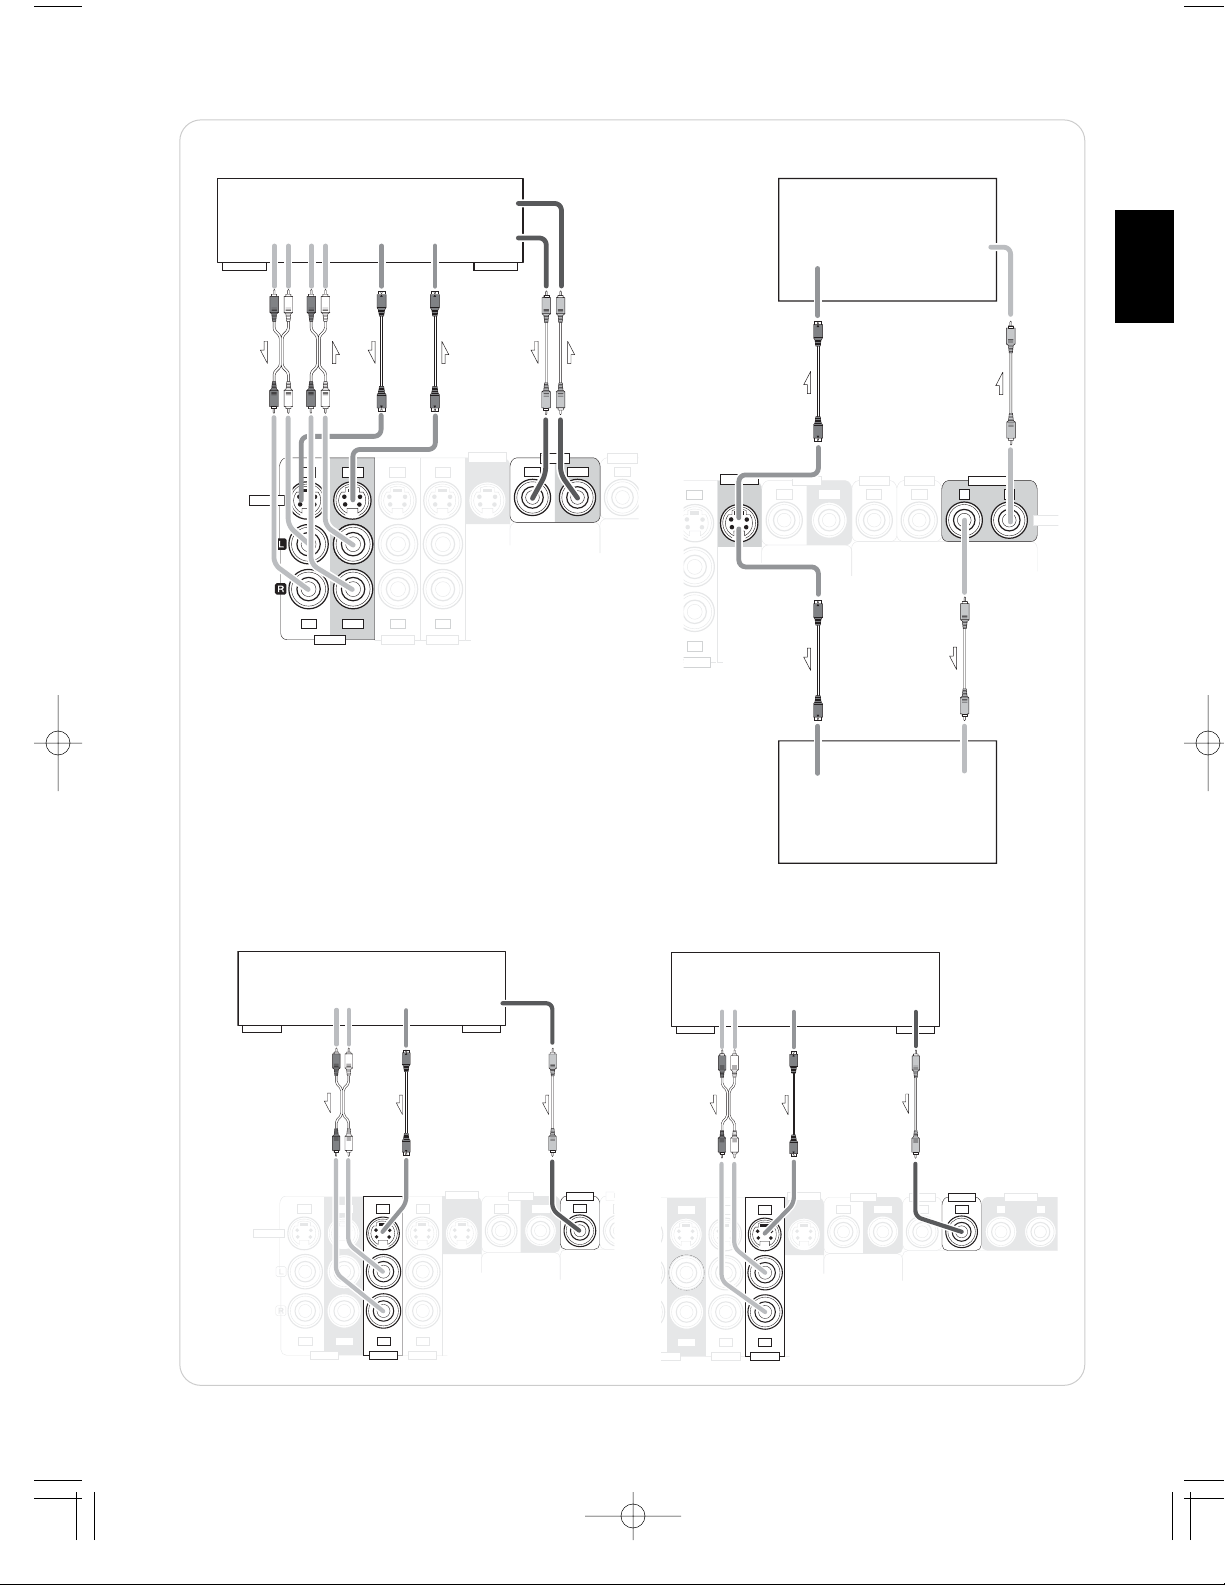
4. CONNECTING VIDEO COMPONENTS
• This unit incorporates S-VIDEO and composite (normal) VIDEO jacks.
For your reference, the excellence in picture quality is as follows: “S-VIDEO” > composite(normal) “VIDEO”
• A signal input into the composite(normal) VIDEO IN jack will be output in the composite(normal) VIDEO OUT jacks and a
signal input into the S-VIDEO IN jack will be output in the S-VIDEO OUT jacks and the composite (normal) MONITOR 1/2
VIDEO OUT jacks.
• The next picture is different from your real back pannel; just for helping your understnading.
When you connecting the components on the real back pannel, refer to the sticker on top cover.
AUX
CD player, tape deck, etc
UDI
UT
Tape deck, MD recorder, etc
UDI
Page 7
ENGLISH
7
ENGLISH
IN OUT
IN IN
VIDEO 2 VIDEO 3VIDEO 1
VIDEO2
IN IN
S-VIDEO
MONITOR
OUT
IN IN INOUT
AUDIO
OUT
AUDIOINS-VIDEO
OUT
S-VIDEO
IN
VIDEO
IN
VIDEO
OUT
RLRL
VIDEO 1 VCR, DVD player/recorder, etc.
VIDEO1
VID
• The jacks of VIDEO 2/VIDEO 3 can also be connected to an
additional video component such as a cable TV tuner, an LD
player or satellite system.
• The jacks of VIDEO 1 may also be connected to a VCR,
DVD recorder or other digital video recording component.
For details, refer to the operating instructions of the
component to be connected.
IN
VIDEO2 VIDEO3
IN IN IN 1 2
VIDEO
MONITOR
MONITOR
OUT
IN
VIDEO1
.
S-VIDEO IN VIDEO
IN
MONITOR 2
Add
.
S-VIDEO IN
O
IN
itional TV, projector, etc
VIDE
VIDEO 2
S-VIDEO
DVD player, VCR, etc.
AUDIO
S-VIDEO
OUT
RL
IN IN INOUT
IN OUT
IN IN
VIDEO 2 VIDEO 3VIDEO 1
OUT
MONITOR
VIDEO
OUT
IN IN
VIDEO1 VIDEO2
OUT
VIDEO 3
AUDIO
OUT
RL
IN INOUT
IN IN
OUT
VIDEO 2 VIDEO 3
EO 1
MONITOR 1
TV, projector, etc
DVD player, VCR, etc.
S-VIDEO
OUT
MONITOR
VIDEO1 VIDEO2 VIDEO3
IN IN IN 1 2
VIDEO
OUT
OUT
MONITOR
Page 8
ENGLISH
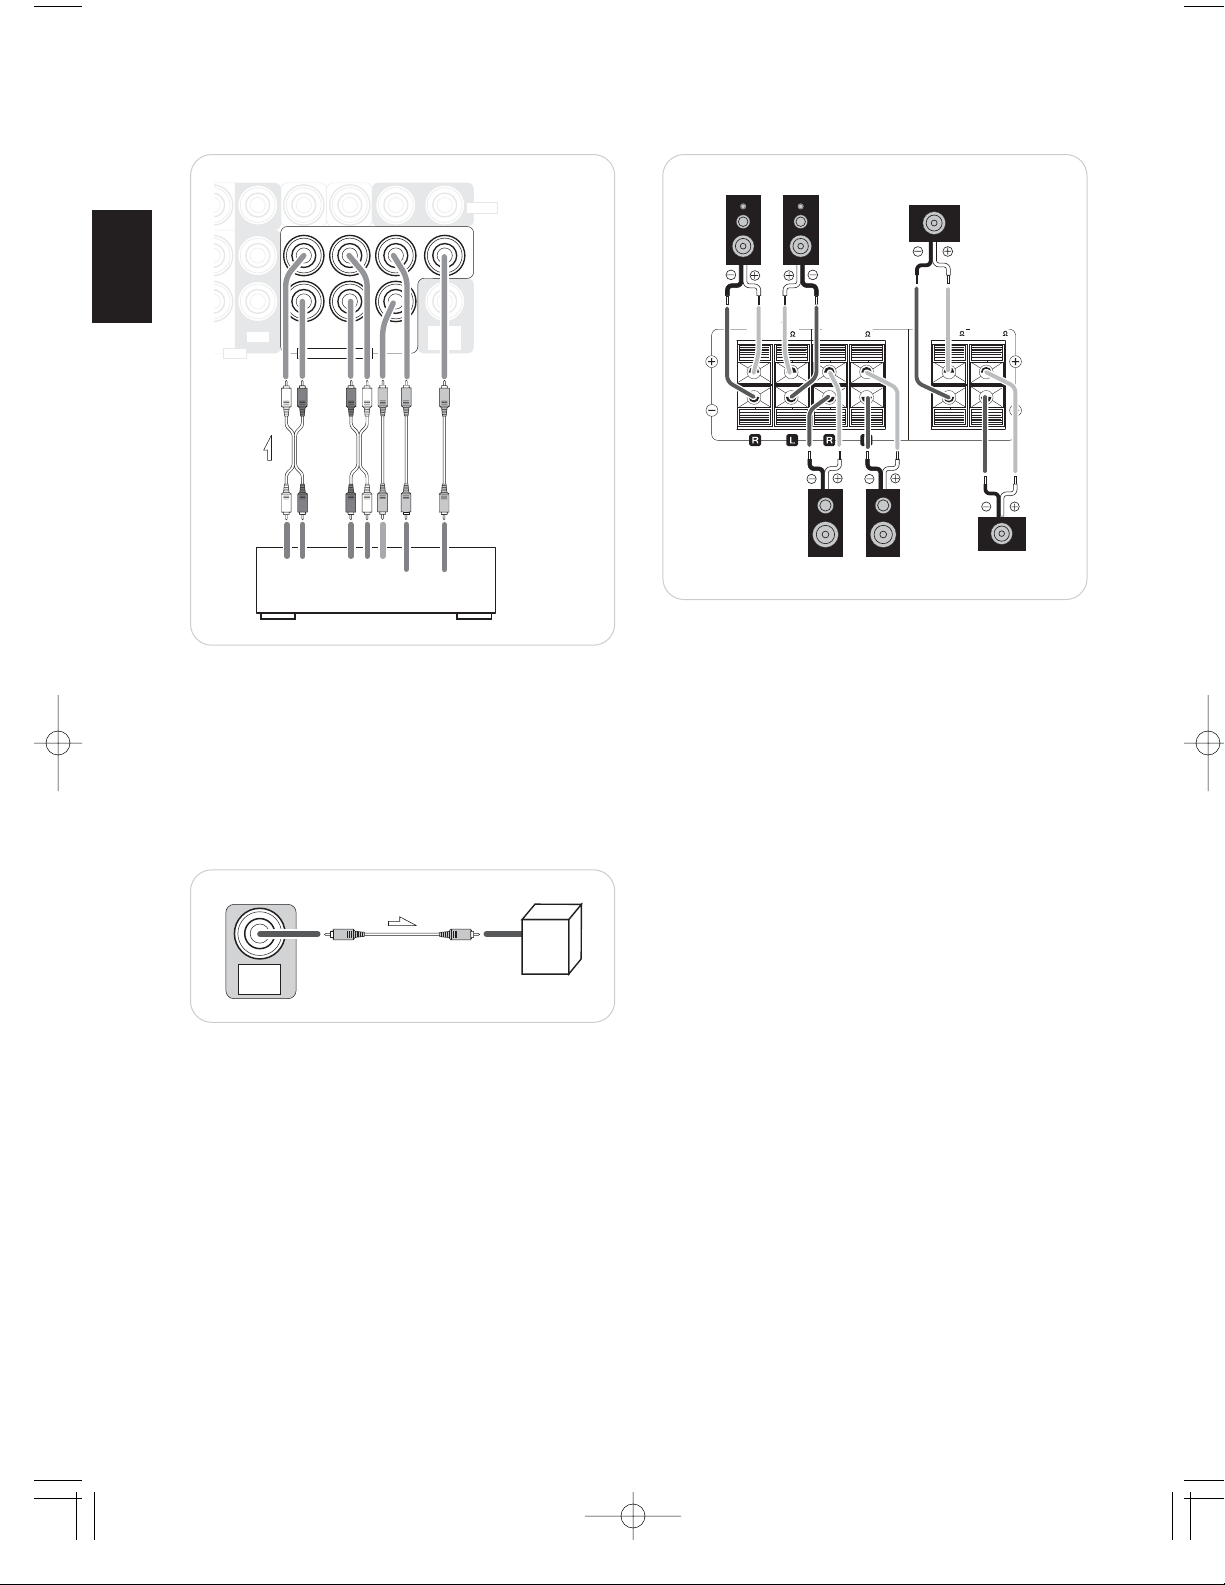
• Be sure to connect speakers firmly and correctly according
to the channel(left and right) and the polarity(+ and -). If the
connections are faulty, no sound will be heard from the
speakers, and if the polarity of the speaker connection is
incorrect, the sound will be unnatural and lack bass.
• For installing the speakers, refer to “Speaker placement” on
page 18.
• After installing the speakers, first adjust the speaker settings
according to your environment and speaker layout.(For
details, refer to “Adjusting the speaker settings” on page
19.)
Caution :
• Be sure to use the speakers with the impedance of 6 ohms
or above.
• Do not let the bare speaker wires touch each other or any
metal part of this unit. This could damage this unit and/or
the speakers.
8
5. CONNECTING 7 CH DIRECT INPUTS 7. CONNECTING SPEAKERS
8. AC INPUT CORD
6. SUBWOOFER PRE OUT connection
SUB-
WOOFER
OUT
Subwoofer
FRONT
SPEAKERS(6 )
SURROUND
SPEAKERS(6 )
CENTER
SPEAKER(6 )
SURR. BACK /
SUB WOOFER(6 )
Surround right
(Front)
Center
Surround left
Front left Front right
Surround
back
• Plug this cord into a wall AC outlet.
SUB-
WOOFER
OUT
FRONT SURROUND SURR.BACK
SUB WOOFERCENTER
IN OUT
VIDEO
TAPE 7CH DIRECT INPUT
SURROUND
SUBWOOFER
FRONT
CENTER
7 CH DIRECT OUTPUT
Decoder with 6 or 7
channel outputs
RRLL BACK
• Use these jacks to connect the corresponding analog outputs of a DVD player or external decoder, etc. that has 6 or
7 channel outputs.
• In case of 6 channel outputs, do not connect this SURROUND BACK input to your component.(For details, refer
to the operating instructions of the component to be connected.)
• To emphasize the deep bass sounds, connect a powered
subwoofer.
• Note : When there is not surround back speaker, you can
connect the subwoofer into the terminal of surround back
speaker. In this case, you should change the subwoofer
speaker setting. Refer to “Adjusting the speaker settings” on
page 19.
Page 9
9
ENGLISH
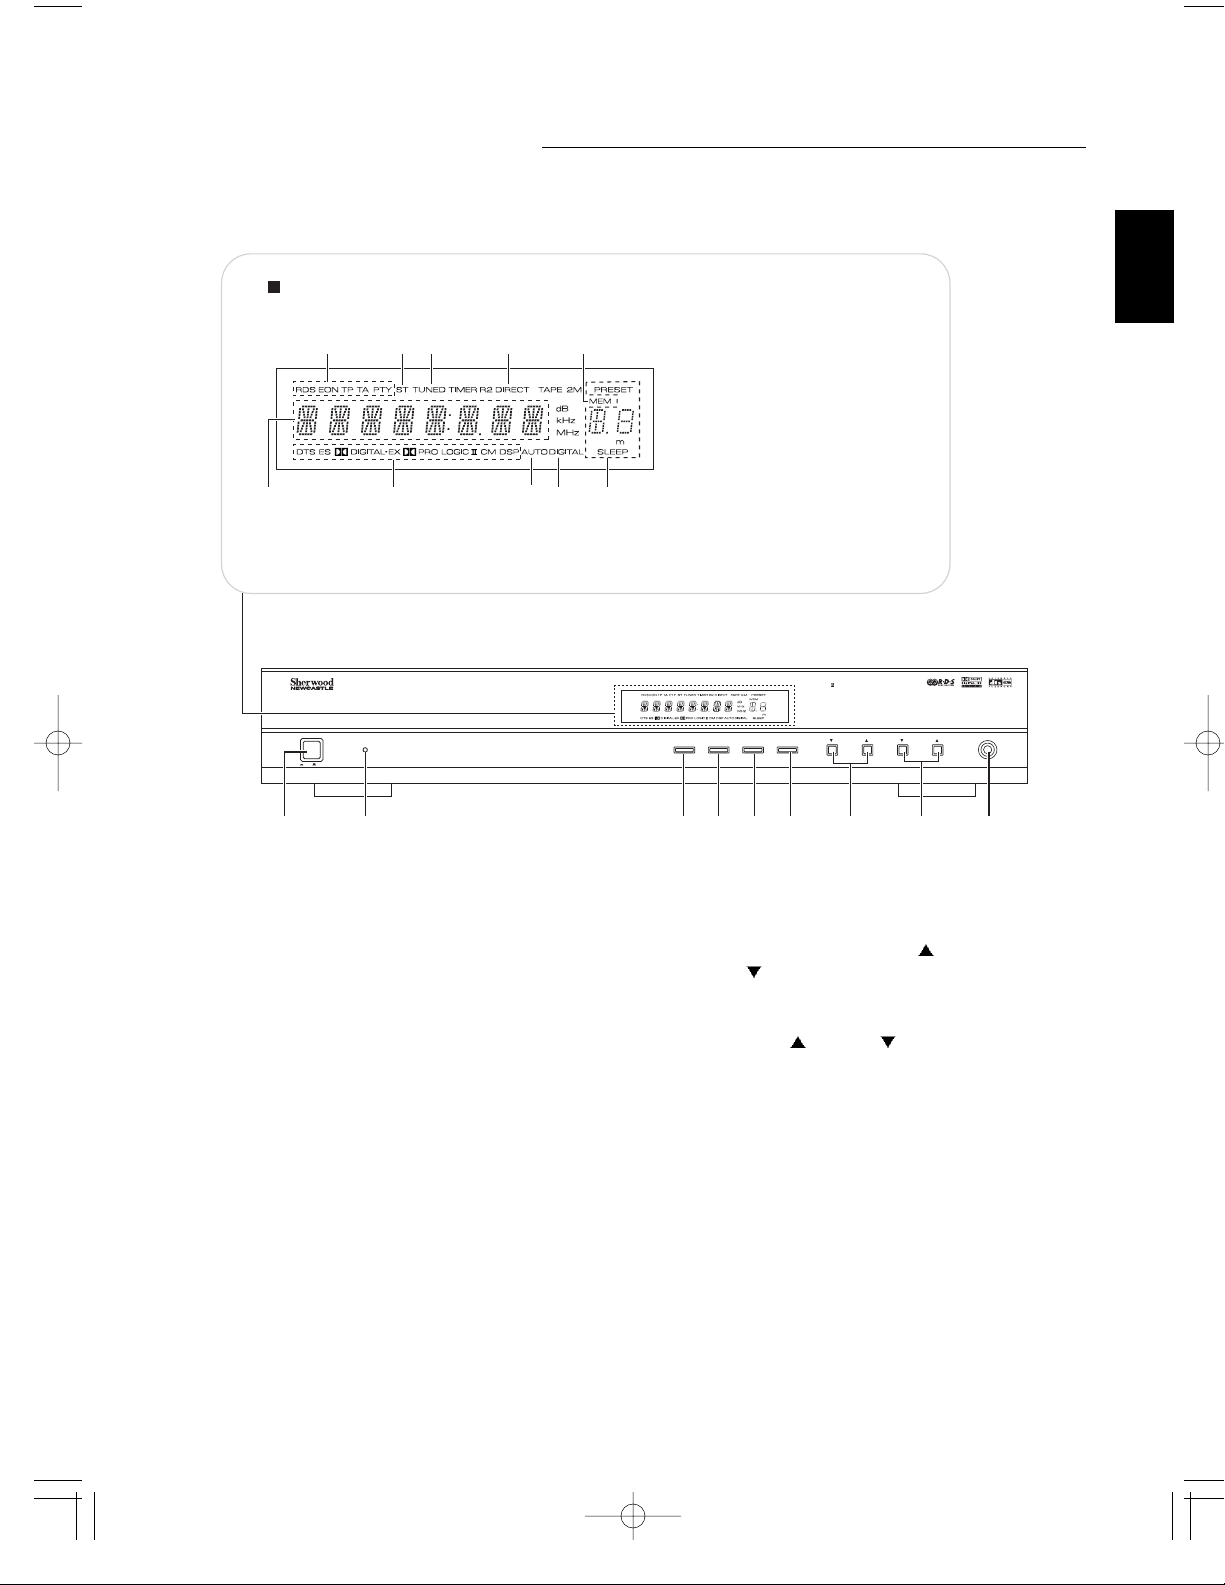
Front Panel Controls
1. POWER switch
2. STANDBY indicator
3. INPUT SELECTOR button
4. DIGITAL INPUT/AM/FM MODE button
• When digital signal(AUX, VIDEO1~3) is
inputted, this button functions as digital
input selector button.
• When tuner is selected, this button
functions as band selector button.
5. SETUP/MEMORY button
• When pressing this button for a seconds,
this button functions as setup button.
6. DECODING/TUNE MODE button
• In setting mode, this button functions as sub
mode button.
7. ADJUST/TUNING/PRESET UP(
) /
DOWN(
) buttons
• In setting mode, this button functions as
ADJUST button.
8. VOLUME UP(
) / DOWN( ) buttons
9. HEADPHONE jack
FLUORESCENT DISPLAY
9810 7
21345
DIGITAL A/V RECEIVER R-903R
1. Input, frequency, volume level,
6
operating information, etc.
2. Surround mode indicators
3. AUTO indicator
4. DIGITAL input signal indicator
5. PRESET number, SLEEP time,
Speaker distance display
6. MEMory indicator
7. DIRECT indicator
8. TUNED indicator
9. STEREO indicator
10. RDS indicators
POWER
STANDBY
ON/ OFF
12 3456789
INPUT SELECTOR
DIGITAL INPUT
AM/FM MODE
MEMORY
SETUP
DECODING
TUNE MODE
ADJUST
TUNING/PRESET
VOLUME
PHONES
Page 10
ENGLISH
10
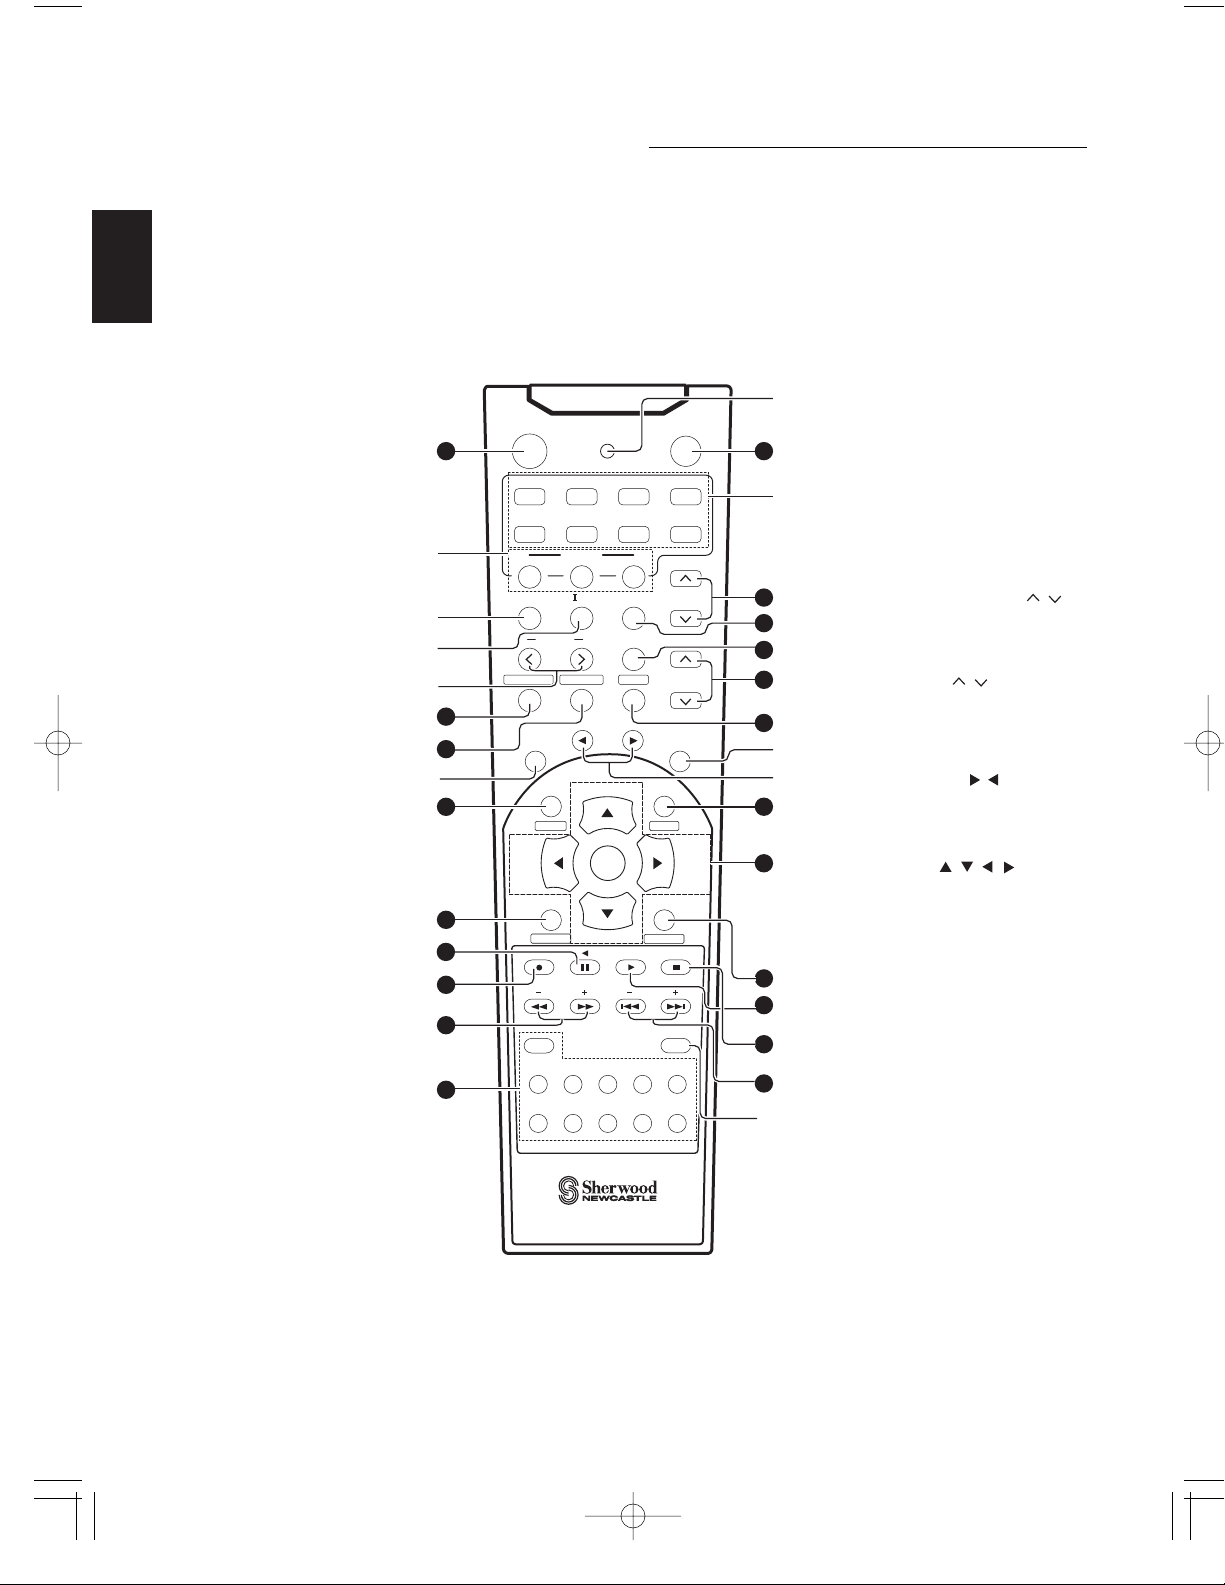
Universal Remote Controls
This universal remote control can operate not only this receiver but also most popular brands of audio and video
components such as CD players, cassette decks, TVs, cable boxes, VCRs, DVD players, satellite receivers, etc.
• To operate 7 components other than this receiver, you should enter the setup code for each component.
(For details, refer to “USING FUNCTIONS OF REMOTE CONTROL” on page 13.)
• The numbered buttons on the remote control have different functions in different device modes. For details, refer to
“FUNCTION TABLE of the NUMBERED BUTTONS” on the following page 11.
POWER
1
POWER
AUDIO
VCR
MACRO
To operate a macro function, press
the corresponding MACRO button.
M1 M2 M3
PL
SPK SET
SPEAKER SETUP
AUDIO SEL.
AUTO
ADJUST
SUBTITLE ZOOM
OSD
SETUP
PL II MUSIC PARAMETER
ADJUST UP/DOWN (>,<)
AUTO
OSD
7
8
10
STANDBY
CD AUX TV
DVD CABLE SAT
MACRO
PARA.
CH SEL.
CH/LEVEL
T/V
MUTE
DSP
PTY SELECT
STEREO
T.TO NE
MENU
VOLUME
LED
2
DEVICE
To operate the desired component with
this remote control, first select the
corresponding DEVICE button.
3
CHANNEL LEVEL UP/DOWN ( , )
4
CHANNEL SELECTOR
5
MUTE
6
VOLUME UP/DOWN( , )
9
STEREO
DSP MODE UP/DOWN ( , )
11
TEST TONE
SLEEP
TUNING UP/DOWN(+,-)
NUMERIC(0~9, +10)
/ INPUT SELECTOR
To select the desired input
source of TUNER~VIDEO 3.
EON TA EON PTY
13
16
18
19
21
DISPLAY
+
TUNER CD AUX
VIDEO1 VIDEO2 VIDEO3
UNIVERSAL REMOTE CONTROL
ENTER
TUNE
SEARCH M.
RNC-47
RDS
PRESET
TAPE
DIMMER
RETURN
P.SCAN
7CH DIR.
SLEEP
10
12345
67890
12
CURSOR CONTROL ( , , , )
/ ENTER
In TUNER function (R-903R only) : RDS buttons.
PTY SELECT, EON TA, EON PTY,
SEARCH M., RDS
14
DIMMER
15
17
PRESET SCAN
20
PRESET UP/DOWN (+,-)
7CH DIRECT
Page 11
11
ENGLISH
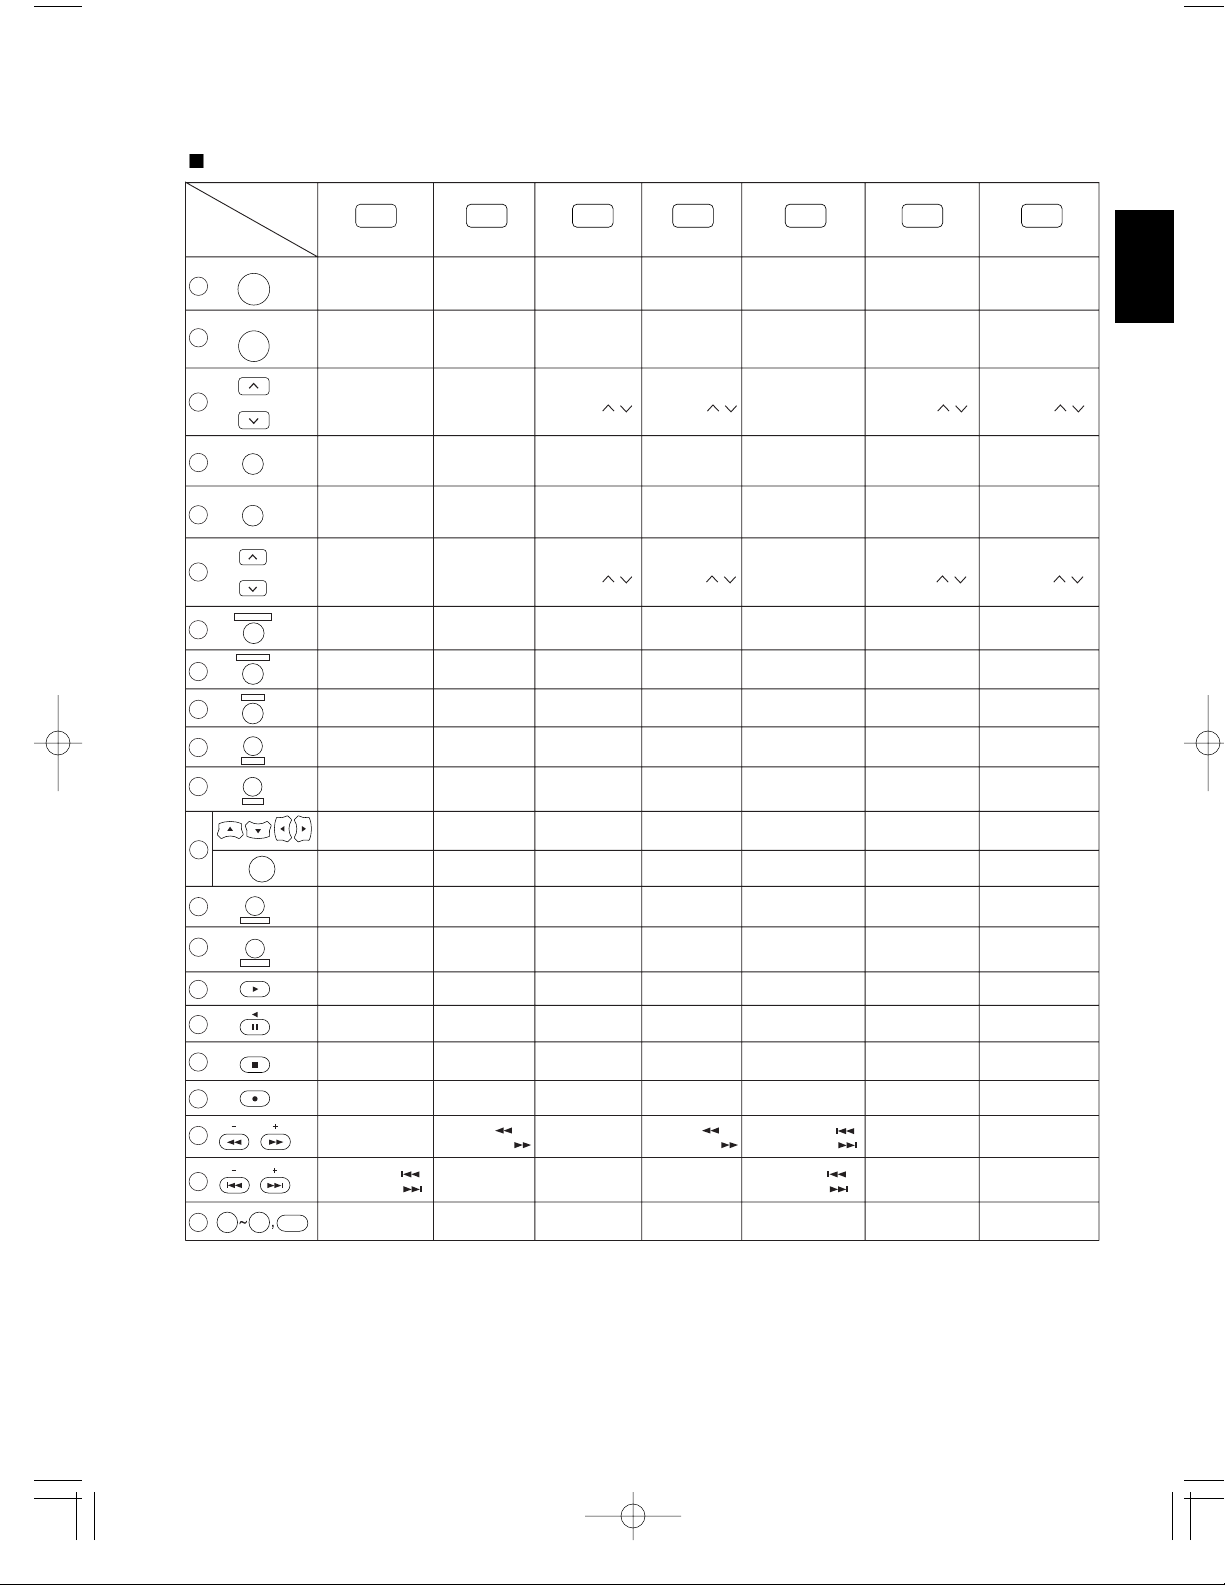
FUNCTION TABLE of the NUMBERED BUTTONS
Device to be
controlled
Button symbol
(for CD player)
(for tape deck) (for VCR) (for DVD player)
(for satellite receiver)
0 9
POWER
+
10
STANDBY
P.SCAN
CH/LEVEL
VOLUME
OSD
SETUP
SLEEP
DISPLAY
DIMMER
RETURN
SUBTITLE
AUDIO SEL.
ZOOM
TUNE
PRESET
CH SEL.
T/V
MUTE
T.TONE
MENU
ENTER
1
2
3
4
5
6
7
8
9
10
11
12
13
14
15
16
17
18
19
20
CD AUX
(for TV)
TV VCR DVD
(for cable box)
CABLE SAT
POWER POWER POWER
MUTE
POWER POWER POWER POWER
PLAY
FORWARD PLAY
REVERSE PLAY
PAUSE
STOP STOP STOP
PLAY
PAUSE
RECORD RECORD
NUMERIC NUMERIC NUMERIC NUMERIC NUMERIC NUMERIC
REVERSE SKIP ( )
FORWARD SKIP ( )
REVERSE SKIP ( )
FORWARD SKIP ( )
REVERSE SEARCH ( )
FORWARD SEARCH ( )
REWIND ( )
FAST FORWARD ( )
REWIND ( )
FAST FORWARD ( )
STANDBY
(POWER OFF)
STANDBY
(POWER OFF)
STANDBY
(POWER OFF)
INPUT SELECTOR
CHANNEL LEVEL
UP/DOWN ( / )
CHANNEL LEVEL
UP/DOWN ( / )
VOLUME
UP/DOWN ( / )
MUTE
SUBTITLE
ZOOM
SETUP
MENU
ENTER
DISPLAY
RETURN
PLAY
PAUSE
STOP
INPUT SELECTOR
AUDIO SELECTOR
CURSOR CONTROL
VOLUME
UP/DOWN ( / )
CHANNEL LEVEL
UP/DOWN ( / )
MUTE
INPUT SELECTOR
VOLUME
UP/DOWN ( / )
CHANNEL LEVEL
UP/DOWN ( / )
MUTE
INPUT SELECTOR
VOLUME
UP/DOWN ( / )
STANDBY
(POWER OFF)
STANDBY
(POWER OFF)
STANDBY
(POWER OFF)
STANDBY
(POWER OFF)
21
Notes:
• Some functions for each component may not be available or may work differently.
• Depending on other kinds of components that are available for each DEVICE button, some functions may not be
available or may work differently, too.
• For details about functions, refer to the operating instructions of each component.
Page 12
ENGLISH
12
DIGITAL RECEIVER R-903
12345
67890
+
10
M1 M2 M3
T/V
7m
30
30
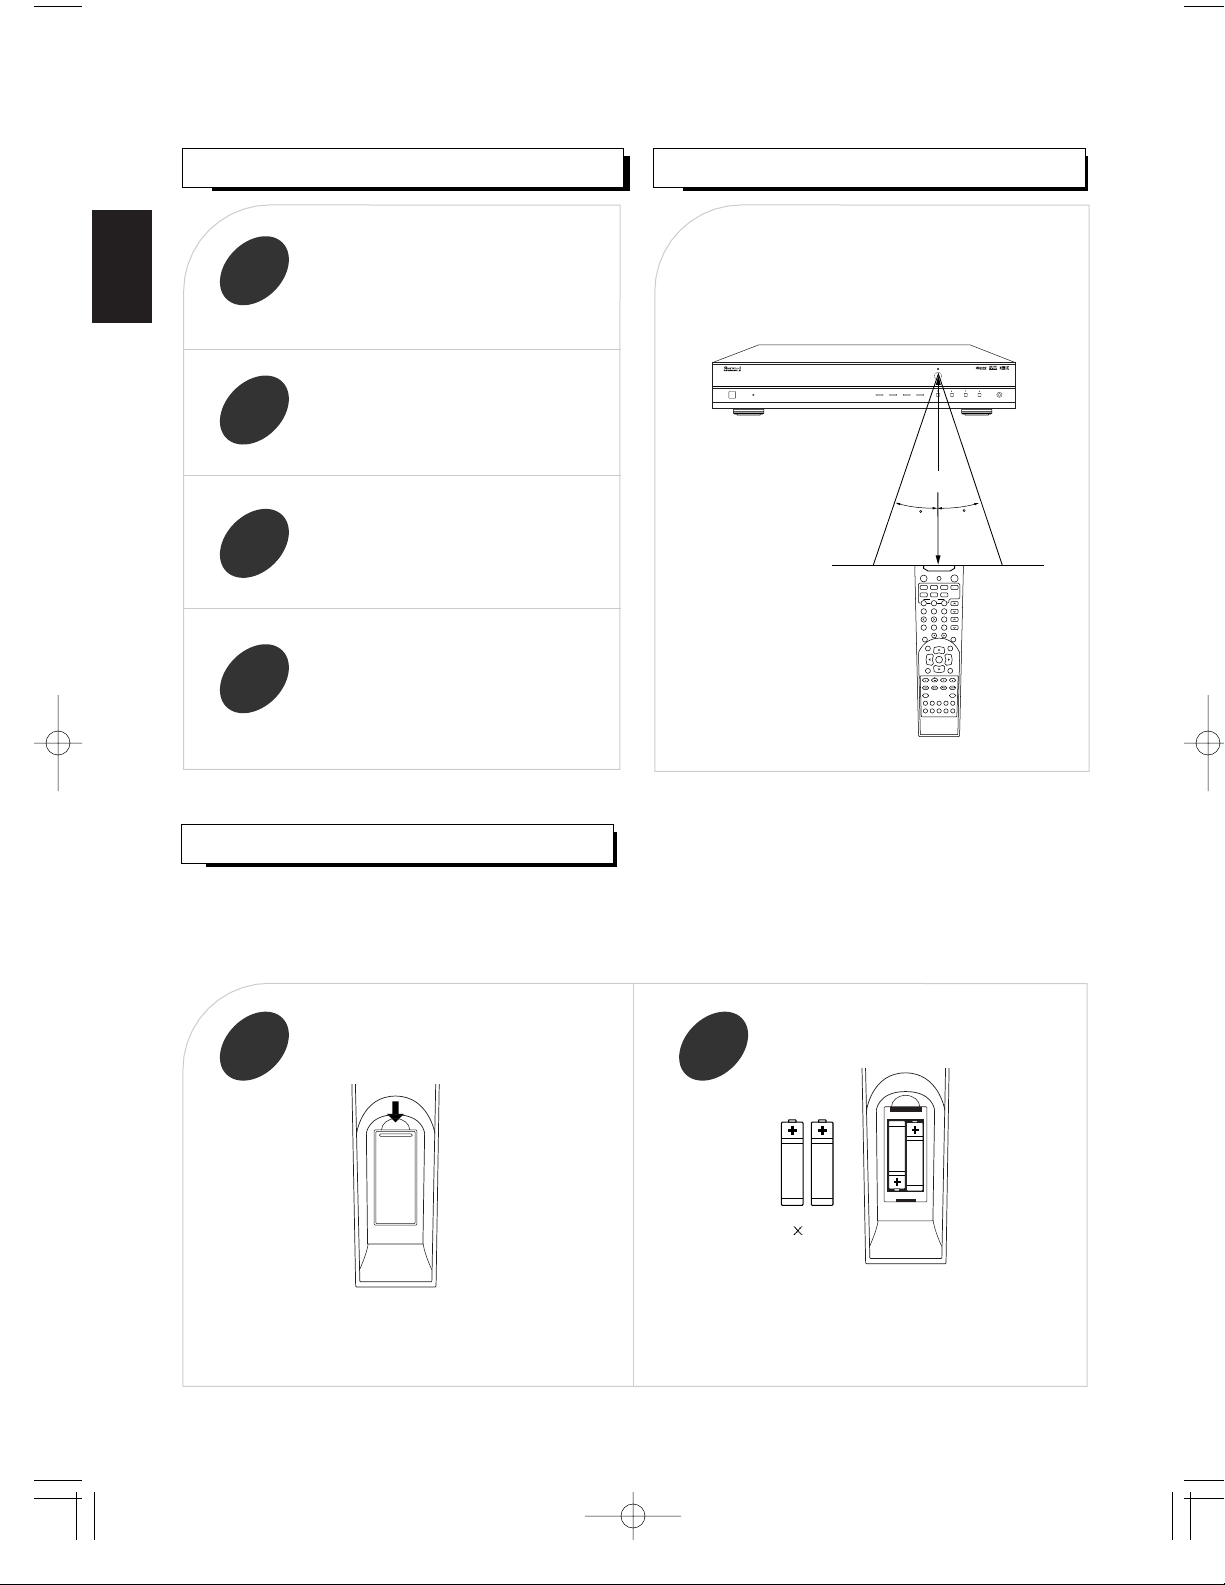
LOADING BATTERIES
REMOTE CONTROL OPERATION RANGE
1 2
• Use the remote control unit within a range of
about 7 meters (23 feet) and angles of up to 30
degrees aiming at the remote sensor.
OPERA TING COMPONENTS WITH REMO TE CONTROL
• Remove the batteries when they are not used for a
long time.
• Do not use the rechargeable batteries(Ni-Cd type).
• Be sure to use alkaline batteries.
Remove the cover.
Load two batteries matching the polarity.
1
Enter the setup code for each component
other than this receiver you wish to
control. For details, refer to “Entering a
setup code” on page 13.
2
Turn on the component you want to
operate.
3
Press the DEVICE button on the remote
control corresponding to the component
you wish to operate.
4
Aim the remote control at the REMOTE
SENSOR of the component you wish to
control and press the button corresponding
to the operation you want.
• When the remote control does not operate, the old batteries should be replaced. In this case, load new batteries within
several minutes after removing old batteries.
• If the batteries are removed or have been exhausted for a longer period of time, memorized contents will be cleared.
Should this happen, you should memorize them again.
2 1.5V
(“AAA” size)
Page 13
13
Turn on the component you want to control
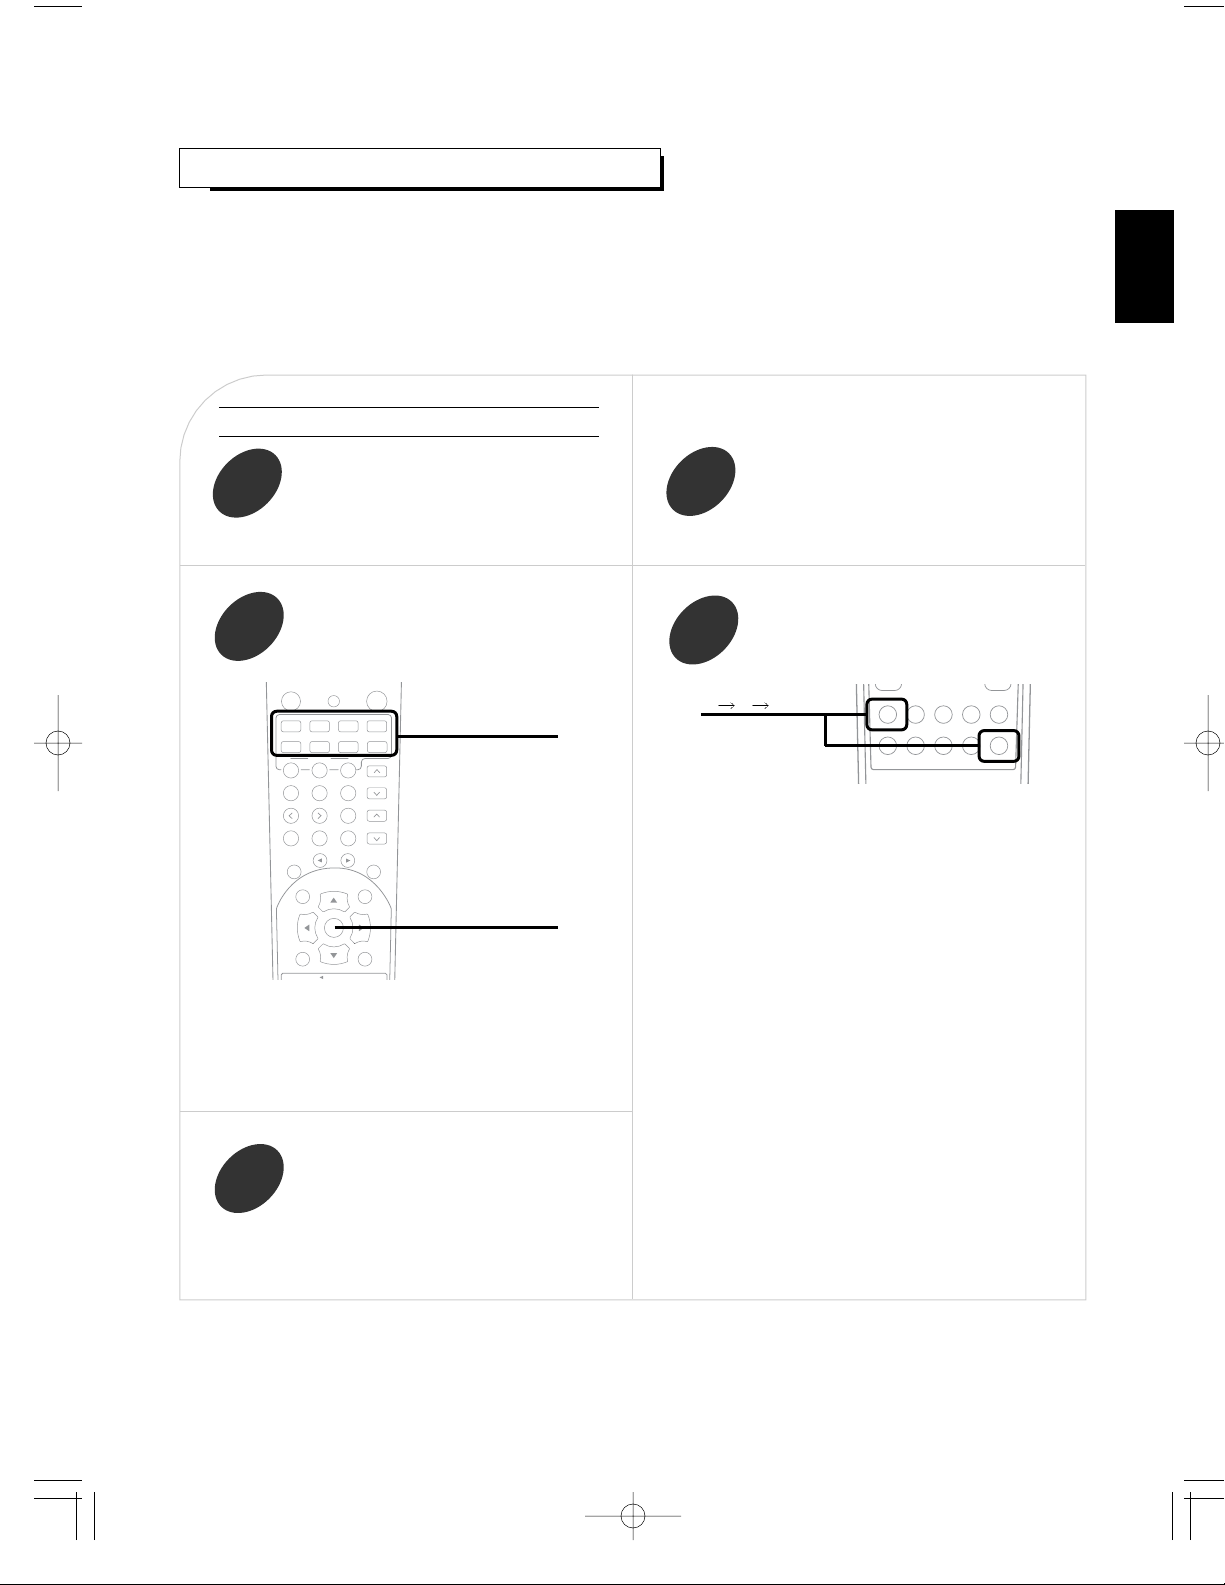
USING FUNCTIONS OF REMOTE CONTROL
Entering a setup code
• This remote control can control up to 8 different components.
• Before operating audio and video components other than this receiver with using this remote control, the setup
code for each component should be entered.
• For system remote control operation, “000” was stored previously in the memory of the device button “CD” for
Sherwood CD player, “DVD” for Sherwood DVD player and “AUX” for Sherwood tape deck respectively as its
factory setup code. So, you don’t need to enter its code for each Sherwood component except in such a case
that its code does not work.
Find the setup codes according to the type
and the brand name of your component,
referring to “SETUP CODE TABLE” on
page 45.
Enter a 3 digit code, aiming the remote control
at the remote sensor on the component.
Example) When entering “001”.
• The LED will flicker once.
Note:
• The AUDIO button is unavailable for the audio
components other than this receiver.
• If entering is performed successfully, the LED will
flicker twice.
• To be sure that the setup code is correct, press the
POWER(or STANDBY) button.
If your component is tuned off, the setup code is correct.
• When your component is not turned off, repeat the
above steps 2 to 4, trying each code for your component
until you find one that works.
Notes:
• If the LED did not flicker twice, then repeat the above
steps 3 to 4 and try entering the same code again.
• Manufacturers may use different setup codes for the
same product category. For that reason, it is important
that you check to see if the code you have entered
operates as many controls as possible. If only a few
functions operate, check to see if another code will
work with more buttons.
Press and hold down both the ENTER
button and the DEVICE button you want
for more than 1 second.
Repeat the above steps 1 to 4 for each of
your components.
AUDIO
VCR
M1 M2 M3
T/V
MACRO
DVD CABLE SAT
CD AUX TV
ENGLISH
ENTER
0 0 1
DEVICE
buttons
1
2
3
4
5
Page 14
ENGLISH
14
Using a punch-through function
This remote control may be programmed to operate
either the AUDIO volume punch-through or the TV
volume and/or TV channel punch-through in
conjunction with any of the eight components
controlled by this remote control.
For example, since this receiver will likely be used as
the sound system while watching TV, you may want
to adjust this receiver’s volume although this remote
control is set to control the TV.
• When programming this remote control for the
AUDIO volume punch-through, press and hold
down both “AUDIO” button and “VOLUME
”
button for more than 1 second.
• If programming is performed successfully, the LED
will flicker twice.
•
When you want either TV volume or TV channel
punch-through, press and hold down both “TV”
button and either “VOLUME ” or “CH ”
button for more than 1 second.
Note :
• If you use one of AUDIO and TV volume punchthrough functions, you cannot use the other.
Removing a punch-through function
• When removing the AUDIO volume punch-through,
press and hold down both “AUDIO” button and
“VOLUME ” button for more than 1 second.
• If removing is performed successfully, the LED will
flicker twice.
•
When you want to remove either TV volume or TV
channel punch-through, press and hold down both
“TV” button and either “VOLUME ” or “CH ”
button for more than 1 second.
Removing all punch-through functions
Press and hold down both “AUDIO” button and
“AUTO” button for more than 1 second.
• If removing all punch-through functions is
performed successfully, the LED will flicker twice.
VOLUME
AUDIO
VOLUME
AUDIO
AUDIO
AUTO
Page 15
15
Programming a macro function
Note:
You should press the corresponding DEVICE buttons
before pressing each operation button.
Example) When playing a DVD on the DVD player
connected to VIDEO 2 jacks of this receiver.
1. Press “AUDIO” button to control this receiver.
2. Press “POWER” button to turn this receiver on.
3. Press “AUDIO” button to control this receiver.
4. Press “VIDEO 2(7)” button to select the desired
input source.
5. Press “DVD” button to control the DVD player.
6. Press “POWER” button to turn the DVD player on.
7. Press “DVD” button to control the DVD player.
8. Press “
” button to start playback.
Press the operation buttons you want to
program in order.
2
Press and hold down both “ENTER” button
and one of three NUMERIC buttons
(“1”~“3”) corresponding to “M1”~“M3”
buttons for more than 1 second.
1
• If the programming is performed successfully, the
LED will flicker twice.
To remove a macro program
• When removing a macro program, perform the above
steps 1 and 3, but ignore the step 2.
To change a macro program
• When a new macro program is stored into a MACRO
button with performing the above steps 1 to 3, the
previous macro program is cleared from the memory
of the MACRO button.
Press “ENTER” button.
3
• The macro function enables you to program a series
of button operations(up to 10) on this remote control
into a single button.
• You can store up to three separate macro command
sequences into “M1”, “M2” and “M3” buttons.
Operating a macro function
Notes:
• The codes programmed into a MACRO button will
be transmitted at an interval of 0.5 seconds.
However, some components may not be able to
complete one operation in 0.5 seconds and may miss
the next code.
In this case, the macro function cannot control the
corresponding components correctly.
• Be sure to use the remote control within the remote
control operation range of the components.
• Depending on the operation status of the
components, etc., the macro function cannot control
the corresponding components correctly.
• Aim the remote control at the REMOTE SENSORs
of the components to be controlled and press the
MACRO button you want.
Example) When pressing “M1” button.
• If the macro mode is entered, the LED will flicker
once.
ENGLISH
Example) When programming a series of button
operations into “M1” button.
ENTER
TUNER
ENTER
M1
POWER POWER
AUDIO AUDIO DVD DVD
VIDEO2
7
Page 16
ENGLISH
16
DTS Neo : 6™ surround
This mode applies conventional 2-channel signals such as
digital PCM or analog stereo signals to the high precision
digital matrix decoder used for DTS-ES Matrix 6.1 to
achieve 6.1-channel surround playback. DTS Neo : 6
surround includes two modes for selecting the optimum
decoding for the signal source.
DTS Neo : 6 Cinema
This mode is optimum for playing movies. Decoding is
performed with emphasis on separation performance to
achieve the same atmosphere with 2-channel sources as
with 6.1-channel sources.
DTS Neo : 6 Music
This mode is suited mainly for playing music. The front left
and front right signals bypass the decoder and are played
directly so there is no loss of sound quality, and the effect
of the surround signals from the center, surround left,
surround right and surround back channels adds a natural
sense of expansion to the sound field.
“DTS”, “DTS-ES Extended Surround” and “Neo : 6” are
trademarks of Digital Theater Systems,Inc.
Dolby Digital
Dolby Digital is the multi- channel digital signal format
developed by Dolby Laboratories. Discs bearing the
“ ” includes the recording of up to 5.1 channels of
digital signals, which can reproduce much better sound
quality, spatial expansion and dynamic range
characteristics than the previous Dolby Surround effect.
Dolby Digital EX
This mode creates the back (sometimes also referred to as
“surround center”) signals from the surround left and right
signals in Dolby Digital 5.1 channel source using a matrix
decoder and provides 6.1 channel surround playback. For
the best results, this mode should be selected during
playback of sources(bearing the “ ”) recorded in
Dolby Digital Surround EX. With this additional channel,
you can experience more dynamic and realistic moving
sound especially.
When Dolby Digital EX sources are decoded with a Dolby
Digital EX decoder, the format is automatically detected
upon decoding and the Dolby Digital EX mode is selected.
However, some Dolby Digital EX sources may be detected
as Dolby Digital sources. In this case, the Dolby Digital EX
mode should be selected manually to play these sources.
Before Operation
SURROUND SOUND
• This receiver incorporates a sophisticated Digital Signal Processor that allows you to create optimum sound
quality and sound atmosphere in your personal Home Theater.
DTS Digital Surround
DTS Digital Surround(also called simply DTS) is a multichannel digital signal format which can handle higher data
rates than Dolby Digital. Although both Dolby Digital and
DTS are 5.1 channel formats, discs bearing the “ ”
are generally thought to provide better sound quality due to
the lower audio compression required.
It also provides wide dynamic range and separation,
resulting in magnificent sound.
DTS - ES Extended Surround™
()
This is a new multi channel digital signal format which
greatly improves the 360- degree surround impression and
space expression thanks to further expanded surround
signals, offering high compatibility with the conventional
DTS format.
In addition to the 5.1 channels, DTS-ES Extended
Surround also offers the surround back (sometimes also
referred to as “surround center”) channel for surround
playback with a total of 6.1 channels. DTS-ES Extended
Surround includes two signal formats with different
surround signal recording methods as follows:
DTS-ES™ Discrete 6.1
Because the signals for 6.1 channels (including the surround
back channel) are fully independent, it is possible to achieve a
sense that the acoustic image are moving about freely among
the background sounds surrounding the listener from 360
degrees.
Though maximum performance is achieved when sound
tracks recorded with this system are played using a DTS -ES
decoder, when played with a conventional DTS decoder, the
surround back channel signals are automatically downmixed
to the surround left and surround right channels so that none
of the signal components are lost.
DTS - ES™ Matrix 6.1
With this format, the additional surround back channel signals
undergo matrix encoding and are input to the surround left and
surround right channels beforehand. During playback, they are
decoded to the surround left, surround right and surround back
channels.
Because the bit stream format is 100% compatible with
conventional DTS signals, the effect of the DTS-ES Matrix 6.1
format can be achieved even with DTS 5.1- channel signal
sources. Of course, it is possible to play DTS-ES Matrix 6.1 channel signal sources with a DTS 5.1 - channel decoder.
When DTS-ES Discrete 6.1 or Matrix 6.1 sources are decoded
with a DTS - ES decoder, the format is automatically detected
upon decoding and the optimum surround mode is selected.
However, some DTS - ES Matrix 6.1 sources may be
detected as DTS sources. In this case, the DTS - ES Matrix
mode should be selected manually to play these sources.
Surround modes
Page 17

17
ENGLISH
The following modes apply conventional 2-channel signals such as digital PCM or analog stereo signals to high
performance Digital Signal Processor to recreate sound fields artificially. Select one of the twelve provided
surround modes according to the program source you want to play.
Theater
This mode provides the effect of being in a theater -in-the
round when watching a play.
Movie
This mode provides the effect of being in a movie theater
when watching a movie.
Hall 1/2
This mode provides the ambience of a chamber hall for
chamber music or an instrumental solo (Hall 1) or a
concert hall for orchestral music or an opera (Hall 2).
Stadium
This mode provides the expansive sound field to achieve
the true stadium effect when watching baseball or soccer
games.
Church
This mode provides the ambience of a church for
baroque, string orchestral or choral group music.
Club 1/2
This mode creates the sound field of a jazz club with a
low ceiling and hard walls (Club 1) or a live house with a
relatively spacious floor (Club 2).
Arena 1/2
This mode provides the feeling of a live concert in a
medium - sized (Arena 1) or large (Arena 2) arena.
Game
Use this mode to enjoy video game sources.
Matrix
This mode reproduces a delayed signals from the
surround channels to emphasize the sense of expansion
for music sources.
Dolby Pro Logic
Dolby Pro Logic is a specially encoded two channel
surround format which consists of four channels ( front left,
center, front right and surround). Sources bearing the
“ ” provide the theater-like surround sound.
The surround channel is monaural, but is played through
both surround speakers.
Dolby Pro Logic II surround
This mode applies conventional 2- channel signals such as
digital PCM or analog stereo signals as well as Dolby
Surround signals, etc. to surround processing to offer
improvements over conventional Dolby Pro Logic circuits.
Dolby Pro Logic II surround includes two modes as follows:
Dolby Pro Logic II Cinema
When enjoying movies, this mode allows you to further
enhance the cinematic quality by adding processing that
emphasizes the sounds of the action special effects.
Dolby Pro Logic II Music
When listening to music, this mode allows you to further
enhance the sound quality by adding processing that
emphasizes the musical effects.
Dolby Virtual
This mode employs sophisticated digital processing to
create the illusion of “phantom” speakers, this mode allows
you to experience surround sound effects from Dolby
Digital, Dolby Surround or 2-channel (recorded in digital
PCM or analog stereo) sources, through just a single pair
of front speakers.
Manufactured under license from Dolby Laboratories.
“Dolby”, “Pro Logic”, “Surround EX” and the double-D
symbol are trademarks of Dolby Laboratories.
MPEG Multichannel
This mode is a surround system which faithfully
reproduces the ambience and dynamics of movie
soundtracks and music alike. Though the number of audio
channels is 5.1 which is same as Dolby Digital, discs
bearing the “ ” provides much better at
locating individual sounds to the correct and stable position
in the sound stage.
When using the 7 CH DIRECT INPUTs to playback the
sound from an additional multichannel decoder for
surround sound, you can enjoy the corresponding surround
sound, too. For details, refer to the operating instructions of
the component to be connected.
Page 18

ENGLISH
18
Ideal speaker placement varies depending on the size of your room and
the wall coverings, etc. The typical example of speaker placement and
recommendations are as follows :
Front left and right speakers and center speaker
Place the front speakers with their front surfaces as flush with TV or
monitor screen as possible.
Place the center speaker between the front left and right speakers
and no further from the listening position than the front speakers.
Place each speaker so that sound is aimed at the location of the listener’s
ears when at the main listening position.
Surround left and right speakers
Place the surround speakers approximately 1 meter (40 inches) above
the ear level of a seated listener on the direct left and right of them or
slightly behind.
Surround back speaker
Place the surround back speaker at the rear center facing the front at a
slightly higher position (0 to 10 inches) than the surround speakers.
We recommend installing the surround back speaker at a slightly
downward facing angle. This effectively prevents the surround back
channel signals from reflecting off the TV or screen at the front center,
resulting in interference and making the sense of movement from the
front to the back less sharp.
Speaker placement
For your reference, the sound from each channel can be reproduced according to the surround modes as follows:
Depending on the speaker settings and the number of the encoded channels, the sound from the corresponding
channels cannot be reproduced.(For details, refer to “Adjusting the speaker settings” on page 19.)
Channels
FRONT L/R CENTER
SURROUND
SURROUND BACK SUBWOOFER
Modes L/R
DTS
DTS ES DISCRETE/MATRIX
DTS NEO MOVIE/MUSIC
DOLBY DIGITAL
DOLBY DIGITAL EX
DOLBY PRO LOGIC
DOLBY PRO LOGIC II MOVIE/MUSIC
DOLBY VIRTUAL
MPEG
MATRIX
Other Surround
STEREO
7 CH DIRECT
Subwoofer
The subwoofer reproduces powerful deep bass sounds.
Place a subwoofer anywhere in the front as desired.
Notes :
When using a conventional TV , to avoid interference with the TV picture,
use only magnetically shielded front left and right and center speakers.
To obtain the best surround effects, the speakers except the subwoofer
should be full range speakers.
TV or SCREEN
1
3
CENTER
4
LISTENING
POSITION
9
8
SURROUND
(BACK)
Surround back
speaker
60 to 90 cm
FRONT (RIGHT)
5
SURROUND
(RIGHT)
Point slightly
downward
SUBWOOFER
FRONT (LEFT)
2
67
SURROUND
(LEFT)
Surround speaker
Front speaker
Page 19

19
Depending or relationship between speakers, settings
possible for each speaker are as follows:
Front L/R Center Surr. L/R Surr. Back Subwoofer
Large
Large Small
Large
None
Small
Small
None
None None
Large
Large Small Yes
Large
Small
None or
Small
Small None
None
None None
Large
Large Small
None None
Small
Small
None
Small
Small
Small None
Small None None Yes
None Small
Small
None
• After you have installed this unit and connected all the components, you should adjust the speaker settings for the optimum
sound acoustics according to your environment and speaker layout.
Setting the type of speakers
The composition of the signals output from the different channels and the frequency reponse are adjusted automatically
according to the combination of speakers actually being used.
Adjusting the speaker settings
Select “Large” or “Small” not according to the actual size
of the speaker but according to the speaker’s capacity for
playing low frequency (bass sound below frequency set for
the Crossover Frequency mode and below) signals.
Large : Select this when connecting speakers that can
fully reproduce sounds below crossover
frequency(*) of your speaker.
Small : Select this when connecting speakers that cannot
fully reproduce sound below crossover frequency.
When this setting is selected, sound below
crossover frequency is assigned to the subwoofer
or speakers which are set to “Large”(when not
using a subwoofer).
None : Select this when no speakers are connected.
When this is selected, sound is sent to the front
speakers.
Yes / None : Select the desired depending on whether a
subwoofer is connected or not.
(*) : Crossover frequency is the frequency (Hz) below which the
bass sound of each main speakers is to output from the
subwoofer or from speakers which are set to “Large” (when not
using a subwoofer).
Refer to the operating instructions of the speakers to be connected.
If the frequency range of your speaker is 80 Hz ~ 12 KHz, the
crossover frequency is 80 Hz.
If you do not know, try comparing the sound at both settings
(setting the volume to a level low enough so as not to damage the
speakers) to determine the proper setting.
Speaker distance settings
When enjoying 5.1 channel surround playback with Dolby Digital and DTS sources, it is ideal that the center and surround
speakers should be the same distance from the main listening position as the front speakers. By entering the distance between
the listening position and each speaker, the delay times of center and surround speakers are automatically adjusted to create
an ideal listening environment virtually as if the center and surround speakers were at their ideal locations respectively as
below:
FL
SL SB SR
Df
Dc
Ds
SW FR
Ideal location of a
center speaker
All speakers should be located
within a circle with a radius of Df
Ideal location of a
surround speaker
Df : Distance between front speakers and listening position
Dc : Distance between center speakers and listening position
Ds : Distance between surround speakers and listening position
C
ENGLISH
Page 20

20
Refer to the previous page and adjust the speaker settings
• You can also adjust these settings with using the buttons on the front panel.(For details, refer to “SETTING UP THE SYSTEM
ON FRONT PANEL” on page 43.)
Note : When the headphones are plugged or the 7 CH DIRECT is selected as an input source, the speaker setting function
cannot be available.
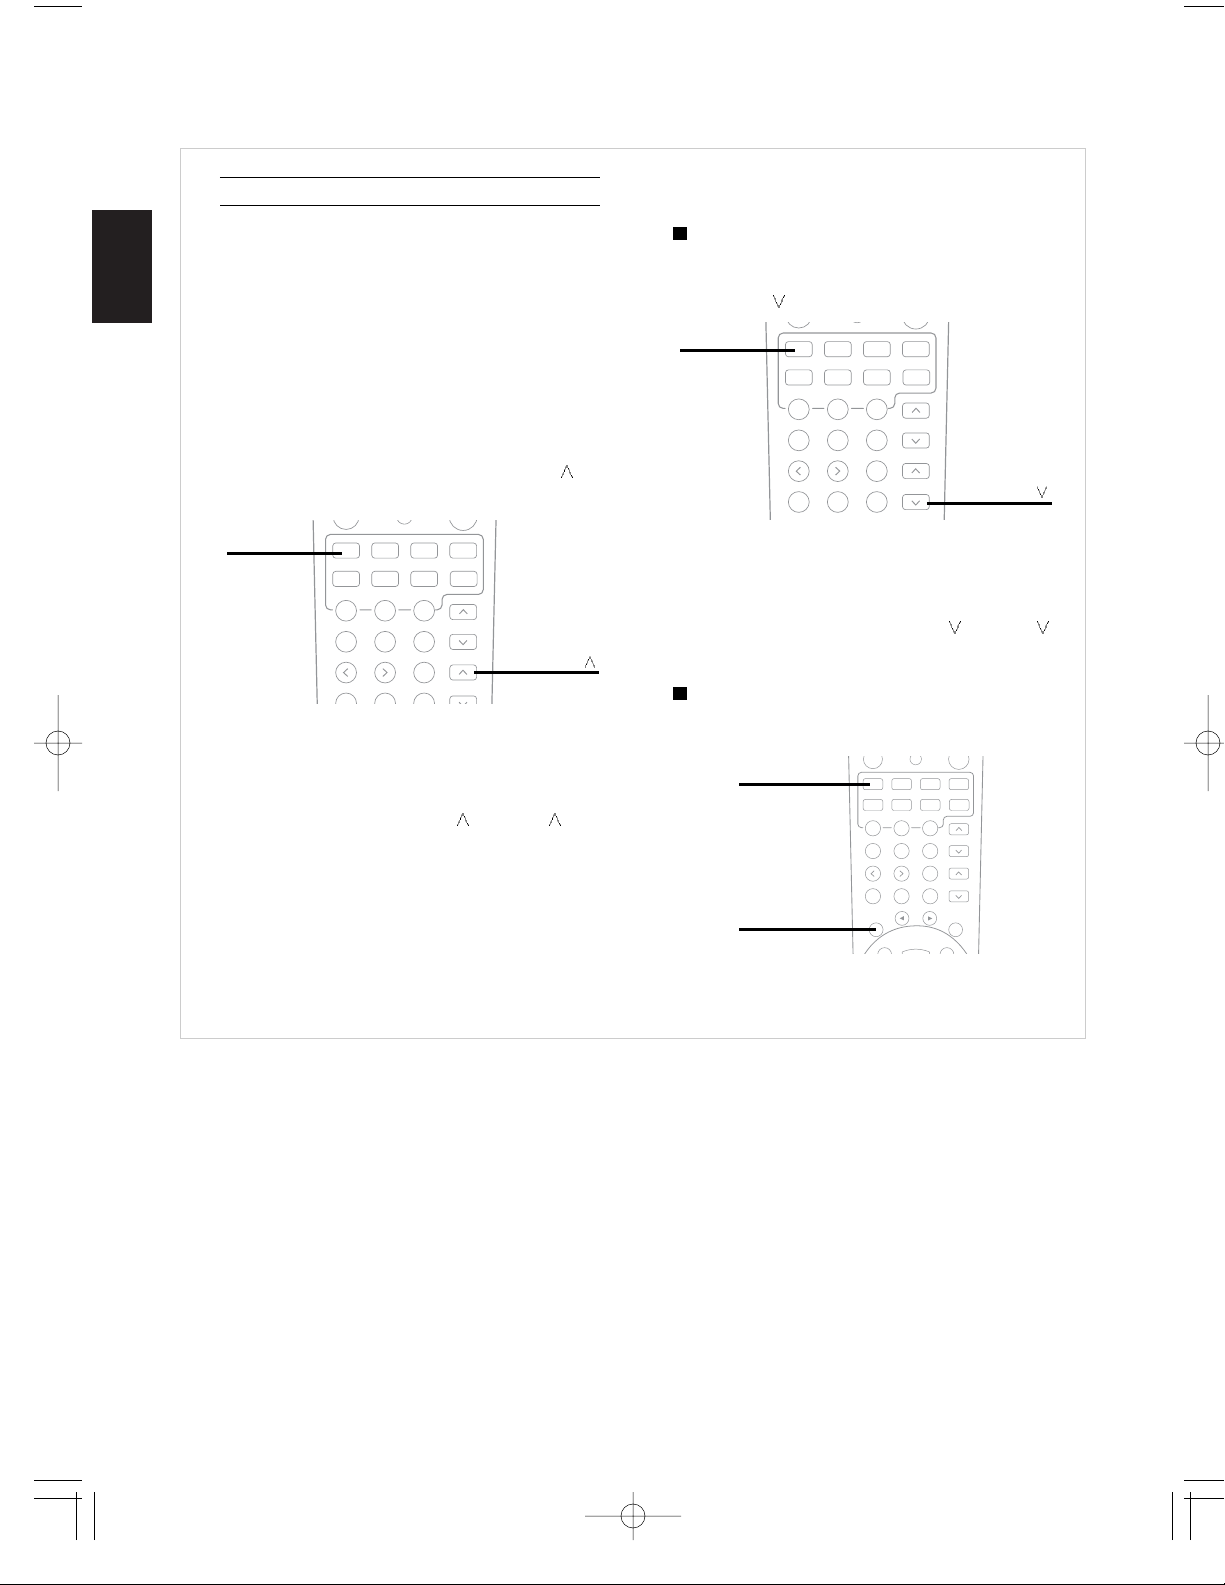
1. When selecting each setting mode
• Each time the SPEAKER SETUP button is pressed,
the speaker setting mode changes in succession and
is displayed for several seconds as follows.
• When the speaker setting mode disappears, press
the SPEAKER SETUP button repeatedly to select
the desired mode.
• When selecting the front-center-surround speaker
setting mode,
“FL - CL - SL”
• When selecting the surround back speaker setting
mode,
“SUR B - L”
• When selecting the subwoofer setting mode,
“SUB W - Y”
• Only when the surround back speaker is set to “N”,
the subwoofer type mode can be selected.
“ACTIVE”
• When the surround back speaker does not exist,
you can connect subwoofer into the terminal of
surround back speaker. In this case, the setting of
surround back speaker is N(one) and the type of
subwoofer have to be changed to PASSIVE.
2. When adjusting the selected setting
mode to the desired setting
• Each time the ADJUST UP( ) or DOWN( )
button is pressed, one of the settings is selected and
displayed for several seconds as follows.
• You can select one of 11 different speaker settings.
FL - CL - SL / FL - CL - SN / FL - CS - SL /
FL - CN - SL / FL - CS - SN / FL - CN - SS /
FS - CS - SS / FS - CS - SN / FS - CN - SS /
FL - CS - SS / FL - CL - SS
(F: Front, C: Center, S: Surround, L: Large, S: Small, N: None)
L S N
• Depending on the surround speaker setting, you
cannot select “L” or/and “S”.
Y(es) N(o)
• When the front speaker is set to “S”, the subwoofer
is automatically set to “Y”.
ACTIVE PASSIVE
• When the surround back speaker is set to L(arge)
or S(mall), this mode set to ACTIVE automatically
and does not be displayed.
• You can adjust the distance within the range of 0.3
~ 9.0 meters in 0.3 meter interval.
Note:
• When the type of speaker is set to “N”, its distance
mode cannot be selected.
• When selecting the front left distance mode,
“FRONT L 3.0 (m)”
SPK SET
ADJUST
UP(>), DOWN(<)
ENGLISH
Page 21

21
• When selecting the front right distance mode,
“FRONT R 3.0 (m)”
• When selecting the center distance mode,
“CENTER 3.0 (m)”
• When selecting the surround left distance mode,
“SURR L 3.0 (m)”
• When selecting the surround right distance mode,
“SURR R 3.0 (m)”
• When selecting the Dolby Virtual delay time mode,
“NARROW”
• This mode can work only in the Dolby Virtual mode.
In the other surround modes, this setting is just
displayed.
• When selecting the crossover frequency setting
mode,
“CFREQ 80”
• You can adjust the distance within the range of 0.3
~ 9.0 meters in 0.3 meter interval.
Note:
• When the type of speaker is set to “N”, its distance
mode cannot be selected.
NARROW : Relatively long distance for the main
listening position to front speakers.
WIDE : Relatively short distance.
80 120
160 200
TURNING THE POWER ON/OFF
Operations
In the standby mode, turn the power on.
2
Press the POWER switch.
1
• This unit enters the standby mode.
The lighting of STANDBY indicator means that the
receiver is not disconnected from the AC mains and a
small amount of current is retained to support the
memorized contents and operation readiness.
• To switch the power off, push the POWER switch
again. Then the power is cut off and the STANDBY
indicator goes off.
• Each time the POWER button on the remote control
is pressed, the receiver is turned on to enter the
operating mode or off to enter the standby mode.
• In the standby mode, if the INPUT SELECTOR
button is pressed, the receiver is turned on
automatically and the desired input is selected.
POWER
ON/ OFF
• Note : Before operating this receiver with the supplied remote control, refer to “Universal Remote Controls” on page 10 for
details about operation.
Memory backup function
• These following items, set before the receiver is turned off, are memorized:
Input settings, surround mode settings, speaker settings, channel level settings, preset stations, etc.
(unit : Hz)
POWER
When the power operation switch is in the OFF or STANDBY state, the apparatus is still connected on
some AC line voltages.
Please be sure to unplug the cord when you leave home for, say, a vacation.
ENGLISH
Page 22

22
ENGLISH
LISTENING T O A PROGRAM SOURCE
Select the desired input source.
1
• Each time the INPUT SELECTOR button on the
front panel is pressed, the input source changes as
follows;
TUNER
TAPE AUX VIDEO 1
(frequency displays.)
7-DIRECT
VIDEO 3 VIDEO 2
When selecting the 7 CH DIRECT
• “7-DIRECT” is displayed and the 7 or 6 separate analog
signals from the component connected to this input can
be controlled only by volume depending on the
surround back speaker setting.
• These analog signals (except front L/R channel)
cannot be recorded.
When AUX, VIDEO 1~3 is selected as an
input source
Select the digital or analog input
connected as desired.
2
• Each time this button is pressed, the corresponding
input is selected as follows ;
A(nalog) o(ptical) 1 o(ptical) 2 c(oaxial) 1
• To listen to a DTS, Dolby Digital or MPEG program
source in the 2-CH downmix mode, in the stereo
mode, the corresponding digital input should be
selected. (For details, refer to “Downmixing into 2
front channels” on page 30.)
Notes :
• When the selected optical or coaxial digital input is
not connected, the “DIGITAL” indicator flickers,
meaning no sound.
• The sound from the component connected to the
selected digital input can be heard regardless of the
selected input source.
DIGITAL INPUT
AM/FM MODE
Depending on the input digital signal format,
select the desired decoding mode.
3
Notes :
• Only when the digital input is selected as signal input for the input sources except TUNER, TAPE and 7 CH
DIRECT, the decoding mode can be selected.
• Noise may be generated at the beginning of playback and while searching during DTS playback in the IN-AUTO
mode. In this case, try playing in the IN-DTS mode.
• Each time this button is pressed, the decoding mode
changes as follows :
IN-AUTO : The input digital signal format(DTS, Dolby
Digital, MPEG or PCM(2 channel stereo),
etc.) used by the selected digital input
source is detected automatically to perform
the necessary decoding process for optimum
surround mode.
IN-DTS : The DTS signal processing is performed only
when DTS signals are input.
IN-PCM : The PCM signal processing is performed only
when PCM signals are input.
DECODING
TUNE MODE
or
INPUT SELECTOR
7 CH DIR.
TUNER
AUX
TAPE
VIDEO1
VIDEO2
VIDEO3
or
AUTO
Page 23

23
Operate the selected component for
playback.
4
Adjust the (overall) volume.
5
• “MUTE” will flicker.
• To resume the previous sound level, press it again.
To mute the sound,
6
To listen with the headphones,
7
• The sound from the speakers is cut off.
• When listening to a DTS, Dolby Digital or MPEG
program source, if the headphones are plugged, it
enters the 2-CH downmix mode automatically. (For
details, refer to “Downmixing into 2 front
channels”on page 30.)
PHONES
• When playing back the program sources with
surround sound, refer to “ENJOYING SURROUND
SOUND” on page 24.
VOLUME
MUTE
ENGLISH
Page 24

24
ENGLISH
Signal format being input Selected decoding mode Selectable surround mode
Dolby Digital 5.1, IN-AUTO mode (DOLBY DIGITAL EX,) DOLBY DIGITAL,
Dolby Digital EX 6.1 channel sources DOLBY VIRTUAL
Dolby Digital 2-channel IN-AUTO mode (DOLBY DIGITAL EX,) PL II CINEMA, PL II
sources MUSIC, PRO LOGIC, DOLBY VIRTUAL
PCM(2 channel) sources IN-AUTO, IN-PCM mode PL II CINEMA, PL II MUSIC, PRO LOGIC,
Analog stereo sources DOLBY VIRTUAL, NEO 6 CINEMA, NEO 6
MUSIC, THEATER, MOVIE, HALL 1/2,
STADIUM, CHURCH, CLUB 1/2, ARENA 1/2,
GAME, MATRIX
DTS 5.1, IN-AUTO, IN-DTS mode (DTS ES DISCRETE/MATRIX)
DTS ES Discrete 6.1, DTS
DTS ES Matrix 6.1 sources
MPEG sources IN-AUTO mode corresponding MPEG surround mode
• You can also select the surround mode with using the buttons on the front panel.
(For details, refer to “SETTING UP THE SYSTEM ON FRONT PANEL” on page 44.)
ENJO YING SURROUND SOUND
Selecting the surround mode
• When the AUTO OSD function is on, the corresponding setup display is on the TV screen.
DSP
STEREO
• Each time the DSP MODE or button is pressed, the surround mode changes depending on the signal format
being input and the selected decoding mode as follows :
( ): possible only when surround back speaker setting is not “N”.
• When 96 kHz PCM signals are input, the stereo mode is selected automatically; the surround mode cannot be selected.
• When MPEG signals are input in the IN-AUTO mode, the corresponding MPEG surround mode will be selected
regardless of using the DSP MODE or button.
Notes:
• When the selected decoding mode is not matched to the input signal format, the “DIGITAL” indicator flickers and
no sound is heard. Therefore, be sure to select the required decoding mode and the available surround mode
according to the input signal format.
• When the 7 CH DIRECT is selected as an input source, the decoding and surround modes cannot be selected.
• When the digital signals are not input, the desired surround mode cannot be selected.
• When the headphone is used, the surround mode cannot be selected.
To cancel the surround mode for stereo operation
• Then the stereo mode is selected.
• To cancel the stereo mode, select the desired surround
mode with using the DSP MODE
or button.
Page 25

25
FL C FR SR
SW SL SB
Front Left Center Front Right Surround
Right
Subwoofer Surround Surround
Left Back
At each channel, adjust the level so that
they are all heard at the same level.
2
Cancel the test tone function.
3
• You can adjust the level of test tone for each channel so that they are all heard at the same level.
Note : When the 7 CH DIRECT is selected as an input source or the headphones are plugged, the test tone function does
not work.
• After adjusting each channel level with test tone, adjust the channel levels either according to the program sources or to
suit your tastes.
• You can also adjust the channel levels with using the buttons on the front panel.
(For details, refer to “SETTING UP THE SYSTEM ON FRONT PANEL” on page 43.)
Adjusting each channel level with test tone
Enter the test tone mode.
1
• The test tone will be heard from the speaker of each
channel for 2 seconds as follows:
FL C
FR SR
SW
SL
SB
• When the speaker setting is “N”, the test tone of the
corresponding channel is not available.
Front Left Center Front Right Surround
Right
Subwoofer Surround Surround
Left Back
• You can select the desired channel and adjust its level
with repeating the steps 1 and 2 in “Adjusting each
channel level” procedure.
Adjusting each channel level
Select the desired channel.
1
• When it is in the stereo or Dolby Virtual mode or the speaker setting is “N”, center, surround
L/R, surround back or subwoofer channel will not be selected.
• When the headphones are plugged, only the front L/R channel can be selected.
• Each time this button is pressed, the
corresponding channel is selected and
displayed for several seconds as follows:
T.TONE
CH/LEVEL
T.TONE
CH.SEL
ENGLISH
Page 26

26
Adjust the level of the selected channel
as desired.
2
Repeat the above steps 1 and 2 to adjust each
channel level.
3
Presetting and Calling the channel levels
Perform the steps 1 to 3 in “Adjusting
each channel level” on page 25~26 to
adjust each channel level you want.
1
SETUP
MEMORY
Press the SETUP button for more than 2
seconds, then it enters the setup mode. While
displaying the setup mode, press this button
short repeatedly until “P CALL” is displayed.
2
Confirm your decision.
4
ADJUST
TUNING/PRESET
”P CALL” : When calling the preset channel
levels.
“P MEMORY” : When storing the adjusted
channel levels in the preset
memory.
While displaying “P CALL”, select “P
MEMORY” with buttons below.
3
DECODING
TUNE MODE
• The adjusted channel levels has now been stored
in the preset memory.
• When using this function with remote control unit,
press OSD button and refer to page 38~40.
• If the channel display disappears, start from the
step 1 again.
• You can store the adjusted channel levels in the memory. If you change the channel levels and want to
hear with preset levels, you can call them again.
• Select “P CALL” with performing the above steps 2 to 4.
• Then the current channel levels are changed to the preset ones.
Presetting the channel levels
Calling the channel levels
CH/LEVEL
ENGLISH
Page 27

27
Adjusting the LFE level
Press the SETUP button for more than 2
seconds, then it enters the setup mode.
While displaying the setup mode, press
this button short repeatedly until “DD L”
is displayed.
1
SETUP
MEMORY
• You can adjust the LFE(Low Frequency Effect)
levels included in Dolby Digital, DTS and MPEG
program sources.
DD L DTS L
MP L
While displaying “DD L”, each time the
button below is pressed, the mode changes
as follows:
2
DECODING
TUNE MODE
(Dolby Digital LFE) (DTS LFE) (MPEG LFE)
• The Dolby Digital LFE level can be adjusted within
the range of -10~0 dB and other LFE levels within
the range of -10~+10 dB.
• In general, we recommend the LFE level to be
adjusted to 0 dB.(However, the recommended LFE
level for some early DTS software is -10 dB.) If the
recommended levels seem too high, lower the setting
as necessary.
• When using this function with remote control unit,
press OSD button and refer to page 38~40.
While displaying the desired LFE mode,
adjust the level as desired.
3
ADJUST
TUNING/PRESET
• The LFE level can be adjusted and applied when Dolby Digital, DTS or MPEG program source
is inputted. In case of other program sources, this mode is adjustable, but not applied.
Press the SETUP button for more than 2
seconds, then it enters the setup mode.
While displaying the setup mode, press
this button short repeatedly until “TONE
OFF” or “BASS” is displayed.
1
BASS TRBL(treble) TONE ON
• While displaying “TONE OFF”, you cannot adjust
the tone. To adjust the tone, first perform the step 3
and change “TONE OFF” to “TONE ON”.
While displaying “BASS”, each time the
DECODING button is pressed, the tone
mode changes as follows:
2
Adjusting the tone(bass and treble)
SETUP
MEMORY
DECODING
TUNE MODE
ENGLISH
Page 28

28
ENGLISH
• Each adjustable range of bass and treble is -10~+10.
• In general, we recommend the bass and the treble to
be set to 0(flat) level.
• At “TONE ON” mode, you can select “TONE OFF”
mode and vice versa.
TONE ON: When adjusting the tone for your taste.
(“DIRECT” indicator goes off.)
TONE OFF: When listening to a program source
without the tone effect.
(“DIRECT” indicator light up.)
• When using this function with remote control unit,
press OSD button and refer to page 38~40.
Notes:
• If the display of the corresponding mode disappears, start from the step 1 again.
• Extreme settings at high volume may damage your speakers.
• When the digital signals from DTS, Dolby Digital or MPEG program sources are input in available surround
mode, you cannot adjust the tone and can hear a program source without the tone effect.
While displaying the desired tone mode,
adjust the tone as desired.
3
ADJUST
TUNING/PRESET
Compressing the dynamic range (Dolby Digital sources only)
• This function compresses the dynamic range of previously specified parts of the Dolby Digital sound track(with
extremely high volume) to minimize the difference in volume between the specified and non-specified parts.
This makes it easy to hear all of the sound track when watching movies at night at low levels.
• Only when the digital signals from Dolby Digital program source are input in available surround mode, the
dynamic range can be adjusted.
SETUP
MEMORY
Press the SETUP button for more than 2
seconds, then it enters the setup mode.
While displaying the setup mode, press this
button short repeatedly until “DYNR 0.0” is
displayed.
1
• Each time the ADJUST UP(
) or DOWN( ) button is pressed, the mode
changes as follows:
DYNR 0.0 : Off
DYNR 0.5 : Low compression
DYNR 1.0 : High compression
• When using this function with remote control unit, press OSD button and refer to
page 38~40.
Notes:
• If the display of the dynamic range mode disappears, start from the step 1 again.
• In some Dolby Digital softwares, this function may not be available.
ADJUST
TUNING/PRESET
While displaying “DYNR 0.0”, select the desired mode.
2
Page 29

29
• Each time this button is pressed, the parameter changes and is displayed for several seconds as follows;
Panorama mode(“PANO”, default value: OFF)
This mode extends the front stereo image to include the surround speakers for an exciting “wraparound”
effect with side wall imaging. Select “OFF” or “ON”.
Center width control(“C-WID”, default value: 0)
This adjusts the center image so it may be heard only from the center speaker, only from the left/right
speakers as a phantom image, or from all three front speakers to varying degrees.
The control can be set in 8 steps from 0 to 7.
Dimension control(“DIMEN”, default value: 0)
This gradually adjusts the soundfield either towards the front or towards the rear. The control can be set
in 7 steps from -4 to +2.
• When selecting the Dolby Pro Logic II Music mode, you can adjust the various surround parameters for
optimum surround effect.
• You can also adjust the Dolby Pro Logic II Music parameters with using the buttons on the front panel.
(For details, refer to “SETTING UP THE SYSTEM ON FRONT PANEL” on page 43.)
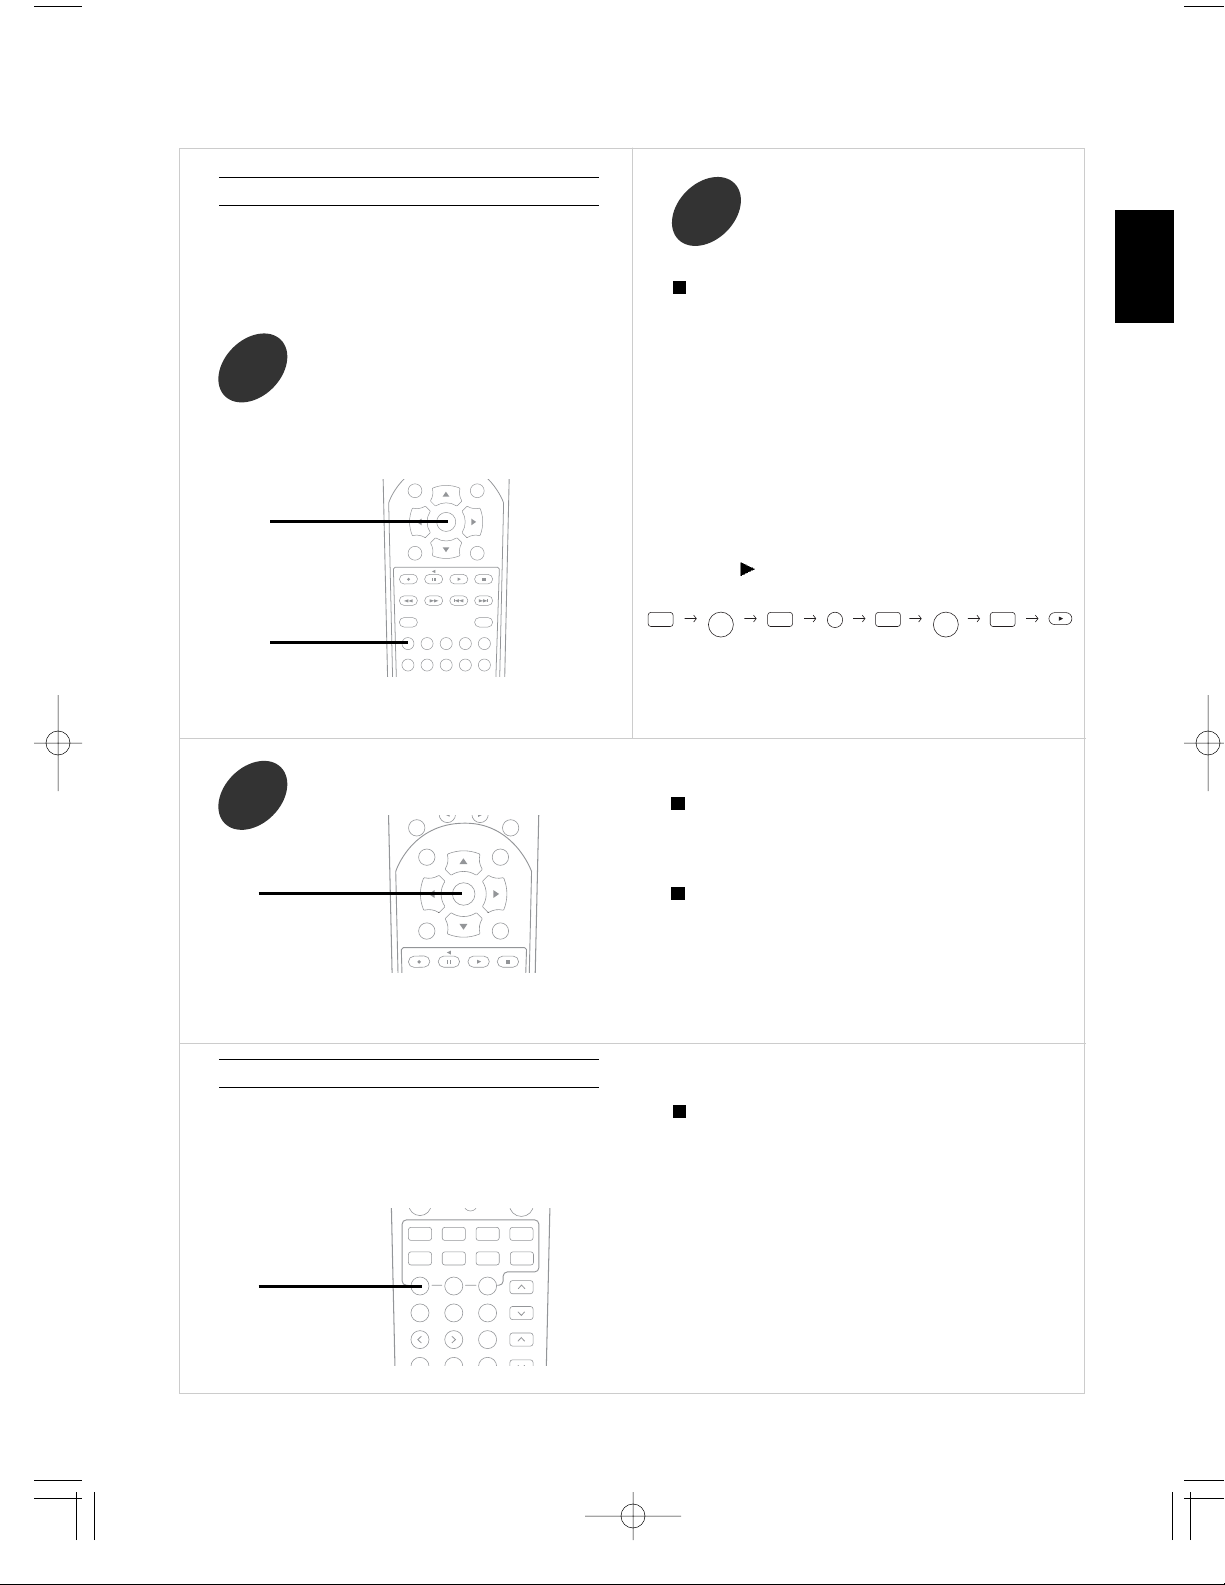
Adjusting the Dolby Pro Logic II Music parameters
Press the PL II MUSIC PARAMETER button to select
the desired parameter.
1
PL II PARA.
ENGLISH
• If the parameter display disappears, start from the
step 1 again.
While displaying the desired parameter,
adjust it as desired.
2
Repeat the above steps 1 and 2 to adjust
other parameters.
3
ADJUST
UP(>), DOWN(<)
Page 30

ENGLISH
30
Downmixing into 2 front channels
• To cancel the 2 - CH downmix mode, select the
desired surround mode with the DSP MODE DOWN
(
) or UP( ) button.
• When the playback of the source on the player is
stopped, interrupted, etc., the 2 - CH downmix mode
is not canceled even though “ ST” and the DTS or
Dolby Digital indicators go off.
• If the headphones are plugged while the digital
signals from the DTS, Dolby Digital or MPEG
program sources are being input, it will enter the 2CH downmix mode automatically and if the
headphones are unplugged in the 2-CH downmix
mode, it will return to the previous mode.
• Allows the multi - channel DTS, Dolby Digital or
MPEG signal to be reproduced through only two
speakers or through headphones.
• When the digital signals from the DTS, Dolby Digital
or MPEG program sources are input in available
surround mode, press the STEREO button.
• “ST” indicator lights up and “2 CH DOWNMIX” is
scrolled, meaning it enters the 2-CH downmix mode,
and then the discrete multi-channels(except LFE) are
mixed down into 2 front channels.
STEREO
Page 31

31
LISTENING TO RADIO BRO ADCASTS
• Each time this button is pressed, the mode changes
as follows;
Tuning mode : “PRESET” goes off.
Preset mode : “PRESET” lights up.
Manual tuning is useful when you already know the
frequency of the desired station.
Manual tuning
Select the tuning mode.
1
Press the below button repeatedly until the
right frequency has been reached.
2
DECODING
TUNE MODE
DECODING
TUNE MODE
or
ADJUST
TUNING/PRESET
Auto tuning
Select the tuning mode.
1
Press the below button for more than 0.5
second.
2
• Each time this button is pressed, the band is changed
as follows:
FM STEREO FM MONO AM
• When FM stereo broadcasts are poor because of weak
broadcast signals, select the FM mono mode to reduce
the noise, the FM broadcasts are reduced in monaural
sound.
To select the tuner,
To select the desired band
DIGITAL INPUT
AM/FM MODE
BAND FREQUENCY
• The tuner will now search until a station of sufficient
strength has been found. The display shows the tuned
frequency and “TUNED”.
• If the station found is not the desired one, simply
repeat this operation.
• Weak stations are skipped during auto tuning.
• When pressing the TUNE +/- buttons on the remote
control, you need not select the tuning mode on step 1.
TUNER
TUNE
-, +
or
ADJUST
TUNING/PRESET
TUNE
-, +
ENGLISH
INPUT SELECTOR
or
Page 32

32
ENGLISH
Repeat the above steps 1 to 3 to memorize
other stations.
4
After selecting the tuner as an input
source, select the preset mode.
1
• The station has now been stored in
the memory.
• A stored frequency is erased from
the memory by storing another
frequency in its place.
• If “MEM” goes off, start again from
the above step 2.
• Then “PRESET” lights up.
• When pressing the PRESET +/- buttons on the
remote control, you need not select the preset mode
on step 1.
Tuning to preset stations
Select the desired preset number.
2
Select the desired preset number (1~30) and press the MEMORY button.
3
SETUP
MEMORY
DECODING
TUNE MODE
Presetting radio stations
• You can store up to 30 preferred stations in the
memory.
• “MEM” is flickering for 5 seconds.
Tune in the desired station with auto or
manual tuning.
1
Press the MEMORY button.
2
SETUP
MEMORY
Scanning preset stations in sequence
• The receiver will start scanning the stations in the preset
sequence and each station is received for 5 seconds.
• At the desired station, press this button again to stop
scanning.
• When pressing this button without selecting the tuner,
the tuner will be selected automatically.
or
ADJUST
TUNING/PRESET
PRESET
-, +
or
ADJUST
TUNING/PRESET
PRESET
-, +
P.SCAN
Page 33

ENGLISH
33
ENGLISH
LISTENING TO RDS BRO ADCASTS(FM ONLY)
While displaying “TP SRCH”.
2
While displaying “PTY SRCH”, select the
desired program type.
2
While displaying “RDS SRCH”,
2
• Use this function to automatically search and
receive the stations offering RDS services.
THIS IS ADDITIONAL FUNCTION FOR R-903R TUNER ONLY
RDS(Radio Data System) is a method for sending information signals together with the transmitter signals. Your tuner is
capable of translating these signals and putting the information on the display. These codes contain the following informations.
Program Service name(PS), A list of Program Types(PTY), Traffic Announcement(TA), Clock Time(CT), Radio Text(RT).
• Use this function to automatically search and receive
the stations broadcasting the desired program type.
• “PTY SRCH” is displayed.
• Each time this button is pressed, one of 32
different types of programs is selected.
(NEWS, AFFAIRS, INFO, SPORT, EDUCATE, DRAMA, CULTURE,
SCIENCE, VARIED, POP M, ROCK M, EASY M, LIGHT M,
CLASSICS, OTHER M, WEATHER, FINANCE, CHILDREN, SOCIAL,
RELIGION, PHONE IN, TRAVEL, LEISURE, JAZZ, COUNTRY,
NATION M, OLDIES, FOLK M, DOCUMENT, TEST, ALARM, NONE)
• When “PTY SRCH” is not displayed, repeat again
from the above step 1.
• Each time this button is pressed, the search mode
changes as follows;
RDS SRCH TP SRCH PTY SRCH OFF
In the FM mode, select the RDS search mode.
1
RDS search
PTY search
In the FM mode, select the TP search mode.
1
• Use this function to automatically search and receive
the stations broadcasting the traffic program.
• “TP SRCH” is displayed.
TP search
• The tuner automatically searches stations offering RDS
services and the station name is displayed.
• If the station found is not the desired one, press the
ADJUST/TUNE/PRESET UP(>/
/+) or DOWN(</
/-) button again while the RDS indicator is flickering.
• If no other RDS station is found, “NO RDS” is
displayed.
• When “RDS SRCH” is not displayed, repeat again from
the above step 1.
• The tuner automatically searches for stations
broadcasting the traffic program.
• “NO TRAFF”is displayed if the signal is too weak or
there are no stations broadcasting the traffic program.
• When “TP SRCH” is not displayed, repeat again from
the above step 1.
In the FM mode, select the PTY search mode.
1
SEARCH M.
or
ADJUST
TUNING/PRESET
TUNE
-, +
PRESET
-, +
or
ADJUST
TUNING/PRESET
TUNE
-, +
PRESET
-, +
SEARCH M.
SEARCH M.
PTY SELECT
Page 34

34
• Use this function to automatically search and receive
the desired program type while listening to a RDS
station.
• Use this function to automatically search and receive
the traffic announcement while listening to traffic
program.
In the TP mode,
• Traffic program is displayed and the EON TA indicator
lights up.
• If the preset station broadcasting traffic announcement
is found, it will be tuned in while listening to the traffic
program.
• If the station stops broadcasting traffic announcement,
the tuner will find other stations repeatedly.
• If no station is found, the previous traffic program
station will be tuned in.
• Press the EON TA button to cancel the EON TA mode.
• Program type is displayed and the EON PTY indicator
is flickering.
• If one of the preset stations is broadcasting the
selected program type, it will be tuned in while
listening to a RDS station.
• If the station stops broadcasting the selected
program type, the tuner will find other stations
repeatedly.
• If no station is found, the previous RDS station will
be tuned in.
• When the PTY indicator goes off, repeat again from
the above step 1.
• press the EON PTY button to cancel the EON PTY
mode.
In the RDS mode,
1
While the PTY indicator is flickering,
select the desired program type.
2
EON PTY (EON: Enhanced Other
Networks information)
EON TA
• Each time this button is pressed, the display mode
changes as follows;
• If the signals are too weak or no RDS service is
available, “NO NAME”, “NO PTY”, “NO TIME” or
“NO TEXT” will be displayed.
In the FM mode,
DISPLAY
Frequency
Program
Service name
(PS)
Program
Type
(PTY)
Clock
Time
(CT)
Radio
Text
(RT)
3
• The tuner automatically searches a station
offering PTY services.
• If no station is found, “NO PROG” is displayed.
or
ADJUST
TUNING/PRESET
TUNE
-, +
PRESET
-, +
EON PTY
EON TA
PTY SELECT
RDS
ENGLISH
Page 35

35
ANALOG A UDIO/VIDEO RECORDING
Start recording on the TAPE.
2
Select the desired input as a recording
source except for TAPE.
1
Recording with TAPE
Select VIDEO 2 or VIDEO 3 as a recording
source.
1
Dubbing from video components onto
VIDEO 1
Select AUX as an audio recording source.
CD player should be connected to AUX jacks.
1
Dubbing the audio and video signals
separately onto VIDEO 1
Start play on the desired input.
3
Press the OSD button on the remote control unit
and select FUNCTION SELECT
VIDEO
SELECT
VIDEO 2.
(Refer to page 39.)
2
Start recording on the VIDEO 1.
2
Start play on the VIDEO 2 or the VIDEO 3.
3
• The audio and video signals from the VIDEO 2 or the
VIDEO 3 will be dubbed onto the VIDEO 1 and you
can enjoy them on the TV set and from the speakers.
Example) When dubbing the VIDEO 2 video signal
and the CD audio signal separately onto
VIDEO 1.
• The analog signals (except front L/R channel) from the 7 CH DIRECT inputs as well as the digital signals from the coaxial or
optical digital input cannot be recorded.
• The volume and tone (bass, treble) settings have no effect on the recording signals.
INPUT SELECTOR
TUNER
AUX
VIDEO1
VIDEO2
VIDEO3
or
INPUT SELECTOR
VIDEO2
VIDEO3
or
INPUT SELECTOR
AUX
or
ENGLISH
OSD
Page 36

36
ENGLISH
• The audio signal from the AUX and the video signal
from the VIDEO 2 will be dubbed and you can
enjoy them on the TV set and from the speakers.
Start recording on the VIDEO 1.
3
Start play on the AUX and the VIDEO 2
respectively.
4
DIGIT AL A UDIO RECORDING WITH MD RECORDER
For digital recording, select the desired
digital input as recording signal input.
2
Select a desired input of AUX, VIDEO
1~3 as a recording source.
1
Start recording on the component
connected to OPTICAL DIGITAL OUT.
3
• Only when the OPTICAL DIGITAL OUT of this receiver is connected to the OPTICAL DIGITAL IN of the MD recorder or CD
recorder, you can enjoy high-quality sound of digital recording without converting the original signals. Refer to “
CONNECTING AUDIO COMPONENTS”/ “ CONNECTING VEDIO COMPONENTS”/“CONNECTING DIGITAL INs and OUT”
on page 6~7 and the operating instructions of the MD recorder or CD recorder.
Notes:
• Digital recording is available for the digital audio program sources such as CDs, MDs, some DVDs, etc.
• In most DVDs as well as some CDs, etc., digital recording may not be available depending on the signal format.
• There are some restrictions on recording digital signals. When making digital recordings, refer to the operating instructions of
your digital recording equipment to know what restrictions are imposed.
Start play on the desired input.
4
• Each time this button is pressed, the corresponding
input is selected as follows:
A(nalog) o(ptical) 1 o(ptical) 2 c(oaxial) 1
Note : When the selected digital input is not
connected, “DIGITAL” indicator flickers.
There will be no recording as well as no sound.
DIGITAL INPUT
AM/FM MODE
INPUT SELECTOR
AUX
VIDEO1
VIDEO2
VIDEO3
or
If you select AUX for hearing and VIDEO 1 for seeing, whenever you select AUX, the VIDEO 1 is selected
automatically as video input source. So you are sure to be observe the order and doing of the above steps 1 and 2.
Page 37

37
• Each time this button is pressed, the sleep time
changes and “GOOD NIGHT” message scrolls.
10 20 30 60 90 OFF
Unit : minutes
• While operating the sleep timer, “SLEEP” lights up.
Operating the sleep timer
• The sleep timer allows this unit to continue to operate
for a specified period of time before automatically
shutting off.
• To set the receiver to automatically turn off after the
specified period of time.
• Each time this button is pressed, the brightness of
fluorescent display of this unit changes as follows;
ON
dimmer OFF
• In the display OFF mode, pressing any button will
restore the display ON mode.
Adjusting the brightness of the
fluorescent displays
OTHER FUNCTIONS
SLEEP
DIMMER
ENGLISH
Page 38

38
ENGLISH
Using the OSD
CURRENT ST ATUS DISPLA Y
MENU SCREEN
When the AUTO OSD mode is set to ON on the menu screen, this mode shows the status corresponding to each
operation.
• The on-screen display will automatically disappear in several seconds.
• For examples, there are 2 status displays as follows.
When selecting the desired input source When selecting the TEST TONE mode
• This function simplifies the setup procedures.
• The menu screen operation is performed easily with the CURSOR control(
, , , ), OSD and ENTER buttons.
This unit incorporates an OSD(On-screen display) function to provide information about basic operation of this unit and to
simplify the setup procedures.
The OSD function uses a monitor TV connected to this unit as a display and has two kinds of display modes such as current
status display and menu screen.
Notes:
• Any on-screen display shown on the monitor TV will not be recorded onto VIDEO 1.
• In some countries, this unit allows you to select either NTSC or PAL color system as video format.
If it is different from your video components and video softwares, etc., in the standby mode, press the ADJUST down( )
button keeping the SETUP button pressed on the front panel, then the video format is changed to the NTSC or the PAL
color system.
However, it is fixed to NTSC color system in other countries.
• The main menu will be shown.
• To turn the menu screen off, press this button again.
OSD : quit this OSD
,
: press cursor up( )/ down( ) button to move
ENTER : select menu or change the setting
• When the speaker setting is “N”, the test tone of the
corresponding channel is not shown.
• When adjusting each channel level or overall volume, the
volume level display will be shown.
• The test tone display will be shown until the test tone mode is
canceled.
Turn the menu screen on.
1
OSD
Input source Digital input
Page 39

39
ENGLISH
Select the desired menu using the
CURSOR UP(
) or DOWN(
) button.
2
When selecting the SPEAKER SETUP
When selecting the FUNCTION SELECT When selecting the SURROUND MODE
Confirm your selection.
3
• Only when one of TUNER, TAPE, 7 CH DIRECT and AUX is selected, you can select a video input
source on the VIDEO SELECT menu and enjoy the audio and video signals separately.
• When dubbing them onto VIDEO 1, select either VIDEO 2 or VIDEO 3 on the VIDEO SELECT menu.
• The displayed surround mode changes depending on the input signal format.(Refer to “Selecting the
surround mode” page 24.)
CURSOR
ENTER
Page 40

40
ENGLISH
Select the desired menu or(and) change the
condition with the corresponding buttons.
4
Repeat the above steps 2~4 to change the
conditions on other menus.
5
When selecting the AUTO OSD
• Each time the ENTER button is pressed, the AUTO OSD mode is set to ON to turn on the current display or OFF
to turn it off.
• When the AUTO OSD mode is set to ON, the current status display overlays the program image on the monitor TV
and may interference with your movie enjoyment. In such a case, set it to OFF.
Notes:
• OSD function on this unit can display all the settings.
• According to your selections for the input source, input signal, decoding mode, surround mode, speaker settings,
etc., the conditions of each menu may differ.
• When adjusting the speaker distance or channel level, etc., use the CURSOR LEFT( ) and RIGHT( ) buttons.
• In OSD, the parenthesized passage means that it is changeable by pressing CURSOR LEFT(
) and RIGHT( )
buttons.
When selecting the CH LEVEL SETUP
• You can adjust the preset channel level in PRESET TRIM menu.
The adjusted is(are) memorized in preset channel level.
• You can adjust the current channel level in CH LEVEL SETUP mode.
The adjusted is(are) just memorized, not in preset channel level.
• If you press ENTER button on the remote control unit after adjusting the current channel level in CH LEVEL SETUP
menu, that setting is memorized in preset channel level. You can load it again by selecting PRESET CALL.
When selecting
PRESET TRIM menu
When selecting
CH LEVEL TRIM menu
Page 41

41
Troubleshooting Guide
ENGLISH
PROBLEM POSSIBLE CAUSE REMEDY
No power
Power shuts off abruptly
during operation
No sound
No sound from the surround
speakers
No sound from the center
speaker
No sound from the surround
back speaker
Stations cannot be received
Preset stations cannot be
received
Poor FM reception
Continuous hissing noise during
FM reception, especially when a
stereo broadcast is received.
Continuous or intermittent
hissing noise during AM
reception, especially at night.
Remote control unit does not
operate.
OSD function is not available
• The AC input cord is disconnected.
• Poor connection at AC wall outlet or the outlet
is inactive.
The protection circuit is activated by the
following causes.
• Speaker terminals are short-circuited.
• Speaker settings are not adjusted correctly.
• This unit is operated for long periods of time
at extreme sound levels.
• The speaker cords are disconnected.
• The master volume is adjusted too low.
• The MUTE button on the remote control is
pressed to ON.
• Incorrect selection of the input source.
• Incorrect connections between the
components.
• Surround mode is switched off(stereo mode).
• Master volume and surround level are too low.
• A monaural source is used.
• Surround speaker setting is “N”.
• Dolby Virtual, stereo mode, etc. is selected.
• Center speaker setting is “N”.
• Master volume and center level are too low.
• The input signal format or the current surround
mode cannot support the 6.1 surround playback.
• Master volume and surround back level are
too low.
• Surround back speaker setting is “N”.
• No antenna is connected.
• The desired station frequency is not tuned in.
• The antenna is in wrong position.
• An incorrect station frequency has been
memorized.
• The memorized stations are cleared.
• No antenna is connected.
• The antenna is not positioned for the best
reception.
• Weak signals.
• Noise is caused by motors, fluorescent lamps
or lightning, etc.
• Batteries are not loaded or exhausted.
• The remote sensor is obstructed.
• Video connections between this unit and the
TV monitor are not made correctly.
• Connect the cord securely.
• Check the outlet using a lamp or another
appliance.
Should this happen, do the following steps.
• Switch off the power and check the speaker
connections.
• Adjust the speaker settings correctly.
• Adjust the volume low.
• Check the speaker connections.
• Adjust the master volume.
• Press the MUTE button to cancel the muting
effect.
• Select the desired input source correctly.
• Make connections correctly.
• Select a surround mode.
• Adjust master volume and surround level.
• Select a stereo or surround source.
• Select the desired surround speaker setting.
• Select the desired surround.
• Select the desired center speaker setting.
• Adjust master volume and center level.
• Under the proper situations, perform the 6.1
surround playback.
• Adjust master volume and surround back
level.
• Select the desired surround back speaker
setting.
• Connect an antenna.
• Tune in the desired station frequency.
• Move the antenna and retry tuning.
• Memorize the correct station frequency.
• Memorize the stations again.
• Connect an antenna.
• Change the position of the antenna.
•
Change the position of the antenna.
•
Install an outdoor antenna.
• Keep the receiver away from noise sources.
• Install an outdoor AM antenna.
• Replace the batteries.
• Remove the obstacle.
• Make proper video connections.
If a fault occurs, run through the table below before taking your receiver for repair.
If the fault persists, attempt to solve it by switching the receiver off and on again. If this fails to resolve the situation, consult
your dealer. Under no circumstances should you attempt to repair the receiver yourself. This could void the warranty.
Page 42

42
Amplifier Section
Power output, stereo mode, 6 Ω, THD 0.3 %, 40 Hz~20 kHz | 2 100 W
Total harmonic distortion, 6 Ω, 50 W, 1 kHz | 0.09%
Intermodulation distortion
60 Hz : 7 kHz= 4 : 1 SMPTE, 6 Ω, 100 W | 0.1%
Input sensitivity, 47 kΩ
Line (AUX) | 200 mV
Signal to noise ratio, IHF “A” weighted
Line (TAPE) | 95 dB
Frequency response
Line (AUX, TAPE), 20 Hz~44 kHz |
3 dB
Output level
TAPE OUT, 2.2 kΩ | 180 mV
Bass/Treble control, 100 Hz/10 kHz | 10 dB
Surround mode, only channel driven
Front power output, 6 Ω, 1 kHz, THD 0.3 % | 100 W+100 W
Center power output, 6 Ω, 1 kHz, THD 0.3 % | 100 W
Surround power output, 6 Ω, 1 kHz, THD 0.3 % | 100 W+100 W
Surround back power output, 6 Ω, 1 kHz, THD 0.3 % | 100 W
Digital Audio Section
Sampling frequency | 32, 44.1, 48, 96 kHz
Digital input level
Coaxial, 75 Ω | 0.5 Vp-p
Optical, 660 nm | -15 ~ -21 dBm
Video Section
Video format | PAL
Input sensitivity(=Output level), 75 Ω
Video (Composite(normal)) | 1 Vp-p
S-Video (luminance signal) | 1 Vp-p
(chrominance signal) | 0.286 Vp-p
FM Tuner Section
Tuning frequency range | 87.5~108 MHz
Usable sensitivity, THD 3%, S/N 26 dB | 17.2 dBf
46 dB quieting sensitivity, mono/stereo | 20.8/41.2 dBf
Signal to noise ratio, 1 mV, mono/stereo | 72/65 dB
Total harmonic distortion, 1 kHz, mono/stereo | 0.2/0.4 %
Frequency response, 20 Hz~15 kHz | 1 dB
Stereo separation, 65 dBf, 1 kHz | 45 dB
Capture ratio | 4 dB
IF rejection ratio | 120 dB
AM Tuner Section
Tuning frequency range | 522~1611 kHz
Usable sensitivity | 500 V/m
Signal to noise ratio | 40 dB
Selectivity | 25 dB
General
Power supply | AC 220 - 240 V, 50/60 Hz
Power consumption | 110 W
Dimensions (W H D) | 435 73.5 254 mm (17-1/8 2-7/8 10 inches)
Weight (Net) | 4.2 kg (9.3 Ibs)
Note: Design and specifications are subject to change without notice for improvements.
Specifications
ENGLISH
Page 43

43
ENGLISH
Appendix
INITIALIZING THE SYSTEM
• When the display is not normal or when the operation of the unit does not shows the reasonable result, the
initialization of this unit is required by the following procedure.
After seeing the flickering standby indicator,
take your hand(s) off from buttons.
In standby mode, press SETUP and
DECODING buttons at the same time.
SETTING UP THE SY STEM ON FRONT P ANEL
• You can adjust the system settings in succession according to your system using the buttons on the front panel.
• This section explains how to adjust the settings using the buttons on the front panel.
• Refer to the corresponding pages indicated in ( ) for details about each mode and use of remote control.
Press the SETUP button for more than 2 seconds, then it enters the setup mode.
While displaying the setup mode, each time the SETUP button is pressed, the setup mode changes as
follows:
1
While displaying the selected setup mode, each time the DECODING button is pressed, the setting mode changes
as follows:
2
While displaying the selected setting mode, each time the ADJUST UP(
) or DOWN( ) button is pressed, the
mode is adjusted to the desired setting.
Notes:
• Only when selecting preset channel levels, press ADJUST UP(
) or DOWN( ) button to change the setting
mode and DECODING button to confirm your decision(refer to page 26).
• If the display of the corresponding mode disappears, start from the step 1 again.
• To help your understanding, each setting operation is explained with using its default setting.
3
SETUP
MEMORY
DECODING
TUNE MODE
1
2
ENGLISH
• If this unit has been reset, all the button settings
are reset to the default values (the values set upon
shipment from the factory).
Page 44

44
Turn back to previous surrond mode and
select the desired surround mode.
(For details, refer to “Selecting the surround
mode” on page 24.)
Adjust the selected mode as desired.
(For details, refer to “Adjusting the speaker
settings” on page 19.)
Adjust the level of the selected channel as
desired.
(For details, refer to “Adjusting each
channel level” on page 25.)
Adjust the tone as desired.
(For details, refer to “Adjusting the tone
(bass and treble)” on page 26.)
Adjust the level of the selected LFE channel
as desired.
(For details, refer to “Adjusting the LFE
channel level” on page 27.)
[2] Select Preset Call or Preset Memory as
desired.
Adjust the selected parameter as desired.
(For details, refer to “Adjusting the Dolby
Pro Logic II Music parameters” on page 29.)
STEREO(or 2 CH DOWNMIX) mode
( ): Possible when the digital signals from the DTS
or Dolby Digital program sources are being
input.
FL-CL-SL SUR B - L SUB W-Y FRONT 3.0(m)
CFREQ80
NARROW SURROUND 3.0(m) CENTER 3.0(m)
FL C FR SR SB
SW
SL
BASS TRBL TONE ON
• While displaying “TONE OFF”, you cannot
adjust the tone.
DD L DTS L
MP L
[3] Confirm your decision.
PANO OFF C-WID 0 DIMEN 0
[ 1 ] [ 2 ] [ 3 ]
SETUP
MEMORY
DECODING
TUNE MODE
ADJUST
TUNING/PRESET
Surround mode
: not available when the
input signal is 96kHz PCM
or headphone is used.
Speaker setup mode
(“FL - CL - SL”)
Channel level trim mode
(“FL 0”)
Tone mode
(“BASS” or “TONE OFF”)
: available only when STEREO is
selected during that analog or PCM
signal is input.
LFE channel level mode
(“DD L”)
Dolby Pro Logic II Music
Parameter mode
(“PANO OFF”)
: available only when the
current surroudn mode is
Dolby Pro Logic II Music.
[1]
Preset channel level mode
(“P CALL”)
Dynamic range mode
(“DYNR 0.0”)
: available only when the input
signal is Dolby Digital.
Select the desired setting.
(For details, refer to “compressing the
dynamic range(Dolby Digital sources only)”
on page 28.)
Ignore this step and skip to the step 3.
ENGLISH
Page 45

45
SETUP CODE T ABLE
ADMIRAL 050 134
AKAI 093 049 123
ALBA 068
ALBIRAL 116
ALCATEL 022
AMSTRAD 000 021
ANAM 155 156 157
ARC EN CIEL 028 039 043 145 081
ARISTONA 099 049 050 019 142 149
078
ARTHUR MARTIN 053 139 117 120 122 123
125 128
ASA 050 055 057 113 134
ATLANTIC 099 111
AUDIOSONIC 054
AUSIND 053
AUTOVOX 099 144 055 019 057 069
BAIRD 083
BASICLINE 006
BAUR 011
BEKO 023 049
BLAUPUNKT 094 100 102 111 114
BRANDT 028 039 040 043 145 081
BRION VEGA 050
BRUNS 048 050
BSR 059 110 132
BUSH 033 068 124 074
CENTURY 098 101 050 079 136
CGE 016 101 124 079 132 136
CIHAN 065
CLARIVOX 048 116
CONDOR 099 111
CONTEC 087
CONTINENTAL
EDITION 028 039 040 043 145 081
CROSLEY 101 050 109
CROWN 147
CTC CLATRONIC 046
DAEWOO 089
DECCA 099 060 063 115 118
DEGRAAF 036
DIXI 049 090
DRYNATRON 049
DUAL 099 141
DUAL-TEC 096 099 132
DUMONT 046 050 057 073
ELBE 016 116
ELBIT 065
TV
ELCIT 046 097 103 050 109 127
132
ELMAN 046 132
ELTA 090
EMERSON 158 098 050
ERRES 049 142
EUROPHON 098 046 097 099 051 115
132
FERGUSON 146 040 041 150 057 061
116 149
FIDELITY 099 149
FINLUX 034 046 053 055 057 109
113 073 074 079
FISHER 015 048 050 052 109 136
FORGESTONE 149
FORMENTI 099 053 109 111 125
FORTRESS 137
FRABA 075
FRONTECH 054
FUJITSU 025
FUNAI 054 059
GBC 109 132
GEC 099 060 109 115 134 088
GELOSO 103 109 132 134 090
GOLDSTAR 092 003 017 099 049 075
076 077 090 152
GOODMANS 033 049 060 077
GORENJE 066 136
GREATZ 001 058 109 122 123 128
129 130 134
GRANADA 033 099 049 058 060 142
115 125 134
GRUNDIG 094 100 057 058 108 112
114 082
HANSEATIC 033 047 099 049 109 139
111
HANTAREX 097
HEMMERMANN 127
HIFIVOX 028 039 043 145 081
HINARI 158 033 045 143 090
HITACHI 014 033 034 036 099 145
056 109 139 110 067 117
132 134 084 091 081 088
HYPER 093 099
IMPERIAL 016 101 124 079 132 133
INGELEN 001 058 109 122 128 129
130 134
ENGLISH
Page 46

46
INNO HIT 093 098 097 099 143 077
090
INTERFUNK 047 049 050 145 058 109
142 123 128 129 091
IRRADIO 093 143 053 077 090
ITT 001 140 058 105 109 122
123 128 148 129 130 134
135 083 089
JVC 033 154
KTV 099
KAISUI 006
KARCHER 006
KENDO 098
KENNEDY 144 019 109
KORTING 050 059 111
KRIESLER 099 049 050 019 142 149
078
LENOIR 099
LOEWE OPTA 008 097 047 049 050 115
072
LOGIK 118 149
LUMA 049 120 134
LUXOR 058 139 117 120 123 129
135 083
MAGNADYNE 046 097 103 050 109 115
127 132
MAGNAFON 046 097 099 051 053 115
MARANTZ 049
MATSUI 158 099 106 060 118 068
134 090
McMICHAEL 088
MEMOREX 090
METZ 094 050 114 133
MINERVA 094 100 057 058 114
MISTRAL 149
MITSUBISHI 033 035 047 049 050 062
118 119 148 080 138
MIVAR 097 099 115 077
MULTITECH 046 099 115 136
MURPHY 134
MAONIS 096 144 019 110 134
NATIONAL 042 104 109
NEC 033 085
NECKERMANN 099 050 139 120 136
NEI 049
NIKKAI 060
NOBLEX 015
NOBLIKO 098 046 099 053 057
NOGAMATIC 028 039 043 145 081
NOKIA 001 140 058 105 109 122
123 128 148 129 130 134
135 083 089
NORDMENDE 028 032 039 043 145 131
091 081
OCEANIC 109 064 123
ONCEAS 099
OPTONICA 137
ORION 000 059 118 068 127 090
OSAKI 060
OSIO 077
OSUME 087
OTTO VERSAND 033 047 049 109 139
P.T ACTTRON 065
PAEL 099 053
PANASONIC 030 042 095 104 107 109
121 126
PATHE CINEMA 099 111 116 132
PERDIO 060
PHILCO 016 030 101 050 109 124
079 132 136
PHILIPS 009 010 013 018 024 099
049 050 019 142 148 149
078 088
PHOENIX 099 053 109 111 125
PHONOLA 099 049 050 019 142 149
078
PIONEER 020 049 145 091
PRANDONI-
PRINCE 098 097 053 115 134
PREMIER 124
PRINCE 098 097 053 134
PROTECH 049 054
PYE 099 049 050 019 142 148
149 078
QUASAR 046 097 051 053 077
QUELLE 047 099 100 049 053 055
057 058 111 112 113 114
118 123 073 074 128
RADIOLA 099 049 050 019 142 149
078
RADIOMARELLI 046 097 103 050 109 062
127 132
RANK 074
RBM 074
REDIFFUSION 062 123 134
REX 096 144 019 141 110 069
134
ROBOTRON 048 050
RTF 048 050
SABA 028 031 032 037 039 040
043 097 050 145 115 120
086 091 081
SAISHO 158 099 118 119 068 090
SALORA 053 139 117 120 122 123
125 128 135 083
ENGLISH
Page 47

47
UNIVERSUM 092 034 054 077
UNIVOX 116
VEGAVOX 079
VOXSON 050 134
WATSON 111
WATT RADIO 046 099 051 109 116 127
WEGA 033
WHITE
WESTINGHOUSE 099 111
YOKO 099
ZANUSSI 096 144 019 110 069 134
ZOPPAS 096 144 019 110 134
AKAI 042 022 052 032 033
ALBA 008 020
AMSTRAD 011
ANITSCH 009
ARC EN CIEL 042 056 052
ARISTONA 045 031
ASA 018
AWIA 011 042
BAIRD 042 033
BAUER. BOSCH 014 043
BLAUPUNKT 014 043 055 031 054 040
BRANDT
ELECTRONIQUE 042 056 052
BRIONVEGA 041
BUSH 008 020
C.EDISON 041
CANON 014
CAPEHART 020
CGE 011 042 052
CONTINENTAL
EDISON 042 056 052
CRAIG 000 013
CURTIS MATHES 019
DAEWOO 001 020 021
DAYTRON 020
DECCA 011 042
DEGRAAF 003 006 011 045 018
DUAL 042 052
DUMONT 003 011 018
DYNATECH 011
EMERSON 002 010 011 019 025
FERGUSON 042 059 030 052 034 036
FIDELITY 011
FINLANDIA 003 018
FINLUX 003 006 011 018
FISHER 000 003 005
VCR
SAMBERS 046 097 051 053 115 077
SAMPO 121
SAMSUNG 015 026 099 054 077 136
090 151 153
SANYO 001 002 005 033 044 048
060 113 118 071 054 136
SBR 049 142 148 149 088
SCHAUB LORENZ 001 058 109 122 123 128
129 130 134
SCHNEIDER 096 099 049 050 052 019
141 109 142 125 149 078
132
SEG 046
SEI 158 059
SELECO 016 096 144 019 141 110
069 134
SHARP 033 087 137
Sherwood 000
SIAREM 046 097 050 109 115
SICATEL 116
SIEMENS 005 094 036 100 111 114
087
SIERA 099 049 050 019 142 149
078
SILVER 054
SINGER 016 046 050 109
SINUDYNE 158 046 050 059 109 127
SONOKO 049 090
SONY 146 007 027 033 038 118
STERN 096 144 019 110 069 134
TANDBERG 133
TANDY 099 060 137
TASHIKO 002 033
TATUNG 099 060 063 065 115 118
TEC 096 099 132
TELEAVIA 028 039 040 043 145 091
081
TELEFUNKEN 028 041 145 150 086 091
TELETECH 090
TELEVIDEON 099 053 109 111 125
TENSAI 049
THOMSON 012 028 032 039 040 043
145 091 081
THORN-
FERGUSON 014 040 041 054 150 057
061 116 149 086
TOCOM 029
TOSHIBA 004 016 033 070 074
TRANS
CONTINENTS 098 097 053 134
TRIUMPH 158
UHER 052 111 125
ULTRA VOX 098 046 099 050 109 120
ENGLISH
Page 48

48
ENGLISH
FUNAI 011
GE 019
GENERAL 014
GOLDSTAR 004 062
GOODMANS 008 011 046
GRAETZ 041 042 056 050 052 038
GRANADA 003 005 018
GRUNDIG 014 043 018 055 031 053
054
HANSEATIC 043
HARMAN-
KARDON 004
HIFIVOX 042 056 052
HINARI 002 008 024 027
HITACHI 006 007 011 042 057
IMPERIAL 011
INGELEN 042 056 052 038
INGERSOL 027
ITT 005 041 042 056 050 052
033 038
JENSEN 042
JVC 042 056 060 030 052 063
KENWOOD 005 042 060
KRIESLER 045 031
KUBA 043
LLOYD 011
LOEWE OPTA 014 018 029 031
LOGIK 008 027
LUXOR 033 038
MAGNADYNE 041
MAGNASONIC 038
MAGNAVOX 019
MARANTZ 004 014 046 018 031
MATUI 010 025 027
MEMOREX 000 003 005 011 045
METZ 014 043 031 054 037
MGA 017
MINERVA 055 054
MINOLTA 006 007
MITSUBISHI 060 017 049
MTC 011 013
MULTITECH 008 011
MURPHY 011
NAONIS 042 056 052
NATIONAL 040
NEC 004 042 060 052
NECKERMANN 002 041 014 042 052
NOGAMATIC 042 056 052
NOKIA 003 005 041 042 056 050
052 033 038
NORDMENDE 039 042 056 052 053 035
OPTONICA 045 046
ORION 002 010 025 027
OSAKI 011
OTTO VERAND 043
P. CINEMA 014
PALLADIUM 041 014
PANASONIC 023 051 040
PATHE MARCONI 042 056 052
PENTAX 006 007
PERDIO 011
PHILIPS 012 014 045 046 018 029
031
PHONOLA 014 045 018 029 031
PIONEER 060
PORTLAND 020
PROLINE 011
PYE 014 045 018 029 031
QUARTZ 005
QUELLE 002 044 054
RADIOLA 045 031
RADIOMARELLI 041
RCA 019
REALISTIC 000 003 005 011 013 045
046
REX 042 056 052
SABA 039 042 056 052 035
SAISHO 002 010 025 027
SALORA 005 017
SAMSUNG 013 019 032 061
SANSUI 042 060
SANYO 000 003 005 025 038
SBR 018 029
SCHAUB LORENZ 041 042 056 050 052 038
SCHNEIDER 008 011 045 031
SEI-SINUDYNE 027
SELECO 042 056 052
SENTRA 020
SHARP 045 046 105 048
SHINTOM 008
SIEMENS 014 043 055 031 054 038
SIERA 045 031
SINUDYNE 027
SONY 044 015 016 026 028
STERN 042 056 052
STS 006
SUNKAI 025
SYLVANIA 011 017
SYMPHONIC 011 017
TASHIKO 011
TATUNG 011 042
TEAC 011 042
TEKNIKA 011
TELEAVIA 042 056 052
TELEFUNKEN 042 056 052
TENOSAL 008
Page 49

49
ENGLISH
THOMSON 042 056 052
THORN-
FERGUSON 039 042 059 030 052 034
036
TOSHIBA 001 042 056 017 058 052
TOTELEVISION 013
UHER 042
ULTRA VOX 041
UNITECH 013
UNIVERSUM 041 014 043
URANYA 041
VECTOR 004
VICTOR 042 060
VIDITAL 041
WESTING HOUSE 041
WARDS 019
YAMAHA 004 042
ZANUSSI 042 056 052
ZENDER 052
ZOPPAS 042 056
DENON 017
GE 003 004
JVC 007
LG 011 010
MAGNAVOX 019
MITSUBISHI 001
ONKYO 009
PANASONIC 015
PHILIPS 019
PIONEER 002 023
PROSCAN 003 004
RCA 003 004
SAMSUNG 016 008
SHERWOOD 000 010 011 012 013 014
022 020 021
SONY 005
THOMSON 003 004
TOSHIBA 006
VIETA 014
YAMAHA 019
ZENITH 011 010
DVD
ABC 002 003 009 030
007 006 008
Allegro 018 021
Archer 018 026
Bell&Howell 009
Century 018
Citizen 018 021
Comtronics 014
Contec 011
Easten 001
Emerson 026
Everquest 010 014
Focus 022
Garrard 018
Gemini 010
General Instrument
033 276 006 034
GoldStar 017 040
Goodmind 026
Hamlin 012 020 004 013
Hitachi 006
Hytex 007
Jasco 010 018 021
Jerrold 002 007 033 032 009 010
006 034
Memolex 000
Movie Time 015
NSC 015
Oak 011
Optimus 031
Panasonic 000 016 031
Paragon 000
Philips 018
Pioneer 017 025
Popular Mechanics 022
Pulsar 000
Quasar 000
RCA 031
Radio Shack 010 021 026 028
Recoton 022
Regal 012 020
Regency 001
Rembrandt 006
Runco 000
SL Marx 014
Smasung 017 014
Scientific Atlanta 003 023 030 027
Signal 010 014
Signature 006
Sprucer 031
Starcom 002 010
CBL
Page 50

50
ENGLISH
MAGAI 022
MARANTZ 012
MASPRO 016
MATSUSHITA 000
METZ 036
MINERVA 036
MULTISTAR 022
MURATO 004
NEC 040
NEIRU 021
NOKIA 026 037
NORSAT 015
PACE 001 042 016 017 018 044
PANASONIC 032
PHILIPS 003 011 012 029
PHONOLA 016
PROSAT 030
PYE 016
QUADRAL 030
QUELLE 036
RADIOLA 016
REDIFFUSION 015
SABA 035
SALORA 026
SAMSUNG 003 022
SAT PARTNER 004
SATPORTNER 021
SCHAUB LORENZ 026 037
SCHNEIDER 005 016
SIEMENS 033 036
SIERA 016
SILVA 004 021
SKY 039
STARCOM 038
STARSAT 022
TECHNISAT 003
TELEFUNKEN 025
TELESYSTEM 005
THORN-
FERGUSON 010 014 041 016 017 018
043
TRIAD 004
UNIDEN 022
UNITED CABLE 038
V TECHNOLOGY 004
VORTEC 003 024 025
ZENDER 022
Stargate 010 014 026
Starquest 010
TV86 015
Teleview 014
Tocom 007 008
Toshiba 000
Tusa 010
Unika 018
United Artists 007
Universal 153 019
Viewstar 015
Zenith 000 024
Zentek 022
ALBA 030
AMSTRAD 008 019 027
ARCON 021
ARISTONA 016
ASTRA 028
BLAUPUNKT 033
BUSH 016
CH.MASTER 030
CITY COM 005
DDC 030
DYNASAT 005
ECHOSTAR 002 009 032 020
EMME ESSE 005
FAIT 005
FERGUSON 014 041 016 017 018
FINLUX 006 007 013
FRACARRO 005
FTE 022
GOLDSTAR 004 021
GRAETZ 026 037
GROTHUSEN 004
GRUNDIG 033 016 018 036
HINARI 030
HIRSCHMANN 003 006
HITACHI 013
INGELEN 026 037
ITT 034
ITT-NOKIA 032 018 026 037
JERROLD 038 014
KATHREIN 005 022 023
KOSMOS 004
KRIESLER 016
LENCO 004 021
LUXOR 026 037
SAT
Page 51

ENGLISH
51
ADCOM 021
AIWA 045 039 022
AKAI 046
AUDIO 016
ARC EN CIEL 036 014 027 030 031 018
230
DENON 054
FISHER 006
H/K 017 012 047 016
JVC 028 034 001
KENWOOD 003 020 010 029 006
MARANTZ 015 014
MONDIAL 033
NAD 048 002 042
NAKAMICHI 049
NIKKO 016
ONKYI 013 037 011 021 038
PANASONIC 051 052
PHILPS 014
PIONEER 005 008 041
RCA 007 009
REALISTIC 045
SANSUI 040
SHARP 019 053
SHERWOOD 000 035 023 019 056 057
058
SONY 050 024 025 026
TEAC 055 032
TECHNICS 051 004 052
VICTOR 001
YAMAHA 044 043 016
CD
SHERWOOD 000(for tape deck)
015 016(for MD recorder)
AUX-TAPE/MD
DAEWOO 002
DENON 012
GOLDSTAR 004
KENWOOD 003
MAGNAVOX 010
OPTIMUS 007
PANASONIC 013
PHILIPS 010
POINNEER 000 009
RCA 006
REALISTIC 007
SAMSUNG 001 005
SHARP 003 011
TECHINCS 013
TOSHIBA 003
YAMAHA 008
AUX-LD
 Loading...