

Page 1
ELECTRONIC CASH REGISTER
CAISSE ENREGISTREUSE ELECTRONIQUE
INSTRUCTION MANUAL MANUEL D’INSTRUCTIONS
XE-A203A
MODEL
MODELE
Page 2

CAUTION
The socket-outlet shall be installed near the equipment and shall be
easily accessible.
ATTENTION
La prise de courant murale devra être installée à proximité de
l’équipement et être facilement accessible.
Page 3
INTRODUCTION
Thank you very much for your purchase of the SHARP Electronic Cash Register, Model XE-A203A.
Please read this manual carefully before operating your machine in order to gain full understanding of
functions and features.
Please keep this manual for future reference. It will help you if you encounter any operational problems.
CAUTION!
Never install the batteries into the cash register before initializing it. Before you start operating the cash
register, you must first initialize it, then install three new alkaline batteries LR6 (“AA” size) on the register.
Otherwise, distorted memory contents and malfunction of the cash register will occur. For this procedure,
please refer to page 7.
English
IMPORTANT
• On the printer, a cutter to cut the paper roll is mounted. Always be careful not to cut yourself by the
cutter.
• Install your register in a location that is not subject to direct radiation, unusual temperature changes,
high humidity or exposed to water sources.
Installation in such locations could cause damage to the cabinet and the electronic components.
• Never operate the register with wet hands.
The water could seep into the interior of the register and cause component failure.
• When cleaning your register, use a dry, soft cloth. Never use solvents, such as benzine and/or
thinner.
The use of such chemicals will lead to discoloration or deterioration of the cabinet.
• The register plugs into any standard wall outlet (120V AC ±10%).
Other electrical devices on the same electrical circuit could cause the register to malfunction.
• For protection against data loss, please install three alkaline batteries LR6 (“AA” size) after
initializing the cash register. When handling the batteries, never fail to observe the followings:
Incorrectly using batteries can cause them to burst or leak, possibly damaging the interior of the
cash register.
• Be sure that the the positive (+) and negative (-) poles of each battery are facing in the proper
direction for installation.
• Never mix batteries of different types.
• Never mix old batteries and new ones.
• Never leave dead batteries in the battery compartment.
• Remove the batteries if you do not plan to use the cash register for long periods.
• Should a battery leak, clean out the battery compartment immediately, taking care to avoid letting
the battery fluid come into direct contact with your skin.
• For battery disposal, follow the corresponding law in your country.
• If the register malfunctions, call 905-568-7140 for service - do not try to repair the register yourself.
• For a complete electrical disconnection, disconnect the main plug.
English
Customer Service Hotline
905-568-7140
SD logo is a trademark of the SD Card Association.
For Easy Set-up, see
“GETTING STARTED” (page 7).
1
Page 4

CONTENTS
INTRODUCTION............................................................................................................................................1
IMPORTANT ..................................................................................................................................................1
CONTENTS....................................................................................................................................................2
PARTS AND THEIR FUNCTIONS.................................................................................................................4
1 External View..................................................................................................................................................4
2 Printer .............................................................................................................................................................4
3 Mode Switch and Mode Keys .........................................................................................................................5
4 Keyboard.........................................................................................................................................................5
5 Displays ..........................................................................................................................................................6
6 Drawer Lock Key.............................................................................................................................................6
GETTING STARTED......................................................................................................................................7
FOR THE OPERATOR
OVERVIEW OF FLOW OF DAILY SALES ENTRIES .................................................................................11
BASIC SALES ENTRY ................................................................................................................................12
1 Basic Sales Entry Example...........................................................................................................................12
2 Error Warning................................................................................................................................................13
3 Item Entries...................................................................................................................................................14
Single item entries .................................................................................................................................14
Repeat entries .......................................................................................................................................15
Multiplication entries ..............................................................................................................................15
Split pricing entries ................................................................................................................................16
Single item cash sale (SICS) entry........................................................................................................17
4 Displaying Subtotal .......................................................................................................................................17
5 Finalization of Transaction............................................................................................................................17
Cash or check tendering........................................................................................................................17
Cash or check sale that does not require tender entry..........................................................................18
Charge (credit) sale ...............................................................................................................................18
Mixed-tender sale ..................................................................................................................................18
6 Tax Calculation .............................................................................................................................................19
Automatic tax.........................................................................................................................................19
Manual tax .............................................................................................................................................19
Tax delete..............................................................................................................................................19
Tax status shift.......................................................................................................................................20
OPTIONAL FEATURES...............................................................................................................................21
1 Auxiliary Entries ............................................................................................................................................21
Discount and premium entries using the percent key............................................................................21
Discount and premium entries using the discount key ..........................................................................21
Refund entries .......................................................................................................................................22
Non-add code number entries and printing ...........................................................................................22
2 Auxiliary Payment Treatment........................................................................................................................23
Currency conversion..............................................................................................................................23
Received-on Account and Paid-out Entries...........................................................................................24
No sale (exchange)................................................................................................................................24
3 Automatic Sequence Key (
CORRECTION .............................................................................................................................................25
1 Correction of the Last Entry (direct void) ......................................................................................................25
2 Correction of the Next-to-last or Earlier Entry (indirect void) ........................................................................25
3 Subtotal Void.................................................................................................................................................26
4 Correction of Incorrect Entries not Handled by the Direct or Indirect Void Function.....................................26
key) Entries..................................................................................................24
a
FOR THE MANAGER
PRIOR TO PROGRAMMING ......................................................................................................................27
BASIC FUNCTION PROGRAMMING (For Quick Start) ............................................................................27
1 Date and Time Programming........................................................................................................................27
2 Tax Programming for Automatic Tax Calculation Function...........................................................................28
Tax programming using a tax rate.........................................................................................................28
2
Page 5

The tax table (applicable to the add-on tax) ..........................................................................................29
Quantity for doughnut tax exempt (for Canadian tax system) ...............................................................31
AUXILIARY FUNCTION PROGRAMMING .................................................................................................32
1 Department Programming.............................................................................................................................32
2 PLU (Price Look-Up) and Sub-department Programming ............................................................................33
3 Miscellaneous Key Programming .................................................................................................................35
Rate for
Amount for
Percent rate limitation for % and
Function parameters for
Function parameters for
Entry digit limit for
Function parameters for
4 Text programming.........................................................................................................................................39
ADVANCED PROGRAMMING....................................................................................................................44
1 Register Number and Consecutive Number Programming...........................................................................44
2 Electronic Journal (EJ) Programming ...........................................................................................................45
3 Various Function Selection Programming 1..................................................................................................47
Function selection for miscellaneous keys ............................................................................................47
Print format ............................................................................................................................................48
Receipt print format ...............................................................................................................................48
Function selection for tax.......................................................................................................................48
Other programming................................................................................................................................49
4 Various Function Selection Programming 2..................................................................................................51
Power save mode..................................................................................................................................51
Logo message print format....................................................................................................................51
Online time out setting...........................................................................................................................52
Thermal printer density..........................................................................................................................52
Language selection................................................................................................................................53
Training clerk specification for training mode ........................................................................................53
AUTO key programming........................................................................................................................54
5 Reading Stored Program ..............................................................................................................................54
TRAINING MODE ..................................................................................................................................................56
READING (X) AND RESETTING (Z) OF SALES TOTALS ........................................................................57
EJ REPORT READING AND RESETTING .................................................................................................60
OVERRIDE ENTRIES ..................................................................................................................................61
CORRECTION AFTER FINALIZING A TRANSACTION (Void mode).......................................................61
HOW TO USE AN SD MEMORY CARD......................................................................................................62
1 What You Can Do with an SD Memory Card................................................................................................62
2 In Case of SD Error.......................................................................................................................................63
3 Inserting and Removing an SD Memory Card ..............................................................................................64
4 Formatting an SD Memory Card...................................................................................................................64
5 Saving and Restoring All the Data................................................................................................................65
6 Writing and Reading of Programming Data ..................................................................................................65
7 Writing of Sales Data ....................................................................................................................................66
8 Writing and Printing of Electronic Journal.....................................................................................................67
OPERATOR MAINTENANCE......................................................................................................................68
1 In Case of a Power Failure ...........................................................................................................................68
2 In Case of Printer Error.................................................................................................................................68
3 Cautions in Handling the Printer and Recording Paper ................................................................................68
4 Replacing the Batteries.................................................................................................................................69
5 Replacing the Paper Roll ..............................................................................................................................69
6 Removing a Paper Jam ................................................................................................................................72
7 Cleaning the Printer (Print Head / Sensor / Roller).......................................................................................72
8 Removing the Till and the Drawer.................................................................................................................72
9 Opening the Drawer by Hand .......................................................................................................................72
10 Before calling for service...............................................................................................................................73
Error code table .....................................................................................................................................73
SPECIFICATIONS .......................................................................................................................................74
%, &
and
......................................................................................................................................36
-
......................................................................................................................35
V
..................................................................................................36
&
%, &
V
r, R
C, c
and
..................................................................................................................37
and
t
and
.............................................................................................36
-
....................................................................................................38
(when using as CA key).................................................38
A
3
Page 6
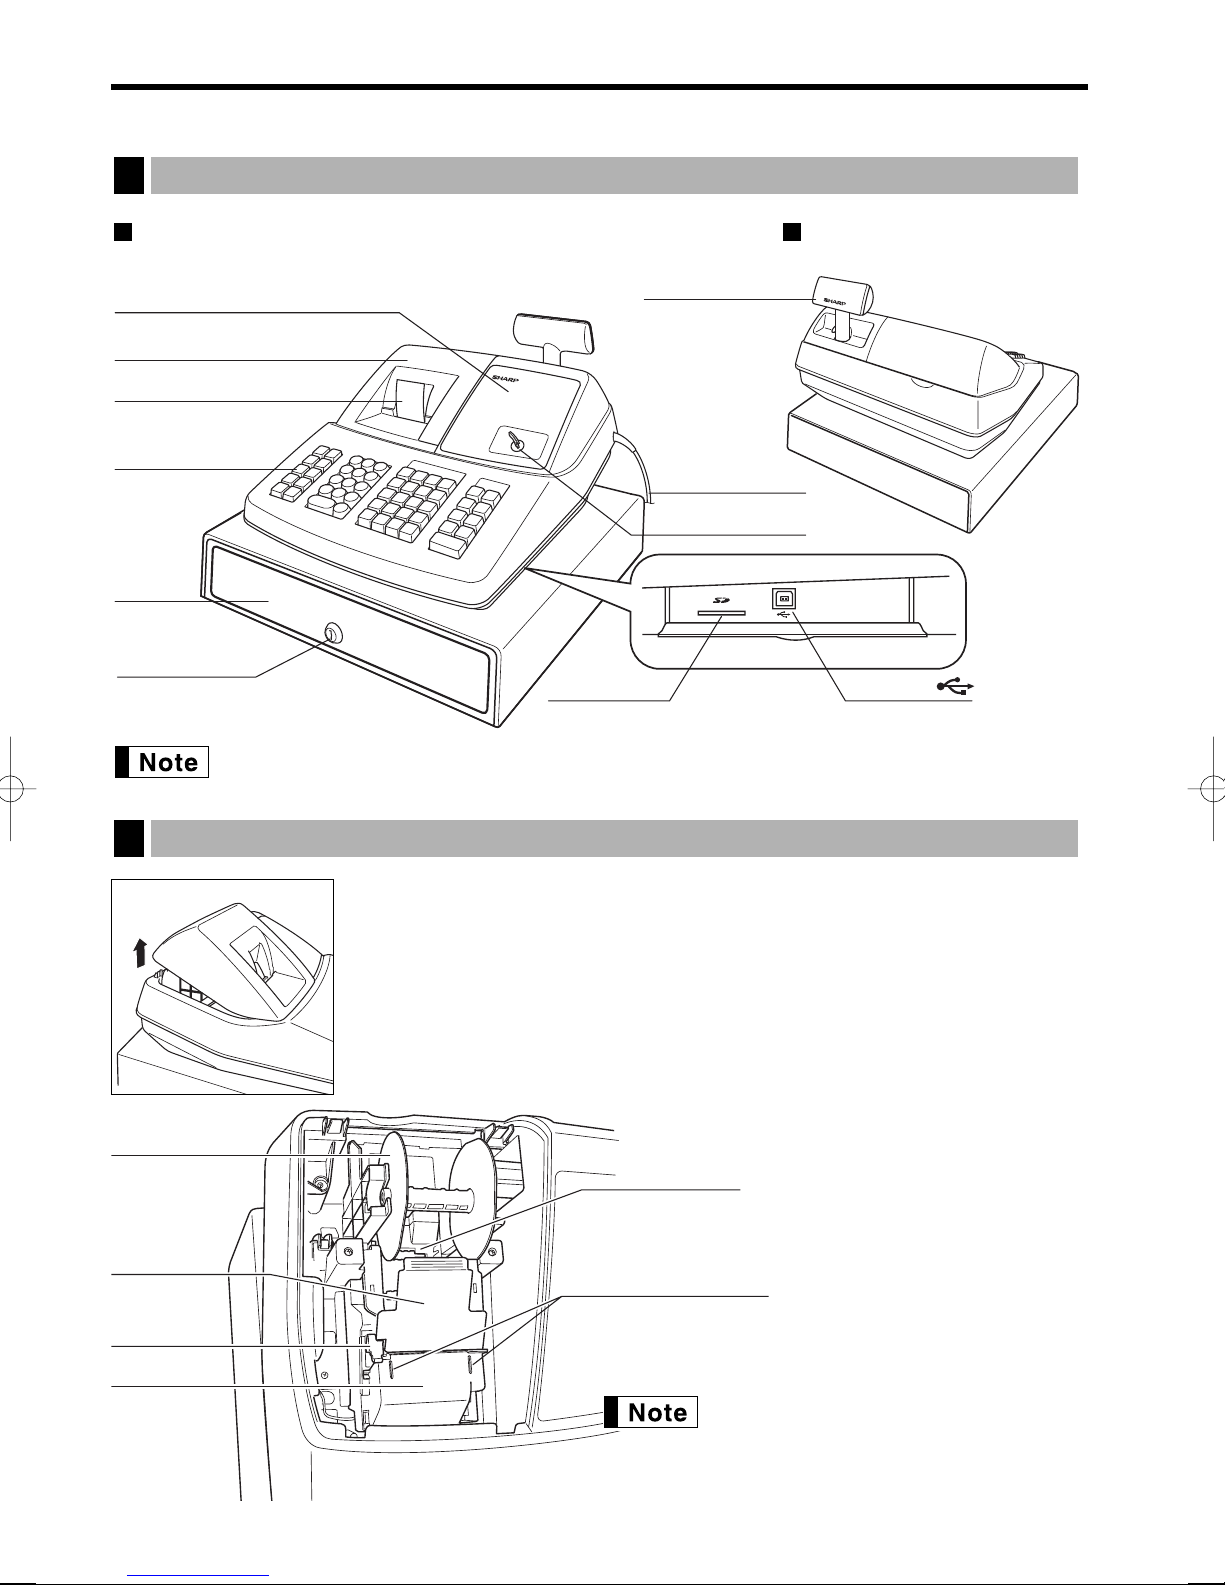
PARTS AND THEIR FUNCTIONS
Take-up spool
Print roller
release lever
Print roller arm
Inner cover
Paper roll cradle
Paper positioning guides
External View
1
Front view Rear view
Customer display
Operator display
Printer cover
Receipt paper
Keyboard
Drawer
(Pop-up type)
Power cord
Mode switch
Drawer lock
Printer
2
USB portSD card slot
(Refer to page 64.)
Use only the USB cable (manufactured by SHARP) supplied with the XE-A203A for the connection
with a PC. Never use other cables.
The printer is a one station type thermal printer, therefore it does not require any
type of ink ribbon or cartridge.
Lift the rear of the printer cover to remove. To re-install, hook the pawls on the
cabinet and close.
Caution: The paper cutter is mounted on the printer cover. Be careful not to
cut yourself.
4
Do not attempt to remove the paper roll
with the print roller arm locked. This may
result in damage to the printer and print
head.
Page 7
Mode Switch and Mode Keys
123
456
789
CL
•
00
0
DEPT
SHIFT
CLK
#
CONV
%1RA
VOID
RFND
–
%2
NUMBER
SHIFT
SPACE
DC
ESC
BS
RCPT
/PO
@/
FOR
PLU
/SUB
DEPT
#
B
A
20
4
C
19
3
D
18
2
E
17
1
G
F
24
8
H
23
7
I
22
6
J
21
5
L
K
28
12
M
27
11
N
26
10
O
25
9
Q
32
P
16
R
31
15
S
30
14
T
29
13
AUTO
TAX
TAX2
SHIFT
TAX1
SHIFT
MDSE
SBTL
#/TM
SBTL
CHK
CH
Y
X
Z
V
U
W
CA/AT/NS
3
The mode switch can be operated by inserting one of the two supplied mode keys - manager (MA) and operator
(OP) keys. These keys can be inserted or removed only in the “REG” or “OFF” position.
MA
OP
REG
OP
X/Z
OFF
VOID
PGM
Manager key (MA)
Operator key (OP)
Keyboard
4
MGR
X
X2/Z2
Keyboard layout
1/Z1
OPMA
The mode switch has these settings:
OFF: This mode locks all register operations. (AC power turns off.)
No change occurs to register data.
OP X/Z: To take individual clerk X or Z reports, and to take flash reports.
It can be used to toggle receipt state “ON” and “OFF” by pressing
the
R
key.
REG: For entering sales.
PGM: To program various items.
VOID
: Enters into the void mode. This mode allows correction after
finalizing a transaction.
MGR: For manager’s entries. The manager can use this mode for an
override entry.
X1/Z1: To take the X/Z report for various daily totals
X2/Z2: To take the X/Z report for periodic (weekly or monthly)
consolidation
The small characters on the bottom or lower right in each key indicates functions or characters
which can be used for character entries for text programming. For details, refer to page 39.
Key names
Paper feed key
RA
Received-on account key
RCPT
Receipt print/Paid-out key
/PO
VOID
Void key
ESC
Escape key
CONV
Conversion key
%2
%1
RFND
Percent 1 and 2 keys
Refund key
Discount key
@/
FOR
Multiplication key
•
Decimal point key
CL
Clear key
00
PLU
PLU/Sub-department key
/SUB
DEPT
Department code entry key
#
DEPT
Department shift key
SHIFT
Clerk code entry key
CLK
#
17
~
1
16
0
~
32
Department keys
Numeric keys
9
Tax key
TAX
TAX1
TAX2
SHIFT
AUTO
CHK
CH
MDSE
SBTL
#/TM
SBTL
CA/AT/NS
Tax 1 and 2 shift keys
SHIFT
Automatic sequence key
Check key
Charge key
Merchandise subtotal key
Non-add code/Time display
/Subtotal key
Total/Amount tender
/No sale key
5
Page 8
Displays
SK1-1
5
Operator display Customer display (Pop-up type)
PLU/SUB
DEPT REPEAT
Clerk code
RCPT
OFF
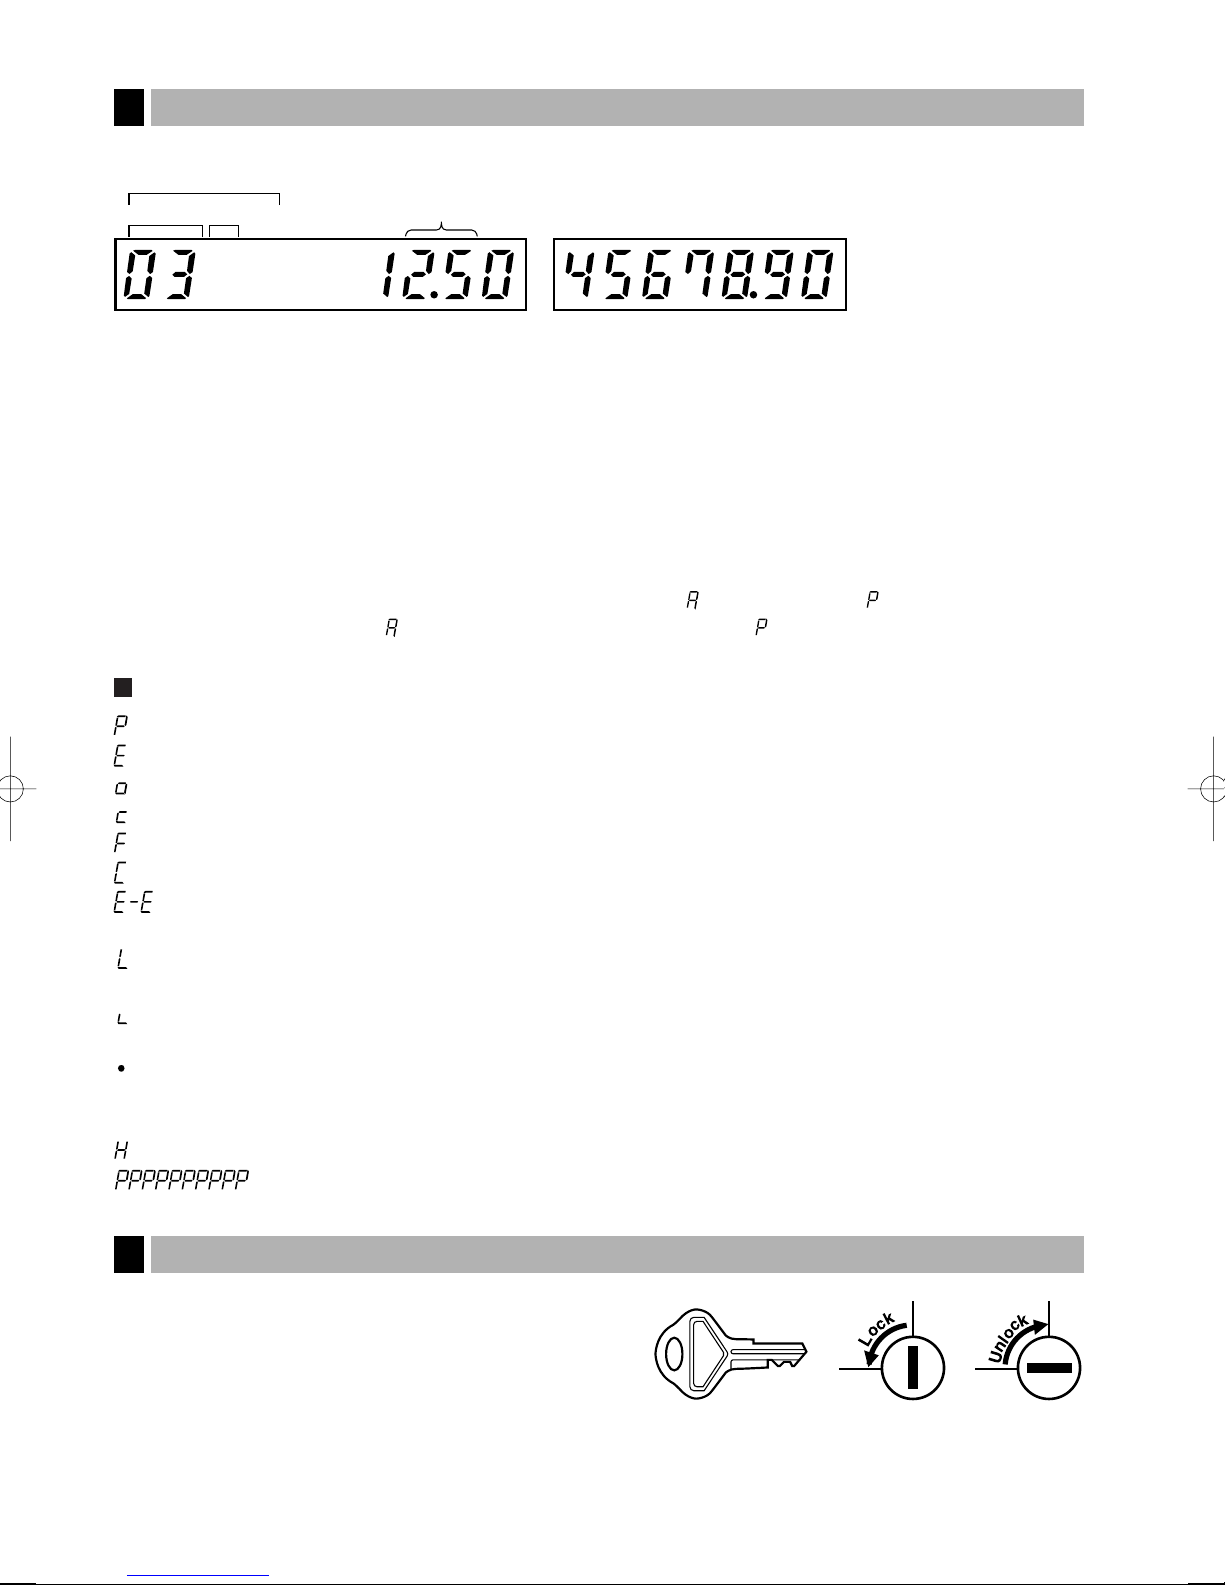
Amount: Appears in the far-right eight (max.) positions. When the amount is negative, the minus symbol “-”
Number of repeats for repetitive registrations:
Receipt function status:
Time: Appears in the far-right six positions (hour-minute -“ ” or hour-minute -“ ”) in the OP X/Z, REG,
DC
appears before the amount.
The number of repeats is displayed, starting at “2” and incremental with each repeat. When you
have registered ten times, the display will show “0.”(2 → 3
The indicator “_” appears in the RCPT OFF position when the receipt function is in the OFF
status.
or MGR mode. “ ” is displayed in the morning (AM), and “ ” in the afternoon (PM). In the REG
or MGR mode, press the
NUMBERSHIFT
key to display the time.
s
.....
9 → 0 → 1 → 2
...
)
Machine state symbols
: Appears during programming.
: Appears when an error is detected.
: Appears when the subtotal is displayed or when the amount tendered is smaller than the sales amount.
: Appears when the
: Appears when a transaction is finalized by pressing the
: Appears when the change due amount is displayed.
: May appear in the far-left three positions at the timing of key entry when the electronic journal (EJ)
memory is full. (Depending on programming.)
: Appears when the voltage of the installed batteries is under the required level. You must replace with
new ones within two days. Refer to page 69 for details.
: Appears when the batteries are not installed, or the installed batteries are dead. You must replace with
new ones immediately. Refer to page 69 for details.
: May appear right below the eighth and ninth places at the timing of finalization of a transaction when the
electronic journal (EJ) memory is nearly full.
Also appears right below the tenth place when power save mode is effective.
: Appears when the print roller arm is not locked.
: Appears when the paper is not set or has run out.
key is pressed to calculate a subtotal in foreign currency.
V
A, C
or ckey.
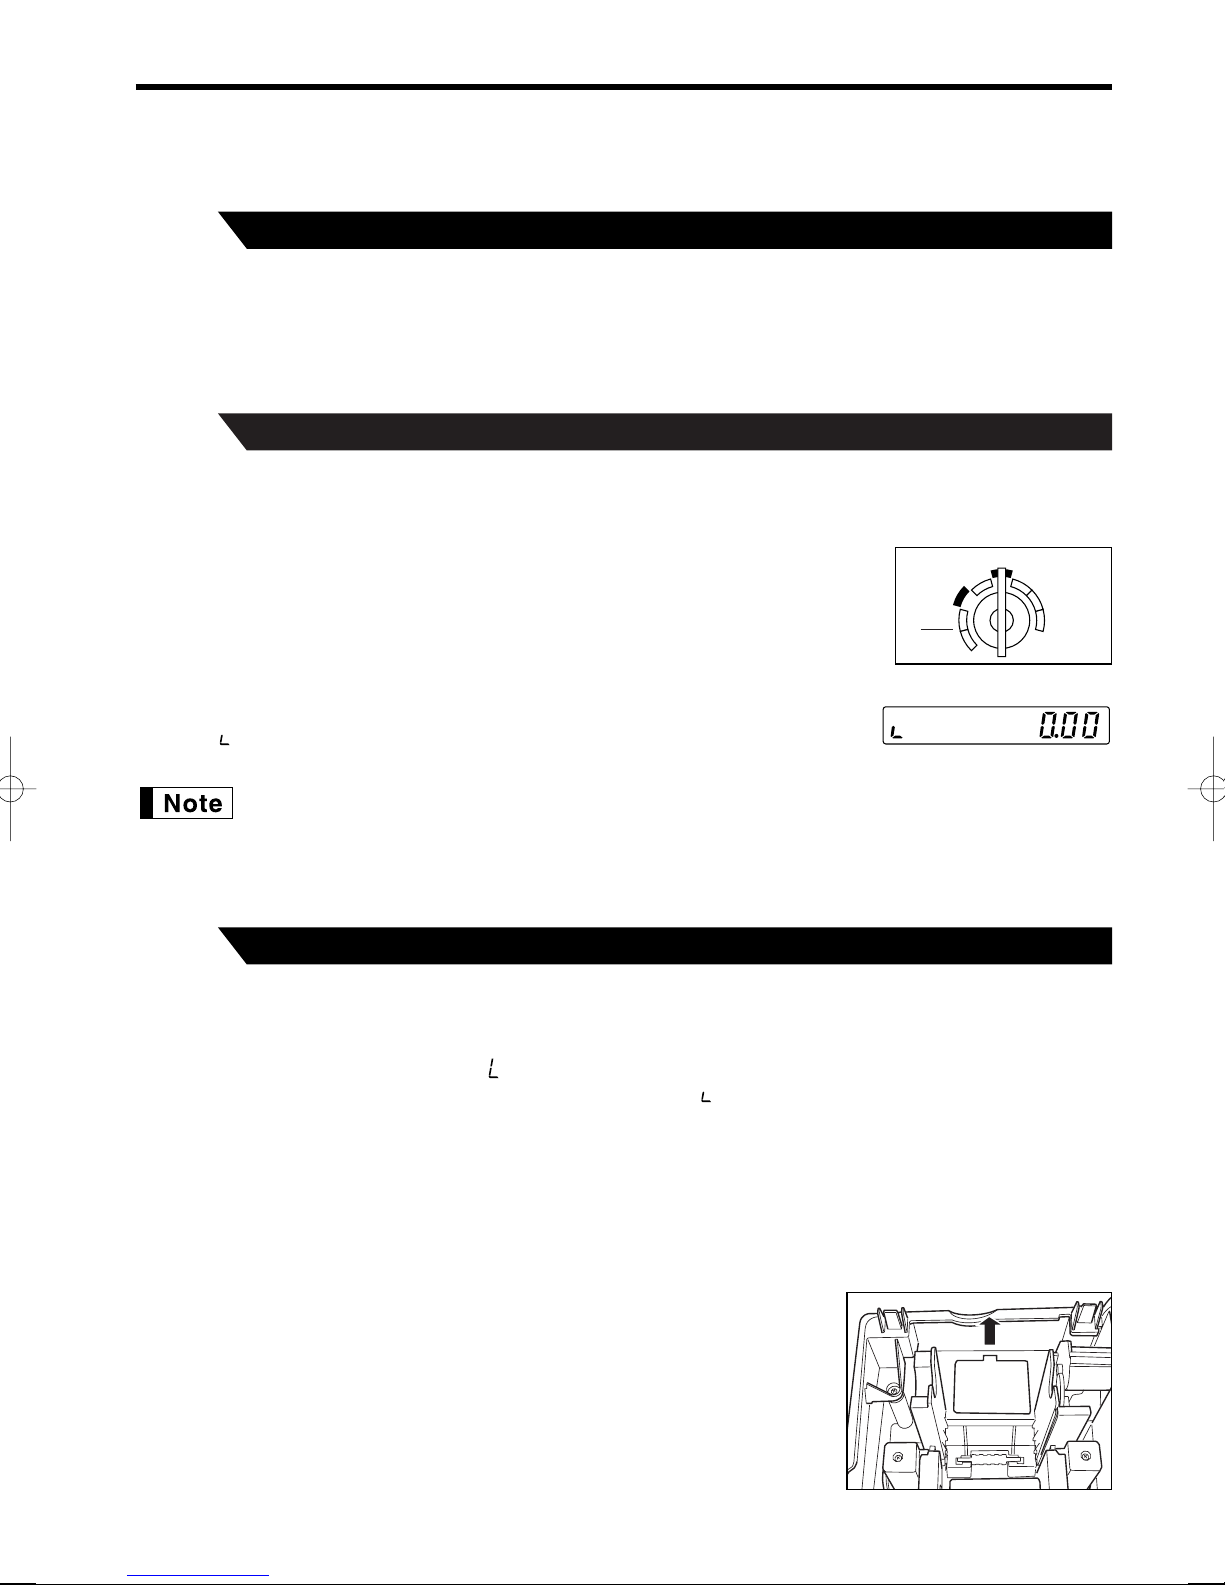
Drawer Lock Key
6
This key locks and unlocks the drawer. To lock it, turn 90
degrees counterclockwise. To unlock it, turn 90 degrees
clockwise.
6
Page 9
GETTING STARTED
REG
OPX/Z MGR
PGM
X1/Z1
X2/Z2
OFF
VOID
Please follow the procedure shown below. The batteries are not installed and the power is OFF.
Installing the cash register
1
AC outlet.
Unpack the cash register and make sure all accessories are included. For details of accessories, please refer to
“Specifications” section.
2
time. Follow this procedure.
1. Insert the manager (MA) key into the mode switch and turn it to the REG
2. Insert the plug into the AC outlet. The buzzer will sound three times.
3. The cash register has now been initialized. The register display will show “0.00”
Find a stable surface where the cash register is not subject to water sources or direct sunlight near an
Initializing the cash register
In order for your cash register to operate properly, you must initialize it before programming for the first
position.
IMPORTANT: This operation must be performed without batteries installed.
with “ ”.
If the buzzer does not sound when the plug is inserted, the initialization has not been done
successfully. (This will occur when the voltage is still high because you operated the cash register
just before starting initialization.) In this case, wait at least one minute after pulling out the plug,
and insert the plug again.
Installing batteries
3
and user-programmed settings from being erased from the memory, when the AC cord is accidentally
disconnected or in case of power failure. Once installed, the batteries will last approximately one year before
needing replacement. At this time, the “ ” symbol will appear on the display to indicate the batteries are low
and must be replaced within two days. If the no battery symbol “ ” appears, you must install the batteries at
once.
Install three new alkaline batteries LR6 (“AA” size) according to the procedure shown below with the AC cord
connected and the mode switch set to the REG position:
1. Push the printer cover forward and detach it.
2. Open the battery compartment cover next to the paper roll cradle.
Three new alkaline batteries LR6 (“AA” size) must be installed in the cash register to prevent the data
Be careful with the paper cutter, so as not to cut yourself.
7
Page 10
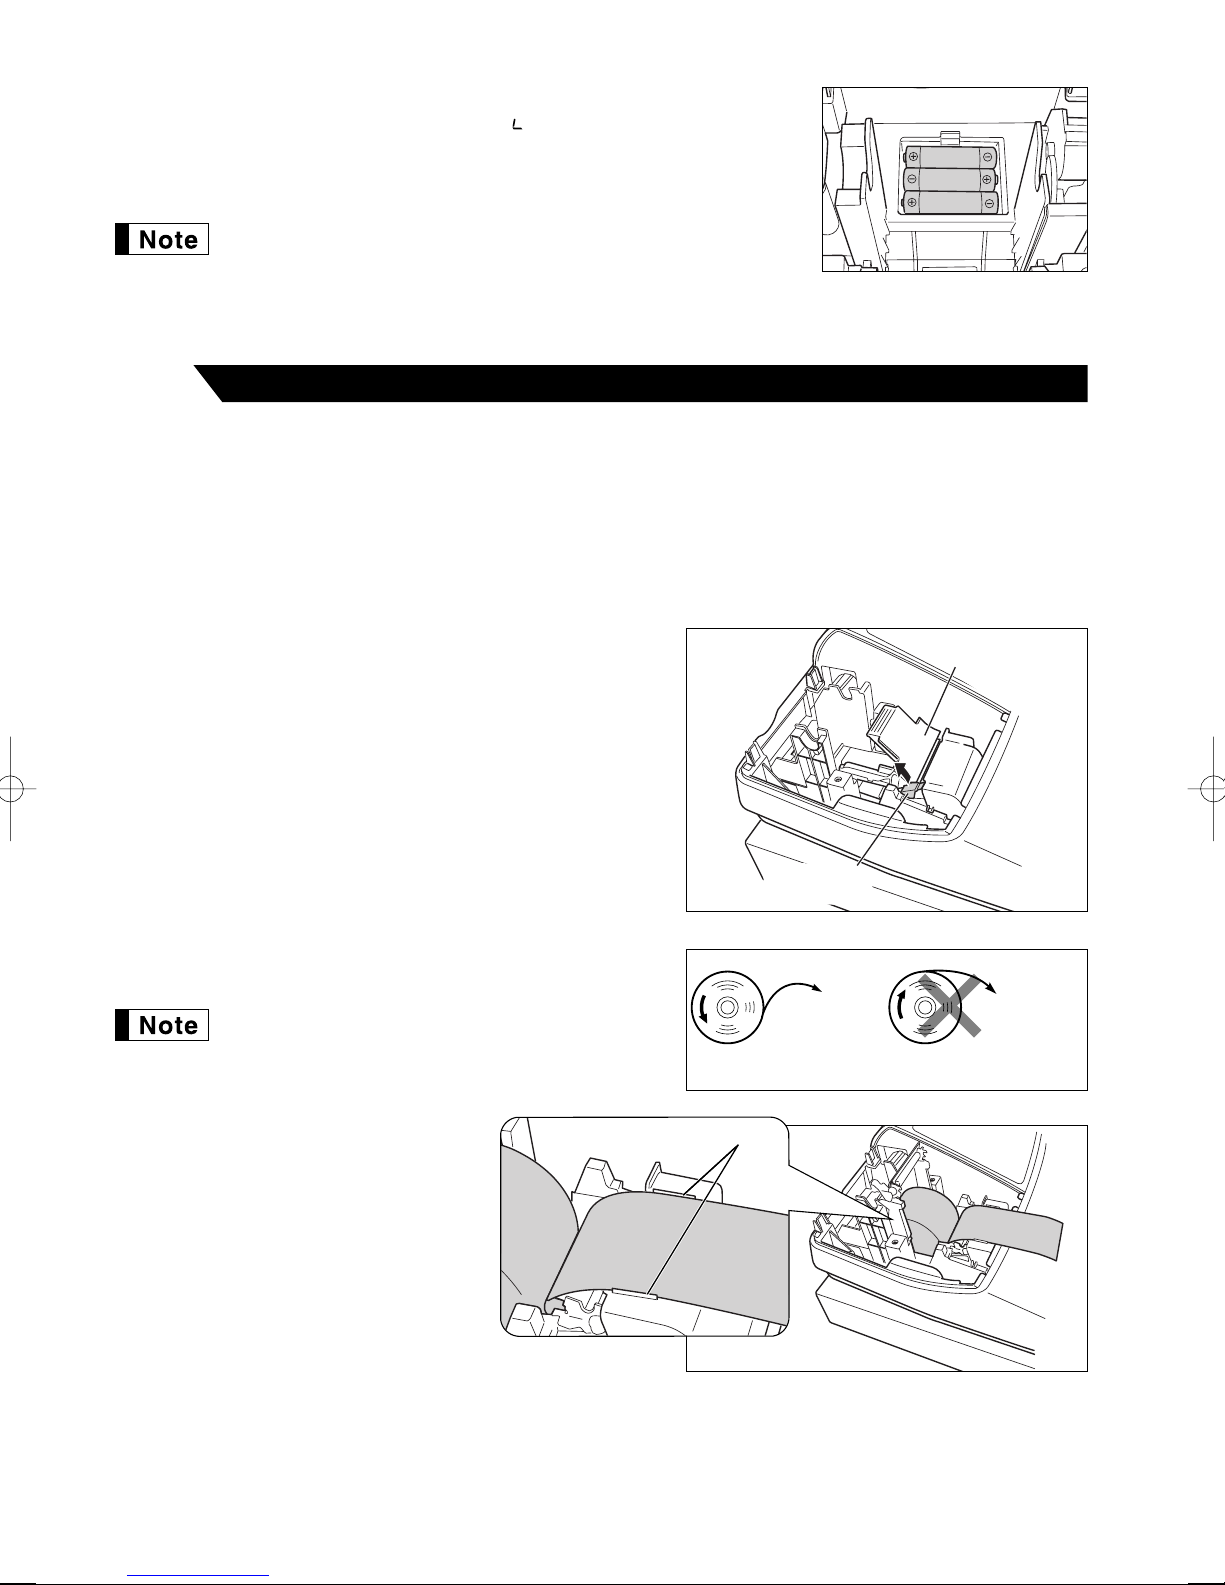
3. Insert three new alkaline batteries LR6 (“AA” size) as illustrated at the right.
Paper positioning guides
When the batteries are properly installed “ ” on the display will disappear.
4. Close the battery compartment cover.
Be sure to observe precautions shown on page 1 when handling
batteries.
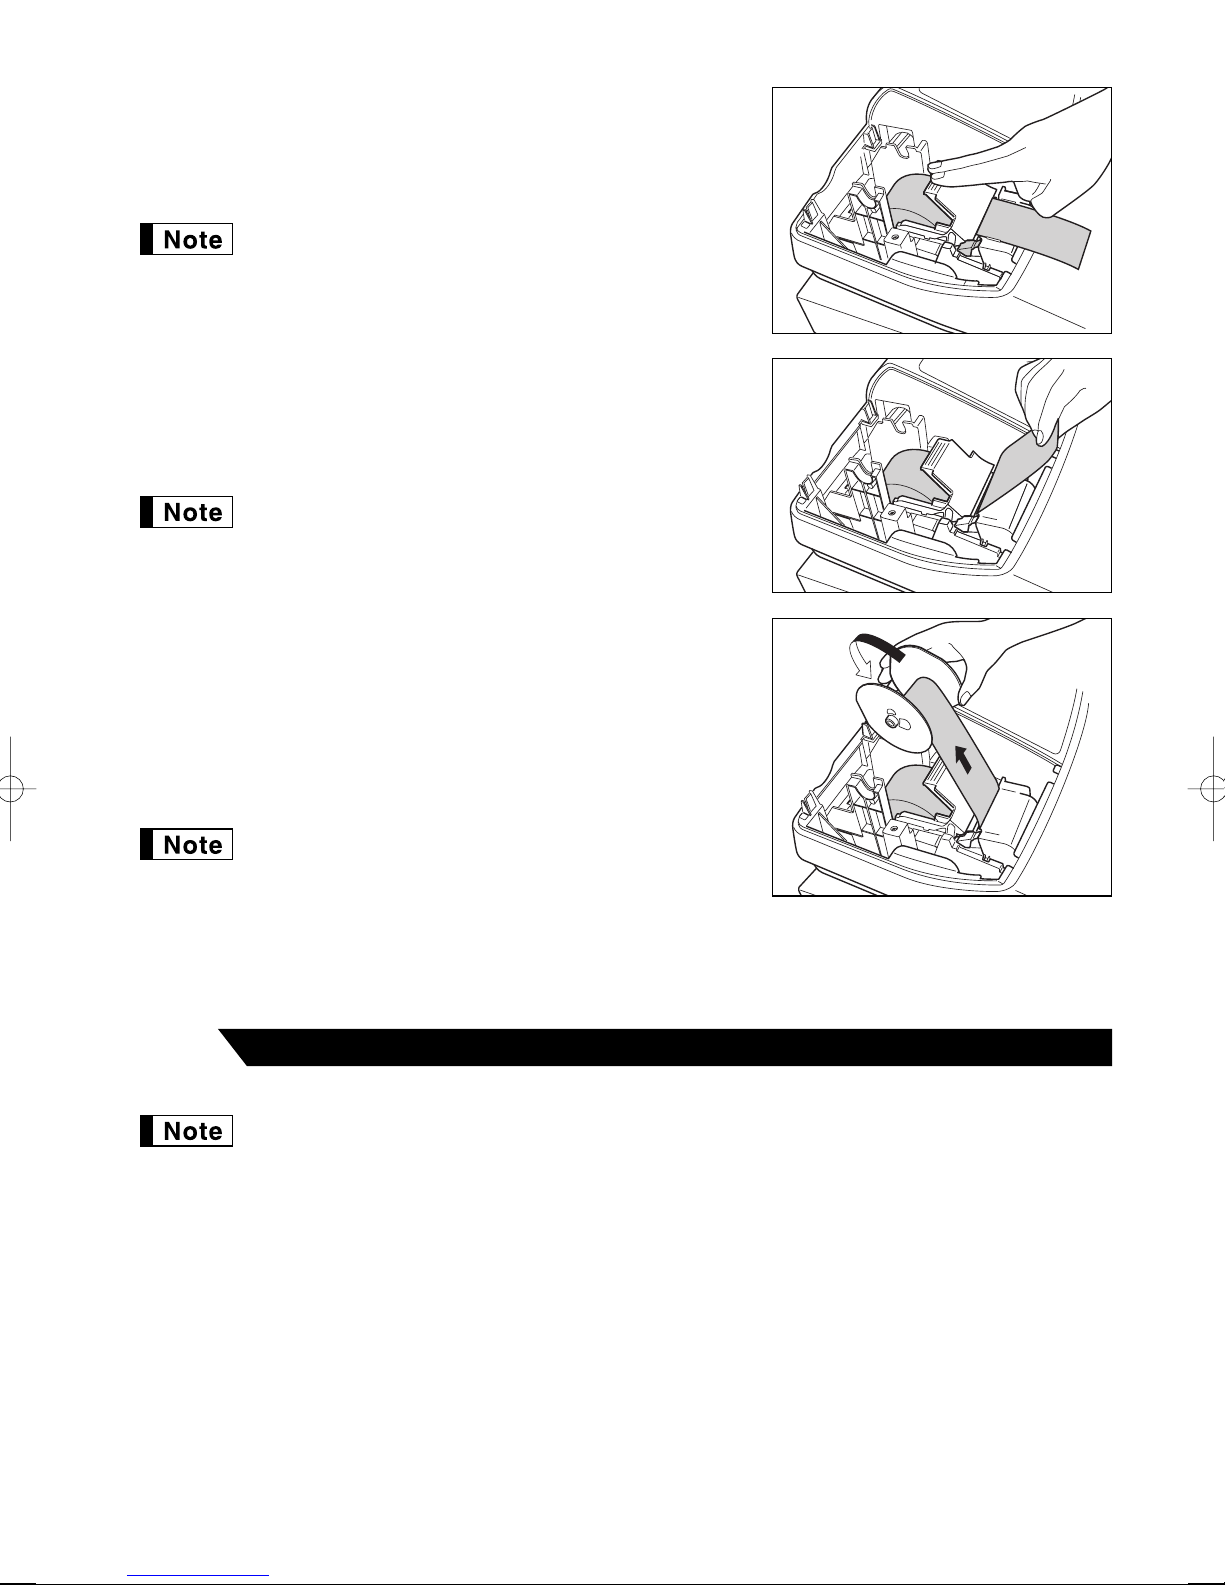
Installing a paper roll
4
The register can print receipts or journals. For the printer, you must install the paper roll provided with the
register, even when you program the register for not printing receipts or journals.
Install the paper roll according to the procedure shown below with the AC cord connected and the mode switch
set to the REG position:
Precaution: The paper cutter is mounted on the printer cover. Take caution when removing and
installing the cover.
1. Lift up the print roller release lever to unlock and open the
print roller arm.
2. Set a paper roll in the paper roll cradle as illustrated at the
right.
When setting a new paper roll in the paper roll
cradle, be sure to cut the paper end behind the
taped (or pasted) point in advance.
3. Feed the end of the paper along with
the paper positioning guides as
illustrated at the right.
Print roller
release lever
To the printer
Correct
Print roller arm
To the printer
Incorrect
8
Page 11
4. While holding down the paper, slowly close the print roller arm, and
push down the arm until you hear a click locking the arm. Make
sure securely you push down the center of the wing part of the arm
as illustrated at the right. The paper will be fed automatically.
If the print roller arm is not securely locked, the unit will
not print correctly. If this problem occurs, open the arm,
and close the arm as instructed above.
5. When not using the take-up spool (using as receipt paper):
• Cut off the excess paper using the edge of the inner cover, and
replace the printer cover. Press the
paper end comes out of the printer cover and clean paper
appears.
If the paper end does not come out, open the printer
cover, and pass the paper end between the paper cutter
and the paper guide of the printer cover, and replace the
cover.
When using the take-up spool (using as journal paper):
• Insert the end of the paper into the slit in the spool. (Press the
key to feed more paper if required.)
• Wind the paper two or three turns around the spool shaft.
• Set the spool on the bearing, and press the
excess slack in the paper.
• Replace the printer cover.
key to make sure the
F
key to take up
F
F
When using a paper roll as journal paper, you must change
the printing style. Refer to “Print Format” in “Various
Function Selection Programming 1” section (Job code 6)
for changing the printing style.
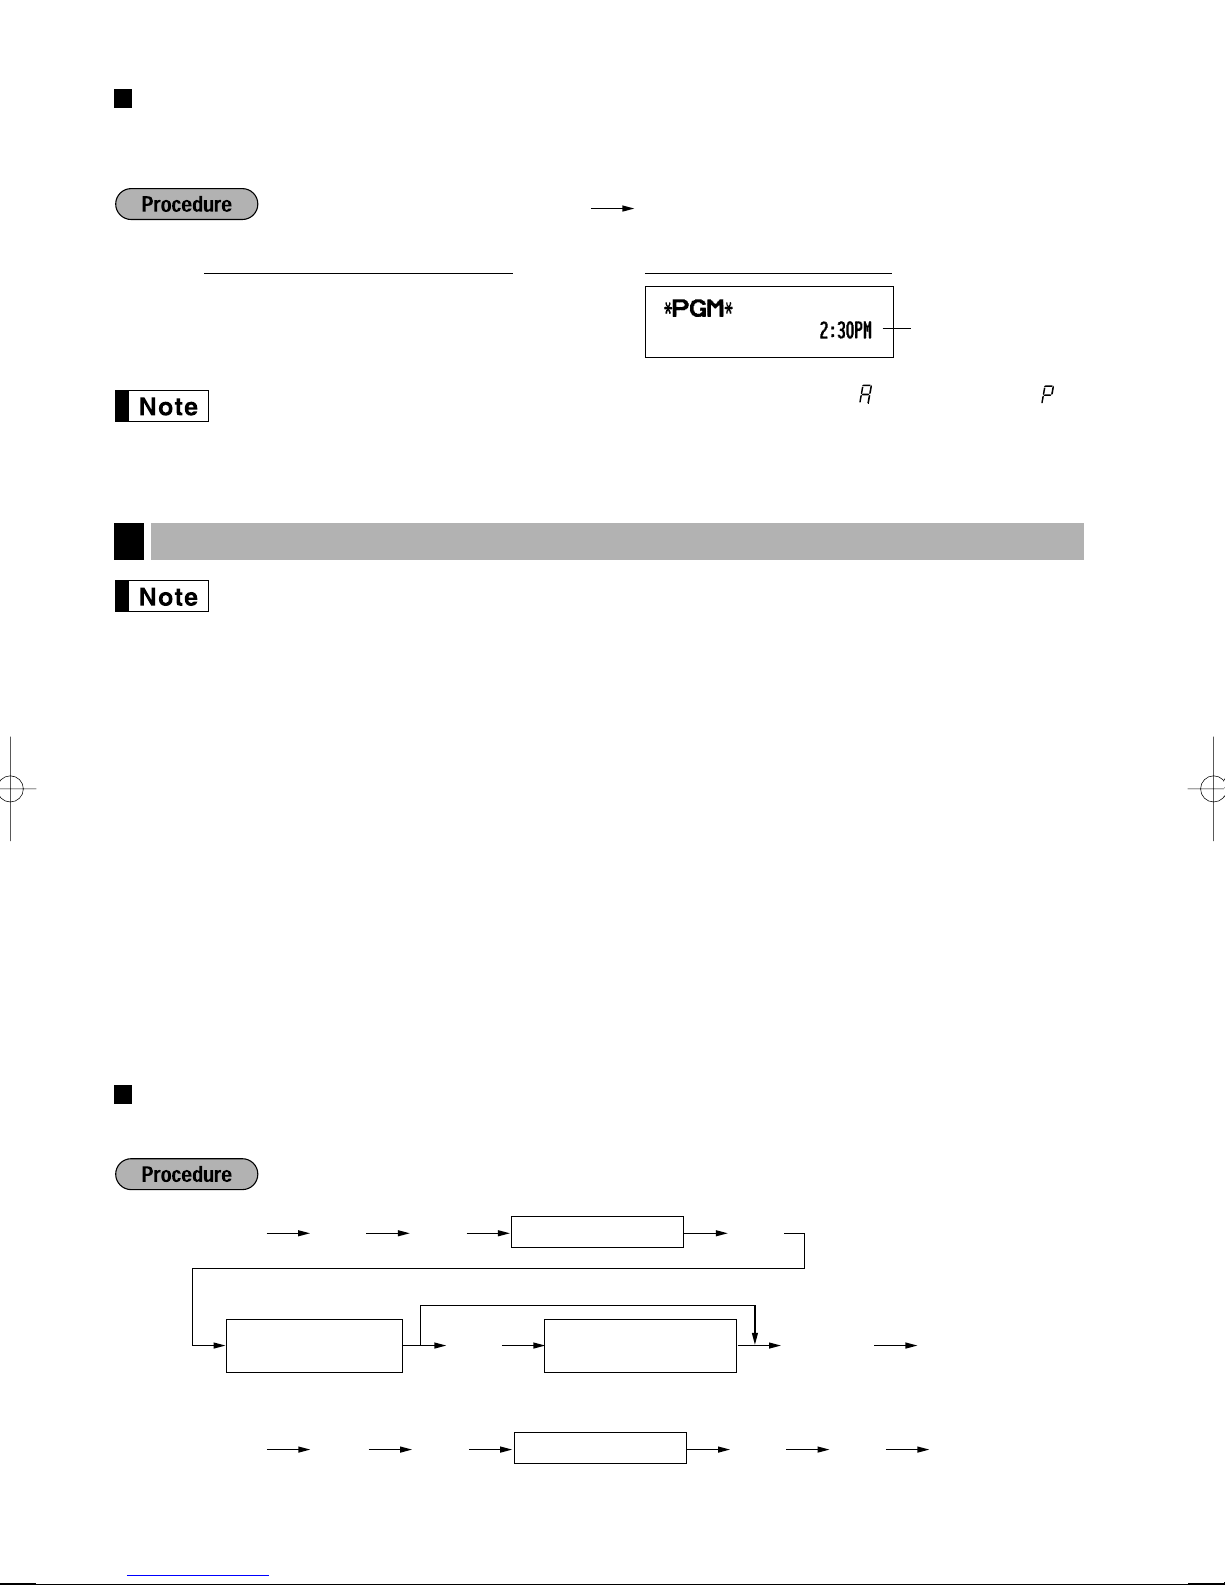
Programming date, time and tax
5
The cash register provides text languages of English, French and Spanish. It is preset to English.
If you want to change the language, you must change it before programming. Refer to “Language
selection” in “Various Function Selection Programming 2” section for changing the language.
Before you can proceed with registration of sales, you must program:
• date
• time
• tax
Please refer to the BASIC FUNCTION PROGRAMMING section for details (page 27).
9
Page 12

Programming other necessary items
6
with optional functions. Before you start programming, please read through the sales operations section to
understand optional functions. The main optional functions are listed below.
While the cash register is pre-programmed so it can be used with minimal setup, it does provide you
• PLU (price lookup)
• Consecutive number
• Machine number
• Receipt or journal printing selection (factory setting: receipt printing)
• Power save mode (factory setting: goes into power save mode in 30 minutes)
• Electronic journal (EJ) memory size (factory setting: 2000 lines are storable. Up to 3000 lines)
The memory for electronic journal is commonly used for PLU. If you change the setting, the
maximum number of PLU code will decrease from 1200 to 200.
• Text programming for clerk name, department items, PLU/sub-department items, logo messages printed on
the top or bottom of receipts, function texts and foreign currency symbol
• Split pricing entry
This is not factory preset. You must enable this function.
• Foreign currency conversion rate
You must set a conversion rate to use
• Preset unit price for departments and PLUs
• Preset amount for
• Preset rates for
You do not have to program these preset prices/amount/rates because you can enter during
registration. It might be convenient to preset so you do not have to re-enter every time.
• Amount entry digit limit for PO amount, RA amount, Manual tax amount
The factory setting makes the maximum amount you can enter. You can program to limit the amount.
• Key sequence for AUTO key
• Online time out setting
• Specification of clerk to be trained
-
%&
V
key.
Department programming:
The cash register is pre-programmed for departments as follows:
Department: Allow open price entry, taxable status- taxable 1 for department 1 to 10, and non taxable
for department 11 to 99
When you use department 11 or above, and/or you apply taxable status other than taxable 1 for department 1 to
10, you must change department settings. Please refer to the department programming section for
programming details.
Starting sales entries
7
Now you are ready for sales registration.
10
Page 13

FOR THE OPERATOR
OVERVIEW OF FLOW OF DAILY SALES ENTRIES
Things to do before you start sales entries:
• Make sure the power cord is securely inserted into the AC outlet.
• Turn the mode switch to OP X/Z position, and check if time is correctly set.
• Replace the drawer, if removed for safety.
• Check if there is enough paper on roll.
• Select receipt ON/OFF function.
• Make any necessary programming for the day in PGM mode.
For details, refer to BASIC SALES ENTRY, page 12. For drawer and paper roll, refer to OPERATOR
MAINTENANCE, page 68 and for programming, refer to programming sections.
Things you can do for sales entries:
• Item entries
• Item repeat entries
• Item multiplication entries
• Single item cash sale (SICS), if programmed.
• Split pricing entries, if programmed.
• Displaying subtotals
• Cash/Check/Charge sale
• Cash tendering in a foreign currency, if the currency conversion rate is programmed.
• Manual tax entry
• Discount or premium using
• Refund entry
• No sale
• Paid-out entries
• Received on account entries
• Printing non-add code number
• Making corrections
• Checking sales report
%&
and -key
For details of sales entry method, refer to BASIC SALES ENTRY (page 12) and OPTIONAL FEATURES
(page 21). For details of correcting sales entries, refer to CORRECTION (page 25). For details on reading
sales information, refer to READING (X) AND RESETTING (Z) OF SALES TOTAL (page 57).
Things to do after you close your store:
• Print sales reports, and clear sales data for the day.
• Print Electronic Journal (EJ) reports, and clear Electronic Journal (EJ) data, if necessary.
• Account money - comparing it with the amount in cash in drawer printed on the general report.
• Remove the drawer for safety.
• Turn the mode switch to OFF position.
For details of reading sales information, refer to READING (X) AND RESETTING (Z) OF SALES TOTAL (page
57) and EJ REPORT READING AND RESETTING (page 60). For details of removing the drawer and
maintenance details, refer to OPERATOR MAINTENANCE (page 68).
11
Page 14
BASIC SALES ENTRY
REG
OPX/Z MGR
PGM
X1/Z1
X2/Z2
OFF
VOID
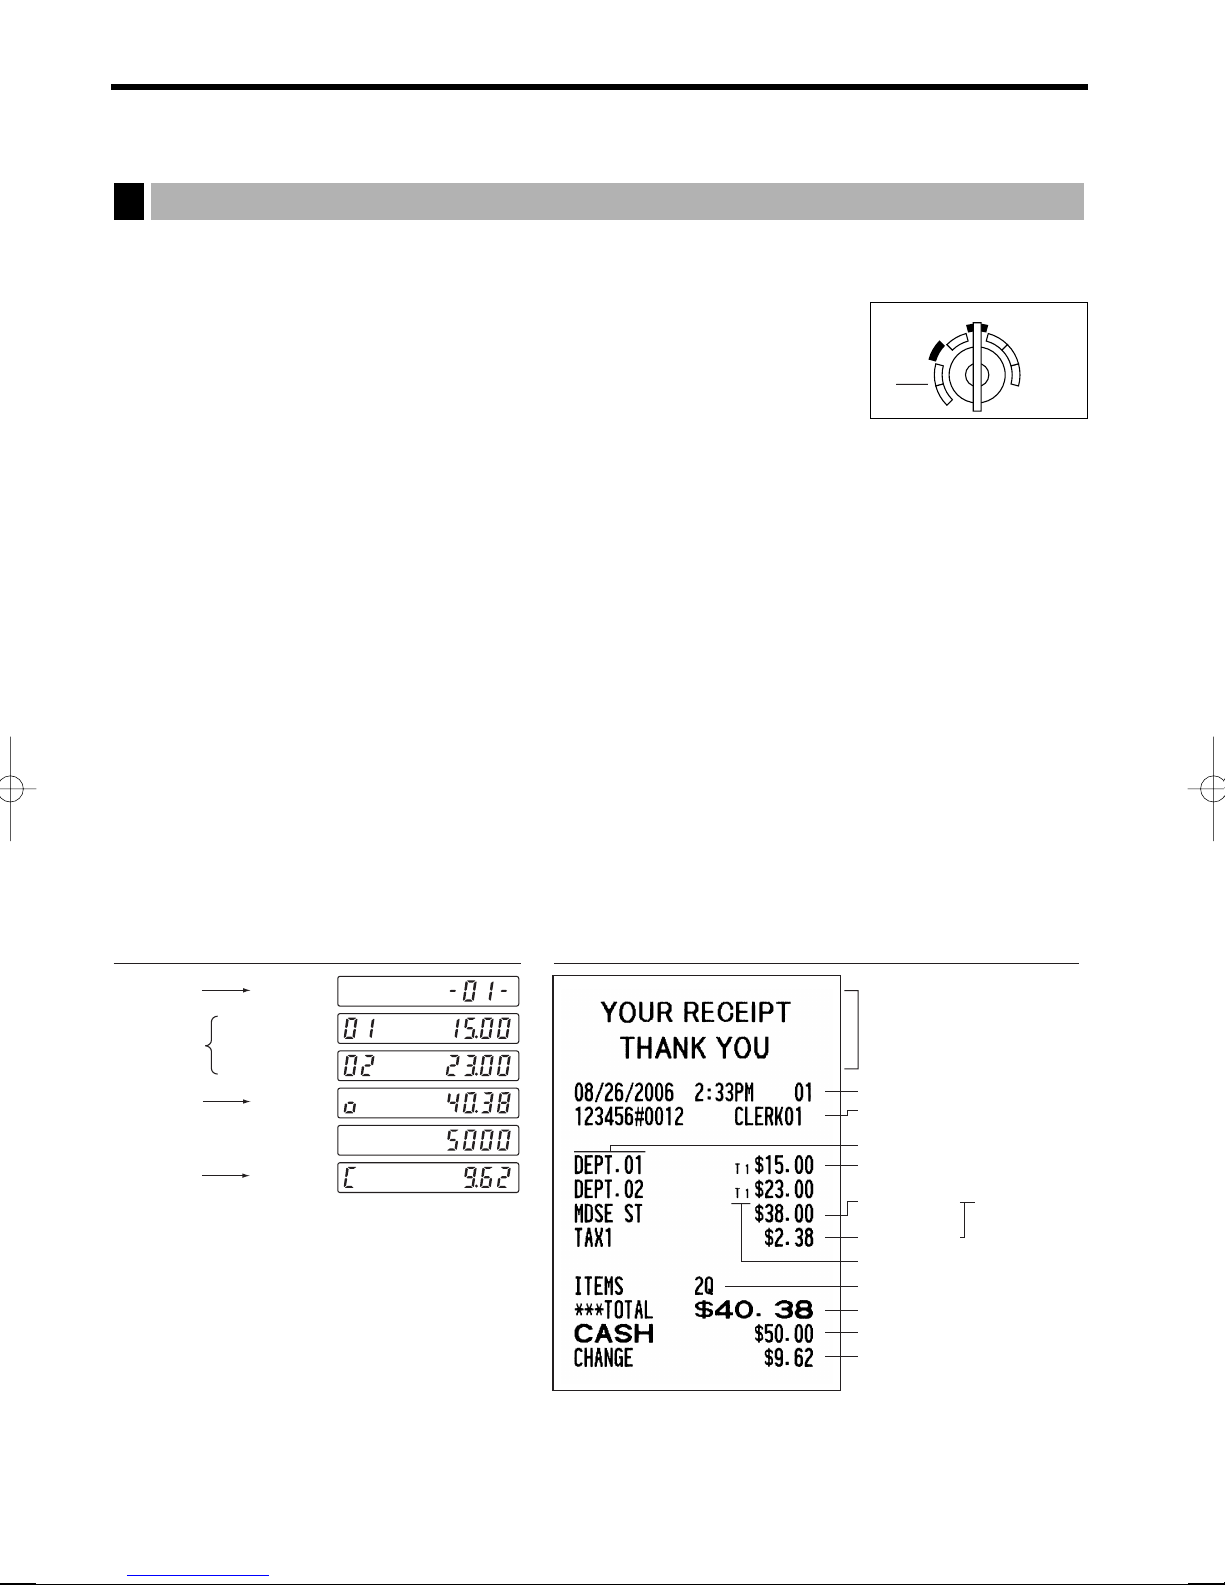
Basic Sales Entry Example
1
Listed below is a basic sales entry example when selling department items by cash. For operation details,
please refer to each section.
Mode switch setting
1. Turn the mode switch to the REG position.
Clerk assignment
2. Enter your clerk code. (For example, clerk code is 1. Press the
this order.) The clerk code 1 is automatically selected just after initialization of the
cash register.
Item entries
3. Enter the price for the first department item. (For example, for 15.00, enter
appropriate department key.)
For department 17 to department 32, press the
For department 33 and above, enter the department code using numeric keys, and press the
then enter the price and press the
d
key again.
D
key first before pressing the department key.
4. Repeat step 3 for all the department items.
Displaying subtotals
5. Press the
Finalizing the transaction
key to display the amount due.
s
6. Enter the amount received from the customer. (You can omit this step if the amount tendered is the same as
the subtotal.)
7. Press the
amount is displayed) and the drawer is opened.
key, and the change due is displayed (when the amount received was not entered, the total
A
8. Tear off the receipt and give it to the customer with his or her change.
9. Close the drawer.
and Lkey in
1
15:
, and press the
d
key,
Clerk
assignment
Item
entries
Displaying
subtotal
1 L
1500 !
2300 "
s
5000
Finalizing
the transaction
(In this example, the tax rate is set to 6.25%.)
12
A
PrintKey operation example
Graphic logo
Date/Time/Clerk code number
Register number
/Consecutive number/Clerk name
Items
Price
Merchandise
subtotal
Tax amount
Tax status (T1: taxable 1)
Total quantity
Total amount
Cash tendering/amount received
Change
Not printed when
non-taxable items
only are sold.
Page 15
Clerk assignment
L
Clerk code 1 to 25
To display the signed-on clerk code
LL
■ Sign-on (in REG, MGR, VOID mode) ■ Sign-off (in REG, MGR, VOID mode)
l
Transaction
To clear the error state
E
E
Prior to any item entries, clerks must enter their clerk codes into the register. However, the code entry may not
be necessary when the same clerk handles the next transaction.
Receipt ON/OFF function
When you use the printer to issue receipts, you can disable receipt printing in the REG mode to save paper
using the receipt ON/OFF function. To disable receipt printing, press the
key toggles the receipt printing status ON and OFF.
To check the receipt printing status, turn the mode switch to the OP X/Z position or press the
mode. When the function is in the OFF status, the receipt off indicator “_” is illuminated. Your register will print
reports regardless of the receipt state, so the paper roll must be installed even when the receipt state is “OFF”.
To issue a receipt when receipt ON/OFF function is set to OFF:
If your customer wants a receipt after you finalized a transaction with the receipt ON/OFF function being OFF
status, press the
receipt will be issued in the format of summary receipt print.
Power Save Mode
The register will enter into power save mode when no entries are performed based on the pre-programmed time
limit (by default, 30 minutes).
When your register goes to the power save mode, all the display lights will turn off except the decimal point at
the left-most position. Your register will return to the normal operation mode when any key is pressed or a mode
is changed with the mode key. Please note when your register is recovered by a key entry, its key entry is
invalid. After the recovery, start the key entry from the beginning.
key. This will produce a receipt. However, if more than 30 items were entered, the
R
key in the OP X/Z position. This
R
key in the REG
l
Error Warning
2
In the following examples, your register will go into an error state accompanied with a warning beep and the
error symbol “ ” on the display. Clear the error state by pressing the
Please refer to the error code table on page 73.
• You enter over a 32-digit number (entry limit overflow): Cancel the entry and re-enter the correct number.
• You make an error in key operation: Clear the error and continue operation.
• You make an entry beyond a programmed amount entry limit: Check to see if the entered amount is correct. If
it is correct, it can be rung up in the MGR mode. Contact your manager.
• An including-tax subtotal exceeds eight digits: Delete the subtotal by pressing the
or ckey to finalize the transaction.
C
Error escape function
When you want to quit a transaction due to an error or an unforeseen event, use the error escape function as
shown below:
The transaction is voided (treated as a subtotal void) and the receipt is issued by this function. If you have
already entered a tendered amount, the operation is finalized as a cash sale.
key and take proper action.
l
key and press the
l
A
,
13
Page 16

PLU code
(1 to 1200)
p
Unit price *
(max. 7 digits)
p
PLU code
(1 to 1200)
p
Dept. code
(1 to 99)
Unit price *
1
(max. 7 digits)
When using a programmed unit price
(In case only preset price entry is allowed.)
dd
Department keyUnit price *
1
(max. 7 digits)
When using a programmed unit price
D
*
2
Item Entries
3
Single item entries
Department entries
The cash register provides a maximum of 99 departments for a merchandise classification. Group attributes,
such as taxable status, are applied on items when they are entered to the departments.
• When using the department keys (for department 1 to 32)
For department 1 to 16, enter a unit price and press a department key. If you use a programmed unit price,
press a department key only.
For department 17 to 32, enter a unit price, press the
programmed unit price, press the
• When using the department code entry key
Enter a department(dept.) code and press the dkey, then enter a unit price and press the dkey again. If
the dept. code is programmed to preset price entry style and a unit price is preset, your cash register will finish
its registration operation.
key and press a department key.
D
key and press a department key. If you use a
D
1
*
Less than the programmed upper limit amounts
When zero is entered, only the sales quantity is
added.
2
*
For the optional departments 17 through 32,
press the
D
key.
PLU/sub-department entries
For another merchandise classification, the cash register provides a maximum of 1200 PLUs/sub-departments.
PLUs are used to call up preset prices by a code entry. Sub-departments are used to classify merchandise into
smaller groups under the departments. Every PLU and sub-department has a code from 1 to 1200, and should
belong to a department to obtain attributes of that department.
The cash register is pre-programmed to PLU mode and zero for unit price. To use PLU entries, their preset unit
prices should be previously programmed. (Refer to page 33.)
To use sub-department entries, change to sub-department mode for the PLU codes.
• PLU entries
• Sub-department (open PLU) entries
14
1
*
Less than the programmed upper limit
amounts
When zero is entered, only the sales
quantity is added.
* Less than the programmed upper limit
amounts
When zero is entered, only the sales
quantity is added.
Page 17

PrintKey operation example
1200 (
500 D !
Department entry
PLU entry
Sub-department
entry
50 d 1500 d
11p1200p
"
D
33 d
2 p
A
)
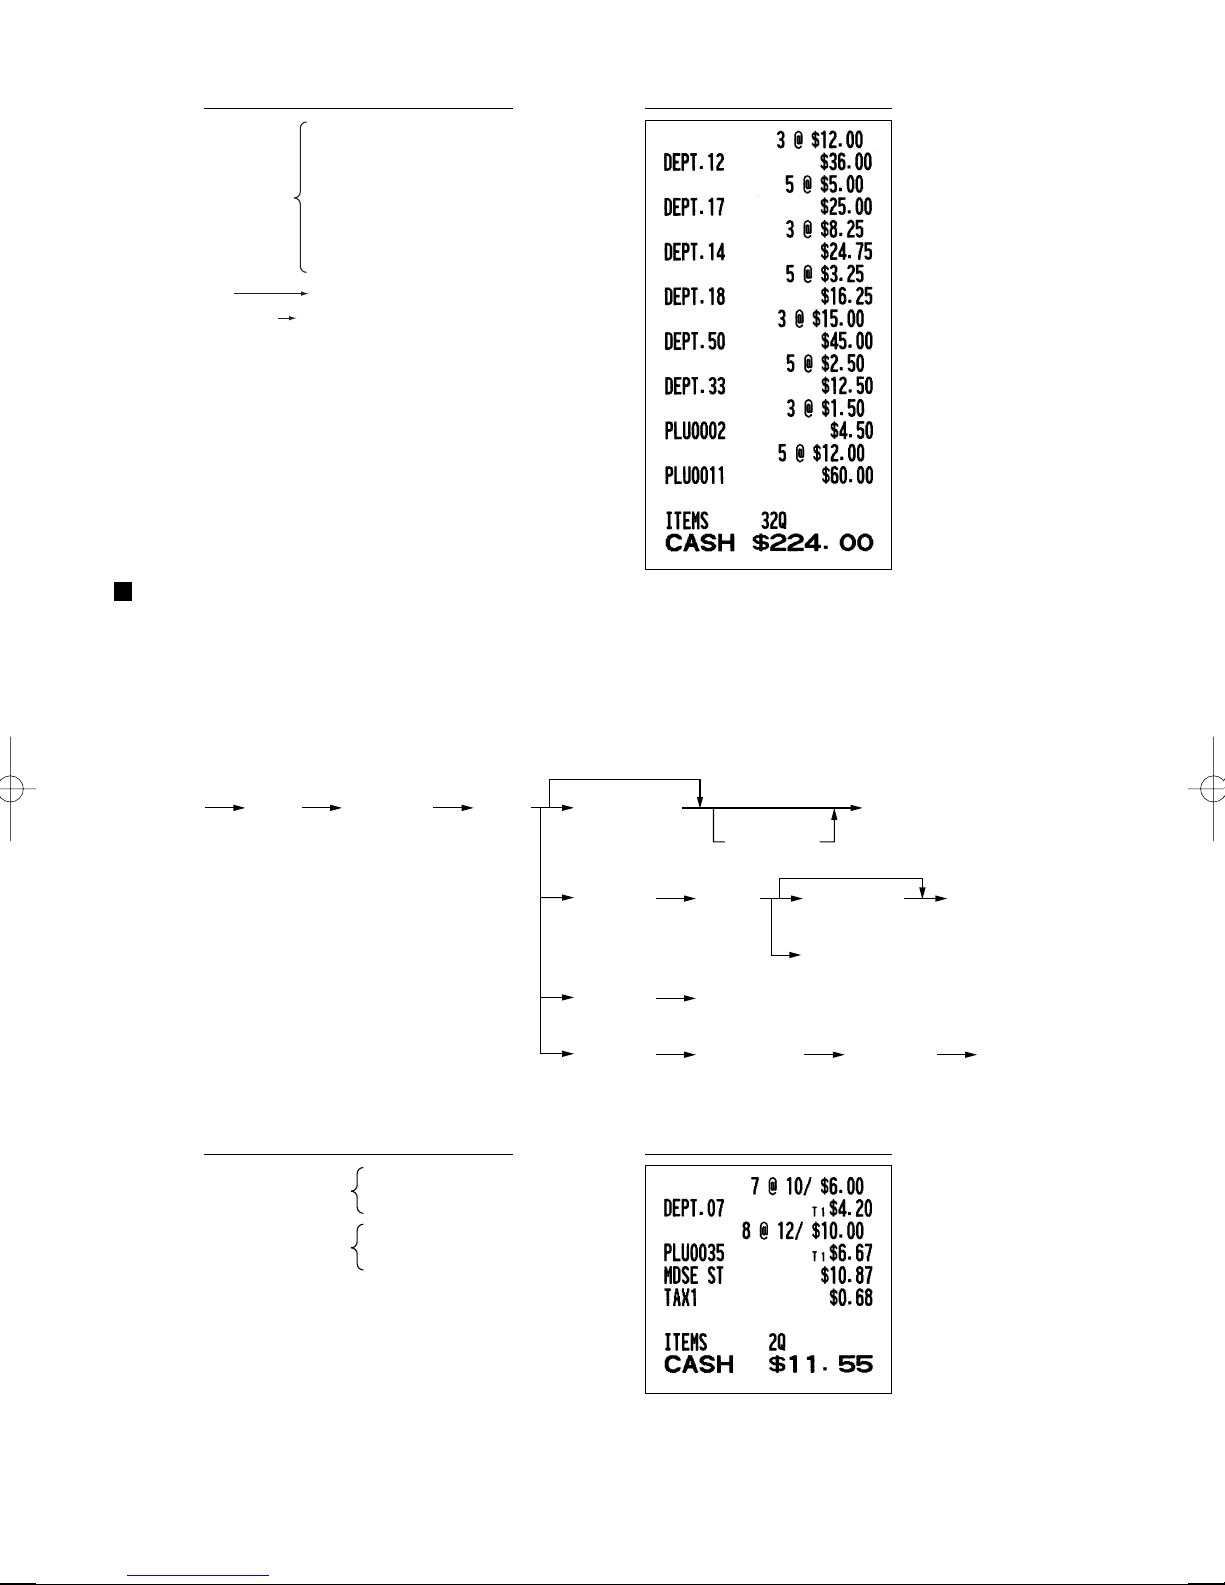
Repeat entries
You can use this function for entering a sale of two or more of the same items. Repeat pressing a department
key,
key or
d
Department entry
PLU entry
Sub-department
entry
p
11 p 1200 p p
key as shown on key operation example.
1200 ( (
500 D ! !
) )
" "
D
50 d 1500 d d
33 d d
2 p p
A
PrintKey operation example
Multiplication entries
When you sell a large quantity of items, it is convenient to use the multiplication entry method. Enter quantity
using numeric keys and press the
When programmed to allow fractional quantity entries, you can enter up to four integers and three
digit decimal, though the quantity is counted as one for sales reports. To enter a fractional quantity,
use the decimal point key between integer and decimal, as
key before starting item entry as shown in the example below.
@
7P5
for entering 7.5.
15
Page 18
Selling q'ty
(Up to 4 digits)
Base q'ty
(Up to 2 digits)
Unit price
per base q'ty
When using a programmed unit price
@ @
Department key
D
Dept. code
d
PLU code
p
PLU code Unit price
per base q'ty
p p
Unit price
per base q'ty
d
(Only preset entry is allowed.)
PrintKey operation example
3 @ 1200 (
5 @ 500 D !
Department entry
PLU entry
Sub-department
entry
3 @ 50 d 1500 d
5@ 11p1200p
3 @ )
5 @ D "
5 @ 33 d
3 @ 2 p
A
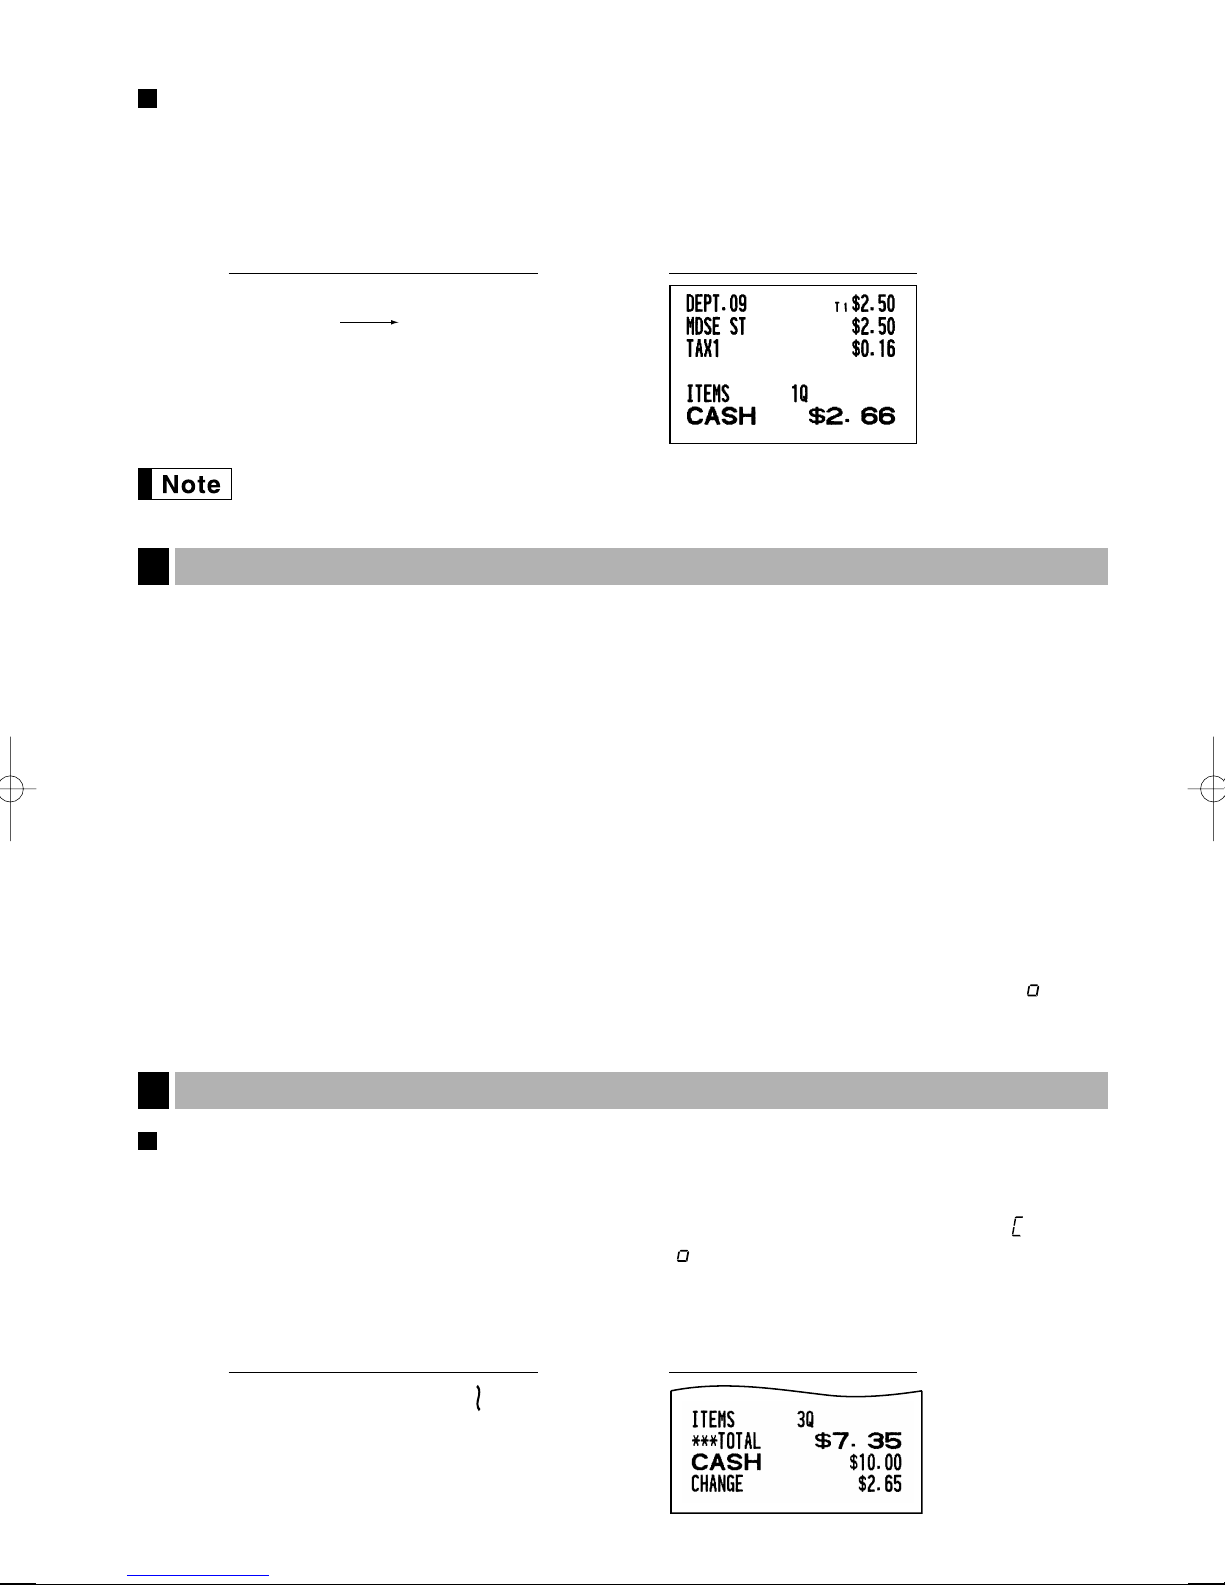
Split pricing entries
This function is practical when the customer wants to purchase items normally sold in bulk.
To utilize this function, you must change the pre-programmed or default programmed setting. Refer to “Various
Function Selection Programming 1” (job code 70) for programming details.
To make split pricing entries, follow the procedure below:
Department entry
PLU entry
7 @ 10 @
600 *
8 @ 12 @
35 p
A
PrintKey operation example
16
Page 19
Single item cash sale (SICS) entry
s
1000 A
• This function is useful when a sale is for only one item and is for cash. This function is applicable only to those
departments that have been set for SICS or to their associated PLUs or sub-departments.
• The transaction is complete and the drawer opens as soon as you press the department key,
p
4
The register provides three types of subtotals:
Merchandise subtotal
Press the
the display.
key.
PrintKey operation example
250
For finishing
the transaction
If an entry to a department or PLU/sub-department set for SICS follows the ones to departments or
PLUs/sub-departments not set for SICS, it does not finalize and results in a normal sale.
,
Displaying Subtotals
key at any point during a transaction. The net sale subtotal - not including tax - will appear in
m
d
key or
Taxable subtotal
Taxable 1 subtotal
Press the
taxable 1 items will appear in the display.
Taxable 2 subtotal
Press the
taxable 2 items will appear in the display.
Including-tax subtotal (full subtotal)
Press the
appear in the display.
Finalization of Transaction
5
key at any point during a transaction. The sale subtotal including tax and the symbol “ ” will
s
T
U
and
and
keys in this order at any point during a transaction. The sale subtotal of
s
keys in this order at any point during a transaction. The sale subtotal of
s
Cash or check tendering
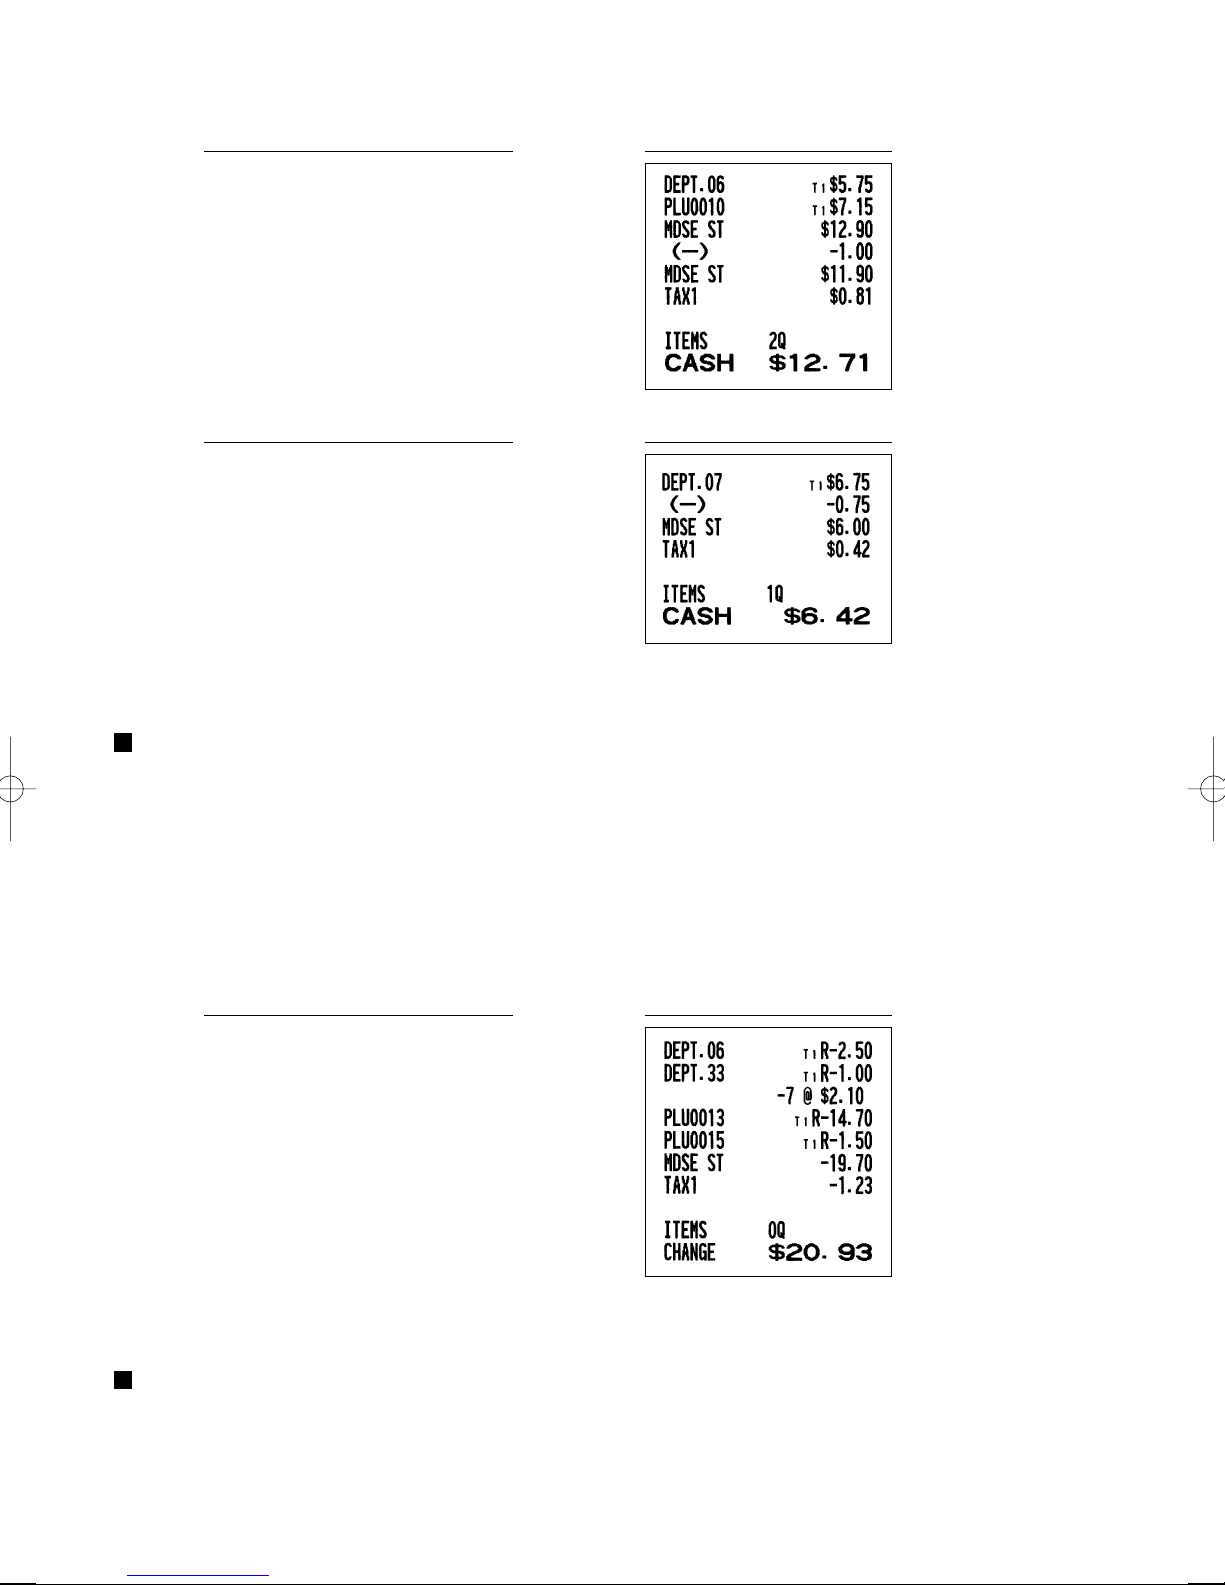
Press the
the
A
greater than the amount of the sale, your register will show the change due amount and the symbol “ ” will light
up. Otherwise the register will show a deficit and the symbol “ ” will light up. You now must make a correct
tender entry.
Cash tendering
key to get an including tax subtotal, enter the amount tendered by your customer, then press
s
key if it is a cash tender or press the Ckey if it is a check tender. When the amount tendered is
PrintKey operation example
17
Page 20
Check tendering
s
950 A
c
s
1000 C
Cash or check sale that does not require entry
Enter items and press the
display the total sale amount.
key if it is a cash sale or press the Cif it is a check sale. Your register will
A
300
+
10
p
A
PrintKey operation example
PrintKey operation example
In the case of check sale
Charge (credit) sale
Enter items and press the charge key (c).
PrintKey operation example
2500
+
3250
*
c
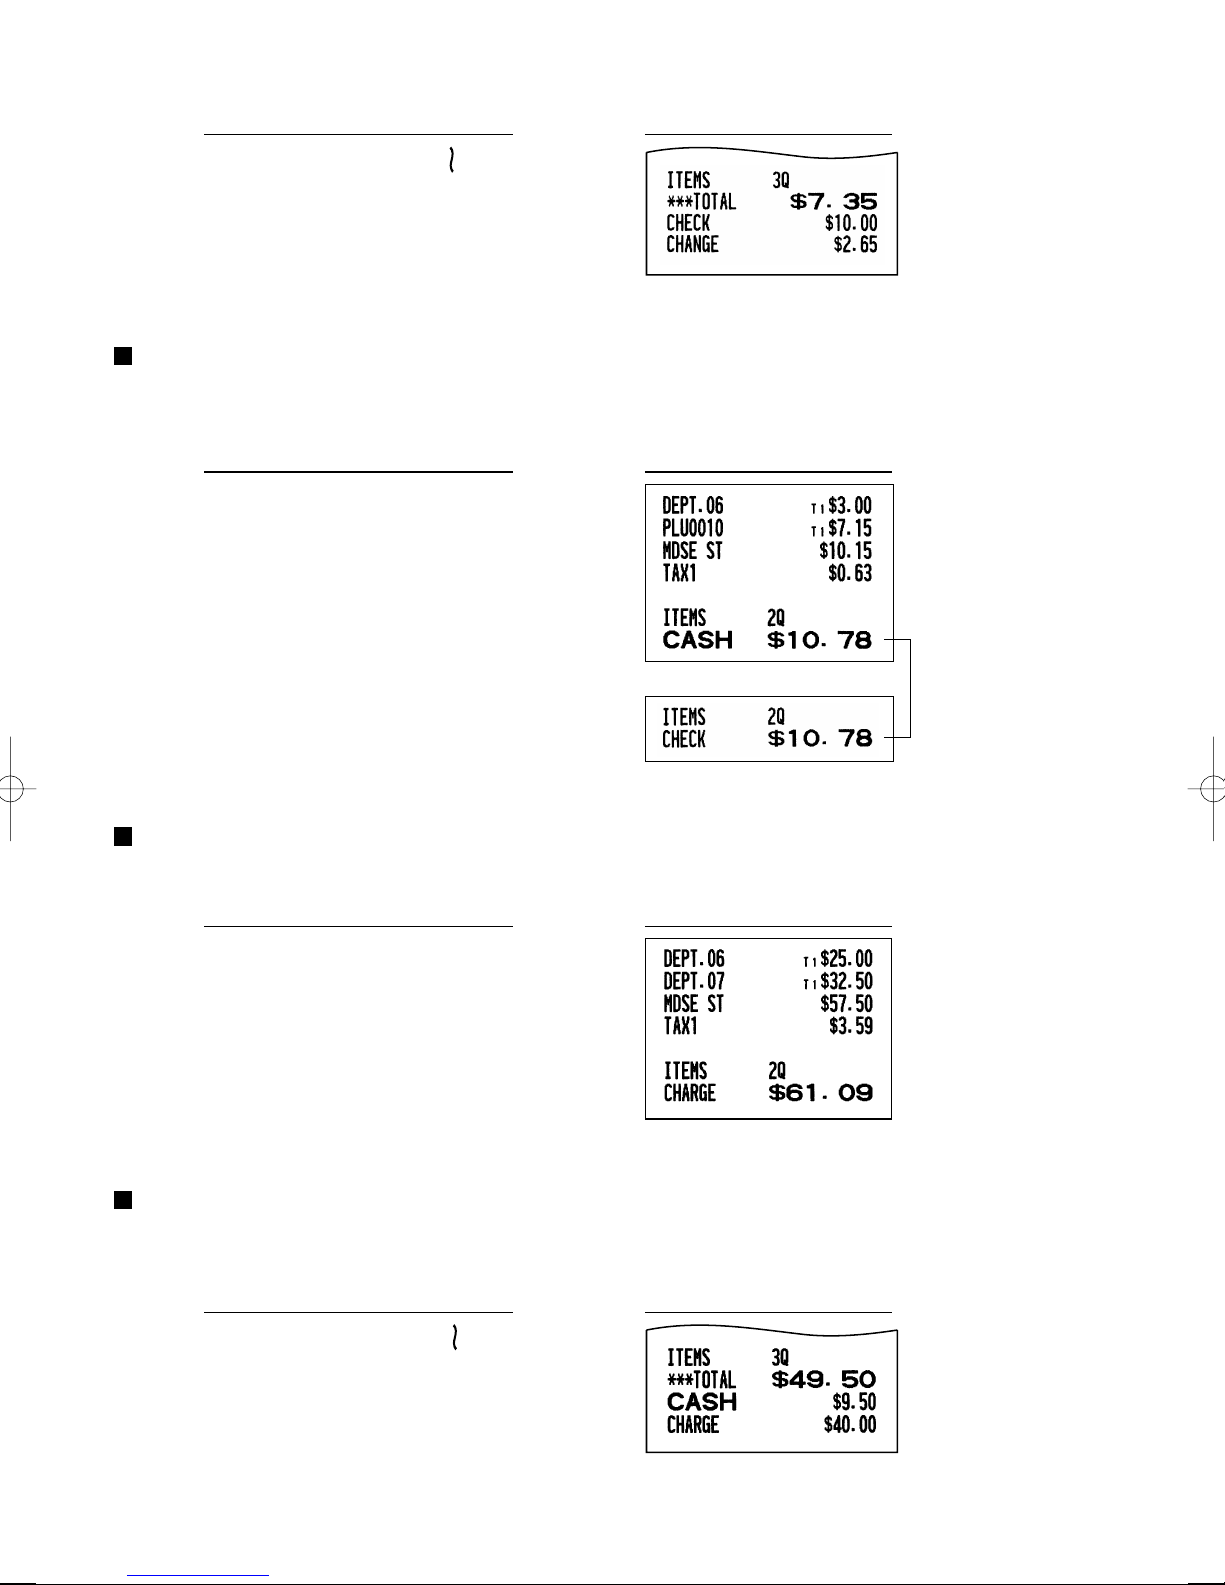
Mixed-tender sale
You can perform mixed-tendering of check and cash, cash and charge, and check and charge.
Example: Your customer pays $9.50 in cash and $40.00 by charge for an including-tax subtotal of $49.50.
18
PrintKey operation example
Page 21
Tax Calculation
6
Automatic tax
When the register is programmed with a tax rate (or tax table) and the tax status of an individual department is
set for taxable, it computes the automatic tax on any item that is entered directly into the department or indirectly
via a related PLU.
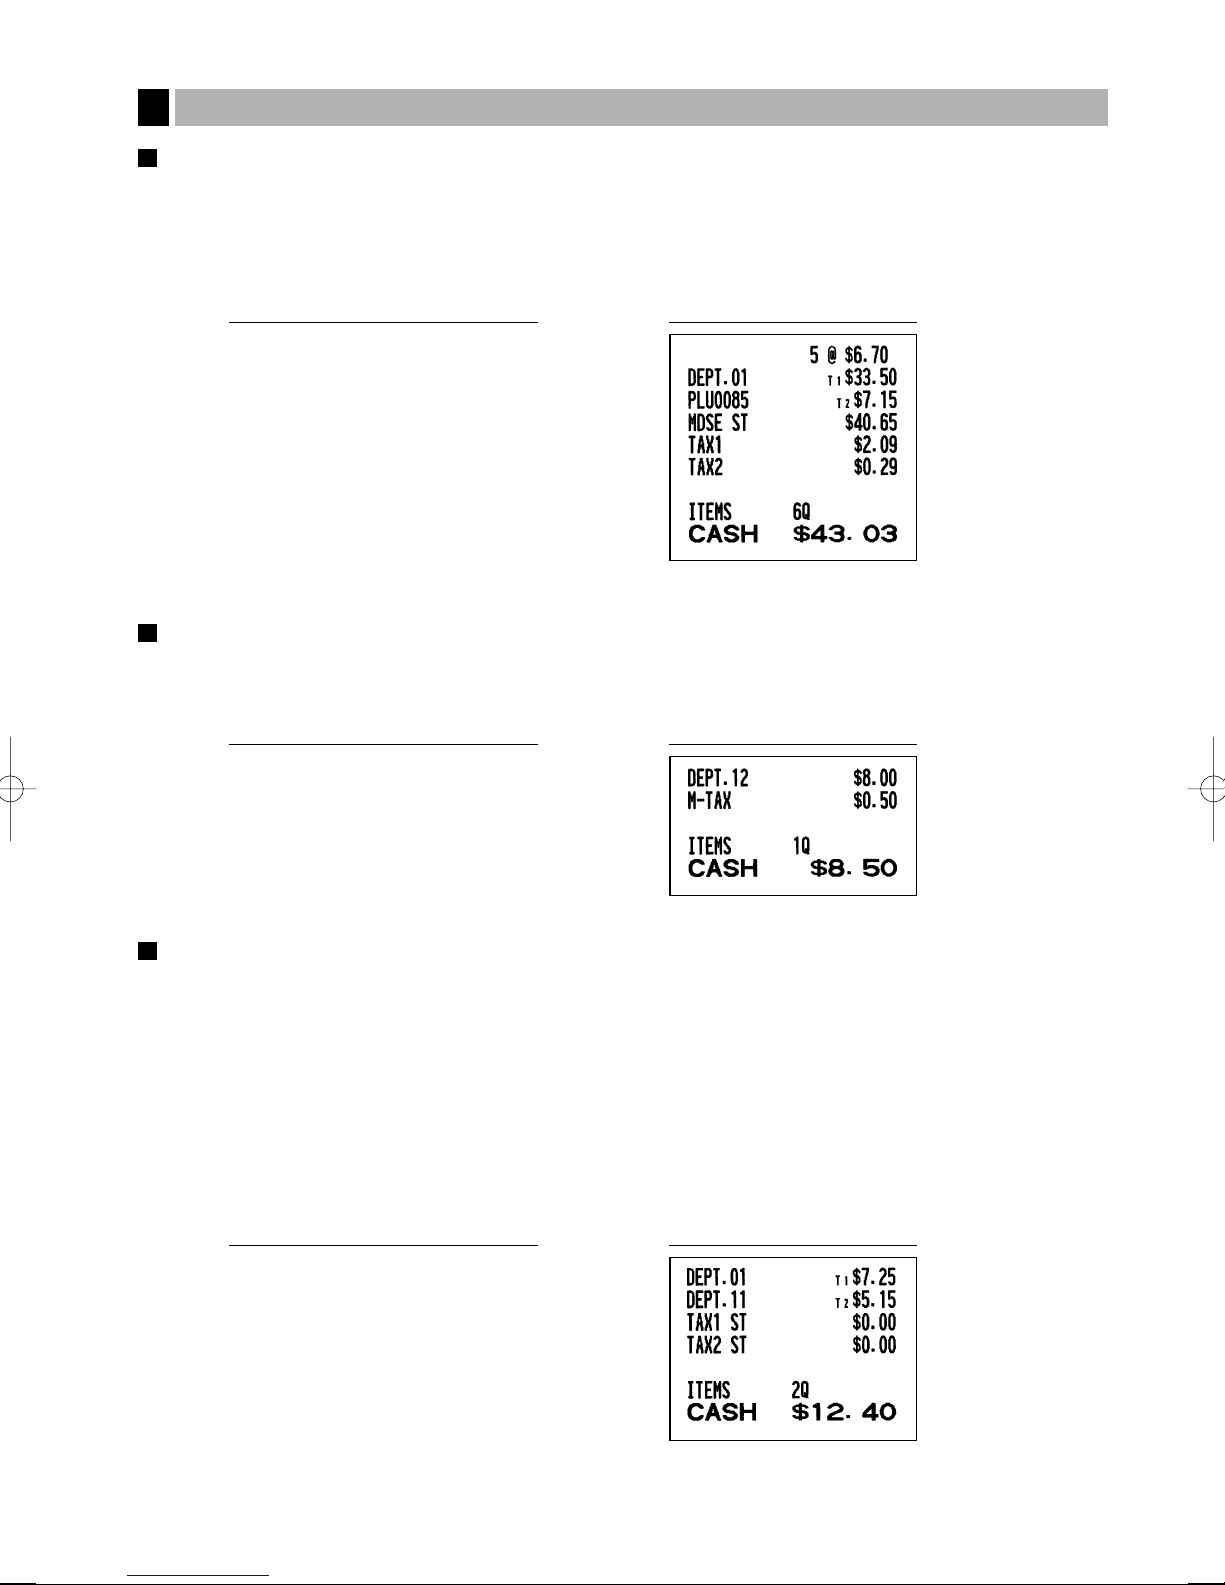
Example: Selling five $6.70 items (dept. 1, taxable 1) and one $7.15 item (PLU no. 85, taxable 2) for cash
PrintKey operation example
5 @670
85
!
p
A
Manual tax
The machine allows you to enter tax manually after it finalizes an item entry.
Example: Selling an $8.00 item (dept. 12) for cash with 50 cents as tax
PrintKey operation example
800
(
50
t
A
Tax delete
You can delete the automatic tax on the taxable 1 and taxable 2 subtotal of each transaction by pressing the
key after the subtotal is displayed.
To delete taxable 1 subtotal, press
subtotal.
To delete taxable 2 subtotal, press
subtotal.
To delete all taxable (1-4) subtotal, press
Example: Selling a $7.25 item (dept. 1, taxable 1) and another $5.15 item (dept. 11, taxable 2) for cash and
entering the sale as a non-taxable one
T, s
U, s
T, U, s
725
!
515
/
to get taxable 1 subtotal, and then press tto delete the
to get taxable 2 subtotal, and then press tto delete the
and tin this order.
PrintKey operation example
Ts
t
Us
t
A
t
19
Page 22
Tax status shift
The machine allows you to shift the programmed tax status of each department or the PLU key by pressing the
and/or
T
key is resumed.
Example: Selling the following items for cash with their programmed tax status reversed
• One $13.45 item of dept. 16 (non-taxable) as a taxable 1 item
• One $7.00 item of PLU no. 25 (non-taxable) as a taxable 1 and 2 item
• One $4.00 item of dept. 11 (taxable 2) as a non-taxable item
• Two $10.50 items of dept. 1 (taxable 1) as taxable 2 items
keys before those keys. After each entry is completed, the programmed tax status of each
U
PrintKey operation example
1345
T<
25
TUp
400
U/
1050
TU!
!
A
When Canadian tax system is applied:
When using a tax status shift, the entry of a multi-taxable item for PST or GST will be prohibited.
Please see below:
In case of; Tax 1: PST, Tax 2: PST,
Tax 3: PST, Tax 4: GST
Taxable 1 and 2 item ········· prohibited
Taxable 1 and 3 item········· prohibited
Taxable 2 and 3 item ········· prohibited
Taxable 1 and 4 item ············· allowed
Taxable 2 and 4 item ············· allowed
Taxable 3 and 4 item ············· allowed
In case of; Tax 1: PST, Tax 2: PST,
Tax 3: GST, Tax 4: GST
Taxable 1 and 2 item ········· prohibited
Taxable 1 and 3 item ············· allowed
Taxable 2 and 3 item ············· allowed
Taxable 1 and 4 item ············· allowed
Taxable 2 and 4 item ············· allowed
Taxable 3 and 4 item ········· prohibited
20
Page 23
OPTIONAL FEATURES
Auxiliary Entries
1
Discount and premium entries using the percent key
The percent key is used to apply a manually entered or preset discount or premium percent rate to individual
items or to a merchandise subtotal. In the default setting, you can manually enter a discount percent rate to
both individual items and merchandise subtotal. For manual entry of discount or premium percent rate, enter the
rate (up to 100.00) with the numeric keys (you need a decimal point when you enter a fractional percent rate),
and press a percent key. When using a preset rate (if programmed), just press a percent key.
When entry limit is programmed for a percent key, you can not enter a rate over the limit (error code 34 will
occur.)
Percent calculation for the merchandise subtotal
PrintKey operation example
4
@
140
>
570
*
m
10
%
A
Percent calculation for item entries
PrintKey operation example
800
+
7 P5
15
%
p
&
A
(When premium and 15% are
programmed for the &key)
Discount and premium entries using the discount key
The discount key is used to apply a manually entered or preset discount or premium amount to individual items
or to a merchandise subtotal. In the default setting, you can manually enter a discount amount to both individual
items and merchandise subtotal. For manual entry of discount or premium amounts, enter the amount with the
numeric keys, and press the discount key. When using a preset amount (if programmed), press the discount
key.
When entry digit limit is programmed for the discount key, you can not enter an amount over the limit (error code
34 will occur.)
21
Page 24
Discount for the merchandise subtotal
575
+
10
p
m
100
-
A
Discount for item entries
675
*
-
A
(When a discount amount of
$0.75 is programmed.)
PrintKey operation example
PrintKey operation example
Refund entries
For departments 1 to 16, enter the refund amount and press the fkey, and then press the corresponding
department key and for departments 17 to 32, enter the refund amount and press the
key and press the corresponding department key (when using the preset price, omit entering the amount).
D
In case of department 33 to 99, enter the department code and press
refund amount and press the
For a refund of a PLU item, enter the PLU code and press the
For a refund of a sub-department item, enter the PLU code and press the
the refund amount and press the
33
fd
15
fp
key if necessary.
d
p
250
f+
100
13
fp
150
p
7
d
@
key.
key, then press the
f
key and the
f
f
PrintKey operation example
key and
key, then press the
f
key, then enter the
d
p
p
key.
key, then enter
A
Non-add code number entries and printing
You can enter a non-add code number such as a customer’s code number and credit card number, a maximum
of 16 digits, at any point during the entry of a sale. The cash register will print it at once.
To enter a non-add code number, enter the number and press the
22
s
key.
Page 25
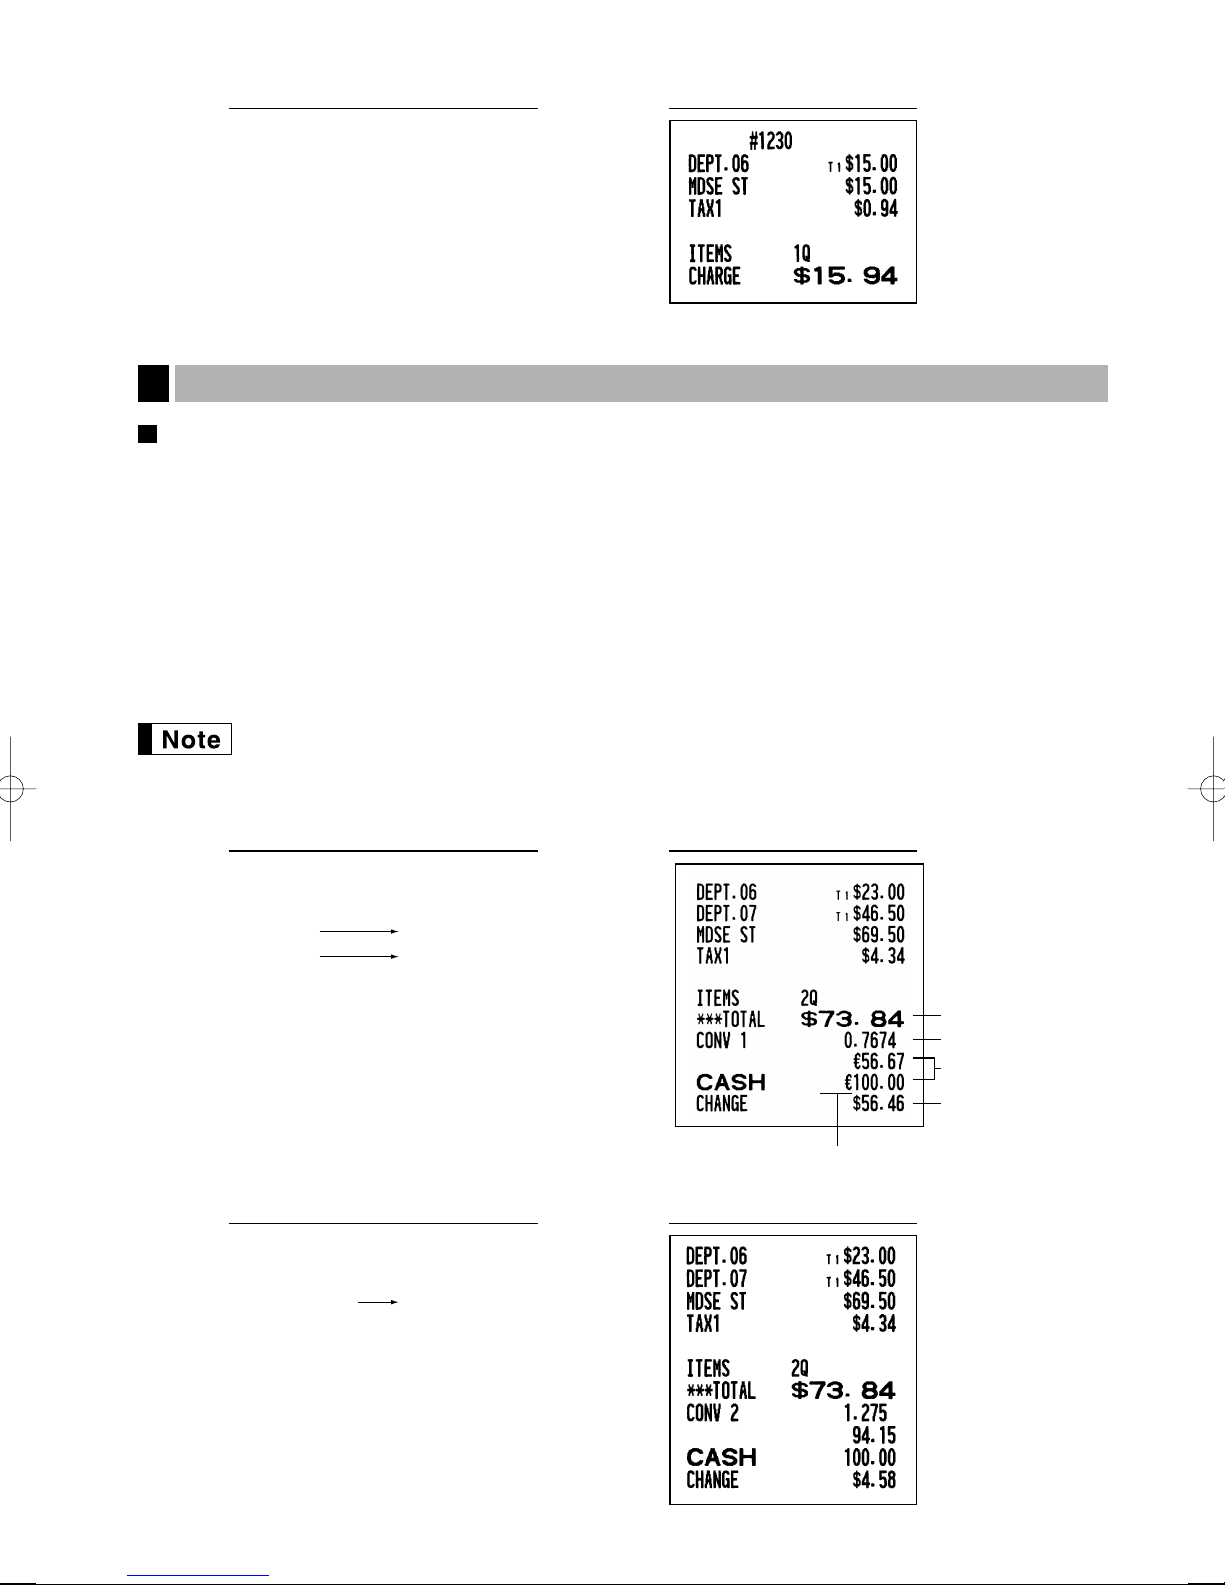
Domestic currency
Conversion rate
Domestic currency
Foreign currency
Foreign currency symbol
(Printed if programmed)
Currency
conversion
Amount
tendered in
foreign currency
(When a currency conversion
rate of 0.7674 is programmed for
the V key.)
2300 +
4650 *
V
10000 A
PrintKey operation example
1230
s
1500
+
c
Auxiliary Payment Treatment
2
Currency conversion
The register allows payment entries in a foreign currency (only cash payment is available). Pressing the Vkey
creates a subtotal in the foreign currency.
When using a programmed currency conversion rate, press the
tendered amount in foreign currency if not exact amount payment, and press the
When making a manual entry of currency conversion rate, after item entries, enter the conversion rate (0.0000 to
9999.9999; you need a decimal point when you enter fractional conversion rate) and press the
enter the tendered amount in foreign currency if not exact amount payment, and press the
In both cases, the change due will be displayed in domestic currency, and when the amount tendered is short,
the deficit is shown in domestic currency.
key after item entries, then enter the
V
key.
A
A
V
key.
key, then
• Press the
• If programmed, a foreign currency symbol is printed when you use a prest rate.
key after pressing the Vkey to cancel payment in a foreign currency.
l
Applying preset conversion rate
Applying manual conversion rate
2300 +
4650 *
Conversion rate
1 P 275 V
10000 A
PrintKey operation example
PrintKey operation example
23
Page 26
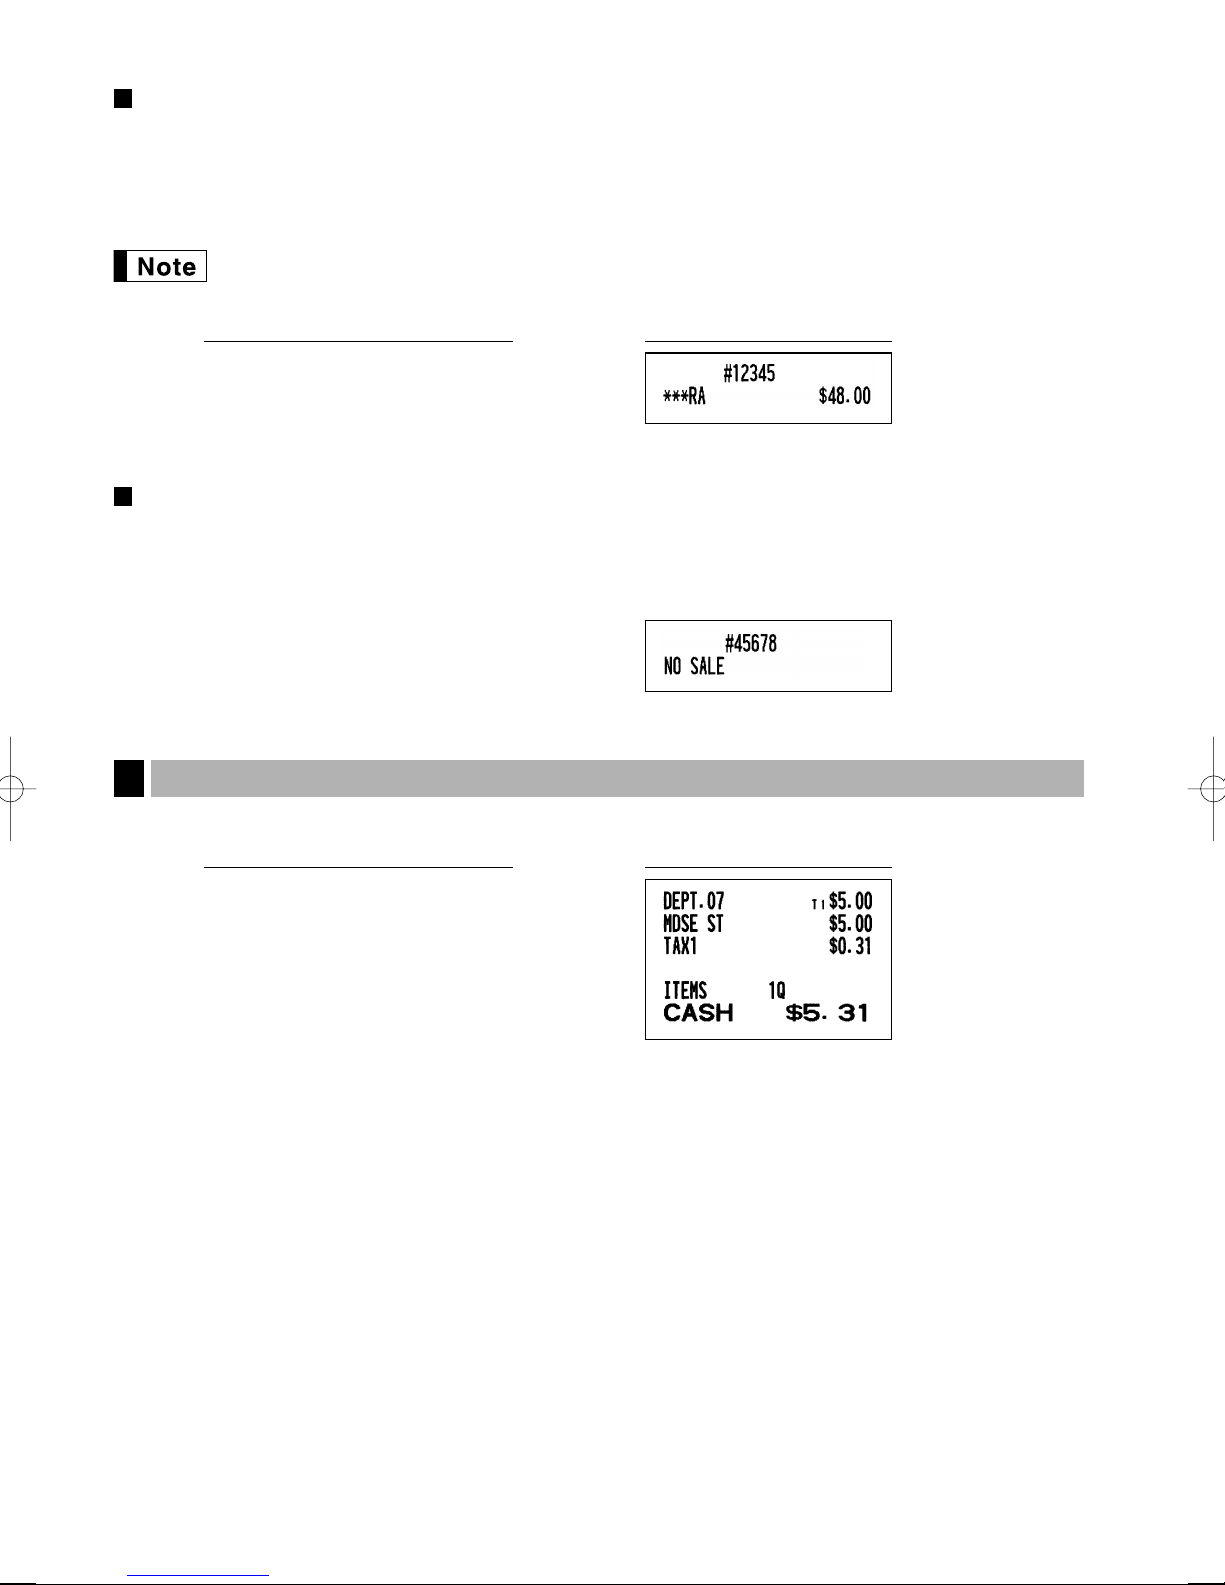
Received-on Account and Paid-out Entries
When you receive on account from a customer or when you pay an amount to a vendor, it is a good idea to use
the
For the received-on-account (RA) entry, enter the amount, and press the
For the paid-out (PO) entry, enter the amount and press the
key or the
r
key respectively.
R
key.
R
Cash tendering only available for RA and PO operation.
r
PrintKey operation example
key.
12345
s
4800
r
No sale (exchange)
When you need to open the drawer with no sale, just press the
print “NO SALE” on the receipt or journal. If you let the machine print a non-add code number before pressing
the
3
You can achieve a programmed transaction simply by pressing the
key, a no sale entry is achieved and a non-add code number is printed.
A
Automatic Sequence Key (
key) Entries
a
key. The drawer will open and printer will
A
key.
a
PrintKey operation example
a
24
(a= 500
*A
)
Page 27
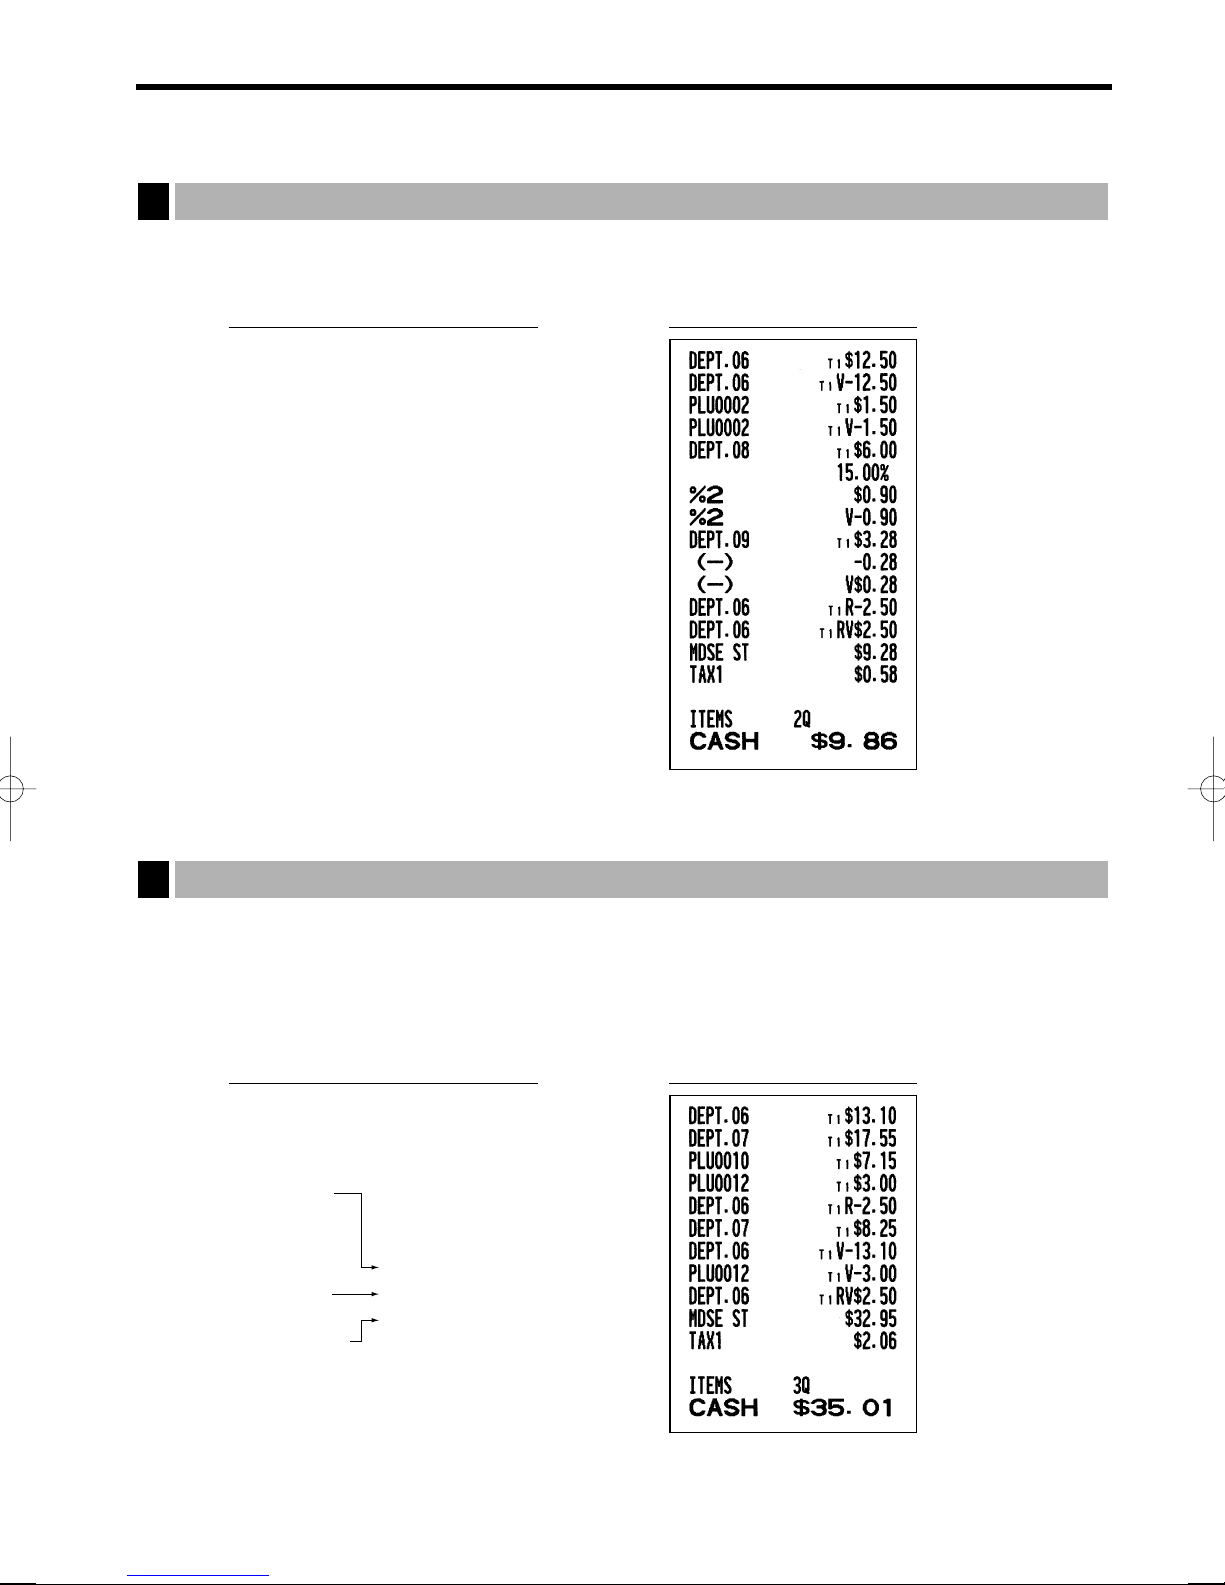
CORRECTION
Correction of the Last Entry (direct void)
1
If you make an incorrect entry relating to a department, PLU/sub-department, percentage (%and &), discount
(
) or refund, you can void this entry by pressing the vkey immediately after the incorrect entry.
-
PrintKey operation example
1250
+
v
2
p
v
600
'
&
v
328
,
28
v
250
f+
v
A
Correction of the Next-to-last or Earlier Entry (indirect void)
2
You can void any incorrect department entry, PLU/sub-department entry or item refund entry made during a
transaction if you find it before finalizing the transaction (e.g. pressing the
applicable to department, PLU/sub-department and refund entries only.
For the operation, press the
refund indirect void, press the
Correction
of a
department
entry
Correction
of a PLU entry
Correction of
a refund entry
key just before you press a department key, dkey or
v
key after you press the fkey.
v
1310 +
1755 *
10 p
12 p
250 f +
825 *
1310 v +
12 v p
250 f v +
A
PrintKey operation example
key). This function is
A
p
key. For the
25
Page 28

Subtotal Void
3
You can void an entire transaction. Once subtotal void is executed, the transaction is aborted and the register
issues a receipt. This function does not work when more than 30 items have been entered.
PrintKey operation example
1310 "
"
1755 +
10 p
35 p
s
Subtotal void
v
s
Correction of Incorrect Entries not Handled by the Direct or Indirect Void
4
Function
Any errors found after the entry of a transaction has been completed or during an amount tendered entry cannot
be voided. These errors must be corrected by the manager.
The following steps should be taken:
1. If you are making the amount tendered entry, finalize the transaction.
2. Make correct entries from the beginning.
3. Hand the incorrect receipt to your manager for its cancellation.
26
Page 29
Date(MM/DD/YYYY)
s
FOR THE MANAGER
PRIOR TO PROGRAMMING
Before starting sales entries, you must first program necessary items so that the cash register suits your sales
manner. In this manual, there are three sections, BASIC FUNCTION PROGRAMMING where required items
must be programmed, AUXILIARY FUNCTION PROGRAMMING where you can program for more convenient
use of keys on the keyboard, and ADVANCED FUNCTION PROGRAMMING where various optional
programming features are provided. Find the appropriate features for your needs, and make the necessary
programming changes.
You can select the language of text (English, French or Spanish) printed on receipts or journals.
For the language selection, please refer to “Language Selection” described later in this section.
Procedure for programming
Check to see whether a paper roll is present in the machine. If there is not enough paper on the roll, replace
1.
it with a new one (refer to MAINTENANCE section for the replacement).
2. Put the manager key in the mode switch and turn it to the PGM position.
3. Program necessary items into the cash register.
Every time you program an item, the cash register will print the setting. Please
refer to print samples in each section.
4. If necessary, issue programming reports for your reference.
OFF
VOID
PGM
REG
OPX/Z MGR
X1/Z1
X2/Z2
• On the procedures and key operation examples shown in the programming details, numbers such
as “08262006” indicates the parameter which must be entered using the corresponding numeric
keys.
• Asterisks in the tables shown in the programming details indicate default settings.
BASIC FUNCTION PROGRAMMING
(For Quick Start)
Date and Time Programming
1
Date
For setting the date, enter the date in 8 digits using the month-day-year (MM/DD/YYYY) format, then press the
key.
s
PrintKey operation example
08262006
(Aug. 26, 2006)
You can use the date format of day-month-year (DD/MM/YYYY) or year-month-day (YYYY/MM/DD)
format. To change the format, refer to “Various Function Selection Programming 1” section (Job
code 61).
s
Date
27
Page 30
Time
To delete a tax rate, use the following sequence:
s @ v A@
Tax number (1 to 4)
9
s @9 @
@ s A
When the lowest taxable amount is zero
Tax number (1 to 4)
Tax rate
(0.0000 to 100.0000)
Lowest taxable amount
(0.01 to 999.99)
Time
Time(max. 4 digits in 24-hour format)
s
For setting the time, enter the time in 4 digits (HHMM) using the 24-hour format. For example, when the time is
set to 2:30 AM, enter 230; and when it is set to 2:30 PM, enter 1430.
PrintKey operation example
1430
s
In the display, current time is displayed in 12-hour format. For AM time, “ ” and for PM time “ ”
will appear in the rightmost position with the current time. If you want to display time in the 24-hour
format, refer to “Various Function Selection Programming 1” section (Job code 61).
Tax Programming for Automatic Tax Calculation Function
2
The cash register can support US and Canadian tax systems. If you use the Canadian tax system,
you must first change the tax system, then program the tax rate or tax table and quantity for
doughnut exempt which are described in this section. For changing your cash register’s tax
system, please refer to “Various Function Selection Programming 1” section (job code 70).
Before you can proceed with ringing sales transactions, you must first program the tax that is levied in
accordance with the laws of your state. The cash register comes with the ability to program four different tax
rates. In most states, you will only need to program Tax 1. However if you live in an area that has a separate
local tax (such as a Parish tax) or a hospitality tax, the register can be programmed to calculate these separate
taxes.
When you program the tax status for a department, tax will be automatically added to sales of items assigned to
the department according to the programmed tax status for the department. You can also enter tax manually.
There are two tax programming methods. The tax rate method uses a straight percentage rate per dollar. The
tax table method requires tax break information from your states or local tax offices. Use the method which is
acceptable in your state. You can obtain necessary data for tax programming from your local tax office.
Tax programming using a tax rate
The percent rate specified here is used for tax calculation on taxable subtotals.
28
Page 31

Example: Programming the tax rate 4% as tax rate 2 with tax exempt as 12¢
Taxes
Range of sales amount
Minimum breakpoint
.00
.01
.02
.03
.04
.05
.06
.07
.08
.09
.10
.11
.12
.13
.01
.11
.23
.39
.57
.73
.89
1.11
1.23
1.39
1.57
1.73
1.89
2.11
Maximum breakpoint
.10
.22
.38
.56
.72
.88
1.10
1.22
1.38
1.56
1.72
1.88
2.10
2.22
to
to
to
to
to
to
to
to
to
to
to
to
to
to
T Q
M1
M2
A: Difference between the
minimum breakpoint and
the next one (¢)
–
10 (0.11 - 0.01)
12 (0.23 - 0.11)
16 (0.39 - 0.23)
18 (0.57 - 0.39)
16 (0.73 - 0.57)
16 (0.89 - 0.73)
22 (1.11 - 0.89)
12 (1.23 - 1.11)
16 (1.39 - 1.23)
18 (1.57 - 1.39)
16 (1.73 - 1.57)
16 (1.89 - 1.73)
22 (2.11 - 1.89)
B: Non-cyclic
C: Cyclic-1
D: Cyclic-2
PrintKey operation example
s9 @
2
@
4
@
12
s
A
• If you make an incorrect entry before pressing the third
it with the
l
key.
key in programming a tax rate, cancel
@
• You do not need to enter the trailing zeros of the tax rate (after the decimal point), but you do
need to enter the decimal for fractions.
• The lowest taxable amount setting is ignored when you select VAT system for Canadian tax.
The tax table (applicable to the add-on tax)
If you are in an area that uses a tax table for tax calculation, you can program the cash register accordingly. Tax
table programming can be performed for Tax 1 through Tax 4.
Sample tax table
New Jersey tax table: 6%
To program a tax table, first make a table like the one shown above right.
From the tax table, calculate the differences between a minimum break point and the next one (A). Then, from
the differences, find irregular cycles (B) and regular cycles (C and D). These cycles will show you the following
items necessary to program the tax table:
T: The tax amount collected on the minimum taxable amount (Q)
Q: The minimum taxable amount
M1: The maximum value of the minimum breakpoint on a regular cycle (C)
We call this point “MAX point.”
M2: The maximum value of the minimum breakpoint on a regular cycle (D)
We call this point “MAX point.”
M: Range of the minimum breakpoint on a regular cycle: difference between Q and M1 or between M1 and M2
29
Page 32

*1 First figure:
s @ s@
max. six digits
(0.0001 - 99.9999%)
max. four
digits
One- or twodigit number
Rate
M
*1
*2
@@8
To delete a tax table, use the following sequence:
s @ @
max. six digits
(0.0001 - 99.9999%)
max. four
digits
One- or twodigit number
Rate
M
*1
*2
@
max. three
digits
T
@
max. five
digits
Q
@ A
Minimum breakpoint
max. five digits
Repeat until the MAX point is entered.
@@8
(1 or 0)
Second figure:
(1 to 4)
*2 If the rate is fractional (e.g. 4-3/8%), then the fractional portion (3/8) would be converted to its decimal
equivalent (i.e. .375) and the resulting rate of 4.375 would be entered. Note that the nominal rate (R) is
generally indicated on the tax table.
If you make an incorrect entry before entering the M in programming a tax table, cancel it with the
l
again from the beginning.
• Limitations to the entry of minimum breakpoints
The register can support a tax table consisting of no more than 72 breakpoints. (The maximum number of
breakpoints is 36 when the breakpoint difference is $1.00 or more.) If the number of breakpoints exceeds the
register’s table capacity, then the manual entry approach should be used.
Example: Programming the sample tax table shown on the previous page as tax table 1
The first figure to be entered depends upon whether the difference between a minimum
breakpoint to be entered and the preceding minimum breakpoint is not less than $1.00 or
more than 99¢. When the difference is not less than $1.00, enter “1,” and when it is not more
than 99¢, enter “0” or nothing.
The second figure depends upon whether your tax table is to be programmed as tax table 1,
2, 3 or 4.
key; and if you make an error after entering the M, cancel it with the
PrintKey operation example
key. Then program
s
s 8 @
1 @
Tax rate
M
T
Q
The first
cyclic
portion
M1
(MAX point)
6 @
100 @
1 @
11 @
23 @
39 @
57 @
73 @
89 @
111 @
A
30
You do not need to enter the trailing zeros of the tax rate (after the decimal point) but you do need
to enter the decimal point for fractions.
Page 33

• If the tax is not provided for every cent, modify the tax table by setting the tax for every cent
s @19 s A
To program zero
Q’ty for doughnut
tax exempt
(max. 2 digits: 1 to 99)
in the following manner.
When setting the tax, consider the minimum breakpoint corresponding to unprovided tax to be the same as the
one corresponding to the tax provided on a large amount.
Sample tax table Modification of the left tax table
Example 8%
Tax
.00
.01
.02
.03
.04
.06
.09
.10
.11
.12
.14
.17
Minimum
breakpoint
.01
.11
.26
.47
.68
.89
1.11
1.26
1.47
1.68
1.89
2.11
Tax
.00
.01
T Q
.02
.03
.04
.05
.06
.07
.08
.09
.10
.11
.12
.13
.14
.15
.16
.17
Minimum
breakpoint
.01
.11
.26
.47
.68
.89
.89
1.11
M1
1.11
1.11
1.26
1.47
1.68
1.89
1.89
2.11
M2
2.11
2.11
From the modified tax table above;
Rate = 8(%), T = $0.01 = 1¢, Q = $0.11 = 11¢, M1 = 1.11, M2 = 2.11, M = 100
Breakpoint
difference (¢)
1
10 (0.11-0.01)
15 (0.26-0.11)
21 (0.47-0.26)
21 (0.68-0.47)
21 (0.89-0.68)
0 (0.89-0.89)
22 (1.11-0.89)
0 (1.11-1.11)
0 (1.11-1.11)
15 (1.26-1.11)
21 (1.47-1.26)
21 (1.68-1.47)
21 (1.89-1.68)
0 (1.89-1.89)
22 (2.11-1.89)
0 (2.11-2.11)
0 (2.11-2.11)
B: Non-cyclic
C: Cyclic-1
D: Cyclic-2
Quantity for doughnut tax exempt (for Canadian tax system)
This option is available only when the Canadian tax system is selected.
Example: To program the quantity “6”
19
s
6
s
@
A
PrintKey operation example
31
Page 34

AUXILIARY FUNCTION PROGRAMMING
For department 33-99:
d@
Dept. code
ABCDEFGH
A
To set all zeros
To set all zeros
@
Dept. keyABCDEFGH
A
D
*
*To program departments 17 through 32, press the department shift key at this point.
Department Programming
1
Merchandise can be classified into a maximum of 99 departments. Items sold with use of the department keys
can later be printed on a report that shows the quantities sold and sales amounts classified by department. The
data is useful for making purchasing decisions and other store operations. Departments can be assigned to
articles whose prices were set using PLU/sub-department function.
When using a department key, you must set the parameters to specify the department status, such as positive
or negative department. Prices can be assigned directly to departments for frequently purchased items, which
enables you to enter the prices by simply pressing the department keys or dept. code entries.
Department status
To program another department, start from the beginning without pressing the
Item: Selection: Entry:
A Tax 4 status Taxable 1
Non-taxable* 0
B Tax 3 status Taxable 1
Non-taxable* 0
C Tax 2 status Taxable 1
Non-taxable* 0
D Tax 1 status Taxable (*for dept. 1 thru 10) 1
Non-taxable (*for dept. 11 thru 99) 0
E SICS / Normal SICS 1
Normal* 0
F Sign Negative department 1
Positive department* 0
G Entry digit limit 0-7 (default: 7)
H Type of unit price entry Open and preset 3
Preset only 2
Open only* 1
Inhibit department key 0
Tax status (taxable 1 through 4 / non-taxable)
• When any entry of a taxable department is made in a transaction, tax is automatically computed according to
the associated tax table or rate.
SICS (Single Item Cash Sale)
• If an entry of a department programmed for SICS is made first, the sale will be finalized as a cash sale as
soon as the department key is pressed. If the entry is made after entering a department not programmed for
SICS, the sale will not be finalized until the
Entry digit limit
• Set the number of allowable digits for the maximum entry amount for each department. The limit is effective
32
for operations in the REG mode and can be overridden in the MGR mode.
key is pressed.
A
A
key.
Page 35

Example: Programming department 2 as taxable 1, SICS, negative department, entry digit limit - 7 digits, and
Unit price
For department 33-99:
ds
Dept. code
Unit price
(max. six digits)
A
To program zero
To program zero
Dept. key
Unit price
(max. six digits)
D
*
*To program departments 17 through 32, press the department shift key at this point.
A
allowing open & preset entry. (ABCDEFGH: 00011173)
PrintKey operation example
00011173
@
"A
Tax status
Preset unit price
To program another department, start from the beginning without pressing the
PrintKey operation example
A
From left, EGH
Sign(F)
key.
1000
!
A
Even if a department is not programmed to allow the entry of preset unit prices in functional
programming, the department is automatically changed to allow the entry of preset unit prices by
this programming entry.
PLU (Price Look-Up) and Sub-department Programming
2
The PLU function allows speedy key entries whereby a price is automatically called up when a code is entered.
The sub-department is a kind of “open PLU”, which requires you to enter a price after the PLU code is entered.
A maximum of 1200 PLU/sub-department settings are possible. Each one belongs to a department and
acquires the department’s parameters (tax status, SICS and sign).
The cash register is preprogrammed so all 1200 codes are assigned as PLUs associated with department 1 and
preset unit price “0”.
33
Page 36

Unit price and associated department assignment
PLU/sub-dept.
*1PLU code
p
To program "0"
To program the following PLU
To program another PLU
As
*2A
1
To program zero
3
*
*2PLU code
*1: To assign departments 17 through 32, press the department shift key at this point.
p
Unit price
(max. six digits)
*
D
Associated
Dept. key
A
When the associated department is department 33-99:
1
p
125
Associated
dept. code
(1 to 99)
#
ds
*2PLU code
*2: 1 through 1200 (Depending on the EJ memory size setting, up to 200)
*3: For a sub-department, set the limit amount of unit price entry.
To program the following PLU, start from entering a unit price or an associated department code without
pressing the
To program another PLU, start from the beginning without pressing the
A
p
key.
A
To delete a PLU code, use the following sequence:
PLU code
pv
To delete the following PLU
To delete another PLU
To program zero
3
Unit price
*
(max. six digits)
PLU code
A
PrintKey operation example
A
A
key.
Unit price
Associated dept.
PLU/sub-department selection
*1: 1 through 1200 (Depending on the EJ memory size setting, up to 200)
*2: 0 for sub-department or 1 for PLU (default: 1)
1
p
0
sA
34
When you program the last PLU code, the programming sequence will be complete with a press of
the
key.
s
PrintKey operation example
Page 37

Percent rate
Currency
conversion rate
*Rate or
%
V
A&
To program another rate
To program zero
Miscellaneous Key Programming
3
The cash register provides miscellaneous keys such as %, &, -, f, r, R, V, t, C, cand
. While the cash register is pre-programmed so you can use these keys, you must set a currency
A
conversion rate to use
data below for programming these keys. Factory setting is indicated with parentheses.
key. You can also program these keys for more convenient use. Please refer to the
V
%, &
-
f
r, R
V
C, c
t
and
A
(Manual tax) Entry digit limit (7 digits)
* Item %/Item
* Subtotal %/Subtotal
_
Rate for %,
Percent rate (0.00%), tax status (non-taxable), sign (minus), item % and subtotal %
entry* (both are allowed), percent rate limitation (100 %)
Amount (0.00), tax status (non-taxable), sign (minus), item _and subtotal _entry*
(both are allowed), entry digit limit (7 digits)
Not necessary to program
Entry digit limit (9 digits)
Currency conversion rate (0.0000), currency conversion rate entry method - open or
preset (both are enabled)
Compulsory entry of amount tender (not compulsory), entry digit limit (8 digits), footer
printing (not printed)
: Percent/discount calculation is applied to individual department and PLU/sub-
department.
: Percent/discount calculation is applied to subtotals.
_
and
&
V
*: Rate
0.00 — 100.00 (% rate)
0.0000 — 9999.9999 (Currency conversion rate)
10 P25
0 P7674
You must use a decimal point when setting fractional rates.
PrintKey operation example
%
V
A
35
Page 38

Amount for
*ABCDEFGH or
%@
-
A&
To program for another key
To program “0” for all items
s @29
Percentage limit (0.00 -100.00%)
A
To program zero
To program for another percent key
or
%&
Discount amount (max. six digits)
A-
To program zero
-
200
PrintKey operation example
-
A
Discount amount
Percent rate limitation for
• Percent entries that exceed the upper limit may be overridden in the MGR mode.
• 10.00% can be entered as
for fractional entry.
%
10
s29@
15
P00%
A
Function parameters for %,
and
&
&
or
10P00
and
-
. The Pkey is needed only
PrintKey operation example
Percentage limit
36
Page 39

*: Item: Selection: Entry:
From left, AB
*AB
A
To program “0” for all items
@V
A Tax 4 status Taxable 1
Non-taxable* 0
B Tax 3 status Taxable 1
Non-taxable* 0
C Tax 2 status Taxable 1
Non-taxable* 0
D Tax 1 status Taxable 1
Non-taxable* 0
E +/- sign + (premium) sign 0
- (discount) sign* 1
F Item % / Item
G Subtotal % / Subtotal
H Entry digit limit for discount key 0-7 (default: 7)
When programming percent keys, always enter 0 for H.
Tax status (taxable 1 through 4 / non-taxable)
• When taxable is selected, tax is applied to the amount obtained after premium or discount calculation.
+/- sign
• Programming of the +/- sign assigns the premium or discount function for each key.
Entry digit limit (For discount key only)
• The entry digit limit is in effect for the REG mode operations but can be overridden in the MGR mode. The
entry digit limit is represented by the number of allowable digit for the maximum entry amount for discount
key.
_
_
Allow* 0
Disallow 1
Allow* 0
Disallow 1
PrintKey operation example
00011006
@
-A
Tax status
Function parameters for
*: Item: Selection: Entry:
A Open rate entry Allow* 0
B Preset rate entry Allow* 0
V
Disallow 1
Disallow 1
PrintKey operation example
From left, FGH
Sign(E)
00
@
VA
37
Page 40

Entry digit limit for r,
*1ABC or
A
To program “0” for all items
To program for another key
*
2
:Press s key for CA key setting.
@s, Cc
*
2
Entry digit limit
(only for manual entry)
A@r, R or t
R
and
t
• For
rR
and 7 for tare set.
Entry digit limit is in effect for REG mode operation but can be overridden in MGR mode. The entry digit limit
is represented by the number of allowable digits for maximum entry or total amount. When “0” is set, the
operation of the corresponding key is prohibited.
, enter 0 to 9 (digits), and for t(manual tax), enter 0 to 7 (digits). By default, 9 for rand
PrintKey operation example
4
@
RA
Function parameters for C,
*1:Item: Selection: Entry:
A Footer printing Allow 1
B Amount tendered entry Compulsory 1
C Entry digit limit 0-8 (default: 8)
and
c
A
Disallow* 0
Non-compulsory (for the CA or CHK keys)* 0
Inhibit (for the CH key)* 0
(when using as CA key)
R
Footer printing
• This option decides whether or not the machine should print a message at the bottom of a receipt when a
specified media key is used. To program a footer logo message, refer to “Logo messages” section on page
43.
Amount tendered entry
• You may select amount tendered, compulsory or optional, for the
• You may select amount tendered, compulsory or inhibited, for the
Entry digit limit
• For the
program upper limit entry for total cash amount which can be handled on the register. The entry digit limit is
in effect for REG mode operation but can be overridden in the MGR mode. The entry digit limit is represented
by the number of allowable digits for the maximum entry or total amount. When “0” is set, the operation of the
corresponding key is prohibited.
and Ckeys, program upper limit entry amount for the tendered amount. For the
c
018
CA
38
@
A
c
and Ckeys.
key.
PrintKey operation example
key,
A
ABC (A:0, B:1, C:8)
Page 41

253
:
083
:
072
:
065
:
082
:
080
:
S H A R P
Text Programming
4
The register allows you to program the text for clerk names, department item names, PLU/sub-department item
names, and so on, if necessary. There are two ways for programming text: using character keys on the
keyboard or entering character codes with numeric keys on the keyboard.
Using character keys on the keyboard
You can enter characters according to the small figures printed in the lower right position of the key tops. For
the layout, please refer to “Keyboard” section on page 5.
The following are used as control keys for character entry:
H
N
W
B
Toggles between upper-case and lower-case letters. By default, the upper-case letter is selected.
Once the
SHIFT position of the display when lower-case letters entry is selected.
Press the
key. If you press the 1key without pressing the
entry mode.
Once the
NUMBER position of the display when numeric characters entry is selected.
Toggles between single-size and double-size characters. By default, the single-size character is
selected. Once the
up at the DC position of the display when double-size characters entry is selected.
Backs up the cursor, erasing the character to the left.
key is pressed, you are locked in for entering lower-case letters. “_” lights up at the
H
key to enter numeric characters. For example to enter “1”, press the
N
key, the cash register goes to character codes
N
key is pressed, you are locked in for entering numeric characters. “_” lights up at the
N
key is pressed, you are locked in for entering double size characters. “_” lights
W
N
and
1
To program the word “Clerk01” with the letter “C” being double size.
To make the letter “C” double size character
To make character size return to normal size
To toggle the characters to lower-case letters
Wg
W
H
hijk
To enter numbers
Entering character codes with numeric keys on the keyboard
Numerals, letters and symbols are programmable by entering the character code and the :key. (If numeric
characters entry is selected, that is, “_” lights up at the NUMBER position of the display, press the
release it.) Set the alphanumeric character code table on the next page. By doing this, you can program
characters other than those on the key tops.
• Double-size characters can be made by entering the character code 253.
• All three digits of the character code MUST be entered (even if it starts with zero).
To program the word “SHARP” in double-size characters
When you press an appropriate number key (job code number) and press the
start programming with the
Listed below is an overview of what you can program and the allowable number of single sized characters for
each text entry.
• Department text 12 characters
• PLU text (item label) 12 characters
• Function text 8 characters
• Logo message 6 lines and 24 characters for each line
• Clerk name 8 characters
• Foreign currency symbol 4 characters
key, the cash register will be automatically ready for text entry.
s
N01
key for text entry just after you
P
N
key to
39
Page 42

Alphanumeric character code table
Code
001
002
003
004
005
006
007
008
009
010
011
012
013
014
015
016
017
018
019
020
021
022
023
024
025
026
027
028
029
030
031
032
033
034
035
036
037
038
039
040
041
042
043
044
045
Character
á
â
ê
î
ì
í
ô
ó
û
ú
œ
u
´´
ú
o
´´
ó
⌳
⌿
⌫
¨
⍀
⌬
⍜
⌶
⌸
⌺
⌼
⌽
´´
U
Ú
´´
O
Ó
(space)
!
”
#
$
%
&
’
(
)
+
,
-
Code
046
047
048
049
050
051
052
053
054
055
056
057
058
059
060
061
062
063
064
065
066
067
068
069
070
071
072
073
074
075
076
077
078
079
080
081
082
083
084
085
086
087
088
089
090
Character
.
/
0
1
2
3
4
5
6
7
8
9
:
;
<
=
>
?
@
A
B
C
D
E
F
G
H
I
J
K
L
M
N
O
P
Q
R
S
T
U
V
W
X
Y
Z
Code
091
092
093
094
095
096
097
098
099
100
101
102
103
104
105
106
107
108
109
110
111
112
113
114
115
116
117
118
119
120
121
122
123
124
125
126
127
128
129
130
131
132
133
134
135
Character
Ä
Ö
Ü
^
_
’
a
b
c
d
e
f
g
h
i
j
k
l
m
n
o
p
q
r
s
t
u
v
w
x
y
z
{
|
}
ß
¢
!!
1
2
3
4
1/2
F
T
←
Code
136
137
138
139
140
141
142
143
144
145
146
147
148
149
150
151
152
153
154
155
156
157
158
159
160
161
162
163
164
165
177
178
180
181
182
183
184
185
186
187
188
189
190
191
192
Character
→
▲
▲
F
T
↓
ç
°
¿
ù
à
Æ
ø
Å
¤
é
è
Pt
i
Ñ
ò
£
¥
°
.
Á
Í
A
a
E
e
I
i
U
u
N
.
n
.
C
S
C
.
Code
193
194
195
196
197
198
199
200
201
202
203
204
205
206
207
208
209
210
211
212
213
214
215
216
217
218
219
224
225
226
227
228
229
230
231
232
233
234
235
236
237
238
253
Character
.
I
.
G
S
.
G
.
.
g
K
.
k
.
L
l
Z
D
d
C
c
P
e
s
c
z
y
.
u
n
r
§
Ø
↑
]
[
”
ä
ö
ü
æ
å
É
ñ
*(DC)
*(DC): Double-size character code
: The shaded character cannot be displayed (displayed as space).
The character “!!” (code 128) cannot be displayed (displayed as “!”).
40
Page 43

Department text
*
D
s 1 P
Dept. code
(1 to 99)
To program another dept.
*To program departments 17 through 32, press the department shift key.
Dept. key
d
To keep current setting
Character keys
(max.12 digits)
s1 P
!
FRUIT
s
A
(Programming FRUIT for dept.1)
PLU text (item label)
To keep current setting
s P2 p
PLU code
Character keys
(max.12 digits)
s
PrintKey operation example
Text
programmed for
dept. 1
A
As
To program another PLU
s2 P
1
p
MELON
s
A
(Programming MELON to PLU1)
Function text
*Function no.
s P3 @
(max. 2 digits)
To program another function text
When the next PLU code immediately
follows the one just entered
PrintKey operation example
To keep the current setting
Character keys
(max. 8 digits)
s
Text
programmed for
PLU code 1
A
* Function no.: See “List of function texts” shown on the following page.
41
Page 44

1
2
3
4
5
6
7
8
9
10
11
12
13
14
15
16
17
18
19
20
21
22
23
24
25
26
27
28
29
30
31
32
33
34
35
(–)
%1 %1
%2 %2
Net sales total NET1
Net taxable 1 subtotal TAX1 ST
Gross tax 1 total GRS TAX1
Tax 1 total of refund entries RFD TAX1
Net tax 1 total TAX1
Exempt tax 1 TX1 EXPT
Net taxable 2 subtotal TAX2 ST
Gross tax 2 total GRS TAX2
Tax 2 total of refund entries RFD TAX2
Net tax 2 total TAX2
Exempt tax 2 TX2 EXPT
Net taxable 3 subtotal TAX3 ST
Gross tax 3 total GRS TAX3
Tax 3 total of refund entries RFD TAX3
Net tax 3 total TAX3
Exempt tax 3 TX3 EXPT
Net taxable 4 subtotal TAX4 ST
Gross tax 4 total GRS TAX4
Tax 4 total of refund entries RFD TAX4
Net tax 4 total TAX4
Exempt tax 4 TX4 EXPT
Gross manual tax total GRS MTAX
Refund manual tax total RFD MTAX
Net manual tax total M-TAX
Exempt total from GST GST EXPT
PST total PST TTL
GST total GST TTL
Tax total TTL TAX
Net
NET
Sales total including tax total NET2
Refund REFUND
Item void VOID
Function
no.
Key or function
Default
setting
36
37
38
39
40
41
42
43
44
45
46
47
48
49
50
51
52
53
54
55
56
57
58
59
60
61
62
63
64
65
66
67
68
69
Void mode
VOID
Manager void MGR VD
Subtotal void SBTL VD
No sale NO SALE
RA RA
PO PO
Customer counter TRANS CT
Sales total
NET 3
Cash CASH
Check CHECK
Gross charge CHARGE
Refund charge CHARGE–
Currency conversion1
(Preset)
CONV 1
Currency conversion2
(Open)
CONV 2
Cash in drawer CID
Cash+check in drawer CA+CH ID
Check change CHK/CG
Exempt VAT VAT EXPT
(+)Dept. total DEPT TL
(–)Dept. total DEPT(–)
Subtotal SUBTOTAL
Merchandise subtotal MDSE ST
Total TOTAL
Change CHANGE
Items ITEMS
Department report title
DEPT
PLU report title PLU
Transaction report title TRANS.
Clerk report title CLERK
Hourly report title HOURLY
Non add symbol #
Copy receipt title
COPY
EJ report title EJ
EJ report end title EJ END
Function
no.
Key or function
Default
setting
*
*
*
s3 P
CARD
(Programming CARD for gross
charge)
List of function texts
46
s
A
PrintKey operation example
@
42
• The items marked with “ * ” are for Canada only.
• The function no. 53 “Exempt VAT” is only effective for the Canadian tax system (2 GST, VAT
type).
Page 45

Clerk names
Graphic logo
Default setting
Text 2nd line
Graphic logoGraphic logo
Text 3rd line
Text 1st line
Header 3-line
message and
footer 3-line
messages
Header 3-line message Footer 3-line
message
Header 6-line
message
Text 2nd line
Text 3rd line
Text 1st line
Text 2nd line
Text 3rd line
Text 1st line
Text 2nd line
Text 3rd line
Text 1st line
Text 5th line
Text 6th line
Text 4th line
Text 5th line
Text 6th line
Text 4th line
Text 5th line
Text 6th line
Text 4th line
To keep current setting
s P5 s@
Clerk code
(1-25)
To program another clerk
Character keys
(max. 8 digits)
PrintKey operation example
A
s5 P
1
@
DAVID
s
A
Logo messages
The register can print programmed messages on every receipt. On the standard model, the graphic logo is
printed on the receipt. If you want to print logo messages, please change the logo message print format. (See
page 51 for the programming details.) The options are listed below:
To keep the current setting
*Line number
s P4 @
(1-6)
Character keys
(max. 24 digits)
As
To program another line
* “Header 3-line message” type: 1 to 3
“Footer 3-line message” type : 4 to 6
“Header 6-line message” type: 1 to 6
“Header 3-line and footer 3-line message” type: 1 to 6 (1 to 3 as header, 4 to 6 as footer)
Logo print format (6 types)
43
Page 46

To print the logo message “THANK YOU” using double sized characters and centering on the third line.
Foreign currency
symbol
Entry using
character code
s 6 P
S S S
207 :
s
A
s P6
Character keys
(max. 4 digits)
As
To keep the current setting
Register number
1s
@
s A
Register number (one to six digits)
To set the register number “0”
PrintKey operation example
s4 P
3
@
SSS
THANK SYOU
W
W
SSS
sA
A 6-line logo message is pre-programmed when shipped. Bigin entry from the first line when you
initially program a logo message.
Foreign currency symbol
Foreign currency symbol for Vkey is printed with a foreign currency exchange amount.
PrintKey operation example
ADVANCED PROGRAMMING
Register Number and Consecutive Number Programming
1
The register number and consecutive numbers are printed on every receipt or journal.
When your store has two or more registers, it is practical to set separate register numbers for their identification.
The consecutive number is increased by one each time a receipt is issued or when a journal print occurs.
For consecutive number programming, enter a number (max. 4 digits) that is one less than the desired starting
number.
Register number
s1 @
123456
44
sA
PrintKey operation example
Page 47

Consecutive numbers
s @90 A
*A
Consecutive
number
To begin the count from 0001
2s
@
A number (one to four digits) that is one
less than the desired starting number
PrintKey operation example
s A
s2 @
1000
sA
Electronic Journal (EJ) Programming
2
The cash register provides the electronic journal (EJ) function. By default, a maximum of 2000 lines can be
stored in memory. If you want to store more journal data, you can expand to a maximum of 3000 lines, although
the maximum number of PLUs is decreased to 200 codes because the memory is shared with PLU settings.
You can also program various options for EJ, such as availability of EJ memory nearly full warning, availability of
printing EJ data during a transaction, data type to be stored in memory, and printing format.
For reading journal data, refer to “EJ REPORT READING AND RESETTING” (page 60).
EJ memory type
When this procedure is executed, EJ data is cleared, and PLU data (programming data and sales
data) are reset to the default after all data is cleared even if the same memory type is selected.
*A: 0 for EJ 2000 lines and PLU 1200 codes (default)
1 for EJ 3000 lines and PLU 200 codes
90
s
1
A
@
PrintKey operation example
45
Page 48

Function parameters for EJ
To set “00000000”
ss68 @
* Item: Selection: Entry:
A Always enter 0. (Fixed position) 0
B Always enter 0. (Fixed position) 0
C Temporary EJ printing during a transaction Disallow 0
Allow* 1
D EJ printing and clearing EJ data when No* 0
issuing general Z1 report Yes 1
E PGM mode operation records type Details* 0
Header information only 1
F REG/MGR/VOID modes operation Details* 0
records type Total 1
G Compressing printing for EJ data No (normal size) 0
Yes (small size)* 1
H Action when EJ memory area is full Continue 0
Warning (near full warning)* 1
Lock (with near full warning) 2
On the default setting, an asterisk is marked.
Temporary EJ printing during a transaction
• If selecting “yes”, you can print journal data of a current transaction recorded in EJ memory by pressing the
key during the transaction. To utilize this function completely, the cash register is programmed to receipt
R
printing and set Receipt ON/OFF function to OFF.
PGM mode operation records type
• The header information only is printed during the program reading operation.
The header information only is printed for X/Z reports.
(Receipt sample for Header Information only)
*ABCDEFGH
A
Action when EJ memory area is full
• By default, when the memory for EJ becomes nearly full, the cash register shows decimal points at the 8th
and 9th positions of the display (EJ memory nearly full message), and the cash register keeps storing new
data while erasing the oldest data. When “0” is selected, the cash register will no longer show EJ memory
nearly full message. When “2” is selected, the cash register shows EJ memory nearly full message and when
the memory is totally full, the cash register locks the sales/data entry with a display of the memory full
message “ ”. You will only be able to issue an EJ report.
s
00100002
46
sA
68
PrintKey operation example
@
Page 49

s @
*2ABCDEFGH*1Job code
As
To set “00000000”
Various Function Selection Programming 1
3
The cash register provides various detailed functions listed below.
• Function selection for miscellaneous keys
• Print format
• Receipt print format
• Function selection for tax
• Others
For this programming, job code entry style is applied. You can continue programming until you press the
key for the programming described in this section. To continue programming, repeat from a job code entry.
*1 Enter job code using numeric keys specified in each section below.
*2 Data entry details are listed on each table in each section below.
Example: When programming for job code 5 as ABCDEFGH: 00000100.
PrintKey operation example
s5 @
00000100
sA
A
Function selection for miscellaneous keys
Job code: 5
* Item: Selection: Entry:
A PO in REG mode Allow the PO operation in REG mode* 0
Disallow it 1
B RA in REG mode Allow the RA operation in REG mode* 0
Disallow it 1
C Subtotal void in REG mode Allow the REG mode subtotal void* 0
Disallow it 1
D Indirect void in REG mode Allow the REG mode indirect void* 0
Disallow it 1
E Direct void in REG mode Allow the REG mode direct void* 0
Disallow it 1
F Refund key availability Allow the REG mode refund entry* 0
Disallow it 1
G No sale in REG mode Allow the no sale operation in REG mode* 0
Disallow it 1
H Fractional quantity availability Allow fractional quantity entry 0
Disallow it* 1
47
Page 50

Print format
Job code: 6
* Item: Selection: Entry:
A Printing style Use the printer for journal printing 0
Use the printer for receipt printing* 1
B Receipt print format Total 0
Detailed* 1
C Time print on all receipts/journals Allow time printing* 0
Disallow it 1
D Date print on all receipts/journals Allow date printing* 0
Disallow it 1
E Consecutive no. print on Allow consecutive no. printing* 0
all receipts/journals Disallow it 1
F Always enter 0. (Fixed position) 0
G Zero skip for PLU sales report Disallow zero skip 0
Allow zero skip* 1
H Zero skip for full sales, clerk and Disallow zero skip 0
hourly reports Allow zero skip* 1
Printing style
• Even when receipt printing is selected, the journal rewind motor will be driven in PGM, OP X/Z, X1/Z1 and
X2/Z2 modes so you can wind sales and programming reports.
Receipt print format
Job code: 7
* Item: Selection: Entry:
A Always enter 0. (Fixed position) 0
B Always enter 0. (Fixed position) 0
C Subtotal print with a press of subtotal key Disallow subtotal printing* 0
Allow it 1
D Merchandise print with a press of Disallow merchandise subtotal printing* 0
merchandise subtotal key Allow it 1
E Always enter 0. (Fixed position) 0
F Always enter 0. (Fixed position) 0
G Always enter 0. (Fixed position) 0
H Number of purchases print Allow printing of number of purchases* 0
Disallow it 1
Function selection for tax
Job code: 15
* Item: Selection: Entry:
A to F Always enter 0. (Fixed position) 0
G Tax delete in REG mode availability Allow tax delete in REG mode* 0
Disallow it 1
H Manual tax entry in Allow manual tax entry in REG mode* 0
REG mode availability Disallow it 1
48
Page 51

Other programming
Job code: 61
* Item: Selection: Entry:
A Always enter 0. (Fixed position) 0
B Always enter 0. (Fixed position) 0
C
D Fractional treatment Round off (4 down, 5 up)* 0
E Use of :key Use :key as 00 key* 0
F Time format Use 12-hour format* 0
G Date format Use month-day-year format* 0
H
Job code: 62
* Item: Selection: Entry:
A Always enter 0. (Fixed position) 0
B Error beep activation By lock error* 0
C Key touch sound availability Allow to sound* 0
D Buffered keyboard Yes* 0
E Void mode operation availability Allow void mode operation* 0
F Void mode entry data print in Z2 reports Allow printing of void mode entry data in Z2 reports* 0
G Void mode entry data print in Z1 reports Allow printing of void mode entry data in Z1 reports* 0
H Addition of hourly sales total data in No* 0
Minus dept. and PLU/sub-dept. availability
Position of decimal point (from right) (TAB)
void mode Yes 1
Disallow to program minus dept. and PLU/sub-dept. 0
Allow it* 1
Raising to unit 1
Disregarding fractional treatment 2
Use :key as 000 key 1
Use 24-hour format 1
Use day-month-year format 1
Use year-month-day format 2
0 to 3 (default 2)
By misoperation 1
Disallow it 1
No 1
Disallow it 1
Disallow it 1
Disallow it 1
Job code: 66
* Item: Selection: Entry:
A Printing a receipt after transaction Total only 0
B Amount printing when PLU/sub-dept. Disallow printing* 0
unit price is zero Allow it 1
C Subtotal printing for conversion of Allow printing* 0
deficit Disallow it 1
D Always enter 0. (Fixed position) 0
E Compression printing on journals in Disallow compression printing (normal size) 0
PGM, OP X/Z, X1/Z1 and X2/Z2 modes Allow compression printing (small size)* 1
F Compression printing on journals in Disallow compression printing (normal size) 0
REG, MGR and VOID modes Allow compression printing (small size)* 1
G Logo message printing on journals Disallow logo message printing on journals* 0
H Footer printing Printing footer on all receipts* 0
Compression printing
• This programming is valid only when journal printing is selected. This does not affect EJ printing. (For EJ
programming, please refer to page 46.)
Details* 1
Allow logo message printing on journals 1
Printing footer with selected function key at the time of finalization
1
49
Page 52

Job code: 70
Canadian tax
Tax 4 method Tax 3 method Tax 2 and 1 method
type number
GST GST PST PST
01 VAT VAT - Tax on tax
02 VAT VAT - Tax on base
03 VAT - Tax on tax Tax on tax
04 VAT - Tax on base Tax on base
05 Add on Tax - Tax on tax Tax on Tax
06 Add on Tax - Tax on base Tax on base
07 Add on Tax VAT - Tax on tax
08 Add on Tax VAT - Tax on base
09 Add on Tax Add on Tax - Tax on tax
10 Add on Tax Add on Tax - Tax on base
11 VAT - VAT (Tax on base) Tax on tax
* Item: Selection: Entry:
A Split pricing counting Quantity* 0
Package 1
B Multiplication/split pricing entry availability Allow multiplication entry only* 0
Allow both of multiplication and split pricing 1
C Always enter 0. (Fixed position) 0
D Always enter 0. (Fixed position) 0
E Tax printing when GST is VAT Allow tax printing* 0
Disallow it 1
F GST exempt printing on X/Z reports Allow printing of GST exempt* 0
Disallow it 1
GH Tax calculation system Auto tax* 00
Canadian tax (tax type number) 01 through 11
Tax calculation system
• For US tax system, select “auto-tax”.
• For Canadian tax, from the table below, specify a tax system suitable for your province (if necessary contact
your local tax office for correct sales tax information) and for your type of retail business. In the cash register,
four kinds of tax can be set and each tax is arranged to match GST or PST as follows:
Tax 1: PST Tax 2: PST
Tax 3: PST or GST Tax 4: GST
(The most common type for Canada is type number 06.)
• To program a GST, use Tax 4; and to program two GSTs, use Tax 3 and 4. To program a PST,
use Tax 1; to program two PSTs, use Tax 1 and 2; and to program three PSTs, use Tax 1, 2 and
50
3.
• The entry of a multi-taxable item for PST or GST is prohibited as follows for the Canadian tax
system. When programming for departments, avoid programming the prohibited multi-taxable
status.
In case of; Tax 1: PST, Tax 2: PST,
In case of; Tax 1: PST, Tax 2: PST,
Tax 3: PST, Tax 4: GST
Taxable 1 and 2 item ········· prohibited
Taxable 1 and 3 item ········· prohibited
Taxable 2 and 3 item ········· prohibited
Taxable 1 and 4 item ············· allowed
Taxable 2 and 4 item ············· allowed
Taxable 3 and 4 item ············· allowed
Taxable 1 and 2 item ········· prohibited
Taxable 1 and 3 item ············· allowed
Taxable 2 and 3 item ············· allowed
Taxable 1 and 4 item ············· allowed
Taxable 2 and 4 item ············· allowed
Taxable 3 and 4 item ········· prohibited
Tax 3: GST, Tax 4: GST
Page 53

s11@
*A
As
To set “0”
s10@
*ABCD
As
Various Function Selection Programming 2
4
The cash register provides various options so you can use the register to suit your sales needs.
In this section, you can program the following features (parameters within parentheses indicates default setting):
• Power save mode (entering the power save mode in 30 minutes)
• Logo message print format (graphic logo only)
• Thermal printer density (standard density)
• Online time out setting
• Language selection (English)
• Training clerk specification (none) - If you specify a clerk code who is trained for use on this cash register, the
cash register will go into training mode when the clerk code is registered for sales entries. The sales
operations done by the trained clerk does not affect sales total. For details, refer to TRAINING MODE section.
Power save mode
* Item: Selection: Entry:
A Entering power save mode Yes* 0
when time is displayed No 1
B-D Time(min.) to entering power save mode 001-254 or 999
since no operation is made (Default 030)
When 999 is set for B to D, entering into power save mode is inhibited.
PrintKey operation example
10
0060
s
sA
@
Logo message print format
You can select the number of lines for your logo message, and the position to print it on receipt or journal.
*A: Logo message type
0: Header 3-line message without graphic logo
1: Graphic logo only (default)
2: Footer 3-line message with graphic logo
3: Header 6-line message
4: Header 3-line message with graphic logo
5: Header 3-line message and footer 3-line message
s
0
sA
11
@
PrintKey operation example
51
Page 54

Online time out setting
s50@
*Printer density
(00-99)
As
To set “0”
s35@
Time out (1 to 255 sec.)
As
Default: 007
PrintKey operation example
35
s
30
sA
Thermal printer density
* 50 is the default setting. To make the print darker, set a larger number, and to make the print lighter, set a
smaller number.
@
s
00
sA
50
PrintKey operation example
@
52
Page 55

Language selection
s86@
Clerk code
(1 to 25)
As
To cancel
s88@
*Language
(0, 2 or 3)
A
To set “0”
*Language: 0: English 2: French 3: Spanish (default: English)
PrintKey operation example
88
s
When you change the language, the texts such as clerk names, logo messages and function texts
(refer to page 42), which you programmed, will be reset to the default settings. The language
selection must be made before programming clerk names, logo messages and function texts.
2
A
@
Training clerk specification for training mode
For the details of clerk training, please refer to “TRAINING MODE” on page 56.
s
25
sA
86
PrintKey operation example
@
53
Page 56

AUTO key programming — Automatic sequence key —
a
A
Transaction
Delete
max. 25 times
a
Report name Key sequence
Programming report 1
A
Programming report 2 2 A
Auto key programming report 1 A
Printer density programming report 3 A
PLU programming report Start PLU code @ End PLU code p
If you program frequently performed transactions or report sequences for the akey, you can recall those
transactions and/or reports simply by pressing the
key in key operations.
a
Programming for
; entering a PLU 2 item (programmed unit price: 1.50) and a dept. 6 item (unit price: 1.00)
a
a
AUTO
setting
2
p
100
+
a
A
When the
in the appropriate position (OPX/Z for individual clerk reports, X1/Z1 for daily reports or X2/Z2 for
weekly or monthly reports).
Reading Stored Programs
5
The machine allows you to read every program stored in the PGM mode.
Key sequence for reading stored program
key has been programmed to execute a report job function, the mode switch must be
a
PrintKey operation example
• To stop reading programming report 1 or PLU programming report, turn the mode switch to the
MGR position.
• When printing is performed continuously, the printing may be intermitted several seconds. After
the intermission, the printing will be restarted.
54
Page 57

Sample printouts
1 Programming report 1
Mode
Dept. code
Dept. text
Dept. unit price w/sign
Dept. function
Minus department
Logo Message
Tax status
Function no.& its text
Tax status
Function parametrs (F-H)
Discount amt. w/sign
Function parametrs (F-H)
Percent rate with sign
Percent limit
Entry digit limit
Entry digit limit
Function parameters (A-C)
Function selection for
miscellaneous keys (A-H)
Print format (A-H)
Receipt print format(A-H)
Power save mode(A-D)
Logo message print format
Function selection for tax (A-H)
Doughnut tax exempt
Online time out
Thermal printer density
Tax table
Tax rate
Min. taxable amount
Clerk code/name
Function parameters
Foreign currency
symbol/Rate
55
Page 58

2 Programming report 2
Job code
A to H from the left
Training clerk specification
Language selection
EJ memory type
* Job code #63, 64, 65, 67,
69, 71, 72, 76, 77, 85, 87
and 95 are fixed settings,
for which you cannot
change the settings.
Entered Value
Printer density
Printing density
example
PLU code
PLU text
Mode parameter
Unit price
Range
Associated
dept. code
A clerk set in training
25 L
1000 >
3 @
#
A
4 Printer density programming report
5 PLU programming report
3 Auto key programming report
TRAINING MODE
Training mode is used when the operator or the manager practices register operations.
When a clerk in training is selected, the machine automatically enters training mode. To specify a clerk to be
trained, refer to “Training clerk specification for training mode” in the “ADVANCED PROGRAMMING” in page
53. The training operation is valid only in REG, MGR and VOID mode.
The corresponding clerk memory is only updated in training mode.
PrintKey operation example
56
Page 59

READING (X) AND RESETTING (Z)
Item
Mode switch position
Key operation
D
OPX/Z
X
--
--
--
--
X, Z
A
key: Sales total
@
key: Amount of cash in drawer
For dept. 17 to 32; Dept. key ( ! to < )
Dept. code : Department sales total
d
For dept. 1 to 16; Dept. key ( ! to < )
Full clerk report
PLU sales report
Hourly report
X1/Z1
--
X1, Z1
X1, Z1
X1, Z1
X1, Z1
--
X2/Z2
--
X2, Z2
--
--
--
--
Flash report:
(Only display)
To clear the
display, press the
l
key or turn the
mode switch to
another position.
Full sales report
Individual clerk
report
P
AA
Reading: Resetting:
P
LL
Reading: Resetting:
P
LL
Reading:
Resetting:
Resetting:
P
ss
Reading: Resetting:
(The report of the current clerk)
P
All PLUs
End
PLU code
Start
PLU code
p@
Reading:
All PLUs
End
PLU code
Start
PLU code
p@
OF SALES TOTALS
• Use the reading function (X) when you need to take a reading of sales information entered since the last reset.
You can take this reading any number of times. It does not affect the register’s memory.
• Use the resetting function (Z) when you need to clear the register’s memory. Resetting prints all sales
information and clears the entire memory except for the GT1 through GT3, Training GT, reset count, and
consecutive number.
Summary of Reading (X) and Resetting (Z) Reports
1
X1 and Z1 reports: Daily sales reports
X2 and Z2 reports: Periodic (monthly) consolidation reports
When you take a X or Z report, turn the mode switch to the appropriate position referring to the column of “Mode
switch position” shown on the table below, and use the following corresponding key sequence.
• When both sales quantities and sales amounts are zero, printing is skipped. If you do not want to
• “X” represents read symbol and “Z” represents reset symbol in the reports.
• To stop reading and resetting the PLU sales report, turn the mode switch to the MGR position.
• When printing is performed continuously, the printing may be intermitted several seconds. After
skip, change the programming. (Refer to “Print format” of “Various Function Selection
Programming 1”.)
The data will not be erased when you reset.
the intermission, the printing will be restarted.
57
Page 60

Exempt total from GST
PST total
GST total
Daily Sales Totals
REG-mode void counter
and total
Subtotal void counter and
total
Manager item void counter
and total
Void-mode transaction
counter and total
Refund counter and total
Received on account
counter and total
Paid out counter and total
Next sales total
Taxable 1 total
Gross tax 1 total
Refund tax 1 total
Net tax 1 total
Mode title*1
Reset counter
Net grand total(GT2-GT3)
Grand total of plus
registration
Grand total of
minus registration
Grand total of training
mode registration
Dept. code
Sales q'ty
Sales amount
“+” dept. counter
and total
“-” dept. counter
and total
Subtotal counter
and total
Subtotal percent 1
counter and total
Item counter and total
Item percent 1
counter and total
*2
Manual tax total
*3
Tax total
Net total without tax
Net total with tax
No-sales counter
Customer counter
Sales total
Foreign currency total (preset)
Foreign currency total (open)
Cash in drawer
Cash + check in drawer
Change total for check tendering
Cash counter and total
Check sales counter and total
Charge sales counter and total
Charge refund counter and total
2
Full sales report
• Sample report
*1: When you take X1 report, “X1” is printed.
*2: Printed in the Z1 report only.
*3: When the Canadian tax system is selected, the following is printed here.
58
Page 61

Mode title*1
Reset counter of daily total
Reset counter of periodic
Grand total
*2
Clerk reports
Mode title*
Report title
Clerk code
Clerk name
Customer counter
Mode title*
Report title
Customer counter
Sales total
PLU code
Item label
Mode title*
Report title
Range
Range sum
Sales q'ty and total
Individual clerk report
• Sample report
Full clerk report
The report prints in the same format as in the
sample report of individual clerk, but all clerk’s sales
data is sorted by clerk code number (from #1 to
#25).
PLU sales report
• Sample report
Hourly report
• Sample report
*: When you take Z1 report, “Z1” is printed.
Periodic Consolidation
3
Full sales report
• Sample report
*: When you take Z1 report, “Z1” is printed.
The subsequent printouts are the same in format
as in the X1/Z1 full sales report.
*1: When you take X2 report, “X2” is printed.
*2: Printed in the Z2 report only
59
Page 62

EJ REPORT READING AND RESETTING
7: P
To reset all of the data:
A@
710
To read the last 10 records:
A@
7:
To read all of the data:
A@
The cash register provides an electronic journal (EJ) function. This function is intended to record the journal
data in memory instead of journal paper, and print the data as an EJ report. The register records the journal
data in REG, PGM, VOID, X1/Z1 and X2/Z2 modes. By default, a maximum of 2000 lines are stored in memory,
but you can expand it to 3000 lines. For details on EJ programming, please refer to “Electronic Journal
Programming” section (page 45).
Printing journal data on the way of a transaction
You can print journal data of a current transaction recorded in EJ memory by pressing the
transaction.
This function is valid when the printing style is programmed to receipt, and the receipt ON/OFF
function is set to OFF.
• Sample print
EJ report title
EJ report end title
key during the
R
Reading and resetting the electronic journal data (Issuing EJ report)
You can read the journal data stored in the EJ memory in journal format by performing the following procedure in
the X1/Z1 or OP X/Z mode.
• With EJ memory, a maximum of 2000 (or 3000, if programmed)
lines of data can be stored. When executing an all data
reading, all of the data stored in the EJ memory will be printed.
To save paper, compression print is available.
• To stop reading or resetting the data, turn the mode switch to
“MGR” position. The data will not be erased when resetting.
• When printing is performed continuously, the printing may be
intermitted several seconds. After the intermission, the printing
will be restarted.
• Sample EJ report
Header
information
print
60
Page 63

OVERRIDE ENTRIES
REG
OPX/Z MGR
PGM
X1/Z1
X2/Z2
OFF
VOID
REG
OPX/Z MGR
PGM
X1/Z1
X2/Z2
OFF
VOID
Programmed limit for functions (such as for maximum amounts) can be overridden by making an entry in the
MGR mode.
1. Turn the mode switch to the MGR position.
2. Make an override entry.
On this example, the register has been programmed not to allow
discounts entries over $1.00.
PrintKey operation example
REG-mode 1500
entries 250 -...Error
#
l
Turn the mode switch
to the MGR position.
250
-
Return the mode switch
to the REG position.
A
CORRECTION AFTER FINALIZING A
TRANSACTION (Void mode)
When you need to void incorrect entries that clerks cannot correct (incorrect entries found after finalizing a
transaction, or a transaction that cannot be corrected by direct or indirect void), follow this procedure:
1. Turn the mode switch to the
void mode.
2. Repeat the entries that are recorded on the incorrect receipt. (All data for the
incorrect receipt are removed from register memory; the voided amounts are
added to the void-mode transaction totalizer.)
position using the manager key (MA), to enter
VOID
Cancellation receiptIncorrect receipt
61
Page 64

HOW TO USE AN SD MEMORY CARD
What You Can Do with an SD Memory Card
1
You can exchange data through an SD memory card between your cash register and a PC when managing the
data in your cash register by using the SHARP’s PC software “Customer Support Tool.”
You can also save all necessary data in the cash register to an SD memory card for backup.
This instruction manual describes only those operations needed on the cash register. For details, please refer to
the help section in the “Customer Support Tool”.
List of functions
All data backup: With this function you can save all the sales data and programming data in the cash
register to an SD memory card for backup. By loading the data saved to the SD memory
card into the cash register you can restore it to its original state, if necessary.
Programming data: With this function you can write all the programming data in the cash register onto an SD
memory card. You can manage this data on a PC by using “Easy Programming Tool”
contained in the Customer Support Tool. You can also load the programming data edited
with “Easy Programming Tool” into the cash register through an SD memory card.
Graphic logo: With this function you can load the graphic logo data created with “Easy Programming
Tool” into the cash register through an SD memory card.
Sales data: With this function you can write all the sales data of daily and periodic totals in the cash
register onto an SD memory card. You can manage the data on a PC by using “Sales Total
Reporting” contained in the Customer Support Tool.
Electronic journal: With this function you can write the electronic journal data in the cash register onto an SD
memory card. You can manage this data on a PC by using “Electronic Journal Print”
contained in the Customer Support Tool. You can also load the data edited with “Electronic
Journal Print” into the cash register through an SD memory card for printing.
62
Page 65

Recommended SD memory cards
We recommend you to use the following SD memory cards. If you want to use other card models, please visit
the Sharp web site: http://www.sharpusa.com.
Recommended card models: SanDisk card models SDSDB-128-A10, SDSDB-256-A10, SDSDG-256-A10,
SDSDB-512-A10 and SDSDG-512-A10
• The data stored in an SD memory card could be lost or distorted due to accidents or other issues.
Sharp is not responsible for any damage incurred by lost data.
• 128-Mbyte to 512-Mbyte SD memory cards are available and the relationship between the
memory card capacity and the maximum holding period of sales data which can be saved in an
SD memory card is as follows:
Memory card capacity Sales data holding period *
128MB 3 Months
256MB 6 Months
512MB 1 Year
*: This period refers to the time period during which sales data can be stored in an SD memory card
when additionally written onto it once a day.
In Case of SD Error
2
If an error occurs while data is transferred from your cash register to the inserted SD memory card and vice
versa, it will be indicated by a corresponding error code shown on the operator display. Press the
clear the error, then take the corresponding action.
l
key to
SD error code table
Display
(Error code)
No SD memory card is found. Insert an SD memory card into the SD card slot or reinsert it correctly.
The write-protect switch on the SD memory card is in the “PROTECTED” position. Set the switch on the
“NOT PROTECTED” position.
The SD memory card is full. Delete unwanted data from the card on a PC or replace the card with a new
one. When using a new SD memory card, be sure to format it in advance.
The SD memory card has no desired data. Replace it with another SD memory card containing the
desired data.
The data stored in the SD memory card is incorrect. Write correct data into the SD memory card on a
PC.
The maximum allowable number of times of sales data or EJ data writing is exceeded. Delete unwanted
data from the SD memory card on a PC or replace the card with a new one. When using a new SD
memory card, be sure to format it in advance.
A power failure has occurred while the SD memory card is accessed. Perform the interrupted operation
again from the beginning after power recovery.
An error other than the above mentioned has occurred while the SD memory card is accessed. Perform
the interrupted operation again from the beginning.
Error status and action
63
Page 66

Inserting and Removing an SD Memory Card
3
The SD card slot is located on the right side of your cash register and has a cover.
Inserting an SD memory card
Insert an SD memory card into the SD card slot with the printed SD
logo facing upwards. Push the card in steady with a finger until it
clicks and release it slowly.
Removing the SD memory card
Push the card in gently with a finger and release it. The card will
come out.
• Be sure to check if the SD memory card has perfectly been inserted before closing the cover. If
this instruction is not performed correctly, the card or SD card slot may be damaged.
• When inserting or removing the SD memory card, be sure to release it slowly. Otherwise, the card
may pop out and injure your finger.
• Never touch or remove the SD memory card while it is accessed, otherwise the data stored in it
may be damaged.
• If a power failure occurs, the cash register is unplugged, or the mode switch is turned to another
position while the SD memory card is accessed, the data stored in that card could be damaged.
Formatting an SD Memory Card
4
When you use a new SD memory card for the first time, be sure to format it on your cash register before
writing programming data etc. to it.
Never format any SD memory card that contains some data, otherwise all of the data stored on the card will be
erased.
Set the mode switch to the PGM position.
The comfirmation message is printed.
To execute
s s@140 A
* The message “ ” will appear and stay on the display until the SD memory card is completely
formatted. When formatting is finalized, the message “***NORMAL END” will be printed. In case an error
occurs, a corresponding error message will be printed.
1
To cancel
*
l
64
Page 67

Saving and Restoring All the Data
5
Set the mode switch to the PGM position.
Saving (writing) all the data
The comfirmation message is printed.
To execute
s s@144 A
Restoring (reading) the saved data
The comfirmation message is printed.
s s@148 A
* The message “ ” will appear and stay on the display until all data is completely written or read.
When writing or reading is finalized, the message “***NORMAL END” will be printed. In case an error occurs, a
corresponding error message will be printed.
If you save all the data by using an SD memory card that contains some data, the existing data will
be erased and replaced with newly saved data. If you need the existing data, use another SD
memory card.
1
To cancel
To execute
1
To cancel
*
l
*
l
Writing and Reading of Programming Data
6
Reading the graphic logo data
Set the mode switch to the PGM position.
The comfirmation message is printed.
To execute
s s@145 A
* The message “ ” will appear and stay on the display until all data is completely read. When
reading is finalized, the message “***NORMAL END” will be printed. In case an error occurs, a corresponding
error message will be printed.
1
To cancel
*
l
65
Page 68

Writing and reading all the programming data
You can write all the programming data in the cash register onto an SD memory card (Writing). The existing
programming data in the card will all be replaced with the newly written data at this time.
You can also replace the programming data stored in the cash register with those stored in an SD memory card
by loading the latter into the cash register(Reading).
Set the mode switch to the PGM position.
Writing
The comfirmation message is printed.
To execute
s s@141 A
Reading
The comfirmation message is printed.
s s@147 A
* The message “ ” will appear and stay on the display until all data is completely written or read.
When writing or reading is finalized, the message “***NORMAL END” will be printed. In case an error occurs, a
corresponding error message will be printed.
Writing of Sales Data
7
1
To cancel
To execute
1
To cancel
*
l
*
l
Write all of the existing sales data (daily and periodic totals) into an SD memory card. You can write the data into
the same card a maximum of 400 times unless the card becomes full.
Set the mode switch to the X1/Z1 position.
650 P
* The message “ ” will appear and stay on the display until all data is completely written. When
writing is finalized, the message “***NORMAL END” will be printed. In case an error occurs, a corresponding
error message will be printed.
66
The comfirmation message is printed.
To execute
s@A
1
To cancel
*
l
Page 69

Writing and Printing of Electronic Journal
8
Writing of electronic journal
Write electronic journal data in the EJ memory of your cash register onto an SD memory card (this will clear the
memory). You can write the data into the same card a maximum of 400 times unless the card becomes full.
Set the mode switch to the X1/Z1 position.
The comfirmation message is printed.
To execute
s@750 PA
* The message “ ” will appear and stay on the display until all data is completely written. When
writing is finalized, the message “***NORMAL END” will be printed. In case an error occurs, a corresponding
error message will be printed.
1
To cancel
*
l
Printing of electronic journal
You can print the electronic journal data saved last to an SD memory card by using the printer of your cash
register.
Set the mode switch to the X1/Z1 position.
The comfirmation message is printed.
To execute
s@740 A
1
*
* The message “ ” will appear and stay on the display until all data is completely printed. When
printing is finalized, the display will return to its initial state. In case an error occurs, a corresponding error
message will be printed.
To cancel
l
67
Page 70

OPERATOR MAINTENANCE
In case of a Power Failure
1
When power is lost, the machine retains its memory contents and all information on sales entries.
• When a power failure is encountered in register idle state or during an entry,
the machine returns to normal operation after power recovery.
• When a power failure is encountered during a printing cycle, the register prints
“========” and then carries out the correct printing procedure after power
recovery. (See the sample print.)
In Case of Printer Error
2
If the printer runs out of paper, the printer will stall, and “PPPPPPPPPP” will appear on the display. Key entries
will not be accepted. Refer to section 5 in this chapter, install a new roll, then press the
print the power failure symbol and resume printing.
If the print roller arm is not locked, the printer stalls, “H” will appear on the extreme left of the display. Key
entries will not be accepted. Push down the arm until it is securely locked, then press the
will print the power failure symbol and resume printing.
key. The printer will
l
key. The printer
l
Cautions in Handling the Printer and Recording Paper
3
Cautions in handling the printer
• Avoid dusty and humid environments, direct sunlight and iron powder. (A permanent magnet and
electromagnet are used in this machine.)
• Never pull the paper when the print roller arm is locked. First lift up the arm, and then remove the paper.
• Never touch the surface of the print head and print roller.
Cautions in handling the recording paper (thermal paper)
• Use only the paper specified by SHARP.
• Do not unpack the thermal paper until you are ready to use it.
• Avoid heat. The paper will color at around 70°C.
• Avoid dusty and humid storage places. Avoid direct sunlight.
• The printed text on the paper can discolor under conditions of high humidity and temperature, exposure to the
direct sunlight, contact with glue, thinner or a freshly copied blueprint, and heat caused by friction from
scratching or other such means.
• Be very careful when handling the thermal paper. If you want to keep a permanent record, copy the printed text
with a photocopier.
68
Page 71

To the printer
Incorrect
To the printer
Correct
Replacing the Batteries
4
This cash register displays a low battery symbol ( ) when the batteries are low, and displays a no battery
symbol ( ) when batteries are extremely low or batteries are not installed.
When the low battery symbol is displayed, replace the batteries with new ones as soon as possible. The
existing batteries will be dead in about two days.
When the no battery symbol is displayed, replace the batteries immediately. Otherwise, if the AC power cord is
disconnected or a power failure occurs, all the programmed settings will be reset to the default settings and any
data stored in memory will be cleared.
While the no battery symbol is being displayed, do not turn the mode switch to any positions. Follow the battery
replacement procedure below without changing the mode switch position. Otherwise, if the mode switch passes
or is set to the OFF position, all the programmed settings will be reset to the default settings and any data stored
in memory will be cleared.
Be sure to observe precautions shown on page 1 when handling batteries.
To replace the batteries:
1. Make sure that the cash register is plugged in.
2. Remove the printer cover.
3. Open the battery compartment cover next to the paper roll cradle and
remove the old batteries.
4. Install three new alkaline batteries LR6 (“AA” size) in the battery
compartment. Be sure the positive and negative poles of each battery are
facing in the proper direction. When they are installed correctly, the “ ” or
“ ” symbol will disappear.
5. Close the battery compartment cover.
6. Replace the printer cover.
Replacing the Paper Roll
5
Be sure to use paper rolls specified by SHARP.
The use of any other paper rolls other than those specified could cause paper jamming, resulting in register
malfunction.
Paper specification
Paper width: 2.25 ± 0.02 in (57.5 ± 0.5 mm)
Max. outside diameter: 3.15 in (80 mm)
Quality: Thermal paper
• Be sure to set the paper roll prior to using your machine, otherwise it may cause a malfunction.
Install the paper roll in the printer. Be careful to set the roll correctly.
(How to set the paper roll)
69
Page 72

Removing the paper roll
Paper positioning guides
When a red dye appears on the paper roll, it is time to replace it. Replace the paper roll with a new one. If you
plan on not using the register for an extended period of time, remove the paper roll, and store it in an appropriate
place.
Caution: The paper cutter is mounted on the printer cover. Be careful not to cut yourself.
When not using the take-up spool (using as receipt paper):
Print roller arm
1. Remove the printer cover.
2. Lift up the print roller release lever to unlock and open the print
roller arm.
3. Remove the paper roll from the paper roll cradle.
Print roller
release lever
When using the take-up spool (using as journal paper):
Area to cut
1. Turn the mode switch to a position other than OFF with the
power cord connected.
2. Remove the printer cover.
3. Press the
part is out of the way.
4. Cut the paper and remove the take-up spool.
5. Lift up the print roller release lever to unlock and open the print
roller arm.
6. Remove the paper roll from the paper roll cradle.
Do not pull the paper through the printer.
key to advance the journal paper until its printed
F
Do not pull the paper through the printer.
7. Remove the outer side of the take-up spool as shown
on the left.
8. Remove the printed journal roll from the take-up spool.
Installing the paper roll
Caution: The paper cutter is mounted on the printer cover. Be careful not to cut yourself.
Installing the receipt paper roll:
1. Turn the mode switch to a position other than
OFF with the power cord connected.
2. Remove the printer cover.
3. Lift up the print roller release lever to unlock
and open the print roller arm.
4. Set the paper correctly in the paper roll
cradle.
5. Feed the end of the paper along with the
70
paper positioning guides.
Page 73

Installing the journal paper roll:
6. While holding down the paper, slowly close the print roller arm, and
push down the arm until you hear a click locking the arm. Make
sure securely you push down the center of the wing part of the arm
as illustrated at the left. The paper will be fed automatically.
If the print roller arm is not securely locked, the unit will
not print correctly. If this problem occurs, open the arm,
and close the arm as instructed above.
7. Cut off the excess paper using the edge of the inner cover, and
replace the printer cover. Press the
paper end comes out of the printer cover and clean paper appears.
If the paper end does not come out, open the printer
cover, and pass the paper end between the paper cutter
and the paper guide of the printer cover, and replace the
cover.
key to make sure the
F
1. Turn the mode switch to a position other than OFF with the power
cord connected.
2. Remove the printer cover.
3. Lift up the print roller release lever to unlock and open the print
roller arm.
4. Set the paper correctly in the paper roll cradle.
5. Feed the end of the paper along with the paper positioning guides.
6. While holding down the paper, slowly close the print roller arm, and
push down the arm until you hear a click locking the arm. Make
sure securely you push down the center of the wing part of the arm
as illustrated at the left. The paper will be fed automatically.
7. Insert the end of the paper into the slit in the spool. (Press the
key to feed more paper if required.)
F
8. Wind the paper two or three turns around the spool shaft.
9. Set the spool on the bearing, and press the
excess slack in the paper.
key to take up
F
10. Replace the printer cover.
You can wind the roll paper in OP X/Z, X1/Z1, and X2/Z2 modes even if you programmed so that
the printer is used for issuance of receipts. This may be convenient to wind reports. In this case,
set the roll paper to the take-up spool.
71
Page 74

Lever
Removing a Paper Jam
Print head
Roller
Sensor
Till
Coin case
6
Caution: The paper cutter is mounted on the printer cover. Be careful not to cut yourself. Never touch
the print head immediately after printing, as the head may still be hot.
1. Remove the printer cover.
2. Lift up the print roller release lever to unlock the print roller arm, and open the print roller arm.
3. Remove the paper jam. Check for and remove any shreds of paper that may remain in the printer.
4. Reset the paper roll correctly by following the steps in “Installing the paper roll”.
Cleaning the Printer (Print Head / Sensor / Roller)
7
When the printed text is getting dark or faint, paper dust may be stuck to the print head, sensor and/or roller.
Clean them as follows:
Caution:
• Never touch the print head with a tool or anything hard
as it may damage the head.
• The paper cutter is mounted on the printer cover. Be
careful not to cut yourself.
1. Turn the mode switch to the OFF position.
2. Remove the printer cover.
3. Lift up the print roller release lever to unlock and open the
print roller arm.
4. Remove the paper roll referring to the “Removing the
paper roll” section.
5. Clean the print head with a cotton swab or soft rag
moistened with ethyl alcohol or isopropyl alcohol. Clean
the roller and the sensor in the same manner.
6. Reset the paper roll correctly by following the steps in
“Installing the paper roll”.
8
9
Removing the Till and the Drawer
Opening the Drawer by Hand
The drawer automatically opens. However, when a power failure occurs or the
machine becomes out of order, slide the lever located on the bottom of the
machine in the direction of the arrow. (See the figure at the left.)
The drawer will not open if it is locked with the key.
The till in the register is detachable. After
closing your business for the day, remove
the till from the drawer and keep the
drawer open. To detach the drawer, pull
it forward fully with the till removed. And
remove it by lifting it up. The 6denomination coin case is detachable.
72
Page 75

Before Calling for Service
10
The malfunctions shown in the left-hand column below, labelled “Fault,” do not necessarily indicate functional
faults of the machine. It is therefore advisable to refer to “Checking” shown in the right-hand column before
calling for service.
Fault Checking
The display shows symbols that do not make sense. • Has the machine been initialized properly as shown
(1)
“GETTING STARTED”?
(Note that initialization clears all the data and programmed
settings stored in memory.)
The display won’t be illuminated even when
(2)
the mode switch is turned to any other
position than “OFF”.
The display is illuminated, but the whole machine
(3)
refuses registrations.
No receipt is issued. • Is the paper roll properly installed?
(4)
No journal paper is taken up. • Is the take-up spool installed on the bearing properly?
(5)
Printing is unusual. • Is the print roller arm securely locked?
(6)
• Is power supplied to the electrical outlet?
• Is the power cord plug out or loosely connected to the
electrical outlet?
• Is a clerk code assigned to the register?
• Is the mode switch set properly at the “REG” position?
• Is there a paper jam?
• Is the receipt function in the “OFF” status?
• Is the print roller arm securely locked?
• Is there a paper jam?
• Is the journal printing selected in the printing style
programming? (If the receipt printing is selected, the paper
is not wound around the take-up spool.)
• Is the paper roll properly installed?
• Are the print head/sensor/roller clean?
Error code table
When the following error codes are displayed, press the lkey and take a proper action according to the table
below.
Error
code
E01 Registration error Make a correct key entry.
E02 Misoperation error Make a correct key entry.
E03 Undefined code is entered. Enter a correct code
E07 Memory is full (in the akey programming). Program the akey within 25 steps.
E11 Compulsory depression of the
direct finalization
E12 Compulsory tendering Make a tendering operation.
E32 No entry of a clerk code Make a clerk code entry.
E34 Overflow limitation error Make a registration within a limit of entry.
E35 The open price entry is inhibited. Make a preset price entry.
E36 The preset price entry is inhibited. Make an open price entry.
E37 The direct finalization is inhibited. Make a tendering operation.
E67 Subtotal void is not allowed. Finalize the transaction, and correct the wrong entries in the
Error status Action
key for Press the
s
key and continue the operation.
s
void mode.
73
Page 76

SPECIFICATIONS
D
18
2
E
17
1
1
I
22
6
J
21
5
N
26
10
O
25
9
S
30
14
T
29
13
B
20
4
C
19
3
G
24
8
H
23
7
L
28
12
M
27
11
Q
32
16
R
31
15
E
17
Example:
Candy
Danish
Model: XE-A203A
Dimensions: 16.5 (W) x 16.9 (D) x 11.9 (H) in. (420 (W) x 430 (D) x 302 (H) mm)
Weight: 24.2 Ib (11 kg)
Power source: 120V AC ± 10%, 60 Hz
Power consumption: Stand-by 7.7 W
Operating 28 W (max.)
Working temperature: 32 °F to 104 °F (0 °C to 40 °C)
Electronics: LSI (CPU) etc.
Display:
Operator display: 7-segment display (10 positions)
Customer display: 7-segment display (7 positions)
Printer:
Type: One-station thermal printer
Printing speed: Approx. 12 lines/second
Printing capacity: 24 digits each for receipt and journal paper
Other functions: • Graphic logo printing function
• Logo message function
• Receipt (ON-OFF) function, compression printing function
Paper roll: Width: 2.25 ± 0.02 in (57.5 ± 0.5 mm)
Max. diam.: 3.15 in (80 mm)
Quality: High quality (0.06 to 0.08 mm thickness)
Cash drawer: 5 slots for bill and 6 for coin denominations
Accessories: Manager key 2
Operator key 2
Drawer lock key 2
Paper roll 1
Take-up spool 1
USB cable (0GS5422580) *
Customer support tool 1 disk
Quick Start Guide (English) 1 copy
Quick Start Guide (French) 1 copy
Instruction manual 1 copy
Limited warranty 1 copy
Specifications and appearance subject to change without notice for improvement.
1
1
*1 Use only the USB cable (manufactured by SHARP) supplied with the XE-A203A for the connection with a PC.
In case you need a new USB cable, order the USB cable manufactured by SHARP Co. Ltd. (Part code: 0GS5422580) for
use with the XE-A203A.
Use these labels with the department keys. Write department names on the labels and attach them to the
department keys by first removing the transparent key covers. (Please make a copy of this page.)
74
Page 77

INTRODUCTION
Nous vous remercions beaucoup pour votre achat de la Caisse Enregistreuse Electronique SHARP, Modèle
XE-A203A.
Veuillez lire attentivement ce Manuel d’instructions avant d’utiliser votre machine, de manière à en
comprendre parfaitement son fonctionnement et ses possibilités.
Veuillez conserver ce Manuel pour vous y référer ultérieurement. Cela vous aidera si vous rencontrez
n’importe quel problème opérationnel.
PRECAUTION!
Ne jamais installer les piles dans la caisse enregistreuse avant de l’initialiser. Avant que vous ne
commenciez à faire fonctionner la caisse enregistreuse, vous devez tout d’abord l’initialiser, et ensuite installer
trois piles alcalines neuves LR6 (dimension “AA”) dans l’enregistreuse. Sinon, les contenus de la mémoire
seront déformés et un fonctionnement défectueux de la caisse enregistreuse se produira. Pour cette
procédure, veuillez vous référer à la page 7.
IMPORTANT
• Sur l’imprimante, un coupoir pour couper le rouleau de papier est installé. Faites très attention de ne
pas vous blesser vous-même avec ce coupoir.
• Installez votre enregistreuse dans un endroit qui ne soit pas exposé à un ensoleillement direct, à des
changements anormaux de températures, à une humidité élevée ou exposée à des éclaboussures
d’eau.
Une installation dans de pareils endroits pourrait endommager le boîtier et les composants électroniques.
• Ne faites pas fonctionner l’enregistreuse avec des mains humides.
De l’eau pourrait pénétrer à l’intérieur de l’enregistreuse et entraîner une panne des éléments internes.
• Lorsque vous nettoyez l’enregistreuse, utilisez un tissu sec et doux. N’utilisez jamais de solvants,
tels que de la benzine et/ou un diluant pour peinture.
L’utilisation de tels produits chimiques amènerait la décoloration ou la détérioration du boîtier.
• L’enregistreuse peut être branchée sur n’importe quelle prise de courant murale (120V C.A. ±10%).
D’autres dispositifs électriques utilisés sur le même circuit électrique risquent d’entraîner un fonctionnement
défectueux de la caisse enregistreuse.
• Pour une protection contre une perte des données, veuillez installer trois piles alcalines LR6
(dimension “AA”) après l’initialisation de la caisse enregistreuse. Lors de la manipulation des piles,
n’oubliez jamais de suivre les points suivants:
Une utilisation incorrecte des piles peut provoquer leur explosion ou des fuites, endommageant
éventuellement l’intérieur de la caisse enregistreuse.
• Pour l’installation, assurez-vous que les pôles positif (+) et négatif (-) de chaque pile soient
orientés dans la direction appropriée.
• Ne mélangez jamais des piles de types différents.
• Ne mélangez jamais des piles usagées avec des neuves.
• Ne laissez jamais des piles épuisées dans le compartiment des piles.
• Retirez les piles si vous pensez ne pas utiliser la caisse enregistreuse pendant une période de
temps prolongée.
• Si une fuite des piles survenait, nettoyez immédiatement le compartiment des piles, en prenant
garde de ne pas laisser le liquide des piles entrer en contact avec votre peau.
• Pour une mise au rebut des piles, suivez la législation correspondant à votre pays.
• Si l’enregistreuse fonctionne défectueusement, appelez le 905-568-7140 pour un dépannage.
N’essayez pas de réparer vous-même l’enregistreuse.
• Pour un débranchement électrique total, retirez la fiche principale.
English
Français
Ligne directe pour un
dépannage du client
905-568-7140
SD est une marque déposée de SD Card Association.
Pour une configuration aisée, voir
“Pour mettre en marche” (page 7).
1
Page 78

TABLE DES MATIERES
INTRODUCTION............................................................................................................................................1
IMPORTANT ..................................................................................................................................................1
TABLE DES MATIERES................................................................................................................................2
COMPOSANTS ET LEURS FONCTIONS.....................................................................................................4
1 Vue extérieure.......................................................................................................................................4
2 Imprimante ............................................................................................................................................4
3 Commutateur de mode et clés de mode ...............................................................................................5
4 Clavier ...................................................................................................................................................5
5 Affichages..............................................................................................................................................6
6 Clé de verrouillage du tiroir ...................................................................................................................6
POUR METTRE EN MARCHE.......................................................................................................................7
POUR L’OPERATEUR
PANORAMA DU DEROULEMENT POUR DES ENTREES DE VENTES QUOTIDIENNES......................11
ENTREES POUR DES VENTES DE BASE ................................................................................................12
1 Exemple d’entrée pour des ventes de base........................................................................................12
2 Avertissement d’une erreur .................................................................................................................13
3 Entrées d’articles.................................................................................................................................14
Entrées d’un seul article ...............................................................................................................14
Entrées répétées ..........................................................................................................................15
Entrées multiplicatives..................................................................................................................15
Entrées de la fixation de prix fractionnés......................................................................................16
Entrées de la vente au comptant d’un seul article (SICS)............................................................17
4 Affichage de totaux partiels.................................................................................................................17
5 Achèvement d’une opération...............................................................................................................17
Vente au comptant ou contre un chèque......................................................................................17
Vente au comptant ou contre un chèque qui ne nécessite aucune entrée...................................18
Vente à crédit ...............................................................................................................................18
Vente contre une offre mixte ........................................................................................................18
6 Calcul des taxes..................................................................................................................................19
Taxe automatique.........................................................................................................................19
Taxe manuelle..............................................................................................................................19
Annulation d’une taxe...................................................................................................................19
Changement de statut d’une taxe.................................................................................................20
FONCTIONS FACULTATIVES....................................................................................................................21
1 Entrées auxiliaires...............................................................................................................................21
Entrées de rabais et de primes en utilisant la touche de pourcentage.........................................21
Entrées de rabais et de primes en utilisant la touche de rabais...................................................21
Entrées de remboursements ........................................................................................................22
Entrées de numéros de codes non-additifs et impression............................................................22
2 Traitement d’un payement annexe......................................................................................................23
Conversion d’une monnaie...........................................................................................................23
Entrées de comptes admis et de décaissements.........................................................................24
Pas de vente (échange) ...............................................................................................................24
3 Entrées de touches (touche
RECTIFICATION..........................................................................................................................................25
1 Rectification de la dernière entrée (annulation directe).......................................................................25
2 Rectification de l’avant-dernière entrée ou d’une entrée précédente (annulation indirecte) ..............25
3 Annulation d’un total partiel.................................................................................................................26
4 Rectification d’entrées incorrectes non traitées par la fonction d’annulation directe ou indirecte .......26
) dans une séquence automatique....................................................24
a
POUR LE DIRECTEUR
AVANT LA PROGRAMMATION ................................................................................................................27
PROGRAMMATION DE FONCTIONS DE BASE (Pour un démarrage rapide) .......................................27
1 Programmation de la date et de l’heure ..............................................................................................27
2 Programmation de la taxe pour la fonction de calcul automatique d’une taxe....................................28
Programmation d’une taxe en utilisant un taux de taxe................................................................28
2
Page 79

Table de taxes (applicable à la taxe additionnelle).......................................................................29
Quantité pour une exemption de taxe pour des doughnuts (pour le système de
taxation canadien) ........................................................................................................................31
PROGRAMMATION DE FONCTIONS AUXILIAIRES.................................................................................32
1 Programmation pour les rayons ..........................................................................................................32
2 Programmation de PLU (prix par article déjà programmé) et de rayons auxiliaires............................33
3 Programmation de touches diverses...................................................................................................35
.............................................................................................................35
Taux pour
Montant pour
Limitation du taux de pourcentage pour
Paramètres de fonction pour
Paramètres de fonction pour
Limitation d’entrée numérique pour
Paramètres de fonction pour
4 Programmation d’un texte ...................................................................................................................39
PROGRAMMATION AVANCEE..................................................................................................................44
1 Programmation du numéro de l’enregistreuse et du numéro consécutif.............................................44
2 Programmation de la bande de détails électronique (EJ) ...................................................................45
3 Programmation 1 pour la sélection de diverses fonctions...................................................................47
Sélection de fonctions pour des touches diverses .......................................................................47
Disposition pour une impression ..................................................................................................48
Disposition d’impression d’un reçu...............................................................................................48
Sélection d’une fonction pour la taxe............................................................................................48
Autres programmations ................................................................................................................49
4 Programmation 2 pour la sélection de diverses fonctions...................................................................51
Mode d’économie d’énergie .........................................................................................................51
Disposition de l’impression d’un message logotype.....................................................................51
Réglage de temporisation en ligne...............................................................................................52
Densité de l’imprimante thermique...............................................................................................52
Choix de la langue........................................................................................................................53
Spécification d’un employé stagiaire pour le mode de formation .................................................53
Programmation de la touche AUTO – Touche de mise en séquence automatique – ..................54
5 Lecture de programmes mémorisés....................................................................................................54
MODE DE FORMATION..............................................................................................................................56
LECTURE (X) ET REMISE A ZERO (Z) DES TOTAUX DE VENTES ........................................................57
LECTURE ET REMISE A ZERO D’UN RAPPORT DE LA BANDE DE DETAILS QUOTIDIENS
ELECTRONIQUE (EJ) .................................................................................................................................60
ENTREES DE SURPASSEMENTS .............................................................................................................61
RECTIFICATION APRES L’ACHEVEMENT D’UNE OPERATION (Mode d’annulation) .........................61
COMMENT UTILISER UNE CARTE MEMOIRE SD ...................................................................................62
1 Ce que vous pouvez faire avec une carte mémoire SD......................................................................62
2 Dans le cas d’une erreur SD ...............................................................................................................63
3 Insertion et enlèvement d’une carte mémoire SD ...............................................................................64
4 Formatage d’une carte mémoire SD ...................................................................................................64
5 Sauvegarde et restauration de toutes les données.............................................................................65
6 Ecriture et lecture des données d’une programmation........................................................................65
7 Ecriture des données de ventes..........................................................................................................66
8 Ecriture et impression de la bande de détails quotidiens électronique ...............................................67
ENTRETIEN PAR L’OPERATEUR..............................................................................................................68
1 Dans le cas d’une panne de courant...................................................................................................68
2 Dans le cas d’une erreur de l’imprimante............................................................................................68
3 Précautions pour la manipulation de l’imprimante et du papier d’enregistrement...............................68
4 Remplacement des piles.....................................................................................................................69
5 Remplacement du rouleau de papier ..................................................................................................69
6 Suppression d’un bourrage du papier .................................................................................................72
7 Nettoyage de l’imprimante (Tête d’impression/détecteur/rouleau)......................................................72
8 Enlèvement du casier pour l’argent et du tiroir....................................................................................72
9 Ouverture du tiroir à la main................................................................................................................72
10 Avant d’appeler pour un dépannage ...................................................................................................73
Table des codes d’erreurs............................................................................................................73
DONNEES TECHNIQUES ...........................................................................................................................74
%, &
et
V
..........................................................................................................................36
-
et &.......................................................................36
%
................................................................................36
%, &
V
C, c
et
-
..................................................................................................37
....................................................................38
r, R
et
et
t
(lorsqu’on utilise en tant que touche CA)...........38
A
3
Page 80

COMPOSANTS ET LEURS FONCTIONS
Bobine enrouleuse
Levier de
relâchement du
rouleau d’impression
Bras du rouleau
d’impression
Couvercle interne
Logement du
rouleau de papier
Guides de
positionnement du papier
Vue extérieure
1
Vue frontale Vue arrière
Affichage du client
Affichage de l’opérateur
Capot de l’imprimante
Papier pour les reçus
Clavier
Tiroir-caisse
Serrure du tiroir
Fente de la carte SD
(Référer à la page 64.)
(type à éjection)
Câble d’alimentation
Commutateur de mode
Port USB
2
N’utilisez seulement que le câble USB (fabriqué par SHARP) fourni avec la XE-A203A pour un
raccordement avec un ordinateur. N’utilisez jamais d’autres câbles.
Imprimante
L’imprimante est une imprimante thermique de type uniposte et, par conséquent, elle
ne nécessite aucune sorte de cartouche ou de ruban encreur.
Soulevez l’arrière du capot de l’imprimante pour le retirer. Pour le réinstaller,
l’accrocher sur les cliquets du boîtier et le refermer.
Avertissement: Un coupoir pour papier est installé sur le capot de
l’imprimante. Faites attention à ne pas vous couper.
4
N’essayez pas de retirer le rouleau de
papier lorsque le bras du rouleau
d’impression est verrouillé. Cela risquerait
d’endommager l’imprimante et la tête
d’impression.
Page 81

Commutateur de mode et clés de mode
123
456
789
CL
•
00
0
DEPT
SHIFT
CLK
#
CONV
%1RA
VOID
RFND
–
%2
NUMBER
SHIFT
SPACE
DC
ESC
BS
RCPT
/PO
@/
FOR
PLU
/SUB
DEPT
#
B
A
20
4
C
19
3
D
18
2
E
17
1
G
F
24
8
H
23
7
I
22
6
J
21
5
L
K
28
12
M
27
11
N
26
10
O
25
9
Q
32
P
16
R
31
15
S
30
14
T
29
13
AUTO
TAX
TAX2
SHIFT
TAX1
SHIFT
MDSE
SBTL
#/TM
SBTL
CHK
CH
Y
X
Z
V
U
W
CA/AT/NS
RA
ESC
RCPT
/PO
CA/AT/NS
Touche d’alimentation en
papier
Touche de compte admis
Touche d’impression pour
reçus/Décaissement
Touche d’annulation
Touche de conversion
Touche d’échappement
Touche de multiplication
Touche du point de
décimalisation
Touche d’effacement
Touche d’entrée du code d’un
rayon
Touche de PLU/Rayon auxiliaire
Touche de changement d’un
rayon
Touche d’entrée du code d’un
employé
Touches des rayons
~
Touche de total/Offre
d’une somme/Non-vente
~
Touches
numériques
9
00
0
VOID
@/
FOR
CL
•
CONV
RFND
Touche de remboursement
%1
%2
Touches de
pourcentages 1 et 2
Touche de rabais
PLU
/SUB
DEPT
#
DEPT
SHIFT
TAX1
SHIFT
Touche du total partiel d’une
marchandise
MDSE
SBTL
Touche de code non-additif/
Affichage de l’heure/Total partiel
#/TM
SBTL
CLK
#
Touche de taxes
TAX
Touche de chèques
CHK
Touche de séquence
automatique
AUTO
Touche de crédits d’achats
CH
17
1
32
16
TAX2
SHIFT
Touches de changement
de taxes 1 et 2
3
Le commutateur de mode peut être mis en marche en y introduisant l’une des deux clés de mode fournies – clé
du directeur (MA) ou de l’opérateur (OP). Ces clés ne peuvent être introduites ou retirées que lorsque le
commutateur de mode est sur la position “REG” ou “OFF”.
MA
OP
REG
OP
X/Z
OFF
VOID
PGM
Clé du directeur (MA)
Clé de l’opérateur (OP)
Clavier
4
MGR
X
1/Z1
X2/Z2
OPMA
Disposition du clavier
Le commutateur de mode a les réglages suivants:
OFF: Ce mode bloque toutes les opérations de l’enregistreuse.
(L’alimentation secteur est mise hors circuit.)
Aucun changement ne se produit dans les données de
l’enregistreuse.
OP X/Z: Pour obtenir des rapports X ou Z d’un employé individuel et obtenir
des rapports immédiats. Il peut être utilisé pour alterner la condition
d’un reçu sur “ON” et “OFF” en appuyant sur la touche
R
.
REG: Pour des entrées de ventes.
PGM: Pour programmer divers articles.
VOID
: Pour introduire le mode d’annulation. Ce mode permet une
rectification après l’achèvement d’une opération.
MGR: Pour des entrées réservées au directeur. Le directeur peut utiliser
ce mode pour une entrée de surpassement.
X1/Z1: Pour obtenir un rapport X/Z pour divers totaux quotidiens.
X2/Z2: Pour obtenir un rapport X/Z pour un regroupement périodique
(hebdomadaire ou mensuel).
Les petits caractères au bas ou à la partie inférieure droite de chaque touche indiquent les
fonctions ou les caractères qui peuvent être utilisés pour des entrées de caractères pour la
programmation d’un texte. Pour les détails, se référer à la page 39.
Noms des touches
5
Page 82

Affichages
SK1-1
Déverrouillage
Verrouillage
5
Affichage de l’opérateur Affichage du client (Type à éjection)
PLU/SUB
DEPT REPEAT
Code d’employé
RCPT
OFF
Montant: Apparaît aux huit (max.) positions les plus à droite. Lorsque le montant est négatif, le symbole de
Nombre de répétitions pour des enregistrements répétitifs:
Conditions d’établissement d’un reçu:
Heure: Apparaît aux six positions les plus à droite (heure-minute -“ ” ou heure-minute -“ ”) sur le mode
DC
soustraction “-” apparaît avant le montant.
Le nombre de répétitions est affiché à partir de “2” et augmenté avec chaque répétition. Lorsque
vous avez enregistré dix fois, l’affichage montrera “0”. (2 → 3
L’indicateur “_” apparaît à la position RCPT OFF lorsque la fonction d’établissement d’un reçu est
sur la condition OFF.
OP/ X/Z, REG ou MGR. “ ” est affiché le matin (AM), et “ ” l’après-midi (PM). Sur le mode
REG ou MGR, appuyez sur la touche
NUMBERSHIFT
pour faire afficher l’heure.
s
.....
9 → 0 → 1 → 2
...
)
Symboles de condition de la machine
: Apparaît pendant une programmation.
: Apparaît lorsqu’une erreur est détectée.
: Apparaît lorsqu’un total partiel est affiché ou lorsque la somme présentée est inférieure au montant de la
vente.
: Apparaît lorsque l’on appuie sur la touche
: Apparaît lorsqu’une opération est achevée en appuyant sur la touche
: Apparaît lorsque le montant requis d’un rendu est affiché.
: Peut apparaître aux trois positions les plus à gauche au moment de l’entrée de la clé lorsque la mémoire
de la bande de détails quotidiens (EJ) électronique est pleine. (Cela dépendant de la programmation.)
: Apparaît lorsque la tension des piles installées est inférieure au niveau requis. Il est nécessaire de
remplacer les piles par des neuves avant deux jours. Se référer à la page 69 pour les détails.
: Apparaît lorsque les piles ne sont pas installées ou lorsque les piles installées sont épuisées. Il est
nécessaire de remplacer immédiatement les piles par des neuves. Se référer à la page 69 pour les
détails.
: Peut apparaître juste au-dessous de la huitième et neuvième positions au moment de l’achèvement
d’une opération lorsque la mémoire de la bande de détails quotidiens électronique est presque pleine.
Apparaît aussi juste au-dessous de la dixième place lorsque le mode d’économie d’énergie est effectif.
: Apparaît lorsque le bras du rouleau d’impression n’est pas bloqué.
: Apparaît lorsque le rouleau de papier n’est pas installé ou lorsqu’il n’y a plus de papier.
pour calculer un total partiel dans une monnaie étrangère.
V
A, C
ou c.
Clé de verrouillage du tiroir
6
Cette clé verrouille et déverrouille le tiroir-caisse. Pour le
verrouiller, tournez la clé de 90° dans le sens inverse des
aiguilles d’une montre. Pour le déverrouiller, tournez la clé
de 90° dans le sens des aiguilles d’une montre.
6
Page 83

POUR METTRE EN MARCHE
Veuillez suivre la procédure indiquée ci-dessous. Les piles ne doivent pas être installées et l’énergie doit être
mise hors circuit.
Installation de la caisse enregistreuse
1
éclaboussures d’eau ou à une lumière solaire directe et à proximité d’une prise de courant secteur.
Déballez la caisse enregistreuse et assurez-vous que tous les accessoires y soient. Pour des détails sur les
accessoires, veuillez vous référer à la section des “Données Techniques”.
2
de la programmer pour la première fois. Suivez la procédure ci-dessous.
Installez la caisse enregistreuse sur une surface stable qui ne risque pas d’être soumise à des
Initialisation de la caisse enregistreuse
De manière à ce que votre caisse enregistreuse fonctionne correctement, vous devez l’initialiser avant
1. Introduisez la clé du directeur (MA) dans le commutateur de mode et tournez-la
sur la position REG.
2. Insérez la fiche dans la prise de courant secteur. Un avertissement sonore se
fera entendre trois fois.
IMPORTANT: Cette opération devra être exécutée sans installer les piles.
3. La caisse enregistreuse est maintenant initialisée. L’affichage de l’enregistreuse
indiquera “0.00” avec le symbole “ ”.
S’il n’y a pas d’avertissement sonore lorsque la fiche est introduite, l’initialisation n’a pas été
satisfaisante. (Cela se produira lorsque la tension est encore élevée car vous avez fait fonctionner
la caisse enregistreuse juste avant l’initialisation.) Dans ce cas, attendez au moins une minute
avant de retirer la fiche, puis insérez-la à nouveau.
OFF
VOID
PGM
REG
OPX/Z MGR
X1/Z1
X2/Z2
Installation des piles
3
pour éviter que les données et les réglages programmés par l’utilisateur ne soient effacés de la mémoire,
lorsque le câble d’alimentation secteur est accidentellement débranché ou dans le cas d’une panne de courant.
Une fois installées, la durée des piles est d’approximativement un an avant de devoir être remplacées. A ce
moment, le symbole “ ” apparaîtra sur l’affichage pour indiquer que les piles s’affaiblissent et doivent être
remplacées dans les deux jours. Si le symbole “ ” indiquant qu’il n’y a pas de piles apparaît, vous devez
installer immédiatement des piles.
Trois piles alcalines neuves LR6 (dimension “AA”) doivent être installées dans la caisse enregistreuse
Installer trois piles alcalines neuves LR6 (dimension “AA”) en suivant la procédure indiquée ci-dessous avec le
câble d’alimentation secteur branché et le commutateur de mode réglé sur la position REG:
1. Poussez le capot de l’imprimante vers l’avant et retirez-le.
Faites attention au coupoir du papier, de manière à ne pas vous
couper vous-même.
2. Ouvrez le couvercle du compartiment des piles à proximité du logement du
rouleau de papier.
7
Page 84

3. Installez trois piles alcalines neuves LR6 (dimension “AA”), comme il est
Guides de
positionnement du papier
illustré à droite.
Lorsque les piles sont correctement installées, le symbole “ ” disparaîtra
de l’affichage.
4. Refermez le couvercle du compartiment des piles.
Assurez-vous d’observer les précautions indiquées à la page 1
lors de la manipulation des piles.
Installation du rouleau de papier
4
L’enregistreuse peut imprimer des reçus ou des bandes de détails quotidiens. Pour l’imprimante, vous devez
installer le rouleau de papier fourni avec l’enregistreuse, même si vous avez programmé cette dernière pour
qu’elle n’imprime pas de reçus ou des bandes de détails quotidiens.
Installez le rouleau de papier selon la procédure montrée ci-dessous avec le câble d’alimentation secteur
raccordé et le commutateur de mode réglé sur la position REG:
Précaution: Un coupoir pour le papier est installé sur le capot de l’imprimante. Faites attention
lors de l’enlèvement et de l’installation du capot.
1. Soulevez le levier de relâchement du rouleau d’impression
pour débloquer et ouvrir le bras du rouleau d’impression.
2. Installez un rouleau de papier dans le logement pour
rouleau de papier, comme il est illustré.
Lorsqu’on installe un rouleau de papier neuf dans
le berceau pour rouleau de papier, assurez-vous
de couper l’extrémité du papier derrière le point
percé (ou collé) à l’avance.
3. Insérez l’extrémité du rouleau de
papier le long des guides de
positionnement du papier, comme il
est illustré à droite.
Levier de relâchement
du rouleau d’impression
Vers
l’imprimante
Correct
Bras du rouleau
d’impression
Vers
l’imprimante
Incorrect
8
Page 85

4. Tout en maintenant enfoncé le papier, refermez doucement le bras
du rouleau d’impression et appuyez sur le bras jusqu’à ce que
vous entendiez le son d’un cliquètement bloquant le bras. Assurezvous d’appuyer de façon sûre sur la surface portante du bras,
comme il est montré sur l’illustration. Le papier avancera
automatiquement.
Si le bras du rouleau d’impression n’est pas sûrement
bloqué, l’impression ne sera pas correcte. Si ce problème
se produit, ouvrez le bras, puis refermez-le comme il est
indiqué ci-dessus.
5. Lorsqu’on n’utilise pas la bobine enrouleuse (utilisée en tant
que bobine pour le papier des reçus):
• Coupez l’excédent de papier en utilisant le bord du couvercle
interne, et replacez ensuite le capot de l’imprimante. Appuyez sur
la touche
ressorte du capot de l’imprimante et que la surface du papier soit
propre.
pour vous assurer que l’extrémité du papier
F
Si l’extrémité du papier ne ressort pas, ouvrez le capot de
l’imprimante et faites passer l’extrémité du papier entre le
coupoir du papier et la pièce de guidage du papier du
capot de l’imprimante, puis remettez en place le capot.
Lorsqu’on utilise la bobine enrouleuse (utilisée en tant que
bobine pour le papier de la bande de détails quotidiens):
• Insérez l’extrémité du papier dans la fente de la bobine. (Si c’est
nécessaire, appuyez sur la touche
en papier.)
• Enroulez le papier de deux ou trois tours autour de l’axe de la
bobine.
• Installez la bobine sur le support et appuyez sur la touche
tendre le papier qui est détendu.
• Remettez en place le capot de l’imprimante.
Lorsqu’on utilise un rouleau de papier en tant que papier
de la bande de détails quotidiens, vous devez changer le type d’impression. Référez-vous à
“Disposition pour une impression” dans la section de “Programmation 1 pour une sélection de
fonctions diverses” (code de travail 6) pour un changement du type d’impression.
pour alimenter davantage
F
F
Programmation de la date, de l’heure et des taxes
5
La caisse enregistreuse permet d’utiliser des langues libellées en anglais, français et espagnol. Elle
est préréglée pour l’anglais. Si vous désirez changer de langue, vous devez le faire avant
d’effectuer une programmation. Référez-vous à “Choix de la langue” dans la section
“Programmation 2 pour la sélection de diverses fonctions” pour le changement de la langue.
pour
Avant de procéder à un enregistrement des ventes, vous devez programmer:
• la date
• l’heure
• les taxes
Veuillez vous référer à la section PROGRAMMATION DE FONCTIONS DE BASE pour plus de détails (page 27).
9
Page 86

Programmation d’autres articles nécessaires
6
de réglages et elle vous fournit en outre certaines fonctions disponibles. Avant de commencer une
programmation, veuillez lire entièrement la section concernant les opérations de ventes afin de mieux
comprendre les fonctions disponibles. Les principales fonctions sont énumérées ci-dessous.
Du fait que la caisse enregistreuse est préprogrammée, elle peut donc être utilisée avec un minimum
• PLU (prix par article déjà programmé)
• Numéro consécutif
• Numéro de la machine
• Choix pour l’impression de reçus ou de bandes de détails quotidiens (réglage en usine: impression pour
des reçus)
• Mode d’économie d’énergie (réglage en usine: passe sur le mode d’économie d’énergie après 30 minutes)
• Capacité de la mémoire de la bande de détails quotidiens électronique (EJ) (réglage en usine: 2000 lignes
peuvent être mémorisées. On peut aller jusqu’à 3000 lignes)
La mémoire pour la bande de détails quotidiens électronique est communément utilisée pour des
PLU. Si vous modifiez le réglage, le nombre maximum de codes PLU diminuera de 1200 à 200.
• Programmation d’un texte pour le nom d’un employé, les articles d’un rayon, les articles d’un PLU/rayon
auxiliaire, des messages logotypes imprimés à la partie supérieure ou inférieure de reçus, des textes de
fonctions et le symbole d’une monnaie étrangère.
• Entrée de fixation d’un prix fractionné
Ceci n’est pas réglé en usine. Vous devez mettre en service vous-même cette fonction.
• Taux de conversion d’une monnaie étrangère
Vous devez régler un taux de conversion pour utiliser la touche
• Prix unitaire préréglé pour des rayons et des PLU
• Montant préréglé pour
• Taux préréglés pour
Vous n’avez pas à programmer ces prix/montants/taux préréglés car vous pouvez les introduire lors
d’un enregistrement. Il peut être pratique de les prérégler de manière à ne pas les réintroduire
chaque fois.
• Limitation des chiffres d’entrée d’une somme pour un montant PO, un montant RA et le montant d’une taxe
manuelle.
Le réglage en usine établit le montant maximum que vous pouvez introduire. Vous pouvez effectuer
une programmation pour limiter le montant.
• Séquence de touches pour des touches automatiques
• Réglage de temporisation en ligne
• Spécifications de l’employé devant être formé
-
%&
V
.
Programmation d’un rayon:
La caisse enregistreuse est préprogrammée pour les rayons de la manière suivante:
Rayon: Permet l’entrée d’un prix libre, d’un statut taxable-taxable 1 pour les rayons 1 à 10 et non taxable pour
les rayons 11 à 99.
Lorsque vous utilisez le rayon 11 ou au-dessus, et/ou que vous appliquiez un statut taxable autre que taxable 1
pour les rayons 1 à 10, vous devez changer les réglages du rayon. Veuillez vous référer à la section de
programmation des rayons pour les détails de la programmation.
Démarrage pour des entrées de ventes
7
10
Maintenant vous êtes prêt pour exécuter des enregistrements de ventes.
Page 87

POUR L’OPERATEUR
PANORAMA DU DEROULEMENT POUR DES
ENTREES DE VENTES QUOTIDIENNES
Choses à faire avant de commencer des entrées de ventes:
• S’assurer que le câble d’alimentation soit inséré de façon sûre dans la prise de courant secteur.
• Tourner le commutateur de mode sur la position OP X/Z et vérifier si l’heure est correctement réglée.
• Remettre en place le tiroir-caisse, si on l’avait retiré par sécurité.
• Vérifier s’il y a suffisamment de papier sur le rouleau.
• Sélectionner la fonction ON/OFF pour les reçus.
• Effectuer n’importe quelle programmation nécessaire pour la journée sur le mode PGM.
Pour les détails, se référer à ENTREES POUR DES VENTES DE BASE, page 12. Pour le tiroir-caisse et le
rouleau de papier, se référer à ENTRETIEN PAR L’OPERATEUR, page 68, et pour la programmation, se
référer aux sections de programmations.
Choses que vous pouvez réaliser pour des entrées de ventes:
• Entrées d’articles
• Entrées répétées d’un article
• Entrées multiplicatives d’un article
• Vente au comptant d’un seul article (SICS), si programmé.
• Entrées de fixation d’un prix fractionné, si programmé.
• Affichage de totaux partiels
• Ventes au comptant/Contre chèque/A crédit
• Offre d’une somme au comptant dans une monnaie étrangère, si le taux de conversion de la monnaie est
programmé.
• Entrée d’une taxe manuelle
• Rabais ou prime en utilisant les touches
• Entrée d’un remboursement
• Pas de vente
• Entrées de décaissements
• Entrées de comptes admis
• Impression d’un numéro de code non-additif
• Système de rectifications
• Rapport de ventes contre chèques
%&
et
-
Pour les détails concernant la méthode d’entrée de ventes, se référer aux sections ENTREES POUR DES
VENTES DE BASE (page 12) et FONCTIONS FACULTATIVES (page 21) et pour les détails des rectifications
sur les entrées de ventes, se référer à la section RECTIFICATION (page 25). Pour les détails concernant des
informations sur la lecture des ventes, se référer à la section LECTURE (X) ET REMISE A ZERO (Z) DES
TOTAUX DES VENTES (page 57).
Choses à faire après la fermeture de votre magasin:
• Impression des rapports sur les ventes et effacement des données sur les ventes pour la journée.
• Impression des rapports des bandes de détails quotidiens électronique (EJ) et effacement des données des
bandes de détails quotidiens (EJ), si c’est nécessaire.
• Espèces en compte, en comparant avec le montant des liquidités dans le tiroir-caisse imprimé sur le rapport
général.
• Par mesure de sécurité, enlèvement du tiroir-caisse.
• Tourner le commutateur de mode sur la position OFF.
Pour les détails sur des informations concernant la lecture des ventes, se référer aux sections LECTURE (X)
ET REMISE A ZERO (Z) DES TOTAUX DES VENTES (page 57) et LECTURE ET REMISE A ZERO D’UN
RAPPORT DE LA BANDE DE DETAILS QUOTIDIENS ELECTRONIQUE (EJ) (page 60). Pour les détails sur
l’enlèvement du tiroir-caisse et l’entretien, se référer à la section ENTRETIEN PAR L’OPERATEUR (page 68).
11
Page 88

ENTREES POUR DES VENTES DE BASE
REG
OPX/Z MGR
PGM
X1/Z1
X2/Z2
OFF
VOID
Exemple d’entrée pour des ventes de base
1
Ci-dessous est montré un exemple d’entrée de ventes de base lorsque les articles d’un rayon sont vendus au
comptant. Pour les détails sur l’opération, veuillez vous référer à chaque section.
Réglage du commutateur de mode
1. Tournez le commutateur de mode sur la position REG.
Affectation d’un employé
2. Introduisez votre code d’employé. (Par exemple, le code de l’employé est 1.
Appuyez dans l’ordre sur les touches
automatiquement sélectionné juste après l’initialisation de la caisse enregistreuse.
Entrées d’articles
3. Introduisez le prix pour le premier article du rayon. (Par exemple, pour $15,00, introduisez
appuyez sur la touche du rayon approprié.)
Pour les rayons 17 à 32, appuyez d’abord sur la touche
Pour les rayons 33 et au-delà, introduisez le code du rayon en utilisant les touches numériques, appuyez
sur la touche
et introduisez ensuite le prix. Puis, appuyez à nouveau sur la touche d.
d
4. Répétez l’étape 3 pour tous les articles du rayon.
Affichage de totaux partiels
5. Appuyez sur la touche
pour faire afficher le dû du montant.
s
Achèvement de l’opération
6. Introduisez le montant reçu provenant du client. (Vous pouvez omettre cette étape si la somme offerte est la
même que celle du total partiel.)
7. Appuyez sur la touche
, le requis du rendu est affiché (lorsque le montant reçu n’a pas été introduit, le
A
montant du total est affiché) et le tiroir s’ouvre.
8. Détachez le reçu et donnez-le au client avec son rendu.
9. Refermez le tiroir.
et L.) Le code de l’employé 1 est
1
D
15:
, et
avant d’appuyer sur la touche du rayon.
Affectation
de l’employé
Entrées
des articles
Affichage du
total partiel
1 L
1500 !
2300 "
s
5000
Achèvement
de l’opération
(Dans cet exemple, le taux de la taxe est réglé
sur 6,25%.)
12
A
ImpressionExemple de manipulation des touches
Logotype graphique
Date/Heure/Numéro du code
de l’employé
Numéro de l’enregistreuse/Numéro
consécutif/Nom de l’employé
Articles
Prix
Total partiel
des
marchandises
Montant de la
taxe
Statut de la taxe (T1: taxable 1)
Quantité totale
Montant total
Offre au comptant/Montant reçu
Rendu
Non imprimé
lorsque seulement
des articles non
taxables
sont vendus.
Page 89

Affectation d’un employé
L
Code de l’employé 1 à 25
Pour afficher le code de l’employé entré
LL
■
Entrée dans le système (sur le mode REG, MGR, VOID)■ Sortie du système (sur le mode REG, MGR, VOID)
l
Opération
Pour effacer la condition d’erreur
E
E
Avant n’importe quelle entrée d’articles, les employés doivent introduire leur code d’employé respectif.
Cependant, l’entrée du code peut ne pas être nécessaire lorsque le même employé traite l’opération suivante.
Fonction de mise en circuit/hors circuit des reçus
Lorsque vous utilisez l’imprimante pour l’établissement de reçus, vous pouvez invalider l’impression pour reçus
sur le mode REG pour économiser du papier en utilisant la fonction de mise en circuit/mise hors circuit pour
reçus. Pour invalider l’impression pour reçus, appuyez sur la touche
alterne sur la condition de mise en circuit et hors circuit pour l’impression d’un reçu.
Pour vérifier le statut d’impression d’un reçu, tournez le commutateur de mode sur la position OP X/Z ou
appuyez sur la touche
l’indicateur de mise hors circuit pour reçus “_” s’éclaire. Votre enregistreuse imprimera des rapports sans tenir
compte du statut des reçus. Aussi, le rouleau de papier doit-il être installé, même lorsque le statut pour reçus est
sur “OFF”.
Pour établir un reçu lorsque la fonction de mise en circuit/ hors circuit pour reçus est réglée sur une
mise hors circuit:
Si votre client demande un reçu après que vous ayez achevé une opération avec la fonction de mise en
circuit/hors circuit pour reçus réglée sur le statut de mise hors circuit, appuyez sur la touche
un reçu. Cependant, si plus de 30 articles sont introduits, le reçu sera établi dans la disposition résumée d’un
reçu.
sur le mode REG. Lorsque la fonction est sur le statut de mise hors circuit,
l
à la position OP X/Z. Cette touche
R
R
. Cela établira
Mode d’économie d’énergie
L’enregistreuse entrera sur le mode d’économie d’énergie si aucune entrée n’est réalisée en se basant sur la
limitation de l’heure préprogrammée (implicitement, 30 minutes).
Lorsque votre enregistreuse est sur le mode d’économie d’énergie, elle éteindra tout l’affichage à l’exception du
point de décimalisation à la position la plus à gauche. Votre enregistreuse reviendra à un mode de
fonctionnement normal lorsqu’on appuie sur n’importe quelle touche ou qu’un mode est modifié avec la clé de
mode. Veuillez noter que lorsque votre enregistreuse reprend un fonctionnement normal par l’entrée d’une
touche, l’entrée de cette touche est invalidée. Après le rétablissement, commencez l’entrée des touches à partir
du début.
Avertissement d’une erreur
2
Dans les exemples suivants, votre enregistreuse entrera dans une condition d’erreur accompagnée d’un signal
sonore d’avertissement et du symbole d’erreur “ ” sur l’affichage. Supprimez la condition d’erreur en appuyant
sur la touche
Veuillez vous référer à la table des codes d’erreurs, à la page 73.
• Lorsque vous introduisez un nombre supérieur à 32 chiffres (dépassement de la limitation d’entrée): Annulez
l’entrée et réintroduisez le nombre correct.
• Lorsque vous faites une erreur dans la manipulation des touches: Supprimez l’erreur et continuez l’opération.
• Lorsque vous effectuez une entrée au-delà de la limitation d’entrée d’un montant programmé: Vérifiez si le
montant introduit est correct. S’il l’est, il peut être enregistré sur le mode MGR. Consultez votre directeur.
• Lorsqu’un total partiel comprenant une taxe dépasse huit chiffres: Annulez le total partiel en appuyant sur la
touche
Fonction d’échappement à une erreur
Lorsque vous désirez cesser une opération du fait d’une erreur ou de quelque chose d’incontrôlable, utilisez la
fonction d’échappement à une erreur comme il est montré ci-dessous:
l
et effectuez les mesures nécessaires.
l
et appuyez ensuite sur la touche
A, C
ou cpour achever l’opération.
L’opération est annulée (traitée en tant qu’annulation d’un total partiel) et un reçu est établi par cette fonction. Si
vous avez déjà introduit la somme présentée, l’opération est achevée en tant que vente au comptant.
13
Page 90

Code du PLU
(1 à 1200)
p
Prix unitaire *
(7 chiffres max.)
p
Code du PLU
(1 à 1200)
p
Code du rayon
(1 à 99)
Prix unitaire *
1
(7 chiffres max.)
Lorsqu’on utilise un prix unitaire programmé
(Dans le cas où seule une entrée
de prix préréglé est autorisée.)
d
d
Touche du rayonPrix unitaire *
1
(7 chiffres max.)
Lorsqu’on utilise un prix unitaire programmé
D
*
2
Entrées d’articles
3
Entrées d’un seul article
Entrées de rayons
Pour un classement des marchandises, la caisse enregistreuse permet un maximum de 99 rayons. Aux rayons,
un groupe est attribué tels que des statuts taxables qui sont appliqués sur les articles qui sont introduits.
• Lorsqu’on utilise les touches de rayons (pour les rayons 1 à 32)
Pour les rayons 1 à 16, introduisez un prix unitaire et appuyez sur la touche d’un rayon. Si vous utilisez un prix
unitaire programmé, n’appuyez seulement que sur la touche du rayon.
Pour les rayons 17 à 32, introduisez un prix unitaire, appuyez sur la touche
touche du rayon. Si vous utilisez un prix unitaire programmé, appuyez sur la touche
sur la touche du rayon.
1
*
Moins que les montants de limitation
supérieure programmés
Lorsqu’un zéro est introduit, seule la quantité
des ventes est ajoutée.
2
*
Pour les rayons 17 à 32, appuyez sur la
touche de changement de rayons.
• Lorsqu’on utilise la touche d’entrée du code d’un rayon
Introduisez un code de rayon et appuyez sur la touche
nouveau sur la touche
unitaire est préréglé, votre caisse enregistreuse achèvera son opération d’enregistrement.
. Si le code du rayon est programmé pour une entrée de prix préréglé et que le prix
d
. Puis, introduisez un prix unitaire et appuyez à
d
et appuyez ensuite sur la
D
et appuyez ensuite
D
Entrées de PLU/rayons auxiliaires
Pour une classification d’autres marchandises, la caisse enregistreuse permet un maximum de 1200
PLU/rayons auxiliaires. Les PLU sont utilisés pour appeler des prix préréglés par l’entrée d’un code. Les rayons
auxiliaires sont utilisés pour classer les marchandises en groupes plus petits sous les rayons. Chaque PLU et
rayon auxiliaire a un code allant de 1 à 1200 et doit relever d’un rayon pour obtenir l’attribut de ce rayon.
La caisse enregistreuse est préprogrammée sur le mode PLU et sur zéro pour un prix unitaire. Pour utiliser des
entrées de PLU, leur prix unitaire préréglé devra être préalablement programmé. (Se référer à la page 33.)
Pour utiliser des entrées de rayons auxiliaires, changer sur le mode de rayons auxiliaires pour des codes de
PLU.
• Entrées de PLU
• Entrées de rayons auxiliaires (PLU disponibles)
14
1
*
Moins que les montants de limitation
supérieure programmés
Lorsqu’un zéro est introduit, seule la
quantité des ventes est ajoutée.
* Moins que les montants de limitation
supérieure programmés
Lorsqu’un zéro est introduit, seule la
quantité des ventes est ajoutée.
Page 91

ImpressionExemple de manipulation des touches
1200 (
500 D !
Entrée du rayon
Entrée du PLU
Entrée du rayon
auxiliaire
50 d 1500 d
11p1200p
"
D
33 d
2 p
A
)
Entrées répétées
Vous pouvez utiliser cette fonction pour introduire la vente de deux ou davantage articles semblables. Répétez
en appuyant sur la touche d’un rayon, la touche
manipulation des touches.
1200 ( (
500 D ! !
Entrée du rayon
Entrée du PLU
Entrée du
rayon auxiliaire
50 d 1500 d d
2 p p
11 p 1200 p p
) )
" "
D
33 d d
A
ou la touche
d
p
ImpressionExemple de manipulation des touches
, comme il est montré sur l’exemple de
Entrées multiplicatives
Lorsque vous vendez une grande quantité d’articles, il est pratique d’utiliser la méthode d’entrée multiplicative.
Introduisez la quantité en utilisant les touches numériques et appuyez sur la touche
l’entrée des articles, comme il est montré dans l’exemple ci-dessous.
Lorsque vous programmez pour autoriser des entrées de quantités fractionnelles, vous pouvez
introduire jusqu’à quatre chiffres entiers et une décimale à trois chiffres, bien que la quantité soit
comptée en tant qu’unique pour des rapports de ventes. Pour introduire une quantité fractionnelle,
utilisez la touche du point de décimalisation entre le chiffre entier et la décimale, tel que
pour introduire 7,5.
avant de commencer
@
7P5
15
Page 92

Volume des
ventes
(Jusqu’à 4 chiffres)
Q’té de base
(Jusqu’à 2 chiffres)
Prix unitaire
par q’té de base
Lorsqu’on utilise un prix unitaire programmé
@ @
Touche de rayon
D
Code du
rayon
d
Code du
PLU
p
Code du
PLU
Prix unitaire
par q’té de base
p p
Prix unitaire
par q’té de base
d
(Seule une entrée préréglée est
autorisée.)
3 @ 1200 (
5 @ 500 D !
Entrée du rayon
Entrée du PLU
Entrée du rayon
auxiliaire
3 @ 50 d 1500 d
5@ 11p1200p
3 @ )
5 @ D "
5 @ 33 d
3 @ 2 p
A
Entrées de la fixation de prix fractionnés
ImpressionExemple de manipulation des touches
Cette fonction est pratique lorsque le client désire acheter des articles vendus normalement en vrac.
Pour utiliser cette fonction, vous devez changer le réglage programmé ou le réglage implicite. Référez-vous à
“Programmation 1 pour la sélection de diverses fonctions” (code de travail 70) pour les détails sur la
programmation.
Pour réaliser des entrées de fixation de prix fractionnés, suivez la procédure ci-dessous:
16
Entrée du rayon
Entrée du PLU
7 @ 10 @
8 @ 12 @
35 p
600 *
A
ImpressionExemple de manipulation des touches
Page 93

Entrées de la vente au comptant d’un seul article (SICS)
s
1000 A
• Cette fonction est pratique lorsqu’on ne vend qu’un seul article au comptant. Cette fonction n’est applicable
qu’aux rayons qui ont été réglés pour des SICS ou leurs PLU ou rayons auxiliaires associés.
• L’opération est achevée et le tiroir s’ouvre dès que vous appuyez sur la touche du rayon, la touche
touche
4
L’enregistreuse permet trois sortes de totaux partiels:
Total partiel d’une marchandise
Appuyer sur la touche
comprenant pas la taxe – apparaîtra sur l’affichage.
p
Affichage de totaux partiels
.
ImpressionExemple de manipulation des touches
250
Pour achever
l’opération
Si une entrée à un rayon ou à un PLU/rayon auxiliaire réglé pour SICS suit celles à des rayons ou à
des PLU/rayons auxiliaires non réglés pour SICS, elle ne s’achève pas et aboutit à une vente
normale.
à n’importe quel point durant une opération. Le total partiel net de la vente – ne
m
,
d
ou la
Total partiel taxable
Total partiel taxable 1
Appuyez dans l’ordre sur les touches
total partiel de la vente des articles taxables 1 apparaîtra sur l’affichage.
Total partiel taxable 2
Appuyez dans l’ordre sur les touches
total partiel de la vente des articles taxables 2 apparaîtra sur l’affichage.
Total partiel comprenant la taxe (total partiel complet)
Appuyez sur la touche
comprenant la taxe et le symbole “ ” apparaîtra sur l’affichage.
Achèvement d’une opération
5
à n’importe quel point durant une opération. Le total partiel de la vente
s
T
U
et
et
à n’importe quel point durant une opération. Le
s
à n’importe quel point durant une opération. Le
s
Vente au comptant ou contre un chèque
Appuyez sur la touche
appuyez sur la touche
chèque. Lorsque la somme présentée est plus élevée que le montant de la vente, votre enregistreuse indiquera
le montant requis du rendu et le symbole “ ” s’allumera. Sinon, l’enregistreuse montrera un déficit et le
symbole “ ” s’allumera. Vous devez effectuer une entrée d’offre correcte.
Offre au comptant
pour obtenir un total partiel comprenant la taxe, introduisez la somme offerte, puis
s
si c’est une offre au comptant ou appuyez sur la touche Csi le client offre un
A
ImpressionExemple de manipulation des touches
17
Page 94

Offre contre chèque
s
950 A
c
ImpressionExemple de manipulation des touches
s
1000 C
Vente au comptant ou contre un chèque qui ne nécessite aucune entrée
Introduisez les articles et appuyez sur la touche
c’est une vente contre chèque. Votre enregistreuse affichera le montant global de la vente.
300
+
10
p
si c’est une vente au comptant ou sur la touche Csi
A
ImpressionExemple de manipulation des touches
A
Dans le cas d’une vente contre chèque
Vente à crédit
Introduisez les articles et appuyez sur la touche de crédit d’achats (c).
ImpressionExemple de manipulation des touches
2500
+
3250
*
c
Vente contre une offre mixte
Vous pouvez effectuer l’opération de l’offre mixte d’un chèque et d’une somme au comptant, d’une somme au
comptant et d’une vente à crédit, et d’un chèque et d’une vente à crédit.
Exemple: Votre client paye $9,50 au comptant et $40,00 par crédit d’achats pour un total partiel comprenant la
taxe de $49,50.
18
ImpressionExemple de manipulation des touches
Page 95

Calcul des taxes
6
Taxe automatique
Lorsque l’enregistreuse est programmée avec un taux de taxe (ou une table de taxes) et que le statut de taxe
d’un rayon individuel est réglé pour taxable, elle calcule la taxe automatique sur n’importe quel article qui est
introduit directement dans le rayon ou indirectement via un PLU apparenté.
Exemple: Vente au comptant de cinq articles à $6,70 (rayon 1, taxable 1) et d’un article à $7,15 (PLU N° 85,
taxable 2)
ImpressionExemple de manipulation des touches
5 @670
85
!
p
A
Taxe manuelle
La caisse enregistreuse vous permet d’introduire manuellement une taxe après l’achèvement de l’entrée d’un
article.
Exemple: Vente au comptant d’un article à $8,00 (rayon 12) avec 50 cents en tant que taxe.
ImpressionExemple de manipulation des touches
800
(
50
t
A
Annulation d’une taxe
Vous pouvez annuler une taxe automatique sur le total partiel taxable 1 et taxable 2 de chaque opération en
appuyant sur la touche
Pour annuler un total partiel taxable 1, appuyez sur
appuyez sur
Pour annuler un total partiel taxable 2, appuyez sur
appuyez sur
Pour annuler tous les totaux partiels taxables (1-4), appuyez dans l’ordre sur
Exemple: Vente au comptant d’un article à $7,25 (rayon 1, taxable 1) et d’un autre article à $5,15 (rayon 11,
pour annuler le total partiel.
t
pour annuler le total partiel.
t
taxable 2) et introduction de la vente en tant que vente non taxable.
après que le total partiel soit affiché.
t
Ts
Us
725
515
A
!
/
t
t
T, s
U, s
pour obtenir un total partiel taxable 1, puis
pour obtenir un total partiel taxable 2, puis
T, U, s
ImpressionExemple de manipulation des touches
et t.
19
Page 96

Changement de statut d’une taxe
La machine vous permet de changer le statut d’une taxe programmée de chaque touche de rayon ou de PLU en
appuyant sur les touches
de la taxe programmée de chaque touche est repris.
Exemple: Vente des articles suivants au comptant avec leurs statuts de taxes programmés inversés.
• Un article à $13,45 du rayon 16 (non taxable) en tant qu’article taxable 1
• Un article à $7,00 du PLU N° 25 (non taxable) en tant qu’article taxable 1 et 2
• Un article à $4,00 du rayon 11 (taxable 2) en tant qu’article non taxable
• Deux articles à $10,50 du rayon 1 (taxable 1) en tant qu’articles taxables 2
25
TUp
1050
TU!
T
1345
400
et/ou
U
T<
U/
avant ces touches. Après que chaque entrée soit achevée, le statut
ImpressionExemple de manipulation des touches
!
A
Lorsque le système de taxe canadien est appliqué:
Lorsqu’on utilise un changement de statut de taxe, l’entrée d’un article multi-taxable pour PST ou
GST sera interdit.
Veuillez voir ci-dessous:
Dans le cas de: Taxe 1: PST, Taxe 2: PST,
Taxe 3: PST, Taxe 4: GST
Article taxable 1 et 2 ······················ interdit
Article taxable 1 et 3 ······················ interdit
Article taxable 2 et 3 ······················ interdit
Article taxable 1 et 4 ···················· autorisé
Article taxable 2 et 4 ···················· autorisé
Article taxable 3 et 4 ···················· autorisé
Dans le cas: Taxe 1: PST, Taxe 2: PST,
Taxe 3: GST, Taxe 4: GST
Article taxable 1 et 2 ······················ interdit
Article taxable 1 et 3 ···················· autorisé
Article taxable 2 et 3 ···················· autorisé
Article taxable 1 et 4 ···················· autorisé
Article taxable 2 et 4 ···················· autorisé
Article taxable 3 et 4 ······················ interdit
20
Page 97

FONCTIONS FACULTATIVES
Entrées auxiliaires
1
Entrées de rabais et de primes en utilisant la touche de pourcentage
La touche de pourcentage est utilisée pour appliquer le taux de pourcentage d’un rabais ou d’une prime introduit
manuellement ou préréglé à des articles individuels ou au total partiel d’une marchandise. Pour l’entrée
manuelle du taux de pourcentage d’un rabais ou d’une prime, introduisez le taux (jusqu’à 100,00) avec les
touches numériques (vous avez besoin d’un point de décimalisation lorsque vous introduisez un taux de
pourcentage fractionnel), et appuyez sur une touche de pourcentage. Lorsqu’on utilise un taux préréglé (s’il est
programmé), appuyez seulement sur une touche de pourcentage.
Lorsque l’entrée d’une limitation est programmée pour une touche de pourcentage, vous ne pouvez pas
introduire un taux au-delà de la limitation (le code d’erreur 34 se produira).
Calcul du pourcentage pour le total partiel d’une marchandise
ImpressionExemple de manipulation des touches
4
@
140
>
570
*
m
10
%
A
Calcul du pourcentage pour des entrées d’articles
ImpressionExemple de manipulation des touches
800
+
7 P5
15
%
p
&
A
(Lorsqu’une prime et 15% sont
programmés pour la touche &.)
Entrées de rabais et de primes en utilisant la touche de rabais
La touche de rabais est utilisée pour appliquer le montant d’un rabais ou d’une prime introduit manuellement ou
préréglé à des articles individuels ou au total partiel d’une marchandise. Dans le réglage implicite, vous pouvez
introduire manuellement le montant d’un rabais à la fois à des articles individuels et au total partiel d’une
marchandise. Pour l’entrée manuelle des montants d’un rabais ou d’une prime, introduisez le montant avec les
touches numériques et appuyez sur la touche de rabais. Lorsqu’on utilise un montant préréglé (s’il est
programmé), appuyez aussi sur la touche de rabais.
Lorsque l’entrée d’une limitation numérique est programmée pour la touche de rabais, vous ne pouvez pas
introduire un montant au-delà de la limitation (le code d’erreur 34 se produira).
21
Page 98

Rabais pour le total partiel d’une marchandise
575
+
10
p
m
100
-
A
Rabais pour des entrées d’articles
675
*
-
A
(Lorsque le montant d’un rabais
de $0,75 est programmé.)
ImpressionExemple de manipulation des touches
ImpressionExemple de manipulation des touches
Entrées de remboursements
Pour le remboursement de l’article d’un rayon 1 à 16, commencez en introduisant le montant du remboursement
et appuyez sur la touche
à 32 d’un rayon, commencez en introduisant le montant du remboursement et appuyez sur la touche
appuyez sur la touche
d’introduire le montant). Dans le cas des rayons 33 à 99, introduisez le code du rayon et appuyez sur les
touches
nécessaire.
Pour le remboursement de l’article d’un PLU, introduisez le code du PLU et appuyez sur la touche
appuyez sur la touche
Pour le remboursement de l’article d’un rayon auxiliaire, introduisez le code du PLU et appuyez sur la touche
et sur la touche
f
et d. Puis, introduisez le montant du remboursement et appuyez sur la touche dsi c’est
f
p
33
15
fp
. Puis, appuyez sur la touche du rayon correspondant et dans le cas d’un article 17
f
et la touche du rayon correspondant (lorsqu’on utilise un prix préréglé, omettez
D
p
.
. Puis, introduisez le montant du remboursement et appuyez sur la touche
ImpressionExemple de manipulation des touches
250
f+
fd
100
13
fp
150
d
7
@
p
f
. Puis,
f
. Puis,
p
.
A
Entrées de numéros de codes non-additifs et impression
Vous pouvez introduire un numéro de code non-additif tels que le numéro de code d’un client et le numéro de sa
carte de crédit, avec un maximum de 16 chiffres et à n’importe quel point durant l’entrée d’une vente.
L’enregistreuse les imprimera immédiatement.
Pour introduire un numéro de code non-additif, introduisez le numéro et appuyez sur la touche
22
s
.
Page 99

Monnaie nationale
Taux de conversion
Monnaie nationale
Monnaie étrangère
Symbole de la monnaie étrangère
(Imprimé s’il est programmé)
Conversion de
la monnaie
Somme présentée
dans la monnaie
étrangère
(Lorsque le taux 0,7674 de
conversion d’une monnaie est
programmé pour la touche V.)
2300 +
4650 *
V
10000 A
ImpressionExemple de manipulation des touches
1230
s
1500
+
c
Traitement d’un payement annexe
2
Conversion d’une monnaie
L’enregistreuse permet des entrées de payements dans une monnaie étrangère (seul un payement au comptant
est possible). L’enfoncement de la touche
Lorsqu’on utilise un taux de conversion d’une monnaie programmé, appuyez sur la touche
d’articles, puis introduisez la somme offerte dans la monnaie étrangère si le payement du montant n’est pas
exact, et appuyez ensuite sur la touche
Lorsqu’on effectue l’entrée manuelle d’un taux de conversion d’une monnaie, après les entrées d’articles,
introduisez le taux de conversion (0,0000 à 9999,9999); vous avez besoin d’un point de décimalisation lorsque
vous introduisez un taux de conversion fractionnel) et appuyez sur la touche
offerte dans la monnaie étrangère si le payement du montant n’est pas exact et appuyez ensuite sur la touche
.
A
Dans les deux cas, le requis du rendu sera affiché dans la monnaie nationale, et lorsque la somme offerte est
insuffisante, le déficit est indiqué dans la monnaie nationale.
créera un total partiel dans la monnaie étrangère.
V
.
A
. Puis, introduisez la somme
V
après les entrées
V
• Appuyez sur la touche
effectué dans une monnaie étrangère.
• S’il est programmé, le symbole de la monnaie étrangère est imprimé lorsque vous utilisez un taux
préréglé.
Application d’un taux de conversion préréglé
Application d’un taux de conversion manuel
Taux de conversion
après avoir appuyé sur la touche Vpour annuler un payement
l
2300 +
4650 *
1 P 275 V
10000 A
ImpressionExemple de manipulation des touches
ImpressionExemple de manipulation des touches
23
Page 100

Entrées de comptes admis et de décaissements
Lorsque vous recevez une somme d’un client ou lorsque vous payez une somme à un vendeur, c’est une bonne
idée d’utiliser respectivement la touche
Pour l’entrée d’un compte admis (RA), introduisez le montant et appuyez sur la touche
Pour l’entrée d’un décaissement (PO), introduisez le montant et appuyez sur la touche
Une offre au comptant n’est possible que pour les opérations RA et PO.
ou la touche R.
r
.
r
.
R
ImpressionExemple de manipulation des touches
12345
s
4800
r
Pas de vente (échange)
Lorsque vous avez besoin d’ouvrir le tiroir-caisse sans aucune vente, appuyez seulement sur la touche
Le tiroir s’ouvrira et l’imprimante imprimera “NONVENTE” sur le reçu ou la bande de détails quotidiens. Si vous
laissez la machine imprimer un numéro de code non-additif avant d’appuyer sur la touche
non-vente sera effectuée et le numéro d’un code non-additif sera imprimé.
Entrées de touches (touchea) dans une séquence automatique
3
Vous pouvez achever une opération programmée en appuyant simplement sur la touche
ImpressionExemple de manipulation des touches
a
, une entrée de
A
.
A
a
.
(a= 500
24
*A
)
 Loading...