

Page 1
LXM32
Common DC bus
Application note
MNA01M001EN, V1.01, 08.2014
MNA01M001EN, V1.01, 08.2014
www.schneider-electric.com
Page 2

LXM32
The information provided in this documentation contains general
descriptions and/or technical characteristics of the performance of the
products contained herein. This documentation is not intended as a
substitute for and is not to be used for determining suitability or reliability of these products for specific user applications. It is the duty of
any such user or integrator to perform the appropriate and complete
risk analysis, evaluation and testing of the products with respect to the
relevant specific application or use thereof. Neither Schneider Electric
nor any of its affiliates or subsidiaries shall be responsible or liable for
misuse of the information contained herein. If you have any suggestions for improvements or amendments or have found errors in this
publication, please notify us.
No part of this document may be reproduced in any form or by any
means, electronic or mechanical, including photocopying, without
express written permission of Schneider Electric.
All pertinent state, regional, and local safety regulations must be
observed when installing and using this product. For reasons of safety
and to help ensure compliance with documented system data, only
the manufacturer should perform repairs to components.
When devices are used for applications with technical safety requirements, the relevant instructions must be followed.
Failure to use Schneider Electric software or approved software with
our hardware products may result in injury, harm, or improper operating results.
Failure to observe this information can result in injury or equipment
damage.
© 2013 Schneider Electric. All rights reserved.
2 Common DC bus
MNA01M001EN, V1.01, 08.2014
Page 3

LXM32 Table of contents
Table of contents
Table of contents 3
Safety Information 5
Hazard categories 5
Qualification of personnel 6
Intended use 6
Basic information 7
DC bus voltage measurement 9
Standards and terminology 9
About the book 11
1 Introduction 13
1.1 Permissible device types for common DC bus 14
2 Technical Data 15
2.1 Firmware version 15
2.2 DC bus data 16
2.3 Braking resistor 17
2.3.1 External braking resistors (accessories) 19
2.4 Cables for the DC bus 20
3 Engineering 21
3.1 Energy balance 22
3.1.1 Energy balance basics 22
3.2 Electromagnetic compatibility (EMC) 24
3.3 DC bus connection 24
3.4 Fuses 25
3.4.1 DC bus connection of single-phase drives 25
3.4.2 DC bus connection of three-phase drives 27
3.4.3 Supply via the DC bus 29
3.5 Braking resistors 32
3.5.1 Rating the braking resistor 32
3.5.2 Rating information 34
3.6 Mains reactor 36
3.7 Mains filter 38
3.8 Mains reactor and external mains filter 39
4 Installation 41
MNA01M001EN, V1.01, 08.2014
Common DC bus 3
Page 4

Table of contents LXM32
4.1 Assembling cables 42
4.2 Wiring the DC bus 45
4.2.1 Drives with connectors 45
4.2.2 Drives with terminals 47
4.2.3 Connecting the DC bus 48
4.3 Verifying installation 49
5 Commissioning 51
5.1 Commissioning procedure 52
5.1.1 DC bus connection LXM32 to LXM32 52
5.1.2 Supply via the DC bus 53
5.2 LXM32: Setting the braking resistor parameters 54
6 Accessories and spare parts 55
6.1 DC bus accessories 55
6.2 DC fuses 55
6.3 External braking resistors 56
Glossary 57
Units and conversion tables 57
Length 57
Mass 57
Force 57
Power 57
Rotation 58
Torque 58
Moment of inertia 58
Temperature 58
Conductor cross section 58
Terms and Abbreviations 59
Table of figures 61
Index 63
4 Common DC bus
MNA01M001EN, V1.01, 08.2014
Page 5
LXM32
Safety Information
Safety Information
Read these instructions carefully, and look at the equipment to
become familiar with the device before trying to install, operate, or
maintain it. The following special messages may appear throughout
this documentation or on the equipment to warn of potential hazards
or to call attention to information that clarifies or simplifies a procedure.
The addition of this symbol to a Danger safety label indicates that an electrical hazard exists, which will result in
personal injury if the instructions are not followed.
This is the safety alert symbol. It is used to alert you to
potential personal injury hazards. Obey all safety messages
that follow this symbol to avoid possible injury or death.
Hazard categories
Safety instructions to the user are highlighted by safety alert symbols
in the manual. In addition, labels with symbols and/or instructions are
attached to the product that alert you to potential hazards.
Depending on the seriousness of the hazard, the safety instructions
are divided into 4 hazard categories.
DANGER
DANGER indicates an imminently hazardous situation, which, if not
avoided, will result in death or serious injury.
WARNING
WARNING indicates a potentially hazardous situation, which, if not
avoided, can result in death, serious injury, or equipment damage.
CAUTION
CAUTION indicates a potentially hazardous situation, which, if not
avoided, can result in injury or equipment damage.
NOTICE
NOTICE indicates a potentially hazardous situation, which, if not
avoided, can result in equipment damage.
MNA01M001EN, V1.01, 08.2014
Common DC bus 5
Page 6

Safety Information
Qualification of personnel
Intended use
LXM32
Only appropriately trained persons who are familiar with and understand the contents of this manual and all other pertinent product documentation are authorized to work on and with this product. In addition,
these persons must have received safety training to recognize and
avoid hazards involved. These persons must have sufficient technical
training, knowledge and experience and be able to foresee and detect
potential hazards that may be caused by using the product, by changing the settings and by the mechanical, electrical and electronic equipment of the entire system in which the product is used.
All persons working on and with the product must be fully familiar with
all applicable standards, directives, and accident prevention regulations when performing such work.
The functions described in this document are only intended for use for
the products described in this document.
The product may only be used in compliance with all applicable safety
regulations and directives, the specified requirements and the technical data.
Prior to using the product, you must perform a risk assessment in view
of the planned application. Based on the results, the appropriate
safety measures must be implemented.
Since the product is used as a component in an entire system, you
must ensure the safety of persons by means of the design of this
entire system (for example, machine design).
Operate the product only with the specified cables and accessories.
Use only genuine accessories and spare parts.
Any use other than the use explicitly permitted is prohibited and can
result in hazards.
Electrical equipment should be installed, operated, serviced, and
maintained only by qualified personnel.
6 Common DC bus
MNA01M001EN, V1.01, 08.2014
Page 7

LXM32
Safety Information
Basic information
DANGER
HAZARD DUE TO ELECTRIC SHOCK, EXPLOSION OR ARC FLASH
• Only appropriately trained persons who are familiar with and
understand the contents of this manual and all other pertinent
product documentation and who have received safety training to
recognize and avoid hazards involved are authorized to work on
and with this drive system. Installation, adjustment, repair and
maintenance must be performed by qualified personnel.
• The system integrator is responsible for compliance with all local
and national electrical code requirements as well as all other
applicable regulations with respect to grounding of all equipment.
• Many components of the product, including the printed circuit
board, operate with mains voltage. Do not touch. Use only electrically insulated tools.
• Do not touch unshielded components or terminals with voltage
present.
• The motor itself generates voltage when the motor shaft is rotated. Block the motor shaft to prevent rotation prior to performing
any type of work on the drive system.
• AC voltage can couple voltage to unused conductors in the motor
cable. Insulate both ends of unused conductors of the motor
cable.
• Do not short across the DC bus terminals or the DC bus capacitors.
• Before performing work on the drive system:
- Disconnect all power, including external control power that
may be present.
- Place a "Do Not Turn On" label on all power switches.
- Lock all power switches in the open position.
- Wait 15 minutes to allow the DC bus capacitors to discharge.
Measure the voltage on the DC bus as per chapter "DC bus
voltage measurement" and verify the voltage is <42 Vdc. The
DC bus LED is not an indicator of the absence of DC bus voltage.
• Install and close all covers before applying voltage.
Failure to follow these instructions will result in death or serious injury.
MNA01M001EN, V1.01, 08.2014
Common DC bus 7
Page 8

Safety Information
LXM32
WARNING
LOSS OF CONTROL
• The designer of any control scheme must consider the potential
failure modes of control paths and, for certain critical functions,
provide a means to achieve a safe state during and after a path
failure. Examples of critical control functions are emergency stop,
overtravel stop, power outage and restart.
• Separate or redundant control paths must be provided for critical
functions.
• System control paths may include communication links. Consideration must be given to the implication of unanticipated transmission delays or failures of the link.
• Observe all accident prevention regulations and local safety
guidelines.
• Each implementation of the product must be individually and thoroughly tested for proper operation before being placed into service.
Failure to follow these instructions can result in death, serious
injury, or equipment damage.
1)
1) For USA: Additional information, refer to NEMA ICS 1.1 (latest edition), “Safety
Guidelines for the Application, Installation, and Maintenance of Solid State Control”
and to NEMA ICS 7.1 (latest edition), “Safety Standards for Construction and Guide
for Selection, Installation and Operation of Adjustable-Speed Drive Systems”.
8 Common DC bus
MNA01M001EN, V1.01, 08.2014
Page 9

LXM32
Safety Information
DC bus voltage measurement
The DC bus voltage can exceed 800 Vdc. The DC bus LED is not an
indicator of the absence of DC bus voltage.
DANGER
ELECTRIC SHOCK, EXPLOSION OR ARC FLASH
• Disconnect the voltage supply to all connections.
• Wait 15 minutes to allow the DC bus capacitors to discharge.
• Use a properly rated voltage-sensing device for measuring
(>800 Vdc).
• Measure the DC bus voltage between the DC bus terminals (PA/+
and PC/-) to verify that the voltage is less than 42 Vdc.
• Contact your local Schneider Electric representative if the DC bus
capacitors do not discharge to less than 42 Vdc within a period of
15 minutes.
• Do not operate the product if the DC bus capacitors do not discharge properly.
• Do not attempt to repair the product if the DC bus capacitors do
not discharge properly.
Failure to follow these instructions will result in death or serious injury.
Standards and terminology
Technical terms, terminology and the corresponding descriptions in
this manual are intended to use the terms or definitions of the pertinent standards.
In the area of drive systems, this includes, but is not limited to, terms
such as "safety function", "safe state", "fault", "fault reset", "failure",
"error", "error message", "warning", etc.
Among others, these standards include:
• IEC 61800 series: "Adjustable speed electrical power drive systems"
• IEC 61158 series: "Digital data communications for measurement
and control – Fieldbus for use in industrial control systems"
• IEC 61784 series: "Industrial communication networks – Profiles"
• IEC 61508 series: "Functional safety of electrical/electronic/
programmable electronic safety-related systems"
Also see the glossary at the end of this manual.
MNA01M001EN, V1.01, 08.2014
Common DC bus 9
Page 10

Safety Information
LXM32
10 Common DC bus
MNA01M001EN, V1.01, 08.2014
Page 11

LXM32
About the book
Source manuals The latest versions of the manuals can be downloaded from the Inter-
Work steps If work steps must be performed consecutively, this sequence of steps
About the book
This document describes how several Schneider Electric drives type
LXM32 can share a common DC bus.
This application note replaces application note MNA01D001.
The information provided in this document supplements the manuals.
Before beginning, fully read and understand the manuals of the products used.
net at:
http://www.schneider-electric.com
is represented as follows:
■
Special prerequisites for the following work steps
▶
Step 1
◁
Specific response to this work step
▶
Step 2
If a response to a work step is indicated, this allows you to verify that
the work step has been performed correctly.
Unless otherwise stated, the individual steps must be performed in the
specified sequence.
Making work easier Information on making work easier is highlighted by this symbol:
Sections highlighted this way provide supplementary information on
making work easier.
SI units Technical data are specified in SI units. Converted units are shown in
parentheses behind the SI unit; they may be rounded.
Example:
Minimum conductor cross section: 1.5 mm2 (AWG 14)
Glossary Explanations of special technical terms and abbreviations.
Index List of keywords with references to the corresponding page numbers.
MNA01M001EN, V1.01, 08.2014
Common DC bus 11
Page 12

About the book
LXM32
12 Common DC bus
MNA01M001EN, V1.01, 08.2014
Page 13

LXM32
1 Introduction
Use of electrical energy If an application operates with multiple drive systems, it may be useful
Common DC bus Whether or not a common DC bus makes sense depends on the
1 Introduction
A drive system requires energy for acceleration or constant movement
that must be supplied to the system.
During deceleration, a motor acts as a generator. A considerable portion of the kinetic energy is re-generated as electrical energy.
Since electrical energy can only be stored to a limited extent in a single drive, a drive uses a braking resistor to transform the excess
energy into thermal energy.
to employ a common DC bus. By sharing a common DC bus, the
energy regenerated by one drive can be supplied to another drive.
acceleration and deceleration cycles of the drive systems.
A common DC bus is useful, for example, if one drive systems accelerates while another drive system decelerates.
If the drive systems accelerate and decelerate at the same time, a
common DC bus does not make sense.
MNA01M001EN, V1.01, 08.2014
Common DC bus 13
Page 14

1 Introduction
1.1 Permissible device types for common DC bus
The DC bus of drives with identical numbers of mains phases can be
connected.
Single-phase drives:
• LXM32∙∙∙∙M2 with LXM32∙∙∙∙M2
Three-phase drives:
• LXM32∙∙∙∙N4 with LXM32∙∙∙∙N4
LXM32
14
MNA01M001EN, V1.01, 08.2014
Common DC bus
Page 15
LXM32
2 Technical Data
2.1 Firmware version
2 Technical Data
A common DC bus requires the devices to have at least the specified
firmware versions:
Drive Firmware version
LXM32C, LXM32A V01.04.00
LXM32M V01.02.00
MNA01M001EN, V1.01, 08.2014
Common DC bus
15
Page 16
2 Technical Data
LXM32
2.2 DC bus data
Single-phase drives
LXM32∙... U45M2 U90M2 D18M2 D30M2
Nominal voltage (1 ∼) V 115 230 115 230 115 230 115 230
Nominal voltage DC bus V 163 325 163 325 163 325 163 325
Undervoltage limit V 55 130 55 130 55 130 55 130
Voltage limit: activation of Quick Stop V 60 140 60 140 60 140 60 140
Overvoltage limit V 450 450 450 450 450 450 450 450
Maximum continuous power via DC bus kW 0.2 0.5 0.4 0.9 0.8 1.6 0.8 2.2
Maximum continuous current via DC bus A 1.5 1.5 3.2 3.2 6.0 6.0 10.0 10.0
Three-phase drives
LXM32∙... U60N4 D12N4 D18N4 D30N4 D72N4 D85N4 C10N4
Nominal voltage (3 ∼) V 208 208 208 208 208 208 208
Nominal voltage DC bus V 294 294 294 294 294 294 294
Undervoltage limit V 150 150 150 150 150 150 150
Voltage limit: activation of Quick Stop V 160 160 160 160 160 160 160
Overvoltage limit V 820 820 820 820 820 820 820
Maximum continuous power via DC bus kW 0.4 0.8 1.7 2.8 6.5 7.0 11.0
Maximum continuous current via DC bus A 1.5 3.2 6.0 10.0 22.0 28.0 40.0
LXM32∙... U60N4 D12N4 D18N4 D30N4 D72N4 D85N4 C10N4
Nominal voltage (3 ∼) V 400 400 400 400 400 400 400
Nominal voltage DC bus V 566 566 566 566 566 566 566
Undervoltage limit V 350 350 350 350 350 350 350
Voltage limit: activation of Quick Stop V 360 360 360 360 360 360 360
Overvoltage limit V 820 820 820 820 820 820 820
Maximum continuous power via DC bus kW 0.8 1.6 3.3 5.6 13.0 15.0 22.0
Maximum continuous current via DC bus A 1.5 3.2 6.0 10.0 22.0 28.0 40.0
LXM32∙... U60N4 D12N4 D18N4 D30N4 D72N4 D85N4 C10N4
Nominal voltage (3 ∼) V 480 480 480 480 480 480 480
Nominal voltage DC bus V 679 679 679 679 679 679 679
Undervoltage limit V 350 350 350 350 350 350 350
Voltage limit: activation of Quick Stop V 360 360 360 360 360 360 360
Overvoltage limit V 820 820 820 820 820 820 820
Maximum continuous power via DC bus kW 0.8 1.6 3.3 5.6 13.0 15.0 22.0
Maximum continuous current via DC bus A 1.5 3.2 6.0 10.0 22.0 28.0 40.0
16
MNA01M001EN, V1.01, 08.2014
Common DC bus
Page 17

LXM32
2 Technical Data
2.3 Braking resistor
LXM32 drives have an internal braking resistor and a connection for
an external braking resistor. If the internal braking resistor is insufficient for the dynamics of the application, one or more external braking
resistors must be connected.
Single-phase drives
LXM32∙... U45M2 U90M2 D18M2 D30M2
Resistance value of internal braking
resistor
Continuous power internal braking resistor P
PR
Peak energy E
CR
External braking resistor minimum
External braking resistor maximum
1)
Maximum continuous power external
braking resistor
Capacitance of internal capacitor μF 390 780 1170 1560
Parameter DCbus_compat = 0 (default value)
Switch-on voltage braking resistor V 430 430 430 430
Energy absorption of internal capacitors
E
at nominal voltage 115 V +10%
var
Energy absorption of internal capacitors
E
at nominal voltage 200 V +10%
var
Energy absorption of internal capacitors
E
at nominal voltage 230 V +10%
var
Parameter DCbus_compat = 1 (reduced switch-on voltage)
Switch-on voltage braking resistor V 395 395 395 395
Energy absorption of internal capacitors
E
at nominal voltage 115 V +10%
var
Energy absorption of internal capacitors
E
at nominal voltage 200 V +10%
var
Energy absorption of internal capacitors
E
at nominal voltage 230 V +10%
var
1) The maximum specified braking resistor can derate the peak power of the device. Depending on the application, it is possible to use
a higher ohm resistor.
Ω
94 47 20 10
W 10 20 40 60
Ws 82 166 330 550
Ω
68 36 20 10
Ω
110 55 27 16
W 200 400 600 800
Ws 30 60 89 119
Ws 17 34 52 69
Ws 11 22 33 44
Ws 24 48 73 97
Ws 12 23 35 46
Ws 5 11 16 22
MNA01M001EN, V1.01, 08.2014
Common DC bus
17
Page 18

2 Technical Data
LXM32
Three-phase drives
LXM32∙... U60N4 D12N4 D18N4 D30N4 D72N4 D85N4 C10N4
Resistance value of internal braking resistor
Continuous power internal braking resistor P
PR
Peak energy E
CR
External braking resistor minimum
External braking resistor maximum
1)
Maximum continuous power external
braking resistor
Capacitance of internal capacitor μF 110 195 390 560 1120 1230 1230
Parameter DCbus_compat
2)
Switch-on voltage V 780 780 780 780 780 780 780
Energy absorption of internal capacitors
E
at nominal voltage 208 V +10%
var
Energy absorption of internal capacitors
E
at nominal voltage 380 V +10%
var
Energy absorption of internal capacitors
E
at nominal voltage 400 V +10%
var
Energy absorption of internal capacitors
E
at nominal voltage 480 V +10%
var
1) The maximum specified braking resistor can derate the peak power of the device. Depending on the application, it is possible to use
a higher ohm resistor.
2) Parameter DCbus_compat has no effect in the case of three-phase devices
Ω
132 60 30 30 10 10 10
W 20 40 60 100 150 150 150
Ws 200 400 600 1000 2400 2400 2400
Ω
70 47 25 15 8 8 8
Ω
145 73 50 30 12 11 11
W 200 500 800 1500 3000 4500 5500
Ws 28 49 98 141 282 310 310
Ws 14 25 50 73 145 159 159
Ws 12 22 43 62 124 136 136
Ws 3 5 10 14 28 31 31
18
MNA01M001EN, V1.01, 08.2014
Common DC bus
Page 19

LXM32
2.3.1 External braking resistors (accessories)
The resistance values for external braking resistors must not be below
the minimum resistance specified for the drives.
2 Technical Data
VW3A760... 1Rxx
Resistance
Continuous power W 400 100 200 400 100 200 400
Maximum time in braking at 115 V /
230 V
Peak power at 115 V / 230 V kW 18.5 6.8 6.8 6.8 2.6 2.6 2.6
Maximum peak energy at 115 V / 230 V Ws 13300 3800 7400 18100 3700 9600 24700
Maximum time in braking at 400 V /
480 V
Peak power at 400 V / 480 V kW 60.8 22.5 22.5 22.5 8.5 8.5 8.5
Maximum peak energy at 400 V / 480 V Ws 7300 1900 4900 11400 2500 6600 16200
Degree of protection IP65 IP65 IP65 IP65 IP65 IP65 IP65
UL approval (file no.) - E233422 E233422 - E233422 E233422 -
1) Resistors with a continuous power of 400 W are not UL/CSA-approved.
VW3A77... 04 05
Resistance
Continuous power W 1000 1000
Maximum time in braking at 115 V /
230 V
Peak power at 115 V / 230 V kW 12.3 18.5
Maximum peak energy at 115 V / 230 V Ws 43100 36500
Maximum time in braking at 400 V /
480 V
Peak power at 400 V / 480 V kW 40.6 60.8
Maximum peak energy at 400 V / 480 V Ws 26500 22500
Degree of protection IP20 IP20
UL approval (file no.) E221095 E221095
Ω
s 0.72 0.552 1.08 2.64 1.44 3.72 9.6
s 0.12 0.084 0.216 0.504 0.3 0.78 1.92
Ω
s 3.5 1.98
s 0.65 0.37
1)
2Rxx 3Rxx 4Rxx
10 27 27 27 72 72 72
15 10
1)
5Rxx 6Rxx 7Rxx
1)
MNA01M001EN, V1.01, 08.2014
Common DC bus
19
Page 20

2 Technical Data
2.4 Cables for the DC bus
Minimum requirement A cable for the common DC bus must meet the following require-
ments.
Shield: Shielded at cable lengths of > 0.2 m
Twisted Pair: Twisted pair at cable lengths of >
Cable: Two wires, shielded
Maximum cable length between 2
drives:
Special characteristics: • Insulation must be rated for the
The connection of the fuses for the DC bus must be rated for the total
maximum continuous current on the DC bus of all drives connected
via the DC bus. Analyze the most critical case in your application (for
example EMERGENCY STOP) and select an appropriate conductor
cross section.
LXM32
0.2 m
3 m
DC bus voltage
• Conductor cross section according to the calculated current, but
at least 2* 6 mm2 (2* AWG 10)
20
MNA01M001EN, V1.01, 08.2014
Common DC bus
Page 21

LXM32
3 Engineering
3 Engineering
This chapter provides engineering information for a common DC bus
for several drives.
Incorrect use of the DC bus may permanently damage the drives
either immediately or over time.
WARNING
DESTRUCTION OF SYSTEM COMPONENTS AND LOSS OF CONTROL
Verify that all requirements for using the DC bus are met.
Failure to follow these instructions can result in death, serious
injury, or equipment damage.
WARNING
DESTRUCTION OF SYSTEM COMPONENTS
• Connect only drives with identical nominal voltages.
• Connect single-phase drives only to single-phase drives. Connect
single-phase drives to the same phase.
• Connect three-phase drives only to three-phase drives.
Failure to follow these instructions can result in death, serious
injury, or equipment damage.
LXM32: See the Engineering chapter in the LXM32 product manual
for vital engineering information concerning the LXM32 drive.
MNA01M001EN, V1.01, 08.2014
Common DC bus
21
Page 22

3 Engineering
3.1 Energy balance
3.1.1 Energy balance basics
LXM32
To be able to estimate the effect of an interconnection of drives via a
common DC bus, create an energy balance of the individual drives
over a movement cycle. A movement cycle typically consists of the following phases: acceleration, continuous movement and deceleration.
The energy generated during deceleration can be used by other
drives connected via a common DC bus. Excess energy can be
absorbed by the braking resistors.
The assessment of the energy balances of the individual drives per
movement cycle and of the cyclic sequence of the movement cycles
allows you to draw a conclusion regarding the efficiency of a common
DC bus.
The energy balance is influenced by the following factors:
Energy absorption of the capaci-
tors E
var
Electrical losses EelThe electrical losses Eel of the drive system can be estimated on the
Mechanical losses E
mech
• Energy absorption of capacitors E
• Electrical losses of the drive system E
• Mechanical losses of the facility and the drive system E
• Braking resistor E
B
in the drive
var
el
mech
The higher the mains voltage, the lower the energy absorption of the
capacitors E
. In your calculation, use the values for the highest
var
mains voltage that is used in your application, see chapter
"2.3 Braking resistor".
The energy absorption of the capacitors E
is the square difference
var
between the voltage prior to the start of the deceleration and the
switch-on voltage of the braking resistor.
basis of the peak power of the drive. The maximum power dissipation
is approximately 10% of the peak power at a typical efficiency of 90%.
If the current during deceleration is lower, the power dissipation is
reduced accordingly.
The mechanical losses result from friction during operation of the system. Mechanical losses are negligible if the time required by the system to coast to a stop without a driving force is considerably longer
than the time required to decelerate the system. The mechanical losses can be calculated from the load torque and the velocity from
which the motor is to stop.
22
Braking resistor EBTwo characteristic values determine the energy absorption of a brak-
ing resistor:
• The continuous power PPR is the amount of energy that can be
continuously absorbed without overloading the braking resistor.
• The maximum energy ECR limits the maximum short-term power
that can be absorbed.
MNA01M001EN, V1.01, 08.2014
Common DC bus
Page 23

v
I
t
t
D
i
2π
n
i
2
60
ω
i
2
= Ei =J
t
1
2
J
t
1
2
LXM32
3 Engineering
Rating
Figure 1: Movement cycle: Profile for energy assessment
This profile with velocity (v) and motor current (I) is also used for rating
the motor and the braking resistor. The deceleration segment to be
considered is labeled Di.
Calculation of the energy at constant deceleration:
The total inertia (Jt) must be known.
Jt with:
Jt = Jm + J
c
Jm: Motor inertia with or without holding brake
Jc: Load inertia
The energy for each deceleration segment is calculated as follows:
Units: Ei in Ws (wattseconds), Jt in kgm2, ω in rad and ni in min-1.
See the technical data for the energy absorption E
(without consideration of an internal or external braking resistor).
In the next calculation steps, only consider those segments Di, whose
energy Ei exceeds the energy absorption of the device (see chapter
of the devices
var
"2.2 DC bus data"). These excess energies EDi must be diverted by
means of the braking resistor (internal or external).
MNA01M001EN, V1.01, 08.2014
Common DC bus
EDi is calculated using the following formula:
EDi = Ei - E
(in Ws)
var
The continuous power Pc is calculated for each machine cycle:
23
Page 24

Pc =
Σ
E
Di
Cycletime
3 Engineering
Units: Pc in W, EDi in Ws and cycle time T in s
These calculations allow you to select the required braking resistor.
3.2 Electromagnetic compatibility (EMC)
If drives are to be operated via a common DC bus, the following
aspects must be considered in terms of EMC:
• Keep DC bus cables as short as possible.
• Shielded DC bus cables must be used at a cable length of > 0.2 m.
In the case of shielded DC bus cables, connect the cable shield to
the shield connection (large surface area contact).
3.3 DC bus connection
LXM32
The DC bus is connected by means of a plug and socket connection
or screw terminals.
See the manual of the respective product for tightening torque of the
screw terminals.
Cable specifications See chapter "2.4 Cables for the DC bus", page 20 for the cable speci-
fications. Connector kits and pre-assembled cables can be found in
chapter "6 Accessories and spare parts", page 55.
24
MNA01M001EN, V1.01, 08.2014
Common DC bus
Page 25

PC/- PA/+ PC/- PA/+ PC/- PA/+
DC+
DC
-
N/L2
L1
N/L2 L1 N/L2 L1 N/L2 L1
LXM32
3.4 Fuses
The number of mains fuses depends on the input current of all drives
connected via the common DC bus.
Choose fuse ratings as low as possible according to the power of the
drive as well as the conductor cross section.
See manual of the respective product for more information.
The maximum permissible fuse ratings must not be exceeded.
3.4.1 DC bus connection of single-phase drives
Single mains fuse A single mains fuse is sufficient if the total input current of all drives
connected via the common DC bus is less than the maximum fuse rating shown in the table below.
Single mains fuse Maximum fuse rating
LXM32∙∙∙∙M2 A 25
3 Engineering
MNA01M001EN, V1.01, 08.2014
Common DC bus
Figure 2: Single mains fuse for single-phase drives
25
Page 26

N/L2 L1
N/L2
L1
N/L2 L1N/L2 L1
PC/- PA/+ PC/- PA/+ PC/- PA/+
DC+
DC
-
3 Engineering
Multiple mains fuses Multiple mains fuses are required if the total input current of all drives
LXM32
connected via the common DC bus exceeds the maximum fuse rating
shown in the table below.
Multiple mains fuses Maximum fuse rating
LXM32∙∙∙∙M2 A 25
If multiple mains fuses are required, additional DC bus fuses must be
used upstream of each drive. The DC bus fuses must be suitable for
600 Vdc.
DC bus fuses Maximum fuse rating
LXM32∙∙∙∙M2 A 25
26
Figure 3: Multiple mains fuses for single-phase drives
See chapter "6.2 DC fuses" for fuses for the DC bus.
The use of mains reactors can reduce the input current. Due to the
lower input current, it may be possible to operate the drives with just a
single mains fuse.
MNA01M001EN, V1.01, 08.2014
Common DC bus
Page 27

PC/- PA/+ PC/- PA/+ PC/- PA/+
DC+
DC
-
L3
L2
L1
L2 L1L3 L2 L1L3L2 L1L3
LXM32
3.4.2 DC bus connection of three-phase drives
Single mains fuse A single fuse is sufficient if the total input current of all drives connec-
ted via the common DC bus is less than the maximum fuse rating
shown in the table below.
Single mains fuse Maximum fuse rating
LXM32∙U60N4, LXM32∙D12N4,
LXM32∙D18N4, LXM32∙D30N4,
LXM32∙D72N4
LXM32∙D85N4, LXM32∙C10N4 A 63
3 Engineering
A 32
MNA01M001EN, V1.01, 08.2014
Common DC bus
Figure 4: Single mains fuse for three-phase drives
27
Page 28

PC/- PA/+ PC/- PA/+ PC/- PA/+
L3
L2
L1
L2 L1L3 L2 L1L3L2 L1L3
DC+
DC
-
3 Engineering
Multiple mains fuses Multiple mains fuses are required A single fuse is sufficient if the total
LXM32
input current of all drives connected via the common DC bus is less
than the maximum fuse rating shown in the table below.
Multiple mains fuses Maximum fuse rating
LXM32∙U60N4, LXM32∙D12N4,
LXM32∙D18N4, LXM32∙D30N4,
LXM32∙D72N4
LXM32∙D85N4, LXM32∙C10N4 A 63
If multiple mains fuses are required, additional DC bus fuses must be
used upstream of each drive. The DC bus fuses must be suitable for
600 Vdc.
DC bus fuses Maximum fuse rating
LXM32∙U60N4, LXM32∙D12N4,
LXM32∙D18N4, LXM32∙D30N4,
LXM32∙D72N4
LXM32∙D85N4, LXM32∙C10N4 A 63
A 32
A 32
28
Figure 5: Multiple mains fuses for three-phase drives
See chapter "6.2 DC fuses" for fuses for the DC bus.
The use of mains reactors can reduce the input current. Due to the
lower input current, it may be possible to operate the drives with just a
single mains fuse.
MNA01M001EN, V1.01, 08.2014
Common DC bus
Page 29

LXM32
3.4.3 Supply via the DC bus
3 Engineering
A single or multiple drives can be supplied directly via the DC bus.
The supply is provided by a correspondingly sized drive or by a DC
power supply unit.
In the case of supply via the DC bus, DC bus fuses must be used. The
DC bus fuses must be suitable for 600 Vdc.
The number of DC bus fuses depends on the total maximum continuous current on the DC bus of all drives connected via the common DC
bus.
Single-phase drives
Three-phase drives
DC bus fuses Maximum fuse rating
LXM32∙∙∙∙M2 A 25
DC bus fuses Maximum fuse rating
LXM32∙U60N4, LXM32∙D12N4,
LXM32∙D18N4, LXM32∙D30N4,
LXM32∙D72N4
LXM32∙D85N4, LXM32∙C10N4 A 63
A 32
MNA01M001EN, V1.01, 08.2014
Common DC bus
29
Page 30

L3
L2
L1
L2 L1L3
PC/- PA/+ PC/- PA/+ PC/- PA/+
PC/- PA/+
L2 L1L3 L2 L1L3 L2 L1L3
L2 L1L3 L2 L1L3 L2 L1L3
~
+-
PC/- PA/+ PC/- PA/+ PC/- PA/+
L3
L2
L1
3 Engineering
Single DC bus fuse If the total maximum continuous current on the DC bus of all drives
LXM32
connected via the common DC bus does not exceed the maximum
fuse rating of a drive, a single DC bus fuse is sufficient.
Figure 6: Supply via the DC bus by a drive
Figure 7: Supply via the DC bus by a DC power supply unit
30
MNA01M001EN, V1.01, 08.2014
Common DC bus
Page 31

L2 L1L3 L2 L1L3 L2 L1L3
L3
L2
L1
L2 L1L3
PC/- PA/+ PC/- PA/+ PC/- PA/+
PC/- PA/+
L2 L1L3 L2 L1L3 L2 L1L3
~
+-
PC/- PA/+ PC/- PA/+ PC/- PA/+
L3
L2
L1
LXM32
3 Engineering
Multiple DC bus fuses If the total maximum continuous current on the DC bus of all drives
connected via the common DC bus exceeds the maximum fuse rating
of a drive, DC bus fuses are required at each drive.
Figure 8: Supply via the DC bus by a drive
Figure 9: Supply via the DC bus by a DC power supply unit
MNA01M001EN, V1.01, 08.2014
Common DC bus
31
Page 32

3 Engineering
3.5 Braking resistors
Excess energy in the common DC bus must be absorbed by the braking resistors. Depending on the application, one or more braking resistors can be connected. Consider the internal braking resistors of
LXM32 drives in your calculations.
If drives with a different nominal power are connected via the DC bus,
you must connect braking resistors to the drive with the highest nominal power. See the manual of the respective product for more information.
3.5.1 Rating the braking resistor
An insufficiently rated braking resistor can cause overvoltage on the
DC bus. Overvoltage on the DC bus causes the power stage to be
disabled. The motor is no longer actively decelerated.
MOTOR WITHOUT BRAKING EFFECT
• Verify that the braking resistor has a sufficient rating.
• Verify that the parameter settings for the braking resistor are correct.
• Verify that the I2t value for temperature monitoring does not
exceed 100% by performing a test run under maximum load conditions.
• Verify that the calculations and the test run take into account the
fact that the DC bus capacitors can absorb less braking energy at
higher mains voltages.
LXM32
WARNING
Failure to follow these instructions can result in death, serious
injury, or equipment damage.
The temperature of the braking resistor may exceed 250 °C (482 °F)
during operation.
WARNING
HOT SURFACES
• Ensure that any contact with a hot braking resistor is avoided.
• Do not allow flammable or heat-sensitive parts in the immediate
vicinity of the braking resistor.
• Verify that the heat dissipation is sufficient by performing a test
run under maximum load conditions.
Failure to follow these instructions can result in death, serious
injury, or equipment damage.
Braking resistors are required for dynamic applications. During deceleration, the kinetic energy is transformed into electrical energy in the
motor. The electrical energy increases the DC bus voltage. The braking resistor is activated when the defined threshold value is exceeded.
The braking resistor transforms electrical energy into heat. If highly
dynamic deceleration is required, the braking resistor must be well
adapted to the system.
32
MNA01M001EN, V1.01, 08.2014
Common DC bus
Page 33

R =
P
max
U
2
LXM32
3 Engineering
Further information on the subject Page
Technical data chapter "2.3 Braking resistor" 17
Commissioning chapter
"5.2 LXM32: Setting the braking resistor parameters"
See also chapter "3.1 Energy balance", page 22 for rating information.
Internal braking resistor A braking resistor to absorb braking energy is integrated in LXM32
drives. The device is shipped with the internal braking resistor active.
If the braking energy of all drives sharing a common DC bus is greater
than the energy the internal braking resistors can absorb, you must
use an external braking resistor. Consider the most extreme case of
your application in calculating the braking energy.
Example: In the case of an EMERGENCY STOP, all drives decelerate
simultaneously; the braking resistors must be able to absorb the entire
braking energy.
External braking resistor An external braking resistor is required in applications in which the
braking energy is greater than the energy that can be absorbed by the
drives sharing a common DC bus. Consider the most extreme case of
your application in calculating the braking energy.
Example: In the case of an EMERGENCY STOP, all drives decelerate
simultaneously; the braking resistors must be able to absorb the entire
braking energy.
54
LXM32: Monitoring LXM32 drives monitor the load on the connected braking resistor. The
Selection of the external braking
resistor
load on the braking resistor can be read out.
The connection of the external braking resistor is short-circuit protected. A ground fault of the braking resistor is not detected.
The rating of an external braking resistor depends on the required
peak power and continuous power with which the braking resistor can
be operated.
The resistance R is derived from the required peak power and the DC
bus voltage.
R = Resistance value in Ω
U = Switch-on voltage braking resistor in V
P
= Required peak power in W
max
If 2 or more braking resistors are connected to one drive, note the following criteria:
• The braking resistors must be connected in parallel or in series so
the required resistance is reached. Only connect resistors with
identical resistance in parallel in order to evenly distribute the load
to all braking resistors.
• The total resistance of all external braking resistors connected to
one drive must not fall below a lower limit.
• The continuous power of the network of connected braking resistors must be calculated. The result must be greater than or equal
to the actually required continuous power.
MNA01M001EN, V1.01, 08.2014
Common DC bus
33
Page 34

3 Engineering
Use only resistors that are specified as braking resistors. See chapter
"2.3 Braking resistor", page 17 for suitable braking resistors.
Connection of braking resistor Braking resistors with degree of protection IP65 may be installed out-
side the control cabinet in an appropriate environment in order to
decrease the temperature in the control cabinet.
The external braking resistors listed in the Accessories chapter are
shipped with an information sheet that provides details on installation.
Further procedure:
• Connect the braking resistors to the drive.
• LXM32: Check the parameter RESint_ext during commissioning.
This parameter allows you to switch between internal and external
braking resistor.
• LXM32: If you have connected an external braking resistor to an
LXM32 drive, you must set the parameters for the external braking
resistor during commissioning.
• During commissioning, test the braking resistors under realistic
conditions, see page 54.
Wire ferrules: If you use wire ferrules, use only wire ferrules with collars for these terminals.
LXM32
3.5.2 Rating information
To rate the braking resistor, calculate the proportion contributing to
absorbing braking energy.
An external braking resistor is required if the kinetic energy that must
be absorbed exceeds the total of the internal proportions, including
the internal braking resistor.
The energy E
the deceleration process and the response threshold.
The voltage prior to the deceleration process depends on the mains
voltage. The energy absorption by the DC bus capacitors is lowest
when the mains voltage is highest. In the calculation, use the values
for the highest mains voltage.
Energy absorption braking resistor Two characteristic values determine the energy absorption of the
braking resistor:
• The continuous power PPR is the amount of energy that can be
continuously absorbed without overloading the braking resistor.
• The maximum energy ECR limits the maximum short-term power
that can be absorbed.
If the continuous power was exceeded for a specific time, the braking
resistor must remain without load for a corresponding period.
is the square difference between the voltage before
var
34
The characteristic values PPR and ECR of the internal braking resistor
can be found in chapter "2 Technical Data".
See page 22 for information on assessing the electrical and mechanical losses.
Example: LXM32 drive Deceleration of a rotary motor with the following data:
MNA01M001EN, V1.01, 08.2014
Common DC bus
Page 35

LXM32
3 Engineering
Selecting an external braking
resistor
• Initial speed of rotation: n = 4000 min
• Rotor inertia: JR = 4 kgcm
• Load inertia: JL = 6 kgcm
2
2
-1
Calculation of the energy to be absorbed:
EB = 1/2 * J * (2*π*n * 1/60)
2
to 88 Ws
Electrical and mechanical losses are ignored.
In this example, the DC bus capacitors absorb 23 Ws (the value
depends on the device type, see chapter "2 Technical Data").
The internal braking resistor must absorb the remaining 65 Ws. It can
absorb a pulse of 80 Ws. If the load is decelerated once, the internal
braking resistor is sufficient.
If the deceleration process is repeated cyclically, the continuous output must be considered. If the cycle time is longer than the ratio of the
energy to be absorbed EB and the continuous power PPR, the internal
braking resistor is sufficient. If the system decelerates more frequently,
the internal braking resistor is not sufficient.
In the example, the ratio EB/PPR is 1.3 s. If the cycle time is shorter, an
external braking resistor is required.
The selection is made in two steps:
• The maximum energy during deceleration must be less than the
peak energy that the internal braking resistor can absorb:
(EDi)<(ECr). In addition, the continuous power of the internal braking
resistor must not be exceeded: (PC)<(PPr). If these conditions are
met, then the internal braking resistor is sufficient.
• If one of the conditions is not met, you must use an external braking resistor. The braking resistor must be rated in such a way that
the conditions are met. The resistance of the braking resistor must
be between the specified minimum and maximum values, since
otherwise the load can no longer be decelerated or the product
might be destroyed.
MNA01M001EN, V1.01, 08.2014
Common DC bus
See chapter "2.3 Braking resistor", page 17 for technical data on the
external braking resistors.
35
Page 36

PC/- PA/+ PC/- PA/+
DC+
DC
-
L3
L2
L1
L2 L1L3 L2 L1L3
S2
S3
S1
E3
E2
E1
3 Engineering
3.6 Mains reactor
LXM32
A mains reactor is required if at least one of the following criteria is
met:
• The output power of the drive is to be increased.
• The short-circuit current rating (SCCR) of the supplying mains is
greater than specified for the drives.
• Current harmonics are to be reduced.
If one drive requires a mains reactor, then all drives connected via the
DC bus must be equipped with mains reactors.
The mains reactor for several drives with a common AC fuse must be
rated in such a way that the nominal current of the mains reactor is
greater than the total of the input current of the drives.
The fuse rating of the fuse upstream of the mains reactor must not be
greater than the nominal current of the mains reactor.
36
Figure 10: Wiring of drives with common AC fuse and a mains reactor, example shows three-phase drives.
MNA01M001EN, V1.01, 08.2014
Common DC bus
Page 37

N/L2
L1
S2
S1
E2
E1
PC/- PA/+
DC+
DC
-
N/L2 L1
S2
S1
E2
E1
PC/- PA/+
N/L2 L1
LXM32
3 Engineering
Figure 11: Wiring of drives with individual AC fuses and mains reactors, example shows singe-phase drives.
See the manual of the respective product for information on mains
reactors.
MNA01M001EN, V1.01, 08.2014
Common DC bus
37
Page 38

PC/- PA/+ PC/- PA/+
DC+
DC
-
L3
L2
L1
L2 L1L3 L2 L1L3
L3
L2
L1
L3'
L2'
L1'
3 Engineering
3.7 Mains filter
LXM32
The emission depends on the length of the motor cables. If the
required limit value is not reached with the internal mains filter, you
must use an external mains filter.
See manual of the respective product for information on mains filters.
The mains filter for several drives with a common AC fuse must be
rated in such a way that the nominal current of the external mains filter
is greater than the total of the input current of the drives.
The fuse rating of the fuse upstream of the external mains filter must
not be greater than the nominal current of the external mains filter.
Mount the external mains filter in such a way that the lines from the
mains filter to the drives are as short as possible. For EMC reasons,
route the cables from the mains filter to the drives separately from the
line to the mains filter.
External three-phase mains filters do not have a neutral conductor
connection; they are only approved for three-phase devices.
38
Figure 12: Wiring of an external mains filter, example shows three-phase
drives.
See the manual of the respective product for information on external
mains filters.
MNA01M001EN, V1.01, 08.2014
Common DC bus
Page 39

PC/- PA/+ PC/- PA/+ PC/- PA/+
DC+
DC
-
L3
L2
L1
L2 L1L3 L2 L1L3
S2
S3
S1
E3
E2
E1
L3
L2
L1
L3'
L2'
L1'
L2 L1L3
LXM32
3.8 Mains reactor and external mains filter
If a mains reactor and an external mains filter are required, the mains
reactor and external mains filter must be arranged according to the
following illustrations for EMC reasons.
3 Engineering
Figure 13: Wiring of drives with common mains fuse, mains reactor and mains filter, example shows three-phase drives.
MNA01M001EN, V1.01, 08.2014
Common DC bus
39
Page 40

3 Engineering
LXM32
40
MNA01M001EN, V1.01, 08.2014
Common DC bus
Page 41

LXM32
4 Installation
4 Installation
An engineering phase is mandatory prior to mechanical and electrical
installation. See chapter "3 EngineeringInstallation", page 21, for basic
information.
Incorrect use of the DC bus may permanently damage the drives
either immediately or over time.
WARNING
DESTRUCTION OF SYSTEM COMPONENTS AND LOSS OF CONTROL
Verify that all requirements for using the DC bus are met.
Failure to follow these instructions can result in death, serious
injury, or equipment damage.
WARNING
DESTRUCTION OF SYSTEM COMPONENTS
• Connect only drives with identical nominal voltages.
• Connect single-phase drives only to single-phase drives. Connect
single-phase drives to the same phase.
• Connect three-phase drives only to three-phase drives.
Failure to follow these instructions can result in death, serious
injury, or equipment damage.
NOTICE
DESTRUCTION DUE TO INCORRECT OPERATION
Verify that the power stage supplies of the drives connected via a
common DC bus are switched on simultaneously.
Failure to follow these instructions can result in equipment
damage.
MNA01M001EN, V1.01, 08.2014
Common DC bus
41
Page 42

L1
N/L2
L1
N/L2
M2
M2
L1
L3
L2
L1
L3
L2
N4
N4
L1
L3
L2
N
L1
L3
L2
N
M2
M2
L1
L3
L2
N
L1
L3
L2
N
N4
M2
4 Installation
LXM32
Figure 14: Specifications for drives with mains supply
4.1 Assembling cables
Pre-assembled cables are available for common DC bus. If the preassembled cables do not have the required length, use cables and
crimp contacts, see chapter "6.1 DC bus accessories", page 55.
Properties of the DC bus cable Note the DC bus cable properties, see chapter
Assembling DC bus cables The following instructions apply to drives with plug connections for the
"2.4 Cables for the DC bus" , page 20.
DC bus.
42
MNA01M001EN, V1.01, 08.2014
Common DC bus
Page 43

4
3
A
1
2
5
C
B
PC/-PA/+
PC/-
PA/+
LXM32
4 Installation
Part Length in mm (inches)
A Cable jacket 130 (5.2)
B Length of shield connection 60 (2.5)
C Stripping length 6 (0.25)
Diameter ring-type cable lug /
fork-type cable lug
For M5 screw
▶
(1) Strip the cable jacket, length A.
▶
(2) Slide back the shield braiding. Open the shield braiding and
twist it to form a shield connection wire.
▶
(3) Shorten the twisted shield connection wire to length B and insulate the shield braiding with heat shrink tube.
Crimp the crimp contacts to the two stripped conductors. The stripping length is C. See chapter "6.1 DC bus accessories", page 55
for information on the crimping tool.
▶
(4) Crimp a fork-type cable lug to the shield connection wire.
Push the crimp contacts into the connector housing. Polarity: the
red wire is PA/+, the black wire is PC/-.
▶
(5) Secure the shield with heat shrink tube.
MNA01M001EN, V1.01, 08.2014
Common DC bus
43
Page 44

3
A
B
1
2
C
4 Installation
LXM32
The following instructions apply to drives with screw terminals for the
DC bus.
LXM32∙... D85, C10
A mm (in) 220 (8.66)
B mm (in) 50 (1.97)
C mm (in) 18 (0.71)
(1) Strip the cable jacket, length A.
(2) Slide the shield braiding back over the cable jacket.
(3) Secure the shield braiding with a heat shrink tube. The
shield must have at least length D. Verify that a large surface
area of the shield braiding is connected to the EMC shield
clamp.
44
MNA01M001EN, V1.01, 08.2014
Common DC bus
Page 45

PA/+
PC/-
LXM32
4.2 Wiring the DC bus
The DC bus is connected by means of a plug and socket connection
or screw terminals.
Cable specifications See chapter "2.4 Cables for the DC bus", page 20 for the cable speci-
fications. Pre-assembled cables and connector kits can be found in
chapter "6 Accessories and spare parts", page 55.
4.2.1 Drives with connectors
Connector coding The connectors are coded. If you do not use pre-assembled cables,
verify that the crimp contacts properly snap into the connector. Verify
that PA/+ is connected to PA/+ and PC/- is connected to PC/-. Incorrect wiring will destroy the devices.
4 Installation
NOTICE
EQUIPMENT DAMAGE CAUSED BY INCORRECT POLARITY
Verify correct polarity during installation.
Failure to follow these instructions can result in equipment
damage.
Connector lock The connector has a snap lock mechanism. Pull the connector hous-
MNA01M001EN, V1.01, 08.2014
Common DC bus
Figure 15: Connector coding
ing to unlock the connector.
Both wires in the connector housing must be able to move independently for unlocking.
If you want to remove the DC bus connection cable, you must open
the connector lock by pulling at the housing.
The connection cable is easier to remove if you remove the motor
connector first.
45
Page 46

PC/-PA/+
PC/-PA/+
4 Installation
LXM32
Figure 16: Unlocking the DC bus connector, step 1: Push cables towards connector.
46
Figure 17: Unlocking the DC bus connector, step 2: Push cables towards connector, at the same time remove the connector with the other hand.
If the two wires cannot move freely, the DC bus connector will not
unlock.
▶
Push the two wires towards the connector (see Figure 16).
▶
While pushing the wires towards the connector, pull the connector
at the connector housing with the other hand.The connector is
unlocked and you can remove the DC bus connection cable (see ).
The connector is unlocked and you can remove the DC bus connection cable (see Figure 17).
Common DC bus
MNA01M001EN, V1.01, 08.2014
Page 47

BR+BR-
L3/TL2/SL1/R
CN9
U/T1 W/T3V/T2PA/+ PC/-PBU/T
1
W/T3
V/T2
PB
LXM32
4.2.2 Drives with terminals
4 Installation
This chapter describes LXM32 drives with screw terminals.
Properties of the connection termi-
nals CN9
Wiring diagram
LXM32∙... D85, C10
Connection cross section mm2
(AWG)
Tightening torque for terminal
screws
Stripping length mm
Nm
(lb.in)
(in)
6 ... 25
(10 ... 4)
3.8
(33.6)
18
(0.71)
The terminals are approved for fine wire conductors and rigid conductors. Observe the maximum permissible connection cross section.
Take into account the fact that wire ferrules increase the conductor
cross section.
Figure 18: Wiring diagram DC bus
Connecting the DC bus
▶
Switch off all supply voltages. Observe the safety instructions concerning electrical installation.
▶
Connect the DC bus to the device. Connect PA/+ to PA/+ (red) and
PC/- to PC/- (black). Note the tightening torque specified for the
terminal screws.
▶
Connect the cable shield with a shield clamp to an EMC rail (large
surface area contact).
Verify that the individual wires are in the individual guides.
▶
Mount the cable guide.
MNA01M001EN, V1.01, 08.2014
Common DC bus
47
Page 48

CN9 DC Bus
PC/- PA/+
ESC
W
V
U
ESC
CN9 DC Bus
PC/- PA/+
W
V
U
4 Installation
4.2.3 Connecting the DC bus
LXM32
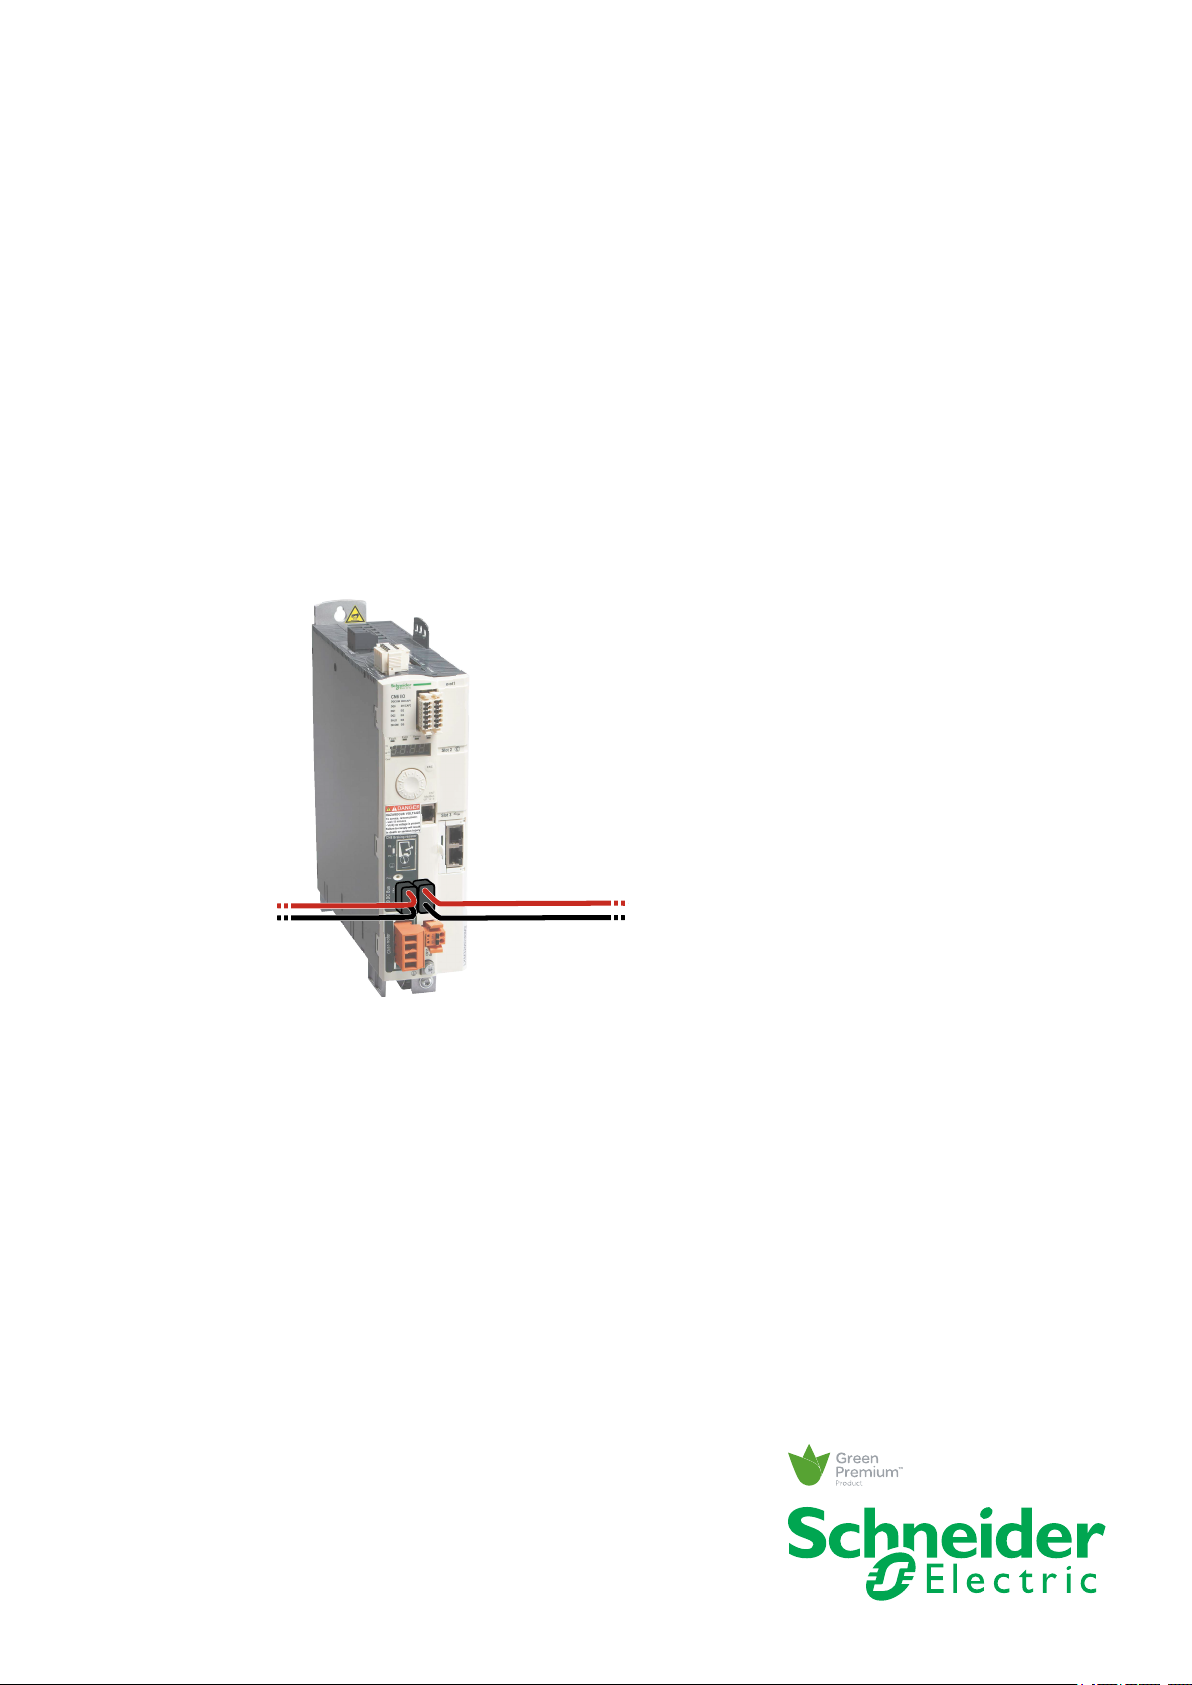
Figure 19: DC bus connection, example with connector
▶
Verify that the requirements concerning the DC bus are met, see
chapter "3 EngineeringInstallation".
▶
Use pre-assembled cables whenever possible (page 55) to reduce
the risk of wiring errors.
▶
Only connect the devices with the specified accessories. The connectors are coded. Connect PA/+ to PA/+ (red) and PC/- to PC/(black).
48
MNA01M001EN, V1.01, 08.2014
Common DC bus
Page 49

LXM32
4.3 Verifying installation
▶
▶
▶
▶
▶
4 Installation
Verify that the wiring complies with the specifications as per chapter "3 EngineeringInstallation".
Verify that the fuses used do not exceed the maximum permissible
fuse rating.
Verify that PA/+ is only connected to PA/+ and that PC/- is only
connected to PC/-.
Verify that the shield is connected to a large surface area if you use
shielded DC bus cables.
Verify that the connector locks are properly snapped in.
MNA01M001EN, V1.01, 08.2014
Common DC bus
49
Page 50

4 Installation
LXM32
50
MNA01M001EN, V1.01, 08.2014
Common DC bus
Page 51

LXM32
5 Commissioning
5 Commissioning
For commissioning, follow the commissioning instructions for the individual devices in the manual of the respective product.
Incorrect use of the DC bus may permanently damage the drives
either immediately or over time.
WARNING
DESTRUCTION OF SYSTEM COMPONENTS AND LOSS OF CONTROL
Verify that all requirements for using the DC bus are met.
Failure to follow these instructions can result in death, serious
injury, or equipment damage.
NOTICE
DESTRUCTION DUE TO INCORRECT OPERATION
Verify that the drives connected via a common DC bus are switched
on simultaneously.
Failure to follow these instructions can result in equipment
damage.
MNA01M001EN, V1.01, 08.2014
Common DC bus
51
Page 52

5 Commissioning
5.1 Commissioning procedure
5.1.1 DC bus connection LXM32 to LXM32
Commissioning steps:
▶
Verify proper installation of the drives and the connections for the
common DC bus, see chapter "4.3 Verifying installation", page 49.
▶
Switch on the controller supply for all devices.
▶
Set the parameters for the braking resistors, see chapter
"5.2 LXM32: Setting the braking resistor parameters".
▶
Commission the drives, see the descriptions in the manuals for the
individual products.
LXM32
52
MNA01M001EN, V1.01, 08.2014
Common DC bus
Page 53

LXM32
5.1.2 Supply via the DC bus
5 Commissioning
Commissioning steps:
▶
Verify proper installation of the drives and the connections for the
common DC bus, see chapter "4.3 Verifying installation", page 49.
▶
Switch on the controller supply for all devices.
▶
LXM32: Set the parameter MON_MainsVolt to "DC-Bus Only" for
LXM32.
Parameters Value
MON_MainsVolt
▶
LXM32: Set the parameters for the braking resistors of LXM32
drives, see chapter
"5.2 LXM32: Setting the braking resistor parameters".
▶
Commission the drives, see the descriptions in the manuals for the
individual products.
DC-Bus Only
MNA01M001EN, V1.01, 08.2014
Common DC bus
53
Page 54

5 Commissioning
5.2 LXM32: Setting the braking resistor parameters
An insufficiently rated braking resistor can cause overvoltage on the
DC bus. Overvoltage on the DC bus causes the power stage to be
disabled. The motor is no longer actively decelerated.
WARNING
MOTOR WITHOUT BRAKING EFFECT
• Verify that the braking resistor has a sufficient rating.
• Verify that the parameter settings for the braking resistor are correct.
• Verify that the I2t value for temperature monitoring does not
exceed 100% by performing a test run under maximum load conditions.
• Verify that the calculations and the test run take into account the
fact that the DC bus capacitors can absorb less braking energy at
higher mains voltages.
Failure to follow these instructions can result in death, serious
injury, or equipment damage.
LXM32
The temperature of the braking resistor may exceed 250 °C (482 °F)
during operation.
WARNING
HOT SURFACES
• Ensure that any contact with a hot braking resistor is avoided.
• Do not allow flammable or heat-sensitive parts in the immediate
vicinity of the braking resistor.
• Verify that the heat dissipation is sufficient by performing a test
run under maximum load conditions.
Failure to follow these instructions can result in death, serious
injury, or equipment damage.
▶
Check the parameter RESint_ext. If you have connected an
external braking resistor, you must set the parameter to "external".
▶
If you have connected an external braking resistor, (value of the
parameter RESint_ext is set to "external"), you must assign the
appropriate values to the parameters RESext_P, RESext_R and
RESext_ton. Verify that the selected external braking resistor is
really connected.
▶
Test the function of the braking resistor under realistic, worst case
conditions.
54
If the regenerated power becomes greater than the power that can be
absorbed by the braking resistor, an error message is generated and
the power stage is disabled.
See the product manual for a description of the parameters.
MNA01M001EN, V1.01, 08.2014
Common DC bus
Page 55

LXM32
6 Accessories and spare parts
6 Accessories and spare parts
6.1 DC bus accessories
Description Order no.
DC bus connection cable, 2 * 6 mm2 (2 * AWG 10), pre-assembled, 0.1 m, 5 pieces VW3M7101R01
DC bus connection cable, 2 * 6 mm2 (2 * AWG 10), Twisted Pair, shielded, 15 m VW3M7102R150
DC bus connector kit, connector housing and crimp contacts for 3 ... 6 mm2 (AWG 12 ... 10),
10 pieces
A crimping tool is required for the crimp contacts of the connector kit.
Manufacturer:
Tyco Electronics, Heavy Head Hand Tool, Tool Pt. No 180250
6.2 DC fuses
VW3M2207
The following DC fuses are offered by SIBA.
http://www.siba-fuses.com
Description SIBA order no.
DC fuse, DC 700V 10A 5020106.10
DC fuse, DC 700V 16A 5020106.16
DC fuse, DC 700V 25A 5020106.25
DC fuse, DC 700V 32A 5020106.32
DC fuse, DC 700V 40A 5020106.40
DC fuse, DC 700V 50A 5020106.50
DC fuse, DC 700V 63A 5020106.63
MNA01M001EN, V1.01, 08.2014
Common DC bus
55
Page 56

6 Accessories and spare parts
6.3 External braking resistors
Description Order no.
Braking resistor IP65; 10 Ω; maximum continuous power 400 W; 0.75 m connection cable
(2.1 mm2), UL
Braking resistor IP65; 10 Ω; maximum continuous power 400 W; 2 m connection cable
(2.1 mm2), UL
Braking resistor IP65; 10 Ω; maximum continuous power 400 W; 3 m connection cable
(2.1 mm2), UL
Braking resistor IP65; 27 Ω; maximum continuous power 100 W; 0.75 m connection cable
(2.1 mm2), UL
Braking resistor IP65; 27 Ω; maximum continuous power 100 W; 2 m connection cable
(2.1 mm2), UL
Braking resistor IP65; 27 Ω; maximum continuous power 100 W; 3 m connection cable
(2.1 mm2), UL
Braking resistor IP65; 27 Ω; maximum continuous power 200 W; 0.75 m connection cable
(2.1 mm2), UL
Braking resistor IP65; 27 Ω; maximum continuous power 200 W; 2 m connection cable
(2.1 mm2), UL
Braking resistor IP65; 27 Ω; maximum continuous power 200 W; 3 m connection cable
(2.1 mm2), UL
Braking resistor IP65; 27 Ω; maximum continuous power 400 W; 0.75 m connection cable
(2.1 mm2), UL
Braking resistor IP65; 27 Ω; maximum continuous power 400 W; 2 m connection cable
(2.1 mm2), UL
Braking resistor IP65; 27 Ω; maximum continuous power 400 W; 3 m connection cable
(2.1 mm2), UL
Braking resistor IP65; 72 Ω; maximum continuous power 100 W; 0.75 m connection cable
(2.1 mm2), UL
Braking resistor IP65; 72 Ω; maximum continuous power 100 W; 2 m connection cable
(2.1 mm2), UL
Braking resistor IP65; 72 Ω; maximum continuous power 100 W; 3 m connection cable
(2.1 mm2), UL
Braking resistor IP65; 72 Ω; maximum continuous power 200 W; 0.75 m connection cable
(2.1 mm2), UL
Braking resistor IP65; 72 Ω; maximum continuous power 200 W; 2 m connection cable
(2.1 mm2), UL
Braking resistor IP65; 72 Ω; maximum continuous power 200 W; 3 m connection cable
(2.1 mm2), UL
Braking resistor IP65; 72 Ω; maximum continuous power 400 W; 0.75 m connection cable VW3A7607R07
Braking resistor IP65; 72 Ω; maximum continuous power 400 W; 2 m connection cable VW3A7607R20
Braking resistor IP65; 72 Ω; maximum continuous power 400 W; 3 m connection cable VW3A7607R30
Braking resistor IP65; 100 Ω; maximum continuous power 100 W; 0.75 m connection cable VW3A7608R07
Braking resistor IP65; 100 Ω; maximum continuous power 100 W; 2 m connection cable VW3A7608R20
Braking resistor IP65; 100 Ω; maximum continuous power 100 W; 3 m connection cable VW3A7608R30
Braking resistor IP20; 15 Ω; maximum continuous power 1000 W; M6 terminals, UL VW3A7704
Braking resistor IP20; 10 Ω; maximum continuous power 1000 W; M6 terminals, UL VW3A7705
VW3A7601R07
VW3A7601R20
VW3A7601R30
VW3A7602R07
VW3A7602R20
VW3A7602R30
VW3A7603R07
VW3A7603R20
VW3A7603R30
VW3A7604R07
VW3A7604R20
VW3A7604R30
VW3A7605R07
VW3A7605R20
VW3A7605R30
VW3A7606R07
VW3A7606R20
VW3A7606R30
LXM32
56
MNA01M001EN, V1.01, 08.2014
Common DC bus
Page 57

LXM32
Glossary
Glossary
Units and conversion tables
The value in the specified unit (left column) is calculated for the
desired unit (top row) with the formula (in the field).
Example: conversion of 5 meters (m) to yards (yd)
5 m / 0.9144 = 5.468 yd
Length
in ft yd m cm mm
in - / 12 / 36 * 0.0254 * 2.54 * 25.4
ft * 12 - / 3 * 0.30479 * 30.479 * 304.79
yd * 36 * 3 - * 0.9144 * 91.44 * 914.4
m / 0.0254 / 0.30479 / 0.9144 - * 100 * 1000
cm / 2.54 / 30.479 / 91.44 / 100 - * 10
mm / 25.4 / 304.79 / 914.4 / 1000 / 10 -
Mass
lb oz slug kg g
lb - * 16 * 0.03108095 * 0.4535924 * 453.5924
oz / 16 - * 1.942559*10
slug / 0.03108095 / 1.942559*10
kg / 0.45359237 / 0.02834952 / 14.5939 - * 1000
g / 453.59237 / 28.34952 / 14593.9 / 1000 -
-3
- * 14.5939 * 14593.9
-3
* 0.02834952 * 28.34952
Force
lb oz p N
lb - * 16 * 453.55358 * 4.448222
oz / 16 - * 28.349524 * 0.27801
p / 453.55358 / 28.349524 - * 9.807*10
N / 4.448222 / 0.27801 / 9.807*10
-3
-
-3
Power
HP W
HP - * 746
W / 746 -
MNA01M001EN, V1.01, 08.2014
Common DC bus
57
Page 58

Glossary
LXM32
Rotation
min-1 (RPM) rad/s deg./s
min-1 (RPM) - * π / 30 * 6
rad/s * 30 / π - * 57.295
deg./s / 6 / 57.295 -
Torque
lb‧in lb‧ft oz‧in Nm kp‧m kp‧cm dyne‧cm
lb‧in - / 12 * 16 * 0.112985 * 0.011521 * 1.1521 * 1.129*10
lb‧ft * 12 - * 192 * 1.355822 * 0.138255 * 13.8255 * 13.558*10
oz‧in / 16 / 192 - * 7.0616*10-3* 720.07*10-6* 72.007*10-3* 70615.5
Nm / 0.112985 / 1.355822 / 7.0616*10-3- * 0.101972 * 10.1972 * 10*10
6
kp‧m / 0.011521 / 0.138255 / 720.07*10-6/ 0.101972 - * 100 * 98.066*10
kp‧cm / 1.1521 / 13.8255 / 72.007*10-3/ 10.1972 / 100 - * 0.9806*10
dyne‧cm / 1.129*106/ 13.558*106/ 70615.5 / 10*10
6
/ 98.066*106/ 0.9806*106-
Moment of inertia
6
6
6
6
2
lb‧in
2
lb‧ft
2
kg‧m
2
kg‧cm
kp‧cm‧s
2
oz‧in
2
lb‧in
- / 144 / 3417.16 / 0.341716 / 335.109 * 16
* 144 - * 0.04214 * 421.4 * 0.429711 * 2304
* 3417.16 / 0.04214 - * 10*10
* 0.341716 / 421.4 / 10*10
2
* 335.109 / 0.429711 / 10.1972 * 980.665 - * 5361.74
/ 16 / 2304 / 54674 / 5.46 / 5361.74 -
lb‧ft
2
kg‧m
2
3
kg‧cm
2
3
kp‧cm‧s
* 10.1972 * 54674
2
oz‧in
- / 980.665 * 5.46
2
Temperature
°F °C K
°F - (°F - 32) * 5/9 (°F - 32) * 5/9 + 273.15
°C °C * 9/5 + 32 - °C + 273.15
K (K - 273.15) * 9/5 + 32 K - 273.15 -
Conductor cross section
AWG 1 2 3 4 5 6 7 8 9 10 11 12 13
2
mm
42.4 33.6 26.7 21.2 16.8 13.3 10.5 8.4 6.6 5.3 4.2 3.3 2.6
AWG 14 15 16 17 18 19 20 21 22 23 24 25 26
2
mm
58
2.1 1.7 1.3 1.0 0.82 0.65 0.52 0.41 0.33 0.26 0.20 0.16 0.13
Common DC bus
MNA01M001EN, V1.01, 08.2014
Page 59

LXM32
Glossary
Terms and Abbreviations
See chapter " Standards and terminology" for information on the pertinent standards on which many terms are based. Some terms and
abbreviations may have specific meanings with regard to the standards.
AC Alternating current
DC Direct current
DC bus Circuit that supplies the power stage with energy (direct voltage).
Drive system System consisting of controller, drive and motor.
EMC Electromagnetic compatibility
Error Discrepancy between a detected (computed, measured or signaled)
value or condition and the specified or theoretically correct value or
condition.
Error class Classification of errors into groups. The different error classes allow
for specific responses to errors, for example by severity.
Factory setting Factory settings when the product is shipped
Fault Fault is an operating state. If the monitoring functions detect an error,
a transition to this operating state is triggered, depending on the error
class. A "Fault Reset" is required to exit this operating state after the
cause of the detected error has been removed. Further information
can be found in the pertinent standards such as IEC 61800-7, ODVA
Common Industrial Protocol (CIP).
Fault Reset A function used to restore the drive to an operational state after a
detected error is cleared by removing the cause of the error so that
the error is no longer active.
Parameter Device data and values that can be read and set (to a certain extent)
by the user.
PELV Protective Extra Low Voltage, low voltage with isolation. For more
information: IEC 60364-4-41
Persistent Indicates whether the value of the parameter remains in the memory
after the device is switched off.
Power stage The power stage controls the motor. The power stage generates cur-
rent for controlling the motor on the basis of the motion signals from
the controller.
Quick Stop The Quick Stop function can be used for fast deceleration of a move-
ment as a response to a detected error or via a command.
Warning If the term is used outside the context of safety instructions, a warning
alerts to a potential problem that was detected by a monitoring function. A warning does not cause a transition of the operating state.
MNA01M001EN, V1.01, 08.2014
Common DC bus
59
Page 60

Glossary
LXM32
60
MNA01M001EN, V1.01, 08.2014
Common DC bus
Page 61

LXM32
Table of figures
Table of figures
1) Movement cycle: Profile for energy assessment 23
2) Single mains fuse for single-phase drives 25
3) Multiple mains fuses for single-phase drives 26
4) Single mains fuse for three-phase drives 27
5) Multiple mains fuses for three-phase drives 28
6) Supply via the DC bus by a drive 30
7) Supply via the DC bus by a DC power supply unit 30
8) Supply via the DC bus by a drive 31
9) Supply via the DC bus by a DC power supply unit 31
10) Wiring of drives with common AC fuse and a mains reactor, example shows three-phase drives. 36
11) Wiring of drives with individual AC fuses and mains reactors, example shows singe-phase drives. 37
12) Wiring of an external mains filter, example shows three-phase drives. 38
13) Wiring of drives with common mains fuse, mains reactor and mains filter, example shows three-phase
drives. 39
14) Specifications for drives with mains supply 42
15) Connector coding 45
16) Unlocking the DC bus connector, step 1: Push cables towards connector. 46
17) Unlocking the DC bus connector, step 2: Push cables towards connector, at the same time remove the
connector with the other hand. 46
18) Wiring diagram DC bus 47
19) DC bus connection, example with connector 48
MNA01M001EN, V1.01, 08.2014
Common DC bus
61
Page 62

Table of figures
LXM32
62
MNA01M001EN, V1.01, 08.2014
Common DC bus
Page 63

LXM32
Index
Index
A
Abbreviations 59
Accessories
External braking resistor, data 19
Accessories and spare parts 55
B
Braking resistor 17
External 19
Monitoring 33
Rating 32
Selection 33
Braking resistors common DC bus 32
C
E
EMC 24
Energy balance 22
External braking resistors 19
G
Glossary 57
H
Hazard categories 5
I
Installation of common DC bus 45
Intended use 6
Introduction 13
Commissioning 51
Parameters for braking resistor 54
steps 52
Common DC bus
Braking resistors 32
Common DC-Bus
Installation 45
Connector
Coding 45
Lock 45
D
DC bus
Braking resistors 32
M
Manuals
Source 11
Monitoring
Braking resistor 33
P
Parameters for braking resistor 54
Q
Qualification of personnel 6
R
Rating
Energy balance 22
MNA01M001EN, V1.01, 08.2014
Common DC bus
63
Page 64

Index
LXM32
Rating information
Braking resistor 34
Rating of braking resistor 32
S
Safety Information 5
Source
Manuals 11
T
Technical data 15
Terms 59
U
Units and conversion tables 57
W
Wiring 45
Wiring diagram
External braking resistor 47
64
MNA01M001EN, V1.01, 08.2014
Common DC bus
 Loading...