


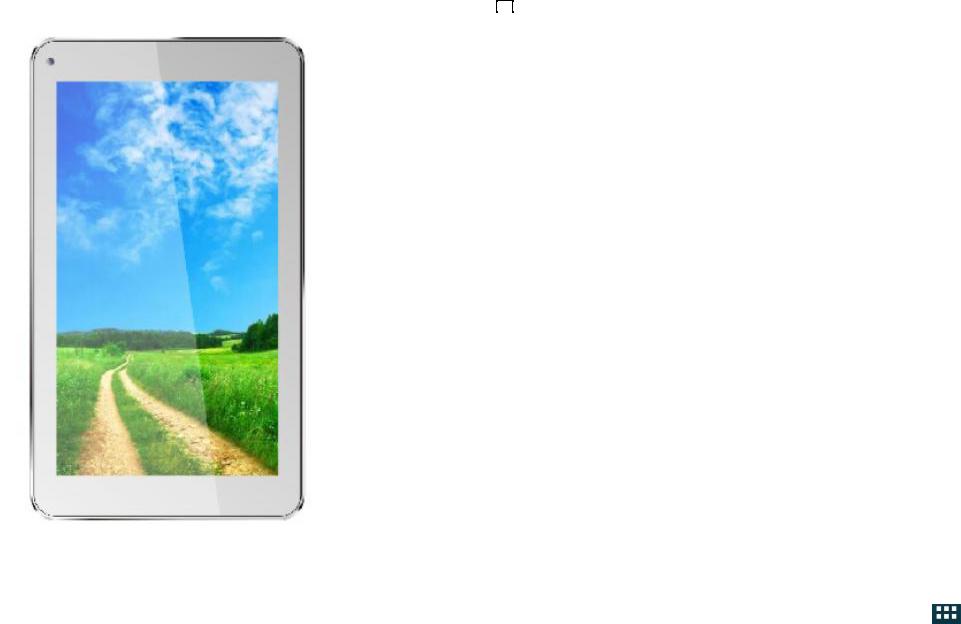
ST-TPC0708
TABLET PC
ПЛАНШЕТНЫЙ ПК
ПЛАНШЕТНИЙ ПК
GB
TABLET PC
Dear Buyer!
We congratulate you on having bought the device under trade name “Saturn”. We are sure that our devices will become essential and reliable assistance in your housekeeping.
Avoid extreme temperature changes. Rapid temperature change (e.g. when the unit is moved from freezing temperature to a warm room) may cause condensation inside the unit and a malfunction when it is switched on. In this case leave the unit at room temperature for at least 1.5 hours before switching it on.
If the unit has been in transit, leave it indoors for at least 1.5 hours before starting operation.
POWER BUTTON USAGE
Turn On: Press the power button and hold for 2 seconds.
Turn Off: Press the power button and hold for 2 seconds →tap Power off→tap OK. Reboot: Press the power button and hold for 2 seconds →Tap Reboot→tap OK. Airplane mode: Press the power button and hold for 2 seconds →tap Airplane mode. Silent mode: Press the power button and hold for 2 seconds →tap Silent mode.
Force Off: If device does not respond, press and hold the power button for 5 seconds.
(Warning: Force off could lead to unpredictable system errors!)
Reset: Pressing the reset button could reset the device. It will clear the all data. Please be careful with the function.
After the current reset function cannot restart, can only be turned off, so you need to press the power button restart the device after reset.
TOUCH-SCREEN NAVIGATION
The touch-screen allows for quick, easy and convenient navigation for all applications. Refer to the following method to operate the touch screen with the finger pulp:
Tap: Quick tap & release on an item on the screen.
Touch & hold: Touch and hold in place approximately 2 seconds, and then release to display an options window.
Finger slide: Touch & slide your finger across the screen and then release.
Two points to zoom in or out: Press and hold any two points relative or opposite direction to drag in desktop, video play interface, picture view interface and so on. It will zoom in or out the interface.
To avoid scratching or crushing, do not place objects on the touch screen surface.
U-DISK
Insert U-Disk
Insert your U-disk into the device via USB host transfer cable. When ready for use, enter into the file browser, switch to the USB folder to view it.
Remove U-Disk
Close all applications or documents which have been opened on the U-disk. Tap
, Settings, Storage, USB storage, Unmount this storage device. When it displayed
Mount this device and then you can unplug the U-disk.
2 |
3 |
Do not insert and remove the U-disk repeatedly in a short time, as this may cause damage to the U-disk.
USING MICRO-SD CARD
The device supports a maximum 32GB micro SD card.
Insert your card into the microSD slot until it clicks into place. It’s OK.
Remove micro SD Card
Close all applications or documents which have been opened on the card. Tap ,
Settings, Storage, SD card, Unmount this storage device. When it displayed
Mount this device and then press the card lightly; it is partially ejected allowing you to pull the card out.
Do not insert and remove the SD Card repeatedly in a short time, as this may cause damage to the card.
We recommend using major brands of memory cards to avoid incompatibility.
GETTING STARTED
Charge the device
It is not recommended to use the device while charging.
Plug the power adapter into an electrical wall outlet, and then connect to the device to fully charge the battery before use (A full charge takes about 6 hours in the off status).
Turn the device on
Press & hold the power button 2 seconds.
Wi-Fi Network Setup
Since many features require a Wi-Fi connection, we recommend you set up your Wi-Fi network now.
1. |
Tap |
→ Settings. |
2. |
Slide Wi-Fi switch to turn on. |
|
The device automatically scans and lists all local Wi-Fi Network found. A lock indicates |
||
secure Wi-Fi networks that require input password to connect. |
||
3. |
Tap the desired network to which you want to connect → enter the Network |
|
Password if applicable → tap Connect. |
||
4. |
Tap |
to return to the Desktop screen. |
If your Wi-Fi network is set as hidden, it won’t be found by the auto scan. Tap Add Wi-Fi network and follow the prompts to add your network.
USB device mode options
Before using this feature, please connect to PC via the Mini USB cable.
USB debugging
Debug mode used to debug program for developers. ADB driver needs to be installed before using this mode. Installation method as follows
1 First switch on the device to Install Driver mode, and then find the "CD driver"(such as F:) on your PC. Use the resource manager to open the CD drive, then copy all files in the folder (\adb_driver) to your PC;
2 And then switch to USB debugging mode on the device. If the PC-side prompts to install the driver, select manual installation, and specify the drive path to the location where you saved the ADB driver.
Media Transfer Protocol(MTP)
Media transfer protocol (MTP) mode used to synchronize transmits data and the users can copy, paste or delete the files in the device. If this is the first time using this mode on your PC, you need to install the driver. Installation method as follows
Firstly, switch to Install Driver mode on the device, and then your PC will automatically pop-up driver installation interface, users need only follow the prompts, and reboot the system after the installation completed. (If not, please go to the Microsoft official website to download Media Player 11 upgrade package and install.)
Install Driver
Install driver mode used to install the driver for USB debugging and media transfer protocol (MTP) mode. The media transfer protocol (MTP) mode driver only for Windows XP, Windows 7 support by default, not need to install.
You can also refer to the readme.txt in the "CD drive".
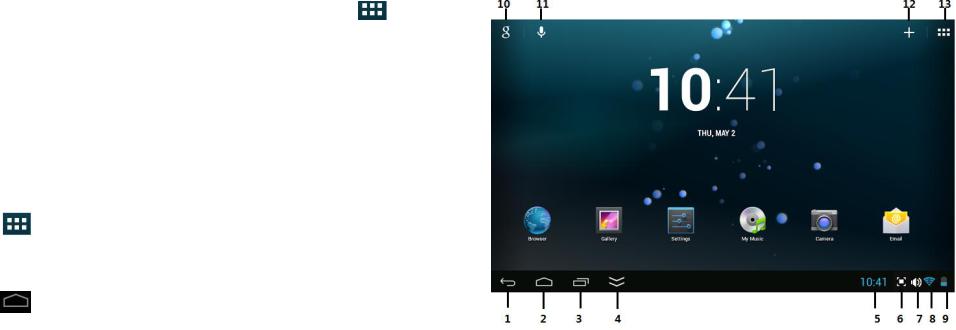
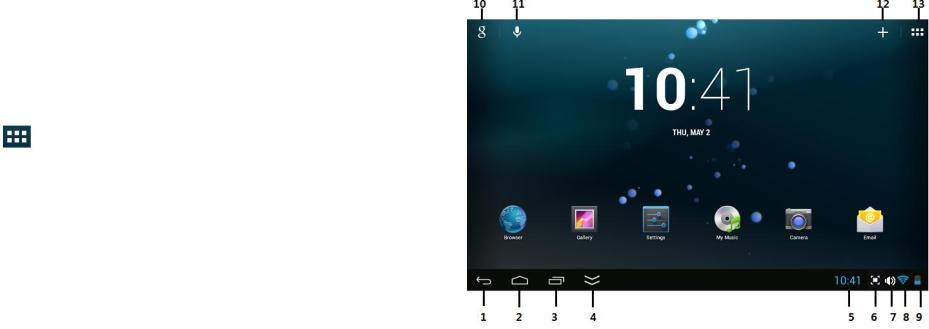
DESKTOP
1.Back.
2.Home.
3.Recent Apps.
4.Hide status bar.
5.Current time.
6.Screen capture.
7.Volume.
8.Wireless network
9.Battery Status. 10.Google search. 11.Voice search.
12.Add Widgets/Apps shortcuts or setting wallpapers and more. 13.Tap to view the applications screen
Through add icon  or in the desktop make two points to zoom in the interface can make many personalized operation, such as, add widgets, application shortcuts, set wallpaper, add bookmarks, email accounts and set up the shortcut.
Tap on any application icon to launch it.
4 |
5 |

Touch, hold and then slide icons to reposition them on the screen.
Touch, hold and slide icons onto  to remove them from the Desktop screen.
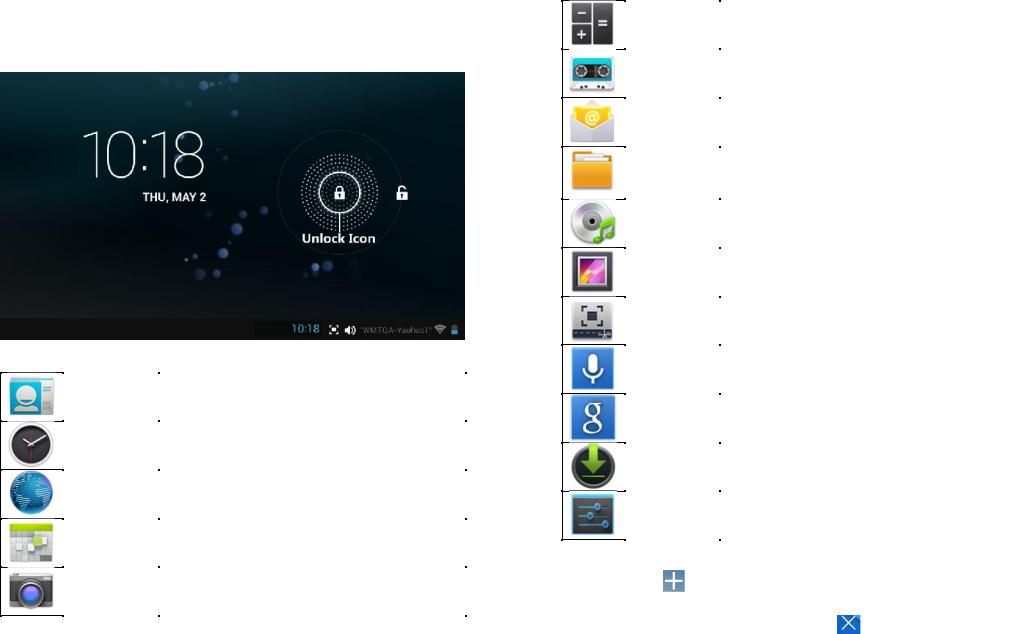
SCREEN LOCK
Can be set to automatically lock screen or quickly press the power button to manually lock screen. The system provides four lock screen style for users. You can enter
Settings, Security, Lock Screen to switch.
Lock screen displays the following:
Tap the unlock icon and drop it to the right and out of the circle to unlock.
PRE-LOADED APPLICATIONS
People |
Create a list with e-mail contacts |
|
|
|
|
Clock |
It can display the time and set the alarm. |
|
|
|
|
Browser |
Access internet. |
|
|
|
|
Calendar |
Calendar. |
|
|
|
|
Camera |
Take normal photos, panoramic photos and take |
|
video. |
||
|
||
|
|
Calculator
My Recorder
File Browser
My Music
Gallery
Picture
Capture
Voice search
Downloads
Settings
Do calculation.
Recording and playback of recorded audio.
Send/Receive email using your existing email addresses.
File manager application for viewing and managing files and apps. Use to install Android apps, and to backup files to your SD card.
Play and manage audio files.
Play, view, and manage video and photo files.
Capture image of the screen.
Voice search.
Local search and online search.
View the downloads and the download progress.
Multiple settings for personalizing and enhancing your Device.
To move an icon to the Desktop screen, touch & hold the icon, and then release it
when it appears on the Desktop screen, or click  icon. Then click on the icon which you want to add to desktop in the App shortcuts below this interface, the icon will automatically move to the desktop.
Touch, hold and then slide icons to reposition them on the screen.
Touch, hold and slide icons onto |
to remove them from the Desktop screen. |
6 |
7 |
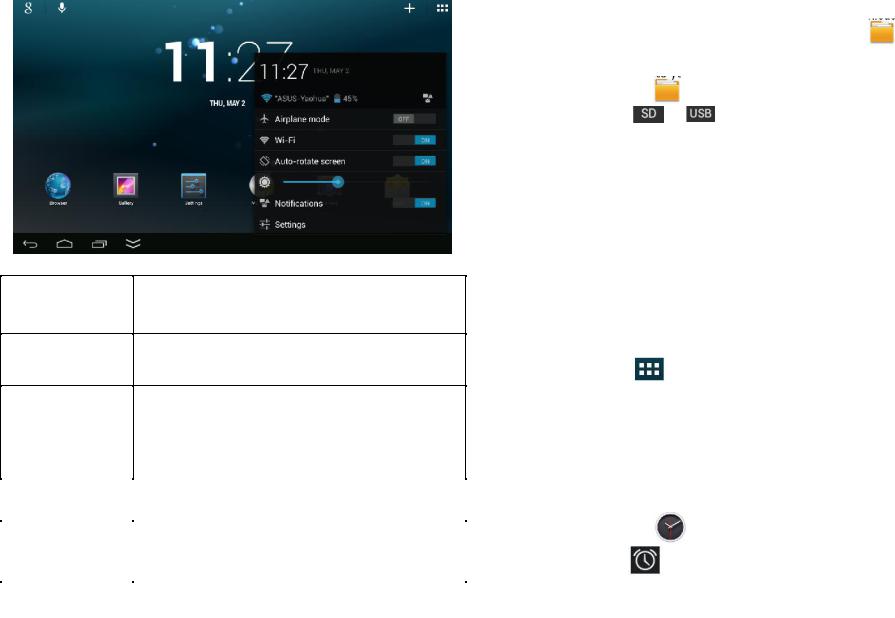
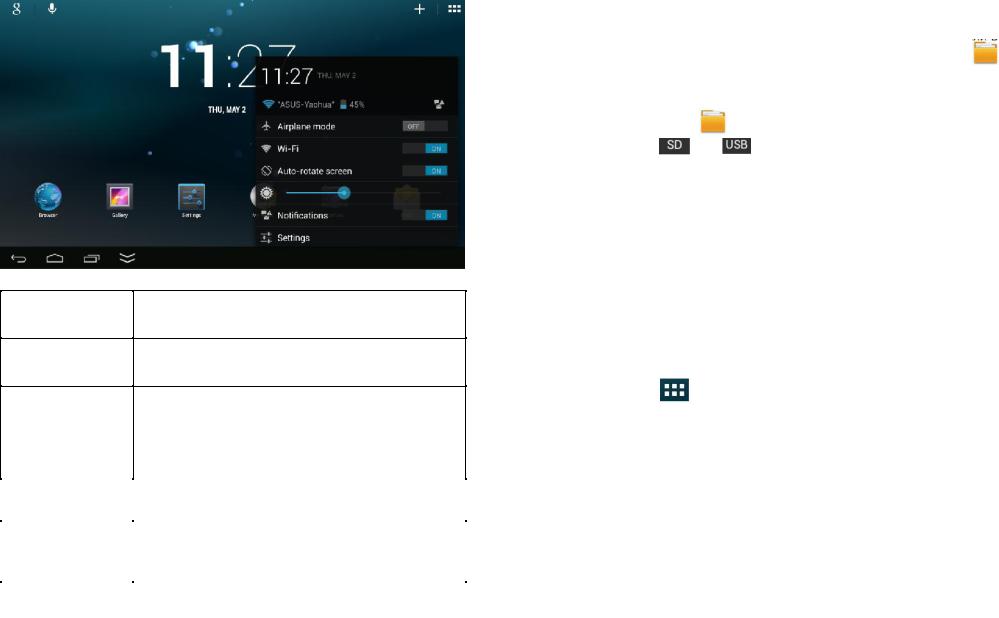
STATUS AND NOTIFICATION AREA
On the Desktop screen, click the icons which in the state bar to view more state information and events.
Airplane mode
Wi-Fi
Auto-rotate screen
Switch airplane mode.
Access to Wi-Fi settings interface.
Auto-rotate switch. After opening, and the screen will automatically rotating screen with gravity induction.
Brightness |
Setting screen brightness. |
|
|
Notifications |
Open or close the notification. |
|
|
Settings |
Access to settings. |
|
|
APPLICATION MANAGEMENT
Install Android Applications
There are many interesting and free Android applications that can be found on the web. Such as launch your web browser and do a search for “Android applications”. Purchased or free Android applications that you have downloaded to your computer can
be installed quickly & easily on your Tablet using the |
File Browser or task |
|||
manager application. |
|
|
||
1. |
Copy the |
.apk files that you want to install onto a SD card or USB device → |
||
insert or connect to your Device. |
|
|||
2. |
Tap the |
|
File Browser application icon. |
|
3. |
Tap |
or |
and locate the folder in which the .apk application files |
|
were saved. |
|
|
|
|
4. |
Tap on a .apk file → Install. |
|
||
The application is installed and the application icon is added to the Applications |
||||
screen. |
Tap Open to launch the application now, or tap Done to return to the File |
|||
5. |
||||
Browser screen. |
|
|
|
|
Download Android Applications direct from a Website
You can download Android applications directly from websites, and then quickly and easily install them on your device.
1.Tap the  browser application icon to launch the internet.
2.Enter the desired website URL, and tap the download link for the application you want to install on your device.
3.After the download is completed, tap  →Downloads. Open the applications from app list.
Uninstalling Android Applications
You can also quickly and easily uninstall the Android applications that you have installed.
1.Tap , Settings, Apps, All.
2.Tap the application you want to uninstall → Uninstall.
3.Tap OK to confirm the Uninstall.
CLOCK
Tap the  Clock application icon. You can see the time and date.
Alarm
You can use your device as an alarm clock by setting multiple alarms.
Add Alarm
1.Tap the Clock application icon.
2.Tap Set alarm →  Add alarm.
3.Set up your alarm as desired.
4.Tap OK.
5.Turn on the right switch of the alarm clock which need to be enabled.
8 |
9 |
Shut Off Alarm Alert
appears.When a scheduled alarm is activated, a pop-up window with the alarm title
Drop |
to |
if you want to be reminded again in 10 minutes. |
Drop |
to |
to cancel the alert. |
Turn Alarm on
1. In the Alarm list, find the desire alarm.
2. The switch button to open the alarm clock on the right side, the switch button from  to
to  .
.
Edit Alarm
1. Enter the alarm list, click the alarm time to edit. 2. After editing, tap OK.
Delete Alarm
1. Enter the alarm list, drag left or right to delete the alarm you want to delete.
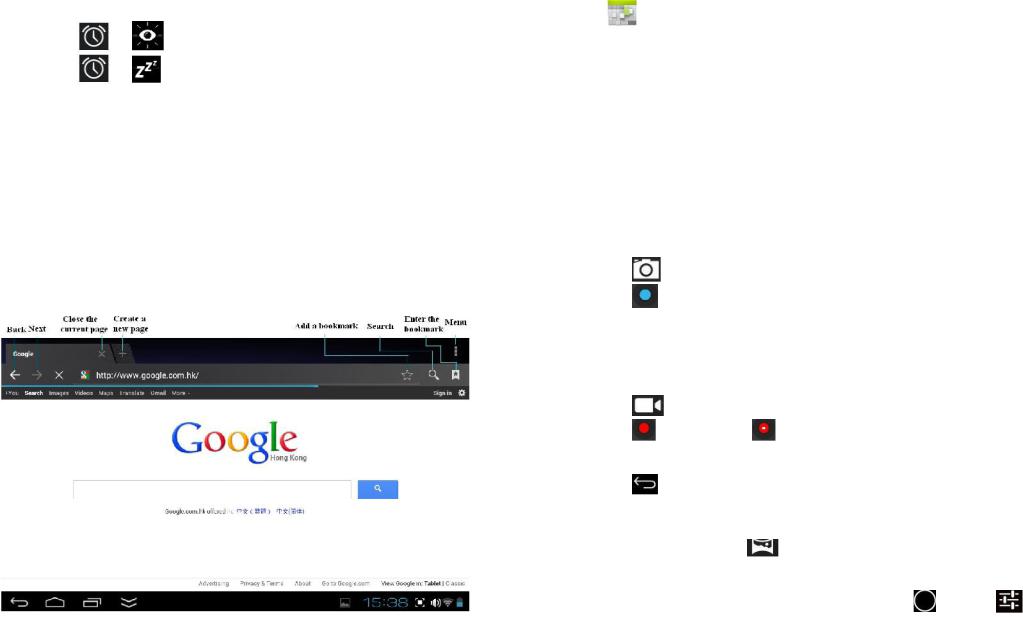
BROWSER
Users can connect to the Internet through browser.
Click the browser icon on the Desktop  , and then you can open the Web browser.
CALENDAR
Tap the Calendar application icon.
For the first time using the Calendar, you need to add an Exchange account. Enter account email address and password. Enter the system Settings → Account & sync →Add account. According to the prompts, complete the setting. After then you can use the calendar. Only to view the calendar need not to add Exchange account.
Add Event
1. On the Calendar screen, tap on the date to which you want to add an event.
2. Tap on the event time → tap  .
.
3. In each field, enter the details of the related activities. 4. Tap Done.
Click the date time in the upper left to choose the calendar you want, such as DAY, WEEK MONTH and AGENDA display mode.
Dates with gray bars indicate scheduled events.
CAMERA
Tap the  Camera application icon.
Take Pictures
1. |
Tap |
switch to video, and you can take pictures. |
2.Tap take a picture.
3.The picture will be saved.
4.Sliding the screen from right to left, and you can enter the gallery to browser the complete picture.
5.Press Back to the Camera.
6.Tap  to exit the Camera and back to the Desktop.
Take Videos
1. |
Tap |
switch to video, and you can take videos. |
|
|
|
2. |
Tap |
to begin and tap |
to stop. |
|
|
3. |
The video will be saved. |
|
|
|
|
4. |
Sliding the screen from right to left, and you can enter the preview list. |
|
|||
5. |
Press Back to the Camera. |
|
|
|
|
6. |
Tap |
to exit the Camera and back to the Desktop. |
|
|
|
|
During video recording you can click the frame quickly to take pictures. Quick |
||||
shot function does not terminate the video recording. |
|
|
|||
Single-motion Panorama |
|
|
|
||
For capturing larger scenes, tap |
icon and switch to single-motion panorama |
||||
mode. In this mode, the user starts an exposure and then slowly turns the Camera to |
|||||
encompass as wide a perspective as needed. The Camera assembles the full range of |
|||||
continuous imagery into a single panoramic photo. |
|
|
|||
You can press Viewfinder long, or on the top right screen tap |
, then tap |
, |
|||
enter camera settings menu. In the dialog box, click select storage device, to choose the files are stored in the Local, SD card or USB storage.
10 |
11 |
CALCULATOR
1.Tap the  Calculator application icon.
2.Tap the numbers and sign of operation to do the calculation.
3.Tap CLEAR to clear the result one by one, tap and hold CLEAR to clear all.
MYRECORDER
1. Tap the |
recorder icon. |
2. Tap the |
record icon to start recording. |
3. Tap the |
record icon to stop record. |
4. Tap the |
play button to play the voice of recording. |
POP3, SMTP and Exchange accounts are supported.
Add Email accounts
You can enter one or more personal email addresses that you would like to access through your Tablet.
1. |
Tap the |
Email application icon. |
2. |
On the Account setup screen, tap in the Email address entry field → enter |
|
your email address. |
||
3. |
Tap in the |
Password entry field → enter your email password. |
4. |
Tap Next. |
|
5. |
Manual Setup (optional): The server settings are automatically populated |
|
based on your email account provider (i.e., gmail.com, etc). However, if you need to |
||
change the server settings tap Manual Setup and make necessary changes. |
||
6. |
According to the selected mailbox server, enter or select the parameter and |
|
server type, and then tap Next. |
||
7. |
(Optional): Enter a name for the account. |
|
8. |
Enter name for outgoing message → tap Done. |
|
|
After setup, if you are unable to connect to a free email account, check with your |
|
email provider to make sure their servers support free accounts on Post Office Protocol (POP) or Simple Mail Transfer Protocol (SMTP).
Email Inbox
1.Tap the  Email application icon.
2.If you set up only one email account, it opens immediately. If you set up multiple accounts, they are listed in the Accounts screen.
3.Tap on the desired email account → tap Inbox.
Open Email Message
1. On the Inbox screen, tap on an email to open it.
2. For attachments, tap Open to launch appropriate application, or tap Save to save attachment to a SD card.
3. To reply, tap  Reply or Reply all.
a. Tap in the Compose Mail entry field to enter your reply message.
b. Tap Send to send immediately, Save as draft to save without send or Discard to discard without saving or sending.
4. To delete the email immediately, tap Delete.
Compose New Email Message
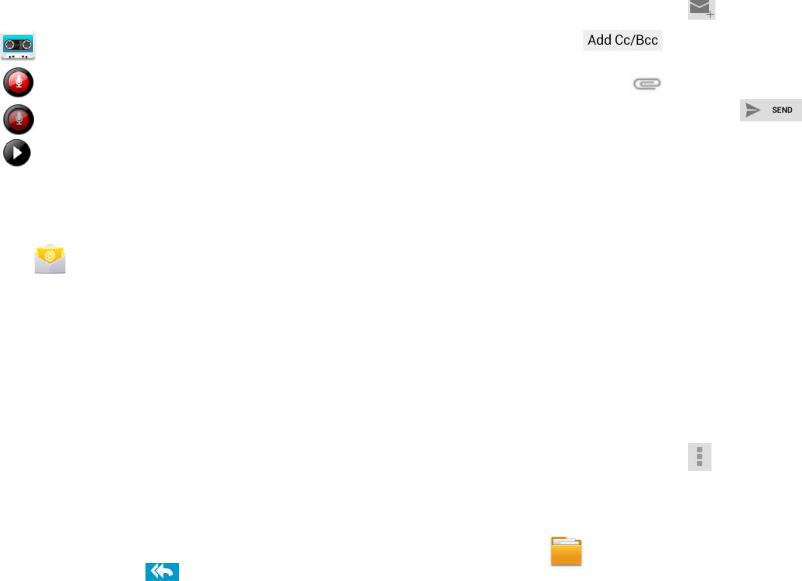
1.On the Inbox screen, tap
2.Enter the e-mail address in the recipient field. If you want to add Cc or Bcc
recipients, tap |
, and then enter the recipient’s email address. |
||
3. |
Tap in the Subject entry field to enter your desired subject title. |
||
4. |
Tap in the Compose Mail area to enter your personal message. |
||
5. |
If desired, tap |
to attach a file. |
|
6. |
When ready to send the email, tap |
. |
|
Edit Email Accounts
1.Tap the  Email application icon.
2.On the Inbox screen, tap  → Settings.
3.Set your desired preferences to customize your email account.
4.Tap  to return to the Inbox screen.
Delete Email Accounts
If you have multiple accounts, and you delete the account designated as the default account, the next email listed is automatically set as the default.
1.Tap the  Email application icon.
2.On the Inbox screen, tap  → Settings.
3.Click the account you want to delete.
4.In the pop-up Account options window, tap Delete.
5.Tap OK to confirm the deletion.
Set Default Email Account
You must always have one account designated as the default account, so if you have multiple email accounts, you can select any one as the default.
1. Tap the  Email application icon.
2. |
On the Inbox screen, tap |
→ Settings. |
3. |
Tap the desire account. |
|
4. |
In the right settings list, tap Default Account to select it. |
|
If you delete the account that was designated as the default account, the next email listed is automatically designated as the default.
FILE BROWSER
Tap the File Browser application icon to view the files on all storage devices (Internal memory, SD card, USB device), and to quickly & easily install Android application on your Tablet.
Use the icons across the top of the screen as follows:
12 |
13 |
Internal Flash (ROM)
SD Card
USB Storage
Paste
Back to the previous folder
Switch folder display mode.
Menu
Copy Media between Computer and Tablet
You can use the File Browser to copy files between an external storage devices and your computer. You can first copy the desired files onto a SD card or USB device.
The internal device storage is titled “Local”, a memory card “SD”, and a USB storage device is titled “USB”.
The instructions below are for copying from a SD card or USB storage device into the device. You can use the same method to copy from the device to a SD card or USB storage device, and then connect the storage device to your computer to transfer the files into the desired folder on your computer.
1.Tap GoTo, select or to display the contents of your storage device.
2.Tap and hold a folder/file and enter into the multi-select mode, select the folder/file as desire → tap Copy.
3. |
Tap GoTo, select |
Internal Memory → tap on the folder into which you |
want to copy the file → tap |
. |
|
Delete files
Tap and hold a folder/file and enter into the multi-select mode, select the folder/file as desire → tap Delete, OK to confirm the deletion.
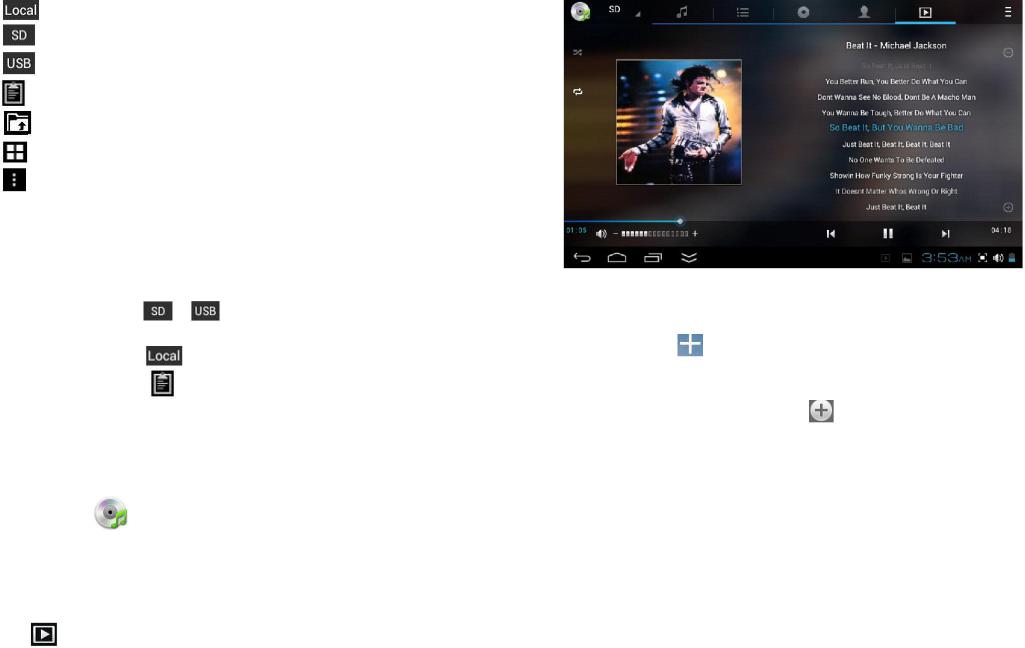
MY MUSIC
Audio file formats supported: MP2, MP3, WAV, AAC, WMA.
Play Music
1.Tap the My Music application icon.
2.Select an audio file from All/Albums/Artists/Directories/My Favorites/User Defined Playlists to play it.
3.Tap the Pause  icon to pause your music.
4.When you playing the music you can tap  or
or  to return to the previous screen.
Click |
switch to the currently playing interface. It is shown as follows: |
At this interface, you can do: view/ download the lyrics, display album photo or spectrum, play/ pause, switch to the previous/ next, loop and random operation etc.
Create Music Widget
Through the Music Widget can be quickly play the music.
On the desktop tap |
icon. In the pop-up list select Widgets → select Music |
Widget. |
|
The Operation with Music and Playlist
Add playlist
1.Enter  Play list interface → click .
2.Input the playlist name.
3.Tap Save.
Rename or Delete playlist
Switch to Display mode, tap the playlist → tap  → Enter a new name in the dialog box, and click Save. If you want delete the playlist, click
  →click Save.
Add music
1. In the all song, album, and artist list, tap the music and hold for switch to multi-select mode.
2. Select the music which you want to add to the list (if you do not want to add, tap it again to cancel).
3. Tap Add to playlist, and then select a playlist.
Delete music
Tap and hold on the music you want to delete → tap Delete.
14 |
15 |
Sort by title or date added |
|
In the all song interface, on the upper right click the |
, in the pop-up list select Sort |
by title, and then click the alphabetical of the right hand, the interface will quickly jump to the songs match the first letter (including the first letter of the pinyin)in the alphabetical list. If you select Sort by date added, all songs will sorted by add date.
GALLERY 
Switch the view storage area
In the root directory, on the top left click the Local, SD or U-Disk to switch the view storage area.
Classification of photos and videos list
In the root directory, on the top left click the Albums, Locations, Times, People or Tags to classify the photos and videos. In the classification file folder, on the top left click Filmstrip view or Grid view to switch the view display mode.
View, play the photos and videos
Photo
In the classification folder, click on the photo thumbnails to open the photo, and on the top right of the folder interface tap  →Slideshow to playing slide.
Video
In the classification folder, click on the view preview. Enter to the video preview interface, and click the play button in the video preview to play the video.
In preview picture interface on the top right screen click  to operate the corresponding photos (including zoom in/ zoom out, share, rotate, trim, photos set to, adjust the current display scale, show details)
In preview video interface, on the top right screen click  to operate the corresponding videos (including trim and details).
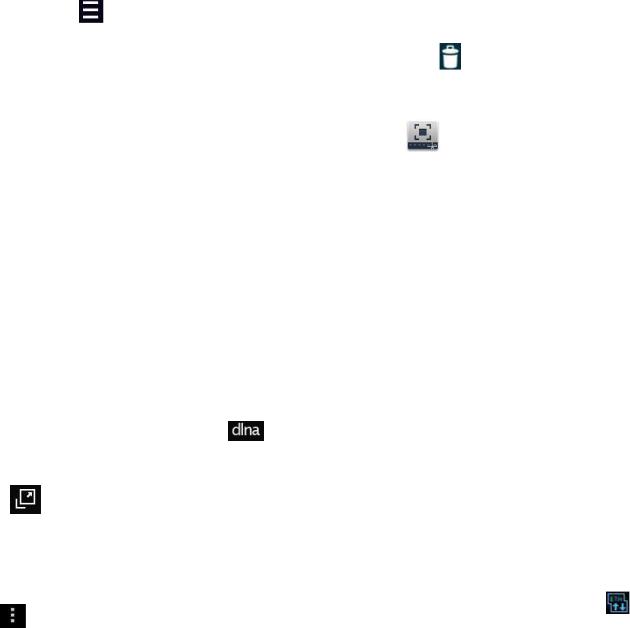
The operation with picture or video playback DLNA
In preview photo interface or video playback interface on the top right click
follow the prompt to operate you can easily share the tablet picture (or video)to support DLNA TV broadcast.
Playback of the video floating window
In video playback, on the top right click |
to switch to playback of the video floating |
window. |
|
Ordinary video playback and floating window playback all are supported by two points |
|
zoom to adjust the size of the video screen. |
|
Floating window video will continue to play after you switch to other interface (ex: |
|
browser the website, desktop, run the software etc. . |
|
You can easily drag the floating window to adjust the position in the screen. |
|
Delete the photos and videos in the list |
|
On the top right of the screen, tap |
icon →tap Select album or Select item. |
Select the album, image thumbnails or video preview which you want to delete, tap
 →OK. If you want to delete a single picture (or video), please enter the folder, select the picture (or video), tap
  , or delete it in the image thumbnails (or video
preview) , tap |
→ OK. |
SCREEN CAPTURE
You can capture a screen image by tapping  at any time.
Tap the Screen Capture application icon to set options for a screen capture. ●Select a delay timer to capture the screen seconds .
●Select the default storage device. ●Show screen capture icon in status bar. ●View software version information.
After the images are saved, they can be viewed through  Gallery application.
WI-FI
Tap Settings → Wi-Fi, enter into Wi-Fi settings. 1. Slide the Wi-Fi switch to turn on Wi-Fi.
2. All the wireless network in the vicinity will be listed, click to select the name you want to connect to wireless network;
3. If the wireless network is connected successful before, the wireless network information will be saved in the pop-up window, select "Connect" starts to connect, choose "forget" to remove wireless network information;
4. If the wireless network is not encrypted, in the pop-up window, select "Connect" Start Connection;
5. If the wireless network is encrypted, enter the password in the pop-up window, and click "Connect" Start Connection;
6. When internet connections are successful, the wireless connection icon in the bottom status bar appears.
3G NETWORK
First of all you need to buy 3G wireless network card according to China Telecom, China Mobile or China Unicom. The currently supported on the 3G card type please refer to
3G dongle support list or appendix.
We strongly recommend on buy the 3G Network Cards, in order to ensure normal 3G Internet access. Please come to the prepaid card into the purchase of 3G Network Cards, put the 3G network card insert into the USB host transfer cable and then insert device. At this time it will be bright lights on the 3G network card, which indicated that it could begin to connect the 3G network.
PPPoE SETTINGS
Before using this feature, connect the USB network card via the USB host transfer cable access to device.
1. Tap Settings → PPPoE settings .
2. Input name and password then click connect to access the broadband network.
ETHERNET
Before using this feature, connect the USB network card via the USB host transfer cable access to device. When the USB network cable plugged into the USB network card, you
will see the bottom of status bar ETH symbol appears.
1. Tap Settings, Ethernet.
2. The device can automatically obtain IP address to connect to the network. You can also choose to manually set the IP address to get connected.
16 |
17 |
SETTINGS
Wi-Fi
Ethernet
PPPoE settings
Wireless & |
3G network |
networks |
Data usage |
|
|
|
|
|
More |
|
|
|
|
|
|
|
|
Sound
Device
Display
Storage
Turn on/off Wi-Fi, Set up & manage wireless access points.
DHCP |
Automatic assign IP |
|
address |
||
|
||
Use Static IP |
Manual assign IP |
|
address |
||
|
||
Set up ADSL network |
|
|
|
|
|
Set up 3G network. |
|
View of data usage |
|
|
|
|
|
Airplane mode |
Disable all wireless |
|
connections. |
||
|
||
VPN |
Add Virtual Private |
|
Networks (VPNs). |
||
|
||
Tethering & |
USB tethering. |
|
Portable Wi-Fi hotspot. |
||
Portable hotspot |
||
Set up Wi-Fi hotspot. |
||
|
||
Volumes |
To adjust the Media |
|
volume. |
||
|
Default notification
Dial pad touch tones
Touch sounds
Select desired ringtone sound.
Turn on/off dial pad touch tones.
Turn on/off touch sounds.
Screen lock sound
Brightness
Wallpaper
Auto-rotate screen
Allow hiding the status bar
Show full-screen gesture tip
Sleep
Daydream
Font size
Wireless display
Turn on/off lock sounds.
Adjust the screen brightness as desired.
Set up wallpaper
Auto-rotate switch.
Allow hiding the status bar.
Full-screen gesture prompts.
Adjust the delay before the screen automatically turns off.
Set the daydream.
Set the system font size.
Search and connect available wireless displays.
View, uninstall, and format the ROM disk, SD card and USB storage.
Battery
Apps
Users |
|
|
|
|
Access to my |
|
location |
Location |
|
|
|
access |
WIFI network |
|
location |
|
|
|
Screen lock |
|
Owner info |
|
Encrypt device |
|
|
|
Make passwords |
|
visible |
|
Device |
|
administrators |
Security |
Unknown sources |
|
|
|
Verify apps |
|
|
|
Trusted |
|
credentials |
|
Install from SD |
|
card |
|
Clear credentials |
|
Language |
Language & |
|
input |
|
|
|
View the usage of the battery.
View and uninstall applications
Modify owner info, add modify delete new users
and their associated information.
Let apps that have asked your permission use your location information.
Let apps use Google’s location service to estimate your location faster. Anonymous location data will be collected and sent to Google.
Require a numeric PIN or password to decrypt your device each time you power it on.
View or deactivate device administrators
Allow installation of non-
Market apps.
Disallow or warn before installation of apps that may cause harm
Display trusted CA certificates.
Install certificates from
SD card.
Remove all certificates.
Setting system language.
Spelling correction, personal dictionary, keyboard and input methods, Voice search, text to speech (TTS) output, and pointer speed.
18 |
19 |
|
Backup & |
|
Reset |
|
|
|
|
Accounts |
Add account |
|
|
|
Date & Time |
Accessibility
System
Developer options
About device
Back up app data, Wi-Fi
Back up my data passwords, and other settings to Google
servers.
Backup account
Automatic restore
Factory data reset
Automatic date & time
Set date
Set time
Select time zone
Use 24-hour format
Choose date format
Backing up to debug-only private cache.
When reinstalling an app, restore backed up settings and data.
Erases all data on tablet.
Use network-provided time
Set date
Set time
Select time zone
Choose 24-hour format or 12-hour format.
Select date format.
Talkback, Magnification gestures, Large text, auto-rotate screen, speak passwords, Accessibility shortcut, Text-to-speech output, Touch & hold delay, Enhance web accessibility
Take bug report, Desktop backup password, Stay awake, Protect SD card, Super user setting, USB debugging, Power menu bug reports, Allow mock locations, Select debug app, Wait for debugger, Verify apps over USB, Show touches, Pointer location, Show layout bounds, Show GPU view updates, Show hardware layers updates, Show GPU overdraw, Show surface updates, Window animation scale, Transition animation scale, Animator duration scale, Disable HW overlays, Force GPU rendering, Force 4x MSAA, Simulate secondary displays, Strict mode enabled, Show CPU usage, Profile GPU rendering, Enable OpenGL traces, Enable traces, Don’t keep activities, Background process limit, Show all ANRs
System updates, Status, Legal information, Model number, android version, Kernel version, Build number.
FREQUENTLY ASKED QUESTIONS
Android
Q: What Android OS version is on my Device?
A: 4.4
Basic Device Functionary
Q: Do I have to charge the battery before use?
A: You should charge the battery for at least 6 hours in the off status. You can use the device while it is charging, but this method to charge is not recommended.
Q: Can I use any of my personal email addresses to send/receive email?
A: The device supports POP3 and SMTP accounts. Some free email accounts are not supported on mobile devices. Check with your email provider to see if you account is supported.
Media Cards
Q: Which media cards are compatible with my Device?
A: micro SD cards.
Music
Q: What type of music files can I play on my device?
A: MP2, MP3, WAV, AAC, WMA
Q: How do I add music files to my device?
A: Copy the music files from your computer onto a SD card or USB storage device, and then use the File Browser application to copy the files into the device.
Photos
Q: What type of photo files can I view on my device?
A: JPG, JPEG, BMP and PNG.
Q: How do I add photo files to my device?
A: Copy the photo files from your computer onto a SD card or USB storage device, and then use the File Browser application to copy the files into the device.
Video
Q: What type of video files can I play on my device?
A: Video file formats supported: MPEG1/2/4 H263 H264 VC1 Real Video Motion JPEG.. The largest video format is supported 1080P(1920×1080) resolution.
Q: How do I add video files to my device?
A: Copy the video files from your computer onto a SD card or USB storage device, and then use the File Browser application to copy the files into the device.
Wi-Fi
Q: Do I need a Wi-Fi adapter to connect to the Internet?
A: No. The Wi-Fi adapter is built-in to the device.
BATTERY MANAGEMENT
The battery is not fully charged out of the box, so it is recommended that you charge the battery for at least 6 hours before you start to use the device.
The rechargeable battery is designed and manufactured to be used and recharged frequently. As with all batteries, the capacity of the battery reduces each time it is charged/depleted. However, you can still try to prolong the battery’s lifetime by following the suggestions below:
● Use your Tablet at least once a week. ● Charge the battery regularly and fully.
● Never leave the battery fully discharged for a long period of time. ● Always keep the device and the battery away from heat.
Charge battery
Plug the power adapter into an electrical wall outlet, and then connect to the device to fully charge the battery before use (A full charge takes about 6 hours in the off status).
When fully charged, the battery icon displays as .
A fully discharged battery takes approximately 6 hours to fully charge in the off status, but you can use the device while plugged in when desired.
SPECIFICATIONS
Display: 7"
OS: Android 4.4
Resolution: 800x480
20 |
21 |
Screen Type: TFT |
|
Aspect Ratio: 16:9 |
|
CPU: Cortex A9, Rockchip 3026 |
|
Number of cores: Dual core |
|
Frequency: 1,2 GHz |
|
GPU: Dual Mali 400 |
|
RAM: 512 MB |
|
Flash Memory: 4 GB |
|
Storage Card Type: TF |
|
Wi-Fi 802.11 b/g/n |
|
Port USB: 2.0 |
|
Camera front: 0.3 MP |
|
Camera back: 2.0 MP |
|
SET |
1 |
Tablet PC |
|
Power adapter |
1 |
USB cable |
1 |
Instruction manual |
1 |
with warranty card |
|
Package |
1 |
ENVIRONMENT FRIENDLY DISPOSAL
You can help protect the environment! Please remember to respect the local regulations: hand in the non-working electrical equipment to an
appropriate waste disposal center.
The manufacturer reserves the right to change the specification and design of goods.
RU
ПЛАНШЕТНЫЙ ПК
Уважаемый покупатель!
Поздравляем Вас с приобретением изделия торговой марки “Saturn”. Мы уверены, что наши изделия будут верными и надежными помощниками в Вашем домашнем хозяйстве.
Не подвергайте устройство резким перепадам температур. Резкая смена температуры (например, внесение устройства с мороза в теплое помещение) может вызвать конденсацию влаги внутри устройства и нарушить его работоспособность при включении. Устройство должно отстояться в теплом помещении не менее 1,5 часов. Ввод устройства в эксплуатацию после транспортировки производить не ранее, чем через 1,5 часа после внесения его в помещение.
КНОПКА ВКЛЮЧЕНИЯ/ ВЫКЛЮЧЕНИЯ
Включение: Нажмите и удерживайте кнопку в течение 2 секунд.
Выключение: Нажмите и удерживайте кнопку в течение 2 секунд →нажмите
Power off (Отключить питание) →нажмите OK.
Перезагрузка: Нажмите и удерживайте кнопку в течение 2 секунд →нажмите Reboot (Перезагрузить) → нажмите OK.
Режим полета: Нажмите и удерживайте кнопку в течение 2 секунд → нажмите Airplane mode (Режим полета).
Режим без звука: Нажмите и удерживайте кнопку в течение 2 секунд → нажмите Silent mode (Режим без звука).
Принудительное выключение: Если устройство не отвечает, нажмите и удерживайте кнопку выключения в течение 5 секунд.
(Внимание: Принудительное выключение может привести к непредвиденным ошибкам системы!)
Сброс: Нажатием кнопки сброса вы можете отменить все настройки компьютера и удалить данные. Пожалуйста, будьте осторожны с этой функцией.
После использования функции сброса компьютер нельзя перезагрузить, но можно только выключить. Поэтому для включения устройства нажмите кнопку включения.
УПРАВЛЕНИЕ С ПОМОЩЬЮ СЕНСОРНОГО ЭКРАНА
Сенсорный экран позволяет быстро, легко и удобно пользоваться всеми приложениями. Следующие способы применяются для управления с помощью подушечки пальца:
Нажатие: Быстро нажать и отпустить значок на экране.
Нажатие и удерживание:
Приложить и удерживать палец на месте в течение 2 секунд, затем убрать палец, чтобы на экране появилось окно функции.
Скольжение: Приложить и вести палец по экрану, затем убрать палец.
Увеличение и уменьшение двумя пальцами: Приложить два пальца к любым двум точкам на экране. Сдвинуть или раздвинуть пальцы, чтобы уменьшить или увеличить изображение.
Во избежание царапания экрана не касайтесь его какими-либо предметами.
U-DISK
Подсоединение U-диска
Подключите U-диск к планшету с помощью USB кабеля. Когда планшет будет готов к работе, откройте браузер файлов, выберите папку USB для просмотра.
Извлечение U-диска
Закройте все приложения или документы, которые были открыты на U-диске.
Нажмите , Settings (Настройки), Storage, USB storage, Unmount this storage device. Когда на экране появится надпись Mount this device, тогда можно отсоединить U-диск.
Не подключайте/отключайте U-диск повторно в течение короткого времени, так как это может привести к повреждению U-диска.
ИСПОЛЬЗОВАНИЕ МИКРО SD-КАРТЫ
Устройство поддерживает микро SD-карту на максимум 32GB. Вставьте карту в слот для микро SD-карты до щелчка.
Извлечение микро-SD карты
Закройте все приложения или документы, которые были открыты на карте. Нажмите
, Settings (Настройки), Storage, SD card, Unmount this storage device. Когда на экране появится надпись Mount this device, тогда слегка вдавите карту, она немного выдвинется, и вы сможете ее вытащить.
Не вставляйте/извлекайте SD-карту повторно в течение короткого времени, так как это может привести к повреждению карты.
Рекомендуется использовать карты памяти проверенных произво-дителей, чтобы не возникло несовместимости.
22 |
23 |
НАЧАЛО РАБОТЫ С УСТРОЙСТВОМ
Зарядка устройства
Не рекомендуется пользоваться устройством во время его зарядки. Подсоедините адаптер питания к розетке, затем подключите адаптер к устройству и полностью зарядите его перед использованием (Полная зарядка занимает примерно 6 часов, если планшет выключен).
Включение устройства
Нажмите и удерживайте кнопку включения в течение 2 секунд.
Настройка сети Wi-Fi
Так как многие функции требуют соединения с Wi-Fi, рекомендуется сразу же настроить сеть Wi-Fi.
1. |
Нажмите |
→ Settings (Настройки). |
2. |
Сдвиньте переключатель Wi-Fi для включения. |
|
Устройство автоматически сканирует и составляет список всех найденных местных |
||
сетей Wi-Fi. Значок замка означает защищенный паролем Wi-Fi. |
||
3. |
Нажмите |
на ту сеть в списке, с которой вы хотите соединиться → Введите |
пароль Network Password, (если требуется) → нажмите Connect (Соединить).
4. Нажмите  чтобы вернуться на рабочий стол.
Если сеть Wi-Fi настроена как скрытая, то она не будет найдена автоматическим сканированием. Нажмите Add Wi-Fi network (Добавить Wi-Fi сеть) и следуйте подсказкам, чтобы добавить сеть.
Функция USB
Перед использованием этой функции подсоедините устройство к компьютеру с помощью мини-кабеля USB.
Отладка USB
Режим отладки используется для отладки программы для разработчиков. Драйвер ADB должен быть установлен перед использованием этого режима. Способ установки следующий
1 Сначала переключите устройство в режим Install Driver (Установить драйвер), затем найдите "CD-драйвер" (например, F:) на своем ПК. Используйте менеджер ресурсов, чтобы открыть CD-драйв, затем скопируйте все файлы в папке (\adb_driver) на свой ПК;
2 Затем переключите устройство в режим USB debugging (Отладка USB). Если ПК подсказывает, что нужно установить драйвер, выберите ручную установку и укажите путь туда, где вы сохранили драйвер ADB.
Протокол передачи медиа (MTP)
Протокол передачи медиа используется для синхронизации переданных данных, с тем, чтобы пользователь мог копировать, вставлять и удалять файлы в устройстве. Если вы впервые используете эту функцию на своем ПК, необходимо установить драйвер. Способ установки следующий
Сначала переключите устройство в режим Install Driver (Установить драйвер), затем на вашем ПК автоматически всплывет интерфейс установки драйвера. Следуйте подсказкам, а после завершения установки перезагрузите систему. (В случае неудачи зайдите на официальный вебсайт Microsoft, чтобы загрузить пакет обновлений Media Player 11 и установить его.)
Установка драйвера
Режим установки драйвера используется для установки драйвера для отладки USB и протокола передачи медиа (MTP). Драйвер протокола передачи медиа (MTP) нужен только для Windows XP. Windows 7 поддерживается по умолчанию, поэтому установка драйвера не нужна.
Информацию можно найти в файле readme.txt на "CD drive".
РАБОЧИЙ СТОЛ
1.Назад
2.Главная
3.Недавние приложения
4.Скрыть строку состояния
5.Текущее время
6.Скриншот
7.Громкость
8.Беспроводная сеть
9.Состояние батареи 10.Поиск в Google 11.Голосовой поиск.
12.Добавить виджеты/ ярлыки для приложений, установить обои и т.п. 13.Просмотр списка приложений
Посредством значка  или с помощью зума двумя точками на экране вы можете делать множество операций, таких как добавление виджетов, ярлыков для приложений, установка обоев, добавление закладок, почтовых ящиков и т.п.
Нажмите значок любого приложения, чтобы запустить его.
Нажмите, удерживайте и сдвиньте значок для перемещения его на экране.
Нажмите, удерживайте и сдвиньте значок на  чтобы убрать его с рабочего стола.
24 |
25 |
БЛОКИРОВКА ЭКРАНА
Можно установить автоматическую блокировку, либо поставить блок быстрым нажатием кнопки выключения. Система предусматри-вает четыре способа блокировки экрана. Вы можете ввести Settings (Настройки), Security (Безопасность), Lock Screen (Блокировка экрана) для включения блока.
На экране отобразится следующее:
Нажмите замочек (Unlock Icon) и ведите его вправо из круга для снятия блокировки.
ЗАГРУЖЕННЫЕ ПРОГРАММЫ
Люди |
Создать список контактов электронной почты. |
|
|
|
|
Часы |
Показывает время. Можно установить будильник. |
|
|
|
|
Браузер |
Навигация в Интернете. |
|
|
|
|
Календарь |
Календарь. |
|
|
|
|
Камера |
Делать обычные снимки, панорамные снимки, |
|
снимать видео. |
||
|
||
|
|
Калькулятор |
|
Делать расчеты. |
||||
|
|
|
|
|
|
|
|
|
|
|
|
|
|
Диктофон |
|
Запись и воспроизведение записанных |
||||
|
аудиофайлов. |
|
|
|
|
|
|
|
|
|
|
||
|
|
|
|
|
||
Электронная |
|
Отправлять/ Получать почту на уже существующие |
||||
почта |
|
адреса. |
||||
|
|
|
|
|
||
Браузер |
|
Программа для просмотра и управления файлами и |
||||
|
приложениями. Используйте для установки |
|||||
файлов |
|
программы Android и для резервного копирования |
||||
|
|
файлов на карту памяти SD. |
||||
Музыка |
|
Воспроизведение и управление |
|
|
|
|
|
аудиофайлами. |
|||||
|
|
|
||||
Галерея |
|
Воспроизведение, просмотр и управление видео- и |
||||
|
фото файлами. |
|||||
|
|
|||||
|
|
|
||||
Скриншот |
|
Захват изображения на экране. |
||||
|
|
|
|
|
|
|
Голосовой |
|
Голосовой поиск. |
||||
поиск |
|
|||||
|
|
|
|
|
|
|
|
|
|
||||
|
Поиск в Интернете. |
|||||
|
|
|
||||
Загрузки |
|
Просмотр загрузок и состояния загрузки. |
||||
|
|
|
||||
Настройки |
|
Множество настроек для персонализации и |
||||
|
улучшения вашего устройства. |
|||||
|
|
|||||
|
|
|
|
|
|
|
Для перемещения значка на экран рабочего стола нажмите и удерживайте значок, а затем отпустите его, когда он появится на экране рабочего стола. Либо
нажмите значок |
, затем нажмите на значок, |
который вы хотите сделать |
ярлыком на рабочем столе. Значок автоматически переместится на рабочий стол. |
||
Нажмите, удерживайте и сдвиньте значки, чтобы переместить их на экране. |
||
Нажмите, удерживайте и сдвиньте значки на |
чтобы убрать их с рабочего |
|
стола. |
|
|
26 |
27 |
СТРОКА СОСТОЯНИЯ И УВЕДОМЛЕНИЙ
На экране рабочего стола нажмите значки, которые находятся в строке состояния для просмотра дополнительной информации о состоянии и событиях.
Режим полета
Wi-Fi
Автоматический поворот экрана
Включить режим для пребывания в самолете.
Открыть интерфейс настроек Wi-Fi.
Переключатель автоматического поворота. Экран будет автоматически поворачиваться в зависимости от ориентации к центру гравитации.
Яркость |
Настройка яркости экрана. |
|
|
Уведомления |
Открыть или закрыть уведомление. |
|
|
Настройки |
Открыть настройки. |
|
|
УПРАВЛЕНИЕ ПРИЛОЖЕНИЯМИ
Установка программ Android
Множество интересных и бесплатных программ для Android можно найти в Интернете. Запустите сетевой браузер и наберите в строке поиска “Android applications”.
Купленные или бесплатные программы для Android, которые вы загрузили в свой
компьютер, можно легко и быстро установить на планшет с помощью |
File |
|||
Browser (Браузер файлов) или приложения Task manager (Менеджер задач). |
||||
1. |
Скопируйте файлы |
.apk , которые вы хотите установить, на карту памяти |
||
SD или устройство USB → |
вставьте карту в планшет или подсоедините USB к |
|||
планшету. |
|
|
|
|
2. |
Нажмите значок |
File Browser (Браузер файлов). |
|
|
3. |
Нажмите |
или |
и выберите папку, в которой были сохранены |
|
программные файлы.apk. |
|
|
||
4. |
Нажмите |
файл .apk → Install (Установить). |
|
|
Программа установлена, и значок программы добавлен в список приложений. |
|
|||
5. |
Нажмите |
Open (Открыть), чтобы запустить приложение, либо нажмите |
||
Done (Готово), чтобы вернуться на экран File Browser (Браузер файлов). |
|
|||
Скачать приложения для Android прямо с веб-сайта
Вы можете скачивать приложения для Android непосредственно с веб-сайтов, а затем легко и быстро устанавливать их на свой планшет.
1.Нажмите значок  браузера, чтобы запустить Интернет.
2.Введите желаемый адрес веб-сайта и нажмите ссылку для загрузки приложения, которое необходимо установить на ваш планшет.
3.После завершения загрузки нажмите  →Downloads (Загрузки). Откройте приложение в списке приложений.
Удаление программ для Android
Вы также можете легко и быстро удалить программы для Android, которые вы установили.
1.Нажмите , Settings (Настройки), Apps (Приложения), All (Все).
2.Нажмите значок программы, которую вы хотите удалить → Uninstall (Удалить).
3.Нажмите OK для подтверждения удаления.
ЧАСЫ
Нажмите значок  Clock. Вы увидите время и дату.
Будильник
Вы можете использовать планшет в качестве будильника, установив сигнал на определенное время. Можно установить несколько будильников.
Добавить будильник
1.Нажмите значок  Clock.
2.Нажмите  установить будильник →
  добавить будильник.
3.Установите будильник на желаемое время.
28 |
29 |
 Loading...