


ST-DV 7705
DVD PLAYER
DVD ПРОИГРЫВАТЕЛЬ
DVD ПРОГРАВАЧ
GB
DVD PLAYER
Dear Buyer!
We congratulate you on having bought the device under trade name “Saturn”. We are sure that our devices will become faithful and reliable assistance in your housekeeping.
Avoid extreme temperature changes. Rapid temperature change (e.g. when the unit is moved from freezing temperature to a warm room) may cause condensation inside the unit and a malfunction when it is switched on. In this case leave the unit at room temperature for at least 1.5 hours before switching it on.
If the unit has been in transit, leave it indoors for at least 1.5 hours before starting operation.
TABLE OF CONTENTS
Remote Control Unit
Function
System Connection
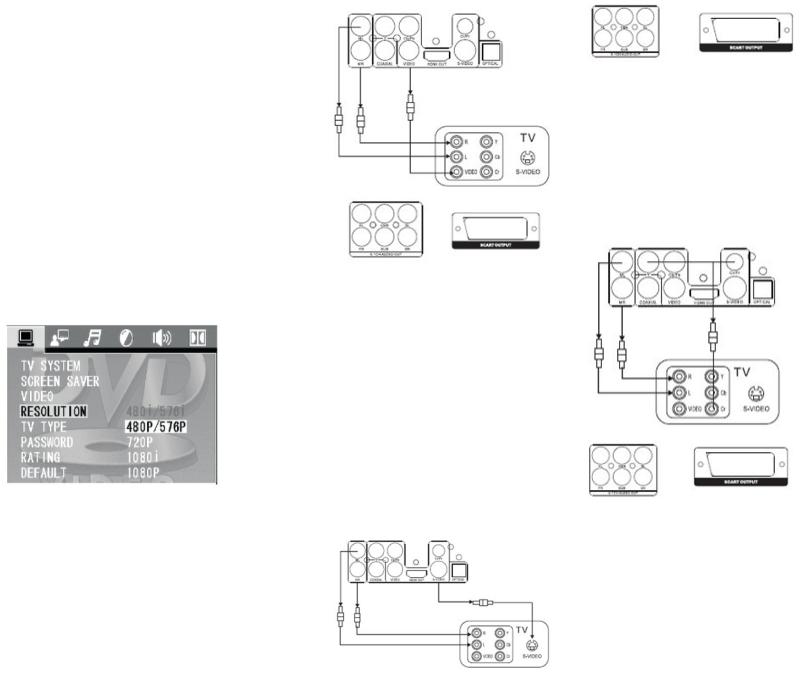
Connecting to TV(AV Input)
S-video Output Terminals
Y, Pb/Cb, Pr/Cr Terminals
Connecting to Progressive Scan TV set Connecting to Stereo Amplifier Connecting to AC-3
Connection to 5.1 CH Amplifier Basic Operation
System Setup
Language Setup
Audio Setup
Video Setup
Speaker Setup
Digital Setup
Media Operating Instruction
Trouble Shooting
Specifications
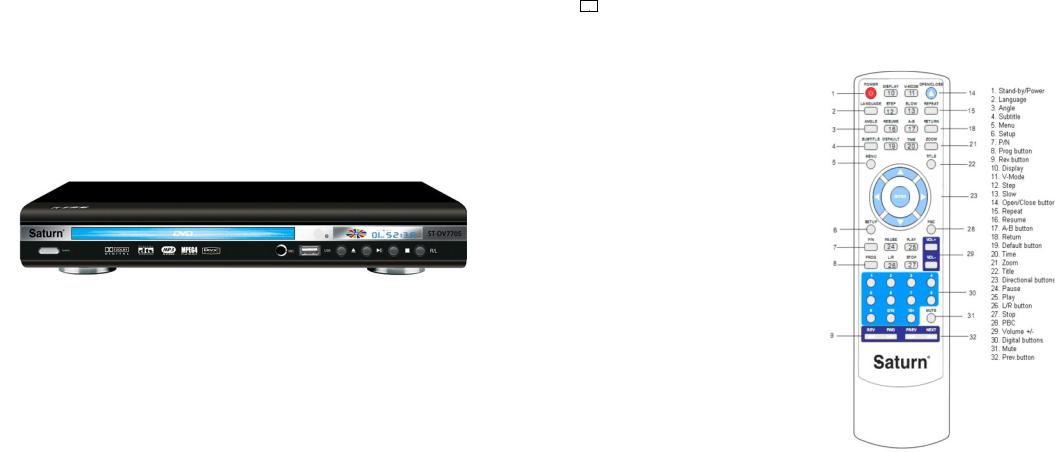
Function Keys of Remote Control:
POWER
Turn on/off the DVD player.
OPEN/CLOSE
Open or Close the disc tray.
MUTE
To mute the sound during playing.
PLAY
Start to play when placed a disc.
PAUSE
Press this key to stop playback. The image and sound will be in static status. Press PLAY to return to normal playback.
STOP
To stop playback.
2 |
3 |

NUMERAL KEYS
Select your desired item directly through these keys.
TIME
You can use this key to set a playback start point. Press this key & move directional buttons to highlight input part & input numbers according to your desired title, character, item or time. Press ENTER to confirm & start playback from your searching part.
Notice:
1.The function is invalid in program mode.
2.When using this function, it will make PBC off automatically
while PBC is on.
3.When playing Mp3 disc, the function is invalid.
PROG
Press PROG under stop or playback status. Press numeral keys to select titles or chapters. Select PLAY or press ENTER to start program playback from your selected items according to your desired playback order. Select CLEAR and then press ENTER to confirm to exit program playback or you can also press STOP twice.
SLOW
When press SLOW, the speed of playback changes in circles
of slow forward; Press PLAY to return to normal playback.
DISPLAY
When playing, press DISPLAY , the screen shows playing
time and residual time.
REPEAT
Press this key to play selected item repeatedly.
When playing DVD, press REPEAT once, screen shows in circle.
as below:
REP: [OFF] REP: [ CHAPTER] REP: [TITLE].
When playing SVCD /VCD /CD, the screen shows in circle as below:
(The function is only valid when PBC is OFF.)
REP: [OFF] REP: [REP1] REP: [REP ALL] A-B
Press A-B firstly to set location A: REPEAT: A
Press again to set location B, then playback will repeat during the two locations: REPEAT: A-B
Press A-B the third time to cancel the function and return to
normal playback: REPEAT: CANCEL
STEP
Press this key to play picture by picture. Press PLAY to return to normal playback. ENTER/DIRECTIONAL BUTTONS
Confirm your selection by using directional buttons..
SETUP
Press SETUP to get into SETUP menu.
REV & FWD
Press REV / FWD to go into Fast Forward/Fast Reverse status
and the continues, the screen will show the speed changes of
2X , 4X , 8X , 20X
TITLE
Press TITLE ,the disc will stop playback and return to the title
menu. Press directional keys and numeral keys to select title.
ANGLE
Press this key to select your liked watching angle when playing a multi-angle disc.
NEXT/PREV
Press NEXT/PREV to select the Next or Previous item during the playing.
LANGUAGE
Select your liked language when playing DVD discs that have more than two languages.
VOL
Press VOL - when playing discs ,the sound will be lower.
Press VOL + when playing discs, the sound will be higher.
PBC
The function is only available for VideoCD version 2.0 or higher. The PBC function may differ by disc. When PBC ON, you can select items through menu list using PREV and NEXT keys and numeral keys .When PBC OFF, you can not select items through menu list but select through numeral keys directly or through PREV and NEXT keys.
MENU
Press MENU to return to DVD menu.
SUBTITLE
Press this key to select subtitles when playing a multi-subtitle DVD or SVCD disc.Types and numbers are subjected to the manufacture of the disc. DVD disc has at most 32 subtitles & SVCD disc has at most 4 subtitles.
RETURN
Press this key to return to VCD menu.
R/L
Switch the output audio.
When playing SVCD or VCD, press R/L key to change channels in circle like following:
STEREO ----MONO L----MONO R ----
AUTO L -----AUTO R.
When playing CD or Mp3 ,switch the output audio in MONO L,
MONO R and STEREO
RESUME
When you press STOP during playback, you can press RESUME to continue watching from the place you stopped while PLAY key has no function of this.
ZOOM
Press ZOOM to turn on or off zoom pan function. The picture will be displayed at the ratio selected by the users. You also can move the picture to watch your desired viewing part via directional keys.
ZOOM 1 ZOOM 2 ZOOM 3 ZOOM 4 ZOOM OFF
V-MODE
This button can set VIDEO output among “COMPONENT”, “COMPONENT”, “COMPONENT PROGRESSIVE” or “HDMI”.
Note: The screen disappear when press this button, press this button continuously until the screen turn normal. If there are picture interferences or no picture, please press "V.MODE" to correct it.
Dеfault
Default settings
This button can restart preset settings substituting them by default settings (excluding password). Select the button Default and press Enter to confirm and reset the system.
Composite Video Output Terminals
(AV Input)
One set of AV Cable is included in the standard packing.
Connecting the unit’s Video ouput to the Tv’s Video input terminal (yellow) Connecting the unit’s echo audio output to the Tv’s audio input terminals(white for left speaker and red for right speaker).
When connecting , please refer to the manual of the TV set.
If your TV set has no AV port,please use the external radiofrequency box to connect the unit’s (RF interlace) and Tv’s antenna interpolation port. And adjust the channel and
frequency to make the image and acoustic get the optimum state.
Convert to PAL or NTSC when watching different kind of discs.
S-Video Output Terminal
4 |
5 |
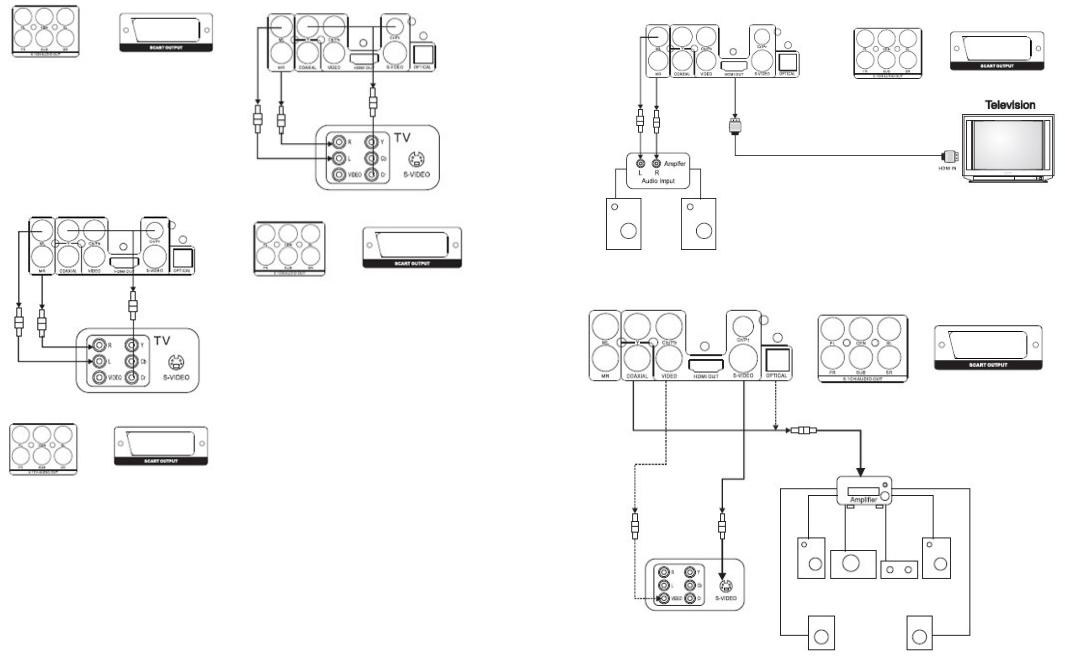
S-video connecting is optional and not included in the standard packing. Connect the unit to TV set using the S- video cable instead of the video connecting cord. A clearer picture will be shown.
Connect the unit’s echo audio output(white for left speaker and red for right speaker). When connecting, please refer to the manual of the TV set.
Y Cb Cr Output Terminal
The connecting is optional and not included in the standard packing.
Connect the Y,Cb,Cr terminals of the cable to the Y, Cb, Cr input of the TV set.
Connect the unit’s echo audio output to the Tv’s audio input terminals (white for left speaker and red for right speaker).
Connecting to Progressive Scan TV set
Connecting to a devices with HDMI faucet
If the TV has Y, Cb ,Cr input connectors, connect the unit via Y ,Cb, Cr output connector. A higher quality picture you will see. Connect the unit’s echo audio output to the Tv’s audio input terminals (White for left speker and red for right speaker).
When connecting to progressive scan TV set, the YUV or RGB in setup menu are equal to Y, Cb, Cr or VGA output.
YUV = Y , Cb ,Cr
RGB = VGA
For example: connecting to Y , Cb, Cr 1. Connect video ouput.
2. Set DVD video output mode to be YUV.
3. Convert to progressive state via the progressive / interlaced key on the remote control
4.Convert the progressive scan TV set to Y, Cb, Cr state.
Connecting to Stereo Amplifier
Connect the video output terminals of the unit to the video input terminals (Video , S-Video or Y/ Cb / Cr ) of the TV set.
Connect the audio output terminals
(Prepositive Left and Prepositive Right ) of the unit to the stereo amplifier’s input terminals Left (white) and Right (Red).
6 |
7 |
Easy DVD hook up guide: For the best possible picture, simply follow these guidelines and use the best cables your TV accepts:
Normal: Composite video Good: S- video.
Better: Component video Best: HDMI video.
HD DVD playback: Enjoy your entire DVD collection in brilliant
high definition format.This DVD player upconvert DVDs to your HDTV's native resolution,whether it's 480p,720p,576p or 1080i.
HDMI output:Use this output for HD conversion and experience stunning HD images and crisp digital audio.
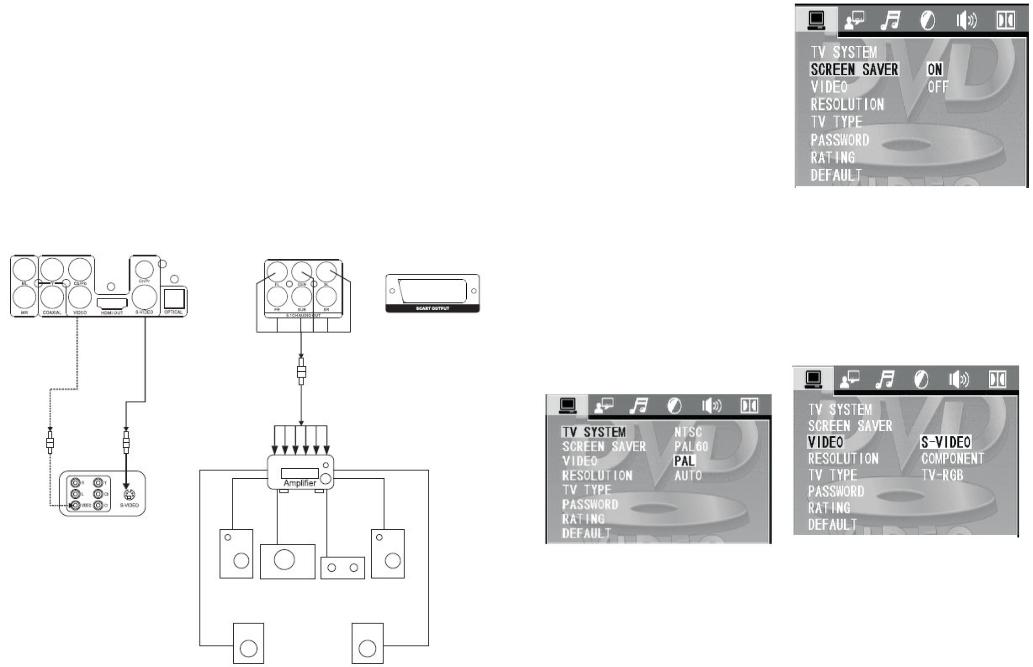
Connecting to 5.1 CH Amplifier
Connecting the AC-3 Decoding Amplifier. Connect the unit’s video output to the video input terminals (Video, S-Video or Y Cb Cr ) of the TV set.
Connect the digital output( optical or coaxial ) to the AC-3 built-in amplifier. Press SETUP button on the remote control to enter the unit’s SETUP menu. Press directional keys on the remote control to select the AUDIO OUTPUT. Press directional keys on the remote control to select digital output and choose BISTREAM or LPCM48K.
Press SETUP again to save your selection and exit [SETUP] menu.
8
Connect the unit’s video output terminal to the Tv’s video input terminals (Video , S-Video or Y Cb Cr). Connect the unit’s 5.1 channels surround audio output terminals to the 5.1 channels amplifier’s audio input terminals.
Prepositive Left , Prepositive Right, Surround Left , Surround Right, Center and Sub-woofer.
BASIC OPERATION
Press SETUP button on the remote control unit to the initial setting. Select related SETUP PAGE through directional buttons. The selected item will be highlighted.
Menu Operations
You can set the mode of audio and video output, OSD language ,initial setup, parental control level and so on.
You can also select the aspect ratio of the playback picture to confirm to your TV screen.
Press SETUP to display setup menu and the system convert to stop status itself.
1. Introduction of setup page
1) SYSTEM SETUP
Press SETUP and select system setup page via directional buttons.
TV system: Using up/down arrow button to make a selection for TV system. There are some TV output systems for chosen:
NTSC, PAL-M, PAL-N , PAL, AUTO.
SCREEN SAVER
Using up/down arrow button to select the status of the screen saver On: When enabled, if the machine has been idle (e.g. in stop/pause state or waiting for user input or for about 60 seconds), the video will be blanked while a screen saver will bounce around the screen to protect screen.
Off: Setting without screen saver
VIDEO
There are three video output modes for your choice:
1) COMPONENT: use Y Cb Cr /Y Pb Pr terminals to output signals
2) TV-RGB: Use S-video or composite video output terminals to output signals. 3) P-SCAN YPBPR: use Y Pb Pr terminals to output signals and convert to progressive output.
4) PC-VGA: Use VGA to output signals & convert to progressive output.
5) S-VIDEO: Use S-VIDEO to output signals
TV TYPE
Using left/right arrow buttons to select TV aspect ratio: 16: 9
16:9 Wide screen video output for a wide screen TV set;
4:3/LB.
4:3 Letter Box video output for a normal TV set. The screen displays the wide picture with brand displayed on the upper and lower portions of the screen.
4:3/PS.
4:3 Pan & Scan video output for a normal TV set. The screen displays the wide 9 picture on the whole screen with a left
and right portion automatically cut off.

PASSWORD
The initial setting of this item is under locked status. You can not set rating & also can not change password. Input initial password: 0000 and press [ENTER] to confirm and then set rating and change the password.
RATING
Playing some DVD discs can be limited depending on the age of the users. Parental control function allows playback limitation level to be set by parents from level
The level is from high to low.
Level 1 is the lowest level & level 8 is the highest level. This function is only valid for some DVD discs which has limited level.
And you should set password firstly & make sure the password lock is locked.
DEFAULT
Using right arrow button to select [RESTORE] and press
[ENTER]to return all the settings of the system to original
settings.
Level 1 is the lowest level & level 8 is the highest level. This function is only
valid for some DVD discs which has limited level.And you should set password firstly & make sure the password lock is locked .
2) LANGUAGE SETUP
OSD LANGUAGE
Using up/down buttons to select desired OSD language and press [ENTER] to confirm;
The unit supports: English, German , Spanish , French , Italian,and Portuguese.
AUDIO LANGUAGE
Using up/down button to select desired AUDIO language and press[ENTER] to confirm;
This unit support 8 languages: Turkish , English , Hebraic, French, Spanish , Portuguese, Latin, German
3) Audio Setup
AUDIO OUTPUT
Using right arrow buttons to select audio output way. There are three ways for your choices: SPDIF/ OFF, SPDIF /RAW and SPDIF/PCM.
When you use Optica or Coaxial Output,
please select SPDIF/ RAW or SPDIF/PCM Output.
MIC SETUP
Use right arrow button to select status of the Karaoke. The Karaoke may set to be AUTO or OFF.
ECHO
You can use up/down buttons to increase or decrease the echo level.
MIC VOL
You can use up/down buttons to increase or decrease the Karaoke volume.
KEY
You can use up/down buttons to increase or decrease the tone level.
4)Video Setup
BRIGHTNESS
Use up/down buttons to adjust the brightness of the video output
10 |
11 |

CONTRAST
Use up/down to adjust the contrast value of video output.
HUE
Use up/down to adjust HUE value of video output.
SATURATION
Use up/down to adjust saturation value of video output.
5) Speaker Setup
DOWNMIX
LT/RT: When you play disc that has no prologic Dolby effect, you can choose LT/RT output. The disc information will be decoded and show better effect. STEREO: When use 5.1 Ch output, the front left & front right channel have audio output signals. When use 2 Ch output, audio output in normal output stereo signals.
VSS: When play discs which have 5.1 Ch output, the main channel is able to output virtual surround effect.
5.1 CH: The 5.1 Ch output is valid only when this page is set at 5.1 CH.
SUBWOOFER
ON: The unit detects subwoofer output itself. If has audio input and the subwoofer will have sound output.
OFF: The subwoofer will have no sound output
CENTER DELAY
You can set delay time of the center and rear audio output.
REAR DELAY
You can set delay time of the rear audio output.
5) DIGITAL SETUP
Press SETUP and select speaker setup page via up/down button.The screen displays as below:
OP MODE
LINE OUT: The input signals are linear compressed & the volume is low. So choose LINE OUT at night will be better. RF REMOD: The volume is higher and adapt to daytime use.
DYNAMIC RANGE
When you choose LINE OUT mode, select DYNAMIC RANGE
to adjust compression ratio & you can get different effects.
When adjust to FULL , the compression ration will be set lowest. When adjust to OFF, the compression ratio will be set highest.
DUAL MONO
You can set audio output way of L & R channel. There are four modes: STEREO, MONOL, MONO R, MIX MONO.
Media Operating Instruction
1. Support USB,compatible with JPEG,MP3,AVI,WMA,etc.
2. Support SD,MMC,RSMMC,MS,compatible with JPEG,MP3,AVI,WMA,etc.
3. USB media operation: USB function are available on no disc or no card status,
media will be auto play when USB is connected to the unit in the above status.
4. Card media operation: Card media function are available on no disc or no USB status,
media will be auto play when memory
12 |
13 |
card is connected to the unit in the above status.
Notice:
A. DVD and USB function can be switched from each other by the DVD/USB key on the
remote control.
B. The unit is not all purpose for all of the media as some of them have unforeseeable problem.
Trouble Shooting
Symptoms |
Possible Cause and Remedies |
||
|
|
|
|
|
1. |
Make sure there’s connection between |
|
|
the power cord and the outlet. |
||
|
2. |
Check it the power is on (Always pow- |
|
|
er off the unit after use. |
||
|
3. |
Check if the power is on. |
|
|
4.Check if the disc has been loaded in. |
||
|
5. |
Check if the disc has been placed right |
|
|
way. Make sure the disc with label side |
||
No playback |
up. |
||
6. |
The disc has been damaged & should |
||
|
|||
|
change another or clean it. |
||
|
7. |
Moisture may be condensed inside the |
|
|
unit. |
||
|
8. |
Turn power on for 1-2 hours before |
|
|
using. |
||
|
9. |
The region code for the disc is not |
|
|
matching to the unit. |
||
|
10. The format of the disc is not correct. |
||
No Video |
1. Check if the TV is on & the video con- |
||
|
nectors are all right. |
||
|
2. |
Check if the video output setting con- |
|
|
forms to the setting in SETUP menu. |
||
|
3. |
Check if the connection cables are all |
|
|
right. |
||
|
4. |
Please clean the disc. |
|
Picture indefinable or distorted |
1. The disc has been damaged or dirted. |
||
|
2. |
Reset the disc TV system of the unit & |
|
|
TV. |
||
|
3. |
Connect the unit directly to the TV set |
|
|
and no other connections. |
||
Image can not get full screen |
1. Set the TV system again. |
||
|
2. |
Select proper aspect ratio from SETUP. |
|
Can not select a song |
Song parts of the discs can not be pro- |
||
|
grammed its sequence. |
||
No Karaoke |
1. Check if the karaoke is power on |
||
for echo |
for echo. |
||
|
2. |
Check if the volume tuner is turned on. |
|
Sharpe Sound from microphone |
1. Put the microphone away from speak- |
||
|
ers |
||
|
2. |
Turn down the volume of TV & amplifi- |
|
|
er. |
||
|
3. |
Turn down the volume of the micro- |
|
|
phone. |
||
Remote Control does not function |
1. Remove the obstacles between remote |
||
|
|
and the unit. |
|
|
2. Point the remote control unit the re- |
|
|
mote sensor with a valid scope and |
|
|
should not be away from the unit far than |
|
|
7m. |
|
|
3. Check if the batteries loaded into the |
|
|
remote control unit correctly. |
|
|
4. Check if the batteries are still useful or |
|
|
change new ones. |
No Sound or Video Output Imperfect |
|
1. Make sure the TV and amplifier are |
|
|
turned on and connected correctly. |
|
|
2. Check if there’s connection shield |
|
|
exists between the connection of the TV |
|
|
& amplifier. |
|
|
3. Check if the system is in mute status. |
|
|
4. Press L/R or LANGUAGE to convert. |
|
|
5. There’s no audio output in these sta- |
|
|
tus: |
|
|
|
Specification |
||
|
|
|
Disc type: |
|
DVD/MP4/SVCDA/CD/DVCD/JPEG/ KO- |
|
|
DAK CD/M P3/CD/HDCD/CD-R/ CD- |
|
|
RW/DVD-R/DVD-RW. |
|
|
|
Video Format: DVD: |
|
MPEG2/MPEG4;VCD:MPEG1,MPEG3 |
Audio Format: |
|
MPEG1,MPEG2,MPEG3,MPEG4,PCM, |
|
|
DOLBY ,DIGITAL, Virtual Stereo Virtual |
|
|
Surround, 5.1 CH |
|
|
|
Signal Output: |
|
Audio: 5.1 channels output, Optical outpi |
|
|
Coaxial output |
|
|
Video: AV output, S- Video output, Y, |
|
|
Cb output. VGA output |
|
|
|
Video features: |
|
Video output lever :1.0V p-p (75 A ) Y |
|
|
output lever :1.0Vp-p (75 n) C output |
|
|
lever: 0.286Vp-p/ NTSC;0.3Vp p/PAL |
|
|
(75 A) |
|
|
|
Frequency response |
|
20--20KHz(+1dB) |
|
|
|
Audio features: |
|
S/N : > 90dB |
Total distortion : |
|
<0.01 % |
|
|
|
Power input voltage: |
|
220-230V, 50Hz |
|
|
|
Rated current: |
|
0,11 А |
|
|
|
Power consumption: |
|
25 W |
|
|
|
14 |
15 |
Set |
|
DVD |
1 |
Instruction manual |
|
with warranty book |
1 |
Package |
1 |
ENVIRONMENT FRIENDLY DISPOS- AL
You can help protect the
environment!
Please remember to respect
the local regulations: hand in the non-working electrical equipment to an appropriate
waste disposal center.
The manufacturer reserves the right to change the specification and design of goods.
RU
DVD ПРОИГРЫВАТЕЛЬ
Уважаемый покупатель! Поздравляем Вас с приобретением изделия торговой марки “Saturn”. Уверены, что наши изделия будут верными и надежными помощниками в Вашем домашнем хозяйстве.
Не подвергайте устройство резким перепадам температур. Резкая смена температуры (например, внесение устройства с мороза в теплое помещение) может вызвать конденсацию влаги внутри устройства и нарушить его работоспособность при включении. Устройство должно отстояться в теплом помещении не менее 1,5 часов. Ввод устройства в эксплуатацию после транспортировки производить не ранее, чем через 1,5 часа после внесения его в помещение.
Содержание
Пульт дистанционного управления Функционирование Подключения систем Подключение к ТВ (Вход АV) S-Video выход
Выходы Y, Pb/Cb, Pr/Cr
Подключение к функции Прогрессивное сканировние.
Подключение к стерео усилителю Подключение к АС-3 (система пространственного звуковоспроизведения)
Подключение к усилителю 5.1 CH Основные функции Настройка системы
Установка языка Настройка аудио Настройка видео Настройка динамиков Цифровая установка
Работа с мультимедийной системой Устранение неисправностей Технические характеристики
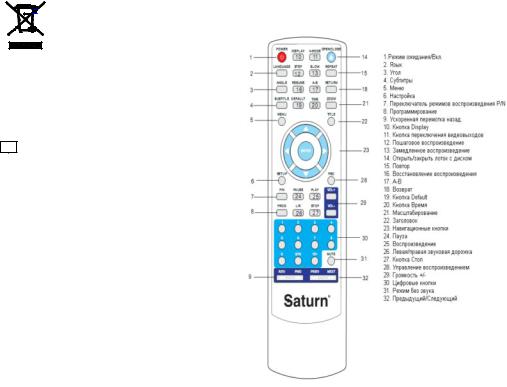
Пульт дистанционного управления
Кнопки на пульте дистанционного управления
РЕЖИМ ОЖИДАНИЯ/ВКЛ
Загрузить/Выгрузить диск Открыть/Закрыть лоток с диском
Включение/Выключение звука Выключение звука во время воспроизведения
Воспроизведение
Начало воспроизведения диска
ПАУЗА
Прекращение воспроизведения диска. Изображение и звук будут в неподвижном положении. Нажмите кнопку PLAY для возврата к обычному воспроизведению.
СТОП
Прекращение воспроизведения
Цифровые кнопки
С помощью этих кнопок выберите необходимую функцию.
ВРЕМЯ
С помощью этой кнопки выбирается время пуска воспроизведения. Нажмите эту кнопку и при помощи навигационных кнопок выберите вводимую категорию и номер согласно предпочтений заголовка, позиции или времени. Кнопкой ENTER подтвердите выбор и начните воспроизведение с места поиска.
Примечание:
1. Данная функция недоступна в режиме программирования.
2. При использовании этой функции управление воспроизведением автоматически отключается.
При воспроизведении диска Mp3 данная функция недоступна.
PROG
В состоянии остановки или воспроизведения нажмите кнопку PROG. Цифровыми кнопками выбираются разделы или главы. Нажмите кнопку PLAY или ENTER для начала воспроизведения диска согласно порядка воспроизведения. Нажмите кнопку CLEAR и нажмите ENTER для подтверждения выхода из воспроизведения или дважды нажмите кнопку STOP.
SLOW
Нажатием кнопки SLOW воспроизведение замедляется.
Нажмите PLAY для возврата в нормальный режим воспроизведения.
DISPLAY
При нажатии кнопки DISPLAY на экране отображается время воспроизведения и время, оставшееся до конца.
REPEAT (ПОВТОР)
Нажмите эту кнопку для повторного воспроизведения выбранной части диска.
При воспроизведении DVD диска однократно нажмите REPEAT, на экране отобразится следующее:
ПОВТОР: [ВЫКЛ] ПОВТОР: [ГЛАВА] ПОВТОР: [ЗАГЛАВИЕ].
При воспроизведении SVCD /VCD /CD, на экране отобразится:
(функция активна только при выключенной функции PBC (управление воспроизведением)):
ПОВТОР: [ВЫКЛ] ПОВТОР: [ПОВТОР1] ПОВТОР: [ПОВТОР ВСЕХ]
A-B:
Сначала нажмите A-B для настройки положения A: REPEAT (Повтор): А- Нажмите кнопку для настройки положения B - будет воспроизведение двух положений: REPEAT (Повтор): A-B:
Нажмите кнопку А-В третий раз для отмены функции и возврата к обычному воспроизведению. ПОВТОР: ОТМЕНА
ШАГ
Нажмите эту кнопку для последовательно воспроизведения картинок на экране. Нажмите PLAY для возврата к нормальному режиму воспроизведения.
ВВОД/НАВИГАЦИОННЫЕ КНОПКИ
Подтверждайте ваш выбор при помощи навигационных кнопок
SETUP
Нажмите кнопку SETUP для входа в меню Настройки
REV & FWD
Нажмите кнопку REV / FWD для перехода в положение Ускоренного воспроизведения вперед /Ускоренного воспроизведения назад.
На экране отобразится процесс изменения скорости
2X , 4X , 8X , 20X
ЗАГОЛОВОК
Нажмите кнопку TITLE - воспроизведение диска прекратится и возвратится к меню Заголовка. При помощи кнопок направлений выберите заголовок.
УГОЛ
Нажмите кнопку для выбора угла обзора при воспроизведении диска с несколькими углами обзора.
СЛЕДУЮЩИЙ/ПРЕДЫДУЩИЙ
Кнопка NEXT/PREV предназначена для перехода к следующему или предыдущему фрагменту во время воспроизведения.
Язык
Во время воспроизведения DVD дисков выберите предпочитаемый язык,
16 |
17 |
если DVD диск имеет более двух языков.
VOL
Нажмите кнопку VOL - для уменьшения громкости звучания.
Нажмите кнопку VOL + для увеличения громкости звучания.
PBC (Управление воспроизведением)
Эта функция доступна только для Video-CD версии 2.0. или выше. Функция PBC может отличаться для разных типов дисков. При включенной функции PBC можно выбирать команды через список мею с использованием кнопок PREV и NEXT и цифровых кнопок. Если функция PBC выключена, команды списка меню недоступны, но доступны с цифровых кнопок или с помощью кнопок PREV и NEXT.
МЕНЮ
Нажмите кнопку MENU для возврата в DVD меню.
Subtitle (субтитры)
При воспроизведении диска DVD или SVCD с субтитрами нажмите эту кнопку. Типы и номера субтитров определяются производителем DVD. На DVD диске установлено максимум 32 типа субтитров и на SVCD диске установлено не более 4 типов субтитров.
ВОЗВРАТ
Нажмите эту кнопку для возврата в
VCD меню.
R/L
Переключение режима звучания При воспроизведении дисков SVCD или VCD нажмите кнопку R/L для изменения каналов:
STEREO ----MONO L----MONO R ----
AUTO L -----AUTO R
При воспроизведении CD или MP3 переключите режим звучания в MONO L, MONO R или STEREO.
P/N
Нажмите кнопку P/N для изменения системы воспроизведения.
RESUME
Если во время воспроизведения диска была нажата кнопка STOP, кнопкой RESUME воспроизведение восстанавливается.
Нажмите кнопку RESUME для продолжения воспроизведения с места остановки.
Кнопка PLAY при этом заблокирована.
ZOOM (Масштабирование)
Нажмите кнопку ZOOM для увеличения или уменьшения изображения на экране. Изображение отобразится в выбранном Вами масштабе. Вы также можете перемещать изображение при помощи навигационных клавиш.
ZOOM 1 ZOOM 2 ZOOM 3 ZOOM 4 ZOOM ВЫКЛ
V-MODE
Данной кнопкой выберите видео вы-
ход: “COMPONENT”, “COMPONENT PROGRESSIVE” или “HDMI”.
Примечание: при нажатии кнопки изображение пропадает. Нажимайте эту кнопку непрерывно до появления изображения. При появлении помех или отсутствии изображения нажмите кнопку "V.MODE" для корректировки.
Настройки по умолчанию
Они позволяют перезапустить установленные настройки, заменив их заводскими настройками (за исключением пароля). На пульте ДУ выберите команду Default и нажмите кнопку Enter для перезагрузки.
Подключение систем Подключение к ТВ (Вход АV)
Выходы Composite Video (Ввод AV)
Кабель AV входит в стандартный комплект DVD проигрывателя. Подключите видео выход DVD проигрывателя к видео входу телевизора (желтый).
Подключите каждый аудио выход DVD проигрывателя к входу телевизора (белый для левого динамика, а красный - для правого динамика).
При подключении телевизора к DVD см. инструкцию по эксплуатации телевизора.
Если Ваш телевизор не оборудован портом AV, используйте внешний декодер или разъем для антенны. Настройте каналы и частоту на максимально четкое изображение и звучание.
Переключите режим PAL или NTSC при воспроизведении разных видов дисков.
S-Video выход
S-Video выход – опция, которая не входит в стандартную комплектацию. Подключите DVD проигрыватель к телевизору при помощи S-video кабеля вместо обычного видео кабеля. На экране отобразится четкое изображение.
Подключите каждый аудио выход DVD проигрывателя (белый для левого динамика, а красный - для правого динамика). При подключении см. инструкцию по эксплуатации телевизора.
Выход ы Y, Pb/Cb, Pr/Cr
Выход Y Cb Crопция, которая не входит в стандартную комплектацию. Подключите контакты разъема Y,Cb,Cr кабеля к входам Y,Cb,Cr телевизора. Подключите каждый аудио выход ДВД проигрывателя к входу телевизора (белый для левого динамика, а красный - для правого динамика).
Подключение к функции «Прогрессивное сканирование».
18 |
19 |
Если в телевизоре есть разъемы Y, Cb ,Cr , подключите к DVD при помощи разъемов Y ,Cb, Cr . Качество изображения будет улучшено. Подключите каждый аудио выход DVD проигрыва-
Подключение устройств к HDMI выходу
Подключение DVD к устройству: для получения наиболее четкого изображения следуйте руководству и используйте кабели, наиболее подходящие для вашего телевизора:
теля к входу телевизора (белый для левого динамика, а красный - для правого динамика).
При подключении телевизора к progressive scan, меню установки YUV, RGB
аналогично меню установки Y, Cb, Cr
или VGA:
YUV = Y , Cb ,Cr
RGB = VGA
Например: Подключение к Y , Cb, Cr 1. Подключите кабель к видео выходу. 2. Выберите YUV режим видео выхода
DVD.
На пульте дистанционного управления переведите DVD в режим progressive, нажав соответствующую кнопку.
4. Переключите телевизор из режима прогрессивного сканирования
(progressive scan) в режим Y, Cb, Cr.
Подключение к стерео усилителю
Подключите видео выходы DVD к ви-
део входам (Video , S-Video или Y/ Cb / Cr) телевизора.
Подключите аудио выходы (левый и правый) DVD к входам - левому (белый) и правому (красный).
Нормальное изображение: Composite video:
Хорошее: S-video
Лучше: Компонентное видео: Лучшее HDMI видео Воспроизведение с HD DVD:
DVD плеер преобразует DVD диски в наилучшее разрешение HDTV для Ва-
шего телевизора, будь то
480p,720p,576p или 1080i.
Выход HDMI: используйте этот выход для воспроизведения изображения в HD режиме вместе с великолепным звучанием.
Подключение к АС-3
Подключите видео выход DVD проигрывателя к разъемам видео входа
(Video,
S-Video или Y Cb Cr ) вашего телевизора.
Подключение к усилителю 5.1 CH
Подключите цифровой выход (оптический или коаксиальный) к встроенному усилителю АС-3.
На пульте ДУ нажмите кнопку SETUP для входа в меню установки. Навигационными кнопками на пульте ДУ выберите AUDIO OUTPUT (AUDIO OUTPUT).
Навигационными кнопками на пульте ДУ выберите цифровой выход и выбе-
рите BISTREAM или LPCM48K.
Повторно нажмите кнопку SETUP для сохранения выбора и [SETUP] для выхода.
20 |
21 |
 Loading...