


Samsung WF326LAS, WF326LAW, WF316LAS, WF316CAW, WF316BAC User Manual
...WASHING MACHINE
Model code : WF306LAW/XAA
WF316LAW/XAA
WF316LAS/XAA
WF326LAS/XAA
WF306BHW/XAA
WF316BAW/XAA
WF316BAC/XAA
WF306BAW/XAA
WF306C1W/XAA
WF316CAW/XAA
SERVICE WF326LAW/XAA
MANUAL
WASHING MACHINE |
|
THE FEATURE OF PRODUCT |
1. SilverCare
2. SuperSize Capacity
3. Direct Drive Motor
4. Child Lock
5. My Cycle

CONTENTS
1. Precautions |
|
1-1. Safety Precautions............................................................................................................................. |
1-1 |
1-2. Precautions upon Installation............................................................................................................. |
1-2 |
2. PRODUCT SPECIFICATIONS |
|
2-1. THE FEATURE OF PRODUCT......................................................................................................... |
2-1 |
2-2. SPECIFICATIONS OF PRODUCT.................................................................................................... |
2-2 |
2-3. THE COMPARATIVE SPECIFICATIONS OF PRODUCT.................................................................. |
2-3 |
2-4. OPTION SPECIFICATIONS.............................................................................................................. |
2-4 |
3. OPERATING INSTRUCTIONS AND INTALLATION |
|
3-1. Each Key and Display........................................................................................................................ |
3-1 |
3-2. FUNCTION OF CONTROL KEYS..................................................................................................... |
3-2 |
3-3. MAIN FUNCTIONS............................................................................................................................ |
3-6 |
3-4 SPECIAL FUNCTIONS....................................................................................................................... |
3-8 |
4. ALIGNMENT AND ADJUSTMENTS |
|
4-1. GENERAL ERROR FUNCTION........................................................................................................ |
4-1 |
4-2. TEST MODE...................................................................................................................................... |
4-2 |
5. ASSEMBLY AND DISASSEMBLY |
|
5-1. TOOLS FOR DISASSEMBLY AND ASSEMBLY................................................................................ |
5-1 |
5-2. DISASSEMBLY.................................................................................................................................. |
5-2 |
5-3. ASSEMBLY........................................................................................................................................ |
5-5 |
6. TROUBLE SHOOTING |
|
6-1. TROUBLE DIAGNOSIS..................................................................................................................... |
6-1 |
6-2. PROBLEM CHECKING AND METHOD OF PCB.............................................................................. |
6-3 |
6-3 Control Panel...................................................................................................................................... |
6-4 |
6-4 Driving Unit......................................................................................................................................... |
6-5 |
7. EXPLODED VIEWS AND PARTS LIST |
|
7-1. ASSY-COVER TOP............................................................................................................................ |
7-1 |
7-2. ASSY-TUB OUTER(SPIN BASKET).................................................................................................. |
7-2 |
7-3. ASSY-CASE OUTER......................................................................................................................... |
7-3 |
7-4. BOLT/SCREW PARTS LIST.............................................................................................................. |
7-4 |

CONTENTS
8. ELECTRICAL PARTS LIST...................................................................................................................... |
8-1 |
9. BLOCK DIAGRAM................................................................................................................................... |
9-1 |
10. WIRING DIAGRAM.............................................................................................................................. |
10-1 |
11. PCB DIAGRAM.................................................................................................................................... |
11-1 |
12. SCHEMATIC-DIAGRAMS .................................................................................................................. |
12-1 |
13. CIRCUIT DESCRIPTIONS................................................................................................................... |
13-1 |
14. REFERENCE INFORMATION |
|
14-1. MODEL NAME............................................................................................................................... |
14-1 |
14-2. TERMINOLOGY............................................................................................................................ |
14-2 |
14-3. FABRIC CARE CHART.................................................................................................................. |
14-3 |
14-4. ELECTRICAL WARNINGS............................................................................................................ |
14-4 |
14-5. Q & A.............................................................................................................................................. |
14-5 |

1. |
P r e c a uti o n s |
|
|
|
|
1 - 1. |
S af et y P r e c a uti o n s |
|
|
|
|
1. |
D o |
n ot all o w t h e c u st o m e r t o r e p ai r t h e p r o d u ct. |
It may cause personal injury or product damage when the unit is serviced by unqualified personnel.
2. |
Di s c o n n e ct |
p o w e r t o t h e a p pli a n c e b ef o r e s e r vi ci n g. |
|
|
|
|
|||||||
Be aware of the possibilities of an electric shock. |
|
|
|
|
|
||||||||
3. |
D o |
n ot u s e |
m ulti - pl u g. |
|
|
|
|
|
|
|
|
|
|
Power outlet may be overloaded causing the socket to overheat. |
|
|
|||||||||||
4. |
C h e c k f o r a n y d a m a g e o n p o w e r pl u g o r p o w e r o utl et. |
|
|
|
|
||||||||
Replace it immediately if it has problem. (It may cause an electric shock or fire) |
|
||||||||||||
5. |
M a k e s u r e t o e a rt h t h e p r o d u ct. |
|
|
|
|
|
|
|
|||||
May cause electric shock. |
|
|
|
|
|
|
|
|
|
||||
6. |
D o |
n ot cl e a n t h e p r o d u ct |
wit h |
w at e r. |
|
|
|
|
|
|
|
||
May cause electric shock / fire or shorten product life. |
|
|
|
|
|||||||||
7. |
T h e |
wi ri n g |
h a r n e s s s h o ul d |
b e f r e e f r o m |
m oi st u r e a n d c o n n e ct e d p r o p e rl y d u ri n g s e r vi n g. |
||||||||
It should be proof against any external force. |
|
|
|
|
|
|
|||||||
8. |
R e m o v e a n y d u st o r di rt i n t h e p r o d u ct, |
wi ri n g s e cti o n |
a n d |
c o n n e cti o n s |
d u ri n g |
s e r vi ci n g. |
|||||||
Protect against possibilities of fire due to tracking etc. |
|
|
|
|
|||||||||
9. |
C h e c k f o r |
a n y |
w at e r t r a c e |
o n |
el e ct ri c al |
p a rt s, |
h a r n e s s, |
et c. |
|
|
|
||
Replace the parts and /or wipe dry the water. |
|
|
|
|
|
|
|||||||
1 0. C h e c k t h e |
a s s e m bl e d st at u s of t h e p a rt s aft e r |
s e r vi ci n g. |
|
|
|
||||||||
Check if the product is assembled in the same status as before servicing. |
|
|
|||||||||||
1 1. B e |
s u r e n ot t o |
p ull o n t h e |
p o w e r c o r d |
b ut t o |
u n pl u g it |
b y |
h ol di n g t h e |
pl u g. |
|
||||
Beware of possibility of electric shock or fire when the power cord is damaged. |
|
||||||||||||
1 2. U n pl u g t h e p o w e r pl u g f r o m t h e o utl et |
w h e n t h e |
w a s hi n g m a c hi n e i s n ot u s e d. |
|
||||||||||
Beware of possibility of electric shock or fire while lightening. |
|
|
|
||||||||||
1 3. D o |
n ot u s e |
o r |
p ut fl a m m a bl e |
m at e ri al s (i n cl u di n g |
g a s oli n e, |
al c o h ol, t hi n n e r et c ) |
a r o u n d t h e |
||||||
|
w a s hi n g |
m a c hi n e. |
|
|
|
|
|
|
|
|
|
||
Flammable materials may spark an explosion or fire. |
|
|
|
|
|
||||||||
1 4. D o |
n ot p ut a |
w at e r c o nt ai ni n g |
b o wl o r |
w et l a u n d r y o n t h e |
w a s hi n g m a c hi n e. |
|
|||||||
It may cause an electric shock or fire, or shorten the product life when its water penetrates into the washing machine.
1 5. D o n ot i n st all t h e |
w a s hi n g m a c hi n e i n a pl a c e |
w h e r e it i s e x p o s e d t o s n o w o r r ai n et c. |
||||
It may cause an electric shock or fire and shorten the product life. |
|
|||||
1 6. D o n ot p r e s s c o nt r ol b utt o n s |
wit h p oi nt e d o bj e ct s |
s u c h a s pi n s, |
n e e dl e s, et c. |
|||
It may cause an electric shock or other problems. |
|
|
|
|||
1 7. C h e c k t h e |
w a s hi n g |
m a c hi n e i s l e v el e d h o ri z o nt all y |
o n t h e fl o o r |
a n d i s i n st all e d p r o p e rl y. |
||
Vibration may shorten the product life. |
|
|
|
|||
1 8. M a k e s u r e t o u s e c o n n e ct o r s |
w h e n c o n n e cti n g |
wi r e s. |
|
|||
If wires are connected without connectors, it may cause a tracking fire. |
||||||
1 9. W h e n t h e |
w a s hi n g |
m a c hi n e i s t o b e l ai d d o w n f o r s e r vi ci n g, p ut a p a d o n t h e fl o o r a n d l a y t h e |
||||
p r o d u ct o n it s si d e sl o wl y. |
|
|
|
|
||
If the wash machine is laid on its front, internal components may be damaged by the tub.
1-1

1-2. Precautions upon Installation
■ How to Remove Shipping Bolts
1.Remove the screws by using the supplied spanner.
2.Remove the shipping bolts from the back of the unit.
3. Fill the holes with the supplied |
4. Keep the shipping bolts and |
plastic caps. |
screws for future use. |
■ Precautions before Installation |
|
The unit is quite heavy. So, make sure to have 2 or more personnel move it.
Install the unit at a place with a wall outlet easily accessible.
Make sure that the unit stands on a firm and leveled floor.
Keep the unit away from places in which it is freezing, especially in winter.
eep it away from direct sunlight or high humidity, and install it in a place with good ventilation.
Keep the unit away from heat appliances such as a heater.
1-2
1-2. Precautions upon Installation
■ Grounding
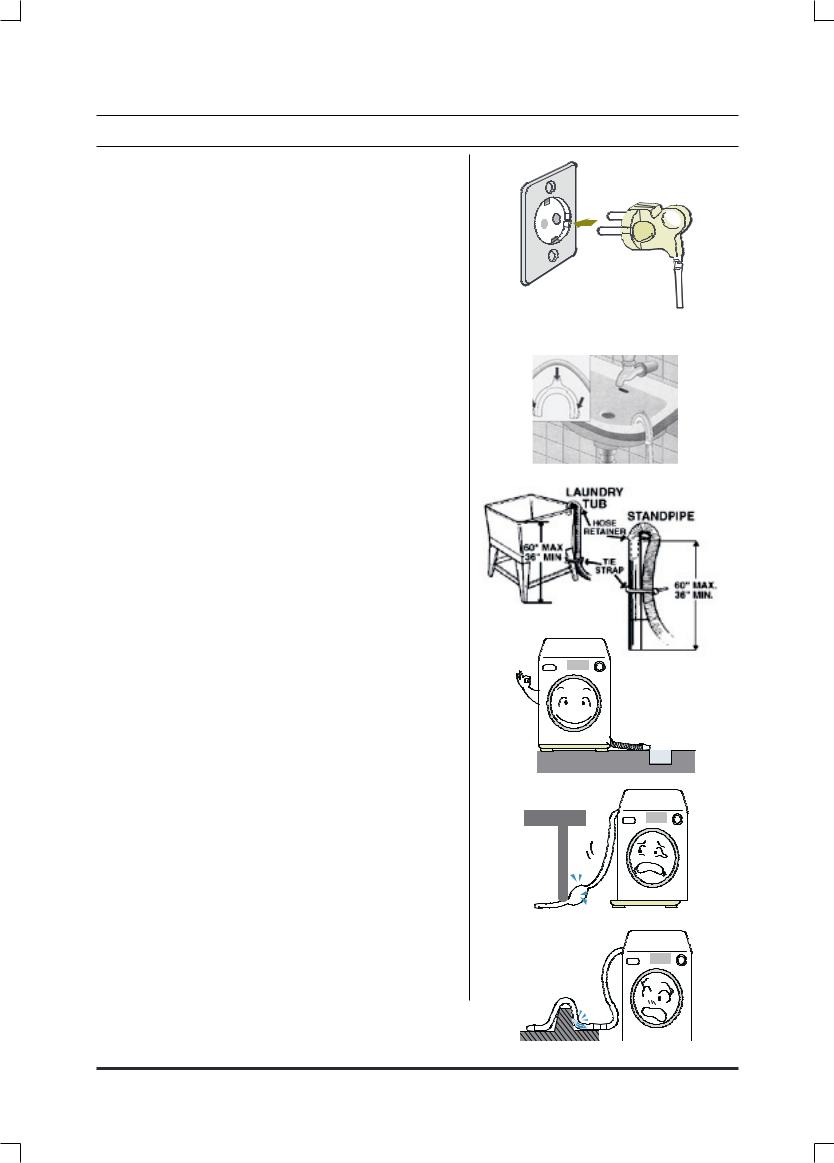
►Make sure to ground the unit to prevent electric leakage or shock.
With a grounded receptacle
►It does not need an additional grounding.
■Water Drainage
►Hook the drain hose over the Wash Basin or Laundry Tub or plug the end of the drai hose into the Standpipe
-Hook the drain hose over the Wash Basin or Laundry Tub or plug the end of the drain hose into the Standpipe
-The outlet end of the drain hose must be at least 60-90 cm above the base of the machine.
►Seal the drain pipe connections - If not, it may cause water leakage.
►Prevent water from siphoning away
-If the end of the drain hose is put in water, it could siphon away water during washing.
So, make sure that the end of the drain hose is not put in water.
Note: Caution must always be exercised to avoid collapsing or damaging the drain hose.
For best performance the drain hose should not be restricted in any way, through elbows, couplings or excessive lengths.
1-3
1-2. Precautions upon Installation
■ How to Level the Unit
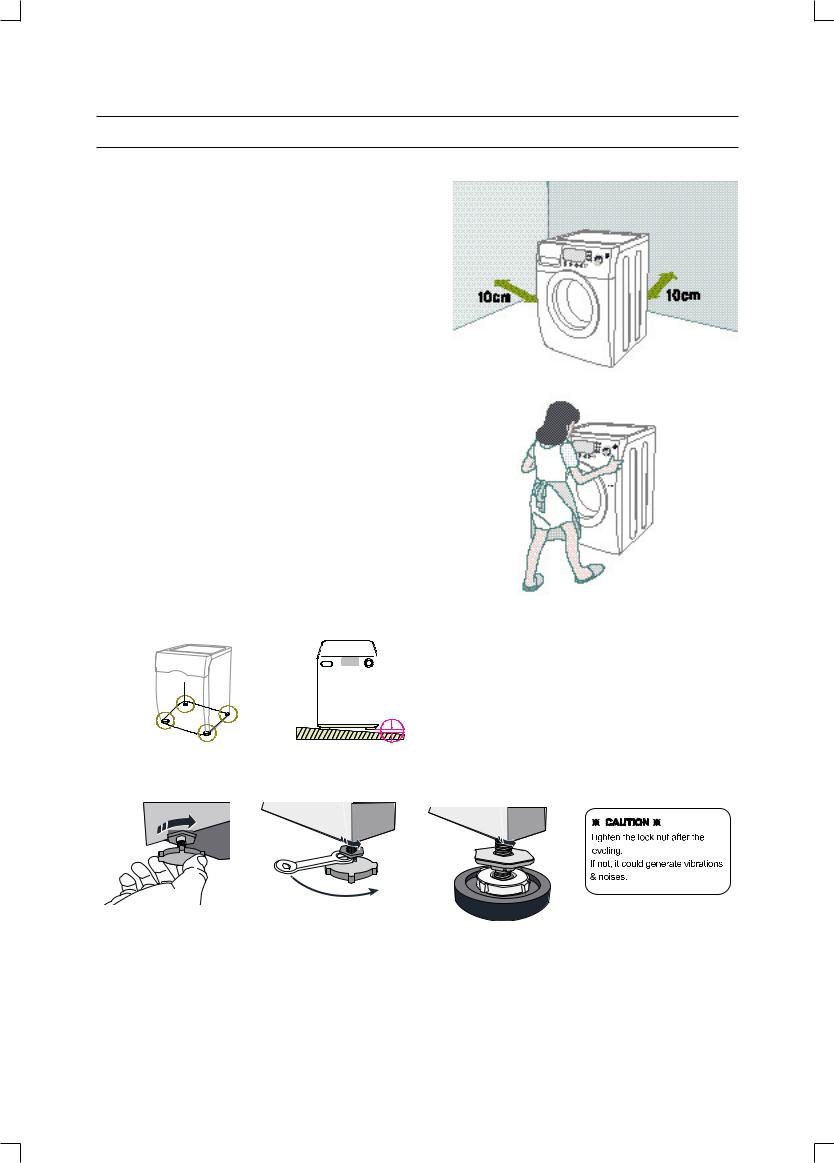
1.Select an installation place.
►Install the unit with 10cm or more clearance from its surrounding walls.
2.Check if the unit is leveled.
►If the unit wabbles, adjust the leveling legs.
3.Adjust the leveling legs.
When the unit is not leveled
►Lift up the unit a little bit and adjust the shortest.
►Turn the leveling bolt counter clockwise as shown in the picture above (The leveling leg gets longer.)
►The 4 leveling legs should touch the floor all together.
► Slide your Washer into |
► Level your Washer by |
► If you install your washer on |
position. |
turning the leveling legs |
softfloor, you should place the |
|
in or out as necessary |
rubber cup under adjustable |
|
by hand. When your |
eg. Before put rubber cup, please |
|
Washer is level, tighten |
remove film for double-side tape |
|
the nuts using |
attached on rubber cup. |
|
the wrench included |
|
|
with your Washer. |
|
|
|
|
1-4 |
|
|

2. PRODUCT SPECIFICATIONS
2-1. SPECIFICATIONS OF PRODUCT
TYPE |
|
FRONT LOADINGWASHER |
|
|
|
|
|
|
|
|
Div |
Inches (cm) |
Div |
Inches (cm) |
|
|
|
|
|
DIMENSION |
A. Height-Overall |
38 (96.5) |
C. Depth With Door Open 90° |
49 (124.5) |
|
|
|
|
|
|
B. Width |
27 (68.6) |
D. Depth |
30.25 (77.0) |
|
|
|
|
|
WATER PRESSURE |
|
|
50 kPa ~ 800 kPa |
|
|
|
|
|
|
WEIGHT |
|
|
89.9 kg |
|
|
|
|
|
|
CAPACITY |
|
|
3.29 Cu.ft |
|
|
|
|
|
|
|
WASHING |
|
120V |
226W |
|
|
|
|
|
|
WASHINGAND HEATING |
120V |
997W |
|
POWER CONSUMPTION |
|
|
|
|
SPIN |
|
120V |
379W |
|
|
|
|||
|
|
|
|
|
|
DRAIN |
|
120V |
41W |
|
|
|
|
|
|
WF326 * |
|
1200rpm |
|
SPIN REVOLUTION |
WF316* |
|
1100rpm |
|
|
WF306 * |
|
1000rpm |
|
2-1
2-2. OVERVIEW OF THE WASHING MACHINE
Hot water supply hose 


 Cold water supply hose
Detergent 
drawer
Control
panel
Door
Drain Hose
Adjustable leg
2-2

2-3. THE COMPARATIVE SPECIFICATIONS OF PRODUCT
Item |
Samsung |
Whirlpool |
LG |
Bosch |
|
(WF316LAW) |
(GHW9250M) |
(WM2432HW) |
(WFMC6400) |
||
|
|||||
|
|
|
|
|
|
Capacity (Cu.ft) |
3.29 (DOE) |
3.21 (DOE) |
3.22 (3.72) |
2.93 (DOE) |
|
|
|
|
|
|
|
Volume of Spinner (ℓ) |
93.4 |
90 |
91 |
83 |
|
|
|
|
|
|
|
Motor |
Direct Drive |
3-Phase |
Direct Drive |
3-Phase |
|
|
|
|
|
|
|
User Interface |
LED |
LED |
LED |
LCD (red) |
|
|
|
|
|
|
|
Cycle Time |
57 |
52 |
59 |
66 |
|
|
|
|
|
|
|
Wash Performance |
1.01 |
1.00 |
0.99 |
1.02 |
|
|
|
|
|
|
|
Water Consumption/Cycle |
48 Liter |
56 Liter |
49 Liter |
61 Liter |
|
|
|
|
|
|
|
Energy Consumption |
128 |
105 |
114 |
189 |
|
(W/O Heater Wh/Cycle) |
|||||
|
|
|
|
||
|
|
|
|
|
|
RPM |
1,100 |
1,100 |
1,200 |
1,200 |
|
|
|
|
|
|
|
Noise |
57 dB |
59 dB |
66 dB |
62 dB |
|
|
|
|
|
|
2-3
2-4. OPTION SPECIFICATIONS |
|
|
|
Item |
Item Name |
CODE.NO |
Remark |
|
|
DC60-4014 6A |
|
|
|
DC61-10688A |
|
|
HOSE DRAIN |
DC97-07126Afor HOT |
|
|
DC97-07127Afor COLD |
|
|
|
|
|
|
|
MANUAL-BOOK |
DC68-02291A |
|
2-4

Memo
2-5
3. O P E R R A TI N G I N S T |
A L L A TI O N A N D I N S T A L L A TI O N |
|
|
3 - 1. O V E R VI E W O F T H E C |
O N T R O L P A N E L |
|
|
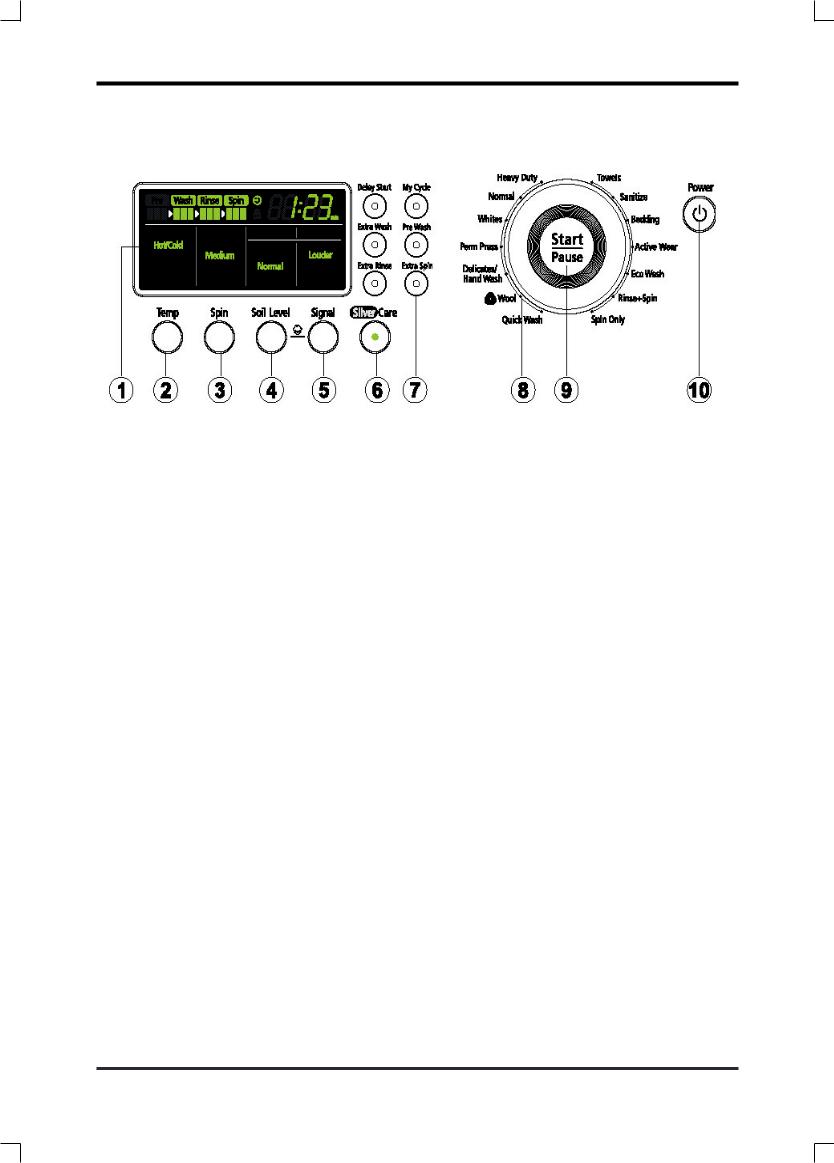
1.Digital graphic display
Displays the remaining wash time, all wash information, and error messages.
2.Temperature selection button
Pressthebuttonrepeatedlytocyclethroughthedifferentwatertemperatureoptions. Extra Hot/Cold -Heavilysoiled,colorfastitems.OnlyavailablewiththeSanitizecycle. Hot/Cold -Whitesandheavilysoiled,colorfastitems.
Warm/Warm -Colorfastitems.Whenwarmrinseisselected,onlythefinalrinsewillbewarm.Theotherrinseswillbecoldto conserveenergy.
Warm/Cold -Moderatelysoiled,colorfastitems;mostwrinkle-freeitems. Cold/Cold -Brightlycolored,verylightlysoileditems;washablewoolens.
3.Spin selection button
Pressthebuttonrepeatedlytocyclethroughthedifferentspinspeedoptions. Extra High -Removesmorewaterfromloadsduringspin.
NOTE:Tominimizewrinklingofwrinkle-freeandno-ironfabrics,DONOTusetheExtraHighspinoptionfortheseloads,noroverload yourWasher.
High -Useforunderwear,t-shirts,jeansandsturdycottons.
Medium -Useforjeans,wrinkle-freeorwash-and-wearitemsandsynthetics.
Low - Use for delicate items needing a slow spin speed because of fabric and construction.
No Spin -DrainsyourWasherwithoutspinning.Useforextremelydelicateitemsthatcannottolerateanyspin.
4.Soil Level selection button
PressthebuttontoselecttheSoilLevel/washingtime. Heavy -Forheavilysoiledloads.
Normal -Formoderatelysoiledloads.Thissettingwillbeappropriateformostloads. Light -Forlightlysoiledloads.
5.Signal selection button
Pressthebuttontoincreaseordecreasetheendofcyclesignalvolumeorturnoffthesignal.
6.SilverCare button
Silverionsareaddedduringthewashandrinsecyclestomaximizethesanitizingandantibioticeffects.
3-1
3 - 1. O V E R VI E W O F T H E C O N T R O L P A N E L
7.Select Cycle Option
Delay Start -Anycyclecanbedelayedforupto12,19or24hours(selectmodels)inone-hourincrements.Displayedhourindicates thetimeatwhichthewashwillbefinished.
ExtraWash -Add additional time to the wash for better stain removal.
Extra Rinse -Add an additional rinse at the end of the cycle to more thoroughly remove laundry additives and perfumes. Extra Spin -Add additional time to remove more water from loads
My Cycle - Choose your favorite cycle including temperature, spin, soil level, option, etc.
PreWash -Add detergent to the Pre Wash selection of the detergent compartment. Washer fills with cold water and detergent, tumbles, then drains and advances to the selected wash cycle. Some cycles cannot be selected with this option.*
* You can`t select PreWash option in Delicate/Hand Wash, Wool, Quick Wash andActive Wear cycles.
8.Cycle Selector
Selecttheappropriatecycleforthetypeofload.
Thiswilldeterminethetumblepatternandspinspeedforthecycle.
NOTE: To minimize wrinkling of loads, select the Perm Press cycle.
Heavy Duty -Forsturdy,colorfastfabricsandheavilysoiledgarments.
Normal -Formostfabricsincludingcottons,linens,andnormallysoiledgarments.
Whites - For white fabrics with or without bleach.
Perm Press - For wash-and-wear, synthetic fabrics, and lightly to normally soiled garments.
Delicates/HandWash - For sheer fabrics, bras, lingerie silk, and other handwash-only fabrics. For best results, use liquid detergent.
Wool - For machine-washable wool. Loads should be under 8 pounds.
The wool wash cycle of this machine has been approved by Woolmark for the washing of machine washable Woolmark products provided that the products are washed according to the instructions on the garment label and those issued by the manufacturer of this washing machine, M0509.
QuickWash - For lightly soiled or wrinkled garments needed quickly.
Towels - For bath towels and washcloths. Do not load too many towels because they absorb lots of water.
Sanitize -Forheavilysoiled,colorfastgarments.Thiscycleheatsthewaterto150°Ftoeliminatebacteria.
NOTE: If Pause is selected during the heating portion of the Sanitize Cycle, your Washer door will remain locked for your safety.
Bedding -Forbulkyitemssuchasblanketsandsheets. ActiveWear -Forwashablesportswear.
EcoWash -Forgeographicareaswhereenergyandwaterconservationisneeded.
Rinse + Spin -Useforloadsthatneedrinsingonlyortoaddrinse-addedfabricsoftenertoaload. Spin Only -Providesaspintoremovemorewaterfromtheload.
9.Start/Pause selection button
Presstopauseandrestartprograms.
10.Power button
Press once to turn your Washer on, press again to turn your Washer off. If your Washer is left on for more than 10 minutes without any buttons being touched, the power automatically turns off.
NOTE : Cycles and options vary by model. Refer to cycle chart inAppendix.
3-2

3 - 2. P R O G R A M M E C H A R T
326LAW, 326LAS
|
Functions |
|
|
|
|
|
|
|
|
|
|
|
|
|
|
|
|
|
|
|
|
|
Options |
|
|
|
|
|
|
|
|
|
|
Time |
||||||
|
|
|
|
|
|
|
|
|
|
|
|
|
|
|
|
|
|
|
|
|
|
|
|
|
|
|
|
|
|
|
|
|
|
|
|
|
|
|
|
|
|
Temp |
|
|
|
|
|
|
|
Spin |
|
|
|
|
|
|
|
Soil Level |
|
|
Delay |
Extra |
|
Extra |
My |
Pre |
|
Extra |
Silver |
|
|||||||||||
|
|
|
|
|
|
|
|
|
|
|
|
|
|
|
|
|
|
|
|
|
|
|
|
|
|
Start |
Wash |
|
Rinse |
Cycle |
Wash |
|
Spin |
Care |
|
|||||
|
EH/ |
|
H/C |
W/ |
W/ |
C/C |
|
EH |
H |
M |
|
|
L |
|
NS |
H |
N |
L |
|
|
|
|
|
|
|
|
|
|
|
|
|
|
|
|||||||
|
C |
|
|
|
W |
C |
|
|
|
|
|
|
|
|
|
|
|
|
|
|
|
|
|
|
|
|
|
|
|
|
|
|
|
|
|
|
|
|
|
|
|
|
|
|
|
|
|
|
|
|
|
|
|
|
|
|
|
|
|
|
|
|
|
|
|
|
|
|
|
|
|
|
|
|
|
|
|
|
|
|
|
Heavy |
|
|
|
√ |
√ |
√ |
√ |
|
√ |
√ |
√ |
|
|
√ |
|
√ |
√ |
√ |
|
√ |
√ |
√ |
|
√ |
√ |
√ |
|
|
√ |
√ |
90 |
|||||||||
Duty |
|
|
|
|
|
|
|
|
|
|
|
|
|
|
|
|
|
|
|
|
|
|
|
|
|
|
|
|
|
|
|
|
|
|
|
|
|
|
|
|
Normal |
|
|
|
√ |
√ |
√ |
√ |
|
√ |
√ |
√ |
|
|
√ |
|
√ |
√ |
√ |
|
√ |
√ |
√ |
|
√ |
√ |
√ |
|
|
√ |
√ |
53 |
|||||||||
|
|
|
|
|
|
|
|
|
|
|
|
|
|
|
|
|
|
|
|
|
|
|
|
|
|
|
|
|
|
|
|
|
|
|
|
|
|
|
|
|
Whites |
|
|
|
√ |
√ |
√ |
√ |
|
√ |
√ |
√ |
|
|
√ |
|
√ |
√ |
√ |
|
√ |
√ |
√ |
|
√ |
√ |
√ |
|
|
√ |
√ |
60 |
|||||||||
|
|
|
|
|
|
|
|
|
|
|
|
|
|
|
|
|
|
|
|
|
|
|
|
|
|
|
|
|
|
|
|
|
|
|
|
|
|
|
|
|
Perm Press |
|
|
|
|
√ |
√ |
√ |
|
|
|
√ |
√ |
|
|
√ |
|
√ |
√ |
√ |
|
√ |
√ |
√ |
|
√ |
√ |
√ |
|
|
√ |
√ |
45 |
||||||||
|
|
|
|
|
|
|
|
|
|
|
|
|
|
|
|
|
|
|
|
|
|
|
|
|
|
|
|
|
|
|
|
|
|
|
|
|
|
|
|
|
Delicates/ |
|
|
|
|
√ |
√ |
√ |
|
|
|
|
|
|
|
|
√ |
|
√ |
√ |
√ |
|
√ |
√ |
|
|
|
√ |
√ |
|
|
|
|
√ |
39 |
||||||
HandWash |
|
|
|
|
|
|
|
|
|
|
|
|
|
|
|
|
|
|
|
|
|
|
|
|
|
|
|
|
|
|
|
|
|
|
|
|
|
|
|
|
Wool |
|
|
|
|
|
|
|
√ |
|
|
|
|
|
|
|
|
√ |
|
√ |
|
|
√ |
|
|
√ |
|
|
|
|
|
√ |
|
|
|
|
|
|
57 |
||
|
|
|
|
|
|
|
|
|
|
|
|
|
|
|
|
|
|
|
|
|
|
|
|
|
|
|
|
|
|
|
|
|
|
|
|
|
|
|
|
|
Quick |
|
|
|
√ |
√ |
√ |
√ |
|
√ |
√ |
√ |
|
|
√ |
|
√ |
√ |
√ |
|
√ |
√ |
|
|
|
√ |
√ |
|
|
|
|
√ |
33 |
||||||||
Wash |
|
|
|
|
|
|
|
|
|
|
|
|
|
|
|
|
|
|
|
|
|
|
|
|
|
|
|
|
|
|
|
|
|
|
|
|
|
|
|
|
Towels |
|
|
|
√ |
√ |
√ |
√ |
|
√ |
√ |
√ |
|
|
√ |
|
√ |
√ |
√ |
|
√ |
√ |
√ |
|
√ |
√ |
√ |
|
|
√ |
√ |
64 |
|||||||||
|
|
|
|
|
|
|
|
|
|
|
|
|
|
|
|
|
|
|
|
|
|
|
|
|
|
|
|
|
|
|
|
|
|
|
|
|
|
|
|
|
Sanitize |
√ |
|
|
|
|
|
|
|
|
√ |
√ |
√ |
|
|
√ |
|
√ |
√ |
√ |
|
√ |
√ |
√ |
|
√ |
√ |
√ |
|
|
√ |
√ |
110 |
||||||||
|
|
|
|
|
|
|
|
|
|
|
|
|
|
|
|
|
|
|
|
|
|
|
|
|
|
|
|
|
|
|
|
|
|
|
|
|
|
|
|
|
Bedding |
|
|
|
|
√ |
√ |
√ |
|
|
|
|
|
√ |
|
|
√ |
|
√ |
√ |
√ |
|
√ |
√ |
√ |
|
√ |
√ |
√ |
|
|
√ |
√ |
69 |
|||||||
|
|
|
|
|
|
|
|
|
|
|
|
|
|
|
|
|
|
|
|
|
|
|
|
|
|
|
|
|
|
|
|
|
|
|
|
|
|
|
|
|
Active |
|
|
|
|
√ |
√ |
√ |
|
|
|
√ |
√ |
|
|
√ |
|
√ |
√ |
√ |
|
√ |
√ |
|
|
|
√ |
√ |
|
|
|
|
√ |
49 |
|||||||
Wear |
|
|
|
|
|
|
|
|
|
|
|
|
|
|
|
|
|
|
|
|
|
|
|
|
|
|
|
|
|
|
|
|
|
|
|
|
|
|
|
|
EcoWash |
|
|
|
√ |
√ |
√ |
√ |
|
√ |
√ |
√ |
|
|
√ |
|
√ |
√ |
√ |
|
√ |
√ |
√ |
|
√ |
√ |
√ |
|
|
√ |
√ |
45 |
|||||||||
|
|
|
|
|
|
|
|
|
|
|
|
|
|
|
|
|
|
|
|
|
|
|
|
|
|
|
|
|
|
|
|
|
|
|
|
|
|
|
|
|
Rinse + |
|
|
|
|
|
|
|
√ |
|
√ |
√ |
√ |
|
|
√ |
|
√ |
|
|
|
|
|
√ |
|
|
|
√ |
√ |
|
|
|
√ |
√ |
18 |
||||||
Spin |
|
|
|
|
|
|
|
|
|
|
|
|
|
|
|
|
|
|
|
|
|
|
|
|
|
|
|
|
|
|
|
|
|
|
|
|
|
|
|
|
Spin Only |
|
|
|
|
|
|
|
|
|
√ |
√ |
√ |
|
|
√ |
|
√ |
|
|
|
|
|
√ |
|
|
|
|
|
√ |
|
|
|
√ |
|
|
9 |
||||
|
|
|
|
|
|
|
|
|
|
|
|
|
|
|
|
|
|
|
|
|
|
|
|
|
|
|
|
|
|
|
|
|
|
|
|
|
|
|
|
|
306LAW |
|
|
|
|
|
|
|
|
|
|
|
|
|
|
|
|
|
|
|
|
|
|
|
|
|
|
|
|
|
|
|
|
|
|
|
|
|
|
|
|
|
|
|
|
|
|
|
|
|
|
|
|
|
|
|
|
|
|
|
|
|
|
|
|
|
|
|
|
|
|
|
|
|
|
|
|
|
||||
|
|
|
|
|
|
|
|
|
|
|
|
Functions |
|
|
|
|
|
|
|
|
|
|
|
|
|
|
|
Options |
|
|
|
|
Time |
|||||||
|
|
|
|
|
Temp |
|
|
|
|
|
|
|
Spin |
|
|
|
|
|
|
Soil Level |
|
Delay |
|
Extra |
Extra |
|
Silver |
|
|
|||||||||||
|
H/C |
|
W/W |
|
W/C |
C/C |
|
|
H |
|
M |
|
L |
|
NS |
|
H |
|
|
N |
|
L |
|
Start |
|
Wash |
Rinse |
|
Care |
|
|
|||||||||
|
|
|
|
|
|
|
|
|
|
|
|
|
|
|
|
|
|
|
|
|
|
|
|
|
|
|
|
|
|
|
|
|
|
|
|
|
||||
Heavy |
√ |
|
|
√ |
|
√ |
√ |
|
|
√ |
|
√ |
|
|
|
√ |
|
√ |
|
√ |
|
|
√ |
|
√ |
|
|
√ |
|
√ |
√ |
|
|
√ |
|
65 |
||||
Duty |
|
|
|
|
|
|
|
|
|
|
|
|
|
|
|
|
|
|
|
|
|
|
|
|
|
|
|
|
|
|
|
|
|
|
|
|
|
|
|
|
Normal |
√ |
|
|
√ |
|
√ |
√ |
|
|
√ |
|
√ |
|
|
|
√ |
|
√ |
|
√ |
|
|
√ |
|
√ |
|
|
√ |
|
√ |
√ |
|
|
√ |
|
53 |
||||
Whites |
√ |
|
|
√ |
|
√ |
√ |
|
|
√ |
|
√ |
|
|
|
√ |
|
√ |
|
√ |
|
|
√ |
|
√ |
|
|
√ |
|
√ |
√ |
|
|
√ |
|
60 |
||||
Perm Press |
|
|
|
|
√ |
|
√ |
√ |
|
|
√ |
|
√ |
|
|
|
√ |
|
√ |
|
√ |
|
|
√ |
|
√ |
|
|
√ |
|
√ |
√ |
|
|
√ |
|
45 |
|||
Delicates/ |
|
|
|
|
√ |
|
√ |
√ |
|
|
|
|
|
|
|
|
√ |
|
√ |
|
√ |
|
|
√ |
|
√ |
|
|
√ |
|
|
√ |
|
|
√ |
|
39 |
|||
HandWash |
|
|
|
|
|
|
|
|
|
|
|
|
|
|
|
|
|
|
|
|
|
|
|
|
|
|
|
|
|
|
|
|
|
|
|
|
|
|
|
|
Wool |
|
|
|
|
|
|
|
√ |
|
|
|
|
|
|
|
|
√ |
|
√ |
|
|
|
|
√ |
|
|
|
|
√ |
|
|
|
|
|
|
|
|
57 |
||
Quick |
√ |
|
|
√ |
|
√ |
√ |
|
|
√ |
|
√ |
|
|
|
√ |
|
√ |
|
√ |
|
|
√ |
|
√ |
|
|
√ |
|
|
√ |
|
|
√ |
|
33 |
||||
Wash |
|
|
|
|
|
|
|
|
|
|
|
|
|
|
|
|
|
|
|
|
|
|
|
|
|
|
|
|
|
|
|
|
|
|
|
|
|
|
|
|
Towels |
√ |
|
|
√ |
|
√ |
√ |
|
|
√ |
|
√ |
|
|
|
√ |
|
√ |
|
√ |
|
|
√ |
|
√ |
|
|
√ |
|
√ |
√ |
|
|
√ |
|
64 |
||||
Rinse + |
|
|
|
|
|
|
|
√ |
|
|
√ |
|
√ |
|
|
|
√ |
|
√ |
|
|
|
|
|
|
|
|
|
√ |
|
|
√ |
|
|
√ |
|
18 |
|||
Spin |
|
|
|
|
|
|
|
|
|
|
|
|
|
|
|
|
|
|
|
|
|
|
|
|
|
|
|
|
|
|
|
|
|
|
|
|
|
|
|
|
3-3

3 - 2. P R O G R A M M E C H A R T
316LAW, 316BAW, 316BAC
|
|
|
|
|
|
|
|
|
|
|
Functions |
|
|
|
|
|
|
|
|
|
|
|
|
|
Options |
|
|
|
|
|
Time |
||||||||||
|
|
|
|
|
|
|
|
Temp |
|
|
|
|
|
|
Spin |
|
|
|
|
SoilLevel |
|
Delay |
Extra |
Extra |
My |
Pre |
|
Silver |
|
|
|||||||||||
|
|
|
EH/ |
|
H/ |
W/ |
|
W/C |
C/ |
|
EH |
H |
M |
|
L |
NS |
H |
|
N |
L |
|
Start |
Wash |
Rinse |
Cycle |
Wash |
|
Care |
|
|
|||||||||||
|
|
|
|
C |
|
C |
W |
|
|
C |
|
|
|
|
|
|
|
|
|
|
|
|
|
|
|
|
|
|
|
|
|
|
|
|
|
|
|
|
|
|
|
|
Heavy Duty |
|
|
|
|
√ |
√ |
|
√ |
√ |
|
√ |
√ |
√ |
|
√ |
√ |
√ |
|
√ |
√ |
|
√ |
√ |
√ |
√ |
√ |
|
√ |
90 |
|
||||||||||
|
|
|
|
|
|
|
|
|
|
|
|
|
|
|
|
|
|
|
|
|
|
|
|
|
|
|
|
|
|
|
|
|
|
|
|
|
|
|
|
|
|
|
Normal |
|
|
|
|
√ |
√ |
|
√ |
√ |
|
√ |
√ |
√ |
|
√ |
√ |
√ |
|
√ |
√ |
|
√ |
√ |
√ |
√ |
√ |
|
√ |
53 |
|
||||||||||
|
Whites |
|
|
|
|
√ |
√ |
|
√ |
√ |
|
√ |
√ |
√ |
|
√ |
√ |
√ |
|
√ |
√ |
|
√ |
√ |
√ |
√ |
√ |
|
√ |
60 |
|
||||||||||
|
Perm Press |
|
|
|
|
|
|
√ |
|
√ |
√ |
|
|
|
√ |
√ |
|
√ |
√ |
√ |
|
√ |
√ |
|
√ |
√ |
√ |
√ |
√ |
|
√ |
45 |
|
||||||||
|
|
|
|
|
|
|
|
|
|
|
|
|
|
|
|
|
|
|
|
|
|
|
|
|
|
|
|
|
|
|
|
|
|
|
|
|
|
|
|
|
|
|
Delica-tes/ |
|
|
|
|
|
|
√ |
|
√ |
√ |
|
|
|
|
|
|
√ |
√ |
√ |
|
√ |
√ |
|
√ |
|
|
√ |
√ |
|
|
|
√ |
39 |
|
||||||
|
HandWash |
|
|
|
|
|
|
|
|
|
|
|
|
|
|
|
|
|
|
|
|
|
|
|
|
|
|
|
|
|
|
|
|
|
|
|
|
|
|
|
|
|
|
|
|
|
|
|
|
|
|
|
|
|
|
|
|
|
|
|
|
|
|
|
|
|
|
|
|
|
|
|
|
|
|
|
|
|
|
|
|
|
|
|
Wool |
|
|
|
|
|
|
|
|
|
√ |
|
|
|
|
|
|
√ |
√ |
|
|
√ |
|
|
√ |
|
|
|
|
√ |
|
|
|
|
|
57 |
|
||||
|
QuickWash |
|
|
|
|
√ |
√ |
|
√ |
√ |
|
√ |
√ |
√ |
|
√ |
√ |
√ |
|
√ |
√ |
|
√ |
|
|
√ |
√ |
|
|
|
√ |
33 |
|
||||||||
|
|
|
|
|
|
|
|
|
|
|
|
|
|
|
|
|
|
|
|
|
|
|
|
|
|
|
|
|
|
|
|
|
|
|
|
|
|
|
|
|
|
|
Towels |
|
|
|
|
√ |
√ |
|
√ |
√ |
|
√ |
√ |
√ |
|
√ |
√ |
√ |
|
√ |
√ |
|
√ |
√ |
√ |
√ |
√ |
|
√ |
64 |
|
||||||||||
|
Sani-tize |
|
√ |
|
|
|
|
|
|
|
|
√ |
√ |
√ |
|
√ |
√ |
√ |
|
√ |
√ |
|
√ |
√ |
√ |
√ |
√ |
|
√ |
110 |
|
||||||||||
|
Bed-ding |
|
|
|
|
|
|
√ |
|
√ |
√ |
|
|
|
|
√ |
|
√ |
√ |
√ |
|
√ |
√ |
|
√ |
√ |
√ |
√ |
√ |
|
√ |
69 |
|
||||||||
|
Rinse + Spin |
|
|
|
|
|
|
|
|
|
√ |
|
√ |
√ |
√ |
|
√ |
√ |
|
|
|
|
|
|
√ |
|
|
√ |
√ |
|
|
|
√ |
18 |
|
||||||
|
|
|
|
|
|
|
|
|
|
|
|
|
|
|
|
|
|
|
|
|
|
|
|
|
|
|
|
|
|
|
|
|
|
|
|
|
|
|
|
|
|
|
Spin Only |
|
|
|
|
|
|
|
|
|
|
|
√ |
√ |
√ |
|
√ |
√ |
|
|
|
|
|
|
√ |
|
|
|
|
√ |
|
|
|
|
|
9 |
|
||||
|
|
|
|
|
|
|
|
|
|
|
|
|
|
|
|
|
|
|
|
|
|
|
|
|
|
|
|
|
|
|
|
|
|
|
|
|
|
|
|
|
|
|
306BHW |
|
|
|
|
|
|
|
|
|
|
|
|
|
|
|
|
|
|
|
|
|
|
|
|
|
|
|
|
|
|
|
|
|
|
|
|
|
|
|
|
|
|
|
|
|
|
|
|
|
|
|
|
|
|
|
|
|
|
|
|
|
|
|
|
|
|
|
|
|
|
|
|
|
|
|
|
|
|
||||
|
|
|
|
|
|
|
|
|
|
|
|
|
|
Functions |
|
|
|
|
|
|
|
|
|
|
|
|
|
Options |
|
|
|
Time |
|
||||||||
|
|
|
|
|
|
|
|
|
|
|
|
|
|
|
|
|
|
|
|
|
|
|
|
|
|
|
|
|
|
|
|
|
|
|
|
|
|||||
|
|
|
|
|
|
|
Temp |
|
|
|
|
|
|
|
Spin |
|
|
|
|
Soil Level |
|
Delay |
|
Extra |
|
Extra |
|
Silver |
|
|
|
||||||||||
|
|
EH/ |
H/C |
|
W/ |
|
W/ |
C/C |
|
|
H |
M |
|
|
L |
|
NS |
|
|
H |
|
N |
L |
|
Start |
|
Wash |
|
Rinse |
|
Care |
|
|
|
|||||||
|
|
C |
|
|
|
|
W |
|
C |
|
|
|
|
|
|
|
|
|
|
|
|
|
|
|
|
|
|
|
|
|
|
|
|
|
|
|
|
|
|
|
|
|
Heavy Duty |
|
|
|
√ |
|
√ |
|
√ |
√ |
|
|
√ |
√ |
|
|
√ |
|
√ |
|
|
√ |
|
√ |
√ |
|
√ |
|
√ |
|
√ |
|
|
√ |
|
65 |
|
||||
|
|
|
|
|
|
|
|
|
|
|
|
|
|
|
|
|
|
|
|
|
|
|
|
|
|
|
|
|
|
|
|
|
|
|
|
|
|
||||
|
Normal |
|
|
|
√ |
|
√ |
|
√ |
√ |
|
|
√ |
√ |
|
|
√ |
|
√ |
|
|
√ |
|
√ |
√ |
|
√ |
|
√ |
|
√ |
|
|
√ |
|
53 |
|
||||
|
|
|
|
|
|
|
|
|
|
|
|
|
|
|
|
|
|
|
|
|
|
|
|
|
|
|
|
|
|
|
|
|
|
|
|
|
|
||||
|
Whites |
|
|
|
√ |
|
√ |
|
√ |
√ |
|
|
√ |
√ |
|
|
√ |
|
√ |
|
|
√ |
|
√ |
√ |
|
√ |
|
√ |
|
√ |
|
|
√ |
|
60 |
|
||||
|
|
|
|
|
|
|
|
|
|
|
|
|
|
|
|
|
|
|
|
|
|
|
|
|
|
|
|
|
|
|
|
|
|
|
|
|
|
|
|||
|
Perm Press |
|
|
|
|
|
|
√ |
|
√ |
√ |
|
|
√ |
√ |
|
|
√ |
|
√ |
|
|
√ |
|
√ |
√ |
|
√ |
|
√ |
|
√ |
|
|
√ |
|
45 |
|
|||
|
|
|
|
|
|
|
|
|
|
|
|
|
|
|
|
|
|
|
|
|
|
|
|
|
|
|
|
|
|
|
|
|
|
|
|
|
|
|
|
||
|
Delicates/ |
|
|
|
|
|
|
√ |
|
√ |
√ |
|
|
|
|
|
|
|
√ |
|
√ |
|
|
√ |
|
√ |
√ |
|
√ |
|
|
|
√ |
|
|
√ |
|
39 |
|
||
|
HandWash |
|
|
|
|
|
|
|
|
|
|
|
|
|
|
|
|
|
|
|
|
|
|
|
|
|
|
|
|
|
|
|
|
|
|
|
|
|
|
|
|
|
|
|
|
|
|
|
|
|
|
|
|
|
|
|
|
|
|
|
|
|
|
|
|
|
|
|
|
|
|
|
|
|
|
|
|
|
|
|
|
||
|
Wool |
|
|
|
|
|
|
|
|
|
√ |
|
|
|
|
|
|
|
√ |
|
√ |
|
|
|
|
√ |
|
|
√ |
|
|
|
|
|
|
|
|
57 |
|
||
|
|
|
|
|
|
|
|
|
|
|
|
|
|
|
|
|
|
|
|
|
|
|
|
|
|
|
|
|
|
|
|
|
|
|
|
|
|
||||
|
QuickWash |
|
|
|
√ |
|
√ |
|
√ |
√ |
|
|
√ |
√ |
|
|
√ |
|
√ |
|
|
√ |
|
√ |
√ |
|
√ |
|
|
|
√ |
|
|
√ |
|
33 |
|
||||
|
|
|
|
|
|
|
|
|
|
|
|
|
|
|
|
|
|
|
|
|
|
|
|
|
|
|
|
|
|
|
|
|
|
|
|
|
|
||||
|
Towels |
|
|
|
√ |
|
√ |
|
√ |
√ |
|
|
√ |
√ |
|
|
√ |
|
√ |
|
|
√ |
|
√ |
√ |
|
√ |
|
√ |
|
√ |
|
|
√ |
|
64 |
|
||||
|
|
|
|
|
|
|
|
|
|
|
|
|
|
|
|
|
|
|
|
|
|
|
|
|
|
|
|
|
|
|
|
|
|
|
|
|
|
|
|||
|
Sanitize |
√ |
|
|
|
|
|
|
|
|
|
|
|
√ |
√ |
|
|
√ |
|
√ |
|
|
√ |
|
√ |
√ |
|
√ |
|
√ |
|
√ |
|
|
√ |
|
110 |
|
|||
|
|
|
|
|
|
|
|
|
|
|
|
|
|
|
|
|
|
|
|
|
|
|
|
|
|
|
|
|
|
|
|
|
|
|
|
|
|
|
|||
|
Bedding |
|
|
|
|
|
|
√ |
|
√ |
√ |
|
|
|
√ |
|
|
√ |
|
√ |
|
|
√ |
|
√ |
√ |
|
√ |
|
√ |
|
√ |
|
|
√ |
|
69 |
|
|||
|
|
|
|
|
|
|
|
|
|
|
|
|
|
|
|
|
|
|
|
|
|
|
|
|
|
|
|
|
|
|
|
|
|
|
|
|
|
|
|||
|
Rinse + Spin |
|
|
|
|
|
|
|
|
|
√ |
|
|
√ |
√ |
|
|
√ |
|
√ |
|
|
|
|
|
|
|
√ |
|
|
|
√ |
|
|
√ |
|
18 |
|
|||
|
|
|
|
|
|
|
|
|
|
|
|
|
|
|
|
|
|
|
|
|
|
|
|
|
|
|
|
|
|
|
|
|
|
|
|
|
|
|
|
||
|
Spin Only |
|
|
|
|
|
|
|
|
|
|
|
|
|
√ |
√ |
|
|
√ |
|
√ |
|
|
|
|
|
|
|
√ |
|
|
|
|
|
|
|
|
9 |
|
||
|
|
|
|
|
|
|
|
|
|
|
|
|
|
|
|
|
|
|
|
|
|
|
|
|
|
|
|
|
|
|
|
|
|
|
|
|
|
|
|
|
|
3-4

3 - 3. M AI N F U N C TI O N
CHILD LOCK
Afunction that prevents children from playing with your Washer.
ACTIVATING/DEACTIVATING
If you want to activate/deactivate the Child Lock function, press the Soil Level and Signal buttons at the same time for 3 seconds.
How It Works:
1.Child Lock can be activated while your Washer is running.
2.Once you activate Child Lock, all controls (except for the Power button) will be locked until you deactivate Child Lock.
3.The Child Lock button will be lit while it is in effect.
Note: When buttons, other than the Power button, do not respond, please check if the Child Lock button is on.
GARMENT +
You can add or take laundry items even after the wash has started, as long as the Garment+ light is on. Pushing the Start/ Pause button unlocks the door, unless the water is too hot or if there is too much water in your Washer. If you are able to unlock the door and wish to continue the wash cycle, close the door and press the Start/Pause button.
MY CYCLE
Allows you to activate your custom wash (temperature, spin, soil level, etc.) with one–button convenience.
By pushing the My Cycle button, you activate the settings used during the last My Cycle mode. The My Cycle light will indicate activation.
You can select all options as follows in My Cycle mode.
1.SelectcycleusingCycleSelectordial.
2.Aftercycleselection,seteachoption.
Note: At this time, the option will follow as per each cycle’s default option selection.
Then you can start My Cycle by pushing the Start/Pause button in My Cycle mode.
The cycle and options you select will be displayed next time you choose My Cycle.
3-5

3 - 3. M AI N F U N C TI O N
FOR SILVERCARE WASHING
Silver ions are added during the wash and rinse cycles to maximize the sanitizing and antibiotic effects, treating fabrics with a microscopic coating protection that kills more than 650 kinds of bacteria.
1.Open the door, put in the clothes and close the door again.
2.Press the Power button.
3.Select a Cycle by turning the Cycle Selection dial.
4.Press SilverCare button.
5.Add detergent in the dispenser tray for main washing, and add fabric softener up to the marked line.
: For Pre Wash, put a supplementary detergent in the dispenser.
SilverCare: If it is used together with fabric softener, its effect may be decreased.
6.Press Start/Pause button.
: Automatically selects optimal washing conditions by sensing the laundry’s weight.
Note :
FOR HOME USE ONLY– COMMERCIALUSERS SHOULD NOTIFYTHEIR LOCALWASTE TREATMENT AUTHORITIES BEFORE USE
You can find # of times you used SilverCare option by pushing signal and SilverCare button.
LU3:lessthan1000times
LU2:between1000to2000times
LU1:between2000to2999times
LU0:over2999times
You should replace the silver kit when it display “LU0”. Contact 1-800-SAMSUNG.
Note :
For some model which has no heater if you choose SilverCare, Temp will be fixed to Cold/Cold. If you change Temp selection, SilverCare will be canceled.
3-6

3 - 4. T E C H NI C A L P OI N T
1) Motor on/off time at each course
unit:sec
Course |
|
|
W a s hi n g |
|
M ot o r r. p. m |
|
|
C w |
Off |
|
C c w |
Off |
|
|
|
|
||||
Heavy Duty |
13 |
4 |
|
13 |
4 |
52 |
Normal |
12 |
8 |
|
12 |
8 |
50 |
Whites |
7 |
8 |
|
7 |
8 |
40 |
Perm Press |
5 |
10 |
|
5 |
10 |
40 |
Delicate/Hand wash |
2 |
48 |
|
2 |
48 |
50 |
Wool |
2 |
58 |
|
2 |
58 |
50 |
QuickWash |
12 |
8 |
|
12 |
8 |
50 |
Towels |
10 |
10 |
|
10 |
10 |
50 |
Sanitize |
8 |
12 |
|
8 |
12 |
45 |
Bedding |
10 |
10 |
|
10 |
10 |
45 |
Rinse + Spin |
5 |
10 |
|
5 |
10 |
40 |
2) Final dehydrating r.p.m at each course
unit:rpm
|
Model |
W F 3 1 6 L |
Course |
|
|
|
|
|
Heavy Duty |
|
1200 |
|
|
|
Normal |
|
1200 |
|
|
|
Whites |
|
1200 |
|
|
|
Perm Press |
|
800 |
|
|
|
Delicate/Hand wash |
|
800 |
Wool |
|
400 |
|
|
|
QuickWash |
|
1200 |
|
|
|
Towels |
|
400 |
|
|
|
Sanitize |
|
1200 |
|
|
|
Bedding |
|
1200 |
|
|
|
Rinse + Spin |
|
800 |
|
|
|
Spin Only |
|
1200 |
|
|
|
3-7

3 - 4. T E C H NI C A L P OI N T
3) The water supply control at each process cycle
|
Model |
WF316,WF306 |
Process cycle |
|
|
|
|
|
|
|
|
PreWashing |
|
Cold water 5L/min |
Washing |
|
Cold water 10L/min + (Hot water 10L/min) |
Rinse |
|
Cold water 10L/min |
Final rinse |
|
Cold water 10L/min + Cold water 5L/min |
4) The water level data at each course
|
|
|
|
unit:Khz |
|
|
Model |
Default water level |
Supplementary water START |
Supplementary water |
|
Course |
|
(kHz) |
(kHz) |
End (kHz) |
|
Heavy Duty |
Washing |
24.25 |
24.90 |
23.60 |
|
Rinse |
23.60 |
25.00 |
24.60 |
||
|
|||||
Normal |
Washing |
24.25 |
24.90 |
23.60 |
|
Rinse |
23.60 |
25.00 |
24.60 |
||
|
|||||
Whites |
Washing |
24.40 |
25.00 |
24.75 |
|
Rinse |
23.60 |
25.00 |
24.60 |
||
|
|||||
Perm Press |
Washing |
23.80 |
24.55 |
24.30 |
|
Rinse |
23.65 |
24.55 |
24.30 |
||
|
|||||
Delicate/Hand wash |
Washing |
23.45 |
24.35 |
24.00 |
|
Rinse |
23.15 |
24.35 |
24.00 |
||
Wool |
Washing |
24.40 |
25.00 |
24.70 |
|
Rinse |
23.80 |
25.00 |
24.70 |
||
|
|||||
QuickWash |
Washing |
24.25 |
24.90 |
23.60 |
|
Rinse |
23.50 |
25.00 |
24.60 |
||
|
|||||
Towels |
Washing |
24.25 |
24.90 |
24.60 |
|
Rinse |
23.50 |
25.00 |
24.60 |
||
|
|||||
Sanitize |
Washing |
24.25 |
24.90 |
24.60 |
|
Rinse |
23.50 |
25.00 |
24.60 |
||
|
|||||
Bedding |
Washing |
24.25 |
24.90 |
24.60 |
|
Rinse |
23.50 |
25.00 |
24.60 |
||
|
|||||
Rinse + Spin |
Washing |
24.25 |
24.90 |
24.60 |
|
Rinse |
23.50 |
25.00 |
24.60 |
||
|
3-8
Memo
3-9

4. ALIGNMENT AND ADJUSTMENTS
4-1. GENERAL ERROR FUNCTION
NO |
LED |
Diagnostic |
Description |
Corrective Action |
|
Display |
Code |
||||
1 |
nd |
1 |
The water level fails to drop below the Reset Water Level |
Go to “ Will Not Drain” Troubleshooting |
|
within 15 minutes. |
|||||
Section. |
|||||
|
|
|
|
||
|
|
|
|
|
|
2 |
LO |
2 |
Door fails to unlock after 3 attempts. |
Go to “ Will Not Unlock” Troubleshooting |
|
Section. |
|||||
|
|
|
|
||
3 |
nF |
3 |
When the filling continues for more than 16 minutes or there |
Go to “ No Water Fill” Troubleshooting |
|
is no change of water level for 3 minutes |
Section. |
||||
|
|
|
|||
4 |
FL |
4 |
|
Go to “ Will Not Lock” Troubleshooting |
|
Door fails to lock after 3 attempts. |
Section. |
||||
|
|
|
|
|
|
|
|
|
Water Level Sensor Trouble. |
|
|
5 |
LE |
8 |
(When the input signal from the water level sensor is out of |
Go to “No Water Fill” Troubleshooting Section. |
|
range, the unit will send out beeping sounds and halts the |
|||||
|
|
|
|
||
|
|
|
cycle.) |
|
|
|
|
|
Afault is detected in the water level sensor. |
|
|
6 |
OE |
E |
Data (frequency) shows the water level is at or above the |
First check to see that all of water valves are |
|
overflow water level. (When this condition is detected, the |
not stuck. If water valves are OK, check water |
||||
|
|
|
machine will automatically starts draining water until the water |
level sensor. |
|
|
|
|
level falls below the overflow water level) |
|
|
7 |
dc |
10 |
Unbalance or cabinet bump is detected during final spin, |
|
|
which prevents the drum from spinning over 400 rpm. (Never |
Go to “Wet Clothes” Troubleshooting Section. |
||||
|
|
|
exceeds 400 RPM due to unbalanced load) |
|
|
8 |
- |
11 |
|
Go to “EEPROM Clear Mode” If display |
|
EEPROM Fault. (Program settings are being reset.) |
shows “FAiL”,Replace Machine Control |
||||
|
|
|
|
Board. |
|
9 |
E2 |
15 |
Jammed Key.(When key input signals are coming out for |
Check all of keys. IfAkey is sensed to be |
|
more than 30 seconds, it is regarded as a jam.) |
pressed, all keys will do not respond. |
||||
|
|
|
|||
10 |
dL |
18 |
|
Check for loose wire connections. |
|
Door is detected as open when the motor is operating. |
Go to “Quick Test Mode” and then do Door |
||||
|
|
|
|
lock/Unlock Test and Motor Test. |
|
11 |
dS |
22 |
Door is detected as open while it is trying to lock the door. |
Go to “Quick Test Mode” and then do Door |
|
Lock/Unlock Test |
|||||
|
|
|
|
||
12 |
bE |
25 |
Motor hall sensor signals come out without motor operation. |
Replace Machine Control Board. |
|
|
|
|
|
|
|
13 |
tE |
29 |
Abnormal high/low temperature or resistance (Thermal |
Go to “ Board Input Test” and check Water |
|
Temperature. Check loose or pinched wires. |
|||||
sensor or PBA) resistance. |
|||||
|
|
|
Replace PCB or thermistor. |
||
|
|
|
|
||
|
|
|
MICOM is attempting to drive the motor but is not getting any |
Evaluate wire harness for loose or unhooked |
|
14 |
E3 |
2E |
response signals from the hall sensor. Visual check shows |
connections. Go to “ Quick Test Mode” and |
|
motor is not running. (Locked, Defective Hall Sensor or |
|||||
|
|
|
test Motor. |
||
|
|
|
Overload) |
||
|
|
|
|
||
15 |
Sr |
34 |
System Relay (Main Relay) Failure. (PCB does not notice the |
Replace PCB. |
|
|
|
|
relay operation when there should be.) |
|
|
16 |
Hr |
36 |
Heater Relay Failure (No Heater Relay Check Signal) |
Replace PCB |
|
|
|
|
|
|
|
17 |
3E |
3E |
Over-current is detected. Motor won’t turn. |
Evaluate wire harness for loose or unhooked |
|
connections. |
|||||
(IPM detects over-current.) |
|||||
|
|
|
Go to “ Quick Test Mode” to test Motor. |
||
|
|
|
|
||
18 |
2E |
91 |
Voltage for motor control bus is over specified limit. |
Replace PCB |
|
|
|
|
|
|
|
19 |
2E |
92 |
Voltage for motor control bus is under specified limit. |
Replace PCB |
|
|
|
|
|
|
|
20 |
8E |
8E |
MEMS Sensor Failure. (No MEMS Sensor Check Signal) |
Check MEMS PCB ,Main PCB & Wire- |
|
harness |
|||||
|
|
|
|
||
21 |
7E |
7E |
Silver Care Kit (Silver Care PCB) Failure. |
Check Silver Care PCB ,Main PCB & Wire- |
|
harness |
|||||
|
|
|
|
||
22 |
PF |
- |
It occurs when there is power failure during the washing.(“PF” |
- |
|
|
|
|
is not an error. It is to inform the user of power failure.) |
|
|
23 |
SUdS |
- |
Suds is detected during the washing session. (“SUdS” is not |
Guide a user to reduce amount of detergent |
|
an error. If the washer is in suds period, “SUdS” will light up |
usage. |
||||
|
|
|
instead of remaining time.) |
|
4-1

4-2. TEST MODE
Test Mode:
Each Test Mode for the Frontier Washer is as follows in the coming pages. The test modes indicated by the red arrows are the modes unable to get an access once the washing cycle has started due to safety reasons.
4-2-1. Quick Test Mode
Definition of Quick Test Mode:
-Check operation of all LED’s (Verify faulty LED).
-Check model and software version.
-Check different operating modes (e.g. water valve, motor, door, drain pump, etc.).
How to Enter:
-Plug in and turn on the unit.
-Press Spin Key, Soil Level Key and Power Key at the same time. (Same for all Frontier models.)
Quick Test Mode:
1. All LED’s light up and it sends out Beep Sound when it enters into the Quick Test Mode. (Including 7-Segment)
2. Displays software version for a sec.
(Ex. If S/W Version is 60, 7-Segment will display U060)
3. After displaying the software version, 7-Segment will display the following information for each model.
- F1 : WF326LAW, WF326LAS
-F2 : WF316LAW
-F2b: WF316BAC, WF316BAW
- F3 : WF306LAW
- F8b: WF306BHW
- EEEE : Model option Error (Need to replace PCBAssy.)
4. When model information is being displayed, press the following keys to test various components.
- Temp Key : Water Valve Test - Spin Key : Motor Test
-Soil Level Key : Door Lock/Unlock Test
-Signal Key : Drain Pump Test.
4-2

4-2-1. Quick Test Mode
Water Valve Test:
1. To enter the Water Valve Test, press the Temp Key while model information is being displayed during the Quick Test Mode.
2. Each time the Temp Key is pressed, it will cycle through the operations on the left flow chart. But, WF306LAW(F3) and WF306BHW(F8b) do not have the pre water valve. So, it will skip Pre Water Valve On and jump to Cold Water Valve On.
3. If the Temp Key is pressed duringAll Water Valve OFF, the machine will return to the beginning as shown in the flow chart.
4. The door needs to be secured for the Water Valve to operate. Therefore, the door lock will be on during the water valve operation.
5. If there is any problem with Water Valve, PCBAssy. or Wire Harness, the water valves could not operate. So, to make sure for the water valves to operate, check visually if water comes out with each Water Valve On mode.
Motor Test:
1. To enter the Motor Test, press the Spin Key while model information is being displayed during the Quick Test Mode.
2. Each time the Spin Key is pressed, it will cycle through the operations on the left flow chart.
4. The Door Lock will be on during the motor operation.
5. If there is any problem with Motor, PCBAssy. or Wire Harness,related error codes will be displayed.
Door Lock/Unlock Test:
1.To check the Door Lock/Unlock operation, press the Soil Level Key while model information is being displayed during the Quick Test Mode.
2. Each time the Soil Level Key is pressed, it will cycle through the Door Lock/ Unlock operations on the left flow chart.
3. If the Soil Level Key is pressed during Door Lock and Water Valve, Motor or Drain Pump operation, all of the operations will stop.And, when the Soil Level Key is pressed again,the door will be released.
4. If there is any problem with Door Switch, PCBAssy. or Wire Harness, related error codes will be displayed.
Drain Pump Test:
1. To check the Drain Pump operation, press the Signal Key while model information is being displayed during the Quick Test Mode.
2. Each time the Signal Key is pressed, it will cycle through the operations on the left flow chart.
3.The Drain Pump operation is independent.
Therefore, it will operate regardless of Door Lock/Unlock.
4.If there is any problem with Drain Pump, PCBAssy. or Wire Harness, the Drain Pump will not operate.
So, its operation needs a visual inspection.
4-3
4-2-2. EEPROM Reset Mode
Definition of EEPROM Reset Mode:
-EEPROM initialization.
-All course/option settings are to be reset to default values after EEPROM initialization.
-When Service arises and it needs PCB replacement, EEPROM should be reset.
How to Enter:
-The unit needs to be on.
-Press Delay Start Key, Signal Key and Power Key at the same time. (Same for all Frontier models.)
EEPROM Reset Mode: |
|
1. |
EEPROM can be reset once the user enters the EEPROM Clear Mode. |
2. |
If there is any problem with EEPROM, 7-Segment will display “ FAiL”. “Good” |
|
will be displayed if everything is OK. |
3. |
PCB assy. needs replacing if “FAiL” is displayed during EEPROM reset. |
4. |
If PCB assy. is replaced for some reason, EEPROM needs resetting. |
5. |
If problem occurs with Sticky Function, My Cycle and Power Failure |
|
Compensation, it may be due to EEPROM . |
|
Check EEPROM’s condition at EEPROM Clear Mode. |
4-2-3. Continuous Run Mode |
|
Definition of Continuous Run Mode:
-Will continuously repeat the current cycle until the Continuous Run Mode is cancelled. How to Enter:
-Press Delay Start Key and Extra Rinse Key together for 3 sec. (Same for all Frontier models.)
Continuous Run Mode:
1.Press Delay Start + Extra Rinse Key for 3 sec during Power On State (Normal User Mode) .
2.Once in Continuous Run Mode, 7-Segment will blink “cc” and the remaining time in turns.
3.The Continuous Run Mode will repeat the previous cycle until continuous run mode is cancelled.
4.During Continuous Run Mode, press Delay Start + Extra Rinse Key for 3 seconds to return to normal user mode. 7-segment will no longer display “cc”, but only display the remaining time.
4-2-4. Special Test Mode
Definition of Special Test Mode:
-Special Test Mode enables service technicians to verify the operation of the washing machine and do troubleshooting.
-Special Test Mode can be entered during all washing cycle without interrupting the cycle except some of test modes.
-Various tests can be done with Special Test Mode. So, troubleshooting can be done based on the resulting diagnostic codes. How to Enter:
-To enter the Special Test Mode, press the Signal and Extra Rinse Keys for 3 seconds or until the unit sends out
beeping sounds. (same for all Frontier models.)
4-4
4-2-4. Special Test Mode |
Special Test Mode:
1.The washer must be on to go into the Special Test Mode.
2.The motor speed will be displayed when started (It displays 0 when the motor does not spin).
3.The present state of the machine will not be changed.
(i.e., the current cycle in progress will not be interrupted and only the display will change)
4.All LED’s will be turned off except the “Door Lock” LED. It will continue to display the condition of the door lock.
5.To exit Special Test Mode, press Signal and Extra Rinse Keys for 3 second again, or Power Key.
If no key is operated during Special Test Mode for 5 minutes, the machine will return to normal user mode.
4-2-5. Quick Spin Test Mode
Definition of Quick Spin Test Mode:
-Quick Spin Test Mode is to do Spin Check. (High RPM) How to Enter:
-During Special Test Mode, press the Delay Start and Silver Wash Keys (Rinse Water + Key) for 3 seconds to enter Quick Spin Test Mode. (same for all Frontier models.)
-Cannot enter once the washing cycle has started.
Quick Spin Test Mode:
As it enters into the Quick Spin Test Mode, it starts spinning and reaches to its maximum RPM.And then, it stays at its maximum speed for 2 minutes before it exits the Quick Spin Test Mode.
To hold Quick Spin Test Mode (entering Speed Hold Mode), press the Start/Pause button. If the Start/Pause button is pressed during Quick Spin Test Mode, it will stop accelerating and hold its spinning speed for 10 minutes before going back to Quick Spin Test Mode.
Also, to cancel the hold and allow Quick Spin Test Mode to continue, press the Delay Start and Silver Wash Keys together for 3 seconds.
4-5
4-2-6. Cycle Count Check Mode
Definition of Cycle Count Check Mode:
- Cycle Count Check Mode is to tally up the number of washings.
How to Enter:
-To enter the Cycle Count Check Mode, press the Signal Key during Special Test Mode. (same for all Frontier models.)
Cycle Count Check Mode:
1.Activate the Special Test Mode in advance.
2.When the Signal key is pressed, the total number of washings will light up and a signal LED will glow (Louder, Softer, Off LED).
3.The maximum number of cycles will be 2999.
The counter will roll over to 0 and start counting again after 2999.
4.The counting will be carried out at the end of the normal cycle.
(During Continuous Run Mode, it does not Do not count any cycle in Continuous Run Mode)
5.To exit the Cycle Count Check Mode, press the “Signal” key again. Then, it returns to the Special Test Mode with motor RPM illuminating.
4-2-7. S/W Version Check Mode
Definition of S/W Version Check Mode:
- S/W Version Check Mode is to bring up S/W Version information.
How to Enter:
-To enter the S/W Version Check Mode, press the Soil Level Key during Special Test Mode.
(same for all Frontier models.)
S/W Version Check Mode:
1.Activate the Special Test Mode in advance.
2.Press the Soil Level Key to bring up its software Version Ex) Generate U005 at U005
3.To exit the S/W Version Check Mode, press the Soil Level S/W once again. Then, it returns to the Special Test Mode with motor RPM illuminating.
4-6
 Loading...