


Washer
User manual
WF45T6000A*
Untitled-7 1 |
4/2/2020 2:56:32 PM |

Contents
Safety information
|
What you need to know about the safety instructions |
|
Important safety symbols |
Contents |
Important safety precautions |
CALIFORNIA PROPOSITION 65 WARNING |
|
Critical installation warnings |
|
Installation cautions |
|
|
Critical usage warnings |
|
Usage cautions |
|
Critical cleaning warnings |
Installation
Unpacking your washer
What’s included
Installation requirements
Step-by-step installation
Before you start
Initial settings
Laundry guidelines
Detergent drawer guidelines
Operations
Control panel
Simple steps to start
Cycle overview
Cycle chart
Special features
2 English
4
4
4
5
6
6
8
8
10
13
14
14
15
17
21
26
26
26
28
31
31
34
35
36
38
Untitled-7 Sec32 |
4/2/2020 2:57:50 PM |

Maintenance
Self Clean
Smart Care Emergency drain Cleaning
Recovery from freezing
Care for an extended period of non-use Cleaning the exterior
Cleaning the interior
Troubleshooting
Checkpoints
Information codes
Specifications
Fabric care chart
Protecting the environment
Declaration of conformity
Specification sheet
40
40
41
42
43
46
47
47
47
48
48
52
54
54
55
55
56
English 3
Contents
Untitled-7 Sec33 |
4/2/2020 2:57:50 PM |

information Safety
Safety information
Congratulations on your new Samsung washer. This manual contains important information on the installation, use and care of your appliance. Please take some time to read this manual to take full advantage of your washer’s many benefits and features.
What you need to know about the safety instructions
Please read this manual thoroughly to ensure that you know how to safely and efficiently operate the extensive features and functions of your new appliance. Please store the manual in a safe location close to the appliance for future reference. Use this appliance only for its intended purpose as described in this instruction manual.
Warnings and Important Safety Instructions in this manual do not cover all possible conditions and situations that may occur. It is your responsibility to use common sense, caution and care when installing, maintaining and operating your washer.
Because the following operating instructions cover various models, the characteristics of your washer may differ slightly from those described in this manual and not all warning signs may be applicable. If you have any questions or concerns, contact your nearest service center or find help and information online at www.samsung.com.
Important safety symbols
What the icons and signs in this user manual mean:
 WARNING
Hazards or unsafe practices that may result in severe personal injury, death and/or property damage.
 CAUTION
Hazards or unsafe practices that may result in personal injury and/or property damage.
 NOTE
NOTE
Indicates that a risk of personal injury or material damage exists.
These warning signs are here to prevent injury to yourself and others. Please follow them explicitly.
After reading this manual, store it in a safe place for future reference.
Read all instructions before using the appliance.
As with any equipment that uses electricity and moving parts, potential hazards exist. To safely operate this appliance, familiarize yourself with its operation and exercise care when using it.
SAVE THESE INSTRUCTIONS
4 English
Untitled-7 4 |
4/2/2020 2:57:50 PM |

Important safety precautions
 WARNING
To reduce the risk of fire, electric shock, or injury to persons when using your appliance, follow basic precautions, including the following:
1.Read all instructions before using the appliance.
2.Do not wash or dry articles that have been previously cleaned in, washed in, soaked in, or spotted with gasoline, dry-cleaning solvents, other flammable or explosive substances as they give off vapors that could ignite or explode.
3.Do not allow children to play on or in the appliance. Close supervision of children is necessary when the appliance is used near children.
4.Before the appliance is removed from service or discarded, remove the door to the washing or drying compartment.
5.Do not reach into the appliance if the drum is moving.
6.Do not install or store this appliance where it will be exposed to the weather.
7.Do not tamper with controls.
8.Do not repair or replace any part of the appliance or attempt any servicing unless specifically recommended in the user-maintenance instructions or in published user repair instructions that you understand and have the skills to carry out.
9.Do not add gasoline, dry-cleaning solvents, or other flammable or explosive substances to the wash water. These substances give off vapors that could ignite or explode.
10.Under certain conditions, hydrogen gas may be produced in a hot water system that has not been used for 2 weeks or more. HYDROGEN GAS IS EXPLOSIVE. If the hot water system has not been used for such a period, before using a washer or combination washer-dryer, turn on all hot water faucets and let the water flow from
each for several minutes. This will release any accumulated hydrogen gas. As the gas is flammable, do not smoke or use an open flame during this time.
information Safety
SAVE THESE INSTRUCTIONS
English 5
Untitled-7 5 |
4/2/2020 2:57:50 PM |

Safety information
information Safety
CALIFORNIA PROPOSITION 65 WARNING
 WARNING
Cancer and Reproductive Harm - www.P65Warnings.ca.gov.
Critical installation warnings
 WARNING
The installation of this appliance must be performed by a qualified technician or service company.
•Failure to do so may result in electric shock, fire, an explosion, problems with the product, or injury.
The appliance is heavy, therefore take care when lifting it.
Plug the power cord into a wall socket that meets local electrical specifications. Use the socket for this appliance only, and do not use an extension cord.
•Sharing a wall socket with other appliances, using a power strip, or extending the power cord may result in electric shock or fire.
•Ensure that the voltage, frequency, and current supplied to the washer matches those listed in the product specifications. Failure to do so may result in electric shock or fire. Plug the power plug into the wall socket firmly.
Remove all foreign substances such as dust or water from the power plug terminals and contact points using a dry cloth on a regular basis.
•Unplug the power plug and clean it with a dry cloth.
•Failure to do so may result in electric shock or fire.
Plug the power plug into the wall socket so that the cord is running towards the floor.
•If you plug the power plug into the socket in the opposite direction, the electric wires within the cable may be damaged and this may result in electric shock or fire.
Keep all packaging materials out of the reach of children as these may be dangerous.
•If a child places a plastic bag over his or her head, he or she can suffocate.
If the appliance, power plug, or power cord is damaged, contact your nearest service center.
This appliance must be properly grounded.
SAVE THESE INSTRUCTIONS
6 English
Untitled-7 6 |
4/2/2020 2:57:51 PM |

Do not ground the appliance to a gas pipe, plastic water pipe, or telephone line.
•This may result in electric shock, fire, an explosion, or problems with the product.
•Never plug the power cord into a socket that is not grounded correctly. Make sure that the socket is in accord with local and national regulations.
Do not install this appliance near a heater or any flammable material.
Do not install this appliance in a humid, oily or dusty location, or in a location exposed to direct sunlight or water (rain drops).
Do not install this appliance in a location exposed to low temperatures.
•Frost may cause the tubes to burst.
Do not install this appliance in a location where gas may leak.
•This may result in electric shock or fire.
Do not use an electric transformer to power the washer.
•This may result in electric shock or fire.
Do not use a damaged power plug, damaged power cord, or loose wall socket.
•This may result in electric shock or fire.
Do not pull or bend the power cord excessively.
Do not twist or tie the power cord.
Do not hook the power cord over a metal object, place a heavy object on the power cord, insert the power cord between objects, or push the power cord into the space behind the appliance.
•This may result in electric shock or fire.
Do not pull the power cord when unplugging the power plug.
•Unplug the power plug by pulling the plug.
•Failure to do so may result in electric shock or fire.
This appliance should be positioned so that the power plug, the water supply taps, and the drain pipes are accessible.
information Safety
SAVE THESE INSTRUCTIONS
English 7
Untitled-7 7 |
4/2/2020 2:57:51 PM |

Safety information
information Safety
Installation cautions
 CAUTION
This appliance should be positioned in such a way that the power plug is easily accessible.
•Failure to do so may result in electric shock or fire due to electric leakage.
Install your appliance on a solid, level floor that can support its weight.
•Failure to do so may result in abnormal vibrations, movement, noise, or problems with the product.
Critical usage warnings
 WARNING
If the appliance is flooded, turn off the water & power supplies immediately and contact your nearest service center.
•Do not touch the power plug with wet hands.
•Failure to do so may result in electric shock.
If the appliance generates a strange noise, a burning smell, or smoke, unplug the power plug immediately and contact your nearest service center.
•Failure to do so may result in electric shock or fire.
In the event of a gas leak (such as propane gas, LP gas, etc.), ventilate immediately without touching the power plug. Do not touch the appliance or power cord.
•Do not use a ventilating fan.
•A spark may result in an explosion or fire.
Do not let children play in or on the washer. In addition, when disposing of the appliance, remove the washer door lever.
•Children can suffocate to death if trapped inside the product.
Make sure to remove the packaging (sponge, styrofoam) attached to the bottom of the washer before using it.
Do not wash items contaminated with gasoline, kerosene, benzene, paint thinner, alcohol, or other inflammable or explosive substances in the washer.
•This may result in electric shock, fire, or an explosion.
Do not open the washer door by force while it is operating (high-temperature washing/ drying/spinning).
SAVE THESE INSTRUCTIONS
8 English
Untitled-7 8 |
4/2/2020 2:57:51 PM |

•Water flowing out of the washer may result in burns or cause the floor to be slippery. This may result in injury.
•Opening the door by force may result in damage to the product or injury.
Do not insert your hand under the washer while an operation is in progress.
•This may result in injury.
Do not touch the power plug with wet hands.
•This may result in electric shock.
Do not turn the appliance off by unplugging the power plug while an operation is in progress.
•Plugging the power plug into the wall socket again may cause a spark and result in electric shock or fire.
Do not let children or the infirm use this washer without proper supervision. Do not let children climb in or onto the appliance.
•This may result in electric shock, burns, or injury.
Do not insert your hand or a metal object under the washer while it is operating.
•This may result in injury.
Do not unplug the appliance by pulling the power cord. Always grip the plug firmly and pull it straight out of the outlet.
•Damage to the power cord may cause a short-circuit, fire, and/or electric shock.
Do not attempt to repair, disassemble, or modify the appliance yourself.
•Do not use a fuse (such as copper, steel wire, etc.) other than a standard fuse.
•When the appliance needs to be repaired or reinstalled, contact your nearest service center.
•Failure to do so may result in electric shock, fire, problems with the product, or injury.
If the water supply hose comes loose from the faucet and floods the appliance, unplug the power plug.
•Failure to do so may result in electric shock or fire.
Unplug the power plug when the appliance is not being used for long periods of time or during a thunder or lightning storm.
•Failure to do so may result in electric shock or fire.
If any foreign substance enters the appliance, unplug the power plug and contact your nearest Samsung Customer Service.
information Safety
SAVE THESE INSTRUCTIONS
English 9
Untitled-7 9 |
4/2/2020 2:57:51 PM |

information Safety
Safety information
•This may result in electric shock or fire.
Do not let children (or pets) play in or on your washer. The washer door does not open easily from the inside and children may be seriously injured if trapped inside.
Usage cautions
 CAUTION
If the washer is contaminated by a foreign substance such as detergent, dirt, food waste, etc., unplug the power plug and clean the washer using a damp, soft cloth.
•Failure to do so may result in discoloration, deformation, damage, or rust.
The front glass may be broken by a strong impact. Take care when using the washer.
•If the glass is broken, it may result in injury.
After a water supply failure or when reconnecting the water supply hose, open the faucet slowly.
Open the faucet slowly after a long period of non-use.
•The air pressure in the water supply hose or the water pipe may damage a product part or result in a water leak.
If a draining error occurs during an operation, check if there is a draining problem.
•If the washer is used when it is flooded because of a draining problem, it may result in electric shock or fire.
Insert the laundry into the washer completely so that the laundry does not get caught in the door.
•If laundry gets caught in the door, it may result in damage to the laundry or the washer, or result in a water leak.
Turn the water supply off when the washer is not being used.
•Ensure that the water supply hose connectors are properly tightened.
Ensure that the rubber seal and front door glass are not contaminated by a foreign substance (e.g. waste, thread, hair, etc.).
•If a foreign substance is caught in the door or the door is not completely closed, it may cause a water leak.
Open the faucet and check if the water supply hose connectors are firmly tightened and that there are no water leaks before using the product.
SAVE THESE INSTRUCTIONS
10 English
Untitled-7 10 |
4/2/2020 2:57:51 PM |
• If the connectors on the water supply hoses are loose, it may result in a water leak.
The product you have purchased is designed for domestic use only.
Using the product for business purposes qualifies as a product misuse. If the product is used for business purposes, it will not be covered by the standard warranty provided by Samsung and no responsibility can be attributed to Samsung for malfunctions or damages resulting from such misuse.
Do not stand on the appliance or place objects (such as laundry, lighted candles, lighted cigarettes, dishes, chemicals, metal objects, etc.) on the appliance.
•This may result in electric shock, fire, problems with the product, or injury.
Do not spray volatile material such as insecticide onto the surface of the appliance.
•As well as being harmful to humans, this may result in electric shock, fire, or problems with the product.
Do not place objects that generate electromagnetic fields near the washer.
•This may result in injury due to a malfunction.
Water drained during a high-temperature wash or drying cycle is hot. Do not touch the water.
•This may result in burns or injury.
Do not wash, spin, or dry water-proof seats, mats, or clothing (*) unless your appliance has a special cycle for washing these items.
(*): Woolen bedding, rain covers, fishing vests, ski pants, sleeping bags, diaper covers, sweat suits, and bicycle, motor cycle and car covers, etc.
•Do not wash thick or hard mats even if the washer mark is on the care label. This may result in injury or damage to the washer, walls, floor, or clothing due to abnormal vibrations.
•Do not wash throw rugs or doormats with rubber backing. The rubber backing may come off and stick to inside the drum, and this may result in malfunction such as a drainage error.
Do not operate the washer when the detergent drawer is removed.
•This may result in electric shock or injury due to a water leak.
Do not touch the insides of the drum during or just after drying as it is hot.
•This may result in burns.
information Safety
SAVE THESE INSTRUCTIONS
English 11
Untitled-7 11 |
4/2/2020 2:57:51 PM |

information Safety
Safety information
The door glass becomes hot during washing and drying. Therefore, do not touch the door glass.
Also, do not allow children to play around the washing machine or touch the door glass.
•This may result in burns.
Do not insert your hand into the detergent drawer.
•This may result in injury as your hand may be caught by the detergent input device.
•Do not use the liquid detergent container (on applicable models only) for powdered detergent. Remove the container and put powdered detergent directly into the Main wash compartment.
Do not place any objects (such as shoes, food waste, animals) other than laundry into the washer.
•This may result in damage to the washer, or injury and death in the case of pets, due to the abnormal vibrations.
Do not press the buttons using sharp objects such as pins, knifes, fingernails, etc.
•This may result in electric shock or injury.
Do not wash laundry contaminated by oils, creams, or lotions usually found in skincare shops or massage clinics.
•This may cause the rubber seal to become deformed and result in a water leak.
Do not leave metal objects such as safety pins, hair pins or bleach in the drum for long periods of time.
•Doing either may cause the drum to rust.
•If rust starts appearing on the surface of the drum, apply a (neutral) cleansing agent to the surface and use a sponge to clean it. Never use a metal brush.
Do not use dry cleaning detergent directly and do not wash, rinse, or spin laundry contaminated by dry cleaning detergent.
•This may result in spontaneous combustion or ignition due to the heat from the oxidation of the oil.
Do not use water from water cooling/heating devices.
•This may result in problems with the washer.
Do not use natural hand-washing soap for the washer.
•If it hardens and accumulates inside the washer, it may result in problems with the product, discoloration, rust, or bad odors.
SAVE THESE INSTRUCTIONS
12 English
Untitled-7 12 |
4/2/2020 2:57:51 PM |

Place socks and brassieres in a washing net and wash them with the other laundry.
Do not wash large laundry items such as bedding in the washing net.
•Failure to do so may result in injury due to abnormal vibrations.
Do not use hardened detergent.
•If it accumulates inside the washer, it may result in a water leak.
Make sure that the pockets of all the clothing items to be washed are empty.
•Hard, sharp objects such as coins, safety pins, nails, screws, or stones can cause extensive damage to the appliance.
Do not wash clothing with large buckles, buttons, or other heavy metal objects in the washer.
Sort the laundry by color on the basis of its colorfastness and select the recommended cycle, water temperature, and additional functions.
•Failure to do this may result in discoloration or fabric damage.
Take care that children’s fingers are not caught in the door when you close it.
•Failure to do so may result in injury.
Critical cleaning warnings
 WARNING
Do not clean the appliance by spraying water directly onto it.
Do not use a strong acidic cleaning agent.
Do not use benzene, thinner, or alcohol to clean the appliance.
•This may result in discoloration, deformation, damage, electric shock, or fire.
Before cleaning or performing maintenance, unplug the appliance from the wall socket.
•Failure to do so may result in electric shock or fire.
information Safety
SAVE THESE INSTRUCTIONS
English 13
Untitled-7 13 |
4/2/2020 2:57:51 PM |
Installation
Follow these instructions carefully to ensure proper installation of your washer and to prevent accidents when doing laundry.
 WARNING
Certain internal parts are intentionally not grounded and may present a risk of electric shock only during servicing. Service personnel – Do not contact the following parts while the appliance is energized: Control board, heat sink, motor, inlet valve and pump.
Installation
Unpacking your washer
Unpack your washer and inspect it for shipping damage. Make sure you have received all the items shown on the next page. If your washer was damaged during shipping, or you do not have all of the items, call 1-800-SAMSUNG (1-800-726-7864). To prevent personal injury or strain, wear protective gloves whenever lifting or carrying the unit.
 WARNING
Packing materials can be dangerous to children; Keep all packing material (plastic bags, polystyrene, etc.) well out of children’s reach.
 CAUTION
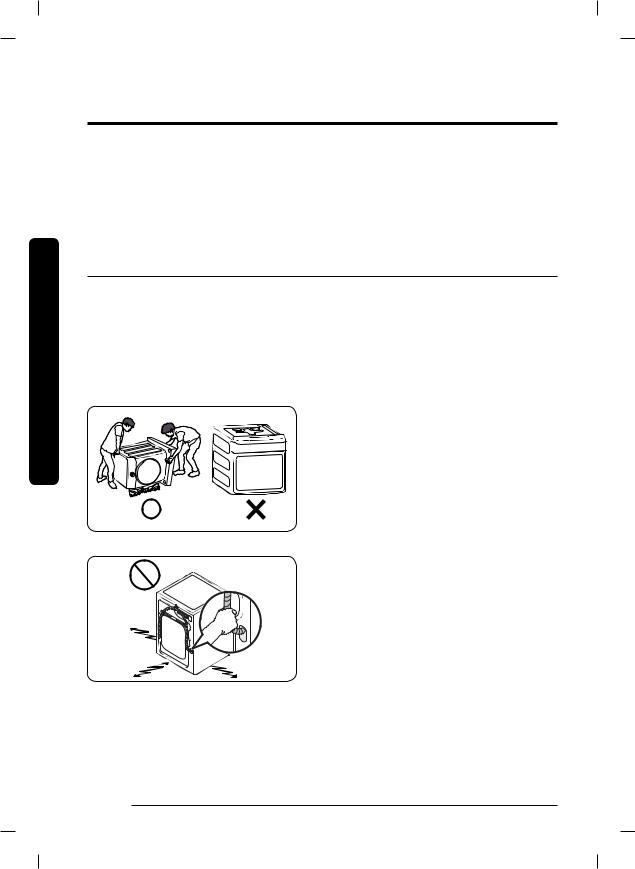
You must have at least 2 people unpack the washer. To remove the cushion bottom of the packing materials, do not tip the washer over on its front side.
When you lay the washer down to remove the carton base, protect the side of the washer and lay it down carefully. Never lay your washer on its back or front.
 CAUTION
Do not grab or pull the drain hose to drag and move the product.
14 English
Untitled-7 14 |
4/2/2020 2:57:52 PM |

What’s included
Make sure all the parts are included in the product package. If you have a problem with the washer or the parts, contact the Samsung customer care center at 1-800-SAMSUNG (1-800-726-7864) or your retailer.
01
|
05 |
02 |
|
|
06 |
03 |
07 |
04 |
|
|
08 |
|
09 |
|
10 |
|
11 |
|
12 |
01 Release lever |
02 Detergent drawer |
03 Door |
04 Drum |
05 Worktop |
06 Control panel |
07 Power plug |
08 Drain hose |
09 Filter cover |
10 Leveling feet |
11 Pump filter |
12 Emergency drain tube |
English 15
Installation
Untitled-7 15 |
4/2/2020 2:57:52 PM |
Installation
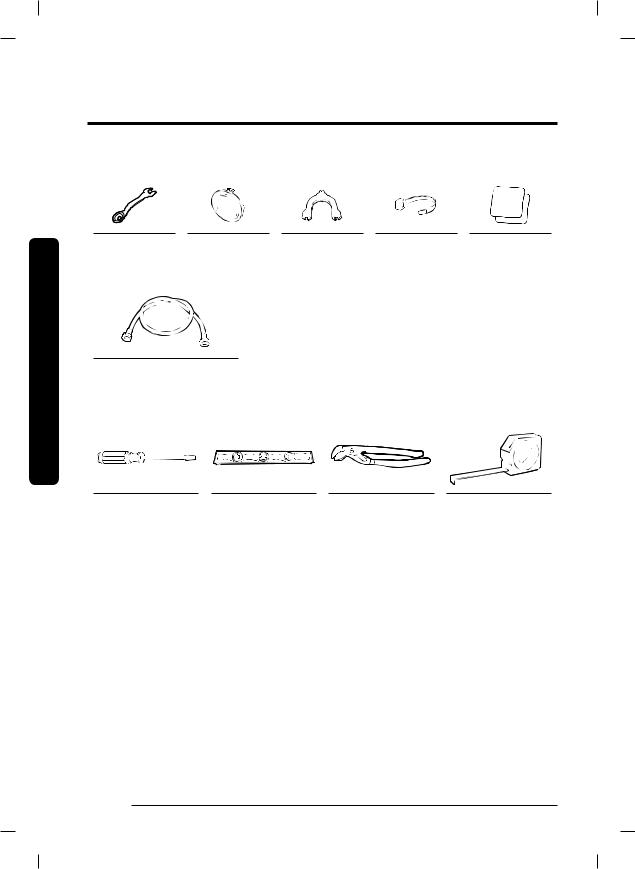
Parts supplied
Installation
Wrench |
Bolt caps |
Hose guide |
Cable tie |
Anti-slip pads |
Parts not supplied
Water hoses (sold separately)
Tools needed for installation
Phillips screwdriver |
Level |
Adjustable pliers |
Measuring tape |
 NOTE
NOTE
•Bolt caps: The number (3 to 6) of bolt caps provided depends on the model.
•The appearance of the washer and provided accessories may differ with the model.
•To purchase an accessory or lost part, contact a local Samsung service center or the retailer.
 CAUTION
•Do not reuse old water hoses, which may leak or burst, causing flooding and/or property damage.
•Make sure rubber washers are inserted in each coupling of both water hoses.
16 English
Untitled-7 16 |
4/2/2020 2:57:52 PM |

Installation requirements
Electrical supply and grounding
•AC 120 V / 60 Hz / 15 AMP fuse or circuit breaker is required.
•Use an individual branch circuit. Connect only the washer to the circuit.
To ensure proper grounding, the washer comes with a power cord featuring a three-prong grounding plug for use in a properly installed and grounded outlet.
Check with a qualified electrician or service person if you are not sure about the grounding.
Do not modify the provided plug. If it does not fit the outlet, call a qualified electrician to install a proper outlet.
 WARNING
•Do NOT use an extension cord.
•Use only the power cord that comes with the washer.
•Do NOT connect the ground wire to plastic plumbing, gas lines, or hot water pipes.
•Improperly connected grounding conductors may cause electric shock.
•To prevent unnecessary risk of fire, electrical shock, or personal injury, all wiring and grounding must be done in accordance with local codes, or in the absence of local codes, in accordance with the National Electrical Code, ANSI/NFPA No. 70-Latest Revision (for the U.S.) or the Canadian Electrical Code CSA C22.1 – Latest Revisions
and local codes and ordinances. It is your responsibility to provide adequate electrical service for your washer.
Water supply
Proper water pressure for this washer is between 20-116 psi (137-800 kPa). Water pressure less than 20 psi (137 kPa) may cause the water valve not to close completely. Or, it may take longer to fill the drum, causing the washer to turn off. Water taps must be within 4 ft. (122 cm) from the rear of the washer so that the provided inlet hoses reach the washer.
To reduce the risk of leaks:
•Make sure water taps are easily accessible.
•Turn off the taps when the washer is not in use.
•Check for any leaks at the water inlet hose fittings on a regular basis.
CAUTION
Before using the washer for the first time, check all connections at the water valve and taps for any leaks.
English 17
Installation
Untitled-7 17 |
4/2/2020 2:57:53 PM |
Installation
Installation
Drain
Samsung recommends a standpipe 18 in. (460 mm) high. The drain hose must be connected through the hose clip to the standpipe, and the standpipe must fully cover the drain hose.
Flooring
For best performance, the washer must be installed on a solid floor. Wood floors may need to be reinforced to minimize vibration and/or unbalanced loads. Carpeting and soft tile surfaces do not provide good resistance to vibrations and may cause the washer to move slightly during the spin cycle.
 CAUTION
Do NOT install the washer on a platform or a poorly supported structure.
Water temperature
Do not install the washer in areas where water may freeze as the washer always retains some water in its water valves, pumps, and/or hoses. Frozen water can cause damage to belts, the pump, and other components of the washer.
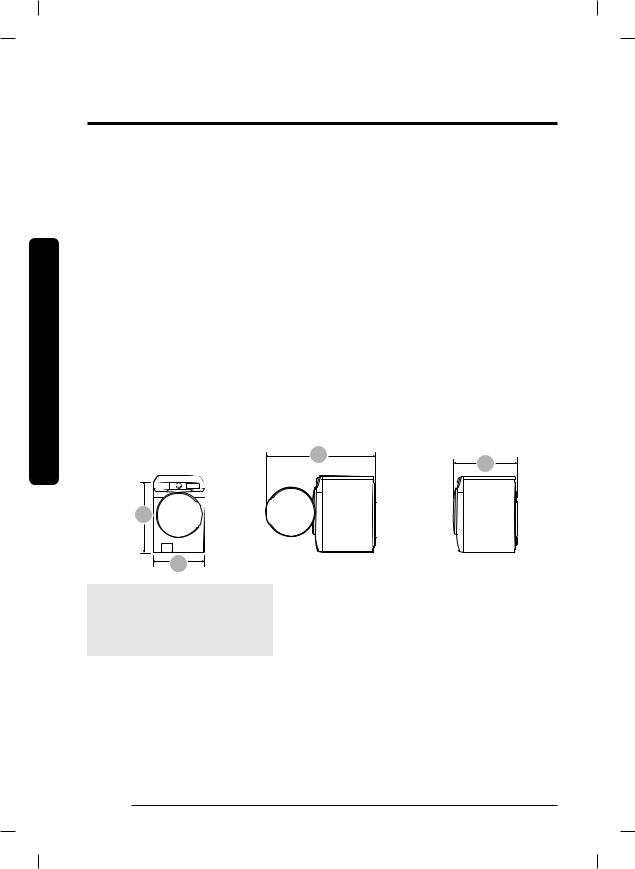
Dimensions
A
U
9
A. Overall height |
38.7 in. (984 mm) |
|
|
B. Width |
27 in. (686 mm) |
|
|
C. Depth with door open |
52.6 in. (1337 mm) |
|
|
D. Depth |
31.3 in (796 mm) |
|
|
18 English
Untitled-7 18 |
4/2/2020 2:57:54 PM |
Clearance requirement
This clearance requirement is applicable for washers only.
 NOTE
NOTE
•For dryer’s clearance requirement, see the dryer’s user manual.
•If the washer and dryer have different clearance requirements, use the one with the larger value.
Alcove or closet installations
Minimum clearance for stable operation:
Sides |
Top |
Rear |
Front |
1 in. (25 mm) |
1 in. (25 mm) |
5 in. (127 mm) |
1 in. (25 mm) |
|
|
|
|
If both the washer and a dryer are installed in the same location, the front of the alcove or closet must have two unobstructed air openings for a combined minimum total area of 72 in.2 (465 cm2).
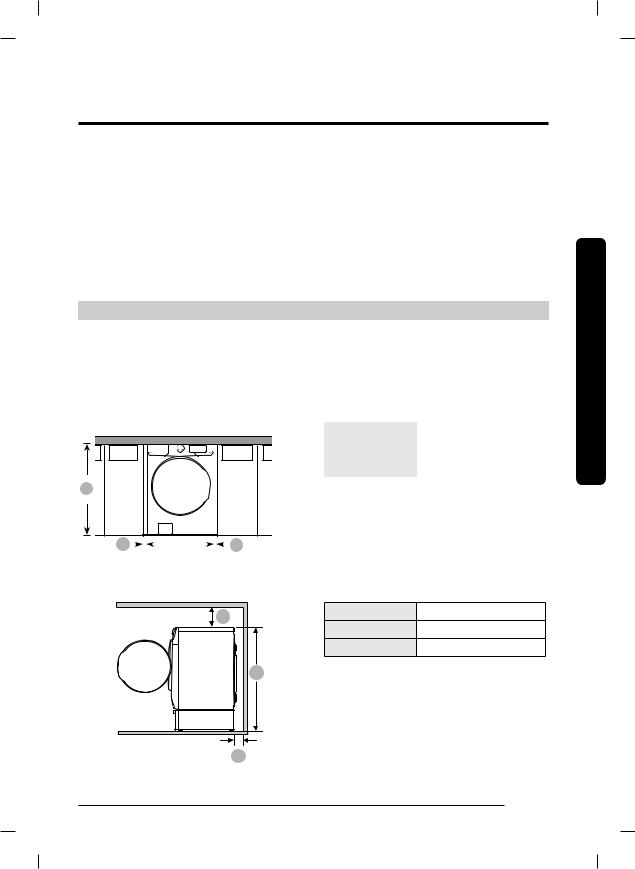
Undercounter installation
|
|
|
|
|
|
|
|
|
|
|
A |
39.6 in. (1006 mm) |
|
|
|
|
|
|
|
|
|
|
|
|
|
|
|
|
|
|
|
|
|
|
|
|
B |
1 in. (25 mm) |
|
|
|
|
|||||||||
|
|
|
|
|
|
|
|
|
|
|
|
|
|
|
|
|
|
|
|
|
|
|
|
C |
1 in. (25 mm) |
|
|
|
|
|
|
|
|
|
|
|
||
|
|
|
|
|
|
|
|
|
|
|
A
B |
|
|
|
|
|
|
|
|
|
C |
|
|
|
|
|||||||
|
|
|
|
|
|
|
|
|
|
|
Installation
Pedestal installation
|
A |
5 in. (127 mm) |
9 |
|
|
|
B |
6 in. (152 mm) |
|
C |
52.0 in. (1320 mm) |
|
A |
|
English 19
Untitled-7 19 |
4/2/2020 2:57:54 PM |

Installation
Installation
This clearance requirement is applicable for washer and dryer pair installation.
Side by side installation |
Stacked installation (Model: SKK-8K) |
|
|
U |
9 |
|
|
|
k 
|
|
|
9 |
|
|
|
A |
A1 in. (25 mm)
B5.9 in. (150 mm)
C7.1 in. (180 mm)
D6 in. (152 mm)
E78.5 in. (1994 mm)
 WARNING
•Samsung’s washers and dryers can be stacked to maximize usable space.
•The dryer feet need to be removed to stack the washer and dryer. You can purchase an optional stacking kit from your Samsung retailer.
20 English
Untitled-7 20 |
4/2/2020 2:57:54 PM |
Step-by-step installation
STEP 1 Select a location
Location requirements:
•A solid, level surface without carpeting or flooring that may obstruct ventilation
•No direct sunlight
•Adequate room for ventilation and wiring
•Ambient temperature always higher than the freezing point (32 °F / 0 °C)
•Away from heat sources
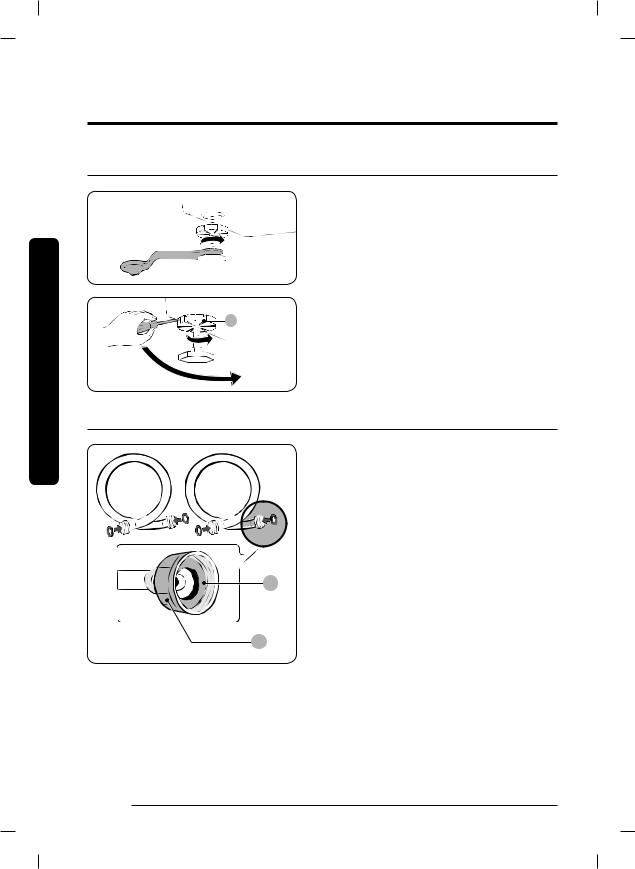
STEP 2 Remove the shipping bolts
Unpack the product package and remove all shipping bolts.
1. Loosen all shipping bolts on the rear of the machine using the spanner.
 NOTE
NOTE
Use the enclosed end of the supplied wrench to remove the shipping bolts.
2. Fill the holes with the supplied plastic bolt caps.
Keep the shipping bolts for future use.
 WARNING
•The shipping bolts secure the tub during product transportation and reduce the chance of suspension damage. Remove the shipping bolts before using the product and only reassemble them back in case you need to move the product.
•Packaging materials can be dangerous to children. Dispose all packaging material (plastic bags, polystyrene, etc.) out of children’s reach.
English 21
Installation
Untitled-7 21 |
4/2/2020 2:57:55 PM |
Installation
Installation
STEP 3 Adjust the leveling feet
1. Gently slide the washer into position. Excessive force may damage the leveling feet.
2. Using a wrench, turn the leveling feet clockwise or counterclockwise to adjust the height until the washer is level.
3. Using a flathead screwdriver, tighten
the locking nuts (A).
 NOTE
NOTE
Use the open-end of the supplied wrench to adjust the leveling feet.
STEP 4 Connect the water hose
 CAUTION
• Make sure to use new water hoses and that rubber gaskets (B) are inside the couplings (A) at both ends of the hoses. Water hoses without the gaskets may leak.
• Allow 5 in. (127 mm) of space between the back of the washer and the wall to
prevent water hoses from being kinked.
B
Kinked hoses may cause water leaks.
• If there is a water leak, stop using the washer and contact a local Samsung
Aservice center. A water leak may cause electric shock.
•Do not stretch the water hoses by force. If a hose is too short, replace the hose with a longer hose.
22 English
Untitled-7 22 |
4/2/2020 2:57:55 PM |
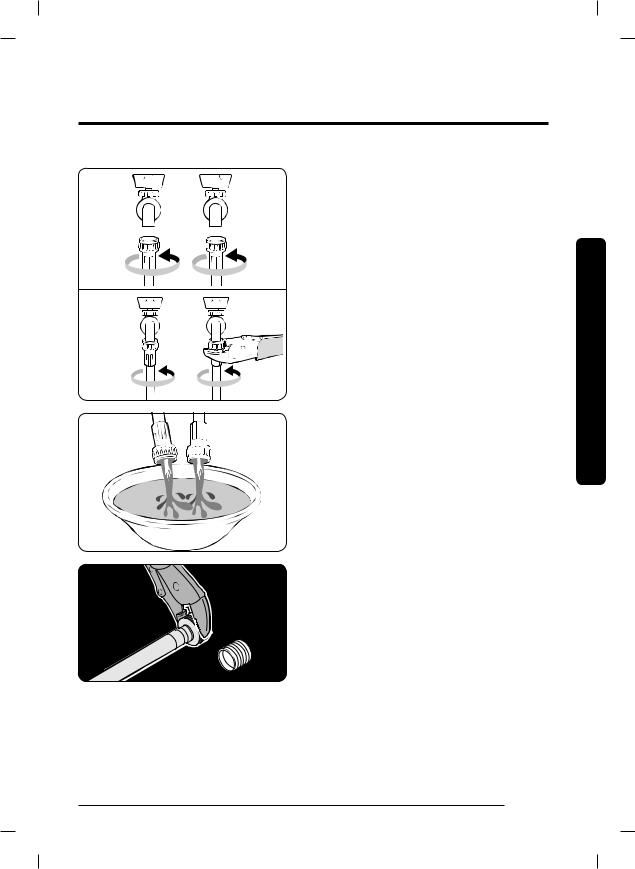
1.Attach the water hoses to the hot and cold water taps, and then hand tighten the water hose fittings until they are tight. Then, use pliers to tighten the fittings by an additional two-thirds of a turn. To avoid damaging the fittings, do not overtighten them.
2.Pull the water hoses to check if they are firmly connected.
Installation
3.Put the other ends of the hoses into a bucket, and then open the water taps for 10 - 15 seconds to remove impurities. When done, close the taps.
4.Attach the water hoses to the hot and cold water inlets on the back of the washer, and then hand tighten the water hose fittings until they are tight. Then, use pliers to tighten the fittings by an additional two-thirds of a turn.
 NOTE
NOTE
If you do not want to use the hot water supply hose, attach the water intake cap to the hot water supply intake. When you do a wash, press Temp. to select Cold.
English 23
Untitled-7 23 |
4/2/2020 2:57:56 PM |
Installation
Installation
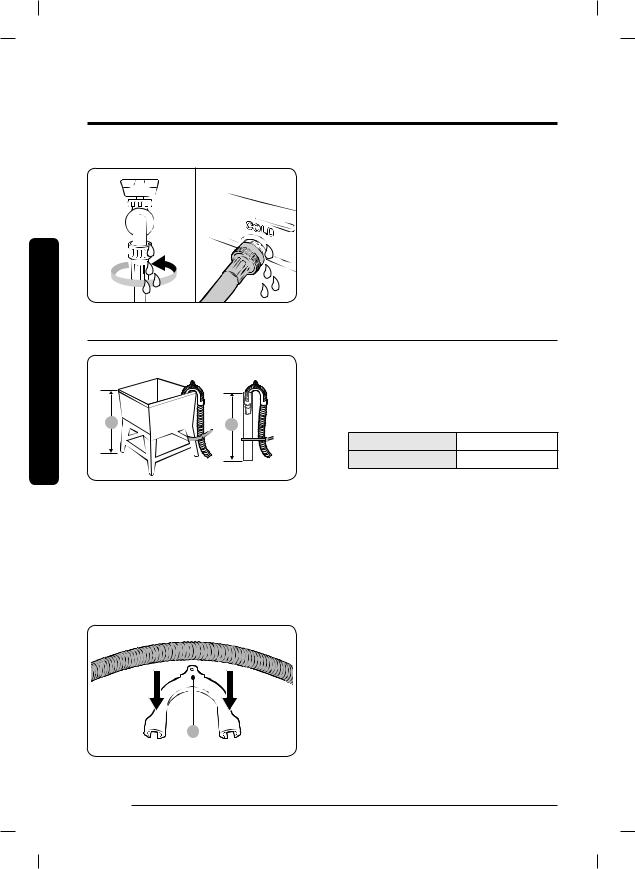
5. Open the water taps, and check for leaks.
STEP 5 Connect the drain hose
|
|
To a Laundry Tub or Drain Pipe |
|
|
|
1. Check the height (A) of your drain |
|
|
|
system and make sure the minimum |
|
|
|
and maximum heights shown below are |
|
|
|
met. |
|
|
|
Minimum |
18 in. (46 cm) |
|
|
Maximum |
96 in. (245 cm) |
 NOTE
NOTE
• Make sure to measure the height from the floor where the washer is placed.
• Draining efficiency may be reduced if the drain system is at the maximum height.
• To prevent the washer from siphoning water, do not use a drain system below the minimum height.
2. Attach the drain hose to the plastic hose guide (B).
9
24 English
Untitled-7 24 |
4/2/2020 2:57:57 PM |

|
|
3. Route the drain hose to the drain |
|
|
system. |
|
|
CAUTION |
|
|
• If using a standpipe, make sure the |
* |
A |
standpipe and drain hose connection is |
|
not airtight. |
|
|
|
• If using a standpipe, make sure the |
(*): Min. 6 in. (152 mm), Max. 8 in. |
|
drain hose is inserted at least 6 in. |
|
(152 mm) but no more than 8 in. |
|
(203 mm) |
|
|
|
(203 mm) into the standpipe. |
|
|
|
|
|
|
4. Secure the drain hose with cable ties. |
|
|
Over the edge of a wash basin |
|
|
The drain hose must be placed no lower |
|
|
than 24 in. (60 cm) and no higher than |
|
|
35 in. (90 cm) from the floor. To keep |
A |
|
the spout of the drain hose bent, use the |
|
supplied plastic hose guide (A). Secure the |
|
|
|
|
|
|
guide to the wall using a hook to ensure |
|
|
stable drainage. |
STEP 6 Remove the film inside the door
Remove the small circle of film (B) above the door latch before use.
B
Installation
STEP 7 Power on
Plug the power cord into an AC 120 V / 60 Hz / 15 AMP approved electrical outlet protected by a fuse or circuit breaker. Then, press Power to turn on the washer.
English 25
Untitled-7 25 |
4/2/2020 2:57:57 PM |

start you Before
Before you start
Initial settings
Run Calibration (recommended)
Calibration ensures accurate weight detection by the washer. Make sure the drum is empty before running Calibration.
1.Press Power to turn on the washer.
2.Press and hold Temp. and Delay End simultaneously for 3 seconds.
3.Press and hold Start/Pause (Hold to Start) to start Calibration.
-The door is locked during the operation.
-The drum keeps rotating clockwise and counterclockwise for several minutes.
4.When complete, the washer turns off automatically.
Laundry guidelines
STEP 1 Sort
Sort the laundry according to these criteria:
•Care Label: Sort the laundry into cottons, mixed fibers, synthetics, silks, wools, and rayon.
•Color: Separate whites from colors.
•Size: Mixing different sized items together in the drum improves the washing performance.
•Sensitivity: Wash delicate items separately. For pure, new woolen items, curtains, and silk items, check the labels on the items.
 NOTE
NOTE
Make sure to check the care label on all clothing, and sort clothing accordingly before starting the wash.
STEP 2 Empty pockets
Empty all the pockets of your laundry items
•Metal objects such as coins, pins, and buckles on clothing may damage other laundry items as well as the drum.
Turn clothing with buttons and embroideries inside out
•If pants or jacket zippers are open while washing, the drum may be damaged. Zippers should be closed and fixed with a string.
•Clothing with long strings may become entangled with other clothes. Make sure to tie the strings before starting the wash.
26 English
Untitled-7 26 |
4/2/2020 2:57:58 PM |

STEP 3 Use a laundry net
•Brassieres (water washable) must be placed in a laundry net. Metal parts of the brassieres may break through and tear other laundry items.
•Small, light clothing such as socks, gloves, stockings, and handkerchiefs may become caught around the door. Place them inside a fine laundry net.
•Do not wash the laundry net by itself without other laundry. This may cause abnormal vibrations that could move the washer and result in injury.
STEP 4 Determine the load capacity
Do not overload the washer. Overloading may cause the washer to wash improperly.
 NOTE
NOTE
When washing bedding or bedding covers, the wash time may be lengthened or the spin efficiency may be reduced.
For bedding or bedding covers, the recommended maximum spin level is Level 2 or Level 3, and the load capacity is 3.0 kg or less.
 CAUTION
If the laundry is unbalanced and the “UB” information code is displayed, redistribute the load. Unbalanced laundry may reduce spinning performance.
STEP 5 Add the correct detergent type
The type of detergent you use - general purpose, specifically for woolens, etc. - depends on the type of fabric (cotton, synthetic, delicate items, wool), color, wash temperature, and degree of soiling. Regardless of the specific type of detergent you use, always use “low suds” HE laundry detergent which is designed for automatic washers.
 NOTE
NOTE
•Follow the detergent manufacturer’s recommendations based on the weight of the laundry, the degree of soiling, and the hardness of the water in your local area. If you are not sure about the water hardness, contact your local water authority.
•Do not use detergent that tends to harden or solidify. This detergent may remain after the rinse cycle, blocking the drain outlet.
 CAUTION
When washing wool using the WOOL cycle, use only a neutral liquid detergent. Powdered detergent used with the WOOL cycle can remain on the laundry and discolor it.
English 27
start you Before
Untitled-7 27 |
4/2/2020 2:57:58 PM |

Before you start
Use HE detergent only
start you Before
Your washer is designed to use high efficiency (HE) detergents.
•For the best cleaning results, use a high efficiency detergent such as Tide HE, Wisk HE, Cheer HE or Gain HE*. High efficiency detergents contain suds suppressors that reduce or eliminate suds. When fewer suds are produced, the load tumbles more efficiently and cleaning is maximized. (* Brand names are trademarks of their respective manufacturers.)
 WARNING
For best results, use HE detergents only. Do not use non-HE detergent, organic detergent, natural detergent or HE detergents with natural ingredients (such as vinegar, baking soda).
Detergent drawer guidelines
The washer provides a three-compartment dispenser: the front-left compartment for the main wash, the front-right for fabric softeners, and the rear-right for the liquid chlorine bleach.
A. Main-wash compartment: Add main-
|
|
|
wash detergent, water softener, |
|
|
|
soaking detergent, color–safe, and/or |
|
|
A |
stain removers. |
|
|
|
|
|
|
|
B. Softener compartment: Add fabric |
|
|
|
|
|
9 |
|
softener. Do not exceed the max line. |
|
|
|
|
|
|
|
C. Bleach compartment: Add liquid |
|
|
|
chlorine bleach. Do not exceed the |
|
|
|
max line. |
28 English
Untitled-7 28 |
4/2/2020 2:57:59 PM |
 CAUTION
•Do not open the detergent drawer while the washer is operating.
•Do not put a tablet or capsule type detergents into the detergent drawer. Put them directly into the drum.
•Do not use a ball type detergent.
•To prevent the compartment from clogging, concentrated or highly-enriched agents (fabric softener or detergent) must be diluted with water before being added.
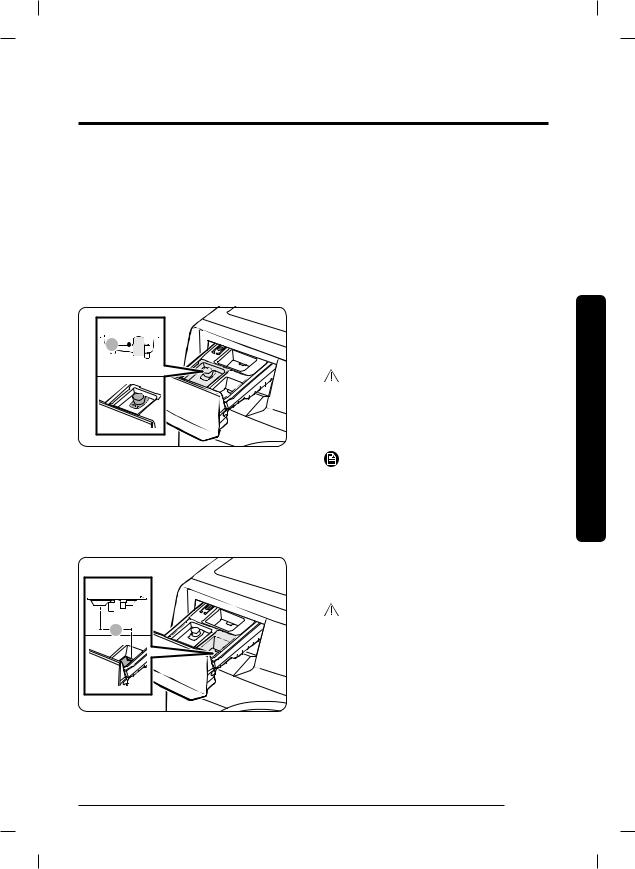
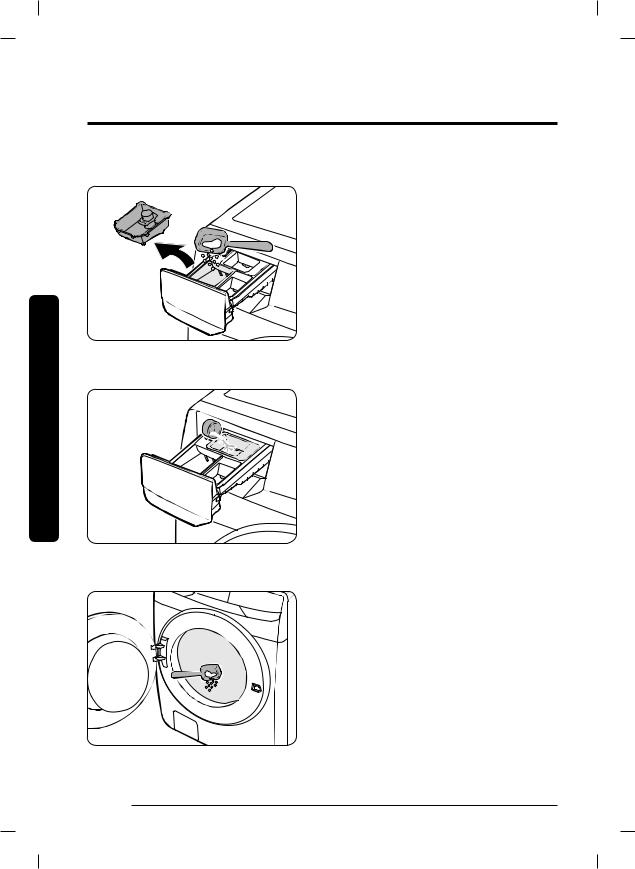
To add washing agents to the detergent drawer
|
1. Slide open the detergent drawer. |
|
2. Add liquid laundry detergent to the |
|
liquid detergent container in the main |
|
wash compartment. |
|
CAUTION |
|
• Make sure the liquid detergent |
|
container is inserted in the main wash |
|
compartment. |
|
• Do not exceed the marked max line (A). |
|
NOTE |
|
• Do not add powdered laundry |
|
detergent or other powdered laundry |
|
agents to the liquid laundry container. |
|
• To use powdered detergent, see page |
|
30. |
|
3. Add fabric softener to the softener |
|
compartment. Do not exceed the max |
|
line (B). |
|
CAUTION |
9 |
• Powdered fabric softener is not |
|
recommended. Use liquid fabric |
|
softener only. |
|
• Concentrated fabric softener must be |
|
diluted with water before being added. |
|
• Do not add main-wash detergent to the |
|
softener compartment. |
|
4. Close the detergent drawer. |
start you Before
English 29
Untitled-7 29 |
4/2/2020 2:57:59 PM |
Before you start
start you Before
To use powdered detergent
First, remove the provided liquid detergent container from the mainwash compartment. Then, add powdered detergent to the main-wash compartment
according to the detergent manufacturer’s instructions.
 CAUTION
Do not add powdered detergent to the liquid detergent container.
To use the bleach compartment
Add only liquid chlorine bleach to the bleach compartment. Do not exceed the max line.
 CAUTION
Do not add undiluted liquid chlorine bleach directly to the load or to the drum. It is a powerful chemical and can cause fabric damage, such as weakening of the fibers or color loss if not used properly.
To use oxygen boosters or color-safe bleach
Oxygen boosters or color-safe bleach can increase washing performance. Make sure to add the oxygen booster or color-safe bleach after putting the laundry into the drum.
 NOTE
NOTE
To use both powdered detergent and powdered oxygen booster or powdered color-safe bleach, it is more effective to put them together into the drum before loading the laundry.
30 English
Untitled-7 30 |
4/2/2020 2:58:00 PM |
 Loading...