


4. Disassembly and Reassembly
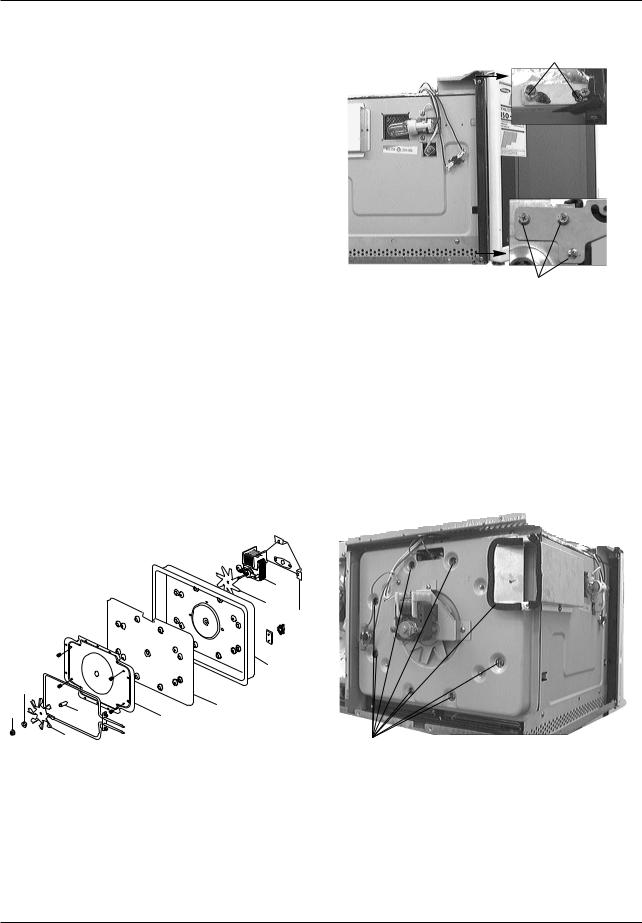
4-1 Replacement of Fan Motor and HVCapacitor
1.Remove out panel.
2.Disconnect all connectors and terminals.
3.Remove a screw 1) securing the fan motor bracket.
4.Remove two screws 2) at back plate.
5.Remove a screw 3) securing HVC bracket for removal of HVC.
4-2 Replacement of Damper, Magnetron
1.After removing out panel and magnetron supporter, disconnect all the terminals and connectors from magnetron and damper assembly.
2.Remove four screws (1) securing damper Ass'y.
3.Remove two screws (2) securing magnetron thermostat.
4.Remove four magnetron flange nuts at top.
=> : 1) When removing the magnetron, make sure that its antenna does not hit any adjacent parts, or it may be damaged.
2)when replacing the magnetron, be sure to remount the magnetron gasket in the correct position and make sure the gasket is in good condition.
3)Never install magnetron without metalic gasket plate, which should be packed with each magnetron to prevent microwave leakage.
4)Check microwave leakage after repair work is carried out on magnetron.
(Top View) |
|
screw 1) |
|
(Rear View)
screw 2) screw 3) of HVC bracket
4 Magnetron flange nuts at top
Pin plate
screws (1) of damper
 screws
(2) of Magnetron thermostat
Choke Coil
4-3 Replacement of Lamp
screws of lamp
1) Remove out panel.
2) Remove two screws securing lamp holder.
Thermistor Probe
Thermal Cutout Switch
Samsung Electronics |
4-1 |
Disassembly and Reassembly
4-4 Replacement of Door Assembly
Remove hex bolts securing the upper hinge and lower hinge. Then remove the door Ass'y.
•After replacement of the defective component parts of the door, reassemble it and follow the instructions below for proper installation and adjustment so as to prevent an excessive microwave leakage.
1.When mounting the door to the oven, be sure to adjust the door parallel to the bottom line of the oven face plate by moving the upper hinge and lower hinge in the direction necessary for proper alignment.
2.Adjust so that the door has no play between the inner door surface and oven front surface. If the door assembly is not mounted properly, microwave may leak from the clearance between the door and oven.
3.Perform the microwave leakage test.
Flange Bolts of upper hinge
Bolts & a screw of lower hinge
4-5 Replacement of H.V.Transformer
1.Discharge the high voltage capacitor.
2.Disconnect all the leads from the high voltage transformer.
3.Remove the mounting bolts on the high voltage transformer.
4.When replacing, connect the leads correctly and firmly.
4-6 Replacement of Fuse
Disconnect the oven from the power source and remove the 15A fuse in the fuse holder in noise filter Ass'y.
4-7 Replacement of Casing Ass'y and Convection Heater
|
|
12 |
|
|
|
10 |
|
|
|
11 |
|
|
6 |
9 |
|
|
|
||
|
4 |
|
|
2 |
5 |
8 |
|
7 |
|||
|
|
||
|
3 |
|
screws 1) of convection heater
1.Remove out panel and back panel.
2.Disconnect all connectors and terminals.
3.Remove air duct and support-back.
4.Remove screws 1) securing convection heater Ass'y.
5.Remove nut'2', blade fan'3', spring washer'4' and bushing'5'.
6.Remove convection assembly '11', '12' and cooling fan'10'.
7.Remove four screws '6'.
8.Remove heater cover '7' '9'. Then heater adiabatic '8' will be disassembled.
4-2 |
Samsung Electronics |
 Loading...