


SBI 140 Indicator
User/Service Instructions
ZERO |
|
|
HOLD |
|||
0 |
|
|
|
|
|
|
|
|
|
|
|
|
|
|
|
|
|
|
|
|
|
|
|
|
|
|
|
NET |
|
|
|
|||
|
|
|
|
kg/lb |
|
0 |
|
|
|
|
|
||
|
|
|
|
|
||
|
|
Hold |
Units |
Tare |
On/Off |
|
|
|
Zero |
||||
|
|
|
|
|||
SBI 140

Specifications
Model |
SBI 140 indicator |
||||||
Calibration Method |
Software calibration with long term storage in |
||||||
|
EEPROM |
||||||
SERIAL COMMUNICATIONS |
|||||||
Mode |
Full Duplex |
||||||
Baud rate |
1200, 2400, 4800, 9600, 19,200 bps |
||||||
Data format |
7 data bits, even or odd parity, 1 stop bit |
||||||
|
8 data bits, non-parity, 1 stop bit |
||||||
Protocol |
Compatible with NCI standard SCP-01 |
||||||
OPERATION INTERFACE |
|
|
|
|
|
|
|
Display |
0.65” (17 mm) 7-segment LCD, 5 1/2 digits |
||||||
Keyboard |
4-key push button |
||||||
POWER |
|
|
|
|
|
|
|
Alkaline Batteries |
4 x “AA” batteries (When all displayed segments |
||||||
|
of the LCD display fl ash, the batteries are low and |
||||||
|
should be replaced immediately.) |
||||||
AC Adapter |
6 VDC, 500mA, with central negative |
|
|
|
|
|
|
|
|
|
|
|
|
||
|
|
|
|
||||
DC Power Consumption |
25mA@6Vdc (does not include load cell’s con- |
||||||
|
sumption) |
||||||
Operation temperature |
9° to 107°F (5° to 35°C) |
||||||
Loadcell |
1. Sensitivity: 0.5mV/V --- 2mV/V |
||||||
|
2. Input Resistor: 300 Ω --- 1100 Ω |
||||||
|
3. Output Resistor: 300 Ω --- 1100 Ω |
||||||
|
4. Pins Defi nition of connect socket: |
||||||
Pin1 = load cell excitation positive
Pin2 = load cell excitation negative
Pin3 = load cell input signal negative
Pin4 = load cell input signal positive
2SBI 140 Indicator User Instructions
Quick Start Guide
ZERO |
|
|
HOLD |
|||
0 |
|
|
|
|
|
|
|
|
|
|
|
|
|
|
|
|
|
|
|
|
|
|
|
|
|
|
|
NET |
|
|
|
|||
|
|
|
|
kg/lb |
|
0 |
|
|
|
|
|
||
|
|
|
|
|
||
|
|
Hold |
Units |
Tare |
On/Off |
|
|
|
Zero |
||||
|
|
|
|
|||
SBI 140
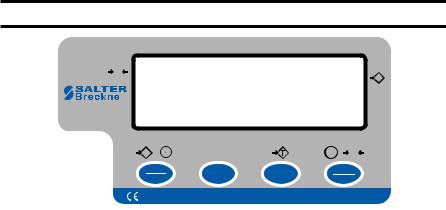
KEYS
On/ Zero/Off key
Press this key to turn the scale on. The display will show the scale’s capacity, the scale will automatically zero if the weight is within 10% of the calibrated zero point, and then 0 (kg/lb) will be displayed. This is normal weighing mode.
The scale powers up in the same unit of measure as when it was turned off.
Press this key to zero any weight, up to 2% of full capacity, on the scale.
Press and hold this key for fi ve seconds to turn the scale off.
Tare Key
Press the tare key to tare the weight on the scale. The net annuncator will illuminate.
To cancel a tare, press the tare key with no weight on the scale.
Units key
All units of measure within the scale should be able to be enabled / disable through the confi guration mode.
When the unit’s key is pressed the scale will automatically switch to the new unit of measure and display the correct weight, even if there is a hold or tare is active.
Hold / Print key
This key can be confi gured so it operates as a hold key only, operate as a print key only or operate as both.
Performing a Weighment
Turn the scale on and press the ZERO key if the display shows any weight.
Place item on the scale. Weight is displayed.
Press the TARE key to tare a weight. Press UNITS key to change unit of measure.
SBI 140 Indicator User Instructions |
3 |

1.0 Introduction
Thank you for purchasing the SBI 140 indicator. Please read all instructions carefully before using the indicator and keep the following points in mind:
•Avoid lengthy exposure to extreme heat or cold. Your scale works best when operated at normal room temperature. Always allow the scale to acclimate to a normal room temperature before use.
•Allow suffi cient warm up time. Turn the scale on and wait for a few minutes if possible, to give the internal components a change to stabilize before weighing.
•These electronic scales are precision instruments. Do no operate near an in-use cell phone, radio, computer or other electronic device. These devices emit RF and can cause unstable readings. If your scale ever performs poorly, try moving the scale to a different room or location.
2.0Key Function
The keys have different functions depending on what mode the unit is in and how long the key is pressed.
In normal mode, hold down the key for less than fi ve seconds for these functions:
In normal weighing mode, hold down the key for more than fi ve seconds for these functions:
- Go to display inner code mode
- Go to user setup mode
- Go to calibration mode
In setting mode, press the keys for these functions.
4SBI 140 Indicator User Instructions

- Shift the fl ashing position to the left; Or go back to above step;
Or decrease the fl ashing digit
- Change the item in fl ashing position; Or increase the fl ashing digit
- Confi rm your input or selection; Or go to next item
- Exit from setting mode to normal work mode
2.1 Key Details
HOLD (1) From normal weighing mode, press this key for less than
fi ve seconds to enable or disable the display data hold function. When this is enabled the ► will flash or continuously appear in the upper right of the display window.
There are three hold function modes (set these in the Setup mode explained later in the manual):
(a)If Hld.00 is set, a stable displayed weight, above 10 divisions, will be held/locked when the weight is removed from the scale. If you place a heavier weight on the scale, that new weight will be displayed and held. If you remove the weight and let the scale become stable, when you place a smaller weight on the scale, that weight will be displayed and held.
(b)If Hld.01 is set, a stable displayed weight, above 10 divisions, will be held/locked when the weight is removed from the scale. If you place a heavier weight on the scale, that new weight will be displayed and held. Only a larger weight than the held weight will change the display. This is different than the Hld.00 mode.
(c)If Hld.02 (… Hld.99) is set, the stable, displayed weight will be held/locked when the weight changes are larger than the ± window set (±02d … ±99d).
Note: Only stable weight can be held! When the unit of measure symbol is not fl ashing, the weight is stable. When ► fl ashes, the displayed reading is the current weight on the scale. When ► is continuously lit, the displayed reading is a steady reading held by the indicator/scale.
If you press TARE when the hold function is enabled, the held reading will be cleared, but the hold function is still enabled. To disable hold function, press HOLD once more.
SBI 140 Indicator User Instructions |
5 |
2) Press this key for more than fi ve seconds to access the DISPLAY INTERNAL CODE mode.
UNIT 1) Press this key for less than fi ve seconds to toggle the unit of measure between lb and kg. This information is saved when you turn off the scale. It will power up in the same unit of measure.
2) Press this key for more than fi ve seconds to access the SETUP mode. In this mode you can set the auto-off timer and select the serial communication protocol.
TARE 1) From normal weighing mode, press this key less than fi ve seconds to zero or tare the scale if the weight is stable. When the current gross weight is in the zero-point range, this will zero the scale and clear the NET. When current gross weight is not in zero-point range, this will tare the scale and light NET on the display window. If the weight is not stable, the scale will attempt the zero/tare function for approximately 10 seconds.
2) From normal weighing mode, press this key more than fi ve seconds to access CALIBRATION mode.
ON/OFF 1) When the scale is off, press this key to power on the scale. It will display the scale’s capacity, try to get a proper zero, and then it will display 0 (kg/lb); This is normal weighing mode. (Note: the proper zero-point weight range is calibration zero-point ±10%
full capacity. If the scale is not in zero-point range, the scale will
_____
display 0 or 0 _____ and wait.
2) When the scale is on, press this key to turn off the scale.
6SBI 140 Indicator User Instructions

3.0 Calibration
You can perform a two or three point calibration.
P0 = zero point
P1 = 12.5%-100% of full capacity
P2 = 25%-200% of full capacity
For three point calibration you need two test weights. One must be more than 12.5% of full capacity. The other must be more than 25% of full capacity.
For two point calibration you need just one weight that is more than 25% of full capacity.
3.1 Calibration Steps
Follow these instructions for two or three point calibration of your scale:
NOTE: To exit the calibration mode any time during these steps, press the ON/OFF key. This ignores any new settings and returns the scale to normal weighing mode.
1.With the scale in normal weighing mode, remove all weight from the scale and press and hold the TARE key until
CAL? is shown. ? will fl ash, asking if you are sure you want to calibrate the scale.
2. Press TARE to accept.
If the Function Set is enabled you are allowed to modify the calibration unit of measure, display divisions (n), the division size (d) and location of the decimal (dot). For information on the Function Set, see the section Function Set.
Go to step 3 if the Function Set is enabled. If it is disabled, skip to the indented portion of step 8b.
3. From the key press (TARE) in step two. . .
Unit. x is displayed. Use this to set the default unit of measure on power up and the calibration weight unit of measure. If x = 1, lbs is the unit of measure. If x = 0, kg is the unit of measure.
4.Toggle between the two choices by pressing the UNITS key. Press TARE to accept the displayed value. . .
The current display divisions value is displayed. Choices are: 500, 600, 750, 800, 1000, 1200, 1500, 2000, 2400, 2500, 3000, 3500, 4000, 5000, 6000, 7000, 7500, 8000, 10000,12000,15000, 20000, 25000, 30000, 35000, 40000, 50000, 60000, 70000, 75000, 80000
SBI 140 Indicator User Instructions |
7 |

5.Press the HOLD or UNITS key to move through the list of choices. Press TARE to accept the displayed value. . .
d.x is displayed. x = division size. Choices are 1, 2 , and 5. This means the countby will be by 1, 2 or 5.
In the next parameter you will select if the countby is, for example, 1, 0.1, 0.01, etc.
Refer to the section:
How to Determine the Display Division, Division Size and Decimal Point for information on choosing usable parameters.
6.Press the UNITS key to move through the list of choices. Press TARE to accept the displayed value. . .
dot. x is displayed. x = number of digits after the decimal point. Choices are 0, 1, 2, or 3.
7.Press the UNITS key to move through the list of choices. Press TARE to accept the displayed value. . .
xxxxxx fl ashes on the display. This is the scale capacity calculated from the choices you made for display divisions (n), division size
(d) and decimal point (dot).
8.Perform step 8a or 8b.
8a. Press the HOLD or UNITS key to return to step 3 and reset any of the parameters in steps 4-7.
OR
8b. Press the TARE key to continue with calibration. . .
CAL.P0 is briefl y displayed, showing the indicator is ready to acquire the calibration zero point, then displays 0.0 weight with the last digit fl ashing.
9.Remove all weight from the scale and press the TARE key to acquire the zero point.
The display will blink and then CAL.P1 is temporarily displayed, then xxx is displayed (50% of capacity is the default value) with the last digit blinking. This shows the scale is ready for the P1 calibration point.
8SBI 140 Indicator User Instructions
 Loading...