


SBI-505 Indicator
USER MANUAL
Rev. A

Safety Instruction
For safety operation please follow the safety instruction.
WARNING
Settings, Calibration, Inspection and Maintenance should only be done by a trained person or staff.
WARNING
Please make sure the indicator has sufficient grounding.
WARNING
The indicator is a static sensitive piece of equipment. Cut off the power during electrical connections and internal components touched by hand are prohibited.
Please take all measure of anti-static protection.
Instruction
This indicator is designed for basic weighing function.
Main function
Weighing function:
Zero, tare, G.W, N.W, accumulation, printing, animal -weighing. kg/lb conversion.
Print format: S.N. G.W N.W Tare. Date, Time
Options:
Pinter
RS232/RS485 serial interface or second display
Technical parameter
Accuracy class |
6000 e |
|
Resolution |
display: 30, 000 |
ADC: 2,000,000 |
Zero stability error |
TK0 < 0.1μV//K |
|
Span stability error |
TKspn < ± 6 ppm//K |
|
Sensitivity (internal) |
0. 3 μV /d |
|
Input voltage |
-30~30mV DC |
|
Excitation circuit |
5 VDC, 4 wire connection, |
|
|
Maximum connect 6 load cell of 350Ω |
|
AC power |
AC100~250V |
Operation temperature |
- 10 °C ~ + 40 °C |
Operation humidity |
≤90%RH |
Storage temperature |
- 40 °C ~ + 70 °C |
1

Installation and calibration
Power supply connection
The indicator is powered by A/C adapter that plugs directly into the “DC” pin at the bottom of the indicator.
Connection of load cell and indicator
The indicator can be connected up to 6 load cell of 350Ω, 4 wire or 6 wire load cell both ok.
Quick disconnect, as below:
PC Board connection
-EXC -IN GND +IN +EXC -EXC
2
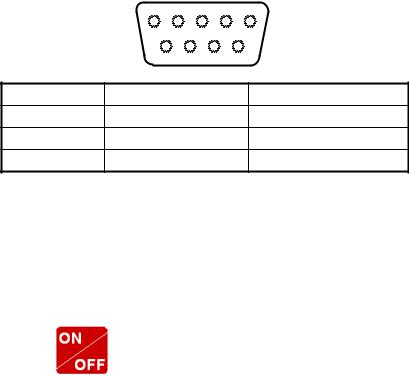
Communication interface
RS232 : DB9 Pin
DB9 definition |
|
|
|
|
|
|
5 |
4 |
3 |
2 |
1 |
|
|
9 |
8 |
7 |
6 |
Pin function and definition as bellows: |
|
||||
DB9 joint |
Definition |
|
|
Function |
|
2 |
TXD |
|
|
|
Sending data |
3 |
RXD |
|
|
|
Receiving data |
5 |
GND |
|
|
|
Ground interface |
Note: if RS485, The connection pin is 2 and 5 pin.
Basic operation
Power on & off |
|
Press |
2 seconds to power on or off the indicator. After self test |
it will go to the weighing mode.
Zero operation
1. Initial zero setting
During power up if the weight on the scale is within the initial zero tolerance, indicator show zero automatically.
2. Manually Zero setting
When the scale is stable and not the negative weight you can zero the
weight within tolerance by press  key.
key.
3

Tare operation
During “TARE” operation when gross weight is tared the indicator will show the Net weight. The “Net” “tared” status light is on. In tare mode, Press” TARE” key to clear the tare weight and the indicator will show the gross weight.
Accumulation operation
With Zero on the Display load weight, Press |
goes to |
accumulation mode, ”Total” light is on, display” n 001”, and then the display goes back to the loaded weight; unload the weight , Display shows zero, load
the second weight again. Press |
display”n002” then display the |
second loaded weight. Repeat it again and again for a maximum 999 times.
Check the accumulation
Press “TOTAL “key and hold it then press “ON/OFF” key, display ”n**”, (it is the accumulating times) then show total weight. If the total weight is beyond the display capability, It will show the first 4 digits then the last 4 digits. For example, the first 4 digits is”0012”, the last 4 digits is”34,56” It means the actual weight is “1234.56”
EXIT the accumulation function
When the indicator show the last 4 digits, Press |
hold it, the |
indicator show “ clr n”, it means don’t clear the total Weight, Press “PRINT” key to exit it; if you want to clear total weight Press “ZERO” or “TARE” key, “clrn” change to “clry” it means clear total weight? Then Press “PRINT” to clear the total weight and exit accumulating mode.
4
If the weight is stable, press” PRINT” you can print the weight.
COUNT
1.In weighing mode, load the Pieces on the platform scales, Press” Count” the indicator show” PCS 0” press” Zero” key in the quantity, press” Print” to confirm it
2. Load the goods on the platform scales, the indicator will show the quantity.
1.Press” Count” to return to weighing mode.
2.If you want to weigh different goods, at weighing mode, put the sample on the platform scales, press” Count” the indicator show”0” Press “Count” hold it and then press “ON/OFF” the indicator show” PCS 0”, press “Zero” input the sample quantity, press “Print” to confirm it. Then repeat the step 2 and 3.
Calibration and Parameter setting
Enter setting
There have two methods to enter the setting menu:
1.when the switch “ CAL” is off, press the “PRINT” hold it and then press” Total” this enters the C08-39 settings.
2.Take out the sealing screw on the back of indicator, move the sealing switch to second position. Press “PRINT” hold it and then press “Total” key this enters C01-C39 settings.
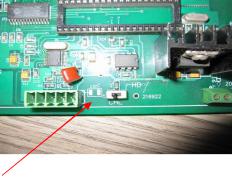
Inside View, Calibration Switch
5
 Loading...