


the Oracle™ Touch
SES990
EN |
QUICK GUIDE |
DE |
KURZANLEITUNG |
FR |
GUIDE RAPIDE |
NL |
SNELSTARTGIDS |
ES |
GUÍA RÁPIDA |
|
|

|
Contents |
2 |
Sage® Recommends Safety First |
5 |
Components |
7 |
Functions |
10 |
Care & Cleaning |
14 |
Troubleshooting |
17 |
Guarantee |
SAGE® RECOMMENDS SAFETY FIRST
At Sage® we are very
safety conscious.We design and manufacture appliances with your safety foremost in mind.We also ask that you exercise a degree of care when using any electrical appliance and adhere to the following precautions.
IMPORTANT
SAFEGUARDS
READ ALL INSTRUCTIONS BEFORE USE AND SAVE FOR FUTURE REFERENCE
•A downloadable version of this document is also available at sageappliances.com
•Before using for the first time, please ensure thatyour electricity supply is the same as shown on the rating label on the underside of the appliance. If you have any concerns, please contact your local electricity company.
•The installation of a residual current safety switch is recommended to provide additional safety when using all electrical appliances. Safety switches with a rated operating current not more than 30mA are recommended. Consult an
electrician for professional advice.
•Remove and discard any packaging materials safely, before first use.
•To eliminate a choking hazard for young children, discard the protective cover fitted
to the power plug safely.
•Ensure the product is properly assembled before first use.
•This appliance is for household use only. Do not use the appliance for anything other than its intended purpose.
Do not use in moving vehicles or boats. Do not use outdoors. Misuse may cause injury.
•Position the appliance on a stable, heat resistant, level, dry surface away from the counter edge, and do not operate on or near a heat source such as a hot plate, oven or gas hob.
•Fully unwind the power cord before operating.
•Do not let the power cord hang over the edge of a counter or table. Do not let the power cord touch hot surfaces or become knotted.
•Do not leave the appliance unattended when in use.
2

•If the appliance is to be:
-left unattended
-cleaned
-moved
-assembled; or
-stored
Always switch off the espresso machine by pressing the POWER button to OFF.Switch off and unplug from the power outlet.
•Regularly inspect the power cord, plug and actual appliance for any damage. If found to be damaged in any way, immediately cease use of the appliance and return the entire appliance to the nearest authorised Sage
Service Centre for examination, replacement or repair.
•Keep the appliance and accessories clean. Follow the cleaning instructions provided in this book. Any procedure not listed in this instruction booklet should be performed at an authorised Sage Service Centre.
•The appliance can be used by children aged 8 years or older and persons with
reduced physical, sensory or mental capabilities or a lack of experience and knowledge, only if they have been given supervision or instruction concerning use of the appliance in a safe way and understand the hazards involved.
•Children should not play with the appliance.
EN
•Cleaning of the appliance should not be carried out by children unless they are 8 years or older and under adult supervision.
•The appliance and it’s cord should be kept out of reach of children aged 8 years and younger.
•Do not use attachments other than those provided with the appliance.
•Do not attempt to operate the appliance by any method other than those described in this booklet.
•Do not move the appliance whilst in operation
•Do not use any other liquid apart from cold mains/town water. We do not recommend the use of highly filtered, de-mineralised or distilled water as this may affect the taste of the coffee and how the espresso machine is designed to function.
•Never use the appliance without water in the water tank.
•Ensure the portafilter is firmly inserted and secured into the brewing head before using the machine.
•Never remove the portafilter during the brewing operation as the machine is under pressure.
•Do not place anything, other than cups for warming, on top of the appliance.
•Use caution when operating machine as metal surfaces are liable to get hot during use.
3

•Do not touch hot surfaces. Allow the product to cool down before moving or cleaning any parts.
•Heating element surface is subject to residual heat after use.
•Use caution after milk texturing as the ‘Auto Purge’ function may purge hot steam when the steam wand is lowered.
•Use caution when using the de-scale feature as hot steam may be released. Before de-scaling, ensure drip tray is empty and inserted. Refer to page 13 for further instructions.
•Do not operate the grinder without the hopper lid in position.Keep fingers, hands, hair, clothing and utensils away from the hopper during operation.
SPECIFIC INSTRUCTIONS FOR WATER FILTER
•Filter cartridge should be kept out of reach of children.
•Store filter cartridges in a dry place in the original packaging.
•Protect cartridges from heat and direct sunlight.
•Do not use damaged filter cartridges.
•Do not open filter cartridges.
•If you are absent for a prolonged period of time, empty the water tank and replace the cartridge.
The symbol shown indicates that this appliance
should not be disposed of in normal household waste.
It should be taken to a local authority waste collection centre designated for this purpose or to a dealer providing this service.
For more information, please contact your local council office.
To protect against electric shock, do not immerse the power cord, power plug
or appliance in water or any other liquid.
FOR HOUSEHOLD USE ONLY SAVE THESE INSTRUCTIONS
4

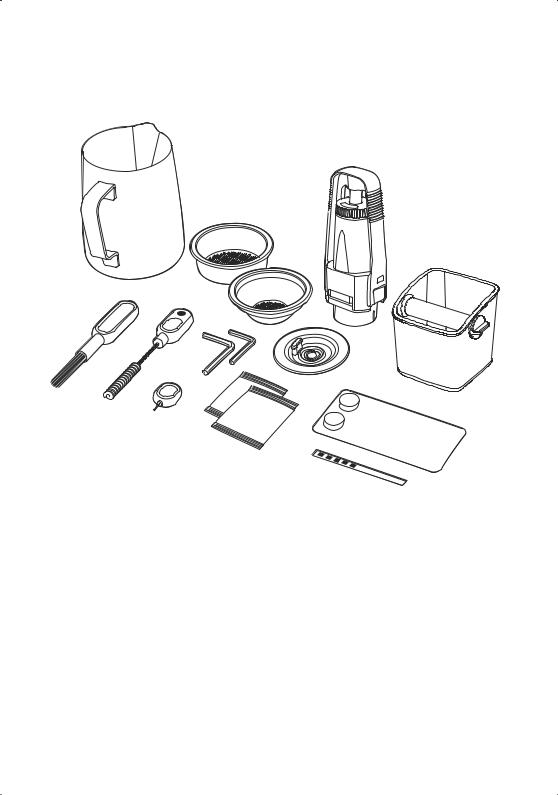
 Components
A
B
C
D
E
F
G
H
A. |
Integrated conical burr grinder |
I. |
Heated cup warming tray |
B. |
Top-fill 2.5L removable water tank |
J. Cool touch steam wand |
|
C. |
Grind size dial |
K. Dedicated hot water outlet |
|
D. |
Touch screen control panel |
L. Descale access point |
|
E. |
Grind outlet |
M. Tool storage tray |
|
F. |
58mm group head |
N. Removable drip tray |
|
G.58mm stainless steel portafilter
H.Drop down swivel foot
Rating Information
220–240V~50–60Hz 2000–2400W
EN
I
J
K
L
M
N
5
A
B
D
C
F
E
I
ACCESSORIES
A.Stainless steel milk jug
B.2 cup filter basket
C.1 cup filter basket
D.Water filter holder with filter
E.Cleaning disc
F.Mini grinds bin
6
G.Grinder burr brush
H.Grind outlet brush & tamp removal magnet
I.Cleaning tool for steam wand tip
J.Two allen keys
K.Steam wand cleaning powder
L.Water hardness test strip
M.Espresso cleaning tablets
 Functions
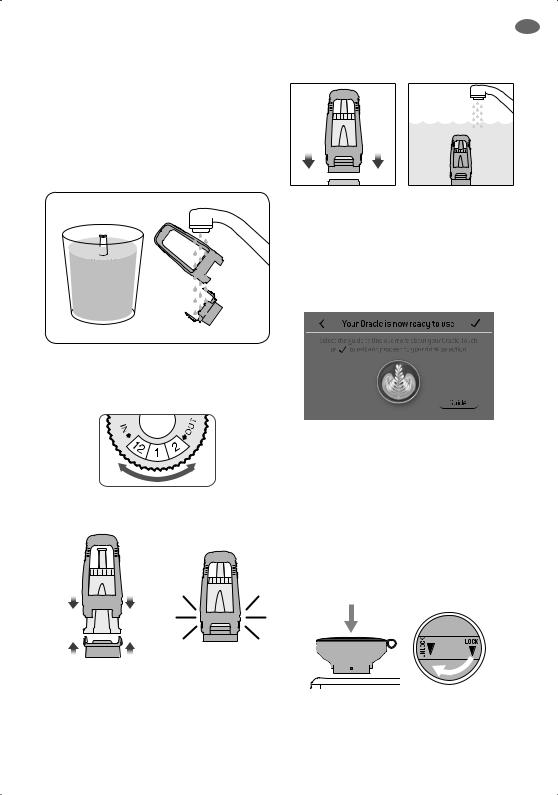
INSTALLING THE WATER FILTER
•Soak the filter in cold water for 5 minutes.
•Wash the filter holder with cold water.
•Set the reminder for next month of replacement. We recommend to replace the filter after 3 months.
•Insert the filter into the two parts of the filter holder.
•To install the assembled filter holder into the water tank, align the base of the filter
holder with the adapter inside the water tank. Push down to lock into place.
EN
•Fill the water tank with cold water, slide and lock back into position.
FIRST USE
1.Press POWER button to turn the machine on.
2.Follow the instructions on screen to guide you through first use setup.
3.After completing setup, the machine will tell that it is ready to use.
The machine is now in STANDBY mode.
 NOTE
NOTE
If your water hardness is either 4 or 5 when tested, we strongly recommend you change to an alternate water source.
GRINDING OPERATION
Insert bean hopper into position on-top of the machine.Turn dial to lock into place. Fill hopper with fresh beans.
7
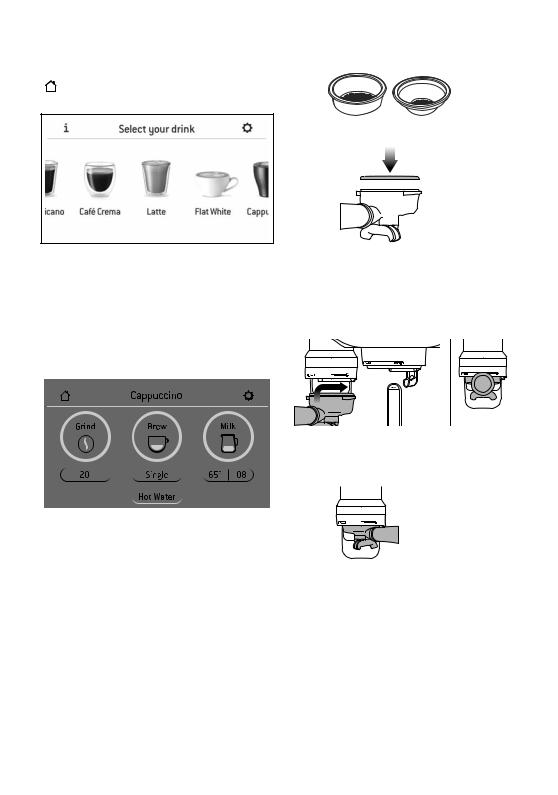
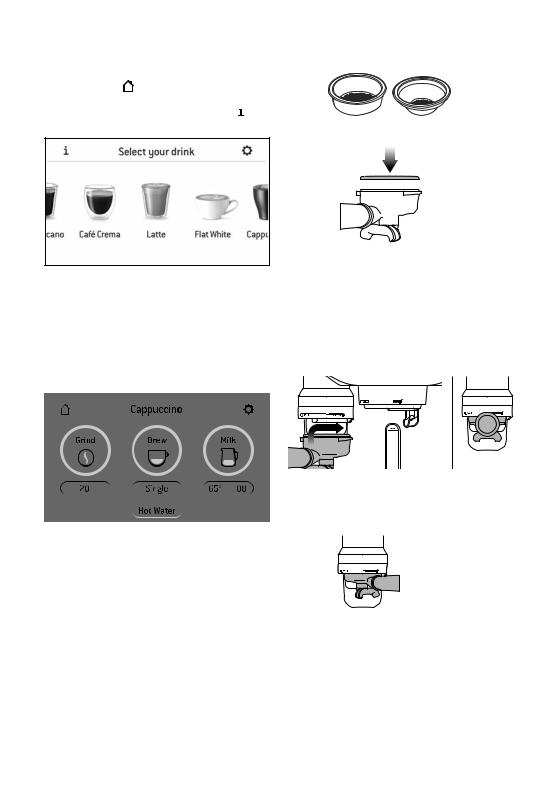
DRINK SELECTION
To enter Drinks Menu screen, touch the Home icon
. Swipe & select your drink.Touch the ‘Help & Tip’ icon  to see Oracle™ Touch Guide.
 NOTE
NOTE
Please keep the touch screen dry and clean to ensure that the machine functions properly.
DRINK SCREEN
SELECTINGYOUR FILTER BASKET
2 Cup |
|
|
|
1 Cup |
||
Filter Basket |
|
Filter Basket |
||||
|
|
|
|
|
|
|
|
|
|
|
|
|
|
|
|
|
|
|
|
|
|
|
|
|
|
|
|
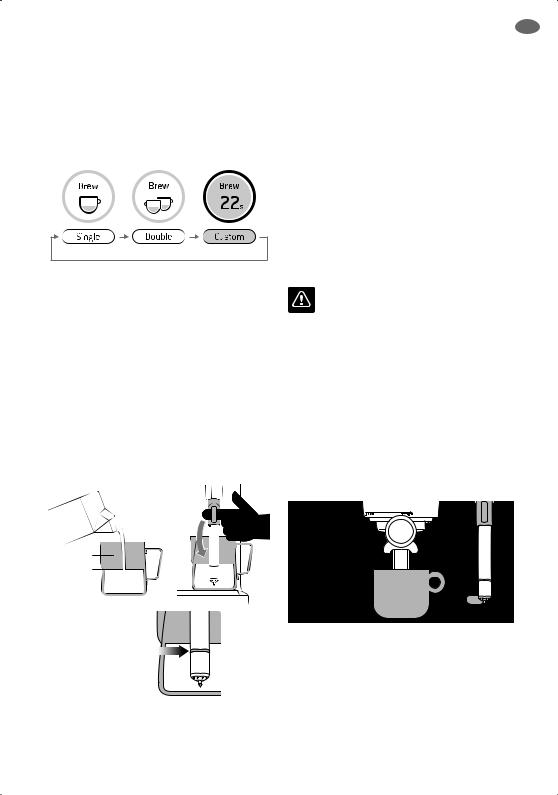
AUTO GRIND DOSE & TAMP
Align portafilter handle with the INSERT position on the grind outlet.Lift to insert portafilter into the grind outlet and rotate to the centre position.
‘Home’ icon |
Drink chosen |
‘Setting’ icon |
|
|
To start the auto grind, dose & tamp function, |
|
|
touch the ‘Grind’ button on the display. Grinding |
|
|
will commence. |
Grind size |
Brew setting: touch this |
Milk froth |
Adjust using the |
button to scroll |
level |
dial on the side |
Espresso – single shot |
Milk |
of the machine |
/ double shot / custom |
|
|
extraction time |
temperature |
|
Long Black – small / |
|
|
medium / large |
When the auto grind, dose & tamp function is |
|
|
complete, rotate the portafilter handle to the |
SELECTING GRIND SIZE |
INSERT position and lower to remove. |
|
There are 45 grind size settings (No.1 – finest, No.45 – coarsest).
We recommend you start at No. 30 and adjust
– finer if extraction is too fast, coarser if too slow. Expresso should start to flow within 8–12 seconds.
8

ESPRESSO EXTRACTION
Align portafilter handle with the INSERT position on the group head.Lift to insert portafilter into the group head and rotate towards the LOCK TIGHT position until resistance is felt.
Press ‘Brew’ button on the display to start extraction.You can change the shot volume.
MANUAL OVERRIDE
Press and hold the‘Brew’ button (approx 2 secs) to enter manual extraction mode.Touch the ‘Brew’ button to start the extraction, touch the‘Brew’ button to stop the extraction.
AUTO TEXTURING MILK
Start with fresh cold milk. Fill milk jug to below the spout position. Lift steam wand and insert into milk jug.Lower steam wand, ensuring it is fully down.
The milk jug should rest on the drip tray and milk should cover the steam wand seal.
MAX
MIN
MILK MUST
COVERTHIS
SEAL
To start, touch the‘Milk’ button.The screen will display the temperature of the milk as it heats. Milk texturing will stop automatically when the selected milk temperature is reached. Lift steam wand to remove milk jug.Wipe the wand & tip with a clean damp cloth. Lower steam wand to the down position and the wand will automatically purge.
EN
MANUAL MILK TEXTURING
Auto milk texturing and auto shut-off are disabled during manual milk texturing mode. Lift the steam wand. Start frothing by touching the button.When frothing is done, touch the Milk button to stop.
Wipe the wand & tip with a clean damp cloth. Lower steam wand to the down position and the wand will automatically purge.
 CAUTION: BURN HAZARD
Pressurised steam can still be released, evenaftermachine has been switched off.
Children must always be supervised.
AMERICANO
There are 3 preset Americano settings – small,medium and large.
Grind dose & tamp your porta-filter & insert into the group head. Position your cup underneath theporta-filter spouts & the hot water spout. Espresso will be extracted first, the hot water is delivered automatically after the espresso.
PRESET CUP SIZE |
AMOUNT |
|
BREWED |
Small |
Approx.6oz / 180ml |
Medium |
Approx.8oz / 240ml |
Large |
Approx.12oz / 360ml |
CAFÉ CREMA
There are 3 presets for the Café Crema setting, Small (120ml), Meduim (150ml), Large (180ml). Insert the single cup filter basket, adjust grinder to a coarse setting as prompted on screen.
9

HOT WATER
The HOT WATER function can be used to pre heat cups or add hot water manually.
To start & stop hot water, touch‘HotWater’ on the screen.
ADDING NEW DRINK
Touch ‘Create New’ in the menu screen to create a customised drink.You can adjust parameters based on a standard style and save your own.
 Care & Cleaning
COLOUR TOUCH SCREEN DISPLAY
Please keep the touch screen dry and clean to ensure that the machine functions properly.
CLEANING CYCLE
•A message for cleaning will be displayed to indicate when a cleaning cycle is required
(approx.200 shots).Or you can start cleaning cycle by choosing ‘Clean Cycle’ in ‘Settings’. The cleaning cycle cleans the shower screen and back-flushes the group head.
•Follow the instruction on the touch screen.
Alternatively, after manually adjusting parameters |
|
|
touch the small icon |
to save the current setting. |
Refer to page 7. |
|
|
|
SETTINGS
To enter settings menu, touch the icon on the upper right on the screen.
TRANSPORTING AND STORING
We recommend draining both boilers completely before transporting the machine or storing for an extended period of time. Refer to the Descale section for the step by step instructions.
This procedure is also intended as an anti-freeze measure in the event the machine is exposed
to extreme cold temperatures.
AUTO OFF MODE
The machine automatically switches to AUTO OFF mode after 30 minutes.
10
EN
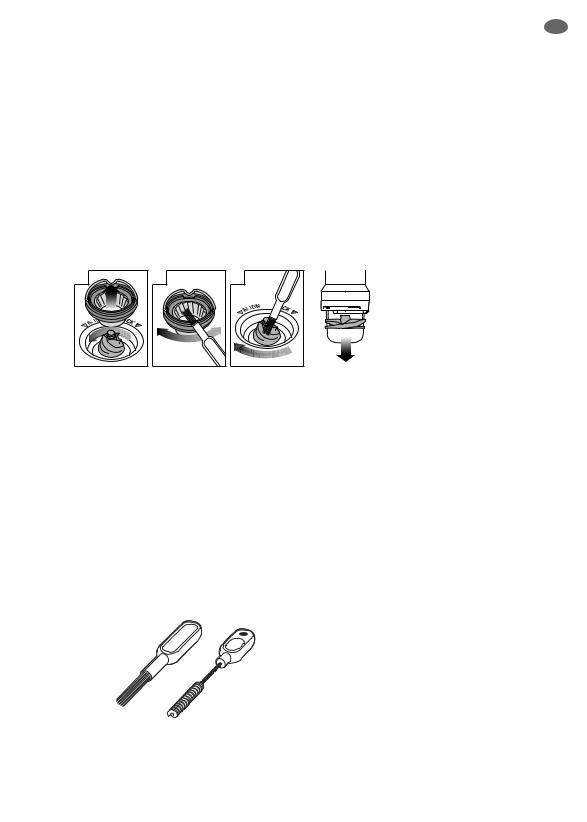
CLEANING CONICAL BURRS
Regular cleaning helps the burrs achieve consistent grinding results which is especially important when grinding for espresso.
1 |
2 |
3 |
4 |
Unlock hopper |
Remove beans Replace & lock Run grinder until empty |
|
hopper |
5
Unlock & remove hopper
6 |
7 |
Remove upper |
Clean upper |
burr |
burr with |
|
burr brush |
8 |
9 |
10 |
11 |
Clean lower |
Remove tamping |
Clean grind |
Replace tamping |
burr with |
fan with tamp |
outlet with grind |
fan by hand |
burr brush |
removal magnet |
outlet brush |
|
12 |
14 |
Push upper |
Lock upper burr |
Insert hopper |
burr firmly into |
|
|
position |
|
|
15 |
Lock hopper
Burr |
Tamp removal |
brush |
magnet |
|
Grind outlet |
|
brush |
11

CLEANING THE STEAM WAND  IMPORTANT
After every use, thoroughly wipe the steam wand and tip with a damp cloth & purge immediately.
Failure to clean the steam wand may affect the milk texturing performance.
•If any of the holes in the tip of the steam wand become blocked, ensure the machine stopped steaming and unblock using the steam tip cleaning tool.
•If steam wand remains blocked, remove the tip and soak together with steam wand using the provided steam wand cleaning powder
(instructions below).Screw tip back onto the steam wand after rinsing.
Steam Wand
Tip
•The steam wand can be left immersed in the milk jug filled with water when not in use to reduce the risk of blockages.
Steam Wand Cleaning Powder
1.Add 1 packet into an empty milk jug.
2.Add 1 cup (8oz/240ml) hot water into milk jug.
3.Remove steam tip and place with steam wand into jug.
4.Leave to soak for 20 minutes.
5.Clean, rinse and replace steam tip.
Place wand back into the jug and activate steam for 10 seconds.
6.Allow to soak for 5 minutes.
7.Activate steam several times to purge the steam wand, then rinse the wand thoroughly.
8.Wipe the steam wand dry with a clean cloth.
9.Discard solution & rinse jug thoroughly.
 NOTE
NOTE
Please ensure the steam wand tip is tightly fastened after cleaning to avoid temp sensing error.
CLEANING THE FILTER BASKET AND PORTAFILTER
•The filter basket and portafilter should be rinsed under hot water after each coffee making session to remove all residual coffee oils.
•If the holes in the filter basket become blocked, dissolve a cleaning tablet in hot water and soak filter basket and portafilter in solution for approx. 20 minutes.Rinse thoroughly.
CLEAR WATER BACKFLUSH
•After each coffee making session we recommend doing a clear water backflush before you turn off the machine.Empty drip tray. Insert the cleaning disc into the filter basket then insert the portafilter into the group head.Touch the ‘Brew’ button and allow pressure to build
for 20 seconds, then touch to stop & release pressure.Repeat this 5 times to purge any fine coffee grounds and residual coffee oils from the brew water paths.
CLEANING THE SHOWER SCREEN
•The group head interior and shower screen should be wiped with a damp cloth to remove any ground coffee particles.
•Periodically, run hot water through the group head with the filter basket and portafilter in place, but without ground coffee.This will remove any residual ground coffee particles from the shower screen.
•If there seems to be stubborn build up on the shower screen, use the allen key to undo the screw in the middle of the shower screen, making note of which side faces into the group head.
12

EN
CLEANING THE DRIP TRAY & STORAGE TRAY
•The drip tray should be removed, emptied and cleaned after each use.
•Remove grill from the drip tray.
Wash the drip tray in warm soapy water.
•The storage tray can be removed andcleanedwith a soft, damp cloth (donotuseabrasive cleansers, pads
orclothswhich can scratch the surface).
CLEANING THE OUTER HOUSING & CUP WARMING TRAY
•The outer housing and cup warming tray can becleaned with a soft, damp cloth.Polish with a soft, dry cloth.Do not use abrasive cleansers, pads or cloths which can scratch the surface.
 NOTE
NOTE
Do not clean any of the parts or accessories in the dishwasher.
DESCALE
•Use this function to access the descale procedure when promoted on screen.
•The machine will enter descale mode if you choose to descale from the pop-up message or if you choose ‘Settings’ > ‘Descale Cycle’. Follow the instruction on the touch screen.
•Please ensure you allow approximately
1.5 hours to complete the entire descale process and follow the step by step instructions.
If you’ve just finished using your machine, please ensure to turn the machine off and allow to cool for at least 1 hour before starting your descale process.
 NOTE
NOTE
DO NOT attempt to descale your machine without using the Descale procedure in the Settings menu. Damage to your machine could occur.
13

 Troubleshooting
PROBLEM |
POSSIBLE CAUSE |
WHAT TO DO |
Grinder Motor starts |
• No coffee beans in |
• Fill bean hopper with fresh coffee beans. |
but no ground |
bean hopper. |
• Remove bean hopper. Inspect bean hopper |
coffee coming |
• Grinder/bean hopper |
& grinding burrs for blockage. Replace |
from grind outlet |
is blocked. |
parts and try again. |
|
• Coffee bean may have |
|
|
become stuck in hopper. |
|
Grinder Motor starts |
• Grinder is blocked |
• Remove bean hopper, inspect burrs |
but operates with a |
with foreign item or |
and remove any foreign body. |
loud ‘clicking’ noise |
chute is blocked. |
• Clean the burrs and grind outlet, |
|
• Moisture clogging grinder. |
see page 11. |
|
• Leave burrs to dry thoroughly before |
|
|
|
re-assembling. It is possible to use a hair |
|
|
dryer to blow air into the burr area to |
|
|
quicken the drying process. |
Unable to lock bean |
• Coffee beans |
• Remove bean hopper. |
hopper into position |
obstructing bean |
Clear coffee beans from top of burrs. |
|
hopper locking device. |
Re-lock bean hopper into position. |
Portafilter overfills |
• Tamping fan was |
• Check that the tamping fan is in position |
|
removed for cleaning |
and mounted correctly to the drive shaft, |
|
and not replaced. |
see Instruction Book on Sage website. |
Grinder |
|
• Rotate the portafilter to the left to stop |
Emergency stop? |
|
the auto grind, dose & tamp function. |
|
|
• Unplug power cord from power outlet. |
Grinder running |
• No beans in hopper. |
• Fill hopper with beans. |
continuously |
|
• Rotate the portafilter to the left to stop |
|
|
the auto grind, dose & tamp function. |
|
• Tamping fan has |
• Check that the tamping fan is in position |
|
been removed. |
and mounted correctly to the drive shaft, |
|
|
see Instruction Book on Sage website. |
14

EN
PROBLEM |
POSSIBLE CAUSE |
WHAT TO DO |
Espresso runs out |
• Portafilter not inserted in |
• Ensure portafilter is rotated to the right |
around the edge |
the group head correctly. |
until the handle is past the centre and is |
of the portafilter |
|
securely locked in place. Rotating past the |
|
|
centre will not damage the silicone seal. |
and/or |
• Thereare coffeegrounds |
• Clean excess coffee from the rim of the |
|
aroundthe filterbasketrim. |
filter basket after grinding to ensure |
|
|
a proper seal in group head. |
Portafilter comes |
• Filter basket rim is wet |
out of the group |
or underside of portafilter |
head during an |
lugs are wet.Wet surfaces |
extraction |
reduce the friction required |
|
to hold the portafilter in |
|
place whilst under pressure |
|
during an extraction. |
•Always ensure filter basket and portafilter are dried thoroughly before filling with coffee, tamping and inserting into the group head.
Issues with the |
• Clock not set or clock is |
• Check that the clock and Auto Start time |
Auto Start feature |
set with incorrect time. |
have been programmed correctly. |
Operation Error |
• A major fault has |
• Contact Sage Customer Service Centre. |
message on the |
occurred and machine |
|
touch screen |
cannot operate. |
|
Pumps continue |
• Using highly filtered, |
• We recommend using cold, filtered water. |
to operate / Steam |
demineralised or distilled |
We do not recommend using water with |
is very wet / Hot |
water which is affecting |
no/low mineral content such as highly |
water outlet leaks |
how the machine is |
filtered, demineralised or distilled water. |
|
designed to function. |
If the problem persists, contact Sage |
|
|
Consumer Support. |
Water does not |
• Machine has not reached |
flow from the |
operating temperature. |
group head |
|
•Allow time for the machine to reach operating temperature.
|
• Water tank is empty. |
• Fill tank. Prime the system by: |
|
|
1)Touching the‘Brew’ button to run water |
|
|
through the group head for 30 seconds. |
|
|
• 2)Touching‘HotWater’torunwaterthrough |
|
|
the hot water outlet for 30 seconds. |
|
|
|
|
• Water tank not fully |
• Push water tank in fully and lock |
|
inserted & locked. |
latch closed. |
15

PROBLEM |
POSSIBLE CAUSE |
WHAT TO DO |
Display says |
• Water tank not fully |
“Water tank |
inserted & locked. |
empty” but water |
|
tank is full |
|
•Push water tank in fully and lock latch closed.
No steam or |
• Machine is not turned |
hot water |
on or up to operating |
|
temperature. |
•Ensure the machine is plugged in and ready for use.
•You may have a blockage in scale. Please run the descale process.
No hot water |
• Water tank is empty. |
• Fill water tank. |
No steam |
• Steam wand is blocked. |
• Refer to‘Cleaning the SteamWand’, |
|
|
page 12. |
|
|
• You may have a blockage in scale. |
|
|
Please run the descale process. |
The machine is ‘On’ |
|
• Turn machine off.Wait for 60 minutes |
but won’t operate |
|
and turn machine back on. |
|
|
• If problem persists, call Sage |
|
|
Consumer Support. |
Steam pouring out |
|
• Turn machine off.Wait for 60 minutes |
of group head |
|
and turn machine back on. |
|
|
• If problem persists, call |
|
|
Sage Consumer Support. |
Espresso only |
• Coffee is ground |
• Adjust the grind size to a higher number |
drips from the |
too finely. |
to make the grind size slightly coarser. |
portafilter spouts, |
|
• You may have a blockage in scale. |
restricted flow |
|
Please run the descale process. |
Espresso flows out |
• The coffee is ground |
• Adjust the grind size to a lower number |
too quickly |
too coarsely. |
to make the grind size slightly finer. |
|
• Coffee beans are stale. |
• Use freshly roasted coffee beans with |
|
|
a ‘Roasted On’ date and consume |
|
|
between 5–20 days after that date. |
Coffee not |
• Cups not pre-heated. |
• Rinse cups under hot water outlet |
hot enough |
|
and place on cup warming tray. |
|
• Milk not hot enough |
• Increase the milk temperature |
|
(if making cappuccino |
in settings menu. |
|
or latté etc). |
|
No crema |
• Coffee beans are stale. |
• Use freshly roasted coffee beans with |
|
|
a ‘Roasted On’ date and consume |
|
|
between 5–20 days after that date. |
16

EN
PROBLEM |
POSSIBLE CAUSE |
WHAT TO DO |
Not enough |
• Steam wand is blocked. |
• Refer to‘Cleaning the SteamWand’, |
milk texture |
|
page 12. |
|
|
• You may have a blockage in scale. |
|
|
Please run the descale process. |
|
|
• Different brands and types of milk and milk |
|
|
alternatives will texture differently.You may |
|
|
need to adjust the froth level accordingly. |
Too much |
• Coffee is ground too |
• Adjust the grind size to a lower number |
coffee extracted |
coarsely. |
to make the grind size slightly finer. |
|
• Shot duration/volume |
• Customise extraction time by touching |
|
needs to be adjusted. |
the ‘Single’ / ‘Double’ button. |
Not enough |
• Coffee is ground too finely. |
• Adjust the grind size to a higher number |
coffee extracted |
• Shot duration/volume |
to make the grind size slightly coarser. |
|
needs to be adjusted. |
• Customise extraction time by touching |
|
|
the ‘Single’ / ‘Double’ button. |
Amount of coffee |
• As coffee beans age, |
extracted has |
the extraction rate |
changed, but |
changes and can affect |
all settings are |
the shot volume. |
the same. |
|
•Adjust the grind size to a lower number to make the grind size slightly finer.
•Customise extraction time by touching the ‘Single’ / ‘Double’ button.
•Use freshly roasted coffee beans with
a ‘Roasted On’ date and consume between
5–20 days after that date.
 Guarantee
2YEAR LIMITED GUARANTEE
Sage Appliances guarantees this product for domestic use in specified territories for 2 years from the date of purchase against defects caused by faulty workmanship and materials. During this guarantee period Sage Appliances will repair, replace, or refund any defective product (at the sole discretion of Sage Appliances).
All legal warranty rights under applicable national legislation will be respected and will not be impaired by our guarantee. For full terms and conditions on the guarantee, as well as instructions on how to make a claim, please visit www.sageappliances.com.
17

|
Inhalte |
18 |
Sage® Empfiehlt: |
21 |
Sicherheit Geht Vor |
Komponenten |
|
23 |
Funktionen |
26 |
Reinigung und Pflege |
30 |
Problembeseitigung |
34 |
Garantie |
SAGE® EMPFIEHLT: SICHERHEIT GEHT VOR
Wir bei Sage® sind sehr sicherheitsbewusst. Beim Design und bei der Herstellung unserer Geräte denken wir zu allererst an Ihre Sicherheit.
Darüber hinaus bitten wir Sie, bei der Verwendung jedes Elektrogeräts angemessene Sorgfalt anzuwenden und sich an die folgenden Vorsichtsmaßnahmen
zu halten.
WICHTIGE
VORSICHTSMASS
NAHMEN
BITTE ALLE ANWEISUNGEN VOR DEM GEBRAUCH LESEN UND ZUR SPÄTEREN BEZUGNAHME AUFBEWAHREN.
•Die komplette Informationsbroschüre ist unter sageappliances.com verfügbar.
•Vor dem ersten Gebrauch prüfen, dass Ihre Netzspannung mit der auf dem Etikett an
der Unterseite des Geräts übereinstimmt. Bitte wenden Sie sich bei etwaigen Bedenken an Ihren örtlichen Stromversorger.
•Vor dem ersten Gebrauch alleVerpackungsmaterialien und Werbeaufkleber von der Oracle™ Touch abnehmen.
•Schutzhülle am Netzstecker des Geräts abnehmen und sicher entsorgen, da sie für Kleinkinder eine Erstickungsgefahr darstellen könnte.
•Produkt beim Betrieb nicht an der Kante einer Arbeitsplatte oder eines Tisches aufstellen.
Standfläche eben, sauber und trocken halten.
•Netzkabel nicht über Arbeitsplatten oder Tischkanten hängen lassen, Kabelgewirr vermeiden.Von heißen
Gasoder Elektrokochplatten oder heißen Öfen fern halten.
•Gerät kann von Personen mit eingeschränkten körperlichen, sensorischen oder geistigen Fähigkeiten oder mit mangelnder Erfahrung und fehlenden
Kenntnissen genutzt werden, sofern sie beaufsichtigt werden oder in den sicheren Gebrauch des Geräts eingewiesen wurden und sich der entsprechenden Risiken bewusst sind.
•Kinder nicht mit dem Gerät spielen lassen.
18

•Netzkabel, Stecker und Gerät regelmäßig auf Beschädigung prüfen. Gebrauch des Geräts bei jeglicher Beschädigung sofort einstellen und Gerät zur
Prüfung, zum Austausch oder zur Reparatur zu Ihrem nächstgelegenen autorisierten SageKundendienstzentrum bringen.
•Gerät und Zubehör sauber halten. Bitte die Reinigungsanweisungen in dieser Broschüre befolgen.
Alle nicht in dieser Broschüre beschriebenenVorgänge nur von einem autorisierten Sage-Kundendienstzentrum ausführen lassen.
•Die Installation eines Schutzoder Sicherheitsschalters wird bei derVerwendung von
Elektrogeräten als zusätzliche
Schutzmaßnahme empfohlen.
Es wird der Einbau eines Fehlerstromschutzschalters mit maximal 30 mA Nennleistung im Stromkreis des Geräts empfohlen. Fachgerechte Beratung erhalten Sie
von Ihrem Elektriker.
SPEZIFISCHE ANWEISUNGEN FÜR DIE SES990
THE ORACLE™ TOUCH
•Dieses Gerät ist nur für den Haushaltsgebrauch bestimmt. Gerät nur bestimmungsgemäß verwenden.Nicht in fahrenden Fahrzeugen oder Booten verwenden. Nicht
im Freien verwenden.
DE
•Gerät immer an der POWER-
Taste ausschalten, Netzstecker ziehen und abkühlen lassen, ehe Sie es bewegen, reinigen, lagern oder unbeaufsichtigt lassen.
•Espressomaschine immer an der POWER-Taste ausschalten, Steckdose ebenfalls ausschalten, sofern möglich, und Netzstecker abziehen.
•Gerät nur nutzen, wenn es richtig zusammengesetzt ist.
•Keine anderen Flüssigkeiten verwenden außer kaltem
Leitungswasser. Die
Verwendung von stark gefiltertem, entmineralisiertem oder destilliertem Wasser wird nicht empfohlen, da sich dies negativ auf das Kaffeearoma und die bestimmungsgemäße
Funktion der Espressomaschine auswirken kann.
•Vor der Extraktion von Kaffee stets prüfen, dass der
Siebträger sicher und fest in die Brühgruppe eingespannt ist. Siebträger nie während des
Extraktionsvorgangs entnehmen.
•Keine heißen Oberflächen berühren. Produkt vor dem Transport oder der Reinigung abkühlen lassen.
•Nach dem Aufschäumen von
MilchVorsicht walten lassen, da durch die Funktion „Auto-Purge“
(Auto-Durchspülung) beim
Absenken der Aufschäumdüse eventuellheißerDampfausströmt.
19

•Maschine vorsichtig betreiben, da Metalloberflächen während des Gebrauchs heiß werden.
•Entkalkungsfunktion vorsichtig verwenden, da heißer Dampf ausströmen kann.Tropfschale vor dem Entkalken leeren und einsetzen. Für weitere Anweisungen siehe Seite 29.
SPEZIELLE ANWEISUNGEN ZUM WASSERFILTER
•Filterkartusche für Kinder unzugänglich aufbewahren.
•Filterkartuschen trocken in der Originalverpackung lagern.
•Kartuschen vor Hitze und direkter Sonneneinstrahlung schützen.
•Keine beschädigten Filterkartuschen verwenden.
•Filterkartuschen nicht öffnen.
•Vor längeren Abwesenheiten
Wassertank leeren und Kartusche austauschen.
Dieses Symbol zeigt, dass das Gerät nicht im normalen Hausmüll entsorgt werden sollte. Es sollte stattdessen
bei einem entsprechenden kommunalenWertstoffhof oder
Fachhändler zur Entsorgung abgegeben werden.Weitere Einzelheiten erfahren Sie von Ihrer Kommunalbehörde.
Zum Schutz gegen
Stromschlag Netzkabel,
Netzstecker oder Gerät nicht in Wasser oder andere Flüssigkeiten tauchen.
NUR FÜR DEN HAUSHALTSGEBRAUCH DIESE ANLEITUNG AUFBEWAHREN
20
 Komponenten
A
B
C
D
E
F
G
H
A.Integriertes Kegelmahlwerk
B.Abnehmbarer, von oben befüllbarer 2,5-l-Wassertank
C.Drehwähler für Mahlgrad
D.Touchscreen-Bedienfeld
E.Mahlwerkausgabe
F.58-mm-Brühgruppe
G.58-mm-Siebträger aus Edelstahl
H.Absenkbarer Schwenkfuß
I.Beheizte Wärmeplatte für Tassen
J.Cool-Touch-Aufschäumdüse
K.Separate Heißwasserabgabe
L.Zugang für die Entkalkung
M.Werkzeugablage
N.Entnehmbare Tropfschale
Leistungsangaben
220–240V ~50–60Hz 2000–2400W
DE
I
J
K
L
M
N
21

A
B
D
C
F
E
I
ZUBEHÖR
A.Edelstahl-Milchkännchen
B.Filtersieb für 2Tassen
C.Filtersieb für 1 Tasse
D.Wasserfilterhalter und Filter
E.Reinigungsscheibe
F.Mini-Kaffeemehlbehälter
G.Kegelbürstchen
22
H.Mahlwerkbürstchen und Magnet zur Entnahme des Tampers
I.Reinigungswerkzeug für die Aufschäumdüse
J.Zwei Inbusschlüssel
K.Reinigungspulver für die Aufschäumdüse
L.Teststreifen für Wasserhärte
M.Espresso-Reinigungstabletten

 Funktionen
EINSETZEN DES WASSERFILTERS
•Filter 5 Minuten lang in kaltem
Wasser einweichen.
•Filter unter kaltem Wasser ausspülen.
•Erinnerung an den nächsten Austausch einstellen.Wir empfehlen, den Filter nach
3 Monaten auszutauschen.
•Filter in die beiden Teile des Filterhalters einlegen.
•Zum Einlegen des zusammengesetzten Filterhalters in den Wassertank Boden des Halters am Adapter im Wassertank ausrichten. Zum Einrasten nach
unten drücken.
•Wassertank mit kaltemWasser füllen, wieder einschieben und einrasten lassen.
DE
ERSTE VERWENDUNG
1.Maschine durch Betätigung der POWER Taste einschalten.
2.Display-Anweisungen für die Einrichtung zur erstenVerwendung befolgen.
3.Maschine zeigt nach der Einrichtung an, dass sie einsatzbereit ist.
Die Maschine ist jetzt im STANDBY-Modus.
 HINWEIS
Bei getestetenWasserhärten von 4 oder 5 wird dieVerwendung einer alternativenWasserquelle dringend empfohlen.
MAHLBETRIEB
Bohnenbehälter oben auf der Maschine einsetzen. Scheibe zum Einrasten drehen. Behälter mit frischen Kaffeebohnen füllen.
23
GETRÄNKEAUSWAHL
Zum Aufruf des Getränkemenüs das HomeSymbol antippen . Zur Auswahl des gewünschten Getränks wischen. Zum Aufruf der Anleitung für die Oracle™ Touch Symbol 
„Help &Tip“ (Hilfe &Tipps) antippen.
 HINWEIS
Touchscreen bitte sauber und trocken halten, um die korrekte Maschinenfunktion zu gewährleisten.
GETRÄNKE-BILDSCHIRM
Home-Symbol |
Gewähltes Getränk |
Einstellungs- |
||||||||
|
Symbol |
|||||||||
|
|
|
|
|
|
|
|
|
|
|
|
|
|
|
|
|
|
|
|
|
|
|
|
|
|
|
|
|
|
|
|
|
|
|
|
|
|
|
|
|
|
|
|
Mahlgrad |
Brüheinstellung: |
Aufschäumung |
Anhand des |
diese Taste zum |
|
Weiterblättern antippen |
|
|
Drehwählers |
Milchtemperatur |
|
an der |
Espresso |
|
Maschinenseite |
– ein Shot / doppelter |
|
zu verstellen |
Shot / personalisierte |
|
|
Extraktionsdauer |
|
|
Schwarzer Kaffee |
|
|
– klein / mittel / groß |
|
AUSWAHL DES MAHLGRADS
Für den Mahlgrad gibt es 45 Einstellungen von Nr. 1 (sehr fein) bis zu Nr.45 (grob).Wir empfehlen, zunächst mit Einstellung 30 zu arbeiten und
dann nach Bedarf nachzustellen – feiner bei zu schneller, gröber bei zu langsamer Extraktion. Espresso sollte innerhalb von 8–12 Sekunden zufließen beginnen.
AUSWAHL DES FILTERSIEBS
Filtersieb für |
|
Filtersieb für |
||||
2Tassen |
|
|
|
1 Tasse |
||
|
|
|
|
|
|
|
|
|
|
|
|
|
|
|
|
|
|
|
|
|
|
|
|
|
|
|
|
MAHLWERK-, MENGENUND
VERDICHTUNGSAUTOMATIK
Griff des Siebträgers an der Position INSERT (Einschieben) an der Mahlwerkausgabe ausrichten. Siebträger durch Anheben in die Mahlwerkausgabe einschieben und in die Mittelposition drehen.
Zum Start der Mahlwerk-, Mengenund Verdichtungsautomatik auf dem Display die Taste„Grind“ (Mahlen) antippen.Die Maschine beginnt zu mahlen.
Am Ende der Mahlwerk-, Mengenund Verdichtungsautomatik den Griff des Siebträgers in die Position INSERT drehen, Siebträger nach unten abnehmen.
24
ESPRESSO-EXTRAKTION
Griff des Siebträgers an der Position INSERT (Einschieben) an der Brühgruppe ausrichten.
Siebträger nach oben in die Brühgruppe einsetzen;
Griff zur Position LOCKTIGHT (fest einspannen) hin drehen, bisWiderstand spürbar wird.
Auf dem Display dieTaste „Brew“ (Brühen) antippen, um die Extraktion zu starten. Siekönnendas Espresso-Volumen ändern.
MANUELLE BRÜHUNG
Für den manuellen Extraktionsmodus die „Brew“-
Taste etwa 2 s lang gedrückt halten.Zum Start der Extraktion „Brew“-Taste antippen; nochmals antippen, um die Extraktion zu stoppen.
AUTOMATISCHES AUFSCHÄUMEN VON MILCH
Mit frischer, kalter Milch beginnen.
Milchkännchen bis unter den Schnabel füllen. Aufschäumdüse anheben und in die Milch eintauchen. Aufschäumdüse komplett absenken. Das Milchkännchen sollte auf der Tropfschale stehen; Milch sollte die Dichtung der Aufschäumdüse bedecken.
MILCH MUSS
DIESEN RING
BEDECKEN
Zum Start „Milk“-Taste antippen. Das Display zeigt die Milchtemperatur während des Aufwärmens an.
DE
Das Aufschäumen der Milch endet automatisch, sobald die eingestellte Milchtemperatur erreicht ist. Aufschäumdüse zum Entnehmen des Milchkännchens anheben. Aufschäumdüse und Spitze mit einem sauberen, feuchten
Tuch abwischen. Aufschäumdüse absenken. Die Düse wird automatisch durchgespült.
MANUELLES AUFSCHÄUMEN VON MILCH
Beim manuellen Aufschäumen von Milch sind die Funktionen Automatisches Aufschäumen und die Selbstabschaltung deaktiviert. Aufschäumdüse anheben.Taste zum Aufschäumen antippen. „Milk“-Taste am Ende des Aufschäumvorgangs antippen, um diesen zu stoppen.Aufschäumdüse und Spitze mit einem sauberen, feuchtenTuch abwischen. Aufschäumdüse absenken. Die Düse wird automatisch durchgespült.
VORSICHT:
VERBRENNUNGSGEFAHR
Dampf kann selbst nach dem Abschalten der Maschine noch unter Druck freigesetzt werden.
Kinder stets beaufsichtigen.
AMERICANO
Für Americano stehen 3Voreinstellungen zurVerfügung:klein, mittel und groß.
Kaffee mahlen und im Siebträger tampern.
Siebträger in die Brühgruppe einspannen.Tasse unter die Siebträgerund Heißwasserausgabe stellen. Es wird erst Espresso ausgegeben und anschließend automatisch Heißwasser zum
Espresso dazugegeben.
VOREINGESTELLTE |
AUSGEGEBENE |
TASSENGRÖßE |
MENGE |
Klein |
Ca.6 oz / 180 ml |
Mittel |
Ca.8 oz / 240 ml |
Groß |
Ca.12 oz / 360 ml |
25

CAFÉ CREMA
Es gibt dreiVoreinstellungen für Café Crema:Klein (120ml), Mittel (150ml), Groß (180ml).Setzen Sie das 1-Tassen-Filtersieb ein und stellen Sie wie auf dem Display angegeben das Mahlwerk auf eine grobe Mahlfunktion ein.
HEIßWASSER
Die Funktion „HOTWATER“ (HEIßWASSER) kann zumVorwärmen vonTassen oder zum manuellen Hinzufügen von Heißwasser verwendet werden.
Zum Start und Stopp von Heißwasser, auf dem
Display „Hot Water“ antippen.
HINZUFÜGEN EINES NEUEN GETRÄNKS
Zur Erstellung eines personalisierten Getränks auf dem Display „Create New“ (Neues erstellen) antippen. Eigenschaften können auf der
Basis eines Standardgetränks angepasst und gespeichert werden.
Passen Sie alternativ Eigenschaften manuell an und speichern Sie die aktuellen Einstellungen durch Antippen des kleinen Symbols .
.
EINSTELLUNGEN
Das Menü „Settings“ (Einstellungen) wird durch
Antippen des Symbols rechts oben im Display aufgerufen.
TRANSPORT UND LAGERUNG
Es wird empfohlen, vor demTransport der
Maschine oder einer längeren Lagerung beide Wasserbehälter zu leeren. Für detaillierte Anweisungen siehe den Abschnitt Entkalkung. Dieser Ablauf dient auch als
Frostschutzmaßnahme, falls die Maschine extrem kalten Temperaturen ausgesetzt wird.
SELBSTABSCHALTUNG
Die Maschine schaltet sich nach 30
Minuten automatisch in den Modus
SELBSTABSCHALTUNG.
Reinigung und Pflege
FARB-TOUCHSCREEN
Touchscreen bitte sauber und trocken halten, um die korrekte Maschinenfunktion zu gewährleisten.
REINIGUNGSZYKLUS
•Eine Aufforderung zur Reinigung der Maschine wird angezeigt, wenn ein Reinigungszyklus fällig ist (nach etwa 200 Espressos).
Reinigungszyklus alternativ durch Antippen derTaste „Clean Cycle“ (Reinigungszyklus) unter „Settings“ (Einstellungen) starten.Der
Reinigungszyklus reinigt die Dusche und spült die Brühgruppe.
•Anweisungen auf dem Touchscreen befolgen.
EINSETZEN DES WASSERFILTERS
Siehe Seite 23.
26
DE
REINIGUNG DER MAHLKEGEL
Regelmäßig gereinigte Mahlkegel erzielen gleichmäßigere Mahlergebnisse, die vor allem für Espresso wichtig sind.
1 |
Bohnenbehälter |
entriegeln |
6 |
Oberen Kegel |
abnehmen |
12 |
Oberen Kegel |
fest einschieben |
2
Bohnen |
entleeren |
7 |
Oberen Kegel |
mit dem |
Kegelbürstchen |
reinigen |
Oberen Kegel |
einrasten lassen |
3 |
Bohnenbehälter |
wieder einsetzen |
und einrasten |
lassen |
8 |
Unteren Kegel |
mit dem |
Kegelbürstchen |
reinigen |
14 |
Bohnenbehälter |
einsetzen |
4 
Mahlwerk leer laufen lassen
9 |
Tamper-Ge- |
bläse mit dem |
vorgesehenen |
Magneten |
entnehmen |
15 |
10 |
Mahlwerkaus |
gabe mit dem |
Mahlwerkbürst |
chen reinigen |
Bohnenbehälter einrasten lassen
5
Bohnenbehälter |
entriegeln und |
abnehmen |
11 |
Tamper-Gebläse |
von Hand wieder |
einsetzen |
Kegelbürstchen |
Magnet zur Entnahme des Tampers |
Mahlwerkbürstchen
27
 Loading...