


Sage™ by Heston Blumenthal‰
Customer Service Centre
Phone: 0844 334 5110 www.sageappliances.co.uk customerservice@sageappliances.co.uk
Register your product and get more from your purchase
Product registration takes only a few minutes and ensures both a record of your purchase and your warranty.
Registration also makes it easier to get support and advice on any questions or issues that you might have in the future. If you wish, we can also send you free recipes and additional hints and tips on making the best of your appliance.
Go to www.sageappliances.co.uk and click on ‘Product Registration’.
What’s on your mind?
Our constant aim is to improve the quality and features of our appliances. We welcome your comments and ideas in assisting our ongoing development.
Go to www.sageappliances.co.uk and click on ‘Support’.
Registered in England & Wales No. 8223512. Due to continued product improvement, the products illustrated or photographed in this document may vary slightly from the actual product.
Copyright BRG Appliances 2013.
BFP800UK Issue - B13

the Kitchen Wizz Pro™
Instruction Booklet
BFP800UK

PAgeContentsheader.....
3 We recommend safety first
8Getting to know your new appliance
10 Assembling your new appliance
14Basic food processing techniques
–Pureeing with the 4 blade processor
–Mixing and whipping with the 4 blade processor
–Slicing, shredding and grating with the multi - function Discs
26Food processing at a glance
–Processing tips
31 Care, cleaning & storage
33 Troubleshooting
2

PAgeWe recommendheader..... safety first
At Sage™ by Heston Blumenthal‰ we are very safety conscious. We design and manufacture consumer products with the safety of you, our valued customer, foremost in mind. In addition we ask that you exercise a degree of care when using any electrical appliance and adhere to the following precautions.
Important safeguards
Read all instructions BEFORE USE AND SAVE FOR FUTURE REFERENCE
•Before using for the first time please ensure that your electricity supply is the same as shown on the rating label on the underside of the appliance. If you have any concerns please contact your local electricity company.
•Your Sage™ by Heston Blumenthal‰ appliance includes a BS 13 amp moulded mains plug on the supply cord.
•Should you need to change this plug, please complete the rewiring as follows (after safe disposal of the moulded plug).
•Please note that a cut off plug inserted into a socket is a serious danger risk
•Wires are coloured as follows: −−Blue = Neutral
−−Brown = Live
−−Green & Yellow = Earth
•As the colours of the wire may not correspond with the coloured markings which identify the terminals in your plug, please refer to the following:
−−The Blue wire must be connected to the terminal which is marked ‘N’.
−−The Brown wire must be connected to the terminal which is marked with the letter ‘L’.
−−The Green & Yellow wire must be connected to the terminal which is marked with the letter E or the earth symbol  .
.
•Please note that if a 13 amp plug is used, a 13 amp fuse should be used.
3

PAgeWe recommendheader..... safety first
•Carefully read all instructions before operating and save for future reference.
•Remove any packaging material and promotional labels before using the food processor for the first time.
•Do not place the food processor near the edge of a bench or table during
operation. Ensure the surface is level, clean and free of water, flour, etc. Vibration during operation may cause the appliance to move.
•Do not place this appliance on or near a hot gas or electric burner, or where it could touch a heated oven.
•Handle the food processor and attachments with care - remember the blades and discs are razor-sharp and should be kept out of reach of children.
•Always make sure the food processor is completely assembled before operating. The appliance will not operate unless properly assembled.
•Ensure the OFF button has been pressed, and the food processor is switched off at the power outlet and unplugged before attaching
the 4 blade processor, dough blade, disc or processing lid.
•Always secure the processing bowl onto the motor base before attaching the 4 blade processor, dough blade or discs.
•Always operate the food processor with the processing lid securely in position.
•Do not push food into the feed chute with your fingers or other utensils. Always use the food pusher provided.
•Keep hands, knives and other utensils away from moving 4 blade processor, dough blade or discs.
•Do not place hands or fingers in the bowl of the food processor unless the motor, 4 blade processor, dough blade or discs have come to a complete stop.
4

PAgeWe recommendheader..... safety first
•Ensure the OFF button has been pressed to switch the motor off and the appliance is switched off at the power outlet and unplugged before removing the lid from the bowl.
•Do not use attachments other than those provided with the food processor.
•Do not attempt to operate the food processor by any method other than those described in this booklet.
•Ensure the motor, blades or discs have
completely stopped before disassembling. Ensure the OFF button has been pressed and the appliance is switched off at the power outlet and unplugged when not in use, if left unattended and before assembling and disassembling, cleaning or storing.
SAVE THESE INSTRUCTIONS
•Care should be taken when removing the food from the processing bowl by ensuring the motor, 4 blade processor, dough blade or disc, have completely stopped before disassembling. Ensure the OFF button has been pressed to switch the motor off,
the appliance is switched off at the power outlet and unplugged, before removing the lid from the bowl. The processing bowl should then be unlocked from the motor body and the 4 blade processor, dough blade or discs carefully removed before attempting to remove the processed food.
•Please do not crush ICE in the large or small processing bowls. This will cause damage to the blades (4 blade processor or mini blade). We recommend that you use a blender for ice crushing.
•Some stiff mixtures, such as dough may cause the processing blade to rotate more slowly than normal. If this happens, do not process for longer than 1 minute.
5

We recommend safety first
•Do not process hot or boiling liquids - allow liquids to cool before placing into the processing bowl.
•Do not use the food processor on slippery, unstable or uneven surfaces such as a sink drain board.
•To protect against electric shock do not immerse power cord, plug or motor base in water or any other liquid.
•Do not move the food processor whilst in operation.
•Do not leave the food processor unattended when in use.
•Do not place any part of the food processor in the microwave oven.
•Do not fill bowl above marked liquid levels (shredding). Always add drier or thicker ingredients to the processing bowl prior to adding fluids.
•Never remove the lid while the processor is operating. Always use the POWER/OFF button to stop the machine before removing the lid.
•Keep the appliance clean. Follow the cleaning instructions provided in this book.
IMPORTANT SAFEGUARDS FOR ALL ELECTRICAL APPLIANCES
•Unwind the power cord fully before use.
•Do not let the power cord hang over the edge of a table, counter, touch hot surfaces or become knotted.
•Children should be supervised to ensure they do not play with the appliance.
•Do not use the appliance if power cord, power plug or appliance becomes damaged in any way. If damaged or maintenance other than cleaning is required, please
contact Sage™ by Heston Blumenthal‰ Customer Service on 0844 334 5110 or go to sageappliances.co.uk.
•This appliance is for household use only. Do not use this appliance for anything other than its intended use. Do not use in moving vehicles or boats. Do not use outdoors
•Misuse may cause injury.
•Regularly inspect the supply cord, plug and actual appliance for any damage. If found damaged in anyway
6

We recommend safety first
or maintenance other than cleaning is required,
immediately cease use of the appliance and contact Sage Customer Service on
0844 334 5110.
•The installation of a residual current device (safety switch) is recommended to provide additional safety protection when using electrical appliances. It is advisable that a safety switch with a rated residual operating current not exceeding 30mA be installed in the electrical circuit supplying the appliance.
See your electrician for professional advice.
•This appliance can be used by persons with reduced physical, sensory or mental capabilities or lack of experience and knowledge if they have been given supervision or instruction concerning use of the appliance in a safe way and understand the hazards involved.
•This appliance shall not be used by children. Keep the appliance and its cord out of the reach of children.
 CAUTION
To avoid possible malfunction of the processing bowl’s
auto switch, do not place the processing lid in the locked position when the appliance is not in use.
 CAUTION
The processing blades and discs are extremely sharp, handle with care at all times. Do not place hands, knives or other utensils into the feed chute. Always use the food pusher to push the food down the feed chute.
The symbol shown indicates that this appliance should not be disposed of in normal household waste. It should be taken to a local authority waste collection centre designated for this purpose or to a dealer providing this service. For more information, please contact your local council office.
7

Getting to know your new appliance
A |
|
|
|
|
B |
|
|
|
G |
|
|
|
||
|
|
|
||
C |
|
|
|
|
|
|
|
|
D
H
I
E J F 


 K
K
L
M
N Q S T U
O Q
V W
P R
8

Getting to know your new appliance
A.Small Food Pusher
For improved processing control of smaller ingredients. It also doubles as a measuring cup for adding/measuring ingredients.
The food processor will run continually whether the small pusher is in or out.
B.Large Food Pusher
For pushing food down the feed chute. The food processor will not start unless the large pusher is in place correctly.
C.Extra Wide Feed Chute
For larger ingredients.
D.Processing Lid
Locks onto the processing bowl.
E.PULSE Button
Press down and hold briefly for short bursts of power. The motor will
automatically stop after the PULSE button has been released.
F.POWER/OFF Button
Provides power to the food processor unit only. Start/Pause is required to be pressed to start operating the food processor.
G.Feed Chute Safety System
Prevents the motor from operating unless the bowl and lid are correctly locked in position, and large feed pusher is inserted.
H.Silicone Seal
Reduces the chance of leakage while processing large volumes of liquid ingredients.
I.Processing Bowl With Handle
15 cup bowl for dry ingredients and 10 cups for liquid (thick, wet ingredients e.g. soups). The processing bowl locks onto the motor base.
J.Count Up & Count Down Timer
Used to set desired time required for processing. Can count up or down, stopping the processor once the time is reached in count down mode.
K.LCD Display
Displays the timing function.
L.Direct Drive Motor Base
2000W induction motor with safety braking system.
M.Non-skid Rubber Feet
For added safety and stability.
N.Julienne Disc
Use this disc for julienning vegetables.
O.Chip Cutter
Use this disc for chipping vegetables.
P.Reversible Shredder
Use one side for small/thin shredding and the other side for coarse shredding.
Q.Adjustable Slicer
Use this disc for slicing ingredients. Able to slice from 0.5mm – 8mm thick.
R.Whisk/Emulsifying Disc
Use this attachment for whisking of eggs and cream.
S.4 Blade Processor
Swift action for chopping, mixing, whipping and blending a variety of ingredients.
T.Dough Blade
Blunt blade designed for a softer action of combining dough ingredients.
U.Mini Processing Blade
Used for chopping, mixing, and blending a variety of ingredients.
V.Disc Spindle
Fits onto bowl drive coupling and is used to hold the reversible shredder, julienne, chip cutting, whisk and adjustable slicing discs in position.
W.Storage Container with Lid
Used for storing all discs and blades when they are not in use.
NOT SHOWN
Cleaning Brush
For cleaning the processor bowl, blades and discs. The flat end is designed as a scraper to remove food particles from crevices.
Plastic Spatula
For scraping the sides of the bowl helping to process ingredients evenly.
Mini Processing bowl
For processing small volumes of ingredients.
Cord Storage
Cord can be pushed into the housing to reduce length.
Sage™ by Heston Blumenthal‰ Assist Plug
Ergonomic ring-pull design allows the power plug to be easily removed from the power outlet.
9
PAgeAssemblingheaderyour..... new appliance
Before first use
Before using your Sage™ by Heston Blumenthal‰ food processor, become familiar with all the parts. Remove all packaging materials and promotional labels, being careful when handling the processing blades and discs as they are very sharp. Wash the processing bowl, processing lid and other attachments in warm, soapy water. Rinse and dry thoroughly.
(Refer to cleaning, care and storage section).
1.Place the motor base on a dry, level work surface. Place the processing bowl on to the motor base with the handle in line with the ALIGN
HANDLE graphic on the motor base.
2.Turn the processing bowl clockwise until the handle aligns with the TURN TO LOCK graphic.
The processing bowl should be securely locked into position.
3. If using a disc, first assemble the disc
spindle onto the bowl drive coupling. Orientate the disc so that the side you wish to use is facing upwards. Hold the disc by the centre
plastic moulding and position the central hole above the attachment spindle. Push down firmly until fitted correctly.
(Please note that these discs only fit the larger processing bowl).
4.For using the processing blades, carefully grasp either the 4 blade processor, dough blade or mini processing blade using the central plastic support and position it over the bowl drive coupling and push down until inserted correctly.
If using the mini processing blade, ensure the mini processing bowl is assembled into the main bowl first.
10
PAgeAssemblingheaderyour..... new appliance
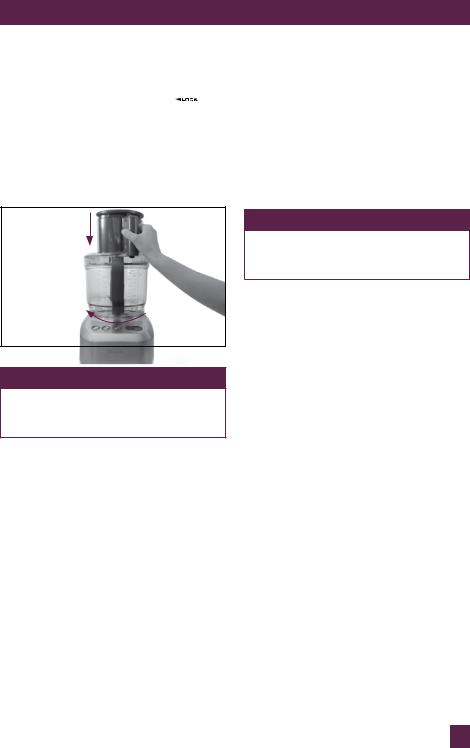
5.Place the processing lid onto the processing bowl so the feed chute is
slightly right of the bowl handle and the arrow graphics are aligned 

 . Holding the feed chute and pressing down firmly at the same time, turn the lid clockwise (as indicated by the graphic) so the ‘Locking Tab’ on the lid slots into the ‘Interlocking Safety Catch’ on the handle. The lid should be securely locked into position.
NOTE
The food processor will not operate unless both the processing bowl and lid are correctly locked into position.
 CAUTION
The processing blade (including the mini bowl blade) and discs are extremely sharp, handle with care at all times.
6.Insert the power plug into a 230/240 volt power outlet and switch the power outlet on.
7.Press the POWER/OFF button to turn your food processor on. The red light illuminates around the POWER/OFF button to indicate that the processor is on.
Your food processor has POWER/OFF, START/PAUSE and PULSE buttons to give total control when processing food. Press the START/PAUSE button to switch the motor on and operate continuously.
NOTE
The food processor will not start unless the large food pusher is inserted correctly into place.
8.Press the POWER/OFF button to switch the motor off. When short bursts of power are required, press the PULSE button and hold down briefly, release, then press again. The PULSE action will automatically stop when the button is released.
9.To set the timer, press the buttons located to the left of the timing window. Time will move up by 5 second intervals, from 0 to 30 seconds. From 30 seconds to 2
minutes the time will increase in 10 second intervals and from 2 minutes to 9.59 minutes the time will increases in 20 second intervals.
10.Once the time is set, press the START/PAUSE button and the timer will start to count down.
11.Ensure the large food pusher is inserted correctly into place. The food processor will not start until pusher is in place.
11

PAgeAssemblingheaderyour..... new appliance
12.Once the timer has finished, the food processor will stop and go into STANDBY mode. Three (3) beeps will be sounded to indicate that the processing is complete.
13.The processor incorporates a ‘Safety Interlock System’ that ensures the unit will not start without the large food pusher in position. Processing will stop automatically, once
the large food pusher has been removed from the lid. The chute MAX fill graphic indicates the maximum volume of food to be placed in the chute for the pusher to activate the unit.
14.At the end of processing, always wait until the blades or discs have stopped spinning before unlocking and removing the lid. To remove the processing lid, ensure the POWER/ OFF button has been pressed, the power is switched off at the power outlet and the cord is unplugged from the power outlet. Holding the feed chute and pressing down firmly at the same time, turn the lid anticlockwise so that the arrow graphics are no longer aligned.
NOTE
As a safety feature, the food processor will automatically switch off when the lid is unlocked, however, it is good practice to manually switch off the food processor using the POWER/ OFF button before removing the lid.
15.Remove the processing bowl (before removing blade or discs) by turning it anti-clockwise until the handle is in line with the ALIGN HANDLE. Lift the bowl off the motor shaft. When removing the discs - carefully remove by gripping the plastic hub on the centre of the disc and lifting the disc up and away from the pin on the spindle.
NOTE
Reassemble the food processor by locking the bowl into position before attaching blade, disc or lid.
NOTE
Care should be taken when removing the food from the processing bowl by ensuring the motor, processing blade, dough blade or discs have completely stopped before disassembling. Ensure the POWER/OFF button is pressed to switch the motor off, the appliance is switched off at the power outlet and it is unplugged, before removing the lid from the bowl. The processing bowl should then be unlocked from the motor body, then the 4 blade processor, dough or disc carefully removed before attempting to remove the processed food.
12

PAgeAssemblingheaderyour..... new appliance
Overload protection system
If the motor overloads, the food processor will go to STANDBY mode and OVERLOAD icon in the LCD starts to flash. The food processor can still be switched off by pressing the POWER/OFF button. To operate the food processor again, allow the machine to cool for approx 30 minutes.
Some stiff mixtures, such as dough, may cause the dough blade to rotate more slowly than normal. If this happens, do not process for longer than 1 minute.
If the blades or discs should jam while processing, ensure the POWER/OFF button is pressed to switch the motor off. Switch off the power outlet. Remove the processing lid and adjust any food wedged between the blade and the bowl or in the disc. Replace the lid and proceed as normal. If this occurs again, the processing bowl may be overloaded, so remove some of the food and process in smaller batches.
NOTE
The food processor is designed so the motor will not operate without the processing bowl and lid are correctly locked into position and the pusher inserted into the feed chute. In the event that the food processor starts without the lid correctly locked into position, immediately disconnect at the power outlet and contact Sage™ by Heston Blumenthal‰ Customer Service on 0844 334 5110 for examination.
13
PBASICge headerFOOD PROCESSING..... TECHNIQUES
The food processor can process food in a variety of ways depending on which blade or disc you choose.
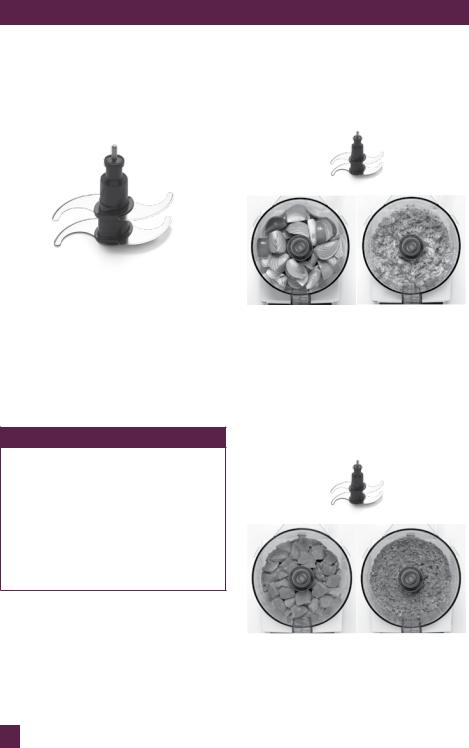
Chopping with the 4 blade processor
Raw Vegetables, Fruit and Cooked Meats
Trim and cut food into 2.5cm cubes. Process no more than 4 cups at a time using the PULSE button at 1–2 second intervals until chopped to desired size or consistency.
The 4 blade processor chops raw and cooked food to the consistency required, from coarsely chopped to minced. For many large processing tasks, the four blades will cut the processing time needed to achieve the desired results. The result depends on the type of food and how long the food is processed. Always remember to place the
4 blade processor into the processing bowl before adding the food.
NOTE
To avoid over-processing check the consistency frequently. For many processing tasks we recommend to use the PULSE button, as it may only take a few seconds to fully process the food to the desired consistency. If necessary, press the POWER/OFF button, unlock the lid and use the
spatula to scrape down the sides of the bowl to ensure even processing.
Spanish Onion wedges |
Chopped Spanish Onion |
Raw meat, chicken and fish
Trim and cut food into 2.5cm cubes. Ensure all bones are removed. Chill well until firm as this will help the 4 blade processor to cut through the food more readily. Process no more than 600g of raw meat at a time using the START/PAUSE button until chopped or minced to desired size or consistency.
Cubed Beef |
Minced Beef |
14
PBASICge headerFOOD PROCESSING..... TECHNIQUES
NOTE
Heavy loads of meat may stall the motor. This is indicated by the blade turning slowly and the meat only moving slowly around the bowl and not processing. If this occurs remove the meat and process in two batches.
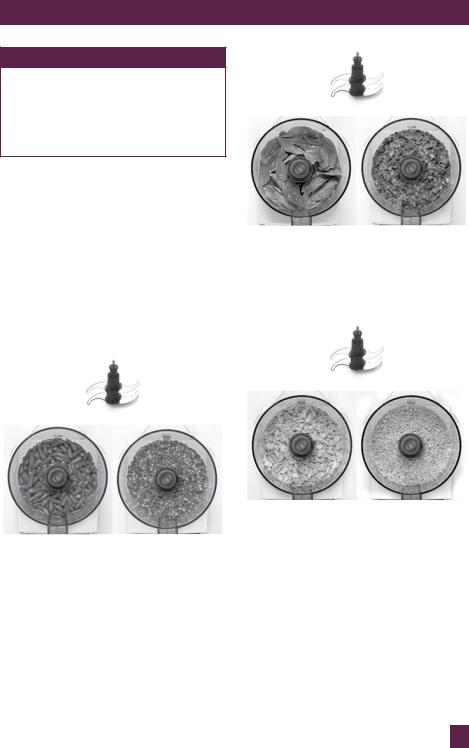
Garlic, chilli and ginger
For garlic, peel cloves and leave whole. For chilli, leave whole (remove seeds for milder chilli). For ginger, peel and cut into 2.5cm cubes. Process until chopped to desired consistency. Store chopped garlic or chilli mixed with a little oil in an airtight container in refrigerator for up to 1 week. Mix ginger with a little sherry. If adding garlic, chilli or ginger to other ingredients, drop whole pieces down feed chute while the motor is running.
Basil leaves |
Chopped basil |
Nuts
Process no more than 250g shelled nuts at a time using the PULSE button at 1–2 second intervals until chopped to desired size.
Whole chillies |
Chopped chillies |
Herbs
Wash and dry herbs thoroughly. Remove any coarse stems. Process no more than
2 bunches at a time using the PULSE button at 1–2 second intervals until chopped to desired size or consistency.
Shelled peanuts |
Chopped peanuts |
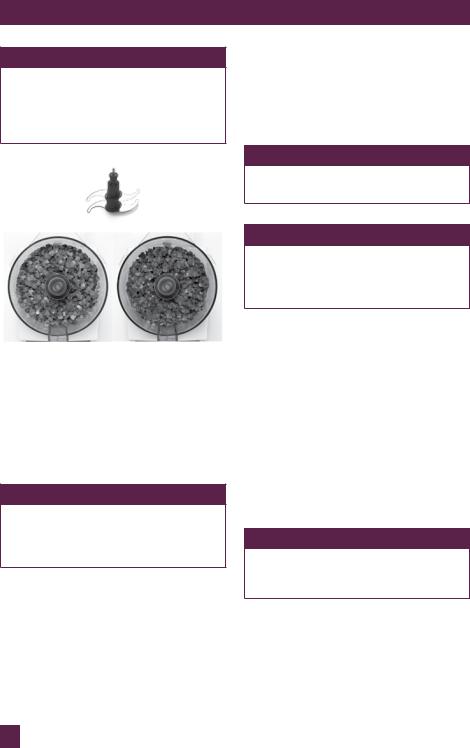
Dried fruit
As dried fruit can be sticky, place in freezer for about 10 minutes (this prevents the fruit sticking to the blades). Process no more than 4 cups at a time using the PULSE button at 1–2 second intervals until chopped to desired size or consistency.
15
PBASICge headerFOOD PROCESSING..... TECHNIQUES
NOTE
If chopping fruit to add to cake batter, process the fruit before making the batter, adding a little flour from recipe quantity to prevent fruit sticking to 4 blade processor.
Whole dried fruit |
Chopped dried fruit |
Citrus peel
Remove the peel from the fruit using a vegetable peeler and cut into 2.5cm pieces. Process no more than 4 cups at a time together with ½ cup granulated sugar and using the PULSE button at 1–2 second intervals until chopped to desired size.
NOTE
The white pith between the skin and citrus flesh is bitter, so carefully remove the citrus peel ensuring the white pith remains on the fruit.
Hard boiled eggs
After cooking eggs to hard boiled stage, allow to cool then remove shells and cut eggs in half. Process no more than 12 eggs at a time using the PULSE button at 1–2 second intervals until chopped to desired size or consistency.
Soft breadcrumbs
Break stale bread into chunks (fresh bread will stick to blades). Process no more than 4 cups at a time using the PULSE button at 1–2 second intervals until crumbed to desired consistency.
NOTE
For best results when making bread crumbs, add one slice at a time.
NOTE
700g pkt sliced bread yields approximately 10 cup soft breadcrumbs. Freeze in one cup portions for later use.
Dried breadcrumbs
Break bread into chunks and toast in oven until golden and crisp. Do not over brown. Process no more than 4 cups at a time using the PULSE button at 1–2 second intervals until crumbed to desired consistency.
Biscuit Crumbs
Break biscuits into quarters, measure quantity and place into processing bowl. Process no more than 4 cups at a time using the PULSE button at 1–2 second intervals until crumbed to desired consistency.
NOTE
Sweet or savory biscuit crumbs can be used as an alternative to pastry for sweet or savory pies.
16
 Loading...