


the Smart OvenTM Air Fryer
BOV860 / SOV860
EN |
QUICK GUIDE |
DE |
KURZANLEITUNG |
FR |
GUIDE RAPIDE |
NL |
SNELSTARTGIDS |
IT |
GUIDA RAPIDA |
ES |
GUÍA RÁPIDA |
PT |
MANUAL RÁPIDO |
|
|

|
Contents |
2 |
Sage® recommends safety first |
7 |
Components |
9 |
Functions |
11 |
Quick Start Guide |
14Care & Cleaning
15Troubleshooting
17Guarantee
SAGE® RECOMMENDS SAFETY FIRST
At Sage® we are very safety conscious.We design and manufacture consumer products with the safety of you, our valued customer, foremost in mind. In addition we ask that you exercise a degree of care when using any electrical appliance and adhere to the following precautions.
IMPORTANT
SAFEGUARDS
READ ALL INSTRUCTIONS BEFORE USE AND SAVE FOR FUTURE REFERENCE
•A downloadable version of this document is also available at sageappliances.com
•Before using for the first time please ensure that your
electricity supply is the same as shown on the rating label on the underside of the appliance.
•Remove and safely discard any packing materials and promotional labels before using the oven for the first time.
•To avoid choking hazard for young children, remove and safely dispose the protective cover fitted on the power plug.
•Do not use the appliance near the edge of a benchtop or table. Ensure the surface is stable, level, heat-resistant and clean.
•A fire may occur if the oven is covered or touches flammable material, including curtains, draperies, walls, and the like, when in operation.
•Do not use the appliance on (or close to) a hot gas or electric burner, or where it could touch a heated oven or surface.
•Do not let the power cord hang over the edge of a table or counter, or touch hot surfaces.
2

•The oven is not suitable to be used in a small appliance enclosure. Ensure to leave
adequate space all around the oven. Minimum space of 10cm is recommended.
•The outer housing of the oven may be hot during and after cooking. Please do not touch hot surfaces. Always keep the power cord of this oven, and those of other appliances near the oven, clear from the oven housing.
•Do not touch hot surfaces. To avoid burns, use extreme caution when removing pans, dishes and accessories such
as the included grilling rack and roasting pan, that contain hot oil or other hot liquids.
•Do not lay cooking utensils, roasting pans or dishes on the glass door.
•Do not leave the door standing open for extended periods
of time.
•Do not store any item on top of the oven when in operation except those described on page 13 of this book.
•Do not place cardboard, plastic, paper, or other flammable materials in the oven.
•Do not cover crumb tray or any part of the oven with metal foil. This will cause overheating of the oven.
EN
•Caution should be exercised when using pans and dishes constructed of materials other than metal. Ensure pans and dishes are oven safe before using in the oven.
•Caution should be exercised when using lids in the oven, as pressure build up in a covered pan or dish may cause hot ingredients to expel or the dish to crack. Do not place sealed or airtight containers in the oven.
•Oversized foods and metal utensils must not be inserted in the oven as they may create fire or risk of electric shock.
•The use of accessories and attachments not recommended or supplied with this oven may cause injuries.
•This appliance is for household use only. Do not use in any type of moving vehicles. Do not use the appliance outdoors, or for anything other than its intended use. Misuse can cause injury.
•If the appliance is to be: left unattended, cleaned, moved, assembled or stored, always switch the unit off and unplug the cord from the power outlet and allow to cool completely.
•Do not clean with metal scouring pads. Pieces can break off the pad and touch electrical parts, creating a risk of electric shock.
3

•The appliance can be used by children aged from 8 years and above and persons with reduced physical, sensory or mental capabilities, or lack of experience and knowledge, if they have been given supervision or instruction
concerning use of the appliance in a safe way and understand the hazards involved.
•Children shall not play with the appliance.
•Cleaning and user maintenance shall not be made by children unless they are older than 8 and supervised.
•The appliance and its cord should be kept out of reach of children aged 8 years and younger.
•It is recommended to regularly inspect the appliance. Do not use the appliance if power cord, power plug or appliance becomes damaged in any way. If damaged or maintenance other than cleaning is required, please contact Sage Customer Service or go to sageappliances.com
•The appliance is not intended to be operated by means of external timer or separate remote control system.
•The appliance must be used on a properly grounded outlet.
If you are unsure the power outlets are properly grounded, please consult an electrician.
•Do not, under any circumstance, modify the power plug or use an adapter.
•Consult a qualified electrician if the grounding instructions are not completely understood, or if doubt exists as to whether the appliance is properly grounded.
•The installation of a residual current device (safety switch) is recommended to provide additional safety protection when using electrical appliances. It is advisable that a safety switch with a rated residual operating current not exceeding 30mA be installed in the electrical circuit supplying the appliance. See your electrician for professional advice.
SPECIFIC INSTRUCTIONS FOR SOV860
•We recommend the oven is operated on a dedicated circuit separated from other
appliances. Consult a licensed and qualified electrician if you are unsure.
•To turn off the oven, press the
 Start/Cancel button on
the control panel.The oven is off when the button back-lights turn off.
4

•Regularly clean the crumb tray. To clean the crumb tray:
−−Turn OFF the oven,
−−Allow the oven to cool completely and then remove the power cord from the power outlet.
−−Remove the crumb tray and clean with warm soapy water.
−−Dry the tray completely before inserting it securely back
in place.
NOTICE TO CUSTOMERS REGARDING MEMORY STORAGE
Please note that in order to better serve our customers, internal memory storage has been imbedded into your appliance. This memory storage consists of a small chip to collect certain information about your appliance including the frequency of
use of the appliance and the manner in which your appliance is being used. In the event your appliance is returned for service, the information collected from the chip enables us to quickly and efficiently service your appliance.The information collected also serves as a valuable resource in developing future appliances to better serve the needs of our consumers. The chip does not collect any information regarding the individuals who use the product
EN
or the household where the product is used. If you have any questions regarding the memory storage chip please contact us at privacy@sageappliances.com.
 WARNING
TO REDUCE THE RISK OF FIRE, ELECTRIC SHOCK, EXPOSURE TO EXCESSIVE UV RADIATION, OR INJURY TO PERSONS:
•Always unplug the oven and let all parts (including the bulb housing, glass cover and enclosure) cool completely before replacing bulb.
•Only use a 25 Watt, 220–240V, G9 type oven bulb.
•Always use a soft cloth when handling the bulb and do not directly touch the surface as oil from your skin can damage the bulb.
•Do not look directly at a glowing bulb.
•Do not remain in the light if skin feels warm.
•Keep bulb away from materials that may burn.
•The bulb gets hot quickly. Only ever use the light button to turn on the light.
•Do not operate the light if the bulb housing, glass cover,
UV filter or enclosure are missing or damaged.
5
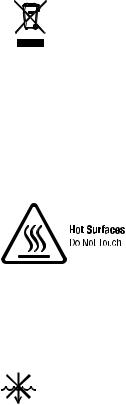
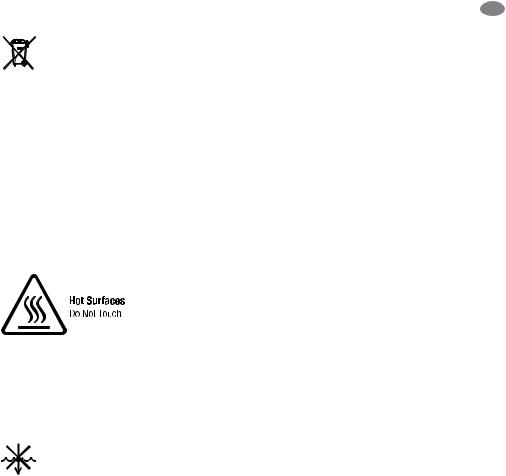
The symbol shown indicates that this appliance should not be
disposed of in normal household waste. It should be taken to a local authority waste collection centre designated for this purpose or to a dealer providing this service. For more information, please contact your local council office.
This symbol indicates, temperature of accessible surfaces may be high when the appliance is operating and for some time after use.
To protect against electric shock, do not immerse the
power cord, power plug or appliance in water or any liquid.
SAVE THESE INSTRUCTIONS
6

EN
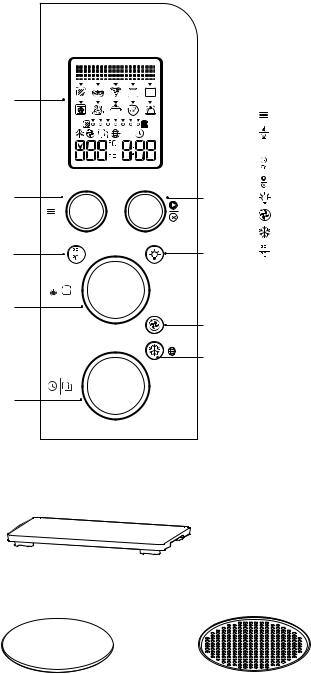
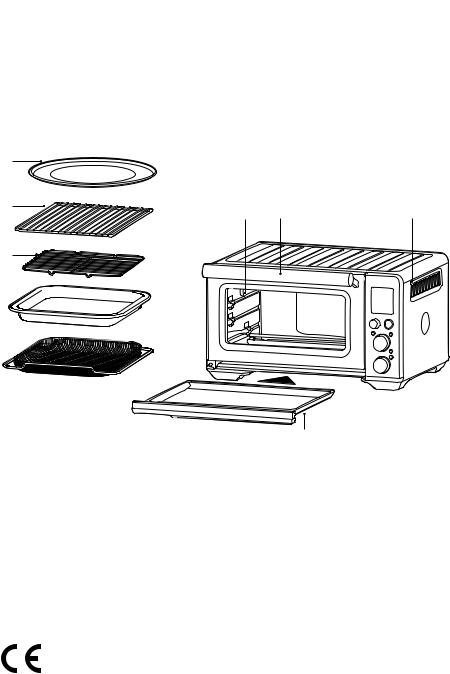
 Components
A
B |
C |
D


E


A.30cm non-stick pizza pan
B.Wire rack
C.Grilling rack
D.28 x 33.5cm enamel roasting pan
E.Air Fry basket
F G H
I
F.Oven light
G.Door handle
H.Ventilation slots
I.Crumb tray
Rating Information
220–240V ~ 50Hz 2000–2400W
7
K |
|
K. LCD screen |
|
|
|
L. |
Function Dial |
HM MS |
|
M. |
Temperature Dial/Toast and Bagel |
|
|
N. |
Darkness Control |
|
|
Time Dial/Toast and Bagel Selection |
|
L |
O |
O. |
Start/Cancel Button |
P. |
Oven Light Button |
||
|
|
Q. |
Convection Button |
|
|
R. |
Frozen Button |
S |
P |
S. |
Temperature Conversion Button |
M
Q
R
N
Accessories sold separately:
Bamboo Cutting Board
Pizza Stone |
Pizza Crisper Pan |
8
 Functions
PREPARING THE OVEN
Before first use, please run the oven empty for
20 minutes to remove protective substances from the heating elements. Ensure the area is well ventilated as the oven may emit vapors.These vapors are safe and are not detrimental to the performance of the oven.
1.Remove and safely discard any packing material, promotional labels and tape from the oven.
2.Remove the crumb tray, wire racks, grilling rack, roasting pan, air fry basket and pizza pan from the polyfoam packaging.Wash them with a soft sponge in warm, soapy water then rinse and dry thoroughly.
3.Wipe the interior of the oven with a soft, damp sponge. Dry thoroughly.
4.Place the oven on a flat, dry surface.Ensure there is a minimum distance of 10cm of space on both sides of the appliance and 15cm above.
5.Insert the crumb tray into the oven.
6.Unwind the power cord completely and insert the power plug into a grounded power outlet.
7.The oven alert will sound and the LCD screen will illuminate. Set desired language. Go to page 12 for guide on language selection.
8.Turn the Start/Cancel dial to the right until the indicator reaches the PIZZA function.
EN
9.Press the  Start/Cancel button.The button backlight will illuminate red, the LCD screen will illuminate orange and the oven alert will sound.
10.The LCD screen will indicate a blinking ‘PREHEATING’. Once the oven has completed the preheating cycle, an alert will sound.
11.The timer will be displayed and automatically begin to count down.
12.At the end of the cooking cycle, the oven alert will sound, the  Start/Cancel button backlight will go out and the LCD screen will illuminate blue.
13.The oven is now ready to use.
ELEMENT IQTM
The Sage Smart OvenTM Air Fryer features Element IQTM, a cooking technology that creates the ideal environment for the food you’re cooking. It steers power where and when it’s needed and creates the right kind of heat, whether even
or intense.
Each of the oven’s functions is preset with our recommended heating element configurations and temperatures, that are based on recipes and testing. However, we suggest experimenting with these depending on the recipe, amount of food and your personal taste.
HM MS |
HM MS |
9

OVEN FUNCTIONS OVERVIEW
Function |
SUGGESTED |
OPTIONAL |
PRESETS |
PREHEAT |
RANGE |
|
|
RACK |
SETTINGS |
|
|
|
|
|
POSITION |
|
|
|
|
|
Toast |
Middle |
Frozen |
Darkness 4 |
No |
Darkness 1-7 |
|
|
|
|
Slices 4 |
|
Slices 1-6 |
|
Bagel |
Middle |
Frozen |
Darkness 4 |
No |
Darkness 1-7 |
|
|
|
|
|
Slices 4 |
|
Slices 1-6 |
Pizza |
Middle |
|
Super |
210°C |
Yes |
160°C - 230°C |
|
|
Convection |
Convection |
|
Up to 2 HRS |
|
|
|
|
Convection |
|
||
|
|
|
Frozen |
|
|
|
|
|
|
Temperature |
|
|
|
|
|
|
20 MINS |
|
|
|
|
|
|
|
|
||
|
|
|
Conversion |
|
|
|
|
|
Frozen |
|
|
|
|
Grill |
Top |
|
|
HI |
No |
HI-MED-LO |
|
|
|
10 MINS |
|
Up to 20 MINS |
|
Bake |
Bottom |
|
Super |
160°C |
Yes |
120°C and above = |
|
|
Convection |
Convection |
|
1 MIN up to 2 HRS |
|
|
|
|
Convection |
|
||
|
|
|
30 MINS |
|
120°C and below = |
|
|
|
|
Temperature |
|
|
1 MIN up to 10 HRS |
|
|
|
Conversion |
|
|
|
Roast |
Bottom |
|
Super |
180°C |
Yes |
120°C and above = |
|
|
Convection |
Convection |
|
1 MIN up to 2 HRS |
|
|
|
|
Convection |
|
||
|
|
|
1:00 HRS |
|
120°C and below = |
|
|
|
|
Temperature |
|
|
1 MIN up to 10 HRS |
|
|
|
Conversion |
|
|
|
Air Fry |
Top |
|
Super |
220°C |
No |
160°C-230°C |
|
|
Convection |
15 MIN |
|
Up to 1:00 HR |
|
|
|
|
Temperature |
|
||
|
|
|
Super Convection |
|
|
|
|
|
|
|
|
||
|
|
|
Conversion |
|
|
|
|
|
Frozen |
|
|
|
|
Reheat |
Bottom |
|
Convection |
160°C |
Yes |
70°C - 160°C |
|
|
Temperature |
Convection |
|
Up to 2:00 HRS |
|
|
|
|
||||
|
|
|
Conversion |
15 MINS |
|
|
|
|
|
|
|
|
|
Keep Warm |
Bottom |
|
Convection |
70°C |
No |
50°C–120°C |
|
|
Temperature |
KEEP WARM |
|
Up to 2:00 HRS |
|
|
|
|
Conversion |
1:00 HRS |
|
|
Slow Cook |
Bottom |
|
Convection |
HI |
No |
LO = 4 to 10 HRS |
|
|
|
Convection |
|
HI = 2 to 8 HRS |
|
|
|
|
|
4:00 HRS |
|
|
10
i QuickGuide Start
OPERATINGYOUR SAGE OVEN
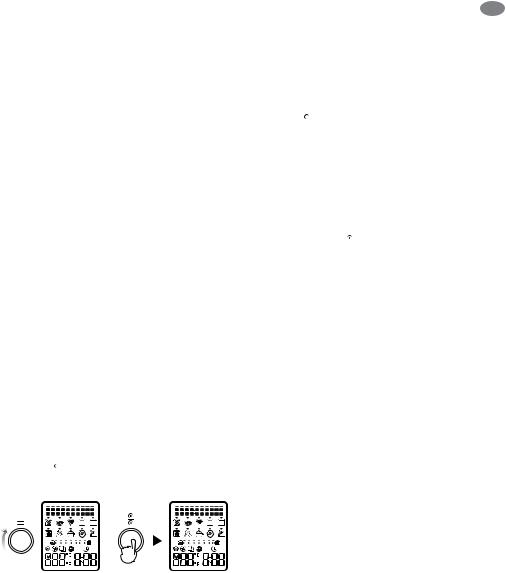
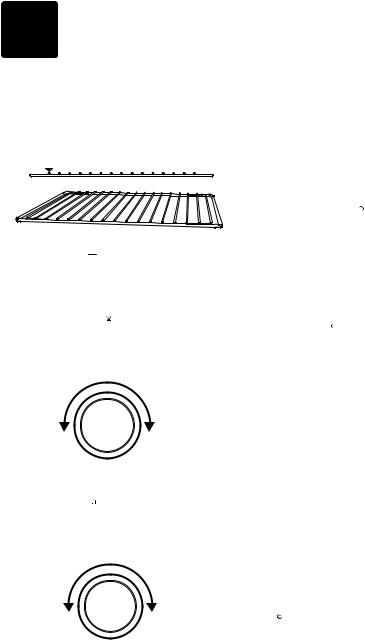
1.Position the wire rack so the spokes face upward and insert it into the desired rack position.The rack positions are conveniently printed on the oven door window.
2.Turn the Function dial until the indicator on the LCD screen reaches the desired setting.
3.The screen indicates the preset cooking temperature for the selected setting. Turn the Temperature dial to the left to reduce the temperature or to the right to increase the temperature.
TEMPERATURE
DIAL
ROTATE
REDUCE |
INCREASE |
TEMPERATURE |
TEMPERATURE |
4.The screen indicates the preset cooking time for the selected setting.Turn the Time dial to the left to reduce the cooking time or to the right to increase the cooking time.
TIME
DIAL
ROTATE
REDUCE |
INCREASE |
TIME |
TIME |
EN
5.For settings without a preheat cycle
(TOAST, BAGEL, GRILL, KEEP WARM, SLOW COOK), place the food directly on the wire rack or on the included air fry basket, pizza pan, grilling rack and/or roasting pan. Ensure the food is centered in the oven for the most even cooking.
6.Close the oven door.
7.Press the Start/Cancel button.
The button backlight will illuminate red, the oven alert will sound, and the LCD screen will illuminate orange.
8.The timer will be displayed and begin to count down.The cooking temperature and time can be adjusted during the cooking cycle.
9.For settings that feature a preheat cycle (BAKE, ROAST, PIZZA, AIR FRY), press the Start/ Cancel button before placing food in the oven. The button backlight will illuminate red, the oven alert will sound and the LCD screen will indicate a blinking ‘PREHEATING’ while the oven is heating up.
a)When the oven is ready for use, the blinking ‘PREHEATING’ will go out, the oven alert will sound and the timer will start counting down. Place the food directly on the wire rack, or on the included air fry basket, pizza pan, grilling rack and/or roasting pan. Ensure the food is centered in the oven for the most even cooking.
b)Close the oven door.
c)The timer will continue to count down. The cooking temperature and time can be adjusted during the cooking cycle.
10.At the end of the cooking cycle, the oven alert will sound, the Start/Cancel button backlight will go out and the LCD screen will illuminate blue.
11

 NOTE
NOTE
The cooking cycle can be stopped at any time by
pressing the Start/Cancel button.This will cancel the cycle and the button backlight will illuminate blue.
 NOTE
NOTE
Press the Convection button to choose between no convection, convection and super convection. Convection and super convection may adjust the temperature to compensate for the faster air flow.Super convection will deliver a crispier food result.
MAGNETIC AUTO-EJECT RACK
When the wire rack is inserted into the middle rack position, it will automatically eject halfway out of the oven when the door is opened so you can easily remove your food.
Always open the door slowly when the wire rack is in this position to prevent the rack from ejecting too quickly.
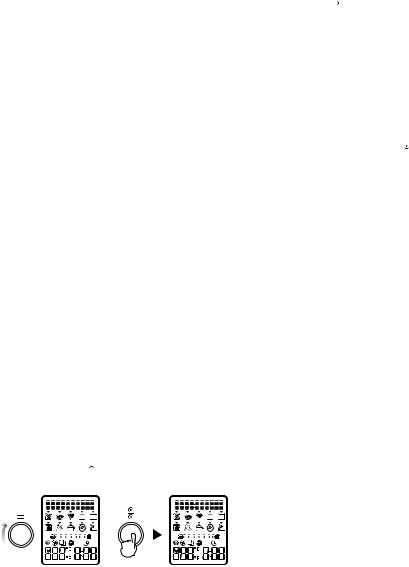
LANGUAGE SELECTION
When the oven is being operated for the first time, it will allow you to select the desired language.
Turn the Temperature or
 Time dials (clockwise or anticlockwise) to select the desired
language, then press the Start/Cancel button to confirm your selection.If the desired language is not confirmed within 5 minutes, the oven will automatically save the default language.
In the event the selected language needs to
be changed, press the Frozen button for 3 seconds.The LCD screen will display the
languages selection.Turn the Temperature or
 Time dials (clockwise or anticlockwise) to select the desired language, then press the
 Start/Cancel button to confirm your selection. If the desired language is not confirmed within 5 minutes, the oven will automatically go back to the previously saved language.
The check mark icon 

 indicates selected language.
12
REPLACING THE OVEN LIGHT
 WARNING
Always unplug oven and let cool before replacing bulb. Only use a 25-Watt, 220-240V, G9 type oven bulb.
1.Remove the wire rack from the oven before replacing the light.
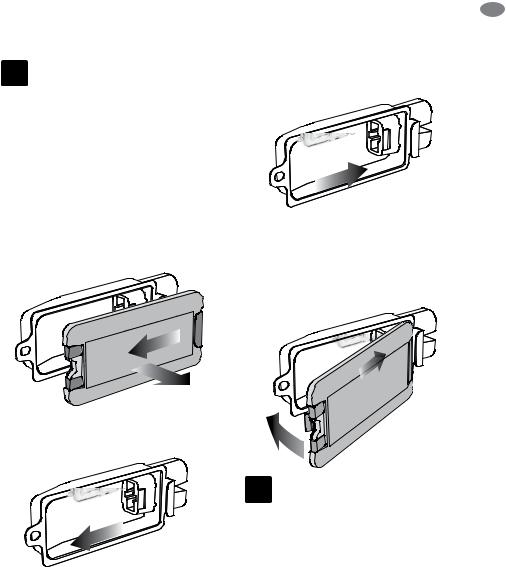
2.The light is positioned on the lefthand side of the oven cavity.Position your fingers on the outside of the light housing and gently pull the glass cover away from the oven wall to remove it.If you are unable to pull the cover off, slide a spoon into the left side of the light housing and gently lever the glass cover off.Always hold the glass cover with the other hand to prevent the cover from falling and breaking.
3.Remove the used bulb by pulling it directly out of its holder.
EN
4.Use a soft cloth to insert the new bulb.
Do not directly touch the surface of the bulb with your fingers as oil from your skin can damage the bulb.
5.To reattach the glass cover, align the metal hook with the left side of the light housing. Slide the opposite end of the glass cover into the metal bracket on the right side of the housing, then push the metal hook into the left side of the housing until it snaps securely into position.
 NOTE
NOTE
The top of the oven is very hot during and after operation. As a result, storing items on top of the oven is not recommended.
The only exception is the optional Sage Bamboo Cutting Board and Serving Tray that fits in the ribbed section on top of the oven.Visit www.sageappliances.com for more information.
13

 Care & Cleaning
Before cleaning, ensure the oven is turned
off by removing the power plug from the power outlet. Allow the oven and all accessories to cool completely before disassembling and cleaning.
Cleaning the outer body and door
1.Wipe the outer body with a soft, damp sponge. A non-abrasive liquid cleanser or mild spray solution may be used to avoid build-up of stains. Apply the cleanser to the sponge, not the oven surface, before cleaning.
2.To clean the glass door, use a glass cleaner or mild detergent and a soft, damp sponge or soft plastic scouring pad. Do not use an abrasive cleanser or metal scouring pad as these will scratch the oven surface.
3.Wipe the LCD screen with a soft damp cloth. Apply cleanser to the cloth and not the LCD surface. Cleaning with dry cloth or abrasive cleaners may scratch the surface.
4.Let all surfaces dry thoroughly prior to inserting the power plug into a power outlet and turning the oven on.
 WARNING
Do not immerse the body, power cord or power plug in water or any other liquid as this may cause electrocution.
Cleaning the interior
The walls on the inside of the oven feature a non-stick coating for easy cleaning.To clean any splattering that may occur while cooking, wipe the walls with a soft, damp sponge. A non-abrasive liquid cleanser or mild spray solution may be used to avoid build-up of stains. Apply the cleanser to the sponge, not the oven surface, before cleaning. Avoid touching the quartz heating elements.
 WARNING
Use extreme caution when cleaning the quartz heating elements. Allow the oven to cool completely, then gently rub a soft, damp sponge or cloth along the length of the heating element. Do not use any type of cleanser or cleaning agent. Let all surfaces dry thoroughly prior to inserting the power plug into a power outlet and turning the oven on.
Cleaning the crumb tray
1.After each use, slide out the crumb tray and discard crumbs.Wipe the tray with a soft, damp sponge. A non-abrasive liquid cleanser may be used to avoid build-up of stains. Apply the cleanser to the sponge, not the tray, before cleaning. Dry thoroughly.
2.Always reinsert the crumb tray into the oven with the oven door closed after cleaning and prior to inserting the power plug into a power outlet and turning the oven on.
3.Always reinsert the crumb tray into the oven with the oven door closed after cleaning and prior to inserting the power plug into a power outlet and turning the oven on.
Cleaning the wire rack, grilling rack, roasting pan and pizza pan
1.Wash all accessories in warm soapy water with a soft sponge or soft plastic scouring pad. Rinse and dry thoroughly. Do not use abrasive cleansers, metal scouring pads or metal utensils to clean any of the accessories as they may damage the surfaces.
2.To extend the life of your accessories,
we do not recommend that these be placed in the dishwasher.
Storage
1.Ensure the oven is turned off by removing the power plug from the power outlet.
2.Allow the oven and all accessories to cool completely before disassembling and cleaning.
3.Ensure the oven and all accessories are clean and dry.
4.Ensure the crumb tray is inserted into the oven; the broiling rack is inserted into the roasting pan and resting on the wire rack in the middle rack height position.
5.Ensure the door is closed.
6.Store the appliance in an upright position standing level on its support legs. Do not store anything on top.The only exception is the optional Sage Bamboo Cutting Board and Serving Tray.
14
EN
 Troubleshooting
POSSIBLE PROBLEM |
EASY SOLUTION |
||
Oven will not switch "ON" |
• Check that the power plug is securely inserted into the outlet. |
||
|
• Insert the power plug into an independent outlet. |
||
|
• Insert the power plug into a different outlet. |
||
|
• Reset the circuit breaker if necessary. |
||
The LCD display light has |
• The oven goes into standby mode if not used for 10 minutes.When |
||
gone out |
in standby mode, the LCD screen will cease to illuminate, however |
||
|
all function options will still be visible. |
||
|
• To re-activate the oven out of standby mode, press the |
||
|
|
|
Start/Cancel button on the control panel, or turn any dial. |
|
|
|
|
|
The LCD screen will re-illuminate. |
||
The pizza does not cook |
• Some large pizzas may brown unevenly in compact ovens. Open the |
||
evenly |
oven door half way through the cooking time and turn the pizza 180 |
||
|
degrees for more even darkness. |
||
The Magnetic Auto-Rack |
• Always open the door slowly and in a controlled manner when the |
||
Eject comes out too far |
wire rack is inserted into the middle rack height position to prevent |
||
when I open the door |
the wire rack from ejecting too quickly. |
||
I cannot select the |
• The Frozen button is only selectable for the following functions: |
||
Frozen button |
TOAST, BAGEL, BAKE, PIZZA, AIR FRY.When selecting the |
||
|
|
|
Frozen button, this will automatically adjust the cooking time for |
|
an optimised food result. |
||
Steam is coming out from |
• This is normal.The door is vented to release steam created from |
||
the oven door |
high moisture content foods such as frozen breads. Be mindful that |
||
|
the steam can be hot. |
||
The heating elements |
• Element IQTM accurately controls the heat inside the oven by pulsing |
||
appear to be pulsing |
the power and adjusting the power level in the heating elements in |
||
|
short bursts to give accurate temperature control.This is normal. |
||
Water is dripping onto |
• This is normal.The condensation created from high moisture |
||
counter from under door |
content foods such as frozen breads will run down the inside of the |
||
|
door and can drip onto the counter. |
||
The temperature reading on the LCD screen doesn’t match the temperature measured inside the oven
•To ensure the measurements are standardized, the oven temperatures have been calibrated in the TOAST position (center of the middle rack with no tray in place). Re-check the temperature in this position, ensuring not to open the oven door for 30 minutes as heat will escape each time the door is opened. Note that the ‘preheat’ alert sounds at 75% of the target temperature.
15

POSSIBLE PROBLEM EASY SOLUTION
The ‘preheat’ alert sounds at a lower temperature than what is displayed on the LCD screen
•The ‘preheat’ alert sounds at 75% of the target temperature.This provides the fastest, combined preheating and cooking time.
•This is because when the ‘preheating’ alert sounds, signaling the user to open the oven door and insert food, there is dramatic temperature loss inside the oven. If the alert sounded at 100% of the target temperature, opening the door would mean a lot of
this waiting time is “wasted”.We have calculated that by sounding the alert at 75% of the target temperature, followed by the oven door being opened to place food inside the oven, that we still recover to the target temperature up to 2 minutes faster.This is why the temperature on the LCD screen does not match the target
temperature at the ‘preheat’ alert. Depending on the set temperature, it can take the oven approximately 8–10 minutes from start-up, including opening the oven door when the ‘preheat’ alert sounds, to reach the target temperature.
The LCD screen displays |
• The LCD screen will display ‘E01’ when there is a non-resettable |
‘E01’ |
issue with the appliance. Should this occur, immediately remove the |
|
power cord from the power outlet and call Sage Consumer Support. |
The LCD screen displays |
• The LCD screen will display ‘E02’ when there is a non-resettable |
‘E02’ |
issue with the appliance. Should this occur, immediately remove the |
|
power cord from the power outlet and call Sage Consumer Support. |
The LCD screen displays |
• The LCD screen will display ‘E03’ if the oven temperature is above |
‘E03’ |
the set maximum limit. Remove the plug from the power outlet, allow |
|
the oven to cool for 15 minutes, then plug back in. |
|
• Call Sage Consumer Support if the ‘E03’ message continues. |
The LCD screen displays |
• The LCD screen will display ‘E05’ when there is a non-resettable |
‘E05’ |
issue with the appliance. Should this occur, immediately remove the |
|
power cord from the power outlet and call Sage Consumer Support. |
Temperature are changing |
• This is normal.The temperature is calibrated to compensate for the |
when convection button is |
convection fan increasing cooking rates. |
pressed |
|
16

EN
 Guarantee
2 YEAR LIMITED GUARANTEE
Sage Appliances guarantees this product for domestic use in specified territories for
2 years from the date of purchase against defects caused by faulty workmanship and materials. During this guarantee period Sage Appliances will repair, replace, or refund any defective product (at the sole discretion of Sage Appliances).
All legal warranty rights under applicable national legislation will be respected and will not be impaired by our guarantee. For full terms and conditions on the guarantee, as well as instructions on how to make a claim, please visit www.sageappliances.com.
17
 Notes
Notes
18
the Smart OvenTM Air Fryer
DE KURZANLEITUNG
 Inhalt
20Bei Sage® steht Sicherheit an erster Stelle
26 Komponenten
28 Funktionen
30 Quick Start Guide
33 Pflege und Reinigung
35 Störungsbehebung
37 Garantie
BEI SAGE® STEHT SICHERHEIT AN ERSTER STELLE
Wir bei Sage® sind sehr sicherheitsbewusst. Beim Design und bei der Herstellung denken wir zuallererst an Ihre Sicherheit.Wir bitten Sie, bei der Verwendung aller
Elektrogeräte angemessene Sorgfalt walten zu lassen und sich an die folgenden Vorsichtsmaßnahmen
zu halten.
HINWEISE ZUR
SICHERHEIT
BITTE ALLE ANWEISUNGEN VOR GEBRAUCH LESEN UND ZUM SPÄTEREN NACHSCHLAGEN AUFBEWAHREN
•Dieses Dokument ist auch zum Download verfügbar unter sageappliances.com
•Bitte vergewissern Sie sich vor dem ersten Gebrauch, dass die Netzspannung der Angabe auf der Unterseite des Geräts entspricht.
•Entfernen und entsorgen Sie jegliches Verpackungsmaterial sowie Aufkleber vor der Inbetriebnahme des Ofens.
•Die Schutzhülle des Netzsteckers muss sicher entsorgt werden, da diese eine Erstickungsgefahr für Kleinkinder darstellt.
•Stellen Sie das Gerät nicht am Rand einer Arbeitsplatte oder eines Tisches auf. Die Fläche, auf der das Gerät aufgestellt wird, muss stabil, eben, hitzebeständig und sauber sein.
•Sollte der Ofen während
Inbetriebnahme mit entflamm baren Materialien wie
Vorhängen oder Stoffen zugedeckt sein oder mit Wänden oder ähnlichem in Berührung kommen, kann es zu einem Brand kommen.
20
•Stellen Sie das Gerät nicht in der Nähe eines heißen
Gaskochers, eines elektrischen Kochelements oder Ofens auf.
•Achten Sie darauf, dass das Kabel nicht über die Kante eines Tisches oder einer
Arbeitsfläche hängt oder eine heiße Oberfläche berührt.
•Dieser Ofen kann nicht komplett eingebaut werden. Bitte sorgen Sie dafür, dass um den Ofen herum ausreichend Raum
für die Luftzirkulation bleibt. Wir empfehlen einen Abstand von mindestens 10 cm.
•Während des Garvorgangs und auch danach kann das Gehäuse des Ofens heiß sein.
Heiße Oberflächen dürfen nicht berührt werden. Bitte halten Sie die Kabel dieses und anderer Geräte vom Gehäuse des Ofens fern.
•Heiße Oberflächen dürfen nicht berührt werden. Um Verbrennungen zu vermeiden, muss mit Gegenständen, die heißes Öl oder andere heiße Flüssigkeiten enthalten, besonders vorsichtig umgegangen werden. Dazu gehören zum Beispiel Pfannen, Geschirr und Zubehör wie der mitgelieferte Grillrost oder das Backblech.
•Kochutensilien, Bratpfannen oder Geschirr müssen von der Glastür ferngehalten werden.
DE
•Lassen Sie die Tür nicht über einen längeren Zeitraum geöffnet.
•Legen Sie keine Gegenstände auf den Ofen, wenn das Gerät in Betrieb ist. Ausnahmen dazu finden Sie auf Seite 34 dieser
Anleitung.
•Legen Sie keine Gegenstände aus Karton, Kunststoff, Papier oder sonstigen entflammbaren
Materialien in den Ofen.
•Decken Sie die Krümelschub lade oder andere Teile des Ofens nicht mit Metallfolie ab. Dies kann zu seiner Überhitzung führen.
•Lassen Sie Vorsicht walten, wenn Sie Pfannen und Geschirr aus nicht-metallischen Materialien verwenden. Vergewissern Sie sich,
dass Pfannen und Geschirr backofenfest sind, bevor Sie diese im Ofen verwenden.
•Bei der Verwendung von Deckeln im Ofen ist Vorsicht geboten, da ein Druckaufbau in einer abgedeckten Pfanne oder Schale dazu führen kann, dass heiße Zutaten austreten oder die Schale bricht. Stellen Sie keine verschlossenen oder luftdichten Behälter in den Ofen.
•Übergroße Lebensmittel und Metallgegenstände dürfen nicht im Ofen platziert
werden, da sie ein Brandoder Stromschlagrisiko darstellen.
21
•Die Verwendung von nicht empfohlenem bzw. nicht im Lieferumfang des Ofens enthaltenem Zubehör
und Zusatzteilen kann zu Verletzungen führen.
•Dieses Gerät ist nur für den Hausgebrauch bestimmt. Verwenden Sie das Gerät niemals in einem fahrenden Fahrzeug.Verwenden Sie das Gerät ausschließlich zu seinem Bestimmungszweck und niemals im Freien. Fehlgebrauch kann zu Verletzungen führen.
•Wenn Sie den Ofen unbeaufsichtigt stehen lassen, reinigen, umstellen, zusammenbauen oder aufbewahren möchten, schalten Sie ihn zuerst aus, ziehen Sie den Stecker und lassen Sie ihn vollständig abkühlen.
•Verwenden Sie zur Reinigung keine Topfreiniger aus Metall. Teile davon könnten sich lösen, mit Elektroteilen in Kontakt kommen und so ein Risiko
für Stromschläge darstellen.
•Dieses Gerät darf von Kindern ab 8 Jahren und Personen mit eingeschränkten körperlichen, sensorischen oder geistigen Fähigkeiten oder Personen, denen es an Erfahrung und Kenntnis mangelt, nur unter Beaufsichtigung benutzt werden oder wenn sie in die sichere Handhabung des
Geräts eingewiesen wurden und die damit verbundenen Gefahren verstehen.
•Das Gerät ist kein Spielzeug für Kinder.
•Die Reinigung und Instandhaltung darf nicht von Kindern unter 8 Jahren durchgeführt werden, es sei denn, sie werden dabei beaufsichtig.
•Das Gerät und das Netzkabel müssen außerhalb der Reichweite von Kindern unter 8 Jahren aufbewahrt werden.
•Wir empfehlen, das Gerät regelmäßig auf Schäden zu überprüfen. Benutzen Sie das Gerät nicht, wenn das Stromkabel, der Netzstecker oder das Gerät selbst in irgendeiner Weise beschädigt sind. Im Falle von Beschädigungen oder Wartungsarbeiten, die über die gewöhnliche Reinigung hinausgehen, kontaktieren Sie den Sage Kundendienst oder besuchen Sie sageappliances.com
•Dieses Gerät ist nicht dafür gedacht, über einen externen Zeitschalter oder eine separate Fernbedienung bedient
zu werden.
•Das Gerät muss an eine korrekt geerdete Steckdose angeschlossen werden. Sollten Sie sich nicht sicher sein, ob Ihre Steckdose korrekt geerdet ist, wenden Sie sich bitte an einen Elektriker.
22

•Unter keinen Umständen darf die Steckdose manipuliert oder ein Adapter verwendet werden.
•Wenden Sie sich an einen qualifizierten Elektriker, falls Sie die Erdungsanweisungen nicht vollständig verstanden oder Zweifel haben, ob das Gerät richtig geerdet ist.
•Als zusätzliche Schutzmaßnahme bei der Verwendung von Elektrogeräten wird die Installation eines Schutzoder Sicherheitsschalters empfohlen. Es ist ratsam, in dem Stromkreis, an den
das Gerät angeschlossen ist, einen Schutzoder Sicherheitsschalter zu installieren, dessen Bemessungsfehlerstrom 30 mA nicht überschreitet.Wenden Sie sich an einen Elektriker für fachgerechte Beratung.
DE
BESONDERE ANWEISUNGEN FÜR SOV860
•Wir empfehlen, den Ofen
an einer getrennten Steckdose anzuschließen, an der keine anderen Geräte angeschlossen sind.Wenden Sie sich im Zweifelsfall an einen zugelassenen und qualifizierten Elektriker.
•Um den Ofen auszuschalten, drücken Sie die Taste  „Start/ Cancel“ auf dem Bedienfeld. Der Ofen ist ausgeschaltet, wenn die Hintergrundbeleuchtung dieser Taste ausgeht.
•Reinigen Sie die Krümelschublade regelmäßig. Folgendes müssen Sie beim Reinigen der Krümelschublade beachten:
−−Schalten Sie den Ofen aus („OFF“).
−−Versichern Sie sich, dass der Ofen vollständig abgekühlt ist, bevor Sie den Netzstecker aus der Steckdose entfernen.
−−Entfernen Sie die Krümelschublade und reinigen Sie sie mit warmer Seifenlauge.
−−Trocknen Sie die Schublade komplett ab, bevor Sie sie wieder ordnungsgemäß einsetzen.
23
KUNDENMITTEILUNG BEZÜGLICH DES SPEICHERS
Bitte beachten Sie, dass in Ihrem Gerät ein internes
Speichermedium enthalten ist, um die Benutzerfreundlichkeit unserer Produkte zu steigern.
Dabei handelt es sich um einen kleinen Chip, der bestimmte Geräteinformationen aufzeichnet, beispielsweise wie häufig
und auf welche Art das Gerät verwendet wird. Falls Ihr Gerät gewartet werden muss, können wir mögliche Problemquellen dank der Informationen auf diesem Chip schnell und effizient beheben. Zudem helfen uns die gesammelten Informationen, unsere Geräte in Zukunft noch besser an die Wünsche und Bedürfnisse unserer Kunden anzupassen. Informationen über die Personen, die ein Gerät verwenden, oder den Haushalt, in dem es sich befindet, werden
nicht gesammelt. Falls Sie Fragen zu dem Speicherchip haben, kontaktieren Sie uns bitte unter privacy@sageappliances.com
 WARNUNG
MINIMIEREN SIE DAS RISIKO FÜR FEUER, ELEKTRISCHEN SCHOCK, EXTREME
UV-STRAHLUNG UND
VERLETZUNGEN:
•Stecken Sie den Ofen stets aus und lassen Sie alle Teile (darunter auch den Lampensockel, die Glasabdeckung und das Gehäuse) komplett abkühlen, bevor Sie eine Glühbirne auswechseln.
•Verwenden Sie nur 25 Watt, 220-240 V, G9-Ofenglühbirnen.
•Verwenden Sie immer ein weiches Tuch, wenn Sie die Glühbirne berühren, da das Hautfett die Glühbirne bei direktem Kontakt beschädigen kann.
•Schauen Sie nicht direkt in eine leuchtende Glühbirne.
•Wenn sich Ihre Haut warm anfühlt, sollten Sie nicht im Lichtstrahl stehen bleiben.
•Halten Sie die Glühbirne von brennbarem Material fern.
•Die Glühbirne wird schnell heiß. Verwenden Sie immer nur den Lichtschalter, um das Licht einzuschalten.
•Schalten Sie das Licht nicht ein, wenn der Lampensockel, die Glasabdeckung, der UV-Filter oder das Gehäuse beschädigt sind oder fehlen.
24
DE
Dieses Symbol bedeutet, dass das Gerät nicht mit
 dem gewöhnlichen Haushaltsmüll entsorgt werden darf. Stattdessen muss es
zu einer für diesen Zweck eingerichteten behördlichen Sammelstelle oder zu einem Händler gebracht werden, der Entsorgung anbietet. Weitere Informationen dazu erhalten Sie bei Ihrem Gemeindeamt.
Dieses Symbol zeigt an, dass manche Bereiche des Geräts heiß werden können, sowohl während es in Gebrauch ist als auch einige Zeit danach.
Um sich vor Stromschlägen zu schützen, tauchen Sie
das Netzkabel, den Netzstecker oder das Gerät nicht in Wasser oder eine andere Flüssigkeit ein.
ANLEITUNG BITTE AUFBEWAHREN
25
 Komponenten
A
B |
C |
D


E


F G H
I
A. Antihaftbeschichtetes Pizza-Backblech |
F. |
Ofen-Innenbeleuchtung |
mit Ø 30 cm |
G. |
Türgriff |
B. Drahtgitterrost |
H. |
Belüftungsschlitze |
C. Grillrost |
I. |
Krümelschublade |
D. 28 x 33,5 cm Emaille-Bratform |
|
|
E. Heißluft-Frittiergitter |
|
|
Leistungsinformationen
220–240 V ~ 50 Hz, 2000–2400 W
26

DE
K |
|
K. LCD-Display |
|
|
|
L. |
„Function“-Drehregler |
HM MS |
|
M. |
„Temperature“-Drehregler/ |
|
|
|
Bräunungsstufe für Toast |
|
|
N. |
und Bagels |
|
|
„Time“-Drehregler/Toast- und Bagel |
|
L |
O |
O. |
Taste „Start/Cancel“ |
|
|
P. |
Taste für die Ofen-Innenbeleuchtung |
|
|
Q. |
Taste für Umluft |
S |
P |
R. |
Taste für Gefrorenes |
|
|
S. |
Taste zur Einstellung der Gradangaben |
M
Q
R
N
Zusätzlich erhältliches Zubehör:
Schneidebrett aus Bambus
Pizzastein |
Pizzablech |
27
 Funktionen
VORBEREITUNG DES OFENS
Vor dem ersten Gebrauch sollten Sie den Ofen 20 Minuten lang leer laufen lassen, um Schutzstoffe von den Heizelementen zu
entfernen. Stellen Sie sicher, dass die Umgebung gut belüftet ist, da der Ofen möglicherweise Dämpfe abgibt. Diese Dämpfe sind nicht gefährlich und schränken die Leistung des Ofens in keiner Weise ein.
1.Entfernen und entsorgen Sie jegliches Verpa ckungsmaterial, Aufkleber und Klebeband vom Ofen.
2.Entnehmen Sie Krümelschublade, Drahtgitterrost, Grillrost, Bratform, Heißluft-Frittiergitter und Pizzapfanne aus der Polyschaum-Verpackung.Waschen Sie das Zubehör mit warmem Seifenwasser und einem weichen Schwamm, spülen Sie es aus und trocknen Sie es gründlich ab.
3.Reinigen Sie die Innenseite des Ofens mit einem weichen, feuchten Schwamm.Trocknen Sie alles gründlich ab.
4.Stellen Sie den Ofen auf eine ebene, trockene Fläche. Achten Sie auf einen Mindestabstand von 10 cm auf beiden Seiten und 15 cm oberhalb des Gerätes.
5.Legen Sie die Krümelschublade in den Ofen ein.
6.Entrollen Sie das Stromkabel vollständig und schließen Sie den Netzstecker an eine geerdete Steckdose an.
7.Dadurch wird der Ofenalarm aktiviert und das LCD-Display beleuchtet. Stellen Sie die von Ihnen gewünschte Sprache ein. Auf Seite 31 finden Sie weitere Informationen zur
Spracheinstellung.
8.Drehen Sie den Drehregler für „Start/Cancel“ solange, bis „PIZZA“ angezeigt wird.
9.Drücken Sie die  Taste „Start/Cancel“. Die Hintergrundbeleuchtung der Taste wird nun rot, das LCD-Display orange und der Ofenalarm wird aktiviert.
10.Auf dem LCD-Display wird der blinkende Schriftzug „PREHEATING“ angezeigt. Sobald der Ofen fertig vorgeheizt hat, ist ein Alarm zu hören.
11.Der Timer wird angezeigt und beginnt einen automatischen Countdown.
12.Am Ende eines Garzyklus ertönt der Ofenalarm, die Hintergrundbeleuchtung der  Taste „Start/ Cancel“ geht aus und das LCD-Display leuchtet blau.
13.Der Ofen ist nun betriebsbereit.
ELEMENT IQ™
The Smart OvenTM Air Fryer bietet Ihnen
Element IQTM, eine Technologie, die für eine ideale Garumgebung sorgt. Diese Technologie leitet Energie dorthin, wo und wann sie benötigt wird und erzeugt jederzeit die richtige Temperatur, egal ob gleichmäßig oder in intensiven Schüben.
Für jede Ofenfunktion werden das Heizelement und empfohlene Temperaturen voreingestellt, basierend auf Rezepten und Tests.Wir raten Ihnen dennoch, diese Einstellungen auszuprobieren und je nach Rezept, Menge und persönlichen Vorlieben zu ändern.
HM MS |
HM MS |
28
DE
ÜBERSICHT DER OFENFUNKTIONEN
Funktion |
EMPFOH |
OPTIONALE |
VOREINSTEL- |
VOR- |
BEREICH |
|
|
LENE ROST- |
EINSTELLUN- |
LUNGEN |
HEIZEN |
|
|
|
POSITION |
GEN |
|
|
|
|
Toast |
Mitte |
|
Gefroren |
Bräunungsgrad 4 |
Nein |
Bräunungsgrad 1-7 |
|
|
|
Scheiben 4 |
|
Scheiben 1-6 |
|
Bagel |
Mitte |
|
Gefroren |
Bräunungsgrad 4 |
Nein |
Bräunungsgrad 1-7 |
|
|
|
|
Scheiben 4 |
|
Scheiben 1-6 |
Pizza |
Mitte |
|
Super-umluft |
210 °C |
Ja |
160 °C - 230 °C |
|
|
Umluft |
Umluft |
|
Bis zu 2 Stunden |
|
|
|
|
Temperatur- |
Gefroren |
|
|
|
|
|
Anzeigewandler |
20 Min. |
|
|
|
|
|
Gefroren |
|
|
|
Grillen |
Oben |
|
|
HI |
Nein |
HI-MED-LO |
|
|
|
10 Min. |
|
Bis zu 20 Min. |
|
Backen |
Unten |
|
Super-umluft |
160 °C |
Ja |
120 °C und darüber = |
|
|
Umluft |
Umluft |
|
1 Min. bis zu 2 Std. |
|
|
|
|
Temperatur- |
30 Min. |
|
120 °C und darunter = |
|
|
|
Anzeigewandler |
|
|
1 Min. bis zu 10 Std. |
|
|
|
|
|
|
|
Braten |
Unten |
|
Super-umluft |
180 °C |
Ja |
120 °C und darüber = |
|
|
Umluft |
Umluft |
|
1 Min. bis zu 2 Std. |
|
|
|
|
Temperatur- |
1:00 Std. |
|
120 °C und darunter = |
|
|
|
Anzeigewandler |
|
|
1 Min. bis zu 10 Std. |
|
|
|
|
|
|
|
Heißluft |
Oben |
|
Super-umluft |
220 °C |
Nein |
160 °C - 230 °C |
|
|
Temperatur- |
15 Min. |
|
Bis zu 1 Std. |
|
frittieren |
|
|
Anzeigewandler |
Super-umluft |
|
|
|
|
|
Gefroren |
|
|
|
Aufwärmen |
Unten |
|
Umluft |
160 °C |
Ja |
70 °C - 160 °C |
|
|
Temperatur- |
Umluft |
|
Bis zu 2 Std. |
|
|
|
|
|
|
|
|
|
|
|
Anzeigewandler |
15 MIN. |
|
|
Warmhalten |
Unten |
|
Umluft |
70 °C |
Nein |
50 °C - 120 °C |
|
|
Temperatur- |
WARMHALTEN |
|
Bis zu 2 Std. |
|
|
|
|
Anzeigewandler |
1:00 Std. |
|
|
Schongaren |
Unten |
|
Umluft |
HI |
Nein |
LO = 4 bis 10 Std. |
|
|
|
Umluft |
|
HI = 2 bis 8 Std. |
|
|
|
|
|
4:00 Std. |
|
|
29
i QuickGuide Start
VERWENDUNG IHRES SAGE OFENS
1.Halten Sie Ihren Drahtgitterrost so, dass die Stäbe nach oben zeigen und schieben Sie ihn auf der gewünschten Rostposition ein.
Besonders praktisch: Die Rostpositionen sind außen auf der Ofentür abgebildet.
2.Drehen Sie den „Function“-Drehregler so lange, bis das LCD-Display die gewünschte Einstellung anzeigt.
3.Das LCD-Display zeigt die voreingestellte Backtemperatur für die gewählte Einstellung an. Drehen Sie den „Temperature“- Drehregler nach links, um die Temperatur zu verringern und nach rechts, um sie zu erhöhen.
„TEMPERATURE“- DREHREGLER
DREHEN
TEMPERATUR |
TEMPERATUR |
SENKEN |
ERHÖHEN |
4.Das LCD-Display zeigt die voreingestellte Backzeit für die gewählte Einstellung an. Drehen Sie den „Time“-Drehregler nach links, um die Garzeit zu verringern und nach rechts, um sie zu erhöhen.
„TIME“-
DREHREGLER
DREHEN
TEMPERATUR |
TEMPERATUR |
SENKEN |
ERHÖHEN |
5.Für Einstellungen ohne Vorheizzyklus (TOAST, BAGEL, GRILLEN, WARMHALTEN, SCHONGAREN) platzieren Sie das Essen direkt auf dem Drahtgitterrost, dem Grillrost oder dem enthaltenen Heißluft-Frittiergitter oder in der Pizzabzw. Bratpfanne. Stellen Sie sicher, dass die Speisen sich in der Mitte des Ofens befinden, damit sie möglichst gleichmäßig durchgaren.
6.Schließen Sie die Ofentür.
7.Drücken Sie die Taste „Start/Cancel“. Die Hintergrundbeleuchtung der Taste wird nun rot, das LCD-Display orange und der Ofenalarm wird aktiviert.
8.Der Timer wird angezeigt und beginnt einen Countdown. Backtemperatur und -zeit können während eines Garzyklus angepasst werden.
9.Bei Einstellungen mit Vorheizzyklus (BACKEN, BRATEN, PIZZA, HEISSLUFTFRITTIEREN) drücken Sie die Taste „Start/Cancel“,
bevor Sie das Essen in den Ofen stellen. Die Hintergrundbeleuchtung der Taste wird nun rot, der Ofenalarm wird aktiviert und auf dem LCD-Display wird „PREHEATING“ blinken, während der Ofen sich aufheizt.
a)Wenn der Ofen betriebsbereit ist, erlischt der blinkende Schriftzug „PREHEATING“, der Ofenalarm ertönt und der Timer beginnt einen Countdown. Platzieren Sie nun das Essen direkt auf Drahtgitterrost, Grillrost,
dem enthaltenen Heißluft-Frittiergitter HeißluftFrittiergitter oder in der Pizzaoder Bratpfanne. Stellen Sie sicher, dass die Speisen sich in der
Mitte des Ofens befinden, damit sie möglichst gleichmäßig durchgaren.
b)Schließen Sie die Ofentür.
c)Der Countdown des Timers wird fortgesetzt. Backtemperatur und -zeit können während eines Garzyklus angepasst werden.
10.Am Ende eines Garzyklus ertönt der Ofenalarm, die Hintergrundbeleuchtung der „Start/Cancel“-Taste geht aus und das LCD-Display leuchtet blau.
30
 Loading...