


FBX SOLO SL-820

OPERATING
GUIDE
FBX-SOLO Model SL820
FBX-SOLO Model SM820
TABLE OF CONTENTS
• Front Panel Descriptions 5
• Back Panel Descriptions 6
• Applications for Use 8
• Before you Begin... 10
• Operating Instructions 13
• FBX Setup Instructions 14
• Trouble Shooting Tips 18
• Product Specifications 20
• Warranty & Cautions 22
QUICK START OPERATION
For best results, read all operating instructions
before using the FBX-SOLO (pages 10-19).
Patch in the SOLO where appropriate for your
1
model, and select the input/output level on the
back.
Adjust the Clip Level on the SOLO so at least
2
1 or 2 input LEDs light with your program input.
With gain down on the mixer input channel, put
3
the SOLO in Active mode (green bypass
LED), then slowly raise the channel gain to the
point of feedback.
Continue raising the gain slowly until 7 FBX
4
filters are set, then reduce gain slightly.
© 2006 Sabine, Inc.

CONGRATULATIONS!
You now have the state-of-the-art in feedback control. The Sabine FBX-SOLO gives you automatic
real-time feedback control for any channel of your
mix. In setup and during the performance, it gives
you more gain and increases the clarity of your
mains and monitors. It's the affordable solution to
feedback problems, perfect for wireless mics, monitors, acoustic/electric instruments, harmonica mics,
multi-mic locations like conference rooms and courthouses — wherever there's an open microphone.
The FBX-SOLO incorporates the latest in design
and digital signal processing technology. It automatically senses feedback in a sound system and
determines its pitch. It then places one of its eight
constant "Q" micro-filters on the resonating frequency and eliminates the feedback in typically less
than one second.
Special features of the SL820 and SM820:
• New ultra fast Turbo Setup Mode grabs
feedback at very low levels.
• The SL820 has 1/4" in/out connectors and
input/output level switches for any combination of ins and outs. The SL is for use
with acoustic/electric guitars and guitar
amplifiers, mixer insert points, powered
mixer patch points and high impedance
mics.
• The SM820, with selectable phantom
power, has XLR in/out connectors for
use with microphones.
• Both models offer standard FBX features
like switchable filter widths and lock-
able fixed filters.
• New improved performance - 24 bit A/D
conversion, expanded dynamic range &
up to 8 FBX filters.
HOW CAN THE SOLO BE USED?
Assign a SOLO to any specific mixer channel. You
can also use the SM820 to connect a phantompowered mic to a non-phantom-powered mixer.
See SOLO Applications on page 8 & 9.
2

THE BEST FEEDBACK
CONTROLLER
Before the invention of the FBX, the most common
device for controlling feedback was the 31-band
graphic EQ. However, the FBX has three distinct
advantages. The most obvious is the FBX functions
automatically, even during the program. Another is
the FBX micro-filters are precisely placed while EQ
filters are fixed; FBX filters can be placed between
predetermined graphic filters. The difference: FBX
filters do not have to be as deep, so there is more
system gain. The final and most important advantage is that FBX micro-filters are ten times narrower
than 31-band EQ filters. FBX micro-filters return up
to 90 percent of the power removed by EQ filters.
Over the years, engineers stopped using 12-band
EQs in favor of the narrower-filter 31-band EQ for
controlling feedback. The FBX represents the next
step. An EQ would need more than 10,000 sliders
to be equivalent to your FBX. With the SOLO, your
monitors will finally sound loud enough, everyone in
the audience will understand each word, and the
mains will sound natural and transparent.
WHO NEEDS THE FBX?
Virtually every sound system will be improved with
the FBX. Small bands that do not have sound
technicians can now increase their monitor volumes
so they can hear themselves clearly and with full
fidelity, without worrying if the program is going to be
ruined by feedback.
Auditoriums and churches of all sizes will enjoy
reliable feedback control. Hotels and conference
centers around the world can offer meeting rooms
with sound systems that won’t howl during programs. The SOLO can be installed in theaters,
schools, sports arenas, courtrooms — anywhere
multiple microphones are used. It can also be used
for teleconferencing, intercoms or interactive remote classrooms.
WHY THE FBX?
The simple beauty of the FBX is its ability to quickly
and effectively eliminate feedback with narrower
filters than ever before possible. The FBX delivers
superior sound quality automatically.
3
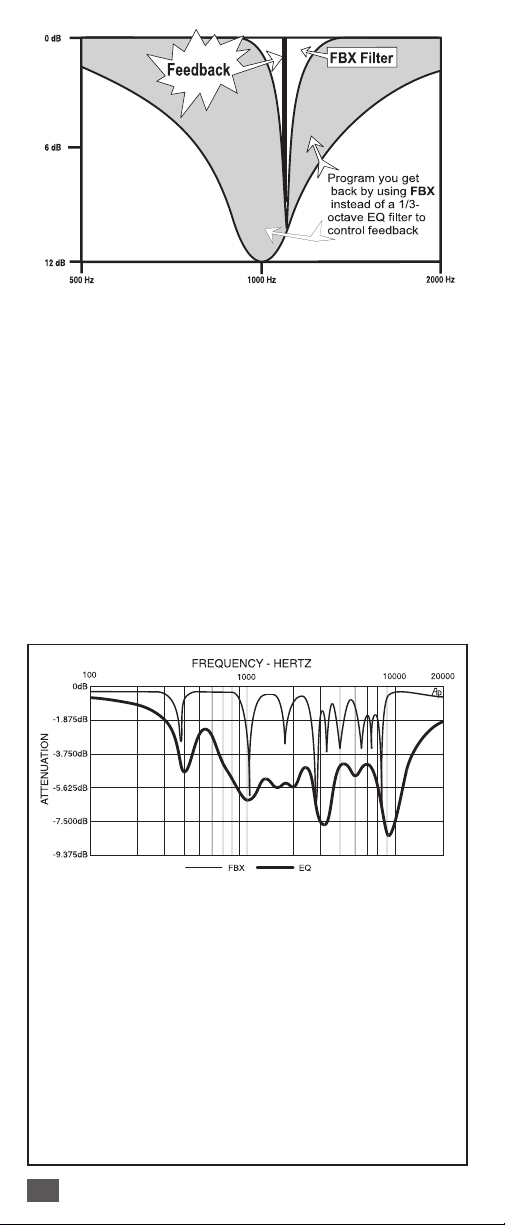
A DIRECT HIT ON FEEDBACK! The FBX-SOLO
targets feedback without taking a big chunk out of
your sound. Tests prove that a single 1/3-octave EQ
slider pulled down 12 dB removes almost half the
power going to the speakers over a two-octave
range. And, as the illustration above shows, you
can't place a graphic EQ filter precisely on the
ringing frequency. When you pull down multiple
sliders in a normal setup (below), you end up with
giant holes in your sound. On the other hand, FBX
constant "Q" micro-filters are 10 times narrower you get back up to 90% of the power you lose with
a graphic EQ! That means more gain before feedback and no loss in sound quality.
FREQUENCY RESPONSE TEST: Full Set-Up FBX
vs. 1/3-Octave Graphic Equalizer. Test procedure: A
PA system was set up using a microphone, mixer, FBX,
power amp and two speakers. The system's gain was
raised until the FBX removed six feedback points. Next,
the FBX was replaced with a 1/3-octave graphic EQ.
The EQ was adjusted while the input was raised to the
same level achieved with the FBX. The frequency
response curves of each device were then plotted.
What this means to you: Doubling the cost of your
microphones, speakers and power amp probably would
not improve your system's frequency response as much
as replacing your EQ with an FBX for chasing feed-
back.
4
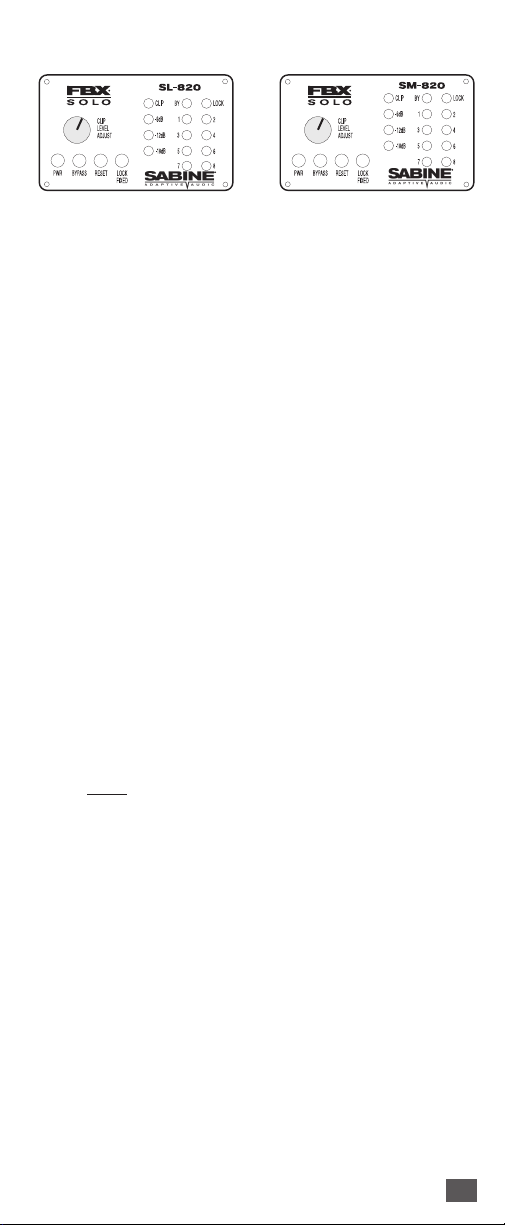
SL820 & SM820 FRONT PANELS
POWER
The On/Off power switch is a two-position push
button switch. The LEDs corresponding to all active
filters will blink on power-up.
ACTIVE/BYPASS
In Active mode, the unit controls feedback automatically. The two-color "BY" LED lights green
when the unit is in Active mode and lights red when
in Bypass mode. The mic preamp remains active in
Bypass mode; only the FBX function is bypassed.
DUAL-FUNCTION RESET
To reset only the dynamic filters, press and hold the
reset button. The LEDs will flash 3 times and then
the LEDs that indicate current Dynamic filter placement will shut off (fixed filter LEDs will remain on).
To reset ALL filters, hold the reset button until all
LEDs go off (approximately 7 flashes).
LOCK FIXED FILTERS
When the "Lock Fixed" button is pressed, its LED
will light to indicate that the FBX is in Lock Fixed
mode. Lock Fixed mode can be activated at any
time after system setup and will stay on until the
button is pressed again and the LED turns off. The
dynamic filters are not affected (see p.10 for details).
CLIP LEVEL ADJUST
The front panel clip level adjust knob has two
functions, and its use will depend on the setting of
the output switch on the back panel. When the
output is set to Unity, the Clip Level Adjust allows
you to set the optimal clip level for the input signal
— in order to optimize the dynamic range while
maintaining unity gain. Higher input levels will require the Clip Level Adjust to be turned counterclockwise to avoid distortion; lower input levels will
require the knob to be turned clockwise, to minimize noise.
5

Recommended setting of the Clip Level Adjust:
the clip LED should blink intermittently. NOTE: regardless of the Clip Level Adjust, setting Unity on the
back panel will maintain unity gain (no net gain or
loss of signal level).
When the back panel output is set to Line, the SOLO
acts as a preamplifier, and the Clip Level Adjust
knob becomes a gain control (see SL820 & SM820
Input Low/High Switch sections below).
SIGNAL LEVEL/TURBO INDICATOR
The LED ladder indicates the signal strength relative
to the SOLO's input level. Clip LED flashes independently
to indicate when the SOLO is in Turbo Setup mode.
FILTER ACTIVITY
When one of the unit’s constant "Q" filters is activated, the corresponding LED lights. A blinking LED
indicates the filter that was most recently activated.
All filter LEDs cycle to indicate Turbo Mode is about
to disengage. This occurs after the first dynamic filter
is set during the setup procedure.
FILTER WIDTH SWITCH
Switch to narrow 1/10-octave filters for music applications or to wider 1/5-octave filters for spoken word
applications. The change takes effect only on power
up. Selecting a new width has no effect unless you
power down and then power up again.
12 VOLT DC ADAPTOR
The FBX external power supply (single unit power
supply; model # SPSPOWR) is included with the
unit. Use of any other power supplies may cause
permanent damage to the unit and WILL VOID THE
WARRANTY.
SL820 BACK PANEL ONLY
INPUT LOW/HIGH SWITCH
Switch to Low for instrument or (high impedance
microphone) IN. Use with
low level inputs such as
piezo mic pick ups — this provides a 30 dB boost in
the FBX's input gain structure. Switch to High for
insert or line IN: use with high level output instruments
and signal processors.
6

OUTPUT UNITY/LINE SWITCH
Switch to Unity (level in = level out) for standard line,
insert, or guitar level applications. In the Unity setting,
the SL820 input level equals the output level, and the
front panel knob adjusts the clip level of the input
signal to the SOLO. Switch to Line (for line level out)
if your signal needs pre-amplification. In the Line
setting the front panel knob adjusts the output gain
between 0 and +35 dB (High IN); +30 to +65 dB (Low
IN).
INPUTS & OUTPUTS
The connector labeled IN/OUT serves as both the
unit's input (tip) and output (ring) when used with a
single TRS plug. When used with a Y-cord, use the
IN/OUT as the input and the OUT as the output (for
channel insert configurations).
SM820 ONLY BACK PANEL
OUTPUT LO/HI SWITCH
In the LO setting, the SM820
has unity gain (input = output); use LO for mic level. In
the HI setting, gain is adjustable between -15 dB
and +20 dB using the clip level adjust; use HI for line
level, or when you need to preamp the signal.
PHANTOM POWER ON/OFF SWITCH
The SM820 is set to "Phantom Power - OFF" at the
factory. If you wish to use phantom power, move the
switch to "ON." NOTE: The SM820 will not pass
phantom power from your mixer.
INPUT
The input accepts balanced XLR-3 (PIN 2 high)
plugs.
OUTPUT
Use balanced XLR-3 connectors (PIN 2 high) for
balanced mixer line inputs. NOTE: the output im-
pedance of the SM820 is unbalanced.
7
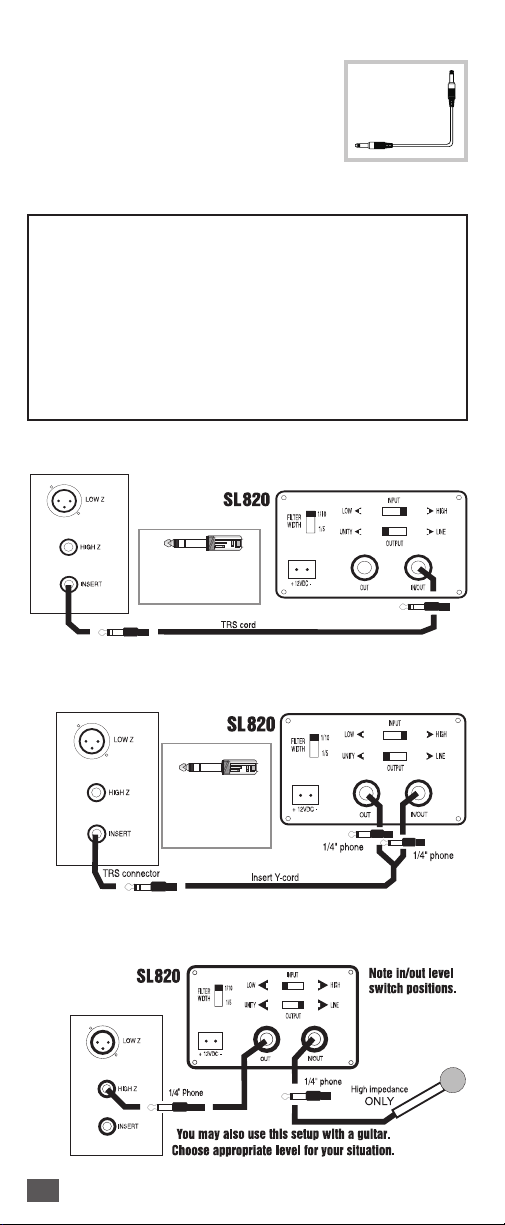
APPLICATIONS
SL820: You can use the SL820 with
acoustic/electric guitars and guitar
amplifiers, mixer insert points, powered mixer patch points and high
impedance mics. Use the following
wiring diagrams as guides for setup:
NOTE: For Configurations 1-4, the output control on the
back panel of the SL820 may actually be set to either
Unity or Line. In the Unity setting the output level will
equal the input level, and, since the input level to the
SL820 in such a setup is already line level, the output will
be line level as well. When the output setting is switched
to Line, the front panel knob becomes a gain control,
and it is possible to add additional gain to your signal
path, if needed. Care should be taken in this situation
to avoid overdriving your mixer channel.
1. Mixer Channel Insert with TRS/TRS Cable
NOTE: Use a TRS
connector at both
ends of cable.
SL820
2. Mixer Channel Insert w/ Insert "Y" Cable
NOTE: Use a
TRS connector
only at the mixer
insert point.
3. Mixer Channel HI Impedance Mic on Line Input
8
 Loading...