

Rover 200 coupe Owner's Handbook Manual
Edited by Vilislav Pankov 2010

Introduction
Welcome to your new Rover. This handbook, together with the other publications supplied in the literature
pack, provides all the information you need to gain maximum economy and pleasure from driving and
owning your new car.
Please take a little time to read the handbook and get to know your car as soon as you can.
'Before You Drive' – this section covers seat adjustment, seat belts and heater controls and deals with
everything you need to know to settle comfortably into the car before you drive.
'Driving Controls' - here the functions of the switches, instruments and driving controls are explained.
'Maintenance' – this part includes the Daily, Weekly and Monthly checks that you, the owner, should carry
out. It also tells you how to do them.
'Emergency Information' - this will help you to solve a few of those unavoidable little problems that
sometimes occur – like replacing bulbs and fuses, or changing a wheel.
'Technical Data' - here you will find details of Tyre pressures, fuel and engine oil specifications – useful
reminders when you stop at the garage forecourt to 'fill up'.
Note : Items identified with an asterisk (*) are not necessarily fitted to every model.
This handbook is an important part of the car. Keep it in the glovebox where it is easy to find.
WARNING!
Always heed the advice given in a warning panel. This indicates either a procedure which must be
followed precisely, or information that should be considered with great care to avoid the possibility of
personal injury or serious damage to the vehicle.
The vehicle specification may vary according to market requirements and from model to model. Rover operate a policy of constant product
improvement and therefore reserve the right to change specifications without notice at any time. Whilst every effort is made to ensure
complete accuracy of the information in this handbook, no liabilities for inaccuracies or the consequences thereof can be accepted by the
manufacturer or the dealer who supplied the handbook.
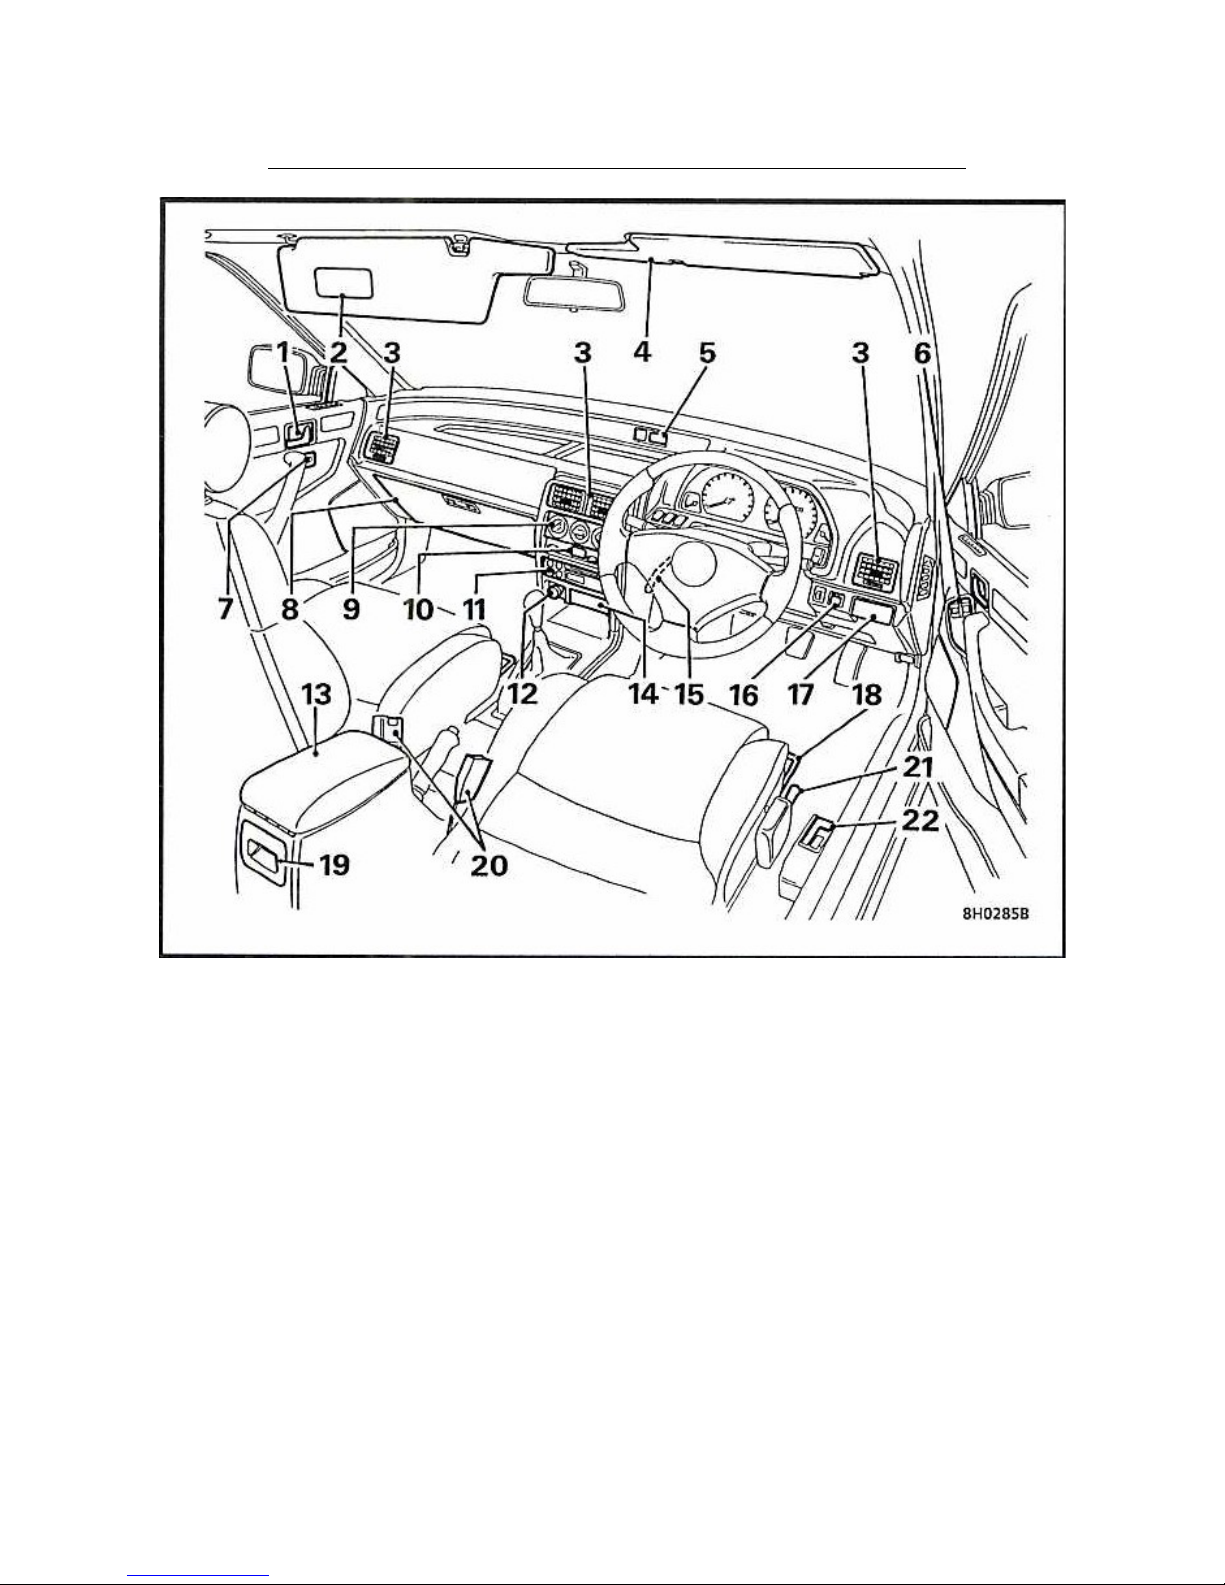
Controls
1. Door release lever 12. Cigar lighter
2. Vanity mirror 13. Cassette holder
3. Face level vents 14. Ashtray
4. Sun visor 15. Steering column locking lever
5. Clock 16. Door mirror switches
6. Electric window switches 17. Coin tray
7. Electric window switch 18. Front seat release bar
8. Glovebox 19. Ashtray
9. Heater controls 20. Seat belt lock
10. Air conditioning switch * 21. Driver's seat height adjustment lever *
11. Radio cassette player 22. Luggage compartment release lever
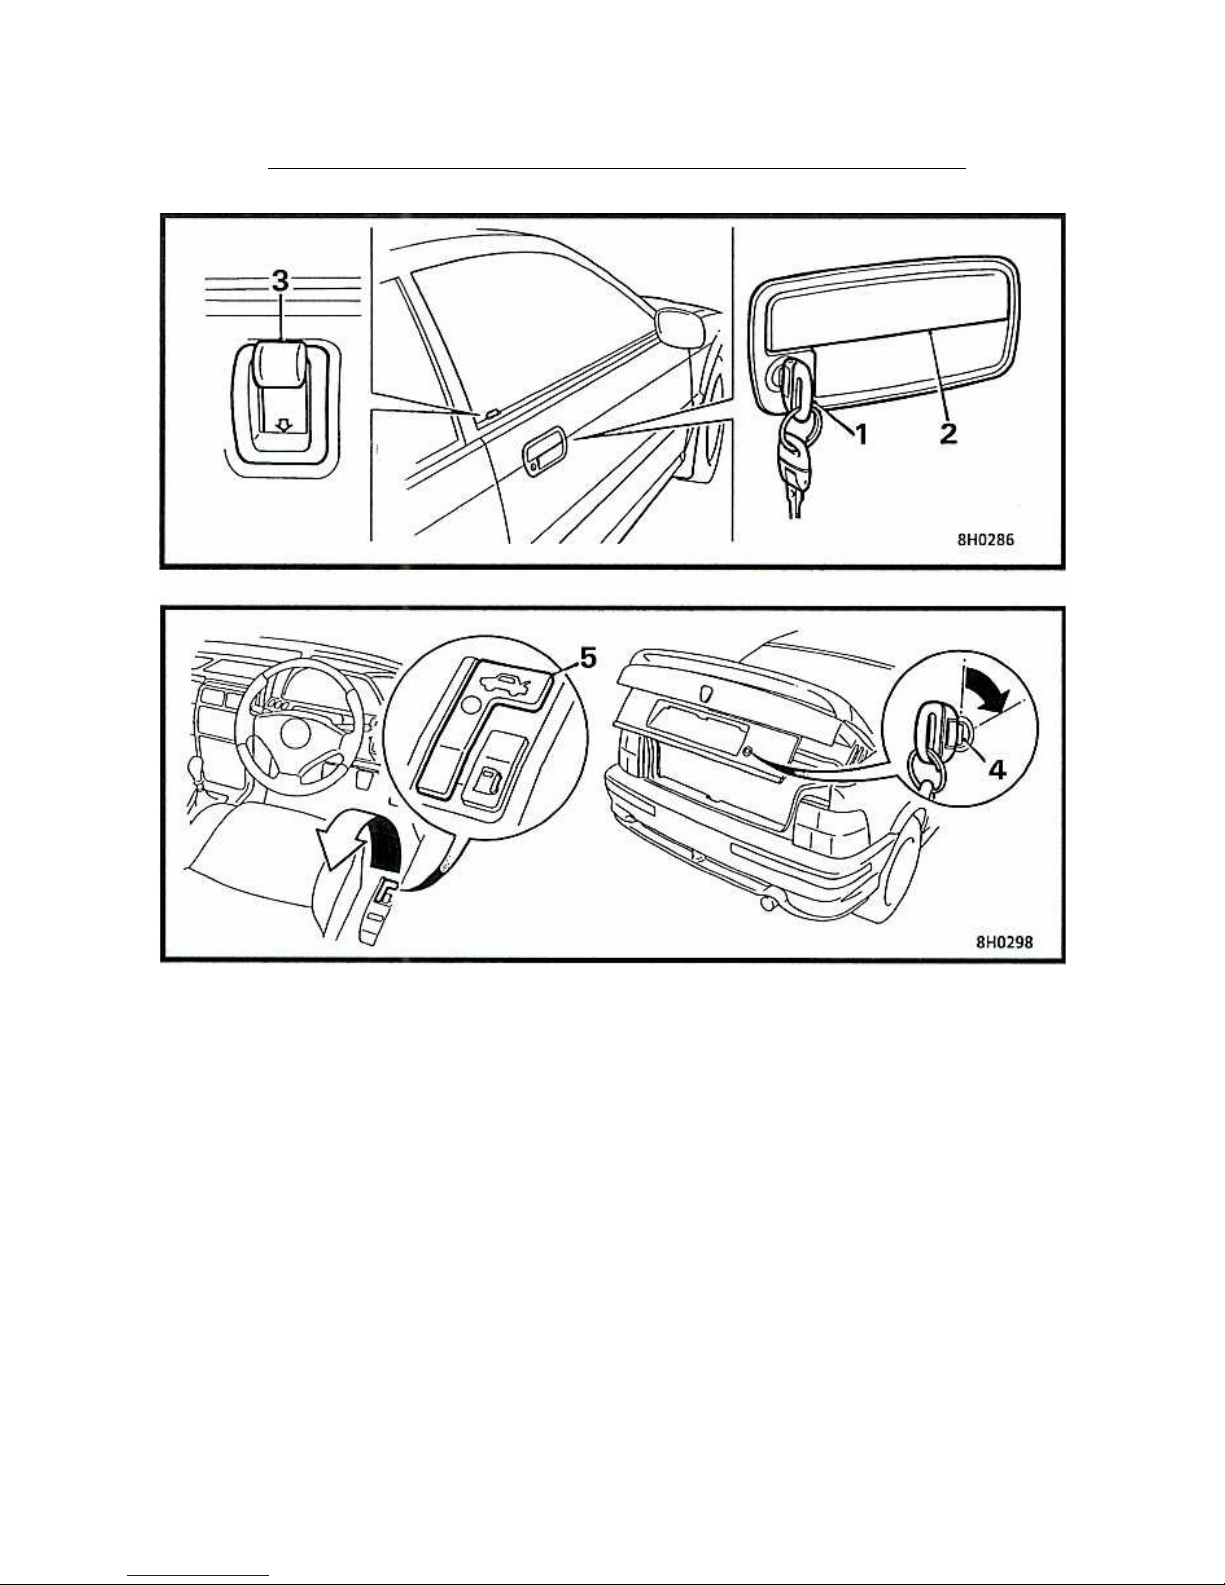
Keys & Locks
1. Door Lock Key 4. Luggage Compartment Lock
Turn clockwise to lock. Turn key clockwise to open.
2. Exterior Door Handle 5. Luggage Compartment Release Lever
Lift to open. Lift to open.
3. Interior Locking Button
Depress button to lock.
LOCKS EXPLAINED Manual Locking
You have been supplied with two identical keys The front doors and luggage compartment may be
which operate all locks. unlocked or locked with either of the keys.
The key number is stamped on the metal tag Door locks can also be operated from inside the car by
attached to your key ring. Keep the tag and spare raising or lowering the appropriate locking button.
key in a safe place – NOT IN THE CAR!
The tag is the only record of the key number and NOTE: There is no door lock on the passenger door.
is essential if you should ever need to obtain a
replacement key.

Keys & Locks
The front doors can also be locked from outside ANTI-THEFT SECURITY PRECAUTIONS
the car without using a key. With the door open, lift
the exterior handle and depress the locking button, The theft of motor vehicles or their
before lowering the handle and closing the door. contents accounts for very large
Proportion of all known crime. It pays to
Always remove your keys from the car before take precautions!
locking the door.
Always adopt this simple ''five point'' drill
By locking the door in this manner the anti-theft whenever you leave your car – even for
system will not be armed, leaving your vehicle just a few minutes:
vulnerable to attack.
- Fully close all windows (and sun roof).
Luggage Compartment - Remove any valuables (or hide them in
The luggage compartment can be opened by lifting the luggage compartment).
the internal release lever at the side of the driver's - Remove the starter key.
seat, or by using the key in the lock. The luggage - Engage the steering lock (by slightly
compartment light switches on automatically when turning the wheel until locks).
the boot lid is opened. - Lock all the doors (including the
luggage compartment).
Always remove the key before shutting the taildoor
in case it is broken by the impact of the door Even when you have done all these things,
closing. there is still much you can do to make your
car a less inviting target for the thief.
WARNING!
It is unwise to drive with the luggage BE SAFE NOT SORRY!
compartment open, as poisonous exhaust
gases will enter the car. If, in an - Try to park where your vehicle can be
emergency, the car must be driven in this seen by householders or passers-by.
state, drive slowly with the front windows - At night always park in well lit areas and
open and the heater blower operating. Try to avoid dimly lit side streets.
- Never leave vehicle documents or spare
Central Locking * keys in the car – these are a real bonus
The central locking system electrically controls all for the thief.
locks (except the luggage compartment) from a - If you have a garage, use it – and don't
single point. Operation of the driver's door lock, risk leaving the keys in the ignition.
from inside or outside, automatically activates the - Remove the radio aerial – an extended
passenger's door lock at the same time. Aerial is an open invitation to vandals!
The passenger's door lock may still be manually
operated independently of the central locking
system. However, it is important to remember that
the system will not automatically re-engage the
locks.
Visually check the locking buttons to be sure the
doors are locked whenever you leave the car.
Keys & Locks
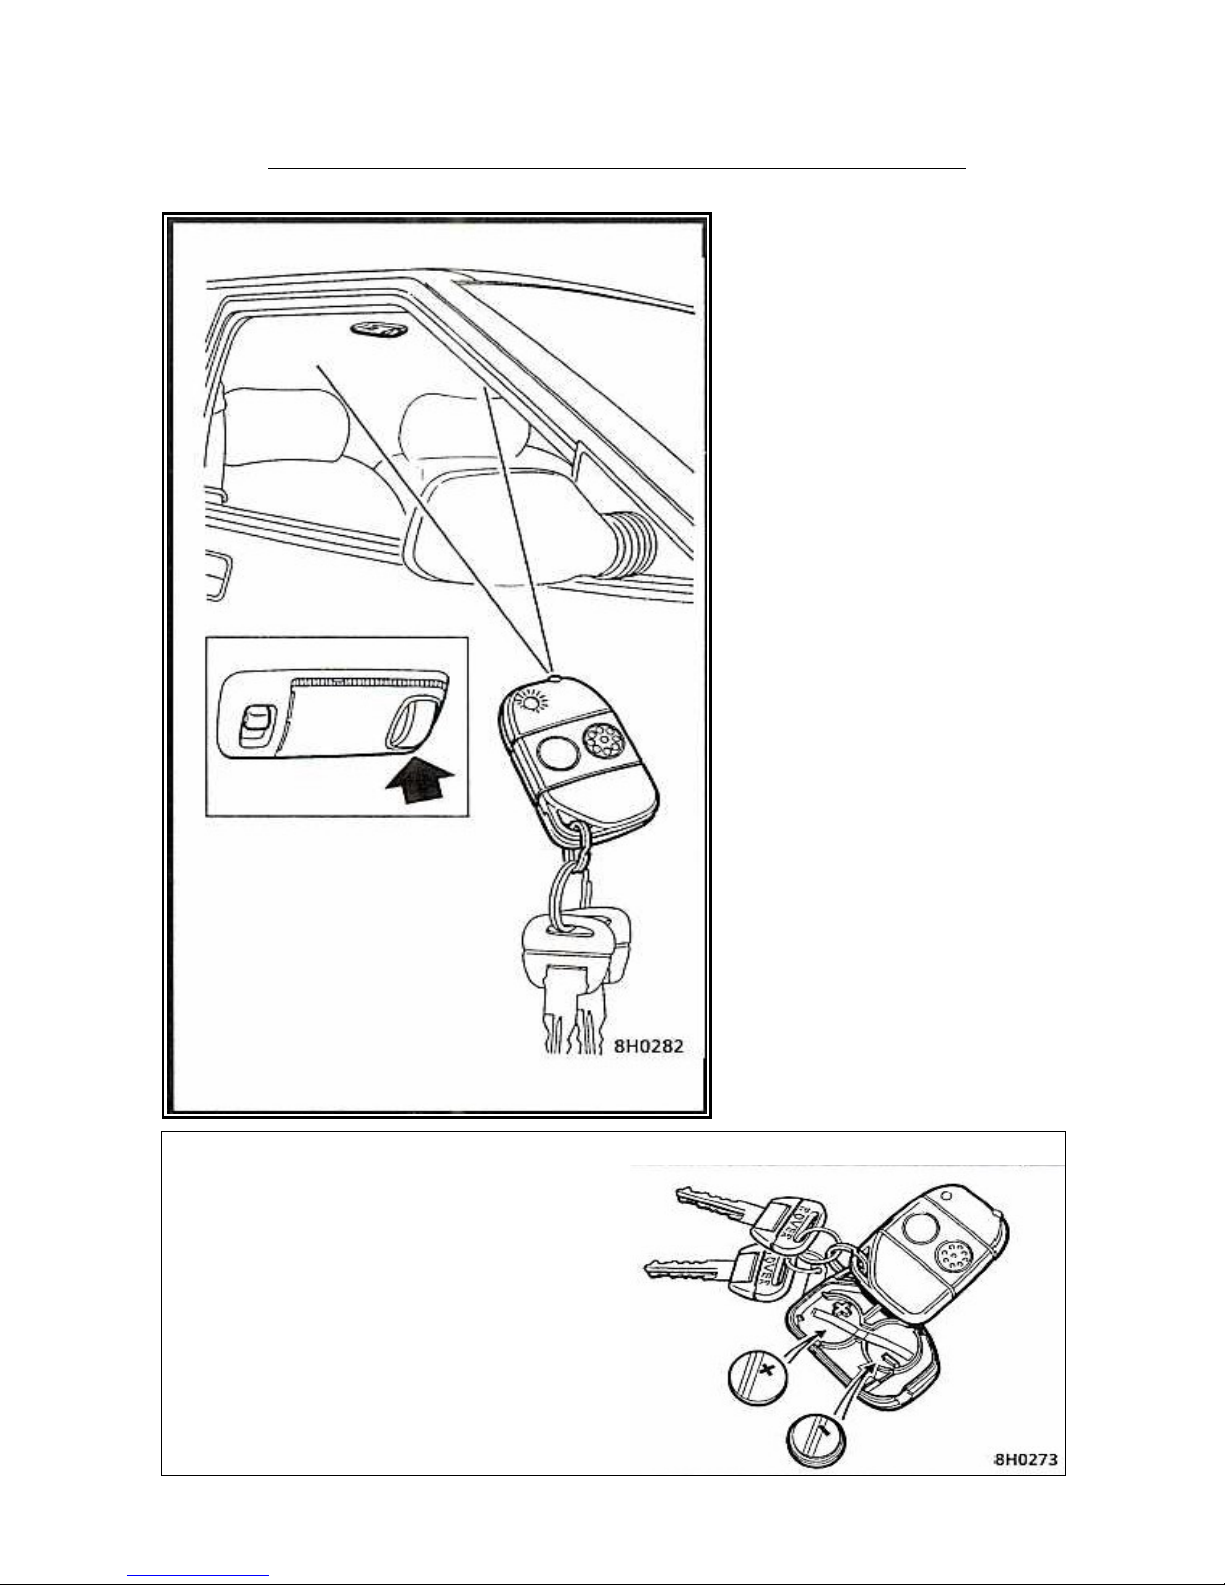
INFRA-RED HANDSET *
The handset numb er is printed on a label at ta ched
To the h ands et. You should rec ord the number in a
Safe pla ce and then des troy the la be l.
NOTE: For security rea sons , re plac em en t ha ndse ts
Are not ea sy to obta in – proof of owne rs hip wil l be
Req uired whe n reque sting a replac me nt.
Using the Handset
Aim th e ha ndset at a window in the direc tion of the
Rec eive r uni t, whic h is si tuated in the interior lamp
(arrowe d in ill us tration).
- Pres s the 'smoot h' button brie fly to unlo ck The indi ca tor light fla shes GREEN sl owly.
- Pres s the 'dim pled' button bri efly to lock – the
Indicat or li ght flas hes RED slo wly.
In ce rtai n ci rcu ms ta nces , the in fra-red sign al ca n
Be s uccess fully tran sm itted from tw en ty fee t or
More . Howeve r, when loc king, it is wi se to obta in
Vis ua l or aud ible confirma tion that the process ha s
Bee n completed. If the hands et shoul d fai l to
Operate the locks, adj us t you r ai m a nd pres s the
Button aga in.
Handset Batteries
If the indicator light fails to flash, the handset
Can still be used successfully for a while.
However, it is an indication that the batteries
Need renewing.
Fit Unipart YWK 10003 replacement batteries
And ensure that battery polarity is correctly
Maintained (as shown in the illustration). The
Handset can be praised apart using a coin or
Small, flat bladed, screwdriver

Keys & Locks
ANTI-THEFT ALARM
The alarm is automatically armed whenever the car
is locked using the key or infra-red handset.
Once armed the alarm will sound if any of the
doors, the luggage compartment or bonnet are
opened without the use of the key or handset. The
alarm will also sound if the key is inserted into the
starter switch while the alarm system is still armed
(ie the doors have been locked using the key or
infra-red handset).
For convenience, unlocking the luggage
compartment with the key will temporarily disarm
the system. The alarm is automatically re-armed as
soon as the boot lid is closed again.
Ultrasonic Space Protection
The alarm system is further enhanced by ultrasonic
space protection; twin sensors situated at the top
of the passenger door pillar monitor the interior
space and activate the alarm if an intrusion into the
passenger compartment is detected.
If necessary the ultrasonic space protection can be
switched off without affecting the reminder of the
alarm system, as follows:
- Remove the key from the starter switch
- Press the button (arrowed) at the top of the
driver's door pillar, the RED warning light (in the
instrument panel) will extinguish, indicating that
the sensor is inhibited.
- Lock the car in the normal way.
Ultrasonic space protection will be reactivated
Automatically after the following sequence:
1) Unlock the door
2) Turn the starter switch on.
3) Turn the starter switch off and remove the
Key
4) Lock the door.
IMPORTANT !
To prevent false alarms, the ultrasonic
space protection MUST BE SWITCHED OFF
when:
- The car is to be left locked with children
or animals inside.
- The car is to be left locked with the sun
roof or windows open.
POINTS TO REMEMBER!
- The alarm will only be armed if the car
is locked using the key or infra-red
handset.
- Once the alarm is sounding it can only
be switched off by unlocking the car
using the key or the infra-red handset.

Seats
1. Forward/Backward Adjustment 4. Head Restraint Adjustment *
Lift the lever to slide the seat forward or back. Depress button to raise or lower.
Lower the lever and check the seat is locked in Adjust the angle of the restraint to ensure
position before driving. It is level with the head.
2. Backrest Angle Adjustment 5. Height Adjustment (Driver's Seat)
Ease your body weight from the backrest and Rotate the handle, anti-clockwise or
rotate the handwheel to adjust the backrest to clockwise, to raise or lower the seat height.
the required angle.
WARNING !
3. Lumbar Support Adjustment Never adjust the seats while the car is in
Rotate handwheel to increase support to the motion, or allow a front seat passenger to
lumbar region of your back. Travel with the seat steeply reclined.
REAR SEAT ACCESS LEVER
Lift the lever to fold the front seat backrest
forward. Ensure the backrest is securely
locked when returned to the normal
position.
HEAD RESTRAINTS
Head restraints are fitted for safety and should
always be adjusted to support the back of the head
and NOT the neck. Properly adjusted head
restraints can considerably reduce the risk of neck
or head injuries. For this reason you should never
carry passengers in seats where the head restraints
have been removed.
To remove a head restraint in order to fully recline
a seat, depress the release button and fully
withdraw the unit from the seat.
REAR SEATS
The rear seats can be folded forwards in order to
increase the luggage area (see 'Load Carrying).
Interior Light & Clock
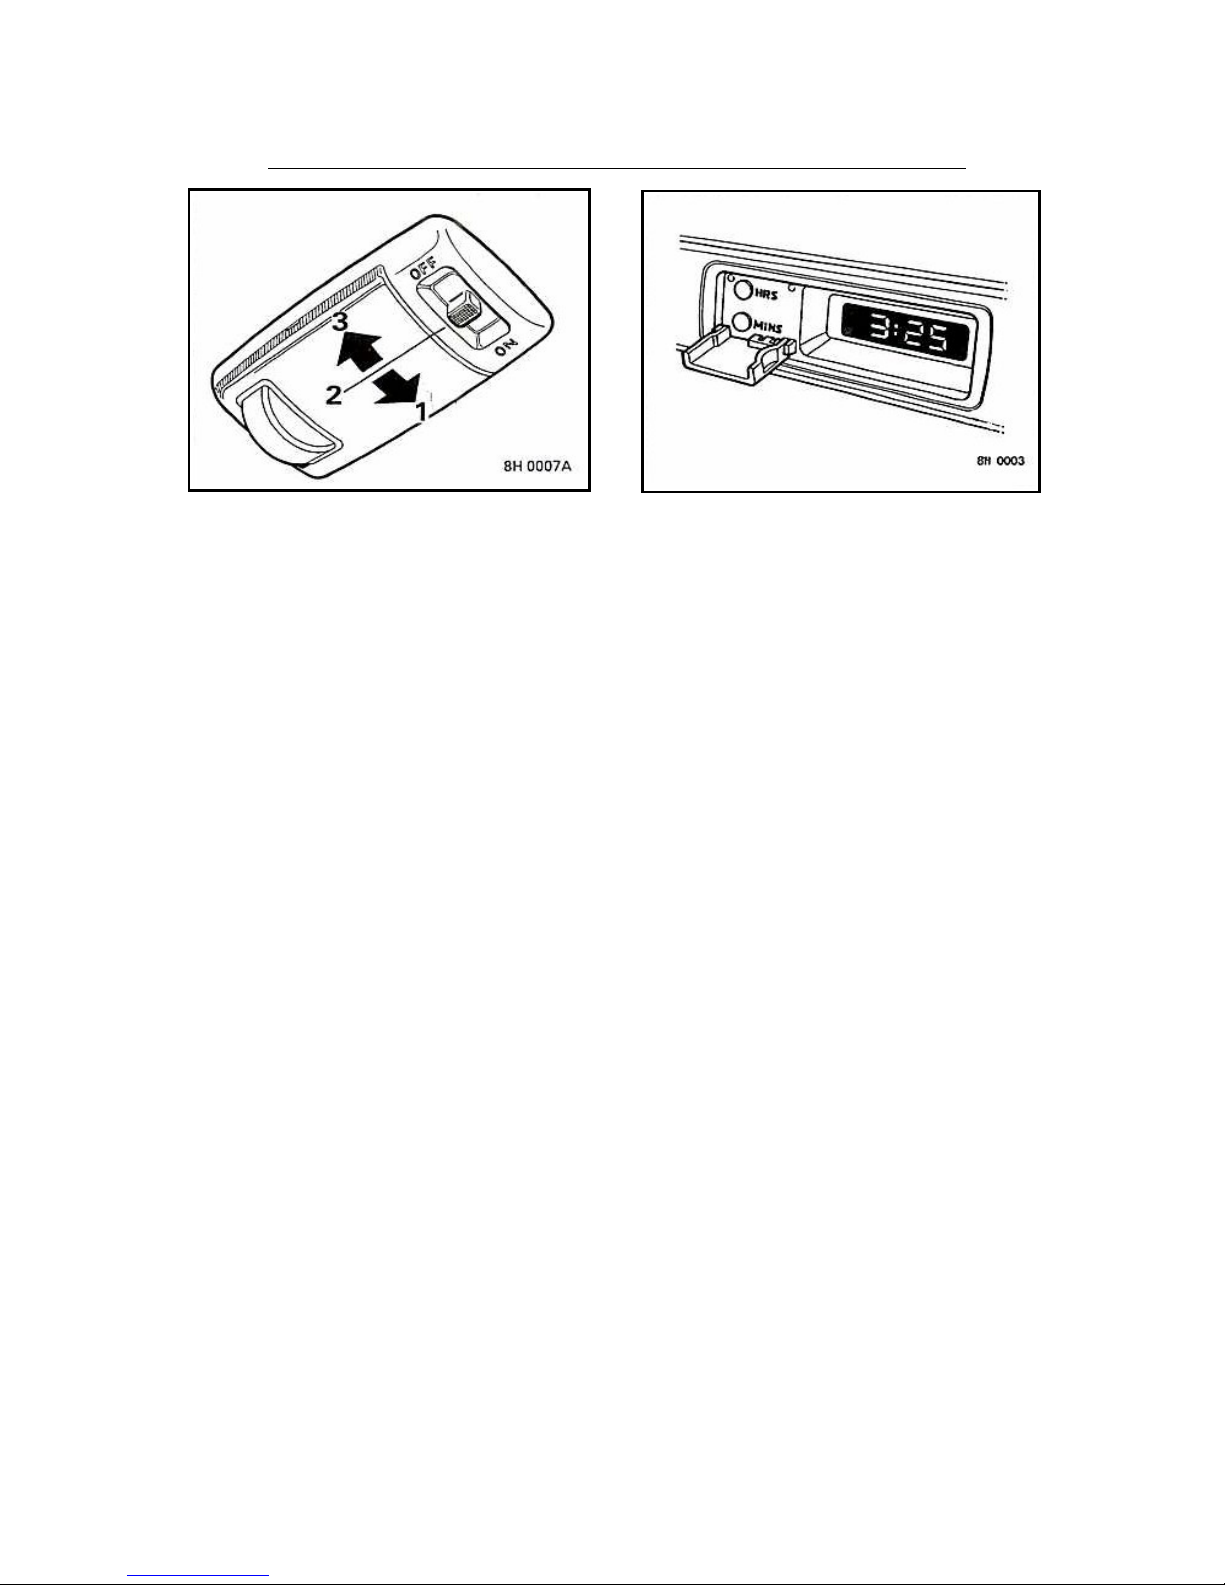
INTERIOR LIGHT SWITCH POSITIONS CLOCK
1. Light Permanently On The 12 hour clock display illuminates when the
2. Light Operated by Door Opening ignition is switched on, and dims for night viewing
3. Light Permanently Off when side or headlights are on.
Interior Light Delay Press the 'HRS' and 'MINS' buttons to adjust the
The interior light delay feature operates on all time. These are concealed behind a protective
doors as follows: flap to the left of the lock face.
When entering the car; the interior light will remain NOTE: The clock will need to be if the battery
illuminated after all the doors are closed, and is disconnected.
extinguish after a 15 seconds delay or as soon as
the ignition is switched on.
When leaving the car after driving; the interior light
will extinguish immediately the doors are closed.
NOTE: Any subsequent opening and shutting of
doors, prior to the ignition being switched on
again, will cause the 15 second delay feature to
operate.

Seat Belts
1. Tongue Plate 3. Lock Release Button
2. Lock 4. Anchorage Release Button
Press to release, slide up or down to adjust.
WEARING SEAT BELTS
To fasten, pull the tongue plate over the shoulder
and push it into the lock nearest the wearer; a click
indicates that the belt is locked in position.
To release, press the RED release button.
Seat belts are designed to be worn with the seats in
a normal upright position – DO NOT allow
passengers to travel with the seats steeply reclined.
Adjusting the Front Seat Belt Three Tests for Checking Seat Belts
Anchorage Point 1. With the seat belt fitted, give the webbing near
The seat belt webbing should cross the shoulder the buckle a quick upward pull. The buckle must
midway between the neck and the edge of the remain securely locked.
shoulder. Front seat travellers should set the
anchorage to its top position and adjust it 2. Unfasten the seat belt, and unreel the webbing
downwards if the webbing is uncomfortably close to the limit of its travel. Check that unreeling is free
to the neck. from snatches and snags.
Caring for Seat Belts 3. With the webbing half unreeled, hold the tongue
Regularly inspect the belt webbing for signs of and give it a quick forward pull. The safety
abrasion or wear, paying particular attention to the mechanism must lock automatically and prevent
fixing points and adjusters. Always replace a seat any further unreeling.
belt that has withstood the strain of an impact or
shows signs of severe fraying.
WARNING!
Seat belt Locks
DO NOT allow foreign matter (particularly
sugary food and drink particles) to enter
the seat belt locks – such substances can
render the locks inoperative.
Seat Belts
SOME DO'S AND DON'TS OF SAFETY IN
THE CAR
Even at low speeds, in a collision any - DO NOT use a child seat that 'hooks' over
unrestrained passengers can be thrown around a seatback, it is not secure!
the car, possibly killing themselves and badly
injuring other occupants in the process. Don't - DO NOT fit more than one person into a
take chances with safety! belt.
- DO make sure all passengers are securely - DO NOT fit the seat belt if the webbing is
strapped in at all times. twisted or obstructed in any way that could
impair the function of the operating
- DO adjust seat belts and shoulder mechanism.
mounting points to ensure the diagonal belt
passes across the shoulder without - DO NOT place carrycots or seat young
slipping off or pressing on the neck, while children in the luggage compartment – the
the lap strap fits as low on the hips as rear end of the vehicle is designed to
possible (never across the abdomen). progressively collapse on impact.
- DO make sure there is no slack in the - DO NOT carry large or sharp-pointed items
webbing. A snug fit is safest. of luggage unsecured inside the car. In a
collision these become flying missiles,
- DO have the seat belts checked if the car is capable of causing serious injury.
involved in an accident.
- DO NOT allow a baby or young child to be
carried on the lap. The force of a crash can
increase effective body weight by as much
as 30 times, making it impossible to hold
on to the baby even if YOU are wearing a
seat belt.
CHILD SEATS
In any car accident, children are as vulnerable
as adults. It makes sense to ensure they are
properly restrained.
A range of child safety seats approved for use
in all Rover cars is available from your Dealer,
who will advise which type is most suitable.
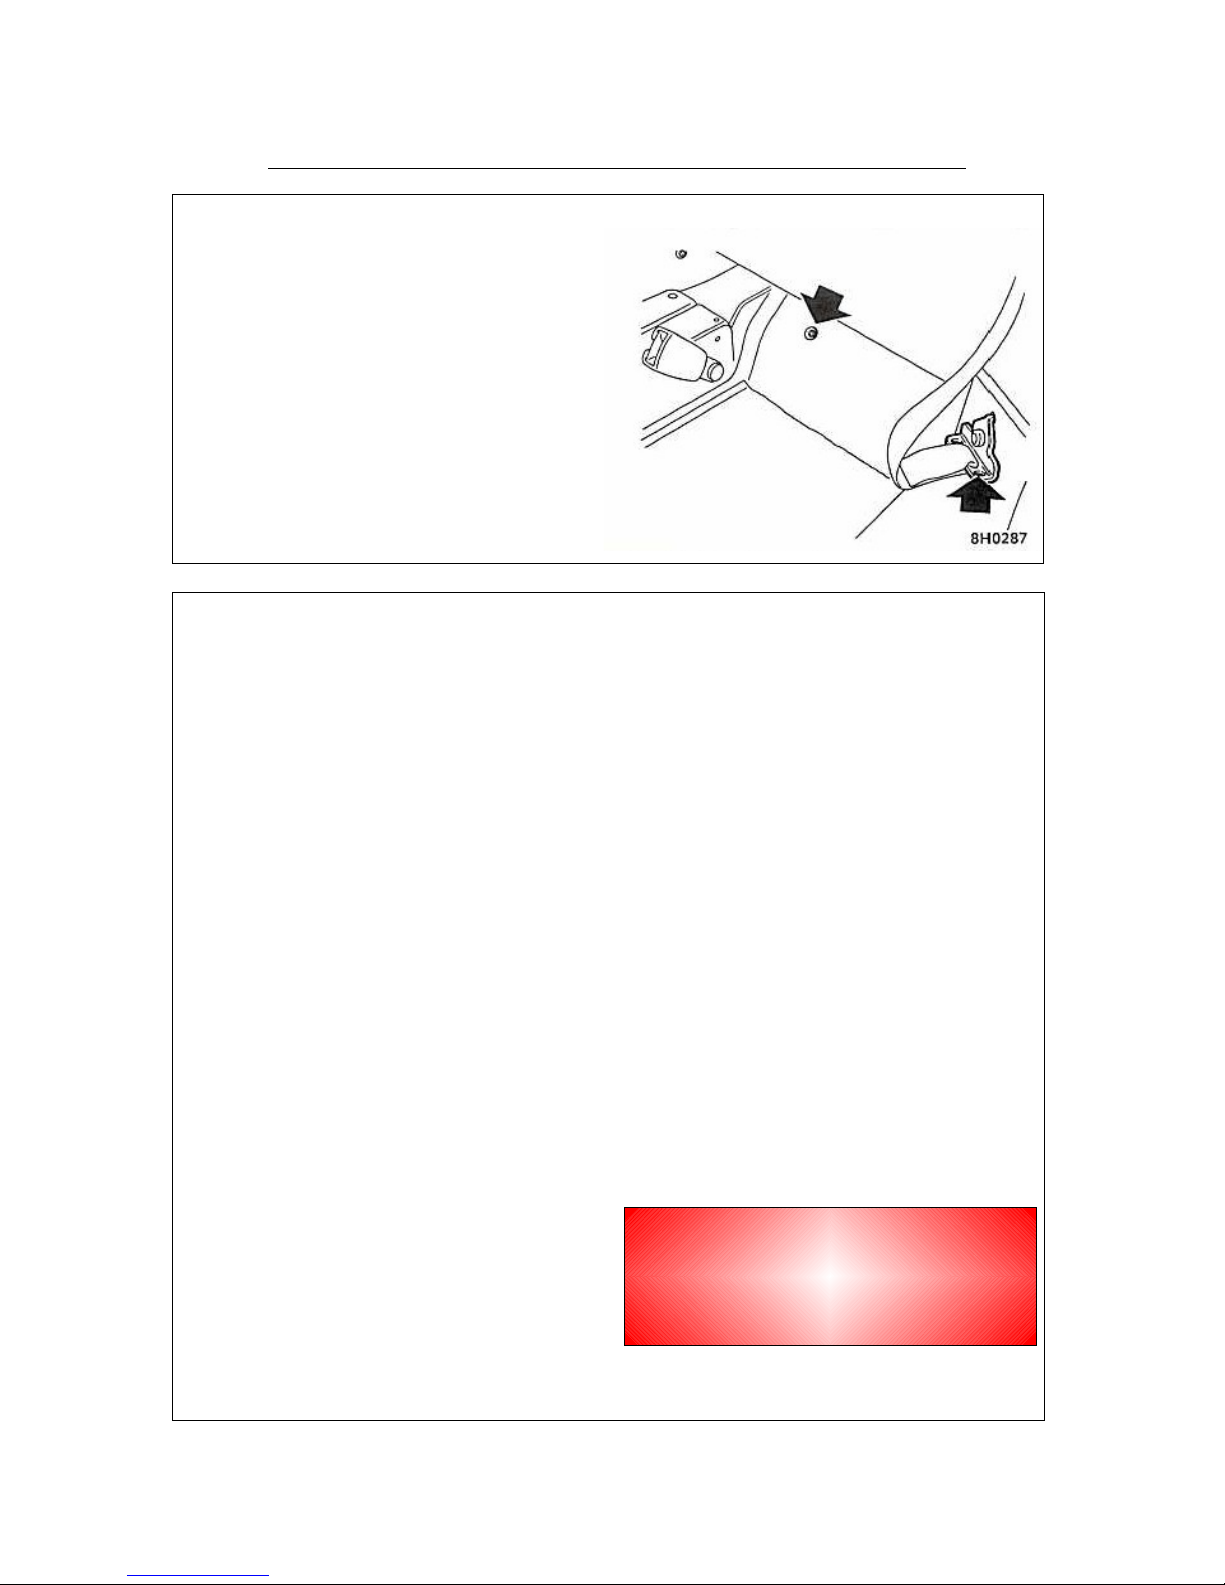
Child safety seat straps can be attached to the
rear seat belt bracket and anchorage point
(arrowed in illustration) using the fixings and
instructions supplied with the safety seat.
WARNING!
A pregnant woman should ask a doctor
for advice on the safest way to wear
seat belts.
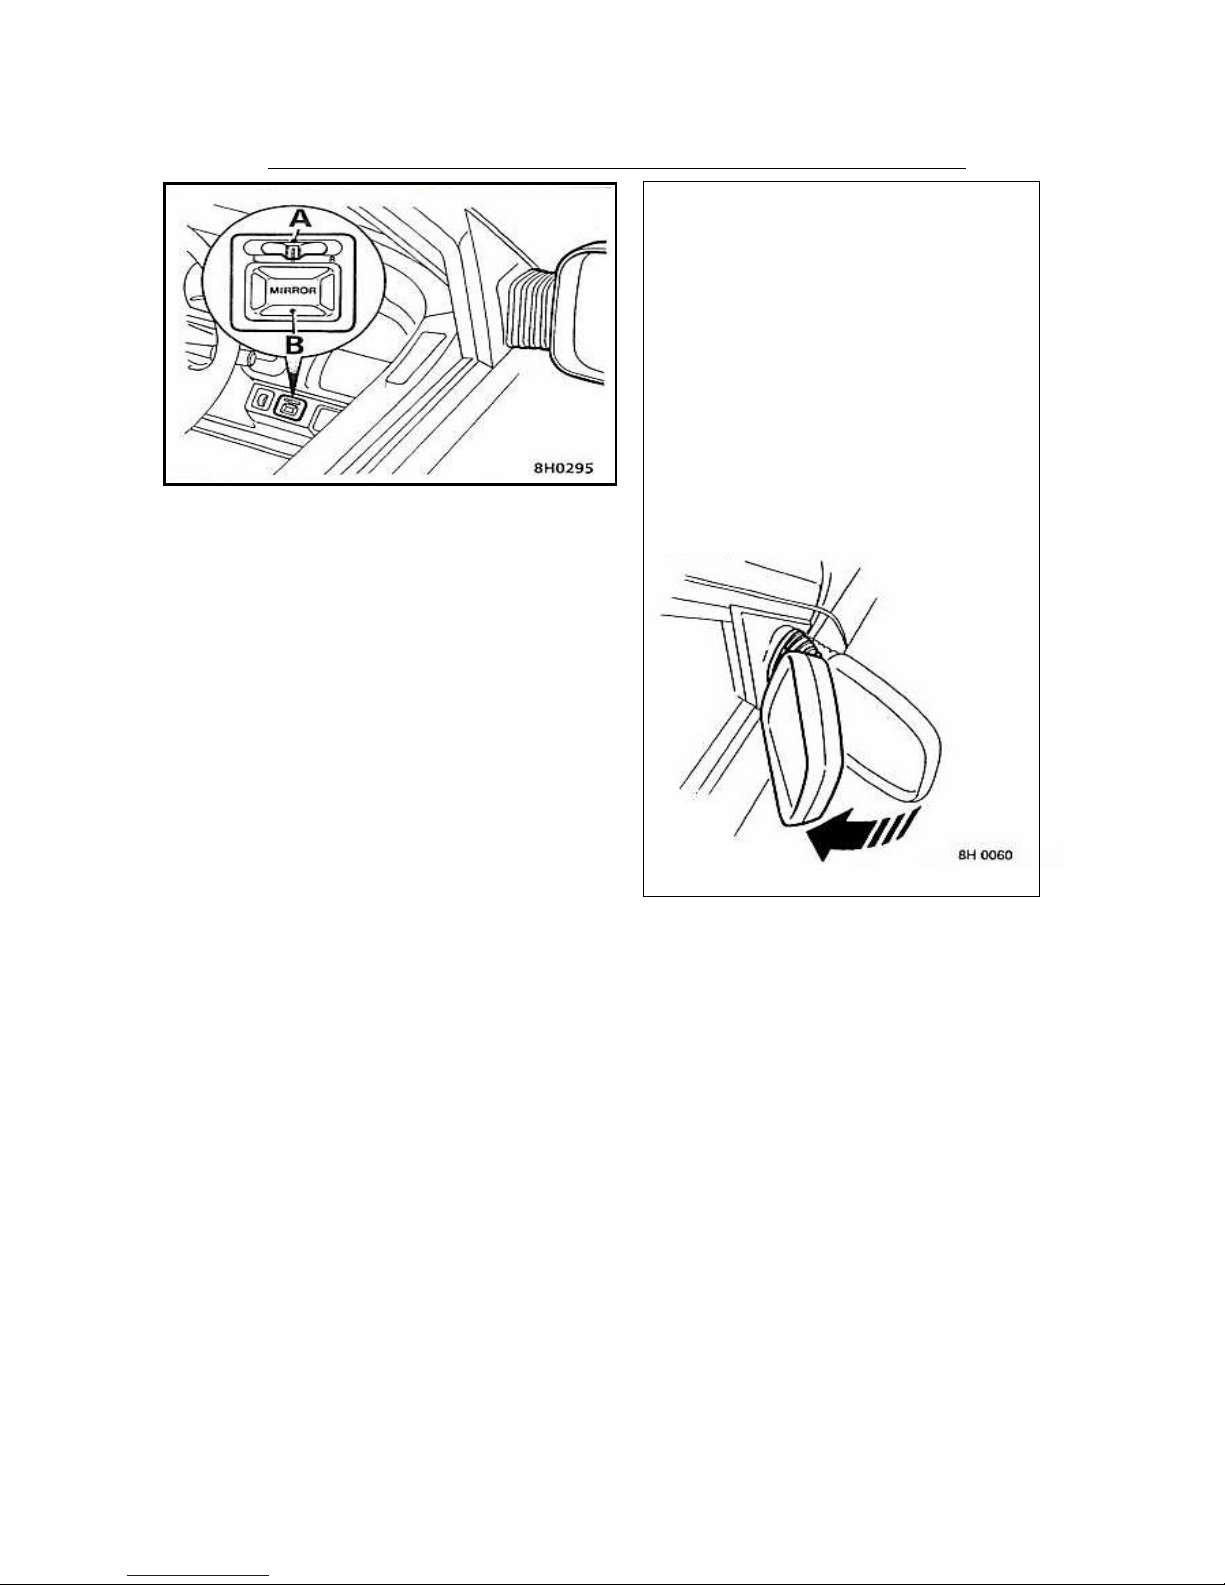
Mirrors
DOOR MIRRORS
Adjustment Control and Selector Switch
Move selector (A) in direction of mirror to be
adjusted. Return to central position after
adjustment.
With starter switch at position 'II', press
appropriate edge of control (B) to move mirror
up/down/left or right.
NOTE: When electric mirrors are fitted, both
mirrors have demisting elements. These
operate whenever the heated rear screen (or
rear screen blower) is switched on, and switch
off automatically after approximately 15
minutes.
INTERRIOR MIRROR
The interior mirror is equipped with an
anti-dazzle dip facility. At night, by moving the
lever at the bottom of the mirror forward, you
can eliminate dazzle from vehicles following
behind.
In some circumstances the view reflected in a
'dipped mirror' can confuse the driver as to the
precise position of other vehicles. Remember
to take additional care!
Vanity Mirror
To avoid possible scorching of the seats,
caused by the sun being reflected in the vanity
mirror, always return the passenger sun visor
to its stowed position when not in use.
DOOR MIRRORS
Both door mirrors are spring loaded and
can be folded back into a 'park' position to
aid entry into narrow openings. To do this:
- Electrically operated mirrors – pull the
mirrors back towards the side windows
until they click into position.
To reset in the driving position, push the
mirrors forward, then check the mirror
settings.
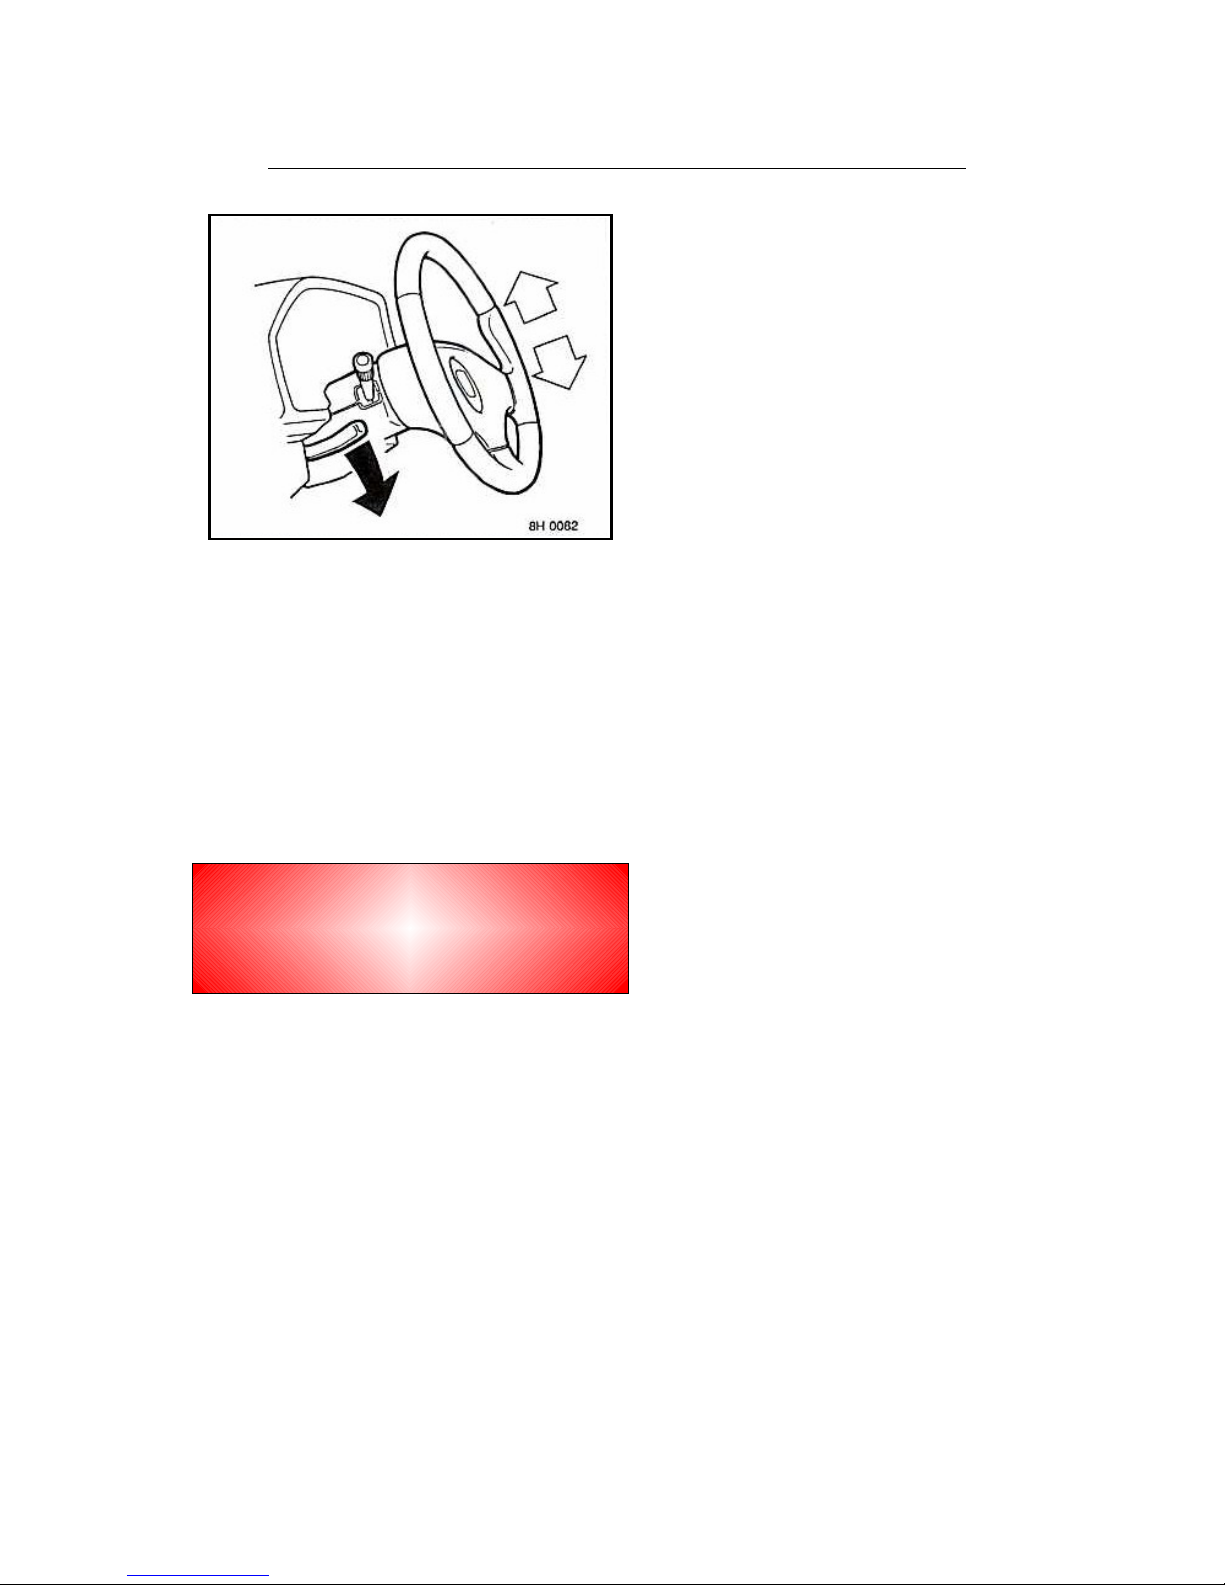
Steering Column
STEERING COLUMN ADJUSTMENT
The height of the steering column can be adjusted
to suit your individual driving position.
Push the locking lever down to free the steering
column. Hold the lever down while moving the
steering wheel (up or down) into the desired
position. Firmly return the lever to its locked
position when adjustment is complete.
WARNING!
Never drive with the lever in the unblocked
Position, or attempt to adjust the steering
Column while the car is in motion.

Windows
ELECTRIC WINDOW SWITCHES
Press down to lower and up to raise.
1. Driver's Window 3. Individual Passenger Window Switch
2. Front Passenger Window
OPERATING ELECTRIC WINDOWS
The electric windows can be operated when the
starter switch is turned to position 'II'.
Ensure that the windows are not obstructed during
operation. In particular, keep children away when
raising or lowering.
Do not attempt to raise or lower a window when it
is held or jammed by ice. Should a window be
obstructed during operation, a cut-out will render
the window inoperative. Clear the obstruction and
wait 15 seconds before re-operating the window.
Driver's Window Switch
The driver's window has a one-touch facility. Press
the switch down fully and hold for a second before
releasing; the window will then continue opening
until it is stopped by LIGHTLY pressing the switch
fr a second time.
WARNING!
Accidental closing of an electrically
Operated window on fingers, hands or on
Any other vulnerable parts of the body,
Can result in serious injury!
Always heed the following precautions:
- ISOLATE the rear window switches
when carrying children.
- ENSURE children are kept clear whilst
raising or lowering windows.
- ALWAYS remove the starter key when
leaving children alone in the car.
- ENSURE that all adult passengers are
familiar with the controls and the
potential dangers of electrically
operated windows.
'T-Bar' Glass Roof
The 'T-Bar' glass roof is made up of twin glass
panels set into the roof. Either can be tilted open
or removed as follows:
Opening a Glass Panel
1. Pull the handle forward (to unlock).
2. Push the handle up.
3. Push the handle to the rear and lock.
To close the panel, reverse the above
procedure.
WARNING!
- DO NOT allow passengers to extend any
part of their bodies through the roof
aperture while the car is moving – they
could be injured by branches of trees or
other obstructions.
- ALWAYS close and secure the roof
when the car is unattended.
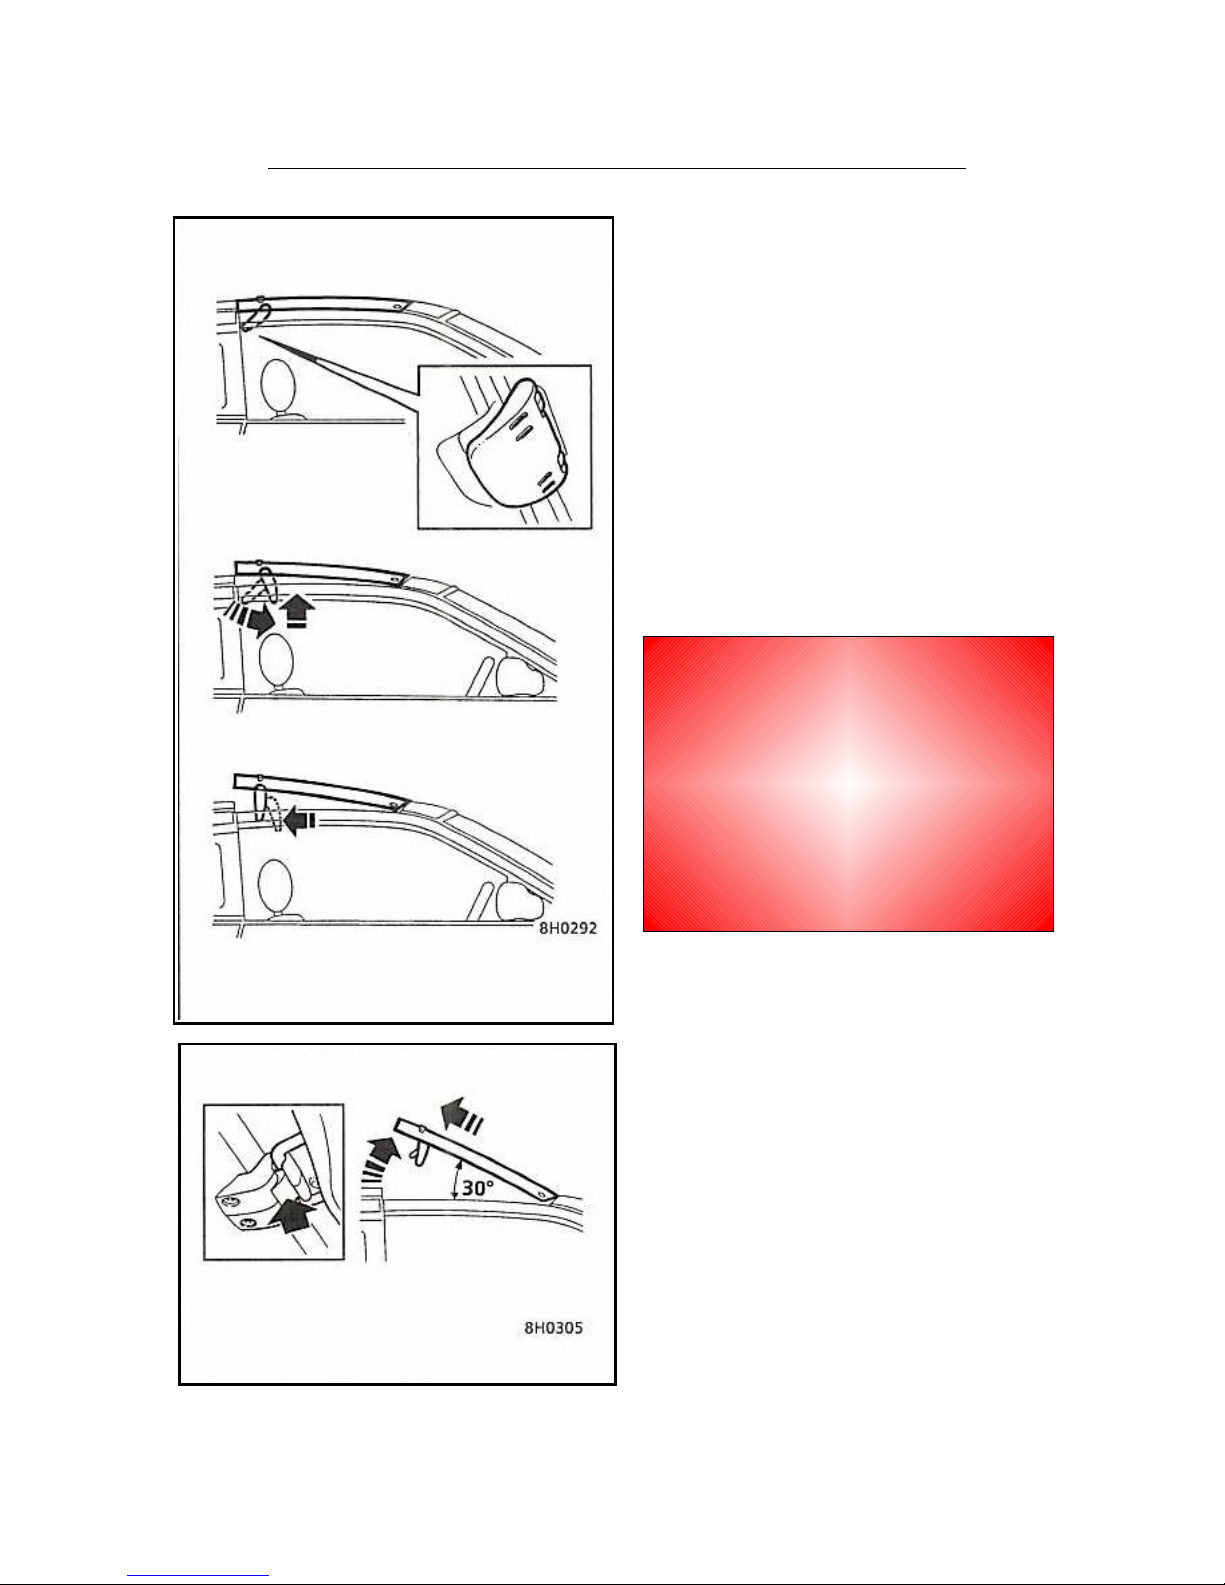
Removing a Glass Panel
Half tilt the glass panel (as in 1 and 2 above), and
then press the RED catch to detach the handle
linkage. With the handle detached, the glass
panel will drop into the closed position.
From outside the car, incline the glass panel to
an angle of approximately 30 degrees. Then,
holding the glass firmly on both sides, ease the
hinge blades from their location points.

'T-Bar' Glass Roof
Refitting a Glass Panel
Before refitting, note that the glass panels are NOT
interchangeable, the curvature at each side of the
roof is more pronounced than in the centre. To
ensure accurate refitting, the wider hinge blade on
each panel MUST be nearest to the centre of the
car.
1. With the glass panel angled at approximately
30 degrees, locate the hinge blades into the
slots at the front of the roof.
2. Push down firmly with the flat of the hand
over the hinge blades, at the same time
lowering and pushing the panel forward into
position.
3. Attach the handle linkage and close the panel.
Removing the 'T-Bar'
If both glass panels are to be removed, the 'T-Bar'
can also be removed: simultaneously press both on
the RED catches (arrowed), then pull the 'T-Bar'
forward and up to remove.
When replacing, ensure that the 'T-Bar' is secured
at the rear before pushing downwards to engage
the front (RED) locking catches.
NOTE: The 'T-Bar' is reversible.
Stowing the Glass Panels
After removal from the car, ALWAYS protect the
glass panels by placing them in the case provided
stow the case on the right hand side of the luggage
compartment and retain with the strap. When
empty, the case can be folded and retained against
the side panel with the strap.
Heating & Ventilation
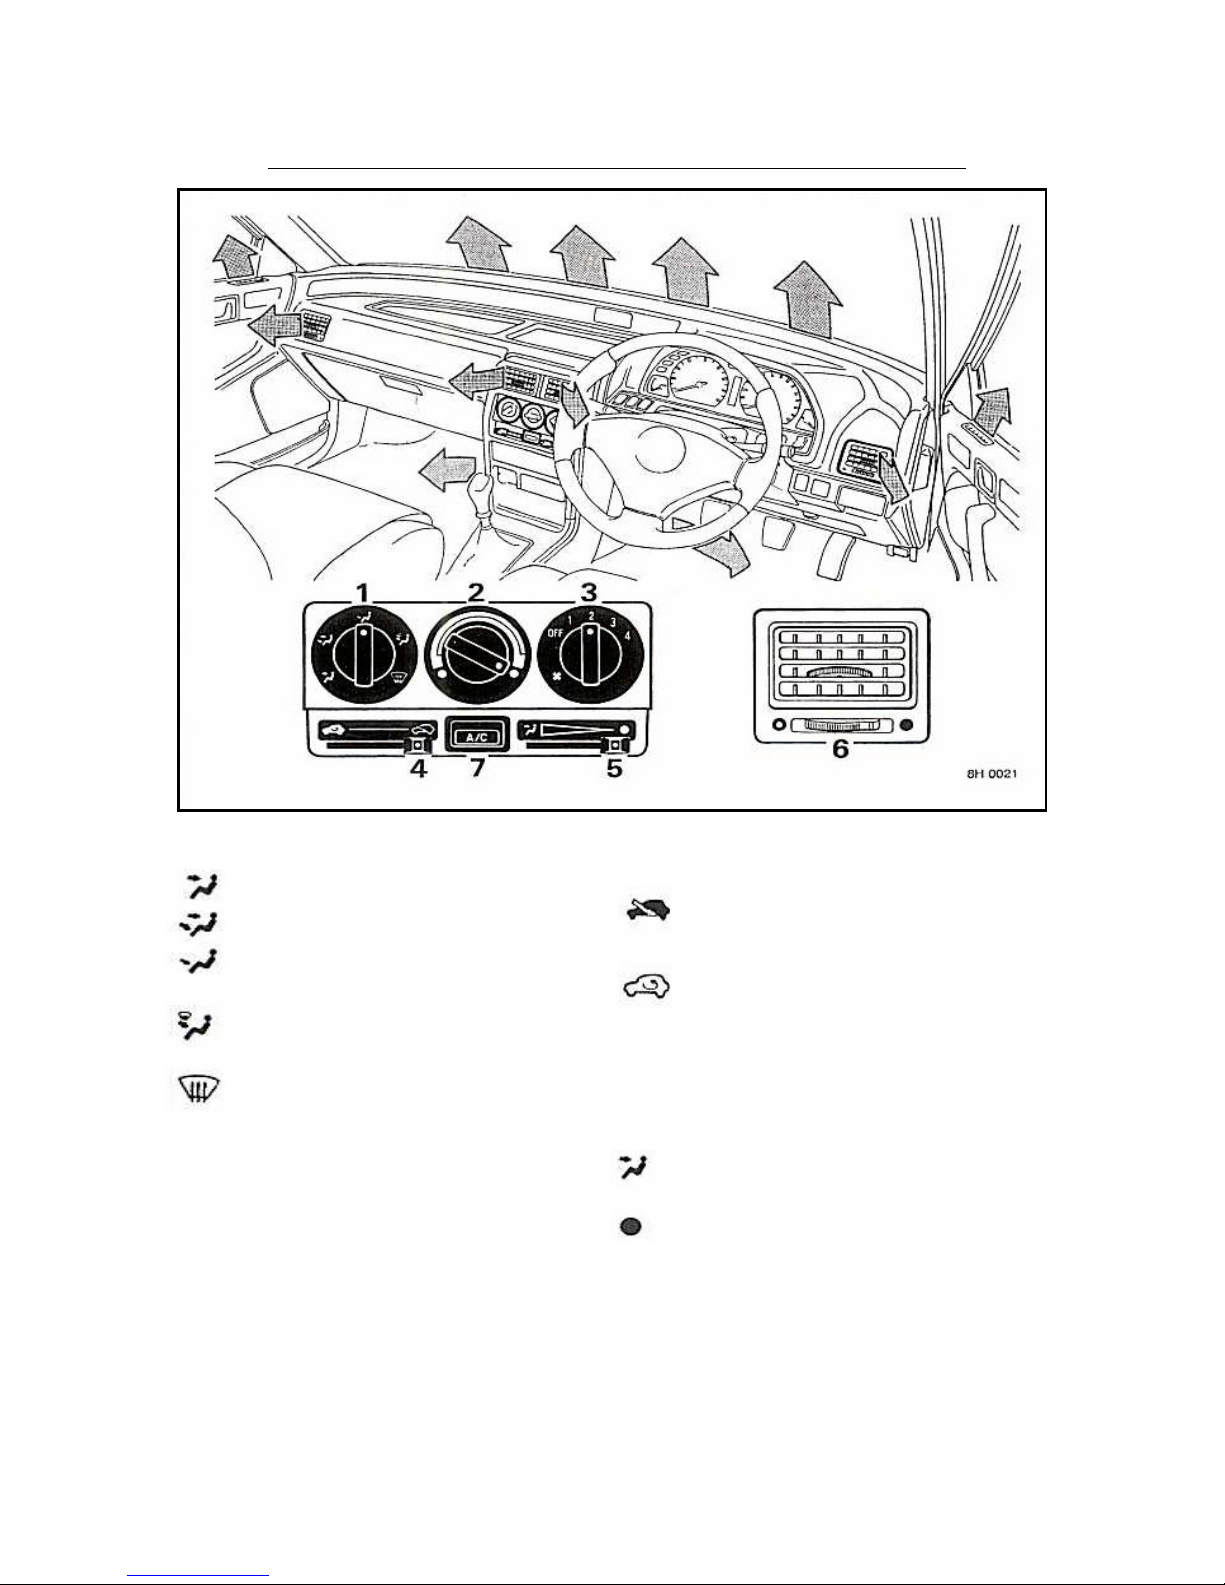
1. Air Distribution Control 4. Air Supply Control
5. Centre Face Level Vents
Face level vents only.
Foot and face level vents.
Foot level vents (some air to
Windscreen and window vents also).
Foot level, windscreen and side
window vents.
Windscreen and side window vents.
Move control to the right to permit
fresh air to be drawn into the car.
Move control to the left to prevent the
entry of traffic fumes.
NOTE: Always return the control to 'fresh air intake'
To prevent the windscreen from misting.
Move control to the left to permit flow
of fresh (unheated) air.
Move control to the right to permit flow
of fan assisted air (hot or cold).
3. Blower Switch
1. speed – slow.
2. speed – normal heating or ventilation.
3. speed – maximum demisting or heating.
4. speed – maximum ventilation or defrosting.
2. Air Temperature Control
BLUE: Unheated air
RED: Heated air
6. Side Face Level Vents
Rotate thumbwheel fully towards the outside of
The car for fan assisted air (hot or cold), and
Fully towards the centre for fresh (unheated) air.
7. Air Conditioning Switch *
Press to operate.
Heating & Ventilation
USING YOUR HEATER
Fresh air enters the heater through the air intake
grille in front of the windscreen. This must always
be kept clear of obstructions, including snow and
ice. Stale air is automatically drawn out through
vents in each side of the luggage compartment.
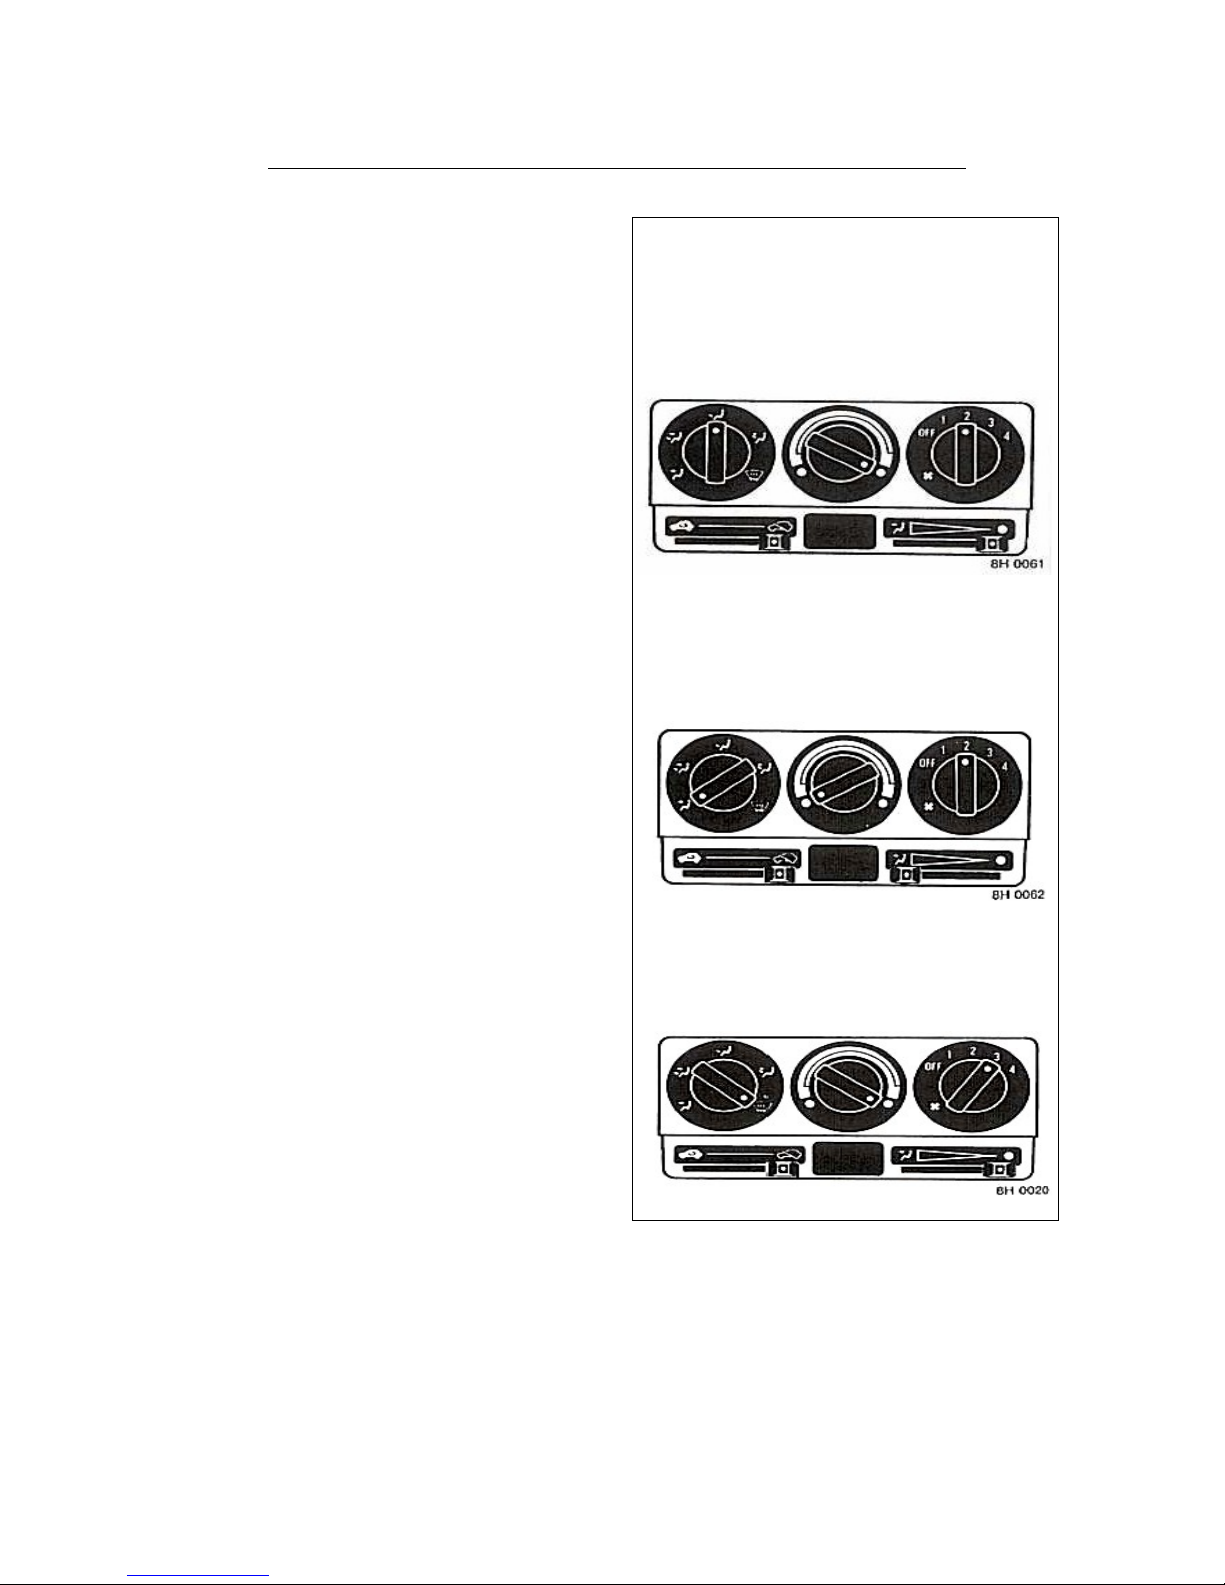
The following examples show three basic heating
and ventilation settings. Further adjustment of the
air distribution, temperature and blower controls
aill result in a wider range of options, enabling you
to always obtain the best use from the heater unit.
Remember; with the blower switched off, the
Volume of air entering the car is dependent on
Driving speed alone, and that full heating is not
Available until the engine has reached its normal
Operating temperature.
NOTE: Foot well ducts beneath the front seats
provide heating for rear passengers. Do not
obstruct them by placing luggage under the seats.
Heating
Set the controls as shown, but with the
blower at the slowest speed (position 1)
until the temperature gauge shows that the
engine is warming up. Keep the centre face
level vents closed.
Ventilation
Set the controls as shown. Open the centre
Face level vents, and adjust the side face
Level vents to deliver fan assisted air. Adjust
The blower speed as required.
Demist or Defrost Windscreen
Set the controls as shown to obtain
maximum heated air flow from windscreen
and side window vents.
Heating & Ventilation
AIR CONDITIONING *
The air conditioner provides additional coolant
and reduces humidity.
Using Your Air Conditioning
The air conditioning can only be used when the
engine is running. It is also important to keep
the windows and sun roof closed and adjust
the side face level vents to deliver fan assisted
air during operation.
In very hot conditions, and particularly if the
engine is working unusually hard, the air
conditioning may automatically switch off. Full
air conditioning will return when the engine
coolant temperature has dropped to normal.
To maintain the air conditioner in peak
operating condition, it should be switched on
for at least 10 minutes every week, even in winter.
NOTE: The air conditioner will only operate
when the blower is switched to positions 1, 2,
3 or 4. It will not operate with the blower
switched off, nor when the temperature is near
freezing point.
Cooling the Car
After starting the engine, press the 'A/C' switch
to operate the air conditioner. Set the heating
and ventilation controls as shown, open the
centre face level vents and vary the blower
speed to suit your requirements.
Rapid Cooling
For rapid cooling, move the air supply control
to the left to prevent the introduction of warm
air from outside the car and turn the blower
switch to Position 4. Once the interior is cool,
return the air supply control to the right, to
allow air to be drawn in form outside the car,
and reset the blower switch as required.
Reducing Humidity
After switching on the air conditioner, set the
Controls as shown to reduce the humidity
Inside the car and demist the windscreen.
Adjust the temperature control and blower
Speed as required.
NOTE: If the interior of the car is particularly hot
Before you start the engine, it will take time for
The air conditioner to become fully effective. It
Is best to first ventilate the car by opening the
Windows and sun roof, and operating the
Blower at a fast speed (position 3 or 4) before
Switching on the air conditioning. Remember to
Close the windows and sun roof when you
Operate the air conditioner.
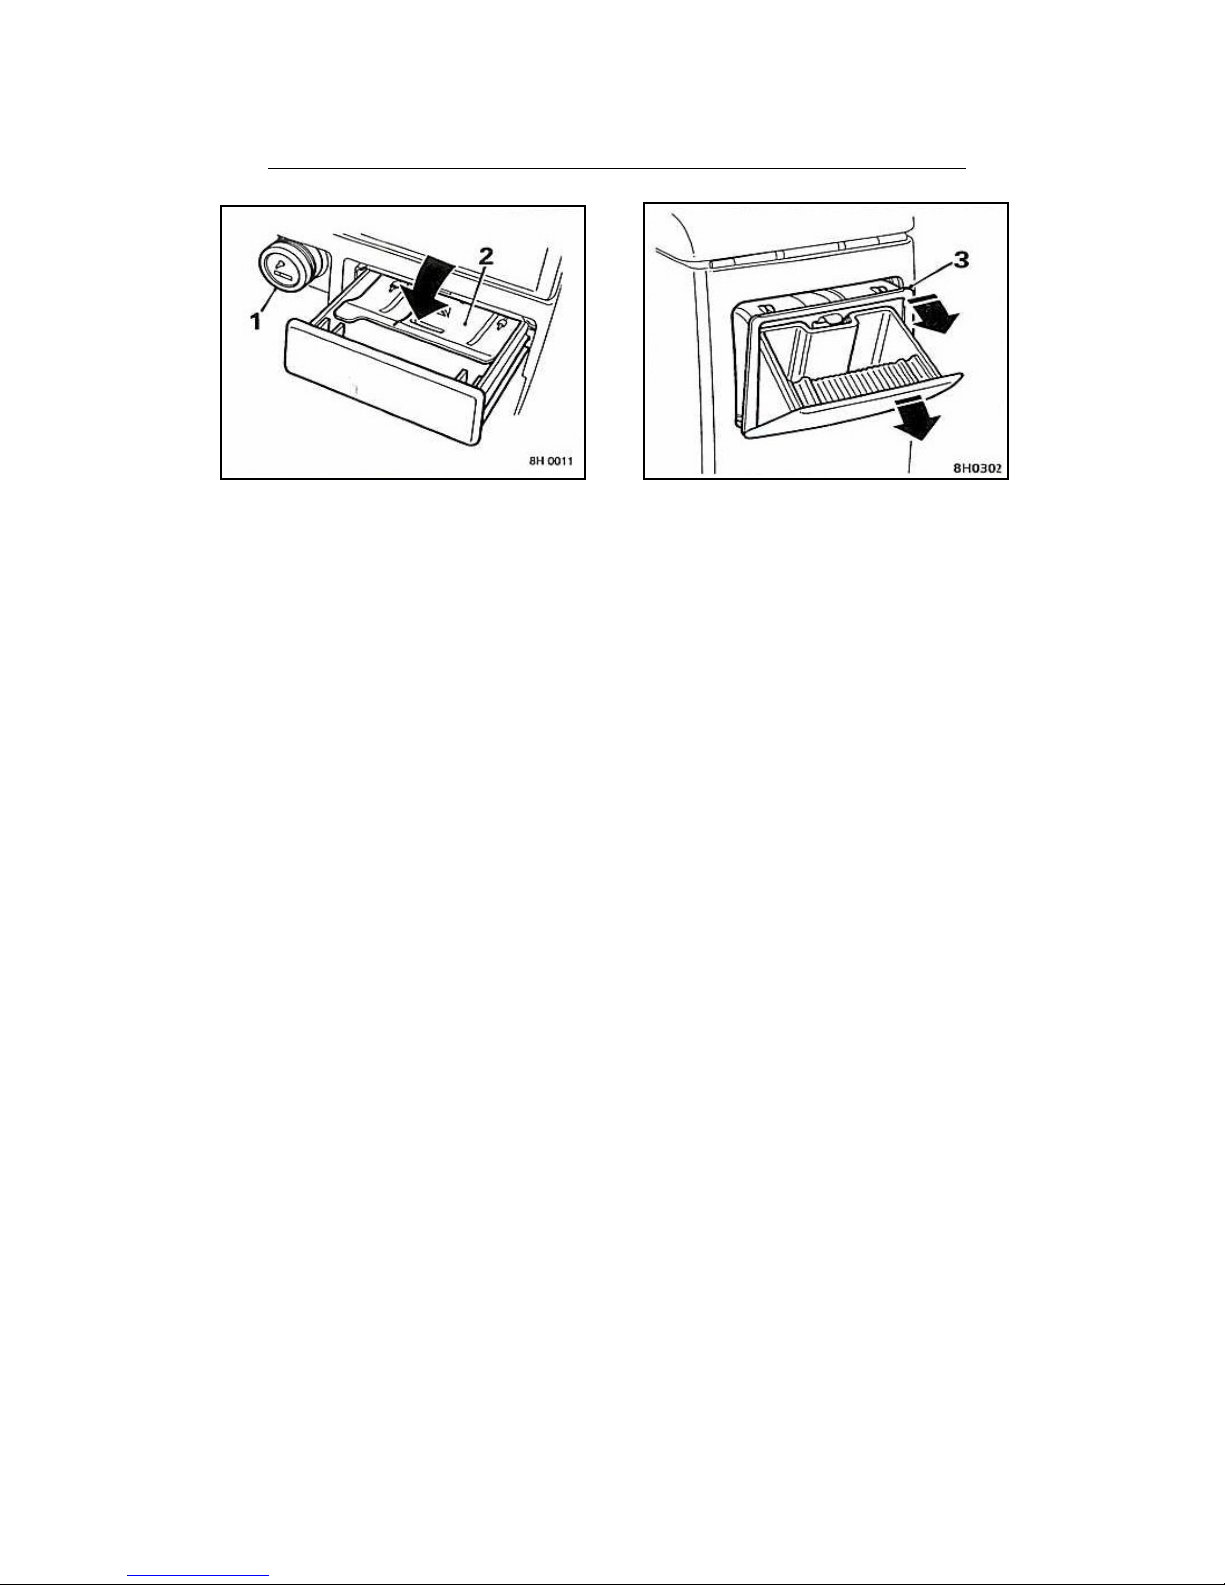
Cigar Lighter & Ashtrays
1. Cigar Lighter 3. Rear Ashtray – high console
Push in centre of lighter to heat. When ready, Open ashtray, pull to disengage top of casing
the lighter will partially eject and can then be and remove.
withdrawn for use.
2. Front Ashtray Release Plate
Open ashtray fully and depress release plate to
remove.
CIGAR LIGHTER
Always hold the cigar lighter by the handle to avoid
injury.
To avoid any risk of overloading the electrical
circuit, accessories should not be plugged into the
cigar lighter socked unless they are approved for
this use.
NOTE: The Cigar lighter only operates with the
ignition switch at position 'I' or 'II'.
ASHTRAYS
DO NOT put paper or other combustible material in
the ashtrays.

In-Car Entertainment
RADIO CASSETTE AND CD PLAYER
Full operating instructions are given in the separate
'In-car Entertainment' book.
COMPACT DISC CHANGER UNIT
The compact disc changer unit is located beneath
the front passenger's seat.
RADIO AERIAL
The radio aerial must be in place whenever the
radio is to be used. Unscrew and remove the aerial
before entering a car wash or an area with
restricted headroom.

Load Carrying
ROOF RACKS TOWING CARAVANS AND TRAILERS
It is ESSENTIAL that you only fit a roof rack
designed and tested for your car. See your dealer Tow Bars
for details of Rover approved roof racks. It is ESSENTIAL that you only fit a tow bar
designed and tested for your car. Your dealer has
The total roof rack load must NEVER exceed that details of all Rover approved towing equipment and
given in 'Technical Data', and must include the can advise you of the most suitable type.
weight of the roof rack within the load. All loads
should be evenly distributed, properly secured, and The permissible maximum towing weight, rear axle
carried within the periphery of the roof rack. Load and towing hitch load are given in 'Technical
Data'. In the interest of safety, these must not be
exceeded!
WARNING!
A loaded roof rack can reduce the stability
Of the vehicle, particularly when cornering
And encountering crosswinds. Always
Reduce your speed to suit the conditions!
 Loading...