

Page 1

User Manual
Stratix 5900 Services Router User Manual
Catalog Number 1783-SR
Page 2
Important User Information
IMPORTANT
Read this document and the documents listed in the additional resources section about installation, configuration, and
operation of this equipment before you install, configure, operate, or maintain this product. Users are required to
familiarize themselves with installation and wiring instructions in addition to requirements of all applicable codes, laws,
and standards.
Activities including installation, adjustments, putting into service, use, assembly, disassembly, and maintenance are required
to be carried out by suitably trained personnel in accordance with applicable code of practice.
If this equipment is used in a manner not specified by the manufacturer, the protection provided by the equipment may be
impaired.
In no event will Rockwell Automation, Inc. be responsible or liable for indirect or consequential damages resulting from the
use or application of this equipment.
The examples and diagrams in this manual are included solely for illustrative purposes. Because of the many variables and
requirements associated with any particular installation, Rockwell Automation, Inc. cannot assume responsibility or
liability for actual use based on the examples and diagrams.
No patent liability is assumed by Rockwell Automation, Inc. with respect to use of information, circuits, equipment, or
software described in this manual.
Reproduction of the contents of this manual, in whole or in part, without written permission of Rockwell Automation,
Inc., is prohibited.
Throughout this manual, when necessary, we use notes to make you aware of safety considerations.
WARNING: Identifies information about practices or circumstances that can cause an explosion in a hazardous environment,
which may lead to personal injury or death, property damage, or economic loss.
ATTENTION: Identifies information about practices or circumstances that can lead to personal injury or death, property
damage, or economic loss. Attentions help you identify a hazard, avoid a hazard, and recognize the consequence.
Identifies information that is critical for successful application and understanding of the product.
Labels may also be on or inside the equipment to provide specific precautions.
SHOCK HAZARD: Labels may be on or inside the equipment, for example, a drive or motor, to alert people that dangerous
voltage may be present.
BURN HAZARD: Labels may be on or inside the equipment, for example, a drive or motor, to alert people that surfaces may
reach dangerous temperatures.
ARC FLASH HAZARD: Labels may be on or inside the equipment, for example, a motor control center, to alert people to
potential Arc Flash. Arc Flash will cause severe injury or death. Wear proper Personal Protective Equipment (PPE). Follow ALL
Regulatory requirements for safe work practices and for Personal Protective Equipment (PPE).
Allen-Bradley, Rockwell Software, Rockwell Automation, Stratix 5900, Stratix Configurator, Logix5000 and are trademarks of Rockwell Automation, Inc.
Trademarks not belonging to Rockwell Automation are property of their respective companies.
Page 3

Table of Contents
Table of Contents
Important User Information . . . . . . . . . . . . . . . . . . . . . . . . . . . . . . . . . . . . . . . . 2
Preface
Getting Started
Install Stratix 5900 Services Router
Audience . . . . . . . . . . . . . . . . . . . . . . . . . . . . . . . . . . . . . . . . . . . . . . . . . . . . . . . . . . 5
Services Router Configuration . . . . . . . . . . . . . . . . . . . . . . . . . . . . . . . . . . . . . . 5
Additional Resources . . . . . . . . . . . . . . . . . . . . . . . . . . . . . . . . . . . . . . . . . . . . . . . 6
Chapter 1
Stratix 5900 Services Router . . . . . . . . . . . . . . . . . . . . . . . . . . . . . . . . . . . . . . . . 7
Items Shipped with the Stratix 5900 Services Router . . . . . . . . . . . . . . . . . . 9
Power Supply . . . . . . . . . . . . . . . . . . . . . . . . . . . . . . . . . . . . . . . . . . . . . . . . 10
Status Indicators . . . . . . . . . . . . . . . . . . . . . . . . . . . . . . . . . . . . . . . . . . . . . 11
Serial Port . . . . . . . . . . . . . . . . . . . . . . . . . . . . . . . . . . . . . . . . . . . . . . . . . . . 11
Configuration Software. . . . . . . . . . . . . . . . . . . . . . . . . . . . . . . . . . . . . . . . . . . 12
Chapter 2
Install the Unit . . . . . . . . . . . . . . . . . . . . . . . . . . . . . . . . . . . . . . . . . . . . . . . . . . 17
Install the Router on a DIN Rail. . . . . . . . . . . . . . . . . . . . . . . . . . . . . . . . . . . 17
Installation Clearance . . . . . . . . . . . . . . . . . . . . . . . . . . . . . . . . . . . . . . . . . . . . 18
Prevent Damage to the Router . . . . . . . . . . . . . . . . . . . . . . . . . . . . . . . . . . . . 18
Ground the Router. . . . . . . . . . . . . . . . . . . . . . . . . . . . . . . . . . . . . . . . . . . . . . . 18
Connect a Personal Computer, Server, or Workstation. . . . . . . . . . . . . . 19
Connect an External Ethernet Switch. . . . . . . . . . . . . . . . . . . . . . . . . . . . . . 20
Connect a Terminal or Computer to the Console Port . . . . . . . . . . . . . . 21
Terminal Emulator Application Settings . . . . . . . . . . . . . . . . . . . . . . . 22
Connecting a Modem to the Console Port . . . . . . . . . . . . . . . . . . . . . . . . . 22
Apply Power. . . . . . . . . . . . . . . . . . . . . . . . . . . . . . . . . . . . . . . . . . . . . . . . . . . . . 23
Assemble the On/Off Power Lock. . . . . . . . . . . . . . . . . . . . . . . . . . . . . . . . . 25
Verify Connections . . . . . . . . . . . . . . . . . . . . . . . . . . . . . . . . . . . . . . . . . . . . . . 26
Reset the Services Router . . . . . . . . . . . . . . . . . . . . . . . . . . . . . . . . . . . . . . . . . 26
Replacement Accessory Parts. . . . . . . . . . . . . . . . . . . . . . . . . . . . . . . . . . . . . . 27
Configure the Stratix 5900 Services
Router
Rockwell Automation Publication 1783-UM005A-EN-P - September 2013 3
Chapter 3
Basic Configuration . . . . . . . . . . . . . . . . . . . . . . . . . . . . . . . . . . . . . . . . . . . . . . 30
Required Configuration . . . . . . . . . . . . . . . . . . . . . . . . . . . . . . . . . . . . . . 30
Configure the IP Address on the Computer . . . . . . . . . . . . . . . . . . . . . . . . 31
Obtain an IP Address in Microsoft Windows XP . . . . . . . . . . . . . . . 31
Obtain an IP Address in Microsoft Windows Vista. . . . . . . . . . . . . . 31
Obtain an IP Address in Microsoft Windows 7 . . . . . . . . . . . . . . . . . 32
Assign a Specific IP Address . . . . . . . . . . . . . . . . . . . . . . . . . . . . . . . . . . . 33
Connect the Computer to the Router . . . . . . . . . . . . . . . . . . . . . . . . . . 33
Getting Started with Stratix 5900 Device Manager Software . . . . . . . . . 34
Stratix Device Manager Software Functions . . . . . . . . . . . . . . . . . . . . 34
Stratix 5900 Device Manager Software Wizard . . . . . . . . . . . . . . . . . . . . . 36
Getting Started with Stratix Configurator Software . . . . . . . . . . . . . . . . . 38
Page 4

Table of Contents
Install Stratix Configurator Software . . . . . . . . . . . . . . . . . . . . . . . . . . . 39
Discover the Router. . . . . . . . . . . . . . . . . . . . . . . . . . . . . . . . . . . . . . . . . . . 41
Creating a Community and Adding Devices . . . . . . . . . . . . . . . . . . . . . . . . 44
Create a Community . . . . . . . . . . . . . . . . . . . . . . . . . . . . . . . . . . . . . . . . . 45
Creating an Initial Configuration of a Feature . . . . . . . . . . . . . . . . . . . . . . 47
Interfaces and Connections. . . . . . . . . . . . . . . . . . . . . . . . . . . . . . . . . . . . 48
Editing a Configuration. . . . . . . . . . . . . . . . . . . . . . . . . . . . . . . . . . . . . . . . . . . 49
Summary Window . . . . . . . . . . . . . . . . . . . . . . . . . . . . . . . . . . . . . . . . . . . . . . . 50
Configuring a Wide Area Network Interface . . . . . . . . . . . . . . . . . . . . . . . 50
WAN Interface Selection. . . . . . . . . . . . . . . . . . . . . . . . . . . . . . . . . . . . . . 50
Internet (WAN): Ethernet Interface . . . . . . . . . . . . . . . . . . . . . . . . . . . 51
Internet (WAN): Autodetect Encapsulation . . . . . . . . . . . . . . . . . . . . 52
Internet (WAN): User Specified Encapsulation . . . . . . . . . . . . . . . . . 53
Serial Connections . . . . . . . . . . . . . . . . . . . . . . . . . . . . . . . . . . . . . . . . . . . . . . . 55
Configuring a Firewall . . . . . . . . . . . . . . . . . . . . . . . . . . . . . . . . . . . . . . . . . . . . 57
Configuring Security Settings. . . . . . . . . . . . . . . . . . . . . . . . . . . . . . . . . . 58
Advanced Firewall Configuration Wizard . . . . . . . . . . . . . . . . . . . . . . 58
Configure the Stratix 5900 Services
Router by Using CISCO IOS Commandline Interface (CLI)
Index
Chapter 4
How to Use CLI for the First Time . . . . . . . . . . . . . . . . . . . . . . . . . . . . . . . . 60
CLI Architecture. . . . . . . . . . . . . . . . . . . . . . . . . . . . . . . . . . . . . . . . . . . . . . . . . 60
CLI Editor Features . . . . . . . . . . . . . . . . . . . . . . . . . . . . . . . . . . . . . . . . . . . . . . 62
Context Sensitive Help. . . . . . . . . . . . . . . . . . . . . . . . . . . . . . . . . . . . . . . . 62
Command Syntax Check. . . . . . . . . . . . . . . . . . . . . . . . . . . . . . . . . . . . . . 63
Hot Keys. . . . . . . . . . . . . . . . . . . . . . . . . . . . . . . . . . . . . . . . . . . . . . . . . . . . . 64
Use Command Line Instructions to Configure the Router . . . . . . . . . . 64
Configure Initial Router Settings . . . . . . . . . . . . . . . . . . . . . . . . . . . . . . 64
Enter the Configuration Commands Manually. . . . . . . . . . . . . . . . . . 66
Take Interfaces Out of Shutdown . . . . . . . . . . . . . . . . . . . . . . . . . . . . . . 69
Remove Commands / Resetting Default Values . . . . . . . . . . . . . . . . . 70
Save Configurations . . . . . . . . . . . . . . . . . . . . . . . . . . . . . . . . . . . . . . . . . . 71
Router Management. . . . . . . . . . . . . . . . . . . . . . . . . . . . . . . . . . . . . . . . . . . . . . 72
Display Configurations . . . . . . . . . . . . . . . . . . . . . . . . . . . . . . . . . . . . . . . 72
Display Software Version. . . . . . . . . . . . . . . . . . . . . . . . . . . . . . . . . . . . . . 73
Display Interface States . . . . . . . . . . . . . . . . . . . . . . . . . . . . . . . . . . . . . . . 75
Setup Command Facility . . . . . . . . . . . . . . . . . . . . . . . . . . . . . . . . . . . . . . 76
Copy the Default Configuration File to NVRAM. . . . . . . . . . . . . . . . . . . 80
4 Rockwell Automation Publication 1783-UM005A-EN-P - September 2013
Page 5

Preface
IMPORTANT
This publication describes the installation and configuration of the Stratix 5900™
services router. This services router is the Rockwell Automation version of the
Cisco 819 (ISR819H) Secure Hardened Router with Serial connection.
Audience
Services Router Configuration
This guide is for the person configuring and monitoring Stratix 5900 services
router. We assume that you are familiar with these topics:
• Local area network (LAN) router fundamentals
• Concepts and terminology of the Ethernet protocol, LAN, and WAN,
networking
There are three ways that you can configure the router.
• Stratix 5900 Device Manager™ Software
Stratix 5900 Device Manager software offers limited configuration
options, see Getting Started with Stratix 5900 Device Manager Software
on page 34. The software comes installed on the router when shipped.
• Stratix Configurator™ Software
Stratix Configurator software eliminates the need for multiple device
managers by providing a single tool to configure and manage devices. The
software is available for download at the Rockwell Automation Product
Compatibility and Download Center.
For instructions about how to use this software, see Getting Started with
Stratix Configurator Software on page 38.
• Command Line Interface (CLI)
Use a terminal services emulator. For instructions about how to use CLI
through the console, see Use Command Line Instructions to Configure
the Router on page 64.
In addition, this publication provides troubleshooting information to help you
resolve basic router and network issues.
Any Internet Protocol (IP) addresses and phone numbers used in this document
are not intended to be actual addresses and phone numbers. Any examples,
command display output, network topology diagrams, and other figures
included in the document are shown only for illustrative purposes. Any use of
actual IP addresses or phone numbers in illustrative content is unintentional
and coincidental.
Rockwell Automation Publication 1783-UM005A-EN-P - September 2013 5
Page 6

Preface
Additional Resources
These documents contain additional information concerning related products
from Rockwell Automation.
Resource Description
Stratix 5900 Device Manager Online Help Provides context-sensitive information on configuring and using the router,
Stratix Configurator Online Help Provides context-sensitive information on configuring and using the router,
EtherNet/IP Secure Communication User Manual, publication ENET-UM003
EtherNet/IP Network Configuration User Manual, publication ENET-UM001
Cisco Manuals for Cisco 819 Integrated Router, http://www.Cisco.com
Using the Cisco IOS Command-Line Interface Configuration Guide 15.3
Cisco Configuration Professional Express 2.7 User Guide
Cisco Configuration Professional Administration Guide
Basic Router Configuration Using Cisco Configuration Professional
Cisco Configuration Professional 2.7 Users Guide
Industrial Automation Wiring and Grounding Guidelines, publication 1770-4.1
Product Certifications we bsite, http://www.ab.com
Provides detailed instructions on how an administrator uses the Cisco Configuration
Provides detailed instructions on how to use the Cisco Configuration Professional
Provides comprehensive information about using the Cisco IOS Command-Line
including system messages.
including system messages.
Provides description and configuration of the 1756-EN2TSC module, securityenhanced version of the 1756-EN2T.
Describes how you can use EtherNet/IP communication modules with your
Logix5000™ controller and communicate with various devices on the Ethernet
network.
Cisco Systems Website
Interface.
Provides the router with the configuration essentials so that it can start working on
the network.
Professional software.
Provides basic information on how to use Cisco Configuration Professional.
software.
Provides general guidelines for installing a Rockwell Automation industrial system.
Provides declarations of conformity, certificates, and other certification details.
You can view or download Rockwell Automation publications at
http:/www.rockwellautomation.com/literature/
. To order paper copies of
technical documentation, contact your local Allen-Bradley distributor or
Rockwell Automation sales representative.
Other information that can be of use to you is available at
http://www.Cisco.com
.
• Cisco IOS 15.3S Website
• Cisco IOS Security Configuration Guide, Release 15.3S
• Cisco IOS 15.3S Configuration Guides
• Cisco 819 Series Integrated Routers Software Configuration Guide
6 Rockwell Automation Publication 1783-UM005A-EN-P - September 2013
Page 7

Chapter 1
Getting Started
This chapter provides an overview of the features available for the Stratix 5900
services router.
Top ic Pag e
Stratix 5900 Services Router 7
Items Shipped with the Stratix 5900 Services Router 9
Power Supply 10
Status Indicators 11
Serial Port 11
Configuration Software 12
Stratix 5900 Services Router
The Stratix 5900 services router is a hardened network device with available wall,
floor, and DIN rail mount features that supports Ethernet communication. The
chassis is rated for use in industrial automation and harsh environments. This
router is powered by an external AC power adapter, see Power Supply
for more information.
It provides the flexibility for use in many different stationary environments where
space, heat dissipation, exposure to extreme temperatures, harsh environments,
and low power consumption are important factors.
The Stratix 5900 services router is capable of bridging and multi-protocol routing
between LAN and WAN ports. It is a fixed-configuration data router that
provides four 10/100 Fast Ethernet (FE), 1 Gigabit Ethernet (GE), and WAN
connections over a serial communication port.
on page 10
Rockwell Automation Publication 1783-UM005A-EN-P - September 2013 7
Page 8

Chapter 1 Getting Started
The Stratix 5900 services router provides the following these features.
Table 1 - Stratix 5900 Services Router Features
Item Description
Stratix 5900
Services Router
Router • Hostname
Security • One step router lock-down
Firewall • Wizards are provided to configure a basic and advanced firewall.
VPN • Configure different types of VPNs.
Voi ce • Unified Communication (Voice) Modes
Flash File
Management
System Features
VBAC
• Table, wall and DIN rail mounting options
• Hardened exterior with IP41, extended temperature operation –25…60 °C (–13…140 °F)
with additional shock/vibration protection
• Fan-less design
• 512 MB DRAM
• 256 KB of NVRAM storage
• 4 LAN Fast Ethernet RJ45 ports
• Power cord retention lock
• Status indicators
• Onboard crypto acceleration
• 1 Gigabit Ethernet WAN RJ45 port
• Reset button for configuration recovery
• Real Time Clock (RTC)
• Single console/AUX port
• Simple Network Management Protocol (SNMP)
• Warm re load
• 1 RS-232 RJ45 console/AUX port
• 1 12-in-1 serial port (async and sync), in addition to the console port
• P1021S Freescale Dual-Core 400 MHz processor
• Class A Compliance
• 100-240 V AC universal AC power adaptor
• Username, Password
• DHCP, DNS
• NAT
• Static Routing
• Dynamic Routing (RIP, OSPF, EIGRP) Advanced Functions
• QoS
• Performance Routing (PFR)
• Security audit of the router
• Firewall (Zone Based and CBAC)
• VPN and Advanced VPN Functions
• Intrusion Prevention System (IPS)
• Content Filtering
• One step router lock-down
• Security audit of the router
• Change individual parameters in the edit mode.
• Add a rule to configure ALG (Application Level Gateway) rules or AIC (Application Inspection
Control) rules or otherwise know as deep packet inspection.
• Advanced users have the option of using the options provided under C3PL (Cisco Common
Classification Engine Policy Language) to configure class maps and polic y maps.
• Supports Virtual Tunnel Interface configuration for Easy VPN.
• As part of Site to Site IPsec, VPN lets you generate a mirror configuration that can be applied
to the peer device to complete the configuration.
• The VPN design guide helps you identify the VPN options that are best for your deployment
based on end user requirements.
• Cisco Unified Communication Manager Express (CME)
• Gateway to Cisco Unified Communication Manager with options to add SRST or CME as SRST
• CME as SRST
• Free Form Show Commands
• Configuration Editor
• Save Router Configuration
• Create a user profile to allow/disallow access to a screen
• Deploy template features for baseline configurations to other routers
• Offline Mode
8 Rockwell Automation Publication 1783-UM005A-EN-P - September 2013
Page 9
Getting Started Chapter 1
RESET
SERIAL
CON / AUX
GE WAN 0
FE 1
SL
FE 0
SL
FE 3
SL
FE 2
SLS L
SYS
ACT
LAN
32380-M
3
1
4
6
7
8
9
10
2
5
Items Shipped with the Stratix 5900 Services Router
These items are included with the services router.
• AC power supply with cable
• Power cord retention lock
• Power switch lock
• Serial to Ethernet (RJ-45-to-DB-9) console cable
• Din Rail mount
• Product information, publication 1783-PC004A-EN-P
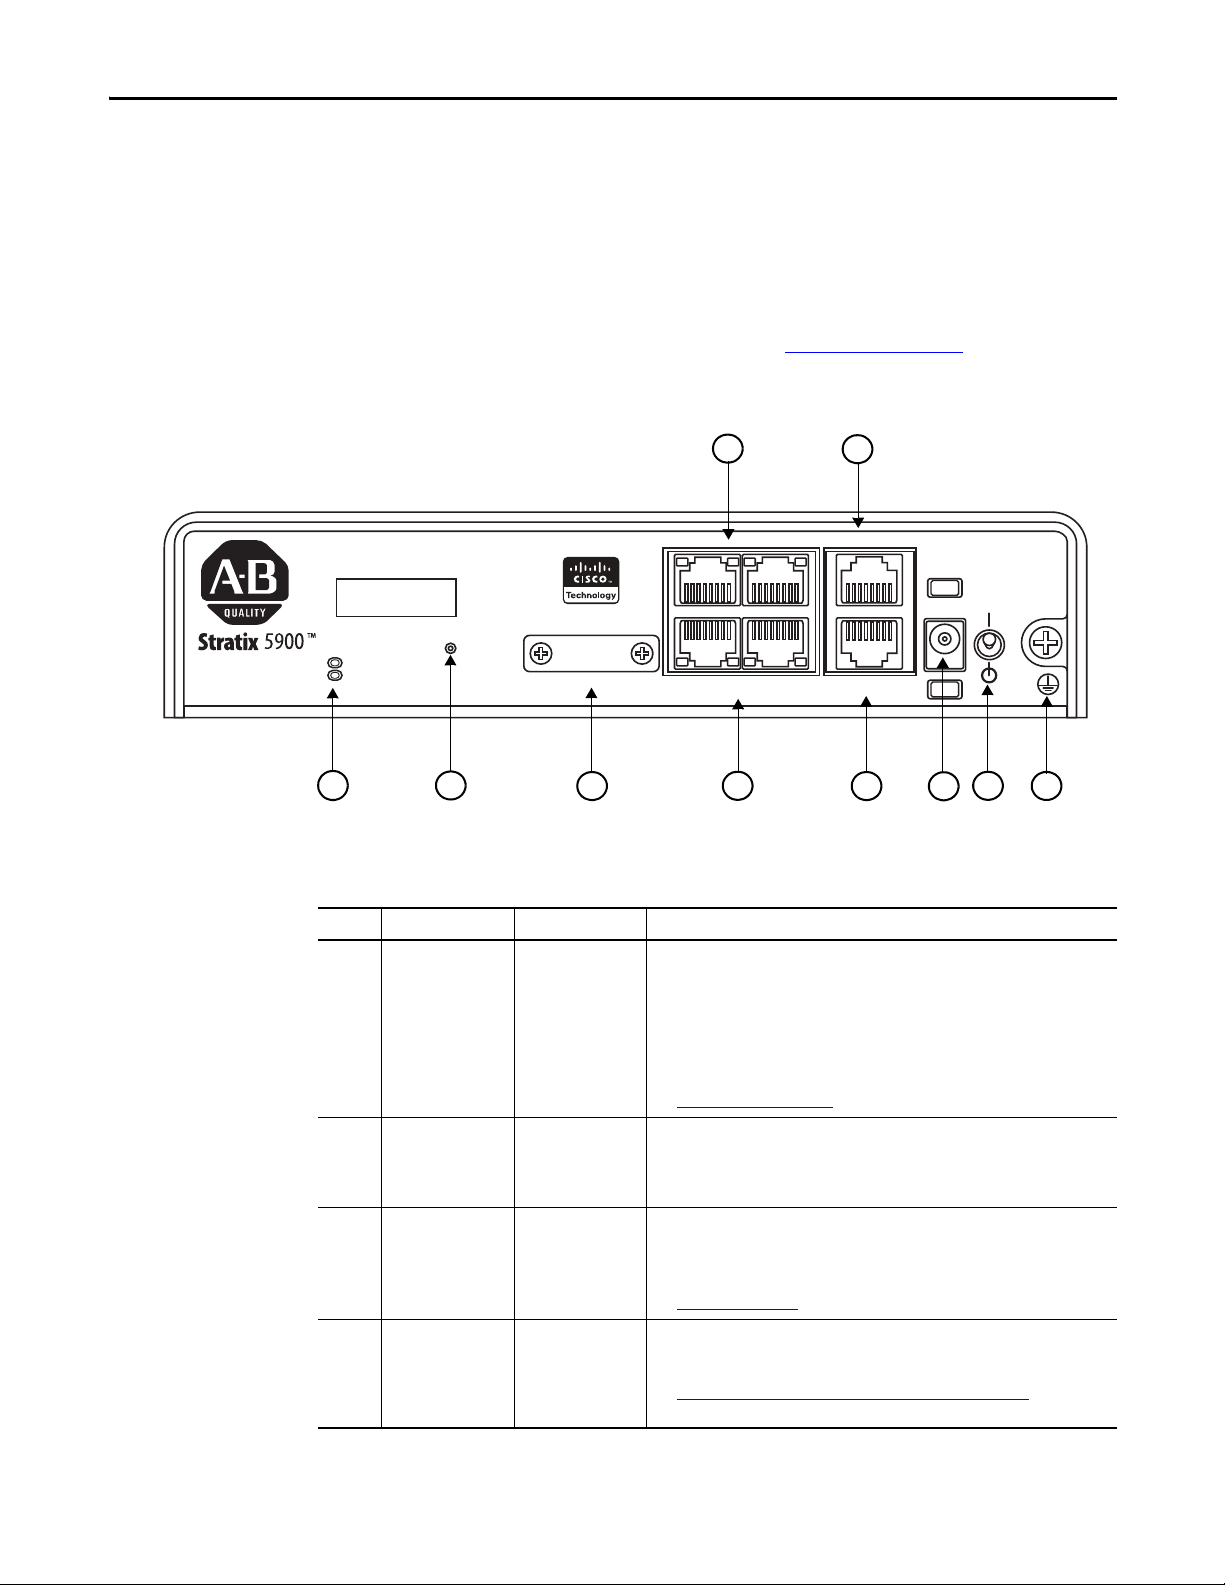
This illustration shows the front of the services router.
This table describes the features of the Straitx 5900 services router.
Table 2 - Stratix 5900 Services Router Features
No. Item Labeled Description
1 SYS/ACT
status indicators
2 Reset Reset Resets the router configuration to the default configuration set by the factor y.
3 Serial Port Serial A 12-in-1 serial por t provides an attachment to RS-232 sync and async devices.
4 and 5 LAN...FE ports LAN, FE0–FE3 There are four RJ45 Fast-Ethernet (100 Mb) switched LAN ports. These LAN por ts
SYS
ACT
Yellow FPGA download is complete.
Green (blinking) ROMMON is operational.
Green (solid) IOS is operational.
Green Four blinks during bootup.
Reset button has been pushed during bootup.
Off After powering up, when FPGA is being
downloaded (in ROMMON).
See Status Indicators
on page 11 for more information.
To restore the router configuration to the default configuration set by the factory,
use a standard size #1 paper clip with wire gauge 0.033 inch or smaller and
simultaneously press reset while applying power to the router.
A high speed Serial 12-in-1 connector provides the connections to various DTE/DCE
devices. The 12-in-1 serial interface pins connect to the FPGA. The FPGA configures
the pin directions based on the cable type used.
See Serial Port on page 11 for more information.
have full wire-speed L2 switching capability and support auto-negotiation with
auto-MDIX.
See Connect a Personal Computer, Server, or Workstation on page 19 for more
information.
Rockwell Automation Publication 1783-UM005A-EN-P - September 2013 9
Page 10
Chapter 1 Getting Started
32381-M
Table 2 - Stratix 5900 Services Router Features (continued)
No. Item Labeled Description
6 Console /AUX port CON/AUX An RJ45 console port provides console access if a Console cable is attached. If a
7 Gigabit Ethernet
WAN Port
7 Power input The router requires a 5 V DC power source. The router uses a 5.5 x 2.5 mm barrel-
8 Power Switch Shuts down the router. A power switch lock is available to prevent accidental
9 Ground Make sure you ground the router bef ore applying p ower. See Ground the Router on
GE WAN 0 A single RJ45 Gigabit Ethernet port (full auto-negotiation with auto-MDIX) WAN
modem or other serial device (DCE) is attached, and the proper license enabled, it
can also function as a AUX port. The pinout is identical to the AUX port on ISR/G2
platforms, and includes CTS/RTS, and DSR/DTR.
See Connect a Terminal or Computer to the Console Port on page 21, Connecting a
Modem to the Console Port on page 22, and Serial Connections on page 55 for more
information.
port is on the I/O panel. The hardware supports Gigabit 1000 Mbps speed, but is
limited to Fast Ethernet speeds by the software for the Stratix 5900 services router.
See Connect a Personal Computer, Server, or Workstation on page 19 and
Configuring a Wide Area Network Interface on page 50 for more information.
type connector with separate locking clip. See Ap ply Power on page 23 for more
information.
turning off of the router.
There is a retention lock that you can connect to the power switch, see Assemble
the On/Off Power Lock on page 25 for more information.
page 18 for more information.
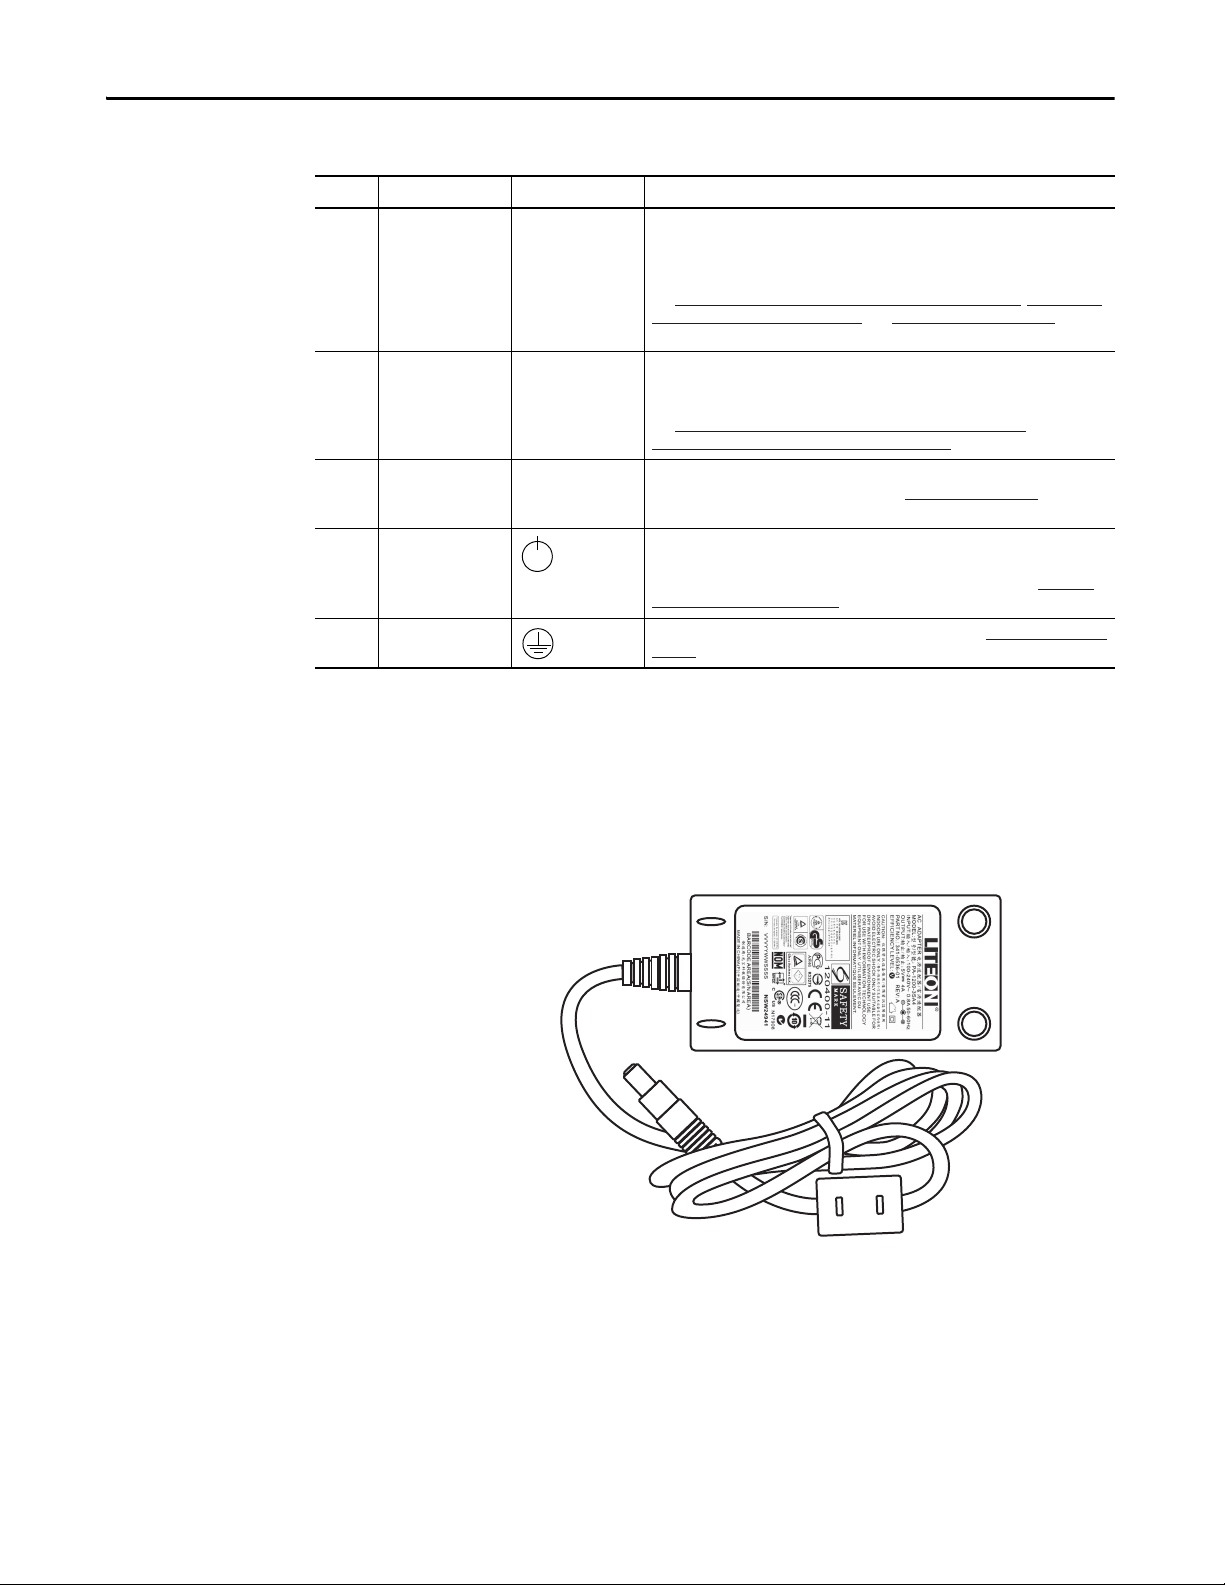
Power Supply
The supported power adapter for the Stratix 5900 services router is the AC
Power Adapter, PA-1200-3SA4. The nominal input range for the power adapter
is 100…240 V AC and it is shipped with the router.
The default configuration includes an external AC adapter that supplies up to 20
W of power. The AC power connection is a two-pin IEC 320 C8 receptacle. A
mating AC power cord is supplied. The AC adapter does not provide chassis
grounding to the router. A 1.3 meter long output cable connects to the router.
10 Rockwell Automation Publication 1783-UM005A-EN-P - September 2013
Page 11

Getting Started Chapter 1
Status Indicators
This table describes the status indicators for the Stratix 5900 services router.
Table 3 - Stratix 5900 Services Router Status Indicators
Status Indicator Color Description
SYS Yellow FPGA download is complete.
Green (blinking) ROMMON is operational.
Green (solid) IOS is operational.
Green (four blinks during bootup) Reset has been pushed during the bootup.
Off After applying power, when FPGA is being downloaded
ACT check Green Network activity on FE Switch ports, GE WAN port, and
Off No network activity.
WWAN check Green Module is powered on and connected but not
Green (slow blinking) Module is powered and searching for connection.
Green (fast blinking) Module is transmitting or receiving.
Off Module is not powered.
Off/Off No SIM present in either slots.
(in ROMMON).
serial interfaces.
transmitting or receiving.
Serial Port
The High Speed Smart Serial 12-in-1 connector provides high flexibility of the
connections to DTE/DCE devices. The 12-in-1 serial interface pins connect to
the Field Programmable Gate Array (FPGA). The FPGA configures the pin
directions based on the cable type you use.
Rockwell Automation Publication 1783-UM005A-EN-P - September 2013 11
Page 12

Chapter 1 Getting Started
Configuration Software
Stratix 5900 Configurator software and Stratix 5900 Device Manager are GUIbased device-management tools for the Stratix 5900 services router.
Stratix 5900 Configurator software is a PC-based application that simplifies
router, firewall, intrusion prevention system (IPS), VPN, unified
communications, WAN, LAN, and basic wireless configuration through easy-touse wizards.
Stratix 5900 Device Manager is a lightweight version of Stratix 5900
Configurator software. It is an embedded device manager that is available on the
router flash memory that you can use to configure some of the LAN and WAN
interfaces and basic configurations to bootstrap the router.
Stratix 5900 Device Manager is available on the router flash memory. The router
comes with a default configuration, and Stratix 5900 Device Manager can be
accessed through a browser by using the WAN IP address using HTTP. Stratix
5900 Device Manager provides the necessary functions to bootstrap the routers.
The user interface supports basic features including different WAN and LAN
interfaces, static routes, user management, Domain Name System (DNS),
Dynamic Host Configuration Protocol (DHCP), and Hostname configurations.
It also provides the ability to configure the server on the router.
Users of the Cisco IOS® Software CLI can execute and configure the Cisco IOS
Software CLI on the routers using Stratix 5900 Device Manager. In addition,
Device Manager provides basic utility tools such as ping and traceroute as basic
troubleshooting tools.
There are three software programs that can be used to configure the Stratix 5900
services router.
• Stratix 5900 Device Manager software
• Stratix Configurator software
• Cisco’s IOS command line interface programming software
Stratix Configurator software is not shipped on a CD. Stratix 5900 Device
Manager software is embedded in the nonvolatile memory of the router. A
default router configuration file is placed in both the nonvolatile memory and
NVRAM of the router.
Stratix Configurator software is available for download at the Rockwell
Automation Product Compatibility and Download Center.
12 Rockwell Automation Publication 1783-UM005A-EN-P - September 2013
Page 13
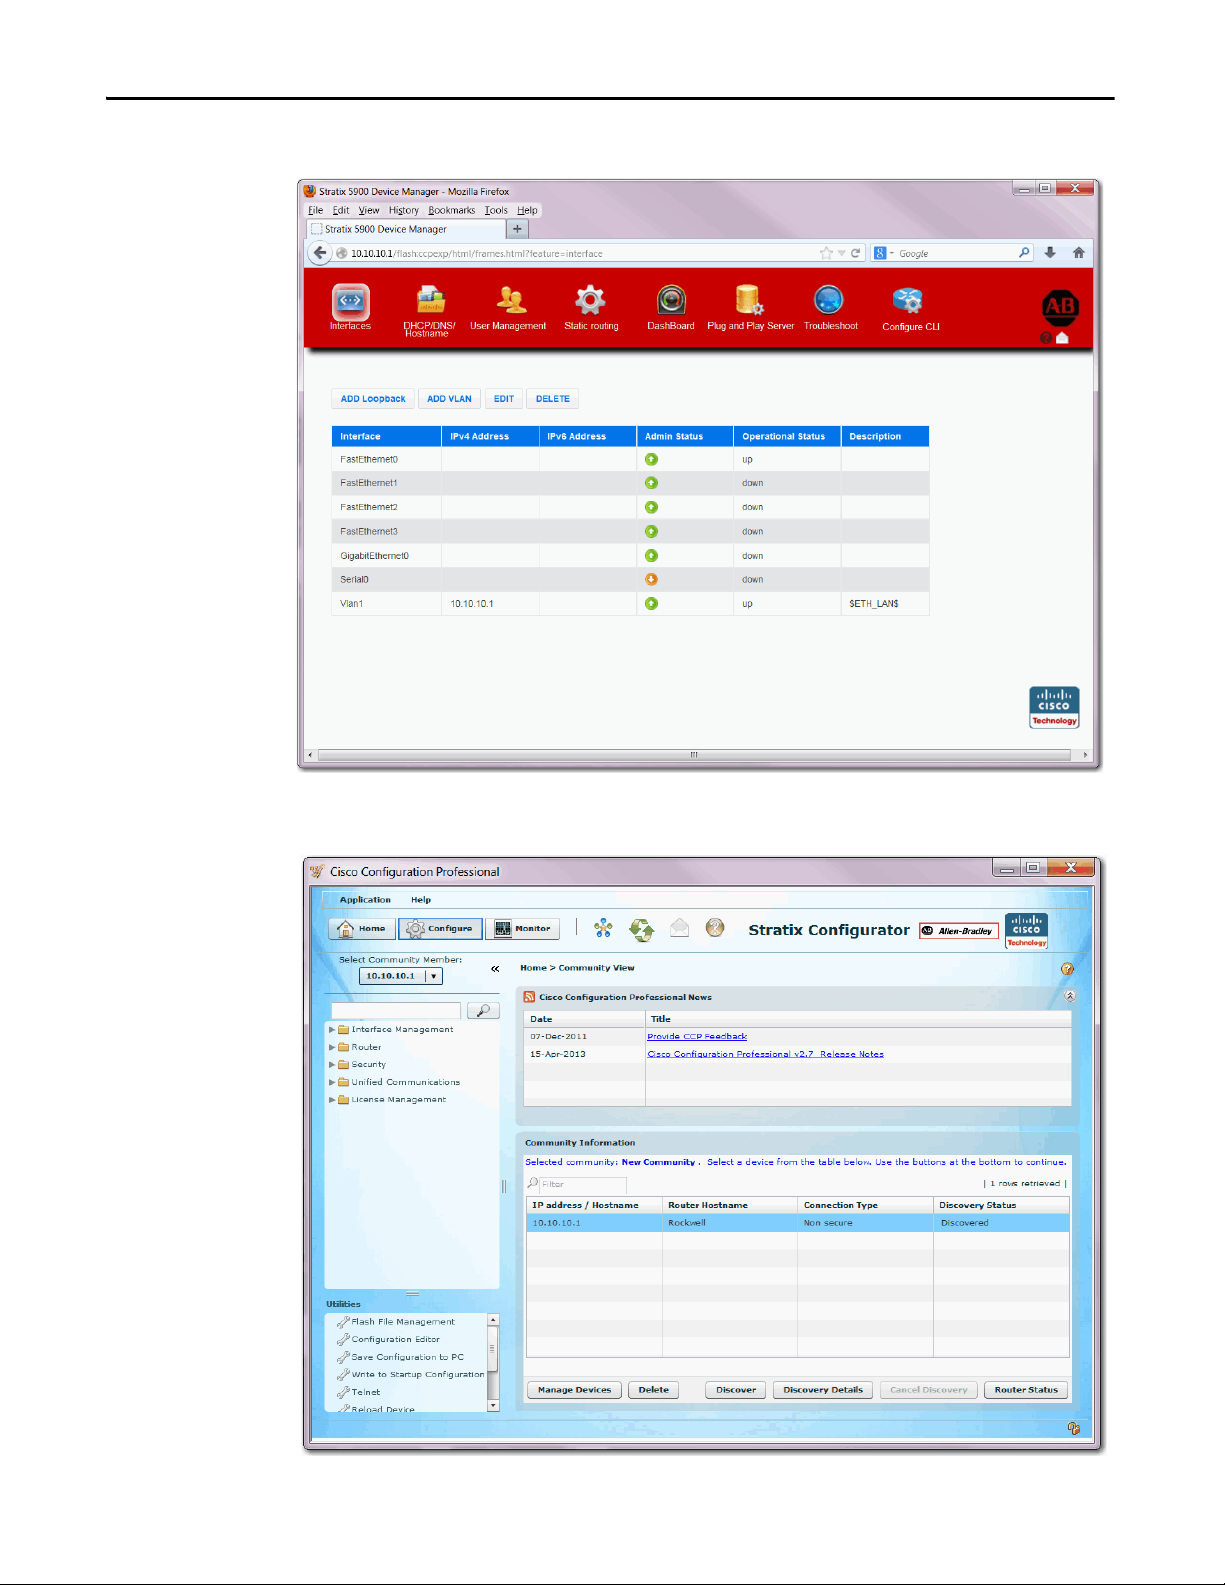
Stratix 5900 Device Manager Software Interface Window
Getting Started Chapter 1
Rockwell Automation Publication 1783-UM005A-EN-P - September 2013 13
Page 14
Chapter 1 Getting Started
Stratix 5900 Device Manager Software Interface and Connections Window
Stratix Configurator Software Page
14 Rockwell Automation Publication 1783-UM005A-EN-P - September 2013
Page 15

Chapter 2
Install Stratix 5900 Services Router
This chapter explains how to install and connect the Stratix 5900 services router.
This router supports Ethernet communication from component to component.
It has a chassis for use in industrial automation and harsh environments.
Top ic Pag e
Install the Unit 17
Install the Router on a DIN Rail 17
Installation Clearance 18
Prevent Damage to the Router 18
Ground the Router 18
Connect a Personal Computer, Server, or Workstation 19
Connect an External Ethernet Switch 20
Connect a Terminal or Computer to the Console Port 21
Terminal Emulator Application Settings 22
Connecting a Modem to the Console Port 22
Apply Power 23
Assemble the On/Off Power Lock 25
Verify Connections 26
ATTENTION:
• Before installing, configuring, operating, or maintaining this product, read this document and the documents listed in the
Additional Resources section for installing, configuring, or operating equipment. Familiarize yourself to the installation and wiring
instructions in addition to requirements of all applicable codes, laws, and standards.
• Installation, adjustments, putting into service, use, assembly, disassembly, and maintenance shall be carried out by suitably
trained personnel in accordance with applicable code of practice. In case of malfunction or damage, no attempts at repair can be
made. The product can be returned to the manufacturer for repair. Do not dismantle the module.
• If this equipment is used in a manner not specified by the manufacturer, the protection provided by the equipment can be
impaired.
• This equipment is certified for use only within the surrounding air temperature range of -25…60 °C (-13…140 °F). The
equipment must not be used outside of this range.
ATT EN TI ON : When installing the product, use the provided or designated connection cables/power cables/AC adapters. Using any
other cables/adapters could cause a malfunction or a fire. Electrical Appliance and Material Safety Law prohibits the use of ULcertified cables (that have the `UL’ shown on the code) for any other electrical devices than products designated by CISCO. The use
of cables that are certified by Electrical Appliance and Material Safety Law (that have `PSE’ shown on the code) is not limited to
CISCO-designated products.
Rockwell Automation Publication 1783-UM005A-EN-P - September 2013 15
Page 16

Chapter 2 Install Stratix 5900 Services Router
IMPORTANT
IMPORTANT
IMPORTANT
ATTENTION: Read the DIN-rail mounting instructions carefully before beginning installation. Failure to use the correct hardware
or to follow the correct procedures could result in a hazardous situation to people and damage to the system.
• The covers are an integral part of the safety design of the product. Do not operate the unit without the covers installed.
• No user-serviceable parts inside. Do not open.
• Hot surface.
ATTENTION: To avoid electric shock, do not connect safety extra-low voltage (SELV) circuits to telephone-network voltage (TNV)
circuits. LAN ports contain SELV circuits, and WAN ports contain TNV circuits. Some LAN and WAN ports both use RJ45 connectors.
Use caution when connecting cables.
ATTENTION: Installation of the equipment must comply with local and national electrical codes.
• Read the installation instructions before connecting the system to the power source.
• To avoid electric shock, do not connect safety extra-low voltage (SELV) circuits to telephone-network voltage (TNV) circuits. LAN
ports contain SELV circuits, and WAN ports contain TNV circuits. Some LAN and WAN ports both use RJ45 connectors. Use caution
when connecting cables.
• This equipment must be grounded. Never defeat the ground conductor or operate the equipment in the absence of a suitably
installed ground conductor. Contact the appropriate electrical inspection authority or an electrician if you are uncertain that
suitable grounding is available.
• When installing or replacing the unit, the ground connection must always be made first and disconnected last.
• Do not use this product near water; for example, near a bath tub, wash bowl, kitchen sink, or laundry tub, in a wet basement, or
near a swimming pool.
At the end of its life, collect this equipment separately from any unsorted municipal waste.
This product is not intended to be directly connected to the Cable Distribution System. Additional regulatory compliance and
legal requirements can apply for direct connection to the Cable Distribution System. This product can connect to the Cable
Distribution System only through a device that is approved for direct connection.
ATTENTION: This equipment is sensitive to electrostatic discharge, which can cause internal damage and affect normal
operation. Follow these guidelines when you handle this equipment:
• Touch a grounded object to discharge potential static.
• Wear an approved grounding wriststrap.
• Do not touch connectors or pins on component boards.
• Do not touch circuit components inside the equipment.
• Use a static-safe workstation, if available.
• Store the equipment in appropriate static-safe packaging when not in use.
When the router is installed in an industrial enclosure, the temperature within the enclosure is greater than normal room
temperature outside the enclosure.
The temperature inside the enclosure must not exceed 60 °C (140 °F), the maximum ambient enclosure temperature of the
router.
16 Rockwell Automation Publication 1783-UM005A-EN-P - September 2013
Page 17
Install Stratix 5900 Services Router Chapter 2
32379-M
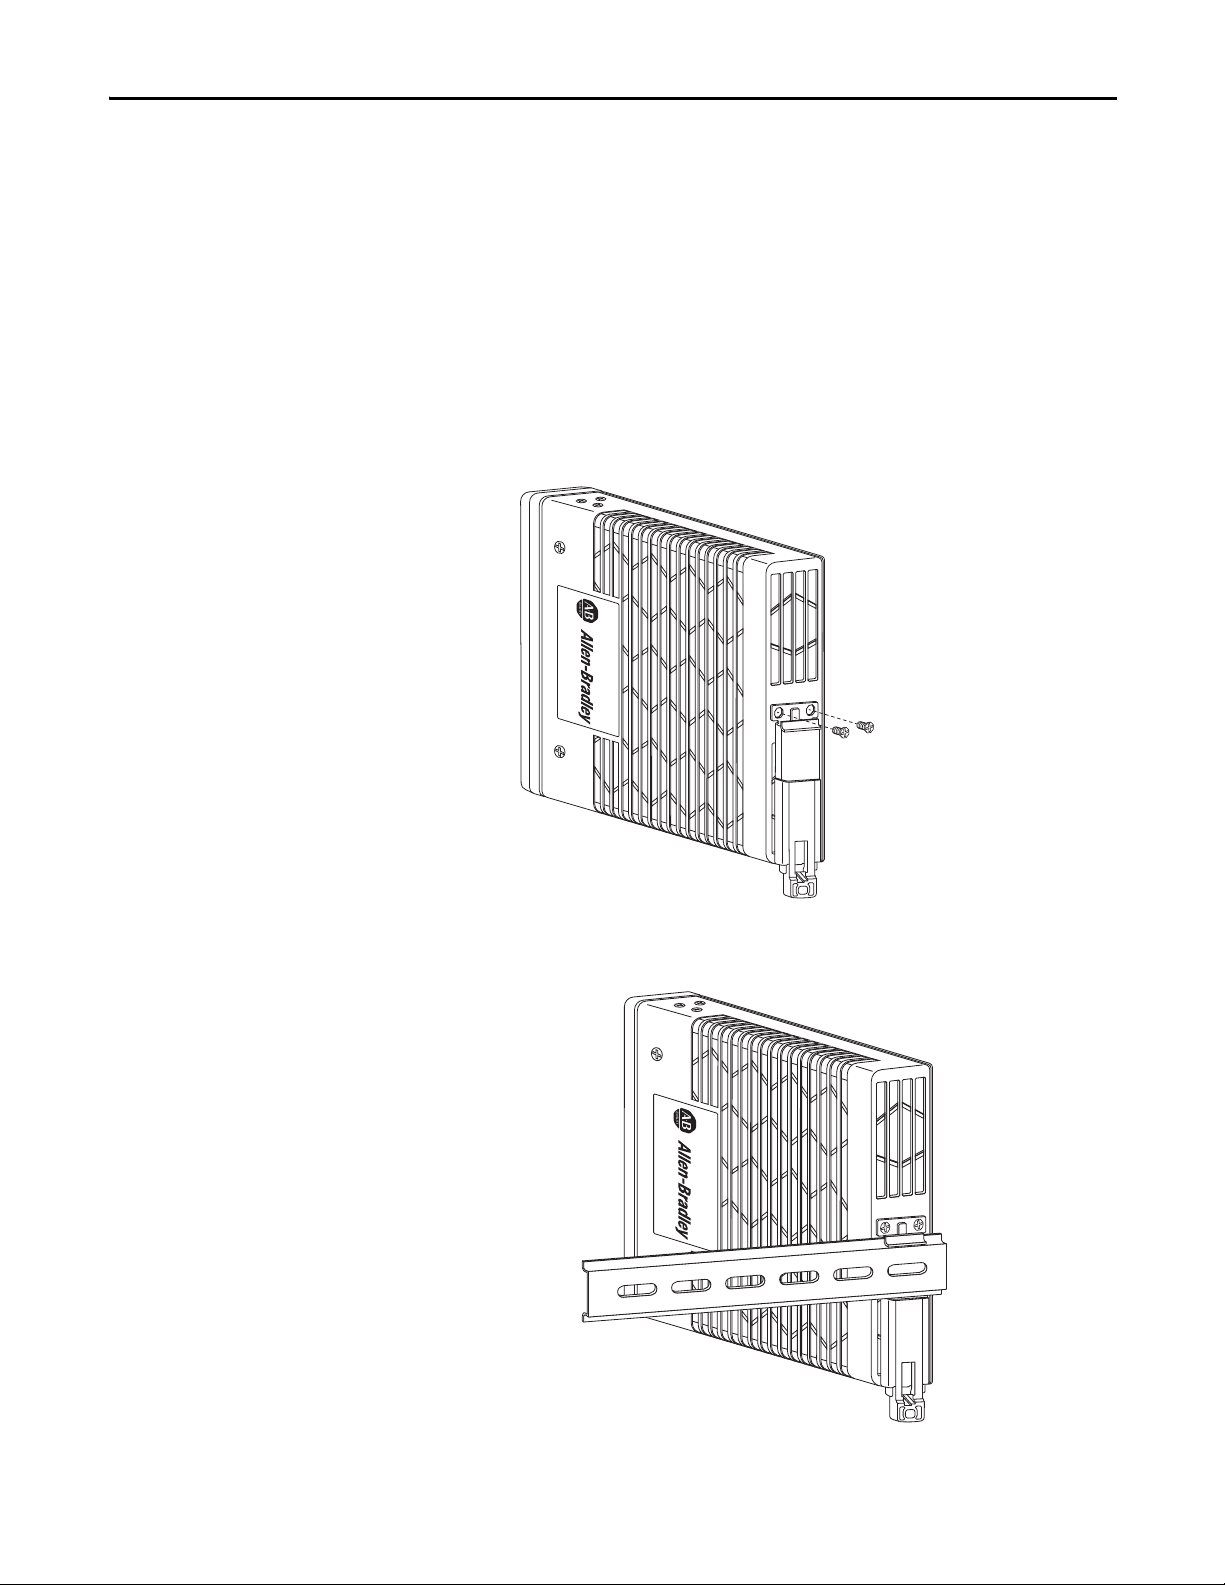
Install the Unit
Install the Router on a DIN Rail
The following items are needed to install the unit.
• ESD-preventive cord and wrist strap
• DIN-rail bracket
• Ethernet cables for connecting to the Fast Ethernet (FE) WAN and LAN
ports
The Stratix 5900 services router can be installed on a flat surface or mounted
DIN rail.
1. Remove the two screws on the back of the unit.
32378-M
2. Line the bracket holes up and attach the bracket.
3. Attach to the DIN-rail.
Rockwell Automation Publication 1783-UM005A-EN-P - September 2013 17
Page 18
Chapter 2 Install Stratix 5900 Services Router
IMPORTANT
2434-M
Installation Clearance
Prevent Damage to the Router
The recommended clearance when horizontally mounted is 1.5 inches on both
sides for floor-mount bracket clearance and 2 inches on top.
Top clearance is not required but stacking heat dissipating objects on top of
the services router is not allowed.
I/O side clearance is needed as it is required to access the cable connections.
Clearance is not required on the backside (opposite side from I/O face) unless
DIN rail mounting is required. Clearance is required to attach and mount the
DIN rail bracket. The same clearances apply when mounted vertically.
To prevent damage to your router, follow these guidelines when connecting
devices to your router.
ATTENTION: Turn off power to the router and any devices until all connections
are completed.
Do not turn on the devices until after you have completed all connections to the
router.
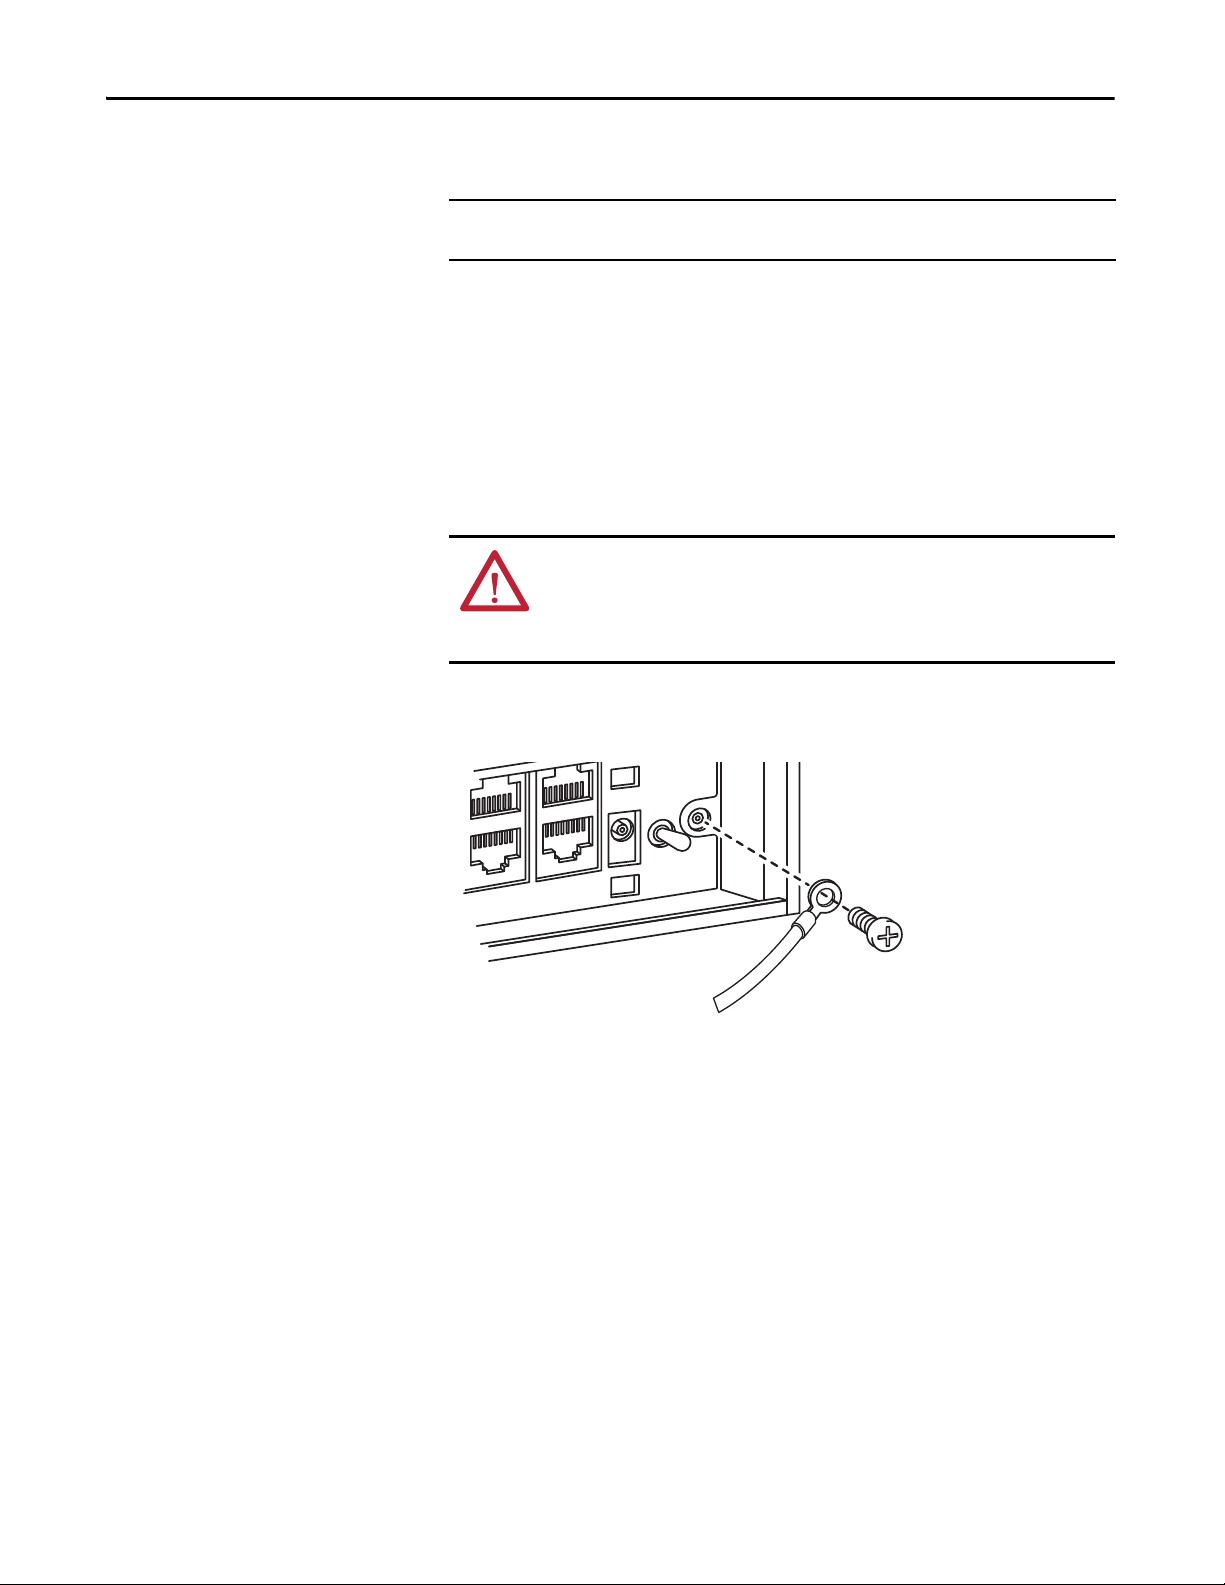
Ground the Router
Follow this illustration to ground the router.
18 Rockwell Automation Publication 1783-UM005A-EN-P - September 2013
Page 19
Install Stratix 5900 Services Router Chapter 2
32445-M
RESET
SERIAL
CON / AUX
GE WAN 0
FE 1SLFE 0
SL
FE 3SLFE 2
SLS L
SYS
ACT
LAN
1
3
2
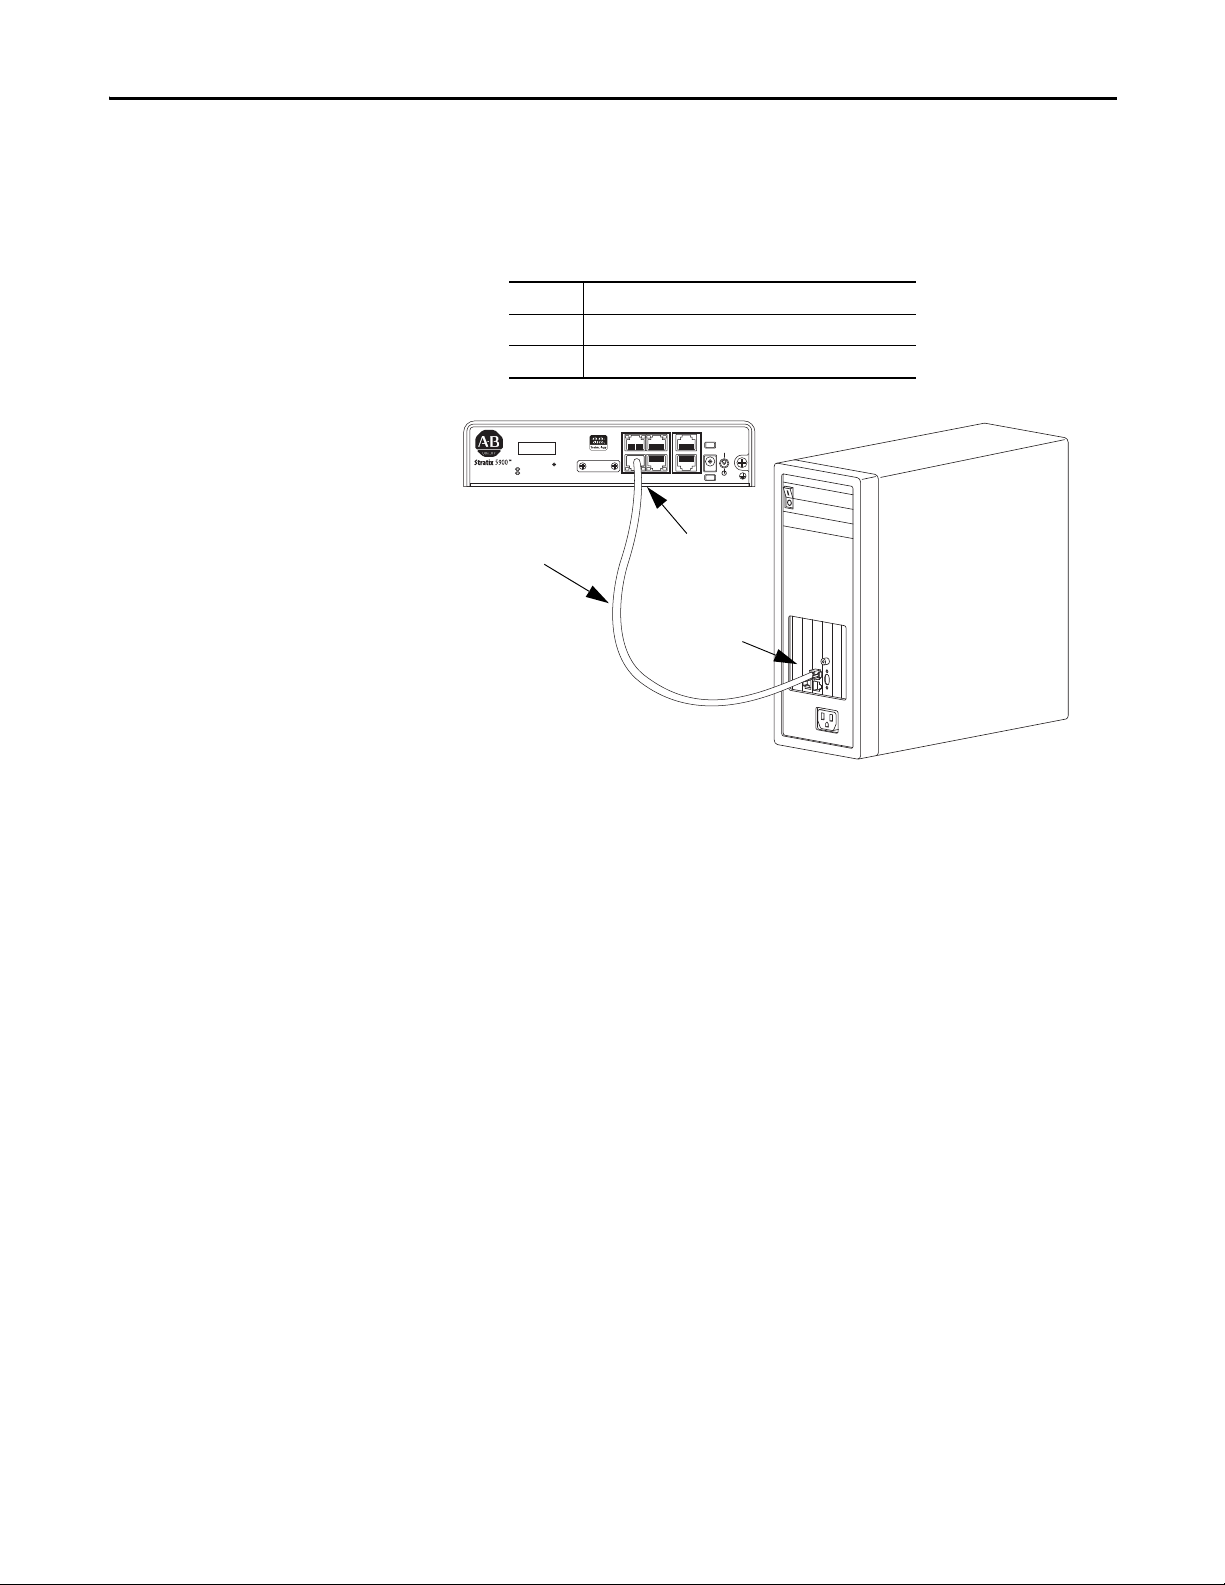
Connect a Personal Computer, Server, or Workstation
To connect a computer (or other Ethernet devices) to an Ethernet switch port,
follow these steps.
1. Connect one end of the Ethernet cable to an Ethernet switch port on the
router.
1 Ethernet cable
2 Ethernet port on the router
3 RJ45 Port on the computer
2. Connect the other end of the cable to the RJ45 port on the network
interface card (NIC) that is installed in the personal computer, server, or
workstation.
3. (Optional) Connect additional servers, personal computers, or
workstations to the other Ethernet switch ports.
Rockwell Automation Publication 1783-UM005A-EN-P - September 2013 19
Page 20
Chapter 2 Install Stratix 5900 Services Router
32435-M
RESET
SERIAL
CON / AUX
GE WAN 0
FE 1
SL
FE 0
SL
FE 3
SL
FE 2
SLS L
SYS
ACT
LAN
1
3
2
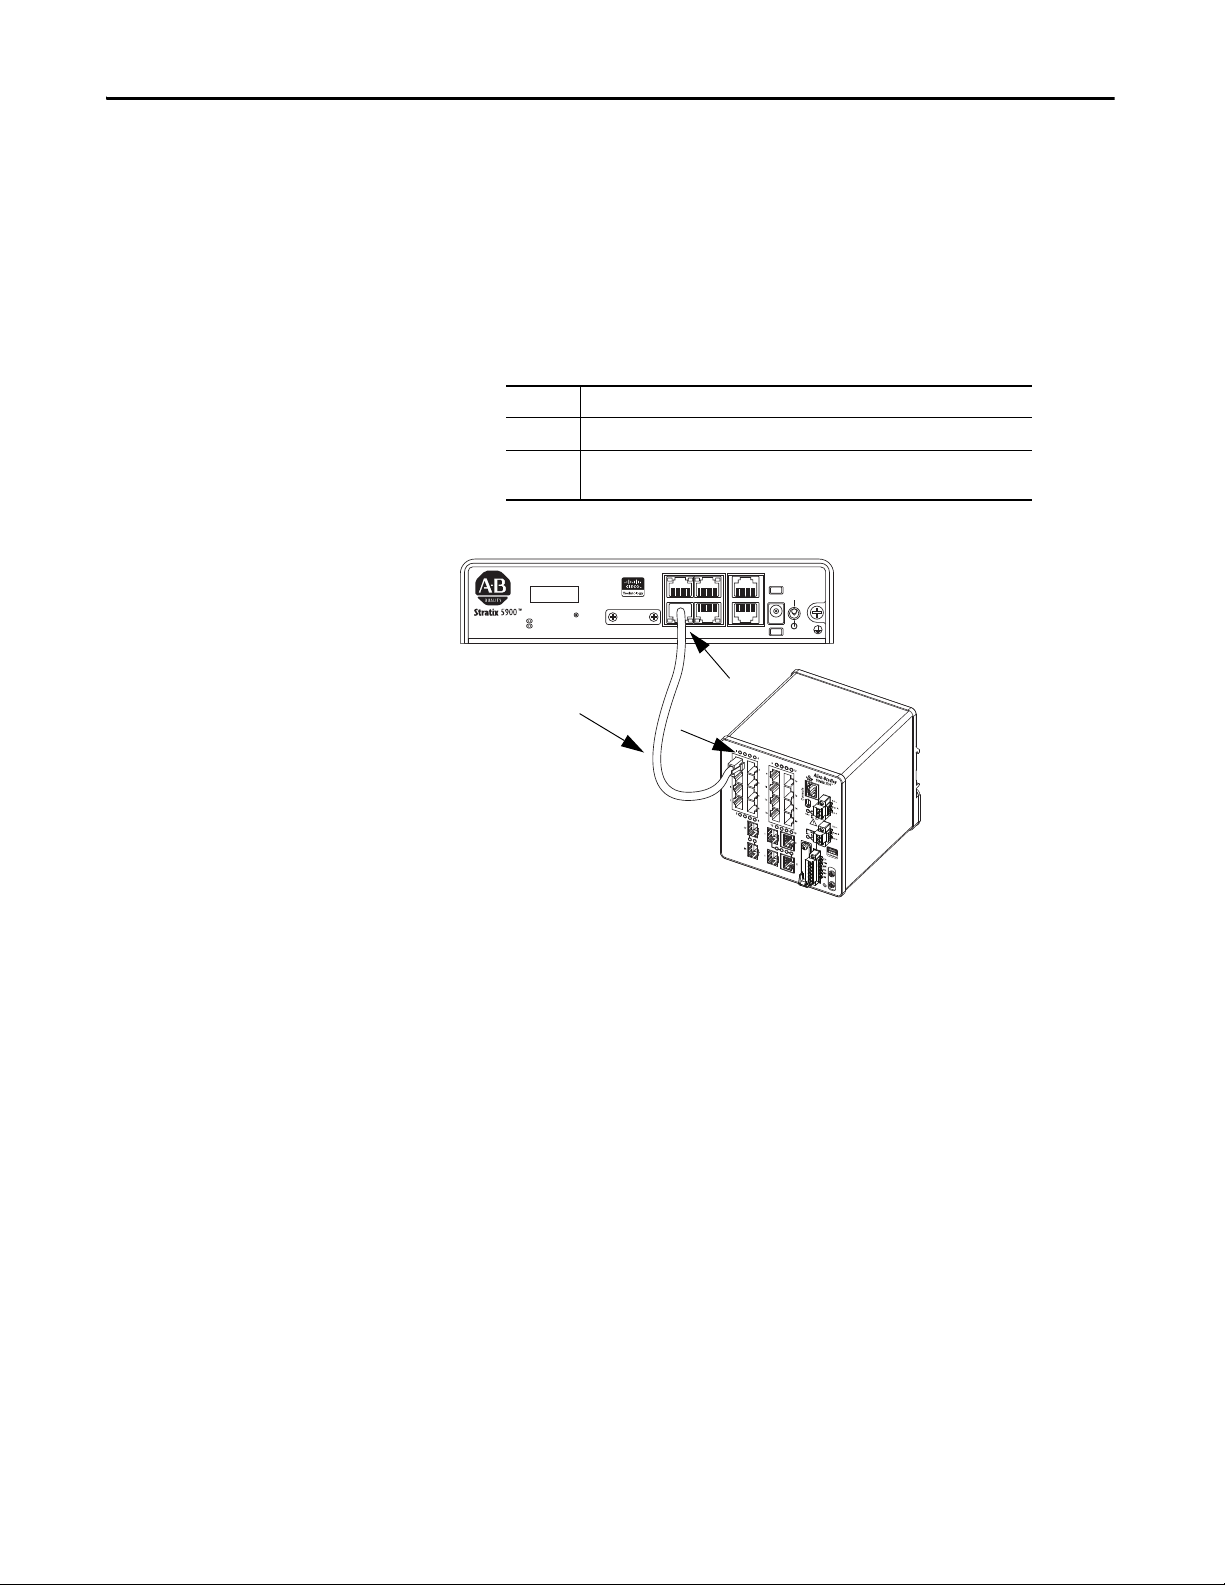
Connect an External Ethernet Switch
If more than four computers are required to be connected to each other, you can
add Ethernet connections to the router by connecting an external Ethernet
switch to the Ethernet switch on the router.
To connect an external Ethernet switch to an Ethernet switch port on the router,
complete these steps.
1. Connect one end of the Ethernet cable to an Ethernet switch port on the
router.
1 Ethernet port on the router.
2 Available port on the external Ethernet switch.
3 CAT5 Ethernet cable, RJ-45–to–RJ-45, connecting to an external Ethernet
switch port.
2. Connect the other end of the cable to the available port on the Ethernet
switch to add additional Ethernet connections.
3. Turn on the Ethernet switch.
20 Rockwell Automation Publication 1783-UM005A-EN-P - September 2013
Page 21
Install Stratix 5900 Services Router Chapter 2
TIP
32447-M
RESET
SERIAL
CON / AUX
GE WAN 0
FE 1
SL
FE 0
SL
FE 3
SL
FE 2
SLS L
SYS
ACT
LAN
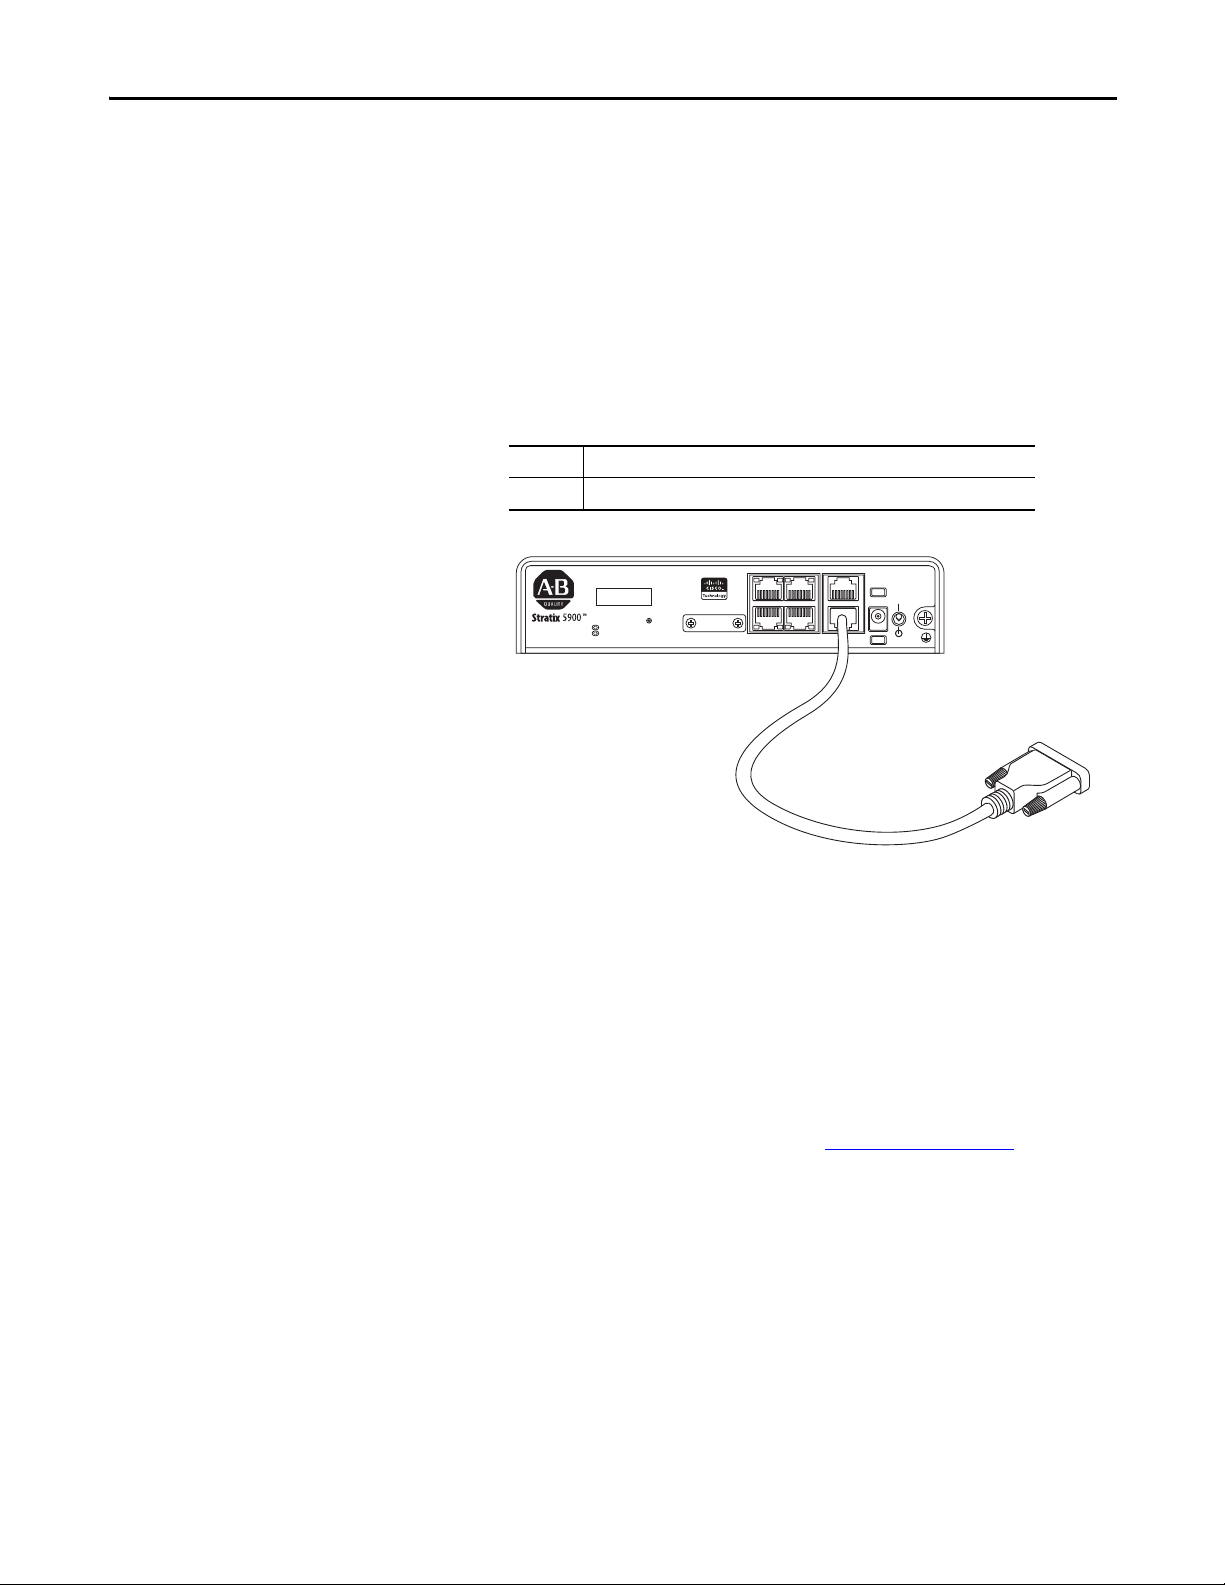
Connect a Terminal or Computer to the Console Port
Connect a terminal or computer to the Console port either to configure the
software by using the configuration software or to troubleshoot problems with
the router.
To connect a terminal or computer to the console port on the router, follow these
steps:
1. Connect the RJ-45 end of a DB-9-to-RJ-45 serial cable to the RJ-45
Console port on the router.
1 RJ-45 connector to the Console Aux port on the router
2 DB-9 connector
2. Connect the DB-9 end of the DB-9-to-RJ-45 serial cable to the COM
port on your computer.
Some personal computers do not come with DB-9 serial port
connectors and can require a USB-to-serial port adapter.
3. To communicate with the router, start a terminal emulator application,
such as Putty or Tereterm.
You can download the free program at http://www.putty.org/
.
Rockwell Automation Publication 1783-UM005A-EN-P - September 2013 21
Page 22
Chapter 2 Install Stratix 5900 Services Router
TIP
1
3
2
Terminal Emulator Application Settings
Use these settings for the terminal emulator connection.
• 9600 baud
• 8 data bits, no parity
• 1 stop bit
• No flow control
When the terminal emulator establishes communication, the router prompt is
displayed.
For more information on terminal emulation settings, see Applying Correct
Terminal Emulator Settings for Console Connections on the Cisco website.
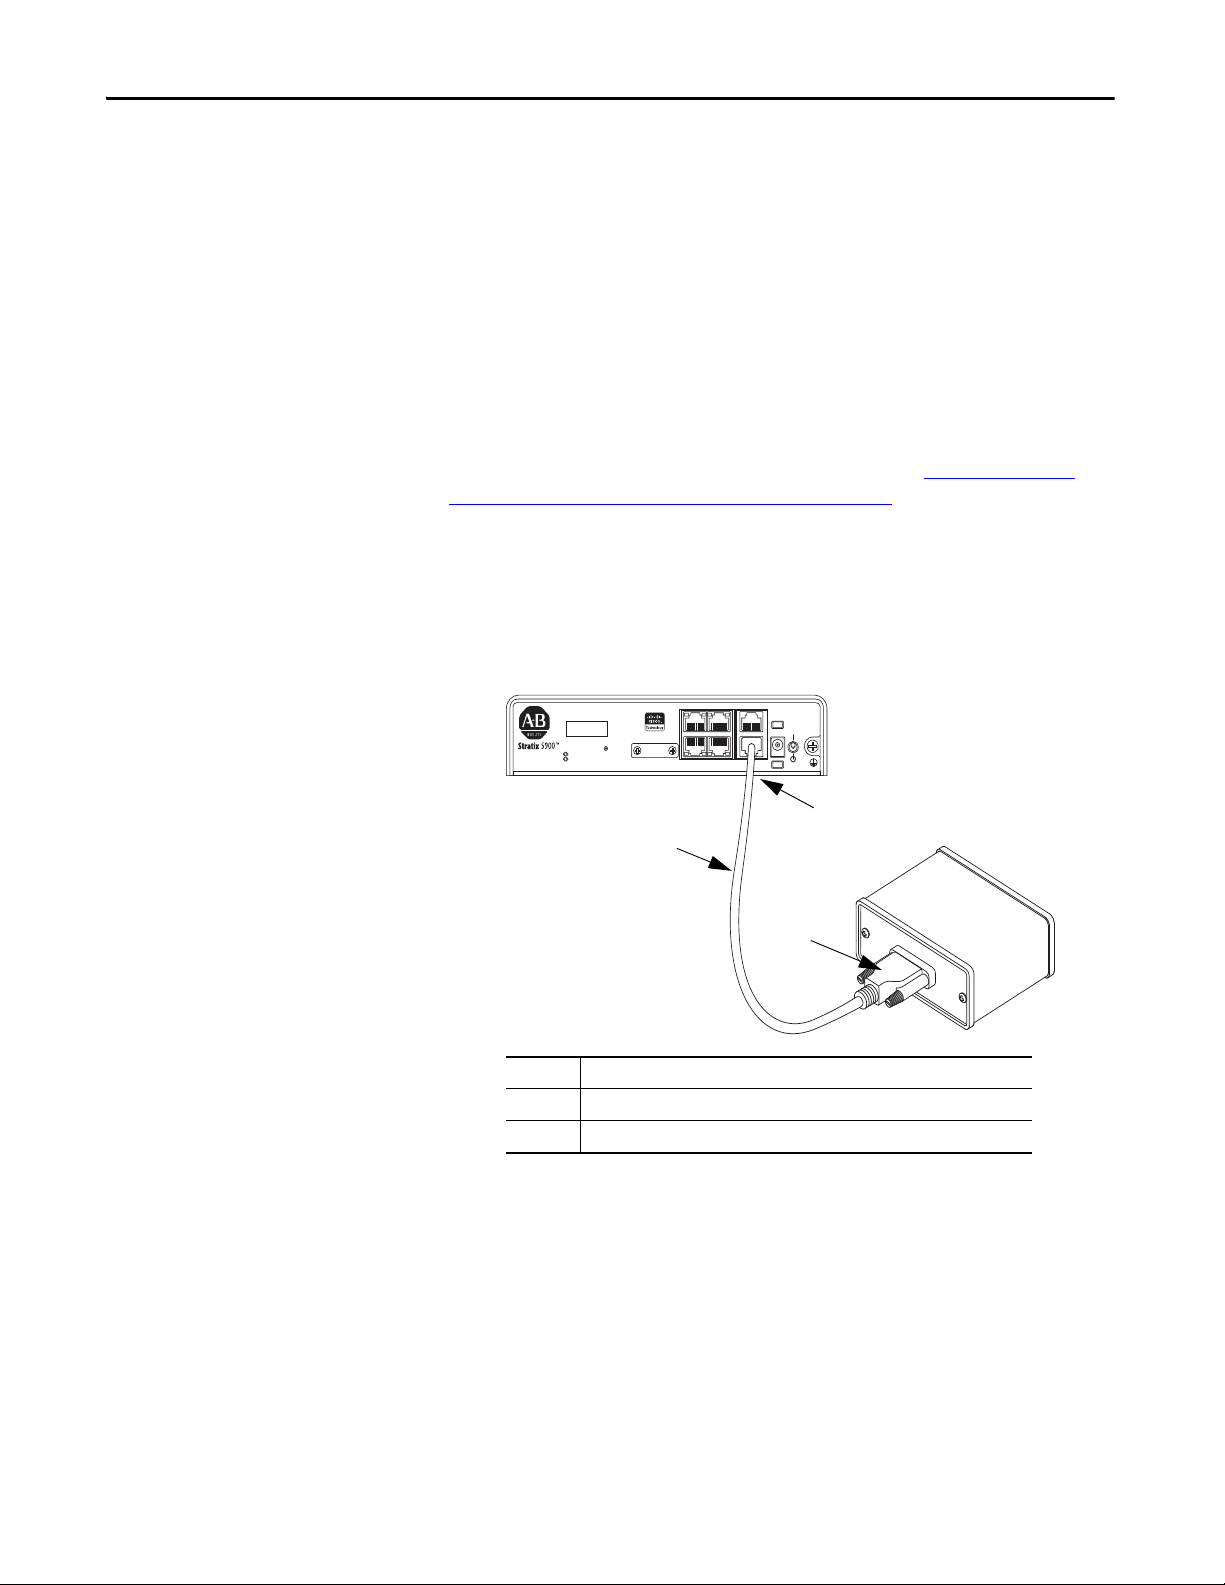
Connecting a Modem to the Console Port
To connect a modem to the router, follow these steps:
1. Connect the RJ-45 end of the adapter cable to the Console port on the
router.
FE 3SLFE 2
GE WAN 0
SLS L
RESET
SYS
ACT
1 RJ-45 connector to the Console Aux port on the router
2 DB-9 connector
3Console cable
SERIAL
SL
CON / AUX
FE 1SLFE 0
LAN
32446-M
2. Connect the DB-9 end of the console cable to the DB-9 end of the modem
adapter.
3. Connect the DB-25 end of the modem adapter to the modem.
Make sure that your modem and the router console port are configured for the
same transmission speed (up to 115200 b/s is supported) and support mode
22 Rockwell Automation Publication 1783-UM005A-EN-P - September 2013
control with data carrier detect (DCD) and data terminal ready (DTR).
Page 23
Apply Power
IMPORTANT
IMPORTANT
32382-M
32383-M
Locking Connector Assembled
Install Stratix 5900 Services Router Chapter 2
This product relies on the building’s installation for short-circuit (overcurrent)
protection. Be sure that the protective device is rated not greater than: 120 V
AC, 20 A U.S (240 V AC, 16…20 A international).
This product requires short-circuit (overcurrent) protection, to be provided as
part of the building installation. Install only in accordance with national and
local wiring regulations.
The device is designed to work with TN power systems.
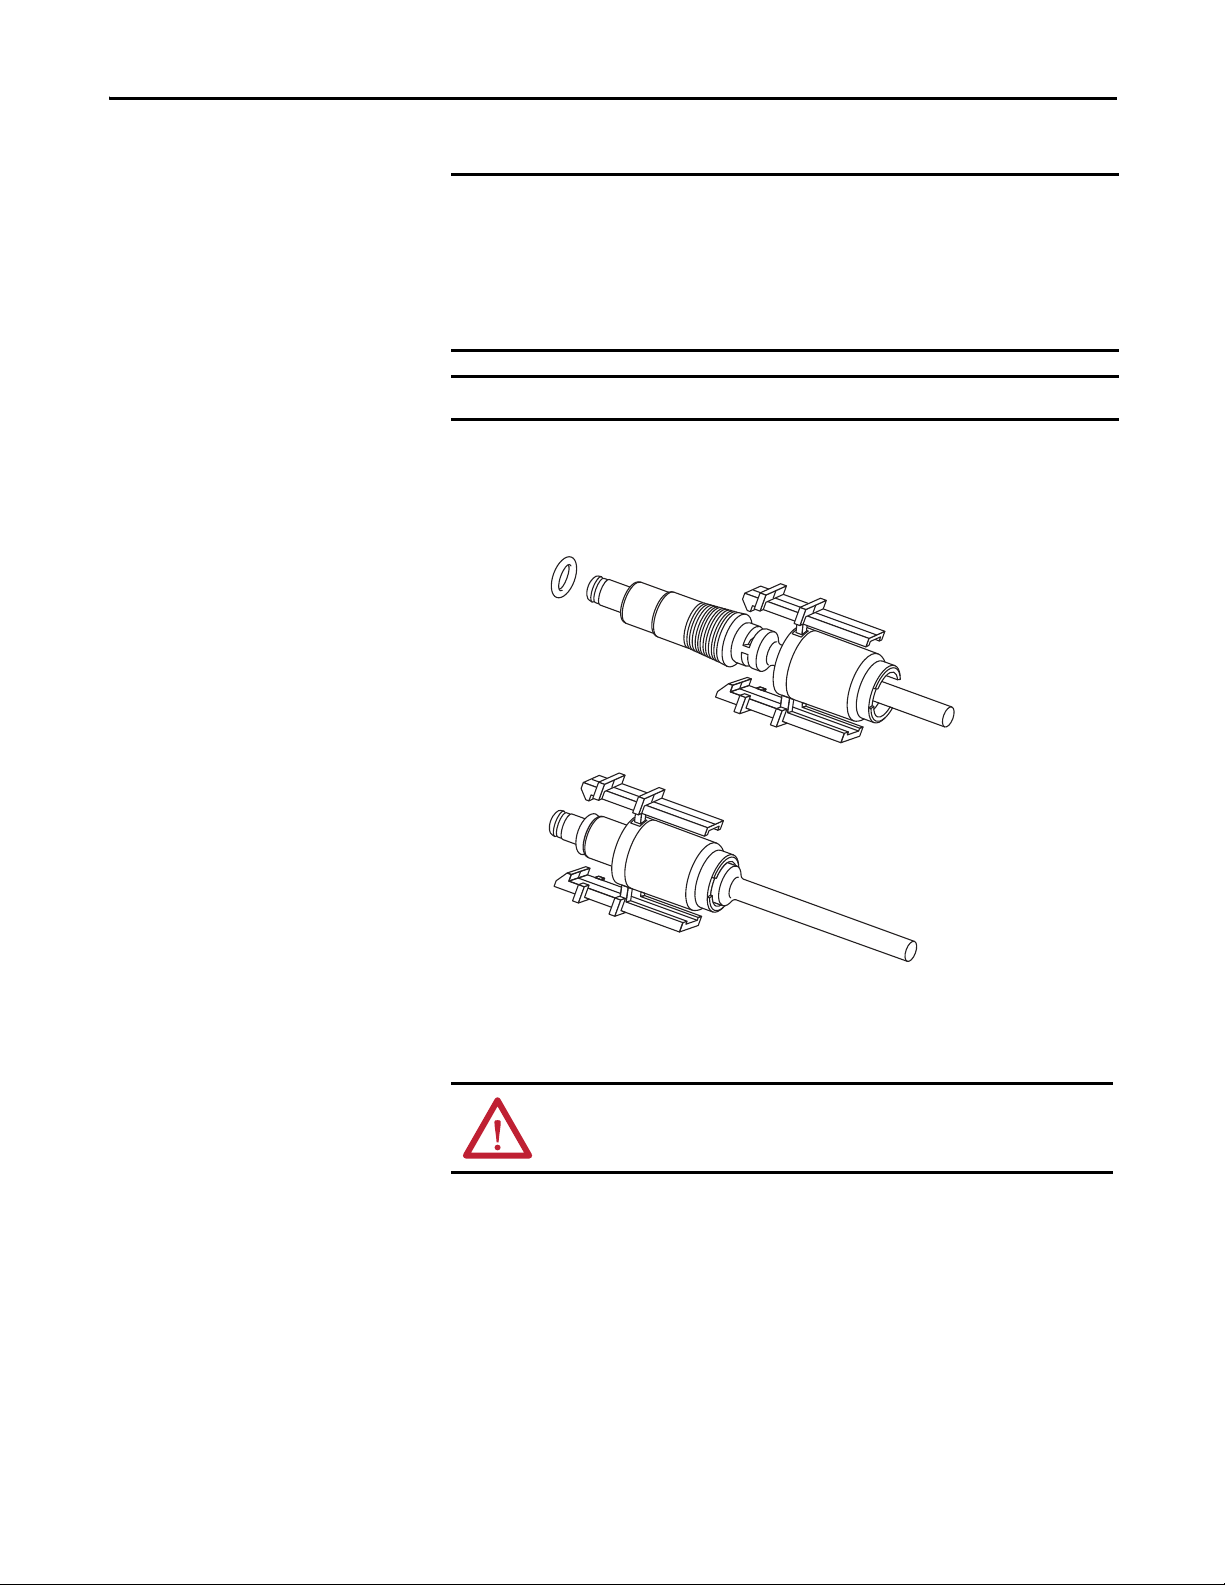
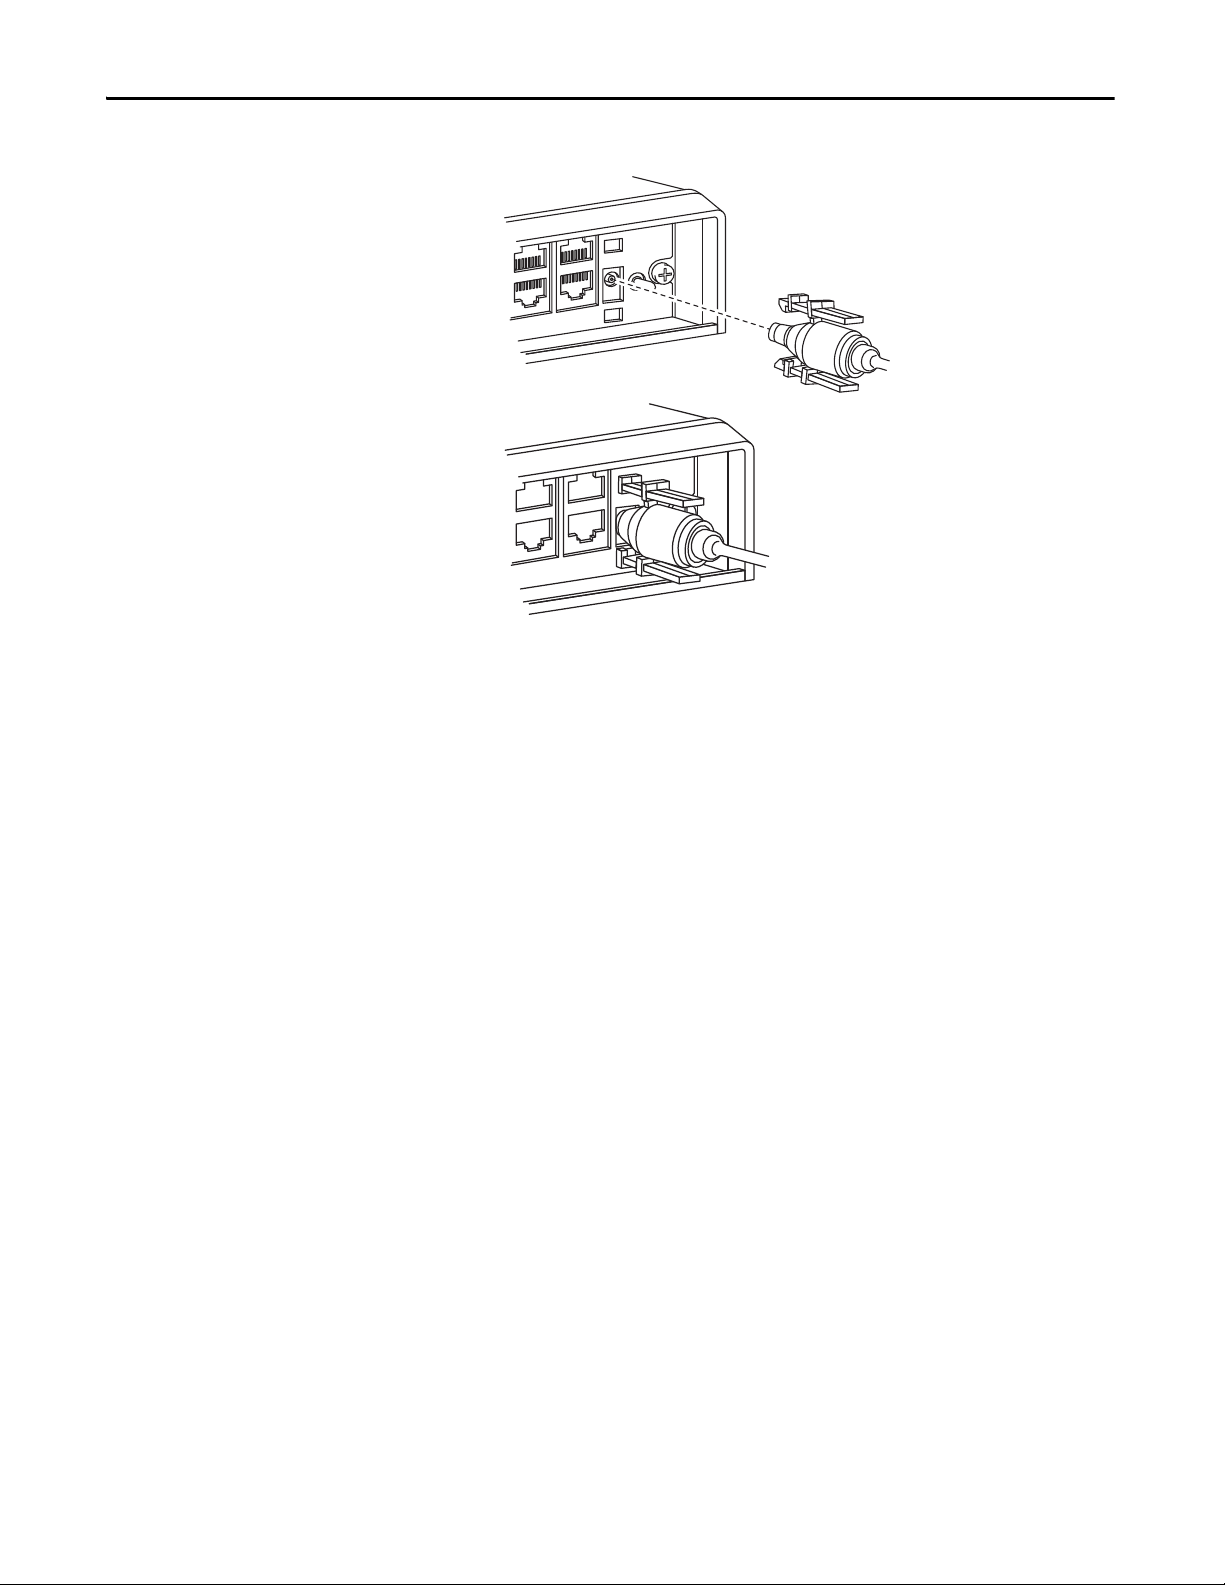
The router comes with a retention lock plug and the power supply. Follow these
instructions to apply power.
1. Attach the locking connector to the power cord.
2. Plug the adapter (with the power cord attached) into the router.
3. Plug the power cord into the outlet.
ATTENTION: This product is to be connected to a Listed or certified class 2
output/IEC 60950-1 compliant limited power source, rated 5 V DC, 4 A max.
Rockwell Automation Publication 1783-UM005A-EN-P - September 2013 23
Page 24
Chapter 2 Install Stratix 5900 Services Router
32384-M
4. Push the adapter in to connect the lock clips.
32385-M
Power is connected to the services router.
24 Rockwell Automation Publication 1783-UM005A-EN-P - September 2013
Page 25
Install Stratix 5900 Services Router Chapter 2
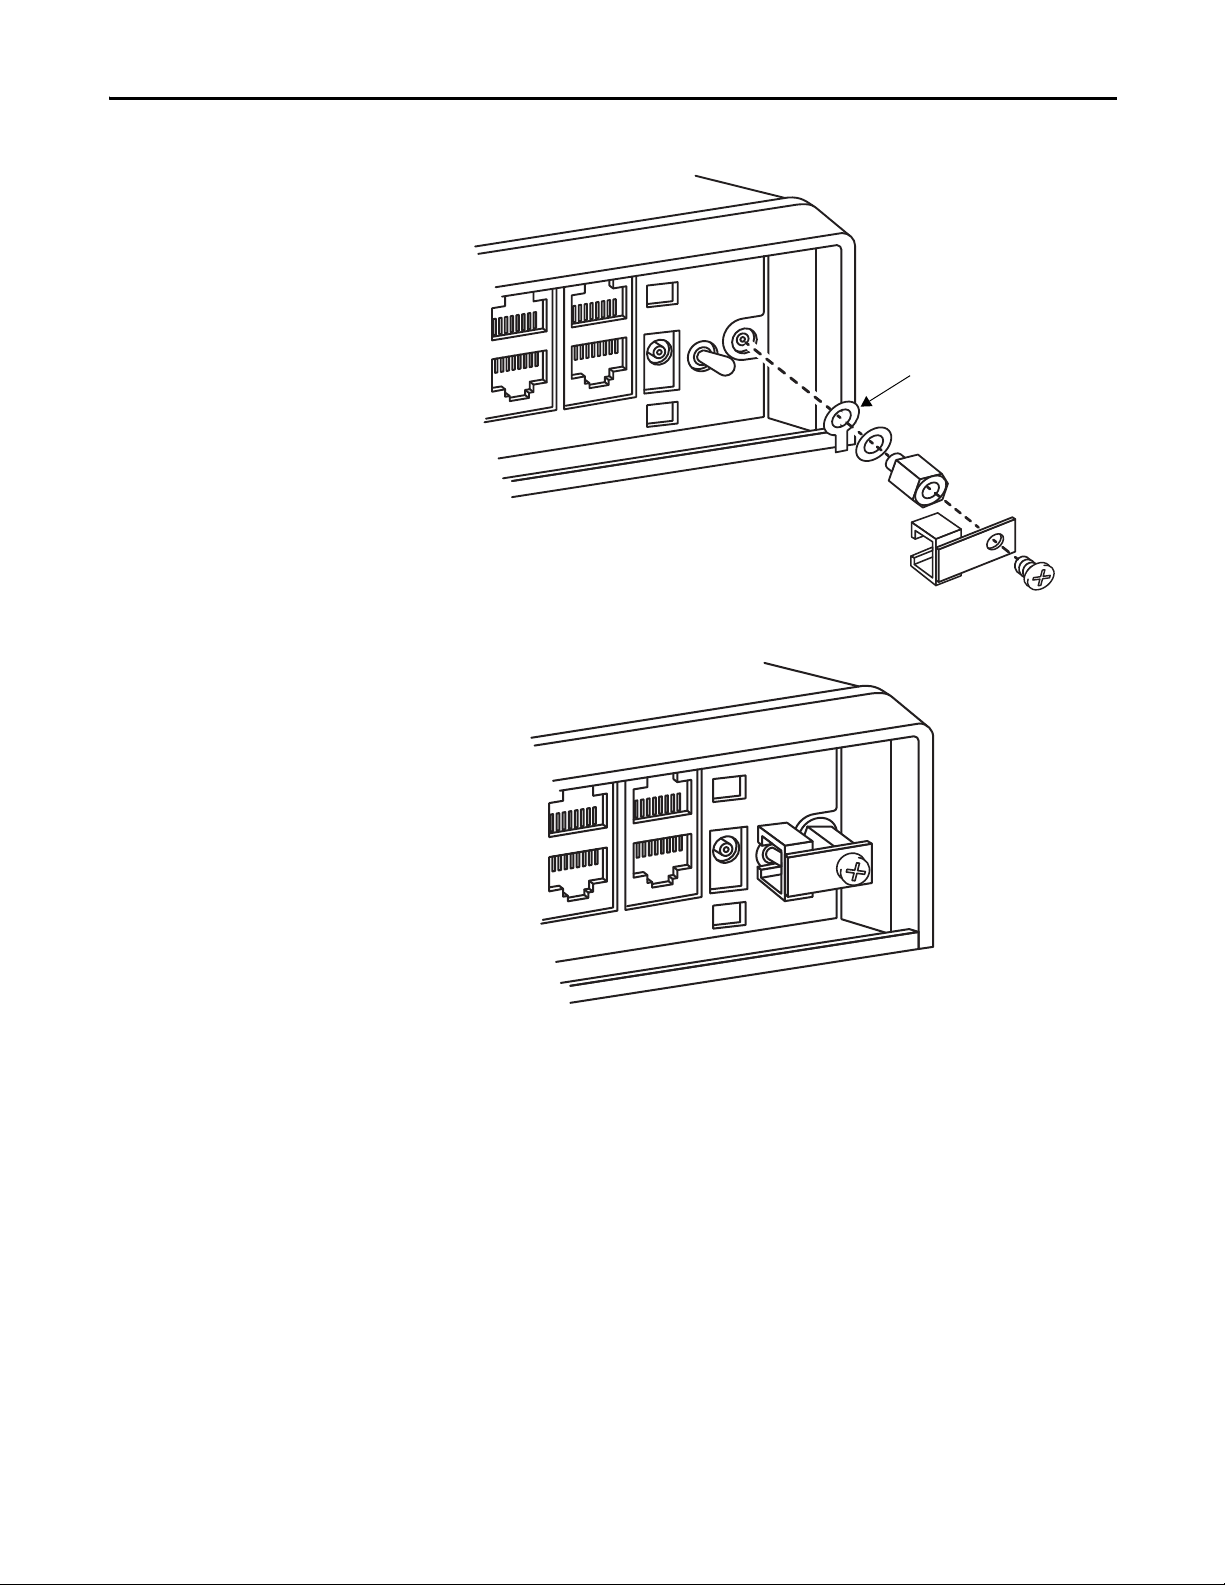
Ground Wire
32433-M
Assemble the On/Off Power Lock
Follow this illustration to assemble the power lock.
32432-M
Connected On/Off Power Lock
Rockwell Automation Publication 1783-UM005A-EN-P - September 2013 25
Page 26

Chapter 2 Install Stratix 5900 Services Router
RESET
SERIA
SYS
ACT
32380-M
Verify Connections
Reset the Services Router
Follow these instructions to verify that all devices are properly connected to the
router.
1. Turn on all the connected devices.
2. Check the status indicators.
3. Use this table to verify the router operation. For complete status indicator
descriptions, see Status Indicators
Power and Link Status Indicator Normal Patterns
SYS Yellow FPGA download is complete.
Green (blinking) ROMMON is operational.
Off After powering up, when FPGA is being downloaded (in ROMMON).
ACT Green Network activity on FE Switch ports, GE WAN port, and serial
Off No network activity.
EN Green when the interface is up.
S S Blinking green indicates port speed. Slow blinking for 100Base SFPs
on page 11.
interfaces.
and fast blinking for 1000Base SFPs.
The Reset button resets the router configuration to the default configuration set
at the factory.
Follow these instructions to reset router configuration to the default
configuration.
1. Locate the Reset location on the services router.
2. Using a standard size #1 paper clip (wire gauge 0.033 inch or smaller),
simultaneously press the reset button while applying power to the router.
3. Keep the reset button pressed for five seconds after applying power.
26 Rockwell Automation Publication 1783-UM005A-EN-P - September 2013
Page 27

Install Stratix 5900 Services Router Chapter 2
Replacement Accessory Parts
Replacement accessory parts are available through your local Cisco distributor.
• Power Supply: PWR2-20W AC power supply
• Mounting: ACS-810-DM – Din Rail Mounting Kit
• Console and Smart Serial Cabling
See the Cisco 819 Integrated Services Routes Software Configuration Guide,
http://www.cisco.com/en/US/docs/routers/access/800/819/software/
configuration/Guide/819_SCG.html for detailed information.
Rockwell Automation Publication 1783-UM005A-EN-P - September 2013 27
Page 28

Chapter 2 Install Stratix 5900 Services Router
Notes:
28 Rockwell Automation Publication 1783-UM005A-EN-P - September 2013
Page 29

Chapter 3
Configure the Stratix 5900 Services Router
This chapter provides instructions for initial configuration of the Stratix 5900
services router.
Top ic Pag e
Basic Configuration 30
Configure the IP Address on the Computer 31
Getting Started with Stratix 5900 Device Manager Software 34
Stratix 5900 Device Manager Software Wizard 36
Getting Started with Stratix Configurator Software 38
Install Stratix Configurator Software 39
Discover the Router 41
Creating a Community and Adding Devices 44
Creating an Initial Configuration of a Feature 47
Editing a Configuration 49
Configuring a Wide Area Network Interface 50
Summary Window 50
Configuring a Wide Area Network Interface 50
Serial Connections 55
Configuring a Firewall 57
Configuring Security Settings 58
Rockwell Automation Publication 1783-UM005A-EN-P - September 2013 29
Page 30

Chapter 3 Configure the Stratix 5900 Services Router
Create a Hostname
Enter the name you want to give the router.
Identify the Domain Name
Enter the domain name for your organization. An example of a domain name is
rockwellautomation.com, but your domain name can end with a different suffix,
such as .org or .net.
Set the Username and Password
You must set the username and password for Stratix 5900 services router users
and Telnet users.
You use the username and password you set in this window the next time you use
Stratix 5900 Device Manager software, and thereafter, unless you change it.
Enter Username
Enter a username.
Enter New Password
Enter the new password. The password must be at
least 6 characters.
Reenter New Password
Reenter the new password for confirmation.
Enable Secret Password
Enter and enable the secret password.
Assign IP Address
Configure the IP Address on the computer.
Install the Router
Connect the computer to the router.
Basic Configuration
A basic configuration gives the router a name, creates a user account with a
password, and creates the enable secret password. The Basic Configuration
window is where you name the router that you are configuring, enter the domain
name for your organization, and control access. The windows appear when you
first configure the router. You can create the basic configuration by using CLI,
Stratix 5900 Device Manager, or Stratix Configurator software.
These are the basic steps to configure the router.
Required Configuration
The configuration software you choose to use requires the following basic
configurations to connect to the router and manage it:
• An http or https server must be enabled with local authentication.
• A local user account with privilege level 15 and accompanying password
must be configured.
• A Vty line with protocol ssh/telnet must be enabled with local
authentication. This is needed for interactive commands.
• An http timeout policy must be configured with the parameters shown in
30 Rockwell Automation Publication 1783-UM005A-EN-P - September 2013
Copy the Default Configuration File to NVRAM
on page 80.
Page 31

Configure the Stratix 5900 Services Router Chapter 3
Configure the IP Address on the Computer
You must configure an IP address on the computer so that you can configure the
router. The default configuration file assigns an IP address to a LAN interface on
the router, and you must configure the computer to be on the same subnet as the
router LAN interface.
• If the router is a fixed-interface model, it is configured as a DHCP server,
and you must configure the computer to accept an IP address
automatically.
• If the router can accept modular interfaces and it is not configured as a
DHCP server, you must configure the computer with a static IP address
on the same subnet as the router.
Obtain an IP Address in Microsoft Windows XP
If you are running Microsoft Windows XP software version, follow these steps to
display the Internet Protocol TCP/IP Properties dialog box and obtain an IP
address automatically.
a. Choose Start > Control Panel > Network Connections > Local Area
Connection.
b. In the item list, select Internet Protocol (TCP/IP).
c. Click Properties.
d. Click Obtain an IP address automatically to configure the computer to
obtain an IP address from a DHCP server.
Obtain an IP Address in Microsoft Windows Vista
If you are running Microsoft Windows Vista software version, follow these steps
to display the Internet Protocol TCP/IP Properties dialog box and obtain an IP
address automatically.
a. Choose Start > Control Panel > Network and Sharing Center.
b. In the Tasks column on the left, click Manage network connections.
c. In the Network Connections screen, click Local Area Connection.
d. In the Networking tab of the Local Area Connection Properties dialog
box, select Internet Protocol Version 4, and click Properties.
e. Go to Step 3.
4. From the General tab, configure the IP address.
5. Click Obtain an IP address automatically to configure the computer to
obtain an IP address from a DHCP server.
Rockwell Automation Publication 1783-UM005A-EN-P - September 2013 31
Page 32

Chapter 3 Configure the Stratix 5900 Services Router
Obtain an IP Address in Microsoft Windows 7
If you are running Windows 7 software version, follow these steps to open the
Internet Protocol TCP/IP Properties dialog box and obtain an IP address
automatically.
a. Choose click Start > Control Panel > Network and Sharing Center.
b. Click Change Adapter Settings.
c. Right-click Local Area Connection.
d. Click Properties.
e. On the Networking tab, select Internet Protocol Version 4 (TCP/
IPv4).
f. Click Properties.
g. Click Obtain an IP address automatically.
h. Click OK.
32 Rockwell Automation Publication 1783-UM005A-EN-P - September 2013
Page 33

Configure the Stratix 5900 Services Router Chapter 3
Assign a Specific IP Address
Follow these steps to assign a specific IP address to the computer. For example, a
static IP address of 10.10.10.3 and a subnet mask of 255.255.255.248.
1. On the General Tab, click Use the following IP address.
2. In the IP address field, enter the IP address.
For example: 10.10.10.3
3. In the Subnet mask field, enter the subnet mask.
For example: 255.255.255.248
If needed, use this dialog box to assign a specific DNS server address.
4. Click OK.
Connect the Computer to the Router
For information on how to physically connect the router to a computer, see
Connect a Personal Computer, Server, or Workstation
Rockwell Automation Publication 1783-UM005A-EN-P - September 2013 33
on page 19.
Page 34

Chapter 3 Configure the Stratix 5900 Services Router
Getting Started with Stratix 5900 Device Manager Software
Stratix Device Manager software lets you quickly configure router connections.
The software is a lite version of Stratix Configurator software program. The
factory installs the software into the router’s nonvolatile memory. You access the
software on the router by using a browser window and an IP address.
After you use Stratix Device Manager software to give the router basic
configurations such as a router name, username, and passwords, you can use
Stratix Configurator software for more complex configurations. Other
configurations include WAN and LAN interfaces, static routes, DNS, DCHP,
hostname, CNS server, configure IOS CLI, and perform basic troubleshooting
by using ping and traceroute.
With Stratix 5900 Device Manager software, you can set these configuration
parameters for the router.
• Local Area Network (LAN) configuration
• DHCP Server Configuration
• Wide Area Network (WAN)
• Firewall
• Security Settings
• Router Provisioning
Both programs are Rockwell Automation’s versions of the Cisco software
programs, Configuration Express and Configuration Professional.
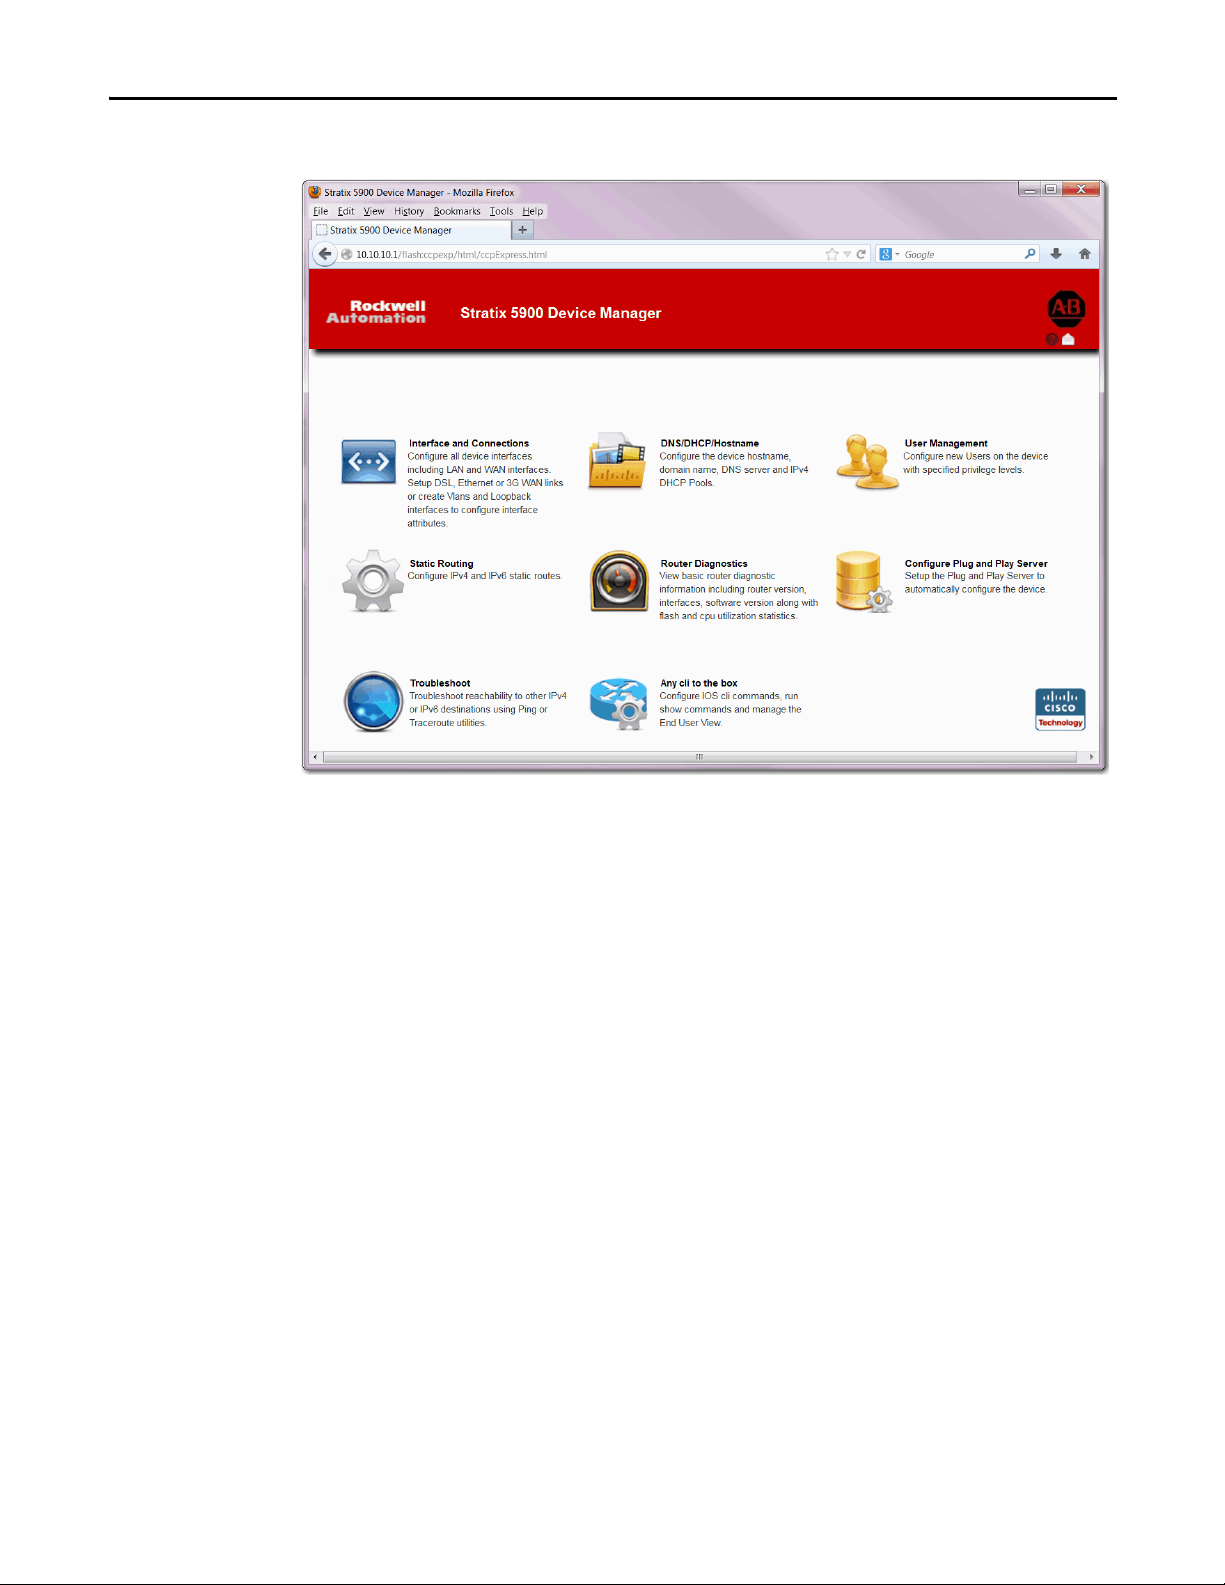
Stratix Device Manager Software Functions
These are the functions that are available in the device manager software.
Table 4 - Stratix Device Manager Parameter Descriptions
Item Description
Interfaces and connections Configure all device interfaces including LAN and WAN interfaces. Setup DSL, Ethernet
DHCP/DNS/Hostname Configure the device hostname, domain name, DNS server and IPv4 DHCP Pools.
User Management Configure new Users on the device with specified privilege levels.
Static Routing Configure IPv4 and IPv6 static routes.
Dashboard View basic router diagnostic information including router version, interfaces, software
Plug and Play Server Setup the Plug and Play Server to automatically configure the device.
Troubleshoot Troubleshoot reachability to other IPv4 or IPv6 destinations with Ping or Traceroute
Configure CLI Configure IOS CLI commands, run show commands and manage the End User View.
or 3G WAN links or create Vlans and Loopback interfaces to configure interface
attributes.
version along with nonvolatile memory and cpu utilization statistics.
utilities.
34 Rockwell Automation Publication 1783-UM005A-EN-P - September 2013
Page 35

Stratix 5900 Device Manager Main Window
Configure the Stratix 5900 Services Router Chapter 3
Rockwell Automation Publication 1783-UM005A-EN-P - September 2013 35
Page 36

Chapter 3 Configure the Stratix 5900 Services Router
TIP
Stratix 5900 Device Manager Software Wizard
The configuration wizard appears the first time you turn on your services router
and communicate with it by using an IP address. The wizard guides you through
the essential parts of the router configuration so that the router can start
functioning on the network.
Figure 1 - Example Stratix 5900 Device Manager Software Wizard Dialog Box
To reactivate the wizard, reset the router to the factory default settings. See Reset
the Services Router on page 26 for more information.
To use the wizard, perform the following steps:
1. Open a web browser on the computer, disable any active popup blockers,
and enter the following URL:
http://10.10.10.1
Stratix Configurator software runs in Firefox, Google Chrome, and
Internet Explorer. If you are going to use Internet Explorer, it must be
version 9.0 or later.
2. Enter the username cisco, and the password cisco in the login window. If
other login windows appear during the startup process, enter the same
credentials (cisco/cisco).
If the launch page does not appear when you enter the URL http://10.10.10.1,
test the connection between the computer and the router by doing the
following:
• Check that the Power to the router is on, and that the status indicator for
the port that the computer is connected to is on, indicating an active
Ethernet connection between the router and the computer. If this status
indicator is not lit, verify that you are using a crossover cable to connect the
computer to the router, or that you are using a straight-through cable
between the router and the switch.
• Verify that the web browser work offline option is disabled. In Internet
Explorer, click the File menu, and verify that the work offline option is
unchecked.
• Verify that the files cpexpress.tar, home.tar, and home.shtml files are
loaded into nonvolatile memory. Open a Telnet session to 10.10.10.1,
entering the username cisco and the password cisco. Enter the show flash
command to display the files that are loaded in nonvolatile memory.
36 Rockwell Automation Publication 1783-UM005A-EN-P - September 2013
Page 37

Configure the Stratix 5900 Services Router Chapter 3
IMPORTANT
For security reasons, the username cisco and password cisco expires the first time
they are used. If you reset the router to the factory defaults, the username cisco
and password cisco reactivate.
3. Replace username and password with the username and password that you
want to use.
This command creates a new user with privilege level 15 and a password
for that user. If you do not do this, you cannot log into the router after you
end the session. Use the new credentials that you create for future sessions,
instead of using the username cisco and password cisco.
4. Verify that the computer IP address is properly configured.
Some routers require that the computer obtain an IP address automatically
and some require that it be configured with a static IP address.
5. Click Yes, or click Grant to accept the certificates.
6. Click Next to begin configuring the router.
Stratix Configurator software wizard asks you to enter an enable secret
password to control access to Cisco IOS software.
The Enable Secret Password parameter controls access to privileged EXEC
mode by users who are accessing the router by means of Telnet or the
console port. In privileged EXEC mode, users can make configuration
changes and have access to other commands not available outside of this
mode.
You must enter the enable secret password in the Enter Password field, and
reenter it in the Reenter Password field for confirmation. The password
must be 6 characters or more.
7. Choose an enable secret password that is easy to remember but difficult for
others to guess.
You cannot read it by viewing the configuration file because it is stored in
encrypted form.
Be sure to write down or remember the enable secret password that you enter.
It is not shown in the Enable Password field or in the Summary window, and it
cannot be reset without erasing the router configuration and resetting the
router to the factory default. You are also asked to change the router's LAN IP
address from its default value.
8. When the Summary window appears, write down the LAN IP address, the
username and the user password that you entered, and click Finish.
You need this information to reconnect to the router to perform
additional configuration.
Rockwell Automation Publication 1783-UM005A-EN-P - September 2013 37
Page 38

Chapter 3 Configure the Stratix 5900 Services Router
TIP
Getting Started with Stratix Configurator Software
Stratix Configurator software is a GUI-based device-management tool for the
services router. The software lets you perform advanced configurations on the
router.
• Virtual Private Network (VPN)
• Intrusion Prevention System (IPS)
• Network
Stratix Configurator software is a valuable productivity enhancing tool for
network administrators and channel partners for deploying routers with
increased confidence and ease. This tool simplifies routing, firewall, IPS, VPN,
unified communication, WAN and LAN configuration through easy-to-use
wizards.
ATT EN TI ON : This user manual incorporates basic configuration steps.
Advanced, in-depth instructions can be found in the Cisco Configuration
Professional 2.7 Users Guide at http://www.cisco.com/en/US/docs/
net_mgmt/cisco_configuration_professional/v2_7/olh/ccp.pdf.
This is a list of the features and benefits of the software.
• Reduces total cost of ownership
• Increased productivity
• System up and running quickly
• Intuitive wizards and dialog boxes
• Cost savings
• Low learning curve
• Reliability
• Configurations approved by Cisco
• Comprehensive charts for troubleshooting & monitoring
Stratix Configurator software monitors router status and troubleshoots WAN
and VPN connectivity issues. The software contains smart wizards for routing
and security configuration as well as license management.
Stratix Configurator software offers a one-click router lock-down and an
innovative voice and security auditing capability to check and recommend
changes to router configuration. The software monitors router status and
troubleshoots WAN and VPN connectivity issues.
• Offers a single integrated tool
• Intuitive device management GUI for easily configuring access routers
• Windows Based Application
• Supports the configuration of advanced technology deployment on ISRs
and ISR/G2
• Device Management tool for access router
• Security
• Unified Communication (CCME, SRST)
• License Management
• Application Management
38 Rockwell Automation Publication 1783-UM005A-EN-P - September 2013
Page 39

Configure the Stratix 5900 Services Router Chapter 3
After you have used Stratix 5900 Device Manager software or CLI commands to
give your router a basic configuration, you can use Stratix Configurator software
to do the following:
• Add more connections.
• Fine-tune configurations you completed by using Stratix 5900 Device
Manager software.
• Configure advanced features such as Virtual Private Networks (VPN) and
Digital Certificates.
After you follow the instructions in the Install Stratix 5900 Services Router
on
page 15, you can use Stratix Configurator software to configure the router.
Install Stratix Configurator Software
If Stratix Configurator software is installed on your computer, you can start the
configuration and provide the IP address of the router. The computer that is
running the software must be configured with IP addresses from the same subnet.
If it is not installed, you can download this software for free at the Rockwell
Automation Product Compatibility and Download Center,
http://www.rockwellautomation.com/rockwellautomation/support/pcdc.page?
Follow these steps to install Stratix Configurator software on a computer.
1. Download the software from the Rockwell Automation Product
Compatibility and Download Center.
2. Go to the location of the downloaded file.
3. Double-click the installation file and follow the instructions.
Stratix Configurator software Installshield wizard appears.
4. When the Welcome window appears, click Next to begin the installation.
5. In the screens that follow, review the license terms, and choose where you
want to install Stratix Configurator software.
6. Click Next to begin copying the files to the computer.
7. Choose where you want to create shortcuts for Stratix Configurator
software and then click Next.
8. Click Finish.
Stratix Configurator software runs in Firefox, Google Chrome, and Internet
Explorer. If you are going to use Internet Explorer, you must use version 9.0 or
later. You must also use a non-debug Adobe Flash Player Version 10.0 or later.
If the computer that has Stratix Configurator software installed has Internet
Explorer but does not have Adobe Flash Player installed on it, the software opens
a web browser pointing to the Adobe website http://get.adobe.com/flashplayer
Rockwell Automation Publication 1783-UM005A-EN-P - September 2013 39
.
Page 40

Chapter 3 Configure the Stratix 5900 Services Router
TIP
9. Download the Adobe Flash Player for Internet Explorer, and then start
Stratix Configurator software.
10. Read the section Creating a Community and Adding Devices
on page 44
to create a community of devices and how to use Stratix Configurator
software to configure them.
If you are installing Stratix Configurator software on a computer that uses the
Microsoft Windows Vista Business Edition operating system or the Microsoft
Windows 7 operating system, be sure to install while in administrator mode.
You can do this by creating a Windows administrative account, and then logging
on to the computer by using that account name and password before you install
Stratix Configurator software. If you don’t set up an administrative account, you
can install the software but then you have to right-click the Stratix Configurator
software icon or menu item, and choose Run as administrator each time you want
to run the software.
Stratix Configurator software is not compatible with Windows Internet
Explorer 8 and earlier. In Windows Internet Explorer 9, you need to change the
Compatibility View settings.
In Explorer, choose Tools>Compatibility View Settings>Display all website in
Compatibility View. If you do not make this setting change, you see something
similar to a thin ribbon of content.
40 Rockwell Automation Publication 1783-UM005A-EN-P - September 2013
Page 41

Configure the Stratix 5900 Services Router Chapter 3
Discover the Router
You can verify your connection by starting Stratix Configurator software and
discovering your devices. Follow these steps to verify your connection by
discovering your router.
1. Open Stratix Configurator software.
The Select / Manage Community dialog box appears.
2. Enter the device information and click OK.
Stratix Configurator software Community View window appears and
states that the device is not discovered.
3. Select the device and click Discover.
Rockwell Automation Publication 1783-UM005A-EN-P - September 2013 41
Page 42

Chapter 3 Configure the Stratix 5900 Services Router
The software schedules and starts discovering the device.
Once the device is discovered, it states Discovered.
If the device is not discovered, Discovery Failed appears.
42 Rockwell Automation Publication 1783-UM005A-EN-P - September 2013
Page 43

Configure the Stratix 5900 Services Router Chapter 3
4. Click Details to research the error.
Usually, the errors are related to the following:
• Username/password not recognized
• IP address is incorrect
• Browser is configured incorrectly
• Router not powered
• Ethernet cable not connected
Rockwell Automation Publication 1783-UM005A-EN-P - September 2013 43
Page 44

Chapter 3 Configure the Stratix 5900 Services Router
Creating a Community and Adding Devices
Stratix Configurator software works with device communities. A community
consists of one or more devices that you specify by providing their IP addresses
and login credentials. After you create the community, you can begin working
with the devices in it.
You can create and manage communities from the Manage Community dialog box. The Manage Community dialog box appears when you start Stratix Configurator software.
From the Manage Community dialog box, you can create communities, change
the community name, delete a community, add devices to a community, export
and import community information, and discover all the devices in a community.
Before you begin using Stratix Configurator software, you must first create a
community and then add devices to that community. When you start the
software for the first time, it automatically creates a community for you, to which
you can add devices.
A community is a group of devices (community members). A single community
can contain a maximum of 10 devices. You can create a community and then add
the devices to it based on some common parameters. For example, you can create
communities based on the location of the devices. You can create a Factory A
Milwaukie community and add devices to it, then you can create a Factory B
Cleveland community and add devices to it, and so on.
When you add a device to a community, you must specify its IP address or
hostname, credential information (username and password), and other optional
parameters. Stratix Configurator software uses this information to discover the
device. After you discover the device, you can configure and monitor it.
44 Rockwell Automation Publication 1783-UM005A-EN-P - September 2013
Page 45

Configure the Stratix 5900 Services Router Chapter 3
TIP
Create a Community
Follow these steps to create a community, add devices to it, and discover all the
devices in a community.
1. From the menu bar, choose Application > Manage Community.
2. Click Create a new community.
You can rename a community by clicking on the name and typing a
new name. You can right-click the community icon and add a new
community or delete a community.
3. Enter the IP address or hostname.
4. Enter the username and password information for the devices that you
want to configure.
5. Check the Connect Securely check box if you want the software to
connect securely with the device.
Rockwell Automation Publication 1783-UM005A-EN-P - September 2013 45
Page 46

Chapter 3 Configure the Stratix 5900 Services Router
TIP
When you check the Connect Securely check box, HTTPS port 443 and
SSH port 22 information is automatically added for the device. To view
the port information, click the down-arrow next to the Connect Securely
check box.
If you did not check the Connect Securely check box, the HTTP port 80
and Telnetport 23 information is automatically added for the device. To
view the port information, click the down-arrow next to the Connect
Securely check box.
6. If you want to change the default port information, click it, and then enter
a new port value. Make sure that Stratix Configurator software can access
the device at the specified secure or non-secure ports.
7. Check the Discover All Devices check box if you want the software to
discover all of the devices in a community.
You can choose to discover the devices later, from the Community View
page.
8. Click OK.
The Community View page opens and the information about the devices
in the community appears.
46 Rockwell Automation Publication 1783-UM005A-EN-P - September 2013
Page 47

Configure the Stratix 5900 Services Router Chapter 3
Creating an Initial Configuration of a Feature
When you create an initial configuration of a feature, you are configuring a router
interface. Follow these steps to create an initial configuration of a feature.
1. Choose the community that the device belongs to, and click OK.
2. In the Community View page, choose the device that you want to work
with, and click Discover.
Depending on network conditions, Stratix Configurator software can take
several minutes to discover the device. If you want to work with additional
devices in the community, choose them and click Discover.
3. From the Select Community Member pull-down menu, choose a device to
begin configuring a discovered device.
4. Click Configure.
Configuration functions appear in the Configure tree.
Rockwell Automation Publication 1783-UM005A-EN-P - September 2013 47
Page 48

Chapter 3 Configure the Stratix 5900 Services Router
5. Choose the configuration task that you want to perform in the Configure
tree.
For example, choose Interface Management > Interfaces and Connections.
Interfaces and Connections
The Interfaces and Connections Window has a Create Connection Tab and an
Edit Connection/Interface tab. The Create tabs provide access to smart wizards
that guide you through the configuration and that let you know if changes you
are making conflict with the existing configuration. The Edit tabs provide
additional settings.
It is a best practice to create a starting configuration by using the wizards then
examine the configuration on the Edit tab to make any further changes.
Follow these instructions to use the wizard.
1. On the Create tab, click Create.
Decide if you need to Enable AAA. For more information, see the Online
Help.
48 Rockwell Automation Publication 1783-UM005A-EN-P - September 2013
Page 49

Configure the Stratix 5900 Services Router Chapter 3
Editing a Configuration
Once you have created a configuration by using a wizard, you can edit that
configuration without returning to the wizard again. Editing the configuration
gives you access to additional configuration values that are not available in the
wizards. The following example procedure describes editing a Fast Ethernet
connection.
Follow these instructions to edit a configuration.
1. To access the edit screens, click the Edit tab.
2. Double-click the entry to edit a configuration.
3. Make the necessary settings in the dialog box.
4. Click the tab for the next dialog and make changes.
5. Click OK.
The Summary window appears.
Rockwell Automation Publication 1783-UM005A-EN-P - September 2013 49
Page 50

Chapter 3 Configure the Stratix 5900 Services Router
TIP
Summary Window
The Summary dialog box shows you the changes you have made to the router
configuration and the associated CLI commands that are sent to the router.
You can do these tasks on the Summary dialog box.
• Click cancel to go back and make changes.
• Click Deliver the settings to the router.
• Click Save to file to save the configuration file.
Configuring a Wide Area Network Interface
With Stratix 5900 Device Manager software, you can configure one wide area
network (WAN) interface.
WAN Interface Selection
If your router has multiple WAN interfaces, choose the interface that you want to
configure in this window.
1. Choose the interface you want to configure from the list.
2. Click Configure.
3. Go to Interfaces and Connections.
4. Click Create New Connection.
5. Check Ethernet (PPPoE or Unencapsulated Routing).
6. Click Create New Connection again.
The WAN Wizard appears.
7. Follow the instructions in the Wizard.
If you do not configure a WAN connection, you cannot configure a firewall,
routing, Cisco Network Services, or SDP.
50 Rockwell Automation Publication 1783-UM005A-EN-P - September 2013
Page 51

Configure the Stratix 5900 Services Router Chapter 3
Table 5 - WAN Interface Parameter Descriptions
Item Description
Add Connection Add Connection is enabled if no WAN connection is configured yet. The Edit and Delete buttons
Edit To edit an existing configuration, select the interface and click Edit.
Delete To delete a configuration, select the inter face and click Delete.
Enable or Disable
Button
Interface List Lists the interface name, IP address, and interface type for all WAN interfaces. If no IP address is
Refresh Button Visible if you are editing an initial configuration.
are enabled if at least one WAN connection has been configured.
To configure an interface, select the inter face and click Add Connection. If this button is disabled,
you can configure additional WAN connections with Stratix Configurator, or delete a configured
connection and configure a different one.
Available when you are using Stratix 5900 Device Manager software to edit an initial
configuration. If a selected interface is enabled, you can use the Disable button to shut down the
interface. If a selected inter face is shut down, you can use the Enable button to enable the
interface.
configured for an interface, the text `no IP address’ is displayed.
If you did not configure the default LAN interface with a new IP address in the LAN Interface
Configuration window, it is listed in this window, and can be configured as a WAN interface.
Internet (WAN): Ethernet Interface
Use this window to configure an Ethernet WAN interface. This table provides
descriptions of each parameter.
Table 6 - Internet (WAN): Ethernet Interface Parameter Description
Item Description
Enable PPPoE Check Box If your service provider requires that the router use PPPoE, check to enable PPPoE
Address Type List Static IP Address Option
Dynamic (DHCP Client) Op tion The router leases an IP address from a remote DHCP server. Enter the name of the
Rockwell Automation Publication 1783-UM005A-EN-P - September 2013 51
encapsulation. Uncheck if your service provider does not use PPPoE. This check
box is not available if your router is running a Cisco IOS release that does not
support PPPoE encapsulation.
Enter the IP address and subnet mask or the subnet bits in the fields provided.
DHCP server that assigns addresses.
Page 52

Chapter 3 Configure the Stratix 5900 Services Router
Table 6 - Internet (WAN): Ethernet Interface Parameter Description (continued)
Item Description
IP Unnumbered Option Share an IP address that has already been assigned to another interface. Then,
Easy IP (IP Negotiated) The router obtains an IP address by PPP/IPCP address negotiation. If you did not
Authentication Type Check Box Check the box for the type of authentication used by your service provider. If you
Username Given to you by your Internet service provider or network administrator and is
Password Enter the password exactly as given to you by your ser vice provider. Passwords
Confirm Password Reenter the same password that you entered in the previous box.
Refresh, Apply Changes, Discard
Changes Buttons
choose the interface whose IP address you want the interface that you are
configuring to use. If you did not choose Enable PPPoE, this option is not
available.
choose Enable PPPoE, this option is not available.
do not know the type of service your provider uses, you can check both boxes: the
router attempts both types of authentication, and one attempt succeeds.
CHAP authentication is more secure than PAP authentication.
used as the username for CHAP and/or PAP authentication.
are case sensitive. For example, the password ‘test’ is not the same as ‘Test’.
Visible if you are editing an initial configuration.
Internet (WAN): Autodetect Encapsulation
Use Autodetect to discover the encapsulation type.
• If Stratix 5900 Device Manager software succeeds, it automatically
supplies the encapsulation type and other configuration parameters it
discovers.
• If Stratix 5900 Device Manager software is unable to detect the type of
encapsulation, you must specify the encapsulation and authentication
types by clicking User Specified.
52 Rockwell Automation Publication 1783-UM005A-EN-P - September 2013
Page 53

Configure the Stratix 5900 Services Router Chapter 3
Encapsulation Description
PPPoE Provides Point-to-Point Protocol over Ethernet encapsulation. An
ATM subinterface and a dialer interface are created when you
configure PPPoE over an ATM interface. These logical inter faces are
visible in the Summary window.
The PPPoE option is disabled if your router is running a release of
Cisco IOS software that does not support PPPoE encapsulation.
PPPoA Provides Point-to-Point Protocol over ATM encapsulation (AAL5
SNAP, and AAL5 MUX). The PPPoA option is disabled if your router is
running a release of Cisco IOS software that does not support PPPoA
encapsulation.
RFC 1483 routing
with AAL5 SNAP
This option is available when you have selected an ATM interface.
An ATM subinterface is created when you configure an RFC 1483
connection. This subinterface is visible in the Summary window.
RFC 1483 routing
with AAL5 MUX
This option is available when you have selected an ATM interface.
An ATM subinterface is created when you configure an RFC 1483
connection. This subinterface is visible in the Summary window.
Internet (WAN): User Specified Encapsulation
The User Specified Encapsulation window lets you configure a WAN interface
when you are specifying the encapsulation.
Table 7 - WAN Interface Parameter Descriptions
Item Description
Status Icon and
Enable or Disable
Button
Encapsulation These are the encapsulations available if you have an ADSL, G.SHDSL, or ADSL over ISDN
The Status and Enable or Disable icons are available to edit an initial configuration. The Up arrow
icon indicates the interface is up. The Down arrow icon indicates the interface is down.
• If a selected interface is enabled, you can click Disable to shut down the interface.
• If a selected interface is shut down, you can click Enable to activate the interface.
interface.
Virtual Path
Identifier
Virtual Circuit
Identifier
Address Type List Choose one of the following:
IP Address for
Remote Connection
in Central Office
Enable Multilink
PPP
Rockwell Automation Publication 1783-UM005A-EN-P - September 2013 53
Enter the Virtual Path Identifier (VPI) value obtained from your service provider or system
administrator. The VPI is used in ATM switching and routing to identify the path used for a
number of connections.
Enter the Virtual Circuit Identifier (VCI) value obtained from your service provider or system
administrator. The VCI is used in ATM switching and routing to identify a particular connection
within a path that it can share with other connections.
• Static IP Address—If you choose static IP address, enter the IP address and subnet mask or
the subnet bits in the fields provided.
• Dynamic (DHCP Client)—If you choose Dynamic, the router leases an IP address from a
remote DHCP server. Enter the name of the DHCP server that assigns addresses.
• IP Unnumbered—Choose IP Unnumbered if you want the interface to share an IP address
that has already been assigned to another interface. Then, choose the interface whose IP
address you want the interface that you are configuring to use.
• Easy IP (IP Negotiated)—Choose Easy IP (IP Negotiated) if the router obtains an IP address
by PPP/IPCP address negotiation.
If you are configuring a G.SHDSL connection, enter the IP address of the gateway that connects
to this link. This IP address is supplied by the service provider or network administrator. The
gateway is the sys tem that the router must connec t to access to the Internet or to your
organization’s WAN.
Check this check box if you want to use Multilink Point-to-Point Protocol (MLP) with this
interface. MLP can improve the performance of a network with multiple WAN connections by
using load balancing functionality, packet fragmentation, bandwidth-on-demand, and other
features.
Page 54

Chapter 3 Configure the Stratix 5900 Services Router
Table 7 - WAN Interface Parameter Descriptions (continued)
Item Description
Authentication
Typ e Ch eck Box
Username Enter the username given to you by your Internet service provider or network administrator and
Password Enter the password exactly as given to you by your service provider. Passwords are case sensitive.
Confirm Password Reenter the same password that you entered in the previous box.
Check the box for the type of authentication used by your service provider. If you do not know
the type of service your provider uses, you can check both boxes. The router attempts both types
of authentication, and then one attempt succeeds. CHAP authentication is more secure than PAP
authentication.
is used as the username for CHAP and/or PAP authentication.
For example, the password ‘test’ is not the same as ‘Test’.
54 Rockwell Automation Publication 1783-UM005A-EN-P - September 2013
Page 55

Configure the Stratix 5900 Services Router Chapter 3
Serial Connections
You can use the wizard to create a serial connection.
Rockwell Automation Publication 1783-UM005A-EN-P - September 2013 55
Page 56

Chapter 3 Configure the Stratix 5900 Services Router
This table describes the Serial Connection parameters.
Table 8 - Serial Connection Parameter Descriptions
Parameter Description
Encapsulation List Choose the encapsulation for this connec tion. If you are editing a connection, you
Authentication Details If you choose PPP encapsulation, you can provide authentication information that your
Address Type List • Static IP address
IP Address and Subnet Mask If you choose Static IP address, provide the IP address and subnet mask in these fields.
Frame Relay Configuration
Settings Link
cannot change the encapsulation type in this window. You must delete the
connection, and then create a new connection with the encapsulation type you need.
• Frame Relay
A switched data link layer protocol that handles multiple virtual circuits by using
HDLC encapsulation between connected devices.
• HDLC
High-Level Data Link Control. A bit-oriented synchronous data link layer protocol
developed by the International Standards Organization (ISO). HDLC specifies a data
encapsulation method on synchronous serial links by using frame characters and
checksums.
• PPP
Point-to-Point Protocol.
Internet service provider requires.
• Username
Enter exactly as given to you by your Internet service provider or network
administrator and is used as the username for CHAP and/or PAP authentication.
• Pass word
Enter exactly as given to you by your service provider. Passwords are case sensitive.
For example, the password `test’ is not the same as `Test’.
• Confir m Password
Reenter the same password that you entered in the previous box.
Available with Frame Relay, PPP, and HDLC encapsulation types. If you choose static
IP address, enter the IP address and subnet mask or the subnet bits in the fields
provided.
• Dynamic (DHCP Client)—If you choose Dynamic, the router leases an IP address
from a remote DHCP server. Enter the name of the DHCP server that assigns
addresses.
• IP Unnumbered
Available with Frame Relay, PPP, and HDLC encapsulation types. Choose IP
Unnumbered if you want the interface to share an IP address that has already been
assigned to another interface. Then, choose the interface whose IP address you
want the interface that you are configuring to use.
• IP Negotiated
Available only with PPP encapsulation type. Choose Easy IP (IP Negotiated) if the
router obtains an IP address by PPP/IPCP address negotiation.
Click Frame Relay Configuration Settings for a description of the DLCI, LMI, and Use
IETF Frame Relay Encapsulation fields.
56 Rockwell Automation Publication 1783-UM005A-EN-P - September 2013
Page 57

Configure the Stratix 5900 Services Router Chapter 3
TIP
TIP
Configuring a Firewall
Stratix Configurator software lets you configure a firewall that uses default
settings if you have configured a WAN interface on the router.
For detailed information see the Cisco Configuration Professional User Guide
The Cisco IOS image on the router must support the Firewall feature set in
order for you to be able to configure a firewall with Stratix Configurator
software.
These are the ways the a firewall protects your network.
• Applies default access rules to inside and outside interfaces.
• Applies default inspection rules to outside interface and the software
creates and applies a list of default inspection rules.
• Enables IP Unicast Reverse-Path Forwarding (RPF) on the outside
interface.
The IP Unicast RPF feature causes the router to check the source address of any
packet against the interface that the packet entered into the router. If the input
interface is not a feasible path to the source address according to the routing table,
the packet is dropped. This source address verification is used to defeat IP
spoofing.
.
The Firewall Configuration window does not appear if you did not configure a
WAN interface.
This feature is available if the Cisco IOS release you are running on your router
supports the Firewall feature set.
Rockwell Automation Publication 1783-UM005A-EN-P - September 2013 57
Page 58

Chapter 3 Configure the Stratix 5900 Services Router
Configuring Security Settings
Some configuration settings that compromise router and network security are
enabled by default because they offer useful services. For example Cisco
Discovery Protocol (CDP) enables an administrator to view information about
neighboring routers on the network. However, CDP can be a security risk if the
information that it provides gets into the wrong hands. Stratix Configurator
software lists common settings that pose security risks and lets you disable them
of you want to do so to secure the router and the network.
There are also settings, like TCP Syn Wait time, and logging that are disabled by
default but that can protect the network against attacks and aid in
troubleshooting when they are enabled. Stratix Configurator software lists these
settings and lets you choose whether to enable them or not.
Advanced Firewall Configuration Wizard
Stratix Configurator helps you create an Internet firewall by asking you for
information about the interfaces on the router, whether you want to configure a
DMZ (demilitarized zone) network, and what rules you want to use in the
firewall.
For detailed information see the Cisco Configuration Professional User Guide
.
58 Rockwell Automation Publication 1783-UM005A-EN-P - September 2013
Page 59

Chapter 4
Configure the Stratix 5900 Services Router by
Using CISCO IOS Command-line Interface (CLI)
The Cisco IOS command-line interface (CLI) is a user interface that is used for
configuring, monitoring, and maintaining devices. This interface is a terminal
emulator program, such as Putty. Use the emulator to execute Cisco IOS
commands, by using a router console or terminal, or remote access methods.
Top ic Pag e
How to Use CLI for the First Time 60
CLI Architecture 60
CLI Editor Features 62
Use Command Line Instructions to Configure the Router 64
Router Management 72
Copy the Default Configuration File to NVRAM 80
To create the initial configuration the setup command facility prompts you for
basic information about your router and network.
To configure the initial router settings by using the Cisco IOS CLI, you must set
up a console connection. For instructions on how to set up a console connection,
see Connect a Terminal or Computer to the Console Port
For more detailed information about CLI, see http://www.cisco.com/en/US/
docs/ios/fundamentals/configuration/guide/cf_cli-basics.html.
on page 21.
Rockwell Automation Publication 1783-UM005A-EN-P - September 2013 59
Page 60

Chapter 4 Configure the Stratix 5900 Services Router by Using CISCO IOS Command-line Interface (CLI)
How to Use CLI for the First Time
CLI Architecture
The following section introduces you to the Cisco Internetworking Operating
System (IOS) user to the IOS command line interface (CLI). This information
explains ho to use the IOS CLI to configure and manage an IOS router.
This table defines important terms and acronyms that are used throughout this
section.
Term Definition
Cisco IOS Cisco Internetworking Operating System
CLI Command Line Interface
EXEC Command line session to the router (could be console, modem, or telnet)
Flash Nonvolatile Memory used to store IOS software image
NVRAM Nonvolatile RAM used to store router configuration
RAM Random Access Memory
You can access a Cisco IOS router command line interface through either a
console connection, modem connection, or a telnet session. Regardless of the
connection method, access to the IOS command line interface is generally
referred to as an EXEC session.
As a security feature, Cisco IOS separates EXEC sessions into two different
access levels - user EXEC level and privileged EXEC level. User EXEC level lets
you access only a limited amount of basic monitoring commands. Privileged
EXEC level lets you access all router commands, for example, configuration and
management, and can be password protected to allow only authorized users the
ability to configure or maintain the router.
For example, when an EXEC session is started, a ‘Router>’ prompt appears. The
right arrow (>) in the prompt indicates that the router is at the user EXEC level.
The user EXEC level does not contain any commands that control (reload or
configure) the operation of the router. To list the commands available at the user
EXEC level, type a question mark (?) at the Router> prompt. This feature is
referred to as context sensitive help.
Critical commands, for example, configuration and management, require that
you be at the privileged EXEC level.
Follow these steps to change to the privileged EXEC level.
1. Type enable at the Router> prompt.
If an enable password is configured, the router prompts for that password.
When the correct enable password is entered, the router prompt changes
to ‘Router#’ indicating that the user is now at the privileged EXEC level.
60 Rockwell Automation Publication 1783-UM005A-EN-P - September 2013
Page 61

Configure the Stratix 5900 Services Router by Using CISCO IOS Command-line Interface (CLI) Chapter 4
TIP
2. Type disable at the Router# prompt to switch back to user EXEC level.
Typing a question mark (?) at the privileged EXEC level reveals many
more command options than those available at the user EXEC level.
Router> enable
Password: [enable password]
Router# disable
Router>
For security reasons, the router does not echo the password that is
entered. If configuring a router via telnet, the password is sent in clear
text. Telnet does not offer a method to secure packets.
Once an EXEC session is established, commands within Cisco IOS are
hierarchically structured. To successfully configure the router, it is important to
understand this hierarchy. This graphic illustrates a simple high-level schematic
diagram of some IOS commands.
Command options and applications vary depending on position within this
hierarchy. Configuration command options are not available until you have
navigated to the configuration branch of the IOS CLI structure.
Rockwell Automation Publication 1783-UM005A-EN-P - September 2013 61
Page 62

Chapter 4 Configure the Stratix 5900 Services Router by Using CISCO IOS Command-line Interface (CLI)
Once in the configuration branch, you can enter system level configuration
commands that apply to the entire router at the global configuration level.
Interface specific configuration commands are available once you have switched
to the particular interface configuration level.
For more detailed information and examples on how to navigate through the IOS
CLI hierarchy see Router Management
To assist you in navigating through IOS CLI, the command prompt changes to
reflect your position within the command hierarchy. This lets you identify where
within the command structure you are at any time.
This table describes a few command prompts and the corresponding location
within the command structure.
Command Prompt Description
Router> User EXEC mode
Router# Privileged EXEC mode
Router(config)# Configuration mode
Notice the # sign indicates this is accessible only at privileged EXEC mode.
Router(config-if)# Interface level within configuration mode
Router(config-router)# Routing engine level within configuration mode
Router(config-line)# Line level (vty, tty, async) within configuration mode
on page 72.
CLI Editor Features
For more detailed information about command prompts, see http://
www.cisco.com/en/US/docs/ios/fundamentals/configuration/guide/cf_clibasics.html.
The following are the basic features of the CLI editor.
Context Sensitive Help
The Cisco IOS CLI software provides you with context sensitive help. This is a
useful tool because at any time during an EXEC session, you can type a question
mark (?) to get help. Two types of context sensitive help are available - word help
and command syntax help.
Word Help
You can use word help to obtain a list of commands that begin with a particular
character sequence. To use word help, type in the characters in question followed
immediately by the question mark (?). Do not include a space before the question
mark. A list of commands that start with the characters that were entered appears.
62 Rockwell Automation Publication 1783-UM005A-EN-P - September 2013
Page 63

Configure the Stratix 5900 Services Router by Using CISCO IOS Command-line Interface (CLI) Chapter 4
This is a an example of word help.
Router# co?
configure connect copy
Command Syntax
You can use command syntax help to obtain a list of command, keyword, or
argument options that are available based on the syntax that you already entered.
To use command syntax help, enter a question mark (?) in the place of a keyword
or argument. Include a space before the question mark. A list of the available
command options appear with <cr> standing for carriage return. This is an
example of command syntax help.
Router# configure ?
memory Configure from NV memory
network Configure from a TFTP network host
overwrite-network Overwrite NV memory from TFTP
network host=20
terminal Configure from the terminal
<cr>
Command Syntax Check
If you enter a command improperly, for example, a typo or invalid command
option, the router informs you and indicates where the error has occurred. A caret
symbol (^) appears underneath the incorrect command, keyword, or argument.
The following example illustrates what happens if the keyword ‘ethernet’ is
spelled incorrectly.
Router(config)#interface ethernet
^
% Invalid input detected at '^' marker.
Command Abbreviation
You can abbreviate commands and keywords to the minimum number of
characters that identifies a unique selection. For example, you can abbreviate the
‘configure’ command to ‘conf ’ because ‘configure’ is the only command that
begins with ‘conf’. You could not abbreviate the command to ‘con’ because more
than one command could fit this criteria. The router issues the following error
message if you do not supply enough characters.
cisco(config)#i
% Ambiguous command: "i"
Rockwell Automation Publication 1783-UM005A-EN-P - September 2013 63
Page 64

Chapter 4 Configure the Stratix 5900 Services Router by Using CISCO IOS Command-line Interface (CLI)
Hot Keys
For many editing functions, the IOS CLI editor provides hot keys. The following
table lists some of the shortcuts that are available.
Hot Key Description
Delete Removes one character to the right of the cursor
Backspace Removes one character to the left of the cursor
TAB Finishes a partial command
Ctrl-A Moves the cursor to the beginning of the current line
Ctrl-R Redisplays a line
Ctrl-U Erases a line
Ctrl-W Erases a word
Ctrl-Z Ends configuration mode and returns to the EXEC
Up Arrow Scrolls forward through former commands
Down Arrow Scrolls backward through former commands
Use Command Line Instructions to Configure the Router
This section illustrates IOS CLI navigation by providing an example of a simple
router configuration. The comments in the example do not attempt to explain
the meaning of each individual command, but rather intend to display where
configuration commands are entered within the IOS command structure.
Configure Initial Router Settings
To configure the initial router settings by using the Cisco IOS CLI, follow these
steps.
1. Set up a console connection to your router.
router con0 is now available
2. Press Return.
Cisco Configuration Professional Express (Cisco CP Express) is installed
on this device. This feature requires the one-time use of the username
‘username1’ with the password ‘password1.’ The default username and
password have a privilege level of 15.
Change these publicly known initial credentials
using Cisco CP Express or the Cisco IOS CLI.
These are the Cisco IOS commands:
username <myuser> privilege 15 secret 0
<mypassword>
no username username1
Replace <myuser> and <mypassword> with the username
and password you want to use.
64 Rockwell Automation Publication 1783-UM005A-EN-P - September 2013
Page 65

Configure the Stratix 5900 Services Router by Using CISCO IOS Command-line Interface (CLI) Chapter 4
TIP
TIP
User Access Verification
Username:
3. Enter the username username1 and press Return or Enter.
Password:
4. Enter the password password1 and press Return or Enter.
Router#
A message appears that is similar to the first warning message. The message
directs you to change the username and password.
You are now in privileged EXEC mode.
You must change the username and password before you log off the
router. You cannot use the username username1 or password
password1 after you log off from this session.
To change the username and password follow these steps.
1. Enter the following at the prompt:
username username privilege 15 secret 0 password
The username and password are the username and password that you
determine.
Save your configuration changes regularly to avoid losing them during
resets, power cycles, or power outages. Use the copy running-config
startup-config command at the privileged EXEC mode prompt
(Router#) to save the configuration to NVRAM.
2. Verify the initial configuration.
See Discover the Router
on page 41 for more information.
Rockwell Automation Publication 1783-UM005A-EN-P - September 2013 65
Page 66

Chapter 4 Configure the Stratix 5900 Services Router by Using CISCO IOS Command-line Interface (CLI)
Enter the Configuration Commands Manually
You can use the Cisco IOS CLI to enter the necessary configuration commands.
To enter the Cisco IOS commands manually, complete these steps.
1. Log on to the switch through the Console port or through an Ethernet
port.
See Connect a Terminal or Computer to the Console Port
on page 21 for
more information.
2. If you use the Console port, and no running configuration is present in the
switch, the Setup command Facility starts automatically, and this text
appears.
---System Configuration Dialog---
Continue with configuration dialog? [yes/no]:
Enter no so that you can enter Cisco IOS CLI
commands directly.
If the Setup Command Facility does not start automatically, a running
configuration is present, go to the next step.
3. When the user EXEC mode prompt appears, enter the enable command,
and the enable password, if one is configured, as shown in the following
example:
Switch> enable
password: password
4. Enter config mode by entering the config terminal command, as shown in
the following example.
Switch> config terminal
Switch(config)#
5. Use the command syntax shown to create a user account with privilege
level 15.
Switch(config)# username name privilege 15
secret 0 password
6. If IP Address is not configured, configure one so that you can access the
switch over the network. The following example shows the IP Address
configured on interface Vlan1.
Switch(config)# interface Vlan1
66 Rockwell Automation Publication 1783-UM005A-EN-P - September 2013
Page 67

Configure the Stratix 5900 Services Router by Using CISCO IOS Command-line Interface (CLI) Chapter 4
Switch(config-if)# ip address 10.10.10.1
255.255.255.248
Switch(config-if)# no shutdown
Switch(config-if)# exit
If you are going to connect the computer directly to the switch, the
computer must be on the same subnet as this interface.
7. Configure the switch as an http server for nonsecure communication, or as
an https server for secure communication.
To configure the switch as an http server, enter the ip http server command
shown in the example:
Switch(config)# ip http server
To configure the switch as an https server, enter the ip http secure-server
command shown in the example:
Switch(config)# ip http secure-server
8. Configure the switch for local authentication, by entering the ip http
authentication local command, as shown in the example:
Switch(config)# ip http authentication local
9. Configure the http timeout policy as shown in the example:
Switch(config)# ip http timeout-policy idle 60
life 86400 requests 10000
10. Configure the vty lines for privilege level 15.
• For nonsecure access, enter the transport input telnet command.
• For secure access, enter the transport input ssh command.
An example of these commands follows:
Switch(config)# line vty 0 4
Switch(config-line)# privilege level 15
Switch(config-line)# login local
Switch(config-line)# transport input telnet
Switch(config-line)# transport output telnet
Switch(config-line)# transport input telnet
ssh
Rockwell Automation Publication 1783-UM005A-EN-P - September 2013 67
Page 68

Chapter 4 Configure the Stratix 5900 Services Router by Using CISCO IOS Command-line Interface (CLI)
Switch(config-line)# transport output telnet
ssh
Switch(config-line)# exit
Switch(config)# line vty 5 15
Switch(config-line)# privilege level 15
Switch(config-line)# login local
Switch(config-line)# transport input telnet
Switch(config-line)# transport output telnet
Switch(config-line)# transport input telnet
ssh
Switch(config-line)# transport output telnet
ssh
Switch(config-line)# end
Pay particular attention to how the command prompt changes as you navigate
through the IOS CLI hierarchy. Notice that the global parameters are configured
at the global configuration level (indicated by the ‘Router(config)#’ prompt)
whereas the interface specific commands are entered after switching to the
particular interface (indicated by the ‘Router(config-if )#’ prompt). Global
parameters and interface parameters are discussed further in Display
Configurations on page 72.
Router> enable - switches to privileged EXEC level
Router# configure terminal - switches to global
configuration level
Router(config)# enable secret cisco - configures
router with an enable secret (global)
Router(config)# ip route 0.0.0.0 0.0.0.0 20.2.2.3
- configures a static IP route (global)
Router(config)# interface ethernet0 - switches to
configure the ethernet0 interface
Router(config-if)# ip address 10.1.1.1 255.0.0.0 configures an IP address on ethernet0 (interface)
Router(config-if)# no shutdown - activates
ethernet0 (interface)
Router(config-if)# exit - exits back to global
configuration level
Router(config)# interface serial0 - switches to
configure the serial0 interface
68 Rockwell Automation Publication 1783-UM005A-EN-P - September 2013
Page 69

Configure the Stratix 5900 Services Router by Using CISCO IOS Command-line Interface (CLI) Chapter 4
Router(config-if)# ip address 20.2.2.2 255.0.0.0 configures an IP address on serial0 (interface)
Router(config-if)# no shutdown - activates serial0
(interface)
Router(config-if)# exit - exits back to global
configuration level
Router(config)# router rip - switches to configure
RIP routing engine
Router(config-router)# network 10.0.0.0 - adds
network 10.0.0.0 to RIP engine (routing engine)
Router(config-router)# network 20.0.0.0 - adds
network 20.0.0.0 to RIP engine (routing engine)
Router(config-router)# exit - exits back to global
configuration level
Router(config)# exit - exits out of configuration
level
Router# copy running-config startup-config - saves
configuration into NVRAM
Router# disable - disables privileged EXEC level
Router> - indicates user is back to user EXEC level
In the above example, the exit command is used to back up a level within the IOS
hierarchy. For example, if in the interface configuration level, for example, Router
(config-if )# prompt, typing exit puts you back in the global configuration level
(Router (config)# prompt).
Take Interfaces Out of Shutdown
Routers ship from the factory with all interfaces deactivated. Deactivated
interfaces are referred to as being in a shutdown state. Before an interface can be
used, it must be taken out of the shutdown state. To take an interface out of
shutdown, type ‘no shutdown’ at the appropriate interface configuration level.
The example above includes these commands for both the ethernet and serial
interfaces.
Rockwell Automation Publication 1783-UM005A-EN-P - September 2013 69
Page 70

Chapter 4 Configure the Stratix 5900 Services Router by Using CISCO IOS Command-line Interface (CLI)
Remove Commands / Resetting Default Values
The IOS software provides an easy way to remove commands from a
configuration. To remove a command from the configuration, simply navigate to
the proper location and type ‘no’ followed by the command to be removed. The
following example shows how to remove an IP address from the ethernet0
interface.
Router> enable - switches to privileged EXEC level
Router# configure terminal - switches to global
configuration level
Router(config)# interface ethernet0 - switches to
configure the ethernet0 interface
Router(config-if)# no ip address - removes IP
address
Router(config-if)# exit - exits back to global
configuration level
Router(config)# exit - exits out of configuration
level
Router# disable - disables privileged EXEC level
Router> - prompt indicates user is back to user
EXEC level
Some configuration commands in IOS are enabled by default and assigned a
certain default value. When left at the default value, these commands are not
displayed when the configuration is listed. If the value is altered from the default
setting, issuing a ‘no’ form of the command restores the value to the default
setting.
70 Rockwell Automation Publication 1783-UM005A-EN-P - September 2013
Page 71

Configure the Stratix 5900 Services Router by Using CISCO IOS Command-line Interface (CLI) Chapter 4
TIP
IMPORTANT
Save Configurations
The services router stores configurations in two locations - RAM and NVRAM.
The running configuration is stored in RAM and is used by the router during
operation. Any configuration changes to the router are made to the runningconfiguration and take effect immediately after the command is entered.
The startup-configuration is saved in NVRAM and is loaded into the router's
running-configuration when the router boots up. If a router loses power or is
reloaded, changes to the running configuration are lost unless they are saved to
the startup-configuration. To save the running-configuration to the startup
configuration, type the following from privileged EXEC mode, for example, at
the ‘Router#’ prompt.
Router# copy running-config startup-config
Prior to 11.x software, the command to save the runningconfiguration to the startup-configuration was different. Use the
following command if your IOS version is prior to 11.x:
Router#write memory
When editing a configuration, SAVE the configuration often.
Rockwell Automation Publication 1783-UM005A-EN-P - September 2013 71
Page 72

Chapter 4 Configure the Stratix 5900 Services Router by Using CISCO IOS Command-line Interface (CLI)
Router Management
IOS supports many different types of show commands. This section covers a few
of the common show commands used to both manage and troubleshoot a router.
The scope of this document is not to instruct how to use these commands to
troubleshoot a router, but to make you aware that these management options
exist.
Display Configurations
To display the running-configuration, type the following command in privileged
EXEC mode:
Router#show running-config
To display the startup-configuration that is stored in NVRAM, type the
following command in privileged EXEC mode:
Router#show startup-config
The following is the show running-config output from the example used in the
Router Configuration section.
Current configuration:
!
version 11.2
!
hostname cisco
!
enable password cisco
!
interface Ethernet0
ip address 10.1.1.1 255.0.0.0
!
interface Serial0
ip address 20.2.2.2 255.0.0.0
!
router rip
network 10.0.0.0
network 20.0.0.0
!
ip route 0.0.0.0 0.0.0.0 20.2.2.3
!
line vty 0 4
password telnet
login
!
end
72 Rockwell Automation Publication 1783-UM005A-EN-P - September 2013
Page 73

Configure the Stratix 5900 Services Router by Using CISCO IOS Command-line Interface (CLI) Chapter 4
TIP
When displaying a configuration, the exclamation marks (!) function as line
separators to make reading easier. Referring to the above example, notice how
commands entered at the interface configuration level appear indented
underneath the respective interface, for example, interface Ethernet0. Likewise,
commands entered underneath the routing engine configuration level appear
indented underneath the routing engine, for example, router rip. Global level
commands are not indented. This type of display lets you identify the
configuration parameters that are set at the global configuration level and set at
the various configuration sub-levels.
If an interface was in a shutdown state, the word 'shutdown' appears indented
under the particular interface in shutdown state. Also, commands that are
enabled by default are not displayed in the configuration listing.
Display Software Version
The show version command provides a lot of information in addition to the
version of software that is running on the router. The following information can
be collected with the show version command:
• Software Version - IOS software version, stored in nonvolatile memory
• Bootstrap Version - Bootstrap version, stored in Boot ROM
• System up-time - Time since last restart
• System restart info - Method of restart, for example, a power cycle or crash
• Software image name - IOS filename stored in nonvolatile memory
• Router Type and Processor type - Model number and processor type
• Memory type and allocation (Shared/Main) - Main Processor RAM
• Shared Packet I/O buffering
• Software Features - Supported protocols / feature sets
• Hardware Interfaces - Interfaces available on router
• Configuration Register - Bootup specifications, console speed setting
The following is a sample output of a show version command.
Router# show version
Cisco Internetwork Operating System Software
IOS (tm) 3600 Software (C3640-J-M), Version
11.2(6)P, SHARED PLATFORM,
RELEASE SOFTWARE (fc1)
Copyright (c) 1986-1997 by cisco Systems, Inc.
Compiled Mon 12-May-97 15:07 by tej
Image text-base: 0x600088A0, data-base: 0x6075C000
ROM: System Bootstrap, Version 11.1(7)AX [kuong
(7)AX], EARLY DEPLOYMENT
RELEASE SOFTWARE (fc2)
Rockwell Automation Publication 1783-UM005A-EN-P - September 2013 73
Page 74

Chapter 4 Configure the Stratix 5900 Services Router by Using CISCO IOS Command-line Interface (CLI)
Router uptime is 1 week, 1 day, 38 minutes
System restarted by power-on
System image file is “flash:c3640-j-mz_1126_P.bin”, booted
via flash
Host configuration file is “3600_4-confg”, booted
via tftp
from 171.69.83.194
cisco 3640 (R4700) processor (revision 0x00) with
107520K/23552K bytes
of memory.
Processor board ID 03084730
R4700 processor, Implementation 33, Revision 1.0
Bridging software.
SuperLAT software copyright 1990 by Meridian
Technology Corp).
X.25 software, Version 2.0, NET2, BFE and GOSIP
compliant.
TN3270 Emulation software.
Primary Rate ISDN software, Version 1.0.
2 Ethernet/IEEE 802.3 interface(s)
97 Serial network interface(s)
4 Channelized T1/PRI port(s)
DRAM configuration is 64 bits wide with parity
disabled.
125K bytes of non-volatile configuration memory.
16384K bytes of processor board System flash (Read/
Write)
Configuration register is 0x2102
74 Rockwell Automation Publication 1783-UM005A-EN-P - September 2013
Page 75

Configure the Stratix 5900 Services Router by Using CISCO IOS Command-line Interface (CLI) Chapter 4
Display Interface States
To view information about a particular interface, use the show interface
command. The show interface command provides the following list of important
information:
• Interface State, for example, UP, DOWN, and LOOPED
• Protocol addresses
• Bandwidth
• Reliability and Load
• Encapsulation type
• Packet Rates
• Error Rates
• Signaling Status, for example, DCD, DSR, DTR, RTS, and CTS
The following is an example of a ‘show interface serial0’ output:
Router#show interface serial 0
Serial0 is up, line protocol is down
Hardware is QUICC Serial
Internet address is 10.1.1.2/24
MTU 1500 bytes, BW 1544 Kbit, DLY 20000 usec, rely
255/255, load 1/255
Encapsulation FRAME-RELAY, loopback not set,
keepalive set (10 sec)
LMI enq sent 207603, LMI stat recvd 113715, LMI upd
recvd 0, DTE LMI
down
LMI enq recvd 0, LMI stat sent 0, LMI upd sent 0
LMI DLCI 1023 LMI type is CISCO frame relay DTE
Broadcast queue 0/64, broadcasts sent/dropped 0/0,
interface broadcasts
62856
Last input 1w, output 00:00:08, output hang never
Last clearing of "show interface" counters never
Input queue: 0/75/0 (size/max/drops); Total output
drops: 0
Queueing strategy: weighted fair
Output queue: 0/64/0 (size/threshold/drops)
Conversations 0/1 (active/max active)
Reserved Conversations 0/0 (allocated/max
allocated)
5 minute input rate 1000 bits/sec, 1 packets/sec
Rockwell Automation Publication 1783-UM005A-EN-P - September 2013 75
Page 76

Chapter 4 Configure the Stratix 5900 Services Router by Using CISCO IOS Command-line Interface (CLI)
5 minute output rate 0 bits/sec, 0 packets/sec
1012272 packets input, 91255488 bytes, 0 no buffer
Received 916 broadcasts, 0 runts, 0 giants
18519 input errors, 0 CRC, 17796 frame, 0 overrun,
0 ignored, 723 abort
283132 packets output, 13712011 bytes, 0 underruns
0 output errors, 0 collisions, 31317 interface
resets
0 output buffer failures, 0 output buffers swapped
out
3 carrier transitions
DCD=up DSR=up DTR=up RTS=up CTS=up
Setup Command Facility
The setup command facility guides you through the configuration process by
prompting you for the specific information that is needed to configure your
system. Use the setup command facility to configure a hostname for the router, to
set passwords, and to configure an interface for communication with the
management network.
To use the setup command facility, you must set up a console connection with the
router and enter the privileged EXEC mode.
To configure the initial router settings by using the setup command facility,
follow these steps:
1. Set up a console connection to your router, and enter privileged EXEC
mode.
For instructions on how to enter privileged EXEC mode, CLI
Architecture on page 60.
2. In privileged EXEC mode, at the prompt, enter setup.
yourname# setup
The following message is displayed:
--- System Configuration Dialog ---
Continue with configuration dialog? [yes/no]:
You are now in the setup command facility.
76 Rockwell Automation Publication 1783-UM005A-EN-P - September 2013
Page 77

Configure the Stratix 5900 Services Router by Using CISCO IOS Command-line Interface (CLI) Chapter 4
TIP
The prompts in the setup command facility vary, depending on your
router model, on the installed interface modules, and on the software
image. The following steps and the user entries (in bold) are shown only as
examples.
If you make a mistake while using the setup command facility, you can
exit and run the setup command facility again. Press Ctrl-C and enter
the setup command at the privileged EXEC mode prompt (Router#).
For more information on using the setup command facility, see `The
Setup Command’ chapter in Using the Cisco IOS Command-Line
Interface Guide 15.3.
3. To proceed using the setup command facility, enter yes.
Continue with configuration dialog? [yes/no]: yes
4. When the following messages appear, enter yes to enter basic management
setup.
At any point you may enter a question mark '?' for
help.
Use ctrl-c to abort configuration dialog at any
prompt.
Default settings are in square brackets '[]'.
Basic management setup configures only enough
connectivity for management of the system, extended
setup will ask you to configure each interface on
the system
Would you like to enter basic management setup?
[yes/no]: yes
5. Enter a hostname for the router (this example uses Router).
Configuring global parameters:
Enter host name [Router]: Router
6. Enter an enable secret password.
This password is encrypted (more secure) and cannot be seen when
viewing the configuration.
The enable secret is a password used to protect
access to privileged EXEC and configuration modes.
This password, after entered, becomes encrypted in
the configuration.
Enter enable secret: xxxxxx
Rockwell Automation Publication 1783-UM005A-EN-P - September 2013 77
Page 78

Chapter 4 Configure the Stratix 5900 Services Router by Using CISCO IOS Command-line Interface (CLI)
7. Enter an enable password that is different from the enable secret password.
This password is not encrypted (less secure) and can be seen when viewing
the configuration.
The enable password is used when you do not specify
an enable secret password, with some older software
versions, and some boot images.
Enter enable password: xxxxxx
8. Enter the virtual terminal password, this prevents unauthenticated access
to the router through ports other than the console port.
The virtual terminal password is used to protect
access to the router over a network interface.
Enter virtual terminal password: xxxxxx
9. Respond to the following prompts as appropriate for your network:
Configure SNMP Network Management? [yes]:
Community string [public]:
A summary of the available interfaces is displayed.
10. Choose one of the available interfaces for connecting the router to the
management network.
Enter interface name used to connect to the
management network from the above interface
summary: fastethernet4
11. Respond to the following prompts as appropriate for your network:
Configuring interface FastEthernet0:
Use the 100 Base-TX (RJ-45) connector? [yes]: yes
Operate in full-duplex mode? [no]: yes
Configure IP on this interface? [yes]: yes
IP address for this interface: 172.1.2.3
Subnet mask for this interface [255.255.0.0] :
255.255.0.0
Class B network is 172.1.0.0, 26 subnet bits;
mask is /16
The configuration is displayed:
The following configuration command script was
created:
hostname Router
enable secret 5 $1$D5P6$PYx41/lQIASK.HcSbfO5q1
enable password xxxxxx
line vty 0 4
password xxxxxx
snmp-server community public
78 Rockwell Automation Publication 1783-UM005A-EN-P - September 2013
Page 79

Configure the Stratix 5900 Services Router by Using CISCO IOS Command-line Interface (CLI) Chapter 4
!
no ip routing
!
interface FastEthernet0
no shutdown
speed 100
duplex auto
ip address 172.16.2.3 255.255.0.0
!
12. Respond to the following prompts. Enter 2 to save the initial
configuration.
[0] Go to the IOS command prompt without saving
this config.
[1] Return back to the setup without saving this
config.
[2] Save this configuration to nvram and exit.
Enter your selection [2]: 2
Building configuration...
Use the enabled mode 'configure' command to modify
this configuration.
Press RETURN to get started! RETURN
The user prompt is displayed.
Router>
13. Verify the initial configuration. See Discover the Router on page 41.
Rockwell Automation Publication 1783-UM005A-EN-P - September 2013 79
Page 80

Chapter 4 Configure the Stratix 5900 Services Router by Using CISCO IOS Command-line Interface (CLI)
Copy the Default Configuration File to NVRAM
If you want to start with a factory default configuration that is designed to
support Stratix Configurator software, you can use this procedure. The factory
default configuration includes all the commands necessary to support Stratix
Configurator software and configures an Ethernet interface with the IP address
10.10.10.1.
To copy the default configuration file from router nonvolatile memory to
NVRAM, complete these steps.
1. Log on to the router through the Console port or through an Ethernet
port.
If you use the Console port, and no running configuration is present in the
router, the Setup command Facility starts automatically, and the following
text appears:
--- System Configuration Dialog ---
Continue with configuration dialog? [yes/no]:
Enter no so that you can enter Cisco IOS CLI
commands directly.
If the Setup Command Facility does not start automatically, a running
configuration is present, go to the next step.
2. When the router user EXEC mode prompt appears, enter the enable
command, and the enable password, if one is configured, as shown below:
Router> enable
password password
Router#
3. Enter the show flash command to identify the default configuration file.
The filename is of the form cpconfig-modelnumber.cfg, where
modelnumber represents the router series. For example, the configuration
file name for the Cisco 860 and 880 series routers is cpconfig-8xx.cfg.
Router# show flash
-#- --length-- -----date/time------ path
1 2903 Apr 15 2008 20:34:48 +00:00 cpconfig8xx.cfg
2 115712 Apr 15 2008 20:34:50 +00:00 home.tar
80 Rockwell Automation Publication 1783-UM005A-EN-P - September 2013
Page 81

Configure the Stratix 5900 Services Router by Using CISCO IOS Command-line Interface (CLI) Chapter 4
3 2279424 Apr 15 2008 20:34:54 +00:00
cpexpress.tar
Router#
4. Enter the copy flash: nvram: command, as shown in this example.
Router# copy flash:cpconfig-8xx.cfg nvram:
This copies the default configuration file to router NVRAM,
When the default configuration file is in NVRAM, it becomes the router
startup configuration.
5. Enter the copy startup-config running-config command, as shown in this
example.
Router# copy startup-config running-config
This makes the new startup configuration the running configuration, so
that the router can support Stratix Configurator software.
Rockwell Automation Publication 1783-UM005A-EN-P - September 2013 81
Page 82

Chapter 4 Configure the Stratix 5900 Services Router by Using CISCO IOS Command-line Interface (CLI)
Notes:
82 Rockwell Automation Publication 1783-UM005A-EN-P - September 2013
Page 83

Index
A
AAL5 MUX 53
AAL5 SNAP
adapter
address type list
Adobe Flash Player
authentication
53
15
53
54
serial connection
39
56
C
cable 15, 17, 19
crossover
36
not connected 43
CDP
58
CHAP
52, 54
Cisco
documentation
software
Cisco Discovery Protocol 58
Cisco Internetworking Operating System
Cisco IOS
image
clearance
installation
CLI
12, 34
command line
command syntax 63
configurations
configure using
default values
detailed information
device manager 34
display
editor
help
61, 62
hierarchy
hot keys
NVRAM
router management
setup command 76
software
using it for the first time
community
connect securely
create
devices
manage
select
46
view
configuration
basic
30, 39
edit
49
initial
configuration software
6
34
57
18
12, 59
save
71
59, 64
reset
70
interface states
62
61, 68
64
71
display version
45
45
40
41, 44
41
47
59
75
72
73
60
12
60
connection
verify
41
console connection
console port
credentials
21
37, 64
D
damage
prevent
18
DB-9
21
device manager
CLI
34
dashboard
DHCP/DNS/Hostname 34
interfaces
plug and play server
static routing
troubleshoot
user management
wizard 34, 36
DHCP
31, 51, 53, 56
DIN-rail
discover
device error
DNS
33
domain name
dynamic IP address
34
34
34
34
16, 17
43
30
E
electric shock 16
encapsulation
PPPoE
RFC 1483 Routing 53
serial connection
Ethernet
connect
switch port
EXEC
mode
session
53
53
7
20
19
65
60
F
Firefox 36, 39
firewall
configuration
features
frame relay
57
8
56
G
Google Chrome 36, 39
ground
16, 18
59
34
34
53, 56
56
Rockwell Automation Publication 1783-UM005A-EN-P - September 2013 83
Page 84

Index
H
hierarchy
CLI
68
hostname
http
https
30
30
30
I
install 15, 17
Internet Explorer
intrusion prevention system
IOS
60
IP address
communicate with
configure
dynamic
negotiated
specific 33
static
unnumbered
IP Unicast 57
IPS
38
IPv4
34
36, 39
30, 43
36
31
53, 56
53
53
53
L
LAN 37
bridging and routing
connect
interface 31, 51
interfaces
ports
9, 16
subnet 31
lock-down
38
17
34
7
M
memory
nonvolatile
Microsoft
Windows 7
Windows Vista
Windows XP
mounting
Multilink PPP
60
32, 40
31, 40
31
18
53
N
nonvolatile memory 34
manage
8
NVRAM
12
default configuration file
P
PAP 52, 54
80
38
power
100…240 V AC
supply
troubleshoot 36
PPPoA
53
PPPoE
53
privilege level
privileged EXEC mode
10
10
30
R
reset
router
resources 6
RFC 1483 Routing
RJ-45
router
RPF
9, 26
19, 21
CLI commands
57
53
62
S
security
auditing
38
congiuration 58
features
8
security risks
serial connection
serial interface 11
serial port
services router
shutdown
software
58
11
wizard
55
11
7
configure
5, 29
Console /AUX port
description
discover 41
features
Gigabit Ethernet WAN Port
ground
install
LAN...FE ports
power adapter
power input
power switch
reset
serial port
shipping contents
SYS/ACT
7
8, 9
10
15
9
10
10
10
9
9
9
69
IOS command line interface
Stratix 5900 Device Manager
Stratix Configurator
community view
device communities
interface
14
schedule discover
37
10
10
9
12
12
12, 39, 41
41
44
42
84 Rockwell Automation Publication 1783-UM005A-EN-P - September 2013
Page 85

status indicators 11
ACT check
blinking
fast blinking 11
slow blinking
SYS
Stratix 5900 Device Manager software
interface
Stratix Configurator software
subnet mask
summary window
11
11
11
11
13
38
33
37, 50
T
temperature 16
template
terminal emulator
timeout policy
transmitting
8
21
30
11
U
UL 15
USB
to serial
21
user access verification
65
Index
34
V
virtual circuit identifier 53
virtual path identifier
voice
features
features
30
8
8
VPN 38, 39
Vty line
53
W
WAN 34
autodetect encapsulation
configuring
ethernet interface
firewall
user specified encapsulation
web browser
50
51
57
36
52
53
Rockwell Automation Publication 1783-UM005A-EN-P - September 2013 85
Page 86

Index
Notes:
86 Rockwell Automation Publication 1783-UM005A-EN-P - September 2013
Page 87

Page 88

Rockwell Automation Support
Rockwell Otomasyon Ticaret A.Ş., Kar Plaza İş Merkezi E Blok Kat:6 34752 İçerenköy, İstanbul, Tel: +90 (216) 5698400
Rockwell Automation provides technical information on the Web to assist you in using its products.
At http://www.rockwellautomation.com/support
software service packs. You can also visit our Support Center at https://rockwellautomation.custhelp.com/
updates, support chats and forums, technical information, FAQs, and to sign up for product notification updates.
In addition, we offer multiple support programs for installation, configuration, and troubleshooting. For more
information, contact your local distributor or Rockwell Automation representative, or visit
http://www.rockwellautomation.com/services/online-phone
Installation Assistance
If you experience a problem within the first 24 hours of installation, review the information that is contained in this
manual. You can contact Customer Support for initial help in getting your product up and running.
United States or Canada 1.440.646.3434
Outside United States or Canada Use the Worl dwid e Loc ator
Rockwell Automation representative.
at http://www.rockwellautomation.com/rockwellautomation/support/overview.page, or contact your local
New Product Satisfaction Return
you can find technical and application notes, sample code, and links to
for software
.
Rockwell Automation tests all of its products to help ensure that they are fully operational when shipped from the
manufacturing facility. However, if your product is not functioning and needs to be returned, follow these procedures.
United States Contact your distributor. You must provide a Customer Suppor t case number (call the phone number above to obtain one) to your
Outside United States Please contact your local Rockwell Automation representative for the return procedure.
distributor to complete the return process.
Documentation Feedback
Your comments will help us serve your documentation needs better. If you have any suggestions on how to improve this
document, complete this form, publication RA-DU002
, available at http://www.rockwellautomation.com/literature/.
Publication 1783-UM005A-EN-P - September 2013
Copyright © 2013 Rockwell Automation, Inc. All rights reserved. Printed in the U.S.A.
 Loading...