

Page 1
ALLEN-BRADLEY
1336 FORCEt Language Module
Installation/Replacement
Instructions
Purpose
Module Replacement
This publication will guide you through installation (or
replacement) of the 1336 FORCE Language Module.
ATTENTION: This drive contains ESD
!
!
(Electrosta tic Discha rge) sensitive parts and
assemblies. Static control precautions are required
when installing, testing, servicing or repairing this
assembly. Component damage may result if ESD
control procedures are not followed. If you are not
familiar with static control proce dure s, refe re nc e
A-B publication 8000-4.5.2, “Gua rding Against
Electrostatic Damage” or any other applicable ESD
protection handbook.
ATTENTION: T o avoid a shock hazard, assure
that all power to the drive has been removed before
proceeding with the following procedure. In
addition, verify that the DC bus has dischar ged by
measuring across the “+ DC” and “–DC” terminals
of TB1 with a voltmeter. The voltage should be
0.0VDC.
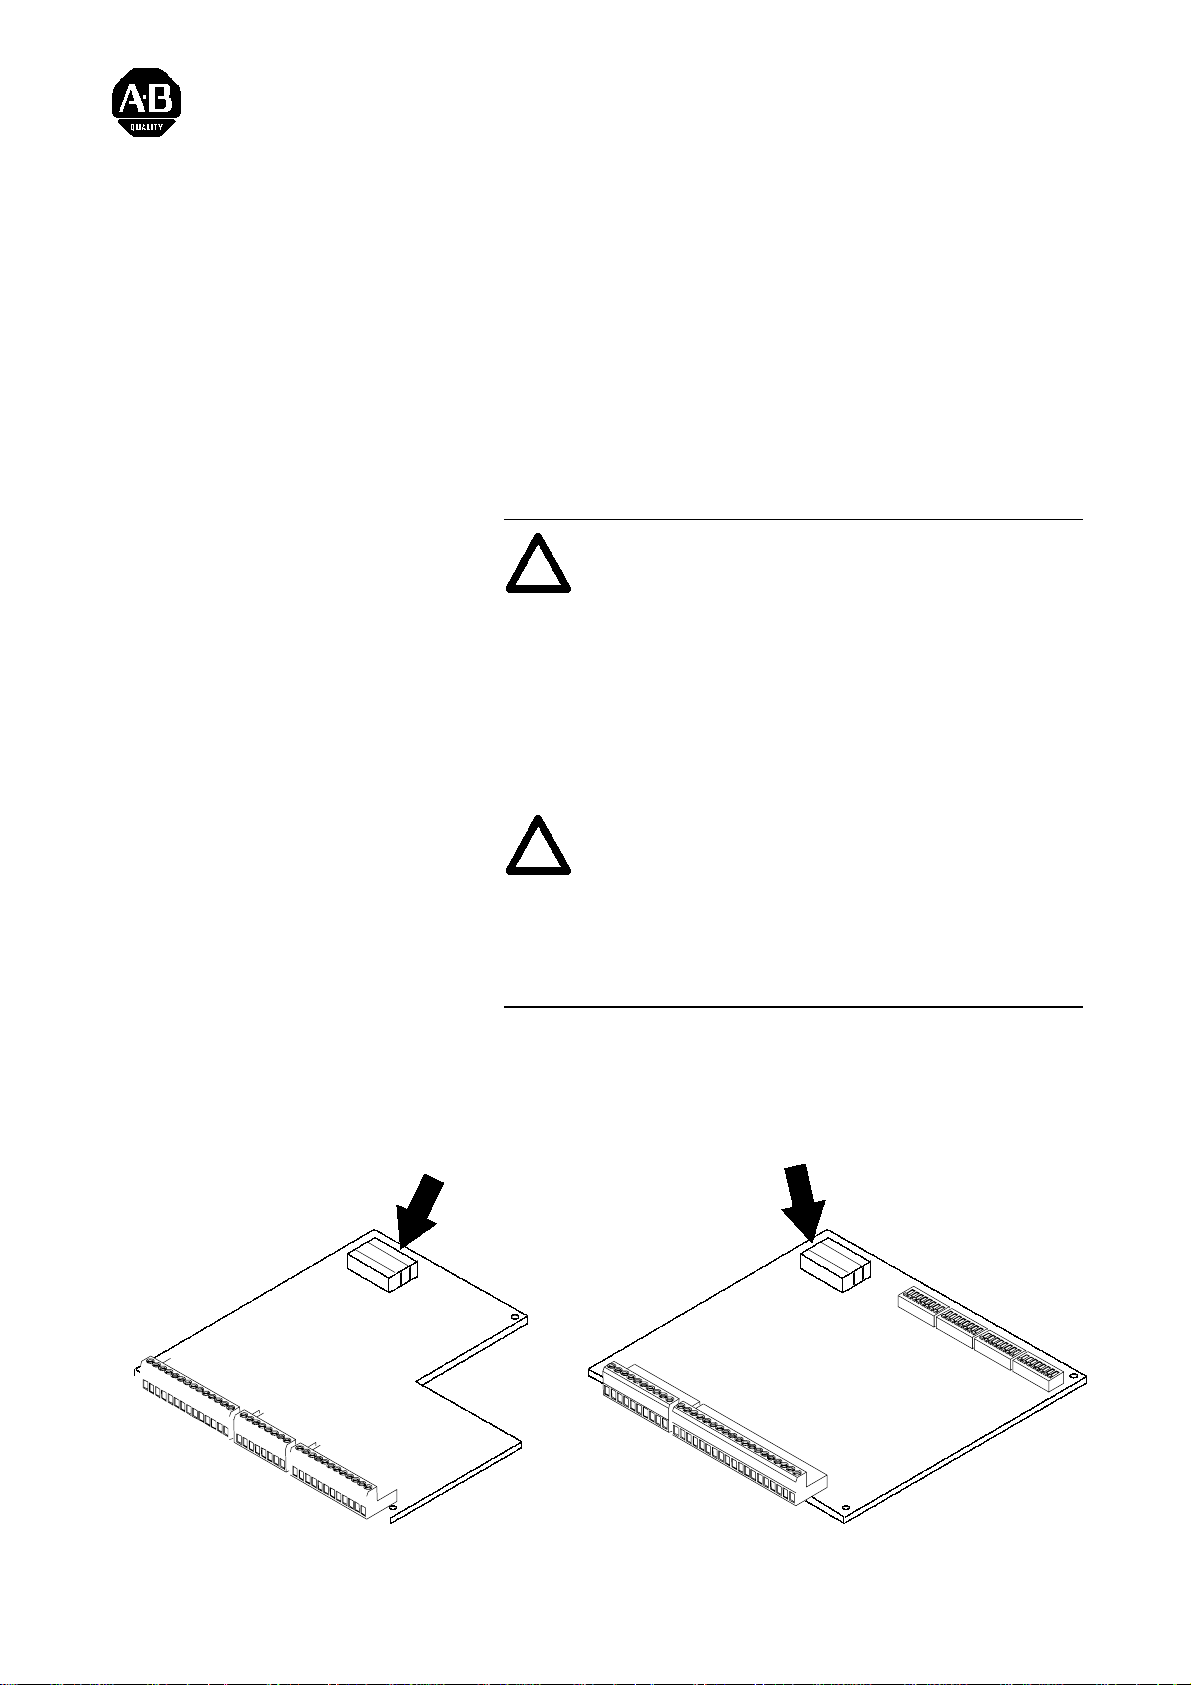
LANGUAGEMODULE
ALLEN--BRADLEY
Standard Adapter Board
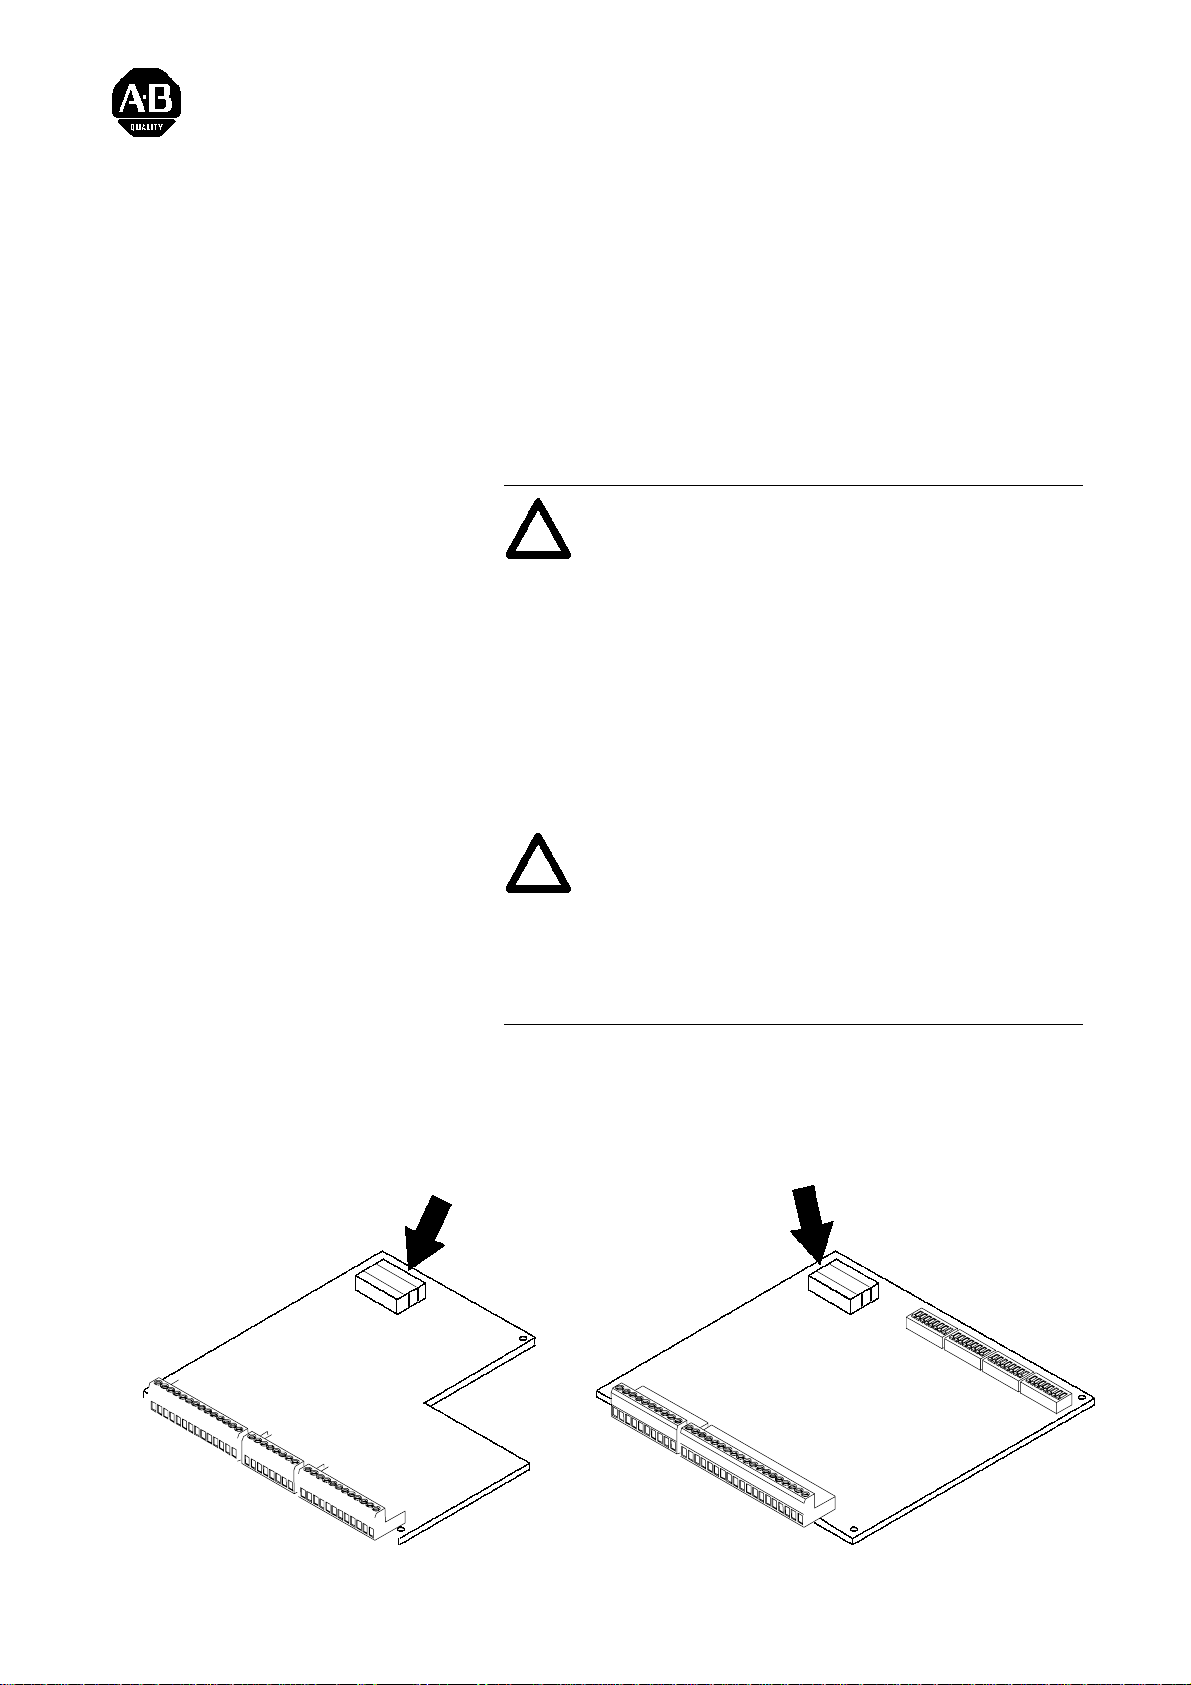
❏ 1. Remove and lock-out all incoming power to the drive.
Remove the drive cover.
❏ 2. Using the figure below, locate the Language Module for
your drive and note orientation.
LANGUAGEMODULE
ALLEN--BRADLEY
PLC Comm Board
Page 2

1336 FORCEt Language Module Replacement2
❏ 3. Remove the module by squeezing the
sides - in, and pulling outward. Discard
module.
❏ 4. Position the new Language Module on
the board, using the silk screen outline on
the board as a guide.
❏ 5. Carefully align the module connector
with the board connector. Firmly press the
module onto the board until fully seated.
The module will “snap” (lock) in place.
❏ 6. Replace drive cover and check for proper
operation.
L
A
N
G
U
A
G
E
A
M
L
O
L
E
D
N
U
-
L
B
E
R
A
D
L
E
Y
L
A
N
G
U
A
G
E
A
M
L
O
L
E
D
N
U
-
L
B
E
R
A
D
L
E
Y
Important: Each module contains English
and an alternate language. The
factory default setting for the
[Language] parameter is
“English.” T o program and
operate the drive in the alternate
language, the [Language]
parameter must be programmed
to the alternate language.
1336 FORCE is a trademark of Allen-Bradley Company, Inc.
Page 3
ALLEN- BRADLEY
Installazione/Sostituzione del Modulo
di Linguaggio 1336 FORCEt
Istruzioni
Scopo
Sostituzione del modulo
Questa pubblicazione contiene informazioni sull’installazione (o
sostituzione) del Modulo di Linguaggio 1336 FORCE.
ATTENZIONE: Questo azionamento contiene
!
!
parti e componenti sensibili a Scarica Elettrostatica
(ESD). Durante l’installazione, il testing, l’uso o la
riparazione di questo componente sono richieste
precauzioni per il controllo della corrente statica.
Dalla mancata osservanza delle procedure di
controllo ESD possono derivare danni ai
componenti. Se non si ha dimestichezza con le
procedure di controllo statico, fare riferimento alla
pubblicazione A--B 8000--4.5.2, ‘‘Guarding
Against Electrostatic Damage’’ o a qualsiasi altro
manuale sulla prote zione da ESD.
ATTENZIONE: Per evitare il pericolo di scosse,
assicurarsi di aver tolto del tutto l’alimentazione
all’azioname nto prima di proc ed er e con la seguente
procedura. In aggiunta , verificare che il bus CC si
sia scaricato misurando con un voltmetro la
differenza di potenziale tra i terminali ‘ ‘+CC’ ’ e
‘ ‘--CC’’ di TB1. Il voltaggio deve essere 0,0V CC.
LANGUAGEMODULE
ALLEN--BRADLEY
Scheda adattatore
standard
❏ 1.
Rimuovere e bloccare tutta l’alimentazione che arriva
all’azionamento. Rimuovere il coperchio dell’azionamento.
❏ 2.
Con l’ausilio della figura seguente, localizzare il Modulo
di Linguaggio dell’azionamento e notarne l’orientamento.
LANGUAGEMODULE
ALLEN--BRADLEY
Scheda PLC Com.
1336 FORCE is a trademark of Allen-Bradley Company, Inc.
Page 4

Installazione/Sostituzione del Modulo di Linguaggio 1336 FORCEt2
❏ 3. Rimuovere il modulo premendo sui l ati e
tirando verso l’esterno. Scartare il
modulo.
❏ 4. Disporre il nuovo Modulo di Linguaggio
sulla scheda, usando il profilo di
posizionamento presente sulla scheda
stessa.
❏ 5. Allineare con cura il connettore del
modulo con il connettore della scheda.
Premere con decisione il modulo sulla
scheda fino a bloccarlo del tutto. Il
modulo farà uno scatto (blocco) quando
è a posto.
L
A
N
G
U
A
G
E
A
M
L
O
L
E
D
N
U
-
L
B
E
R
A
D
L
E
Y
L
A
N
G
U
A
G
E
A
M
L
O
L
E
D
N
U
-
L
B
E
R
A
D
L
E
Y
❏ 6. Rimettere il coperchio sull’azionamento
e verificare il corretto funzionamento.
Importante: Ogni modulo consente
l’uso della lingua inglese e di un’altra
lingua. Il parametro [Lingua] è impostato
per default dal costruttore su “Inglese”.
Per programmare e far funzionare
l’azionamento nell’altra lingua, il
parametro [Lingua] deve essere impostato
di conseguenza.
Page 5

Allen-Bradley
Instalación y reemplazo del módulo de
idioma 1336 FORCEt
Instucciones
Propósito
Reemplaco de Módulo
Esta publicación le servirá de guía para instalar (o reemplazar) el
módulo de idioma 1336 FORCE.
A TENCION: Este variador tiene partes y
!
!
conjuntos sensibles a descargas electrostáticas
(ESD). Durante la instalación, prueba, servicio de
mantenimiento o re pa ra ción de esta unidad deben
tomarse precauciones de control de estática. Si no
se siguen los procedimientos de control de
descar gas electrostáticas, los componentes pueden
sufrir daño. Si usted no está familiarizado con los
procedimientos de control de estática, consulte la
publicación de A-B 8000-4.5.2, “Guarding Against
Electrostatic Damage”, o cualquier otro manual
aplicable sobre protección contra descargas
electrostáticas.
A TENCION: Para evitar un peligro de choque,
asegúrese de desconectar toda la alimentación
eléctrica al variador antes de proceder con el
siguiente procedimiento. Además, verifique que el
bus de CC esté descargado haciendo una medición
a través de los terminales de “+CC” y “–CC” de
TB1 con un voltímetro. El voltaje debe ser de 0.0
VCC.
❏ 1. Desconecte y desactive toda la alimentación de entrada al
variador. Quite la cubierta del variador.
❏ 2. Usando la siguiente figura, ubique el módulo de idioma de
su variador y observe la orientación.
Page 6

Instalación y reemplazo del módulo de idioma 1336 FORCEt2
LANGUAGEMODULE
ALLEN--BRADLEY
Tarjeta de adaptador
estándar
LANGUAGEMODULE
ALLEN--BRADLEY
Tarjeta de comunicación PLC
Page 7

❏ 3. Desinstale el módulo apretando los lados
hacia adentro, y tirando hacia afuera.
Deseche el módulo.
❏ 4. Coloque el nuevo módulo de idioma en
la tarjeta usando el contorno de la plantilla
de seda de la tarjeta como guía.
❏ 5. Con cuidado alinee el conector del
módulo con el conector de la tarjeta.
Presione firmemente el módulo sobre la
tarjeta hasta que quede totalmente asentado.
El módulo encajará en su lugar.
3
L
A
N
G
U
A
G
E
A
M
L
O
L
E
D
N
U
-
L
B
E
R
A
D
L
E
Y
L
A
N
G
U
A
G
E
A
M
L
O
L
E
D
N
U
-
L
B
E
R
A
D
L
E
Y
❏ 6. Vuelva a colocar la cubierta del variador
y verifique su correcta operación.
Importante: Cada módulo tiene el idioma
Inglés y un idioma alternativo.
La selección predeterminada en
fábrica del parámetro [Idioma}
es “Inglés”. Para programar y
operar el variador en el idioma
alternativo, el parámetro
[Idioma] debe programarse al
idioma alternativo.
1336 FORCE es una marca comercial de Allen-Bradley Company, Inc.
Page 8

ALLEN- BRADLEY
Installation/remplacement du module
de langue 1336 FORCEt
Instructions
Objet
Remplacement du module
Cette publication est un guide d’installation (ou de
remplacement) du module de langue 1336 FORCE.
ATTENTION : Le variateur contient des pièces et
!
!
ensembles sensibles aux ESD (décharges
électrostatiques). Des précautions de contrôle des
parasites atmosphériques doivent être prises lors de
l’installation, du test, de l’entretien ou de la
réparation de cet ensemble. Une détérioration de
composants peut se produire si les procédures de
contrôle des ESD ne sont pas suivies. Si vous ne
connaissez pas ces procédures, consultez la
publication Allen-Bradley 8000-4.5.2 « Guarding
Against Electrostatic Damage » ou toute autre
document sur la protection contre les ESD.
ATTENTION : Pour éviter tout risque de décharge, assurez-vous que le variateur a été mis hors tension avant d’entreprendre la procédure qui suit. De
plus, vérifiez que le bus c.c. est déchargé en mesurant la tension aux bornes « + c .c. » et « --c.c. » du
bornier TB1 à l’aide d’un voltmètre. La tension
doitêtrede0,0Vc.c.
LANGUAGEMODULE
ALLEN--BRADLEY
Carte adaptateur st a ndard
Coupez et protégez toute a limentation d’arrivée au
❏ 1.
variateur. Enlevez le capot du varia teur.
En vous servant de la figure c i-dessous, repérez le
❏ 2.
module de langue de votre variat eur et notez son orientation.
LANGUAGEMODULE
ALLEN--BRADLEY
Carte de communication PLC
Page 9

2
Installation/remplacement du module de langue 1336 FORCE
❏ 3. Retirez le module en appuyant sur les
côtés et en tirant. Jetez le module.
❏ 4. Placez le module de langue neuf sur la
carte en vous guidant sur le t racé
sérigraphique
de la carte.
L
A
N
G
U
A
G
E
A
M
L
O
L
E
D
N
U
-
L
B
E
R
A
D
L
E
Y
❏ 5. Alignez soigneusement le connecteur
du module avec celui de la carte.
Appuyez fermement sur le module
jusqu’à ce qu’il soit bien enfoncé. Le
module s’enclenche (se bloque) à sa
place.
❏ 6. Replacez le capot du variateur et
vérifiez s’il fonctionne correctement.
Important : Chaque module contient
l’an- glais et une autre langue. Le réglage usine par défaut pour le paramètre
[LANGUE] est l’anglais. Pour
programmer et faire fonctionner le
variateur dans une autre langue, le
paramètre [LANGUE] doit être programmé pour cette autre langue.
L
A
N
G
U
A
G
E
A
M
L
O
L
E
D
N
U
-
L
B
E
R
A
D
L
E
Y
Page 10

ALLEN- BRADLEY
Installation und Austausch des
Sprachmoduls für den Frequenzumrichter 1336 FORCEt
Anleitung
Zweck dieser Publikation
Austausch des Moduls
Diese Anleitung beschreibt die Installation bzw. den Austausch
des Sprachmoduls für den Frequenzumrichter 1336 FORCE.
ACHTUNG: Dieser FU enthält Teile und Baugruppen, die empfindlich gegen elektrostatische
!
Entladung sind. Bei der Insta lla tion, Prüfung und
W artung oder Reparatur dieses Geräts müssen deshalb
Vorsichtsmaßnahmen getroffen werden, um solch eine
elektrostatische Entladung zu ver- hindern, da
Komponenten anderenfalls beschädigt werden können.
Sollten Sie mit der V er hinder ung statischer Entladung
nicht vertraut sein, beziehen Sie sich auf die
A-B-Publikation 8000--4.5.2, “Guarding Against
Electrostatic Damage” oder ein entsprechendes
Handbuch.
ACHTUNG: Zur Vermeidung eines elektrischen
Schlags müssen Sie zunächst sicherstellen, daß
!
keinerlei Spannung am FU anliegt. Stellen Sie
außerdem sicher, daß der DC-Bus entladen ist. Messen
Sie hierzu das Potential zwischen den Klemmen
“+DC” und “–DC” von TB1 mit einem Voltmeter. Die
Spannung muß 0,0 V DC betragen.
❏ 1. Trennen und sperren Sie jegliche Stromzufuhr des F Us.
Nehmen Sie die Abdeckung des FUs ab.
❏ 2. Suchen Sie anhand der folgenden Abbildung das Sprach-
modul des FUs und beachten Sie die Einbaulage.
1336 FORCE ist ein Warenzeichen der Firma Allen-Bradley Company, Inc.
Page 11

Installazione/Sostituzione del Modulo di Linguaggio 1336 FORCEt2
ALLEN--BRADLEY
Standardmäßige
Adapterplatine
LANGUAGEMODULE
LANGUAGEMODULE
ALLEN--BRADLEY
PLC-Kommunikationsplatine
Page 12

Installazione/Sostituzione del Modulo di Linguaggio 1336 FORCEt 3
❏ 3. Entfernen Sie das Modul. Drücken Sie
hierzu die Seiten nach innen und ziehen
Sie es nach oben ab. Entsorgen Sie das
Modul.
❏ 4. Halten Sie das neue Sprachmodul über
die Platine. Als Richtlinien können Sie
hierbei den Aufdruck auf der Platine
verwenden.
L
A
N
G
U
A
G
E
A
M
L
O
L
E
D
N
U
-
L
B
E
R
A
D
L
E
Y
❏ 5. Richten Sie den Steckverbinder des
Moduls sorgfältig am Platinenanschluß
aus. Drücken Sie das Modul auf die
Platine, bis es einrastet.
❏ 6. Bringen Sie die FU-Abdeckung wieder
an und vergewissern Sie sich, daß alles
ordnungsgemäß funktioniert.
Wichtig:Jedes Modul enthält die
Sprachen Englisch und eine weitere
Sprache. Standardmäßig weist der
Paramete r [Sprache] die Einstellung
“Englisch” auf. Wenn Sie den FU in
deutscher Sprache programmieren und
betreiben möchten, müssen Sie den
Parameter [Sprache] entsprechend ändern.
L
A
N
G
U
A
G
E
A
M
L
O
L
E
D
N
U
-
L
B
E
R
A
D
L
E
Y
Page 13

1336 FORCE, DeviceNet are Trademarks of Allen-Bradley Co., Inc.
Allen-Bradley, a Rockwell automation business, has been helping its customers improve
productivity and quality for more than 90 years. We design, manufacture and support a broad
range of automation products worldwide. They include logic processors, power and motion control
devices, operator interfaces, sensors and a variety of software. Rockwell is one of the world’s
leading technology companies.
Worldwide representation.
Argentina • Australia • Austria • Bahrain • Belgium • Brazil • Bulgaria • Canada • Chile • China, PRC • Colombia • CostaRica • Croatia • Cyprus • Czech Republic • Denmark
Ecuador • Egypt • El Salvador • Finland • France • Germany • Greece • Guatemala • Honduras • Hong Kong • Hungary • Iceland • India • Indonesia • Ireland • Israel • Italy
Jamaica • Japan • Jordan • Korea • Kuwait • Lebanon • Malaysia • Mexico • Netherlands • New Zealand • Norway • Pakistan • Peru • Philippines • Poland • Portugal
Puerto Rico • Qatar • Romania • Russia--CIS • Saudi Arabia • Singapore • Slovakia • Slovenia • South Africa, Republic • Spain • Sweden • Switzerland • Taiwan • Thailand
Turkey • United Arab Emirates • United Kingdom • United States • Uruguay • Venezuela • Yugoslavia
Allen-Bradley Headquarters, 1201 South Second Street, Milwaukee, WI 53204 USA, Tel: (1) 414 382-2000 Fax: (1) 414 382-4444
Publication 1336 FORCE - 5.16ML -- August, 1995 P/N 74002-149-01(A)
Copyright 1996 Rockwell Automation
 Loading...