

Page 1
WIRELESS SUPERVISED PHOTOELECTRIC SMOKE
DETECTOR
MODEL: WL T33S
INSTALLATION INSTRUCTIONS
Page 2

2
Wireless Supervisor Photoelectric Smoke Detector
Page 3

WIRELESS SUPERVISED
PHOTOELECTRIC SMOKE DETECTOR
Model: WL T33S
INSTALLATION INSTRUCTIONS
Page 4

GENERAL DESCRIPTION
RISCO Group's smoke detector is single station, photoelectric smoke detector with
a built-in supervised wireless transmitter.
When sufficient smoke is detected, or the test feature is operated, the detector will
sound its alarm horn and the transmitter will send an ALARM message. The Alarm
output in the receiver will remain activated until the alarm condition clears.
The smoke alarm base lock discourages unauthorized removal of the smoke alarm
by requiring a screwdriver to remove the alarm from the base.
The smoke alarm provides the following signals to the control panel:
♦ Alarm
♦ Alarm restore
♦ Low battery
♦ Tamper
♦ Supervision
WARNINGS:
This smoke detector is designed for use in a single residential unit only, which means that it
should be used inside a single family home or apartment. It is not meant to be used in
lobbies, hallways, basements, or another apartment in multi-family buildings, unless there are
already working detectors in each family unit. Smoke detectors, placed in common areas
outside of the individual living unit, such as on porches or in hallways, may not provide early
warning to residents. In multi-family buildings, each family living unit should set up its own
detectors.
This detector is not to be used in non-residential buildings. Warehouses, industrial or
commercial buildings, and special purpose non-residential buildings require special fire
detection and alarm systems. This detector alone is not a suitable substitute for complete fire
detection systems for places where many people live or work, such as hotels or motels. The
same is true of dormitories, hospitals; nursing homes or group homes of any kind, even if
they were once single - family homes. Please refer NFPA 101, the Life Safety Code,
NFPA71, 72A, 72B, 72C, 72D, and 72E for smoke detector requirements for fire protection in
buildings not defined as “households”.
4
Wireless Supervisor Photoelectric Smoke Detector
Page 5

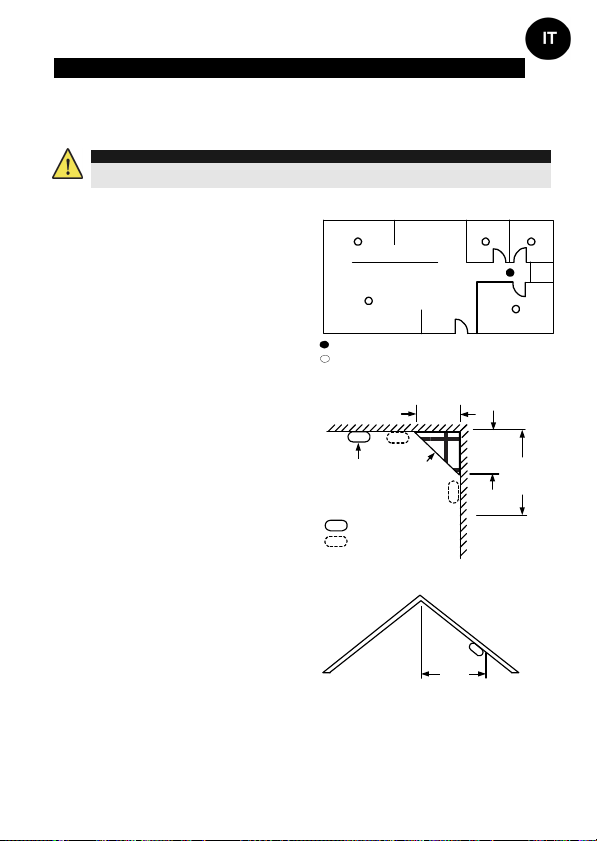
SELECTING A LOCATION
Smoke detectors should be installed in accordance with the NFPA Standard 74
(National Fire Protection Association, Batterymarch Park, Quincy, MA 02169). For
complete coverage in residential units, smoke detectors should be installed in all
rooms, halls, storage areas, basements, and attics in each family living unit.
Minimum coverage is one detector on each floor and one in each sleeping area and
attics in each family living unit. Minimum coverage is one detector on each floor and
one in each sleeping area.
♦ Install a smoke detector in the hallway
outside every separate bedroom area,
as shown in Figure 1. Two detectors are
required in homes with two bedroom
areas, as shown in Figure 2.
♦ Install a smoke detector on every floor
of a multi-floor home or apartment, as
shown in Figure 3.
♦ Install a minimum of two detectors in
any household.
♦ Install a smoke detector inside every
bedroom.
♦ Install smoke detectors at both ends of
a bedroom hallway if the hallway is
more than 40 feet (12 meters) long.
♦ Install a smoke detector inside every
room where one sleeps with the door
partly or completely closed, since
smoke could be blocked by the closed
door and a hallway alarm may not wake
up the sleeper if the door is closed.
♦ Install basement detectors at the bottom
of the basement stairwell.
♦ Install second-floor detectors at the top
of the first-to-second floor stairwell.
♦ Be sure no door or other obstruction
blocks the path of smoke to the
detector.
♦ Install additional detectors in your living
room, dining room, family room, attic,
utility and storage rooms.
♦ Install smoke detectors as close to the
center of the ceiling as possible. If this
is not practical, put the detector on the
ceiling, no closer than 4 inches (10 cm)
from any wall or corner, as shown in
Figure 4.
♦ If ceiling mounting is not possible and
Wireless Supervisor Photoelectric Smoke Detector 5
Figure 1: Locations for placing smoke
detectors for single residence with only
Figure 2: Locations for placing smoke
detectors for single-floor residence with
more than one sleeping area
one sleeping area
Page 6
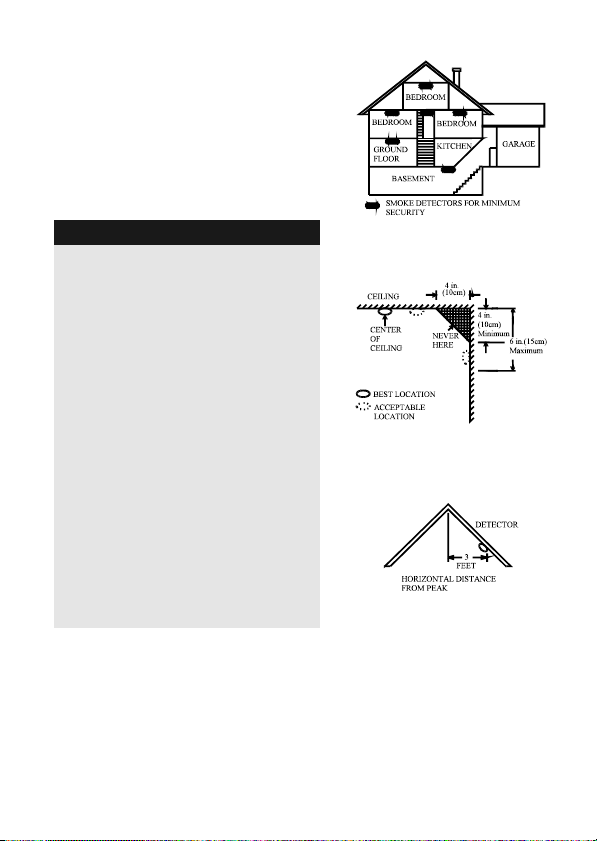
wall mounting is permitted by your local
and state codes, put wall-mounted
detectors between 4 and 6 inches (10 ~
15 cm) from the ceiling, also see
Figure 4.
♦ If some of your rooms have sloped,
peaked, or gabled ceilings, try to mount
detectors 3 feet (0.9 meter) measured
horizontally from the highest point of the
ceiling as shown in Figure 5.
CAUTION:
(As required by the California State Fire Marshall)
“Early warning fire detection is best achieved by the
installation of fire detection equipment in all rooms
and areas of the household as follows: (1) A smoke
detector installed in each separate sleeping area (in
the vicinity, but outside of the bedrooms), and (2)
Heat or smoke detectors in the living rooms, dining
rooms, bedrooms, kitchens, hallways, attics, furnace
rooms, closets, utility and, storage rooms, basements
and attached garages.”
For your information, NFPA Standard 74, Section 2-4
reads as follows:
“2-4.1.1 Smoke detectors shall be installed outside of
each separate sleeping area in the immediate vicinity
of the bedrooms and on each additional story of the
family living unit including basements and excluding
crawl spaces and unfinished attics.
The provisions of 2-4.1.1 represent the minimum
number of detectors required by this standard. It is
recommended that the householder consider the use
of additional smoke detectors for increased
protection for those areas separated by a door from
the areas protected by the required smoke detectors
under 2-4.1.1 above. The recommended additional
areas are living room, dining room, bedroom(s),
kitchen, attic (finished or unfinished), furnace rooms,
utility room, basement, integral or attached garage,
and hallways not included in 2-4.1.1 above. However,
the use of additional detectors remains the option of
the householder.” We recommend complete
coverage and use of additional smoke detectors.
Figure 3: Location for placing smoke
detectors for a multi-floor residence
Figure 4: Recommended best and
acceptable locations to mount
Figure 5: Recommended location to
mount smoke detectors in rooms with
sloped, gabled, or peaked ceiling
smoke detectors
6
Wireless Supervisor Photoelectric Smoke Detector
Page 7

Where to Install Your Smoke Detectors in Mobile
Homes and RVs
Mobile homes and RVs built after about 1978 were designed and insulated to be
energy-efficient. In mobile homes and RVs built after 1978, smoke detectors should
be installed as described above. Older mobile homes and RVs may have little or no
insulation compared to current standards. Outside walls and roofs are often made
of non-insulated metal, which can transfer thermal energy flow from outdoors. This
makes the air right next to them hotter or colder than the rest of the inside air.
These layers of hotter or colder air can keep smoke from reaching a smoke
detector. Thereby, install smoke detectors in such units only on inside walls. Place
them between 4 and 6 inches (10 ~ 15 cm) from the ceiling. If you are not sure how
much insulation is in your mobile home or RV, then install the detector on an inside
wall. If the walls or ceiling are unusually hot or cold, then install the detector on an
inside wall. Install one detector as close to the sleeping area as possible for
minimum security, or install one detector in each room for security. Before you
install any detector, please read the following section on “Where not to install your
smoke detectors”.
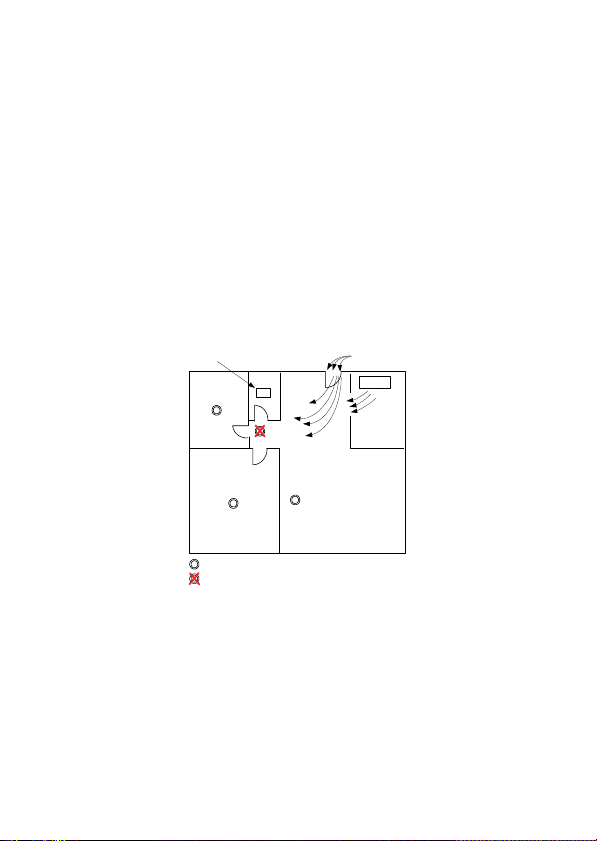
Where Not to Install Your Smoke Detectors
False alarms occur when smoke detectors are installed where they will not work
properly. To avoid false alarms, do not install smoke detectors in the following
situations:
♦ Combustion particles are by-products of something burning. Do not install
smoke detectors in or near areas where combustion particles are present,
such as kitchens with few windows or poor ventilation, garages where there
may be vehicle exhaust, near furnaces, hot water heaters and space heaters.
♦ Do not install smoke detectors less than 6 meters (20 feet) away from places
where combustion particles are normally present, like kitchens. If a 20-foot
distance is not possible, e.g. in a mobile home, try to install the detector as far
away from the combustion particles as possible, preferably on the wall. To
prevent false alarms, provide good ventilation in such places.
IMPORTANT:
Never try to avoid false alarms by disabling the detector.
♦ Do not mount smoke detectors in the path of fresh air intake. The flow of fresh
♦ Near paint thinner fumes.
♦ In close proximity to an automobile exhaust pipe; this will damage the detector.
♦ In damp or very humid areas or near bathrooms with showers. Moisture in
air in and out can drive smoke away from the smoke detector; thus reducing its
efficiency. Figure 6 indicates the correct and incorrect locations concerning
this problem.
humid air can enter the sensing chamber, then turns into droplets upon
cooling, which can cause false alarms. Install smoke detectors at least 3
meters (10 feet) away from bathrooms.
Wireless Supervisor Photoelectric Smoke Detector 7
Page 8
♦ In very cold or very hot areas, including unheated buildings or outdoor rooms.
If the temperature goes above or below the operating range of smoke detector,
it will not work properly. The temperature range for your smoke detector is 4°C
to 38°C (40°F to 100°F).
♦ In very dusty or dirty areas, dirt and dust can build up on the detector's sensing
chamber, to make it overly sensitive.
♦ Additionally, dust or dirt can block openings to the sensing chamber and keep
the detector from sensing smoke.
♦ Near fresh air vents or very drafty areas like air conditioners, heaters or fans.
Fresh air vents and drafts can drive smoke away from smoke detectors.
♦ Dead air spaces are often at the top of a peaked roof, or in the corners
between ceilings and walls. Dead air may prevent smoke from reaching a
detector. See Figures 8 and 9 for recommended mounting locations.
♦ In insect-infested areas. If insects enter a detector's sensing chamber, they
may cause a false alarm. Where bugs are a problem, get rid of them before
putting up a detector.
♦ Near fluorescent lights, electrical "noise" from fluorescent lights may cause
false alarms. Install smoke detectors at least 1.5 meters (5 feet) from such
lights.
Bath
Bedroom
Bedroom
Correct Locatio n
Incorrect Locatio n
Figure 6: Recommended Smoke Detector Locations
Air EntryAir Return
Stove
Kitchen
Living
Room
8
Wireless Supervisor Photoelectric Smoke Detector
Page 9

w
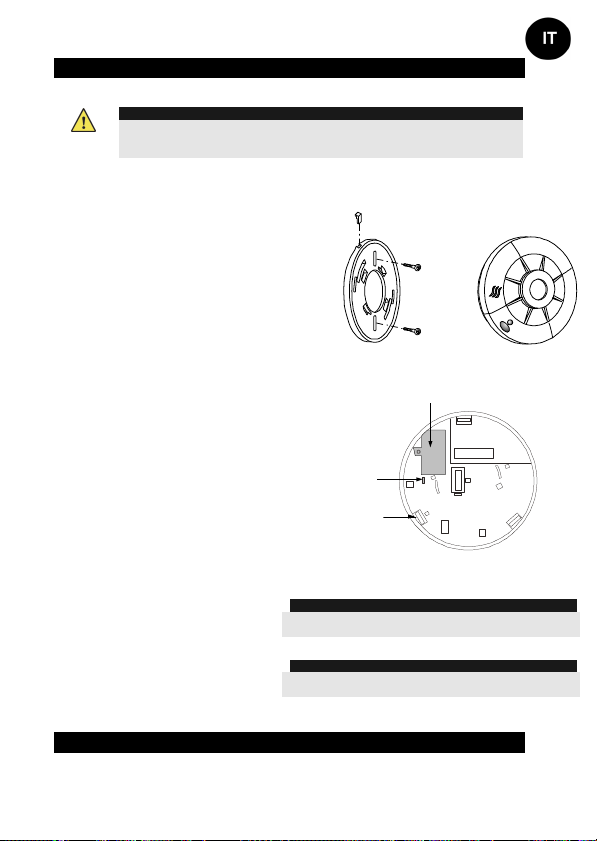
INSTALLATION
The smoke detector is to be mounted on the ceiling or on the wall, if necessary. Since
the smoke detector is a single-station type, it cannot be linked to other detectors.
Read the “Where To Install Your Smoke Detector” and “Where Not To Install Your
Smoke Detectors” sections in this Manual before installing. To install the detector,
perform the following steps (see Figure 7).
♦ Select the installation location.
♦ Remove locking pin securing the
♦ Remove the mounting bracket from
♦ Use the bracket as a template for
♦ Using an appropriate drill, drill two
♦ Using screws (supplied) attach the
♦ Open the batteries compartment
♦ Observing proper polarity, insert a
♦ Write message is sent automatically,
♦ Line up the side slot of the bracket
♦ Pull the detector outward to make
WARNING:
Do not connect the smoke detectors to any other alarm or auxiliary device.
Connecting anything else to this detector will prevent it from working properly.
mounting bracket to the unit (see
Figure 7).
the unit by rotating it
counterclockwise.
marking the mounting holes
holes at the marks and insert
anchors.
bracket to the wall as in Figure 7.
cover (see Figure 8).
2xCR123 3V Lithium batteries
(supplied) into the batteries
compartment and close the
compartment cover.
10 seconds after placing the
batteries, or by pressing the
detector’s tamper for a period of 3
seconds.
and the detector. Push the detector
onto the mounting bracket and turn it
clockwise to fix it into place.
Insert the locking pin in order to
secure the mounting bracket to the
detector (see figure 7).
sure it is securely attached to the
mounting bracket.
Locking Pin
Bracket
Screws
Figure 7: Smoke Detector Installation
Battery Compartment
Tamper
Figure 8: Batteries Compartment/Tamper
WARNING:
This detector is not suitable for installation in a
hazardous location, as defined in the national electrical
code. Do not use detector in an outlet controlled by a
all switch.
Detector
Wireless Supervisor Photoelectric Smoke Detector 9
Page 10
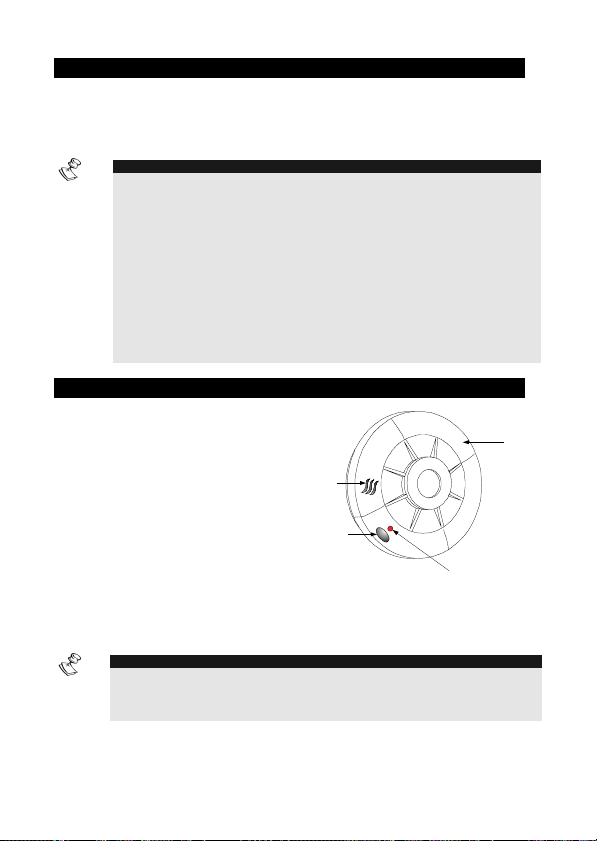
RED INDICATOR
When the red LED indicator (see Figure 9) flashes once in 30 seconds, it indicates
the detector is under normal operation. When the red LED flashes very frequently
and an audible alarm sounds simultaneously, it indicates that the detector senses
smoke.
NOTE:
The red LED behaves according to one of the following set modes:
Mode 1: The red LED indicator will not reset automatically at the end of an alarm
event. This means that after the smoke chamber is cleared, the audible alarm will stop
automatically, but the red LED indicator will continue to flash, until it is manually
restored by the user. To restore – press the test button for 2-3 seconds, the LED will
stop flashing.
Mode 2 (Default): The red LED will reset automatically at the end of an alarm event.
The user can check to which mode the detector is defined and switch between modes.
• To check the mode, press the Test button. The red LED will light up. If the red LED
lights up continuously the detector is in Mode 1. If the red LED is blinking the
detector is in Mode 2.
• To switch from one mode to another, press the Test button for 8 seconds. The
buzzer will sound and the red LED will change its behavior either from a continuous
light to a blinking light or from a blinking light to a continuous light.
TESTING YOUR SMOKE DETECTOR
To be sure that detector is working
correctly test the detector weekly by
performing the following procedure:
Use your finger to firmly press the
test button. If the detector is
functioning correctly, the alarm horn
sounds. To stop the alarm horn,
press the test button again. If the
detector fails to test properly, have it
repaired or replaced immediately.
If the alarm horn begins to beep once
every 35 seconds, it means that the
detector’s batteries are weak.
Replace the batteries immediately.
Keep fresh batteries on hand for this
purpose.
NOTE:
Cooking smoke or a dusty furnace (sometimes called “friendly fires”) can cause the
alarm to sound. If this happens, open a window or fan the air to remove the smoke or
dust. The alarm will turn off as soon as the air is completely clear. Do not disconnect
the batteries from the detector. This will cancel your protection from fire.
Buzzer
Openings
Test / Silence
Button
Figure 9: Smoke Detector Cover
LED Indicator (Red)
Detector
10
Wireless Supervisor Photoelectric Smoke Detector
Page 11

TAKING CARE OF YOUR SMOKE DETECTOR
To keep your detector in good working condition, you must test the detector weekly,
according to the “Testing Your Smoke Detector” section.
CLEANING THE SMOKE DETECTOR
Clean the housing with a dry or damp cloth to remove dust and dirt. If necessary,
open the smoke chamber and clean the interior of the detector.
1. Remove the detector from the detector base.
2. Remove the batteries.
3. Using a flat screwdriver release the smoke detector cover.
4. Using a flat screwdriver lift the smoke chamber housing slightly.
5. Use a fine paintbrush to remove dirt from the chamber.
6. After cleaning, close the smoke chamber, fix the housing and remount the
detector on the ceiling.
DO NOT FORGET TO REPLACE THE BATTERIES!
BATTERY REPLACEMENT
Replace the detector batteries once a year or immediately when the low battery
“beep” signal sounds once every 35 seconds. The low-battery "beep" should last at
least 30 days before the batteries die out completely.
NOTE:
If false alarms keep coming from the detector, you should check whether the detector’s
location is adequate. Refer to section “WHERE TO INSTALL SMOKE DETECTORS.” Have
your detector moved if it is not located properly. Clean the detector as described above.
WARNING! LIMITATIONS OF SMOKE ALARMS
Wireless smoke alarms are very reliable, but may not work under all conditions. No fire
alarm provides total protection of life or property. Smoke alarms are not a substitute for life
insurance.
Smoke alarms require a source of power to work.
This smoke alarm will not operate and the alarm will not sound if batteries are dead or not
installed properly.
Smoke alarms may not be heard. A sound sleeper or someone who has taken drugs or
alcohol may not awaken if the alarm is installed outside a bedroom. Closed or partially
closed doors and distance can block sound. This alarm is not designed for the hearing
impaired.
Smoke alarms may not always activate and provide warning early enough. Smoke alarms
only activate when enough smoke reaches the alarm. If a fire starts in a chimney, wall,
roof, on the other side of closed doors, or on a different level of the property enough
smoke may not reach the alarm for it to alarm.
Smoke alarms are a significant help in reducing loss, injury and even death.
However, no matter how good a detection device is, nothing works perfectly under
every circumstance and we must warn you that you cannot expect a smoke alarm to
ensure that you will never suffer any damage or injury.
Wireless Supervisor Photoelectric Smoke Detector 11
Page 12

Specifications
Voltage:
Typical Average Standby
Current:
Typical Test Current:
Typical Alarm Current:
Peak Trouble Pulse Current:
Peak Pulse Current:
Typical Battery Life:
Battery Type:
Low Battery Threshold:
Low Battery Beep rate:
Low Battery Life:
Operating Temperature:
Operating Humidity:
Color:
Dimensions:
Alarm Sound Level:
Transmitter Characteristics:
Nominal Center Frequency
Supervision Time
In order to continue improving the product, RISCO Group reserves the right to
change specifications and/or designs without prior notice.
6 volt
0.04mA
55mA
55mA
4.73mA
0.074mA
3 years
2xCR123 3V Lithium battery
5.2 Volt
One beep every 30 seconds
At least 30 days from warning signal
-10°C to 40°C (14°F - 104°F)
10% to 85% RH, no condensation or icing
White
Diameter: 148 mm (5.83”)
Height: 53 mm (2”)
Exceeds 85dB at 3m (10 feet)
RWT33S86800A and 74015 : 868.65 MHz
RWT33S43300A: 433.92 MHz
15 min. for 868.65 MHz /
65 min. for 433.92 MHz
Note:
Smoke detectors are not to be used with detector guards unless the combination
has been evaluated and found suitable for that purpose.
12
Wireless Supervisor Photoelectric Smoke Detector
Page 13

RIVELATORE FOTOELETTRICO
DI FUMO SUPERVISIONATO
Modello: WL T33S
ISTRUZIONI DI INSTALLAZIONE
Page 14

DESCRIZIONE GENERALE
Il rivelatore di fumo è un sensore fotoelettrico alimentato a batteria che integra un
trasmettitore radio supervisionato.
Quando il rivelatore rileva fumo a sufficienza o quando viene premuto il pulsante di
test, il sensore attiva il suo cicalino interno e il trasmettitore trasmette un messaggio
di ALLARME. L’uscita d’allarme del ricevitore resterà attiva fino a quando la
condizione d’allarme non viene ripristinata e il rivelatore non rileva più fumo.
La base auto-bloccante del sensore scoraggia tentativi non autorizzati di rimuovere
il rivelatore poichè è necessario un cacciavite per effettuare questa operazione.
Il rivelatore di fumo segnala i seguenti eventi:
♦ Allarme
♦ Ripristino allarme
♦ Basso livello batteria
♦ Tamper
♦ Supervisione
14
Rivelatore Fotoelettrico di Fumo Supervisionato
Page 15
SCELTA DELLA POSIZIONE PER L'INSTALLAZIONE
La scelta del posizionamento del sensore è molto importante per la corretta
rilevazione del fumo. Questa apparecchiatura dovrebbe essere installata in
conformità agli Standard vigenti relativi ai sistemi di rilevazione incendio.
Consultare l’esempio della Figura 1.
IMPORTANATE:
La regolamentazione riguardante i sistemi di rilevazione incendio varia da Paese a Paese.
Per maggiori informazioni contattare le Autorità locali.
Quelle che seguono sono alcune regole generali per il posizionamento dei rivelatori
di fumo.
♦ Posizionare i rivelatori di fumo con
supporto da soffitto al centro della
stanza da proteggere o su di un
lato della stanza ma non più vicino
di 10 cm dalla parete, come
mostrato in Figura 2.
♦ Posizionare i rivelatori con
supporto a parete a 10 - 15 cm di
distanza dal soffitto, come mostrato
in Figura 2.
♦ Posizionare i rivelatori in un
ambiente che abbia le seguenti
caratteristiche:
Temperatura compresa tra
4°C e 38°C
Umidità compresa tra 0 e
95% senza condensa
♦ Posizionare l’unità lontano da
condizionatori, ventilatori, o altre
apparecchiature che potrebbero
interferire con l’ingresso del fumo
all’interno della camera di
rilevazione del rivelatore.
♦ Montare i rivelatori di fumo su
superfici fisse permanentemente.
♦ Posizionare i rivelatori lontano da
grandi oggetti metallici, computer,
apparecchi televisivi che
potrebbero interferire con la parte
trasmittente dell’unità.
♦ Se ci sono locali con soffitti
particolarmente inclinati,
posizionare il rivelatore a 90 cm
calcolati orizzontalmente dal punto
più alto del soffitto, come mostrato
in Figura 3.
Rivelatore Fotoelettrico di Fumo Supervisionato
Sala da Pranzo Cucina
Soggiorno
Sensori di Fumo per una minima protezione
Sensori di Fumo aggiuntivi per una maggiore
protezione
Figura 1: Posizionamento dei rivelatori di fumo
Soffitto
Centro d el
Soffitto
Figura 2: Posizione perfetta e accettabile di
installazione dei rivelatori di fumo
Figura 3: Posizione consigliata di installa zione
dei rivelatori di fumo nei locali con soffitti
Qui
Mai
Posizione perfetta
Posizione accettabile
Distanza orizzontale dal punto
particolarmente inclinati
Camera
Minimo
10 cm
90
cm
più alto del soffitto
Camera
Camera matrim.
Minimo
10 cm
Massimo
15 cm
Rivelatore
15
Page 16

DOVE NON INSTALLARE I RIVELATORI DI FUMO
I falsi allarmi possono avvenire se i rivelatori vengono installati dove non
funzionerebbero correttamente. Per evitare i falsi allarmi, non installare i rivelatori di
fumo nelle seguenti situazioni:
♦ Non installare i rivelatori di fumo all’interno o vicino ad aree dove sono presenti
particelle di combustione, come cucine senza finestre o scarsa ventilazione,
autorimesse dove ci possono essere fumi di scarico di veicoli, vicino a fornaci,
caldaie e locali con un’elevata temperatura.
♦ Non installare i rivelatori a meno di 6 metri da posti dove sono normalmente
presenti particelle di combustione, come per esempio le cucine. Se non è
possibile mantenere una distanza di 6 metri, per evitare falsi allarmi,
provvedere ad effettuare una buona ventilazione all’interno di questi locali.
♦ In prossimità di fumi di scarico di automobili; questo danneggerà il rivelatore.
♦ Vicino a vapori di solventi.
♦ In locali molto sporchi o polverosi, la sporcizia e la polvere possono
depositarsi sulla camera di rilevazione del rivelatore e renderlo
eccessivamente sensibile.
♦ Inoltre, la sporcizia e la polvere possono ostruire le fessure di rilevazione della
camera del rivelatore e impedire che il rivelatore rilevi il fumo.
♦ In aree infestate da insetti. Se gli insetti si introducono nella camera di
rilevazione del rivelatore, possono causare falsi allarmi. Quando gli insetti
possono essere un problema, disinfestare l’area prima di installare i rivelatori.
♦ Vicino a luci fluorescenti, il rumore elettrico delle luci fluorescenti può causare
falsi allarmi. Installare i rivelatori di fumo ad almeno 1,5 metri da queste luci.
IMPORTANATE:
Non provare ad evitare i falsi allarmi escludendo il rivelatore.
16
Rivelatore Fotoelettrico di Fumo Supervisionato
Page 17
INSTALLAZIONE DEL RIVELATORE
Il rivelatore di fumo può essere installato a soffitto o a parete, se necessario.
Per installare il rivelatore, eseguire le seguenti fasi (vedi Figure 4):
♦ Scegliere il luogo di installazione.
♦ Rimuovere la linguetta di blocco
♦ Rimuovere la base di montaggio
♦ Utilizzare la base come dima per
♦ Utilizzando un trapano appropriato,
♦ Utilizzando le viti (fornite) avvitare la
♦ Aprire il vano porta-batteria (vedi
♦ Inserire 2 batterie al litio da 3 Volt
♦ Il messaggio di “Trasmissione
♦ Allineare la fessura sul bordo della
♦ Tirare il rivelatore verso il basso per
ATTENZIONE:
Non collegare i rivelatori di fumo a nessun altro rivelatore o dispositivo ausiliario.
Collegando altri dispositivi a questo rivelatore verrà impedito il suo corretto
funzionamento.
Linguetta di b locco
posta su un lato della base di
montaggio dell’unità (vedi Figura 6).
dall’unità ruotandolo in senso
antiorario.
segnare i punti di fissaggio.
effettuare due fori nei punti marcati
e inseri re i tas selli.
base alla parete, come in Figura 4.
Figura 5).
tipo CR123 (fornite) nel vano portabatteria prestando attenzione alla
polarità, poi chiudere il coperchio
del vano.
Indirizzo” (WRITE) viene trasmesso
automaticamente dall’unità, 10
secondi dopo aver inserito le
batterie, o premendo il tamper del
rivelatore per almeno 3 secondi.
base di montaggio con la fessura
situata sul rivelatore. Spingere il
rivelatore verso la base e girare in
senso orario per fissarlo alla base.
Inserire la linguetta di blocco in
modo da serrare la base di
montaggio al rivelatore (vedi
Figura 4).
assicurarsi che sia agganciato
saldamente alla base.
Base di
montaggio
Figura 4: Installazione del Rivelatore di Fumo
Tamper
Linguetta
per aprire il
coperchio
Figure 5. Tamper/Vano porta-batteria
IMPORTANTE:
il rivelatore non può essere agganciato alla base di supporto
se la batteria non è stata installata.
Viti
Vano porta-batteria
ATTENZIONE:
Questo rivelatore deve essere installato in conformità agli
Standard vigenti relativi ai sistemi di rilevazione incendio.
Rivelatore
INDICATORE ROSSO
Quando l’indicatore LED rosso (vedi Figura 6) lampeggia una volta ogni 30
secondi, indica che il rivelatore è in condizione di funzionamento normale. Quando
Rivelatore Fotoelettrico di Fumo Supervisionato
17
Page 18

il LED rosso lampeggia molto frequentemente e simultaneamente il cicalino interno
del rivelatore emette un tono acustico, indica che il rivelatore sta rilevando fumo.
NOTA:
Il comportamento del LED rosso segue uno dei modi seguenti:
Modo 1: Il LED rosso non si ripristinerà automaticamente alla fine dell’evento di allarme.
Questo significa che dopo che la camera di rilevazione fumo si è svuotata, la segnalazione
acustica si fermerà automaticamente ma il LED rosso continuerà a lampeggiare fino al
ripristino manuale da parte dell’utente. Per ripristinare manualmente premere il pulsante di test
per 2-3 secondi e il LED smetterà di lampeggiare.
Modo 2 (Default): Il LED rosso si ripristinerà automaticamente alla fine dell’evento di allarme.
L’utente può verificare quale modo di funzionamento è stato configurato e modificarlo.
• Per verificare il modo impostato premere il pulsante di test. Il LED rosso si illuminerà.
Se il LED resta acceso stabilmente il modo è il numero 1. Se invece il LED lampeggia, il
modo
impostato è il modo 2.
• Per commutare tra un modo di funzionamento ed un altro premere il pulsante di test per 8
secondi. Il buzzer dell’unità emetterà un tono acustico e il LED modificherà il suo
funzionamento da continuamente acceso a lampeggiante o viceversa.
TEST FUNZIONALE DEL RIVELATORE DI FUMO
Per assicurarsi che il rivelatore di
fumo stia funzionando correttamente
testare settimanalmente il sensore
effettuando la seguente procedura:
tenere premuto con un dito il tasto di
test. Se il rivelatore sta funzionando
correttamente, il cicalino interno del
rivelatore emetterà dei brevi toni
acustici fin quando non viene
rilasciato il tasto di test. Se invece il
rivelatore non emette nessun tono
acustico, significa che deve essere
immediatamente riparato o sostituito.
Se il cicalino interno del rivelatore
emette un tono acustico ogni 35
secondi, significa che le batterie del
rivelatore sono scariche. Sostituire
immediatamente le batterie. Si
consiglia di tenere di scorta batterie
cariche da sostituire all’occorenza.
NOTA:
Il fumo di cottura o di griglia può causare una condizione di allarme. Se questo accade, aprire
una finestra o ventilare il locale. L’allarme si taciterà non appena l’aria sarà completamente
pulita. Non scollegare la batteria dal rivelatore. Questa operazione disabiliterà la protezione
antincedio del locale protetto dal rivelatore.
Fessure per
il cicali no
Tasto per il
Test/ Tacitazio ne
Figura 6: Coperchio del Rivelatore di Fumo
Indicatore LED
(Rosso)
Rivelatore
18
Rivelatore Fotoelettrico di Fumo Supervisionato
Page 19

MANUTENZIONE DEL RIVELATORE DI FUMO
Per mantenere il rivelatore in buone condizioni di funzionamento, dovrebbe essere
testato settimanalmente. Consultare la sezione “Test funzionale del rivelatore di fumo”.
PULIZIA DEL RIVELATORE DI FUMO
Pulire il contenitore con un panno asciutto per rimuovere polvere e sporcizia. Se
necessario, aprire la camera di rilevazione fumo e pulire anche l’interno.
1. Rimuovere il rivelatore dalla base.
2. Rimuovere le batterie.
3. Usare un cacciavite a testa piatta e sollevare con attenzione il contenitore
della camera di rilevazione fumo.
4. Usare un pennello sottile/aria compressa per rimuovere la sporcizia dalla
camera di rilevazione fumo.
5. Terminata la pulizia chiudere la camera di rilevazione fumo, fissare il
contenitore e rimontare il rivelatore sulla base.
NON DIMENTICARE DI RIMETTERE LE BATTERIE
NELL’UNITÀ!
SOSTITUZIONE DELLE BATTERIE
Sostituire le batterie del rivelatore una volta l’anno o immediatamente quando il
cicalino interno del rivelatore emette un tono acustico ogni 35 secondi. Il tono
acustico di batterie scariche avverte almeno 30 giorni prima che le batterie si
scarichino completamente.
NOTA:
Se il rivelatore rileva frequentemente falsi allarmi, si deve controllare se la posizione di
installazione del rivelatore è appropriata. Fare riferimento alle sezioni “Scelta della
posizione per l’installazione” e “Dove non installare i rivelatori di fumo”. Spostare il rivelatore
se non è stato posizionato correttamente.
Rivelatore Fotoelettrico di Fumo Supervisionato
19
Page 20

AVVERTENZA! LIMITAZIONI DEI SYSTEMI DI
RILEVAZIONE FUMO
I sistemi radio di rilevazione fumo sono molto affidabili, ma tuttavia non possono
essere utilizzati in tutte le condizioni. Nessuno di questi sistemi garantisce una
totale protezione della propria vita o della propria casa. I sistemi di rilevazione fumo
non sono una sostituzione ad un’assicurazione sulla vita e sulla casa.
I sistemi di rilevazione fumo richiedono una sorgente di alimentazione per poter
funzionare. Questo rivelatore di fumo non funziona e non genera condizioni di
allarme se la batteria è scarica o non è stata installata correttamente.
I sistemi di rilevazione fumo possono non essere sentiti. Una persona che dorme
profondamente o qualcuno che ha assunto droghe o ha abusato di bevande
alcoliche potrebbe non svegliarsi se l’allarme è installato fuori da una camera da
letto. Porte chiuse o parzialmente chiuse possono bloccare il suono d’allarme.
I sistemi di rilevazione fumo si attivano solo quando c’è sufficiente fumo per
raggiunge la soglia di allarme. Se un incendio ha inizio in un camino, su un tetto o
su un piano differente della casa, una quantità di fumo sufficiente potrebbe non
raggiungere tempestivamente il rivelatore per generare una condizione di allarme.
I sistemi di rilevazione fumo sono un’importante aiuto per ridurre danni,
infortuni e anche morte. Comunque, per quanto sia efficiente il dispositivo di
rilevazione, nessun sistema di rilevazione fumo può funziona perfettamente
in tutte le circostanze e non ci si può aspettare che un sistema di rilevazione
fumo assicuri di non subire mai nessun danno o infortunio.
20
Rivelatore Fotoelettrico di Fumo Supervisionato
Page 21

Specifiche Tecniche
Alimentazione:
Assorbimento di Corrente a
Riposo:
Assorbimento di Corrente in
Test:
Assorbimento di Corrente in
Allarme:
Autonomia Batteria:
Tipo Batteria:
Soglia Batteria Scarica:
Segnale di Batteria Scarica:
Autonomia Batteria Scarica:
Temperatura di Funzionamento:
Limiti Umidità per il
Funzionamento:
Colore:
Dimensioni:
Sensibilità di rilevazione:
Pressione acustica cicalino
interno:
Caratteristiche della sezione trasmittente:
Frequenza Nominale:
Trasmissione Supervisione:
Al fine di migliorare continuamente il prodotto, RISCO Group si riserva il diritto di
modificare caratteristiche e/o prodotto senza l’obbligo di alcun preavviso.
6 Volt
0,010mA
55mA
55mA
3 anni
2 batterie al litio da 3 Volt CR123A
5,2 Volt
1 tono ogni 35 secondi
Almeno 30 giorni dal segnale di
batteria scarica
Da -10°C a 40°C
Da 10% a 85% UR, senza condensa o
ghiaccio
Bianco
Diametro: 148 mm
Altezza: 53 mm
1,87+/- 0,53% FT
85dB a 3 metri
RWT33S86800A: 74015: 868,65 MHz
RWT33S43300A: 433,92 MHz
Ogni 15 minuti in 868,65 MHz / ogni
65 minuti in 433,92 MHz
Rivelatore Fotoelettrico di Fumo Supervisionato
21
Page 22

Page 23

DÉTECTEUR DE FUMÉE
PHOTOÉLECTRIQUE SUPERVISÉ
SANS FILS
Modèle: WL T33S
INSTRUCTIONS D’INSTALLATION
Detecteur de fumee photoélectrique sans fil 23
Page 24

DESCRIPTION GÉNÉRALE
Le produit du Groupe RISCO est un détecteur de fumée photoélectrique
entièrement autonome équipé d’un émetteur intégré supervisé sans fils.
Lorsqu’un volume de fumée suffisant est détecté, ou lorsque le système de test est
actionné, le détecteur enclenchera sa sirène et l’émetteur enverra un message
d’ALARME. Le signal de sortie d'alarme vers le récepteur restera activé jusqu’à ce
que la cause de l'alarme soit supprimée.
Le système de verrouillage de la base du détecteur évite un démontage facile non
autorisée de celui-ci en exigeant l’utilisation un tournevis pour l’ôter de sa base.
Le détecteur fournit au panneau de contrôle les signaux suivants:
♦ Alarme
♦ Remise en service de l’alarme
♦ Batterie faible
♦ Altération
♦ Supervision
AVERTISSEMENTS :
Ce détecteur de fumée est conçu pour être utilisé seulement dans une seule unité
résidentielle, ce qui signifie qu’il doit être utilisé à l’intérieur d’une maison ou appartement
unifamilial. Il n’est pas prévu pour être utilisé dans des vestibules, corridors, sous-sols, ou
autre appartement dans des bâtiments à plusieurs familles, à moins qu’ils y aient déjà des
détecteurs fonctionnant dans chaque unité familiale. Les détecteurs de fumées placés dans
les zones communes hors de l’unité de logement individuelle, telles que vérandas ou dans
des corridors, risquent de ne pas donner assez tôt un avertissement aux résidents. Dans les
bâtiments logeant plusieurs familles, chaque unité d’habitation familiale doit installer ses
propres détecteurs.
Ce détecteur ne peut pas être utilisé dans des bâtiments non-résidentiels. Les entrepôts,
bâtiments industriels ou commerciaux et bâtiments non-résidentiel à buts spéciaux exigent
des systèmes spécifiques de détection et d’alarme incendie. Ce détecteur seul n’est pas une
alternative convenable aux systèmes complets de détection d’incendie pour les lieux où
beaucoup de personnes vivent ou travaillent, tels que les hôtels ou motels. Il en est de même
pour les dortoirs, hôpitaux, maisons de soins infirmiers ou groupe de maisons de quelques
types que ce soit, même si auparavant ils avaient été des maisons unifamiliales -. Veuillez
vous référer au Code de sécurité des personnes, pour les exigences relatives aux détecteurs
de fumée destinés à la protection incendie dans des bâtiments qui ne sont pas définis
comme des “maisons familiales”.
24
Detecteur de fumee photoélectrique sans fil
Page 25

CHOIX DE L’EMPLACEMENT
Les détecteurs de fumée doivent être installés conformément aux standards en
vigueur. Afin de couvrir complètement les unités résidentielles, les détecteurs de
fumée doivent être installés dans toutes les chambres, halls, zones de rangement,
sous-sols, et greniers de chaque unité d’habitation familiale. La couverture
minimale est de un détecteur à chaque étage et un détecteur dans chaque
chambre à coucher et greniers de chaque unité d’habitation familiale.
♦ Installer un détecteur de fumée
dans le corridor au dehors de
chaque zone séparée de chambre
à coucher, comme indiqué dans la
figure 1. Deux détecteurs sont
nécessaires dans les maisons
disposant de deux zones de
chambres à coucher, comme
indiqué dans la figure 2.
♦ Installer un détecteur de fumée à
chaque étage de maison ou
appartement à plusieurs étages,
comme indiqué dans la figure 3.
♦ Installer au minimum deux
détecteurs dans tout foyer.
♦ Installer un détecteur de fumée
dans chaque chambre à coucher.
♦ Installer des détecteurs de fumée
à chaque bout de couloir de
chambre à coucher dans le cas où
le couloir est plus long que 12
mètres (40 pieds).
♦ Installer un détecteur de fumée
dans chaque chambre où une
personne dort, la porte étant
partiellement ou complètement
fermée, sachant que la fumée
pourrait être bloquée par la porte
fermée et qu’une alarme de
corridor pourrait ne pas réveiller le
dormeur si la porte est fermée.
♦ Installer des détecteurs de sous-
sol au bas de la cage d’escalier du
sous-sol.
Detecteur de fumee photoélectrique sans fil 25
Figure 6 : Emplacements des détecteurs de
fumée pour une résidence unique ayant
seulement une chambre à coucher
Figure 7 : Emplacements des détecteurs de
fumée d’une résidence à un seul étage
ayant plus qu’une zone de sommeil
Page 26

♦ Installer des détecteurs au second
étage à la partie supérieure de la
cage d’escalier du premier au
second étage.
♦ Assurez-vous qu’aucune porte ou
autre obstacle n’empêchent pas le
passage de fumée vers le
détecteur.
♦ Installez des détecteurs
supplémentaires dans vos salons,
salles à manger, salles familiale,
greniers, buanderies et salles de
rangement.
♦ Installez les détecteurs de fumée
aussi près que possible des
centres des plafonds. Si ce n’est
pas possible, placer les alors aux
plafonds, mais pas plus près que
10 cm (4 pouces) de tout mur ou
coin, comme indiqué dans la figure
4.
♦ Si le montage au plafond n’est pas
possible, et si le montage au mur
est permis par vos codes locaux et
nationaux, placez les détecteurs
montés au mur entre 10 à 15 cm
(4 et 6 pouces) du plafond, voir
aussi la figure 4.
♦ Si certaines de vos chambres ont
un plafond en pente, à pignon, ou
à crête, essayez de monter les
détecteurs à 0,9 mètre (3 pieds)
mesuré horizontalement du point
le plus élevé du plafond comme
indiqué dans la figure 5.
Figure 8 : Emplacement des détecteurs de
fumée pour une résidence à plusieurs étages
Figure 9 : Les emplacements les plus
recommandés et les emplacements acceptables
pour monter les détecteurs de fumée
Détecteur
3 feet
90 cm
Distance horizontale par rapport au sommet
Figure 10 : Emplacement recommandé pour
monter le détecteur de fumée dans les chambres
à plafond en pente, à pignon ou à crête.
26
Detecteur de fumee photoélectrique sans fil
Page 27

Où installer vos détecteurs de fumée dans un Mobile
Home et dans un véhicule de camping
Les Mobile Homes et les véhicules de camping fabriqués après 1978 ont été
conçus et isolés pour être énergétiquement efficaces. Dans les Mobile Homes et
véhicules de camping fabriqués après 1978, les détecteurs de fumée doivent être
installés comme décrit ci-dessus. Les anciens véhicules de camping et Mobile
Homes peuvent être mal isolés ou ne pas être isolés en comparaison aux
standards actuels. Souvent les murs extérieurs et les toits sont faits de métal nonisolé, ils peuvent transférer un flux d’énergie thermique de l’extérieur. Ceci rend l’air
proche d’eux plus chaud ou plus froid que le reste de l’air à l’intérieur. Ces couches
d’air plus chaud ou plus froid peuvent empêcher la fumée d’atteindre un détecteur
de fumée. Ainsi, dans de telles unités, installez les détecteurs de fumée seulement
aux murs intérieurs. Placez les détecteurs de 10 à 15 cm (4 à 6 pouces) du plafond.
Si vous n’êtes pas sûr de la quantité d’isolation de votre Mobile Home ou véhicule
de camping, alors installez le détecteur à un mur intérieur. Si les murs ou plafond
sont inhabituellement froids ou chauds, alors installez le détecteur à un mur
intérieur. Installez un détecteur aussi près que possible de la zone de sommeil pour
la sécurité minimale, ou installez un détecteur dans chaque chambre pour la
sécurité. Avant d’installer un détecteur, veuillez lire la section suivante “Où ne pas
installer vos détecteurs de fumée”.
Où ne pas installer vos détecteurs de fumée
De fausses alarmes se produisent lorsque les détecteurs de fumée sont installés à
des endroits où ils ne peuvent fonctionner correctement. Pour éviter les fausses
alarmes, n’installez pas de détecteurs de fumée dans les emplacements suivants :
♦ Les particules de combustion sont des sous produits de quelque chose qui
brûle. N’installez pas des détecteurs de fumée dans des zones où des
particules de combustion sont présentes ou à proximité de telles zones, telles
que les cuisines ayant peu de fenêtres ou mal ventilées, les garages où des
gaz d’échappement de véhicule sont présents, à proximité de fours, chauffeeaux et calorifères.
♦ N’installez pas des détecteurs de fumée à moins de 6 mètres (20 pieds) des
endroits où des particules de combustion sont normalement présentes,
comme les cuisines. Si une distance de 6 mètres (20 pieds) n’est pas
possible, par exemple dans un Mobile Home, essayez d’installer le détecteur
aussi loin que possible des particules de la combustion, préférablement sur le
mur. Pour éviter les fausses alarmes, assurez une bonne ventilation dans de
tels endroits.
IMPORTANT :
N’essayez jamais d’éviter les fausses alarmes en désactivant le détecteur.
♦ Ne montez pas les détecteurs de fumée dans le trajet de l’aspiration d’air frais.
♦ À proximité de vapeurs de diluant de peinture.
♦ À proximité d’un pot d’échappement d’automobile ; ceci pourrait endommager
L’écoulement d’air frais vers l’intérieur ou vers l’extérieur peut tirer la fumée
loin du détecteur de fumée ; et réduire ainsi son efficacité. La figure 6 indique
les emplacements corrects et incorrects en ce qui concerne ce problème.
le détecteur.
Detecteur de fumee photoélectrique sans fil 27
Page 28

♦ Dans des zones humides ou très humides ou à proximité de salles de bain
équipées de douches. De l’air humide pourrait pénétrer dans la chambre
sensible, l’humidité se transformant en gouttelettes lors du refroidissement
pourrait provoquer des fausses alarmes. Installez les détecteurs de fumée à
au moins 3 mètres (10 pieds) de distance de salles de bain.
♦ Dans les zones très froides ou très chaudes, y compris les bâtiments qui ne
sont pas chauffés ou des chambres extérieures. Si la température dépasse ou
est en dessous de la plage de fonctionnement du détecteur de fumée, celui-ci
ne fonctionnera pas correctement. La plage de température pour votre
détecteur de fumée est de 4°C à 38°C (40°F à 100°F).
♦ Dans les zones très poussiéreuses ou sales, la saleté et la poussière pouvant
s’amonceler dans la chambre sensible du détecteur, rendrait le détecteur
excessivement sensible.
♦ De plus, la poussière ou la saleté pouvant obstruer les ouvertures de la
chambre sensible empêcherait le détecteur de détecter la fumée.
♦ À proximité des bouches d’air frais ou de zones à très fort tirage tels que
climatiseurs, calorifères ou ventilateurs. Les bouches d’air frais et les tirages
pouvant tirer la fumée et l’éloigner des détecteurs de fumée.
♦ Les volumes morts se trouvent souvent au sommet des toits à crête ou dans
les coins entre les plafonds et les murs. Les volumes morts peuvent empêcher
la fumée d’atteindre un détecteur. Voir les figures 8 et 9 pour les
emplacements de montage recommandés.
♦ Dans les zones infestées d’insectes. Si des insectes entrent dans la chambre
sensible du détecteur, ils risqueraient de causer de fausses alarmes. Lorsque
les cafards sont un problème, se débarrasser d’eux avant d’installer un
détecteur.
♦ À proximité de lampes fluorescentes, le "bruit" électrique provenant de lampes
fluorescentes risquerait de causer de fausses alarmes. Installez les détecteurs
de fumée à au moins 1,5 mètres (5 pieds) de telles lampes.
Retour d’air
Baignoire
Chambre à coucher
Entrée d’air
Fourneau
Cuisine
Chambre à coucher
Bon emplacement
Mauvais emplacem ent
Figure 6 : Emplacements recommandés pour les détecteurs de fumée
28
Detecteur de fumee photoélectrique sans fil
Salon
Page 29

INSTALLATION
Le détecteur de fumée doit être monté au plafond ou sur un mur, si besoin est. Vu que
le détecteur de fumée est du type autonome, il ne peut pas être lié à d’autres
détecteurs.
AVERTISSEMENT :
Ne pas connecter les détecteurs de fumée à une autre alarme ou à tout appareil auxiliaire.
La connexion de quoi que ce soit à ce détecteur l’empêchera de fonctionner correctement.
Avant d’installer, lisez les sections “Où installer vos détecteurs de fumée” et “Où ne
pas installer vos détecteurs de fumée” dans ce manuel. Pour installer le détecteur,
exécutez les opérations suivantes (voir la figure 7).
♦ Choisissez l’emplacement de
l’installation.
♦ Retirez la goupille de verrouillage
fixant le support de montage à l’unité
(voir la figure 7).
♦ Retirez le support de montage de
l’unité en le tournant dans le sens
inverse des aiguilles d’une montre.
♦ Utilisez le support comme gabarit pour
marquer les trous de montage.
♦ En vous servant d’un foret approprié,
percez deux trous préalablement
marqués puis insérez des chevilles.
♦ En vous servant des vis fournies, fixez
le support au mur selon la figure 7.
♦ Ouvrez le couvercle du logement des
batteries (voir la figure 8).
♦ En respectant la polarité convenable,
insérez les batteries au lithium
2xCR123 3V (fournies) dans le
logement des batteries, puis fermer le
couvercle du compartiment.
♦ Un message est envoyé automatique-
ment, 10 secondes après la mise en
place des batteries, ou en appuyant
sur le l’interrupteur de sabotage du
détecteur pendant 3 secondes.
♦ Alignez la rainure latérale du support
et le détecteur. Poussez le détecteur
dans le support de montage, puis
tournez-le dans le sens horaire pour le
fixer en place.
Insérez la goupille de verrouillage afin
de fixer le support de montage au
détecteur (voir la figure 7).
♦ Tirez le détecteur vers l’extérieur pour
assurer qu’il est bien fixé au support
de montage.
Detecteur de fumee photoélectrique sans fil 29
Figure7: Installation du détecteur de fumée
Figure 8: Logement des batteries/interrupteur
AVERTISSEMENT :
Il est recommandé que le chef de famille considère
l’utilisation de détecteurs de fumée supplémentaires
pour améliorer la protection des zones séparées par
une porte des zones protégées par les détecteurs de
fumée. Les zones supplémentaires recommandées
sont les salons, salle à manger, chambre(s) à
coucher, cuisine, grenier (habités ou non), chaufferies,
buanderie, sous-sol, garage intégré ou attaché, et
corridors. Toutefois, l’utilisation de détecteurs
supplémentaires reste l’option du chef de famille.
Nous recommandons la couverture complète et
l’utilisation de détecteurs de fumée supplémentaires.
de sabotage
Page 30

VOYANT ROUGE
Lorsque l’indicateur à LED rouge (voir la figure 9) clignote une fois toutes les 30
secondes, il indique que le détecteur fonctionne normalement. Lorsque le LED
rouge clignote très fréquemment et qu’une alarme sonore retentit simultanément,
ceci indique que le détecteur a détecté de la fumée.
NOTE :
La LED rouge se comporte différemment suivant le mode :
Mode 1: La LED rouge ne se réinitialise pas automatiquement à la fin de l’évènement d’alarme.
Ceci signifie que la chambre de détection est propre et libre de fumée, le signal sonore
s’arrêtera automatiquement, mais la LED continuera à clignoter jusqu’à une intervention
manuelle de remise à zéro par l’utilisateur. Pour effectuer cette remise à zéro, enfoncer le
bouton de test pendant 2 à 3 secondes, la LED s’arrêtera alors de clignoter.
Mode 2 (mode par défaut): La LED rouge s’arrêtera de clignoter automatiquement à la fin de
l’évènement d’alarme.
L’utilisateur peut contrôler en quel mode le détecteur est programmer et changer le mode, si
nécessaire.
• Pour vérifier le mode, enfoncer le bouton de test. La LED rouge s’allumera. Si la LED rouge
s’illumine continuellement le détecteur est en mode 1. Si LED clignote, le détecteur est en
mode 2.
• Pour changer de mode, enfoncer le bouton de test pendant 8 secondes. Le buzzer se fera
entendre et le comportement de la LED changera ou bien de mode illumination continue
vers
clignotement, ou bien du clignotement vers le l’illumination continue.
TESTS DE VOTRE DÉTECTEUR DE FUMÉE
Pour être sûr que le détecteur
fonctionne correctement, testez le
détecteur une fois par semaine en
exécutant la procédure suivante :
Presser fermement avec un doigt sur
le bouton de test. Si le détecteur
fonctionne correctement, l’avertisseur
de l’alarme retentira. Si le détecteur
échoue lors du test, faites-le réparer
ou remplacez-le immédiatement.
Si l’avertisseur de l’alarme commence
à retentir une fois toutes les 35
secondes, ceci signifie que les
batteries du détecteur sont faibles.
Remplacez les batteries
immédiatement. Ayez toujours des
batteries neuves disponibles dans ce
but.
NOTE :
La fumée de cuisine ou un calorifère poussiéreux peuvent provoquer une alarme. Si ceci se
produit, ouvrir une fenêtre ou aérer à l’aide d’un ventilateur pour supprimer la fumée ou la
poussière. L’alarme cesse dès que l’air est complètement clair. Ne pas déconnecter les
batteries du détecteur. Ceci annulera votre protection contre le feu.
30
Detecteur de fumee photoélectrique sans fil
Figure 9 : Couvercle du détecteur de fumée
Page 31

COMMENT PRENDRE SOIN DE VOTRE DÉTECTEUR
DE FUMÉE
Afin de maintenir votre détecteur en état de bien fonctionner, vous devez tester le
détecteur une fois par semaine, selon la section “Tests de votre détecteur de fumée”.
NETTOYAGE DU DÉTECTEUR DE FUMÉE
Nettoyez le boîtier avec un tissu sec ou humide pour retirer la poussière et la
saleté. Si nécessaire, ouvrir la chambre de détection de fumée, puis nettoyer
l’intérieur du détecteur.
1. Retirez le détecteur de la base du détecteur.
2. Retirez les batteries.
3. En vous servant d’un tournevis plat soulevez légèrement le boîtier de la
chambre de détection.
4. Utilisez une brosse fine (par exemple pour la peinture) pour enlever la saleté
de la chambre.
5. Après le nettoyage, fermez la chambre de détection de fumée, fixez le boîtier
et remontez le détecteur au plafond.
NE PAS OUBLIER DE REMPLACER LES BATTERIES.
REMPLACEMENT DES BATTERIES
Remplacez les batteries du détecteur une fois par an ou immédiatement lorsque le
signal “bip” retentit toutes les 35 secondes et indique ainsi que les batteries sont
faibles. Le "bip" de batterie faible peut durer au moins 30 jours avant que les
batteries soient complètement hors service.
NOTE :
Si de fausses alarmes continuent à provenir du détecteur, vous devez vérifier
si l’emplacement du détecteur est adéquat. Se référer à section “OÙ INSTALLER LES
DÉTECTEURS DE FUMÉE”. Déplacez votre détecteur s’il n’est pas positionné
correctement. Nettoyez le détecteur comme décrit ci-dessus.
Detecteur de fumee photoélectrique sans fil 31
Page 32

AVERTISSEMENT ! LIMITATIONS DES ALARMES DE
FUMÉE
Les alarmes de fumée sans fils sont très fiables, mais peuvent ne pas fonctionner
dans toutes les conditions. Aucune alarme de feu ne fournit une protection totale
des personnes ou de biens. Les alarmes de fumée ne se substituent pas à une
assurance vie.
Pour fonctionner les alarmes de fumée ont besoin d’une source d’alimentation.
Cette alarme de fumée ne fonctionnera pas et l’alarme ne retentira pas si les
batteries sont mortes ou ne sont pas installées correctement.
Les alarmes de fumée risquent de ne pas être entendues. Un dormeur profond ou
une personne qui a pris des médicaments ou de l’alcool risque de ne pas se
réveiller si l’alarme est installée hors de la chambre à coucher. Des portes fermées
ou partiellement fermées et la distance peuvent atténuer le son. Cette alarme n’a
pas été conçue pour les mal entendants.
Les alarmes de fumée risquent de ne pas être activée dans tous les cas ni
d’assurer assez tôt l’avertissement. Les alarmes de fumée ne s’activent seulement
que si assez fumée atteint la chambre du détecteur. Si un feu commence dans une
cheminée, un mur, un toit, de l’autre côté d’une porte fermée, ou à un étage
différent de la propriété, la quantité de fumée atteignant l’alarme peut ne pas être
suffisante pour qu’elle donne l’alarme.
Les alarmes de détection de fumée aident substantiellement à réduire les
pertes, les lésions et même la mort. Toutefois, aussi bon que soit un appareil
de détection, rien ne fonctionne parfaitement dans toutes les circonstances
et nous devons vous prévenir que vous ne pouvez pas attendre d’une alarme
de détection de fumée qu’elle vous assure que vous ne connaîtrez jamais
quelque dommage ou lésion que ce soit.
32
Detecteur de fumee photoélectrique sans fil
Page 33

Spécifications
Tension :
Intensité moyenne typique en réserve :
Intensité typique de test :
Intensité typique d’alarme :
Intensité de crête d’impulsion de
dérangement :
Intensité de crête d’impulsion :
Duré de vie des batteries :
Type de batteries :
Seuil des batteries faibles :
Rythme des bips en cas de batteries
faibles :
Durée de vie des batteries faibles :
Température de fonctionnement :
Humidité de fonctionnement :
Couleur :
Dimensions :
Niveau sonore de l’alarme :
Caractéristiques de l’émetteur :
Fréquence centrale nominale
Durée de la supervision
Afin de continuer à améliorer le produit, le Groupe RISCO se réserve le droit de
modifier les spécifications et/ou le design sans préavis.
6 volts
0,010 mA
55 mA
55 mA
4,73 mA
0,074 mA
3 ans
Batterie au lithium 2xCR123 3V
5,2 Volts
Un bip par minute
Au moins 30 jours à partir du signal
d’avertissement
-10°C à 40°C (14°F - 104°F)
Humidité relative de 10% à 85%, sans
condensation ou givrage
Blanc
Diamètre : 148 mm (5.83”)
Hauteur : 53 mm (2”)
Plus que 85dB à 3m (10 pieds)
RWT33S86800A, 74015 : 868.65 MHz
RWT33S43300A: 433.92 MHz
15 minutes pour 868,65 MHz / 65
minutes pour 433,92 MHz
Detecteur de fumee photoélectrique sans fil 33
Page 34

Page 35

DETECTOR DE HUMO
FOTOELÉCTRICO INALÁMBRICO
Modelo: WL T33S
INSTRUCCIONES DE INSTALACIÓN
Detector de Humo Fotoélectrico Inalámbrico 35
Page 36

DESCRIPCIÓN GENERAL
El detector de humo de RISCO Group es un detector de humo fotoeléctrico
independiente, con un transmisor vía radio supervisado incorporado.
Cuando se detecta una cantidad suficiente de humo, o cuando se acciona la
función de prueba, el detector activará su alarma sonora y el transmisor enviará un
mensaje de ALARMA. La salida de Alarma en el receptor permanecerá activada
hasta que se suprima la situación de alarma.
El cierre de la base del sensor de humo evita la extracción no autorizada de éste,
al necesitar un destornillador para quitar el equipo de la base.
El sensor de humo envía las siguientes señales a la central:
♦ Alarma
♦ Restauración de alarma
♦ Batería baja
♦ Tamper
♦ Supervisión
ADVERTENCIAS:
Este detector de humo está diseñado sólo para el uso en una instalación residencial; lo que
significa que debe utilizarse en una vivienda unifamiliar o apartamento. No debe utilizarse en
vestíbulos, pasillos, sótanos u otros espacios en edificios multi-familiares, a menos que ya
haya detectores instalados en cada unidad de vivienda familiar. Los detectores de humo
ubicados en áreas comunes fuera de la unidad de vivienda individual (como porches o
pasillos) pueden no brindar un aviso inmediato a los residentes. En las instalaciones multifamiliares, cada vivienda familiar debe instalar sus propios detectores.
Este detector no debe utilizarse en instalaciones no residenciales. Los almacenes, las
instalaciones industriales o comerciales, y los edificios no residenciales de uso específico
requieren detectores de incendios y sistemas de alarma específicos. Este detector no es un
sustituto adecuado para un completo sistema de detección de incendios en aquellos lugares
donde convivan o trabajen muchas personas, como hoteles o moteles. Esto mismo es
aplicable a residencias universitarias, hospitales, asilos o grupos de hogares de cualquier
tipo, aún si antes fueron viviendas unifamiliares. Consulte los códigos NFPA 101 (Código de
Seguridad Humana), NFPA71, 72A, 72B, 72C, 72D y 72E para los requisitos de detección
de humo para la protección contra incendios en edificios que no calificados como
“residenciales", así como la normativa vigente en su Comunidad Autónoma o Ayuntamiento.
36
Detector de Humo Fotoélectrico Inalámbrico
Page 37

SELECCIÓN DE LA UBICACIÓN
Los detectores de humo deben instalarse según la norma NFPA 74 (Asociación
Nacional de Protección contra Incendios, Batterymarch Park, Quincy, MA 02169).
Para una cobertura completa en unidades residenciales, los detectores de humo
deben instalarse en todas las habitaciones, recibidores, áreas de almacenaje,
sótanos y áticos de cada vivienda familiar. La cobertura mínima es un detector en
cada piso y uno en cada zona de dormitorios y ático de cada vivienda familiar.
♦ Instale un detector de humo en el pasillo o
vestíbulo fuera de cada zona de
dormitorios apartada, como se muestra en
la Figura 1. Se necesitan dos detectores
en casas con dos zonas de dormitorios,
como se muestra en la Figura 2.
♦ Instale un detector de humo en cada planta
de una casa o apartamento de varios
pisos, como se muestra en la Figura 3.
♦ Instale un mínimo de dos detectores en
cualquier vivienda familiar.
♦ Instale un detector de humo en cada
dormitorio.
♦ Instale detectores de humo en ambos
extremos del pasillo de un dormitorio si el
pasillo tiene más de 12 metros (40 pies) de
largo.
♦ Instale un detector de humo dentro de cada
habitación donde se duerma con la puerta
parcial o completamente cerrada, pues
ésta puede bloquear el humo, y una alarma
en el pasillo podría no despertar a quien
duerme en la habitación con la puerta
cerrada.
♦ Instale detectores en el sótano, al final de
la escalera que conduce a éste.
♦ Instale detectores en el segundo piso, en la
parte superior de la escalera que va del
primer piso al segundo.
♦ Asegúrese de que ninguna puerta u otra
obstrucción bloquea el camino del humo
hacia el detector.
♦ Instale detectores adicionales en su salón,
comedor, sala de estar, ático, y trastero.
♦ Instale los detectores de humo lo más
centrado posible del techo. Si no es
posible, coloque el detector en el techo, a
no más de 10 cm (4 pulgadas) de cualquier
pared o rincón, como se muestra en la
Figura 4.
♦ Si no es posible la instalación en el techo y
Detector de Humo Fotoélectrico Inalámbrico 37
Figura 11: Lugares de ubicación de los
detectores de humo en una residencia
con una zona de dormitorios.
Figura 12: Lugares de ubicación de
los detectores de humo en una
residencia de un piso con más de
una zona con dormitorios.
Page 38

la normativa estatal y provincial permiten la
instalación en pared, coloque los
detectores en la pared a una distancia del
techo de entre 10 ~ 15 cm (4 y 6 pulgadas)
según Figura 4.
♦ Si algunas habitaciones poseen techos
abovedados, inclinados o a dos aguas,
intente colocar los detectores a 0,9 metros
(3 pies) medidos horizontalmente desde el
punto más alto del techo, como se muestra
en la Figura 5.
AVISO: (Según lo requerido por el Jefe del Cuerpo
de Bomberos del Estado de California)
“La alerta temprana de la detección de una alarma
de incendio se conseguirá con la instalación de
equipos de detección de incendios en todas las
habitaciones y áreas de la residencia de la siguiente
manera: (1) Un detector de humo instalado en cada
zona de dormitorios (cerca, pero fuera de los
dormitorios), y (2) Detectores de calor o humo en
salones, comedores, dormitorios, cocinas, pasillos,
áticos, sala de calderas, roperos, trasteros,
despensas, sótanos y garajes adosados.”
Para su información, la Norma 74 NFPA, Sección 2-4
estipula:
“2-4.1.1 Los detectores de humo se instalarán fuera
de cada zona de dormitorios por separado, en las
cercanías de los dormitorios y en cada piso adicional
de la unidad de vivienda familiar, incluyendo sótanos,
y excluyendo los espacios entre plantas y áticos no
acabados.
Las disposiciones 2-4.1.1 representan el número
mínimo de detectores que se requieren según lo
estipulado por esta norma. Se recomienda al
propietario considerar el uso de detectores de humo
adicionales para mayor protección en aquellas áreas
separadas por una puerta de las áreas protegidas
por los detectores de humo requeridos según 2-
4.1.1, mencionada arriba. Las otras áreas
recomendadas son el salón, el comedor,
dormitorio(s), la cocina, el ático (acabado o no), la
sala de calderas, el trastero, el sótano, el garaje
(adosado o no) y los pasillos no incluidos en 2-4.1.1.
Sin embargo, se utilizarán detectores adicionales
según la decisión del propietario.” Recomendamos
una cobertura completa y el uso de detectores de
humo adicionales.
38
Detector de Humo Fotoélectrico Inalámbrico
Figura 13: Lugares de ubicación de
los detectores de humo en una
residencia con varios pisos.
Figura 14: Ubicaciones recomendables
y aceptables para montar los
Figura 15: Lugar recomendado para montar
los detectores de humo en techos
inclinados, abovedados o a dos aguas.
detectores de humo.
Page 39

Dónde instalar los detectores de humo en casas
móviles y autocaravanas
Las casas móviles o autocaravanas construidas después de 1978 fueron
diseñadas y aisladas para ser energéticamente eficientes. En las casas móviles y
autocaravanas construidas después de 1978, los detectores de humo deben
instalarse como se ha indicado anteriormente. Las casas móviles y autocaravanas
más antiguas pueden poseer muy poca o nula protección, comparadas con los
estándares actuales. Las paredes y techos de la parte exterior a menudo están
hechos de metal no aislante, que puede transferir el flujo de energía térmica desde
el exterior. Esto hace que el aire próximo a las paredes se caliente o se enfríe más
que el resto del aire interior. Estas capas de aire más caliente o frío pueden impedir
que el humo llegue al detector. En estos casos instale los detectores de humo sólo
en las paredes interiores. Colóquelos a una distancia del techo de entre 10 ~ 15 cm
(4 y 6 pulgadas). Si no está seguro de la cantidad de material aislante de su casa
móvil o autocaravana, entonces instale el detector en una pared interior. Si las
paredes o el techo están más calientes o frías de lo normal, instale el detector en
una pared interior. Instale un detector lo más cerca posible de la zona de
dormitorios para tener un mínimo de seguridad, o instale un detector en cada
habitación para mayor seguridad. Antes de instalar cualquier detector, lea la
siguiente sección: “Dónde no instalar detectores de humo”.
Dónde no instalar los detectores de humo
Se producen falsas alarmas cuando los detectores de humo se instalan donde no
pueden funcionar adecuadamente. Para evitar falsas alarmas, no instale los
detectores en las siguientes situaciones:
♦ Las partículas de humo son consecuencia de la combustión de algo que se
quema. No instale los detectores de humo en o cerca de áreas donde se
produzcan dichas partículas; por ejemplo, en cocinas con pocas ventanas o
mala ventilación, en garajes donde puede haber salida de gases de vehículos,
cerca de hornos, calentadores de agua y calefactores.
♦ No instale detectores de humo a menos de 6 metros (20 pies) de lugares
donde normalmente se produzcan partículas de humo, como en cocinas. Si
fuese imposible guardar una distancia de 6 metros, como en una casa móvil,
procure instalar el detector lo más lejos posible de las partículas de humo,
preferentemente en la pared. Para evitar falsas alarmas, ventile
adecuadamente esos lugares.
IMPORTANTE:
Nunca trate de inutilizar el detector para evitar falsas alarmas
♦ No instale los detectores de humo por donde pasen corrientes de aire fresco.
♦ Cerca de emanaciones de disolventes.
♦ Cerca del tubo de escape de un automóvil, ya que dañará el detector.
Dicha corriente de entrada y de salida de aire fresco puede alejar el humo del
detector, reduciendo su eficacia. La Figura 6 indica los lugares apropiados e
inapropiados que responden a este problema.
Detector de Humo Fotoélectrico Inalámbrico 39
Page 40

♦ En zonas mojadas o con mucha humedad, o cerca de cuartos de baño con
duchas. La humedad en el aire puede entrar en la cámara del sensor y
condensarse; las gotas de condensación pueden provocar falsas alarmas.
Instale los detectores de humo a una distancia de al menos 3 metros (10 pies)
de los cuartos de baño.
♦ En áreas muy frías o muy calientes, incluyendo edificios sin calefacción o
habitaciones exteriores. Si la temperatura es superior o inferior al rango de
temperatura definido para el funcionamiento del detector de humo, éste no
funcionará adecuadamente. El rango de temperatura de su detector es de 4°C
a 38°C (40°F a 100°F).
♦ En áreas muy polvorientas o sucias, la suciedad y el polvo pueden
acumularse en la cámara del sensor del detector, haciendo que se vuelva más
sensible.
♦ Además, el polvo y la suciedad pueden bloquear las entradas de la cámara
del sensor y anular la capacidad de detección del detector.
♦ Cerca de conductos de ventilación o áreas con muchas corrientes de aire,
como aquéllas con aire acondicionado, calefactores o ventiladores. Los
conductos de ventilación y las corrientes de aire pueden alejar o desviar el
humo de los detectores.
♦ Los espacios con aire viciado suelen encontrarse en la parte superior de un
techo abovedado, o en los rincones entre el techo y las paredes. El aire
viciado puede obstruir la llegada del humo al detector. Ver Figuras 4 y 5 con
las ubicaciones de instalación recomendadas.
♦ En áreas infestadas de insectos. Si un insecto entra en la cámara del sensor,
puede provocar una falsa alarma. Donde haya problemas de insectos,
deshágase de ellos antes de instalar un detector.
♦ Cerca de luces fluorescentes. El “ruido eléctrico” producido por los
fluorescentes puede causar falsas alarmas. Instale los detectores de humo a
una distancia mínima de 1,5 metros (5 pies) de ese tipo de luces.
Figura 6: Ubicaciones recomendadas para el detector de humo
40
Detector de Humo Fotoélectrico Inalámbrico
Page 41

INSTALACIÓN
El detector de humo se instalará en el techo, o sobre la pared si es necesario. Al
ser un detector de humo independiente, no puede conectarse a otros detectores.
Antes de la instalación, lea las secciones de este manual “Selección de la
ubicación” y “Donde no instalar los detectores de humo”. Para instalar el detector
siga los siguientes pasos (ver Figura 7)
♦ Seleccione la ubicación de la instalación.
♦ Quite el pasador de fijación que sujeta el
♦ Quite el soporte de montaje de la unidad
♦ Use el soporte de montaje como plantilla
♦ Con la broca adecuada, taladre dos
♦ Fije el soporte a la pared con tornillos
♦ Abra la tapa del compartimiento de las
♦ Observando su correcta polaridad,
♦ ¡IMPORTANTE! El mensaje de escritura
♦ La ranura lateral del soporte deberá
♦ Tire del detector hacia afuera para
ADVERTENCIA:
No conecte los detectores de humo a otra alarma o dispositivo auxiliar. La conexión
de otros dispositivos a este detector impedirá su correcto funcionamiento.
soporte de montaje a la unidad (ver
Figura 7).
girándolo en sentido contrario al de las
agujas del reloj.
para marcar los agujeros de fijación.
agujeros en las marcas e inserte los
tacos.
(incluidos), como se muestra en la
Figura 7.
pilas (ver Figura 8).
inserte dos pilas de litio CR123 3V
(incluidas) en el compartimiento y
ciérrelo.
se envía automáticamente al cabo de 10
segundos después de colocar las pilas, o
al presionar el tamper del detector
durante 3 segundos.
alinearse con el detector. Presione el
detector sobre el soporte y gírelo en
sentido horario para fijarlo.
Inserte el pasador de fijación para
asegurar el soporte al detector (ver
Figura 7).
asegurarse de que está bien sujeto al
soporte de montaje.
Figura 7: Instalación del detector de humo
Figura 8: Compartimento de pilas / Tamper
Detector de Humo Fotoélectrico Inalámbrico 41
Page 42

INDICADOR ROJO
Si el LED rojo (ver Figura 9) parpadea cada 30 segundos, indica que el detector
funciona correctamente. Si el LED rojo parpadea con mayor frecuencia y suena
una alarma simultáneamente, indica que el dispositivo está detectando humo.
NOTA:
El LED rojo se comporta de acuerdo a uno de los siguientes modos:
Modo 1: el LED rojo no se restaurará automáticamente al finalizar un evento de
alarma. Esto significa que una vez que la cámara de humo esté limpia la alarma
sonora se detendrá, pero el LED rojo continuará parpadeando hasta que el usuario lo
restaure manualmente. Para restaurarlo, presionar el botón de Test durante 2-3
segundos (el LED rojo dejará de parpadear).
Modo 2 (predeterminado): el LED rojo se restaurará automáticamente al finalizar un
evento de alarma.
El usuario puede comprobar en qué modo está definido el detector, y conmutar entre
ambos modos.
• Para comprobar el modo, presionar el botón de Test. El LED rojo se iluminará. Si el
LED rojo se queda fijo encendido, el detector está en el Modo 1. Si el LED rojo
parpadea, el detector está en el Modo 2.
• Para conmutar de un modo a otro, presionar el botón de Test durante 8 segundos.
El zumbador pitará y el LED rojo cambiará su comportamiento (de una luz continua a
una parpadeando, o de parpadeando a una luz continua).
PRUEBA DEL DETECTOR DE HUMO
Para asegurarse de que el detector
funciona correctamente, pruebe el
detector una vez por semana,
realizando el siguiente
procedimiento:
Con el dedo presione firmemente el
botón de prueba. Si el detector
funciona correctamente, sonará la
alarma. Si el detector no pasa esta
prueba, hágalo reparar o
reemplácelo inmediatamente.
Si la alarma comienza a emitir un
pitido cada 35 segundos, significa
que la pila del detector se está
agotando. Reemplácela
inmediatamente. Para esto, tenga a
mano pilas nuevas.
NOTA:
El humo de una cocina, o una caldera polvorienta (generalmente denominados “fuego
no hostil”) pueden activar la alarma. Si esto sucede, abra una ventana o coloque un
ventilador para quitar el humo o el polvo. La alarma se desactivará en cuanto el aire
esté limpio. No desconecte la pila del detector. Esto anulará su protección contra
incendios.
Figura 9: Tapa del detector de humo
42
Detector de Humo Fotoélectrico Inalámbrico
Page 43

CUIDADO DEL DETECTOR DE HUMO
Para mantener su detector en buenas condiciones de funcionamiento, debe probar
el detector semanalmente, según lo indicado en la sección “Prueba del detector de
humo".
LIMPIEZA DEL DETECTOR DE HUMO
Limpie la carcasa con un trapo seco o húmedo para quitar el polvo y la suciedad.
Si es necesario, abra la cámara de humo y limpie el interior del detector.
1. Quite el detector de su base.
2. Quite las pilas.
3. Con un destornillador plano levante ligeramente la carcasa de la cámara de humo.
4. Quite la suciedad de la cámara con un pincel fino.
5. Después de limpiar, cierre la cámara de humo, fije la carcasa y vuelva a
colocar el detector en el techo.
¡NO OLVIDE CAMBIAR LAS PILAS!
REEMPLAZO DE LAS PILAS
Reemplace las pilas del detector una vez al año o inmediatamente después de una
señal de batería baja (pitido cada 35 segundos). El pitido de baja batería debería
durar al menos 30 días antes de que las pilas se agoten completamente.
NOTA:
Si continúan las falsas alarmas, deberá revisar que la ubicación del detector sea la
adecuada. Vea la sección “Selección de la ubicación.” Mueva el detector a otro lugar si no
está ubicado correctamente. Limpie el detector como se detalla arriba.
¡ADVERTENCIA! LIMITACIONES DE LOS SENSORES
DE HUMO
Los sensores de humo vía radio son muy fiables, pero podrían no funcionar en ciertas
circunstancias. Ninguna alarma contra incendios brinda protección total de su vida o
propiedad. Los sensores de humo no son un substituto de un seguro de vida.
Los sensores de humo requieren de una fuente de energía para su funcionamiento.
Este sensor de humo no funcionará, y la alarma no se activará, si las pilas están agotadas
o mal instaladas.
Usted podría no escuchar la alarma. Una persona que duerme o una persona que
consumió drogas o alcohol podría no despertarse si la alarma se instaló fuera del
dormitorio. Las puertas parcial o completamente cerradas, y la distancia, pueden bloquear
el sonido. Esta alarma no fue diseñada para personas con problemas de audición.
Las alarmas podrían no activarse ni brindar una advertencia lo suficientemente rápida.
Las alarmas sólo se activan cuando una cantidad suficiente de humo llega al sensor. Si un
incendio se genera en una chimenea, pared, techo, al otro lado de una puerta cerrada, o
en un piso de la propiedad donde no hay detectores, puede que no llegue hasta el sensor
la cantidad suficiente de humo para que se active la alarma.
Los sensores de humo son una ayuda significativa a la hora de reducir pérdidas,
lesiones, e incluso muertes. Sin embargo, aunque un dispositivo de detección sea
muy eficiente, nada funciona perfectamente en todas las circunstancias, y es
nuestro deber advertirle que usted no debe esperar que un sensor de humo le
garantice que usted nunca sufrirá ningún daño o lesión.
Detector de Humo Fotoélectrico Inalámbrico 43
Page 44

Especificaciones
Voltaje:
Corriente media en reposo:
Corriente en prueba:
Corriente en alarma:
Corriente de impulso máxima
(en situación de alarma):
Corriente de impulso
máxima:
Duración de la pila:
Tipo de pila:
Umbral de pila baja:
Frecuencia de pitidos de
batería baja
Duración con batería baja:
Temperatura de
funcionamiento:
Humedad de funcionamiento:
Color:
Dimensiones:
Nivel de sonido de la alarma:
Características del transmisor:
Frecuencia nominal
Tiempo de supervisión
Con el fin de continuar las mejoras del producto, RISCO Group se reserva el
derecho de cambiar especificaciones y/o diseños sin previo aviso.
6 voltios
0,010mA
55mA
55mA
4,73mA
0,074mA
3 años
pila de litio 2xCR123 3V
5,2 Voltios
1 pitido cada 30 segundos
Por lo menos 30 días desde la señal de a
4°C a 38°C (40°F - 100°F)
10% a 85% RH, sin condensación o
congelación
Blanco
Diámetro: 148 mm (5.83”)
Altura: 53 mm (2”)
Excede de 85dB a 3 metros (10 pies)
RWT33S86800A and 74015 : 868,65 MHz
RWT33S43300A: 433,92 MHz
15 min. para 868,65 MHz /
65 min. para 433,92 MHz
44
Detector de Humo Fotoélectrico Inalámbrico
Page 45

DETECTOR DE FUMAÇA
FOTOELÉTRICO SUPERVISIONADO
SEM FIOS
Modelo: WL T33S
INSTRUÇÕES DE INSTALAÇÃO
Page 46

DESCRIÇÃO GERAL
O detector WL T33S, é um detector de fumaça fotoelétrico supervisionado da
RISCO com transmissor sem fios incorporado.
Quando fumaça suficiente é detectada ou quando um teste de fumaça é
executado, o detector irá produzir um alarme e o transmissor enviará uma
mensagem de ALARME. A saída de alarme no receptor permanecerá ativada até o
aviso de alarme desaparecer.
A trava da base do detector de fumaça desencoraja a remoção do detector de
fumaça ao exigir uma chave de fenda para remover o mesmo da base.
O detector de fumaça fornece os seguintes sinais ao painel de controle:
♦ Alarme
♦ Reset do detector (Re-ativação do Detector)
♦ Bateria fraca
♦ Tamper (proteção contra aberturas)
♦ Supervisão
AVISOS:
Este detector de fumaça foi desenvolvido para ser usado em unidades residenciais
particulares ou escritórios, o que significa que deve ser usado dentro de casas familiares
particulares ou em apartamentos. Ele não deve ser utilizado em lobbies, corredores, sótãos
ou noutro apartamento em edifícios multi-familiares, a não ser que já existam detectores
utilizados em cada unidade familiar. Detectores de fumaça, colocados em áreas fora de uma
unidade residencial individual, como varandas ou corredores, podem não fornecer avisos
prévios aos moradores. Em edifícios multi-familiares, cada unidade residencial familiar deve
configurar os seus próprios detectores.
46
Detector de Fumaça Fotoélectrico Supervisonado Sem Fios
Page 47

R
SELEÇÃO DO LOCAL
Para que haja uma completa cobertura das unidades residenciais, os detectores de
fumaça deverão ser instalados em todas as habitações, entradas, áreas de
fornalha, adegas e sótãos, em cada habitação familiar. A cobertura mínima é de
um detector em cada piso e um em cada área de dormitórios.
♦ Instale um detector de fumaça no
hall/corredor de entrada de cada
área separada dos dormitórios, como
na Figura 1. São necessários dois
detectores em casas com duas áreas
de dormitório, como na Figura 2.
♦ Instale um detector de fumaça em
cada piso da casa ou apartamento
de vários pisos, conforme é mostrado
na Figura 3.
♦ Instale no mínimo dois detectores em
cada habitação.
♦ Instale um detector de fumaça dentro
de cada dormitório.
♦ Instale dois detectores de fumaça em
cada dormitório, um a cada extremo,
caso a distância entre eles seja
superior a 12 metros.
♦ Instale um detector de fumaça dentro
de cada habitação onde alguém
durma com a porta parcialmente ou
totalmente fechada porque a fumaça
poderá ser bloqueada pela porta, e
no hall/corredor o detector não
ativará o alarme, não despertando a
pessoa que está dormindo em caso
de fumaça.
♦ No caso de existirem sótãos, instalar
um detector de fumaça na parte de
baixo das escadas. (próximo aos
degraus mais baixos, no inicio da
subida)
♦ Instale detectores na parte de cima
de cada escada que conduza ao piso
superior. (final da subida)
♦ Assegure-se de que nenhuma porta
ou outro tipo de obstrução bloqueie a
passagem do fumaça até o detector.
Figura 1: Locais para o estabelecimento
de detectores de fumaça numa
residência com um dormitório
Figura 2: Locais para o estabelecimento de
detectores de fumaça numa residência com
um único andar com mais de um dormitório
Detector de Fumaça Fotoélectrico Supervisonado Sem Fios 47
P
Page 48

♦ Instale detectores adicionais na sala,
na sala de jantar, no hall, na área de
fornalha e na despensa.
♦ Instale os detectores de fumaça o
mais próximo possível do centro do
teto. Caso não seja possível,
coloque-o pelo menos a 10
centímetros das paredes e esquinas,
como se pode ver na Figura 4.
♦ Caso a montagem no teto não seja
possível, e a montagem nas paredes
seja permitida pelas leis locais e
estatais, coloque os detectores a
uma distância de 10 - 15 centímetros
do teto; veja a Figura 4.
♦ Se alguma das suas habitações tem
tetos inclinados, convexos ou a duas
águas, procure montar os detectores
a 0.9 metros do ponto mais alto do
teto, medidos horizontalmente, como
se sugere na Figura 5.
Figura 3: Local para o estabelecimento
de detectores de fumaça numa
residência com vários andares
Figura 4: Locais mais recomendados
Figura 5: Local recomendado para montar
detectores de fumaça em dormitórios com teto
inclinado, a duas águas ou convexo.
48
Detector de Fumaça Fotoélectrico Supervisonado Sem Fios
e adequados para montar
detectores de fumaça
Page 49

R
Onde instalar detectores de fumaça em trailers e
veículos de recreação
Trailers e veículos de recreação construídos após 1978 foram projetados e
isolados de modo a operar com energia. Em Trailers e veículos de recreação
construídos após 1978, os detectores de fumaça devem ser instalados conforme
descrito acima. Trailers e veículos de recreação mais antigos podem ter pouco ou
nenhum isolamento se comparados com os padrões atuais. As paredes e os
telhados externos são feitos de metal não isolado, que pode transferir um fluxo de
energia térmica do lado de fora. Isto torna o ar próximo a eles mais quente ou
mais frio quando comparado com o ar do interior. Estas camadas de ar mais
quente ou mais frio podem obstruir a chegada do fumaça ao detector. Assim,
nestas unidades, instale os detectores apenas nas paredes internas. Coloque-os
entre 10 a 15 centímetros do teto. Se não tiver a certeza da quantidade de
isolamento do seu trailer ou veículo de recreação, instale o detector na parede
interna. Se as paredes ou o teto estiverem raramente frios ou quentes, instale o
detector na parede interna. Instale um detector o mais próximo possível da área
onde se dorme para uma segurança mínima, ou instale o detector em cada
dormitório para segurança. Antes de instalar qualquer detector, leia a seção "Onde
instalar detectores de fumaça".
Onde não se devem instalar detectores de fumaça
Produzem-se falsos alarmes quando os detectores de fumaça são instalados onde
não podem funcionar de forma adequada. Para evitar alarmes falsos, não deverão
ser instalados nas seguintes situações:
♦ As partículas de fumaça é conseqüência da combustão. Não instale
detectores de fumaça perto de áreas onde possam produzir-se fumaça de
forma controlada, como cozinhas com poucas janelas ou com fraca ventilação
ou em garagens onde pode haver gases de escape, perto de aquecedores,
fornalhas e estufas.
♦ Não instale detectores de fumaça a menos de 6 metros de lugares onde é
normal a existência de partículas de fumaça, como em cozinhas. Se for
impossível afastar 6 metros de distância, como por exemplo, em um trailer,
coloque tão longe quanto seja possível da fonte de tais partículas de fumaça,
preferencialmente na parede. Para prevenir falsos alarmes, ventile bem as
ditas zonas.
IMPORTANTE:
Nunca resolva os falsos alarmes desconectando o detector.
♦ Não fixe os detectores de fumaça onde passem correntes de ar fresco. Tais
♦ Perto de locais onde exista vapor de pinturas ou de solventes.
♦ Muito perto de tubos de escape de qualquer tipo de veículo; isto danificará o
correntes de ar, de entrada ou de saída, arrastariam a fumaça para longe do
detector, reduzindo assim a sua eficácia. A Figura 6 mostra os lugares
corretos e incorretos que respondem a estes problemas.
detector.
P
Detector de Fumaça Fotoélectrico Supervisonado Sem Fios 49
Page 50

♦ Em zonas molhadas ou de muita umidade, ou zonas de banho (banheiros). O
vapor pode entrar na antecâmara do sensor, onde se condensaria formando
pequenas gotas que podem causar falsos alarmes. Instale os detectores de
fumaça pelo menos a 3 metros de distância dos locais de banho.
♦ Em áreas muito quentes ou muito frias, incluindo edifícios sem aquecimento
ou quartos exteriores. Se a temperatura ultrapassar, para cima ou para baixo,
o limite de temperatura definido para o funcionamento do detector de fumaça,
este não funcionará adequadamente. Os limites de temperatura para o normal
funcionamento do detector de fumaça são de 4°C até 38°C.
♦ Em áreas poluídas ou sujas, a sujeira e o pó podem acumular-se na
antecâmara do sensor, provocando hiper-sensibilidade.
♦ Para, além disso, o pó e a sujeira podem bloquear as entradas da antecâmara
do sensor, anulando a sensibilidade do detector.
♦ Perto de ventiladores de ar fresco ou áreas muito ventiladas, como ar
condicionado, estufas ou ventiladores. Estes podem desviar a fumaça da
proximidade dos detectores de fumaça.
♦ As bolsas de ar estacionárias podem formar-se no alto das habitações com
teto convexo, ou nas esquinas entre o teto e as paredes. Estas bolsas de ar
paradas podem obstruir a chegada do fumaça ao detector. Ver Figuras 8 e 9
sobre os lugares de montagem recomendados.
♦ Em áreas empestadas. Se os insetos entrarem na antecâmara do sensor do
detector, podem causar falsos alarmes. Onde haja problemas com insetos,
extermine-os antes de instalar o detector.
♦ Perto de lâmpadas fluorescentes, o "ruído elétrico" produzido pelas luminárias
pode causar falsos alarmes. Instale os detectores de fumaça a uma distância
de, no mínimo, 1.5 metros desse tipo de luminária.
Figura 6: Locais recomendados para o detector de fumaça
50
Detector de Fumaça Fotoélectrico Supervisonado Sem Fios
Page 51

R
INSTALAÇÃO
O detector de fumaça deve ser instalado no teto ou, se necessário, na parede. Uma
vez que o detector de fumaça é um tipo de estação simples, ele não pode ser
vinculado a nenhum outro detector.
Leia as seções "Onde instalar detectores de fumaça" e "Onde não se devem
instalar detectores de fumaça" neste manual antes de proceder com a instalação.
Para instalar o detector, execute as seguintes etapas (Veja a Figura 7)
♦ Selecione o local de instalação.
♦ Solte o parafuso de segurança do
♦ Solte o suporte para montagem da
♦ Use o suporte como modelo para marcar
♦ Usando uma máquina de furar
♦ Usando os parafusos fornecidos,
♦ Abra a tampa do compartimento das
♦ Observando a polaridade correta,
♦ Uma mensagem é enviada
♦ Faça coincidir a ranhura lateral do
♦ Puxe o detector para fora para assegurar
AVISO:
Não conecte os detectores de fumaça a nenhum outro alarme ou dispositivo
auxiliar. Ao conectar algo a este detector evitará o seu funcionamento adequado.
suporte para montagem da unidade
(Figura 7).
unidade fazendo-o rodar no sentido
contrário ao dos ponteiros do relógio.
os pontos de montagem.
adequada, fure dois furos nas marcas e
introduza as alhetas.
conecte o suporte na parede como na
Figura 7.
baterias (veja a Figura 8).
encaixe as baterias de lítio 2xCR123 de
3V fornecidas no compartimento de
baterias e feche a tampa do
compartimento.
automaticamente, 10 segundos após
colocar as baterias, ou ao apertar o
tamper do detector por 3 segundos.
suporte com o detector. Coloque o
detector no suporte para montagem e
rode-o no sentido dos ponteiros do
relógio até encaixar.
Introduza o pino de trava para unir o
suporte para montagem ao detector (veja
a Figura 7).
que está unido ao suporte para
montagem.
Figura 7: Instalação do detector de fumaça
Figura 8: Compartimento das pilhas/Tamper
P
Detector de Fumaça Fotoélectrico Supervisonado Sem Fios 51
Page 52

INDICADOR VERMELHO
Quando o diodo de luz vermelha (LED) (Figura 9) pisca a cada 30 segundos, isto
significa que o detector está ativado. Quando o LED vermelho pisca e o buzzer
(Pequena Sirene interna) toca intermitentemente, significa uma possível existência
de fumaça.
NOTA:
O LED vermelho se comporta de acordos com os modos abaixo:
Modo 1: O indicador do LED Vermelho não irá se restaurar automaticamente no final
de cada evento de alarme. Isso significa que após a câmara se encontrar
limpa, o alarme audível irá parar automaticamente, mas o LED vermelho
indicará através de piscadas que ele deve ser restaurado manualmente pelo
usuário. Para restaurar – mantenha apertado o botão “TEST” por 2 ou 3
segundos, o LED irá parar de piscar.
Modo 2 (configuração de fábrica): O Led vermelho irá se restaurar automaticamente
no fim do evendo te alarme.
O usuário pode verificar em qual modo o detector está ajustado e modificar o ajuste.
• Para verificar o modo, aperte o botão de test. O LED vermelho irá acender, se o
LED acender de forma contínua, o detector está ajustado para o modo 1. Se o LED
piscar, o detector está ajustado no modo 2.
• Para modificar o ajuste, de um modo para o outro, mantenha o botão de teste
apertado por 8 segundos. O Buzzer irá tocar e o LED irá mudar o comportamento
entre acender continuo, ou piscar.
TESTANDO O SEU DETECTOR DE FUMAÇA
Para assegurar que o seu detector
está funcionando como pretendido,
você deve testá-lo semanalmente:
Aperte firmemente o botão de teste. Se
o detector estiver funcionando
corretamente, o alarme emite um som.
Se o teste do detector falha, conserteo ou substitua-o imediatamente.
Se a sirene de alarme apita uma vez
em cada 35 segundos, este sinal
significa que as baterias do detector
estão descarregadas. Substitua as
baterias imediatamente. Tenha à
mão baterias novas para este fim.
NOTA:
Fumaça da cozinha ou pó (algumas vezes chamados de "fogos amigáveis") podem
causar o disparo de um alarme. Caso isto ocorra, abra uma janela ou ligue um
ventilador de ar para arejar a fumaça ou o pó. O alarme cessará quando o ar voltar a
estar completamente limpo. Não desconecte as pilhas do detector. Caso isto ocorra,
ele ficará desprotegido contra os incêndios.
Figura 9: Tampa do detector de fumaça
52
Detector de Fumaça Fotoélectrico Supervisonado Sem Fios
Page 53

P
R
MANUTENÇÃO DO DETECTOR DE FUMAÇA
Para manter o seu detector em boas condições de funcionamento, você deve testá-lo
semanalmente, de acordo com a seção "Testando o seu detector de fumaça".
LIMPEZA DO DETECTOR DE FUMAÇA
Limpe o dispositivo com um pano seco ou úmido para remover poeira e sujeira. Se
necessário, remova a antecâmara de fumaça e limpe o interior do detector.
1. Remova o detector da base.
2. Remova as pilhas.
3. Utilize uma chave de fenda para remover delicadamente o compartimento da
câmara de fumaça.
4. Utilize um pincel para remover a sujeira da antecâmara.
5. Ao terminar de limpar, feche a antecâmara de fumaça, encaixe o
compartimento e remonte o detector no teto.
NÃO ESQUEÇA DE TROCAR AS BATERIAS.
TROCA DAS BATERIAS
Substitua as baterias do detector uma vez por ano ou quando o sinal de " bateria
fraca" for emitido a cada 35 segundos. O sinal de pilha fraca será emitido pelo
menos durante 30 dias antes que as baterias se descarreguem completamente.
NOTA:
Se o detector emitir falsos alarmes, verifique se o local do seu detector está adequado. Consulte a
secção "ONDE INSTALAR DISPOSITIVOS DE FUMAÇA". Se o seu detector não estiver em um
local apropriado, mova-o a outro local. Limpe o detector conforme indicado acima.
AVISO! LIMITAÇÕES DOS ALARMES DE FUMAÇA
Os detectores de fumaça sem fios são confiáveis, mas podem não funcionar em certas
circunstâncias. Nenhum alarme de fumaça possui proteção total para vidas e
propriedades. Alarmes de fumaça não são substitutos de seguros de vida.
Os alarmes de fumaça necessitam de energia para funcionar.
O alarme de fumaça não funciona caso haja um alerta de pilha fraca ou caso as pilhas
não tiverem sido instaladas adequadamente.
O detector de fumaça pode não ser ouvido. Pessoas de sono profundo, ou que utilizem
medicamentos, drogas ou álcool, poderão não ouvir o alarme, se instalado fora do
dormitório. O alarme poderá não ser ouvido se bloqueado por uma porta parcialmente ou
totalmente fechada. Este alarme não alertará pessoas com problemas de audição.
Os alarmes de fumaça podem não estar sempre ativados e fornecer um aviso prévio
suficiente. Os alarmes de fumaça podem ser ativados quando fumaça suficiente alcança o
alarme. A fumaça do fogo das chaminés, parede, telhados, ou nas partes externas de
portas fechadas ou em outro nível do mesmo, poderá não alcançar o detector de fumaça
e pode não ativar o alarme.
Os alarmes de fumaça ajudam significativamente na redução de perdas, danos ou
até mesmo a morte. No entanto, mesmo sendo um dispositivo excelente, nada
garante que funcionará perfeitamente em qualquer circunstância, e deve-se ter em
mente que um alarme de fumaça não garante que sempre será evitado qualquer
dano ou perda.
Detector de Fumaça Fotoélectrico Supervisonado Sem Fios 53
Page 54

Especificações
Voltagem:
Corrente Standby típica
Corrente de teste típica:
Corrente de alarme típica:
Corrente de pulso
problemático de pico:
Corrente de pulso de pico:
Duração da pilha:
Tipo de pilha:
Limiar de pilha fraca:
Taxa de alarme de pilha
fraca:
Duração da pilha:
Temperatura de
funcionamento:
Umidade operacional:
Cor:
Dimensões: Diâmetro: 148 milímetros
Nível de som de alarme:
Características do transmissor:
Freqüência central nominal
Tempo de supervisão
Para continuar a aperfeiçoar o produto, a RISCO Group têm o direito de modificar
as especificações e/ou os desenhos sem aviso prévio.
6 volts
0.010 mA
55 mA
55 mA
4.73 mA
0.074 mA
3 anos
2pilhas de lítio xCR123 de 3V
5.2 Volt
Um alarme a cada minuto
No mínimo 30 dias do sinal de aviso
De -10°C a 40°C (De 14°F a 104°F)
Desde 10% até 85% sem condensação ou
congelamento
Branco
Altura: 53 milímetros
Excede 85 dB a 3 metros
RWT33S86800A, 74015 : 868.65 MHz
RWT33S43300A: 433.92 MHz
15 minutos para 868.65 MHz /
65 minutos para 433.92 MHz
54
Detector de Fumaça Fotoélectrico Supervisonado Sem Fios
Page 55

Compliance Statement
RTTE
Hereby, RISCO Group declares that this equipment is in compliance with the essential
requirements and other relevant provisions of Directive 1999/5/EC. For the CE Declaration
of Conformity please refer to our website: www.riscogroup.com.
UL Compliance Section
This product is UL639 listed for Residential and Commercial intrusion detectors.
To comply with UL, note the following:
♦ The units are intended to be connected to a Listed control unit or Burglar alarm
power supply with output voltage range between 9-16vdc that provides a
minimum of four hours standby.
♦ The unit relays are to be connected to resistive loads only .
♦ For indoor use only.
CE CPR Approval
The wireless smoke and heat detector, RWT33S86800B, designed by RISCO Ltd in Israel,
assembled in China, has been tested and approved according to the CPR directive
305/2001/EU, standard EN 14604:2005/AC:2008 by ANPI, BELGIUM number
1134-CPR-109
FCC Note (for 433.92 MHz)
FCC ID: JE4RWT30S433
IC: 6564A-RWT30S
This equipment has been tested and found to comply with the limits for a Class B digital
device, pursuant to part 15 of the FCC Rules. These limits are designed to provide
reasonable protection against harmful interference in a residential installation. This
equipment generates, uses and can radiate radio frequency energy and, if not installed
and used in accordance with the instructions, may cause harmful interference to radio
communications. However, there is no guarantee that interference will not occur in
particular installation. If this equipment does cause harmful interference to radio or
television reception, which can be determined by turning the equipment off and on, the
user is encouraged to try to correct the interference by one or more of the following
measures:
(1) Reorient or relocate the receiving antenna.
(2) Increase the separation between the equipment and receiver.
Consult the dealer or an experienced radio/TV technician for help.
Changes or modifications to this equipment not expressly approved by the party
responsible for compliance, RISCO Group could void the user's authority to operate the
equipment.
* 433.92 MHz: RWT33S43300A
55
Page 56

RISCO Group Limited Warranty
RISCO Group and its subsidiaries and affiliates ("Seller") warrants its products to be free from
defects in materials and workmanship under normal use for 24 months from the date of production.
Because Seller does not install or connect the product and because the product may be used in
conjunction with products not manufactured by the Seller, Seller cannot guarantee the performance
of the security system which uses this product. Seller's obligation and liability under this warranty is
expressly limited to repairing and replacing, at Seller's option, within a reasonable time after the date
of delivery, any product not meeting the specifications. Seller makes no other warranty, expressed or
implied, and makes no warranty of merchantability or of fitness for any particular purpose.
In no case shall seller be liable for any consequential or incidental damages for breach of this or any
other warranty, expressed or implied, or upon any other basis of liability whatsoever.
Seller's obligation under this warranty shall not include any transportation charges or costs of
installation or any liability for direct, indirect, or consequential damages or delay.
Seller does not represent that its product may not be compromised or circumvented; that the product
will prevent any personal injury or property loss by burglary, robbery, fire or otherwise; or that the
product will in all cases provide adequate warning or protection.
Seller, in no event shall be liable for any direct or indirect damages or any other losses occurred due
to any type of tampering, whether intentional or unintentional such as masking, painting or spraying
on the lenses, mirrors or any other part of the detector.
Buyer understands that a properly installed and maintained alarm may only reduce the risk of
burglary, robbery or fire without warning, but is not insurance or a guaranty that such event will not
occur or that there will be no personal injury or property loss as a result thereof.
Consequently seller shall have no liability for any personal injury, property damage or loss based on
a claim that the product fails to give warning. However, if seller is held liable, whether directly or
indirectly, for any loss or damage arising under this limited warranty or otherwise, regardless of
cause or origin, seller's maximum liability shall not exceed the purchase price of the product, which
shall be complete and exclusive remedy against seller.
No employee or representative of Seller is authorized to change this warranty in any way or grant
any other warranty.
WARNING: This product should be tested at least once a week.
CAUTION: Risk of explosion if battery is replaced by an incorrect type. Dispose of used batteries
according to local regulations.
Contacting RISCO Group
RISCO Group is committed to customer service and product support. You can contact us through
our website (www.riscogroup.com) or at the following telephone and fax numbers:
United Kingdom
Tel: +44-(0)-161-655-5500
support-uk@riscogroup.com
Italy
Tel: +39-02-66590054
support-it@riscogroup.com
Spain
Tel: +34-91-490-2133
support-es@riscogroup.com
France
Tel: +33-164-73-28-50
support-fr@riscogroup.com
All rights reserved.
No part of this document may be reproduced in any form without prior written permission from the
publisher.
© RISCO Group 12/13 5IN1415 E
56
Belgium (Benelux)
Tel: +32-2522-7622
support-be@riscogroup.com
USA
Tel: +1-631-719-4400
support-usa@riscogroup.com
Brazil
Tel: +55-11-3661-8767
support-br@riscogroup.com
China (Shanghai)
Tel: +86-21-52-39-0066
support-cn@riscogroup.com
China (Shenzhen)
Tel: +86-755-82789285
support-cn@riscogroup.com
Poland
Tel: +48-22-500-28-40
support-pl@riscogroup.com
Israel
Tel: +972-3-963-7777
support@riscogroup.com
 Loading...