

Page 1

For safe and correct use, be sure to read the Safety Information in
"Read This First" before using the machine.
For information not in this manual, refer to
the HTML/PDF files on the supplied
CD-ROM.
Troubleshooting
Loading Paper
Getting Started
User Guide
Page 2

Page 3

TABLE OF CONTENTS
Manuals for This Machine.................................................................................................................................3
List of Manuals....................................................................................................................................................5
1. Getting Started
Before You Start..................................................................................................................................................7
How to Read the Manuals.............................................................................................................................7
Model-Specific Information...........................................................................................................................8
List of Options.................................................................................................................................................9
Guide to Names and Functions of Components............................................................................................11
Guide to Components.................................................................................................................................11
Guide to the Names and Functions of the Control Panel.........................................................................16
Guide to the Names and Functions of the Control Panel Screen............................................................20
Turning On/Off the Power..............................................................................................................................26
Turing On the Power....................................................................................................................................26
Turning Off the Power..................................................................................................................................26
Saving Energy..............................................................................................................................................27
Displaying the Printer Configuration Screens Using the Control Panel........................................................30
Configuring Printer Settings from the [Menu] key......................................................................................30
Configuring Printer Settings from the [User Tools] key..............................................................................30
Using Web Image Monitor.............................................................................................................................32
Displaying the top page..............................................................................................................................33
2. Loading Paper
Paper Loading Procedure................................................................................................................................37
Paper Size Specifications................................................................................................................................38
Paper Type Specifications...............................................................................................................................41
Paper Precautions.............................................................................................................................................43
Loading Paper into Paper Trays......................................................................................................................45
When Loading Paper Larger than A4 or 81/2 × 11................................................................................48
Loading Paper into the Bypass Tray...............................................................................................................50
Loading Orientation-Fixed Paper or Two-Sided Paper................................................................................52
Loading Envelopes...........................................................................................................................................54
Specifications of Envelopes.........................................................................................................................55
Printing on Envelopes with Windows (PCL 6/PostScript 3).....................................................................57
Printing on Envelopes with Windows (PCL 5e/5c)...................................................................................57
1
Page 4

Printing on Envelopes with Mac OS X........................................................................................................58
Paper Settings...................................................................................................................................................60
Specifying a Paper Size..............................................................................................................................60
Specifying a Paper Type.............................................................................................................................61
Configuring Envelope Settings Using the Control Panel...........................................................................62
3. Troubleshooting
When a Panel Tone Beeps..............................................................................................................................65
When Checking the Indicator Lamps, Status Icons, and Messages on the Control Panel.........................66
Indicators......................................................................................................................................................66
Checking Printer Status and Settings..........................................................................................................66
When the Indicator Lamp for the [Check Status] Key Is Lit or Flashing...................................................67
If USB Connection Fails...................................................................................................................................70
When Messages Are Displayed.....................................................................................................................71
Status Messages..........................................................................................................................................71
Alert Messages (Displayed on the Control Panel)....................................................................................72
Alert Messages (Printed on Error Logs and Reports)................................................................................83
When You Cannot Print...................................................................................................................................98
When the Data In Indicator Does Not Light Up or Flash.......................................................................101
Other Printing Problems.................................................................................................................................102
When You Cannot Print Properly.............................................................................................................102
Paper Misfeeds Occur Frequently...........................................................................................................107
Additional Troubleshooting......................................................................................................................111
The Printed Image is Different from the Image on the Computer...........................................................115
When Printer Is Not Functioning Properly...............................................................................................116
Removing Jammed Paper..............................................................................................................................119
Paper Misfeed Message (A1)..................................................................................................................119
Paper Misfeed Message (A2)..................................................................................................................121
Paper Misfeed Message (B).....................................................................................................................122
Paper Misfeed Message (B) (C)..............................................................................................................125
Paper Misfeed Message (Y1) or (Y2).....................................................................................................130
Paper Misfeed Message (Z1)..................................................................................................................132
Paper Misfeed Message (Z2)..................................................................................................................134
Trademarks.....................................................................................................................................................137
2
Page 5

Manuals for This Machine
Read this manual carefully before using this machine.
Refer to the manuals that are relevant to what you want to do with the machine.
• The method for viewing the manual depends on the manual.
• Adobe® Acrobat® Reader®/Adobe Reader must be installed in order to view the manuals as PDF
files.
• A Web browser must be installed in order to view the HTML manuals.
User Guide
Summaries are provided below for the operating instructions regarding the basic usage of this
machine, frequently used functions, and troubleshooting when an error message appears.
Read This First
Before using the machine, be sure to read the "Safety Information" section of this manual. It
describes the regulations and environmental conformance.
Quick Installation Guide
Describes procedures from unpacking the machine to connecting it to a computer.
Operating Instructions
Provides detailed information about the operation of the machine in HTML format. The following
are the main topics of the manual:
• Getting Started
• Setting Up the Printer
• Loading Paper
• Printing
• Configuring and Managing the Printer
• Troubleshooting
• Maintenance and Specifications
• VM Card Extended Feature Settings
Security Guide
This manual is for administrators of the machine. It explains security functions that you can use to
prevent unauthorized use of the machine, data tampering, or information leakage. For enhanced
security, we recommend that you first:
• Install the Device Certificate.
• Enable SSL (Secure Sockets Layer) Encryption.
• Change the user name and password of the administrator using Web Image Monitor.
3
Page 6

For details, see "Before Using This Printer", Security Guide.
Be sure to read this manual when configuring the enhanced security functions or user and
administrator authentication.
Driver Installation Guide
Explains how to install and configure the drivers.
4
Page 7
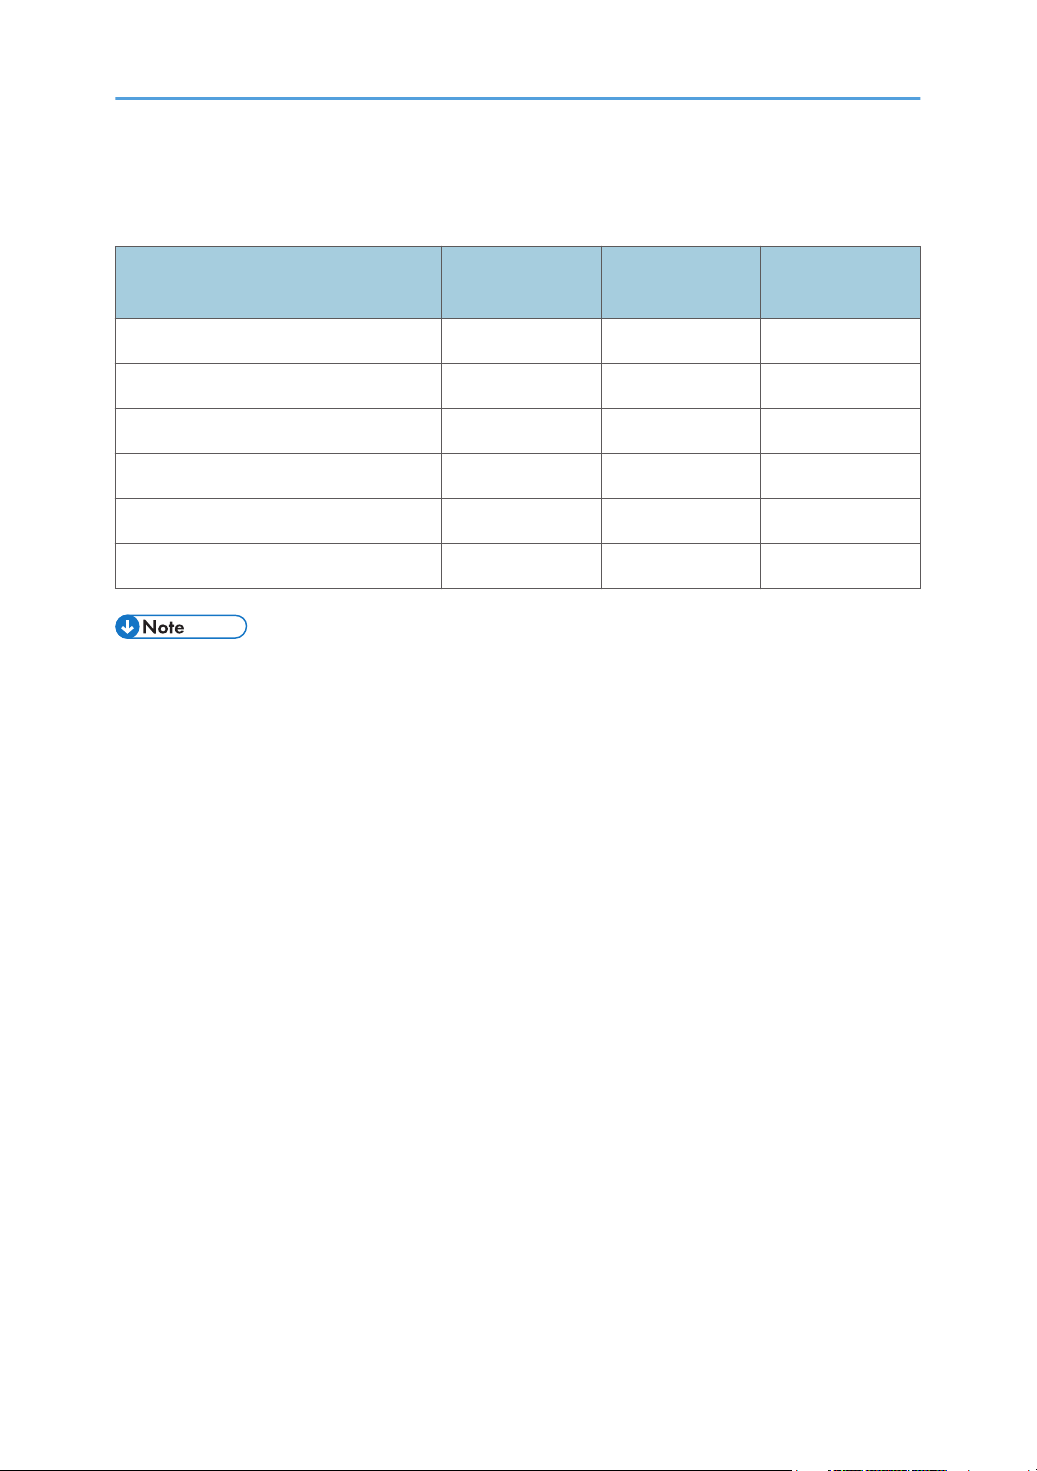
List of Manuals
Manual Name
User Guide No Yes No
Read This First Yes No No
Quick Installation Guide Yes No No
Operating Instructions No No Yes
Security Guide No Yes No
Driver Installation Guide No Yes No
• Operating Instructions and Driver Installation Guide are available in English, German, French,
Italian, Spanish, Dutch, and Russian.
Printed Manual
Provided
PDF Manual
Provided
HTML Manual
Provided
5
Page 8

6
Page 9
1. Getting Started
This section describes the symbols used in the manuals supplied with the printer, available options, and
names and functions of components.
Before You Start
How to Read the Manuals
Symbols used in the manuals
This manual uses the following symbols:
Indicates points to pay attention to when using the machine, and explanations of likely causes of paper
misfeeds, damage to originals, or loss of data. Be sure to read these explanations.
Indicates supplementary explanations of the machine's functions, and instructions on resolving user
errors.
This symbol is located at the end of sections. It indicates where you can find further relevant information.
[ ]
Indicates the names of keys on the machine's display or control panels.
Indicates the key sequence order you should perform using the control panel.
Example:
Select [Host Interface] Press [OK]
(Select [Host Interface], and then press the [OK] key.)
(mainly Europe and Asia)
(mainly North America)
Differences in the functions of Region A and Region B models are indicated by the two symbols. Read
the information indicated by the symbol that corresponds to the region of the model you are using. For
details about which symbol corresponds to the model you are using, see page 8 "Model-Specific
Information".
7
Page 10
CYN090
1. Getting Started
Disclaimer
Contents of this manual are subject to change without prior notice.
To the maximum extent permitted by applicable laws, in no event will the manufacturer be liable for any
damages whatsoever arising out of failures of this machine, losses of the registered data, or the use or
non-use of this product and operation manuals provided with it.
Make sure that you always copy or have backups of the data registered in this machine. Documents or
data might be erased due to your operational errors or malfunctions of the machine.
In no event will the manufacturer be responsible for any documents created by you using this machine or
any results from the data executed by you.
Notes
The manufacturer shall not be responsible for any damage or expense that might result from the use of
parts other than genuine parts from the manufacturer with your office products.
For good output quality, the manufacturer recommends that you use genuine toner from the
manufacturer.
Some illustrations in this manual might be slightly different from the machine.
About IP addresses
In this manual, "IP address" covers both IPv4 and IPv6 environments. Read the instructions that are
relevant to the environment you are using.
Model-Specific Information
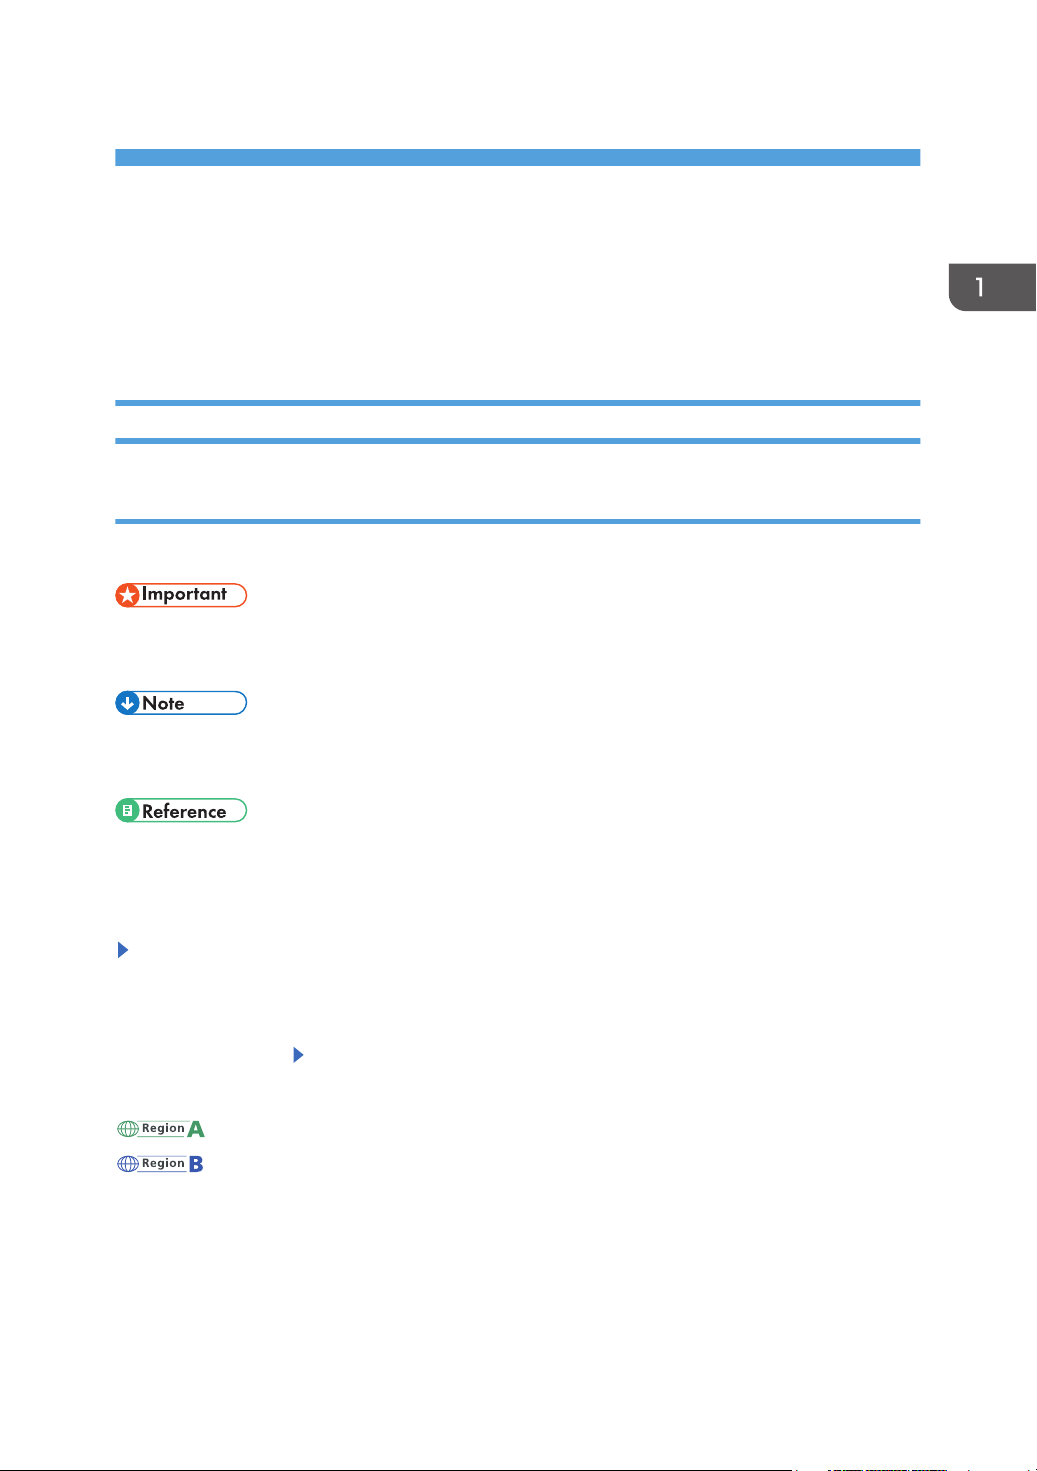
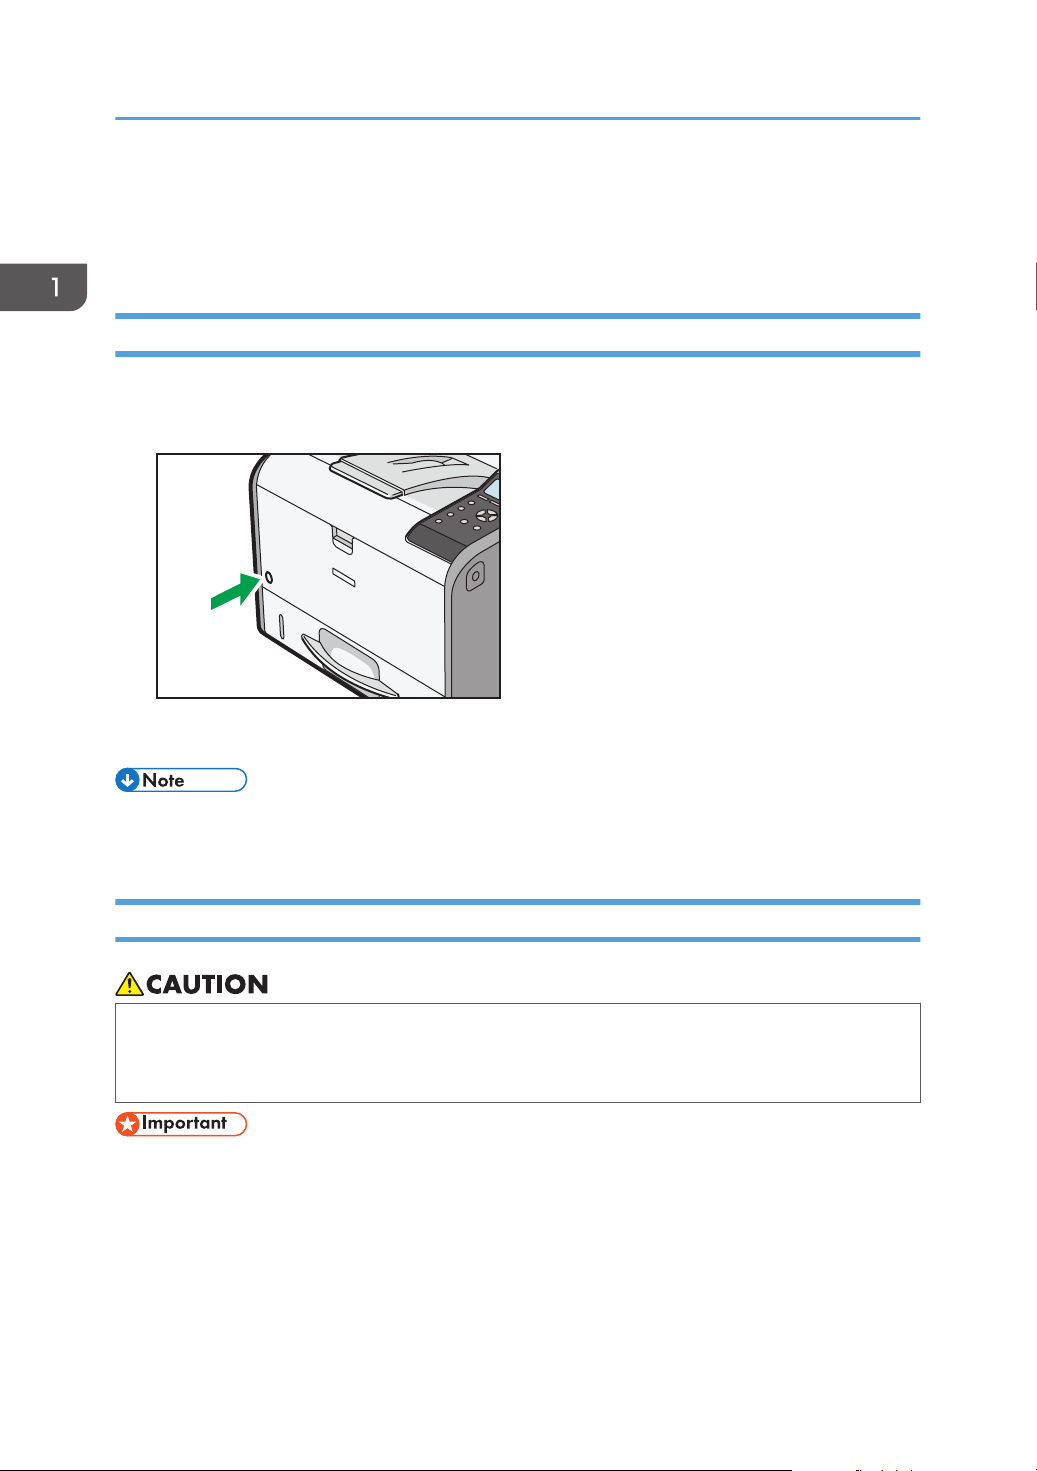
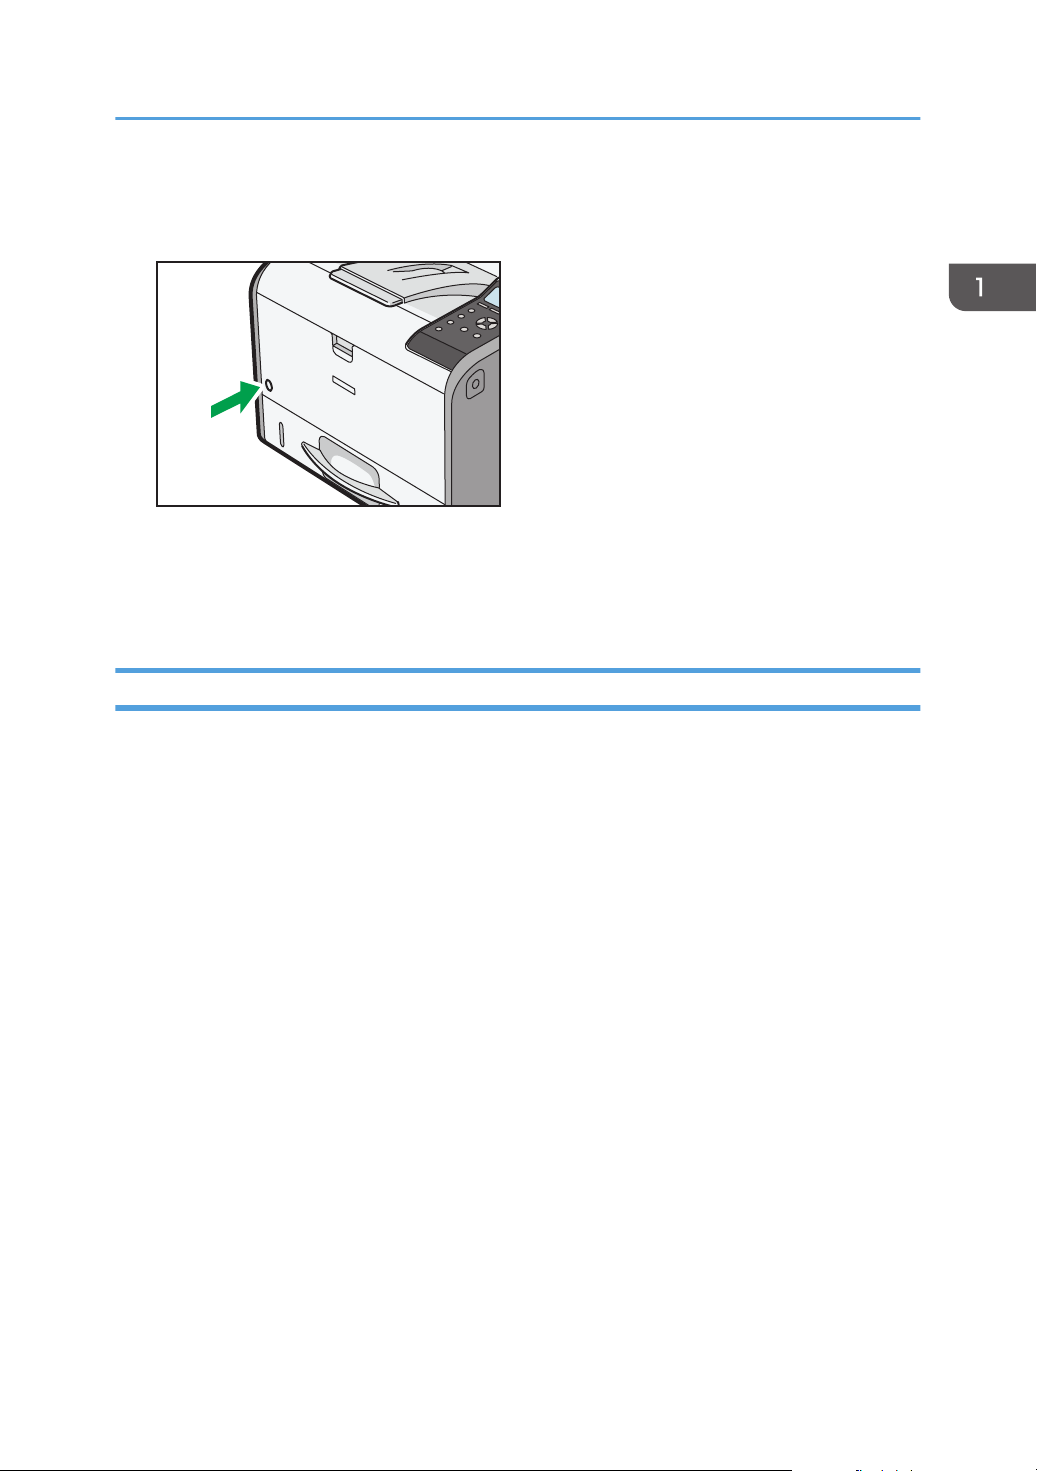
This section explains how to identify the region to which your printer belongs.
There is a label on the rear of the printer, located in the position shown below. The label contains details
that identify the region to which your printer belongs. Read the label.
8
Page 11
Before You Start
The following information is region-specific. Read the information under the symbol that corresponds to
the region of your printer.
(mainly Europe and Asia)
If the label contains the following, your printer is a Region A model:
• CODE XXXX -27
• 220–240 V
(mainly North America)
If the label contains the following, your printer is a Region B model:
• CODE XXXX -17
• 120–127 V
• Dimensions in this manual are given in two measurement units: metric and imperial. If your printer is
a Region A model, refer to the metric units. If your printer is a Region B model, refer to the imperial
units.
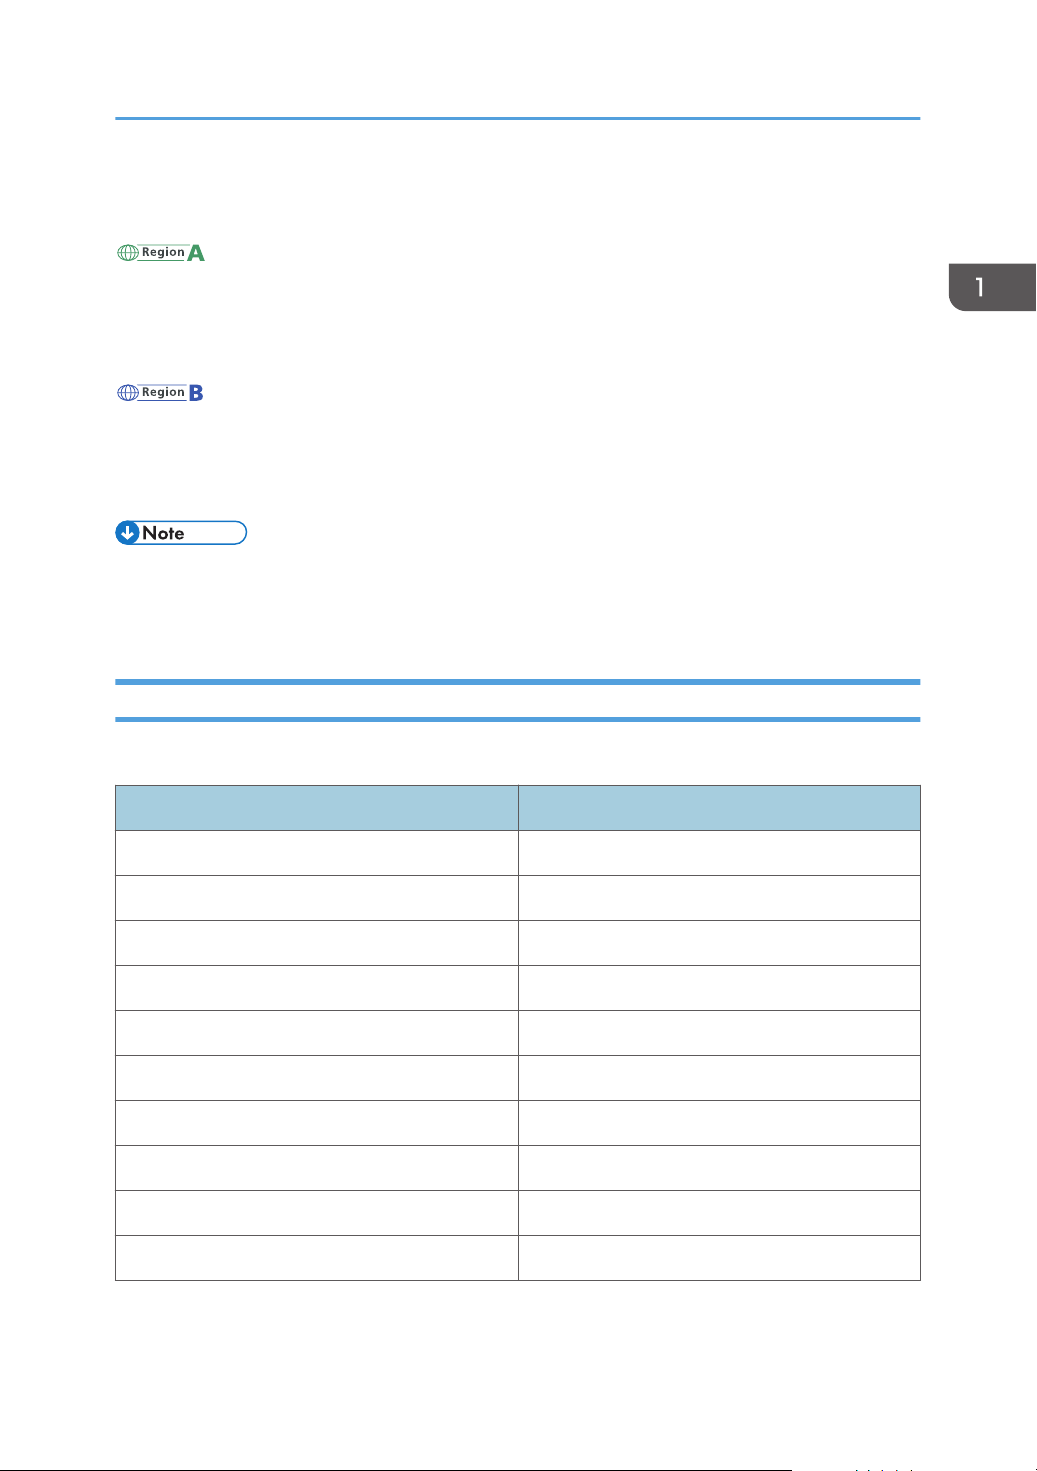
List of Options
This section provides a list of options for this printer and the names commonly used in this manual.
Option name Description
Paper Feed Unit PB1060 250-sheet paper feed unit
Paper Feed Unit PB1070 500-sheet paper feed unit
Memory Unit Type N1 1.0GB SDRAM module
Hard Disk Drive Option Type P1 Hard disk
IEEE802.11 Interface Unit Type O Wireless LAN interface board
IEEE 1284 Interface Board Type A IEEE 1284 interface board
SD card for NetWare printing Type P1 NetWare card
Browser Unit Type P1 Browser unit
XPS Direct Print Option Type P1 XPS card
VM CARD Type W VM card
9
Page 12

1. Getting Started
• The browser unit is available for SP 4520DN only.
10
Page 13
2 31
4
5
6
7
8
15
14
13
12
11
9
10
CYN001
Guide to Names and Functions of Components
Guide to Names and Functions of Components
Guide to Components
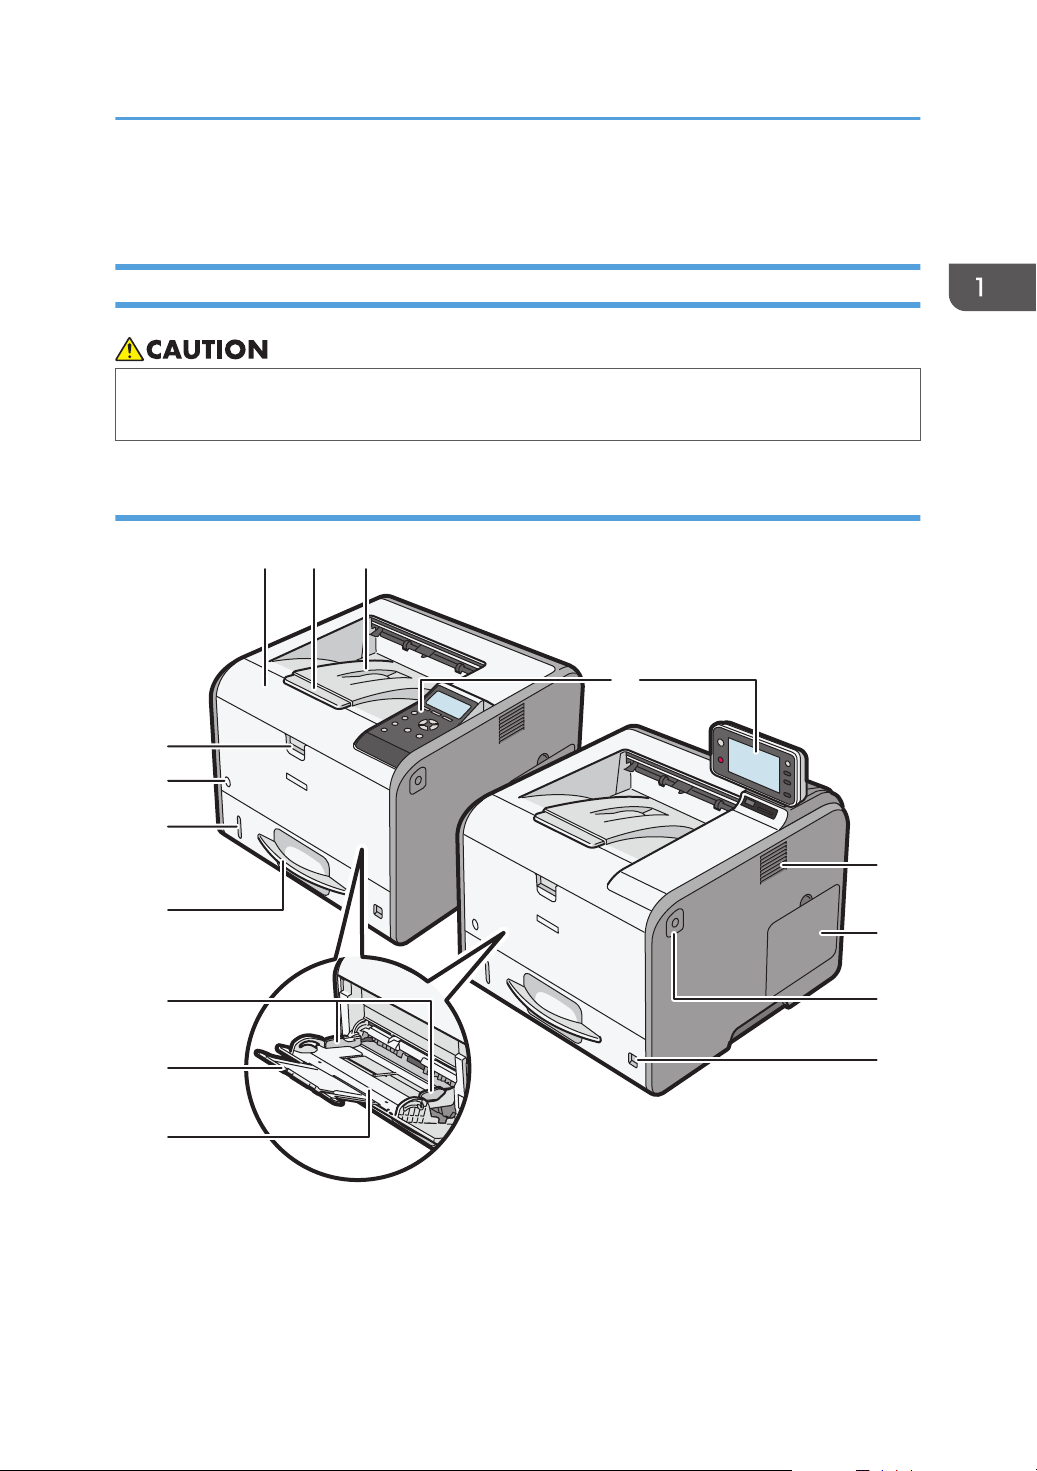
• Do not obstruct the machine's vents. Doing so risks fire caused by overheated internal
components.
Exterior: Front view
1. Front cover
Open to access the inside of the printer and remove jammed paper.
Open here to replace the print cartridge and the drum unit.
11
Page 14
CYN089
1. Getting Started
2. Tray Extension
Pull this fence to prevent paper from falling off.
3. Standard tray
Output is stacked here with the print side down.
4. Control panel
For details, see page 16 "Guide to the Names and Functions of the Control Panel".
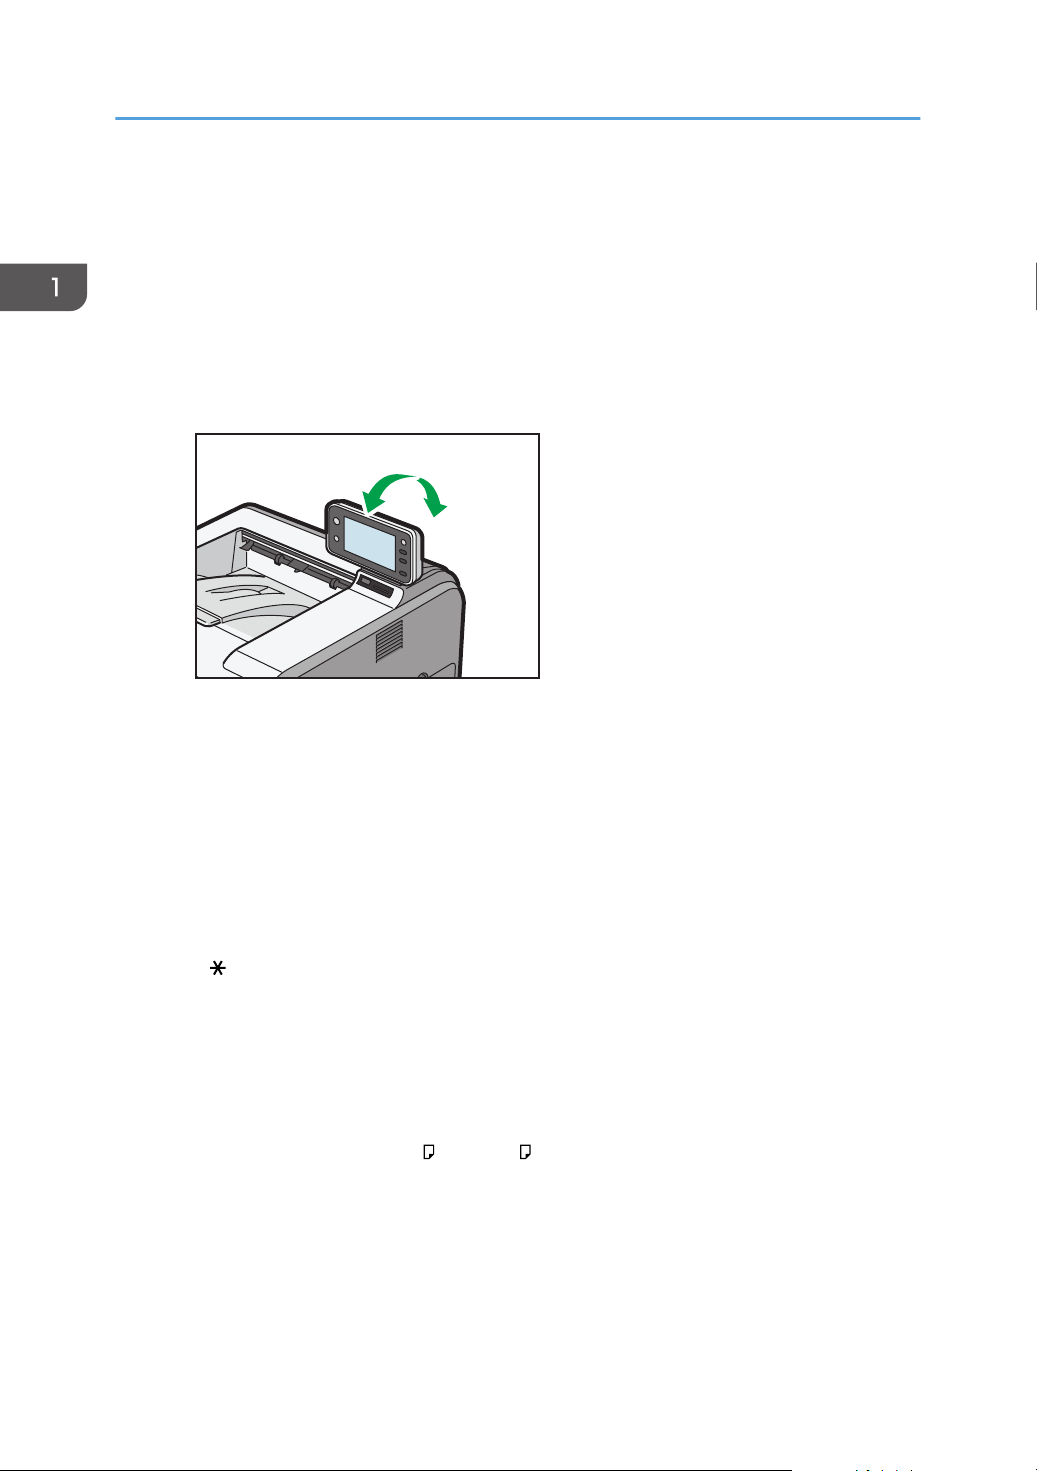
• For SP 4520DN
You can adjust the display with your hands. Adjust the angle of it to see clearly.
5. Ventilation holes
Prevent overheating.
6. Memory cover
Remove this cover to install the optional SDRAM module and hard disk.
7. Front cover open button
Push this button to open the front cover.
8. Paper size dial
Use this dial to specify the paper size. To use a paper size that is not indicated on the paper size dial, set the
dial to " ". If this is the case, set the paper size using the control panel.
9. Bypass tray
Up to 100 sheets of plain paper can be loaded.
For details about the sizes and types of paper that can be used, see page 38 "Paper Size Specifications"
and page 41 "Paper Type Specifications".
10. Extender for the bypass tray
Pull this extender out when loading A4 , 81/2 × 11 or larger size paper in the bypass tray.
11. Paper guides
When loading paper in the bypass tray, align the paper guides flush against the paper.
12. Tray 1
Up to 500 sheets of plain paper can be loaded.
12
Page 15
CYN003
1
34
5
6
7
8
9
10
2
Guide to Names and Functions of Components
For details about the sizes and types of paper that can be used, see page 38 "Paper Size Specifications"
and page 41 "Paper Type Specifications".
13. Remaining paper indicator
Indicates the approximate amount of paper remaining in the tray.
14. Main power switch
Use this switch to turn the power on and off.
For details about how to shut down the printer, see page 26 "Turning Off the Power".
15. Bypass tray open lever
Push this lever to open the bypass tray.
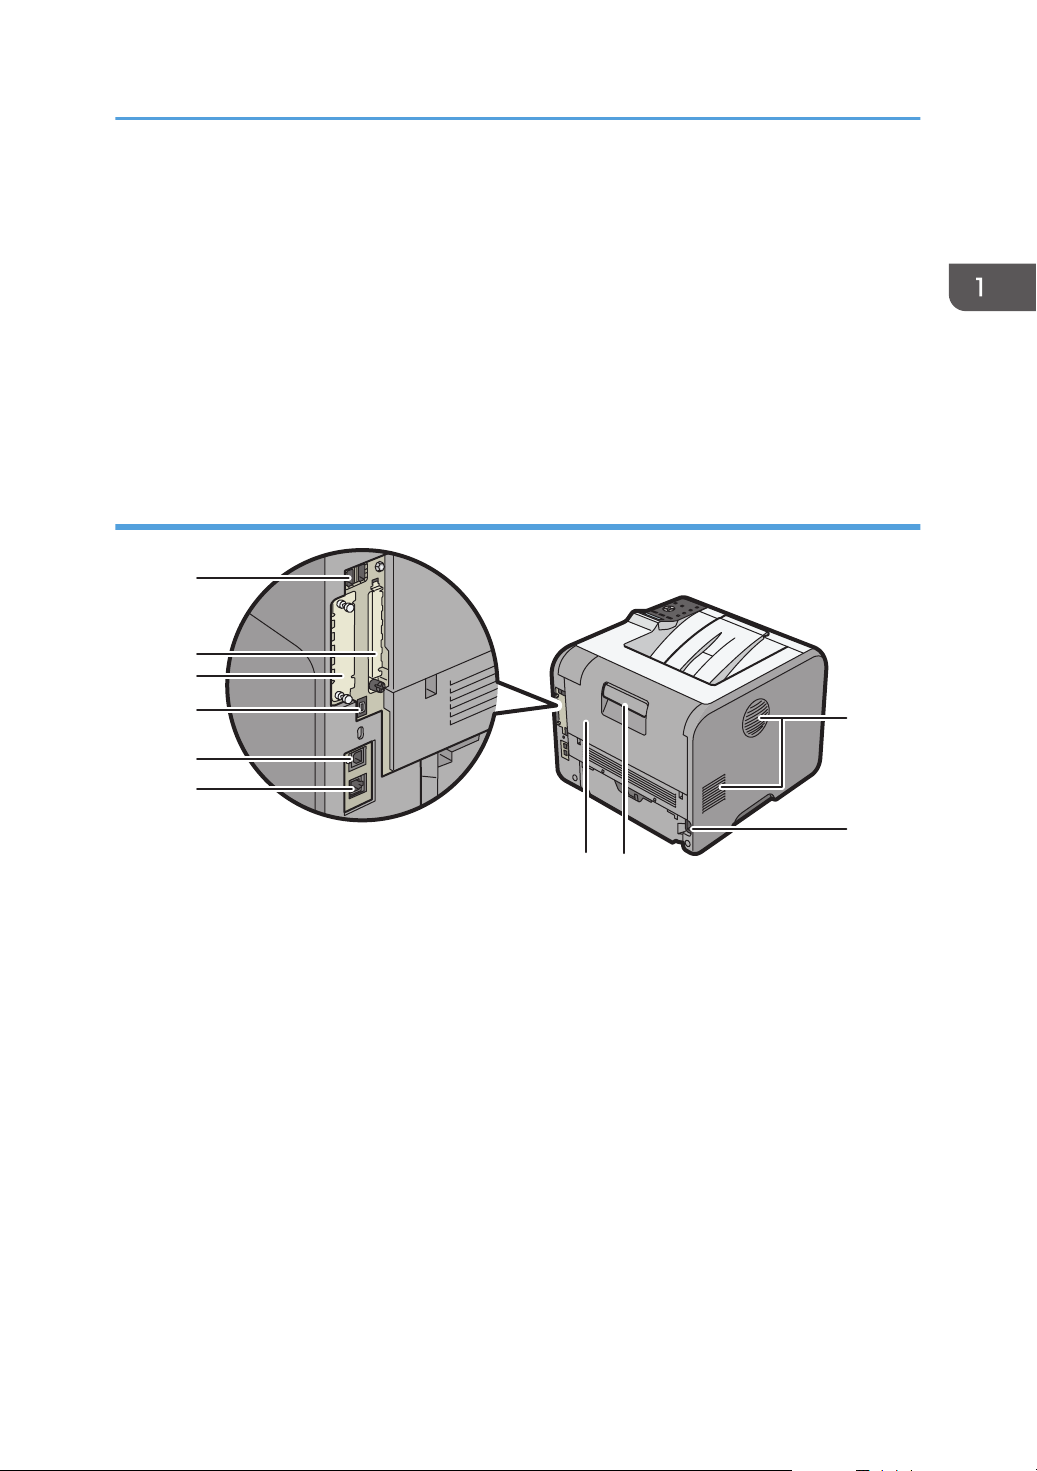
Exterior: Rear view
1. Ventilation holes
Prevent overheating.
2. Power connector
Connect the power cord to the printer. Insert the other end into an electrical outlet.
3. Rear cover open lever
Pull this lever to open the rear cover.
4. Rear cover
Open to access the inside of the printer.
Open here to replace the fusing unit or using the envelope lever.
5. Ethernet port
Use a network interface cable to connect the printer to a network.
6. USB port B
Use a USB cable to connect the printer to a computer.
13
Page 16
1
2
CYN002
1. Getting Started
7. USB port H (Port for use by customer engineer)
Do not use this port.
8. Optional interface board slot
Optional interface boards can be inserted.
Insert an optional wireless LAN interface board or IEEE 1284 interface board.
9. Expansion card slots
Remove the cover to install SD cards.
10. USB port A
Connect external devices such as a card authentication device, etc.
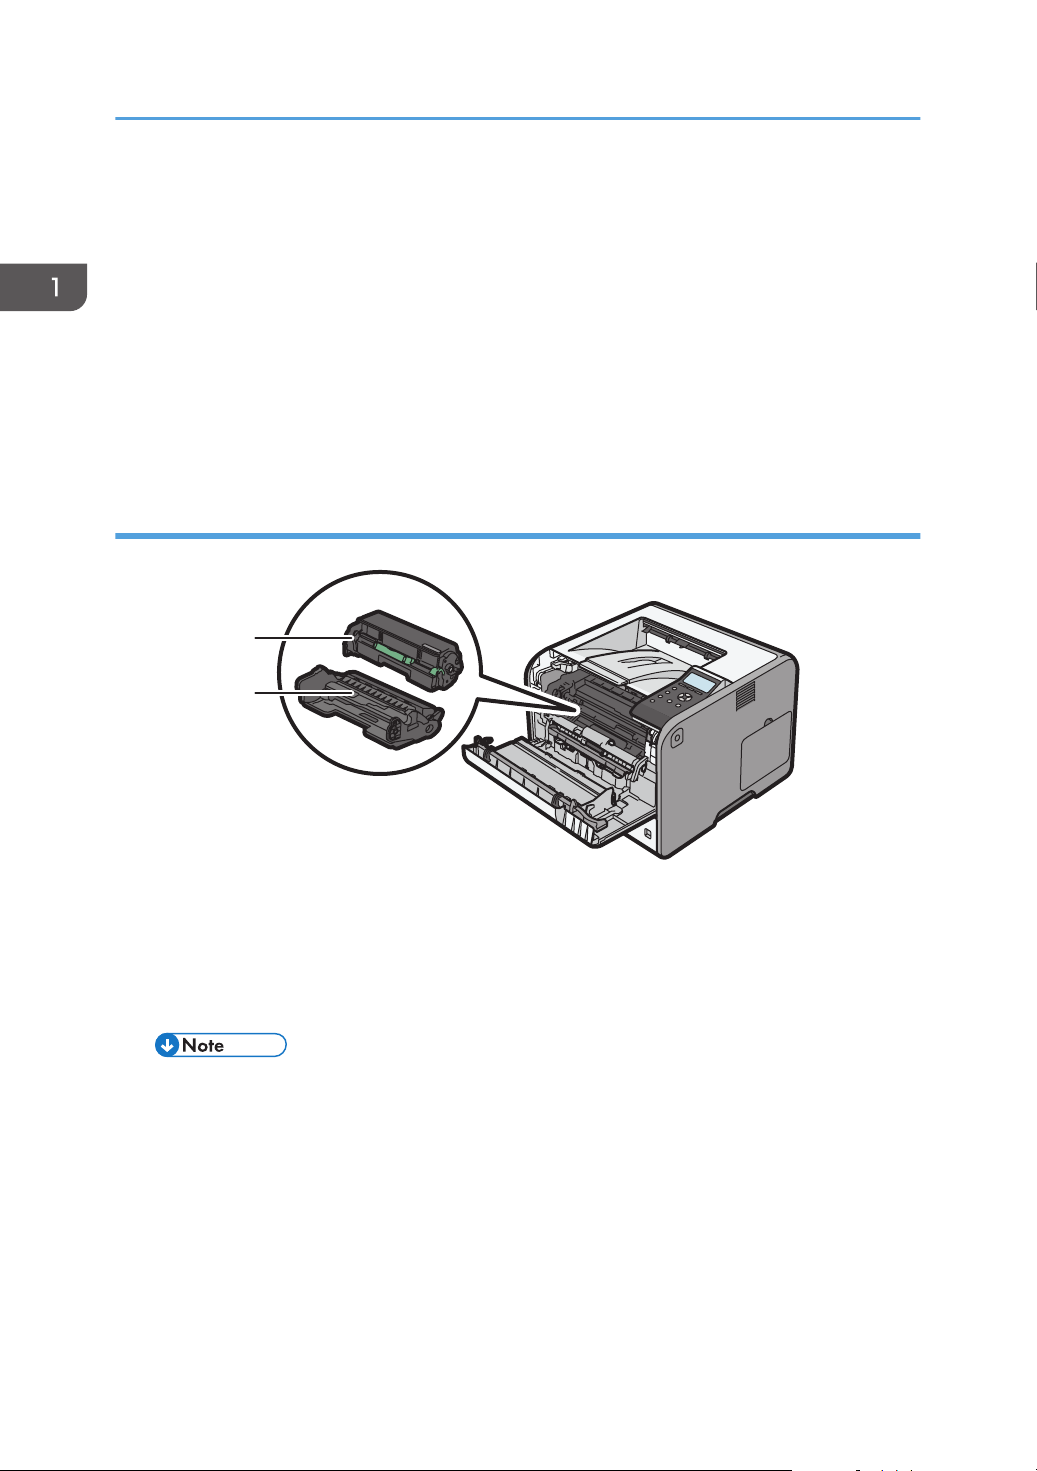
Interior: Front view
1. Print cartridge
Messages appear on the screen when the print cartridge needs to be replaced, or a new cartridge needs to
be prepared.
For details about the messages that appear on the screen when consumables need to be replaced, see
"Replenishing and Replacing Consumables", Operating Instructions.
• When you set the print cartridge apart from the drum unit, pull down the lever on the right side of the
print cartridge, and then pull the print cartridge out.
2. Drum unit
Messages appear on the screen when the drum unit needs to be replaced, or a new drum unit needs to be
prepared.
For details about the messages that appear on the screen when consumables need to be replaced, see
"Replenishing and Replacing Consumables", Operating Instructions.
14
Page 17
1
CYN004
1
3
4
2
CYN088
Guide to Names and Functions of Components
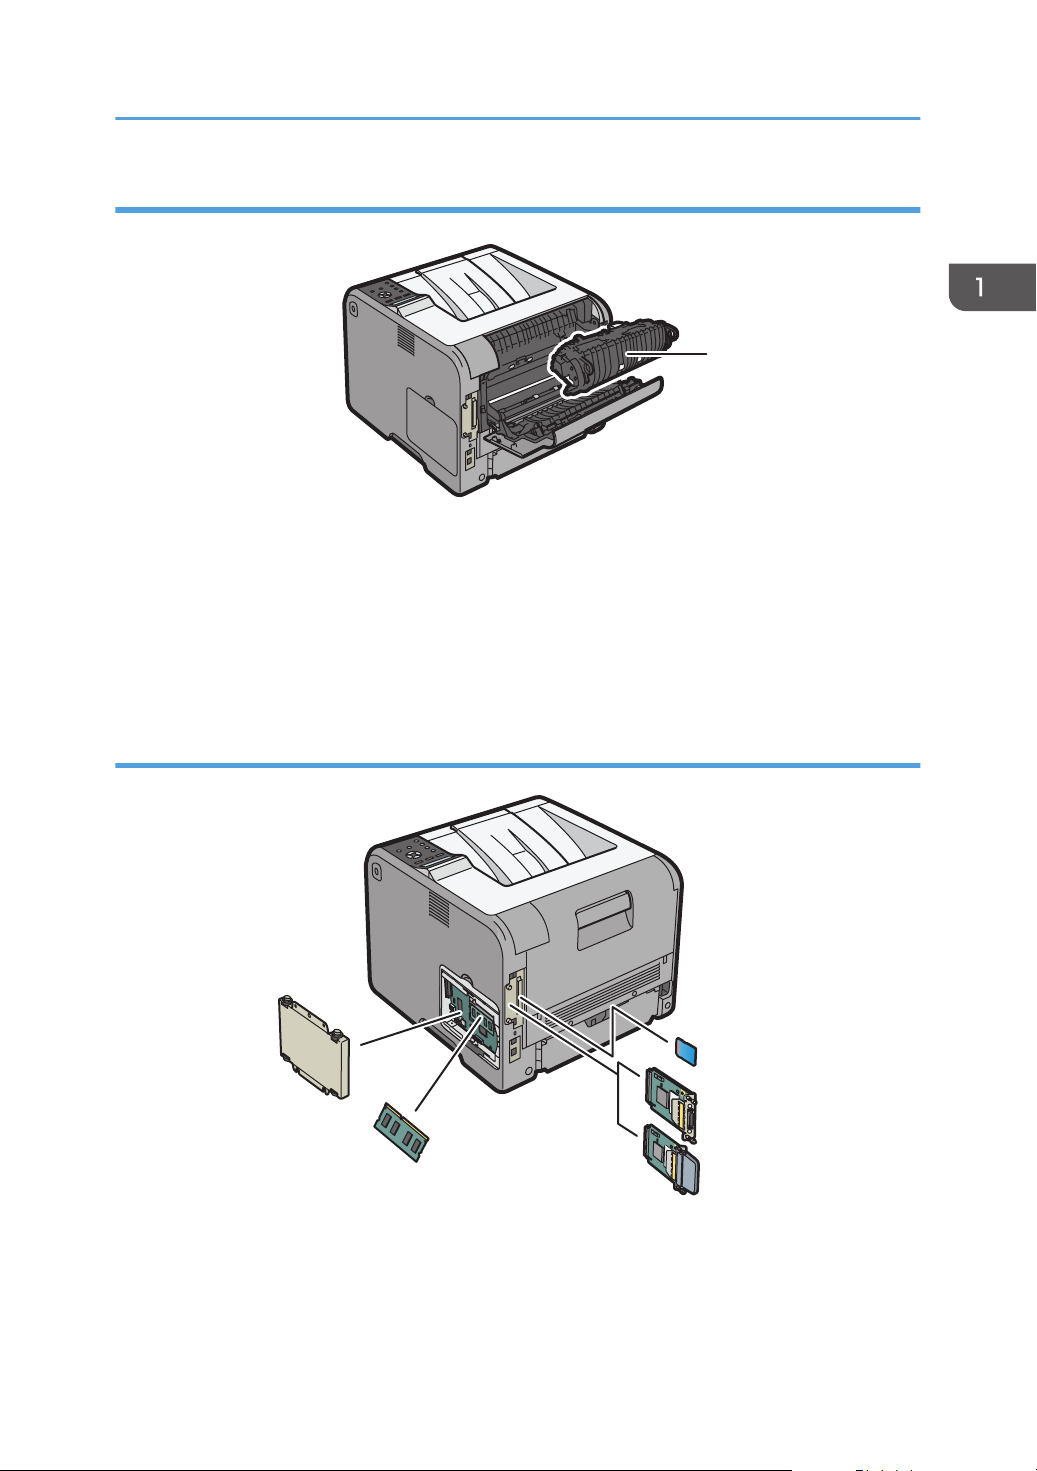
Interior: Rear view
1. Fusing unit
Messages appear on the screen when the fusing unit needs to be replaced, or a new fusing unit needs to be
prepared.
For details about the messages that appear on the screen when consumables need to be replaced, see
"Replenishing and Replacing Consumables", Operating Instructions.
The fusing unit is included in Maintenance Kit.
Guide to functions of the printer's internal options
1. SD memory card options
• VM card
With this card, you can install embedded software applications.
• NetWare card
15
Page 18
1. Getting Started
This card is needed when using a NetWare server.
• XPS card
Allows you to print XPS files.
• Browser unit (for SP 4520DN)
Allows you to display Web pages on the screen of the control panel and print them.
To attach this option, "Installing SD Card Options", Operating Instructions.
2. Optional interface units
• Wireless LAN board
Allows you to communicate over a wireless LAN.
• IEEE 1284 interface board
Allows you to connect to an IEEE 1284 cable.
To attach this option, see "Installing the Interface Units", Operating Instructions.
3. SDRAM module
You can add the SDRAM up to 1.0 GB.
To attach this option, see "Installing the SDRAM module", Operating Instructions.
4. Hard disk
Allows you to store documents to be printed.
To attach this option, see "Installing the hard disk", Operating Instructions.
• If you want to use two or more SD cards that can be inserted in the same slot, contact your sales or
service representative.
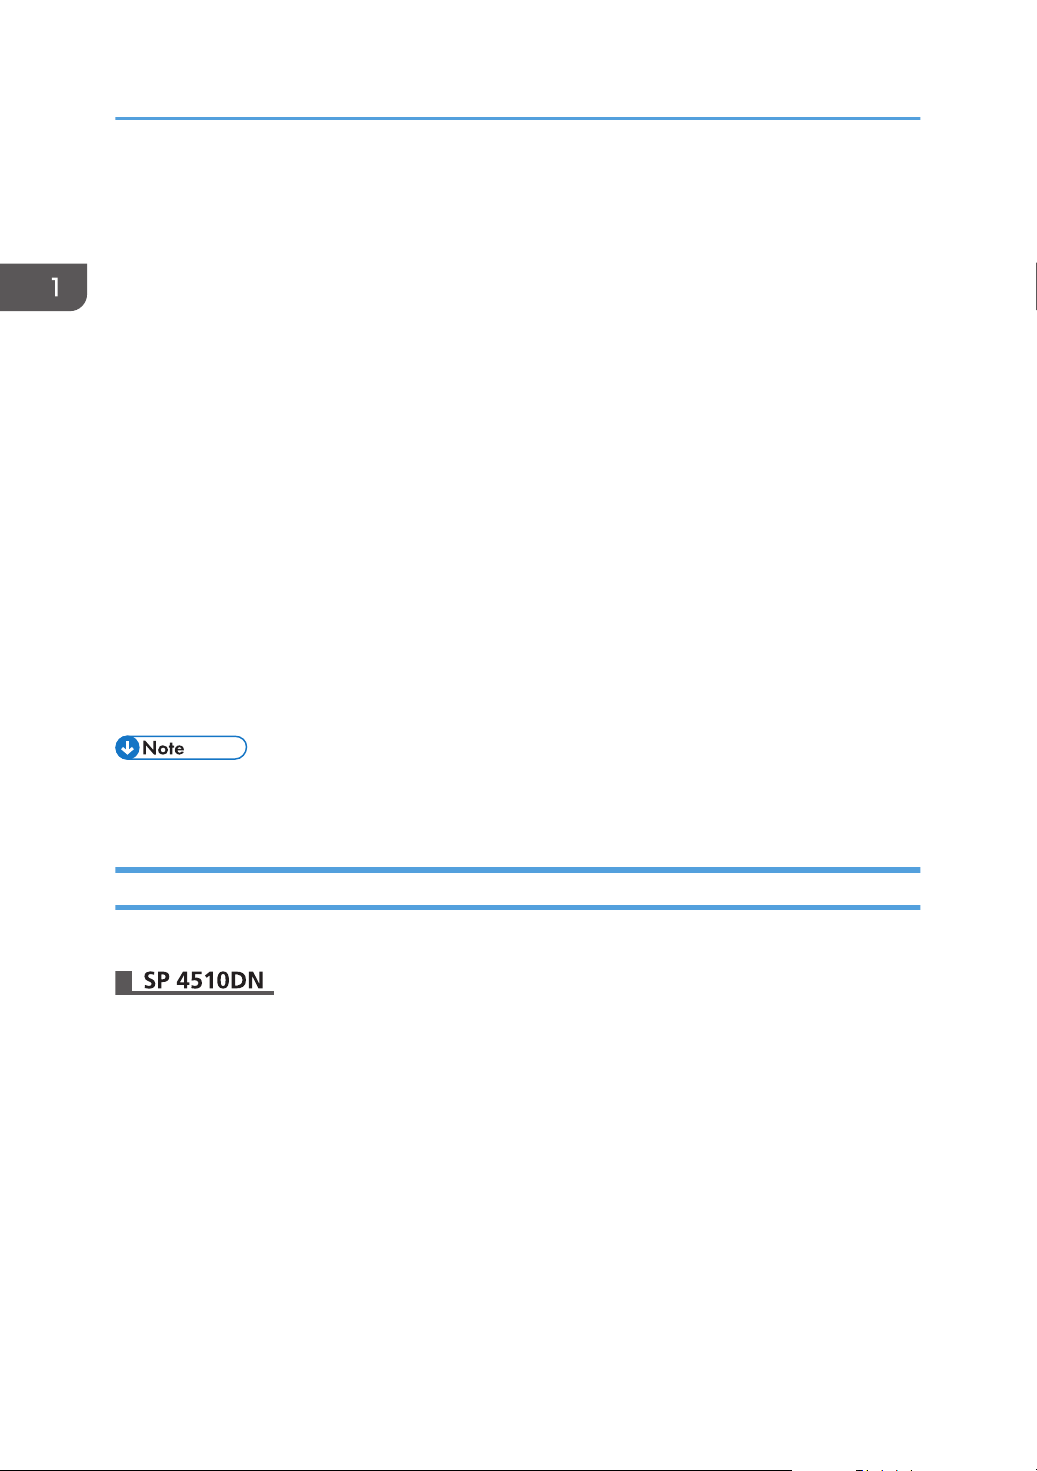
Guide to the Names and Functions of the Control Panel
This illustration shows the control panel of the printer.
16
Page 19
CYN041
10
1
2
3
4
5
6
7
8
9
11
12
13
Guide to Names and Functions of Components
1. Display
Displays current printer status and error messages.
Entering energy saver mode turns off the back light. For details about energy saver mode, see page 27
"Saving Energy".
2. Selection keys
Correspond to the function items at the bottom line on the display.
Example: When this manual instructs you to press [Option], press the selection key on the left below the initial
screen.
3. [Switch Functions] key
Press this key to switch between the operation screen of the printer function and the function screens of the
extended features currently in use.
4. [Menu] key
Press this key to configure and check the current printer settings.
Press to change the default settings to meet your requirements. See page 30 "Configuring Printer Settings
from the [Menu] key".
17
Page 20

1. Getting Started
5. [Job Reset] key
Press to cancel the current print job.
6. [Suspend/Resume] key
Press this to suspend the print job currently being processed. The indicator remains lit as long as the job is
suspended.
To resume the job, press this key again. The suspended job will resume automatically when the time specified
in [Auto Reset Timer] elapses (default: 60 seconds).
For details about the [Auto Reset Timer] setting, see "Timer Settings", Operating Instructions.
7. Power indicator
Lights up when the printer is ready to receive data from a computer. Flashes when the printer is warming up or
receiving data. It is unlit when the power is off or while the printer is in energy saver mode.
8. Alert indicator
Lights up or flashes when a printer error occurs.
Steady red: printing is not possible, or is possible but print quality cannot be ensured.
Flashing yellow: the printer will soon require maintenance or a replacement consumable such as print
cartridge.
Follow the instructions that appear on the display.
9. Data in indicator
Flashes when the printer is receiving data from a computer. The data in indicator is lit if there is data to be
printed.
10. Light sensor
The sensor that detects the ambient light level when the ECO Night Sensor function is enabled.
11. [Escape] key
Press this key to cancel an operation or return to the previous display.
12. [OK] key
Use this key to confirm settings or setting values, or move to the next menu level.
13. Scroll keys
Press these keys to move the cursor in each direction.
When the [ ] [ ] [ ] [ ] keys appear in this manual, press the applicable key for the direction that you
want to move the cursor.
18
Page 21
8
9
10
11
12
13
14
1
2
3
4
5
6
7
CYN040
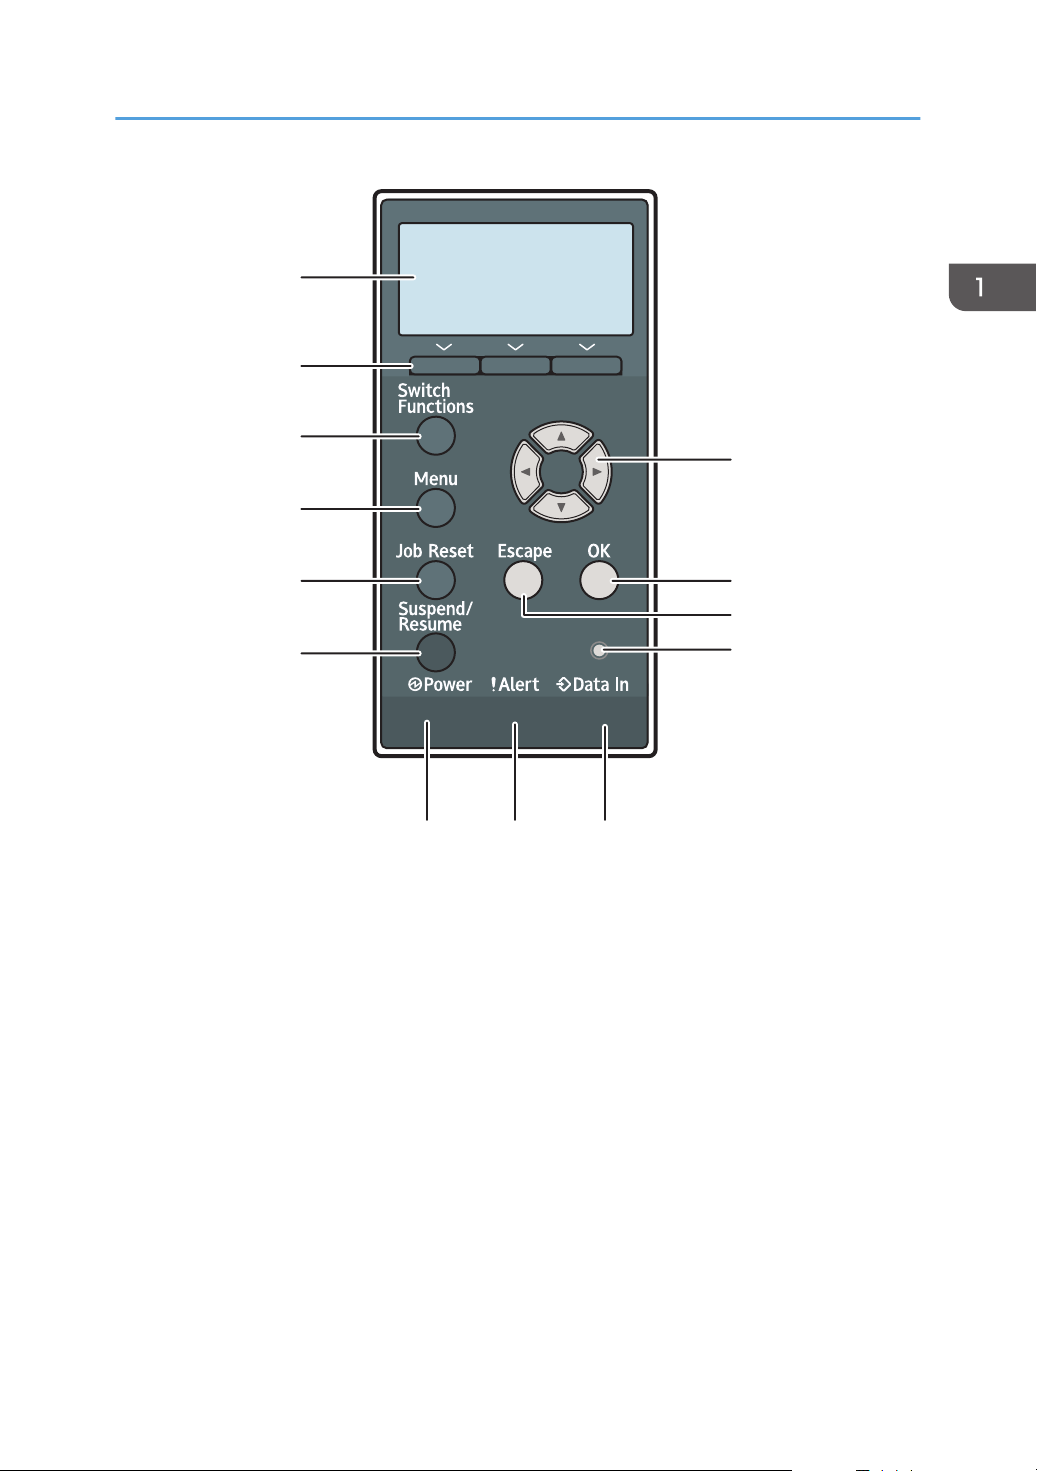
Guide to Names and Functions of Components
1. Display panel
Displays function keys, operation status, and messages. See page 20 "Guide to the Names and Functions of
the Control Panel Screen".
2. Light Sensor
Indicates that the sensor that detects the ambient light level when the ECO Night Sensor function is enabled.
3. [Home] key
Press to display the [Home] screen. For details, see page 22 "Using the [Home] screen".
4. [Suspend] key
Press this key to suspend a print job. The key lights up while the job is suspended.
5. [Check Status] key
Press to check the printer's system status, operational status of each function, and current jobs. You can also
display the job history and the printer's maintenance information.
6. Data In indicator
Flashes when the printer is receiving print jobs from a computer. The indicator lights up when there is data to
be printed.
7. Check Status indicator
Lights up or flashes when a printer error occurs.
Steady red: Printing is not possible.
Flashing yellow: The printer will soon require maintenance or a replacement consumable such as a print
cartridge. Printing is possible, but print quality cannot be ensured.
Follow the instructions that appear on the display.
8. Power indicator
Remains lit while the power is on. It is not lit when the power is off or when the printer is in energy saver mode.
19
Page 22
CYN901
1. Getting Started
9. [Energy Saver] key
Press to switch to and from Sleep mode. See page 27 "Saving Energy". When the printer is in Sleep mode,
the [Energy Saver] key flashes slowly.
10. [Login/Logout] key
Press to log in or log out.
11. [User Tools] key
Press to change the default settings as needed. See page 30 "Configuring Printer Settings from the [User
Tools] key".
12. [Simple Screen] key
Press to switch to the simple screen. See "Switching screen patterns", Operating Instructions.
13. Media slots
Insert an SD card or a USB flash memory device.
14. Media access lamp
Lights up when a memory storage device is inserted in the media slot or is being accessed.
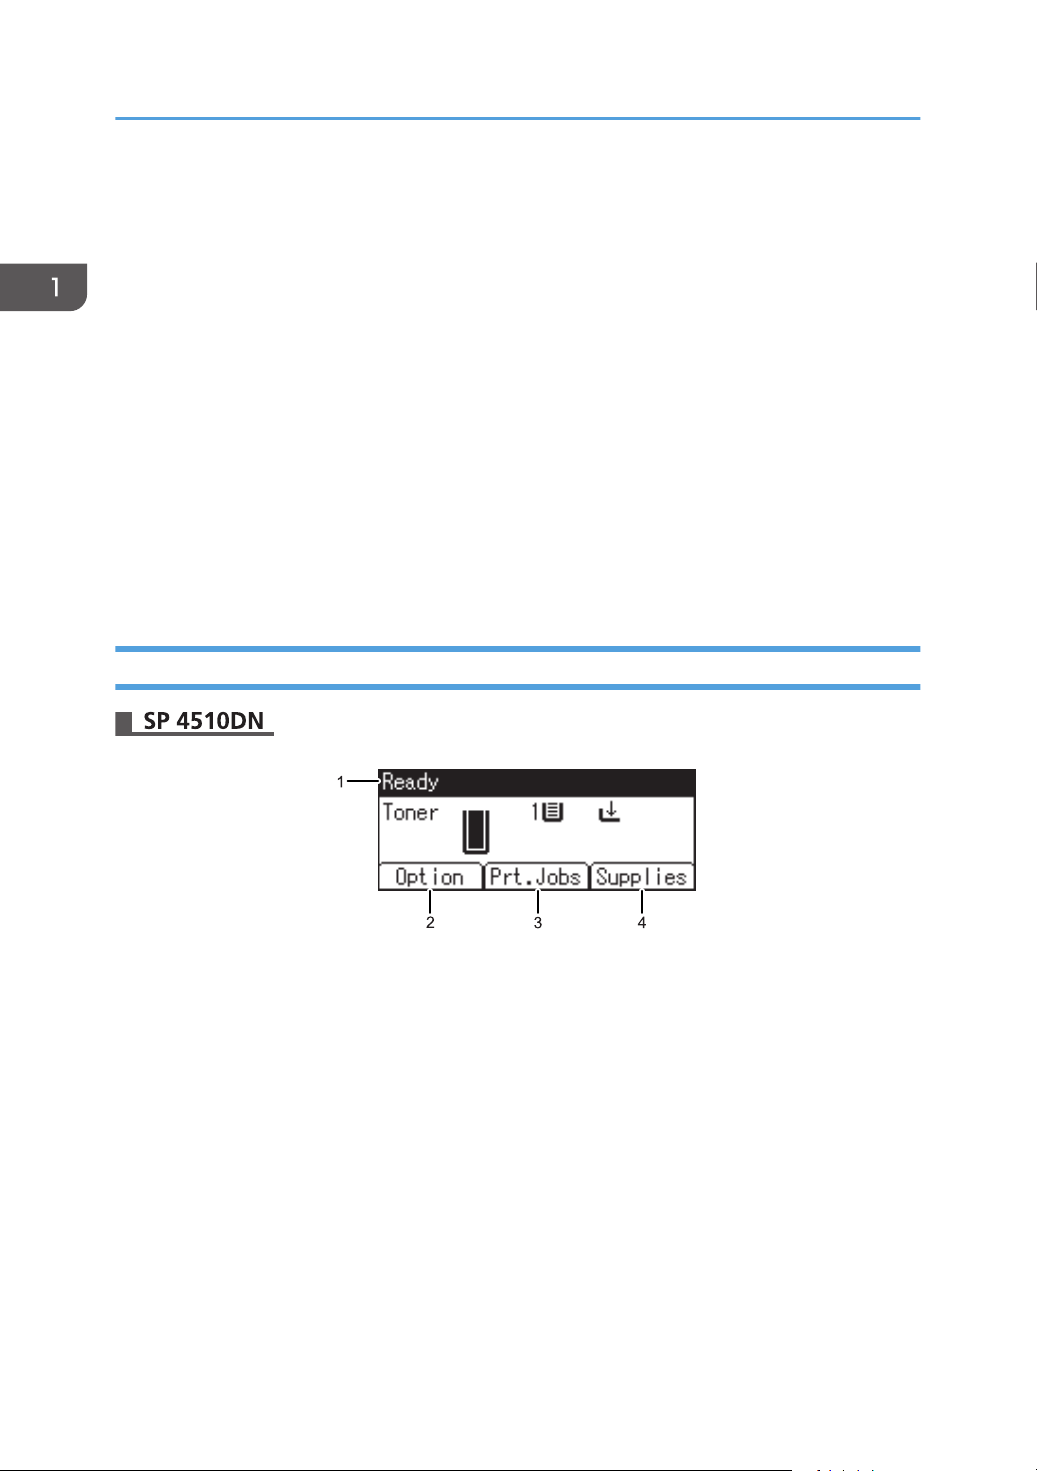
Guide to the Names and Functions of the Control Panel Screen
20
1. Operational Status or Messages
Displays the printer status and messages.
2. [Option]
Press to display the following items:
• Form Feed
• Error Log
3. [Prt.Jobs]
Press to display print jobs sent from a computer.
[Prt.Jobs] is displayed only when the optional hard disk is installed in the printer.
4. [Supplies]
Press to display the information about printer supplies.
Page 23
1
2
3
Touch the display panel
Press the [Home] key
CYN902
Guide to Names and Functions of Components
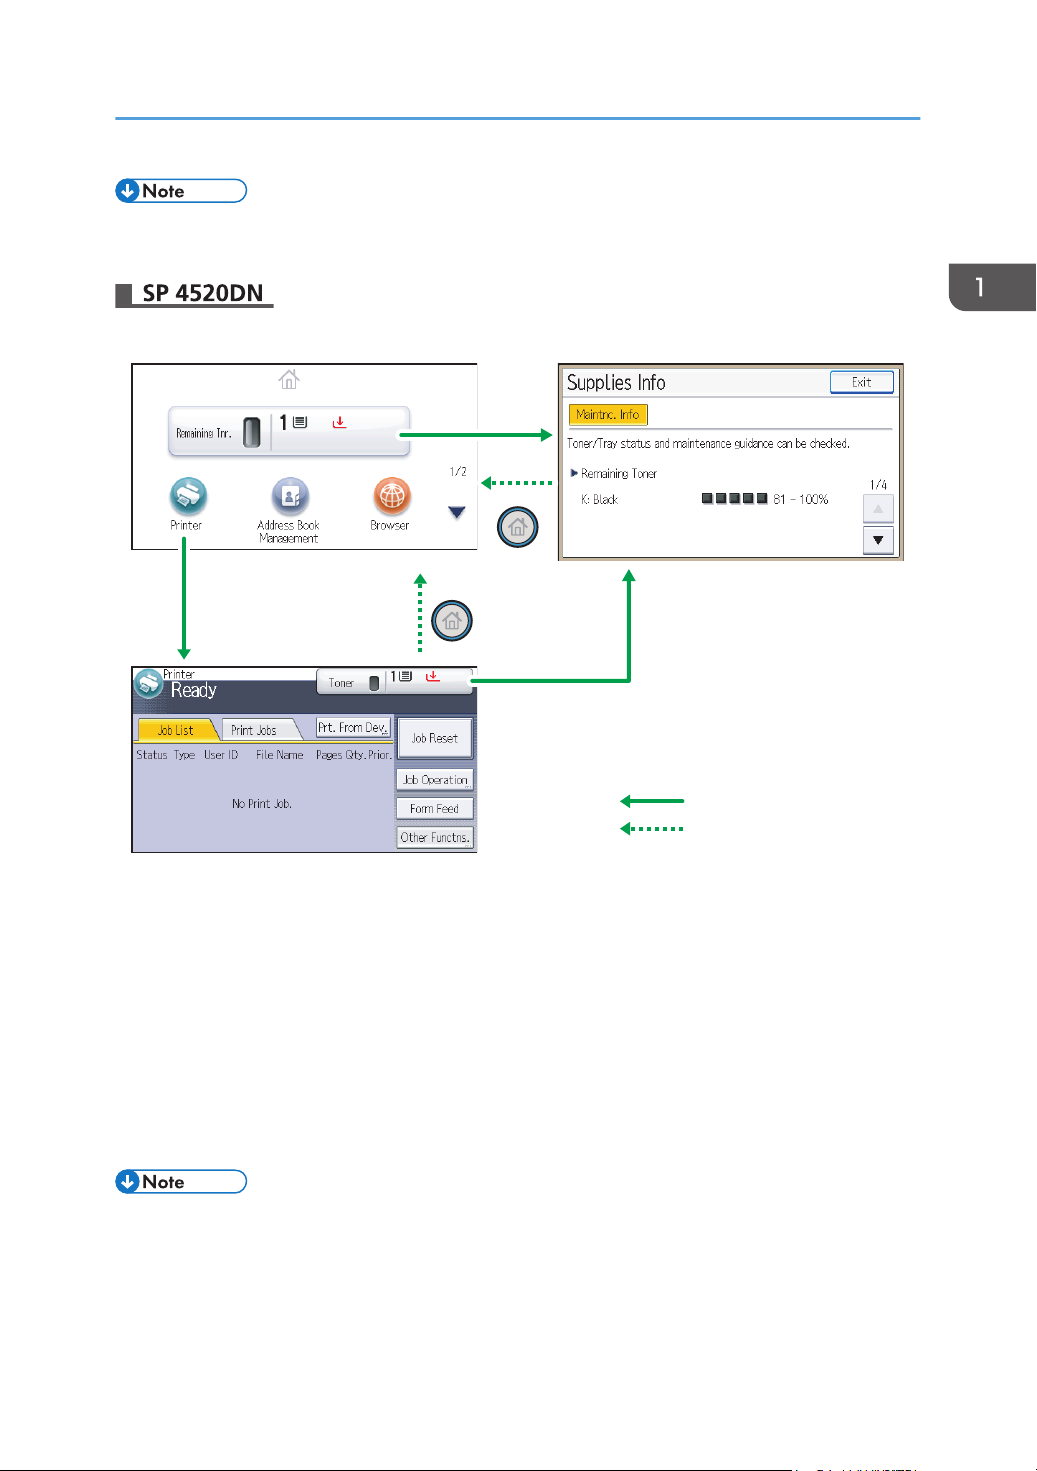
• By default, the remaining amount of toner is displayed. To avoid displaying the remaining amount
of toner, set [Display Supply Info] to [Off] in [General Settings] under [Maintenance].
1. [Home] screen
Displays function and shortcut icons. For details, see page 22 "Using the [Home] screen".
The [Home] screen is set as the default screen when the printer is turned on. You can change this default
setting under Function Priority. See "System Settings", Operating Instructions.
2. [Printer] screen
Displays operation status, messages, and function menus. For details, see page 23 "Using the [Printer]
screen".
3. [Supplies Info] screen
Checks the printer status, such as toner and paper levels.
• After finishing a job, the printer waits a specified length of time, then restores its settings to the
default values specified under Function Priority. This function is called "System Reset". For the
procedure for specifying default settings under Function Priority, see "System Settings", Operating
Instructions.
21
Page 24

CYN903
5
1
2
3
4
1. Getting Started
• To change the length of time that the printer waits before restoring its settings to their default values,
use the Printer Auto Reset Timer setting. See "System Settings", Operating Instructions.
Using the [Home] screen
This function is available for SP 4520DN only.
To display the [Home] screen, press the [Home] key.
Each function has its own icon, and these icons are displayed on the [Home] screen.
You can add shortcuts to frequently used embedded software applications to the [Home] screen. The
icons of added shortcuts appear on the [Home] screen. The embedded software applications can be
called easily by pressing the shortcut icons.
• Do not apply strong impact or force to the screen. Doing so will damage the screen. Maximum
force allowable is approx. 30 N (approx. 3 kgf). (N = Newton, kgf = Kilogram force. 1 kgf = 9.8
N.)
1. Supply Information icon
Press to display the [Supplies Info] screen to check toner and paper levels.
2. [Printer]
Press to display the [Printer] screen.
3. Shortcut icon area
You can add shortcuts to embedded software applications to the [Home] screen. For details about registering
shortcuts, see "Adding icons to the [Home] screen", Operating Instructions.
4. Home screen image
You can display an image such as a corporate logo on the [Home] screen. To change the image, see
"Displaying the image on the [Home] screen", Operating Instructions.
/
5.
Press to switch pages when icons are not displayed on one page.
22
Page 25
1
4
2
8
5
3
6
7
CYN904
Guide to Names and Functions of Components
• When a software application to be embedded is installed, the function icon for the application is
displayed on the [Home] screen.
• You can change the order of the icons. For details, see "Changing the order of icons on the [Home]
screen", Operating Instructions.
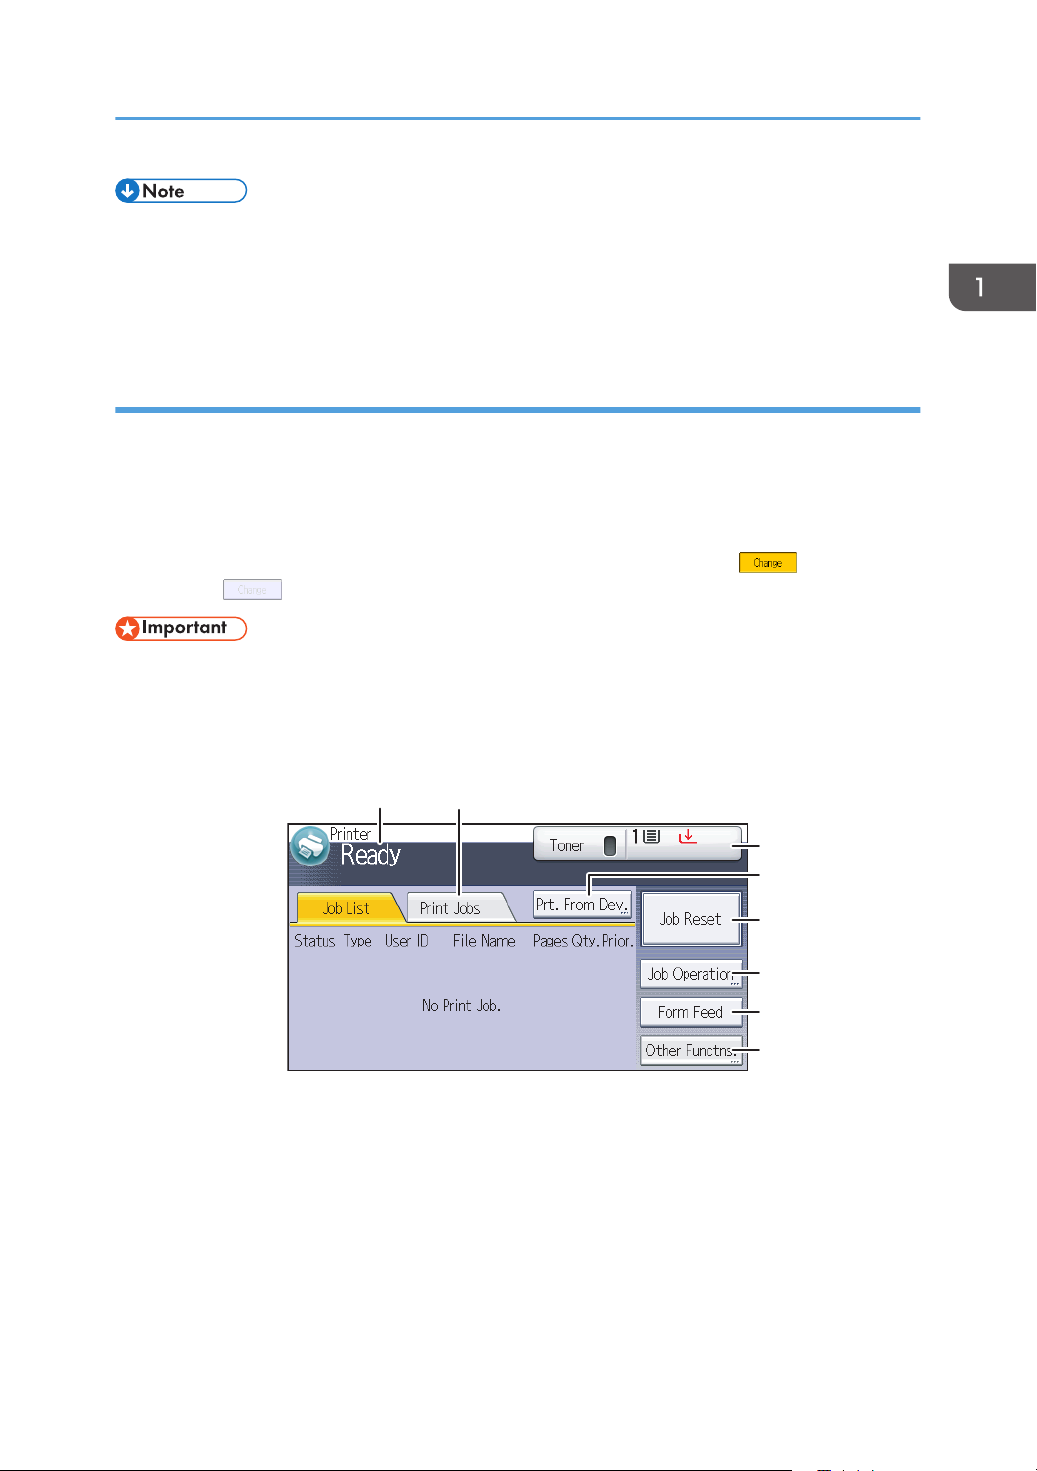
Using the [Printer] screen
This function is available for SP 4520DN only.
The display panel shows the operation status, messages, and function menus.
The function items displayed serve as selector keys. You can select or specify an item by lightly pressing
these keys.
When you select or specify an item on the display panel, it is highlighted such as . Keys
appearing as cannot be used.
• Do not apply strong impact or force to the screen. Doing so will damage the screen. Maximum
force allowable is approx. 30N (approx. 3 kgf). (N = Newton, kgf = Kilogram force. 1 kgf =
9.8N.)
The [Home] screen is set as the default screen when the printer is turned on.
1. Operational status or messages
2. [Print Jobs]
3. Supply Information
Displays the current printer status, such as "Ready", "Offline", and "Printing...". Information (user ID and
document name) about the print job appears in this section.
Press to display print jobs sent from a computer.
You can check the remaining toner and paper. Press to display the [Supplies Info] screen.
23
Page 26

CQT201
1
2
3
4
5
1. Getting Started
4. [Prt. From Dev.]
Press to display the screen for directly printing files stored on memory storage devices.
5. [Job Reset]
Press to cancel the current print job.
If you press it when Hex Dump is selected, Hex Dump is canceled.
6. [Job Operation]
Press to suspend a job being processed.
7. [Form Feed]
Press to print all the data left in the printer's input buffer.
8. [Other Functns.]
Press to display the error logs and status of spooled jobs.
Using the [Information] screen
This function is available for SP 4520DN only.
To raise environmental awareness, you can configure the printer to show users the amount of paper
saved by using the various paper saving functions of the printer.
When user authentication is enabled, the screen is displayed when you log in to the printer. When user
authentication is not enabled, the screen is displayed after the printer returns from Sleep mode or after a
system reset. The [Information] screen appears when the power is turned on, regardless of the
authentication settings.
1. Message
Displays messages from the administrator.
2. Total Print Pages
Displays the total numbers of pages printed in the current and previous count periods.
3. Eco-friendly Indicator
• Paper Reduction:
24
Page 27
Guide to Names and Functions of Components
Shows the amount of paper saved by using the duplex and combine printing functions. The value
indicates the percentage of paper saved from the total of all the paper used. As the percentage
increases, the stack of paper decreases and the flower grows. When the ratio is 76% or more, the
flower starts to bloom.
• 2 sided Utilization:
Displays the ratio of 2-sided prints to the total number of prints.
• Combine Utilization:
Displays the ratio of combined prints to the total number of prints.
4. Count periods
Displays the current and previous count periods.
5. [Exit]
Press this to close the [Information] screen and return to operation.
• Depending on the printer settings, the [Information] screen may not be displayed. For details, see
Security Guide.
• You can also use Web Image Monitor to check the usage status. For further details, see Web
Image Monitor Help.
• Under [Eco-friendly Counter Period/Administrator Message] in [System Settings], you can check
"Count Period", "Administrator Message", "Display Information Screen", and "Display Time". Only
the administrator can change the settings. For details, see Security Guide.
25
Page 28
CYN031
1. Getting Started
Turning On/Off the Power
This section explains how to turn on/off the printer.
Turing On the Power
1. Make sure the power cord is firmly plugged into the wall outlet.
2. Push the main power switch.
The power indicator turns on.
• After you switch the main power on, a screen may appear to indicate that the printer is initializing.
Do not switch the power off during this process. Initialization takes about three minutes.
Turning Off the Power
• When disconnecting the power cord from the wall outlet, always pull the plug, not the cord.
Pulling the cord can damage the power cord. Use of damaged power cords could result in fire
or electric shock.
• Do not press and hold the main power switch when turning off the printer. Doing so shuts down the
printer forcefully and may damage the hard disk and the SDRAM module, causing a malfunction of
the printer.
• Before unplugging the power cord plug, turn off the power switch and make sure the power switch
indicator turns off. Not doing so may result in damage to the hard disk or memory, leading to a
malfunction.
26
Page 29
CYN031
Turning On/Off the Power
• Do not turn off the power while the printer is in operation.
1. Push the main power switch.
The main power is turned off automatically when the shutdown process is complete.
If the shutdown process is not complete within the period of time displayed on the screen, contact
your service representative.
Saving Energy
This printer has the following energy saving functions:
Fusing Unit Off Mode
If you do not use the printer for a certain period after an operation, the display will turn off and the
printer goes into Fusing Unit Off mode. The printer uses less electricity in Fusing Unit Off mode.
When the printer is in Fusing Unit Off mode, the display is on but the fusing unit heater is off to save
energy. In this mode, you can change the printer settings on the control panel. However, the printer
must exit this mode to print.
You can change the amount of time that the printer waits before switching to Fusing Unit Off mode
under [Fusing Unit Off Mode Timer]. For details, see:
• "System", Operating Instructions. (for SP 4510DN)
• "Timer Settings", Operating Instructions. (for SP 4520DN)
To exit Fusing Unit Off mode, do one of the following:
• Start print jobs
• Display the [Maintenance] screen on the control panel (for SP 4510DN)
• Display the [Maintenance: Print] or [Maintenance: Image] screen on the control panel (for SP
4520DN)
• Operate the control panel when [Exit Fusing Unit Off Mode] is set to [On Operating Control
Panel]
• Start print jobs
27
Page 30

1. Getting Started
Sleep mode
If the printer remains inactive for a specified period after entering Fusing Unit Off mode, it enters
Sleep mode to further reduce the power consumption. The printer also enters Sleep mode when:
• The printer waits before entering Sleep mode is set in [Sleep Mode Timer]
• It is the day and time specified in [Weekly Timer]
When the printer is in Sleep mode, only the [Energy Saver] key and the [Check Status] key are
usable. (for SP 4520DN)
The printer can print jobs from computers.
You can change the amount of time that the printer waits before switching to Sleep mode.
For details about setting [Sleep Mode Timer] and [Weekly Timer], see:
• "System", Operating Instructions. (for SP 4510DN)
• "Timer Settings", Operating Instructions. (for SP 4520DN)
To exit Sleep mode, do one of the following:
• Press one of the keys on the control panel (for SP 4510DN)
• Press the [Energy Saver] key or [Check Status] key (for SP 4520DN)
• Start print jobs
ECO Night Sensor
ECO Night Sensor can detect darkness and automatically turn off this product's power.
If ECO Night Sensor is enabled and detects darkness in a room after the lights are turned off, the
sensor automatically turns the power off and reduces the power consumption of this product to 1W
or less.
The default settings of ECO Night Sensor are enabled.
To change the settings, see:
• "System", Operating Instructions. (for SP 4510DN)
• "Administrator Tools", Operating Instructions. (for SP 4520DN)
• The ECO Night Sensor function's factory default is [Auto Power Off Only]. If the printer is
located in an environment where the ambient light level is low (such as in a hallway or a
location with motion sensor lighting), it is advisable that you either keep this function disabled
or adjust its sensitivity.
• You can configure the printer to automatically turn its power on when it detects an increase in
the ambient light level. The printer may also react to daylight and turn its power on. If the
printer is located in an environment where it is exposed to direct sunlight, it is advisable that
you do not change the factory default configuration and only enable [Auto Power Off Only].
28
Page 31

Turning On/Off the Power
• When the printer is in Sleep mode, the [Energy Saver] key flashes slowly. (for SP 4520DN)
• The energy saving functions will not activate when:
• Communicating with external devices
• The hard disk is active
• A warning message is displayed
• The service call message is displayed
• Paper is jammed
• The printer's covers are opened
• Toner is being replenished
• The printer settings screen is displayed
• Fixed warm-up is in progress
• Data is being processed
• Operations are suspended during printing
• The Data In indicator is on or flashing
• The sample print, locked print, hold print, or stored print screen is displayed
• Accessing the printer using Web Image Monitor
• The printer consumes less energy when in Sleep mode, but it takes longer to start printing.
• If two or more energy saving functions are set, the function for which the predetermined conditions
to enter energy saving mode are met takes effect first.
29
Page 32

CYN042
1. Getting Started
Displaying the Printer Configuration Screens Using the Control Panel
Configuring Printer Settings from the [Menu] key
This function is available for SP 4510DN only. If you are using SP 4520DN, see page 30
"Configuring Printer Settings from the [User Tools] key"
The configuration screens allow you to change or set defaults.
• If Administrator Authentication Management is specified, contact your administrator.
1. Press the [Menu] key.
2. Select the settings you want to change.
Press the [
3. Press the [OK] key.
• Any changes you make with configuration screens remain in effect even if the main power switch is
turned off.
• To cancel changes made to settings and return to the initial display, press the [Escape] key.
] or [ ] key to select the next or previous items.
Configuring Printer Settings from the [User Tools] key
This function is available for SP 4520DN only. If you are using SP 4510DN, see page 30 "Configuring
Printer Settings from the [Menu] key".
This section explains the setting items available on the [User Tools] screen of the printer.
The configuration screens allow you to change or set the default settings.
30
Page 33

CYN043
Displaying the Printer Configuration Screens Using the Control Panel
• If Administrator Authentication Management is specified, contact your administrator.
1. Press the [User Tools] key.
2. Select the settings you want to change.
Press [ ] or [ ] to display the next or previous page.
3. Change the settings by following the instructions on the display, and then press [OK].
4. Press the [User Tools] key.
• Any changes you make with the configuration screens remain in effect even if the main power
switch is turned off.
• To cancel changes made to the settings and return to the initial display, press the [User Tools] key.
31
Page 34

1. Getting Started
Using Web Image Monitor
Using Web Image Monitor, you can check the printer status and change settings.
Available operations
The following operations can be remotely performed using Web Image Monitor from a client
computer.
• Displaying printer status or settings
• Checking the print job status or history
• Interrupting currently printing jobs
• Resetting the printer
• Managing the Address Book
• Configuring printer settings
• Configuring network protocol settings
• Configuring security settings
Configuring the printer
To perform the operations from Web Image Monitor, TCP/IP is required. After the printer is
configured to use TCP/IP, operations from Web Image Monitor become available.
Recommended Web browser
• Windows:
Internet Explorer 6.0 or higher
Firefox 10 and 15 or higher
Google Chrome 19 or higher
• Mac OS:
Safari 3.0 or higher
Firefox 10 and 15 or higher
Google Chrome 19 or higher
Web Image Monitor supports screen reader software. We recommend JAWS 7.0 or a later
version.
• Display and operation problems may occur if you do not enable JavaScript and cookies, or if you
are using a non-recommended Web browser.
• If you are using a proxy server, change the Web browser settings. Contact your administrator for
information about the settings.
32
• We recommend using Web Image Monitor in the same network.
Page 35

Using Web Image Monitor
• If the printer is firewall-protected, it cannot be accessed from computers outside the firewall.
• If the printer under DHCP is used, the IP address may be changed automatically by the DHCP
server settings. Enable DDNS setting on the printer, and then connect using the printer's host name.
Alternatively, set a static IP address to the DHCP server.
• If the HTTP port is disabled, a connection to the printer using the printer's URL cannot be
established. SSL settings must be enabled on this printer. For details, contact your network
administrator.
• If Firefox is used, fonts and colors may be different, or tables may not appear properly configured.
• When using a host name under Windows Server 2003/2003 R2/2008/2008 R2/2012/2012
R2 with IPv6 protocol, perform host name resolution using an external DNS server. The host file
cannot be used.
• To use JAWS 7.0 under Web Image Monitor, you must be running Windows and Internet Explorer
6.0 or a later version.
• If you are using Internet Explorer 8.0 or higher, downloading will be slower than with other
browsers. To download faster with Internet Explorer 8.0 or higher, open the browser's [Internet
Options] menu and register the printer's URL as a trusted site, and then disable SmartScreen filter
for trusted sites. For details about these settings, see the Internet Explorer Help files.
• You can access Web Image Monitor more quickly by registering the printer's URL as a bookmark.
Note that the URL you register must be the URL of the top page, which is the page that appears
before login. If you register the URL of a page that appears after login, Web Image Monitor will
not open properly from the bookmark.
• If user authentication is activated, you must enter your login user name and password to use Web
Image Monitor. For Details, see page 33 "Displaying the top page".
• When you configure settings using Web Image Monitor, do not log in from the control panel. The
settings you have configured using Web Image Monitor may become invalid.
Displaying the top page
There are two modes available with Web Image Monitor: guest mode and administrator mode.
Displayed items may differ depending on the printer type.
Guest mode
This mode requires no login to enter.
In the guest mode, the printer status, settings, and print job status can be viewed, but the printer
settings cannot be changed.
Administrator mode
This mode requires an administrator login to enter.
In the administrator mode, you can configure various printer settings.
33
Page 36

1
2
3
5
4
CYN910
1. Getting Started
• When entering an IPv4 address, do not begin segments with zeros. For example: If the address is
"192.168.001.010", you must enter it as "192.168.1.10".
1. Start your Web browser.
2. Enter "http://(printer's IP address or host name)/" in your Web browser's address bar.
The top page of Web Image Monitor appears.
If the printer's host name has been registered on the DNS or WINS server, you can enter it.
When setting SSL, a protocol for encrypted communication, under the environment in which server
authentication is issued, enter "https://(printer's IP address or host name)/".
3. To log in to Web Image Monitor in the administrator mode, click [Login] on the top page.
The window for entering the login user name and password appears.
4. Enter your login user name and password, and then click [Login].
For details about the login user name and password, contact your administrator.
Depending on the configuration of your Web browser, the login user name and password might be
saved. If you do not want to save them, configure your Web browser's settings so that this
information is not saved.
1. Menu area
Displays the content of a selected menu item.
2. Header area
Displays the dialog box for switching to the user mode and administrator mode and the menu for each mode.
Also displays the link to Help and dialog box for keyword search.
3. Refresh/Help
(Refresh): Click at the upper right in the work area to update the printer information. Click the Web
browser's [Refresh] button to refresh the entire browser screen.
(Help): Use Help to view or download Help file contents.
34
Page 37

4. Basic Information area
Displays the basic information of the printer.
5. Work area
Displays the contents of the item selected in the menu area.
Using Web Image Monitor
35
Page 38

1. Getting Started
36
Page 39

2. Loading Paper
This chapter describes available trays for each paper size and type, and explains how to load paper in
paper trays.
Paper Loading Procedure
To achieve the print results you expect, it is important to select an appropriate input tray according to the
size, type, and weight of the paper you want to use for printing. You also need to specify the paper size
and type properly using the control panel or Web Image Monitor, and/or the paper size dial on the
tray.
Follow the procedure below to load paper.
1. Check the paper tray available for the size, type, and weight of the paper you want to
use for printing.
For details about available paper trays for each paper size and type, see page 38 "Paper Size
Specifications" and page 41 "Paper Type Specifications".
2. Change the paper size and type settings for the tray you selected.
Use the control panel of the printer or Web Image Monitor to change the paper size and type.
When loading paper into Trays 1 to 3, adjust the paper size dial on the trays.
For details about changing paper settings using the control panel, see page 60 "Paper Settings".
3. Load paper into the tray.
For details about loading paper, see page 45 "Loading Paper into Paper Trays" or page 50
"Loading Paper into the Bypass Tray".
For details about loading envelopes, see page 54 "Loading Envelopes".
37
Page 40

2. Loading Paper
Paper Size Specifications
The following tables show the paper sizes that can be loaded in each paper tray. The "Paper size"
column shows the names of paper sizes and their dimensions in millimeters and inches. The and
icons indicate the paper orientation in relation to the printer body.
The letters in the tables indicate the following:
• A: Select the paper size using the control panel.
• B: Select the paper size using the paper size dial on the tray.
• C: Set the paper size dial on the tray to " ", and select the paper size with the control panel.
• : You can print on both sides of paper.
• -: Not supported
Metric sizes
Paper size name Actual size Two-sided Bypass tray Tray 1 Trays 2, 3
A4 210 × 297 mm A B B
*
A5
A5 148 × 210 mm A C C
A6 105 × 148 mm A B B
B5 182 × 257 mm A C C
B6 128 × 182 mm A C C
B6 128 × 182 mm - A - -
C5 Env 162 × 229 mm - A C -
C6 Env 114 × 162 mm - A C -
DL Env 110 × 220 mm - A C -
16K 195 × 267 mm A C C
While a print job is performed on paper that is loaded vertically, smearing may occur near the edges of the
*
printed paper. If this happens, set the paper horizontally and print again.
Imperial sizes
Paper size name Actual size Two-sided Bypass tray Tray 1 Trays 2, 3
148 × 210 mm A B B
38
81/2 × 14 8.5" × 14" A B B
Page 41

Paper Size Specifications
Paper size name Actual size Two-sided Bypass tray Tray 1 Trays 2, 3
81/2 × 13 8.5" × 13" A C C
81/2 × 11 8.5" × 11" A B B
81/4 × 14 8.25" × 14" A C C
81/4 × 13 8.25" × 13" A C C
8 × 13 8" × 13" A C C
8 × 101/
2
8" × 10.5" A C C
8 × 10 8" × 10" A C C
71/4 × 101/
7.25" × 10.5" A C C
2
51/2 × 81/2 *5.5" × 8.5" A B B
51/2 × 81/
41/8 × 91/
37/8 × 71/
While a print job is performed on paper that is loaded vertically, smearing may occur near the edges of the
*
printed paper. If this happens, set the paper horizontally and print again. Use the bypass tray when printing
on paper that is set horizontally.
5.5" × 8.5" - A - -
2
4.125" × 9.5" - A C -
2
3.875" × 7.5" - A C -
2
Custom Size Specifications
You can also load custom size paper by specifying horizontal and vertical sizes.
The following tables show the custom paper sizes that can be loaded in each tray.
Metric sizes
Tray
Horizontal size
(One-sided)
Vertical size
(One-sided)
Horizontal size
(Two-sided)
Vertical size
(Two-sided)
Bypass tray
Trays 1–3
60.0 to 216.0
mm
127.0 to 900.0mm100.0 to 216.0mm148.0 to 356.0
mm
100.0 to 216.0mm148.0 to 356.0mm100.0 to 216.0mm279.0 to 356.0
mm
39
Page 42

2. Loading Paper
Imperial sizes
Tray
Horizontal size
(One-sided)
Vertical size
(One-sided)
Horizontal size
(Two-sided)
Vertical size
(Two-sided)
Bypass tray 2.37 to 8.50" 5.00 to 35.43" 3.94 to 8.50" 5.83 to 14.01"
Trays 1–3 3.94 to 8.50" 5.83 to 14.01" 3.94 to 8.50" 10.99 to 14.01"
40
Page 43

Paper Type Specifications
Paper Type Specifications
The following table show the paper types that can be loaded in each tray. See “Paper weight” table for
the actual paper weight indicated by numbers in the “Paper weight No.” column. Use both tables to
specify the correct paper type for the paper you are using.
The letters in the tables indicate the following:
• A: Supported
• : You can print on both sides of paper.
• -: Not supported
Paper type
Thin Paper 1 A A A
Plain Paper 2 A A A
Plain Paper 2 3 A A A
Middle Thick Paper 4 A A A
Thick Paper 1 5 A A A
Thick Paper 2 6 A A A
Recycled Paper 2 to 4 A A A
Color Paper 2 to 4 - A A A
Special Paper 1 -
Special Paper 2 -
Letterhead Paper 1 to 6 A A A
Preprinted Paper 2 to 4 - A A A
Paper weight
No.
*1
*1
Two-sided Bypass tray Tray 1 Trays 2, 3
A A A
- A A A
Transparency -
Label Paper 3 to 5 - A A A
Envelope 3 to 6 - A A -
*1
- A - -
41
Page 44

2. Loading Paper
Paper weight
No. Paper weight
1 52–65 g/m2 (14–18 lb. BOND)
2 66–74 g/m2 (18–20 lb. BOND)
3 75–90 g/m2 (20–24 lb. BOND)
4 91–105 g/m2 (24–28 lb. BOND)
5 106–130 g/m2 (28–35 lb. BOND)
6 131–162 g/m2 (35 lb. BOND–90 lb. INDEX)
*1
It is not necessary to specify the paper weight for this paper type.
• If [Thick Paper 2] is selected, the print speed may change.
42
Page 45

Paper Precautions
• Do not attempt to print on stapled sheets, aluminum foil, carbon paper, or any kind of
conductive paper. Doing so risks fire.
Precautions
• Recommended paper: Paper with calcium carbonate (CaCO3) ratio of 15% or less.
• To prevent multiple sheets from being fed at once, fan the paper before loading it.
• If you load paper when only a few sheets of paper remain in the tray, multiple sheet feeding
may occur. Remove any remaining paper, stack them with the new sheets of paper, and then
fan the entire stack before loading it into the tray.
• Straighten curled or warped paper before loading.
• For details about available paper sizes and types for each paper tray, see page 38 "Paper
Size Specifications" and page 41 "Paper Type Specifications".
• Depending on the environment where the printer is being used, you might at times hear a
rustling noise from paper moving through the printer. This noise does not indicate a
malfunction.
Paper Precautions
Unusable Paper
To prevent errors and misfeeds, do not use:
• Paper for inkjet printers, thermal fax paper, art paper, paper with perforated lines, hemmed-
edge paper, or window envelopes
• Bent, folded, or creased paper, perforated paper, slippery paper, torn paper, rough paper,
thin paper with little stiffness, and paper with a dusty surface
• Errors can occur if you print onto sides that are already printed. Be sure to print onto blank
sides only.
• Even supported types of paper may cause paper jams or malfunctions if they have been
improperly stored.
• If you print onto rough grain paper, the output image might be blurred.
• Do not load sheets that have already been printed by another printer.
Paper Storage
When storing paper, the following precautions should always be followed:
• Do not store paper where it will be exposed to direct sunlight.
• Avoid storing paper in humid areas (humidity: 70% or less).
• Store on a flat surface.
43
Page 46

CEC244
2
3
3
1
4
4
2. Loading Paper
• Do not store paper vertically.
• Once opened, store paper in plastic bags.
Print Area
The following shows the recommended print area for paper printed with this printer:
1. Print area
2. Feed direction
3. 4.2 mm (0.2 inches)
4. 4.2 mm (0.2 inches)
• The print area may vary depending on the paper size, printer language, and printer driver
settings.
• Depending on the printer driver settings, you may be able to print outside the recommended
print area. However, the actual output may not come out as desired, or a paper feed problem
may occur.
• If [Edge to Edge Print] is enabled, the margins on the left, right, and bottom edges in relation
to the feed direction will become 0 mm. For details, see:
• "Print Settings", Operating Instructions. (for SP 4510DN)
• "Printer Features", Operating Instructions. (for SP 4520DN)
44
Page 47

CYN916
Loading Paper into Paper Trays
Loading Paper into Paper Trays
In the following example procedure, paper is loaded into Tray 1.
• When loading paper, take care not to trap or injure your fingers.
• When using the envelope lever, take care not to trap or injure your fingers.
• For details about trays that can be loaded for each paper size and type, see page 38 "Paper Size
Specifications" and page 41 "Paper Type Specifications".
• Be sure to select the correct paper size and feed direction using the paper size dial on the tray.
Otherwise, the printer might be damaged, or printing problems might occur.
• Make sure the paper stack does not exceed the upper limit mark inside the paper tray. Excessive
stacking can cause paper jams.
• If paper jams occur frequently, flip the paper stack in the tray.
• Do not mix different types of paper in the same paper tray.
• After loading paper, specify the paper size using the control panel or paper size dial, and paper
type using the control panel. When printing a document, specify the same paper size and type in
the printer driver as specified on the printer.
• Do not move the side paper guides and end paper guide forcefully. Doing so may damage the
tray.
• When loading label paper, load it one by one.
• The envelope lever is kept down by the factory default. Before printing with paper, except for
envelopes, be sure to raise the envelope lever all the way up.
45
Page 48

CYN027
CYN028
CXC613
2. Loading Paper
1. Pull out the paper tray carefully. Adjust the paper size dial to match the size and feed
direction of paper in the paper tray.
2. Pull the tray carefully until it stops, lift the front side of the tray, and then pull it out of the
printer.
46
Place the tray on a flat surface.
3. Squeeze the clip on the side paper guide and slide it to match the paper size.
Page 49

CXC614
CBK254
CXC666
Loading Paper into Paper Trays
4. Squeeze the end guide and slide it inward to match the standard size.
5. Fan the paper before loading it in the tray.
6. Load the new paper stack print side down.
Make sure paper is not stacked higher than the upper limit (upper line) marked inside the tray.
7. Adjust the paper guides to close any gaps.
Do not move paper loaded in the tray more than a few millimeters.
Moving the loaded paper excessively may cause damage to paper edges on the openings of the
tray's lifting plate, resulting in sheets being folded or becoming jammed.
47
Page 50

CYN029
2
2
1
1
CXC607
2. Loading Paper
8. Lift the front side of the tray, and then slide it into the printer carefully until it stops.
To avoid paper jams, make sure the tray is securely inserted.
• When loading paper larger than A4 or 81/2 × 11 into Tray 1, extend the tray. For details, see
page 48 "When Loading Paper Larger than A4 or 81/2 × 11".
• Letterhead paper must be loaded in a specific orientation. For details, see page 52 "Loading
Orientation-Fixed Paper or Two-Sided Paper".
• You can load envelopes into Tray 1. Envelopes must be loaded in a specific orientation. For
details, see page 54 "Loading Envelopes".
When Loading Paper Larger than A4 or 81/2 × 11
When loading paper larger than A4 or 81/2 × 11 into Tray 1, extend the tray.
1. Pull the tray out of the printer.
For details, see Steps 1 and 2 on page 45 "Loading Paper into Paper Trays".
2. Slide the catches inwards to unlock the tray, and then slide the tray until it stops.
48
Page 51

CXC608
Loading Paper into Paper Trays
3. Return the catches to the positions where they lock.
• When loading A4 , 81/2 × 11 , or smaller paper, do not extend the tray. Otherwise, a paper
jam may occur.
49
Page 52

CYN036
CYN037
2. Loading Paper
Loading Paper into the Bypass Tray
• For details about trays that can be loaded for each paper size and type, see page 38 "Paper Size
Specifications" and page 41 "Paper Type Specifications".
• Make sure the paper stack does not exceed the upper limit mark. Excessive stacking can cause
paper jams.
• Do not mix different types of paper.
• After loading paper, specify the paper size and type using the control panel. When printing a
document, specify the same paper size and type in the printer driver as specified on the printer.
• When loading label paper, load it one by one.
1. While pressing and holding the bypass tray open lever in the upper center of the bypass
tray, pull the tray open.
50
Pull the extender out when loading paper larger than A4 or 81/2 × 11 .
Page 53

1
1
2
CYN038
CYN039
Loading Paper into the Bypass Tray
2. Slide both sides of the paper guide outward, and then load paper print side up until it
stops.
3. Adjust both sides of the paper guide to match the paper width.
• When using the bypass tray, it is recommended that you set the paper direction to .
• Letterhead paper must be loaded in a specific orientation. For details, see page 52 "Loading
Orientation-Fixed Paper or Two-Sided Paper".
• You can load envelopes into the bypass tray. Envelopes must be loaded in a specific orientation.
For details, see page 54 "Loading Envelopes".
51
Page 54

2. Loading Paper
Loading Orientation-Fixed Paper or Two-Sided Paper
Orientation-fixed (top to bottom) or two-sided paper (for example, letterhead paper, punched paper, or
copied paper) might not print correctly, depending on how the paper is placed.
Settings using the control panel
Set [Letterhead Setting] to [Auto Detect] or [On (Always)], and then place the paper as shown in
the table below. For details about [Letterhead Setting], see:
• "Machine Modes", Operating Instructions. (for SP 4510DN)
• "System", Operating Instructions. (for SP 4520DN)
Paper orientation
The meanings of the icons are as follows:
Icon Meaning
Place or load paper printed side face up.
Place or load paper printed side face down.
Print side Trays 1–3 Bypass tray
One-sided
Two-sided
52
Page 55

Loading Orientation-Fixed Paper or Two-Sided Paper
• To print on letterhead paper when [Letterhead Setting] is set to [Auto Detect], you must specify
[Letterhead] for the paper type in the printer driver's settings.
• If a print job is changed partway through printing from one-sided to two-sided printing, one-sided
output after the first copy may be printed facing a different direction. To ensure all paper is output
facing the same direction, specify different input trays for one-sided and two-sided printing. Note
also that two-sided printing must be disabled for the tray specified for one-sided printing.
• For details about how to make two-sided prints, see "Printing on Both Sides of a Page", Operating
Instructions.
53
Page 56

CYN112
CYN113
2. Loading Paper
Loading Envelopes
This section explains various details about and recommendations concerning envelopes.
• The inside of the machine could be very hot. Do not touch the parts with a label indicating the
"hot surface." Otherwise, an injury might occur.
• Some of this machine's internal components get very hot. For this reason, take care when
removing misfed paper. Not doing so could result in burns.
• When using the envelope lever, take care not to trap or injure your fingers.
Before loading envelopes, be sure to lower the envelope lever.
1. Open the rear cover.
54
2. Lower the envelope lever all the way down.
Page 57

CYN114
Loading Envelopes
3. Close the rear cover.
• Be sure to raise the envelope lever after printing on envelopes.
• If printed envelopes come out badly creased, load the envelopes in the opposite direction. Also,
configure the printer driver to rotate the print object 180 degrees.
Specifications of Envelopes
• Do not use window envelopes.
• Envelopes, especially those with glue on their flaps, may stick together. Fan the envelopes to
separate them before loading. If the envelopes still stick together, load them one by one. For the
envelope types that can be used with this printer, see page 38 "Paper Size Specifications" and
page 41 "Paper Type Specifications".
• Misfeeds might occur depending on the length and shape of the flaps.
• Before loading envelopes, press down on them to remove any air from inside, flattening out all four
edges. If they are bent or curled, flattening their leading edges (the edge going into the printer) by
running a pencil or ruler across them.
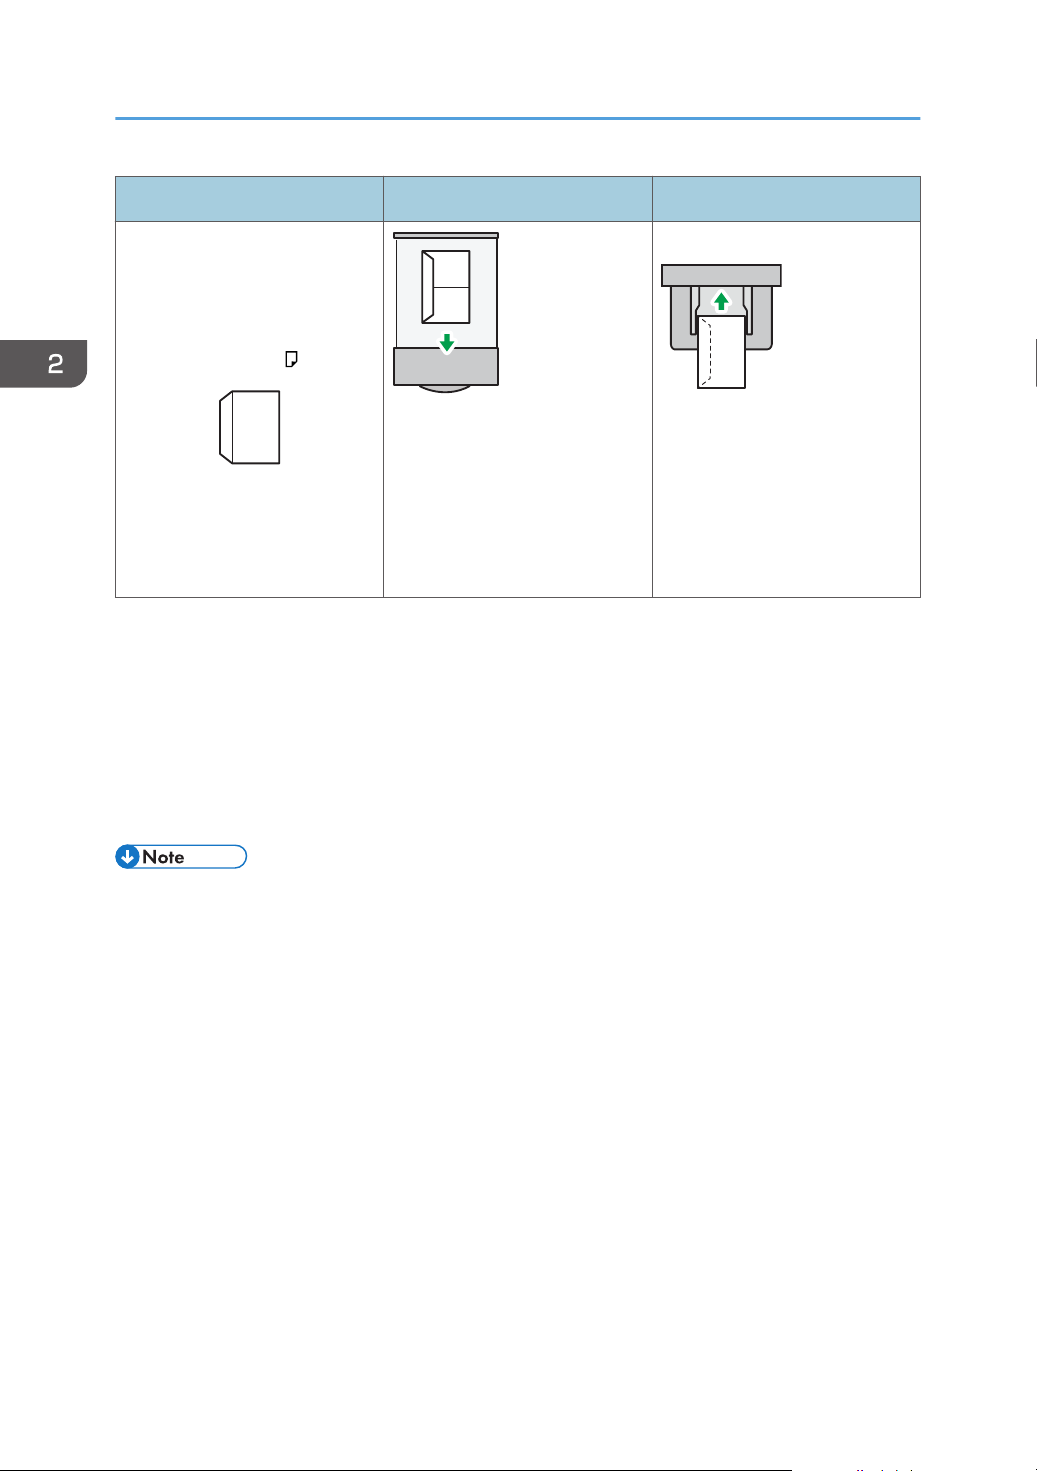
The method for loading envelopes varies depending on the orientation of the envelopes. Be sure to load
envelopes with the correct orientation.
55
Page 58
2. Loading Paper
Orientation Paper tray 1 Bypass tray
Envelopes
• Flaps: closed
• Bottom side of envelopes:
toward the right of the
printer
• Side to be printed: face
• Flaps: closed
• Bottom side of envelopes:
toward the right of the
printer
• Side to be printed: face up
down
When loading envelopes, use both the control panel and the printer driver to select "Envelope" for the
paper type and specify the thickness of the envelopes. For details, see page 62 "Configuring
Envelope Settings Using the Control Panel".
Recommended envelopes
For details about recommended envelopes, contact your local dealer.
The size of envelopes that you can load depends on the tray in which you load them. For details,
see page 38 "Paper Size Specifications".
• Load only one size and type of envelope at a time.
• The duplex function cannot be used with envelopes.
• Straighten any curls within 2 mm (0.1 inch) upward and 0 mm (0 inches) downward on the tray
before loading.
56
• To achieve better output quality, it is recommended that you set the right, left, top, and bottom print
margin to at least 15 mm (0.6 inches) each.
• The output quality on envelopes may be uneven if parts of an envelope have differing thicknesses.
Print one or two envelopes to check the print quality.
• When printing onto envelopes, the print speed is slower than usual.
• Flatten out prints if they are creased or curled.
• Check that the envelopes are not damp.
• High temperature and high humidity conditions can reduce print quality and cause envelopes to
become creased.
Page 59

Loading Envelopes
• Depending on the environment, printing on envelopes may wrinkle them even if they are the
recommended envelopes.
• Certain types of envelopes might be output creased, dirtied, or misprinted. If you are printing a
solid color on an envelope, lines may appear where the overlapped edges of the envelope make it
thicker.
Printing on Envelopes with Windows (PCL 6/PostScript 3)
1. After creating a document, open the [Printing Preferences] dialog box in the document's
native application.
2. Click the [Detailed Settings] tab.
3. In the "Menu:" box, click the [Basic] icon, and then configure the following settings:
• Document Size:
Select the envelope size.
4. In the "Menu:" box, click the [Paper] icon, and then configure the following settings:
• Input Tray:
Select the paper tray where the envelopes are loaded.
• Paper Type:
Select [Envelope].
Change any other print settings as necessary. For details, see the printer driver's Help.
5. Click [OK].
6. Start printing from the application's [Print] dialog box.
• Configure the paper settings appropriately using both the printer driver and the control panel. For
details about settings using the control panel, see page 62 "Configuring Envelope Settings Using
the Control Panel".
• Envelopes must be loaded in a specific orientation. For details, see page 55 "Specifications of
Envelopes".
Printing on Envelopes with Windows (PCL 5e/5c)
1. After creating a document, open the [Printing Preferences] dialog box in the document's
native application.
57
Page 60

2. Loading Paper
2. Click the [Paper] tab, and then configure the following settings:
• Input Tray:
Select the paper tray where the envelopes are loaded.
• Document Size:
Select the envelope size.
• Type:
Select [Envelope].
Change any other print settings as necessary. For details, see the printer driver's Help.
3. Click [OK].
4. Start printing from the application's [Print] dialog box.
• Configure the paper settings appropriately using both the printer driver and the control panel. For
details about settings using the control panel, see page 62 "Configuring Envelope Settings Using
the Control Panel".
• Envelopes must be loaded in a specific orientation. For details, see page 55 "Specifications of
Envelopes".
Printing on Envelopes with Mac OS X
1. After creating a document, open the [Printing Preferences] dialog box in the document's
native application.
2. Configure the following settings:
• Two-Sided:
Clear the check box.
• Paper Size:
Select the envelope size.
• Orientation:
Select the orientation of the envelope.
3. Select [Paper Feed] in the pop-up menu.
4. Select the paper tray where the envelopes are loaded.
5. Select [Printer Features] in the pop-up menu.
58
Page 61

Loading Envelopes
6. Switch the "Feature Sets:" menu to configure the following settings:
• Paper Type:
Select [Envelope].
7. Change any other print settings as necessary.
8. Start printing from the application's [Print] dialog box.
• Configure the paper settings appropriately using both the printer driver and the control panel. For
details about settings using the control panel, see page 62 "Configuring Envelope Settings Using
the Control Panel".
• Envelopes must be loaded in a specific orientation. For details, see page 55 "Specifications of
Envelopes".
59
Page 62

2. Loading Paper
Paper Settings
This section explains how to specify paper size and type using the control panel.
• When [Tray Setting Priority] is set to [Machine Setting(s)], the paper settings configured using the
printer's control panel have priority over the settings specified in the printer driver or commands.
For details, see:
• "Machine Modes", Operating Instructions. (for SP 4510DN)
• "System", Operating Instructions. (for SP 4520DN)
Specifying a Paper Size
• To use the paper size and feed direction other than those indicated on the paper size dial, set the
dial to " ", and set the paper size using the control panel.
• To use custom size paper, be sure to specify the paper size using the control panel and the printer
driver.
• The printer cannot print on custom size paper if the application does not support custom size paper.
Specifying Standard Size Paper
Press the [Menu] key, and then select the setting items using the [ ] or [ ] key.
1. Select [Paper Input]
2. Select [Paper Size: (tray name)] Press [OK]
3. Select the size of the paper set in the specified tray Press [OK]
1. Press the [User Tools] key, and then display the [Tray Paper Settings] screen.
[System Settings] [Tray Paper Settings]
2. Specify the paper size and feed direction.
[Tray Paper Size: (tray name)] Select the paper size and feed direction [OK]
Press [OK]
60
Page 63

• For details about the available paper size, see page 38 "Paper Size Specifications".
Specifying Custom Size Paper
Press the [Menu] key, and then select the setting items using the [ ] or [ ] key.
1. Select [Paper Input] Press [OK]
2. Select [Paper Size: (tray name)] Press [OK]
3. Select [Custom Size] Press [OK]
4. Enter the horizontal value Press [OK]
5. Enter the vertical value Press [OK]
1. Press the [User Tools] key, and then display the [Tray Paper Settings] screen.
Paper Settings
[System Settings] [Tray Paper Settings]
2. Specify the paper size and feed direction.
[Tray Paper Size: (tray name)] [Custom Size] [Vertical] Enter the vertical dimension of the
paper [OK] [Horizontal] Enter the horizontal dimension of the paper [OK]
3. Press [OK] twice.
• For details about the available paper size, see page 38 "Paper Size Specifications".
Specifying a Paper Type
You can improve printer performance by selecting the optimum paper type for the tray.
Press the [Menu] key, and then select the setting items using the [ ] or [ ] key.
1. Select [Paper Input] Press [OK]
2. Select [Paper Type: (tray name)] Press [OK]
3. Select the type of the paper set in the specified tray. Press [OK]
61
Page 64

2. Loading Paper
4. If you have selected [Recycled Paper], [Color Paper], [Letterhead], [Label Paper],
[Envelope], or [Preprinted Paper] for the paper type, press [Escape]
5. Select [Maintenance] Press [OK]
6. Select [General Settings] Press [OK]
7. Select the paper thickness setting for the specified paper type Press [OK]
8. Select the tray where the specified type of paper is loaded Press [OK]
If you selected [Letterhead Setting], [Label Paper Setting], or [Envelope Setting] in Step 8, you can
specify the paper thickness for each tray separately. For other paper types, the specified paper
thickness is applied to all trays.
9. Select the paper thickness Press [OK]
1. Press the [User Tools] key, and then display the [Tray Paper Settings] screen.
[System Settings] [Tray Paper Settings]
2. Press [Paper Type: (tray name)], and then specify the paper type and thickness.
• [Paper Type]
Select the paper type [OK]
• [Paper Thickness]
Select the paper thickness [OK]
• For details about the available paper type, see page 41 "Paper Type Specifications".
Configuring Envelope Settings Using the Control Panel
When printing on envelopes, load envelopes in Tray 1 or bypass tray, and then follow the procedure
below to specify envelope type and thickness.
Press the [Menu] key, and then select the setting items using the [ ] or [ ] key.
1. Select [Paper Input] Press [OK]
2. Select [Paper Size: (tray name)] Press [OK]
3. Select the envelope type Press [OK]
4. Select [Paper Type: (tray name)] Press [OK]
62
5. Select [Envelope] Press [OK]
Page 65

Paper Settings
6. Press [Escape]
7. Select [Maintenance] Press [OK]
8. Select [General Settings] Press [OK]
9. Select [Envelope Setting] Press [OK]
10. Select the source tray for which you want to change the paper thickness Press [OK]
11. Select the paper thickness Press [OK]
1. Press the [User Tools] key, and then display the [Tray Paper Settings] screen.
[System Settings] [Tray Paper Settings]
2. Press [Tray Paper Size: (tray name)], and then specify the paper size.
Select the envelope size [OK]
3. Press [Paper Type: (tray name)], and then specify the paper type and thickness.
• [Paper Type]
[Envelope] [OK]
• [Paper Thickness]
[Plain Paper 2] or [Thick Paper 2] [OK]
• For details about how to load envelopes, see page 54 "Loading Envelopes".
• Configure the paper settings appropriately using both the printer driver and the control panel. For
details about paper settings using the printer driver, see page 57 "Printing on Envelopes with
Windows (PCL 6/PostScript 3)", page 57 "Printing on Envelopes with Windows (PCL 5e/5c)", or
page 58 "Printing on Envelopes with Mac OS X".
63
Page 66

2. Loading Paper
64
Page 67

3. Troubleshooting
This chapter provides solutions to common problems and it also explains how to correct unwanted print
results.
When a Panel Tone Beeps
The following table describes various beep patterns that the printer produces to alert users about printer
conditions and the meaning of each beep pattern.
Beep pattern Meaning Causes
Single short beep Panel/screen input
accepted.
Two long beeps Printer has warmed up. When the power is turned on or the
Five long beeps repeated
four times.
Five short beeps repeated
five times.
• Beep alerts cannot be muted. If the printer's covers are opened and closed repeatedly within a
short space of time during an alert indicating a paper jam or insufficient toner, a beep alert might
continue, even after normal status has resumed.
Soft alert An error message appears on the
Strong alert The printer requires user attention
A control panel key was pressed.
printer exits Sleep mode, the printer
has fully warmed up and is ready for
use.
control panel if there is no tray for the
selected paper size or the tray is
empty.
because paper has jammed, the toner
needs replenishing, or other problems
have occurred.
• You can enable or disable beep alerts. For details, see:
• "General Settings", Operating Instructions. (for SP 4510DN)
• "General Features", Operating Instructions. (for SP 4520DN)
65
Page 68

3. Troubleshooting
When Checking the Indicator Lamps, Status Icons, and Messages on the Control Panel
Indicators
This section describes the indicators displayed when the printer requires the user to remove misfed
paper, to add paper, or to perform other procedures.
Indicator Status
: Paper Misfeed indicator Appears when a paper misfeed occurs.
For details about removing jammed paper, see page 119
"Removing Jammed Paper".
: Load Paper indicator Appears when paper runs out.
For details about loading paper, see page 37 "Loading Paper".
: Add Toner indicator Appears when toner runs out.
For details about adding toner, see "Replacing the Print
Cartridge", Operating Instructions.
: Service Call indicator Appears when the printer is malfunctioning or requires
maintenance.
: Cover Open indicator Appears when one or more covers of the printer are open.
Checking Printer Status and Settings
This function is available for SP 4520DN only.
Maintnc. Info
You can check the following items under [Maintnc. Info]:
• Remaining Toner
Displays the amount of remaining toner.
• Paper Tray
Displays the paper type and size loaded into the paper tray.
• Output Tray Full
66
Displays whether the output tray is overloaded.
• Paper Misfeed
Page 69

When Checking the Indicator Lamps, Status Icons, and Messages on the Control Panel
Displays the state of and solutions for paper misfeeds.
• Cover Open
Indicates whether one or more covers of the printer are open.
Data Storage
You can check the following items under [Data Storage]:
• HDD Remaining Mem.
Displays the amount of available hard disk memory.
• HDD File(s)
Displays the total number of jobs stored on the hard disk.
• Print Job(s)
Displays the number of jobs for "Hold Print Job(s):", "Stored Print Job(s):", "Locked Print
Job(s):", and "Sample Print Job(s):".
Machine Adres Info
You can check the following items under [Machine Adres Info]:
• Machine IPv4 Address
Displays the printer's IPv4 address.
• Machine IPv6 Address
Displays the printer's IPv6 address.
1. Press the [Check Status] key, and then check the contents.
[Maintnc/MacInfo] tab Each key Check the contents [Exit]
• [Paper Misfeed], [Output Tray Full], and [Cover Open] appear on [Maintnc. Info] only when these
errors occur.
• Depending on the security settings, [Machine Adres Info] might not be displayed.
• For details about how to locate and remove misfeeds, see page 119 "Removing Jammed Paper".
When the Indicator Lamp for the [Check Status] Key Is Lit or Flashing
This function is available for SP 4520DN only.
If an indicator for the [Check Status] key lights up, press the [Check Status] key to display the [Check
Status] screen. Check the status of the printer in the [Check Status] screen.
[Check Status] screen
67
Page 70

1
2
43
CQT666
3. Troubleshooting
1. [Mac/ApliStat] tab
Indicates the status of the printer.
2. Status icons
The icons that can be displayed are described below:
: The printer function is performing a job.
: An error has occurred on the printer.
: An error has occurred in the printer function being used, or the printer function cannot be used because an
error has occurred on the printer.
3. Messages
Displays a message that indicates the status of the printer. This icon may also appear if the toner is running
low.
4. [Check]
If an error occurs, press [Check] to view details.
Pressing [Check] displays an error message or the printer screen. Check the error message displayed on the
printer screen and take the appropriate action. For details about error messages and their solutions, see
page 71 "When Messages Are Displayed".
The following table describes problems that cause the indicator to light:
Problem Cause Solution
Documents and reports do
not print out.
Documents and reports do
not print out.
An error has occurred.
The paper output tray is
full.
There is no paper left.
A function that has the
status "Error Occurred" in
the [Check Status] screen is
defective.
Remove the prints from the tray.
Load paper. For details about loading
paper, see page 37 "Loading Paper".
Press [Check], and then check the
displayed message and take appropriate
action. For details about error messages
and their solutions, see page 71 "When
Messages Are Displayed".
68
Page 71

Problem Cause Solution
The printer is unable to
connect to the network.
When Checking the Indicator Lamps, Status Icons, and Messages on the Control Panel
• Press [Check], and then check the
displayed message and take
appropriate action. For details about
error messages and their solutions,
see page 71 "When Messages
Are Displayed".
• Check that the printer is correctly
connected to the network and that
A network error has
occurred.
the printer is correctly set. For details
about how to connect the network,
see "Interface Settings", Operating
Instructions.
• For details about connecting to the
network, contact your administrator.
• If the indicator is still lit even after
trying to solve the problem as
described here, contact your service
representative.
69
Page 72

3. Troubleshooting
If USB Connection Fails
Problem Causes Solutions
The printer is not
automatically recognized.
Windows has already
configured the USB settings.
The USB cable is not
connected properly.
Check whether or not the
computer has identified the
printer as an unsupported
device.
Disconnect the USB cable, turn off the
printer, and then turn it on again.
When the printer has fully booted up,
reconnect the USB cable.
Open Windows' Device Manager,
and then, under [Universal Serial Bus
controllers], remove any conflicting
devices. A [!] or [?] icon is displayed
for conflicting devices. Take care not to
accidentally remove required devices.
For details, see Windows Help.
70
Page 73
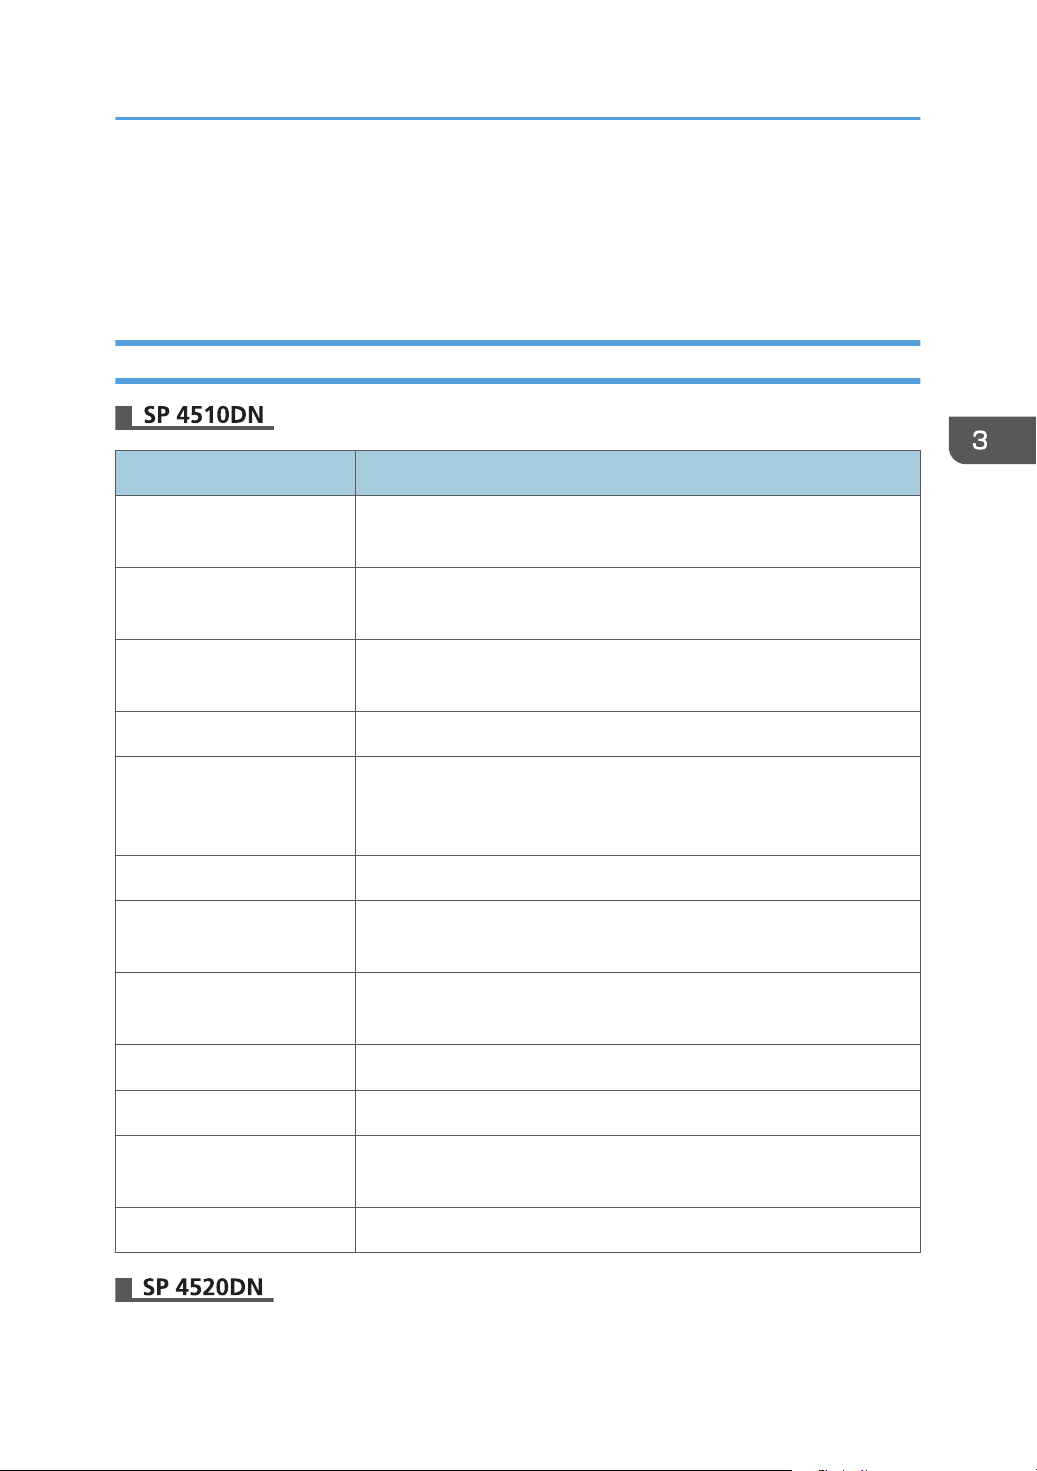
When Messages Are Displayed
When Messages Are Displayed
This section describes the main messages that appear on the display panel and printed error logs and
reports. If other messages appear, follow their instructions.
Status Messages
Message Status
"Energy Saver Mode" The printer is in Energy Saver mode. Press any key to recover to the
normal mode.
"Hex Dump Mode" In Hex Dump mode, the printer receives data in a hexadecimal format.
Turn off the printer after printing, and then turn it on again.
"Job Suspended" All jobs are suspended. Turn off the printer, and turn it on again to
resume the jobs.
"Offline" The printer is offline and cannot print.
"Please wait..." This message may appear for a few seconds. It means the printer is
initializing, replenishing toner, or performing maintenance operations.
Wait a while.
"Printing..." The printer is printing. Wait a while.
"Printing Suspended" Printing is suspended. To resume printing, press the [Suspend/Resume]
key.
"Ready" This is the default ready message. The printer is ready for use. No
action is required.
"Resetting Job" The printer is resetting the print job. Wait a while.
"Setting change..." The printer is applying the changes made to its settings. Wait a while.
"Updating Certificate..." The printer is updating the @Remote certificate. Turn the power off, and
then turn it on again.
"Waiting for print data..." The printer is waiting for the next data to print. Wait a while.
71
Page 74

3. Troubleshooting
Message Status
"Hex Dump Mode" In Hex Dump mode, the printer receives data in a hexadecimal format.
Press [Job Reset] to cancel Hex Dump mode.
"Job suspended." Printing was temporarily suspended because [Job Operation] or the
[Suspended] key was pressed.
"Loading Toner..." The printer is loading the toner. Wait a while.
"Offline" The printer is offline.
"Please wait." This message might appear for a second or two while the printer is
preparing, performing initial adjustments, or adding toner. Wait a
while.
"Printing..." The printer is printing. Wait a while.
"Ready" This is the default ready message. The printer is ready for use. No
action is required.
"Resetting job..." The printer is resetting the print job. Wait until "Ready" appears on the
display panel.
"Setting change..." The printer is changing settings. You cannot use the control panel while
this message is displayed. Wait a while.
"Suspended job exists." Printing was temporarily stopped by SmartDeviceMonitor for Client.
You can resume printing via [My Job List] in SmartDeviceMonitor for
Client, or via the Web Image Monitor. To resume printing via Web
Image Monitor, ask your system administrator first.
"Updating certif..." The @Remote certificate is being updated. Wait a while.
"Waitg. for prt.data" The printer is waiting for the next data to print. Wait a while.
Alert Messages (Displayed on the Control Panel)
Message Cause Solution
" (A1) Open Front Cover and
remove the paper."
Open the front cover and
remove the jammed paper
from the paper feed path.
For details, see page 119
"Removing Jammed Paper".
72
Page 75

When Messages Are Displayed
Message Cause Solution
" (A2) Remove misfeed in Trays.
Opn & cls Frt. Cov."
" (B) Open Front Cover and remove
the paper."
" (B) (C) Open Front/Rear Cover
and remove misfeed."
" (Y1) Remove misfeed in Tray 2.
Opn & cls Frt. Cov."
" (Y2) Remove misfeed in Tray 3.
Opn & cls Frt. Cov."
Remove the jammed paper
from the bypass tray. To reset
the error, open the front
cover and then close it.
Open the front cover and
remove the jammed paper
from the internal paper feed
path.
Open the front cover and
remove any jammed paper
from the internal paper feed
path.
Open Tray 2 and remove the
jammed paper. To reset the
error, open the front cover
and then close it.
Open Tray 3 and remove the
jammed paper. To reset the
error, open the front cover
and then close it.
For details, see page 119
"Removing Jammed Paper".
For details, see page 119
"Removing Jammed Paper".
For details, see page 119
"Removing Jammed Paper".
For details, see page 119
"Removing Jammed Paper".
For details, see page 119
"Removing Jammed Paper".
" (Z1) Open Rear Cover and
remove misfeed"
Open the rear cover and
remove the jammed paper
from the paper duplex unit.
" (Z2) Opn Tray1/R.Cov & remove
ppr. Opn & cls F.Cov"
Open Tray 1 and the rear
cover, and then remove the
jammed paper. To reset the
error, open the front cover
and then close it.
" Toner is almost empty." The print cartridge is almost
empty.
" Add toner. Replace Toner
Cartridge."
The toner has run out.
Replace the print cartridge.
For details, see page 119
"Removing Jammed Paper".
For details, see page 119
"Removing Jammed Paper".
For details, see "Replacing
the Print Cartridge",
Operating Instructions.
For details, see "Replacing
the Print Cartridge",
Operating Instructions.
73
Page 76

3. Troubleshooting
Message Cause Solution
"@Remote Cert. update failed" Updating the @Remote
certificate failed.
"Cannot connect=>Comm.Serv.
Check proxy user/password."
"Cannot connect with DHCP server.
(101/201)"
The proxy user name or
password is incorrect.
An IP address cannot be
obtained from the DHCP
server.
"Cannot connect with NetWare print
server. (107/207)"
No connection with the
NetWare print server is
available.
"Cannot connect with NetWare
server.(106/206)"
No connection with the
NetWare print server is
available.
"Cannot print." The printer cannot print the
sent data.
Turn the printer off, and then
turn it on again. If the
problem persists, contact
your sales or service
representative.
Check the proxy server
settings, and then change the
user name and/or password
if they are incorrect.
Contact your network
administrator.
Contact your network
administrator.
Contact your network
administrator.
Check that the file you want
to print is a supported file
type.
74
"Change (Tray name) to the following
settings:"
The size of the paper in the
tray does not match the
paper size specified in the
printer driver.
"Check network settings.(103/203)" The IP address setting is
incorrect.
"Classification Code Error" A classification code is not
specified for the print job.
Check the misfeeds and ask
your network administrator
for help.
Select a tray containing
paper that is the same size as
the specified paper size.
Check the IP address, subnet
mask, and gateway address.
Enter a classification code
using the printer properties
and print the document
again.
Page 77

When Messages Are Displayed
Message Cause Solution
"Connect failed:WirelessCard Turn
power off, check card."
The printer cannot detect the
wireless LAN interface
board.
"Cover Open. Please close the
A cover of the printer is open. Close the cover as indicated
indicated cover."
"Duplex mode is in off position for
(tray name)"
The duplex mode for the
indicated tray is not
available.
"Ethernet Board Error" An error on the Ethernet is
detected.
"Exceeded max. No. of files." While printing a Sample
Print, Locked Print, Hold Print,
or Stored Print file, the
maximum file capacity was
exceeded.
Check that the board is
supported or installed
correctly.
on the control panel.
You can use one-sided
printing only. Press [Change]
to change the tray's settings,
press [JobReset] to reset the
job, or press [Form Feed] to
force printing.
Turn the printer off, and then
turn it on again. If the
problem persists, contact
your sales or service
representative.
Delete unneeded files stored
in the printer.
"Exceeded max. No. of pages." While printing a Sample
Print, Locked Print, Hold Print,
or Stored Print file, the
maximum page capacity was
exceeded.
"Exceeded max. print size. Press
[FormFeed] or [JobReset]."
The specified paper size
exceeds the maximum size
supported by this printer.
"Exceeded max. print size. Press
[JobReset]."
The specified paper size
exceeds the maximum size
supported by this printer.
"Failed to connect to server for
Remote Diagnostics."
The printer cannot
communicate with Remote
Communication Gate.
• Delete unneeded files
stored in the printer.
• Reduce the number of
pages to print.
Press [Form Feed] to force
printing or [JobReset] to
cancel printing.
Press [JobReset] to cancel
printing.
Check the connection to the
Remote Server Gate.
75
Page 78

3. Troubleshooting
Message Cause Solution
"Independent-supply toner" Independent-supply toner is
set.
"IPv6 Address already exists Linklocal Address(109/209)"
"IPv6 Address already exists Stateless
Address(109/209)"
"IPv6 Address already exists Manual
Config. Address(109/209)"
The same IPv6 address is
already used.
The same IPv6 address is
already used.
The same IPv6 address is
already used.
"Load paper in (tray name)" There is no paper in the
specified tray.
"No privileges to use funct." The logged in user does not
have the privileges to register
programs or change the
paper tray settings.
"Option RAM Error" The printer cannot detect an
optional SDRAM module.
Use the toner recommended
for this printer.
Contact your network
administrator.
Contact your network
administrator.
Contact your network
administrator.
Load the specified paper in
the tray, press [JobReset] to
reset the job.
For details about how to set
permissions, see Security
Guide.
Check that the SDRAM
module installed correctly.
76
"Par. I/F board has a problem." The printer's self-diagnostic
test failed due to a loopback
error.
"Printer Font Error." There are problems with the
printer's font file.
"Problem with Hard Disk Please call
service."
The printer cannot detect the
hard disk.
Replace the IEEE 1284
board that caused the error.
Turn the printer off, and then
turn it on again.
If the problem persists,
contact your sales or service
representative.
Check that the hard disk
installed correctly. If the
problem persists, contact
your sales or service
representative.
Page 79

When Messages Are Displayed
Message Cause Solution
"Problem:Wireless card Please call
service."
The printer cannot detect a
wireless LAN interface
board.
"Replacmnt Requrd Maint. Kit" You need to replace the
maintenance kit.
"Replcmnt Requrd Drum Unit" You need to replace the
drum unit.
"Repl Requrd Soon Maint. Kit" You will need to replace the
maintenance kit soon.
"Rplcmnt Rqrd Soon:Drum Unit" You will need to replace the
drum unit soon.
"SD Card authenticatn.failed Error
recurs, call service."
Authentication from the SD
card failed.
Check that the wireless LAN
interface board installed
correctly. If the problem
persists, contact your sales or
service representative.
For details, see "Replacing
Other Consumables",
Operating Instructions.
For details, see "Replacing
Other Consumables",
Operating Instructions.
Contact your sales or service
representative to obtain a
new unit.
Contact your sales or service
representative to obtain a
new unit.
Turn the printer off, and then
turn it on again. If the
problem persists, contact
your sales or service
representative.
"Set the Drum Unit correctly." The drum unit may not be
installed correctly.
"Set the Maintenance Kit correctly." The fusing unit may have not
been installed correctly.
"Set the Toner Cartridge correctly." The print cartridge may have
not been installed correctly.
Turn the printer off, and then
install the drum unit again.
Turn the printer off, and then
install the fusing unit again.
If the message continues to
appear after the unit is
installed again, contact your
sales or service
representative.
Turn the printer off, and
install the print cartridge
again.
77
Page 80

3. Troubleshooting
Message Cause Solution
"Standard Tray is full. Remove the
The standard tray is full. Remove the paper.
paper."
"Supply order has failed." The automatic supply order
failed.
"This NetBIOS name is already in use.
(108/208)"
The NetBIOS name specified
for the printer is already used
by another device on the
network.
"The same IPv4 Address already
exists.(102/202)"
The IPv4 address specified
for the printer is already used
by another device on the
network.
"The selected job has already been
printed or deleted."
This message might appear if
you print or delete a job from
Web Image Monitor.
"USB has a problem. Please call
service."
The printer has detected a
USB board failure.
The message indicates the
printer tried to order the
supplies.
Contact your network
administrator.
Contact your network
administrator.
Press Exit on the message
screen.
Turn the printer off, and then
turn it on again. If the
problem persists, contact
your sales or service
representative.
78
"Values set for IPv6/Gateway
addresses are invalid.(110/210)"
"Waste Toner almost full" The print cartridge must be
The IPv6 address or gateway
address is invalid.
replaced when the life of the
Check the network settings.
Prepare a new print
cartridge.
waste toner is ending.
"Waste Toner full" The waste toner is full. For details, see "Replacing
the Print Cartridge",
Operating Instructions.
"WPA Auth. incomplete.(211)" WPA authentication could
not be completed.
Contact your network
administrator.
Page 81

When Messages Are Displayed
Message Cause Solution
"Cannot connect with the
wireless card. Turn the main
power switch off, then check the
card."
• The wireless LAN interface
board was not inserted
when the printer was
turned on.
• The wireless LAN interface
board was pulled out after
the printer was turned on.
• The settings are not
updated although the unit
is detected.
"Cannot print because both the
main and designation (chapter)
sheets are set to the same paper
The tray selected for other
pages is the same as the one for
slip sheets.
tray. Press [Job Reset] to cancel
the job."
"Hardware Problem: Ethernet" An error has occurred in the
Ethernet interface.
• Turn off the main power
switch, and then confirm
the wireless LAN interface
board is inserted correctly.
For details about installing
the board, contact your
service representative.
• If the message appears
again, contact your service
representative.
Reset the job. Be sure the tray
you select for slip sheets is not
providing paper for other
pages.
Turn the main power switch off
and then back on again. If the
message appears again,
contact your service
representative.
"Hardware Problem: HDD" An error has occurred in the
hard disk.
• Turn the main power switch
off and then back on
again. If the message
appears again, contact
your service
representative.
• The hard disk may have
not been installed properly
if you have installed it
yourself. Check that it is
properly installed For
details about installing the
unit, see "Installing the
Memory Expansion Units",
Operating Instructions.
79
Page 82

3. Troubleshooting
Message Cause Solution
"Hardware Problem: Parallel
I/F"
An error has occurred in the
IEEE 1284 interface board.
"Hardware Problem: USB" An error has occurred in the
USB interface.
"Hardware Problem: Wireless
Card"
(A "wireless LAN interface
The wireless LAN interface
board can be accessed, but an
error was detected.
board" is referred to as a
"wireless card".)
• Turn the main power switch
off and then confirm the
IEEE 1284 interface board
is inserted correctly. For
details about installing the
board, see "Installing the
Interface Units", Operating
Instructions.
• If the message appears
again, contact your service
representative.
Turn the main power switch off
and then back on again. If the
message appears again,
contact your service
representative.
• Turn off the main power
switch, and then confirm
the wireless LAN interface
board is inserted correctly.
For details about installing
the board, see "Installing
the Interface Units",
Operating Instructions.
80
"Load ppr blw in (Tray name)." The printer driver settings are
incorrect or the tray does not
contain paper of the size
selected in the printer driver.
"Maintenance Kit is not set
correctly. Please call service."
The fusing unit may have not
been installed correctly.
• If the message appears
again, contact your service
representative.
Check that the printer driver
settings are correct, and then
load paper of the size selected
in the printer driver into the input
tray. For details about how to
change the paper size, see
page 37 "Loading Paper".
Contact your sales or service
representative.
Page 83

When Messages Are Displayed
Message Cause Solution
"No toner. Replace Toner
Cartridge."
"n ppr siz msmtch Select new
tray or use ppr size below."
("n" is a tray name.)
The toner has run out. Replace
the print cartridge.
The size of the paper in the tray
does not match the paper size
specified in the printer driver.
"Printer font error." An error has occurred in the font
settings.
"Problems with the wireless
board. Please call service."
(A "wireless LAN interface
The printer has detected a
wireless LAN interface board
failure.
board" is referred to as a
"wireless board".)
"Remove the paper from
The standard tray is full. Remove the paper.
Standard Tray."
"Replacement of Drum Unit is
now necessary. Please call
You need to replace the drum
unit.
service."
For details, see "Replacing the
Print Cartridge", Operating
Instructions.
Select a tray containing paper
that is the same size as the
specified paper size.
Contact your service
representative.
If the message appears again,
contact your service
representative.
Contact your sales or service
representative to obtain a new
unit.
"Replacement of Drum Unit will
soon be necessary. Please call
service."
"Replacement of Maintenance
Kit is now necessary. Please call
service."
"Replacement of Maintenance
Kit will soon be
necessary.Please call service."
"The selected file(s) contained
file(s) without access privileges.
Only file(s) with access
privileges will be deleted."
You will need to replace the
drum unit soon.
You need to replace the
maintenance kit.
You will need to replace the
maintenance kit soon.
You have tried to delete files
without the authority to do so.
Contact your sales or service
representative to obtain a new
unit.
Contact your sales or service
representative to obtain a new
unit.
Contact your sales or service
representative to obtain a new
unit.
To check your access
permission for stored
documents, or to delete a
document you do not have
permission to delete, see
Security Guide.
81
Page 84

3. Troubleshooting
Message Cause Solution
"Toner Cartridge is almost
empty. Replace Toner
Cartridge."
"Tray setg. do not match spcfd
siz&typ. Select new tray or use
sz&typ below."
The print cartridge is almost
empty.
The printer driver settings are
incorrect or the tray does not
contain paper of the size or
type selected in the printer
driver.
Prepare a new print cartridge.
• Check that the printer
driver settings are correct,
and then load paper of the
size selected in the printer
driver into the input tray.
For details about how to
load paper, see page 37
"Loading Paper".
• Select the tray manually to
continue printing, or
cancel a print job. For
details about how to select
the tray manually, or
cancel a print job, see "If
an Error Occurs with the
Specified Paper Size and
Type", Operating
Instructions.
82
"Failed to update @Remote
certificate. Please call service."
Updating the @Remote
certificate failed.
Turn the printer off, and then
turn it on again. If the problem
persists, contact your sales or
service representative.
"Waste Toner is almost full" The print cartridge must be
Prepare a new print cartridge.
replaced when the life of the
waste toner is ending.
"Waste Toner full" The waste toner is full. Replace the print cartridge. For
details, see "Replacing the Print
Cartridge", Operating
Instructions.
"You do not have the privileges
to use this function."
The logged in user name does
not have permission for the
For details about how to set
permissions, see Security Guide.
selected function.
Page 85

Messages during Direct print from a memory storage device
Message Causes Solutions
When Messages Are Displayed
"Unable to access the
specified memory storage
device."
"Exceeded the limit value for
total data size of the
selected files. Cannot select
more files."
The memory device used
cannot be recognized.
• The size of the selected
file exceeds 1 GB.
• The total size of the
selected files exceeds
1 GB.
For details about the recommended
memory devices for the Direct printing
function from memory storage devices,
contact your service representative. The
USB flash memory device that features
password protection or other security
features may not work normally.
Files or groups of files larger than 1 GB
cannot be printed.
• When the total size of the multiple
files that are selected exceeds 1
GB, select files separately.
• When the size of the selected file
exceeds 1 GB, print by using a
function other than the Direct
printing function from memory
storage devices.
You cannot select files of different
formats at the same time.
Alert Messages (Printed on Error Logs and Reports)
This section describes likely causes of and possible solutions for the error messages that are printed on
the error logs or reports.
Message Cause Solution
"84: Error" There is no work area available
for image processing.
"85: Error" The specified graphics library is
unavailable.
Select [Font Priority] for
[Memory Usage] in [System].
Decrease the number of files
sent to the printer.
Check that the data is valid.
83
Page 86

3. Troubleshooting
Message Cause Solution
"86: Error" Parameters of the control code
are invalid.
"91: Error" Printing was canceled by the
auto job cancel function due to
a command error.
"92: Error" Printing was canceled because
the [Job Reset] key or the
[Suspend/Resume] key was
pressed on the printer's control
panel.
"Address book is in use." The printer currently cannot
perform authentication because
the Address Book is being used
by another function.
"Auto-user prog. failed." Automatic registration of
information for LDAP
Authentication or Windows
Authentication failed because
the Address Book is full.
Check the print settings.
Check that the data is valid.
Perform the print operation
again as necessary.
Wait a while, and then retry the
operation.
For details about the automatic
registration of user information,
see Security Guide.
84
"Cannot print." You have no privileges to print
the PDF file you want to print.
"Classification Code Error" The classification code is not
specified with the printer driver.
Contact the owner of the
document.
Select [Optional] for the
classification code. For details
about how to specify
classification code settings, see
"Registering Classification
Codes", Operating Instructions.
"Collate cancelled." Collate was canceled. Turn the printer off, and then
turn it on again. If the message
appears again, contact your
service representative.
"Collate: Page max." The amount of free memory is
insufficient to perform collating.
Reduce the number of pages to
be printed or install the optional
SDRAM.
Page 87

When Messages Are Displayed
Message Cause Solution
"Command Error." An RPCS command error
occurred.
Check that the communication
between a device and the
printer is working correctly.
"Compressed Data Error" The printer detected corrupt
compressed data.
Check that the program you
used to compress the data is
functioning correctly.
"Duplex cancelled." Duplex printing was canceled. Change the setting for "Duplex
Tray" in [Paper Input] to enable
duplex printing for the paper
tray.
"Error occured. Prntd/Cncld." An error occurred during
Check the print settings.
printing, but it was ignored.
"Excd Prt Vol Use max count." Printing was canceled because
Contact your user administrator.
the print maximum number was
reached.
"Excd Prt Vol Use max count." Maximum number of user codes
Delete unnecessary user codes.
that can be registered has been
reached.
"File System Error." PDF direct printing could not be
performed because the file
system could not be obtained.
"File System Full." The PDF file cannot be printed
because the capacity of the file
system is full.
Turn the printer off, and then
turn it on again. If the message
appears again, contact your
service representative.
Delete all unnecessary files from
the hard disk, or decrease the
file size sent to the printer.
85
Page 88

3. Troubleshooting
Message Cause Solution
"Function use denied." The print job was cancelled
because of one of the following:
• The user does not have
privileges to print.
• No privileges to print are
assigned to the entered
user name or user code, or
• A wrong password was
specified for the user
name.
"HDD is full." The hard disk became full while
printing a Sample Print, Locked
Print, Hold Print, or Stored Print
file. Delete unnecessary files
stored in the printer.
Enter the user name or user
code with privileges to print, or
enter the correct password for
the user name.
Reduce the data size of the
Sample Print, Locked Print, Hold
Print, or Stored Print file.
When printing with the
PostScript 3 printer driver, the
hard disk capacity for fonts and
forms has been exceeded.
Delete unnecessary forms or
fonts registered to the printer.
86
"HDD not installed." The printer received a stored
job file but no hard disk is
installed.
"I/O buffer overflow." An input buffer overflow
occurred.
Install a hard disk.
• Select [Font Priority] for
[Memory Usage] in
[System].
• In [I/O Buffer] under the
[Host Interface] menu, set
the maximum buffer size to
a larger value.
• Reduce the number of files
being sent to the printer.
Page 89

When Messages Are Displayed
Message Cause Solution
"Insufficient Memory." A memory allocation error
occurred.
PCL 6
Select a lower resolution
on the printer driver. For
details about how to
change the resolution
setting, see the printer
driver Help. On the printer
driver's [Detailed Settings]
tab, click [Print Quality] in
"Menu:", and then select
[Raster] in the "Vector/
Raster:" list. In some cases,
it will take a long time to
complete a print job.
PCL 5e/5c, PostScript 3
Select a lower resolution
on the printer driver. For
details about how to
change the resolution
setting, see the printer
driver Help.
"Memory Retrieval Error." A memory allocation error
occurred.
"No response from server." A timeout occurred while the
printer was connecting to the
server for LDAP Authentication
or Windows Authentication.
"Paper Size Error" Printing was canceled because
the specified paper size cannot
be fed from the tray.
Turn off the printer, and then
turn it on again. If the message
appears again, replace the
SDRAM.
Check the status of the server.
Check the available paper size.
87
Page 90

3. Troubleshooting
Message Cause Solution
"Paper Type Error" The printer does not recognize
the paper type specified using
the printer driver.
Check that the printer is
connected to the network
correctly and bidirectional
communication is enabled. If the
problem persists, check the user
paper type settings of the
printer.
"Password mismatch." A wrong password was entered
Check the password.
when an encrypted PDF file was
printed.
"PDF File Error." A syntax error, etc., occurred. Check that the PDF file is valid.
"Print overrun." Printing images was aborted. Select a lower resolution on the
printer driver. For details about
how to change the resolution
setting, see the printer driver
Help.
"Receiving data failed." Data reception was aborted. Resend the data.
"Sending data failed." The printer received a command
to stop a transmission from the
Check that the computer is
working correctly.
printer driver.
88
"User auth. already exists." The same account name is
already used in the newly
selected domain or server in an
environment using LDAP
Authentication or Integration
Server Authentication.
Contact your user administrator.
Page 91

When Messages Are Displayed
Message Cause Solution
"84: Error" There is no work area available
for image processing.
"85: Error" The specified graphics library is
unavailable.
• Select [Font Priority] for
[Memory Usage] in
[System]. Decrease the
number of files sent to the
printer.
• Decrease the number of
files sent to the printer or
install the optional SDRAM
module. For details about
installing SDRAM module,
contact your service
representative.
• Check that the data is
valid.
• Decrease the number of
files sent to the printer or
install the optional SDRAM
module. For details about
installing SDRAM module,
contact your service
representative.
"86: Error" Parameters of the control code
are invalid.
"91: Error" Printing was canceled by the
auto job cancel function due to
a command error.
"92: Error" Printing was canceled because
[Job Reset] or the [Suspended]
key was selected on the printer's
control panel.
"98: Error" The printer could not access the
hard disk correctly.
Check the print settings.
Check that the data is valid.
Perform the print operation
again as necessary.
Turn the main power switch off
and then back on again. If the
message appears frequently,
contact your service
representative.
89
Page 92

3. Troubleshooting
Message Cause Solution
"Address Book is currently in
use by another function.
Authentication has failed."
"Auto-registration of user
information has failed."
"Classification Code is
incorrect."
"Classification Code is
incorrect."
The printer currently cannot
perform authentication because
the Address Book is being used
by another function.
Automatic registration of
information for LDAP
Authentication or Windows
Authentication failed because
the Address Book is full.
The classification code has not
been entered, or the
classification code has been
entered incorrectly.
The classification code is not
supported by the printer driver.
Wait a while, and then retry the
operation.
For details about automatic
registration of user information,
see Security Guide.
Enter the correct classification
code.
Select [Optional] for the
classification code. For details
about how to specify
classification code settings, see
"Registering Classification
Codes", Operating Instructions.
90
"Collate has been cancelled." Collate was canceled. Decrease the number of files
sent to the printer or install the
optional SDRAM module. For
details about installing SDRAM
module, contact your service
representative.
"Command Error" An RPCS command error
occurred.
Check that the communication
between a device and the
printer is working correctly.
"Compressed Data Error." The printer detected corrupt
compressed data.
• Check the connection
between the computer and
the printer.
• Check that the program
you used to compress the
data is functioning
correctly.
Page 93

When Messages Are Displayed
Message Cause Solution
"Data storage error." You tried to print a Sample Print,
Locked Print, Hold Print, or
Stored Print file while the hard
disk was not installed.
The hard disk is required when
printing a Sample Print, Locked
Print, Hold Print, or Stored Print.
If the message appear after
installing the hard disk, contact
your service representative.
"Duplex has been cancelled." Duplex printing was canceled. • Select the proper paper
size for the duplex
function. For details about
paper size, see page 38
"Paper Size
Specifications".
• Change the setting for
"Apply 2 sided" in [System
Settings] to enable duplex
printing for the paper tray.
For details about setting
"Apply 2 sided", see "Tray
Paper Settings", Operating
Instructions.
"Error has occurred." A syntax error, etc., occurred. Check that the PDF file is valid.
"Error occurred. Either job was
printed with settings changed or
An error occurred during
printing, but it was skipped.
Check that the data is valid.
it was cancelled."
"Excdd max. No. of files to print
for temp./stored jobs."
While printing a Sample Print,
Locked Print, Hold Print, or
Delete unneeded files stored in
the printer.
Stored Print file, the maximum
file capacity was exceeded.
"Excdd max. No. of files.(AT)" While using the error job store
function to store Normal Print
jobs as Hold Print files, the
Delete Hold Print files
(automatic) or unneeded files
stored in the printer.
maximum file capacity for file
storage or Hold Print file
management (automatic) was
exceeded.
91
Page 94

3. Troubleshooting
Message Cause Solution
"Excdd max. No. of pages(AT)" While printing a Sample Print,
Locked Print, Hold Print, or
Stored Print file, the maximum
page capacity was exceeded.
"Exceeded max. No. of pages
for temporary/stored jobs."
While printing a Sample Print,
Locked Print, Hold Print, or
Stored Print file, the maximum
page capacity was exceeded.
"Exceeded max. pages. Collate
is incomplete."
The number of pages exceeds
the maximum number of sheets
that can be used with Collate.
"Exceeded the maximum unit
count for Print Volume Use. The
job has been cancelled."
The number of pages the user is
permitted to print has been
exceeded.
"Failed to obtain file system." PDF direct printing could not be
performed because the file
system could not be obtained.
• Delete unneeded files
stored in the printer.
• Reduce the number of
pages to print.
• Delete unneeded files
stored in the printer.
• Reduce the number of
pages to print.
Reduce the number of pages to
print.
For details about Print Volum.
Use Limit., see Security Guide.
Turn off the main power switch
and then back on again. If the
message appears again,
contact your service
representative.
92
"File system is full." The PDF file does not print out
because the capacity of the file
system is full.
"HDD is full." The hard disk became full while
printing a Sample Print, Locked
Print, Hold Print, or Stored Print
file.
"HDD is full." When printing with the
PostScript 3 printer driver, the
hard disk capacity for fonts and
forms has been exceeded.
Delete all unnecessary files from
the hard disk, or decrease the
file size sent to the printer.
• Delete unneeded files
stored in the printer.
• Reduce the data size of the
Sample Print, Locked Print,
Hold Print, or Stored Print
file.
Delete unneeded forms or fonts
registered in the printer.
Page 95

When Messages Are Displayed
Message Cause Solution
"HDD is full. (Auto)" The hard disk became full while
using the error job store function
to store Normal Print jobs as
Hold Print files.
"I/O buffer overflow." An input buffer overflow
occurred.
"Information for user
authentication is already
registered for another user."
The user name for LDAP
Authentication or Integration
Server Authentication was
already registered in a different
server with a different ID, and a
duplication of the user name
occurred due to a switching of
domains (servers), etc.
• Delete unneeded files
stored in the printer.
• Reduce the data size of the
Temporary Print file
and/or the Stored Print
file.
• Select [Font Priority] for
[Memory Usage] in
[System].
• In [I/O Buffer] under the
[Host Interface] menu, set
the maximum buffer size to
a larger value.
• Reduce the number of files
being sent to the printer.
For details about User
Authentication, see Security
Guide.
93
Page 96

3. Troubleshooting
Message Cause Solution
"Insufficient Memory" A memory allocation error
occurred.
PCL 5/PostScript 3
Select a lower resolution
on the printer driver. For
details about how to
change the resolution
setting, see the printer
driver Help.
PCL 6
Select a lower resolution
on the printer driver. For
details about how to
change the resolution
setting, see the printer
driver Help. On the printer
driver's [Detailed Settings]
tab, click [Print Quality] in
"Menu:", and then select
[Raster] in the "Vector/
Raster:" list. In some cases,
it will take a long time to
complete a print job.
94
"Memory Retrieval Error" A memory allocation error
occurred.
"No response from the server.
Authentication has failed."
A timeout occurred while
connecting to the server for
LDAP Authentication or
Windows Authentication.
• Install the optional SDRAM
module. For details about
installing SDRAM module,
contact your service
representative.
Turn off the main power switch
and then back on again. If the
message appears again,
replace the SDRAM. For details
about replacing SDRAM,
contact your service
representative.
Check the status of the server.
Page 97

When Messages Are Displayed
Message Cause Solution
"Print overrun." Images were discarded while
printing.
Select a lower resolution on the
printer driver. For details about
how to change the resolution
setting, see the printer driver
Help.
"Printing privileges have not
been set for this document."
The PDF document you have
tried to print has no privileges to
Contact the owner of the
document.
print.
"Receiving data failed." Data reception was aborted. Resend the data.
"The selected paper size is not
supported. This job has been
cancelled."
"Sending data failed." The printer received a command
Job Reset is automatically
performed if the specified paper
size is incorrect.
to stop transmission from the
Specify the correct paper size,
and then print the file again.
Check that the computer is
working correctly.
printer driver.
"The print job has been
cancelled because capture
The hard disk became full after
a file was stored.
Reduce the file size to be sent.
file(s) could not be stored:
Exceeded max. memory."
"The selected paper type is not
supported. This job has been
cancelled."
Job Reset is automatically
performed if the specified paper
type is incorrect.
"Unauthd. Copy Preventn. Error" The [Enter User Text:] field on
the [Unauthorized Copy
Prevention for Pattern Details]
screen is blank.
Specify the correct paper type,
and then print the file again.
PCL 6/PostScript 3
On the printer driver's
[Detailed Settings] tab,
click [Effects] in "Menu:".
Select [Unauthorized
Copy Prevention], and
then click [Details] to
display [Unauthorized
Copy Prevention for
Pattern Details]. Enter text
in [Enter User Text:].
95
Page 98

3. Troubleshooting
Message Cause Solution
"Unauthorized Copy Prevention
error occurred. Job cancelled."
The resolution is set to a value
less than 600 dpi when
[Unauthorized Copy Prevention]
is specified.
"User Paper Type Error" The printer does not recognize
the paper type specified using
the printer driver.
"You do not have a privilege to
use this function. This job has
The entered Login User Name
or Login Password is not correct.
been cancelled."
"You do not have a privilege to
use this function. This job has
been cancelled."
The logged in user is not
allowed to use the selected
function.
On the printer driver, set the
resolution to 600 dpi or higher,
or deselect [Unauthorized Copy
Prevention].
Check that the printer is
connected to the network
correctly and bidirectional
communication is enabled. If the
problem persists, confirm the
user paper type settings of the
printer. For details, see
"Registering Unique Names to
Paper Types", Operating
Instructions.
Check that the Login User
Name and Login Password are
correct.
For details about how to set
permissions, see Security Guide.
"You have no privilege to use
this func. Operation canceld."
The logged in user does not
have the privileges to register
programs or change the paper
tray settings.
Messages during Direct print from a memory storage device
Message Causes Solutions
"99: Error" This data cannot be printed.
The specified data is either
corrupt or not supported by
the Direct printing function
from memory storage devices.
96
For details about how to set
permissions, see Security Guide.
Check that the data is valid.
For details about the kinds of
data supported by the Direct
printing function from memory
storage devices, see "Direct
Printing from a Memory
Storage Device", Operating
Instructions.
Page 99

When Messages Are Displayed
If printing does not start, contact your service representative.
• The contents of errors may be printed on the Configuration Page. Check the Configuration Page in
conjunction with the error log. For details about how to print the Configuration Page, see "Test
Printing", Operating Instructions.
97
Page 100

3. Troubleshooting
When You Cannot Print
Problem Cause Solution
Printing does not start. The power is off. For details about how to turn on
the main power switch, see
page 26 "Turning On/Off the
Power".
Printing does not start. The cause is displayed on the
screen of the control panel.
Printing does not start. The interface cable is not
connected correctly.
Printing does not start. The correct interface cable is
not being used.
Check the error message or
warning status on the display
panel, and then take the
required action. For details
about solutions, see page 71
"When Messages Are
Displayed".
For details about how to
connect interface cables
correctly, see
"Connecting the Printer",
Operating Instructions.
The type of interface cable to
use depends on the computer.
Be sure to use the correct one. If
the cable is damaged or worn,
replace it. For details about
interface cable, see
"Connecting the Printer",
Operating Instructions.
98
Printing does not start. The interface cable was
connected after the printer was
switched on.
Connect the interface cable
before turning on the main
power switch.
 Loading...