

Page 1
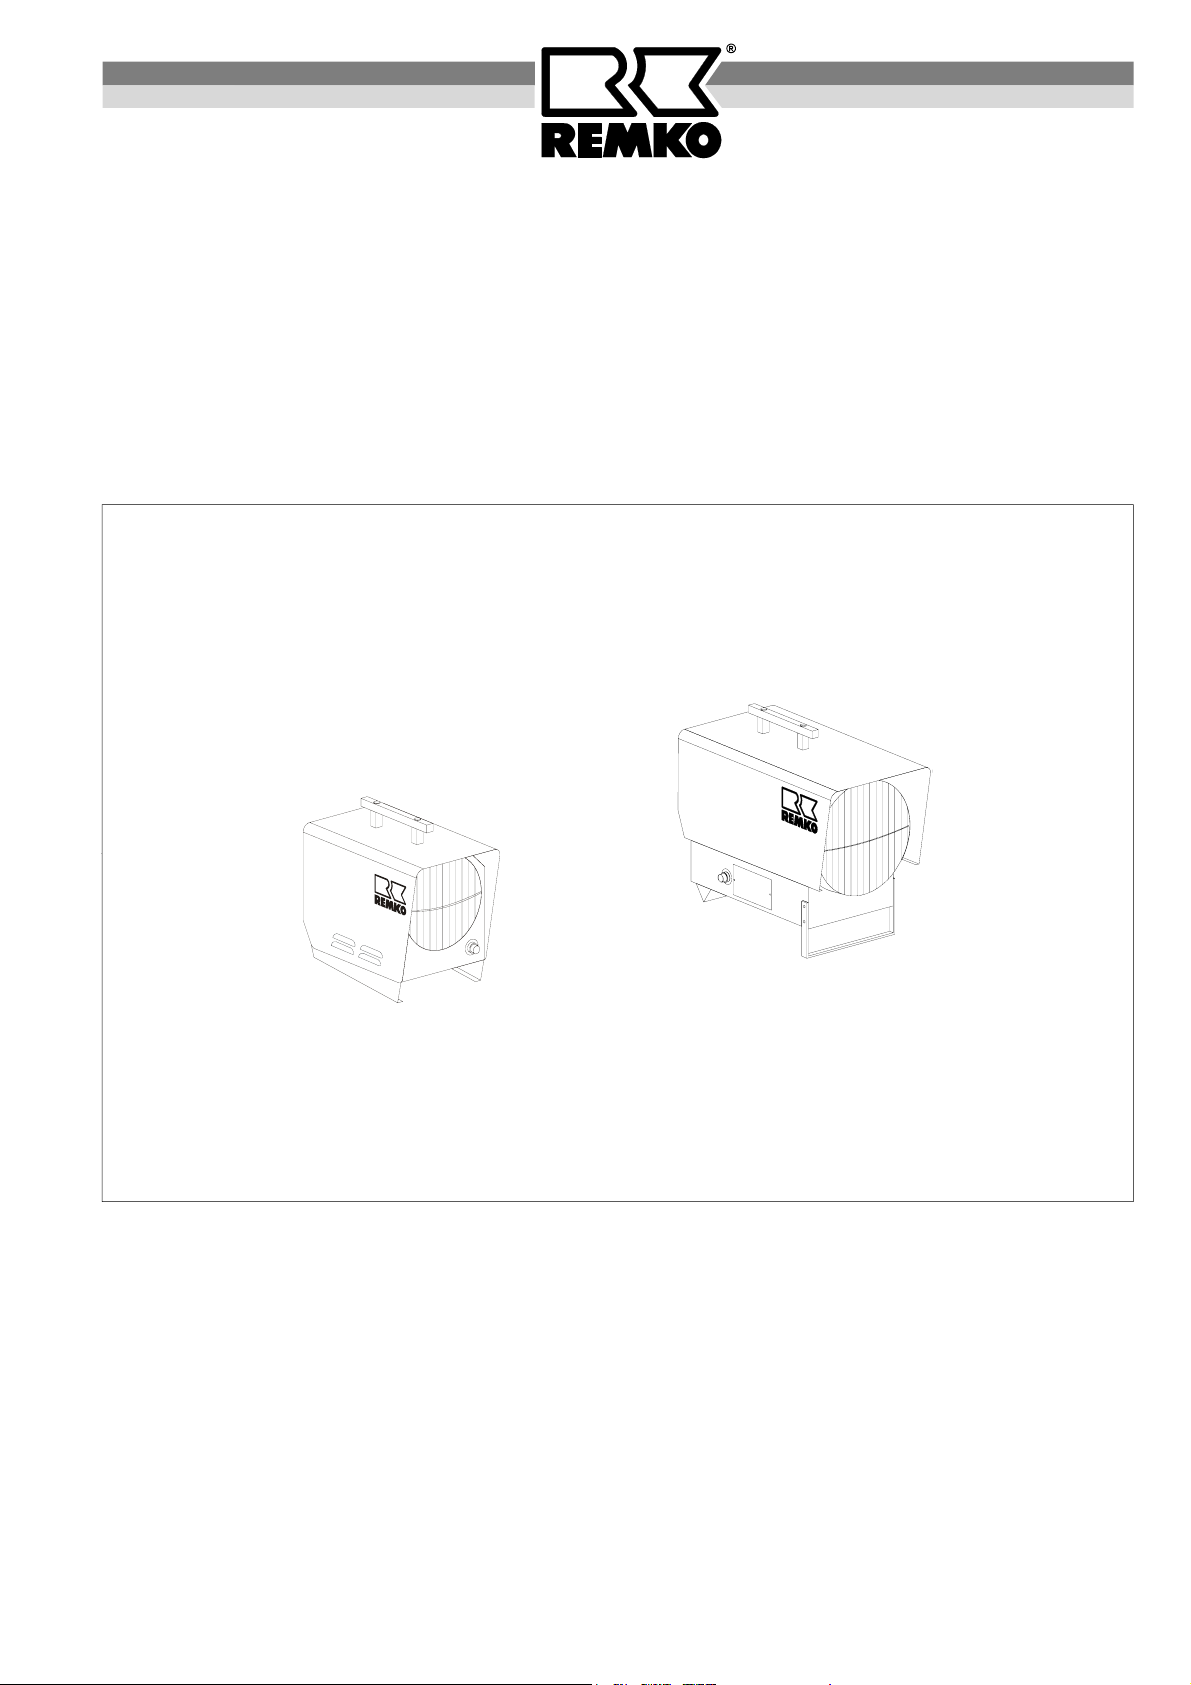
REMKO PGM 30 / 30 E
REMKO PGM 60 / 60 E
Propane gas heater
Operation
Technology
Spare Parts
Edition GB – R02
REMKO - powerful like a bear.
Page 2

Page 3
Operating instructions
Read these instructions carefully before setting up/operating the unit!
Our guarantee becomes null and void if the unit is used, set up
or maintained improperly, or if modifications are made to the supplied unit
without our prior consent.
Subject to alterations!
Mobile propane gas heater
REMKO PGM 30 / 30 E
REMKO PGM 60 / 60 E
Contents Page
Safety Instructions 4
Description of the Unit 4
General Instructions 5
Before Starting 5
Gas Supply 6
Starting 7
Safety Mechanism 7
Unit Shut Down 8
Maintenance 8
Always keep these operating instructions near or on the unit!
*
Contents Page
Technical Data 9
Wiring Diagram 9
Service and Guarantee 9
Exploded View PGM 30 / 30 E 10
Spare Part List PGM 30 / 30 E 11
Exploded View PGM 60 / 60 E 12
Spare Part List PGM 60 / 60 E 13
Troubleshooting 14
Maintenance Log 15
*
3
Page 4

Safety Instructions
Make sure to observe relevant local building and fire
protection codes and abide by professional association
regulations when the unit is in operation.
Please also observe the following.
The unit may only be operated by persons who have
received proper training in its operation.
The units must be installed and operated in such a
way that people are not exposed to radiant heat and
fires cannot occur.
The units may only be installed and operated in
closed rooms where the units have an adequate air
supply for combustion.
The portable liquid gas tanks must be set up se-
curely in an upright position.
During unit operation, the portable liquid gas tanks
may never be used while they are lying on their sides.
Danger of explosion: liquid gas may leak out of the
gas nozzle.
The unit may only be operated in well-ventilated
rooms.
Persons may not remain in the room where the unit
has been installed for longer periods of time.
Warning signs must be placed at the entrances.
The unit may only be set up and operated on a non-
flammable surface.
Make sure that no flammable objects/materials can
be sucked in to the unit.
The unit may not be set up or operated in surround-
ings susceptible to fire or explosions.
A safe distance off 1.5 m must be maintained
around the unit; a distance of 3 m must be maintained from its exhaust opening, even for nonflammable objects.
The unit’s exhaust opening may not be reduced in
size or equipped with hoses or pipes.
Never insert foreign objects into the unit.
The air suction grille must always be kept free of dirt
and loose objects.
Do not expose the unit to a direct stream of water.
All electric cables outside the unit are to be pro-
tected from damage (e.g. caused by animals, etc.).
Before performing any maintenance or repair work,
make sure to unplug the unit from the power supply
and disconnect it from the fuel supply.
Do not bypass or block safety mechanisms while
the unit is in operation.
*
Description of the Unit
The unit is a mobile, liquid gas-fired heater with a fan for
transporting hot air. It does not have a heat-exchanger.
The unit works without an exhaust system and is only
suitable for industrial purposes. The unit is a direct-fired
device which has been designed for universal and
smooth operation.
The unit is equipped with an integrated “power regulation“ function for gradual control of heat output, as well
as with a durable flame burner, an electromagnetic
valve, a piezo electric ignition, a safety pilot with thermoelectric flame monitoring, a connecting cable with
plug and finally a quiet axial fan which requires little
maintenance.
The unit meets the basic safety and health requirements found in the relevant EU regulations.
Areas of Application
The unit can be used, for example:
to dry new buildings
to provide localised heat for outdoor workplaces or
localised heat in production rooms and halls not susceptible to fire.
to permanently or temporarily heat closed and open
rooms that have sufficient fresh air intake
to de-ice machines, vehicles and non-flammable
stored goods and regulate the temperature of components susceptible to frost.
For optimum unit operation, the device should not
be operated at an ambient temperature above 25 °C.
*
Unit Functionality
When the unit is switched on (operating switch set to "I"
= heating mode), the air supply fan starts and the electromagnetic valve opens. However, the gas supply to
the burner is still closed off.
The gas supply to the burner is released by pressing
the pin of the thermoelectric gas valve (safety pilot).
The liquid gas is supplied to the burner pipe through a
pressurised nozzle where enough oxygen is added to
meet the respective burner capacity.
The resulting gas-air-mixture is ignited on the burner
head by an electric ignition spark. The spark is generated
by manually triggering the piezo electric igniter.
Thermoelectric flame monitoring is started by heating
the thermocouple. The safety pilot pin must now be released. If there are operational problems or the flame
goes out, the gas supply is interrupted. However, the
supply air fan continues running.
The safety temperature limiter (STB) interrupts the gas
supply and locks all functions if the unit overheats. The
STB can only be manually released after the unit has
cooled.
The min/max heat output can be gradually with the
“power regulation“ function during unit operation.
4
Page 5

General Instructions
The unit may only be operated by persons who have
received proper training in its operation and how to
handle liquid gas.
When operating the unit, make sure to comply with
the relevant national/regional guidelines.
The unit may only be operated in rooms
– with sufficient air supply for combustion
– that are well-ventilated
– where the quantities of substances which can be
harmful when breathed in are admissible.
Good natural ventilation exists when, for example:
1. The room content in m³ equals 30 times the rated
heat output of all units in operation in the room
and natural ventilation is supplied through doors
and windows or
2. There are non-closable openings for air output
and intake close to the ceiling and floor whose
size in m² equals at least 0.003 times the rated
heat output in kW of all heating units in operation
in the room.
A standard unit connection pressure of 1.5 bar
(1500 mbar) of category I
countries.
is required for all EU
3B/P
Prior to operating the unit, the operating personnel
must check that the unit and its safety mechanisms
are functioning properly and that the safety mechanisms have not been removed.
Any defects are to be reported to the supervisor im-
mediately.
The unit must be switched off if any defects are
found which endanger the safe operation of the unit!
The unit may be only serviced by authorised person-
nel; only original spare parts may be used.
Parts that wear out must be replaced on a regular
basis unless an authorised service person confirms
that the unit is functioning smoothly.
If the unit has been switched off by the temperature
limiter due to overheating, the reason the problem
occurred has to be identified and fixed.
If work is performed on the gas supply hose or if
the gas cylinder is replaced, all stop valves must
be closed and nothing which can potentially ignite
*
may be present in the immediate surroundings.
The connection pressure may not fall below or ex-
ceed the required value.
When longer hoses are used, the corresponding
pressure loss has to be taken into account.
Use only those parts, such as gas hoses, pressure
controller and mechanisms which protect lines and
hoses from breaking and safety mechanisms that
prevent gas leakage, that have been tested and are
suitable for the intended purpose.
The pressure controllers must have a fixed initial pres-
sure of 1500 mbar and must be equipped with a
mechanism that prevents the hose from breaking.
The unit may not be operated if the gas is in a liquid
state as it enters the burner.
At building sites, only hoses designed for use with
liquid gas may be used.
In accordance with regional regulations.
The length of the gas hose should not exceed 2 me-
tres.
Longer hoses may be used if safety regulations are
observed and the length of the hoses is kept as
short as possible.
Gas hoses must be protected against chemical,
thermal and mechanical damage.
If unit operation is unmonitored, hoses must be used
that protected against breakage.
Before Starting
Only individuals who have been sufficiently trained in
the respective area may operate the units and monitor
the containers and storage of the cylinders.
Make sure that the operator is aware of potential dangers when handling liquid gas.
Prior to operation, the operators must check the units’
operating and safety mechanisms for any visible defects and ensure that the safety mechanisms have not
been removed.
Important Information
The unit may only be installed in well-ventilated
rooms; it may not be installed in residential living
rooms or similar spaces!
A constant unit connection pressure of 1.5 bar (1500
mbar) must be maintained even when the unit is in
continuous operation.
If the unit is operated at a building site, only hoses
designed for this purpose may be used.
Clean the gas supply hose thoroughly before operat-
ing the unit for the first time.
For optimum unit operation, the device should not
*
be operated at an ambient temperature above 25 °C.
5
Page 6
Gas Supply
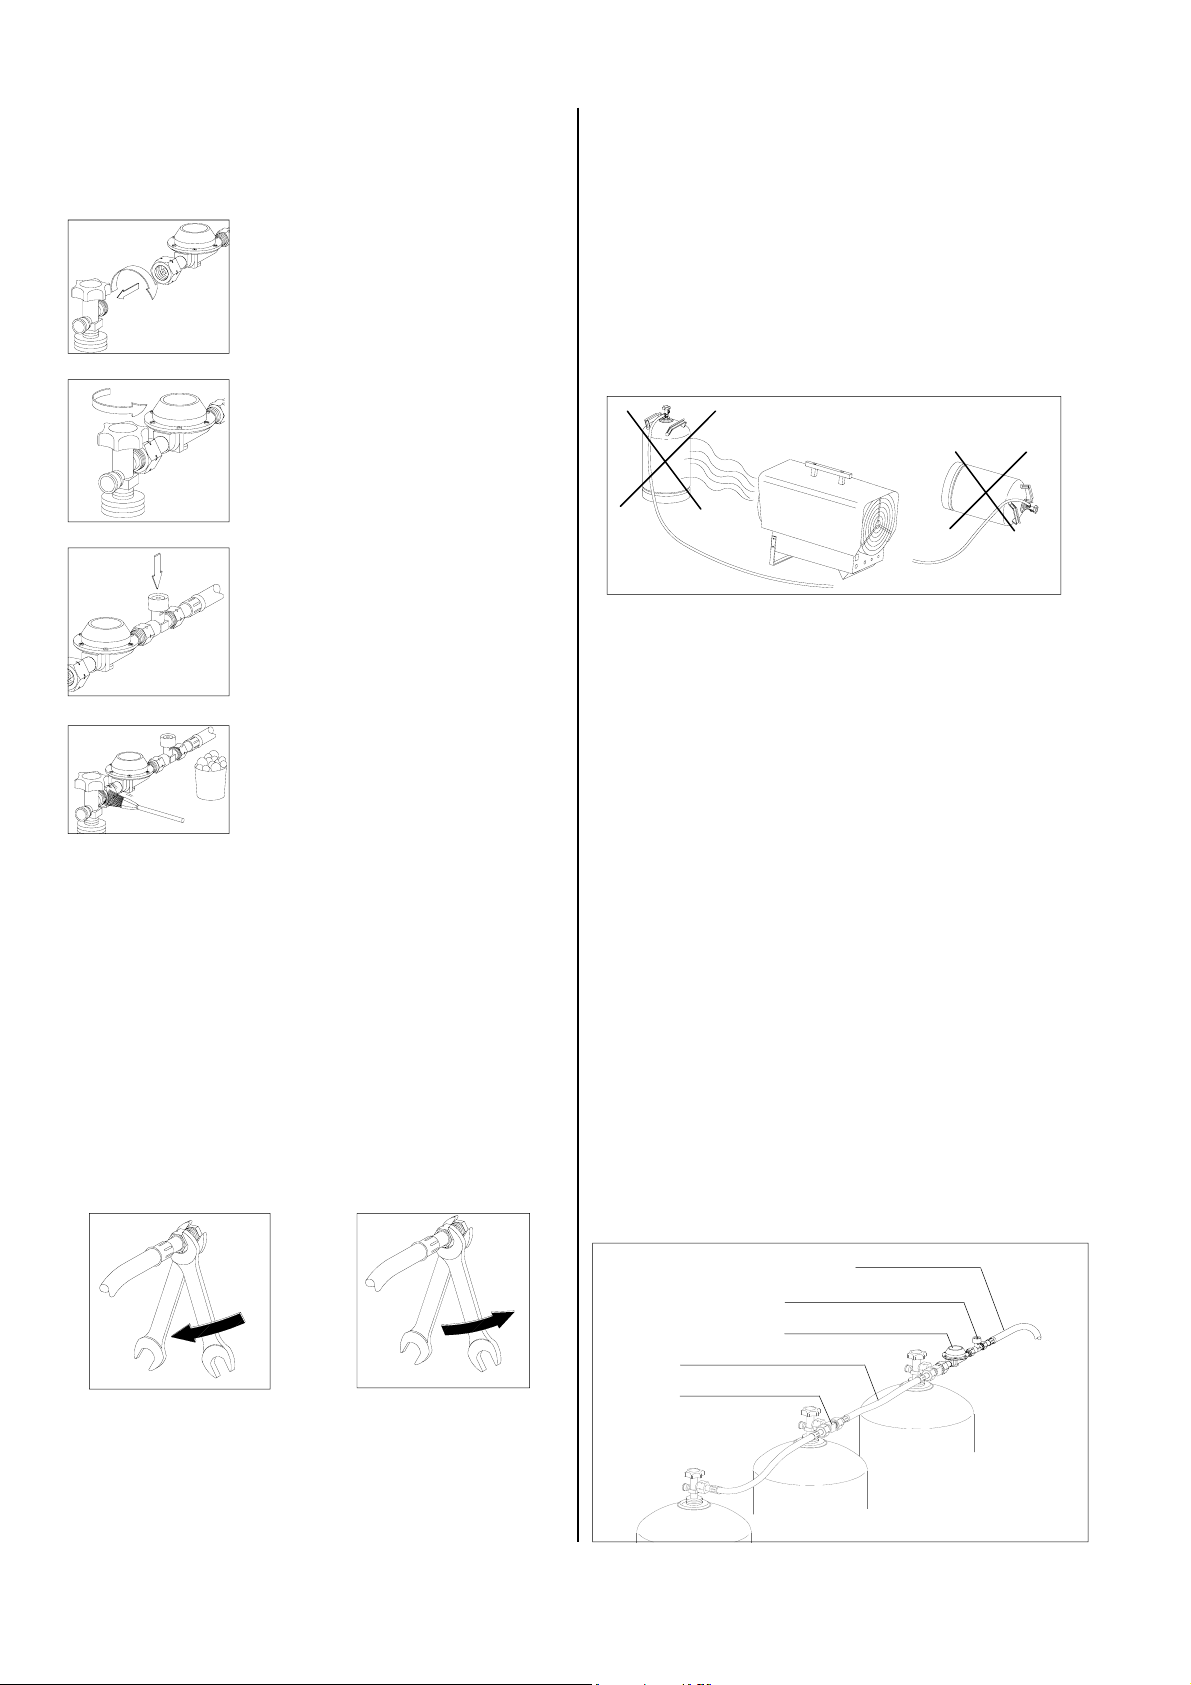
Connect the gas hose as follows:
1. Connect the pressure controller
to the gas cylinder(s).
Caution!
Left-handed thread!
*
2. Open cylinder(s) valve(s).
When gas is removed from several gas cylinders simultane-
ously, all the valves have to be
opened.
3. Press the release button of the
hose protection mechanism
opening
This must be done each time
the cylinders are replaced.
4. After installing and connecting
the units, check all gas connections to make sure they are
tight.
Soap solution, leak detection
spray etc.
Do not use open flames!
Important Information about Installation
When installing or removing the gas hose, make sure to
exert counterpressure on the unit’s gas connection nipple using an open-end spanner SW 19 and remembering that the thread is left-handed.
This process also applies to all other gas components,
including the pressure controller, hose protection device
(against breakage), etc.
Unscrew gas hose
the valve(s).
Fasten gas hose
after
Important Safety Instructions
The gas tanks may not be placed directly behind the
unit!
Never heat up or de-ice the gas tank using the hot
air coming out of the unit.
Danger of explosion.
Never place the gas tank on its side when the unit is
in operation.
Danger of explosion.
Important Information about Ice Formation on the
Gas Supply System
There is a danger that ice will form on the gas or pressure tanks if the dimensions of the gas supply system
are insufficient. When the gas pressure falls, it is no
longer possible to ensure that gas is properly supplied
to the consumer system.
This can result in imperfect combustion or harmful exhaust fumes, or may cause the flame to go out.
The frost crystals may not be removed using an open
flame, burning embers or radiators.
The gas supply system is to be set up in accordance
with the unit’s connection value (see type plate), length
of operation and ambient temperature of the supply
tanks.
In general, we recommend that using a set of at least 3
cylinders to prevent heavy ice formation on the tanks.
The number of cylinders can be increased using a
multi-cylinder set (accessories) depending on the unit
capacity and the length of operation.
Assembly of Multi-Cylinder Set
All cylinder valves must be open to ensure constant gas
supply!
Gas hose to unit
Turn union nut
clockwise
Install gas tanks only in well-ventilated rooms;
they may not be set up in rooms where people re-
*
side for longer periods!
6
Turn union nut
counter-clockwise
Line breakage protection
pressure controller
High pressure hose 0.4 m
T-connection
Page 7
Starting
Only individuals who have been sufficiently trained in
the respective area may operate the units and monitor
the containers and storage of the cylinders.
Please also observe the following.
Make sure that the operator is aware of potential
dangers when handling liquid gas.
The unit may only be installed in well-ventilated
rooms; it may not be installed in residential rooms or
similar spaces!
For optimum unit operation, the device should not be
operated at an ambient temperature above 25 °C.
Make sure to maintain a safe distance to combusti-
ble and flammable materials and comply with local
fire codes.
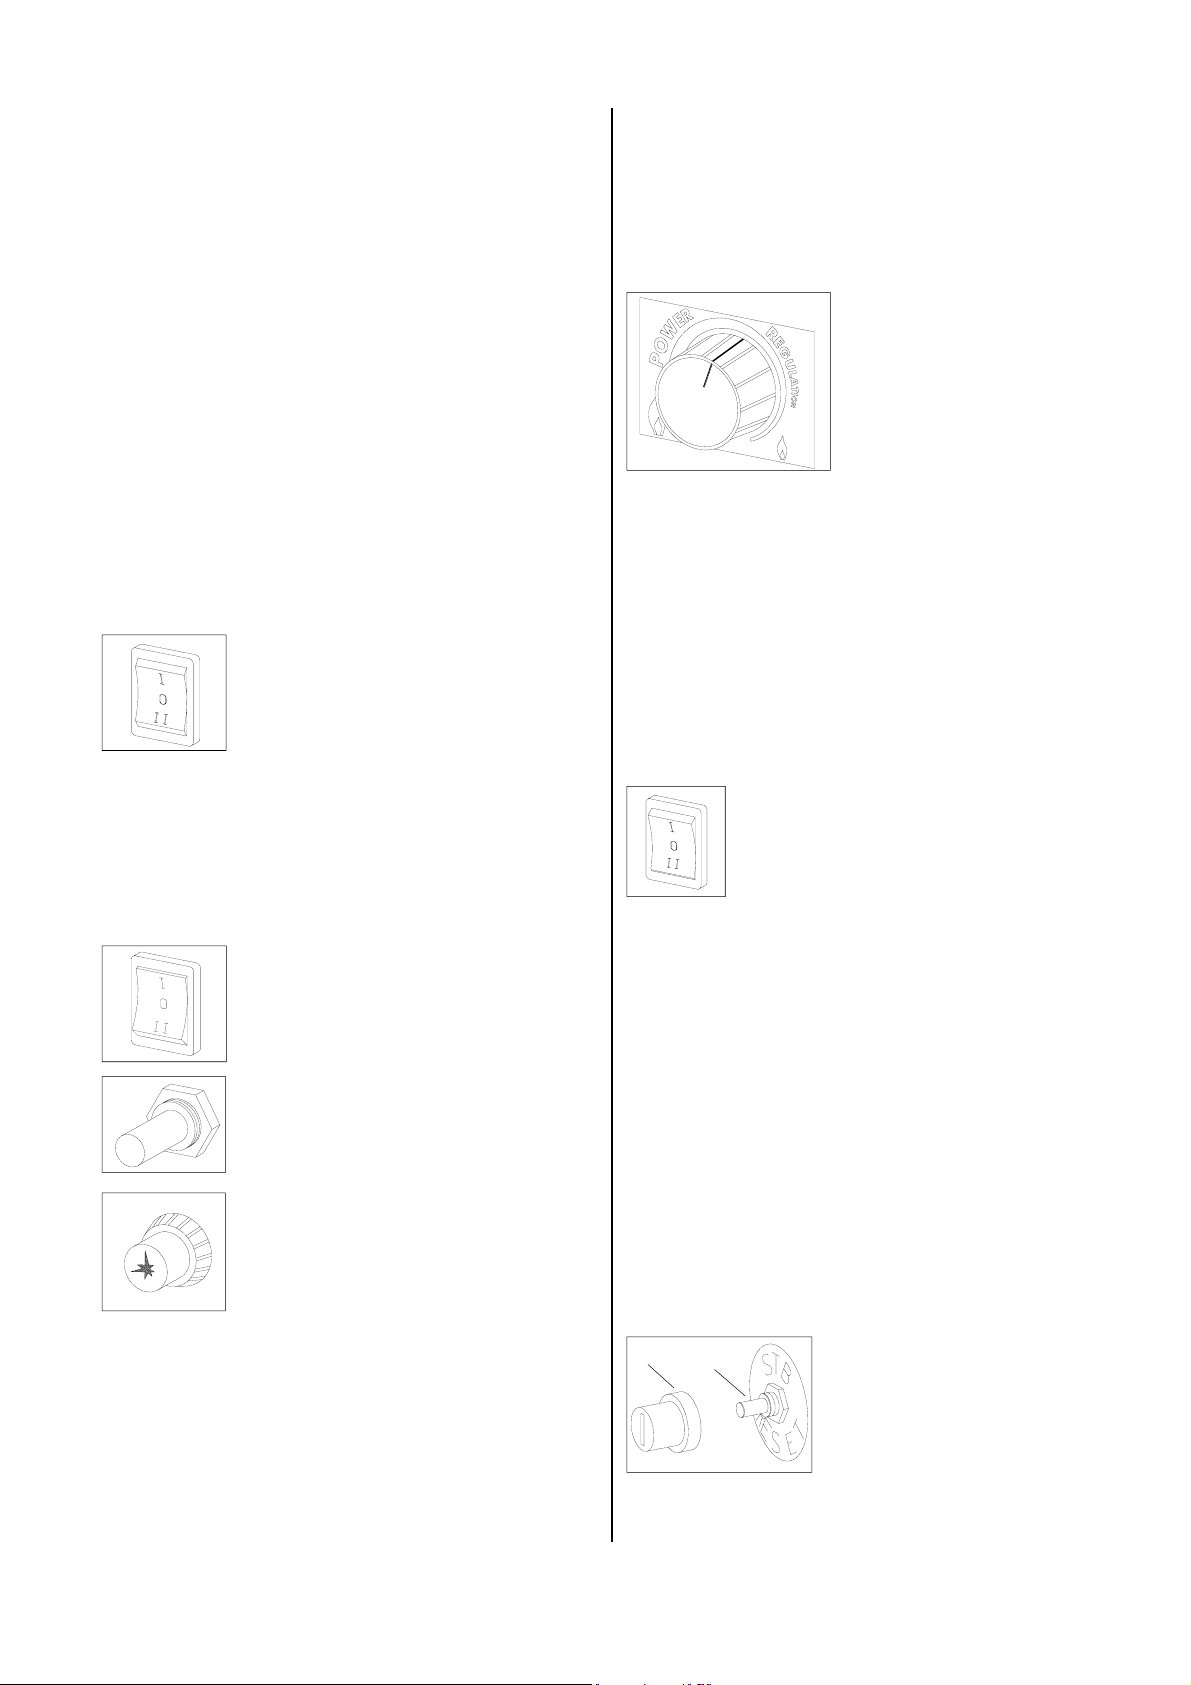
Setting and regulating the heat output
1. Set the heat output gradually using the adjustable
“power regulation”.
2. Please note: this setting can also be gradually
changed while the unit is in operation.
Turn to the left:
Increases heat output
Turn to the right:
Lowers heat output
Important Information
Make sure that the air supply can be freely suctioned in
and the heated air blown out.
Connecting the unit to the power supply
1. Set the operating switch to "0".
Off.
2. Plug the unit in to a power socket
with the right connection.
230V/1~ 50Hz.
The unit must be connected to the power supply
via a special supply point with fault current safety
*
switch.
Heating
1. Set the operating switch to "I".
Heating mode.
The air supply fan starts.
2. Press and hold the pressure pin 2
of the thermoelectric gas valve.
Safety pilot.
3. Hold the pressure pin down for
approx. 2 or 3 sec. and then press
the piezo electric igniter until a
flame appears.
4. After a flame has appeared, continue holding down
the pressure pin for approx. 10 - 15 seconds until the
thermoelectric flame monitoring function has started.
5. Do not release the pressure pin before this.
6. If the flame goes out once you release the pressure
pin, repeat the ignition process after waiting approx.
1 minute.
7. Keep the pressure pin pressed down a little longer.
The unit’s air intakes and outlets may not be constricted
or equipped with hoses or pipes.
Ventilation
In ventilation mode, only the air supply fan runs and the
unit can be used for air circulation.
1. Set operating switch to "II".
2. Please note: it is not possible to
heat!
Safety Mechanism
Should overheating occur, the safety temperature limiter (STB) interrupts the gas supply and locks the unit’s
electrical system. All unit functions are switched off.
Before resetting the unit, check the operating conditions to ensure that the STB temperature is not
*
exceeded again.
“RESETTING” is not possible before the sensor has
cooled down to below approx. 90 °C.
The unit is released once the protective cap has been
unscrewed by pressing the “STB-RESET“ button.
1
You will find a detailed table for fixing problems under
“Troubleshooting”.
2
1. Remove the protective cap 1
2. Press the reset button 2.
3. Replace the protective cap.
7
Page 8
Unit Shut Down
Removing and Cleaning the Gas Burner
1. Close all cylinder valves.
2. Let the flame burn out.
3. Set the operating switch to “0”.
Off.
4. Unplug the unit plug from the power
supply.
Maintenance
Depending on the operating conditions, the units must
be serviced as necessary, at least once every two years
by a authorised individual to ensure that they are functioning properly
The test results must be recorded in a test log which is
kept in a safe place until the next test so that it can be
provided to authorised persons for control purposes at
any time.
Regular maintenance and care, especially after each
heating period, are required to ensure a long service life
and a faultless operation of the unit.
1. Shut off the gas supply and unplug the unit from the
power supply.
2. Remove the blow-out grille and the outside casing.
3. Loosen the clamping screw on the nozzle holder.
4. Remove the ignition cable from the ignition electrode.
Pay attention to the cap nut and the lock washer.
5. Screw the thermocouple capillary tube out of the
safety pilot.
6. Loosen the fastening screws on the burner and remove the burner with ignition electrode and thermocouple from the unit.
7. Clean the burner using a steel brush and compressed air.
8. Put the burner with ignition electrode and thermocouple back into the unit.
9. If necessary, set the ignition electrode and thermocouple by following the instructions below.
When the unit is being serviced, adjusted or repaired, the gas supply has to be turned off and the
*
unit unplugged from the power supply!
Adjustments or maintenance work may only be
performed by authorised personnel!
*
Please observe the following:
The unit must be maintained and cleaned at regular
intervals.
The unit must be kept free of dust and other deposits
and may only the cleaned using a dry or damp cloth.
Do not use place the unit in a direct stream of water.
Do not use any aggressive cleaning agents or those
which are harmful to the environment.
Do not use cleaning agents which contain solvents.
Use only suitable cleaners even when the unit is ex-
tremely dirty.
Check air suction and blow-out grille on a regular
basis and clean when necessary.
Make sure that the air intake for combustion air, the
injector behind it and the gas nozzle are not dirty.
Check gas burner, gas nozzle and gasket for dam-
age; replace when necessary.
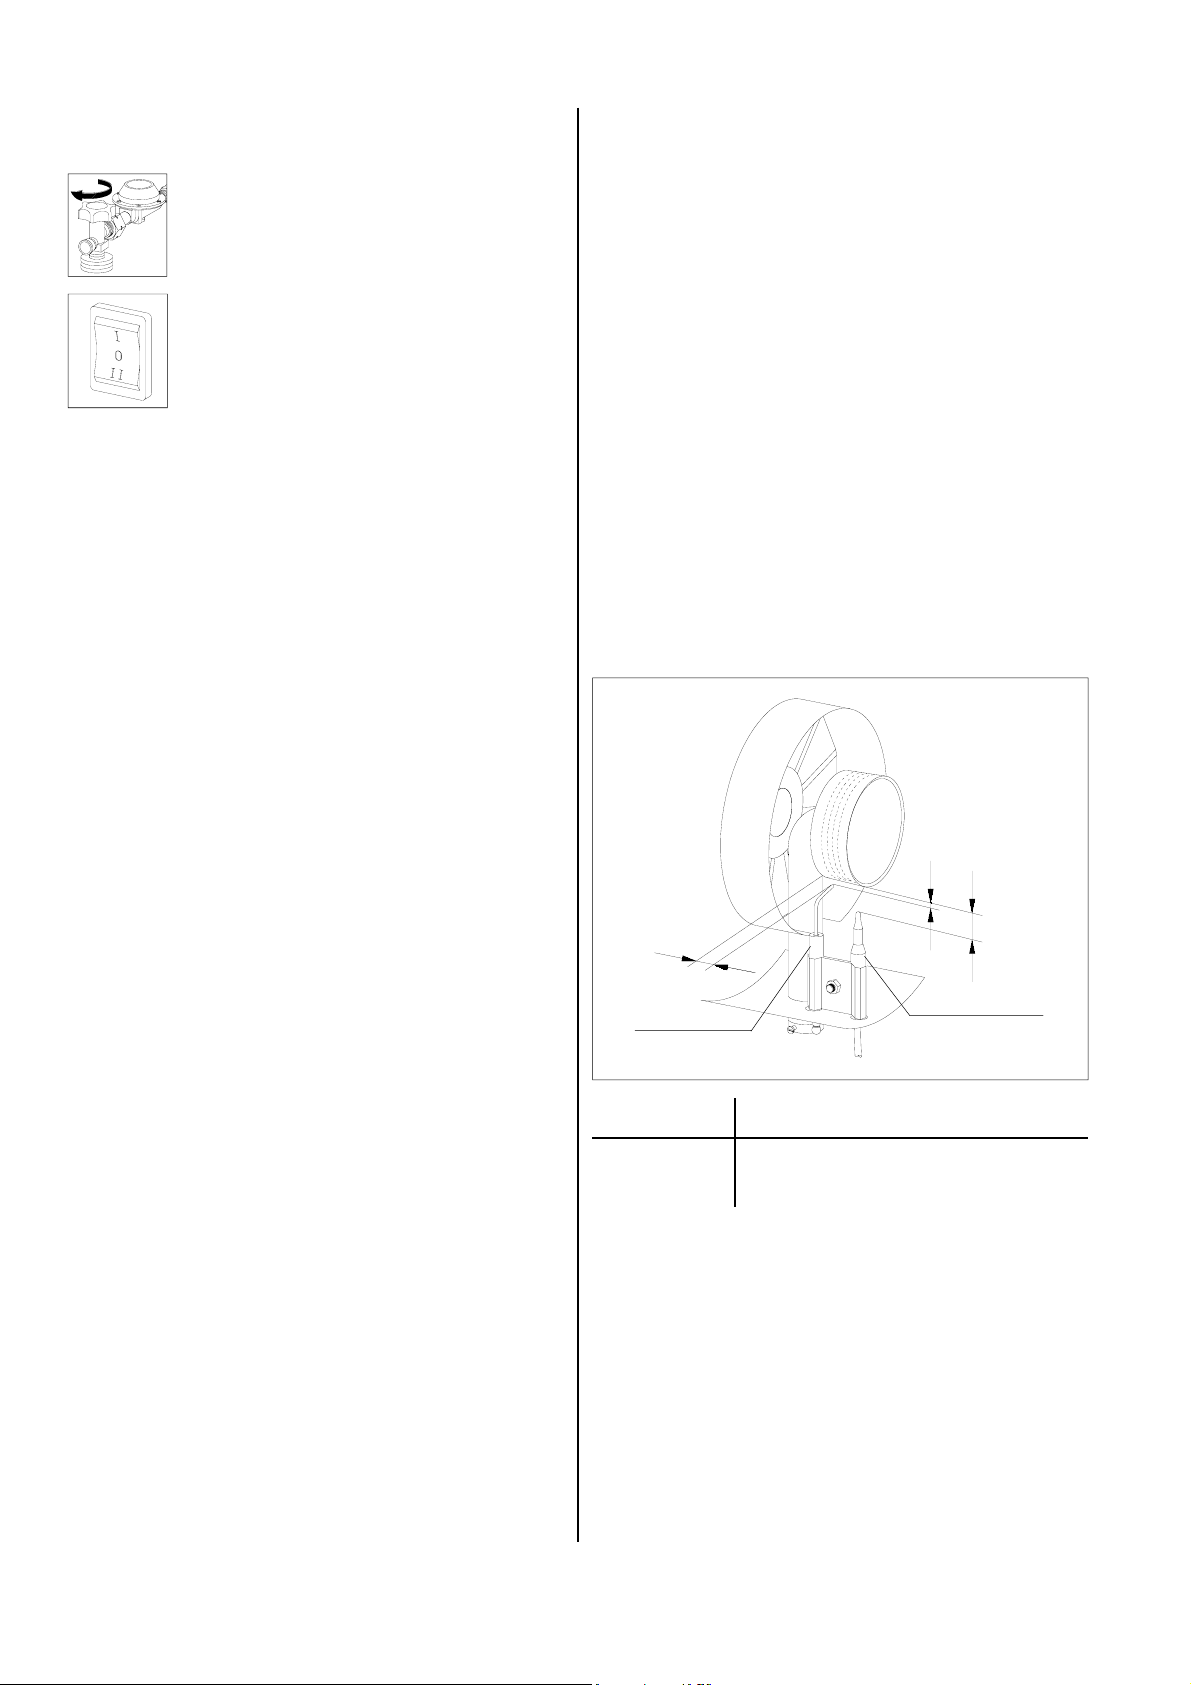
Clean baffle plate regularly.
A
C
B
Ignition
electrode
Type A B C
PGM 30 / 30E 3 mm 15 mm 20 mm
PGM 60 / 60E 3 mm 15 mm 35 mm
10. Assemble all other parts in the reverse order.
11. Test the entire unit to ensure that it is functioning
properly; make sure that all gas supply hoses are
impermeable using either a soap solution or a leak
detection spray.
12. Conduct an electrical safety test after performing
any maintenance work.
Bright yellow flames are an indication that the
fresh air supply is insufficient or that there is dirt
*
inside the unit.
Thermocouple
approx. dimensions
8
Page 9
Technical Data
Series PGM 30 / 30 E PGM 60 / 60 E
Rated heat output kW 26 55
Heating capacity kW adjustable from 10 to 26 adjustable from 25 to 55
Air output m³/h 800 1,450
Fuel/type of gas
Gas pressure bar 1,5 1,5
Gas consumption kg/h 0.78 - 2.0 1.95 - 4.27
Electrical connection 1~ V 230 230
Frequency Hz 50 50
Power consumption max. kW 0,07 0,11
Fuse protection A 10 10
Type of protection IP 44 IP 44
Sound pressure level L
Weight (without accessories) kg 12 20
Dimensions total length mm 450 650
width mm 260 320
height mm 410 510
1) noise measuring DIN 45635 - 01- KL 3
pA 1m
1)
dB(A) 56 - 69 62 - 72
Liquid gas Cat. I
3 B/P
, I3+
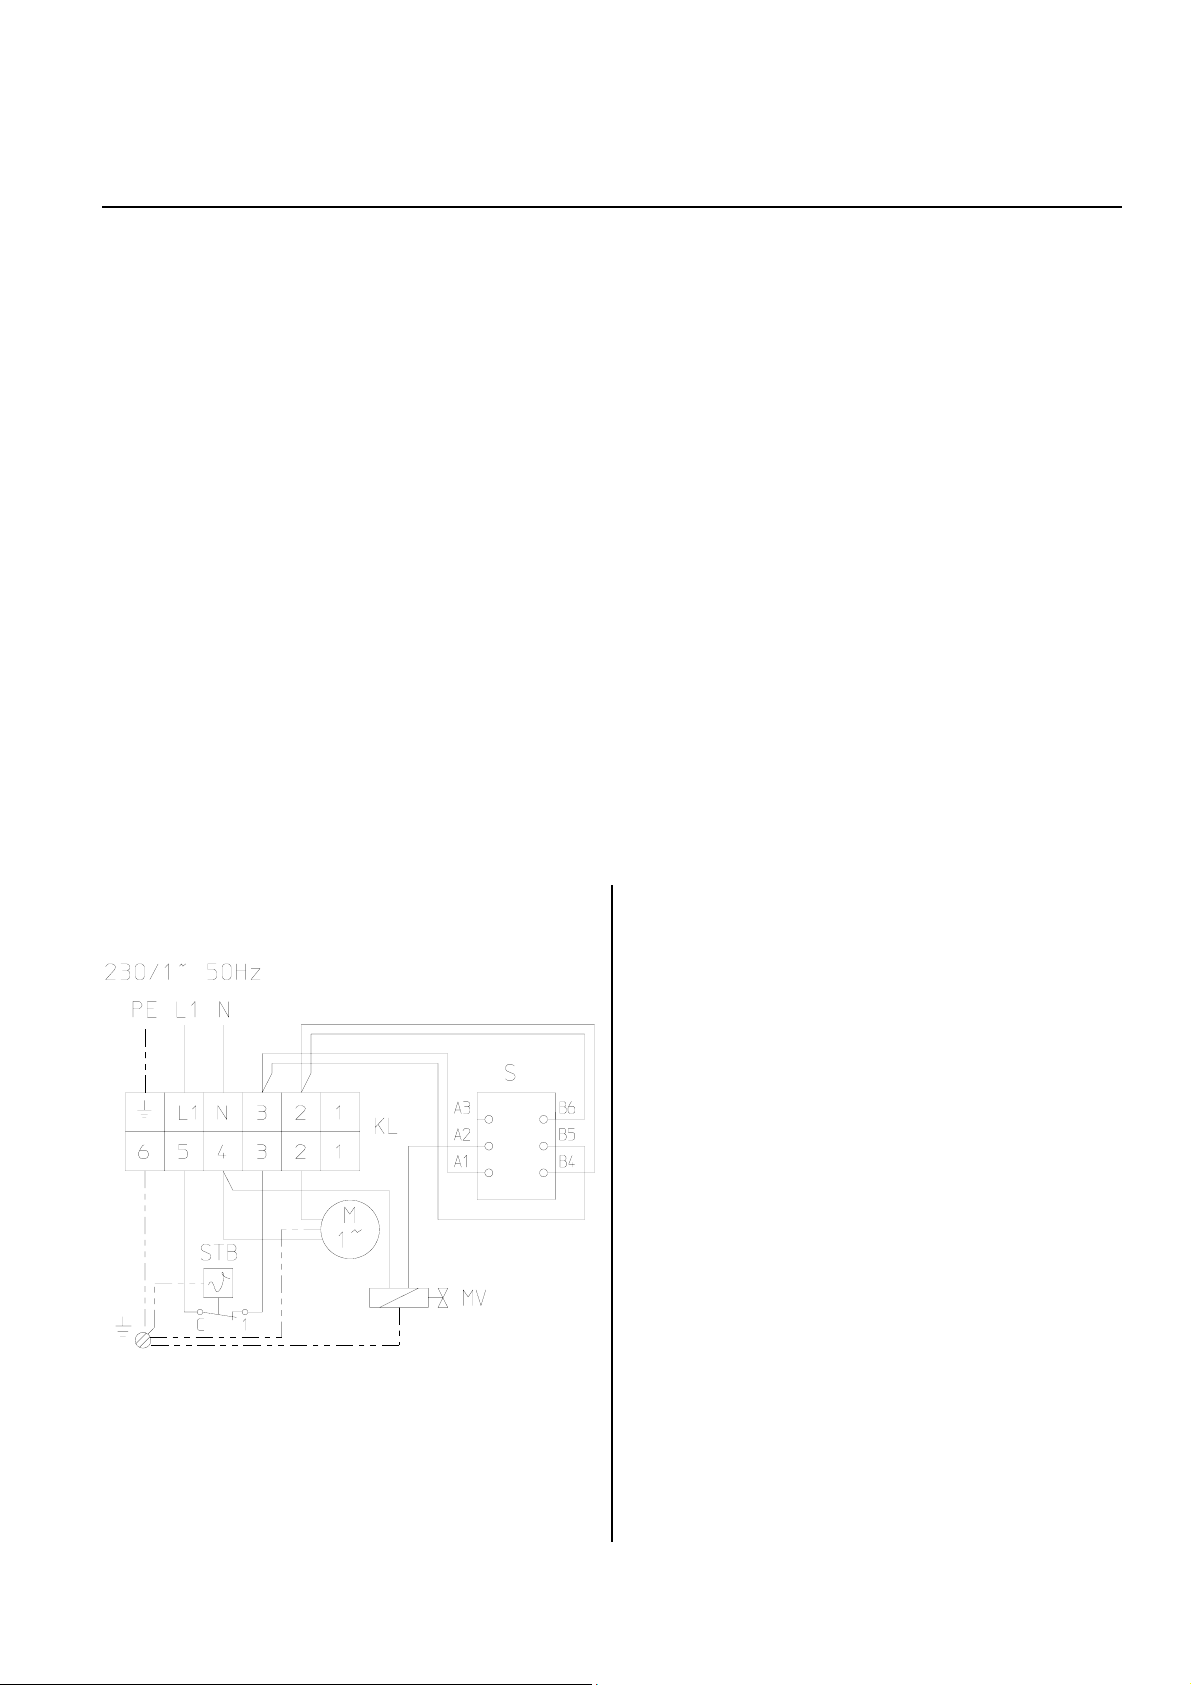
Wiring Diagram
MV = gas valve
M = fan motor
STB = safety temperature limiter
KL = terminal strip
S = operating switch
Service and Guarantee
For the guarantee to be valid, the customer must completely fill out the “guarantee certificate” enclosed with
all heating units and send it back to REMKO GmbH &
Co. KG in a timely manner after purchasing of the unit
and putting it into operation.
The units have undergone testing at the factory to ensure
proper functioning. If there are still malfunctions that
cannot be fixed by the operator using the troubleshooting instructions, please contact your dealer or contract
partner.
An operation/use other than indicated in these instructions is prohibited!
In the case of non-compliance, we assume no li-
*
ability and our guarantee becomes null and void.
Proper Use
These devices have been designed and equipped exclusively to be used for heating and ventilation for industrial
and commercial purposes.
The manufacturer is not liable for any damage resulting
from non-adherence to manufacturer specifications, legal requirements or any modifications to the units.
9
Page 10
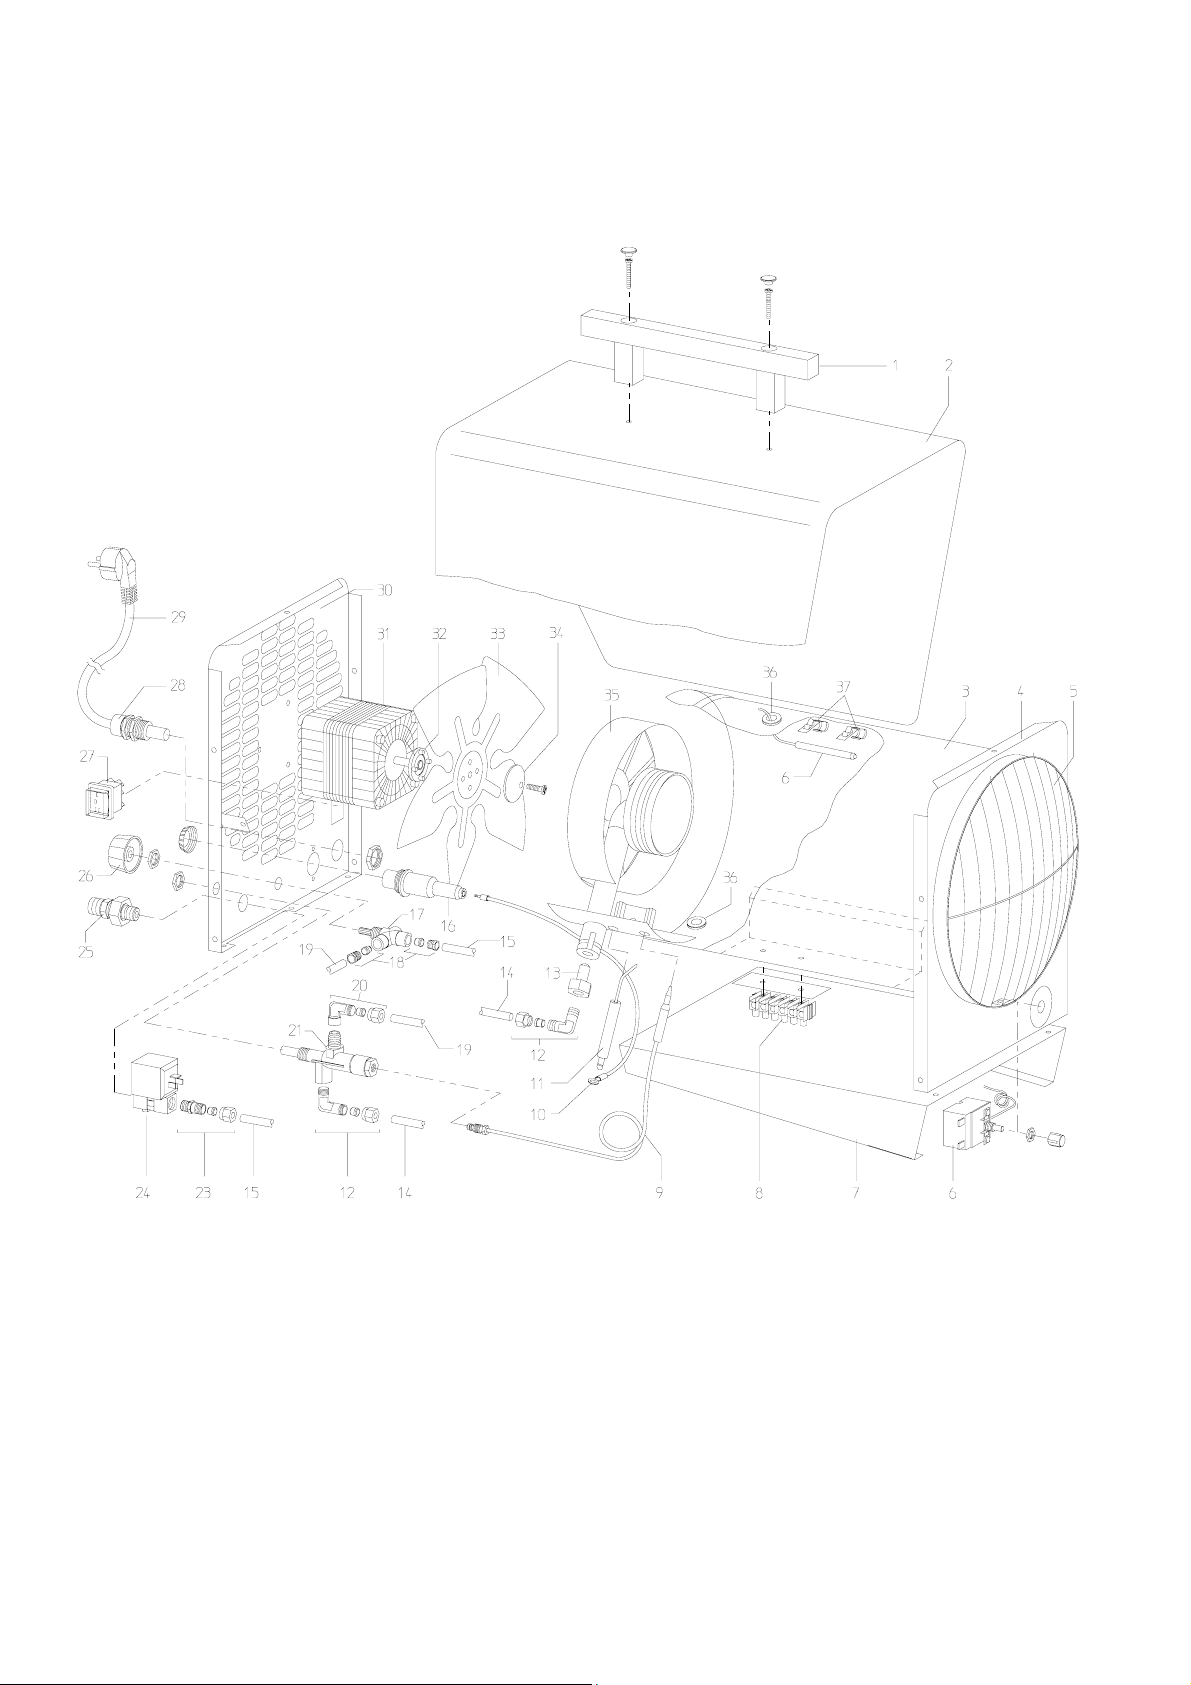
Exploded View PGM 30 / 30 E
10
We reserve the right to make changes to dimensions and design in the interest of technical progress.
Page 11

Spare Part List PGM 30 / 30 E
No. Description Ref. No.
1 transport handle 1101142
2 outside casing PGM 30 1101405
2a outside casing PGM 30 E (stainless steel) 1101463
3 combustion chamber 1101384
4 end plate, front 1101479
5 blow-out protection grille 1101383
6 safety temperature limiter with sensor 1101197
7 inspection cover 1101385
8 terminal strip, 6er 1101366
9 thermocouple 1101164
10 ignition cable 1101283
11 ignition electrode 1101180
12 angled screw coupling 1/8" x 6mm 1101316
13 gas nozzle 1101159
14 gas pipe Z/D 1101452
15 gas pipe M/R 1101441
16 piezo igniter 1101364
17 gas regulator 1101411
18 fitting M10x1 1101409
19 gas pipe R/Z 1101451
20 angled coupling 1/8" x 6mm 1101468
21 thermoelectric gas valve 1101169
23 GE-coupling 1/4" x 6mm 1101396
24 solenoid valve 1101376
25 gas connection nipple 3/8" lks. 1101134
26 control knob, cpl. 1101192
27 operating switch, cpl. 1101188
28 traction relief 1101267
29 connecting cable with plug 1101320
30 end plate, rear 1101480
31 fan motor 1108049
32 clutch plate B 6 Ø 1108455
33 fan blade 1101392
34 clutch disc 1101375
35 gas burner 1101417
36 protection socket 1101304
37 retaining bracket 1101395
not shown pressure controller with protection from hose breakage 1101470
2 metres of continuous gas hose 1101419
2 metres of continuous gas hose (HD for building sites) 1101174
5 metres of continuous gas hose (HD for building sites) 1108410
10 metres of continuous gas hose (HD for building sites) 1108411
multi-cylinder set (2 - 3 cylinders) 1014050
T - connection for multi-cylinder set 1101177
nylon seal for T - connection 1101178
HD - gas hose 0.4m for multi-cylinder set 1101179
When ordering spare parts, please indicate ref. no. and machine no. (see type plate)!
11
Page 12
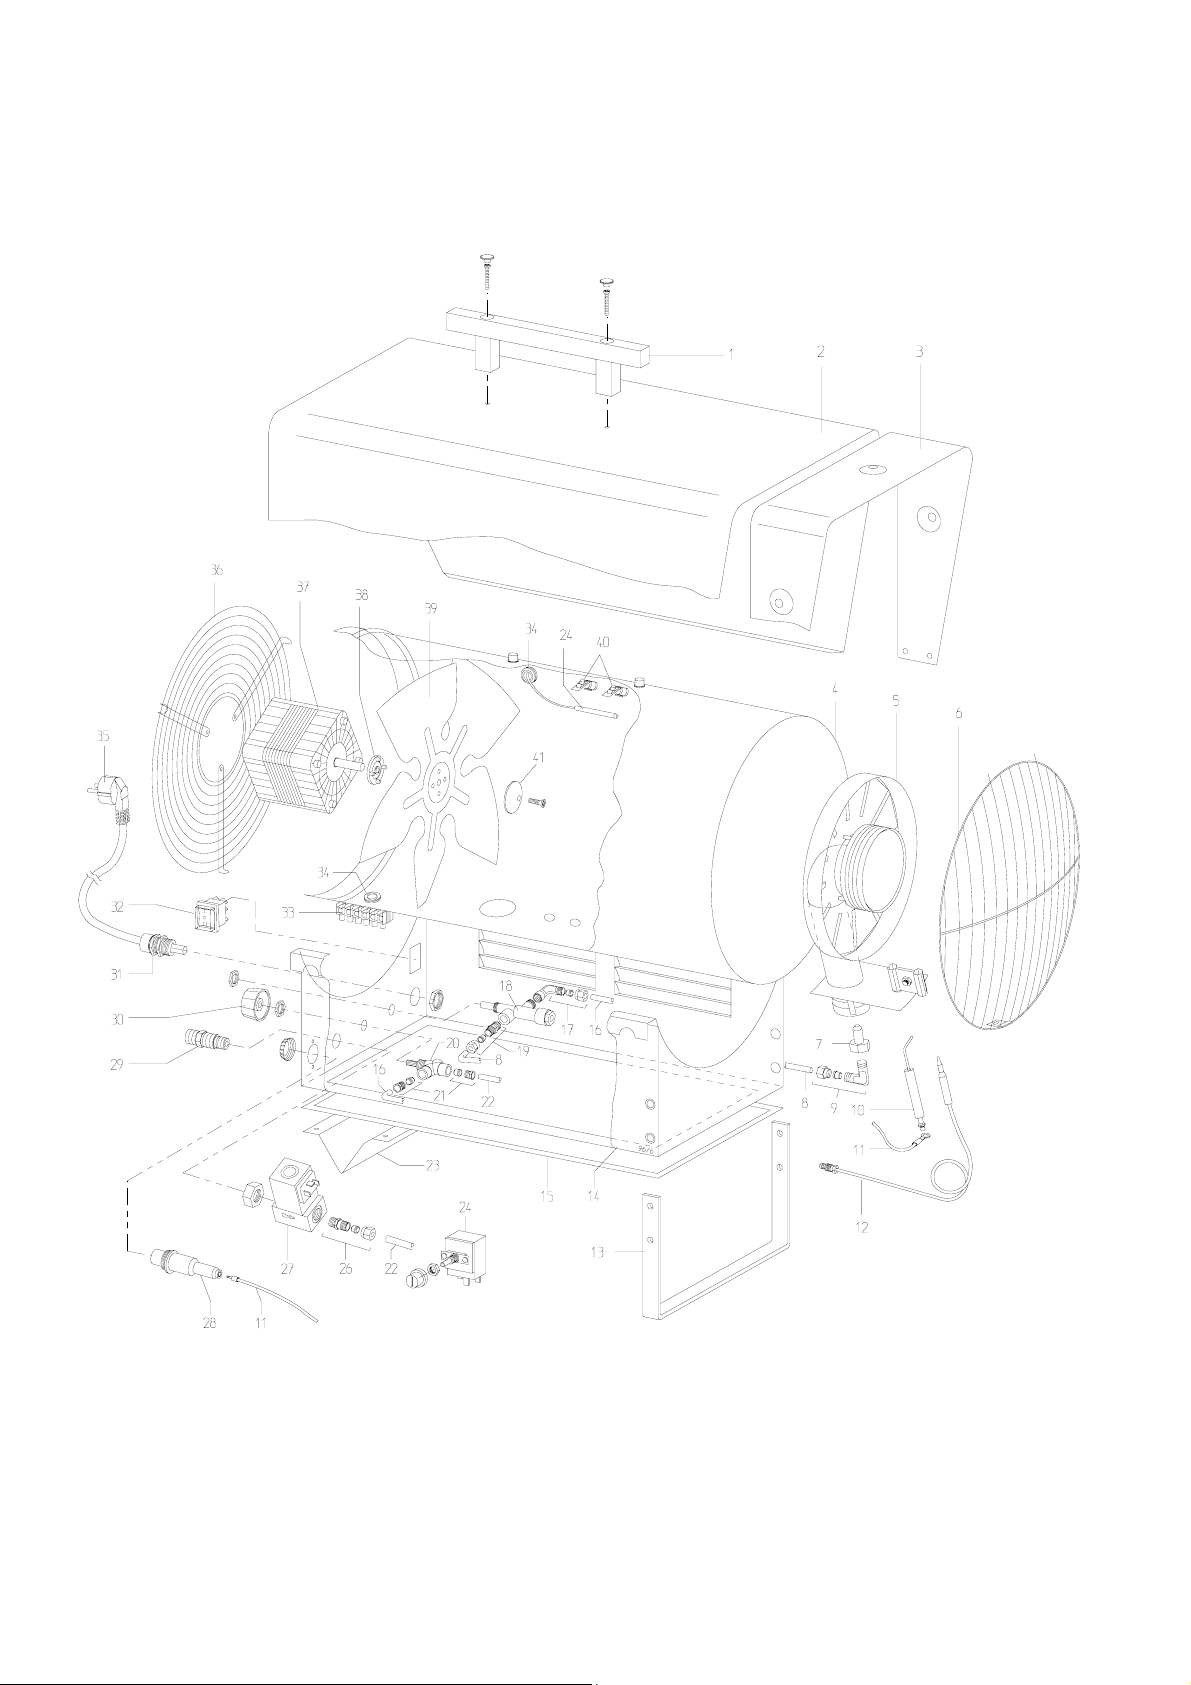
Exploded View PGM 60 / 60 E
12
We reserve the right to make changes to dimensions and design in the interest of technical progress.
Page 13

Spare Part List PGM 60 / 60 E
No. Description Ref. No.
1 transport handle 1101142
2 outside casing PGM 60 1101420
2a outside casing PGM 60 E (stainless steel) 1101461
3 insulation 1101421
4 combustion chamber 1101422
5 gas burner 1101423
6 blow-out protection grille 1101424
7 gas nozzle 1101426
8 gas pipe Z/D 1101458
9 angled screw coupling 1/8“ x 6mm 1101316
10 ignition electrode 1101280
11 ignition cable 1101283
12 thermocouple 1101164
13 support bracket, front 1101427
14 base plate 1101428
15 inspection cover 1101469
16 gas pipe R/Z 1101459
17 angled coupling 1/8" x 6mm 1101468
18 thermoelectric gas valve 1101169
19 GE-coupling 1/8" x 6mm 1101359
20 gas regulator 1101412
21 fitting M10x1 1101409
22 gas pipe M/R 1101441
23 support bracket, rear 1101249
24 safety temperature limiter with sensor 1101197
26 GE-coupling 1/4" x 6mm 1101396
27 solenoid valve 1101376
28 piezo igniter 1101364
29 gas connection nipple 3/8" lft. 1101134
30 control knob, cpl. 1101192
31 traction relief 1101267
32 operating switch, cpl. 1101188
33 terminal strip, 6er 1101366
34 protection socket 1101304
35 connecting cable with plug 1101320
36 air suction grille 1101432
37 fan motor 1101254
38 clutch plate B 8 ø 1101255
39 fan blade 1101150
40 retaining bracket 1101395
41 clutch disc 1101375
not shown pressure controller with protection from hose breakage 1101470
2 metres of continuous gas hose 1101419
2 metres of continuous gas hose (HD for building sites) 1101174
5 metres of continuous gas hose (HD for building sites) 1108410
10 metres of continuous gas hose (HD for building sites) 1108411
multi-cylinder set (2 - 3 cylinders) 1014050
T - connection for multi-cylinder set 1101177
nylon seal for T - connection 1101178
HD - gas hose 0.4m for multi-cylinder set 1101179
When ordering spare parts, please indicate ref. no. and machine no. (see type plate)!
13
Page 14
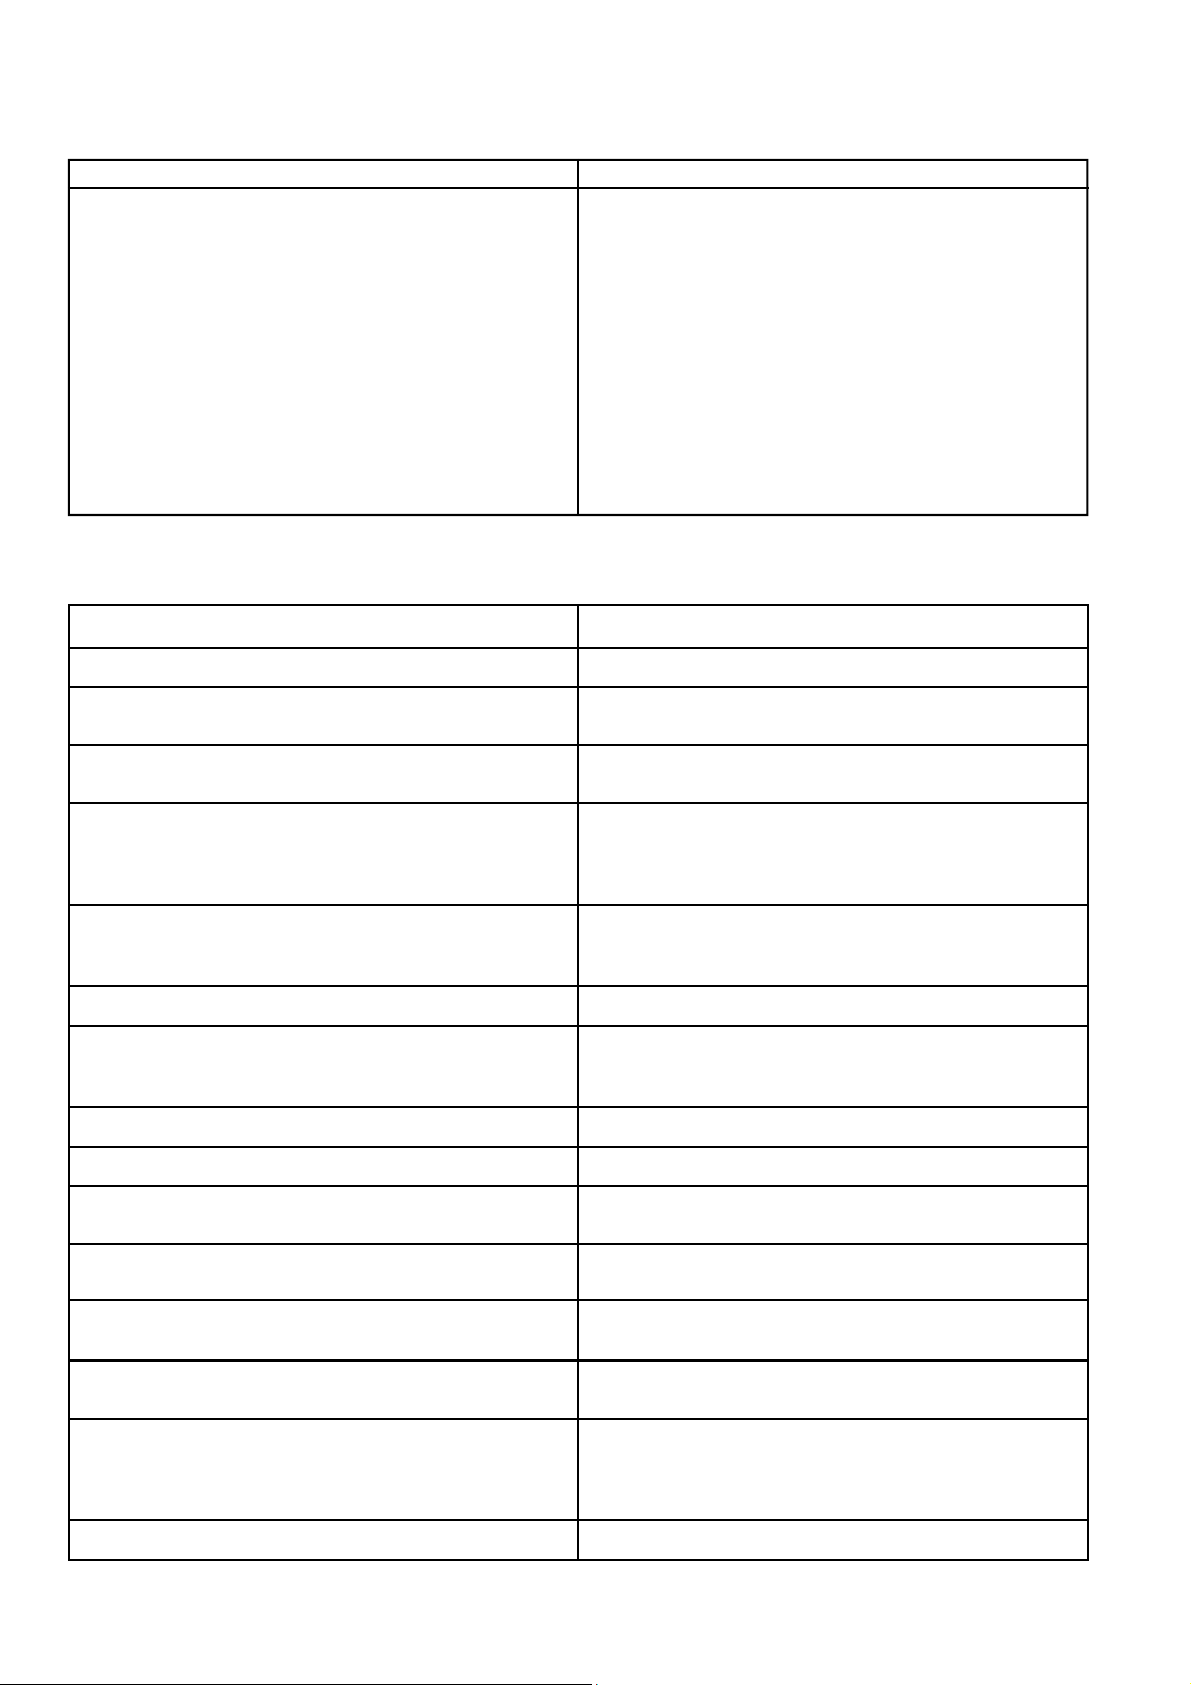
Troubleshooting
Cause: Problem:
– unit doesn’t start
– unit stops during operation
– fan blows but gas supply is blocked
or the flame does not ignite
– flame goes out after the pin of
thermoelectric gas valve is released
– gas supply is blocked or the flame goes out
– fuel consumption is too high
– unit can’t be shut down
– heating capacity diminishes during continuous operation
Shut off the gas supply and unplug the unit from the power supply before performing any work on the unit!
* *
Adjustments or maintenance work may only be performed by authorised personnel!
1 – 2 – 3 – 4 – 7
2 – 4 – 7 – 12 – 13
4 – 5 – 8 – 9 – 12
8 – 10 – 11
4 – 6 – 7 –10 – 11 – 12 – 13
12 – 15
3 – 14
13
1. no electrical connection
2. fan motor is overloaded
(fan blows irregularly or is blocked)
3. operating switch is defective
4. no gas pressure on solenoid valve
5. no ignition spark
6. Air suction grille is dirty
7. unit is shut down by safety temperature limiter (STB)
8. safety pilot does not open or does not lock
9. piezo igniter is defective
10. thermocouple is not getting warm enough
Cause: Remedy:
- plug the unit into an appropriate mains socket (230V/1~ 50Hz)
- check fan motor, fan blade and clutch plate and replace if necessary.
- shut off gas supply, unplug the unit and replace defective operating
switch
- check gas supply
- check contents of gas cylinders
- check gas hose(s) for damage
- release hose break protection resp. replace it
- set ignition electrode
- check ignition cable
- check porcelain insulation of ignition electrode
- clean air suction grille
- check air suction and blow-out grille and clean if necessary
- check fresh air supply
- release safety thermostat (STB - Reset)
- replace safety pilot
- replace piezo igniter
- check position of thermocouple and adjust according to setting in-
structions
11. loose or dirty connection between safety pilot and thermocouple
12. pressure controller defective or improper pressure controller attached or hose breakage protection is blocked
13 ice has formed on the gas cylinder(s) due to low temperatures
and too much gas output
14. solenoid valve does not open
15. gas hose(s) are leaking
14
- check connection and clean if necessary
- attach original pressure controller
- release hose breakage protection or replace it
- replace empty gas cylinder(s) and connect 2-3 cylinders using multi
cylinder set (Ref-No. 1014050)
- shut off gas supply
- let flame burn out
- set operating switch to “0” and unplug the unit
- replace solenoid valve
- find leakage using foam substance to eliminate leaks
Page 15

Maintenance Log
Model: : ................................ Model No.: : ......................................
1 2 3 4 5 6 7 8 9 10 11 12 13 14 15 16 17 18 19 20
Clean unit -surface-
Clean unit -interior-
Clean fan blade
Clean combustion chamber
Clean gas burner
Set/replace ignition electrode
Check gas hose
Check gas supply parts for leaks
Check safety facility
Check protection guards
Check unit for damage
Check fastening screws
Electrical safety inspections
Test run
Remarks:.......................................................................................................................................................................
......................................................................................................................................................................................
1. Date:………………. 2. Date: ...................... 3. Date: ...................... 4. Date: ...................... 5. Date:……………….
……………………….. ................................... ................................... ................................... ………………………..
Signature Signature Signature Signature Signature
6. Date:………………. 7. Date: ...................... 8. Date: ...................... 9. Date: ...................... 10. Date:……………..
……………………….. ................................... ................................... ................................... ………………………..
Signature Signature Signature Signature Signature
11. Date:…………….. 12. Date: .................... 13. Date: .................... 14. Date: .................... 15. Date:……………..
……………………….. ................................... ................................... ................................... ………………………..
Signature Signature Signature Signature Signature
16. Date:…………….. 17. Date: .................... 18. Date: .................... 19. Date: .................... 20. Date:……………..
……………………….. ................................... ................................... ................................... ………………………..
Signature Signature Signature Signature Signature
Adjustments or maintenance work may only be performed by authorised personnel!
15
Page 16

REMKO GmbH & Co. KG
Klima- und Wärmetechnik
32791 Lage, Im Seelenkamp 12
32777 Lage, PO Box 1827
Phone +49 5232 606-0
Fax +49 5232 606-260
E-mail [email protected]
Internet www.remko.de
 Loading...