

Page 1
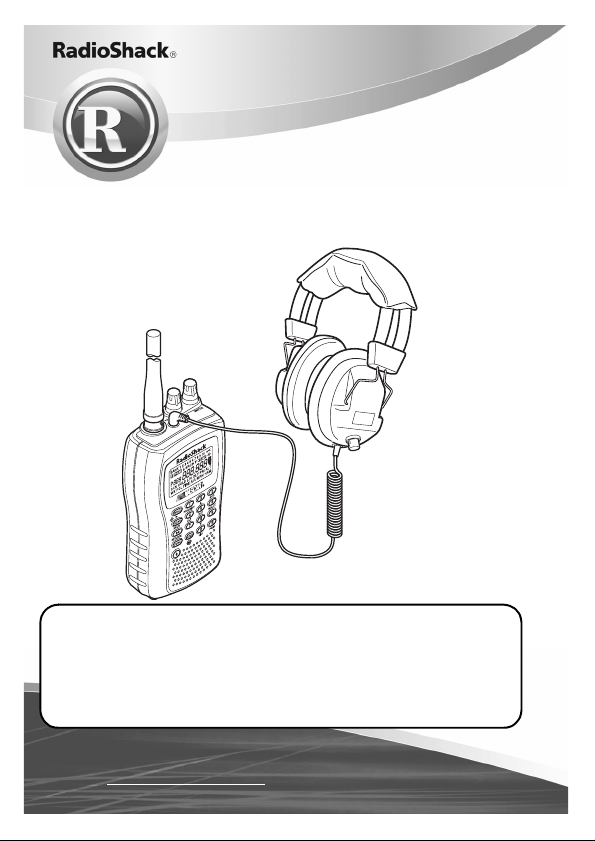
what’s included
scanner
antenna
user’s guide
quick start guide
Read this user’s guide completely
before using your scanner.
www.radioshack.com
20-516
PRO-84 200 channel
racing scanner
with headphones
•headphones
• belt clip w/two screws
•race frequency list
Page 2

s
2
Contents
The Basics
The FCC wants you to know . . . . . . . . . . . . . . . . 4
powering your scanner . . . . . . . . . . . . . . . . . . . . 5
using rechargeable batteries . . . . . . . . . . . . . . . . 7
using AC power . . . . . . . . . . . . . . . . . . . . . . . . . 10
using vehicle battery power. . . . . . . . . . . . . . . . 11
setting up your scanner . . . . . . . . . . . . . . . . . . . 13
connecting the antenna . . . . . . . . . . . . . . . . . . . 13
connecting an optional antenna . . . . . . . . . . . . 13
connecting an earphone/headphone . . . . . . . . 14
listening safely . . . . . . . . . . . . . . . . . . . . . . . . . . 14
traffic safety . . . . . . . . . . . . . . . . . . . . . . . . . . . . 15
connecting an extension speaker . . . . . . . . . . . 15
attaching the belt clip . . . . . . . . . . . . . . . . . . . . . 16
about your scanner . . . . . . . . . . . . . . . . . . . . . . 17
a look at the keypad . . . . . . . . . . . . . . . . . . . . . . 18
a look at the display . . . . . . . . . . . . . . . . . . . . . . 22
understanding banks . . . . . . . . . . . . . . . . . . . . . 24
service banks . . . . . . . . . . . . . . . . . . . . . . . . . . . 24
channel storage banks . . . . . . . . . . . . . . . . . . . . 24
Beyond the Basics
operating your scanner . . . . . . . . . . . . . . . . . . . 25
turning on the scanner and setting squelch . . . 25
storing known frequencies into channels . . . . . 25
race scanning tips. . . . . . . . . . . . . . . . . . . . . . . . 27
NASCAR is a registered trademark of the National Association for Stock Car
Auto Racing, Inc.
©2005. RadioShack Corporation. All rights reserved.
RadioShack and RadioShack.com are trademarks used by
RadioShack Corporation.
The Basic
Page 3

s
searching for and temporarily storing
active frequencies . . . . . . . . . . . . . . . . . . . . . . 28
service search . . . . . . . . . . . . . . . . . . . . . . . . . . . 28
storing frequencies into channels during
service search. . . . . . . . . . . . . . . . . . . . . . . . . . 29
scanning the stored channels. . . . . . . . . . . . . . . 30
manually selecting a channel . . . . . . . . . . . . . . . 31
signal stalker . . . . . . . . . . . . . . . . . . . . . . . . . . . . 31
setting the signal stalker options . . . . . . . . . . . . 33
using signal stalker . . . . . . . . . . . . . . . . . . . . . . . 35
Skywarn . . . . . . . . . . . . . . . . . . . . . . . . . . . . . . . . 36
about skywarn . . . . . . . . . . . . . . . . . . . . . . . . . . . 36
WX alert . . . . . . . . . . . . . . . . . . . . . . . . . . . . . . . . 38
turning on the weather alert feature. . . . . . . . . . 38
chain search. . . . . . . . . . . . . . . . . . . . . . . . . . . . . 39
chain search mode . . . . . . . . . . . . . . . . . . . . . . . 39
chain search hold mode . . . . . . . . . . . . . . . . . . . 40
storing frequencies found during chain
search into channel memory . . . . . . . . . . . . . . 41
program band select mode . . . . . . . . . . . . . . . . 42
direct entry search . . . . . . . . . . . . . . . . . . . . . . . 43
direct entry search hold mode . . . . . . . . . . . . . . 44
storing direct entry search frequencies
into channel memory . . . . . . . . . . . . . . . . . . . 44
search skip memory . . . . . . . . . . . . . . . . . . . . . . 45
delay . . . . . . . . . . . . . . . . . . . . . . . . . . . . . . . . . . 47
turning channel-storage banks on and off . . . . . 48
locking out channels . . . . . . . . . . . . . . . . . . . . . . 48
locking out frequencies . . . . . . . . . . . . . . . . . . . 49
priority . . . . . . . . . . . . . . . . . . . . . . . . . . . . . . . . . 50
3 The Basic
Page 4

s
4
using keylock . . . . . . . . . . . . . . . . . . . . . . . . . . . 51
wired programming . . . . . . . . . . . . . . . . . . . . . . 52
using the display/key backlight . . . . . . . . . . . . . 53
resetting the scanner . . . . . . . . . . . . . . . . . . . . . 54
frequently asked questions . . . . . . . . . . . . . . . . 55
specifications . . . . . . . . . . . . . . . . . . . . . . . . . . . 58
glossary. . . . . . . . . . . . . . . . . . . . . . . . . . . . . . . . 59
index . . . . . . . . . . . . . . . . . . . . . . . . . . . . . . . . . . 60
warranty . . . . . . . . . . . . . . . . . . . . . . . . . . . . . . . 63
The FCC Wants You to Know
This equipment has been tested and found to comply with the limits for a
Class B digital device, pursuant to Part 15 of the FCC Rules. These limits
are designed to provide reasonable protection against harmful interference
in a residential installation. This equipment generates, uses, and can
radiate radio frequency energy and, if not installed and used in accordance
with the instructions, may cause harmful interference to radio
communications.
However, there is no guarantee that interference will not occur in a
particular installation. If this equipment does cause harmful interference to
radio or television reception, which can be determined by turning the
equipment off and on, the user is encouraged to try to correct the
interference by one or more of the following measures:
• Reorient or relocate the receiving antenna.
• Increase the separation between the equipment and receiver.
• Consult your local RadioShack store or an experienced radio/TV
technician for help.
• If you cannot eliminate the interference, the FCC requires that you
stop using your scanner.
Changes or modifications not expressly approved by RadioShack may
cause interference and void the user’s authority to operate the equipment.
You must use shielded interface cables with this equipment.
This device complies with Part 15 of the FCC Rules. Operation is subject to
the following two conditions: (1) this device may not cause harmful
interference, and (2) this device must accept any interference received,
including interference that may cause undesired operation.
The Basic
Page 5

s
powering your scanner
You can power your scanner from any of three
sources:
• internal batteries (not supplied)
• standard AC power (using an optional
AC adapter)
• vehicle battery power (using an optional
DC adapter)
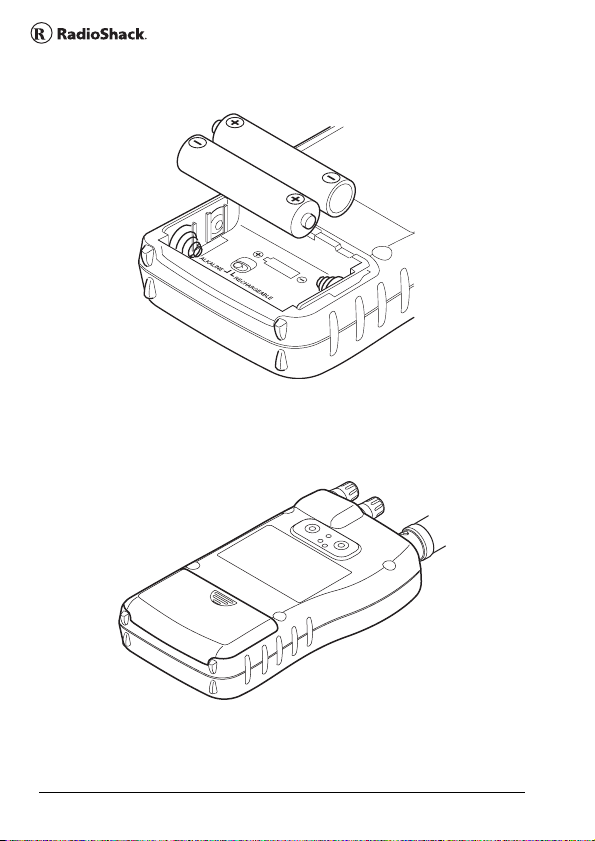
Before installing batteries, set the switch in the
battery compartment to match the type of batteries
you will use. Select ALKALINE for non-rechargeable
battery types and RECHARGEABLE for rechargeable
battery types, including Ni-Cd and Ni-MH. See also
“using rechargeable batteries” on Page 7 when you
use rechargeable batteries.
X Remove battery cover and set battery switch.
5 The Basic
Page 6
s
6
Y Install 2 AA batteries, matching the polarity
symbols (+ -).
Z Replace the cover.
The Basic
Page 7

s
Warning: Set the ALKALINE/RECHARGEABLE
switch to RECHARGEABLE only when using nickel
cadmium (Ni-Cd) or nickel metal hydride (Ni-MH)
rechargeable batteries. Never attempt to recharge
non-rechargeable batteries. Non-rechargeable
batteries can get hot or explode if you try to
recharge them.
Cautions:
• Use only fresh batteries of the required size and
recommended type.
• Always remove old or weak batteries. Batteries
can leak chemicals that destroy electronic
circuits.
• Do not mix old and new batteries, different
types of batteries (standard, alkaline, or
rechargeable), or rechargeable batteries of
different capacities.
When flashes and the scanner beeps every
15 seconds, replace both batteries.
Warning: Always dispose of old batteries promptly
and properly. Do not bury or burn them.
using rechargeable batteries
You can also use two rechargeable batteries to
power your scanner. Before you use Ni-Cd or Ni-MH
batteries, you must charge them.
7 The Basic
Page 8

s
8
The scanner has a built-in circuit that lets you
recharge Ni-Cd or Ni-MH batteries while they are in
the scanner. To charge the batteries, set ALKALINE/
RECHARGEABLE inside the battery compartment to
RECHARGEABLE, install the batteries in the scanner,
and connect an external AC or DC adapter to the
scanner’s DC 6V jack (see “using AC power” on
Page 10 or “using vehicle battery power” on
Page 11). CHArg appears while the scanner is
charging the batteries.
Warning: Do not connect either adapter to the
scanner if non-rechargeable batteries (such as
alkaline batteries) are installed in the scanner and
ALKALINE/RECHARGEABLE is set to
RECHARGEABLE, or if you are unsure of the
switch’s position. Non-rechargeable batteries will
get hot and can even explode if you try to recharge
them.
Before you use Ni-Cd or Ni-MH batteries for the first
time, charge them for 14 hours to bring them to a
full charge.
Discharged batteries take about 14 hours to fully
recharge.
Notes:
• Ni-Cd batteries last longer and deliver more
power if you occasionally let them fully
discharge. To do this, simply use the scanner
The Basic
Page 9

s
until it beeps every 15 seconds and
flashes.
• To prevent damage to Ni-Cd and Ni-MH
batteries, never charge them in an area where
the temperature is above 113°F (40°C) or below
40°F (4°C).
• If you connect an external power source to the
scanner with ALKALINE/RECHARGEABLE set to
ALKALINE, CHArg appears but the scanner
does NOT charge the batteries. The scanner’s
microprocessor unit does not recognize the
switch position when you incorrectly connect an
external power source. Make sure that you use
the correct batteries and set ALKALINE/
RECHARGEABLE to the correct position when
you connect an external power source.
•If CHArg does not appear, the rechargeable
batteries might be completely discharged.
Connect the scanner to an AC or DC adapter and
wait about 1 minute. Then, unplug the adapter
from the scanner for a few seconds then plug it
back in.
Important: The EPA certified RBRC
Battery Recycling Seal on the
rechargeable battery indicates
RadioShack is voluntarily
participating in an industry program
to collect and recycle these batteries
9 The Basic
Page 10

s
0
at the end of their useful life, when taken out of
service in the United States or Canada. The RBRC
program provides a convenient alternative to
placing used rechargeable batteries into the trash or
the municipal waste stream, which may be illegal in
your area. Please call 1-800-THE-SHACK
(1-800-843-7422) for information on rechargeable
battery recycling and disposal bans/restrictions in
your area. RadioShack’s involvement in this
program is part of the company's commitment to
preserving our environment and conserving our
natural resources.
using AC power
You can power the scanner using a 6V, 300 mA AC
adapter and a size B Adaptaplug™ adapter (neither
supplied). Both are available at your local
RadioShack store.
Cautions:
• You must use a Class 2 power source that
supplies 6V DC and delivers at least 300 mA.
Its center tip must be set to positive and its plug
must fit the scanner's DC 6V jack. Using an
adapter that does not meet these specifications
could damage the scanner or the adapter.
• Always connect the AC adapter to the scanner
before you connect it to AC power. When you
finish, disconnect the adapter from AC power
before you disconnect it from the scanner.
The Basic
1
Page 11

s
Follow these steps to use the scanner on AC power.
X Make sure the power is turned off.
Y Insert the Adaptaplug into the AC adapter's
cord so it reads TIP +. Then, insert the
Adaptaplug into the scanner's DC 6V jack.
Z Plug the AC adapter into a standard AC outlet.
using vehicle battery power
You can power the scanner from a vehicle’s 12V
power source (such as a cigarette-lighter socket)
using a 6V, 300 mA DC adapter and a size B
Adaptaplug (neither supplied). Both are available at
your local RadioShack store.
Cautions:
• You must use a power source that supplies 6V DC
and delivers at least 300 mA. Its center tip must
be set to positive and its plug must fit the
scanner’s DC 6V jack. Using an adapter that
does not meet these specifications could damage the scanner or the adapter.
• Always connect the DC adapter to the scanner
before you connect it to the power source.
When you finish, disconnect the adapter from
the power source before you disconnect it from
the scanner.
11 The Basic
Page 12

s
2
X Make sure the power is turned off.
Y If the adapter has a voltage switch, set the switch
to 6V.
Z Insert the Adaptaplug into the DC adapter’s cord
so it reads TIP +. Then, insert the Adaptaplug into
the scanner's DC 6V jack.
[ Plug the other end of the adapter into your
vehicle’s cigarette-lighter socket.
If rechargeable batteries are installed and
ALKALINE/RECHARGEABLE is set to
RECHARGEABLE, the adapter powers the scanner
and recharges the installed batteries at the same
time.
Note: If the scanner does not operate properly
when you use a DC adapter, unplug the adapter
from the cigarette-lighter socket and clean the
socket to remove ashes and debris.
The Basic
1
Page 13

s
setting up your scanner
connecting the antenna
To attach the supplied flexible antenna to the
connector on the top of your scanner, align the slots
around the antenna's connector with the tabs on the
scanner's BNC connector. Then slide the antenna's
connector down over the scanner's connector and
rotate the antenna connector's outer ring clockwise
until it locks into place.
connecting an optional antenna
The scanner’s BNC connector makes it easy to
connect a variety of optional antennas, including an
external mobile antenna or outdoor base station
antenna. Your local RadioShack store sells a wide
selection of antennas.
13 The Basic
Page 14
s
4
Note: Always use 50-ohm, RG-58, or RG-8 coaxial
cable to connect an outdoor antenna. If the antenna
is over 50 feet from the scanner, use RG-8 low-loss
dielectric coaxial cable. If your antenna’s cable does
not have a BNC connector, your local RadioShack
store carries a variety of BNC adapters.
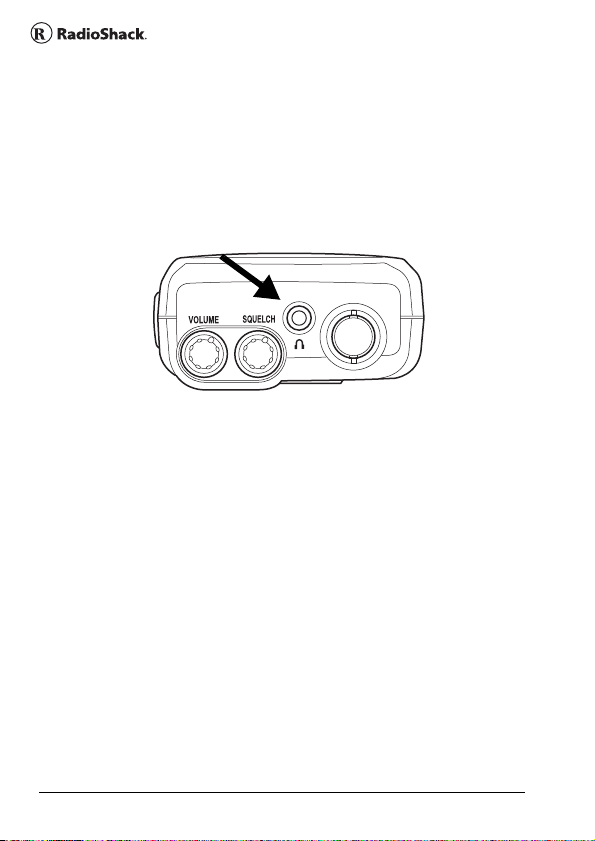
connecting an earphone/headphone
In a noisy area, you can use the supplied mono
headphones. When you use the headphones, set
the scanner’s VOLUME to the center position, then
adjust the volume controls of the headphones.
For private listening, you can plug a
mm) mini-plug earphone (not supplied) into the
headphone jack on top of your scanner.
Connecting the headphones or the earphone
automatically disconnects the internal speaker.
1
/8-inch (3.5
listening safely
To protect your hearing, follow these guidelines
when you use an earphone or headphones.
The Basic
1
Page 15

s
• Do not listen at extremely high volume levels.
Extended high-volume listening can lead to
permanent hearing loss.
• After you begin listening, adjust the volume to a
comfortable level.
• Once you set the volume, do not increase it.
Over time, your ears adapt to the volume level,
so a volume level that does not cause
discomfort might still damage your hearing.
traffic safety
Do not use an earphone or headphones with your
scanner when operating a motor vehicle in or near
traffic. Doing so can create a traffic hazard and could
be illegal in some areas.
If you use an earphone or headphones with your
scanner, be very careful. Do not listen to a
continuous broadcast. Even though some
earphones/headphones let you hear some outside
sounds when listening at normal volume levels, they
still can present a traffic hazard.
connecting an extension speaker
In a noisy area, an optional extension speaker,
positioned in the right place, might provide more
comfortable listening. Plug the speaker cable’s
1
/8-inch (3.5-mm) mini-plug into your scanner’s
headphone jack. Your local RadioShack store carries
a selection of suitable speakers.
15 The Basic
Page 16

s
6
Warning: If you connect an external speaker to the
scanner's headphone jack, never connect the audio
output line to a power supply and ground. This
might damage the scanner.
attaching the belt clip
To make your scanner easier to carry when you are
on the go, use the supplied belt clip. Use a Phillips
screwdriver and the supplied screws to attach the
clip to the scanner.
The Basic
1
Page 17

s
about your scanner
We use a few simple terms in this manual to explain
the features of the scanner. Familiarize yourself with
these terms and the scanner’s features, and you can
put the scanner to work for you right away. Simply
determine the type of communications you want to
receive, then set the scanner to scan those
communications.
A frequency, expressed in kHz or MHz, is the tuning
location of a station. To find active frequencies, you
use the search function or refer to a frequency
reference.
Besides searching within a selected frequency
range, you can also search your scanner's service
banks. Service banks are preset groups of
frequencies categorized by the type of services that
use those frequencies. For example, many amateur
radio frequencies are located in the HAM service
bank.
When you search and find a desired frequency, you
can store it into a programmable memory location
called a channel. Channels are grouped into
channel-storage banks. The scanner has 10 channelstorage banks and each bank has 20 channels. You
can scan the channel-storage banks to see if there is
activity on the frequencies stored there.
17 The Basic
Page 18
s
8
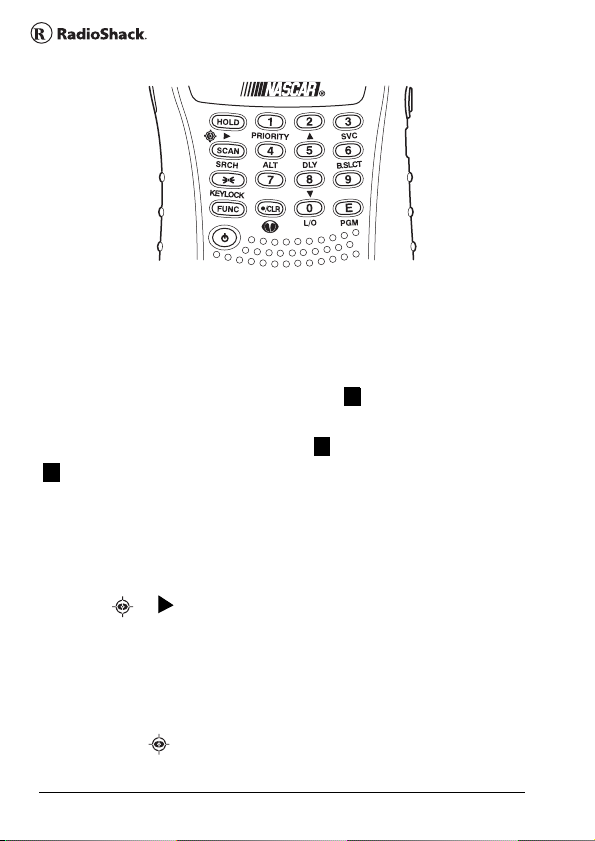
a look at the keypad
Your scanner's keys have various functions labeled
on the key tops and below the keys.
To select the function labeled on a key, simply press
the key. To select the function labeled below a key,
first press FUNC then release it. appears on the
display. Then quickly press the next key in the
function key sequence while appears.
appears or disappears as you press FUNC.
F
If your scanner’s keys seem confusing at first, the
following information should help you understand
each key’s function.
HOLD//:
F
F
HOLD Holds the scan or the frequency search.
Press and hold HOLD to increment channels
continuously.
FUNC + Switches between the three signal
stalker modes
The Basic
1
Page 19

s
SCAN/SRCH:
SCAN Scans the stored channels.
FUNC+ SRCH Starts chain search or resumes
searching.
/KEYLOCK:
Turns the display and key backlight on or off.
FUNC+ KEYLOCK Locks and unlocks the keypad.
FUNC Lets you use various functions by pressing
this key in combination with other keys.
Press and hold for more than 2 seconds to turn
the scanner on or off.
1/PRIORITY:
1 Enters a 1.
FUNC + PRIORITY Sets and turns the priority
function on or off.
2/:
2 Enters a 2.
FUNC + Selects the scan or search direction.
19 The Basic
Page 20

s
0
3/SVC:
3 Enters a 3.
FUNC + SVC Lets you search the five service
search banks.
4/ALT:
4 Enters a 4.
FUNC + ALT Turns the WX alert function on or
off.
5/DLY:
5 Enters a 5.
FUNC + DLY Turns the delay function on or off.
6/B.SLCT:
6 Enters a 6.
FUNC + B.SLCT Goes to program band select
mode.
7 Enters a 7.
8/ :
8 Enters an 8.
FUNC + Selects the scan or search direction.
The Basic
2
Page 21

s
9 Enters a 9.
.
/CLR/:
.
/CLR Enters a decimal point or clears an
incorrect entry.
FUNC + Jumps directly to the last channel
in memory (Ch#200) from any mode.
0/L/O:
0 Enters a 0.
FUNC + L/O Lets you lock out a selected channel
or skip a specified frequency.
E/PGM:
E Enters frequencies into channels.
FUNC+ PGM Programs frequencies into
channels.
21 The Basic
Page 22

s
2
a look at the display
The display has indicators that show the scanner’s
current operating status. The display information
helps you understand how your scanner operates.
BANK - appears with numbers (1-10).
P - appears when you select a priority channel.
SCN - appears when you scan channels.
SRCH - appears during search mode.
PRI - appears when the priority feature is turned on.
HOLD - appears during scan hold mode and search
hold mode.
DLY - appears when you select a delay.
The Basic
2
Page 23

s
L/O - appears when you manually select a channel
you locked out or a skip frequency.
- appears when you lock the keypad.
- alerts you when the battery power gets low.
- appears while you store a frequency into a
PGM
channel.
or - appears during search mode.
F
- appears only when the function mode is on.
WX, POL FIRE, AIR, MRN, or HAM - appears along
with an indicator that shows the current service
bank during a service search.
ALT - appears during a WX alert or while the signal
stalker function is on.
- appears when the scanner is set to a signal
stalker mode.
23 The Basic
Page 24

s
4
understanding banks
service banks
The scanner is preprogrammed with all the
frequencies allocated to the weather, ham, marine,
aircraft, and police (fire/emergency) services.
channel storage banks
To make it easier to identify and select the channels
you want to listen to, the 200 channels are divided
into 10 channel-storage banks. Each bank has 20
channels. Use each channel-storage bank to group
frequencies, such as those for the police
department, fire department, ambulance services,
or aircraft.
For example, the police department might use four
frequencies in your town while the fire department
uses an additional four. You could program the four
police frequencies starting with Channel 1 (the first
channel in bank 1), and program the fire department
frequencies starting with Channel 21 (the first
channel in bank 2).
The Basic
2
Page 25

s
operating your scanner
turning on the scanner and setting
squelch
Your scanner is preprogrammed at the factory with
two major race series frequencies. See the supplied
race frequency list.
Note: Make sure the scanner’s antenna is
connected before you turn it on.
X Tur n SQUELCH fully counterclockwise.
Y Press and hold for about 2 seconds to turn
the scanner on, then turn VOLUME clockwise
until you hear a hissing sound.
Z Tur n SQUELCH clockwise until the hissing stops.
[ Press SCAN. See “scanning the stored channels”
on Page 30.
storing known frequencies into
channels
You can locate and store specific frequencies into
channels for later use. To assist you in locating a
desired frequency from the scanner’s wide range,
consider using a frequency guide.
Excellent references for active frequencies are the
25 Beyond the Basic
Page 26

s
6
RadioShack Police Call Guide including Fire and
Emergency Services, and Official Aeronautical
Frequency Directory. We update these directories
every year, so be sure to get a current copy.
Follow these steps to store frequencies into
channels.
X Press HOLD. Then enter the channel number
where you want to store a frequency, then press
FUNC + PGM. The channel number appears.
Y Use the number keys and
frequency (including the decimal point) you want
to store.
.
/CLR to enter the
Z Press E to store the frequency into the channel.
Notes:
•If you entered an invalid frequency in Step
Error appears and the scanner beeps three
times. Enter a valid frequency.
•The scanner automatically rounds the entered
number to the nearest valid frequency. For
example, if you enter 151.473 (MHz), your
scanner accepts it as 151.475.
Beyond the Basic
Y,
2
Page 27

s
•When you enter a frequency into a channel, the
scanner automatically turns on the delay
function and DLY appears. When delay is turned
on, the scanner automatically pauses scanning 2
seconds after the end of a transmission before
scanning proceeds to the next channel. To turn
the function off or on, press FUNC + DLY.
•If you enter a frequency that has already been
entered elsewhere, the scanner sounds an error
tone and displays the channel that was
duplicated. If you entered the frequency by
mistake, press ./CLR then enter the correct
frequency. To enter the frequency anyway, press
E to accept.
[ To program the next channel in sequence, press
FUNC + PGM or E and repeat Steps
Y and Z.
\ To program the scanner with your local Skywarn
frequency, repeat Steps
Channel 200 with that frequency. For more
information, see “Skywarn” on Page 36.
X-Z to program
race scanning tips
• Most race teams use frequencies between 450
MHz and 470 MHz (some teams use 800 MHz
band).
27 Beyond the Basic
Page 28

s
8
• You can find race frequencies at Internet sites or
you can obtain up to date frequency lists at the
races.
• You can program each race team by the car
number. For example, program car #24 on
channel 24 and car #56 on channel 56 and so
on.
• For superior short-range reception, a stubby
antenna is available at your local RadioShack
store.
searching for and temporarily storing
active frequencies
If you do not have a reference to frequencies in your
area, use a search (except weather service search)
to find a transmission.
Note: When the scanner starts searching, it
automatically turns on the delay function. To turn
delay on or off, press FUNC + DLY.
service search
You can search for weather, ham, marine, aircraft, or
police (fire/emergency) transmissions without
knowing the specific frequencies used in your area.
The scanner is preprogrammed with all the
frequencies allocated to these services. To use this
feature, press FUNC + SVC. SRCH appears and the
scanner searches starting with the weather service
bank. To select a different service bank, repeatedly
Beyond the Basic
2
Page 29

s
press FUNC + SVC. Service mode appears on the
display.
When the scanner stops on a transmission, quickly
press HOLD to stop searching and listen to the
transmission. HOLD appears. In this mode, you can
press FUNC + or FUNC + to step through
the frequencies.
To release the hold and continue searching, press
HOLD. Or, if you did not press HOLD, simply press
FUNC + or FUNC + to continue searching.
Note: Because there are many different frequencies
allocated to fire and police departments, it can take
several minutes to search all the service
frequencies.
storing frequencies into channels
during service search
You can store frequencies you found during service
search or service search hold mode into channels.
X Press FUNC + PGM during service search or
service search hold mode. The frequency and the
lowest blank channel alternately appear.
Y Press E to store the frequency into the blank
channel. If you want to select another channel,
press FUNC + or before you press E.
To enter the frequency, press FUNC.
29 Beyond the Basic
Page 30

s
0
F
disappears. Then press E. You can also use
the 0-9 keys to select the bank. To continue
searching, press FUNC + SVC.
If you entered a frequency that has already been
entered elsewhere, the scanner sounds an error
tone and displays the channel that was duplicated.
If you entered the frequency by mistake, press ./CLR
then enter the correct frequency. To enter the
frequency anyway, press E to accept.
scanning the stored channels
To begin scanning channels, press SCAN. The
scanner scans through all non-locked channels in
the activated banks. (See “locking out channels” on
Page 48 and “turning channel-storage banks on and
off” on Page 48). The scanner stops when it finds a
transmission. When the transmission ends, the
scanner resumes scanning.
Notes:
• If you have not stored frequencies into any
channels, the scanner does not scan.
• If the scanner picks up unwanted partial, or very
weak transmissions, turn SQUELCH clockwise
to decrease the scanner’s sensitivity to these
signals. To listen to a weak or distant station,
turn SQUELCH counterclockwise.
Beyond the Basic
3
Page 31

s
• To ensure proper scanning, adjust SQUELCH
until the audio mutes.
manually selecting a channel
You can continuously monitor a single channel
without scanning. This is useful if you want to
monitor a specific channel, or hear an emergency
broadcast on a channel and do not want to miss any
details, even though there might be periods of
silence.
To manually select a channel, press HOLD, enter the
channel number then press HOLD again.
Or, during scanning, if the radio stops at a channel
you want to listen to, press HOLD once. (Repeatedly
pressing HOLD at this time causes the scanner to
step through the channels.) Press SCAN to resume
automatic scanning.
signal stalker
Your scanner’s Signal Stalker feature lets you set the
scanner to detect and display the frequency of
nearby strong radio transmissions. Signal Stalker
can work “in the background” while you are
scanning other frequencies, or you can turn off
normal scanning while Signal Stalker is working.
You can set the scanner so it alerts you when Signal
Stalker finds a frequency. You can also set the
frequency band where you want the scanner to look
for transmissions.
31 Beyond the Basic
Page 32

s
2
Notes:
• Signal Stalker works well for locating the source
of strong local transmissions such as mobile
and handheld two-way radios in areas with no
other strong transmission sources. However, if
you are in an area with many transmission
sources (such as pager radio transmitters, multiuse radio towers, traffic control devices, etc.),
Signal Stalker might not find the transmission
you are searching for, or it might find a
transmission other than the one you are
searching for. You can screen unwanted
transmissions by pressing FUNC + L/O to lock
them out. See “locking out frequencies” on
Page 49 for more information.
• Signal Stalker cannot detect satellite dishes or
any transmitter with a frequency above or below
the frequency ranges listed under “setting the
signal stalker options” on Page 33.
• Signal Stalker works better with some types of
transmissions than others. It might not correctly
display frequency information for transmitters
using a highly directive antenna (such as an
amateur radio beam antenna), if there are many
transmitters operating at the same time in the
same area, or if the transmitter is a broadcast
television station.
• The scanner’s pager screening feature lets it
ignore common pager frequencies.
Beyond the Basic
3
Page 33

s
setting the signal stalker options
X Press FUNC then press and hold for 2
seconds. One of the following signal stalker
options appears.
S-S.bnd: Lets you select the signal stalker band.
S-S.ALt: Lets you select the signal stalker alert
settings.
Y Repeatedly press or to select the option
you want, then press E.
If you selected S-S.bnd, one of the following
band names appears.
bnd Lo: VHF Low Band (25.0000 - 54.0000 MHz)
bnd Air: AIR Band (108.0000 - 136.9875 MHz)
bnd Hi: VHF High Band (137.0000 - 174.0000
MHz)
bnd UHF: UHF Band (406.0000 - 512.0000 MHz)
bnd 800: 800MHz Band (806.0000 - 956.0000 MHz)
If you selected S-S.Alt, skip to Step
[.
Z Repeatedly press or until the band you
want to search appears, then press E. Otherwise,
press ./CLR if you do not want to select it.
The scanner displays the following options.
33 Beyond the Basic
Page 34

s
4
Lo On or Lo OFF
Air On or Air OFF
Hi On or Hi OFF
UHF On or UHF OFF
800 On or 800 OFF
[ Repeatedly press or until the option you
want appears, then press E. Otherwise, press ./
CLR if you do not want to select it. Then skip to
Step
^.
\ Press E while S-S.Alt appears. One of the
following alert options appears.
ALt bEEP: The scanner beeps when a Signal
Stalker signal is detected.
ALt Light: The scanner flashes the display
backlight when a Signal Stalker signal is
detected.
ALt bP-Lt: The scanner flashes the display
backlight and beeps when a Signal Stalker signal
is detected.
ALt OFF: The scanner does not provide any alert
when a Signal Stalker signal is detected.
] Repeatedly press or until the option you
want appears, then press E to select it.
Beyond the Basic
3
Page 35

s
Otherwise, press ./CLR if you do not want to
select it.
^ When you select the option, press
the option mode. Otherwise, to continue normal
scanning, repeatedly press FUNC until
disappears then press SCAN.
.
/CLR to exit
F
using signal stalker
To turn on Signal Stalker, turn SQUELCH fully
clockwise, then press FUNC + once except in
WX search, band select, or program mode.
appears. Every 2 seconds, the scanner searches
for frequencies in the range you specified in “setting
the signal stalker options” on Page 33.
Note: To continue scanning normally while Signal
Stalker is working, simply press SCAN.
When the scanner finds a frequency, it sounds the
alert you specified in “setting the signal stalker
options” on Page 33, and Found flashes. Press any
key to confirm the displayed frequency. During
Signal Stalker operation, the delay time is 10
seconds. After 10 seconds have elapsed, or if you
press SCAN, the scanner resumes searching. If you
find a frequency you want to monitor continuously,
press HOLD to hold the frequency. While in hold
mode, you can select the band where you are
searching by pressing or while appears.
F
35 Beyond the Basic
Page 36

s
6
To turn on Signal Stalker and turn off normal
scanning, press FUNC + twice. and - - - - - -
flash.
To turn off Signal Stalker and turn on normal
scanning, press FUNC + three times.
disappears.
Skywarn
The Skywarn function lets you jump directly to the
last channel in memory (Channel 200) from any
mode by pressing FUNC + . The scanner goes
into scan hold mode and starts receiving
transmissions in the last channel. If no frequency is
programmed in the last channel, No Prg appears
and the scanner sounds an error tone.
about Skywarn
Skywarn is an organized group of trained weather
observers. A Skywarn group exists in virtually every
US county with a significant population. During
inclement weather, reports made by Skywarn
observers include information about:
• pea-sized and larger hail
• wind and wind gusts 40 MPH and greater
• heavy rainfall
• lightning (cloud-to-cloud and especially
cloud-to-ground)
Beyond the Basic
3
Page 37

s
• wall clouds seen in severe thunderstorms
(which spawn tornadoes)
• severe lowering of a wall cloud
• turbulence in a wall cloud
• funnel clouds
• tornadoes
• high water areas
• downed power lines
• other emergency conditions that affect life or
property
Listening to Skywarn broadcasts makes it easy to
quickly find out about and prepare for inclement
weather conditions in your immediate area, even
before your local NOAA weather broadcast and
local TV or radio station can announce them.
Enter the local Skywarn frequency for your area into
Channel 200 on your scanner, then listen to Skywarn
first when severe weather threatens.
Listen to NOAA for weather alerts and warnings,
watch box notices, and weather forecasts.
Listen to Skywarn to hear trained observers in your
vicinity call in official reports to a “net control”
station who relays those reports to NOAA and other
emergency agencies.
37 Beyond the Basic
Page 38

s
8
If you tune to a Skywarn frequency when the
Skywarn net is not active, you may hear nothing or
you may hear amateur radio operators talking on a
local repeater system.
Most importantly, you get Skywarn reports directly
from trained observers - that means you get them
several minutes before they can be relayed for
broadcast by NOAA and as much as 5 or 10 minutes
sooner than you will hear them on local TV or radio!
Those few minutes can be worth a lot when it
comes to deciding if your family needs to take cover.
WX Alert
turning on the weather alert feature
Turn on the WX alert function by pressing FUNC +
ALT in the WX search or WX search hold mode. ALT
appears. If the scanner receives a WX alert signal
while the WX alert function is on, it goes into WX
alert hold mode and generates a WX alert tone, and
ALT flashes. To stop the WX alert tone, press any
key. ALT disappears.
Beyond the Basic
3
Page 39

s
chain search
This feature lets you search through preset
frequency ranges. You can also change each range
to a range you set. There are three modes within
this feature: chain search mode, chain search hold
mode, and program band select mode.
The preset frequency ranges are:
Bank No. Frequency (MHz) Step (kHz)
1 25.0000-27.9950 5
2 28.0000-29.6950 5
3 29.7000-49.9950 5
4 50.0000-54.0000 5
5 137.0000-143.9950 5
6 144.0000-147.9950 5
7 406.0000-419.99375 6.25
8 420.0000-449.99375 6.25
9 450.0000-469.99375 6.25
10 806.0000-956.0000 12.5
chain search mode
Press FUNC + SRCH to start chain search mode.
SRCH, the enabled search bank number, and or
39 Beyond the Basic
Page 40

s
0
(indicating the search direction) appear. The
search bank number being searched flashes.
Press 0-9 to enable or disable the search bank
number being searched in this mode. Enabled bank
numbers appear. Disabled bank numbers disappear.
At least one search bank must be enabled. The
scanner sounds an error tone if you try to disable all
the search banks. The search bank and the
frequency where chain search starts depends on
how the scanner was set before you selected chain
search mode.
chain search hold mode
To start chain search hold mode, press HOLD in
chain search mode. The scanner stops searching
and HOLD appears. In this mode, pressing
FUNC + changes the search direction
downward and pressing FUNC + changes the
search direction upward. or appears
according to the current search direction.
Pressing while appears decreases the
frequency by one step and pressing increases it
by one step.
Hold down or to quickly decrease or increase
the frequency.
F
Beyond the Basic
4
Page 41

s
To resume chain search, press HOLD (if does not
appear on the display) or press SRCH (if appears
on the display).
F
F
storing frequencies found during
chain search into channel memory
You can store frequencies you find in chain search
mode or chain search hold mode.
X Press FUNC + PGM in chain search mode or
chain search hold mode. The lowest blank
channel and bank appear.
Y To select another channel, press FUNC + or
. To enter the frequency, press FUNC.
disappears. You can also press 0-9 to select the
bank.
Z Press E to store the frequency into the blank
channel.
If you try to save a frequency that is already stored,
the scanner sounds an error tone and displays the
channel that was duplicated. If you entered the
frequency by mistake, press ./CLR. To enter the
frequency anyway, press E to accept.
F
The scanner sets itself to program mode after you
store a frequency.
41 Beyond the Basic
Page 42

s
2
program band select mode
You can use this mode to define the search range
used during a chain search in each search bank.
To set the scanner to program band select mode,
press FUNC + B.SLCT. SRCH appears. Then select a
search bank.
When you select the search bank, the lower limit
and upper limit frequency assigned in the search
bank alternate on the display.
To select another search bank, press FUNC +
B.SLCT or FUNC + to increase the search bank
number or FUNC + to decrease it. Hold down
FUNC + or FUNC + for about 1 second to
quickly move through the search bank numbers.
After choosing the search bank, follow these steps
to set the lower limit and upper limit frequency.
X Enter the lower limit frequency by using the 0-9
and ./CLR keys.
Y Press E to select the lower limit frequency.
Z Enter the upper limit frequency by using the 0-9
and ./CLR keys.
[ Press E to select the upper limit frequency.
Beyond the Basic
4
Page 43

s
direct entry search
You can use direct entry search to search up or
down from the currently displayed frequency.
X If the scanner is scanning or searching, press
HOLD.
Y Enter the frequency you want to start from by
using the number keys. (Press ./CLR to enter a
decimal point).
Z Press FUNC + or . The scanner searches,
starting from the frequency you entered in
Step
Y.
If you enter a frequency that is out of range, the
scanner sounds an error tone and Error appears.
Press FUNC + to change the search direction
downward or FUNC + to change the search
direction upward. Frequencies appear during the
search.
Notes:
• You can set the delay function on or off during
the search or while the search stops.
• You can skip a frequency when the search stops.
After the search skip frequency is set, the
scanner starts direct search again.
43 Beyond the Basic
Page 44

s
4
direct entry search hold mode
To stop searching during direct entry search, press
HOLD. HOLD appears. In this mode, pressing FUNC
+ changes the search direction downward and
pressing FUNC + changes the search direction
upward. or appears depending on the search
direction.
Press FUNC + to decrease the frequency by one
step or FUNC + to increase it by one step. Hold
down or for about 1 second to quickly
decrease or increase the frequency.
To resume direct search, press FUNC + SEARCH or
HOLD. ( or appears on the display, showing the
search direction).
storing direct entry search
frequencies into channel memory
Follow these steps to store frequencies received
during direct entry search (active search and hold).
X Press FUNC + PGM in direct entry search mode
or direct entry search hold mode. The frequency
and lowest blank channel alternate on the display.
Y To select another channel, press FUNC + or
. To enter the frequency, press FUNC.
Beyond the Basic
F
4
Page 45

s
disappears. You can also press 0-9 to select the
bank.
Z Press E to store the frequency into the blank
channel.
If you enter a frequency that has already been
stored elsewhere, the scanner sounds an error tone
and displays the channel that was duplicated.
If you entered the frequency by mistake, press
.
/CLR. To enter the frequency anyway, press E to
accept.
The scanner moves to program mode after you
stored the frequency.
search skip memory
You can skip up to 50 specified frequencies during a
search. This lets you avoid unwanted frequencies or
those already stored in channels.
Notes:
• You cannot skip frequencies during WX service
search.
• Search skip frequencies are shared by service
search, direct entry search, chain search, and
signal stalker modes. If skip frequencies are set
in certain mode, the frequencies are also
skipped in other search modes and Signal
Stalker mode.
45 Beyond the Basic
Page 46

s
6
To skip a frequency, press FUNC + L/O when the
scanner stops on the frequency during a search or a
search hold. The scanner stores the frequency in
memory and automatically resumes the search if it
is not in hold.
Follow these steps to clear a single frequency from
skip memory so the scanner stops on it during a
search.
X Press HOLD to stop the search.
Y Press FUNC + or FUNC + to select the
frequency. L/O appears.
Z Press FUNC + L/O. L/O disappears.
To clear all the skip frequencies at once while
searching or search hold, press FUNC then press
and hold L/O until the scanner beeps.
Notes:
• If you selected all frequencies to be skipped
within the search range, the scanner beeps 3
times and does not search.
• If you select more than 50 frequencies to skip,
each new frequency replaces a frequency
previously stored, beginning with the first stored
frequency.
Beyond the Basic
4
Page 47

s
delay
Sometimes a user might pause before replying to a
transmission. To avoid missing a reply on a specific
channel, you can program a 2-second delay into any
channel or frequency. The scanner continues to
monitor the channel frequency for an additional 2
seconds after the transmission stops before
resuming scanning or searching. The scanner
automatically sets a delay when you store
frequencies into channels or when you search
frequencies. When the delay feature is on, DLY
appears. If it is off, follow one of these steps to
program a delay depending on how the scanner is
operating.
• If the scanner is scanning and stops on an active
channel where you want to store a delay, quickly
press FUNC + DLY before it continues
scanning again. DLY appears.
• If the desired channel is not selected, manually
select the channel, then press FUNC + DLY.
DLY appears.
• If the scanner is searching, press FUNC + DLY
while the scanner is searching. DLY appears and
the scanner automatically adds a 2-second delay
to every frequency it stops on in that band.
To turn off the 2-second delay, press FUNC + DLY
while the scanner is monitoring a channel, scanning,
or searching. DLY disappears.
47 Beyond the Basic
Page 48

s
8
turning channel-storage banks on
and off
You can turn each channel-storage bank on and off.
When you turn off a bank, the scanner does not scan
any of the 20 channels in that bank.
While scanning, press the number key that
corresponds to the bank you want to turn on or off.
Numbers appear at the top of the display, showing
the currently active banks.
The scanner scans all the channels within the
displayed banks that are not locked out (see
“Locking Out Channels”). The bank number flashes
when the scanner scans a channel that belongs to
the bank.
Notes:
• You can manually select any channel within a
bank, even if that bank is turned off.
• You cannot turn off all banks. One bank must
always be active.
locking out channels
You can increase the scanning speed by locking out
channels that have a continuous transmission, such
as a weather channel. To lock out a channel,
manually select the channel, then press FUNC +
L/O. L/O appears.
Beyond the Basic
4
Page 49

s
Notes:
• The scanner does not skip locked-out channels
when you use Signal Stalker. You must lock out
frequencies instead. See “Locking Out
Frequencies.”
• You can still manually select locked-out
channels.
To unlock a channel, manually select the channel,
then press FUNC + L/O. L/O disappears.
To unlock all channels in the banks that are turned
on, press HOLD to stop scanning, then press FUNC
and press and hold L/O until the scanner beeps
twice.
locking out frequencies
While searching and using Signal Stalker, you can
reduce the number of “hits” from frequencies you
do not want to find by locking out frequencies that
have a continuous transmission, such as a radio
pager.
Press FUNC + L/O to lock out a frequency.
L/O appears.
49 Beyond the Basic
Page 50

s
0
priority
The priority feature lets you scan through channels
and still not miss important or interesting calls on
specific channels. You can program one stored
channel in each bank as a priority channel (10 total).
If the priority feature is turned on, as the scanner
scans the bank, it checks that bank's priority channel
for activity every 2 seconds.
The scanner automatically designates each bank's
first channel as its priority channel.
Follow these steps to select a different channel in a
bank as the priority channel.
X Manually select the channel you want to select as
the priority channel.
Y Press FUNC + PGM, then press FUNC +
PRIORITY. P appears to the left of the selected
channel number.
Z Repeat Steps X and Y for the channel in each
bank you want to program as a priority channel.
To turn on the priority feature, press FUNC +
PRIORITY during scanning. PRI appears. Then the
scanner checks the designated priority channel
every 2 seconds in each bank.
Beyond the Basic
5
Page 51

s
To turn off the priority feature, press FUNC +
PRIORITY. PRI disappears.
using keylock
Use the scanner's keylock to protect it from
accidental program changes. When the scanner's
keys are locked, the only controls that operate are
SCAN, FUNC, HOLD, , KEYLOCK, and .
To turn on keylock, press FUNC + KEYLOCK.
appears. To turn off keylock, press FUNC +
KEYLOCK. disappears.
Note: Using keylock does not prevent the scanner
from scanning channels.
51 Beyond the Basic
Page 52
s
2
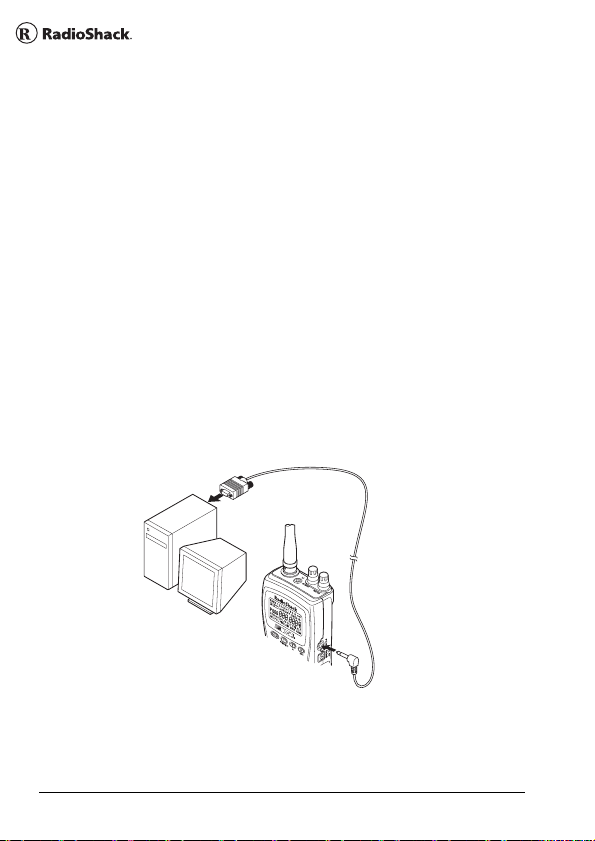
wired programming
You can transfer programming data to your scanner
using your PC and an optional interface cable (Cat.
No. 20-289 or 20-047, available at your local
RadioShack store) and software (available at your
local RadioShack or www.radioshack.com). Do not
use an interface cable other than the specified.
Note: If the scanner receives no data from the PC
for more than 20 seconds, T- E r r appears and wired
programming stops.
X Make sure your scanner is turned off.
Y Connect the interface cable to your computer
then connect the other end of the cable to PC/IF
on the side of the scanner.
Z Install the software to your computer and run the
program.
Beyond the Basic
5
Page 53

s
[ To set up the program, click on Tools, select
Configuration, and select PRO-83 (if necessary).
\ Turn on the scanner. The scanner automatically
goes into the wired programming mode. PGM
and WirEd appear. Then send the data from the
PC.
Data frame numbers being received appear.
] When the scanner has successfully received all
data, End appears. If the scanner received an
error while receiving data, End, d-Err, and its
frame number appear. If the scanner received a
communication error while receiving data, C-Err
indicates the packet number where the error
occurred. If the scanner received a checksum
error while receiving data, S-Err indicates the
packet number where the error occurred. If the
scanner received a length field error while
receiving data, L-Err indicates the packet number
where the error occurred.
using the display/key backlight
To turn on the display/key light for easy viewing at
night, press . The display lights for 15 seconds.
To turn off the light sooner, press again.
53 Beyond the Basic
Page 54

s
4
resetting the scanner
If the scanner’s display locks up or stops operating
properly, you might need to reset the scanner.
Caution: This procedure clears all the information
stored in channel memories including the race
frequencies. Before you reset the scanner, try
turning it off and on to see if it begins working
properly. Reset the scanner only when you are sure
it is not working properly.
X Make sure your scanner is turned off.
Y While holding down 2, 9, and HOLD, turn on the
scanner. After about 3 seconds, the scanner
initializes and CLEAr appears.
Your scanner has 150 most frequently used
frequencies (not the preloaded race frequencies) in
special permanent memory. You can load the
frequencies in Channels 1 to 150.
Caution: This procedure overwrites all channel
memories. Use this procedure only when you are
sure you do not mind erasing the current channel
memories.
Follow these steps to load the 150 frequencies.
X Make sure your scanner is turned off.
Y While holding down 3 and E, turn on the scanner.
After several seconds, the scanner restores the
frequencies and -LoAd- appears.
Beyond the Basic
5
Page 55

s
frequently asked questions
Q: My scanner isn’t working at all. How do I turn it on?
A: The scanner might not be receiving power.
Make sure the batteries are installed correctly and
are good (if you installed alkaline batteries) or fully
charged (if you installed rechargeable batteries). See
“powering your scanner” on Page 5 for more
information.
If the batteries are good, make sure the AC adapter’s
or DC adapter’s barrel plug is fully inserted into the
scanner’s 6V 300 mA jack. See “using AC power” on
Page 10 for more information.
If the scanner is receiving power, make sure it is
turned on. See “turning on the scanner and setting
squelch” on Page 25 for more information.
Q: My scanner is on but won’t scan. How do I get it
to scan?
A: Make sure the squelch is adjusted correctly. See
“turning on the scanner and setting squelch” on
Page 25 for more information.
If the squelch is set correctly, you might not have
stored frequencies into any channels or only one
channel. You must store at least two frequencies for
the scanner to scan. See “storing known frequencies
into channels” on Page 25 for more
information.
55 Beyond the Basic
Page 56

s
6
Q: The scanner’s display is dim and hard to see. The
scanner also beeps once every 15 to 30 seconds.
What’s wrong?
A: The scanner might not be receiving enough
power or the batteries might not be correctly
installed. Make sure the batteries are installed
correctly and are good (if you installed alkaline
batteries) or fully charged (if you installed
rechargeable batteries). See “powering your
scanner” on Page 5 for more information.
Q: Nothing happens when I press the scanner’s
keys. How do I get the keys to work?
A: The scanner’s keylock might be turned on. To
turn off keylock, press FUNC and KEYLOCK until
disappears. See “using keylock” on Page 51 for
more information.
Q: flashes on the display. What is it?
A: The batteries might be weak. Make sure the
batteries are good (if you installed alkaline batteries)
or fully charged (if you installed rechargeable
batteries). See “powering your scanner” on Page 5
for more information.
Q: My scanner is not receiving anything or
reception is weak. What’s wrong?
A: The batteries might be weak. Make sure the
batteries are good (if you installed alkaline batteries)
Beyond the Basic
5
Page 57

s
or fully charged (if you installed rechargeable
batteries. Also make sure the AC adapter’s or DC
adapter’s barrel plug is fully inserted into the
scanner’s 6V 300 mA jack. See “using AC power” on
Page 10 for more information.
If the batteries are OK, the antenna might not be
connected or is connected incorrectly. See
“connecting the antenna” on Page 13 for more
information.
Q: My scanner is not receiving weather channels.
How do I set it so I can receive weather channels?
A: The scanner might be set to weather alert mode.
If this happens, it cannot receive weather channels
until it receives a weather alert. To hear a weather
channel at any time, make sure weather alert is
turned off. See “WX Alert” on Page 38 for more
information.
Q: Error appears on the display. What does it mean?
A: If you were trying to enter a frequency, you might
have made a programming error. Re-enter the
frequency correctly, including the decimal point.
See “storing known frequencies into channels” on
Page 25 for more information.
57 Beyond the Basic
Page 58

s
8
specifications
Frequency Coverage:
25.0000-27.9950 MHz (in 5 kHz steps)
28.0000-29.9950 MHz (in 5 kHz steps)
30.0000-49.9950 MHz (in 5 kHz steps)
50.0000-54.0000 MHz (in 5 kHz steps)
108.0000-136.9875 MHz (in 12.5 kHz steps)
137.0000-143.9950 MHz (in 5 kHz steps)
144.0000-147.9950 MHz (in 5 kHz steps)
148.0000-174.0000 MHz (in 5 kHz steps)
406.0000-419.99375 MHz (in 6.25 kHz steps)
420.0000-449.99375 MHz (in 6.25 kHz steps)
450.0000-469.99375 MHz (in 6.25 kHz steps)
470.0000-512.0000 MHz (in 6.25 kHz steps)
806.0000-823.9875 MHz (in 12.5 kHz steps)
849.0125-868.9875 MHz (in 12.5 kHz steps)
894.0125-956.0000 MHz (in 12.5 kHz steps)
Operating Temperature:
Normal -4° to 140°F (-20° to 60°C)
Signal Stalker 14° to 122°F (-10° to 50°C)
IF Frequencies
1st (25-174 MHz) 380.6050-380.7000 MHz
1st (406-512 MHz) 380.6125-380.7000 MHz
1st (806-956 MHz) 380.7000-380.7875 MHz
2nd 21.3 MHz
3rd 450 kHz
Specifications are typical; individual units might vary.
Specifications are subject to change and improvement
without notice.
Beyond the Basic
5
Page 59

s
glossary
ALKALINE/RECHARGEABLE Switch - Lets you select
the type of batteries you want to use in the scanner
(alkaline or rechargeable) ........................................ 5
Channel - a programmable memory location.
Channels are grouped into channel-storage banks.
Your scanner has 10 channel-storage banks and
each bank has 20 channels. .................................. 17
Channel-Storage Banks - Groups of channels, used
for frequency storage. ........................................... 24
Service Banks - preset groups of frequencies
categorized by the type of services that use those
frequencies. ..................................................... 17, 24
Signal Stalker - lets you set the scanner so it detects
then displays the frequency of a nearby strong radio
transmission. ......................................................... 31
Skywarn - lets you jump directly to the last channel
in memory (Channel 200) from any transmission.
You can program this channel with the frequency of
your local Skywarn broadcaster. .......................... 36
59 Beyond the Basic
Page 60

s
0
index
ALKALINE/RECHARGEABLE Switch ...................... 5
Antenna
Connecting ........................................................ 13
Using an Optional Antenna .............................. 13
Attaching a belt clip ............................................... 16
Backlight ................................................................. 53
Batteries
Charging .............................................................. 7
Installing .............................................................. 5
Belt Clip
Attaching ........................................................... 16
Chain Search .......................................................... 39
Mode ................................................................. 39
Hold Mode ......................................................... 40
Storing Frequencies .......................................... 41
Channel-Storage Banks .................................. 24, 48
Connecting an antenna ......................................... 13
Connecting an earphone ....................................... 14
Connecting an extension speaker ......................... 15
Delay ...................................................................... 47
Beyond the Basic
6
Page 61

s
Direct Entry Search ............................................... 43
Earphone
Connecting ........................................................ 14
Extension Speaker
Connecting ........................................................ 15
Frequently Asked Questions ................................. 55
FUNC Key ............................................................... 18
Keylock ................................................................... 51
Locking Out Channels ........................................... 48
Locking Out Frequencies ...................................... 49
Manually Selecting Channels ................................ 31
Priority .................................................................... 50
Powering the scanner
Using Batteries .................................................... 5
Using AC Power ................................................ 10
Using Vehicle Battery Power ............................ 11
Program Band Select Mode .................................. 42
Resetting the Scanner ........................................... 54
Scanning ................................................................ 30
Search Skip Memory ............................................. 45
61 Beyond the Basic
Page 62

s
2
Service Banks ........................................................ 24
Service Search ....................................................... 28
Squelch
Setting ............................................................... 25
Storing frequencies ............................................... 25
During Service Search ..................................... 29
Direct Entry Search Mode ................................ 44
Chain Search Mode .......................................... 41
Signal Stalker ......................................................... 31
Locking Out Frequencies .................................. 49
Setting Options ................................................. 33
Using .................................................................. 35
Skywarn ................................................................. 36
Specifications ........................................................ 58
Turning on the scanner/setting squelch ............... 25
Weather Alert ......................................................... 38
Wired Programming .............................................. 52
Beyond the Basic
6
Page 63

s
warranty
This product is warranted by RadioShack against
manufacturing defects in material and workmanship
under normal use for 1 (one) year from the date of
purchase from RadioShack company-owned stores
and authorized RadioShack franchisees and dealers.
For complete warranty details and exclusions, check
with your local RadioShack store.
RadioShack Customer Relations
300 RadioShack Circle, Fort Worth, TX 76102
04/04
63 Beyond the Basic
Page 64

Lightweight, and loaded with the frequencies you want!
This compact scanner fits in your palm and has an orange
backlit display and keypad for easy use at night. Store up
to 200 frequencies into memory. Scanner enthusiasts will
appreciate the Signal Stalker feature that instantly “locks
on” to radio being used in your immediate area—no need
to scan! The built-in NOAA receiver keeps you informed of
current weather conditions. Plus, just press the Skywarn
button and you can hear in-the-field reports from storm
spotters in your area—hear storm reports before they’re
broadcast (requires 1-time programming).
• PC interface available for downloading.
• Extended coverage— 806-956MHz (except cellular)
• Includes antenna
Frequency coverage:
25-54;108-174; 406-512; 806-956MHz (except cellular).
Covers CB radio, 10m Ham, VHF low-band 2-way; 6m
Ham;, commercial aircraft, 137-144MHz military band, 2m
Ham, VHF high-band 2-way; 406-420MHz federal
government; 70cm Ham; UHF, T-band and 800MHz 2-way
bands
Custom Manufactured in China for RadioShack Corp.,
Fort Worth, TX 76102
Product may vary from depiction
20-516 Printed in China
11A05 UBZZ01327AA(0)
 Loading...