

Page 1

Highway 200
Page 2

Page 3
Safety
1A
12V DC
Before you use your H ighw ay, read the fol lo wing saf ety i nstruction s.
1. Fol low the ope ratin g i nstructio ns p rovided an d t ake n ote of any warni ngs.
2. If you do not fol low the op erati ng instructi ons provided, i t may compromise the safe ty of your product and thi s may in vali date th e w arranty.
3. Onl y u se th e suppl ied 12V pow er a dapte r wi th your p roduct.
4. Do n ot i nsta ll your product in a wa y tha t may i nterfere with th e safe opera tion of the veh icle, o r a ffect th e depl oyment of a ir bags or other safety items.
Do not in stall cable s a nd wires nea r th e steering wh eel.
5. Do no t pl ace your product on or n ear sources of you r vehi cle's heat or venti lati on.
6. Do no t u se you r produ ct i n a way that may cause carele ss drivi ng or i mproper control of your veh icle .
7. Keep your product dry an d only clea n with a dry cloth.
8. Do no t e xpose you r prod uct to na ked f lames.
9. Do no t u se you r produ ct i n extremely h ot or col d te mperature.
10. If you need to conne ct your product to the rear of your veh icle 's hea d uni t, remove a ny p ower b efore you start to i nsta ll your product. Whe n you have
safel y i nstal led your product, you can reconn ect th e power. See your vehi cle's o wner's man ual f or more inf ormation.
11. Do not use the produ ct if i t i s d amaged .
12. Product repai rs sho uld onl y b e ca rried out by a utho rised personn el.
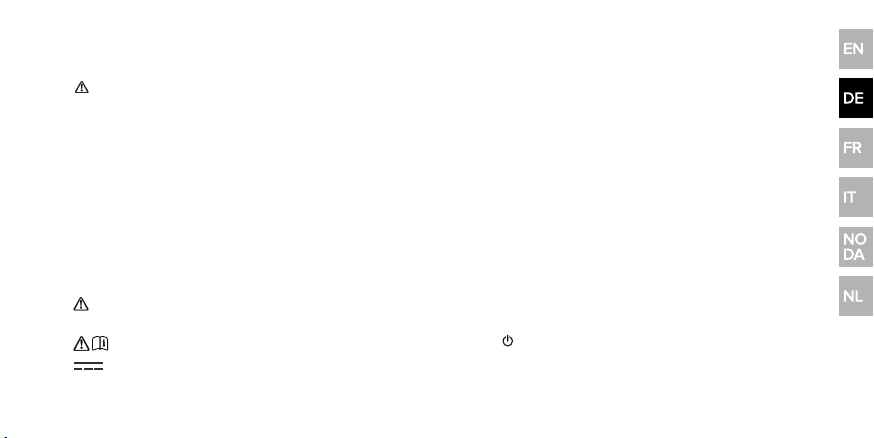
Symbols on the product and in the user manua l
Potent ial ly serious risk to you r pe rsonal sa fety. To avoid po ssible i nju ry or
dea th, obey al l safety noti ces wi th thi s symbol.
Ca ution . Read the u ser man ual b efore use.
12V DC po wer su pply.
USBsocket rated at 1amp maximum.
Where to switch on or off the produ ct, o r pu t i t i n stand by.
1
Page 4

Contents
Safety 1
Contents 2
Overview 3
What's in the box 3
Display icons 4
Controls 5
Gettingstarted 6
Installingy our Highway 6
Whereto install your Highway 7
Positioning the antenna 8
Positioning the controller 10
Connecting the antenna to the controller 11
Connecting the controller to y our vehicle 12
Switching your Highway on for the first time 13
Switching your Highway on and off 13
2
Digitalradio 14
Listeningto digital radio 14
Digital radiopresets 14
FM transmission frequencies 15
Auxiliary input 16
Listeningto music on a mobile device 16
Settings 17
Changing between the Line Out cable and FM
transmission 17
Settingyour Highway to enter standby automatically 17
Switching phantom power to the aerial on and off 18
Radio settings 18
Display settings 19
Updating the software 21
Troubleshooting 22
Page 5
Overview
1
2
3
6
4
7
5
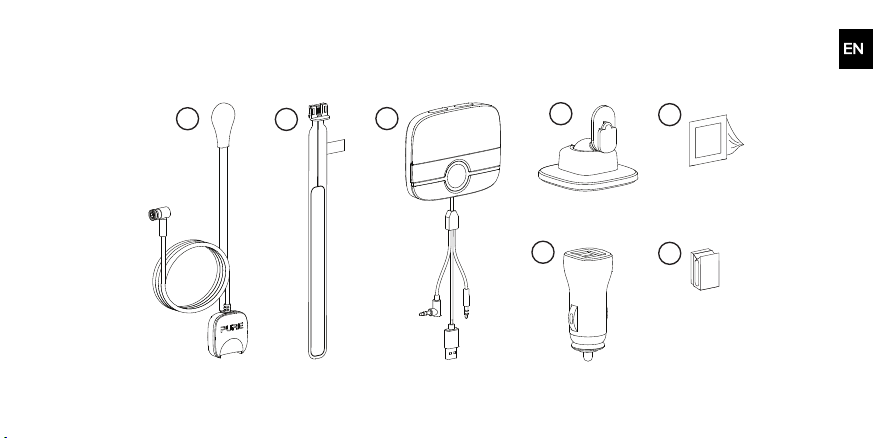
What's in the box
Before you get started, check y ou have everything below.
3
Page 6
1 Antenna, with magnetic grounding tail attached
4
1
3
2
5
6
2 DAB film aerial
3 Controller with USBpower and audio connectors
4 Controller bracket
Restrictions for use - to be used only with items shown on this page and configured/installed/used according to this manual.
5 Cleaning clo th
6 12V powe r adapter (dua l USB por t)
7 Se lf-adhes ive ca ble clips
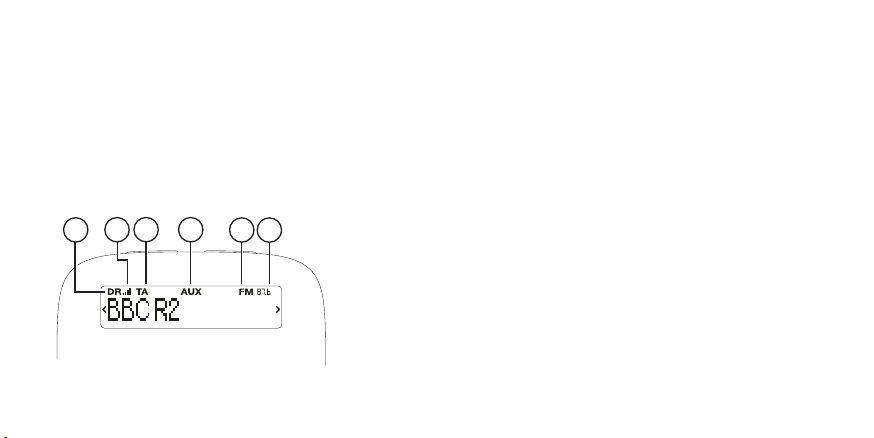
Display icons
The icons below appear on the screen of the
controller.
1 Digital ra dio mod e 4 Auxiliar y input mode
2 Digital ra dio s ignal s trength 5 FMtransmit e nabl ed
3 Traffic announcements ena ble d 6 FM tra nsmit freq uency
4
Page 7
Controls
4
6
7
5
1
2
3
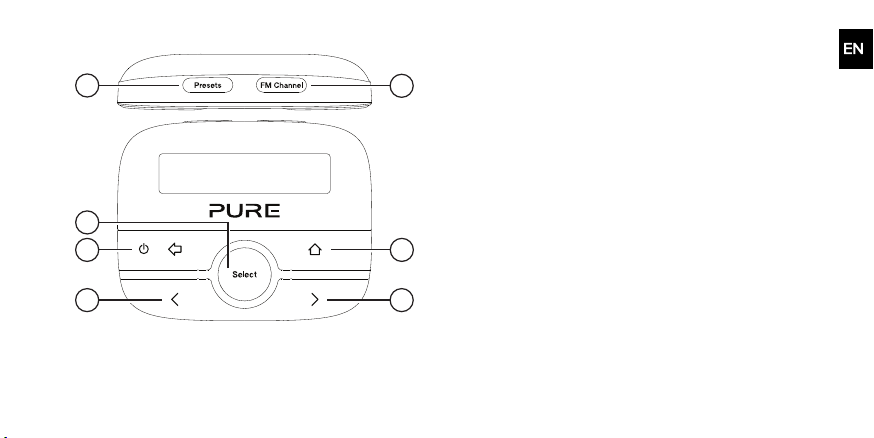
1 Prese ts Pre ss to view your digital radio presets. When in this
2
Sele ct
3 Power /
Back
4 Previous Press to choose the p revious radio sta tion o r menu
5 Next Pre ss to choose the next rad io statio n or menu o ption.
6 Home Pre ss to ope n the main menu.
7 FMChannel Press to vie w store d FM transmissi on fre quencies.
menu, press a nd hold to s ave the current station to a
pre set number.
Pre ss to sele ct a ra dio station or menu option.
Pre ss to switch your Highway on. Press a nd hold to
put your Highway in standby. Pres s to g o ba ck to the
pre vious screen or ca ncel an action.
optio n.
When in this menu, press a nd hold to s tore the current
FM frequency to an FMchannel.
5
Page 8

Getting started
Installing your Highway
Before you can start using your Highway, you need to dothe following:
1. Position the antenna in your vehicle.
2. Position the controller in your vehicle.
3. Connect the antenna to the c ontroller.
4. Connect the controller'spowerand audio cables to your vehicle.
5. Switch your Highway on for the first time.
To watch a video showinghow to install your Highway, search for 'Highway 200 installation' on YouTube.
Vehicle requirements
l Fitted audio system with auxiliary (3.5mm) port or FM receiver.
l Standard 12V negative earth powersupply. YourHighway is not suitablefor use with a 24Vpowersupply.
Gettingthe bestDAB signal
As with FMradio,DAB signal coveragechanges depending on your location. As you use the Highway in your vehicle, you may
travel throughareas where DAB signal coverage is poor.
6
Page 9
To help get the best DAB signal when coverageis pooror there is a weak signal:
l Follow the installation instructionscarefully.
l Usethe supplied 12V power adapter, as other third-party adapterscan cause interference.
l Switch off other devices in your vehicle that aren't in use. Devices such as satellite navigationsystems and dashboard
camerascan cause interference.
Where to install your Highway
It's important to install your Highway in a safe location in your vehicle. Do not fit any components in locations that
may interfere with safe operation of the vehicle, or affect the deployment of air bagsor other safety products.
Keep cables and wiresaway from the steering wheel.
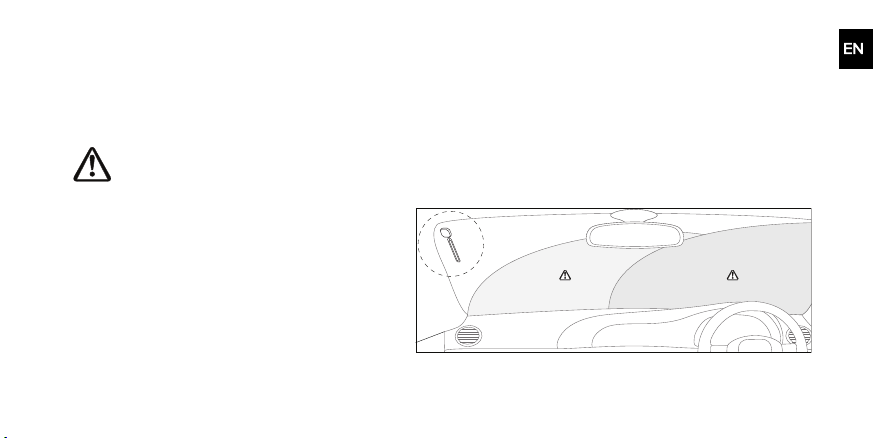
Where toinstalltheantenna
We recommendyou install the antenna for your
Highway in the top corner of the windscreen, on the
passenger's side of your vehicle.
Install the antenna so that it is not within the swept
area of the windscreen. Make sure the antenna and
wireless controller do not obstruct the v iew of the
driver.
7
Page 10
If you have a heated windscreen in your vehicle, or the windscreen containsmetallic UVfilters, it can cause interference for
the DAB signal. Install the antenna on a part of the windscreen that doesnot contain heating elements or UV filters.
For more information on whereto safely and legally install your Highway in your vehicle, contact your local transport
office. Tofind local fittersthat can install your Highway professionally, visit pure.com/store-locator.
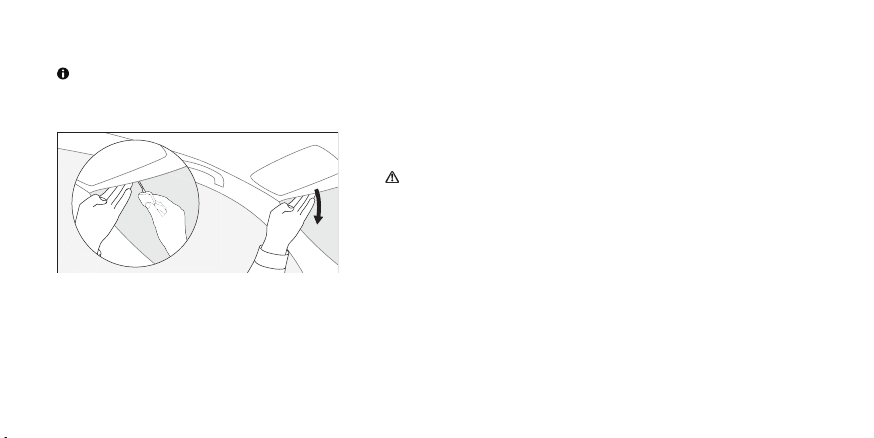
Positioning the antenna
1. Choose a position for the antenna, sothat it's as high as possible on
the windscreen and at least 4cm from the side of the screen.
Make sure the antenna doesnot obstruct the view of the driver.
2. Gently pull down the front of the roof liner in your vehicle,until there is
a small gap.
3. Pushthe magnetic grounding tail throughthe gap, with the
silver-coloured magnet facing upwards. Make sure the magnet
touches your vehicle's metal bodywork.
8
Page 11
4. Clean the chosenarea of the windscreen with a cleaningcloth and
wait for it to dry.
5. Unpeel the backing from the antenna and stick the antenna ontoyour
windscreen.
6. Insert the DAB film aerial into the slot in the antenna.
7. Gently unpeel the backing from the DAB film aerial and stick the
aerial onto your windscreen. Take care not to fold or twist the aerial.
9
Page 12

Positioning the controller
10
1. Choose an area on your vehicle's dashboardwhereyou want to install
the controller. Clean the surface with a cleaning cloth and wait for it to
dry.
Make sure the controller does not obstruct the view of the driver.
2. Peel off the backing from the controller bracket and gently stick it
onto your dashboard. Gently press the bracket to ensureit's attached
securely.
3. Slidethe controller onto the bracket, until it clicks into place.
Page 13

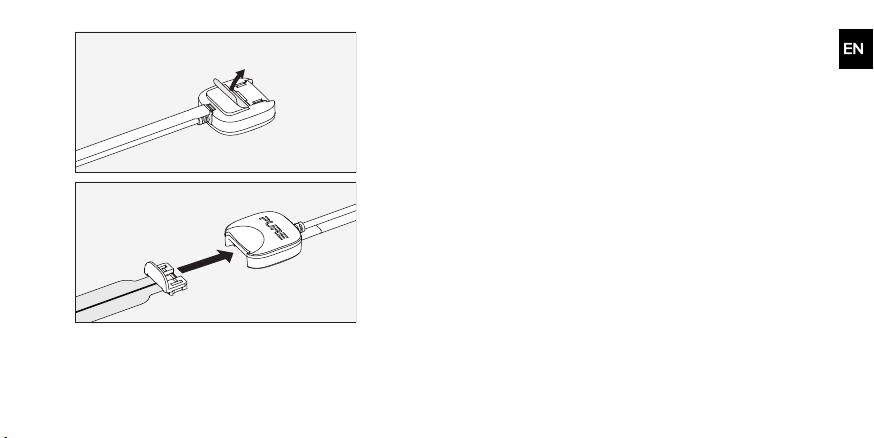
Connecting the antenna to the controller
1. Place the antenna cable so that it follows a path to the controller on
your vehicle's dashboard.
Note: To prevent interference to the DAB signal, keep cables away
2. If possible, tuck the cable behindthe trim down the side of your
windscreen. Alternatively, secure the cable to your windscreen and
dashboardwith self-adhesive clips.
3. Insert the antenna cable into the connector on the rear of the
controller.
Note: Push the antenna cablein firmly, to ensure it's fully inserted.
from display units such as LCD screens.
11
Page 14
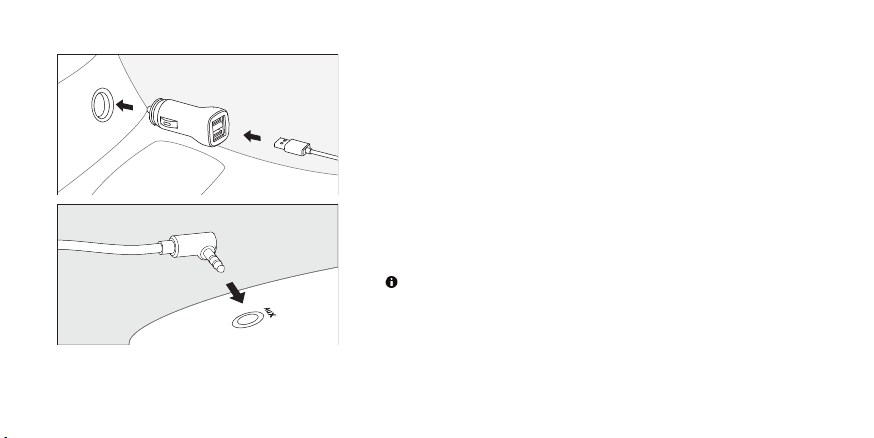
Connecting the controller to yourvehicle
12
1. If required, gently pull apart the controller'spower and audiocables to
separate them.
Note: To prevent interference to the DAB signal, keep cables away
from display units such as LCD screens.
2. Insert the USB power cable into the supplied12V power adapter, then
insert the power adapter into your vehicle's power socket.
3. If you're connecting your Highway with the Line Out cable, insert the
cable into your vehicle'sauxiliary socket. If you're connecting your
Highway by FM radio, you can store the LineOutcable so it's out of
the way.
We recommendyou connect your Highway with the Line Out
cable to get the best audioquality.
Page 15

Switching your Highway on for the first time
After you've installed your Highway, switch it on to finishsettingit up.
1. Turn on y our vehicle’s ignition to make sure your Highway is switched on.
2. Press and to change the display language, then press Select to choose it.
3. Press and Select to c hoose how to connect your Highway to your vehicle.
•
If you've connectedyour Highway with the LineOut cable, choose 'Line out'. Then press and Select to choose
'Normal gain'. If you later find that audiois distorted, you can change the gain setting. Read m ore on page17.
•
If you're connecting your Highway by FM radio, choose ‘FM transmit' and then choose an FM frequency. Ensure a
radiostation isn't usingthe frequency you choose.
Tuneyour vehicle’saudiosystem to the same FM frequency as your Highway. To easily find the FM
frequency in the future, save it as a preset on your vehicle’saudio system.
After you’ve chosen how to connect your Highway, it starts tuning to digital radiostations.Whenthe autotune is complete,
you can start listening to digital radio.
Switching your Highway on and off
•
To switch on your Highway, press .
•
To put your Highway in standby and use lesspower,press and hold .
Note: By default, the controller automatically enters standby after 4hours.Tochange the delay, see page17.
13
Page 16

Digital radio
Listening to digital radio
1. Press .
2. Press and Select to choose'Digital radio'.
3. To change to another radio station,press to choosea station and then press Select.
Digital radio presets
You can save up to 20 of your favourite digital radio stationsin the presets list.
Storing a radio stationas a preset
1. When listeningto a digital radio station, press Presets.
2. Press to choosea preset number. You can overwrite previousradio stations.
3. PressandholdSelect or Presetsto save the c urrent digital radio station to the preset number.
Listening to a preset
1. PressPresets.
2. Press to choosethe preset you want to listen to, then press Select.
You can also listen to a preset using only the Presetsbutton.Press Presetsmultipletimes, until the preset you want
to listen to is displayed. After 3 seconds,your Highway tunes to that radio station.
14
Page 17

FM transmission frequencies
If you connect your Highway to your vehicle's audio system usingFMradio, local radio stations may broadcast at the same
FMfrequency as your Highway. To quickly change the FMtransmissionfrequency on your Highway, you can store up to nine
frequenciesas FMchannels.
The FMtransmission frequency is displayedin the top-right of the screen. If you're using the 'Line out' setting,the
FMtransmission frequency is not displayed and the FMChannelbutton is disabled.
Storing an FMtransmission frequency
1. PressFMChannel.
2. Press to choosean FMchannel.You can overwrite previous FMfrequencies.
3. PressandholdSelect or FMChannel to save the current FMradiofrequency to the FMchannel.
4. If required,you can press to edit the FMfrequency, then press Select to update the FMchannel.
Changingthe FM transmission frequency
1. PressFMChannel.
2. Press to choosea stored FM transmissionfrequency, then press Select.
You can also changethe FM transmission frequency using only the FMChannel button. PressFMChannelm ultiple
times, until the FM tranmission frequency you want to use is displayed. After 3 seconds,your Highway changes to
that FM transmission frequency.
15
Page 18
Auxiliary input
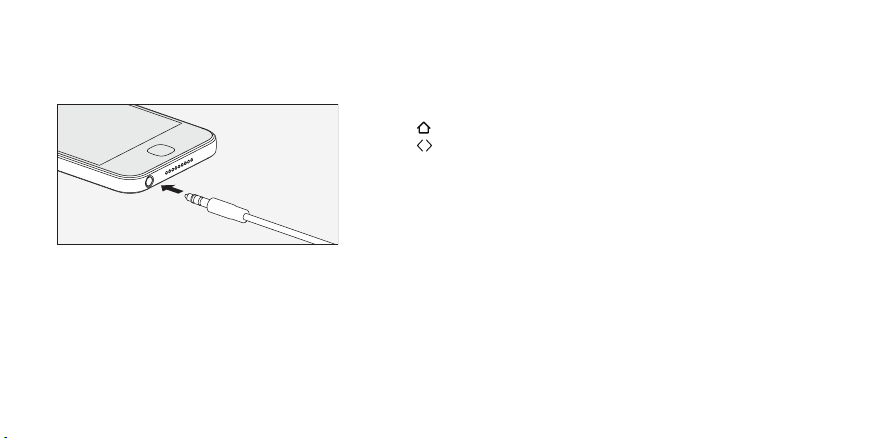
Listening to music on a mobile device
You can use the controller'sAux Incable to listento music on a mobile device throughyour vehicle'saudiosystem.
1. Connect a mobile device to your Highway usingthe Aux Incable.
2. Press .
3. Press and Select to c hoose 'Auxiliary input'. Your Highway is now
ready to play music from the connected device.
16
Page 19

Settings
Changing between the Line Outcable and FM transmission
You can choose how your Highway is connected to your vehicle's audio system.
1. Press .
2. Press and Select to choose'Settings' > 'Audio out'.
3. Press and Select to c hoose how to connect your Highway to your vehicle.
•
If you've connectedyour Highway with the LineOut cable, choose 'Line out'. Then press and Select to choose
a gainsetting of 'Low gain' or 'Normal gain'. If the audio sounds distorted, choose 'Low gain'.
•
If you're connecting your Highway over FM radio, choose ‘FM transmit' and then choose an FM frequency.
Ensure a radio station isn't usingthe frequency you choose.
Setting your Highway to enter standby automatically
By default, your Highway enters standby after 4hours, but you can changethe delay.
1. Press .
2. Press and Select to choose'Settings' > 'Auto standby'.
3. Press and Select to c hoose a delay between 1 and 8 hours.
17
Page 20

Switching phantom power to the aerial on and off
By default, your Highway powersthe DAB film aerial throughthe antenna'scable. If you're using the DAB film aerial that
came with your Highway, keepthis setting on. If you're using an aerial from a different manufacturer,check the aerial'suser
manual to see whether you need to change this setting.
1. Press .
2. Press and Select to choose'Settings' > 'D igital radio' > 'Phantom power'.
3. Press and Select to c hoose 'On' or 'Off'.
Radio settings
Performing an autotune
If you can't find any digital radio stations, try retuning yourHighway.
l To perform an autotune, press and hold Select when you are in digital radio mode.
Listening to alternative stations when the signal is weak
If the current radiostation has a weak signal, your Highway automatically tries to find a stronger signal.If y our Highway can't
find a stronger signal for the current radio station, it can automatically tune to a similar radio stationwhen supported by the
broadcaster.
1. Press .
2. Press and Select to choose'Settings' > 'D igital radio' > 'Alt stations'.
3. Press and Select to c hoose 'On' or 'Off'.
18
Page 21

Switching traffic announcements on and off
You can set your Highway to automatically play traffic announcements when y ou are listening to digital radio. When your
Highway plays traffic announcements, it displays 'Traffic'.
1. Press .
2. Press and Select to choose'Settings' > 'D igital radio' > 'Traffic messages'.
3. Press and Select to c hoose 'On' or 'Off'.
To cancel a traffic announcement when it plays, press .
Display settings
Changing the language
1. Press .
2. Press and Select to choose'Settings' > 'D isplay' > 'Language'.
3. Press and Select to c hoose a language.
19
Page 22

Changing the information displayed on the screen
Your Highway can display different information while you are listening to a radio station.
1. Press .
2. Press and Select to choose'Settings' > 'D isplay' > 'Information'.
3. Press and Select to c hoose a setting.
l To display the names of radio stations, choose 'Station name'.
l To display text that the radio station broadcasts, choose 'Scrollingtext'. Thissetting is not recommendedwhile
driving.
l To display the signal quality of radio stations, choose'Signal quality'.
l To display the signal strength of radio stations, choose 'Signal strength'. The signal strength is displayedon a scale
from 0to 15bars. A marker onthe scale showsthe minimum number of barsrequired for goodreception.
Changing the screen brightness
A light sensor on the controllerautomatically sets the screen brightness, but you can manually changeit.
1. Press .
2. Press and Select to choose'Settings' > 'D isplay' > 'Brightness' > 'Manual'.
3. Press and Select to c hoose a brightnesslevel.
You can set the screen on the controller to dim after a certain length of time. Tochange the length of time, choose
'Settings' > 'Display' > 'Timeout'.
20
Page 23

Updating the software
We may providesoftware updatesto improve your Highway. To find out moreabout updatingthe software on your Highway,
visit pure.com/highway-update.
21
Page 24

Troubleshooting
Proble m Possib le cause Solution
I can't hear a ny sound. Your Highway is not connected to your
The controller is not
res ponding.
Sound is distorted when
my Highway is connected
with the Line Outca ble .
22
vehicle .
Your vehicle 's audio system is not in the
corr ect input source .
Your Highway is not in the correct
mode.
The volume is too low on your vehicle
or connected mob ile de vice.
The controller isn't connected pr ope rly
to a power supply.
The ga in setting is n't correct. Set the g ain setting to ' Low ga in' or change to FM tra nsmission.
Ensure the Line Outca ble i s firmly co nnected to yo ur vehicle' s audio
system, or ensure you a re tuned to the corr ect FMfrequency.
Change the input source on your vehicle 's a udio system to FMradio
or a uxilia ry input.
Change the mode to d igita l radio or auxilia ry input. Rea d more on
pa ges14 a nd 16.
Turn up the volume on your ve hicle and on the co nnected mobile
device.
Ensure the controlle r is fully co nnected to the 12V p owe r ad ap ter,
and that the adapter is fully inserted into your ve hicle's p owe r
socke t. Then turn on your vehicle 's ignition. If there 's still a pro ble m,
remove the 12V power a da pter from the socket, then reinsert the
ad ap ter and wa it for your Highwa y to r esta rt.
Rea d more o n pa ge 17.
Page 25
My Highway kee ps losing
digital ra dio s ignal.
My Highway kee ps
switching off by itse lf.
You a re trave lling through a re as with
wea k DAB signal.
Your Highway is not installed co rre ctly. Check the installa tion instructions on pa ge 6.
Something is causing interference. l Switch off sa tellite naviga tion systems, dashboa rd ca mera s
Auto standby mod e is switched on. If this is hap pening too often, change the auto standby setting. Rea d
If you need more help, visit support.pure.com.
Check DAB cove ra ge in your ar ea .
or other devices to see if the signal impro ves.
l Use the supplied 12Vpower adapter, as o ther a da pters can
cause interfe rence.
more on pa ge17.
23
Page 26

Correct disposalof thisproduct
This marking indic ates that thi s product should not be disposed with otherhousehold waste throughout theEU. To prevent possible harm to the
environment or human health from uncontrolled waste disposal, recycl e it responsibly to promote the sustainable reuse of material resources.
To return your used devi ce, please use the return and coll ection system or contact the retailer where the product was purchased. They can
take this product for environmental safe recycl ing.
Copyright
Copyright2017 by Pure International Limited. All rights reserved. No part of this publication may be c opied or distributed, transmitted, transcribed, stored in a
retrieval system, or translated into any human or c omputer language, in a ny form or by any means, electronic, mechanic al, magnetic, manual or otherwise,
or disclosed to third parties without the ex press written permission of Pure International Limited. For warranty and disclaimer information, visit pure.com.
Trademarks
Highway, Pure and the Pure logo are trademarks or registered trademarks of Pure I nternational Limi ted. Al l other product names are trademarks of their
respective companies. Version 1February2016.
Approvals
CE marked. Hereby, Pure declares that this BandII LPDdevice is in compliance with the essential requirements and other provisions of the
R&TTEDirective1999/5/EC or RED2014/53/EU from 12thJune2017. Compliant with UNECE Regulation10 (E-Mark) and RF exposure requirements
EN62479:2010. You can view the Declaration of Conformity at http://www.pure.com/about/rtte-doc.
Specifications
For the full list of technical specifications, visit pure.com. Operational temperature: -20°C to+60°C. Storage temperature: -40°C to+85°
C. FMfrequency range: 87.6-107.9MHz. FM max power: 51.78db(uV/m).
Software Version: v1.1
Restrictions of use: None (configure and install as per this manual)
24
Page 27
Sicherheit
1A
12V DC
Bevor Sie I hr Highw ay in Betri eb neh men, l esen Sie di e fol genden Si cherhei tsanwei sungen.
1. Fol gen Si e den vorl iegende n Bedie nungsvorschriften un d achten Si e auf a lle a ufgefü hrten Warn ungen.
2. Wen n Sie den Bed ienun gsvorschriften ni cht folge n, kann d ies die Si cherheit des P rodukts bee inträchti gen un d die Ga ranti e an nulli eren.
3. Verwend en Sie a usschließl ich den mitg elief erten 12V-Adapter für I hr Produkt.
4. I nstall ieren Si e Ihr P rodukt so, da ss es den siche ren Betrieb des Fa hrzeugs ni cht beei nträchtigt u nd da s Auslöse n von Airba gs oder an deren
Sicherh eitsvorkehrungen n icht behi ndert. I nstall ieren Sie Ka bel u nd Dräh te nicht in d er Nähe des Lenkrades.
5. Pl atzieren Sie I hr Produkt ni cht a uf oder i n der N ähe de r Heizung od er Lüftung I hres Autos.
6. Verwende n Sie Ih r Produkt nicht a uf ein e Weise, d ie na chlä ssiges Fa hren od er unzureich ende Kon troll e über I hr Fah rzeug zu r Folge ha ben könn te.
7. Hal ten Sie da s Produkt trocken un d reini gen Si e es au sschli eßlich mit trockenen T üchern.
8. Setzen Si e das Produ kt nicht off enem Feue r aus.
9. Verwende n Sie Ih r Produkt nicht bei extrem hohe n oder ni edrigen T emperatu ren.
10. Wenn Si e Ihr Prod ukt auf de r Rückseite der Ha uptein heit I hres Fah rzeugs a nbringe n müssen, entf ernen Si e jegl iche Stromzufu hr, bevor Si e mit der
Insta lla tion de s Produkts begin nen. Na chdem Sie I hr Produkt siche r instal liert h aben, könn en Sie e s wieder mit der Stromquel le verbi nden. Wei tere
Info rmation en fi nden Si e im Bedi enungsh andbuch Ih res Fa hrzeugs.
11. Verwenden Si e das Produ kt ni cht, wen n die ses Beschä digunge n aufw eist.
12. Repa raturen d es Produkts soll ten au sschli eßlich durch zu gelassen es Fachpe rsona l erfolg en.
Symbole auf dem Produkt un d i m Benutzerhandbuch
Potenzi ell ernste s Risiko für I hre persönl iche Si cherheit. U mmögl iche
Verletzun gen oder tödl iche Ge fahren zu vermeide n, bea chten Si e al le mit
die sem Symbol verseh enen Si cherheitsh inweise .
Achtung. Lesen Si e vor der Verwendu ng das Benu tzerhandbu ch.
12V-Glei chstromversorgung.
USB-Anschlu ssbuchse mi t maximal 1A N ennstärke.
Ein - oder Ausschal ten des G eräts oder Versetzen i n den
Stan dby-Modus.
1
Page 28

Inhaltsverzeichnis
Sicherheit 1
Inhaltsverzeichnis 2
Übersicht 3
Lieferumfang 3
Anzeigesymbole 4
Steuerungen 5
ErsteSchritte 6
Installieren desHighway 6
Installationsposition desHighway 8
Positionieren der Antenne 9
Positionieren der Steuereinheit 11
Anschließender Antenne an dieSteuereinheit 12
Anschließender Steuereinheit an Ihr Fahrzeug 13
ErstesEinschalten des Highway 14
Ein- und Ausschalten des Highway 15
2
Digitalradio 16
Hören vondigitalen Radiosendern 16
Digitalradio-Favoriten 16
UKW-Ü bertragungsfrequenzen 17
AUX-Eingang 18
Hören vonMusik auf einem Mobilgerät 18
Einstellungen 19
Wechseln zwischen dem Line Out-Kabelund einer
UKW-Ü bertragung 19
Einrichten desHighway zum automatischen Wechsel
in den Standby-Modus 19
Ein- und Ausschalten der Phantomspeisungfür die
Antenne 20
Radioeinstellungen 20
Anzeigeeinstellungen 21
Aktualisieren der Software 23
Fehlerbehebung 24
Page 29

Übersicht
1
2
3
6
4
7
5
Lieferumfang
Bevor Sie loslegen,prüfen Sie anhand der unten stehenden Aufstellung,obSiealles haben.
3
Page 30

1 Antenne mit magnetischer Erdung
4
1
3
2
5
6
2 DAB-Film-Antenne
3 Steuereinheit mit USB-Strom- und Audioanschlüssen
4 Haltevorrichtung für die Steuereinheit
Einschränkungen für den Gebrauch - nur mit auf dieser Seite dargestellten Artikeln zu verwenden und entsprechend diesem Handbuch zu konfigurieren / zu
installieren / zu verwenden.
5 Reinigungstuch
6 12V-Netza dapter (zwei USB-Anschlüsse)
7 Se lbstklebe nde Ka belkle mmen
Anzeigesymbole
FolgendeSymbolewerdenauf dem Bildschirm der Steuereinheit angezeigt.
1 Digitalradio-Modus 4 AUX-Modus
2 Stär ke de s dig itale nRadiosignals 5 UKW-Übe rtragung a ktiviert
3 Verke hrsnachrichten aktivie rt 6 UKW-Übertragungs-
4
frequenz
Page 31

Steuerungen
4
6
7
5
1
2
3
1 Prese ts Drücken Sie diese Taste, um Ihre digitalen Favor itensende r
2
Sele ct
3 Ein/Aus/
Zurück
4 Zurück D rücken Sie d iese Ta ste, um den vorherige nRadiose nder o der
5 Weiter Drücken Sie diese Taste, um den nächsten Ra diosender oder
6 Home Drücken Sie die se Ta ste, um das Hauptmenü aufzurufen.
7 FMChannel Drücken Sie d iese Taste, umges peicherte UKW-
anzuzeigen. Innerhalb de s Menüs halten Sie die Taste gedrückt,
um den a ktuellen Sende r als Favo riten auf einem Speicherpla tz
zu speichern.
Drücken Sie diese Taste, um einen Ra diosende r oder e ine
Menüoption auszuwä hlen.
Drücken Sie diese Taste, um da s Highway einzuschalten. Ha lten
Sie sie ge drückt, um das Highway in den Standby-Modus zu
versetzen. Drücken Sie, um zurück zumvorherigen Bildschirm zu
gelange no der e ine Aktion abzubrechen.
die vo rangeg angene Menüoption a uszuwählen.
die nä chste Menüoptio n auszuwähle n.
Sende freq uenzen anzuzei gen. Innerhalb de s Menüs halten Sie
die T aste ged rückt, umd ie aktuelle U KW-Frequenz a uf einem
UKW-Ka nal zu speichern.
5
Page 32

Erste Schritte
Installieren des Highway
Bevor Sie Ihr Highway verwenden können,müssenSiefolgende Schritte ausführen:
1. Positionieren der Antenne in Ihrem Fahrzeug
2. Positionieren der Steuereinheit in Ihrem Fahrzeug
3. Anschließen der Antenne an dieSteuereinheit
4. Anschließen desStrom- undAudiokabelsder Steuereinheit an Ihr Fahrzeug.
5. ErstesEinschalten des Highway
Auf YouTubekönnenSieein Videozur InstallationdesHighway betrachten. Suchen Sie hierfür einfach nach „Highway
200 installation“.
Fahrzeuganforderungen
l Eingebautes Audiosystem mit AUX-Buchse (3,5mm) oderUKW-Empfänger
l Standardmäßige 12V-NegativerdungIhr Highway ist nicht geeignet für die Verwendung mit einer 24V-
Stromversorgung.
Erhaltdes bestmöglichen DAB-Signals
Wie auch bei UKW-Radio,hängt der Empfang des DAB-Signals von Ihrem Standort ab. Da Sie das Highway in Ihrem Fahrzeug
nutzen,kommen Siemöglicherweise auch durch Gebiete, in denen das DAB-Signal nur sehr schwach ist.
6
Page 33

Soerhalten Sie auch bei schlechter Reichweite oderschwacher Signalstärke das bestmögliche DAB-Signal:
l Befolgen Sie die Installationsanweisungen sorgfältig.
l Verwenden Sie den beiliegenden 12V-Adapter, da Adapter vonDrittherstellern zu Interferenzen führen können.
l Schalten Sie andere, nicht verwendete Geräte in Ihrem Fahrzeugaus. Geräte wie Satelliten-Navigationssysteme und
Dash-Cams (Autokameras) können Interferenzen verursachen.
7
Page 34

Installationsposition des Highway
Das Highway muss unbedingt aneinersicherenPositionin Ihrem Fahrzeugangebracht werden. Installieren Sie
Komponentennicht an Positionen,in denensieden sicherenBetrieb desFahrzeugsbeeinträchtigen oderdas
Auslösenvon Airbagsoder anderenSicherheitsvorkehrungen behindern könnten. Sorgen Sie dafür, dass Kabel
und Drähte nicht in die Nähe desLenkradeskommen.
Installationspositionder Antenne
Wir empfehlen, die Antenne für das Highway in der
oberen Ecke der Windschutzscheibe auf der
Beifahrerseite anzubringen.
Installieren Siedie Antenne so, dassSiesich nicht im
Scheibenwischerbereich derWindschutzscheibe
befindet. Stellen Sie sicher, dassdieAntenneund
die Steuereinheit dieSicht des Fahrers nicht
behindern.
WennSieeine beheizte Windschutzscheibe besitzen oderdie Windschutzscheibe metallischeUV-Filter enthält, kanndies
Interferenzen mit dem DAB-Signal verursachen. Bringen Sie die Antenne an einem Bereich der Windschutzscheibe an,der
keine Heizelemente oderUV-Filter enthält.
8
Page 35

Für weitere Informationen über das sichere und rechtlich zulässigeAnbringendesHighway in Ihrem Fahrzeugwenden Sie
sich an Ihre örtliche Verkehrsbehörde.Örtliche Monteure, die Ihr Highway professionell installieren, finden Sie unter
pure.com/store-locator.
Positionieren der Antenne
1. Wählen Sie für dieAntenneeine Position möglichst weit obenan der
Windschutzscheibe und mindestens4cm von der Seite der Scheibe
entfernt.
Stellen Sie sicher, dass die Antenne die Sicht desFahrers nicht
behindert.
2. Ziehen Sie das Dachfutter vorne vorsichtig herunter,bis eine kleine
Lücke entsteht.
3. ZiehenSiediemagnetische Erdung durch die Lücke, wobei der
silberne Magnet nach oben weist. StellenSiesicher, dassder Magnet
das Metall der Fahrzeugkarosserieberührt.
9
Page 36

4. SäubernSiedenausgewählten Bereich der Windschutzscheibe mit
einem Reinigungstuch undlassen Sie ihn trocknen.
5. Ziehen Sie die Folievon der Hinterseite der Antenne ab undbefestigen
Siedie Antenne an der Windschutzscheibe.
6. Stecken Sie die DAB-Film-Antennein den Schlitz an derAntenne.
7. Ziehen Sie die Folievon der Hinterseite der DAB-Film-Antenne
vorsichtig abundbefestigen Sie die Antenne ander
Windschutzscheibe. Achten Siedabei darauf, dieAntennenicht zu
verdrehen oder zu knicken.
10
Page 37

Positionieren der Steuereinheit
1. Wählen Sie den Bereich auf dem Armaturenbrett IhresFahrzeugsaus,
an dem SiedieSteuereinheit anbringenwollen.Säubern Sie die
Oberfläche mit einem Reinigungstuch und lassenSiesie trocknen.
Stellen Sie sicher, dass die Steuereinheit die Sicht des Fahrers
nicht behindert.
2. Ziehen Sie die Folie von Haltevorrichtung der Steuereinheit ab und
bringen Sie die Vorrichtung vorsichtig am Armaturenbrett an. Drücken
Siedie Haltevorrichtung sorgfältig fest, um sicherzustellen, dassdiese
sicher befestigt ist.
3. SchiebenSiedieSteuereinheit auf dieHaltevorrichtung, bis sie hörbar
einrastet.
11
Page 38

Anschließen der Antenne an die Steuereinheit
1. Platzieren Sie das Antennenkabel so, dasses entlang dem
2. Stecken Sie das Kabel nach Möglichkeit hinter die seitliche
3. Führen Sie das Antennenkabel indieBuchse auf der Rückseite der
12
Armaturenbrett zur Steuereinheit verläuft.
Hinweis: Um Interferenzenmit dem DAB-Signalzu vermeiden,
sorgen Sie dafür, dass keine Kabel in die Nähevon
Anzeigenwie LCD-Bildschirmen kommen.
Verkleidungder Windschutzscheibe. Wahlweisekönnen Sie das Kabel
auch mit selbstklebendenKlemmen an der Windschutzscheibeund
dem Armaturenbrett befestigen.
Steuereinheit ein.
Hinweis: Stecken SiedasAntennenkabel fest ein,um
sicherzustellen, dass es vollständig und korrekt
angeschlossen ist.
Page 39

Anschließen der Steuereinheit an IhrFahrzeug
1. ZiehenSiedas Strom- unddas Audiokabel der Steuereinheit
gegebenenfalls vorsichtig auseinander, um die beiden Kabel
voneinander zu trennen.
Hinweis: Um Interferenzenmit dem DAB-Signalzu vermeiden,
sorgen Sie dafür, dass keine Kabel in die Nähevon
Anzeigenwie LCD-Bildschirmen kommen.
2. Schließen Sie das USB-Stromkabel an dem beiliegenden 12VNetzstromadapter an undstecken Sie den Netzstromadapter inden
Stromanschluss IhresFahrzeugs.
3. Wenn Sie das Highway über das Line Out-Kabel anschließen, stecken
Siedieses in die AUX-Buchse IhresFahrzeugs. Wenn Sie das Highway
per UKW-Übertragunganschließen, können Sie das Line Out-Kabel
an einem Ort aufbewahren, an dem es Ihnennicht im Wegist.
Es wird empfohlen, das Highway mit dem LineOut-Kabel
anzuschließen, um die bestmögliche Tonqualität zu erhalten.
13
Page 40

Erstes Einschalten des Highway
Nachdem Sie das Highway installiert haben, schalten Sie es ein, um die Einrichtung abzuschließen.
1. DrehenSiedenZündschlüssel IhresFahrzeugs, um sicherzustellen,dassdasHighway eingeschaltet ist.
2. Drücken Sie und , um die Anzeigesprache zu ändern,und drücken Sie Select, um die gewünschte Sprache
festzulegen.
3. Drücken Sie und Select, um anzugeben, wie das Highway an Ihr Fahrzeug angeschlossen werden soll.
•
WennSiedas Highway mit dem LineOut-Kabelangeschlossen haben,wählen Sie „Line-out“. Drücken Siedann
und Select, um „Normal Verstärkung“ auszuwählen.WennSiespäter feststellen,dassderTonverzerrt ist,
könnenSiedie Verstärkungseinstellungändern. Mehr darüber finden Sie auf Seite19.
•
WennSiedas Highway über UKW-Radio verbinden, wählenSie„UKW-Übertragungs“ undsuchen eineUKWFrequenzaus. StellenSiesicher, dass die von Ihnen gewählte Frequenz nicht von einem Radiosender verwendet
wird.
Stellen Sie das Audiosystem IhresFahrzeugsauf dieselbe UKW-Frequenzein wie dasHighway. Um die UKWFrequenzin Zukunft schnellzu finden, speichernSiesieals Favoriten im Audiosystem IhresFahrzeugs.
Nachdem Sie sich für eine Anschlussmethode für dasHighway entschieden haben,beginnt dieses, nach digitalen
Radiosendern zu suchen. Nachdem die automatische Sendersuche abgeschlossen ist, können Sie Digitalradio hören.
14
Page 41

Ein- und Ausschalten des Highway
•
Um das Highway einzuschalten, drücken Sie .
•
Um das Highway in den Standby-Moduszu setzen, damit es wenigerStrom verbraucht, drücken und halten Sie .
Hinweis: Standardmäßig wechselt dieSteuereinheit nach 4Stunden automatisch in den Standby-Modus. Hinweise zum
Ändern dieses Intervalls finden Sie auf Seite19.
15
Page 42

Digitalradio
Hören von digitalen Radiosendern
1. Drücken Sie .
2. Drücken Sie und Select, um „Digitalradio“ auszuwählen.
3. Um zu einem anderen Sender zu wechseln, drücken Sie , wählen Sie einenSender aus unddrücken Siedann Select.
Digitalradio-Favoriten
Siekönnenbiszu 20 Ihrer Lieblingssender in der Favoritenliste speichern.
SpeicherneinesRadiosenders alsFavorit
1. Drücken Sie beim Höreneines digitalenRadiosenders aufPresets.
2. Drücken Sie , um einen Speicherplatz auszuwählen. Sie können zuvor gespeicherte Sender überschreiben.
3. Halten SieSelect oder Presetsgedrückt, um den aktuellendigitalen Radiosender auf dem ausgewählten Speicherplatz
zu speichern.
Aufrufeneines Favoriten
1. Drücken Sie Presets.
2. Drücken Sie , um den gewünschten Favoriten auszuwählen, und drücken Sie dann Select.
SiekönneneinenFavoriten auch ausschließlich über die Presets-Taste aufrufen. Drücken Siemehrmals Presets, bis
der gewünschte Favorit angezeigt wird. Nach 3Sekunden stellt dasHighway dengewünschten Sender ein.
16
Page 43

UKW-Übertragungsfrequenzen
WennSiedas Highway über UKW-Radio mit dem Audiosystem Ihres Fahrzeugs verbinden, senden lokale Radiosender
möglicherweise auf derselbenUKW-Frequenzwie das Highway. Damit Sie die UKW-ÜbertragungsfrequenzdesHighway
schnell ändernkönnen,ist es möglich, bis zu neun Frequenzenals UKW-Kanäle zuspeichern.
Die UKW-Übertragungsfrequenz wirdoben rechts auf dem Bildschirm angezeigt. Wenn Sie die Einstellung „Line-out“
verwenden, wirddieUKW-Ü bertragungsfrequenznicht angezeigt unddieTaste FMChannelist deaktiviert.
Speicherneiner UKW-Übertragungsfrequenz
1. Drücken Sie FMChannel.
2. Drücken Sie , um einen UKW-Kanal auszuwählen.Siekönnenzuvor gespeicherte UKW-Frequenzen überschreiben.
3. Halten SieSelect oder FMChannel gedrückt, um den aktuellen UKW-Radiosenderauf dem UKW-Kanal zu speichern.
4. Gegebenenfalls können Sie drücken, um die UKW-Frequenzzu ändern; drücken Sie dann Select, um den UKW-Kanal
zu aktualisieren.
Ändernder UKW-Übertragungsfrequenz
1. Drücken Sie FMChannel.
2. Drücken Sie , um eine gespeicherte UKW-Übertragungsfrequenzauszuwählen, und drücken Sie Select.
Siekönneneine UKW-Übertragungsfrequenzauch ausschließlich über die FMChannel-Taste ändern.Drücken Sie
mehrmals FMChannel, bis die gewünschte UKW-Übertragungsfrequenz angezeigt wird. Nach 3Sekunden
wechselt das Highway zu dieser UKW-Übertragungsfrequenz.
17
Page 44

AUX-Eingang
Hören von Musik auf einem Mobilgerät
Siekönnendas Aux In-Kabel der Steuereinheit verwenden,um überdas Audiosystem Ihres Fahrzeugs Musik auf einem
Mobilgerät abzuspielen.
1. Verbinden Sie das Mobilgerät überdas Highway mit dem Aux In.
2. Drücken Sie .
3. Drücken Sie und Select, um „Zusatzeingang“ auszuwählen. Ihr
Highway kann jetzt Musik von dem angeschlossenen Gerät abspielen.
18
Page 45

Einstellungen
Wechseln zwischen dem Line Out-Kabel und einer UKW-Übertragung
Siekönnenselbst bestimmen, wie Ihr Highway an dasAudiosystem Ihres Wagensangeschlossen werden soll.
1. Drücken Sie .
2. Drücken Sie und Select, um „Einstellungen“> „Audioout“ auszuwählen.
3. Drücken Sie und Select, um anzugeben, wie das Highway an Ihr Fahrzeug angeschlossen werden soll.
•
WennSiedas Highway mit dem LineOut-Kabelangeschlossen haben,wählen Sie „Line-out“. Drücken Siedann
und Select, um die Einstellung „Niedrig Verstärkung“ oder„Normal Verstärkung“ auszuwählen. Sollteder Klang
verzerrt sein,wählen Sie „Niedrig Verstärkung“.
•
WennSiedas Highway über UKW-Radio verbinden, wählenSie„UKW-Übertragungs“ undsuchen eineUKWFrequenzaus. StellenSiesicher, dass die von Ihnen gewählte Frequenz nicht von einem Radiosender verwendet
wird.
Einrichten des Highway zum automatischen Wechsel in den Standby-Modus
Standardmäßig wechselt das Highway nach 4Stundenin den Standby-Modus.SiekönnendiesesIntervall jedoch anpassen.
1. Drücken Sie .
2. Drücken Sie und Select, um „Einstellungen“> „Autom. Standby“ auszuwählen.
3. Drücken Sie und Select, um ein Intervall zwischen 1und 8Stunden einzurichten.
19
Page 46

Ein- und Ausschalten der Phantomspeisung fürdie Antenne
Standardmäßig versorgt das Highway die DAB-Film-Antenneüberdas Kabel der Antenne mit Strom. WennSiediemit dem
Highway gelieferte DAB-Film-Antenne verwenden,behaltenSiediese Einstellung bei.Wenn Sie die Antenne einesanderen
Herstellersv erwenden, schlagenSieim Benutzerhandbuch der Antenne nach, obdiese Einstellung geändert werden muss.
1. Drücken Sie .
2. Drücken Sie und Select, um „Einstellungen“> „Digitalradio“> „Phantomspeisung“ auszuwählen.
3. Drücken Sie und Select, um „Ein“ oder „Aus“ auszuwählen.
Radioeinstellungen
Durchführen einer automatischen Sendersuche
WennSiekeine digitalen Radiosenderfinden,führen Sie eine erneute Sendersuche auf dem Highway durch.
l Für eine automatische Sendersuchehalten Sie Select im D igitalradio-Modus gedrückt.
Einstellen alternativer Sender bei schwachem Signal
Wenndas Signaldesaktuellen Radiosendersschwach ist, sucht das Highway automatisch nach einem stärkeren Signal. Wenn
das Highway kein stärkeres Signal für den aktuellen Sender finden kann,kann esautomatisch zu einem ähnlichen
Radiosenderwechseln,soferndiesv om Sendergestattet wird.
1. Drücken Sie .
2. Drücken Sie und Select, um „Einstellungen“> „Digitalradio“> „Alt. Sender“ auszuwählen.
3. Drücken Sie und Select, um „Ein“ oder „Aus“ auszuwählen.
20
Page 47

Ein- und Ausschalten von Verkehrsnachrichten
Siekönnendas Highway so einstellen, dass bei laufendem Digitalradioautomatisch Verkehrsansagen abgespielt werden.
Währenddas Highway Verkehrsansagen abspielt, wirdauf dem Display „Verkehr“ angezeigt.
1. Drücken Sie .
2. Drücken Sie und Select, um „Einstellungen“> „Digitalradio“> „Verkehr-Meldung“ auszuwählen.
3. Drücken Sie und Select, um „Ein“ oder „Aus“ auszuwählen.
Um eine geradeabgespielte Verkehrsansageabzubrechen,drücken Sie .
Anzeigeeinstellungen
Ändern der Sprache
1. Drücken Sie .
2. Drücken Sie und Select, um „Einstellungen“> „Anzeige“> „Sprache“ auszuwählen.
3. Drücken Sie und Select, um eine Sprache auszuwählen.
21
Page 48

Ändern der auf dem Bildschirm angezeigten Informationen
Ihr Highway kann verschiedeneInformationen anzeigen, während ein Radiosenderläuft.
1. Drücken Sie .
2. Drücken Sie und Select, um „Einstellungen“> „Anzeige“> „Informationen“ auszuwählen.
3. Drücken Sie und Select, um eine Einstellung auszuwählen.
l Um dieNamen von Radiosendern anzuzeigen,wählen Sie „Sendername“.
l Um Text anzuzeigen,den der Radiosender überträgt, wählen Sie „Lauftext“. Diese Einstellung wird währendder
Fahrt nicht empfohlen.
l Um dieSignalqualität von Radiosendernanzuzeigen, wählen Sie „Signalqualität“.
l Um dieSignalstärke vonRadiosendernanzuzeigen, wählen Sie „Signalstärke“. Die Signalstärke wird auf einer
Skala aus0bis15Balken angezeigt. Eine Markierung auf der Skala zeigt die Mindestanzahl der Balken,die für
einenguten Empfang erforderlich ist.
22
Page 49

Ändern der Bildschirmhelligkeit
Ein Lichtsensoran der Steuereinheit richtet die Bildschirmhelligkeit automatisch ein; Sie können diesejedoch manuell
anpassen.
1. Drücken Sie .
2. Drücken Sie und Select, um „Einstellungen“> „Anzeige“> „Helligkeit“> „Manuell“ auszuwählen.
3. Drücken Sie und Select, um eine Helligkeitsstufe auszuwählen.
Siekönnenden Bildschirm der Steuereinheit so einstellen, dass er nach einer gewissen Zeit abgedunkelt wird. Um
die Dauer biszum Abdunkeln des Bildschirms zu ändern, wählen Sie „Einstellungen“> „Anzeige“> „Timeout“.
Aktualisieren der Software
Unter Umständen stellt Software-Updatesfür das Highway zur Verfügung. Mehr über das Aktualisierender Software auf
Ihrem Highway finden Sie unter pure.com/highway-update.
23
Page 50

Fehlerbehebung
Proble m Mögliche Ursache Lösung
Ich kann nichts hören. Da s Highway ist nicht mit Ihrem
24
Fahrzeug verb unden.
Da s Audiosystem Ihres Fahrzeugs ist
nichtdie richtige Eingangsq uelle .
Da s Highway ist nicht auf den richtigen
Modus einge stellt.
Die La utstärke Ihre s Fahrze ugs od er
ange schlossenen Mobilgeräts ist zu
niedrig eingestellt.
Stelle nS ie sicher, d ass da s Line Out-Kabel ord nungsge mäß mit
dem Audiosys tem Ihres Fahrze ugs verbunden ist, bzw. prüfen Sie ,
ob S ie die richtige U KW-Frequenz eingestellt haben.
Stelle nS ie die E inga ngsquelle im Audiosystem Ihres Fahrze ugs a uf
UKW-Radio o der de nAUX-Eingang um.
Ändern Sie d en Modus auf Digitalradio od er Zusatzeingang. Auf
den Seiten 16 und 18 finden Sie weitere Informa tionen.
Erhöhen Sie die Lautstärke Ihres Fa hrzeugs und des
ange schlossenen Mobilgeräts.
Page 51

Die Steuereinheit reagiert
nicht.
Wenn das Highway mit
dem Line Out-Kab el
ange schlossen ist, ist der
Ton verzer rt.
Da s Highway ve rliert
ständig da s digitale
Radiosignal.
Die Steuereinheit ist nicht
ord nungsge mäß a ndie
Stromver sorgung angeschlossen.
Die Antennengewinn-Einstellung ist
falsch.
Sie fa hren durch Gebiete mit
schwachem DAB-Signa l.
Stelle nS ie sicher, d ass die Steuer einheit korr ekt mit dem 12VNetza dapter ver bunden und der Adapter vollständig an de n
Stromanschluss Ihres Fahrzeugs a ngeschlossen ist. Drehen Sie
da nn den Zündschlüsse l des Fahrzeugs. Wennnach wie vo r ein
Pro blem besteht, ziehen Sie de n 12V-Netzadapter a us dem
Anschluss; stecken Sie ihndannerneut ein und warten Sie da rauf,
da ss das Highway neu startet.
Setze nSie di e Ge winneinstellung auf „Niedrig Ve rstärkung“ oder
wechseln Sie zu UKW-Üb ertrag ung. Mehr dar über finde nS ie a uf
Seite19.
Übe rprüfen Sie d ie DAB-Netza bdeckung in Ihrem Aufenthaltsgebiet.
Da s Highway ist nicht korre kt installiert. Über prüfen Sie d ie Installationsanweisungen auf Seite6.
Irge ndetwa s verursa cht Interfer enzen. l Schalten Sie Satell iten-Navig ationssysteme, Dash-Cams
ode r ander e Gerä te a us, um zuprüfen, ob d as Signal
stär ker wird.
l Verwenden Sie d en beilie gende n12V-Adapter, da andere
Adapter zu Interfer enzen führen können.
25
Page 52

Da s Highway schaltet sich
immer von al leine a us.
Falls Sie weitere Hilfe benötigen,besuchen Sie support.pure.com.
26
Der automatische Standby-Modus ist
aktivie rt.
Wenn dies z u oft geschieht, pa ssen Sie d ie Einstellung für den
automatischen Standby-Modus a n. Mehr dar über finde n Sie a uf
Seite19.
Page 53

Korrekte EntsorgungdiesesProdukts
Diese Markierung weist darauf hin, dass dieses Produkt innerhalb der EU nicht zusammen mit anderen Haushaltsabfällen entsorgt werden darf.
Um Gesundheits- oder Umweltschäden durch unkontrollierte Abfallentsorgungzu vermeiden, sorgen Sie für ein verantwortungsvolles
Recycling. Sie ermöglichen damit glei chzeitig eine nachhaltige Wiederverwendung von Ressourcen. Wenn Sie Ihr gebrauchtes Gerät
zurückgeben wollen, nutzen Sie das Rückgabe- und Sammelsystem, oder wenden Sie sich an den Händler, bei dem Sie das Gerät gekauft
haben. Diese Stellen können das Produkt einem umweltgerechten Recycling zuführen.
Copyright
Copyright2017 by Pure International Limited. Alle Rechte vorbehalten. Jegliche Verviel fältigung dieser Publikation– auch auszugsweise– sowie ihre
Verbreitung, Übermittlung, Abschrift, Speicherung in einem Datenverarbeitungssystem oder Übersetzung in eine natürliche Sprache oder
Programmiersprache in jeglicher Form, sei es elektronisch, mechanisch, magnetisch, manuell oder anderweitig, sowie jegliche O ffenlegung an Dritte ist
ohne ausdrückliche schriftliche Zustimmung durch Pure International Limited untersagt. Informationen zur Garantie und zu Haftungsausschlüssen finden Sie
auf pure.com.
Marken
Highway, Pure und das Pure-Logo sind Marken oder eingetragene Marken von Pure International Limi ted. Alle anderen Produktnamen sind Marken ihrer
jeweiligen Unternehmen. Version 1, Februar2016.
Zulassungen
CE-zertifiziert. Pure erklärt hiermit, dass dieses BandII LPD-Gerät den wesentlichen Anforderungen und anderen Vorschriften der R&TTERichtlinie1999/5/EC (nach dem 12.Juni 2017 RED 2014/53/EU) entspricht. Entspricht der UN/ECE Regelung 10 (E-Marke) und HF
Expositionsanforderungen EN62479:2010. Sie können die Konformitätserklärung unter http://www.pure.com/about/rtte-doc einsehen.
Technische Daten
Eine umfassende Liste der technischen Daten finden Sie auf pure.com. Betriebstemperatur: -20°C bis+60°C. Lagertemperatur: -40°C bis+85°
C. UKW-Frequenzbereich: 87,6-107,9 MHz. Maximale UKW-Leistung: 51,78 db (uV/m).
Software-Version: v1.1
Nutzungsbeschränkungen: Keine (konfigurieren und installieren nach diesem Handbuch)
27
Page 54

Page 55

Sécurité
1A
12V DC
Avant d'uti liser votre Hi ghway, l isez l es instructio ns de sécurit é suivan tes.
1. Respectez l es instructi ons d’ut ilisa tion ment ionnée s et tenez compte de tou s les a vertissements.
2. Le no n-respect de ces i nstructions d ’util isatio n peut compromettre la sé curité de votre prod uit et en i nvalid er la g aranti e.
3. N'uti lisez que de s adapta teurs 12V fourn is avec votre prod uit.
4. I nstall ez votre produi t de sorte q u'il n'i nterfère pa s avec le fon ction nement sécurisé du véhi cule, qu 'il n'a ffecte pas l e dépl oiement des a irbags o u de tou t
autre système de sécuri té. N'in stalle z pas le s câbles e t les condu cteurs à proxi mité d u volan t.
5. Ne pl acez pas votre produ it sur ou à p roximité des sources de cha leur ou de ven tilati on de votre véh icule.
6. Veil lez à ce qu e l'uti lisati on de votre prod uit n'ent raî ne pas u ne condu ite imprud ente ou un mau vais contrôl e de votre véh icule.
7. Mainte nez votre produ it au sec et ne l e nettoyez qu'à l 'aid e d'un chi ffon sec.
8. N'exposez pa s votre produit à u ne fla mme nue .
9. N'uti lisez pa s votre produi t dans des condi tions extrêmes d e chaud ou de froi d.
10. Si vou s avez besoi n de ra ccorder votre produ it à l 'arrière de l 'uni té princip ale d e votre véhicul e, a lors coupez to ute al imentati on ava nt de procéde r à
l'in stalla tion d e votre produi t. Un e fois qu e vous a vez in stallé votre p roduit de man ière sécurisé e, vous p ouvez rétabl ir l'al imentati on. C onsulte z le
manue l du p roprié taire du véh icule p our plus d'in formati ons.
11. N'util isez pas le prod uit s'il est en dommagé.
12. Les répara tions du prod uit ne do ivent être effe ctuées que pa r du pe rsonnel agréé .
Symboles présents sur le produit et d ans le manuel utili sateur
Risque p otentiel g rave p our votre sécurité pe rsonne lle. Pou r éviter toute
ble ssure ou to ut acciden t mortel, respe ctez tou tes les consi gnes de sécurit é
accompagné es de ce symbole .
Attentio n. Lisez l e manue l uti lisateu r avant u tili sation.
Alimenta tion 12VCC .
Inte nsité maxi male de 1a mpère po ur la prise U SB.
Quan d all umer ou éte indre votre produ it ou l e mettre en
veil le.
1
Page 56

Contenu
Sécurité 1
Contenu 2
Présentation 3
Contenu de la boîte 3
Icônesde l'affichage 4
Commandes 5
Démarrage 6
Installationde votre Highway 6
Où installer votre Highway? 8
Positionnement del'antenne 9
Positionnement du boîtierde commande 11
Raccordement del’antenneau boîtier de commande 12
Raccordement du boîtierde commande à votre
véhicule 13
Premièremise en route de votreHighway 14
Mise en route et arrêt devotre Highway 15
2
Radionumérique 16
Écoute de la radionumérique 16
Mémoires de la radionumérique 16
Fréquences d'émission FM 17
Entrée AUX 19
Écoute de musique sur unappareil mobile 19
Paramètres 20
Passage d'un raccordement par câble Line Out à une
transmission enFM 20
Paramétrage de votre Highway pourentrer
automatiquement en mode veille 20
Mise et route et arrêt de l’alimentation fantôme de
l’antenne 21
Paramètres radio 21
Paramètres d'affichage 23
Mise à jour du logiciel 24
Dépannage 25
Page 57

Présentation
1
2
3
6
4
7
5
Contenu de la boîte
Avant de comm encer, assurez-vous que tous les éléments ci-dessous sont présents.
3
Page 58

1 Antenne, munie d' une extrémité magnétique de mise à la
4
1
3
2
5
6
masse
2 Antenne film DAB 6 Adap tateur pour alimentation 12V (po rt USB
audio
4 Support pour boîtier de commande boîtier de commande.
Restrictions d'utilisation - pour être utilisé uniquement avec les éléments présentés sur cette page et configurés / installés / utilisés selon ce manuel.
5 Chiffon de nettoya ge
double)
7 Attaches de câble a utocolla ntes3 Boîtier de commande a vec connecteurs d’a limentation USB et
Icônes de l'affichage
Les icônes ci-dessous s'affichent à l'écran du boîtier de
commande.
4
1 Mode r ad io numérique 4 Mode e ntrée a uxilia ire
2 Force d usignal radio numérique 5 É metteur FMactivé
3 Annonces d e tra fic activé es 6 Fréq uence de l’émetteur FM
Page 59

Commandes
4
6
7
5
1
2
3
1 Prese ts Appuyez sur ce bouton pour vo ir les mémoir es de votre
2
Sele ct
3 Mise sous
tension /
Retour
4 Précé dent App uyez sur ce b outon pour sé lectionner la station ra dio
5 Suivant Appuyez sur ce bouton pour sélectionner la station ra dio
6 Accueil Appuyez pour accéder a umenuprincip al.
7 FMChannel Appuyez sur ce b outon pour voir les fréquences
ra dio numérique. Dans ce menu, ap puyez e tma intenez
enfoncé le bouton pour mémoriser la station rad io
coura nte dans unnuméro d e mémoire .
Appuyez sur ce bouton pour sélectionner une station ra dio
ou une option du menu.
Appuyez pour allumer votre Highway. Appuyez e t
maintenez enfoncé pour mettre votre Hig hway en veille.
Appuyez pour revenir à l 'écr an précé dent ou pour annuler
une action.
pré cédente ou une option du menu.
suivante ou une option du menu.
d'é missio n FM mémorisées. Da ns ce menu, appuyez e t
maintenez enfoncé le bo uton pour mémor iser la FM
fréquence ra dio courante da ns un canal FM.
5
Page 60

Démarrage
Installation de votre Highway
Avant de pouvoir utiliser votre Highway, vous devezeffectuer les opérations suivantes:
1. Positionner l'antenne dans votre véhicule.
2. Positionner leboîtier decommande dansv otre véhicule.
3. Connecter l’antenne au boîtier de commande.
4. Connecter l’alimentation duboîtier dec ommande et les câbles audio à votre véhicule.
5. Allumer pour la premièrefois votre Highway.
Pour visionner une vidéo détaillant l'installation de votre Highway, recherchez« Highway 200 installation» sur YouTube.
Exigences concernantle véhicule
l Système audioadapté, équipéd'un port auxiliaire(3,5mm) ou d'unrécepteurFM.
l Alimentation standard 12V, avec pôle négatif à la masse. Votre Highway ne doit pas être utilisé avec unealimentation
24V.
Obtentiondu meilleursignalDAB
Comme pour laradio FM, la couvertureDAB dépend de votre emplacement. Lorsque vous utilisezle Highway dans votre
véhicule, vouspouvez traverserdeszones dans lesquellesla couverture DAB est mauvaise.
6
Page 61

Pour obtenir le meilleur signal DAB lorsque lacouverture est mauvaise ou lorsque lesignal est faible:
l Respectez scrupuleusement les instructionsd'installation.
l Utilisezl'adaptateur 12V fourni, car les adaptateurs tiers peuvent provoquer desinterférences.
l Éteignez tous les appareilsnon utilisés dans votre véhicule. Les appareilstels que les systèmes de navigationpar
satellite et lescamérassur les tableaux debordpeuvent provoquer des interférences.
7
Page 62

Où installer votre Highway?
Il est important d'installervotre Highway à un emplacement sécuriséà l'intérieur de votrevéhicule. N'installezpas
les composants à desemplacements où ilspourraient interférer avec le fonctionnement sécurisédu véhicule ou
qui pourraient affecter le déploiement des airbagsou de tout autre système desécurité. Éloignezlescâbles et les
conducteursdu volant.
Où installer l'antenne?
Nous vousrecommandonsd'installer l'antenne de
votre Highway dansle coin supérieur du pare-brise
de votre véhicule, côté passager.
Installezl'antennede manière à ce qu'ellene soit
pas dans la zone balayée par lesessuie-glaces.
Assurez-vousquel'antenne et le boîtier de
commandesansfil ne gênent pas la visibilité du
conducteur.
Si votre véhicule est équipéd'un pare-brise chauffant, ousi le pare-brise est doté de filtresmétalliquesanti-UV, alorsceux-ci
peuvent provoquer desinterférencesavec le signal DAB. Installezl'antennesur une portiondu pare-brise qui ne comporte pas
d'élément chauffant ou de filtreanti-UV.
8
Page 63

Pour plus d'informations sur les emplacements légaux et sécuriséspourinstallerle Highway dans votre véhicule,
contactez votre office local chargé destransports. Pourtrouver les installateursprofessionnelsles plusprochesdechez
vous qui pourront installer votreHighway, visitez le site pure.com/store-locator.
Positionnement de l'antenne
1. Choisissez un emplacement pour l'antenne, de manièreà ce qu’elle
soit placée aussi haut que possible sur lepare-briseet située à 4cm au
moins du borddecelui-ci.
Assurez-vousquel'antenne ne gêne pas la visibilité du
conducteur.
2. Tirezdélicatement sur l'avant dela garniture intérieuredutoit devotre
véhicule, jusqu'à dégager une petite fente.
3. Insérez l'extrémité magnétique de mise à la masse dans cette fente,
côté argenté de l'aimant tournévers le haut. Assurez-vous que
l'aimant est encontact avec lechâssismétallique du véhicule.
9
Page 64

4. Nettoyez la zone sélectionnée du pare-brise à l'aide du chiffon de
nettoyage et patientezjusqu'à ce qu'ellesoit sèche.
5. Décollez la protection arrière de l'antenne puiscollezl'antenne contre
votre pare-brise.
6. Insérez l'antenne film DAB dans la fente présentesur l'antenne.
7. Décollez délicatement la protection arrière de l'antenne film DAB puis
collezl'antenne contre votre pare-brise. Prenezgarde à ne pasplier ou
tordrel'antenne film.
10
Page 65

Positionnement du boîtier de commande
1. Choisissez la zone du tableau debord de votrevéhicule oùvous
souhaitez installer le boîtier de commande. Nettoyez la surface
choisieà l'aided'un chiffon de nettoyage et patientezjusqu'à ce
qu'ellesoit sèche.
2. Retirez la protection dusupport du boîtier de commande et collez-le
délicatement sur letableau de bord.Appuyez doucement sur le
support pour vous assurerqu'il est solidement fixé.
3. Glissezle boîtierde commande dans le support, jusqu'au clic de mise
en place.
Assurez-vousquele boîtierde commande ne gêne pas la visibilité
du conducteur.
11
Page 66

Raccordement de l’antenne au boîtier de commande
1. Positionnezle câble del'antenne de manière à ce qu'il chemine vers le
boîtier decommande situésur le tableau de bordde votre véhicule.
Remarque: Pouréviter toute interférence avec lesignal DAB,
2. Si possible, coincez lec âble derrière la garniture latérale située de
chaque côtéde votre pare-brise.Sinon, attachez de manière
sécurisée le câblecontre lepare-briseet le tableau de bordà l'aide
d'attaches autocollantes.
3. Insérez le câblede l’antenne dans le connecteur situéà l’arrière du
boîtier decommande.
Remarque: Enfoncez fermement le câblede l’antenne,pourvous
12
éloignezlescâbles desunités d'affichagetellesque les
écrans LCD.
assurer qu'il est correctement inséré.
Page 67

Raccordement du boîtier de commande à votre véhicule
1. Si nécessaire, séparezdélicatement le câbled’alimentation du boîtier
de commande et lescâbles audio.
Remarque: Pouréviter toute interférence avec lesignal DAB,
éloignezlescâbles desunités d'affichagetellesque les
écrans LCD.
2. Insérez le câbled'alimentation USB dans l'adaptateur 12V fourni, puis
insérez celui-ci dans la prise d'alimentation devotre véhicule.
3. Si vousraccordezvotre Highway à l'aide du câbleLineOut,alors
insérez-ledans la prise auxiliaire devotre véhicule.Si vous raccordez
votre Highway via la radio FM, alorsvous pouvezrangerle câbleLine
Out de manière à ce qu'il nevous gênepas.
Nous vousconseillons de raccorder votre Highway à l'aide du
câble Line Out pour une meilleure qualité de son.
13
Page 68

Première mise en route de votre Highway
Une fois que vous avezinstallé votre Highway, allumez-lepour achever son paramétrage.
1. Mettez le moteurde votre véhicule en route pour garantir que votre Highway est alimenté.
2. Appuyezsur et sur pour modifier la langue d'affichage,puisappuyez sur Select pour la sélectionner.
3. Appuyezsur et sur Select pour choisir la manière de raccorder votre Highway au véhicule.
•
Si vous avez raccordé votreHighway à l'aidedu câble Line Out, alors choisissez «Sort ligne». Puisappuyezsur
et surSelect pour choisir « Gain normal ». Si ultérieurement vous trouvez que le son est distordu, alors vous
pourrez modifier leréglage du gain. Pouren savoir plus, reportez-vous à la page20.
•
Si vous raccordezvotre Highway via la radioFM, alors choisissez«Émetteur FM » puis choisissezune fréquence
FM. Assurez-vous qu'aucune station radio n'utilise la fréquence choisie.
Syntonisez le système audio de votrevéhicule sur la même fréquence FM que votre Highway.
Ultérieurement, pour retrouver facilement la fréquence FM, enregistrez-la dans une mémoiredu système
audiode votre véhicule.
Une fois que vous avezchoisi la manière de raccorder votre Highway, celui-ci commence à sesyntoniser sur les stations radio
numériques. Lorsquela syntonisation automatiqueest achevée, vous pouvezcommencer à écouter la radionumérique.
14
Page 69

Mise en route et arrêt de votre Highway
•
Pour mettre enroute votre Highway, appuyez sur .
•
Pour mettre votre Highway en veilleet pour consommer moinsde puissance, appuyez et maintenezenfoncé .
Remarque: Par défaut, le boîtierde commande se met automatiquement en veille au bout de 4heures.Pour modifier ce
délai,reportez-vousà la page20.
15
Page 70

Radio numérique
Écoute de la radio numérique
1. Appuyezsur .
2. Appuyezsur et sur Select pour choisir «Radio numérique».
3. Pour changer de station radio, appuyezsur pour choisir une station puis appuyezsur Select.
Mémoires de la radio numérique
Vouspouvez enregistrer jusqu'à 20de vos stationsradionumériques préférées dans la liste de mémorisation.
Enregistrementd'une stationradio dans une mémoire
1. Lorsquevous écoutez une station radio numérique,appuyez et maintenez enfoncéPresets.
2. Appuyezsur pour choisir un numéro de mémoire.Vouspouvez écraser desstations radio plus anciennes.
3. Appuyezet maintenezenfoncé Select ou Presetspourenregistrerla station radio numériquecourante dans le numéro
de mémoire.
Écoute d'une stationmémorisée
1. Appuyezsur Presets.
2. Appuyezsur pour choisir la mémoire que vous souhaitezécouter,puisappuyezsurSelect.
16
Page 71

Vouspouvez également écouter unestation mémorisée à l’aidedu boutonPresets uniquement. Appuyez à plusieurs
reprisessur Presets, jusqu’à ce que la mémoire désirée s’affiche. Après 3secondes, votreHighway se syntonise sur
cette station radio.
Fréquences d'émission FM
Si vous connectez votre Highway au système audio de votre véhicule via la radio FM, alorsil se peut que des stations radio
locales utilisent la même fréquence FM quevotre Highway. Pourmodifier rapidement la fréquence d'émissionFM devotre
Highway, vous pouvez mémoriser jusqu’à neuf fréquences utilisables en tant que canaux FM.
La fréquence d'émission FM s’affiche dansle coin supérieur droit de l’écran. Si vousutilisez le réglage«Sort ligne», alors la
fréquence d'émission FM n’est pas affichée et le bouton FMChannelest désactivé.
Mémorisation d’une fréquence d'émissionFM
1. Appuyezsur FMChannel.
2. Appuyezsur pour choisir un canal FM. Vous pouvezécraser des fréquencesFM plusanciennes.
3. Appuyezet maintenezenfoncé Select ou FMChannelpour enregistrer la fréquence radio FM courante dans lecanal
FM.
4. Si nécessaire, vouspouvez appuyer sur pour modifier la fréquence FM; puis appuyezsur Select pour mettre à jour le
canal FM.
17
Page 72

Modification d’une fréquence d'émissionFM
1. Appuyezsur FMChannel.
2. Appuyezsur pour choisir une fréquence d'émission FM mémorisée, puisappuyezsur Select.
Vouspouvez également modifier la fréquence d'émission FM à l’aide du boutonFMChanneluniquement. Appuyez
à plusieurs reprises sur FMChannel,jusqu’à ce que la fréquence d’émission FM désirée s’affiche. Après 3secondes,
votre Highway bascule sur cette fréquence d'émission FM.
18
Page 73

Entrée AUX
Écoute de musique surunappareil mobile
Vouspouvez utiliser le câbleAux In du boîtier de comm ande pour écouter la musique de votreappareil mobile via lesystème
audiode votre véhicule.
1. Connectezun appareilmobile à votre Highway à l’aidedu câbleAux
In.
2. Appuyezsur .
3. Appuyezsur et sur Select pour choisir «EntréeAUX». Votre
Highway est maintenant prêt à lire la musique présente sur l'appareil
connecté.
19
Page 74

Paramètres
Passage d'un raccordement par câble Line Out à une transmission en FM
Vouspouvez choisir la manière dont votreHighway est raccordéau système audiodevotre véhicule.
1. Appuyezsur .
2. Appuyezsur et sur Select pour choisir «» > «Paramètres» > «Sort audio».
3. Appuyezsur et sur Select pour choisir la manière de raccorder votre Highway au véhicule.
•
Si vous avez raccordé votreHighway à l'aidedu câble Line Out, alors choisissez «Sort ligne». Puisappuyezsur
et surSelect pour choisir un paramétragede gain «Gain faible» ou «Gain normal». Si le son est distordu, alors
choisissez«Gain faible».
•
Si vous raccordezvotre Highway via la radioFM, alors choisissez«Émetteur FM» puis choisissezune fréquence
FM. Assurez-vous qu'aucune station radio n'utilise la fréquence choisie.
Paramétrage de votre Highway pour entrer automatiquement en mode veille
Par défaut, votre Highway entre automatiquement en veilleau bout de 4heures, mais vous pouvezmodifier ce délai.
1. Appuyezsur .
2. Appuyezsur et sur Select pour choisir «» > «Paramètres» > «Veille auto».
3. Appuyezsur et sur Select pour choisir undélaientre 1 et 8heures.
20
Page 75

Mise et route et arrêt de l’alimentation fantôme de l’antenne
Par défaut, votre Highway alimente l’antennefilm DAB via le câbled’antenne. Si vous utilisezl’antennefilm DAB fournie avec
votre Highway, alors conservezce réglage.Si vous utilisezune antenne d’un autre fabricant, alorsconsultez le manuel
utilisateur de l’antennepourvérifier sivous avez besoinde modifier ce réglage.
1. Appuyezsur .
2. Appuyezsur et sur Select pour choisir «Paramètres» > «Radionumérique» > «Alimentation fantôme».
3. Appuyezsur et sur Select pour choisir «On» ou«Off».
Paramètres radio
Syntonisation automatique
Si vous netrouvez aucune station radio numérique, alors essayezde refaire une syntonisation de votreHighway.
l Poureffectuer une syntonisation automatique, appuyez et maintenez enfoncé Select lorsquevous êtes en moderadio
numérique.
21
Page 76

Écoute d'autres stations lorsque le signal est faible
Si la station radio courante émet un signal faible, alors votre Highway essaye automatiquement detrouver un signal plus fort.
Si votre Highway ne trouve pasde signal plusfort, alorsil peut automatiquement se syntoniser sur une station radiosimilaire
lorsque cela est compatible avec l'organisme de radiodiffusion.
1. Appuyezsur .
2. Appuyezsur et sur Select pour choisir «Paramètres» > «Radionumérique» > «Stationsalt».
3. Appuyezsur et sur Select pour choisir «On» ou«Off».
Mise en route et arrêt des annonces de trafic
Vouspouvez paramétrer votre Highway pour qu'il diffuse automatiquement desannoncesdetrafic pendant que vous écoutez
une radio numérique.Lorsque votre Highway diffuse desannoncesde trafic, ilaffiche «Circulation».
1. Appuyezsur .
2. Appuyezsur et sur Select pour choisir «Paramètres» > «Radionumérique» > «Messages trafic».
3. Appuyezsur et sur Select pour choisir «On» ou«Off».
Pour supprimer uneannonce de trafic pendant qu'elle est en coursdediffusion,appuyezsur .
22
Page 77

Paramètres d'affichage
Modification de la langue
1. Appuyezsur .
2. Appuyezsur et sur Select pour choisir «Paramètres» > «Affichage» > «Langue».
3. Appuyezsur et sur Select pour choisir une langue.
Modification des informations affichées à l'écran
Votre Highway peut afficher différentesinformationslorsque vous écoutez une station radio.
1. Appuyezsur .
2. Appuyezsur et sur Select pour choisir «Paramètres» > «Affichage» > «Informations».
3. Appuyezsur et sur Select pour choisir unréglage.
l Pourafficher les noms des stations radio, choisissez«Nom destation».
l Pourafficher le texte diffusépar la station radio, choisissez«Texte défilant». Ce réglagen’est pasrecommandé
pourla conduite.
l Pourafficher la qualité du signaldesstationsradio,choisissez«Qualité signal».
l Pourafficher la force dusignal des stations radio,choisissez«Force du signal». La force du signal s’affiche sous
forme d’une échelle de 0à 15barres. Un curseur sur l’échelle indique le nombre minimum debarresrequis pour
bénéficier d’une bonneréception.
23
Page 78

Modification de la luminosité de l'écran
Un capteur de luminosité présent surle boîtierde commande règleautomatiquement la luminosité de l'écran, mais vous
pouvezégalement la modifier manuellement.
1. Appuyezsur .
2. Appuyezsur et sur Select pour choisir «Paramètres» > «Affichage» > «Luminosité» > «Manuelle».
3. Appuyezsur et sur Select pour choisir unniveau de luminosité.
Vouspouvez paramétrer l’écran du boîtier de comm ande pour que sa luminosité diminue aprèsun certain temps.
Pour modifierce délai, choisissez«Paramètres» > «Affichage»> «Extinction».
Mise à jour du logiciel
Nous pouvonsmettre à dispositiondesm isesà jour logicielles pour améliorer votre Highway. Pour en savoir plus sur la mise à
jour logicielle de votre Highway, visitez le site pure.com/highway-update.
24
Page 79

Dépannage
Problè me Cause possible Solution
Je n'e ntends aucun son. Votre Highway n'e st pas raccordé à
votre vé hicule.
Le système audio de vo tre véhicule
n'est pa s raccordé à la bonne so urce
en entrée .
Votre Highway n’e st pas da ns le mode
ap propr ié.
Le volume so nore e sttrop fa ible da ns
votre vé hicule ou sur l'a ppa reil mobil e
connecté.
Assurez-vous que le câ ble Line Outest corre ctement racco rdé a u
système a udio de votre véhicule ou assure z-vous que vous êtes
syntonisé(e ) sur la bonne fréquence FM.
Pa ssez la s ource e ne ntrée d u système audio de votre véhicule en
ra dio FM ou en entrée a uxilia ire.
Changez de mode p our pa sser e nRadio numérique ou en Entrée
auxili aire. Pour en sa voir plus, r epo rtez-vous à la pa ge 16 e t 19.
Augmentez le volume sonore dans votre véhicule e t sur l'a ppa reil
mobile connecté.
25
Page 80

Le bo îtier d e commande
ne rép ond pas .
Le son est distor du
lorsque mon Highway est
ra ccord é à l'aid e d' un
câb le Line Out.
Mon Highway perd sans
cess e le signal r adio
numériq ue.
26
Le bo îtier d e commande n’est pas
corr ectement raccord é à l’alimentation.
Le pa ramétra ge du ga in n'est pa s
corr ect.
Vous trave rsez des zo nes da ns
lesquelle s le signa l DAB est faible.
Votre Highway n'e st pas insta llé
corr ectement.
Un élé ment provoq ue de s
interfére nces.
Assurez-vous que le b oîtier de commande est corre ctement
ra ccord é à l’a daptateur 12 V et que celui-ci est bien inséré da ns la
prise d'alimentation de votre vé hicule. Puis mettez le moteur de
votre vé hicule en route. Si le pro blè me per siste, a lors retirez
l’a da ptateur 12 V de la pr ise d'alimentation, puis réinsérez-le et
pa tientez pe ndant que votre Hig hway re démarr e.
Réglez le pa ramétra ge du ga insur «Ga in faib le » ou passez e n
transmission en FM. Pour e nsavo ir pl us, rep ortez-vous à la
pa ge20.
Vérifie z la couver ture DAB da ns votre zo ne.
Vérifie z les instructions d'installa tion à la page6.
l Éteignez les systèmes de navig ation satellite, le s caméra s
sur le ta bleau de bord ou tout autre a ppa reil p our voir si le
signa l reçu est meille ur.
l Utilise z l'ad ap tateur 12V fourni, car le s autres a dapta teurs
peuvent pro voquer de s interférences.
Page 81

Mon Highway ne ce sse de
s'é teindre d e lui-même.
Le mode Veille a uto est activé. Si cela se p roduit trop fré quemment, alor s modifie z les pa ramètres
Si vous avez besoin d'aide,alorsvisitez le site support.pure.com.
de la ve ille a uto. Pour e nsavo ir plus, rep ortez -vous à la pa ge20.
27
Page 82

Miseau rebut adaptée de ce produit
Ce marquage indique que, au sein de l'UE, ce produit ne doit pas être mis au rebut avec les ordures ménagères. L'élimi nation incontrôlée des
déchets pouvant porterpréjudice à l'environnement ou à la santé humaine, merci de l e recycler de façon responsable pourpromouvoir
l'utilisation durable des ressources matérielles. Pour renvoyer votre ancien appareil, util isez les systèmes de retouret de coll ecte disponibles
ou contactez le détaillant chez qui vous avez acheté le produit. Ceux-ci peuvent procéderau recyclage du produit en toute sécurité.
Copyright
Copyright2017 détenu par Pure International Limi ted. Tousdroits réservés. Aucune partie de cette publication ne peut être copiée ou distribuée, transmise,
transcrite, enregistrée dans un système d'archivage ou traduite en langage humain ou informatique sous quelque forme que ce soit, électronique,
mécanique, magnétique, manuelle ou autre, ni div ulguée à de tierces parties, en tout ou en partie, sans le consentement préalable écrit et expli cite de Pure
International Limi ted. Pour des informations relatives à la garantie et à la cl ause de non-responsabilité, vi sitez le site pure.com.
Marquescommerciales
Highway, Pure et le logo Pure sont des marques commerciales ou des marques déposées de Pure International Li mited. Tousl esautres noms de produits sont
des marques commerciales de leurs entreprises respectives. Version 1février2016.
Homologations
Marquage CE. Présentement, Pure déclare que cet appareil de faible puissance (LPD) dans la Bande II est conforme aux principales exi gences et
autres clauses de la Directive R&TTE1999/5/EC ou de la Directive RED2014/53/EU applicable à partir du 12juin 2017. Conforme au règlement
CEE-ONU R10 (marquage E) et exigences d'exposition RF EN62479:2010. Vous pouvez consulter la Déclaration de Conformité à l'adresse
suivante: http://www.pure.com/about/rtte-doc.
28
Page 83

Spécifications
Pour connaître la liste complète des caractéristiques techniques, visitez le site pure.com.
Température de fonctionnement: de -20°C à +60 °C. Température de stockage: de -40°C à +85°
C. Bande de fréquences FM : de 87,6 à 107,9 MHz. Puissance FM maximale : 51,78 dB (µV/m).
Version du logiciel: v1.1
Restrictions d'utilisation: Aucun (configurer et installer selon ce manuel)
29
Page 84

Page 85

Norme di sicurezza
1A
12V DC
Prima di uti li zzare l'appa recchio Hig hway, l eggere le seg uenti norme di sicurezza.
1. Osservare l e istruzi oni per l'uso forni te con il prodo tto e l e eventua li a vvertenze riportat e.
2. L'inosservan za dell e istruzio ni per l'uso forni te potrebbe preg iudi care la sicu rezza d el prodotto e comportare il p ossibi le an nul lamen to d ell a garan zia.
3. Ut ili zzare il prodo tto soltan to con l 'ada ttatore di corrente i n dotazi one.
4. No n insta lla re il prodo tto i n una p osizio ne tal e d a pregiu dicare i l funzi onamen to in sicurezza del veicolo , o l'azion amento de gli a irbag o deg li al tri
dispo sitivi di si curezza, Non i nstal la re ca vi e fi li i n prossimità d ell o ste rzo.
5. Non p osizion are il p rodotto sopra o vicino a ll'i mpiant o d i riscalda mento o di venti la zione del veicolo .
6. Non u til izzare il prod otto in modo tal e da ind urre a gui dare in modo in cauto o a perdere i l controll o del veicol o.
7. Tenere a sciutto il prod otto e puli rlo solta nto con un pa nno asciu tto.
8. Non e sporre i l prodotto a fi amme libe re.
9. Non u til izzare l'ap parecchio a tempera ture troppo basse o troppo a lte.
10. Qual ora sia ne cessario coll egare i l prodotto al retro d ell 'impian to audi o del vei colo, di sinseri re l 'ali mentazi one el ettrica prima di i nstal la re i l prodotto .
Una vol ta in stall ato il prodotto in si curezza, rei nserire l'al imenta zion e elettri ca. Per ulte riori in formazion i, si riman da al la l ettura del ma nua le d'uso del
veicolo .
11. Non uti lizza re i l prodotto se è dan neggi ato.
12. Le ri parazi oni de l prodotto devon o e ssere e segui te esclusiva mente da persona le a utorizzato .
Simboli sul prodotto e ne l manua le d'uso
Possibi le grave rischi o all 'incol umità person ale . Onde evita re l esio ni an che
mortali , osservare tutte le i struzioni di sicurezza che conten gono qu esto
simbolo .
Avvertenza . Leggere il man ual e prima del l'uso.
Alimenta zion e i n c.c. da 12V.
Presa USB da 1 a mp. max.
Accensi one, spe gnimen to o i nserimento moda li tà stand-b y
del prodo tto.
1
Page 86

Indice
Norme disicurezza 1
Indice 2
Informazionidi carattere generale 3
Contenuto della confezione 3
Icone sul display 4
Comandi 5
Informazionipreliminari 6
Installazionedel Highway 6
Posizione d'installazione del Highway 7
Posizionamento dell'antenna 8
Posizionamento del controller 10
Collegamento dell'antenna al controller. 11
Collegamento del controller al veicolo 12
Prima accensione del Highway 13
Accensionee spegnimento del Highway 14
2
Radiodigitale 15
Ascolto dellestazioni radio digitali 15
Stazioni radio digitali preselezionate 15
Frequenzedi trasmissioneFM 16
Ingresso ausiliario 18
Ascolto di musica su un dispositivo mobile 18
Impostazioni 19
Scelta del m etododi connessionetra cavo Line Out e
trasmissione FM 19
Impostazione dell'inserimento automatico della
modalità standby dell'Highway 19
Attivazione e disattivazione dell'alimentazione
phantom 20
Impostazioni della radio 20
Impostazioni per il display 21
Aggiornamento del software 23
Ricerca e soluzione problemi 24
Page 87

Informazioni di carattere generale
1
2
3
6
4
7
5
Contenuto della confezione
Prima di utilizzare il prodotto, controllare che la confezionecontenga i componenti elencati qui di seguito.
3
Page 88

1 Antenna, con filo magnetico di messa a terra
4
1
3
2
5
6
2 Antenna flessibile a pellicola DAB
3 Controller con alimentatore USB e connettori audio.
4 Staffa per il controller
Restrizioni all'utilizzo - da utilizzare solo con gli elementi mostrati in questa pagina e configurati / installati / usati in base a questo manuale.
5 Panno per pulizia
6 Adattatore di corrente da 12V (dop pio ingr esso USB)
7 Fermacavi a utoad esivi
Icone sul display
Le iconeelencate qui di seguito appaionosul display delcontroller.
1 Moda lità ra dio digitale 4 Moda lità ingresso
2 Intensità del segnale ra dio d igita le 5 Tra smissione FM
3 Attivazione co municazione informazioni
sulla viabilità
4
ausiliar io
attiva ta
6 Frequenza di
tras missione FM
Page 89

Comandi
4
6
7
5
1
2
3
1 Prese ts Premere questo p ulsante pe r visual izza re le stazioni
2
Sele ct
3 Accensione
/ Indietro
4 Prece dente Premere il pulsa nte per se lezionare la sta zione radio o
5 Successiva Premere il pulsa nte per se lezionare la sta zione radio o
6 Home Pre mere il comando per aprire il menu generale.
7 FMChannel Premere il p ulsante pe r visualizza re le frequenze di
ra dio digitali pre selezio nate. Da ll' interno di questo menu,
pre mere e tenere premuto questo pulsante per salvare
la sta zione a ttuale a d un numero pr ese lez ionato.
Pre mere il pulsante per s ele ziona re una stazione ra dio o
un'opzio ne del menu.
Pre mere il comando per acce ndere il Highway. Pre merlo
e tenerlo premuto p er mettere il H ighwa y in standby.
Pre mere il comando per ritorna re a lla schermata
pre cedente o per a nnulla re un'ope ra zione.
l'opzio ne d el menu pr ecedente.
l'opzio ne d el menu succes siva .
tras missione FM. Dall'interno di questo menu, p remere e
tenere p remuto q uesto pulsa nte p er sa lva re la freq uenza
dell'a ttuale frequenza FM su un ca nale FM.
5
Page 90

Informazioni preliminari
Installazione del Highway
Prima di utilizzare il Highway perla prima volta, eseguire le seguenti operazionipreliminari:
1. Posizionare l'antenna nel veicolo.
2. Posizionare il controller nel veicolo.
3. Collegare l'antenna al controller.
4. Collegare l'alimentazione del controller e i cavi audioal veicolo.
5. Accendere l'Highway per la prima volta.
Pervisionareun video che illustra le m odalità di installazione dell'Highway, cercare 'Highway 200 installation' su
YouTube.
Requisitidel veicolo
l Presenza di un impianto dotato di ingressoausiliario (3,5 mm) o di ricevitore FM.
l Presenza di alimentazione standard da 12 V conmassa negativa. Il Highway non puòessere utilizzato con
un'alimentazioneda 24 V.
Ricezione ottimaledelsegnaleDAB
In comune alla copertura della radio FM, la copertura del segnaleDAB varia in funzione della località in cui ci si trova. Durante
l'utilizzo dell'Highway nel veicolo, si potrebbero attraversarezone con scarsa copertura del segnale DAB.
6
Page 91

Perottenereil segnale DAB ottimale in presenza di scarsa copertura o di segnaledebole:
l Seguire attentamente le istruzioni d'installazione.
l Utilizzare l'adattatore di corrente da 12 V in dotazione perché gli adattatori di altri fabbricanti potrebberoprovocare
interferenze.
l Spegneregli altri dispositivi nel veicolo non utilizzati. I dispositivi come i navigatorisatellitari e le videocamere da
cruscotto possono provocare interferenze.
Posizione d'installazione del Highway
E' importante installarel'Highway in una posizione sicura all'internodelveicolo. Non installarenessun
componente in posizioni che pregiudichino il funzionamento in sicurezza del veicolo,o l'azionamento degli airbag
o degli altri dispositivi di sicurezza. Tenere cavi e fili lontani dallosterzo.
Posizioned'installazione dell'antenna
Si consiglia di installare l'antenna per l'Highway
nell'angolo superioredelparabrezza,sul lato del
passeggero del veicolo.
Non installare l'antenna nell'area del parabrezza in
cui vengono azionati i tergicristalli. Accertarsi che
l'antenna e il controller wirelessnon limitino la
visuale del conducente.
7
Page 92

L'eventuale dotazionesul veicolo di parabrezzatermico o di filtri UV metallici può provocare interferenze per il segnale DAB.
Installarel'antenna sulla parte del tergicristallo che noncontiene serpentine o filtri UV.
Perulterioriinformazionisulla posizione in cui installare l' Highway in sicurezza e in conformità alle norme vigenti nel
veicolo, contattare l'azienda di trasporto locale. Il sito pure.com/store-locator riporta i nominativi di installatori
professionisti locali in grado di installare l'Highway.
Posizionamento dell'antenna
1. Scegliereper l'antenna la più alta posizione possibilesul parabrezza,
ad almeno4 cm di distanzadal lato del parabrezza.
Accertarsi che l'antenna non limiti la v isuale del conducente.
2. Abbassare delicatamente la parte frontale della pannellodel tettuccio
nel veicolo fino a quando si trova un piccolo foro.
3. Spingere il filo magnetico di messa a terra attraverso questo foro, con
il magnete color argento rivolto versol'alto. Acc ertarsi che il magnete
tocchi la scocca metallica del veicolo.
8
Page 93

4. Pulirel'area prescelta del parabrezza con un panno e lasciarla
asciugare.
5. Togliere la pellicola protettiva dall'antenna e fissare l'antenna al
parabrezza.
6. Inserire l'antenna flessibilea pellicola D AB nel foro nell'antenna.
7. Toglieredelicatamente la pellicola protettiva dall'antenna flessibilea
pellicola DAB e fissarla al parabrezza. Avere l'accortezza di non
piegare o attorcigliare l'antenna flessibile.
9
Page 94

Posizionamento del controller
10
1. Scegliereuna posizionedel cruscotto del veicolo in cui installare il
controller.Pulire la superficie con un pannoe lasciarla asciugare.
Accertarsi che il controllernon limiti la visuale del conducente.
2. Toglierela pellicola protettiva dalla staffa del controller e fissare
delicatamente la staffa al cruscotto.Esercitare una leggerapressione
sulla staffa per accertarsi che sia fissata saldamente.
3. Infilare il controller sulla staffa fino a quando non scatta in posizione.
Page 95

Collegamento dell'antenna al controller.
1. Posizionare il cavo dell'antennain modoche segua il percorso al
controllersul cruscotto delveicolo.
Nota: Ondeevitare interferenze sul segnaleDAB, tenerei cavi
2. Se possibile, nascondereil cav o dietro la guarnizionedi finitura laterale
del parabrezza.Diversamente, fissareil cavo al parabrezza e al
cruscotto c on fermacavi autoadesivi.
3. Inserire il cavo dell'antenna nel connettore sul retro del controller.
Nota: Spingerea fondo il cavo dell'antenna per assicurarsi che sia
lontani dai display, come gli schermi a cristalli liquidi.
inserito saldamente.
11
Page 96

Collegamento del controller al veicolo
12
1. Se necessario, separare con delicatezza il cavo di alimentazione del
controllere il cavo audio.
Nota: Ondeevitare interferenze sul segnaleDAB, tenerei cavi
lontani dai display, come gli schermi a cristalli liquidi.
2. Inserire il cavo di alimentazione USB nell'adattatore di corrente da
12V,poiinserire quest'ultimo nella presa di alimentazionedelveicolo.
3. Qualora l'Highway vengacollegato tramite il cavo LineOut,inserire il
cavo nella presa ausiliaria del veicolo. Qualora si sia collegato
l'Highway tramite radio FM, è possibile mettereda parte il cavo Line
Out in modoche non sia d'intralcio.
Al fine di ottenere la qualità audio ottimale, si consiglia di collegare
l'Highway con il cavoLine Out.
Page 97

Prima accensione del Highway
Una volta installato il Highway, accenderlopercompletarne l'impostazione.
1. Accendere il m otore del veicolo per accertarsi che l'antenna Highway sia accesa.
2. Premere e per cambiare la lingua visualizzata, poi premere Select per selezionarla.
3. Premere e Select per scegliere la modalità di collegamento dell'Highway al veicolo.
•
Qualora l'Highway sia stato collegato con il cavo Line Out, scegliere 'Uscita linea'. Premere quindi e Select e
scegliere 'Guadagno normale'. In caso di distorsione dell'audio, è possibile cambiareil valoredi guadagno
impostato. Per ulteriori informazioni,vedere a pagina 19.
•
Qualora si abbia collegato il Highway tramite radio FM, scegliere ‘Transmissione FM', poi scegliere una frequenza
FM. Accertarsi che non ci siano altre stazioni radio che utilizzanola frequenza prescelta.
Sintonizzare l'impianto audiodel veicolo sulla m edesima frequenza FM dell'Highway. Per agevolarela ricerca
della frequenza FM in futuro, memorizzarla come frequenzapreselezionata sull'impianto audio del veicolo.
Una volta scelto il metododi connessione,il Highway comincerà a sintonizzarsisullestazioni radio digitali. Al termine
dell'operazionedi sintonizzazioneautomatica, è possibile ascoltare le stazioniradiodigitali.
13
Page 98

Accensione e spegnimento del Highway
•
Peraccendere il Highway, premere .
•
Permettere il Highway in modalità standby e risparmiare energia,premeree tenere premuto .
Nota: Il controller è impostato in m ododa inserireautomaticamente la modalità standby dopo 4 ore. Per modificare il periodo
di tempo, v edi pagina19.
14
Page 99

Radio digitale
Ascolto delle stazioni radio digitali
1. Premere .
2. Premere e Select e scegliere 'Radio digitale'.
3. Per scegliereun'altra stazione radio, premere e scegliere una stazione, poi premere Select.
Stazioniradio digitali preselezionate
E' possibile memorizzarefino a 20 stazioni radio nella lista dellestazioni radio preselezionate.
Memorizzazione di una stazione preselezionata
1. Durante l'ascolto di una stazioneradiodigitale, premere Presets.
2. Premere per scegliereun numero preselezionato. E' possibile sovrascrivere stazioni radio già selezionate.
3. Premere e tenerepremuto Select o Presetspermemorizzarel'attuale stazione radio digitale su un numero
preselezionato.
15
Page 100

Ascolto di una stazione preselezionata
1. Premere Presets.
2. Premere per sceglierela stazione preselezionata che si desidera ascoltare,poi premere Select.
E anche possibile ascoltare una stazionepreselezionata premendosoltanto il pulsante Presets. Premere più volte
Presets fino a quandonon appare la stazione radio preselezionata che si desidera ascoltare. Dopo 3 secondi,
l'Highway si sintonizza su questa stazione radio.
Frequenze di trasmissione FM
Qualora si colleghi l'Highway all'impianto audiodel veicolo tramite la radio FM, è possibileche le stazioni radio locali
trasmettano alla medesima frequenza dell'Highway. Per cambiare rapidamente le frequenze di trasmissioneFM sull'Highway,
è possibilememorizzarefino a nove frequenzecome canali FM.
La frequenza di trasmissione FM appare nell'angolo superiore destrodello schermo. Qualora si utilizzil'impostazione
'Uscita linea', la frequenza di trasmissioneFM non viene visualizzata e il pulsante FMChannel viene disattivato.
Memorizzazione della frequenza di trasmissione FM
1. Premere FMChannel.
2. Premere e scegliere il canale FM. E' possibile sovrascrivere frequenze FM già selezionate.
3. Premere e tenerepremuto Select o FMChannel per memorizzare l'attuale frequenza radio FM sul canale FM.
4. Volendo, è possibile premere per cambiare la frequenza FM, poi premere Select per aggiornareil canale FM.
16
 Loading...