

Page 1
Owner’s manual
DTM-300 Desktop Micro System
XUA OFNIMF/BAD
Page 2

Safety instructions
Keep the unit away from heat sources such as radiators, heaters or other appliances that produce heat and
ensure naked flame sources, such as lighted candles are not placed on or near the unit.
Ensure that the unit is not placed in such a way as to interfere with proper ventilation such as in enclosed
bookcases or cupboards.
Ensure the ventilation openings are not covered by items such as newspapers, tablecloths, curtains, etc.
Do not expose the unit to direct sunlight.
Do not use the unit near water.
Avoid objects or liquids getting into the unit. Do not expose to dripping or splashing and ensure that objects
filled with liquids, such as vases, are not placed on or near the unit.
Do not remove screws from or open the unit casing.
CLASS 1 LASER PRODUCT
Copyright
Copyright 2005 by Imagination Technologies Limited. All rights reserved. No part of this publication may be copied or distributed, transmitted,
transcribed, stored in a retrieval system, or translated into any human or computer language, in any form or by any means, electronic,
mechanical, magnetic, manual or otherwise, or disclosed to third parties without the express written permission of Imagination Technologies
Limited.
Disclaimer
Imagination Technologies Limited makes no representation or warranties with respect to the content of this document and specifically disclaims
any implied warranties of merchantability or fitness for any particular purpose. Further, Imagination Technologies Limited reserves the right to
revise this publication and to make changes in it from time to time without obligation of Imagination Technologies Limited to notify any person or
organisation of such revisions or changes.
Trademarks
DTM-300, PURE, the PURE logo, PURE Digital, the PURE Digital logo, Imagination Technologies, and the Imagination Technologies logo
are trademarks or registered trademarks of Imagination Technologies Limited. All other product names are trademarks of their respective
companies.
Warranty information
Imagination Technologies Ltd. warrants to the end user that this product will be free from defects in materials and workmanship in the course of
normal use for a period of two years from the date of purchase. This guarantee covers breakdowns due to manufacturing or design faults; it does
not apply in cases such as accidental damage, however caused, wear and tear, negligence, adjustment, modification or repair not authorised
by us. Please register your product on our website at www.pure.com/register or by filling in and returning your warranty card. Should you have a
problem with your unit please contact your supplier or contact PURE Support at the address shown on the rear of this manual.
Credits
This manual was written by Bruce Murray. It is a product of PURE Digital, Imagination Technologies Ltd., Imagination House, Home Park Estate,
Kings Langley, Herts, WD4 8LZ, UK.
Version 1 September 2005
Page 3

Contents
Getting started ................................................................... 2
Overview diagrams ................................................................................... 2
Switch on and off ....................................................................................... 4
Navigating menus ..................................................................................... 4
Listening to DAB radio ........................................................ 5
Selecting a station .................................................................................... 5
Changing the information displayed ......................................................... 5
Storing and recalling presets ................................................................... 5
Changing DAB options ............................................................................... 5
Listening to a CD ................................................................. 7
Selecting a CD track .................................................................................. 7
Great Britain
Selecting an MP3 file ................................................................................ 7
Changing the information displayed ......................................................... 7
Setting CD track repeat options ................................................................ 7
Listening to FM radio .......................................................... 8
Selecting a station .................................................................................... 8
Changing the information displayed ......................................................... 8
Storing and recalling presets ................................................................... 8
Changing FM stereo mode ........................................................................ 8
Listening to an auxiliary source ......................................... 9
Setting clock, timer and alarms ....................................... 10
Set time ...................................................................................................10
Set alarm .................................................................................................10
Sleep timer ..............................................................................................10
Setting audio levels .......................................................... 11
Bass ......................................................................................................... 11
Treble ....................................................................................................... 11
Hints and tips .................................................................... 12
Technical specifications .................................................... 13
1
Page 4
Great Britain
Getting started
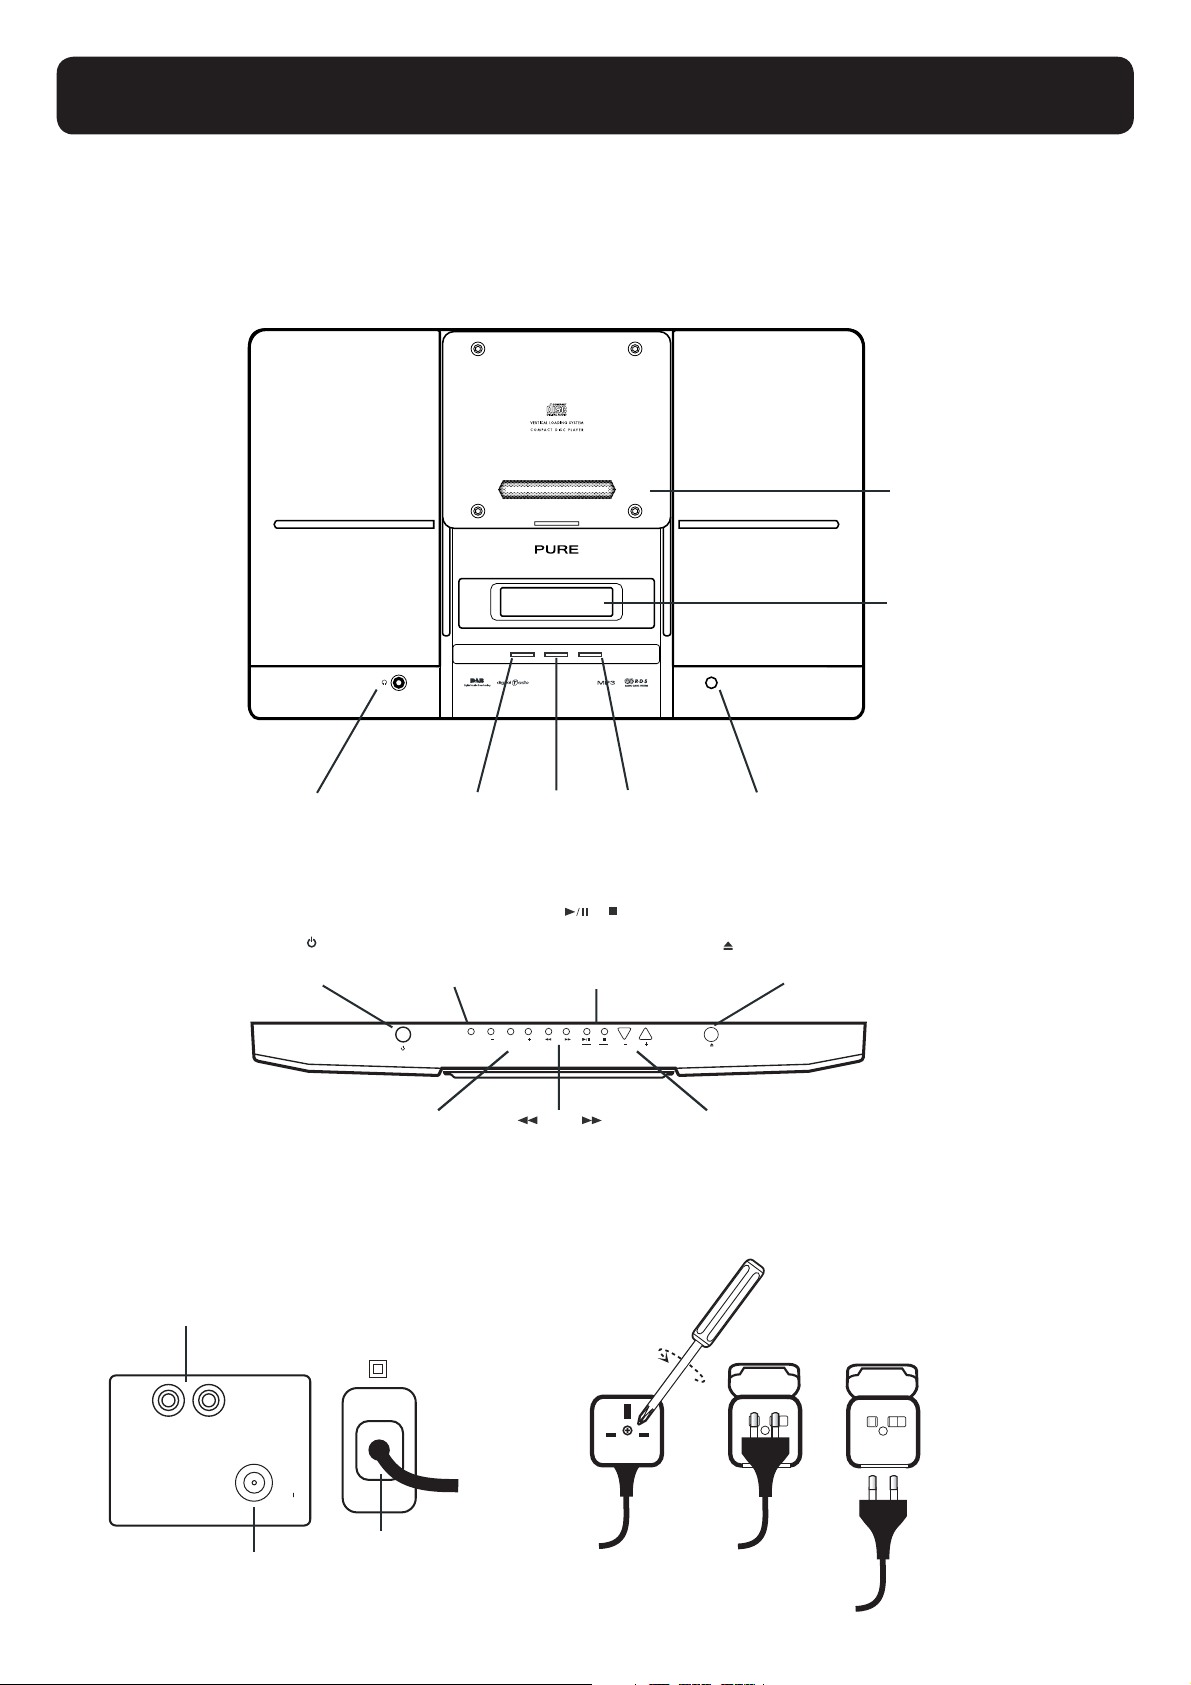
Overview diagrams
These diagrams show the function of controls, the connectors on the rear panel, the remote control and screen icons.
Front panel
Headphones
3.5 mm
headphone
socket
(mutes speakers)
DAB/FM
Toggles
between
DAB and FM
DTM-300 Desktop Micro System
XUA OFNIMF/BAD
AUX
Switches to
Auxiliary input
INFO
Changes the
information displayed
on the screen
CD door
Slides open for access
to the CD player
LCD screen
Backlit LCD screen with
16 x 2 characters and status icons
Infrared receiver
Receives signal
from remote control
Top panel
Rear panel
AUX IN
Stereo input from
iPod/minidisc etc.
R
Power
Switches between
on and standby
MENU
Access setup options
and alarms
- SELECT +
Use + and - to scroll
and SELECT to choose
stations, tracks and
menu options
CD controls
Play, pause and
stop CD/MP3
playback
TCELESUNEMNACS
SCAN
Hold to scan or push to
step through FM frequencies
Hold to rewind/fast forward
in CD/MP3 tracks
DC
EMULOV
Volume controls
CD OPEN/CLOSE
Opens and closes the CD door
ESOLC/
NEPODC
- VOLUME +
UK adapter removal
AUX IN
L
DAB/FM
AERIAL
Power Lead
DAB/FM AERIAL
F-type connector
for DAB/FM aerial
2
Page 5
T
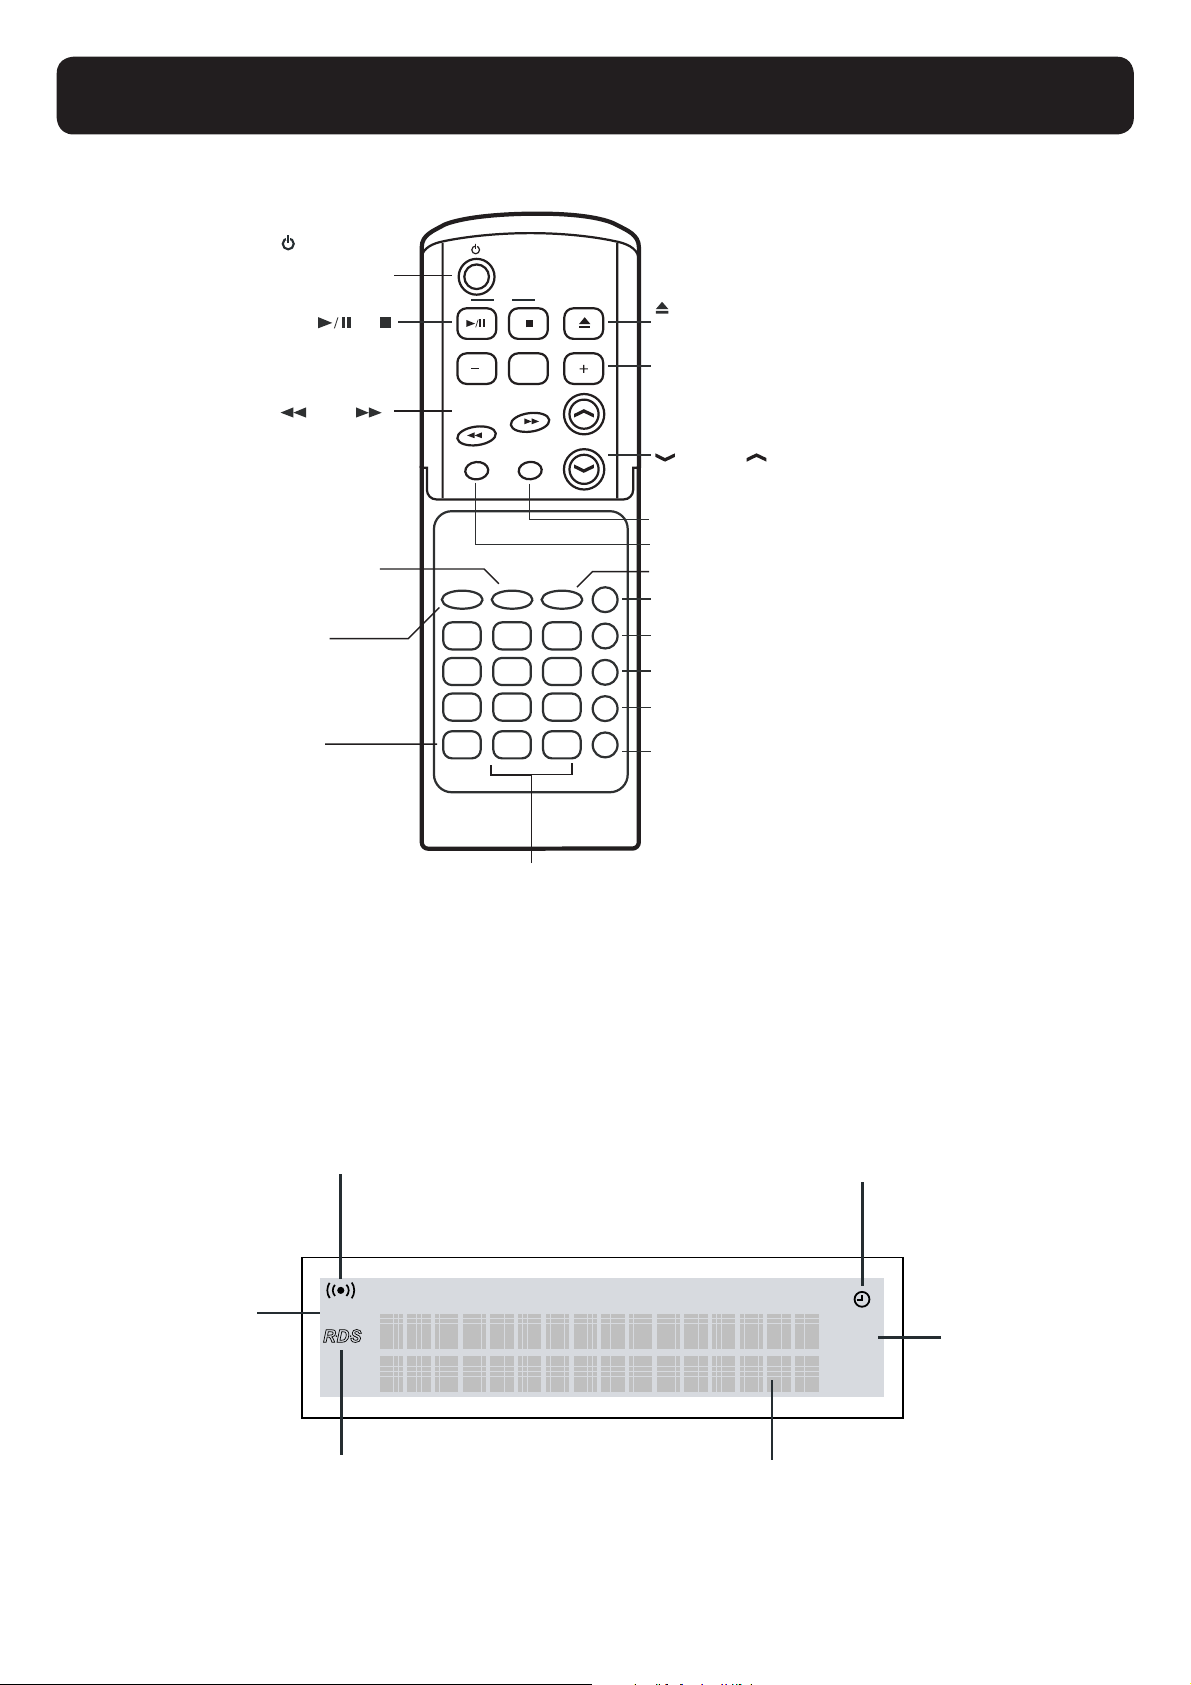
Remote control
Power
Switches between
on and standby
CD
Play, pause and stop
CD/MP3 playback
SCAN
Hold to scan or push
to step through FM
frequencies
Hold to rewind/
fast forward
in CD/MP3 tracks
BASS
Adjust bass level
MUTE
oggles mute on
output from speakers
TIME
Displays clock
on screen
MUTE
C
ACS
MF/BA
D
4
7
EMIT
D
N
A
BASS
21
5
89
0
/NEPO
TCELES
VOLUME
U
X
TREBLE
3
6
01+
ESOLC
OPEN/CLOSE
Opens and closes the CD door
- SELECT +
Use + and - to scroll and
SELECT to choose stations,
tracks and menu options
VOLUME
Volume controls
AUX Switches to auxiliary input
DAB/FM Toggles between DAB and FM
TREBLE Adjusts treble level
MENU
MENU Access setup options and alarms
INFO
INFO Changes the information shown on screen
ENUTOTUA
AUTOTUNE (DAB) Scans DAB frequencies in Band III.
ER
TAEP
REPEAT (CD) Switches between Repeat all,
Repeat one or Repeat off for CD/MP3 tracks
SLEEP
SLEEP Press and use +/- SELECT to set sleep timer
for 15, 30, 45, 1 hour, 1 hour 30, 2 hours or 0 (off) minutes.
Great Britain
Number buttons
Press and hold 1-9 to store a radio preset.
Press 1-9 to select a radio preset.
Press 1-9 to quickly access CD or MP3 tracks
Press +10 first for tracks 10-19, twice first for 20-29 etc.
LCD screen
FM Stereo
Indicates stereo
FM reception
DAB Mode
Indicates DAB
mode selected
DAB
FM RDS
Indicates FM
RDS station
BBC Radio 2
all now on 0870
16 x 2 text
character area
Alarm set
Indicates alarm is set
Flashes when alarm goes off
SLEEP
Sleep Timer
Indicates that a
sleep timer is active
3
Page 6

Great Britain
Switch on and off
When you first plug in your DTM-300 it switches to DAB mode and performs
an autotune (full Band III) to find all DAB stations available in your area.
These stations are stored in a station list and ordered alphanumerically.
The first station on the station list is selected.
To switch your unit off (standby) - press the
remote control. You see the clock on the screen.
To switch your DTM-300 back on press the
starts in whatever mode you were in when you switched off.
Navigating menus
Use the +/- buttons on the remote or main unit to scroll through menu
options, stations or track lists and push SELECT to choose options. In most
menus if you do not select anything you return to the previous screen.
Power button on the unit or
Power button again. Your unit
4
Page 7

Listening to DAB radio
To listen to DAB radio push the DAB/FM button until you see the DAB icon on the left
of the screen.
When you first switch on your DTM-300 it automatically enters DAB mode, autotunes
to find all the DAB stations available in your area and lists them in alphanumeric
order.
Selecting a station
To change stations, press the +/- buttons to scroll through the station list,
then push the SELECT button to tune to the highlighted station.
The currently selected station is shown at the top of the screen.
Changing the information displayed
DTM-300 has seven DAB display modes which change what you see on the
bottom line of the screen while you listen to DAB radio. Push the Display
button to switch between the modes.
Great Britain
Text Scrolling text broadcast by most stations.
Frequency DAB channel and frequency of the current station.
Broadcast info Data rate at which the station is being transmitted and
stereo or mono indicator. The data rate is set by the stations
to suit the type of material being transmitted. High rates
generally mean higher quality.
Signal quality As a guide, values from 85 to 100 indicate good reception,
70 to 84 average reception and 0 to 69 poor reception.
Content Description of the content broadcast by the station.
Multiplex Name of the multiplex the current station belongs to.
Multiplexes are groups of stations broadcast by a single
operator.
Time and Date Time and date broadcast by the multiplex.
Storing and recalling presets
You can store up to 9 of your favourite stations as presets which you can then
access quickly using the numbered buttons on the remote control.
To store a preset - Hold down the numbered button you want to store the
current station under. The preset is stored, overwriting any previous one.
To recall a preset - Press the numbered button for the preset you want to
listen to.
Changing DAB options
To customise the way your DTM-300 works in DAB mode push the Menu
button and select one of the following options:
Station order
Change the order of stations on your station list using this option. The current
order is shown at the top of the screen. Choose from the following:
5
Page 8

Great Britain
Alphanumeric Displays all stations in alphanumeric order.
Multiplex Lists stations in groups according to their multiplex.
Multiplexes are groups of stations owned and broadcast by a
multiplex operator.
Trim stn. list Removes inactive stations from the station list. Inactive
stations are those on your station list but not currently
available, marked with a ’?’.
Fav station Displays your most listened to stations at the top of the
station list and the others below. Your favourite stations are
selected by how long you listen to each station and indicated
by a
presets Available only when Favourite station order (above) has
♥
been selected. Transfers your favourite stations to presets
overwriting any presets currently stored.
next to the name in the station list.
♥
Autotune
Update your DAB station list using this option. Scans the full range of digital
frequencies in Band III and adds any new stations found to the station list.
You may want to do this if you move the unit.
Manual tune
Manually tune to new DAB stations or fine tune your reception using this
option.
You see a list of channels and frequencies. Each multiplex has a different
channel and frequency (E.g., BBC is channel 12B and Digital One is 11D).
1. Select the channel you want from the list.
You see a signal strength display. The marker indicates the minimum
required level for reception and the filled blocks indicate the current
level.
2. Move your aerial and try to raise the current level to the marker or
beyond. You see the multiplex name if a good signal is received and the
stations in that multiplex are added to the station list.
DRC Value
Make the quieter sounds in a broadcast easier to hear at low volume or in
a noisy environment using this option. The DRC (Dynamic Range Control)
level of a broadcast is set by the station and sent with the signal. At the time
of writing only stations such as BBC Radio 3 and 4 regularly broadcast a
DRC level. Check with the broadcasters to find out if they use DRC on their
stations.
Select one of the following options:
DRC off DRC is switched off. Any DRC level broadcast is ignored. This is
the default setting.
DRC half DRC level is set to half that sent with the broadcast.
DRC full Applies the DRC level as sent with the broadcast.
6
Page 9

Listening to a CD
Great Britain
To listen to a CD press the CD OPEN/CLOSE (
gently push your CD label side out onto the spindle in the CD player. Push the CD
OPEN/CLOSE button again to close the CD door.
Press play to switch to CD mode, load the CD and start playback of the first track. If
you insert a CD with MP3 files loading the CD may take longer. Your unit scans the
disc and creates a list of all the folders and files on the CD.
) button to open the CD door and
Selecting a CD track
To change tracks on a CD, either:
• press the +/- buttons to select the next/previous track
• use the SCAN buttons to fast rewind/fast forward to another track
• select a track number using the numbered buttons on the remote
Selecting an MP3 file
MP3 file and folders (including nested folders) are displayed in a single
list with folders first (Indicated by an arrow →), then files (indicated by an
asterisk *). To see the list press the Stop ( ) button and use the +/- and
SELECT buttons to browse the list or select a file.
Inserting a CD
If you select a folder , the list will change to show the files within that folder.
Press the Stop button again to go back to the complete folder list.
Note Any files found in the root folder on the CD are listed in a folder called
→ ROOT.
To change MP3 tracks on a CD, either:
• press the +/- buttons to select the next/previous track in the current
folder
• use the SCAN buttons to fast rewind/fast forward to another track in the
current folder
• select a track number using the numbered buttons on the remote tracks
are numbered sequentially the first track (1) in the first folder.
Changing the information displayed
To change what you see on screen while you listen to a CD push the INFO
button. Choose from the following options:
Track elapsed Time the current track has been playing, or if stopped total
time and number of tracks on the CD.
Track remaining Time remaining of the current track.
Disc remaining Time remaining of current CD.
If playing an MP3 CD the bottom line of the display shows ID3 tag text such
as track information, artist, etc., if included with the file.
Setting CD track repeat options
Press the REPEAT button on the remote control in CD mode to switch
between repeating one, all or none of the tracks on the CD automatically.
7
Page 10

Great Britain
Listening to FM radio
To listen to FM radio push the DAB/FM button until you see FM on the left of the
screen and the frequency display.
Selecting a station
To select a station either:
• press the SCAN buttons to step up/down the frequency range in steps
of 0.05 MHz or hold down for a second to seek to the next station with a
strong signal.
• press the +/- buttons to skip to the next/previous FM preset
• press a numbered button on the remote to select an FM preset directly
If you are listening to an RDS station you see the RDS icon on screen and
extra RDS information may be available as described below.
If you are listening to a stereo station you see the Stereo icon (
screen.
Changing the information displayed
To change what you see on screen while you listen to FM radio push the
Display button. Choose between the following options:
RadioText Dynamic text broadcast by some RDS stations.
Broadcast info Description of the content broadcast by the station and its
frequency. RDS stations only.
Date and time Date and time obtained from the FM signal. RDS stations
only.
Storing and recalling presets
You can store up to 9 of your favourite stations as presets which you can then
access quickly using the numbered buttons on the remote control.
To store a preset - Hold down the numbered button you want to store the
current station under. The preset is stored, overwriting any previous one.
To recall a preset - Press the numbered button for the preset you want to
listen to.
)on
Changing FM stereo mode
To change between Stereo and Mono press the Menu button, select FM mode
and choose between Stereo or Mono. Mono may be clearer for stations with
weak signals. The current mode is shown on the top line of the display.
8
Page 11

Listening to an auxiliary source
To listen to an audio source such as an iPod or MiniDisc player attached to the
AUX IN sockets on your DTM-300 push the AUX button.
AUX IN
R
L
Great Britain
/ AUDIO OUT
9
Page 12

Great Britain
Setting clock, timer and alarms
Push the menu button and use +/- and SELECT to choose the Clock settings option
to view and set the time, a timer or an alarm. Choose one of the following options:
Set time
The current time is shown on the top line of the display. Press SELECT and the
+/- buttons to change the hour (24 hour clock) and minutes.
Press the TIME button on the remote at any time to see the clock.
Set alarm
The current settings are shown on the top line of the display. Press SELECT to
change the alarm settings:
Press the +/- and SELECT buttons to set an alarm time, mode [DAB/FM/CD]
and set the alarm on or off. DAB or FM alarms tune to the last station you
were tuned to. CD alarms play the CD from the first track.
Note If no CD is inserted, or the station you selected is unavailable at the
time an alarm is due to go off it will not work.
When the alarm is set you see the Alarm icon (
icon flashes when the alarm goes off.
To cancel the alarm and leave the unit switched on press SELECT or press the
Power button to cancel the alarm and switch off.
Note Alarm volume will be whatever the current volume is set to or whatever
the volume was set to when you last had your unit switched on.
Note Alarm time uses the clock you set as described above so ensure you set
this correctly before setting an alarm.
Sleep timer
The current setting is shown on the top line of the display. Press SELECT and
the +/- buttons to change the time after which you want your DTM-300 to
switch off. Choose between 15, 30, 45, 60, 1 hour 30 minutes and 2 hours
and push SELECT to confirm. To switch the sleep timer off, set the time to
zero.
You see the SLEEP timer icon on the screen when a sleep timer is set. You
can check the sleep time remaining by returning to the Sleep timer menu.
) on the screen. The alarm
10
You can also access the Sleep timer directly using the SLEEP button on the
remote control.
Page 13

Setting audio levels
Push the menu button and use +/- and SELECT to choose the Audio mode option to
adjust bass and treble levels. Choose one of the following options:
Bass
Press SELECT and use +/- to adjust the bass level between -05 and +05.
Press SELECT again to confirm the change and exit.
Press MENU or wait a moment to exit.
Treble
Press SELECT and use +/- to adjust the treble level between -05 and +05.
Press SELECT again to confirm the change and exit.
Press MENU or wait a moment to exit.
Great Britain
You can also access the bass and treble menu options directly using the BASS and
TREBLE buttons on the remote control.
11
Page 14

Great Britain
Hints and tips
(>>/<<) DAB Secondary services
Secondary services accompany some stations, providing extra information or alternative
content and may only be broadcast at certain times. At the time of writing not many
secondary services are available. If a station has secondary services available, the station
shows ‘>>’ next to its name in the station list and the secondary service appears next to the
station in the list. A secondary service has a ‘<<’ before its name in the station list.
(?) Inactive or unavailable DAB stations
Inactive or unavailable stations are those which appear on the station list but are not
currently available because either you are outside the broadcast area, have lost reception or
the station is not currently broadcasting. Unavailable stations have a ‘?’ before their name
on the station list. If you select a station which has this symbol, DTM-300 will retry the
station and, if still unavailable, returns to the last station you were listening to.
I hear a ‘burbling’ sound on some DAB stations
Although DAB is excellent at providing quality audio from very little signal, the quality can
suffer if the signal strength is too low. If that happens, a ‘burbling’ sound can sometimes
be heard. To help reduce this, check that your aerial is mounted as high as possible and
the arms are fully extended vertically. If the problem persists try moving your radio or
repositioning your aerial using manual tuning.
Screen says ‘ No stations available’ in DAB mode
Check that your aerial is connected and fully extended. Use Autotune to search for stations.
Use manual tuning to adjust your aerial or radio position.
Resetting your unit
Resetting your DTM-300 removes all presets, stored stations and favourite station settings
and resets all options to defaults. To reset:
1. Press and hold the Menu button for three seconds. You see ‘Press SELECT to confirm
reset’ on screen.
2. Press the SELECT button to confirm the reset or press no buttons to cancel the reset.
Clock shows the wrong time
There are three clock displays available on your DTM-300. The first is the built-in clock which
you view by pressing the TIME button on the remote. You set this clock using the Clock
settings > Set time menu option.
The second clock is broadcast by most DAB radio stations and the third by some FM (RDS)
stations. You can view these clocks by pressing the INFO button until the clock display is
shown on screen. These two clocks are controlled by the broadcasters and you cannot
adjust the time on these clocks.
12
Page 15

Technical specifications
Amplifier
6.5W RMS per channel power output (into 4 Ohms)
Bass and treble tone control
Mute option from remote control.
CD player
CD-R and CD-RW playback compatible
Repeat playback modes
MP3 playback, including support for ID3 tags
DAB
Full Band III (174 - 240 MHz) reception. Fully compliant with ETS 300 401
and capable of decoding all DAB transmission modes 1-4
Fast autotune feature
FM
Great Britain
Supports RDS and RadioText
87.5 - 108 MHz frequency range
Speakers
Separate woofers and tweeters in bass ported cabinet.
Connectors
3.5 mm headphones output
Combined DAB/FM aerial connection
Dual phono for external line level audio input
General
Fully featured remote control
Compliant with the EMC and Low Voltage Directives (89/336/EEC and
73/23/EEC)
Main unit dimensions 435 (w) x 280 (h) x 160 mm (d)
Removable UK power socket adapter
Bootlace aerial supplied
Telephone support and website
Two year warranty
13
Page 16

www
.pure.com
12M76
PURE Digital, Imagination Technologies Ltd., Imagination House, Home Park Estate, Kings Langley, Herts, WD4 8LZ, UK
+44 (0) 1923 270188 +44 (0) 1923 277477 support
+44 (0) 1923 277488 sales
support@pure.com
sales@pure.com
 Loading...