

Page 1
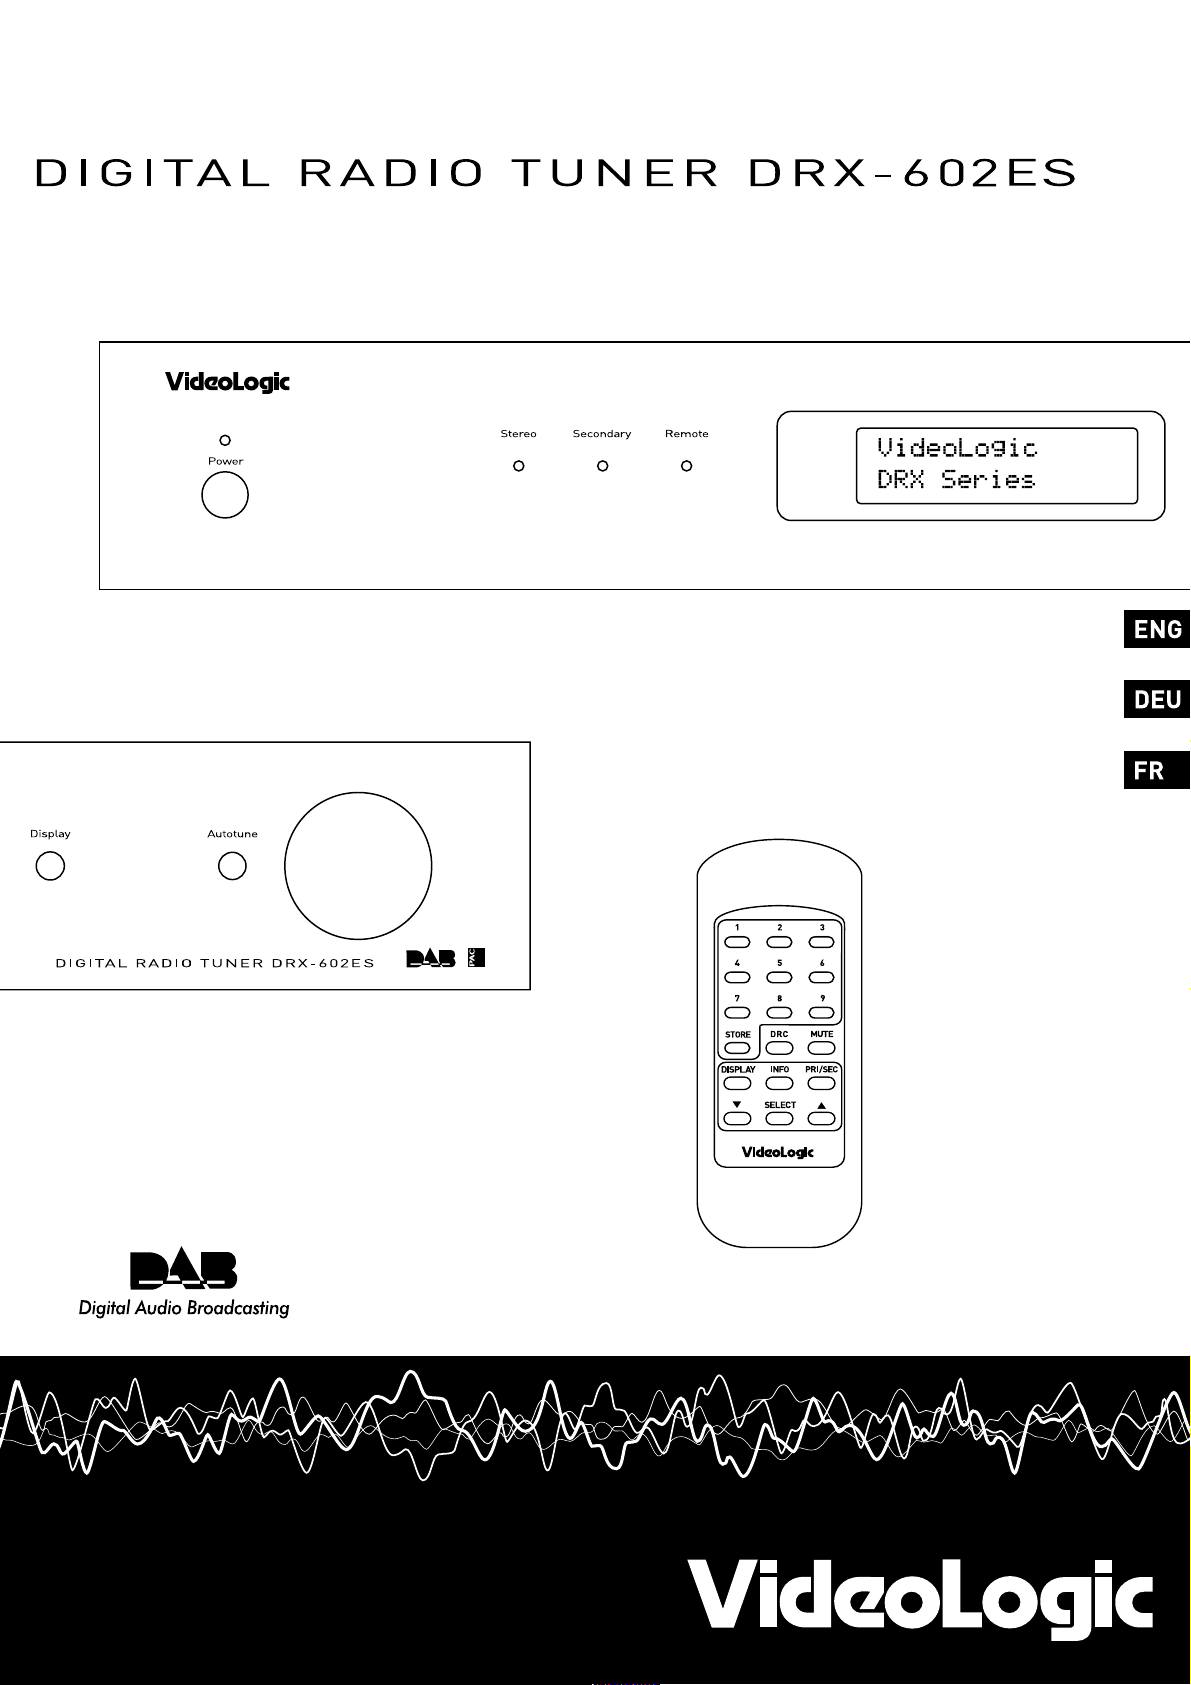
Operating Instructions..........
Bedienungsanleitung............
Consignes d'utilisation.........
Page 2
Safety instructions
Sicherheitsvorschriften
Consignes de Sécurité
Keep the unit awa y from heat sources.
Do not use the unit near water.
Avoid objects or liquids getting into the unit.
Unplug the power lead if the unit will not be
used for a long period.
Mains safety
The unit uses a 220-240V AC 50 Hz (Europe)
or 115V A C 60Hz (Canada) power supply .
When replacing the fuse in the
supplied moulded mains plug,
always refit the integ ral fuse
holder/cover . Alwa ys fit a 3 amp
fuse either in the plug or adapter,
or at the distribution board.
Do not attempt to remove an y screws or open
the unit. No user serviceable parts are inside.
For your safety , alwa ys obey the warning:
CAUTION - RISK OF ELECTRIC SHOCK - DO NOT
OPEN COVER
Halten Sie der Radio von Wärmequellen fern.
Betreiben Sie der Radio nicht in unmittelbarer
Wassernähe.
Verhindern Sie jegliches Eindringen v on
Flüssigkeit in das Innere der Radio.
Unterbrechen Sie die Stromzufuhr zum Radio,
wenn sie es für längere Zeit nicht nutzen.
Sicherheit im Umgang
mit Netzstrom
DigiTheatre DTS benötigt eine Betriebsspannung
von 220-240 V olt W echselstrom mit 50 Hz
(Europa) oder 115 V olt W echselstrom mit 60 Hz
(Kanada).
Versuchen Sie keinesfalls der
Radio zu öffnen. Es befinden sich
keine Teile innerhalb des
Gehäuses, die vom Benutzer
gewartet werden können.
Für Ihre Sicherheit beachten Sie folgendes:
ACHTUNG - GEHÄUSE NICHT ÖFFNEN -
LEBENSGEFÄHRLICHE SP ANNUNG.
Ne pas placer l'unité à proximité d’une source
de chaleur.
Protéger l'unité contre la pluie et l’humidité.
Veiller à ce qu’aucun objet ou liquide ne
pénètre dans l'unité.
Débrancher le câble d’alimentation en cas de
non utilisation prolongée de DRX-602ES.
Sécurité électrique
L'unité doit être branché sur une tension
secteur de 220-240 V CA 50 Hz (L'Europe) ou
115V CA 60Hz (Canada).
Ne pas tenter d’ouvrir l'unité.
Aucune des pièces se trouvant
à l’intérieur ne peut être
réparée par l’utilisateur.
Respecter la consigne de sécurité suivante:
ATTENTION – RISQUE DE CHOC ÉLECTRIQUE –
NE P AS OUVRIR LE BOÎTIER.
Copyright
Copyright 2001 by Imagination Technologies Limited. All rights
reserved. No part of this publication may be copied or distributed,
transmitted, transcribed, stored in a retrieval system, or translated into
any human or computer language, in any form or by any means,
electronic, mechanical, magnetic, manual or otherwise, or disclosed to
third parties without the express written permission of Imagination
Technologies Limited.
Disclaimer
Imagination Technologies Limited makes no representation or warranties
with respect to the content of this document and specifically disclaims any
implied warranties of merchantability or fitness for any particular purpose.
Further, Imagination Technologies Limited reserves the right to revise this
publication and to make changes in it from time to time without obligation
of Imagination Technologies Limited to notify any person or organization of
such revisions or changes.
Trademarks
VideoLogic, the VideoLogic Logo, Imagination Technologies, and the
Imagination Technologies logo are trademarks or registered trademarks of
Imagination Technologies Limited. All other product names are trademarks
of their respective companies.
Credits
This manual was written by Bruce Murray and illustrated by Philippa Page. It
is a product of VideoLogic Systems, Imagination Technologies Ltd., Home
Park Estate, Kings Langley, Hertfordshire WD4 8LZ, UK.
Editio n 1 June 2001
Copyright
Copyright 2001 Imagination Technologies Limited. Alle Rechte
vorbehalten. Kopien, auch auszugsweise, von diesem Dokument, egal in
welcher Form, bedürfen der schriftlichen Genehmigung von Imagination
Technologies Limited.
Haftungsausschluß
Imagination Technologies Limited übernimmt keine Haftung, bzw.
Gewährleistung,, die über den Inhalt dieses Dokuments hinausgehen und
schließt alle implimierten Gewährleistungsansprüche aus. Desweiteren behält
sich Imagination Technologies Limited das Recht vor, ohne vorherige
Ankündigung oder Benachrichtigung einzelner Personen, bei Bedarf
Änderungen und Ergänzungen an diesem Dokument vorzunehmen.
Warenzeichen
VideoLogic, das VideoLogic Logo, Imagination Technologies, und das
Imagination Technologies logo sind Warenzeichen, bzw. eingetragene
Warenzeichen von Imagination Technologies Limited. Alle anderen
gennanten Warenzeichen und Markennamen gehören Ihren jeweiligen
Besitzern.
Impressum
Dieses Manual wurde von Bruce Murray erstellt unt Ilustrationen von Philippa
Page. Dies ist ein Produkt von VideoLogic Systems, Imagination Technologies
Limited, Home Park Estate, Kings Langley, Hertfordshire WD4 8 LZ, Groß
Britannien.
Erstausgabe Juni 2001
Copyright
Copyright 2001 par Imagination Technologies Limited. Tout droits
réservés. Il est interdit de copier, distribuer, transmettre, transcrire,
traduire et archiver tout ou partie de ce document, sous quelque forme
que ce soit et par tout procédé que se soit, sans l’autorisation écrite
préalable de Imagination Technologies Limited.
Disclaimer
Cette publication n’implique aucun engagement contractuel de
Imagination Technologies Limited concernant la présentation ou les
garanties. En particulier, Imagination Technologies Limited refute toute
garantie implicite d’usage ou de valeur marchande, pour quelque but
que ce soit. En outre, Imagination Technologies limited se réserve le
droit de modifier cette publication et d’y opérer des changements
ponctuels, sans avoir l’obligation d’en informer quelque personne ou
organisation que ce soit.
Trademarks
VideoLogic, le logo VideoLogic, Imagination Technologies et le logo
Imagination Technologies sont des marques et des marques déposées
de Imagination Technologies Limited. Tous les autres noms de produits
sont des marques de leur compagnie respective.
Crédits
Ce manuel a été écrit par Bruce Murray et illustré par Philippa Page.
C’est un produit de VideoLogic Systems, Imagination Technologies
Limited, Home Park Estate, Kings Langley, Hertfordshire WD4 8LZ, United
Kingdom.
Premier edition Juin 2001
Page 3

Contents
Introduction ............................................................................... 2
Unpacking ................................................................................. 2
Controls and Connectors ............................................................. 3
Setting up.................................................................................. 4
Using your DRX-602ES ............................................................... 5
Using the remote control ............................................................. 7
Guide to Digital Radio ................................................................. 8
Troubleshooting ......................................................................... 9
Aerial advice ............................................................................ 10
Accessories ..............................................................................10
Getting Help .............................................................................10
Technical Specifications ............................................................11
Index .......................................................................................12
1
Page 4
Introduction
Thank you for choosing the DRX-602ES Digital Radio T uner .
This manual provides information on setting up your unit, instructions on using it and details of the accessories and support available.
The DRX-602ES is a dedicated high performance digital radio tuner. Also known as Digital Audio Broadcast (D AB), digital radio provides superb
quality sound, eliminating the hiss, crackle and fade associated with analogue radio broadcasts.
Designed to complement your hi-fi separates system, the DRX-602ES has a range of input and output sockets for maximum connectivity including:
dual phono for stereo analogue audio output to your amplifier; coaxial and optical S/PDIF digital output (48 kHz) for direct digital recording to
MiniDisc, CD-R or D AT; AM/FM tuner line-lev el input with auto pass-through to output at power off; optical RDI data output connector
and RF F-connector for your aerial.
If you are new to digital radio, see Guide to Digital Radio for our quick guide.
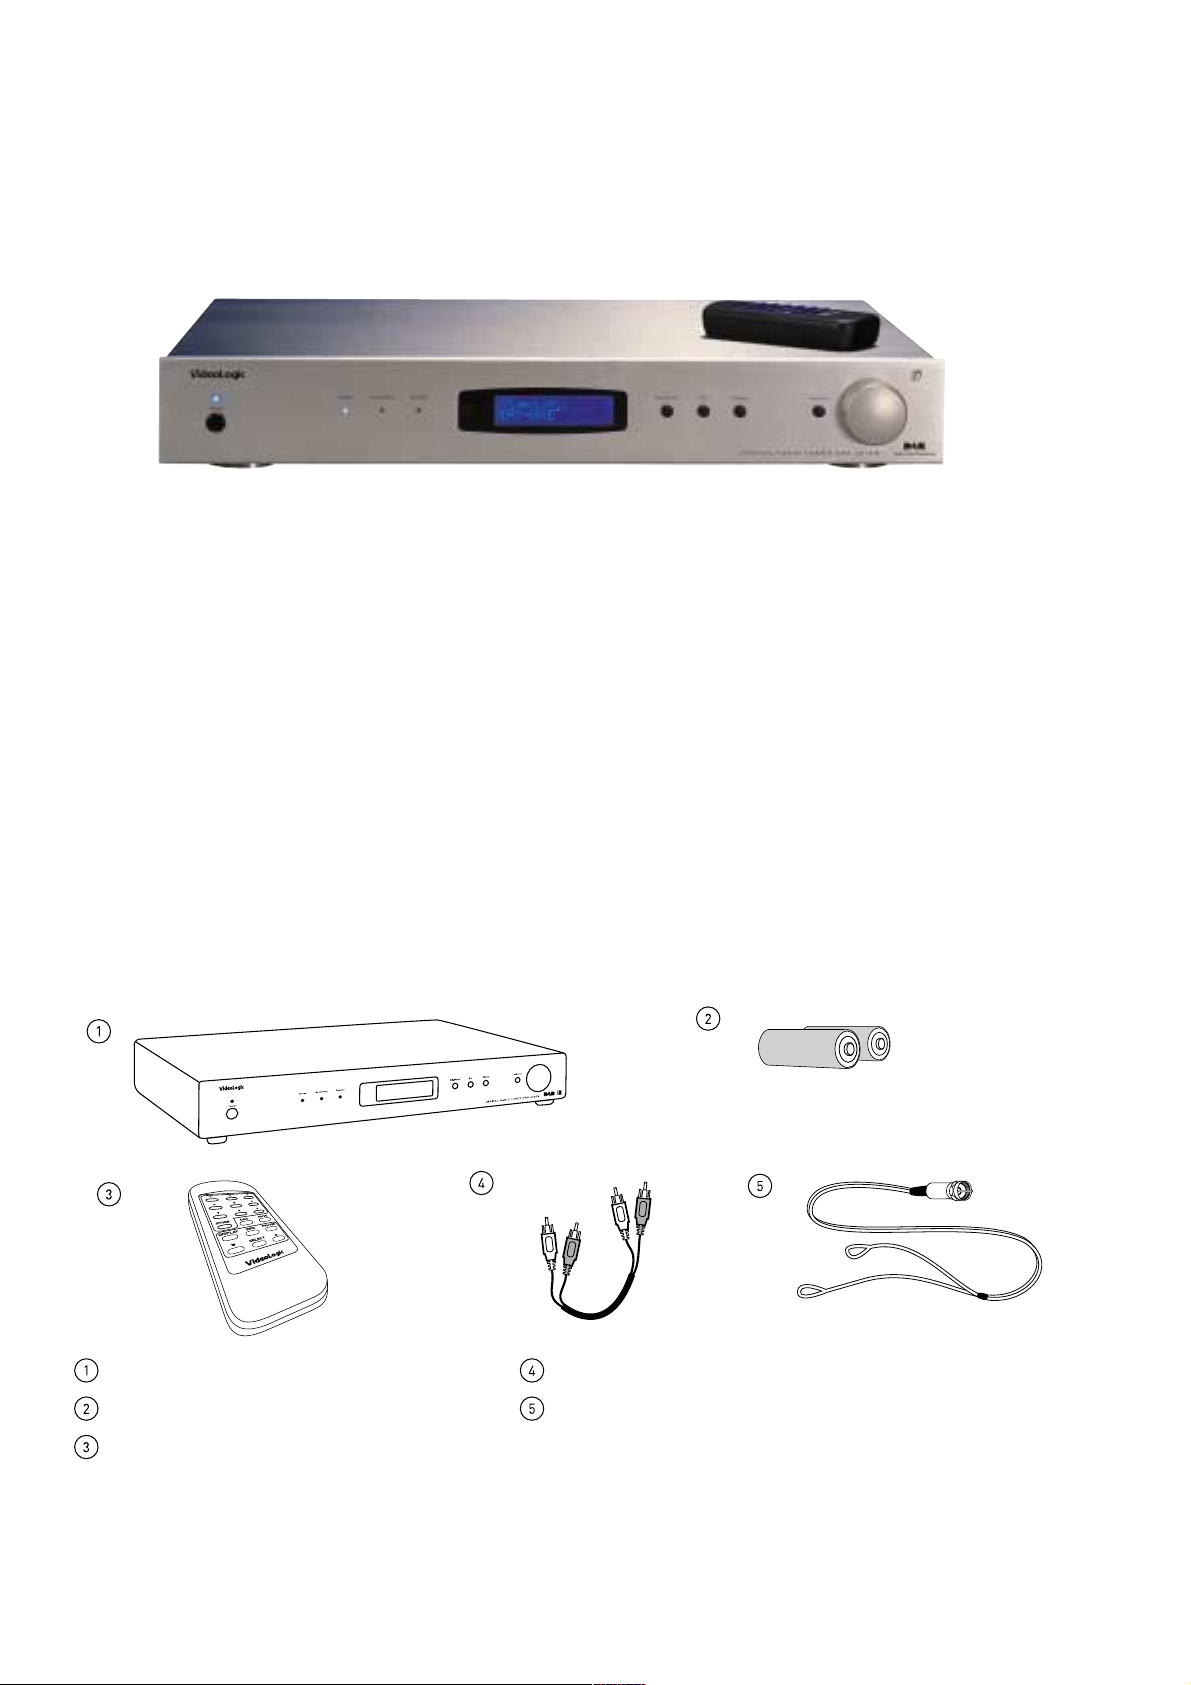
Unpacking
This section lists the contents of your DRX-602ES packag e. After unpacking y our box check that you hav e all of the following items.
Contact us if any items are missing or damaged.
One DRX-602ES Digital Radio Tuner unit One stereo phono to stereo phono cable
Tw o batteries (AAA size) for the remote control One DAB ribbon indoor aerial
One infrared remote control handset
2
Page 5
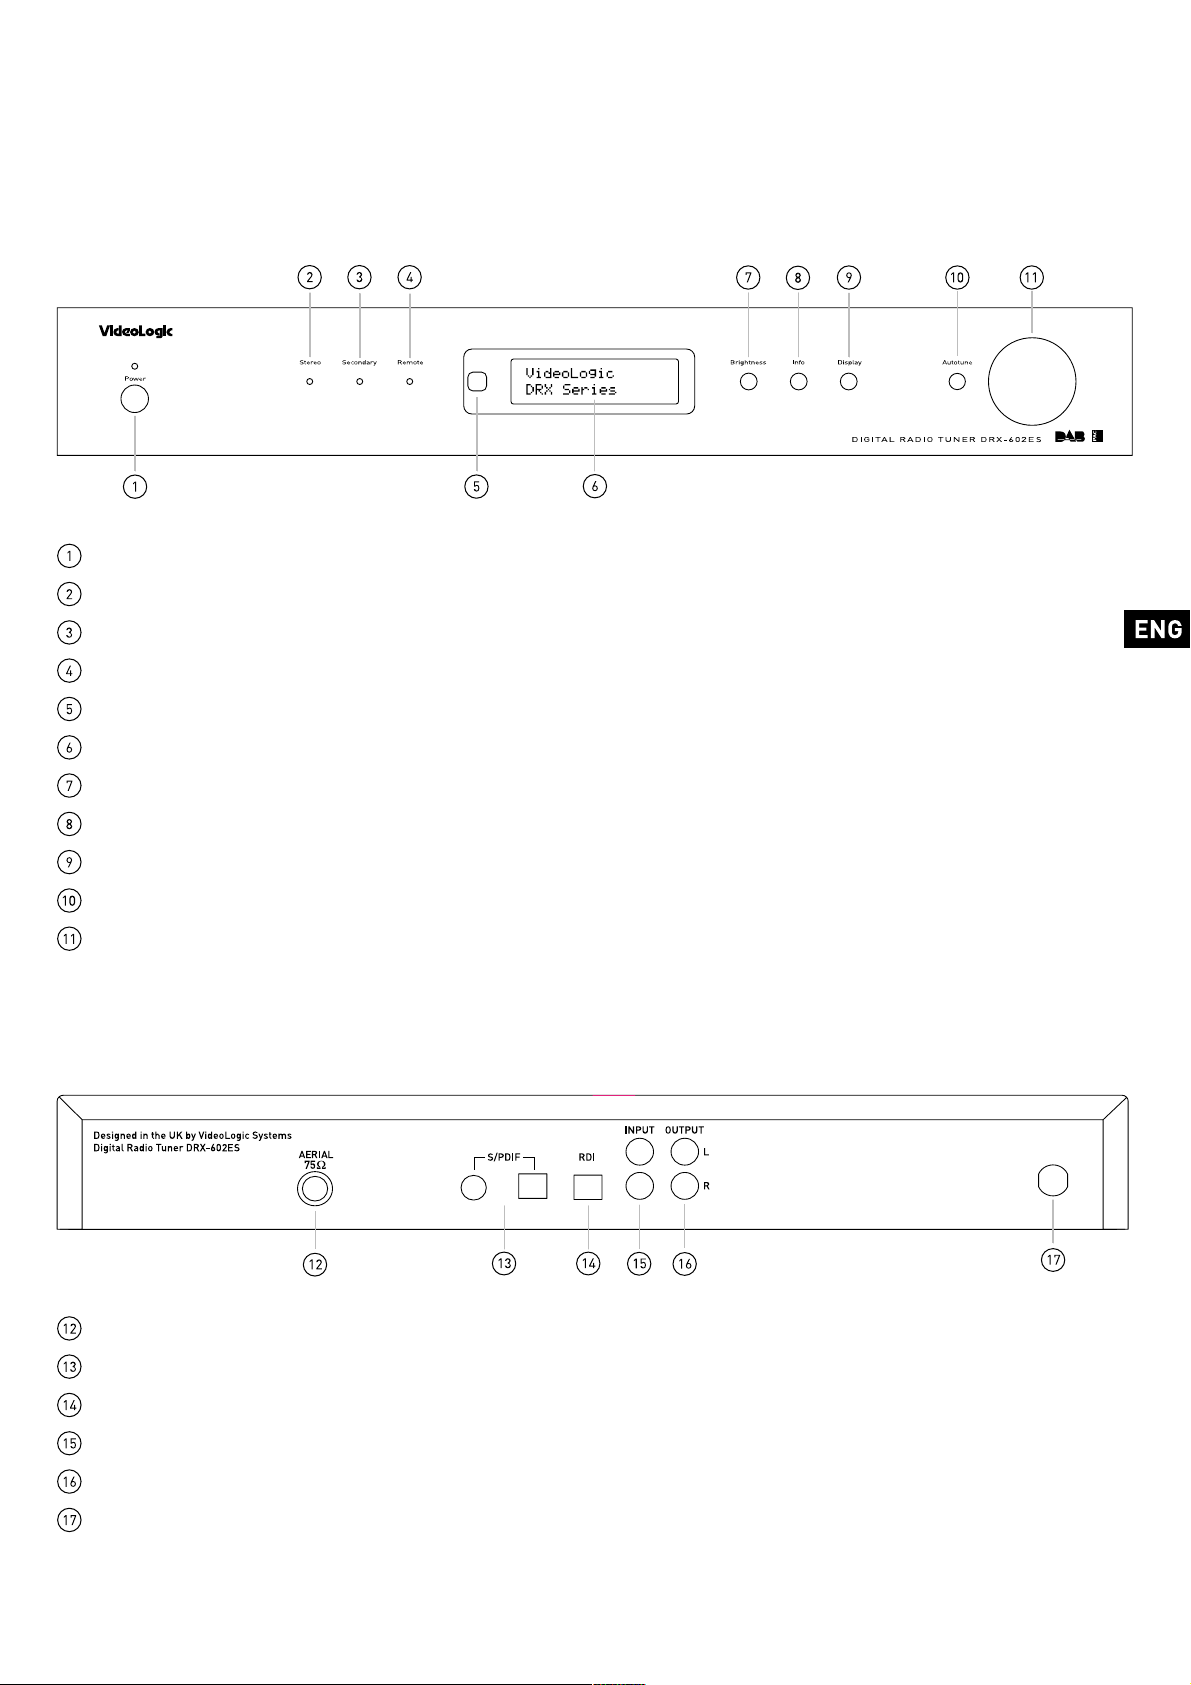
Controls and Connectors
This section provides information on the controls and connectors available on the front and back panels of y our DRX-602ES .
For information on the remote control, see Using the remote control.
Front Panel
Power on/off button and LED
Stereo LED indicates when stereo service is being received, see Using your DRX-602ES: Selecting a service
Secondary LED indicates whether secondary services are av ailable, see Using your DRX-602ES: Selecting a service
Remote LED indicates remote control activity
Remote sensor picks up the infrared signal from the remote
Backlit LCD display
Brightness button chang es the display brightness
Info button changes the information mode of the displa y, see Using your DRX-602ES: Viewing extra information
Display button changes the main displa y mode, see Using your DRX-602ES: Changing the display mode
Autotune button pro vides one touch tuning, language and tuning zone selection see Using your DRX-602ES: Tuning
Tuning button selects the digital radio service, see Using your DRX-602ES: Selecting a service
Rear Panel
AERIAL connector
S/PDIF co-axial and optical digital outputs, see Setting up: Connecting to digital devices
RDI (Receiver Data Interface) socket, see Setting up: Connecting to an external decoder
INPUT loop through input for AM/FM tuner
OUTPUT to amplifier line-level stereo (analogue)
Power lead for connection to wall outlet
3
Page 6

Setting up
This section provides information on connecting your DRX-602ES to your hi-fi and connecting y our aerial. Connector sockets are provided on the back
panel of your DRX-602ES . Before connecting other de vices to your DRX-602ES , switch both devices off.
Connecting to your amplifier
T o get sound from your DRX-602ES y ou need to connect it to y our speakers via an amplifier. This ma y be a stand alone
unit or it may be built into y our existing hi-fi system or powered speak ers.
Connect the OUTPUT sockets to the T uner-in sockets on the back of your amplifier using the supplied stereo phono cable.
Connecting to an auxiliary source
If you ha ve an existing radio tuner, or other auxiliary device, y ou can connect it through y our DRX-602ES to reduce
connections to your amplifier . The auxiliary device output will then be passed through the analogue outputs to your
amplifier when your DRX-602ES is s witched off.
Connect the INPUT sockets to the output sockets on the back of y our auxiliary device using a stereo phono cable.
Connecting to digital devices
Your DRX-602ES can pro vide digital audio output for connection to digital speakers, the digital input on your amplifier or
digital devices such as MiniDiscs, CD-Rs or DA T recorders.
Connect the coaxial S/PDIF or the optical S/PDIF socket to the digital-in socket on y our digital device using a suitable
cable. Connecting cables are a vailable from VideoLogic, see Accessories for details.
Connecting to your aerial
You need to connect either the supplied indoor aerial or an external D AB aerial to your DRX-602ES to receive
digital radio transmissions. For information on the different types of aerials av ailable, see Aerial advice.
For information on how to find out about DAB cov erage in y our area, see Guide to Digital Radio.
1. Screw the aerial plug onto the F-type AERIAL connector.
2. For the best reception, if using the indoor aerial supplied, attach the aerial horizontally to a wall
using some adhesive tape and extend the arms on the end of the aerial wire vertically
into a ‘T’ shape on its side, as illustrated.
Connecting to an external decoder
The RDI (Receiver Data Interface) optical connector provides access to raw multiplex data. This ma y be used in the future
to connect to an external decoder or computer for access to extra services. These services may not currently be available
in your area.
Connecting to power supply
Once all audio connections are complete as described above connect the power lead to a wall outlet.
4
Page 7

Using your DRX-602ES
This section provides information on using your DRX-602ES including tuning, selecting a service and altering the display ed information.
Switching on for the first time
Before switching on for the first time, check all connections and ensure that the volume on y our amplifier is low .
1. Push and release the Power button to switch the unit on. The blue po wer LED will light up.
2. Press the Autotune button to enter first time setup mode.
3. Rotate the tuning button to select your tuning zone; UK, Canada or Rest of World and press the Autotune button
again to confirm your selection.
4. Rotate the tuning button to select the language your DRX-602ES will use for displa y text. Press the Autotune
button to confirm your selection and start the autotune process.
When autotune is complete you will hear the first service found and its name will be shown on the display. All the
services found are now stored in the unit and setup is complete.
If you want to chang e any of these settings, follow the instructions giv en in the sections below .
Selecting a service
Once you hav e tuned your DRX-602ES y ou can use the turn-and-push tuning button to select digital radio services.
1. Rotate the tuning button to see the names of the stored services on the bottom line of the displa y. Stop when y ou
find the service to which you want to listen.
2. Push and release the tuning button to confirm your selection. The service name will be display ed on the top line of
the display
If the service you select is in stereo, the Stereo LED will light up. If the service you select has one or more secondary
services available, the Secondary LED will light up. For information on primary and secondary services, see Guide to
Digital Radio. For details on selecting primary or secondary services, see Using the remote control.
If reception is poor, check the signal strength and try repositioning your aerial using the signal strength indicator, see
Using your DRX-602ES: Viewing extra information.
Changing the display mode
The DRX-602ES has four display modes w hich enable you to view different elements of the broadcast data on the
bottom line of the display. Press the Displa y button and repeat or hold to cycle through the four different displa y modes.
Dynamic Label Segment Scrolling text accompanying the audio, where a vailable.
Program T ype A description of the type of content being broadcast by the service.
Multiplex name The name of the multiplex in which the current service is found.
T echnical Information The channel label and centre frequency for the current multiplex.
Changing the display brightness
The DRX-602ES has four levels of brightness which y ou can alter to suit the light le vel in y our room.
Press the Brightness button and repeat or hold to cycle through the four brightness levels.
5
Page 8

Viewing extra information
The DRX-602ES has two information modes. Press the Info button and repeat or hold to view the information modes.
Signal strength Displays the strength of the signal for the current multiplex. Maximum strength is shown by 16 bars.
If sound quality is poor you ma y be able to increase signal strength by repositioning y our aerial.
Mode Displays the mode of the current service, Stereo (ST) or Mono (MN) and the data rate at which the
audio signal is being transmitted. The data rate is set by the broadcaster to suit the type and
quality of material being transmitted.
Changing your tuning zone
Your DRX-602ES can receiv e both Band III and L-band DAB transmissions. T o speed up the autotune process you can
restrict the frequencies scanned by selecting one of three tuning zones: UK (Part of Band III), Canada (Band III +
Canada L-band) or Rest of W orld (Band III+Europe L-band). The tuning zone is selected w hen you first set up the unit.
T o change y our tuning zone:
1. Press and release the Autotune button three times.
2. Rotate the large tuning button to select the required zone and press the Autotune button again to confirm your
selection. Y ou can now select the displa y language as described below.
Changing your display language
You can set the displa y to one of 11 languages. If y ou are setting your displa y language directly after setting y our tuning
zone go straight to step 2 below .
1. Press and release the Autotune button four times.
2. Rotate the large tuning button to select the required language and press the Autotune button ag ain to confirm
your selection. Y ou can now tune y our DRX-602ES as described below.
Tuning
T uning the DRX-602ES is very simple. In most cases y ou only need to perform this operation once, when y ou first set up
the unit. If y ou are tuning directly after setting y our display language g o straight to step 2 below.
1. Push and release the Autotune button. The display will indicate tuning is underwa y.
2. If you want to cancel the autotune procedure, push and release the Autotune button a second time during tuning.
When finished, y ou will; hear the first service found and its name will be shown on the display. All the services
found are now stored in the unit.
If no services are found the display will show NO ENSEMBLES. Check your aerial connection and positioning and try the
tuning process again.
You ma y want to repeat this process in the future if you chang e your aerial position or if y ou want to receive a newly
introduced service.
Switching on and off
We recommend that y ou switch off y our DRX-602ES when not in use to pre vent energy wastage. If you lea ve the unit
switched off for an extended period (around a month or longer) y ou ma y need to re-tune the unit to refresh the
available services.
Push and release the Power button to switch the unit on or off.
6
Page 9

Using the remote control
This section provides information on using the remote control. The infrared remote control provides access to the main functions of your DRX-602ES
and also advanced facilities such as presets and d ynamic range control. Before using your remote, insert the supplied batteries. Aim the remote
control at the sensor on the display panel on y our DRX-602ES.
Buttons (1-9) and the STORE button enable y ou to store your fa vourite radio services for easy access.
To store a service
While listening to the service you want to store.
1. Press the STORE button. The displa y on y our DRX-602ES shows PRESET_ _?
2. Press the number (from 1 to 99) under which you want to store the preset.
3. Press the SELECT button to confirm your selection.
To recall a previously stored service
Press the numbered button(s) under which you stored the service.
The DRC Dynamic Rang e Control button enables you to alter the d ynamic range of the received audio (dependent on
broadcast material) by making the quieter sounds in a broadcast more audible. This ma y be useful in noisy
environments or particularly quiet parts of programmes.
Press the DRC button to check whether DRC is av ailable for the current service then press the DRC button again to
toggle DRC on or off. The default setting is off.
The MUTE button is a quick way of reducing the output volume from y our DRX-602ES .
1. Press the MUTE button to mute the sound. The display on y our DRX-602E shows MUTE.
2. Press any ke y on the remote control or main unit to return to the previous listening volume.
Press the DISPLAY button and repeat or hold down to cycle through the four displa y options.
same function as the Display button on the main unit. See Using your DRX-602ES: Changing the display for details.
The INFO button enables you to change the information mode on your DRX-602ES . This button performs the same
function as the Info button on the main unit, see Using your DRX-602ES: Viewing extra information for details.
Press the INFO button and repeat or hold to view the two information modes.
The PRI/SEC button enables you to select between the primary and secondary services where secondary services are
available. If a secondary service is available for the current service, the Secondary LED will light up on the front of your
DRX-602ES. Press the PRI/SEC button and repeat or hold to cycle through the av ailable services. For an explanation
of primary and secondary services, see Guide to Digital Radio.
This button performs the
The !" and SELECT buttons enable y ou to cycle through and select services. T ogether , these buttons perform the
same function as the large tuning button on the main unit, see Using your DRX-602ES: Selecting a service for details.
1. Press and release or hold the ! or " button to cycle through the stored services.
2. The bottom line of the display on y our DRX-602ES shows the service names.
3. Press the SELECT button to select and listen to the display ed service.
7
Page 10

Guide to Digital Radio
This section provides a brief guide to digital radio (DAB), explains how the features of y our DRX-602ES pro vide access to it, and pro vides some
useful addresses for finding out more.
Your DRX-602ES enables y ou to receive and listen to Digital Audio Broadcast (D AB) digital radio programmes. D AB uses digital transmission rather
than traditional analogue transmission, providing near CD-quality audio with virtually interference-free reception. DAB also enables broadcasters to
transmit additional data along with the audio including other audio channels, text and in the future, perhaps computer data and images.
DAB digital radio is broadcast as groups of data called multiplexes or ensembles . Each multiplex can contain a number of services (stations) and
each service contains a primary service and can also contain secondary services as illustrated in the following diagram. Each multiplex is
transmitted at a set frequency and is received by y our DRX-602ES for decoding. Y our DRX-602ES can receive multiplexes broadcast on all D AB
frequencies (Band III and L-Band). The number of multiplexes and radio stations y ou receive, will vary depending on your location.
With DAB, radio stations ha ve labels (names) which are used to identify them. Instead of needing to know a particular frequency to listen to y our
favourite broadcast y ou can simply select the station name. Secondary services and additional data such as text containing programme or multiplex
information are also easily accessed using your DRX-602ES.
DAB Signal
Multiplex
National DAB
Primary DAB Services
Main higher bandwidth services
e.g music, speech
Secondary DAB Services
Lower band width services
e.g. news, text information, speech
Useful addresses
The following addresses provide additional useful information about digital radio including coverag e, av ailable services and usage tips:
WorldDA B
web: www .worlddab.org
tel: +44 (0)20 7288 4642
fax: +44 (0)20 7288 4643
8
Page 11

Troubleshooting
This section gives some of the most likely solutions to problems y ou might have with y our DRX-602ES .
I can’t get any sound
! Make sure your DRX-602ES and amplifier are s witched on.
! Check that you hav e connected the DRX-602ES to your amplifier correctly , see Setting up, and that y our amplifier has the correct source selected.
! Check that the volume on your amplifier is not too lo w or that you ha ve selected MUTE on the remote control.
! Ensure that you hav e completed the autotune procedure to find digital radio services.
Remote control not functioning
! Check that you hav e inserted the batteries correctly.
! Check that you are not too far awa y from the main unit (not more than 7 metres recommended) and that the remote sensor is not obscured.
Display says ‘No Service Check Setup’
Check that your aerial is connected and positioned properly . Use the autotune facility to search for services.
I can’t access secondary services
If secondary services are av ailable for the currently selected service the Secondary indicator LED will light up. Use the remote control to select
secondary services, see Using the remote control.
Display says ‘Memory Reset Presets Lost’
This may occur if the unit has been switched off for an extended period of time (long er than a month). Use autotune to refresh your stored services if
necessary. You can then re-enter y our presets using the remote control.
Display has gone blank
This may occur if a broadcaster chang es a service or removes a service while you are listening to it. Use autotune to restore av ailable services to your
unit, see Using your DRX-602ES: T uning.
I’ve lost my remote control
If you lose your remote control y ou can still use y our DRX-602ES but you will not be able to access y our preset stations, switch between primary or
secondary services or use DRC or mute facilities. Contact VideoLogic Support to obtain a replacement remote control, see Getting Help.
I can’t hear my FM/AM radio although it is connected
! Ensure that your DRX-602ES is switched off. This enables your FM/AM radio to pass through the analogue outputs to y our amplifier.
! Ensure that you hav e connected your FM/AM radio to y our DRX-602ES and your DRX-602ES to y our amplifier correctly , see Setting up.
! Ensure that your FM/AM radio and amplifier are switched on and that the FM/AM radio is tuned to a station.
I can’t hear the station I have selected on the display
T o hear the station you need to confirm y our selection by pressing the large tuning button, see Using your DRX-602ES; Selecting a service.
I hear a 'burbling' sound on some stations
Although DAB is excellent at providing quality audio from v ery little signal, the quality can suffer if the signal strength is too low . If that happens, a
‘burbling’ sound can sometimes be heard. Check y our aerial connection and position, see Setting up: Connecting to your aerial.
If the problem persists, a signal booster ma y be the solution - these are av ailable from our on-line store at www .videologic.com
Autotune takes a long time or can’t find a service I know I should receive
Ensure you hav e selected the relevant tuning zone for y our location, this ensures that the correct frequency band is scanned for services, see Using
your DRX-602ES: Changing your tuning zone.
For the latest troubleshooting information and a list of Frequently Asked Questions (F AQs), visit the DRX-602ES support section on our website at
www.videologic.com or www.videologic.de.
9
Page 12

Aerial advice
Your DRX-602ES is supplied with a T -shaped ribbon dipole aerial. This is an indoor aerial w hich is designed to give g ood reception in areas with good
to moderate DAB signal strength. In areas with poor DAB co verage or poor signal strength y ou ma y want to consider using a loft mounted or external
aerial. T o find out about co verage in y our area, see Guide to Digital Radio.
Ribbon Aerial 4-element AerialDipole Aerial
The following options may help y ou improv e reception in your area and are a vailable from the on-line store on our website, see Accessories.
1. Ribbon Aerial Optimise the position of your ribbon aerial by mounting it as high as possible and extending the arms vertically . Use the Signal
Strength meter to fine tune the aerial placement, see Using your DRX-602ES: Viewing extra information.
2. TV/FM Aerial If you ha ve an externally mounted TV or FM aerial it may pro vide a stronger signal than an indoor aerial but as they are not tuned
for the digital radio frequency range and are pointed at your local TV/FM transmitter , reception ma y be no better . The standard TV or FM RF
connector cannot be plugged into your DRX-602ES directly, y ou will need to use an RF to F-type adapter . Y ou ma y also find that you need to use a
signal booster if you want to use the aerial for both TV or FM and DAB reception.
3. External or loft mounted DAB Aerial T wo main types are used. These types of aerials may require professional installation:
Dipole - for use in marginal signal areas, this type is omnidirectional and should increase the strength of all D AB stations being received.
4-element aerial - for use in marginal or poor signal areas, this type is directional and has high gain. Like a TV or FM aerial this type needs to
point at the transmitter. Installation requires someone to move the aerial w hile y ou monitor signal strength. If y ou receive signals from multiple
transmitters you should point y our aerial at the one which gives the best signal for the services to which y ou want to listen.
4. Signal booster This is a signal amplifier w hich connects into an aerial cable and boosts the strength of the received signal. If your ribbon aerial
works fairly well this ma y be the easiest and best option.
Accessories
VideoLogic supply a range of accessories and complementary products for your DRX-602ES including external aerials, signal boosters, aerial cable
adapters and amplified speaker sets.
Visit our website at www.videologic.com or www.videologic.de or contact us using the details on the back cover of this manual to find out more.
Getting Help
The Troubleshooting section of this manual, lists some of the more likely reasons for problems y ou might have with y our DRX-602ES.
If you still ha ve a problem with your DRX-602ES , either visit our website at www.videologic.com or www.videologic.de or contact us using the details
on the back cover of this manual for the latest support information.
10
Page 13

Technical Specifications
This section lists the technical specifications for the DRX-602ES.
General Digital radio tuner with full Band III and L-band reception capability , for reception of all UK, Europe and Canada D AB broadcasts.
Fully compliant with ETS 300 401 and capable of decoding all DAB transmission modes 1-4. Analogue stereo output, optical
and coaxial 48 kHz S/PDIF digital output and RDI digital output
Frequency Range Band III (174 - 240 MHz) and L-band (1452-1490 MHz), with autotune feature
Tuner Sensitivity -98 dBm
Integr ated DAC 24-bit 96 kHz stereo DAC
Input connectors RF F-connector 75 W for D AB aerial connection (aerial supplied)
(rear panel) Dual phono for external line level audio input (from FM/AM/AUX tuner unit) with auto pass-through to output at power off
Output connectors Dual phono for stereo analogue audio output
(rear panel) Optical T oslink connector for digital S/PDIF output (IEC958 @ 48 kHz)
Coaxial connector for digital S/PDIF output (IEC958 @ 48 kHz)
Optical T oslink connector for digital RDI data output
Controls Power on/off
Rotary selection switch - selects service
Autotune - tunes in unit to broadcast services and enables language and tuning zone selection
Brightness - selects between 4 levels of LCD displa y brightness
Display - selects between DLS (Dynamic Label Segment) scrolling text, prog ramme type, and service information
Info - switches LCD between displa y of signal strength indicator and mono/stereo mode plus service’s data rate
LCD Display High visibility STN LCD display with 16 x 2 characters, 4 user-selectable brightness le vels and 11 languag e options
Indicators LED power-on indicator
(front panel) Remote control activity indicator
Stereo service indicator
Secondary service availability indicator
Frequency response 20 Hz to 20 kHz for 48 kHz decode at full data rate
20 Hz to 12 kHz for 24 kHz low sample frequency (LSF) decode
THD (nominal output) Less than 0.005% at 1 kHz
S/N Ratio: 100 dB
Display Languages English, German, Swedish, French, Italian, Spanish, Norewegian, Finnish, Danish, Dutch, Portuguese.
Remote control Infrared remote control functions: service select, preset service store/recall, DRC (dynamic range control), mute and primary or
secondary information displa y
Power supply High-performance low noise internal toroidal transformer power supply . 220-240V AC 50Hz (Europe) or
115V AC 60Hz (Canada)
Approvals CE marked. Compliant with the EMC and Lo w V oltage Directives (89/336/EEC and 73/23/EEC)
Dimensions 430mm (width) x 59mm (height) x 270mm (depth)
11
Page 14

Index
A
Accessories 10
Aerial 2
Aerial advice 10
Aerial connector 4
Autotune 5, 6
Autotune button 5, 6
B
Band III 6
Batteries 2
Brightness button 3
C
Cables 2
Changing the display mode 4
Changing your display language 6
Changing your tuning zone 6
Channels 8
Connecting cables
aerial 4
amplifier 4
auxilliary source 4
CD-R 4
DAT 4
digital devices 4
external decoder 4
MiniDisc 4
power 4
RDI 4
S/PDIF 4
Controls and Connectors 3
H
Help 10
I
Info button 3, 7
Information button 6
Information mode 6
INPUT sockets 4
Introduction 2
Items 2
L
L-band 6
Language selection 6
LCD Display 3
Leads 2
M
Main unit 2
Memory Reset 9
Multi-element aerial 10
Multiplexes 4, 8
Mute 7
N
New service 6
No Service 9
O
On/Off button 5, 6
OUTPUT sockets 4
T
Technical information 4
Technical Specifications 11
Tuning 5, 6
Tuning button 5
Tuning zone 6
U
Unpacking 2
Using your DRX-602ES 5
W
Website 10
D
DAB 8
Data rate 6
Dipole aerial 10
Display brightness 5
Display button 7
Display language 6
Display mode 4
DRC 7
DRC button 7
DRX-602ES 2
Dual band 6
Dynamic Label Segment 4
E
Ensembles 8
External aerial 4
F
Frequency 8
Frequency Range 11
Front Panel 3
G
Getting Help 10
Guide to Digital Radio 8
P
Phono cable 2
Preset buttons 7
Program Type 4
R
RDI jack 3
RDI socket 4
Rear Panel 3
Remote control 7
Remote sensor 3
Ribbon aerial 10
S
S/PDIF sockets 4
Secondary ser vices 8
Select button 7
Selecting a service 5
Services 8
Setting up 4
Signal strength 6
Specifications 11
Stereo LED 3
Store button 7
Switching on and off 6
Switching on for the first time 5
12
Page 15

Please return your registration card to your nearest VideoLogic centre.
Schicken Sie Ihre Registrierkarte zum nächsten VideoLogic Center.
Veuillez envoyer la carte d’enregistrement au centre VideoLogic le plus proche.
Canada
VideoLogic Service Center
6980 Corte Santa Fe,
San Diego, CA 92121, USA +44 (0)1923 270188 fax
sales_usa@videologic.com +44 (0)1923 277488 sales
support_usa@videologic.com +44 (0)1923 277477 support & service
Deutschsprachige Länder
VideoLogic GmbH
Max-Planck-Str. 25,
D - 63303 Dreieich, Germany +49 (0)6103 311022 Fax
sales_gmbh@videologic.com +49 (0)6103 934722 Vertrieb
support_gmbh@videologic.com +49 (0)6103 934714 Support
UK and all other countries
VideoLogic Systems
Imagination Technologies Ltd.,
Home Park Estate,
Kings Langley, Herts WD4 8LZ, UK +44 (0)1923 270188 fax
sales@videologic.com +44 (0)1923 277488 sales
support@videologic.com +44 (0)1923 277477 support & service
www.videologic.com
www.videologic.de
11P79
 Loading...