


Speaker Bar System Barre de haut-parleurs
Sistema de barra de altavoces
SP-SB23W
Register your product at:
http://www.pioneerelectronics.com (US)
Protect Your New Investment
The details of your purchase will be on file for reference in the event of an insurance claim such as loss or theft.
Improve Product Development
Your input helps us continue to design products that meet your needs.
Receive a Free Pioneer Newsletter
Registered customers can opt in to receive a monthly newsletter.
Enregistrez votre produit sur :
http://www.pioneerelectronics.com (États-Unis)
Protégez votre nouvel investissement
Les détails de votre achat seront conservés dans nos dossiers pour référence future, notamment en cas de réclamation d’assurance pour perte ou vol.
Amélioration de nos activités de développement de produits
Vos idées sont importantes pour nous aider à créer des produits répondant à vos besoins.
Recevez gratuitement un bulletin d’informations Pioneer
Les clients enregistrés peuvent demander de recevoir un bulletin d’informations mensuel.
Registre su producto en:
http://www.pioneerelectronics.com (EE. UU.)
Proteja su nueva inversión
Los detalles de su compra se conservarán en el expediente para referencia futura en el caso de una reclamación de seguro, como pérdida o robo.
Ayúdenos a mejorar el desarrollo de productos
Sus comentarios nos ayudan a seguir diseñando productos que satisfacen sus necesidades.
Reciba gratis un boletín informativo de Pioneer
Los clientes registrados pueden optar por recibir un boletín informativo mensual.
Operating Instructions Instructions d’utilisation Instrucciones para el uso

2 English

English 3

4 English

English 5
Product Disposal
Certain international, national and/or local laws and/ or regulations may apply regarding the disposal of this product. For further detailed information, please contact the retailer where you purchased this product or the in your country.
NOTE: This equipment has been tested and found to comply with the limits for a Class B digital device, pursuant to part 15 of the FCC Rules. These limits are designed to provide reasonable protection against harmful interference in a residential installation. This equipment generates, uses, and can radiate radio frequency energy, and, if not installed and used in accordance with the instructions, may cause harmful interference to radio communications. However, there is no guarantee that interference will not occur in a particular installation.
PLEASE TAKE INVENTORY
If this equipment does cause harmful interference to radio or television reception, which can be determined by turning the equipment off and on, the user is encouraged to try to correct the interference by one or more of the following measures: Reorient or relocate the receiving antenna. Increase the separation between the equipment and receiver. Connect the equipment into an outlet on a circuit different from that to which the receiver is connected. Consult the dealer or an experienced radio/TV technician for help.
•The antenna(s) used for this transmitter must be installed to provide a separation distance of at least 20 cm from all persons and must not be co-located or operating in conjunction with any other antenna or transmitter.
•Changes or modifications not expressly approved by the party responsible for compliance could void the user’s authority to operate the equipment.
Please check to ensure you have everything in your Pioneer SP-SB23W Speaker Bar System carton. Inside, you should find:
Speaker Bar
Power Cord (x2)
Subwoofer
6’ Digital (Optical) Cable (1)
Remote Control |
Rubber Feet for Speaker Bar (x2) |
(Battery Included)
6 English
Owner’s Manual
Important Note: If anything is missing or damaged, or if your new Pioneer SP-SB23W Speaker Bar System fails to operate, please notify your dealer immediately. We recommend keeping your original carton and packing materials in case you need to ship the unit in the future.
About Your SP-SB23W
Speaker Bar System
Thank you for choosing the SP-SB23W Speaker Bar System from Pioneer Electronics Please read through this Owner’s Manual before using your Speaker Bar System to optimize performance. After you have finished reading this Owner’s Manual, store it in a safe place for future reference.
The Speaker Bar utilizes technology and components derived from our award-winning home theater speakers, with a primary goal of producing the most immersive, natural, and room filling sound experience for both movies and music.
The curved wood cabinetry houses six speakers, individually amplified, for the best audio experience. Utilizing a three-way active crossover network, the speaker bar delivers a tailored response for all your favorite sources.
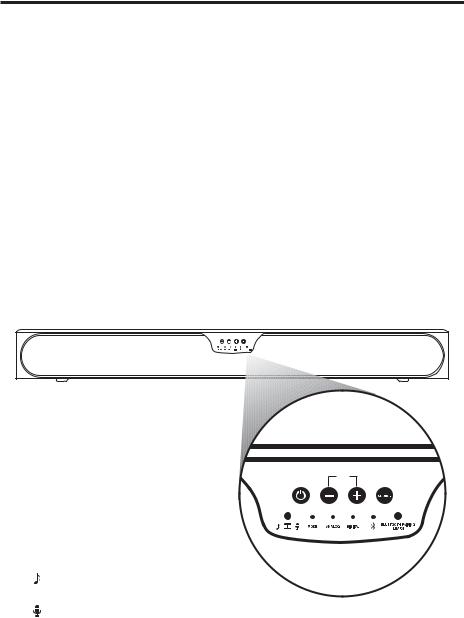
BAR CONTROLS (Front Panel)
1.Power—Turns on the bar or puts it in standby mode.
2.Volume Up and Down ( + / - ) —Adjusts the volume of the Speaker Bar.
3.Source—Changes which input source you are listening to.
Source 1: Analog. LED color will be a steady Blue
Source 2: Digital/optical. LED color will be a steady Blue
Source 3: Bluetooth: Bluetooth® wireless technology (See “PAIR AND CONNECT YOUR BLUETOOTH DEVICE” on page 10) LED color will be a steady Blue
PLEASE NOTE: Only one Source connection will be active during use of the Speaker Bar System
4.Listening Mode (Second Row Left)
Music
 Movie
Movie
Dialogue
5. Bluetooth/Pairing/Learn (Second Row Right)
Bluetooth® wireless technology allows for playback of music from your smartphone, tablet or other compatible device.
Learning mode enables you to use your favorite TV remote to control the volume of your Speaker Bar.
Compact wireless subwoofer can be placed anywhere in the room up to 30’ of the SP-SB23W Speaker Bar.
Like every subwoofer we build, this wireless subwoofer is engineered to offer incredible design and amazing low-end frequency sound quality, ideal for music and movies.
Dolby® Digital decoding, the standard for high definition sound.
1. 2. 3.
English 7
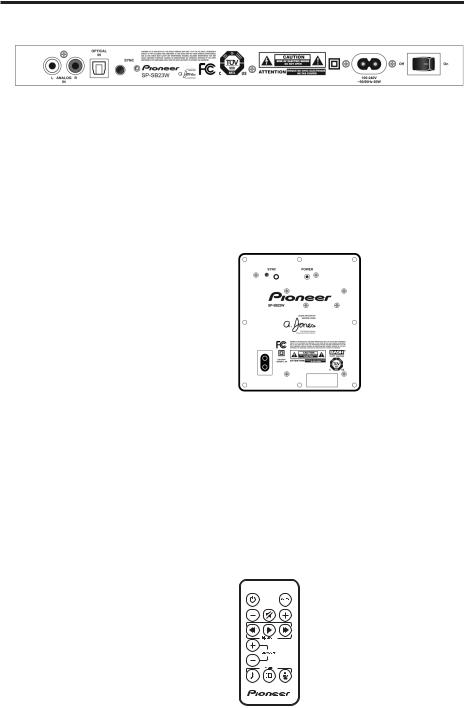
BAR CONTROLS (Back Panel)
3.4. 2.
1.Power Connection—The bar power supply connects here.
2.SYNC—The SYNC button ensures the subwoofer and bar are communicating. (See “How to Pair Your Subwoofer to the Speaker Bar” on page 8.)
3.Analog Input—Allows for the connection of most legacy audio devices.
4.Optical Input—Allows for the connection of digital audio from modern electronics such as TV’s, Disc Players, cable boxes, and satellite boxes.
5.Power Switch — Main power switch for the Speaker Bar
Speaker Bar Power Indicator
Normal Operating Mode:
Blue Fast Blinking (At power up)—The bar and subwoofer have established a wireless connection.
Blue Steady—Power is on; all is well.
No Lights—Main power switch is off or the speaker bar is in standby mode
Blue Slow Blinking—System is muted.
Speaker Bar Power Indicator
Learning Mode—(See page 10 for instructions.)
Solid Green—The bar has accepted the remote control command.
Red Blinking—The bar has failed to learn a remote control command.
SOURCE LED
Blue Solid—Dialogue Preset. Ideal bass balance for the most natural music reproduction
Red Solid—Music preset. Ideal for special effects and movie soundtracks
Green Solid—Movies preset. Ideal for late night viewing or dialogue heavy content
1. 5.
Subwoofer CONTROLS (Rear Panel) Subwoofer Power LED
Red Steady—The subwoofer is plugged in/in standby mode
Green Steady—The subwoofer is on and producing sound
Subwoofer Sync LED
Blue Flashing—The subwoofer is searching for the speaker bar
Blue Steady—The subwoofer and speaker bar are synced
REMOTE CONTROL
1.Power ( )—Turns on the bar or puts it in standby mode.
2.Source 1, 2, 3—Changes which input source you are listening to.
3.Volume Up and Down ( + / - ) —Adjusts the master volume of the system.
4.Mute—Mutes and unmutes the audio coming from the speaker bar and subwoofer.
5.Bluetooth®—Track forward, Play, Pause, Track Forward
6.SUB Volume Up and Down ( + / - ) —Adjusts the volume of the subwoofer
7.Mode—Music, Movie, Dialogue

8 English
How to connect your speaker bar and subwoofer to your TV
The simplest approach is to connect the optical audio output of your TV to the optical input on the back of the bar. This method will provide the highest quality audio regardless of whether you are watching TV or watching your favorite optical disc player. If your TV does not have an optical output, you can use the optical output from your DVD player or your cable/satellite box to connect to the optical input on the bar. Then simply use the other bar inputs for your other audio sources.
How to pair your subwoofer to the speaker bar
Make sure that both the Speaker Bar and subwoofer are plugged into an AC outlet.
1.Power on the Speaker bar
2.Press and hold the Sync button on the rear of the Speaker Bar until the Sync LED begins to flash red rapidly
3.Press and hold the Sync button on the rear of the subwoofer until the blue LED begins to flash rapidly.
4.After a couple of seconds both Sync LEDs should become solid blue.
5.If the LEDs continue to blink then move the subwoofer closer to the Speaker Bar.
Speaker Bar
Subwoofer
Concerning the Placement of this System
Caution
When assembling the system, lay them down flat on their side to avoid accidents or injury. Make sure to use a stable surface when assembling, setting up, and placing the system.
WHERE TO LOCATE YOUR BAR FOR THE BEST SOUND
Correct placement is important for maximizing the sound quality of your Speaker Bar. Take time to experiment with positioning according to these guidelines.
The speaker bar may be positioned above or below the TV. For best results align the front of the speaker bar with the front of the TV.
Due to the well-controlled vertical directivity, it is not normally necessary to vertically aim the loudspeaker towards the listener. If, however, the speaker bar is placed under the TV and very close to the floor, then tilting upwards may be beneficial.
To achieve optimum audio performance, place the main unit beneath the television monitor.
USING THE RUBBER FEET WITH THE SPEAKER BAR
Included in the SP-SB23W Speaker Bar carton are
(2) feet for the Speaker bar to rest on. Place the feet at the desired location of the speaker. They can be spaced a variety of widths apart for installation
flexibility. Once placed on the feet, tilt the speaker to the desired angle, depending on the location of the speaker in relation to the desired listening position.
At least 20"apart
NOTE: Spacing between the rubber feet should be at least
20 inches apart to avoid the Speaker Bar from tipping over
NOTE: Do not use adhesive or screws to attach the feet to the speaker. Doing this will damage the cabinet and void the warranty.

English 9
WALL MOUNTING THE SPEAKER BAR
The main unit can be mounted on a wall if desired. If your TV is wall mounted, the bar can mount right beneath it. The bar has built-in keyhole slots that make it easy.
Caution
Pioneer recommends that you consult a installation professional for wall mounting the speaker bar.
•When the Speaker Bar is mounted to a wall, there is a risk of it dropping, falling, etc. due to the weight or mounting method. Take sufficient care not to cause an accident.
•Select a location for installation/mounting with sufficient strength to withstand the weight. If you are unsure of the strength or anything else, consult with a professional.
•Pioneer is not responsible for any accidents or damage that result from improper installation/ mounting, incorrect use, modification, disaster, etc.
•Do not hang from the unit. Pay special attention to children. The unit may fall and break, resulting in injury.
•Do not connect or disconnect the cables while the unit is mounted to the wall. Install the cables in such a way that a foot or other object cannot get caught in them.
WHERE TO LOCATE YOUR SUBWOOFER FOR THE BEST SOUND
Your wireless subwoofer is really easy to place and can go just about anywhere in the room. Plus you don’t have to worry about connecting wires, because the only wire you have to plug in is the power cord.
PLACEMENT AND FINE TUNING
The subwoofer receives its audio signals wirelessly from the main unit, so it requires no speaker cables, allowing you to place it in the most convenient location (a power cord connection is required, however).
The placement of your new subwoofer is critical to its performance. The two of the most common locations include:
A)In the corner of the room (which can result in a boomy or exaggerated low frequency response),
B)Placement along one wall but out of the corner (moderate bass performance with increased fidelity over corner placement
Experimentation with subwoofer placement is highly encouraged, as slight adjustments can create large benefits in sound reproduction. To further test subwoofer placement, install the subwoofer temporarily in your main listening position and while playing a familiar piece of music, walk around the listening room until you find the best sounding position. This is a possible location for the subwoofer to be placed.
Important
Precautions regarding subwoofer installation:
•Do not place objects behind the subwoofer and occlude the ventilation ports.
•Sound from the subwoofer may be interrupted due to poor signal conditions, but this is not a malfunction. If it occurs, rearrange the position and orientation of the main unit and/or subwoofer as required.
•The subwoofer is designed to be used within a distance of 10 m (32 ft.) from the main unit. The actual distance within which it can be used, however, may be less, depending on the environment and design of the room where it is used.
•Signal reception by the subwoofer may be unstable if it is placed too close to the main unit. In this case, separate the subwoofer at least 1 m (3.2 ft.) from the main unit.
•Signal reception by the subwoofer may be interrupted if an obstruction (metal door or concrete wall, aluminum covered insulation, etc.) is placed between it and the main unit. In this case, install the subwoofer in an uninterrupted line-of-sight orientation from the main unit.
CABINET MAINTENANCE
Great care and craftsmanship has gone into the construction and finish of the cabinet. Periodically use a soft, dry cloth to remove dust or fingerprints. Do not use paper towels or other abrasive materials as it may damage the finish.
NOTE: Please retain the carton and packing material for your Pioneer products, to protect them in the event of a move or if they need to be shipped to a service center. Product received damaged by a service center that has been shipped by the end user in other than the original packaging will be repaired, refurbished and properly packaged for return shipment, at the end user’s expense.

10 English
BLUETOOTH WIRELESS TECHNOLOGY
To use your Bluetooth® wireless technology device with the SP-SB23W Speaker Bar System, you must first pair your device with your Speaker Bar.
Pairing creates the ability of your Bluetooth® device to connect with your Speaker Bar wirelessly and exchange information.
You only have to pair your Speaker Bar with your Bluetooth® device one time for this exchange of information to take place.
Pair and Connect Your Bluetooth Device
1.Make sure your Bluetooth® device and Speaker Bar are powered on and the Bluetooth® source is selected on the speaker bar (Blue light above Bluetooth® logo is solid blue).
2.Activate the Bluetooth® function on your Bluetooth® source device and it is actively looking for a Bluetooth® device.
3.Press and hold the Bluetooth® Pairing button until the Bluetooth® light begins to flash slowly.
4.Your speaker bar will now appear on your Bluetooth® source device. Select “SP-SB23W” on your Bluetooth® device to initiate pairing.
5.After a few seconds your Speaker Bar will now be paired with your Bluetooth® device and you can enjoy music playback wirelessly. Note: only one device can be connected to the Speaker Bar at one time.
How to disconnect with a Bluetooth device
Turn off or disconnect the Bluetooth® feature on your
Bluetooth® device.
Using the included remote for your Speaker Bar, you can track forward and back, Pause and Play your current track, and turn the Volume Up and Down
Not all features are available on all Bluetooth source devices.
Automatic connection
Any time you want to connect the last paired device and play it through the speaker bar, do the following:
1.Turn your device’s Bluetooth® function On.
2.Enter Bluetooth® source by pressing the Bluetooth® source button from the remote
Note: By default, the last connected Bluetooth® device will automatically connect if available.
Teaching your Speaker Bar to respond to another remote control
PROGRAMMING NOTE: For your speaker bar to respond to your remote control, you MUST FIRST program the bar to respond to your television’s original IR (Infra-Red) remote. An RF (Radio Frequency) remote will not work. Other remotes (cable, satellite) will work only after you have programmed the bar to respond to the TV’s IR remote.
Not all remote controls can be used to control the Speaker Bar.
Programming Instructions: Your speaker bar is currently programmed to respond to the remote control that is included with the product. However, we strongly recommend programming the speaker bar to also respond to your existing remote control using the steps illustrated below. This will enable you to operate all of your components using a single remote control. While programming the speaker bar, ignore anything that may be displayed on the TV screen.
1.Power On the speaker bar and wait for the blue light to become solid.
2.Using the SOURCE button select either Analog or Digital Input.
3.Press and hold the Speaker Bar’s BLUETOOTH/ PAIRING/LEARN button until the Bluetooth® light becomes a solid blue.
4.Press the button on the speaker bar that you would like to teach, the Bluetooth® light should begin to flash slowly.
5.Point the remote control that you want to use for your speaker bar and push the corresponding command button that you chose in Step 4.
1'- 2' |
6.The Bluetooth® light should begin flashing quickly and the mode light will flash green if the code was accepted (if the mode light flashes red the code was not accepted. Move the remote control closer and push the button again). Now push the button again and if the mode light flashes green the command is now set.
7.Repeat this process for each button you would like to teach your speaker bar.
8.To exit the learning mode press and hold the BLUETOOTH/PAIRING/LEARN button until the Bluetooth® light turns off.
English 11
HOW TO OPTIMIZE THE SOUND WHEN TV SPEAKERS ARE ON
You should hear sound from the bar. If you don’t, turn up the volume on the bar using its volume control buttons. If your bar is connected to your TV, there’s a very good chance your TV speakers are also playing. It’s impossible to give specific instructions on how to turn off the speakers for every TV, but here’s a way to do it that covers many of the TVs out there.
1.On your TV remote control, find a “menu” or “setup” button.
2.Press this button. You should see an on-screen menu.
3.Next, look for an option to control audio functions and select it.
The setting to turn off your TV’s internal speakers should be here. If you can’t turn off your TV internal speakers, don’t worry. To enjoy the best performance from your bar, you’ll want it to play louder than your TV.
Use the following steps to adjust the volume balance between your TV and the bar:
1.If necessary, program your bar to respond to the volume up and down control commands of your TV remote.
2.Turn your TV volume all the way down using the control buttons on your TV.
3.Then, using the volume keys on your speaker bar set the volume to a normal listening level (do not use the remote control). After you make these adjustments, your speaker bar should always be louder than your TV speakers.
Then use the TV remote control to adjust the volume as you normally do.
Customer Service/Technical Support:
For assistance with basic set up, operation, or troubleshooting, you may contact our customer service hotline at:
1 (800) 421-1404
Hours: Monday-Friday10:30 am-7:00 pm EST
Speaker Bar |
|
|
|
Dimensions |
35.98" W x 4.05" H x 4.74" D |
|
|
Cabinet |
CARB2 MDF Wood |
|
|
Finish |
Black Ash Vinyl |
|
|
Frequency Range |
45Hz - 20kHz |
|
|
Drivers: Mid-Woofer |
3" x 4 (2 Per Side) |
|
|
Drivers: Tweeter |
1" x 2 (1 Per Side) |
|
|
Power Output |
6 x 28 Watts (1kHz 1% THD @ 4 Ohms) |
|
|
Inputs |
Toslink Optical x 1, Analog x 1 |
|
|
Bluetooth® |
A2DP Wireless 2.4 gHz |
Voltage Inputs |
100v - 240v |
|
|
Power Consumption |
60 Watts |
|
|
Power Consumption (Standby) |
2 Watts Power Off/4 Watts Auto Power Off |
|
|
Power Consumption (Main Power Switch Off) |
0 Watts |
|
|
|
|
Subwoofer |
|
|
|
Dimensions |
9.01" W x 10.01" H x 9.01" D |
|
|
Cabinet |
CARB2 MDF Wood |
|
|
Finish |
Black Ash Vinyl |
|
|
Driver |
6.5" Woofer |
|
|
Voltage Input |
100v-240v |
|
|
Power Output |
50 Watts (50Hz 1% THD @ 6 Ohms) |
|
|
Power Consumption |
60 Watts |
|
|
Power Consumption (Standby) |
1 Watt |
|
|
 Loading...