


SPH-DA230DAB

SPH-DA230DAB
RDS AV RECEIVER
English
Operation Manual

Important
Contents
Thank you for buying this Pioneer
product.
Please read through these instructions
so you will know how to operate your
model properly. After you have finished
reading the instructions, keep this
document in a safe place for future
reference.
The screen shown in the examples may
differ from actual screens, which may be
changed without notice for
performance and function
improvements.
■Precaution ......................... 3
Important safet y information ............................ ...... 3
To ensure safe driving .................... ............................. 3
When using a display conne cted to V OUT......... 4
To avoid battery exhaustion ................. .................... 4
Rear view camer a.. ............................. .......................... 4
Handling the U SB connector............. ....................... 4
In case of trouble .................... ................................ ...... 4
Visit our website ............................ ............................. ... 4
About this p roduct.................... ............................. ...... 4
Protecting the LCD panel and screen .................... 4
Notes on internal memor y................. ....................... 4
About this man ual........................ ............................. ... 4
■Parts and controls............. 5
Main unit....... ................................ ................................ ... 5
■Basic operation ................. 6
Resetting the micropro cessor................... ............... 6
Remote control.... ................................ .......................... 6
Starting up the uni t... ................................ .................. 6
Using the touch panel ....... ................................ ......... 6
Top menu screen .................... ............................. ......... 7
■Bluetooth........................... 8
Bluetooth connec tion ............... ................................ . 8
Bluetooth settings ........... ................................ ............ 8
Switching the connected Bluetooth device ....... 9
Hands-free phoning ...................... .............................. 9
Bluetooth audio ........................... ............................... 12
■AppRadio Mode + ........... 13
Using AppRadio Mode + ................ ......................... 13
Starting procedu re. ............................. ...................... 13
Using the keyboard ....................... ............................ 14
Using the audio mix funct ion............. ................... 14
■AV source ......................... 15
Supported AV source ................................ ................ 15
Displaying the AV operation sc reen.......... .......... 15
Selecting a s ource................. ............................. ........ 15
Changing the displ ay order of source ................ 15
Adjusting the range of favourite source icons
area....... ............................... ................................ ..... 16
■iPod/iPhone or
smartphone connection
for AV source.................... 16
iPod/iPhone with a L ightning connector .......... 16
iPhone with a 30-pin connec tor........... ................ 17
Smartphone (Androi d™ device)... ......................... 17
■Digital Radio.................... 18
Digital Radio tuner op erations................. ............. 18
Starting procedu re. ............................. ...................... 18
Basic operation ................. ................................ .......... 19
DAB settings ....... ................................ ......................... 19
■Radio ................................ 20
Starting procedu re. ............................. ...................... 20
Basic operation ................. ................................ .......... 20
Storing the strongest broadcast frequencies
(BSM).... ............................... ................................ ..... 21
Radio settings ............................ ................................ .. 21
■Compressed files ............. 22
Plugging/unplugging a USB storage device.... 22
Starting procedu re................ ............................. ....... 22
Basic operation .......................... ................................ . 23
■iPod.................................. 26
Connecting your iPod ................ .............................. 26
Basic operation .......................... ................................ . 26
■Spotify®............................ 28
Listening to Spotify .................. ................................ . 28
Basic operation .......................... ................................ . 28
■AUX .................................. 30
Starting procedu re................ ............................. ....... 30
Basic operation .......................... ................................ . 30
■AV input ........................... 31
Starting procedu re................ ............................. ....... 31
■MIXTRAX .......................... 32
MIXTRAX EZ operation .............................. ............... 32
Starting procedu re................ ............................. ....... 32
MIXTRAX settings .... ................................ .................. 32
■Settings............................ 33
Displaying the s etting screen........... ..................... 33
System settings ........... ................................ ............... 33
Theme settings ....................... ................................ .... 37
Audio settings ....................... ............................. ......... 37
Video settings .............. ................................ ............... 41
■Favourite menu............... 42
Creating a shortcut .... ................................ ............... 42
Selecting a shor tcut................. ................................ . 42
Removing a shortcut ............ ................................ .... 42
■Other functions ............... 42
Setting the time and date ........................... ............ 42
Changing the wide screen mode ......................... 42
Restoring this product to the default
settings ....................... ................................ ............ 43
■Apple CarPlay .................. 43
Using Apple CarPlay ........... ............................... ....... 43
Setting the driving pos ition................. .................. 43
Starting procedu re................ ............................. ....... 44
Adjusting the volume ........ ............................... ....... 44
■Android Auto™ ................ 45
Using Android Auto .................... .............................. 45
Setting the dr iving position ............... .................... 45
Starting procedu re .......................... .......................... 45
Adjusting the volum e.......... ............................. ........ 45
Setting the au to-launch function..... .................... 46
■Appendix for Apple CarPlay
and Android Auto............ 46
Error messages ................. ............................. .............. 46
Detailed information regarding connected iPod
devices ............. ................................ ....................... 47
Using app-based connec ted content......... ........ 47
■Appendix ......................... 48
Troubleshooting ....................... ................................ .. 48
Error messages ................. ............................. .............. 48
Detailed informati on for playable media .......... 50
Bluetooth .......... ............................... ............................. 51
WMA.............. ................................ ................................ .. 51
FLAC ............................ ................................ .................... 51
DivX ............................. ................................ .................... 52
AAC.... ................................ ................................ .............. 52
Google™, Goog le Play, Android ....................... ..... 52
MIXTRAX ............................. ................................ ........... 52
Detailed information regarding connected iPod
devices ............. ................................ ....................... 52
Using app-based connec ted content......... ........ 52
Spotify® ................... ................................ ....................... 53
Notice regarding vi deo viewing ...................... ..... 53
Notice regarding MP3 file usage ..................... ..... 53
Using the LCD screen correctly ............ ................. 53
Specifications... ............................... ............................. 53
2En
English
CAUTION
WAR NING
Precaution
WAR NING
Certain co untry and government l aws may prohibit or restric t the placement and use of this product
in your vehicle. Please comply with all applicable laws and regulations regarding the use, installation
and operation of th is product.
If you want to dispose this product, do not mix it with general household waste. There is a separate
collection system for used electronic products in accordance with legislation that requires proper
treatment, recovery and recycling.
Private households in the member states of the EU, in Switzerland and Norway may return their used
electronic products free of charge to designated collection facilities or to a retailer (if you purchase a
similar new one).
For countries n ot mentioned above, ple ase contact your loc al authorities for th e correct method of
disposal.
By doing so you will ensure that your disposed produc t undergoes the neces sary treatment, recover y
and recycling and thus prevent potential negative effects on the environment and human health.
• Do not disassemble or modify this product, as there are high-voltage components inside which may
cause an electric shock. Be sure to consult your dealer or the nearest authorised Pioneer Service
Station for internal inspection, adjustments or repairs.
Before using this product, be sure to read and fully understand the following safety
information:
• Do not operate this product, any applications, or the rear view camera option (if
purchased) if doing so will divert your attention in any way from the safe operation of
your vehicle. Always observe safe driving rules and follow all existing traffic
regulations. If you experience difficulty in operating this product or reading the
display, park your vehicle in a safe location and apply the handbrake before making
the necessary adjustments.
• Never set the volume of this produc t so high that you cannot hear outside traffic and
emergency vehicles.
• To promote safety, certain functions are disabled unless the vehicle is stopped and/or
the handbrake is applied.
• Keep this manual handy as a reference for operating procedures and safety
information .
• Do not install this product where it may (i) obstruc t the driver’s vision, (ii) impair th e
performance of any of the vehicle’s operating systems or safety features, including air
bags or hazard lamp buttons or (iii) impair the driver ’s ability to safely operate the
vehicle.
• Please remember to fasten your seat belt at all times while operating your vehicle. If
you are ever in an accident, your injuries can be considerably more severe if your seat
belt is not properly buckled.
• Never use headphones while driving.
This product is evaluated in moderate and tropical climate condition under the Audio, video and
similar electronic ap paratus - Safety requirements, IEC 60065.
Important safety information
• Do not attempt to inst all or service t his product by yourse lf. Installation or s ervicing of this product by
persons withou t training and experience in ele ctronic equipment and automot ive accessories may
be dangerous and could expose you to the risk of electric shock, injury or other hazards.
• Do not allow this product to come into contact with liquids. Electrical shock could result. Also,
damage to the product, smoke, and overheating could result from contact with liquids.
• If liquid or foreign matter should get inside this product, park your vehicle in a safe place, turn the
ignition switch off (ACC OFF) immediately and consult your dealer or the nearest authorised Pioneer
Service Station. Do not use this product in this condition because doing so may result in a fire, electric
shock, or other failure.
• If you notice smoke, a strange nois e or odour from this product, or any other abnormal signs on the
LCD screen, turn off the power immediately and consult your dealer or the nearest authorised Pioneer
Service Station. Using this product in this condition may result in permanent damage to the system.
To ensure safe driving
• LIGHT GREEN LEAD AT POWER CONNECTOR IS DESIGNED TO DETECT PARKED STATUS AND
MUST BE CONNECTED TO THE POWER SUPPLY SIDE OF THE HANDBRAKE SWITCH. IMPROPER
CONNECTION OR USE OF THIS LEAD MAY VIOLATE APPLICABLE LAW AND MAY RESULT IN
SERIOUS INJURY OR DAMAGE.
• Do not take any steps to tamper with or disable the handbrake interlock system which is in
place for your protection. Tampering with or disabling the handbrake interlock system could
result in se rious injury or death.
• To avoid the risk of damage and injury and the potential vi olation of applicable laws, this
product is not for use w ith a video image that is visible to the d river.
• In some countries the viewing of video image on a display inside a vehicle even by persons other
than the driver may be illegal. Where such regulations apply, they must be obeyed.
If you attempt to watch video image while driving, the warning “Viewing of front seat
video source while driving is strictly prohibited.” will appear on the screen. To watch
video image on this display, stop the vehicle in a safe place and apply the handbrake.
Please keep the brake pedal pushed down before releasing the handbrake.
3En

WAR NIN G
WAR NIN G
WAR NIN G
CAUTION
CAUTION
When using a display connected to V OUT
The video output terminal (V OUT) is for connection of a display to enable passengers in
the rear seats to watch video images.
NEVER install the rear display in a location that enables the driver to watch video images while driving.
To avoid battery exhaustion
Be sure to run the vehicle engine while using this product. Using this product without
running the engine can drain the battery.
Do not install this product in a vehicle that does not have an ACC wire or circuitry available.
Rear view camera
With an optional rear view camera, you are able to use this product as an aid to keep an
eye on trailers, or backing into a tight parking spot.
• SCREEN IMAGE MAY APPEAR REVERSED.
• USE INPUT ONLY FOR REVERSE OR MIRROR IMAGE REAR VIEW CAMERA. OTHER USE MAY RESULT IN
INJURY OR DAMAGE.
The rear view mode is to use this product as an aid to keep an eye on the trailers, or while backing up.
Do not use this function for en tertainment purpose s.
Handling the USB connector
Visit our website
Visit us at the following site:
http://www.pioneer-car.eu
• Register your product. We will keep the details of your purchase on file to help you
refer to this information in the event of an insurance claim such as loss or theft.
• We offer the latest information about PIONEER CORPORATION on our website.
• Pioneer regularly provides software updates to further improve it’s products. Please
check the support section of the Pioneer website for all available software updates.
About this product
• This product does not work correctly in areas other than Europe. The RDS (Radio Data
System) function operates only in areas with FM stations broadcasting RDS signals.
The RDS-TMC service can also be used in the area where there is a station that
broadcasts the RDS-TMC signal.
• The Pioneer CarStereo-Pass is for use only in Germany.
Protecting the LCD panel and screen
• Do not expose the LCD screen to direct sunlight when this product is not used. This
may result in LCD screen malfunction due to the resulting high temperatures.
• When using a mobile phone, keep the aerial of the mobile phone away from the LCD
screen to prevent disruption of the video in the form of spots, coloured stripes, etc.
• To protect the LCD screen from damage, be sure to touch the touch panel keys only
with your finger and do so gently.
Notes on internal memory
• The information will be erased by disconnecting the yellow lead from the battery (or
removing the battery itself ).
• Some of the settings and recorded contents will not be reset.
• To prevent data loss and damage to the storage device, never remove it from t his product while data
is being transferred.
• Pioneer cannot guarantee compatibility with all USB mass storage devices and assumes no
responsibility for any loss of data on media players, iPhone, smartphone, or other devices while using
this product .
In case of trouble
Should this product fail to operate properly, contact your dealer or nearest authorised
Pioneer Service Station.
4En
About this manual
This manual uses diagrams of actual screens to describe operations. However, the
screens on some units may not match those shown in this manual depending on the
model used.
English
Meanings of symbols used in this manual
NOTE
This indicates to touch the appropriate soft key on the touch screen.
Parts and controls
This indicates to touch and hold the appropriate soft key on the touch screen.
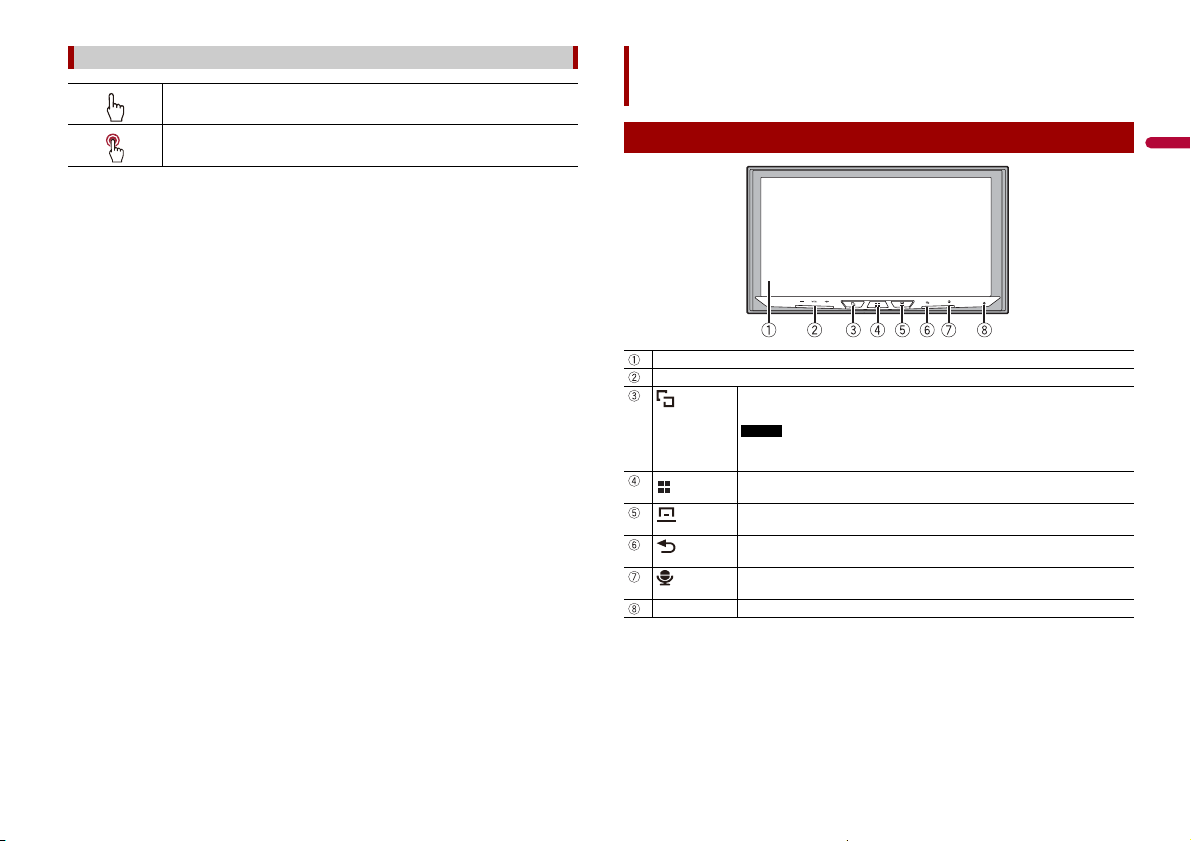
Main unit
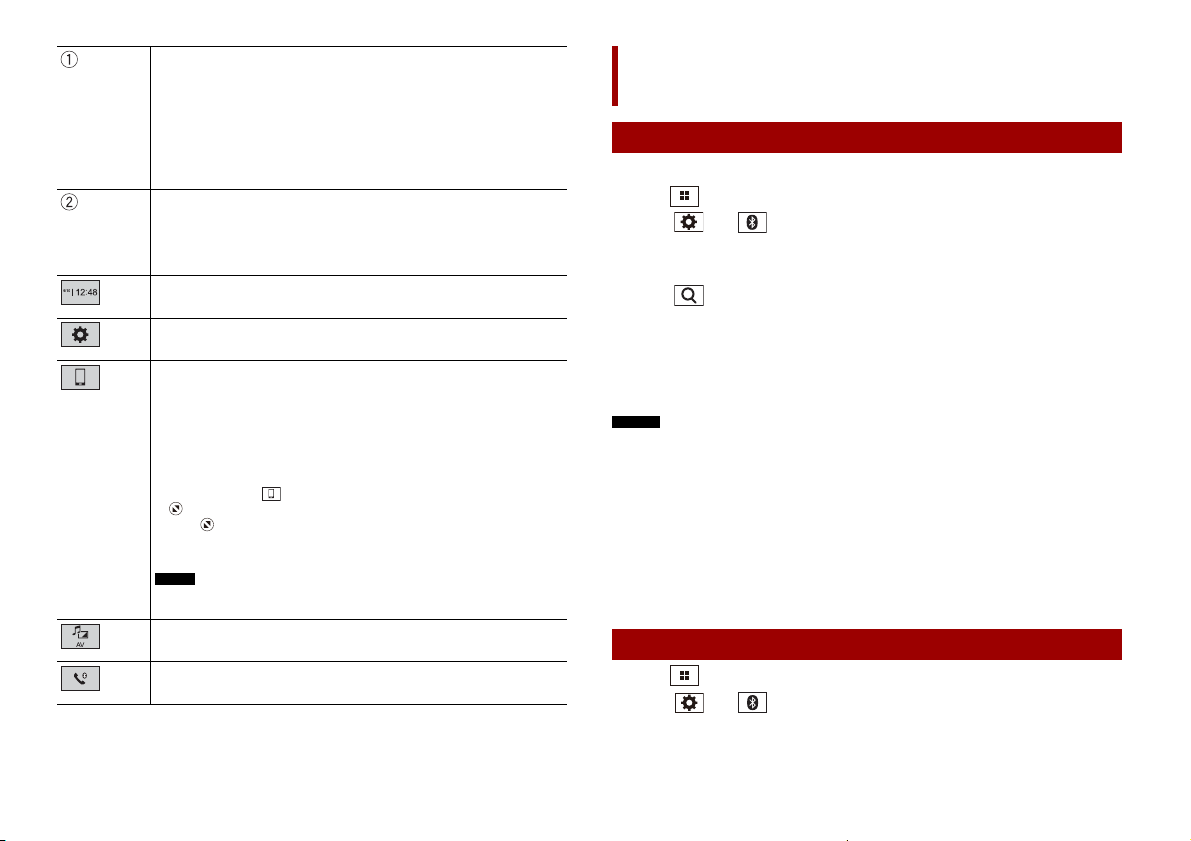
LCD screen
VOL (+/-)
RESET Press to reset the micro processor (page 6).
Press to switch between the Application screen and the AV operation screen.
Press and hold to switch to the camera view mode.
To activate the camera vi ew mode with this button, se t [Back Camera Input] to
[On] or [AV Input] to [Camera] (page 34).
Press to display the top menu screen.
Press and hold to power off. To power back on, press any button.
Press to display the menu bar (page 7).
Press and hold to mute or unmute.
Press to display the top menu screen or back to previous screen.
Press and hold to turn off the display.
Press to activate the voice recognition mode such as Siri when the iPhone is
connected to the unit via Blueto oth or USB.
5En
CAUTION
NOTE
Basic operation
WAR NING
NOTE
NOTE
Resetting the microprocessor
• Pressing the RESET button resets settings and recorded contents to the factory settings.
– Do not perform this operation when a device is connected to this product.
– Some of the settings and recorded contents will not be reset.
• The microprocessor must be reset under the following conditions:
– Prior to using this pro duct for the first time after ins tallation.
– If this product fails to operate properly.
– If there appears to be problems with the operation of the system.
1 Turn the ignition switch OFF.
2 Press RESET with a pen tip or other pointed tools.
Settings and recorded contents are reset to the factory settings.
Remote control
The remote control CD-R33 is sold separately. For details concerning operations, see the
remote control manual.
Starting up the unit
1 Start the engine to boot up the system.
The [Select Program Language] screen appears.
From the second time on, the screen shown will differ depending on the previous conditions.
2 Touch the language.
3 Tou ch .
The [Speaker Mode Settings] screen appears.
4 Touch the speaker modes.
[Standard Mode]
4-speaker system with front and rear speakers, or a 6-speaker system with front and
rear speakers and subwoofers.
[Network Mode]
3-way system with a high range speaker, middle range speaker and subwoofer (low
range speaker) for reproduction of high, middle and low frequencies (bands).
Do not use the unit in standard mode when a speaker system for 3-way network mode is
connected to the un it. This may cause damage to the spea kers.
5 Tou ch [O K].
Initial Legal Disclaimer screen appears.
6 Tou ch [O K].
The top menu screen appears.
Once the speaker mode is set, the setting cannot be changed unless this product is restored to the
default setti ngs. Restore the default setti ngs to change the speaker mod e setting (page 43).
Switching the speaker mode
To change the speaker mode, you need to restore this product to the default settings.
1 Restore the default setting (page 43).
Using the touch panel
You can operate this product by touching the keys on the screen directly with your
fingers.
To protect the LCD screen from d amage, be sure to touch the screen only with your fin ger gently.
Common touch panel keys
: Returns to the previous screen.
: Close the screen.
6En
English
NOTE
Operating list screens
NOTE
NOTE
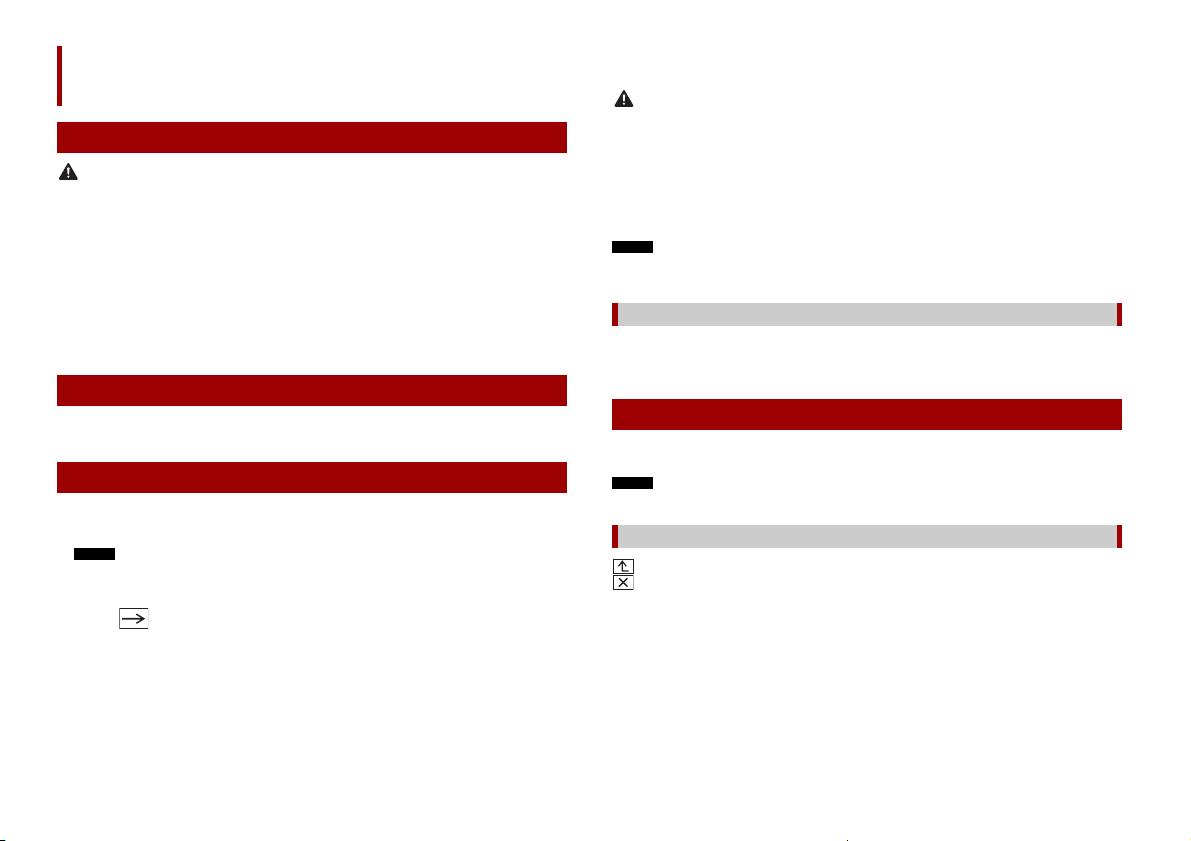
Touching an item on the list allows you to narrow down the options and
proceed to the next oper ation.
Appears when all ch aracters are not displayed on the displ ay area.
If you touch the key, the rests are scrolled for display.
This function is available only when you s top your vehicle in a safe place and apply
the handbrake.
Appears when items ca nnot be displayed on a single page.
Drag the side bar, the initial search bar or the list to view any hidden items.
Operating the time bar
You can change th e playback point by dragging the key.
The playback time corres ponding to the position of the key is dis played while
dragging the key.
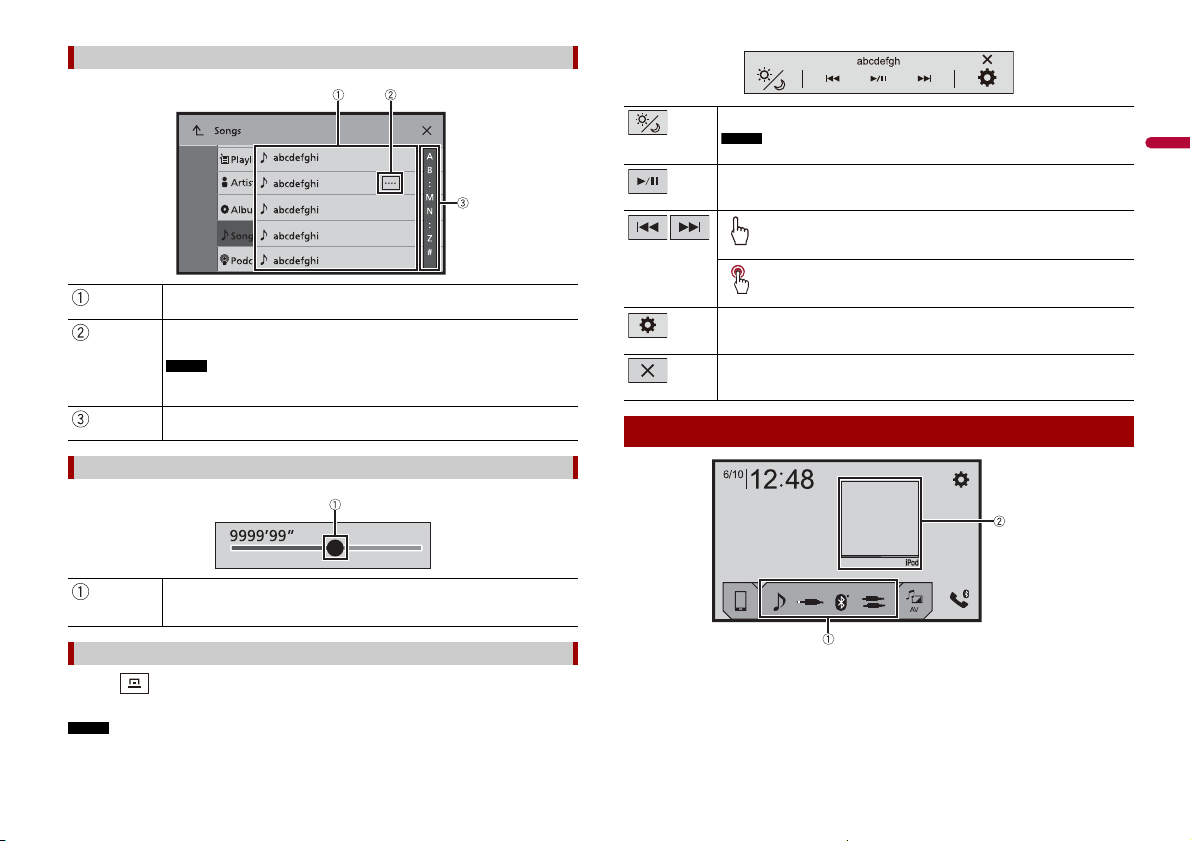
Switches the dimmer duration by day or night.
When AppRadio Mode + is on, AppRadio Mode + SideControlBar is displayed.
Switches between playback and pause.
Skips fi les forwards or bac kwards.
Performs fast reverse or fast forwards.
Displays setting menu screen (page 33).
Closes the menu bar.
Top menu screen
Operating the menu bar
1 Press .
The menu bar pops up on the screen.
The menu bar availability may vary depending on the activating source.
7En
Favourite source icons
TIPS
TIP
TIP
NOTE
NOTES
TIPS
• When you connect the extern al navigation system to this unit , the navigation
mode key is displayed at the middle of the right side of the display.
• If you select [Power OFF], you can turn off almost all functions.
– An incoming call is received (only for hands-free phoning via Bluetooth).
– A rear view camera image is input when the vehicle is in reverse.
– A button on this unit is pressed.
– The ignition switch is turned off (ACC OFF), then turned on (ACC ON).
AV operation key
Displays the cur rent source.
When the last source is displayed behind the key, you can switch the source by
touching the key.
Setting the time and date (page 42)
Settings (page 33) and Favourite me nu (page 42)
Connected device key
Displays connected device.
Switches the source or application with connected devices such as AppRadio
Mode +, external navigation system, etc.
When a device with a compatible application is connected, the favourite
application key appears. Once the key appears, you can adjust the range of the
favourite ap plication key area with the following steps.
1 Tou ch a nd h old .
appears at the top right of the favourite application key.
2 Drag to the desired position.
To finish the adjusting, touch any place of the display except for the
favourite application key.
This function is available only when you stop your vehicle in a safe place and apply
the handbrake.
AV source (page 15)
Hands-free phonin g (page 9)
Bluetooth
Bluetooth connection
1 Turn on the Bluetooth function on the device.
2 Press .
3 Tou c h t he n .
The Bluetooth screen appears.
4 Touch [Connection].
5 Tou c h .
The unit starts to search for available devices, then displays them in the device list.
6 Touch the Bluetooth device name.
After the device is successfully registered, a Bluetooth connection is established by
the system. Once the connection is established, the device name is displayed on the
list.
• If five devices are already paired, [Memory Full] is displayed. Delete a paired device first (page 9).
• If your device supports SSP (Secure Simple Pairing), a six-digit number appears on the display of this
product. Touch [Yes] to pair the device.
• If you try to connect an unconnected mobile phone while two mobile phones are already connected,
the first one of the two connected mobile phones will be disconnected and the unconnected mobile
phone will be connected instead.
• The Bluetooth connection can also be made by detecting this product from the Bluetooth device.
Before registration, make sure that [Visibility] in the [Bluetooth] menu is set to [On] (page9). For
details on Bluetooth device operations, refer to the operating instructions supplied with the
Bluetooth device.
• Two mobile phones ca n be connected to th is product at the sam e time (page 9).
Bluetooth settings
1 Press .
2 Tou c h th e n .
8En

English
CAUTION
Never turn this product off and disconnect the device while the Bluetooth setting operation is being
NOTE
NOTE
CAUTION
processed.
Menu Item Description
[Connection] Connect, disconnect, or delete regist ered Bluetooth device
[Auto Connect]
[On] [Off]
[Visibility]
[On] [Off]
[PIN Code Input] Change the PIN code for Bluetooth connection.
[Device Infor mation] Displaying the device name and address of this product.
[Bluetooth Memory Clear] Touch [Clear] then [OK] to clear the Bluetooth memory.
manually.
Touch to delete registered device.
To connect a registered Bluetooth device manually, touch
the name of the device.
To disconnect the device, touch the name of the connected
device in the list.
Connect the Bluetooth device manually in the following cases:
• Two or more Bluetooth devices are registered, and you want to
manually select the device to be used.
• You want to reco nnect a disconnected Bl uetooth device.
• Connection cannot be established automatically for some
reason.
Select [On] to connect the last connected B luetooth device
automatica lly.
If two Bluetooth devices were connected the last time, the two
devices are connected to this product automatically in the order
that they are registered in the device list.
Select [ On] to make this produc t visible to the other d evice.
The default PIN code is “0000”.
1 Touch [0] to [9] to input the pin code (up to 8 digits).
2 Tou c h .
registered devices are already connected, you can connect the remaining third device
to use the audio function only from the switch devices key on the audio source screen.
• The icon for the mobile phone currently being used is displayed on the Phone menu
screen. If you connect two mobile phones to this product at the same time, you can
switch between the mobile phones using the switch devices key. The contents of the
phone menu are memorised for each connected mobile phone (page 9).
• The switch devices key will appear for some audio sources. The audio source may
automatically switch to another source depending on the selected device.
Hands-free phoning
To use this function you need to connect your mobile phone to this product via
Bluetooth in advance (page 8).
For your safety, avoid talking on the phone as much as possible while driving.
Making a phone call
1 Press .
2 Touch .
The phone menu screen appears.
3 Touch one of the call icons on the phone menu screen.
Switching the connected Bluetooth device
After registering and connecting the Bluetooth devices to this product, you can switch
among the devices using the switch devices key in the phone func tion and some audio
sources.
• You can register up to five Bluetooth devices on this product (page 8).
• You can connect one of the registered devices to this product. In cases where the
registered device is equipped with a phone function, a total of two devices can be
connected at the same time when using the phone function. If two of the five
9En

The following items are displayed.
TIP
NOTE
TIPS
NOTES
TIPS
NOTE
NOTES
• Name of the current mobile phone
• List number of the current mobil e phone
• Reception status of the current mobile phone
• Battery status of the current mobile p hone
If you conne ct two mobile phone s to this product at t he same time, you ca n switch
between the mobile phones using the switch devices key.
Switches the search language to English or system language.
It may not appear depending on th e system language setting.
Synchronises the contacts on this product's phone book with the contacts on
your phone manually.
Using preset dial list (page 10)
Using phone book
Select a con tact from the phone book. Touch the desired name on the list then
select the phone number.
• The contacts on your phone will be automatically transferred to this product.
• Update the phone book manually.
• [Visibility] of the [Bluetooth] screen should be on (page 9).
• If two mobile phones are aut omatically connected to this prod uct with the
Bluetooth devi ce auto connect function , the phone book of the se cond phone is
displayed.
Using call history
Make a phone call from the received call , dialled call , or missed call .
Direct phone number input
Enter the number keys to enter the phone number then touch to make a call.
▶To end the call
1 Touch .
Using the preset dial lists
▶Registering a phone number
You can easily store up to six phone numbers per device as presets.
1 Press .
2 Touch .
3 Touch or .
On the [Phone Book] screen, touch the desired name to display the contact’s phone
number.
4 Touch .
▶Dialling from the preset dial list
1 Touch .
2 Touch the desired entry on the list to make a call.
The dial screen appears and dialling starts.
▶Deleting a phone number
1 Press .
2 Touch .
3 Touch .
4 Touch .
5 Touch [Yes].
Receiving a phone call
1 Touch to answer the call.
Touch to end the call.
• Touch while getting a call waiting, switch to the talking person.
• Touch while getting a call waiting to reject the call.
When two phones are connected at the same time, if an incoming call is received on the second phone
while you are talking on the first phone, the dial confirmation screen for the second phone will be
displayed.
Voice recognition function (for iPhone)
By connecting your iPhone to this product, you can use the voice recognition function
(Siri Eyes Free Mode) on this product.
• When an iPhone is used, Siri Eyes Free Mode is available with this product.
• In this chapter, iPhone and iPod touch will be referred to as “iPhone”.
10En
English
1 Press .
TIPS
TIP
NOTES
NOTES
2 Touch .
3 Touch .
The voice recognition function launches and the voice control screen appears.
• You can also launch the voice recognition function by pressing .
• If two mobile phones are auto matically connected to this prod uct with the Bluetooth devi ce auto
connect function, the voice recognition function (Siri Eyes Free Mode) will be set on the second
phone.
• If you want to use the voice recognition function (Siri Eyes Free Mode) on another connected iPhone,
touch with numbered to the other iPhone. The iPhone that you switch to will be set as the
current device.
Minimising the dial confirmation screen
1 Touch .
To display the dial confirmation screen, touch again.
• The dial confirmation screen cannot be minimised on the AV operation screen.
• AV sources cannot be selected even if the dial confirmation screen is minimised while talking on the
phone or receiving an incoming call.
Phone settings
1 Press .
2 Touch then .
Menu Item Description
[Auto Answer]
[On] [Off]
[Ring Tone]
[On] [Off]
[Invert Name] Select [Yes] to change the order of the first and last names
Setting the private mode
During a conversation, you can switch to private mode (talk directly on your mobile
phone).
Select [On] to answer an incoming call automatically.
Select [On] if the ring tone does not come out from the car
speakers.
in the phone book.
1 Touch or to turn private mode on or off.
• If two mobile phones are con nected to this product and th e first phone is set to private mo de, you
can receive incoming calls on the second phone while maintaining the call in progress on the first
phone.
• When two mobile phones are connected to this product and private mode of the first phone is turned
off, if an incoming call on the second phone is answered while a call is in progress on the first phone
or while dialling or receiving a call on the first phone, the call, dialling, or receiving on the first phone
is ended.
Adjusting the other party’s listening volume
This product can be adjusted to the other party’s listening volume.
1 Touch to switch between the three volume levels.
Notes for hands-free phoning
▶General notes
• Connection to all mobile phones featuring Bluetooth wireless technology is not
guaranteed.
• The line-of-sight distance between this product and your mobile phone must be 10
metres or less when sending and receiving voice and data via Bluetooth technology.
• With some mobile phones, the ring sound may not be output from the speakers.
• If private mode is selected on the mobile phone, hands-free phoning may be disabled.
▶Registration and connection
• Mobile phone operations vary depending on the type of mobile phone. Refer to the
instruction manual that came with your mobile phone for detailed instructions.
• When phone book transfer does not work, disconnect your phone and then per form
pairing again from your phone to this product.
▶Making and receiving calls
• You may hear a noise in the following situations:
– When you answer the phone using the button on the pho ne.
– When the person on the other end of the line hangs up the phone.
• If the person on the other end of the line ca nnot hear the conversation due to an echo,
decrease the volume level for hands-free phoning.
• With some mobile phones, even after you press the accept button on the mobile
phone when a call comes in, hands-free phoning may not be performed.
• The registered name will appear if the phone number is already registered in the
phone book. When the same phone number is registered under different names, only
the phone number will be displayed.
11En
▶The received call and dialled number histories
NOTES
NOTE
Bluetooth audio playback screen
• You cannot make a call to the entry of an unknown user (no phone number) in the
received call history.
• If calls are made by operating your mobile phone, no history data will be recorded in
this product.
▶Phone book transfers
• If there are more than 1 000 phone book entries on your mobile phone, not all entries
may download completely.
• Depending on the phone, this product may not display the phone book correctly.
• If the phone book in the phone contains image data, the phone book may not be
transferred correctly.
• Depending on the mobile phone, phone book transfer may not be available.
Bluetooth audio
Before using the Bluetooth audio player, register and connect the device to this product
(page 8).
• Depending on t he Bluetooth audio player connected to this prod uct, the available o perations with
this product may be limited to the following two levels:
– A2DP (Advanced Audio Distribution Profile): Only playing back songs on your audio player is
possible.
– A2DP and AVRCP (Audio/Video Remote Control Profile): Playing back, pausing, selecting songs, etc.,
are possible.
• Depending on the Bluetoo th device connected to this produc t, the available operations wi th this
product may be limited or differ from the descriptions in this manual.
• While you are listening to songs on your Bluetooth device, refrain from operating the phone function
as much as possible. If you try operating, the signal may cause noise for song playback.
• When you are talking on the Bluetooth device conne cted to this product via Bluet ooth, it may pause
playback.
1 Press .
2 Tou ch the n .
The system setting screen appears.
3 Touch [AV Source Settings].
4 Confirm that [Bluetooth Audio] is turned on.
5 Press .
6 Tou ch .
The AV source screen appears.
7 Touch [Bluetooth Audio].
The Bluetooth audio playback screen appears.
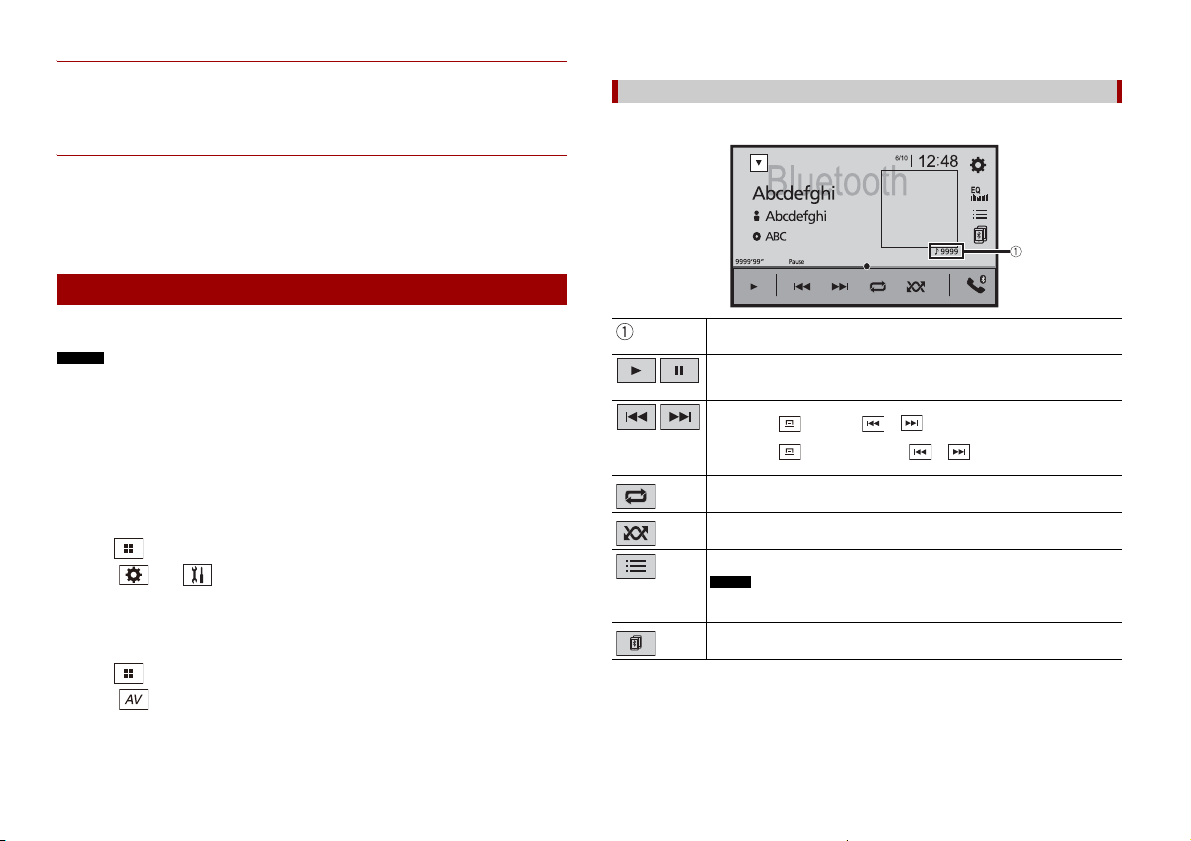
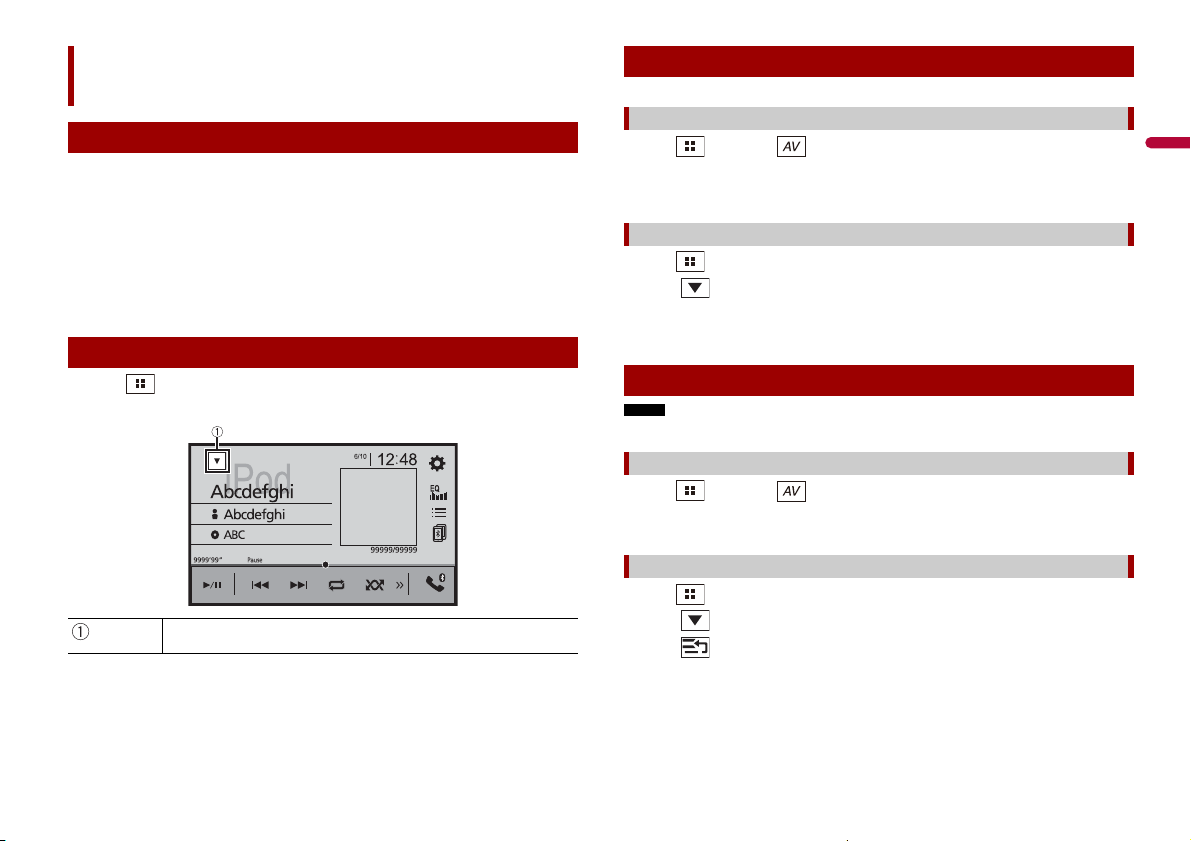
Basic operation
Track number indicator
Switches between playback and pause.
Skips files forwards or backwards.
• By pressing then touch or , you can also skip files forwards or
backwards.
• By pressing then touch and hold or , you can also perform fast
reverse or fast forwards.
Sets a repeat play range.
Plays files in random order.
Selects a file or folder from the list to playback.
This function is available only when the AVRCP version of the Bluetooth device is
1.4 or higher.
Switches among the Blue tooth devices when the devices are conn ected to
this product via Bluetooth (page 9).
12En
English
NOTES
WAR NING
Important
TIPS
AppRadio Mode +
AppRadio Mode +
You can operate iPhone or smartphone applications with finger gestures such as
tapping, dragging, scrolling, or flicking on the screen of this product.
• The compatible finger gestures vary depending on the application for an iPhone or a smartphone.
• Even though an application is not compatible with AppRadio Mode +, depending on the application
an image may be displayed. But you can not operate the application. To use AppRadio Mode +, install
the AppRadio app on the iPhone o r smartphone in advance. For details about the AppRadio app, visit
the following site:
http://www.pioneer-car.eu/eur/appradiomode
• Be sure to read Using app-based connected content (page 52) before you perform this operation.
• Copyright protected files such a s DRM cannot be played.
• AppRadio Mode + may be referred to a s AppRadio Mode.
• If you connect your device to t his product while an AppR adio Mode + compatible appli cation is
already running, the application operation screen will appear on this product.
• The desired application is launched, and the application operation screen appears.
• Press to go back to the to p menu screen.
• Certain uses o f the iPhone or sm artphone may no t be legal while driving in your ju risdiction, so you
must be aware of and obey any such restrictions.
• If in doubt as to a particular function, only perform it while the car is parked.
• No feature should be use d unless it is safe to do so un der the driving condi tions you are experiencin g.
Using AppRadio Mode +
• Pioneer is not liable for any iss ues that may arise from incorrec t or flawed app-based cont ent.
• The content and functionality of the supported applications are the responsibility of the App
providers.
• In AppRadio Mode +, functionality through the product is limited while driving, with available
functions de termined by the App providers.
• Availability of AppRadio Mode + functionality is determined by the App provider, and not
determined by Pioneer.
• AppRadio Mode + all ows access to applications oth er than those listed (subjec t to limitations while
driving), but the extent to which content can be used is determined by the App providers.
Starting procedure
When connecting an iPhone or a smartphone to this product, the settings are
automatically configured according to the device to be connected. For details of the
available connection, refer to iPod/iPhone or smartphone connection for AV source
(page 16).
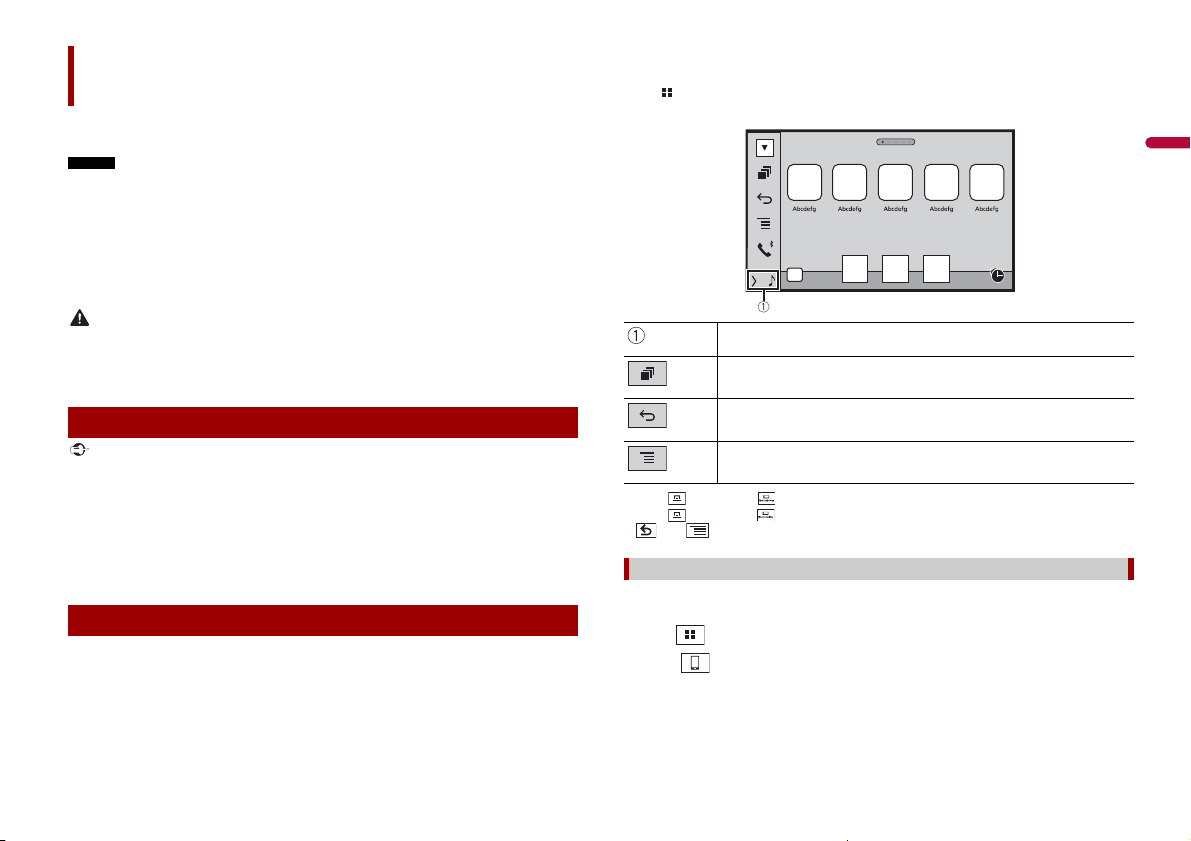
• Touch the desired application icon after the AppRadio app is launched.
Displays the current source.
Displays the launcher appl ication screen.
Displays the previous screen.
Displays the menu screen.
• Press then touch to hide the AppRadio Mode + SideControlBar.
• Press then touch again to display the AppRadio Mode + SideControlBar again.
• and are not available depending on the type of device.
For iPhone users
1 Connect your iPhone.
Refer to the Installation Manual.
2 Press .
3 Touch .
4 Touch [AppRadio Mode].
5 Touch desired icon in the tab.
The AppRadio app is launched.
13En
NOTES
NOTE
CAUTION
TIP
NOTE
For smartphone (Android) users
TIP
• [USB MTP] is set to [Off] to use A ppRadio Mode + (page 33).
• The video playback capability depends on the connected Android device.
1 Unlock your smartphone and connect it to this product via USB.
Refer to the Installation Manual.
2 Press .
3 Touch .
4 Touch [AppRadio Mode].
5 Touch desired icon in the tab.
The AppRadio app is launched.
Using the keyboard
When you tap the text input area of an application for iPhone, a keyboard will be
displayed on the screen. You can input desired text directly from this product.
This function is only available in AppRadio Mode + on the iPhone.
For your safety, the keyboard functionality is only available when the vehicle is stopped and the
handbrake is engaged.
1 Start up the AppRadio Mode +.
2 Touch the text input area on the application operation screen.
A keyboard for entering text appears.
You can select the keyb oard language (page 35).
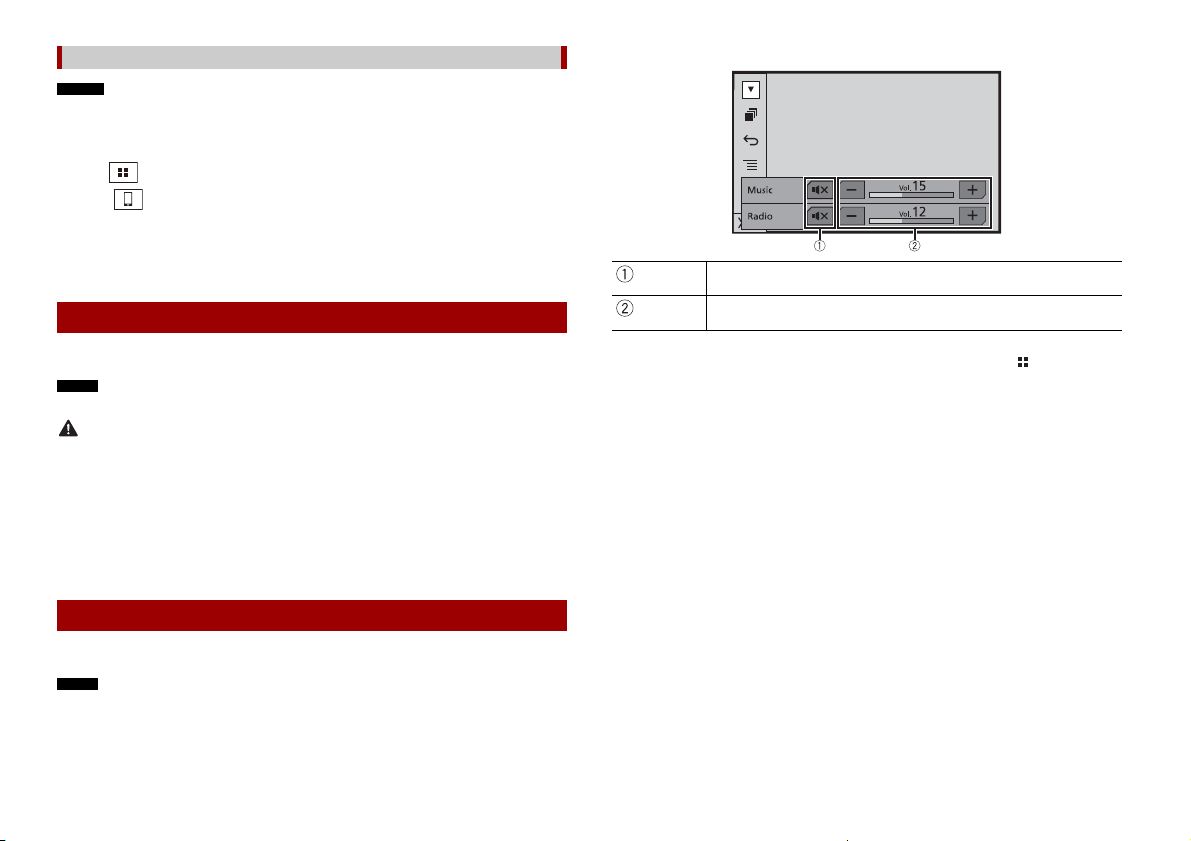
Using the audio mix function
You can output the audio mixing AV source and an application for iPhone or
smartphone when AppRadio Mode + is used.
The audio mix menu will be displayed on the screen.
Touch to mute. Touch again to cancel mute.
Adjusts the audio volume.
The AV operation screen and the Application screen can be switched by pressing .
Depending on the application or AV source, this function may not be available.
1 Start up the AppRadio Mode +.
2 Press VOL (+/-).
14En
English
AV source
NOTE
Selecting a source
Supported AV source
You can play or use the following sources with this product.
• Radio
• Digital Radio
• USB
The following sources can be played back or used by connecting an auxiliary device.
• iPod
• Spotify®
• Bluetooth® audio
• AV in put ( AV)
• AUX
Displaying the AV operation screen
1 Press then touch the AV operation key.
The AV operation screen appears.
Displays the source list.
Source on the AV source selection screen
1 Press then touch .
2 Touch the source icon.
When you select [Source OFF], the AV source is turned off.
Source on the source list
1 Press then touch AV operation key.
2 Touch .
3 Touch the source key.
When you select [Source OFF], the AV source is turned off.
Changing the display order of source
This function is available only when you stop your vehicle in a safe place and apply the handbrake.
Changing the display order of source icons
1 Press then touch .
2 Touch and hold the source icon and drag the icon to the desired position.
Changing the display order of source keys
1 Press then touch AV operation key.
2 Touch .
3 Touch .
4 Drag the source key to the desired position.
15En

NOTE
Adjusting the range of favourite source icons area
NOTES
TIP
This function is available only when yo u stop your vehicle in a safe place and apply the handbrake.
1 Press .
2 Touch and hold .
appears at the top left of the favourite source icons.
3 Drag to the desired position.
To finish the adjusting, touch any place of the display except for the favourite source
icons area.
iPod/iPhone or
smartphone connection
for AV source
When using an iPod/iPhone or a smartphone with this product, the settings are
automatically configured according to the device to be connected. This section
describes source compatibility for each device with the connection.
• Operation methods may vary depending on the iPod/iPhone model or smartphone and its software
version.
• Depending on the software version of iPod/iPhone or the version of smartphone OS, it may not be
compatible with this unit.
iPod/iPhone with a Lightning connector
These are the methods to connect an iPod/iPhone with a Lightning connector to this
product. The available sources vary depending on the connection method.
• Connecting via Bluetooth (page 17)
• Connecting via CD-IU52* (page 17)
* Sold separately
Compatible iPod/iPhone models
• iPhone 7, 7 Plus
• iPhone SE
• iPhone 6, 6 Plus, 6s, 6s Plus
• iPhone 5, 5c, 5s
• iPod touch 5th, 6th generation
• iPod nano 7th generation
Depending on the iPod models, it may not be compatible with some AV sources. For
details about iPod/iPhone compatibility with this product, refer to the information on
our website.
16En
You can connect and control an iPod/iPhone compatible with this product by using separately sold
connector cables.

English
Connecting via Bluetooth
TIP
The following sources are available when an iPod/iPhone is connected to the unit via
Bluetooth.
• iPod
• Spotify
• Bluetooth audio
1 Connect an iPod/iPhone with this product via Bluetooth (page 8).
2 Press then touch .
3 Touch compatible desired source.
Connecting via CD-IU52
The following sources are available when an iPod/iPhone with a Lightning connector is
connected to the unit via CD-IU52 (sold separately).
• iPod
• Spotify
1 Connect an iPod/iPhone to USB port of this product by CD-IU52.
2 Press then touch .
3 Touch compatible desired source.
• AppRadio Mode +
1 Connect an iPod/iPhone to USB port of this product by CD-IU52.
2 Press then touch .
3 Touch [AppRadio Mode].
4 Touch desired icon in the tab.
iPhone with a 30-pin connector
These are the methods to connec t an iPhone with a 30-pin connector to this product.
The available sources vary depending on the connection method.
• Connecting via Bluetooth (page 17)
• Connecting via CD-IU51* (page 17)
* Sold separately
Compatible iPhone model
• iPhone 4s
For details about iPhone compatibility with this product, refer to the information on our
website.
You can connect and control an iPhone compatible with this product by using separately sold
connector cable s.
Connecting via Bluetooth
The following sources are available when an iPhone is connected to the unit via
Bluetooth.
• iPod
• Spotify
• Bluetooth audio
1 Connect an iPhone with this product via Bluetooth (page 8 ).
2 Press then touch .
3 Touch compatible desired source.
Connecting via CD-IU51
The following sources are available when an iPhone with a 30-pin connector is
connected to the unit via CD-IU51 (sold separately).
• iPod
• Spotify
1 Connect an iPhone to USB port of this product by CD-IU51.
2 Press then touch .
3 Touch compatible desired source.
Smartphone (Android™ device)
These are the methods to connect a smartphone to this product. The available sources
vary depending on the connection method.
• Connecting via Bluetooth (page 18)
• Connecting via CD-MU200* (page 18)
* Sold separately
Compatible smartphones
Compatibility with all smartphones is not guaranteed. For details about smartphone
compatibility with this product, refer to the information on our website.
17En
 Loading...