

Page 1

hobby
Owner´s manual
114 2
Page 2
2525
24
24
44
8
3
3
Page 3

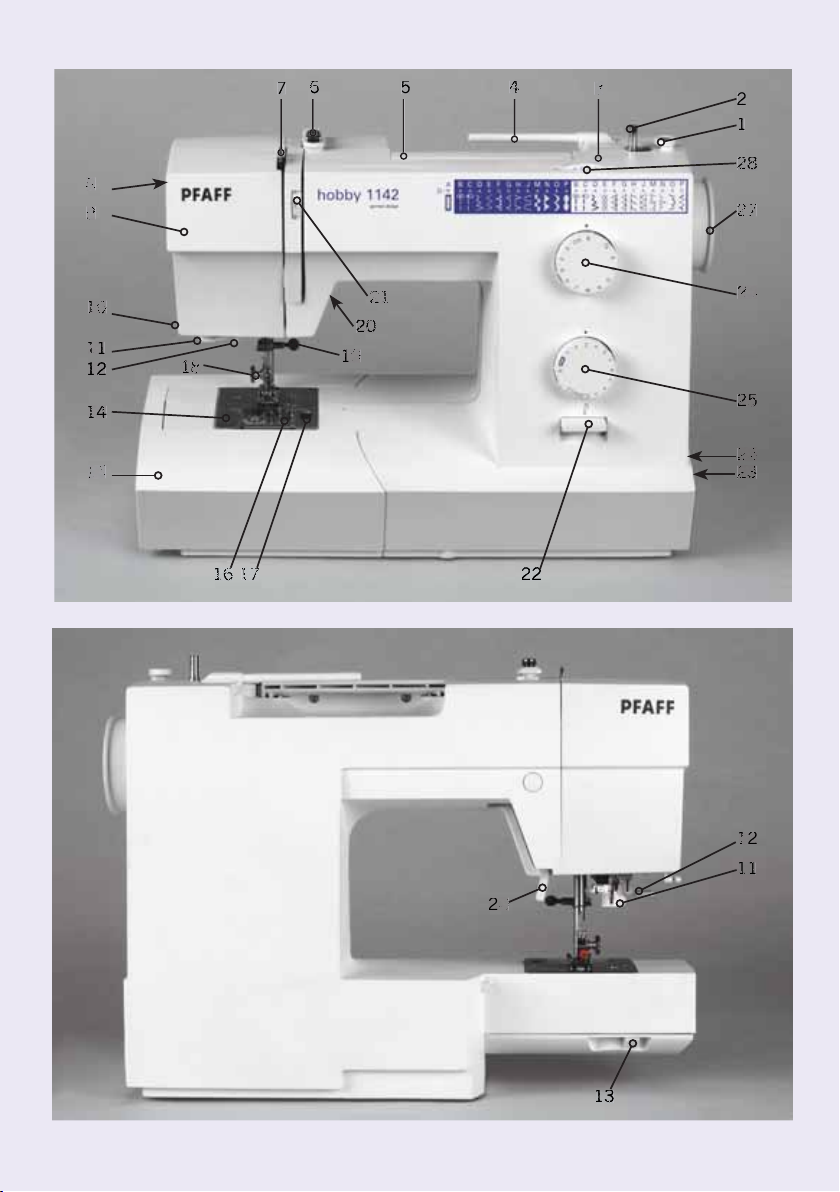
Parts of your hobby™ 1142 sewing machine
1 Bobbin winder stop
2 Bobbin winder spindle
3 Hole for extra spool pin
4 Spool pin
5 Carrying handle
6 Bobbin thread guide
7 Take-up lever
8 Foot pressure dial
9 Face plate
10 Thread cutter
11 Buttonhole lever
12 Needle threader
13 Slide for lowering the feed dog
14 Needle plate
15 Accessory tray
16 Throat plate
17 Throat plate release button
18 Thumbscrew
19 Needle screw
20 Presser foot lifter
21 Thread tension dial
22 Reverse stitch lever
23 Power switch
24 Connecting socket
25 Stitch length dial
26 Stitch selector dial
27 Handwheel
28 Stitch width dial
Page 4

Congratulations on purchasing
your new PFAFF® hobby!
Your hobby is so easy to use and offers a
whole range of features and accessories
for you to explore. Please spend some time
reading these operating instructions as it is
a great way to learn the machine and also to
make full use of the features.
Your Pfaff dealer will be at your service
with any help or advice you need.
We wish you many enjoyable
hours of sewing !
Some fabrics have excess dye which can cause
discoloration on other fabric but also on your sewing
impossible to remove.
Fleece and denim fabric in especially red and blue often contain a
lot of excess dye.
If you suspect that your fabric/ready-to-wear garment
contains a lot of excess dye, always pre-wash it before sewing/
embroidering to avoid the discoloring.
machine. This discoloring may be very difÀ cult or
Page 5

This houshold sewing machine is designed to comply with IEC/EN 60335-2-28 and UL1594
IMPORTANT SAFETY INSTRUCTIONS
When using an electrical appliance, basic safety precautions should always be followed, including
the following:
Read all instructions before using this household sewing machine.
DANGER - To reduce the risk of electric shock:
• A sewing machine should never be left unattended when plugged in. Always unplug this sewing
machine from the electric outlet immediately after using and before cleaning.
• Always unplug before relamping. Replace bulb with same type rated 15 Watt.
WARNING - To reduce the risk of burns, À re,
electric shock, or injury to persons:
• This sewing machine is not intended for use by persons (including children) with reduced
physical, sensory or mental capabilities, or lack of experience and knowledge, unless they
have been given supervision or instruction concerning use of the sewing machine by a person
responsible for their safety.
• Children should be supervised to ensure that they do not play with the sewing machine.
• Use this sewing machine only for its intended use as described in this manual. Use only
attachments recommended by the manufacturer as contained in this manual.
• Never operate this sewing machine if it has a damaged cord or plug, if it is not working properly,
if it has been dropped or damaged, or dropped into water. Return the sewing machine to the
nearest authorised dealer or service center for examination, repair, electrical or mechanical
adjustment.
• Never operate the sewing machine with any air openings blocked. Keep ventilation openings of
the Sewing machine and foot controller free from the accumulation of lint, dust, and loose cloth.
• Keep À ngers away from all moving parts. Special care is required around the Sewing machine
needle.
• Always use the proper needle plate. The wrong plate can cause the needle to break.
• Do not use bent needles.
• Do not pull or push fabric while stitching. It may deÁ ect the needle causing it to break.
• Wear safety glasses.
• Switch the sewing machine off (“0”) when making any adjustment in the needle area, such as
threading needle, changing needle, threading bobbin, or changing presser foot, etc.
• Always unplug the sewing machine from the electrical outlet when removing covers, lubricating,
or when making any other user servicing adjustments mentioned in the instruction manual.
• Never drop or insert any object into any opening.
• Do not use outdoors.
• Do not operate where aerosol (spray) products are being used or where oxygen is being
administrated.
• To disconnect, turn all controls to the off (“0”) position, then remove plug from outlet.
• Do not unplug by pulling on cord. To unplug, grasp the plug, not the cord.
SAVE THESE INSTRUCTIONS
Page 6

II
Introduction
TABLE OF CONTENTS
Introduction
Standard accessories IV
Optional accessories V
Accessory tray V
Stitch table VI
1. Operate your hobby 1142
Carrying handle, carrying case 1:2
Connecting the foot control 1:2
Foot preassure dial 1:3
Dropping the feed dog 1:3
Presser foot lifter 1:4
Changing the presser foot 1:4
Removing and attaching
the foot holder 1:5
Changing the needle 1:5
Bobbin winding 1:6
Inserting the bobbin 1:8
Threading the machine 1:9
Needle threader 1:10
Threading for twin needle 1:11
Bringing up the bobbin thread 1:12
Stitch selection 1:13
Stitch length dial 1:13
Adjusting stretch stitch balance 1:14
Stitch width dial 1:14
Variable needle position 1:15
Reverse sewing 1:15
Balancing needle thread tension 1:16
2. Utility stitches and practical
sewing
Basic sewing 2:2
Free arm sewing 2:4
Seam guides on the needle plate 2:5
Turning a square corner 2:5
Explanation of the sewing chart 2:6
Straight stitch 2:7
Stretch triple straight stitch 2:8
Zigzag stitch 2:8
Tricot stitch (Triple zigzag stitch) 2:9
Honeycomb stitch 2:9
Open overlock stitch (Knit stitch) 2:10
Closed overlock stitch 2:10
Blindhem 2:11
Blindhem stitch (elastic) 2:11
Automatic buttonhole 2:12
Buttonhole with gimp thread 2:14
Manual buttonhole 2:14
Button sewing 2:15
Sewing on zippers 2:16
Sewing on patches 2:18
Darning with the elastic stitch 2:18
Repairing tears 2:18
Page 7

3. Maintenance and
trouble-shooting
Cleaning 3:2
Changing the light bulb 3:3
Trouble-shooting 3:4
Index 3:6
Technical data 3:8
Introduction
III
Page 8
IV
Introduction
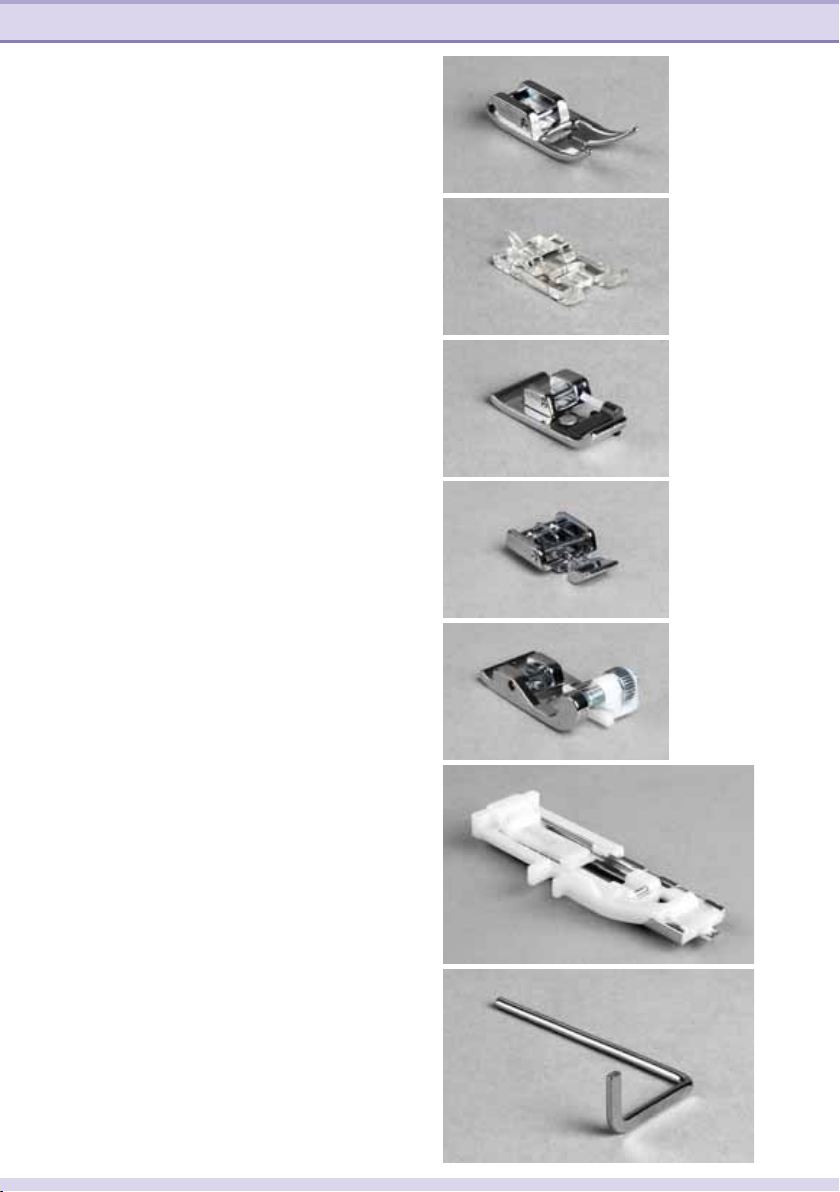
Standard accessories
1 Standard presser foot A
Part No. 820 546-096
2 Buttonhole foot B
Part No. 820 547-096
3 Overcasting foot C
Part No. 820 548-096
4 Zipper foot E
Part No. 820 549-096
5 Blindhem foot G
Part No. 820 550-096
1
2
3
4
5
6 Automatic buttonhole foot R
Part No. 820 551-096
7 Edge Guide/Quilting Guide
Part No. 820 552-096
6
7
Page 9

Introduction
V
8-9 Spool cap
Part No. 4160424-01
10 Cushion felt
Part No. 4160234-01
11 Brush
Part No. 4160409-01
12 Seam ripper
Part No. 4160304-01
13 Extra spool pin
Part No. 4160292-01
14 Screwdriver
Part No. 4160422-01
15 Bobbins
Part No. 4160233-01
16 Needles
Part No. 4160471-01
910
13 14 15 16
11
128
Optional accessories - available from your dealer
Bias binder foot 820 554-096 Makes it easier to put bias tape on your projects, pre-
Dual feeder with
quilting guide
Gathering foot 820 556-096 When you want to have a nice gathering on a single
Pintuck foot deep
groove with yarn guide
Piping foot 820 558-096 The foot has grooves to make it easier to sew perfect
Ribbon sewing foot 820 559-096 Your ribbon is hold perfectly in place while you sew it
Roller foot 820 560-096 For a better feed on material like vinyl plastic and
820 555-096 This foot will help the fabric move more smoothly,
820 557-096 Make nice even rows of pintucks, with or without
fabricated or hand made
feeding from both top and bottom
layer of fabric
cording
piping
onto your project
leather
Accessory tray
Your sewing machine has a removable
accessory tray which is also used as an
extended work support. The enclosed
accessories are numbered.
Page 10
VI
Introduction
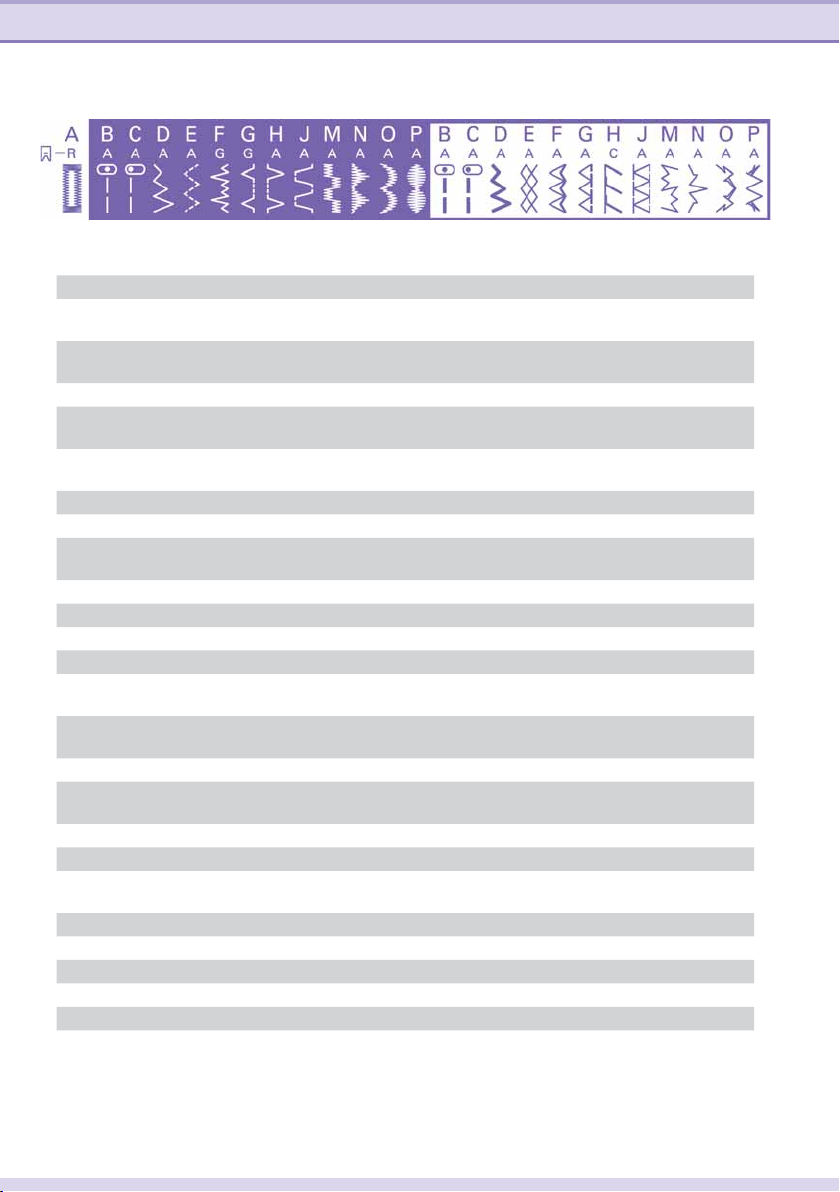
Stitch table hobby 1142
Stitch Description
Buttonhole Standard buttonhole for blouses or bed linens
A
Straight stitch, needle position
B
middle
Straight stitch, needle position left For all sewing and topstitching work requiring a
C
Zigzag stitch For serging and appliqué
D
Triple zigzag stitch For stitching on elastic band, darning tears and
E
Elastic blindhem stitch For invisible hem attachment and simultaneous
F
Blindhem stitch For invisible hem attachment
G
Shell-edging stitch For decorative hems on À ne materials, e.g. linen
H
Greek stitch A traditional decorative stitch e.g. for borders and
J
Checker satin stitch Satin decorative stitch
M
Triangle satin stitch Satin decorative stitch
N
Open scallop Satin decorative stitch
O
Oval satin stitch Satin decorative stitch
P
Stretch triple straight stitch, needle
B
position middle
Stretch triple straight stitch, needle
C
position left
Stretch triple zigzag stitch For attaching elastic tape on elastic materials
D
Honeycomb stitch For sewing on elastic threads, overlocking
E
Edge stitch wide For closing and serging one or more fabric layers
F
Edge stitch narrow For closing and serging one or more fabric layers
G
Open overlock stitch A closing and serging seam for stronger or non-
H
Closed overlock stitch A closing and serging seam for fraying materials
J
Decorative stitch A decorative stretch stitch
M
Decorative stitch A decorative stretch stitch
N
Decorative stitch A decorative stretch stitch
O
Decorative stitch A decorative stretch stitch
P
For all straight stitching and topstitching work up
to 4 mm
left needle position
patches
serging. Also for stretch fabrics
towels
For stretch seams, e.g. crotch seams on sports- and
workwear
For stretch seams requiring a left needle position
towelling and for decorative hem seams
fraying materials
Page 11

1. Operate your hobby 1142
Page 12
Operate your hobby 1142
1:2
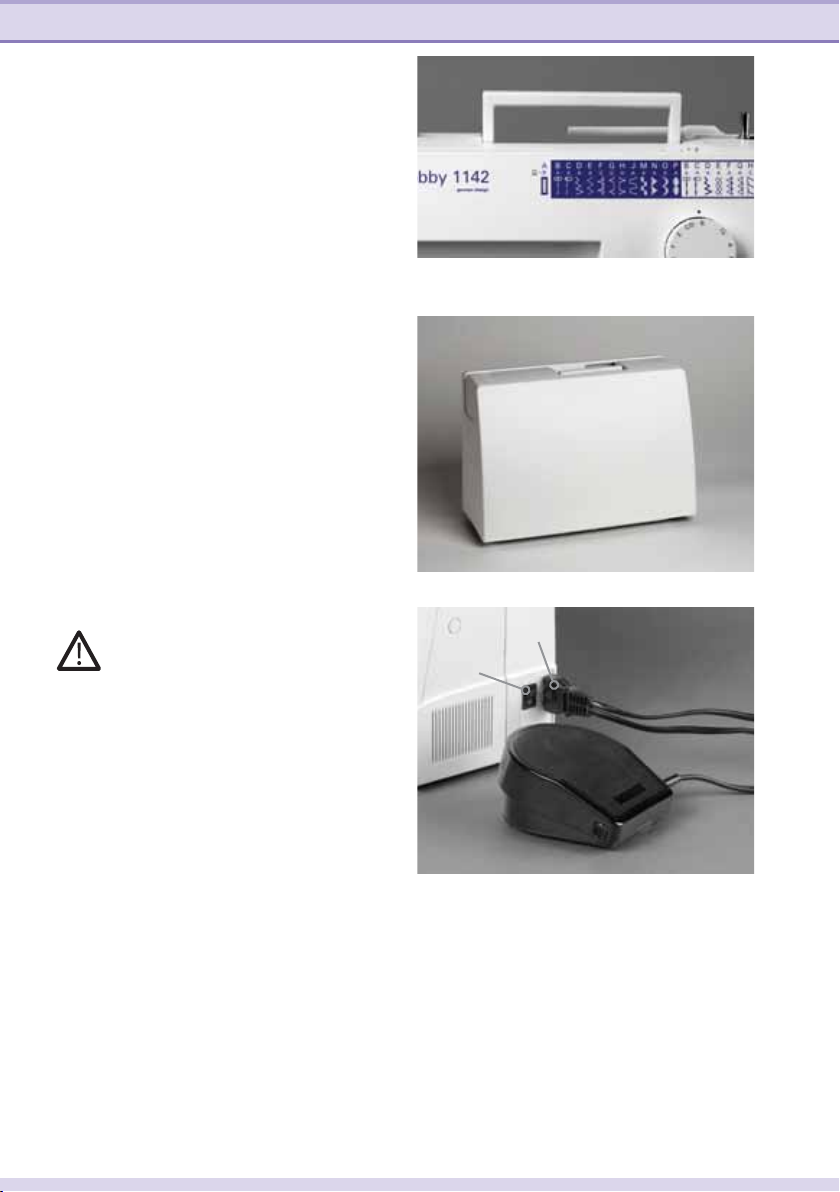
Carrying handle
Lift up the carrying handle of the sewing
machine from behind.
Carrying case
The carrying case, which is part of the
basic equipment, protects your sewing
machine from dust and damage while
transporting.
Before putting on the carrying case, lift up
the carrying handle.
Connecting the foot control
Before connecting to the power supply,
make sure the voltage shown on the
machine conforms to your electrical power.
Connect the plug of the foot control to
the connecting socket (A) of the sewing
machine and to the wall socket. The
sewing speed is regulated by pressing the
foot control.
Make sure that you have the right type of
foot control:
For USA and Canada, 120V - YC-482J
(not shown)
For Europe, 230V - YC-190
For Australia, 240V - YC-190A
Main switch
When the main switch (B) is turned on,
the sewing light bulb lights up. The
sewing machine is now ready to use.
A
B
For the USA and Canada
This appliance has a polarized plug (one
blade wider than the other). To reduce the
risk of electric shock, this plug is intended
to À t in a polarized outlet only one way.
If the plug does not À t fully in the outlet,
reverse the plug. If it still does not À t,
contact a qualiÀ ed electrician to install the
proper outlet.
DO NOT modify the plug in any way.
Page 13
C
DE
Operate your hobby 1142
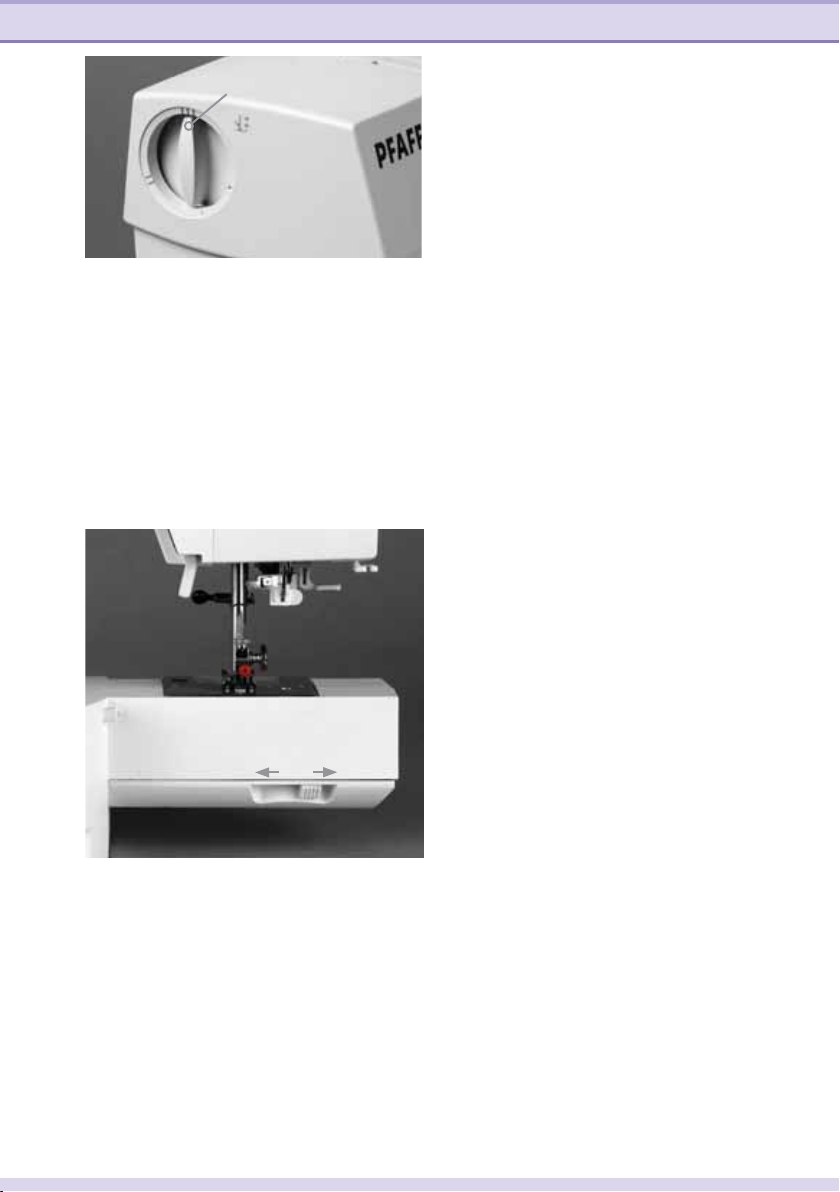
Foot pressure dial
Turn the foot pressure dial to adjust the
foot pressure.
The foot pressure dial should be set at
“III” for regular sewing.
Reduce the pressure to “II” for appliqué,
cutwork, drawn work and basting.
Set the setting mark (C) at “I” when
sewing chiffon, lace, organdy and other
À ne fabrics.
Dropping the feed dog
For certain sewing work, e.g. darning the
feed dog has to be dropped.
The slide for lowering the feed dog is
located underneath the free-arm bed on
the backside of the machine.
To drop the feed dog, push the slide in
the direction of the arrow, as shown in the
picture (D).
To raise the feed dog, push the silde in
the direction of the arrow, as shown in
the picture (E), and turn the handwheel
toward you.
The feed dog must be up for regular
sewing.
1:3
Page 14
Operate your hobby 1142
1:4
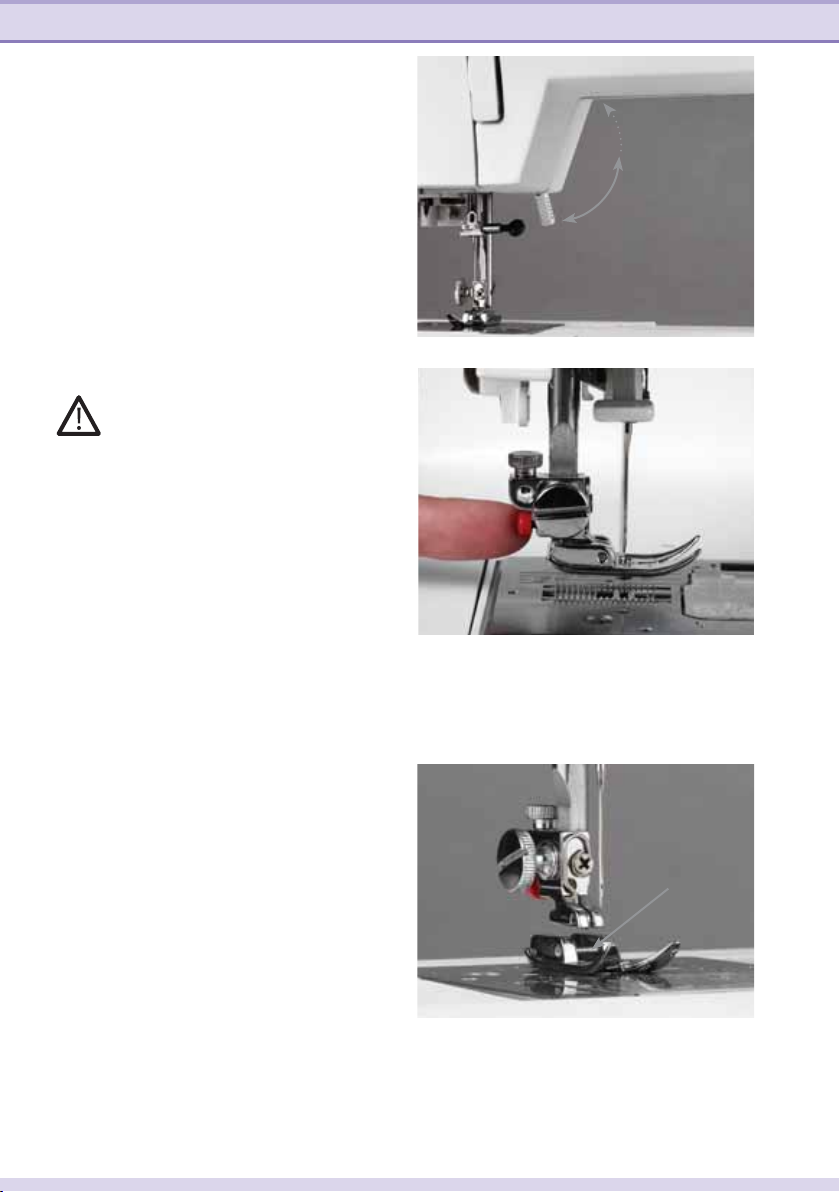
Presser foot lifter
The presser foot is raised or lowered with
the presser foot lifter.
You can raise the foot about 1/4" (6 mm)
higher than the normal up position for
easy removal of the presser foot, or to
help you place heavy fabric under the
foot.
A Lowered position
B Normal up position
C Extra lift position
Changing the presser foot
Turn off the main switch.
Removing the presser foot
Raise the needle to its highest position by
turning the handwheel.
Raise the presser foot, and press the red
button on the back of the foot holder.
C
B
A
Engaging the presser foot
Place the desired presser foot, so that
when the presser foot lifter is lowered, the
pins (D) of the foot engage in the presser
foot holder.
Note: Check that the presser foot is properly
engaged by raising the presser foot lifter.
D
Page 15
Operate your hobby 1142
Removing and attaching the foot
holder
1:5
E
Turn off the main switch.
To remove the foot holder
Remove the thumbscrew (E) by turning it
counterclockwise with a screwdriver and
remove the foot holder.
To attach the foot holder
Match the hole in the foot holder with
the threaded hole in the presser bar. Fit
the thumbscrew into the hole. Tighten
the screw by turning it clockwise with a
screwdriver.
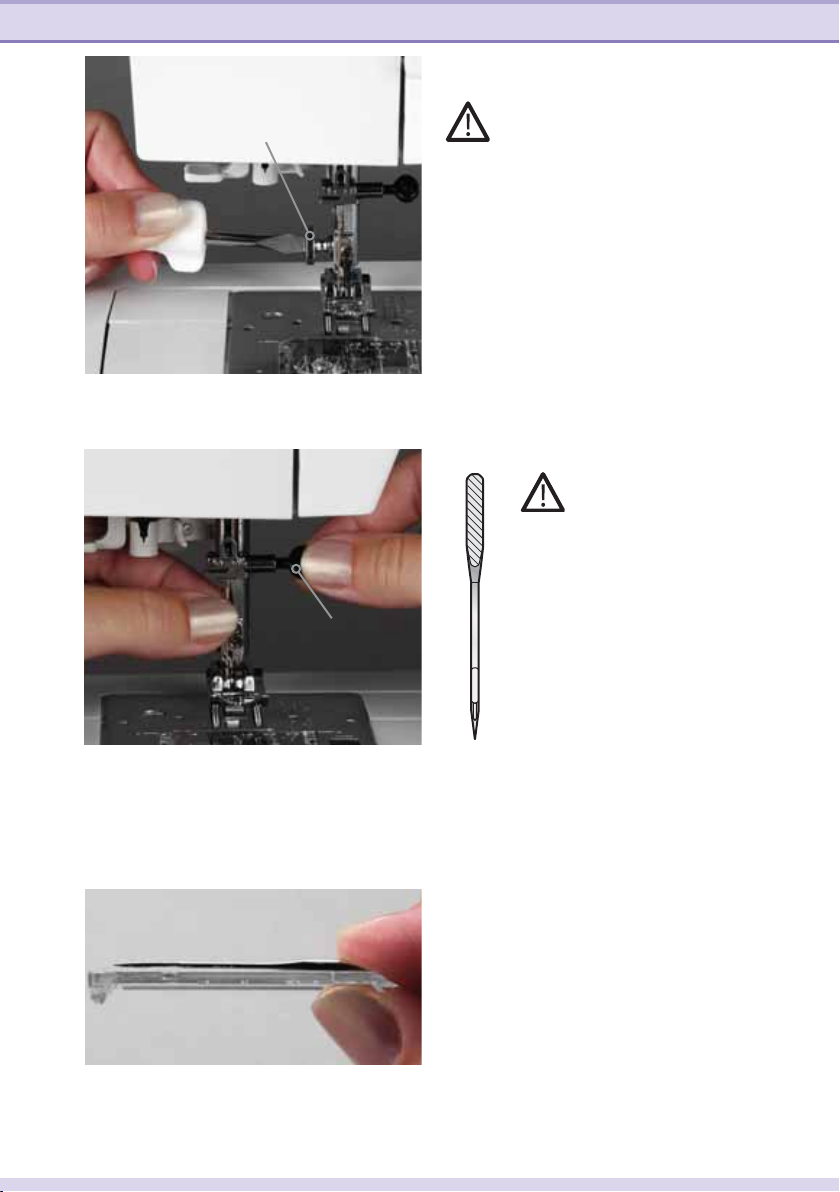
Changing the needle
Turn off the main switch.
To remove the needle
Lower the presser foot and
move the needle to its highest
point. Now loosen the needle
screw (F) and pull the needle
F
downwards.
To insert the needle
The Á at side of the needle
must face to the rear. Lower
the presser foot and insert the
needle, pushing it up as far as
it goes. Hold the needle and tighten the
needle screw À rmly.
To check for a good needle:
Put the Á at side of the needle onto
something Á at (needle plate, glass etc.).
The gap between the needle and the Á at
surface should be consistent.
Never use a bent or blunt needle.
Note: Check the needle frequently for barbed
or blunted points.
A damaged needle can cause permanent
snaps or runs in knits, À ne silks and silk-
like fabrics.
Page 16
Operate your hobby 1142
1:6
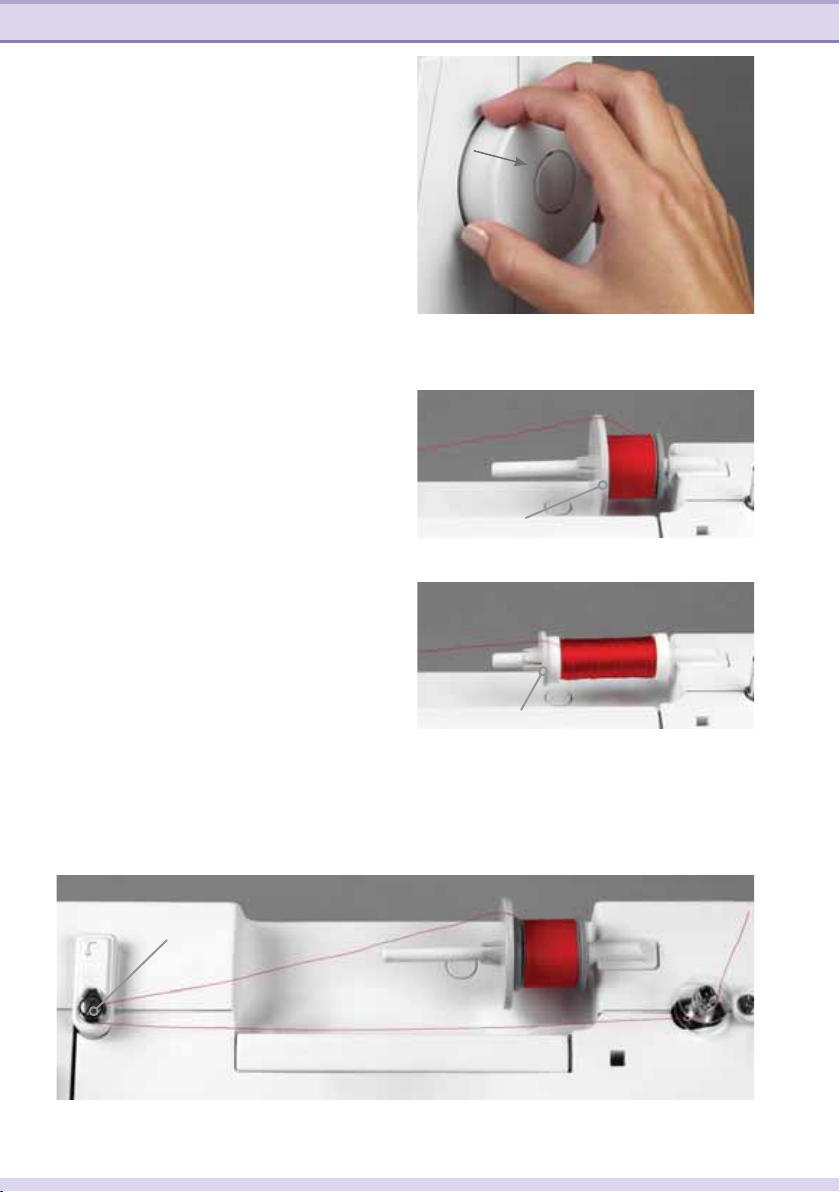
Bobbin winding
Preparing the machine for bobbin
winding
Pull out the handwheel to disengage the
clutch.
Setting the spool
Place a spool of thread on the spool pin
with the thread coming off the spool as
shown in the picture.
Press the large spool cap (A) À rmly
against the spool of thread.
For a small spool, use the small spool cap
(B).
A
Pull the thread around the bobbin thread
guide(C).
C
B
Page 17
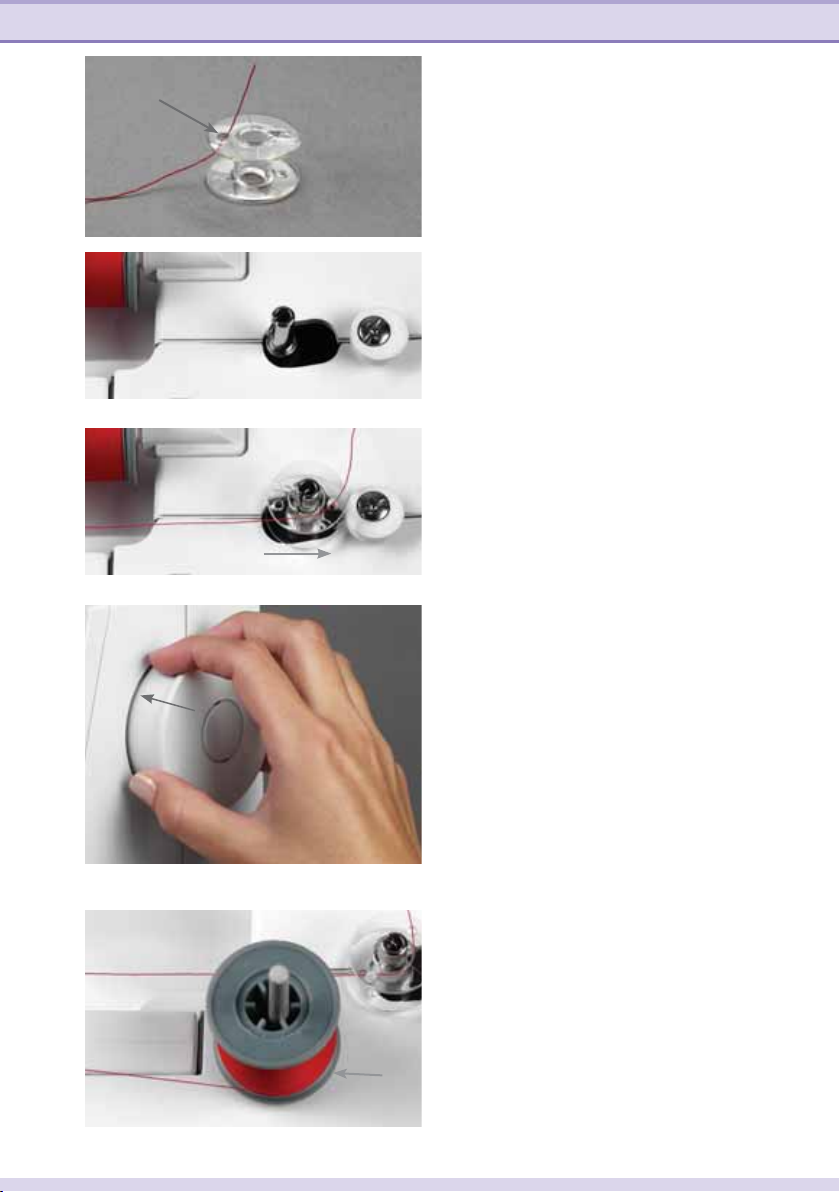
Operate your hobby 1142
1:7
Thread through the hole in the bobbin (D)
D
from the inside to the outside as shown in
the picture.
Place the bobbin on the bobbin winder
spindle with the free end of the thread at
the top.
Push the bobbin to the right.
Note: The bobbin can only be wound when it
is moved fully to the right. Do not move the
bobbin winder spindle while the machine is
running.
Hold the end of the thread À rmly and
press the foot control. Stop the machine
when the bobbin has made several turns,
and cut the free thread end close to the
bobbin.
Press the foot control again. When
the bobbin is fully wound, it will stop
automatically.
Push the bobbin to the left, remove it and
cut the thread.
Push in the handwheel to engage the
clutch.
Extra spool pin
If the machine is already threaded, you
can easily wind thread from the second
spool pin without unthreading the
machine.
Insert the extra spool pin into the hole (E).
Place the felt and a spool on the pin.
E
Thread the machine for winding in the
same way as before.
Page 18

Operate your hobby 1142
1:8
Inserting the bobbin
Turn off the main switch.
Place the bobbin in the bobbin holder
with the thread running off as shown in
the picture.
Pull the thread into the front notch (A) on
the front side of the bobbin holder. Pull
the thread to the left, sliding it between
the tension spring blades.
Continue to pull the thread lightly until
the thread slips into the side notch (B).
Pull out about 10 cm (4”) of thread.
Attach the throat plate. Check the
threading by referring to the chart shown
on the throat plate (C).
A
B
Removing the bobbin
Push the throat plate release button (D) to
the right and remove the throat plate (E).
Lift out the bobbin.
C
D
E
Page 19

Operate your hobby 1142
1:9
G
F
H
Threading the machine
F
Turn off the main switch.
Raise the presser foot and turn the
handwheel towards you until the take-up
lever (F) is in it's highest position.
Pull the thread from the spool and pass it
under the thread guide (G). Then pull it
down along the right threading slot.
Pull the thread up around the bottom of
the thread guide plate (H).
Firmly pull the thread from right to left
over the take-up lever (F) and down into
I
the take-up lever eye.
Pull the thread down into the left
threading slot and slip the thread behind
the needle bar thread guide (I) from the
left.
Thread the needle from front to back
through the needle eye.
To thread the needle using the needle
threader, please refer to the next page.
Page 20

Operate your hobby 1142
1:10
Needle threader
Turn off the main switch.
To make threading the needle easier and
quicker, you have been provided with a
needle threader.
Lower the presser foot. Turn the
handwheel until the needle is at its
highest position.
Move the needle threader (A) completely
downwards and turn it towards the
needle so that the small hook B goes
through the needle eye from behind. Pull
the thread from the left around the guide
and under the hook.
Turn the needle threader towards the
rear, releasing the thread carefully, and
allow the threader to move upwards. A
loop of the thread is pulled up through
the needle eye.
You can now pull the thread through the
needle eye.
B
A
Page 21

Operate your hobby 1142
C
1:11
D
E
Threading the twin needle
Turn off the main switch
Insert the twin needle.
Insert the extra spool pin into its hole (C).
Place a piece of felt and a spool on the
extra spool pin.
The threading path is the same as single
needle threading.
Slide one of the threads through the
needle bar thread guide (D) on the left,
and the other one on the right (E).
Thread the needles from the front to back.
Note: You cannot use the needle threader for
a twin needle.
How to sew with a twin needle
Do not set the stitch width at more than 3
mm, otherwise the needle hit the needle
plate and the needle will break.
Set the stitch length at 2 mm or more for
straight stitches. Set the stitch length at 1.5
mm or more for other stitches.
Use the same foot as recommended for
single needle sewing of the selected stitch.
Cotton threads and cotton wrapped
threads are recommended. Synthetic
threads are not recommendable, as they
tend to twist.
Note: When changing the sewing direction,
raise the needle and turn the fabric.
Page 22

Operate your hobby 1142
1:12
Bringing up the bobbin thread
Turn off the main switch.
Raise the presser foot. Hold the needle
thread and turn the handwheel towards
you until the needle is at the top again
and the bobbin thread has formed a loop.
Bring the bobbin thread (B) up by pulling
the needle thread (A) as shown in the
picture.
A
B
Pull 10 cm (4”) of both threads back and
under the presser foot.
Page 23

D
0 1 2 3 4
Operate your hobby 1142
Stretch stitches
Stitch selection
Raise the needle to its highest position.
Turn the stitch selector dial (C) to set the
desired stitch at the setting mark (D).
C
Note: Do not turn the stitch selector dial
while the needle is in the fabric, otherwise the
needle may bend or break.
1:13
F
Stitch length dial
With the stitch length dial(E) you can
adjust the stitch length to the required
length, between 0 and 4 mm, by turning
the dial to the setting mark (F).
The higher the number, the longer the
stitch
E
The buttonhole marking shows
the adjustment range when
sewing the buttonhole. The further you
turn the dial to 0, the higher the density of
the stitch.
To sew stretch stitches (light
background), you must turn
the stitch length dial to the
stretch area. The closer to “–” , the higher
density of the stitch.
Page 24

Operate your hobby 1142
1:14
Adjusting stretch stitch balance
If the stretch stitches are uneven when
you sew on a particular fabric, correct
them by turning the stitch length dial.
Balancing stitches:
If the stitches are drawn out, correct them
by turning the dial in the “–” direction.
If the stitches are compressed, correct
them by turning the dial in the “+”
direction.
Stitch width dial
The stitch width can be adjusted with the
stitch width dial (A). Set the desired stitch
width number at the setting mark (B).
The higher the number, the wider the
stitch.
Straight stitch is sewn with stitch width 0.
Note: Do not turn the stitch width dial while
the needle is in the fabric, otherwise the needle
may bend or break.
A
B
5 4 3 2 1 0
Page 25

Operate your hobby 1142
Variable needle position
The needle drop position of the straight
stitches can be moved between the center
(5) and left (0) with the stitch width dial.
Note: Do not turn the stitch width dial while
the needle is in the fabric, otherwise the needle
may bend or break
Reverse sewing
Push the reverse stitch lever down to sew
in reverse.
The machine sews in reverse only as long
as the reverse sewing button is pressed.
1:15
Page 26

Operate your hobby 1142
1:16
Balancing needle thread tension
The thread tension should be adjusted
depending on the sewing materials, layers
of fabric and sewing method. To ensure
perfect sewing results, the needle thread
tensions must be perfectly tuned.
Balanced tension:
The ideal straight stitch has threads
locked between two layers of fabric, as
shown in the picture.
Check the tension with a wide zigzag
stitch. The threads must be interlaced
between the two fabric pieces.
• If the needle thread tension is too high
the threads are interlaced above the top
fabric. Loosen the needle thread tension
by moving the dial to a lower number.
• If the needle thread tension is too low,
the threads are interlaced below the lower
fabric. Tighten the needle thread tension
by moving the dial to a higher number
Setting the needle thread tension
Set the required needle thread tension
with the needle thread tension dial.
The normal setting for sewing is 4 to 5.
For darning and buttonhole set the
tension between 2 and 3.
Perfect tension
Too high tension
Too low tension
Page 27

2. Utility stitches
and practical sewing
Page 28

Utility stitches and practical sewing
2:2
Basic sewing
Starting to sew
Raise the presser foot and place the fabric
under the foot.
Lower the needle into the fabric.
Lower the presser foot and smooth the
threads toward the back. Depress the foot
control.
Gently guide the fabric along the seam
guide letting the fabric feed by itself.
Note: Pull the threads to the left when sewing
with the buttonhole foot.
To lock the beginning of the seam, À rst sew a
few stitches forward, then sew a few stitches
in reverse, then sew forward.
Changing the sewing direction
Stop the machine and turn the handwheel
toward you to bring the needle down into
the fabric.
Raise the presser foot.
Pivot the fabric around the needle to
change sewing direction as desired.
Lower the presser foot and continue
sewing in the new direction.
Page 29

Utility stitches and practical sewing
Finishing sewing
Press the reverse stitch lever and sew
several stitches in reverse at the end of the
seam.
Raise the presser foot and remove the
fabric, pulling the threads to the back.
Pull the threads up and into the thread
cutter.
The threads are cut the proper length for
starting the next seam.
2:3
Page 30

Utility stitches and practical sewing
2:4
Free arm sewing
For stitching sleeves, waistbands, pant
legs or any other tubular garments. In
order to sew with the free arm, you must
remove the accessory tray.
Hook your À ngers on the bottom left of
the accessory tray and pull it to the left.
When replacing the accessory tray to its
proper position, insert the pins (A) into
the holes (B) and push the accessory tray
to snap it in place.
A
B
Page 31

mm
inches
Utility stitches and practical sewing
Seam guides on the needle plate
The seam guides on the needle plate help
you to measure seam allowance.
The numbers indicate the distance
between the center needle position and
the seam guide.
Turning a square corner
When the fabric edge facing you lines up
with the cornering guide (C) as shown
in the picture, stop stitching and lower
the needle into the fabric by turning the
handwheel toward you.
Raise the presser foot and pivot the fabric
to line the edge with the 1.6 cm (5/8”)
seam guide.
Lower the presser foot and start stitching
in the new direction.
2:5
C
Page 32

Utility stitches and practical sewing
2:6
Explanation of the sewing chart
The following charts show the
recommended settings for each stitch or
technique.
These charts also provide you with
further instructions that are necessary
when sewing the selected stitches.
The choice of the sewing foot, the
setting of the needle thread tension and
recomended presser foot.
Always use the “center” needle position
if not otherwise speciÀ ed in the
instructions.
stitch
stitch
Recommended stitch
Stitch width in mm
Stitch length in mm
Thread tension
Recommended presser
foot
Page 33

stitch
B/C 0/5 1.5-4 2-6 A
Straight stitch
Straight stitch B/C is the basic straight
stitch. The stitch length can be increased
up to 4 mm.
It is easier to do some sewing jobs by
changing the needle position, e.g. topstitching a collar or sewing in a zipper.
The needle position is determined by the
stitch width dial. (5 is center, 0 is left).
If you wish to make a topstitch farther
from the fabric edge, simply guide the
fabric along the guide marks on the
needle plate or use the edge guide. The
edge guide is inserted into hole (A) and is
secured with À xing screw (B).
Note: Ensure that the needle is at its highest
position when adjusting the needle position.
Utility stitches and practical sewing
B
A
Note: To ensure a consistent feed when
beginning sewing at a thick seam, we
recommend supporting the presser foot on
a piece of fabric of the same thickness as the
workpiece.
Attach the quilting guide
Loosen the screw on the back of the foot
holder.
Insert the quilting guide into the opening
and set the quilting guide at the desired
seam spacing then tighten the screw.
Sew, tracing the previous row of stitching
with the quilting guide.
2:7
Page 34

Utility stitches and practical sewing
2:8
stitchstitch
B/C 0/5 stretch 2-5 A
Stretch triple straight stitch
This stitch is used for sewing all seams
where great strength is needed, e.g. inside
trouser seams, crotch and armhole seams.
The stitch is sewn with two stitches
forward and one stitch backward,
forming a seam that does not rip easily.
Also use it when constructing items such
as backpacks for extra strength.
Carefully guide the fabric while sewing as
the fabric moves back and forth.
A
B
D 1-5 0.5-3 2-5 B/C
Zigzag stitch
Simple zigzag stitching is widely used for
overcasting, sewing on buttons etc. Adjust
the stitch length to suit your sewing needs.
Note: Use a stabilizer for stretch fabrics such
as tricot and knits to prevent puckering.
Overcasting
In addition to overlock stitching, zigzag
stitch D, is also suitable for overcasting
various materials. In this case, the
material should only be positioned
halfway under the sewing foot.
When overcasting the edge, make sure the
needle goes into the material and over the
edge alternately.
When sewing with the overcasting foot
C, the thread lies over pin (A), guide the
edge of the fabric along guide (B). This
prevents curling of the fabric
edge. In this way you can sew
beautiful smooth seams.
Note: Do not set the stitch
width less than 5 when using the
overcasting foot C, otherwise the
needle may hit the foot causing the
needle to bend or break.
Page 35

Utility stitches and practical sewing
2:9
stitch
E 3-5 0.5-1.5 3-6 A
Tricot stitch (Triple zigzag stitch)
This stitch is used to À nish the seam
allowance on synthetics and other fabrics
that tend to pucker.
Place the fabric to leave a 1.6 cm (5/8")
seam allowance.
Trim the extra allowance after sewing.
It is also used for mending tears.
Elastic stitch
Because of its high elasticity, this
stitch can be used for sewing elastic on
swimwear, skirts or lingerie.
Mark elastic and fabric in quarters.
Pin elastic to fabric at quarter markings.
Place fabric and elastic under sewing foot.
Stretch elastic to À t the fabric. Begin
sewing.
stitch
E 5 stretch 3-7 A
Honeycomb stitch
The honeycomb stitch is an elastic and
decorative hem which is particularly
suitable for hems on T-shirts and
childrens clothes.
Fold the hem over double and overstitch
it.
Note: When stretching elastic, make sure to
stretch from the front and back of the sewing
foot.
Page 36

Utility stitches and practical sewing
2:10
stitchstitch
H 5 stretch 3-7 C
What is an overlock stitch?
For elastic materials and knits, the hobby
1142 offers an overlock stitch which sews
two fabric layers together and overcasts
simultaneously. It is more elastic than
normal seams, very durable and quickly
sewn.
When sewing overlock seams, use
overcasting foot C. It guides particularly
well and prevents the seam from
puckering.
Open overlock stitch
With this stitch, thicker materials and
fabrics which do not fray too much can be
sewn together perfectly.
This stitch seams and À nishes the fabric
edges simultaneously.
Place the edge of the fabric next to the
guide of foot and sew while guiding the
fabric edge along the guide.
Tip: Make sure that the needle is just off the
raw edge of the fabric and not into it, when
the needle swings to the right.
Note: Do not set the stitch width less than 5
when using the overcasting foot C, otherwise
the needle may hit the foot causing the needle
to bend or break.
J 5 stretch 3-7 C
Closed overlock stitch
The closed overlock stitch is perfect for
sewing jersey knits. You can also sew
sleeve cuffs and knit collars which are
well-sewn and long-lasting.
Tip: Ensure that the sleeve cuff is stretched
while it is being sewn.
Remember!
When overlocking, if you select a needle
position other than center, and
stitch width other than 5, make sure the
needle does not strike the bar (A) of the
overcasting foot C.
A
Page 37

Utility stitches and practical sewing
2:11
Stitch G
stitch
F/G 2-3 2-3 1-4 G
Blindhem
Blindhem foot G is best suited for
invisible hems; sewing by hand is no
longer necessary.
Note: On heavy weight fabrics that ravel, the
raw edge should be overcasted À rst.
Serge the edge of the hem
Fold the edge inwards by the hem width.
Now unfold the hem again so that the
hem edge protrudes by about 1 cm.
Place the fabric under the sewing foot
so that the needle just pierces the folded
edge. If the needle pierces too far left,
move the guide slightly to the left. If the
needle misses the fold, move the guide
slightly to the right.
Sew slowly while guiding the folded edge
along the guide.
When the needle enters the crease line, it
must only pick up one À ber of the fabric.
Note: If the needle goes too far left, the
stitches will be apparent on the right side of
the fabric.
Stitch F
Blindhem stitch (elastic)
Stitch F is a blindhem stitch for woven
or elastic materials. The hem is sewn and
overcast at the same time.
Page 38

Utility stitches and practical sewing
2:12
A
D
C
B
stitch
A 4-5 0.5-1 1-5 R
Automatic Buttonhole
Buttonholes are generally sewn onto a
piece of doubled fabric. However, for
some materials, e.g. silk, organza and
viscose, it is necessary to use stabilizer to
prevent the material from puckering.
To produce beautiful buttonholes,
embroidering or darning threads are
ideally suited to this purpose.
Mark the starting point of the buttonhole
either with a magic pen or dress pin, and
always sew a sample buttonhole À rst,
using the actual fabric
Note: The size of buttonhole is automatically
determined by placing the button in the
automatic buttonhole foot R.
The button holder of the foot takes a
button size up to 2.5 cm (1") in diameter.
Use stabilizer on stretch fabrics and check
the settings.
Turn the handwheel toward you to raise
the needle to its highest position. Attach
the automatic buttonhole foot.
E
F
To open the button holder (A), pull to the
back and place the button in it. Push back
the button holder against the button to
keep it in place.
Pull the buttonhole lever (B) down as far
as it will go.
Raise the foot and pass the needle thread
through the opening in the foot (C). Pull
both needle and bobbin threads to the left.
Insert the fabric under the foot and lower
the needle into the starting point using
the handwheel. Lower the presser foot.
Note: Make sure there is no gap between the
slider (D) and front stopper (E). If there is a
gap, the length of the right and left rows of the
buttonhole will differ(F).
Page 39

Utility stitches and practical sewing
2:13
G
The machine sews the front bartack and
left row À rst, then the back bartack and
right row.
Sew slowly and stop the machine when a
buttonhole is completed.
Raise the foot and remove the fabric. Cut
both needle and bobbin threads leaving
about 10 cm (4") thread ends.
Pull the needle thread to wrong side of
fabric by pulling the bobbin thread. Knot
the threads.
To open the buttonhole
Insert a pin inside the bartack. Carefully
cut the opening. Take care not to cut the
stitches.
To sew another buttonhole, turn the stitch
selector to “ ”, then back to “A” again.
Then press the foot control to sew an
identical buttonhole.
When buttonhole sewing is À nished, push
the buttonhole lever upward as far as it
will go.
Adjusting the buttonhole stitch density
Turn the stitch length dial within
the range of "
" to adjust the
buttonhole stitch density. To get a narrow
buttonhole, set the marking as close to "0"
as possible, still in the " "-range. To
get a wide buttonhole, set the marking
close to "1".
Note: For thick buttons, make a test
buttonhole. If the button does not À t through
the test buttonhole, lengthen the buttonhole
by pulling the button holder a little to the back
and make a small gap (G).
Page 40

Utility stitches and practical sewing
2:14
A
B
C
stitch
A 4-5 0.5-1 1-5 R
Buttonhole with gimp thread
To sew strong durable buttonholes, on
heavy fabrics, knits or sportswear, using a
gimp thread is recommended.
On knits the gimp thread is important to
prevent the buttonhole from stretching.
With the buttonhole foot raised, hook the
gimp thread on the spur (A) at the back of
the foot.
Bring the ends toward you under the foot,
clearing the front end.
Hook the gimp thread into the forks on
the front of the foot (B) to hold them tight.
Pull both needle and bobbin thread to
the left. Lower the needle into the fabric
at the starting point and lower the foot.
Press the foot control gently and sew the
buttonhole over the gimp thread.
The sewing sequence is the same as the
automatic buttonhole.
Pull the left end of the gimp cord to
tighten it and cut the excess tails. To
cut the buttonhole opening, refer to the
instructions on page 2:13.
stitch
A 4-5 0.5-1 1-5 B
Manual buttonhole
If the diameter of the button is more than
2.5 cm (1"), a buttonhole must be made
manually as follows:
Attach the buttonhole foot B.
Pull the buttonhole lever down as far as
it will go.
Pull both needle and bobbin thread to the
left. Lower the needle into the fabric at the
starting point, and lower the presser foot.
Sew the front bartack and left row to the
desired length then stop the machine.
Click the buttonhole lever toward you
(C).
Start sew again to make the machine sew
the back bartack and right row, and then
stop the machine at the starting point.
When buttonhole sewing is À nished, push
the buttonhole lever upward as far as it
will go.
Page 41

stitch
D adjust 0 3-7 B
Utility stitches and practical sewing
2:15
Button sewing
With zigzag stitch D you can sew on twoand four-hole buttons.
Note: Lower the feed dog when sewing on
buttons.
Adjust the stitch width to match it with
the span of the holes in the button. Turn
the handwheel to check if the needle
enters into each hole in the button.
Lower the foot to hold the button in place.
The holes in the button should align with
the slot of the foot.
A pin can be placed on the foot to form a
shank.
Make sure to check if the needle enters
into both holes in the button.
Sew about 10 stitches.
Note: When sewing a four-hole button, move
the button to the other pair of holes, and sew
the button again.
Raise the presser foot and remove the
fabric. Cut the needle and bobbin threads
leaving 20 cm (8") tails.
Bring the needle thread between the
button and fabric through the holes in the
button.
Pull the needle thread to pick bobbin
thread up to the right side of the fabric.
Wind the threads to form a shank and tie
them together.
Note: Raise the feed dog after sewing.
Page 42

Utility stitches and practical sewing
2:16
stitch
B 5 1.5-4 3-6 E
Sewing on zippers
There are various methods of sewing
on zippers. For skirts, we recommend
the fully concealed zipper, for men’s
and ladies’ trousers the semi concealed
zipper. Various zippers are available.
We recommend using a metal zipper for
strong fabrics such as denim. For all other
materials we recommend a plastic zipper.
It is important for all types of zippers to
sew very close to the edge of the teeth of
the zipper. This is why it is possible to
insert the zipper foot either on the right or
the left of the presser foot holder.
To sew the left side of the zipper, attach
zipper foot with the right side pin (A).
To sew the right side of zipper, attach the
zipper foot with the left side pin(B).
The trouser zipper
• Iron the seam allowances, making
sure that the underlap extends by about 4
mm.
• Baste the zipper under the underlap
so that the teeth are visible.
• Insert the zipper foot on the right side
(A) to sew on the left side of the zipper.
• Stitch along the edge of the zipper.
• Just before the end of the seam, open
the zipper and À nish sewing the seam.
• Close the zipper and baste the overlap
evenly to the other half of the zipper.
• Then sew through the basted seam.
Note: To achieve a perfect seam, we
recommend using the edge guide.
A
B
Page 43

Utility stitches and practical sewing
2:17
Fully concealed, sew-in zipper
• Insert the zipper foot on the right side
(A) to sew on the left side of the zipper.
• Baste in the zipper and lay it
underneath the presser foot so that the
teeth of the zipper run alongside the foot.
• Stitch in half of the zipper, leave the
needle in the fabric, raise the presser foot
and close the zipper.
• Now you can continue sewing the
seam up to the end of the zipper and sew
the cross seam.
• Sew the second half of the zipper
parallel at the same distance.
• Stop after the À rst half and leave the
needle in the fabric. Raise the presser foot
and open the zipper.
• Now you can À nish sewing the seam.
Page 44

Utility stitches and practical sewing
2:18
stitch
E 5 0.2-1.5 3-5 A
Sewing on patches
To cover large holes it is necessary to sew
a new piece of fabric onto the damaged
area.
• Baste the new piece of fabric onto
the damaged area of the face side of the
fabric.
• Sew over the fabric edges with the
elastic stitch.
• Now cut the damaged area back to the
seam from the reverse side of the fabric.
Darning with the elastic stitch
Darning with the elastic stitch is suitable
for repairing damaged areas.
• Sew over the damaged area in rows
until it is well covered. Make sure that the
rows overlap.
Repairing tears
On tears, frayed edges or small holes it is
useful to lay a piece of material under the
reverse side of the fabric. The underlayed
fabric reinforces the workpiece and
ensures perfect repair.
• Lay a piece of fabric underneath the
damaged fabric. It must be a little larger
than the damaged area.
• Now sew over the damaged area.
• Cut the under layed piece of material
back to the seam.
Page 45

3. Maintenance and
trouble-shooting
Page 46

Maintenance and trouble-shooting
3:2
Cleaning:
Turn off the main switch
It is very important to clean your sewing
machine, because it will reward you with
a longer service life. The more often you
use the machine, the more care it needs.
Do not dismantle the machine other than
as explained in this section.
Clean the outside of the machine with a
soft cloth and mild soap.
Removal
• Remove the presser foot and needle.
• Remove the screw (A) on the needle
plate with the screwdriver. Remove the
needle plate and take out the bobbin
holder.
• Lift up the bobbin holder (B) and
remove it.
• Clean the bobbin holder with the
brush. Wipe the bobbin holder with a soft,
dry cloth.
• Clean the feed dog and hook race with
the brush. Wipe the hook race with a soft,
dry cloth.
A
B
Replacing
• Insert the bobbin holder into the hook
race.
Note: Make sure the knob (C) of the bobbin
holder À ts next to the stopper (D) in the race.
• Attach the needle plate, inserting the
two guide pins into the holes (E) in the
needle plate. Tighten the screw (A) À rmly
with the screwdriver.
D
C
E
A
E
Page 47

Maintenance and trouble-shooting
Changing the light bulb
Turn off the main switch
• Disconnect the main plug and the foot
control plug from the machine.
• If you have used the machine, wait for
the lamp to cool before touching it.
Removal
• Remove the cap and screw. Remove
the face plate.
• Push and turn the bulb
counterclockwise, seen from below, to
remove it.
Insertion
• Push and turn the bulb clockwise to
replace it
• Replace the faceplate, the screw and
the cap.
Important!
The maximum allowed wattage of the lamp
with a plug-in socket is 15 watts!
3:3
Page 48

Maintenance and trouble-shooting
3:4
Trouble-shooting
The needle thread breaks.
The needle thread is not threaded properly. Page 1:9
The needle thread tension is too tight. Page 1:16
The needle is bent or blunt. Page 1:5
The needle is incorrectly inserted. Page 1:5
The needle thread and the bobbin thread are not set under the
presser foot when start sewing.
The threads were not pulled to the rear after sewing. Page 2:3
The bobbin thread breaks
The bobbin thread is not threaded properly in the bobbin holder. Page 1:8
Lint has collected in the bobbin holder. Page 3:2
The bobbin is damaged and does not turn smoothly. Change the
The needle breaks
The needle is incorrectly inserted. Page 1:5
The needle screw is loose. Page 1:5
The threads were not pulled to the rear after sewing. Page 2:3
The needle is incorrectly inserted, bent or blunt. Page 1:5
Page 2:2
bobbin
The machine skips stitches
The needle thread is not threaded properly. Page 1:9
A poor quality needle is used. Change the
needle; 1:5
The needle thread tension is too tight. Page 1:16
Seam puckering
The needle thread is not threaded properly. Page 1:9
The stitch length is too long for the fabric.
Page 1:13
Page 49

Maintenance and trouble-shooting
The cloth is not fed smoothly
The feed dog is packed with lint. Page 3:2
The stitches are too À ne. Page 1:13
The feed dog is not raised after ”drop feed” sewing. Page 1:3
Loops on the seams
The needle thread tension is too loose. Page 1:16
The machine does not sew or run
The machine is not plugged in. Page 1:2
Thread has been caught in the hook race. Page 3:2
The bobbin winder spindle is not returned to the left after
Page 1:6
bobbin winding. (Bobbin winding condition)
The stitch density is not suitable for the fabric being sewn Page 1:14
The machine is noisy
Thread has been caught in the hook race. Page 3:2
Lint has built up in the hook race or bobbin holder. Page 3:2
3:5
Buttonhole is not sewn neatly
The stitch density is not suitable for the fabric being sewn. Page 2:13
Stabilizer is not used when sewing on the stretch fabrics. Use stabilizer
Layer slippage
Foot pressure is not adjusted properly. Page 1:3
Important notes: Before changing presser feet and needle you must turn the main
switch off. Do not attempt to sew without fabric under the presser foot.
When leaving the machine, even for only a short time, switch off the main switch.
This is important if there are any children nearby.
Page 50

Maintenance and trouble-shooting
3:6
Index
A
Accessories
- optional V
- standard IV
Accessory tray V
Automatic buttonhole 2:12
B
Basic sewing 2:2
Blindhem 2:11
Blindhem stitch (elastic) 2:11
Bobbin winding 1:6
Bringing up the bobbin thread 1:12
Button sewing 2:15
Buttonhole
- automatic 2:12
- manual 2:14
- with gimp thread 2:14
C
Carrying handle, carrying case 1:2
Changing the needle 1:5
Changing the presser foot 1:4
Changing the light bulb 3:3
Cleaning 3:2
Closed overlock stitch 2:10
Connecting the foot control 1:2
F
Foot preassure dial 1:3
Free arm sewing 2:4
H
Honeycomb stitch 2:9
I
Inserting the bobbin 1:8
M
Manual buttonhole 2:14
N
Needle threader 1:10
O
Open overlock stitch 2:10
Optional accessories V
P
Presser foot lifter 1:4
Presser foot holder
- remove and attach 1:5
D
Darning with the elastic stitch 2:18
Dropping the feed dog 1:3
E
Extra spool pin 1:7
R
Repairing tears 2:18
Reverse sewing 1:15
Page 51

S
Seam guides on the needle plate 2:5
Sewing chart - explanation 2:6
Sewing on patches 2:18
Sewing on zippers 2:16
Special accessories V
Straight stitch 2:7
Stretch stitch balance - adjust 1:14
Stretch triple straight stitch 2:8
Standard accessories IV
Stitch length dial 1:13
Stitch selection 1:13
Stitch table VI
Stitch width dial 1:14
T
Thread tension 1:16
Threading for twin needle 1:11
Threading the machine 1:9
Tricot stitch (triple zigzag stitch) 2:9
Trouble-shooting 3:4
Turning a square corner 2:5
Maintenance and trouble-shooting
3:7
V
Variable needle position 1:15
Z
Zigzag stitch 2:8
Zippers 2:16
Page 52

Technical data
Dimensions (w x h x d) 385 x 280 x 170
Weight 8 kg
Nominal voltage (Europe) 230 V
Nominal voltage (USA/Canada) 120 V
Nominal voltage (Australia) 240 V
Power consumption 75 W
Sewing lamp 15 W
Sewing speed Max 800 stitches/minute
Stitching width 0...5 mm
Stitching length 0...4 mm
Presser foot lift 6 mm
Max. presser foot height 13 mm
Needle system 103 / 705 H
Package contents
Sewing machine
Carrying case
Foot control
Accessories
Owner's manual
Please note that on disposal, this product must be
safely recycled in accordance with relevant National
legislation relating to electrical/electronic products.
If in doubt please contact your retailer for guidance.
Page 53

Page 54

Page 55

We reserve the right to change the machine equipment
and the ass ort ment of accessories without prior notice,
or make modiÀ cations to the performance or design.
Such modiÀ cations, however, will always be to the
beneÀ t of the user and the product.
Intellectual Property
PFAFF and HOBBY are trademarks of
KSIN Luxembourg II, S.ar.l.
All trademarks are used under license by VSM Group AB.
Page 56

VSM Group AB • SE-561 84 Huskvarna • SWEDEN
www.pfaff.com
412 90 10 - 26H • English • Inhouse • © 2009 KSIN Luxembourg II, S.ar.l. • All rights reserved • Printed in Sweden on environmentally-friendly paper
 Loading...